

Page 1
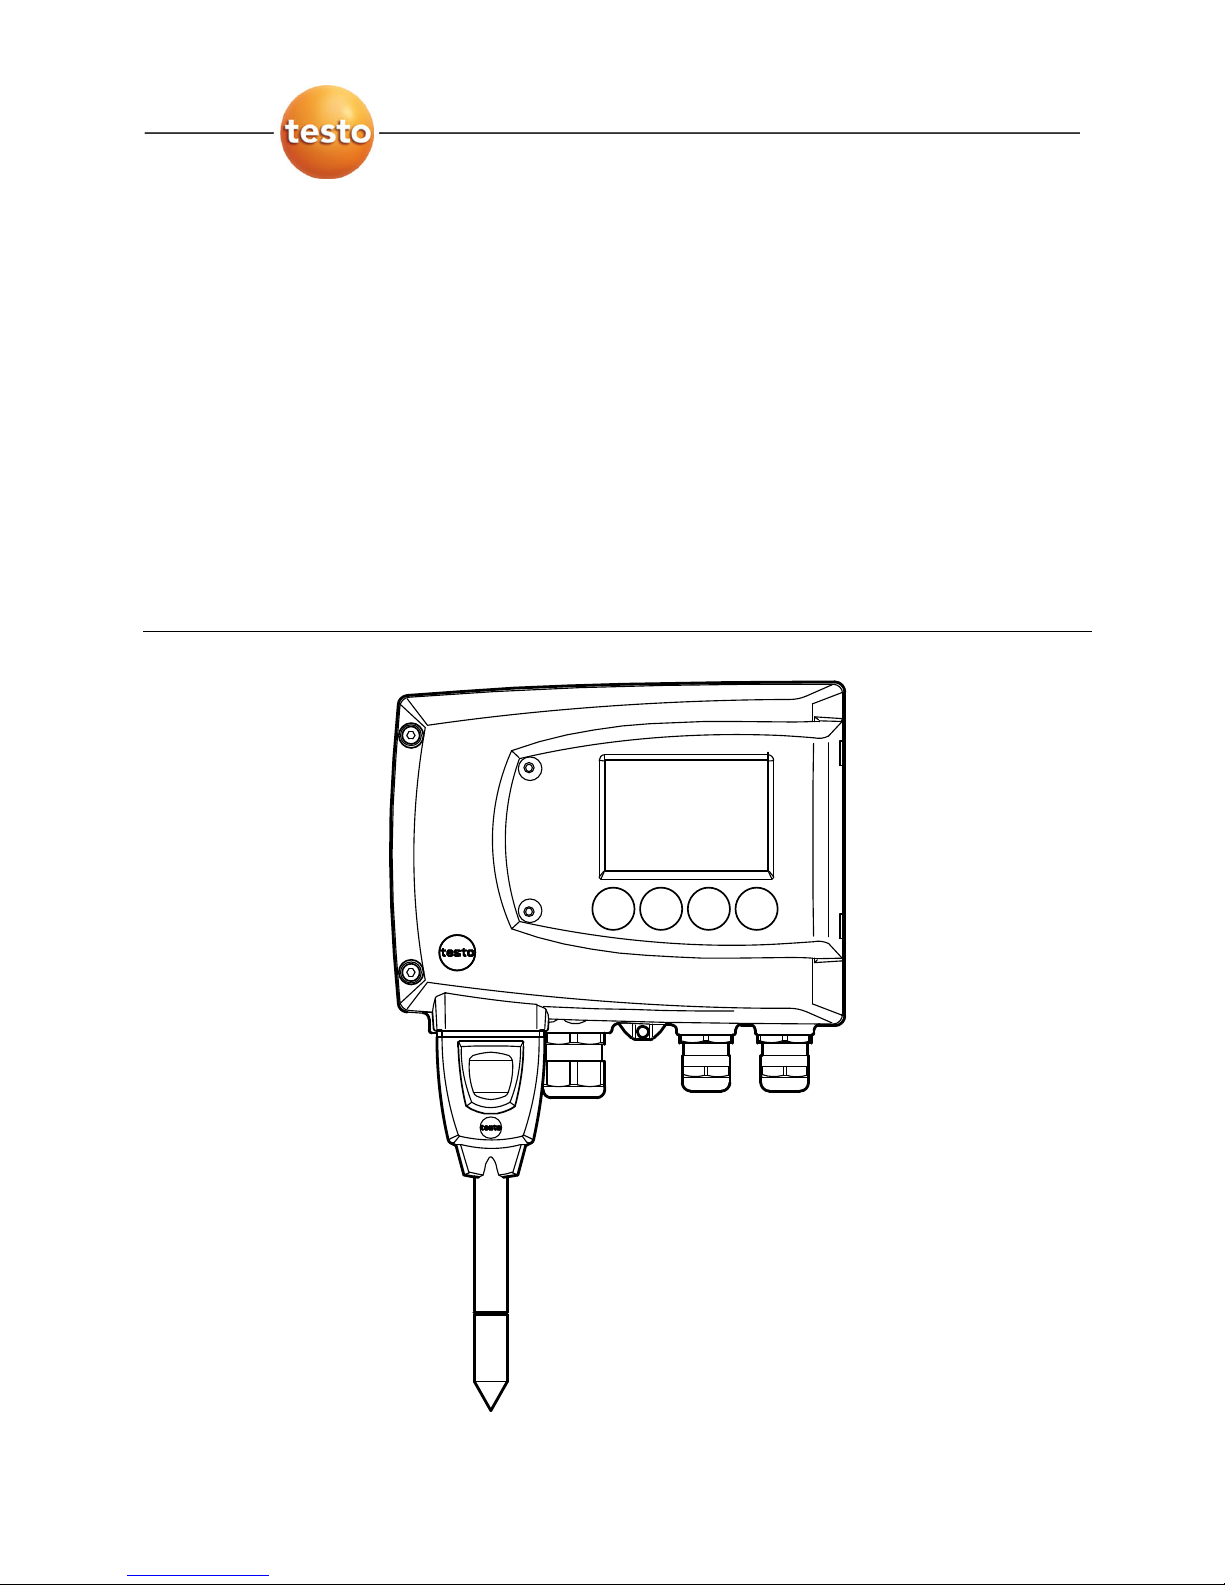
testo 6681 Profibus · Humidity transmitte
r
with Profibus module
testo 6610 · Probes
P2A software · Parameterizing, adjusting and analyzing
software
Instruction manual Volume 1 en
Page 2

Page 3

Safety and the environment
3
Safety and the environment
Avoiding electrical hazards
Never use the instrument and connected probes to measure on or near live
parts!
Damaged mains cables must only be replaced by authorized personnel.
Only have the transmitter wired and connected by authorized personnel with
the voltage disconnected.
You must always comply with the regulations applicable in your country to the
opening and repair of electrical equipment.
Avoiding personal injury/damage to equipment
Installation, setting and calibration work must only be carried out by qualified
and authorized personnel!
Only open the instrument when this is expressly described in the instruction
manual for installation, maintenance or repair purposes.
Observe the permissible storage, transport and operating temperatures.
Never store or operate the product with solvents and do not use any
desiccants.
Do not use the instrument for control purposes at the same time as operating
or servicing the transmitter.
Only operate the product properly, for its intended purpose and within the
parameters specified in the technical data. Do not use force.
Carry out only the maintenance and repair work that is described in the
documentation. Follow the prescribed steps when doing so. Use only
OEM spare parts from Testo.
Any additional work must only be carried out by authorized personnel.
Otherwise Testo will not accept any responsibility for the proper functioning of
the instrument after repair and for the validity of certifications.
Protecting the environment
Send the product back to Testo at the end of its useful life. We will ensure
that it is disposed of in an environmentally friendly manner.
Page 4
4
About this document
About this document
Please read this documentation through carefully and familiarize yourself with
the product before putting it to use. Keep this document to hand so that
you can refer to it when necessary. Hand this documentation on to any
subsequent users of the product.
The following conventions are followed in this document:
Character/
display:
Explanation/example
With the signal word Warning!:
Warns against hazards which could result in serious physical
injury if the precautionary measures indicated are not taken,
e.g.:
De-energize the mains connection before connecting the
transmitter!
With the signal word Caution!:
Warns against hazards which could result in minor physical
injury or damage to equipment if the precautionary
measures indicated are not taken, e.g.:
Observe the permissible operating temperature!
Important information, e.g.:
Administrator rights are required to install the program under
Windows
®
2000, XP and Vista.
Aim of action, e.g.:
Assembling the instrument at the process
connection:
Requirement that must be met, e.g.:
USB drivers are installed.
Page 5

About this document
5
Character/
display:
Explanation/example
1
Steps are numbered if a certain sequence of actions must
be followed, e.g.:
1 Loosen and remove housing screws.
2 Remove the upper part of housing.
A step is not numbered if there are no further steps or if the
step is optional, e.g.:
Insert probe connector into socket of testo 6681 until it
engages.
" to "
Example entries are in inverted commas, e.g.:
The value "0" results in ....
Bold type
Elements of the program interface or instrument display,
e.g.:
The instrument designation appears in the
instrument/parameter file list.
Select Main Menu Channel 1 and confirm with SET.
…>…
Functions/paths within a menu, e.g.:
Start > All Programmes > Testo > P2A Software.
[ ]
Buttons which start an action, e.g.:
Confirm the software key with [OK].
CAPITAL
LETTERS
Keys on the instrument or keypad, e.g.:
Press ESC.
Page 6

6
Contents
Contents
1 TRANSMITTER ............................................................................................ 9
1.1 Specifications ........................................................................................... 9
1.1.1 Functions and use ...................................................................... 9
1.1.2 Scope of delivery ........................................................................ 9
1.1.3 Accessories............................................................................... 10
1.1.4 Technical Data .......................................................................... 10
1.1.5 Dimensions ............................................................................... 12
1.2 Product description ................................................................................ 13
1.2.1 At a glance ................................................................................ 13
1.2.2 Usable probes ........................................................................... 14
1.2.3 Display and keypad .................................................................. 15
1.2.4 Service interface ....................................................................... 15
1.2.5 Relay board (option) ................................................................. 15
1.2.6 Analog outputs .......................................................................... 16
1.2.7 Parameters ............................................................................... 16
1.2.8 Scaling ...................................................................................... 17
1.2.9 Alarm handling .......................................................................... 19
1.3 Commissioning ...................................................................................... 20
1.3.1 Insert Profibus module (Order no. 0554 6686) ......................... 20
1.3.2 Assembling the instrument ....................................................... 22
1.3.3 Connecting the instrument ........................................................ 25
1.3.4 Connect instrument to the bus system ..................................... 42
1.3.5 Configure Profibus module using EDD ..................................... 49
1.3.6 Adjusting the instrument ........................................................... 55
1.4 Operation ............................................................................................... 66
1.4.1 Relationship between user menu and mini-DIN socket is
active ......................................................................................... 66
1.4.2 Key cover .................................................................................. 67
1.4.3 Password protection ................................................................. 68
1.4.4 Structure of user menu ............................................................. 69
1.4.5 Overview of the testo 6681 user menu ........................................... 70
1.4.6 The individual main menus ....................................................... 72
Page 7

Contents
7
1.5 Status, warning and error messages ..................................................... 84
1.5.1 Status messages ...................................................................... 84
1.5.2 Warning messages ................................................................... 85
1.5.3 Transmitter error messages ...................................................... 87
1.5.4 Status codes in cyclical service ................................................ 88
1.5.5 Handling alarm messages ........................................................ 88
1.5.6 Namur fault conditions .............................................................. 90
1.6 Maintenance and cleaning ..................................................................... 91
1.6.1 Maintaining the instrument ........................................................ 91
1.6.2 Cleaning the instrument ............................................................ 91
Page 8

8
Certificate
Page 9

testo 6681 Profibus - 1.1 Specifications
9
1 Transmitter
1.1 Specifications
1.1.1 Functions and use
The testo 6681 humidity transmitter with Profibus module is used in
conjunction with plug-in, adjusted probes from the testo 6610 range.
Please refer to volume 2, chapter 2, page 97 for information
about commissioning, operating and maintaining the
testo 6610 probe.
The testo 6681 humidity transmitter is suitable for the following applications
with Profibus networking, for example:
Process instrumentation
Clean rooms
Test benches
Drying processes
Production and storage air quality
Complex room climate applications.
1.1.2 Scope of delivery
The scope of delivery of the testo 6681 humidity transmitter includes the
following:
Key cover
Rear panel bracket
Page 10
10
testo 6681 Profibus - 1.1 Specifications
1.1.3 Accessories
The following accessories are available for the testo 6681 humidity
transmitter:
Protection caps for probes
Mains unit
P2A software (parameterizing, adjusting and analyzing software)
Assembly accessories.
Information about accessories and their order numbers can
be found in volume 2, chapter 4.2, page 167 or on the
website at www.testo.com.
1.1.4 Technical Data
Parameters
Humidity (various variables and units)
Temperature (°C/°F)
Measuring range
Depends on probe
Accuracy
Depends on probe
Resolution
0.1 % RH or 0.1 °C/0.1 °F
Meas. cycle
1/s
Interface
Mini-DIN for P2A software
(parameterizing and adjusting
software) and handheld testo
400/650
Optional Profibus-DP module
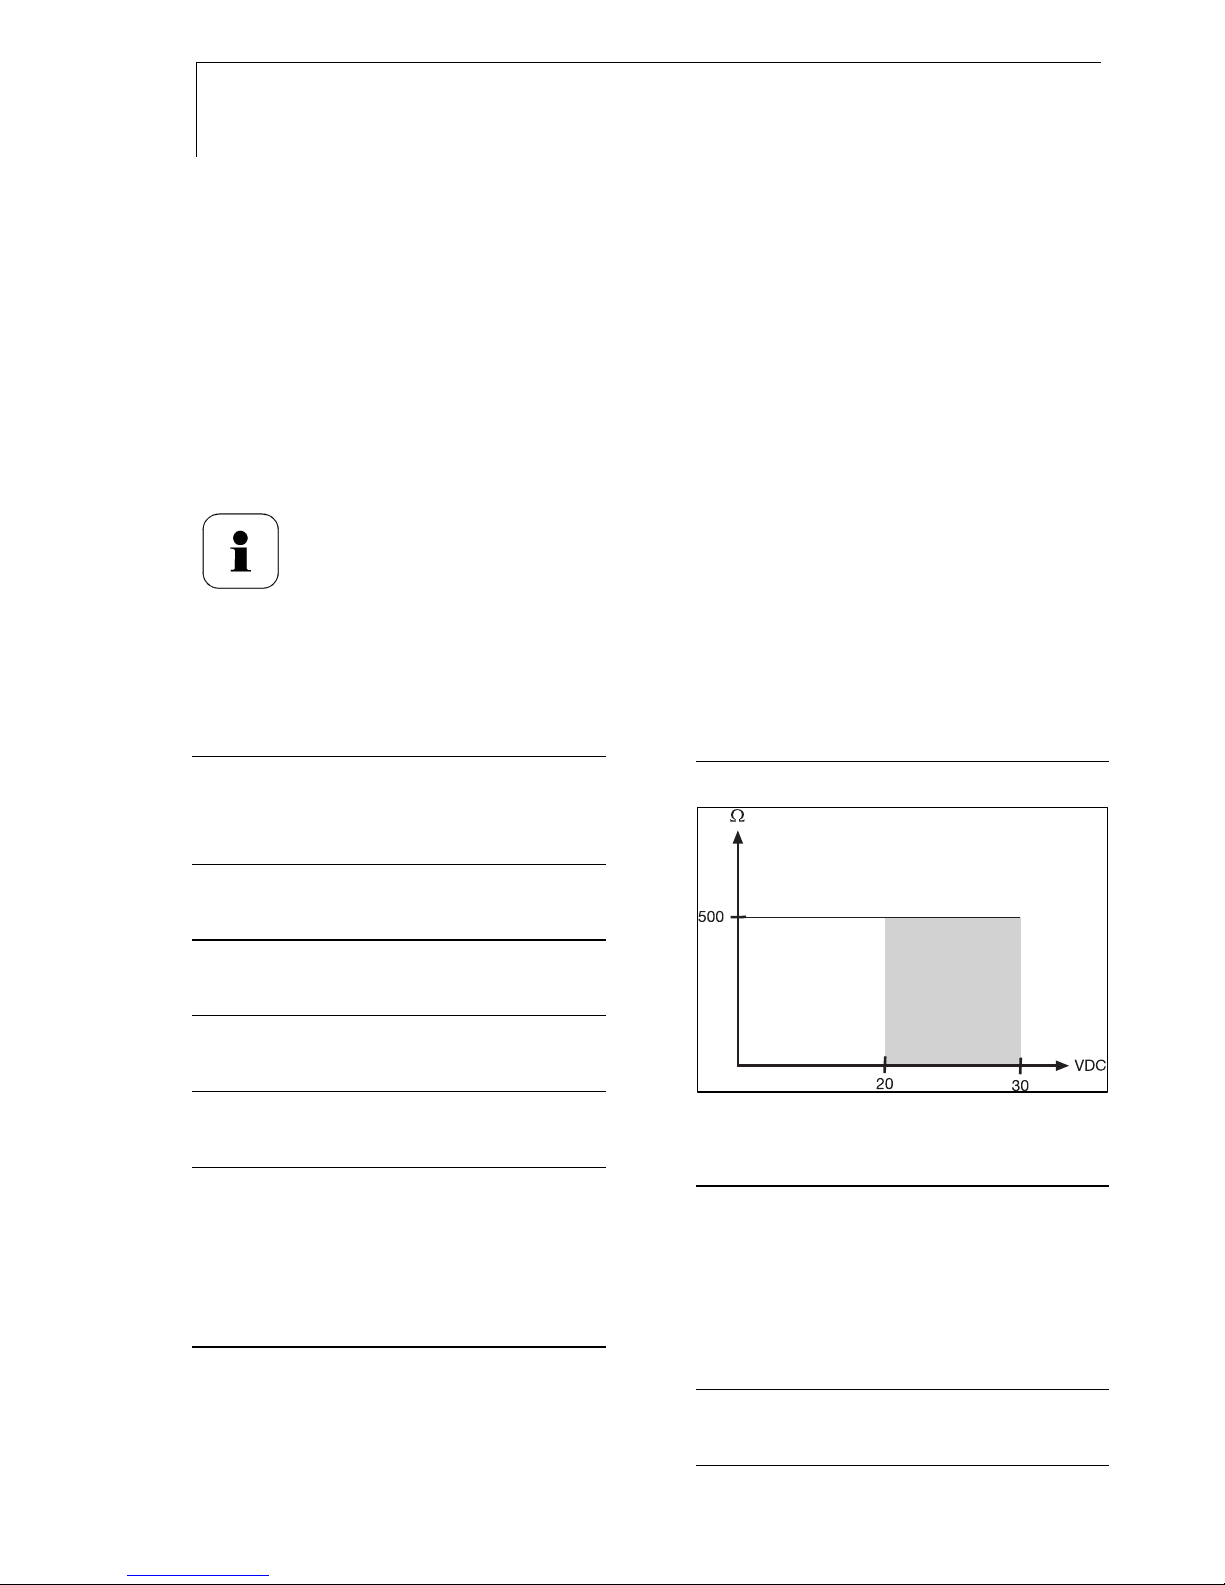
Voltage supply
4-wire (separate signal and supply
lines):
20 - 30 V AC/DC,
300 mA power consumption
Maximum load
- 4-wire: 500 (power output)
Analogue output*
0 to 1 V ± 1.5 mV (4-wire) or
0 to 5 V ± 7.5 mV (4-wire) or
0 to 10 V ± 15 mV (4-wire) or
0 to 20 mA ± 0.03 mA (4-wire) or
4 to 20 mA ± 0.03 mA (4-wire)
Resolution of analog output
12 bit
Relay
4 relays, 250 V AC/DC, 3 A (optional)
Page 11

testo 6681 Profibus - 1.1 Specifications
11
Display
2-line LCD with plain text line
(optional)
Housing operating temperature
-40 to +70 °C/-40 to +158 °F, with display
from 0 to 50 °C/+32 to +122 °F
With integrated relay: -40 - +60 °C
Storage temperature
- 40 to 80 °C/-40 to +176 °F
Housing, weight
Metal: 1.960 kg
Profibus: 0.610 kg
Protection class
IP 65 only if the transmitter is wired
and/or seal plugs are inserted
Directives, standards and tests
EC Directive: 2004/108/EC
Warranty
Duration: 2 years
Warranty conditions: See web page
www.testo.com/warranty
Page 12
12
testo 6681 Profibus - 1.1 Specifications
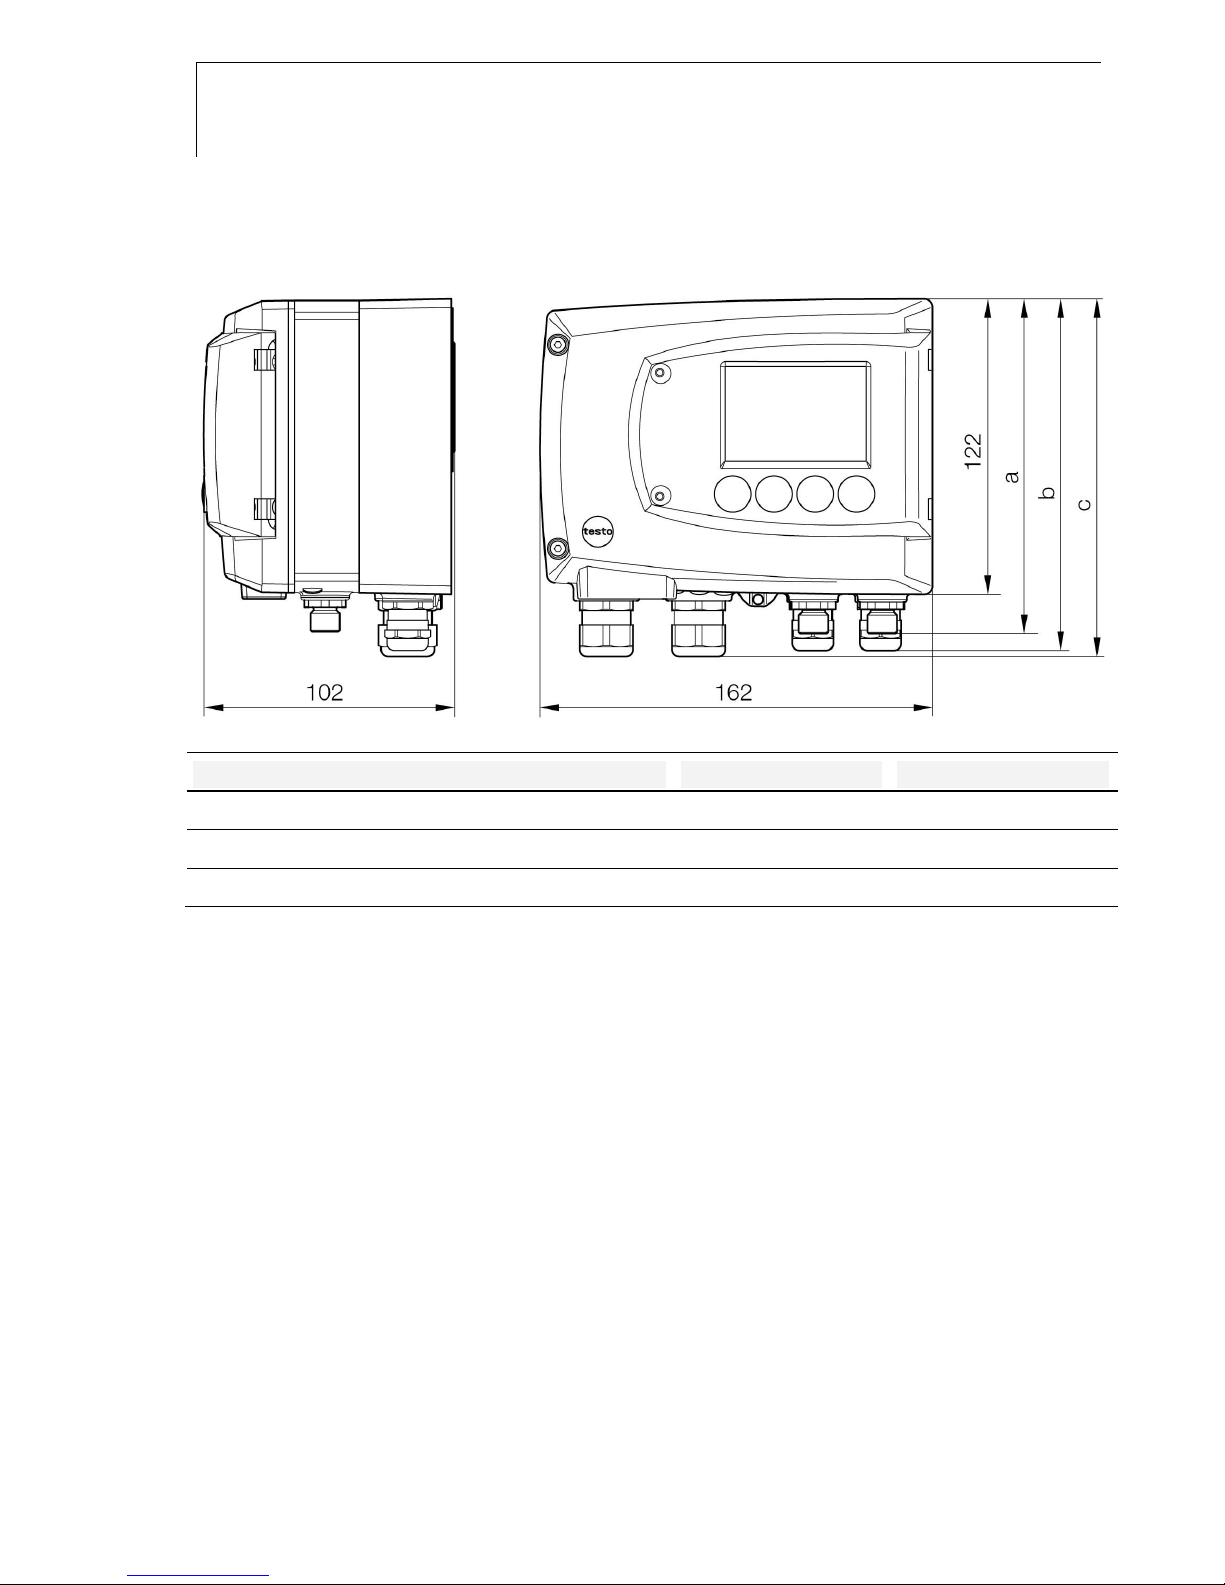
1.1.5 Dimensions
Dimensions in mm a b
With M 20 cable couplings 144 147
With NPT cable couplings 144 144
With M plug-in connections 143
Page 13
testo 6681 Profibus - 1.2 Product description
13
1.2 Product description
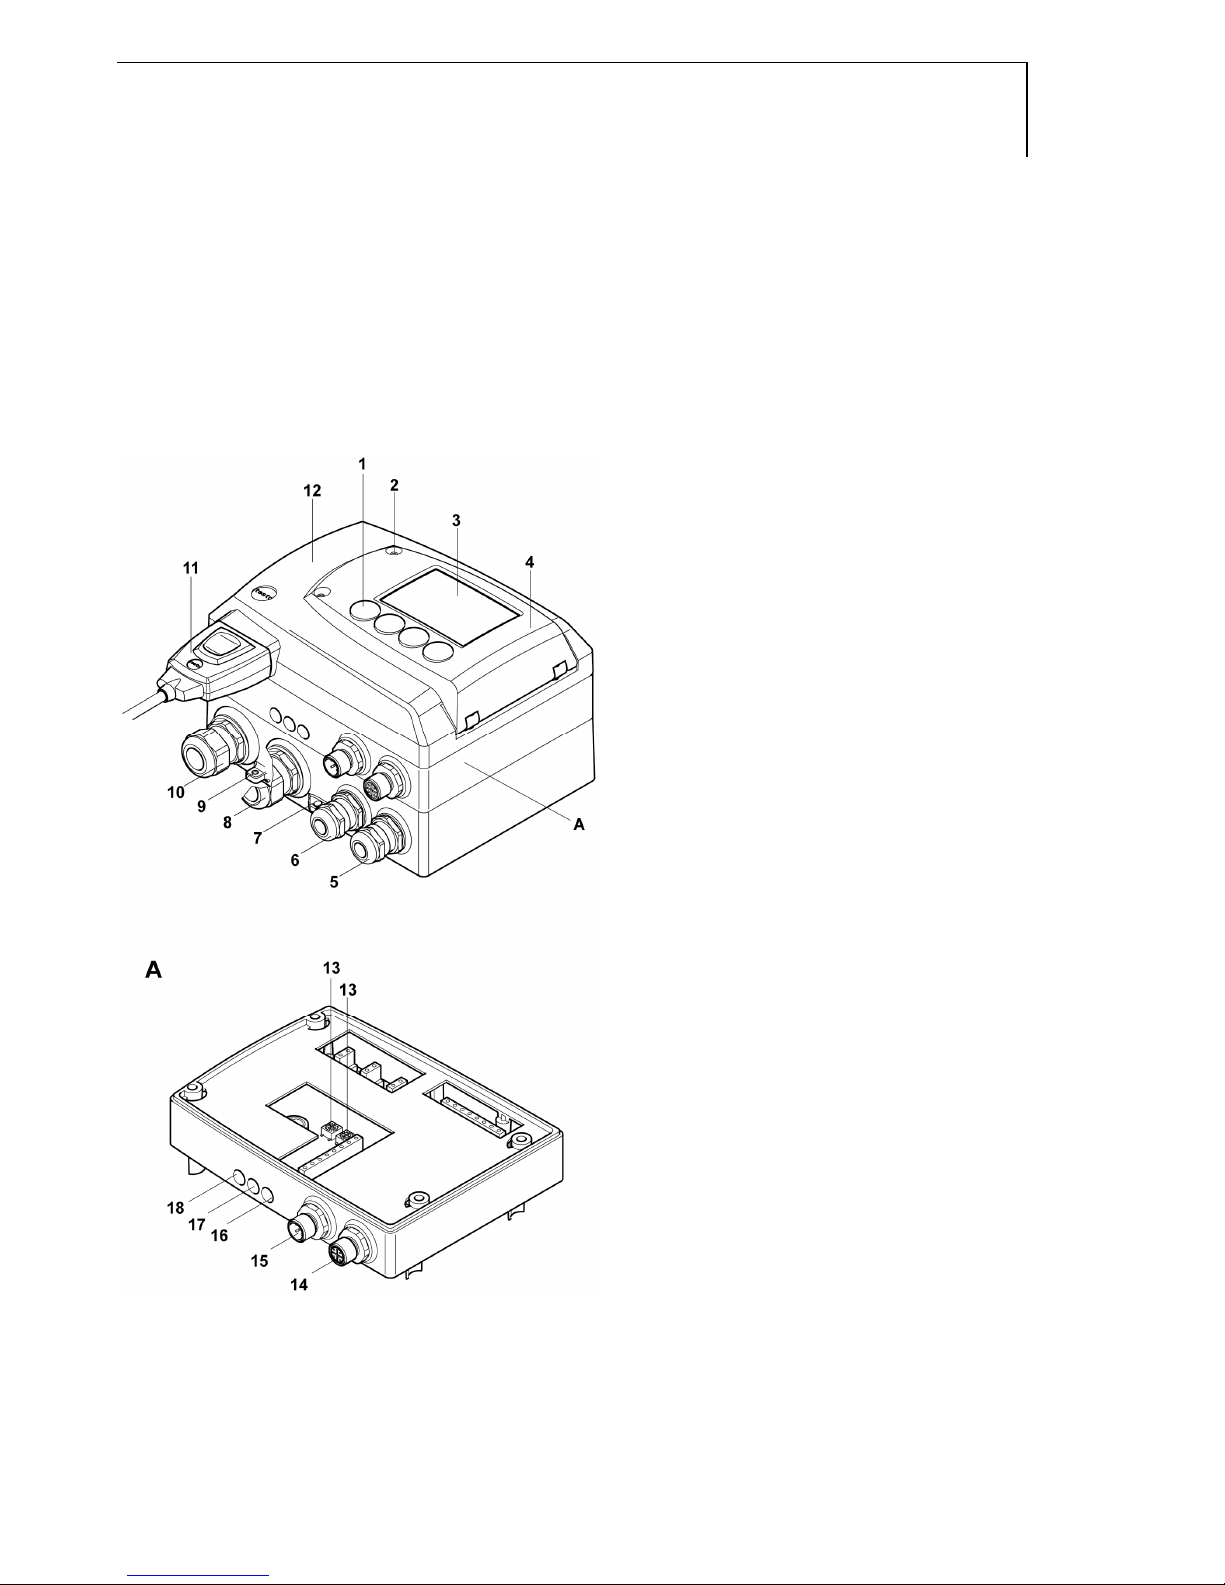
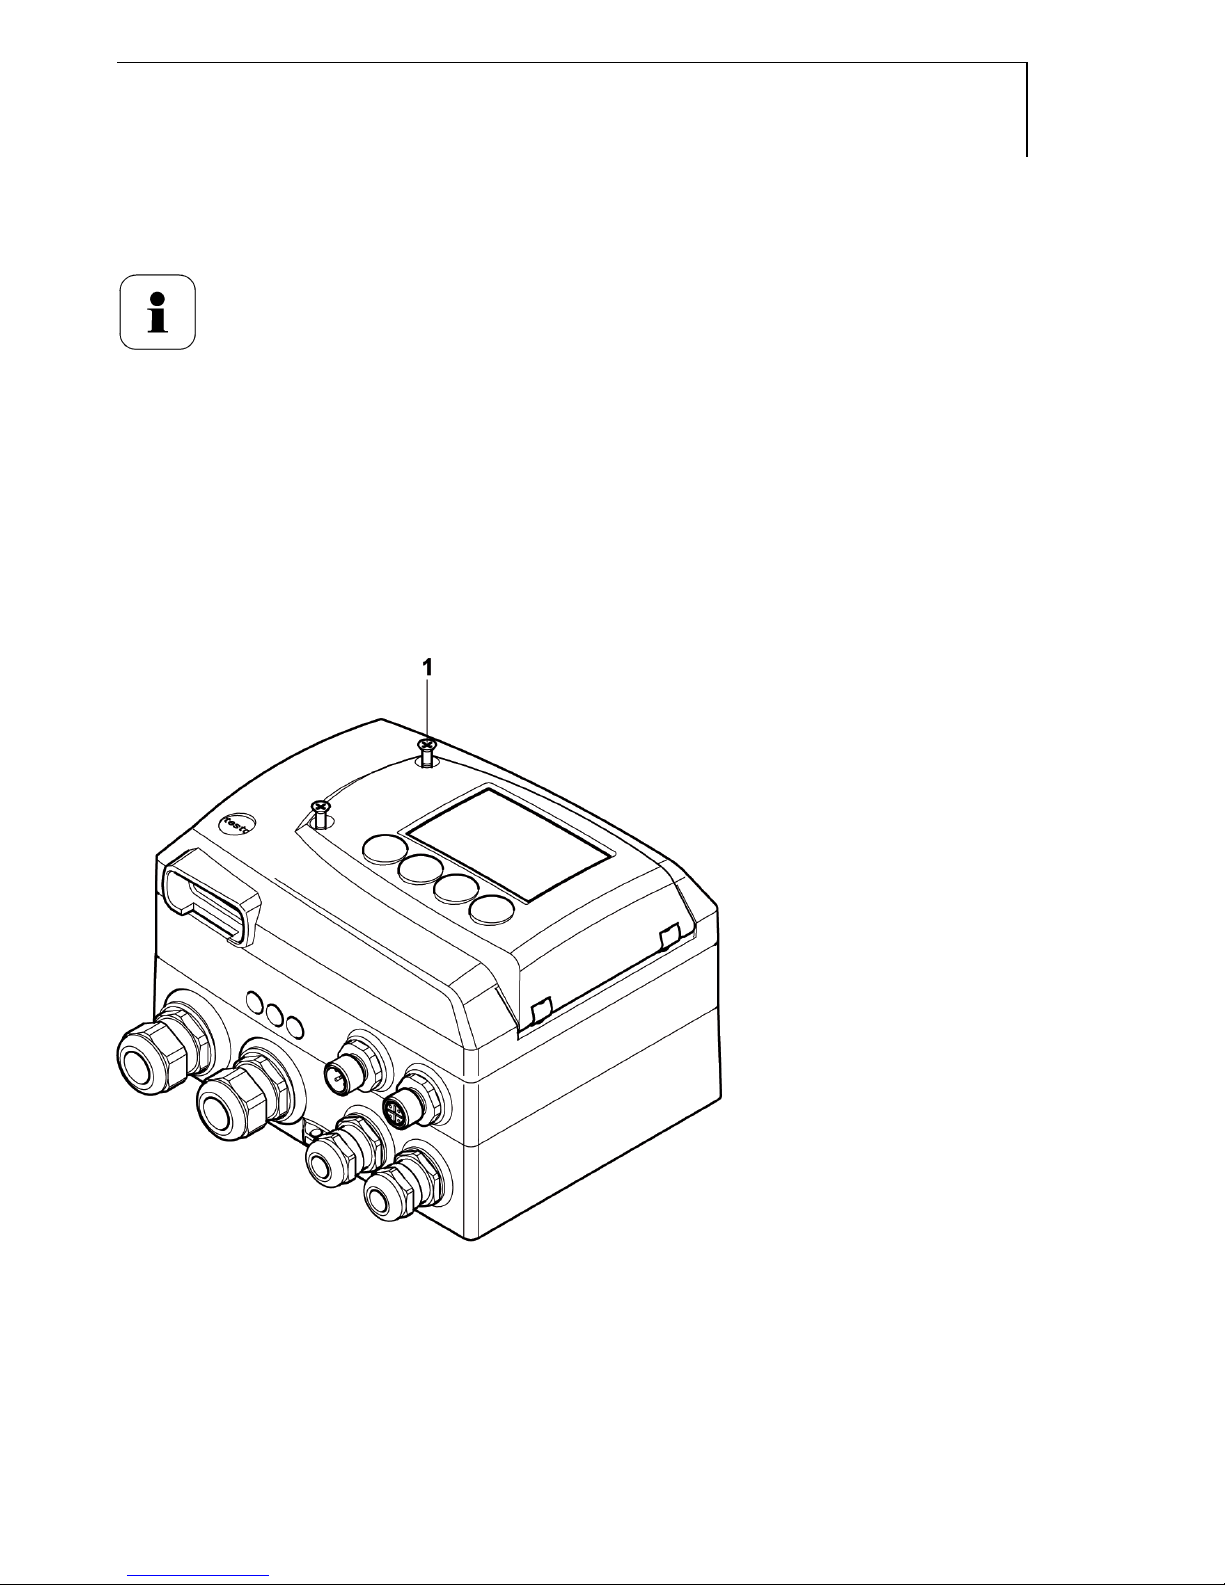
1.2.1 At a glance
1 Keys (with optional display)
2 Service flap screw
connection (self-locking,
2x)
3 Display (optional)
4 Service flap
5 M 16 x 1.5 screw
connection*, e.g. analog
outputs
6 M 16 x 1.5 screw
connection*, e.g. voltage
supply
7 Eyelet for measuring point
panel
8 M 20 x 1.5 screw
connection*, e.g. relay R 3
and R 4
9 Earthing/PE connection
10 M 20 x 1.5 screw
connection*, e.g. relay R 1
and R 2
11 Probe connector
(testo 6610)
12 Upper part of housing
* Alternatively, NPT cable
couplings or M plug-in
connections are available
A
Profibus module
13 Rotary encoder switch for
addressing
14 Profibus M12 socket
15 Profibus M12 connector
16 LED: Bus error
17 LED: System error
18 LED: Supply
Page 14
14
testo 6681 Profibus - 1.2 Product description
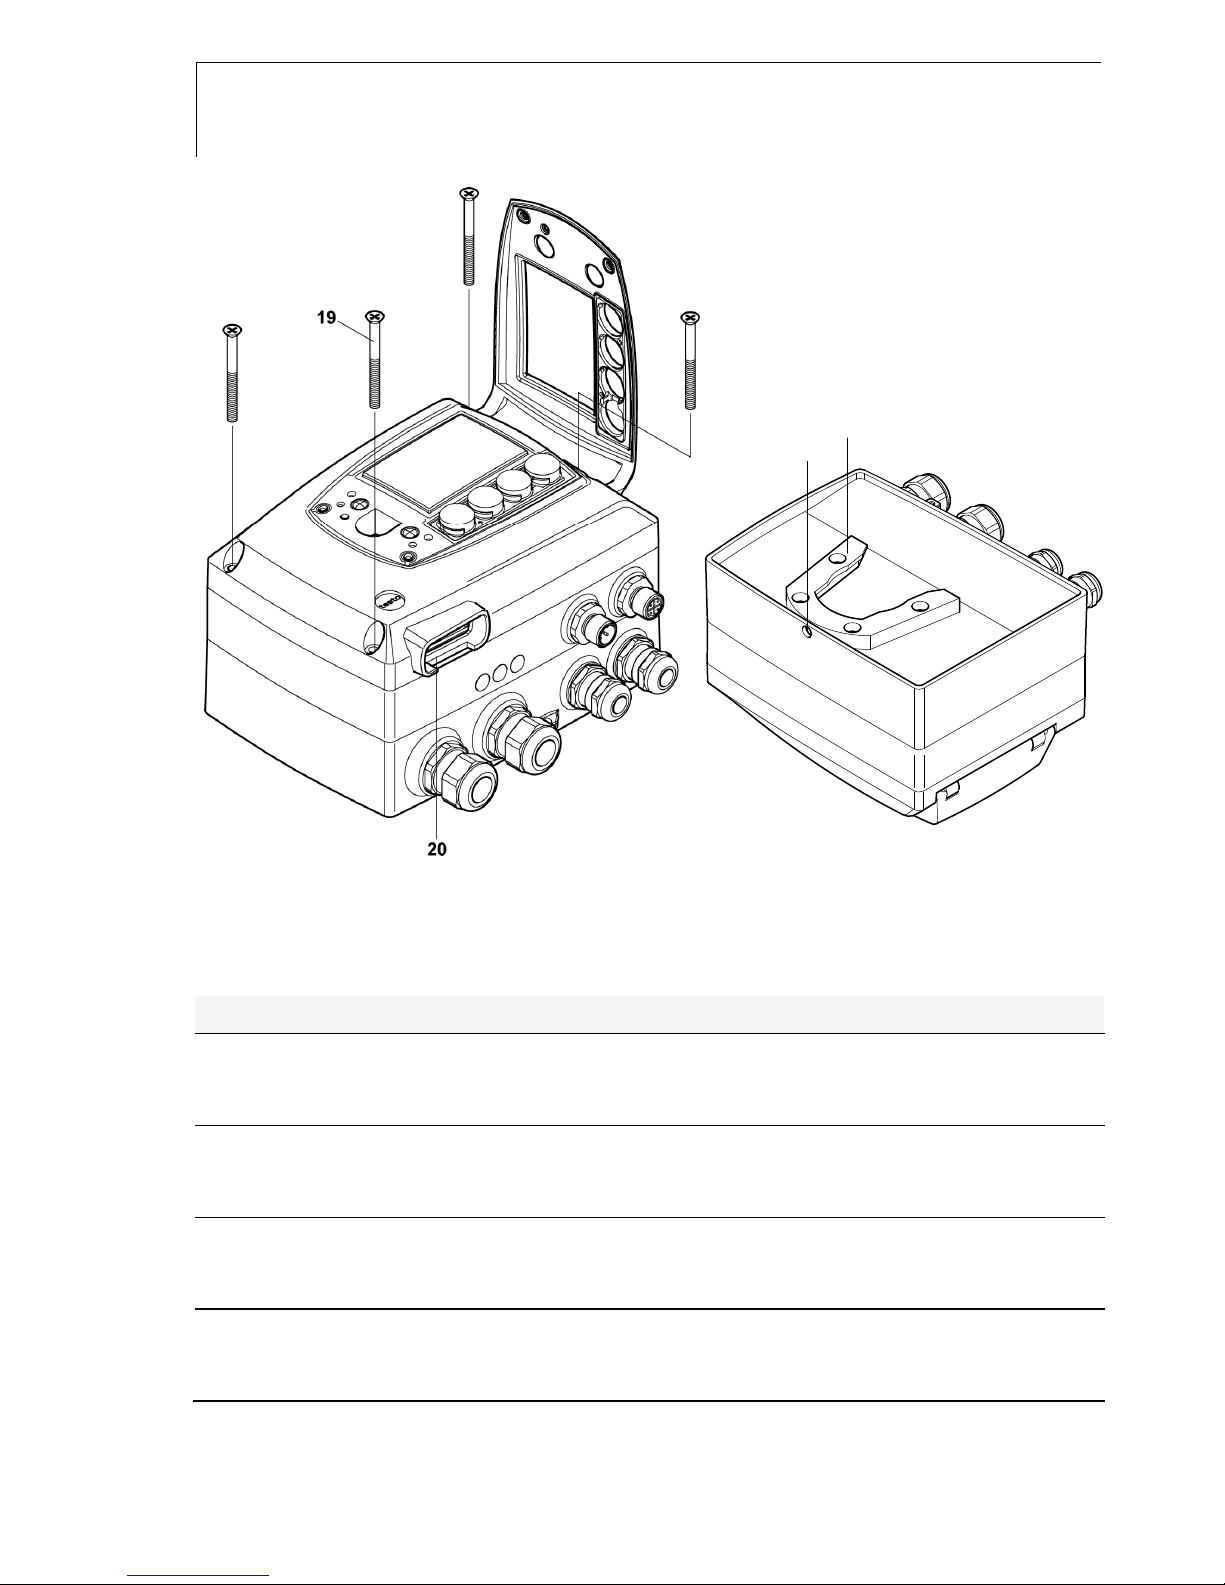
19 Housing screws (4x)
20 Socket for probe connector
21 Hole for fastening to rear
panel bracket (M3 x 6
screw)
22 Plastic bracket for assembly
on rear panel
22
21
1.2.2 Usable probes
The testo 6681 humidity transmitter can be used with the following probes:
Probe Article no. Characteristic
testo 6611 0555 6610-L11 Wall probe version; accuracy to ± 1 % RH;
temperature range -20 °C to +70 °C/-4 to +158 °F,
sensor plugged
testo 6612 0555 6610-L12 Duct probe version; accuracy to ± 1 % RH;
temperature range -30 °C to 150 °C/-22 to +302 °F,
sensor soldered/optionally plugged
testo 6613 0555 6610-L13 Cable probe version; accuracy to ± 1 % RH;
temperature range -70 °C to +180 °C/-94 to
+356 °F, sensor soldered/optionally plugged
testo 6614 0555 6610-L14 Heated cable probe version; accuracy to ± 1.0 %
RH; temperature range -40 °C to +180 °C/
-40 to +356 °F, sensor soldered
Page 15

testo 6681 Profibus - 1.2 Product description
15
Probe Article no. Characteristic
testo 6615 0555 6610-L15 Trace humidity cable probe version;
accuracy ± 6 K at -60 °Ctd;
temperature range -40 °C to +120 °C/-40 to
+248 °F, sensor soldered
testo 6617 0555 6610-L17 Cable with cover electrode monitoring probe
version; accuracy to ± 1.2 % RH; temperature range
-40 °C to +180 °C/-40 to +356 °F, sensor soldered
1.2.3 Display and keypad
The display option allows the testo 6681 humidity transmitter to be operated
via the display and four keys.
The LCD display consists of two 7-segment lines for displaying readings and
units and of an information line (for status messages, for example).
The brightness and contrast of the display and the background lighting
(permanent or off) can be changed via the user menu or the P2A software.
1.2.4 Service interface
Behind the service flap is the parameterizing socket (mini-DIN) as an
interface to the P2A software or Testo handheld instrument
(testo 400/testo 650).
1.2.5 Relay board (option)
This has a floating switch capacity of 250 V AC/3 A. The switching limits and
hysteresis can be set via the display or the P2A software or via the Profibus.
Further features include:
Function of changeover contacts (NC/NO contacts) freely selectable
12 terminals for a total of 4 relays.
If no relays are available, settings for monitoring limit values
or alarms can still be controlled via the display. The alarm
status will be shown on the display.
Only have the transmitter wired and connected by authorized
personnel with the voltage disconnected.
Page 16

16
testo 6681 Profibus - 1.2 Product description
1.2.6 Analog outputs
For analog outputs, the testo 6681 has either
2 or optionally 3 current outputs of 4 to 20 mA/0 to 20 mA (4-wire) or
2 or optionally 3 voltage outputs of 0 to 1 V/0 to 5 V/0 to 10 V (4-wire).
The transmitter can be ordered with a third analog output as an option.
If the Profibus module is integrated directly into the
testo 6681 humidity transmitter (order code B77), it has two
current outputs 4 ...20 mA.
1.2.7 Parameters
The following parameters are displayed:
Relative humidity in %RH (technical)
Relative humidity in % WMO* (calculation according to the WMO
standard)
Temperature °C and °F
Dewpoint in °Ctd and °Ftd
Absolute humidity in g/m³ and gr/ft³
Degree of humidity in g/kg and gr/lb
Enthalpy in kJ/kg and BTU/lb
Psychrometer temperature in °Ctw and °Ftw
Water vapour partial pressure in hPa and "H
2
O (inch H2O)
Water content in ppm
vol
and % vol
Dewpoint of H
2O2
mixture in °Ctm and °Ftm
Mixture humidity H
2O2
in %RHm
*It is possible that condensation appears as of a displayed humidity
starting from 70 % and is shown on the display. This unit is used in
meteorology, for example. According to the WMO, the Magnus
coefficient is used for sub-cooled water in the calculation of relative
humidity.
Calculated humidity variables correspond to the medium of
air. With other gases/gas compositions, deviations may
occur, e.g. with the enthalpy
Page 17

testo 6681 Profibus - 1.2 Product description
17
1.2.8 Scaling
There are three types of min./max. values:
1 The measuring range
The maximum sensor performance is in this range. Values outside of
the measuring range are displayed via messages, for example. Refer
to table (see below) for the measuring range.
2 Standard scaling
The output signals are assigned to this measuring range as standard:
- during delivery if no entries are made in the order code
- after exchanging the unit, the measuring range recorded in the
instrument is applied as standard.
The transmitter even retains its scaling with the voltage
disconnected.
Refer to table (see below) for the measuring range.
3 The maximum settings for the manual scaling
- the values are not expressly given in the table. The maximum limits
can be calculated as follows:
X = difference between MIN. and MAX. value of the standard scaling
(Max. value of standard) + (50 % of X)
(Min. value of standard) - (50 % of X)
- It is thus possible to scale beyond the measuring range, e.g. for the
adjustment of the scaling limits to standard values of a PLC.
However, the physical measurement range limits are the deciding
factor when defining alarms.
Page 18

18
testo 6681 Profibus - 1.2 Product description
Parameter Unit Probe
Measuring
range
Physical
at 1013 hPa
Standard
scaling
MUF
measuring
range
MIN MAX MIN MAX
Temperature °C 6611 -20
+70
-20 +70
°F 6611 -4 +158
-4
+158
°C 6612 -30 +150
-30 +150
°F 6612 -22 +302
-22 +302
°C 6613 -70 +180
-70 +180
°F 6613 -94 +356
-94 +356
°C 6614, 6617 -40 +180
-40 +180
°F 6614, 6617 -40 +356
-40 +356
°C 6615 -40 +120
-40 +120
°F 6615 -40 +248
-40 +248
relative humidity % RH 0 +100
0
+100
WMO relative humidity % RH 0 +100
0
+100
Mixture humidity H2O2 % RHm 0 100
0
100
Dewpoint °Ctd 6611 -20
+70
-80 +100
°Ftd 6611 -4 +158 -112 +212
°Ctd
6612, 6613, 6614,
6617
-20
+100
-80 +100
°Ftd
6612, 6613, 6614,
6617
-112 +212 -112 +212
°Ctd 6615 -60
+30
-80 +100
°Ftd 6615 -148 +212 -112 +212
Mixture dewpoint (H2O2) °Ctm -20 +100
-20 +100
°Ftm -4 +212
-4
+212
Absolute humidity g/m3 all probes 0
600
0
2000
gr/ft3 0
250
0
800
Degree of humidity g/kg all probes 0 13300
0
9500
gr/lb 0 93000
0
66500
Enthalpy kJ/kg -40 99999
-40 8000
BTU/lb -18 43000
-18 3500
Psychrometer temperature °Ctw -40
100
-40 180
°Ftw -58
210
-40 356
Page 19
testo 6681 Profibus - 1.2 Product description
19
Parameter Unit Probe
Measuring
range
Physical
at 1013 hPa
Standard
scaling
MUF
measuring
range
MIN MAX MIN MAX
Water content
ppm vol
H2O 0 99999
0
99999
% vol 0
100
0
100
Water vapour partial pressure hPa 0 1000
0
7000
inchH2O 0
400
0
2800
1.2.9 Alarm handling
For upper and lower alarm limits, individual alarms as well as collective
alarms can be specified. If the collective alarm function is activated, an alarm
is triggered as soon as the alarm limit of an alarm is exceeded, if this alarm is
assigned to the collective alarm.
The testo 6681 monitors limit values using relays. If a reading is outside the
limit values, a relay to be specified by the user is switched.
If the reading reverts to more than a specified hysteresis below or above the
limit value, the alarm is cancelled.
In addition, information about the occurrence of error/status messages can
be provided by means of a collective alarm relay, see chapter 1.5, Status,
warning and error messages, page 84.
If multiple alarm messages are activated at the same time,
the last alarm is shown. If the alarm is cancelled again, the
previous messages are no longer shown.
Example:
If the condensation of the probe begins, the "Condensation"
message appears on the display and the "Start" status
display. If the condensation is over, the status display
changes from "Start" to "End".
Page 20
20
testo 6681 Profibus - 1.3 Commissioning
1.3 Commissioning
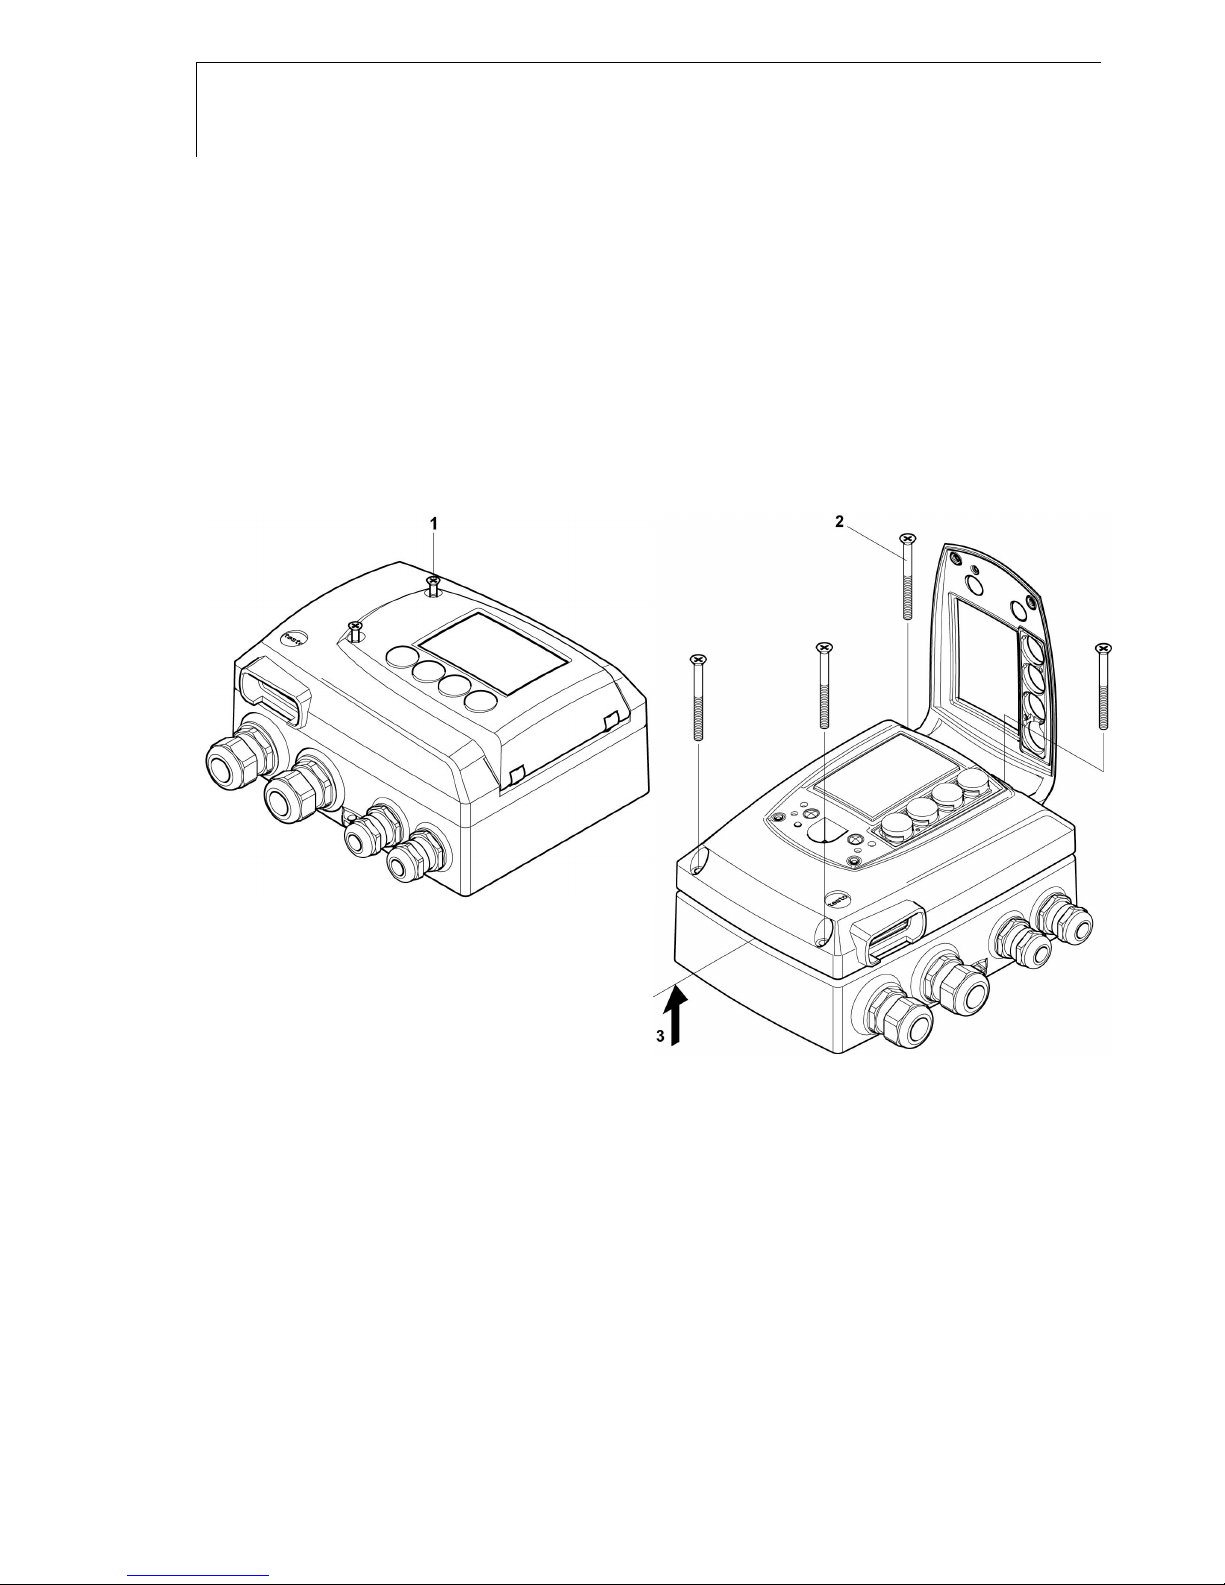
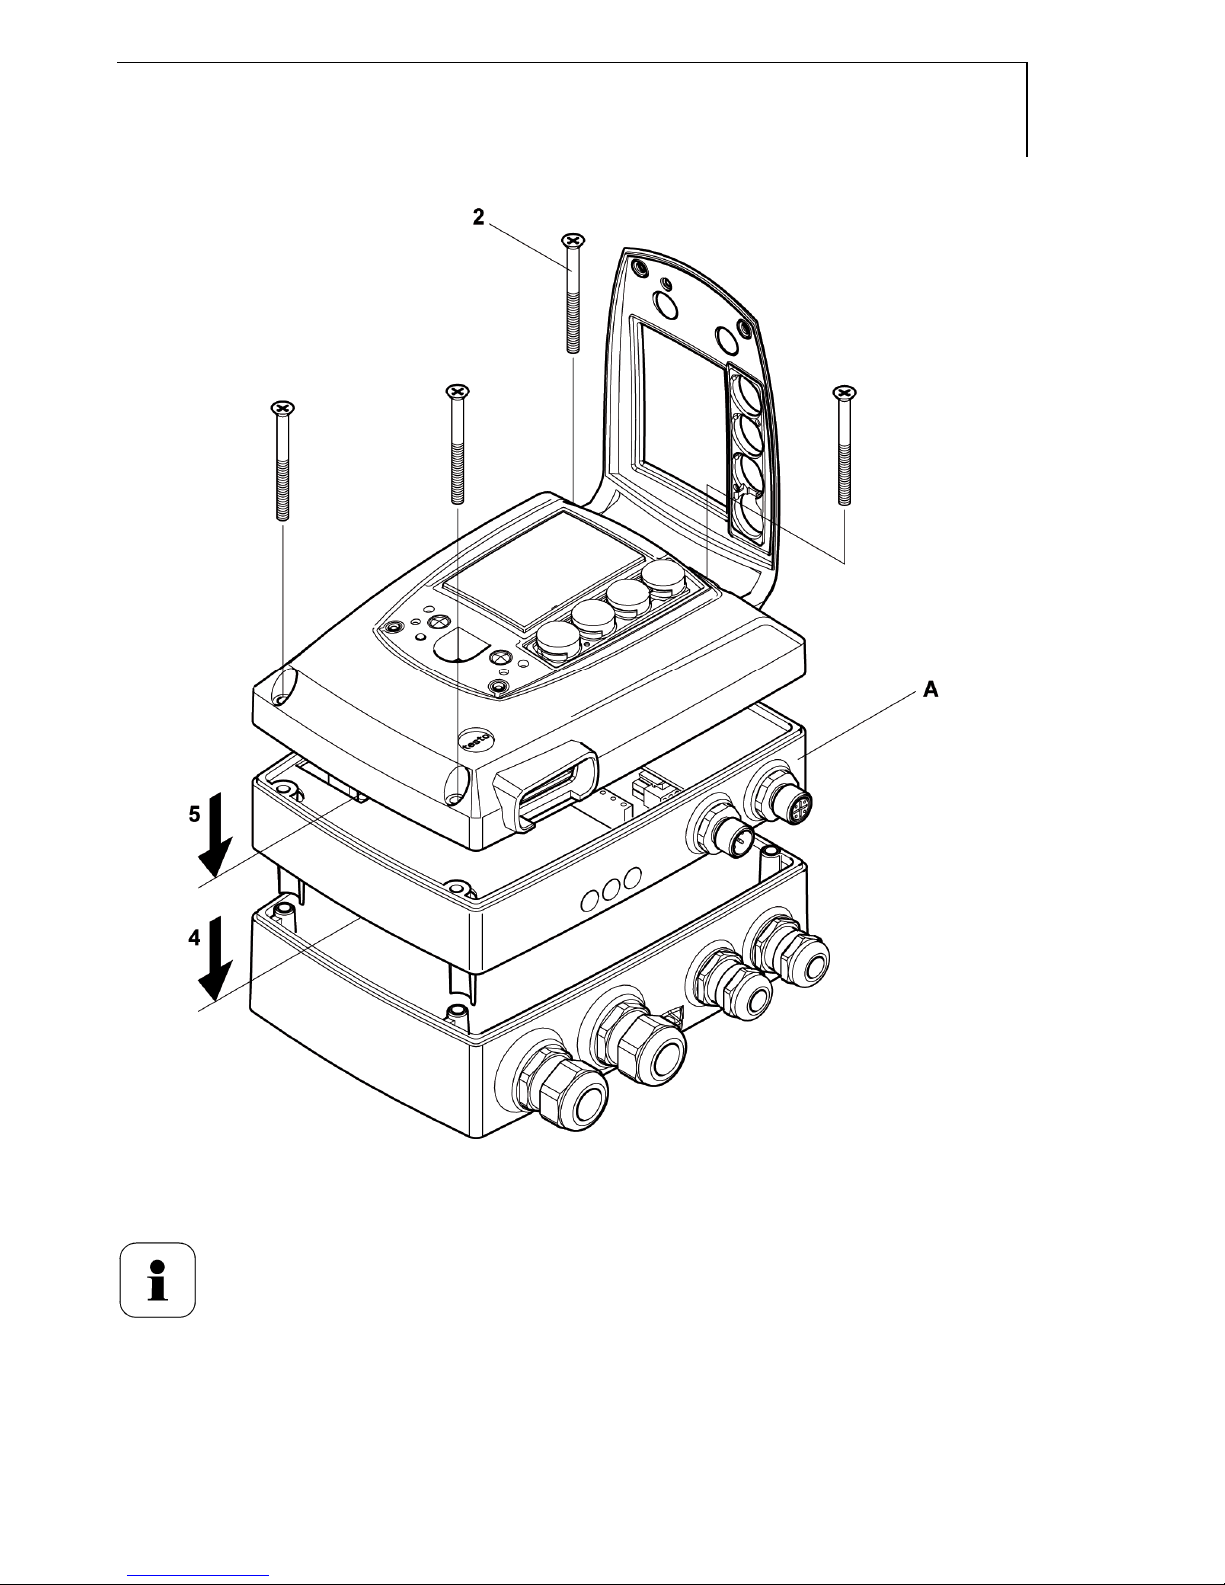
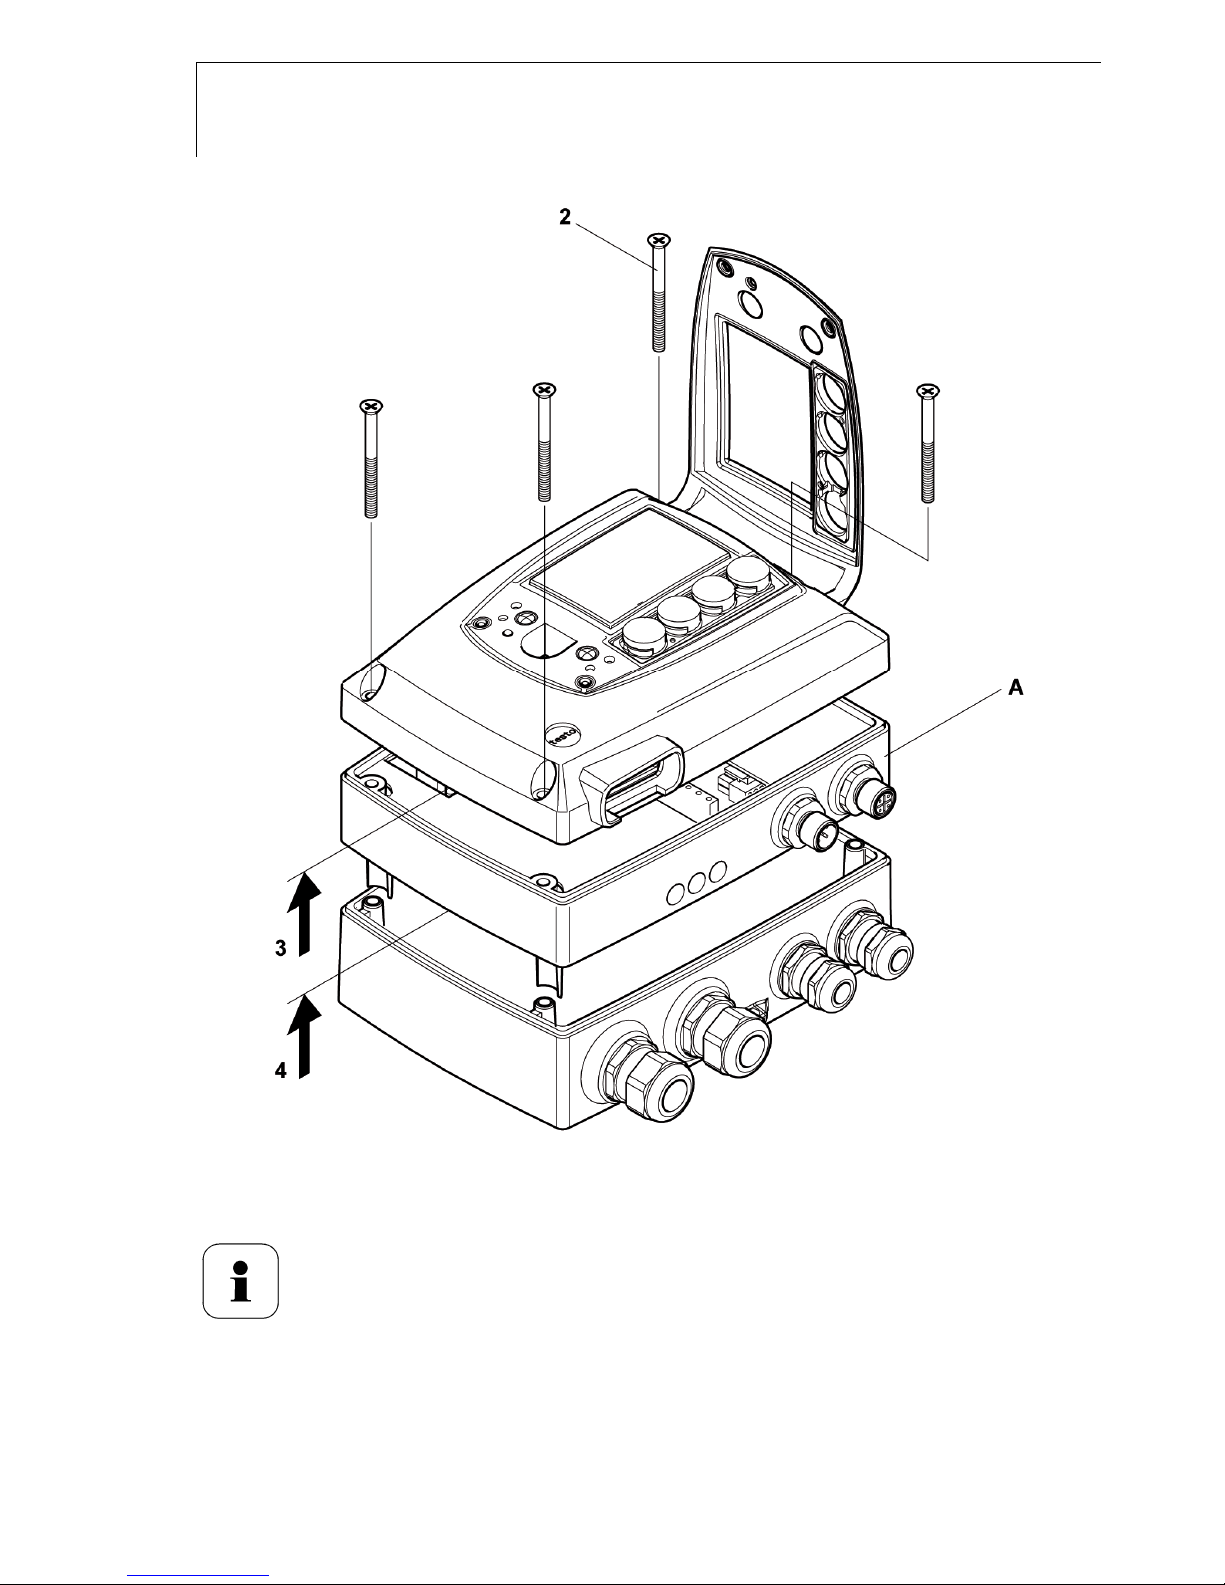
1.3.1 Insert Profibus module (Order no.
0554 6686)
The Profibus module can be ordered retroactively as an accessory. It can
easily be installed in the testo 6681 humidity transmitter.
The probe connector must be disconnected.
4 Loosen screw connection (1) of service flap and open the flap.
5 Loosen and remove housing screws (2).
6 Remove upper part of housing (3) and place on a clean surface.
Page 21
testo 6681 Profibus - 1.3 Commissioning
21
7 Place Profibus module (A) on lower part of instrument (4).
If necessary, manually set the address using the rotary
encoder switches (see chapter 1.3.3.6, page 37 before fixing
the instrument in place.
8 Set on upper part of instrument (5) and fix in place using housing screws
(2).
Page 22
22
testo 6681 Profibus - 1.3 Commissioning
1.3.2 Assembling the instrument
1.3.2.1 Wall mounting
(for testo 6611/6613/6614/6615/6617 probes)
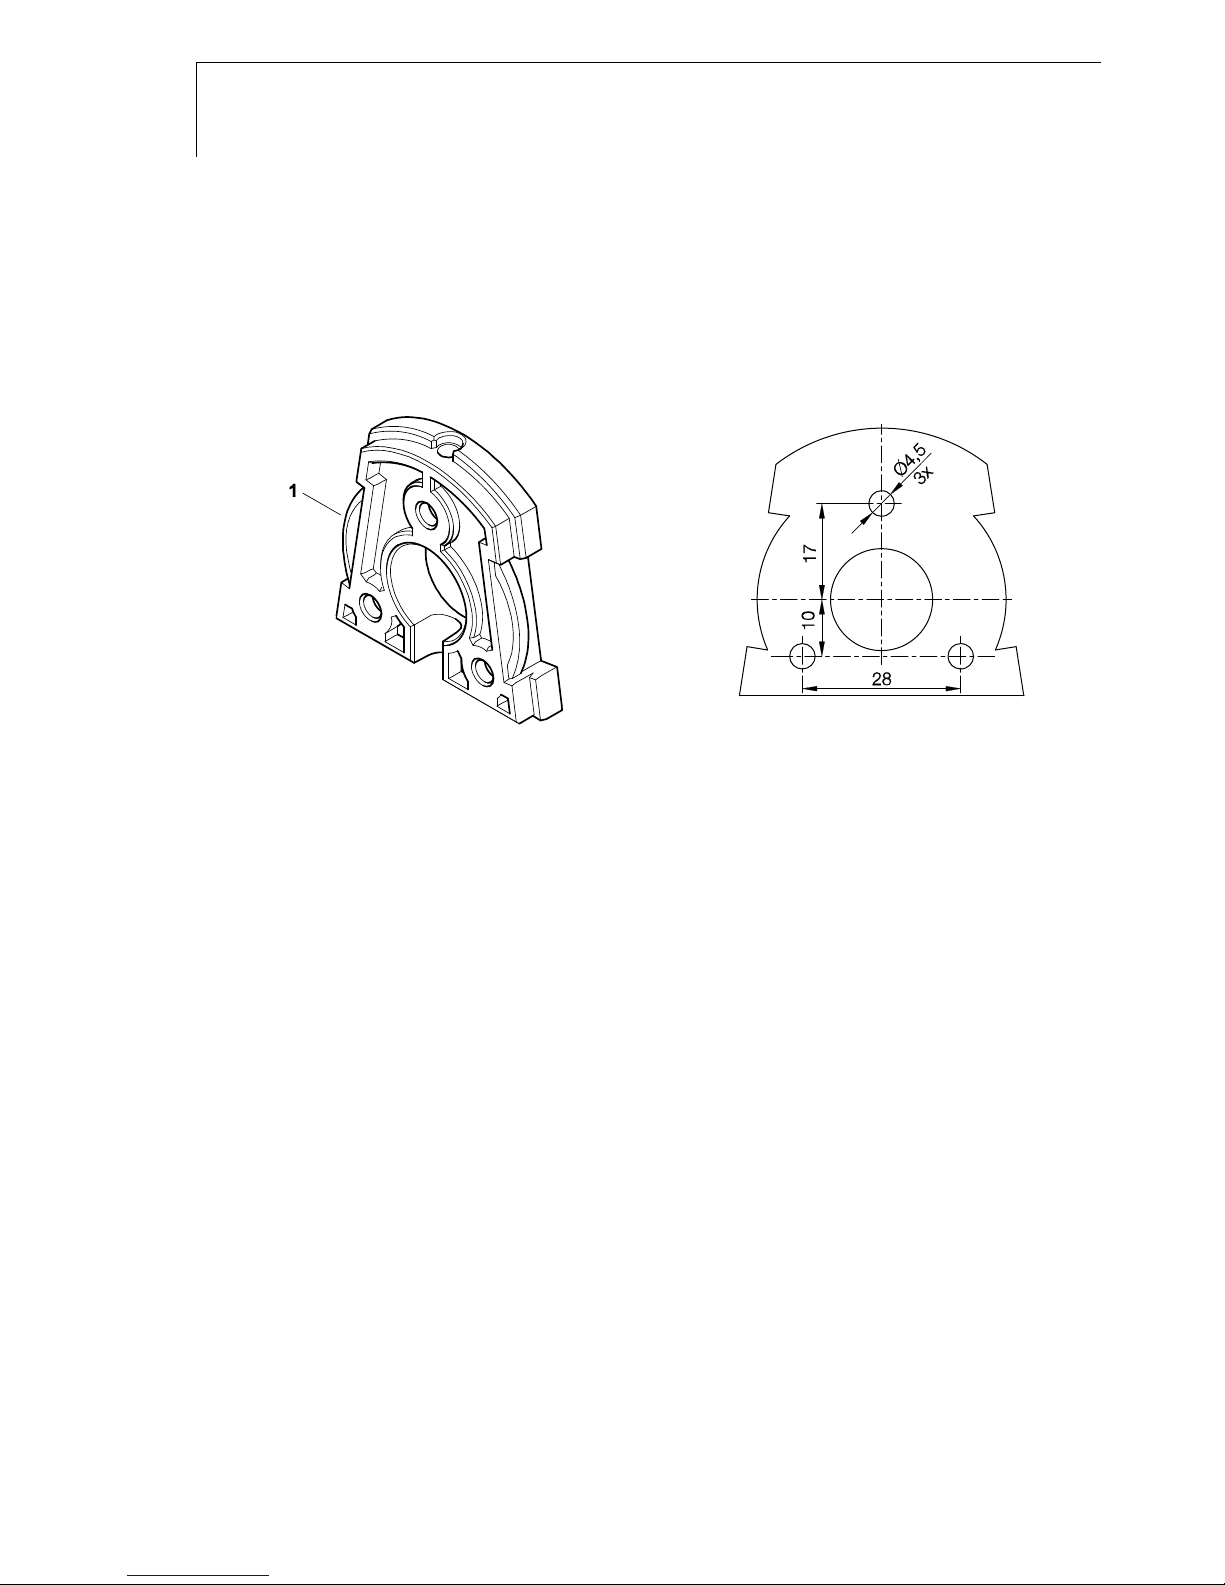
Attaching rear panel bracket
1 Remove locking screw (item (4) of drawing on page 21) and detach rear
panel bracket from plastic bracket (item (2) of drawing on page 21).
2 Hold rear panel bracket in assembly position and mark the three drill
holes.
3 Drill three holes ( 5 mm) and insert dowels where necessary.
4 Screw on rear panel bracket.
Remember that the clamping brackets (1) must face the wall.
Page 23
testo 6681 Profibus - 1.3 Commissioning
23
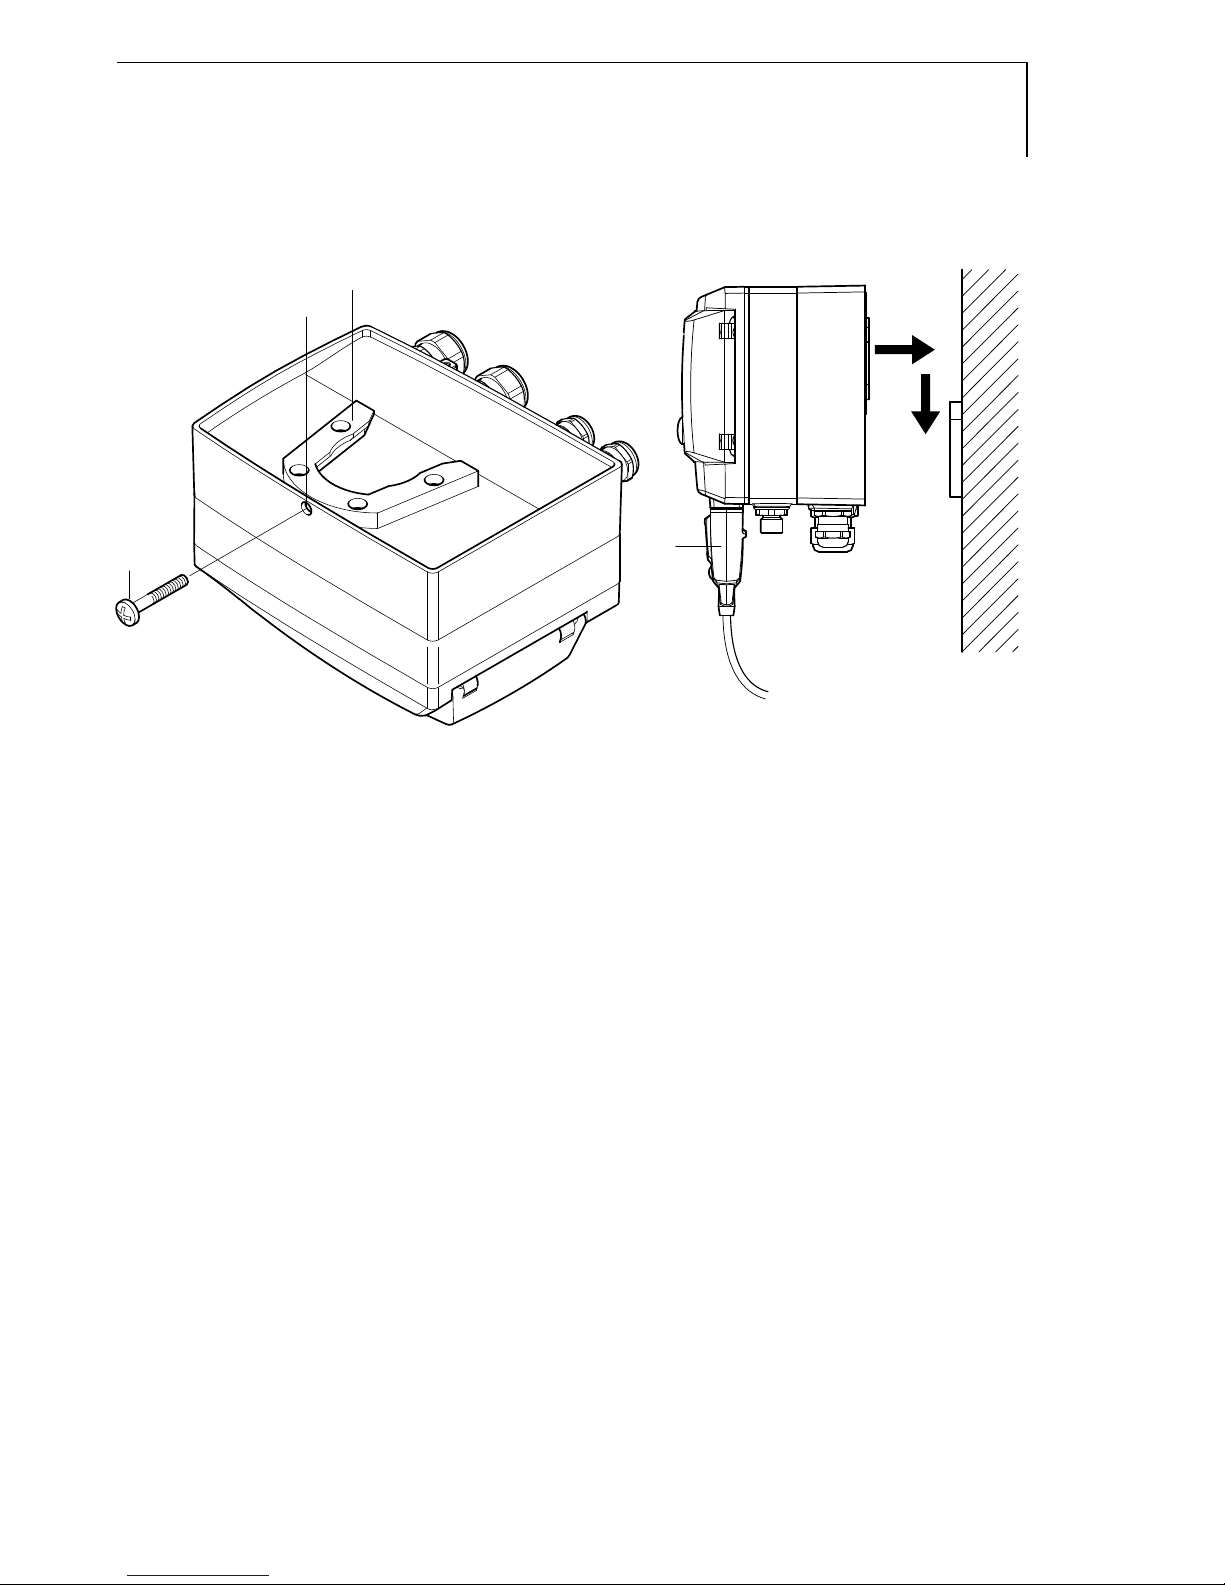
Fastening instrument to rear panel bracket
2
3
4
5
1 Slide plastic bracket (2) on the back of instrument onto rear panel bracket
until it engages (see arrows).
2 Insert screw (4) through hole (3) and screw into rear panel bracket.
3 Insert probe connector (5) into socket until it engages.
Page 24
24
testo 6681 Profibus - 1.3 Commissioning
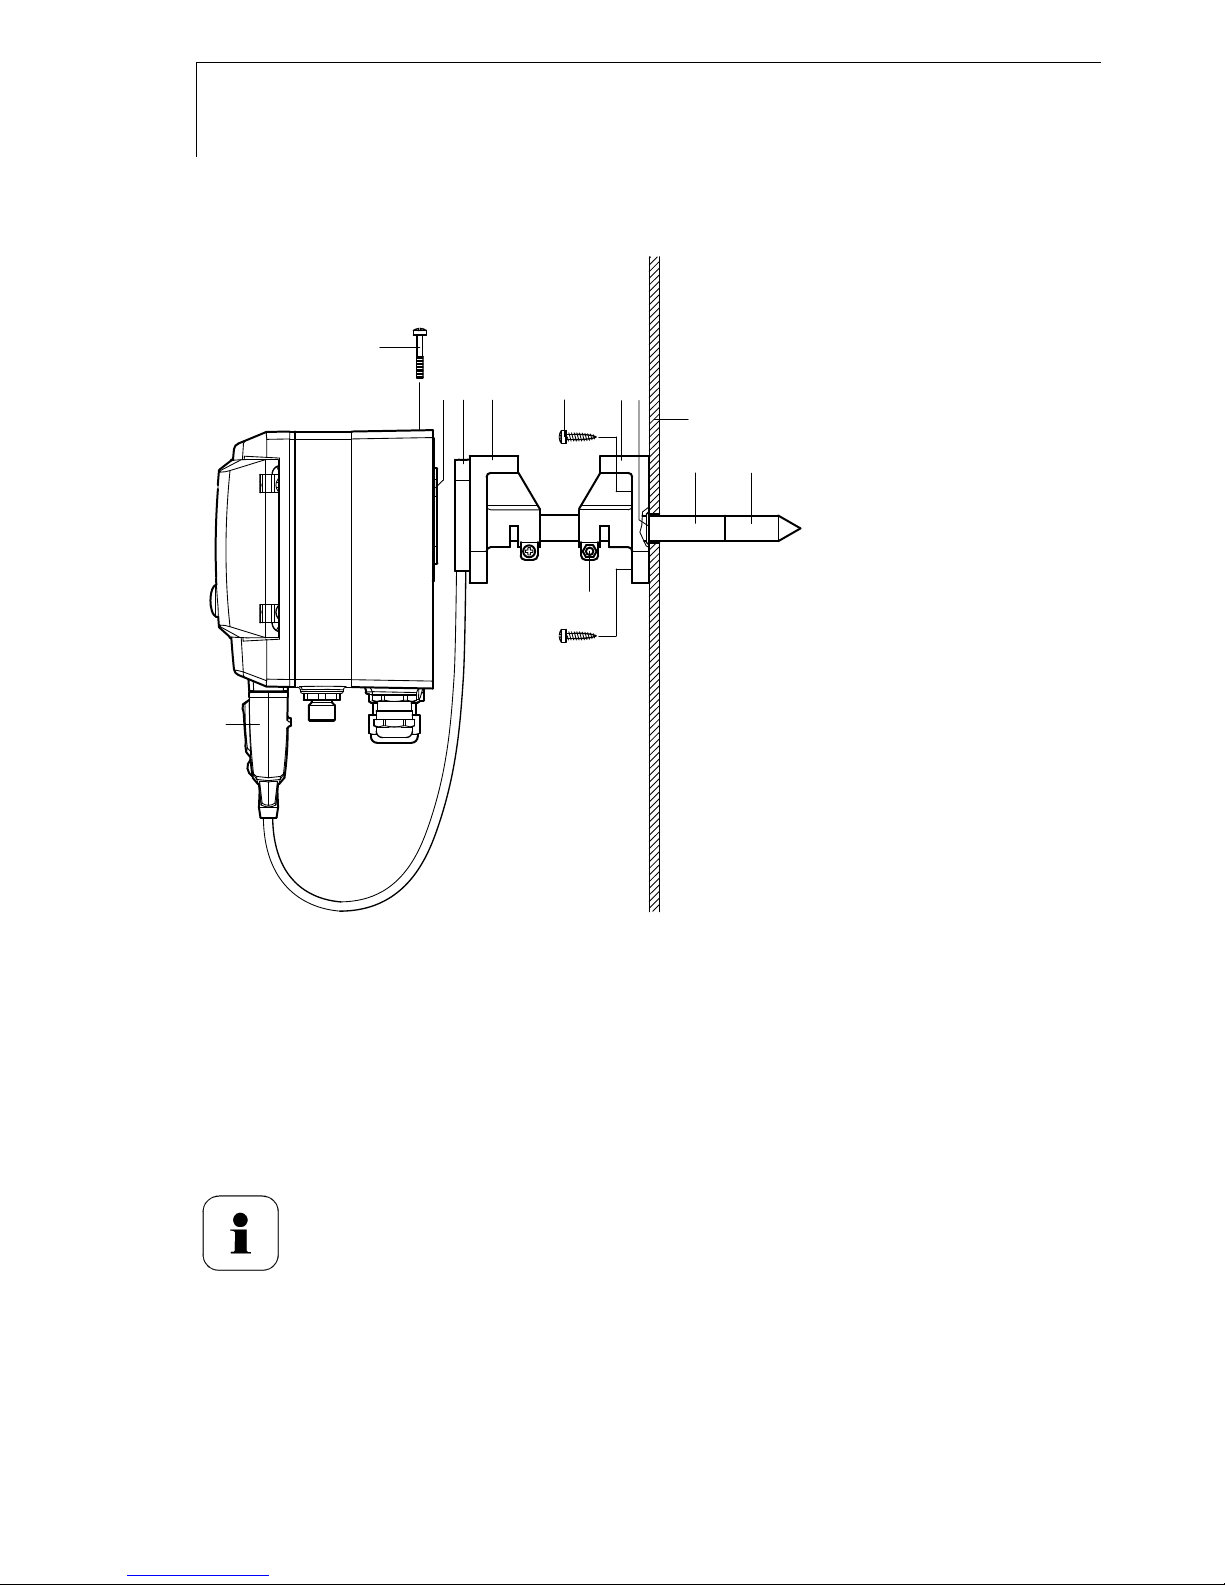
1.3.2.2 Duct mounting (for testo 6612 probes)
3
10
5
1
4
11
2
6
9
12
7
8
1 Hold wall/duct bracket (order no. 0554 6651) (6) against duct wall (8) and
mark drill holes for wall/duct bracket and probe shaft.
2 Drill a hole ( 12,5 mm) in the duct wall to feed through the probe shaft.
3 Fasten wall/duct bracket (6) to duct wall with screws (5).
4 Push probe shaft (9) with filter (10) through the middle hole of the
mounting bracket.
The wall/duct bracket (6) has an O-ring (7) to seal it against
the duct. Feed the probe shaft (9) carefully through the
wall/duct bracket so that the O-ring is not damaged.
5 Fix the correct position of the probe shaft (9) with screw (11) and mark
(insert probe shaft as far as possible).
Page 25
testo 6681 Profibus - 1.3 Commissioning
25
6 Slide plastic bracket (2) on the back of the transmitter onto bracket (3, 4)
until it engages.
Take the weight of the transmitter into account. Ensure that
the brackets (4, 6) are fastened securely.
7 Insert screw (1) through hole on the top of the instrument and screw into
bracket (3).
8 Insert probe connector (12) into socket until it engages.
1.3.3 Connecting the instrument
Opening the instrument
1 Loosen screw connection (1) of service flap and open the flap.
Page 26
26
testo 6681 Profibus - 1.3 Commissioning
2 Loosen and remove housing screws (2).
Important.
The Profibus module (A) is already separated from the upper
and lower parts of the instrument when the housing screws
(2) are removed.
3 Remove upper part of housing (3) and place on a clean surface.
4 Remove Profibus module (A) from lower part of housing (4) and also
place on a clean surface.
Page 27

testo 6681 Profibus - 1.3 Commissioning
27
Warning!
Electrical voltage.
Danger of short-circuit!
De-energize the mains connection before connecting the
transmitter!
Only have the transmitter wired and connected by authorized
personnel with the voltage disconnected.
Page 28
28
testo 6681 Profibus - 1.3 Commissioning
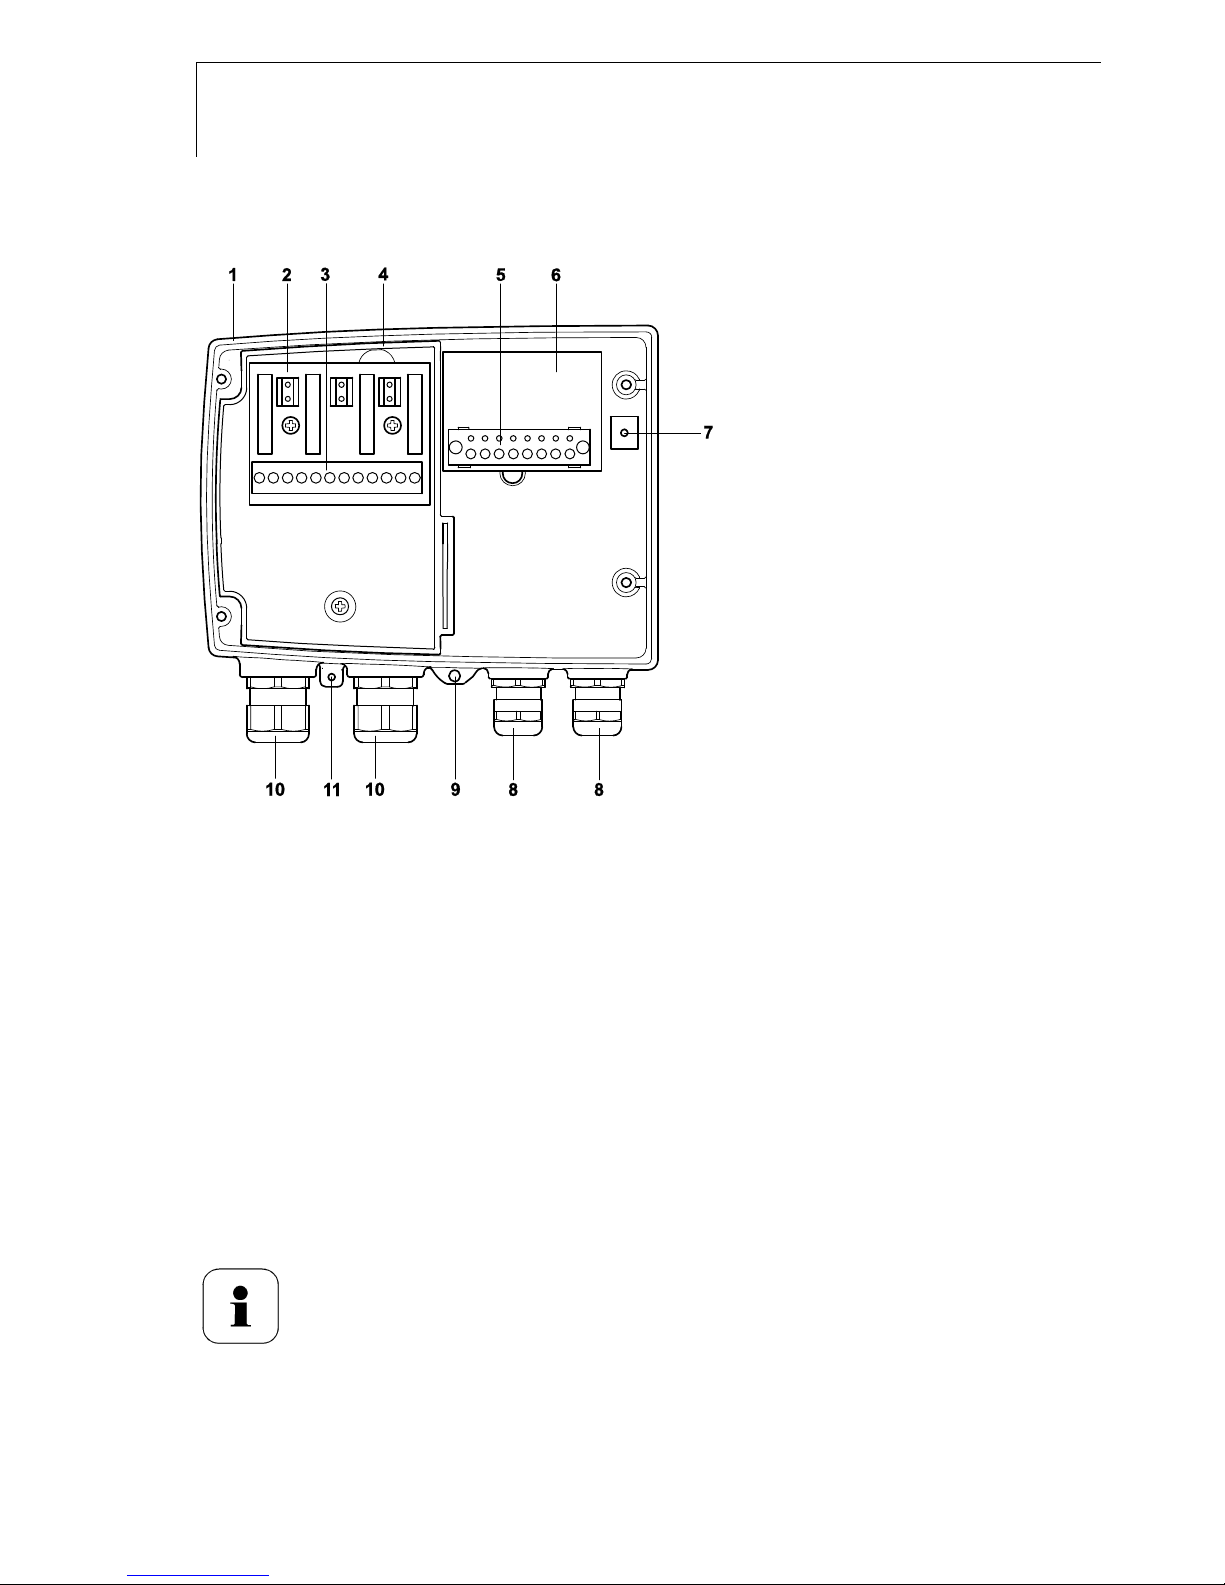
1.3.3.1 Overview of terminals
1 Lower part of housing
2 Relay board (option)
3 Relay terminals
4 Insulating trough for relay
board
5 Terminal strip for voltage
supply and analog outputs*
* The transmitter testo 6681 with
integrated Profibus module (order
code B 77) has two current
outputs 4 to 20 mA.
6 Terminal board
7 Earthing terminal (internal)
8 M 16 x 1.5 screw
connection**
9 Earthing terminal (external)
10 M 20 x 1.5 screw
connection*
11 Eyelet for measuring point
panel
** Alternatively, NPT cable coupling
or M plug-in connection.
The following description of the terminals refers to this
overview and its numbering.
Page 29

testo 6681 Profibus - 1.3 Commissioning
29
1.3.3.2 Connecting voltage supply and analog outputs
Terminal strip for voltage supply and
analog outputs (item (5) of Overview
of terminals, chapter 1.3.3.1, page
28).
1 Feed cable with voltage supply and analog signal lines through opened
M 16 x 1.5 screw connection (item (8) in Overview of terminals, chapter
1.3.3.1, page 28.
2 Strip the cable ends, clamp wire end ferrules on and screw down onto
voltage terminals.
3 Close M 16 x 1.5 screw connection (item (8) in Overview of terminals,
chapter 1.3.3.1, page 28.
Wiring diagram for 2-wire system (4 - 20 mA)
12 to 24 VDC
0 V
2 or 3 channels
4 to 20 mA, max. load 100 to 750
(at 24 V)
Page 30

30
testo 6681 Profibus - 1.3 Commissioning
If the channels have to be galvanically isolated, a separate
mains unit must be used for each channel.
Wiring diagram for 4-wire system
(0 to 20 mA/4 to 20 mA/0 to 1 V/0 to 5 V/0 to 10 V)
+
-
+
-
+
-
+
-
+
-
CH1
CH2 CH3
24V
Requirement for the connecting cable of the supply:
Insulated with cross-section of at least 0.25 sq. mm.
The supply line must be secured against exceeding 8 A.
An OFF switch must be installed in an easily accessible
position close by and be marked as such.
1 Feed connection cables of the two, or optionally three, channels through
opened M 16 x 1.5 screw connection (item (8) in Overview of terminals,
chapter 1.3.3.1, page 28.
2 Strip the cable ends, clamp wire end ferrules on and screw to channel
terminals as shown in diagram.
3 Close M 16 x 1.5 screw connection (item (8) in Overview of terminals,
chapter 1.3.3.1, page 28.
0 V
20 to 30 V
AC/DC
2 or 3 channels
0 to 20 mA/
4 to 20 mA/
max. load per 500
0 to 1 V/0 to 5 V/0 to 10 V
Page 31

testo 6681 Profibus - 1.3 Commissioning
31
Connecting the analog outputs is only required if you also
wish for analog monitoring in addition to use of the readings
via Profibus (e.g. for local signal use).
1.3.3.3 Connecting the relay outputs
Only have the transmitter wired and connected by authorized
personnel with the voltage disconnected.
Relay terminal strip (item (3)
of Overview of terminals,
chapter 1.3.3.1, page 28.
There is the option of twelve terminals for a total of four relays. The
designations NC/C/NO (normally closed contact/root or pin/normally open
contact) are etched on the surface of the board.
Using PG screw connection
4 Feed connection cables for the relays through opened M 20 x 1.5 screw
connection (item (10) of Overview of terminals, chapter 1.3.3.1, page 28.
5 Strip cable ends and clamp on wire end ferrules.
6 Connect relays according to chosen function (NC/NO) (see diagrams
below; relay 1 is shown as an example of a connection).
Using plug-in connections (optional)
Only insert or disconnect the plug-in connection when the
voltage is disconnected.
1 Clean the connector of the probe line and the coupling of any foreign
matter.
Do not disconnect the connector of the probe line from the
instrument for extended periods to protect against
contamination.
Page 32

32
testo 6681 Profibus - 1.3 Commissioning
Connection note
For the connection, a double-insulated mains cable
(sheathed cable) with a cross-section of at least 1.5 sq.
mm must be used.
Cable connection (2) may not be routed in a loop within
the tray (1).
It is recommended that you always tie 3 cores to one
another using a cable tie (3).
The insulation of the cable must be fed at least 5 mm (4)
into the tray.
Page 33

testo 6681 Profibus - 1.3 Commissioning
33
Use of relay as NC contact (NC = normally closed)
The busy light (alarm/status light) is permanently on until the
relay opens or the circuit is interrupted. This circuit can
therefore be used to monitor the functionality of the alarm
circuit, as a cable break, for instance, is indicated by the busy
light going off.
Use of relay as NO contact (NO = normally open)
250 V AC/DC, 3 A
Alarm/status light
(example of installation)
250 V AC/DC, 3 A
Alarm/status light
(
example of installation
)
Page 34

34
testo 6681 Profibus - 1.3 Commissioning
The busy light (alarm/status light) only comes on when the
relay is switched (closed). Monitoring the functionality of the
alarm circuit is therefore not possible with this switching
operation.
2 Close M 20 x 1.5 screw connection (item (10) in Overview of terminals,
chapter 1.3.3.1, page 28.
1.3.3.4 Plug-in connection option
As an option, the PG screw connections of the signal and supply lines can be
replaced with plug-in connections that are installed at the housing (see Fig. 1
and 2). The relay cabling occurs via standard cable entries and PG screw
connections, see Fig. 3 and 4
Plug-in connections for power supply and channels
M12 plug-in connection (5-pin) socket (1)
View of the plug-in connections in the installed state from outside.
Pin Assignment.
1 V 24 -
2 V 24 +
3 + Ch 1
4 - Ch 1
5 PE
Transmitter housing
Page 35

testo 6681 Profibus - 1.3 Commissioning
35
M12 plug-in connection (5-pin) connector (2)
Pin Assignment.
1 - Ch 2
2 + Ch 2
3 + Ch 3
4 - Ch 3
5 PE
1.3.3.5 Creating the PE/earthing terminal
As the testo 6681 has a metal housing, we recommend that the instrument
be earthed. This can be done using the earthing terminal within the
instrument (1) or the earthing terminal outside of the instrument (2).
Only use the external earthing terminal in dry interiors.
Page 36

36
testo 6681 Profibus - 1.3 Commissioning
Using the earthing terminal within the instrument
1 Guide PE line (yellow-green) (5) through the cable coupling (x) and fit
cable lug (8). Fix this to the side of the instrument (6) using M 5 screw
(3), washer (4) and snap ring (7) on the internal earthing terminal (1).
2 Place the other cable end on an appropriate (PE) earth conductor, e.g.
an earthing bar.
Using an earthing terminal outside of the instrument
1 Use shielded cable (5) with cable lug (8). Fix this in place using M 5
screw (3), washer (4) and snap ring(7) on the external earthing terminal
(2).
2 Place the other cable end on an appropriate (PE) earth conductor, e.g.
an earthing bar.
3 Set Profibus module on lower part of housing (see arrow).
4 For the configuration of the Profibus module, see following chapter.
If you do not wish to perform a configuration, close the transmitter (see
chapter 1.3.3.7, page 40)
Page 37

testo 6681 Profibus - 1.3 Commissioning
37
1.3.3.6 Manually set address
To ensure that the individual bus subscribers can be addressed directly by
the master, it is necessary that every bus subscriber is assigned a unique
address.
Important:
The address of a subscriber may only be assigned once!
Repeated assignment of an address leads to bus faults!
In the condition on delivery for the testo 6681 with Profibus
module, the switch setting FF is set.
If you wish to set the address using the Profibus
parameterization software, e.g. Siemens Simatic PDM (see
chapter 1.3.5.4, page 51), the default setting is required.
The manual setting of the address (hard address) overrides
the setting via the parameterization software (soft address).
The testo 6681 must be disconnected from the bus system.
1 Open transmitter (see Section Opening the instrument, chapter 1.3.3,
page 25).
Page 38

38
testo 6681 Profibus - 1.3 Commissioning
2 With a Phillips screwdriver, set the address via the rotary encoder
switches (1) and (2) at Profibus module (see following Section ).
3 Insert Profibus module and close instrument (see chapter 1.3.3.7, page
40).
Table of addresses
The addressing of the bus subscribers is performed via the rotary encoder
switches (items (1) and (2), see drawing on page 30) in a hexadecimal
system (see table).
dec (1) (2) dec (1) (2) dec (1) (2) dec (1) (2)
0 0 0
16 1 0 32 2 0 48
3 0
1 0 1 17 1 1
33 2 1 49
3 1
2 0 2 18 1 2 34 2 2 50 3 2
3 0 3 19 1 3 35 2 3 51 3 3
4 0 4 20 1 4 36 2 4 52 3 4
5 0 5 21 1 5 37 2 5 53 3 5
6 0 6 22 1 6 38 2 6 54 3 6
7 0 7 23 1 7 39 2 7 55 3 7
8 0 8 24 1 8 40 2 8 56 3 8
9 0 9 25 1 9 41 2 9 57 3 9
10 0 A 26 1 A 42 2 A 58 3 A
11 0 B 27 1 B 43 2 B 59 3 B
12 0 C 28 1 C 44 2 C 60 3 C
13 0 D 29 1 D 45 2 D 61 3 D
14 0 E 30 1 E 46 2 E 62 3 E
15 0 F 31 1 F 47 2 F 63 3 F
Page 39

testo 6681 Profibus - 1.3 Commissioning
39
dec (1) (2) dec (1) (2) dec (1) (2) dec (1) (2)
64 4 0
80 5 0 96 6 0 112
7 0
65 4 1 81 5 1
97 6 1 113
7 1
66 4 2 82 5 2 98 6 2 114 7 2
67 4 3 83 5 3 99 6 3 115 7 3
68 4 4 84 5 4 100 6 4 116 7 4
69 4 5 85 5 5 101 6 5 117 7 5
70 4 6 86 5 6 102 6 6 118 7 6
71 4 7 87 5 7 103 6 7 119 7 7
72 4 8 88 5 8 104 6 8 120 7 8
73 4 9 89 5 9 105 6 9 121 7 9
74 4 A 90 5 A 106 6 A 122 7 A
75 4 B 91 5 B 107 6 B 123 7 B
76 4 C 95 5 C 108 6 C 124 7 C
77 4 D 93 5 D 109 6 D 125 7 D
78 4 E 94 5 E 110 6 E 126 7 E
79 4 F 95 5 F 111 6 F
Page 40

40
testo 6681 Profibus - 1.3 Commissioning
1.3.3.7 Closing the instrument
1 Place Profibus module (A) on lower part of instrument (1).
2 Set on upper part of instrument (2) and fix in place using housing screws
(3).
Page 41

testo 6681 Profibus - 1.3 Commissioning
41
3 Close the service flap and tighten screws (4).
Page 42

42
testo 6681 Profibus - 1.3 Commissioning
1.3.4 Connect instrument to the bus system
Overview
1 Terminati
ng
resistor
2 Profibus
3 Profibus
Characteristics
RS485 transmission technology
Baud rates between 9 kBit/s and 12 Mbit/s
Connected in linear structure (see Fig. above).
Stubs
These should be avoided, as they cause reflections on the bus and thereby
disruptions in communication (especially as of transfer rates 1.5 Mbits/s).
Connecting a bus monitor or similar is also an example of a stub, so these
instruments should only be connected via active stubs (see Section
Terminating resistor, chapter 1.3.4.2, page 45).
Page 43

testo 6681 Profibus - 1.3 Commissioning
43
Number of subscribers
A maximum of 32 subscribers may be attached per segment (2).
If more than 32 subscribers are to be integrated into the Profibus or the
network dimensions are to be expanded, so-called repeaters (3) are to be
installed which connect the individual bus segments with one another.
However, a maximum of 9 repeaters (3) should be inserted in the
transmission path between the Profibus master and the bus subscriber.
In total, a maximum of 126 subscribers (including repeaters) can be
connected to the bus. The repeaters do not require their own bus address,
but are included in the number of bus subscribers.
Note the bus terminating resistors (1) (see Section Terminating resistor,
chapter 1.3.4.2, page 45)
Page 44

44
testo 6681 Profibus - 1.3 Commissioning
1.3.4.1 Data transfer and baud rate
With the RS485 transmission technology, the use of shielded and twisted
two-wire line of cable type A is recommended in accordance with EN 50170:
Loop resistance < 110 /km
Surge impedance 135 to 165 (at f= 3 to 20 MHz)
Wire diameter > 0.64 mm
Wire cross-section > 0.34 sq. mm
Effective capacitance < 30 pF/m.
Depending on the transfer rate and number of repeaters,
distances up to 10 km can be achieved using this
transmission technology.
Line lengths
The line length depends on the baud rate (see table).
Baud rate in kBit/s 9.6 19.2 93.75 187.5 500 1500 12000
Line length in m
(cable type A)
1200 1200 1200 1000 400 200 100
Bus cycle time
The bus cycle time is dependent on the
number of bus subscribers and the
selected transfer rate (see Fig.).
Subscribers
Bus cycle time (ms)
Page 45

testo 6681 Profibus - 1.3 Commissioning
45
1.3.4.2 Electrical connection
To simplify the connection of the transmitter to the Profibus, the Profibus
module of the testo 6681 has pre-fabricated plug-and-socket connections.
Using the connector (2) and the socket (1) (accessory 0554 6683), the
testo 6681 can be connected to the existing cable infrastructure in the linear
structure of the Profibus.
The pin-assignment of the connector and the socket as per IEC 60947-5-2 is
as follows:
Pin 1 Supply voltage VP (5 V)
Pin 2 RxD/TxD-N A line
Pin 3 Reference potential to VP
(DGND)
Pin 4 RxD/TxD-N B line
Pin 5 Shield or protective earth
When using both plug-in connections, the communication of
the bus is necessarily interrupted during the integration of the
removal of a field instrument.
Page 46

46
testo 6681 Profibus - 1.3 Commissioning
Alternatively, the transmitter can be connected to the bus system via a T
plug-in connection (3) (accessory 0554 6687).
Using the T plug-in connection (3) the field instruments (4) can be
disconnected during Measuring Mode and the bus communication is not
interrupted. However, the T plug-in connections (3) are only advantageous up
to a transfer speed of 1.5 MBits/s.
Terminating resistor
To prevent disruptions in communication due to reflections, a bus terminator
(1) must be attached to the beginning and end of every bus (2) (accessory
0554 6688).
Page 47

testo 6681 Profibus - 1.3 Commissioning
47
Shielding
To safeguard the Profibus from electromagnetic influences, you should
use shielded cable type A data cables (see chapter 1.3.4.1, page 44).
route the bus cables as far away from all live cables as possible.
connect the double-sided cable shield to each connective bus subscriber.
ensure optimum equipotential bonding between the individual bus
subscribers (e.g. by means of equipotential bonding line/common
earthing bar).
Without equipotential bonding the differences in potential may
lead to low-frequency equalizing currents and, in extreme
cases, to destruction of the cables.
If no equipotential bonding can be ensured within the system,
we recommend only applying the shield on one side and
establishing capacitive connections for all further earthing
points.
Use of the external earthing terminal only in interiors
1 Equipotential
bonding strip
2 Equipotential
bonding line
3 Data cable
4 Transmitter
(slave)
5 Master
Page 48

48
testo 6681 Profibus - 1.3 Commissioning
1.3.4.3 Configuration
The communication in the Profibus occurs cyclically (permanent data
exchange such as e.g. the humidity and temperature readings) as well as
acyclically (data exchange dependent on event such as e.g. status, warning
and error messages).
The testo 6681 has two measurement channels that are provided for the
Profibus interface.
Parameters can be found in chapter 1.2.7, page 16.
In the condition on delivery, measurement channel 1 is set
with temperature (°C) and measurement channel 2 with
relative humidity (% RH) for Profibus.
To Change the factory settings for the testo 6681 via
Profibus, the Profibus parameterization tool Siemens Simatic
PDM is required, for example (see chapter 1.3.5, page 49).
For the cyclical service, you must ensure that the GSD file
(General Station Description) was read into the master
class 1 in the configuration tool.
The GSD can be obtained under:
www.profibus.com/pb/applications/gsd,
www.testo.com or can
be downloaded from the product CD that is included with
the testo 6681.
Page 49

testo 6681 Profibus - 1.3 Commissioning
49
1.3.5 Configure Profibus module using EDD
1.3.5.1 Start parameterizing software
The following description of the configuration using the
Process Device Manager (PDM) refers to the stand-alone
version of the Siemens Simatic PDM software.
The project planning and parameterization tool Siemens Simatic PDM
can be master class 2 (at least version 6.0 SP2).
1 Start the software Simatic PDM
The program window is opened.
2 In the right selection window, select the testo 6680 by double clicking.
The Simatic PDM - User dialogue is opened.
3 Select:
Maintenance engineer to read out the settings of the testo 6681 or
Specialist to parameterize the measurement channels (see Section Menu
item Output, chapter 1.3.5.3, page 50).
4 Confirm with [OK].
Page 50

50
testo 6681 Profibus - 1.3 Commissioning
1.3.5.2 Overview of user interface
The individual menu items are
shown in a tree structure in
the left selection window (1).
In the right selection window
(2) input fields can be opened
by clicking on the white fields
(3) with the right mouse
button.
When settings are changed,
status (4) changes from Initial
val to Changed.
1.3.5.3 Menu items
Menu items Explanation
Operation
unit
Entry of the exact designation of the measuring point.
Device
Selection of the identification number with which the
instrument registers on the Profibus.
You may select:
Manufacturer-specific
Instrument registers itself with the identification
number 0A8A
hex
.
For commissioning the instrument in cyclical data
communication, the manufacturer GSD is required.
Profile-specific
Instrument registers itself with the identification
number 9701
hex
.
For commissioning the instrument in cyclical data
communication, the corresponding profile GSD of the
Profibus user organization (PNO) is required.
2
4
1
3
Page 51

testo 6681 Profibus - 1.3 Commissioning
51
As the testo 6681 is the first humidity transmitter with a
Profibus interface, no standardized humidity profile exists at
this point, meaning that Manufacturer-specific should be
selected.
Input Description of the Profibus input measurement channels, i.e.
the parameters that the Profibus interface should be provided
with. With testo 6681, these are the channels Temperature
Transducer and Humidity Transducer.
Output
Select the parameter settings for unit, filter time constants,
reading scaling, limit values, etc.
1.3.5.4 Set address
FF must be set at the Profibus module (see chapter 1.3.3.7, page 40).
1 Click on [Set address].
2 Enter addresses and confirm with [Assign Address].
The address is assigned and saved directly.
Page 52

52
testo 6681 Profibus - 1.3 Commissioning
Important:
The address of a subscriber may only be assigned once.
Repeated assignment leads to bus faults.
1.3.5.5 Parameter settings
In the Output menu item you can perform the parameter settings. To simplify
the multitude of entry steps, an entry assistant is available for this.
Start assistant
Select Device > Menu Transmitter setup in the menu bar.
The dialogue is opened.
Instrument settings tab
Changing parameterizations is only possible when the write
protection of the variables is removed.
If the write protection is activated, the settings can only be
shown.
Page 53

testo 6681 Profibus - 1.3 Commissioning
53
1 Click on [Read Device Settings].
The display of the instrument settings is updated and the parameters,
units and status of the write lock are thereby adopted in the
testo 6681.
2 Select Write locking Off and click on [Apply read-only settings].
Write protection is now deactivated.
3 In the Channel Settings list field, set the required parameters via the
Channel 1 and Channel 2 pull-down menus.
Using Profibus, the temperature can only be set on channel 1.
The humidity values on the other hand can be set on both
channels, but a humidity value selected on one measurement
channel cannot be set on the other measurement channel.
The units are updated when the parameter is changed. Alternative
units that correspond to the parameter can be set using the pull-down
menu.
4 Confirm with [Apply Channel Settings].
The values are updated, the status was changed.
Relay parameters tab
In the user menu of the testo 6681 or in the P2A software, the relay
status Not used or Profibus is set. Otherwise the message
no access appears from Profibus.
Profibus
Not used
MAX
General alarm
With Profibus
parameterization
tool
With P2A software
or user menu
Page 54

54
testo 6681 Profibus - 1.3 Commissioning
1 Click on [Read relay parameters from transmitter].
The display of the relay settings is updated and the relay parameters
set in the testo 6681 are applied.
For usage and parameterization of the relay, testo 6686 must
be equipped with the relay options (order code H01 or H02).
Precondition for changing relay parameterizations is that you
have deactivated the write protection beforehand in the
Device Settings tab
2 Select the required relay usage in the Apply relay parameters list field
using the Limit Relay X pull-down menu (see table) below.
Pull-down menu
selection
Description
Relay is not being used means that neither the transmitter nor the
Profibus are using the relay.
Relay parameters
managed by device
means that the relays are assigned using the
testo 6681.
Limit Lo-Lo channel x means that the relay should be used as the
main alarm for monitoring the lower limit value.
Limit Lo channel x means that the relay should be used as the pre-
alarm for monitoring the lower limit value.
Limit Hi-Hi channel x means that the relay should be used as the
main alarm for monitoring the lower limit value.
Limit Hi channel x means that the relay should be used as the pre-
alarm for monitoring the upper limit value.
3 Confirm with [Apply Relay Parameters].
Using [Relay Factory Settings] all relays are reset to Relay is not being
used.
A precondition for this is that the write protection was deactivated
beforehand and that the relays were used by the Profibus.
Page 55

testo 6681 Profibus - 1.3 Commissioning
55
1.3.6 Adjusting the instrument
The testo adjusting concept allows the entire signal chain from the sensor
signal (probe) and the digital signal (within the transmitter) through to the
analog signal (transmitter output signal) to be adjusted (see diagram).
1-point adjustment 2-point adjustment Analog adjustment
Adjustment via
testo 400/650 handheld
instrument with
adjustment adapter
P2A software
User menu
A
djustment 11.3 % RH and
75.3 % RH via
A
djustment keys (1, 2)
P2A software
A
djustment 20 % rH and
80 % rH via
User menu
Adjustment using a precise
multimeter and transmission
of analog reference value in
P2A software or
User menu
Either the 1-point adjustment or 2-point adjustment is suitable for adjusting
the sensor signal - digital signal chain.
The testo 6681 transmitter has digital probes whose adjustment information
is stored in the probes' internal memory. Both 1-point and 2-point
adjustments can thus be carried out on another testo 6681 (e.g. in the
calibration laboratory).
Page 56

56
testo 6681 Profibus - 1.3 Commissioning
1.3.6.1 Overview: Adjustment keys and test contacts
1 Status LED
2 Contact ch. 1 +
3 Contact ch. 1 -
4 Adjust key 11.3 %
5 Service interface
6 Adjust key 75,3 %
7 Contact ch. 2 +
8 Contact ch. 2 -
1.3.6.2 1-point adjustment (Offset)
In the 1-point adjustment, the reading at the working point is raised to the reference
value so that there is no longer any deviation in the working point. The reference
condition can be measured using a precise handheld instrument (e.g. testo 400/650
with precision humidity probe) or be created in an air conditioning cabinet.
The advantage of the 1-point adjustment is the good measuring result in the
working range. But the further away the measurement is from the working
point, the greater the deviation can become. The 1-point adjustment should
therefore only be used for a relatively narrow measuring range (working
range), e.g. clean room applications, air conditioning applications for storage
and similar.
Deviation
after
before
Working range
WP
e.g. scale = 0 - 100 % RH
Page 57

testo 6681 Profibus - 1.3 Commissioning
57
The 1-point adjustment can be performed
via the user menu (see chapter 1.4.6.9, page 81) or
via the P2A software (see volume 2, chapter 3, page 135) or
directly by means of a Testo handheld instrument (testo 400/650) (see
description of how to proceed below).
Please note that the 1-point adjustment is generally
performed on the basis of the % RH and °C/°F parameters.
Adjusting testo 6681 using Testo handheld instrument
The service flap is open, a testo 400/650 handheld instrument with a
precision humidity probe is ready.
1 Connect Testo handheld instrument 400/650 (1) with connected humidity
reference probe (3) (order no. reference set 0699 3656/20) to the service
interface (5) of the testo 6681 via the adjustment adapter (2) (connected
to the probe socket 1 of the handheld instrument).
1
2
3
4
5
Page 58

58
testo 6681 Profibus - 1.3 Commissioning
2 Expose the humidity probe (4) of the testo 6681 and the reference probe
(3) to the same reference conditions (e.g. in the humidity generator) and
allow climatic conditions to equalize.
3 Switch on the testo 400/650. The two-part display of the handheld
instrument will show the values of the transmitter on the left, and the
values of the reference probe on the right. The humidity and temperature
values are adjusted to the reference probe using the Probe > Probe
Adjustment menu item on the testo 400/650.
The 1-point adjustment is performed for both the humidity and the
temperature.
4 Disconnect the adapter (2) from the service interface (5).
5 Close the service flap.
1.3.6.3 2-point adjustment
With the 2-point adjustment, the parameter is adjusted to the reference value
at the two standard adjustment points 11.3 % RH and 75.3 % RH or 20 % RH
and 80 % RH. The reference conditions are created either by using Testo
humidity adjustment set (order no. 0554 0660, only for adjustment points 20
%RH and 80 %RH) or in the humidity generator.
In the 2-point adjustment, the deviations between the reading and the
nominal value are minimized across the entire measuring range. The 2-point
adjustment is therefore recommended for large working ranges, e.g. in drying
processes.
The 2-point adjustment can be performed
via P2A software (see volume 2, chapter 3, page 135) or
using the adjustment keys under the service flap, see description of how to
proceed below.
Deviation
after
before
Page 59

testo 6681 Profibus - 1.3 Commissioning
59
The 2-point adjustment for the adjustment points 20 %RH and 80 %RH is
carried out via the user menu.
A 2-point adjustment cancels any previous 1-point
adjustment.
Adjustment with the standard Testo adjustment salt pots is
not suitable for the testo 6614 (heated for high-humidity
applications) and testo 6615 (trace humidity) probes. The
reference conditions should be generated in a humidity
generator to adjust these probes.
In addition, these probes can also be adjusted at a third
adjustment point by Testo Service.
testo 6614: third adjustment point at 90 % RH
testo 6615: third adjustment point at -40 °Ctd/-40 °Ftd.
Page 60

60
testo 6681 Profibus - 1.3 Commissioning
Adjusting testo 6681 using adjustment keys
The 2-point adjustment for the adjustment points 20 %RH and
80 %RH is carried out via the user menu.
The service flap of the testo 6681 is open.
1 Expose the humidity probe of the testo 6681 to the reference condition of
11.3 % RH for at least 1.5 hours at 25 °C.
11.3 % RH
1.5 h
11.3 % RH
1.5 h
75.3 % RH
1.5 h
75.3 % RH
1.5 h
or
(salt pots) (humidity generator)
Page 61

testo 6681 Profibus - 1.3 Commissioning
61
2 After this equalization period, press the 11.3 % adjustment key (4) for at
least 10 seconds with something like a ball-point pen that is not too
sharp. The LED (1) flashes when the adjustment process begins. At the
same time, the 2-point adjustment 11.3 % status message appears on
the display
Completion of the adjustment is signalled by the LED (1) coming on
permanently and the Probe reset status message is shown.
Carry out the adjustment analogously for the reference condition
75.3 % RH. Press on the 75.3 % RH adjustment key (6) to do this.
3 Close the service flap.
1.3.6.4 Analog output adjustment
The analog output adjustment is only required if the analog
outputs are used in addition to the Profibus output.
The purpose of adjusting the analog outputs is to adjust the signal chain from
the digital signal (within the transmitter) to the analog outputs. The signal type
that was appointed for the transmitter is adjusted respectively for each
channel (e.g. 4 to 20 mA or 0 to 1 V, etc.)
Page 62

62
testo 6681 Profibus - 1.3 Commissioning
1 Status LED
2 Contact ch. 1 +
3 Contact ch. 1 -
4 Adjust key 11.3 %
5 Service interface
6 Adjust key 75.3 %
7 Contact ch. 2 +
8 Contact ch. 2 -
Analog outputs 1 and 2 adjusted
A precise multimeter (minimum resolution of 6.5 digits, accuracy of
100
A, e.g. Agilent 34401A) is available.
If only a simple multimeter is available, the analog outputs
may not be adjusted.
The service flap is open.
1 Connect the inputs of the multimeter with the contacts (2) and (3) for
channel 1 or with contacts (7) and (8) for channel 2.
2 Transfer the reference analog value measured with the multimeter to the
P2A software (see volume 2, chapter 3, page 135) or enter it via the user
menu (see chapter 1.4.6.9, page 81).
3 Disconnect connections between multimeter and contacts of the
testo 6681 and close service flap.
Adjusting analog output 3 (optional)
If the optional third analog output is to be adjusted, a cable
connection to measure the analog value must be installed.
Do this by proceeding as follows:
Page 63

testo 6681 Profibus - 1.3 Commissioning
63
1 Open transmitter (see chapter 1.3.3, page 25).
2 Connect measuring cable to the terminals of the third analog output and
guide through the cable coupling and out of the transmitter.
3 Reassemble upper part of transmitter.
4 Connect cable ends to the inputs of the multimeter.
5 Transfer the reference analog value measured with the multimeter to the
P2A software (see volume 2, chapter 3, page 135) or enter it via the user
menu (see chapter 1.4.6.9, page 81).
6 Remove the upper part of the transmitter, detach the cable connections
for the adjustment of the 3rd analog output and reassemble the
transmitter.
1.3.6.5 High-humidity adjustment for testo 6614
With the testo 6614, the rear of the Testo humidity sensor is heated, creating
a microclimate around the sensor (within the filter) that is constantly 5 K
warmer than the actual process conditions. As can be seen in the Mollier
diagram, this reduces the relative humidity at the sensor from around
100 % RH to a lower value, e.g. 73 % RH. In this range, the reaction time of
the sensor is noticeably shorter than in the condensation range and the risk
of the sensor corroding is also reduced. Using the separate temperature
probe, the testo 6681 transmitter compensates the microclimate conditions
and displays the process readings.
Mollier diagram
After heating
"Microclimate"
sensor conditions
e.g. 73 % RH
100 % RH
High-humidity process
conditions
Mist
Page 64

64
testo 6681 Profibus - 1.3 Commissioning
The reference conditions (11.3 % RH and 75.3 % RH) for the
2-point adjustment of the testo 6614 should be generated in a
humidity generator, as humidity adjustment sets cannot be
used due to the heat generated. The adjustment can also be
carried out at a third adjustment point (90 % RH) by Testo
Service so that optimum accuracy is also achieved in the high
humidity ranges.
1.3.6.6 Self adjustment of testo 6615 trace humidity
probe
Conventional trace humidity probes show a steep rise in measuring
uncertainty at low humidities. In the trace humidity probe of the testo 6615,
these measuring uncertainties are corrected by means of an automatic selfadjustment process. This means that extremely accurate measuring results
are also attained to -60 °Ctd.
To this end, a temperature sensor is fitted on the back of the testo 6615
which is used as a heater. A humidity and temperature value pair is taken in
both the unheated and heated state. The deviation of the probe obtained
from these pairs of values is automatically corrected.
The graph shows the effect of the self-adjustment, e.g. during the Init. phase.
1 Self-adjustment
2 Correction of measurement value
Page 65

testo 6681 Profibus - 1.3 Commissioning
65
3 Process dew point temperature
For the effectiveness of the self-adjustment the following prerequisites are
decisive over the duration of the self-adjustment.
The process temperature should not vary by more than 0.5K
The dew point temperature should remain stable, as far as possible
The process pressure should not vary excessively
If these prerequisites cannot be fulfilled, the values obtained
during the last successful self-adjustment will be maintained.
All adjustment processes are saved in the history of the transmitter, see
Transmitter history page 160.
testo 6615:
Fühler-
verhalten
Analog-
Ausgang
°Ctpd/
°Ftpd
„Zykluszeit Selbstabgleich“
Heizphase
Heizphase
Parameter
„Dauer Heizphase“
The heating time and storing of cycles can be edited in the P2A software; for
example, they can be deactivated by setting the two parameters to "0".
testo 6615:
probe
behaviour
Analog
output °Ctpd/
°Ftpd
Paramete
r
"Duration self-adjustment time"
"Self-adjustment cycle time"
Sel
f
-adjustment time
Page 66

66
testo 6681 Profibus - 1.4 Operation
Important:
Deactivating the adjustment function of the testo 6615
will reduce measuring accuracy and should therefore
be restricted to the shortest possible length of time.
During the heating phase, the relay and analog
outputs, the display value and output value are
"frozen", see diagram above. Self-adjustment active
is shown in the display until it has finished. The factory
setting for the Self-adjustment time (incl. heating time,
calculation time, cooling time) is 30 minutes per day.
The cycle time can be edited via the operating menu or
the P2A software.
In the factory setting, a third adjustment point (-
40 °Ctd) is approached for the testo 6615 in addition to
the 2-point adjustment.
This special adjustment can be performed again by
your Testo Service team if necessary.
1.4 Operation
1.4.1 Relationship between user menu and
mini-DIN socket is active
The testo 6681 can be parameterized using either the user menu or the P2A
software (see volume 2, chapter 2, page 97).
The testo 6681 humidity transmitter can only be operated via
the display and keypad if the display option is available.
If the testo 6681 is connected to the P2A software, the user
menu is blocked for the duration of the communication. The
message Service plug is shown in the display of the
testo 6681. As soon as the P2A software is disconnected, the
user menu is accessible again.
Page 67

testo 6681 Profibus - 1.4 Operation
67
1.4.2 Key cover
To prevent unauthorized operation of the keys, the standard key frame can
be replaced with a key cover.
If the key cover has been assembled, the service flap must be opened for
operation (see Section Opening the instrument, chapter 1.3.3, page 25).
Attaching the key cover
The service flap is open, see Opening the instrument, chapter 1.3.3,
page 25.
1 Undo screws (3) and remove key frame (2).
2 Insert key cover (1) into service flap and tighten screws (3).
3 Close and screw down the service flap.
Page 68

68
testo 6681 Profibus - 1.4 Operation
1.4.3 Password protection
The user menu can be protected with a four-digit numerical code (see Editing
Main Menu Settings, chapter 1.4.6.5, page 75) so that access to the user
menu is denied to unauthorized persons not familiar with this numerical code.
If the password protection is not to be used, the numerical code "0000" must
be entered. This is also the status upon delivery.
Page 69

testo 6681 Profibus - 1.4 Operation
69
1.4.4 Structure of user menu
At the main menu level, the user menu comprises the following:
Main menu of channel 1
Main menu of channel 2
Main menu of channel 3 (if this option is available)
Main Menu Alarm
Editing Settings main menu
Analysis main menu
Main Menu Messages
Ident main menu
Adjustment main menu
Reset main menu
Four keys enable the user to navigate/scroll through the menus and
enter/amend values and settings:
Key Function/description
SET
In Measuring Mode: changes to parameterization
In Parameterizing Mode: confirms a selection or setting
ESC
Leaves a menu (without modifying any settings)
Selecting: scrolls through menus (downwards) or selectable alternatives
Editing: changes to next digit (to the right)
Selecting: scrolls through menus (upwards) or selectable alternatives
Editing: increases the value of the current digit by 1
19.3 °C
57.8 % RH
-4.1 °Ctd
Channel 1 display
Channel 2 display
Channel 3 display or for messages
Page 70

70
testo 6681 Profibus - 1.4 Operation
1.4.5 Overview of the testo 6681 user menu
Page 71

testo 6681 Profibus - 1.4 Operation
71
Page 72

72
testo 6681 Profibus - 1.4 Operation
1.4.6 The individual main menus
1.4.6.1 Editing main menu of channel 1
An overview is given in Overview of the testo 6681 user menu, chapter 1.4.5,
page 70).
You can perform basic settings for channel 1.
1 In Measuring Mode, press SET, select Main Menu Channel 1 using or
and confirm selection with SET.
One of the following parameters can now be selected using or , after
which the selection must be confirmed with SET:
Channel 1 unit
The parameter for this channel is selected.
Selection: % RH, °C, °F, °Ctd, °Ftd, g/m³, gr/ft³, g/kg, gr/lb, kJ/kg,
BTU/lb, °Ctw, °Ftw, "H2O, hPa, ppm
vol
, % Vol, °Ctm, °Ftm.
Edit/select parameter with or , confirm with SET or abort input
with ESC.
Scale minimum for channel 1
The lower scale limit is edited;
Unit as selected above (example: 4 mA = 0 % RH).
Editing the value: Scroll one digit to the right using , increase value
of digit by 1 using . Confirm with SET or abort entry with ESC.
Scale maximum for channel 1
The upper scale limit is edited;
Unit as selected above (example: 20 mA = 100 % RH).
Editing the value: Scroll one digit to the right using , increase value
of digit by 1 using . Confirm with SET or abort entry with ESC.
Signal delay ("Damping") for channel 1
The analog signal can be delayed ("Damping"); a time constant is
selected for this (1 = no delay; 15 = longest delay).
Edit/select parameter using or , confirm with SET or cancel entry
via ESC.
2 Continue to Main Menu Channel 2 using or or return to Measuring
Mode by pressing ESC.
1.4.6.2 Editing main menu of channel 2
See channel 1.
Page 73

testo 6681 Profibus - 1.4 Operation
73
1.4.6.3 Editing main menu of channel 3 (if this option is
available)
See channel 1.
1.4.6.4 Editing Main Menu Alarm
With the alarm, the relays, available as options, are programmed. In addition,
the alarm statuses are shown on the display (top right) (even without relays).
You can choose whether the alarm is to be used to monitor limit values or as
a collective alarm. If an alarm is to be used to monitor limit values, you can
choose between monitoring the minimum or maximum value and set a limit
value and hysteresis for each alarm.
Note:
If the relays are already assigned using the Profibus, these
can no longer be parameterized via the transmitter.
3 In Measuring Mode, press SET, select Main Menu Alarm using or
and confirm selection with SET.
Four alarms can be parameterized.
4 Select Alarm x using or and confirm selection with SET.
Page 74

74
testo 6681 Profibus - 1.4 Operation
Using alarm to monitor limit values
5 Select Channel x (e.g. "Channel 1") using or and confirm selection
with SET.
6 Select Max control or Min control with or (see graphic).
7 Press SET and edit limit value and hysteresis: Scroll one digit to the
right using , increase value of digit by 1 using . Confirm with SET or
abort entry with ESC.
8 Return to Channel x by pressing ESC.
9 Return to Alarm x by pressing ESC.
10 Change to the other relays using or and perform settings in the
same way.
Using alarm as collective alarm or not using it at all
If the collective alarm is assigned to an alarm, the relay is switched as soon
as (at least) one of the warning or error messages of the testo 6681
transmitter (or the connected testo 6610 probe) is activated.
Note:
The messages affecting the collective alarm can only be
selected in the P2A software, see volume 2, chapter 2, page
97.
Alarm is selected (see previous steps 1 and 2).
11 Specify with or whether Alarm x is to be used as the Alarm relay
or is to be not used. Confirm selection with SET and return to Alarm x.
Monitoring minimum Monitoring maximum
Hysteresis Hysteresis
Limit value Limit value
Off
Off
On On
Cannel 2
e.g. °C
NO contact
NC contact
On On
Off
Off
Page 75

testo 6681 Profibus - 1.4 Operation
75
12 Change to another alarm using or and perform settings in the same
way.
13 Continue to Main Menu Settings using or or return to Measuring
Mode by pressing ESC.
1.4.6.5 Editing Main Menu Settings
You can edit instrument settings and other settings.
In Measuring Mode, press SET, select Main Menu Settings using or
and confirm selection with SET.
You can edit settings for:
Display
Language
H
2O2
proportion by weight entry (optional with 3rd analog output)
Unit: %
Absolute pressure unit
Selection: bar, psi, mPa, hPa
Absolute pressure
Unit as selected above.
Code
Editing display settings
You can set the brightness and contrast of the display.
1 Select Display Settings using or and confirm selection with SET.
2 Select Backlight or Contrast using or and confirm selection with
SET.
One of the following parameters can now be selected using or , after
which the selection must be confirmed with SET:
Backlight
The display illumination is changed.
Edit/select parameter with or , confirm with SET or cancel entry
with ESC (the effect of the change in parameter can be seen during
input).
Contrast
The brightness difference between the display background and the
displayed values is changed.
Page 76

76
testo 6681 Profibus - 1.4 Operation
Edit/select parameter with or , confirm with SET or cancel entry
with ESC (the effect of the change in parameter can be seen during
input).
Backlight on 24 h
Using or select On or Off and confirm with SET.
Off: The display light switches off automatically if no button was
pressed for 30 seconds.
On: The display light is activated
3 Go back to Display Settings by pressing ESC and continue to
Language using or .
Selecting language
You can select the language for the plain text line in the display.
Press SET, select required language with or , confirm selection with
SET and return to Language.
Only choose a language that you can understand well.
Editing H
2O2
proportion by weight (optional with 3rd analog output)
This menu is only used to parameterize humidity measurements in H
2O2
atmospheres (e.g. in sterilization processes) and determines whether °Ctm or
°Ftm is the output parameter.
This menu is only used to parameterize humidity measurements in H
2O2
atmospheres (e.g. in sterilization processes) and determines whether
°Ctm,°Ftm or %rFm is the output parameter.
4 Select H
2O2
Weight Proportion using or and confirm selection with
SET.
The selection H
2O2
passively vaporized or H2O2 actively vaporized
in the submenu describes whether H
2O2
is created through
evaporation or is actively evaporated in the process.
5 Select H
2O2
passively vaporized or H2O2 actively vaporized using
or and confirm with SET.
6 Editing proportion by weight of H
2O2
in % (% H2O2 proportion by weight
in the liquid end solution): Scroll one digit to the right using , increase
value of digit by 1 using . Confirm with SET or abort entry with ESC.
Page 77

testo 6681 Profibus - 1.4 Operation
77
7 Using ESC return to H2O2 proportion by weight and continue to
Absolute pressure unit using or .
Selecting absolute pressure unit (Abs. pressure unit)
This parameter determines the humidity variables, standardised atmospheric
dewpoint (°CtA, °FtA), relative humidity (g/kg or gr/lb) and water content
(ppm
vol
or % vol).
1 Press SET, select desired unit (selection: bar, psi, mPa, hPa) using or
confirm selection with SET or cancel with ESC.
2 Continue to Absolute Pressure with or .
Editing absolute pressure (Abs. pressure value)
You can set a value for the process absolute pressure.
1 Using or , select Abs. pressure value and confirm selection with
SET.
The absolute pressure is displayed.
2 Scroll one digit to the right using , increase value of digit by 1 using .
Confirm with SET or abort entry with ESC.
3 Press SET and return to Abs. pressure value.
4 Return to Main Menu Settings by pressing ESC.
5 Continue to Main Menu Analysis using or or return to Measuring
Mode by pressing ESC.
Editing code settings
You can set the access code (password).
If a code other than "0000" (factory setting) is set, the
transmitter can only be operated once this code has been
entered via the menu.
1 Select Code using or and confirm selection with SET.
2 Scroll one digit to the right using , increase value of digit by 1 using .
Confirm with SET or abort entry with ESC.
3 Return to Code by pressing ESC.
Page 78

78
testo 6681 Profibus - 1.4 Operation
1.4.6.6 Editing Analysis main menu
You can test the functionality of analog and relay outputs. In addition, you
can read off the minimum and maximum values (since the last voltage supply
or reset of the min./max. values).
Testing functionality of analog outputs
This function affects the analog outputs directly, not only the
test contacts.
1 In Measuring Mode, press SET, select Main Menu Analysis using or
and confirm selection with SET.
Test Analog Output is shown.
2 Press SET, choose between Analog Output 1, 2, 3 with or .
3 Press SET, scroll one digit to the right using , increase value of digit by
1 using . Any analog output value can be predefined, e.g. for an analog
output of 4 to 20 mA, the value "6.0 mA". Confirm with SET or abort entry
with ESC.
4 Accept setting by pressing SET and test with multimeter (minimum
requirement: resolution of 6.5 digits, accuracy of 100 nA):
Analog output 1 or 2: Via test contacts under service flap, see
diagram.
1 3
5
4
2
1 Channel 1 test
contacts
2 Service interface
3 Channel 2 test
contacts
4 Multimeter
5 Ends of channel 3
cables
Analog output 3: Connect measuring cables to terminals for channel 3,
guide measuring cables out of housing and perform measurement
outside of the transmitter, see diagram.
5 Return to Test Analog Output using ESC and continue to Test Relay
Output using or .
Page 79

testo 6681 Profibus - 1.4 Operation
79
Testing functionality of relay outputs
1 Press SET, choose between Alarm 1, 2, 3, 4 with or .
2 Press SET.
The relay can now be tested. You can choose between OFF and ON
using or . If ON is chosen, the NO contact is closed, the NC
contact opened. If OFF is chosen, the NC contact is closed, the NO
contact opened.
3 To test, route a measuring cable from the relay terminals (see chapter
1.3.3.3, page 31) out of the transmitter to a multimeter (resistance
measurement) or continuity tester.
4 Return to Test Relay Output by pressing either SET (starts relay test) or
ESC (exits the menu without relay test).
Reading off min./max. values of channels
To reset the max./min. values, see chapter 1.4.6.10, page 83.
1 Read off the min./max. values of the three channels by pressing or
one after the other and return to Main Menu Analysis using ESC.
2 Continue to Main Menu Message using or or return to Measuring
Mode by pressing ESC.
1.4.6.7 Editing Message main menu
Messages can be confirmed/acknowledged, the last messages can be called
up and the display of the messages can be switched on or off.
348 h
4/7
Scaling changed
Operating hours at the time of
message
Message number/number of messages
present
Example: "4/7" refers to the fourth of
seven messages
Message text
Page 80

80
testo 6681 Profibus - 1.4 Operation
Using the P2A software (see volume 2, chapter 3, page 135)
you can predefine which of the messages are to be shown in
the display.
1 In Measuring Mode, press SET, select Main Menu Message using or
and confirm selection with SET.
2 Confirm Confirm message using SET.
3 Select Last messages using or and confirm with SET.
4 Scroll between the messages recorded so far using or and press
ESC to return to Last messages.
5 Continue to Display of message with or .
ON: Measurements are shown on the display in Measuring Mode.
OFF: No messages shown on display.
6 Select ON or OFF using or and confirm selection with SET.
7 Return to Main Menu Message by pressing ESC.
8 Continue to Main Menu Ident using or or return to Measuring Mode
by pressing ESC.
An overview of the messages can be found in chapter 1.5,
Status, warning and error messages, page 84.
1.4.6.8 Calling up Main Menu Ident
The serial numbers of the transmitter and probe can be read off.
1 In Measuring Mode, press SET, select Main Menu Ident using or
and confirm selection with SET.
6681
2.01
Serial 11111111
Instruments or probe type
Firmware version
Serial number
Page 81

testo 6681 Profibus - 1.4 Operation
81
The type, firmware version and serial number of the transmitter are
displayed.
2 Press ESC to return to the Main Menu Ident or read off the type,
firmware version and serial number of the probe using or and then
press or to return to the Main Menu Ident.
3 Continue to Main Menu Adjustment using or or return to
Measuring Mode by pressing ESC.
1.4.6.9 Editing Adjust main menu
A reference value can be entered for both relative humidity (RH) and
temperature (°C/°F) for the 1-point adjustment. Please refer to the description
in chapter 1.3.6.2, page 56.
In addition, the analog outputs can be adjusted. See chapter 1.3.6.4, page 61
for instructions on how to do this.
The 2-point adjustment for the adjustment points 20 %RH and 80
%RH is carried out via the user menu.
For the adjustment points 11.3 %RH and 75.3 %RH, the 2point adjustment is carried out via the adjustment buttons or
the P2A software, see chapter 1.3.6.3, page 58 or volume 2,
chapter 3, page 135.
Enter reference value for 1-point adjustment
Please also refer to chapter 1.3.6.2, page 56.
1 In Measuring Mode, press SET, select Main Menu Adjust using or
and confirm selection with SET.
Reference value % RH is displayed.
2 Press SET, edit value: Scroll one digit to the right using , increase
value of digit by 1 using . Confirm with SET or cancel entry with ESC.
3 Continue to Reference value temp with or .
4 Press SET and Reference value °C is displayed.
5 Press SET, edit value: Scroll one digit to the right using , increase
value of digit by 1 using . Confirm with SET or abort entry with ESC.
6 Continue to Reference value °F with or .
Page 82

82
testo 6681 Profibus - 1.4 Operation
7 Press SET, edit value: Scroll one digit to the right using , increase
value of digit by 1 using . Confirm with SET or abort entry with ESC.
8 Continue to Analog Adj. Ch. 1 with or .
9 Continue with the adjustment of the analog outputs (see below, step 2) or
press ESC to return to Main Menu Adjustment.
10 Continue to Main Menu Reset using or or return to Measuring
Mode by pressing ESC.
Performing the 2-Points-Adjustment for 20% RH and 80 % RH
1 In the Measuring Mode press SET, select main menu Adjust with or
and confirm selection with SET.
2 Continue to 2Pt Adjust 20/80% with or .
3 Press SET.
4 Continue to Adj. Point 20% or Adj. Point 80% with or
5 Confirm selection with SET.
The red LED ADJ flashes
In the display 2Pt Adjust 20/80%, 1-point adjustment, Probe reset
appears consecutively.
The adjusted measurement values appear after probe reset.
Performing analog adjustment
Please refer to chapter 1.3.6.4, page 61.
1 In Measuring Mode, press SET, select Main Menu Adjust using or
and confirm selection with SET.
Each channel is adjusted at three points in the analog range
(at 10 %; 50 %; 90°% of the analog scale).
2 Select Analog Adj. Ch. 1 using or and confirm with SET.
3 Select Adj. Point 1 using or .
4 Press SET. Read off multimeter display (e.g. 5.601 mA) and enter this
value in the user menu. Do this by scrolling one digit to the right using
and increasing the value of digit by 1 using . Confirm with SET or abort
entry with ESC.
Page 83

testo 6681 Profibus - 1.4 Operation
83
5 Select Adj. Point 2 using or .
6 Press SET. Read off multimeter display (e.g. 12.001 mA) and enter this
value in the user menu. Do this by scrolling one digit to the right using
and increasing the value of digit by 1 using . Confirm with SET or abort
entry with ESC.
7 Select Adj. Point 3 using or .
8 Press SET. Read off multimeter display (e.g. 18.401 mA) and enter this
value in the user menu. Do this by scrolling one digit to the right using
and increasing the value of digit by 1 using . Confirm with SET or abort
entry with ESC.
9 Continue to Analog Adj. Ch. 2 or 3 with or (repeat steps 3 to 8).
10 Return to Main Menu Adjust by pressing ESC.
11 Continue to Main Menu Reset using or or return to Measuring
Mode by pressing ESC.
1.4.6.10 Editing Reset main menu
You can reset the factory settings for the following:
Instrument
Sensor/probe
Min./max. values
Resetting to the factory settings means resetting to the order
specification, i.e. the specific condition at the time of supply to
the customer.
1 In Measuring Mode, press SET, select Main Menu Reset using or
and confirm selection with SET.
Reset device to factory settings is displayed.
2 Select the setting to be reset using or and confirm selection with
SET.
Reset Completed is displayed.
3 Press ESC or SET to return to reset setting and press ESC to return to
Main Menu Reset.
4 Continue to Main Menu Channel 1 using or or return to Measuring
Mode by pressing ESC.
Page 84

84
testo 6681 Profibus - 1.5 Status, warning and error messages
1.5 Status, warning and error
messages
To achieve optimum operational reliability (machine
availability), the transmitter provides the following via the user
menu (see chapter 1.4, page 66) or the P2A software (see
volume 2, chapter 2, page 97):
Status messages,
Warning messages and
Error messages
for either the testo 6681 or the connected testo 661x probe
as applicable.
All messages are stored in the transmitter with an operating
hours stamp. Use the user menu (see chapter 1.4.6.7, page
79) or P2A software (see volume 2, chapter 2, page 97) to
view the message history.
In the transmitter, the last 160 messages are stored in a ring
memory, but there is no restriction in the P2A software.
1.5.1 Status messages
Status messages show the current operating mode of the testo 6681.
Message Display Description
00300 New limit value The limit value has been changed or shifted
00301 Scaling changed The scaling has been changed
00500 Transmitter reset: The transmitter was reset to the factory settings
and is restarted.
0052F Reset Min/Max Resets all saved Min/Max values for all channels
02506 Probe connection A probe has been connected
01D19 Service plug The Mini-DIN socket is connected to: the USB
adapter for P2A software, the adjustment
adapter or the service plug (is not recorded/no
number)
00307 User Setting Change User Setting Change: General settings were
changed for the transmitter.
Page 85

testo 6681 Profibus - 1.5 Status, warning and error messages
85
Message Display Description
02d07 Probe disconnected No probe is connected
02104 Analog out adjust An analog adjustment has been made
02101 1-point adjustment A 1-point adjustment is performed.
02102 2-point adjustment
11.3%
As part of the 2-point adjustment, an adjustment
is performed at 11.3 % RH
02103 2-point adjustment
75.3%
As part of the 2-point adjustment, an adjustment
is performed at 75.3 % RH
02120 2-point adjustment 20 % As part of the 2-point adjustment, an adjustment
is performed at 20 % RH
02130 2-point adjustment 80 % As part of the 2-point adjustment, an adjustment
is performed at 80 % RH
02105 Self-adjustment active For testo 6615 probe only: The probe performs
an automatic self-adjustment
02518 Probe reset Probe reset: The probe performs a reset
1.5.2 Warning messages
Warning messages show an early warning or a current malfunction which
may negatively impact measuring.
Message Display Cause Remedying of fault
02101 2-point adjustment
drift*
In the 2-point adjustment,
corrections repeatedly
occur in the same direction;
this may indicate a sensor
drift
Send the probe into Testo
Service
00E00 T ambient high** The ambient temperature
exceeds the permissible
temperature for the
transmitter
Take necessary
measures to lower
ambient temperature, e.g.
through venting or cooling
00E01 T ambient low** The ambient temperature is
below the permissible
temperature for the
transmitter
Take necessary
measures to raise
ambient temperature, e.g.
through heating
00E02 Supply voltage
low**
The supply voltage is below
the minimum voltage
required for the transmitter
Ensure sufficient voltage
supply
Page 86

86
testo 6681 Profibus - 1.5 Status, warning and error messages
Message Display Cause Remedying of fault
00E00 T process high** The process temperature
exceeds the temperature
designated for the probe
Remove the probe from
the process and take any
necessary measures to
lower the process
temperature
02806 Condensation* 100 % RH has been
reached, condensation
developing
Take measures to reduce
process humidity
02807 Values less than
0 % RH**
The adjustment or sensor
is faulty
Check adjustment (via
P2A adjustment history,
perform 2-point
adjustment where
necessary)
If the problem persists,
contact Testo Service
02809 Sensor early
warning*
For testo 6617 probe only:
The cover electrode of the
sensor is damaged; this
may soon cause the sensor
to break
Carry out visual
inspection
If the mirror-like surface of
the sensor is dirty or
damaged, contact Testo
Service
* Early warning
** Current malfunction
Page 87

testo 6681 Profibus - 1.5 Status, warning and error messages
87
1.5.3 Transmitter error messages
Error messages show a current malfunction.
Message Display Cause Remedying of fault
03401 No probe signal The probe communication
is interrupted
Ensure that the probe
connector is fully
engaged in the
transmitter.
If communication still
cannot be established,
contact Testo Service
03508 Wrong probe The connected probe is not
compatible with the present
transmitter
Use a compatible probe
Note: The 660x probes
match the 665x
transmitter, and the 661x
probes the 668x
transmitter
01528 Watchdog error Due to a processor error,
the transmitter performs an
automatic restart
If the problem occurs
frequently, contact Testo
Service
0300A % RH sensor
short-circuit
Short-circuit in humidity
sensor
Contact Testo Service
0300B %RH sensor
broken
The humidity sensor is
damaged (sensor broken)
Contact Testo Service
0300C T sensor short-
circuit
Short-circuit in temperature
sensor
Contact Testo Service
0300D T sensor broken The temperature sensor is
damaged (sensor broken)
Contact Testo Service
03105 Self-adjustment
error
For testo 6615 probe only:
The automatic selfadjustment was faulty
Contact Testo Service
Page 88

88
testo 6681 Profibus - 1.5 Status, warning and error messages
1.5.4 Status codes in cyclical service
1.5.4.1 Status codes for error messages
Message
(Hexdecimal code)
Description Cause
0x08 No communication
- No probe connected
- Wrong probe connected
- Communication with probe
interrupted
0x10 No sensor signal
- Breakage of the sensor
- Short-circuit humidity sensor
- Short-circuit temperature sensor
0x0C Transmitter malfunction
- Supply voltage to low
- Ambient temperature to high
- Ambient temperature to low
- Transmitter is restarted
1.5.5 Handling alarm messages
Shown on the
display 1
Can be used for
collective alarm
2
Message
start/end
Limit value x x
Scaling changed x x
Transmitter reset x x
Reset Min/Max x
Transmitter refresh x
Probe connection
Service plug
User Setting Change x
Probe disconnected
Analog out adjust x
1-point adjustment x x
2-point adjustment 11.3% x x
2-point adjustment 75.3% x x
Probe self-adjustment x x
Probe reset x x
Page 89

testo 6681 Profibus - 1.5 Status, warning and error messages
89
Shown on the
display 1
Can be used for
collective alarm
2
Message
start/end
2-point adjustment drift* x
T ambient high** x
T ambient low** x
Supply voltage low** x
T process high** x
Condensation* x
Values less than
0 % RH**
x
Sensor early warning* x
No probe signal x
Wrong probe
Watchdog error x
% RH short-circuit x
%RH sensor broken x
T short-circuit x
T sensor broken x
Self-adjustment error
1 If multiple messages/alarms are activated at the same time, only the last
message/alarm is shown. If this is cancelled, the other messages that are
still active are no longer displayed.
2 The message can be assigned the collective alarm function, which means
that the collective alarm is activated as soon as at least one of the
messages assigned to it is activated. The collective alarm can be assigned
to each of the 4 optional relays. The collective alarm is then always the
same, as it can only be defined once.
Execute Confirm message function (via control keys at transmitter):
The message/alarm is no longer shown on the display. If multiple
messages/alarms are active at the same time, all are reset
simultaneously.
If at least one message is assigned to the collective alarm, the collective
alarm is reset. If the collective alarm is set on a relay, the relay is also
reset, meaning switched to its neutral position.
Page 90

90
testo 6681 Profibus - 1.5 Status, warning and error messages
1.5.6 Namur fault conditions
If the faults named in the following table occur, the analog outputs output
special values that enable a general fault warning in the higher-level control
system. The values correspond to the "Namur" industry standard.
Analog output
Display message Class 0 -
20 mA
4 -
20 mA
1 V 5 V 10 V
No probe signal Error 21 mA 21 mA 1.2 V 5.5 V 11 V
Wrong probe Error 21 mA 21 mA 1.2 V 5.5 V 11 V
Watchdog error Error 21 mA 21 mA 1.2 V 5.5 V 11 V
Values < 0 %RH Underrange 0 mA 3.8 mA 0 V 0 V 0 V
Condensation Overrange 20.5 mA 20.5 mA 1.2 V 5.5 V 11 V
%RH short-circuit Error 21 mA 21 mA 1.2 V 5.5 V 11 V
%RH sensor broken Error 21 mA 21 mA 1.2 V 5.5 V 11 V
T short-circuit Error 21 mA 21 mA 1.2 V 5.5 V 11 V
T sensor broken Error 21 mA 21 mA 1.2 V 5.5 V 11 V
Probe disconnected Error 21 mA 21 mA 1.2 V 5.5 V 11 V
Page 91

testo 6681 Profibus - 1.6 Maintenance and cleaning
91
1.6 Maintenance and cleaning
1.6.1 Maintaining the instrument
We recommend that the adjustment and settings of the transmitter be
checked at regular intervals using the
User menu (chapter 1.4, page 66) or
P2A software (volume 2, chapter 2, page 97)
Convenient "remote monitoring" of the transmitter can be implemented, for
example by using a relay as a collective alarm (see chapter 1.4.6.4, page 73)
whose messages are forwarded to a local alarm transmitter (horn, light) or
PLC.
1.6.2 Cleaning the instrument
Only clean the instrument carefully with a moist cloth.
Do not use aggressive cleaning agents.
Do not use any solvents
Do not touch or damage the sensor.
Page 92

0970 6686 en 04 V01.20 V01.70-1 en-GB Vol1
 Loading...