

Page 1
testo 445 · testo 645
Instruction manual en
Page 2

Contents
Contents ........................................................................................................................................... 2
Foreword ........................................................................................................................................... 3
Initial operation .................................................................................................................................. 4
First measurement ............................................................................................................................. 5
Instrument description
-Keypad/ connection assignment ................................................................................................... 6
-Display .......................................................................................................................................... 7
Overview of controls ....................................................................................................................... 8-9
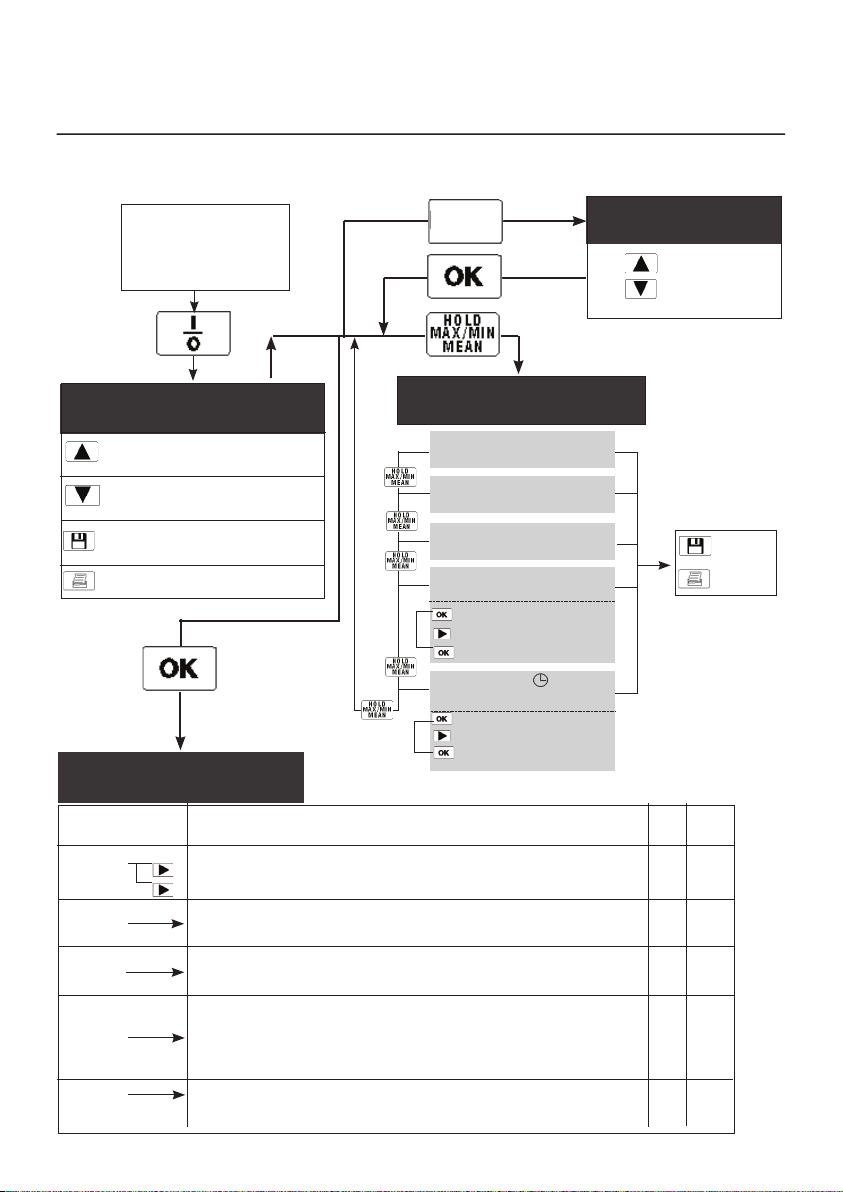
1. Current measurement.................................................................................................................. 10
Switching on, selecting parameter in display ......................................................................... 10
Saving, printing .................................................................................................................... 10
2. Measurement functions 11-13
Freezing readings .................................................................................................................. 11
Maximum readings ................................................................................................................ 11
Minimum readings ................................................................................................................. 11
Multi-point mean calculation .................................................................................................. 12
Timed mean calculation ........................................................................................................13
3. Location selection ....................................................................................................................... 14
4. Parameter settings ................................................................................................................. 15-17
System adjustment (testo 645) ............................................................................................. 15
Adjusting humidity probes .....................................................................................................16
Displaying calculated humidity parameters (td°C; g/m3; g/kg; J/g)......................................... 16
Switches CO2 ppm Vol% (testo 445) ............................................................................... 16
Initialising differential pressure probe (testo 445) ................................................................... 17
Activating m/s in differential pressure probes (testo 445) ...................................................... 17
Activates volume flow and sets duct cross-sections
for velocity and differential pressure probes (testo 445) ........................................................ 17
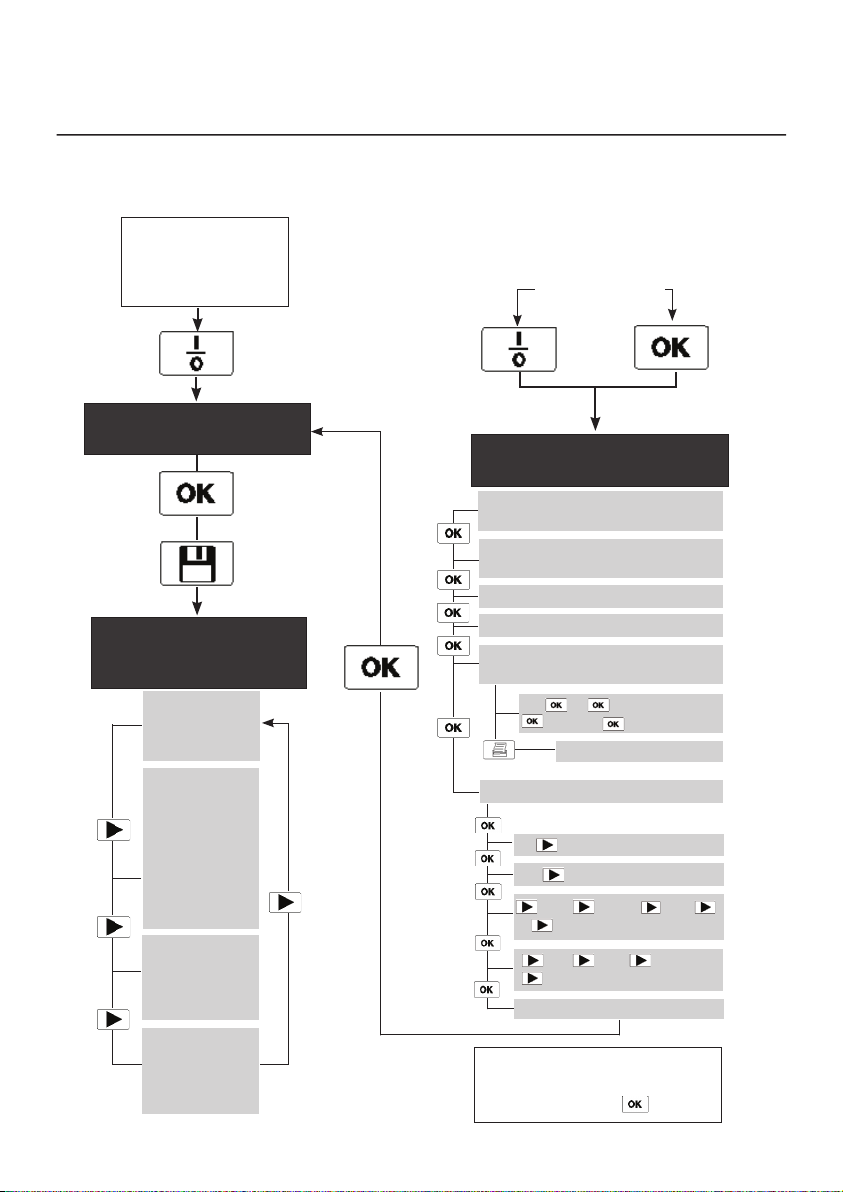
5. Memory settings .....................................................................................................................18-21
Overview ............................................................................................................................... 18
Manual saving ....................................................................................................................... 19
Automatic saving ................................................................................................................... 19
Reading or printing memory contents ................................................................................... 20
Clearing memory contents .................................................................................................... 21
According to the conformity certificate, the instruments fulfill 2014/30/EC
guidelines.
©1999 Copyright Testo GmbH & Co.
The software and software structure included in the product testo 445/645 are protected by
copyright laws worldwide.
2
Page 3

Contents
6. Instrument configuration ......................................................................................................... 22-26
“AutoOFF” power save function ........................................................................................... 22
Setting power supply, with rechargeable battery or battery ................................................... 23
Setting date/time ................................................................................................................... 24
Setting parameters for absolute pressure and density compensation .................................... 25
Unit selection ........................................................................................................................ 26
Factory reset .............. 26
7. Velocity measurement ............................................................................................................27-28
Volume flow funnel (testo 445) .............................................................................................. 27
Pitot tube and pressure probe (testo 445) ............................................................................. 28
Thermal anemometer probes (testo 445) .............................................................................. 28
8. CO/CO2 measurement ...........................................................................................................29-30
Measuring absolute pressure ......................................................................................................31-32
Error messages ............................................................................................................................... 33
Technical data ............................................................................................................................ 34-35
Ordering data .............................................................................................................................36-41
Foreword
Dear Customer
You have made the right decision by choosing a measuring instrument from Testo. Every year,
thousands of customers purchase our high-quality products. There are many good reasons for this.
1) We offer value for money. Reliable quality at the right price.
2) Considerably longer guarantee periods of up to 3 years - depending on the instrument.
3) With over 40 years of specialist experience we are optimally equipped to solve your measuring
tasks.
4) Our high quality standards are confirmed by ISO 9001 certification.
5) It goes without saying that our instruments bear the CE mark required by the EU.
3
Page 4
Initial operation
Please read prior to measurement
Do not measure on live parts.
Do not switch instrument on or off with the button
Complete automatic saving before connecting instrument to the Comfort software.
If the instrument does not function remove battery and put it in again. The respective error
message is shown in the display. Refer to the information on “Error messages” on page 33 of
Observe storage and transport temperature and max. operating temperature (e.g. protect
When changing configurations (e.g. changing the probe), the instrument should be switched off
because the values specific to the probe can only be read when the instrument is switched on.
The V24 cable (PC connection) can be inserted anytime.
A simultaneous print command is not possible if the PC cable is connected.
Ensure that the contacts are correct in probes with a plug-in head.
The swivel nut in the probe handle should be securely tightened.
Opening the instrument, inexpert handling and use of force cancels your warranty.
- during instrument configuration
- during automatic saving
the Instruction manual.
measuring instrument from direct sunlight)
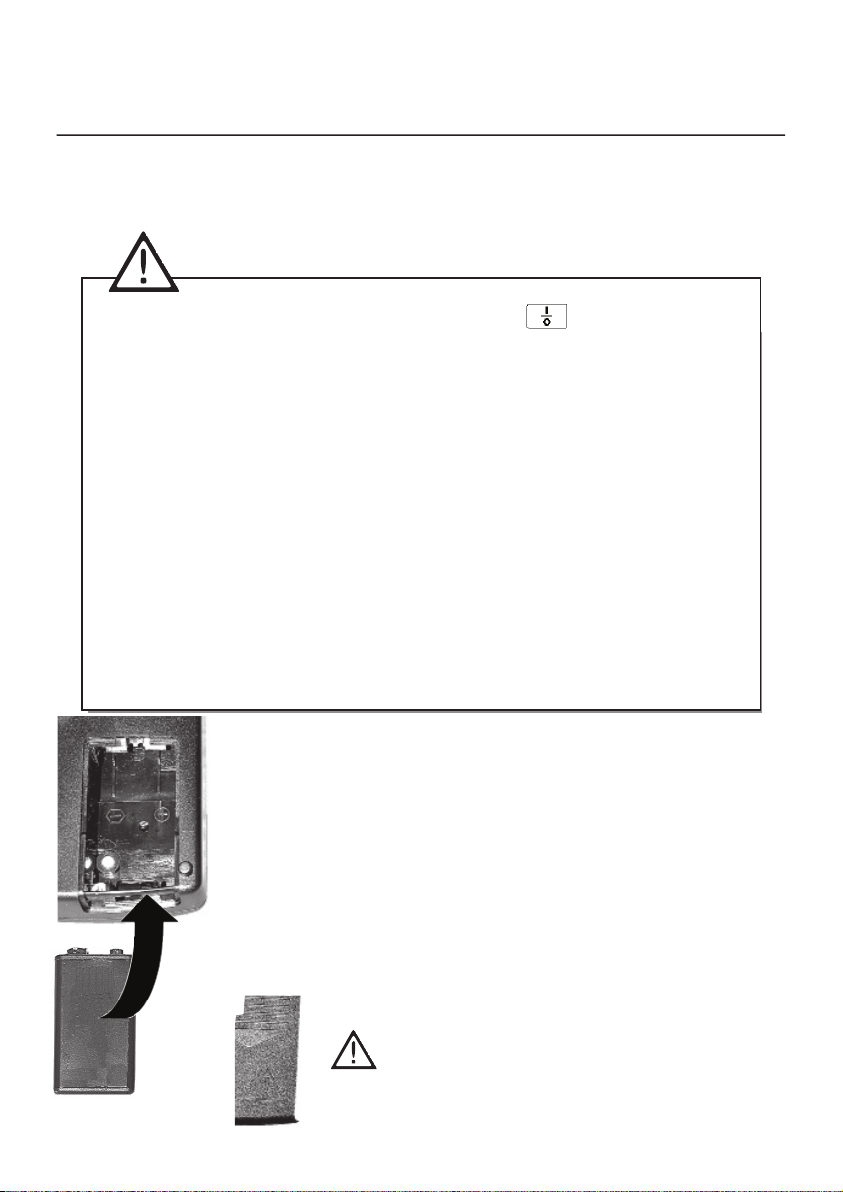
Putting in the batteries
9V block battery is included in delivery.
Open the battery compartment at the back of the instrument.
Put in block battery. Observe polarisation.
Close battery compartment.
Refer to “Power supply” Chapter for more information on
alternative power supply, charge, battery quality, charging
procedure.
Observe instrument configuration when using
rechargeable batteries.
4
Page 5

i
Instrument configuration
First measurement
A description of the instrument and an overview of the
controls guarantee a quick introduction.
Note: The measuring instrument must be switched off before a probe
is connected.
You will receive up-to-date readings once a probe is inserted and the
measuring instrument is switched on. However, you will still need to
update or define the data in the instrument:
Date/Time:
Auto Off:
Units:
Some things can only be set via PC software (See Ordering data):
Location name (8 characters)
Log head (24 characters), e.g. your company name -
is also printed when readings are printed.
5
Page 6
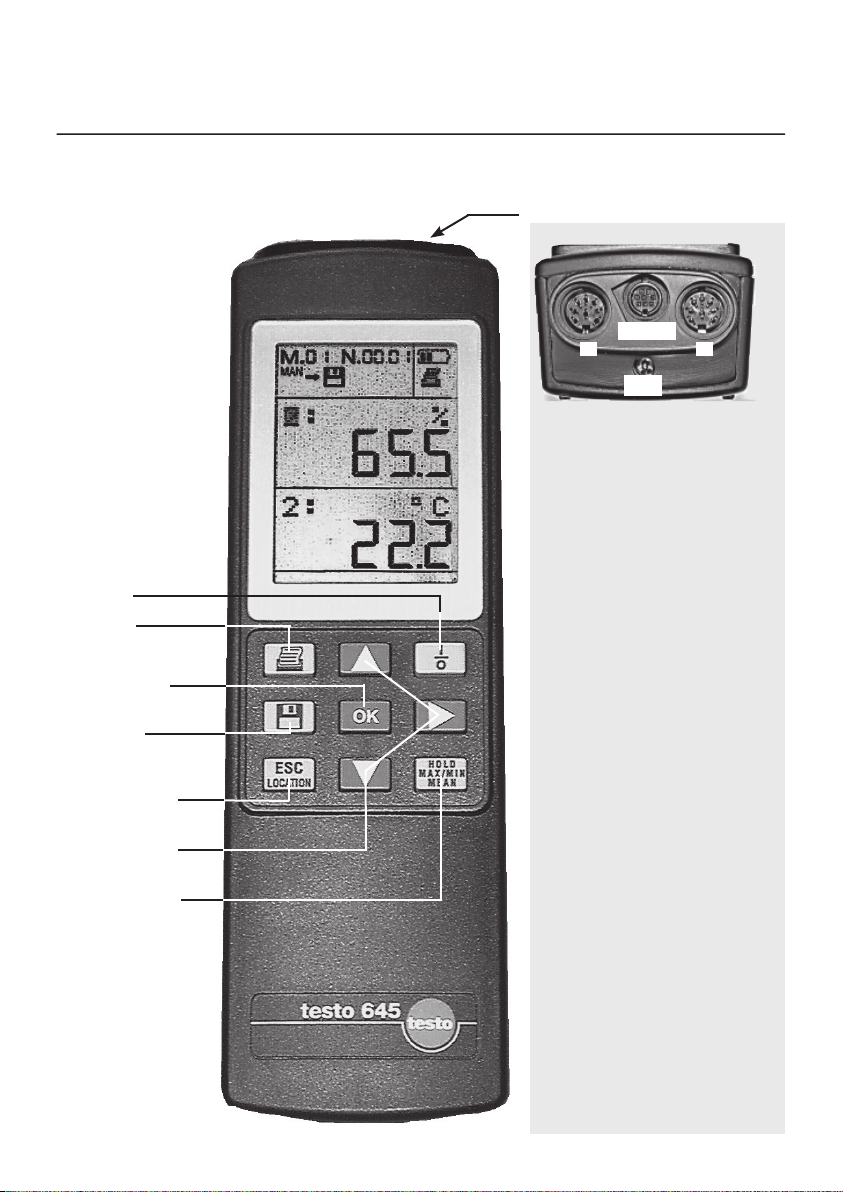
Keypad:
On/Off
Prints
Confirms menu
setting/
executes function
Saves
Return to current
measurement/
location
Arrow buttons
move the cursor
Instrument description
Keypad/Connection assignment
Connection assignment:
RS232
2
12V
testo 445
Socket 1:
– Thermal velocity probes
(heated wire or ball)
– Vanes (inductive)
– Temperature probes
(Type K/J/S T/C or NTC)
– Differential pressure probes
(piezoresistive)
– Absolute pressure probes
(piezoresistive)
– CO
probe
2
(2 beam infrared sensor)
– CO probe
Socket 2:
– Combined probe for humidity
(capacitive)
and temperature
(NTC or Ni 10000)
– 3-function probe for
humidity (capacitive),
temperature (NTC) and velocity
(ball)
RS232: PC connection
12V: Mains connection
1
Hold Max Min
Mean
testo 645
Socket 1:
– Temperature probes
(T/C type K/J/S or NTC)
Socket 2:
– Combined probe for humidity
(capactive)
and temperature
(NTC or Ni 10000)
– Temperature probes
(PT100)
RS232: Connection for PC
12V: Mains unit connection
6
Page 7
M. 00
Instrument description
Display
The symbols on the top line are explained below
Name of input socket and parameter
Displays reading in line 1
Name of input socket and parameter
Displays reading in line 2
Displays measurement functions
Explanation of symbols:
Counter for the log number in the memory.
When saving manually: number of a measurement saved.
When saving automatically: number of a measurement series.
This counter is needed in order to be able to find single logs or a
measurement series when reading the memory.
N. 0000
Counter for saving a measurement cycle (is only required with
automatic saving).
The measurement cycle in a measurement series can be found.
Manual saving of a single measurement by pressing the save
button
Automatic saving program has been set up.
Saving is activated by pressing the
Symbol for reading contents of memory on display.
Symbol for deleting memory contents
If this symbol appears, the printing function is activated.
The symbol flashes while data is being transmitted. You can
print on the desktop printer by pressing the print button
Shows capacity of battery and rechargeable battery.
If the inner segment no longer appears (symbol flashes), the
battery has to be changed or the rechargeable battery has to be
recharged. The instrument switches itself off automatically after
1 minute.
.
button.
.
7
Page 8
Overview of controls
Connect probe
corresponding to
connection assignment
(rear of instrument)
ESC
Location
3.
Location
1 Buttons to
...
select
99 location
1.
2. Measurement functions
Current measurement
Select reading in
the first line
Select reading in
the second line
Save manually or automatically,
depending on setting (5.)
Print readings
Multi-point mean calculation
HOLD
Freeze values
Display maximum values
MAX
Display minimum values
Timed mean calculation
MIN
MEAN•
Update values
Calculate mean
Reset mean
Start and end
Calculate mean
Reset mean
MEAN
4.
Parameter settings
Selected The setting functions are activated in accordance with the reading testo testo
parameter selected - flashing cursor in display (See 1.): 645 445
°C
(4.1)
% Humidity probe (0636.9740 and 0636.9715)/ X X
(4.2) Checks and adjusts 3-function probe (0635.1540)
td Select calculated humidity parameters: td°C dew point X X
(4.3) g/m3 - absolute humiidty, g/kg - degree of humidity, J/g - enthalpy
m/s, mbar Differential pressure probes: initialisation, activation/deactivation X
m3/h m/s, m
(4.4) Velocity probes: activation/deactivation m
Change cross-section input for an activated volume flow measurement X
ppm Switch between ppm and vol% with CO
(4.5) Initialisation of CO probe
System adjustment with EEPROM probe X
Reset - system adjustment X
3
/h in addition to mbar
3
/h in addition to m/s X
2 X
8
Manual
saving
Print
readings
Page 9
Connect probe
corresponding to
connection assignment
(rear of instrument)
1.
Current measurement
5.
Memory
settings
MAN
Activate
manual
saving
AUTO
Program
automatic
saving
• Select meas.
cycles
• Set
measurement
rate
OUT
Read memory
contents on
display with
printing option
CLEAR
Clear memory
Note: Everything
in the memory is
deleted
Overview of controls
Simultaneously
6.
Instrument configuration
Activate - deactivate
automatic switch-off function
Select power supply
battery/rechargeable battery
Setting: Date
Setting: Time
Parameter setting for absolute
pressure and density compensation
°C, %, Abs.mbar,
°C°F
m/sfpm [ft/min] (testo 445)
m3/h m3/min m3/s
l/s cfm [ft3/min](testo 445)
hPa mbar psi
Factory reset
Note:
Flashing display is activated and is
confirmed by pressing
rho-g/m3,
Print parameters
Unit selection
O] (testo 445)
in W [”H
2
Pitot tube factor
.
9
Page 10
1. Current measurement
Switching on / Selecting parameters / Saving / Printing
Connect measurement probes
I/0
Segment test
Line 1
Line 2
Battery / rech.
VBAT
battery power
8.5
Location
Location
1
Duct 1
M.05
N.0017
MAN
1:
m/s
58.06
1:
hPa
21.80
Current readings - different,
depending on probe(s)
connected.
Line 1
Line 2
All of the readings, made available by the probes connected
to socket 1 and 2, on both lines of the reading display can
be called up with the exception of the value selected in the
other line.
Scroll with
button in line 1:
Select socket.
Select parameter.
If this button in multi-function probes is pressed
repeatedly, it is possible to select the parameter (°C,
m/s...) to be displayed.
Scroll with
button in line 2:
Select socket.
Select parameter.
If this button in multi-function probes is pressed
repeatedly, it is possible to select the parameter (°C,
m/s...) to be displayed.
There are different processing options available in
the menus described below corresponding to the
parameters selected.
Example of a reading:
Selected
socket
1:
m/s
58.06
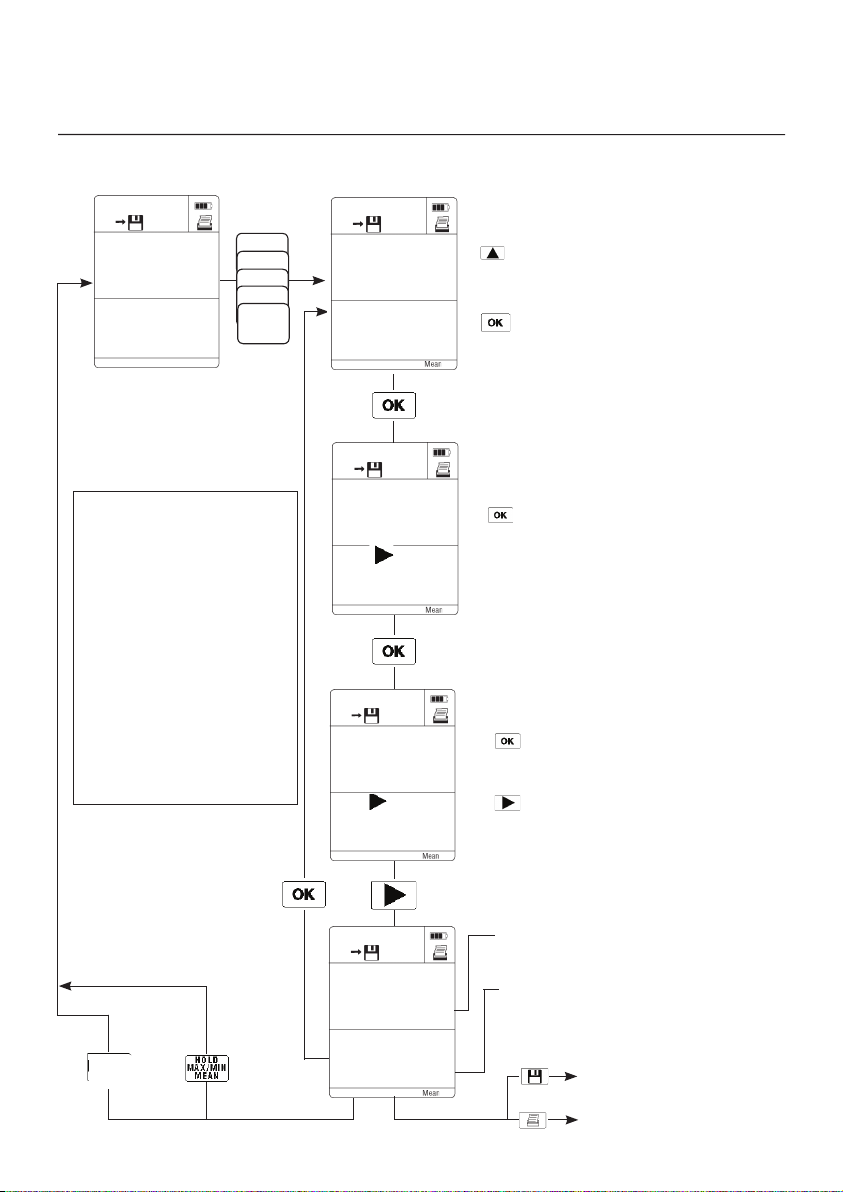
It is possible to activate the following functions during measuring at the touch of a button.
Save readings
Manual or automatic saving is determined by the
save setting (Chapter 5)
Print readings.
Note on printing:
A distance 0f 0.5 m should not be exceeded in order to
guarantee problem-free data transfer. Objects between
instrument and printer prevent the data from being
transferred. Please observe notes in the instruction manual
on the printer.
10
Parameter
Reading
Page 11

2. Meaurement functions
Hold/Max/Min
ESC
Location
Hold
Max/Min
Mean
Hold
Max/Min
Mean
Hold
Max/Min
Mean
M.05
N.0017
MAN
1:
58.06
1:
21.80
M.05
N.0017
MAN
1HLD
58.06
1HLD
21.60
M.05
N.0017
MAN
1MAX
73.37
1MAX
34.80
M.05
N.0017
MAN
1MIN
56.62
1MIN
Current measurement
m/s
hPa
Freezing values
m/s
hPa
Maximum readings since the
measurement began
m/s
hPa
Minimum readings since the
measurement began
m/s
hPa
Save reading
Print reading
Save maximum
measured value
Print maximum
measured value
Save measured
value
Print measured value
Hold
Max/Min
Mean
20.00
See multi-point/timed
mean calculation
11
Page 12
2. Measurement functions
Multi-point mean calculation Mean•
Only for parameter in the 1st line
ESC
Location
New mean
calculation possible
M.05
N.0017
MAN
1:
58.06
1:
21.80
Hold
Hold
Max/Min
Hold
Max/Min
Mean
Max/Min
Mean
Max/Min
Mean
M.05
N.0017
MAN
1:
25.21
OK MEAN
Current measurement
m/s
hPa
Hold
Mean
Multi-point mean calculation
The mean is only calculated for the para-
m/s
meter selected in the first line.
Exception:
Selection of volume flow (see note on
page 13)
0
•
Select parameter required.
Update values.
M.05
N.0017
MAN
MEAN
m/s
25.21
MEAN NEW
Calculate mean
Mean
Number of updated
5
•
values
Save mean
Print mean
12
Page 13
2. Measurement functions
Current measurement
M.05
N.0017
MAN
Hold
1:
58.06
1:
m/s
hPa
Max/Min
Hold
Mean
Max/Min
Hold
Mean
Max/Min
Hold
Mean
Max/Min
Hold
Mean
Max/Min
Mean
21.80
Note on saved or printed logs:
1. The log of a multi-point mean
calculation contains single value,
max. value, min. value and
mean value.
2. The log of a timed mean
calculation contains max.
value, min. value and mean
value.
Special solution for volume
flow selected:
3. Any additional velocity values
(m/s) are saved with the volume
flow values in the memory.
M.05
N.0017
MAN
1:
55.21
START
00:00
M.05
N.0017
MAN
1:
55.17
MEAN
END
00:10
M.05
N.0017
MAN
1:
55.20
MEAN
GO
m/s
m/s
m/s
Timed mean calculation Mean
Only for parameter in the 1st line
Select required reading.
Start timed mean calculation
Finish timed mean calculation.
Continue timed mean calculation
or
calculate mean.
New mean
calculation possible
ESC
or
Location
00:15
M.05
N.0017
MAN
MEAN
m/s
55.21
MEAN NEW
00:05
13
Mean
Timed duration of
mean calculation
Save mean.
Print mean.
Page 14
3. Location selection
M.05
N.0017
MAN
1:
58.06
1:
21.80
Location
m/s
hPa
ESC
Location
Duct 1
The location names Location 1 to 99 are specified by the factory.
Additional location names (8 characters) can only be loaded onto
1. Current
measurement
your instrument using PC software.
01
The cross-section
can only be called up if
volume flow is activated
(testo 445 instrument)
/ Select location
A
cm
50.0
Increase value
Decrease value
Select digit box
ESC
Location
Use ESC to go
to selection of
cross-section entry
Ø AxB, m2, Funnel)
Return to current
measurement
B
cm
50.0
or :
From now on all measured data which is saved or printed is
linked to the selected location or product names.
14
Increase value
Decrease value
Select digit box
Page 15

M.05
MAN
1:
2:
N.0017
°C
69.6
°C
70.0
CAL Re
M.05
MAN
1:CAL
OFFSET
N.0017
°C
70.0
00.4
4. Parameter settings
System adjustment
The setting functions are activated in accordance with the rea-
i
ding selected - flashing cursor in display.
System adjustment (only possible in testo 645):
testo 645 and probes with EEPROM (Part no. 0614.xxxx) can
be adjusted to the “zero error adjustment point”. The probe
characteristic saved in the measuring instrument is offset at a
measurement point. This is simply entered in the instrument at
the touch of a button. The following serves as a reference for
offset calculations:
- A Testo calibration certificate or
- A highly accurate Pt100 probe:
An accurate Pt100 probe measures the temperature at
socket 2; an inaccurate but quick probe measures in the
same substance; the offset correction must be such that both
probes show the same value.
Example: The reference probe in socket 2 measures 70.0 °C in
the vat.
The probe in socket 1 measures 69.6 °C.
Correct by 0.4 °C!
The respective flashing position can be changed using the
buttons or confirmed by pressing .
Current measurement
1:
RESET CAL
Current measurement
Note:
Offset is saved in probes with EEPROM and is automatically
recognised when the instrument is switched on.
In probes without EEPROM, the set offset is located in the
input socket.
The OFFSET value is displayed or printed when switching
on, saving or printing.
Deleting system adjustment: The set OFFSET is reset to 00.0.
15
Page 16

4. Parameter settings
Adjusting: humidity probes / humidity parameters /
ppm vol%
M.05
N.0017
MAN
2:
10.1
CAL %
M.05
N.0017
MAN
td°C
2:
12.9
1:
15246
M.05
N.0017
MAN
%
%
m/s
CAL11.3 %
11.1
NO YES
td°C g/m
The setting functions are activated in accordance with reading
i
selected - flashing cursor in display.
Adjusting humidity probes
Monitoring and adjusting humidity probes
(0636.9740/0636.9715) or 3-function probe (0635.1540).
To carry out the adjustment, immerse the probe in the
adjustment container belonging to the control and
adjustment set (Part no. 0554.0660). Observe the
instructions given in the Instruction manual (0973.1820)!
NO flashes No adjustment.
YES flashes The probe is adjusted.
Switch to YES/NO
Confirm selelction and return to measurement.
Displaying calculated humidity parameters.
If Testo`s combination humidity probe (e.g. 0636.9740) is
connected, testo 445 and testo 645 display a calculated humidity
parameter in addition to temperature and relative humidity. You
can select from the following parameters:
td°C
Dew point Absolute Degree Enthalpy
temperature humidity of humidity
Degree of humidity and enthalpy are pressure-dependent
parameters. Absolute pressure has to be set (See 6. Instrument
configuration -Parameter setting).
The respective selected parameter flashes.
g/m3 g/kg J/g td°C ...
Select
Confirm selection and return to measurement..
The selected humidity parameter is displayed.
2:
1:
ppm
ppm vol%
Switch between ppm and vol% if a CO2 probe is connected
(only possible in a testo 445 instrument).
ppm vol% ppm ...
The respective selected parameter flashes.
Select
Confirm selection and return to measurement.
16
Page 17

M.05
N.0017
MAN
1:
mbar
22.73
td°C
2:
hpa=0 m/s
m/s
4. Parameter settings
Initializing pressure probe / Activating velocity and volume flow
The setting functions are activated in accordance with
i
reading line selected - flashing cursor in display.
Differential pressure probe (testo 445 only):
Activating/deactivating m/s, m3/h, in addition to mbar;
initialisation
Velocity probes (testo 445 only):
Activating/deactivating m3/h, in addition to m/s
Zero adjustment of differential pressure probe (hPa) and
return to current measurement.
/ =
scroll
value
= Next
position
m/s
ON OFF
m3/h
ON OFF
...
100. cm
Ø AxB
100. cm
A
B
100, cm
Switch velocity speed (m/s) in the display on and off.
Switch ON/OFF
The respective flashing setting is confirmed with .
Switch volume flow (m3/h) in the display on and off.
Switch to ON/OFF
OFF flashes return to measurement.
ON blinkt Input of duct cross-section:
2
m
0.500 m
FUNNEL
Ø = round duct cross-section;
enter diameter.
AxB = rectangular duct;
enter side lengths A and B.
20
2
m
area in m
section area.
FUNNEL = Funnel factor in
volume flow funnel used
(See Instruction manual on
volume flow funnel).
Ø
2
= known cross-section
2
; enter cross-
...
Once the cross-section is entered, return to the current volume flow measurement.
17
Page 18

5. Memory settings
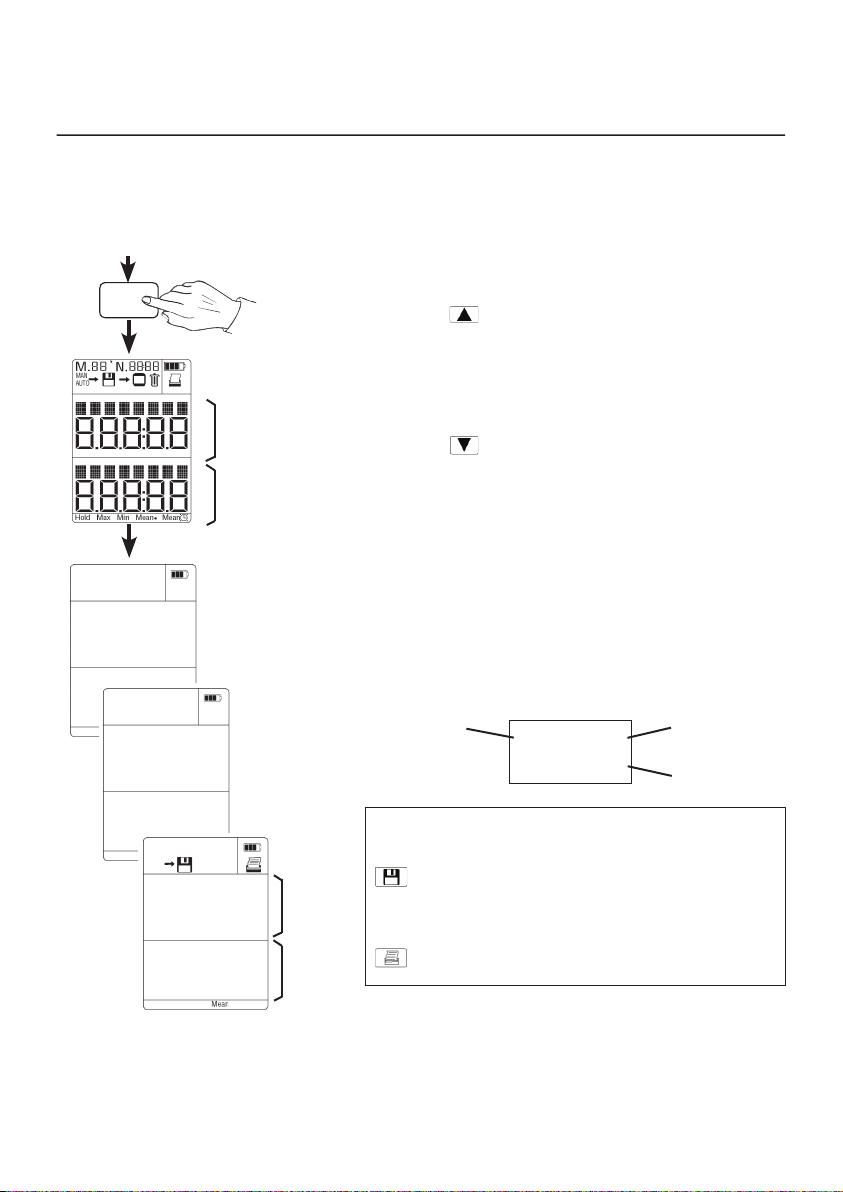
Overview
1. Current measurement
M.05
MAN
1:
58.06
1:
21.80
ESC
Location
MAN
MAN AUTO
MEMORY
N.0017
m/s
hPa
Press the button to get to the memory settings mode
i
Confirm flashing save symbol via button.
4 memory settings are possible. Select the required saving option
by pressing
MAN AUTO OUT CLEAR MAN ...
The symbol corresponding to the selection appears in the top line.
The function is activated with
Parameter settings
(See Chapter 4).
AUTO
AUTO OUT
MEMORY
:
.
OUT CLEAR
MEMORY
CLEAR MA
MEMORY
.
ESC
Location
18
Page 19

5. Memory settings
Manual / Automatic saving
MAN
MAN AUTO
MEMORY
ESC
Location
AUTO
CYCLE-N.
M.05
N.0017
MAN
1:
m3/h
19665
1:
21.85
AUTO
AUTO OUT
MORY
660
AUTO
CYCLE h
min sec
01:30
m/s
00
MAN
Manual saving:
Each time
the instrument and includes measured values, location, date and
time. The counter in the top left corner of the display shows the
number of logs saved for this location.
Saving a log with timed or multi-point mean calculation :
The log includes MIN value, MAX value and mean of the
measurement and also single values in multi-point mean
calculations.
AUTO
Automatic saving:
When this saving function is set, the instrument automatically
accepts the measured values at fixed intervals and saves them
(=logger operation).
The number of measuring cycles (CYCLE-N.) to be saved and
intervals (CYCLE) have to be programmed:
1. Cycle-N.
The instrument automatically offers the maximum possible number
of measuring cycles. Set required number using
/ / .
Confirm set value by pressing .
2. Cycle
Select interval in which the measured values are to be saved. The
blinking position can be changed using
Confirm set value by pressing .
Automatic saving is started by pressing
until the programmed measurement
series is accepted.
is pressed a log of the measurement is saved in
.
. The symbol flashes
M.05 N.0017
AUTO
1:
19665
1:
m3/h
m/s
M.06
AUTO
N.0001
19
ESC
Location
Cancel saving procedure.
Starts automatic saving again.
An additional measurement series is
added.
Page 20

OUT CLEAR
MEMORY
ESC
Location
Location
5. Memory settings
Reading or printing memory contents
Press the button to access the memory settings
i
mode. Confirm flashing save symbol via the button. Cancel printing by pressing the button.
OUT
1. Reading out or printing memory contents:
If the “OUT” display is flashing and the button is pressed,
printing of the complete memory
contents is started. Cancel printout by pressing the
button.
M.05 N.0017
Pizza
01:13
01.01
1998
M.05 N.0017
1:
79.7
°C
M.05 N.0017
1:
Duct 1
ESC
Location
ESC
Location
01
ESC
Location
ESC
Location
°C
2. Selecting the location:
is activated selection options appear in the display to select
If
the required location. Select location by pressing
If printing is activated by pressing at this
point, all of the logs
(measurement series and cycles) for this location are printed.
Cancel printout by pressing the button.
3. Selecting the log:
Confirm the location selected above by pressing
The M.0x counter flashes in the display.
Select the log no. by pressing
activates a printout of the
selected measurement log.
Press
Cancel printout by pressing the button
4. Selecting the measurement cycle: (only possible if a
measurement log consists of a measurement series):
Confirm the measurement log selected above by pressing
The N.0x counter flashes in the display.
Select the measurement cycle by pressing
to display the values measured.
activates a printout of the selected
measurement cycle.
.
.
.
.
.
79.7
The
ESC
button enables you to go back one step.
Location
20
Page 21

5. Memory settings
Clearing memory contents/Sample printouts
Press the button to access the memory settings mode. Confirm flashing save
i
CLEAR MA
MEMORY
Memory is
not cleared.
Printout of manual saving:
Messrs. Smith
31.08.1998
11:26:05
Raum 1
M.001
31.08.1998
11:20:05
1: 21.4 °C
2: 44.7 %
2: 22.1 °C
2: 0.55 m/s
2: 9.6 td°C
Info :
symbol via the button.
CLEAR Clearing memory:
NO YES
CLEAR
MAN
MAN AUTO
MEMORY
Header
Date of prinout
Location
Start of saving
Log
Save
Readings
YES NO
CLEAR
Memory is cleared
completely.
Current measurement
M.05
N.0017
MAN
1:
58.06
1:
21.80
Printout of automatic saving procedure:
Firma Mustermann
31.08.1998 11:27:32
Raum 1
M.002
31.08.1998 11:26:59
cycle: 00:0002
1:°C 2:% 2:°C
01 21.4 45.1 22.2
02 21.2 44.7 22.3
03 21.1 44.6 22.3
04 21.8 44.6 22.3
2:m/s 2:td°C
01 1.00 9.8
02 1.66 9.7
03 2.01 9.7
04 1.52 9.7
Info :
m/s
hPa
21
Page 22

Simultaneously
6. Instrument configuration
Power save function / Power supply
ESC
Location
The
i
button enables you to change to the current
measurement from every menu item.
AUTO-OFF
ON OFF
Auto Off function: On/Off
BAT ACCU
Battery: Battery or accu
ACCU BAT
See page 24
AUTO-OFF
OFF ON
The
(
The blinking position can be changed by pressing
Power save function
Auto OFF function is switched on (“ON”)
If a button has not been pressed in the last 5 minutes or
there is no communication with the PC, the instrument
switches off automatically.
Exceptions:
- the instrument does not switch off if the mains unit is
- the function is deactivated during timed and multi-point
button has to be kept pressed for approx. 2
seconds when switching on the instrument
button).
or confirmed by pressing .
plugged in
mean calculation
Important:
The instrument must be set at battery or rechargeable
battery operation.
Incorrect instrument setting
- Rechargeable battery operation is set and battery is put in:
If the mains unit is connected and the charging
procedure is confirmed:
- Battery operation is set and rechargeable battery is put in:
Rechargeable battery will not be charged.
22
Risk of explosion!!!!
Page 23

6. Instrument configuration
Power supply
Battery operation with 9 V block battery, alkali manganese IEC
6LR61.
Parallel power supply is possible with mains unit without damaging
batteries.
Zinc carbon batteries should not be used with thermal probes because
their inner resistance is too high and the probe is not supplied with
sufficient energy. The instrument switches off.
Rechargeable battery operation with Testo rechargeable battery
(Part no. 0515.0025), Type: Ni-MH IEC 6F22.
If the rechargeable battery is empty: Parallel power supply and
simultaneous recharging of the battery in the instrument with mains
unit.
Connect mains unit to recharge battery. Query as to whether
rechargable battery should be recharged.
Has a rechargeable battery or battery been put in? Check!
There is a risk of explosion if batteries have been put in! Select “NO” in
this case.
If a rechargeable battery is inside confirm Charge “Yes” with
The instrument can be switched off if a measurement is not
taking place. The rechargeable battery capacity and power is
displayed. Recharging takes approximately 6 hours if the rechargeable
battery is completely empty.
Correct battery recharging in the instrument via the mains unit can
only be guaranteed if the above mentioned Testo rechargeable
batteries are used. If other rechargeable battery types are used,
recharging will have to be carried out by an external recharger.
Note:
The instrument should be switched off before changing the battery/
rechargeable battery or when operating using mains unit without
rechargeable battery and battery. If the battery/rechargeable battery is
removed, the instrument loses the set values (date/time). The capacity
of the battery/rechargeable battery is shown in the display:
100 %
75 %
50 %
25 % (if the last segment is flashing the
battery/rechargeable battery is almost empty)
Operation
via mains
unit (Part
no. 0554.0088):
Insert mains unit in the mains unit socket of the instrument (see
connection assignment).
0 % (change battery/recharge rechargeable
battery). Instrument will switch off after 1 minute.
23
Page 24

DATE
01.01
1998
6. Instrument configuration
ESC
Location
The
i
Setting date
The flashing position in the display can be set
-
button enables you to change to the current
measurement from every menu item.
= scroll/ = next position -
/
Setting date/time
TIME
11:25
Setting the time
The blinking position in the display can be set
-
= scroll/ = next position -
/
24
Page 25

6. Instrument configuration
Parameters
1. Temperature
Parameter
°C
025.0
2. Humidity
3. Absolute pressure
4. Density
(calculated)
5. Pitot tube factor
Parameter
Factor
1.00
(testo 445)
(testo 445)
(testo 445
testo 645)
(testo 445)
(testo 445)
Parameter setting for pressure and density compensation:
Humidity (g/kg, J/g), velocity (measured with thermal probes) and
are pressure-dependent parameters.
CO
2
Density is included in the measurement when velocity is measured
using a Pitot tube.
testo 445/645 automatically carries out pressure and density
compensation. Temperature, humidity and absolute pressure
must be entered.
3 parameters can be measured on location using a Testo
humidity/temperature probe (e.g. Part no. 0636.9740) and the
Testo absolute pressure probe (Part no. 0638.1645). See the
Chapter “Measuring absolute pressure” for more information on
measuring absolute pressure without an absolute pressure probe.
Density is automatically calculated by the instrument based
on these 3 values:
Temperature
Humidity Density
Factory
settings:
Note:
If the density set in the factory is taken as the basis, the
measurement error can be up to 10% of the measurement when
velocity is measured using a Pitot tube. Parameters must be
determined and set in the instrument in order to achieve exact
measurements.
The flashing position in the display can be set.
-
/
= Confirm.
= Print parameter.
Pitot tube factor setting:
The factor for Pitot tubes from Testo is constantly at 1.00 and
does not need to be changed. If the Pitot tubes from other firms
are used, ask your supplier for the Pitot tube factor and save in
instrument.
Absolute pressure
Temperature 20 °C
Humidity 50 %RH Density 1199 g/m3
Absolute pressure 1013 mbar
= Scroll/ = Next position -
25
Page 26

°C
m
Unit
m3
hPa
Factory reset
M.05
MAN
2:
2:
Current measurement
mbar
N.0017
°C
20.0
%RH
51.8
6. Instrument configuration
Unit selection / Factory reset
ESC
Location
The
i
measurement from every menu item.
°C °F
The selected parameter flashes.
Select
confirms the selection.
m/s
The selected parameter flashes.
Select
confirms the selection.
m3/h
l/s cfm (ft3/min) (testo 445
only)
The selected parameter flashes.
Select
confirms the selection.
hPa
The selected parameter flashes
Select
confirms the selection.
Factory reset
Factory reset (confirm with ”Yes”) resets all of the settings in the
instrument configuration to the factory settings.
confirms the selection and switches to the display of the cur-
rent setting.
button enables you to change to the current
fpm (ft/min) (testo 445 only)
m3/m (m3/min) m3/s
mbar psi in W (”H2O) (testo 445 only)
26
Page 27

7. Velocity measurement
Volume flow funnel (testo 445)
A volume flow funnel is needed to measure the volume flow in a
ventilation opening (grid or outlet with dual wall clearance). The
opening of the funnel must be covered completely by the grid
(max. 190 x 190 mm with 0554.0400 or max. 350 x 350 mm with
0554.0410).
For the measurement, a velocity probe (0635.1041, 0628.0005
or 0635. 9540) is placed in the funnel’s hole, is positioned in the
middle and is aligned. The probe is snapped into the funnel’s
handle. Connect the probe to the instrument and switch on.
Position the cursor on the m/s parameter (
You will get to the “Parameter setting” menu by pressing .
Press to get the volume flow (m
Confirm the m
3
/h ON setting by pressing .
3
/h) in the display.
or ).
Press twice and confirm with .
(funnel/=funnel factor).
Enter the factor for the funnel used by you:
Funnel factor for funnel with part no. 0554.0400 = 20
Funnel factor for funnel with part no. 0554.0410 = 22
Press the funnel tightly on the opening. You can accept the
displayed reading as it is or you can carry out a timed mean
calculation if the readings fluctuate.
27
Page 28

7. Velocity measurement
Pitot tube and pressure probe (testo 445)
The measuring range is not symmetrical when the measurement
is carried out using differential pressure probes (see Technical
data on page 35)
Connect silicone hose to the correct connection plug (obser-
When measuring velocity with the Pitot tube, it is better to use the
0638.1445 pressure probe on account of its optimum accuracy.
The measuring range extends to approx. 40 m/s. Velocity is
calculated in the instrument using the pressure difference p in the
Pitot tube and based on the following formula:
m/s = S x 200000 x p [hPa]
rho [g/m3]
Press to activate the conversion. The “Parameter setting”
menu is displayed. m/s appears in the display when activated via
the button. Confirm the m/s ON setting with .
The next step is to decide, using the button, as to whether
the volume flow is to be calculated immediately (m3/h ON) or not
(m3/h OFF). Confirm input with .
Pitot tube factor S and the temperature, humidity and absolute
pressure parameters required to automatically calculate density
have to be set in the instrument configuration.
The Pitot tube factor for testo Pitot tubes is at a constant 1.00 and
does not need to be changed. If non-Testo Pitot tubes are used,
please ask your supplier for the factor and save it.
ve + and - on the probes.)
Thermal anemometer probes (testo 445)
The measuring principle of thermal anemometers with a heated
wire or heated ball sensor is based on the cooling down of the
sensor element via the air flow. The sensor element is heated to
100 °C for this purpose. The power needed to keep the sensor
constantly at this temperature is a measure of the strength of the
flow. According to this measuring principle, this probe requires a
heating up period after being switched on which appears as ”Count
Down” in the display. Measuring in accordance with this measuring
principle depends on the ambient pressure. The absolute pressure
can be set in the instrument configuration menu.
28
Page 29

CO/CO2 measurement (testo 445)
CO measurement (testo 445)
The connected probe 0632.1247 is initialised during the switchon phase (“Count Down” runs in the display). For this reason,
the measuring instrument should only be switched on in an
atmosphere free of CO. Values will be too low otherwise in
subsequent measurements.
If you want to initialize the instrument while switched on, place
the probe in an atmosphere free of CO. Press and confirm
initialisation of the CO probe (CO=0) by pressing again.
Connect probe before switching on the instrument
The protective cap must be on the probe during the initialisation
phase (otherwise risk of inaccurate measurements).
The initialisation cap should only be removed during the actual
measurement and should be replaced directly afterwards
(mechanical protection of sensor and adherence to
Cigarette smoke influences the measurement (min. 50 ppm).
accuracies).
A smoker’s breath influences the measurement by approx.
Switch on - Initialisation phase (60 s).
The ambient CO probe is initialised during the initialisation phase.
• Remove yellow protective cap.
• Probe can be put in shirt pocket, for example. The direction
of the flow on the probe influences the accuracy of the
measurement. Optimum measured results are achieved by
moving the probe gently back and forth. If the air blows headon on the sensor, the values measured will be too high.
29
5 ppm.
Page 30

CO2 measurement
CO2 measurement (testo 445)
The 0632.1240 probe measures concentrations from
0 to 1 vol % CO2. The unit can be switched between ppm and
vol% as described in “Parameter settings” on page 16.
The measuring principle is based on infrared absorption. The
probe has a relatively high power consumption on account of its
sensor. Use mains unit and rechargeable batteries for long-term
measurements.
Note: The correct reading is available 20 to 30 seconds after
being switched on.
The corresponding “Count Down” is displayed.
If there are major changes in the concentration, the probe needs
30 - 60 seconds to adapt itself to the outside world.
Gently swinging of the probe shortens the adaptation time.
Hold the probe as far away as possible from you to reduce
the influence of the CO2 level in your breath on the
measurement.
Pressure offset
Please note that the CO2 reading depends on absolute air pressure. This effect is compensated in the instrument.
Enter the correct absolute pressure for the location in the
“Instrument configuration” menu (see Chapter 6).
Permissible ambient temperature: 0 to +50 °C
Permissible storage temperature: -20 to +70 °C
30
Page 31

Measuring absolute pressure
Absolute pressure is calculated from:
• Elevation pressure (metres above NN)
The annual mean is 1013 mbar at sea level, the higher the
location above sea level, the lower the pressure.
• Barometric pressure
The annual mean is 1013 mbar regardless of height. This
pressure can deviate from the annual mean by ±20 mbar
depending on the weather (see display on nearest barometer).
• Differential pressure
is the positive or negative pressure in the duct.
You can determine the annual mean air pressure value for your
elevation using the following table and any additional fluctuation
using a barometer or ask your weather station for the exact air
pressure value.
Elevation
M.S.L
Table: Barometric elevation formula
Air pressure
(mbar)
Elevation
M.S.L
Air pressure
(mbar)
31
Elevation
M.S.L
Air pressure
(mbar)
Elevation
M.S.L
Air pressure
(mbar)
Page 32

Determining absolute pressure
Example:
If you are at 800 m above mean sea level, you have an annual
mean air pressure of 920 mbar.
The annual mean air pressure has to be reduced by 10 (910 mbar
air pressure) to correspond to the barometer display
(1003 mbar) and to the barometer’s height offset (to 1013 hPa).
Add the difference between your ambient air pressure and the
static process air pressure (e.g. positive pressure in an air duct
which is to be measured - can be measured using the differential
pressure probe at up to 100 mbar) to this (air) pressure value.
Example: We have measured an annual mean air pressure of
910 mbar. We will now add 90 mbar based on the static process
pressure. We therefore assume an absolute air pressure in the
measurement medium of 1000 mbar.
The table on page 31 is also saved in the Testo Comfort software.
Absolute pressure can be calculated automatically using this
software if the height above mean sea level, barometric pressure
and differential pressure are entered. The calculated absolute
pressure is then taken over by the instrument.
32
Page 33

Error messages
Error message Cause Remedy
Memory full The memory is full Clear memory
Measuring range has not The probe is not suitable
been reached for this measurement task.
The measured values are
outside the allowed
measuring range. Remove
probe from location.
Measuring range has been The probe is not suitable
exceeded for this measurement task.
The measured values are
outside the allowed
measuring range. Remove
probe from location.
1st possibilty Some probes cannot
Measuring range has been differentiate between
exceeded or has not been not reaching or not
reached exceeding a measuring
range. Remove probe from
measurement location.
The probe is not suitable
for this measuring task.
The measured values are
outside the measuring
range allowed.
2nd possibility Check if the probe is
Probe is not connected connected to the right
or is defect socket and that the
plug has been pushed in
far enough. Turn
instrument on and off
again
If the error message
returns, please contact
your nearest Testo
service point.
If we were unable to answer your question, please contact your distributor or Testo
Customer Service. For contact data, see back of this document or web page www.
testo.com/service-contact
33
Page 34

testo 645/445
Technical data - Instruments
testo 645/445
General technical data
Memory space: Up to 3000 readings
Power supply: Battery / rechargeable batt.
Alternative: 12 V mains unit
Battery recharging in instr.
Typical Temperature/humidity
battery probes, pressure probes,
lifetimes: vane probes:
30 to 45 h
Thermal probes,
CO2 probes, 3-function
probe:
>3 - 12 h
Reduce the hour times by
a factor of 5 if a 9V battery
is used.
Operating
temperature: 0 to +50 °C
Storage
temperature: -20 to +70 °C
Weight: Approx. 255 g incl. batteries
Other features - Automatic recognition of
all connected probes
- RS232 interface for
data management
(electrically isolated)
Temperature measurement
Type K (NiCr-Ni)
Measuring range: -200 to +1370 °C
Accuracy* ±0.3 °C or ±0.5 % of
at 22 °C: reading
(the larger value applies)
Additional error over
operating
temperature range: ±0.2 °C
Resolution: 0.1 °C
Type J (FeCu-Ni)
Measuring range: -200 to +1000 °C
Accuracy* ±0.3 °C or ±0.5 % of
at 22 °C: reading
(the larger value applies)
Additional error
over operating
temperature range: ±0.2 °C
Resolution: 0.1 °C
The following can also be connected:
thermocouple: Type S (Pt Rh-Pt)
NTC
Measuring range: -50 to +150 °C
Accuracy*: ±0.2 °C (-25 to +74.9 °C)
±0.4 °C (-50 to -25.1 °C/
+75 to +99.9 °C)
±0.5 % of reading
(+100 to +150 °C)
Resolution: 0.1 °C
Humidity measurement
Temperature: -20 to +180 °C
Measuring range: 0 to 100 %RH
Resolution: 0.1 %RH
System Up to 1.0 %RH
accuracy*: (see probe data)
Calc. humidity td, g/m
parameters: (pressure-compensated)
Warranty
Instruments 2 years
Probes 1 year
Terms of warranty: see website
www.testo.com/warranty
3
, g/kg, J/g
34
Page 35

testo 645
Technical data - Instruments
testo 645/445
Temperature measurement
Pt100
measuring range: -200 to +800 °C
Accuracy* ±0.2 °C or ±0.1 % of
at 22 °C: reading
(the larger value applies)
Additional error
over operating
temperature range: ±0.1 °C
Resolution: 0.1 °C
testo 445
Velocity measurement
Vane
Measuring range: 0 to 60 m/s
Resolution: 0.01 m/s
Accuracy: See probe data
Thermal anemometer
Measuring range: 0 to 20 m/s
Resolution: 0.01 m/s (0 to 10 m/s)
0.1 m/s (remaining range)
Accuracy: See probe data
Pitot tube
Measuring range: 0 to 10 mbar / 0 to 100 mbar
0 to 40 m/s / 0 to 100 m/s
Resolution: 0.01 m/s
Accuracy: See probe data
3
Volume flow in m
cfm (ft3/min)
Measuring range: 99,999 m3/h
/h, m3/min, l/s,
Pressure units can be switched:
mbar, psi; in W(”H2O)
Calculated velocity values
density compensated: 0 to 100 m/s
Calculated volume flow values:
m
3
/h, m3/min, l/s, cfm (ft3/min)
CO2 measurement
Measuring range: 0 to 10000 ppm
0 to 1 vol. %
Resolution: 1 ppm
0.0001 vol. %
Accuracy*: ±50 ppm ±2 % of reading
(0 to 5000 ppm)
±100 ppm ±3 % of reading
(remaining range)
CO measurement
Measuring range: 0 to 500 ppm
Resolution: 1 ppm
Accuracy*: ±5 ppm (0 to 100 ppm)
±5 % of measured value
(remaining range)
Pressure measurement
Measuring range: Resolution: Accuracy*:
-40 to 100 mbar 0.01 mbar ±0.1 mbar
(0 to 20 mbar)
1 % of reading
(rem. range)
-4 to 10 mbar 0.001 mbar ±0.01 mbar
2000 mbar 1 mbar ±2 mbar
* Accuracy: ±1 digit
35
Page 36

Ordering data
Measuring instruments/Accessories/Probes for testo 645 / 445
Measuring instruments
testo 645 humidity measuring instrument, with TopSafe
2 channel temperature (type K/J/S, NTC, Pt100 thermocouples) and humidity measuring instrument, with battery
and calibration protocol
testo 445 multi-function measuring instrument, with TopSafe
2 channel multi-function measuring instrument for temperature (type K/J/S thermocouples), humidity, velocity,
pressure, CO
, CO with battery and calibration protocol
2
Part no..
0563 6450
0560 4450
Accessories
Software
Comfort software “Professional” for data management, incl. data base, convenient analysis and graphics function 0554 0274
RS232 cable to connect measuring instrument - PC for the transfer of data 0409 0178
TopSafe / Cases
TopSafe protects instrument from dirt, water (IP 65) and impact - dishwasher-proof - with bench stand, belt clips and
probe clips to attach probe to TopSafe
System case, plastic for instrument, probes and additional accessories Clear layout of case contents by placing probes
in lid.
System case, aluminium for instrument, probes and additional accessories. Clear layout of case contents by placing
probes in lid.
Additional accessories
9 V rechargeable battery for testo 445, testo 645 measuring instruments 0515 0025
PT 100-probes
Standard immersion/penetration probe
Pipe: stainless steel
Highly accurate immersion/penetration probe -100...+350°C, 1/5,
Flexible precision immersion probe, cable between handle
and tip, heat-proof up to +300 °C
Meas. range / Accuracy t
-200...+400°C, Class A 20 Plug-in head 0604.0273
Class B
-100...+265°C, 1/5,
Class B
Connection cable Part no..
99
sec.
30 Plug-in head
80 Plug-in head 0628.0016*
) 0628.0015*
0516 0440
0516 0400
0516 0410
* With EEPROM: Precision adjustment for each probe at a measuring point
36
Page 37

Ordering data
Fühler für testo 645 / 445
NiCr-Ni probes
Meas. range / Accuracy t
Quick-action surface probe with sprung thermocouple strip -200...+300°C, Short-
term up to +500 °C,
Class 2
Spare measuring head for pipe clamp probe, for pipes with
-60...+130°C, Class 2 5 1,5 m, PVC 0602 0092
Connection Part no.
99
sec.
3 Plug-in head
Please order connection
(
cable 0430.0143)
a 2"diameter
Rapid response immersion/penetration probe -200...+400°C, Class 1 3 Plug-in head
Quick action immersion/penetration probe for measure-
-200...+600°C, Class 1 1 Plug-in head
ments in liquids
Quick action immersion/penetration probe for high tem-
-200...+1100°C, Class 1 1 Plug-in head
peratures
Quick action immersion/penetration probe for measure-
-200...+600°C, Class 1 <1 Plug-in head
ments in gases and liquids with a slim tip, low in mass
Please order connection
(
cable 0430.0143)
Please order connection
(
cable 0430.0143)
Please order connection
(
cable 0430.0143)
Please order connection
(
cable 0430.0143)
Plug-in measuring tips Ø 3 ffor high temperatures, bendable
a) Stainless steel outer coating 1.4541 L 750
b) Stainless steel outer coating 1.4541 L 1200
c) Inconel outer coating 2.4816 L 550
d) Inconel outer coating 2.4816 L 1030
-200..+900 °C
-200..+900 °C
-200..+1100 °C
-200..+1100 °C
3,5
3,5
3,5
3,5
Handle for plug-in measuring tips coiled cable
PUR
Accessories for NiCr-Ni probes
Adapter to connect NiCr-Ni thermocouples and probes with
open wire ends
Silicone heat paste (14g), Tmax = +260 °C to improve heat
transfer in surface probes
Connection cable for probes Length 1,5 m,
Connection cable for probes with plug-in head Length 5,0 m,
Extension cable between plug-in cable and instrument Length 5,0 m,
0.3 m, PVC 0600.1693
PUR
PUR
PUR
0604 0194
0604.0293
0604.0493
0604.0593
0604.9794
0600.5393
0600.5493
0600.5793
0600.5893
0600 5593
0554.0004
0430.0143
0430.0145
0409.0063
37
Page 38

Ordering data
Probes for testo 645 / 445
Humidity/temperature
Measuring range System
probes
Standard indoor air quality probe up to +70 °C 0 to 100 %RH, probe
Highly accurate reference humidity/temp.
probe incl. calibration certificate
Robust humidity probe e.g. for measuring
material moisture equilibrium or for measurements in exhaust ducts up to +120 °C
Robust high temperature probe up to +180 °C 0 to 100 %rH
Flexible humidity probe, does not retain shape
for measurements in inaccessible places
Pressure-tight probes for measuring remaining, e.g. in compressed air systems
Flexible, humidity probe (retains shape) for
measurements in inaccessible places
tip), -20 to +70°C
0 to 100 %RH, probe
tip), -20 to +70°C
0 to 100 %rH
-20 to +120°C
-20 to +180°C
0 to 100 %rH
-20 to +180°C
0 to 100 %rH
-30 to +50°C t
pd
0 to 100 %rH
-50 to +50°C t
pd
* Accuracy data at rated temperature of +25 °C, temperature coefficient ± 0.03% / °C
accuracy*
±2 %rH (2 to 98 %rH)
±0,4°C (0 to 50°C)
±0,5 °C (rem. range)
±1%rH (10 to 90 %rH
from +15 to+30°C)
±2%rH (rem. range
plus Tcomp.)
±0,4°C (0 to 50°C)
±0,5°C (rem. range)
±1%rH (10 to 90 %rH
from +15 to +30°C)
±2%rH (rem. range
.)
plus Tcomp
±0,4°C (0 to 50°C)
±0,5°C (rem. range))
±1%rH (10 to 90 %rH
from +15 to +30°C)
±2%rH (rem. range
plus Tcomp.)
±0,4°C (0 to 50°C)
±0,5°C (rem. range)
±2 %rH (2 to 98 %rH)
±0,4°C (0 to 50°C)
±0,5 °C (rem. range)
-30 to +50°C t
±0,9 to ±4°C t
-40 to +50°C t
±0,8 to ±4°C t
pd
pd
pd
pd
t99
sec.
<12
at 2m/s
<12
at
2m/s
<30
at
2m/s
<30
at
2m/s
<30
at
2m/s
1 to 5
min
typically
2 min
1 to 5
min
typically
2 min
Connection
cable
Plug-in head
Please order connecti-
(
on cable 0430.0143)
Plug-in head
Please order connecti-
(
on cable 0430.0143)
Plug-in head
Please order connecti-
(
on cable 0430.0143)
Plug-in head
Please order connecti-
(
on cable 0430.0143)
Plug-in head
Please order connecti-
(
on cable 0430.0143)
Plug-in head
Please order connecti-
(
on cable 0430.0143)
Plug-in head
Please order connecti-
(
on cable 0430.0143)
Part no.
0636 9740
0636 9741
0636 2140
0628 0021
0628 0022
0636 9840
0636 9841
38
Page 39

Ordering data
Probes for testo 645 / 445
Accessories for humidity/temperature probes, 3-function probe
Diameter Part no.
Caps for all humidity probes
Metal protection cage, material: stainless steel V4A. Quick adjustment time, robust and temperature-proof. Application: for velocities < 10 m/s
Cap with wire mesh filter. 12 mm 0554 0757
PTFE sintered filter, PTFE material. Not affected by condensation, water-repellent, resistant to corrosive substances. Applications: compressed air measurements, high humidity range (long-term
measurements), high velocities.
Stainless steel sintered cap, material: V2A stainless steel. Very robust, suitable for penetration, should
be cleaned with fresh air, mechanical protection of sensor. Application: large mechanical loads, high
velocities.
21 mm
12 mm
21 mm
12 mm
21 mm
12 mm
0554 0665
0554 0755
0554 0666
0554 0756
0554 0640
0554 0647
Additional accessories
Connection cable for probes with plug-in head, 1.5 m long, PUR coating material 0430 0143
Connection cable for probes with plug-in head, 5 m long, PUR coating material 0430 0145
Extension cable between plug-in head cable and instrument, 5 m long, PUR coating material 0409 0063
Telescope for probes with plug-in head, extension length: maximum 1 m, cable: 2.5 m, PUR coating
material
Control and adjustment set 11.3 % / 75.3 % for humidity probes and 3-function probe (please order
0554.0661 adapter for 3-function probe)
Control and storage humidity (33 %) for humidity probe and 3-function probe 0554 0636
Pressure probes
Pressure probe for measuring velocities gand differential pressure or absolute pressure
Accessories for pressure
Measuring range Accuracy Connection cable Part no..
-4 to 10 hPa
-40 to 100 hPa
2000 hPa (Abs.p)
Temp.max Material Length / Ø Part no..
±0,03 hPa
±0,1 hPa (0 to 20hPa)
±0,5% of m.v. (rem.)
±5 hPa
1,5 m, PUR 0638.1445
0430.0144
0554 0660
0638.1545
0638.1645
probes
Pitot tubes to measure velocity (in connection
with pressure probes); longer versions on request
Silicone hose to connect Pitot tube and pressure
probe, 5 m long
+350 °C
+350 °C
Chromium-plated brass
Chromium-plated brass
500 mm/7 mm
350 mm/7 mm
0635.2045
0635.2145
0554.0440
39
Page 40

Ordering data
Probes for testo 645 / 445
Velocity probes
Vane/temperature probe, can be attached to
handle or telescope
Vane/temperature probe, can be attached to
handle or telescope
Bendable vane probe for integrated velocity measurement Range of application: -20 to +60 °C
Bendable vane probe for integrated velocity measurement Range of application: -20 to +60 °
Low cost, robust hot bulb probe for measure-
ments in the lower velocity range
Robust hot bulb probe with handle and telescope
for measurements in the lower velocity range
Quick-reaction hot wire probe with telescope for
measurements in the lower velocity range with
direction recognition function
Flügelrad-Meßsonde mit Teleskop, T
High temperature probe with handle for long-term
measurements up to +350 °C
Accessories for velocity probes
Telescope for plug-in vane probes, max. 1 m long 2,3 m Silicon 0430 0941
Handle for plug-in vane probes 1,5 m Silicon 0430 3545
Volume flow funnel to measure the extraction
capacity in ventilation systems
Extension cable between connection cable and
instrument for plug-in vanes
+60°C Vane 0,4...40 m/s ±(0,2 m/s , +2 % of m.v.). 0628 0005
max
Sensor Meas. range Accuracy (System) Part no..
0,6 to 60 m/s
-30 to +140 °C
0,6 to 40 m/s
-30 to +140 °C
0,25 to 20 m/s ±(0,1 m/s +1,5 % of m.v.) 0635 9440
0,25 to 15 m/s ±(0,1 m/s +1,5 % of m.v.) 0635 9340
Hot bulb NTC 0 to 10 m/s
Hot bulb NTC 0 to 10 m/s
Hot bulb NTC 0 to 20 m/s
Vane, NiCr-Ni 0,6 to 20 m/s
Meas. range Dimension Connection cable Part no.
b) 20 to 400 m
-20 to +70 °C
-20 to +70 °C
-20 to +70 °C
-40 to +350 °C
3
/h 350x350 mm 0554 0410
±(0,2 m/s +1 % of m.v.) 0635 9540
±(0,2 m/s +1 % of m.v.) 0635 9640
±(0,03 m/s +5% of m.v.) 0635 1549
±(0,03 m/s +5% of m.v.) 0635 1049
±(0,03 m/s +4% of m.v.) 0635 1041
±2,5 % of final value 0635 6045
5 m, PUR 0409 0063
40
Page 41

Ordering data
Probes for testo 645 / 445
Additional probes
3-function probe for simultaneous measurement
of Ttemperature, humidity and velocity. With plugin head (please order 0430.0143 connection cable)
Comfort level probe for meas. degree of turbulence, with telescope and stand. Fulfills the requirements of DIN 1946 Part 2 or VDI 2080
2 probe for measuring indoor air qualityund and
CO
for monitoring workplace conditions
Sensor Meas. range Accuracy Part no.
Hot bulb
Capacitive
NTC
Hot bulb
NTC
0 to 10 m/s
0 to 100 %rF
(probe tip)
-20 to +70 °C
0 to 5 m/s
0 to 50 °C
0 to 10.000 ppm
0 to 1Vol.%
±(0,03 m/s +5 % v.Mw.)
±2 %rF (2 to 98 %rF)
±0,4 °C (0 to 50 °C)
±0,5 °C (rem. range)
±(0,03 m/s +4 % v. Mw.)
± 0,3 °C
±50 ppm ±2 % of m.v.
(0 to 5000 ppm)
±100 ppm ±3 % of m.v.
(rem. range)
0635 1540
0628 0009
0632 1240
41
Page 42

42
Page 43

43
Page 44

0970 4450 en 05 V02.00 en-GB
 Loading...