

Thermo-Hygrometer
· testo 605-H1
Bedienungsanleitung de
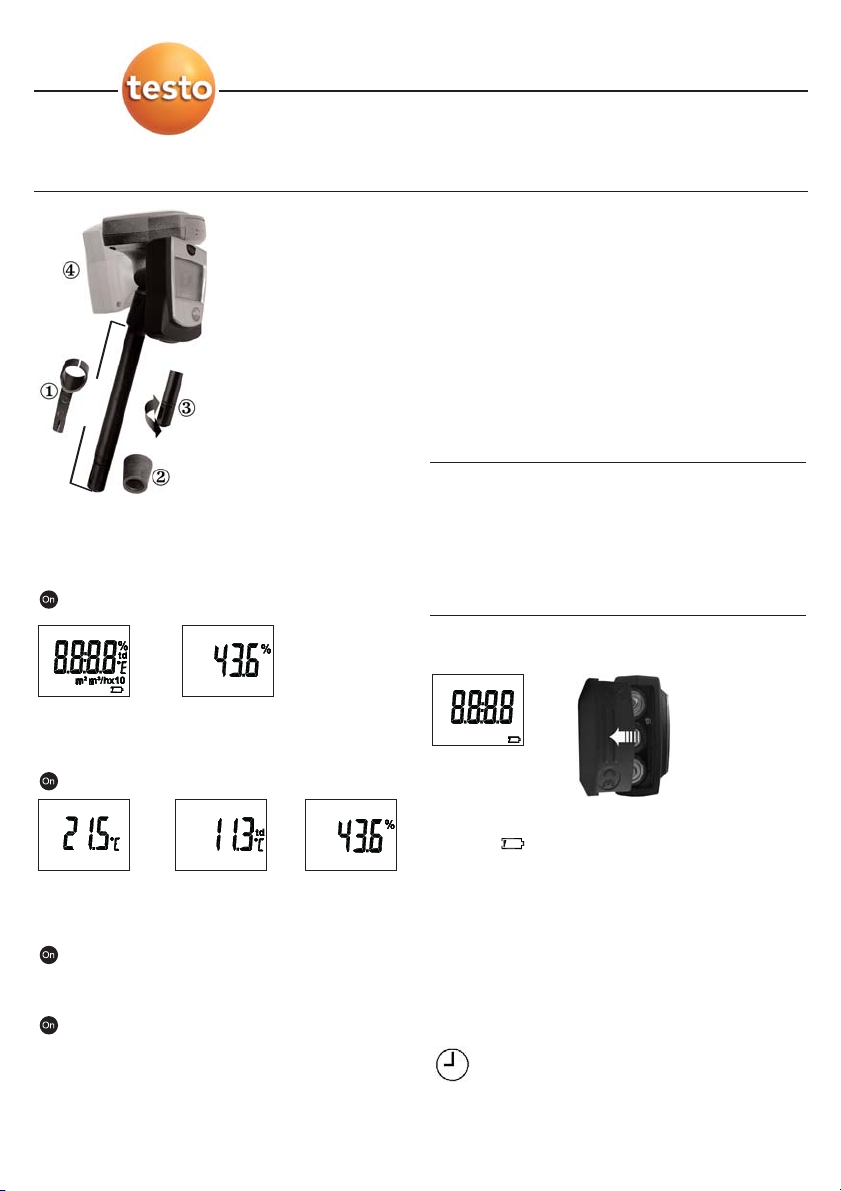
Befestigungs-Clip
Kanalhalterung, zur
Fixierung im Klimakanal
Ø 12 mm
Ein kurzer Dreh am
Ende des Fühlerrohres
schützt den Feuchtesensor die Schutzkappe ist geschlossen.
Nur für die Dauer der
125 mm
Messung öffnen!
Schwenkbarer Anzei-
gekopf. Die Anzeige ist
immer ablesbar.
Inbetriebnahme
Display-Schutzfolie entfernen.
Einschalten
Taste betätigen:
Segmenttest Aktueller Messwert
Umschalten der Messgrößen
Taste wiederholt betätigen:
Technische Daten
Anwendungstyp:............................................................Kurzzeitmessung
Messbereich: .............................................. 5 bis 95 %rF/ 0 bis +50°C/
-20 bis +50 °C td
Auflösung:......................................................................0,1 %rF / 0,1 °C
Genauigkeit:......................................................(Systemgenauigkeit bez.
auf 25°C) ±3 %rF/ ±0,5°C
Messgrößen:..........................................................................%rF, °C, °F
Umgebungstemperatur: ......................................................0 bis +50 °C
Lagertemperatur: ............................................................-20 bis +70 °C
Batterietyp:............................................................................3 Stk. AAA
Batteriestandzeit: ..................................................................ca. 1000 h
Fühlerrohr:......................................................Ø 12 mm/Länge: 125 mm
Garantie: ....................................................................................2 Jahre
CE-Richtlinie ..................................................................2004/108/EWG
Unbedingt vor Inbetriebnahme lesen!
• Messbereiche der Messwertaufnehmer beachten!
• Zul. Lager- und Betriebstemperatur nicht über-
schreiten (z.B. Messgerät vor direkter Sonneneinstrahlung schützen)!
• Bei unsachgemäßer Behandlung erlöschen die
Gewährleistungsansprüche!
Batteriewechsel
Temperatur Taupunkt Feuchte
Ausschalten
Taste 3 sec gedrückt halten.
°C/°F - Umschaltung
Taste beim Einschalten halten bis der Segmenttest beendet ist. Gerät schaltet in das Konfigurations-Menü. Taste erneut betätigen, Gerät schaltet
abwechselnd zwischen °C und °F um. 2 sec.
warten ohne die Taste zu betätigen - die ausgewählte Einheit wird übernommen.
Batteriewechsel wird erforderlich, wenn während der
Messung in der Anzeige erscheint.
.Gerät ist ausgeschaltet.
1 Batteriefachdeckel abnehmen.
2 Leere Batterien/Akkus entnehmen und neue
Batterien/ Akkus (3 x AAA) in das Batteriefach
einlegen. Polung beachten!
3 Batteriefachdeckel schließen.
Auto-Off-Funktion
Nach ca. 10 Minuten im Ruhezustand schaltet
das Gerät automatisch aus.
0973.6053/02/T/wh/09.01.2008

Thermo-Hygrometer
· testo 605-H1
Instruction manual en
Multi-purpose clip
Holder for positioning
stick in duct
Ø 12 mm
The humidity sensor is
protected by a quick
twist of the bottom of
the probe stem
the
protective cap is closed.
4.9 in
Should only be left open
for the duration of the
measurement.
Swivel head. The dis-
play can always be
read.
Commissioning
Remove the protective film on the display.
Switching on
Press button:
Segmenttest
Current reading
Changing the parameters
Press button repeatedly:
Temperature Dew point Humidity
Switching off
Keep button pressed for 3 seconds.
Technical data
Type of application: ..................................................Short measurement
Measuring range: ................................................5 to 95 %RH / 0 to +50°C /
Resolution: ........................................................0.1 %RH / 0.1 °C/ 0.1°F
Accuracy: ......................................................(System accuracy at 25 °C/
Parameters: ..........................................................................%RH, °C, °F
Ambient temperature: ....................................0 to +50°C/32 to +122 °F
Storage temperature: ..................................-20 to +70 °C/-4 to +160°F
Battery type:................................................................................3 x AAA
Battery lifetime: ..............................................................Approx. 1000 h
Probe stem:................................................................................Ø 0.5 in
Length: ........................................................................................4.9 in
Warranty: ....................................................................................2 years
CE guideline......................................................................2004/108/EEC
• Observe measurement ranges of sensor
Please read before using instrument
+32 to +122°F/-4 to +122°F td
+77 °F ) ±3 %RH / ±0.5°C/±0.9°F
-20 to +50 °C td
• Do not exceed maximum storage and operating
temperatures (e.g. protect measuring instrument
from direct sunlight).
• Inexpert handling cancels your warranty.
Changing the battery
The battery has to be changed if the symbol
appears in the display during the measurement.
Instrument is switched off.
1 Open battery compartment cover.
2 Remove spent batteries and insert new batteries
(3x AAA) into the battery compartment. Observe
polarity!
3 Close battery compartment cover.
Selecting between °C/°F
When switching on keep button pressed until the
segment test is finished, instrument switches to
configuration menue. Press button again the
instrument alternates between °C and °F. Wait
2 sec. before pressing the button again. The
selected unit then applies.
Auto Off function
If no button has been pressed in approx. 10
minutes, the instrument switches itself off
automatically.

Thermo-hygromètre · testo 605-H1
Mode d’emploi fr
Clip de fixation
Pour fixation en gaine,
par ex. dans les gaines
de ventilation (voir
photo ci-contre).
Ø 12 mm
Une brève rotation de
l’extrémité de la sonde
protège le capteur le
capuchon de protection
125 mm
est fermé. A n’ouvrir
que pendant la mesure!
Tête pivotante pour une
lecture optimale.
Mise en service
Retirez le film de protection de l’afficheur.
Mise en route
Touche
Test écran Valeur actuelle
Changement de grandeurs
Caractéristiques techniques
Type d'application : ................................................Mesure courte durée
Etendue de mesure: ..........................................5 à 95 %HR / 0 à +50°C /
..................................................................................................-20 à +50°C td
Résolution: ....................................................................0,1 %HR / 0,1°C
Précision: ............................................................(Précision du système
a +25 °C) ±3 %HR / ±0,5°C
Grandeurs:............................................................................%HR, °C, °F
Temp. ambiante: ....................................................................0 à +50 °C
Temp. de stockage: ............................................................-20 à +70 °C
Alimentation: ............................................................Pile bouton 3 x AAA
Autonomie:............................................................................env. 1000 h
Dimensions sondas:..............................................Ø 12 mm / L=125 mm
Garantie: ........................................................................................2 ans
Directive européenne ........................................................2004/108/CEE
A lire avant mise en route!
• Surveillez les valeurs mesurées!
• Ne pas dépasser les températures de stockage et
d’utilisation!
• Un dépassement des consignes d’utilisation risque
d’entraîner l’affichage de valeurs erronées!
Remplacement de la pile
Appuyez plusieurs fois sur ON.
Température Point de rosée Humidité
Arrêt
Appuyer 3 secondes en continu .
Conversion °C/°F
Lors de l'allumage, maintenir la touche actionnée
jusqu'à ce que le test des segments soit terminé.
L'appareil affiche le menu de configuration.
Actionner de nouveau la touche, l'appareil
bascule entre °C et °F. Ne pas actionner la touche
pendant 2 s, l'unité sélectionnée est appliquée.
Si le signal apparaît pendant la mesure, les piles
doivent être changées.
L'appareil est éteint.
1 Retirer le couvercle du compartiment pile.
2 Retirer les piles vides / accus déchargés et
insérer des piles neuves / accus rechargés
(3x AAA) dans le compartiment pile.
Attention à la polarité !
3 Fermer le couvercle du compartiment pile.
Fonction Auto-Off
Arrêt automatique env. 10 minutes sans
manipulation.
0973.6053/02/T/wh/09.01.2008

Termohigrómetro · testo 605-H1
Manual de instrucciones es
Clip multi-uso
Sujeciones para posi-
cionar el mini en conducto, ej. en un conducto de aire, ver fig.
Ø 12 mm
El sensor de velocidad
está protegido por un
cabezal en la punta de
la sonda el cierre de
protección estará
125 mm
cerrado. Se debe dejar
abierto solamente
durante la medición.
Cabezal giratorio. El
visualizador puede
leerse siempre.
Conexión
Tirar cuidadosamente del film protector del
visualizador.
Poner en marcha
Pulsar la tecla:
test de segmentos Valor de medición actual
Datos técnicos
Tipo de aplicación: ..........................................................medición breve
Rango: ..........................................................5 a 95 %HR / 0 a +50 °C /-
20 a +50 °C td
Resolución:....................................................................0.1 %HR / 0.1 °C
Exactitud: ..................................(Exactitud del sistemareferido a +25°C)
±3 %HR/±0.5°C
Parámetro:............................................................................%HR, °C, °F
Temperatura ambiente: ..........................................................0 a +50°C
Temperatura almacenamiento: ............................................-20 a +70°C
Tipo de pila:..........................................................pila tipo botón 3 x AAA
Vida de la pila: ..................................................................Aprox. 1000 h
Sonda: ........................................................Ø 12 mm/ longitud: 125 mm
Garantía: ......................................................................................2 años
Directiva CE: ....................................................................2004/108/CEE
Por favor, leer antes de utilizar el instrumento
• Respetar los rangos de medición del sensor.
• No exceder las temperaturas máximas de
almacenamiento y funcionamiento (ej. proteger el
instrumento de la luz solar directa).
• Un manejo inadecuado invalida la garantía.
Cambio de la pila
Conversión a los parámetros
Pulsar la tecla repetidamente:
Temperatura Punto de rocío Humedad
Desconectar
Presionar la tecla durante unos 3 segundos.
Selección entre °C/°F
Al encender, presionar la tecla hasta que haya
finalizado el test de segmentos. El instrumento
pasa al menú de configuración. Volver a pulsar la
tecla para cambiar alternativamente de °C a °F.
Esperar 2 segundos sin pulsar ninguna tecla. Se
aplica la unidad seleccionada.
Cuando aparece en el visualizador durante la medición
el simbolo la pila debe cambiarse.
El instrumento se encuentra apagado.
1 Retirar la tapa del compartimento para pilas.
2 Sacar las pilas/baterías agotadas e introducir
pilas/baterías (3 de AAA) nuevas en el
compartimento para pilas. Respetar la polaridad.
3 Cerrar la tapa del compartimento para pilas.
Función de auto-desconexión
Si no se pulsa la tecla en aprox. 10 minutos, el
instrumento se apaga automaticamente.

Termoigrometro
· testo 605-H1
Istruzioni per l'uso it
Clip di fissaggio
Supporto canale da
fissare nel canale di
rilevamento
Ø 12 mm
Una breve rotazione
sull'estremità del tubo
protegge il sensore di
umidità il cappuccio
protettivo viene chiuso.
125 mm
Lasciarlo aperto
soltanto durante la
misurazione!
Testina del display
orientabile. È sempre
possibile consultare il
display.
Messa in opera
Tirare la pellicola protettiva dal display.
Accensione
Azionare il tasto:
Test segmenti Lettura attuale
senza azionare il tasto - l'unità prescelta viene
acquisita.
Dati tecnici
Tipo di applicazione:....................................................Misurazione breve
Campo di misura: ........................................ da 5 fino a 95 %Ur / da 0 a
+50 °C/
da -20 a +50 °C td
Risoluzione: ..................................................................0,1 %Ur / 0,1 °C
Precisione: ................(Precisione del sistema a 25 °C) ±3 %Ur / ±0,5°C
Unità di misura: ....................................................................%Ur, °C, °F
Temperatura ambiente: ....................................................da 0 a +50 °C
Temperatura di stoccaggio:............................................da -20 a +70 °C
Tipo di batteria: ....................................................................3 unità AAA
Durata batteria: ......................................................................ca. 1000 h
Stelo sonda: ............................................Ø 12 mm/Lunghezza: 125 mm
Garanzia: ......................................................................................2 anni
Direttiva CE ......................................................................2004/108/CEE
Si raccomanda di leggere prima dell'uso!
• Prestare attenzione ai campi di misura del sensore di
misura!
• Non superare la temperatura di stoccaggio ed
esercizio ammessa (ad es. non esporre il dispositivo
di misura direttamente ai raggi solari)!
• In caso di utilizzo non conforme a quello previsto
decade qualsiasi diritto di garanzia.
Cambio delle batterie
Commutazione tra i parametri
Azionare più volte il tasto:
Temperatura Punto di rugiada Umidità
Spegnimento
Mantenere premuto il tasto 3 s.
Commutazione °C/°F
All'accensione tenere premuto il tasto finché il test
segmento non sia concluso. Lo strumento passa
al menu di configurazione. Azionando
nuovamente il tasto è possibile commutare lo
strumento da °C a °F e viceversa. Attendere 2 s
Un cambio della batteria si rende necessario se
durante la misurazione sul display compare .
.Lo strumento è spento.
1 Aprire il coperchio del vano batterie.
2 Togliere le batterie consumate e introdurre le nuove
batterie (3 unità AAA - anche ricaricabili) nel vano
batterie. Fare attenzione alle polarità!
3 Chiudere il coperchio del vano batterie.
Funzione Auto Off
Quando lo strumento non viene utilizzato si
spegne automaticamente dopo ca. 10 minuti.
0973.6053/02/T/wh/09.01.2008

Higrómetro térmico
· testo 605-H1
Manual de instruções pt
Clip de fixação
Fixação para condutas
de ar condicionado
Ø 12 mm
Basta um giro breve na
ponta do tubo da sonda
para proteger o sensor
de medição da
humidade A capa de
protecção está fechada.
125 mm
Deixar aberto apenas
durante a medição.
O cabeçal do visor é
rotativo. Isto faz com
que seja sempre
possível ver o visor.
Conexão
Tirar cuidadosamente o filme protector do visor.
Ligar
Carregar no botão:
Teste de segmentos Valor de medição actual
Mudar os parâmetros
Carregar várias vezes no botão:
carregar no botão. A unidade seleccionada
aplica-se.
Dados técnicos
Tipo de aplicação: ..........................................Medição de curta duração
Gama de medição: ......................................5 até 95% HR / 0 até +50 °C/
-20 bis +50 °C td
Resolução: ..................................................................0,1 % HR / 0,1 °C
Exactidão: ............................................................(Exactidão do sistema
a 25 °C) ±3% HR / ±0,5 °C
Parâmetros: ........................................................................% RH, °C, °F
Temperatura do ambiente circundante: ..............................0 até +50 °C
Temperatura de armazenamento: ....................................-20 até +70°C
Tipo de pilha:..................................................................3 unidades AAA
Autonomia da pilha: ..........................................................aprox. 1000 h
Tubo da sonda: ....................................Ø 12 mm/Comprimento: 125 mm
Garantia: ......................................................................................2 anos
Directiva CE......................................................................2004/108/CEE
Importante ler antes da colocação em
funcionamento!
• Tenha em conta as gamas de medição dos
sensores.
• Não ultrapasse a temperatura de armazenagem e
de funcionamento (p. ex., proteger o instrumento da
incidência directa de raios solares).
• A utilização imprópria do instrumento anula os
direitos à garantia
Substituição da pilha
Temperatura Ponto de orvalho Humidade
Desligar
Manter a tecla carregada durante 3 segundos.
Comutar entre °C e °F
Ao ligar, mantenha o botão carregado até o teste
de segmentos estar terminado. O instrumento
passa para o menu de configuração. Carregando
outra vez no botão, o instrumento alterna entre °C
e °F. Aguarde 2 segundos antes de voltar a
Se, durante a medição, surgir o símbolo no visor,
é necessário substituir a pilha
.O instrumento está desligado.
1 Retirar a tampa do compartimento para as pilhas.
2 Retirar as pilhas/pilhas recarregáveis gastas e
colocar as novas (3x AAA) no compartimento para
as pilhas. Tenha em conta a polaridade correcta.
3 Fechar a tampa do compartimento para as pilhas.
Função de desligar automático
Após aprox. 10 minutos sem estar a trabalhar, o
instrumento desliga-se automaticamente.
 Loading...