

Page 1
testoterm
testoterm
testoterm
testoterm
testoterm
Flexible Rauchgassonde 0600.9430 / 0600.9440
Anwendungshinweise
mmiinndd..
114400 mmmm
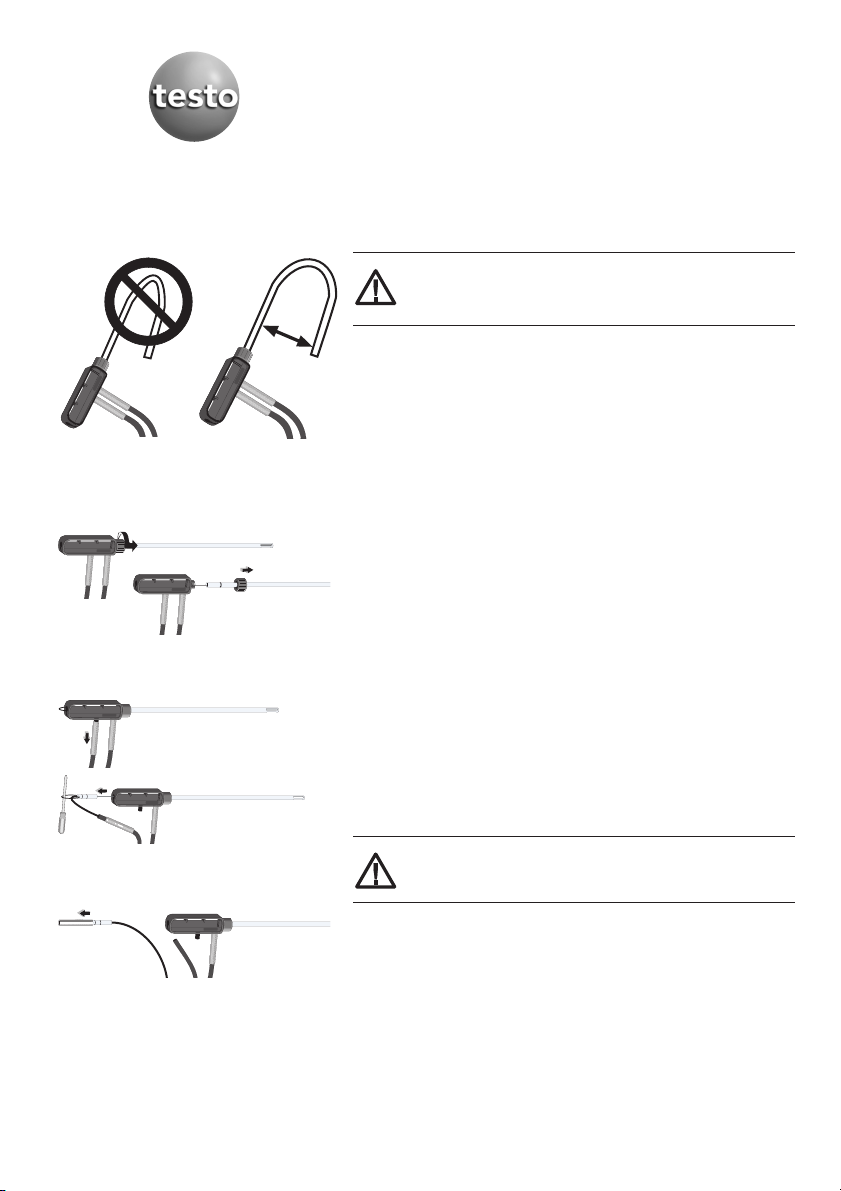
Sondenrohr nnicht kknicken
gen
. KKeine GGewalt aanwenden!
(
)
, ssondern nnur bbie-
()
Technische Daten
Messbereich: bis 500 °C
Aussendurchmesser Sondenrohr: 10 mm
Sondenrohrlänge: 330 mm
Max. Eintauchtiefe: 280 mm
Minimaler Biegedurchmesser (
): 140 mm
Rauchgassonde reinigen
Das Sondenrohr an der Verschraubung lösen und abziehen.
Sondenrohr in heißes Wasser legen bzw. darin bewegen. Anschließend mit Luft ausblasen oder mit einer
Rundbürste (z. B. aus Messing) reinigen.
Thermoelement wechseln
Biegeschutzfeder des hintersten Abgangs mit einer
Drehbewegung im Uhrzeigersinn von der Führung abziehen und Schlauchleitung herausziehen.
Thermoelement mit Hilfe eines Schraubendrehers
Kunststoffbügel
herausziehen.
am
Nicht aan dder TThermoelementleitung
ziehen!
Biegeschutzfeder über das Thermoelement abziehen
und Thermoelementleitung aus dem geschlitzten
Schlauch nehmen.
Vor dem Einbau eines Thermoelements den O-Ring mit
einem Schmiermittel z. B. Fett einstreichen, um beschädigungen zu verhindern
Beim Einlegen des neuen Thermoelements nicht an der
Thermoelementleitung sondern am Kunststoffbügel
drücken.
Page 2
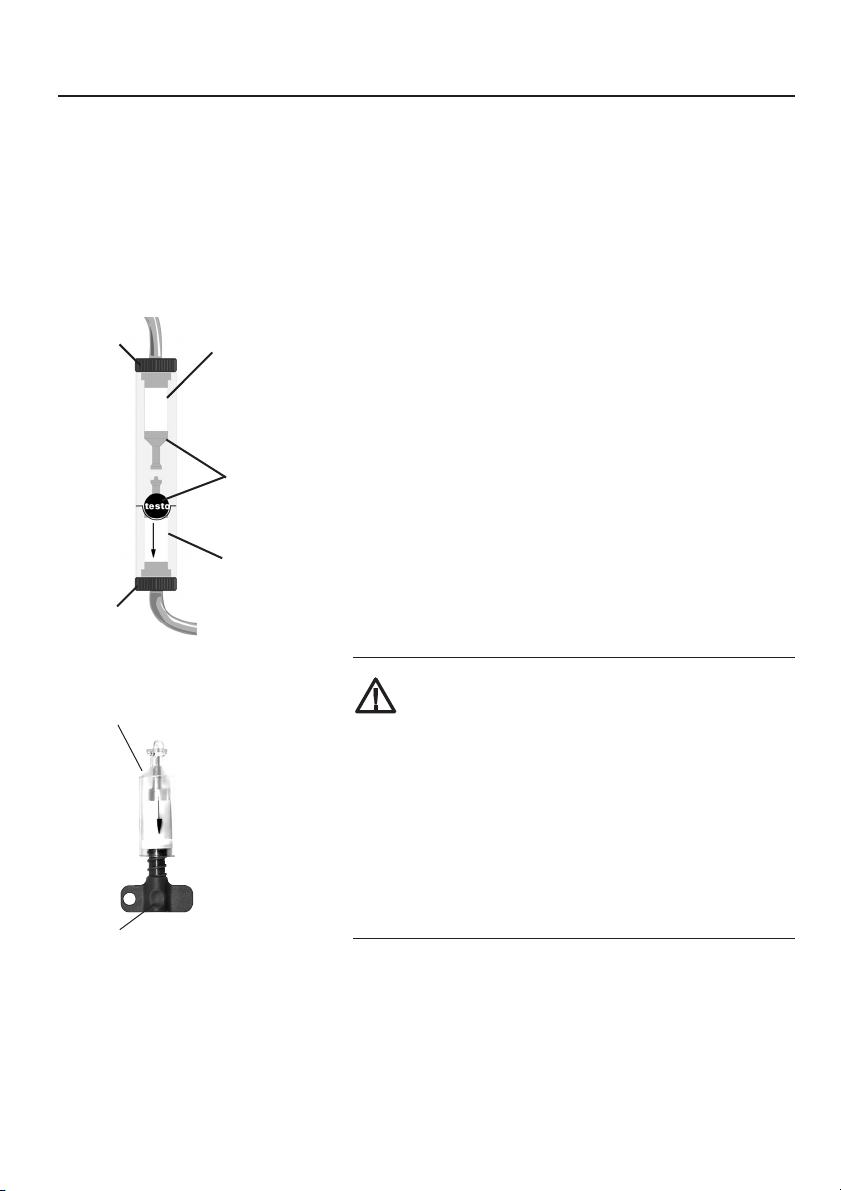
von der RG-Sonde
Endstück
Endstück
zum Messgerät
Filterröhrchen
Ausziehschlüssel
Eingangsfilter
Filterröhrchen
Ausgangsfilter
Flexible Rauchgassonde 0600.9430 / 0600.9440
Bei Rauchgassonden mit Kondensatfalle:
Kondensatfalle entleeren
Eines der beiden Endstücke der Kondensatfalle abziehen und Kondensat ausgießen.
Filter wechseln
Bei sichtbarer Verschmutzung des Ausgangsfilters auf
jeden Fall den Eingangsfilter wechseln.
Filter bei nachlassender Pumpenleistung (hörbar) wechseln. In den meisten Fällen ist das Wechseln des
Eingangsfilters ausreichend.
Zum Wechseln des Filters das Filterröhrchen abziehen.
Ausziehschlüssel in den Filter eindrehen und aus dem
Filterröhrchen herausziehen. Neuen Filter fest in das
Filterröhrchen eindrücken.
Verwenden Sie ausschließlich Original-testo-Ersatzfilter
(Best.-Nr. 0554 3371).
Die KKondensatfalle nnur bbei aausgeschalteter
Pumpe eentleeren.
Die KKonstruktion dder KKondensatfalle sschreibt eeine
bestimmte DDurchflussrichtung vvor. DDiese iist aauf
dem GGehäuseteil ddurch PPfeile mmarkiert. BBei eent-
gegengesetzter GGasströmung ffunktioniert ddie
Kondensatabscheidung nnicht oordnungsgemäß;
dies kkann zzu eeinem AAusfall ddes GGerätes fführen.
Bei MMontagearbeiten aan dder KKondensatfalle ddarauf
achten, ddass ddie DDichtringe nnicht bbeschädigt uund
die FFilterröhrchen nnicht vvertauscht wwerden.
Page 3

testoterm
testoterm
testoterm
testoterm
testoterm
Flexible flue gas probes 0600.9430 / 0600.9440
mmiinndd..
114400 mmmm
Instructions for use
Probe ppipe ccan bbe bbent
Do nnot uuse fforce
(), but not kinked ()
Technical data
Measurement range: Up to 500 °C
Outer diameter of probe pipe: 10 mm
Probe pipe length: 330 mm
Max. immersion depth: 280 mm
Minimum bending diameter (
): 140 mm
Cleaning the flue gas probe
Unscrew probe pipe at the screw connection and remove pipe.
Place probe pipe in hot water and move the probe pipe
around. Blow air through pipe or clean with a round
brush (e.g. made of brass).
Change thermocouple
Pull out the bending protection spring from the guide at
the back outlet with a counter-clockwise movement and
pull off the tubing.
Remove the thermocouple
screwdriver.
from tthe pplastic cclip
using a
.
Do nnot ppull oon tthe tthermocouple ccable!
Pull bending protection spring over the thermocouple
and remove the thermocouple cable from the slit hose.
Apply lubricant e.g. grease to the O ring before installing
a thermocouple in order to avoid damage.
When inserting the new thermocouple press on the plastic clip but not on the thermocouple cable.
Page 4

From the flue gas probe
End piece
End piece
To the analyser
Filter tube
Inlet filter
Filter tube
Outlet filter
Flexible flue gas probes 0600.9430 / 0600.9440
For flue gas probes with condensate trap:
Emptying the condensate trap
Pull off one of the two end pieces from the condensate
trap and pour out the condensate.
Changing the filter
If dirt is visible on the output filter, the inlet filter should
be removed.
Remove filter if pump power drops (audible). Changing
the inlet filter is sufficient in most cases.
Remove the small filter pipe to change the filter. Screw
the withdrawing screw into the filter and remove from
the filter pipe. Press new filter firmly into the filter pipe.
Only spare parts from Testo should be used
(Part no. 0554 3371).
The ccondensate ttrap sshould bbe eemptied iif tthe
pump iis sswitched ooff.
The ccondensate ttrap iis ddesigned iin ssuch aa wway
that tthere iis aa ccertain fflow ddirection. TThis iis mmar-
ked wwith aarrows oon tthe hhousing ssection. IIf ggas
flows iin tthe oopposite ddirection tthe ccondensate
trap ccannot ffunction pproperly aand tthis ccould llead
to tthe iinstrument bbreaking ddown.
When aassembling tthe ccondensate ttrap, eensure
that ssealing rrings aare nnot ddamaged aand tthe ffilter
tubes ddo nnot gget mmixed uup.
Withdrawing
screw
0973.0348/01/T/dr/05.09.2008
 Loading...