

Page 1
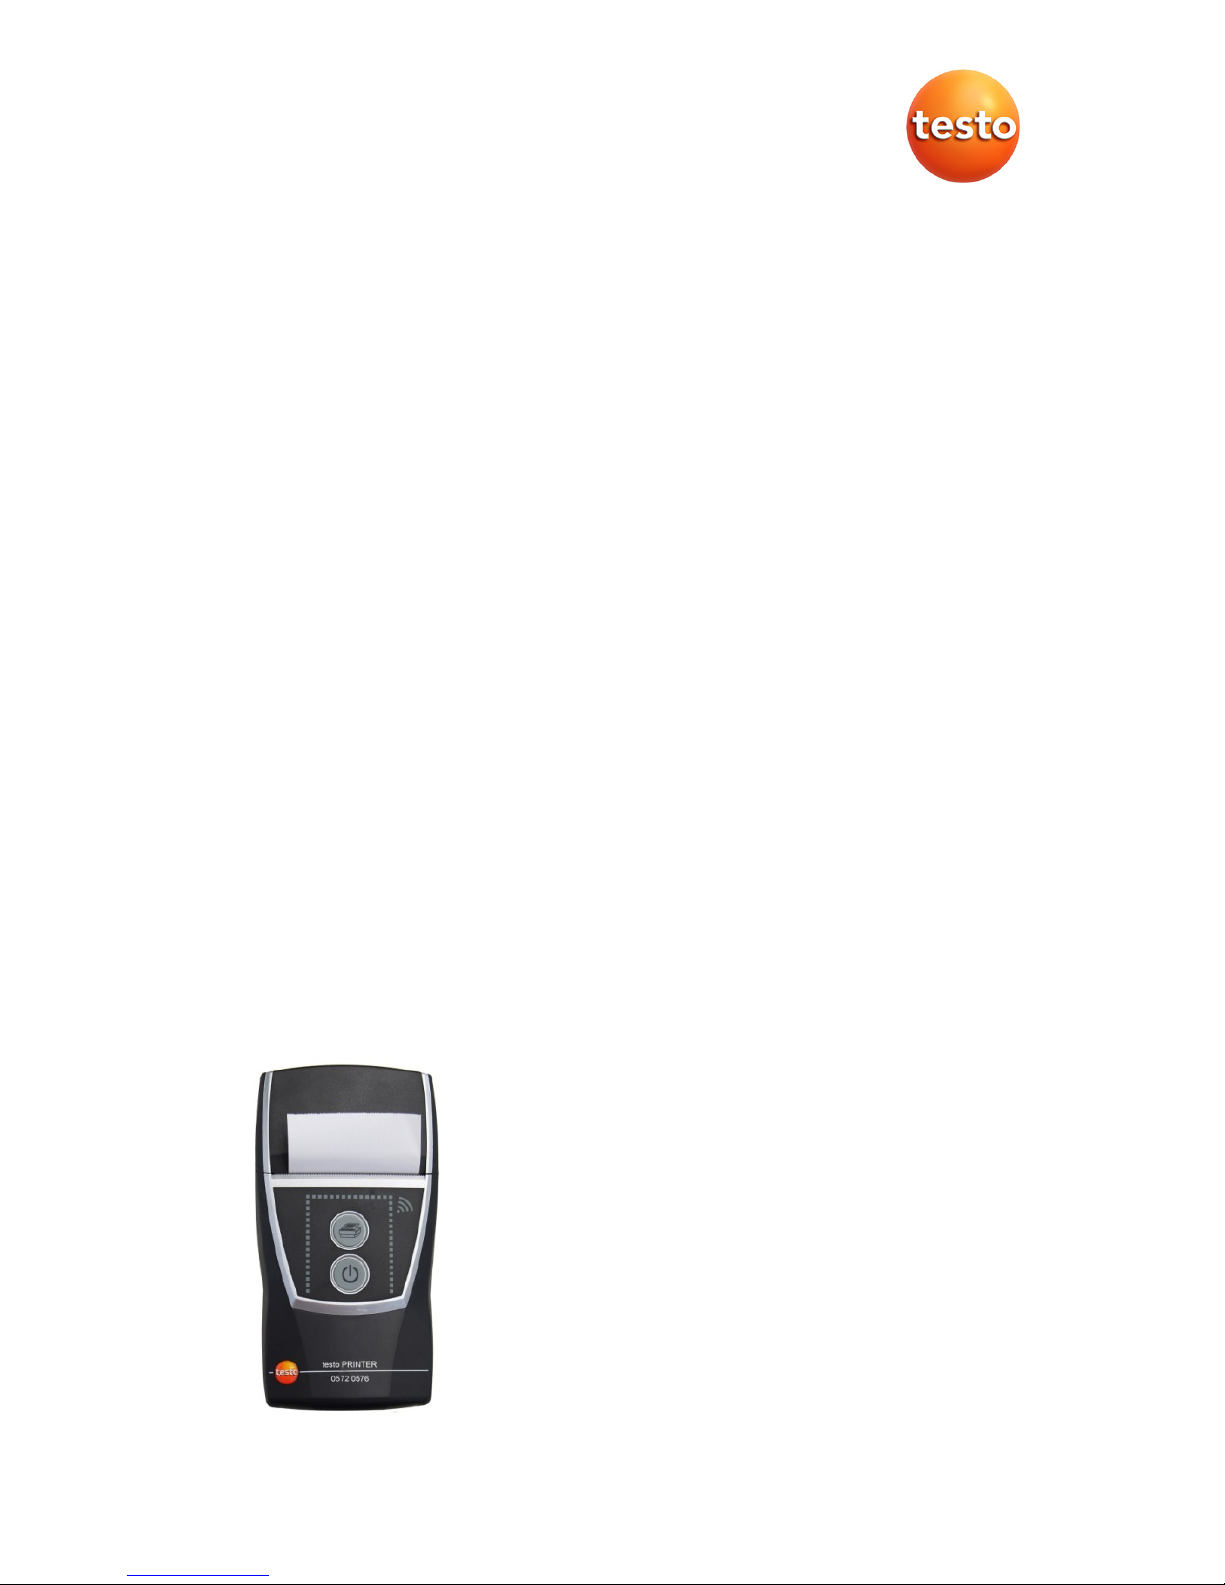
Mobiler Drucker für Datenlogger 0572 0576
Bedienungsanleitung
Mobile printer for data loggers 0572 0576
Instruction manual
L'imprimante testo mobile pour enregistreur de
données 0572 0576
Mode d'emploi
Impresora portátil testo para registradores de datos
0572 0576
Manual de instrucciones
Stampante mobile per data logger 0572 0576
Istruzioni per l'uso
Mobiele printer voor gegevenslogschrijvers 0572 0576
Gebruiksaanwijzing
Портативный принтер для логгеров
данных 0572 0576
Руководство пользователя
Page 2

2
German ......................................................................................................... 3
English ........................................................................................................ 11
French ......................................................................................................... 19
Spanish ....................................................................................................... 27
Italian....................................................................................... ................... 35
Dutch ........................................................................................................... 43
Russian ....................................................................................................... 51
Page 3

2 Leistungsbeschreibung
3
1 Sicherheit und Umwelt
> Entsorgen Sie defekte Akkus / leere Batterien entsprechend
den gültigen gesetzlichen Bestimmungen.
> Führen Sie das Produkt nach Ende der Nutzungszeit der
getrennten Sammlung für Elektro- und Elektronikgeräte zu
(lokale Vorschriften beachten) oder geben Sie das Produkt an
Testo zur Entsorgung zurück.
2 Leistungsbeschreibung
2.1. Verwendung
Der testo mobile Drucker für Datenlogger dient zum Erstellen von
Protokollausdrucken, in Verbindung mit kompatiblen Geräten:
• testo 175/176 (ab Baujahr 2011)
• testo 184 (ab Baujahr 2013)
2.2. Technische Daten
Allgemeine Daten
Eigenschaft Werte
Bauart Thermodrucker mit USB/NFC -Schnittstelle
Druckgeschwindig-
keit
30 mm/s
Betriebstemperatur
0...+50 °C / 32...122 °F
Lagertemperatur
-20...+50 °C / -4...122 °F
Abmessungen
(LxBxH)
150 mm x 80 mm x 41 mm
Gewicht
ca. 400 g (inklusive Akku-Pack, Papierrolle,
Netzteil)
EU-Richtlinie
2004/108/EG
Stromversorgung Lithium Ionen Akku-Pack, 2600 mAh, 3.7 V
Thermopapier-Rolle 56.5 mm x 34 mm x 12 mm
Lagertemperatur
Akku
±0...35 °C / 32...95 °F
Page 4
2 Leistungsbeschreibung
4
Eigenschaft Werte
Akku-Ladezeit ca. 5-6 h
Akku-Standzeit > 6 h (20°C / 68 °F Umgebungstemperatur)
Garantie 2 Jahre (außer Druckwerk, Akku-Pack)
Garantiebedin-
gungen
Garantiebedingungen: siehe Internetseite
www.testo.com/warranty
Zubehör/Ersatzteile
Beschreibung Artikel-Nr.
Netzteil 5 V mit 1,0 A 0554 1105
Micro-USB-Leitung 0449 0134
Ersatz-Thermopapier, 6 Rollen 0554 0568
Page 5
3 Produktbeschreibung
5
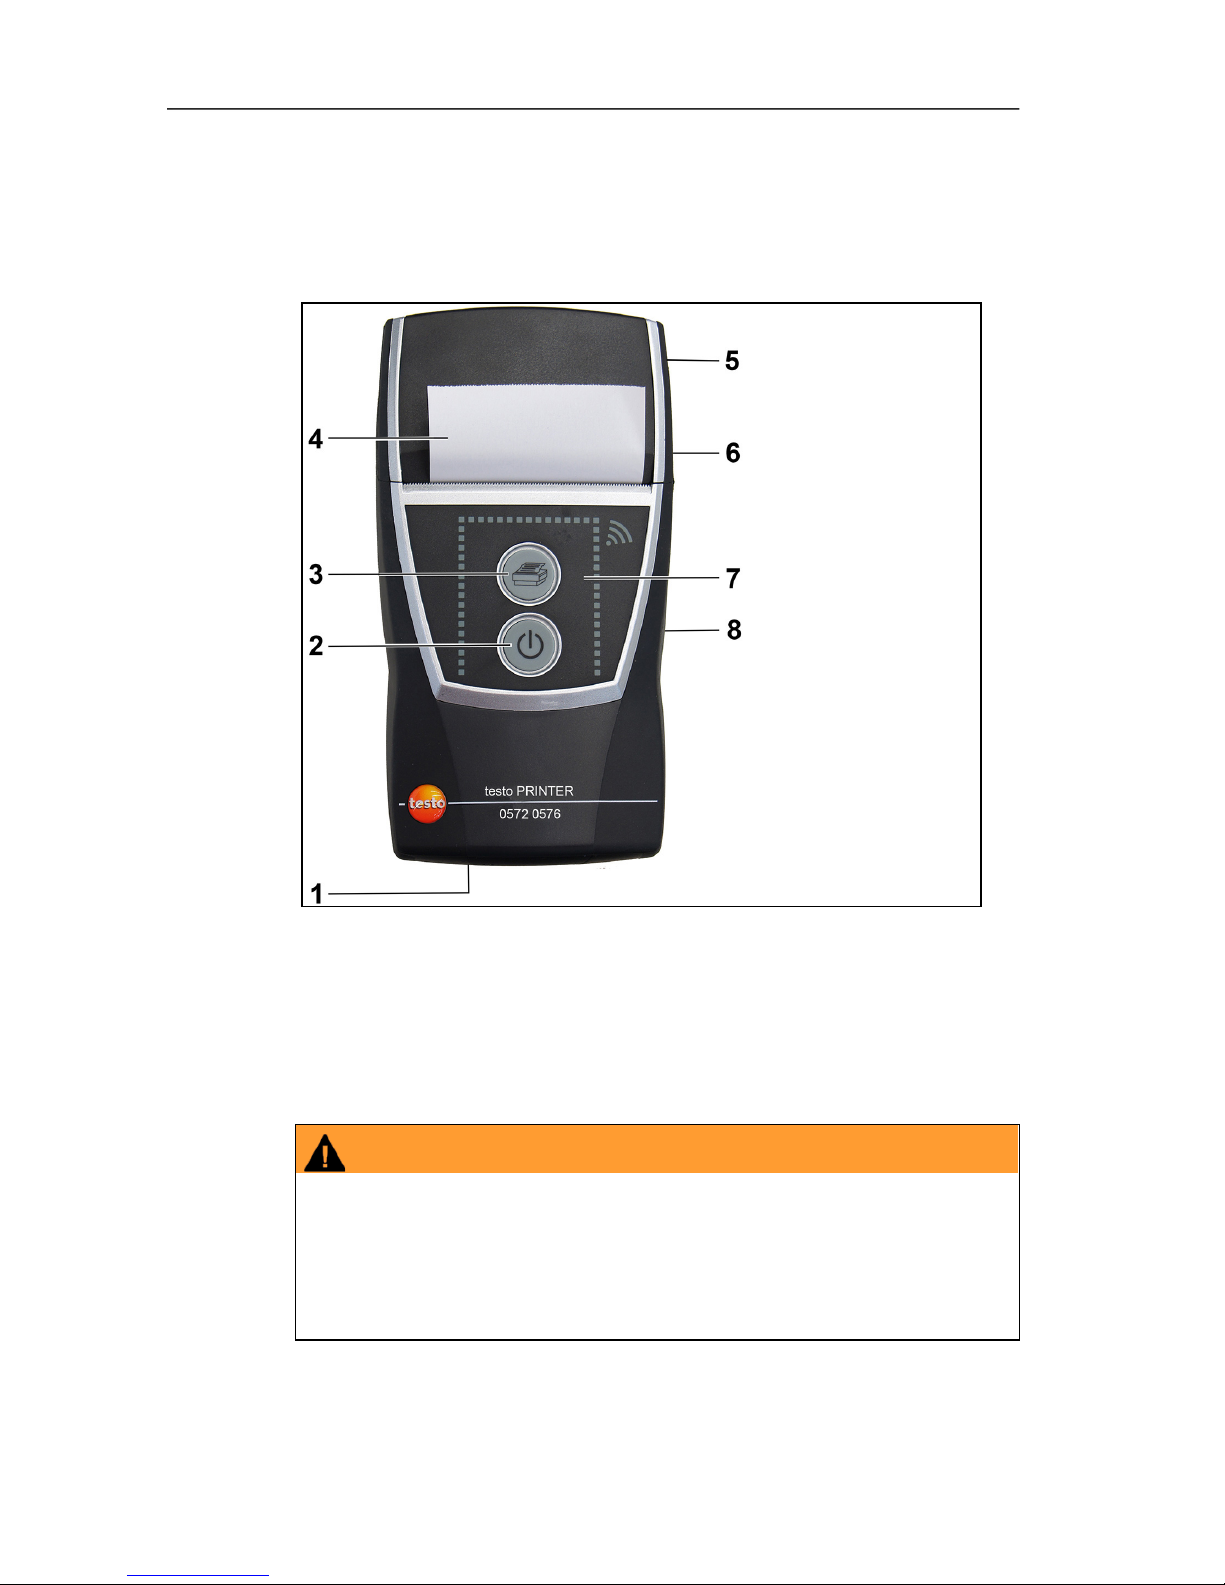
3 Produktbeschreibung
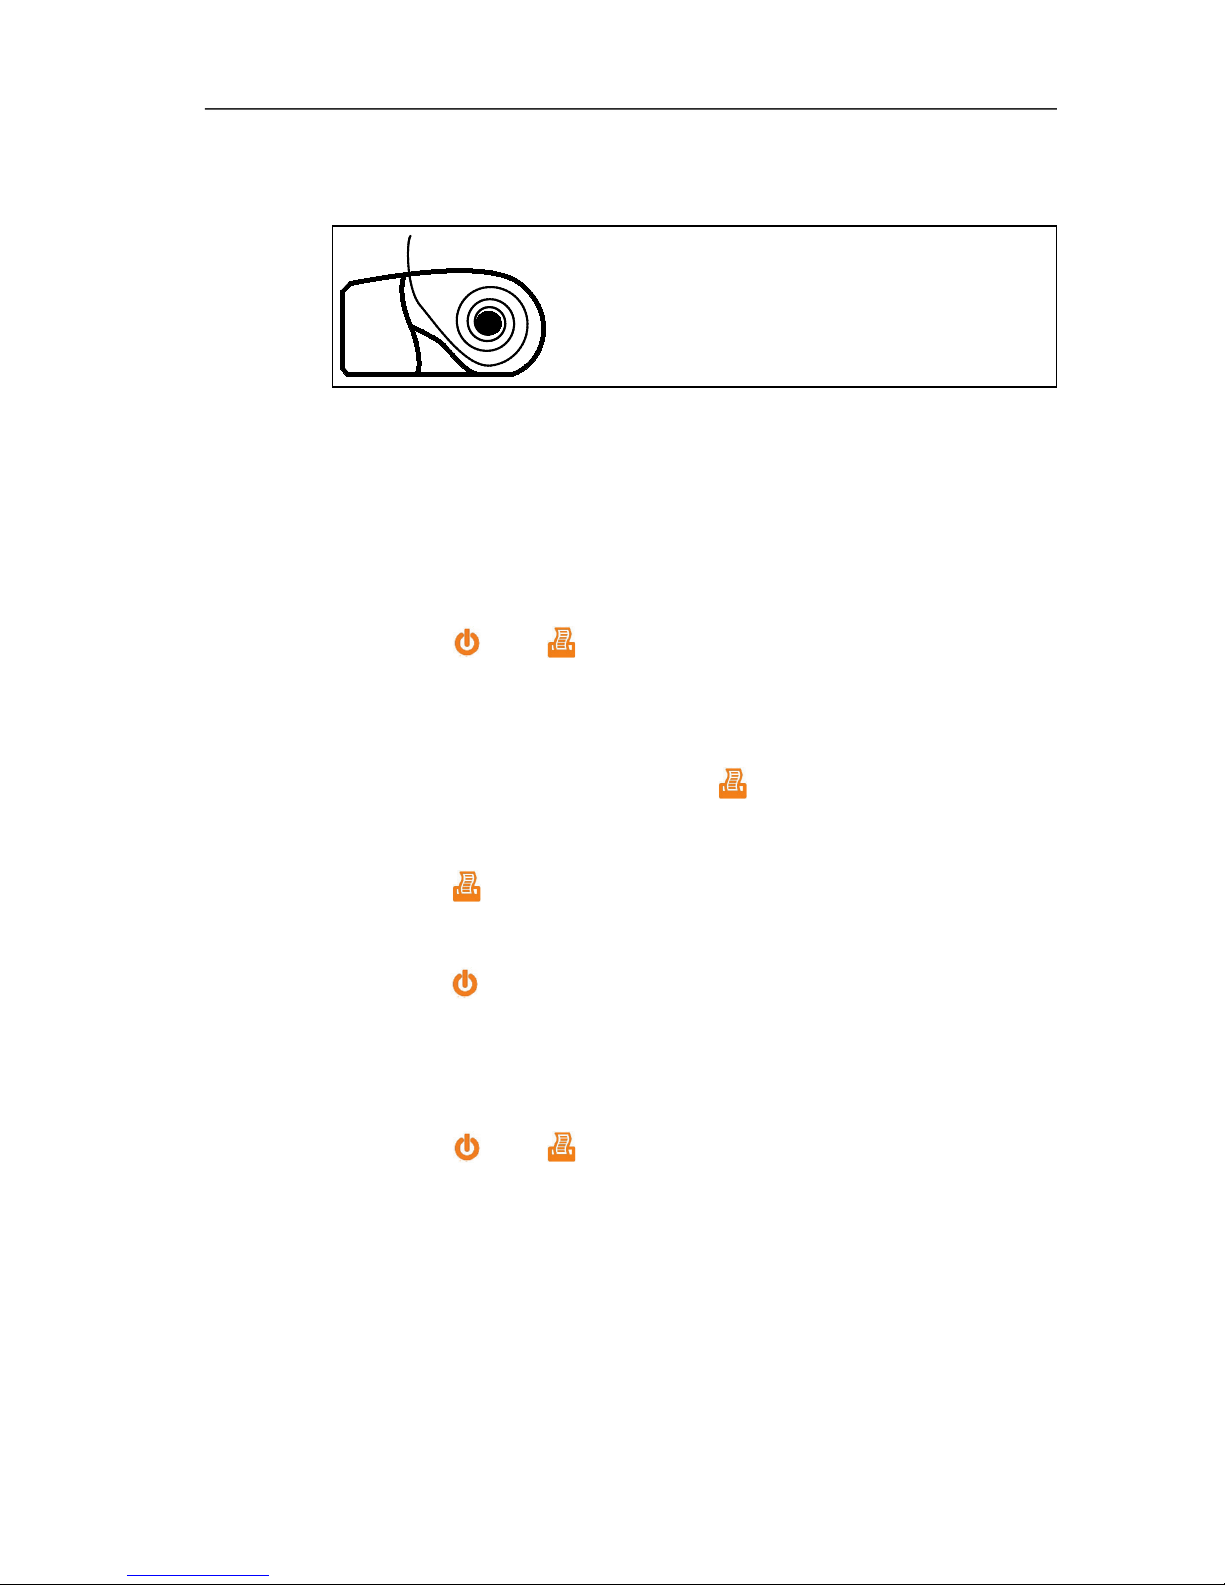
3.1. Übersicht
1 Anzeige Betriebsmodus
2 Bedientaste Ein/Aus
3 Bedientaste Papiervorschub / Drucken
4 Papierrolle (bedruckbare Seite außen)
5 Papierfachabdeckung
6 Magnethalterung (Rückseite)
WARNUNG
Magnetisches Feld
Kann gesundheitsgefährdend für Träger von
Herzschrittmachern sein.
> Mindestabstand von 15 cm zwischen Herzschrittmacher und
Drucker einhalten.
Page 6
3 Produktbeschreibung
6
ACHTUNG
Magnetisches Feld
Beschädigung anderer Geräte!
> Sicherheitsabstand zu Produkten einhalten, die durch
Magnetismus beschädigt werden können (z. B. Monitore,
Computer, Kreditkarten).
7 Auflagefläche für Datenlogger
8 Micro-USB-Anschluss zum Verbinden mit dem Netzteil oder
dem PC.
3.2. Anzeige des Betriebsmodus
LED Funktion
leuchtet grün
• Bereitschaftsmodus
• Ausdruck der Druckdaten
blinkt grün
• Empfang von Druckdaten
• Konfigurationsmodus
leuchtet rot
• Nicht betriebsbereit
• Papierfachabdeckung geöffnet
• kein Papier eingelegt.
blinkt rot
• Akku fast leer
blinkt rot-grün
• Akku wird geladen
aus
• Ruhe-Modus, wird nach 2 Minuten ohne
Tastenbetätigung automatisch aktiviert
• Ruhe-Modus, wird nach 5 Minuten
aktiviert,
- wenn eine Verbindung zum Logger
besteht und Daten ausgelesen
wurden.
- wenn der Logger zum Ausdruck bereit
ist, die Taste [ ] aber nicht betätigt
wird.
Page 7
4 Erste Schritte
7
3.3. Funktionen der Bedientasten
Bedientasten Funktionen
[ ]
• Drucker einschalten:
Taste < 2 s drücken
• Drucker ausschalten:
Taste > 2 s drücken
[ ]
• Kurzer Papiervorschub:
Taste < 1 s drücken
• Langer Papiervorschub:
Taste > 1 s drücken
• Ausdruck starten:
Taste < 1 s drücken
[ ] und [ ]
• Testausdruck starten (Drucker ist
ausgeschaltet):
Tasten gleichzeitig drücken
4 Erste Schritte
4.1. Akku laden
Der Akku kann nur bei einer Umgebungstemperatur von
±0...+35 °C geladen werden. Ist der Akku komplett entladen,
beträgt die Ladezeit bei Raumtemperatur mit dem testo-Netzteil
ca. 6 h.
> Akku-Ladegerät (0554 1105) an eine Netzsteckdose und den
Drucker anschließen.
Bei längeren Lagerzeiten sollte der Akku von Zeit zu Zeit
geladen werden, da dieser sonst Schaden durch
Tiefenentladung nehmen kann.
Laden im Messgerät
1. Gerätestecker des Netzteils an die Micro USB-Buchse des
Messgeräts anschließen.
2. Netzstecker des Netzteils an eine Netzsteckdose anschließen.
- Der Ladevorgang startet. Ist der Akku geladen, stoppt der
Ladevorgang automatisch.
Akkupflege
> Akkus nicht tiefentladen.
Page 8
4 Erste Schritte
8
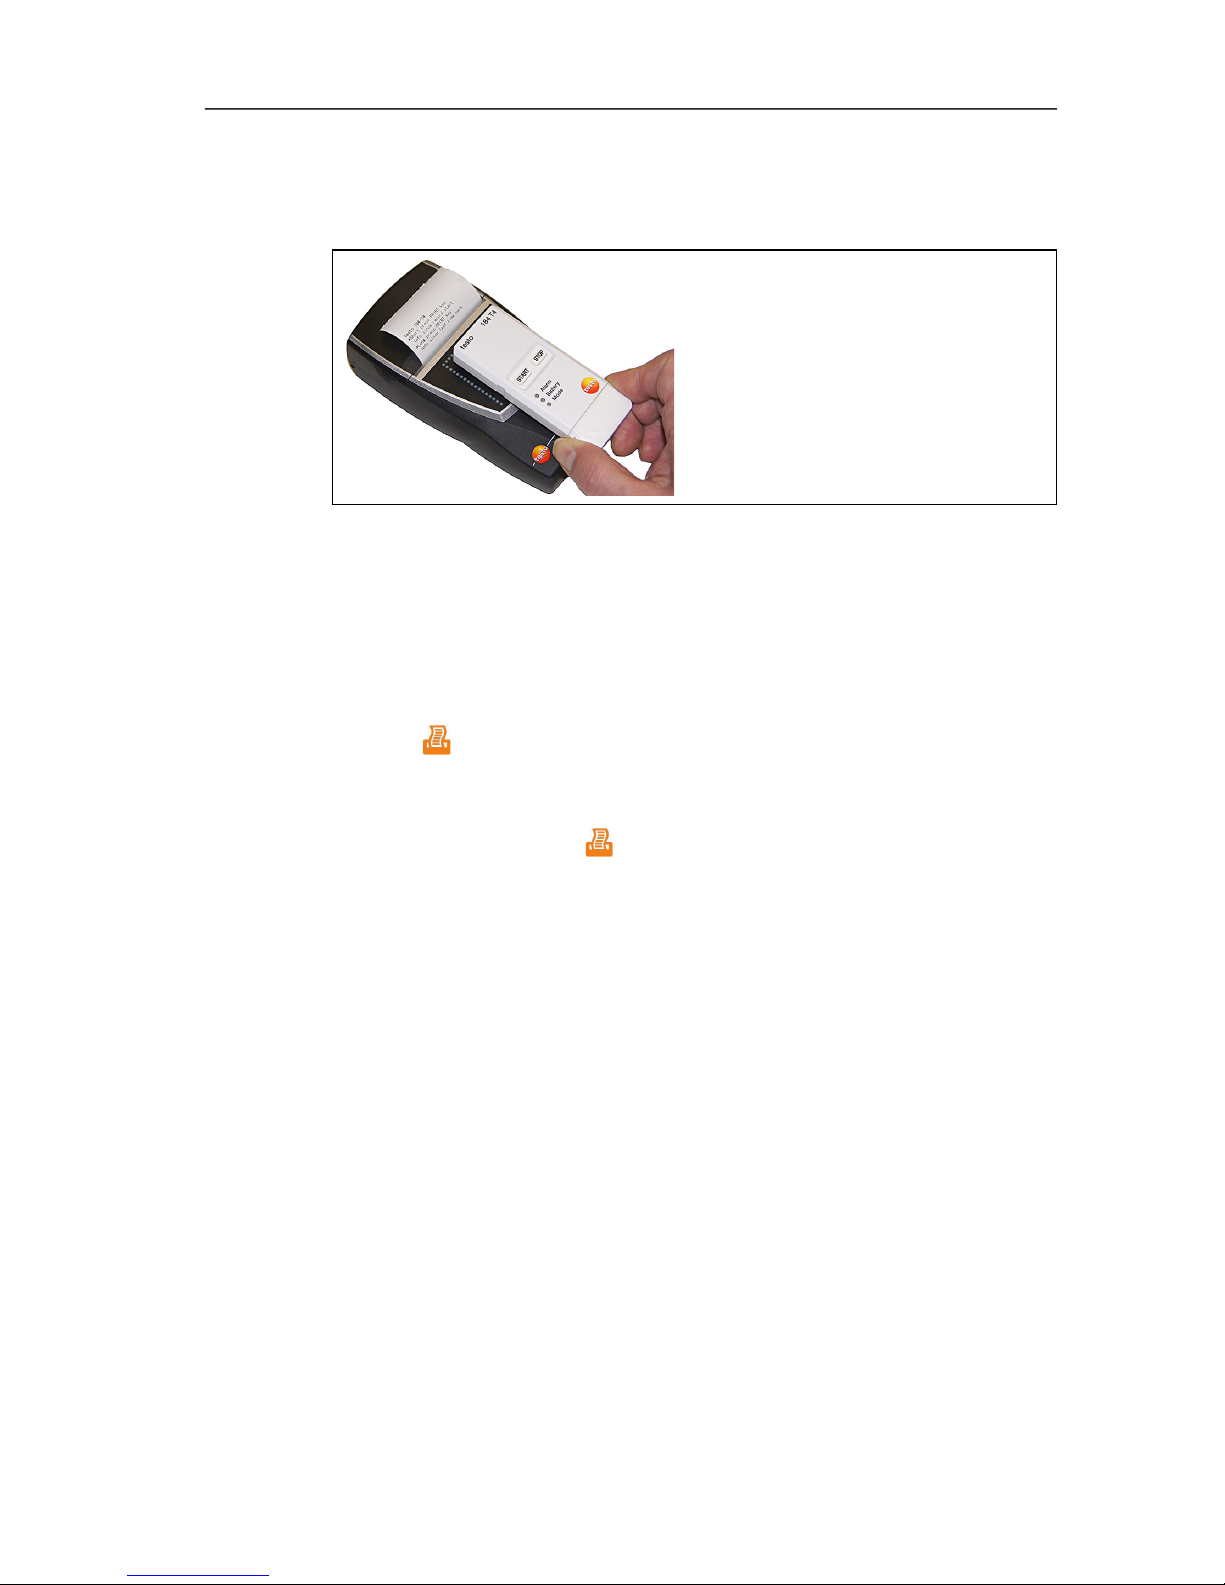
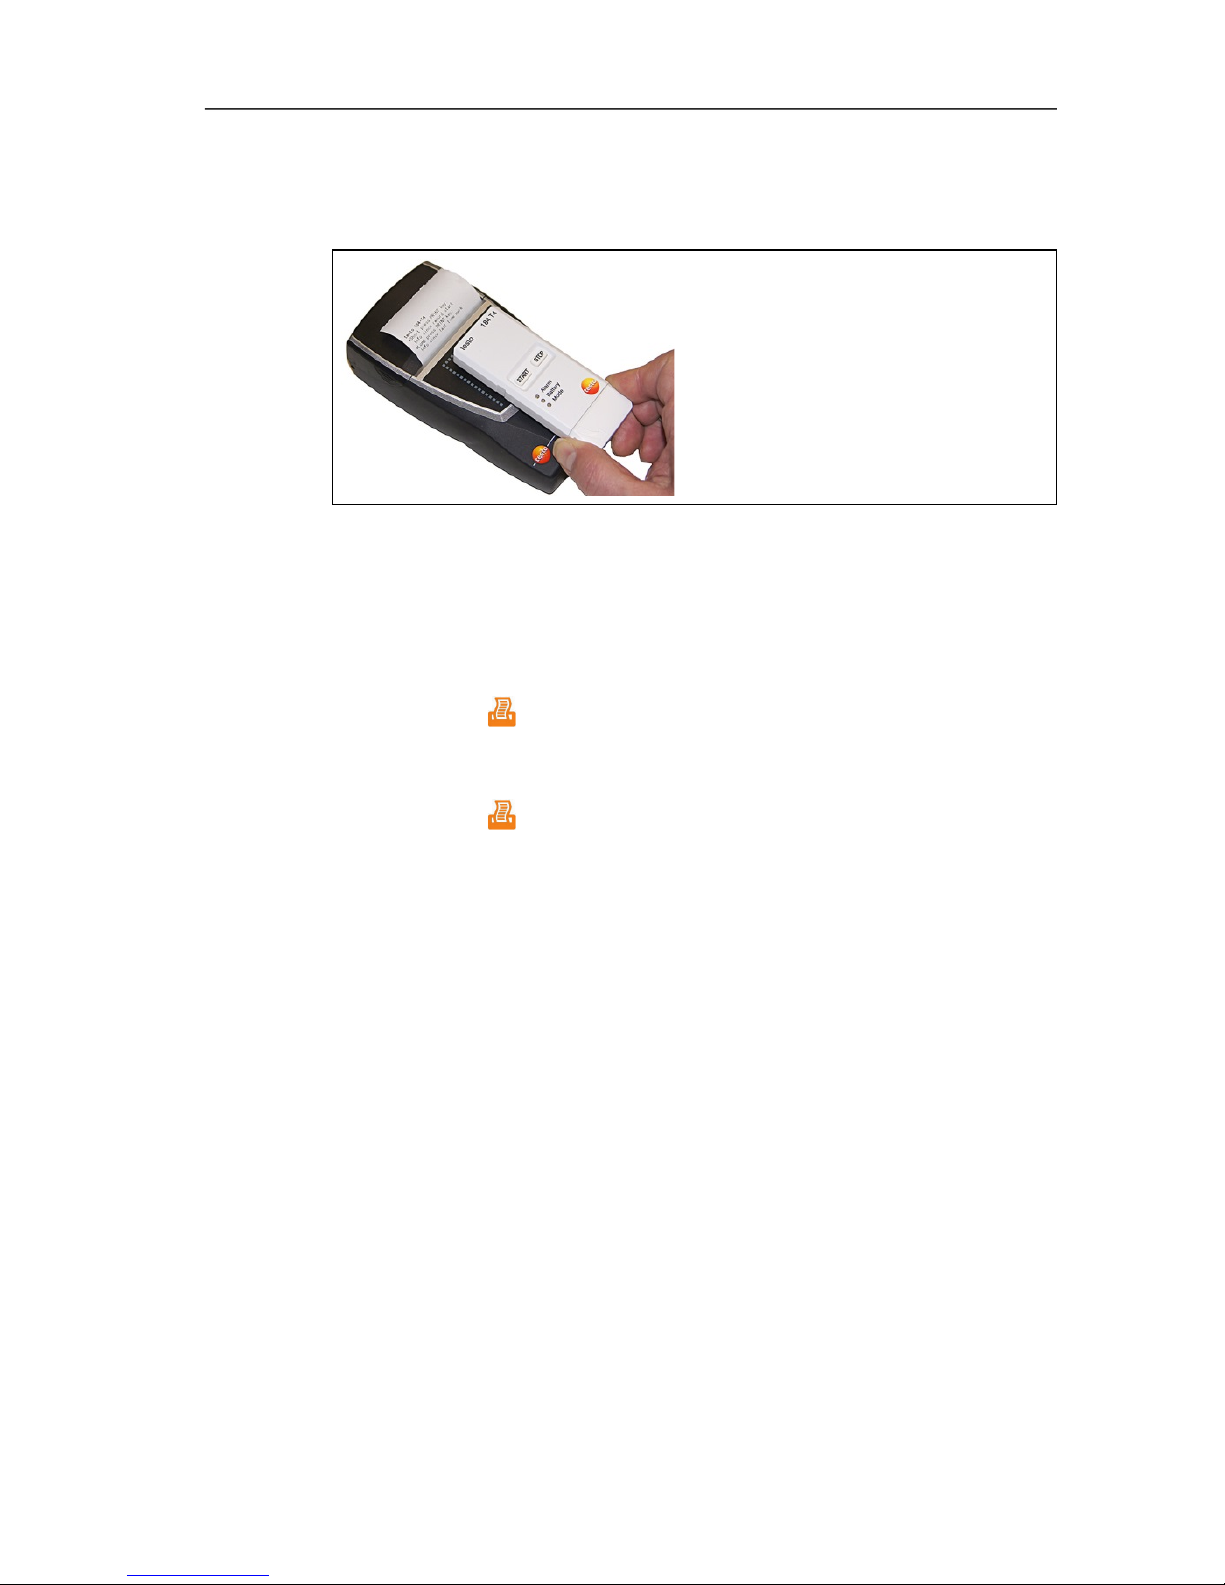
4.2. Papier einlegen
1. Papierfachabdeckung nach oben klappen.
2. Papierrolle einlegen, siehe Abbildung.
3. Papierfachabdeckung schließen.
4.3. Sprachversion einstellen
✓ Drucker ist ausgeschaltet.
1. [ ] und [ ] > 2 s drücken.
- Konfigurationsmodus ist aktiviert.
- Automatischer Ausdruck der verfügbaren Sprachversionen.
- Die aktuelle ausgewählte Sprache ist mit einem * gekenn-
zeichnet.
2. Sprachversion auswählen: [ ] kurz drücken.
- Nach jedem Tastendruck erfolgt automatisch ein Ausdruck und
die nachfolgende Sprache ist mit einem * gekennzeichnet.
> [ ] kurz drücken so lange wiederholen bis die gewünschte
Sprache mit einem * markiert ist.
3. Sprachversion speichern und Konfigurationsmodus verlassen:
[ ] kurz drücken.
4.4. Testausdruck
✓ Drucker ist ausgeschaltet.
> [ ] und [ ] gleichzeitig drücken.
- Testausdruck wird gestartet.
Page 9
5 Produkt verwenden
9
4.5. Grafikausdruck (nur testo 175 / testo 176)
Es kann eingestellt werden, ob ein Ausdruck Grafik anzeigen soll
oder nicht.
Grafikausdruck aktivieren
1. USB-Verbindung zwischen testo 175 / testo 176 und dem
Drucker trennen.
✓ Drucker befindet sich im Bereitschaftsmodus.
2. [ ] und [ ] gleichzeitig drücken.
- Ausdruck des Druckformats. Das aktuell ausgewählte
Druckformat ist mit einem * gekennzeichnet.
Bei Bedarf kann das Druckformat gewechselt werden.
> [ ] und [ ] erneut gleichzeitig drücken.
- Ausdruck des aktuell ausgewählten Druckformats.
5 Produkt verwenden
5.1. Daten drucken testo 175 und testo176
✓ Drucker ist eingeschaltet.
1. Drucker und testo175 / testo 176 mit dem Micro-USB-Kabel
verbinden.
- Die Druckererkennung erfolgt automatisch und wird als
Meldung ausgedruckt.
2. [ ] kurz drücken.
- Daten werden gelesen.
- Die geschätzte Auslesezeit wird angezeigt.
Um eine einwandfreie Datenübertragung zu gewährleisten,
darf die Verbindung zwischen Drucker und testo175 / testo
176 nicht unterbrochen werden.
3. Ausdruck starten.
> Protokoll der kompletten aufgenommenen Daten drucken:
[ ] < 1 s drücken
oder
> Protokoll der Daten drucken, seitdem die letzte Zeitmarke
gesetzt wurde: [ ] > 2 s drücken.
- Daten werden ausgedruckt (LED blinkt grün).
Page 10
5 Produkt verwenden
10
5.2. Daten drucken testo 184
✓ Drucker ist eingeschaltet.
1. Das testo 184 auf die gekennzeichnete Fläche halten (Abstand
ca. 0 - 10 mm).
- Die Druckererkennung erfolgt automatisch und die Daten
werden übertragen.
2. testo 184 entfernen.
3. Ausdruck starten.
> Protokoll der kompletten aufgenommenen Daten drucken:
[ ] < 1 s drücken
oder
> Protokoll der Daten drucken, seitdem die letzte Zeitmarke
gesetzt wurde: [ ] > 2 s drücken.
- Daten werden ausgedruckt (LED blinkt grün).
Page 11
2 Specifications
11
1 Safety and the environment
> Dispose of faulty rechargeable batteries/spent batteries in
accordance with the valid legal specifications.
> At the end of its useful life, send the product to the separate
collection for electric and electronic devices (observe local
regulations) or return the product to Testo for disposal.
2 Specifications
2.1. Use
The testo mobile printer for data loggers is used to produce report
printouts, in conjunction with compatible devices:
• testo 175/176 (manufactured during or after 2011)
• testo 184 (manufactured during or after 2013)
2.2. Technical data
General data
Feature Values
Model Thermal printer with USB/NFC interface
Printing speed 30 mm/s
Operating
temperature
0 to +50 °C / 32 to 122 °F
Storage
temperature
-20 to +50 °C / -4 to 122 °F
Dimensions
(LxWxH)
150 mm x 80 mm x 41 mm
Weight
approx. 400
g (including rechargeable battery
pack, paper roll, mains unit)
EU Directive
2004/108/EC
Power supply Lithium-Ion rechargeable battery pack,
2600 mAh, 3.7 V
Thermal paper roll 56.5 mm x 34 mm x 12 mm
Rechargeable
battery storage
temperature
±0 to 35 °C / 32 to 95 °F
Page 12
2 Specifications
12
Feature Values
Rechargeable
battery charge time
approx. 5-6 h
Rechargeable
battery life
> 6 h (20 °C / 68 °F ambient temperature)
Warranty 2 years (excl. printer mechanism,
rechargeable battery pack)
Warranty terms Warranty terms: see website
www.testo.com/warranty
Accessories/spare parts
Description Item no.
Mains unit 5 V / 1.0 A 0554 1105
Micro USB cable 0449 0134
Spare thermal paper, 6 rolls 0554 0568
Page 13
3 Product description
13
3 Product description
3.1. Overview
1 Operating mode indicator
2 On/Off control key
3 Paper feed / print control key
4 Paper roll (printable side out)
5 Paper compartment cover
6 Magnetic holder (on back)
WARNING
Magnetic field
May be harmful to those with pacemakers.
> Keep a minimum distance of 15 cm between pacemaker and
printer.
Page 14
3 Product description
14
CAUTION
Magnetic field
Damage to other devices!
> Keep a safe distance away from products that could be
damaged by the effects of magnetism (e.g. monitors,
computers or credit cards).
7 Contact surface for data logger
8 Micro USB connection for connecting to the mains unit or the
PC.
3.2. Operating mode indicator
LED Function
Steady green light
• Standby mode
• Printing out print data
Flashing green light
• Receiving print data
• Configuration mode
Steady red light
• Not ready for operation
• Paper compartment cover open
• No paper inserted.
Flashing red light
• Rechargeable battery low
Flashing red/green
light
• Rechargeable battery is charging
Off
• Sleep mode, automatically activated 2
minutes after a button was last pressed
• Sleep mode, activated after 5 minutes
- if a connection to the logger is
established and data has been read
out.
- if the logger is ready for printout, but
the [ ] key is not pressed.
Page 15
4 First steps
15
3.3. Control key functions
Control keys Functions
[ ]
• Switch on printer:
press key < 2 s
• Switch off printer:
press key > 2 s
[ ]
• Short paper feed:
press key < 1 s
• Long paper feed:
press key > 1 s
• Start printout:
press key < 1 s
[ ] and [ ]
• Start a test print (printer is switched off):
press keys simultaneously
4 First steps
4.1. Charging the rechargeable battery
The rechargeable battery can only be charged at an ambient
temperature of ±0 to +35 °C. If the rechargeable battery has been
completely discharged, charging time at room temperature using
the testo mains unit is approx. 6 h.
> Connect battery charger (0554 1105) to a mains socket and
connect the printer.
If stored for a prolonged period of time, the battery should
be charged every once in a while because otherwise this
may result in damage due to deep discharge.
Charging in the measuring instrument
1. Plug the mains unit instrument plug into the instrument's micro
USB socket.
2. Plug the mains plug of the mains unit into a mains socket.
- The charging process will start. The charging process will stop
automatically when the battery is fully charged.
Battery care
> Do not fully exhaust rechargeable batteries.
Page 16
4 First steps
16
4.2. Inserting paper
1. Flip paper compartment cover up.
2. Insert paper roll, see illustration.
3. Close paper compartment cover.
4.3. Setting the language version
✓ Printer is switched off.
1. Press [ ] and [ ] > 2 s.
- Configuration mode is activated.
- Automatic printout of the available language versions.
- The language currently selected is indicated by an *.
2. Select language version: press [ ] briefly.
- Each key press automatically generates a printout and the
subsequent language is indicated by an *.
> Press [ ] briefly, repeating this until the language you need is
indicated by an * .
3. Save the language version and exit configuration mode:
press [ ] briefly.
4.4. Test print
✓ Printer is switched off.
> Press [ ] and [ ] simultaneously.
- Test print is started.
Page 17
5 Using the product
17
4.5. Printing graphics (only testo 175 / testo 176)
You can set whether a printout should display graphics or not.
Activate graphics printout
1. Disconnect the USB connection between testo 175 / testo 176
and the printer.
✓ Printer is in standby mode.
2. Press [ ] and [ ] simultaneously.
- The print format is printed out. The print format currently
selected is indicated by an *.
If necessary, the print format can be changed.
> Press [ ] and [ ] again simultaneously.
- The print format currently selected is printed out.
5 Using the product
5.1. Printing data, testo 175 and testo176
✓ Printer is switched on.
1. Connect the printer and testo175 / testo 176 via the micro USB
cable.
- Printer detection is automatic and is indicated as a message.
2. Press [ ] briefly.
- Data is read.
- The estimated read-out time is displayed.
To ensure fault-free data transfer, the connection between
the printer and the testo175 / testo 176 must not be
interrupted.
3. Start printout.
> Print a log of all recorded data:
press [ ] < 1 s
or
> Print a log of the data since the last time mark was set:
press [ ] > 2 s.
- Data is printed out (LED flashes green).
Page 18
5 Using the product
18
5.2. Printing data, testo 184
✓ Printer is switched on.
1. Move the testo 184 up to the indicated area (distance approx. 0
- 10 mm).
- The printer is detected automatically and the data is transferred.
2. Remove testo 184.
3. Start printout.
> Print a log of all recorded data:
press [ ] < 1 s
or
> Print a log of the data since the last time mark was set:
press [ ] > 2 s.
- Data is printed out (LED flashes green).
Page 19

2 Description
19
1 Sécurité et environnement
> Éliminez les accus défectueux / piles vides conformément aux
prescriptions légales en vigueur.
> Au terme de la durée d'utilisation du produit, apportez-le dans
un centre de collecte sélective des déchets d'équipements
électriques et électroniques (respectez les règlements locaux
en vigueur) ou renvoyez-le à Testo en vue de son élimination.
2 Description
2.1. Utilisation
L'imprimante testo mobile pour enregistreur de données sert à
établir des procès-verbaux imprimés en combinaison avec les
appareils compatibles :
• testo 175/176 (à partir de l'année de construction 2011)
• testo 184 (à partir de l'année de construction 2013)
2.2. Caractéristiques techniques
Caractéristiques générales
Propriété Valeurs
Modèle Imprimante thermique avec interface USB /
NFC
Vitesse
d'impression
30 mm/s
Température de
service
0...+50 °C / 32...122 °F
Température de
stockage
-20...+50 °C / -4...122 °F
Dimensions (LxlxP)
150 mm x 80 mm x 41 mm
Poids
env. 400 g (avec accumulateur, rouleau de
papier et bloc d'alimentation)
Directive UE
2004/108/CE
Alimentation en
courant
Accumulateur au Lithium-Ion, 2600 mAh,
3.7 V
Page 20

2 Description
20
Propriété Valeurs
Rouleau de papier
thermique
56.5 mm x 34 mm x 12 mm
Température de
stockage de
l'accumulateur
±0...35 °C / 32...95 °F
Temps de charge
de l'accumulateur
Env. 5-6 h
Autonomie > 6 h (température ambiante de 20 °C /
68 °F)
Garantie 2 ans (sauf système d'impression,
accumulateur)
Conditions de
garantie
Conditions de garantie : cf. site Internet
www.testo.com/warranty
Accessoires / Pièces de rechange
Description Réf.
Bloc d'alimentation 5 V avec 1,0 A 0554 1105
Câble Micro-USB 0449 0134
Recharges de papier thermique ; 6 rouleaux 0554 0568
Page 21

3 Description du produit
21
3 Description du produit
3.1. Aperçu
1 Affichage du mode de fonctionnement
2 Touche de commande Marche / Arrêt
3 Touche de commande Avance du papier / Impression
4 Rouleau de papier (face imprimable vers l'extérieur)
5 Capot du compartiment à papier
6 Fixation magnétique (au dos)
AVERTISSEMENT
Champ magnétique
Peut présenter des risques pour la santé des personnes
portant un stimulateur cardiaque.
> Conserver une distance d'au moins 15 cm entre le stimulateur
cardiaque et l'imprimante.
Page 22

3 Description du produit
22
ATTENTION
Champ magnétique
Endommagement d'autres appareils !
> Respecter les distances de sécurité par rapport aux produits
pouvant être endommagés par le champ magnétique (par ex.
moniteurs, ordinateurs, cartes de crédit,...).
7 Support pour enregistreur de données
8 Raccord Micro-USB pour la connexion du bloc d'alimentation ou
d'un PC.
3.2. Affichage du mode de fonctionnement
LED Fonction
Verte, allumée
• Appareil de mesure opérationnel
• Impression des données
Verte, clignotante
• Réception des données
• Mode de configuration
Rouge, allumée
• Appareil de mesure non opérationnel
• Capot du compartiment à papier ouvert
• Pas de papier
Rouge, clignotante
• Accumulateur presque vide
Rouge-vert,
clignotante
• Chargement de l'accumulateur
Eteinte
• Mode de veille, activé automatiquement
après 2 minutes sans pression sur une
touche
• Mode de veille, activé après 5 minutes :
- lorsqu'un enregistreur est connecté et
que des données sont consultées.
- lorsque l'enregistreur est prêt pour
l'impression, mais que la touche [ ]
n'est pas enfoncée.
Page 23

4 Prise en main
23
3.3. Fonctions des touches de commande
Touches de
commande
Fonctions
[ ]
• Allumer l'imprimante :
appuyer sur la touche < 2 s.
• Eteindre l'imprimante :
appuyer sur la touche > 2 s.
[ ]
• Brève avance du papier :
appuyer sur la touche < 1 s.
• Avance longue du papier :
appuyer sur la touche > 1 s.
• Démarrer l'impression :
appuyer sur la touche < 1 s.
[ ] et [ ]
•
Lancer un impression de test (imprimante
éteinte) :
appuyer simultanément sur les touches.
4 Prise en main
4.1. Chargement de l'accumulateur
L'accumulateur ne peut être chargé que lorsque la température
ambiante varie entre ± 0...+35 °C. Lorsque l'accumulateur est
complètement déchargé, la durée de chargement à température
ambiante est d'env. 6 heures avec le bloc d'alimentation testo.
> Raccorder le chargeur (0554 1105) à une prise électrique et à
l'imprimante.
En cas de stockage prolongé, l'accumulateur doit être
rechargé de temps en temps car une décharge totale
pourrait l'endommager.
Chargement dans l'appareil de mesure
1. Raccorder la prise du bloc d'alimentation à la fiche Micro-USB
de l'analyseur.
2. Raccorder la fiche du bloc secteur à la prise secteur.
- Le chargement démarre. Lorsque l'accumulateur est chargé, le
chargement s'arrête automatiquement.
Entretien de l'accumulateur
> Ne pas décharger totalement l'accumulateur.
Page 24

4 Prise en main
24
4.2. Mise en place du papier
1. Rabattre le capot du compartiment à papier vers le haut.
2. Mettre le rouleau de papier en place ; cf. illustration.
3. Fermer le capot du compartiment à papier.
4.3. Réglage de la version linguistique
✓ L'imprimante est éteinte.
1. Appuyer sur [ ] et [ ] > 2 s.
- Le mode de configuration est actif.
- Impression automatique des versions linguistiques disponibles.
- La langue sélectionnée est indiquée par un *.
2. Sélection d'une version linguistique : Appuyer brièvement sur [
].
- Une impression est effectuée automatiquement après chaque
pression sur une touche et la langue suivante est indiquée par
un *.
> Appuyer brièvement sur [ ] jusqu'à ce que la langue souhaitée
soit marquée par un *.
3. Enregistrer la version linguistique et quitter le mode de
configuration :
Appuyer brièvement sur [ ].
4.4. Impression de test
✓ L'imprimante est éteinte.
> Appuyer simultanément sur [ ] et [ ].
- L'impression de test démarre.
Page 25

5 Utilisation du produit
25
4.5. Impression des graphiques (testo 175 / 176
uniquement)
Permet de définir sur les graphiques doivent apparaître ou non à
l'impression.
Activation de l'impression des graphiques
1. Débrancher la connexion USB entre le testo 175 / testo 176 et
l'imprimante.
✓ L'imprimante est opérationnelle.
2. Appuyer simultanément sur [ ] et [ ].
- Impression du format. Le format sélectionné est indiqué par un
*.
Si nécessaire, le format peut être modifié.
> Appuyer à nouveau simultanément sur [ ] et [ ].
- Impression du format actuellement sélectionné.
5 Utilisation du produit
5.1. Impression de données avec les testo 175 et
testo176
✓ L'imprimante est allumée.
1. Connecter l'imprimante et le testo 175 / testo 176 au moyen du
câble Micro-USB.
- L'imprimante est automatiquement détectée et une impression
est lancée.
2. Appuyer brièvement sur [ ].
- Les données sont consultées.
- La durée estimée pour la consultation des données s'affiche.
Pour garantir un transf
ert parfait des données, la connexion
entre l'imprimante et le testo 175 / 176 ne peut pas être
interrompue.
Page 26

5 Utilisation du produit
26
3. Démarrer l'impression.
> Imprimer un procès-verbal avec l'ensemble des données
collectées :
appuyer sur [ ] < 1 s.
ou
> Imprimer le procès-verbal pour les données collectées
depuis le dernier repère de temps : appuyer sur [ ] > 2 s.
- Les données sont imprimées (la LED clignote en vert).
5.2. Impression de données avec le testo 184
✓ L'imprimante est allumée.
1. Placer le testo 184 à l'endroit marqué (à une distance d'env. 0 à
10 mm).
- L'imprimante est automatiquement détectée et les données
sont transférées.
2. Retirer le testo 184.
3. Démarrer l'impression.
> Imprimer un procès-verbal avec l'ensemble des données
collectées :
appuyer sur [ ] < 1 s.
ou
> Imprimer le procès-verbal pour les données collectées
depuis le dernier repère de temps : appuyer sur [ ] > 2 s.
- Les données sont imprimées (la LED clignote en vert).
Page 27

2 Especificaciones
27
1 Seguridad y eliminación
> Elimine las baterías defectuosas o agotadas según las
disposiciones legales vigentes.
> Una vez finalizada su vida útil, lleve el producto a un centro de
reciclaje especial para equipos eléctricos y electrónicos (tenga
en cuenta las leyes vigentes en su país) o devuelva el producto
a testo para su eliminación.
Atención: su producto está marcado con este
símbolo.
Significa que los productos eléctricos y
electrónicos usados no deberían mezclarse con
los residuos domésticos generales. Existe un
sistema de recogida independiente para estos
productos.
2 Especificaciones
2.1. Uso
La impresora portátil testo para registradores de datos se utiliza
para crear impresiones de protocolos, en combinación con
dispositivos compatibles:
• testo 175/176 (a partir del año de construcción 2011)
• testo 184 (a partir del año de construcción 2013)
2.2. Datos técnicos
Datos generales
Características Valores
Diseño Impresora térmica con interfaz USB/NFC
Velocidad de
impresión
30 mm/s
Temperatura de
servicio
0...+50 °C / 32...122 °F
Temperatura de
almacenamiento
-20...+50 °C / -4...122 °F
Dimensiones
(LxAxA)
150 mm x 80 mm x 41 mm
Page 28

2 Especificaciones
28
Características Valores
Peso
aprox. 400 g (incluyendo pack de baterías,
rollo de papel y fuente de alimentación)
Normativa UE
2004/108/CE
Alimentación de
corriente
Pack de baterías de iones de litio, 2600 mAh,
3.7 V
Rollo de papel
térmico
56.5 mm x 34 mm x 12 mm
Temperatura de
almacenamiento de
la batería
recargable
0...35 °C / 32...95 °F
Tiempo de carga de
la batería
aprox. 5-6 h
Duración de servicio
de la batería
recargable
> 6 h (20 °C / 68 °F temperatura ambiente)
Garantía 2 años (excepto mecanismo de impresión y
pack de baterías)
Condiciones de la
garantía
Condiciones de la garantía: véase
www.testo.com/warranty
Accesorios/repuestos
Descripción N° de
artículo
Fuente de alimentación 5 V / CC / 1.0 A 0554 1105
Cable micro USB 0449 0134
Papel térmico de recambio, 6 rollos 0554 0568
Page 29

3 Descripción del producto
29
3 Descripción del producto
3.1. Visión global
1 Indicación del modo de funcionamiento
2 Botón de mando encendido/apagado
3 Botón de mando avance de papel / imprimir
4 Rollo de papel (lado de impresión hacia fuera)
5 Cubierta de la bandeja de papel
6 Sujeción magnética (lado trasero)
ADVERTENCIA
Campo magnético
Puede ser peligroso para la salud de personas con
marcapasos.
> Mantener una distancia mínima de 15 cm entre el instrumento
y un marcapasos.
Page 30

3 Descripción del producto
30
ATENCIÓN
Campo magnético
¡Posibles daños a otros aparatos!
>
Mantenga la distancia seguridad prescrita a objetos que pueda
dañar el magnetismo (como pantallas de ordenador,
ordenadores, marcapasos o tarjetas de crédito).
7 Superficie de apoyo para registrador de datos
8 Conexión micro USB para conectar con la fuente de
alimentación o el PC.
3.2. Indicación del modo de funcionamiento
LED Función
se ilumina de color
verde
• Modo de espera
• Impresión de datos
parpadea en color
verde
• Recepción de datos de impresión
• Modo de configuración
se ilumina de color
rojo
• No está lista para el uso
• Cubierta de la bandeja de papel abierta
• Falta papel.
parpadea en color
rojo
• Batería casi agotada
parpadea en color
rojo-verde
• Batería en proceso de carga
apagar
• Modo de reposo, se activa
automáticamente al cabo de 2 minutos sin
presionar tecla alguna
• Modo de reposo, se activa al cabo de 5
minutos,
- cuando existe conexión con el
registrador de datos y se leyeron
éstos.
- cuando el registrador de datos está
listo para imprimir, pero no se acciona
el botón [ ].
Page 31

4 Primeros pasos
31
3.3. Funciones de los botones de mando
Botones de mando Funciones
[ ]
• Encender la impresora:
Pulsar el botón < 2 s
• Apagar la impresora:
Pulsar el botón > 2 s
[ ]
• Avance breve de papel:
Pulsar el botón < 1 s
• Avance prolongado de papel:
Pulsar el botón > 1 s
• Iniciar la impresión:
Pulsar el botón < 1 s
[ ] y [ ]
• Iniciar impresión de prueba (la impresora
está apagada):
Pulsar simultáneamente los botones
4 Primeros pasos
4.1. Cargar la batería
La batería recargable solo se puede cargar a una temperatura
ambiente comprendida entre ±0...+35 °C. Si la batería está
totalmente descargada, tardará unas 6 horas en volver a
recargarse a temperatura ambiente con la fuente de alimentación
testo.
> Conectar el cargador para pila recargable (0554 1105) a un
alimentador de red y a la impresora.
En caso de un período de almacenamiento prolongado es
importante recargar la pila de tanto en tanto para que no
sufra daños debido a una descarga total.
Recarga en el instrumento de medición
1. Conecte el enchufe de la fuente al micro USB del instrumento
de medición.
2. Conectar el enchufe de la fuente de alimentación a la red.
- Comienza la recarga. Cuando la batería está recargada, el
proceso de recarga se detiene automáticamente.
Cuidados y mantenimiento de la batería recargable
> No descargar del todo las baterías.
Page 32

4 Primeros pasos
32
4.2. Colocación del papel
1. Levantar la tapa de la bandeja de papel.
2. Colocar el rollo de papel, véase la ilustración.
3. Cerrar la tapa de la bandeja de papel.
4.3. Configurar el idioma
✓ La impresora está apagada.
1. Pulsar [ ] y [ ] > 2 s.
- El modo de configuración está activado.
- Impresión automática de los idiomas disponibles.
- El idioma actualmente elegido aparece destacado con *.
2. Seleccionar el idioma: Pulsar brevemente [ ].
- Cada vez que se pulsa el botón se produce una impresión, y el
idioma siguiente aparece destacado con * .
> Pulsar brevemente [ ] y repetir hasta que el idioma deseado
aparezca destacado con *.
3. Guardar el idioma y salir del modo de configuración:
Pulsar brevemente [ ].
4.4. Impresión de prueba
✓ La impresora está apagada.
> Pulsar [ ] y [ ] simultáneamente.
- Se inicia la impresión de prueba.
Page 33

5 Utilización del producto
33
4.5. Impresión de gráficas (solo testo 175 / 176)
Se puede ajustar si una impresión debe contener gráficas o no.
Activar la impresión de gráficas
1. Interrumpir la conexión USB entre el testo 175 / testo 176 y la
impresora.
✓ La impresora se encuentra en modo de espera.
2. Pulsar [ ] y [ ] simultáneamente.
- Impresión del formato de impresión. El idioma actualmente
elegido aparece destacado con *.
En caso necesario, se puede cambiar el formato de impresión.
> Pulsar otra vez [ ] y [ ] simultáneamente.
- Se imprime el formato de impresión actualmente seleccionado.
5 Utilización del producto
5.1. Impresión de datos testo 175 y testo176
✓ La impresora está encendida.
1. Conectar la impresora con el testo175 / testo 176 mediante el
cable micro USB.
- La detección de la impresora se efectúa automáticamente y se
imprime como mensaje.
2. Pulsar brevemente [ ].
- Se leen los datos.
- Se visualiza el tiempo de lectura aproximado.
Para garantizar una transmisión de datos impecable, la
conexión entre impresora y testo 175 / testo 176 no debe
sufrir interrupciones.
3. Iniciar la impresión.
> Imprimir el protocolo de todos los datos registrados:
Pulsar [ ] < 1 s
o bien
> Imprimir protocolo de los datos a partir de la última marca
temporal colocada: Pulsar [ ] > 2 s.
- Se imprimen los datos (el LED parpadea en color verde).
Page 34

5 Utilización del producto
34
5.2. Impresión de datos testo 184
✓ La impresora está encendida.
1. Sostener el testo 184 sobre la superficie marcada (distancia:
aprox. 0 - 10 mm).
- La detección de la impresora se efectúa automáticamente y se
transfieren los datos.
2. retirar el testo 184.
3. Iniciar la impresión.
> Imprimir el protocolo de todos los datos registrados:
Pulsar [ ] < 1 s
o bien
> Imprimir protocolo de los datos a partir de la última marca
temporal colocada: Pulsar [ ] > 2 s.
- Se imprimen los datos (el LED parpadea en color verde).
Page 35

2 Descrizione delle prestazioni
35
1 Sicurezza e ambiente
> Smaltire le batterie difettose o esauste in conformità con le
disposizioni di legge vigenti.
> Al termine della vita operativa dello strumento, smaltirlo nella
raccolta differenziata per dispositivi elettrici/elettronici (secondo
le norme vigenti) oppure restituirlo a testo per lo smaltimento.
2 Descrizione delle prestazioni
2.1. Utilizzo
La stampante mobile per data logger serve per stampare i
protocolli di misura in combinazione con gli strumenti compatibili:
• testo 175/176 (da anno di costruzione 2011)
• testo 184 (da anno di costruzione 2013)
2.2. Dati tecnici
Dati generici
Proprietà Valori
Modello Stampante termica con interfaccia USB/NFC
Velocità di stampa 30 mm/s
Temperatura
d'esercizio
0...+50 °C / 32...122 °F
Temperatura di
stoccaggio
-20...+50 °C / -4...122 °F
Dimensioni (LxPxH)
150 mm x 80 mm x 41 mm
Peso
Circa 400 g (inclusi batteria, rotolo di carta,
alimentatore)
Direttiva UE
2004/108/CE
Alimentazione
elettrica
Batteria agli ioni di litio da 2600 mAh, 3.7 V
Rotolo di carta
termica
56.5 mm x 34 mm x 12 mm
Page 36

2 Descrizione delle prestazioni
36
Proprietà Valori
Temperatura
stoccaggio batteria
±0...35 °C / 32...95 °F
Durata carica
batteria
Circa 5-6 h
Durata batteria > 6 h (temperatura ambiente 20 °C / 68 °F)
Garanzia 2 anni (eccetto testina di stampa, batteria)
Condizioni di
garanzia
Per le condizioni di garanzia consultare la
pagina web www.testo.com/warranty
Accessori/Ricambi
Descrizione N° art.
Alimentatore 5 V da 1.0 A 0554 1105
Cavo micro-USB 0449 0134
Carta termica di ricambio, 6 rotoli 0554 0568
Page 37

3 Descrizione del prodotto
37
3 Descrizione del prodotto
3.1. Panoramica
1 LED modalità operativa
2 Tasto ON/OFF
3 Tasto avanzamento carta / stampa
4 Rotolo di carta (lato stampabile rivolto verso l'esterno)
5 Coperchio del vano portacarta
6 Dispositivo di fissaggio magnetico (sul retro)
AVVERTENZA
Campo magnetico
Può rappresentare un pericolo per i portatori di pace-maker.
> Mantenere una distanza minima di 15 cm tra pace-maker e
stampante.
Page 38

3 Descrizione del prodotto
38
ATTENZIONE
Campo magnetico
Danneggiamento di altri strumenti!
> Mantenere una distanza di sicurezza da prodotti che
potrebbero essere danneggiati dai campi magnetici (p.es.
monitor, computer, carte di credito).
7 Superficie di appoggio del data logger
8 Porta micro-USB per il collegamento all'alimentatore o al PC.
3.2. Visualizzazione della modalità operativa
LED Funzione
Verde permanente
• Stampante operativa
• Stampa dei dati
Verde lampeggiante
• Ricezione dei dati di stampa
• Modalità di configurazione
Rosso permanente
• Stampante non operativa
• Vano portacarta aperto
• Rotolo di carta non inserito.
Rosso
lampeggiante
• Batteria quasi scarica
Rosso-verde
lampeggiante
• Ricarica della batteria in corso
Spento
• Modalità sleep, si attiva automaticamente
se dopo 2 minuti non viene premuto alcun
tasto
• Modalità sleep, si attiva dopo 5 minuti
- se è stata stabilita una connessione
con il data logger e i dati sono stati
letti.
- se il data logger è pronto per la
stampa, ma il tasto [ ] non è stato
premuto.
Page 39

4 Prima di utilizzare lo strumento
39
3.3. Funzioni dei tasti
Tasti Funzioni
[ ]
• Accendere la stampante:
premere il tasto < 2 s
• Spegnere la stampante:
premere il tasto > 2 s
[ ]
• Avanzamento carta breve:
premere il tasto < 1 s
• Avanzamento carta lungo:
premere il tasto > 1 s
• Per avviare la stampa:
premere il tasto < 1 s
[ ] e [ ]
•
Fare una stampa di prova (la stampante è
spenta):
premere contemporaneamente i tasti
4 Prima di utilizzare lo strumento
4.1. Ricarica della batteria
La batteria può essere ricaricata soltanto a una temperatura
ambiente di ±0...+35 °C. Se la batteria è completamente scarica, il
tempo necessario per la ricarica a temperatura ambiente con
l'alimentatore testo è di circa 6 h.
> Collegare il caricatore (0554 1105) a una presa elettrica e
quindi alla stampante.
Se si prevede di non utilizzare la batteria per lungo tempo,
dovrebbe essere caricata di tanto in tanto per evitare che si
danneggi in seguito a una scarica profonda.
Ricarica nello strumento
1. Collegare il connettore dello strumento di misura alla porta
micro-USB dello strumento.
2. Collegare la spina dell'alimentatore a una presa elettrica.
- Il processo di ricarica inizia. Il processo di ricarica si arresta
automaticamente quando la batteria è completamente carica.
Cura della batteria
> Evitare una scarica profonda della batteria.
Page 40

4 Prima di utilizzare lo strumento
40
4.2. Introdurre la carta
1. Sollevare il coperchio del vano portacarta.
2. Inserire il ritolo di carta come illustrato nella figura.
3. Chiudere il coperchio portacarta.
4.3. Impostazione della lingua
✓ La stampante è spenta.
1. Premere [ ] e [ ] > 2 s.
- La modalità di configurazione è stata attivata.
- Stampa automatica delle lingue disponibili.
- La lingua momentaneamente selezionata è contrassegnata con
un asterisco (*).
2. Per selezionare la lingua: Premere brevemente [ ].
- Ogni volta che viene premuto il tasto viene fatta una stampa
automatica e la lingua successiva è contrassegnata con un
asterisco (*).
> Premere varie volte brevemente [ ] sino a quando la lingua
desiderata è contrassegnata con un asterisco (*).
3. Per salvare la lingua e uscire dalla modalità di configurazione:
Premere brevemente [ ].
4.4. Stampa di prova
✓ La stampante è spenta.
> Premere contemporaneamente [ ] e [ ].
- La stampa di prova viene avviata.
Page 41

5 Utilizzare il prodotto
41
4.5. Stampa del grafico (solo testo 175 / 176)
È possibile impostare se visualizzare o meno la stampa del grafico.
Attivazione della stampa del grafico
1. Scollegare la connessione USB tra lo strumento testo 175 /
testo 176 e la stampante.
✓ La stampante è operativa.
2. Premere contemporaneamente [ ] e [ ].
- Stampa del formato di stampa. Il formato di stampa
momentaneamente selezionato è contrassegnato con un
asterisco (*).
Se necessario il formato di stampa può essere modificato.
> Premere di nuovo contemporaneamente [ ] e [ ].
- Stampa del formato di stampa momentaneamente selezionato.
5 Utilizzare il prodotto
5.1. Stampa dei dati testo 175 e testo176
✓ La stampante è accesa.
1. Con il cavo micro-USB, collegare la stampante allo strumento
testo175 / testo 176.
- La stampante viene rilevata automaticamente e la conferma
stampata nel messaggio.
2. Premere brevemente [ ].
- I dati vengono letti.
- Viene visualizzato il tempo di lettura stimato.
Per garantire un trasferimento senza problemi dai dati, la
connessione tra la stampante e lo strumento testo175 /
testo 176 non deve essere interrotta.
3. Avviare la stampa.
> Per stampare il protocollo di tutti i dati rilevati:
premere [ ] < 1 s
oppure
> Per stampare il protocollo dei dati dall'ultimo indicatore
orario impostato: premere [ ] > 2 s.
- I dati vengono stampati (LED verde lampeggiante).
Page 42

5 Utilizzare il prodotto
42
5.2. Stampa dei dati testo 184
✓ La stampante è accesa.
1. Appoggiare lo strumento testo 184 come illustrato nella figura
(distanza circa 0 - 10 mm).
- La stampante viene rilevata automaticamente e i dati vengono
trasferiti.
2. Rimuovere lo strumento testo 184.
3. Avviare la stampa.
> Per stampare il protocollo di tutti i dati rilevati:
premere [ ] < 1 s
oppure
> Per stampare il protocollo dei dati dall'ultimo indicatore
orario impostato: premere [ ] > 2 s.
- I dati vengono stampati (LED verde lampeggiante).
Page 43

2 Functionele beschrijving
43
1 Veiligheid en milieu
> Voer defecte accu's / lege batterijen af conform de plaatselijke
wet en regelgeving.
> Voer dit product na het einde van zijn levensduur op de juiste
wijze af naar de afvalscheiding van elektrische en elektronische
apparatuur (houd u aan de plaatselijke voorschriften) of lever
het in bij Testo voor verantwoorde verwerking.
2 Functionele beschrijving
2.1. Toepassing
De testo mobiele printer voor gegevenslogschrijvers dient voor het
opstellen van protocoluitdraaien, in combinatie met compatibele
instrumenten:
• testo 175/176 (vanaf bouwjaar 2011)
• testo 184 (vanaf bouwjaar 2013)
2.2. Technische gegevens
Algemene gegevens
Eigenschap Waarden
Bouwwijze Thermische printer met USB/NFC-interface
Afdruksnelheid 30 mm/s
Bedrijfstemperatuur
0...+50 °C / 32...122 °F
Opslagtemperatuur
-20...+50 °C / -4...122 °F
Afmetingen (LxBxH)
150 mm x 80 mm x 41 mm
Gewicht
ca. 400 g (inclusief accu-pack, papierrol,
netadapter)
EU-richtlijn
2004/108/EG
Stroomtoevoer Lithium-ion accu-pack, 2600 mAh, 3.7 V
Rol thermisch papier 56.5 mm x 34 mm x 12 mm
Opslagtemperatuur
accu
±0...35 °C / 32...95 °F
Accu-laadtijd ca. 5-6 h
Page 44

3 Produktbeschrijving
44
Eigenschap Waarden
Accu-standtijd > 6 h (20 °C / 68 °F
omgevingstemperatuur)
Garantie 2 jaar (behalve afdrukapparaat, accu-pack)
Garantievoorwaarden Garantievoorwaarden: zie internetsite
www.testo.com/warranty
Toebehoren/Onderdelen
Beschrijving Artikel-nr.
Netadapter 5 V met 1.0 A 0554 1105
Micro-USB-leiding 0449 0134
Thermisch papier (reserve), 6 rollen 0554 0568
3 Produktbeschrijving
3.1. Overzicht
Page 45

3 Produktbeschrijving
45
1 Indicatie bedrijfsmodus
2 Bedieningstoets Aan/Uit
3 Bedieningstoets papierdoorvoer / afdrukken
4 Papierrol (bedrukbare zijde buiten)
5 Afdekking papiervak
6 Magneethouder (achterkant)
WAARSCHUWING
Magnetisch veld
Kan schadelijk zijn voor de gezondheid van dragers van
pacemakers.
> Minimum afstand van 15 cm tussen pacemaker en printer
aanhouden.
OPGELET
Magnetisch veld
Beschadiging van andere apparatuur!
> Veiligheidsafstand in acht nemen tot producten die door
magnetisme beschadigd kunnen worden (bijv. beeldschermen,
computers, kredietkaarten).
7 Legvlak voor gegevenslogschrijver
8 Micro-USB-aansluiting om te verbinden met de netadapter of de
PC.
3.2. Indicatie van de bedrijfsmodus
LED Functie
brandt groen
• Operationaliteitsmodus
• Uitdraai van de afdrukgegevens
knippert groen
• Ontvangst van afdrukgegevens
• Configuratiemodus
brandt rood
• Niet operationeel
• Afdekking van het papiervak geopend
• Geen papier erin gelegd
knippert rood
• Accu bijna leeg
knippert rood-groen
• Accu wordt geladen
Page 46

3 Produktbeschrijving
46
LED Functie
uit
• Rust-modus, wordt na 2 minuten zonder
toetsbediening automatisch geactiveerd
• Rust-modus, wordt na 5 minuten
geactiveerd,
- als er een verbinding met de logger
bestaat en gegevens werden
uitgelezen.
- als de logger gereed is voor de
uitdraai, maar de toets [ ] niet wordt
ingedrukt.
Page 47

4 Eerste stappen
47
3.3. Functies van de bedieningstoetsen
Bedieningstoetsen Functies
[ ]
• Printer inschakelen:
Toets < 2 s indrukken
• Printer uitschakelen:
Toets > 2 s indrukken
[ ]
• Korte papierdoorvoer:
Toets < 1 s indrukken
• Lange papierdoorvoer:
Toets > 1 s indrukken
• Uitdraai starten:
Toets < 1 s indrukken
[ ] en [ ]
• Testuitdraai starten (printer is
uitgeschakeld):
Toetsen gelijktijdig indrukken
4 Eerste stappen
4.1. Accu laden
De accu kan alleen bij een omgevingstemperatuur van ±0...+35 °C
worden geladen. Als de accu compleet ontladen is, dan bedraagt
de laadtijd bij ruimtetemperatuur met de testo netadapter ca. 6 uur.
> Acculader (0554 1105) aansluiten aan een contactdoos en de
printer.
Bij langere opslagtijden moet de accu van tijd tot tijd
worden geladen, aangezien deze anders beschadigd kan
raken door diepe ontlading.
Laden in het meetinstrument
1. Stekker van de netadapter aansluiten aan de micro-USB-bus
van het meetinstrument.
2. Netstekker van de netadapter op een contactdoos aansluiten.
- Het laden begint. Als de accu is opgeladen, stopt het laden
automatisch.
Accu-onderhoud
> Accu's niet helemaal ontladen.
Page 48

4 Eerste stappen
48
4.2. Papier erin leggen
1. Afdekking van het papiervak naar boven klappen.
2. Papierrol erin leggen, zie afbeelding.
3. Afdekking van het papiervak sluiten.
4.3. Taalversie instellen
✓ Printer is uitgeschakeld.
1. [ ] en [ ] > 2 s indrukken.
- Configuratiemodus is geactiveerd.
- Automatische uitdraai van de beschikbare taalversies.
- De momenteel geselecteerde taal is gekenmerkt met een *.
2. Taalversie selecteren: [ ] kort indrukken.
- Na elke druk op de toets volgt automatisch een uitdraai en de
daarop volgende taal is gekenmerkt met een *.
> [ ] kort indrukken zo lang herhalen, tot de gewenste taal
gemarkeerd is met een *.
3. Taalversie opslaan en configuratiemodus verlaten:
[ ] kort indrukken.
4.4. Testuitdraai
✓ Printer is uitgeschakeld.
> [ ] en [ ] gelijktijdig indrukken.
- Testuitdraai wordt gestart.
Page 49

5 Product gebruiken
49
4.5. Grafiekuitdraai (alleen testo 175 / testo 176)
Het kan worden ingesteld of een uitdraai een grafiek moet
weergeven of niet.
Grafiekuitdraai activeren
1. USB-verbinding tussen testo 175 / testo 176 en de printer
verbreken.
✓ Printer bevindt zich in de operationele modus.
2. [ ] en [ ] gelijktijdig indrukken.
- Uitdraai van het afdrukformaat. Het momenteel geselecteerde
afdrukformaat is gekenmerkt met een *.
Indien nodig kan het afdrukformaat worden veranderd.
> [ ] en [ ] opnieuw gelijktijdig indrukken.
- Uitdraai van het momenteel geselecteerde afdrukformaat.
5 Product gebruiken
5.1. Gegevens afdrukken testo 175 en testo 176
✓ Printer is ingeschakeld.
1. Printer en testo 175 / testo 176 verbinden met de micro-USBkabel.
- De printer wordt automatisch herkend, en dit wordt als melding
afgedrukt.
2. [ ] kort indrukken.
- Gegevens worden gelezen.
- De geschatte uitleestijd wordt weergegeven.
Om een foutloze gegevensoverdracht te garanderen mag
de verbinding tussen printer en testo 175 / testo 176 niet
worden onderbroken.
3. Uitdraai starten.
> Protocol van alle geregistreerde gegevens afdrukken:
[ ] < 1 s indrukken
of
> Protocol afdrukken van de gegevens sinds het laatste
tijdstempel werd gezet: [ ] > 2 s indrukken.
- Gegevens worden afgedrukt (LED knippert groen).
Page 50

5 Product gebruiken
50
5.2. Gegevens afdrukken testo 184
✓ Printer is ingeschakeld.
1. De testo 184 op het gekenmerkte vlak houden (afstand ca. 0 -
10 mm).
- De printer wordt automatisch herkend en de gegevens worden
overgedragen.
2. testo 184 verwijderen.
3. Uitdraai starten.
> Protocol van alle geregistreerde gegevens afdrukken:
[ ] < 1 s indrukken
of
> Protocol afdrukken van de gegevens sinds het laatste
tijdstempel werd gezet: [ ] > 2 s indrukken.
- Gegevens worden afgedrukt (LED knippert groen).
Page 51

2 Технические условия
51
1 Безопасность и окружающая среда
> Утилизируйте аккумуляторы/отработавшие батареи в
соответствии с официально установленными требованиями
законодательства.
> По окончании срока службы прибор необходимо отправить
в компанию по утилизации электрических и электронных
устройств (в соответствии с требованиями страны
эксплуатации) или в Testo.
2 Технические условия
2.1. Использование
Мобильный принтер testo для логгеров данных используется
для распечатки отчетов; может использоваться со
следующими приборами:
• testo 175/176 (с датой производства 2011 г. и позже)
• testo 184 (с датой производства 2013 г. и позже)
2.2. Технические характеристики
Общие характеристики
Характеристика Значения
Тип Термопринтер с USB/NFC интерфейсом
Скорость печати 30 мм/с
Рабочая
температура
0…+50 °C / 32… 122 °F
Температура
хранения
-20…+50 °C / -4…122 °F
Габаритные
размеры (ДxШxВ)
150 x 80 x 41 мм
Масса
около 400 г (включая аккумуляторную
батарею, рулон бумаги, блок питания)
Директива ЕС
2004/108/EC
Питание Литий-ионная аккумуляторная батарея,
2600 мАч, 3.7 В
Page 52

2 Технические условия
52
Характеристика Значения
Рулон
термобумаги
56.5 x 34 x 12 мм
Температура
хранения
аккумулятора
±0…35 °C / 32…95 °F
Время зарядки
батареи
около 5-6 ч
Ресурс
аккумулятора
> 6 ч (при окружающей температуре 20 °C
/ 68 °F)
Гарантия 2 года (кроме печатающего механизма и
аккумуляторной батареи)
Условия гарантии См на сайте www.testo.ru
Принадлежности / запасные части
Описание № заказа
Блок питания 5 В / 1.0 A 0554 1105
Микро-USB кабель 0449 0134
Запасная термобумага, 6 рулонов 0554 0568
Page 53

3 Описание прибора
53
3 Описание прибора
3.1. Обзор
1 Индикатор режима работы
2 Кнопка вкл./выкл.
3 Кнопка подачи бумаги / печати
4 Бумага (печатной стороной вверх)
5 Крышка отсека для бумаги
6 Магнитный держатель (задняя сторона)
ПРЕДУПРЕЖДЕНИЕ
Магнитное поле
Может быть опасно для людей с кардиостимуляторами.
> Соблюдайте дистанцию как минимум в 15 см между
принтером и кардиостимулятором.
Page 54

3 Описание прибора
54
ВНИМАНИЕ
Магнитное поле
Возможно повреждение других устройств!
> Не подносите близко к устройствам, которые можно
повредить магнитным полем (мониторы, компьютеры,
кредитные карты).
7 Контактная поверхность для логгера данных
8 Микро USB порт для подключения к ПК или блока питания.
3.2. Индикатор режима работы
СД-индикатор Функция
Светится зеленым
• Режим ожидания
• Распечатка данных
Мигает зеленым
• Получение данных для печати
• Режим настройки
Горит красным
• Не готов для использования
• Открыта крышка отсека для бумаги
• Не вставлена бумага.
Мигает красным
• Низкий уровень заряда аккумулятора
Мигает
красным/зеленым
• Идет зарядка аккумулятора
Выключен
• Спящий режимe, автоматически
активируется через 2 минуты после
последнего нажатия на кнопки
• Спящий режим, активируется через 5
минут
- если соединение с логгером
установлено и данные считаны.
- если логгер готов к печати, но не
была нажата кнопка [ ] .
3.3. Кнопки управления
Кнопка Функция
Page 55

4 Первые шаги
55
Кнопка Функция
[ ]
• Включение принтера:
удерживать нажатой < 2 сек
• Выключение принтера:
удерживать нажатой > 2 сек
[ ]
• Краткая подача бумаги:
удерживать нажатой < 1 сек
• Долгая подача бумаги:
удерживать нажатой > 1 сек
• Начать печать:
удерживать нажатой < 1 сек
[ ] и [ ]
• Начать пробную печать (принтер
выключен):
нажать кнопки одновременно
4 Первые шаги
4.1. Зарядка аккумулятора
Зарядка аккумулятора возможна только при температуре
окружающей среды от ±0 до +35 °C. Если аккумулятор был
полностью разряжен, время зарядки при комнатной
температуре с использованием блока питания testo займет
около 6 часов.
> Подключите зарядное устройство (0554 1105) к розетке и
подсоедините к принтеру.
При хранении в течение длительного времени
необходимо периодически заряжать аккумулятор. В
противном случае это может привести к повреждению
вследствие глубокой разрядки.
Зарядка в принтере
1. Подключите штекер блока питания к разъему микро USB
принтера.
2. Включите вилку блока питания в розетку.
- Начнется процесс зарядки. При полном заряде
аккумулятора процесс зарядки будет автоматически
остановлен.
Уход за аккумулятором
> Не допускайте абсолютно полной разрядки аккумулятора.
Page 56

4 Первые шаги
56
4.2. Загрузка бумаги
1. Поднимите вверх крышку отсека для бумаги.
2. Вставьте рулон бумаги, как показано на рисунке.
3. Закройте крышку отсека.
4.3. Выбор языка
✓ Принтер выключен.
1. Нажмите и удерживайте [ ] и [ ] > 2 s.
- Будет активирован режим настройки.
- Автоматическая распечатка доступных языков.
- Выбранный на данный момент язык будет помечен *.
2. Выберите язык: кратко нажмите [ ].
- Каждое нажатие кнопки автоматически запускает печать и
следующий по порядку язык будет отмечаться *.
> Кратко нажмите [ ], повторяйте это до тех пор, пока
необходимый вам язык не будет отмечен * .
3. Сохраните выбранный язык и выйдите из режима
настройки:
кратко нажмите [ ].
4.4. Пробная печать
✓ Принтер выключен.
> Одновременно нажмите [ ] и [ ].
- Будет запущена пробная печать.
4.5. Печать графиков (только для testo 175 /
testo 176)
Вы можете выбрать необходимость отображения графиков на
распечатках.
Page 57

5 Использование прибора
57
Активировать распечатку графиков
1. Отключите USB соединение между testo 175 / testo 176 и
принтером.
✓ Принтер в режиме ожидания.
2. Одновременно нажмите [ ] и [ ].
- Будет распечатан формат печати. Выбранный на данный
момент формат печати отмечен *.
При необходимости формат печати можно изменить.
> Еще раз одновременно нажмите [ ] и [ ].
- Будет распечатан выбранный формат печати.
5 Использование прибора
5.1. Печать данных, testo 175 и testo176
✓ Принтер включен.
1. Подсоедините принтер к testo175 / testo 176 с помощью
кабеля микро USB.
- Распознавание принтера осуществляется автоматически и
сопровождается появлением соответствующего сообщения.
2. Кратко нажмите [ ].
- Начнется считывание данных.
- Будет отображено примерное время, необходимое для
считывания данных.
Для обеспечения безотказной передачи данных, не
разрывайте соединение между принтером и testo175 /
testo 176.
3. Начнется распечатка данных.
> Распечатать все записанные данные:
удерживайте [ ] нажатой < 1 сек
или
> Распечатать данные, записанные с момента последнего
установленного штампа времени: удерживайте [ ]
нажатой > 2 сек.
- Данные начнут распечатываться (СД-индикатор мигает
зеленым).
Page 58

5 Использование прибора
58
5.2. Печать данных, testo 184
✓ Принтер включен.
1. Поднесите testo 184 к указанной области (на расстоянии
примерно 0 - 10 мм).
- Принтер распознается автоматически и начнется передача
данных.
2. Уберите testo 184.
3. Начнется печать.
> Распечатать все записанные данные:
удерживайте [ ] нажатой < 1 сек
или
> Распечатать данные, записанные с момента последней
установленной временной метки: удерживайте [ ]
нажатой > 2 сек.
Данные начнут распечатываться (СД-индикатор мигает
зеленым).
Page 59

Page 60

0973 0519 de en fr es it nl ru 01
testo AG
Testo-Straße 1, 79853 Lenzkirch
Tel.: 07653 681-0, Fax: 07653 681-7699
info@testo.de
www.testo-international.com
 Loading...