

Page 1

Product images are for illustrative purposes only and may differ from the actual product.
WASHING
MACHINE
WF81490M
User Manual
Page 2

2
ENG
SAFETY INSTRUCTIONS
For your safety,the information in this manual must be followed to minimize the risk of fire or explosion,
electric shock, or to prevent property damage, personal injury or loss of life.
Explanation of the symbols:
WARNING!
This combination of symbol and signal word indicates a potentially dangerous situation which may result in
death or serious injuries unless it’s avoided.
CAUTION!
This combination of symbol and signal word indicates a potentially dangerous situation which may result in
slight or minor injuries or damage to property and the environment.
NOTE
This combination of symbol and signal word indicates a potentially dangerous situation which may result in
slight or minor injuries.
WARNING!
The electric shock!
• If the supply cord is damaged, it must be replaced by the manufacturer, its service agent or similarly
qualified persons in order to avoid a hazard.
• The new hose-sets supplied with the appliance are to be used and that old hose-sets should not be
reused.
• Before any maintenance the device, unplug the appliance from the mains.
• Always unplug the machine and turn off the water supply after use. The max. inlet water pressure, in
pascals. The min. inlet water pressure, in pascals.
• To ensure your safety, power plug must be inserted into an earthed three-pole socket. Check carefully and
make sure that your socket is properly and reliably earthed.
• Make sure that the water and electrical devices must be connected by a qualified technician in accordance
with the manufacturer’s instructions and local safety regulations.
Risk to children!
• EN countries: the appliance can be used by children aged from 8 years and above and persons with
reduced physical, sensory or mental capabilities or lack of experience and knowledge if they have been
given supervision or instruction concerning use of the appliance in a safe way and understand the hazards
involved. Children shall not play with the appliance. Cleaning and user maintenance shall not be made by
children without supervision.
• Children of less than 3years should be supervised to ensure that they do not play with appliance.
• Animals and children may climb into the machine. Check the machine before every operation.
• Kids should be supervised that they do not play with the appliance.
• Glass door may be very hot during the operation. Keep kids and pets far away from the machine during
the operation very wet rooms as well as in the rooms with explosive or caustic gas.
• Remove all packages and transport bolts before using the appliance. Otherwise, serious damage may
result.
• Plug must be accessible after installation.
Risk of explosion!
• Do not wash or dry articles that have been cleaned in, washed in, soaked in, or dabbed with combustible
or explosive substances( such as wax, oil, paint, gasoline, degreasers, dry-cleaning solvents, kerosene, etc.)
This may result in fire or explosion.
• Before hand thoroughly rinse items of washing by hand.
Page 3

3
ENG
CAUTION!
Installing the product!
• This washing machine is for indoor use only.
• It isn’t intended to be built-in using.
• The openings must not be obstructed by a carpet.
• Washing machine shall not be installed in bath room or very wet rooms as well as in the rooms with
explosive or caustic gases.
• The washing machine with single inlet valve only can be connected to the cold water supply. The product
with double inlet valves should be correctly connected to the hot water and cold water supply.
• Plug must be accessible after installation.
• Remove all packages and transport bolts before using the appliance. Otherwise, serious damage may
result.
Risk of damaging appliance!
• Your product is only for home use and is only designed for the textiles suitable for machine washing.
• Do not climb up and sit on top cover of the machine.
• Do not lean against machine door.
• Cautions during Handling Machine:
1. Transport bolts shall be reinstalled to the machine by a specialized person.
2. The accumulated water shall be drained out of the machine.
3. Handle the machine carefully. Never hold each protruded part on the machine while lifting. Machine
door can not be used as the handle during the conveyance.
4. This appliance is heavy. Transport with care.
• Please do not close the door with excessive forces. If it is found difficult to close the door, please check if
the clothes are put in or distributed well.
• It is forbidden to wash carpets.
Operating the appliance!
• Before washing the clothes at first time, the product shall be operated in one round of the whole
procedures without the clothes inside.
• Flammable and explosive or toxic solvents are forbidden. Gasoline and alcohol etc.Shall not be used as
detergents. Please only select the detergents suitable for machine washing, especially for drum.
• Make sure that all pockets are emptied. Sharp and rigid items such as coin,brooch,nail,screw or stone etc.
may cause serious damages to this machine.
• Please check whether the water inside the drum has been drained before opening its door.Please do not
open the door if there is any water visible.
• Be careful of burning when the product drains hot washing water.
• Never refill the water by hand during washing.
• After the program is completed, please wait for two minutes to open the door.
Packaging/Old appliance
This marking indicates that this product should not be disposed with other household wastes throughout the
EU.To prevent possible harm to the environment or human health from uncontrolled waste disposal,recycle it
responsibly to promote the sustainable reuse of material resources.To return your used device, please use the
collection systems or contact the retailer where the product was purchased. They return and can take this
product for environmental safe recycling.
Page 4
4
ENG
INSTALLATION
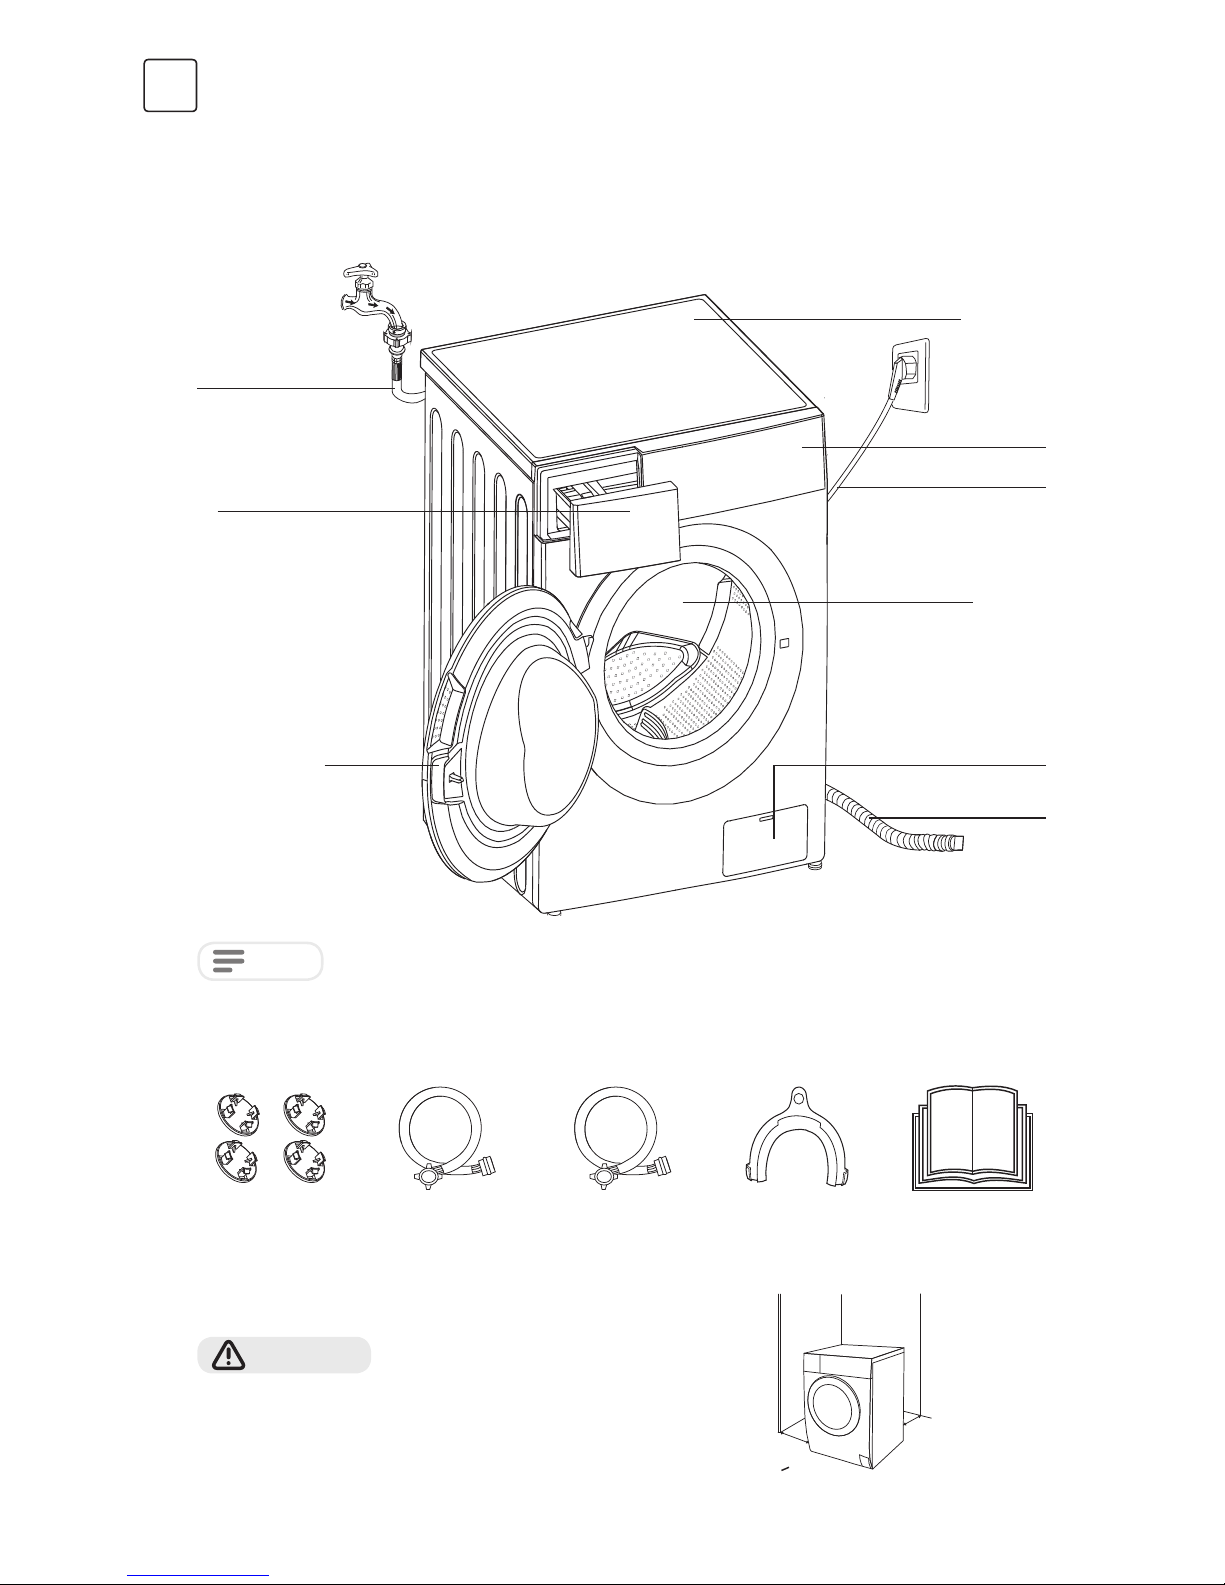
Product Description
Accessories
NOTE
• The product line chart is for reference only, please refer to real product as standard.
Transport hole plug Supply hose
cold water
Supply hose hot
water (optional)
Drain hose support
(optional)
Owner’s manual
Installation area
WARNING!
• Stability is important to prevent the product from wandering!
• Make sure that the product should not stand on the power cord.
w
w
W> 2 0m m
Top cover
Water supply hose
Detergent dispenser
Door
Control panel
Power supply cord
Drain hose
Service filter
Drum
Page 5
5
ENG
Before installing the machine, the location characterized as follows shall be
selected:
1. Rigid, dry, and level surface
2. Avoid direct sunlight
3. Sufficient ventilation
4. Room temperature is above 0 °C
5. Keep far away from the heat resources such as coal or gas.
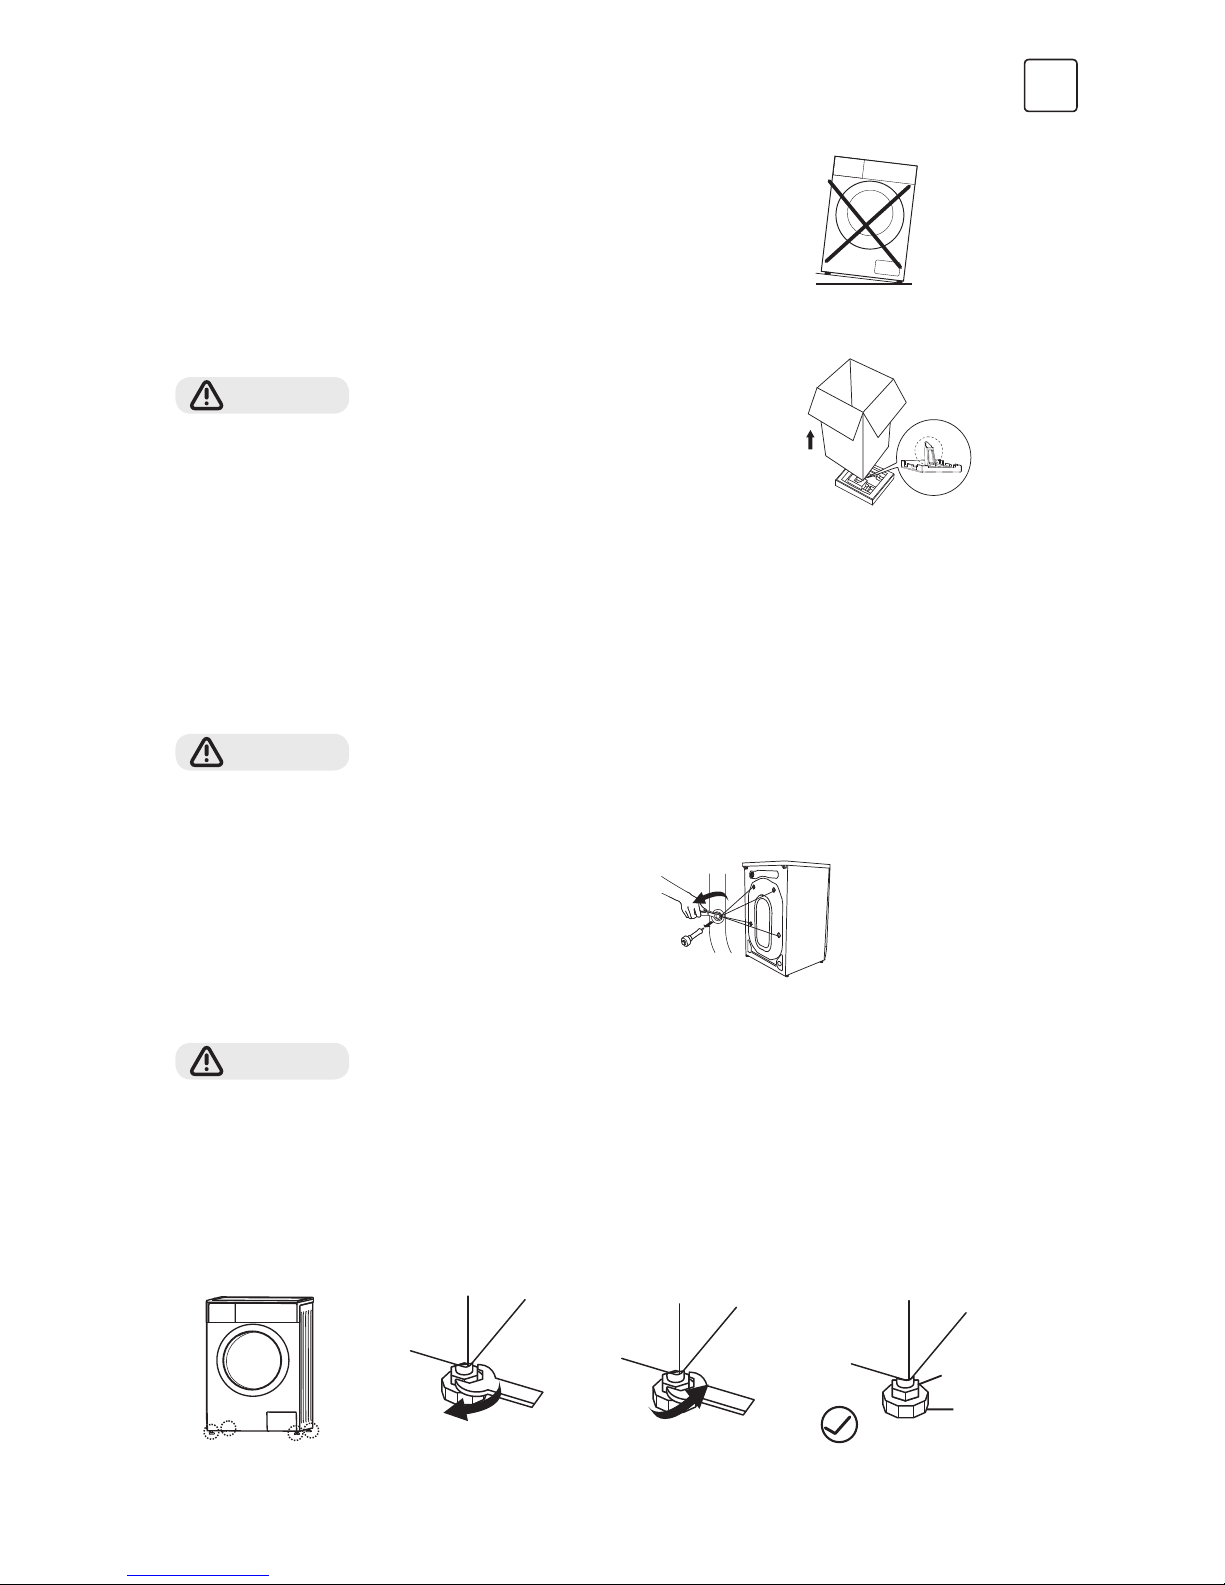
Unpacking the washing machine
WARNING!
• Packaging material (e.g. Films, Styrofoam) can be dangerous for children.
• There is a risk of suffocation! Keep all packaging well away from children.
1. Remove the cardboard box and styrofoam packing.
2. Lift the washing machine and remove the base packing. Make sure the small triangle foam is removed
with the bottom one together. If not, lay the unit down with side surface, then remove the small foam
from the unit bottom manually.
3. Remove the tape securing the power supply cord and drain hose.
4. Remove the inlet hose from the drum.
Remove transport bolts
WARNING!
• You must remove the transport bolts from the backside before using the product.
• You’ll need the transport bolts again if you move the product , so make sure you keep them in a safe place.
Please take the following steps to remove the bolts:
1. Loosen 4 bolts with spanner and then remove them.
2. Stop the holes with transport hole plugs.
3. Keep the transport bolts properly for future use.
Levelling the washing machine
WARNING!
• The lock nuts on all four feet must be screwed tightly against the housing.
1. Check if the legs are closely attached to the cabinet. If not, please turn them to their original positions
tighten the nuts.
2. Loosen the lock nut turn the feet until it closely contacts with the floor.
3. Adjust the legs and lock them with a spanner, make sure the machine is steady.
1
2
3 4
Raise Lower
Foot
Lock nut
Page 6
6
ENG
Min .6 0 cm
100 cm
Max .
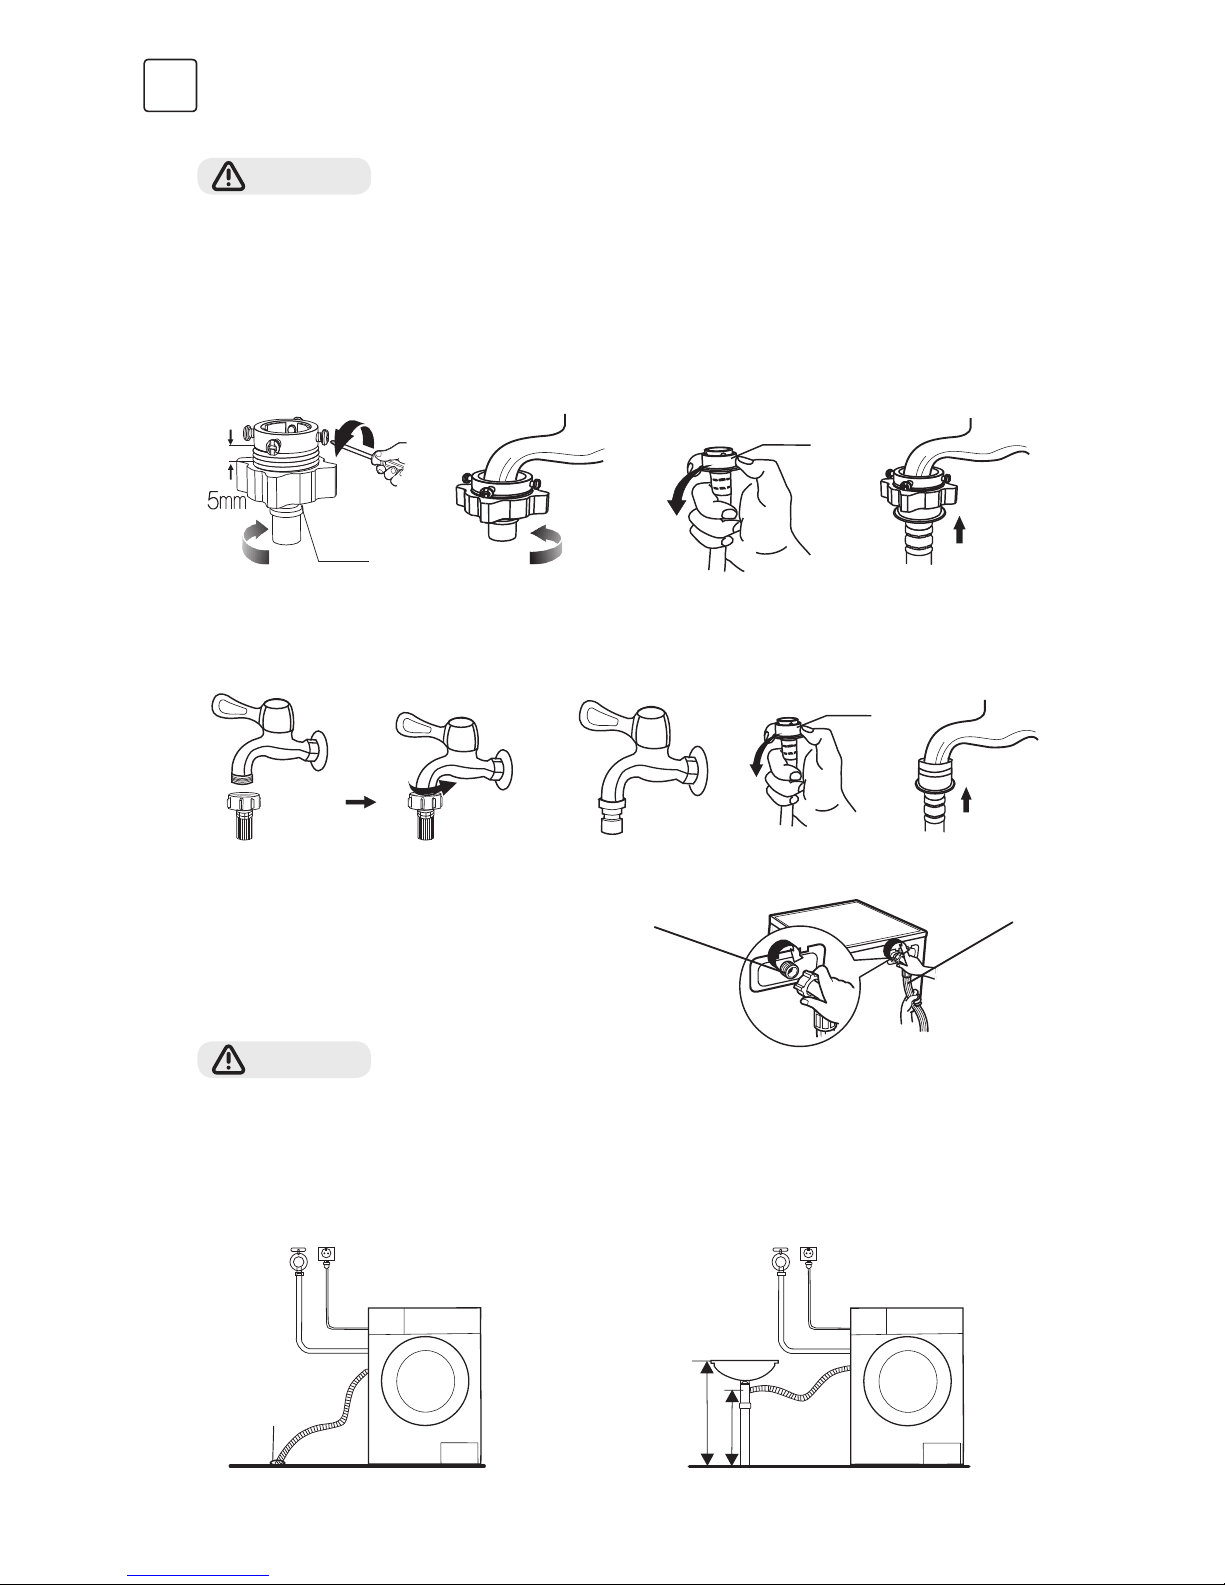
Connect Water Supply Hose
WARNING!
• To prevent leakage or water damage, follow the instructions in this chapter!
• Do not kink, crush, modify or sever water inlet hose.
• For the model equips hot valve,connect it to hot water tap with hot water supply hose. Energy
consumption will decrease automatically for some program.
Connect the inlet pipe as indicated, There are two ways to connect the inlet pipe.
1. Connection between ordinary tap and inlet hose.
2. Connection between screw tap and inlet hose.
Connect the other end of inlet pipe to the inlet
valve at the backside of product and fasten the
pipe tightly clockwise.
Drain Hose
WARNING!
• Do not kink or protract the drain hose.
• Position drain hose properly ,otherwise damage might result of water leakage.
There are two ways to place the end of drain hose:
1
2
3
4
Slide bushing
Slide bushing
Clamp nut
Loosen clamp nut and
four bolts
Tap with threads and inlet hose Special tap for washing machine
1. Put the hose into the water drain 2. Connect it to a drain pipe.
Press slide bushing insert inlet
hose into connecting base
Tighten clamp nut Tighten clamp nut
Water Inlet valve
Water drain
Water supply hose
Page 7
7
ENG
WARNING!
• When installing drain hose, fix it properly with a rope.
• If drain hose is too long, do not force it into washing machine as it will cause abnormal noises.
CAUTION!
• Before washing, please make sure it’s installed properly.
• Before washing at first time, the washing machine shall be operated in one round of the whole procedures
without clothes in as follows.
1. Before Washing
Hose
Retainer
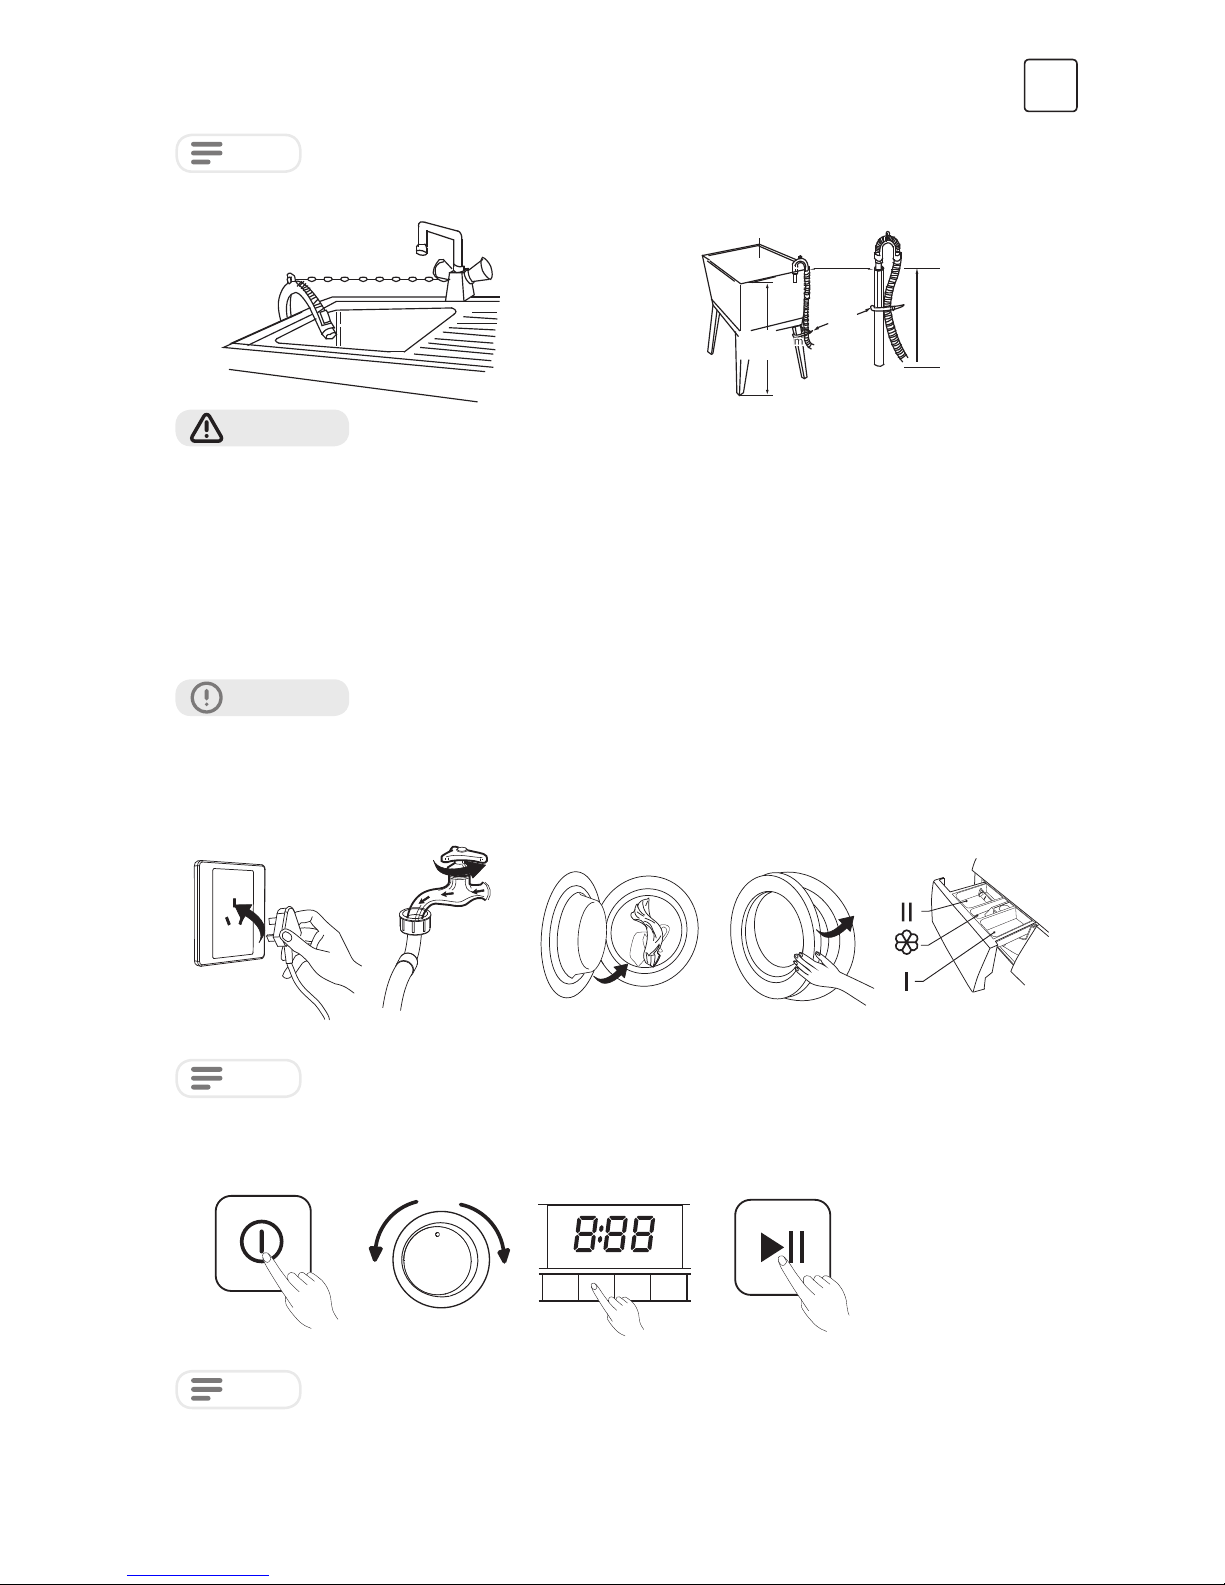
NOTE
• If the machine has drain hose support, please install it like the following.
NOTE
• Detergent need to be added in “case I“ after selecting pre-washing for machines with this function.
NOTE
• If default is selected, step 3 can be skipped.
2. Washing
Max .1 00 c
Min .6 0c m
Min .6 0c m
Max .1 00 cm
Drain
Bind
OPERATIONS
Quick Start
Plug in Open tap Load Close door Add detergent
Main
wash
Softener
Prewash
Power On Select function or defaultSelect program Start up
Page 8
8
ENG
3. After Washing
Buzzer beep or “End” on display.
• The working condition of the washer should be (0-40) °C.If used under 0 °C,the inlet valve and draining
system may be damaged. If the machine is placed under condition of 0 °C or less, then it should be
transferred to normal ambient temperature to ensure the water supply hose and drain hose are not frozen
before use.
• Please check the labels and the explanation of using detergent before wash. Use non-foaming or
less-foaming detergent suitable for machine washing properly.
Prewash detergent
Main wash detergent
Softener
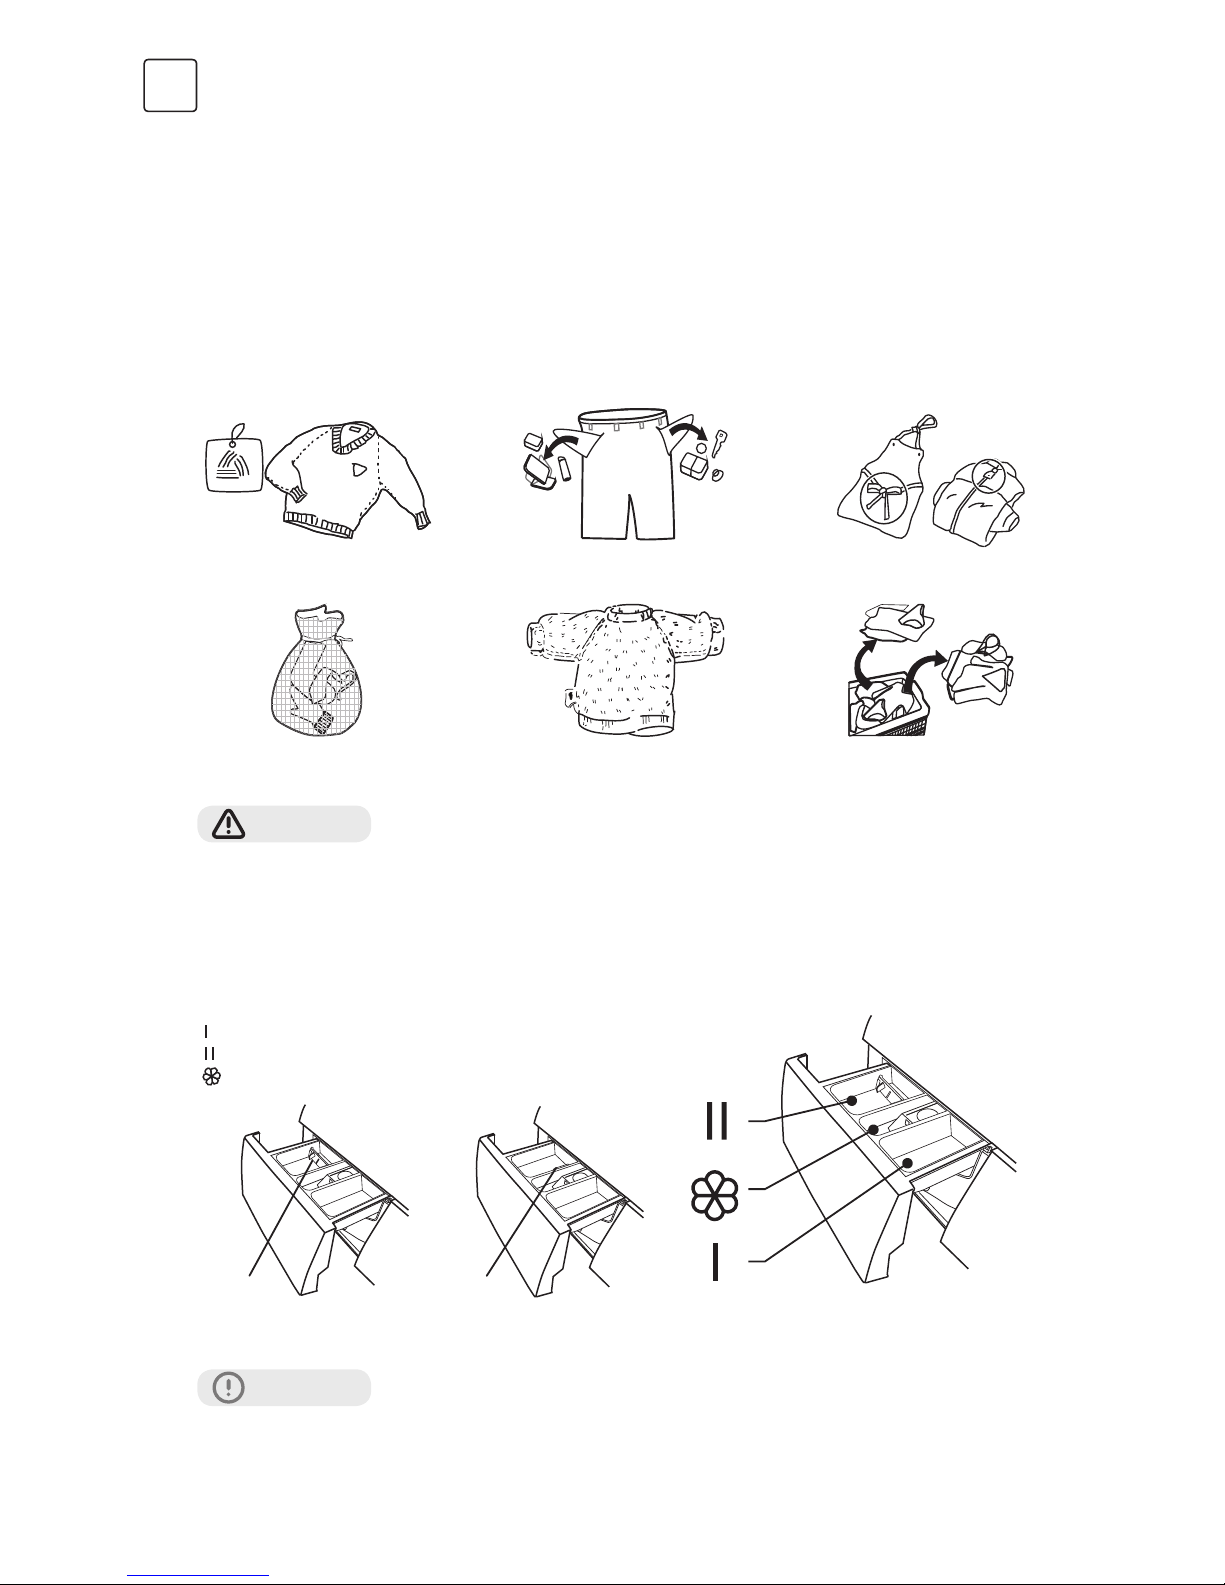
Before Each Washing
Detergent Dispenser
Check the label
Put small clothes into the pillow slip
Liquid detergent
Dam-board Dam-board
Powder detergent Pull out the dispenser
Take out the items out of the pockets
Turn easy-pilling and long-pile fabric
inside out
Knot the long strips, zip or button
Separate clothes with different textures
WARNING!
• When washing a single clothes, it may easily cause great eccentricity and give alarm due to great
unbalance. Therefore it is suggested to add one or two more clothes to be washed together so that
draining can be done smoothly.
• Don’t wash clothes that have been in touch with kerosene, gasoline, alcohol and other flammable materials.
CAUTION!
• Detergent only need to be added in “case I“ after selecting pre-washing for machines with this function.
Page 9
9
ENG
Program
Drain Only
Wool
Delicate
Mixed
Synthetic
Sports
Baby Care
Program
Cotton
Cotton 60 °C
Cotton 40 °C
Express 15’
Rapid 45’
ECO 60’
Rinse&Spin
Spin Only
Means must Means optional
NOTE
• As for the agglomerated or ropy detergent or additive, before they are poured into the detergent box, it
is suggested to use some water for dilution to prevent the inlet of detergent box from being blocked and
overflowing while filling water.
• Please choose suitable type of detergent for the various washing temperature to get the best washing
performance with less water and energy consumption
NOTE
• The chart is for reference only, Please refer to real product as standard.
Spin Only
My Cycle
Cotton
60°C
Cotton
40°C
Cotton
Express 15’
Rapid 45’
Eco 60’
Rinse and spin
Drain Only
Wool
Delicate
Mixed
Synthetic
Sports
Baby Care
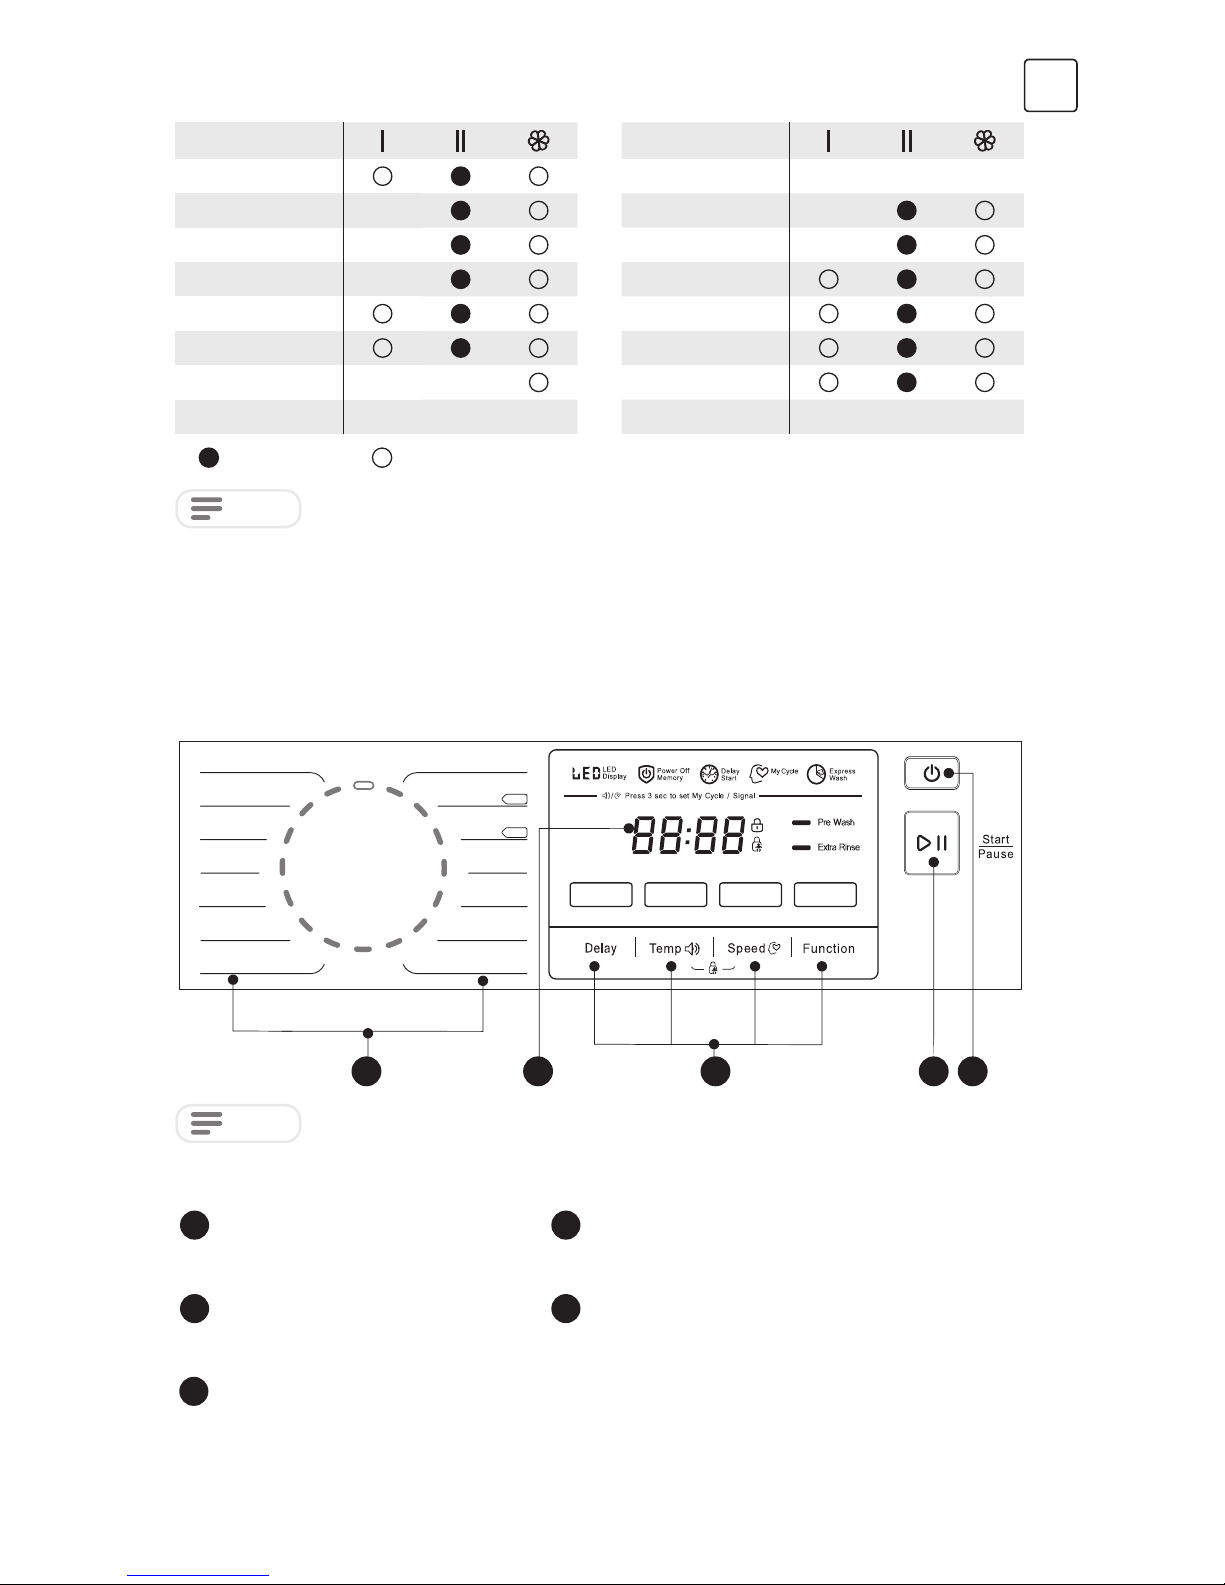
On /O f f
5
3
121
1
4
On/Off
Product is switched on or off.
Start/Pause
Press the button to start or pause the
washing cycle.
Programs
Available according to the laundry type.
Option
This allows you to select an additional
function and will light when selected.
1
1
3
1
2
4
Display
The display shows the settings, estimated time remaining, options, and status messages
for your washer. The display will remain on through the cycle.
3
5
Control Panel
Page 10
10
ENG
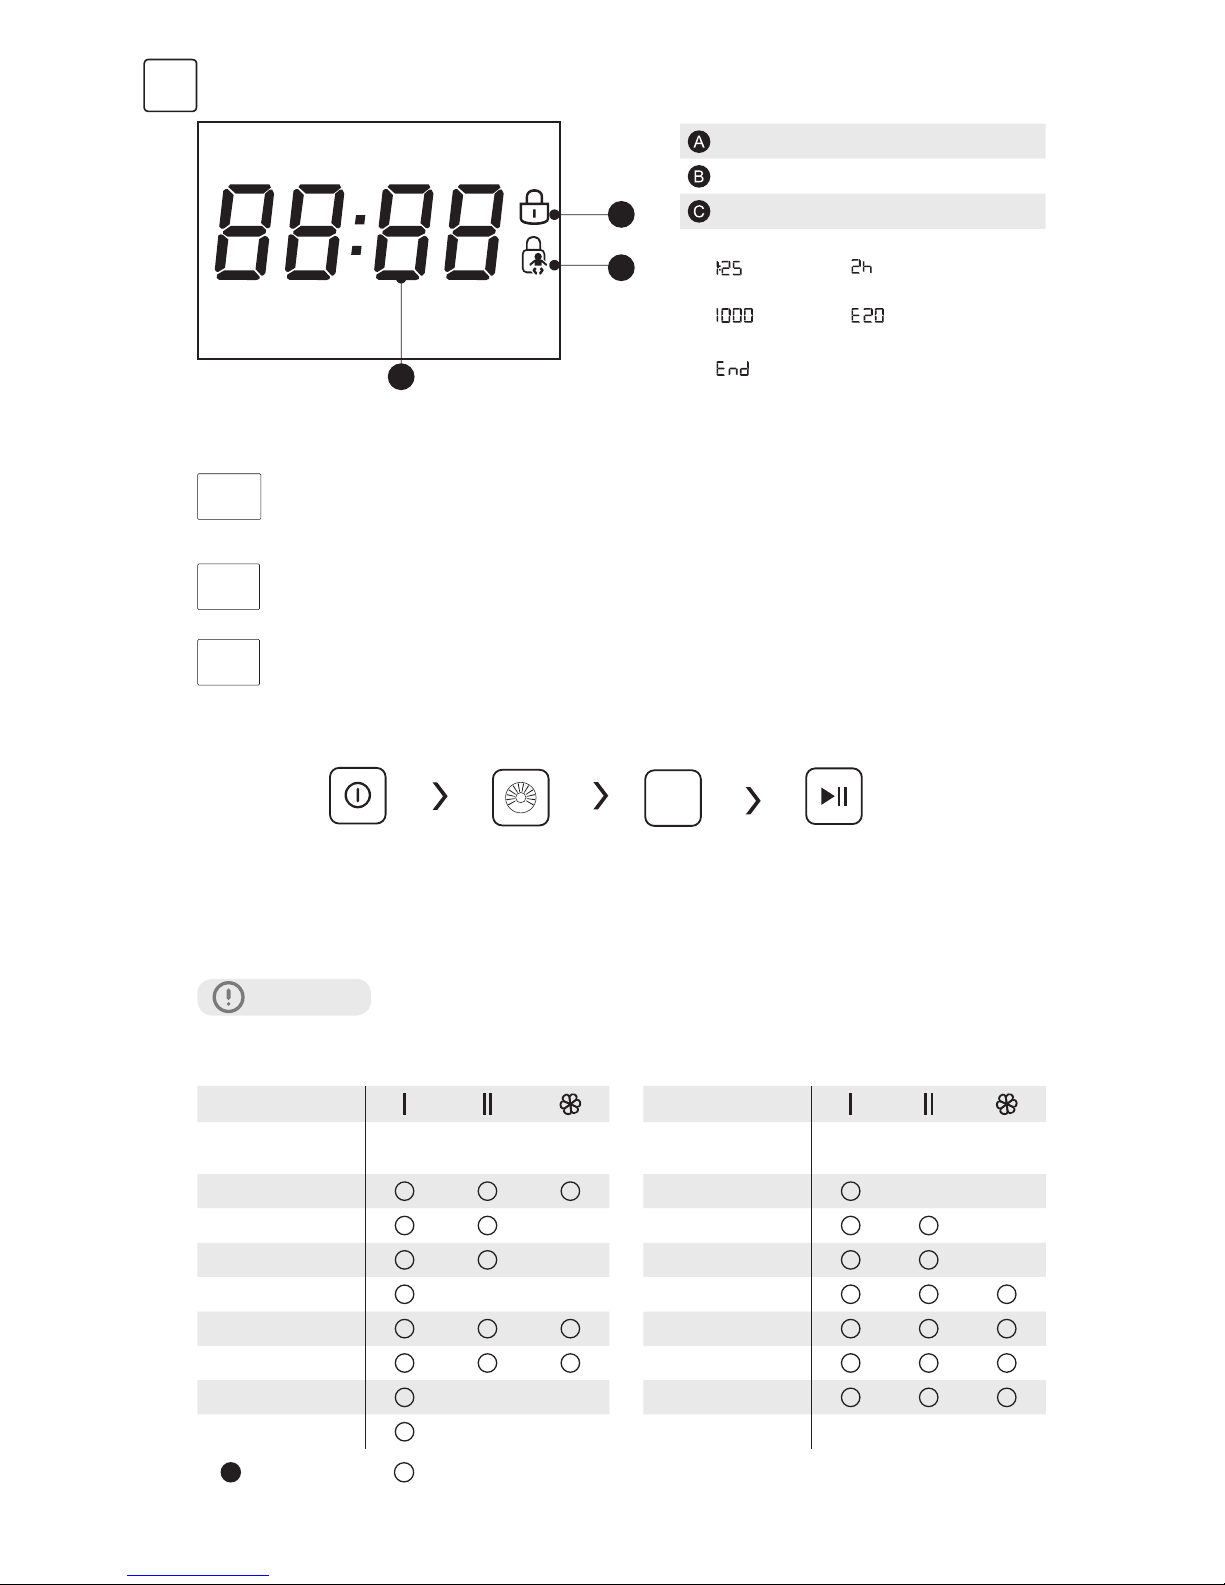
Option
C
A
B
Pre Wash
The Prewash function can get an extra wash before main wash, it is suitable for washing the dust
rises to surface of the clothes; You need to put detergent into the Case (I) when select it.
Extra Rinse
The laundry will undergo extra rinse once after you select it.
Delay
Set the Delay function:
1. Select a program
2.Press the Delay button to choose the time(the delaying time is 0-24 H.)
3.Press [Start/Pause] to commence the delay operation
Cancel the Delay function:
Press the [Delay] button until the display be 0H.It should be pressed before
starting the program. If the program already started, should press the
[On/Off] button to reset the program.
CAUTION!
If there is any break in the power supply while the machine is operating, the selected program will be stored
in special memory when the power is restarted, press the [On/Off] button, the program will continue.
Delay
On/Off Choose the Program Setting time Start
Program
Delay
Extra
rinse
Pre
wash
Drain Only
Wool
Delicate
Mixed
Synthetic
Sports
Baby Care
Program
Delay
Extra
rinse
Pre
wash
Cotton
Cotton 60 °C
Cotton 40 °C
Express 15’
Rapid 45’
ECO 60’
Rinse&Spin
Spin Only
Means must Means optional
Door Lock
Child Lock
Display
Wash Time
Speed
End
Error
Delay Time
Pre Wash
Extra Rinse
Delay
Page 11
11
ENG
Temp.
Other functions
Temp.
Press the button to regulate the temperature (Cold, 20 °C, 30 °C, 40 °C, 60°C, 90 °C)
Speed
Press the button to change the speed.
0-600-800-1000-1200-1400
Temp.
Speed
Program Default Speed(rpm)
Drain Only
—
Wool
400
Delicate
600
Mixed
1000
Synthetic
800
Sports
800
Baby Care
1000
Program Default Speed(rpm)
Cotton
800
Cotton 60 °C
1400
Cotton 40 °C
1400
Express 15’
800
Rapid 45’
800
ECO 60’
800
Rinse&Spin
1000
Spin Only
1000
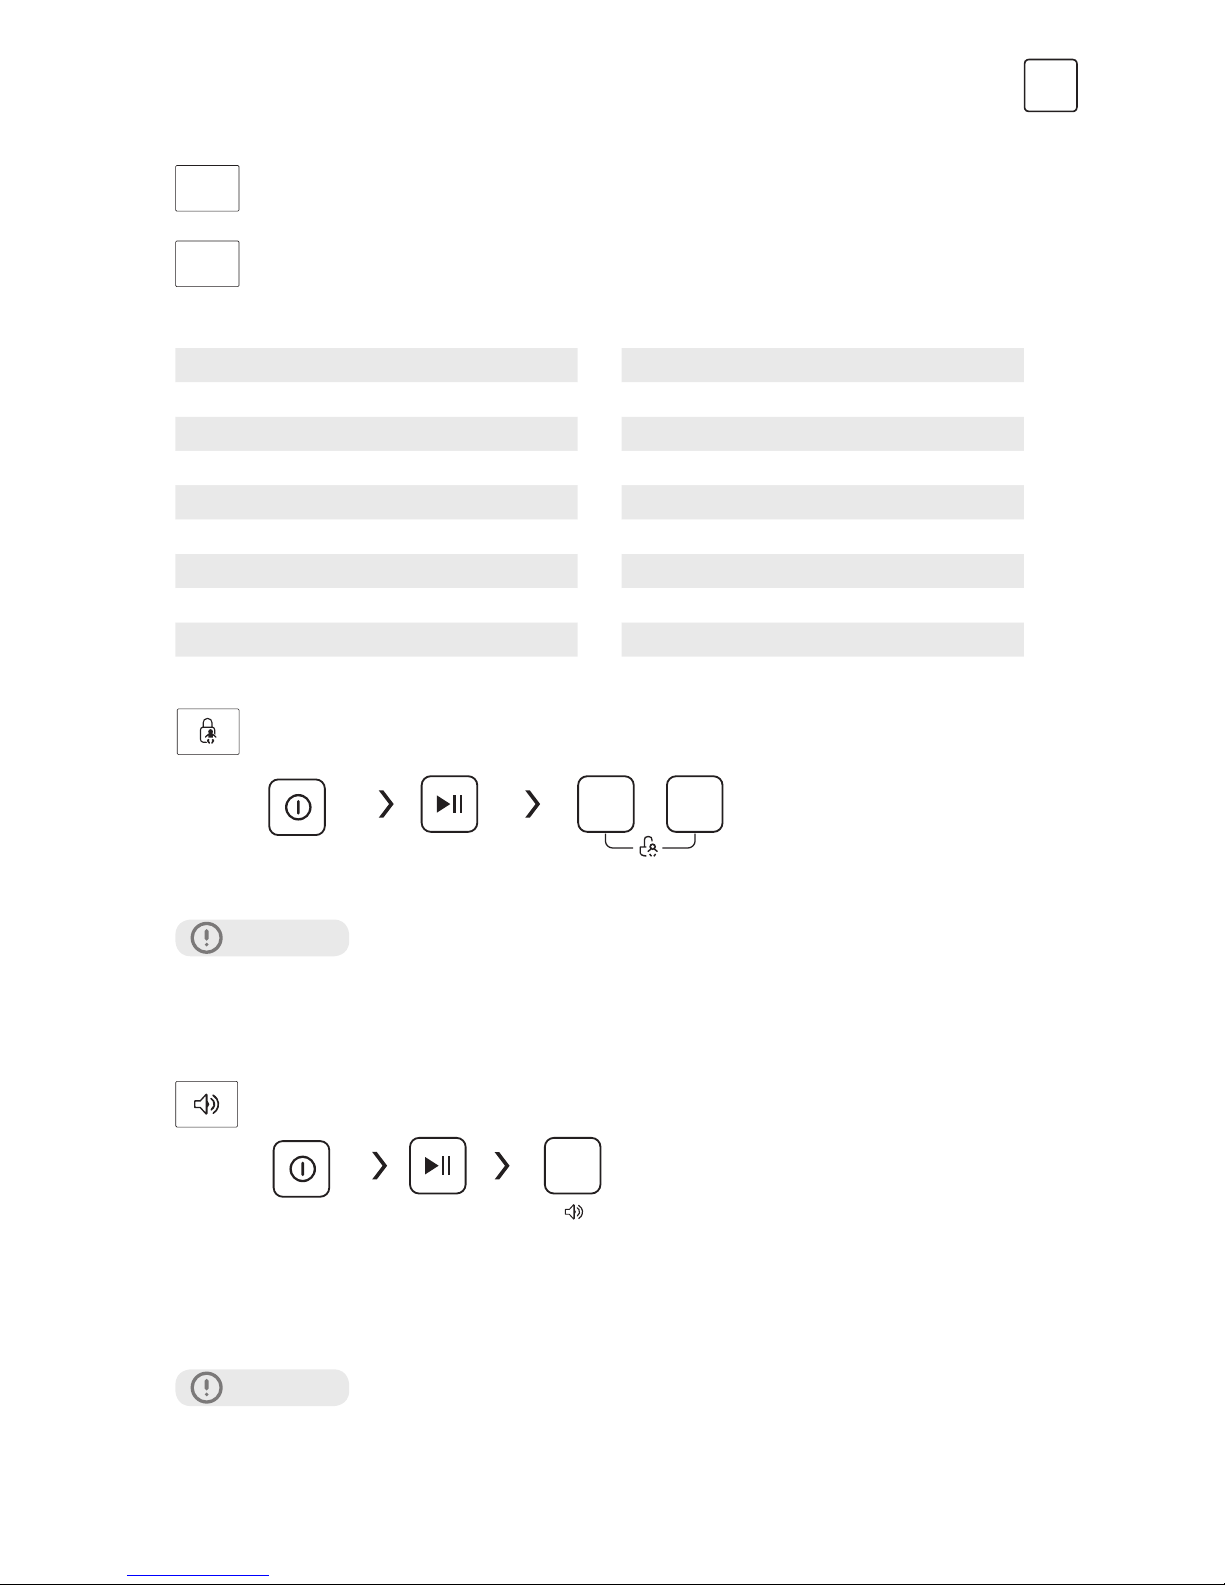
Child Lock
To avoid miss-operation by children.
CAUTION!
• Press the two button 3sec. also to be released the function.
• The “Child Lock” will lock all buttons except [On/Off].
• Cut off the power supply, the kid’s protection is to be released.
• The child lock will remain effective when the power is resumed for some models.
Mute the buzzer
To act the buzzer function, press the two buttons again for 3 seconds. The setting
will be kept until the next reset.
CAUTION!
• After Muting the buzzer function, the sounds will not be activated any more.
On/Off
Start/Pause Press [Function] and [Select] 3
sec. till buzzer beep.
Temp.
Speed
On/Off Start/Pause Press the [Temp.] & [Spin] or [Dry] & [Temp.] button
for 3sec.the buzzer is mute.
Page 12

12
ENG
Power off memory
For the convenience of the users, this program remembers the washing program and function
that was the last the choice of the users before power off. The next time when selecting the
program Memory, this machine will run the program of your memory automatically.
My Cycle
Memorize the frequently used programes
Press [Speed] 3sec. to memory the running programme. The default is cotton.
Programs
Programs are available according to the laundry type
Washing Programs Table
Programs
Cotton Hard-wearing textiles, heat-resistant textiles made of cotton or linen.
Synthetic Wash synthetic articles, for example: shirts, coats, blending. While washing
the knitting textiles, detergent quantity shall be reduced due to its loose
string construction and easily forming bubbles.
Baby Care Washing the baby’s clothes, it can make the baby’s wear cleaner and make
the rinse performance better to protect the baby skin.
Rapid 45’ Washing few and not very dirty clothes quickly.
Mixed Mixed load consisting of textiles made of cotton and synthetics.
ECO 60’ As for few light dirty clothes, the maximum temperature of washing is
limited to 30°C, and saving more energy.
Cotton 60/40 °C Washing the daily clothes. The washing period is quite long with quite
strong washing intension. The temperature of default is 60°C/40°C.
Sports Washing the activewear.
Express 15’ Extra short programme approx, suitable for lightly soiled washing as a small
amounts of laundry.
Delicate For delicate, washable textiles, e.g. made of silk, satin, synthetic fibres or
blended fabrics.
Wool Hand or machine-washable wool or richwool textiles.Especially gentle wash
programme to prevent shrinkage, longer programme pauses (textiles rest
in wash liquor).
Spin Only Extra spin with selectable spin speed.
Rinse&Spin Extra rinse with spin.
Drain Only Drain off the water.
Program Load(kg) Temp.(°C) Default Time
8.0 Default
8.0
1400
Cotton
8.0 40 2:40
Cotton60°C
8.0 60 3:25
Page 13

13
ENG
Program Load(kg) Temp.(°C) Default Time
8.0 Default
8.0
1400
Cotton 40°C
8.0 40 3:25
Express15’
2.0 Cold 0:15
Rapid 45’
2.0 40 0:45
ECO60’
2.0 Cold 1:00
Rinse&Spin
8.0 − 0:31
Spin Only
8.0 − 0:14
Drain Only
− − 0:01
Wool
2.0 40 1:06
Delicate
2.5 30 1:00
Mixed
8.0 40 1:13
Synthetic
4.0 40 1:40
Sports
4.0 40 1:19
Baby Care
8.0 60 1:39
• The EU energy efficiency class is: A+++
Energy test program: Cotton 60/40°C. Speed: the highest speed; Other as the default.
Half load for 6.0/7.0/8.0/9.0/10.0Kg machine:3.0/3.5/4.0/4.5/5.0Kg.
Cotton 60/40°C ” is the standard washing programs to which the information in the label and the fiche
relates, and they are suitable to clean normally soiled cotton laundry and that they are the most efficient
programs in terms of combined energy and water consumptions for washing that type of cotton laundry,
that the actual water temperature may differ from the declared cycle temperature.
NOTE
• The parameters in this table are only for user’s reference. The actual parameters may bedifferent with the
parameters in above mentioned table.
WARNING!
• Before your maintenance starts, please unplug the machine and close the tap.
Cleaning The Cabinet
Proper maintenance on the washing machine can extend its working life.
The surface can be cleaned with diluted non-abrasive neutral detergents
when necessary. If there is any water overflow, use the wet cloth to wipe it
off immediately. No sharp items are allowed.
NOTE
• Formic acid and its diluted solvents or equivalent are forbidden, such
as alcohol, solvents or chemical products,etc.
MAINTENANCES
Cleaning And Care
Page 14

14
ENG
Cleaning The Drum
• The rusts left inside the drum by the metal articles shall be removed immediately with chlorine-free
detergents. Never use steel wool.
NOTE
• Don’t put laundry in the washing machine during the
drum cleaning.
Cleaning The Door Seal and Glass
Wipe the glass and seal after each wash
to remove lint and stains. If lint builds up it can cause leaks.
Remove any coins, buttons and other objects from the
seal after each wash.
Cleaning The Inlet Filter
NOTE
• Inlet filter must be cleaned if the water presure is low.
Washing the filter in the tap
1. Close the tap.
2. Remove the water supply hose from the tap.
3. Clean the filter.
4. Reconnect the water supply hose.
Washing the filter in washer dryer:
1. Screw off the inlet pipe from the backside of the
machine.
2. Pull out the filter with long nose pliers and
reinstall it back after being wash
3. Use the brush to clean the filter.
4. Reconnect the inlet pipe.
NOTE
• If the brush is not clean, you can pull out the filter and wash it separately;
• Reconnect, turn on the tap.
d.
Cleaning The Detergent Dispenser
1. Press down the arrow location on softener cover inside the dispenser drawer.
2. Lift the clip up and take out softener cover and wash all grooves with water.
3. Restore the softener cover and push the drawer into position.
NOTE
• Do not use alcohol, solvents or chemical products to clean the machine.
A
1 2 3 4
Pull out the dispenser
drawer by pressing the
button marked with “A“
Clean the dispenser
drawer under water
Clean inside the recess
with an old toothbrush
Insert the dispenser
drawer
Page 15

15
ENG
Cleaning The Drain Pump Filter
WARNING!
• Be careful of the hot water!
• Allow detergent solution to cool down.
• Unplug the machine to avoid electrical shock before washing.
• Drain pump filter can filter the yarns and small foreign matters from the washing.
• Clean the filter periodically to ensure the normal operation of washing machine.
1
2
3
6
54
Open the lower cover cap
Open the filter by turning
to the counter clockwise
Rotate 90° and pull out
the emergency drain hose,
and take off the hose cap
Emergency
drain hose
Remove extraneous matter
After water runs out,
reset the drain hose
Close the lower cover cap
CAUTION!
• Make sure that valve cap and emergency drain hose are reinstalled properly, cap plates should be inserted
aligning to hole plates otherwise water may leak;
• Some machines don’t have emergency drain hose, rotate lower cover cap directly to make water run into
basin.
• When the appliance is in use and depending on the program selected there can be hot water in the
pump. Never remove the pump cover during a wash cycle, always wait until the appliance has finished the
cycle, and is empty. When replacing the cover, ensure it is securely re-tightened.
Description Reason Solution
Washing machine
cannot start up
Door is not closed properly Restart after the door is closed
Check if the clothes are stuck
Door can’t be opened Washer’s safety protection
design is working
Disconnect the power, restart the product
Troubleshooting
The start of the appliance does not work or it stops during operation.
First try to find a solution to the problem, If not, contact the service centre.
Page 16

16
ENG
Description Reason Solution
Water leakage The connection between
inlet pipe or outlet hose is
not tighten
Check and fasten water pipes
Clean up outlet hose
Detergent residues in
the box
Detergent is dampened or
agglomerated
Clean and wipe the detergent box
Indicator or display does
not light
Disconnect the power
PC board or harness has
connection problem
Check if the power is shut down and the
power plug is connected correctly
Abnormal noise Check if the fixing (bolts) have been removed
Check it’s installed on a solid and level floor
Technical Specifications
MAX. Current 10A
Standard Water Pressure 0.05MPa~1MPa
D
W
H
Power Supply 220-240V~,50Hz
Washing Capacity 8.0kg
Dimension (W*D*H) 595*565*850
Weight 68kg
Rated Power 2000W
Description Reason Solution
Door is not closed properly Restart after the door is closed
Check if the clothes is stuck
Water injecting problem
while washing
Check if the water pressure is too low
Straighten the water pipe
Check if the inlet valve filter is blocked
Overtime water draining Check if the drain hose is blocked
Water overflow Restart the washer
Others Please try again first, call up service line if there
are still troubles
NOTE
• After the check, activate the appliance. If the problem occurs or the display shows other alarm codes
again, contact the service.
Page 17

17
ENG
Capacity 8kg
Spin Speed 1400 rpm
Energy efficiency class
❶
A +++
Annual energy consumption
❷
196 kWh /annual
Power consumption of off-mode 0.5W
Power consumption of Left on-mode 1.0W
Annual water consumption
❸
11000L /annual
Spin-drying efficiency class
❹
B/B
Standard washing cycle
❺
Cotton
Energy consumption of the standard 60°C at full load 0.90 kwh /cycle
Energy consumption of the standard 60°C at partial load 0.88 kwh /cycle
Energy consumption of the standard 40° C at partial load 0.79kwh /cycle
Program duration of standard 60° C at full load 228 min
Program duration of standard 60°C at partial load 228 min
Program duration of standard 40°C at partial load 222 min
Water consumption of the standard 60° C at full load 54L /cycle
Water consumption of standard 60°C at partial load 45L /cycle
Water consumption of the standard 40° C at partial load 45L /cycle
Remaining moisture content of the standard 60°C at full load 50%
Remaining moisture content of the standard 60°C at partial load 55%
Remaining moisture content of the standard 40°C at partial load 55%
Noise level of washing 59dB (A)
Noise level of spinning 76/78dB (A)
Product Fiches
Remarks
❶
The energy efficiency class is from A (highest efficiency) to D (lowest efficiency)
❷
Energy consumption per year, based on 220 standard washing cycles for standard program at 60°C and
40°C at full and partial load, and the consumption of the low-power modes. Actual energy consumption
will depend on how the appliance is used.
❸
Water consumption per year based on 220 standard washing cycles for standard program at 60°C and
40°C at full and partial load. Actual water consumption will depend on how the appliance is used.
❹
Spin-drying efficiency class from G (least efficient) to A (most efficient).
❺
The standard 60°C program and the standard 40°C program are the standard washing programs. These
programs are suitable to clean normally soiled cotton laundry and they are the most efficient programs in
terms of combined energy and water consumptions for washing that type of cotton laundry. The actual
water temperature may differ from the declared cycle temperature. Please choose the suitable type of
detergent for the various washing temperatures to get the best washing performance with less water and
energy consumption
Page 18

18
ENG
NOTE
• Program setting for testing in accordance with applicable standard En60456.
• When using the test programs, wash the specified load using the maximum spin speed.
• The actual parameters will depend on how the appliance is used, and maybe different with the
parameters in above mentioned table.
• The household washing machine is equipped with power management system. The duration of the left-on
mode time is less than 1 minute.
• The noise emissions during washing/spinning for the standard washing cycle at full load.
.
Page 19

19
SRB
BEZBEDNOSNA UPUTSTVA
Radi sopstvene bezbednosti, pridržavajte se uputstava navedenih u ovom korisničkom uputstvu. Na taj
način ćete rizik od požara, eksplozije ili strujnog udara svesti na minimum i sprečiti štetu po imovinu, kao i
mogućnost povređivanja ili gubitak života.
Pojašnjenje značenja simbola:
UPOZORENJE!
Ova kombinacija simbola i signalne reči ukazuje na potencijalno opasnu situaciju koja, ukoliko se ne izbegne,
za rezultat može imati smrt ili ozbiljne povrede.
OPREZ!
Ova kombinacija simbola i signalne reči ukazuje na potencijalno opasnu situaciju koja za rezultat može imati
blage ili lakše povrede ili štetu po imovinu i okruženje.
NAPOMENA
Ova kombinacija simbola i signalne reči ukazuje na potencijalno opasnu situaciju koja za rezultat može imati
blage ili lakše povrede.
UPOZORENJE!
Strujni udar!
• Ukoliko je priključni kabl oštećen, njegovu zamenu mora da obavi proizvođač, servis koji je angažovao ili
lica sa sličnim kvalifikacijama, kako bi se izbegla opasnost.
• Upotrebljavajte novi komplet creva dostavljen uz uređaj. Nemojte upotrebljavati stare komplete creva.
• Pre svakog održavanja, uređaj isključite iz struje.
• Nakon svake upotrebe, isključite mašinu iz struje i isključite vodu.
• Radi sopstvene bezbednosti, utikač priključite na uzemljenu tropolnu utičnicu. Pažljivo proverite svoju
utičnicu i uverite se da je na adekvatan i bezbedan način uzemljena.
• Uverite se da je priključivanje uređaja koji koriste vodu i struju obavilo kvalifikovano tehničko lice i da je to
učinjeno u skladu sa uputstvima proizvođača i lokalnim propisima o bezbednosti.
Rizik po decu!
• Zemlje engleskog govornog područja: uređaj mogu da upotrebljavaju deca starija od 8 godina, kao i
osobe sa umanjenim fizičkim, čulnim ili mentalnim sposobnostima ili osobe bez iskustva i znanja ukoliko
su pod nadzorom ili ukoliko su dobili uputstva o bezbednoj upotrebi uređaja i shvataju opasnosti koje
upotreba istog nosi. Deca ne treba da se igraju uređajem. Deca ne treba da obavljaju čišćenje i održavanje
uređaja bez nadzora.
• Potrebno je nadgledati decu mlađu od 3 godine kako im se ne bi dozvolilo da se igraju uređajem.
• Životinje i deca se mogu uvući u mašinu. Pre svakog uključivanja, proverite unutrašnjost mašine.
• Potrebno je nadgledati decu kako im se ne bi dozvolilo da se igraju uređajem.
• Tokom rada, staklena vrata mogu biti izuzetno topla. Držite decu i kućne ljubimce dalje od mašine kada
je uključena. Mašinu nemojte držati u veoma vlažnim prostorijama ili u prostorijama sa eksplozivnim ili
nagrizajućim gasom.
• Pre upotrebe uređaja, uklonite kompletnu ambalažu i transportne šrafove. U suprotnom, može doći do
ozbiljnih oštećenja.
• Nakon postavljanja uređaja, utičnica mora da bude dostupna.
Rizik od eksplozije!
• Nemojte prati niti sušiti garderobu koja je prethodno bila čišćena, prana, potapana ili u kontaktu sa
zapaljivim ili eksplozivnim supstancama (kao što su vosak, ulje, farba, benzin, odmašćivači, razređivači za
hemijsko čišćenje, kerozin itd.). U suprotnom, možete izazvati požar ili eksploziju.
• Garderobu najpre temeljno ručno isperite.
Page 20

20
SRB
OPREZ!
Postavljanje proizvoda!
• Ova mašina za pranje veša je namenjena isključivo za upotrebu u zatvorenom prostoru.
• Nije predviđeno da se upotrebljava kao ugradni uređaj.
• Otvori ne smeju biti blokirani tepihom.
• Mašinu za pranje veša ne bi trebalo stavljati u kupatilo ili u veoma vlažne prostorije, kao ni u prostorije sa
eksplozivnim ili nagrizajućim gasom.
• Mašina za pranje veša koja ima samo jedan ulazni ventil može se povezati na dovod sa hladnom vodom.
Proizvod koji ima dva ulazna ventila treba na pravilan način povezati na dovod tople i hladne vode.
• Nakon postavljanja uređaja, utičnica mora da bude dostupna.
• Pre upotrebe uređaja, uklonite kompletnu ambalažu i transportne šrafove. U suprotnom, može doći do
ozbiljnih oštećenja.
Rizik od oštećenja uređaja!
• Vaš proizvod je predviđen isključivo za kućnu upotrebu i napravljen je isključivo za materijale koji se mogu
mašinski prati.
• Nemojte se penjati i sedeti na poklopcu mašine.
• Ne naslanjajte se na vrata mašine.
• Mere opreza prilikom prenošenja mašine:
1. Potrebno je da kvalifikovano lice ponovo postavi transportne šrafove na mašinu. .
2. Potrebno je iz mašine ispustiti akumuliranu vodu.
3. Pažljivo prenosite mašinu. Nikada nemojte podizati mašinu tako što ćete je držati za isturene delove.
Vrata mašine se ne smeju upotrebljavati kao drška prilikom nošenja.
4. Ovaj uređaj je težak. Prenosite ga pažljivo.
• Ne koristite prekomernu silu prilikom zatvaranja vrata. Ukoliko sa teškoćom zatvarate vrata, proverite da li
je garderoba dobro postavljena i raspoređena.
• Zabranjeno je prati tepihe
Upotreba uređaja!
• Pre prvog pranja veša, proizvod treba uključiti da, praznog bubnja, prođe kroz sve faze kompletnog
ciklusa.
• Zabranjena je upotreba zapaljivih i eksplozivnih ili toksičnih rastvarača. Benzin, alkohol i slični proizvodi se
ne smeju upotrebljavati kao deterdženti. Koristite samo deterdžente za mašinsko pranje, a naročito one
pogodne za bubanj.
• Uverite se da su svi džepovi na garderobi ispražnjeni. Oštri i kruti predmeti, poput novčića, broševa,
eksera, šrafova, kamenčića itd., mogu da ozbiljno oštete mašinu.
• Pre nego što otvorite vrata, proverite da li je voda ispuštena iz bubnja. Ne otvarajte vrata ukoliko u bubnju
ima vode.
• Vodite računa da se ne opečete kada proizvod izbacuje vrelu vodu.
• Nikada nemojte ručno dopunjavati proizvod vodom tokom pranja.
• Po završetku programa, sačekajte dva minuta pre nego što otvorite vrata.
Pakovanje/Stari uređaj
Ova oznaka ukazuje da proizvod u EU ne treba odlagati zajedno sa drugim otpadom iz domaćinstva. Da
biste sprečili potencijalnu štetu po životnu sredinu ili zdravlje ljudi koja nastaje nekontrolisanim odlaganjem
otpada, odgovorno reciklirajte proizvod kako biste promovisali održivu ponovnu upotrebu materijalnih
resursa. Za odlaganje upotrebljenog uređaja koristite sisteme za sabiranje otpada ili kontaktirajte
maloprodajni objekat u kome ste proizvod kupili. Oni Vaš proizvod mogu preuzeti i reciklirati na način
bezbedan po životnu okolinu..
Page 21

21
SRB
POSTAVLJANJE
Opis proizvoda
Dodatna oprema
NAPOMENA
• Slika proizvoda je data isključivo u ilustrativne svrhe. Za pravi izgled proizvoda, pogledajte uređaj koji ste kupili.
Čep za transport Crevo za dovod
hladne vode
Crevo za dovod vrele
vode (opcionalno)
Nosač odvodnog
creva (opcionalno)
Korisničko uputstvo
Prostor u kome se uređaj postavlja
UPOZORENJE!
• Važno je da proizvod bude stabilan kako bi se sprečilo njegovo pomeranje
tokom rada!
• Uverite se da proizvod nije postavljen preko priključnog kabla.
w
w
W> 2 0m m
Gornji poklopac
Crevo za dovod vode
Posuda za deterdžent
Vrata
Kontrolna tabla
Priključni kabl
Odvodno crevo
Servisni filter
Bubanj
Page 22

22
SRB
Pre postavljanja mašine, potrebno je da pronađete mesto sa sledećim
karakteristikama:
1. Ima čvrstu, suvu i ravnu površinu
2. Nije izloženo direktnim zracima sunca
3. U dovoljnoj meri je provetreno
4. Ima sobnu temperaturu iznad 0ºC
5. Udaljeno je od izvora toplote, poput peći na ugalj ili gas
Raspakivanje mašine za pranje
UPOZORENJE!
• Ambalaža (npr. folija, stiropor) može biti opasna za decu.
• Postoji rizik od gušenja! Kompletnu ambalažu držite na bezbednoj
udaljenosti od dece.
1. Uklonite kartonsku kutiju i delove od stiropora.
2. Podignite mašinu za pranje veša i skinite osnovu na kojoj se proizvod nalazi. Uverite se da je mali
trougaoni sunđer uklonjen zajedno sa osnovom. Ukoliko to nije slučaj, položite proizvod postrance, a
zatim rukom skinite mali sunđer sa dna proizvoda.
3. Uklonite traku kojom su pričvršćeni priključni kabl i odvodno crevo.
4. Izvadite dovodno crevo iz bubnja
Uklanjanje transportnih šrafova
UPOZORENJE!
• Pre upotrebe proizvoda, morate ukloniti transportne šrafove koji se nalaze na zadnjoj strani proizvoda.
• Transportni šrafovi će Vam ponovo zatrebati ukoliko premeštate proizvod. Zbog toga se postarajte da ih
sačuvate na sigurnom
Za uklanjanje šrafova, pratite sledeće korake:
1. Popustite 4 šrafa ključem za navojne prstenove, a zatim ih skinite.
2. Zatvorite otvore čepovima za transport.
3. Sačuvajte transportne šrafove za buduću upotrebu.
Nivelisanje mašine za pranje veša
UPOZORENJE!
• Navojni prstenovi za pričvršćivanje moraju na svim nožicama biti dobro pričvršćeni za kućište.
1. Proverite da li su nožice dobro pričvršćene za kućište. Ukoliko nisu, okretanjem ih vratite u njihov
prvobitni položaj i pričvrstite navojnim prstenovima.
2. Popustite navojni prsten okretanjem nožice sve dok ona čvrsto ne prione na pod.
3. Podesite nožice i pričvrstite ih ključem za navojne prstenove, vodeći računa da mašina bude stabilna.
1
2
3 4
Podizanje Spuštanje
Nožica
Navojni
prsten
Page 23

23
SRB
Min .6 0 cm
100 cm
Max .
Povezivanje dovodnog creva za vodu
UPOZORENJE!
• Da biste sprečili curenje ili oštećenja prouzrokovana vodom, pratite uputstva data u ovom poglavlju!
• Nemojte savijati, lomiti, prepravljati, niti seći dovodno crevo za vodu.
• Kod modela opremljenih ventilom za toplu vodu, dovodno crevo za toplu vodu povežite sa slavinom za
toplu vodu. Potrošnja energije će se, kod određenih programa, automatski smanjiti.
Povežite dovodnu cev na ovde prikazan način. Dovodna cev se može povezati na dva načina.
1. Povezivanjem dovodne cevi sa običnom slavinom
2. Povezivanje slavine sa navojem i dovodnog creva.
Povežite drugi kraj dovodne cevi na dovodni ventil,
koji se nalazi na zadnjoj strani proizvoda, i cev dobro
pričvrstite okretanjem u smeru kazaljke na satu.
Odvodno crevo
UPOZORENJE!
• Nemojte savijati, niti istezati odvodno crevo.
• Pravilno postavite odvodno crevo. U suprotnom, može doći do curenja vode usled oštećenja.
Odvodno crevo se može povezati na dva načina:
1
2
3
4
klizna jednodelna
ležišna posteljica
klizna jednodelna
ležišna posteljica
stezni navrtanj
Popustite četiri šrafa
steznog navrtnja
Slavina sa navojem i dovodno crevo Posebna slavina za mašinu za pranje veša
1. Povežite ga sa slivnikom za vodu. 2. Povežite ga sa dodatnom odvodnom
cevi slivnika za vodu.
Pritisnite kliznu jednodelnu
ležišnu posteljicu i ubacite
dovodno crevo u osnovu za
povezivanje
Pričvrstite stezni navrtanj Pritegnite stezni navrtanj
dovodni ventil
za vodu
slivnik
dovodno crevo
za vodu
Page 24

24
SRB
Max .1 00 c
Min .6 0c m
Min .6 0c m
Max .1 00 cm
UPOZORENJE!
• Prilikom postavljanja odvodnog creva, dobro ga pričvrstite pomoću kanapa.
• Ukoliko je odvodno crevo predugačko, nemojte ga gurati u mašinu za pranje veša, jer će praviti
neuobičajenu buku.
OPREZ!
• Pre pranja veša, proverite da li je uređaj pravilno postavljen.
• Pre prvog pranja veša, mašinu za pranje veša treba uključiti da na sledeći način, praznog bubnja, prođe
kroz sve faze kompletnog ciklusa.
1. Pre pranja veša
Nosač
creva
NAPOMENA
• Ukoliko mašina ima nosač odvodnog creva, postavite ga na način prikazan na slici.
NAPOMENA
• Deterdžent se u pregradu I dodaje samo ako izaberete pretpranje kod mašina koje imaju ovu funkciju.
NAPOMENA
• Ukoliko izaberete podrazumevane vrednosti, korak 3 se može preskočiti.
2. Pranje
Odvod
Vežite
RAD UREĐAJA
Brzi početak
Uključite u struju Pustite vodu Napunite vešom Zatvorite vrata Dodajte deterdžent
Pranje
Omekšivač
Pretpranje
Priključite na struju Izaberite funkciju ili
ostavite podrazumevane
vrednosti
Izaberite program Započnite ciklus
Page 25

25
SRB
3. Nakon pranja
Oglašava se zvučni signal ili na displeju stoji „End“ (Kraj).
• Radni uslovi mašine trebalo bi da se kreću od (0 do 40)ºC. Ukoliko uređaj upotrebljavate na temperaturama
nižim od 0ºC, može doći do oštećenja ulaznog ventila i odvodnog sistema. Ukoliko se nalazi u okruženju
u kome je temperatura 0ºC ili niža, mašinu je potrebno preneti u okruženje sa normalnom sobnom
temperaturom kako biste pre upotrebe bili sigurni da u dovodnom crevu za vodu i odvodnom crevu nema
zamrznute vode.
• Pre pranja, proverite etikete na vešu i pojašnjenja za upotrebu deterdženta. Za adekvatno mašinsko pranje,
upotrebljavajte deterdžente koji ne proizvode penu ili je proizvode u manjoj meri.
Deterdžent za pretpranje
Deterdžent za pranje
Omekšivač
Pre svakog pranja
Posuda za deterdžent
Proverite etiketu i
odaberite program
Manje komade veša stavite u jastučnicu
Tečni deterdžent
Pregrada Pregrada
Deterdžent u prahu Izvucite posudu
Izvadite predmete iz džepova
Obrnite garderobu koja se lako ćeba na
naličje. Isto učinite i sa garderobom koja
ima duga vlakna
Prevežite dugačke trake, zakopčajte
rasjfešluse i zakopčajte dugmad
Sortirajte veš prema teksturi
UPOZORENJE!
• Pranje jednog komada veša može dovesti do značajne neizbalansiranosti uređaja, zbog čega se može
uključiti alarm. Stoga se preporučuje dodavanje još jednog ili dva komada veša, kako bi proces ispuštanja
vode tekao glatko.
• Ne perite veš koji je prethodno bio u kontaktu sa kerozinom, benzinom, alkoholom i drugim zapaljivim
materijalima.
OPREZ!
• Deterdžent se u pregradu I dodaje samo ako izaberete pretpranje kod mašina koje imaju ovu funkciju.
Page 26

26
SRB
Program
Drain Only (Samo ispuštanje vode)
Wool (Vuna)
Delicate (Delikatan veš)
Mixed (Kombinovani veš)
Synthetic (Sintetika)
Sports (Sportski veš)
Baby Care (Održavanje bebi veša)
Program
Cotton (Pamuk)
Cotton (Pamuk) 60ºC
Cotton (Pamuk) 40ºC
Express (Ekspresni program) 15’
Rapid (Ubrzani program) 45'
ECO (EKO) 60’
Rinse&Spin (Ispiranje i centrifuga)
Spin Only (Samo centrifuga)
Obavezno Opciono
NOTE
• Pre nego što zgrudvane ili slepljene deterdžente ili dodatna sredstva sipate u pregradu za deterdžent,
savetuje se da ih razblažite u malo vode kako biste sprečili začepljenje ulaznog dela pregrade za
deterdžent i prelivanje prilikom primanja vode.
• Izaberite tip deterdženta koji odgovara konkretnoj temperaturi pranja kako biste dobili najbolji učinak uz
manju potrošnju vode i struje
Spin Only
My Cycle
Cotton
60°C
Cotton
40°C
Cotton
Express 15’
Rapid 45’
Eco 60’
Rinse and spin
Drain Only
Wool
Delicate
Mixed
Synthetic
Sports
Baby Care
On /O f f
5
3
121
1
4
Kontrolna tabla
NAPOMENA!
• Slika proizvoda je data isključivo u ilustrativne svrhe. Za pravi izgled proizvoda, pogledajte uređaj koji ste
kupili.
On/Off (Uključeno/Isključeno)
Za uključivanje ili isključivanje
proizvoda.
Start/Pause (Početak/Pauziranje)
Pritisnite ovaj taster kako biste započeli
ciklus pranja ili ga pauzirali.
Programi
Zavisno od tipa veša.
Opcije
Omogućava Vam da izaberete dodatnu
opciju, nakon čega se uključuje lampica.
1
1
3
1
2
4
Displej
Na displeju su prikazana podešavanja, procena vremena preostalog za završetak ciklusa, opcije
i poruke o statusu Vaše mašine. Displej ostaje uključen tokom kompletnog trajanja ciklusa.
3
5
Page 27

27
SRB
Opcije
C
A
B
Prewash (Pretpranje)
Opcija pretpranja omogućava dodatno pranje pre glavnog pranja i pogodna je za spiranje prašine
sa površine veša. Kada izaberete ovu opciju, potrebno je da u pregradu (I) stavite deterdžent
Extra Rinse (Dodatno ispiranje)
Kada izaberete ovu opciju, veš se još jednom ispira.
Delay (Odloženi početak)
Podesite opciju Delay (Odloženi početak) na sledeći način:
1. Izaberite program
2. Pritisnite taster Delay (Odloženi početak) da izaberete vremenski period (vremenski period za
odloženi početak se kreće od 0 do 24 sata).
3. Pritisnite taster [Start/Pause] (Početak/Pauziranje) kako biste aktivirali opciju odloženog početka
pranja
Opciju Delay (Odloženi početak) možete otkazati na sledeći način:
Pritiskajte taster [Delay] (Odloženi početak) sve dok se na displeju ne pojavi vrednost 0 sati. Ovo
treba obaviti pre započinjanja ciklusa pranja. Ukoliko je ciklus već započet, pritisnite taster [On/
Off] (Uključeno/Isključeno) kako biste resetovali program.
OPREZ!
Ukoliko dođe do prekida u snabdevanju električnom energijom u toku rada mašine, izabrani program pranja
će biti sačuvan u posebnoj memoriji. Po ponovnom uspostavljanju snabdevanja električnom energijom,
pritisnite taster [Start/Pause] (Početak/Pauziranje) i mašina će nastaviti započeti ciklus pranja
Delay
Uključite Izaberite program Podesite vremenski period Pokrenite ciklus
Program
Odloženi
početak
Dodatno
ispiranje
Pretpranje
Drain Only (Samo
ispuštanje vode)
Wool (Vuna)
Delicate
(Delikatan veš)
Mixed
(Kombinovani
veš)
Program
Odloženi
početak
Dodatno
ispiranje
Pretpranje
Cotton (Pamuk)
Cotton (Pamuk)
60ºC
Cotton (Pamuk)
40ºC
Express
(Ekspresni
program) 15’
Zaključavanje vrata
Zaključavanje zbog bezbednosti dece
Displej
Trajanje ciklusa pranja
Broj obrtaja
Kraj
Greška (Error)
Delay Time
Pre Wash
Extra Rinse
Delay
Page 28

28
SRB
Program
Odloženi
početak
Dodatno
ispiranje
Pretpranje
Synthetic
(Sintetika)
Sports
(Sportski veš)
Baby Care
(Održavanje bebi
veša)
Program
Odloženi
početak
Dodatno
ispiranje
Pretpranje
Rapid (Ubrzani
program) 45’
Eco
(Eko) 60’
Rinse&Spin
(Ispiranje i
centrifuga)
Spin Only (Samo
centrifuga)
Opciono
Ostale funkcije
Temp.
Pritisnite ovaj taster kako biste regulisali temperaturu (Cold (Hladno), 20ºC, 30ºC, 40ºC, 60ºC, 90ºC)
Broj obrtaja
Pritisnite ovaj taster kako biste promenili broj obrtaja.
0-600-800-1000-1200-1400
Temp.
Speed
Zaključavanje zbog bezbednosti dece
Kako bi se sprečilo da deca na neodgovarajući način rukuju proizvodom.
OPREZ!
• Pritisnite ova dva tastera u trajanju od 3 sekunde kako biste deaktivirali ovu opciju.
• Opcija Zaključavanje zbog bezbednosti dece će zaključati sve tastere sem tastera [On/Off] (Uključeno/
Isključeno).
On/Off (Uključeno/
Isključeno)
Započnite ciklus Pritisnite taster [Temp.] (Temperatura) i [Speed] (Broj obrtaja ) u
trajanju od 3 sekunde, sve dok se ne oglasi zvučni signal.
Temp.
Speed
Program
Podrazumevana
brzina (o/min)
Drain Only
(Samo ispuštanje vode)
—
Wool (Vuna)
400
Delicate (Delikatan veš)
600
Mixed
(Kombinovani veš)
1000
Synthetic (Sintetika)
800
Sports (Sportski veš)
800
Baby Care (Održavanje
bebi veša)
1000
Program
Podrazumevana
brzina (o/min)
Cotton (Pamuk) 800
Cotton (Pamuk) 60ºC 1400
Cotton (Pamuk) 40ºC 1400
Express
(Ekspresni program) 15’
800
Rapid (Ubrzani program) 45' 800
Eco (Eko) 60’ 800
Rinse&Spin
(Ispiranje i centrifuga)
1000
Spin Only (Samo centrifuga) 1000
Page 29

29
SRB
• Isključite uređaj iz struje i opcija za zaštitu dece će se deaktivirati.
• Kod nekih modela, opcija Zaključavanje zbog bezbednosti dece će ostati aktivirana i nakon ponovnog
uključivanja uređaja.
Utišavanje zvučnog signala
Da biste aktivirali zvučni signal, ponovo pritisnite ovaj taster i zadržite pritisak u trajanju od 3
sekunde. Ovo podešavanje će biti aktivirano do sledećeg resetovanja
OPREZ!
• Nakon što utišate zvučni signal, zvuci uređaja se više neće aktivirati.
Memorisanje poslednjeg programa
U cilju veće ugodnosti za korisnike, pomoću ove opcije se memorišu program pranja i opcije
koje je korisnik podesio prilikom poslednjeg korišćenja. Kada se sledeći put odabere program
Memorija, ova mašina će automatski pokrenuti program iz Vaše memorije.
Moj ciklus
Za memorisanje često korišćenih programa.
Zadržite pritisak na tasteru [Speed] (Broj obrtaja) u trajanju od 3 sekunde kako biste memorisali
program čiji je ciklus u toku. Podrazumevani program je Cotton (Pamuk).
Temp.
On/Off
(Uključeno/Isključeno)
Započnite ciklus Pritisnite taster [Temp.] (Temperatura) u trajanju od 3
sekunde. Zvučni signal je utišan.
Programi
Dostupni su različiti programi, zavisno od tipa veša.
Programi
Cotton (Pamuk) Izdržljiv tekstil i tekstil otporan na toplotu, napravljen od pamuka ili lana.
Synthetic (Sintetika) Za pranje sintetičkog veša, na primer majica, kaputa, veša od
kombinovanih materijala. Prilikom pranja pletenog veša, smanjite količinu
deterdženta zbog njegovog retkog tkanja i lakog formiranja pene.
Baby Care (Održavanje bebi veša) Za pranje bebi odeće. Bebi odeću može učiniti čistijom, a postupak
ispiranja učinkovitijim u cilju zaštite kože beba.
Rapid (Ubrzani program) 45' Za brzo pranje male količine veša koji nije mnogo zaprljan.
Mixed (Kombinovani veš) Za kombinaciju pamučnog i sintetičkog veša.
ECO (EKO) 60’ Za malu količinu blago zaprljanog veša, maksimalna temperatura
pranja je ograničena na 30ºC i štedi više energije.
Cotton (Pamuk) 60/40ºC Pranje garderobe za svakodnevnu upotrebu. Period pranja je prilično
dug i intenzivan. Podrazumevana temperature je 60ºC/40ºC
Sports (Sportski veš) Za pranje aktivnog veša.
Express (Ekspresni program) 15’ Izuzetno kratak program, pogodan za blago zaprljan veš kao i za male
količine veša.
Delicate (Delikatan veš) Za delikatne materijale koji se mogu prati, npr. svileni, satenski,
sintetički i veš od kombinovanih materijala.
Page 30

30
SRB
Programi
Wool (Vuna) Za vuneni veš ili materijale bogate vunom koji se mogu prati ručno
ili mašinski. Posebno blag program za pranje, kojim se sprečava
skupljanje veša. Ima duže pauze u toku ciklusa (veš miruje u tečnosti
za pranje).
Spin Only (Samo centrifuga) Dodatno centrifugiranje sa brzinom obrtaja koju možete birati.
Rinse&Spin (Ispiranje i centrifuga) Dodatno ispiranje sa centrifugiranjem.
Drain Only (Samo ispuštanje vode) Ispuštanje vode.
Tabela programa za pranje
Program Težina veša (kg) Temp. (°C) Podrazumevano vreme
8.0 Podrazumevano
8.0
1400
Cotton (Pamuk)
8.0 40 2:40
Cotton (Pamuk) 60ºC
8.0 60 3:25
Cotton (Pamuk) 40ºC
8.0 40 3:25
Express (Ekspresni program) 15’
2.0 Hladno 0:15
Rapid (Ubrzani program) 45'
2.0 40 0:45
ECO (EKO) 60’
2.0 Hladno 1:00
Rinse&Spin (Ispiranje i centrifuga)
8.0 − 0:31
Spin Only (Samo centrifuga)
8.0 − 0:14
Drain Only (Samo ispuštanje vode)
− − 0:01
Wool (Vuna)
2.0 40 1:06
Delicate (Delikatan veš)
2.5 30 1:00
Mixed (Kombinovani veš)
8.0 40 1:13
Synthetic (Sintetika)
4.0 40 1:40
Sports (Sportski veš)
4.0 40 1:19
Baby Care (Održavanje bebi veša)
8.0 60 1:39
• Klasa energetske efikasnosti u EU je A+++
Program za testiranje energetske efikasnosti: Cotton (Pamuk) 60/40ºC.
Broj obrtaja: maksimalan. Ostali parametri podešeni na podrazumevano.
Polovina dozvoljene težine veša za model od 6,0/7,0/8,0/9,0/10,0 kg: 3,0/3,5/4,0/4,5/5,0 kg.
Programi Cotton (Pamuk) 60/40ºC predstavljaju standardne programe pranja na koje se odnose
podaci navedeni na etiketi i u karakteristikama. Pogodni su za pranje normalno zaprljanog pamučnog
veša i predstavljaju najefikasnije programe u smislu kombinovanog utroška energije i vode pri pranju
pomenutog tipa pamučnog veša. Realna temperatura vode može se razlikovati od navedene temperature
za dati ciklus pranja.
NAPOMENA!
• Parametri navedeni u ovoj tabeli dati su samo u ilustrativne svrhe. Realni parametri se mogu razlikovati od
parametara prikazanih u tabeli iznad.
Page 31

31
SRB
ODRŽAVANJE
Čišćenje i održavanje
UPOZORENJE!
• Pre nego što započnete sa održavanjem, izvucite kabal iz utičnice i zavrnite slavinu.
Čišćenje kućišta
Pravilnim održavanjem, možete produžiti životni vek mašini za pranje veša. Po
potrebi, njene površine se mogu čistiti razblaženim, neabrazivnim i neutralnim
deterdžentom. Ukoliko dođe do prelivanja vode, odmah obrišite vlažnom krpom.
Izbegavajte kontakt sa oštrim predmetima.
NAPOMENA
• Zabranjena je upotreba mravlje kiseline i rastvarača na bazi razblažene mravlje
kiseline ili sličnih proizvoda, kao što su alkohol, rastvarači ili hemijski proizvodi itd
Čišćenje bubnja
Rđu koju metalni predmeti stvore unutar bubnja trebalo bi odmah ukloniti pomoću deterdženata bez hlora.
Nikada ne koristite čeličnu vunu.
NAPOMENA
• Ne stavljajte veš u mašinu za pranje veša tokom ciklusa čišćenja bubnja.
Čišćenje zaptivne gume i stakla na vratima
Posle svakog pranja, obrišite staklo i zaptivnu gumu kako
biste uklonili fina vlakna i mrlje. Naslage finih vlakana mogu
da dovedu do curenja. Posle svakog pranja, uklonite novčiće,
dugmad i druge predmete koji se mogu naći u zaptivnoj
gumi.
Čišćenje ulaznog filtera
NAPOMENA
• Čišćenje ulaznog filtera se vrši kada je mašina prazna.
Pranje filtera na slavini:
1. Zavrnite slavinu.
2. Skinite dovodno crevo za vodu sa slavine.
3. Očistite filter.
4. Ponovo postavite dovodno crevo za vodu.
Pranje filtera u mašini za pranje veša:
1. Odšrafite dovodnu cev sa zadnjeg dela mašine.
2. Izvucite filter pomoću dugih klješta i ponovo ga
postavite nakon pranja.
3. Za čišćenje filtera koristite četku.
4. Ponovo postavite dovodnu cev.
NAPOMENA
• Ako se ne može očistiti četkom, filter možete izvući i zasebno ga oprati.
• Ponovo postavite sve elemente i odvrnite slavinu.
d.
Page 32

32
SRB
Čišćenje posude za deterdžent
1. Pritisnite ka dole deo posude sa nacrtanom strelicom, koji se nalazi na poklopcu za omekšivač, u fioci
posude.
2. Podignite štipaljku i izvadite poklopac dela za omekšivač, a zatim sve žljebove operite vodom.
3. Ponovo postavite poklopac dela za omekšivač i guranjem postavite fioku na njeno mesto.
NAPOMENA
• Za čišćenje mašine ne upotrebljavajte alkohol, rastvarače ili hemijske proizvode.
A
1 2 3 4
Izvadite fioku posude za
deterdžent pritiskom na
deo sa strelicom
Očistite fioku posude
vodom
Očistite unutrašnjost
otvora starom četkicom
za zube
Ubacite fioku posude
u otvor
Čišćenje filtera odvodne pumpe
UPOZORENJE!
• Čuvajte se vrele vode!
• Ostavite rastvor deterdženta da se ohladi.
• Pre održavanja, isključite mašinu iz struje kako biste izbegli strujni udar.
• Filter odvodne pumpe može da nakon pranja zadrži konce i strana tela malih dimenzija.
• Povremeno očisitite filter kako biste osigurali normalan rad mašine za pranje veša.
OPREZ!
• Uverite se da su poklopac ventila i odvodno crevo za hitne situacije postavljeni na odgovarajući način.
Zaptivka na poklopcu treba da bude u ravni sa zaptivkom na otvoru. U suprotnom može doći do curenja
vode;
1
2
3
6
54
Otvorite donji poklopac
Filter otvorite okretanjem u
smeru suprotnom od smera
kazaljke na satu
Okrenite odvodno crevo
za hitne situacije za 90º i
izvucite ga, a zatim skinite
poklopac
Odvodno crevo za
hitne situacije
Uklonite predmete koje se
nalaze u unutrašnjosti
Nakon ispuštanja vode,
vratite odvodno crevo
Zatvorite donji poklopac
Page 33

33
SRB
• Neke mašine nemaju odvodno crevo za hitne situacije, pa se koraci 2 i 3 mogu izostaviti. Da biste istočili
vodu u posudu, direktno zarotirajte donji poklopac.
• Prilikom upotrebe uređaja, a zavisno od izabranog programa, pumpa može sadržati vrelu vodu. Nikada
nemojte skidati poklopac pumpe u toku ciklusa pranja. Uvek sačekajte da uređaj završi ciklus pranja i da se
isprazni. Prilikom ponovnog postavljanja poklopca, proverite da li je dobro pričvršćen.
Opis Razlog Rešenje
Vrata nisu dobro zatvorena Ponovo pokrenite mašinu nakon zatvaranja
vrata
Proverite da li se veš zaglavio
Problem sa dovodom vode
prilikom pranja
Proverite da li je pritisak vode preterano nizak
Ispravite cev za vodu
Proverite da li je filter na ulaznom ventilu
zapušen
Predugo ispuštanje vode Proverite da li je odvodno crevo zapušeno
Prelivanje vode Ponovo pokrenite mašinu za pranje
Ostalo Molimo Vas da najpre ponovo pokušate da
pokrenete mašinu. Ako problem nastavi da
se javlja, pozovite servis
NAPOMENA!
• Nakon provere, aktivirajte uređaj. Ukoliko se problem ponovi ili ako se na displeju ponovo prikaže neka od
šifara greške, kontaktirajte servis.
Opis Razlog Rešenje
Mašina za pranje veša ne
počinje da radi
Vrata nisu dobro zatvorena Ponovo pokrenite mašinu nakon zatvaranja
vrata. Proverite da li se veš zaglavio
Vrata ne mogu da se
otvore
Aktivirana je opcija zaštite
mašine za pranje veša
Isključite proizvod iz struje i ponovo ga
pokrenite
Curenje vode Dovodna cev ili odvodno
crevo nije dobro pričvršćeno
Proverite i pričvrstite cevi za vodu
Očistite odvodno crevo
Ostaci deterdženta u
posudi
Deterdžent je vlažan ili
zgrudvan
Očistite i obrišite posudu za deterdžent
Indikator ili displej se ne
uključuje
Isključite uređaj iz struje
Postoji problem sa
povezivanjem u programatoru ili
u nekom drugom delu opreme
Proverite da li je uređaj isključen iz struje i da
li je utikač dobro povezan sa utičnicom
Neuobičajena buka Proverite da li su šrafovi za pričvršćivanje
uklonjeni. Proverite da li je uređaj postavljen
na čvrstoj i ravnoj podlozi
Otklanjanje kvarova
Uređaj ne radi od samog početka ili prestaje da radi usred pranja.
Najpre pokušajte da pronađete rešenje za svoj problem. Ukoliko ne uspete, kontaktirajte servisni centar.
Page 34

34
SRB
Kapacitet 8kg
Broj obrtaja 1400 rpm
Klasa energetske efikasnosti
❶
A +++
Godišnja potrošnja energije
❷
196 kWh/godišnje
Potrošnja struje u režimu isključeno (off) 0.5W
Potrošnja struje u režimu ostavljeno
uključeno (Left-on)
1.0W
Godišnja potrošnja vode
❸
11000L/godišnje
Efikasnost centerifuge/sušenja
❹
B
Standardni ciklus pranja
❺
Cotton (Pamuk)
Potrošnja energije pri standardnom programu na 60ºC, sa
potpuno opterećenim bubnjem
0,90 kWh/ciklusu
Potrošnja energije pri standardnom programu na 60ºC, sa
delimično opterećenim bubnjem
0,88 kWh/ciklusu
Potrošnja energije pri standardnom programu na 40ºC, sa
delimično opterećenim bubnjem
0,79 kWh/ciklusu
Trajanje standardnog programa na 60ºC sa potpuno
opterećenim bubnjem
228 min
Trajanje standardnog programa na 60ºC sa delimično
opterećenim bubnjem
228 min
Trajanje standardnog programa na 40ºC sa delimično
opterećenim bubnjem
222 min
Potrošnja vode pri standardnom programu na 60ºC, sa
potpuno opterećenim bubnjem
54L/ciklusu
Potrošnja vode pri standardnom programu na 60ºC, sa
delimično opterećenim bubnjem
45L/ciklusu
Karakteristike proizvoda
Tehnička specifikacija
MAKS. dozvoljena struja 10A
Standardni pritisak vode 0.05MPa~1MPa
D
W
H
Napajanje 220-240V~,50Hz
Kapacitet pranja 8.0kg
Dimenzije (Š*D*V mm) 595*565*850
Neto težina 68kg
Nominalna snaga 2000W
Page 35

35
SRB
Potrošnja vode pri standardnom programu na 40ºC, sa
delimično opterećenim bubnjem
45L/ciklusu
Preostali sadržaj vlage pri standardnom programu na 60ºC,
sa potpuno opterećenim bubnjem
50%
Preostali sadržaj vlage pri standardnom programu na 60ºC,
sa delimično opterećenim bubnjem
55%
Preostali sadržaj vlage pri standardnom programu na 40ºC,
sa delimično opterećenim bubnjem
55%
Nivo buke prilikom pranja 59dB (A)
Nivo buke prilikom centrifugiranja 76/78dB (A)
NAPOMENA!
• Podešavanje programa za testiranje obavlja se u skladu sa važećim standardom En60456.
• Prilikom upotrebe test programa, navedenu težinu veša perite pri maksimalnom broju obrtaja.
• Realni parametri će zavisiti od načina upotrebe uređaja i mogu se razlikovati od parametara prikazanih u
tabeli iznad.
• Mašina za pranje veša za upotrebu u domaćinstvu opremljena je sistemom za upravljanje energijom.
Trajanje režima Ostavljeno uključeno (left-on) iznosi manje od 1 minuta.
• Nivo buke tokom pranja/centrifugiranja pri standardnom ciklusu pranja sa potpuno opterećenim
bubnjem.
Primedbe:
❶
Klasa energetske efikasnosti se kreće od A (najviša efikasnost) do D (najniža efikasnost).
❷
Potrošnja energije na godišnjem nivou, na osnovu 220 standardnih ciklusa pranja u standardnom
programu na 60ºC i 40ºC, sa potpuno ili delimično opterećenim bubnjem, i pri potrošnji u režimima sa
malim utroškom energije. Realna potrošnja energije zavisiće od načina na koji se uređaj upotrebljava.
❸
Potrošnja vode na godišnjem nivou, na osnovu 220 standardnih ciklusa pranja u standardnom programu
na 60ºC i 40ºC, sa potpuno ili delimično opterećenim bubnjem. Realna potrošnja vode zavisiće od načina
na koji se uređaj upotrebljava.
❹
Klasa efikasnosti sušenja centrifugiranjem se kreće od G (najmanje efikasna) do A (najefikasnija).
❺
Standardni program na 60ºC i standardni program na 40ºC predstavljaju standardne programe pranja.
Ovi programi su pogodni za pranje normalno zaprljanog pamučnog veša i predstavljaju najefikasnije
programe u smislu kombinovanog utroška energije i vode pri pranju pomenutog tipa pamučnog veša.
Realna temperatura vode može se razlikovati od navedene temperature za dati ciklus pranja. Za najbolji
učinak prilikom pranja, sa manjom potrošnjom vode i energije, izaberite odgovarajući tip deterdženta za
datu temperaturu pranja.
Page 36

tesla.info
 Loading...