

Page 1
WASHING
MACHINE
WF101491M
User Manual
ENG SRB
Product images are for illustrative purposes only and may differ from the actual product.
Page 2
ENG
SAFETY INSTRUCTIONS
Intended Use
The product is intended only for home use and for textiles in household amounts suitable for washing. This
appliance is for indoor use only and not intended for built in use. Only use according to these instructions.
The appliance is not intended for commercial use.
Any other use is considered as improper use. The producer is not responsible for any damage or injury that
may result from it.
This appliance is intended to be used in household and similar applications such as:
• Sta kitchen areas in shops, oces and other working environments;
• Farm houses;
• By clients in hotels, motels and other residential type environments;
• Bed and breakfast type environments;
• Areas for communal use in blocks of ats or in launderettes.
DANGER
This symbol indicates that there are dangers to the life and health of persons due to extremely
ammable gas.
WARNING OF ELECTRICAL VOLTAGE
This symbol indicates that there is a danger to life and health of persons due to voltage.
WARNING
The signal word indicates a hazard with a medium level of risk which, if not avoided, may result in
death or serious injury.
CAUTION
The signal word indicates a hazard with a low degree of risk which, if not avoided, may result in
minor or moderate injury.
NOTE
The signal word indicates important information (e.g. damage to property), but not danger.
OBSERVE INSTRUCTIONS
This symbol indicates that a service technician should only operate and maintain this appliance
in accordance with the operating instructions.
Please read the following safety information thoroughly and follow it strictly to minimize the risk of re or
explosion, electric shock and to prevent property damage, personal injury or loss of life. Failing to follow
these instructions shall void any warranty.
This appliance is not intended for use by persons (including children) with reduced physical, sensory or
mental capabilities, or lack of experience and knowledge, unless they have been given supervision or
instruction concerning use of the appliance by a person responsible for their safety.
WARNING!
• If the supply cord is damaged, it must be replaced by the manufacturer, its service agent or similarly
qualied persons in order to avoid a hazard.
• If the machine is damaged, it must not be operated unless repaired by the manufacturer, its service agent
or similarly qualied persons.
• Risk of electric shock!
• The appliance can be used by children aged from 8 years and above and persons with reduced physical,
sensory or mental capabilities or lack of experience and knowledge if they have been given supervision or
instruction concerning use of the appliance in a safe way and understand the hazards involved. Children
shall not play with the appliance. Cleaning and user maintenance shall not be made by children without
supervision.
• Children should be supervised that they do not play with the appliance.
• Children 3 years and under shall be kept away from the appliance or continuously supervised.
Electric Shock Hazard
2
Page 3
• Animals and children may climb into the machine. Check the machine before every operation.
• Do not climb or sit on the appliance.
Installation Location and Surrounding
• All washing and additional substances are to be kept in a safe place out of the reach of children.
• Do not install the machine on a carpet oor.
• The obstruction of the openings by a carpet can damage the machine.
• Keep the appliance clear from heating sources and direct sunlight to avoid plastic and rubber parts to
corrode.
• Do not use the appliance in humid environments or rooms containing explosive or caustic gas. In case of
water leakage or water splashes, let the appliance dry in the open air.
• The appliance must not be installed behind a lockable door, a sliding door or a door with a hinge on the
opposite side to that of the machine .
• Do not operate the machine in rooms with a temperature of below 5°C. This can cause damages to
parts of it. If it is unavoidable, make sure to drain the water completely from the appliance after every use
(see“Maintenance - Cleaning of drain pump lter”) to avoid damages caused by frost.
• Never use ammable sprays or substances in the immediate proximity of the appliance.
Installation
• Remove all packaging material and transport bolts before using the appliance. Otherwise, serious damage
may result.
• This appliance is equipped with a single inlet valve and can be connected to the cold water supply only.
• Mains plug must be accessible after installation.
• Before washing clothes for the rst time, the product shall be operated once throughout all the
procedures without any clothes inside.
• Before using the machine, the product shall be calibrated.
• Do not put any excessively heavy objects on the appliance, like water containers or heating devices.
• The new hose-sets supplied with the appliance are to be used and that old hose-sets
• should not be reused.
• Max. Inlet water pressure 1 MPa. Min. inlet water pressure 0.05 MPa.
ENG
Electrical Connection
• Make sure the supply cable is not trapped by the machine, or it can get damaged.
• Connect the product to a grounded outlet protected by a fuse complying with the values in the “Technical
specications” table. The grounding installation has to be made by a qualied electrician. Ensure that the
machine is installed in accordance with the local regulations.
• Water and electrical connections must be carried out by a qualied technician in accordance with the
manufacturer’s instructions and local safety regulations.
WARNING!
• Don´t use multiple plugs or extension cords.
• The appliance must not have an external switching device such as a timer or connected to a circuit that is
regularly switched on and o.
• Do not pull the plug out of the mains outlet if there is ammable gas around.
• Never pull out power plug with wet hands.
• Always pull at the plug, not at the cable.
• Always unplug the appliance if it is not being used.
Water Connections
• Check the connections of the water inlet tubes, the water tap and the outlet hose for possible problems
due to changes of water pressure. If the connections loosen or leak, close the water tap and get it repaired.
• Do not use the appliance before the pipes and hoses are installed properly by qualied persons.
• Glass door may become very hot during the operation. Keep children and pets far away from the machine
while it is operating.
• The water inlet and outlet hoses have to be safely installed and remain undamaged.
• Otherwise, water leakage can occur.
• Do not remove the drain pump lter while there is still water in the appliance. Big quantities of water can
leak out, and there is a risk of scalding due to hot water.
3
Page 4
ENG
Operation and Maintenance
• Never use any ammable, explosive or toxic solvents. Do not use gasoline and alcohol etc. as detergents.
Only select detergents that are suitable for machine washing.
• Make sure that all pockets are emptied. Sharp and rigid items such as coins, brooches, nails, screws, stones
etc. may cause serious damages to this machine.
• Remove all objects from pockets such as lighters and matches before use the appliance. Thoroughly rinse
items that have been washed by hand.
• Items that have been soiled with substances such as cooking oil, acetone, alcohol, petrol, kerosene, spot
removers, turpentine, wax and wax removers should be washed in hot with an extra amount of detergent
before being dried in the appliance.
• Items containing foam rubber (latex foam), shower caps, water proof textiles, rubber backed articles and
clothes or pillows tted with foam rubber pads should not be washed in the machine.
• Fabric softeners or similar products should be used are recommended in their instructions.
• Never try to open the door forcefully.
• The door will unlock shortly after the end of a cycle.
• Please do not close the door with excessive force. If it is found dicult to close the door, please check if
the clothes are properly inserted and distributed.
• Always unplug the appliance and close the water tap before cleaning and maintenance and after each
use.
• Never pour water over the appliance for cleaning purpose. Risk of electric shock!
• Repairs shall only be carried out by the manufacturer, its service agent or similarly qualied persons in
order to avoid a hazard.
• The producer will not be responsible for damages caused by the intervention of not authorized persons.
Transport
• Before Transport:
-Bolts shall be reinstalled to the machine by a specialized person;
-Accumulated water shall be drained out of the machine.
• This appliance is heavy. Transport with care. Never hold any protruding part of the machine when lifting.
The machine door can not be used as a handle.
Model Washing Capacity
WF101491M 10.0kg
4
Page 5
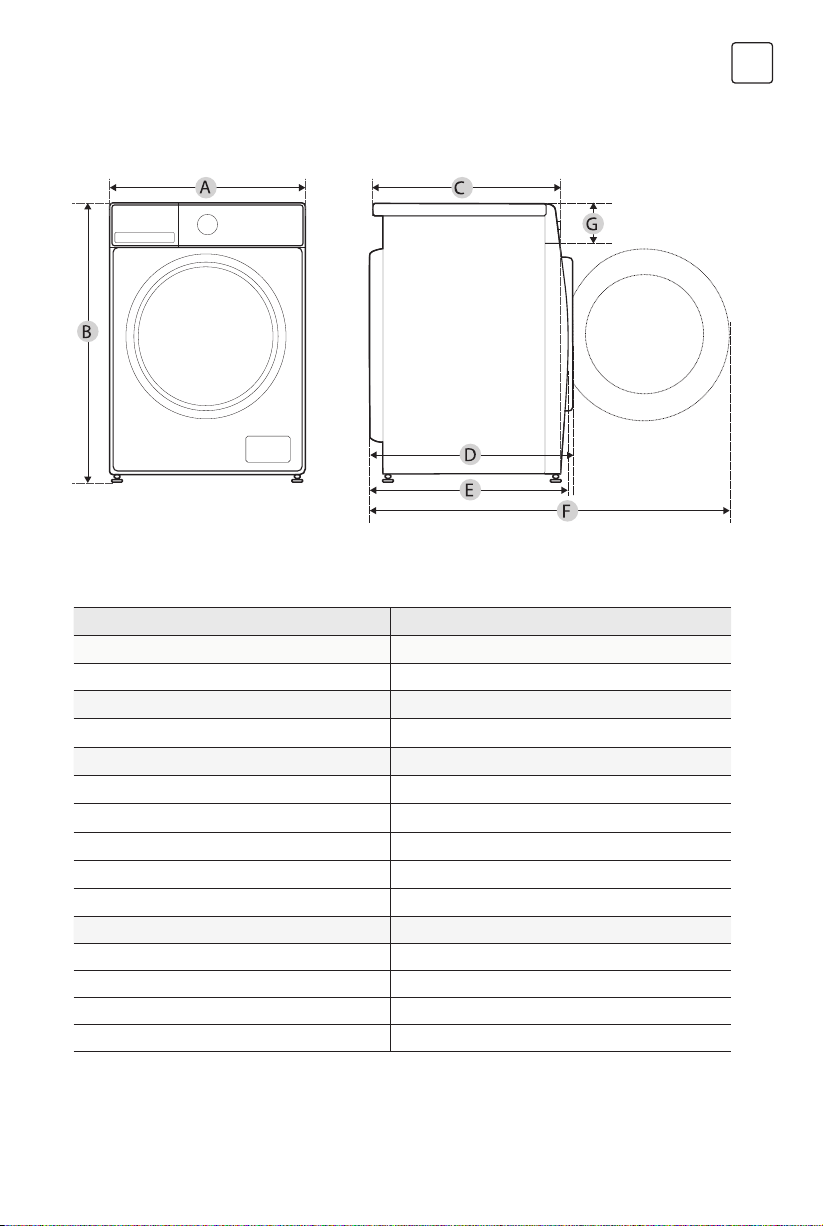
SPECIFICATIONS
Model WF101491M
Power Supply 220-240V~,50Hz
MAX. Current 10A
Standard Water Pressure 0.05MPa~1MPa
Washing Capacity 10.0kg
Dimension
A 595mm
B 850mm
C 530mm
Weight 65kg
Rated Power 1950W
Reference Dimension
D 600mm
E 540mm
F 1045mm
G 135mm
ENG
5
Page 6
ENG
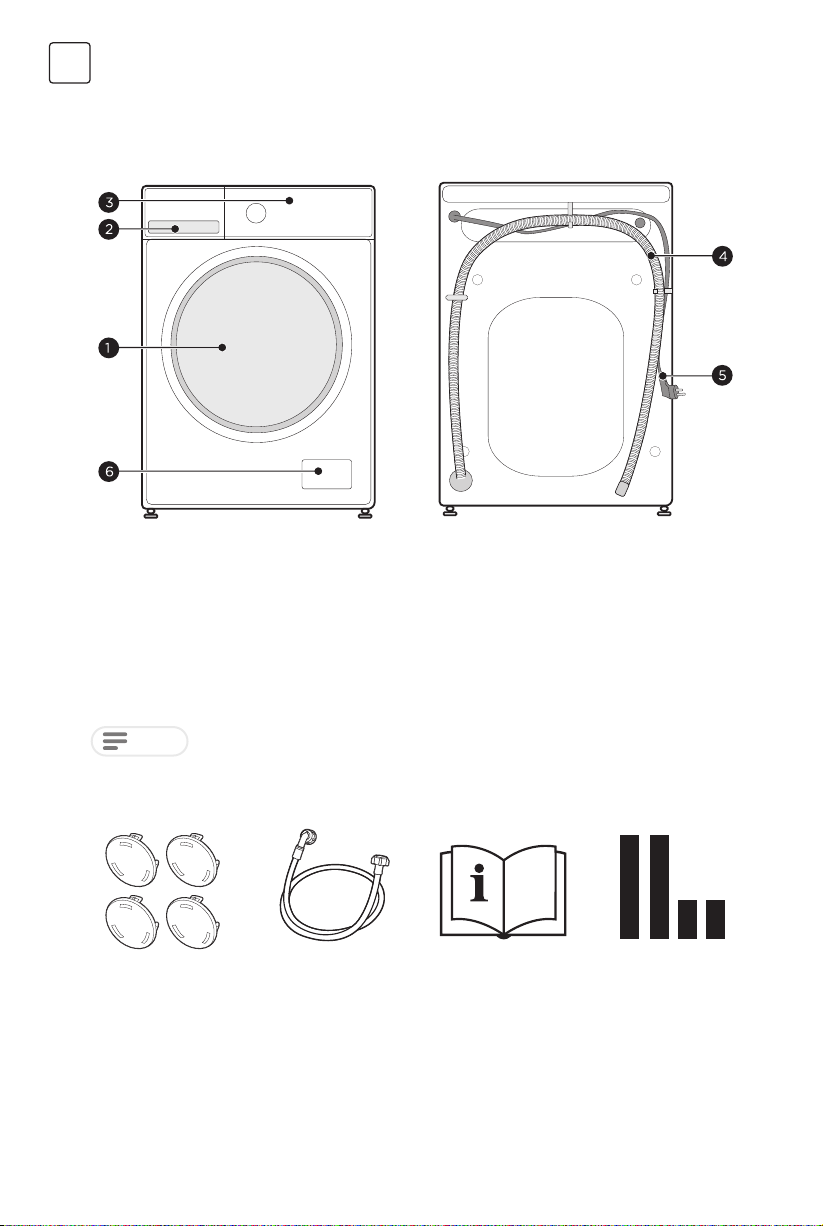
PRODUCT OVERVIEW
1. Door
2. Detergent dispenser
3. Control panel
NOTE
The product picture is for illustration only, please refer to real product as reference.
Accessories
4 x Cover caps 1 x Supply hose cold
water
4. Drain hose
5. Power supply cord
6. Service ap
1 x Owner’s manuall Acoustic sponge
6
(optional)
Page 7
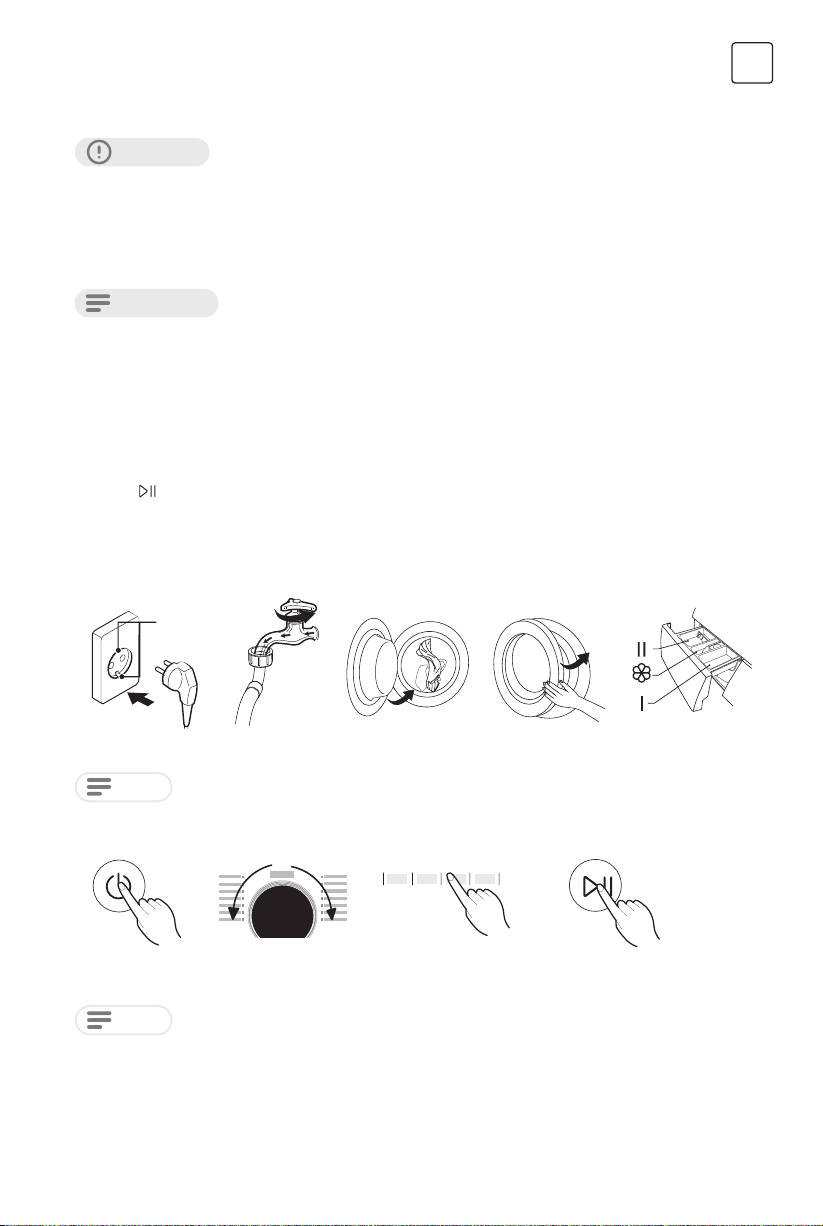
QUICK START GUIDE
CAUTION!
• Before washing, please make sure the machine is installed properly.
• Your appliance was thoroughly checked before it left the factory. To remove any residual water and to
neutralize potential odors, it’s recommended to clean your appliance before rst use. For this reason,
recommended to clean the inner drum by running the “Drum Clean” or other program with the optional
temperature of 90°C. Be careful not to put laundry and detergent in the machine.
CALIBRATION
It’s recommended to calibrate the machine, so that provide the best performance. The appliance is able to
detect the amount of laundry loaded. This function is optimizing the product performance by minimizing
energy and water consumption, saving you money and time. For this reason it’s recommended to calibrate
the appliance for best use.
1. Remove all accessories from the drum and close the door;
2. Insert the mains plug to the socket;
3. Switch on the washing machine, and within 10 seconds, press “Delay” and “Temp.” continuously
(normally 3 seconds) until “t19” is displayed .
4. Press
1. Before Washing
to start the appliance, initially“---” is displayed, and then “***” (such as “126”) is displayed to
indicate the real time drum speed. When the number reaches a certain value (stop changing), it means
the washing machine is successfully calibrated.
ENG
earth
terminal
Softener
Prewash
Plug in Open tap Load Close door Add detergent
NOTE
Detergent need to be added in compartment I if the pre-wash function is selected.
2. Washing
Power on Select function or remain
Select programme
default settings
Press Start/Pause to start
the program
NOTE
1. If default is selected, step 3 can be skipped.
2. The function button line chart is for reference only, please refer to real product as standard.
3. After Washing
Buzzer beep or “End” on display.
7
Main
wash
Page 8
ENG
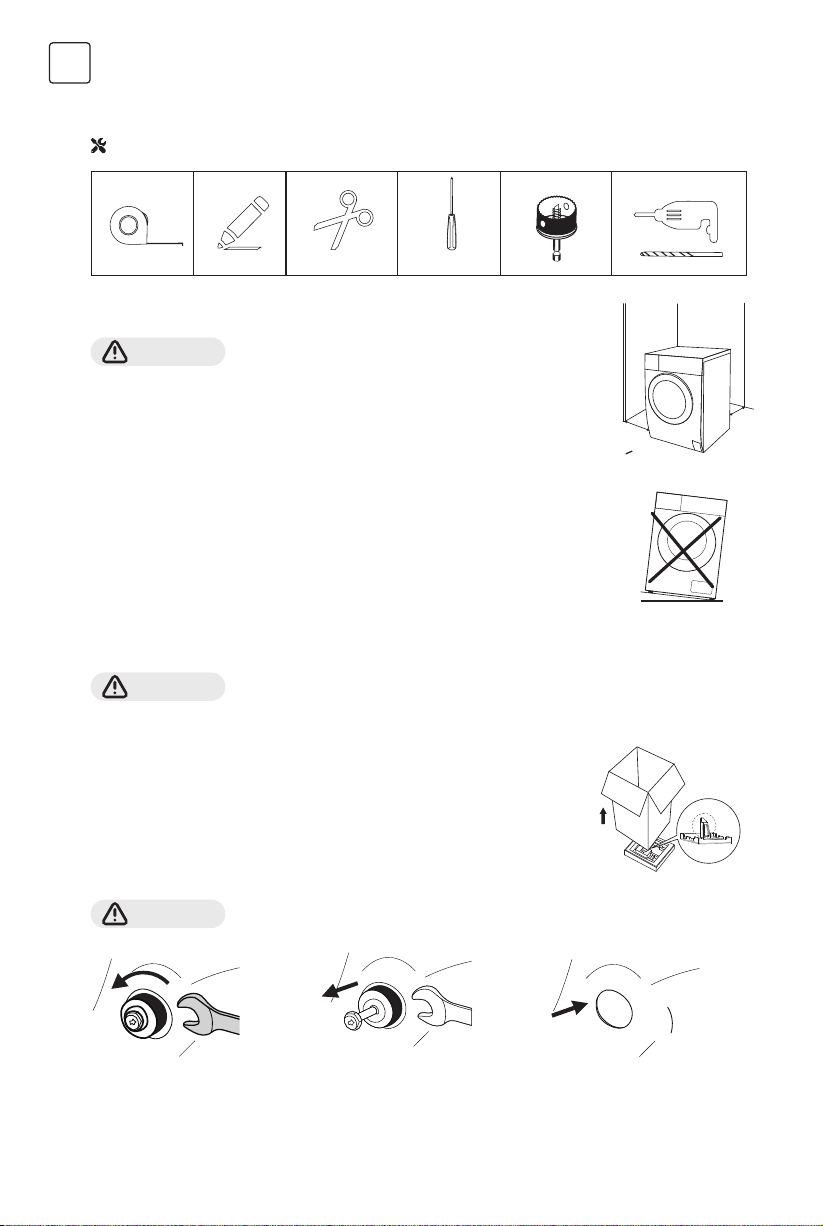
PRODUCT INSTALLATION
Tools Needed If Installation By Yourself (not included)
Installation Area
WARNING!
• Stability is important to prevent the product from wandering!
• Make sure the machine is standing leveled and stable.
• Make sure that the product does not stand onto the power cord.
• Make sure to maintain the minimum distances from the walls as shown in the
picture.
Before installing the machine, the location characterized as follows shall be selected:
1. Rigid, dry, and level surface.
2. Avoid direct sunlight.
3. Sucient ventilation.
4. Room temperature is above 5 °C .
5. Keep far away from the heat sources such as coal or gas burning appliances.
w
W> 2 0m m
w
Unpacking the Machine
WARNING!
• Packaging material (e.g. Films, Styrofoam) can be dangerous for children.
• There is a risk of suocation ! Keep all packaging well away from children.
1. Remove the cardboard box and styrofoam packing.
2. Lift the machine and remove the base packaging.
3. Remove the tape securing the power supply cord and drain hose.
4. Remove the inlet hose from the drum.
Remove Transport Bolts
WARNING!
Loosen the 4 transport bolts
with a spanner.
You must remove the transport bolts from the backside before using the product.
Remove the bolts including
the rubber parts and keep
them for future use.
8
Close the holes using the
cover caps.
Page 9
PRODUCT INSTALLATION
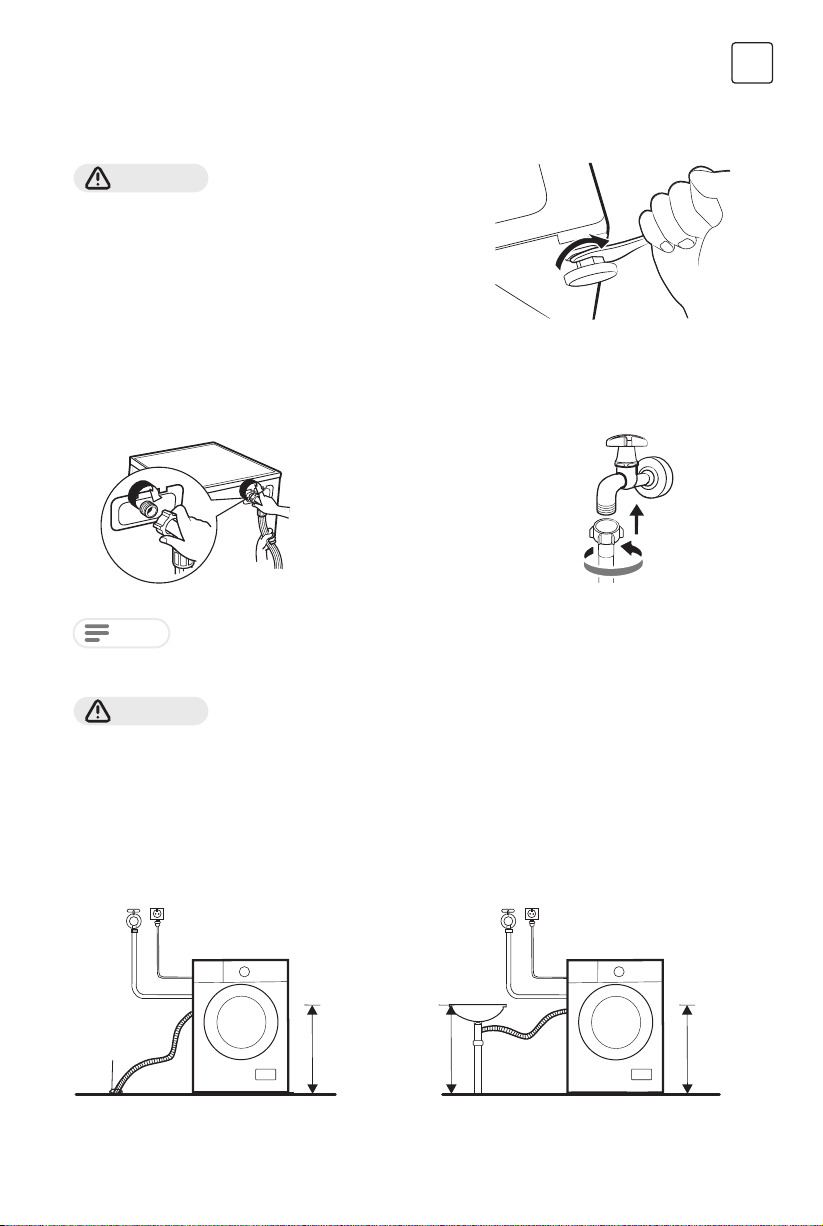
Levelling the Machine
WARNING!
The lock nuts on all four feet must be screwed tightly against the
housing.
1. Loosen the lock nut.
2. Turn the foot until it reaches the oor.
3. Adjust the legs and lock the nuts with a spanner. Make sure the
machine is level using a spirit level.
Connect the Water Supply Hose
To prevent leakage or water damage, follow the instructions in this chapter.
• Do not kink, crush or modify water inlet hose.
Connect the water supply hose to
the water inlet valve and a water
tap with cold water as indicated.
ENG
NOTE
Drain Hose
WARNING!
• Do not kink or protract the drain hose.
• Position drain hose properly ,otherwise damage might result in water leakage.
• It is not allowed to remove the buckle of drain pipe.
There are two ways to place the end of drain hose:
1. Put it into the water trough. 2. Connect it to the branch drain pipe of the
Water trough
Connect manually, do not use tools. Check if the connections are tight.
trough.
Max. 100cm
Min. 60cm
Max. 100cm
Min. 60cm
9
Max. 100cm
Min. 60cm
Page 10
ENG
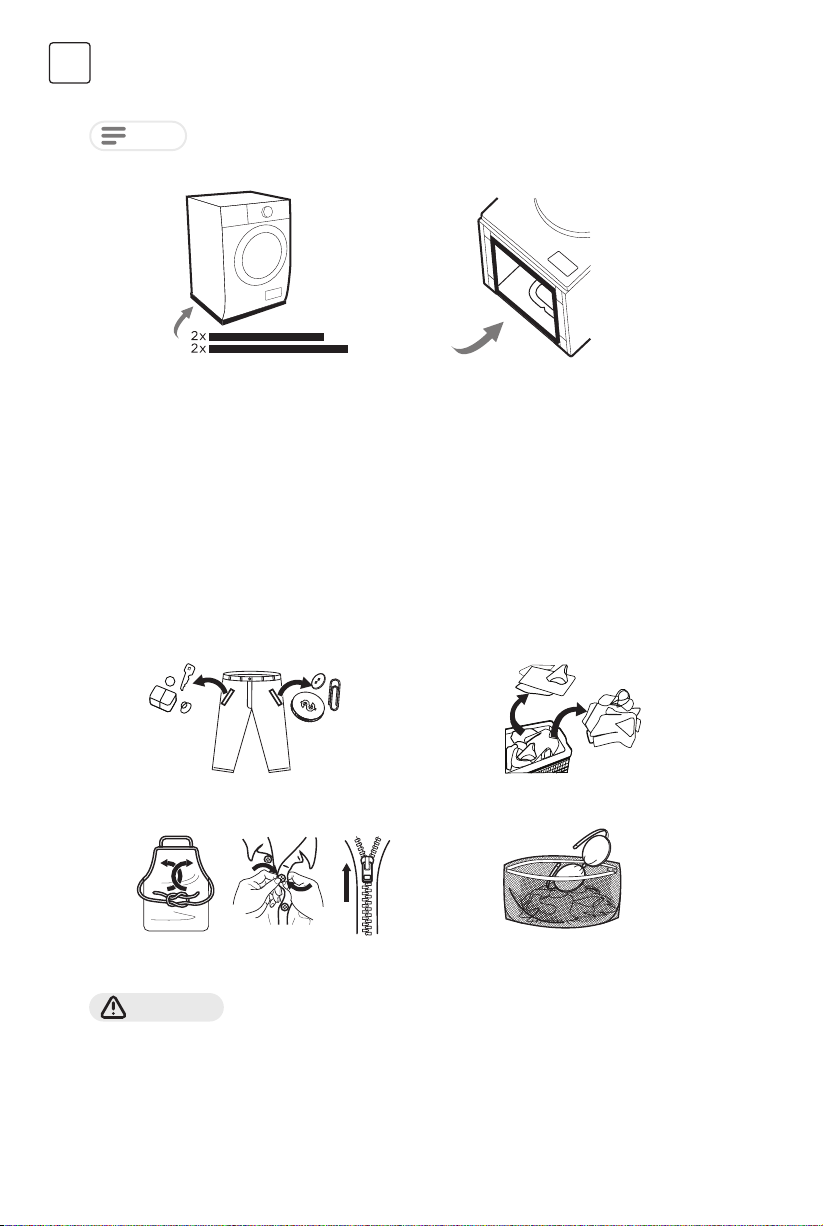
Acoustic Sponge
NOTE
1. Get the machine laid on the oor, using some soft material like foam or clothes between the machine
and oor for a protection;
2. Stick the 2x longer sponges to the longer bottom edges of machine, and the 2x shorter sponges to the
shorter bottom edges.
Please make sure to assemble the acoustic sponges, which can eectively reduce the noise
caused by the machine while working, in order to provide you with a more peaceful and
quiet living environment.
OPERATION INSTRUCTIONS
Before Each Washing
• The ambient temperature of the machine should be 5°C-40°C. If used under 0°C, the inlet valve and
draining system may be damaged. If the machine is installed under freezing conditions, it should be
transferred to normal ambient temperature to ensure the water supply hose and drain hose can unfreeze
before use.
• Please check your laundry care labels and the detergent use instructions before wash. Use non-foaming or
less-foaming detergent suitable for machine properly.
1. Take all items out of the pockets 2. Sort laundry according to color and
3. Tie together long textile strips and
belts, close zips and button
WARNING!
• Do not wash articles that have been cleaned in, washed in, soaked in, or dabbed with combustible or
explosive substances like wax, oil, paint, gasoline, alcohol, kerosene, and other ammable materials.
• Washing single clothes items may easily create big eccentricity. Therefore it is suggested to add one or two
more laundry items to the wash so that spin can be done smoothly.
• Do not wash, spin water-proof seats, mats, or clothing.
4. Put small items into a laundry bag
10
textile type
Page 11
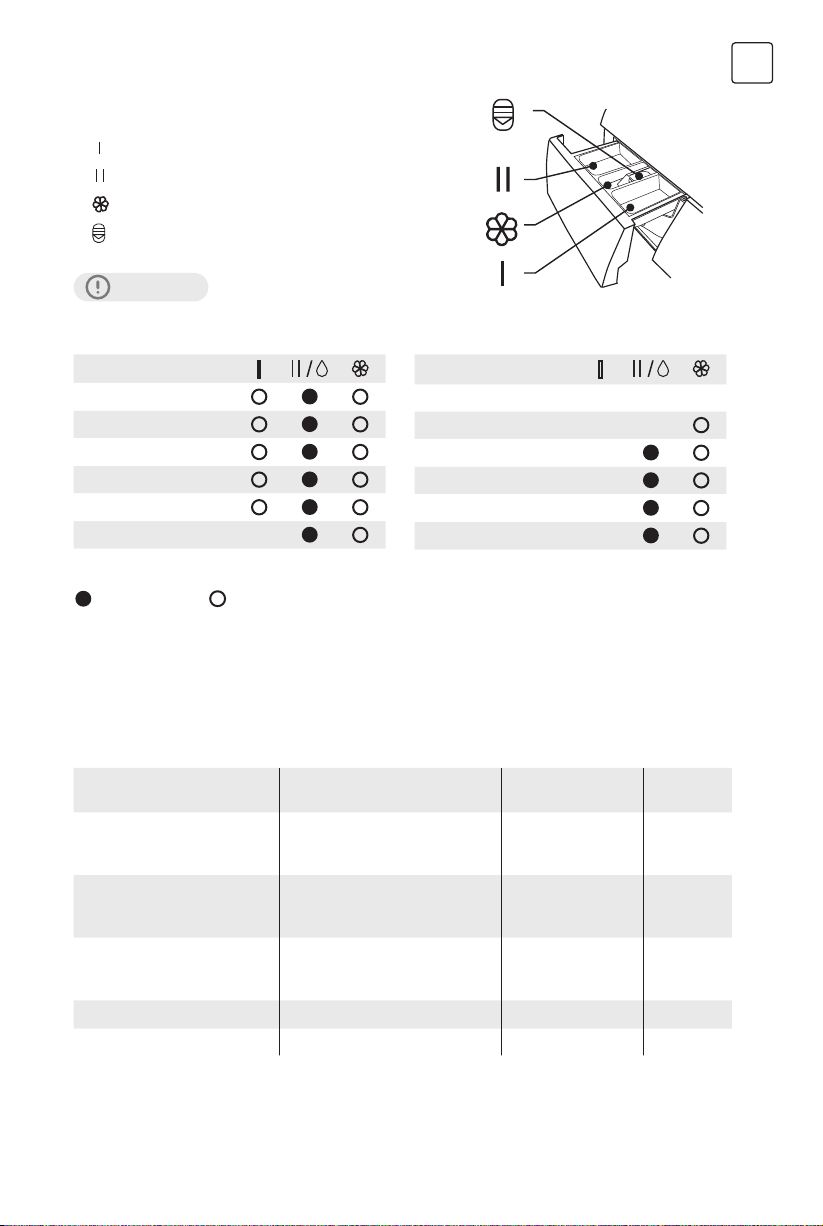
Detergent Dispenser
Prewash detergent
Main wash detergent
Softener
Release button to pull out the dispenser
CAUTION!
Detergent only need to be added in “compartment I ” after selecting pre-wash function.
ENG
Program
Cotton
Synthetic
Mix
Bed Linen
Baby Care
20ºC
Drum Clean
Means must Means optional
Program
Spin Only
Rinse & Spin
Wool
ECO 40-60
Sterilization
Quick 15’
OPERATION INSTRUCTIONS
Detergent Recommendation
Recommended washing
detergent
Heavy-duty detergent with
bleaching agents and optical
brighteners
Colour detergent without
bleaching agent and optical
brighteners
Color or mild detergent
without optical brighteners
Mild washing detergent Delicate textiles, silk, viscose Synthetic 20
Special wool detergent Wool Wool 20/40
Type of laundry and textile Wash cycles
White laundry made from boilproof cotton or linen
Coloured laundry made from
cotton or linen
Coloured laundry made from
easy care bres or synthetic
materials
Cotton,ECO 40-60 40/60
Cotton 20/40
Cotton,Synthetic 20/40
Washing
temp. °C
11
Page 12
ENG
NOTE
• Agglomerating or ropy detergent or additive can be diluted in some water before pouring it into the
detergent dispenser, to avoid its inlet to get blocked and thus cause a water overow.
• Please choose the suitable type of detergent to get a maximum of washing performance and a minimum
of water and energy consumption.
• To achieve the best cleaning result a proper detergent dosing is important.
• Use a reduced detergent amount if the drum is not lled completely.
• Always adjust the amount of detergent to the water hardness, if your tap water is soft, use less detergent.
• Dose according to how dirty your laundry is, less dirty clothes require less detergent.
• Highly concentrated (compact detergent) requires particularly accurate dosing.
Following symptoms are a sign of detergent overdosing:
- heavy foam formation
- poor washing and rinsing result
Following symptoms are a sign of detergent under dosing:
- laundry turns grey
- built-up of limescale deposits on the drum, the heating element and/or the laundry
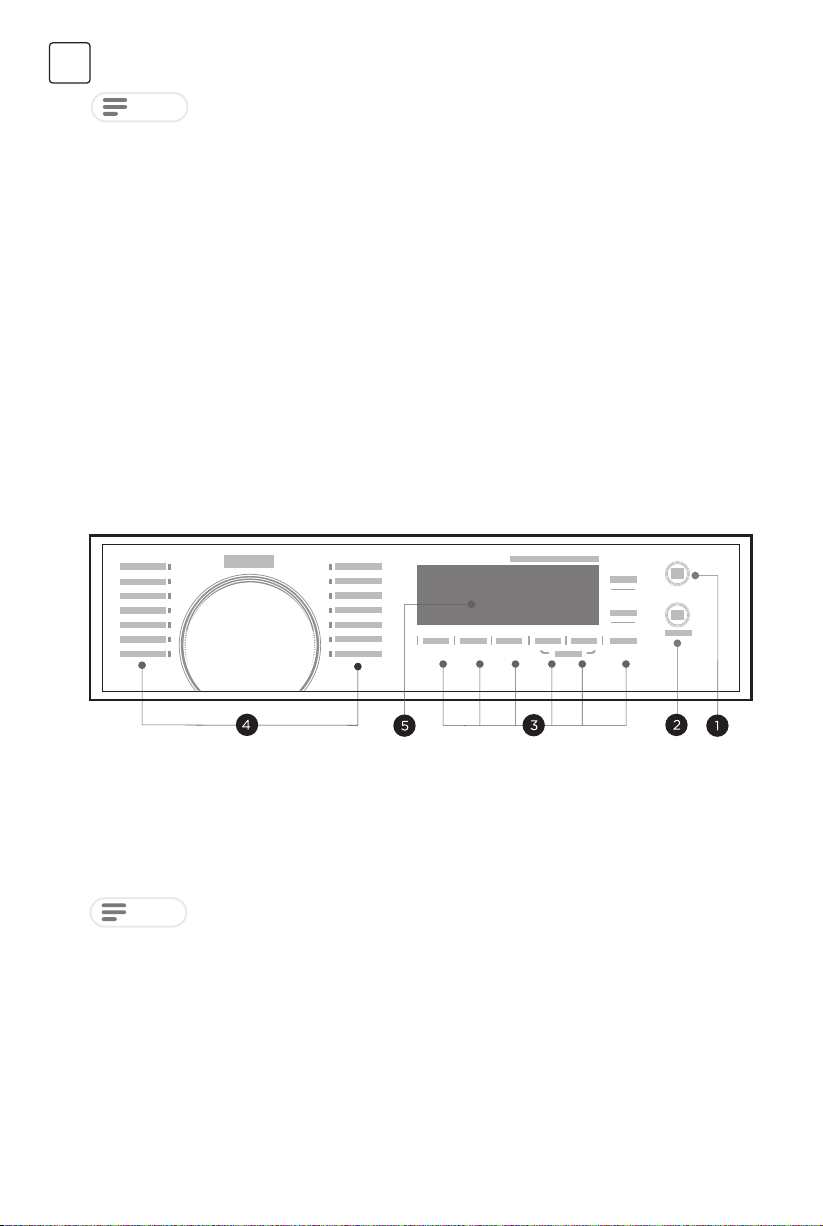
Control Panel
1. ON/OFF
Turn the appliance on / o.
2. Start/Pause
Start or pause your programme.
3. Option
This allows you to select additional functions.
NOTE
The Chart is reference only, please refer to real product as standard.
4. Programmes
Available according to the laundry type.
5. Display
The display shows settings, estimated
remaining time, options and status messages.
12
Page 13
OPERATION INSTRUCTIONS
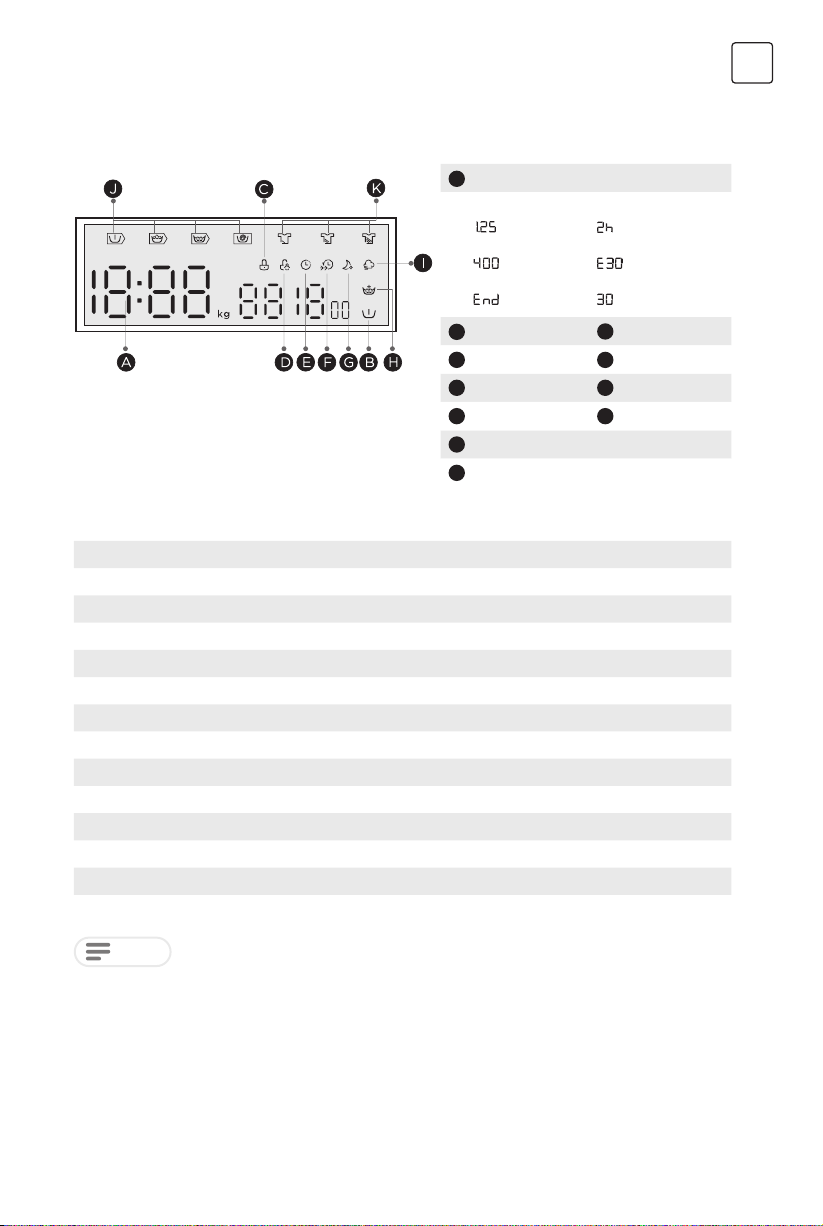
Display
A
Wash Time
Display
Speed
End
ENG
Delay Time
Error
Temp.
B
Pre Wash
D
Child Lock
F
Speed Wash
H
Extra Rinse
J
Pre Wash-Wash-Rinse-Spin
K
Soil Level
C
Door Lock
E
Delay
G
Night Wash
I
Steam Care
Programmes
Programme Load(kg) Default Time (h:min)
Cotton
Synthetic
Mix
Bed Linen
Baby Care
20°C
Drum Clean
Spin Only
Rinse&Spin
Wool
ECO 40-60
Sterilization
Quick 15’
10.0 3:39
5.0 3:18
10.0 1:20
10.0 1:48
10.0 2:01
5.0 1:01
− 1:18
10.0 0:12
10.0 0:20
2.0 1:07
10.0 3:59
5.0 2:27
2.0 0:15
NOTE
The parameters in this table are only for user’s reference. The actual parameters maybe
dierent with the parameters in above mentioned table.
13
Page 14
ENG
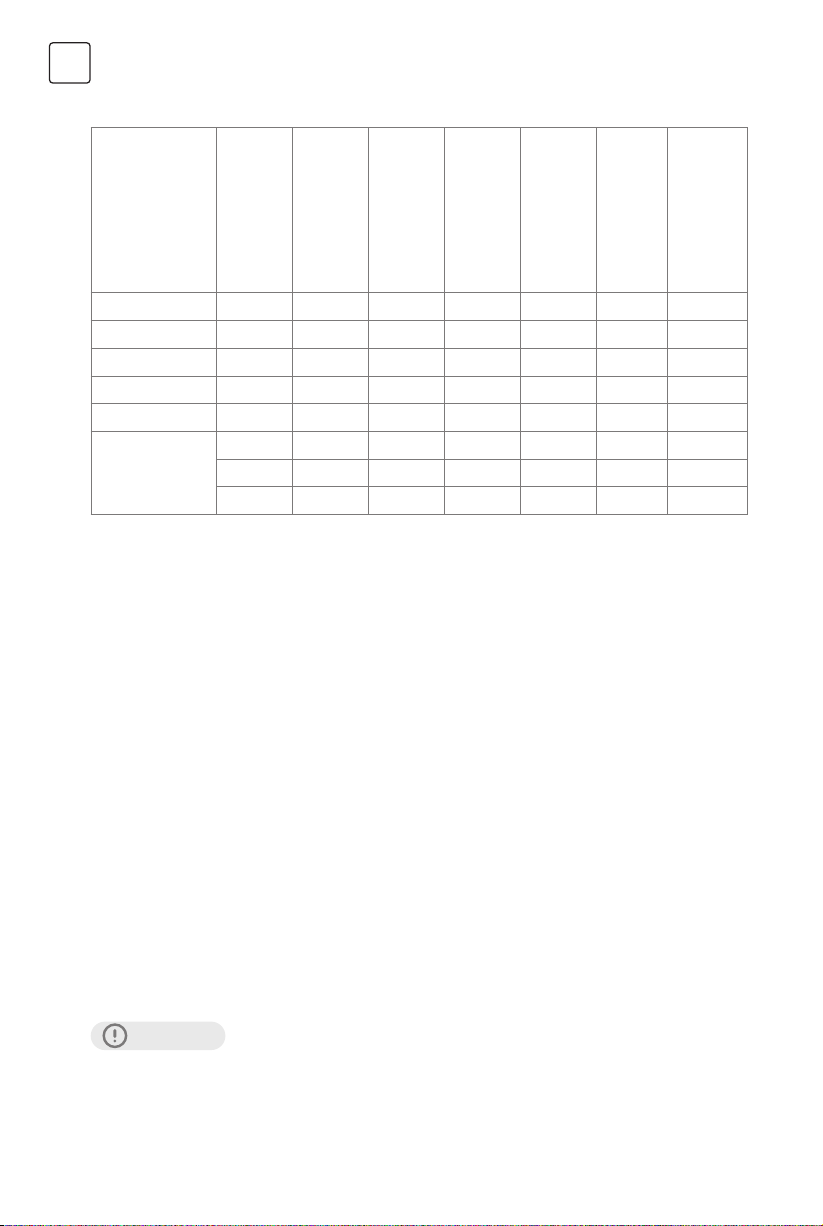
Programmes
Cycle
setting °C
Temperature
Nominal capacity in kg
Cotton(60°C) 10.0 60 3:44 1.726 85 60 53%/800
Mix 10.0 40 1:20 0.889 85 40 70%/800
20 °C 5.0 20 1:01 0.212 51 20 65%/1000
Quick 15' 2.0 Cold 0:15 0.030 31 Cold 70%/800
Bed Linen 10.0 40 1:48 0.920 85 40 65%/1000
10.0 -- 3:59 0.895 67.0 37 53.9%/1350
3)
ECO 40-60
• The above data is for reference only, and the data may change due to dierent actual use conditions.
• The valves given for programmes other than the ECO 40-60 programme are indicative only.
• 20°C is able to clean lightly soiled cotton laundry, at a nominal temperature of 20 °C, which complies with
the regulation (EU) 2019/2023.
• Concerning to EN 60456:2016/prA2019 With (EU)2019/2014, (EU)2019/2023,
(EU)2021/340, (EU)2021/341
• The EU energy eciency class is: A
Energy test program: ECO 40-60. Other as the default.
Half load for 10.0kg machine:5.0kg.
Quarter load for 10.0kg machine:2.5kg.
5.0 -- 3:00 0.560 52.0 33 53.9%/1350
2.5 -- 3:00 0.232 41.5 23 53.9%/1350
Cycle duration in
hours and minutes
cycle
in kWh/operalling
Energy consumption
liter/operalling cycle
Water consumption in
1)
°C
% /spin speed
Highest temperature
Residual moisture in
Programmes
2)
1) The highest temperature reached by the laundry in the wash cycle for at least 5 minutes.
2) Residual moisture after the wash cycle in water content percent and the spin speed at which this was
achieved.
3) The ECO 40-60 programme is able to clean normally soiled cotton laundry declared to be washable
at 40°C or 60°C, together in the same cycle. This programme is used to assess the compliance with the
regulation (EU) 2019/2023.
The most ecient programmes in terms of energy consumption are generally those that perform at lower
temperatures and longer duration.
Loading the household washing machine up to the capacity indicated for the respective programmes will
contribute to energy and water savings.
Noise and remaining moisture content are inuenced by the spinning speed: the higher the spinning speed
in the spinning phase, the higher the noise and the lower the remaining moisture content.
CAUTION!
If there is any break in the power supply while the machine is operating, a special memory stores the
selected programme. The machine will continue the programme when the power supply is re-established.
14
Page 15
OPERATION INSTRUCTIONS
Programmes are available according to the laundry type.
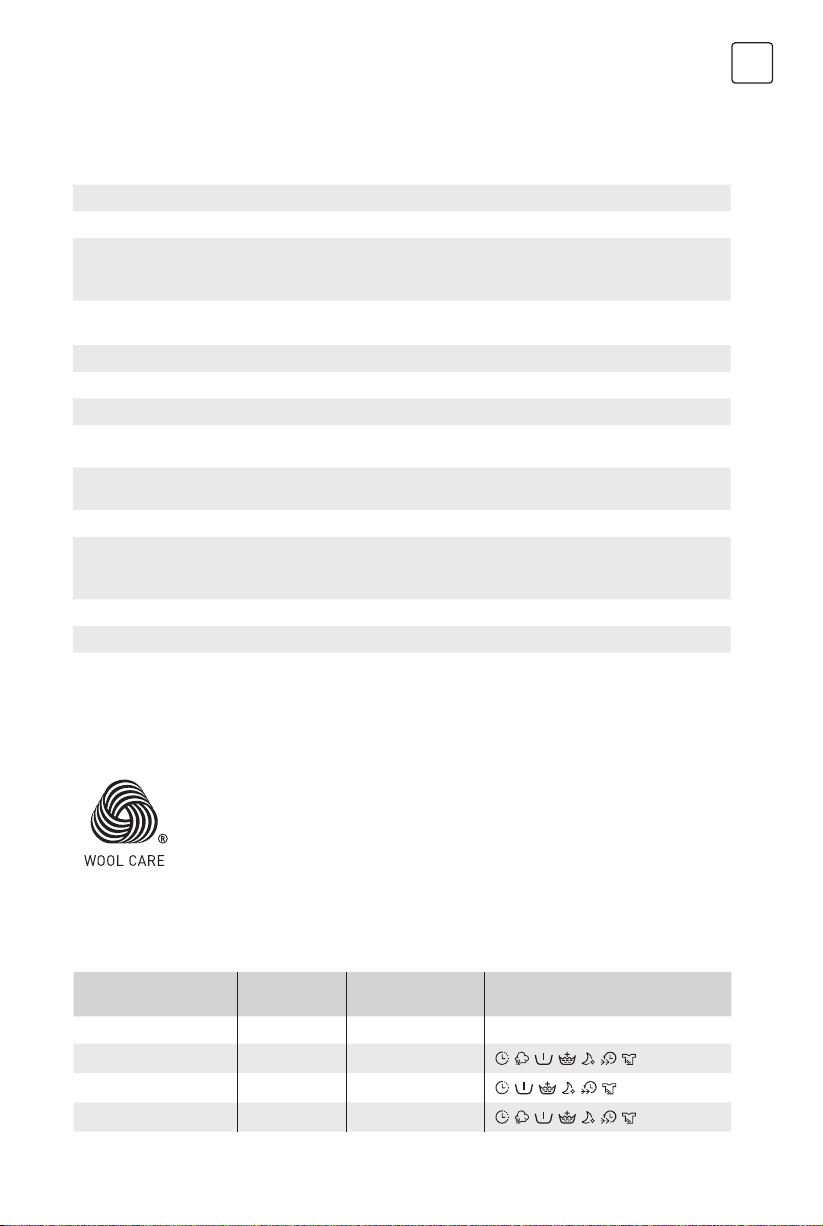
Programs
Cotton Hard-wearing textiles, heat-resistant textiles made of cotton or linen
Synthetic Wash synthetic articles, for example: shirts, coats, blending. While washing the knitting
textiles, detergent quantity shall be reduced due to its loose string construction and
easily forming bubbles.
Baby Care Washing the baby’s clothes, it can make the baby’s wear cleaner
and make the rinse performance better to protect the baby skin.
Mix Mixed load consisting of textiles made of cotton and synthetics.
Bed Linen This program is specially designed for washing Bed Linen.
20°C Able to clean lightly soiled cotton laundry, at a nominal temperature of 20 °C.
ECO 40-60 Able to clean normally soiled cotton laundry declared to be washable at
40 °C or 60 °C, together in the same cycle.
Quick 15' Extra short programme approx, suitable for lightly soiled washing as a small amounts
of laundry.
Sterilization Keep the high temperature for washing, eectively remove harmful bacteria.
Wool Hand or machine-washable wool or richwool textiles. Especially gentle wash
programme to prevent shrinkage, longer programme pauses (textiles rest in wash
liquor).
Spin Only Spins and drains the water.
Rinse&Spin Rinses and then spins the laundry, and then drains the water.
Drum Clean Specially set in this machine to clean the drum and tube. It
applys 90 °C high temperature sterilization to make the clothes washing more green.
When this programme is performed, the clothes or other washing cannot be added.
When proper amount of chlorine bleaching agent is put in, the barrel cleaning eect
will be better. The customer can use this programme regularly according to the need.
ENG
The wool wash cycle of this machine has been approved by The Woolmark Company
for the washing of machine washable wool products provided that the products are
washed according to the instructions on the garment label and those issued by the
manufacturer of this washing machine.
• The Chart is reference only, please refer to real product as standard.
Option
Cycle
Wash cycles 1400
Cotton 40 800
Synthetic 40 800
Mix 40 800
Default
Temp. (°C)
Default spin
speed in rpm
15
Additional Functions
, , , , , ,
, , , , ,
, , , , , ,
Page 16
ENG
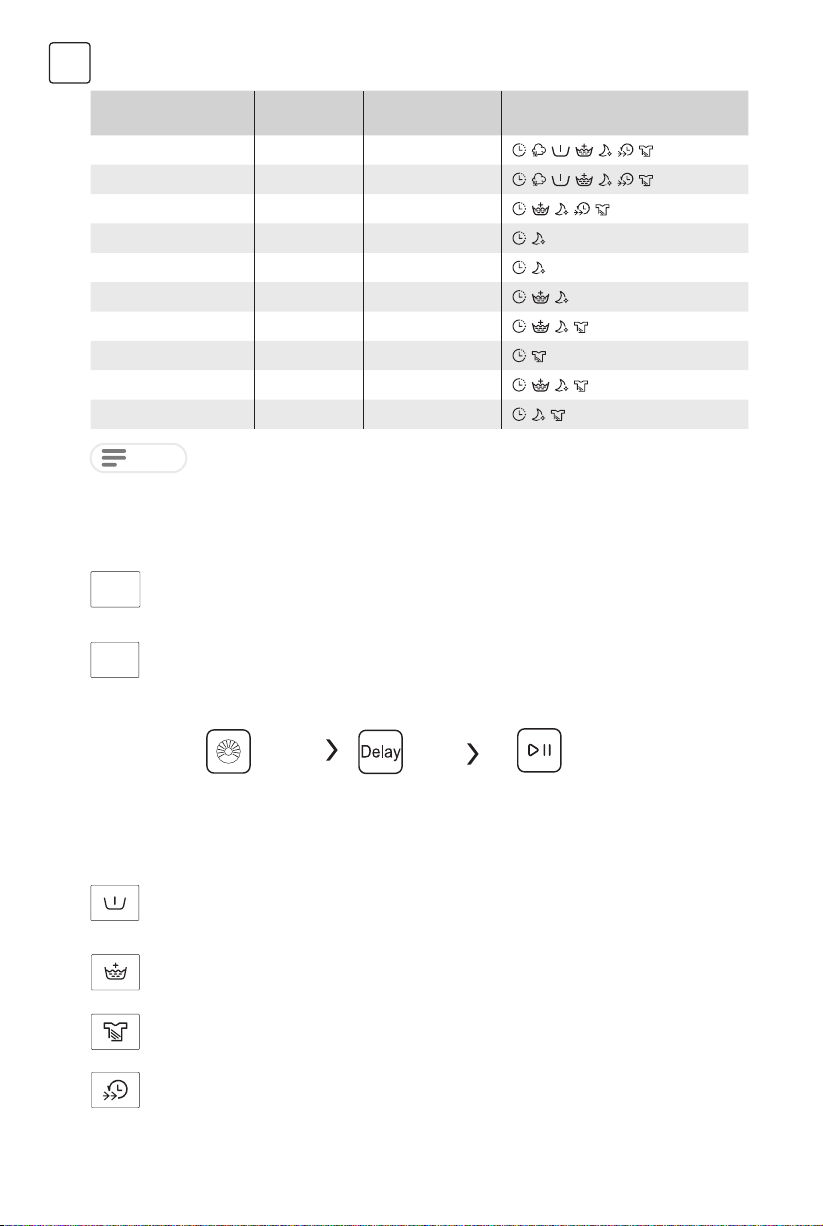
Cycle
Default
Temp. (°C)
Bed Linen 40 1000
Baby Care 60 1000
20°C 20 1000
Drum Clean 90 --
Spin Only -- 1000
Rinse&Spin -- 1000
Wool 40 600
ECO 40-60 -- 1400
Sterilization 70 800
Quick 15’ Cold 800
Default spin
speed in rpm
Additional Functions
, , , , , ,
, , , , , ,
, , , ,
,
,
, ,
, , ,
,
, , ,
, ,
NOTE
• For the maximum spin speed, program time, and other details of the ECO 40-60 program, please refer to
the content on the Product Fiche page.
• The table shows which cycle oers which options for adjustment. If an adjustment is not possible for a
cycle.
Spin
Spin
When needed, the spinning speed can be adjusted pressing the Speed button in the following
steps: 1400:0-400-600-800-1000-1200-1400
Delay
Delay
1. Select a programme
2. Press the Delay button to choose the delaying time 0-24H
3. Press [Start/Pause] to start the delay operation
Choose the Program Setting time Start
To cancel the Delay function, press the “Delay” button before starting the program until the display
shows 0 H. If the program has already started, switch the appliance o and afterwards on and select
a new programme.
Pre Wash
Extra washing function before the main washing cycle starts to increase the washing performance.
Note: Detergent needs to be added to the compartment I.
Extra Rinse
The laundry will undergo an extra rinse after selecting this function.
Soil Level
The washing time will increase or decrease after you select it.
Speed Wash
The function can decrease the washing time.
16
Page 17
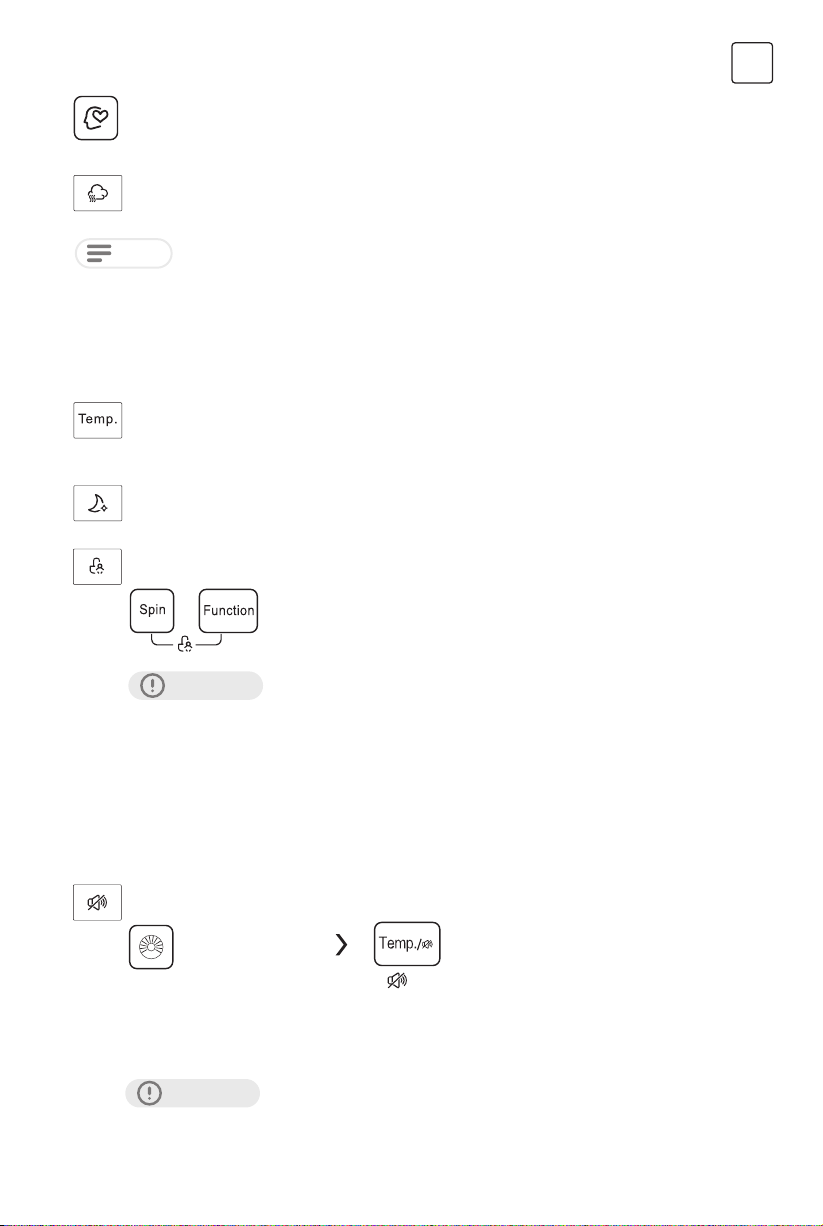
My Cycle
To memory the frequently used programme.
After choosing the programme and setting the options, press [Spin] 3 sec. before start to wash. The
default setting course is Cotton.
Steam Care
SteamCare function can be selected by choose “Cotton”, “Mix”, “Bed Linen” and “Baby Care”.
NOTE
Usage counter
1. Unplug the equipment for 10s and reconnect again.
2. Power on and within 10s, please press “Delay” and “Night Wash” on control panel simultaneously and
continuously for around 5s until the device display shows digits-- the value can indicate the times of
equipment usage.
3. Repeat step 1 again and customer can resume to normal operation.
Temp.
When needed, the washing temperature can be adjusted by pressing the temperature button in
the following steps:
Cold - 20°C - 30°C - 40°C - 60°C- 70°C - 90°C.
Night Wash
If selected spin speed is more than 800rpm, then change to 800rpm, meanwhile cancel the button
sound.
Child Lock
This function is meant to keep children from misusing the controls.
Press [Spin] and [Function] simultaneously for 3 sec.
until the buzzer beep. The child lock indicator switches on.
ENG
CAUTION!
When the Child Lock is activated, the display will alternately show “CL” and the remaining time.
Pressing any other button will cause the Child Lock indicator to ash. When the program ends, “CL”
and “End” will alternate on the display.
The Child Lock deactivates the function of all buttons except the On/O button and the Child lock
button!
Only the simultaneous pressing of the two buttons [Spin] and [Function] can deactivate the Child
Lock!
Please deactivate the Child Lock before selecting a new program!
Mute the buzzer
Choose the Programme
To act the buzzer function, press the button again for 3 seconds. The setting will be kept until the
next reset.
CAUTION!
After Muting the buzzer function, the sounds will not be activated any more.
Press the [Temp.]button for 3sec., the buzzer is mute.
17
Page 18
ENG
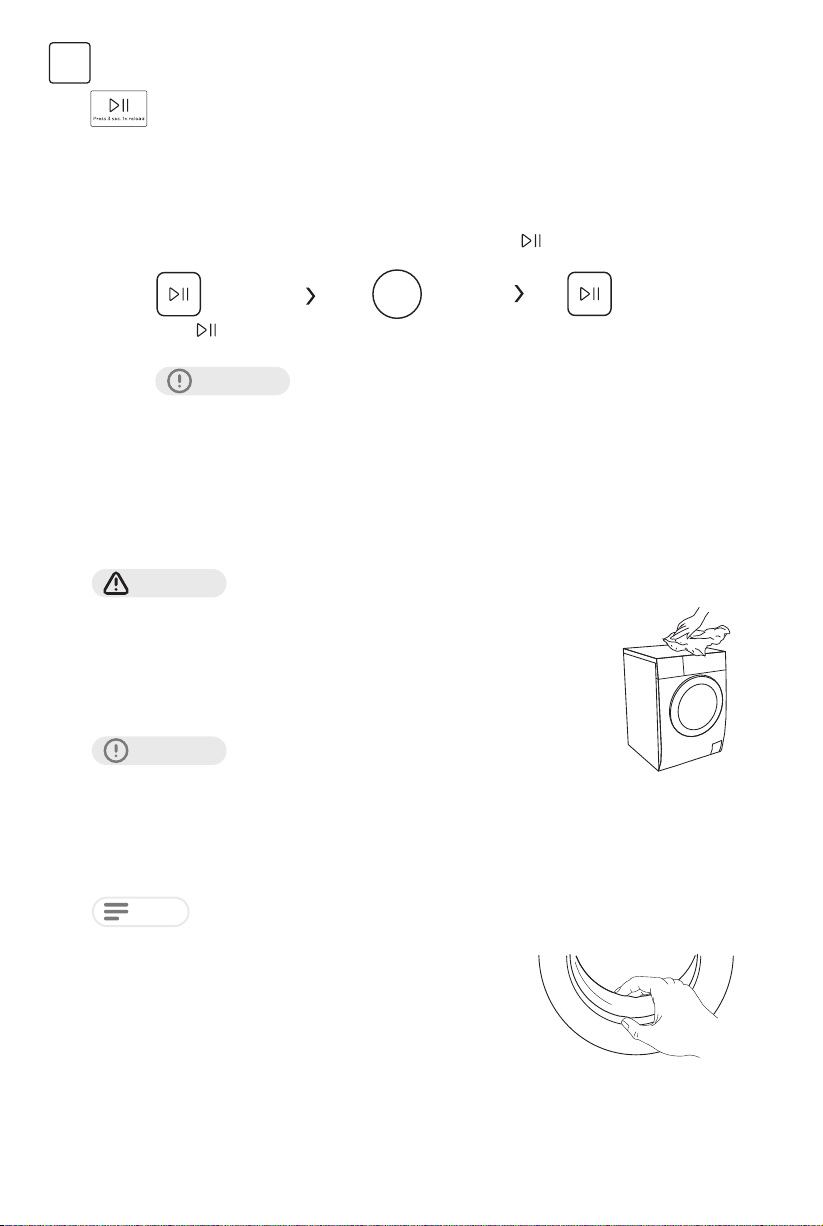
Reload
This operation can be executed during the washing progress. When the drum is still rolling and
there is large amount of water with high temperature in the drum. The state is unsafe and the
door cannot be opened forcefully. To press [Start/Pause] for 3 sec. to reload, and start the clothes
adding in the midway function. Please follow the steps as bellow:
1. Wait until the drum stops rotation.
2. The door lock is unlocked.
3. Close the door when the clothes are reloaded and press [
Clothes
] button.
Press [ ] 3sec.
CAUTION!
Reload the clothes Start
Don’t use the Reload function when the water level over the edge of the
inner tub or the temperature is higher.
CLEANING AND MAINTENANCE
Cleaning and Care
WARNING!
Cleaning The Cabinet
Proper maintenance on the machine can extend its working life. The surface can be
cleaned with diluted non- abrasive neutral detergents when necessary. If there is
any water overow, use a towel to wipe it o immediately. Never use sharp items to
clean the appliance.
CAUTION!
Cleaning The Drum
Any rust stains left inside the drum by metal articles must be removed immediately using chlorine-free
detergents. Never use steel wool for cleaning the drum!
Always unplug the appliance and close the water tap before cleaning and
maintenance.
Never use abrasive or caustic agents. Such as formic acids
or its diluted solvents or similar substances, like alcohol or
chemical products.
NOTE
Cleaning the Door Seal and Glass
Wipe the glass and seal after each wash to remove lint and stains. If
lint builds up it can cause leakages.
Remove any coins, buttons and other objects from the seal after
each wash.Clean the door seal and glass every month to ensure the
normal operation of the appliance.
Keep any laundry away from the machine while cleaning the drum.
18
Page 19
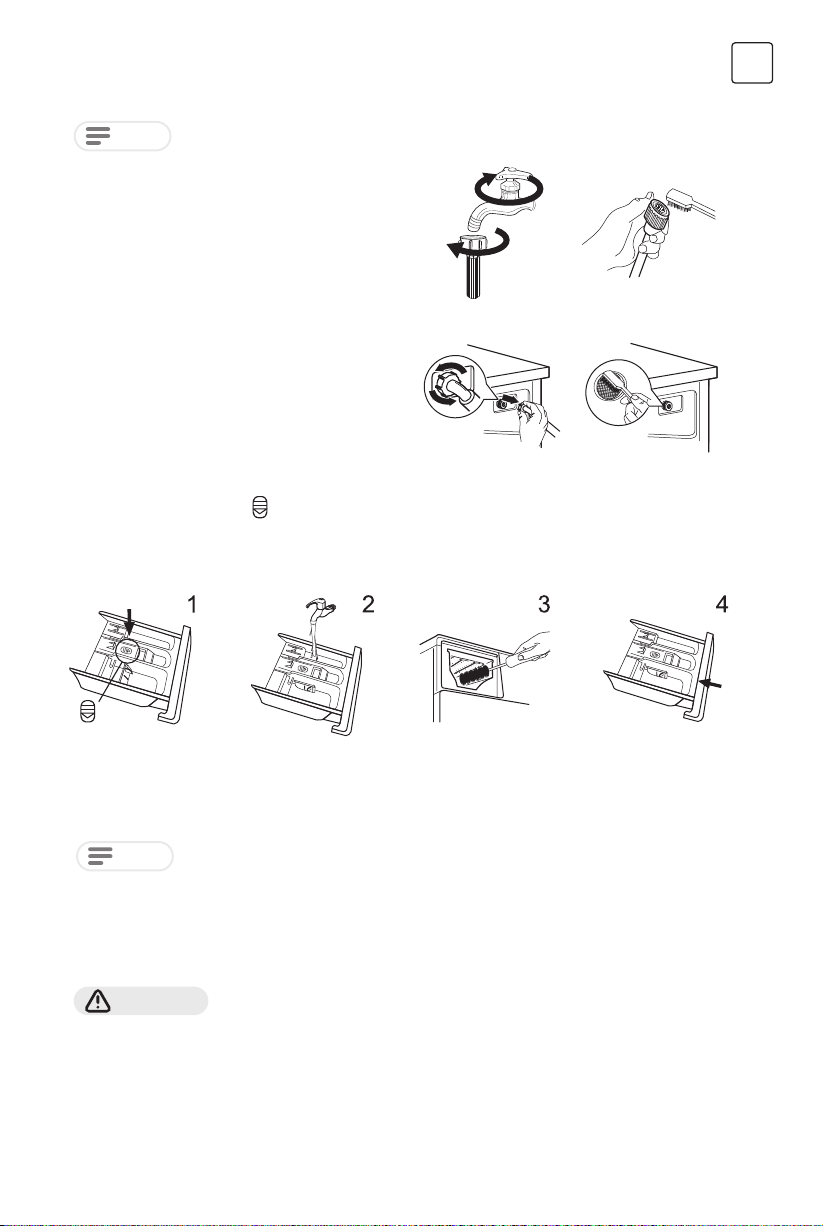
Cleaning The Inlet Filter
ENG
NOTE
1. Close the tap and remove the water supply hose
from it.
2. Clean the lter with a brush.
3. Unscrew the water supply hose from the backside
of the machine. Pull out the lter with long nose
pliers.
4. Use a brush to clean the lter.
5. Reinstall the lter to the water inlet and reconnect
the water supply hose.
6. Clean the Inlet lter every 3 months to ensure the
normal operation of the appliance.
Clean The Detergent Dispenser
1. Press down the release [
the inside of the recess with a brush.
2. Lift the softener cover o the dispenser drawer and wash both items with water.
3. Restore the softener cover and push the drawer back into the recess.
Diminishing water ow is a sign that the lter need to be cleaned.
1
3
d.
] on the softener cover and pull the dispenser drawer out of the recess. Clean
2
4
Press the release and
remove the dispenser
drawer
NOTE
• Do not use abrasive or caustic agents to clean plastic parts.
• Clean the detergent dispenser every 3 months to ensure the normal operation of the appliance.
Cleaning The Drain Pump Filter
WARNING!
• Make sure that the machine has nished the washing cycle and is empty. Switch it o and unplug it before
cleaning the drain pump lter.
• Be careful of hot water. Allow the water to cool down. Risk of scalding!
• Clean the lter periodically every 3 months to ensure the normal operation of the appliance.
Clean the dispenser
drawer and the softener
cover under water
Clean the recess with
an soft brush
19
Insert the dispenser
drawer
Page 20
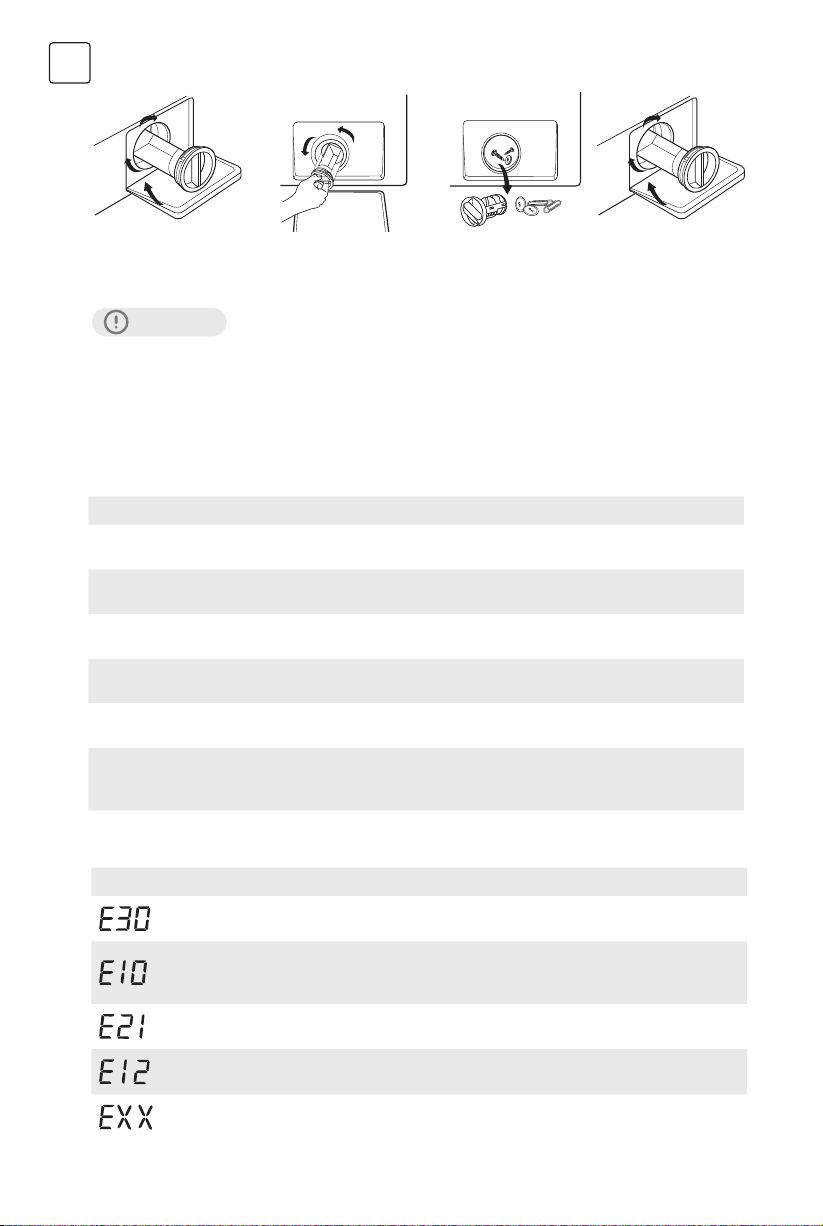
ENG
Open the lower
cover cap
CAUTION!
When the appliance is in use and depending on the programme selected there can be hot water in the
pump. Never remove the pump cover during a wash cycle, always wait until the appliance has nished the
cycle, and is empty. When replacing the cover, ensure it is securely re-tightened.
Open the lter by
turningto the counter
clockwise
Remove extraneous
matter
Close the lower
cover cap
Troubleshooting
Whenever there is a problem with the appliance, check if you can solve it following the tables below. If the
problem persists, please contact the customer service..
Description Possible cause Solution
Appliance does not start
Door can´t be opened
Water leakage
Detergent residues in the
detergent dispenser
Indicator or display does
not work
Abnormal noise
Door is not closed properly
Clothes are stuck.
Safety protection is
activated.
Connections are not tight
enough.
Detergent is damp and/or
clotted.
PC board or harness have
connection problems.
Fixing bolts still in place.
Floor is not solid or level.
Close the door properly and restart.
Check the laundry.
Disconnect the power, restart the product
Check and fasten the water inlet pipe.
Check and clean the outlet hose.
Clean and wipe the detergent dispenser dry.
Switch o the power and check if the mains
plug is connected properly.
Check if the xing bolts have been removed
Make sure the appliance is installed on a solid
and level oor.
Error Codes
Description Reason Solution
Door is not closed properly. Close the door properly and restart.
Water injecting problem
during wash cycle.
Overtime water draining Check the drain hose for blockage.
Water overow Restart the appliance.
Others Restart the appliance. If problem persists,
Check if the water pressure is high enough.
Straighten the water pipe.
Clean the inlet valve lter.
please contact the customer service
20
Page 21
DISPOSAL AND RECYCLING
Important Instructions for Environment
Compliance with the WEEE Directive and Disposing of the Waster Product:
This product complies with EU WEEE Directive (2012/19/EU). This product bears a classication symbol for
waster electrical and electronic equipment (WEEE).
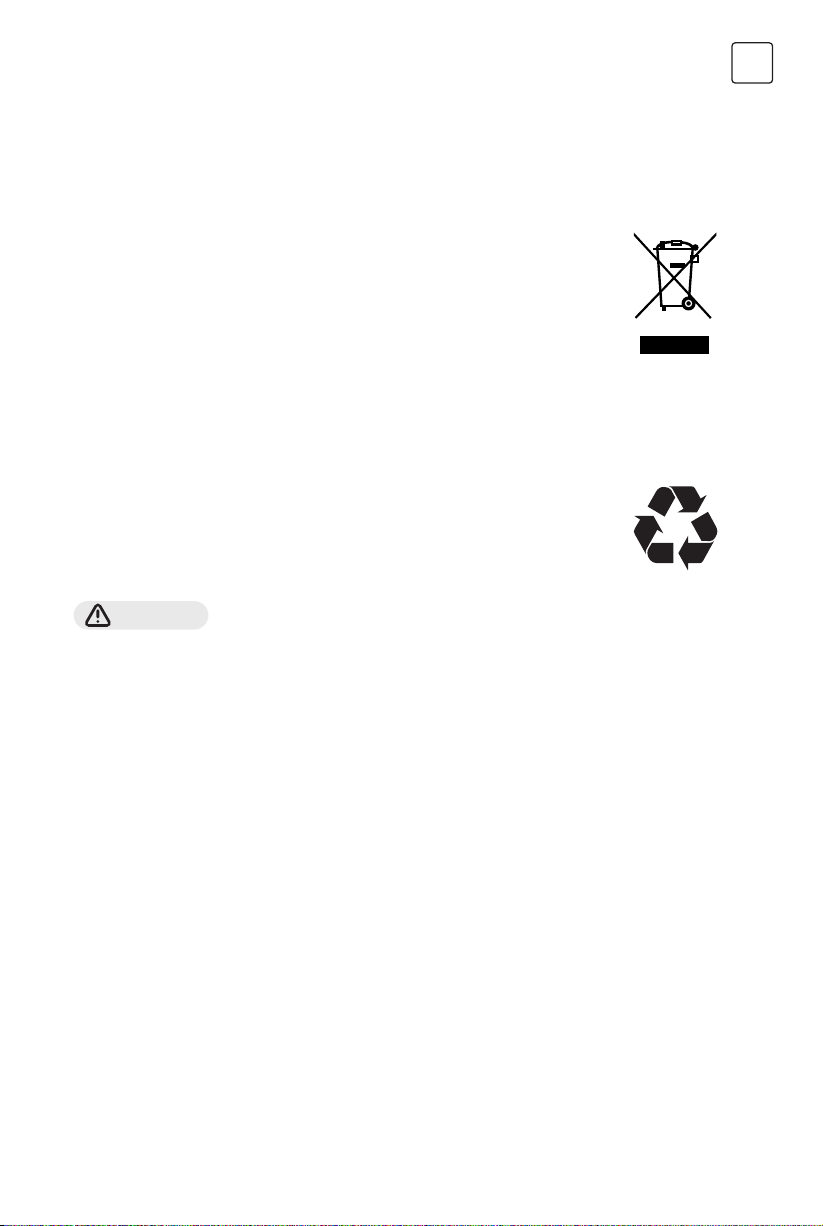
This symbol indicates that this product shall not be disposed with other household
wastes at the end of its service life. Used device must be returned to ocial collection
point for recycling of electrical electronic devices. To nd these collection systems
please contact to your local authorities or retailer where the product was purchased.
Each household performs important role in recovering and recycling of old
appliance. Appropriate disposal of used appliance helps prevent potential negative
consequences for the environment and human health.
Compliance with RoHS Directive
The product you have purchased complies with EU RoHS Directive (2011/65/EU). It does not contain harmful
and prohibited materials specied in the Directive
Package Information
Packaging materials of the product are manufactured from recyclable materials in
accordance with our National Environment Regulations. Do not dispose of the packaging
materials together with the domestic or other wastes. Take them to the packaging
material collection points designated by the local authorities.
ENG
WARNING!
• Never try repair an appliance which is defective of presumed to be defective.
You may put your own and future users’ lives in danger.Only authorised specialists are allowed to carry out
this repair work.
• Improper repair will void the warranty and subsequent damages can’t be recogniced!
Risk of electric shock
Transport
IMPORTANT STEPS WHEN MOVING THE APPLIANCE
• Unplug the appliance and close the water inlet tap.
• Check if the door and the detergent dispenser are closed properly.
• Remove the water inlet pipe and the outlet hose from the house installations.
• Let the water drain completely from the appliance (see “Cleaning the Drain Pump Filter”)
• Important: Re-install the 4 transport bolts in the back of the appliance.
• This appliance is heavy. Transport with care. Never hold any protruding part of the machine when lifting.
The machine door can not be used as a handle.
21
Page 22
SRB
BEZBEDNOSNA UPUTSTVA
Namenjena upotreba
Proizvod je namenjen isključivo za kućnu upotrebu i za tekstil u količinama pogodnim za pranje. Ovaj uređaj
je samo za unutrašnju upotrebu i nije namenjen za ugradnju. Koristite isključivo u skladu sa ovim uputstvima.
Uređaj nije namenjen za komercijalnu upotrebu.
Svaka druga upotreba se smatra neprikladnom. Proizvođač nije odgovoran za bilo kakvu štetu ili povredu
koja može nastati zbog toga.
Ovaj uređaj je namenjen za upotrebu u domaćinstvima i sličnim objektima kao što su:
• Kuhinje osoblja u prodavnicama, kancelarijama i drugim radnim sredinama;
• Seoske kuće;
• Od strane klijenata u hotelima, motelima i drugim stambenim okruženjima;
• Okruženja tipa bed and breakfast;
• Prostorije za zajedničku upotrebu u stambenim zgradama ili u perionicama.
Objašnjenje simbola
OPASNOST
Ovaj simbol ukazuje na opasnosti po život i zdravlje osoba zbog izuzetno zapaljivog gasa.
UPOZORENJE NA ELEKTRIČNI NAPON
Ovaj simbol ukazuje na opasnost po život i zdravlje osoba zbog električnog napona.
UPOZORENJE
Signalna reč označava opasnost sa srednjim nivoom rizika koja, ako se ne izbegne, može
rezultirati smrću ili ozbiljnom povredom.
PAŽNJA
Signalna reč ukazuje na opasnost sa niskim stepenom rizika koja, ako se ne izbegne, može
rezultirati manjom ili umerenom povredom.
NAPOMENA
Signalna reč ukazuje na važne informacije (na primer, oštećenje imovine), ali ne na opasnost.
POŠTUJTE UPUTSTVA
Ovaj simbol ukazuje da servisni tehničar treba da operiše i održava ovaj uređaj samo u skladu sa
uputstvima za rad.
Molimo vas da pažljivo pročitate sledeće informacije o bezbednosti i strogo ih se pridržavajte kako biste
smanjili rizik od požara ili eksplozije, strujnog udara i kako biste sprečili oštećenje imovine, povredu ili gubitak
života. Nepoštovanje ovih uputstava poništava svaku garanciju.
Ovaj uređaj nije namenjen za upotrebu od strane osoba (uključujući decu) sa smanjenim zičkim, senzornim
ili mentalnim sposobnostima, ili nedostatkom iskustva i znanja, osim ako im osoba odgovorna za njihovu
bezbednost nije pružila nadzor ili uputstva o korišćenju uređaja.
UPOZORENJE!
Opasnost od strujnog udara
• Ako je napojni kabl oštećen, mora ga zameniti proizvođač, njegov ovlašćeni servis ili slično kvalikovano
osoblje kako bi se izbegla opasnost.
• Ako je mašina oštećena, ne sme se koristiti dok je ne popravi proizvođač, njegov ovlašćeni servis ili slično
kvalikovano osoblje.
• Opasnost od strujnog udara!
• Aparat mogu koristiti deca stara 8 godina i više, kao i osobe sa smanjenim zičkim, senzornim ili
mentalnim sposobnostima ili nedostatkom iskustva i znanja, pod nadzorom ili uz instrukcije o sigurnoj
upotrebi aparata i razumevanju rizika. Deca se ne smeju igrati sa aparatom. Čišćenje i održavanje koje
obavlja korisnik takođe ne smeju raditi deca bez nadzora.
• Deca treba da budu pod nadzorom da se ne igraju sa aparatom.
• Deca uzrasta do 3 godine treba da budu udaljena od aparata ili neprekidno nadgledana.
• Životinje i deca mogu ući u mašinu. Proverite mašinu pre svake operacije.
• Ne penjite se niti sedite na aparatu.
22
Page 23
Lokacija instalacije i okolina
• Sve deterdžente i dodatne supstance treba čuvati na bezbednom mestu van domašaja dece.
• Ne postavljajte mašinu na tepih.
• Prekrivanje otvora tepihom može oštetiti mašinu.
• Držite uređaj dalje od izvora toplote i direktne sunčeve svetlosti kako biste izbegli koroziju plastičnih i
gumenih delova.
• Ne koristite uređaj u vlažnim sredinama ili prostorijama koje sadrže eksplozivne ili kaustične gasove. U
slučaju curenja vode ili prskanja, ostavite uređaj da se osuši na otvorenom.
• Uređaj ne sme biti postavljen iza zaključanih vrata, kliznih vrata ili vrata sa šarkom na suprotnoj strani od
uređaja.
• Ne koristite mašinu u prostorijama sa temperaturom ispod 5°C. Ovo može izazvati oštećenje delova
mašine. Ako je neizbežno, obavezno ispustite vodu iz uređaja nakon svake upotrebe (pogledajte
“Održavanje - Čišćenje ltera pumpe za odvod”) kako biste izbegli oštećenja izazvana mrazom.
• Nikada ne koristite zapaljive sprejeve ili supstance u neposrednoj blizini uređaja.
Instalacija
• Uklonite sav ambalažni materijal i transportne šrafove pre upotrebe uređaja. U suprotnom, može doći do
ozbiljnih oštećenja.
• Ovaj uređaj je opremljen jednim ulaznim ventilom i može se povezati samo na dovod hladne vode.
• Mrežni utikač mora biti dostupan nakon instalacije.
• Pre prvog pranja veša, uređaj treba pokrenuti jednom kroz sve procedure bez veša unutra.
• Pre upotrebe mašine, proizvod treba kalibrisati.
• Ne stavljajte previše teške predmete na uređaj, kao što su posude s vodom ili grejni uređaji.
• Novi setovi creva isporučeni sa uređajem treba da se koriste, dok stari setovi creva ne treba da se ponovo
koriste.
• Maksimalni pritisak vode na ulazu je 1 MPa. Minimalni pritisak vode na ulazu je 0.05 MPa.
Električno povezivanje
• Uverite se da dovodni kabl nije pritisnut mašinom, jer može doći do oštećenja.
• Povežite uređaj na uzemljenu utičnicu zaštićenu osiguračem u skladu sa vrednostima u tabeli “Tehničke
specikacije”. Uzemljenje mora obaviti kvalikovani električar. Osigurajte da je mašina instalirana u skladu
sa lokalnim propisima.
• Vodovodne i električne priključke mora obaviti kvalikovani tehničar u skladu sa uputstvima proizvođača i
lokalnim bezbednosnim propisima.
SRB
UPOZORENJE!
• Ne koristite razvodne utičnice ili produžne kablove.
• Uređaj ne sme imati eksterni prekidač kao što je tajmer, niti sme biti povezan na strujni krug koji se
redovno uključuje i isključuje.
• Ne izvlačite utikač iz utičnice ako u okolini ima zapaljivog gasa.
• Nikada ne izvlačite utikač mokrim rukama.
• Uvek povucite za utikač, a ne za kabl.
• Uvek isključite uređaj iz struje kada se ne koristi.
Vodovodni priključci
• Proverite spojeve creva za dovod vode, slavinu za vodu i odvodno crevo zbog mogućih problema usled
promena pritiska vode. Ako se spojevi olabave ili procure, zatvorite slavinu za vodu i pozovite servisera.
• Ne koristite uređaj pre nego što su cevi i creva pravilno instalirani od strane kvalikovanih osoba.
• Staklena vrata mogu postati veoma vruća tokom rada. Držite decu i kućne ljubimce daleko od mašine dok
radi.
• Creva za dovod i odvod vode moraju biti sigurno instalirana i ostati neoštećena.
• U suprotnom, može doći do curenja vode.
• Ne uklanjajte lter pumpe za odvod dok još uvek ima vode u uređaju. Velike količine vode mogu iscuriti, a
postoji i rizik od opekotina zbog tople vode.
23
Page 24
SRB
Rad i održavanje
• Nikada ne koristite zapaljive, eksplozivne ili toksične rastvore. Ne koristite benzin, alkohol i sl. kao
deterdžente. Koristite samo deterdžente koji su pogodni za mašinsko pranje.
• Proverite da su svi džepovi ispražnjeni. Oštri i tvrdi predmeti poput novčića, broševa, eksera, šrafova,
kamenja itd. mogu ozbiljno oštetiti ovu mašinu.
• Uklonite sve predmete iz džepova kao što su upaljači i šibice pre korišćenja aparata. Dobro isperite
predmete koji su prani ručno.
• Predmete koji su zaprljani supstancama poput kuvanja ulja, acetona, alkohola, benzina, petroleja, sredstava
za uklanjanje eka, terpentina, voska i sredstava za uklanjanje voska treba oprati na visokoj temperaturi sa
dodatnom količinom deterdženta pre sušenja u aparatu.
• Predmeti koji sadrže penu od gume (lateks penu), kape za tuširanje, vodootporne tekstilne materijale,
predmeti sa gumiranom pozadinom i odeća ili jastuci sa umetcima od gume ne smeju se prati u mašini.
• Omekšivače tkanine ili slične proizvode treba koristiti prema preporukama njihovih uputstava.
• Nikada nemojte pokušavati silom otvoriti vrata.
• Vrata će se otključati ubrzo nakon završetka ciklusa.
• Molimo vas da ne zatvarate vrata sa prevelikim naporom. Ako je teško zatvoriti vrata, proverite da li je
odeća pravilno ubačena i raspoređena.
• Uvek isključite uređaj iz struje i zatvorite slavinu pre čišćenja, održavanja i nakon svake upotrebe.
• Nikada ne sipajte vodu preko aparata u svrhu čišćenja. Postoji opasnost od strujnog udara!
• Popravke smeju vršiti samo proizvođač, njegov ovlašćeni servis ili slično kvalikovane osobe kako bi se
izbegla opasnost.
• Proizvođač neće biti odgovoran za štetu nastalu intervencijom neovlašćenih osoba.
Transport
• Pre transporta:
- Šrafove treba ponovo instalirati na mašinu od strane stručne osobe;
- Nakupljena voda treba biti ispražnjena iz mašine.
• Ovaj uređaj je težak. Prevozite ga pažljivo. Nikada ne držite za izbočene delove mašine prilikom podizanja.
Vrata mašine se ne smeju koristiti kao ručka.
Režiml Kapacitet pranja
WF101491M 10.0kg
24
Page 25
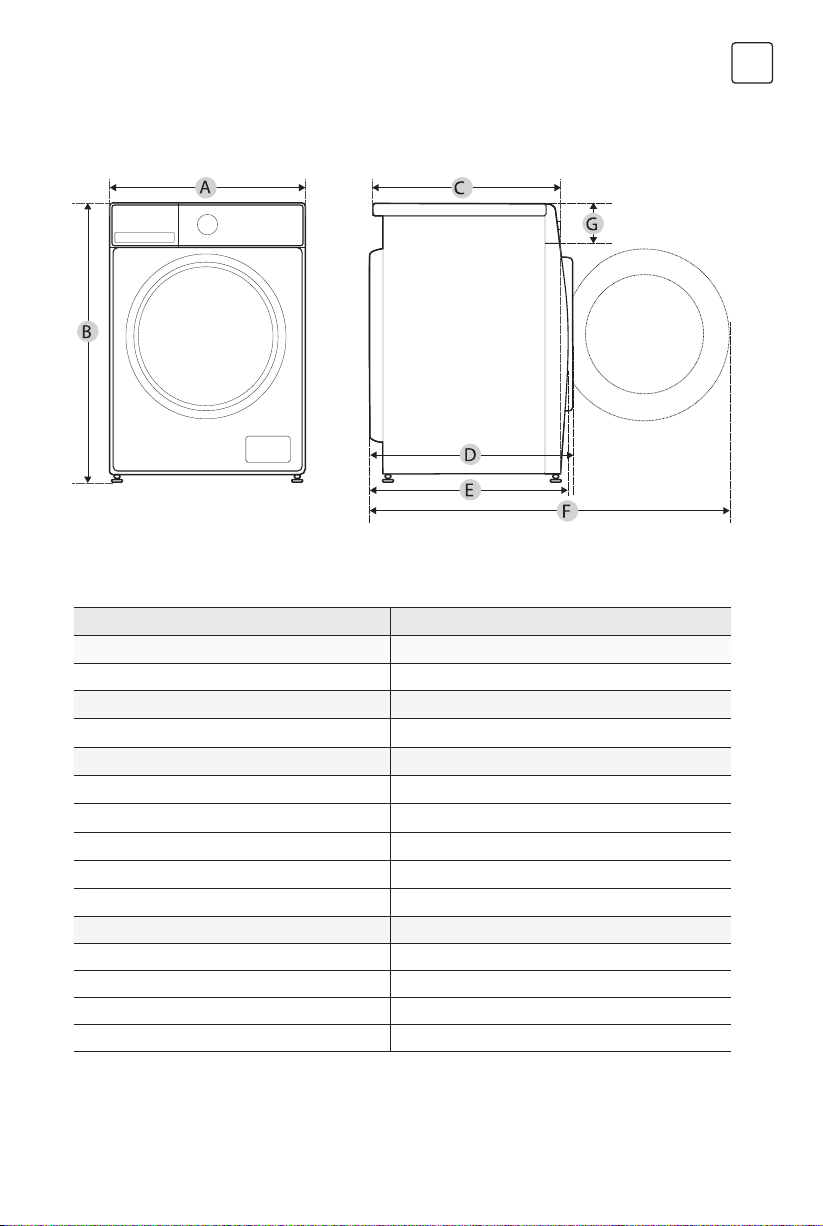
SPECIFIKACIJE
Režiml WF101491M
Napajanje 220-240V~,50Hz
Maksimalna struja 10A
Standardni vodeni pritisak 0.05MPa~1MPa
Kapacitet pranja 10.0kg
Dimenzije
A 595mm
B 850mm
C 530mm
Težina 65kg
Nominalna snaga 1950W
Referentne dimenzije
D 600mm
E 540mm
F 1045mm
G 135mm
SRB
25
Page 26
SRB
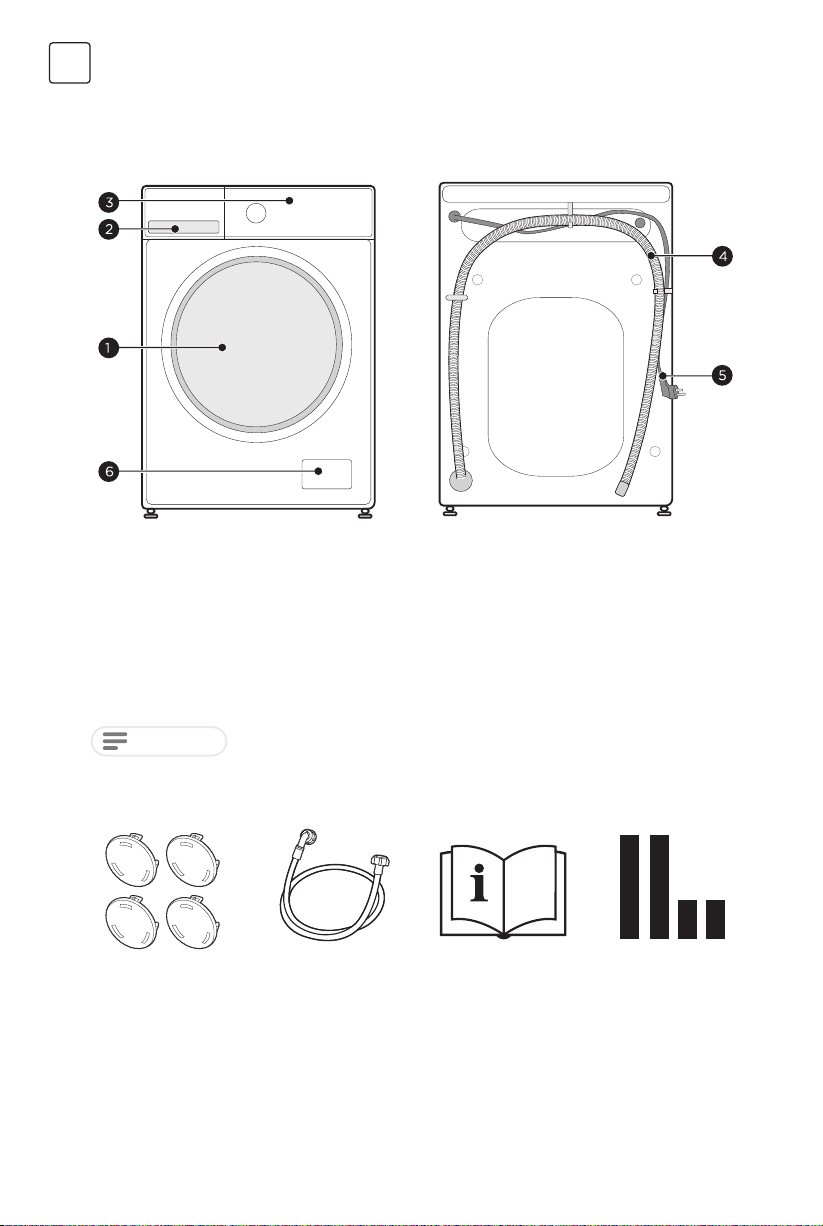
PREGLED PROIZVODA
1. Vrata
2. Dozer deterdženta
3. Kontrolna tabla
NAPOMENA
Slika proizvoda je samo za ilustraciju, molimo vas da se kao referencu koristite stvarnim proizvodom.
Dodaci
4 x Poklopna kapica 1 x Crevo za dovod
hladne vode
4. Crevo za odvod
5. Kabl za napajanje
6. Servisni poklopac
1 x Korisničko
uputstvo
26
Zvučni sunđer
(opciono)
Page 27
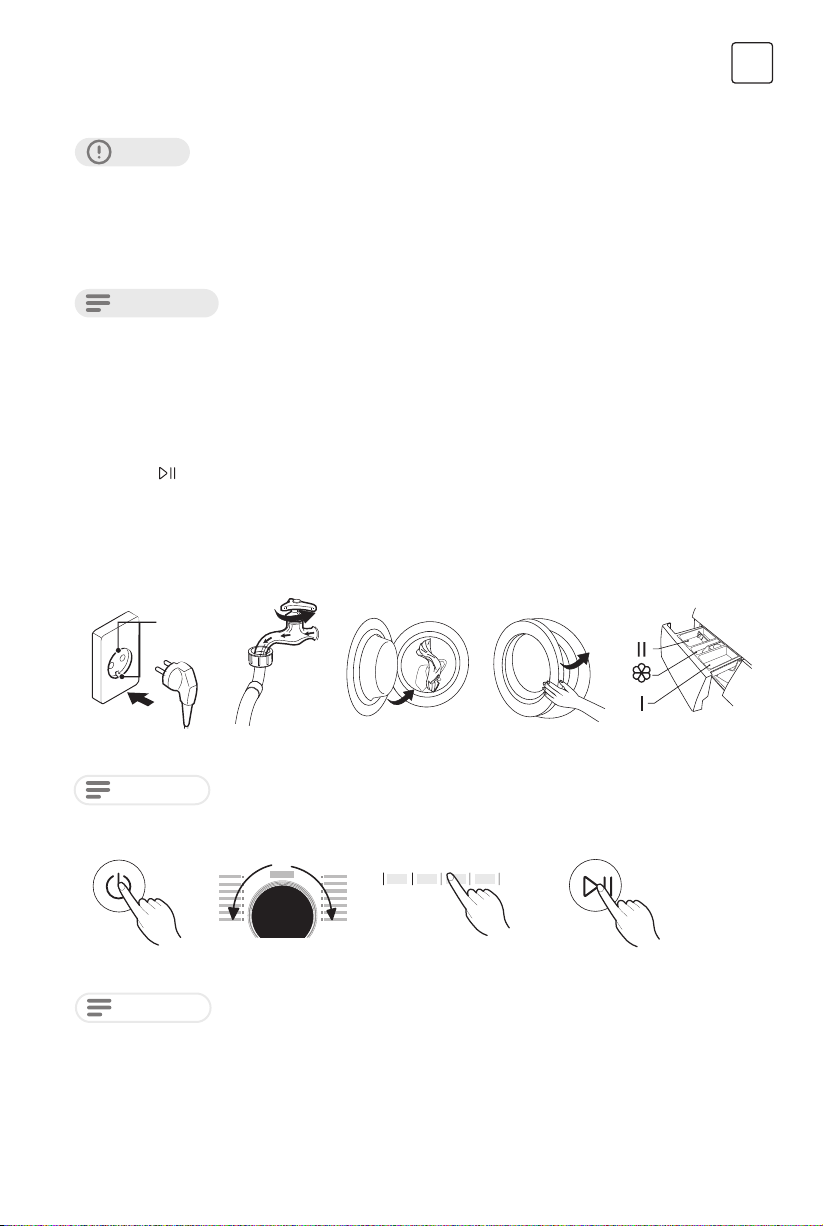
VODIČ ZA BRZO STARTOVANJE
PAŽNJA!
• Pre pranja, molimo vas da se uverite da je mašina pravilno instalirana.
• Vaš uređaj je temeljno pregledan pre nego što je napustio fabriku. Da biste uklonili eventualnu preostalu
vodu i neutralisali moguće mirise, preporučuje se da očistite uređaj pre prve upotrebe. Iz tog razloga,
preporučuje se da očistite unutrašnji bubanj pokretanjem programa “Čišćenje bubnja” ili drugog
programa sa opcionalnom temperaturom od 90°C. Pazite da ne stavljate veš i deterdžent u mašinu.
KALIBRACIJA
Preporučuje se kalibracija mašine kako bi se postigao najbolji performans. Aparat može detektovati količinu
veša koja je ubačena. Ova funkcija optimizuje performanse proizvoda tako što minimizira potrošnju energije i
vode, čime vam štedi novac i vreme. Iz tog razloga, preporučuje se kalibracija aparata za najbolje rezultate.
1. Uklonite sve dodatke iz bubnja i zatvorite vrata.
2. Uključite utikač u utičnicu.
3. Uključite veš mašinu i u roku od 10 sekundi, kontinuirano pritisnite “Odloženo” i “Temp.” (obično 3
sekunde) dok se ne prikaže “t19”.
4. Pritisnite
“126”) da bi se prikazala stvarna brzina bubnja. Kada broj dostigne određenu vrednost (prestane se
menjati), to znači da je veš mašina uspešno kalibrirana.
1. Pre pranja
Start da biste pokrenuli uređaj. Na početku će se prikazati “---”, a zatim “***” (na primer
SRB
uzemljenje
Uključite Otvorite česmu Napunite Zatvorite vrata
NAPOMENA
Deterdžent je potrebno dodati u pregradu I ako je izabrana funkcija predpranja.
Glavno
pranje
Omekšivač
Predpranje
Dodajte deterdžent
2. Pranje
Uključite Izaberite funkciju ili
NAPOMENA
Izaberite program
ostavite podrazumevane
postavke
Pritisnite Start/Pause da
pokrenete program
1. Ako je podrazumevana opcija izabrana, korak 3 se može preskočiti.
2. Linijski grakon funkcijskih dugmadi je samo za referencu, molimo vas da se kao standard koristite
stvarnim proizvodom.
3. Posle pranja
Zvučni signal i “Kraj” na ekranu.
27
Page 28
SRB
INSTALACIJA PROIZVODA
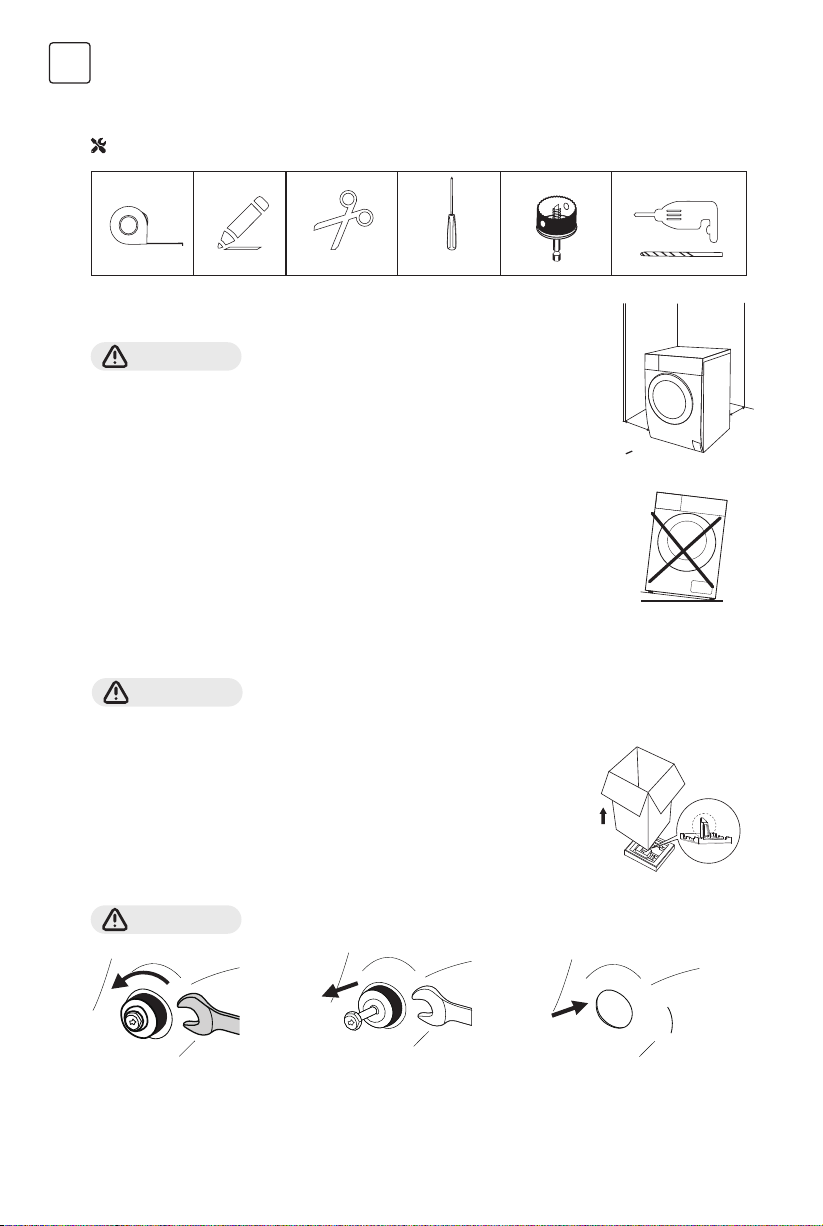
Potrebni alati za samostalnu instalaciju (nisu uključeni)
Područje instalacije
UPOZORENJE!
• Stabilnost je važna da se spreči pomeranje proizvoda!
• Proverite da li je mašina postavljena ravno i stabilno.
• Pazite da proizvod ne stoji na napojnom kablu.
• Održavajte minimalne udaljenosti od zidova kako je prikazano na slici.
Pre instalacije mašine, treba odabrati lokaciju koja ispunjava sledeće karakteristike:
1. Čvrsta, suva i ravna površina.
2. Izbeći direktno sunčevo svetlo.
3. Dovoljna ventilacija.
4. Temperatura u prostoriji iznad 5 °C.
5. Držati daleko od izvora toplote kao što su aparati na ugljen ili gas.
w
W> 2 0m m
w
Raspakivanje mašine
UPOZORENJE!
• Ambalažni materijal (npr. folije, stiropor) može biti opasan za decu.
• Postoji rizik od gušenja! Držite svu ambalažu daleko od dece.
1. Uklonite kartonsku kutiju i stiropor pakovanje.
2. Podignite mašinu i uklonite donje pakovanje.
3. Uklonite traku koja ksira kabl za napajanje i odvodno crevo.
4. Izvadite dovodno crevo iz bubnja.
Uklonite transportne šrafove
UPOZORENJE!
Olabavite 4 transportna
zavrtnja pomoću ključa
Morate ukloniti transportne šrafove sa zadnje strane pre upotrebe proizvoda.
Uklonite vijke zajedno sa
gumastim delovima i sačuvajte
ih za buduću upotrebu.
28
Zatvorite rupe koristeći
poklopne kapice.
Page 29
INSTALACIJA PROIZVODA
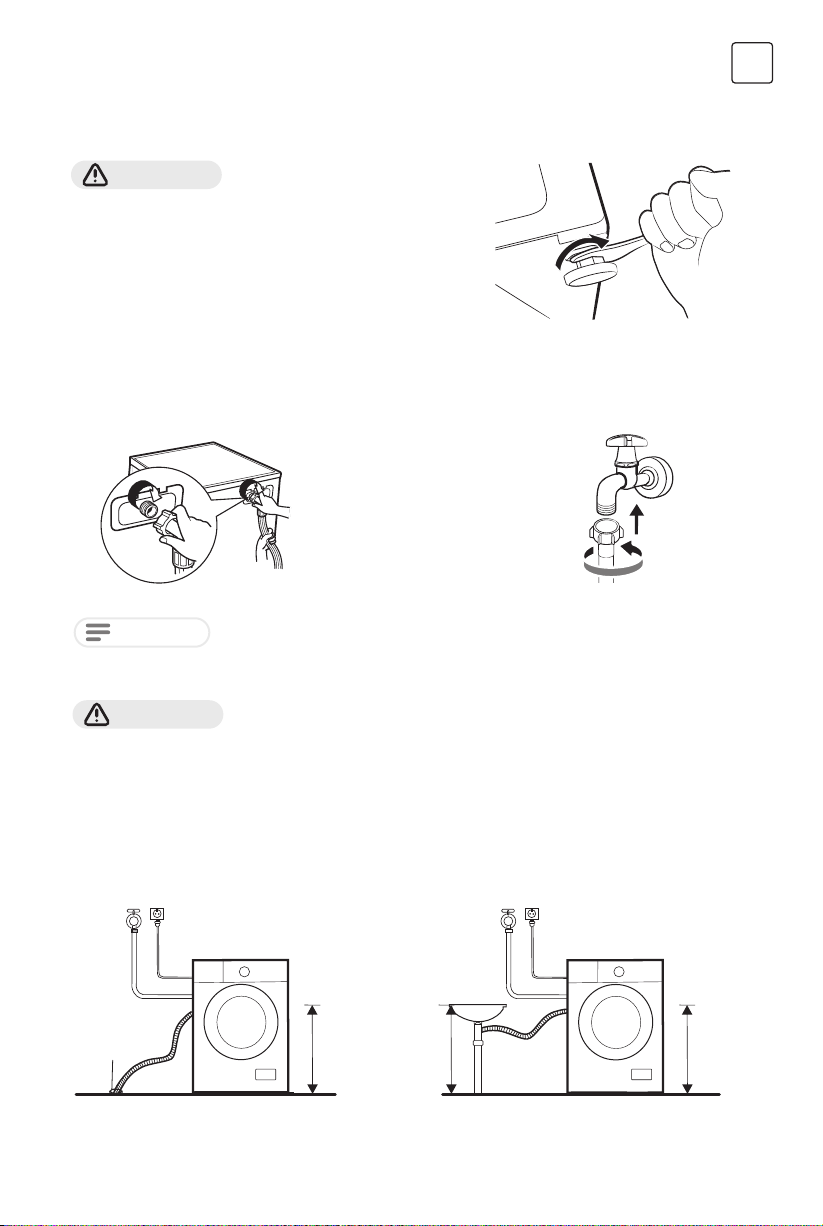
Nivelisanje mašine
UPOZORENJE!
Matični zaključci na sve četiri nožice moraju biti čvrsto zavrnuti uz
kućište.
1. Otpustite kontramatice.
2. Okrenite nogicu dok ne dodirne pod.
3. Podesite nogice i zaključajte matice ključem. Proverite da li je
mašina nivelisana koristeći libelu.
Povežite crevo za dovod vode
• Da biste sprečili curenje ili oštećenje vode, pratite uputstva u ovom poglavlju.
• Ne savijajte, ne gnječite niti modikujte crevo za dovod vode.
Povežite crevo za dovod vode
sa ventilom za dovod vode na
mašini i sa slavinom hladne vode
prema označenom mestu.
SRB
NAPOMENA
Crevo za odvod
UPOZORENJE!
• Nemojte savijati ili izvlačiti odvodno crevo.
• Postavite odvodno crevo pravilno, u suprotnom može doći do curenja vode.
• Nije dozvoljeno uklanjati kopču sa odvodnog creva.
Postoje dva načina da se postavi kraj odvodnog creva:
1. Stavite ga u vodenu kadu. 2. Povežite ga sa odvodnom granom u
Water trough
Povežite ručno, ne koristite alate. Proverite da li su veze čvrsto zategnute.
kadici.
Max. 100cm
Min. 60cm
Max. 100cm
Min. 60cm
29
Max. 100cm
Min. 60cm
Page 30
SRB
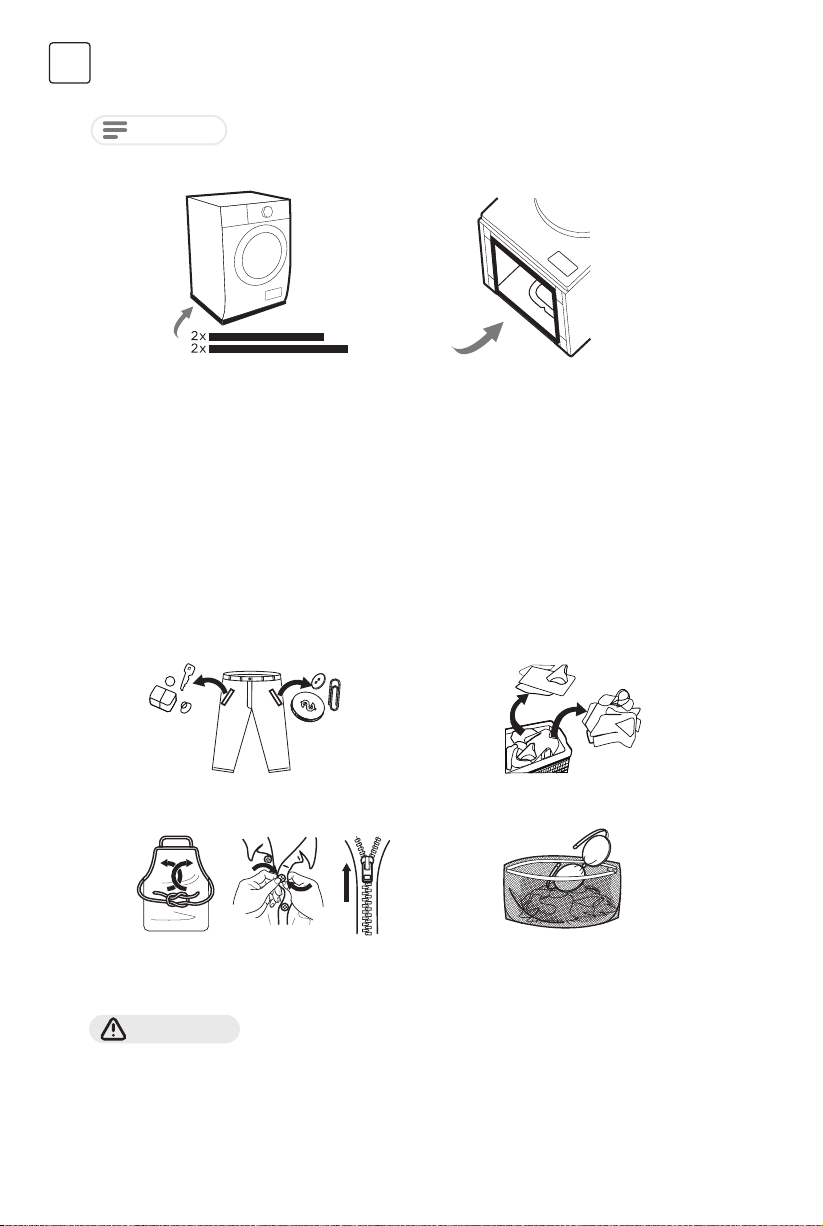
Zvučni sunđer
NAPOMENA
1. Položite mašinu na pod, koristeći neki meki materijal poput sunđera ili tkanine između mašine i poda
radi zaštite.
2. Zalepite dva duža sunđera na duže donje ivice mašine, a dva kraća sunđera na kraće donje ivice.
Molimo vas da se pobrinite da montirate zvučne sunđere, koje mogu ekasno
smanjiti buku koju mašina pravi tokom rada, kako biste obezbedili mirnije i tiše
životno okruženje.
UPUTSTVO ZA UPOTREBU
Pre svakog pranja
• Temperatura okoline mašine treba da bude od 5°C do 40°C. Ako se koristi ispod 0°C, ventili za dovod
vode i sistem odvodnje mogu biti oštećeni. Ako je mašina instalirana u uslovima smrzavanja, treba je
premestiti na normalnu okolnu temperaturu kako bi se osiguralo da se crevo za dovod vode i odvodno
crevo odmrznu pre upotrebe.
• Molimo proverite oznake za negu veša i uputstva za upotrebu deterdženta pre pranja. Koristite deterdžent
koji nije penast ili manje penast, pogodan za mašinsko pranje.
1. Ispraznite džepove 2. Sortirajte veš prema boji i tipu
3. Vežite zajedno duge tekstilne
trake i kaiševe, zatvorite rajsfešluse i
UPOZORENJE!
• Ne perite predmete koji su čišćeni, prani, natopljeni ili poprskani zapaljivim ili eksplozivnim supstancama
poput voska, ulja, boje, benzina, alkohola, kerozina i drugih zapaljivih materijala.
• Pranje pojedinačnih komada veša može lako izazvati veliku neravnotežu. Stoga se preporučuje da dodate
još jedan ili dva komada veša kako bi se centrifuga obavila glatko.
• Ne perite i ne centrifugirajte vodootporne sedeže, prostirke ili odeću.
dugmad.
4. Stavite male predmete u vrećicu za
30
tkanine
pranje veša.
Page 31
Dozer za deterdžent
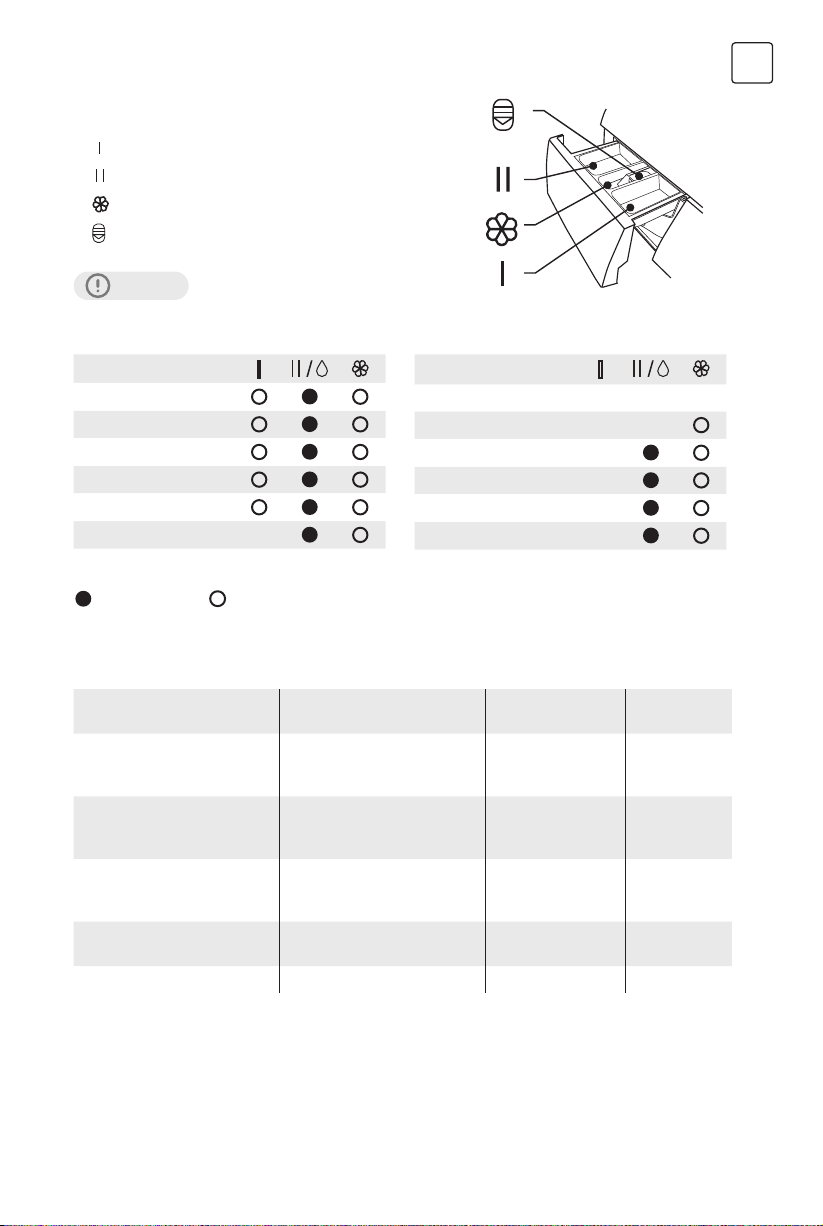
Predpranje
Pranje
Omekšivač
Pritisnite dugme da biste izvukli dozer
OPREZ!
Detergent treba dodati samo u “pregradu I” nakon odabira funkcije predpranja.
SRB
Program
Cotton
Synthetic
Mix
Bed Linen
Baby Care
20ºC
Drum Clean
Znači obavezno Znači opciono
Program
Spin Only
Rinse & Spin
Wool
ECO 40-60
Sterilization
Quick 15’
Preporuka za deterdžent
Preporučeni deterdžent za
pranje:
Jak deterdžent sa
izbeljivačima i optičkim
pojačivačima beline
Deterdžent za boje bez
izbeljivača i optičkih
pojačivača beline
Deterdžent za boje ili blagi
deterdžent bez optičkih
pojačivača beline
Blagi deterdžent za pranje
veša
Poseban deterdžent za vunu Vuna Wool 20/40
Vrsta veša i tkanine Ciklus pranja
Belina od belog veša od
ključalih pamučnih ili lanenih
materijala
Obojen veš od pamuka ili lana Cotton 20/40
Obojen veš od materijala koji
se lako održava ili sintetičkih
materijala
Delikatni tekstili, svila, viskoza Synthetic 20
Cotton,ECO 40-60 40/60
Cotton,Synthetic 20/40
Temperatura
pranja°C
31
Page 32
SRB
NAPOMENA
• Aglomerirajući ili lepljivi deterdžent ili aditiv može se razblažiti u malo vode pre nego što se sipa u oku za
deterdžent, kako bi se izbeglo začepljenje ulaza i eventualno prelivanje vode.
• Molimo vas da odaberete odgovarajući tip deterdženta kako biste postigli maksimalnu ekasnost pranja
uz minimalnu potrošnju vode i energije.
• Za postizanje najboljih rezultata pranja važno je pravilno doziranje deterdženta.
• Koristite manju količinu deterdženta ako bubanj nije potpuno pun.
• Uvek prilagodite količinu deterdženta tvrdoći vode; ako je vaša voda meka, koristite manje deterdženta.
• Dozirajte prema stepenu prljavštine vašeg veša; manje prljavi veš zahteva manje deterdženta.
• Visoko koncentrisani deterdžent (kompaktni deterdžent) zahteva posebno precizno doziranje.
Sledeći simptomi znak su predoziranja deterdženta:
- Intenzivno stvaranje pene
- Loši rezultati pranja i ispiranja
Sledeći simptomi znak su poddoziranja deterdženta:
- Veš postaje siv
- Nakupljanje naslaga kamenca na bubnju, grejnom elementu i/ili vešu
Kontrolna tabla
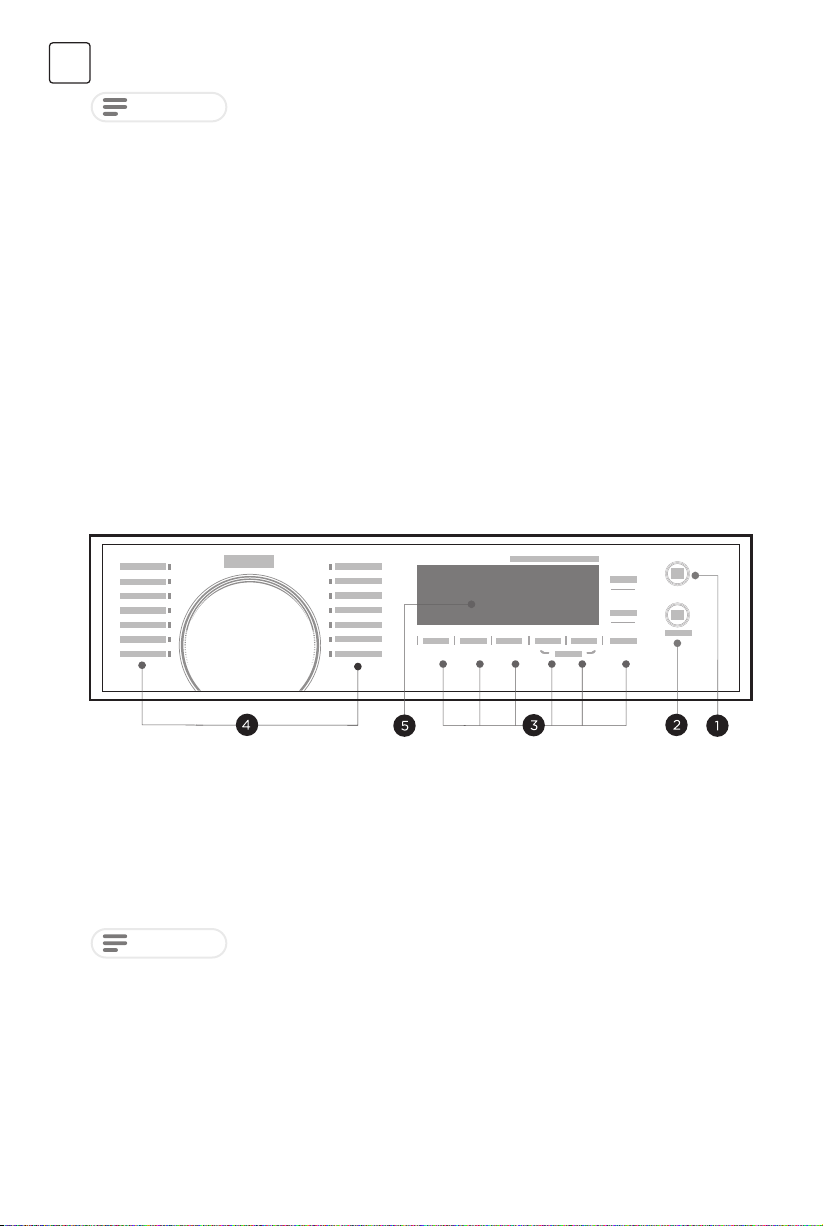
1. ON/OFF
Uključite / isključite uređaj.
2. Start/Pause
Pokrenite ili pauzirajte vaš program.
3. Option
Ovo vam omogućava da izaberete dodatne
funkcije.
NAPOMENA
Tabela je samo za referencu, molimo pogledajte stvarni proizvod kao standard.
4. Programmes
Dostupno u skladu sa vrstom veša.
5. Display
Na displeju se prikazuju podešavanja,
procenjeno preostalo vreme, opcije i poruke
o statusu.
32
Page 33
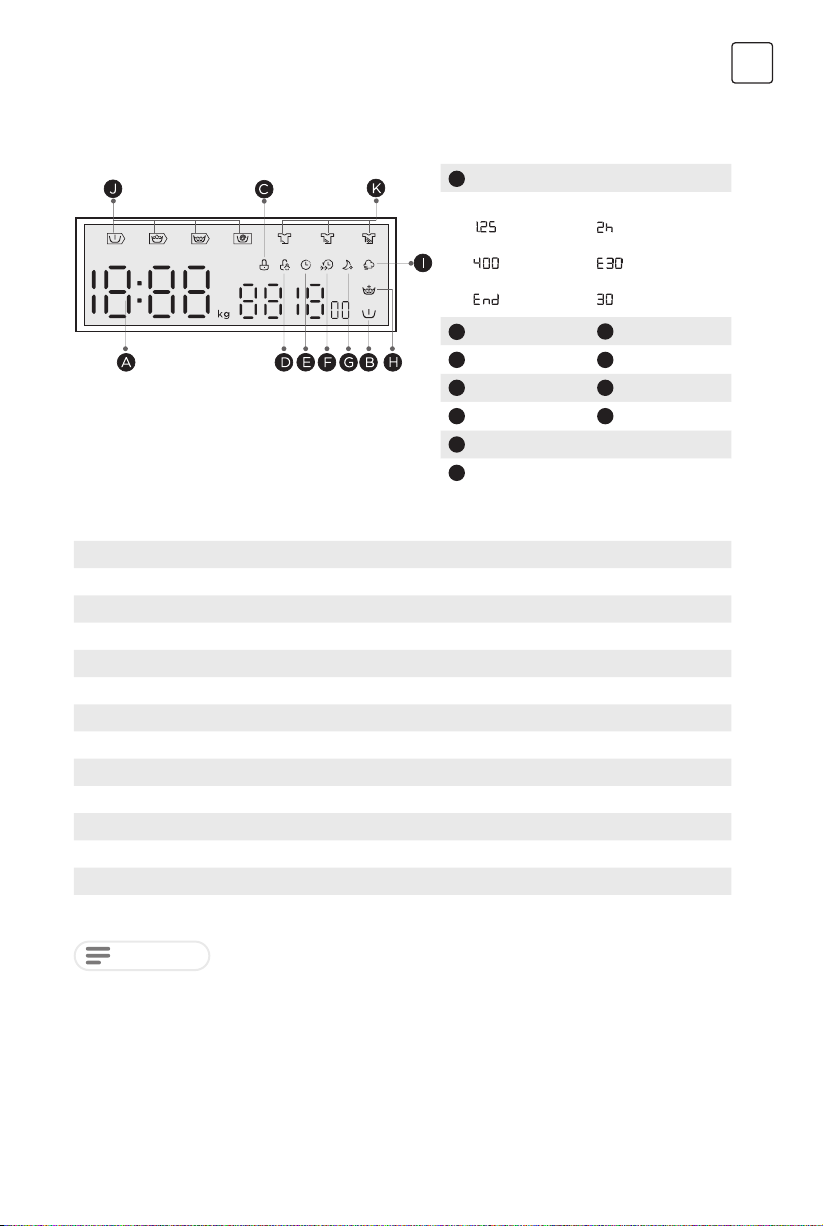
PROGRAMI
Displej
A
Display
Wash Time
Speed
End
SRB
Delay Time
Error
Temp.
B
Pre Wash
D
Child Lock
F
Speed Wash
H
Extra Rinse
J
Pre Wash-Wash-Rinse-Spin
K
Soil Level
C
Door Lock
E
Delay
G
Night Wash
I
Steam Care
Programi
Program Punjenje (kg) Podrazumevano vreme (h:min)
Cotton
Synthetic
Mix
Bed Linen
Baby Care
20°C
Drum Clean
Spin Only
Rinse&Spin
Wool
ECO 40-60
Sterilization
Quick 15’
10.0 3:39
5.0 3:18
10.0 1:20
10.0 1:48
10.0 2:01
5.0 1:01
− 1:18
10.0 0:12
10.0 0:20
2.0 1:07
10.0 3:59
5.0 2:27
2.0 0:15
NAPOMENA
Parametri u ovoj tabeli služe samo kao referenca za korisnika. Stvarni parametri mogu
se razlikovati od parametara navedenih u prethodno pomenutoj tabeli.
33
Page 34
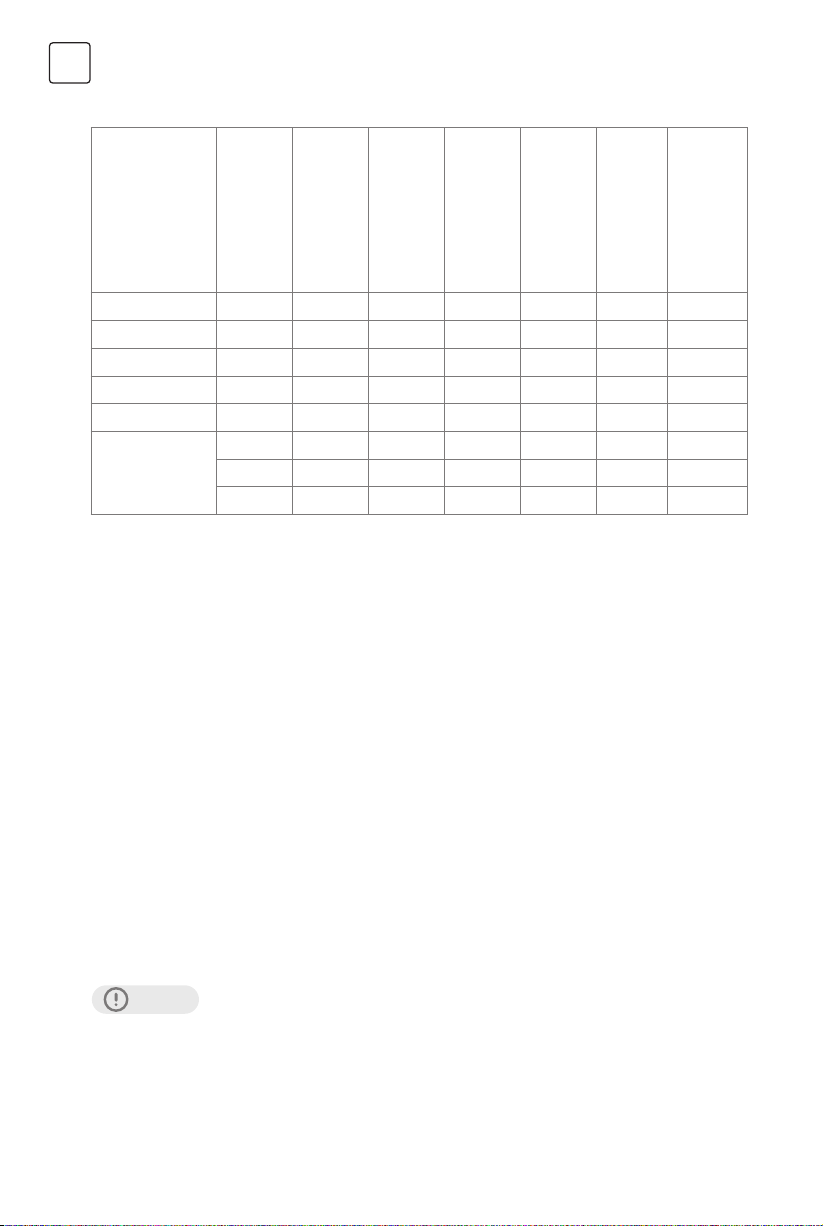
SRB
Programi
Ciklus
1)
u kg
temperature
Podešavanje
Nominalni kapacitet
Trajanje ciklusa u
satima i minutima
Potrošnja energije u
kWh/operacioni ciklus
ciklus
Potrošnja vode u
litrama/operacioni
°C
Najviša temperatura
2)
Preostala vlažnost u
% /brzina centrifuge
Cotton(60°C) 10.0 60 3:44 1.726 85 60 53%/800
Mix 10.0 40 1:20 0.889 85 40 70%/800
20 °C 5.0 20 1:01 0.212 51 20 65%/1000
Quick 15' 2.0 Cold 0:15 0.030 31 Cold 70%/800
Bed Linen 10.0 40 1:48 0.920 85 40 65%/1000
10.0 -- 3:59 0.895 67.0 37 53.9%/1350
3)
ECO 40-60
5.0 -- 3:00 0.560 52.0 33 53.9%/1350
2.5 -- 3:00 0.232 41.5 23 53.9%/1350
• Navedeni podaci su samo za referencu, a podaci se mogu menjati zbog različitih stvarnih uslova
korišćenja.
• Vrednosti date za programe osim programa ECO 40-60 su samo indikativne.
• Temperatura od 20°C može očistiti blago zaprljani pamučni veš na nominalnoj temperaturi od 20°C, u
skladu sa regulativom (EU) 2019/2023.
• U skladu sa EN 60456:2016/prA2019 sa (EU) 2019/2014, (EU) 2019/2023,
• (EU) 2021/340, (EU) 2021/341
Energetska ekasnost prema EU klasikaciji: A
Program za energetski testiranje: ECO 40-60. Ostali kao podrazumevani.
Polovina punjenja za mašinu od 9,0 kg: 4,5 kg.
Četvrtina punjenja za mašinu od 9,0 kg: 2,5 kg.
1) Najviša temperatura koju veš dostiže u toku ciklusa pranja barem 5 minuta.
2) Preostala vlažnost nakon završetka ciklusa pranja, izražena u procentima sadržaja vode, i brzina centrifuge
kojom je postignuta ova vlažnost.
3) Program ECO 40-60 je sposoban da ekasno očisti normalno zaprljan pamučni veš koji se može prati na
40°C ili 60°C, zajedno u istom ciklusu. Ovaj program se koristi radi procene usaglašenosti sa regulativom (EU)
2019/2023.
Najekasniji programi u smislu potrošnje energije obično su oni koji rade na nižim temperaturama i dužeg
trajanja.
Punjenje veš-mašine do kapaciteta naznačenog za odgovarajuće programe doprinosi uštedi energije i vode.
Bučnost i preostala vlažnost su uticani brzinom centrifuge: što je veća brzina centrifuge u fazi centrifugiranja,
to je veća buka i niža preostala vlažnost.
OPREZ!
U slučaju prekida napajanja tokom rada mašine, posebna memorija čuva izabrani program. Mašina će
nastaviti sa programom kada se napajanje ponovo uspostavi.
34
Page 35
UPUTSTVO ZA UPOTREBU
Programi su dostupni u skladu sa vrstom veša
Programi
Cotton Izdržljivi tekstili, toplotno otporni tekstili od pamuka ili lana.
Synthetic Perite sintetičke predmete, na primer: košulje, kapute, mešane tkanine. Dok perete
pletene tekstile, količinu deterdženta treba smanjiti zbog njihove labave strukture
vlakana i lakog stvaranja mehurića.
Baby Care Pranjem bebine odeće, ona će biti čistija, a ispiranje će biti ekasnije kako bi se zaštitila
bebina koža.
Mix Mešano punjenje sastavljeno od tekstila od pamuka i sintetike.
Bed Linen Ovaj program je posebno dizajniran za pranje posteljine.
20°C Može očistiti blago zaprljani pamučni veš na nominalnoj temperaturi od 20 °C.
ECO 40-60 Može očistiti normalno zaprljani pamučni veš koji je deklarisan za pranje na 40 °C ili
60 °C, zajedno u istom ciklusu.
Quick 15' Ekstra kratak program, otprilike, pogodan za blago zaprljani veš kao i za male količine
veša.
Sterilization Održavajte visoku temperaturu za pranje kako biste ekasno uklonili štetne bakterije.
Wool Ručno ili mašinsko pranje vune ili tekstila od bogate vune.
Posebno blag program pranja za sprečavanje skupljanja, sa dužim pauzama u
programu (tekstil ostaje u rastvoru za pranje).
Spin Only Centrifugira i ispuštanje vode.
Rinse&Spin Isprva ispira veš, zatim ga centrifugira, i na kraju ispušta vodu.
Drum Clean Ovaj program je posebno podešen u ovom uređaju za čišćenje bubnja i cevi.
Primjenjuje se sterilizacija visokom temperaturom od 90 °C kako bi se pranje veša
učinilo ekološkijim. Tokom izvođenja ovog programa, ne može se dodavati veš ili
drugo pranje. Kada se pravilna količina izbjeljivača na bazi hlora doda, efekat čišćenja
bubnja će biti bolji. Kupac može redovno koristiti ovaj program prema potrebi.
SRB
Ciklus pranja vune ove mašine odobren je od strane kompanije Woolmark za pranje
mašinski perivih vunenih proizvoda, pod uslovom da se proizvodi peru prema
uputstvima na etiketi odevnog predmeta i onim koje je izdao proizvođač ove veš
mašine.
• Tabela je samo za referencu, molimo vas da se oslonite na stvarni proizvod kao standard.
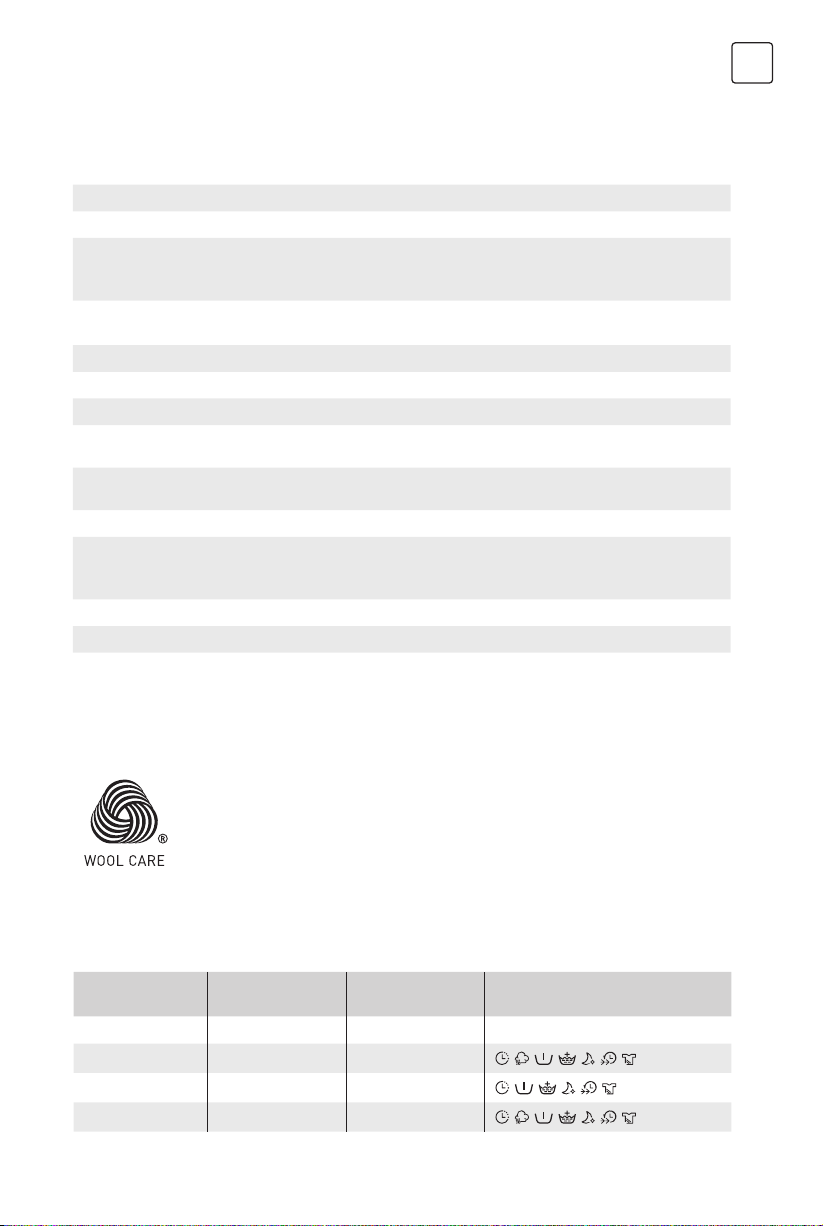
Opcije
Ciklus
Wash cycles 1400
Cotton 40 800
Synthetic 40 800
Mix 40 800
Podrazumevana
temperatura (°C)
Podrazumevana
brzina centrifuge
35
Dodatne funkcije
, , , , , ,
, , , , ,
, , , , , ,
Page 36
SRB
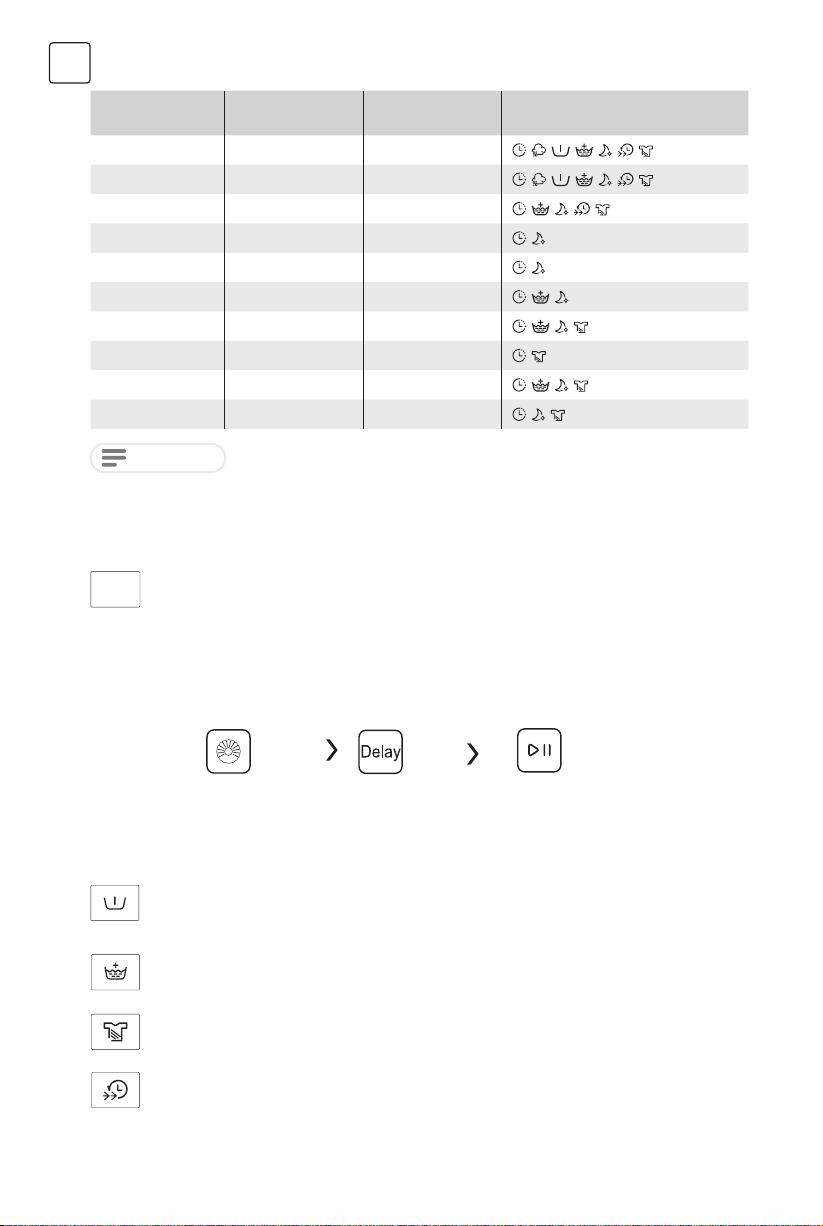
Ciklus
Podrazumevana
temperatura (°C)
Bed Linen 40 1000
Baby Care 60 1000
20°C 20 1000
Drum Clean 90 --
Spin Only -- 1000
Rinse&Spin -- 1000
Wool 40 600
ECO 40-60 -- 1400
Sterilization 70 800
Quick 15’ Cold 800
Podrazumevana
brzina centrifuge
Dodatne funkcije
, , , , , ,
, , , , , ,
, , , ,
,
,
, ,
, , ,
,
, , ,
, ,
NAPOMENA
• Za maksimalnu brzinu centrifuge, vreme programa i druge detalje programa ECO 40-60, molimo vas da
pogledate sadržaj na stranici sa tehničkim podacima proizvoda.
• Tabela prikazuje koje opcije podešavanja nudi svaki ciklus. Ako podešavanje nije moguće za određeni
ciklus.
Centrifuga
Spin
Kada je potrebno, brzina centrifuge može se podešavati pritiskom na dugme za brzinu u sledećim
koracima: 1400 - 0 - 400 - 600 - 800 - 1000 - 1200 - 1400
Odlaganje
1. Izaberite program
2. Pritisnite dugme za odgodu da biste izabrali vreme odgode od 0-24 časa
3. Pritisnite dugme [Start/Pause] da biste pokrenuli operaciju sa odlaganjem.
Izaberite program Podesite vreme Start
Da biste otkazali funkciju odloženog starta, pritisnite dugme “Odlaganje” pre pokretanja programa
dok displej ne pokaže 0 H. Ako je program već započeo, isključite uređaj i zatim ponovo uključite i
izaberite novi program.
Predpranje
Dodatna funkcija pranja pre početka glavnog ciklusa pranja radi poboljšanja performansi pranja.
Note: Deterdžent treba dodati u pregradu I.
Dodatno ispiranje
Veš će proći kroz dodatno ispiranje nakon što se ova funkcija izabere.
Nivo prljavštine
Vreme pranja će se povećati ili smanjiti nakon što ga izaberete.
Brzo pranje
Ova funkcija može smanjiti vreme pranja.
36
Page 37
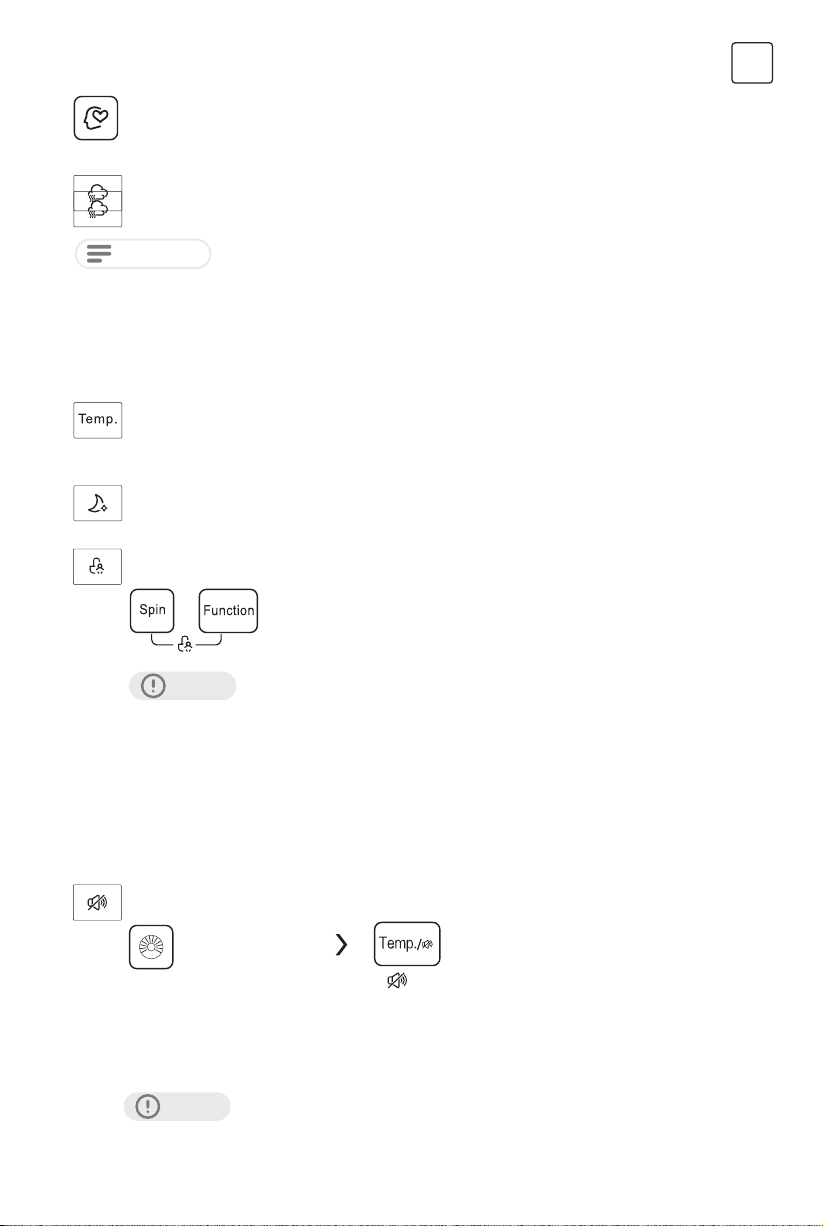
Moj ciklus
Za pamćenje često korišćenog programa.
Nakon što izaberete program i postavite opcije, pritisnite [Centrifuga] 3 sekunde pre početka pranja.
Podrazumevani program je Pamuk.
Steam Care
Funkcija Steam Care može se izabrati odabirom programa “Pamuk”, “Mešano”, “Posteljina” i “Briga
o bebi”.
NAPOMENA
Brojač upotrebe
1. Isključite mašinu na 10 sekundi i ponovo je priključite.
2. Uključite je i u roku od 10 sekundi pritisnite “Delay” i “Night Wash” na kontrolnoj tabli istovremeno
i neprekidno oko 5 sekundi dok displej ne pokaže cifre - vrednost može pokazivati broj korišćenja
opreme.
3. Ponovite korak 1 i kupac može nastaviti sa normalnim radom.
Temperatura
Kada je potrebno, temperatura pranja može se podesiti pritiskom na dugme za temperaturu u
sledećim koracima:
Hladno - 20°C - 30°C - 40°C - 60°C - 70°C - 90°C.
Noćni program
Ako je izabrana brzina centrifuge veća od 800 obrtaja u minuti, tada je promenite na 800 obrtaja u
minuti i istovremeno isključite zvučni signal dugmeta.
Dečja brava
Ova funkcija služi da spreči decu da zloupotrebljavaju kontrole.
Pritisnite istovremeno dugmad [Centrifuga] i [Funkcija] na 3 sekunde dok se
ne oglasi zvučni signal. Indikator sigurnosnog zaključavanja za decu će se
uključiti.
SRB
OPREZ!
Kada je aktiviran Child Lock, displej će naizmenično pokazivati “CL” i preostalo vreme.
Pritiskanje bilo kog drugog dugmeta će uzrokovati treptanje indikatora sigurnosnog zasuna za
decu. Kada program završi, na displeju će se naizmenično prikazivati “CL” i “End”.
Dečja brava deaktivira funkciju svih dugmadi osim dugmeta za uključivanje/isključivanje i dugmeta
za dečju bravu!
Samo istovremeno pritiskanje dugmadi [Centrifuga] i [Funkcija] može deaktivirati dečju bravu!
Molimo deaktivirajte dečju bravu pre nego što odaberete novi program!
Isključite zvučni signal
Izaberite program
Da biste aktivirali funkciju zvučnog signala, ponovo pritisnite dugme na 3 sekunde. Podešavanje će
ostati na snazi do sledećeg resetovanja.
OPREZ!
Nakon što se isključi funkcija zvučnog signala, zvukovi više neće biti aktivirani.
Pritisnite [Temp.] dugme na tri sekunde, zvučni signal je
isključen.
37
Page 38
SRB
Ponovno punjenje
Ova operacija se može izvršiti tokom procesa pranja. Kada se bubanj još uvek okreće i kada
u bubnju ima velike količine vode visoke temperature, stanje je nesigurno i vrata se ne mogu
silom otvoriti. Da biste ponovo napunili veš mašinu, pritisnite [Start/Pause] na 3 sekunde da biste
zaustavili pranje i započeli funkciju dodavanja veša. Molimo pratite sledeće korake:
1. Sačekajte dok se bubanj ne zaustavi.
2. Brava na vratima će se otključati
3. Zatvorite vrata kada dodate veš i pritisnite dugme [
Clothes
] da biste nastavili pranje.
Pritisnite [ ] 3 sek
OPREZ!
Dodajte ponovo veš Start
Ne koristite funkciju Ponovo učitaj kada je nivo vode iznad ivice
unutrašnjeg bubnja ili kada je temperatura viša.
ČIŠĆENJE I ODRŽAVANJE
Čišćenje i čuvanje
UPOZORENJE!
Čišćenje uređaja
Redovno održavanje mašine može produžiti njen radni vek. Površinu možete očistiti
razblaženim neutralnim deterdžentom koji nije abrazivan, kada je potrebno. U
slučaju prelivanja vode, odmah je obrišite suvom krpom. Nikada ne koristite oštre
predmete za čišćenje uređaja.
OPREZ!
Čišćenje bubnja
Eventualne rđe ostavljene unutar bubnja od metalnih predmeta treba odmah ukloniti koristeći deterdžente
bez hlora. Nikada nemojte koristiti čeličnu vunu za čišćenje bubnja!
Uvek isključite aparat iz struje i zatvorite vodovodnu slavinu pre čišćenja i
održavanja.
Nikada ne koristite abrazivna ili kaustična sredstva kao što
su mravlja kiselina ili njeni rastvori ili slične supstance poput
alkohola ili hemijskih proizvoda.
NAPOMENA
Čišćenje zaptivača vrata i stakla
Obrišite staklo i brtvu posle svakog pranja kako biste uklonili dlačice
i mrlje. Nakupljanje dlačica može izazvati curenje. Uklonite novčiće,
dugmiće i druge predmete iz brtve posle svakog pranja. Čistite brtvu
i staklo na vratima svakog meseca kako biste obezbedili normalan
rad aparata.
Držite sav veš dalje od mašine dok čistite bubanj.
38
Page 39
Čišćenje ltera za dovod vode
SRB
NAPOMENA
1. Zatvorite slavinu i uklonite crevo za dovod vode
sa nje.
2. Očistite lter četkom
3. Odvijte crevo za dovod vode sa zadnje strane
mašine.
4. Koristite četku da očistite lter.
5. Ponovo instalirajte lter na dovod vode i ponovo
povežite crevo za vodu.
6. Čistite lter na dovodu vode svaka 3 meseca kako
biste osigurali normalan rad aparata.
Smanjen protok vode je znak da je potrebno očistiti lter
1
3
d.
Čišćenje oke za deterdžent
1. Pritisnite dugme za otpuštanje [
Očistite unutrašnjost otvora četkom.
2. Podignite poklopac omekšivača sa oke za doziranje i operite oba predmeta vodom.
3. Vratite poklopac omekšivača i gurnite oku nazad u otvor.
] na poklopcu omekšivača i izvucite oku za doziranje iz otvora.
2
4
Pritisnite dugme za
otpuštanje i izvucite
oku za doziranje
NAPOMENA
• Ne koristite abrazivna ili korozivna sredstva za čišćenje plastičnih delova.
• Čistite dozer za deterdžent svaka 3 meseca kako biste osigurali normalan rad uređaja.
Čišćenje ltera za pumpu odvoda
UPOZORENJE!
• Uverite se da je mašina završila ciklus pranja i da je prazna. Isključite je i izvucite utikač pre čišćenja ltera
pumpe za odvod.
• Pazite na vruću vodu. Sačekajte da se voda ohladi. Rizik od opekotina!
• Čistite lter periodično, svaka 3 meseca, kako biste osigurali normalan rad uređaja.
Operite oku za
deterdžent i poklopac
omekšivača pod
mlazom vode
Očistite udubljenje
mekanom četkom
39
Ubacite oku za
deterdžent
Page 40
SRB
Otvorite donji
poklopac.
OPREZ!
Kada je uređaj u upotrebi, u zavisnosti od izabranog programa, može biti vruće vode u pumpi. Nikada ne
skidajte poklopac pumpe tokom ciklusa pranja, uvek sačekajte da uređaj završi ciklus i bude prazan. Kada
vraćate poklopac, obavezno ga čvrsto zategnite.
Otvorite lter tako što
ga okrenete suprotno
smeru kazaljke na satu.
Uklonite strane
materije.
Zatvorite donji
poklopac.
OTKLANJANJE PROBLEMA
Kada god postoji problem sa aparatom, proverite da li možete da ga rešite prateći tabele ispod. Ako
problem i dalje postoji, molimo kontaktirajte korisničku službu.
Opis Moguć uzrok Rešenje
Mašina se ne pokreće
Vrata se ne mogu
otvoriti
Curenje vode Spojevi nisu dovoljno čvrsti.
Ostaci deterdženta u
oci za deterdžent
Indikator ili displej ne
rade
Neobična buka
Vrata nisu pravilno
zatvorena. Odeća je zaglavljena.
Aktivirana je sigurnosna zaštita.
Deterdžent je vlažan i/ili
zgrudvan.
Ploča sa štampanim kolima
ili kablovi imaju problema sa
vezom.
Fiksirajući vijci su još uvek na
mestu.
Pod nije čvrst ili nivelisan.
Pravilno zatvorite vrata i ponovo pokrenite.
Proverite veš.
Isključite uređaj iz struje i ponovo ga
pokrenite.
Proverite i pričvrstite dovodnu cev za vodu.
Proverite i očistite odvodno.
Očistite i obrišite oku za deterdžent, kako
bi bio suv.
Isključite iz struje i proverite da li je glavni
priključak povezan pravilno.
Proverite da li su ksirajući šrafovi pomereni.
Osigurajte da uređaj bude instalian na
čvrstom i nivelisanom podu.
Kodovi grešaka
Opis Moguć uzrok Rešenje
Vrata nisu pravilno
zatvorena
Problemi sa
ubrizgavanjem vode
tokom ciklusa pranja
Prekomerno pražnjenje
vode
Prelivanje vode Ponovo pokrenite uređaj.
Ostalo Ponovo pokrenite uređaj. Ako je problem i dalje
Pravilno zatvorite vrata i ponovo pokrenite.
Proverite da li je pritisak vode dovoljno visok.
Ispravite vodovodno crevo. Očistite lter za dovod.
Proverite da li je odvodno crevo blokirano.
prisutan, molimo vas da pozovete korisnički servis.
40
Page 41
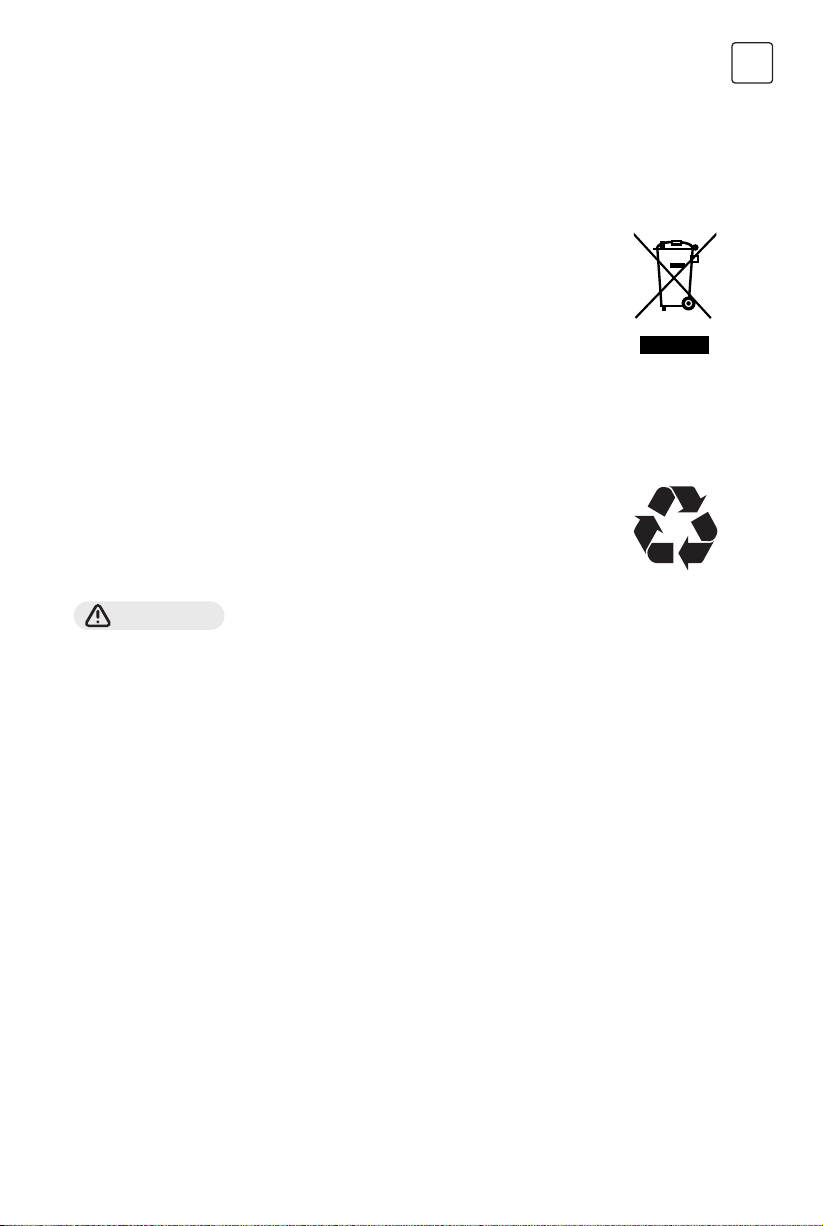
ODLAGANJE I RECIKLAŽA
Važne instrukcije za zaštitu životne sredine
Usklađenost sa WEEE direktivom i odlaganje otpadnog proizvoda:
Ovaj proizvod je usklađen sa EU WEEE direktivom (2012/19/EU). Na ovom proizvodu se nalazi simbol
klasikacije za otpadnu električnu i elektronsku opremu (WEEE).
Ovaj simbol označava da se ovaj proizvod ne sme odlagati zajedno sa ostalim kućnim
otpadom na kraju njegovog radnog veka. Korišćeni uređaj mora se vratiti na zvanično
mesto za sakupljanje radi reciklaže električnih i elektronskih uređaja. Da biste pronašli
ove sisteme za sakupljanje, kontaktirajte lokalne vlasti ili prodavnicu gde ste kupili
proizvod. Svako domaćinstvo igra važnu ulogu u vraćanju i reciklaži starih aparata.
Pravilno odlaganje korišćenih aparata pomaže u sprečavanju potencijalnih negativnih
posledica po životnu sredinu i ljudsko zdravlje.
Usklađenost sa RoHS direktivom
Proizvod koji ste kupili usklađen je sa EU RoHS Direktivom (2011/65/EU). Ne sadrži štetne i zabranjene
materijale navedene u Direktivi.
Informacije o pakovanju
Materijali za pakovanje proizvoda proizvedeni su od reciklabilnih materijala u skladu
sa našim nacionalnim propisima o životnoj sredini. Nemojte odlagati materijale
za pakovanje zajedno sa kućnim ili drugim otpadom. Odnesite ih na punktove za
sakupljanje materijala za pakovanje koje su odredile lokalne vlasti.
SRB
UPOZORENJE!
• Nikada ne pokušavajte da popravite uređaj koji je neispravan ili za koji se pretpostavlja da je neispravan.
Možete ugroziti svoj život i živote budućih korisnika. Samo ovlašćeni stručnjaci smeju da obavljaju ovaj
popravak.
• Nepravilna popravka će poništiti garanciju i naknadne štete neće biti priznate!
Opasnost od strujnog udara
Transport
VAŽNI KORACI PRI PREMEŠTANJU UREĐAJA
• Izvucite utikač uređaja iz struje i zatvorite slavinu za dovod vode.
• Proverite da li su vrata i dozer za deterdžent pravilno zatvoreni.
• Uklonite dovodnu cev za vodu i odvodno crevo iz kućnih instalacija.
• Potpuno ispustite vodu iz uređaja (pogledajte “Čišćenje ltera pumpe za odvod”).
• Važno: Ponovo instalirajte 4 transportna šrafa na zadnju stranu uređaja.
• Ovaj uređaj je težak. Transportujte pažljivo. Nikada ne držite nijedan izbočeni deo mašine prilikom
podizanja. Vrata mašine ne mogu se koristiti kao ručka.
41
Page 42

tesla.info
 Loading...