

Tesla S 2014 Owner's Manual
MODEL S QUICK GUIDE
ROADSIDE ASSISTANCE
SAFETY INFORMATION
WARRANTY (EUROPE)
The full Owner’s Manual and Warranty documents are on
your Model S touchscreen (touch Controls > Settings >
Manual). These digital versions will continuously update as
the software on your car updates, ensuring that the latest
features are properly documented long after your purchase.
More information about your Model S is available at
www.teslamotors.com/mytesla.
DOCUMENT APPLICABILITY
Features released in the most recent versions of software may not be described in this document but are
described in Release Notes. Display Release Notes on the touchscreen by touching the Tesla “T” at the top
center of the touchscreen, then touching the Release Notes link. If information provided in this document
conflicts with information in the Release Notes, the Release Notes take precedence.
ILLUSTRATIONS
The illustrations provided in this document are for demonstration purposes only. Depending on vehicle options,
software version and market region, the information displayed on the touchscreen in your Model S may appear
slightly different.
PRODUCT SPECIFICATIONS
All specifications and descriptions contained in this document are verified to be accurate at the time of printing.
However, because continuous improvement is a goal at Tesla, we reserve the right to make product
modifications at any time.
ERRORS OR OMISSIONS
To communicate any inaccuracies or omissions in this document, please send an email to:
ownersmanualfeedback@teslamotors.com.
©2012-2014 TESLA MOTORS, INC. All rights reserved.
All information in this document and all MODEL S® software is subject to copyright and other intellectual property
rights of Tesla Motors, Inc. and its licensors. This material may not be modified, reproduced or copied, in whole or in
part, without the prior written permission of Tesla Motors, Inc. and its licensors. Additional information is available
upon request. The following are trademarks or registered trademarks of Tesla Motors, Inc. in the United States and
other countries:
TESLA TESLA MOTORS TESLA
HOMELINK® and the HOMELINK® house icon are registered trademarks of Johnson Controls, Inc. Bluetooth® is a
registered trademark of Bluetooth SIG, Inc. iPhone® is a registered trademark of Apple, Inc. Android™ and
Google Maps™ are trademarks of Google, Inc. Sirius, All other trademarks contained in this document are the
property of their respective owners and their use herein does not imply sponsorship or endorsement of their
products or services. The unauthorized use of any trademark displayed in this document or on the vehicle is strictly
prohibited.
ROADSTER
MODEL S

Roadside Assistance......................2
About Roadside Assistance....................................2
Contacting Roadside Assistance2Regional Roadside Assistance Numbers2
Instructions for Transporters..................................4
Use a Flatbed Only4Disable Self-Leveling (air suspension vehicles only)4Activate Tow Mode4Connect the Tow Chain5Pull Onto the Trailer and Secure the Wheels5
Safety Information......................... 6
Seat Belts....................................................................... 6
Wearing Seat Belts6Wearing Seat Belts When Pregnant6Seat Belt Pre-tensioners7Testing Seat Belts7Seat Belt Warnings8
Child Safety Seats.......................................................9
Guidelines for Seating Children9Choosing a Child Safety Seat9Seating Larger Children11Installing Child Safety Seats11Installing Seat Belt Retained Child Seats11Installing ISOFIXChild Seats12Attaching Upper Tether Straps13Testing a Child Safety Seat13Warnings - Child Safety Seats14
Tesla Built-In Rear Facing Child Seats...............15
Usage Restrictions15Opening15Folding16Seating a Child17Warnings - Tesla Child Seats18
Airbags.......................................................................... 19
Location of Airbags19How the Airbags Work20Types of Airbags20Disabling the Passenger Front Airbag21Inflation Effects22Airbag Warning Indicator22Airbag Warnings22
Tire Care and Maintenance...................................23
Maintaining Tire Pressures23Inspecting and Maintaining Tires24Replacing Tires and Wheels25Using Tire Chains26Tire Pressure Monitoring26Understanding Tire Markings28
Vehicle Loading........................................................ 30
Load Capacity Labeling30Calculating Load Limits31Towing a Trailer31
Disclaimers................................................................... 31
Vehicle Telematics/Data Recorders31Quality Control32
Reporting Concerns.................................................33
Contacting Tesla33
Warranty......................................... 34
General Warranty Provisions...............................34
Who is the Warrantor?34What Vehicles are Covered?34Multiple Warranty Conditions34Limitations and Disclaimers34Your Rights Under Local Law35Ownership Transfer35Who Can Enforce this New Vehicle Limited Warranty?35When Does the Warranty Period Begin and End?35
Warranty Coverage................................................. 35
Basic Vehicle Limited Warranty36Supplemental Restraint System Limited Warranty36Battery Limited Warranty36
Exclusions and Limitations....................................37
Warranty limitations37Additional limitations and exclusions37Voided warranty38Damages38
Obtaining Warranty Service.................................39
Payment of Tax for Repairs39Reasonable Time for Repairs39Modifications and Waivers40
Warranty Enforcement Laws and
Dispute Resolution.................................................. 40
Country Specific Consumer Disclosure............ 41
Bulgaria41France42Italy42Norway43Poland44San Marino44
Contents
Roadside Assistance
About Roadside Assistance
Contacting Roadside Assistance
Tesla Roadside Assistance is available to you, 24 hours a day, 365 days a year for the duration of
your warranty period.
To contact Roadside Assistance, call the number for your region, listed on this page.
Advise the representative of the vehicle identification number (VIN), license plate number,
mileage, your location, and the nature of the problem. The VIN is on the upper dashboard on the
driver’s side of your vehicle and is visible through the windshield.
For a complete description of the terms and conditions of the Tesla Roadside Assistance
Program, refer to the policy that was provided to you by Tesla when you purchased Model S.
It is your responsibility to provide vehicle transporters with instructions on how to transport
Model S (see Instructions for Transporters on page 4).
Regional Roadside Assistance Numbers
A toll free number is available in most European regions. If a toll free number is not listed below,
go to www.teslamotors.com to check if a toll free number has become available in your area.
Andorra (Toll) 31 (0)13 799 9501
Andorra (Toll Free) 0800 914 590
Austria (Toll) 31 (0)13 799 9502
Austria (Toll Free) 0800 88 0992
Belgium (Toll) 31 (0)13 799 9503
Belgium (Toll Free) 0800 29 027
Bulgaria (Toll) 31 (0)13 799 9504
Croatia (Toll) 31 (0)13 799 9505
Cyprus (Toll) 31 (0)13 799 9506
Czech Republic (Toll) 31 (0)13 799 9507
Denmark (Toll) 31 (0)13 799 9508
Denmark (Toll Free) 80 71 10 24
Estonia (Toll) 31 (0)13 799 9509
Finland (Toll) 31 (0)13 799 9510
France (Toll) 31 (0)13 799 9511
France (Toll Free) 0800 94 1029
Germany (Toll) 31 (0)13 799 9512
Germany (Toll Free) 0800 5893542
Gibraltar 31 (0)13 799 9513
Greece (Toll) 31 (0)13 799 9514
2 Model S Quick Guide
Greece (Toll Free) 0800 1809 205 0645
Hungary (Toll) 31 (0)13 799 9515
Iceland (Toll) 31 (0)13 799 9516
Ireland (Toll) 31 (0)13 799 9517
Italy (Toll) 31 (0)13 799 9518
Italy (Toll Free) 800 122 709
Latvia 31 (0)13 799 9519
Liechtenstein (Toll) 31 (0)13 799 9520
Liechtenstein (Toll Free) 0800 558 847
Lithuania (Toll) 31 (0)13 799 9521
Luxembourg (Toll) 31 (0)13 799 9522
Luxembourg (Toll Free) 0800 8002 2538
Malta (Toll) 31 (0)13 799 9523
Monaco (Toll) 31 (0)13 799 9524
Monaco (Toll Free) 0800 94 1029
Netherlands (Toll) 31 (0)13 799 9525
Netherlands (Toll Free) 0800 0200160
Norway (Toll) 31 (0)13 799 9527
Norway (Toll Free) 800 11 093
Poland (Toll) 31 (0)13 799 9528
Poland (Toll Free) 800 141 01492
Portugal (Toll) 31 (0)13 799 9529
Romania (Toll) 31 (0)13 799 9530
San Marino (Toll) 31 (0)13 799 9531
Slovakia (Toll) 31 (0)13 799 9532
Slovenia (Toll) 31 (0)13 799 9533
Spain (Toll) 31 (0)13 799 9534
Sweden (Toll) 31 (0)13 799 9535
Switzerland (Toll Free) 0800 83 7521
United Kingdom (Toll) 31 (0)13 799 9537
United Kingdom (Toll Free) 0800 358 577
Roadside Assistance
Roadside Assistance 3
Roadside Assistance
Instructions for Transporters
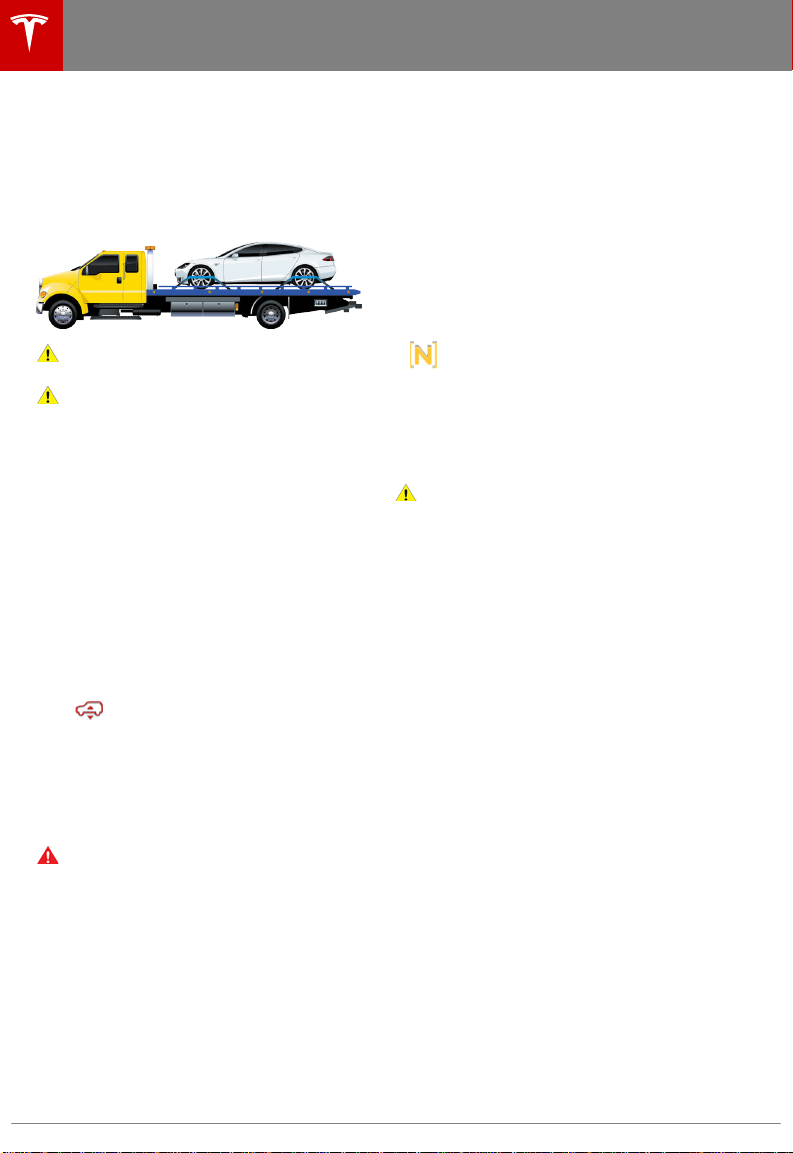
Use a Flatbed Only
Use a flatbed trailer only, unless otherwise
specified by Tesla. Do not transport Model S
with the tires directly on the ground.
Caution: Damage caused by transporting
is not covered by the warranty.
Caution: To transport Model S, follow the
instructions exactly as described next.
Disable Self-Leveling (air suspension vehicles only)
If Model S is equipped with Smart Air
Suspension, it automatically self-levels, even
when power is off. To prevent damage, you
must activate Jack mode to disable selfleveling:
1. Touch Controls > Driving on the
touchscreen.
2. Press the brake pedal, then touch Very
High to maximize height.
3. Touch Jack.
When Jack mode is active,
Model S displays this indicator
light on the instrument panel,
along with a message telling you
that active suspension is
disabled.
Note: Jack mode cancels when Model S is
driven over 7 km/h.
Warning:
on a Model S equipped with Smart Air
Suspension can result in the vehicle
becoming loose during transport, which
may cause significant damage.
Failure to activate Jack mode
Activate Tow Mode
Model S may automatically shift into Park
when it detects the driver leaving the vehicle,
even if it has previously been shifted into
Neutral. To keep Model S in Neutral (which
disengages the parking brake), you must use
the touchscreen to activate Tow mode:
1. Shift into Park.
2. Press the brake pedal, then on the
touchscreen, touch Controls > E-Brake &
Power Off > Tow Mode.
When Tow mode is active, Model S
displays this indicator light on the
instrument panel, along with a
message telling you that Model S is
free-rolling.
Note: Tow mode cancels when Model S is
shifted into Park.
Caution: If the electrical system is not
working, and you therefore cannot
release the electric parking brake,
attempt to quick start the 12V battery.
For instructions, call Tesla. If a situation
occurs where you cannot disengage the
parking brake, use tire skids or transport
Model S for the shortest possible distance
using wheeled dollies. Before doing so,
always check the dolly manufacturer’s
specifications and recommended load
capacity.
4 Model S Quick Guide
Roadside Assistance
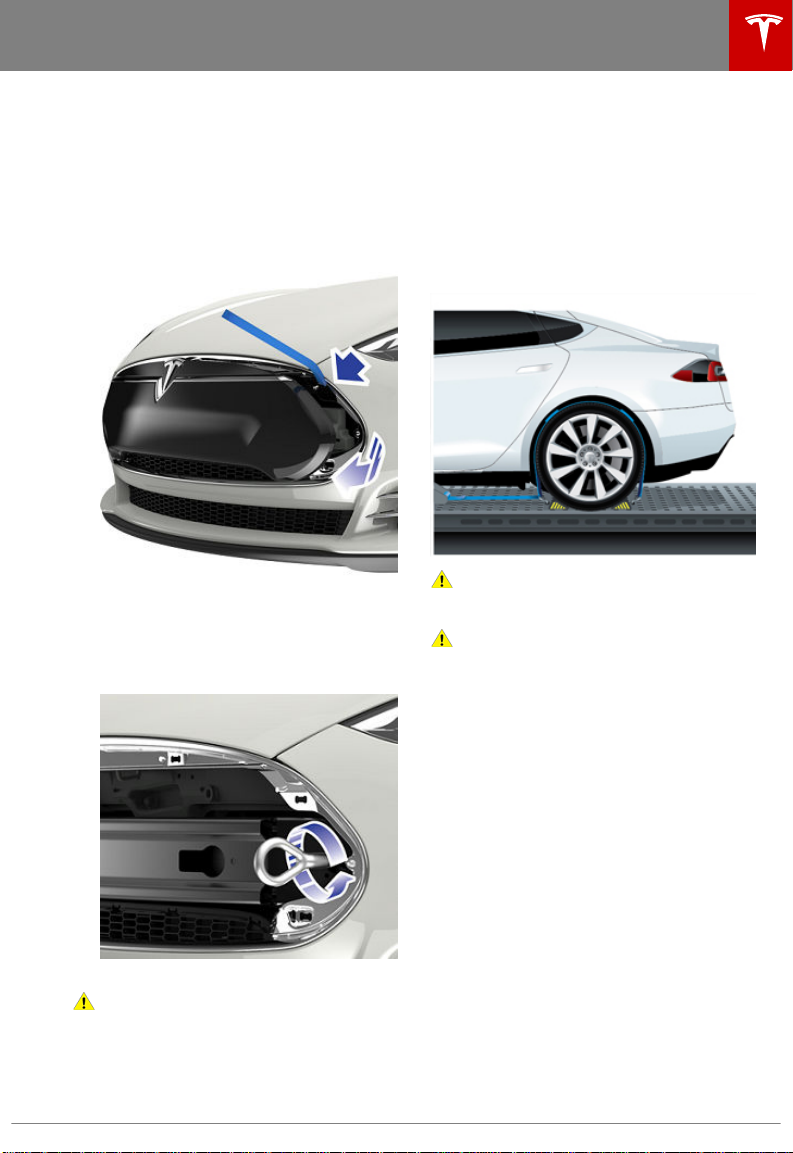
Connect the Tow Chain
1. Remove the nose cone.
Insert a plastic pry tool into the top right
corner, and gently pry the nose cone
toward you. When the clip releases, pull
the nose cone toward you, without
twisting or bending, to release the three
remaining clips.
2. Insert the towing eye.
Fully insert the towing eye (found in the
front trunk) into the opening on the right
side, then turn it counter-clockwise until
securely fastened.
Pull Onto the Trailer and Secure the Wheels
Secure wheels using chocks and tie-down
straps:
• Ensure any metal parts on the tie-down
straps do not contact painted surfaces or
the face of the wheels.
• Do not place straps over body panels or
through the wheels.
Caution: Attaching straps to the chassis,
suspension or other parts of the vehicle's
body may cause damage.
Caution: To prevent damage, do not
transport Model S with the tires directly
on the ground.
3. Attach the tow chain to the towing eye.
Caution:
towing eye is securely tightened.
Roadside Assistance 5
Before pulling, make sure the
Safety Information
Seat Belts
Wearing Seat Belts
Using seat belts and child safety seats is the
most effective way to protect occupants if a
collision occurs. Therefore, wearing a seat belt
is required by law in most jurisdictions.
Both the driver and passenger seats are
equipped with three-point inertia reel seat
belts. Inertia reel belts are automatically
tensioned to allow occupants to move
comfortably during normal driving conditions.
The seat belt reel automatically locks to
prevent movement of occupants if Model S
experiences a force associated with hard
acceleration, braking, cornering, or an impact
in a collision.
The seat belt reminder on the
instrument panel alerts you if a seat
belt for an occupied seat is not
fastened. If the belt remains
unfastened, the reminder flashes and
an intermittent chime sounds. If all
occupants are buckled up and the
reminder stays on, re-fasten seat
belts to ensure they are correctly
latched. Also remove any heavy
objects (such as a briefcase) from an
unoccupied seat. If the reminder
light continues to stay on, contact
Tesla.
3.
Insert the latch plate into the buckle and
press together until you hear a click
indicating it is locked in place.
4. Pull the belt to check that it is securely
fastened.
5. Pull the diagonal part of the belt toward
the reel to remove excess slack.
To Release a Belt
Hold the belt near the buckle to prevent the
belt from retracting too quickly, then press
the button on the buckle. The belt retracts
automatically. Ensure there is no obstruction
that prevents the belt from fully retracting.
The belt should not hang loose. If a seat belt
does not fully retract, contact Tesla.
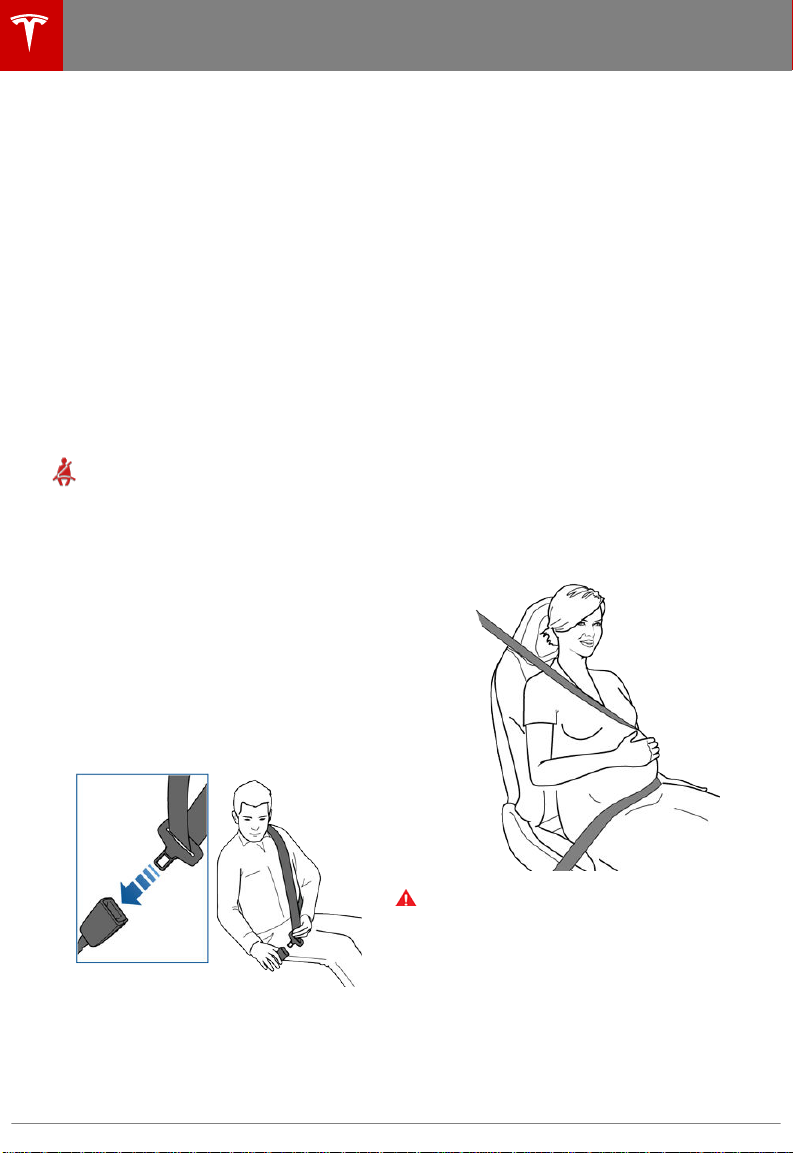
Wearing Seat Belts When Pregnant
Do not put the lap or shoulder sections of the
seat belt over the abdominal area. Wear the
lap section of the belt as low as possible
across the hips, not the waist. Position the
shoulder portion of the belt between the
breasts and to the side of the abdomen.
Consult your doctor for specific guidance.
To Fasten a Belt
1. Ensure correct positioning of the seat.
Warning: Never place anything between
you and the seat belt to cushion the
impact in the event of an accident.
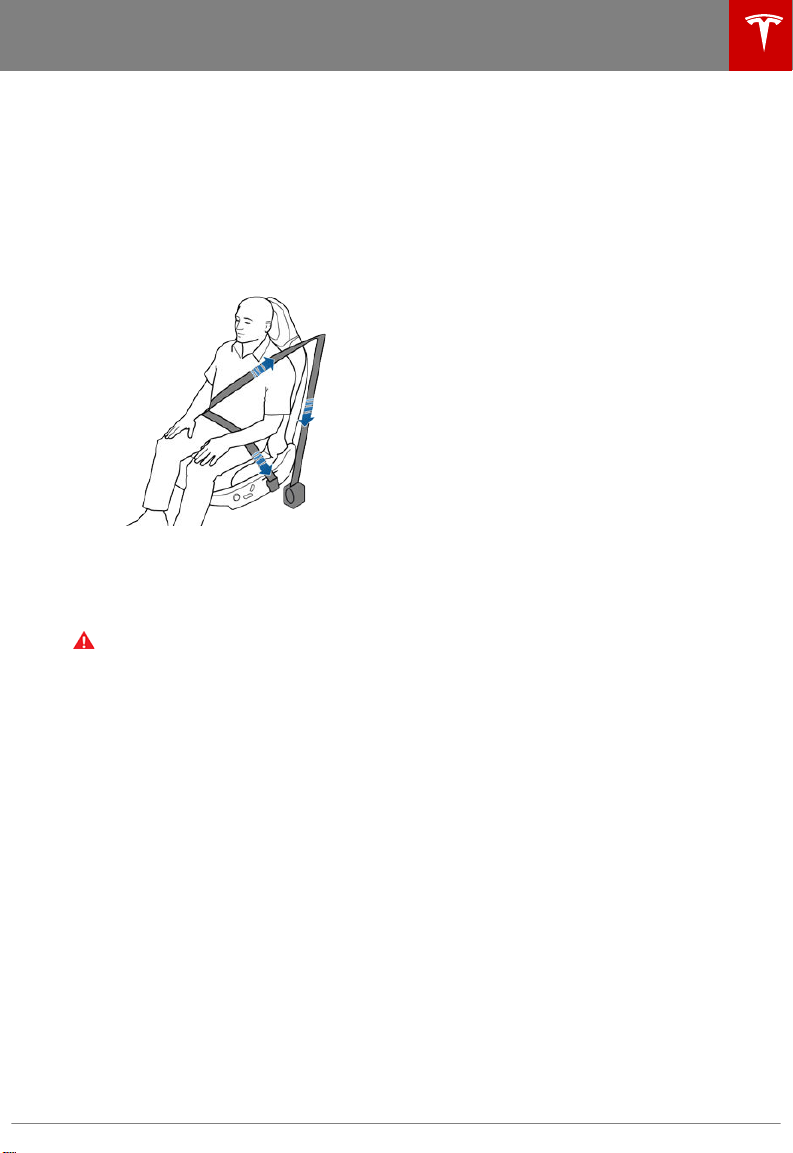
2. Draw the belt out smoothly, ensuring the
belt lays flat across the pelvis, chest and
mid-point of your collar bone, between
the neck and shoulder.
6 Model S Quick Guide
Safety Information
Seat Belt Pre-tensioners
The front seat belts are equipped with
pre‑tensioners that work in conjunction with
the airbags in a severe frontal collision. The
pre‑tensioners automatically retract both the
seat belt anchor and the seat belt webbing,
reducing slack in both the lap and diagonal
portions of the belts, resulting in reduced
forward movement of the occupant.
If the pre-tensioners and airbags did not
activate in an impact, this does not mean they
malfunctioned. It usually means that the
strength or type of force needed to activate
them was not present.
Warning: Once the seat belt pretensioners have been activated, they
must be replaced. After any accident,
have the airbags, seat belt pre-tensioners
and any associated components checked
and, if necessary, replaced.
Testing Seat Belts
To confirm that seat belts are operating
correctly, perform these three simple checks
on each seat belt.
1. With the seat belt fastened, give the
webbing nearest the buckle a quick pull.
The buckle should remain securely locked.
2. With the belt unfastened, unreel the
webbing to its limit. Check that unreeling
is free from snags, and visually check the
webbing for wear. Allow the webbing to
retract, checking that retraction is smooth
and complete.
3. With the webbing half unreeled, hold the
tongue plate and pull forward quickly. The
mechanism should lock automatically and
prevent further unreeling.
If a seat belt fails any of these tests, contact
Tesla immediately.
Safety Information 7

Safety Information
Seat Belt Warnings
Warning: Seat belts should be worn by all
occupants at all times, even if driving for
a very short distance. Failure to do so
increases the risk of injury or death if an
accident occurs.
Warning: Secure small children in a
suitable child safety seat (see Choosing a
Child Safety Seat on page 9). Always
follow the child safety seat
manufacturer's instructions when
installing.
Warning: Ensure that all seat belts are
worn correctly. An improperly worn seat
belt increases the risk of injury or death if
an accident occurs.
Warning: Do not wear seat belts over
hard, fragile or sharp items in clothing,
such as pens, keys, eyeglasses, etc. The
pressure from the seat belt on such items
can cause injury.
Warning: Seat belts should not be worn
with any part of the strap twisted.
Warning: Each seat belt assembly must
be used by one occupant only. It is
dangerous to put a seat belt around a
child being carried on an occupant’s lap.
Warning: Seat belts that have been worn
in an accident must be inspected or
replaced by Tesla, even if damage to the
assembly is not obvious.
Warning: Seat belts that show signs of
wear (such as fraying), or have been cut
or damaged in any way, must be replaced
by Tesla.
Warning: Avoid contaminating a seat
belt’s components with any chemicals,
liquids, grit, dirt or cleaning products. If a
seat belt fails to retract or latch into the
buckle, it must be replaced immediately.
Contact Tesla.
Warning: Do not make modifications or
additions that can prevent a seat belt
mechanism from taking up slack, or that
can prevent a seat belt from being
adjusted to remove slack. A slack belt
greatly reduces occupant protection.
Warning: Do not make modifications that
can interfere with the operation of a seat
belt, or that can cause a seat belt to
become inoperable.
Warning: When seat belts are not in use,
they should be fully retracted and not
hanging loose. If a seat belt does not fully
retract, contact Tesla.
8 Model S Quick Guide
Safety Information
Child Safety Seats
Guidelines for Seating Children
You must restrain infants and small children using a child safety seat appropriate for the child’s
age, weight, and size. Never seat a child in a child safety seat or a booster seat on the front
passenger seat when the airbag is activated. To disable the front passenger seat airbag, see
Disabling the Passenger Front Airbag on page 21. Carefully follow the instructions provided by
the manufacturer of the child safety seat.
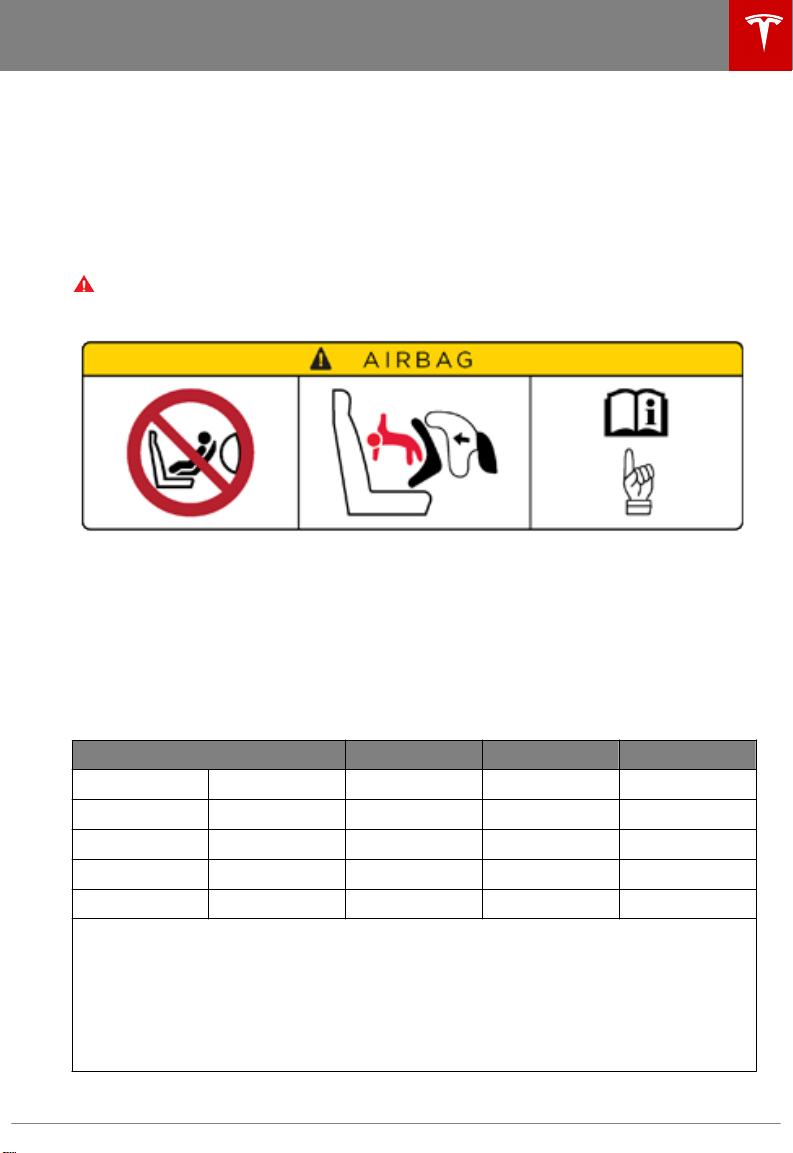
Warning: Never use a rearward facing child restraint on a seat protected by an ACTIVE
AIRBAG in front of it. DEATH or SERIOUS INJURY to the child can occur. Refer to the
following label fitted to both sides of the passenger sunvisor.
If your Model S is equipped with the optional Tesla built-in rear facing child seats, these seats are
child safety seats and are designed only for children within a specific height and weight range
(see Tesla Built-In Rear Facing Child Seats on page 15).
Choosing a Child Safety Seat
Refer to the tables below for guidelines on the type of seat belt installed and ISOFIX installed
child restraint you should use based on the weight of the child.
Seat Belt Installed Child Restraints
Mass Group
Group 0 up to 10 kg L U U
Group 0+ up to 13 kg L U U
Group 1 9 - 18 kg UF* U, UF U, UF
Group II 15 - 25 kg UF* U, UF U, UF
Group III 22 - 36 kg UF* U, UF U, UF
U: Universal rear facing child restraint
UF: Universal forward facing child restraint
L: Suitable for these particular child restraints - Maxi-Cosi Cabrio/Cabriofix E4 04443517 or
Takata Mini E4 04443717
*: Seat must be placed in rearmost highest position.
NOTE: Attach booster seats using seat belts only (do not use ISOFIX).
Safety Information 9
Front Passenger Rear Outboard Rear Centre
Safety Information
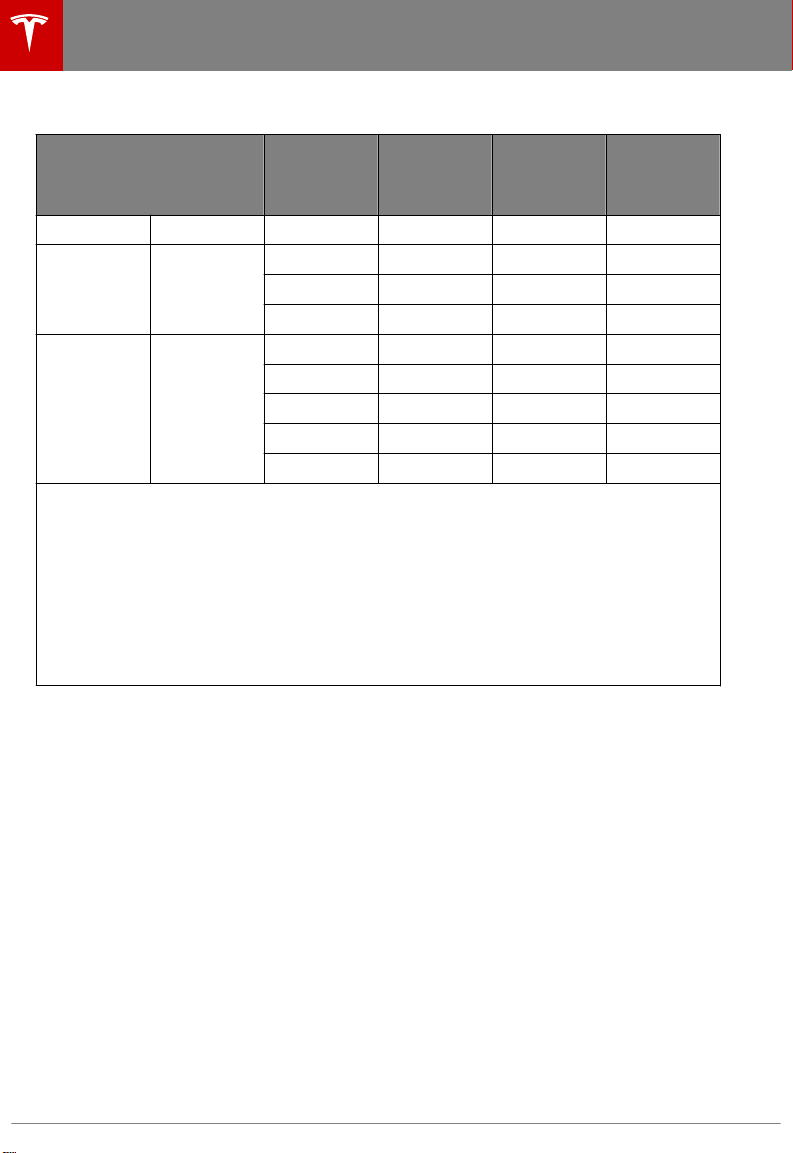
ISOFIX Installed Child Restraints
Rear
Outboard
ISOFIX
Mass Group Size Class Fixture
Position
Group 0 up to 10 kg E R1 IL IL
A, C
A
A, B
Group 0+ up to 13 kg
E R1 IL
D R2 IL
C R3 IL
D R2 IL IL
C R3 IL IL
Group 1 9 - 18 kg
B F2 IUF, IL
B1 F2x IUF, IL
A F3 IUF, IL
IL: Suitable for any semi-universal child restraint (any rear or forward facing restraint with
support leg)
IUF: Suitable for any universal child restraint (forward facing with tether)
A
Recommendation: Takata Mini E4 04443717
B
Recommendation: Takata Midi E4 04444204
C
Recommendation: Maxi-cosi Cabriofix/Easyfix E4 04443517
D
Recommendation: Maxi-cosi Pearl/familyfix E4 043908
*The rear center ISOFIX seating position is not available on all vehicles.
Rear Centre
ISOFIX
Position*
B
B, D
D
IL
IL
IL
IUF
IUF
IUF
Note: If the combined weight of the child and the child safety seat is over 29 kg, Tesla
recommends attaching the safety seat using the seat belt and upper tether strap. In addition to
safety, this has the added benefit of ensuring the seat belt reminder does not stay lit. Always
follow the seat belt manufacturer’s instructions when installing child safety seats.
10 Model S Quick Guide
Safety Information
Seating Larger Children
If a child is too large to fit into a child safety
seat, but too small to safely fit into the
standard seat belts, use a booster seat
appropriate for the child’s age and size.
Carefully follow the manufacturer’s
instructions to secure the booster seat using
the seat belts. Do not use the ISOFIX system
to secure booster seats, even in situations
where the booster seat is equipped with the
ISOFIX system.
Installing Child Safety Seats
There are two general methods used to install
child safety seats:
• Seat belt retained - these seats are
secured using the vehicle’s seat belts (see
Installing Seat Belt Retained Child Seats
on page 11).
• ISOFIX retained - these seats can attach
to anchor bars built into the vehicle’s rear
seats (see Installing ISOFIX Child Seats on
page 12).
Check the child safety seat manufacturer’s
instructions and the table on Choosing a Child
Safety Seat on page 9 to determine which
installation method to use. Some child safety
seats can be installed using either method.
Always follow the child safety seat
manufacturer’s instructions.
Installing Seat Belt Retained Child Seats
First, make sure that the child falls into the
correct weight range for the seat.
Avoid dressing the child in bulky clothing and
do not place any objects between the child
and the restraint system.
Adjust harnesses for every child, every trip.
Always follow the detailed instructions
provided by the child safety seat
manufacturer. General guidelines are provided
below.
1. Place the child safety seat in Model S,
route the seat belt, and secure the buckle
in accordance with the child safety seat
manufacturer’s instructions.
2. Allow the seat belt to retract, and remove
all slack in the seat belt while firmly
pushing the child safety seat into the
Model S seat.
3. If the seat belt retained child safety seat
has an upper tether, attach it to the back
of the seat (see Attaching Upper Tether
Straps on page 13).
Safety Information 11
Safety Information
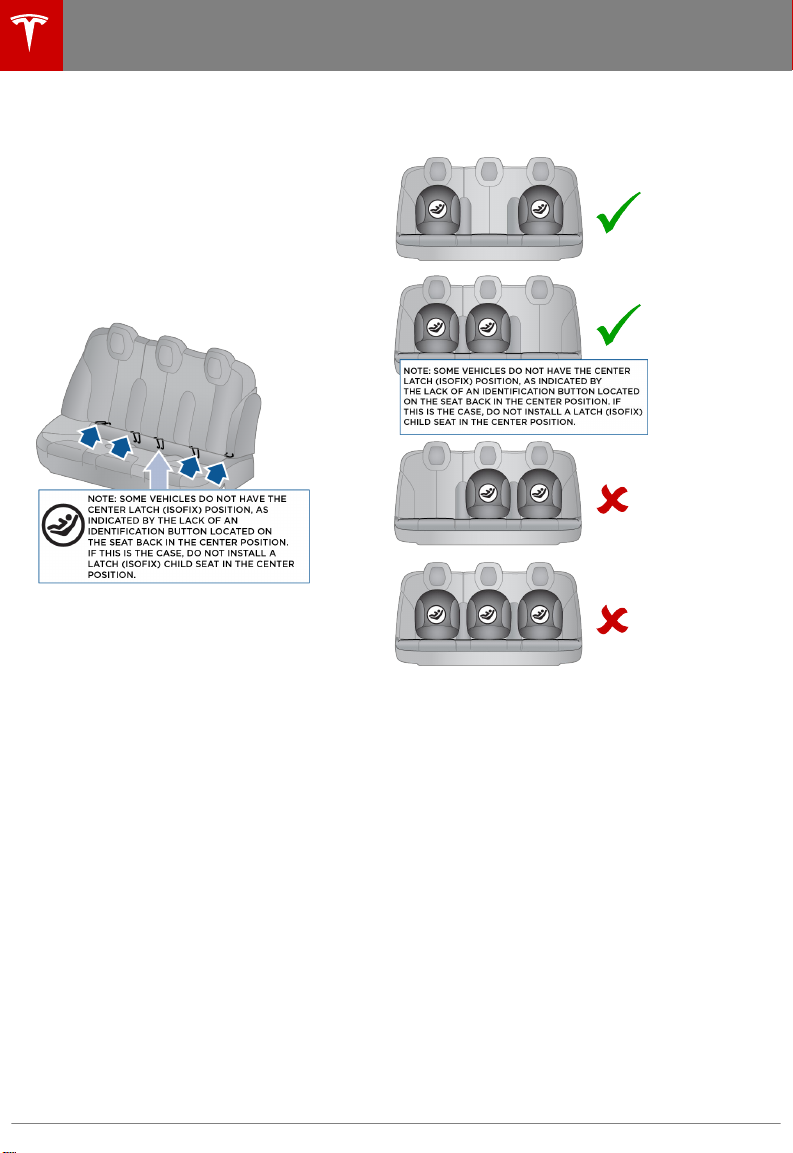
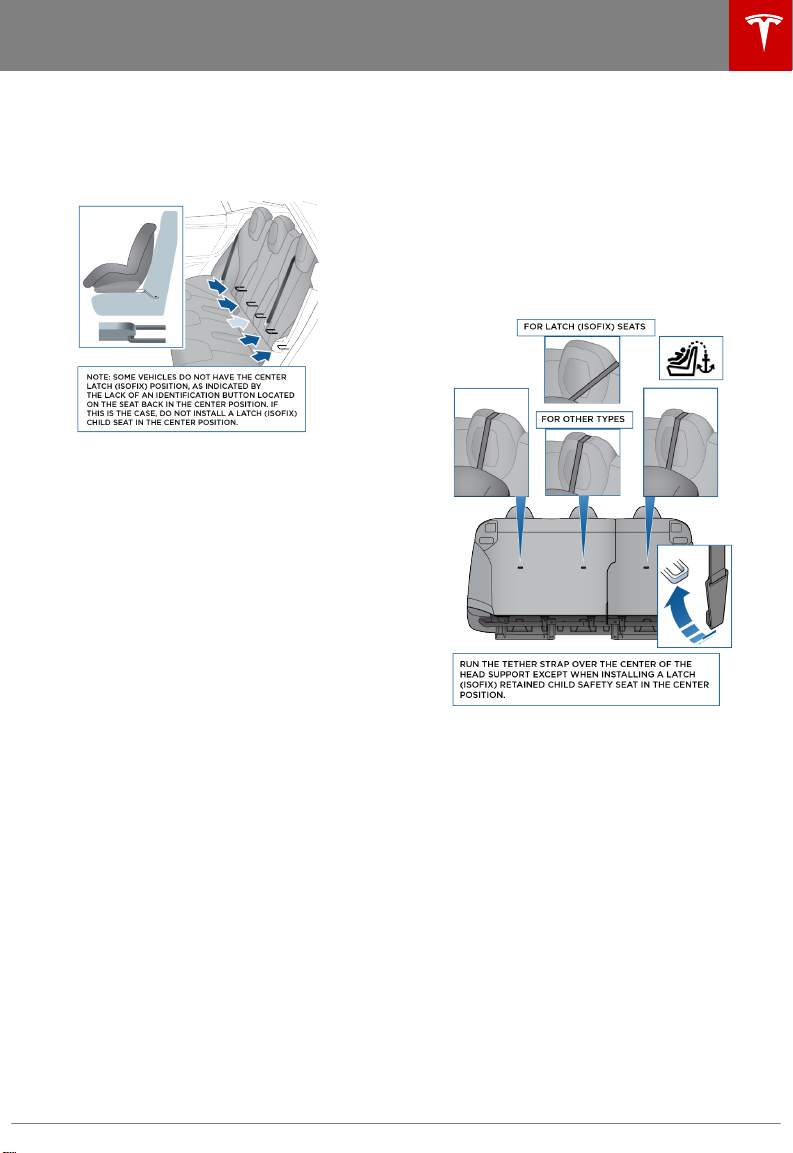
Installing ISOFIX Child Seats
Lower ISOFIX anchor positions are provided
in the second-row seats and are located
between the seat's back rest and rear cushion.
The exact location of each anchor is identified
by a child safety seat identification button,
illustrated below. The button is located on the
seat back, directly above its associated
anchor. Some Model S vehicles have two
ISOFIX seating positions (outboard seating
positions only) whereas others have three.
On vehicles with the center ISOFIX position,
you can install two ISOFIX seats adjacent to
each other only if you install one of the seats
on the right (passenger side) and the other in
the center, as illustrated below. To seat three
children, use a seat belt retained seat in the
center position.
On vehicles without the center ISOFIX
position, install ISOFIX seats in the outboard
seating positions only and always use a seat
belt retained seat in the center position.
12 Model S Quick Guide
Safety Information
To install a ISOFIX retained child safety seat,
slide the safety seat latches onto the anchor
bars until they click into place. Carefully read
and follow the instructions provided by the
child safety seat manufacturer.
Once installed, test the security of the
installation before seating a child. Attempt to
twist the child safety seat from side to side
and try to pull it away from the seat, then
check that the anchors are still securely in
place.
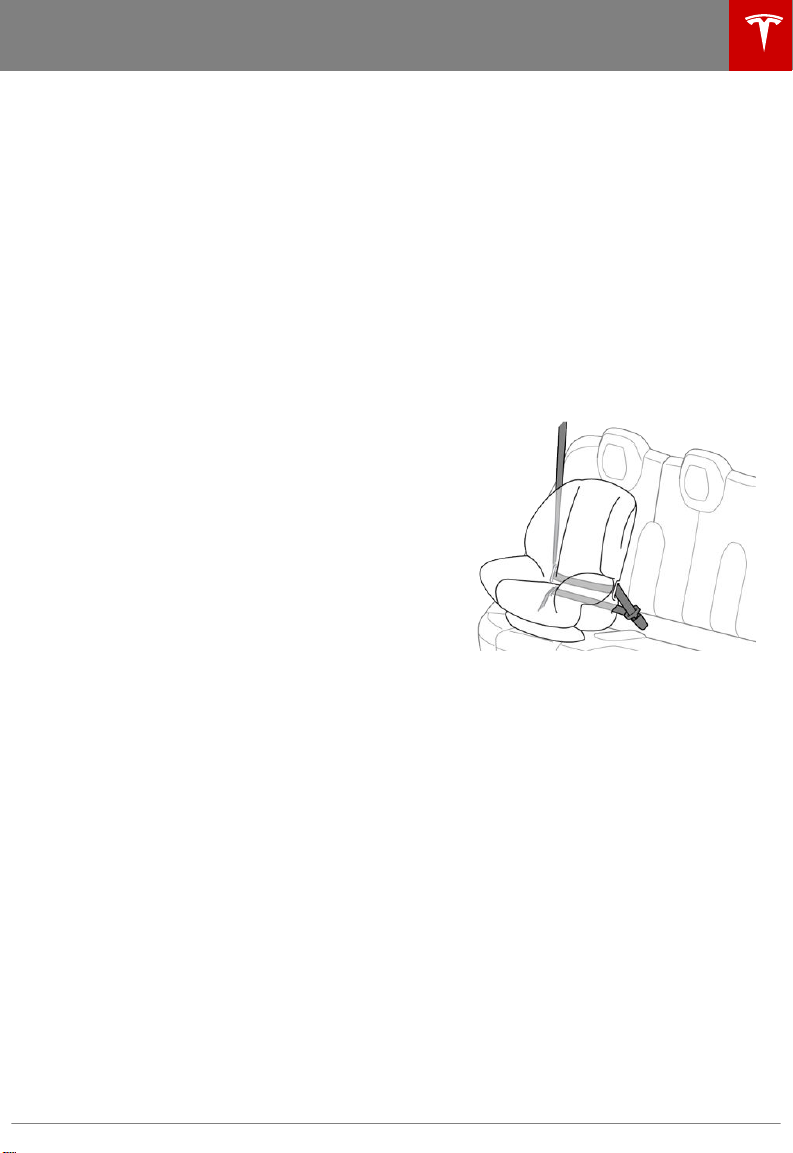
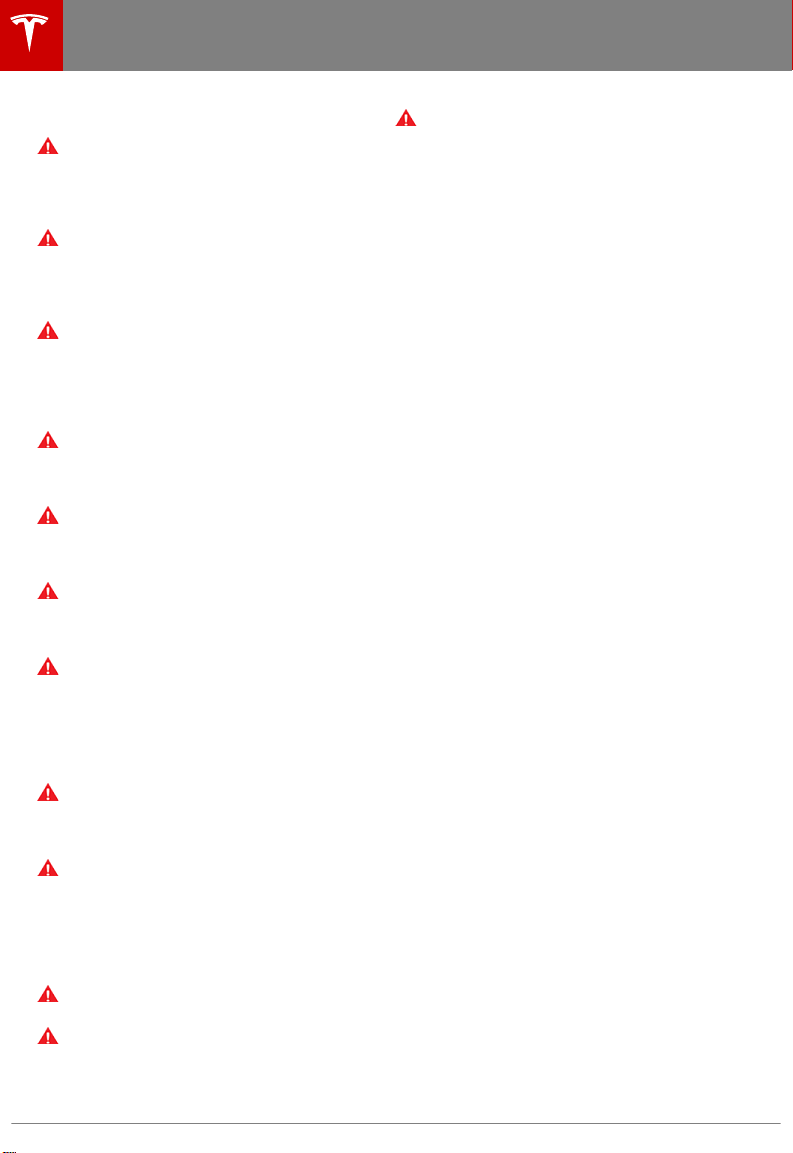
Attaching Upper Tether Straps
If an upper tether strap is provided, attach its
hook to the anchor point located on the back
of the rear seats. Always position the strap so
that it runs over the center of the Model S
head support, except in cases where you are
installing a ISOFIX retained child safety seat in
the center position—in this case, run the strap
over the left hand side of the head support, as
shown. Tighten according to the child safety
seat manufacturer’s instructions.
Note: To prevent the strap from moving from
side to side, the top of the head support
deforms.
Testing a Child Safety Seat
Before seating a child, always make sure the
child safety seat is not loose:
1. Hold the child safety seat by the belt path
and try to slide the safety seat from side
to side and front to back.
2. If the seat moves more than 2.5 cm, it is
too loose. Tighten the belt or reconnect
the ISOFIX retained child safety seat.
3. If you are unable to reduce slack, try a
different seat location or try another child
safety seat.
Safety Information 13
Safety Information
Warnings - Child Safety Seats
Warning: Never seat a child in a child
safety seat or a booster seat on the front
passenger seat when the airbag is
activated. Doing so can cause serious
injury or death.
Warning: Never use a rearward facing
child restraint on a seat protected by an
active airbag. Doing so can cause serious
injury or death. Refer to the warning label
located on the passenger side sun visor.
Warning: Do not use a forward facing
child safety seat until your child weighs
over 9 kg and can sit independently. Up
to the age of two, a child's spine and neck
are not sufficiently developed to avoid
injury in a frontal impact.
Warning: Do not allow a baby or infant to
be held on a lap. All children should be
restrained in an appropriate child safety
seat at all times.
Warning: To ensure children are safely
seated, follow all instructions provided in
this document and by the manufacturer
of the child safety seat.
Warning: Children should ride in a rear
facing child safety seat using the seat’s
integrated 5-point harness for as long as
possible.
Warning: When seating larger children,
make sure the child's head is supported
and the child’s seat belt is properly
adjusted and fastened. The shoulder
portion of the belt must be away from the
face and neck, and the lap portion must
not be over the stomach.
Warning: Never attach two child safety
seats to one anchor point. In a collision,
one anchor point may be incapable of
securing both seats.
Warning: Child restraint anchorages are
designed to withstand only those loads
imposed by correctly fitted child
restraints. Under no circumstances are
they to be used for adult seatbelts,
harnesses, or for attaching other items or
equipment to the vehicle.
Warning: Always check harnesses and
tether straps for damage and wear.
Warning: Never leave a child unattended,
even if the child is secured in a child
safety seat.
Warning: Never use a child safety seat
that has been involved in an accident.
Have the seat inspected or replaced as a
described in the child safety seat
manufacturer’s instructions.
14 Model S Quick Guide
 Loading...