

Tesla Roadster 2, Roadster Sport Owner's Manual

Owners Manual

score
score
Spine: 15/32” wide

A WORD TO ROADSTER OWNERS
Thank you for choosing a Tesla Roadster. Not only have you chosen one of the finest sports cars on the road, you have also
chosen the most energy efficient sports car ever sold. You are participating in a revolution, demonstrating that kicking the oil
habit does not mean you have to give up performance and driving pleasure.
Take the time to get well acquainted with your Tesla Roadster by reading this manual. The more you know and understand
your vehicle, the more safety and pleasure you’ll experience driving it.
Tesla Motors knows your Roadster best. So when service or maintenance is required, Tesla Motors is the place to go. Visit us
regularly at www.teslamotors.com for more information about your Tesla Roadster. By signing into the owners area of this web
site, you can access all the information you need about your specific vehicle, including service information.
Enjoy your Tesla Roadster!
Tesla Motors
San Carlos, California, USA

Table of Contents
For information on how to use the Touch Screen and how to charge your vehicle, refer to the separate manuals
provided in your owners package. For information on how to use the audio and navigation system, refer to the
Original Equipment Manufacturer (OEM) documentation provided by Tesla Motors.
Introduction and consumer information
Important notes about your vehicle 1-2
Important notes about this manual 1-3
Consumer information 1-5
Your vehicle at a glance
Exterior 2-2
Interior 2-4
Seating and safety restraints
Seats 3-2
Seat belts 3-3
Airbag system 3-6
Doors, locks, and security
Keys 4-2
Doors 4-4
Trunk 4-6
Vehicle security 4-7
Charging your vehicle
General information about charging 5-2
Charge settings 5-4
Charging components 5-6
Driving your vehicle
Driving basics 6-2
Switches and controls 6-6
Instruments 6-11
Comfort and convenience
Power windows 7-2
Rear view mirrors 7-3
Interior temperature control 7-4
Interior accessories 7-6
Removable roof 7-8
HomeLink® 7-14
Maintenance and care
Maintenance 8-2
Fluid reservoirs 8-5
Windshield wiper and washer 8-7
Cleaning and vehicle care 8-8
Roadside emergencies
Tool kit 9-2
Energy Depletion 9-3
Tire repair 9-4
Wheels 9-6
Fuse replacement 9-7
Bulb replacement 9-9
Raising the vehicle 9-11
Vehicle recovery 9-13
Technical specifications
Vehicle identification 10-2
Wheels and tires 10-4
Approved fluids and capacities 10-14
Vehicle dimensions and weights 10-15
Subsystem specifications 10-17

1-1
Introduction & consumer information
Important notes about your vehicle
Electric vehicle precautions 1-2
California Proposition 65 1-2
Vehicle modifications 1-2
Service data recording 1-2
Change of address or ownership 1-2
Important notes about this manual
Read this manual first 1-3
Copyright and trademarks 1-3
Symbols glossary 1-4
Consumer information
Reporting safety defects 1-5

Important notes about your vehicle
1-2 Introduction and consumer information
Introduction and consumer informationImportant notes abo ut your vehicle
Electric vehicle precautions
WARN ING: HIGH VOLTAGE. The Tesla
Roadster
TM
has both AC and DC high
voltage systems in addition to a normal 12V
DC system. High voltage is very dangerous
and can cause personal injury including
electric shock, severe burns and even fatal
injury. Always observe and obey the
instructions on all labels attached to
components on your vehicle - they are there
for your safety. Do not touch, remove or
replace any high voltage parts. If your vehicle
is involved in an accident, do not touch any
high voltage wiring (identified by the orange
outer sleeving), the connectors or the
components connected to the wiring.
S
California Proposition 65
WARNING: Certain vehicle components
contain or emit chemicals known to the
State of California to cause cancer and birth
defects or other reproductive harm. In
addition, certain fluids contained in vehicles
and certain products of component wear
contain or emit chemicals known to the State
of California to cause cancer and birth
defects or other reproductive harm.
S
WARNING: Certain components of this
vehicle such as airbag modules and
seat belt pretensioners may contain
Perchlorate Material. Special handling may be
required for service or vehicle end of life
disposal. See http://www.dtsc.ca.gov/
hazardouswaste/perchlorate.
S
WARNING: Battery posts, terminals,
and related accessories contain lead
and lead compounds. Wash hands after
handling.
S
Vehicle modifications
WARNING: The fitting of non-approved
parts and accessories, or the
implementation of non-approved
modifications to any vehicle components,
including any “hacking” of the vehicle’s
software, may be dangerous and could affect
the safety of your vehicle and its occupants
and also invalidate the terms and conditions
of the New Vehicle Limited Warranty.
S
WARN IN G : Te sl a Mo tor sTM will not
accept any liability for death, personal
injury or damage to property which may
occur as a direct or indirect result of
non-approved modifications or the fitment of
non-approved accessories.
S
If you have a disability which requires
modification to your vehicle, consult Tesla
Motors before making these modifications.
Service data recording
Service data recorders in your vehicle are
capable of collecting and storing diagnostic
information about your vehicle. This
potentially includes information about the
performance or status of various systems and
control modules in your vehicle such as
motor, accelerator, or brakes. To properly
diagnose and service your vehicle, Tesla
Motors and service facilities may access
vehicle diagnostic information through a
direct connection to your vehicle.
Change of address or
ownership
If you change your address, it is in your best
interest to notify Tesla Motors so we can
contact you should the need arise. Send in
the “Change of Address Notice” found in the
New Vehicle Limited Warranty” booklet, or
simply call Tesla Motors.
If you sell your vehicle, leave all original
owners package materials in the vehicle to
make it available for the next owner.
If you bought this vehicle used, either fill in
the “Change of Address Notice” found in the
New Vehicle Limited Warranty booklet, or
simply call Tesla Motors.

Important notes about this manual
1-3Introduction and consumer information
Important notes ab out this manual
Read this manual first
This owners manual contains a great deal of
information you need to know about a Tesla
Roadster. We urge you to read it carefully and
familiarize yourself with the vehicle before
driving.
For your own safety, follow the instructions
and warnings contained in this manual.
Ignoring them could result in damage to the
vehicle or personal injury to you or others.
Vehicle damage caused by failure to follow
instructions is not covered by the New
Vehicle Lim ited Warranty.
Keep this manual in your Roadster as a
reference for the safe and enjoyable use of
your Tesla Roadster. Should you sell your
vehicle, be sure to provide this manual to the
new owner.
All specifications and descriptions are
accurate at the time of printing. Because
improvement is a constant goal at Tesla
Motors, we reserve the right to make changes
at any time, without notice and without
obligation.
This manual applies to all Roadster 2 and
Roadster Sport vehicles. As a result, you may
find some explanations for equipment or
options not installed on your vehicle. When
required, Tesla Motors distributes an
addendum to provide updated information.
An effective way to find the information you
need is to use the index at the back of this
manual. If you are unable to find the
information you need, note that the following
additional documents are included in your
owners package:
• Audio and Navigation Guides - describes
how to use the audio/navigation system
• Quick Reference - a summarized version
of the information contained in all
manuals to help you quickly understand
your vehicle and its features
• Touch Screen Users Manual - describes
how to use the screens to display
important information while parking,
driving, and charging the vehicle
• Charging Your Vehicle - describes how to
charge your vehicle
• Roadside Assistance Guide - describes
the Tesla Motors Roadside Assistance
program and provides instructions on
how to transport the vehicle
• Warranty Booklet - details the New
Veh ic le Li mi te d Wa rran ty
• Tire Warranty - details the warranty for
the vehicle’s tires
In addition to the documents in your owners
package, Tesla provides the following
documents:
• High Power Connector Installation
Manual - provides planning guidelines for
the installation of the High Power
Connector as well as step-by-step
installation instructions. This manual is
included with the delivery of the High
Power Connector.
• Mobile Connector Users Manual describes how to the use a Tesla Motors
mobile connector. This manual is included
with the deliery of a Tesla Motors mobile
connector.
• OEM Audio & Navigation System manual
- describes how to use the vehicle’s audio
and navigation system. This manual is
provided in your vehicle’s trunk.
When required, Tesla Motors may also include
an addendum in the owners package if your
vehicle differs from what is in the manuals. If
you are missing a document, contact Tesla
Motors.
Copyright and trademarks
©2009 TESLA MOTORS INC. All rights
reserved. This material may not be
reproduced or copied, in whole or in part,
without the written permission of Tesla
Motors, Inc.
“Tesla Motors
TM
” and “Tesla RoadsterTM” are
trademarks of Tesla Motors, Inc. “HomeLink®”
is a registered trademark of Johnson
Controls, Inc. iPod® is a registered trademark
of Apple Computer, Inc. Havoline® is a
registered trademark of Chevron or its
affiliates. TORX® is a registered trademark of
Textron, Inc. All other trademarks are the
property of their respective owners.
Important notes about this manual
1-4 Introduction and consumer information
Symbols glossary
The following symbols used within this
manual call your attention to specific types of
information:
WARNING: Indicates a situation in
which serious bodily injury or death
could result if the warning is ignored.
S
Caution: Indicates a situation in which
bodily injury or damage to your vehicle,
or both, could result if the caution is ignored.
Identifies items that must be disposed
of safely to prevent unnecessary
damage to the environment.
Note: A note provides useful supporting
information and sometimes suggests how to
make better use of your vehicle.

Consumer information
1-5Introduction and consumer information
Consumer information
Reporting safety defects
United States
If you believe that your vehicle has a defect
which could cause a crash or could cause
injury or death, you should immediately
inform the National Highway Traffic Safety
Administration (NHTSA) in addition to
notifying Tesla Motors.
If NHTSA receives similar complaints, it may
open an investigation, and if it finds that a
safety defect exists in a group of vehicles, it
may order a recall and remedy campaign.
However, NHTSA cannot become involved in
individual complaints between you and
another party such as Tesla Motors.
To contact NHTSA, call the Auto Safety
Hotline toll-free at 1-888-327-4236 (TTY:
1-800-424-9153); go to
http://www.safercar.gov
; or write to:
Administrator, NHTSA
1200 New Jersey Avenue SE
Was hington, D C 2 0590
You can also obtain other information about
motor vehicle safety from
http://www.safercar.gov
.
Canada
If you believe that your vehicle has a defect
which could cause a crash or could cause
injury or death, you should immediately
inform Transport Canada, in addition to
notifying Tesla Motors.
To contact Transport Canada, call their
toll-free number: 1-800-333-0510.

2-1
Your vehicle at a glance
Exterior
Exterior overview 2-3
Interior
Dashboard overview 2-5
Exterior
2-2 Your vehicle at a glance
Your vehicle at a glance
10TR0109
1 2
6543
7
8
10
9

Exterior
2-3Your vehicle at a glance
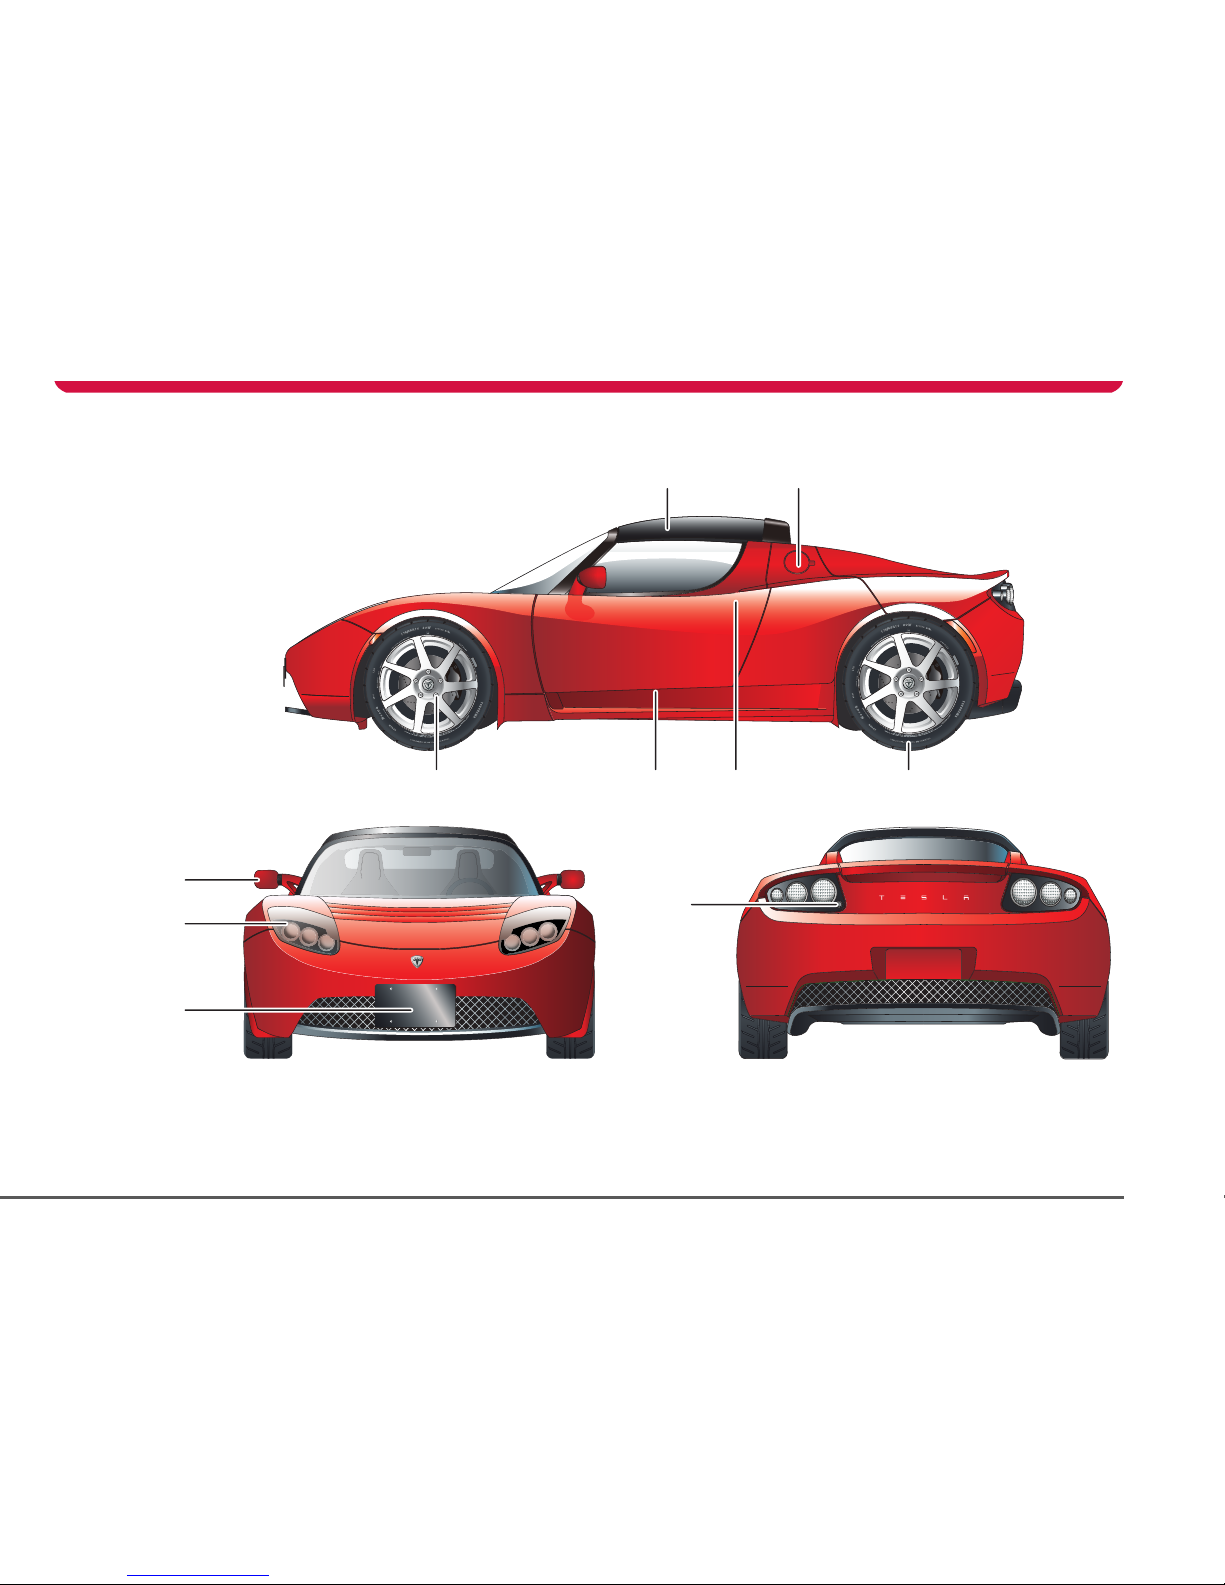
Exterior overview
1. Roof. See Removable roof, page 7-8.
2. Charging port door. For details on vehicle charging, see the manual titled “Charging Your Vehicle” provided in your owners package.
3. Wheel bolts. See Removing the wheel, page 9-6.
4. Emergency door unlock. See Emergency unlocking, page 4-5.
5. Exterior door release. See Exterior door release, page 4-4.
6. Wheels and tires. See Wheels and tires, page 10-4.
7. Exterior mirrors. See Exterior rear view mirrors, page 7-3.
8. Headlights. See Exterior lights, page 6-6.
9. Vehicle recovery eye. See Attaching the vehicle recovery eye, page 9-14.
10. Trunk lock. See Opening the trunk, page 4-6.

Interior
2-4 Your vehicle at a glance
Interior
TR0050
R
P
N
D
TC
i
AMPS
0
RANGE
0
765
MiODO
BRAKE
FAULT
REGEN
POWER
LIMIT
CRUISE
TC
ABS
rpm
x1000
mph
kW
TC
40
20
0
25
50
100
200
0
30
40
60
80
100
120
140
14
12
10
8
6
4
2
160
0
1
2
3
D
TC
i
0
RANGE
FAULT
REGEN
POWER
LIMIT
T
C
rpm
x1000
mph
TC
40
20
0
25
50
100
200
0
30
40
60
80
100
120
140
14
10
8
6
4
160
0
1
2
3
1 2 3 4 5
6
7
8
9111315161718 14 12 10

Interior
2-5Your vehicle at a glance
Dashboard overview
1. Trunk release. See Opening the trunk, page 4-6.
2. Turn signals, headlight high beam and cruise control. See Exterior lights, page 6-6 and Cruise control, page 6-9.
3. Instruments. See Instruments, page 6-11.
4. Windshield wiper and washer. See Windshield wiper and washer, page 6-8.
5. Heating and air conditioning. See Interior temperature control, page 7-4.
6. Touch Screen. See Touch Screen Users Manual provided in your owners package.
7. Hazard warning light switch. See Hazard warning, page 6-10.
8. Gear selector. See Selecting gears, page 6-3.
9. Seat heaters.Seat heaters, page 7-5.
10. Traction control switch. See Traction control, page 6-5.
11. Accessory power socket. See Accessory power socket, page 7-6.
12. Starter switch. See Starting the vehicle, page 6-2.
13. Hood release. See Opening the hood, page 8-3.
14. Horn. See Horn, page 6-10.
15. Instrument panel illumination control. See Instrument panel lighting, page 6-14.
16. Exterior lights master switch. See Exterior lights, page 6-6.
17. Power windows. See Operating the windows, page 7-2.
18. Central door locking. See Central door locking, page 4-4.

3-1
Seating and safety restraints
Seats
Seat adjustment 3-2
Seat belts
General information 3-3
Seat belt safety instructions 3-3
Using the seat belts 3-3
Seat belt reminder 3-4
Wearing seat belts during pregnancy 3-4
Seat belt tensioners 3-4
Caring for seat belts 3-4
Child seats and restraints 3-5
Airbag system
General information 3-6
How the system works 3-6
Deployment effects 3-6
Obstruction of airbags 3-7
Airbag warning indicator 3-7
Airbag warning labels 3-7
Using child seats 3-7
Passenger airbag deactivation 3-7
Airbag service information 3-8
Seats
3-2 Seating and safety restraints
Seating and safet y restraints
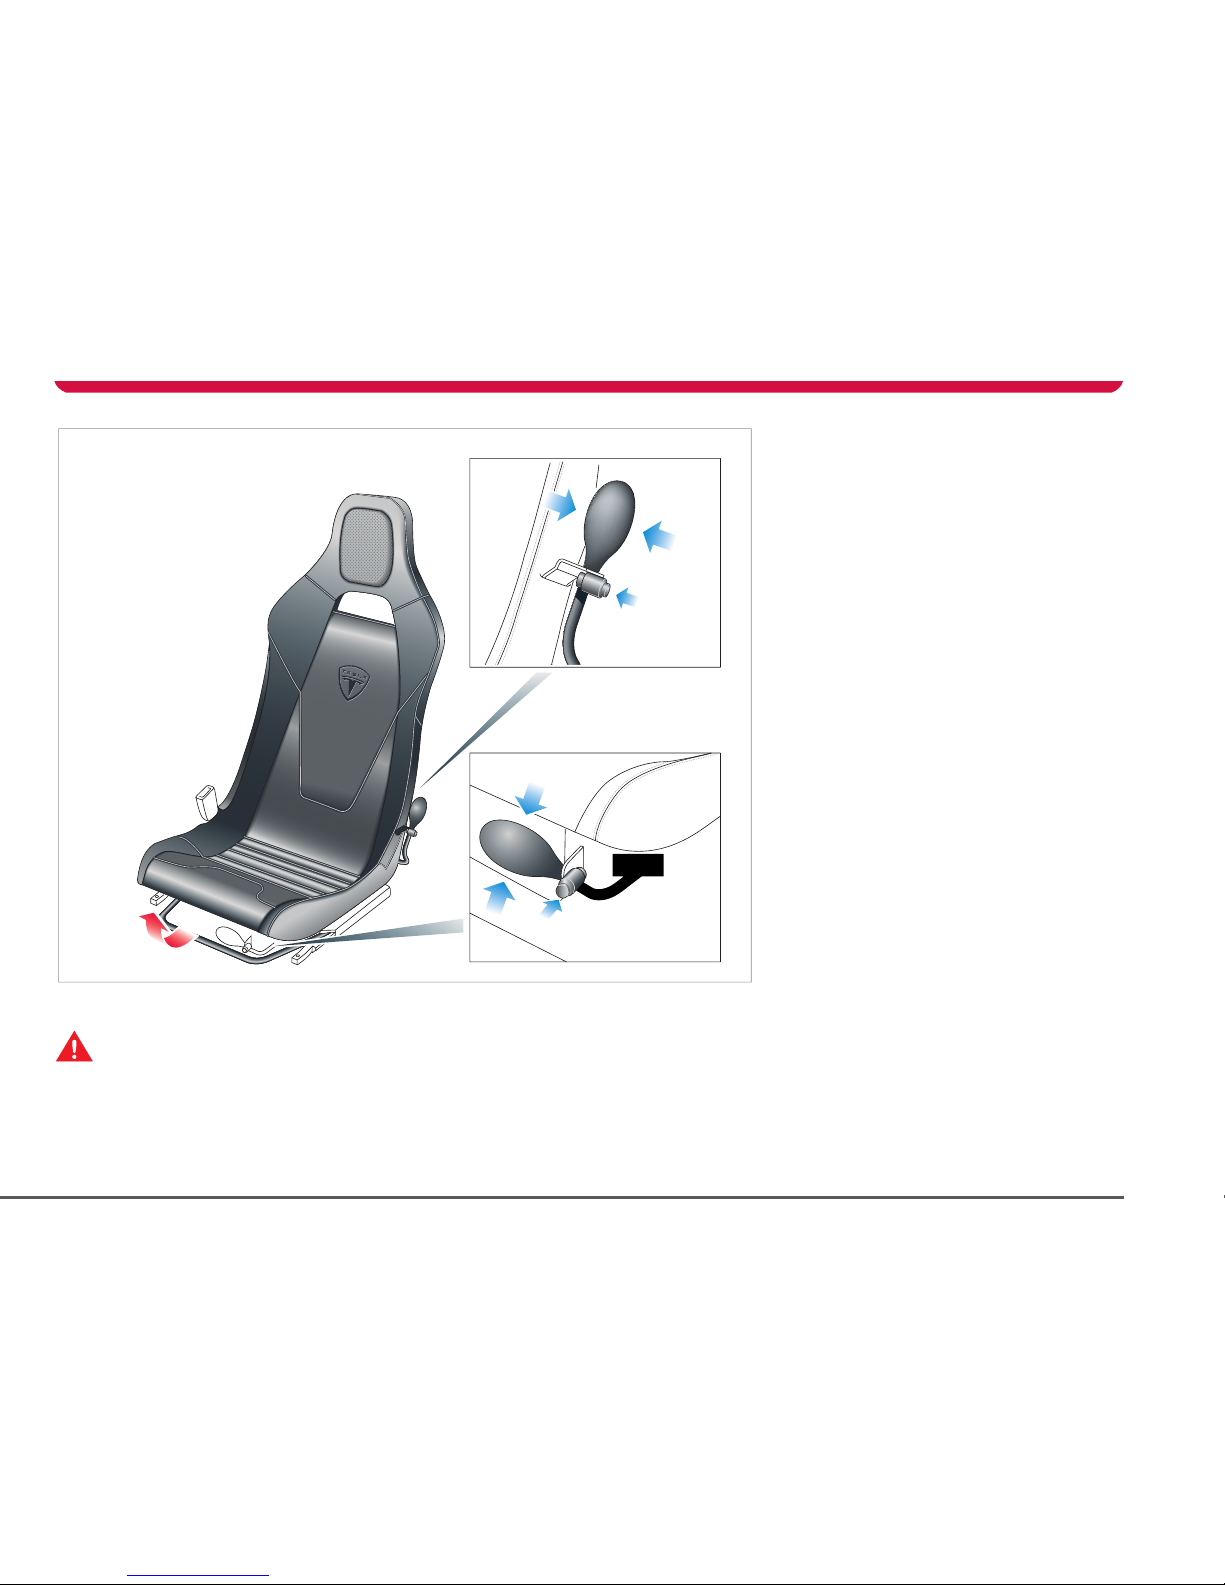
Seat adjustment
WARNING: Never adjust the driver’s
seat while your vehicle is moving.
Unexp ected or sudde n seat movement could
result in an accident.
S
Driver’s seat position
To adjust the forward/rearward position of
the driver’s seat, raise the bar beneath the
front of the seat and slide the seat to the
required position. Release the bar to lock the
TR0001
1
2
seat into position. Ensure that the seat is
locked in position before driving, by trying to
slide the seat forward.
To reduce the risk of injury in the event of an
accident, Tesla recommends the following
when adjusting seat position:
• Adjust the seat so that you can press the
foot pedals fully to the floor with your
knees slightly bent.
• Make sure that you can comfortably reach
the top of the steering wheel.
• Ensure a distance of at least 10 inches (25
cm) between the steering wheel and your
breastbone. The airbag will not provide
adequate protection if you sit closer.
• Fasten your seat belt correctly.
Lumbar support
Adjust lumbar support using the inflator bulb
located on the outside front edge of the
driver’s seat 1 or on the inside front edge of
the passenger seat 2.
To increase lumbar support, squeeze the bulb
repeatedly until sufficient support is obtained.
To reduce the amount of support, press the
button located on the clamp between the
hose and the inflator bulb.
Head restraints
Each seat is provided with a head restraint.
The head restraints are integral with the seats
and therefore can not be adjusted or
removed.
Seat belts
3-3Seating and safety restraints
Seat belts
General information
WARNING: Seat belts should be worn
by all occupants, for every journey no
matter how short. Failure to do so greatly
increases the risk of death or serious injury in
the event of an accident.
S
It is an established fact that seat belts provide
good protection in accidents. Therefore
wearing a seat belt is required by law in most
states.
Both the driver and passenger seating
positions are equipped with three-point
inertia reel seat belts. Inertia reel belts are
tensioned automatically and allow freedom
of movement during normal driving
conditions.
The belt reel automatically locks, preventing
movement of occupants, whenever your
vehicle experiences the force associated with
hard acceleration, braking, cornering or on
impact in a collision. The reel may also lock
when driving on steep hills or slopes.
Seat belt safety instructions
WARNING: Ensure that all seat belts are
worn correctly. An improperly worn
seat belt increases the risk of death or serious
injury in the event of a collision.
S
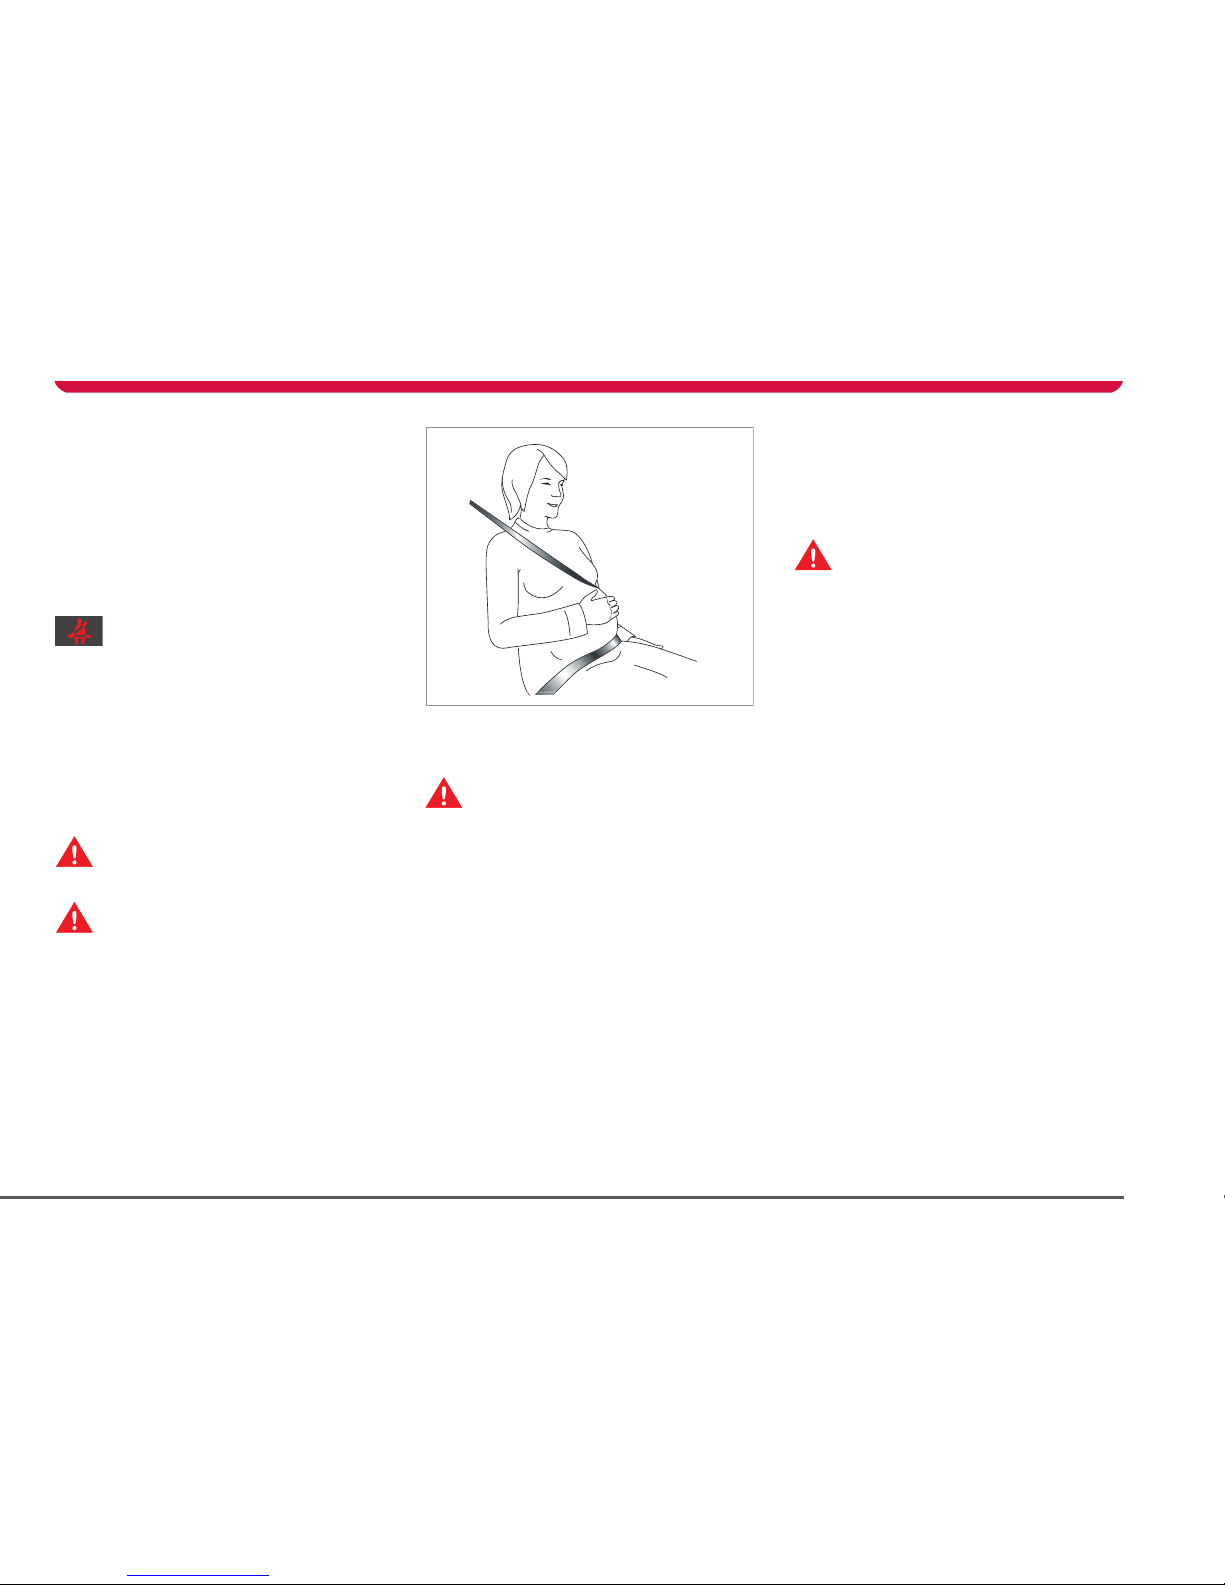
WARNING: Seat belts are designed to
bear upon the bony structure of the
body, and should be worn low across the
pelvis, over the shoulder and across the
chest. Avoid wearing the lap section of the
belt across the abdominal area.
S
WARNING: Always adjust the belt to
remove slack. Seat belts worn too loose
can result in injuries because they allow
excessive forward movement in an
accident.
S
WARNING: Do not wear seat belts over
hard, fragile or sharp items in clothing,
such as pens, keys, eyeglasses, etc. In an
impact, the pressure from the seat belt on
such items can cause them to break, which in
turn may cause serious injury.
S
WARNING: Seat belts should not be
worn with any part of the strap
twisted.
S
WAR NI NG: Ea ch b el t as semb ly mu st b e
used by only one occupant. It is
dangerous to put the belt around a child
being carried on an occupant’s lap.
S
WARNING: It is essential that seat belts
that have been worn in an accident are
replaced, even if damage to the assembly is
not obvious. The belt anchors must also be
checked.
S
WAR NING : Ca re must be t ake n to avo id
contaminating the seat belt webbing,
and seat belt mechanisms with any
chemicals, liquids, grit, dirt or cleaning
products. If a seat belt fails to retract or latch
into the buckle, it must be replaced
immediately.
S
WARNING: No modifications or
additions should be made that prevent
the seat belt mechanism from taking up
slack, or that prevent the seat belt being
adjusted to remove slack. A slack belt greatly
reduces the level of occupant protection.
S
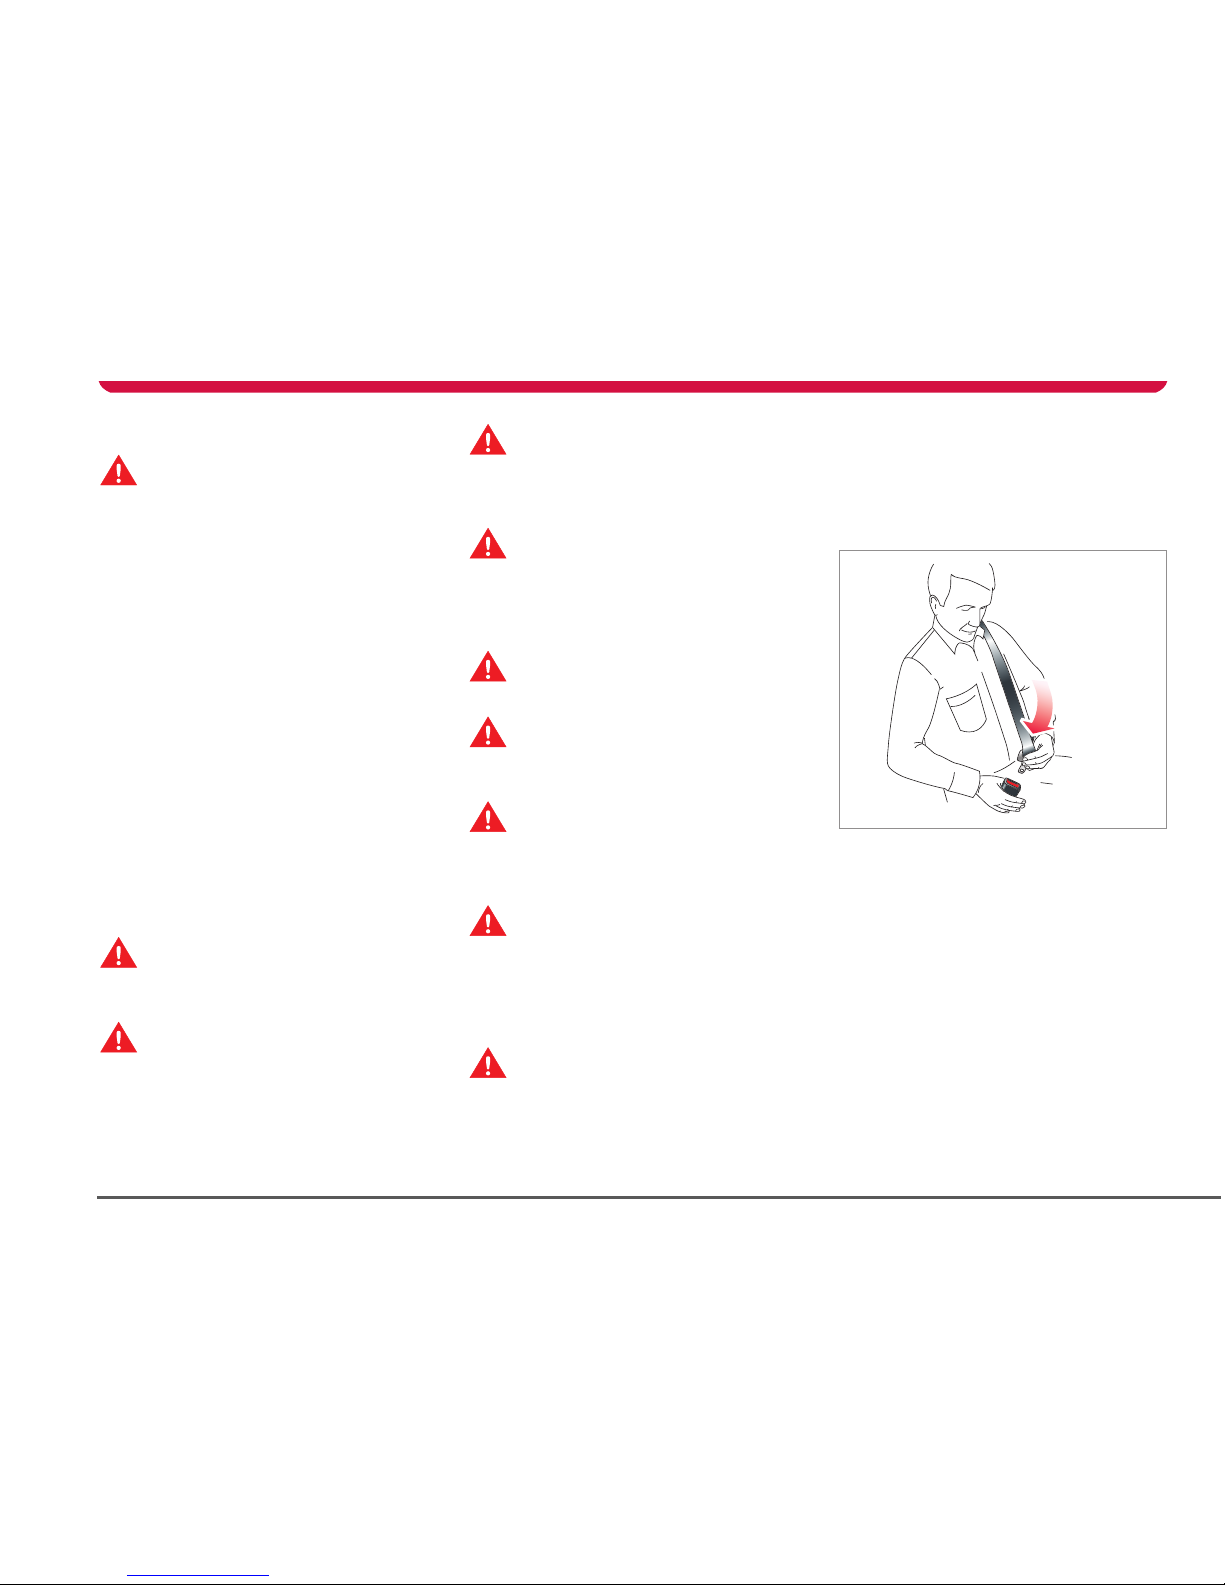
Using the seat belts
Fastening the belt
1. Ensure that the seat is correctly
positioned.
2. Take hold of the latch plate and pull it
slowly across your chest and lap.
3. Insert the latch plate into the buckle and
press down until you hear a “click” that
indicates it is securely locked into place.
4. Pull the belt to check that it is securely
fastened.
5. Position the belt so that it is worn low
across the front of the pelvis, and across
the chest and shoulder.
TR0139
Seat belts
3-4 Seating and safety restraints
6. Pull the diagonal part of the belt towards
the retractor to remove excess slack.
Releasing the belt
Release the seat belts by pressing the red
button on the buckle. The belt retracts
automatically.
Seat belt reminder
The seat belt warning indicator in the
instrument panel illuminates
whenever the driver’s seat belt is unbuckled.
Also, an audible sound will be heard for six
seconds if the key is turned to the ON
position and the drivers seat belt is
unbuckled.
Wearing seat belts during
pregnancy
WARNING: Pregnant woman should
always wear seat belts to protect
themselves and their unborn child.
S
WARNING: Never place anything
between you and the seat belt to
cushion the impact in the event of an
accident.
S
The lap portion of the belt should be worn as
low as possible across the hips, not the waist.
Position the diagonal part of the belt
between the breasts and to the side of the
abdomen.
If you have any concerns about wearing seat
belts, contact your doctor.
Seat belt tensioners
WARNING: If the seat belt
pre-tensioners have been activated
once, they must be replaced. After any
accident, always have the airbags, seat belt
pre-tensioners and any associated
components checked and, if necessary,
replaced by Tesla Motors.
S
The seat belts are equipped with
pre-tensioners that activate in conjunction
with the airbags and provide additional
protection in the event of a severe frontal
impact on your vehicle.
The pre-tensioners automatically retract the
seat belt buckle, reducing any slack in both
the lap and diagonal portions of the belts,
resulting in reduced forward movement of
the occupant.
Following an accident in which the
pre-tensioners have been activated, the seat
belts continue to function as restraints and
must be worn if you drive your vehicle.
Caring for seat belts
WARNING: Regularly check the
condition of both belts. Replace seat
belts if you notice any damage to the belt
webbing, fittings, retractor mechanisms or
buckles.
S
Three tests for checking seat belts:
1. With the seat belt fastened, give the
webbing nearest the buckle a quick pull.
The buckle should remain securely
locked.
2. With the belt unfastened, unreel the
webbing to its limit. Check that unreeling
is free from snags and visually check the
webbing for wear. Allow the webbing to
retract, checking that retraction is
smooth and complete.
3. With the webbing half unreeled, hold the
tongue plate and pull forward quickly.
The mechanism must lock automatically
and prevent further unreeling.
If a seat belt fails any of these tests, contact
Tesla Motors immediately.
For seat belt cleaning information, see Seat
belts, page 8-9.
TR0140
Seat belts
3-5Seating and safety restraints
Child seats and restraints
Currently, child seats and restraints are not
approved for use in your vehicle. Until these
are available, Tesla Motors strongly
recommends that children are not carried as
passengers in your vehicle.
WARNING: The seat belts fitted to your
vehicle are designed to secure adult
sized passengers only.
S
WAR NIN G: Child re n under age 12 and
those weighing less than 80 lb (36 kg)
are not of sufficient size to be carried safely
wearing a standard seat belt of the type
fitted to your vehicle.
S
WARNING: It is dangerous for children
to travel in any type of vehicle without
being restrained by a harness, child seat, or
restraint system suitable for both their age
and size.
S
WARNING: Never let a passenger hold a
child on his or her lap while your vehicle
is moving. The passenger cannot protect the
child from injury in a collision.
S
Airbag system
3-6 Seating and safety restraints
Airbag system
General information
The airbag for the driver is located in the
padded hub of the steering wheel. The airbag
for the passenger is located on the
dashboard. These are indicated by the word
AIRBAG on the trim.
Provided the occupants are correctly seated
and the seat belts are properly worn, the
airbags provide additional protection to the
chest and face of the occupants in the event
of a severe frontal impact.
Note: Airbags inflate and deflate very quickly
and will not protect occupants against the
effects of secondary impacts that may occur.
How the system works
WARNING: The airbags are a
supplemental restraint system
providing additional protection in certain
types of collisions only - they do not replace
the need to wear a seat belt.
S
Operation of the airbag system depends on
the rate at which your vehicle's passenger
compartment changes speed as a result of a
collision.
In the event of a collision, the airbag control
unit monitors the rate of deceleration
induced by the collision to determine
whether the airbags should be deployed.
When deployed, airbags inflate instantly, with
considerable force accompanied by a loud
noise. The inflated bag, together with the
seat belt restraint system, limit the movement
of the occupants, thereby reducing the risk of
injury to the head and upper torso.
TR1322
1 2
The airbag system is not designed to operate
as a result of:
• Rear collisions
• Minor front impacts
• Minor side impacts
• Heavy braking
• Driving over bumps or potholes
It follows, therefore, that significant superficial
damage can occur without the air bags
deploying or, conversely, that a relatively small
amount of structural damage can cause the
airbags to be deployed.
Deployment effects
WARNING: Following inflation, some
airbag system components are hot. Do
not touch until they have cooled.
S
WARNING: The airbag module inflates
with considerable speed and force. An
inflating airbag can cause facial abrasions and
other injuries. To limit these injuries, ensure
that occupants are correctly seated, with the
seat as far back as is practical, and are
wearing seat belts.
S
WARNING: The National Highway Traffic
Safety Administration (NHTSA)
recommends a minimum distance of 10 inches
(25 cm) between an occupant’s chest and the
driver’s airbag module.
S
When the airbags are deployed, a fine powder
is released. This is not a malfunction. However,
the powder may irritate the skin and should be
thoroughly flushed from the eyes and from
any cuts or abrasions on the skin.
Airbag system
3-7Seating and safety restraints
After inflation, the airbags will deflate to
provide a gradual cushioning effect for the
occupants and to ensure the driver's forward
vision is not obscured.
If the airbags have been deployed or if your
vehicle has been in an accident, always have
the airbags, seat belt pre-tensioners and any
associated components checked and, if
necessary, replaced by Tesla Motors.
Obstruction of airbags
WARNING: Do not allow passengers to
obstruct the operation of the airbags
by placing feet, knees or any other part of the
body, or any other objects in contact with, or
in close proximity to, an airbag module.
S
WARNING: Do not attach or position
items on an airbag cover which could
interfere with the inflation of the airbag or be
propelled inside your vehicle and injure
occupants.
S
Airbag warning indicator
A warning indicator in the instrument
panel alerts you of any malfunction of
the airbag system.
The components of the system being
monitored include: the airbag modules, the
seat belt pre-tensioners, the airbag control
unit and the airbag wiring harness.
When the key is turned to the ON position,
the airbag control unit monitors the readiness
of the system’s electrical circuits.
Contact Tesla Motors if:
• The warning indicator fails to illuminate
when the key is turned to the ON position.
• The warning indicator fails to extinguish
within approximately six seconds after
the key is turned to the ON position.
• The warning indicator illuminates while
your vehicle is being driven.
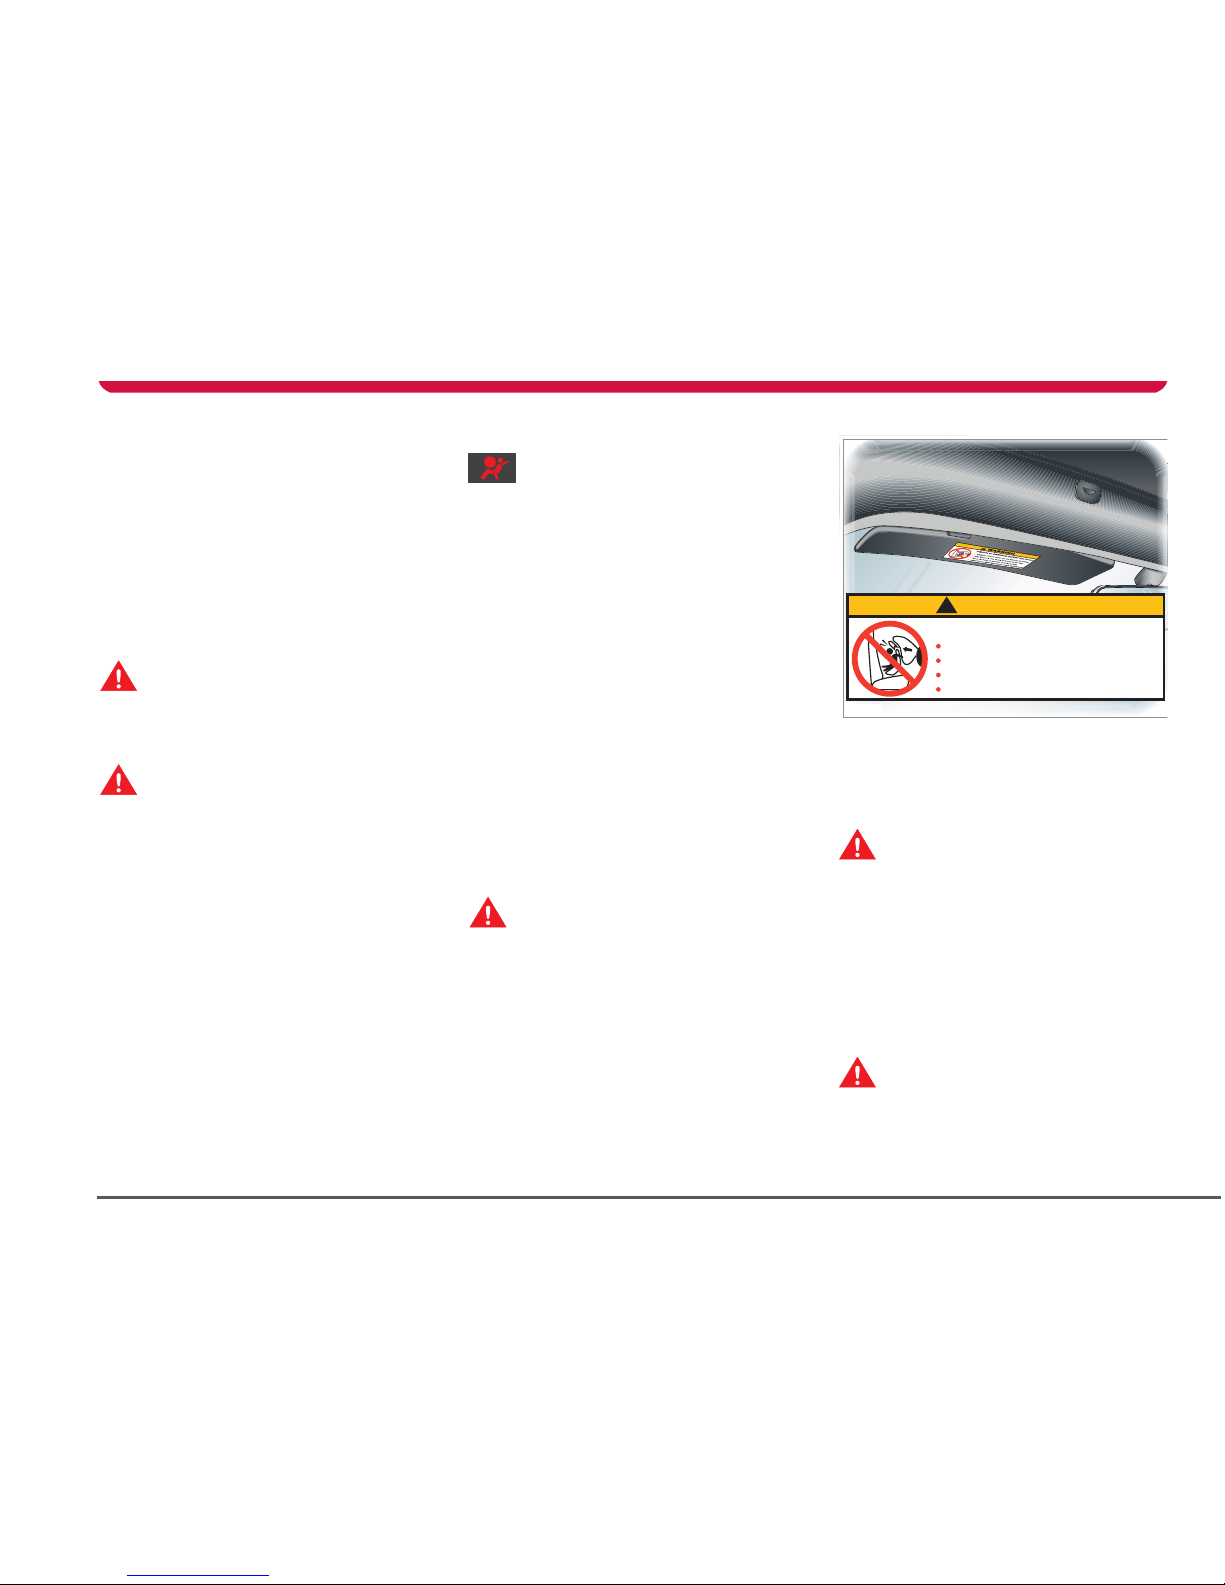
Airbag warning labels
WARNING: Extreme hazard! Do not use
a rearward facing child restraint on a
seat protected by an airbag in front of it.
Doing so increases the risk of death or
serious injury when the airbag deploys.
S
Airbag warning information is printed on the
driver’s and passenger’s sun visor.
Using child seats
WARNING: Currently, child seats and
restraints are not approved for use in
your vehicle. Until these are available, Tesla
Motors strongly recommends that children
are not carried as passengers in your vehicle,
and that you do not fit any type of child seat
into your vehicle. Death or serious injury may
occur if the child is too close to the
dashboard when the airbag inflates.
S
Passenger airbag deactivation
WARNING: Your vehicle is fitted with an
airbag system that has no provision for
switching off or deactivating the passenger
airbag.
S
!
WARNING
DEATH or SERIOUS INJURY can occur
Children 12 and under can be killed by the airbag
NEVER put a rear facing child seat in the front
Sit as far back as possible from the air bag
ALWAYS use SEAT BELTS and CHILD RESTRAINTS
TR0138

Airbag system
3-8 Seating and safety restraints
Airbag service information
WARNING: The disposal of used airbag
units is subject to stringent regulations,
and should only be handled by Tesla
Motors.
S
For your safety, a Tesla Motors technician,
who is familiar with your vehicle, must
perform the following tasks:
• Removal, replacement, repair, or
modification, of any wiring or component
in the vicinity of airbag system
components, including the steering
wheel, steering column, dashboard and
instrument panel.
• Modification to the front or side of your
vehicle, including the bumper and
chassis.
In addition, always seek the assistance of
Te sla Moto r s i f :
• An airbag inflates
• A pre-tensioner activates
• The front or side of your vehicle is
damaged, even if the airbag has not
inflated
• Any part of an airbag module cover
shows signs of cracking or damage

4-1
Doors, locks, and security
Keys
About your keys 4-2
Using the key fob 4-2
Doors
Exterior door release 4-4
Interior door release 4-4
Central door locking 4-4
Emergency unlocking 4-5
Glove box 4-5
Trunk
Opening the trunk 4-6
Closing the trunk 4-6
Trunk interior release handle 4-6
Vehicle security
Alarm System 4-7
Security PIN 4-7
PIN lock 4-9
Valet mode 4-10
Keys
4-2 Doors, locks, and security
Doors, locks, and securityKeys
About your keys
Caution: The key fob contains delicate
electronic circuits and must be
protected from impact, water damage
and high temperatures. Avoid contact with
solvents, waxes and abrasive cleaners.
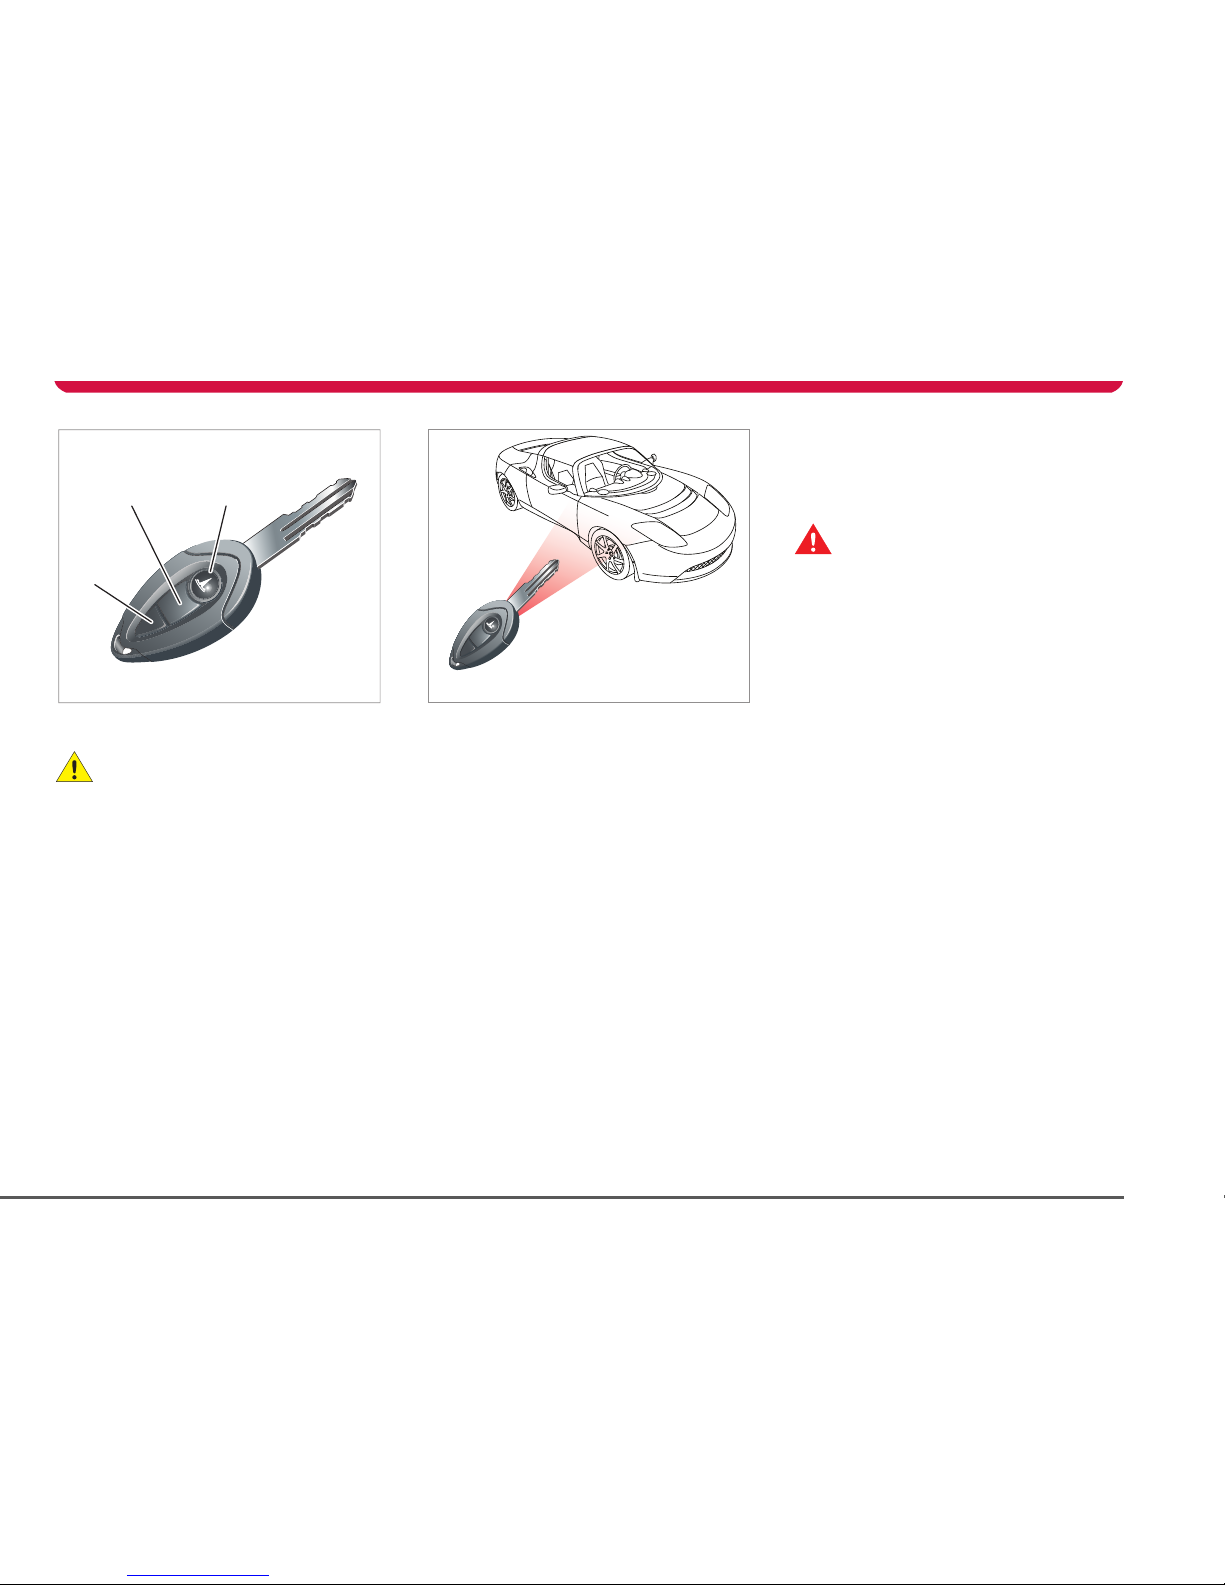
You have been supplied with three keys. Two
of the keys are key fobs with three buttons:
1. Lock button
2. Unlock button
3. Programmable button. See
Programmable button, page 4-3.
Keep one of the keys in a secure place for use
in emergencies. If you lose a key, contact
Tesla Motors for a replacement.
Using the key fob
The buttons on the key fob transmit a coded
radio signal to a receiver in your vehicle. It is
not necessary to point the key fob at your
vehicle, but you must be within operating
range and you must hold the button down for
two seconds. The operating range will vary
according to the key fob’s battery condition
and other physical factors.
If the vehicle can not be locked or unlocked
using the associated button on the key fob,
you may need to change the battery in the
key fob. See Replacing the key fob’s battery,
page 4-3.
Note: Interference from other radio
equipment operating on a similar frequency
may affect operation of the key fob. If this
happens, operate the key fob as close to your
vehicle as possible. If you are unable to
unlock your vehicle with the key fob, use the
emergency key lock. See Emergency
unlocking, page 4-5.
Locking
WARNING: Never leave anyone in your
vehicle when it is locked using the key
fob. The interior door release handles will
operate, but because the car was locked
using the key fob, the alarm will sound. To
re-open the doors using the exterior door
release handles, you must first disarm the
alarm using the key fob.
S
Press the Lock button on the key fob to lock
the doors and arm the alarm.
The turn signals will flash once and the red
security indicator on the console (illustrated
on page 4-7) will illuminate and continue to
flash red while the vehicle is locked. If you
push the Lock button after the vehicle has
already been locked, you’ll hear a
confirmation beep.
If a door, the hood or the trunk are not fully
closed when the lock button is pressed, the
turn signals will not flash and your vehicle is
not armed. Check that the doors, hood and
trunk are fully closed, then try again.
If an attempt is made to open the doors or
the hood from inside the vehicle after the
alarm has been set, the horn will sound and
the turn signals will flash for one minute. See
Alarm System, page 4-7.
TR1323
12
3
TR1333
Keys
4-3Doors, locks, and security
Unlocking
Press the center button on the key fob to
unlock the doors and disarm the alarm.
The turn signals flash twice and the red alarm
indicator on the console extinguishes.
Note: If neither door or trunk are opened
within one minute, the doors will
automatically re-lock and the alarm will arm.
Programmable button
You can program the top button on the key
fob to perform one of the following functions:
• Alarm — sounds the horn and flashes the
exterior lights flash for one minute. Press
again to cancel the alarm.
• Trunk release — opens the trunk
• HomeLink
®
device — operates a
HomeLink device such as a garage door
or gate
By default, Tesla has programmed this key to
open the trunk. To re-program this button,
use the Touch Screen. Refer to the Touch
Screen Users Manual, provided in your
owners package.
To activate the programmed function, press
the button twice.
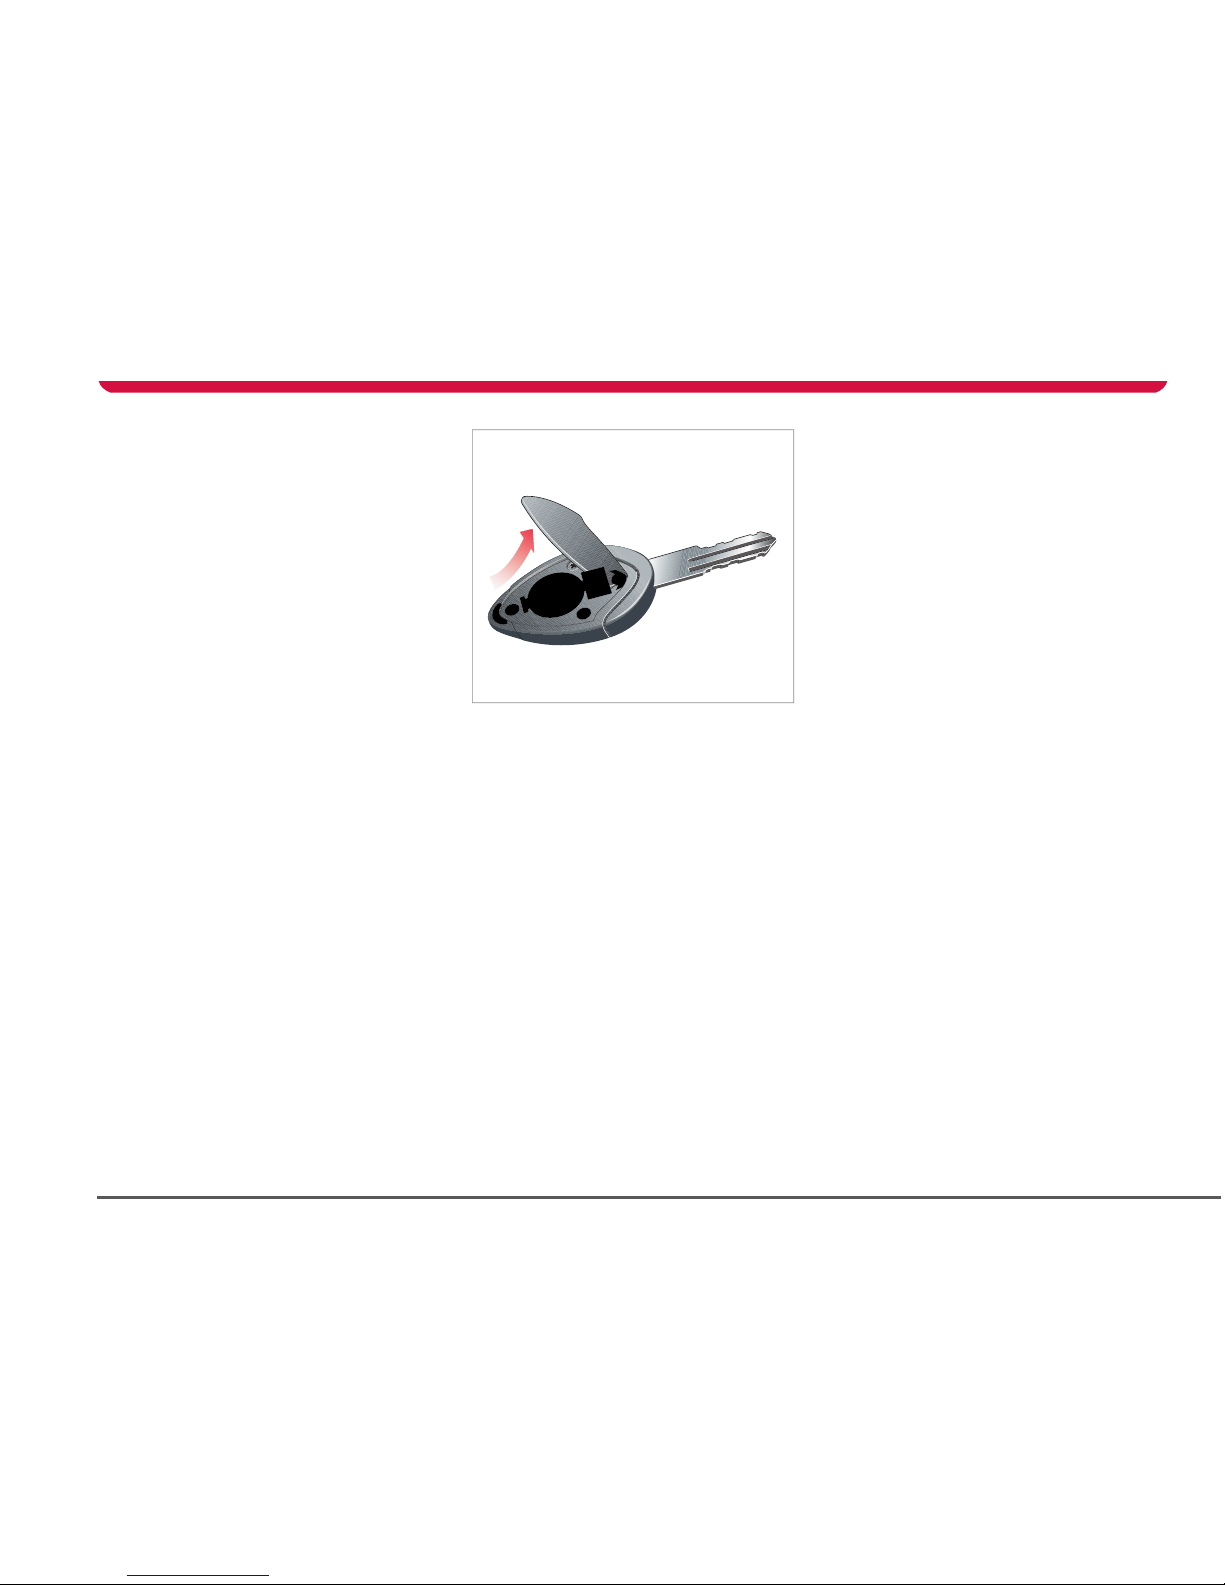
Replacing the key fob’s battery
The key fob’s battery should last for
approximately one year depending on use.
When the battery needs replacing, you’ll
notice a deterioration in performance. For
example, you’ll gradually need to be closer to
the vehicle to operate the key fob.
To replace the battery:
1. Insert a screwdriver into the top of the
key fob and carefully separate the two
halves. Avoid damaging the seal between
the two halves.
2. Remove the battery, taking care to avoid
touching the circuit board or the contact
surfaces of the battery holder.
3. Fit the new battery (type CR2032) with
the ‘+’ sides facing upwards.
If possible, avoid touching the flat
surfaces of the battery because finger
marks will reduce battery life. Wipe the
battery clean before fitting.
4. Re-assemble the two halves of the key
fob by aligning them and pressing them
together until they snap into place.
Compliance
The key fob complies with Part 15 of the FCC
rules and IC-RSS-210 Industry Canada.
Operation is subject to the following
conditions:
• This device may not cause harmful
interference.
• This device must accept any interference
received, including interference that may
cause undesired operation.
Any changes or modifications to the key fob
not expressly approved by the manufacturer
or Tesla Motors could void the user’s
authority to operate the equipment.
TR1334
Doors
4-4 Doors, locks, and security
Doors
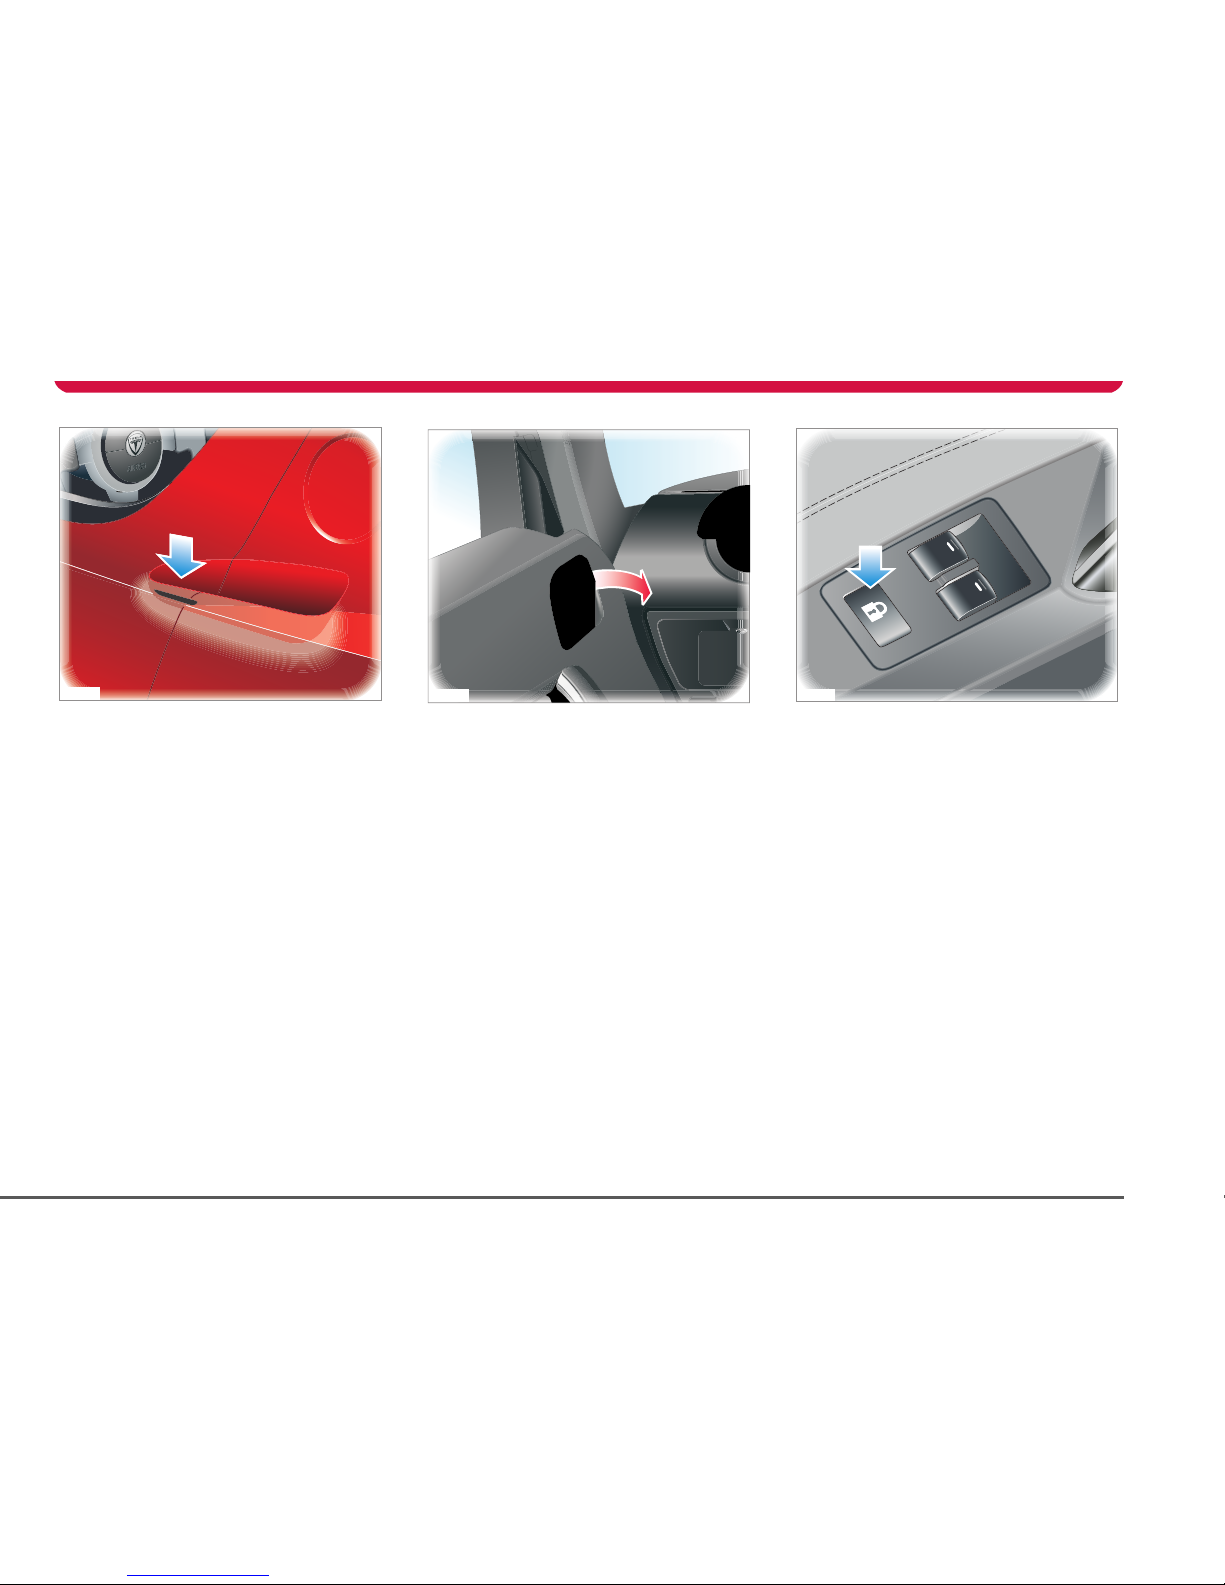
Exterior door release
With the doors unlocked, lightly press the
touch pad (located in the air inlet on the
door) to release the door. There is no need to
press hard. Pull the door to open.
Note: The door release touch pads operate
only if the doors are unlocked.
Interior door release
From inside your vehicle, pull the interior
door release handle to unlock and open the
door.
Central door locking
For your security, you can lock both doors
from inside your vehicle by pressing the
central locking switch on the driver’s door
panel. The doors will lock automatically when
the vehicle is being driven over 5 mph
(8 kmh).
Press the switch once to lock the doors and
inhibit the use of the exterior door release
touch pads. The alarm indicator on the
instrument panel will illuminate when the
doors are locked.
Press the switch to unlock the doors and
enable operation of the exterior door release
touch pads. You can also unlock the doors
using the key fob.
Note: The central door locking switch does
not operate if the doors have been locked
using the key fob. You’ll need to unlock the
TR0091
TR1335
TR0093
Doors
4-5Doors, locks, and security
doors using the key fob. The central door
locking switch also does not operate if a door,
trunk, or the hood is not completely closed.
Drive away locking
For your security, the doors lock and the
trunk release switch is inhibited whenever
your vehicle’s speed exceeds 5 mph (8 kmh).
The trunk release button is reactivated when
your vehicle’s speed is less than 5 mph
(8 kmh).
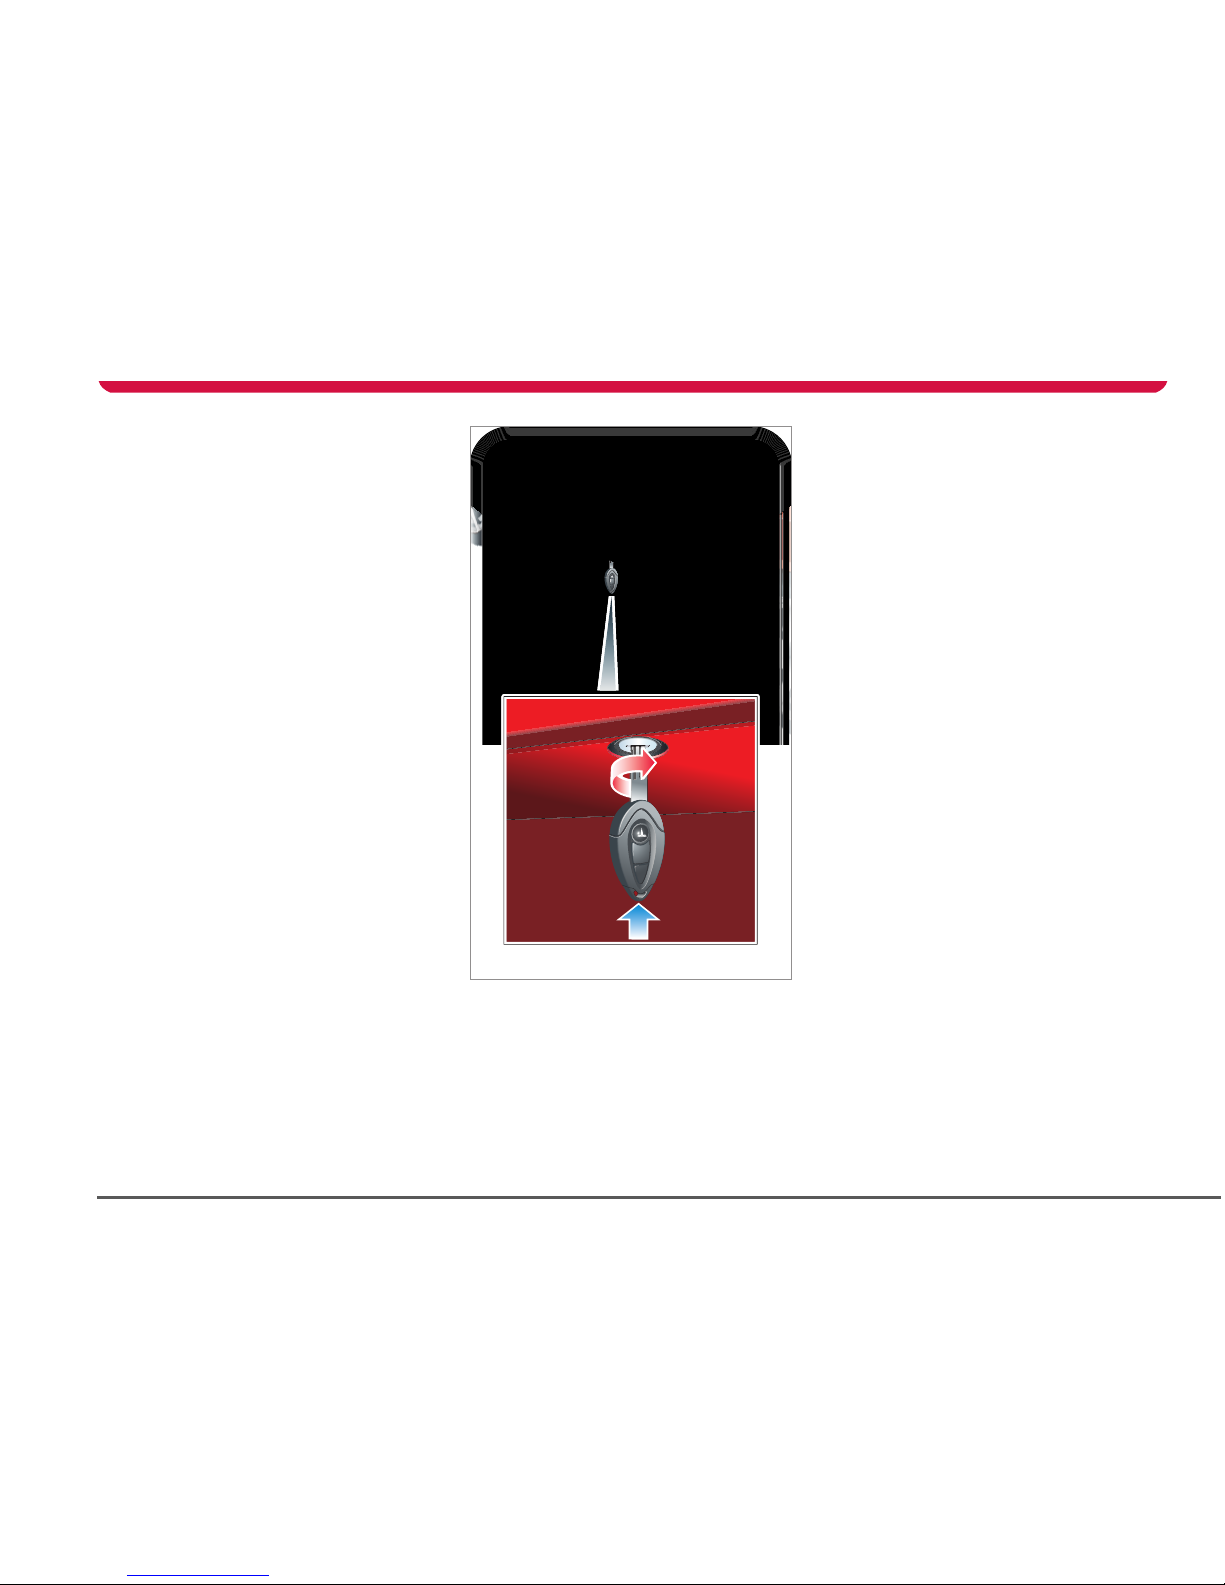
Emergency unlocking
If the key fob fails to unlock the doors (for
instance if there is an electrical failure), you
can unlock the driver’s door using the
mechanical key.
A lock is located on the underside of the
driver’s door. Turn the key clockwise to
unlock the door.
Note: If active, the alarm will sound when the
door is opened. To cancel the alarm, press the
unlock button on the key fob or enter the PIN
Code on the Touch Screen. The default PIN
Code is 1234 but you can personalize this
code using the Touch Screen. For details,
refer to the Touch Screen Users Manual
provided in your owners package.
Glove box
To open the glove box, press the button
located on the dashboard immediately to the
left of the glove box.
To close the glove box, simply push it closed.
Note: The glove box will not open when the
alarm system is on.
TR1350
Trunk
4-6 Doors, locks, and security
Trunk
Opening the trunk
To open the trunk, press the trunk release
button on the dashboard, or insert the key in
the external lock and turn counter-clockwise.
You can also use the key fob if you have set
up its programmable button to remotely
open the trunk. For details on programming
the key fob, refer to the Touch Screen Users
Manual provided in your owners package.
The trunk release button is disabled when the
doors are locked with the key fob, or when
the vehicle’s speed exceeds 5 mph (8 kmh).
Closing the trunk
Close the trunk one side at a time. Use both
hands to firmly but gently apply downward
pressure on one side of the rear spoiler until
you hear it “click: into place. Repeat for the
other side.
TR1331
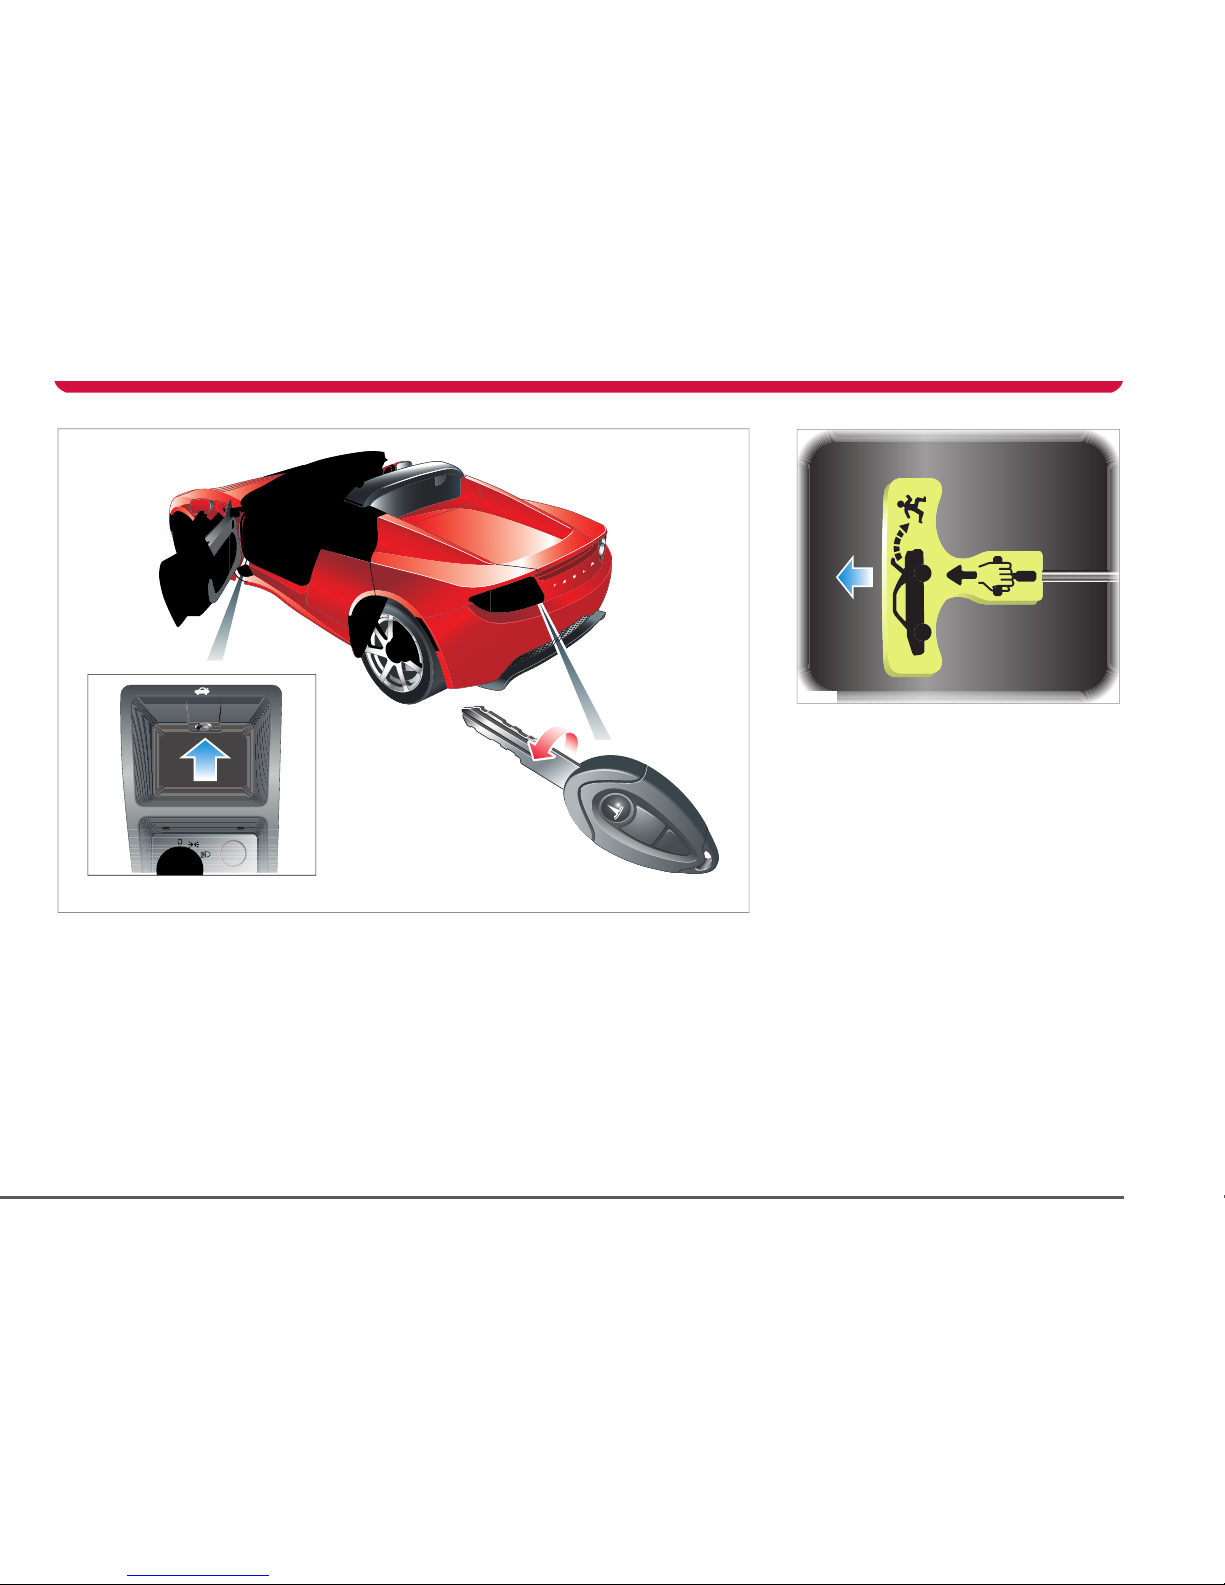
Trunk interior release handle
Your vehicle is equipped with a mechanical
trunk release handle that provides a means of
escape in the event that a person becomes
locked inside the trunk. Adults are advised to
familiarize themselves with the operation and
location of the release handle.
A T-shaped handle is located at the back of
the trunk towards the drivers side of the
vehicle. This handle is made using a
luminescent material that glows for hours
after a brief exposure to ambient light. To
open the trunk from the inside, pull the
T-shaped handle and push up on the trunk lid.
TR0149
Vehicle security
4-7Doors, locks, and security
Vehicle security
Alarm System
Your vehicle is equipped with an anti-theft
alarm system. The alarm is switched on
automatically when you lock the doors with
the key fob. The turn signals flash once to
confirm that your vehicle is locked. The alarm
indicator on the instrument panel flashes red
when the vehicle is locked. An audible tone
will also be heard from inside your vehicle.
Once activated, the alarm monitors the
opening of the:
• Hood
• Doors
• Trunk
If a door is opened without the key fob, the
alarm sounds.
To switch off the alarm, unlock the doors
using the key fob or enter the PIN Code on
the Touch Screen.
Note: If the doors are unlocked with the key
fob, they will automatically re-lock if neither
the trunk or a door is opened within one
minute of the unlock button being pressed.
Alarm indicator
An indicator on the instrument panel
will flash red whenever the alarm
system is active.
An indicator on the instrument panel
will illuminate green whenever the
doors are locked and the alarm is not active.
If the vehicle didn’t lock
If the vehicle doesn’t lock when you press the
Lock button on the key fob, the turn signals
will not flash. Check that both doors, the
hood and the trunk are fully closed before
pressing the lock button again. If the problem
persists, contact Tesla Motors.
Switching off the alarm
If the alarm is triggered, the horn will sound
for one minute and the turn signals will flash
to attract attention. To silence the alarm,
press the UNLOCK button on the key fob or
enter your PIN code on the Touch Screen.
Note: Turning the key to the ACC position will
silence the alarm. However, it will not be
possible to start your vehicle until you either
press the Unlock button on the key fob or
enter the PIN code on the Touch Screen. For
details on using the Touch Screen, see the
Touch Screen Users Manual provided in your
owners package.
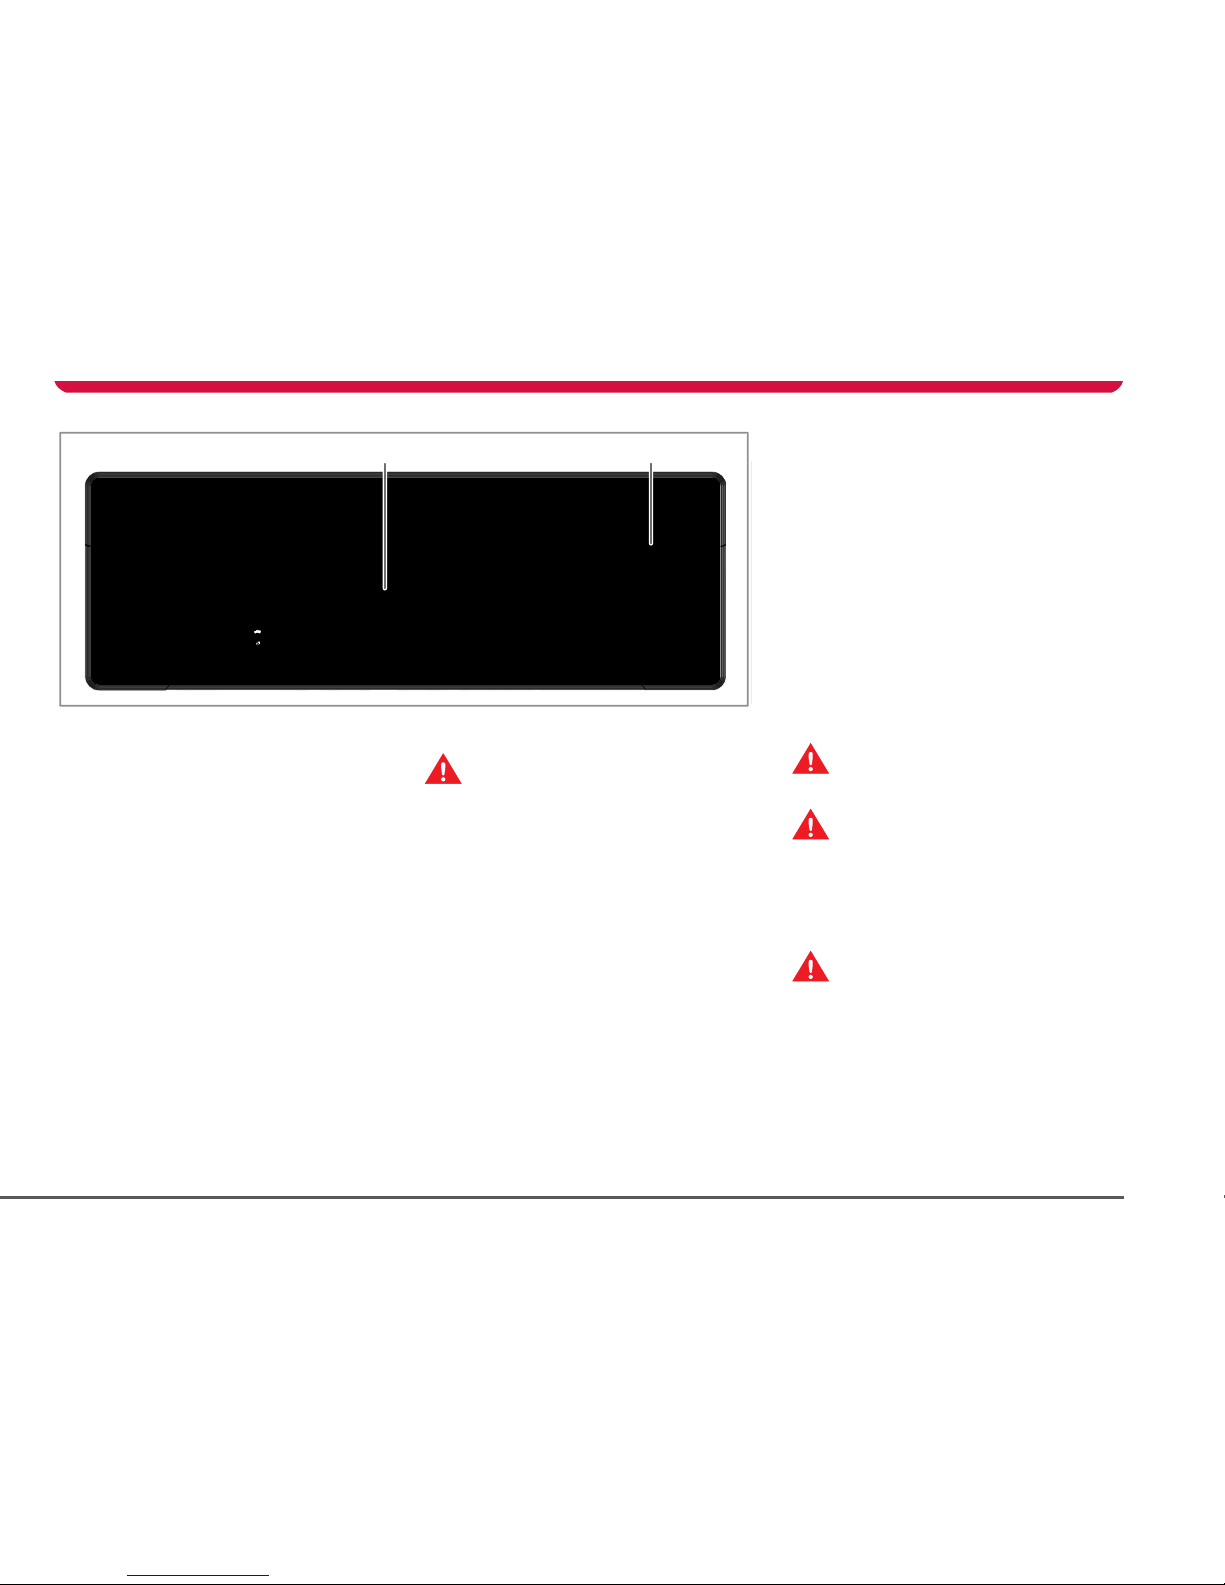
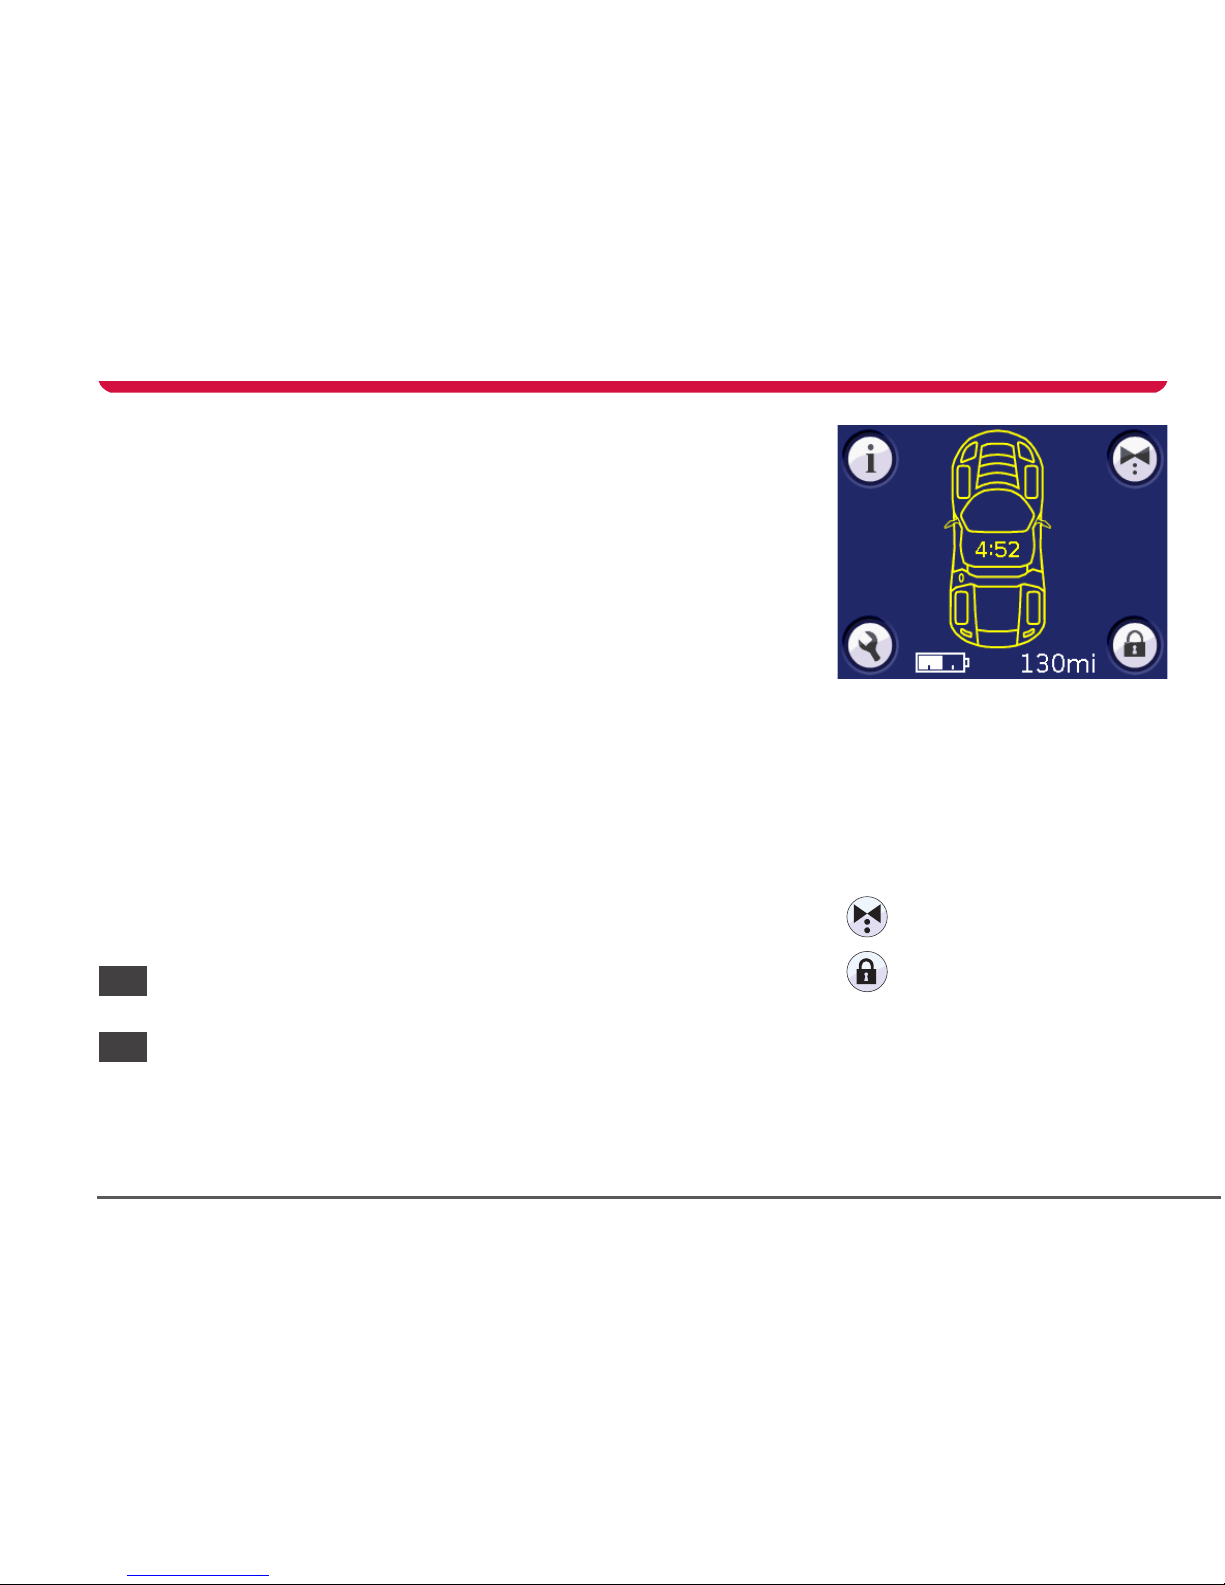
Security PIN
As an alternate level of vehicle security, you
can restrict operation of your vehicle until a
security PIN (Personal Identification
Number) is entered. The security PIN is used
by the following features that can be selected
on the Touch Screen’s parked screen (shown
above— the parked screen is active whenever
the hand brake is engaged).
You can also use the security PIN to turn off
the vehicle’s alarm.
The default PIN code is 1234. Tesla Motors
strongly recommends that you change this to
a unique PIN code. If you sell your vehicle,
you’ll need to tell the new owner the security
PIN you have set.
Val et mo de . S ee Val et mo de ,
page 4-10.
PIN Lock. See PIN lock,
page 4-9.
Vehicle security
4-8 Doors, locks, and security
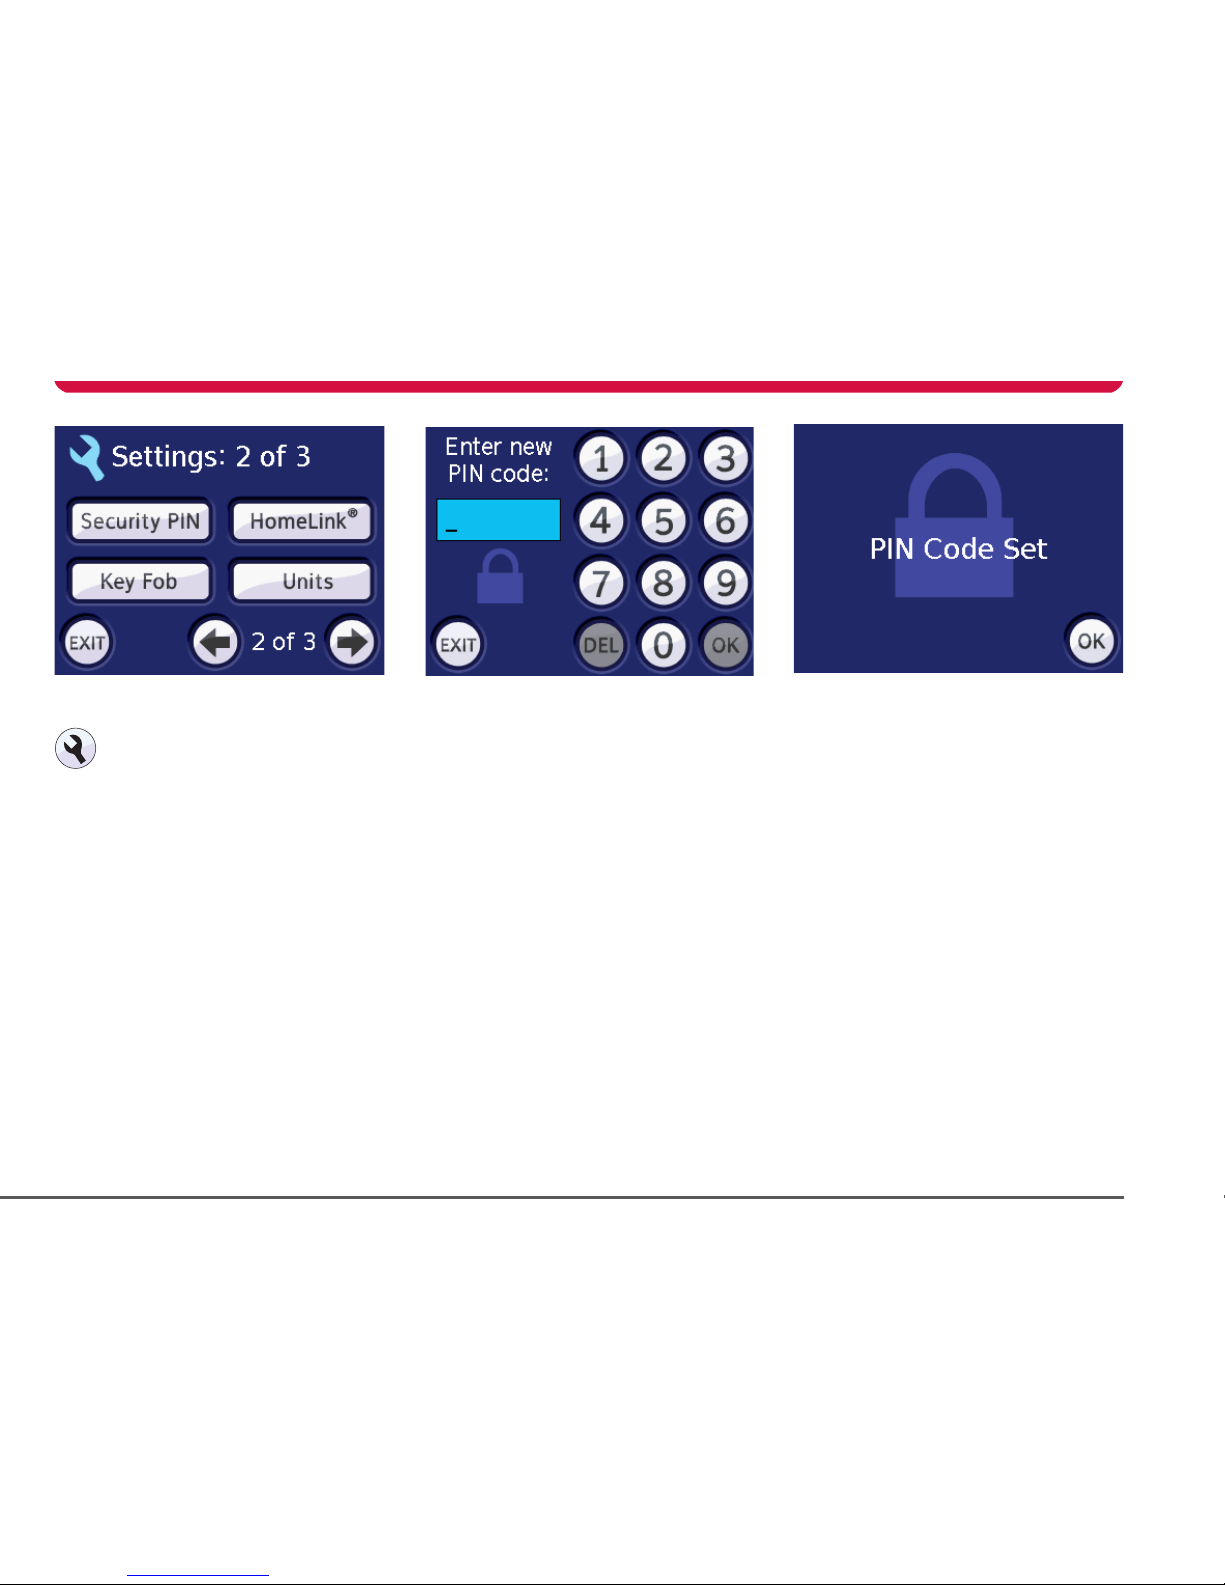
Setting the security PIN
With the hand brake engaged, touch
the SETTINGS icon on the main parked
screen (or any of the drive screens) to
display the settings screens.
Press the right arrow icon to navigate to the
second settings screen.
To u ch Security PIN.
You will be asked to enter the old PIN code.
Enter the old PIN code (if you haven’t
previously set a PIN code, the default code is
1234) by touching the numbers on the screen
and then touch OK. If you enter an incorrect
PIN code, an invalid entry message will be
displayed. Either enter the correct PIN code
or touch the EXIT icon to return to the
previous screen.
You will be then be asked to enter the new
PIN code. Enter a new PIN code and then
touch OK.
Note: The PIN code must be between four
and eight digits in length.
You will then be a sked to c onfi rm t he new PIN
code. Enter the new PIN code again and then
touch OK.
If the PIN code does not match the previously
entered code a message will be displayed
telling you that the PINs differ and you will
need to enter the PIN code again.
If the PIN codes match, then the PIN Code Set
screen will be displayed.
Touch OK to return to the Settings screen.
Note: Always keep a record of your PIN code
and store it in a safe place. Do not store your
PIN code in your vehicle.
 Loading...