

Page 1
MODEL 3
2024
OWNER'S MANUAL
Software version: 2024.2.3
North America
Page 2

YOUR OWNER'S MANUAL
For the latest and greatest information that is customized to your vehicle, view the Owner’s Manual on your vehicle’s
touchscreen by touching the app launcher and then selecting the Manual app. The information is
depending on the features you purchased, vehicle configuration, market region, and software version. In contrast, owner
information that is provided by Tesla elsewhere is updated as necessary and may not contain information unique to your
vehicle.
specific to your vehicle
RELEASE NOTES
Information about new features is displayed on the touchscreen after a software update, and can be viewed at any time
by choosing the Release Notes tab in the Manual app, or by touching Controls > Software > Release Notes. If the
content in the Owner's Manual on how to use your vehicle conflicts with information in the Release Notes, the Release
Notes take precedence.
ILLUSTRATIONS AND PRODUCT SPECIFICATIONS
The illustrations provided in this document are for demonstration purposes only. Depending on vehicle options, software
version and market region, the information displayed on the touchscreen in your vehicle may appear slightly dierent.
All specifications and descriptions contained in this document are verified to be accurate at the time of printing.
However, because continuous improvement is a goal at Tesla, we reserve the right to make product modifications at any
time. To communicate any inaccuracies or omissions in this document, please send an email to:
[email protected].
SAFETY INFORMATION
You can find safety information in your Model 3 Owner's Manual on the touchscreen.
For detailed information about your Model 3, go to the Tesla website for your region, log on to your Tesla account, or
sign up to get an account.
If you have any questions or concerns about your Model 3, call 1-877-79TESLA (1-877-798-3752).
© 2012-2024 TESLA, INC.
All information in this document and all vehicle software is subject to copyright and other intellectual property rights of
Tesla, Inc. and its licensors. This material may not be modified, reproduced or copied, in whole or in part, without the
prior written permission of Tesla, Inc. and its licensors. Additional information is available upon request. Shown here are
trademarks or registered trademarks of Tesla, Inc. in the United States and other countries:
Page 3

Contents
Overview................................................................ 3
Exterior................................................................................................ 3
Interior Overview.............................................................................4
Touchscreen.......................................................................................6
Interior Electronics......................................................................... 11
Car Status..........................................................................................13
Voice Commands........................................................................... 16
Cameras.............................................................................................18
Opening and Closing....................................... 19
Keys..................................................................................................... 19
Doors..................................................................................................22
Windows...........................................................................................24
Storage Areas.................................................... 25
Rear Trunk........................................................................................25
Front Trunk...................................................................................... 27
Interior Storage..............................................................................29
Seating and Safety Restraints.....................30
Front and Rear Seats...................................................................30
Seat Belts......................................................................................... 33
Child Safety Seats.........................................................................36
Airbags..............................................................................................42
Connectivity.......................................................48
Mobile App...................................................................................... 48
Wi-Fi.................................................................................................. 50
Bluetooth...........................................................................................51
Phone, Calendar, and Web Conferencing............................54
Smart Garage..................................................................................56
Driving.................................................................. 59
Starting and Powering O.........................................................59
Steering Wheel................................................................................61
Mirrors............................................................................................... 65
Shifting..............................................................................................67
Lights.................................................................................................70
Wipers and Washers.................................................................... 73
Braking and Stopping................................................................. 74
Park Assist........................................................................................77
Vehicle Hold....................................................................................79
Traction Control.............................................................................80
Acceleration Modes.......................................................................81
Driver Profiles.................................................................................82
Trip Information.............................................................................84
Rear Facing Camera(s)............................................................... 85
Pedestrian Warning System......................................................86
Autopilot..............................................................87
About Autopilot.............................................................................87
Autopilot Features.........................................................................91
Trac Light and Stop Sign Control.......................................99
Full Self-Driving (Beta)
Autopark..........................................................................................110
Summon........................................................................................... 112
Smart Summon..............................................................................114
Limitations and Warnings..........................................................116
............................................................. 106
Active Safety Features..................................122
Lane Assist..................................................................................... 122
Collision Avoidance Assist........................................................125
Speed Assist.................................................................................. 128
Cabin Camera................................................................................129
Dashcam, Sentry, and Security..................130
Safety & Security Settings....................................................... 130
Dashcam..........................................................................................132
Sentry Mode.................................................................................. 134
USB Drive Requirements for Recording Videos.............. 136
Climate................................................................ 137
Operating Climate Controls.....................................................137
Adjusting the Front and Rear Vents.....................................142
Cold Weather Best Practices..................................................144
Hot Weather Best Practices.................................................... 147
Navigation and Entertainment.................. 148
Maps and Navigation................................................................. 148
Media................................................................................................154
Theater, Arcade, and Toybox...................................................156
Charging and Energy Consumption........159
Electric Vehicle Components..................................................159
High Voltage Battery Information..........................................161
Charging Instructions.................................................................163
Scheduled Charging and Scheduled Departure..............169
Getting Maximum Range..........................................................170
Maintenance......................................................172
Software Updates........................................................................172
Maintenance Service Intervals................................................ 174
Tire Care and Maintenance...................................................... 176
Cleaning.......................................................................................... 183
Windshield Wiper Blades, Jets and Fluid...........................187
Jacking and Lifting..................................................................... 189
Parts and Accessories............................................................... 190
Do It Yourself Maintenance......................................................193
Specifications...................................................194
Identification Labels...................................................................194
Vehicle Loading............................................................................195
Dimensions.....................................................................................197
Subsystems....................................................................................199
Wheels and Tires......................................................................... 201
Page 4

Contents
Instructions for Transporters.....................208
Instructions for Transporters................................................. 208
In Case of Emergency.................................... 211
Contacting Tesla Roadside Assistance.................................211
Running Out of Range............................................................... 212
Opening the Hood with No Power........................................213
Jump Starting............................................................................... 215
Opening Doors with No Power.............................................. 216
Troubleshooting...............................................217
Troubleshooting Alerts.............................................................. 217
Consumer Information................................. 272
About this Owner Information...............................................272
Feature Availability Statement..............................................274
Disclaimers.................................................................................... 275
Reporting Safety Defects........................................................ 277
Certification Conformity.......................................................... 278
Index...................................................................280
Page 5
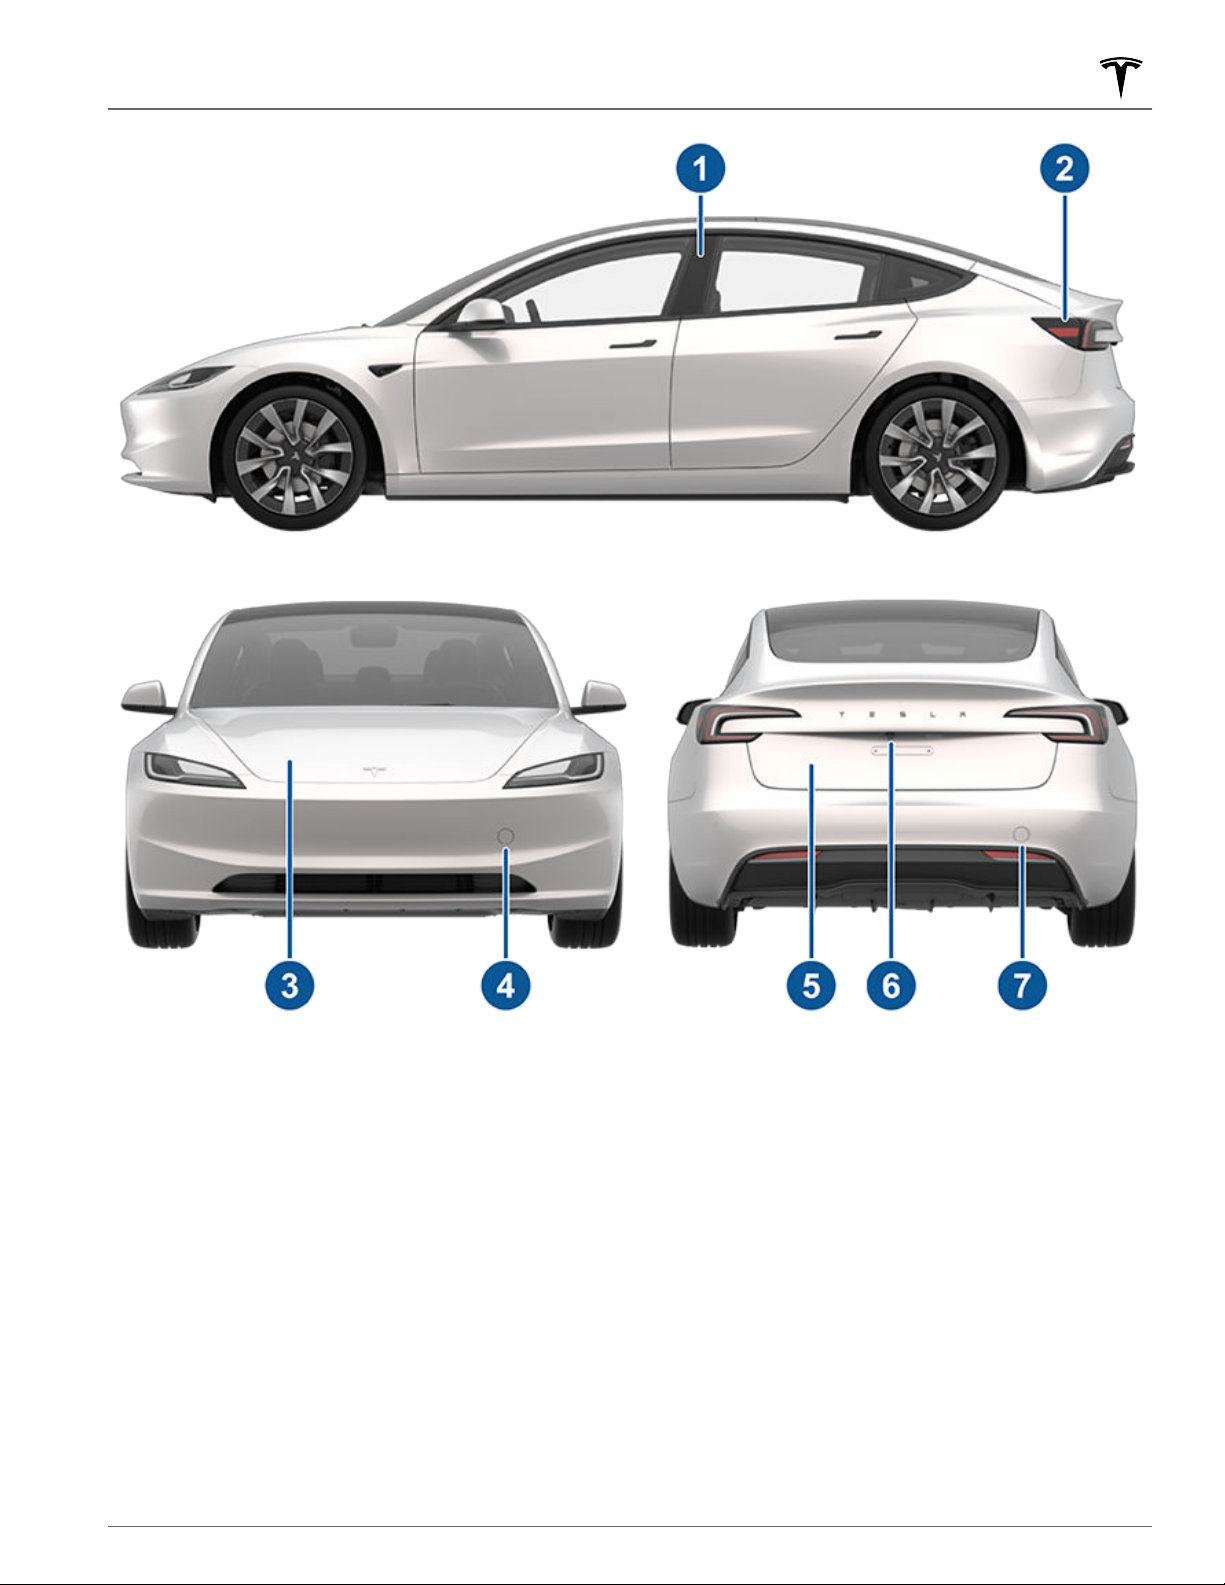
Exterior
Key card sensor (Keys on page 19)
1.
Charge port (Charging Instructions on page 163)
2.
Hood/front trunk (Front Trunk on page 27)
3.
Front tow eye cover (Instructions for Transporters on page 208)
4.
Rear trunk (Rear Trunk on page 25)
5.
Rear view camera (Rear Facing Camera(s) on page 85)
6.
7. Rear tow eye cover (Instructions for Transporters on page 208)
For Autopilot camera locations, see Cameras on page 18.
3Overview
Page 6
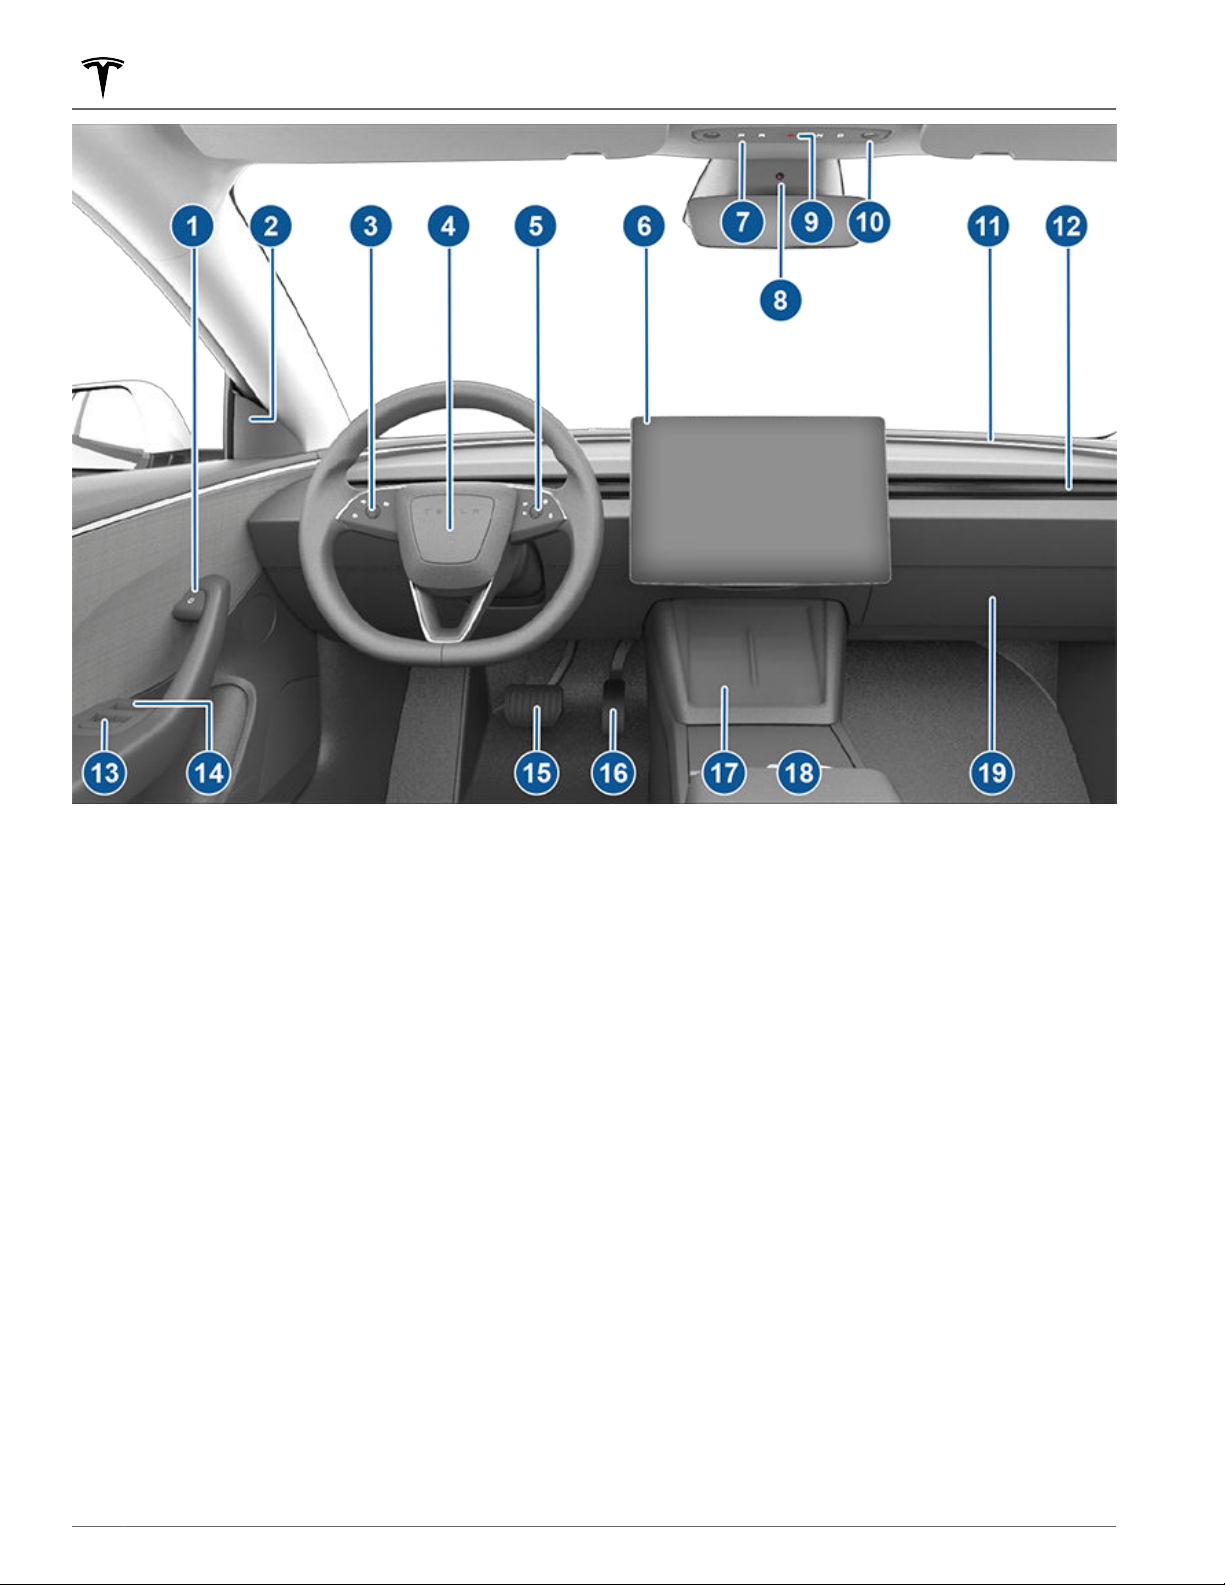
Interior Overview
Door open button (Opening Doors from the Interior on page 22)
1.
Blind spot indicator (Blind Spot Indicator on page 123)
2.
Left scroll wheel (Left Scroll Wheel (Multifunction) on page 63)
3.
Horn (Horn on page 64)
4.
Right scroll wheel (Right Scroll Wheel (Autopilot) on page 63)
5.
Touchscreen (Touchscreen on page 6)
6.
Secondary drive mode selector (P R N D) (Shift Using the Overhead Console on page 67)
7.
Cabin camera (Cabin Camera on page 129)
8.
Hazard warning flashers (Hazard Warning Flashers on page 72)
9.
Dome lights (Lights on page 70)
10.
Accent lights (Lights on page 70)
11.
12. Climate control vent (see Operating Climate Controls on page 137)
Power window switches (Windows on page 24)
13.
Manual door release (Opening Doors from the Interior on page 22)
14.
15. Brake pedal (Braking and Stopping on page 74)
16. Accelerator pedal (Regenerative Braking on page 75)
17. Wireless phone charger (Wireless Phone Chargers on page 11) and key card reader (Keys on page 19)
Center console (Center Console on page 29)
18.
Glovebox (Glovebox on page 29)
19.
4 MODEL 3 Owner's Manual
Page 7
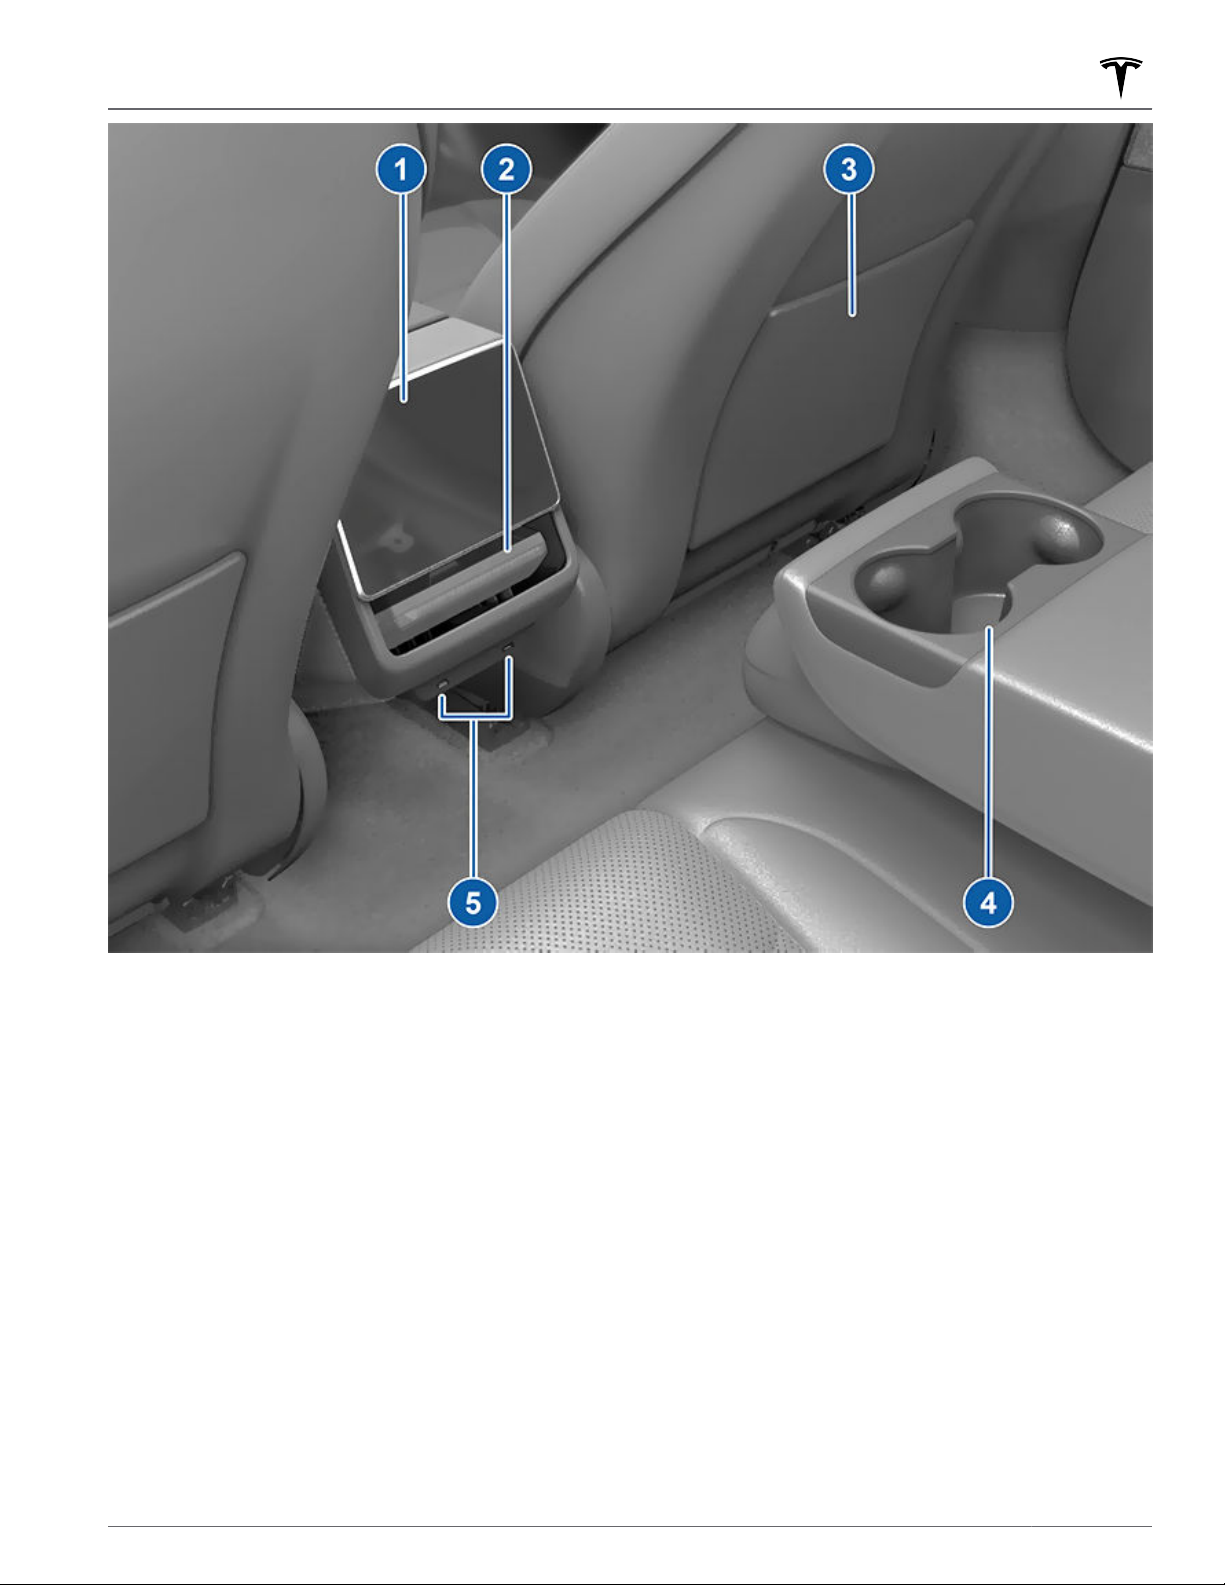
Interior Overview
Rear touchscreen (Rear Touchscreen on page 9)
1.
Adjustable climate control vents (Operating Climate Controls on page 137)
2.
Seat pocket
3.
Cup holders (Rear Console on page 29)
4.
USB ports (USB Ports on page 11)
5.
5Overview
Page 8
Touchscreen
NOTE: Throughout this Owner's Manual, the front touchscreen is referred to as the "touchscreen" whereas the rear
touchscreen is referred to as the "rear touchscreen".
WARNING: Always pay attention to road and trac conditions when driving. To minimize driver distraction and
ensure the safety of vehicle occupants as well as other road users, avoid using the touchscreen to adjust
settings while the vehicle is in motion.
Use the touchscreen to control many features that, in traditional cars, are controlled using physical buttons (for
example, adjusting the cabin heating and air conditioning, headlights, etc.). You also use the touchscreen to control
media, navigate, use entertainment features, and customize
to common touchscreen controls, use voice commands (see Voice Commands on page 16).
If the touchscreen is unresponsive or demonstrates unusual behavior, you can restart it (see Restarting the
Touchscreen on page 8).
NOTE: Illustrations are provided to improve conceptual understanding only. Depending on vehicle options, software
version, market region and regional and language settings, the details displayed on the screen will dier.
Model 3 to suit your preferences. For hands-free access
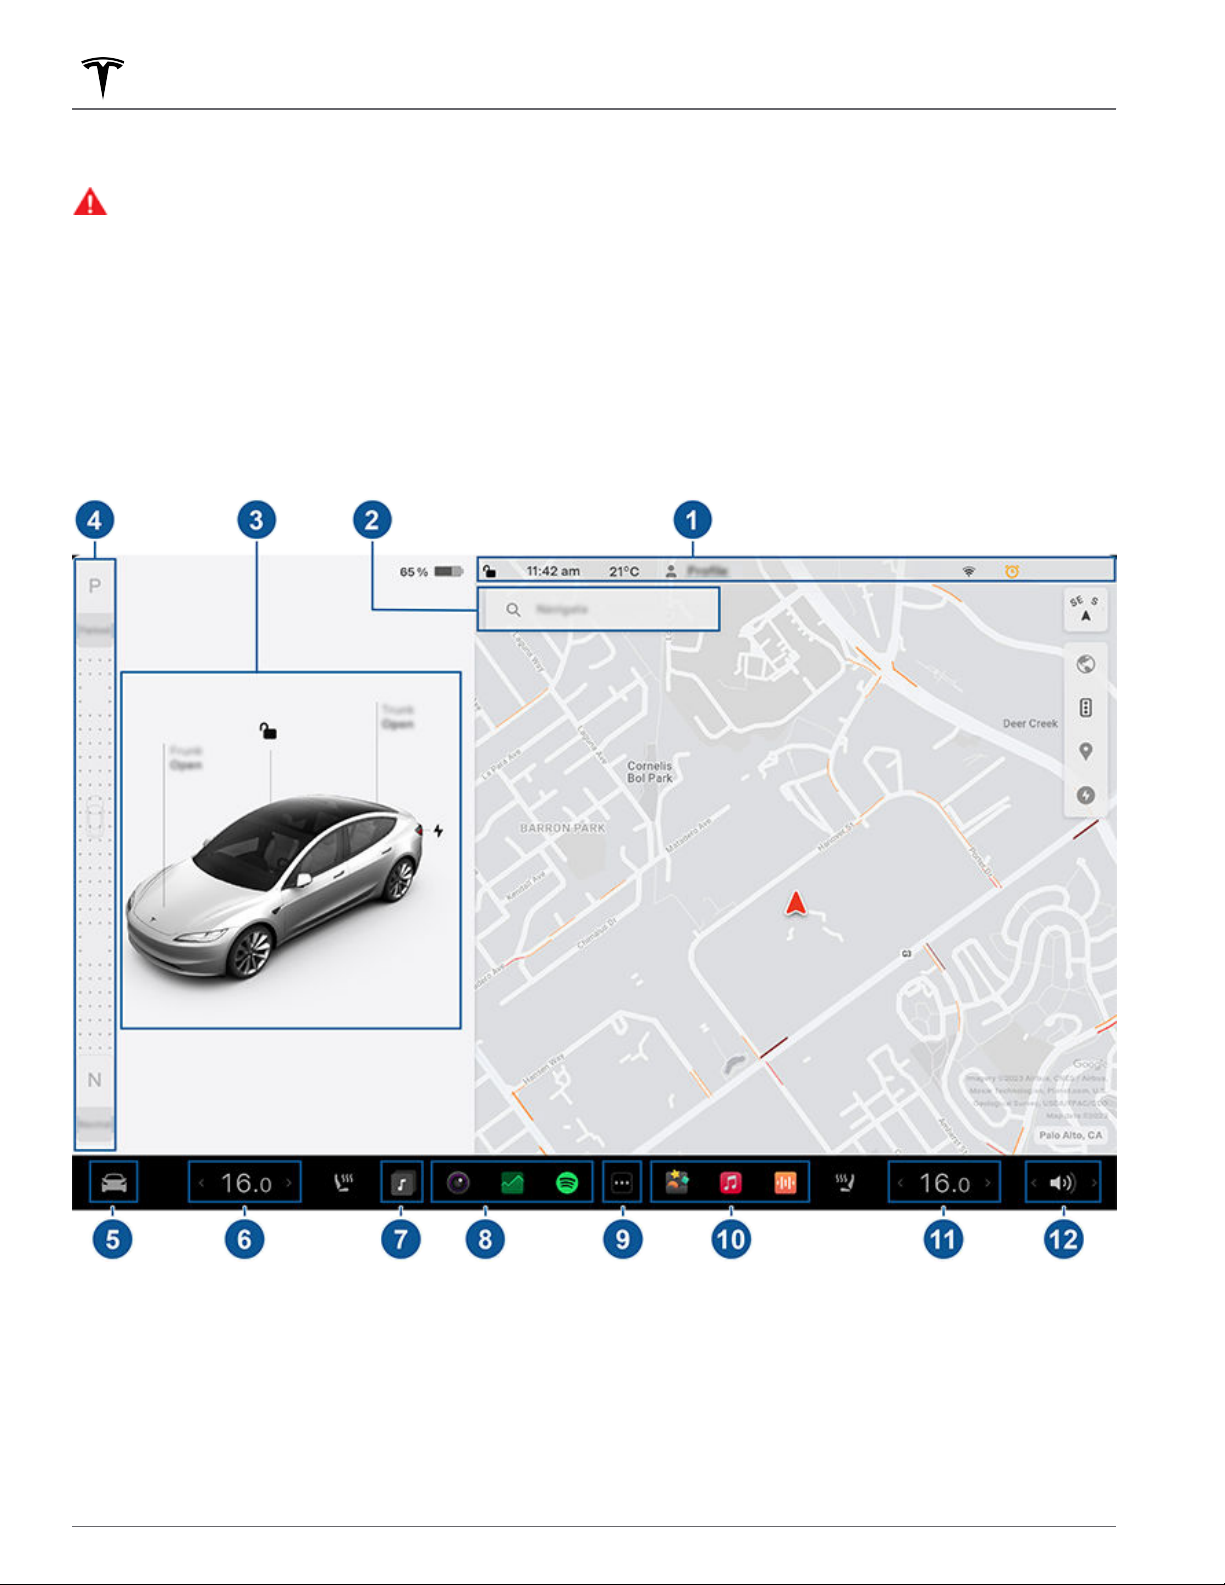
Status bar: Find car controls and status in the top bar (see Top Status Bar Icons on page 7).
1.
Navigation: Change the orientation of the map, find or navigate to a destination, and change navigation settings
2.
(see Maps and Navigation on page 148).
3. Car status: This area dynamically displays the current status of Model 3 as you drive, park, open doors, turn lights
on, etc. Monitor this area when driving as it displays important information such as driving speed and warning
messages (see
This area also houses shortcut "cards" for Media, tire pressures, and Trip Information.
6 MODEL 3 Owner's Manual
Car Status on page 13). When the vehicle is in Park, you can open the trunks or charge port door.
Page 9

Touchscreen
When full self-driving is enabled (if equipped), the car status area displays visualizations of the road and your
vehicle's surroundings. You can expand/condense the visualization by dragging the car status area from side to
side. Expanding the visualization displays more details about the roadway and its surroundings, including road
markings, stop lights, and objects (such as trash cans and poles).
4. Drive mode strip: Use to shift into Park, Reverse, Neutral, or Drive. Swipe from the edge of the touchscreen
towards the passenger, to bring up the drive mode strip. (See Shifting on page 67.)
5.
Controls: Control various features and customize Model 3 to suit your preferences. The Controls screen appears
over the map. Touch an option on the Controls screen to display the various settings and preferences associated
with the chosen option.
To search for a specific setting, touch Search at the top of the Controls screen. Make changes directly from the
result or touch the link to jump to that option in Controls.
When an information icon displays beside a
provides helpful details about the associated setting.
NOTE: Many vehicle controls, settings, and preferences (such as climate, media, and navigation) can be adjusted
hands-free using voice commands (see Voice Commands on page 16).
NOTE: You can send touchscreen feedback to Tesla by long-pressing this icon.
Climate controls (driver): Use the left and right arrows to decrease/increase cabin temperature. Touch Split on
6.
the popup to display separate controls for the driver and passenger. Touch the temperature icon to customize
climate control settings (see Operating Climate Controls on page 137). The passenger climate controls display
when temperature controls have been Split to provide separate controls for the driver and passenger.
Media player shortcut: When using the media player app, swipe downwards and the media player shortcut icon
7.
appears in the bottom bar.
My Apps: For one-touch access to frequently used apps and controls, you can choose what displays here. See
8.
Customizing My Apps on page 7.
App Launcher: Touch the app launcher to open the app tray. Then touch any app to open it. The app you choose
9.
displays on top of the map. To close an app, drag it downward.
Recent App(s): Displays the most recently used app(s). The number of recent apps displayed here depends on
10.
how many apps have been added to My Apps. If you add the maximum number of apps to My Apps, only the
most recent app displays.
Climate controls (passenger): Displays when temperature controls have been Split to provide separate controls
11.
for the driver and passenger.
Volume Control: Controls the volume of media player and phone calls (see Volume Controls on page 154). The
12.
volume of navigation instructions is controlled separately (see Maps and Navigation on page 148).
specific setting, touch it to display a popup that
Customizing My Apps
For one-touch access to commonly used apps and
controls, you can customize what displays in the My
Apps area on the touchscreen's bottom bar:
1. Enter customization mode by touching and holding
any app or control in the My Apps area. If this area is
empty, touch the App Launcher.
2. Drag any app or control from the app tray onto the
My Apps area in the bottom bar.
NOTE: Seat heaters selected from the app tray
appear next to the temperature, instead of in the My
Apps area.
When you've added the maximum number of
NOTE:
apps or controls to My Apps, adding an additional app
removes the rightmost app.
NOTE: Remove an app or control from the My Apps area
by touching and holding, then touching its associated
"X".
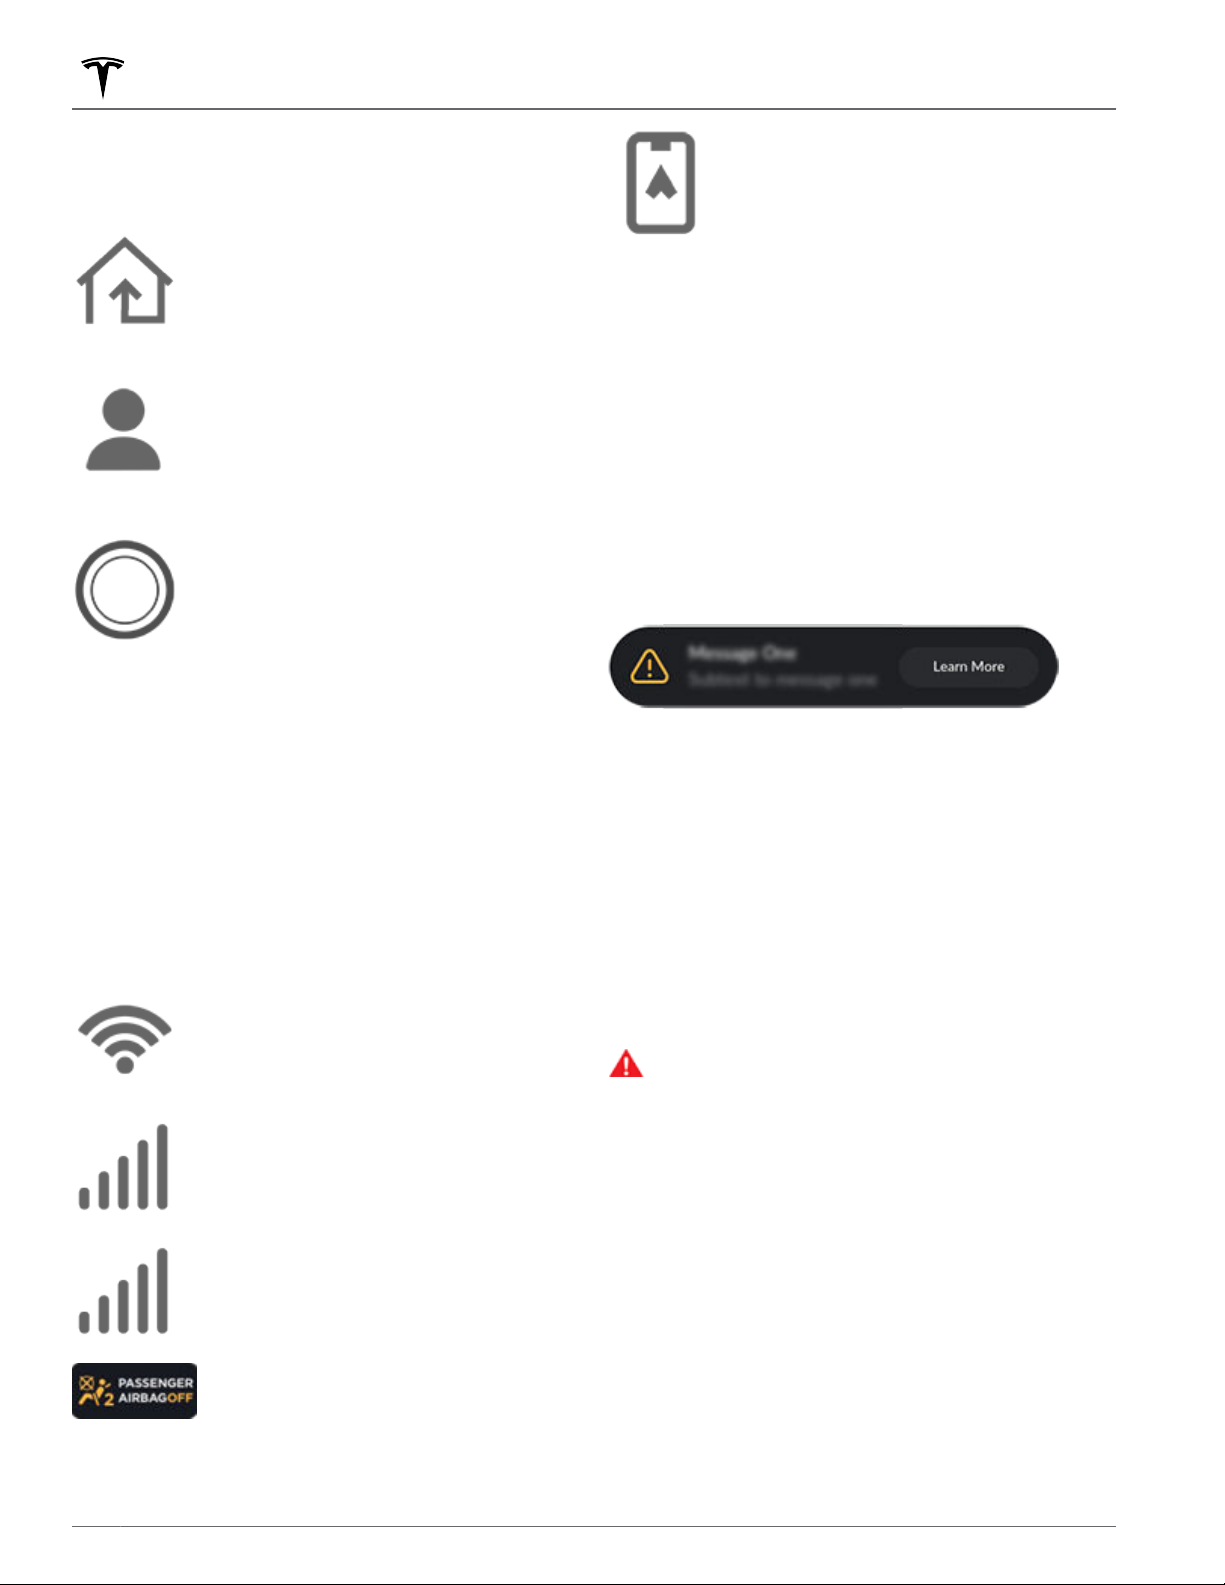
Top Status Bar Icons
Touch to lock/unlock all doors and
trunks.
7Using This Owner's Manual
Page 10
Touchscreen
4:20 pm Your vehicle automatically updates the
time. If the time is incorrect, confirm
your vehicle has internet and GPS
connectivity with the latest software.
Displays on the touchscreen status bar
only when Model 3 detects a
programmed HomeLink within range,
and the touchscreen is not already
displaying the HomeLink screen or
popup. See
Displays on the touchscreen status bar
only when Model 3 is parked. Add,
configure (including Valet Mode and Use
Easy Entry), or quickly switch driver
profiles. Driver profiles can also be
accessed from the top of any Controls
screen. See
Available when Model 3 is parked, touch
to manually enable or disable Sentry
Mode for the current drive cycle. To
automatically turn Sentry Mode on (or
o) every time you leave your vehicle,
enable the setting from
Safety > Sentry Mode. See Sentry Mode
on page 134 for more information.
NOTE: If you turn Sentry Mode on or o
from Controls > Sentry Mode, the
shortcuts on the vehicle's touchscreen
and mobile app will only work for the
current drive cycle.
NOTE: For some vehicles manufactured
after approximately November 1, 2021,
the center console USB ports may only
support charging devices. Use the USB
port inside the glove box for all other
functions.
Smart Garage on page 56.
Driver Profiles on page 82.
Controls >
Appears when your vehicle's GPS
location is actively being accessed in the
Tesla mobile app by the owner, an added
driver, or a third party app you're using.
To disable, navigate to Safety > Allow
Mobile Access on the touchscreen.
Popup Messages and Vehicle Alerts
Popup messages appear at the bottom of the
touchscreen. For example, a seat belt reminder appears
if a seat belt is unfastened in an occupied seat, an alert
appears to notify you of an incoming phone call, a text
message appears (when applicable), and voice
commands appear when in use. If applicable, touch
options from these popup messages (for example,
accept/decline a phone call, choose an option from the
headlight menu, etc.). To dismiss a popup message,
swipe it downward.
If an alert appears on your vehicle's touchscreen, touch
Learn More for more details regarding the alert and how
it can be resolved. You can view a list of vehicle alerts
and notifications by touching the bell icon at the top of
Controls.
NOTE: Not all alerts provide additional information at
this time.
Restarting the Touchscreen
Displays when Model 3 is connected to a
Wi-Fi network.
Displays when Model 3 Connected to
cellular network. Touch this icon for
quick access to Wi-Fi settings.
Displays when Model 3 cellular
connectivity is or unavailable. Touch this
icon for quick access to Wi-Fi settings.
Status of the front passenger airbag (see
Airbags on page 42).
8 MODEL 3 Owner's Manual
You can restart your touchscreen if it is unresponsive or
demonstrates unusual behavior.
WARNING:
vehicle is stopped and in Park. The car status
display, safety warnings, backup camera, etc. will
not be visible during the restart.
Shift into Park.
1.
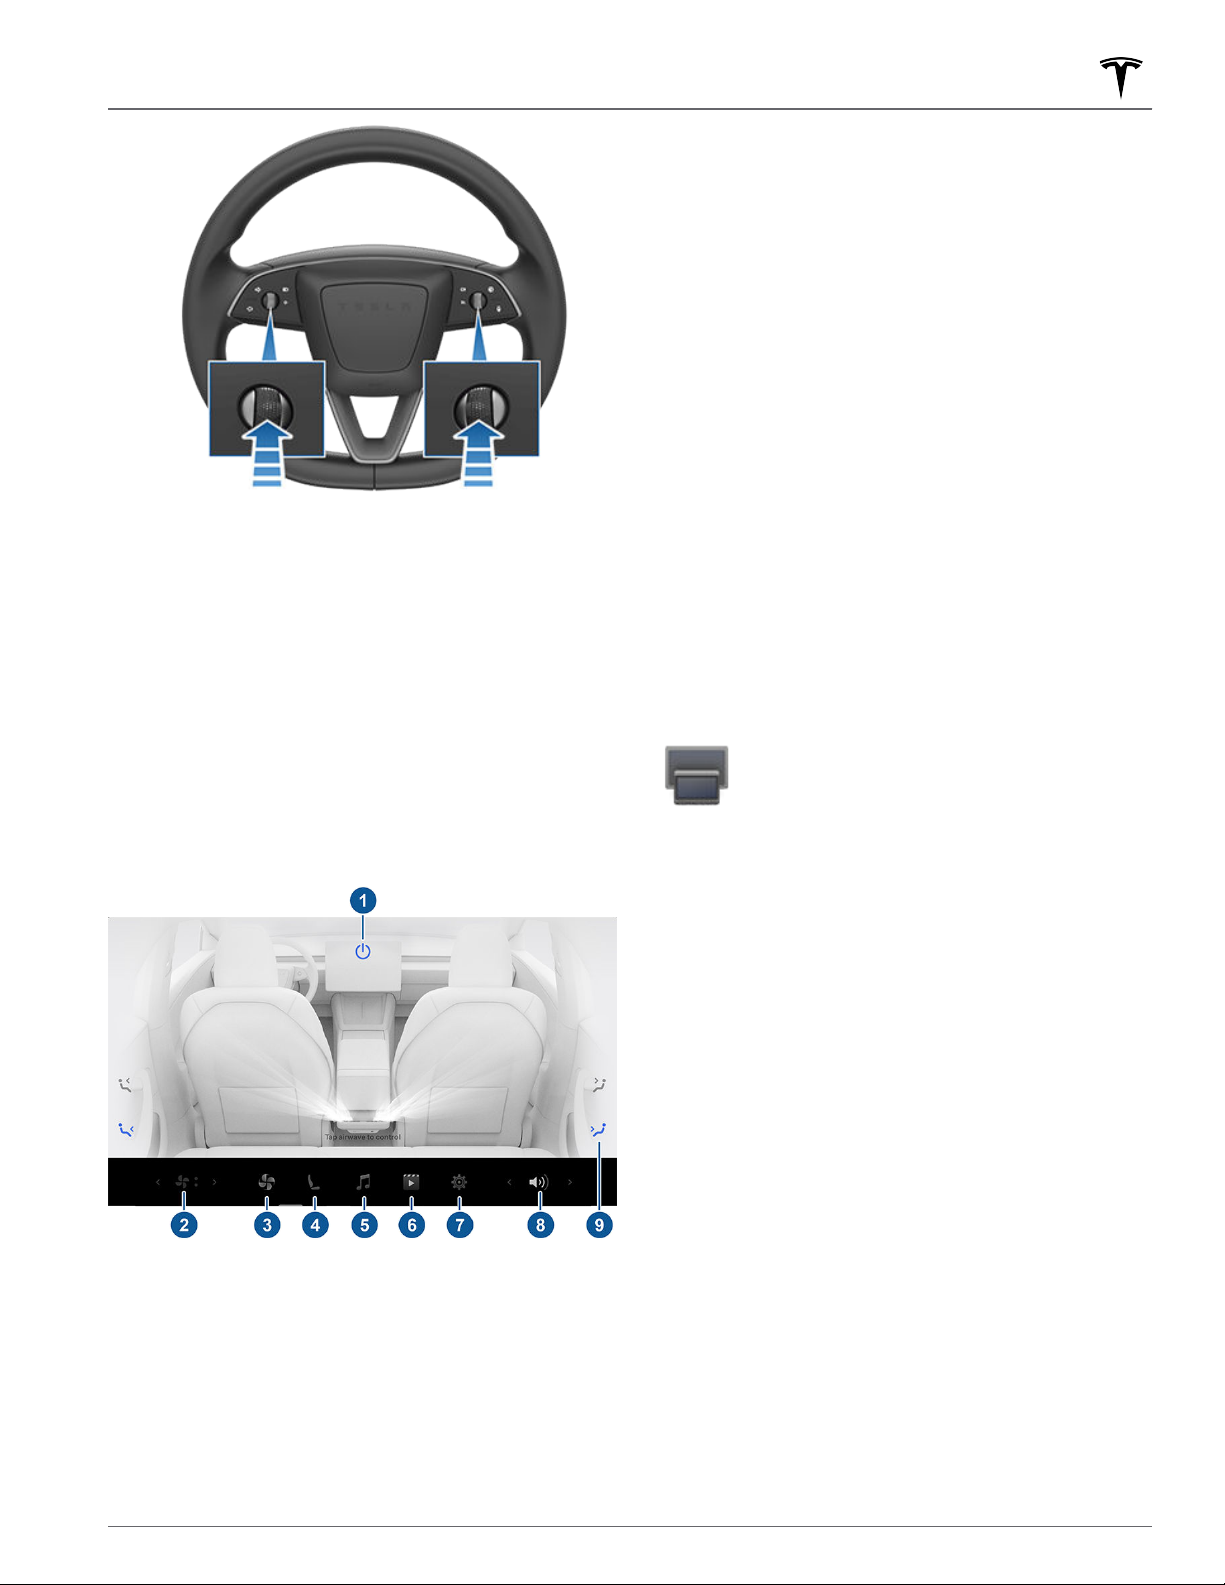
2. Hold down both scroll buttons on the steering wheel
until the touchscreen turns black. Pressing the brake
pedal while holding down the scroll buttons does not
have any impact and is not required.
Only restart the touchscreen while the
Page 11
Touchscreen
3. After a few seconds, the Tesla logo appears. Wait
approximately 30 seconds for the touchscreen to
restart. If the touchscreen is still unresponsive or
demonstrating unusual behavior after a few minutes,
try power cycling the vehicle (if possible). See
Cycling the Vehicle on page 60.
NOTE: Pressing the scroll buttons only restarts the
touchscreen. It does not restart any other vehicle
component and does not power
Model 3 o and on.
Power
Rear Touchscreen
The rear touchscreen provides rear passengers with
access to:
5. Media
6. Video: Access video streaming services.
7. Settings: Touch to pair up to two sets of Bluetooth
8.
9. Air wave preset: Touch to direct the air flow to the
NOTE: You can also use the front touchscreen to adjust
climate settings in the rear cabin (see Adjusting Climate
Control Settings on page 137).
NOTE: Adjusting the media and volume controls also
adjusts the front cabin settings.
: Play, pause, skip or rewind through the
currently playing song (see Media on page 154).
headphones, change the brightness or clean the
display.
NOTE: You can also use the front touchscreen to pair
Bluetooth headphones to the rear display by
launching the Rear Screen app.
Volume: Touch to adjust the volume.
passenger head or torso quickly. Direct the air flow
exactly where you want by touching and moving the
air wave on the touchscreen.
Control the rear screen from the front
To control the rear touchscreen from the
front, open the rear screen remote control
app in the bottom bar on the front
touchscreen. Besides audio, video and
climate controls, you can lock the rear
display in the app or by touching Controls
> Display > Lock Rear Display.
Power: Touch to turn the rear climate control system
1.
o.
on or
Rear fan speed: Touch to adjust fan speed.
2.
3. Rear fan: Touch to turn the rear fan on or o, to
adjust fan speed and control the direction of air flow
from the rear vents (see Adjusting the Front and Rear
Vents on page 142).
Seats: Control rear seat heaters and move the front
4.
passenger seat forward/rearward using the arrows.
Customizing Display and Sound
Settings
Touch Controls > Display to adjust display settings to
suit your preferences:
Appearance: Customize the display to be Dark or
•
Light. When set to Auto, the brightness changes
automatically based on ambient lighting conditions.
Brightness: Drag the slider to manually control the
•
brightness level. If Display Mode is set to Auto, the
touchscreen further adjusts based on both the
ambient lighting conditions and your brightness
preference.
brightness preference and adjusts the touchscreen
accordingly.
• Screen Clean Mode: When enabled, your touchscreen
darkens and temporarily disables to facilitate
cleaning. Follow the onscreen instructions to exit
Screen Clean Mode.
• Touchscreen Language: Select the language that the
touchscreen displays.
Model 3 remembers your chosen
9Overview
Page 12

Touchscreen
NOTE: Model 3 must be in Park to change the
language. When you change the language, you
experience a brief delay as Model 3 shuts down and
restarts the touchscreen.
• Voice Recognition Language: Choose the language
to be used for voice commands.
•
Voice Navigation Language: Choose the language
that the navigation system uses for spoken
instructions.
NOTE: For languages that require a download, select
the language in the dropdown list to initiate the
download (Wi-Fi connection required).
• Text size: Select between Standard and Large to
customize the text size on your vehicle's touchscreen.
Time: Choose to display time in either 12 or 24 hour
•
format.
• Energy Display: Choose to display remaining energy
and charging units as either a percentage of battery
energy remaining, or as an estimate of the distance
you can drive.
NOTE: When anticipating when you need to charge,
use energy estimate as a general guideline only. Many
factors have an impact on energy consumption. See
Factors Aecting Energy Consumption on page 170.
Model 3
enter the user name and password associated with your
Tesla account.
verifies your credentials by prompting you to
Distance: Choose to display measurements in metric
•
(kilometers, centimeters, etc.) or imperial (miles,
inches, etc.) units.
Temperature: Choose to display temperature using
•
Fahrenheit or Celsius.
Tire Pressure: Choose to display tire pressures using
•
BAR or PSI.
In addition to customizing the display, you can enable
Joe Mode to reduce the volume of all chimes that are
not related to critical safety issues. Touch
Safety > Joe Mode to enable.
Controls >
Naming your Vehicle
To further personalize your vehicle, you can name it.
Touch Controls > Software > Name Your Vehicle located
on the right side of the touchscreen below the image of
Model 3. If your vehicle already has a name, touch the
existing name to change it. Enter the new name in the
popup and touch Save. The name of your Model 3 also
appears in the Tesla mobile app.
Erasing Personal Data
You can erase all personal data (saved addresses, music
favorites, HomeLink programming, etc.) and restore all
customized settings to their factory defaults. This is
useful when transferring ownership of
Controls > Service > Factory Reset. Before erasing,
10 MODEL 3 Owner's Manual
Model 3. Touch
Page 13
In addition to storage compartments and cup holders
(see Interior Storage on page 29), the Model 3 interior
supports various electronics such as USB ports, wireless
phone chargers, and a 12V power socket.
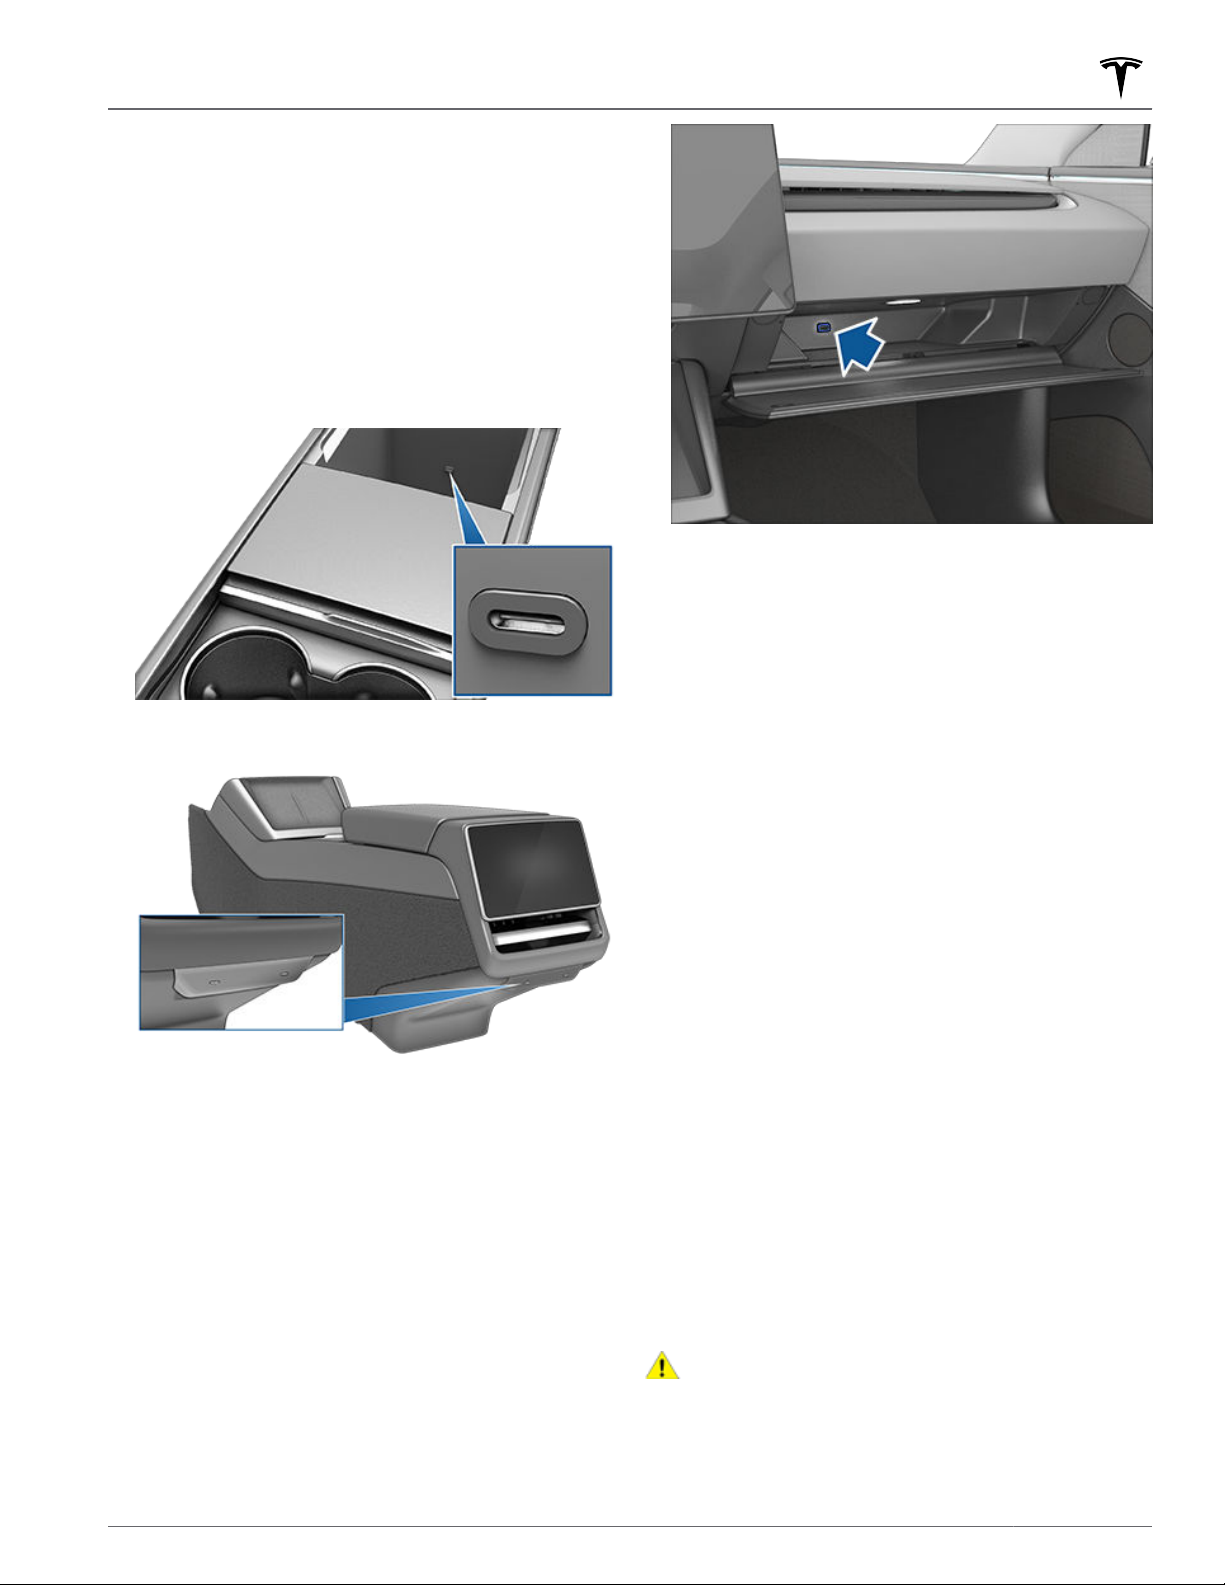
USB Ports
Model 3 has four USB ports. The three USB-C ports
output up to approximately 42W or two ports up to
approximately 65W.
• One USB-C port is located in the rear compartment
of the center console used to charge USB devices.
Two USB-C ports are located below the rear
•
touchscreen that can be used to charge USB devices.
Interior Electronics
USB Drive Requirements for Recording Videos on
See
page 136 for information about formatting USB flash
drives.
NOTE: Power is available whenever the vehicle is
considered "awake". The vehicle may be awake for many
reasons. For example, when using features such as
Summon, or when features such as Keep Climate On,
Dog Mode, Camp Mode, or Sentry Mode are enabled.
The vehicle is also awake whenever the
battery is being charged or is in use, during high voltage
charging, when the vehicle is communicating with the
mobile app, etc. Leaving an accessory plugged in does
not deplete the low voltage battery.
NOTE: Use USB 3.0 compliant cables to connect a
device to a USB port. Using non-compliant cables can
result in slower charging, potential connection problems
or degraded performance.
NOTE: Do not connect multiple devices using a USB
hub. This can prevent connected devices from charging
or from being recognized by Media Player, Sentry Mode,
Dashcam, etc.
low voltage
One USB-A port is located inside the glovebox. This
•
port is equipped with a USB flash drive. The secure
location of this USB port makes it ideal for saving
Sentry Mode and Dashcam video footage. It also
supports audio
Playing Media from Devices on page 155).
files from a phone or USB device (see
Wireless Phone Chargers
Wireless phone chargers are integrated into the front
console, providing up to 15W of power to charge Qienabled phones. To charge your phone, place it on one
of the two charge pads. The phone must be in direct
contact with the wireless charger. Do not place objects
between the phone and the charger (for example, credit
cards, key cards, coins, keys, metal objects, etc.). Your
device may feel warm while charging, but this is a
normal
eect of inductive charging.
CAUTION:
vehicle key card, credit cards, or hotel key) from
integrated phone cases before charging your
phone to avoid damage to the card.
Remove NFC cards (for example, the
11Overview
Page 14
Interior Electronics
When placed on the wireless charger, your phone
charges whenever the vehicle is powered on (the
touchscreen is on and you are in the vehicle). Your
phone does not charge when you leave the vehicle
unless a feature, such as Keep Climate On, Dog Mode,
Camp Mode, or Sentry Mode is enabled.
NOTE: The wireless phone charger may not work if your
phone case is too thick or is made of metal. Try
removing the phone from its case before placing it on
the charger.
NOTE: The wireless phone charger does not charge if
the vehicle's high voltage Battery is discharged.
NOTE:
Power is available whenever the vehicle is
considered "awake". The vehicle may be awake for many
reasons. For example, when using features such as
Summon, or when features such as Cabin Overheat
Protection, Keep Climate On, Dog Mode, Camp Mode,
Sentry Mode, etc. are enabled. The vehicle is also awake
whenever the
in use, during high voltage charging, when the vehicle is
communicating with the mobile app, etc. Leaving an
accessory plugged in does not deplete the
battery.
WARNING: The power socket and an accessory’s
connector can become hot.
WARNING: To prevent excessive interference with
the vehicle’s electronics, Tesla recommends that
you do not plug any non-Tesla accessories,
including power inverters, into the low voltage
power socket. However, if you do use a non-Tesla
accessory and notice any malfunctions or
unexpected behavior, such as indicator lights, alert
messages, or excessive heat from the accessory,
unplug the accessory from the low voltage power
socket immediately.
CAUTION: Do not attempt to jump start Model 3
using the low voltage power socket. Doing so can
result in damage.
low voltage battery is being charged or is
low voltage
Low Voltage Power Socket
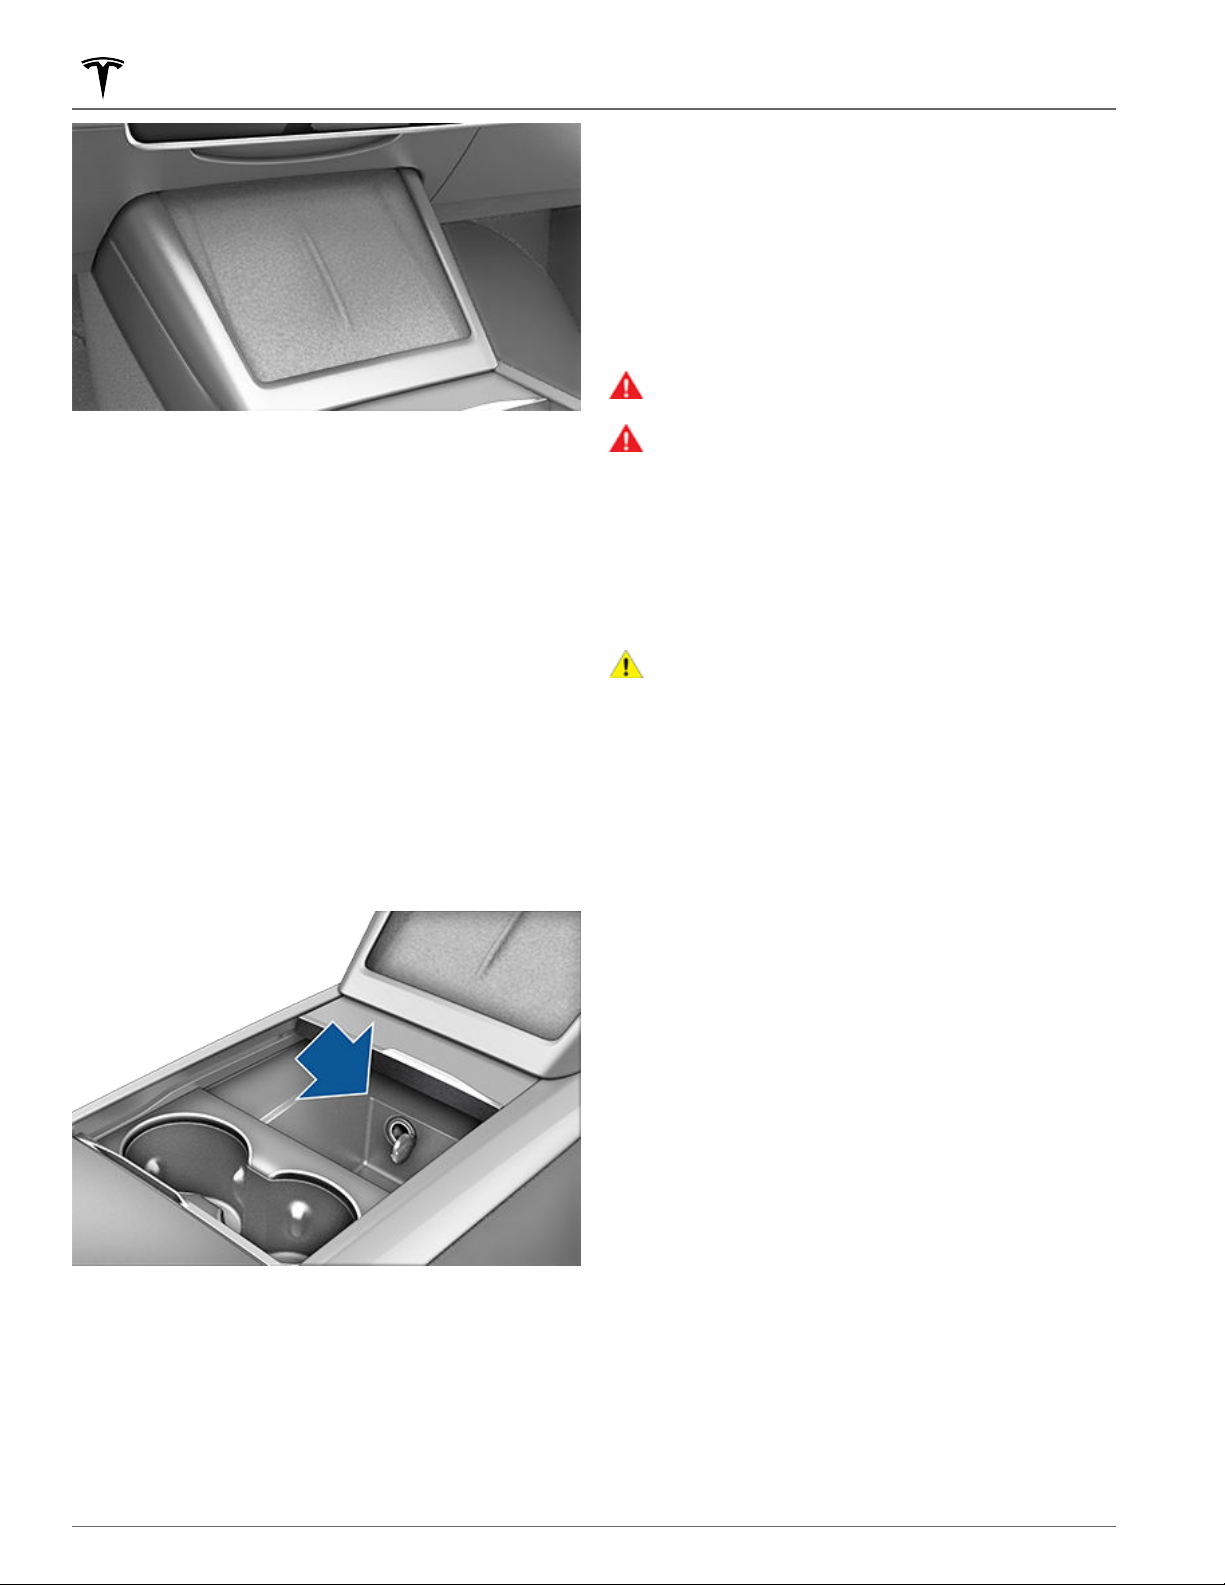
Your Model 3 has a power socket located in the center
console's compartment. To access the low voltage
socket, open the front compartment of the center
console.
The power socket is suitable for accessories requiring up
to 12A continuous draw (16A peak).
12 MODEL 3 Owner's Manual
Page 15
Car Status
Overview
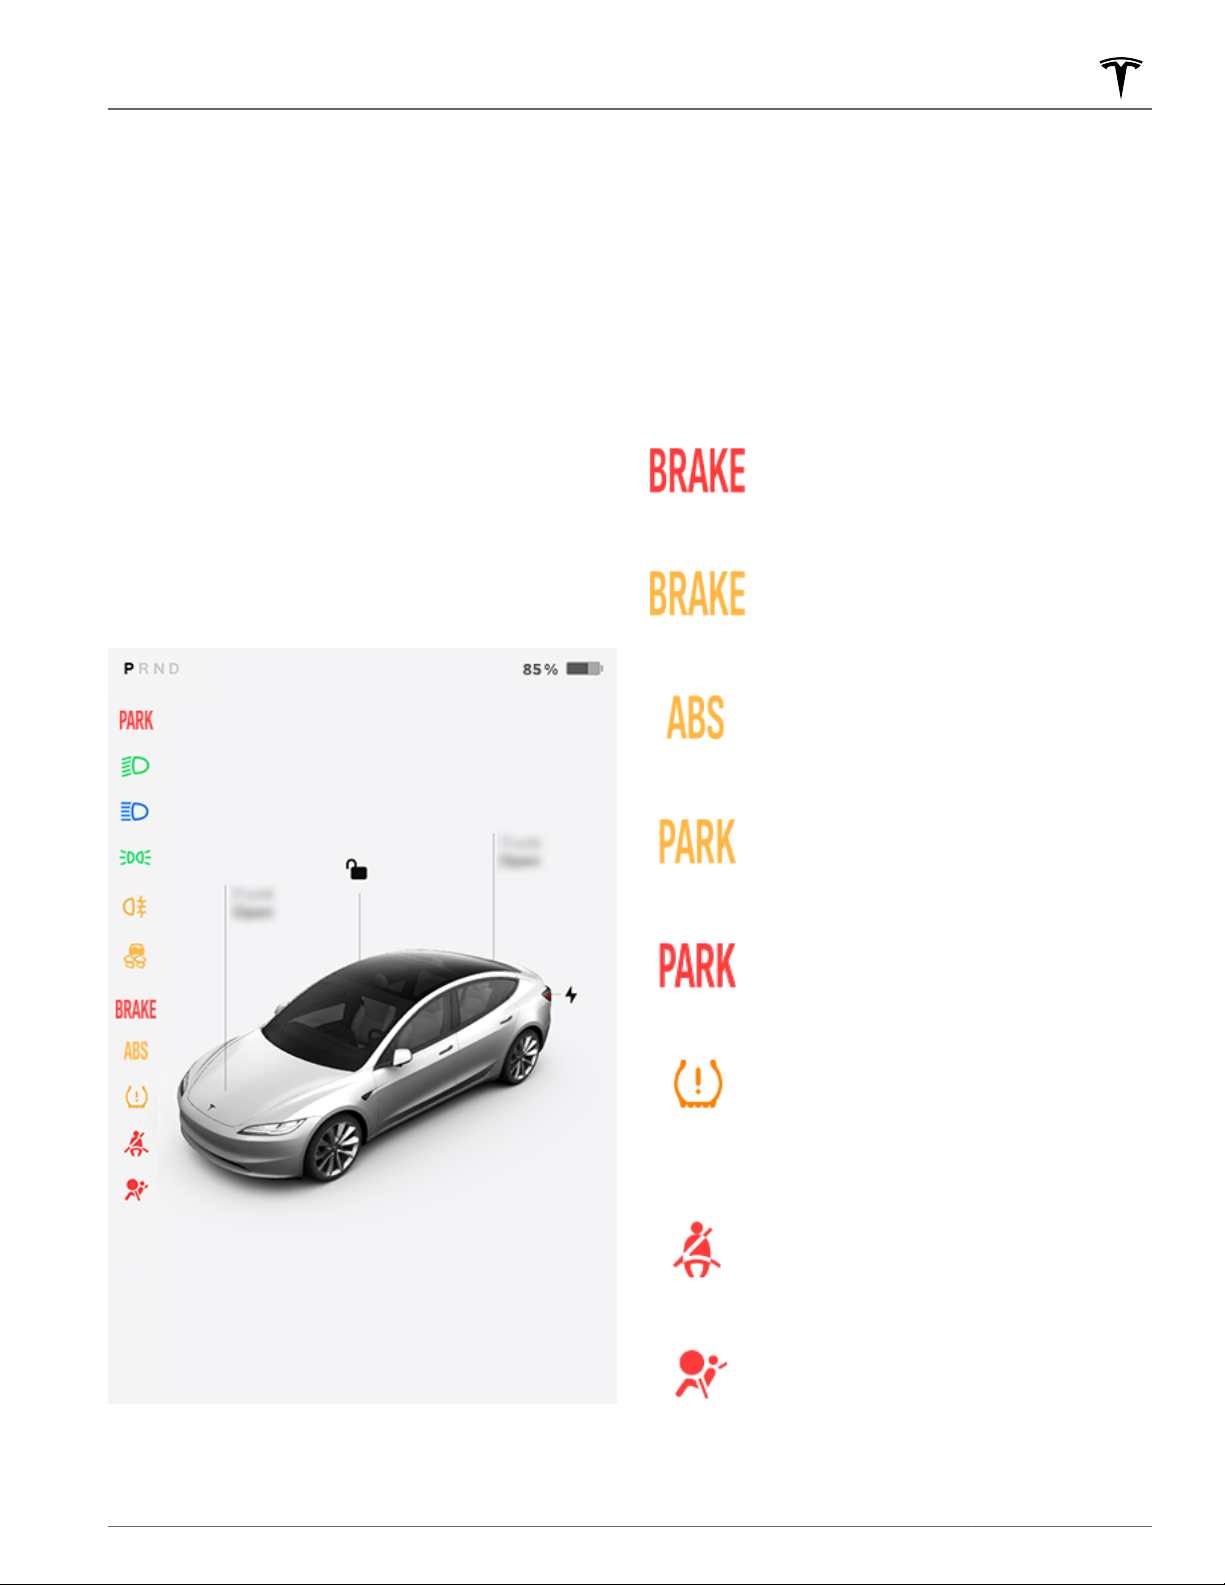
The touchscreen displays the status of Model 3 at all
times. What you see depends on whether the vehicle is:
Parked (shown below).
•
• Driving (see Driving Status on page 14).
• Charging (see Charging Status on page 164).
When Model 3 is parked, the status area shows the drive
mode, estimated range, and an overhead view of the car
with buttons you can touch to open the trunks and
charge port door. When you press the brake, Model 3
powers up and indicator lights flash briefly. Unless an
indicator light applies to the current situation (for
example, a seat belt is not fastened), it should turn o. If
an indicator light fails to turn on or o, contact Tesla.
NOTE: The following image is provided for
demonstration purposes only. Depending on vehicle
options, software version, and market region, the
information displayed may be slightly dierent.
Cards
The bottom of the car status display also shows shortcut
"cards" for quick access to Media, tire pressure data, trip
information, and more. Swipe the cards to the left or
right to customize your cards shortcuts.
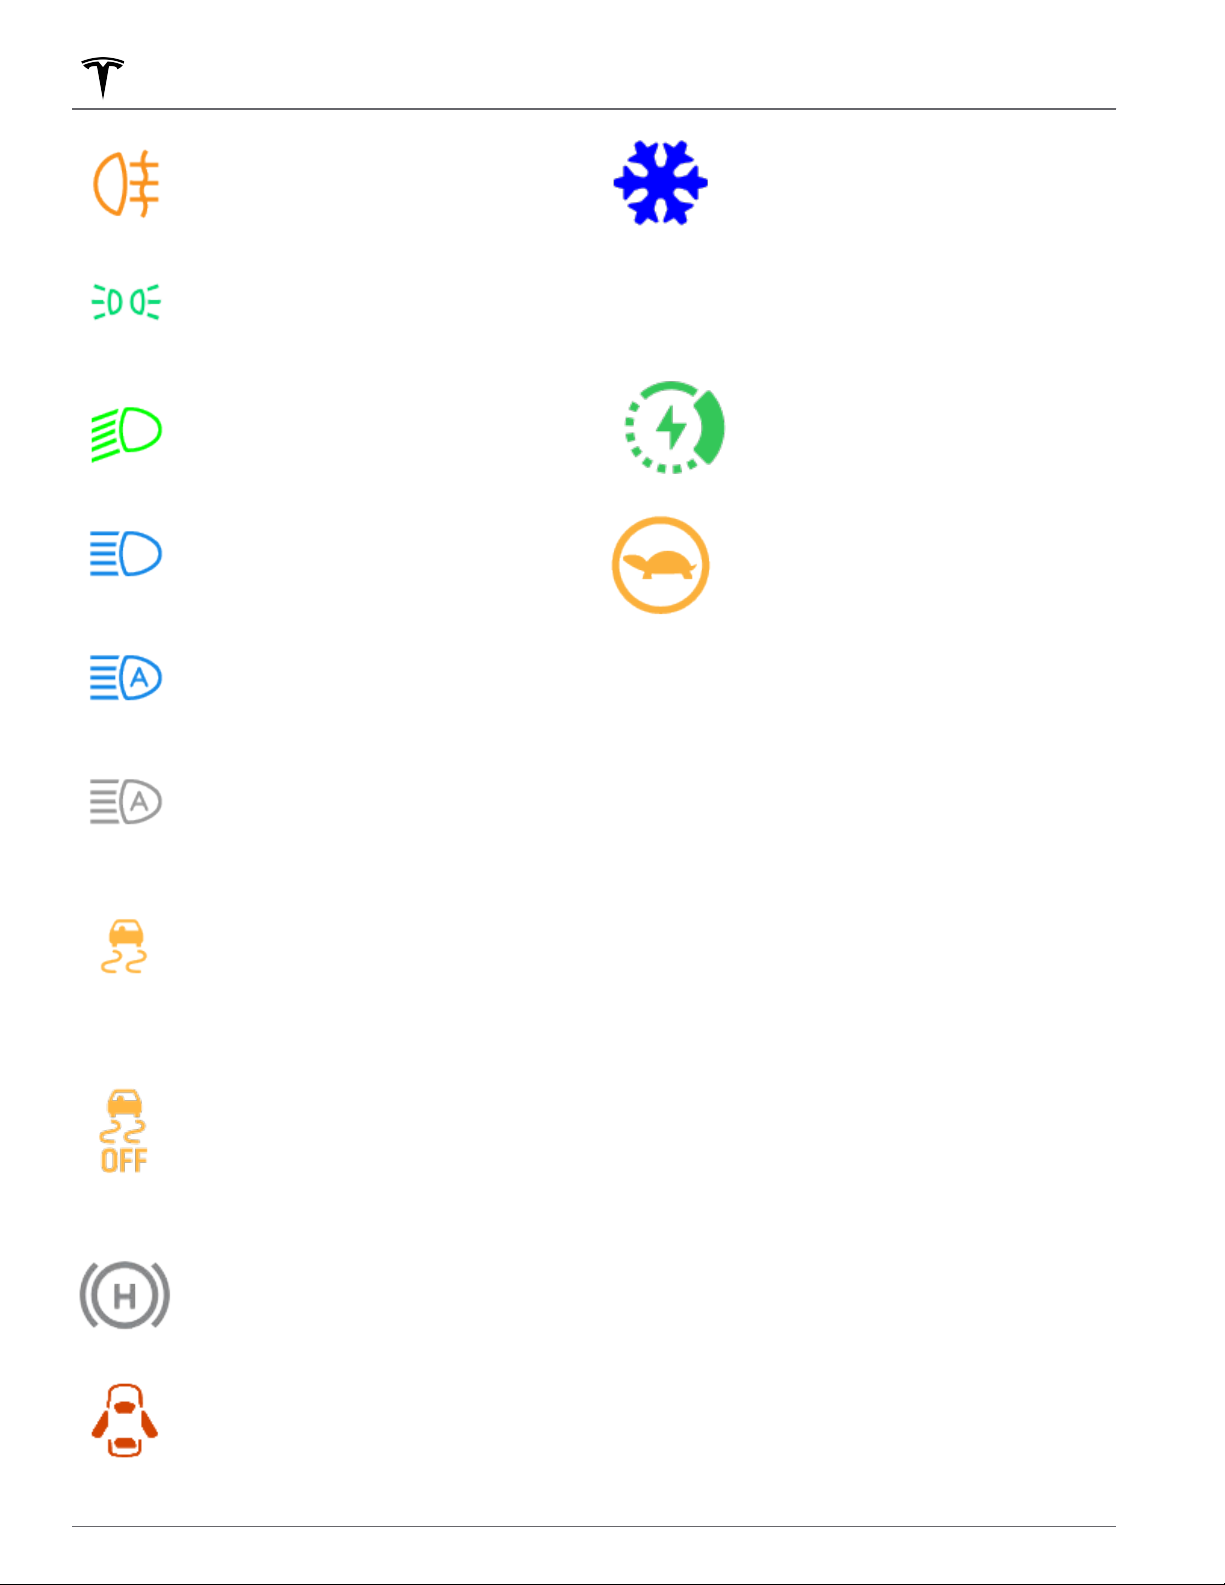
Indicator Lights
The following indicator lights illuminate to advise you or
alert you of a
specific status or condition.
A brake system fault is detected or the
brake fluid level is low. See Braking and
Stopping on page 74. Contact Tesla
immediately.
A brake booster fault has been
detected. See Braking and Stopping on
page 74.
An ABS (Anti-lock Braking System)
fault is detected. See Braking and
Stopping on page 74. Contact Tesla
immediately.
A parking brake fault is detected.
Contact Tesla. See Parking Brake on
page 76.
The parking brake is manually applied.
See Parking Brake on page 76.
Tire pressure warning. The pressure of a
tire is out of range. If a fault with the
Tire Pressure Monitoring System
(TPMS) is detected, the indicator
flashes. For a TPMS fault, contact Tesla.
See
Tire Care and Maintenance on page
176.
A seat belt for an occupied seat is not
fastened. See Seat Belts on page 33.
Airbag safety. If this indicator does not
flash on briefly when Model 3 prepares
to drive, or if it remains on, contact
Tesla immediately. See Airbag Warnings
on page 46.
13Overview
Page 16
Car Status
The rear fog indicator displays on the
touchscreen whenever rear fog lights
are on.
Parking lights are on (side marker
lights, tail lights, and license plate
lights) . See Lights on page 70.
Low beam headlights are on.
High beam headlights are on and Auto
High Beam is disabled or currently
unavailable.
Auto High Beam is enabled and high
beams are on. Model 3 is ready to turn
o the high beams if light is detected.
See High Beam Headlights on page 70.
A blue snowflake appears when some
of the energy stored in the Battery may
not be available due to cold weather
conditions. During these cold weather
conditions, charging rates may also be
limited. If
can heat your Battery by turning on
climate control with the mobile app.
The
Battery is suciently warm.
Appears when regenerative braking is
limited. See Regenerative Braking on
page 75 for more information.
Vehicle power is currently being limited
because the energy remaining in the
Battery is low, the vehicle's systems are
being heated or cooled, or an error is
detected by the drive inverter .
See Popup Messages and Vehicle Alerts on page 8 for
more information about alert popups on your vehicle's
touchscreen.
Model 3 is plugged in, you
snowflake disappears when the
Auto High Beam is enabled but high
beams are not on because light is
detected in front of Model 3. When light
is no longer detected, high beams
automatically turn back on. See High
Beam Headlights on page 70.
This indicator flashes amber when the
electronic stability control systems are
actively minimizing wheel spin by
controlling brake pressure and motor
power. See Traction Control on page
80. If this indicator remains on, a fault is
detected and you should immediately
contact Tesla.
Electronic stability control systems are
no longer minimizing wheel spin. On a
Rear Wheel Drive vehicle, the traction
control system has been turned o, or
on an All-Wheel Drive vehicle, Slip Start
has been enabled. See
on page 80.
Vehicle Hold is actively applying the
brakes. See Vehicle Hold on page 79.
Traction Control
Driving Status
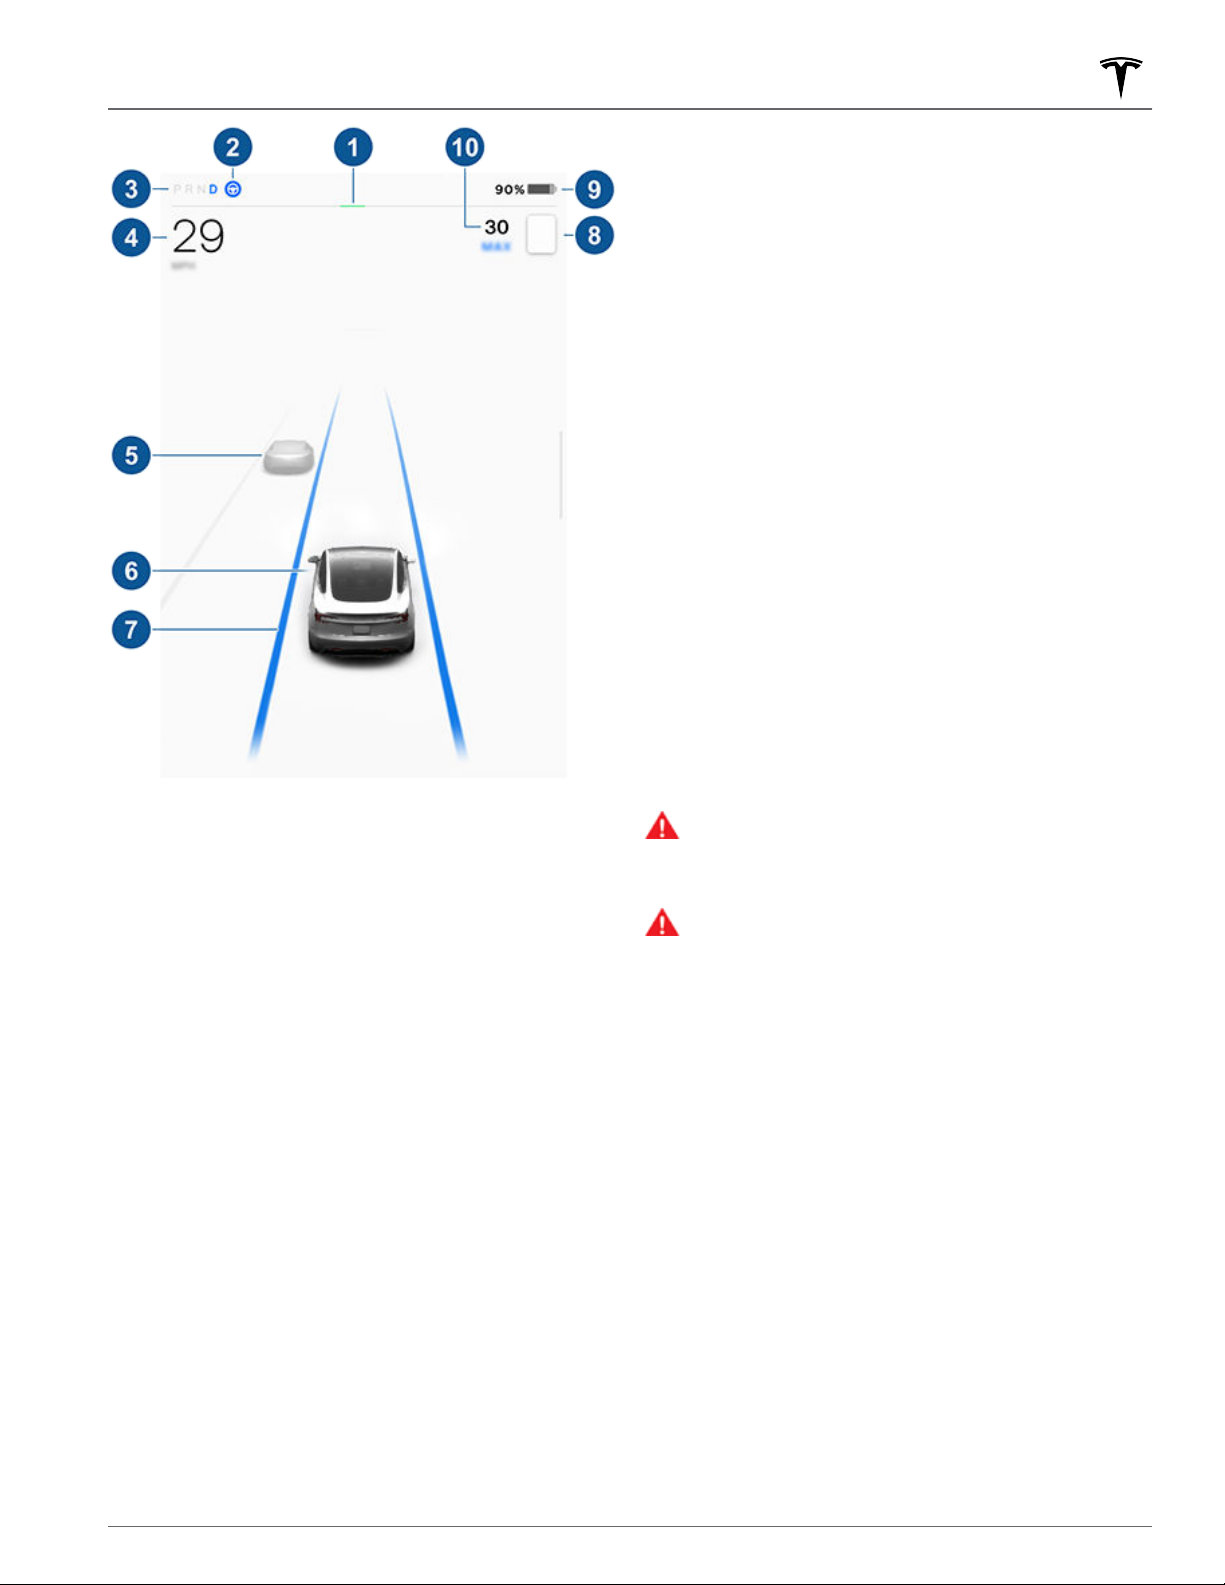
When Model 3 is driving (or ready to drive), the
touchscreen shows your current driving status and a
real-time visualization of the road as detected by the
Autopilot components (see
visualization automatically zooms in and out to better
utilize touchscreen space and inform you when a vehicle
is detected in your blind spot.
NOTE: The following illustration is provided for
demonstration purposes only. Depending on vehicle
options, software version, and market region, the
information displayed may be slightly dierent.
Cameras on page 18). The
A door or trunk is open. See Doors on
page 22, Rear Trunk on page 25, or
Front Trunk on page 27.
14 MODEL 3 Owner's Manual
Page 17
Car Status
white being the farthest and red being very close and
requiring your immediate attention. See
on page 122.
7. When Autosteer is active and detecting the driving
lane, the lane is highlighted in blue (see Autosteer on
page 92).
NOTE: If Navigate on Autopilot is active, the driving
lane displays as a single blue line in front of Model 3
(see Navigate on Autopilot on page 93).
8.
The speed limit that is currently being detected by
Speed Assist (see Speed Assist on page 128).
NOTE: The icon associated with the detected speed
limit
reflects the style of speed limit signs used in
your market region.
Total estimated driving distance (or energy) available.
9.
Touch the displayed value to change how available
energy is displayed. You can toggle between driving
distance and percentage of battery energy remaining.
You can also change how energy is displayed by
touching
NOTE: When anticipating when you need to charge,
use range estimates as a general guideline only.
Controls > Display > Energy Display.
Lane Assist
NOTE: To display more details about the roadway and its
surroundings, such as road markings, stop lights, objects
(such as trash cans and poles), etc., touch
Autopilot > Full Self-Driving Visualization Preview (if
equipped).
The power meter displays real-time power usage.
1.
During acceleration, the bar fills to the right to
represent power being used. During deceleration
(when Model 3 is moving and you release your foot
from the accelerator pedal), the bar fills to the left
with a green color to represent power being fed back
to the Battery by regenerative braking (see
Regenerative Braking on page 75).
When Autosteer is available but you haven't activated
2.
it, the icon is gray. When Autosteer is actively
steering
page 92).
3. Currently selected drive mode: Park, Reverse, Neutral,
or Drive.
Driving speed.
4.
Other cars detected on the road (as applicable).
5.
6. Your Model 3. Colored lines radiate from the image of
your Model 3 as objects are detected (other
motorists, guard rails, etc.). The location of the lines
correspond to the location of the detected object.
The color of the lines (white, yellow, orange, or red)
represents the object's proximity to
Model 3, the icon is blue (see Autosteer on
Controls >
Model 3, with
The set cruising speed. When Trac-Aware Cruise
10.
Control is available but you haven't set a cruising
speed, the number is gray (see Trac-Aware Cruise
Control on page 91).
WARNING:
messages that display at the bottom of the car
status area of the touchscreen. Ignoring these
messages can result in serious injury or death.
WARNING:
surrounding trac, some vehicles may not be
displayed. Never rely on the touchscreen to
determine if a vehicle is present (for example, in
your blind spot). Always use your mirrors and
perform shoulder checks.
Pay attention to important alert
Although the touchscreen shows
15Overview
Page 18
Voice Commands
NOTE: Voice commands are not available in all
languages. To choose the language you want to use for
voice commands, touch Controls > Display > Voice
Recognition Language.
Use voice commands to easily control settings and
preferences without using the touchscreen. Voice
commands are designed to understand natural requests.
Use them to:
•
Adjust climate preferences.
•
Tweak the windshield wiper speed and frequency.
• Control various aspects of your vehicle.
• Navigate to a location.
• Call a contact.
Interact with apps and settings.
•
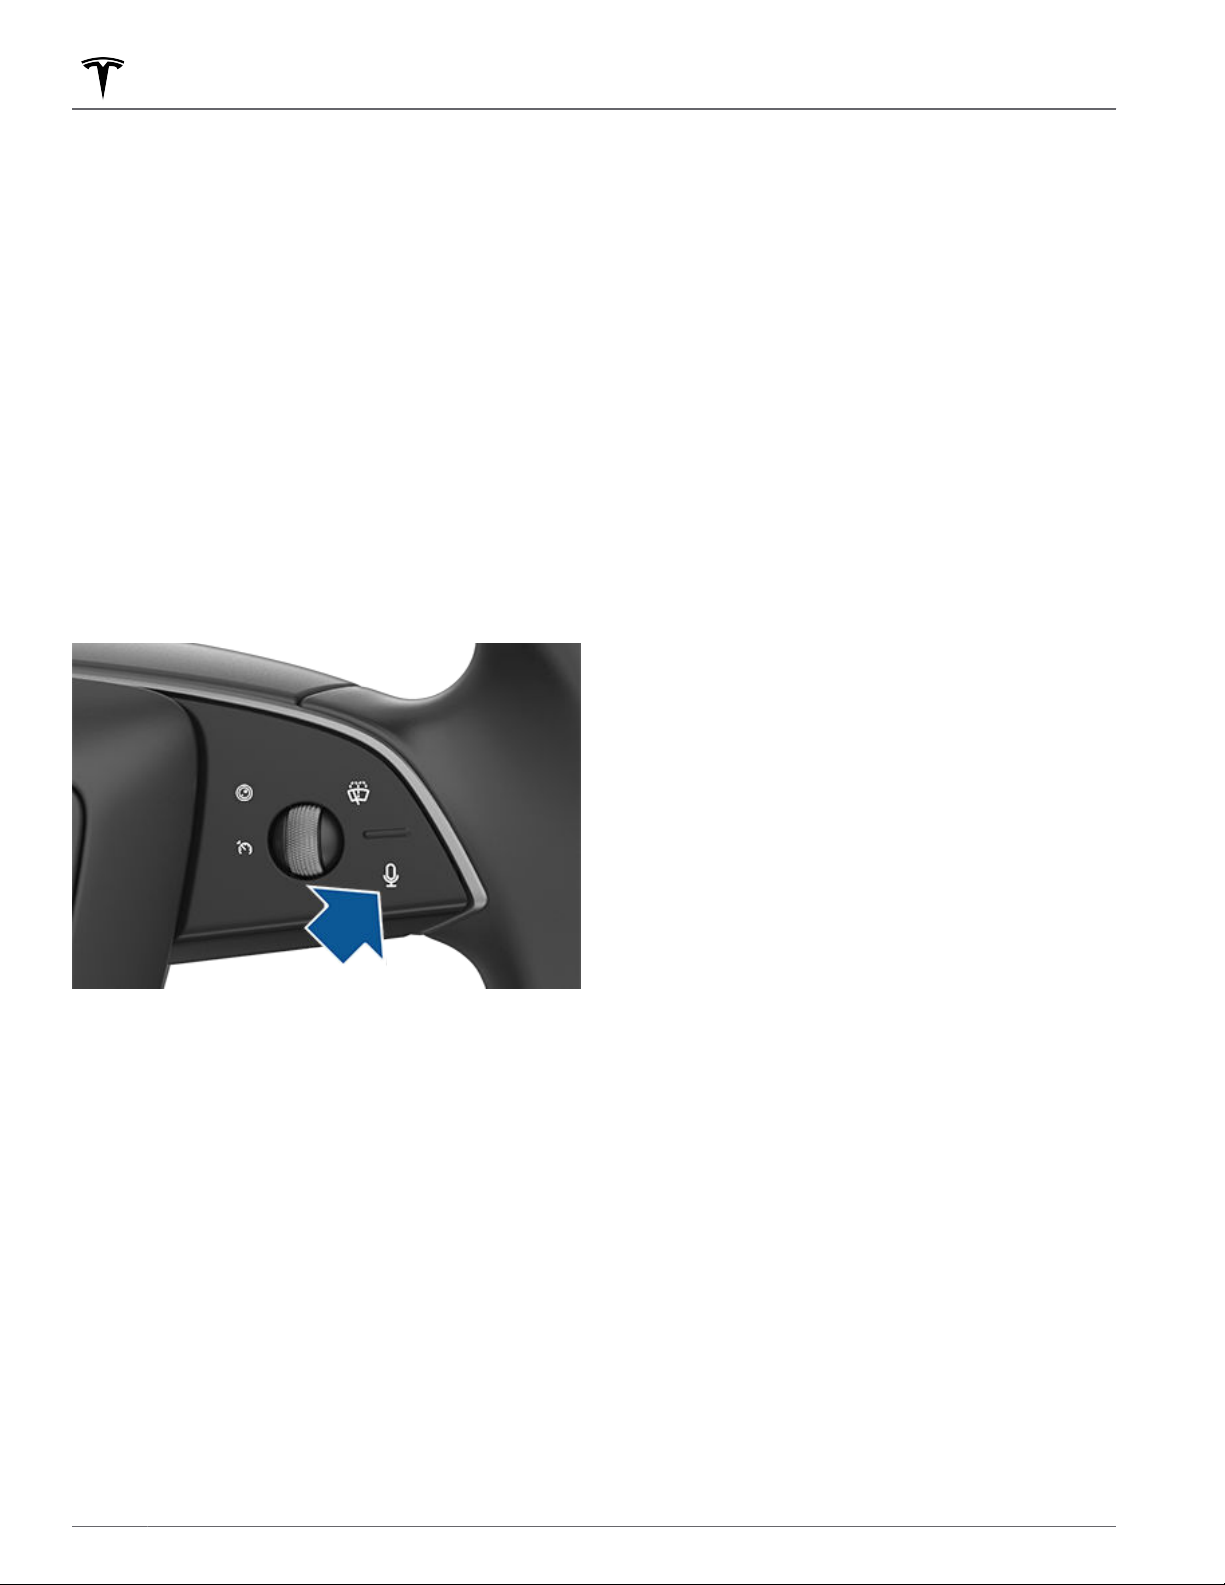
To initiate a voice command, fully press the microphone
button on the right side of the steering wheel. When a
chime sounds, make your request, then Model 3 provides
onscreen responses.
• "Turn
• "Set the temperature/fan..."
•
on/o rear defroster"
"Turn on recirculate"
Windshield Wipers
Update the windshield wiper speed and frequency
based on changing road and weather conditions:
• "Speed up the wipers"
•
"Increase/decrease windshield wiper speed by..."
• "Turn on/o the wipers"
Vehicle Controls
You can also modify various controls in your vehicle
using voice commands:
NOTE: Your vehicle must be in Park to enable some
voice commands (such as Sentry Mode, Dog Mode, etc.).
"Sentry Mode on/o"
•
"Keep my car safe"
•
"Lock/unlock the doors"
•
"Turn on Dog Mode"
•
"Fold/unfold the mirrors"
•
"Open/close charge port"
•
"Start/stop charging"
•
"Open service settings"
•
"Open the glovebox"
•
Navigation
Examples of Voice Commands
Here is a list of example voice commands. This is not an
exhaustive list. Tesla is constantly working to improve
voice commands.
Climate Controls
Adjust your climate preferences using voice commands:
"Make it cooler"
•
"Make it warmer"
•
• "Turn on/o the driver's seat heater"
• "Cool down the passenger"
• "Direct airflow to my face"
"Sync climate"
•
"Increase/decrease the fan speed"
•
16 MODEL 3 Owner's Manual
To search for, or navigate to, a location, say:
"Where is [location]?"
•
"Drive to [location]"
•
"Navigate to [location]"
•
"Show nearby Superchargers"
•
"I'm feeling hungry/lucky" (see Maps and Navigation
•
on page 148).
• "Stop navigation"
• "Mute voice guidance"
If you have defined a navigation address for your home
or work locations, you can use a voice command to
navigate there by saying "Navigate home" or "Take me
to work".
Page 19

Contacts
To call or text a contact on your Bluetooth-connected
phone (see
page 54), say:
• "Call [contact name/phone number]"
• "Text [contact name/phone number]"
Phone, Calendar, and Web Conferencing on
Media
To listen to and adjust your media preferences, say:
"Listen to [song name]"
•
• "Lower/raise the volume"
• "Skip to next"
"Pause/play song"
•
• "Change the source to [media source]"
To improve voice command recognition accuracy,
provide multiple cues in your command, such as artist
and song.
Voice Commands
Apps and Settings
Easily navigate through your apps and settings using
voice commands:
"Open [Toybox/browser/theater/phone]"
•
"Search for..."
•
"The screen is too bright"
•
"Show me the Owner's Manual"
•
Some apps and settings are only accessible while in
Park.
You can also file a bug report by saying "Report" ,
"Feedback", or "Bug report".
For more information on voice commands, go to https://
www.tesla.com/support/voice-commands.
NOTE: To support ongoing quality improvements, Tesla
captures and processes voice command transcriptions
(such as “set the temperature…”). Audio voice
recordings are not collected, and transcriptions are not
associated with your Tesla account or with your vehicle's
identification number. To further protect your privacy,
voice commands containing personal data are not
captured (such as "Navigate to..." or "Make a call to...").
17Overview
Page 20
Cameras
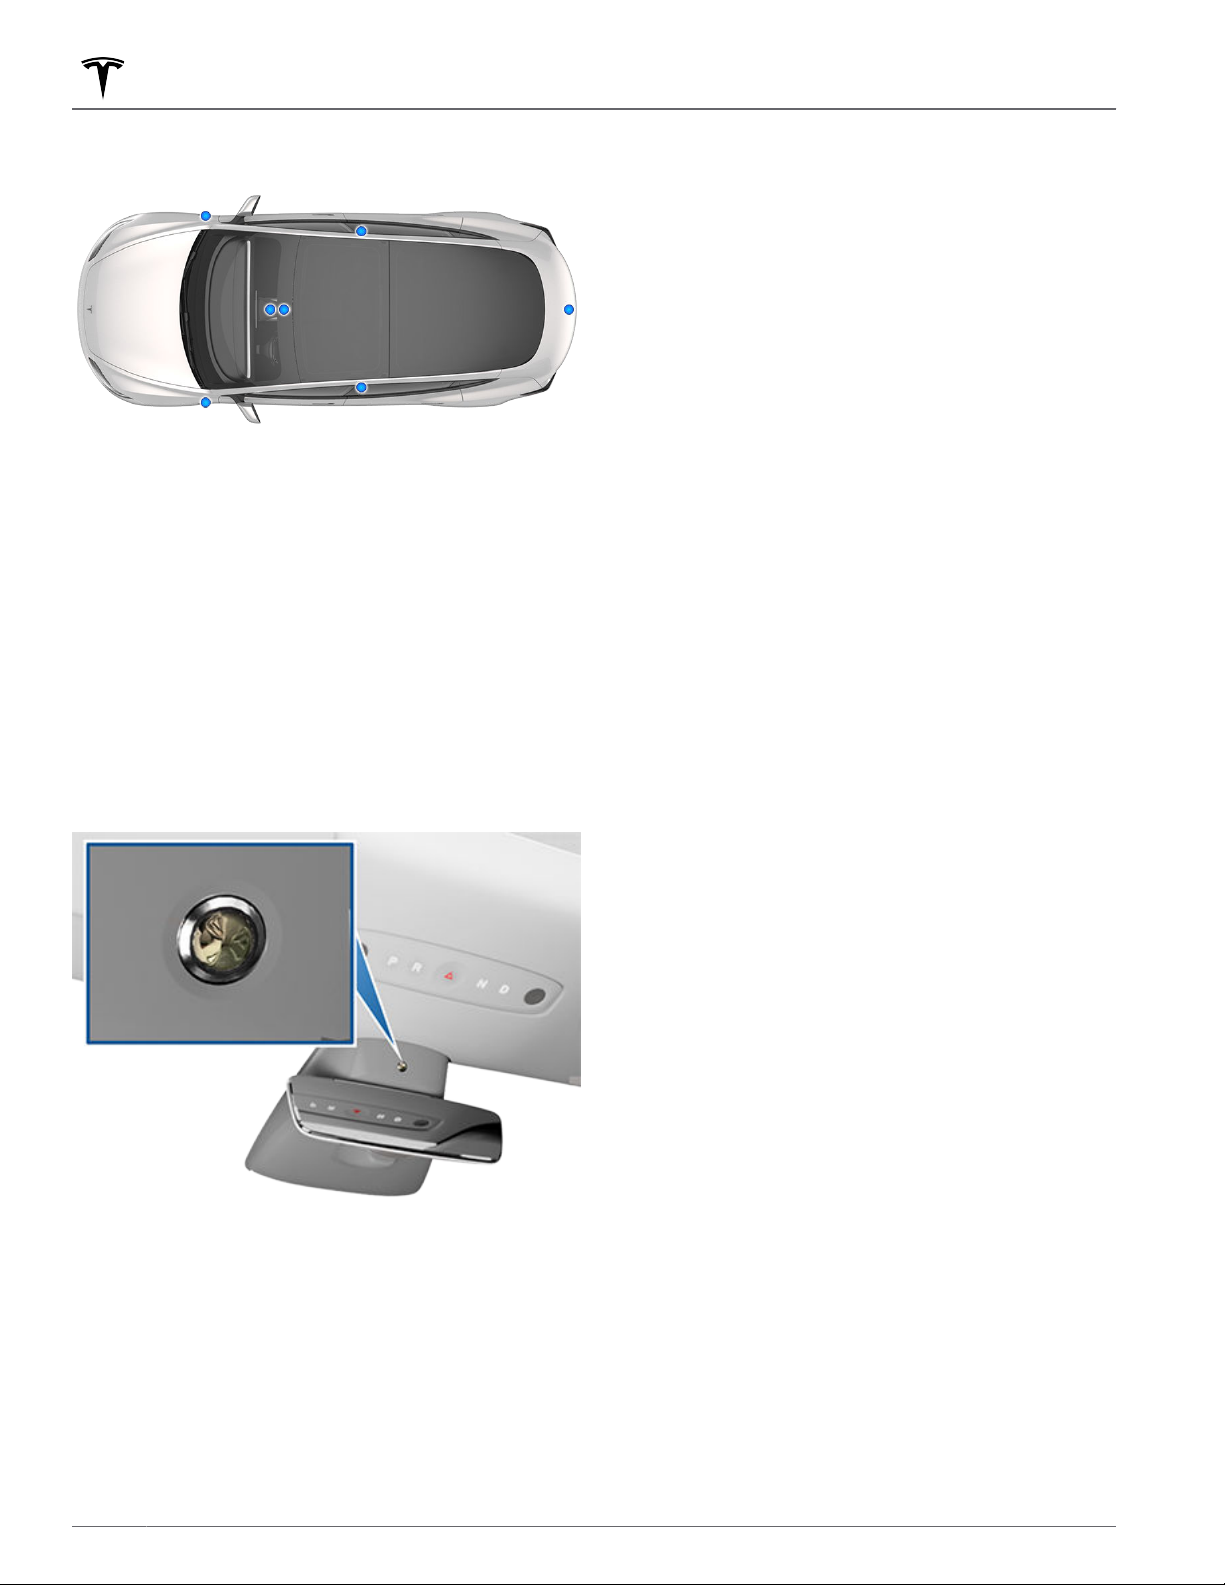
Your Model 3 includes the following components that
actively monitor the surrounding area:
•
A camera is mounted above the rear license plate.
• A camera is mounted in each door pillar.
Two cameras are mounted to the windshield above
•
the rear view mirror.
• A camera is mounted to each front fender.
Model 3 is also equipped with high precision
electronically-assisted braking and steering systems.
Cabin Camera
Your Model 3 is equipped with a cabin camera located
above the rear view mirror. For more information, see
Cabin Camera on page 129.
When calibration is complete, Autopilot features are
available for use. Calibration typically completes after
driving
depending on road and environmental conditions. For
example, calibration completes quicker when driving on
a straight road with multiple lanes (such as a controlledaccess highway), with highly-visible lane markings (in
the driving lane as well as the adjacent lanes). Contact
Tesla only if your
calibration process after driving 100 miles (160 km) in
the described conditions.
If a camera has shifted from its calibrated position (for
example, the camera or windshield was replaced), you
must clear the calibration. To do so, touch
Service > Camera Calibration > Clear Calibration. When
the calibration is cleared, Model 3 repeats the calibration
process. While this helps re-calibrate the cameras in
many cases, Clear Calibration may not resolve all
camera and sensor concerns.
NOTE: To calibrate, cameras require highly-visible lane
markings in both the driving lane and adjacent lanes (at
least two lanes over on each side of the vehicle). For
best results, drive in the middle lane of a multi-lane
highway (ideally with at least five lanes) that has clear
lane markings and minimal trac.
NOTE: If you attempt to use a feature that is not
available until the calibration process is complete, the
feature is disabled and the touchscreen displays a
message.
NOTE: Model 3 must repeat the calibration process if the
cameras are serviced by Tesla, and in some cases, after a
software update.
20-25 miles (32-40 km), but the distance varies
Model 3 has not completed the
Controls >
Drive to Calibrate Cameras
Model 3 must maneuver with precision when Autopilot
features are being used. Therefore, before some features
can be used for the
service repairs, cameras must complete a self-calibration
process. For your convenience, the touchscreen displays
a progress indicator.
first time or after some types of
Keeping Cameras Free of
Obstructions
Ensure all cameras are clean and free of obstructions
before each drive and before using Autopilot features
(see Cleaning a Camera on page 183). Dirty cameras and
sensors (if equipped), as well as environmental
conditions such as rain and faded lane markings, can
aect Autopilot performance. If a camera is obstructed
or blinded, Model 3 displays a message on the
touchscreen and Autopilot features may not be
available. For more information on specific alerts, see
Troubleshooting Alerts on page 217.
Condensation can form inside the camera enclosures,
especially if you park your vehicle outside in cold or wet
conditions. The touchscreen may display an alert stating
that a camera is blocked and that some or all Autopilot
features may be temporarily restricted until the camera
vision is clear. To proactively dry the condensation,
precondition the cabin by setting it to a warm
temperature, turning the windshield defroster on, and
directing the front air vents toward the door pillars (see
Mobile App on page 48).
18 MODEL 3 Owner's Manual
Page 21

Keys
Types of Keys
Model 3 supports the following types of keys:
• Phone key - You can set up your personal phone as a
"phone key" that communicate with Model 3 using
Bluetooth. A phone key supports automatic locking
and unlocking.
Key card - Tesla provides two key cards that
•
communicates with
frequency identification (RFID) signals. The key card
is used to "authenticate" phone keys to work with
Model 3 and to add or remove other keys. Unlike the
phone key, the key card does not support automatic
locking and unlocking. In situations where your phone
key has a dead battery, or is lost or stolen, use your
key card to unlock, drive, and lock
Model 3 supports a total of 19 keys, which can include
phone keys and key cards.
CAUTION:
when you drive. Although you can drive Model 3
away from its key, you will be unable to power it
back on after it powers o.
Remember to bring a key with you
Model 3 using short range radio-
Model 3.
Phone Key
◦ Bluetooth is enabled within your phone's settings
for the Tesla mobile app. For example, on your
phone, navigate to Settings, choose the Tesla
mobile app, and ensure the Bluetooth setting is
turned on.
◦
Access to your location is enabled. Open the Tesla
mobile app in your phone's settings and select
Location > Always. For the best experience, keep
the mobile app running in the background.
◦
Allow Mobile Access is enabled on the vehicle
touchscreen (Controls > Safety > Allow Mobile
Access).
NOTE: Model 3 communicates with your phone using
Bluetooth. Keep in mind that your phone must have
enough battery power to run Bluetooth and that
many phones disable Bluetooth when the battery is
low.
While inside or near the vehicle, open the Tesla
4.
mobile app and touch
screen, or navigate to Security > Set Up Phone Key.
Follow the prompts on the mobile app and vehicle
touchscreen to set up your phone key.
To view a list of keys that can currently access Model 3,
or to remove a phone key, touch Controls > Locks (see
Managing Keys on page 20).
Set Up Phone Key on the main
CAUTION:
vehicle (for example, if you are hiking or at the
beach). If you must leave your phone in the
vehicle, disable Bluetooth and/or turn the phone
o.
Using your phone as a key is a convenient way to access
Model 3. As you approach, your phone's Bluetooth
your
signal is detected and the doors unlock when you pull a
door handle. Likewise, when you exit and walk away with
the phone key, doors automatically lock (provided the
Walk-Away Door Lock feature is turned on; see Walk-
Away Door Lock on page 22).
Before you can use a phone to access Model 3, follow
these steps to authenticate it:
Download the Tesla mobile app to your phone.
1.
Log into the Tesla mobile app using your Tesla
2.
account username and password.
NOTE: You must remain logged in to your Tesla
account to use your phone to access Model 3.
NOTE: If multiple vehicles are linked to your Tesla
account, you must ensure that the vehicle you want
the mobile app to access is currently selected on the
mobile app.
Do not leave your paired phone in your
Model 3 can connect to three phone keys
simultaneously. Therefore, if more than three phone keys
are detected and you want to authenticate or pair a
dierent phone, move the other connected phone key(s)
out of range or turn o its Bluetooth setting.
Once a phone has been authenticated, it no longer
requires an internet connection to be used as a phone
key for Model 3. However, to use the phone hands-free,
access your phone's contacts, play media from it, etc.,
you must also pair it and connect it as a Bluetooth
device (see
Some smartphones with NFC capability can be used to
lock/unlock your vehicle, just like using a key card.
Ensure the Tesla mobile app is correctly paired to your
vehicle and enable the NFC function on your phone.
Once enabled, simply hold the phone to the driver's side
door pillar to lock or unlock the door. Refer to your
smartphone's instructions for
how to do this.
Bluetooth on page 51).
specific information on
Key Card
Tesla provides you with two Model 3 key cards, designed
to fit in your wallet.
3. Ensure:
◦ Your phone's general Bluetooth settings are
enabled.
19Opening and Closing
Page 22
Keys
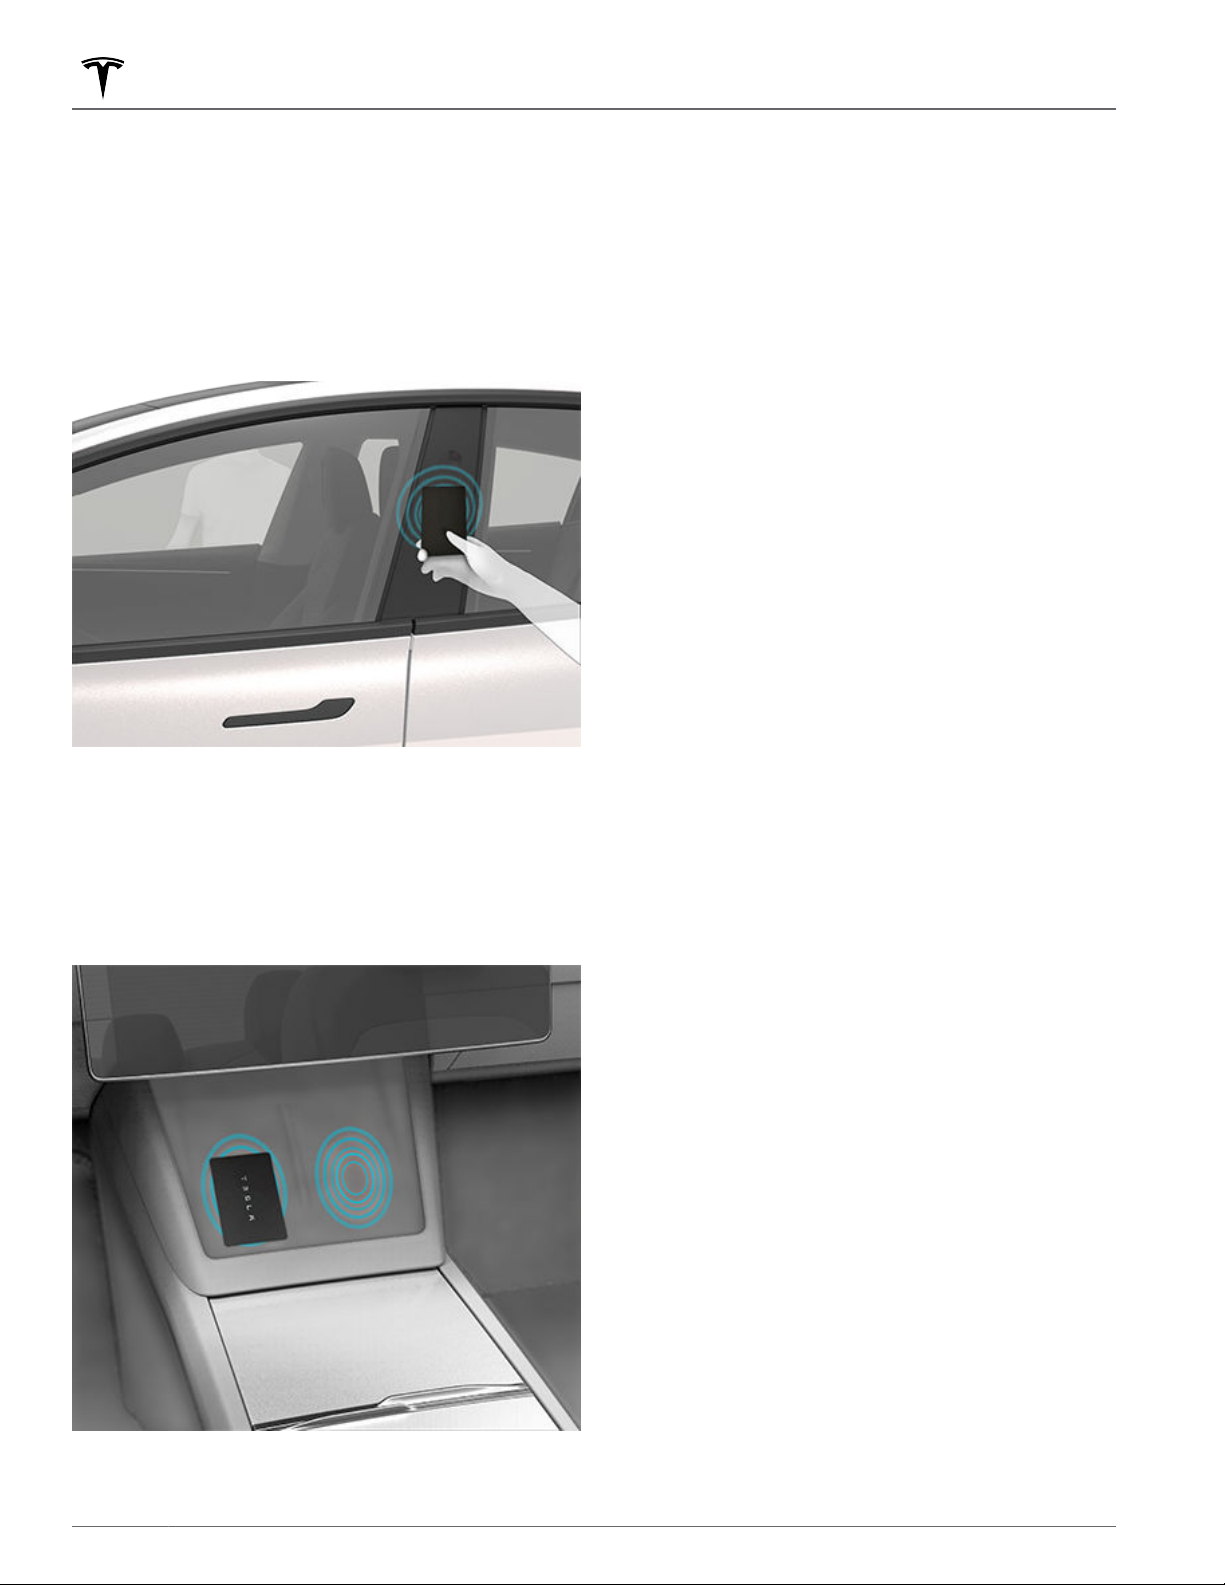
To use a key card to unlock or lock Model 3, position the
card as shown and tap it against the card reader located
approximately one third the way up of the driver's side
door pillar. When Model 3 detects the key card, the
exterior lights flash, the mirrors unfold or fold (if Fold
Mirrors is on), the horn sounds (if Lock
Sound is on), and the doors unlock or lock.
NOTE: You may need to physically touch the wireless
phone charger or driver's side door pillar with the key
card, and you may need to hold it against the
transmitter for one or two seconds.
Confirmation
If enabled, Walk-Away Door Lock (see Walk-
NOTE:
Away Door Lock on page 22) operates only when you
walk away using a phone key. When you walk away
carrying your key card, Model 3 does not automatically
unlock/lock.
Managing Keys
To display a list of all keys that can access your Model 3,
touch
Controls > Locks. An icon displays next to each
key to indicate whether the key is a phone key or key
card. Use this list to manage keys that have access to
your
Model 3. To add or delete keys, see Adding and
Removing Keys on page 20.
Model 3 supports up to 19 keys. When you reach this
limit, you must delete a key before adding a new one.
NOTE: You can use the same key for more than one
Model 3. This prevents you from having to deal with
multiple keys when you switch vehicles. If you customize
the name of an authenticated key card on one Model 3
(by touching the pencil icon), any other Model 3 to
which the key card is authenticated also displays the
changed name.
NOTE: If you are leasing your vehicle, contact your
leasing company to add or remove keys.
Once inside, power up Model 3 by pressing the brake
pedal within two minutes of scanning the key card (see
Starting and Powering O on page 59). If you wait
longer than two minutes, you must re-authenticate by
placing the key card near the card reader located in the
wireless phone charger on the center console. When
your key card is detected, your two minute
authentication period restarts.
Adding and Removing Keys
To add a new key:
On the touchscreen, touch Controls > Locks > Keys >
1.
Add Key.
Scan your new key card on the card reader located
2.
on either wireless phone charger. When you hear a
chime, the new key card is recognized.
Scan a key card that has already been paired to the
3.
vehicle to
When complete, the key list includes the new key.
4.
Touch the associated pencil icon to customize the
name of the key.
Removing a key:
When you no longer want a key to access Model 3 (for
example, you lost your phone or key card, etc.), follow
these steps to remove it.
1. On the touchscreen, touch Controls > Locks.
In the key list, find the key that you would like to
2.
delete and touch its associated trash icon.
3. When prompted, scan an authenticated key on the
card reader to confirm the deletion. When complete,
the key list no longer includes the deleted key.
confirm new key pairing.
NOTE: Model 3 requires at least one authenticated key
card at all times. If only one key card remains on the key
list, you cannot delete it.
20 MODEL 3 Owner's Manual
Page 23

Replacing Key cards
If you lose a key card, you can purchase replacement
ones on the Tesla Shop. When ready to pair, simply
follow the steps in Adding and Removing Keys on page
20. Remember to remove your old key cards from
Controls > Locks > Keys for security purposes.
In the event you lose both keys cards, schedule a service
appointment through the mobile app to replace and pair
them.
Keys
21Opening and Closing
Page 24
Doors
Using Exterior Door Handles
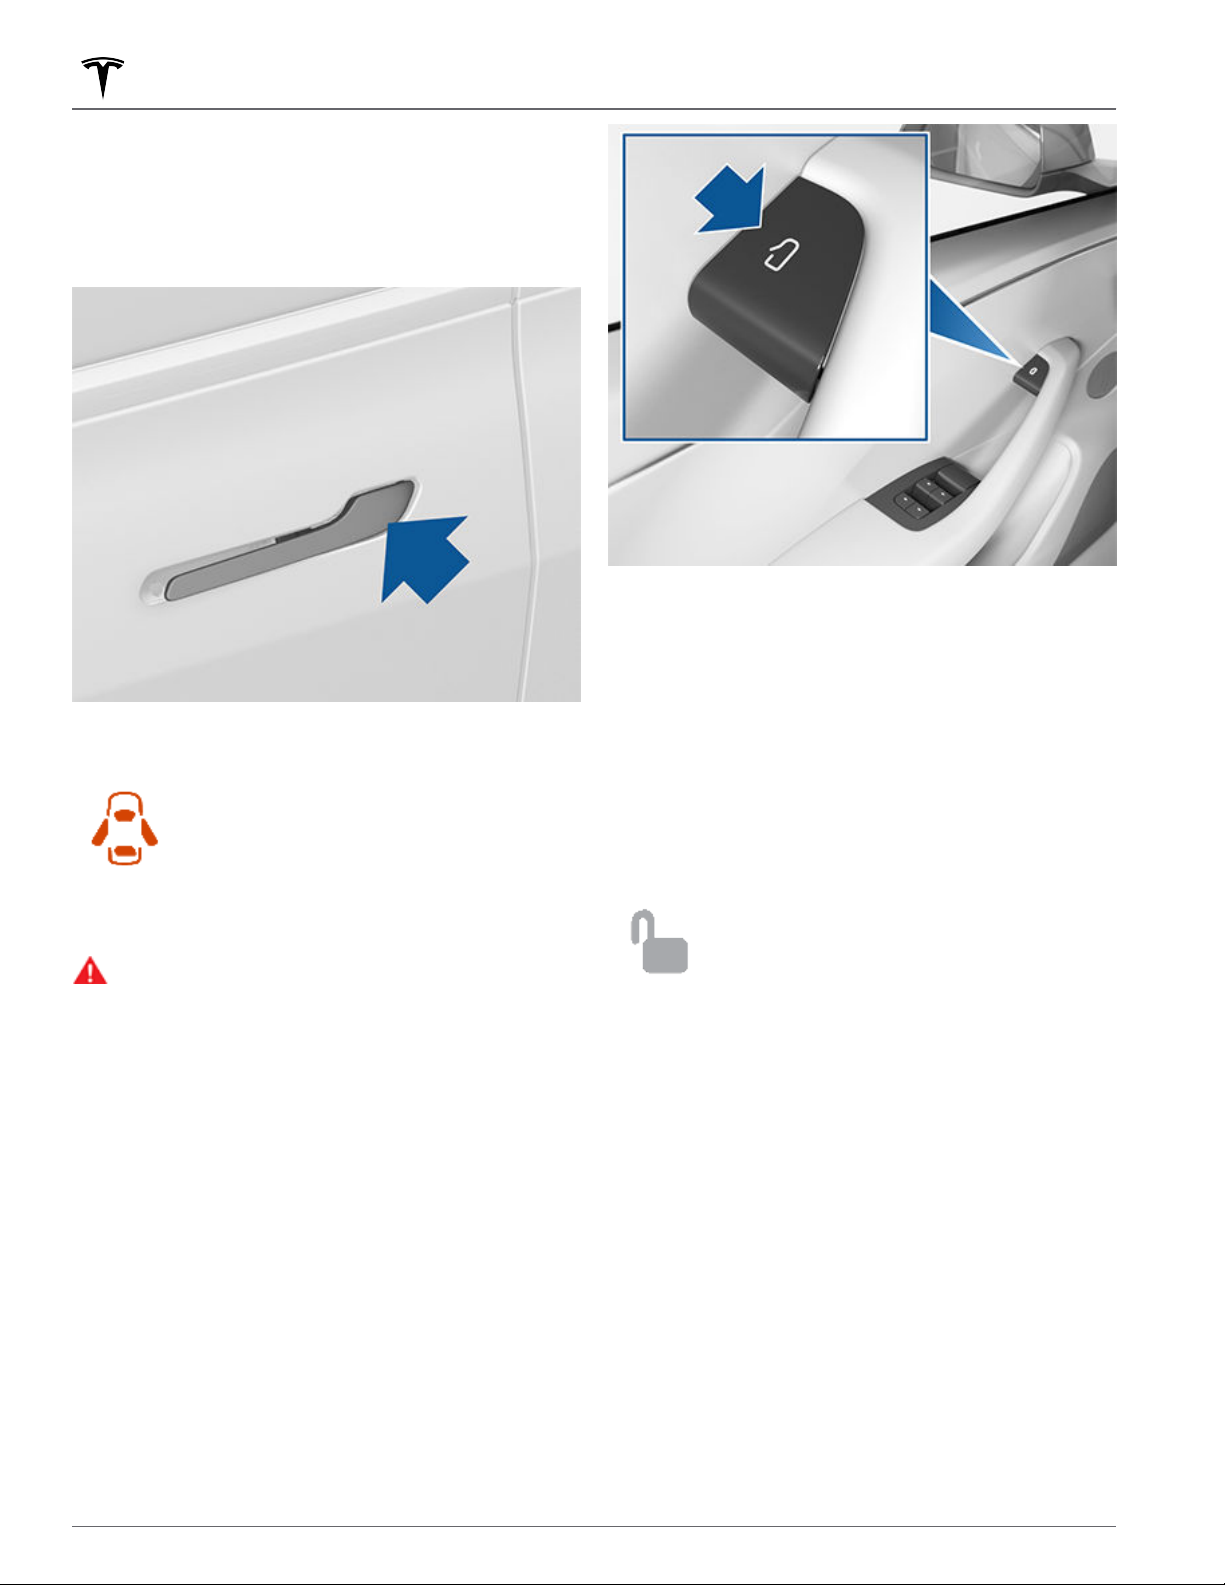
Use your thumb to push the wide part of the door
handle. The handle pivots toward you, and you can open
the door by pulling the handle or pulling the edge of the
door.
The handle retracts automatically.
When a door or trunk is open, the
touchscreen displays the Door Open
indicator light.
To prevent children from opening the rear doors,
NOTE:
turn on child locks (see
NOTE: In the unlikely event that Model 3 has no low
voltage power, you will be unable to open the doors with
the button on the top of the door handle. See Opening
Doors with No Power on page 216 for more information.
Child Locks on page 23).
Interior Locking and Unlocking
While sitting inside Model 3, you can lock and unlock all
doors and trunks by touching the lock icon on the
touchscreen.
NOTE: See Cold Weather Best Practices on page 144 to
ensure door handles function properly in cold weather.
WARNING:
to avoid allowing fingers, jewelry, acrylic nails, etc.
from being pinched by the door or door handle
mechanism. Failure to do so may result in damage
or injury.
While using the door handle, take care
Opening Doors from the Interior
Model 3 doors are electrically powered. To open a door
while sitting inside, press the button located at the top
of the interior door handle
while pushing the door open.
The icon changes to indicate whether
doors are locked or unlocked.
Walk-Away Door Lock
Doors and trunks can automatically lock when you walk
away carrying your phone key (if ordered after
approximately October 1, 2019). To turn this feature on
or o, touch Controls > Locks > Walk-Away Door Lock.
When the doors lock, the exterior lights flash once and
the mirrors fold (if Fold Mirrors is on). To also hear a
confirmation sound when Model 3 locks, touch Controls
> Locks > Lock Confirmation Sound.
NOTE: Touch Toybox > Boombox > Lock Sound to
customize the lock sound when the vehicle is locked
from the outside (Pedestrian Warning System required).
Model 3 does not automatically lock if:
22 MODEL 3 Owner's Manual
Page 25

Doors
• You check the Exclude Home checkbox and Model 3
is parked at the location you have designated as
Home. For details on how to designate a location as
Home, see Home, Work, and Favorite Destinations on
page 150.
•
A phone key is detected inside Model 3.
•
A door or trunk is not fully closed.
• The phone key's Bluetooth setting is turned o.
•
If Model 3 detects an authenticated key for several
minutes after you exit the vehicle and close all doors,
Walk-Away Lock disables and doors do not lock
when you walk away. In this case, you must manually
lock your vehicle until after your next drive.
• The driver does not use the driver door to get out of
the vehicle.
NOTE: It is ultimately your responsibility to ensure your
vehicle is locked, even when Walk-Away Door Lock is
enabled.
Drive Away Locking
Model 3 automatically locks all doors (including the
trunks) when your driving speed exceeds
(8 km/h).
5 mph
Unlock on Park
When you stop Model 3 and engage Park, you can
choose to unlock all doors. To turn this feature on or o,
touch Controls > Locks > Unlock on Park.
Driver Door Unlock Mode
Enabling Controls > Locks > Driver Door Unlock Mode
only unlocks the driver door when you first unlock Model
3. The driver door unlocks only if a key is present on the
driver side of the vehicle and not the passenger side. To
unlock the remaining doors, long press the button
located at the top of the interior driver door handle, use
the touchscreen, mobile app.
Car Left Open Notifications
To receive a mobile notification if a door, trunk and/or
window is left open or if Model 3 is left unlocked
unexpectedly, touch Controls > Locks > Car Left Open
Notifications.
Child Locks
Model 3 has child locks on the rear doors to prevent
them from being opened using the interior release
buttons. On the touchscreen,
Child Lock. You can choose Both to engage the child
lock on both rear doors, or you can choose Left or Right
to engage it on just a specific door.
touch Controls > Locks >
WARNING:
child locks when children are seated in the rear
seats.
It is recommended that you turn on
23Opening and Closing
Page 26
Windows
Opening and Closing
NOTE: It is your responsibility to ensure windows are
closed after locking the vehicle.
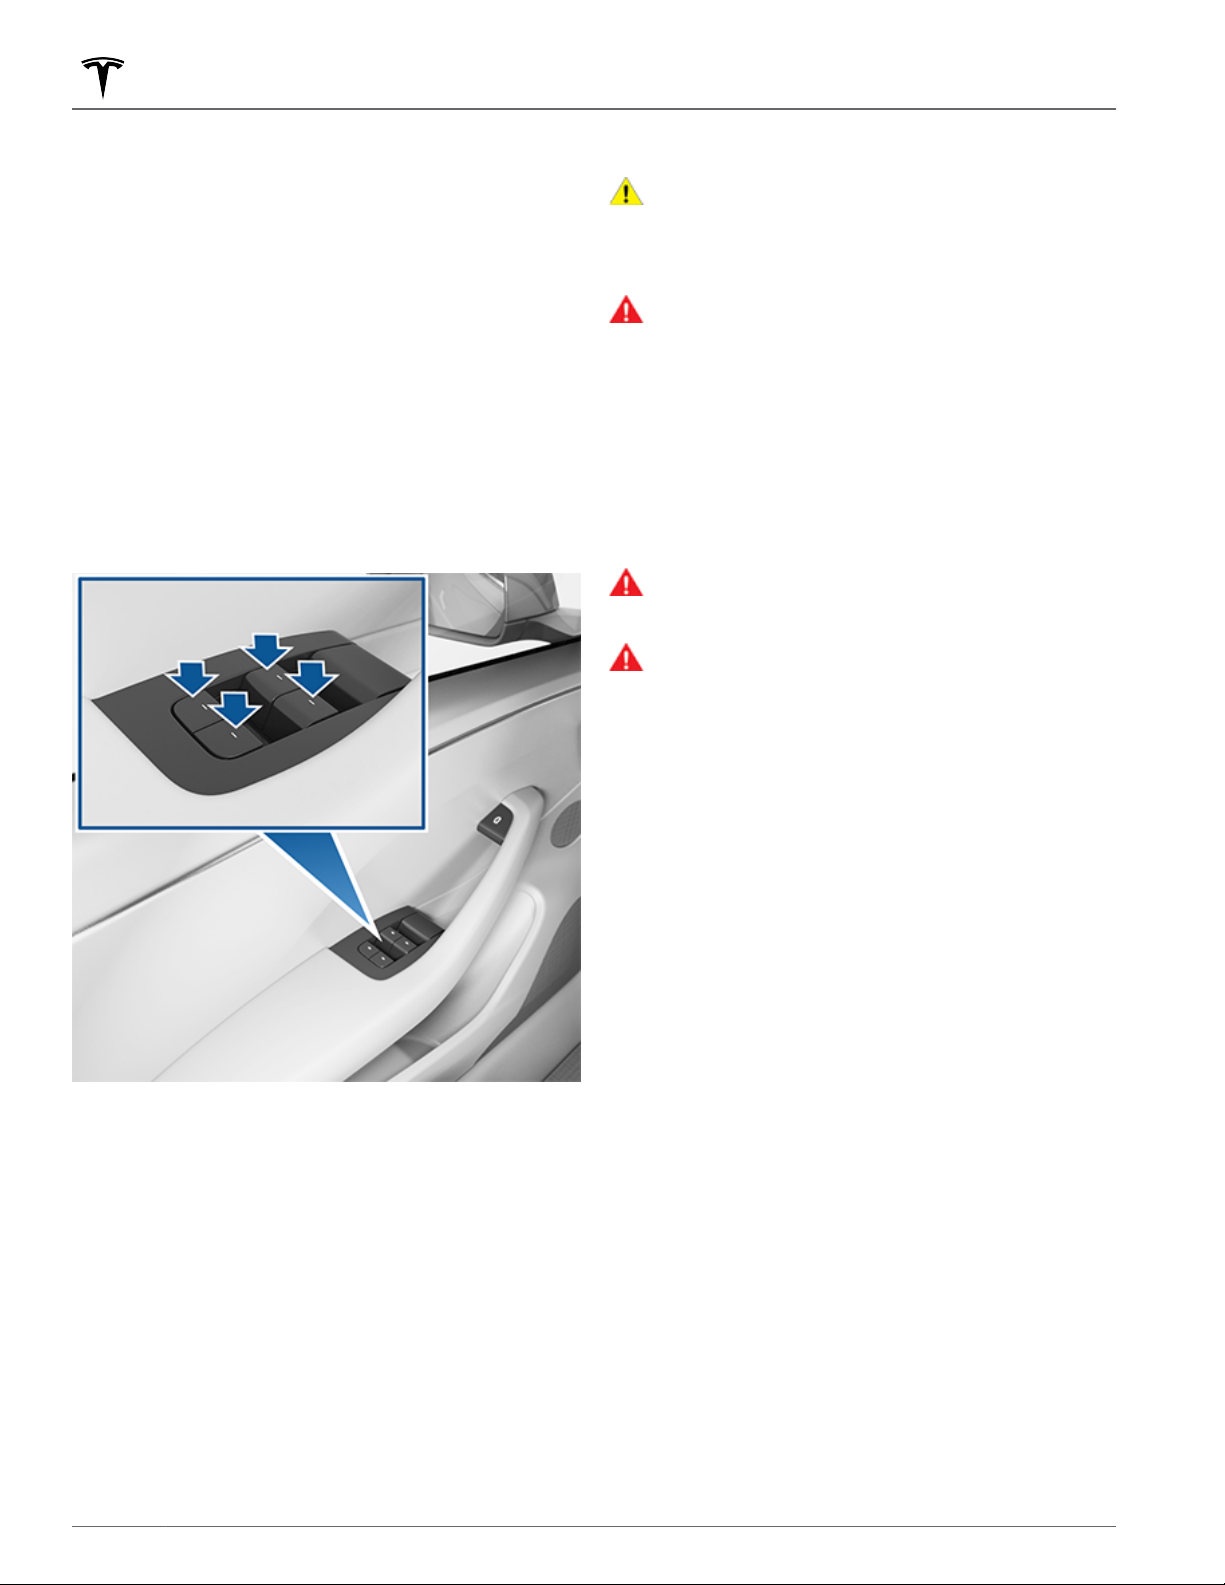
Press down on a switch to lower the associated window.
Window switches operate at two levels:
•
To lower a window fully, press the switch all the way
down and immediately release.
•
To lower a window partially, press the switch gently
and release when the window is where you want it.
NOTE:
See Cold Weather Best Practices on page 144 for
information on preparing windows for cold weather.
CAUTION: To avoid damage, windows
automatically lower slightly when you open or
close a door. If you manually raise a window when
the door is open, ensure it is slightly lowered
before closing the door.
WARNING: Before closing a window, it is the
driver’s responsibility to ensure that all occupants,
especially children, do not have any body parts
extended through the window’s opening. Failure to
do so can cause serious injury.
NOTE: If a window is fully lowered and you open the
associated door, the window rises slightly. Likewise, if
you fully lower a window while the door is already open,
it stops slightly above the edge of the door. To fully
lower a window while the door is open, press the switch
again.
Similarly, pull a switch to raise the associated window:
To raise a window fully, pull the switch all the way up
•
and immediately release.
To raise a window partially, pull the switch gently and
•
release when the window is where you want it.
Locking Rear Windows
To prevent passengers from using the rear window
switches, touch Controls > Locks > Window Lock. To
unlock the rear windows, touch Window Lock again.
WARNING:
that you lock the rear window switches whenever
children are seated in the rear seats.
WARNING:
Model 3.
To ensure safety, it is recommended
Never leave children unattended in
Calibrating Windows
In the unlikely event that a window behaves
unexpectedly (touches the bright molding, fails to open
or close properly, goes down more than normal when
the door opens, etc.), you can calibrate it to potentially
fix the issue.
To calibrate a window:
Close the door with the aected window.
1.
Sit in the driver's seat and close the driver door.
2.
Using the window's switch on the driver's door, raise
3.
the aected window until it stalls.
Using the window's switch on the driver's door, lower
4.
the aected window until it stalls.
Repeat step 3 and raise the aected window until it
5.
stalls.
The window should now be calibrated. If the issue
continues after attempting the calibration procedure a
couple times, contact Tesla.
If a window is left open unintentionally, Model 3 can
send a notification to the mobile app (touch Controls >
Locks > Car Left Open Notification, then choose Doors
& Windows).
You can also enable Close Windows on Lock by
touching Controls > Locks > Close Windows on Lock.
When enabled, your vehicle automatically closes the
windows when Model 3 locks.
24 MODEL 3 Owner's Manual
UV Index Rating
The roof, windshields, and windows in Model 3 are
excellent at protecting you from UV (ultraviolet) rays.
The glass components score less than 2 on the UV Index
scale. Review your region’s UV Index
more information. You are still responsible for taking the
necessary precautions for sun protection.
specifications for
Page 27
Rear Trunk
Opening
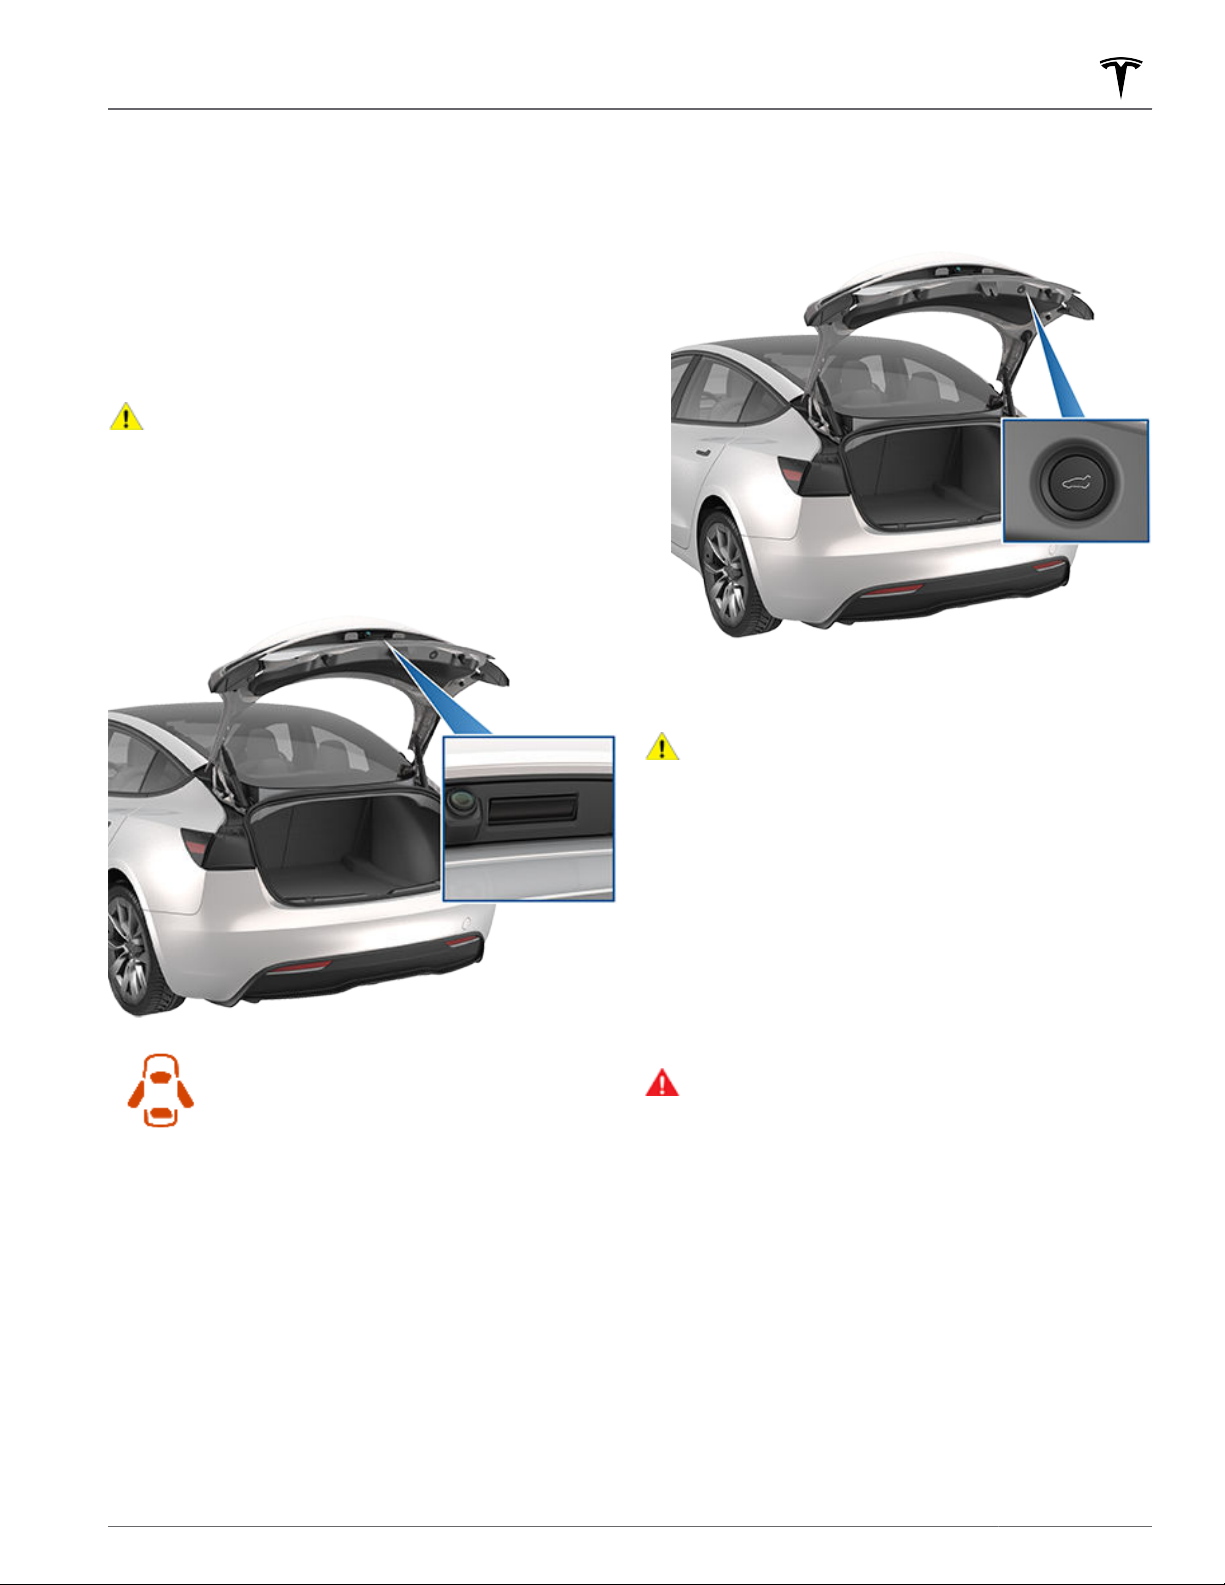
To open the rear trunk, ensure Model 3 is in Park, then
do one of the following:
Touch the associated Open button on the
•
touchscreen.
• Touch the rear trunk button on the mobile app.
Press the switch located under the rear trunk's
•
exterior handle (a valid key must be detected).
CAUTION: Before opening the rear trunk in an
enclosed area (such as a garage), ensure the
opening height of the rear trunk is properly
adjusted to avoid low-hanging ceilings or objects
(see Adjusting Opening Height of Powered Trunk
on page 25).
Model 3 must be unlocked or detect a key before you
can use the switch to open the rear trunk.
1. Open the trunk, then manually lower or raise it to the
desired opening height.
2. Press and hold the button on the underside of the
trunk for three seconds until you hear a confirmation
chime.
Confirm that you have set it to the desired height by
3.
closing the powered trunk, then reopening it.
When a door or trunk is open, the
touchscreen displays the Door Open
indicator light. The image of your Model 3
on the touchscreen also displays the open
trunk.
To open the rear trunk from inside the vehicle in the
unlikely situation that Model 3 has no power, see Interior
Emergency Trunk Release on page 26.
Adjusting Opening Height of
Powered Trunk
CAUTION:
wheel selection), your vehicle's rear trunk can
open up to approximately 6.5 feet (2 meters).
Adjust the rear trunk height to prevent it from
coming into contact with low ceilings or other
objects.
Depending on configuration (such as
Closing
Touch the associated Close button on the
•
touchscreen.
Press the switch located on the underside of the rear
•
trunk
WARNING:
securely latched in the fully-closed position by
lifting up on the bottom edge and confirming
there is no movement.
Before driving, ensure that the trunk is
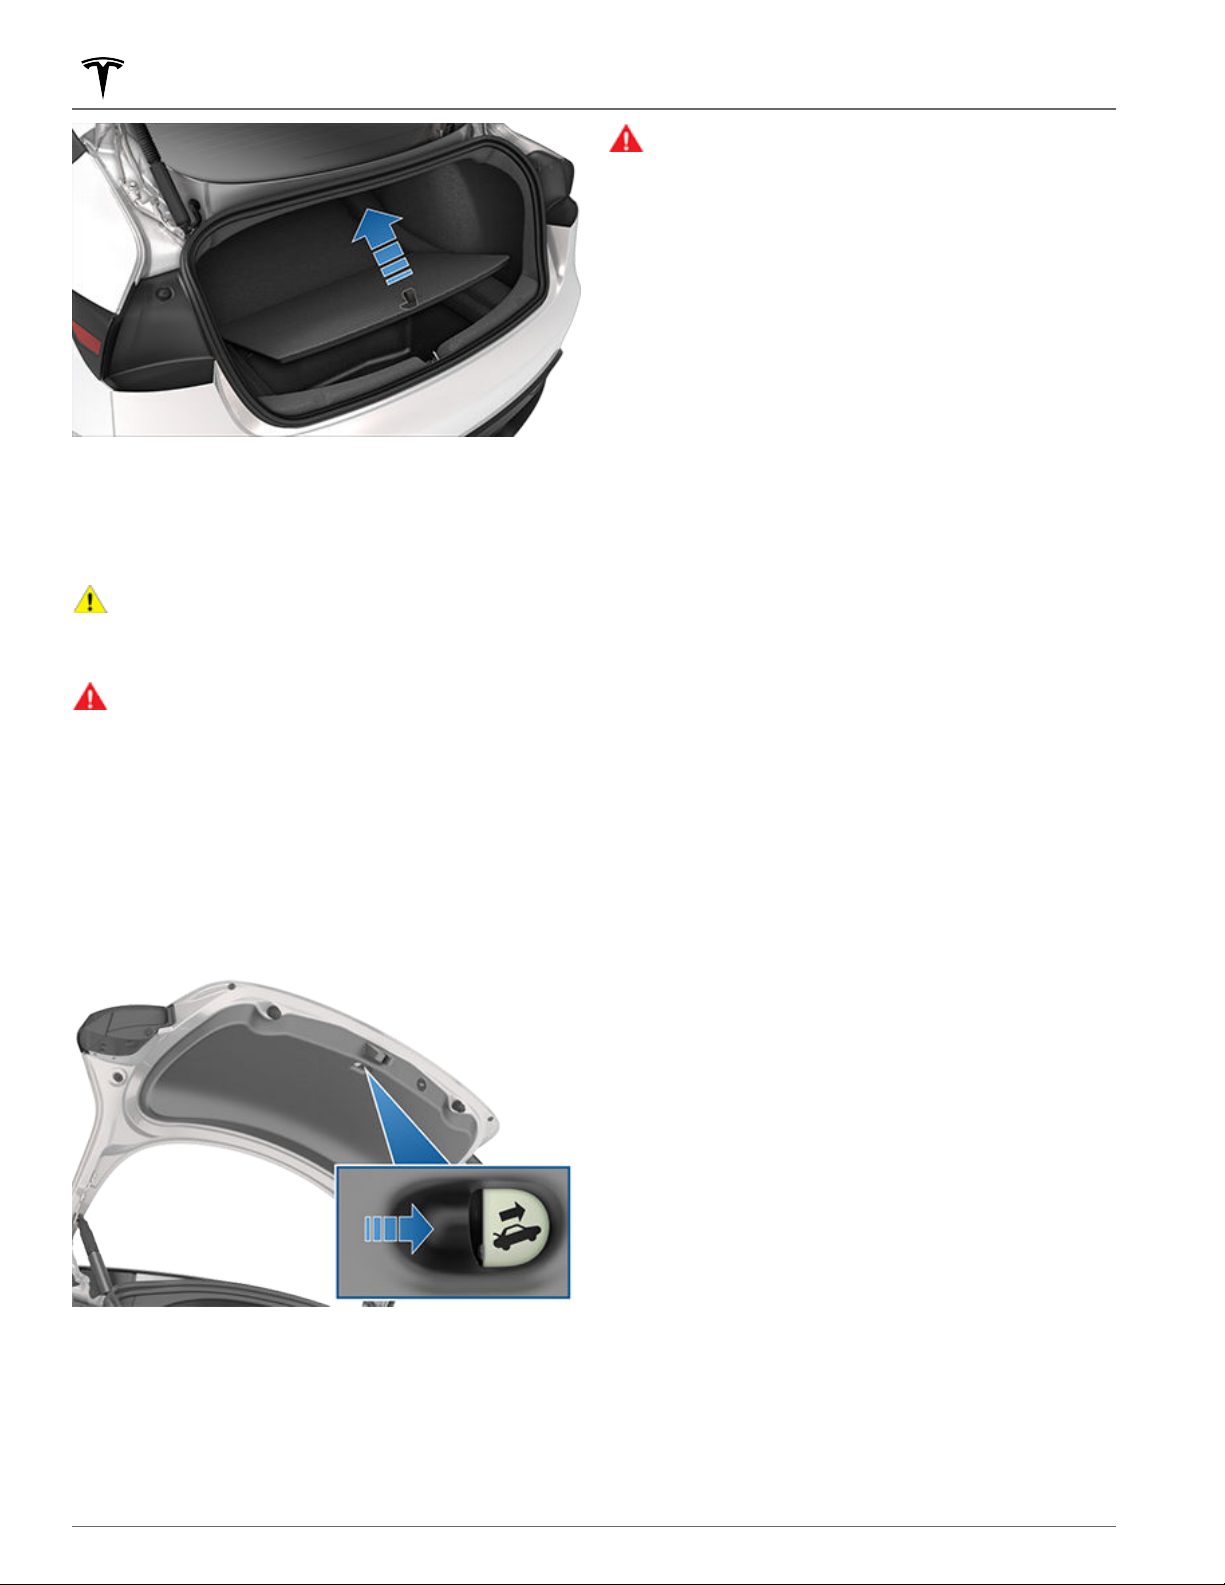
Accessing the Cargo Area
To access the cargo area inside the rear trunk, pull up
the strap at the rear of the cargo cover. You can then
fold the cargo cover forward or remove it from
Secure all cargo before moving Model 3, and place
heavy cargo in the
lower trunk compartment.
Model 3.
You can adjust the opening height of the powered trunk
(if equipped) to make it easier to reach or to avoid lowhanging ceilings or objects (for example, a garage door
or light):
25Storage Areas
Page 28
Rear Trunk
Rear Trunk Load Limits
Distribute the weight of cargo as evenly as possible
between the front and rear trunks.
CAUTION:
the lower compartment of the rear trunk or more
than 287 lbs (130 kg) on the upper compartment.
Doing so can cause damage.
WARNING:
the vehicle's Gross Vehicle Weight Rating (GVWR)
(see Specifications on page 194). The GVWR is the
maximum allowable total mass of the vehicle
including all passengers, fluids, and cargo.
Never load more than 88 lbs (40 kg) in
When loading cargo, always consider
WARNING:
trunk or become locked inside. An unrestrained
child could suer serious injury or death in a crash.
A child could suer heat exhaustion or death if
trapped in the vehicle, especially without climate
control on.
Do not allow children to play inside the
Interior Emergency Trunk Release
An illuminated mechanical release located inside the
rear trunk allows you to open the rear trunk from the
inside if Model 3 has no electrical power. This mechanical
release also allows a person locked inside to get out.
Firmly press and hold the illuminated button in the
1.
direction of the arrow to release the latch.
2. While pressing the button, push the rear trunk open.
NOTE: The button glows for several hours after a brief
exposure to ambient light.
26 MODEL 3 Owner's Manual
Page 29
Opening
To open the front trunk, ensure Model 3 is in Park, and
then do one of the following before pulling the hood
open:
• Touch the associated Open icon on the touchscreen.
• Touch the front trunk button in the mobile app.
Front Trunk
When a door or trunk is open, the
touchscreen displays the Door Open
indicator light. The image of your Model 3
on the touchscreen also displays the open
front trunk.
WARNING: Before opening or closing the hood, it
is important to check that the area around the
hood is free of obstacles (people and objects).
Failure to do so may result in damage or serious
injury.
Closing
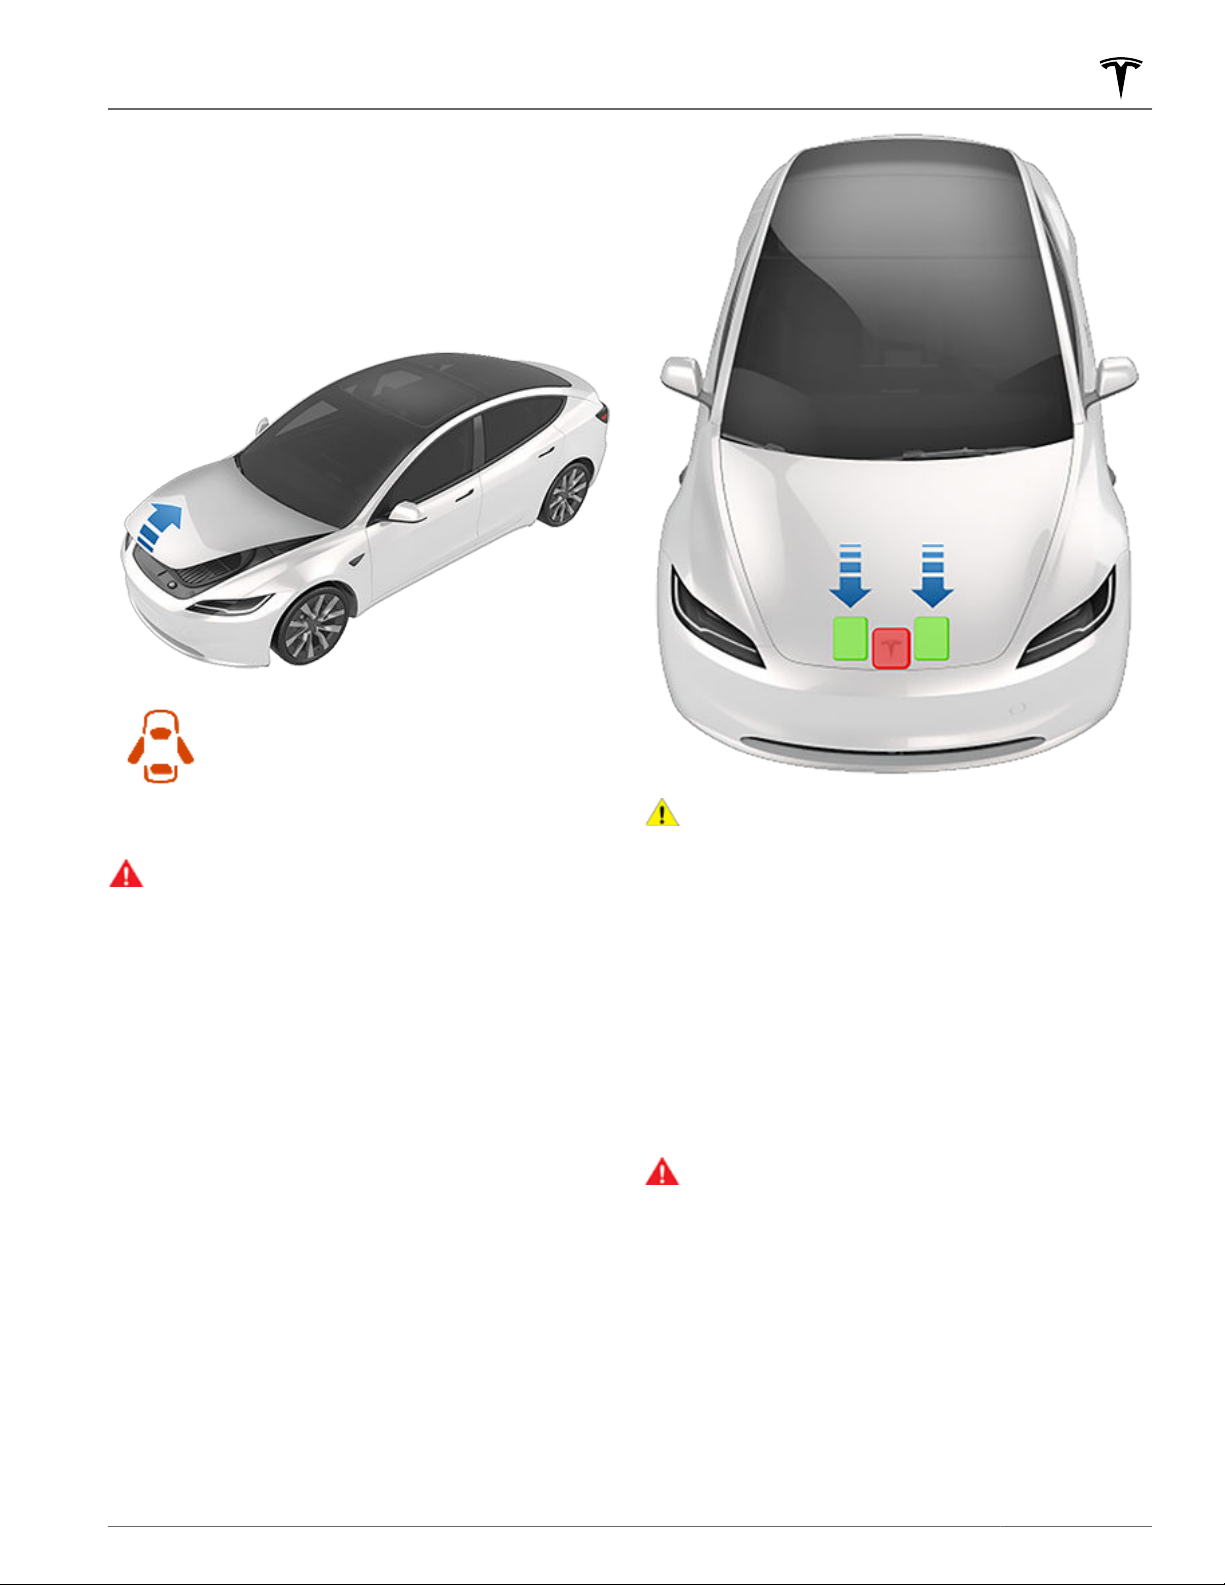
The Model 3 hood is not heavy enough to latch under its
own weight and applying pressure on the front edge or
center of the hood can cause damage.
To properly close the hood:
Lower the hood until the striker touches the latches.
1.
2. Place both hands on the front of the hood in the
areas shown (in green), then press down firmly to
engage the latches.
Carefully try to lift the front edge of the hood to
3.
ensure that it is fully closed.
CAUTION:
• Apply pressure only to the green areas shown.
Applying pressure to the red areas can cause
damage.
• Do not close the hood with one hand. Doing so
applies concentrated force in one area and can
result in a dent or crease.
• Do not apply pressure to the front edge of the
hood. Doing so can crease the edge.
•
Do not slam or drop the hood.
• To avoid scratches, don't have anything in your
hands (keys). Jewelry can also cause scratches.
WARNING:
the hood is securely latched in the fully closed
position by carefully trying to lift the front edge of
the hood upward and confirming there is no
movement. It is the driver's responsibility to ensure
that the front trunk is properly closed before
driving.
If the front trunk is left open when you attempt to shift
out of Park, a notification requiring you to confirm your
intent to drive appears on the touchscreen.
choose to keep the front trunk open while driving, your
vehicle speed is limited.
To prevent damage:
Before driving, you must ensure that
If you
The front trunk locks when:
27Storage Areas
Page 30
Front Trunk
• You lock Model 3 using the touchscreen, key or
mobile app.
• You leave Model 3 carrying your key (if Walk-Away
Door Lock on page 22 is turned on).
• Valet mode is active (see Valet Mode on page 83).
Front Trunk Load Limit
Distribute the weight of cargo as evenly as possible
between the front and rear trunks.
CAUTION: Never load more than 110 lbs (50 kg) in
the front trunk. Doing so can cause damage.
WARNING: When loading cargo, always consider
the vehicle's Gross Vehicle Weight Rating (GVWR)
(see Specifications on page 194). The GVWR is the
maximum allowable total mass of the vehicle
including all passengers, fluids, and cargo.
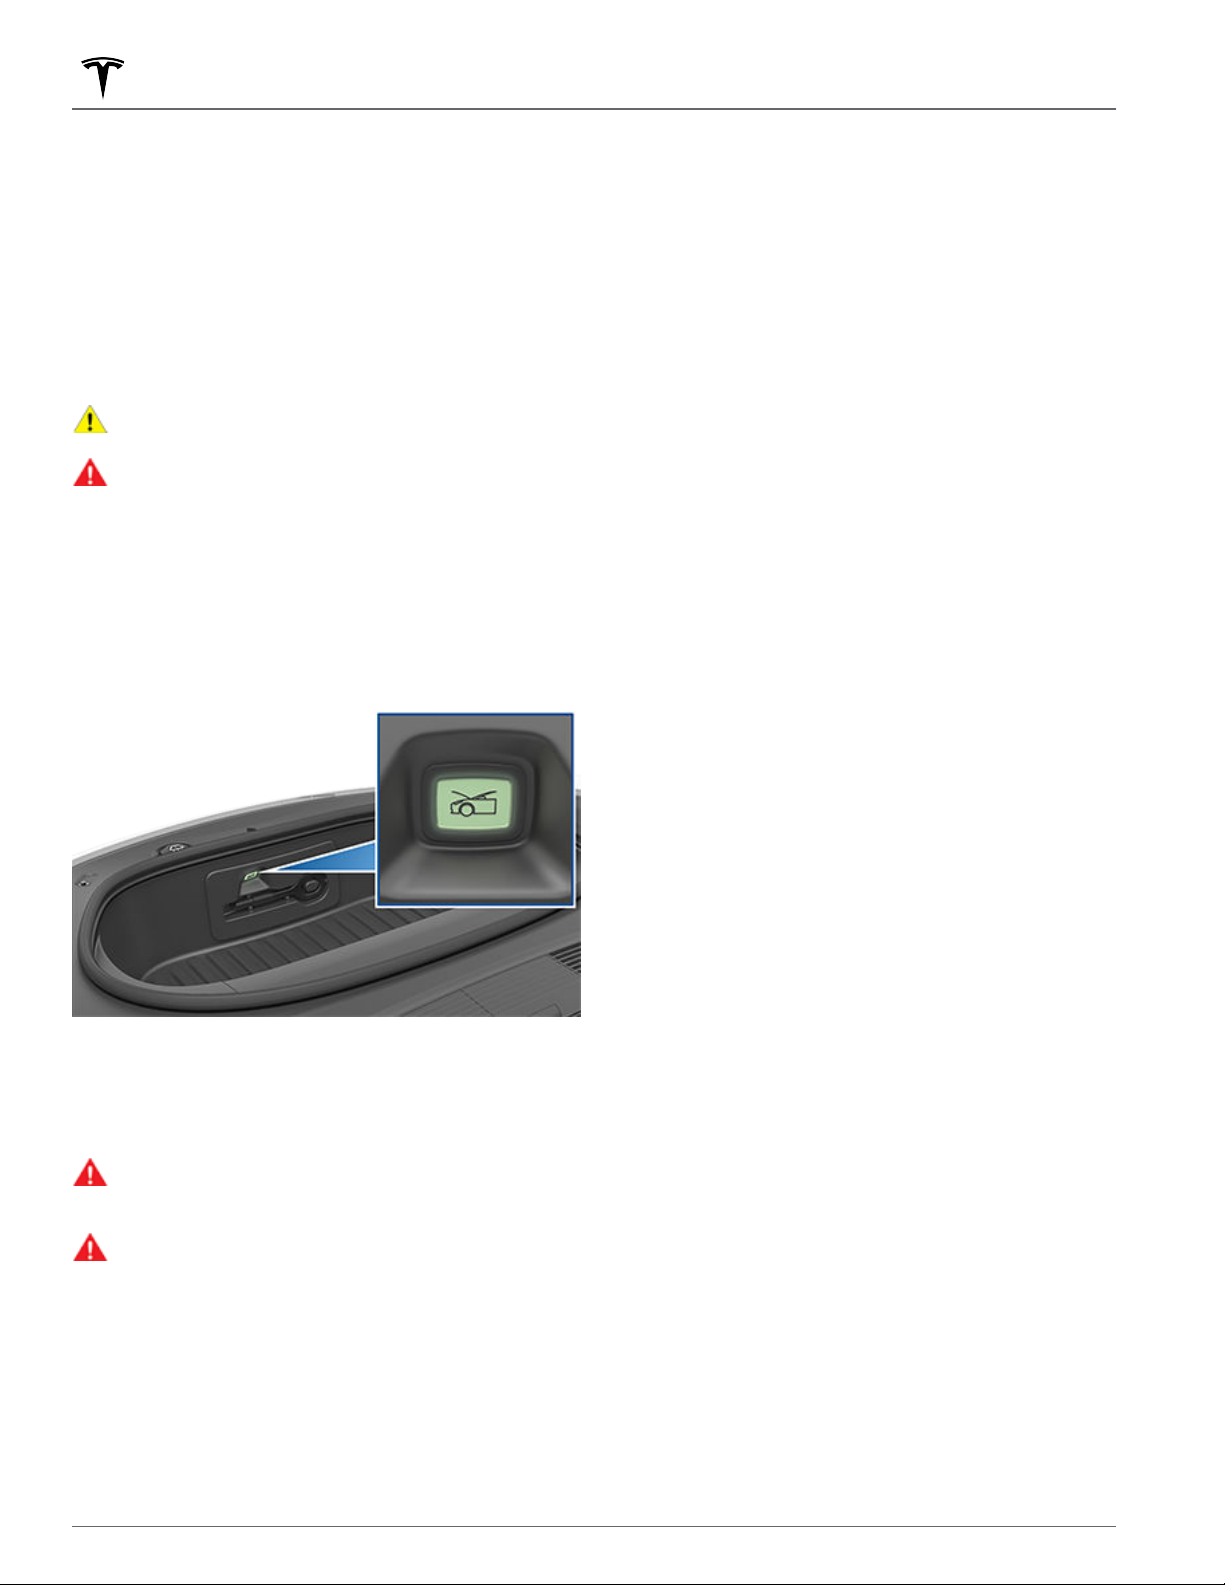
Interior Emergency Release
An illuminated interior release button inside the front
trunk allows a person locked inside to get out.
Press the interior release button to unlatch the front
trunk, then push up on the hood.
NOTE: The interior release button glows following a brief
exposure to ambient light.
WARNING:
front trunk. Never shut the front trunk when a
person is inside.
WARNING:
objects inside the front trunk do not bump against
the release button, causing the hood to
accidentally open.
28 MODEL 3 Owner's Manual
People should never climb inside the
Care should be taken to ensure that
Page 31
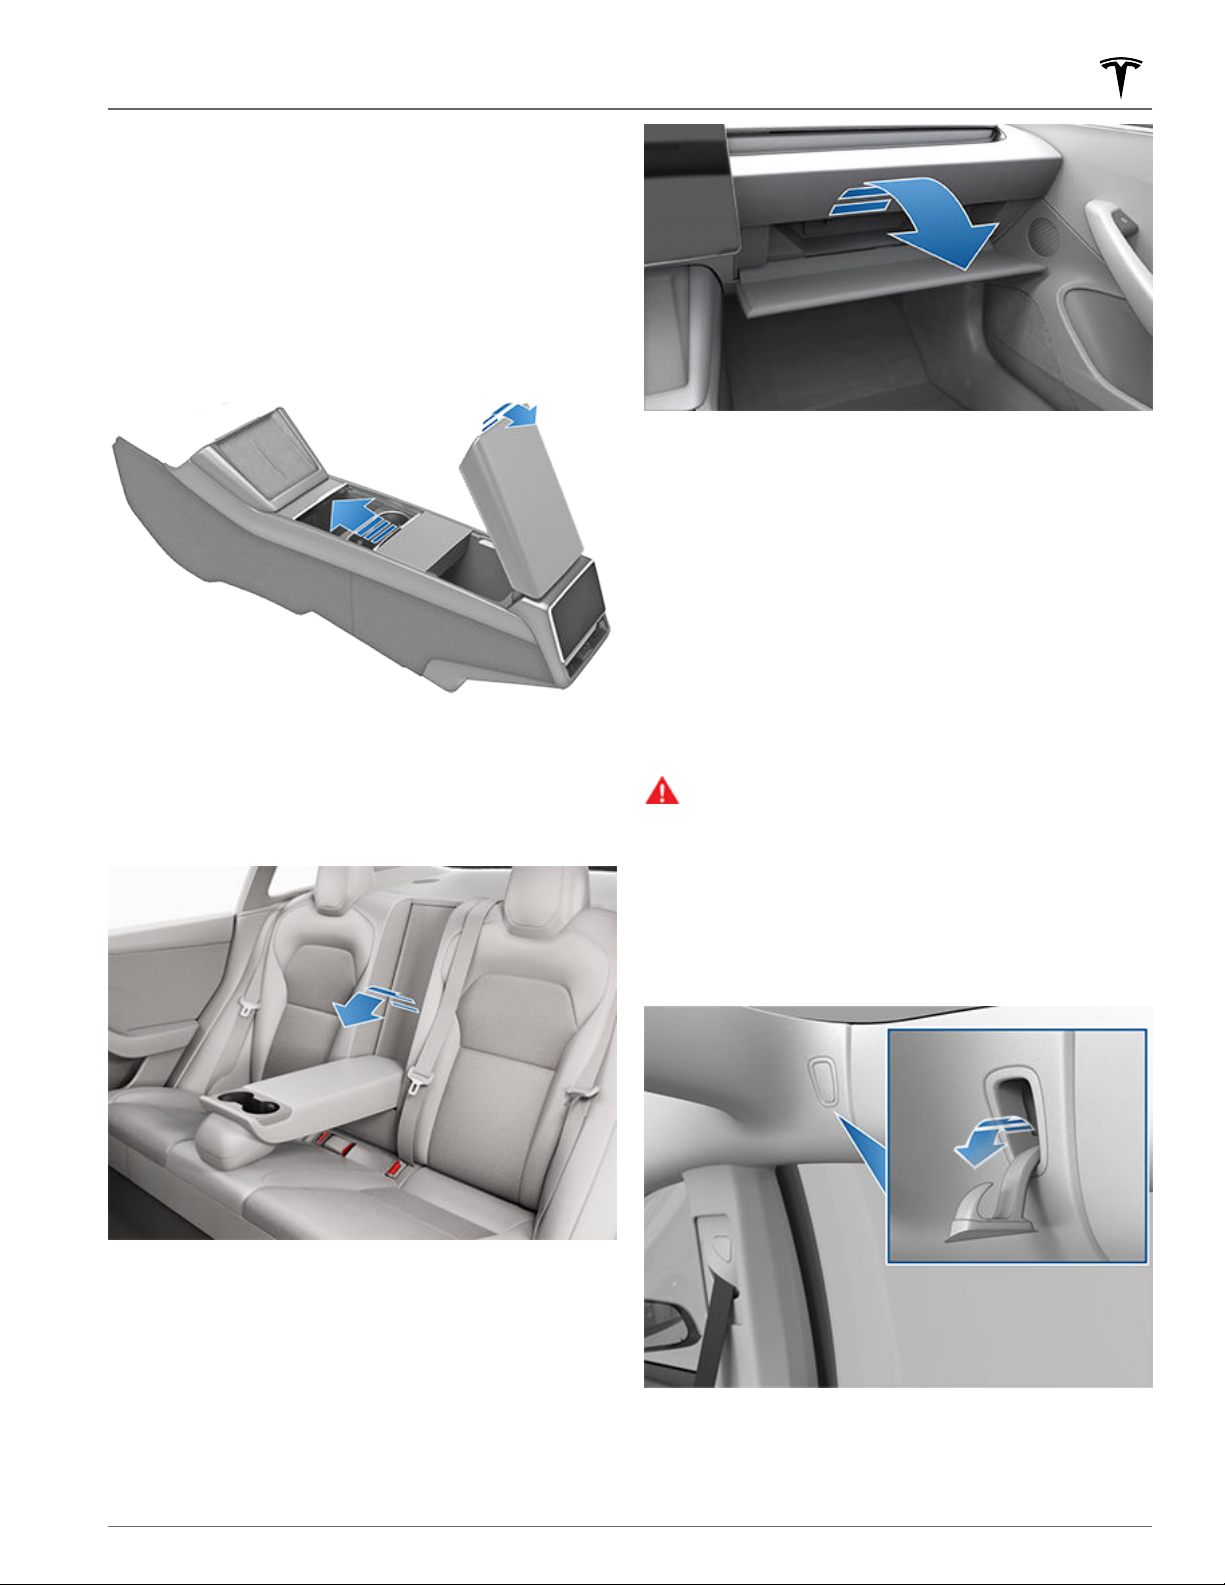
Center Console
In addition to housing an RFID transmitter that reads key
cards (see Keys on page 19), the center console includes
cup holders, two storage compartments, various
chargers (see Interior Electronics on page 11), and a rear
touchscreen.
To open the main storage compartment, squeeze the
latch under the front lip. Open the front storage
compartment by sliding its cover forward.
Rear Console
Your Model 3 has a rear console integrated in the center
of the second row seat back. Pull the console down to
access the rear cup holders or use it as an armrest.
Interior Storage
To close the glovebox, push it upward until it latches into
the closed position.
For additional glovebox security, touch Controls >
Safety > Glovebox PIN to set a 4-digit PIN (see
Glovebox PIN on page 130).
NOTE: If you leave the glovebox open, its light
eventually turns o.
NOTE: The glovebox locks whenever closed and you
Model 3 using the mobile app, key card, you leave
lock
Model 3 carrying your phone key (if Walk-Away Door
Lock is turned on), or if Valet mode is active (see Valet
Mode on page 83). It does not lock when Model 3 is
locked by touching the lock icon on the touchscreen.
WARNING:
closed to prevent injury to a passenger if a
collision or sudden stop occurs.
When driving, keep the glovebox
NOTE: The rear console is self-locking in certain
situations and cannot be lowered. For example, while
driving on a steep slope or during hard accelerations.
Glovebox
To open the glovebox, touch Controls > Glovebox. The
glovebox automatically opens and the light turns on.
Coat Hangers
Your Model 3 has a coat hanger on each side of the
vehicle above the rear window in the second row. Push
the coat hanger to release it. Push it again to retract it.
29Storage Areas
Page 32
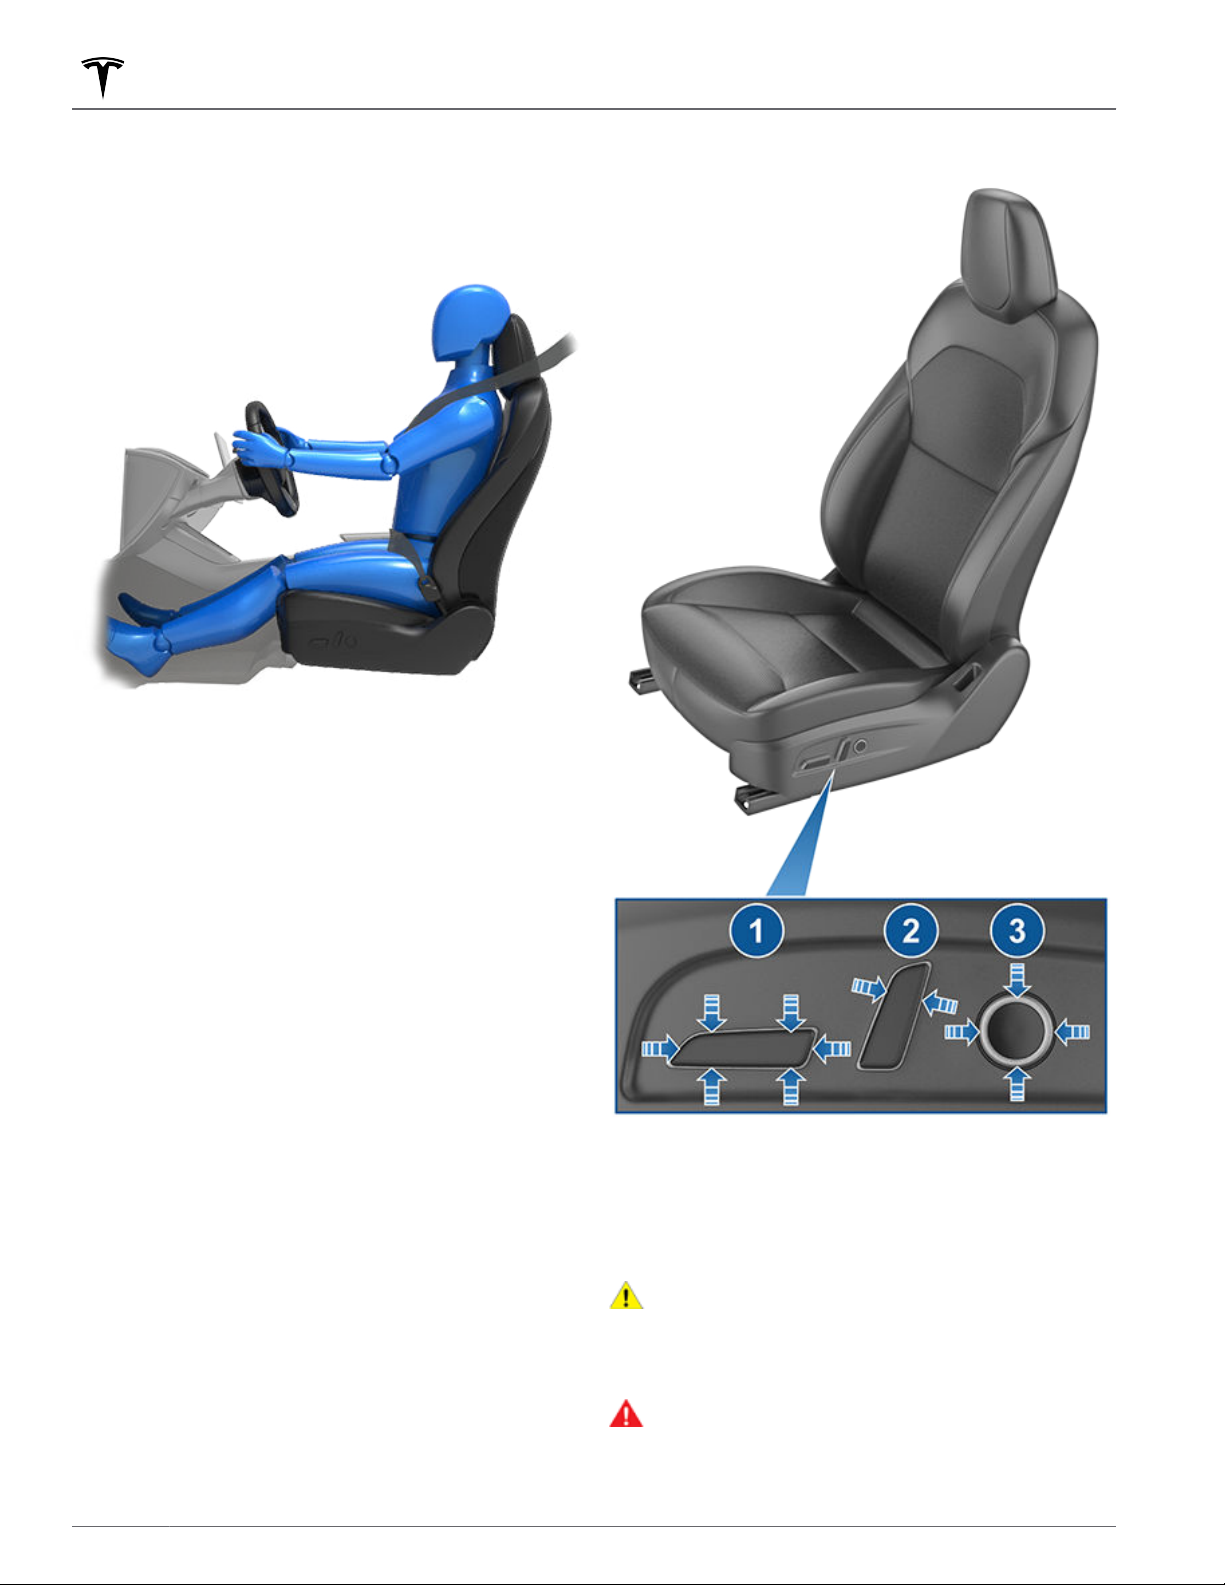
Front and Rear Seats
Correct Driving Position
The seat, head support, seat belt and airbags work
together to maximize your safety. Using these correctly
ensures greater protection.
Adjusting the Front Seats
Position the seat so you can wear the seat belt correctly,
while being as far away from the front airbag as
possible:
Sit upright with both feet on the floor and the seat
1.
back in an upright position.
Make sure you can easily reach the pedals and that
2.
your arms are slightly bent when holding the steering
wheel. Your chest should be at least 10 inches
(25 cm) from the center of the airbag cover.
Place the shoulder section of the seat belt mid-way
3.
between your neck and your shoulder. Fit the lap
section of the belt tightly across your hips, not across
your stomach.
Model 3 seats include integrated head supports that
cannot be adjusted or removed.
Move seat forward/backward and adjust the seat’s
1.
height and tilt angle up/down.
Adjust backrest.
2.
3. Adjust lumbar support.
CAUTION:
fully forward when the seat is also in the fully
forward position. Doing so can cause the top of
the seat to hit, and potentially damage, the sun
visor.
WARNING:
that the area around the seat is free of obstacles
(people and objects).
Do not move a front seat's backrest
Before adjusting a front seat, check
30 MODEL 3 Owner's Manual
Page 33
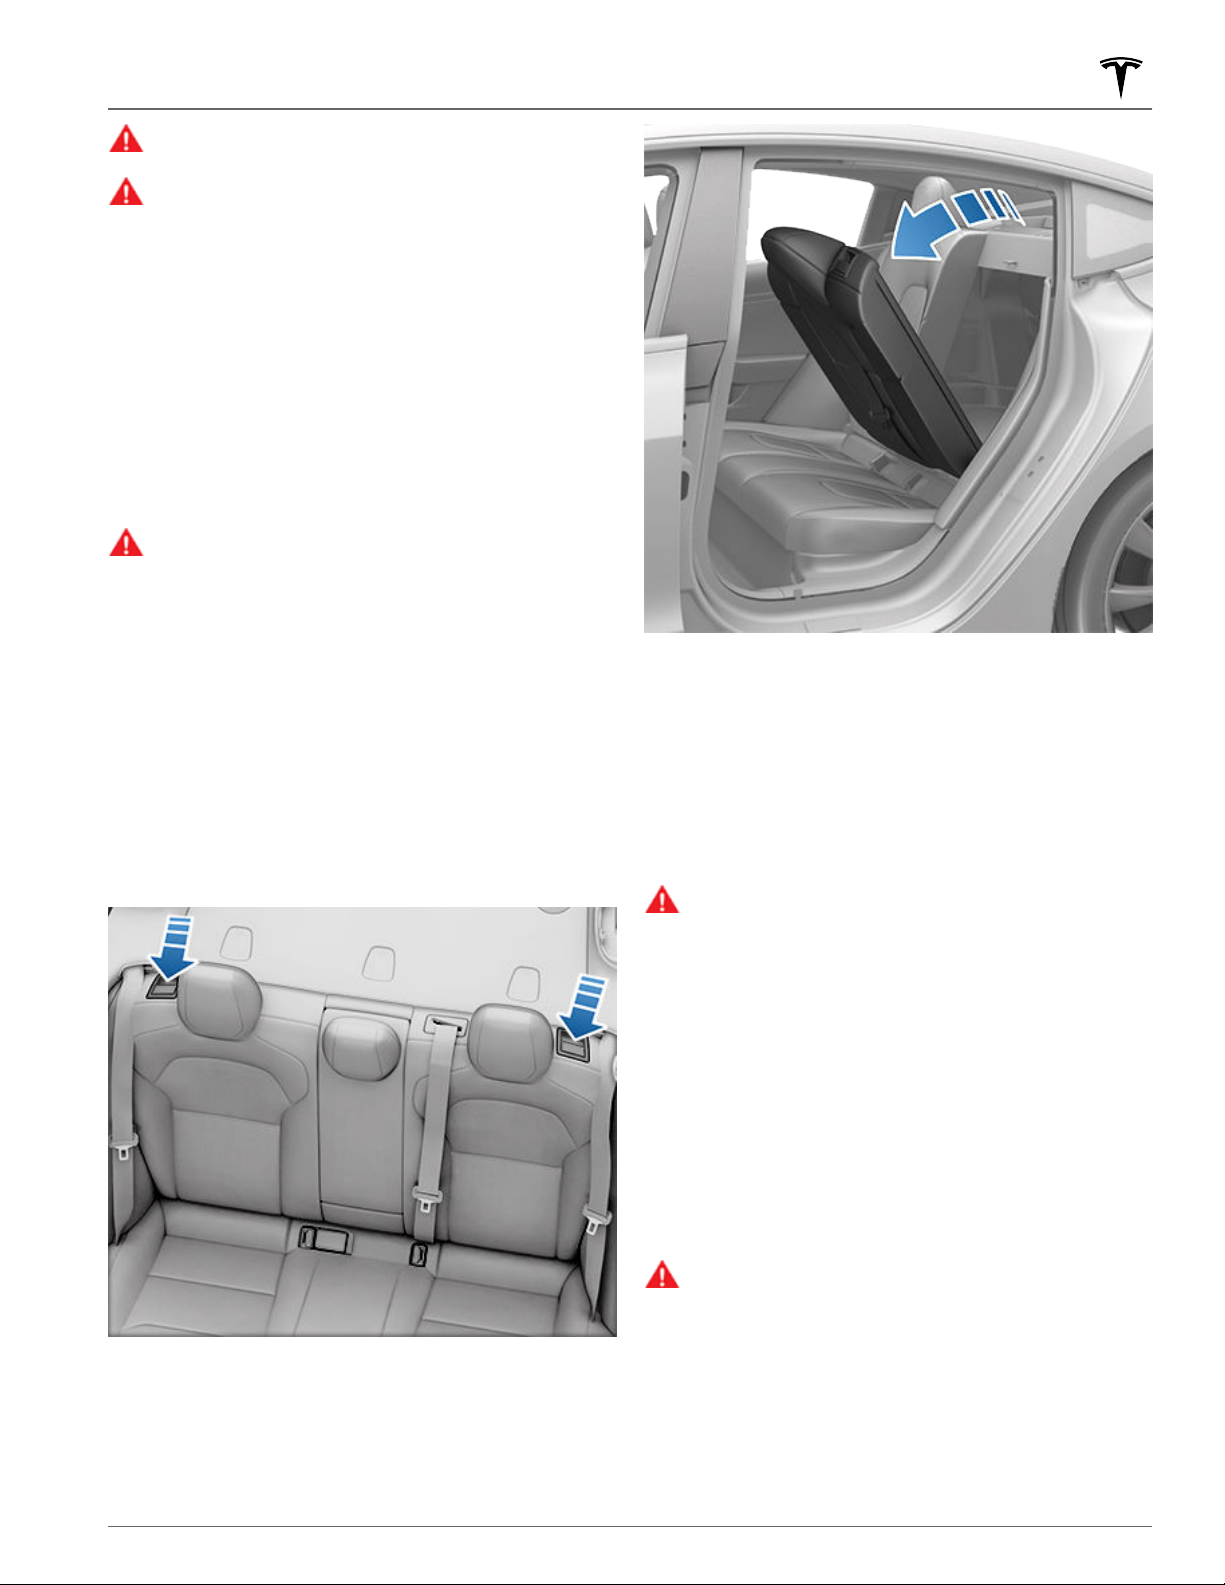
WARNING: Do not adjust seats while driving.
Doing so increases the risk of a collision.
WARNING: Riding in a moving vehicle with the
seat back reclined can result in serious injuries in a
collision, as you could slide under the lap belt or
be propelled into the seat belt. Ensure your seat
back is reclined no more than 30 degrees when
the vehicle is moving.
Calibrating Seats
You can calibrate the driver seat. This is useful if you find
your seat range limited or your driver profile does not
automatically adjust the seat for you. Navigate to
Controls > Service > Driver Seat, Steering & Mirrors
Calibration and follow the instructions on the
touchscreen.
WARNING:
underneath the driver seat during calibration.
Failure to do so may cause serious injury.
Ensure nothing is behind or
Folding Rear Seats
Front and Rear Seats
Model 3 has a split rear seat that can fold forward.
NOTE: Driving with the rear seats folded forward can
increase the amount of perceived noise and/or vibration
coming from the rear of the vehicle (trunk, suspension,
etc.).
Before folding, remove items from the seats and the rear
footwell. To allow the rear seat backs to fold completely
flat, you may need to move the front seats forward.
Raising Rear Seats
Before raising a rear seat, make sure that the seat belts
are not trapped behind the backrest.
Pull the seat back upward until it locks into place.
To confirm that the seat back is locked in the upright
position, try pulling it forward.
WARNING:
locked in their upright position by pushing it
forward or rearward. Failure to do so increases the
risk of injury.
Always ensure the seat backs are
Head Supports
The front and second row seats include integrated head
supports that are not adjustable.
Seat Heaters
The front and rear seats operate at three levels from 3
(highest) to 1 (lowest). To operate the seat heaters, see
Operating Climate Controls on page 137.
To fold a rear seat, pull the corresponding lever and fold
the seat forward.
WARNING:
prolonged use, individuals who have peripheral
neuropathy, or whose capacity to feel pain is
limited because of diabetes, age, neurological
injury, or some other condition, should exercise
caution when using the climate control system and
seat heaters.
To avoid burns resulting from
31Seating and Safety Restraints
Page 34

Front and Rear Seats
Seat Covers
WARNING: Do not use seat covers on a front seat.
Doing so could restrict deployment of the seatmounted side airbags if a collision occurs. Also, if
the vehicle is equipped with an occupant detection
system that is used to determine the status of the
passenger front airbag, seat covers may interfere
with this system.
32 MODEL 3 Owner's Manual
Page 35
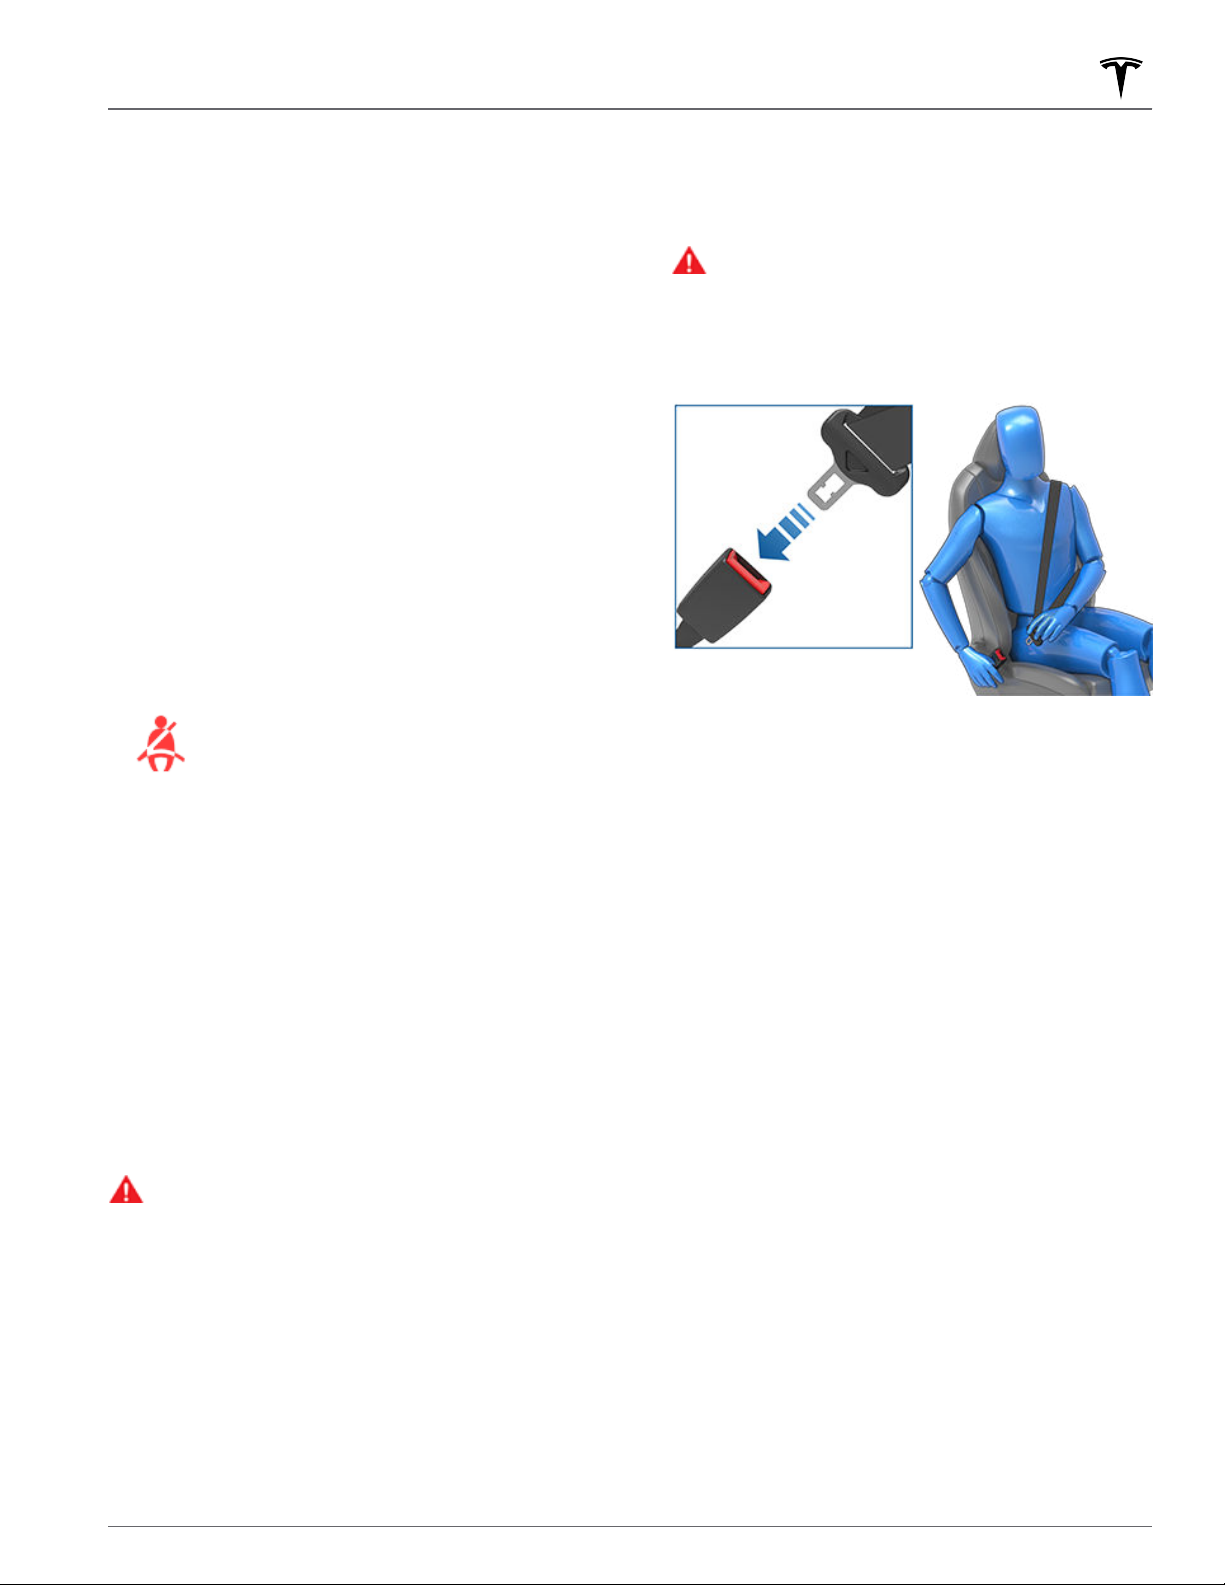
Seat Belts
Wearing Seat Belts
Using seat belts and child safety seats is the most
eective way to protect occupants if a collision occurs.
Therefore, wearing a seat belt is required by law in most
jurisdictions.
All seats are equipped with three-point inertia reel seat
belts. Inertia reel belts are automatically tensioned to
allow occupants to move comfortably during normal
driving conditions.
passenger seating positions are equipped with an
automatic locking retractor (ALR) feature that, by fully
extracting the seat belt (beyond the length needed for a
typical adult occupant), locks the belt into place until
the seat belt is unbuckled (see Installing Seat Belt
Retained Child Seats on page 38).
The seat belt reel automatically tightens or locks to
prevent movement of occupants if Model 3 experiences
a force associated with hard acceleration, braking,
cornering, or an impact in a collision.
To securely hold child safety seats, all
Seat Belt Reminders
The seat belt reminder
alerts you if a seat belt for an occupied
driver or passenger seat is unbuckled. If all
occupants are buckled up and the
reminder stays on, re-buckle seat belts to
ensure they are correctly latched. Also
remove any heavy objects (such as a
briefcase) from an unoccupied seat. If the
reminder light continues to stay on,
contact Tesla.
You can temporarily disable a seat belt reminder
associated with a rear seating position. This is useful
when you are carrying an object in a rear seat that
triggers the seat belt reminder alert. To disable the
reminder, touch the associated seat on the seat belt
reminder popup message that displays on the
touchscreen when a seat belt reminder is active. When a
reminder is disabled, the seat belt reminder icon is
replaced by a seat icon, for the current drive only. Touch
the seat again to re-enable the reminder.
WARNING:
in all seating positions. Do not disable a seat belt
reminder when the seating position is occupied by
a passenger.
Seat belts must be worn by passengers
on the touchscreen
2. Draw the belt out smoothly, ensuring the belt lays
across the pelvis, chest and mid-point of your collar
bone, between the neck and shoulder. Ensure the belt
is routed correctly and is not twisted. Never sit on the
seat belt or any seat belt component.
WARNING: A twisted or incorrectly routed seat
belt can cause damage and interfere with the
functionality of the seat belt system.
3. Insert the latch plate into the buckle and press
together until you hear a click indicating it is locked
in place.
Pull the belt to check that it is securely fastened.
4.
Pull the diagonal part of the belt toward the reel to
5.
remove excess slack.
flat
To Adjust the Shoulder Anchor
Height
Model 3 is equipped with an adjustable shoulder anchor
for each front seat to ensure that the seat belt is
positioned correctly. The seat belt should lay
the mid-point of your collar bone while in the correct
driving position (see Correct Driving Position on page
30). Adjust the height of the shoulder anchor if the seat
belt is not positioned correctly:
Press and hold the button on the shoulder anchor to
1.
release the locking mechanism.
While holding the button, move the shoulder anchor
2.
up or down, as necessary, to correctly position the
seat belt.
flat across
To Fasten a Belt
1. Ensure correct positioning of the seat. See (see
Correct Driving Position on page 30) for details on
the correct position of the driver's seat.
33Seating and Safety Restraints
Page 36
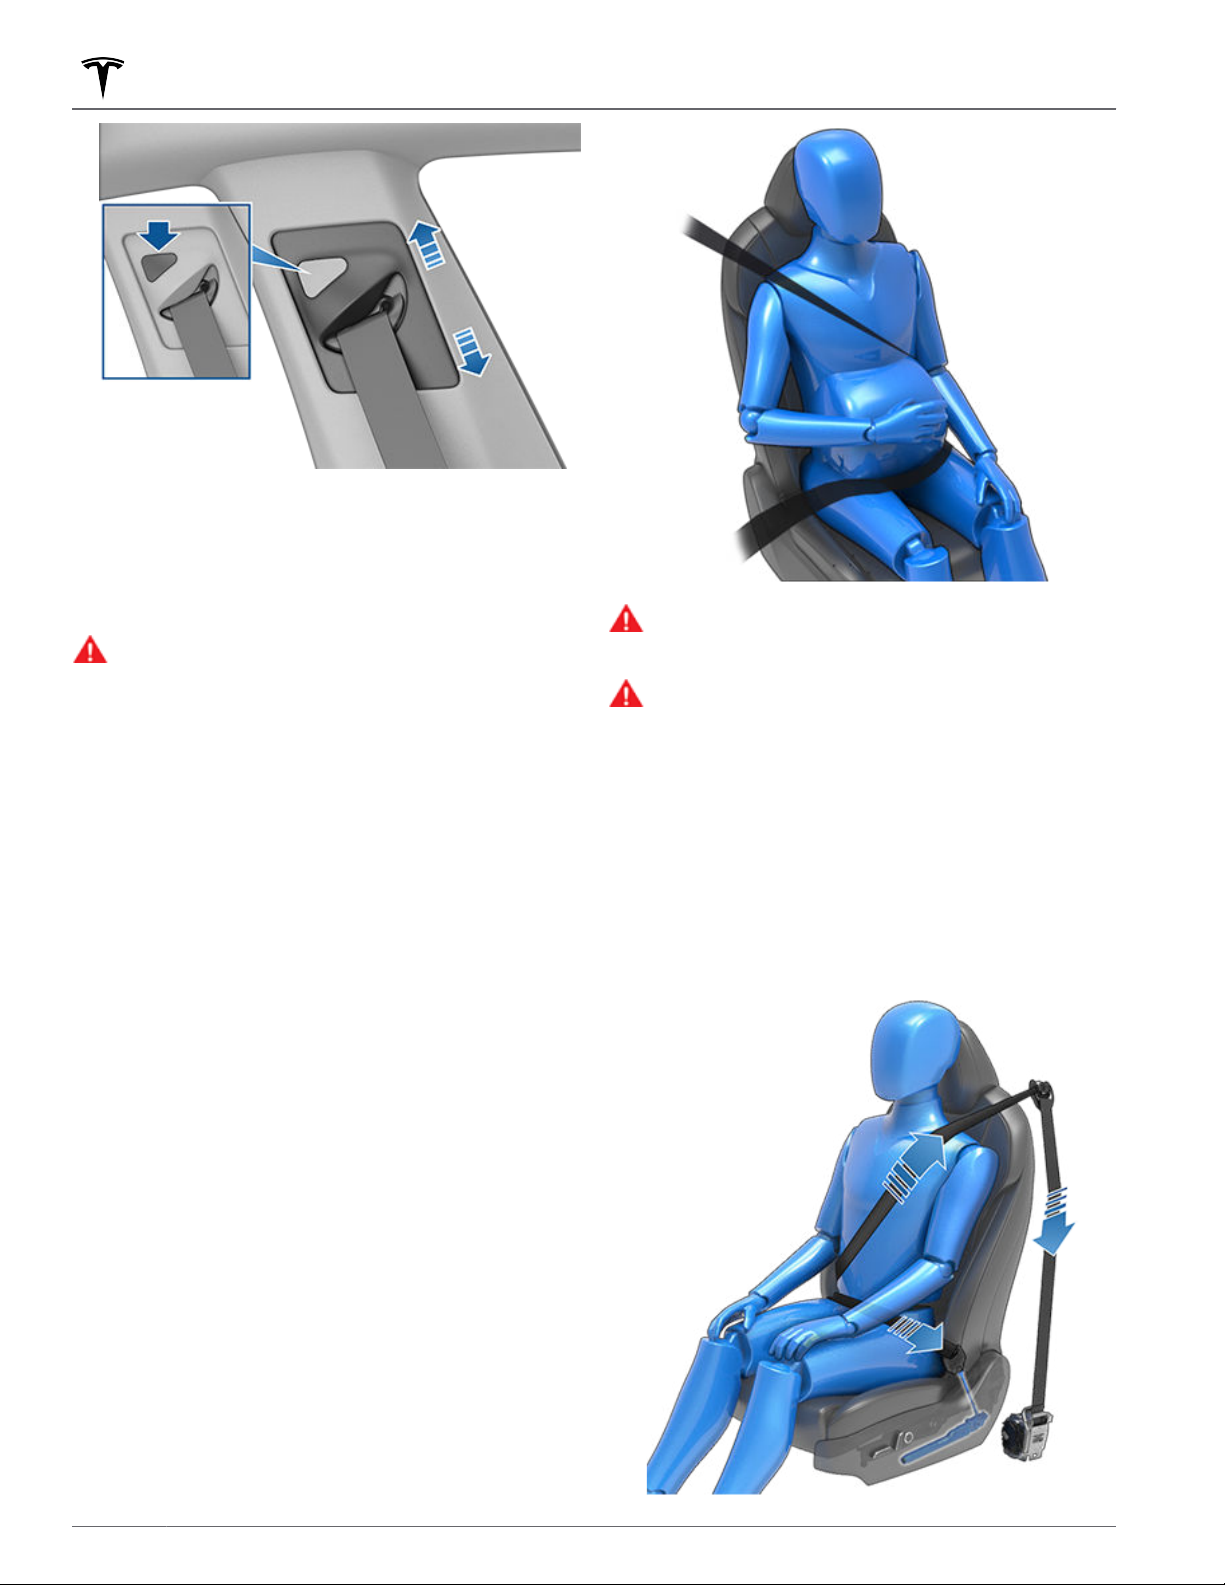
Seat Belts
3.
Release the button on the shoulder anchor so that it
locks into position.
Without pressing the button, pull on the seat belt
4.
webbing and attempt to move the shoulder anchor
downward to check that it is locked into position.
WARNING:
correctly and that the shoulder anchor is locked
into position before driving. Riding in a moving
vehicle with the seat belt positioned incorrectly or
with the shoulder anchor not locked into position
can reduce the eectiveness of the seat belt in a
collision.
Ensure that the seat belt is positioned
WARNING:
the seating position instead of wearing the seat
belt incorrectly.
WARNING:
the seat belt to cushion the impact in the event of
a collision.
If the seat belt is uncomfortable, adjust
Never place anything between you and
Seat Belt Pre-tensioners
To Release a Belt
Hold the belt near the buckle to prevent the belt from
retracting too quickly, then press the button on the
buckle. The belt retracts automatically. Ensure there is
no obstruction that prevents the belt from fully
retracting. The belt should not hang loose. If a seat belt
does not fully retract, contact Tesla.
Wearing Seat Belts When Pregnant
Do not put the lap or shoulder sections of the seat belt
over the abdominal area. Wear the lap section of the
belt as low as possible across the hips, not the waist.
Position the shoulder portion of the belt between the
breasts and to the side of the abdomen. Consult your
doctor for
specific guidance.
The front seat belts are equipped with pre‑tensioners
that work in conjunction with the airbags in a collision.
The pre‑tensioners automatically retract both the seat
belt lower anchor and the upper shoulder webbing,
reducing slack in both the lap and diagonal portions of
the belts, resulting in reduced forward movement of the
occupant.
34 MODEL 3 Owner's Manual
Page 37

Seat Belts
If the pre-tensioners and airbags did not activate in an
impact, this does not mean they malfunctioned. It
usually means that the strength or type of force needed
to activate them was not present.
The rear outboard seats are equipped with shoulder pretensioners to retract the seat belt webbing to reduce
forward movement of the occupant.
WARNING: Do not bend, sit on, or interfere with
the pre-tensioner assembly. Doing so can cause
damage that interferes with the proper
functionality of the seat belt system.
WARNING: Once the seat belt pre-tensioners have
been activated, they must be replaced. After any
collision, have the airbags, seat belt pre-tensioners
and any associated components checked and, if
necessary, replaced.
Testing Seat Belts
To confirm that seat belts are operating correctly,
perform these checks on each seat belt.
With the seat belt fastened, give the webbing nearest
1.
the buckle a quick and forceful pull. The buckle
should remain securely locked.
With the seat belt fastened, give the webbing closest
2.
to the door a quick and forceful pull. The permanent
seat belt attachment should remain securely locked.
Never attempt to remove this attachment.
With the belt unfastened, unreel the webbing to its
3.
limit. Check that unreeling is free from snags, and
visually check the webbing for wear. Allow the
webbing to retract, checking that retraction is
smooth and complete.
With the webbing half unreeled, hold the tongue
4.
plate and pull forward quickly. The mechanism should
lock automatically and prevent further unreeling.
If a seat belt fails any of these tests, repair immediately.
Do not allow occupants to sit in a seat with a failed seat
belt.
For information about cleaning seat belts, see Seat Belts
on page 184.
Seat Belt Warnings
WARNING:
occupants at all times, even if driving for a very
short distance. Failure to do so increases the risk
of injury or death if a collision occurs.
WARNING:
safety seat as described in the Owner's Manual.
Always follow the child safety seat manufacturer's
instructions when installing.
Seat belts should be worn by all
Secure small children in a suitable child
WARNING:
correctly. An improperly worn seat belt increases
the risk of injury or death if a collision occurs.
WARNING:
component. Doing so can cause damage or
improper deployment of safety equipment.
WARNING:
fragile or sharp items in clothing, such as pens,
keys, eyeglasses, etc. The pressure from the seat
belt on such items can cause injury.
WARNING:
part of the strap twisted.
WARNING:
by one occupant only. It is dangerous to put a seat
belt around a child being carried on an occupant’s
lap.
WARNING:
collision must be inspected or replaced by Tesla,
even if damage to the assembly is not obvious.
WARNING:
have been cut or damaged in any way must be
replaced immediately.
WARNING:
components with any chemicals, liquids, grit, dirt
or cleaning products. If a seat belt fails to retract
or latch into the buckle, it must be replaced
immediately. Use the mobile app to schedule a
service appointment.
WARNING:
additions that can prevent a seat belt mechanism
from taking up slack, or that can prevent a seat
belt from being adjusted to remove slack. A seat
belt with slack greatly reduces occupant
protection.
WARNING:
interfere with the operation of a seat belt, or that
can cause a seat belt to become inoperable.
WARNING:
convenience products that attach to the seat belts.
WARNING:
should be fully retracted and not hanging loose. If
a seat belt does not fully retract, schedule a
service appointment.
WARNING:
serviceable parts and may contain pyrotechnics.
Do not disassemble, remove, or replace
components.
Ensure that all seat belts are worn
Never sit on top of any seat belt
Do not wear seat belts over hard,
Seat belts should not be worn with any
Each seat belt assembly must be used
Seat belts that have been worn in a
Seat belts that show signs of wear, or
Avoid contaminating a seat belt’s
Do not make modifications or
Do not make modifications that can
Do not use after market comfort and
When seat belts are not in use, they
The seat belt system has no user
35Seating and Safety Restraints
Page 38
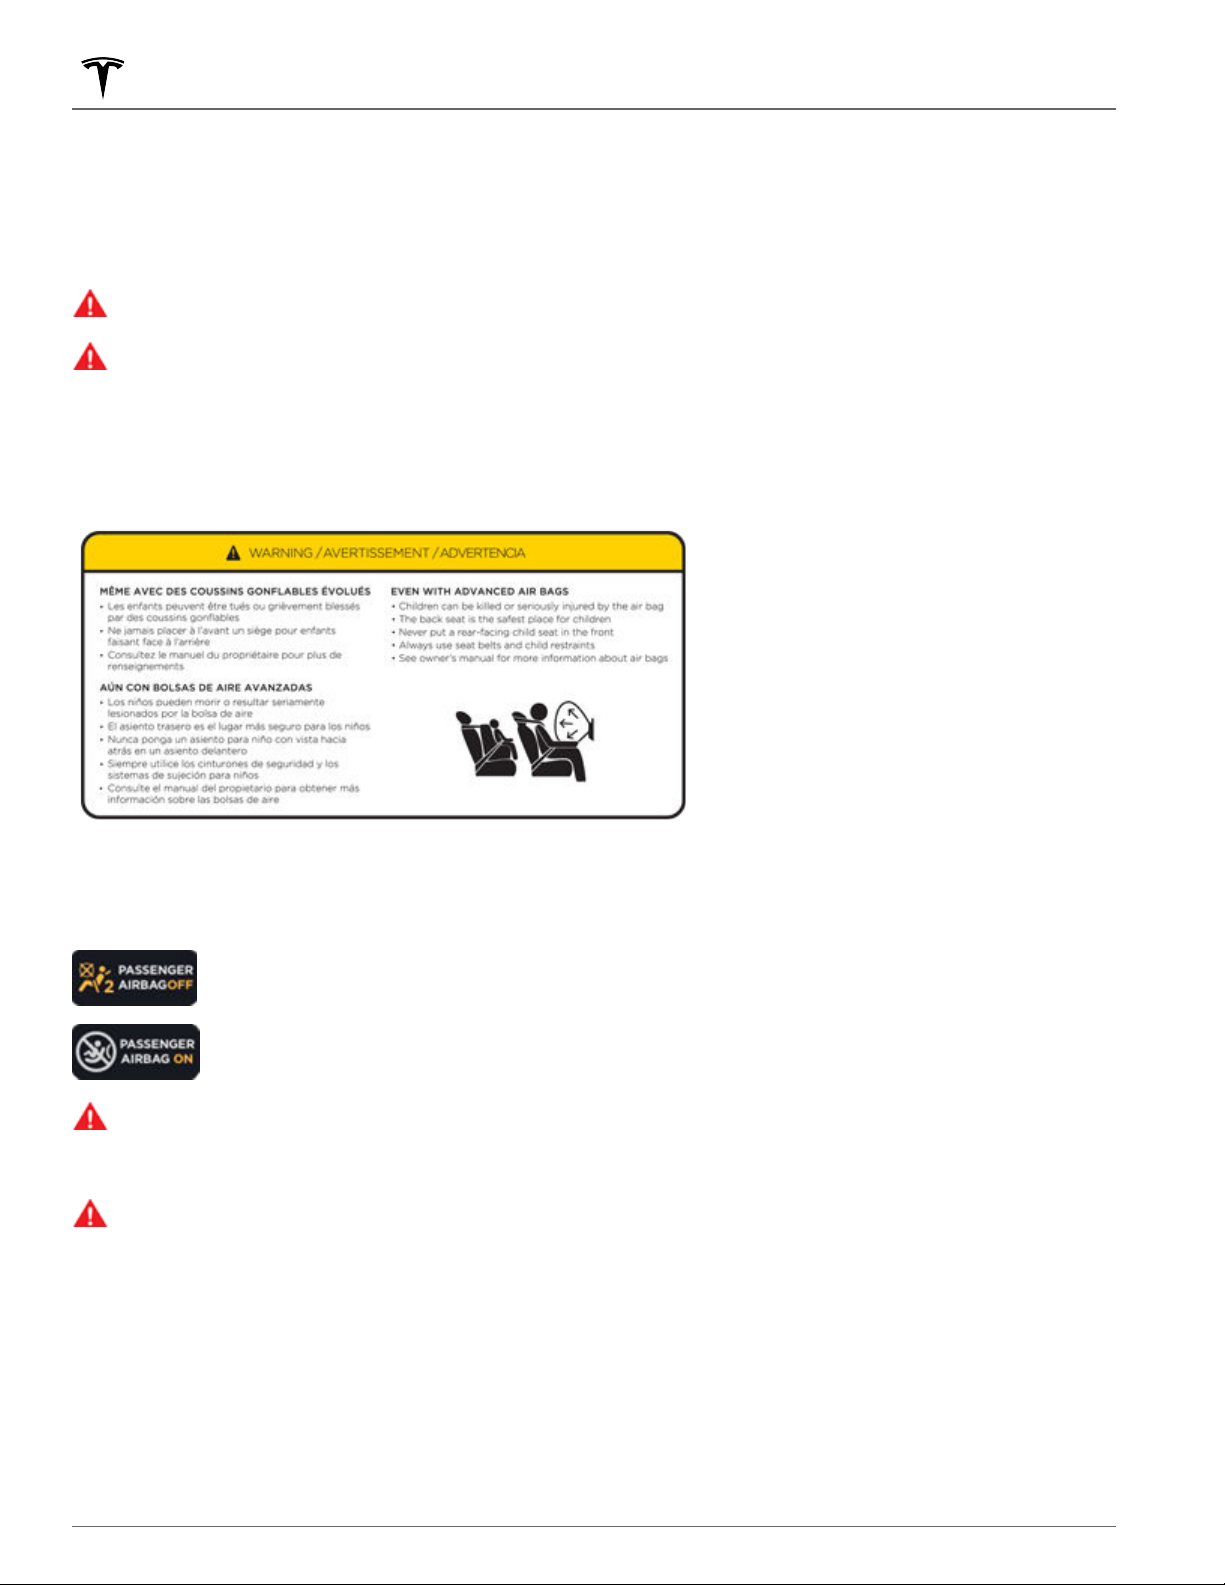
Child Safety Seats
Guidelines for Seating Children
Your Model 3 seat belts are designed for adults and larger children. You must restrain infants and small children in
the second row seats only, and you must use a suitable child safety seat appropriate for the child’s age, weight, and
size.
WARNING: Never seat a child on a seat with an ACTIVE AIRBAG in front of it. DEATH or SERIOUS INJURY to
the child can occur. See Airbags on page 42.
WARNING: Do not associate the Easy Entry setting with the driver's profile when a child is seated in the
second row. Doing so can cause the driver's seat to push against the child, especially when a child is seated in
a forward-facing child seat or booster seat. Do not rely on Model 3 to recognize or accommodate a child
seated in the second row while using this setting (see Driver Profiles on page 82).
Refer to the label located on the sun visors.
NOTE: The image shown below is representative only and may not be identical to the label(s) in your vehicle.
Model 3 has an occupancy sensor in the front passenger seat that controls the status of the passenger front airbag
(see Airbags on page 42).
When driving with a child seat on the front passenger seat, always double-check the status of the
passenger front airbag to
To protect an adult subsequently occupying the front passenger seat, check to verify that the
passenger front airbag is ON.
WARNING:
seated in the front passenger seat. If the passenger front airbag fails to disable with a child seat in position,
place the child and child restraint system in the rear seat and use the mobile app to schedule service
immediately.
WARNING:
increases the risk of injury. Pay attention to all warnings displayed on the touchscreen.
It is the driver's responsibility to confirm that the passenger front airbag is OFF when a child is
Always ensure that all Model 3 seats are locked in position before traveling. Failure to do so
confirm that it is OFF.
Choosing a Child Safety Seat
All children age 12 and under should ride in the second and third row seats. Always use a child safety seat suitable
for a young child’s age and weight. The following table is based on child safety seat recommendations determined
by the National Highway
www.nhtsa.gov/ChildSafety/Guidance).
Trac Safety Administration (NHTSA) in the United States (for more information, go to
36 MODEL 3 Owner's Manual
Page 39
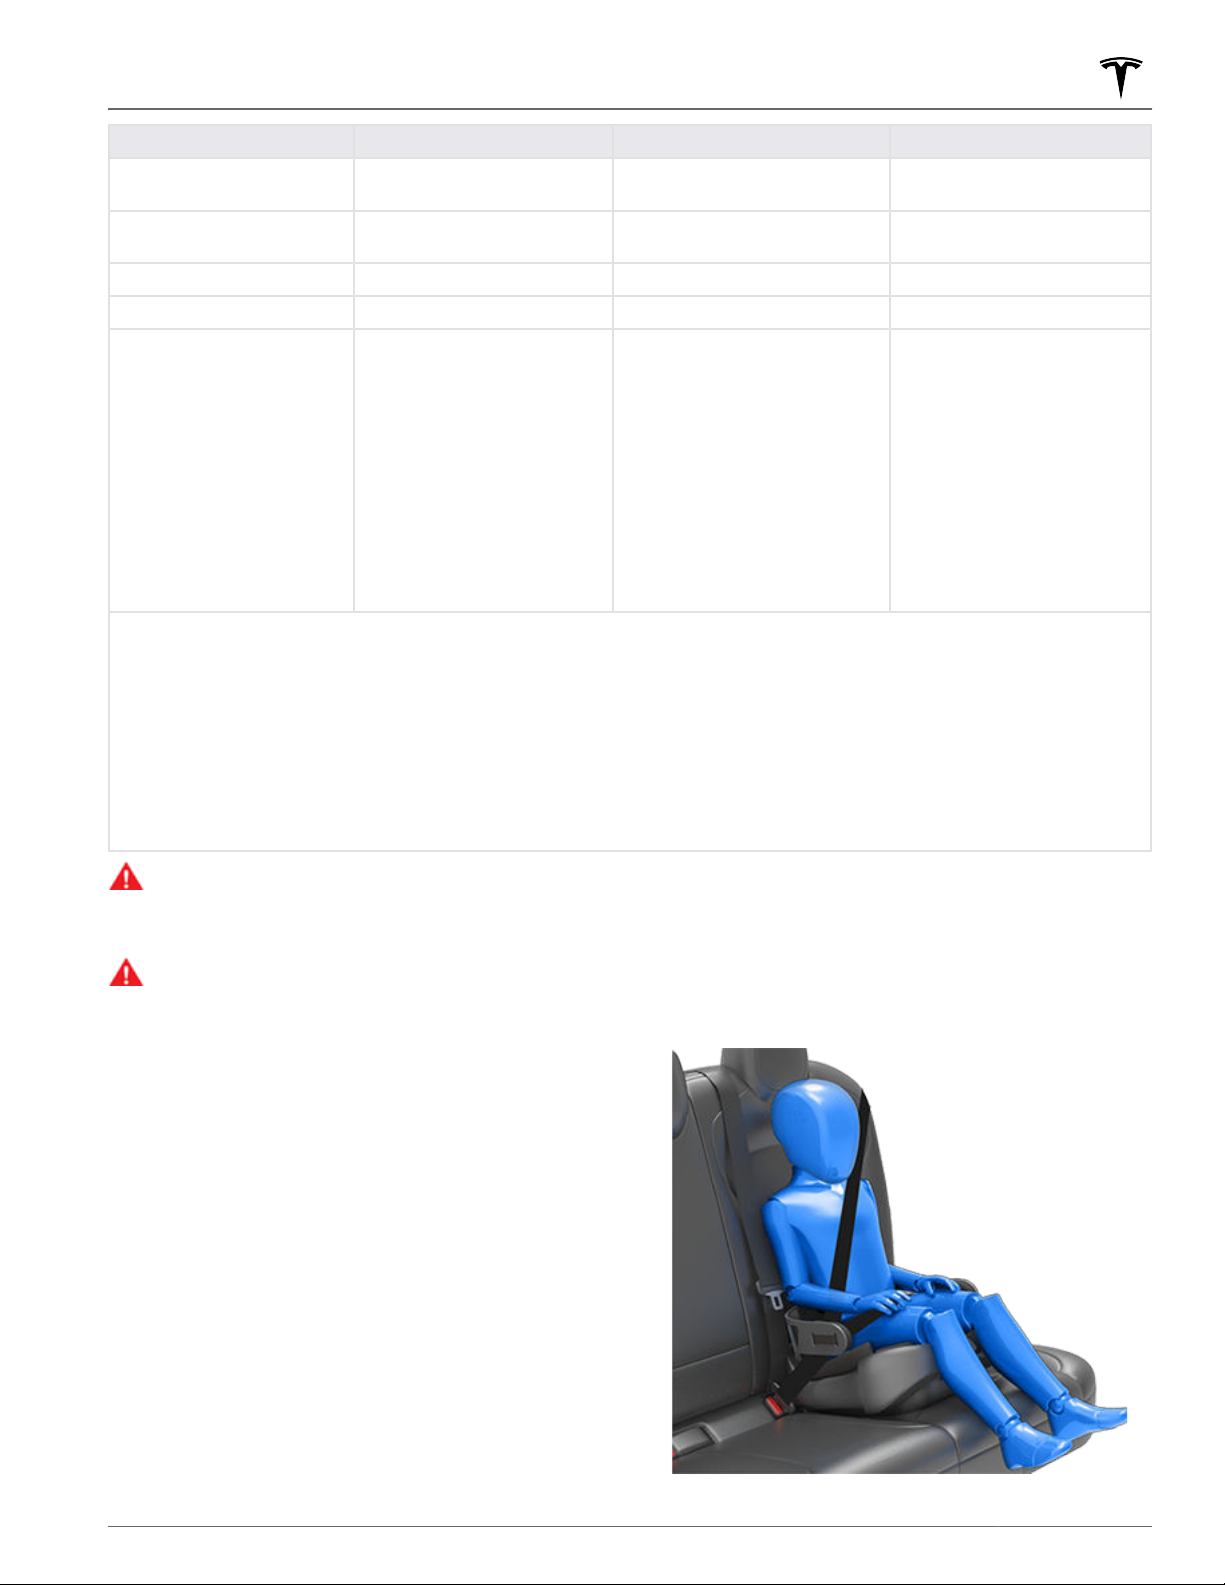
Child Safety Seats
Category Infants Toddlers Young children
Age Birth to 1 year* Over 1 year* 4 years and older, and less
Weight Up to at least 20 lbs (9 kg)** Over 20 lbs (9 kg) (minimum)
Type of child safety seat Rear facing (or convertible) Forward facing (or convertible)* Seat belt retained booster seat
Seat position Rear facing only* Forward facing* Forward facing
Recommended attachment
method
* Many child safety seats currently available allow children to ride rear-facing using the child safety seat’s integrated 5-point
harness for a longer period of time BASED UPON SPECIFIC HEIGHT AND WEIGHT LIMITS. Keep your child in a rear facing seat
for as long as possible. CHECK THE CHILD SAFETY SEAT MANUFACTURER’S INSTRUCTIONS AND CAREFULLY FOLLOW ALL
INSTRUCTIONS.
If combined weight of child
and safety seat is up to 65 lbs
(29.5 kg), attach using either
LATCH** (lower anchor only)
or the seat belt only.*** If
combined weight of child and
safety seat is over
kg), attach using the seat belt
only.***
65 lbs (29.5
and up to 40 lbs (18 kg)*
If combined weight of child and
safety seat is up to 65 lbs (29.5
kg), attach using either LATCH**
(both lower anchors and top
tether anchor), or the seat belt
and upper tether strap.*** If
combined weight of child and
safety seat is over 65 lbs (29.5
kg), attach using the seat belt
and upper tether strap.***
than 57 in. (145 cm) tall
Over 40 lbs (18 kg)
Secure the booster seat using
lower LATCH anchors (if
available) and then restrain the
child with the seat belt. If the
booster seat is not equipped
with LATCH anchors, then
secure the booster seat with
the child using the seat belt.
However, if the combined
weight of the child and
booster seat exceeds 65 lbs
(29.5 kg), secure the booster
seat with the child using the
seat belt only.
** ISOFIX is the international standard for attachment points for child safety seats in passenger cars. The system has other
regional names including
Anchorage System") or
*** Subject to instructions provided by the child safety seat manufacturer.
LATCH ("Lower Anchors and Tethers for Children") in the United States and LUAS ("Lower Universal
Canfix in Canada. It has also been called the "Universal Child Safety Seat System" or UCSSS.
WARNING: Laws that govern how and where children should be carried when traveling in a vehicle are subject
to change. It is the driver’s responsibility to keep up to date on, and comply with, all current regulations in the
region(s) where Model 3 is driven. To check the child passenger safety laws for states in the U.S., go to: http://
www.ghsa.org/html/stateinfo/laws/childsafety_laws.html.
WARNING: Do not use LATCH/Isofix/i-Size anchors with child restraint system or booster seats that have an
integral safety belt where the combined weight of the child plus the child restraint system exceeds 65 lbs
(29.5 kg).
Seating Larger Children
If a child is too large to fit into a child safety seat, but
too small to safely use the standard seat belts, use a
booster seat appropriate for the child’s age and size.
Carefully follow the manufacturer’s instructions to
secure the booster seat.
37Storage Areas
Page 40
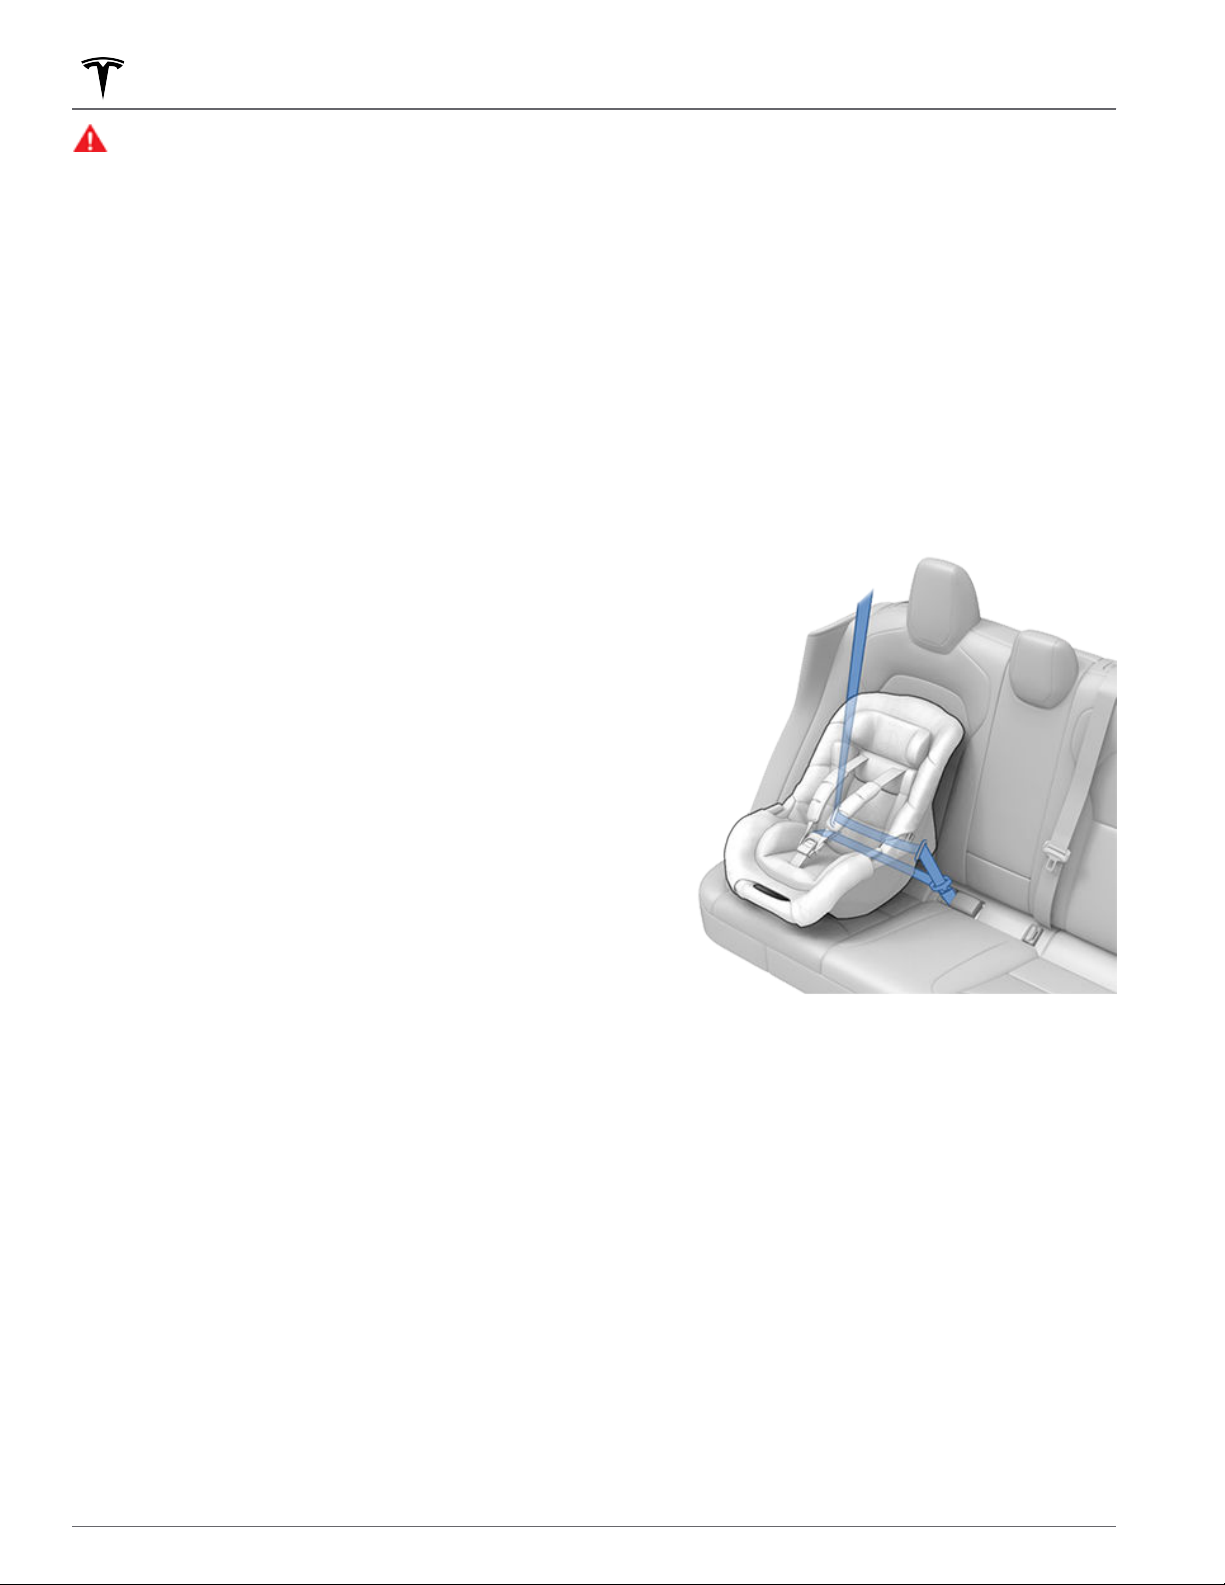
Child Safety Seats
WARNING: Larger children in booster seats should
wear the seat belt like an adult. Do not extend the
seat belt webbing fully to engage the automatic
locking retractor (ALR).
Installing Child Safety Seats
There are two general methods used to install child
safety seats:
• Seat belt retained - these seats are secured using the
vehicle’s seat belts.
•
LATCH retained - these seats attach to anchor bars
built into the vehicle’s rear seats.
Check the child safety seat manufacturer’s instructions
and the table provided in this document to determine
which installation method to use. Some child safety
seats can be installed using either method. Always
follow the child safety seat manufacturer’s instructions.
Installing Seat Belt Retained Child
Seats
First, make sure that the child safety seat is appropriate
for the weight, height, and age of the child.
Always follow the detailed instructions provided by the
child safety seat manufacturer. General guidelines are
provided below.
1. Place the child safety seat in Model 3, and fully
extend the seat belt. Route and buckle the seat belt
in accordance with the child safety seat
manufacturer’s instructions.
2. Allow the seat belt to retract, and remove all slack in
the seat belt while
seat into the Model 3 seat.
3. Once all slack has been removed, forcefully pull the
seat belt webbing to
locking retractor (ALR) is engaged.
NOTE: The ALR disengages only after unbuckling and
fully retracting the seat belt webbing. Once
disengaged, the belt must be fully extended to reengage the locking mechanism.
firmly pushing the child safety
confirm that the automatic
Avoid dressing the child in bulky clothing and do not
place any objects between the child and the restraint
system.
Adjust harnesses for every child, every trip.
To securely hold child safety seats, all passenger seating
positions are equipped with an automatic locking
retractor (ALR) that, by pulling the seat belt beyond the
length needed for a typical adult occupant, locks the
belt into place until the seat belt is unbuckled and the
webbing is fully retracted. The ALR mechanism operates
as a ratchet, winding in slack and preventing the seat
belt from extending any further until it has been
completely rewound. When installing a child safety seat,
engage the belt's automatic locking retractor by pulling
the seat belt webbing until it is
system engages only when the seat belt is at its
maximum extension point.
The automatic locking retractor (ALR) feature is not
used for booster seats in which a large child is restrained
by the vehicle's seat belts directly, and therefore not
using a child safety seat's integrated restraints.
NOTE: An automatic locking retractor disengages only
when the seat belt is unbuckled and fully retracted. The
belt can then be worn as a normal belt, sliding freely in
and out and locking tight only in an emergency. Once
disengaged, the belt must be fully extended to reengage the locking mechanism whenever you install a
child safety seat.
fully extended. The ALR
If the seat belt retained child safety seat has an upper
4.
tether, attach it to the back of the seat (see Attaching
Upper Tether Straps on page 40).
Installing LATCH (ISOFIX) Child
Seats
Lower LATCH anchors are provided in the second row
outboard seats. The anchors are located between the
seat's back rest and rear cushion. The exact location of
each anchor is
identification button, illustrated below. The button is
located on the seat back, directly above its associated
anchor.
identified by a child safety seat
38 MODEL 3 Owner's Manual
Page 41
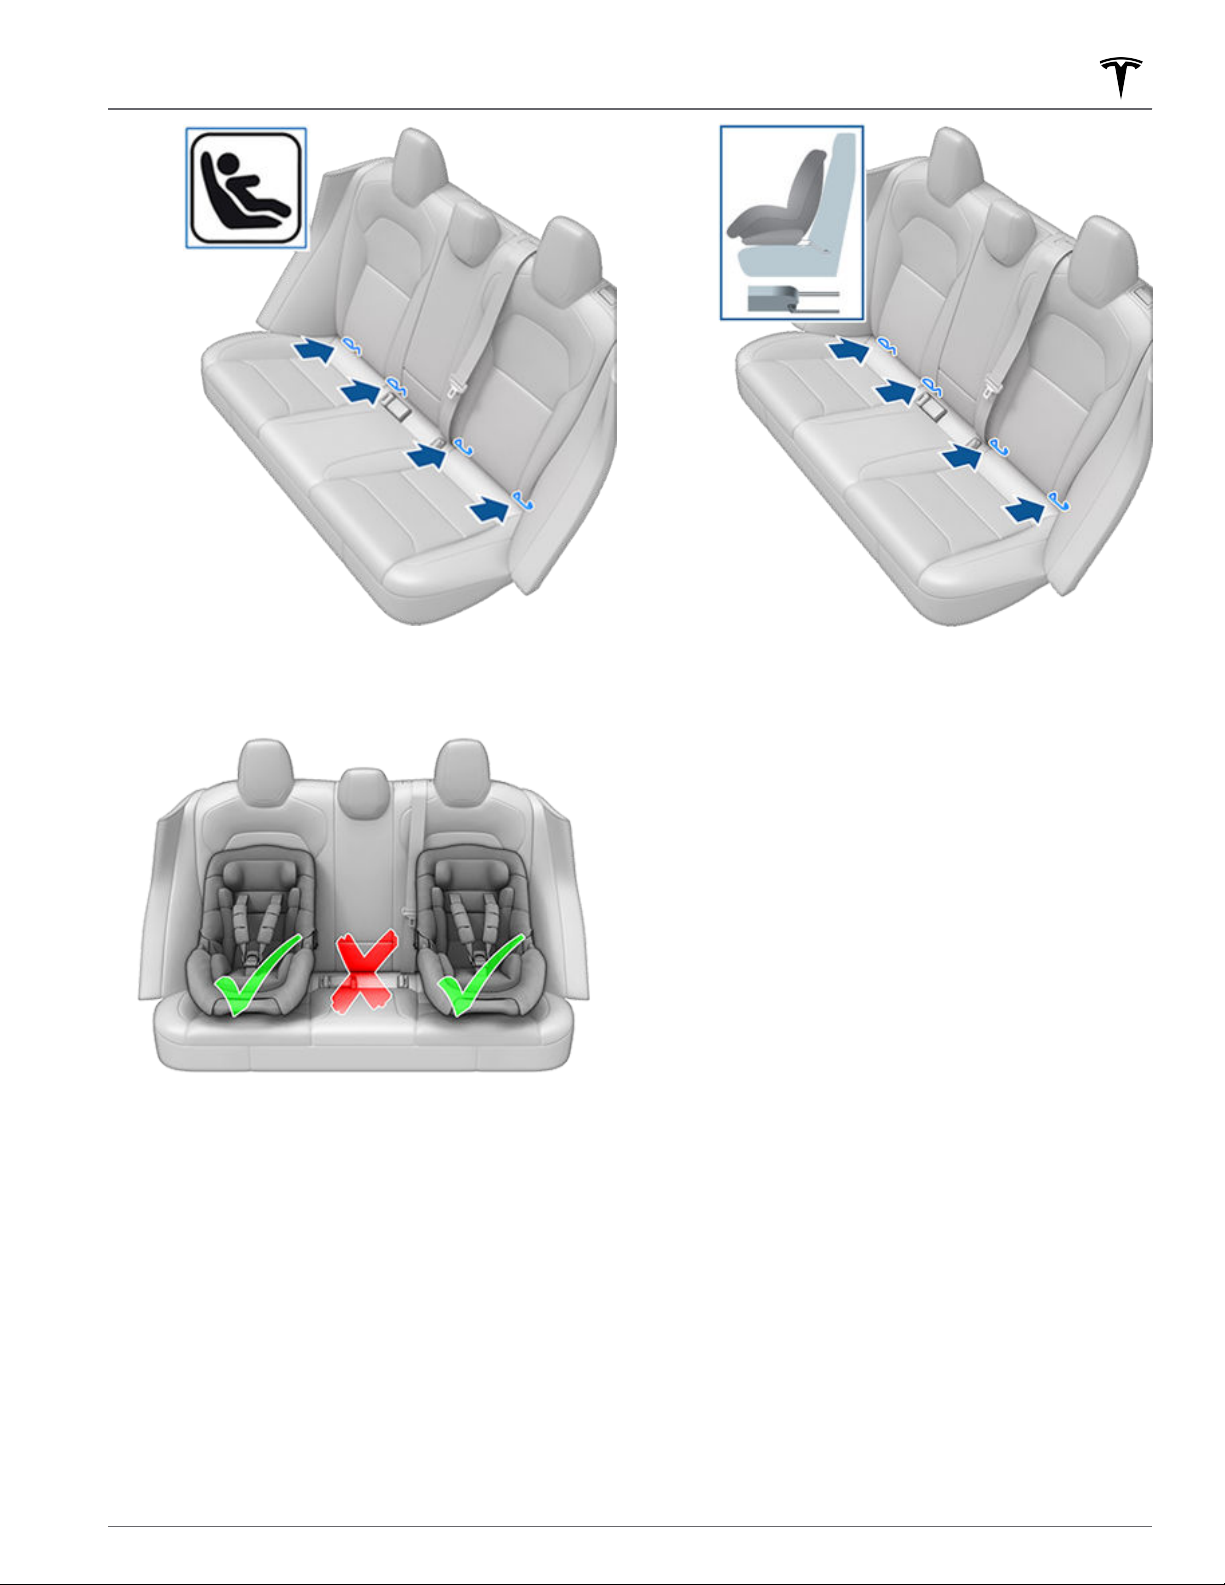
Child Safety Seats
In the second row, install LATCH child safety seats in the
outboard seating positions only. Use only a seat belt
retained seat in the center position.
To install a LATCH child safety seat, slide the safety seat
latches onto the anchor bars until they click into place.
Carefully read and follow the instructions provided by
the child safety seat manufacturer.
Once installed, test the security of the installation before
seating a child. Attempt to twist the child safety seat
from side to side and try to pull it away from the seat,
then check to ensure the anchors remain securely in
place.
NOTE: Lower LATCH anchors should not be used with
child seats or booster seats that have an integrated
safety belt in situations where the combined weight of
the child plus the child restraint is more than
kg). In these situations, use the safety belt instead.
65 lbs (29.5
39Seating and Safety Restraints
Page 42
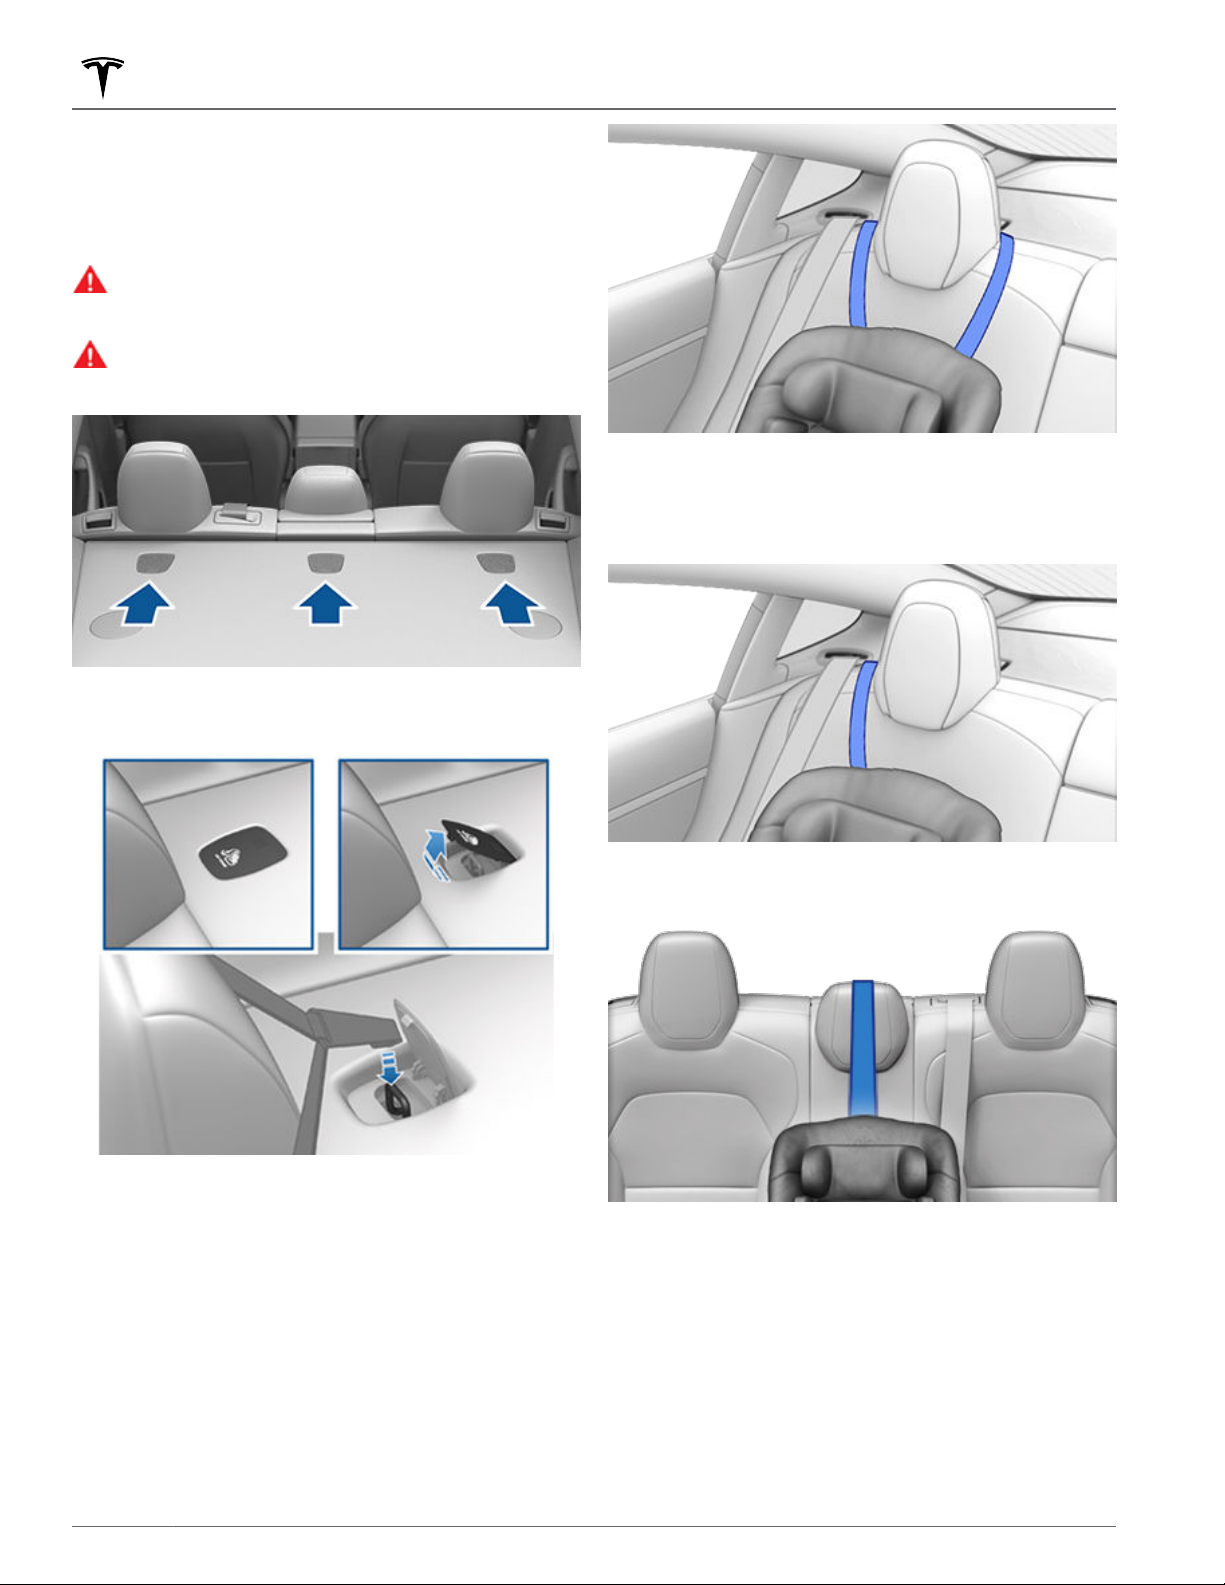
Child Safety Seats
Attaching Upper Tether Straps
If an upper tether strap is provided, attach its hook to
the anchor point located on the shelf behind the rear
seats.
WARNING: Tighten upper tether straps according
to the instructions provided by the manufacturer
of the child safety seat.
WARNING: USE ONLY SEAT BELT RETAINED
CHILD SAFETY SEATS IN THE CENTER SEATING
POSITION.
For single-strap tethers at the outboard seating
positions, route the strap over the outside-facing side of
the head support (same side of the head support as the
seat belt retraction mechanism).
To access an anchor point, press down on the back of its
cover.
For dual-strap tethers, position a strap on each side of
the head support.
For a single strap tether in the rear center seating
position, route the strap over the top center of the head
support.
For dual strap tether in the rear center seating position,
route the straps around each side of the head support.
40 MODEL 3 Owner's Manual
Page 43
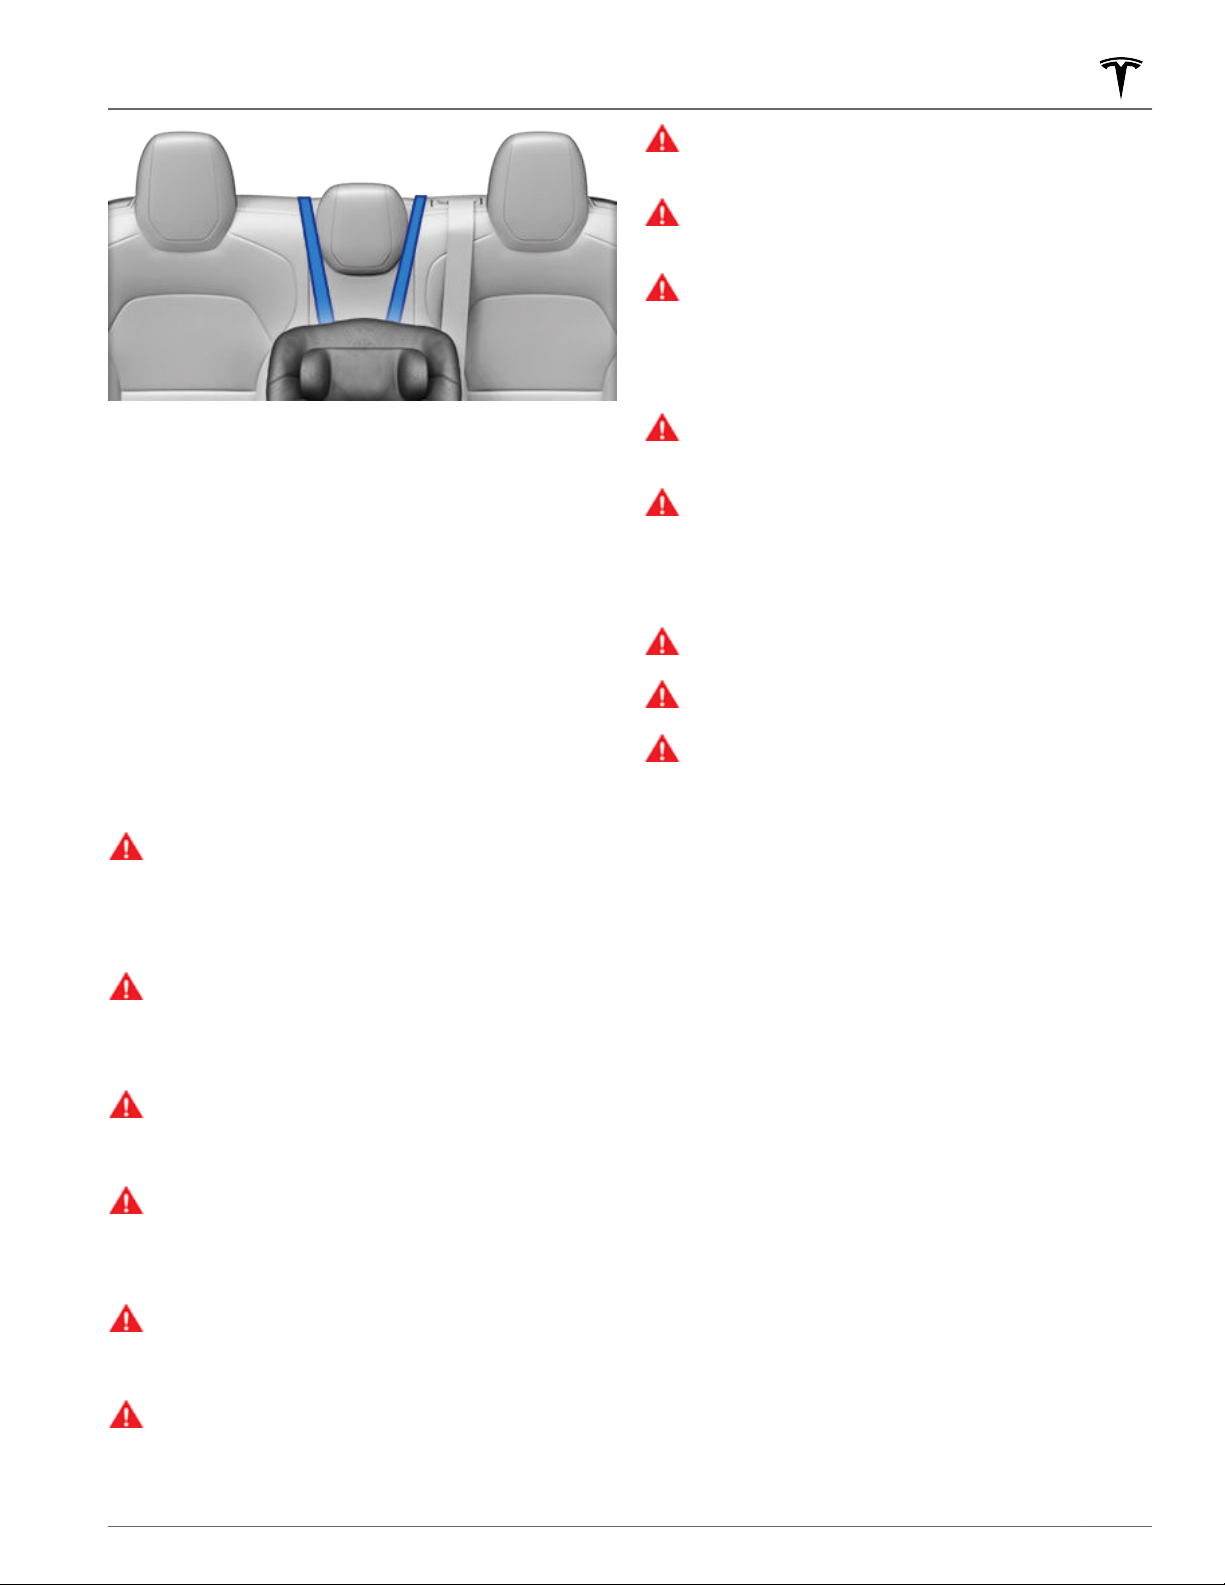
Child Safety Seats
Testing a Child Safety Seat
Before seating a child, always make sure the child safety
seat is not loose:
Hold the child safety seat by the belt path and try to
1.
slide the safety seat from side to side and front to
back.
If the seat moves more than 1 inch (2.5 cm), it is too
2.
loose. Tighten the belt or reconnect the LATCH
retained child safety seat.
If you are unable to reduce slack, try a dierent seat
3.
location or try another child safety seat.
Child Safety Seat Warnings
WARNING:
the front passenger seat even if you are using a
child safety seat. This seat has an airbag in front of
it. Although this airbag is disabled when Model 3
detects a lightweight passenger, do not rely on
technology to protect your child.
WARNING:
be secured in vehicle seats by lap belts or the lap
belt portion of a lap-shoulder belt. Children could
be endangered in a crash if their child restraints
are not properly secured in the vehicle.
WARNING:
children are safer when properly restrained in the
rear seating positions than in the front seating
positions.
WARNING:
safety seat until your child weighs over 20 lbs (9
kg) and can sit independently. Up to the age of
two, a child's spine and neck are not suciently
developed to avoid injury in a frontal impact.
WARNING:
held on an adult's lap. All children should be
restrained in an appropriate child safety seat at all
times.
WARNING:
follow all instructions provided in this document
and by the manufacturer of the child safety seat.
Extreme hazard! Do not seat a child on
Child restraint systems are designed to
According to collision statistics,
Do not use a forward facing child
Do not allow a baby or infant to be
To ensure children are safely seated,
WARNING:
child safety seat using the seat’s integrated 5point harness for as long as possible.
WARNING:
seat belt that is being used to install a child safety
seat or booster seat.
WARNING:
sure the child's head is supported and the child’s
seat belt is properly adjusted and fastened. The
shoulder portion of the belt must be away from
the face and neck, and the lap portion must not be
over the stomach.
WARNING:
one anchor point. In a collision, one anchor point
may be incapable of securing both seats.
WARNING:
withstand only those loads imposed by correctly
fitted child restraints. Under no circumstances are
they to be used for adult seat belts, harnesses, or
for attaching other items or equipment to the
vehicle.
WARNING:
straps for damage and wear.
WARNING:
the child is secured in a child safety seat.
WARNING:
been involved in a collision. Have the seat
inspected or replaced as described in the child
safety seat manufacturer’s instructions.
Children should ride in a rear facing
Do not use seat belt extenders on a
When seating larger children, make
Never attach two child safety seats to
Child restraint anchors are designed to
Always check harnesses and tether
Never leave a child unattended, even if
Never use a child safety seat that has
41Seating and Safety Restraints
Page 44
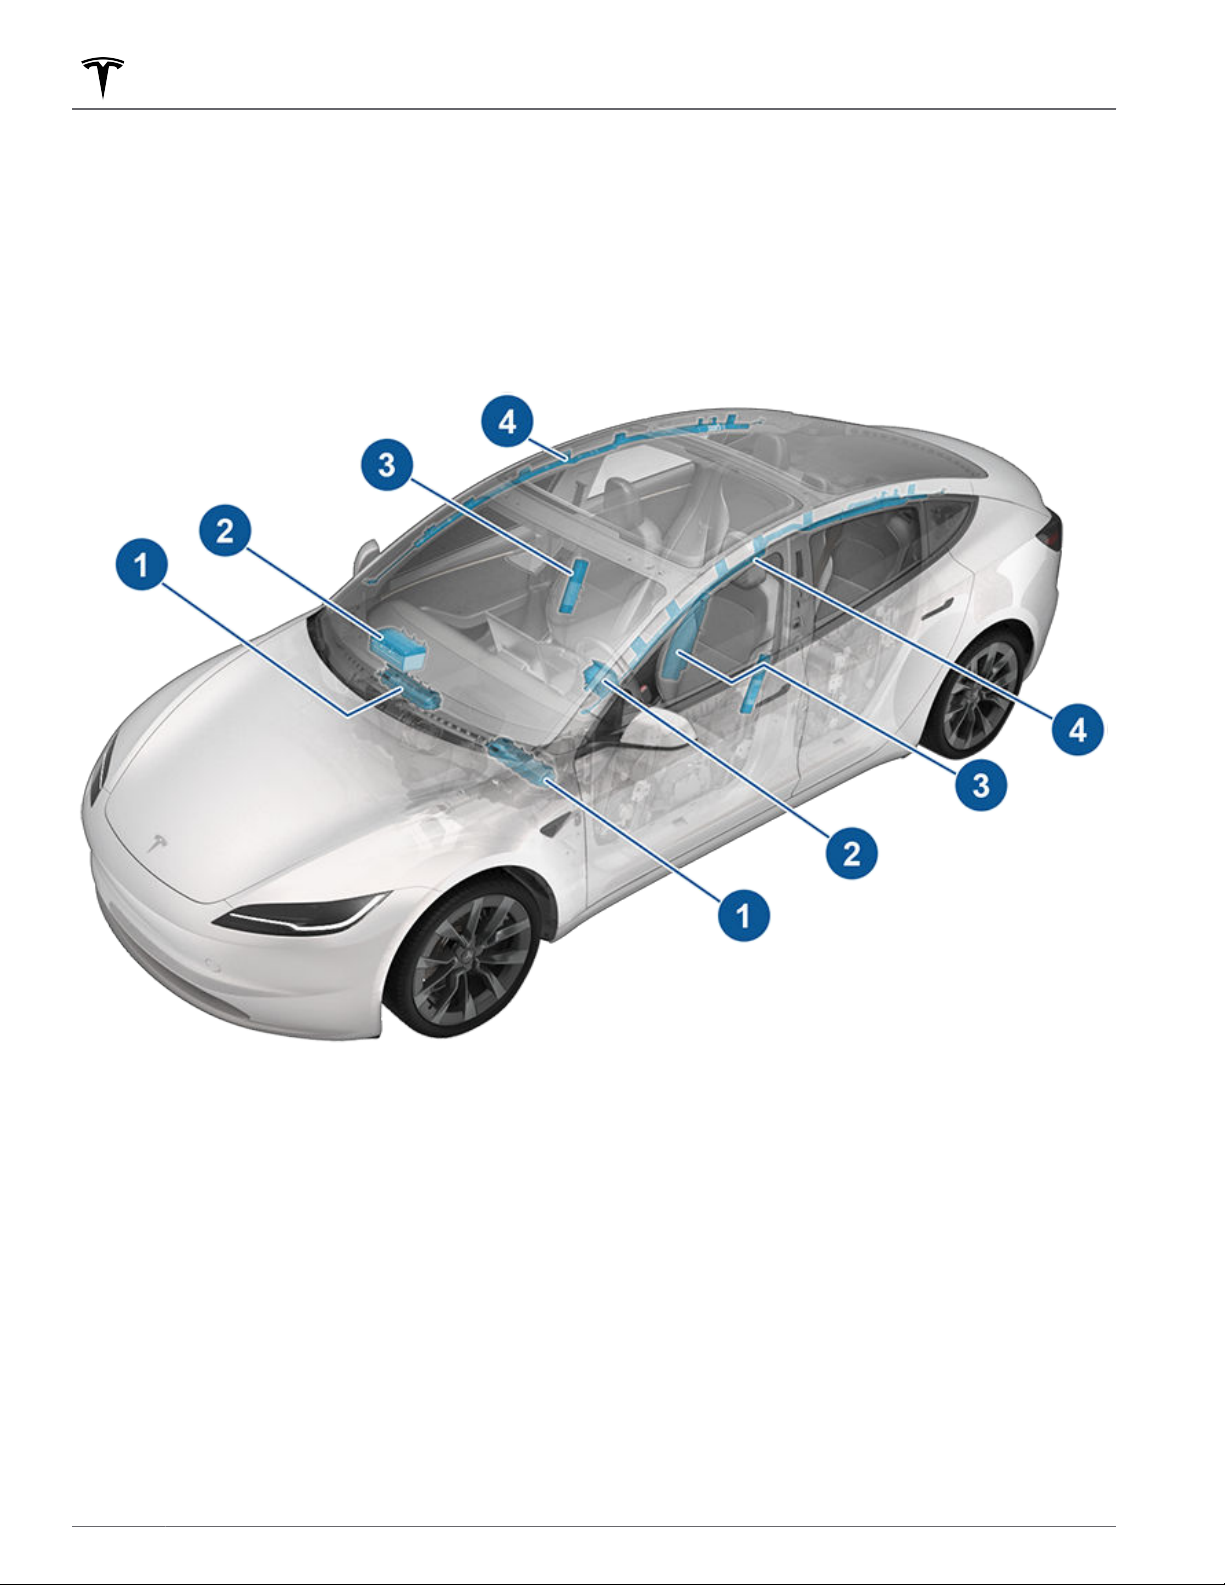
Airbags
Location of Airbags
Airbags are located in the approximate areas shown below. Airbag warning information is printed on the sun visors.
Model 3 is equipped with an airbag and lap/shoulder belt at both front seating positions. The airbag is a
supplemental restraint at those seating positions. All occupants, including the driver, should always wear their seat
belts whether or not an airbag is also provided at their seating position to minimize the risk of severe injury or death
in the event of a crash.
NOTE: On RHD (Right Hand Drive) vehicles, the locations of the passenger and driver airbags are reversed.
United States only: Knee airbag
1.
Front airbags
2.
Seat-mounted side airbags
3.
NOTE: Your vehicle is also equipped with a seat-mounted airbag on the inside portion of the driver's seat.
4. Curtain airbags
42 MODEL 3 Owner's Manual
Page 45
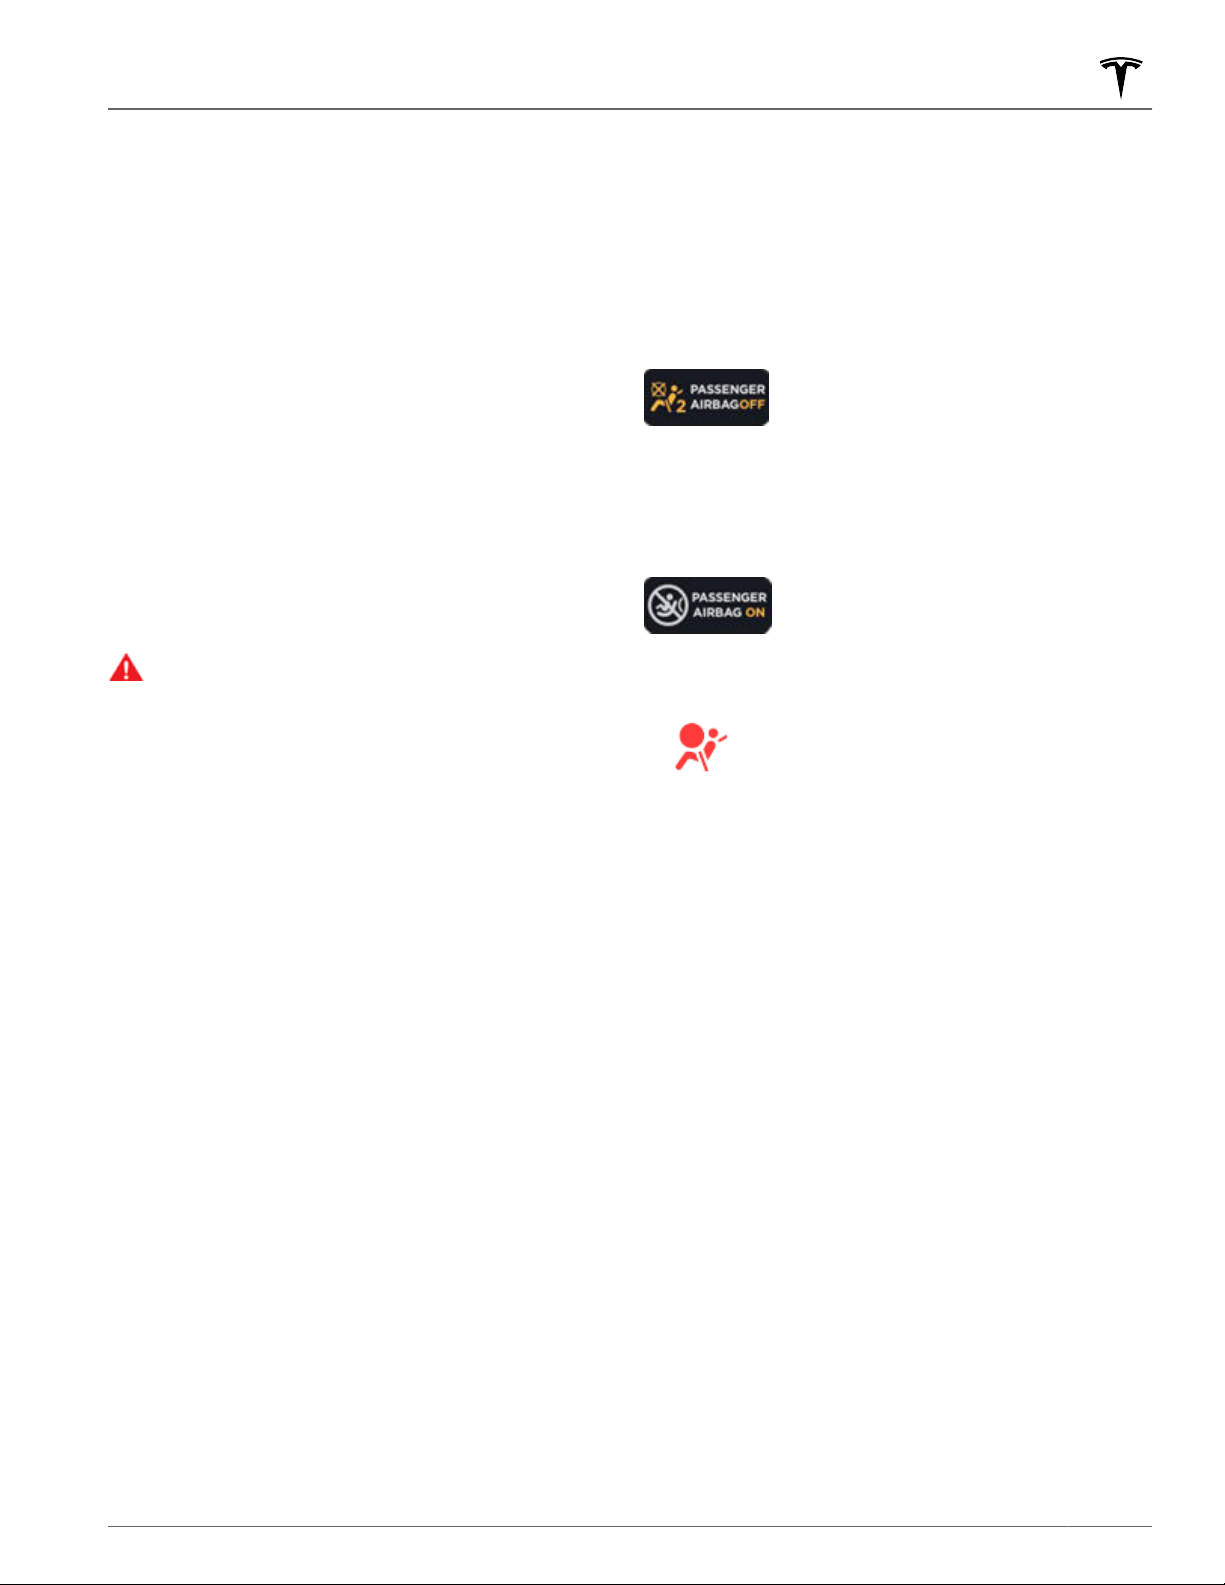
Airbags
How Airbags Work
Airbags inflate when sensors detect an impact that
exceeds deployment thresholds. These thresholds are
designed to predict the severity of a crash in time for
the airbags to help protect the vehicle's occupants.
Airbags
accompanied by a loud noise. The inflated bag, together
with the seat belts, limits movement of occupants to
reduce the risk of injury.
Front airbags are not ordinarily designed to inflate in
rear collisions, rollovers, side collisions and when braking
heavily or driving over bumps and potholes. Likewise,
front airbags may not
as minor front collisions, underride collisions, or minor
impacts with narrow objects (such as posts or poles).
Significant superficial damage can occur to the vehicle
without the airbags inflating and, conversely, a relatively
small amount of structural damage can cause airbags to
inflate. Therefore, the external appearance of the vehicle
after a collision does not represent whether or not the
front airbags should have inflated.
inflate instantly with considerable force
inflate in all frontal collisions, such
WARNING:
accommodate a person with disabilities in a way
that may aect the airbag system, use the mobile
app to schedule a service appointment.
Before modifying your vehicle to
Types of Airbags
• Curtain airbags: Curtain airbags help protect the
head. Curtain airbags on both the impacted and nonimpacted side of the vehicle will
severe side impact occurs, or if the vehicle rolls over.
inflate only if a
Airbag Status Indicator
The status of the passenger front airbag displays in the
top corner of the touchscreen:
Before driving with a child seated on the
front passenger seat (if legally permitted
in your market region), always doublecheck the status of the passenger front
airbag to confirm that it is OFF. When
the passenger front airbag is OFF, it will
not
inflate when a collision occurs. This
indicator also displays when the seat is
unoccupied.
To protect an adult occupying the front
passenger seat, ensure the passenger
front airbag is ON. When the passenger
front airbag is ON, it may inflate when a
collision occurs.
The airbag indicator displays on the
touchscreen for a few seconds at the
start of every drive to check the
following functionality:
Model 3 has the following types of airbags:
Airbags
•
Front airbags: The front airbags are designed to
•
reduce injuries if larger children or adults are riding in
the front seats. Follow all warnings and instructions
related to seating a child on the front passenger seat
(if permitted in your market region).
Seats on page 36.
Knee airbags: Knee airbags and the front airbags
•
work together. The knee airbags limit the forward
motion of the front seat occupants by restricting leg
movement, thereby positioning the occupants so that
the front airbags work more eectively.
Seat-mounted side airbags: A seat-mounted side
•
airbag in the front seats helps protect the pelvis and
the thorax region of the torso; the seat-mounted far
side airbag in the inside portion of the driver’s seat
helps protect the head and torso. The seat-mounted
side airbags on both the impacted and non-impacted
side of the vehicle will inflate in the event of severe
side impact or severe oset frontal impact.
See Child Safety
Seat belt pre-tensioners
•
Impact sensors
•
Occupant/seat belt sensors
•
Passive safety component wiring harnesses
•
Onboard RCM components (ex: accelerometer and
•
other passive safety components)
After this check, the airbag indicator turns o. If the
airbag system detects a fault in any of the previously
mentioned components, the airbag warning indicator
stays on. In this case contact Tesla service immediately.
Do not drive the vehicle until the airbag system is
inspected by Tesla.
Front Passenger Occupant Detection
Model 3 has an occupancy sensor in the front passenger seat that controls the status of the front airbag.
NOTE: The Occupant Classification System (OCS) meets the regulatory requirement of FMVSS 208 and
automatically detects when
inflating the passenger front airbag would be unnecessary or potentially harmful.
43Seating and Safety Restraints
Page 46
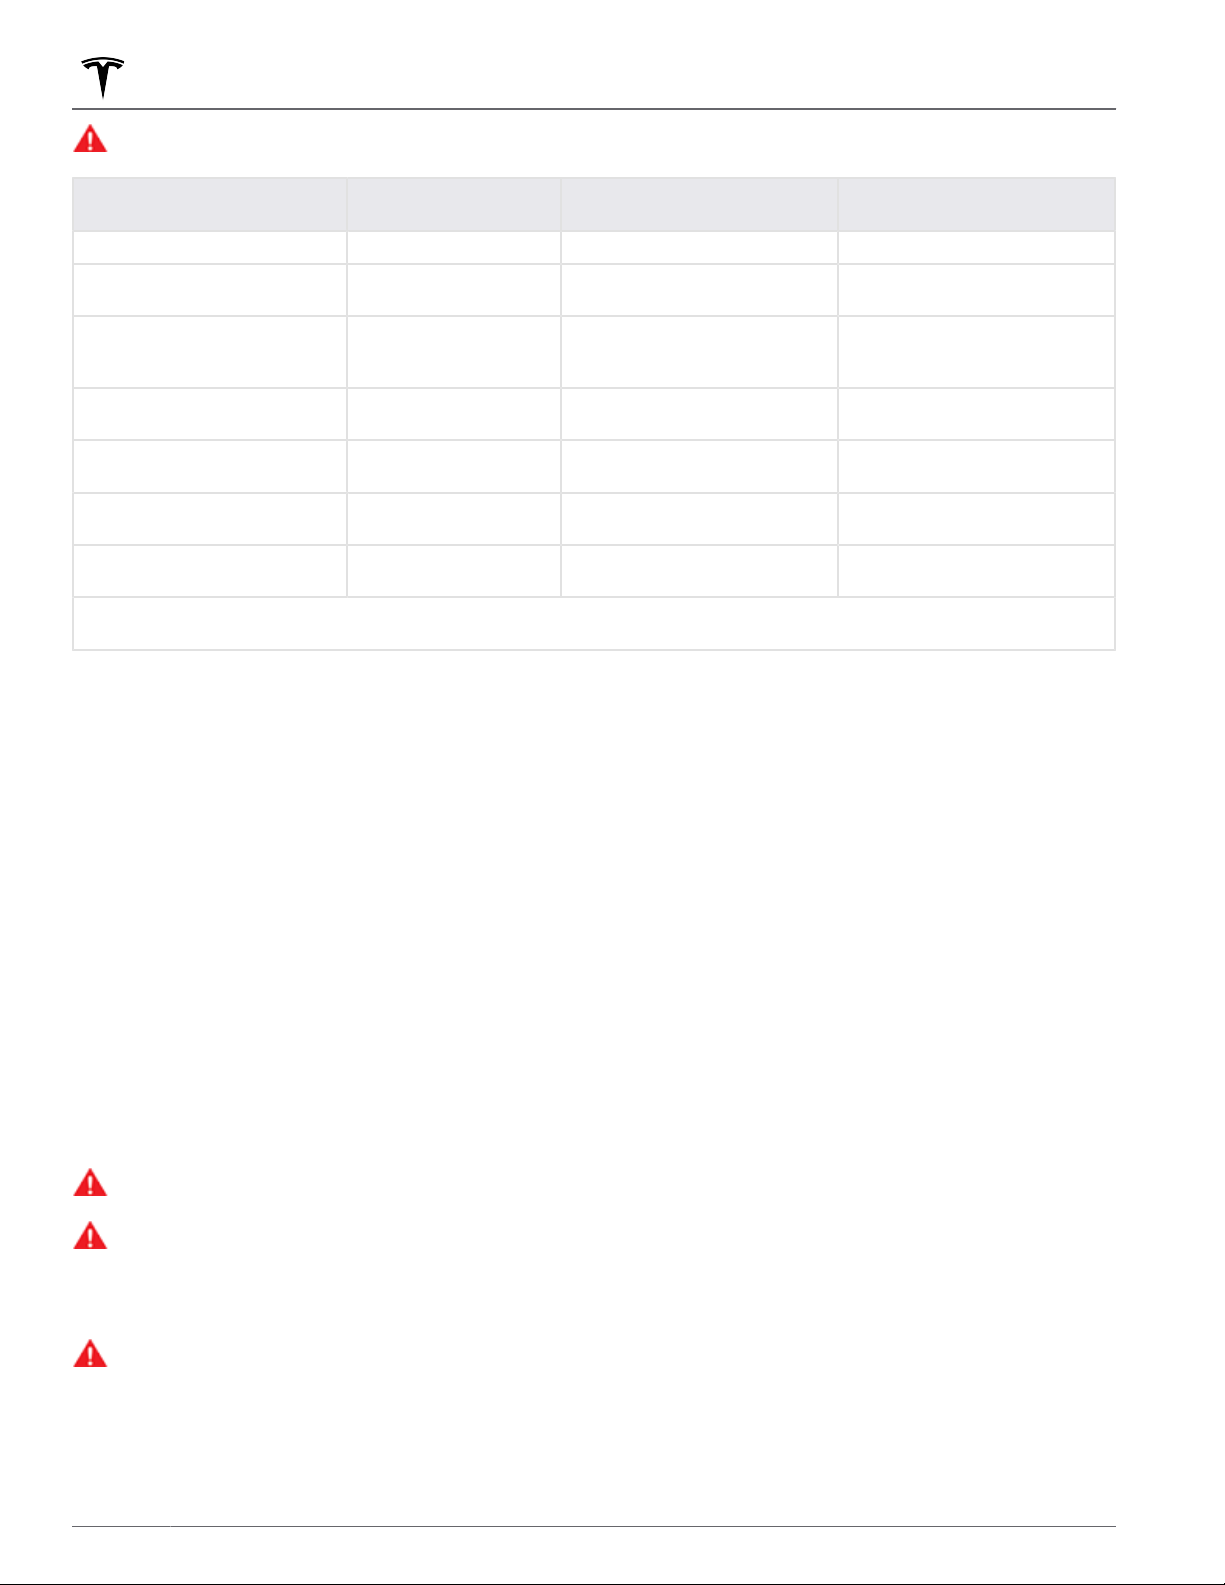
Airbags
WARNING: Seating an infant in a rear facing child restraint system on a seat equipped with an operational
airbag can cause serious injury or death.
Object Classification OCS Passenger Airbag
Empty OFF PASSENGER AIRBAG OFF
Object OFF or ON PASSENGER AIRBAG OFF or
Rear-facing child restraint
system designed for children up
to a year old
Forward facing child restraint
system
Child in a booster seat OFF or ON PASSENGER AIRBAG OFF or
Large child OFF or ON PASSENGER AIRBAG OFF or
5th percentile female or larger
(by weight)
* If the passenger airbag status indicator does not match the situation, do not use the seat. The passenger must ride in a dierent
seat. Use the mobile app to schedule a service appointment.
Status*
OFF PASSENGER AIRBAG OFF 22 lbs (10 kg) or less
OFF or ON PASSENGER AIRBAG OFF or
ON PASSENGER AIRBAG ON Over approximately 103 lbs (47
Indicator status Notes
Depends on material/contents.
PASSENGER AIRBAG ON
22-35 lbs (10-16 kg)
PASSENGER AIRBAG ON
Less than 51 lbs (23 kg)
PASSENGER AIRBAG ON
51-103 lbs (23-47 kg)
PASSENGER AIRBAG ON
kg)
NOTE: It takes approximately six seconds after you power on Model 3 for the Occupant Classification System (OCS)
to report accurate status of the front passenger airbag. As a result, when you first power on Model 3, even in
situations when it should be OFF because the seat is occupied by a weight of 20 lbs (9 kg) or less, it will take the
touchscreen approximately six seconds to display the status, PASS AIRBAG OFF. If it fails to do so, use the mobile
app to schedule a service appointment and do not seat a child in the front passenger seating position.
To make sure the sensing system can correctly detect occupancy status, eliminate the following:
Objects lodged under the seat.
•
Heavy objects sitting on the seat (briefcase, large purse, etc.).
•
Objects wedged between the seat back and seat cushion.
•
Cargo interfering with the seat.
•
Aftermarket items attached to, or sitting on or between, the seat and occupant including but not limited to
•
covers, mats, blankets, etc.
These conditions can interfere with the occupancy sensor. If you have eliminated the above possibilities, and the
airbag status is still incorrect, ask passengers to ride in the rear seats and use the mobile app to schedule a service
appointment to have the airbag system checked.
NOTE: The front passenger occupancy sensor aects the operation of the passenger front airbags only. The side
airbags are not aected.
WARNING:
If the front passenger airbag is not turning on or o as expected based on the weight thresholds
previously described, use the mobile app to schedule a service appointment immediately.
WARNING:
If seating a child in the front passenger seat is legally permissible in your market region, it is the
driver's responsibility to ensure that the passenger front airbag is OFF. Never seat a child in a rear facing safety
seat in the front passenger seat with an active airbag. DEATH or SERIOUS INJURY to the child can occur. Per
recommendations by the National Highway Trac Safety Administration, all occupants age 12 and under must
ride in the rear seats.
WARNING:
Do not use seat covers on Model 3. Doing so could restrict deployment of the seat-mounted side
airbags if a collision occurs. It can also reduce the accuracy of the Occupant Classification System, if equipped.
44 MODEL 3 Owner's Manual
Page 47
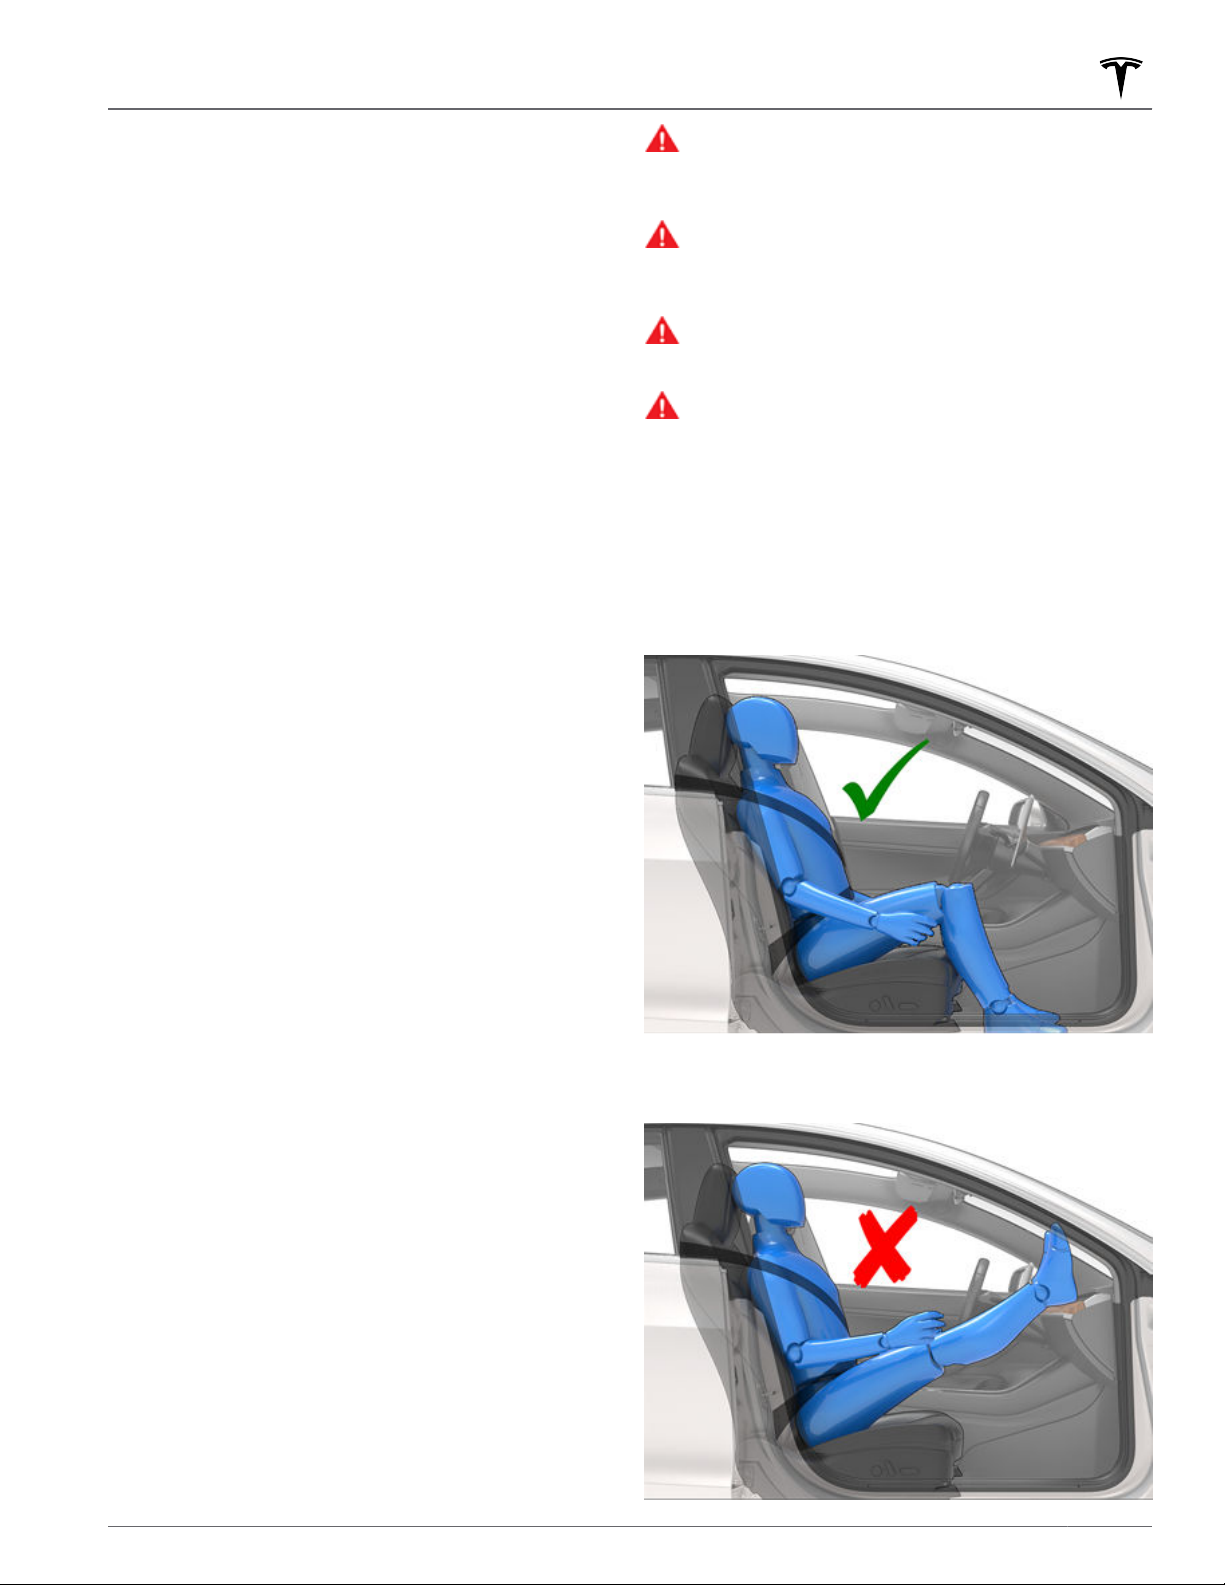
Airbags
Ensuring Accurate Occupant
Detection
To help ensure an occupant in the front passenger seat
can be accurately classified, the passenger must:
• Wear a seat belt.
• Sit upright on the center of the seat cushion, with
shoulders resting against the seat back and legs
extended comfortably in front with feet on the
•
Remain positioned on the seat cushion and not lift
their weight o the seat (for example, by pushing
their feet against the floor or pressing on the center
console or armrest to lift up).
• Never wear thick, wet, or bulky clothing (such as ski
wear or padded clothing).
In addition to the items listed above, the following
situations can interfere with the accuracy of the
occupant classification system:
Placing a radio transmitter (for example, a hunting
•
radio or walkie-talkie) on the front passenger seat.
Placing an AC/DC inverter, or a device that is being
•
powered by the inverter (for example, a cell phone,
tablet, or computer) on the front passenger seat
cushion.
Placing liquid (such as a bottled drink) or food
•
containers on a car seat when a child restraint system
is present.
Incorrectly placing a child restraint system so that the
•
entire lower section is not positioned against the seat
cushion.
Objects lodged under the seat or wedged between
•
the seat back and cushion.
Heavy objects sitting on the seat (briefcase, large
•
purse).
Cargo interfering with the seat.
•
Aftermarket items attached to or placed between the
•
seat and the occupant, such as covers, mats,
blankets, etc.
floor.
WARNING:
adversely aect the Occupant Classification
System (OCS) which can cause serious injury or
death.
WARNING:
turning on or o as expected, do not seat a
passenger in the front passenger seat. Use the
mobile app to schedule a service appointment.
WARNING:
Classification System (OCS), do not make any
modifications to the front passenger seat.
WARNING:
Doing so could restrict deployment of the seatmounted side airbags if a collision occurs. It can
also reduce the accuracy of the occupant
detection system.
Failure to follow the instructions can
If the front passenger airbag is not
To ensure accuracy of the Occupant
Do not use seat covers on Model 3.
Examples of Correct and Incorrect
Seating Positions
Correct seating position:
Incorrect seating position - the passenger's feet must be
on the floor:
These conditions can interfere with the occupancy
sensor. If you have eliminated the above possibilities,
and the airbag status is still incorrect, instruct
passengers to ride in the rear seats and use the mobile
app to schedule a service appointment to have the
airbag system checked.
NOTE: Tesla follows NHTSA (National Highway Trac
Safety Administration) recommendations that all
occupants age 12 and under must ride in a rear seating
position.
NOTE: The front passenger occupancy sensor aects
the operation of the passenger front airbags only. The
side airbags are not aected.
45Seating and Safety Restraints
Page 48
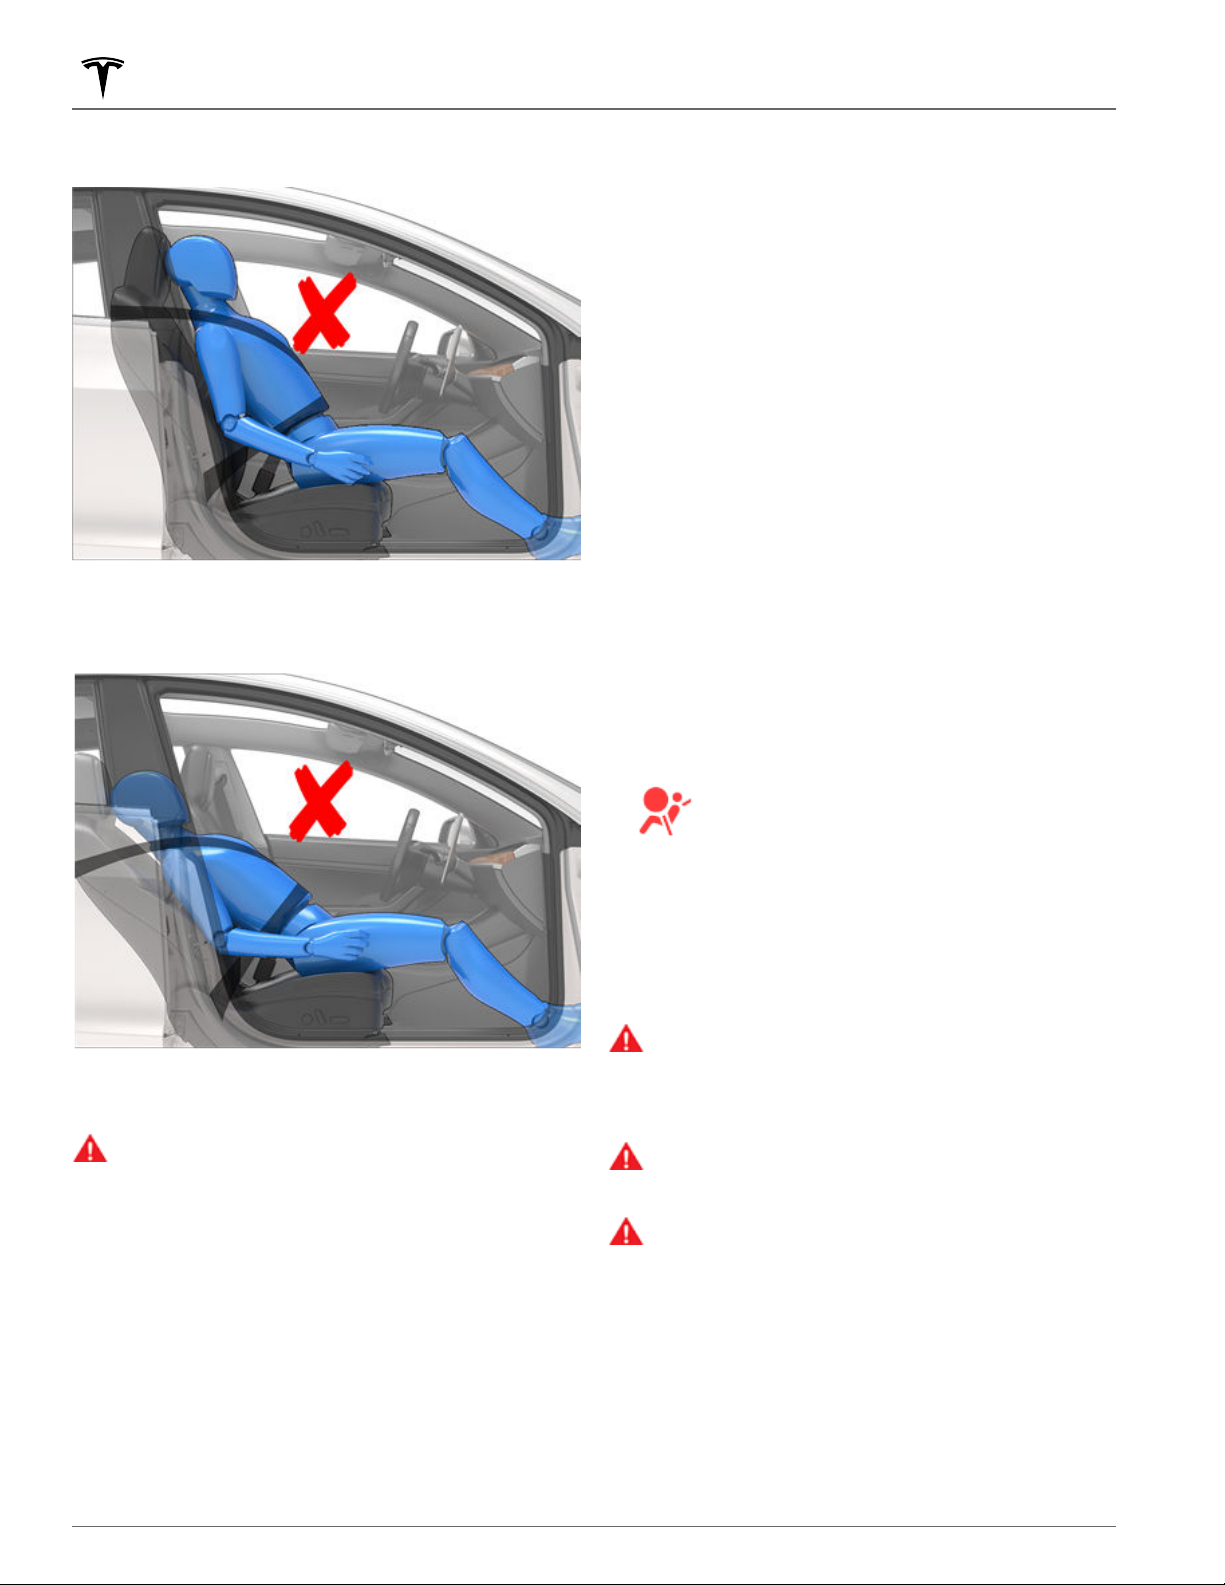
Airbags
Incorrect seating position - the passenger must not slide
forward on the seat cushion:
Incorrect seating position - the passenger must not
recline the backrest to a laying down position when the
vehicle is moving:
• United States only: Your vehicle automatically dials
Controls > Safety > Automatic 911 calls is
911 if
enabled. Cancellation instructions as well as a
countdown timer display on the touchscreen.
• Doors unlock.
•
Hazard warning lights turn on.
•
Interior lights turn on.
• High voltage is disabled.
•
Windows go to the vent position.
•
Vehicle applies the brakes to come to a stop.
NOTE: Depending on the nature of the impact and the
forces involved, doors may not unlock in a collision
and/or damage may prevent them from opening. In such
cases, the door may need to be opened using the
interior manual release, or other means of extrication
(for example, exiting through another door, breaking the
window, etc.).
NOTE: In some collisions, even if airbags did not inflate,
high voltage may be disabled and you will be unable to
power up and drive. Use the mobile app to schedule a
service appointment immediately.
Inflation Eects
WARNING:
released. This powder can irritate the skin and
should be thoroughly flushed from the eyes and
from any cuts or abrasions.
After inflation, the airbags deflate to provide a gradual
cushioning
driver’s forward vision is not obscured.
If airbags have inflated, or if your vehicle has been in a
collision, your vehicle requires servicing before it will
power up. In addition, your airbags, seat belt pretensioners and any associated components must be
checked, and if necessary, replaced. Use the mobile app
to schedule a service appointment immediately.
When airbags inflate, a fine powder is
eect for the occupants and to ensure the
Airbag Warning Indicator
The airbag indicator on the touchscreen
remains lit if the airbag system is
malfunctioning. The only time this indicator
should light up is
powers up, in which case it turns o within
a few seconds. If it remains lit, use the
mobile app to schedule a service
appointment immediately and do not drive.
briefly when Model 3 first
Airbag Warnings
WARNING:
should always wear their seat belts, whether or not
an airbag is also provided at their seating position,
to minimize the risk of severe injury or death in the
event of a collision.
WARNING:
their arms over the airbag module, as an inflating
airbag can cause fractures or other injuries.
WARNING:
Doing so could restrict deployment of the seatmounted side airbags if a collision occurs. It can
also reduce the accuracy of the Occupant
Classification System (OCS), if equipped.
All occupants, including the driver,
Front seat occupants should not place
Do not use seat covers on Model 3.
In a collision, in addition to the airbags inflating:
46 MODEL 3 Owner's Manual
Page 49

WARNING: Airbags inflate with considerable
speed and force, which can cause injury. To limit
injuries, ensure that occupants are wearing seat
belts and are correctly seated, with the seat
positioned as far back as possible. The National
Highway Trac Safety Administration (NHTSA)
recommends a minimum distance of 10 inches
(25 cm) between an occupant’s chest and an
airbag.
WARNING: Children should not be seated on the
front passenger seat unless permitted by
regulations in your market region. Follow all
regulations in your region for the appropriate way
to seat a child based on the child's weight, size,
and age. The safest place to seat infants and
young children is in a rear seating position. Seating
an infant or child in a rear-facing child restraint
system on a seat equipped with an operational
airbag can cause serious injury or death.
WARNING: Do not use a rear-facing child restraint
system on a seat with an operational airbag in
front of it. Doing so can cause injury or death if the
airbag inflates.
WARNING: To ensure correct inflation of the side
airbags, maintain an unobstructed gap between an
occupant’s torso and the side of Model 3.
WARNING: Passengers shouldn't lean their heads
against doors or windows. Doing so can cause
injury if a curtain airbag inflates.
WARNING: Do not allow passengers to obstruct
the operation of an airbag by placing feet, knees
or any other part of the body on or near an airbag.
WARNING: Do not attach or place objects on or
near the front airbags, the side of the front seats,
the headliner at the side of the vehicle, or any
other airbag cover that could interfere with
inflation of an airbag. These include but are not
limited to: steering wheel covers, decals, seat
cushions, pillows, etc. Objects can cause serious
injury if the vehicle is in a collision severe enough
to cause the airbag to inflate.
WARNING: Following inflation, some airbag
components are hot. Do not touch until they have
cooled.
Airbags
47Seating and Safety Restraints
Page 50

Mobile App
The Tesla mobile app allows you to communicate with
Model 3 remotely using your iPhone® or Android™
phone.
NOTE: The information below may not represent an
exhaustive list of the functions available on the Tesla
mobile app. To ensure access to new and improved
features, download updated versions of the mobile app
as they become available.
To Use the Mobile App
To set up the Tesla mobile app to communicate with
your Model 3:
Download the Tesla mobile app to your phone.
1.
2. Log in to the Tesla mobile app by entering your Tesla
account credentials.
Enable mobile access to your Model 3 by touching
3.
Controls > Safety > Allow Mobile Access.
4. Turn your phone's Bluetooth setting ON and ensure
that Bluetooth is turned on within your phone's
global settings for the Tesla mobile app. For example,
on your phone, navigate to Settings, choose the Tesla
mobile app, and ensure the Bluetooth setting is
enabled.
Your phone and vehicle must both be actively
connected to cellular service or Wi-Fi for the mobile app
to communicate with your vehicle. Tesla recommends
that you always have a functional physical key readily
available if parking in an area with limited or absent
cellular service, such as an indoor parking garage.
NOTE: In the event that you require lockout assistance
from Tesla due to a non-warranty issue, such as having
limited cellular connectivity and having no secondary
key available, your expenses are not covered under the
Roadside Assistance policy.
NOTE: Tesla does not support the use of third party
applications to contact Model 3.
Overview
When both your phone and the vehicle have internet
service, the Tesla mobile app's home screen allows you
to:
• Lock or unlock your vehicle.
• Enable or disable the heating or air conditioning and
monitor the cabin climate.
Check your vehicle's charging information. Charging
•
details also appear when a charging cable is plugged
in.
• Open or close the charge port.
NOTE: Twisting red lines next to the Battery icon
indicate that the Battery is actively heating up
(including while charging or preparing to charge).
• See where your vehicle is located.
• View your vehicle’s estimated range.
Open the front trunk.
•
• View your vehicle’s odometer, VIN, and current
software version.
Media settings appear on the mobile app to pause, play,
rewind, fast forward, and adjust the volume of the media
currently playing in the vehicle. You may need to enable
Media settings by touching
Allow Mobile Control.
For supported video sources, send videos to Tesla
Theater by sharing the link through the mobile app.
Navigate to the movie, show, or video you want to play
on your phone and touch the share button. Share the
video with the Tesla app and it appears on the
touchscreen if
Model 3 is in Park.
Audio Settings > Options >
Profile
In the Profile tab located at the top corner, you can:
Switch to a dierent vehicle associated with your
•
Tesla account, if you have access to more than one.
Navigate the Tesla Shop.
•
Manage your account information and view your
•
order history.
View and customize notifications you receive under
•
the Settings tab, such as Calendar sync, when your
security alarm has been triggered, charging updates,
and new software updates. You can start updates
from afar and check its progress.
Controls
The Controls tab allows you to do the following:
Open the front or rear trunk.
•
Lock or unlock Model 3 from afar.
•
NOTE: Your vehicle does not automatically re-lock if
you unlock from the mobile app.
Open or close the charge port.
•
• Flash the lights or honk the horn to find where Model
3 is parked.
• Enable Keyless Driving.
NOTE: Keyless Driving can be used when you do not
have your key or to bypass PIN to Drive in cases
where you forgot your PIN or your touchscreen is
unresponsive (see PIN to Drive on page 130).
Open and close your garage door if your vehicle has
•
a programmed HomeLink connection, if available (see
Smart Garage on page 56).
• Vent the windows.
48 MODEL 3 Owner's Manual
Page 51

Mobile App
Climate
You can check the interior temperature and heat or cool
the cabin before driving (even if it’s in a garage), control
the seat heaters, and defrost the windshield:
• Enable or disable Defrost Car, which helps melt snow,
ice, and frost on the windshield, windows, and
mirrors, by swiping up from the bottom of the screen.
• Enable or disable Dog Mode or Camp Mode.
•
Enable Cabin Overheat Protection, which prevents
the cabin from getting too warm in hot ambient
conditions. You can choose whether you want the
A/C or just the fan to run when the temperature in
the cabin exceeds
temperature (if available). See Operating Climate
Controls on page 137 for more information.
• Vent or close the windows.
•
Using the mobile app to precondition Model 3 also
warms the Battery as needed. The mobile app will notify
you once your vehicle has reached the desired
preconditioning temperature.
NOTE: In some vehicles, depending on vehicle
specifications and date of manufacture, using the mobile
app to defrost Model 3 also thaws ice on the charge port
latch. This is useful in extremely cold weather or icy
conditions in which the charge port latch can freeze in
place, preventing you from removing or inserting the
charge cable.
105° F (40° C) or the selected
• Enable or disable Sentry Mode (see
Sentry Mode (With a USB Flash Drive) on page 134).
• Enable or disable Valet Mode (see Valet Mode on
page 83).
• Enable or disable Speed Limit Mode and receive
notifications when the vehicle's driving speed is
within approximately 3 mph (5 km/h) of your
selected maximum speed (see Speed Limit Mode on
page 130).
How to Use
Upgrades
View and purchase the latest upgrades available for your
vehicle, such as full self-driving.
Service
See Schedule Service on page 174 for information on
how to schedule service through the mobile app.
Roadside
View roadside resources and request roadside
assistance (where applicable). For more information on
Roadside Assistance, see
Assistance on page 211.
Contacting Tesla Roadside
Granting Access to a Second Driver
Add and remove access permission for an additional
driver from the Tesla mobile app.
Location
Locate Model 3 with directions, or track its movement
across a map.
Summon
You can park or retrieve Model 3 using Summon (see
Summon on page 112) or Smart Summon (see Smart
Summon on page 114).
Schedule
Enable scheduled charging or departure, and
precondition the vehicle. See Scheduled Charging and
Scheduled Departure on page 169 for more information.
Scheduled charging or departure can also be saved
based on a preferred location.
Security
The Security tab allows you to do the following:
• Pair your phone to the vehicle (see Phone Key on
page 19).
NOTE: Tesla mobile app version 4.3.1 or higher is
required. Additional drivers can either use a previously
registered Tesla Account or use the app to create a new
Tesla Account.
To add an additional driver, in the Tesla mobile app from
the vehicle home screen, go to Security > Add Driver
and follow the onscreen instructions.
NOTE: The additional driver has access to all app
features except purchasing upgrades.
To remove access, use the mobile app and go to
Security > Manage Drivers and follow the onscreen
instructions.
49Connectivity
Page 52

Wi-Fi
Wi-Fi is available as a data connection method and is
often faster than cellular data networks. Connecting to
Wi-Fi is especially useful in areas with limited or no
cellular connectivity. To ensure fast, reliable delivery of
software and map updates, Tesla recommends leaving
Model 3 connected to a Wi-Fi network whenever
possible (for example, when parked at home).
To connect to a Wi-Fi network:
1.
Touch Controls > Wi-Fi icon at the top of the
Controls screen. Model 3 begins to scan and display
detected Wi-Fi networks that are within range.
When connected to Wi-Fi, the Wi-Fi icon displays at
the top of the touchscreen.
NOTE: If a known Wi-Fi network does not appear in
the list, move Model 3 closer to the access point or
consider using a range extender.
NOTE: When connecting to a 5GHz network (if
available), check which channels are supported in
your region.
5GHz Network Channels Supported
36-48 52-64 100-140 149-165
✓ ✓ ✓ ✓
Select the Wi-Fi network you want to use, enter the
2.
password (if necessary), then touch Confirm.
NOTE: Model 3 does not currently support
connections to captive Wi-Fi networks (a captive WiFi, commonly used by public hotspots, requires you
to access a custom web portal and agree to terms of
service prior to allowing you to log in).
Model 3 connects to the Wi-Fi network. Whenever
3.
the network is within range, Model 3 connects to it
automatically.
You can also connect to a hidden network that isn't
shown on the list of scanned networks. Just touch Wi-Fi
Settings, enter the name of the network in the resulting
dialog box, select the security setting, then touch Add
Network.
NOTE: If more than one previously connected network is
within range, Model 3 connects to the one most recently
used.
NOTE: At Tesla Service Centers, Model 3 automatically
connects to the Tesla Service Wi-Fi network.
Hotspots and Connectivity
You can also use a mobile hotspot or your phone's
Internet connection via Wi-Fi tethering (subject to fees
and restrictions of your mobile carrier) to access the
internet. To remain connected to Wi-Fi when shifting
into Drive or Reverse, choose the connection from the
Wi-Fi settings screen, then touch
Drive.
50 MODEL 3 Owner's Manual
Remain connected in
Page 53

Bluetooth
Bluetooth® Compatibility
You can use various Bluetooth devices in
Model 3 provided it is paired and within
operating range. For example, you can pair
your Bluetooth-capable phone so you can
use it hands-free. In addition to phones,
you can pair other Bluetooth-enabled
devices with
pair an iPod Touch, iPad, Android tablet,
etc. from which you can play music.
Before using your phone or other Bluetooth device with
Model 3, you must pair it. Pairing sets up Model 3 to
communicate with supported Bluetooth-capable
devices. You can pair up to ten Bluetooth phones. Unless
you've
if the phone
range, Model 3 always connects to the last phone that
was used (provided it is within range). To connect to a
dierent phone, see Connecting to a Paired Device on
page 52.
NOTE: Authenticating your phone to use as a key (see
Keys on page 19) does not also allow you to use the
phone hands-free, play media from it, etc. You must also
pair it as described below.
NOTE: On many phones, Bluetooth turns o if the
phone’s battery is low.
NOTE: Although Bluetooth typically supports wireless
communication over distances of up to approximately
30 feet (nine meters), performance can vary based on
the phone, or other device, you are using.
specified a specific phone as a Priority Device, or
specified as Priority Device is not within
CAUTION:
vehicle (for example, if you are hiking or at the
beach). If you must leave your phone in the
vehicle, disable Bluetooth and/or turn the phone
o.
Do not leave your paired phone in your
Model 3. For example, you can
Pairing a Bluetooth Device
Pairing allows you to use your Bluetooth-capable phone
hands-free to make and receive phone calls, access your
contact list, recent calls, etc. It also allows you to play
media
Model 3 can connect to it whenever the phone is within
range.
To pair a phone, follow these steps while sitting inside
Model 3:
files from your phone. Once a phone is paired,
1. Ensure both the touchscreen and the phone are
powered on.
On your phone, enable Bluetooth and ensure it is
2.
discoverable.
NOTE: On some phones, this may require you to go
to Bluetooth Settings for the remainder of the
procedure.
3. Touch the Bluetooth icon located
Controls screen.
4. On the touchscreen, touch Add New Device > Start
Search. The Bluetooth settings screen displays a list
of all available Bluetooth devices within operating
distance.
5.
Choose the phone (or device) with which you want to
pair. When pairing a phone, the Bluetooth settings
screen displays a randomly generated number. Your
phone also display a number.
6. Check that the number displayed on your phone
matches the number on the Bluetooths settings
screen. Then, on your phone,
to pair.
If prompted on your phone, specify whether you
7.
want to allow
information, such as calendar, contacts and media
files (see Importing Contacts and Recent Calls on
page 51).
If you are experiencing issues importing or connecting
to Bluetooth, see Troubleshooting Bluetooth on page 52
for more information.
When paired, Model 3 automatically connects, and the
Bluetooth settings screen displays the Bluetooth symbol
next to the device name to indicate that the connection
is active.
You can display the Bluetooth settings screen at any
time and change the settings associated with a
connected device. For example, you can designate a
connected phone as the Priority Device. This is useful in
situations where you have connected more than one
phone, and both phones are frequently used in
at the same time. Model 3 automatically attempts to
connect to the priority device before others. If a priority
device is not specified, or is not within range, Model 3
connects to the most recently used phone (if
applicable).
Model 3 to access your personal
at the top of the
confirm that you want
Model 3
Importing Contacts and Recent
Calls
Once a phone is paired, use the Bluetooth settings
screen to specify whether you want to allow access to
your phone’s contacts, recent calls and text messages. If
you allow access, you can use the phone app to make
calls and send messages to people in your list of
contacts and on your recent calls list (see
Calendar, and Web Conferencing on page 54). Before
contacts can be imported, you may need to either set
your phone to allow syncing, or respond to a popup on
your phone to confirm that you want to sync contacts.
This varies depending on the type of phone you are
using. For details, refer to the documentation provided
with your phone.
Phone,
51Connectivity
Page 54

Bluetooth
If you are having trouble importing contacts or paiting
with Bluetooth, see Troubleshooting Bluetooth on page
52 for more information.
NOTE: You can turn access to your contacts and recent
calls on or o at any time by touching the Bluetooth
icon on the touchscreen, choosing your phone, and then
changing the associated access settings.
Unpairing a Bluetooth Device
If you want to disconnect your phone, or Bluetooth
device, and use it again later, simply touch
on the Bluetooth settings screen. If you no longer want
to use your device with Model 3, touch Forget This
Device. Once you forget a device, you must pair it again
if you want to use it with
Bluetooth Device on page 51).
NOTE: Your phone automatically disconnects when you
leave Model 3.
NOTE: Unpairing the phone has no eect on using the
phone as a key. To forget an authenticated phone, see
Managing Keys on page 20.
Model 3 (see Pairing a
Disconnect
Connecting to a Paired Device
Model 3 automatically connects to a phone that you
designated as Priority Device on the Bluetooth settings
screen. If you have not set a phone as a priority,
connects to the last phone to which is was connected,
provided it is within operating range and has Bluetooth
turned on. If the last phone is not within range, it
attempts to connect with the next phone that it has
been paired with.
To connect to a dierent phone, touch the Bluetooth
icon at the top of the Controls screen. The Bluetooth
settings screen displays a list of paired phones. Choose
the phone you want to connect to, then touch
If the phone you want to connect to is not listed, you
must pair the phone. See Pairing a Bluetooth Device on
page 51.
When connected, the Bluetooth settings screen displays
the Bluetooth symbol next to the phone's name to show
Model 3 is connected to the phone.
that
Model 3
Connect.
NOTE:
Do not unpair your vehicle to your phone or
remove it as phone key without a working key card
nearby.
Try the following to troubleshoot Bluetooth, starting
with your smartphone.
Smartphone Troubleshooting
Bluetooth may not connect due to settings and updates
on your smartphone:
•
Enable Bluetooth on your phone. If already enabled,
disable and re-enable Bluetooth again.
• Ensure Airplane Mode is turned o.
• Charge your phone; if your phone battery is too low,
it may not support Bluetooth functions.
• Pair your device properly. If already paired, try
unpairing and re-pairing again.
Update your phone to the latest software provided
•
by the manufacturer.
Check that your vehicle's sound system is selected as
•
the audio output source.
Ensure your phone's settings allow for Bluetooth (ex:
•
data is turned on or you are connected to Wi-Fi).
Turn your phone o and on again.
•
Ensure location permissions set to “Always On” for
•
the mobile app.
Tesla Mobile App Troubleshooting
Check the Tesla mobile app:
Confirm the Tesla mobile app is up to date on
•
software.
Verify you're logged into the Tesla mobile app while
•
using your phone key.
Ensure the Tesla app is running in the background.
•
Double check that you have completely set up your
•
profile in the mobile app and properly configured
your settings.
Troubleshooting Bluetooth
Your vehicle uses Bluetooth and BLE (Bluetooth Low
Energy) to seamlessly connect your smartphone to
Model 3. Due to several potential factors, Bluetooth or
BLE may sometimes disconnect or experience issues in
the pairing process. Connecting to Bluetooth allows your
vehicle to use phone functions such as audio, phone
calls, calendars, text messages, etc.
BLE is used for passive functions like phone key.
52 MODEL 3 Owner's Manual
Vehicle Troubleshooting
Your vehicle's settings may aect its ability to pair with
your smartphone:
• Charge Model 3: If the vehicle Battery is too low, you
may lose Bluetooth function.
Update vehicle software and make sure it is always
•
up to date. Check for new software updates available
by navigating to Controls > Software
• Reboot your vehicle.
Page 55

If Bluetooth still does not work, unpair from your vehicle
AND smartphone. Then try re-pairing both again.
For BLE phone key issues, when in the vehicle, navigate
to Controls > Locks and remove your phone as "Phone
as Key". Then set it back up again. But only do this while
you are in the vehicle and have a reliable back up key
available (such as a key card).
Bluetooth
53Connectivity
Page 56
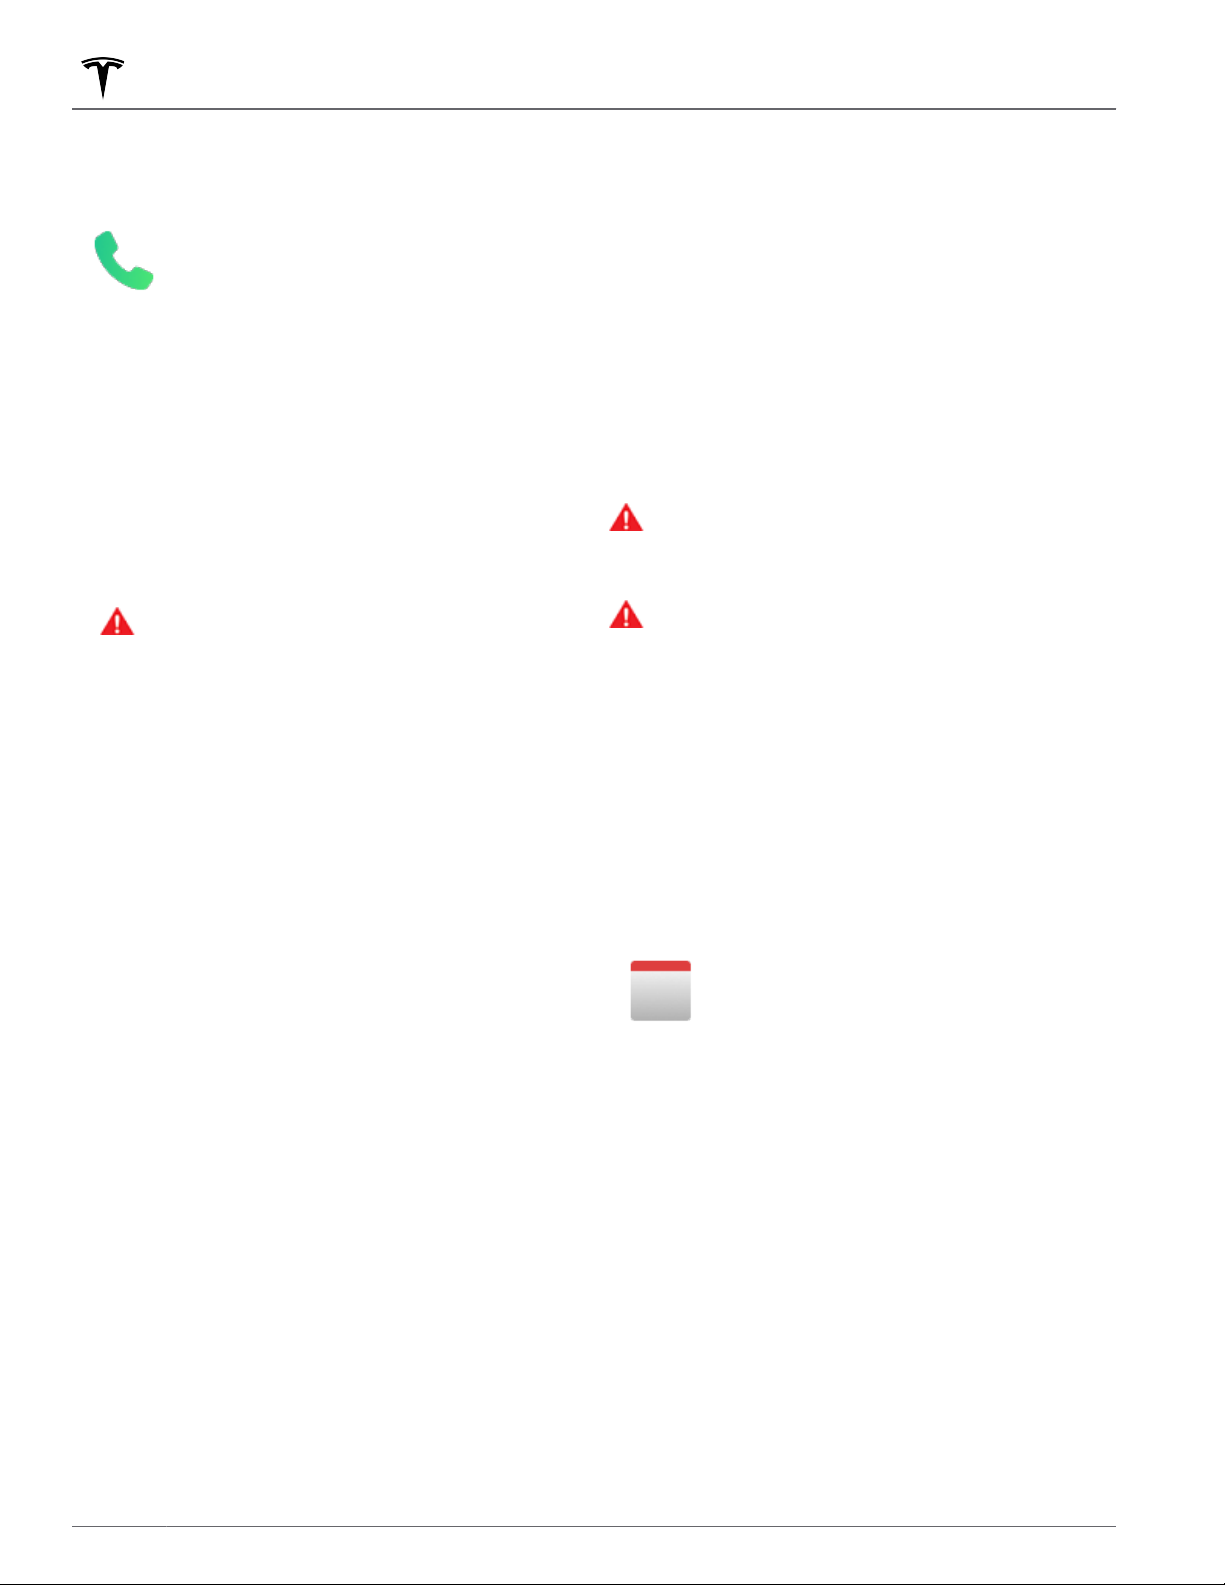
Phone, Calendar, and Web Conferencing
Using the Phone App
NOTE:
You can also make a phone call by touching a pin
on the map and choosing the phone number (if
available) on the popup screen.
When your phone is connected to Model 3
using Bluetooth (see Bluetooth on page
51), and you have allowed access to
information on your phone (see Importing
Contacts and Recent Calls on page 51), you
can use the phone app to display and
make a hands-free call to anyone listed on
your phone.
•
Calls: Displays recent calls in chronological order with
the most recent call listed first.
Messages: Displays message in chronological order
•
with the most recent message listed first. You can
view, send, and receive text messages. Instead of
typing a text message, touch the microphone button
on the right side of the
using your voice.
WARNING:
the safety of occupants as well as other road
users, do not view or send text messages when
the vehicle is in motion. Pay attention to road
and trac conditions at all times when driving.
Contacts: Contacts are listed in alphabetical order
•
and can be sorted by first name or last name. You can
also choose a letter on the right side of the list to
quickly scroll to the names that begin with the
selected character. When you touch a name on your
contacts list, the contact's available number(s)
displays on the right pane, along with other available
information (such as address). Touch the contact's
number to make a call.
Favorites: Displays the contacts from your phone that
•
you have identified as Favorites.
Calendar: Displays calendar entries from your phone
•
Calendar on page 54). If an entry includes a
(see
phone number or an address, you can make a phone
call, or navigate to a destination, by touching the
corresponding information in the calendar entry.
To minimize distraction and ensure
steering wheel to enter text
Receiving a Phone Call
When your phone receives an incoming call, the
touchscreen displays the caller’s number or name (if the
caller is in your phone’s contact list and
access to your contacts).
Touch one of the options on the touchscreen to Answer
or Ignore the call. Depending on the phone you are
using and what speakers you used for your most recent
call, your phone may prompt you to choose which
speakers you want to use for the incoming call.
WARNING:
while driving. Using or programming a phone while
driving, even with Bluetooth enabled, can result in
serious injury or death.
WARNING:
use of phones while driving, including, but not
limited to, laws that prohibit texting and require
hands-free operation at all times.
Stay focused on the road at all times
Follow all applicable laws regarding the
Model 3 has
In Call Options
When a call is in progress, the call displays on the
touchscreen. To adjust the call volume, roll the left scroll
button during a call. Tilt the left scroll button left to
mute/unmute and tilt right to end the call.
Calendar
The calendar displays scheduled events
from your phone’s (iPhone® or Android™)
calendar for the current and next day. The
calendar is conveniently integrated with
the phone app so you can dial into your
meeting from a Calendar entry. It is also
integrated with the navigation system so
you can navigate to the event's location.
Making a Phone Call
You can make a phone call by:
• Speaking a voice command (see Voice Commands on
page 16). Voice commands are a convenient, hands-
free way to call or text your contacts.
• Touching a phone number shown in a list in the
phone app - Contacts, Calls, or Calendar.
• Using the Model 3 on-screen dialer in the Phone app.
NOTE: If it is safe and legal to do so, you can also initiate
a call by dialing the number or selecting the contact
directly from your phone.
54 MODEL 3 Owner's Manual
Ensure your phone is paired to Model 3.
1.
Ensure your are logged into the Tesla mobile app.
2.
3. In your Tesla mobile app, touch Profile > Settings >
Calendar Sync.
NOTE: To ensure you have access to all of the
calendar's features, it is recommended that you use
the most recent version of the mobile app.
4. On your phone, go to Settings and allow access/give
permission to share your calendar with the Tesla
mobile app. The mobile app can then periodically
(and automatically) send calendar data from your
phone to
Model 3.
Page 57

Phone, Calendar, and Web Conferencing
If a calendar event includes an address, a navigation
arrow displays to indicate that you can touch the
address to navigate to the event's location. When an
event on your calendar takes place within the next hour
and has a uniquely specified address, the touchscreen
notifies you if there is a better route due to trac, even
when you’re not actively using navigation.
If an event has a uniquely specified address and takes
place within two hours of you entering your vehicle and
preparing to drive,
the event's address (see Automatic Navigation on page
150).
Touch an event's information icon to display all notes
associated with the event. If the notes include one or
more phone numbers, the information icon shows a
phone icon and the calendar displays the
number found. Touch to initiate a phone call. You can
also initiate a phone call by touching any number in an
event's notes popup screen (this is especially useful for
conference calls). If notes include a web link, you can
touch the link to open it in the Web browser.
Zoom
Model 3 automatically routes you to
first phone
Seamlessly take meetings and calls
through your vehicle's touchscreen. To set
up, touch the Zoom app and sign in or
enter the meeting ID. You can even access
meetings shown on your calendar or in text
messages by touching the Zoom link. Your
vehicle's cabin camera can be used in calls
over Zoom only when Model 3 is Parked.
When the vehicle is shifted out of Park in
the middle of a Zoom call, the cabin
camera turns
only. Use the touchscreen to turn on/o
the video, mute/unmute yourself, and
customize various preferences for your
meeting.
WARNING:
the vehicle is “temporarily parked” on a public
road (such as when the vehicle is parked along the
curb or in a spot that is not a designated parking
spot)..
WARNING:
follow all applicable laws while driving, including,
but not limited to, laws that require hands-free
operation at all times.
Do not to use the video function when
Stay focused on your surroundings and
o and you switch to audio
55Connectivity
Page 58
Smart Garage
myQ
If equipped, Model 3 can intelligently
connect to your myQ smart garage, which
allows you to remotely monitor and control
your garage door from the vehicle's
touchscreen. This is convenient if you
forget to close your garage door, want to
allow friends and family inside, or need the
garage to open or close automatically
when your vehicle is detected nearby.
Follow these steps to set up myQ on your vehicle:
1. Your garage door must be myQ compatible. Use the
myQ Compatibility tool (https://www.myq.com/app/
myq-compatibility) to determine this.
2. Ensure your garage is Wi-Fi compatible. myQ uses
Wi-Fi to communicate with your smart phone and
vehicle. Some garages will have a Wi-Fi or myQ
symbol on the hub. Your garage must have a strong
Wi-Fi signal to control and monitor your garage
through your vehicle.
NOTE: If your garage is not compatible, you may be
able to purchase an external myQ hub to use this
feature.
Download the myQ app from your smart phone's app
3.
store. Use the app to set up your account information
and pair the garage to your phone. myQ requires a
paid subscription, which you can purchase in the app.
Check that your vehicle is running the latest available
4.
software version and has Wi-Fi or LTE connectivity.
Touch the garage icon at the top of the touchscreen
5.
or navigate to Controls > Locks > myQ Connected
Garage > Link Account and follow the instructions to
pair the garage with Model 3. Once paired,
monitoring and controlling the garage becomes
available on the touchscreen, where you can further
customize myQ.
For more information, questions, or troubleshooting
assistance, visit
www.myQ.com/Tesla.
HomeLink Universal Transceiver
WARNING:
Transceiver with a device that does not have safety
stop and reverse features. Using a device without
these safety features increases the risk of injury or
death.
Do not use the HomeLink Universal
Supported Modes
HomeLink supports three dierent transmit modes,
which is how your vehicle and the RF device
communicate. Selecting a transmit mode is determined
by your RF device's compatibility:
•
Standard Mode: Use Standard Mode if your RF device
is equipped with a remote control that must be used
to operate the device (for example, a remotecontrolled garage door). This mode is the most
commonly used transmit mode for HomeLink
devices.
• D-Mode or UR-Mode: Use D-Mode or UR-Mode if the
RF device does not have a remote control, and the
receiver has a "Learn" button (may also be called
"Program" or "Smart"). D-Mode and UR-Mode
function similarly in that Model 3 communicates
directly with the device's receiver as opposed to the
remote control.
NOTE: D-Mode is used primarily in North America
whereas UR-Mode is popular in Europe, the Middle
East, and Asia. To determine the mode your device is
compatible with, contact HomeLink by going to
www.homelink.com or calling 1-800-355-3515.
Each of your devices can be set to a dierent mode. For
example, your garage door can be set to Standard
Mode, your front gate can be set to D-Mode, etc. To
change a transmit mode, touch the HomeLink icon at
the top of the
want to change. Then, select Program and choose the
desired mode for your device. Confirm by touching Set
Mode and follow the onscreen instructions.
For older vehicles, changing the mode for one device
changes the mode for all devices, so be careful when
changing transmit modes. Devices not compatible with
your selected mode may not work. Touch the HomeLink
icon at the top of the touchscreen, then touch
Transmit Mode.
Controls screen and select the device you
Change
If your vehicle is equipped with the
HomeLink® Universal Transceiver, you can
operate up to three Radio Frequency (RF)
devices, including garage doors, gates,
lights, and security systems.
NOTE: Depending on date of manufacture, market
region, and options selected at time of purchase, some
vehicles are not equipped with a HomeLink Universal
Transceiver.
56 MODEL 3 Owner's Manual
NOTE: Check the product information for your
HomeLink device to determine which mode is
compatible with your device.
Programming HomeLink
To program HomeLink®:
Park Model 3 so that the front bumper is in front of
1.
the device you want to program.
Page 59

Smart Garage
CAUTION: Your device might open or close
during programming. Therefore, before
programming, make sure that the device is clear
of any people or objects.
2. Check that the device's remote control has a healthy
battery. Tesla recommends replacing the battery in
the device's remote control before Programming
HomeLink.
3.
Touch the HomeLink icon at the top of the Controls
screen.
4.
Touch Create HomeLink.
5. On the HomeLink screen, enter a name for the device,
then touch Enter or Add New HomeLink.
6. Choose the mode you wish to use (Standard, DMode, or UR-Mode), then touch Set Mode.
Touch Start and follow the onscreen instructions.
7.
NOTE: If you see a screen called “Train the receiver”
while programming the device, remember that this is
a time-sensitive step. After pressing the Learn/
Program/Smart button on the device's remote
control, you have only approximately 30 seconds to
return to your vehicle and press
press the trained HomeLink device name twice.
Consider having an assistant to ensure you can
complete this step within 30 seconds.
Once your device is programmed, touch Save to
8.
complete the programming.
Ensure HomeLink works as expected. In some cases,
9.
you may need to repeat the programming process
multiple times before succeeding.
Once programmed, you can operate the device by
touching its corresponding HomeLink icon on the
touchscreen. HomeLink remembers the location of your
programmed devices. When you approach a known
location, the HomeLink control on the touchscreen
automatically appears. When you drive away, it
disappears.
NOTE: The HomeLink icon displays at the top of the
touchscreen when Model 3 detects a programmed
HomeLink device within range, and the touchscreen is
not already displaying the HomeLink screen or popup,
NOTE: For additional assistance or compatibility
questions, contact HomeLink (www.homelink.com or call
1-800-355-3515).
Continue, and then
Auto Opening and Closing
To operate a HomeLink device without using the
touchscreen, you can automate the device to open as
you approach, and close as you drive away:
◦ Select the
you want the device to open as you approach.
◦ Touch the arrows to specify the distance you want
Model 3 to be from the device before it opens.
◦ Select the Auto-close when leaving checkbox if
you want the device to close as you drive away.
◦
Select the Auto-fold mirrors checkbox if you want
mirrors to fold when you arrive at the HomeLink
location. This is useful for narrow garages.
◦
Select the Chime for Auto-open and Auto-close
checkbox if you want Model 3 to sound a chime
when a signal has been sent to open or close the
device.
As you approach (or drive away from) a device that is
set to operate automatically, the HomeLink status icon
displays a count-down message to let you know when
the device automatically opens or closes. In situations
where you don't want the device to automatically open
or close, touch
any time during the count-down message.
NOTE: Do not rely on HomeLink to ensure the device
fully closes.
Auto-open when arriving checkbox if
Skip Auto-Open or Skip Auto-Close at
Resetting the Location of the
HomeLink Device
If you experience situations in which you sometimes
drive up to your HomeLink device and it doesn't open,
or the touchscreen does not display a notification as you
approach a programmed device, you may need to reset
the device's location. To do so, park as close as possible
to the HomeLink device (garage door, gate, etc.) and
display the HomeLink settings page by touching the
HomeLink icon at the top of the
the name of the device you want to reset, then touch
Reset Location.
Controls screen. Touch
Deleting a Device
To delete a HomeLink device, touch the HomeLink icon
at the top of the Controls screen, then touch HomeLink
Settings. Touch the name of the device you want to
delete, then touch Delete.
NOTE: You can also perform a factory reset to erase
your HomeLink settings, along with all other personal
data (saved addresses, music favorites, imported
contacts, etc.). See
NOTE: For security reasons, delete your HomeLink
devices if you sell your
Erasing Personal Data on page 10.
Model 3.
1. Touch the HomeLink icon at the top of the Controls
screen, touch HomeLink Settings, then choose the
device you want to automate.
2. Adjust the device's HomeLink settings as needed:
57Connectivity
Page 60

Smart Garage
Troubleshooting HomeLink
Standard Mode
In Standard Mode, Model 3 records the RF signal from
your HomeLink device's remote control. The
touchscreen instructs you to stand in front of the
vehicle, point the device's remote control at the front
bumper, and press and hold the button until the
headlights
learned the remote control and you can touch
on the touchscreen. If the headlights do not flash:
Check the batteries in the remote control. It is a good
•
idea to replace the batteries before you start
programming.
Ensure you are standing in front of Model 3 with the
•
device's remote control positioned within
(five cm) of the Tesla emblem.
Press and hold the button on your device's remote
•
control until the headlights
must hold the button on the remote control for up to
three minutes.
NOTE: Some HomeLink remote controls require
multiple short presses (approximately one second
each press) instead of one long duration press. If you
are unsuccessful after multiple attempts of using long
presses, try repeated presses of one second each.
flash. When the headlights flash, Model 3 has
Continue
two inches
flash. In some cases you
For additional assistance or compatibility questions,
contact HomeLink (
1-800-355-3515).
www.homelink.com or call
D-Mode and UR-Mode
In D-Mode and UR-Mode, the device’s receiver learns
Model 3. The touchscreen instructs you to press the
"Learn" button (may also be called "Program" or
"Smart") on the device's receiver. If this does not work,
refer to the following guidelines:
Park Model 3 with its bumper as close as possible to
•
the garage door, gate, etc. that you are trying to
program.
Make sure you are pressing the receiver's Learn/
•
Program/Smart button. For instructions on how to
put the receiver into learning mode, refer to the
product details provided with your RF device that
you are trying to program.
• If you see a screen called "Train the receiver" while
programming the device, remember that this is a
time-sensitive step. After pressing the Learn/
Program/Smart button on the device's remote
control or receiver, you only have approximately 30
seconds to return to your vehicle, press
then press the trained HomeLink device name twice.
Consider having someone assist you with this step.
Most devices stay in learning mode for only three to
•
five minutes. Immediately after pressing the device's
Learn/Program/Smart button, follow the instructions
displayed on the vehicle's touchscreen.
Continue,
58 MODEL 3 Owner's Manual
Page 61
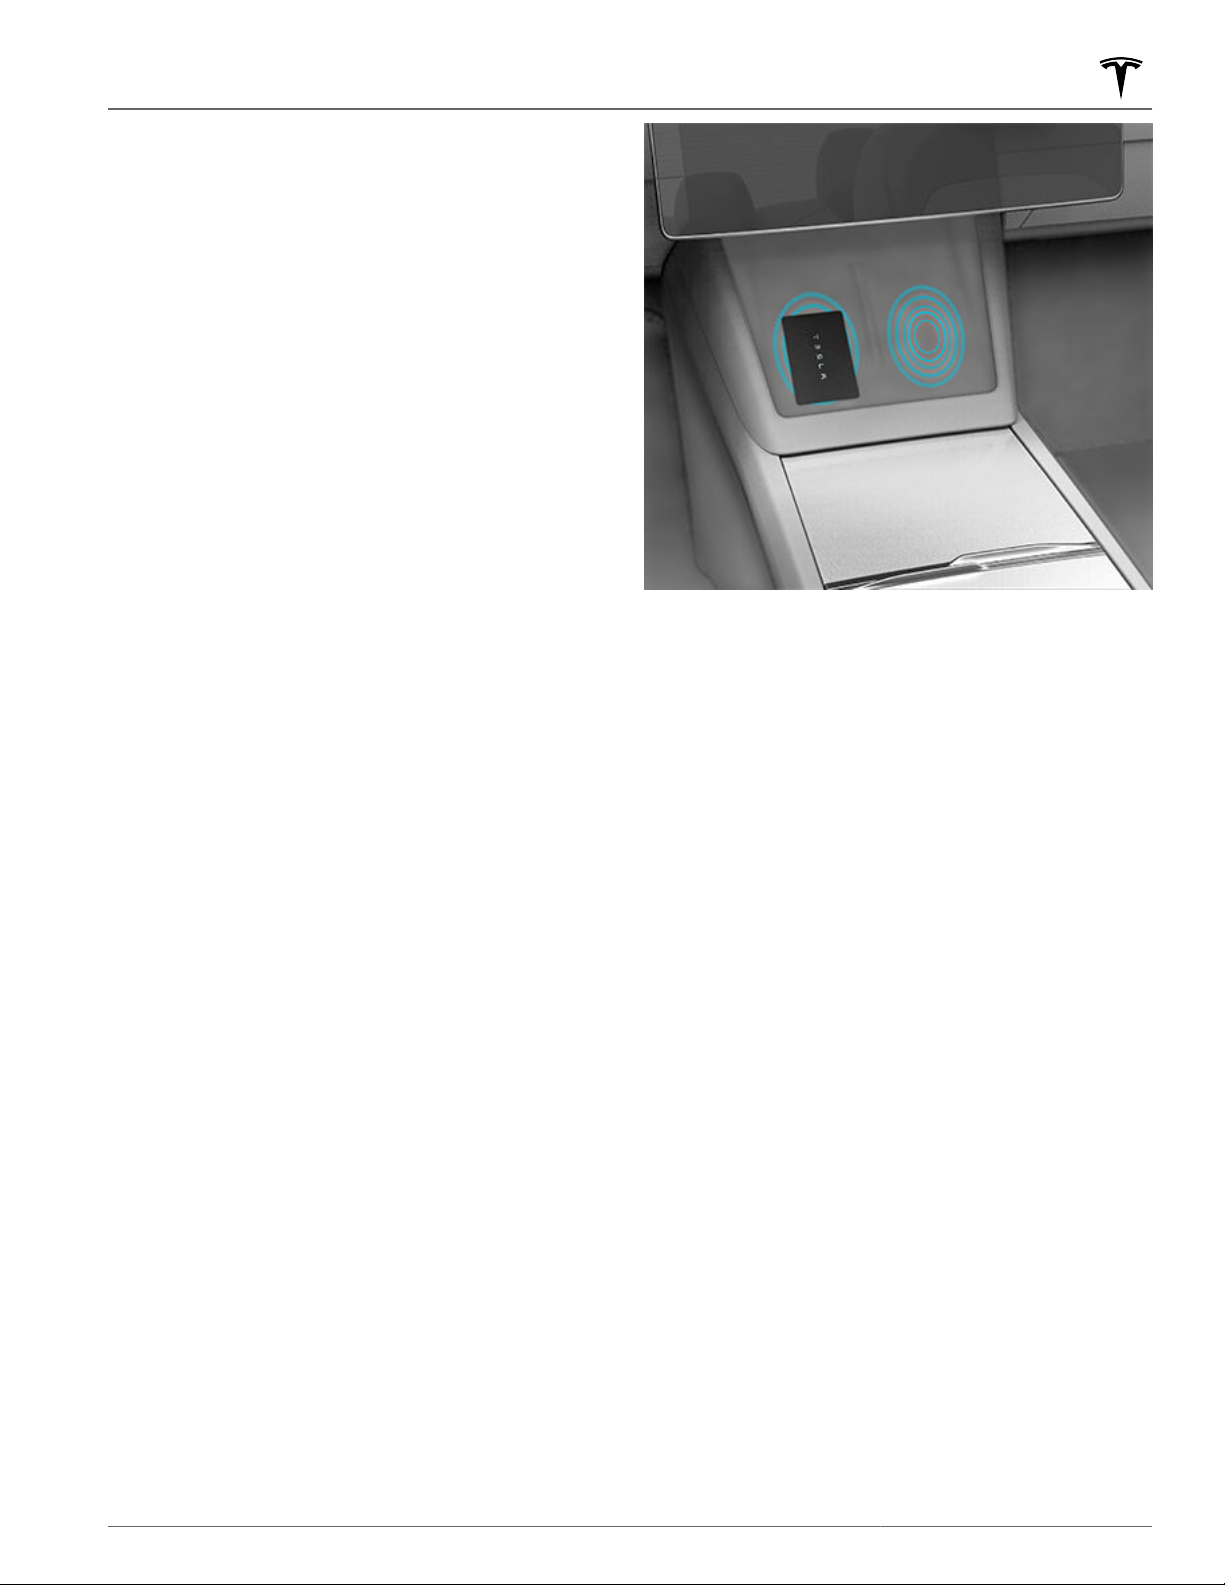
Starting and Powering O
Starting
When you open a door to enter Model 3, the
touchscreen powers on and you can operate all controls.
To shift Model 3, press the brake pedal and swipe up for
Drive or down for Reverse on the touchscreen's drive
mode strip (see
If Auto Shift out of Park is enabled, Model 3
automatically selects Drive or Reverse based on the
detected surroundings . Pressing the brake pedal shifts
the vehicle into the selected drive mode displayed on
the touchscreen's drive mode strip (provided the driver's
door is closed and the driver's seat belt is buckled), and
pressing the accelerator moves the vehicle in that
direction.
NOTE: To turn Auto Shift out of Park on or o, touch
Controls > Pedals & Steering > Auto Shift out of Park.
Before accelerating when Auto Shift out of Park is
enabled, check the touchscreen to make sure that Model
3 has shifted into the drive mode you want (Drive or
Reverse). If the selection is not correct, or if Auto Shift
out of Park is not enabled, swipe up for Drive or down
for Reverse on the touchscreen's drive mode strip to
choose a new drive mode. See Shifting on page 67.
NOTE: If PIN to Drive is enabled (see PIN to Drive on
page 130), you must enter a valid PIN on the
touchscreen before you can drive Model 3.
Everything you need to know when driving Model 3
displays on the touchscreen.
Shifting on page 67).
A number of factors can aect whether Model 3 can
detect a phone key (for example, the device's battery is
low or dead and is no longer able to communicate using
Bluetooth).
Always keep your phone key or a key card with you.
After driving, your key is needed to restart Model 3. And
when you leave the vehicle, you must bring your key
with you to lock
automatically.
Model 3, either manually or
Powering O
Drive Disabled - Requires Authentication
If Model 3 does not detect a key when you press the
brake (a phone key is not detected or two minutes have
passed since you used the key card), the touchscreen
displays a message telling you that driving requires
authentication.
If you see this message, place the key card in either
phone dock where the RFID transmitter can read it. The
two-minute authentication period restarts and you can
start Model 3 by pressing the brake pedal.
When you finish driving and shift into Park, simply exit
the vehicle. When you leave Model 3 with your phone
key, it powers o automatically, turning o the
touchscreen.
Model 3 also powers o automatically after being in
Park for 30 minutes, even if you are sitting in the driver’s
seat.
Although usually not needed, you can power o Model 3
while sitting in the driver’s seat, provided the vehicle is
not moving. Touch Controls > Safety > Power O. Model
3 automatically powers back on after a short period if
you press the brake pedal or touch the touchscreen.
NOTE: Model 3 automatically shifts into Park whenever it
determines that you are exiting the vehicle (for example,
the driver's seat belt is unbuckled and the vehicle is
almost at a standstill). If you shift into Neutral, your
vehicle shifts into Park when you open the door to exit.
To keep your vehicle in Neutral, you will need to activate
Transport Mode (see Instructions for Transporters on
page 208).
59Driving
Page 62

Starting and Powering O
Power Cycling the Vehicle
You can power cycle Model 3 if it demonstrates unusual
behavior or displays a nondescript alert.
NOTE: If the touchscreen is unresponsive or
demonstrates unusual behavior, reboot it before you
power cycle the vehicle (see
on page 8).
1. Shift into Park.
2.
On the touchscreen, touch Controls > Safety > Power
O.
Wait for at least two minutes without interacting with
3.
the vehicle. Do not open the doors, touch the brake
pedal, touch the touchscreen, etc.
After two minutes, press the brake pedal or open the
4.
door to wake the vehicle.
Restarting the Touchscreen
60 MODEL 3 Owner's Manual
Page 63
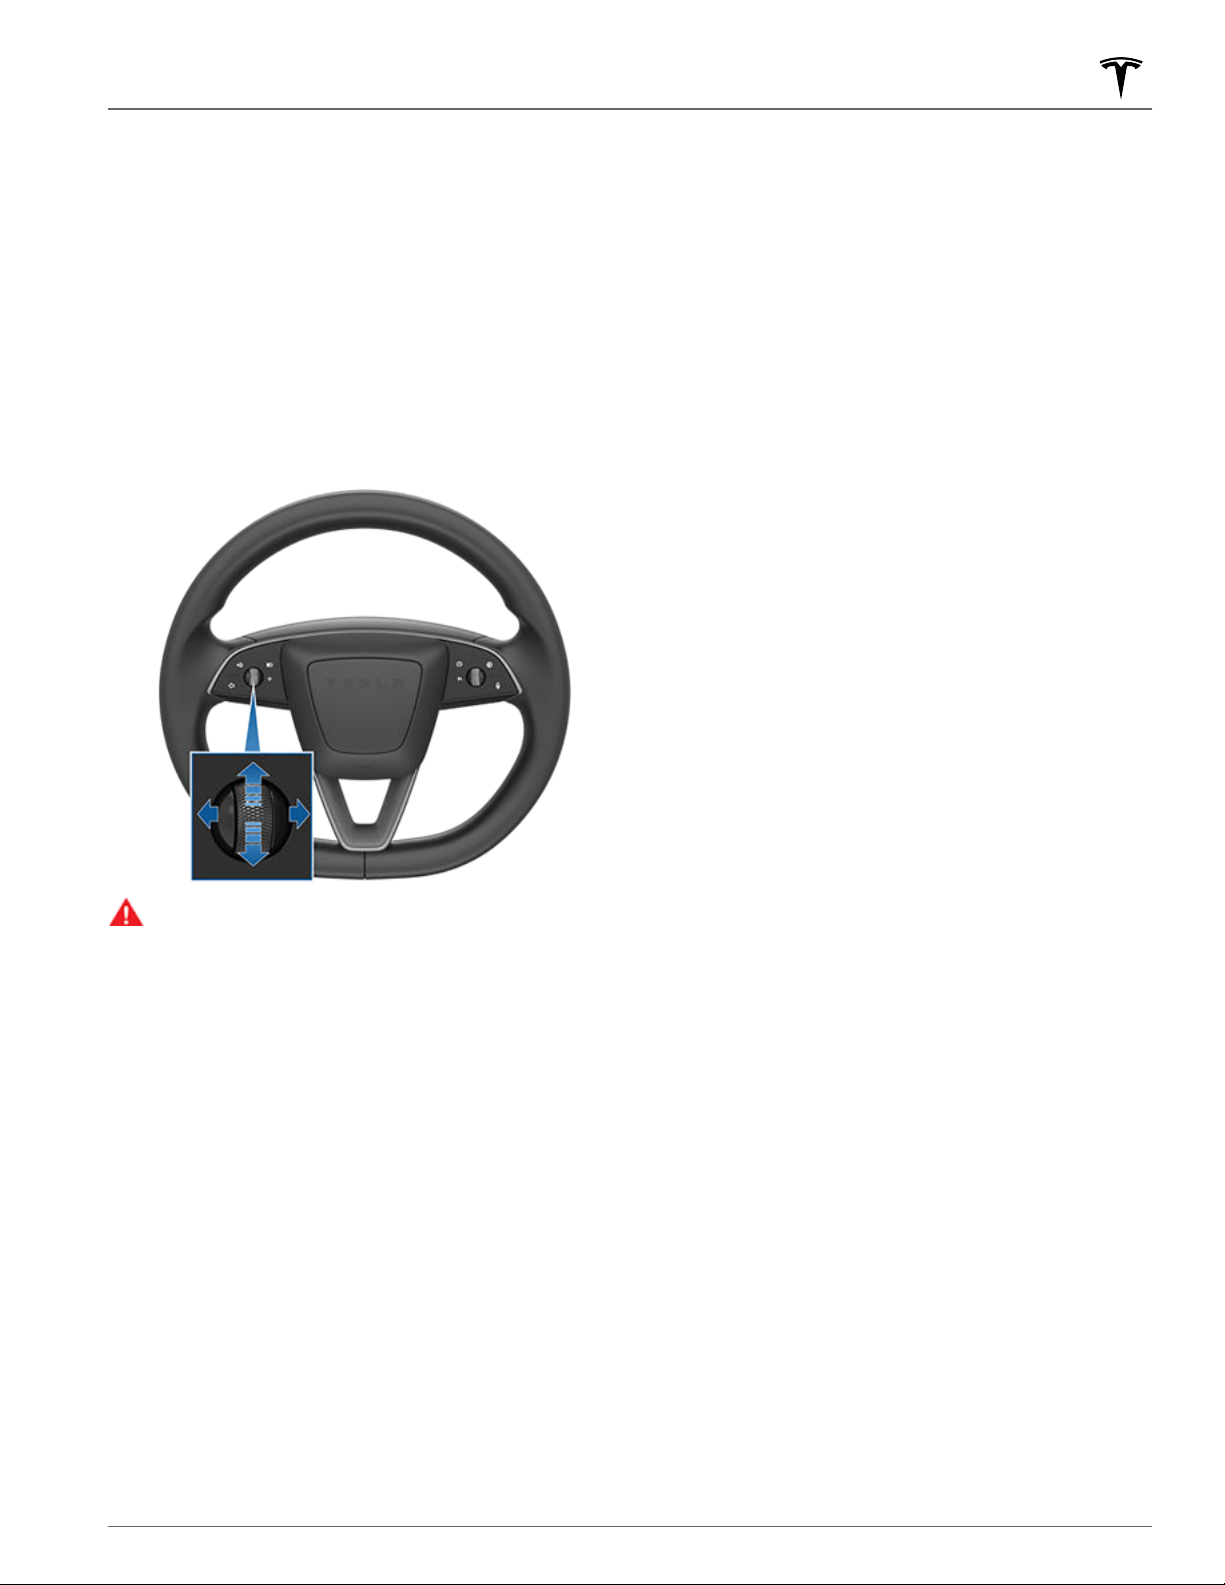
Adjusting the Steering Wheel
Position
To adjust the steering wheel, touch Controls and touch
the Steering icon.
Use the left scroll button on the steering wheel to move
the steering wheel to the desired position:
• To adjust the height/tilt angle of the steering wheel,
roll the left scroll button up or down.
•
To move the steering wheel closer to you, or further
away from you, press the left scroll button to the left
or right.
Steering Wheel
WARNING:
adjustments while driving.
Do not make steering wheel
Adjusting Steering Eort
You can adjust the feel and sensitivity of the steering
system to suit your personal preference:
On the touchscreen, touch Controls > Pedals &
1.
Steering > Steering Mode.
Choose a steering option:
2.
Comfort - Reduces the eort required to turn the
◦
steering wheel. In town, Model 3 feels easier to
drive and park.
Standard - Tesla believes that this setting oers
◦
the best handling and response in most
conditions.
◦ Sport - Increases the eort required to turn the
steering wheel. When driving at higher speeds,
Model 3 feels more responsive.
61Driving
Page 64
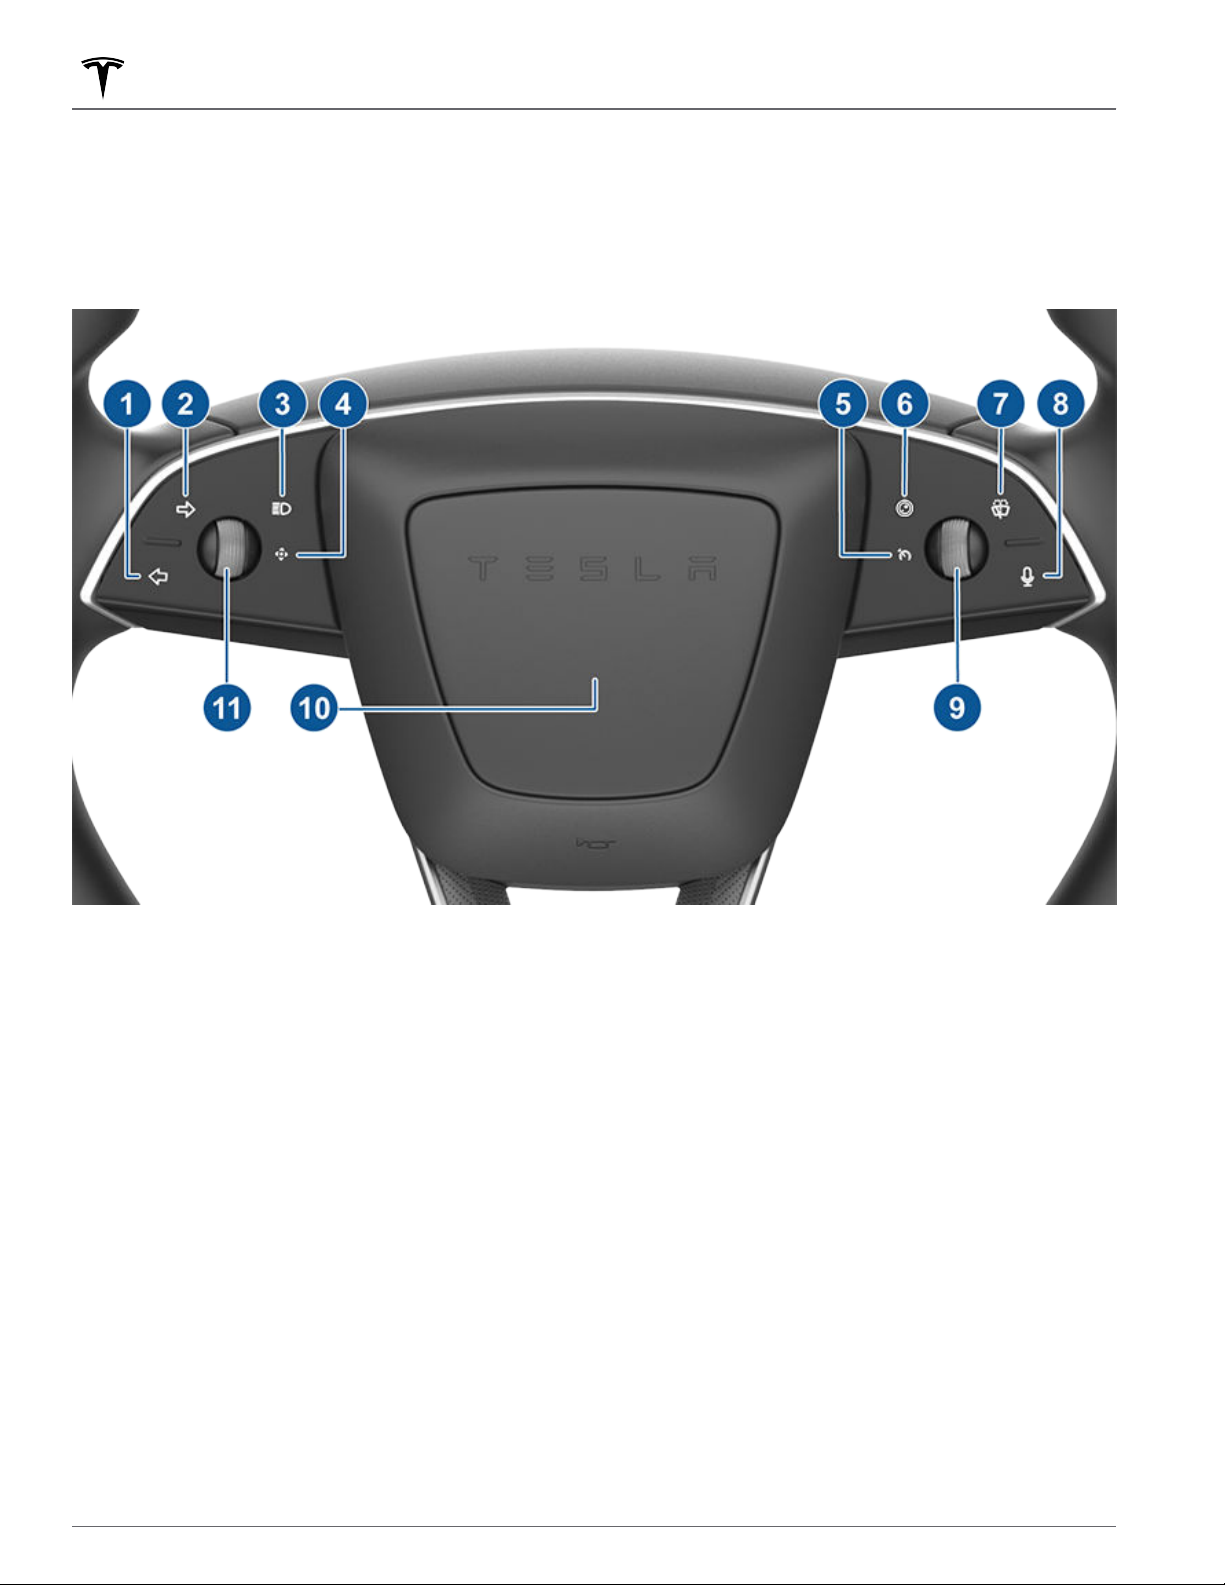
Steering Wheel
Steering Wheel Overview
Your Model 3 features stalkless driving in which all controls you need when driving are accessible on the steering
wheel.
The steering wheel design may vary but the function is the same.
Left turn signal (see Turn Signals on page 71)
1.
Right turn signal (see Turn Signals on page 71)
2.
High beam headlights (see High Beam Headlights on page 70)
3.
Multifunction light (non-functional)
4.
Cruise control light (non-functional)
5.
Rear-facing camera button
6.
Wipers (see Wipers and Washers on page 73)
7.
Voice commands (see Voice Commands on page 16)
8.
Right scroll wheel (see Right Scroll Wheel (Autopilot) on page 63)
9.
10. Horn (see Horn on page 64)
11. Left scroll wheel (see Left Scroll Wheel (Multifunction) on page 63 )
62 MODEL 3 Owner's Manual
Page 65

Steering Wheel
Scroll Wheels
The scroll wheel on the left side of the steering wheel controls functions such as mirror adjustment, volume control,
and wiper speed. The right scroll wheel controls Autopilot features, such as Autosteer initiation and max speed limit.
Left Scroll Wheel (Multifunction)
Mode Action Function More Information
Normal Press Play/pause media Media on page 154
Tilt left/right Next/previous track
Scroll up/down Adjust volume
Wipers* Press Confirm speed Wipers and Washers on page 73
Tilt left/right Select wiper speed
Multifunction Long press Activate/set function Left Scroll Wheel Customization on page 63
Tilt left/right Navigate list
Scroll Select function
Phone call Tilt left/right Answer/decline a phone call Using the Phone App on page 54
In a call, tilt left Mute/unmute
In a call, tilt right End a call
* First press the wiper button on steering wheel to activate.
Left Scroll Wheel Customization
Choose from a list to create quick access to a function by touching Controls > Display > Scroll Wheel Function.
Selecting a function sets the default action when you long press the left scroll button, unless you select Ask each
time.
Right Scroll Wheel (Autopilot)
Mode Action Function More Information
Single Click* Press Activate Autosteer Autopilot Settings
Tilt left/right Adjust follow distance
Scroll up/down Adjust max speed
Double Click* Press Activate
Double press Activate Autosteer
Tilt left/right Adjust follow distance
Scroll Adjust max speed
Full-Self Driving (Beta)** Press* Activate Full-Self Driving (Beta) Full Self-Driving (Beta)
Trac-Aware Cruise Control
* Choose how you want Autopilot features to be enabled by touching Controls > Autopilot > Autopilot Activation.
on page 91
on page 106
** First enable Full Self-Driving (Beta) by touching Controls > Autopilot > Autopilot Features > Full Self-Driving
(Beta).
63Driving
Page 66
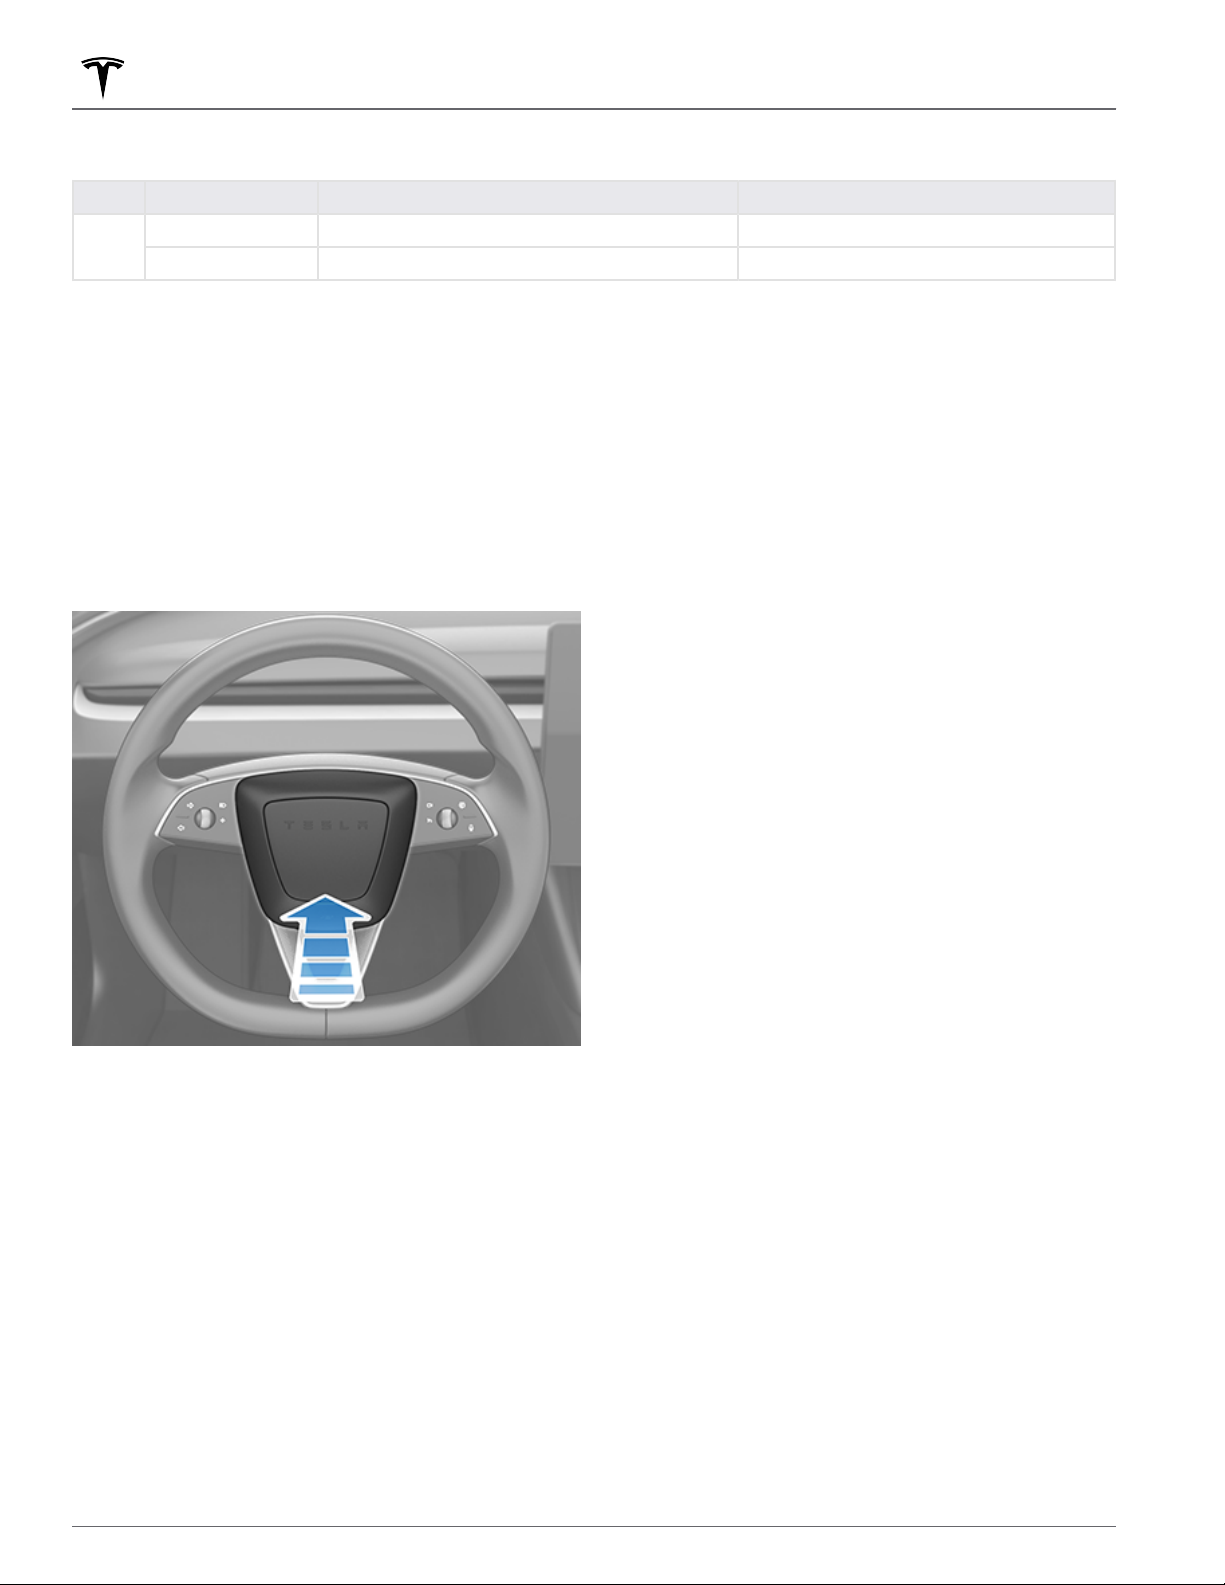
Steering Wheel
Both Scroll Wheels
Mode Action Function More Information
Normal Press both briefly Activate secondary drive mode selector (P, R, N, D) Shift Using the Overhead Console on page 67
Press both and hold Restart the touchscreen Restarting the Touchscreen on page 8
Heated Steering Wheel
To warm up the steering wheel, touch the fan icon on
the touchscreen to display climate controls (see
Adjusting Climate Control Settings on page 137), then
touch the steering wheel icon. When on, radiant heat
keeps the steering wheel at a comfortable temperature.
Horn
To sound the horn, press and hold the center pad on the
steering wheel.
64 MODEL 3 Owner's Manual
Page 67
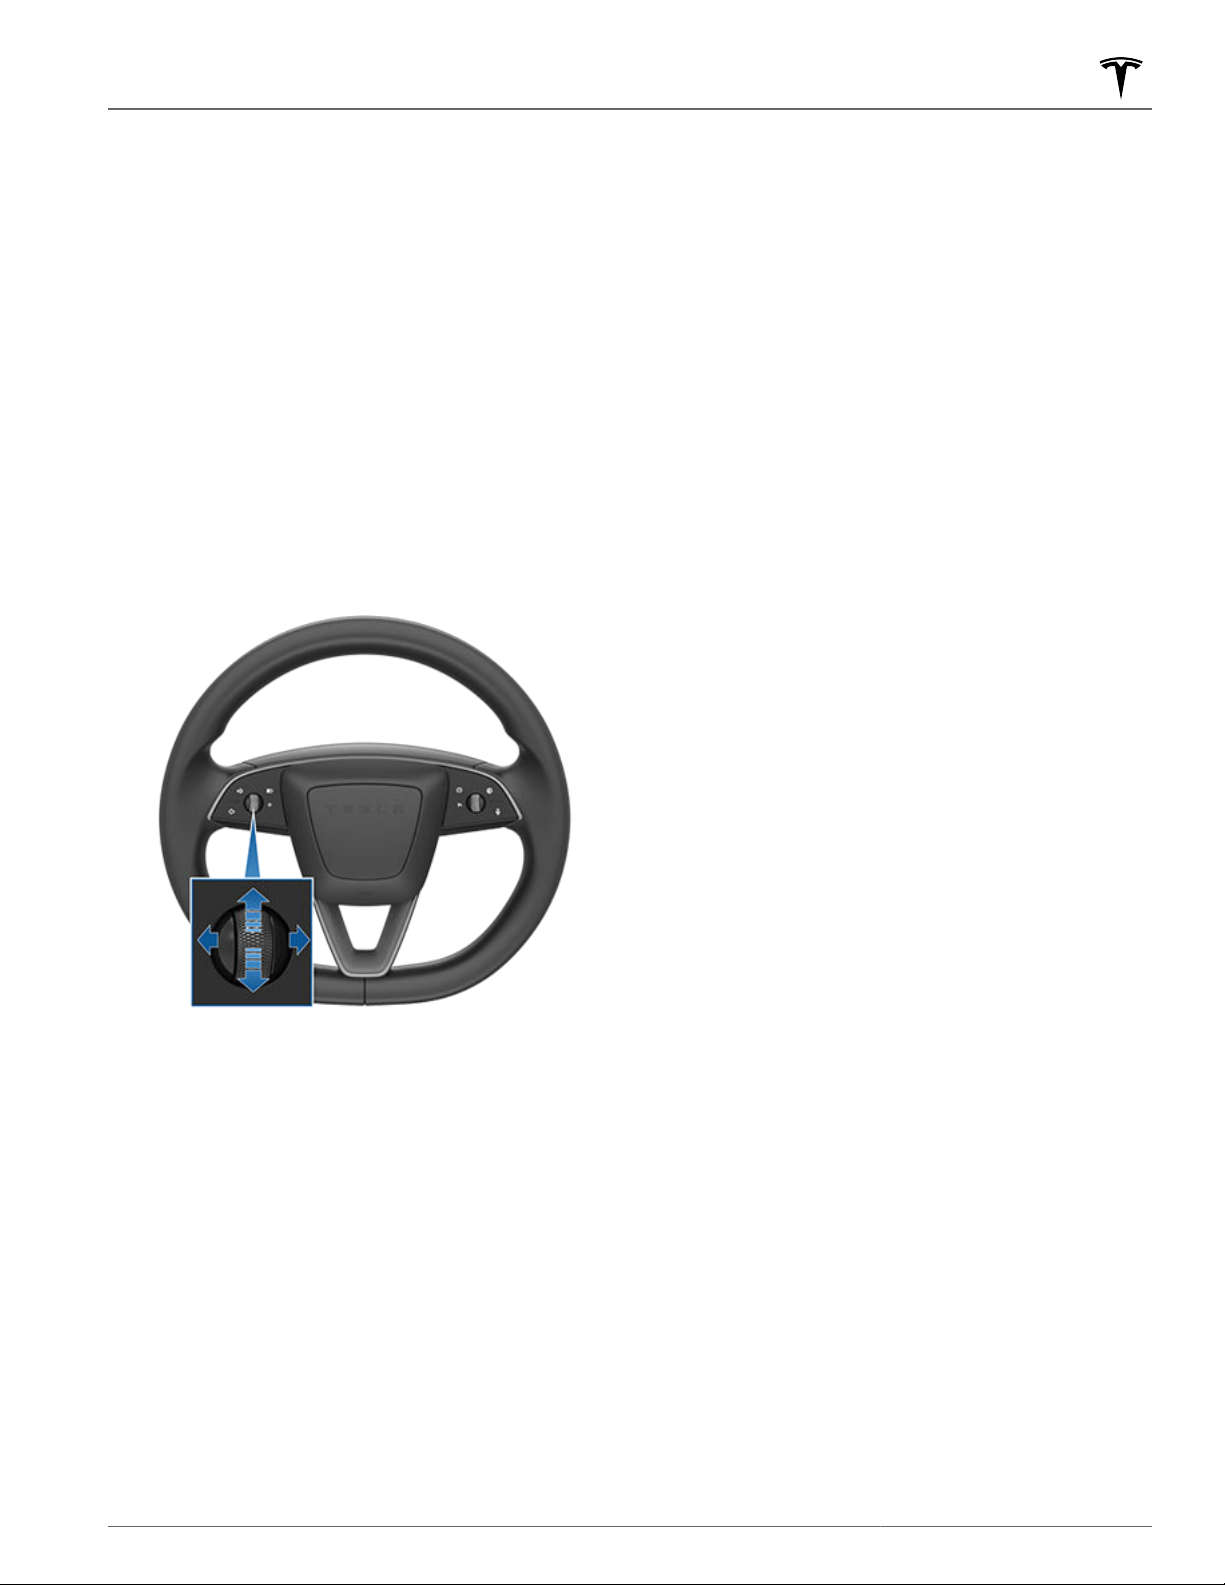
Mirrors
Adjusting Exterior Mirrors
Adjust the exterior mirrors by touching Controls >
Mirrors. Press the left scroll button on the steering wheel
to choose whether you are adjusting the Left or Right
mirror. Then use the left scroll button as follows to adjust
the selected mirror to its desired position:
To move the mirror up or down, roll the left scroll
•
button up or down.
•
To move the mirror inward or outward, press the left
scroll button to the left or right.
Folding Mirrors
To manually fold and unfold exterior mirrors (for
example, parking in a narrow garage, tight space, etc.),
touch Controls > Fold/Unfold Mirrors.
When you manually fold the mirrors, they remain folded
until your driving speed reaches 31 mph (50 km/h) (or
until you manually unfold them by touching Controls >
Unfold Mirrors).
NOTE: You cannot fold a mirror when driving over 31
mph (50 km/h).
To set the mirrors to fold automatically whenever you
exit and lock Model 3 touch Controls > Mirrors > Mirror
Auto Fold. The mirrors unfold automatically when you
unlock
You can also set mirrors to fold automatically whenever
you arrive at a specific location, which saves you from
having to manually fold them each time you arrive at a
frequented place. To set up, stop at the location you
want to save (or drive at less than
fold the mirrors. Touch Save Location when it appears
briefly on the Fold Mirrors control.
Model 3.
3 mph (6 km/h)), and
Both exterior mirrors can tilt downward when the
vehicle is shifted into Reverse. When you shift back into
another drive mode, the mirrors return to their normal
upward position. To turn this feature on or o, touch
Controls > Mirrors > Mirror Auto Tilt.
NOTE: With a future software update, the Save button
will retain the mirror adjustments but it does not
function currently.
To reduce glare when driving at night, the rear view
mirror and exterior side mirrors dim automatically. To
enable or disable this feature, touch Controls > Mirrors >
Mirror Auto Dim.
Availability of this Mirror Auto Dim depends on market
region and date of manufacture.
NOTE: Both exterior mirrors have heaters that turn on
and o with the rear window defroster.
If you no longer want mirrors to automatically fold,
touch Controls > Unfold Mirrors when they fold at the
saved location and then touch Remove Location.
When you leave the saved location, mirrors unfold when
your driving speed reaches 3 mph (6 km/h), or when
you touch Controls > Unfold Mirrors.
NOTE: Mirrors can automatically fold if you return to a
saved location and are driving below 31 mph (50 km/h).
NOTE: You can override the automatic folding/unfolding
of mirrors at any time (for example, Model 3 has no
power) by pushing the mirror assembly away from you
to unfold, or pulling it toward you to fold.
NOTE: If you expect ice to accumulate when Model 3 is
parked, turn o Mirror Auto Fold. Accumulation of ice
can prevent exterior side mirrors from folding or
unfolding. See
for information on how to ensure your mirrors function
properly in cold weather.
You can integrate auto-folding mirrors with HomeLink
(see Smart Garage on page 56). To enable, go to
HomeLink > Auto-Fold Mirrors when Nearby.
Cold Weather Best Practices on page 144
65Driving
Page 68
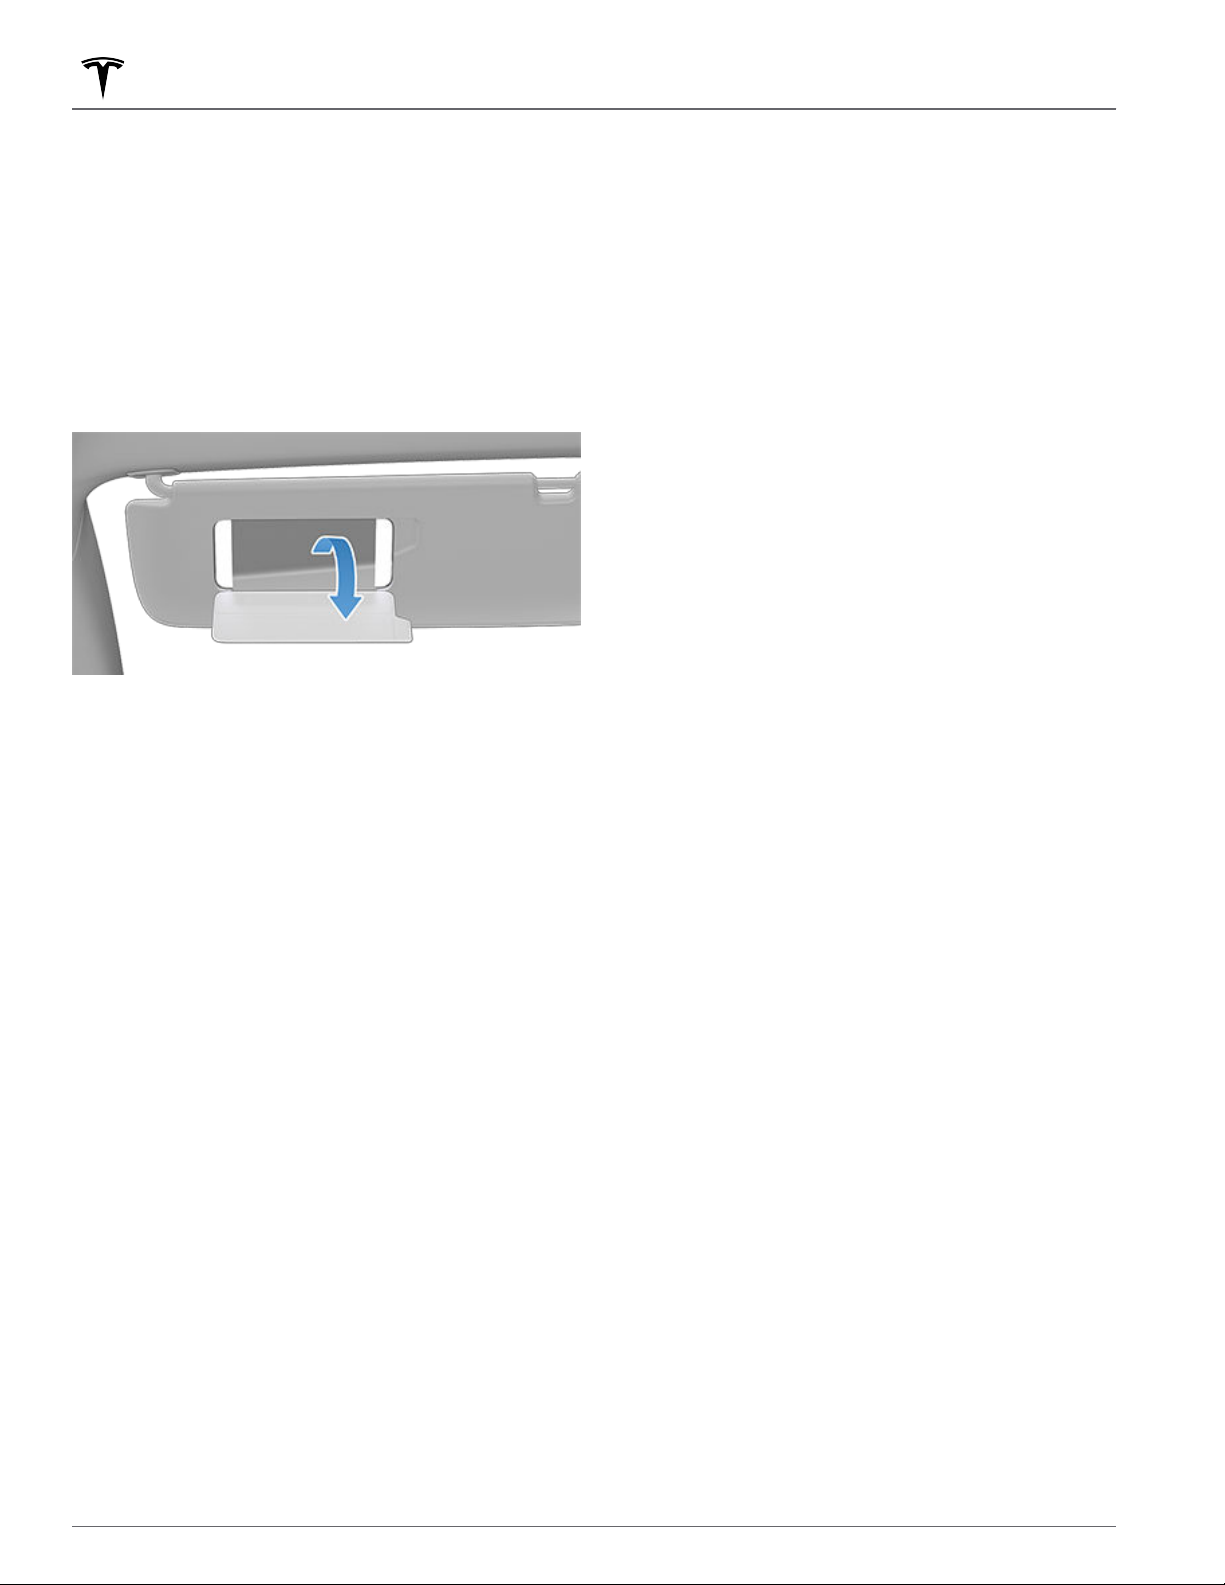
Mirrors
Rear View Mirror
Adjust the rear view mirror manually. When in Drive or
Neutral, the rear view mirror automatically dims in low
lighting conditions based on the time of day (for
example, when driving at night).
Vanity Mirrors
To expose and illuminate the vanity mirror, fold the sun
visor downwards, then use the tab to lower the mirror
cover. After closing the mirror cover, the light turns o.
66 MODEL 3 Owner's Manual
Page 69
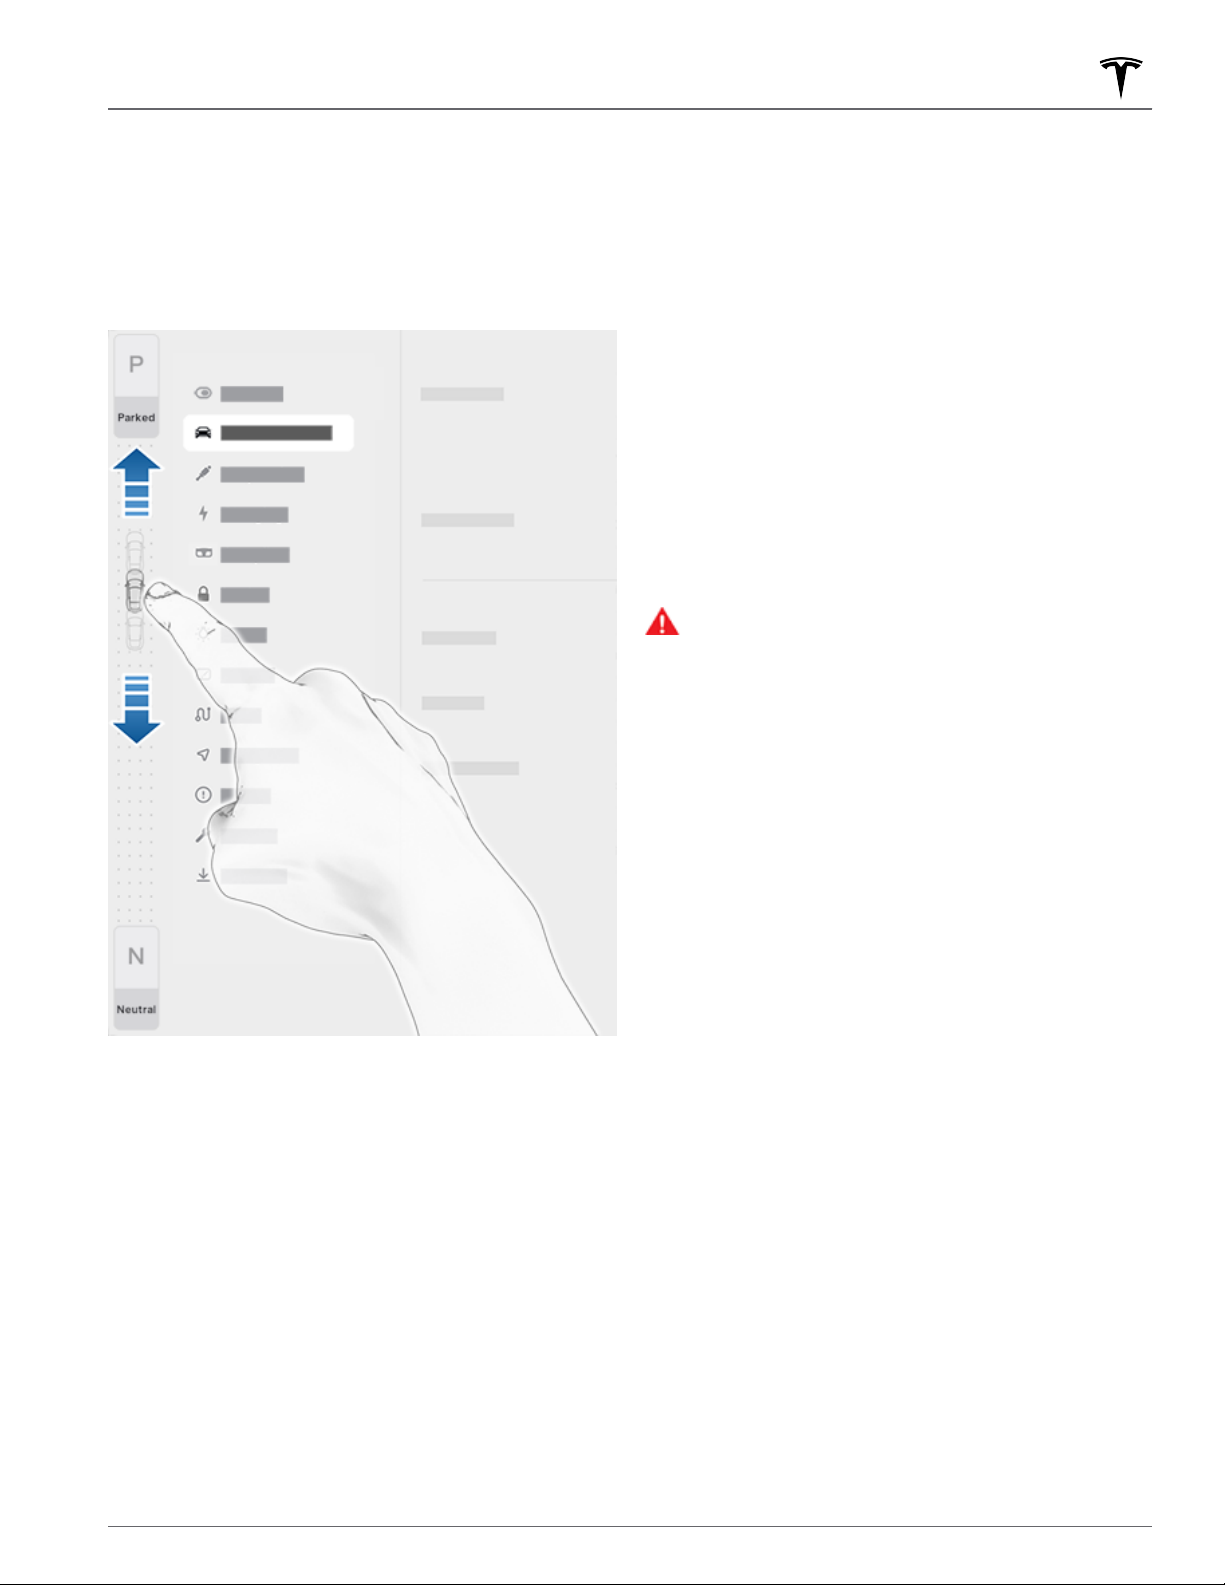
Shifting
Shift Using the Touchscreen
When you press the brake pedal when parked, the drive
mode strip displays on one side of the touchscreen. Use
the drive mode strip to shift Model 3: swipe up for Drive,
swipe down for Reverse or touch the P for Park or N for
Neutral.
towards the passenger to bring up the drive mode strip.
Swipe from the edge of the touchscreen
Auto Shift out of Park
Auto Shift out of Park is a BETA feature and is disabled
by default. When disabled, use the touchscreen or the
overhead console to manually shift. To enable Auto Shift
out of Park, touch Controls > Pedals & Steering > Auto
Shift out of Park.
When Auto Shift out of Park is enabled, Model 3 is
designed to automatically select Drive or Reverse. The
touchscreen displays the selected drive mode when the
driver's door is closed and seat belt is buckled.
To override the selection, press the brake pedal and use
the drive mode strip on touchscreen to shift into your
desired drive mode (Drive, Reverse, Park; see Shift Using
the Touchscreen on page 67).
Confirm the drive mode selection and follow the
instructions on the touchscreen before you press the
accelerator.
WARNING:
and surroundings before driving. Never rely on
Model 3 to automatically select a suitable drive
mode without confirming the selection before you
start to drive.
As always, be aware of your vehicle
NOTE: To shift from Drive into Reverse or vice versa, the
driving speed must be less than 5 mph (8 km/h).
The touchscreen's drive mode strip displays Park and
Neutral at all times. To shift into Park when driving
below 5 mph (8 km/h), touch the button on the drive
mode strip while pressing the brake pedal. In emergency
situations when driving above
and hold the Park button to slowly bring the vehicle to a
stop.
The touchscreen is the preferred method to manually
shift. However, in the unlikely situation in which the
touchscreen is unavailable and therefore can't be used,
the drive mode selector on the overhead console
automatically activates and must be used to shift (see
Shift Using the Overhead Console on page 67).
If you try to shift when it is prohibited by the current
driving speed, the touchscreen displays an alert, a chime
sounds, and the drive mode does not change.
5 mph (8 km/h), press
If Auto Shift out of Park is unavailable, the touchscreen
displays a message.
Model 3 automatically selects a drive mode when:
Auto Shift out of Park is enabled.
•
Model 3 is in Park.
•
The driver's seat belt is fastened.
•
The brake pedal is pressed.
•
All doors and trunks are closed.
•
The drive mode selector on the overhead console is
•
not activated (see Shift Using the Overhead Console
on page 67).
NOTE: Model 3 does not automatically select drive
modes in Valet Mode.
Shift Using the Overhead Console
In addition to manually shifting on the touchscreen, you
can shift by pressing P, R, N or D located on the
overhead console. In most situations, these buttons are
not available until you press the brake and touch one of
the buttons to activate it. When active, the LEDs
associated with each button illuminate and when you
select P, R, N or D, the associated LED illuminates amber.
In situations where the touchscreen is unavailable (for
example, experiencing a technical issue), or Model 3 is in
Valet or Transport Mode, the drive mode selector on the
overhead console activates automatically and there is no
need to touch it.
67Driving
Page 70
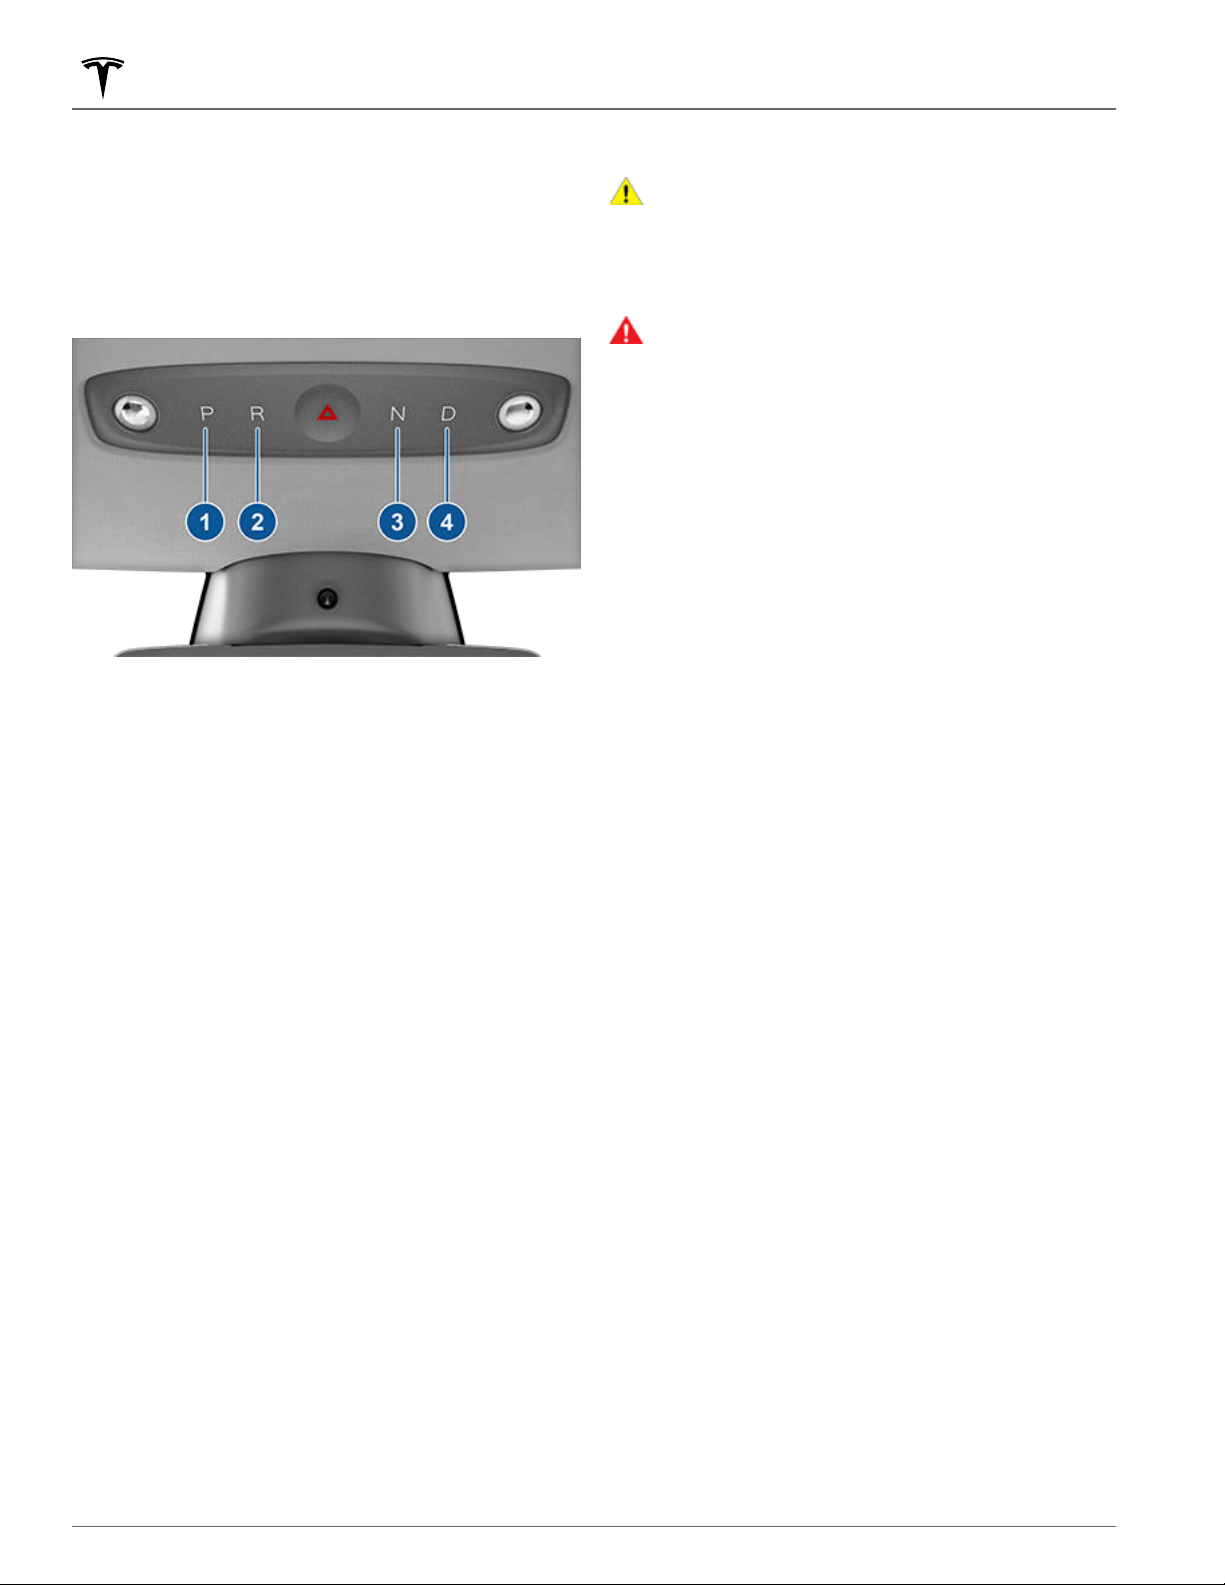
Shifting
NOTE: You can also activate the drive mode selector on
the overhead console by simultaneously and briefly
pressing both scroll buttons on the steering wheel.
However, if you press and hold both buttons
simultaneously, the drive mode selector activates and
the touchscreen restarts (see Restarting the
Touchscreen on page 8).
NOTE: The front trunk must be closed to shift using the
overhead console.
Park
1.
Reverse
2.
Neutral
3.
Drive
4.
NOTE: When the touchscreen is available for shifting
and you have manually activated the drive mode
selector on the overhead console, the overhead console
automatically deactivates if you don't shift within 10
seconds.
Park
To manually shift into Park, press the brake pedal and
touch the Park button on the touchscreen's drive mode
strip. If the touchscreen is unavailable, press Park on the
drive mode selector located on the
Model 3 automatically shifts into Park to prevent rollaway while driving in low speeds. This happens
whenever you connect a charge cable, unbuckle your
seat belt, or open the door while in Drive or Neutral.
Ensure the charge cable is removed, buckle your seat
belt, and close the door before shifting out of Park.
Attempting to engage the parking brake above 5 mph (8
km/h) will result in emergency braking (see Braking and
Stopping on page 74).
NOTE: In emergency situations, if the brakes are not
functioning properly, you can press and hold the Park
button on the touchscreen's drive mode strip to bring
Model 3 to a stop. Do not use this method to stop the
vehicle unless absolutely necessary.
overhead console.
NOTE:
You must always press the brake pedal to shift
out of Park.
CAUTION: Model 3 will not shift out of Park if a
charge cable is plugged in, or if the charge port is
unable to determine whether a charging cable is
plugged in. In situations when Model 3 does not
shift out of Park, check the touchscreen for
instructions on how to proceed.
WARNING: It is the driver's responsibility to always
ensure the vehicle is in Park before exiting. Never
rely on Model 3 to automatically shift into Park for
you.
Drive
To manually shift into Drive, swipe up on the drive mode
strip located on the touchscreen or, if the touchscreen is
unavailable, press D on the drive mode selector located
on the overhead console. You can shift into Drive when
Model 3 is stopped or moving less than 5 mph (8 km/h)
in Reverse.
Reverse
To manually shift into Reverse, swipe down on the drive
mode strip located on the touchscreen or, if the
touchscreen is unavailable, press R on the drive mode
selector located on the
into Reverse when Model 3 is stopped or moving less
than 5 mph (8 km/h) in Drive. You can manually close
the park assist view on the touchscreen by touching the
X in the upper corner.
overhead console. You can shift
Neutral
Neutral allows Model 3 to roll freely when you are not
pressing the brake pedal. To shift into Neutral, do any of
the following:
Swipe from the edge of the touchscreen towards the
•
passenger to bring up the drive mode strip and press
Neutral.
Choose Neutral from the drive mode selector on the
•
overhead console.
NOTE: You must press the brake pedal to shift out of
Neutral if Model 3 is moving slower than approximately 5
mph (8 km/h).
Model 3 automatically shifts into Park when you open
the driver's door to exit the vehicle unless the vehicle is
in certain modes such as Transport or Car Wash Mode
which allows the vehicle to stay in Neutral even when
you leave.
68 MODEL 3 Owner's Manual
Page 71

Keeping Your Vehicle in Neutral
(Transport Mode)
To keep Model 3 in Neutral when you exit, allowing it to
roll freely (for example, pulling onto a flatbed truck), you
must activate Transport mode:
1. Shift into Park.
Press the brake pedal.
2.
3. Touch Controls > Service > Towing. The touchscreen
displays a message reminding you how to properly
transport
Press the Transport Mode. It turns blue to show that
4.
Model 3 is now in Transport Mode. Model 3 is now
free-rolling and can slowly be rolled (no faster than
walking speed) for short distances or winched (for
example, onto a
For more information on Transport Mode, see Activate
Transport Mode on page 208.
NOTE: In Transport mode, Model 3 does not shift into a
drive mode. You must first cancel Transport mode by
touching
cancels if you use the touchscreen or drive mode
selector on the overhead console to shift into Park or if
you manually apply the parking brake by touching
Controls > Safety > Parking Brake.
Model 3.
flatbed truck).
Transport Mode again. Transport mode also
Shifting
69Driving
Page 72
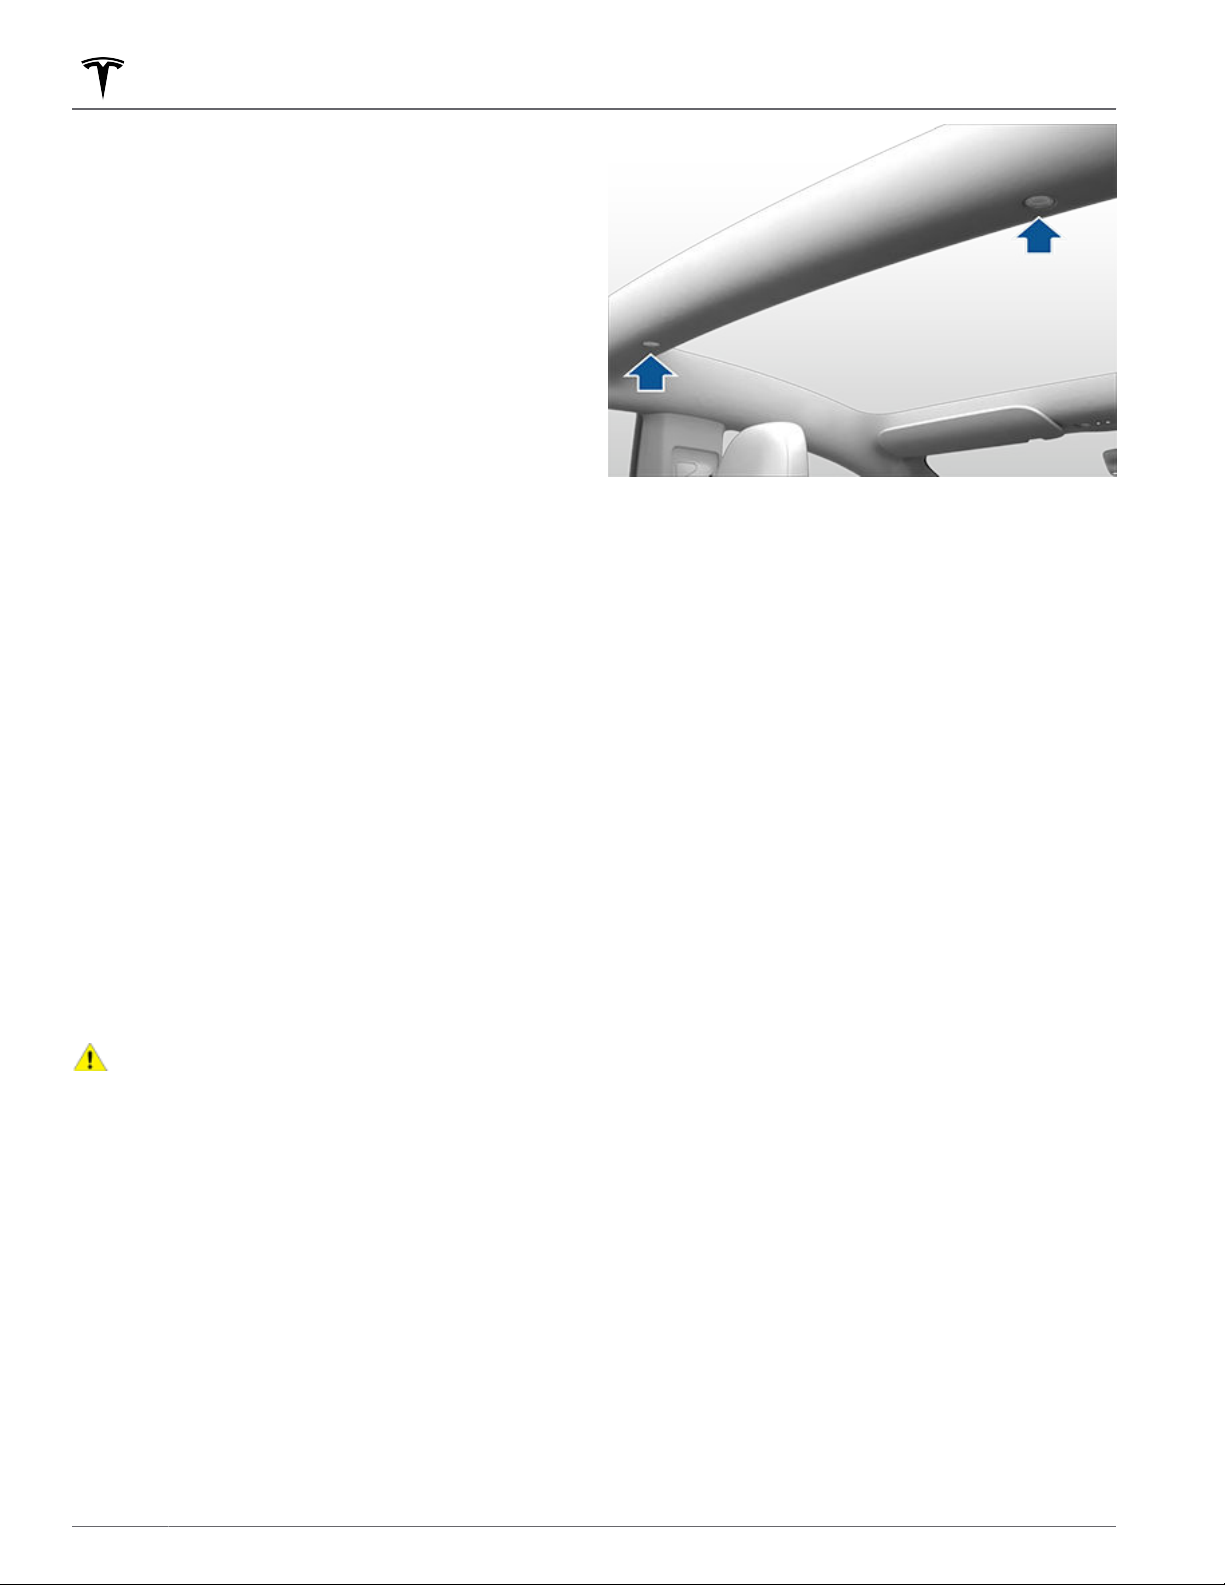
Lights
Controlling Lights
Touch Controls > Lights to control the lights.
NOTE: You can also access an abbreviated lights menu
while driving by touching the High Beam button on the
steering wheel. A lights menu displays on the
touchscreen, providing quick access to headlight
controls.
In addition to the lights that you can control from the
touchscreen, Model 3 has convenience lights that turn
on and o automatically based on what you are doing.
For example, interior lights, marker lights, tail lights, and
puddle lights turn on when you unlock
you open a door, and when you shift into Park. They turn
o automatically after a minute or two or when you shift
or lock
Model 3.
Model 3, when
Accent Lights
Exterior Lights
Exterior lights (headlights, tail lights, side marker lights,
parking lights, and license plate lights) are set to Auto
each time you start Model 3. When set to Auto, exterior
lights automatically turn on when driving in low lighting
conditions, or whenever the wipers are active. If you
change to a dierent setting, lights always revert to
Auto on your next drive.
Touch one of these options to change and retain the
exterior light setting until adjusted again or the next
time you drive:
O: Exterior lights turn o. When driving, daytime
•
running lights may remain on based on regulations in
various market regions.
Parking: Parking lights, side marker lights, tail lights
•
and license plate lights turn on.
On: Low beam headlights, side marker lights, parking
•
lights, tail lights, and license plate lights turn on.
CAUTION:
are on during low visibility conditions (for example,
when it is dark, foggy, snowy, or the road is wet,
etc.). The rear tail lights are o while daytime
running lights are on. Failure to do so can cause
damage or serious injury.
Dome Lights
Turn the interior dome (map) lights on or o. If set to
Auto, all interior dome lights turn on when you unlock
Model 3, open a door upon exiting, or shift into Park.
You can also manually turn an individual dome light on
or o by touching its lens. If you turn a dome light on, it
turns o when Model 3 powers o. If Model 3 was
already powered
on, it turns o after 60 minutes.
Ensure the headlights and rear lights
o when you manually turned the light
Enable or disable the accent lights that line the cabin of
your vehicle and customize the accent light color to your
preferences (if equipped). You can also turn the footwell
lights on or o.
Headlights after Exit
When you stop driving and park Model 3 in low lighting
conditions, exterior lights temporarily remain
illuminated. They automatically turn
or when you lock Model 3 whichever comes first.
NOTE: If you lock Model 3 using the Tesla mobile app ,
the headlights immediately turn
vehicle locks because Walk-Away Door Lock is enabled
(see ), the headlights automatically turn o after one
minute.
To turn this feature on and o, touch Controls > Lights >
Headlights After Exit. When Headlights After Exit is o,
the headlights turn o immediately when you engage
Park and open a door.
o after one minute
o. However, if the
High Beam Headlights
Use the high beam headlight button on the left side of
the steering wheel to control the headlights:
Press and quickly release to flash high beam
•
headlights.
• Press and hold to turn on high beam headlights touchscreen displays a brief timer and you must hold
for the duration of the timer to latch the high beam
headlights to the on position. When headlights are
on, press the button a second time to turn them
o.
70 MODEL 3 Owner's Manual
Page 73
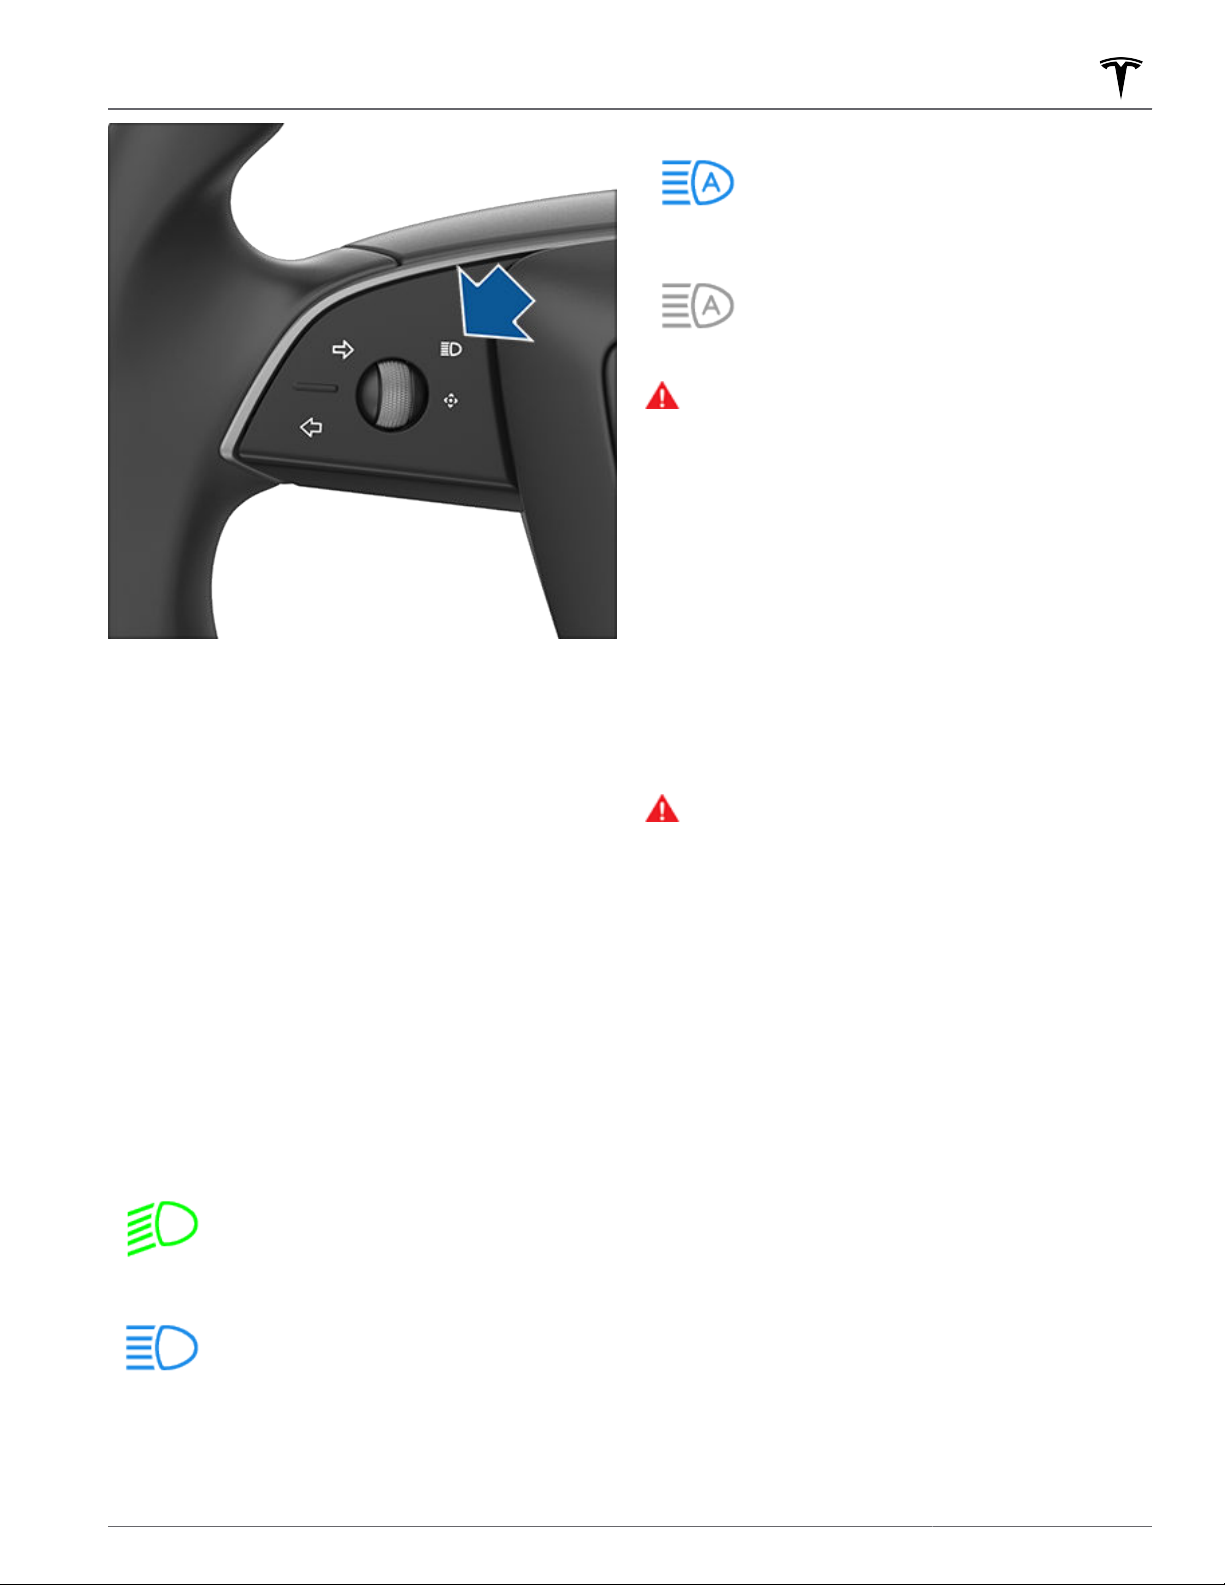
Lights
High beams are currently turned on, and
Auto High Beam is ready to turn o the
high beams if light is detected in front of
Model 3.
Auto High Beam (if equipped)
The high beam headlights can adapt based on light
detected in front of Model 3 (for example, from an
oncoming vehicle). To turn this feature on or o, touch
Controls > Lights > Auto High Beam. Your chosen
setting is retained until you manually change it.
NOTE: When you touch or press the high beam
headlight button on the left side of the steering wheel,
the touchscreen displays an abbreviated lights menu to
provide quick access to control headlights, fog lights (if
equipped), and the
touchscreen to choose options from this menu.
NOTE: Auto High Beam is automatically enabled when
Autosteer is engaged. To switch to low beam headlights,
press the high beam headlight button on the steering
wheel. Auto High Beam is re-enabled every time
Autosteer is activated.
The following indicator lights are visible on the
touchscreen to show the status of the headlights:
Auto High Beam setting. Use the
Low beam headlights are on.
High beams are temporarily turned
because Auto High Beam is operating and
light is detected in front of Model 3. When
light is no longer detected, high beam
headlights automatically turn back on.
WARNING:
and is subject to limitations. It is the driver's
responsibility to make sure that headlights are
always appropriately adjusted for weather
conditions and driving circumstances.
Auto High Beam is a convenience only
o
Headlight Adjustments
To adjust the angle of the headlights, touch Controls >
Service > Adjust Headlights, then follow the onscreen
instructions. You can choose which headlight you would
like to adjust by selecting it on the touchscreen.
NOTE: Headlights do not require adjustments when
temporarily driving into a region where the
direction is dierent (for example, driving in right-hand
trac region, and then driving into a region with lefthand trac).
WARNING:
headlights. Tesla has carefully calibrated the
position of the headlights to be in an optimum
position for most driving scenarios. Tesla
recommends that you do not adjust headlights
unless you are familiar with how headlights should
be adjusted. Once adjusted, you will be unable to
automatically restore them to their originally
calibrated position. Contact Tesla for assistance
when adjusting headlights.
Proceed with caution when adjusting
trac
Turn Signals
To engage a turn signal, press the corresponding arrow
button on the left side of the steering wheel. A turn
signal cancels based on the angle of the steering wheel
(for example, you finish making a turn). You can also
cancel a turn signal by pressing the turn signal button a
second time.
Illuminates when high beams are on but
Auto High Beam setting is turned o
the
or if the Auto High Beam setting is turned
on but is temporarily unavailable.
If Controls > Lights > Automatic Turn Signals is set to
Auto Cancel, turn signals cancel automatically when
Model 3 detects completion of a maneuver such as a
merge, lane change, or a fork in the roadway. You can
override automatic cancellation at any time (for
example, you want the turn signal to remain on because
you are making more than one lane change). To override,
engage the turn signal by pressing and momentarily
holding the turn signal button (instead of just pressing).
Then, when the
signal remains on. If Automatic Turn Signals is set to O,
first maneuver is complete, the turn
71Driving
Page 74
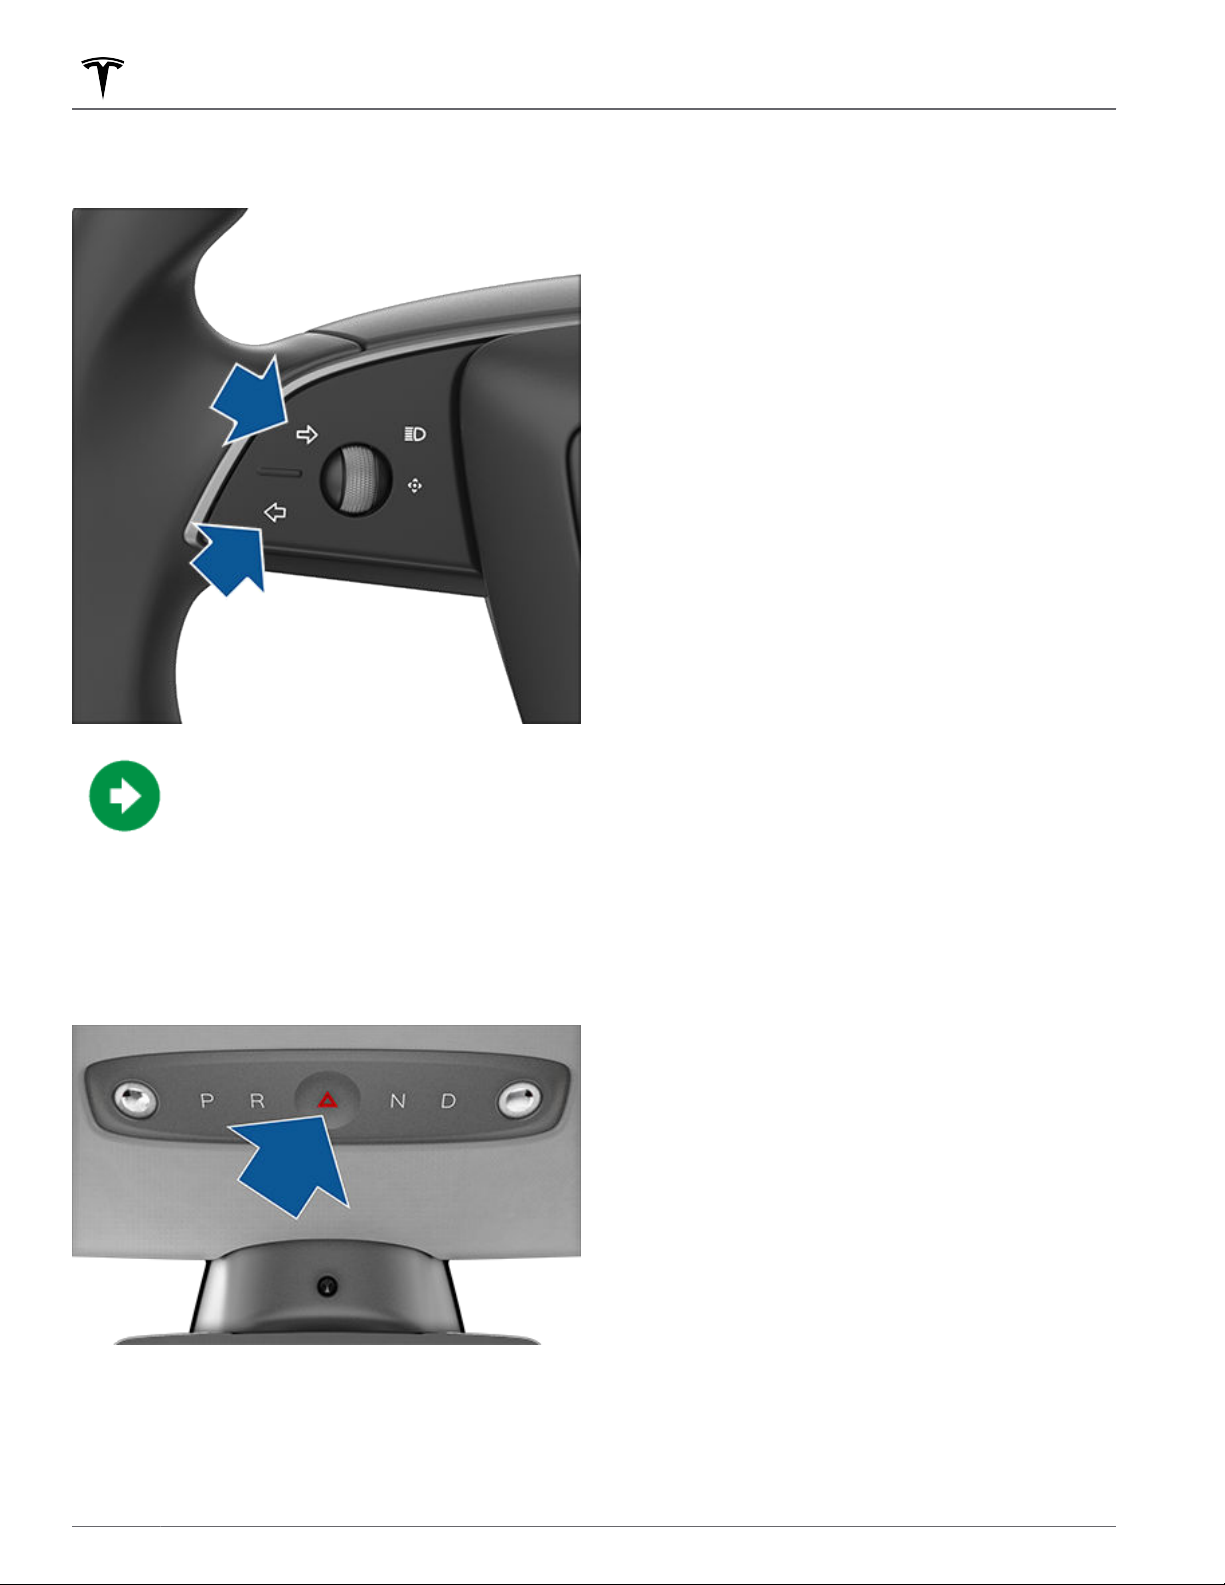
Lights
you must cancel the turn signal manually by pressing the
turn signal button after maneuvers such as a merge, lane
change, or fork in the roadway.
NOTE:
Hazard warning flashers operate even without a
key nearby.
Condensation in Head or Tail Lights
Due to weather changes, humidity levels, or recent
exposure to water (such as a car wash), condensation
may occasionally accumulate in your vehicle’s head or
tail lights. This is normal— as the weather gets warmer
and humidity decreases, condensation often disappears
on its own. If you notice water buildup within the
exterior lenses, or if the condensation aects the
visibility of the exterior lights, contact Tesla Service.
When a turn signal is operating, the
corresponding indicator lights up on the
touchscreen and you can hear a clicking
sound.
Hazard Warning Flashers
To turn on the hazard warning flashers, press the button
on the drive mode selector located on the overhead
center. All turn signals flash. Press again to turn o.
If a severe crash is detected by your vehicle, the hazard
warning flashers will automatically turn on and flash
quickly to increase visibility. Pressing the hazard warning
flashers once will return the lights to their normal
cadence. Pressing a second time turns all hazard
warning flashers o.
72 MODEL 3 Owner's Manual
Page 75
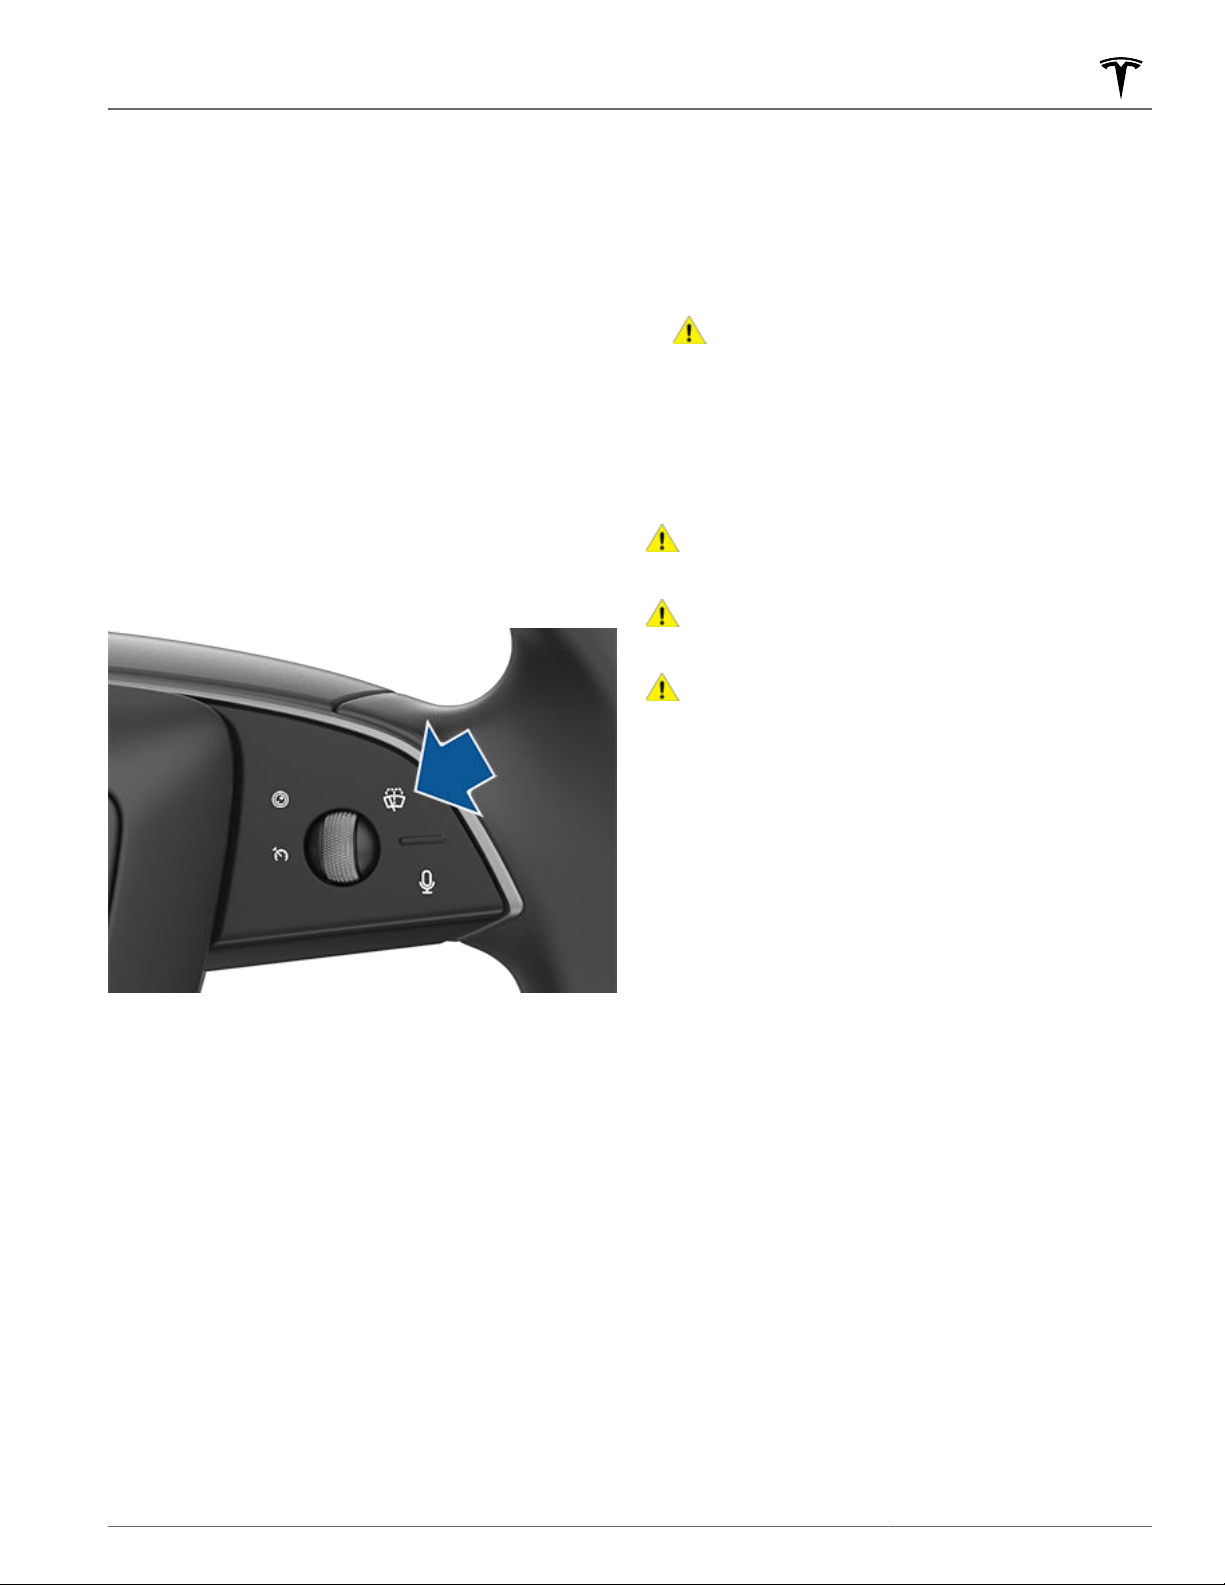
Wipers and Washers
You can access wiper settings by touching the wiper
button on the steering wheel or touching Controls >
Wipers.
Press the wiper button on the steering wheel to wipe the
windshield.
Press and hold the wiper button to spray washer fluid
onto the windshield. After releasing the button, the
wipers perform two additional wipes then, depending on
vehicle and environmental conditions, a third wipe a few
seconds later. You can also press and hold the wiper
button for a continuous spray of washer
wipers perform the wipes after you release.
Whenever you press the wiper button on the steering
wheel, the touchscreen displays the wiper menu,
allowing you to adjust wiper settings. Press the left scroll
button on the
desired setting.
steering wheel left or right to choose your
fluid—the
Wipers and Washers
NOTE:
If you choose Auto and the ability to detect
liquid on the windshield becomes unavailable, the
wiper setting reverts to the most recently used
manual setting. If a manual setting cannot be
determined, the wipers turn o.
NOTE: You can also adjust the windshield wiper
speed and frequency using voice commands (see
Voice Commands on page 16).
CAUTION: To avoid the risk of damaging the
wipers, do not leave the wipers set to Auto
when washing Model 3.
Periodically check and clean the edge of the wiper
blades. If a blade is damaged, replace it immediately. For
details on checking and replacing wiper blades, see
Windshield Wiper Blades, Jets and Fluid on page 187.
CAUTION:
that the hood is fully closed before activating the
windshield wipers.
CAUTION:
turning the wipers on. Ice has sharp edges that can
damage the rubber on the wiper blades.
CAUTION:
blades are not frozen or adhered to the windshield.
To avoid damaging the hood, ensure
Remove ice from the windshield before
In harsh climates, ensure that the wiper
Turn the wipers o.
1.
Choose how you want the wipers to operate:
2.
Auto - Model 3 detects whether or not it is raining.
◦
When liquid is detected on the windshield, Model
3 determines the optimal frequency of the wipers.
If Model 3 does not detect liquid on the
windshield, the wipers do not operate.
NOTE: Autosteer and trac-aware cruise control
require wipers to be set to Auto. This setting is
automatic and you cannot change it.
NOTE: The Auto setting is currently in BETA. If
uncertain about using the Auto setting while in the
BETA phase, Tesla recommends operating the
wipers manually, as necessary.
◦ I - Intermittent, slow.
◦ II - Intermittent, fast.
III - Continuous, slow.
◦
IIII - Continuous, fast.
◦
73Driving
Page 76
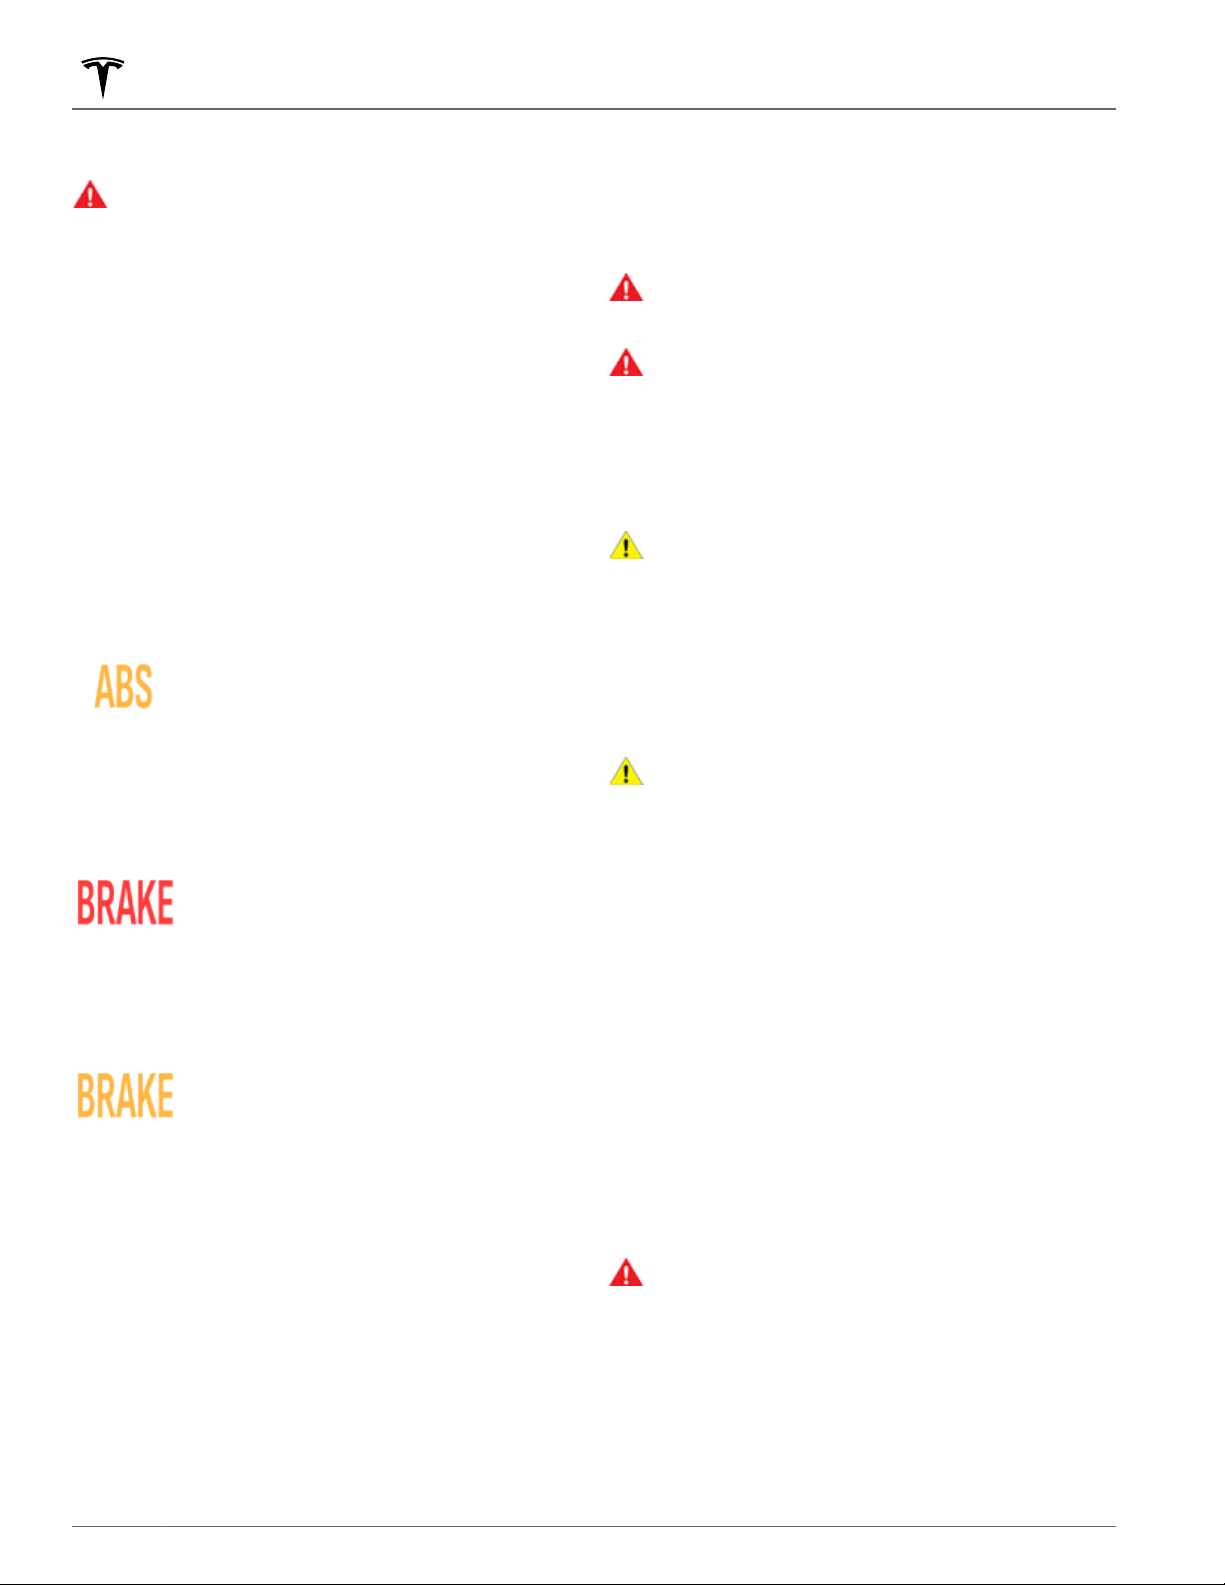
Braking and Stopping
Braking Systems
WARNING: Properly functioning braking systems
are critical to ensure safety. If you experience a
problem with the brake pedal, brake calipers, or
any component of a Model 3 braking system,
contact Tesla immediately.
Model 3 has an anti-lock braking system (ABS) that
prevents the wheels from locking when you apply
maximum brake pressure. This improves steering control
during heavy braking in most road conditions.
During emergency braking conditions, the ABS
constantly monitors the speed of each wheel and varies
the brake pressure according to the grip available.
The alteration of brake pressure can be felt as a pulsing
sensation through the brake pedal. This demonstrates
that the ABS is operating and is not a cause for concern.
Keep
firm and steady pressure on the brake pedal while
experiencing the pulsing.
The ABS indicator
the touchscreen when you first start Model
3. If this indicator lights up at any other
time, an ABS fault has occurred and the
ABS is not operating. Contact Tesla. The
braking system remains fully operational
and is not
However, braking distances may increase.
Drive cautiously and avoid heavy braking.
If the
indicator at any time other than briefly
when you first start Model 3, a brake
system fault is detected, or the level of the
brake fluid is low. Contact Tesla
immediately. Apply steady pressure and
keep the brakes
a stop when safe to do so.
The
indicator if a brake booster fault is
detected. Apply steady pressure and keep
the brakes firm to stop the vehicle when
safety permits. Hydraulic Boost
Compensation will be active (see
Boost Compensation on page 75).
aected by an ABS failure.
touchscreen displays this red brake
touchscreen displays this amber brake
Emergency Braking
In an emergency, fully press the brake pedal and
maintain firm pressure, even on low traction surfaces.
The ABS varies the braking pressure to each wheel
according to the amount of traction available. This
prevents wheels from locking and ensures that you stop
as safely as possible.
briefly flashes amber on
firm to bring the vehicle to
Hydraulic
If an alternative method is needed to bring the vehicle to
a stop, press and hold the Park button on the
touchscreen's drive mode strip to apply the brakes and
remove drive torque while the button is held. Swipe from
the edge of the touchscreen towards the passenger, to
bring up the drive mode strip.
WARNING: Do not pump the brake pedal. Doing so
interrupts operation of the ABS and can increase
braking distance.
WARNING: Always maintain a safe distance from
the vehicle in front of you and be aware of
hazardous driving conditions. While the ABS can
improve stopping distance, it cannot overcome the
laws of physics. It also does not prevent the
danger of hydroplaning (where a layer of water
prevents direct contact between the tires and the
road).
CAUTION: Automatic Emergency Braking (see
Collision Avoidance Assist on page 125) may
intervene to automatically brake in situations
where a collision is considered imminent.
Automatic Emergency Braking is not designed to
prevent a collision. At best, it can minimize the
impact of a frontal collision by attempting to
reduce your driving speed. Depending on
Automatic Emergency Braking to avoid a collision
can result in serious injury or death.
CAUTION: In emergency situations, if the brakes
are not functioning properly, press and hold the
Park button on the overhead console or
touchscreen to bring Model 3 to a stop. Do not use
this method to stop the vehicle unless absolutely
necessary.
Dynamic Brake Lights (if equipped)
If you are driving over 30 mph (50 km/h) and brake
forcefully
the brake lights flash quickly to warn other drivers that
Model 3 is rapidly slowing down. If Model 3 stops
completely, the hazard warning lights flash. Flashing
continues until you press the accelerator or manually
press the hazard lights button to turn them
Hazard Warning Flashers on page 72).
NOTE: When towing a trailer (if applicable), the brake
lights on the trailer also operate as described above,
even when the trailer is not equipped with a separate
braking system.
(or if Automatic Emergency Braking engages),
o (see
WARNING:
always increase your following distance. Sudden
braking may result in skidding, jack-knifing, and
loss of control.
When towing a trailer (if applicable),
74 MODEL 3 Owner's Manual
Page 77
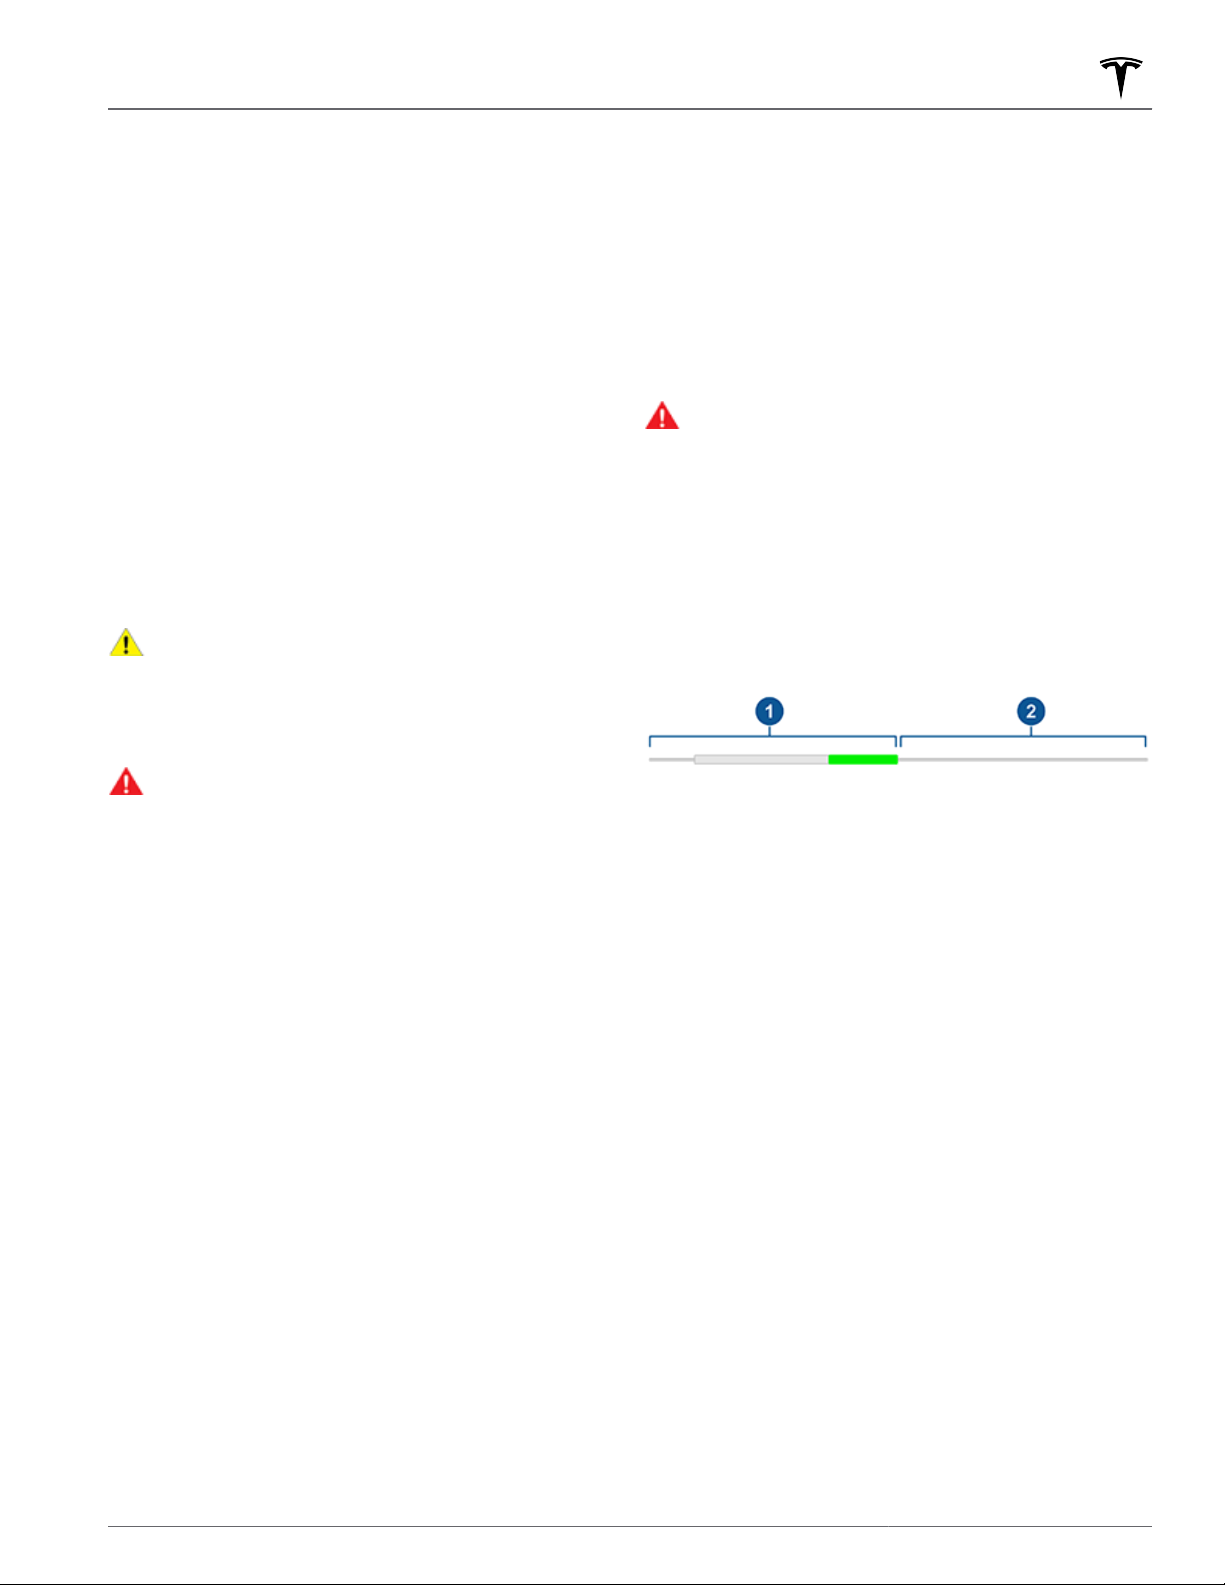
Braking and Stopping
Brake Disc Wiping
To ensure brakes remain responsive in cold and wet
weather,
When cold and wet weather is detected, this feature
repeatedly applies an imperceptible amount of brake
force to remove water from the surface of the brake
discs.
Model 3 is equipped with brake disc wiping.
Hydraulic Fade Compensation
Model 3 is equipped with hydraulic fade compensation.
This assists in monitoring brake system pressure and
ABS activity for instances of reduced brake
performance. If reduced brake performance is detected
(for example, as a result of brake fade, or cold or wet
conditions), you may hear a sound, feel the brake pedal
pull away from your foot, and notice a strong increase in
braking. Brake as you normally would and continue to
press the brake pedal without releasing or pumping the
brakes.
CAUTION:
are not functioning properly, press and hold the
Park button on the overhead console or
touchscreen to bring Model 3 to a stop. Do not use
this method to stop the vehicle unless absolutely
necessary.
WARNING:
from the vehicle in front of you and exercise
caution when driving conditions are hazardous.
Brake disc wiping and hydraulic fade
compensation is not a substitute for adequately
applying the brakes.
In emergency situations, if the brakes
Always maintain a safe driving distance
Hydraulic Boost Compensation
Model 3 is equipped with a brake booster that activates
the brakes when the brake pedal is pressed. Hydraulic
boost compensation provides mechanical assistance if
the brake booster fails. If a brake booster failure is
detected, the brake pedal feels
may hear a sound when you press the brake pedal. To
stop Model 3, apply steady force to the brake pedal
without releasing or pumping. Drive cautiously and
maintain a safe distance from other road users—brake
pedal responsiveness and braking performance may be
degraded.
stier to press and you
Regenerative Braking
Whenever Model 3 is moving and your foot is o the
accelerator, regenerative braking slows down the vehicle
and feeds any surplus power back to the Battery. By
anticipating your stops and reducing or removing
pressure from the accelerator pedal to slow down, you
can take advantage of regenerative braking to increase
driving range.
Vehicle deceleration due to regenerative braking may
vary depending on the current state of the Battery. For
example, regenerative braking may be limited if the
Battery is cold or is already fully charged.
To experience the same amount of deceleration
whenever you release the accelerator pedal, regardless
of the state of the Battery, you can choose to have the
regular braking system automatically engage whenever
regenerative braking is limited. Touch
& Steering > Apply Brakes When Regenerative Braking
is Limited.
WARNING: Apply Brakes When Regenerative
Braking is Limited may not operate if the brakes
are extremely hot.
NOTE: If Apply Brakes When Regenerative Braking is
Limited is enabled and applying the brakes, the brake
pedal may move and it may feel stier when pressed.
This is expected and does not change your ability to
slow down Model 3.
The power meter (a thin horizontal line centered at the
top of the touchscreen's car status area) displays realtime power usage:
The left side of the power meter represents power
1.
generated from regenerative braking, or power that is
used to slow down the vehicle. Power being fed back
to the Battery displays in green whereas power used
by the regular braking system displays in gray.
The right side of the power meter shows power being
2.
output by the Battery, such as that used to accelerate
the vehicle or to cool the cabin. When you press the
accelerator pedal, the power meter fills to the right
with black (or white if the display is dark).
NOTE: Installing winter tires with aggressive compound
and tread design may result in temporarily-reduced
regenerative braking power. However, your vehicle is
designed to continuously recalibrate itself, and after
changing tires it will increasingly restore regenerative
braking power after some straight-line accelerations. For
most drivers this occurs after a short period of normal
driving, but drivers who normally accelerate lightly may
need to use slightly harder accelerations while the
recalibration is in progress. Touch
Tire > Tires to select winter tires and quicken this
process.
NOTE: If regenerative braking is aggressively slowing
Model 3 (such as when your foot is completely o the
accelerator pedal at highway speeds), the brake lights
turn on to alert others that you are slowing down.
Controls > Pedals
Service > Wheel &
75Driving
Page 78
Braking and Stopping
NOTE: Because Model 3 uses regenerative braking, the
brake pads are typically used less frequently than those
in traditional braking systems. To avoid the accumulation
of rust and corrosion, Tesla recommends frequently
pressing the brake pedal to apply the mechanical brakes
and dry the brake pads and rotors.
WARNING: In snowy or icy conditions, Model 3
may experience loss of traction during
regenerative braking.
WARNING: Never rely on your vehicle to
adequately decelerate or fully stop your vehicle.
Many factors can contribute to a longer stopping
distance, including downward slopes and reduced
or limited regenerative braking. Always be
prepared to use the brake pedal to adequately
decelerate or stop.
WARNING: Press the brake pedal if Model 3 moves
when unsafe to do so. It is your responsibility to
stay alert and be in control of the vehicle at all
times. Failure to do so can result in serious
damage, injury, or death.
WARNING: Do not rely on regenerative braking to
keep you and your vehicle safe. Various factors
such as driving with a heavy vehicle load, on a
steep hill, or on wet or icy roads aect
deceleration rate and the distance at which Model
3 will come to a stop. Drive attentively and always
stay prepared to use the brake pedal to stop as
appropriate based on trac and road conditions.
WARNING: Forward Collision Warning and
Automatic Emergency Braking do not operate
when driving at very low speeds (see Collision
Avoidance Assist on page 125). Do not rely on
these features to warn you, or to prevent or reduce
the impact of a collision.
Parking Brake
To engage the parking brake, touch Controls > Safety >
Parking Brake. Follow the onscreen instructions.
Use the touchscreen to manually release the parking
brake (which also shifts Model 3 into Neutral):
Touch Controls > Safety.
1.
Press the brake pedal, then touch Parking Brake. If
2.
Model 3 was previously in Park, it shifts into Neutral.
NOTE:
The parking brake operates on the rear wheels
only, and is independent of the pedal-operated brake
system.
CAUTION: In the unlikely event that Model 3 loses
electrical power, you cannot access the
touchscreen and are therefore unable to release
the parking brake without first jump starting (see
Jump Starting on page 215).
WARNING: In snowy or icy conditions the rear
wheels may not have sucient traction to prevent
Model 3 from sliding down a slope, particularly if
not using winter tires. Avoid parking on hills in
snowy or icy conditions. You are always
responsible for parking safely.
WARNING: Your Model 3 may display an alert if
the road is too steep to safely park on, or if the
parking brakes are not properly engaged. These
alerts are for guidance purposes only and are not a
substitute for the driver’s judgment of safe parking
conditions, including specific road or weather
conditions. Do not depend on these alerts to
determine whether or not it is safe to park at any
location. You are always responsible for parking
safely.
Brake Wear
Model 3 brake pads are equipped with wear indicators.
A wear indicator is a thin metal strip attached to the
brake pad that squeals as it rubs against the rotor when
the pad wears down. This squealing sound indicates that
the brake pads have reached the end of their service life
and require replacement. To replace the brake pads,
contact Tesla Service.
Brakes must be periodically inspected visually by
removing the tire and wheel. For detailed specifications
and service limits for rotors and brake pads, see
Subsystems on page 199. Additionally, Tesla
recommends cleaning and lubricating the brake calipers
every year or 12,500 miles (20,000 km) if in an area
where roads are salted during winter months.
WARNING:
damages the braking system and can result in a
braking hazard.
Neglecting to replace worn brake pads
When you manually apply the parking
brake using the touchscreen, the red
parking brake indicator lights up on the
touchscreen.
If the parking brake experiences an
electrical issue, the amber parking brake
indicator lights up and a fault message
displays on the
76 MODEL 3 Owner's Manual
touchscreen.
Page 79
How Park Assist Works
This feature may be temporarily limited or inactive until
it is enabled with a future software update for vehicles
manufactured as of approximately September 2023.
Model 3 is designed to detect the presence of objects.
When driving slowly (for example, when parking), the
vehicle alerts you if an object is detected in close
proximity of your
objects are detected in front of Model 3 when you are in
Drive, and behind Model 3 when you are in Reverse.
WARNING: You may not be alerted if Model 3 rolls
freely in the opposite direction (for example, Park
Assist does not display an alert if Model 3 rolls
backwards down a hill while in Drive).
WARNING: Never depend on Park Assist to inform
you if an area you are approaching is free of
objects and/or people. Several external factors can
reduce the performance of Park Assist, causing
either no readings or false readings (see
Limitations and False Warnings on page 77).
Therefore, depending on Park Assist to determine
if Model 3 is approaching an obstruction can result
in damage to the vehicle and/or objects, and can
potentially cause serious injury. Always inspect the
area with your own eyes. When reversing, perform
shoulder checks and use all mirrors. Park assist
does not detect children, pedestrians, bicyclists,
animals, or objects that are moving, protruding,
located too far above or below the sensors (if
equipped) or cameras, or too close or too far from
the sensors or cameras. Park Assist is for guidance
purposes only and is not intended to replace your
own direct visual checks. It is not a substitute for
careful driving.
Model 3. The vehicle alerts you when
Visual and Audio Feedback
When you shift to Reverse, the Park Assist view displays
on the
proximity to the front and rear of Model 3. This view
closes when you shift into Drive unless an object is
detected close to the front of Model 3, in which case the
Park Assist view closes automatically when you start
driving faster than the speed at which Park Assist
operates. When reversing, visual feedback also displays
on the touchscreen (see
85). You can manually close the park assist view on the
touchscreen by touching the
When driving at low speeds with the Camera app
displayed on the touchscreen, you can switch to the
Park Assist view by touching the button located in the
upper left corner of the Camera app screen. This is
useful if you need assistance with parallel parking.
If chimes are turned on (see Controlling Audible
Feedback on page 77), an audible beep sounds as you
approach an object.
touchscreen, showing objects that are in close
Rear Facing Camera(s) on page
X.
Park Assist
NOTE:
If Park Assist is unable to provide feedback, the
touchscreen displays an alert message.
CAUTION: Keep sensors (if equipped) and
cameras clean from dirt, debris, snow, and ice.
Avoid using a high pressure power washer on the
sensors and cameras, and do not clean a sensor or
camera with a sharp or abrasive object that can
scratch or damage its surface.
CAUTION: Do not install accessories or stickers on
or near the sensors (if equipped) or cameras.
Controlling Audible Feedback
You can use Park Assist with or without audible
feedback. To turn chimes on or
Safety > Park Assist Chimes.
Limitations and False Warnings
Park Assist may not function correctly in these
situations:
One or more of the sensors (if equipped) or cameras
•
is damaged, dirty, or obstructed (such as by mud, ice,
or snow, or by a vehicle bra, excessive paint, or
adhesive products such as wraps, stickers, rubber
coating, etc.).
The object is located below approximately 8 inches
•
(20 cm) (such as a curb or low barrier).
CAUTION:
(such as curbs or low barriers) can move into a
blind spot. Model 3 cannot alert you about an
object while it is in a blind spot.
Weather conditions (heavy rain, snow, or fog).
•
The object is thin (such as a sign post).
•
Park Assist’s operating range has been exceeded.
•
The object is sound-absorbing or soft (such as
•
powder snow).
The object is sloped (such as a sloped embankment).
•
Model 3 has been parked in, or being driven in,
•
extremely hot or cold temperatures.
The sensors (if equipped) are aected by other
•
electrical equipment or devices that generate
ultrasonic waves.
You are driving in a location where the sensors' (if
•
equipped) waves are deflected away from the vehicle
(such as driving next to a wall or pillar).
• The object is located too close to the bumper.
A bumper is misaligned or damaged.
•
An object that is mounted to Model 3 is interfering
•
with and/or obstructing Park Assist (such as a bike
rack or bumper sticker).
Shorter objects that are detected
o, touch Controls >
77Driving
Page 80

Park Assist
• Model 3 rolls freely in the opposite direction you
selected (for example, Park Assist does not display an
alert if Model 3 rolls backwards down a hill while in
Drive).
Other Parking Aids
In addition to Park Assist, when shifted into Reverse, the
backup camera displays a view of the area behind
3 (see Rear Facing Camera(s) on page 85).
Model
78 MODEL 3 Owner's Manual
Page 81

When Model 3 is stopped, Vehicle Hold can continue to
apply the brakes even after you remove your foot from
the brake pedal.
This indicator displays on the touchscreen
whenever Vehicle Hold is actively braking
Model 3.
To disengage Vehicle Hold, press the accelerator pedal
or press and release the brake pedal.
NOTE: Shifting into Neutral also disengages Vehicle
Hold.
NOTE: After actively braking Model 3 for approximately
ten minutes, Model 3 shifts into Park and Vehicle Hold
cancels.
the driver has left the vehicle.
Model 3 also shifts into Park if it detects that
Vehicle Hold
79Driving
Page 82
Traction Control
How It Works
The traction control system constantly monitors the
speed of the front and rear wheels. If Model 3
experiences a loss of traction, the system minimizes
wheel spin by controlling brake pressure and motor
power. By default, the traction control system is on.
Under normal conditions, it should remain on to ensure
maximum safety.
This yellow indicator flashes on the
touchscreen whenever the traction control
system is actively controlling brake
pressure and motor power to minimize
wheel spin. If the indicator stays on, a fault
is detected with the traction control
system. Contact Tesla Service.
WARNING: Traction control cannot prevent
collisions caused by driving dangerously or turning
too sharply at high speeds.
Allowing Wheel Slip
To allow the wheels to spin at a limited speed, you can
enable Slip Start. Slip Start can be enabled at any speed,
however it is less eective at higher speeds.
Under normal conditions, Slip Start should not be
enabled. Enable it only in circumstances where you
deliberately want the wheels to spin, such as:
Starting on a loose surface, such as gravel or snow.
•
Driving in deep snow, sand or mud.
•
Rocking out of a hole or deep rut.
•
To allow the wheels to spin, touch Controls > Pedals &
Steering > Slip Start.
touchscreen displays an alert message
The
when Slip Start is enabled.
Although Slip Start is automatically disabled the next
time you start Model 3, it is strongly recommended that
you disable it immediately after the circumstances that
required you to enable it have passed.
NOTE: Slip Start can not be enabled when you are
actively using cruise control.
80 MODEL 3 Owner's Manual
Page 83

Touch Controls > Pedals & Steering > Acceleration to
adjust the amount of acceleration you experience when
driving Model 3:
• Chill: limits acceleration for a smooth and gentle ride.
NOTE: When Chill is selected, Chill displays on the
touchscreen above the driving speed.
•
Standard: provides the normal level of acceleration.
You can improve the eciency of the cabin heating by
reducing your selected acceleration mode. This allows
the heat pump system to take more heat from the
Battery to
maintaining the Battery's ability to provide peak
acceleration performance. This helps to maximize
driving eciency in colder weather. Note that when
subsequently increasing the acceleration mode, the
Battery requires time to warm up before the increased
level of acceleration is available.
eciently heat the cabin, instead of
Acceleration Modes
81Driving
Page 84

Driver Profiles
When you first adjust the driver’s seat, steering wheel
position, or exterior side mirrors, the touchscreen
prompts you to create a driver profile to save these
adjustments. Your profile also saves various preferences
you make while customizing Model 3.
To save your profile settings to the cloud and access
them across multiple Tesla vehicles, set up a Tesla Profile
(see Using Tesla Profiles on page 82).
To add a new driver profile, touch the
driver profile icon at the top of the
touchscreen. Then touch Driver Profile
Settings > Add New Driver, type the
driver's name and touch Create Profile.
Follow the onscreen instructions
mirror and steering wheel position to the
driver profile.
Check the Use Easy Entry checkbox if you want to save
(or use existing) Easy Entry settings in which the driver's
seat and the steering wheel are automatically adjusted
to make it easy to enter and exit Model 3.
If you change the position of the driver’s seat, steering
wheel, or exterior side mirrors after you have saved or
chosen a driver profile, the touchscreen prompts you to
Save the new position or Restore the previously saved
position (other settings are automatically saved). To
change a setting without saving or restoring, just ignore
the prompt.
To delete a driver profile, touch the driver profile icon at
the top of the touchscreen, touch Driver Profile Settings
and select the driver profile you want to remove. Once
selected, Delete the driver profile.
NOTE: Valet mode is a built-in driver profile that limits
speed and restricts access to some Model 3 features
(see Valet Mode on page 83).
NOTE: To stop automatic adjustments that are in
process based on a driver's
Driver Profile dropdown menu. Automatic adjustments
also stop if you manually adjust a seat, mirror, or the
steering wheel.
profile, touch Stop on the
to save
Selecting Between Driver Profiles
Using Tesla
Driver profile settings, such as seat adjustments,
temperature preferences, navigation Recents and
Favorites, media settings, and data sharing preferences
can be saved into a Tesla
supported vehicle under your Tesla Account. This
provides convenient access to your profile settings and
preferences across all your Tesla supported vehicles.
To set up your Tesla Profile, navigate to Driver Profile
Settings and select your Tesla Account name. You can
choose to set it up as a New Profile or copy the settings
from an existing driver
using.
To set up a Tesla Profile for additional drivers, share your
vehicle with them from the mobile app and navigate to
Security & Drivers > Manage Drivers > Add Driver. Their
Tesla Profile will appear in the Driver Profile settings
after accepting the invitation from their Tesla Account. If
you remove their access to the vehicle, it also removes
their Tesla
mobile app access, see
Driver on page 49. In addition, you can change your
profile picture from your Tesla Mobile App.
NOTE: Some vehicle settings are synced only between
similar vehicle models. If the seat, steering, and mirror
positions do not restore as expected, touch
Service > Driver Seat, Steering, & Mirrors Calibration on
the aected vehicles. If the setting for Autopilot
Activation does not restore as expected, touch Controls
> Autopilot > Autopilot Activation (see Autopilot
Settings on page 91).
NOTE: Tesla Profiles are supported on vehicles with
software versions 2022.24 or higher.
To remove your Tesla Profile from a vehicle, remove that
vehicle from your Tesla account:
In the Tesla mobile app, touch the profile icon in the
1.
top-right corner.
Touch Add/Remove Products.
2.
Touch Remove.
3.
Select the vehicle you'd like to remove.
4.
Profile. For more information on granting
Profiles
Profile that is synced to every
profile that you were previously
Granting Access to a Second
Controls >
To adjust
profile, touch the driver profile icon at the
top of the Controls screen. Then choose
the driver, and Model 3 is adjusted based
on the settings that have been saved to the
chosen driver
Profiles on page 82 to learn more about
saving profile settings to the cloud for easy
access across multiple Tesla vehicles.
NOTE: Your preferred Stopping Mode setting does not
sync to your driver
Braking and Stopping on page 74.
82 MODEL 3 Owner's Manual
Model 3 based on a driver’s
profile. See Using Tesla
profile. For more information, see
Saved Settings
A subset of the settings that you choose to customize
your Model 3 are automatically saved to your driver's
profile. Once saved, a green check mark appears next to
the driver profile icon on the touchscreen. Examples of
automatically saved driver
• Navigation, temperature, lights and display settings.
• Autopilot and driving preferences.
profile settings are:
Page 85

Driver Profiles
Linking a Driver Profile to a Key
You can link a driver profile to a key (or keys) to allow
Model 3 to automatically select the correct driver profile
when the linked key is detected as you approach the
vehicle and open the driver's door. To link a driver
to a key, first ensure you are using your desired driver
profile, then touch Controls > Locks > Keys. You can
toggle the driver icon to link or delete a key to the
desired driver
appears under the key to show that it is linked.
NOTE: Model 3 supports up to 10 driver profiles. You can
link multiple keys to a driver
multiple driver profiles to a single key.
profile. The name of the driver profile
profile, but you cannot link
profile
Easy Entry
You can define an Easy Entry setting that moves the
steering wheel and driver's seat to make it easy to enter
and exit Model 3. Any driver can use the Easy Entry
setting by associating it with their driver
the Easy Entry setting is associated with a driver
the steering wheel and driver's seat automatically adjust
when in Park and the driver's seat belt is unbuckled,
allowing an easy exit from Model 3. When returning to
the vehicle and stepping on the brake pedal, settings
automatically adjust back to the settings used by the
most recent driver
linked to a driver profile).
profile (or based on the key if it's
profile. When
profile,
• Driver
• Some apps, such as Toybox and Theater, are not
• The touchscreen does not display the list of keys that
•
Profiles are not accessible.
accessible.
can access Model 3 (see Managing Keys on page 20).
Wi-Fi and Bluetooth are disabled. When Model 3 is in
Valet mode, you cannot pair new Bluetooth devices
or view or delete existing paired devices. However, if
a Bluetooth-paired device or a known Wi-Fi network
is within range,
Model 3 connects to it.
Starting Valet Mode
With Model 3 in Park, touch the driver profile icon at the
top of the Controls screen, then touch Valet Mode.
The first time you enter Valet mode, the touchscreen
prompts you to create a 4-digit PIN you will use to
cancel Valet mode.
When Valet mode is active, the touchscreen displays the
word
Valet while the driver profile changes to Valet
Mode on the touchscreen.
You can also use the mobile app to start and cancel
Valet mode (if Model 3 is in Park). When using the
mobile app, you do not need to enter a PIN because you
are already required to log into the app using your Tesla
Account credentials.
To use Easy Entry with a driver profile, ensure the Use
Easy Entry box is checked.
WARNING:
driver's seat to the full rearward position when a
child safety seat is installed on a rear seat located
behind the driver's seat. With reduced clearance,
the movement of the seat may impact a child's
legs, cause injury, or dislodge the seat.
Never use Easy Entry to move the
Valet Mode
When Model 3 is in Valet mode, the following restrictions
apply:
Key card must be used to access and drive Model 3.
•
Speed is limited to 70 mph (113 km/h).
•
• Maximum acceleration and power are limited.
• Front trunk and glovebox are locked.
Home and Work locations are not available in the
•
navigation system.
• Voice commands are disabled.
• Autopilot convenience features are disabled.
• The Allow Mobile Access setting cannot be changed.
HomeLink (if available in your market region) is not
•
accessible.
NOTE: If PIN to Drive is enabled (see PIN to Drive on
page 130), you must enter the driving PIN before you
can define or enter a Valet PIN. Once in Valet mode,
Model 3 can be driven without the valet needing to
enter the driving PIN.
NOTE: The PIN to Drive setting is not available when
Valet mode is active.
If you forget your valet PIN, reset it from inside Model 3
by entering your Tesla Account credentials (which also
cancels Valet mode). You can also reset your PIN using
the mobile app.
Canceling Valet Mode
With Model 3 in Park, touch the Valet Mode driver
profile icon at the top of the Controls screen, and enter
your 4-digit PIN.
When you cancel Valet mode, all settings associated
with the most recently used driver
control settings are restored, and all features are
available.
NOTE: You do not need to enter a PIN to cancel Valet
mode from the mobile app.
profile and climate
83Driving
Page 86

Trip Information
Displaying Trip Information
Trip information displays on the touchscreen in the cards
area on the car status display, or when you touch
Controls > Trips. For the current trip, you can display
distance, duration and average energy usage. You can
also show distance and total and average energy used
since your last charge and for additional trips.
To name or rename a trip, touch the trip's name, enter a
new name for the trip, then press Save. To reset a
particular trip meter, touch its associated Reset button.
Odometer
To display the odometer, do either of the following:
Touch Controls > Software.
•
Touch Controls > Trips.
•
• Open the mobile app and scroll down to the bottom
of the main screen.
84 MODEL 3 Owner's Manual
Page 87
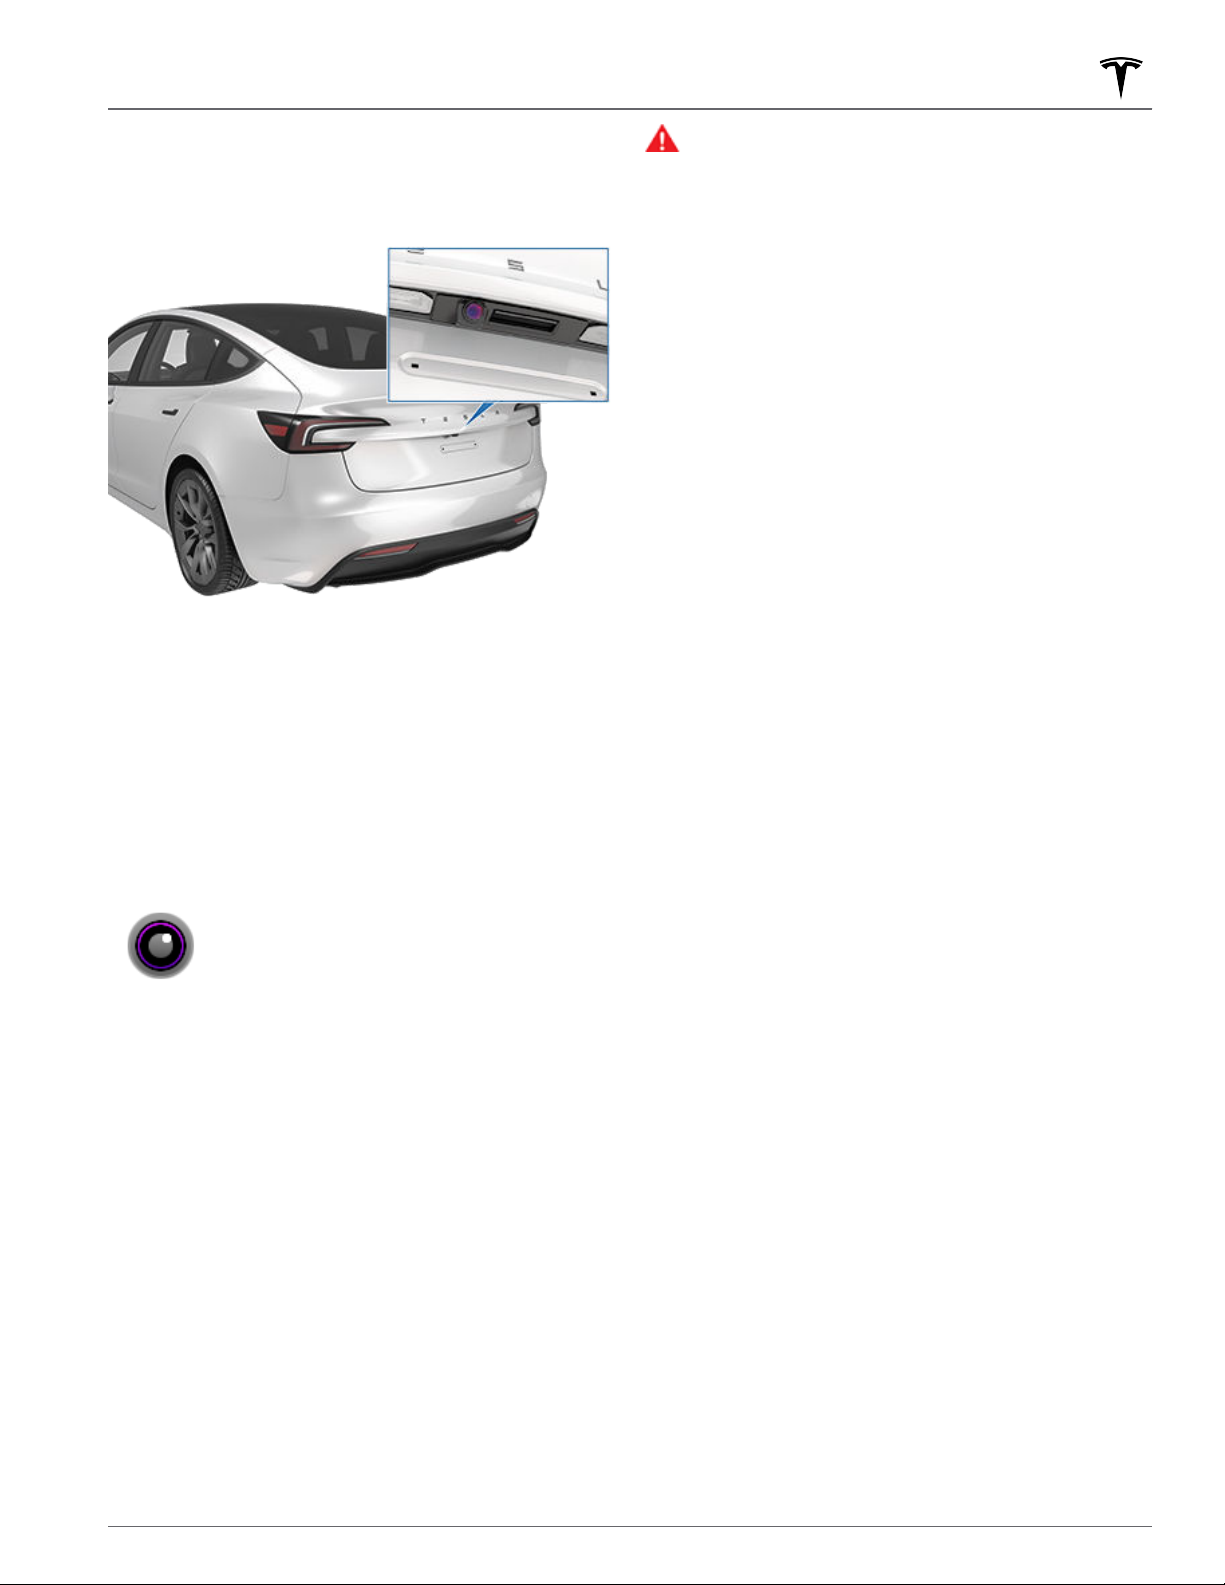
Rear Facing Camera(s)
Camera Location
Model 3 is equipped with a rear view camera located
above the rear license plate.
Whenever you shift into Reverse, the touchscreen
displays the view from the camera. Lines show your
driving path based on the position of the steering wheel.
These lines adjust as you move the steering wheel.
WARNING:
inform you if the area behind you is free of objects
and/or people. The cameras may not detect
objects or barriers that can potentially cause
damage or injury. In addition, several external
factors can reduce the performance of the
cameras, including a dirty or obstructed lens.
Therefore, depending on the cameras to determine
if Model 3 is approaching an obstruction can result
in damage to the vehicle and/or objects and can
potentially cause serious injury. Always inspect the
area with your own eyes. When reversing, perform
shoulder checks and use all mirrors. Use the
cameras for guidance purposes only. It is not
intended to replace your own direct visual checks
and is not a substitute for careful driving.
To ensure a clear picture, the camera lens must be clean
and free of obstructions. See Cleaning on page 183.
Never depend on the cameras to
Model 3 also displays images from the side cameras (if
equipped). Simply swipe up or down to hide or show the
side camera views.
NOTE: Visual feedback from Park Assist also appears on
the touchscreen (see Park Assist on page 77).
To display the view from the rear view
cameras at any time, open the app
launcher and touch the Camera app.
If a black screen appears on the touchscreen instead of
the rear view camera feed when in Reverse, use the rear
view mirrors and ensure your surroundings are safe
before continuing to Reverse. If inoperability of the rear
view camera persists, use the mobile app to schedule a
service appointment.
85Driving
Page 88

Pedestrian Warning System
The Pedestrian Warning System causes Model 3 to emit
sound when driving below approximately 25 mph (40
km/h) or while driving in reverse. Electric vehicles
operate quietly and this sound helps to alert pedestrians
of your oncoming vehicle. The sound, which activates
whenever
speed increases.
Model 3 is shifted out of Park, gets louder as
WARNING: If sound cannot be heard, pedestrians
may not be aware of your oncoming vehicle, which
may increase the likelihood of a collision resulting
in serious injury or death. If the Pedestrian
Warning System is not operating, immediately
contact Tesla.
86 MODEL 3 Owner's Manual
Page 89

About Autopilot
Autopilot is a suite of advanced driver assistance features that are intended to make driving safer and less stressful.
None of these features make Model 3 fully autonomous or replace you as the driver. Autopilot features come
standard with all new Tesla vehicles.
NOTE: Depending on market region, vehicle configuration, options purchased, and software version, your vehicle may
not be equipped with the following features, or a feature may not operate exactly as described.
Basic Autopilot includes Trac-Aware Cruise Control and Autosteer.
• Trac-Aware Cruise Control: Maintains your speed and an adjustable following distance from the vehicle in front
of you, if there is one (see
•
Autosteer: Maintains your speed and distance from a leading vehicle while also intelligently keeping Model 3 in its
lane (see Autosteer on page 92).
Trac-Aware Cruise Control on page 91).
WARNING:
mindful of road conditions, surrounding trac, and other road users (such as pedestrians and cyclists). Always
be prepared to take immediate action. Failure to follow these instructions could cause damage, serious injury,
or death.
Enhanced Autopilot includes additional features. Enhanced Autopilot Features are designed to further reduce driver
workload and make common actions, such as changing lanes or parking, easier.
• Auto Lane Change: Moves Model 3 into an adjacent lane when you engage the turn signal and Autosteer is active
(see Auto Lane Change on page 92).
Navigate on Autopilot: Actively guides Model 3 from a highway’s on-ramp to o-ramp, including performing lane
•
changes, navigating interchanges, automatically engaging the turn signal, and taking the correct exit (see
Navigate on Autopilot on page 93).
Autopark: Parks Model 3, either parallel or perpendicularly (see Autopark on page 110).
•
Summon: Moves Model 3 forward or backward, even while you’re outside the vehicle. This is useful for parking in
•
tight parking spots (see
Smart Summon: Moves Model 3 out of a parking space and through more complex environments, maneuvering
•
around obstacles and other vehicles, to meet you or go to a predetermined target (see Smart Summon on page
114).
WARNING:
be mindful of road conditions, surrounding trac, and other road users (such as pedestrians and cyclists).
Always be prepared to take immediate action. Failure to follow these instructions could cause damage, serious
injury or death.
Full Self-Driving Capability includes:
Basic Autopilot is a hands-on feature. Keep your hands on the steering wheel at all times and be
Summon on page 112).
Enhanced Autopilot is a hands-on feature. Keep your hands on the steering wheel at all times and
Trac Light & Stop Sign Control: Maintains your speed, keeps a following distance, and keeps Model 3 in its lane
•
while also slowing down and stopping for trac lights and stop signs (see Trac Light and Stop Sign Control on
page 99).
Autosteer on City Streets (Full Self-Driving (Beta)): Attempts to drive to your destination by following curves in
•
the road; stopping at and negotiating intersections, stop signs, and roundabouts; making left and right turns; and
entering/exiting highways (see Full Self-Driving (Beta) on page 106).
WARNING:
times and be mindful of road conditions, surrounding trac, and other road users (such as pedestrians and
cyclists). Pay attention to the road at all times and always be prepared to take immediate action. Failure to
follow these instructions could cause damage, serious injury or death.
Autopilot uses the cameras on Model 3, which monitor the surrounding area and detect other vehicles, pedestrians,
road markings, and obstacles such as barriers and curbs. There are cameras mounted on the front, rear, left, and
right sides of Model 3 (see Cameras on page 18).
Model 3 may also be equipped with a cabin camera, mounted in the rear-view mirror, that monitors driver
attentiveness. It is your responsibility to keep your hands on the wheel, pay attention to the road, and be ready to
take immediate action at any time.
Full Self-Driving Capability is a hands-on feature. Keep your hands on the steering wheel at all
87Autopilot
Page 90

About Autopilot
When Autopilot is engaged, Model 3 shows a series of escalating warnings reminding you to keep your hands on the
wheel and pay attention to the road. If there is no response, Autopilot disengages and is unavailable for the
remainder of the drive.
WARNING: Autopilot is designed for your driving comfort and convenience and is not a collision warning or
avoidance system. It is your responsibility to stay alert, drive safely, and be in control of the vehicle at all times.
Never depend on Autopilot to adequately slow down Model 3. Always watch the road in front of you and be
prepared to take corrective action at all times. Failure to do so can result in serious injury or death.
It is your responsibility to familiarize yourself with the limitations of Autopilot and be ready to take control at all
times. For more limitations, cautions, and warnings, see Limitations and Warnings on page 116.
88 MODEL 3 Owner's Manual
Page 91

About Autopilot
Autopilot Conditions
Ensure all cameras are clean and free of obstructions before each drive and before using Autopilot features (see
Cleaning a Camera on page 183). Dirty cameras and sensors (if equipped), as well as environmental conditions such
as rain and faded lane markings, can aect Autopilot performance. If a camera is obstructed or blinded, Model 3
displays a message on the touchscreen and Autopilot features may not be available. For more information on
specific alerts, see Troubleshooting Alerts on page 217.
Before you can use Autopilot features, and after some Service visits, you must drive a short distance to calibrate
cameras. For more information, see Drive to Calibrate Cameras on page 18.
In addition, these features may not work as intended when:
• The road has sharp curves or significant changes in elevation.
Road signs and signals are unclear, ambiguous, or poorly maintained.
•
• Visibility is poor (due to heavy rain, snow, hail, etc. or poorly lit roadways at night)
• You are driving in a tunnel or next to a highway divider that interferes with the view of the camera(s)
Bright light (such as from oncoming headlights or direct sunlight) interferes with the view of the camera(s).
•
The list above does not represent an exhaustive list of situations that may interfere with proper operation of
Autopilot features.
For more information, see Limitations and Warnings on page 116.
NOTE: Depending on market region, vehicle configuration, options purchased, and software version, your vehicle may
not be equipped with the following features, or a feature may not operate exactly as described.
Autopilot
Feature
TracAware
Cruise
Control
Autosteer
Available When
You are driving between
•
NOTE: You can activate Trac-Aware Cruise Control at lower speeds if there is a vehicle detected
at least 5 feet (1.5 meters) ahead of Model 3.
You are driving between
•
NOTE: You can activate Autosteer at lower speeds if there is a vehicle detected at least 5 feet (1.5
meters) ahead of Model 3.
NOTE: On a residential road, a road without a center divider, or a road that is not controlled
access, the maximum allowed cruising speed is limited and the touchscreen displays a message.
The restricted speed will be the speed limit of the road plus
•
Headlights are set to On or Auto. Although Autopilot is available both during the day and in low
light conditions (dusk or dark), Autosteer aborts or is unavailable if headlights are set to O.
When Autosteer is engaged, Auto High Beam is automatically enabled (see High Beam
Headlights on page 70 ) and wipers are set to Auto.
18 mph (30 km/h) and 85 mph (140 km/h)
18 mph (30 km/h) and 85 mph (140 km/h)
5 mph (10 km/h).
Navigate on
Autopilot
You are driving between
•
NOTE: You can activate Navigate on Autopilot at lower speeds if there is a vehicle detected at
least 5 feet (1.5 meters) ahead of Model 3.
• You are driving on a controlled-access highway. When you leave a controlled-access highway,
Navigate on Autopilot reverts to Autosteer.
18 mph (30 km/h) and 85 mph (140 km/h).
89Autopilot
Page 92

About Autopilot
Autopilot
Feature
Full SelfDriving
(Beta)
Available When
• You are driving less than 85 mph (150 km/h).
NOTE: You can activate Full Self-Driving (Beta) at lower speeds, including when Model 3 is at a
standstill, whether or not there is a vehicle detected in front of Model 3.
• Headlights are set to On or Auto. Although Full Self-Driving (Beta) is available both during the
day and in low light conditions (dusk or dark), it aborts or is unavailable if headlights are set to
O. When Full Self-Driving (Beta) is engaged, Auto High Beam is automatically enabled (see
High Beam Headlights on page 70 ) and wipers are set to Auto.
90 MODEL 3 Owner's Manual
Page 93
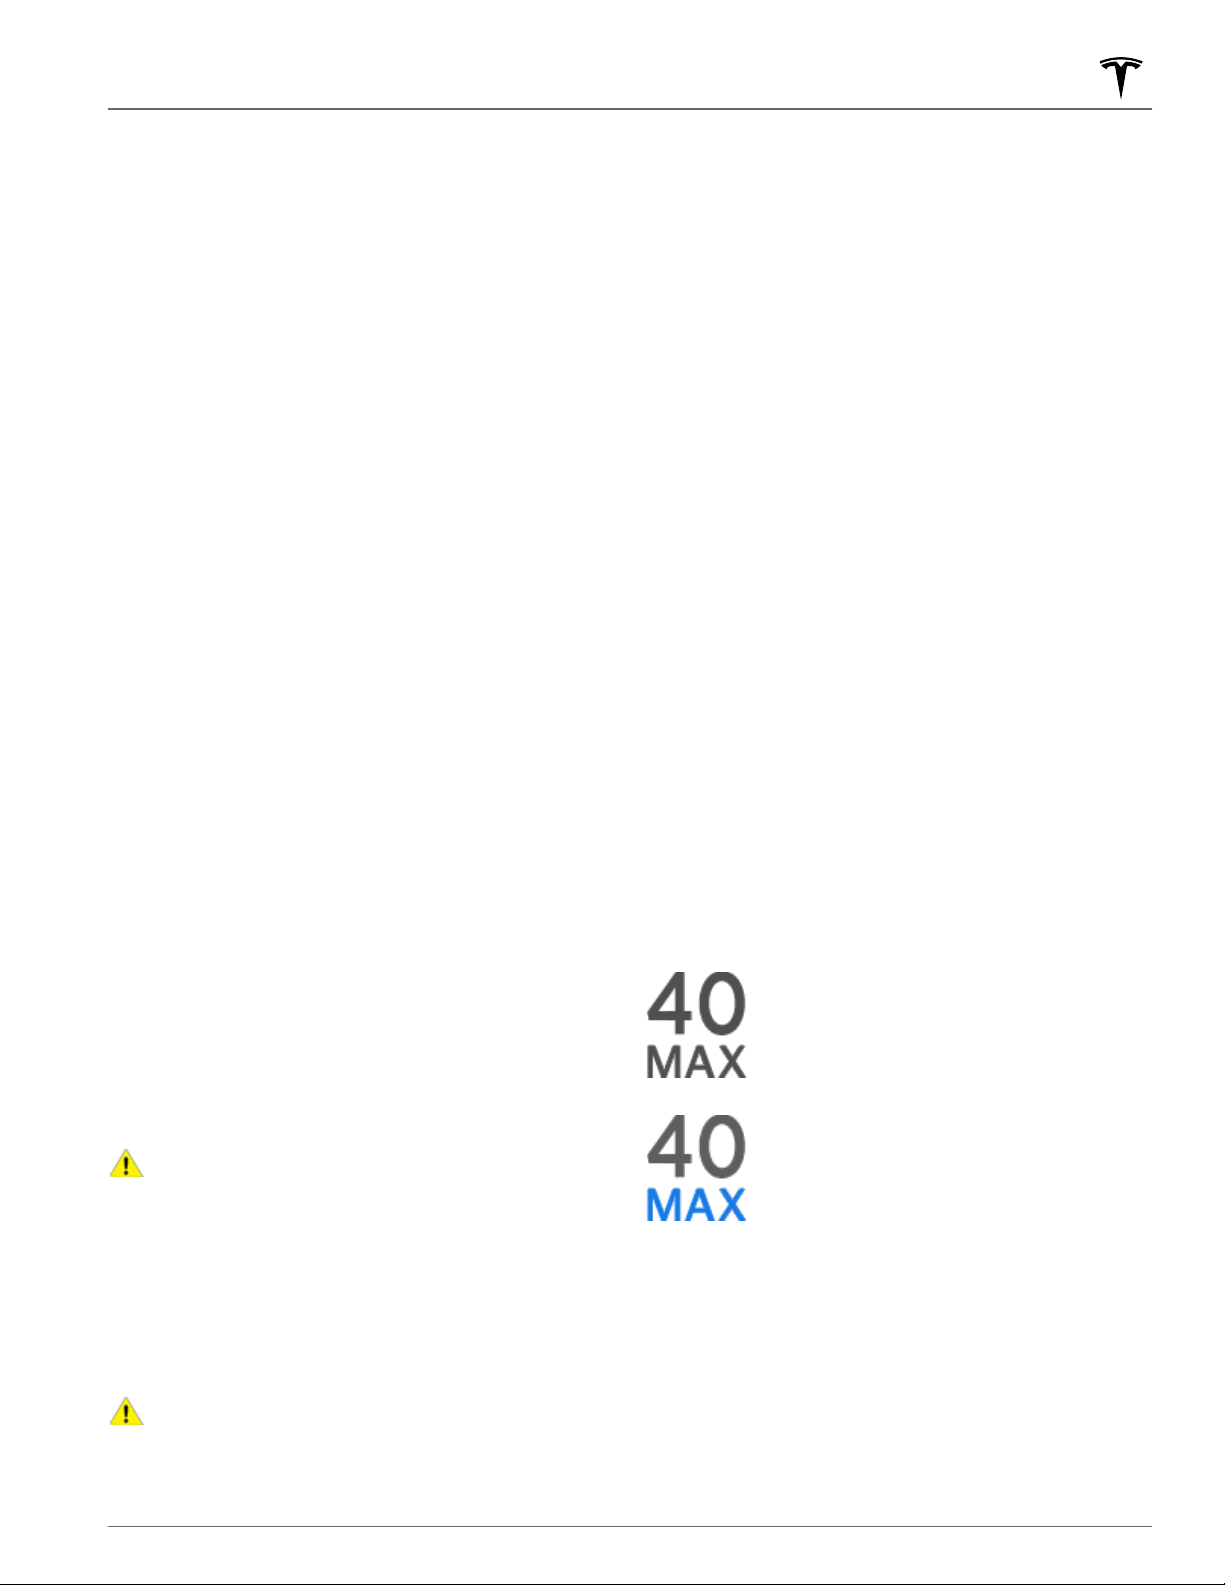
Autopilot Features
This topic describes how to enable and use the following
driver assistance features.
NOTE: Depending on market region, vehicle
configuration, options purchased, and software version,
your vehicle may not be equipped with the following
features, or a feature may not operate exactly as
described.
• Trac-Aware Cruise Control: Like traditional cruise
control,
driving speed. However, Trac-Aware Cruise Control
also slows down or accelerates Model 3 as needed to
maintain the following distance from the vehicle in
front of you. While
engaged, you are still responsible for steering Model
3 (see Trac-Aware Cruise Control on page 91).
• Autosteer: Like Trac-Aware Cruise Control,
Autosteer maintains a set speed (if there is not a
vehicle in front of you) or a set following distance (if
there is a vehicle in front of you). In addition,
Autosteer detects lane markings, road edges, and the
presence of vehicles and objects to intelligently keep
Model 3 in its driving lane (see Autosteer on page
92).
NOTE: Autosteer is a BETA feature.
Auto Lane Change: When you engage a turn signal
•
while Autosteer is active, Auto Lane Change moves
Model 3 into the adjacent lane in the direction
indicated by the turn signal (see Auto Lane Change
on page 92).
Navigate on Autopilot: Navigate on Autopilot builds
•
on the features of Trac-Aware Cruise Control and
Autosteer. While Autosteer is active, Navigate on
Autopilot allows Model 3 to suggest and, if
configured, automatically change lanes to pass other
vehicles and follow the navigation route (see
Navigate on Autopilot on page 93).
NOTE: Navigate on Autopilot is a BETA feature.
Trac-Aware Cruise Control and Autosteer use
information from the cameras on Model 3 to detect lane
markings, road edges, and other vehicles and road users
around Model 3.
Trac-Aware Cruise Control maintains a set
Trac-Aware Cruise Control is
CAUTION:
obstructions before each drive and before using
Autopilot features (see Cleaning a Camera on
page 183). Dirty cameras and sensors (if
equipped), as well as environmental conditions
such as rain and faded lane markings, can aect
Autopilot performance. If a camera is obstructed
or blinded, Model 3 displays a message on the
touchscreen and Autopilot features may not be
available. For more information on specific alerts,
see Troubleshooting Alerts on page 217.
CAUTION:
yourself with the limitations of Autopilot and the
situations in which driver intervention may be
needed. For more information, see Limitations and
Warnings on page 116.
Ensure all cameras are clean and free of
It is your responsibility to familiarize
Autopilot Settings
Before you use Autopilot features, customize how they
work by touching Controls > Autopilot.
Set Speed: Choose whether Autopilot engages at the
•
currently detected speed limit or your current driving
speed. Touch
choose either Speed Limit or Current Speed.
• Oset: If you choose Speed Limit, you can specify an
oset by touching Set Speed Oset. You can choose
Fixed (the cruising speed adjusts by a specific
amount on all roads) or Percentage (the cruising
speed is adjusted as a percentage of the road's
detected speed limit).
Autopilot Activation: Choose how to activate
•
Autosteer. If set to
Cruise Control and Autosteer engage when you
single-press the right scroll wheel. If set to Double
Click, you must double-press the right scroll wheel to
engage Autosteer.
NOTE: Autopilot Activation must be set to Double
Click if you want to use Trac-Aware Cruise Control
independently of Autosteer.
Green Trac Light Chime: In Canada and U.S.: If on, a
•
chime will sound when you are waiting at a red trac
light and the light turns green. If you are not actively
using Trac-Aware Cruise Control and are waiting at
a red light with a car in front of you, the chime
sounds when the car ahead of you advances.
Controls > Autopilot > Set Speed and
Single Click, both Trac-Aware
Trac-Aware Cruise Control
Trac-Aware Cruise Control is always enabled.
Trac-Aware Cruise Control is
When
available but not engaged, the touchscreen
displays the cruising speed in gray. The
number shown represents the speed that
will be set when you engage Trac-Aware
Cruise Control.
Trac-Aware Cruise Control is
When
actively cruising at a set speed, the speed
is highlighted with blue text.
To engage Trac-Aware Cruise Control, press the right
scroll wheel, then release the accelerator pedal to allow
Trac-Aware Cruise Control to maintain the cruising
speed. You can apply the accelerator at any time to
temporarily override the set cruising speed.
NOTE: If Autopilot Activation is set to Single Click,
pressing the right scroll wheel once also activates
Autosteer (which includes Trac-Aware Cruise Control).
Touch Controls > Autopilot > Autopilot Activation and
choose
independently of Autosteer when you single-press the
right scroll wheel.
Double Click to use Trac-Aware Cruise Control
91Autopilot
Page 94

Autopilot Features
If you want a chime to sound when you engage or
cancel Trac-Aware Cruise Control, touch Controls >
Autopilot > Trac-Aware Cruise Control Chime.
WARNING: Trac-Aware Cruise Control is
designed for your driving comfort and
convenience and is not a collision warning or
avoidance system. It is your responsibility to stay
alert, drive safely, and be in control of the vehicle
at all times. Never depend on Trac-Aware Cruise
Control to adequately slow down Model 3. Always
watch the road in front of you and be prepared to
take corrective action at all times. Failure to do so
can result in serious injury or death. For more
information, see Limitations and Warnings on page
116.
Autosteer
NOTE: Depending on market region, vehicle
configuration, options purchased, and software version,
your vehicle may not be equipped with Autosteer, or the
feature may not operate exactly as described.
To enable Autosteer:
Touch Controls > Autopilot > Autopilot Features >
1.
Autosteer (Beta).
After carefully reading and understanding the popup
2.
window, touch Yes.
To indicate that Autosteer is available (but
not actively steering
corner of the touchscreen displays a gray
Autosteer icon next to the driving gear. In
situations where Autosteer is temporarily
unavailable, the Autosteer icon disappears.
(For example, if your driving speed is not
within the speed required for Autosteer to
operate.)
To initiate Autosteer, press the right scroll wheel.
NOTE: If the setting for Autopilot Activation is set to
Double Click, you must double-press the right scroll
wheel to engage Autosteer (see Autopilot Settings on
page 91).
Autosteer confirms activation with an audible chime and
briefly displays a message on the touchscreen reminding
you to pay attention to the road and be ready to take
over at any time.
To indicate that Autosteer is now active,
touchscreen displays the Autosteer
the
icon in blue.
Model 3), the top
Whenever Autosteer is active,
Control is active as well.
In situations where the speed limit cannot be detected
when Autosteer is engaged, Autosteer reduces your
driving speed and limits the set cruising speed to 45
mph (70 km/h). Although you can manually accelerate
to exceed the limited speed, Model 3 will not brake for
detected obstacles as long as you are applying the
accelerator pedal. Autosteer slows down to the limited
speed when you release the accelerator pedal. When
you leave the road or disengage Autosteer by using the
steering wheel, you can increase your set speed again, if
desired.
WARNING:
feature. Keep your hands on the steering wheel at
all times, be mindful of road conditions and
surrounding trac, and always be prepared to take
immediate action. Failure to follow these
instructions could cause damage, serious injury or
death. It is your responsibility to familiarize
yourself with the limitations of Autosteer and the
situations in which it may not work as expected.
For more information, see Limitations and
Warnings on page 116.
Autosteer is a hands-on assistance
Trac-Aware Cruise
Auto Lane Change
NOTE: Depending on market region, vehicle
configuration, options purchased, and software version,
your vehicle may not be equipped with Auto Lane
Change, or the feature may not operate exactly as
described.
If you engage a turn signal while Autosteer is active,
Model 3 moves into the adjacent lane in the direction
indicated by the turn signal, provided the following
conditions are met:
The turn signal is engaged.
•
Lane markings indicate that a lane change is
•
permitted.
Midway through the lane change, Model 3 must
•
detect the target lane's outside lane marking. If this
lane marking is not detected, the lane change is
aborted and
lane.
• The view of the camera(s) is not obstructed.
Model 3 does not detect a vehicle in its blind spot, or
•
a vehicle or obstacle up to the center of the target
lane. If a vehicle or other obstacle is detected in the
target lane, it is shown in red in the visualization on
touchscreen and Model 3 does not complete the
the
lane change until it is safe to do so.
Model 3 returns to its original driving
When Autosteer is able to detect lane markings, it
displays the edges of the driving lane in blue on the
touchscreen.
92 MODEL 3 Owner's Manual
Page 95
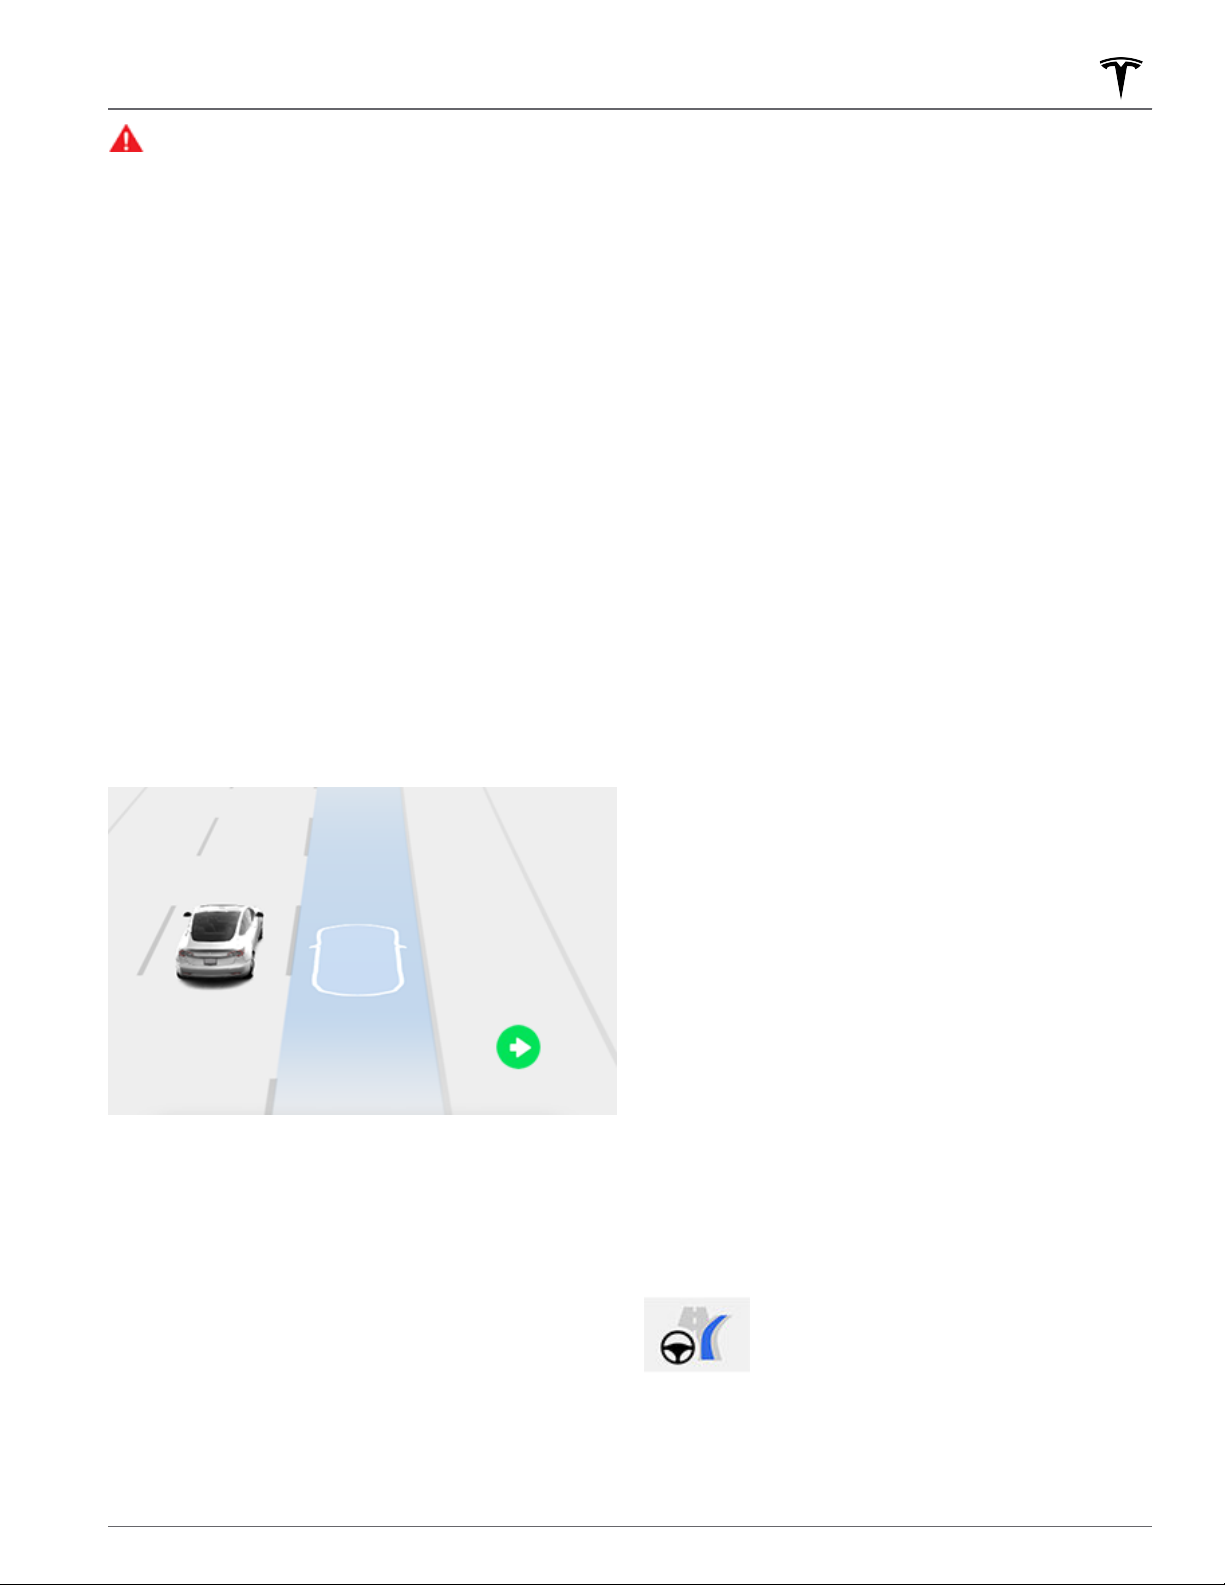
Autopilot Features
WARNING: Although Autopilot is designed to
detect vehicles and obstacles in adjacent lanes, it
is your responsibility to always perform visual
checks to make sure it is safe and appropriate to
move into the target lane. If Autopilot cannot
change lanes due to inadequate data, the
touchscreen displays a series of warnings.
Therefore, when using Auto Lane Change, always
pay attention to the touchscreen and be prepared
to manually steer Model 3.
The minimum speed at which Autopilot changes lanes
may vary depending on region, adjacent lane speeds,
and other factors. Always be ready to manually steer
and change lanes as necessary. When an automatic lane
change is in progress, Overtake Acceleration is
activated, allowing
vehicle in front (see Overtake Acceleration on page 97).
When you engage a turn signal, Autopilot moves Model
3 one lane at a time. Moving into an additional lane
requires you to engage the turn signal a second time
after the
As Model 3 changes lanes, it is important to monitor its
performance by watching the driving path in front of
you and the surrounding area. Stay prepared to take
over steering at any time. As you are crossing over into
the adjacent lane, the
in the lane that
first lane change is complete.
Model 3 to accelerate closer to a
touchscreen displays the location
Model 3 is moving into.
• Enable at Start of Every Trip
automatically enable Navigate on Autopilot for every
navigation route. When enabled, the Navigate on
Autopilot button on the turn-by-turn direction list is
already enabled at the start of every trip.
•
Speed Based Lane Changes: Navigate on Autopilot is
designed to perform both route-based and speedbased lane changes. Speed-based lanes changes are
optional. You can use this setting to disable speedbased lane changes or to specify how assertively you
want Navigate on Autopilot to change lanes to
achieve the set cruising speed (
Max).
• Exit Passing Lane: Choose whether you want
Navigate on Autopilot to maneuver out of a passing
lane when navigating to a destination. In addition to
route-based and speed-based lane changes, Navigate
on Autopilot requests a lane change out of a passing
lane as a reminder to stay in a slower lane when you
are not passing other vehicles. Choose
this and keep Model 3 in a passing lane except when
needed to stay on the navigation route.
Require Lane Change Confirmation: (if equipped) By
•
default, Navigate on Autopilot requires your
confirmation before proceeding with a lane change
by engaging the appropriate turn signal. If you do not
confirm the lane change within 3 seconds, a chime
sounds to remind you that Navigate on Autopilot
requires your confirmation to change lanes.
Lane Change Notification: You can specify if or how
•
you want to be notified of lane changes (O, Chime,
Vibrate, or Both).
: Choose whether to
Mild, Average, or Mad
No to disable
Navigate on Autopilot
NOTE: Depending on market region, vehicle
configuration, options purchased, and software version,
your vehicle may not be equipped with Navigate on
Autopilot, or the feature may not operate exactly as
described.
To enable Navigate on Autopilot, touch Controls >
Autopilot > Navigate on Autopilot (Beta). Then, to
customize how you want Navigate on Autopilot to
operate, touch
Customize Navigate on Autopilot:
If Enable at Start of Every Trip is turned on, Navigate on
Autopilot engages automatically when:
Autosteer is active.
•
You are navigating to a destination.
•
You are on a controlled-access highway.
•
Once enabled, the Navigate on Autopilot button appears
on the map’s turn-by-turn direction list whenever a
navigation route is active and the route includes at least
one controlled-access highway.
If Enable at Start of Every Trip is turned o, touch the
Navigate on Autopilot button above the turn-by-turn
directions to enable it. Once the Navigate on Autopilot is
selected, it will engage whenever you engage Autosteer.
The Navigate on Autopilot icon shows in
the turn-by-turn direction list when you are
navigating to a destination and Navigate
on Autopilot is available but not active.
93Autopilot
Page 96
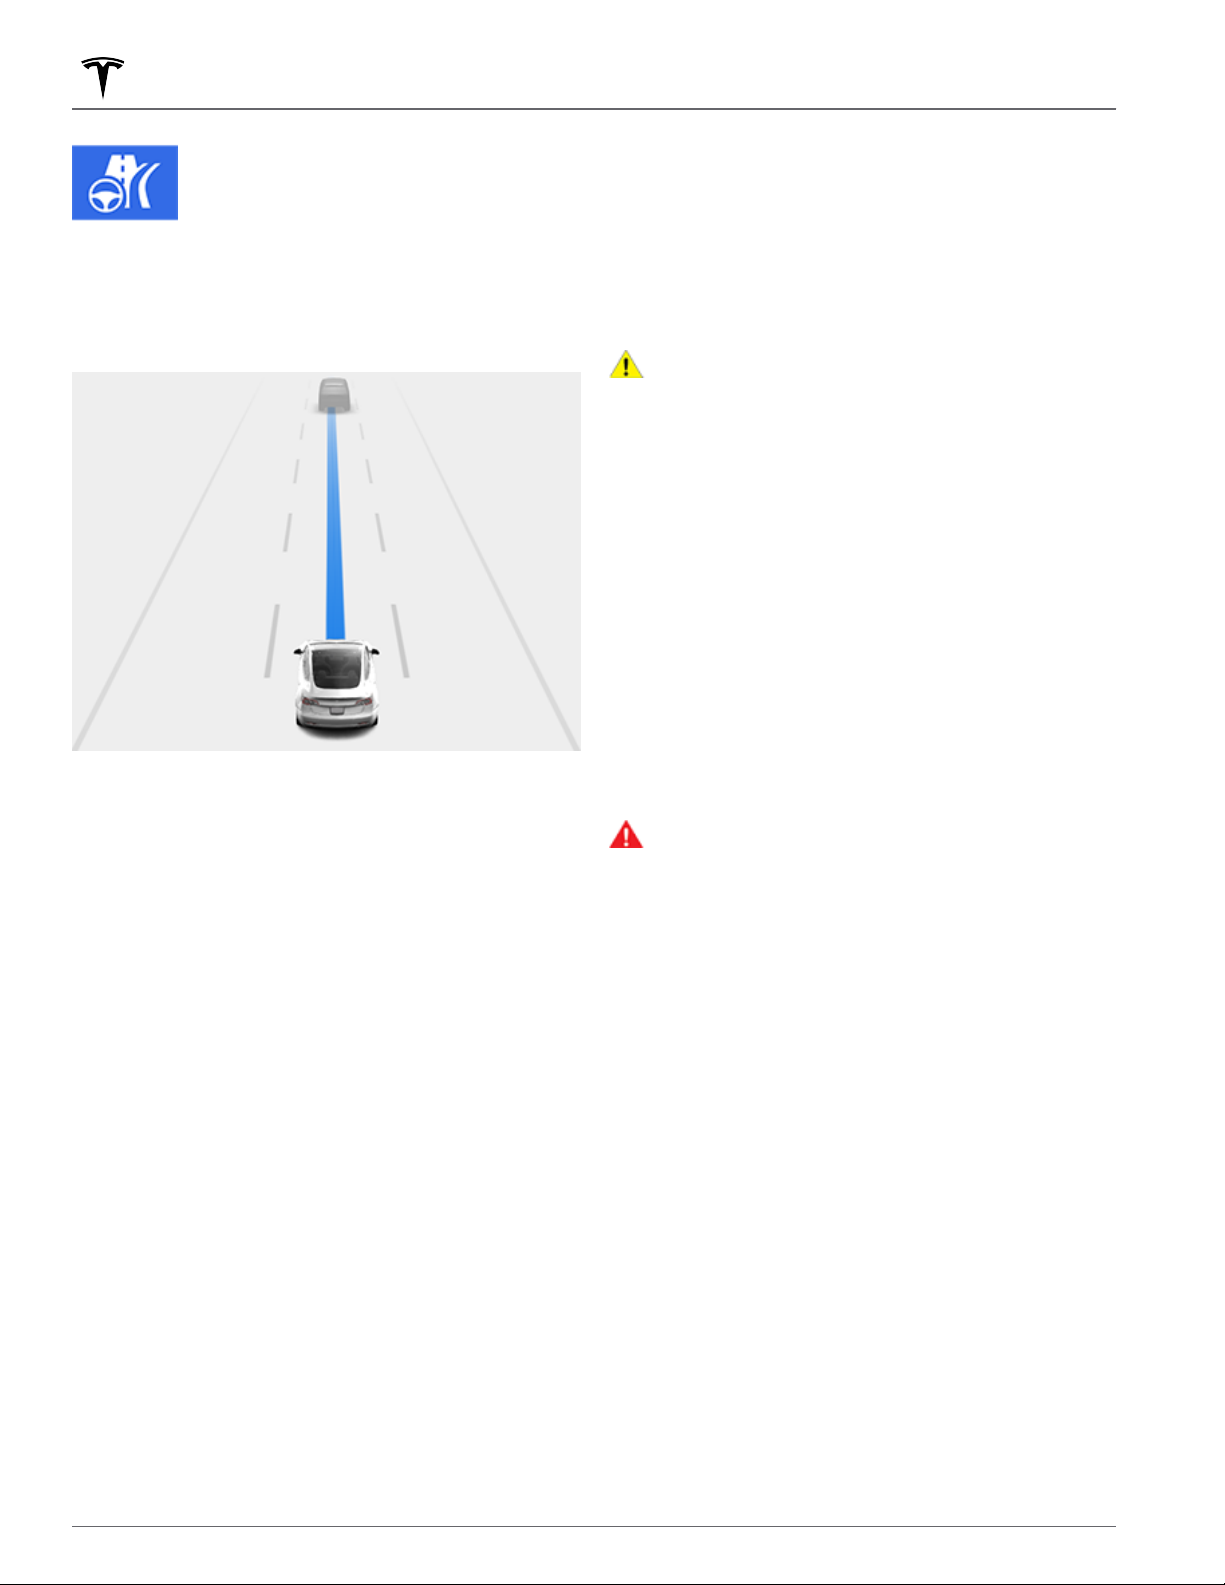
Autopilot Features
If Navigate on Autopilot is active, the icon
is blue. If Enable at Start of Every Trip is
turned on, the Navigate on Autopilot icon
is selected whenever you start navigation.
Touch the icon to cancel Navigate on
Autopilot and revert to Autosteer.
Whenever Navigate on Autopilot is active, the Navigate
on Autopilot button is blue and the touchscreen displays
the driving lane as a single blue line in front of
Model 3:
NOTE:
When determining navigation routes, and
maneuvers at interchanges, Navigate on Autopilot
considers whether or not you want to use High
Occupancy Vehicle (HOV) lanes. Therefore, ensure the
Use HOV Lanes setting is appropriate for your
circumstances (see
the setting is o, Navigate on Autopilot never uses a
HOV lane, regardless of time of day. If the setting is on,
Navigate on Autopilot uses HOV lanes, whenever
applicable.
CAUTION: Navigate on Autopilot may not always
attempt to exit at an o-ramp or change lanes,
even when an exit or lane change is determined by
the navigation route. Always remain alert and be
prepared to manually steer onto an o-ramp, or
make a lane change to prepare for, or to exit at, an
o-ramp or interchange.
Navigate on Autopilot activates and deactivates based
on the type of road you are driving on. When Navigate
on Autopilot is active and you approach an
interchange along your navigation route, the appropriate
turn signal engages and Autosteer maneuvers
onto the o-ramp or interchange.
Maps and Navigation on page 148). If
o-ramp or
Model 3
The turn-by-turn directions display the Autosteer icon
next to the maneuvers (such as o-ramps) that Navigate
on Autopilot will handle.
When Navigate on Autopilot is engaged Model 3
automatically makes both speed-based and route-based
lane changes.
Speed Based Lane Changes: Navigate on Autopilot
•
changes lanes to reduce driving time to your
destination. For example, if
vehicle going below the set cruising speed, Navigate
on Autopilot will move into the passing lane to pass
it. Speed-based lanes changes are optional.
Route Based Lane Changes: Navigate on Autopilot
•
changes lanes to route you to your destination. For
example, Navigate on Autopilot will move into the
exit lane as Model 3 approaches the o-ramp
specified by the navigation route.
If you ignore a route-based lane change suggestion (for
example, you are driving in the left lane while
approaching an o-ramp on the right side of the
highway), Navigate on Autopilot is unable to maneuver
onto the
your destination.
o-ramp and as a result, you are re-routed to
Model 3 is behind a
When you leave a controlled-access highway Navigate
on Autopilot reverts to Autosteer—a chime sounds and
the touchscreen displays the driving lane lines in blue
(instead of the single blue in front of Model 3). When
Navigate on Autopilot deactivates, Autosteer remains
active. Always be prepared to take appropriate action.
WARNING:
feature. Keep your hands on the steering wheel at
all times, be mindful of road conditions and
surrounding trac, and always be prepared to take
immediate action. Failure to follow these
instructions could cause damage, serious injury or
death. It is your responsibility to familiarize
yourself with the limitations of Navigate on
Autopilot and the situations in which it may not
work as expected. For more information, see
Limitations and Warnings on page 116.
Navigate on Autopilot is a hands-on
Canceling Autopilot
Trac-Aware Cruise Control cancels when:
You press the right scroll wheel on the steering
•
wheel.
You press the brake pedal.
•
You exceed 90 mph (150 km/h).
•
• You shift into Reverse, Park, or Neutral.
• A door is opened.
• An Automatic Emergency Braking event occurs (see
Collision Avoidance Assist on page 125).
The driver's seatbelt is released, and/or the driver
•
gets out of their seat.
94 MODEL 3 Owner's Manual
Page 97
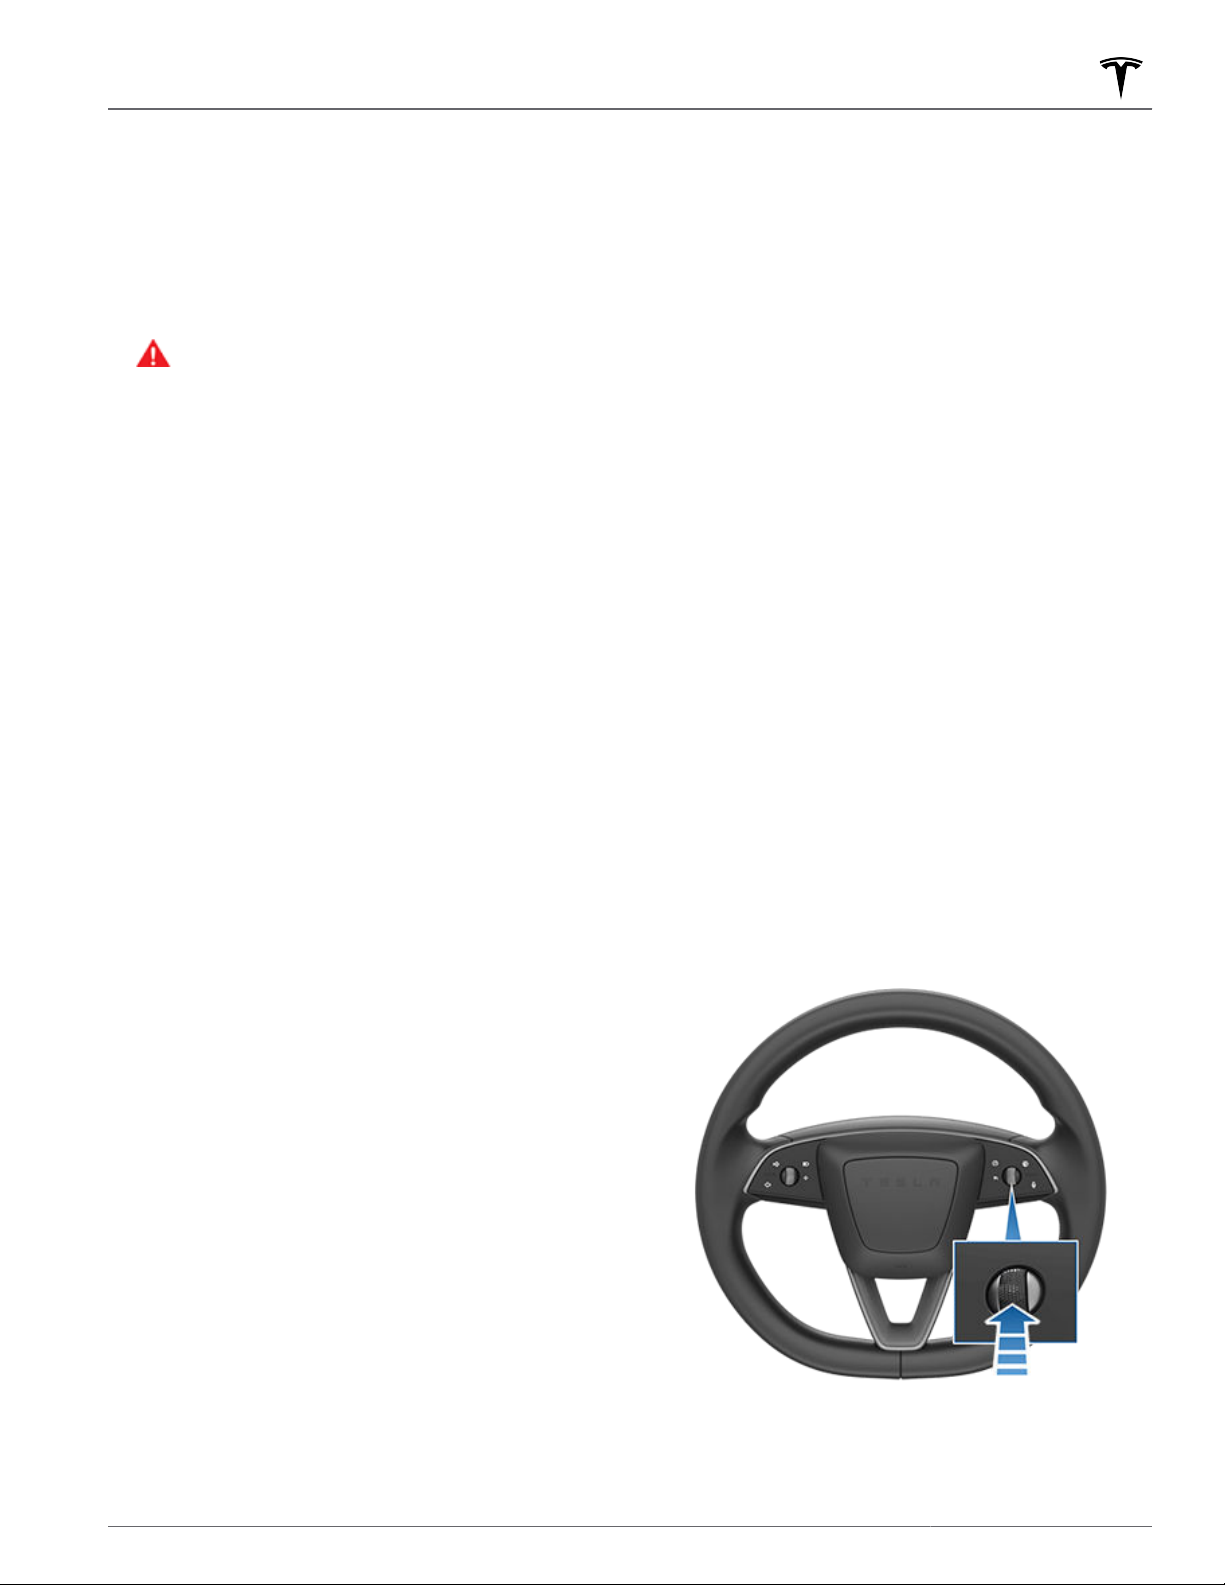
Autopilot Features
When Trac-Aware Cruise Control cancels, the cruising
speed icon on the touchscreen turns gray to indicate
that Trac-Aware Cruise Control is no longer active.
Autosteer cancels when any of the above actions are
taken. In addition, Autosteer cancels when:
•
You exceed 85 mph (140 km/h).
• You take over steering manually.
WARNING: If Autopilot Activation is set to
Double Click and Autosteer cancels because
you started steering manually, Trac-Aware
Cruise Control remains active. If Autopilot
Activation is set to Single Click and Autosteer
cancels because you started steering manually,
Trac-Aware Cruise Control also cancels.
•
You do not respond to repeated reminders to keep
your hands on the wheel and subsequent messages
on the touchscreen (see Driver Attentiveness on page
97).
When Autosteer cancels, a chime sounds and the
Autosteer icon either turns gray to indicate that
Autosteer is no longer active, or disappears to indicate
that it is not currently available.
Navigate on Autopilot cancels when Autosteer cancels,
as described above. In addition, Navigate on Autopilot
cancels when:
You touch the Navigate on Autopilot button on the
•
map’s turn-by-turn direction list. In this case,
Autosteer is still active.
You leave a controlled-access highway. When this
•
happens, Autosteer is still active.
When Navigate on Autopilot cancels but Autosteer
remains active, a chime sounds and the visualization
goes from a single blue line in the driving lane to two
blue lines on either side of the lane.
To display more details about the roadway and its
surroundings, such as road markings, stop lights, and
objects (such as trash cans and poles), touch
Autopilot > Full Self-Driving Visualization Preview.
If unable to detect lane markings, Autosteer may
determine the driving lane based on a vehicle you are
following. In most cases, Autosteer attempts to center
Model 3 in the driving lane. However, there may be
situations in which Autosteer follows a driving path that
is
oset from the center of the lane (for example, if
guard rails are detected).
Controls >
Maintaining the Set Speed
When Autopilot is active, Model 3 maintains your set
cruising speed whenever a vehicle is not detected in
front of it. When cruising behind a vehicle,
accelerates and decelerates as needed to maintain a
chosen following distance (see Adjusting the Following
Distance on page 96), up to the set speed.
You can manually accelerate at any time by pressing the
accelerator pedal, but when you release the pedal Model
3 resumes cruising at the set speed.
Model 3 also adjusts the cruising speed when entering
and exiting curves.
When Model 3 is actively slowing down to maintain the
selected distance from the vehicle ahead, brake lights
turn on. You may notice slight movement of the brake
pedal. However, when Model 3 is accelerating, the
accelerator pedal does not move.
Model 3
Changing the Set Speed
Roll the right scroll wheel up to increase, or down to
decrease, the set speed.
When Trac-Aware Cruise Control or Autosteer cancels,
Model 3 does not coast. Instead, regenerative braking
slows down Model 3 in the same way as when you move
your foot o the accelerator when driving without
Trac-Aware Cruise Control (see Regenerative Braking
on page 75).
While Using Autopilot
When Trac-Aware Cruise Control is active and
Autopilot is maintaining a set speed, the speed is
highlighted with blue text on the
When Autosteer is active, the steering wheel icon is blue
and the lane markings are highlighted in blue on the
visualization.
Navigate on Autopilot button is blue and the
touchscreen displays the driving lane as a single blue
line in front of Model 3.
If Navigate on Autopilot is also active, the
touchscreen.
It may take a few seconds for Model 3 to reach the new
cruising speed.
95Autopilot
Page 98
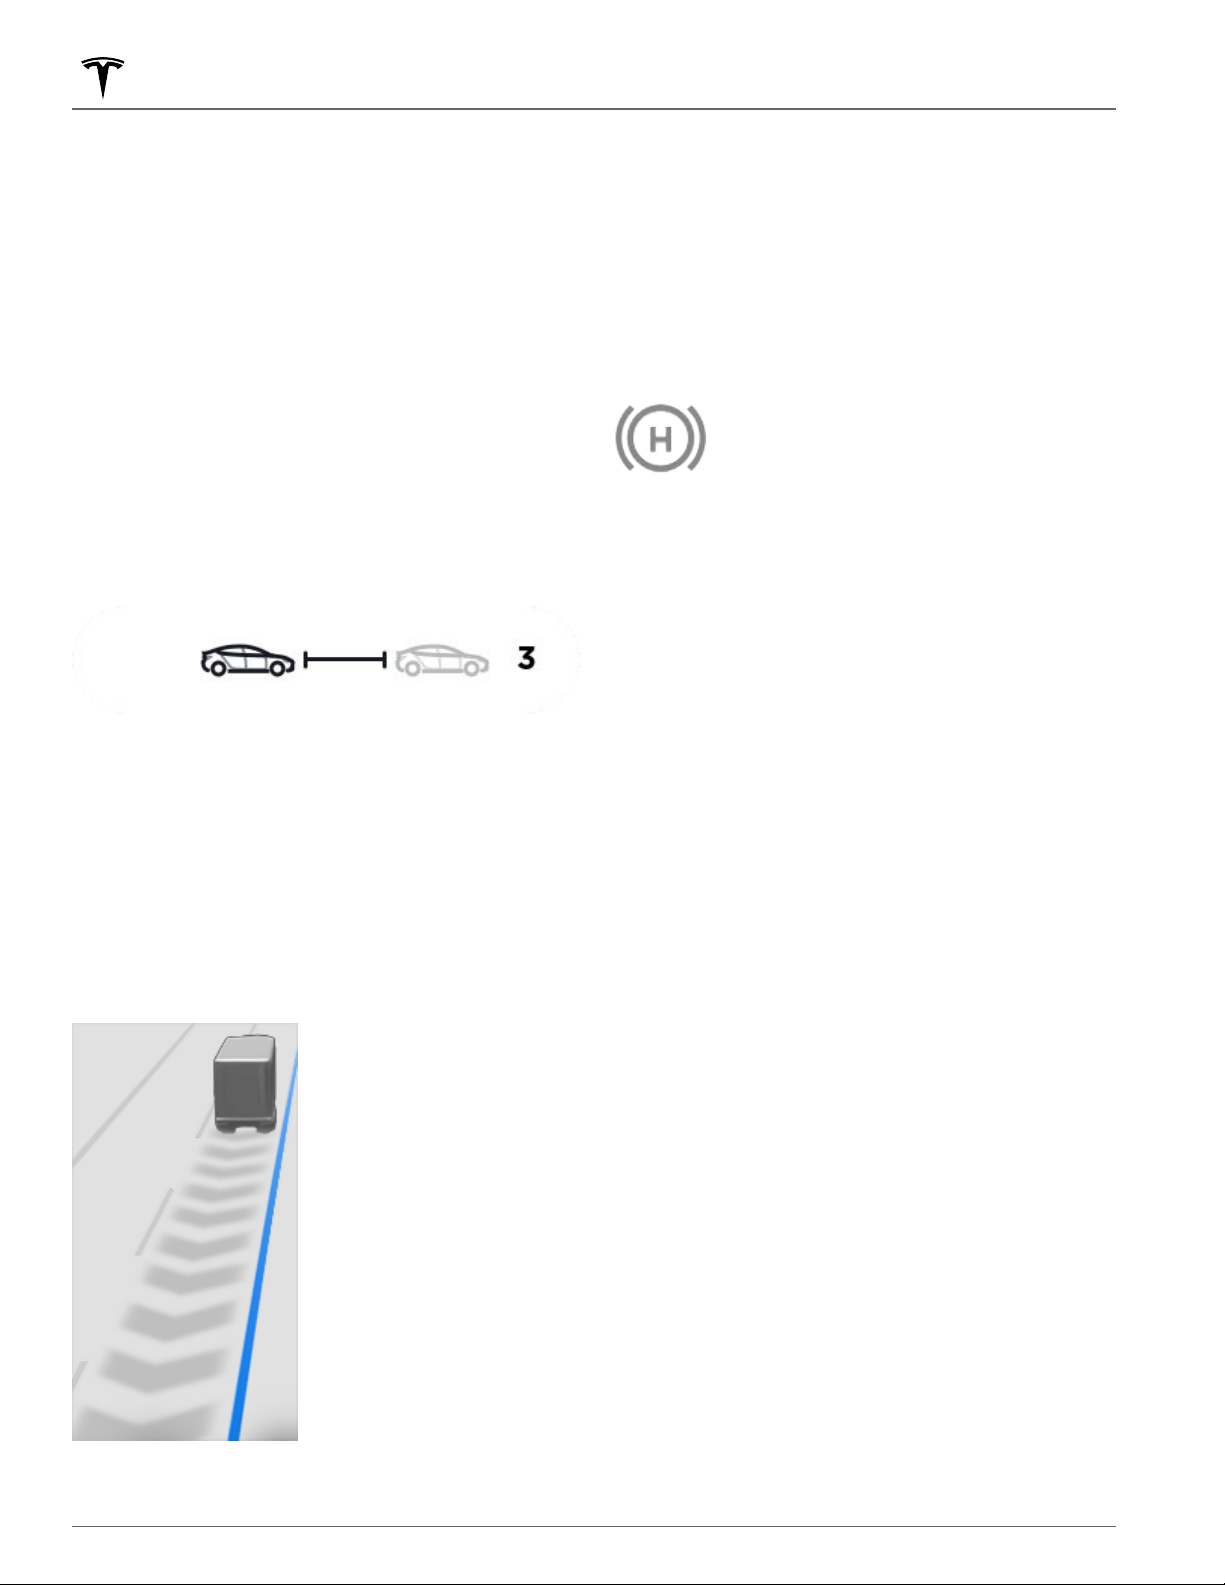
Autopilot Features
Adjusting the Following Distance
To adjust the following distance you want to maintain
between Model 3 and a vehicle traveling ahead of you,
press the steering wheel's right scroll button to the left
or right.
NOTE: If Full Self-Driving (Beta) is active, pressing the
steering wheel's right scroll button to the left or right
changes the Full Self-Driving (Beta) profile (see Full
Self-Driving (Beta) on page 106).
The closest following distance is 2.
Each setting corresponds to a time-based distance that
represents how long it takes for
location, to reach the location of the rear bumper of the
vehicle ahead of you. Autopilot retains your setting until
you change it again.
As you adjust the following distance, the touchscreen
displays the current setting.
Model 3, from its current
Stopping and Slowdowns
When following a vehicle, Autopilot remains active at
low speeds, even when
example, Autopilot remains active even if Model 3 slows
down to a complete or near-complete stop in heavy,
stop-and-go trac on a highway. When trac starts
moving more rapidly, Autopilot again accelerates up to
the set speed.
Sometimes when Model 3 is at a full stop, Autopilot goes
into a HOLD state. If this happens,
accelerator pedal to resume cruising.
When the HOLD status is active, the
touchscreen displays the HOLD icon and a
message that indicates that you need to
resume cruise control.
Model 3 goes into HOLD state while Autopilot is active
in the following circumstances:
Model 3 has been at a standstill for 5 minutes.
•
Model 3 detects a pedestrian (the HOLD state may
•
clear when the pedestrian is no longer detected).
Model 3 suddenly loses visibility of the vehicle in
•
front of you.
An obstacle is detected in front of Model 3.
•
Model 3 comes to a full stop. For
briefly press the
When moving significantly faster than vehicles in
adjacent lanes, Model 3 automatically reduces the
driving speed. This is especially helpful in heavy trac
situations or when vehicles are constantly merging into
dierent lanes. When Model 3 detects other vehicles
driving
the adjacent lanes with arrows and detected vehicles in
gray, and Model 3 reduces the driving speed as
appropriate. To temporarily override this feature, press
the accelerator pedal.
significantly slower, the touchscreen highlights
Cruising Near or On Exits
When you are cruising near an exit on a controlledaccess highway and engage the turn signal toward the
o-ramp, Autopilot assumes you are exiting and begins
to slow down Model 3. If you do not drive onto the o-
ramp, Autopilot resumes cruising at the set speed.
In a region with right hand trac, this occurs only when
you engage the right turn signal when driving in the
right-most lane within
Likewise in regions with left hand trac, this occurs
when engaging the left turn signal when driving in the
left-most lane within 164 ft. (50 meters) of an exit.
NOTE: If Navigate on Autopilot is active, Model 3 will
perform a route-based lane change to enter the exit lane
and take the o-ramp as necessary to follow the
navigation route.
When enabled while on a highway interchange or o-
ramp, Trac-Aware Cruise Control may reduce your set
speed in 5 mph (5 km/h) increments – to as slow as
25 mph (40 km/h) – to better match the reported
speeds of other Tesla vehicles that have driven at that
specific location. To override this and continue cruising
at your set speed, tap the accelerator pedal. The new set
speed is maintained for the duration of the interchange
o-ramp (unless you override it or cancel Autopilot).
or
After the interchange or o-ramp, the set speed may
revert or change as necessary based on the new
164 ft. (50 meters) of an exit.
96 MODEL 3 Owner's Manual
Page 99

Autopilot Features
location. For example, if you merged onto a dierent
highway, the set cruising speed reverts to what it was
before driving on the interchange.
WARNING: In some cases (such as having
insucient data), Trac-Aware Cruise Control may
not automatically reduce the set speed on the
highway interchange or o-ramp. Do not rely on
Trac-Aware Cruise Control to determine an
appropriate driving speed. Tesla recommends
driving at a speed that is safe for road conditions
and within posted speed limits.
When cruising onto an on-ramp to a controlled-access
highway, Autopilot automatically adjusts the set cruising
speed to the speed limit of the highway, plus any oset
you have specified. If Navigate on Autopilot is engaged,
it disengages as you leave the controlled-access
highway (see Canceling Autopilot on page 94). In this
case, Autosteer remains active.
Overtake Acceleration
Engage the turn signal momentarily to accelerate Model
3 towards the vehicle ahead of it. By momentarily
holding the turn signal, you can quickly accelerate up to
your set speed without having to press the accelerator
pedal as long as:
Trac-Aware Cruise Control is operating and detects
•
a vehicle in front of you.
No obstacles or vehicles are detected in the target
•
lane.
Model 3 is traveling below the set speed, but over 45
•
mph (72 km/h).
Stop Light and Stop Sign Warning provides warnings
only. It does not slow down or stop
lights, stop signs, road markings, etc. If equipped with
Trac Light and Stop Sign Control, you can enable this
feature to automatically stop Model 3 at trac lights
and stop signs (see Trac Light and Stop Sign Control
on page 99).
Model 3 at red trac
Emergency Vehicles
If available in your market region, Model 3 automatically
reduces driving speed when lights from an emergency
vehicle are detected when using Autosteer at night on a
high speed road. When this happens, the
displays a message informing you of the slowdown. You
will also hear a chime, and see a reminder to keep your
hands on the
pass by or cease to appear, Autopilot resumes your
cruising speed. Alternatively, you may tap the
accelerator to resume your cruising speed.
Never depend on Autopilot features to determine the
presence of emergency vehicles.
detect lights from emergency vehicles. Keep your eyes
on your driving path and always be prepared to take
immediate action.
steering wheel. When the light detections
Model 3 may not
touchscreen
Driver Attentiveness
Autosteer determines how best to steer Model 3. When
active, Autosteer requires you to hold the steering
wheel. If it does not detect your hands on the steering
wheel for a period of time, a
at the top of the vehicle status section of the
touchscreen and the following message displays:
flashing blue light appears
NOTE: If Autosteer is active and you fully engage the
turn signal, Model 3 will change lanes automatically (see
Auto Lane Change on page 92).
Model 3 stops accelerating when you reach your set
cruising speed, if changing lanes takes too long, or if
Model 3 gets too close the vehicle ahead. Model 3 also
stops accelerating if you disengage the turn signal.
Stop Light and Stop Sign Warning
While Autopilot is in use, Model 3 displays a warning on
the touchscreen and sounds a chime if it detects that
you are likely to run through a red stop light or stop
sign. If this happens, TAKE IMMEDIATE CORRECTIVE
ACTION!
The visual and audible warnings cancel after a few
seconds or when you press the brake pedal, whichever
comes
first.
Apply slight turning force to steering
wheel
When your hands are detected, the message disappears
and Autosteer resumes normal operation. Autosteer
detects your hands by recognizing slight resistance as
the steering wheel turns, or from you manually turning
the steering wheel very lightly (without enough force to
take over steering). Autosteer also
as being detected if you engage a turn signal or use a
button or scroll wheel on the steering wheel.
Autosteer requires that you pay attention to your
surroundings and remain prepared to take control at any
time. If Autosteer still does not detect your hands on the
steering wheel, the
section of the touchscreen increases in frequency and a
chime sounds.
If you repeatedly ignore Autosteer's prompts to apply
slight force to the steering wheel, Autosteer disables for
the rest of the drive and displays the following message
requesting you to drive manually.
flashing light on the vehicle status
qualifies your hands
97Autopilot
Page 100
Autopilot Features
Autosteer unavailable for the rest of this
drive. Hold steering wheel to drive
manually.
For the rest of the drive, you must steer manually.
Autosteer is available again on your next drive (after you
stop and shift Model 3 into Park).
If you don't resume manual steering, Autosteer sounds a
continuous chime, turns on the warning flashers, and
slows the vehicle to a complete stop.
If Autosteer repeatedly disengages due to driver
attentiveness, your access to Autosteer may be
suspended.
In situations where Autosteer is unable to steer Model 3,
Autosteer sounds a warning chime and displays the
following message on the touchscreen.
Take over immediately
When you see this message, TAKE OVER STEERING
IMMEDIATELY.
98 MODEL 3 Owner's Manual
 Loading...