

Page 1

OPERATING INSTRUCTION
EUF4ZX-E012
ENG
Please read these instructions before operating your set and retain them for future reference.
Model: J39E601B2
E-LED TV 39 DVB-T2
Page 2

Page 3

3
ENG
PRECAUTION
1. Read these instructions.
2. Keep these instructions.
3. Heed all warnings.
4. Follow all instructions.
5. This is a CLASS II device.
6. Do not use the device near water. Please protect it from dripping or splashing and
make sure that no objects filled with liquid, such as vases, are placed on the device.
7. Clean only with dry cloth.
8. Do not install this device in windtight places such as wall units. Do not block any
ventilation openings.
9. Do not install near any heat sources such as radiators, heat registers, stoves, or other
devices (including amplifiers) that produce heat.
10. Do not remove safety measures of the polarized or grounding-type plug. A polarized
plug has two blades one of which is wider than the other. A grounding type plug has
two blades and a third grounding prong. Wider blade or the third prong is provided for
your safety. If the provided plug does not fit into your outlet, consult an electrician for
replacement of the obsolete outlet.
11. Protect the power cord from being walked on or pinched particularly at plugs,
convenience receptacles, or places where they exit from the device.
12. Only use attachments/accessories specified by the manufacturer.
13. Use only with the portable TV stand, stand, tripod, bracket, or table specified by the
manufacturer, or sold with the device. When moving a portable TV stand, use caution
to avoid injury from the device tip-over.
14. Unplug this device during lightning storms or when unused for long periods of time.
15. Refer all servicing to qualified service personnel. Servicing is necessary if the device
was damaged in any way, for example, if power supply cord or plug was damaged,
liquid was spilled or object fell on the device, if it was exposed to rain or moisture,
does not operate normally or was dropped.
Page 4
4
ENG
CAUTION
CAUTION
CAUTION
Danger of explosion if battery is incorrectly replaced.
Replace only with the same or equivalent type.
Batteries shall not be exposed to excessive heat such as sunshine, fire or the like.
Used batteries should not be thrown into garbage, please dispose of them at an
appropriate place.
Where the MAINS plug or an appliance coupler is used, the disconnected device shall
remain readily operable.
These servicing instructions are to be used by qualified service personnel only.
To reduce the risk of electric shock, do not perform any servicing other than that
contained in the operating instructions unless you are qualified to do so.
ATTENTION:
Motionless picture might cause permanent damage of the display.
• Be sure not to display motionless picture on the LED TV for more than 2 hours, since
it might cause picture remnants, called “screen burns”, to appear. To avoid such
picture remnants, please decrease the “contrast” and “brightness” of the display when
displaying motionless picture.
• While watching TV program in 4:3 aspect ratio for a long time, there would be traces
on the edge of the screen’s left, right and center parts because of different transmition
of light on the screen. Similar impact on the screen will occur when playing DVD or
connecting game consoles. Warranty does not apply to the products destroyed in such
manner.
• The above mentioned misuse of the device might cause the remnants of electronic
games or motionless PC picture to display on the screen for a long period of time. To
avoid such effect, please decrease the “contrast” and “brightness” when displaying
motionless picture.
Page 5

5
ENG
ImPORTANT INfORmATION
If a television is not positioned in a sufficiently stable location, it can be potentially
hazardous due to falling. Many injuries, particularly to children, can be avoided by taking
simple precautions such as:
• Using cabinets or stands recommended by the manufacturer of the television.
• Only using furniture that can safely support the television.
• Ensuring that the television is not overhanging the edge of the supporting furniture.
• Not placing the television on tall furniture (for example, cupboards or bookcases)
without anchoring both the furniture and the television to a suitable support.
• Not placing the television on cloth or other material.
• Educating children about the dangers of climbing on furniture to reach the television or
its controls.
• Each USB terminal should be loaded with 0.5 A under normal operation.
• Do not put candle on accessible open areas of the television in order to prevent foreign
flammable materials from entering.
• Make sure there is enough space around the device for sufficient ventilation.
• The ventilation should not be impeded by covering the ventilation openings with items,
such as newspapers, table-cloths, curtains, etc.
• No open flame sources, such as lighted candles, should be placed on the device.
• Attention should be drawn to the environmental aspects of battery disposal.
• The use of device in tropical and/or moderate climates.
• Put the TV in the environment of moderate temperature, not to lay aside Air Conditioner
outlet or stove to avoid damage.
• Use both hands with equal force when carrying the TV.
Page 6

6
ENG
• Place the TV on a firm and flat surface, leaving a space of at least 10cm around the set
and 30cm from the top of the set to the wall or cabinet. Ensure the TV is positioned
close to the wall to avoid it falling when pushed.
• To avoid the TV overturning, when installed, it must be fixed to the surface by screws.
• When turning the TV set, do not hold the top side of the TV set, you should hold the
bottom side.
• When lifting the TV set, do not use one hand to handle it, you should lift the TV set by
two hands.
Note: The graphics in the manual are for reference only, for more information, please refer
to the actual product (some models cannot rotate, some do not have the possibility to fix
the base by screws).
10cm 30cm 10cm 10cm
Screw hole
Top view
Page 7

7
ENG
Contents
1. Connection and Preparation of TV . . . . . . . . . . . . . . . . . . . . . . . . . . . 6
1.1 Accessories. . . . . . . . . . . . . . . . . . . . . . . . . . . . . . . . . . . . . . . . . 6
1.2 Installation of Stand . . . . . . . . . . . . . . . . . . . . . . . . . . . . . . . . . . . 6
1.3 Installation of Wallmount Kit (Optional) . . . . . . . . . . . . . . . . . . . . . 6
1.4 Keys and Interfaces. . . . . . . . . . . . . . . . . . . . . . . . . . . . . . . . . . . 7
1.5 Remote Control. . . . . . . . . . . . . . . . . . . . . . . . . . . . . . . . . . . . . . 8
1.6 Installation of Batteries. . . . . . . . . . . . . . . . . . . . . . . . . . . . . . . . . 9
2. Basic Operation. . . . . . . . . . . . . . . . . . . . . . . . . . . . . . . . . . . . . . . . . 9
2.1 Power ON/OFF . . . . . . . . . . . . . . . . . . . . . . . . . . . . . . . . . . . . . . 9
2.2 Setting of Standby Mode. . . . . . . . . . . . . . . . . . . . . . . . . . . . . . . 9
2.3 Selection of Input Mode. . . . . . . . . . . . . . . . . . . . . . . . . . . . . . . . 9
3. Select input Source . . . . . . . . . . . . . . . . . . . . . . . . . . . . . . . . . . . . . 10
4. First Time Setup . . . . . . . . . . . . . . . . . . . . . . . . . . . . . . . . . . . . . . . 10
5. Main Menu Operation . . . . . . . . . . . . . . . . . . . . . . . . . . . . . . . . . . . 11
5.1 Picture Menu. . . . . . . . . . . . . . . . . . . . . . . . . . . . . . . . . . . . . . . 11
5.2 Sound Menu . . . . . . . . . . . . . . . . . . . . . . . . . . . . . . . . . . . . . . . 12
5.3 Channel Menu. . . . . . . . . . . . . . . . . . . . . . . . . . . . . . . . . . . . . . 14
5.4 Lock system Menu . . . . . . . . . . . . . . . . . . . . . . . . . . . . . . . . . . 17
5.5 Setup Menu . . . . . . . . . . . . . . . . . . . . . . . . . . . . . . . . . . . . . . . 18
5.6 EPG Menu. . . . . . . . . . . . . . . . . . . . . . . . . . . . . . . . . . . . . . . . . 22
5.7 PC Setting Menu . . . . . . . . . . . . . . . . . . . . . . . . . . . . . . . . . . . . 22
6. USB Operation . . . . . . . . . . . . . . . . . . . . . . . . . . . . . . . . . . . . . . . . 24
6.1 Photo . . . . . . . . . . . . . . . . . . . . . . . . . . . . . . . . . . . . . . . . . . . . 24
6.2 Music . . . . . . . . . . . . . . . . . . . . . . . . . . . . . . . . . . . . . . . . . . . . 24
6.3 Movie . . . . . . . . . . . . . . . . . . . . . . . . . . . . . . . . . . . . . . . . . . . . 25
6.4 Text . . . . . . . . . . . . . . . . . . . . . . . . . . . . . . . . . . . . . . . . . . . . . . 25
7. Technical Specification. . . . . . . . . . . . . . . . . . . . . . . . . . . . . . . . . . . 26
8. Supported Signal Modes . . . . . . . . . . . . . . . . . . . . . . . . . . . . . . . . . 27
9. Simple Troubleshooting . . . . . . . . . . . . . . . . . . . . . . . . . . . . . . . . . . 28
Page 8
8
ENG
1. Connection and Preparation of TV
1.1 Accessories
• User Manual x1
• Warranty card x1
• Remote Control x1
• Battery (UM-4/R03P/AAA) x2
• Wall Mount Kit (Pre-assembled) (Optional)
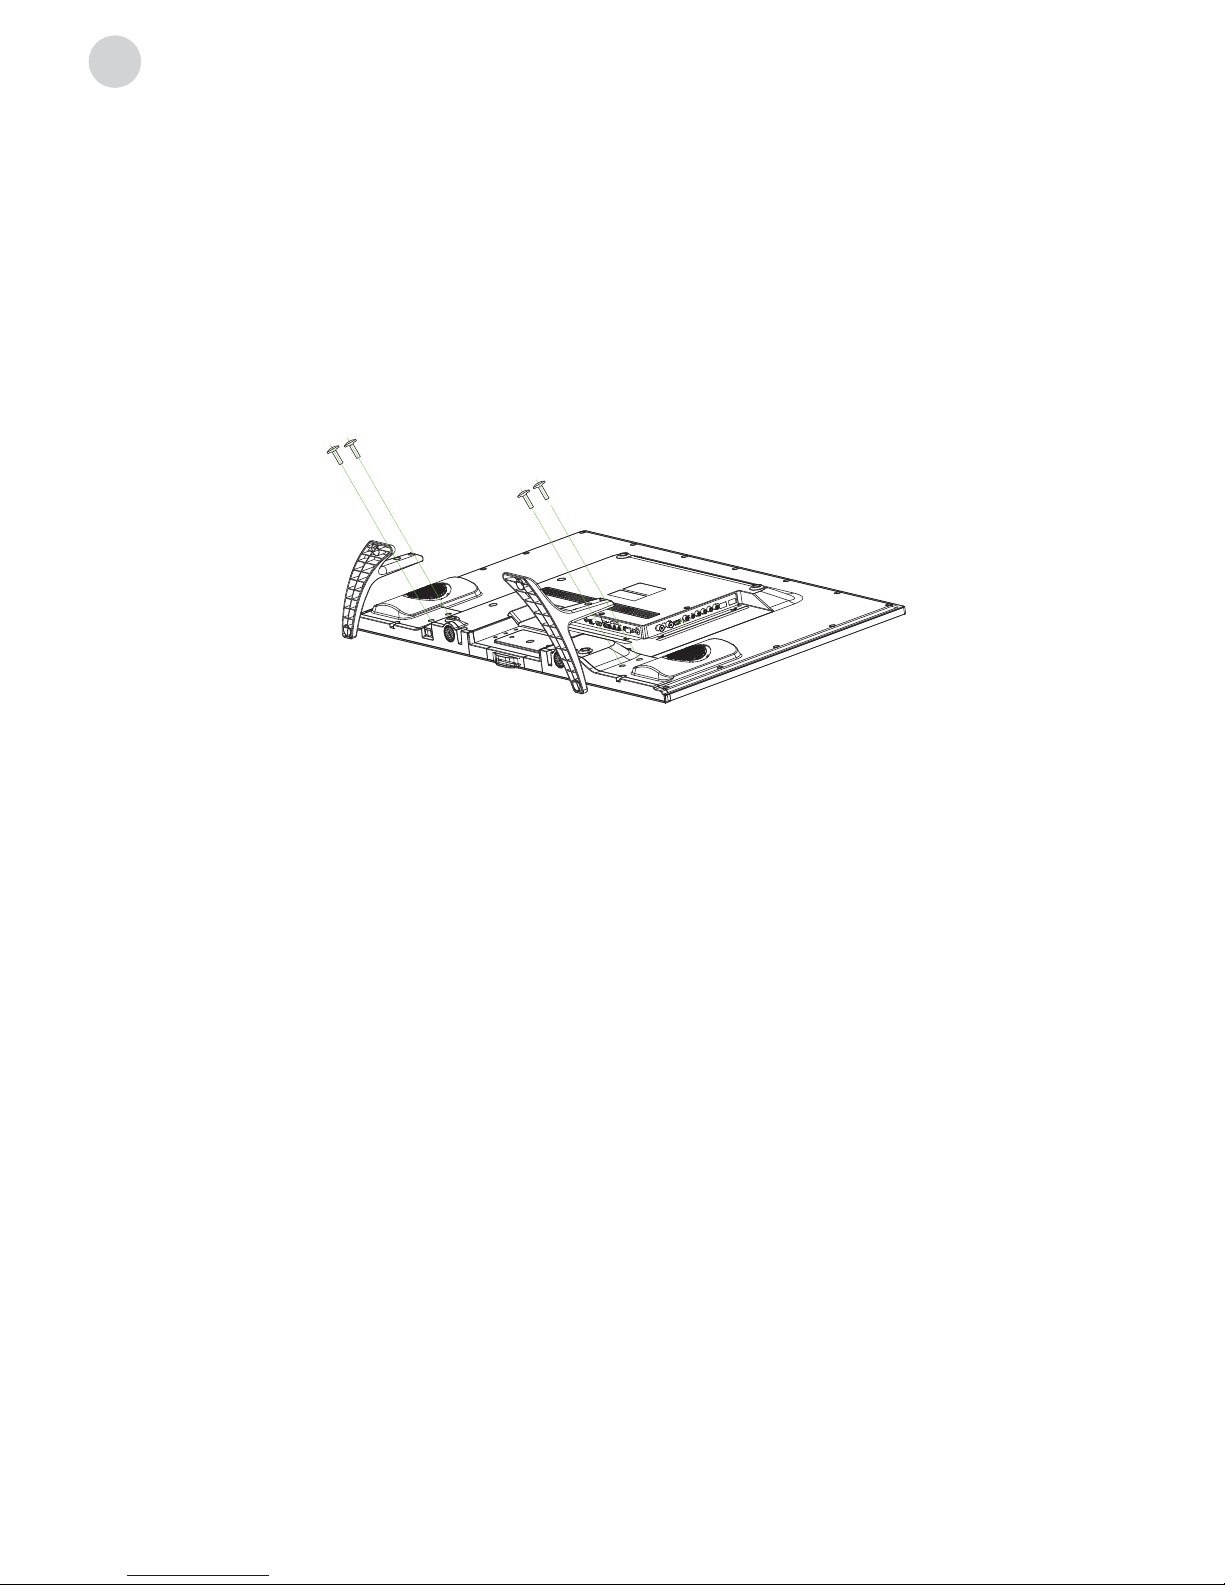
1.2 Installation of Stand
1.3 Installation of Wallmount Kit (Optional)
1. Place the TV with the front panel facing downwards on the soft cloth or soft pads on
a desk.
2. Please put the PVC sticker on the turning axle first.
3. Insert the stand into the bottom socket of the TV.
4. Insert the screws into the sockets and tighten them.
The Wall Mount Kit can help install the TV on the wall.
For more information about wall mounting, please refer to the instructions provided along
with the wall mount kit.
When wall mounting the product please contact qualified personnel.
If users choose to install the TV by themselves,the producer is irresponsible
for any possible damages caused either to the product or to persons.
Page 9

9
ENG
1.4 Keys and Interfaces
The design and speciication take actual products as standard.
11. Speaker
12. Power plug input
13. EARPHONE output
14. SCART input
15. PC AUDIO input
16. PC (VGA) input
17. Coaxial
18. RF input
19. HDMI1
20. HDMI2
21. HDMI3
22. USB
23. MINI AV/YPbPr L/R IN
24. MINI YPbPr input
25. CI card input
3
1 2
4
5
6
7
8
9
10
12
1111
HDmI2 HDmI3 USB
mINI AV/YPbPr
L/R IN
mINI
YPbPr
CI
20 21 22 23 24 25
EARPHONE SCART PC AUDIO PC (VGA) COAXIAL Rf IN HDmI1
13 14 15 16 17 18 19
1. Power switch
2. Power indicator
3. Remote sensor window
4. Menu key
5. Program+ key
6. Program- key
7. Volume+ key
8. Volume- key
9. Source key
10. Standby key
Page 10
10
ENG
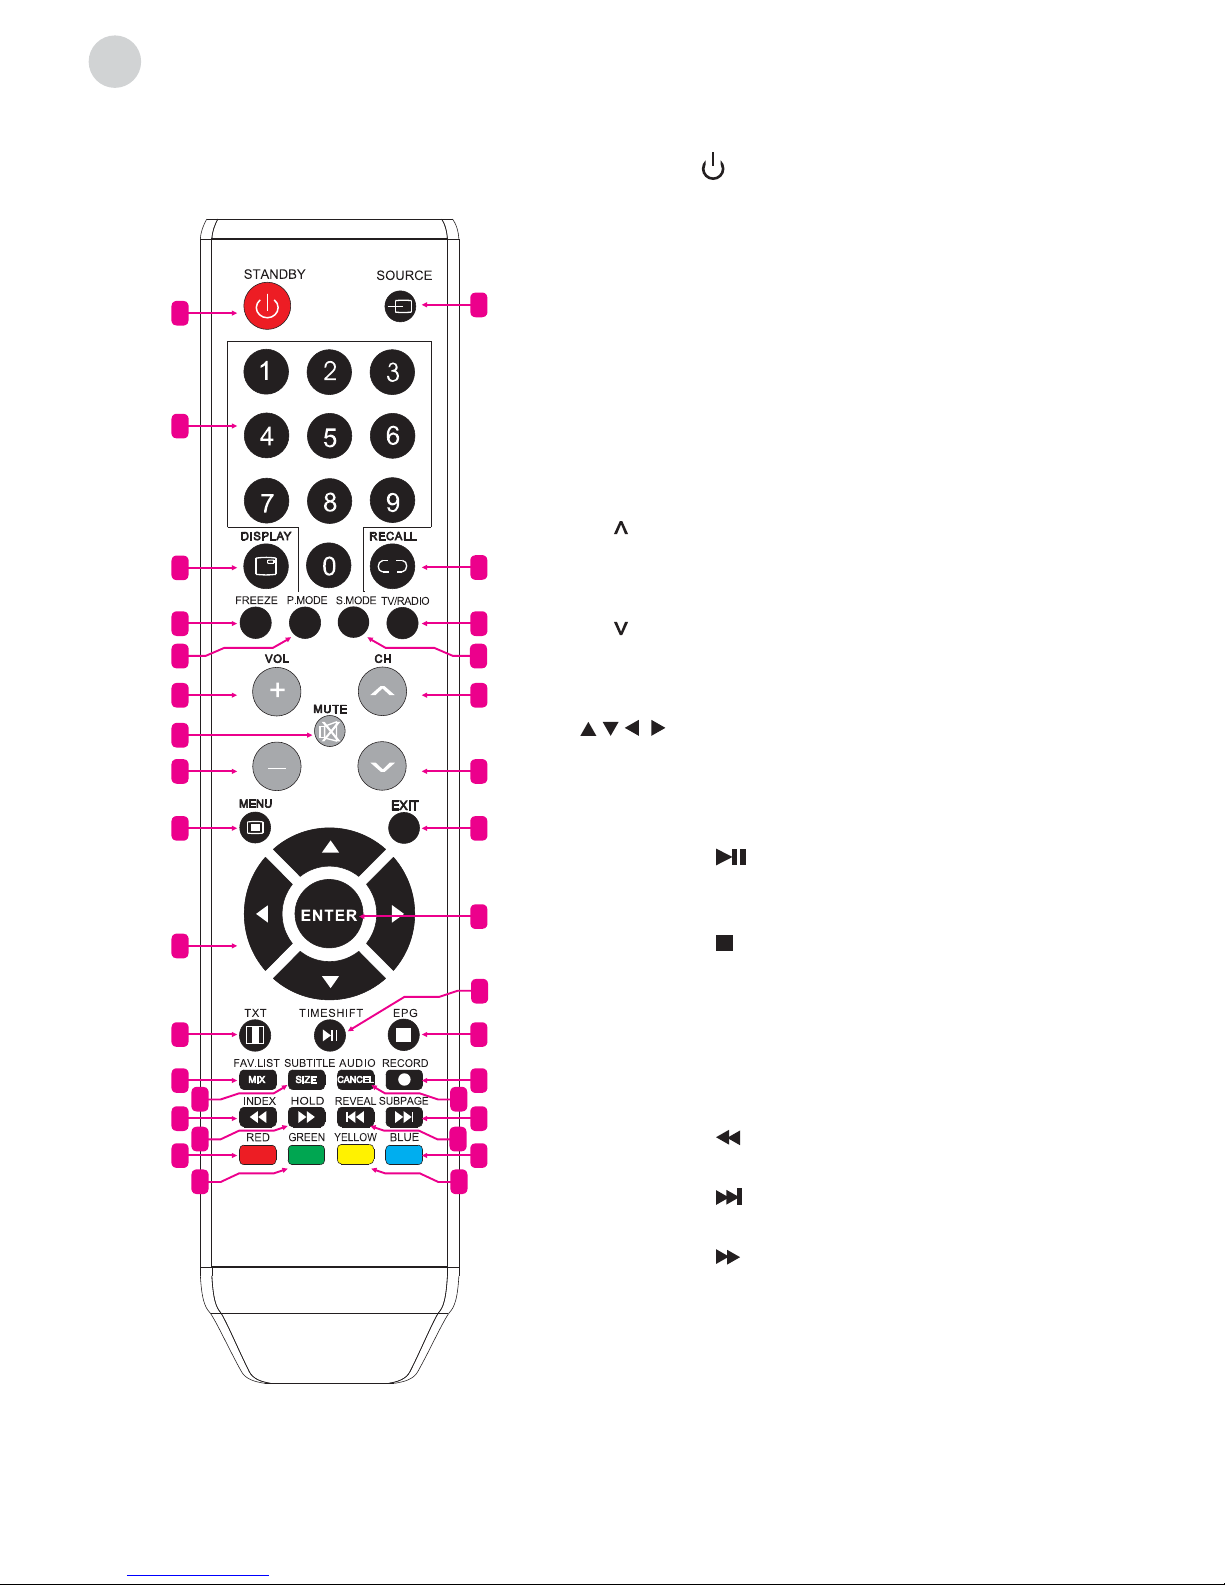
1.5 Remote Control
1. STANDBY (
): Standby turn on and off
2. SOURCE Select signal source
3. 0~9 Continue to press the keys to select a channel
4. DISPLAY Display the information of current video
and audio
5. RECALL Return to previous channel
6. FREEZE Freeze the picture
7. TV/RADIO Select TV or Radio mode
8. P. MODE Select picture mode
9. S. MODE Select sound mode
10. VOL+ Increase volume
11. CH
Select channel forward
12. MUTE Mute sound
13. VOL- Decrease volume
14. CH
Select channel backward
15. MENU Enter or exit menu
16. EXIT Exit menu or operation
17.
, , , key The menu item selection
18. ENTER Confirm or enter
19. TXT Enter or exit teletext
20. TIMESHIFT DTV mode time shift.
MEDIA mode:
Press one time to pause,
press again to playback
21. EPG Enter or exit EPG (Electronic Program Guide).
MEDIA mode:
Stop playback and return to file list
22. FAV. LIST Favorite channel list
23. RECORD DTV mode record data USB disk
24. SUBTITLE DTV mode select subtitle mode
25. AUDIO Select TV audio mode
26. INDEX Display index page.
MEDIA mode:
Fast Backward
27. SUBPAGE Enter sub page mode.
MEDIA mode:
Next
28. HOLD Hold the current page.
MEDIA mode:
Fast Forward
29. REVEAL Reveal the hidden information.
MEDIA Mode: Previous
30. RED Access red item or page
31. BLUE Access blue item or page
32. GREEN Access green item or page
33. YELLOW Access yellow item or page
1
2
5
7
11
14
16
21
23
27
31
18
3
4
6
10
13
15
17
19
22
30
26
12
8 9
24 25
20
28 29
32 33
Page 11

11
ENG
1.6 Installation of Batteries
2. Basic Operation
2.1 Power ON/OFF
- Connect the power cord to the AC input. Insert the power cord into the appropriate
socket.
- Press the Power switch to switch on the TV, then press Power button to turn on the
unit.
- Press the Power switch again to switch off the TV.
Note: After switching off the TV, please do not try to immediately turn on the
power switch again. It could take a couple of minutes before it is ready to
use.
2.2 Setting of Standby Mode
- Press ( ) button to turn on the unit.
- Press (
) button again to put the display to standby mode. The power indicator turns
red.
- Make sure not to set your TV in standby mode for a long period of time.
2.3 Selection of Input Mode
This set has different signal source modes, you may continue to press the Source button
to select a signal source.
1. Open the back lid of the remote control.
2. Install two 7#(AAA)1.5V batteries.
Make sure that the polarity of batteries is
correct.
3. Cover the back lid.
Please take the batteries out of the remote
control if not in use for long time.
If the remote control does not work properly,
please carry out the following checks.
- Check that the TV is turned on.
- Check that the polarity of batteries is correct.
- Check that the batteries are not drained.
- Check that the power supply is normal and power
cord is correctly connected.
- Check that there is no special fluorescent light or
neon light around.
Page 12

12
ENG
3. Select input Source
4. First Time Setup
Press SOURCE button to display the input source list.
Press / or SOURCE button to select the input source you want
to, press ENTER button to enter the input source, then press EXIT
button to quit.
Connect a RF cable from the TV input called “RF-In” to your TV Aerial socket.
Auto Tuning Status
In case of tuning digital, press MENU button to
skip digital tuning. In case of tuning analogue,
press MENU button to skip analogue tuning.
OSD Language
Press
button to select the language to be used for menus and messages.
Mode Setting
Press
button to select mode.
Country
Press button to select the country you want to.
Tuner Type
Press button to select Antenna (DVB-T), Cable (DVB-C) or Satellite.
Auto Scan
Press button to select Mode: DTV+ATV, DTV, ATV.LCN.
Press button to select: On, Off.
Auto Channel Update
Press button to select: On, Off.
Page 13

13
ENG
5. Main Menu Operation
5.1 Picture Menu
Press MENU button to display the main menu.
Press button select PICTURE in the main menu, then press ENTER to enter.
1. Press button to select the option that you want to adjust in the PICTURE Menu.
2. Press Enter
button to adjust.
3. After finishing your adjustment, press MENU button to save and return back to the
previous menu.
Picture MODE
Press
button to select Picture Mode, then press button to select.
(Available Picture modes: Standard, Mild, Personal, Dynamic).
TIPS: You can press PMODE button to change the Picture Mode directly.
Brightness/Contrast/ Sharpness/Saturation/Hue
Press button to select the option, then press button to adjust.
Brightness Adjust optical fiber output of the entire picture, it will affect dark regions of
the Picture.
Contrast Adjust highlight intensity of the picture, but the shadow of the picture
remains invariable.
Sharpness Adjust peaking in the detail of the picture.
Saturation Adjust saturation of the color based on your own like.
Hue Use in compensating color changed with the transmission of the NTSC
code.
Color Temp
Change the overall color cast of the picture.
Press
button to select Color Temp, then press button to select Standard/Cool/
Warm.
Standard Produces a vivid image.
Cool Produces a gentle blue-hued image.
Warm Produces a red-hued image.
Page 14

14
ENG
Advanced Settings
Adjust advanced video features to fine tune the picture.
Press button to select Advanced Settings, then press Enter button to enter sub-menu.
5.2 Sound Menu
Press MENU button to display the main menu.
Press button to select SOUND in the main menu, then press ENTER to enter.
1. Press
button to select the option that you want to adjust in the SOUND menu.
2. Press Enter
button to adjust.
3. After finishing your adjustment, press MENU button to save and return back to the
previous menu.
Sound Mode
Press
button to select Sound Mode, then press button to select.
(Available Sound modes: Standard, Music, Personal, Movie).
Treble/Bass/Balance
Press button to select the option, then press button to adjust.
Treble Adjust treble effect. Increases or decreases high-pitched sounds.
Bass Adjust treble effect. Increases or decreases lower-pitched sounds.
Balance Adjust the balance between left and right speakers to adapt to your listening
position.
NR
Set options to reduce video noise.
Press
button to select NR, then press
button to select.
Off Select to turn off video noise detection.
Week Detect and reduce low video noise.
Medium Detect and reduce moderate video noise.
Strong Detect and reduce intense video noise.
Dynamic Contrast
Automatically adjust picture detail and brightness.
Press
button to select Dynamic Contrast, then press button to select.
(Available Dynamic Contrast: Off, Weak, Medium, Strong).
Page 15

15
ENG
Surround Sound
Press button to select Surround Sound, then press button to select On or Off.
AVL
Set auto volume control.
Press
button to select AVL, then press button to select On or Off.
SPDIF
Press button to select SPDIF then press button to select Off /Auto /PCM.
Mode
Press
button to select Mode, then press button to select On or Off.
When the mode is On, Volume can be adjusted by users.
Sound Type
Press button to select Sound Type then press button to select.
(Available Sound Types: Stereo, Dual I, Dual II, Mixed).
NOTE:
Balance: This item can adjust the speaker s output, it enables you to listen to best at your
position.
AVL: This item uses for reducing the difference between channel and program s
volume automatically. It made the overall water to be even. This function will also reduce
the fluctuation of the sound.
EQ Setting
Adjust the curve of 7 equalizers.
Press button to select EQ Setting, then
press Enter button to enter sub-menu.
Audio Description
Press
button to select Audio Description,
then press Enter button to enter sub-menu.
Page 16

16
ENG
5.3 Channel Menu
Press MENU button to display the main menu.
Press button to select CHANNEL in the main menu, then press ENTER to
enter.
Auto Scan
Press
button to select Auto Scan, then press ENTER button to enter sub-menu.
1. Press
button to select the option that you want to select in the CHANNEL menu.
2. Press Enter button to enter sub-menu.
3. Press MENU button to return back to the previous menu.
Tuner Type
Press
button to select Tuner Type, then press button to select Antenna, Cable
or Satellite.
When Tuner type is Satellite
Tuner type is Antenna
Satellite System
Tuner type is Cable
Page 17

17
ENG
Country
Press
button to select country.
Mode
Press
button to select Mode: DTV+ATV, DTV, ATV.
Scan Type
Press button to select Scan Type: Advanced, Quick, Full.
Network ID
Press button to select Network ID: Auto or enter digital numbers.
Frequency
Press button to select Frequency: Auto or enter digital numbers.
Symbol Rate
Press
button to select Symbol Rate: Auto or enter digital numbers.
Start
Press Enter
button to start auto searching.
It will search digital channels first, then analog channels. Before executing auto channel
search, please confirm your antenna type is Air or Cable. Wrong setting of Signal Type
may cause finding no channel. Found numbers do not include encryption programs.
Manual Scan
Search for the channels manually.
Press
button to select Manual Scan, then
press ENTER button to enter sub-menu.
Digital Manual Scan
Press button to select Digital Manual Scan, then press ENTER button to
enter sub-menu.
Tuner type is Antenna Tuner type is Cable
Page 18

18
ENG
Network ID
Press button to select Network ID: Auto or enter digital numbers.
Frequency
Press button to select Frequency: Auto or enter digital numbers.
Symbol Rate
Press button to select Symbol Rate: Auto or enter digital numbers.
Modulation
Press button to select Modulation: Auto, 16QAM, 32QAM, 64QAM, 128QAM,
256QAM.
Start
Press Enter button to start channel searching.
Analog Scan
Press
button to select Analog Scan.
Channel to Save
Press
button to select.
Color System
Press button to select Color System: Auto, PAL or SECAM.
Sound System
Press button to select Sound System: Auto, DK, BG, I or L.
AFC
Automatic Fine tuning.
Press button to select select On or Off.
Start
Press ENTER button to start channel searching.
Analog Manual Scan
Press button to select Analog Manual Scan,
then press ENTER button to enter submenu.
Page 19

19
ENG
Channel Edit
Press button to select Channel Edit, then press ENTER button to enter sub-menu.
The four colored keys are the shortcut key for programming channels.
First press
to highlight the channel you want to delete or move or skip, then:
- Press the Red button to delete channel.
- Press the Green button to skip the selected
channel. (Your TV set will skip the channel
automatically when using CH+/- to view the
channels.)
- Press the Yellow button to rename channel.
- Press the Blue button to to set the channel to
moving state. Then press
to move it to the
position where you want it to be.
Common Interface
Press
button to select Common interface,
then press Enter button to enter sub-menu. Only
available when there is CI card under DTV.
Signal Information
Press
button to select Signal Information,
then press the Enter button to see detailed
information about the signal. Only available when
there is signal under DTV.
5.4 Lock system Menu
Press MENU button to display the main menu.
Press button to select Lock system in the main menu, then press ENTER to enter.
1. Press
button to select the option that you
want to adjust in the PARENTAL menu.
2. Press Enter
button to adjust.
3. After finishing your adjustment, press MENU
button to save and return back to the previous
menu.
Default password is 0000, in case you forget the
password you set, please call the service center.
Page 20

20
ENG
Enable
Press button to select Enable, then press
button to select On or Off.
Channel Locks, Parental Rating and Lock
Keypad are available when Enable is On.
Parental Rating
Press
button to select Parental Rating, then press button to select.
Lock Keypad
Set to prevent from being used by young children, or other unexpected usage.
Press button to select Lock Keypad, then press button to select On or Off.
New Password
Press
button to select New Password, then enter a 4-digit number you want to set
for 2 times.
Clear Lock
Press button to select Clear Lock, then press ENTER button to enter.
5.5 Setup Menu
Press MENU button to display the main menu.
Press
button select SETUP in the main menu, then press ENTER to enter.
Channel Locks
Press
button to select Channel Locks,
then press ENTER button to enter submenu.
Page 21

21
ENG
1. Press button to select the option that you want to adjust in the SETUP menu.
2. Press ENTER
button to adjust.
3. After finishing your adjustment, press MENU button to save and return back to the
previous menu.
OSD Language
Press
button to select OSD Language, then press button to select.
Audio Languages
Press button to select Audio Languages, then press Enter button to enter sub-menu.
Press / button to select Audio Primary Language and Audio Secondary
Language.
Subtitle
Select a subtitle language can be displayed. Default English is selected as subtitle language.
Press
button to select Subtitle, then press Enter button to enter sub-menu.
Mode
Press button to select Mode, then press button to select On or Off.
Press / button to select Subtitle Primary Language and Subtitle Secondary
Language.
Hearing Impaired
Press button to select Hearing Impaired, then press button to select On or Off.
Teletext
Adjust Teletext settings. Only available under DTV
and ATV source.
Press button to select Teletext, then press
ENTER button to enter sub-menu.
Under DTV source, press
button to select Digital Teletext Language.
Under ATV source, press button to select Decoding Page Language.
Page 22

22
ENG
Mode Setting
Press button to select Mode Setting.
Time Settings
Press
button to select Time Settings, then
press ENTER button to enter sub-menu.
OSD Time
Press
button to select OSD Time, press button to select.
(Available OSD Times: Off, 10 seconds, 20 seconds, 30 seconds, 60 seconds).
Sleep Timer
Set timer for the TV to turn off automatically.
Press button to select Sleep Timer, press button to select.
(Available Sleep Timers: Offf, 5 mins, 15 mins, 30 mins, 60 mins, 90 mins, 120 mins, 240
mins).
Auto Sleep
Press button to select Auto Sleep, press button to select Off, 3 hours, 4 hours
or 5 hours
Time Zone
Select your time zone.
Press button to select Auto Sleep, press ENTER button to enter sub-menu.
Page 23

23
ENG
Time
Press button to select Time, then press ENTER button to enter sub-menu.
Set Auto Sync to Off, Power On/Off Timer to On, then you can set the time manually.
Note: In case of power loss, the clock setup will be lost.
Press
button to select File Manager, then
press ENTER button to enter sub-menu.
PVR Settings
Press
button to select PVR Settings,
then press ENTER button to enter submenu.
It will check the USB.
Press
button to select Device List, then
press ENTER
button to enter sub-menu.
Press
button to select Scheduled Record,
then press ENTER button to enter sub-menu.
First Time Setup
Press
button to select First time Setup, then press ENTER button to enter.
Reset
Press
button to select Reset, then press ENTER button to enter sub-menu.
If you are sure to reset, press Yes to reset.
Page 24

24
ENG
5.6 EPG Menu
Press the button EPG on the remote control to enter EPG menu.
5.7 PC Setting Menu
Press SOURCE buttonon the remote control to select PC.
Press MENU button on the remote control to display the main menu.
Press button on the remote control to select PC SETTING in the main menu.
1. Press
button on the remote control to select the option that you want to adjust
in the PC SETTING menu.
2. Press Enter button on the remote control to adjust.
3. After finishing your adjustment, press MENU button to return back to the previous
menu.
Press the RED button to display previous date.
Press the GREEN button to display next date.
Press the YELLOW button to see the setting you have done before.
Press the BLUE button to set the time you want to remind the program you want to see.
Timeshift
Press Pause key when the program is playing
under the DTV Source to start Timeshift.
The white bar indicated the recording progress.
The blue bar indicated the playback progress.
Page 25

25
ENG
Auto Adjust
Press ENTER button to adjust the screen automatically to the optimal position of the
picture.
H Position
Adjust the horizontal position of the picture.
V Position
Adjust the vertical position of the picture.
Phase
Adjust the horizontal interfering lines.
Clock
Adjust the vertical interfering lines.
*Notes:
1. Sharpness, Saturation and Advanced Settings in PICTURE menu are invalid.
2. Audio Description and Sound Type in SOUND menu are invalid.
3. Channel Locks and Parental Rating in LOCK menu is invalid.
4. Audio Languages, Subtitle, Teletext and PVR Settings in SETUP menu is invalid.
5. PC mode has no CHANNEL menu.
ATV/AV/SCART/YPbPr/HDMI
1. PICTURE menu and description are the same as that for DTV mode.
2. Audio Description and Sound Type in SOUND menu is invalid..
3. SCART/AV/YPbPrHDMI mode has no CHANNEL menu.
4. Parental Rating and Channel Locks in LOCK menu is invalid for SCART/HDMI/AV/
YPbPr mode. Parental Rating is invalid for ATV mode.
5. Audio Languages, Subtitle and PVR Settings in SETUP option are invalid for SCART/
AV/DVD mode. Audio Languages, Subtitle,Teletext PVR Settings in SETUP option are
invalid for HDMI /YPbPr mode.
6. HDMI have screen mode in picture menu. PC for computer input. Auto to auto
choose Video or PC mode.
Page 26

26
ENG
6. USB Operation
Note: Before operating USB menu, Plug in USB device, then press SOURCE button to
set the Input Source to USB.
Press
button to select USB in the Source
menu, then press Enter button to enter.
Press button to select the option you want
to adjust in the main USB menu, then press Enter
button to enter.
Press
button to select PHOTO in the main
menu, then press Enter button to enter.
Press button to select the drive disk you
want to watch, then press Enter button to enter.
Press button to select return option to go
back to the previous menu.
6.1 Photo
Press button to select MUSIC in the main menu, then press Enter button to enter.
Press button to select the drive disk you want to watch, then press Enter button to
enter.
Press button to select return option to go back to the previous menu.
Press to play or pause.
Press to play the previous song.
Press to play the next song.
Press to play backward.
Press to play forward.
Press to stop.
When highlighting the option you select, the file information will appear on the right.
Press CH+/- to switch operation focus between File List and Player.
6.2 Music
Page 27

27
ENG
6.3 Movie
6.4 Text
Press button to select TEXT in the main menu, then press Enter button to enter.
Press button to select the drive disk you want to watch, then press Enter button to
enter.
Press button to select return option to go back to the previous menu.
Press to play or pause.
Press to play the previous movie.
Press to play the next movie.
Press to play backward.
Press to play forward.
Press to stop and back to the previous folder.
Press button to select MOVIE in the main menu, then press Enter button to enter.
Press button to select the drive disk you want to watch, then press Enter button to
enter.
Press button to select return option to go back to the previous menu.
When highlighting the option you select, the file information will appear on the right.
Page 28

28
ENG
7. Technical Specification
Product Model J39E601B2
Screen Size 39” diagonal
Aspect Ratio 16:9
Power Supply AC 100-240V~, 50/60Hz
Power Consumption 74W
TV System PAL B/G D/K I, SECAM B/G D/K
DVB-T/T2, DVB-C
Audio Output Power (Internal) 8Wx2
Input Terminal Antenna Input (D Type) x1
VGA (D-Sub 15 Pin Type) x1
HDMI Connector x3
Mini YPbPr Input Terminals x1
Mini AV Input Terminals x1
PC Audio Input x1
USB x1
CI x1
SCART x1
Output Terminal 1 set of coaxial output
1 set of earphone output
Outline Size (LxWxH) (mm) 884x62.5x523 (without stand)
884x241x551 (with stand)
Working Temperature 0°C ~ 40°C
Working Humidity 20% ~ 80% Non-condensing
Note: The specification shown above may change without notice for quality improvement.
Page 29

29
ENG
8. Supported Signal Modes
A. VGA Mode
Resolution Horizontal Frequency (Khz) Vertical Frequency (Hz)
640 x 480 31.50 60.00
800 x 600 35.16 56.25
37.90 60.00
1024 x 768 48.40 60.00
Note: In order to ensure optimal quality of picture, it is suggested that the VGA
connecting cord in use is no more than 5 meters long.
B. YPbPr Mode
Resolution Horizontal Frequency (Khz) Vertical Frequency (Hz)
480i 15.734 59.94
480p (720x480) 31.468 59.94
576i 15.625 50.00
576p (720x576) 31.25 50.00
720p (1280x720) 37.50 50.00
45.00 60.00
1080i 28.13 50.00
33.75 60.00
1080P (1920x1080) 67.50 60.00
56.25 50.00
C. HDMI Mode
Resolution Horizontal Frequency (Khz) Vertical Frequency (Hz)
480p 31.468 59.94
576p 31.25 50.00
720P 45.00 60.00
1080i 33.75 60.00
1080P (1920x1080) 67.50 60.00
- When signal exceeds the allowed range, a warning message will appear on the screen.
- You can confirm the input signal format on screen.
Page 30

30
ENG
9. Simple Troubleshooting
If the display breaks down or performance changes dramatically, check the display
in accordance with the following instructions. Remember to check the peripherals to
pinpoint the source of failure.
Symptom Solution
Power cannot be turned
on. (Power indicator signal
light is off.)
• Check that both ends of power cable are plugged into
the socket appropriately and wall socket is operational
No Input Signal message
appears.
• Check that the signal line is connected properly.
• Check that the power of relevant peripherals is turned on.
• Check that the Input option that has been selected
matches with the input signal.
The remote control does
not function properly.
• Check that the batteries are not drained. (Use new
batteries.)
• Check that the remote control is within operating range.
• Check that the remote control is pointed to the remote
control window on the display.
• Check that there are no obstacles between the remote
control and the remote control window.
Flashing spots or stripes
appear on the screen.
• Check that there are no emissions (car, HV cable or
neon lamp) or other possible interference sources.
Image colour or quality
deteriorates.
• Check that all video settings are adjusted appropriately,
such as brightness, contrast, colour etc.
• For more information about video settings, refer to OSD
Functions in Chapter 2.
Screen position and size
are incorrect.
• Check that the screen position and size is adjusted
appropriately.
Image or colour is
incorrect.
• Check that the signal line is connected properly.
• When connecting to a PC, you can change the
resolution of the PC to acquire correct image.
The discrepancy of PC output signal may affect the
display of image.
Display warning message. • Check that the input signal line is properly fixed.
• Select the correct input signal.
• For more information, refer to Supported Signal Modes
in Chapter 4.
Page 31

Page 32

EUF4ZX-E012Model: J39E601B2
www.tesla.info
 Loading...