

Page 1
Product images are for illustrative purposes only and may differ from the actual product.
INDUCTION
HOB
HI6400MB
User Manual
Page 2

Page 3

3
ENG
Congratulations on the purchase of your new Induction
Hob.
We recommend that you spend some time to read this
Instruction / Installation Manual in order to fully understand
how to install correctly and operate it.
For installation, please read the installation section.
Read all the safety instructions carefully before use and keep
this Instruction / Installation Manual for future reference.
SAFETY WARNINGS
Your safety is important to us. Please read this information
before using your cooktop.
INSTALLATION
Electrical Shock Hazard
• Disconnect the appliance from the mains electricity supply
before carrying out any work or maintenance on it.
• Connection to a good earth wiring system is essential and
mandatory.
• Alterations to the domestic wiring system must only be
made by a qualified electrician.
• Failure to follow this advice may result in electrical shock or
death.
Cut Hazard
• Take care - panel edges are sharp.
• Failure to use caution could result in injury or cuts.
Important safety instructions
• Read these instructions carefully before installing or using
this appliance.
• No combustible material or products should be placed on
this appliance at any time.
• Please make this information available to the person
responsible for installing the appliance as it could reduce
your installation costs.
• In order to avoid a hazard, this appliance must be installed
according to these instructions for installation.
• This appliance is to be properly installed and earthed only
by a suitably qualified person.
• This appliance should be connected to a circuit
which incorporates an isolating switch providing full
disconnection from the power supply.
• Failure to install the appliance correctly could invalidate any
warranty or liability claims.
• This appliance can be used by children aged from 8 years
and above and persons with reduced physical, sensory or
mental capabilities or lack of experience and knowledge if
they have been given supervision or instruction concerning
use of the appliance in a safe way and understand the
hazards involved.
• Children shall not play with the appliance. Cleaning and
user maintenance should not be made by children without
supervision.
• If the supply cord is damaged, it must be replaced by the
manufacturer, its service agent or similarly qualified persons
in order to avoid a hazard.
• Warning: If the surface is cracked, switch off the appliance
to avoid the possibility of electric shock, for hob surfaces of
glass-ceramic or similar material which protect live parts
• Metallic objects such as knives, forks, spoons and lids
should not be placed on the hob surface since they can get
hot
• A steam cleaner is not to be used.
• Do not use a steam cleaner to clean your cooktop.
• The appliance is not intended to be operated by means of
an external timer or separate remote-control system.
• WARNING: Danger of fire: do not store items on the
cooking surfaces.
• The cooking process has to be supervised. A short term
cooking process has to be supervised continuously.
• WARNING: Unattended cooking on a hob with fat or oil
can be dangerous and may result in fire. NEVER try to
extinguish a fire with water, but switch off the appliance and
then cover flame e.g. with a lid or a fire blanket.
OPERATION AND
MAINTENANCE
Electrical Shock Hazard
• Do not cook on a broken or cracked cooktop. If the
cooktop surface should break or crack, switch the
appliance off immediately at the mains power supply (wall
switch) and contact a qualified technician.
• Switch the cooktop off at the wall before cleaning or
maintenance.
• Failure to follow this advice may result in electrical shock or
death.
Health Hazard
• This appliance complies with electromagnetic safety
standards.
• However, persons with cardiac pacemakers or other
electrical implants (such as insulin pumps) must consult
with their doctor or implant manufacturer before using
this appliance to make sure that their implants will not be
affected by the electromagnetic field.
• Failure to follow this advice may result in death.
Hot Surface Hazard
• During use, accessible parts of this appliance will become
hot enough to cause burns.
• Do not let your body, clothing or any item other than
suitable cookware contact the Induction glass until the
surface is cool.
• Keep children away.
• Handles of saucepans may be hot to touch. Check
saucepan handles do not overhang other cooking zones
that are on. Keep handles out of reach of children.
• Failure to follow this advice could result in burns and scalds.
Cut Hazard
• The razor-sharp blade of a cooktop scraper is exposed
when the safety cover is retracted. Use with extreme care
and always store safely and out of reach of children.
• Failure to use caution could result in injury or cuts.
Page 4
4
ENG
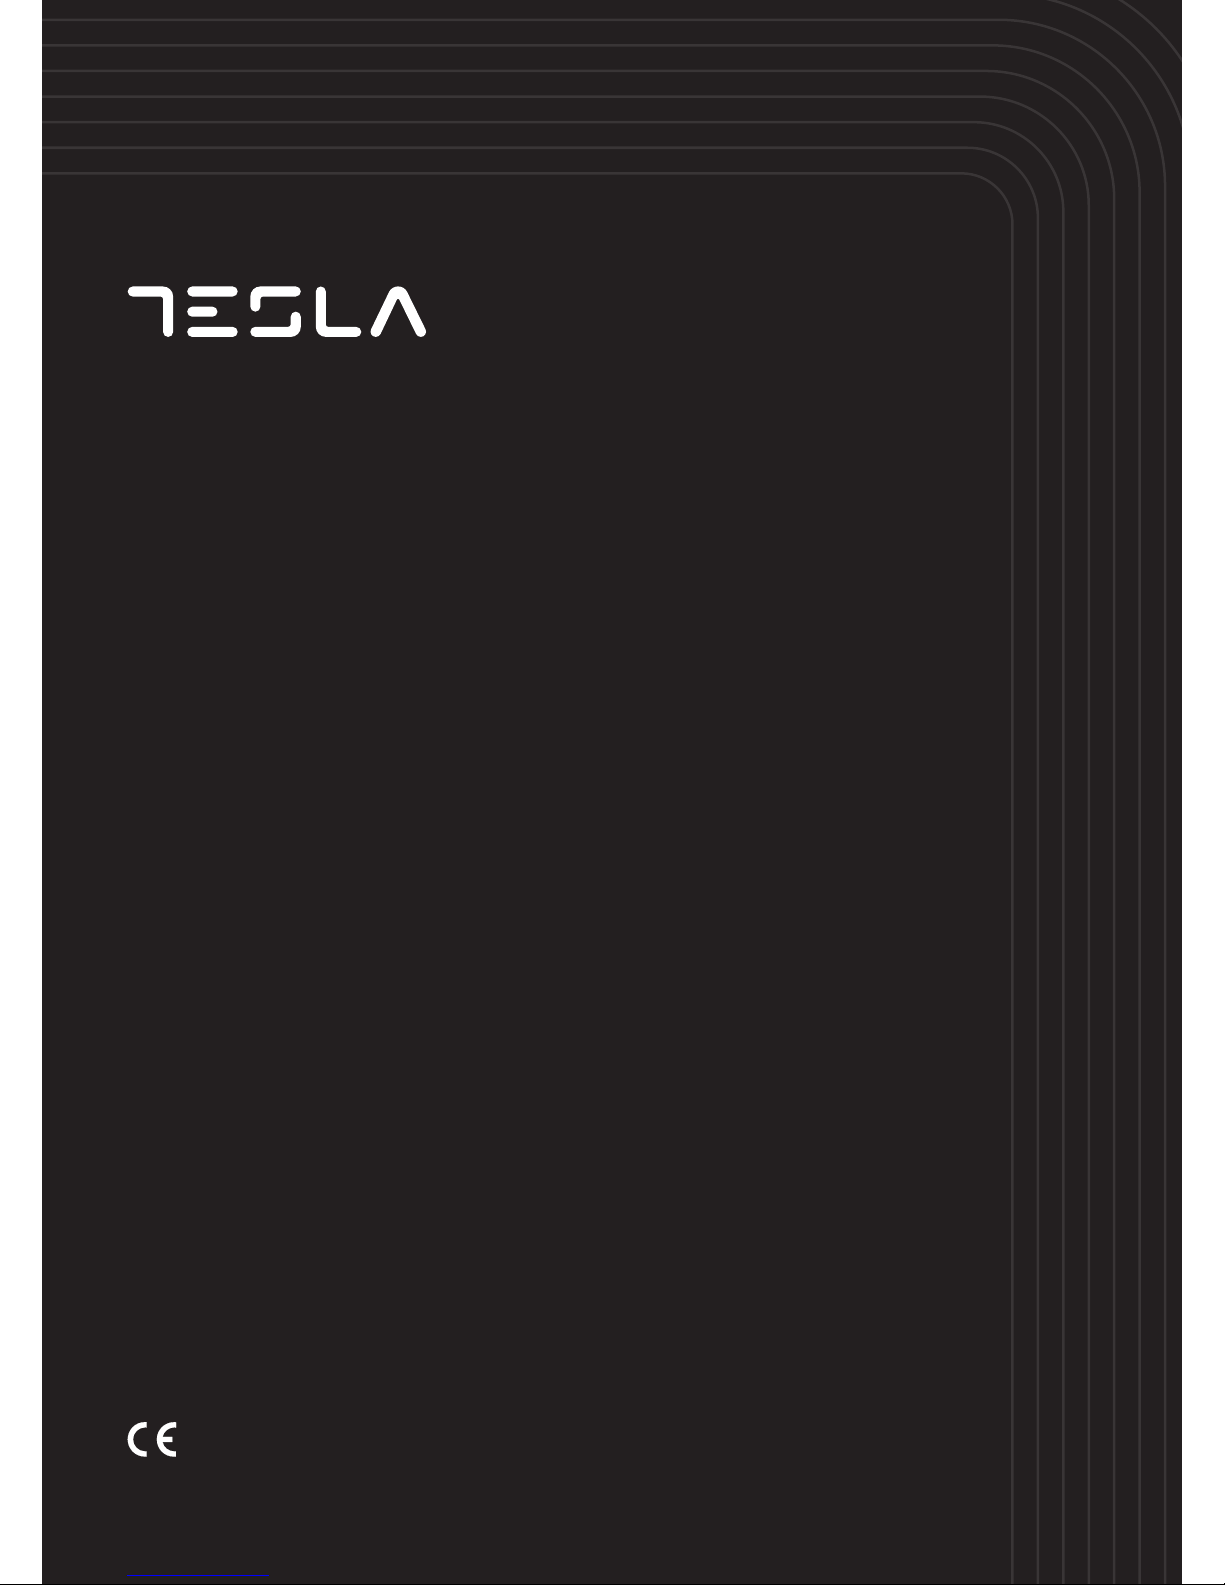
PRODUCT INTRODUCTION
Top View
Working Theory
Control Panel
1. Max. 1500 W zone
2. Max. 2000 W zone
3. Max. 1500 W zone
4. Max. 2000 W zone
5. Glass plate
6. Control panel
7. ON/OFF control
1. Heating zone selection controls
2. Power / Timer regulating key
3. Key lock control
4. ON/OFF control
5. Timer control
3
45
1
1 2
Induction cooking is a safe, advanced,
efficient, and economical cooking
technology. It works by electromagnetic
vibrations generating heat directly in the
pan, rather than indirectly through heating
the glass surface. The glass becomes hot
only because the pan eventually warms
it up.
Important safety instructions
• Never leave the appliance unattended when in use. Boil
over causes smoking and greasy spill overs that may ignite.
• Never use your appliance as a work or storage surface.
• Never leave any objects or utensils on the appliance.
• Do not place or leave any magnetisable objects (e.g. credit
cards, memory cards) or electronic devices (e.g. computers,
MP3 players) near the appliance, as they may be affected
by its electromagnetic field.
• Never use your appliance for warming or heating the room.
• After use, always turn off the cooking zones and the
cooktop as described in this manual (i.e. by using the touch
controls). Do not rely on the pan detection feature to turn
off the cooking zones when you remove the pans.
• Do not allow children to play with the appliance or sit,
stand, or climb on it.
• Do not store items of interest to children in cabinets above
the appliance. Children climbing on the cooktop could be
seriously injured.
• Do not leave children alone or unattended in the area
where the appliance is in use.
• Children or persons with a disability which limits their
ability to use the appliance should have a responsible and
competent person to instruct them in its use. The instructor
must be sure that they can use the appliance without
danger to themselves or their surroundings.
• Do not repair or replace any part of the appliance unless
specifically recommended in the manual. All other servicing
should be done by a qualified technician.
• Do not place or drop heavy objects on your cooktop.
• Do not stand on your cooktop.
• Do not use pans with jagged edges or drag pans across
the Induction glass surface as this can scratch the glass.
• Do not use scourers or any other harsh abrasive cleaning
agents to clean your cooktop, as these can scratch the
Induction glass.
• This appliance is intended to be used in household and
similar applications such as: -staff kitchen areas in shops,
offices and other working environments; -farm houses;
-by clients in hotels, motels and other residential type
environments; -bed and breakfast type environments.
• WARNING: The appliance and its accessible parts become
hot during use.
• Care should be taken to avoid touching heating elements.
• Children less than 8 years of age shall be kept away unless
continuously supervised.
iron pot
magnetic circuit
ceramic glass plate
induction coil
induced currents
Page 5
5
ENG
Before using your New Induction Hob
OPERATION OF PRODUCT
Touch Controls
Choosing the right Cookware
Technical Specification
• Read this guide, taking special note of the ‘Safety Warnings’ section.
• Remove any protective film that may still be on your Induction hob.
Cooking Hob HI6400MB
Cooking Zones 4 Zones
Supply Voltage 220-240V~ 50Hz or 60Hz
Installed Electric Power 7000W
Product Size L×W×H(mm) 590X520X60
Building-in Dimensions A×B (mm) 560X490
Weight and Dimensions are approximate. Because we continually strive to improve our products we may change specifications
and designs without prior notice
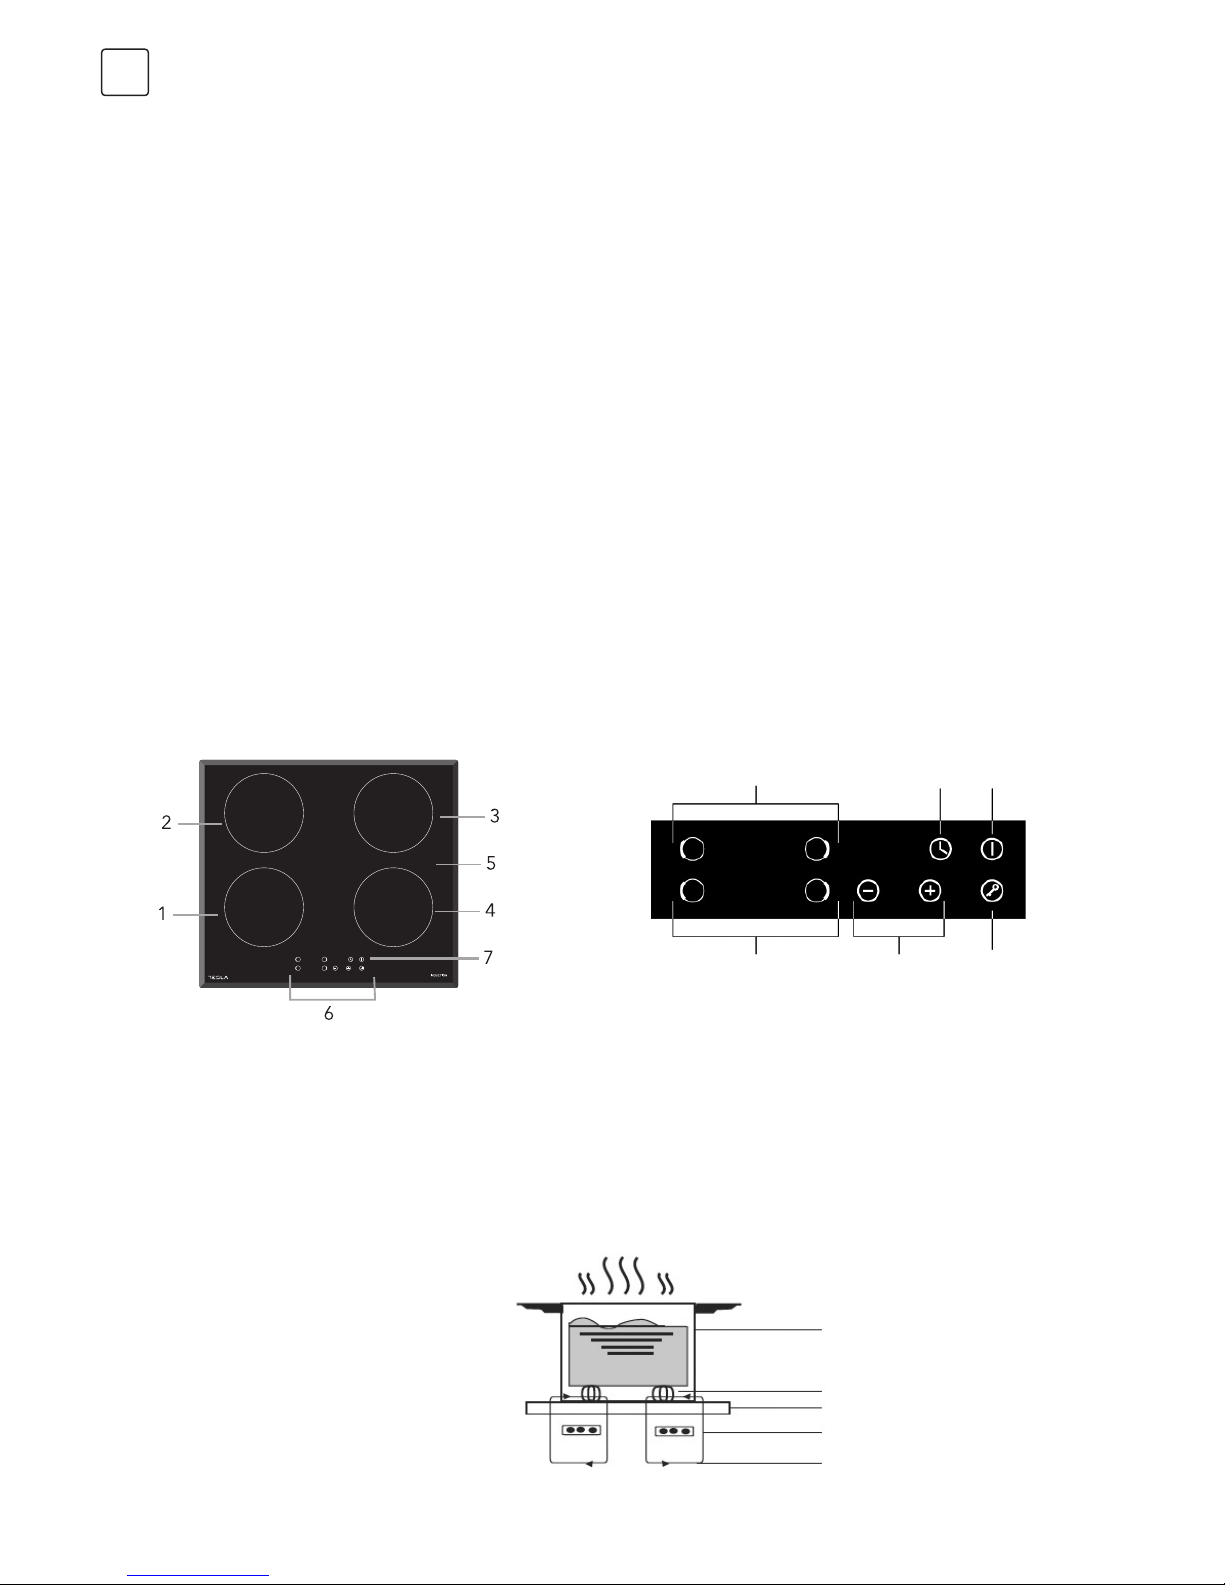
• The controls respond to touch, so you don’t need to apply
any pressure.
• Use the ball of your finger, not its tip.
• You will hear a beep each time a touch is registered.
• Make sure the controls are always clean, dry, and that there
is no object (e.g. a utensil or a cloth) covering them. Even a
thin film of water may make the controls difficult to operate.
Do not use cookware with jagged edges or a curved base.
• Only use cookware with a base suitable for induction cooking. Look for the
induction symbol on the packaging or on the bottom of the pan.
• You can check whether your cookware is suitable by carrying out a magnet test.
Move a magnet towards the base of the pan. If it is attracted, the pan is suitable for
induction.
• If you do not have a magnet:
1. Put some water in the pan you want to check.
2. If
does not flash in the display and the water is heating, the pan is suitable.
• Cookware made from the following materials is not suitable: pure stainless steel,
aluminium or copper without a magnetic base, glass, wood, porcelain, ceramic,
and earthenware.
Page 6
6
ENG
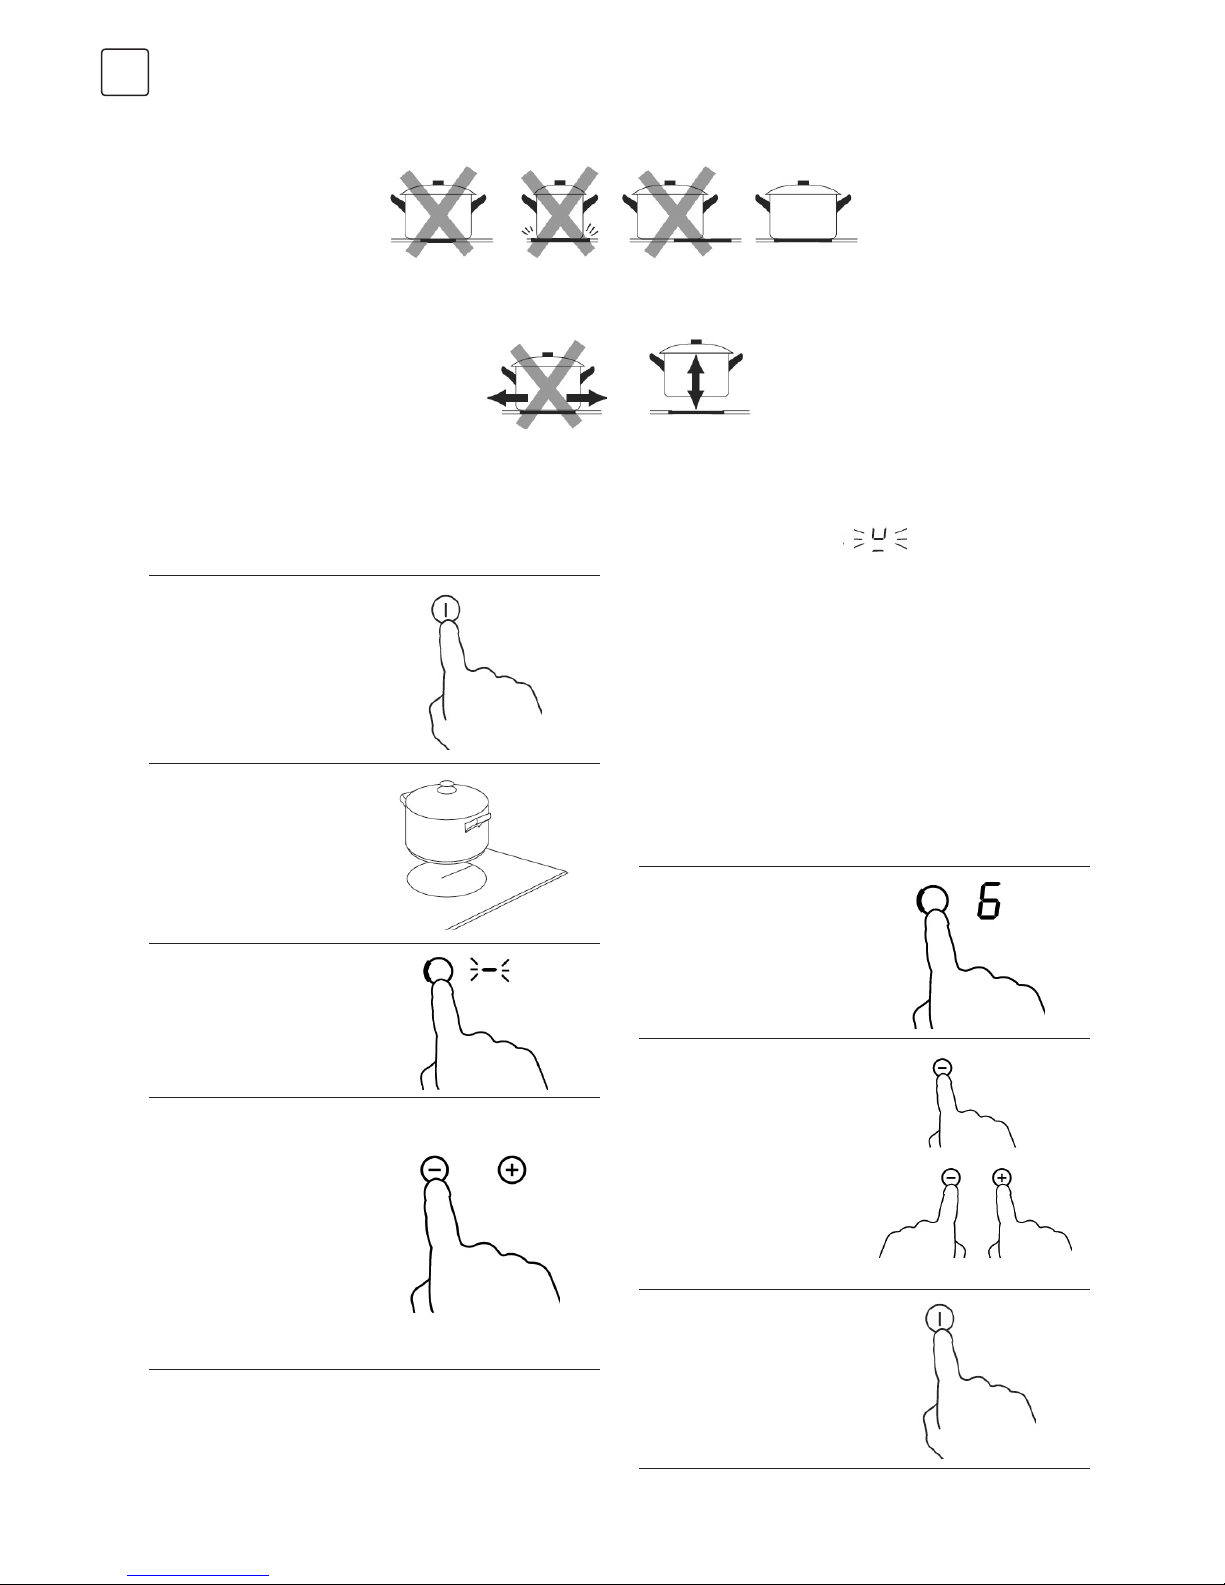
How to use
Start cooking
Finish cooking
Touch the ON/OFF control
for three seconds. After
power on, the buzzer
beeps once, all displays
show “–” or “– –”, indicating
that the induction hob
has entered the state of
standby mode.
Place a suitable pan on the
cooking zone that you wish
to use.
• Make sure the bottom of
the pan and the surface
of the cooking zone are
clean and dry.
Touching the heating zone
selection control, and an
indicator next to the key
will flash
Select a heat setting by
touching the “-” or “+”
control.
• If you don’t choose a heat
setting within 1 minute,
the Induction hob will
automatically switch off.
You will need to start
again at step 1.
• You can modify the heat
setting at any time during
cooking.
Touching the heating zone
selection control that you
wish to switch off
Turn the cooking zone off
by scrolling down to “0” or
touching “-” and “+” control
together. Make sure the
display shows “0”.
Turn the whole cooktop off
by touching the ON/OFF
control.
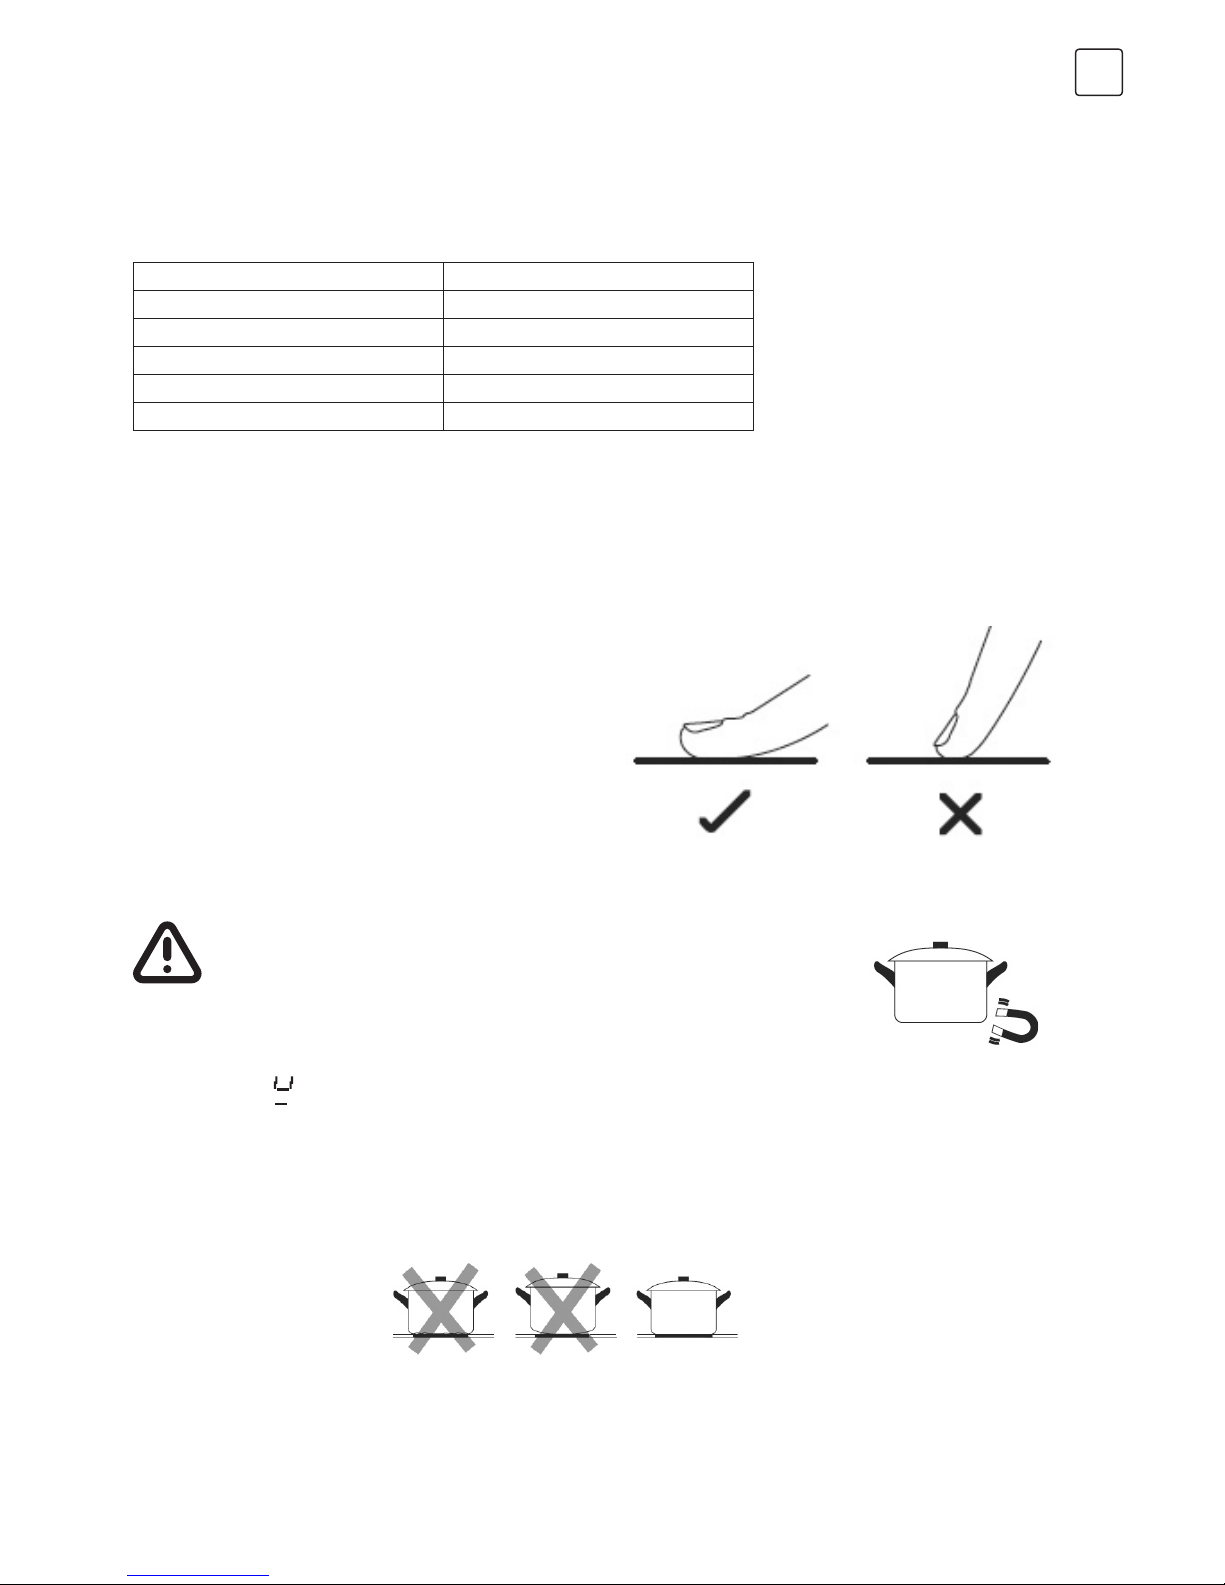
Make sure that the base of your pan is smooth, sits flat against the glass, and is the same size as the cooking zone. Always centre
your pan on the cooking zone.
Always lift pans off the ceramic hob – do not slide, or they may scratch the glass.
If the display flashes alternately with
the heat setting
This means that:
• you have not placed a pan on the correct cooking zone or,
• the pan you’re using is not suitable for induction cooking or,
• the pan is too small or not properly centred on the cooking
zone.
No heating takes place unless there is a suitable pan on the
cooking zone.
The display will automatically turn off after 1 minute if no
suitable pan is placed on it.
Page 7
7
ENG
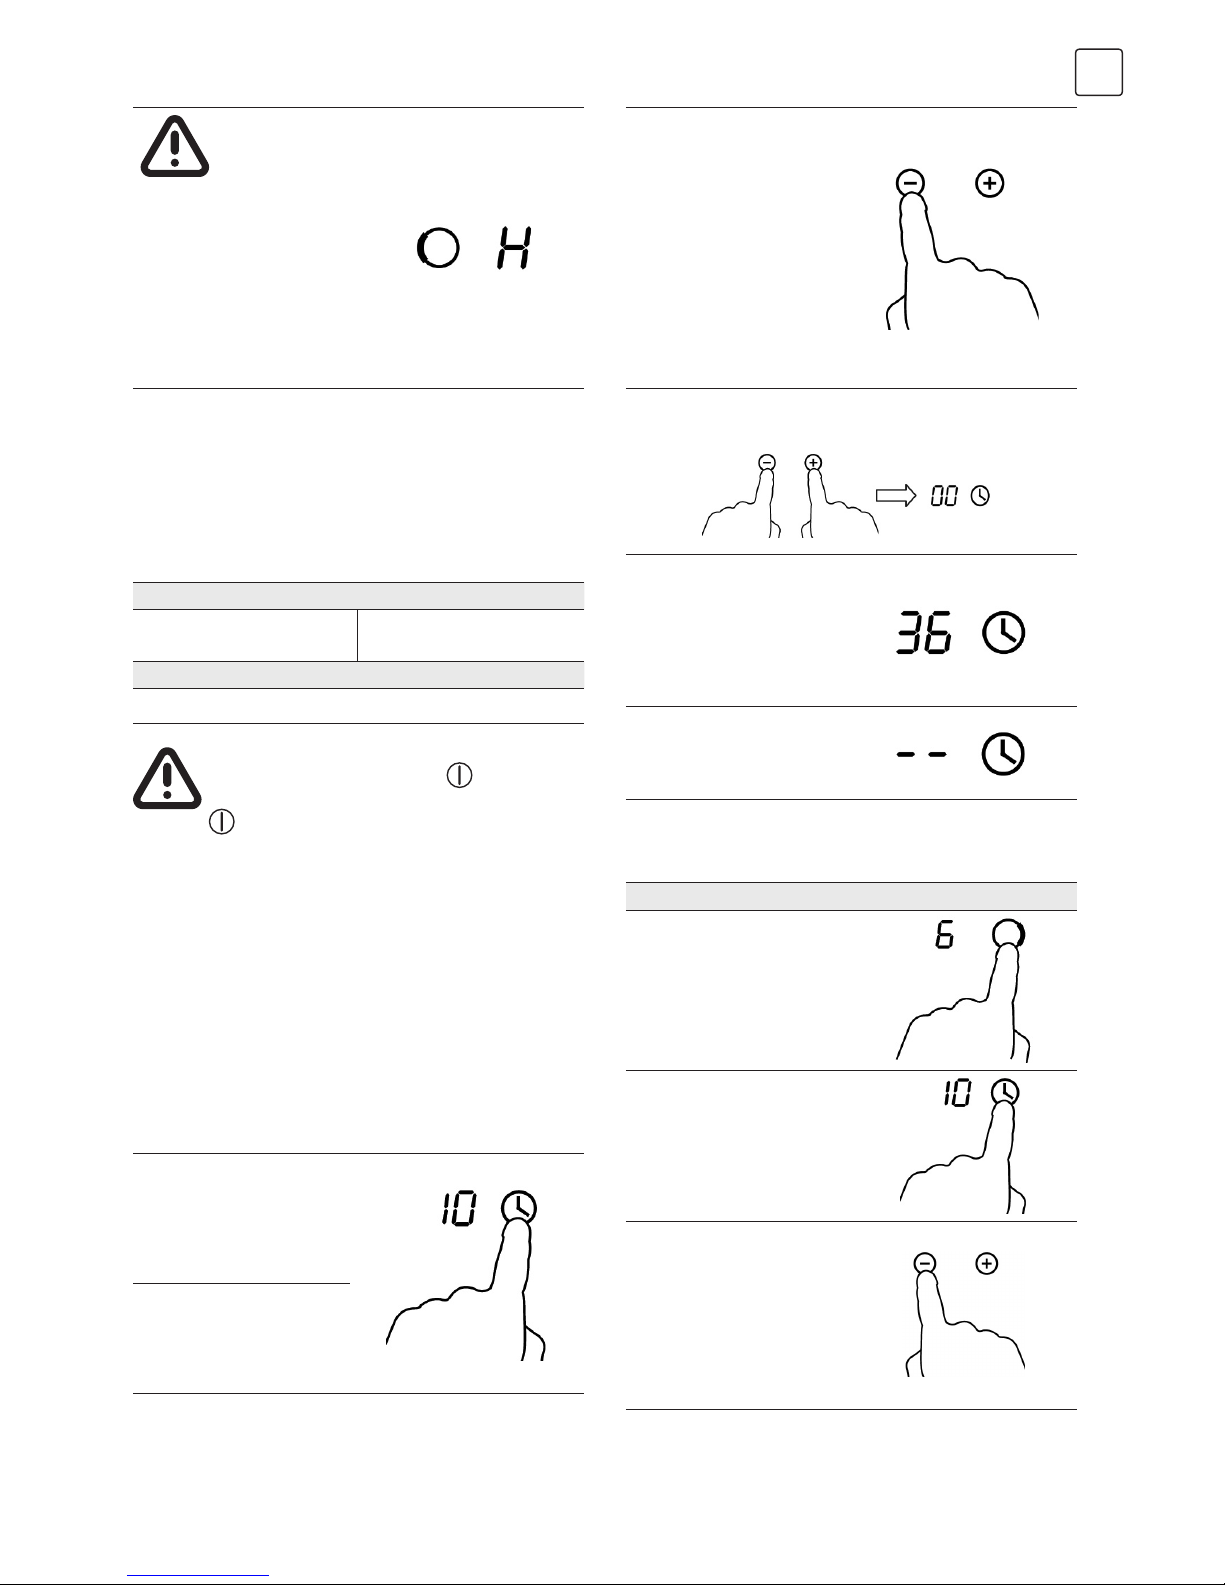
Beware of hot
surfaces
H will show which cooking
zone is hot to touch. It will
disappear when the surface
has cooled down to a safe
temperature. It can also be
used as an energy saving
function if you want to
heat further pans, use the
hotplate that is still hot.
Locking the Controls
Timer control
To lock the controls
Touch the lock control The timer indicator will show
“ Lo “
To unlock the controls
Touch and hold the lock control for a while.
When the hob is in the lock mode, all the controls
are disable except the ON/OFF
, you can
always turn the induction hob off with the ON/OFF
control in an emergency, but you shall unlock
the hob first in the next operation.
• You can lock the controls to prevent unintended use (for
example children accidentally turning the cooking zones
on).
• When the controls are locked, all the controls except the
ON/OFF control are disabled.
You can use the timer in two different ways:
a. You can use it as a minute minder. In this case, the timer will
not turn any cooking zone off when the set time is up.
b. You can set it to turn one or more cooking zones off after
the set time is up. The timer of maximum is 99 min.
Using the Timer as a Minute Minder
If you are not selecting any cooking zone
Make sure the cooktop is
turned on.
Note: you can use the
minute minder even if
you’re not selecting any
cooking zone.
Touch “+” the controls
of the timer. The minder
indicator will start flashing
and “10” will show in the
timer display.
Set the time by touching
the “-” or “+” control of the
timer
Hint: Touch the “-” or “+”
control of the timer once to
decrease or increase by 1
minute.
Touch and hold the “-” or
“+” control of the timer to
decrease or increase by 10
minutes.
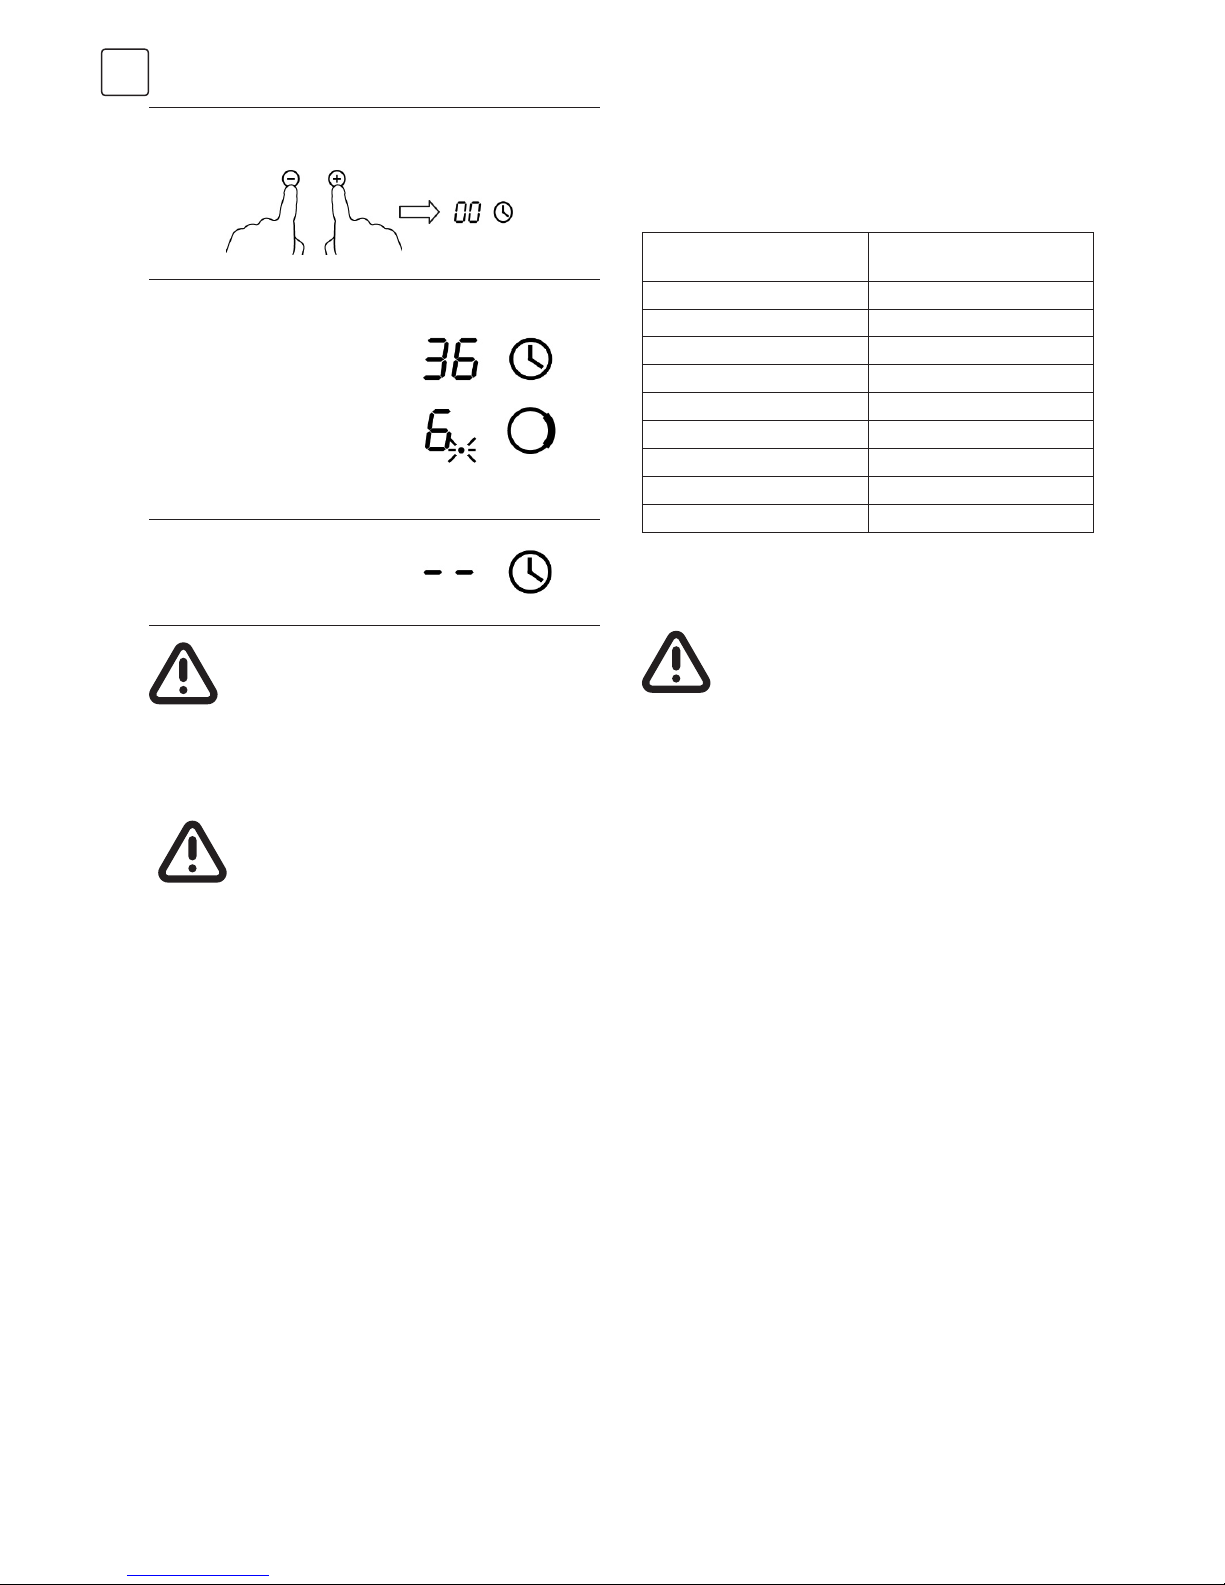
Touching the “-” and “+” together, the timer
is cancelled, and the “00” will show in the minute display.
When the time is set, it
will begin to count down
immediately. The display
will show the remaining
time and the timer
indicator will flash for 5
seconds.
Buzzer will beep for 30
seconds and the timer
indicator shows “- -” when
the setting time finished.
Setting the timer to turn one or more cooking zones off
Set one zone
Touching the heating zone
selection control that you
want to set the timer for.
(e.g. zone 3#)
Touch timer control, the
minder indicator will start
flashing and “10” will show
in the timer display.
Set the time by touching
the or control of the timer
Hint: Touch the “-” or “+”
control of the timer once will
decrease or increase by 1
minute. Touch and hold the
“-” or “+” control of the timer
will decrease or increase by
10 minutes.
Page 8
8
ENG
Touching the “-” and “+” together, the timer is cancelled,
and the “00” will show in the minute display.
When the time is set, it
will begin to count down
immediately. The display will
show the remaining time
and the timer indicator flash
for 5 seconds.
NOTE: The red dot next to
power level indicator will
illuminate indicating that
zone is selected.
When cooking timer
expires, the corresponding
cooking zone will be
switched off automatically.
Other cooking zones will keep operating if they
were turned on previously.
Default working times
Auto shut down is a safety protection function for your
induction hob. It shut down automatically if ever you forget to
turn off your cooking. The default working times for various
power levels are shown in the below table:
Power level
Default working timer
(hour)
1 8
2 8
3 8
4 4
5 4
6 4
7 2
8 2
9 2
When the pot is removed, the induction hob can stop
heating immediately and the hob automatically switch off
after 2 minutes.
People with a heart pace maker should consult
with their doctor before using this unit.
COOKING GUIDELINES
Take care when frying as the oil and fat heat up very quickly, particularly if you’re using PowerBoost. At extremely
high temperatures oil and fat will ignite spontaneously and this presents a serious fire risk.
Cooking Tips
• When food comes to boiling point, reduce the temperature
setting.
• Using a lid will reduce cooking times and save energy by
retaining the heat.
• Minimize the amount of liquid or fat to reduce cooking
times.
• Start cooking on a high setting and reduce the setting
when the food has heated through.
Simmering, cooking rice
• Simmering occurs below boiling point, at around 85˚C,
when bubbles are just rising occasionally to the surface
of the cooking liquid. It is the key to delicious soups
and tender stews because the flavours develop without
overcooking the food. You should also cook egg-based
and flour thickened sauces below boiling point.
• Some tasks, including cooking rice by the absorption
method, may require a setting higher than the lowest
setting to ensure the food is cooked properly in the time
recommended.
Searing steak
To cook juicy flavoursome steaks:
1. Stand the meat at room temperature for about 20 minutes
before cooking.
2. Heat up a heavy-based frying pan.
3. Brush both sides of the steak with oil. Drizzle a small
amount of oil into the hot pan and then lower the meat
onto the hot pan.
4. Turn the steak only once during cooking. The exact
cooking time will depend on the thickness of the steak and
how cooked you want it. Times may vary from about 2 – 8
minutes per side. Press the steak to gauge how cooked it
is – the firmer it feels the more ‘well done’ it will be.
5. Leave the steak to rest on a warm plate for a few minutes
to allow it to relax and become tender before serving.
For stir-frying
1. Choose an induction compatible flat-based wok or a large
frying pan.
2. Have all the ingredients and equipment ready. Stir-frying
should be quick. If cooking large quantities, cook the food
in several smaller batches.
3. Preheat the pan briefly and add two tablespoons of oil.
4. Cook any meat first, put it aside and keep warm.
5. Stir-fry the vegetables. When they are hot but still crisp,
turn the cooking zone to a lower setting, return the meat
to the pan and add your sauce.
6. Stir the ingredients gently to make sure they are heated
through.
7. Serve immediately.
Page 9
9
ENG
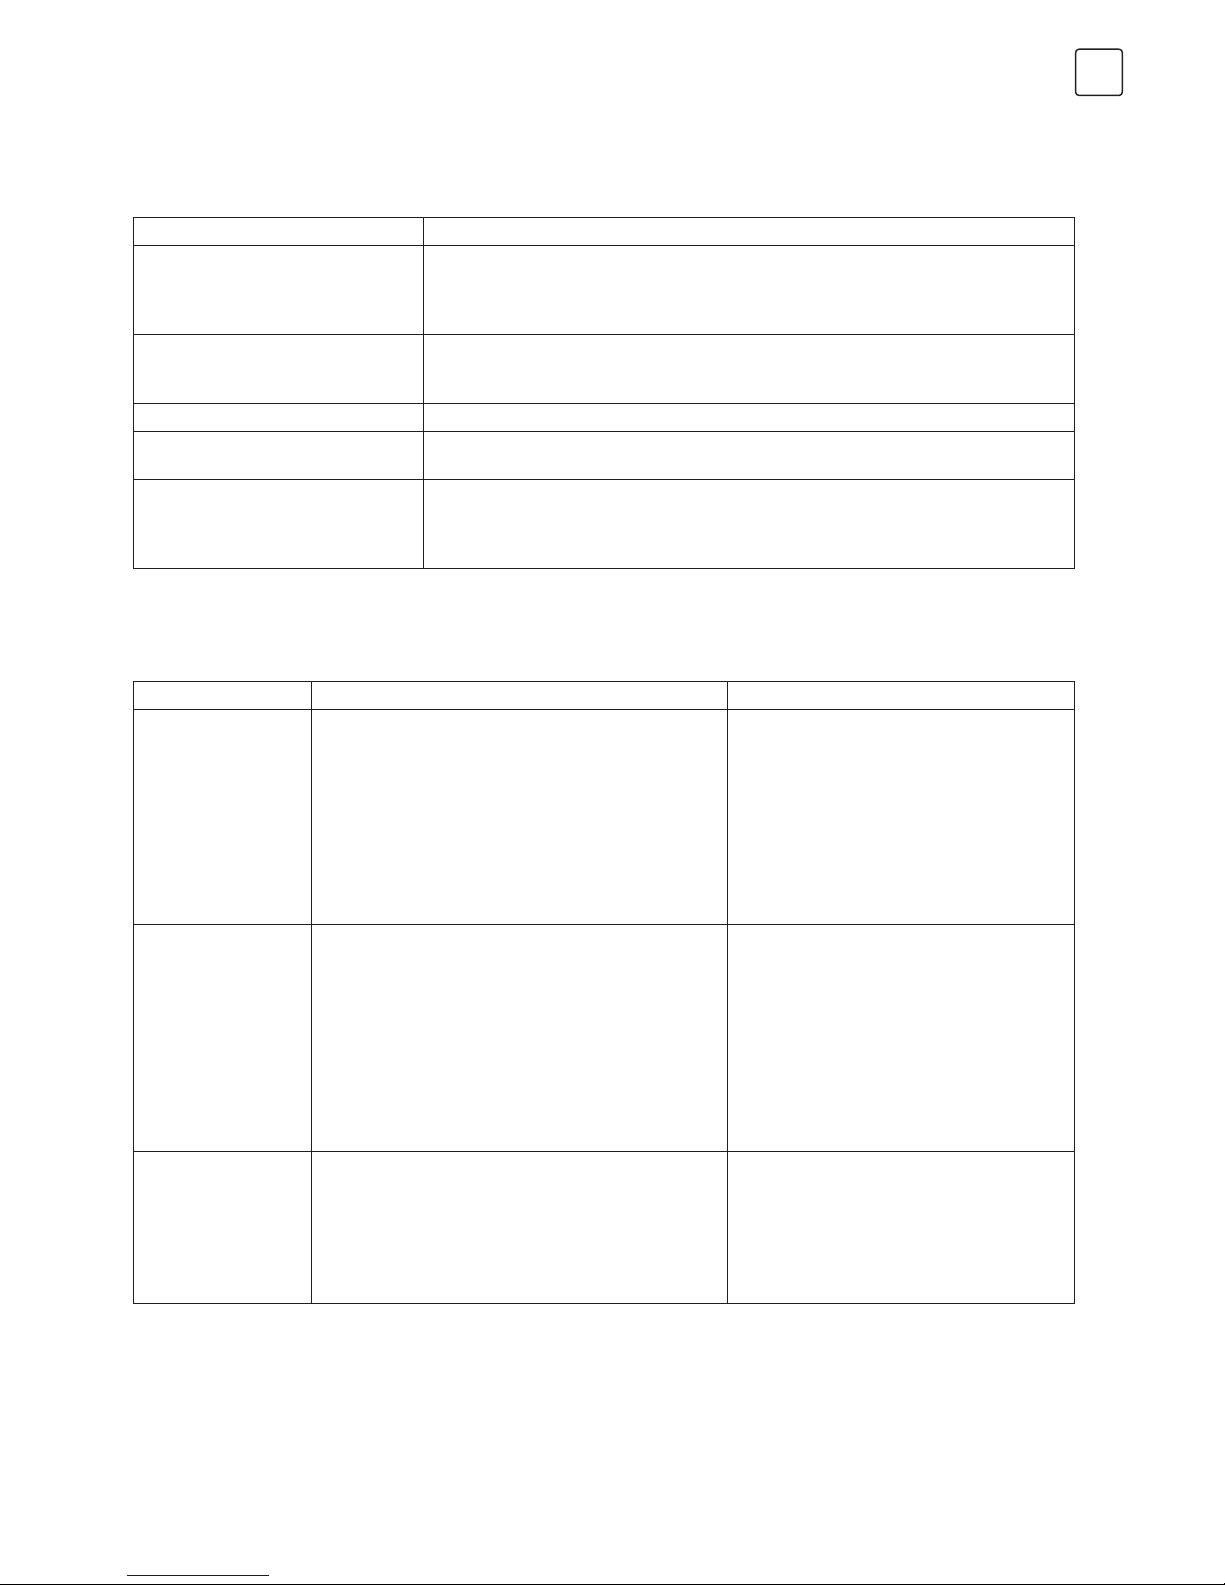
Heat setting Suitability
1 - 2
• delicate warming for small amounts of food
• melting chocolate, butter, and foods that burn quickly
• gentle simmering
• slow warming
3 - 4
• reheating
• rapid simmering
• cooking rice
5 - 6 • pancakes
7 - 8
• sautéing
• cooking pasta
9
• stir-frying
• searing
• bringing soup to the boil
• boiling water
HEAT SETTINGS
The settings below are guidelines only. The exact setting will depend on several factors, including your cookware
and the amount you are cooking. Experiment with the induction hob to find the settings that best suit you.
What? How? Important!
Everyday soiling on
glass (fingerprints,
marks, stains left
by food or nonsugary spill overs on
the glass)
1. Switch the power to the cooktop off.
2. Apply a cooktop cleaner while theglass is still
warm (but not hot!)
3. Rinse and wipe dry with a clean cloth or paper
towel.
4. Switch the power to the cooktop back on.
• When the power to the cooktop is
switched off, there will be no ‘hot surface’
indication but the cooking zone may still
be hot! Take extreme care.
• Heavy-duty scourers, some nylon scourers
and harsh/abrasive cleaning agents may
scratch the glass. Always read the label to
check if your cleaner or scourer is suitable.
• Never leave cleaning residue on the
cooktop: the glass may become stained.
Boil overs, melts,
and hot sugary spills
on the glass
Remove these immediately with a fish slice, palette
knife or razor blade scraper suitable for Induction glass
cooktops, but beware of hot cooking zone surfaces:
1. Switch the power to the cooktop off at the wall.
2. Hold the blade or utensil at a 30° angle and scrape
the soiling or spill to a cool area of the cooktop.
3. Clean the soiling or spill up with a dish cloth or
paper towel.
4. Follow steps 2 to 4 for ‘Everyday soiling on glass’
above.
• Remove stains left by melts and sugary
food or spill overs as soon as possible.
If left to cool on the glass, they may be
difficult to remove or even permanently
damage the glass surface.
• Cut hazard: when the safety cover is
retracted, the blade in a scraper is razorsharp. Use with extreme care and always
store safely and out of reach of children.
Spill overs on the
touch controls
1. Switch the power to the cooktop off.
2. Soak up the spill
3. Wipe the touch control area with a clean damp
sponge or cloth.
4. Wipe the area completely dry with a paper towel.
5. Switch the power to the cooktop back on.
• The cooktop may beep and turn itself off,
and the touch controls may not function
while there is liquid on them. Make sure
you wipe the touch control area dry before
turning the cooktop back on.
CARE AND CLEANING
Page 10
10
ENG
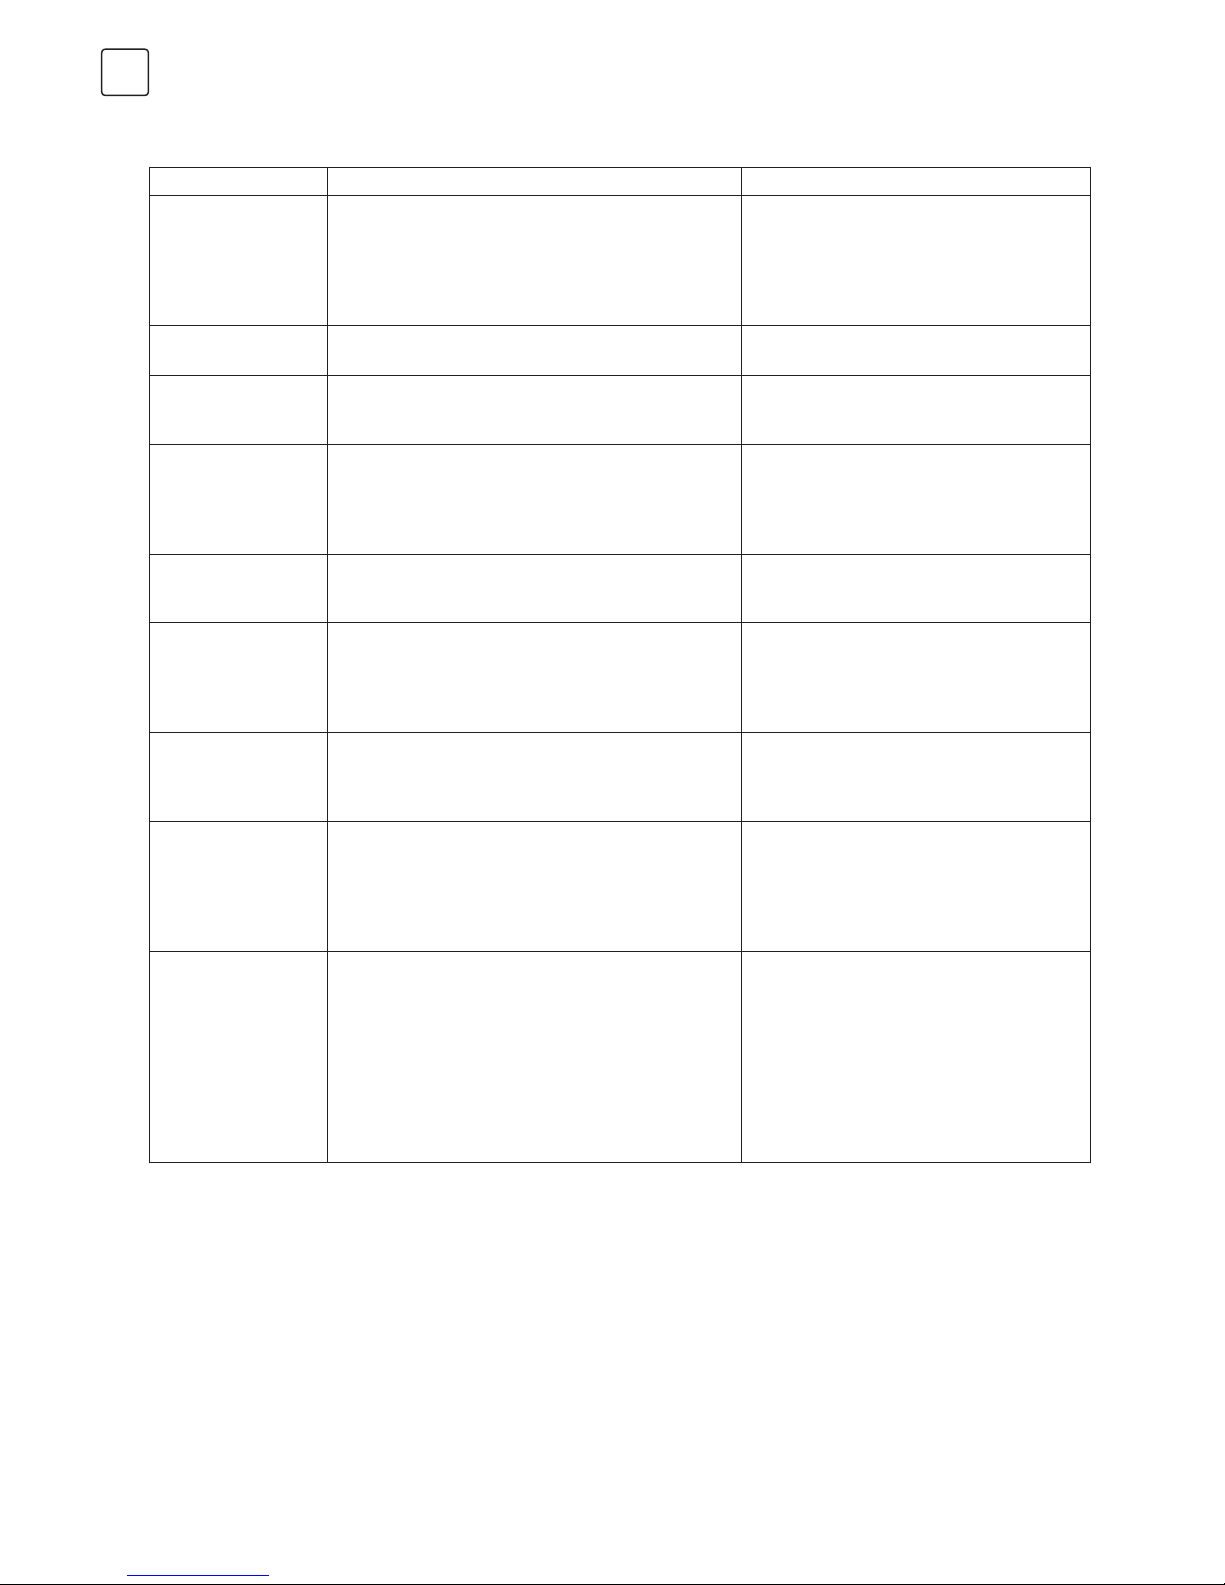
Problem Possible causes What to do
The induction hob
cannot be turned on.
No power. Make sure the induction hob is connected to
the power supply and that it is switched on.
Check whether there is a power outage
in your home or area. If you’ve checked
everything and the problem persists, call a
qualified technician.
The touch controls
are unresponsive.
The controls are locked. Unlock the controls. See section ‘Using your
induction cooktop’ for instructions.
The touch controls
are difficult to
operate.
There may be a slight film of water over the controls or
you may be using the tip of your finger when touching
the controls.
Make sure the touch control area is dry and
use the ball of your finger when touching the
controls.
The glass is being
scratched.
Rough-edged cookware.
Unsuitable, abrasive scourer or cleaning products
being used.
Use cookware with flat and smooth bases.
See ‘Choosing the right cookware’.
See ‘Care and cleaning’.
Some pans make
crackling or clicking
noises.
This may be caused by the construction of your
cookware (layers of different metals vibrating
differently).
This is normal for cookware and
does not indicate a fault.
The induction hob
makes a low
humming noise when
used on a high heat
setting.
This is caused by the technology of induction cooking. This is normal, but the noise should quiete
down or disappear completely when you
decrease the heat setting.
Fan noise coming
from the induction
hob.
A cooling fan built into your induction hob has come
on to prevent the electronics from overheating. It may
continue to run even after you’ve turned the induction
hob off.
This is normal and needs no action. Do not
switch the power to the induction hob off at
the wall while the fan is running.
Pans do not become
hot and appears in
the display.
The induction hob cannot detect the pan because it is
not suitable for induction cooking.
The induction hob cannot detect the pan because it is
too small for the cooking zone or not properly
centred on it.
Use cookware suitable for induction cooking.
See section ‘Choosing the right cookware’.
Centre the pan and make sure that its base
matches the size of the cooking zone.
The induction hob
or a cooking zone
has turned itself off
unexpectedly, a tone
sounds and an error
code is displayed
(typically alternating
with one or two digits
in the cooking timer
display).
Technical fault. Please note down the error letters and
numbers, switch the power to the induction
hob off at the wall, and contact a qualified
technician.
HINTS AND TIPS
Page 11

11
ENG
Failure code Problem Solution
Auto-Recovery
E1 Supply voltage is above the rated voltage. Please inspect whether power supply is
normal.
Power on after the power supply is normal.
E2 Supply voltage is below the rated voltage.
E3 High temperature of ceramic plate sensor . (1#) Wait for the temperature of ceramic plate
return to normal.
Touch “ON/OFF” button to restart unit.
E4 High temperature of ceramic plate sensor . (2#)
E5 High temperature of IGBT . (1#) Wait for the temperature of IGBT return to
normal.
Touch “ON/OFF” button to restart unit.
Check whether the fan runs smoothly; if not ,
replace the fan.
E6 High temperature of IGBT. (2#)
No Auto-Recovery
F3/F6
Ceramic plate temperature sensor failure- -short
circuit. (F3 for 1#, F6 for2#)
Check the connection or replace the ceramic
plate temperature sensor.
F4/F7
Ceramic plate temperature sensor failure--open
circuit. (F4 for 1#, F7 for2#)
F5/F8
Ceramic plate temperature sensor failure—invalid.
(F5 for 1#, F8 for2#)
F9/FA
Temperature sensor of the IGBT failure. (short circuit/
open circuit for 1#)
Replace the power board.
FC /FD
Temperature sensor of the IGBT failure. (short circuit/
open circuit for 2#)
Failure code Problem Solution A Solution B
The LED does not
come on when unit
is plugged in.
No power supplied.
Check to see if plug is secured
tightly in outlet and that outlet is
working.
The accessorial power
board and the display
board connected failure.
Check the connection.
The accessorial power
board is damaged.
Replace the accessorial power
board.
The display board is
damaged.
Replace the display board.
Some buttons can’t
work, or the LED
display is not
normal.
The display board is
damaged.
Replace the display board.
FAILURE DISPLAY AND INSPECTION
The induction hob is equipped with a self-diagnostic function. With this test the technician is able to check the function of several
components without disassembling or dismounting the hob from the working surface.
Troubleshooting
Failure code occur during customer using & Solution;
Specific Failure & Solution
Page 12

12
ENG
L(mm) W(mm) H(mm) D(mm) A(mm) B(mm) X(mm) F(mm)
590 520 60 56 560+4+1 490+4+1 50 min. 3 min.
INSTALLATION
Selection of installation equipment
Cut out the work surface according to the sizes shown in the drawing.
For the purpose of installation and use, a minimum of 5 cm space should be preserved around the hole. Be sure the thickness of
the work surface is at least 30mm. Please select heat-resistant and insulated work surface material (Wood and similar fibrous or
hygroscopic material should not be used as work surface material unless impregnated) to avoid the electrical shock and larger
deformation caused by the heat radiation from the hotplate. As shown below:
The safety distance between the sides of the hob and the inner surfaces of the worktop should be at least 3mm.
NOTE
SEAL
Failure code Problem Solution A Solution B
The Cooking Mode
Indicator comes on,
but heating does
not start.
High temperature of the
hob.
Ambient temperature may be too
high. Air Intake or Air Vent may
be blocked.
There is something wrong
with the fan.
Check whether the fan
runs smoothly, if not , replace the
fan.
The power board is
damaged.
Replace the power board.
Heating stops
suddenly during
operation and the
display flashes “u”.
Pan Type is wrong.
Use the proper pot (refer
to the instruction manual.)
Pan detection circuit is damaged,
replace the power board.
Pot diameter is too small.
Cooker has overheated
Unit is overheated. Wait for
temperature to return to normal.
Push “ON/OFF” button to restart
unit.
Heating zones
of the same side
(Such as the first
and the second
zone ) would
display “u” .
The power board and the
display board connected
failure;
Check the connection.
The display board of
communicate part is
damaged.
Replace the display board.
The Main board is
damaged.
Replace the power board.
Fan motor sounds
abnormal.
The fan motor is damaged. Replace the fan.
The above are the judgment and inspection of common failures.
Please do not disassemble the unit by yourself to avoid any dangers and damages to the induction hob.
Page 13

13
ENG
A(mm) B(mm) C(mm) D E
760 50 min. 20 min. Air intake Air exit 5mm
Under any circumstances, make sure the ceramic cooker hob is well ventilated and the air inlet and outlet are not blocked. Ensure
the ceramic cooker hob is in good work state. As shown below
The safety distance between the hotplate and the cupboard above the hotplate should be at least 760 mm.
NOTE
WARNING!
Ensuring Adequate Ventilation
Make sure the induction cooker hob is well ventilated and that air inlet and outlet are not blocked. In order to avoid accidental
touch with the overheating bottom of the hob, or getting unexpected electric shock during working, it is necessary to put a
wooden insert, fixed by screws, at a minimum distance of 50mm from the bottom of the hob. Follow the requirements below.
There are ventilation holes around outside of the hob. YOU MUST ensure these holes are not blocked by the
worktop when you put the hob into position.
• The work surface is square and level, and no structural members interfere with space requirements.
• The work surface is made of a heat-resistant and insulated material.
• If the hob is installed above an oven, the oven has a built-in cooling fan.
• The installation will comply with all clearance requirements and applicable standards and regulations.
• A suitable isolating switch providing full disconnection from the mains power supply is incorporated in the permanent wiring,
mounted and positioned to comply with the local wiring rules and regulations.
• The isolating switch must be of an approved type and provide a 3 mm air gap contact separation in all poles (or in all active
[phase] conductors if the local wiring rules allow for this variation of the requirements).
• Be aware that the glue that join the plastic or wooden material to the furniture, has to resist to temperature not
below 150ºC, to avoid the unstuck of the panelling.
• The rear wall, adjacent and surrounding surfaces must therefore be able to withstand a temperature of 90ºC.
Before installing the hob, make sure that
Page 14

14
ENG
Under any circumstances, the brackets cannot touch with the inner surfaces of the worktop after installation (see
picture).
• The isolating switch will be easily accessible to the customer with the hob installed.
• You consult local building authorities and by-laws if in doubt regarding installation.
• You use heat-resistant and easy-to-clean finishes (such as ceramic tiles) for the wall surfaces surrounding the hob.
• The power supply cable is not accessible through cupboard doors or drawers.
• There is adequate flow of fresh air from outside the cabinetry to the base of the hob.
• If the hob is installed above a drawer or cupboard space, a thermal protection barrier is installed below the base of the hob.
• The isolating switch is easily accessible by the customer.
The unit should be placed on a stable, smooth surface (use the packaging). Do not apply force onto the controls protruding from
the hob.
Fix the hob on the work surface by screw 2 brackets on the bottom of hob (see picture) after installation.
Adjust the bracket position to suit for different table top thickness.
After installing the hob, make sure that
Before locating the fixing brackets
Adjusting the bracket position
Bracket
HOB
BRACKET
TABLE
Page 15

15
ENG
This hob must be connected to the power supply only by a suitably qualified person.
Before connecting the hob to the power supply, check that:
1. The domestic wiring system is suitable for the power drawn by the hob.
2. The voltage corresponds to the value given in the rating plate
3.The power supply cable sections can withstand the load specified on the rating plate.
To connect the hob to the mains power supply, do not use adapters, reducers, or branching devices, as they can
cause overheating and fire.
The power supply cable must not touch any hot parts and must be positioned so that its temperature will not exceed
75˚C at any point.
Check with an electrician whether the domestic wiring system is suitable without alterations.
Any alterations must only be made by a qualified electrician.
1. The induction hotplate must be installed by qualified personnel or technicians. We have professionals at your service. Please
never conduct the operation by yourself.
2. The hob will not be installed directly above a dishwasher, fridge, freezer, washing machine or clothes dryer, as the humidity
may damage the hob electronics
3. The induction hotplate shall be installed such that better heat radiation can be ensured to enhance its reliability.
4. The wall and induced heating zone above the table surface shall withstand heat.
5. To avoid any damage, the sandwich layer and adhesive must be resistant to heat.
6. A steam cleaner is not to be used.
Cautions
Connecting the hob to the mains power supply
Yellow / Green
Black
Brown
Blue
Page 16

16
ENG
DISPOSAL: Do not
dispose this product
as unsorted municipal
waste. Collection of
such waste separately
for special treatment is
necessary.
This appliance is labelled in compliance with European directive 2012/19/EU for Waste
Electrical and Electronic Equipment (WEEE). By ensuring that this appliance is disposed
of correctly, you will help prevent any possible damage to the environment and to human
health, which might otherwise be caused if it were disposed of in the
wrong way.
The symbol on the product indicates that it may not be treated as normal household
waste. It should be taken to a collection point for the recycling of electrical and electronic
goods.
This appliance requires specialist waste disposal. For further information regarding the
treatment, recovery and recycling of this product please contact your local council, your
household waste disposal service, or the shop where you purchased it.
For more detailed information about treatment, recovery and recycling of this product,
please contact your local city office, your household waste disposal service or the shop
where you purchased the product.
The bottom surface and the power cord of the hob are not accessible after installation.
• If the cable is damaged or to be replaced, the operation must be carried out the by after-sale agent with dedicated tools to
avoid any accidents.
• If the appliance is being connected directly to the mains an Omni polar circuit-breaker must be installed with a minimum
opening of 3mm between contacts.
• The installer must ensure that the correct electrical connection has been made and that it is compliant with safety regulations.
• The cable must not be bent or compressed.
• The cable must be checked regularly and replaced by authorised technicians only.
If the total number of heating unit of the appliance you choose is not less than 4, the appliance can be connected
directly to the mains by single-phase electric connection, as shown below.
Yellow / Green
Black
Brown
Blue
Page 17

17
SRB
Čestitamo Vam na kupovini Vaše nove indukcione ploče.
Predlažemo Vam da malo vremena posvetite čitanju Uputstva
za upotrebu/Uputstva za instalaciju, kako biste potpuno
razumeli kako da ispravno instalirate i koristite uređaj.
Za instalaciju, molimo Vas da pročitate deo vezan za
instalaciju uređaja. Pročitajte sva bezbedonosna uputstva
pažljivo pre upotrebe i čuvajte Uputstvo za upotrebu za slučaj
da Vam zatreba u budućnosti.
BEZBEDONOSNA
UPOZORENJA
Vaša bezbednost nam je važna. Molimo, pričitajte ove
informacije pre upotrebe ploče za kuvanje.
INSTALACIJA
Opasnost od strujnog udara
• Prekinite napajanje uređaja električnom energijom pre bilo
kakve popravke ili održavanja istog.
• Povezivanje na dobro uzemljenje je neophodno i
obavezno.
• Promene u domaćem sistemu za napajanje mora da izvrši
kvalifikovani električar.
• Nepoštovanje ovog saveta može dovesti do strujnog udara
ili smrti.
Opasnost od posekotina
• Pazite se- ivice ploče su oštre.
• Neopreznost može dovesti do povreda ili posekotina.
Važna bezbedonosna uputstva
• Pažljivo pročitajte ova uputstva pre instalacije ili upotrebe
ovog uređaja.
• Nikakav zapaljiv materijal ili proizvod ne sme stajati na
ovom uređaju u bilo kom trenutku.
• Molimo vas, postarajte se da ove informacije budu
dostupne osobi odgovornoj za instalaciju uređaja, budući
da to može smanjiti troškove instalacije.
• Kako bi se izbegli rizici, ovaj uređaj mora biti instaliran u
skladu s ovim informacijama za instalaciju.
• Ovaj uređaj bi trebalo da propisno instalira i uzemlji samo
odgovarajuće kvalifikovana osoba.
• Ovaj uređaj bi trebalo da bude povezan na strujno kolo
koje ima izolacijski prekidač, koji omogućuje potpuno
prekidanje napajanja električnom energijom.
• Neispravna instalacija uređaja može dovesti do
poništavanja bilo kakve garancije i odgovornosti.
• Ovaj uređaj mogu koristiti deca starosti 8 ili više godina
i osobe sa smanjenim fizičkim, čulnim ili mentalnim
sposobnostima, ili manjkom iskustva i znanja ukoliko su
pod nadzorom, ili su im data uputstva u vezi sa bezbednom
upotrebom uređaja, i svesni su mogućeg rizika.
• Deca ne bi trebalo da se igraju uređajem. Uređaj ne smeju
čistiti deca, osim ako to ne čine pod nadzorom.
• Ukoliko je kabl za napajanje oštećen, mora ga zameniti
proizvođač, njegov agent za servisiranje ili slična
kvalifikovana lica, kako bi se izbegli mogući rizici.
• Upozorenje: Ukoliko je površina napukla, isključite aparat
kako biste izbegli mogućnost strujnog udara, u slučaju da
je površina ploče izrađena od keramičkog stakla ili sličnog
materijala, koji štiti žive delove.
• Metalni predmeti, kao što su noževi, viljuške, kašike i
poklopci ne bi trebalo da stoje na površini ploče, s obzirom
na to da može doći do njihovog zagrevanja.
• Ne bi trebalo koristiti paročistač.
• Ne koristite paročistač za čišćenje ploče za kuvanje.
• Uređaj nije namenjen za upravljanje pomoću spoljnog
tajmera ili odvojenog sistema daljinskog upravljanja.
• UPOZORENJE: Opasnost od požara: ne odlažite
predmete na površinu za kuvanje.
• Proces termičke obrade hrane je potrebno nadgledati.
Kratkotrajni proces termičke obrade hrane treba da bude
konstantno nadgledan.
• UPOZORENJE: Pripremanje hrane uz pomoć masti ili ulja
bez nadzora može biti opasno i može prouzrokovati pojavu
otvorenog plamena. NIKAD ne pokušavajte da ugasite
plamen vodom, već isključite aparat i zatim pokrijte vatru,
poklopcem ili protivpožarnim ćebetom, na primer.
RUKOVANJE I ODRŽAVANJE
Opasnost od strujnog udara
• Ne kuvajte na polomljenoj ili razbijenoj ploči za kuvanje.
Ukoliko postoji mogućnost od lomljenja ili pucanja
površine ploče za kuvanje, odmah prekinite napajanje
uređaja električnom energijom (na zidnom prekidaču) i
kontaktirajte kvalifikovanog tehničara.
• Isključite ploču za kuvanje sa napajanja iz zida pre čišćenja
ili popravke.
• Nepoštovanje ovog saveta može dovesti do strujnog udara
ili smrti.
Opasnost po zdravlje
• Ovaj uređaj zadovoljava elektromagnetne bezbedonosne
standarde.
• Međutim, osobe sa srčanim pejsmejkerima ili drugim
električnim implantima (kao što su insulinske pumpice)
moraju se konsultovati sa svojim lekarom ili proizvođačem
implanta pre upotrebe uređaja, kako bi bili sigurni da
elektromagnetno polje neće uticati na njihove implante.
• Nepoštovanje ovog saveta može dovesti do smrti.
Opasnost od vrele površine
• Tokom upotrebe, dostupni delovi uređaja će postati
dovoljno vrući da mogu prouzrokovati opekotine.
• Ne dozvolite da vaše telo, odeća ili bilo koji drugi predmet,
osim onog koji je pogodan za kuvanje, dođe u kontakt sa
indukcionim staklom dok se površina ne ohladi.
• Deca treba da budu udaljena od uređaja.
• Ručke posuda za kuvanje mogu biti vrele na dodir. Proverite
da ručke posuda za kuvanje ne prelaze na druge zone za
kuvanje, sem one na kojoj se nalaze. Držite ručke podalje
od domašaja dece.
• Nepoštovanje ovog saveta može dovesti do opekotina i
oparotina.
Opasnost od posekotina
• Oštrica na strugaču za ploču za kuvanje je otkrivena kada se
ukloni sigurnosna maska. Koristite ga veoma pažljivo i uvek
ga čuvajte van domašaja dece.
• Neopreznost može dovesti do povreda ili posekotina.
Page 18

18
SRB
UPOZNAVANJE SA PROIZVODOM
Poged odozgo Kontrolna tabla
1. Zona s Max. 1500 W
2. Zona s Max. 2000 W
3. Zona s Max. 1500 W
4. Zona s Max. 2000 W
5. Staklena ploča
6. Kontrolna tabla
7. Taster za uključivanje/isključivanje
1. Taster za izbor za zagrevanje zone
2. Taster za regulisanje jačine/vremena
3. Glavni taster za zaključavanje
4. Taster za uključivanje/isključivanje
5. Taster za vreme
3
45
1
1 2
Važna bezbedonosna uputstva
• Nikad ne ostavljate uređaj bez nadzora kada ga koristite.
Kipljenje može da prouzrokuje dim i mastan izliveni sadržaj
koji se može zapaliti.
• Nikad ne upotrebljavajte svoj uređaj kao radnu površinu ili
površinu za odlaganje.
• Nikad ne ostavljajte bilo kakav predmet ili pribor na
uređaju.
• Nemojte stavljati ili odlagati nikakve magnetizovane
predmete (na priemer kreditne kartice ili memorijske
kartice) ili eketronske uređaje (na primer kompjutere,
MP3 plejere) u blizini uređaja, budući da magnetno polje
uređaja može uticati na njih.
• Nikad ne koristite svoj uređaj za zagrevanje ili grejanje
prostorije.
• Nakon upotrebe, uvek isključite zonu za kuvanje i
ploču za kuvanje kako je opisano u ovom priručniku (tj.
korišćenjem kontrola na dodir). Ne oslanjajte se na funkciju
prepoznavanja posude radi isključivanja zona za kuvanje
kada uklonite posudu za termičku obradu hrane.
• Ne dozvolite deci da se igraju uređajem ili da sede na
njemu, stoje ili se penju na njega.
• Predmete koji su zanimljivi za decu ne čuvajte u ormarićima
iznad uređaja. Deca koja se penju na ploču za kuvanje
mogu se ozbiljno povrediti.
• Ne ostavljate decu samu ili bez nadzora u prostoru gde se
koristi uređaj.
• Deca ili osobe sa invaliditetom koji ograničava njihovu
sposobnost da koriste uređaj treba da imaju odgovornu i
kompetentnu osobu koja će ih uputiti u to kako se koristi
uređaj. Instruktor treba da bude uveren da oni mogu da
koriste uređaj bez opasnosti po njih ili njihovu okolinu.
• Nemojte popravljati ili menjati bilo koji deo uređaja, osim
ako to nije posebno preporučeno u uputstvu. Svaku drugu
popravku treba da obavi kvalifikovani tehničar.
• Nemojte stavljati ili ispuštati teške predmete na svoju ploču
za kuvanje.
• Ne stajte na svoju ploču za kuvanje.
• Nemojte koristiti posude sa grubim ivicama ili ih vući po
površini indukcionog stakla budući da mogu izgrebati
staklo.
• Ne koristite žice ili bilo koje jako abrazivno sredstvo za
čišćenje kako biste očistili svoju ploču za kuvanje, budući da
mogu izgrebati indukciono staklo.
• Uređaj je namenjen upotrebi u domaćinstvu i za slične
namene, kao što su: - kuhinje za zaposlene u prodavnicama,
kancelarijama i drugim radnim okruženjima; - seoska
domaćinstva; - za goste hotela, motela i drugih objekata
za smeštaj; - objekte koji pružaju uslugu prenoćišta sa
doručkom.
• UPOZORENJE: Uređaj i njegovi pristupačni delovi postaju
vrući tokom upotrebe.
• Treba da se postarate da izbegnete dodirivanje zagrejanih
elemenata.
• Uređaj treba da bude van domašaja dece mlađe od 8
godina starosti, osim ako nisu pod stalnim nadzorom.
Radna teorija
Indukciono kuvanje je sigurna, napredna, efikasna i
ekonomična tehnologija kuvanja. Način rada je takav da
elektromagnetne vibracije generišu toplotu direktno na
donji deo posude za termičku obradu hrane, umesto
indirektno preko zagrevanja staklene površine. Staklo
postaje toplo samo ukoliko ga zagreje donji deo
posude za termičku obradu hrane.
metalna posuda
magnetno kolo
keramička staklena ploča
indukcioni navoj
indukovana struja
Page 19

19
SRB
Tehnička specifikacija
Ploča za kuvanje HI6400MB
Zone za kuvanje 4 zone
Jačina napona električne energije 220-240V~ 50Hz or 60Hz
Instalirana električna energija 7000W
Veličina proizvoda L×W×H(mm) 590X520X60
Ugradne dimenzije A×B (mm) 560X490
Težina i dimenzije su približne. Budući da konstantno težimo poboljšanju naših proizvoda, moguće su promene specifikacija i
dizajna bez prethodnog obaveštenja.
Pre upotrebe Vaše nove indukcione ploče
• Pročitajte ovaj vodič, posebno obraćajući pažnju na deo “Bezbedonosna upozorenja”.
• Uklonite sve zaštitne prevlake koje se još uvek mogu nalaziti na Vašoj indukcionoj ploči.
FUNKCIJE PROIZVODA
Tasteri na dodir
Biranje pravog posuđa za termičku obradu hrane
• Kontrole odgovaraju na dodir, dakle ne morate primenjivati
pritisak.
• Koristite jagodicu svoga prsta, ne vrh.
• Čućete zvučni signal svaki put kada dodir bude registrovan.
• Postarajte se da kontrolna dugmad budu uvek čista, suva i
da na njima nema predmeta (kao što su pribor ili tkanina),
koji ih pokrivaju. Čak i tanak sloj vode može napraviti
poteškoće u radu kontrolnih dugmadi.
Ne koristite posuđe sa grubim ivicama ili zakrivljenom osnovom.
• Koristite samo posuđe za termičku obradu hrane, koje je prikladno za indukcionu
pripremu hrane. Potražite indukcijski simbol na pakovanju ili na dnu posude za
termičku obradu hrane.
• Možete takođe proveriti da li je vaša posuda za termičku obradu pogodna
izvođenjem magnetnog testa. Primaknite magnet donjem delu posude. Ukoliko
magnet bude privučen, posuda je pogodna za indukciju.
• Ukoliko nemate magnet:
1.Stavite malo vode u posudu koju želite da proverite.
2. Ukoliko
ne treperi na ekranu a voda se zagreva, posuda je odgovarajuća.
• Posuđe za termičku obradu hrane napravljeno od sledećih materijala nije
pogodno: čist nerđajući čelik, aluminijum ili bakar bez magnetne osnove, staklo,
drvo, porcelan, keramika i zemljane posude.
Page 20

20
SRB
Završetak pripreme hrane
Dodirnite taster za
uključivanje/isključivanje
na tri sekunde. Nakon što
se uključi i čuje se jedan
zvučni signal, svi ekrani
pokazuju “–” ili “– –”, što
znači da je indukciona
ploča u stanju čekanja.
Postavite odgovarajuću
posudu na zonu za kuvanje
koju želite da koristite.
• Pobrinite se da dno
posude i površina zone za
kuvanje budu čisti i suvi.
Dodirnite taster za izbor
zone za zagrevanje
indikator pored tastera će
zatreperiti
Izaberite podešavanje
temperature pritiskom na
taster “-” ili “+”.
• Ukoliko ne izaberete
podešavanje temperature
u roku od 1 minuta,
indukciona ploča će
se automatski isključiti.
Moraćete ponovo da
krenete od 1. koraka.
• Temperaturu možete
podešavati bilo kad tokom
procesa termičke obrade
hrane.
Dodirnite taster za izabranu
zonu za kuvanje, koju želite
da isključite
Isključite zonu za kuvanje
tako što ćete podesiti
unazad odbrojavanjem do
“0” ili dodrivanjem tastera “-”
i “+” zajedno. Pobrinite se da
ekran pokazuje “0”.
Isključite celu ploču za
kuvanje dodirom tastera
uključivanje/isključivanje.
Ukoliko na ekranu treperi
naizmenično sa podešavanjem temperature
To znači da:
• niste postavili posudu na odgovarajuću zonu za kuvanje ili,
• da koristite posudu koja nije pogodna za indukcionu
pripremu hrane ili,
• da je posuda premala ili nije pravilno centrirana na zonu za
kuvanje.
Zagrevanje neće početi sve dok se odgovarajuća posuda ne
bude na zoni za kuvanje.
Ekran će se automatski isključiti nakon 1 minuta ukoliko je
neodgovarajuća posuda postavljena na ploču.
Upotreba
Početak prireme hrane
Posude uvek podignite sa indukcione ploče- ne vucite ih po njoj, budući da mogu ogrebati staklo.
Postarajte se da osnova posude bude glatka, pravno prijanja na staklo i da je iste veličine kao i zona za kuvanje. Koristite posude
čiji je prečnik iste veličine kao i izabrane zone za kuvanje. Ukoliko upotrebljavate posudu koja je šira, biće upotrebljeno više
energije za maksimalnu efikasnost. Ukoliko koristite manju posudu, efikasnost može biti manja od očekivane. Ukoliko je prečnik
posude manji od 140 mm, može se dogoditi da ga ploča ne prepozna. Posudu uvek postavite na centar zone za kuvanje.
Page 21

21
SRB
Čuvajte se vruće
površine
H će pokazati koja zona za
kuvanje je topla, kako je
ne biste dodirnuli. Nestaće
kada se površina ohladi do
bezbedne temperature.
Ovo se može koristiti i kao
funkcija za uštedu energije,
ukoliko želite da zagrejete
neku drugu posudu, koristite
površinu koja je i dalje vruća.
Zaključavanje tastera
Kontrola vremena
Za zakljuvačanje tastera
Dodirnite taster za
zaključavanje
Indikator vremena će
pokazati “Lo”
Za otključavanje tastera
Dodirnite i držite neko vreme taster za zaključavanje.
Kada je ploča u zaključanom režimu, svi tasteri
su onemogućeni osim uključivanje/isključivanje
, uvek možete isključiti indukcionu ploču
dodirom tastera uključivanje/isključivanje
u
slučaju nužde, ali treba da prvo otključate ploču pri
sledećem korišćenju.
• Možete zaključati tastere kako biste sprečili neželjenu
upotrebu (na primer slučajno uključivanje zona za kuvanje
od strane dece).
• Kada su tasteri zaključani, svi tasteri sem tastera za
uključivanje/isključivanje su onemogućeni.
Tajmer možete koristiti na dva različita načina:
a. Možete ga koristiti za “upozorenje o isteku vremena”. U
ovom slučaju, tajmer neće isključiti nijednu zonu za kuvanje
kada vreme istekne.
b. Možete ga podesiti da isključi jednu ili više zona za kuvanje
nakon što vreme istekne. Maksimalno vreme na koje možete
da podesite tajmer je 99 min.
Upotreba tajmera za “upozorenje o isteku vremena”
Ukoliko niste izabrali nijednu zonu za kuvanje
Pobrinite se da ploča za
kuvanje bude uključena.
Napomena: možete koristiti
“upozorenje o isteku vremena”
čak iako niste izabrali nijednu
zonu za kuvanje.
Dodirnite “+” taster
na tajmeru. Indikator
“upozorenja” će početi da
treperi i “10” će se prikazati na
ekranu tajmera.
Podesite vreme dodirivanjem
tastera “-” ili “’+” na tajmeru
Savet: Dodirnite taster “-”
ili “+” na tajmeru jedanput,
kako biste vreme smanjili ili
povećali za 1 minut.
Dodirnite i držite taster “-” ili
“+” na tajmeru za smanjivanje
ili povećavanje za 10 minuta.
Ukoliko u isto vreme dodirnete “-” i “+”, tajmer će se
prekinuti i “00” će se pokazati na ekranu koji pokazuje
minute.
Kada je vreme podešeno,
odbrojavanje će odmah
početi. Ekran će prikazivati
preostalo vreme i indikator
vremena će zatreperiti na 5
sekundi.
Oglasiće se zvučni signal
na 30 sekundi i indikator
vremena će pokazati “ - -” kada
podešeno vreme istekne.
Podešavanje tajmera za isključivanje zone za kuvanje
Izaberite zonu
Dodirnite taster za odbair
zagrevanja zone na kojoj želite
da podesite vreme. (npr. zona
3#)
Dodirnite taster tajmer,
“upozorenje o isteku vremena”
će početi da treperi i “10” će se
prikazati na ekranu za tajmer.
Podesite vreme dodirivanjem
tastera na tajmeru Savet:
Dodirnite taster “-” ili “+” na
tajmeru jedanput, kako biste
vreme smanjili ili povećali za 1
minut. Dodirnite i držite taster
“-” ili “+” na tajmeru vreme će se
smanjiti ili povećati za 10 minuta.
Dodirivanjem “-” i “+” zajedno, tajmer će biti prekinut, i “00”
će se prikazati na ekranu za minute.
Page 22

22
SRB
Kada je vreme podešeno,
odbrojavanje će odmah početi.
Ekran će prikaziviti preostalo
vreme i indikator vremena će
zatreperti na 5 sekudni.
NAPOMENA: Crvena tačka
pored indikatora za nivo
napajanja će biti osvetljena
pokazujući da je izbarana zona.
Kada vreme pripreme hrane
istekne, odgovarajuća zona
za kuvanje će biti automatski
isključena.
Druge zone za kuvanje će nastaviti da rade ukoliko
su bile isključene.
Podrazumevano vreme rada
Automatsko isključivanje je funkcija bezbedonosne zaštite
za vašu indukcionu ploču. Ona će se automatski isključiti.
Ukoliko zaboravite da je isključite. Podrazumevano vreme
rada za različite nivoe napajanja je prikazano u tabeli ispod:
Nivo napajanja
Podrazumevano vreme
rada (sat)
1 8
2 8
3 8
4 4
5 4
6 4
7 2
8 2
9 2
Kada je posuda za pripremu hrane uklonjena, indukciona
ploča odmah može prestati sa zagrevanjem i ploča će se
automatski isključiti nakon 2 minuta.
Osobe sa ugraćenim pejsmejkom bi trebalo da se
posavetuju sa svojim lekarom pre upotrebe ovog
uređaja.
UPUTSTVA ZA KUVANJE
Budite pažljvii kada pržite, budući da se ulje i mast mogu zagrejati veoma brzo, naročito ukoliko koristie opciju
“PowerBoost”. Pri ekstremno visokim temperaturama ulje i mast se mogu zapaliti spontano što predstavlja ozbiljnu
opasnost od požara.
Saveti za kuvanje
• Kada hrana počne da vri, smanjite podešenu temperaturu.
• Korišćenje poklopca će smanjiti vreme kuvanja i uštedeti
energiju, tako što će zadržati toplotu.
• Umanjite količinu tečnosti ili ulja kako biste smanjili vreme
potrebno za spremanje hrane.
• Počnite sa termičkom obradom hrane na visokoj
temperaturi, a zatim temperaturu smanjite kada se hrana
zagreje.
Krčkanje, kuvanje pirinča
• Krčkanje je proces koji se događa ispod tačke ključanja, na
oko 85˚C, kada se mehurići povremeno uzdižu na površinu
tečnosti za kuvanje. To je ključ za pravljenje ukusnih supa
i sočnih dinstanih jela, jer ukusi nastaju bez prekuvavanja
jela. Sosove sa jajima i brašnom bi takođe trebalo da
pripremate na temperaturi ispod tačke ključanja.
• Neki procesi, uključujući i kuvanje pirinča pomoću metoda
absorpcije, mogu zahtevati veću temperaturu od najniže
potrebne kako bi se osiguralo da hrana bude skuvana
pravilno i u okviru preporučenog vremena.
Dinstani odrezak
Za pripremu sočnih ukusnih odrezaka:
1. Ostavite meso na sobnoj temperaturi 20 minuta pre
pripreme.
2. Zagrejte tiganj sa debelim dnom.
3. Premažite obe strane odreska uljem. Stavite malu količinu
ulja u zagrejan tiganj i zatim spustite meso u tiganj.
4. Odrezak okrenite samo jednom tokom pripreme. Tačno
vreme pripreme zavisi od debljine odreska i toga koliko
želite da bude pržen. Vreme može varirati od 2-8 minuta
po strani. Pritisnite odrezak da biste odmerili koliko je
ispržen - što je tvrđi na dodir, to će biti bolje pripremljen.
5. Ostavite odrezak nekoliko minuta u toplom tiganju, kako
bi se opustio i postao mekši pre serviranja.
Za prženje
1. Izaberite vok sa ravnom podlogom ili veliki tiganj za
prženje koji je pogodan za indukcionu ploču.
2. Neka svi sastojci i pribor budu spremni. Prženje bi trebalo
da bude brzo. Ukoliko pripremate veću količinu, hranu
pripremajte u nekoliko manjih porcija.
3. Zagrejte kratko tiganj i dodajte dve supene kašike ulja.
4. Prvo pripremite bilo koju vrstu mesa, odložite ga a strane i
držite zagrejanim.
5. Propržite povrće. Kada je povrće vruće ali još uvek
hrskavo, snizite temperaturu zone za kuvanje, vratite meso
u tiganj i dodajte svoj sos.
6. Propržite sastojke, kako biste osigurali da je sve potpuno
zagrejano.
7. Poslužite odmah.
Prepoznavanje malih predmeta
Kada je posuda za pripremu hrane neodgovarajuće veličine
ili nenamagnetisana (npr. aluminijumska) ili neka vrsta malog
predmeta (npr. nož, viljuška ključ) ostavljen na ploči, ploča će
se automatski prebaciti u stanje čekanja u roku od 1 minuta.
Ventilator će nastaviti da hladi indukcionu ploču još jedan minut.
Page 23

23
SRB
Podešavanje toplote Pogodno za:
1 - 2
• blago zagrevanje male količine hrane
• topljenje čokolade, putera i za hranu koja brzo zagori
• blago krčkanje
• sporo zagrejavanje
3 - 4
• ponovno grejanje
• brzo krčkanje
• kuvanje pirinča
5 - 6 • palačinke
7 - 8
• dinstanje
• kuvanje paste
9
• prženje
• grilovanje
• zagrevanje supe
• zagrevanje vode
PODEŠAVANJE TEMPERATURE
Dolenavedene postavke su samo smernice. Tačne postavke će zavisiti od nekoliko faktora, uključujući i posuđe za
pripremu hrane i količine koju spremate. Eksperimentišite s indukcionom pločom, da biste našli postavke koje vam
najbolje odgovaraju.
Šta? Kako? Važno!
Svakodnevno prljanje
stakla (otisci prstiju,
tragovi, fleke ostale
od hrane ili nešećerni
izliveni sadržaj na
staklu)
1. Prekinite napajanje ploče za kuvanje električnom
energijom.
2. Upotrebite čistač za ploču za kuvanje dok je staklo
još uvek toplo (ali ne vruće!)
3. Isperite i osušite čistom tkaninom ili papirnim
ubrusom.
4. Ponovo priključite ploču za kuvanje na napajanje
električnom energijom.
• Kada je prekinuto napajanje ploče
električnom energijom, neće biti oznake
koja prikazuje “vrelu površinu”, ali zona za
kuvanje može još uvek biti vruća! Budite
veoma pažljivi.
• Grube žice, neke vrste najlonskih žica i
grubih/abrazivnih sredstava za čišćenje
mogu ogrebati staklo. Uvek pročitajte
etiketu, da biste videli da li je vaše sredstvo
za čišćenje ili žica odgovarajuća.
• Nikad ne ostavljajte talog sredstava za
čišćenje na ploči za kuvanje: mogu se
pojaviti fleke na staklu.
Kipljenje, topljenje
i mrlje od vrelog
šećera na staklu
Ove mrlje odmah uklonite spatulom nožem ili žiletom
koji su pogodni za staklo indukcionih ploča za kuvanje,
ali se čuvajte vruće površine zone za kuvanje:
1. Isključite ploču za kuvanje sa napajanja električnom
energijom iz zida.
2. Držite strugač ili pribor pod uglom od 30° i
izgrebite mrlju ili izliveni sadržaj sa hladnog dela
ploče za kuvanje.
3. Očistite mrlje ili izliveni sadržaj krpom ili papirnim
ubrusom.
4. Pratite korake 2-4 za “Svakodnevno prljanje stakla”
navedeno gore.
• Uklonite mrlje nastale topljenjem i od
slatke hrane ili kao posledica kipljenja što
je pre moguće. Ukoliko su se mrlje ohladile
na staklu, postoji mogućnost da će biti
teško ukloniti ih ili čak da će trajno oštetiti
staklenu površinu.
• Opasnost od posekotina: kada je
sigurnosna maska uklonjena, oštrica na
strugaču je rizično oštra. Koristite ga veoma
pažljivo i uvek ga odlažite na sigurno
mesto van domašaja dece.
Izliveni sadržaj na
tasteru na dodir
1. Prekinite napajanje ploče za kuvanje električnom
energijom.
2. Pokupite izlivenu tečnost
3. Obrišite deo sa tasterima na dodir čistim vlažnim
sunđerom ili tkaninom.
4. Potpuno osušite površinu s papirnim ubrusom.
5. Ponovo uključite napajanje ploče za kuvanje
električnom energijom.
• Ploča za kuvanje može dati zvučni signal i
isključiti se, a tasteri na dodir možda neće
funkcionisat dok je na njima tečnost.
Postarajte se da površina s tasterima na dodir
bude suva pre nego što uređaj ponovo
uključite.
BRIGA I ČIŠĆENJE
Page 24

24
SRB
Problem Mogući uzrok Šta uraditi
Indukciona ploča
ne može da se uključi.
Nema struje. Pobrinite se da indukciona ploča bude
povezana na napajanje električnom
energijom i da je uključena.
Proverite da nije došlo do prekida
napajanja električnom energijom u vašem
kraju. Ukoliko ste sve proverili, a i dalje postoji
problem, pozovite kvalifikovanog tehničara.
Tasteri na dodir ne
odgovaraju.
Tasteri su zaključani. Otključajte tastere. Pogledajte odeljak
“Upotreba vaše ploče za kuvanje” za
uputstva.
Tasteri teško rade. Moguće je da postoji tanak sloj vode na tasterima ili
ste možda koristi vrh svoga prsta kako biste dodirnuli
tastere.
Postarajte se da površina sa tasterima bude
suva i koristite jagodicu svoga prsta kada
dodirujte tastere.
Staklo je ogrebano. Posude sa grubim ivicama.
Korišćena je neodgovarajućia, abrazivna žica ili
proizvodi za ćišćenje.
Korisite posuđe sa ravnim i glatkim
dnom. Pogledajte “Biranje odgovarajućeg
posuđa za spremanje hrane”.
Pogledajte “Briga i čišćenje”.
Posuđe za pripremu
hrane pravi pucketave
ili krckave zvukove
Mogući uzrok je sastav matrijala vašeg posuđa
(slojevi različitih metala različito vibriraju).
To je normalno za posuđe i nije znak greške.
Indukciona ploča
proizvodi tih brujući
zvuk kad se koristi
na visokim
temperaturama.
To je posledica tehnologije indukcionog kuvanja. Ovo je normalno, ali zvuk bi trebalo da se
utiša ili potpuno nestane kada smanjite
temperaturu.
Čuje se zvuk
ventilatora iz
indukcione ploče.
Ventilator je ugrađen u vašu indukcionu ploču kako bi
sprečio pregrevanje elektronike u uređaju. Moguće je
da će nastaviti s radom čak i kad isključite indukcionu
ploču.
Ovo je normalno, i ne treba ništa preduzimati.
Nemojte prekidati napajanje indukcione
ploče električnom energijom iz zida dok
ventilator radi.
Posuđe se ne zagreva
i indukciona ploča
ne pokazuje da ga je
prepoznala.
Indukciona ploča ga ne može prepoznati, pošto
posuda za termičku obradu hrane nije
pogodna za indukciono kuvanje.
Indukciona ploča ne može da prepozna
posudu zato što je suviše mala
za zonu za kuvanje ili nije pravilno
centrirana na nju.
Koristite posuđe koje je pogodno za
indukciono kuvanje. Pogledajte odeljak
“Biranje odgovarajućeg posuđa za spremanje
hrane”.
Centrirajte posudu, i potrudite se da se njeno
dno poklapa za veličinom zone za
kuvanje.
Indukciona ploča
ili zona za kuvanje se
sama od sebe
neočekivano isključila
čuje se zvuk i kod za
grešku se pojavio
(obično naizmenično
s jednom ili dve cifre
na displeju tajmera za
kuvanje).
Tehnička greška. Molimo vas, zapišite slova i brojeve greške,
prekinite napajanje indukcione ploče
električnom energijom iz zida, i kontaktirajte
kvalifikovanog tehničara.
SAVETI
Page 25

25
SRB
Kod greške Problem Rešenje
Automatska popravka
E1 Napon je veći od nazivnog napona. Proverite da li jedinica napajanja radi
normalno.
Priključite uređaj na napajanje nakon što
jedinica napajanje počne da radi normalno.
E2 Napon je niži od nazivnog napona.
E3 Visoka temperatura senzora keramičke ploče. (1#) Sačekajte da se temperatura senzora
keramičke ploče vrati na normalnu.
Dodirnite dugme “uključivanje/isključivanje”
kako biste ponovo pokrenuli uređaj.
E4 Visoka temperatura senzora keramičke ploče. (2#)
E5
Visoka temperatura IGBT-a (bipolarni tranzistor sa
izolovanim gejtom. (1#)
Sačekajte da se temperatura IGBT-a vrati na
normalu.
Dodirnite dugme “uključivanje/isključivanje”
kako biste ponovo pokrenuli uređaj.
Proverite da li ventilator radi pravilno;
ukoliko ne, zamenite ventilator.
E6 Visoka temperatura IGBT-a. (2#)
Nema automatske popravke
F3/F6
Greška senzora keramičke ploče-
- kratak spoj. (F3 za 1#,F6 za 2#)
Proverite konekciju i zamenite
senzor keramičke ploče.
F4/F7
Greška senzora keramičke ploče
- otvoreno strujno kolo. (F4 za 1#,F7 za 2#)
F5/F8
Greška senzora keramičke ploče
- neispravan (F5 za 1#, F8 za 2#)
F9/FA
Greška senzora temperature IGBT-a.
(kratak spoj/otvoreno strujno kolo za 1#)
Zamenite utičnicu.
FC /FD
Greška senzora temperature IGBT-a.
(kratak spoj/otvoreno struno kolo za 1#)
PRIKAZ GREŠKE I PROVERA
Indukciona ploča je opremljena funkcijom automatskog prepoznavanja greške. Pomoću ovog testa, tehničar je u mogućnosti da
proveri funkciju nekoliko komponenti bez rastavljanja ili rasklapanja indukcione ploče sa radne površine.
Rešavanje problema
Kod greške koji se pojavljuje tokom korišćenja uređaja i rešenje
Specifične greške i rešenje
Greška Problem Rešenje A Rešenje B
LED svetlo se ne
pojavljuje kada
se uređaj priključi
na napajanje
električnom
energijom.
Nema napajanja strujom.
Proverite da li je utikač čvrsto
utaknut i da utičnica radi.
Greška prilikom povezivanja
dodatne utičnice i displeja.
Proverite konekciju.
Greška prilikom povezivanja,
dodatna utičnica je oštećena.
Zamenite dodatnu utičnicu.
Displej je oštećen je oštećen. Zamenite displej.
Neki tasteri ne
mogu da rade, ili
LED deisplej ne
radi normalno.
(normalu)
Displej je oštećen. Zamenite displej.
Page 26

26
SRB
L(mm) W(mm) H(mm) D(mm) A(mm) B(mm) X(mm) F(mm)
590 520 60 56 560+4+1 490+4+1 50 min. 3 min.
INSTALACIJA
Odabir instalacione opreme
Izrežite radnu površinu prema merama naznačenim na crtežu.
Za potrebe instalacije i korišćenja, minimum 5cm prostora mora da ostane oko rupe. Postarajte se da debljina radne površine
bude bar 30mm. Molimo vas, izaberite izolacioni materijal otporan na toplotu (drvo i slični vlaknasti i upijajući materijali ne bi
trebalo da se upotrebljavaju kao radna površina osim ako nisu impregnirani) kako bi se izbegao strujni udar ili veće deformacije
izazvane otpuštanjem toplote sa vruće ploče. Kako je prikazano dole:
SEAL
Greška Problem Rešenje A Rešenje B
Indikator načina
kuvanja se
pojavljuje, ali
zagrevanje ne
počinje.
Visoka temperatura ploče.
Sobna temperatura je možda
veoma visoka. Normalan
protok vazduha je možda
blokiran.
Ventilator ne radi pravilno.
Proverite da li ventilator
radipravilno, ukoliko ne,
zamenite ventilator.
Utičnica je oštećena. Zamenite utičnicu.
Zagrevanje se
iznenada zaustavlja.
tokom rada i na
displeju treperi
znak “u”
Pogrešna vrsta posude. Koristite odgovarajuću posudu
(pogledajte uputstvo za
upotrebu.)
Strujno kolo za prepoznavanje posude
je oštećeno, zamenite utičnicu.
Obim posude je suviše mali.
Štednjak se pregrejao
Uređaj se pregrejao. Sačekajte
da se temperatura vrati u
normalu.
Dodirnite dugme
“uključivanje/isključivanje” da
biste ponovo pokrenuli uređaj.
Zone za zagrevanje
sa iste strane (na
primer prva i i
druga zona)
ne pokazuju “u”.
Utičnica i displej imaju
grešku u povezivanju;
Proverite konekciju.
Deo displej zadužen za prenos
informacija je oštećen.
Zamenite displej.
Glavna utičnica je oštećena. Zamenite utičnicu.
Motor ventilatora
proizvodi čudne
zvukove.
Motor ventilatora je oštećen. Zamenite ventilator.
Gornji primeri su prosuda i provera čestih grešaka.
Molimo vas, ne rasklapajte sami uređaj kako se ne biste izložili opasnosti i oštetili indukcionu ploču.
Sigurna udaljenost između stranica ploče i unutrašnjeg dela radne površine treba da bude najmanje 3mm.
NAPOMENA
Page 27

27
SRB
A(mm) B(mm) C(mm) D E
760 50 min. 20 min. Ulaz vazduha Ispust za vazduh 5mm
U svakom slučaju, pobrinite se da indukciona ploča ima dobar protok vazduha, i da prostor za ulaz i izlaz vazduha ne budu
blokirani. Proverite da li je indukciona ploča u dobrom stanju. Kako je prikazano dole:
Postoje ventilacioni otvori oko i unutar ploče. MORATE SE POBRINUTI da ovi otvori ne budu blokirani radnom
površinom, kada ploču postavite.
• Radna površina bude kvadratnog oblika i ravna, i da sastavni delovi ne zauzimaju potrebni prostor.
• Je radna površina napravljena od izolacionog materijala otpornog na toplotu.
• Ukoliko je ploča postavljena iznad pećnice, pećnica mora imati ugrađeni ventilator.
• Će instalacija biti u skladu sa svim potrebnim zahtevima i važećim standarima i propisima.
• Odgovarajući izolacioni prekidač koji obezbeđuje potpuni prekid napajanja električnom energijom sa izvora napajanja je
ugrađen u stalnu električnu mrežu, postavljen i pozicioniran u skladu sa lokalnim pravilima i propisima za povezivanje na
električnu mrežu.
• Imajte na umu da lepak koji spaja plastične ili drvene materijale nameštaja treba da izdržite temperaturu ne nižu
od 150ºC, kako bi se izbeglo odlepljivanje ploče.
• Zadnji zid i okolne površine zato moraju biti u stanju da izdrže temperaturu od 90ºC.
Pre nego što instalirate uređaj, pobrinite se da
Sigurna razdaljina između ploče i ormarića iznad nje treba da bude najmanje 760mm.
NAPOMENA
UPOZORENJE!
Osiguravanje adekvatnog protoka vazduha
Pobrinite se da indukciona ploča ima dobar protok vazduha, i da prostor za ulaz i izlaz vazduha ne budu blokirani. Kako biste
izbegli slučajni kontakt sa pregrejanim dnom ploče ili neočekivani električni šok tokom rada, potrebno je da stavite drveni
umetak, pričvršćen šrafovima, na minimalnoj udaljenosti od 50mm od dna ploče. Pratite dole navedene zahteve.
Page 28

28
SRB
Podupirači ni u kom slučaju ne mogu dodirivati unutrašnje delove radne površine nakon instalacije (pogledajte
sliku).
• Izolacioni prekidač mora biti neki od odobrenih tipova i obezbediti vazdušni prostor za kontaktno odvajanje od najmanje
3 mm na svim polovima (ili na svim aktivnim [faznim] provodnicima ukoliko lokalni propisi povezivanja na električnu mrežu
dozvoljavaju ovakvu varijaciju zahteva).
• Će izolacioni prekidać biti lako dostupan korisniku nakon što se ploča instalira.
• Ćete se konsultovati sa lokalnim organima za gradnju i podzakonskim aktima, ukoliko imate nedoumice u vezi sa instalacijom.
• Ćete koristiti podlogu otpornu na toplotu i laku za čišćenje (kao što su keramičke pločice) za zidne površine koje okružuju
ploču.
• Kabl za panajanje električnom energijom ne dodiruju vrata ormarića ili fioke.
• Postoji adekvatni protok svežeg vazduha izvan uređaja ka osnovi ploče.
• Je instalirana termalna zaštita ispod osnove ploče ukoliko se ispod nje nalaze fioke ili ormarići.
• Je izolacioni prekidač lako dostupan korisniku.
Uređaj mora biti postavljen na stabilnu, glatku površinu (koristeći pakovanje). Ne primenjujte snagu na ispupčene tastere na
ploči.
Fiksirajte ploču na radnu površinu zavijanjem 2 podupirača na dno ploče (pogledajte sliku) nakon instalacije.
Podesite podupirač tako da bude prilagodljiv različitoj debljini ploče.
Nakon instalacije ploče, pobrinite se da
Pre postavljanja i fiksiranja podupirača
Podešavanje položaja podupirača
Podupirač
PPODUPIRAČ
PLOČA
RADNA
POVRŠINA
Page 29

29
SRB
Ploču na napajanje električnom energijom treba da poveže samo dogovarajuća kvalifikovana osoba.
Pre povezivanja ploče na napajanje električnom energijom, proverite da:
1. Je domaća električna mreža pogodna za energiju koja je potrebna ploči.
2. Napon odgovara vrednosti navedenoj u specifikaciji
3. Odeljci za kablove za napajanje električnom energijom mogu da izdrže teret naveden u specifikaciji.
Ne koristite adaptere, reduktore ili produžne kablove za povezivanje ploče na napajanje električnom energijom,
budući da mogu prouzrokovati pregrevanje i požar.
Kabl za napajanje ne sme dodirivati nijedan topli deo i mora biti pozicioniran tako da njegova temperatura ne prelazi
75˚C ni u kom trenutku.
Proverite sa električarem da li je domaći sistem za napajanje pogodan bez izmena.
Bilo kakvu promenu treba da izvrši kvalifikovani električar.
1. Indukcionu ploču mora instalirati kvalifikovano osoblje ili tehničar. Imamo profesionalce vama na usluzi. Molimo vas, nikad ne
izvodite radove na svoju ruku.
2. Ploča ne sme biti instalirana direktno iznad mašine za pranje sudova, frižidera, zamrzivača, mašine za pranje/sušenje veša,
budući da vlaga može oštetiti elektroniku.
3. Indukciona ploča treba da bude instalirana tako, da se obezbedi bolje otpuštanje toplote, kako bi se poboljšala njena
pouzdanost.
4. Zid i navedeni delovi iznad površine ploče moraju da budu otporni na toplotu.
5. Da biste izbegli bilo kakvo oštećenje, sloj na koji je postavljen uređaj i lepak moraju biti otporni na toplotu.
6. Ne bi trebalo koristiti paročistač.
Upozorenja
Povezivanje ploče na napajanje električnom energijom
Žuto / Zeleno
Crno
Braon
Plavo
Page 30

30
SRB
Donji deo i kabl za napajanje ploče neće biti dostupni nakon instalacije uređaja.
• Ukoliko je kabl oštećen ili ga treba zameniti, tu radnju treba da obavi ovlašćeni serviser ili druga kvalifikovana osoba
upotrebljavajući odgovarajuće alate, kao bi se izbegle nezgode.
• Ukoliko je uređaj direktno povezan na glavni izvor napajanja, jednopolarni osigurač mora biti instaliran sa minimalnim
razmakom od 3 mm između kontakata.
• Osoba zadužena za instalaciju se mora postarati da je izvršeno pravilno povezivanje na izvor napajanja i da je sve u skladu sa
bezbednosnim propisima.
• Kabl ne sme biti savijen ili sabijen.
• Kabl treba redovno proveravati i samo ovlašćeni tehničar ga može zameniti.
Ukupan broj grejnih uređaja koji ste izabrali nije manji od 4, uređaj može biti direktno povezan na glavni izvor
napajanja električnom energijom pomoću monofazne električne veze, kako je prikazano ispod.
Žuto / Zeleno
Crno
Braon
Plavo
ODLAGANJE:
Ne odlažite ovaj proizvod
kao komunalni otpad.
Sakupljanje ovakve vrste
otpada odvojeno zbog
specijalnog načina obrade
je neophodno.
Ovaj uređaj je označen u skladu sa Evropskom direktivom 201/19/Eu za Odlaganje Električne
i Elektronske opreme (WEEE). Pravilnim odlaganjem ovog uređaja, pomoći ćete zaštiti životne
sredine i ljudskog zdravlja od mogućih posledica, koje inače može izazavati nepravilno
odlaganje.
Simbol na proizvodu ukazuje, da se uređaj ne može tretirati kao uobičajeni kućni otpad. Treba
ga ostaviti na odgovarajućem mestu, na kojem se sakupljaju električni i elektronski uređaji.
Ovaj uređaj zahteva specijalno odlaganje. Za detaljnije informacije o obradi delova,
popravkama i reciklaži ovog proizvoda, molimo vas, kontaktirajte lokalni odbor, svoju službu za
odlaganje komunalnog otpada ili prodavnicu u kojoj ste kupili uređaj.
Za detaljnije informacije o obradi delova, popravkama i reciklaži ovog proizvoda, molimo vas,
kontaktirajte svoju lokalnu gradsku kancelariju, službu da odlaganje komunalnog otpada ili
prodavnicu u kojoj ste kupili proizvod.
Page 31

Page 32

tesla.info
 Loading...