

Page 1

TELSTRA
GATEWAY PRO
USER GUIDE
Page 2

2
TELSTRA GATEWAY PRO™ USER GUIDE
CONTENTS
1. Introduction 3
1.1. Getting to know your Telstra Gateway Pro
™
3
1.2. What’s in the box? 3
1.3. Features and Benets 4
1.4. Getting To Know the Gateway 6
2. Setting Up Your Telstra Gateway Pro
™
10
2.1. Alternative placement methods
for the Gateway 10
2.2. Setting up your Telstra Gateway Pro
™
for ADSL and VDSL 11
2.3. Setting up your Gateway with
an NBN box (Fibre to the Premises) 12
2.4. Telstra Gateway Pro™ Quick Start Guide 13
3. Initial Telstra Gateway Pro
™
Conguration 14
3.1. Initial Setup Using The Installation Wizard 15
3.2. Conguring Telstra Gateway Pro
™
Using the Control Panel (GUI) 18
4. Further Conguration of Gateway Settings 20
4.1. Changing your Gateway login Password 20
4.2. Customising your LAN/WAN Settings 22
4.3. Conguring your Gateway Wi-Fi 26
4.4. Setup Voice Calling 29
4.5. Connecting devices to the Telstra Gateway Pro
™
31
4.6. Setting up USB Mobile Broadband Backup 31
5. Advanced Settings 36
5.1. Guest Wireless Network Setup 36
5.2. Content Sharing 38
5.3. LAN IP Pool/DHCP Change 40
5.4. Port Forwarding 41
5.5. Secure Remote Access via VPN 43
6. Troubleshooting & General Tips 44
6.1. The Internet is not working or WAN light is off 44
6.2. My devices aren’t connecting 45
6.3. There is a red internet light (ADSL) 45
6.4. Re-setting Telstra Gateway Pro
™
46
6.5. Wireless Adaptor Faults 49
7. Technical Specications 50
7.1. Devices compatible for use with
the Telstra Gateway Pro
™
50
7.2. About the Telstra Gateway Pro
™
51
© Telstra Corporation Limited (ACN 051 775 556).
Page 3
3
TELSTRA GATEWAY PRO™ USER GUIDE
1. INTRODUCTION
1.1. Getting to know your Telstra Gateway Pro™
Telstra has worked with our partner Netgear to bring you the Telstra Gateway Pro™ (Netgear™
model number v7610). The Telstra Gateway Pro™ is an advanced Gateway, providing high speed
Wi-Fi and connectivity for a variety of business devices. It can connect to the Internet using:
• ADSL
• VDSL (including NBN Fibre to the Basement and NBN Fibre to the Node connections)
• NBN Fibre to the Premises
The Gateway is compatible with optional USB mobile broadband device for peace of mind in case
of an unlikely service interruption.
The Telstra Gateway Pro™ features world leading Wi-Fi and the best connectivity available so you
get the most out of your Telstra xed Broadband service.
• Enjoy faster Wi-Fi with the latest Wi-Fi AC technology
• Experience seamless dual band connectivity of multiple devices on your network
• Make calls on your new business phone with Telstra’s Digital Voice service
• Securely access your business les from home with our remote access feature
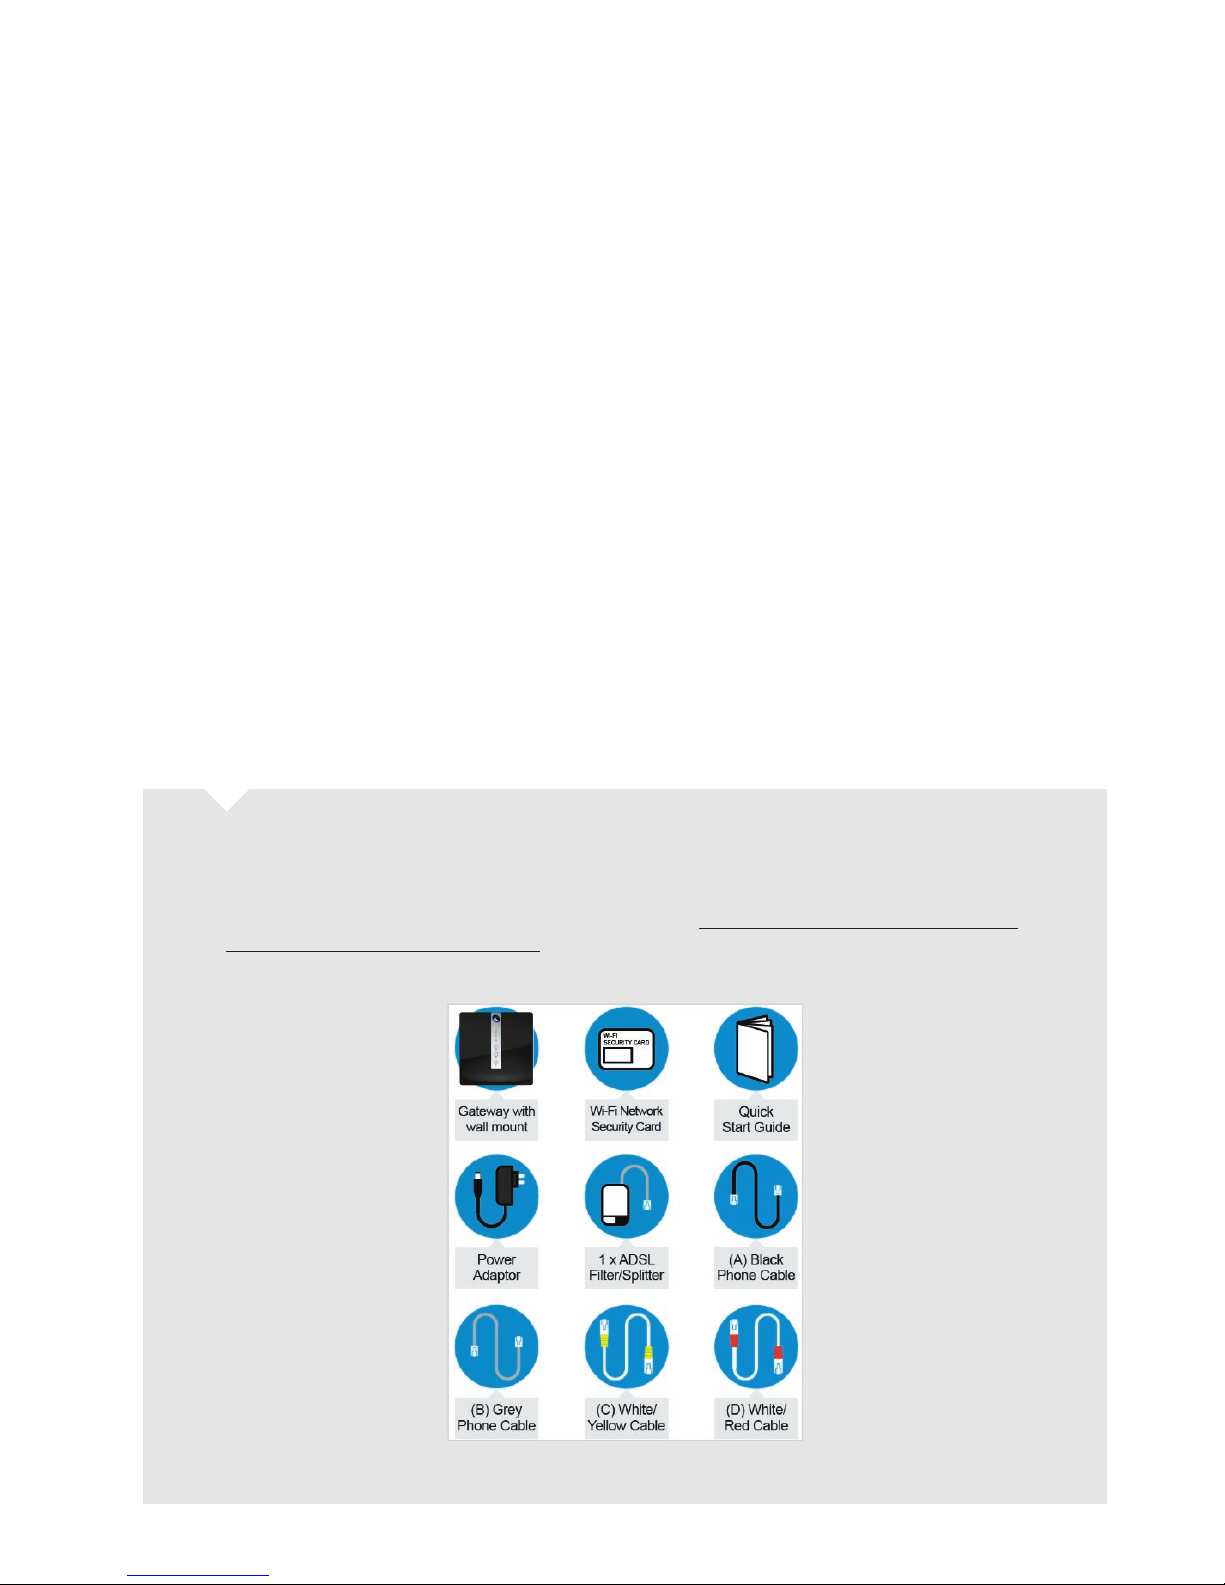
1.2. What’s in the box?
The Quick Start Guide outlines all the components that are included with the Telstra Gateway Pro™
and can be found on Telstra.com using the following link: http://business.telstra.com.au/t5/DOT
-Bundle-Help/ct-p/bundles_and_dot. Note the reference letters for the bundled cables,
which will be used later in this guide.
Figure 1: What’s In The Box?
Page 4
4
TELSTRA GATEWAY PRO™ USER GUIDE
1.3. Features and Bene ts
1.3.1. Faster Wi-Fi with the latest AC technology
The Telstra Gateway Pro™ is a world leading Gateway using the best Wi-Fi standard available,
Wi-Fi 802.11 AC, to maximise your Wi-Fi experience in the of ce. The Telstra Gateway Pro™ also
has 4 x 4 Wi-Fi streams to deliver the best possible coverage for your network.
1.3.2. Connect multiple devices via dual band Wi-Fi
This Gateway enables connection of devices such as laptops, smart phones and tablets to the Internet
via two separate Wi-Fi bands:
• 2.4GHz band for 802.11 B/G/N devices
• 5GHz band for 802.11 A/N/AC devices
This allows you to spread your devices across both bands (depending on device compatibility) to make
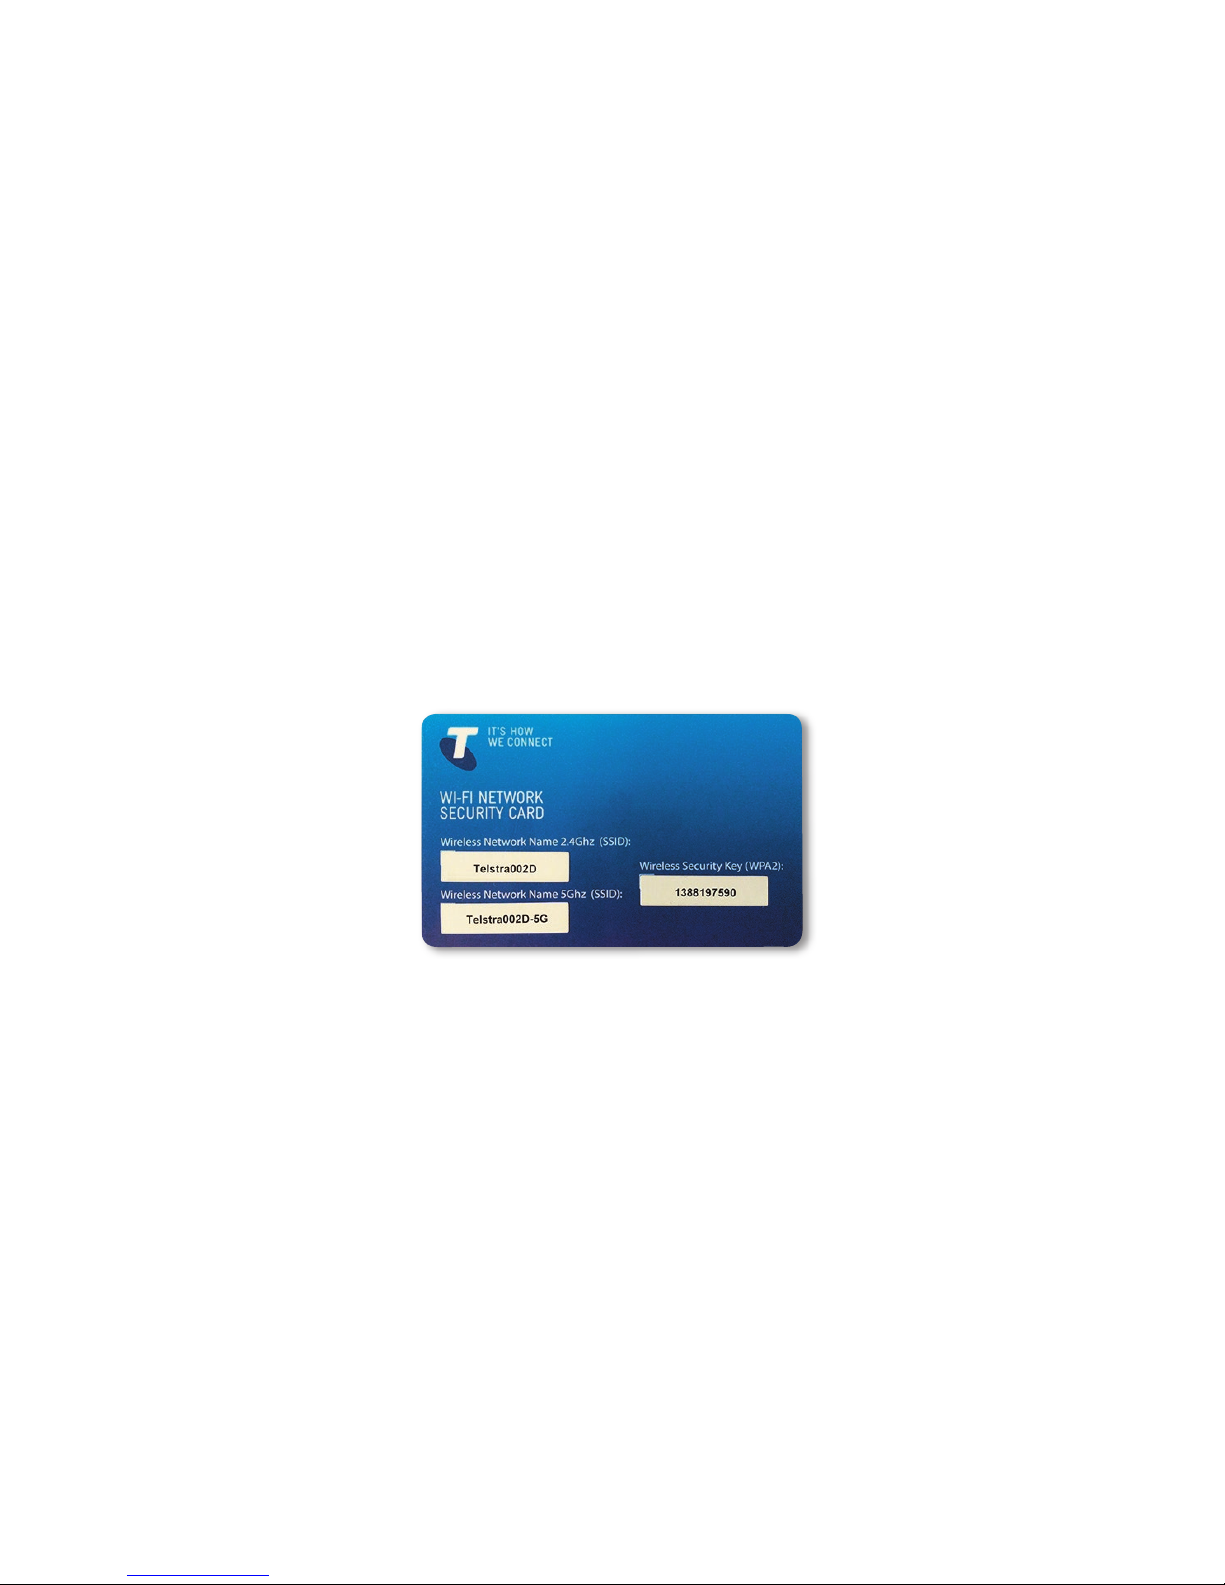
the best use of your Wi-Fi network coverage. The Wi-Fi Network Security Card provided with your
Gateway provides the Wi-Fi Network (SSID) name for both the 2.4GHz and 5GHz bands. The Wireless
Security Key (WPA password) is also provided on this card.
1.3.3. Make phone calls with Telstra’s Digital Voice Service
Digital Of ce Technology (DOT) customers can use one of Telstra’s IP Phones, compatible with this
Gateway, to deliver digital calls over the Fixed Broadband service. Telstra’s Digital Voice service supports
up to 10 services/lines at one site and provides a number of useful calling features to enable smart call
management including:
• Fixed MessageBank
• Simultaneous and Sequential Ring
• Call Forwarding when not reachable
• Virtual Receptionist (Auto-attendant)
Figure 2: Wi-Fi Network Security Card
Page 5

5
TELSTRA GATEWAY PRO™ USER GUIDE
There are a number of compatible business IP phones to choose from including:
• Panasonic Cordless IP DECT Handset with Base Station (KK-TPG600)
• Telstra (Yealink) T42G IP Handset
• Telstra (Yealink) T48G IP Handset
Refer section 7.1 for a full list of compatible IP phones.
For more information about DOT Digital Voice services or the handsets outlined above refer to the
following link: http://business.telstra.com.au/t5/Ofce-Business-Phones/ct-p/ofce_phones
1.3.4. Secure Remote Access Feature
The Gateway’s Remote Access feature enables secure access to your business les from home.
Refer to the VPN conguration guide available at: http://www.telstra.com.au/content/dam/tcom/
small-business/bundles/pdf/telstra-gateway-pro-v7610-conguration-guide.pdf
1.3.5. Always connected with Telstra’s Mobile Broadband USB
The Mobile Broadband USB back up feature provides piece of mind in case of an unlikely Fixed
Broadband service interruption. This feature ensures that the Gateway is always connected to the
Internet via the Telstra Mobile Network USB in the unlikely event that the Broadband service is
unavailable.
The Gateway supports the use of a compatible Telstra Mobile Broadband USB device providing 2 USB
3.0 ports, one port on the side of the device and the other port can be found on the back of the device.
The following USB Mobile Broadband devices are compatible for use with the Telstra Gateway Pro™:
• Netgear 320U (Sierra Wireless).
• Telstra 4Gx e8372 (Huawei).
Page 6
6
TELSTRA GATEWAY PRO™ USER GUIDE
1.4. Getting To Know the Gateway
1.4.1. Understanding the lights and what they mean
Figure 3: Telstra Gateway Pro™ Front Panel
Power LED around
the Telstra Logo
Internet LED
WAN LED
Phone LED
Wi-Fi On/Off button
WPS button
DECT button
Page 7

7
TELSTRA GATEWAY PRO™ USER GUIDE
Front Panel LED
& button description
LED Activity Description
Power LED around
the Telstra Logo
Solid blue
Indicates power is on and the Gateway is operating
Off
No power is being received by the Gateway.
Front Panel LED
& button description
LED Activity Description
Internet LED Solid blue
Physical WAN port is connected successfully, authentication of
username and password is successful and a public IP address has
been assigned
Flashing orange
Authentication of username and password in progress
Off
Physical WAN port is not connected or Mobile Broadband not active
Solid red
Physical WAN port is connected but authentication of username
and password was unsuccessful.
Flashing red
LED is illuminated red and turns off briey every 5 seconds when
operating in mobile fail over mode
WAN LED Solid blue
WAN port is connected successfully to DSL or NBN
Flashing orange
In progress, layer 2 WAN interface connecting
Off
Physical WAN port is not connected
(Note: individual LED on the physical Ethernet port at the back panel
to indicate: Amber = 10/10Mbps, GREEN = 1Gbps)
Phone LED Solid blue
Phone service is working between the Gateway and Broadworks
voice platform. Registration/authentication has been successful
on ALL the congured SIP accounts (FXS and DECT).
Flashing orange
Establishing a new SIP registration to the Broadworks platform
for any one or more congured SIP accounts.
Off
Phone service registered. Phone service disabled.
Wi-Fi On/Off button 2.4GHz and 5GHz status and conguration will be available in the Gateway Control Panel.
Important Note: To switch Wi-Fi on or off, press the Wi-Fi button for at least 3 seconds.
The Wi-Fi button LED will either switch on or off.
Solid blue
Inbuilt Wi-Fi access point for 2.4GHz and 5GHz is up and operating
Flashing orange
Packets are transmitting
Off
Inbuilt Wi-Fi access point for both 2.4GHz and 5GHz is disabled
WPS button Press this button to open a 2-minute window for the Gateway to connect with other
WPS-enabled devices.
Solid blue
Connection succeeded under Wi-Fi Protected Setup (WPS)
Flashing orange
WPS is active, pairing has been initiated and in progress
(Negotiation is in progress under WPS)
Solid red
WPS has not connected successfully
Off
WPS is disabled or not initiated
DECT button
This functionality will be available in a future software update
of the Gateway.
On the front of the Gateway there are 3 LEDs and 3 buttons.
The meaning of the various light sequences and buttons are listed in the following table:
Page 8
8
TELSTRA GATEWAY PRO™ USER GUIDE
1.4.2. Getting to know the back panel
Back Panel LED
& port description
LED Activity Description
DSL port None The DSL port is connected for ADSL and VDSL connections
FXO port None N/A
FXS1 port None Plug an analogue phone / device into this port when voice is enabled
on the Gateway
FXS2 port None If enabled plug a second analogue device into this port
USB (3.0) port None To plug a Mobile Broadband backup device and/or a storage device to
share on the network. There is one USB port on the back and one USB
on the side of the Gateway.
LAN ports 1-4 Solid Green LAN port is connected at 1000Mbps
Flashing green LAN port is connected at 10/100Mbps / packets are transmitting
Off No trafc transmitted or no Ethernet cable plugged in
WAN port Solid green WAN port is connected successfully
Blinking green Packets are sending and receiving
Off Physical WAN port is not connected
(Note: individual LED on the physical Ethernet port at the back panel
to indicate: AMBER = 10/10Mbps, GREEN = 1Gbps)
On/Off button None Turns on the power to the Gateway
Reset button None Using a paperclip to initiate the reset function. This will take the device
back to default factory settings. Refer 6.4.1 for more detail.
Power port None Plug in power pack/cable supplied to the power point and turn power
point on from the wall to turn on power to the Gateway.
In the diagram above there are a number of ports and buttons on the back of the Gateway.
These ports and buttons are described in the table below:
Figure 4: Telstra Gateway Pro™ Back Panel
Page 9
9
TELSTRA GATEWAY PRO™ USER GUIDE
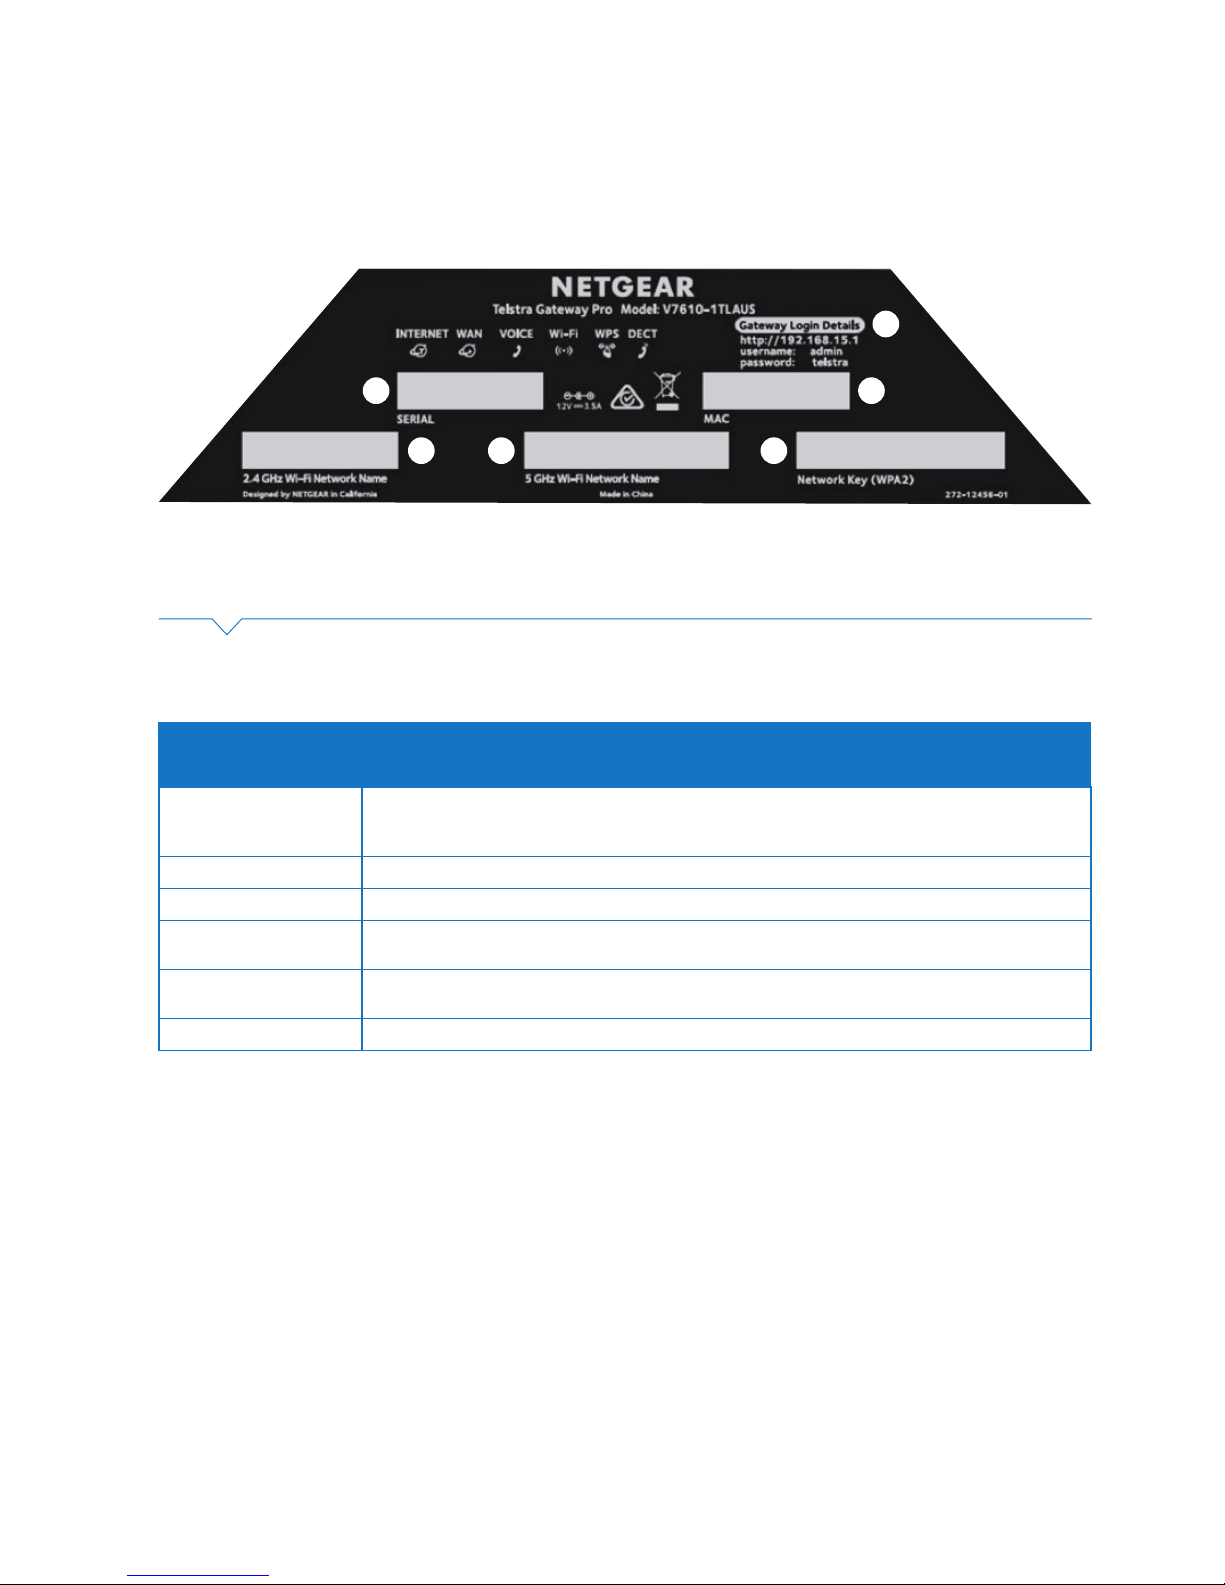
1.4.3. Product label on the bottom of the Gateway
Label Description
1. Gateway Login Details Enables you to access the Gateway Control Panel to manage and customise your Gateway
settings. Please refer to Section 3 of this Guide for more detail on how to manage your Gateway
settings.
2. Serial Number Number supplied by the manufacturer and vendor.
3. Mac Address Registered identied number which interfaces with the Telstra network.
4. 2.4GHz Wi-Fi
Network Name
Broadcast name for the 2.4GHz band of the Wi-Fi Network enabling you to connect your devices
via Wi-Fi.
5. 5GHz Wi-Fi
Network Name
Broadcast name for the 5GHz band of the Wi-Fi Network enabling you to connect your devices
via Wi-Fi.
6. Network Key (WPA2) Password that authenticates the use of devices with the Gateway’s Wi-Fi Network.
You will nd a number of important pieces of information on the product label on the bottom of the
Gateway including:
Figure 5: Telstra Gateway Pro™ Label
1
2 3
64 5
Page 10
10
TELSTRA GATEWAY PRO™ USER GUIDE
The Telstra Gateway Pro™ Quick Start Guide provides a full set of instructions on how to set up your
Gateway. Please refer to the link below to access the Telstra Gateway Pro™ Quick Start Guide:
http://business.telstra.com.au/t5/DOT-Bundle-Help/ct-p/bundles_and_dot
This section will provide detailed information on setting up your Telstra Gateway Pro™ for a variety of
internet connection types.
2.1. Alternative placement methods for the Gateway
The Gateway’s mounting location can affect wireless connections. For best results, place your Gateway:
• Near an AC power outlet, close to computers you plan to connect with Ethernet cables, and near
locations where you use wireless computers.
• In an elevated location, keeping the number of walls and ceilings between the Gateway and your
wireless computers to a minimum.
• Away from electrical devices that are potential sources of interference, such as ceiling fans,
security systems, microwaves, or the base for a cordless phone.
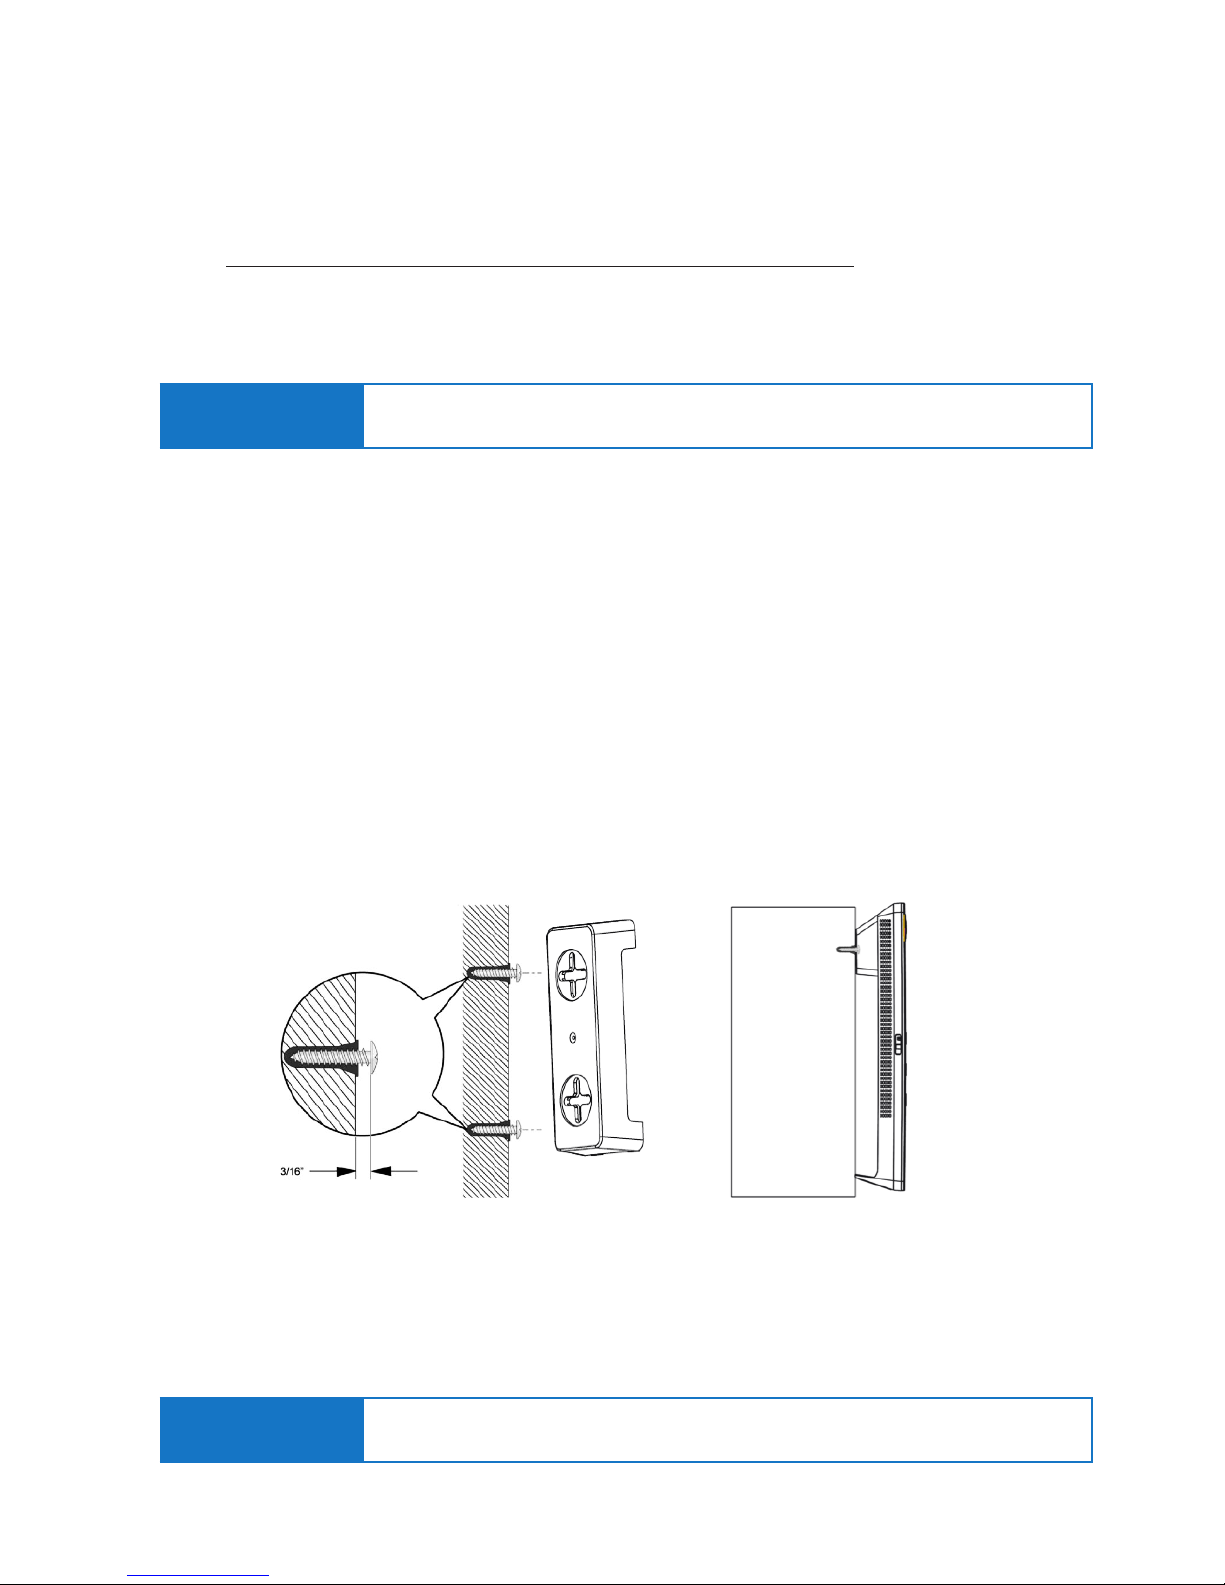
2.1.1. Wall Mount the Gateway
• Drill holes in the wall where you will wall-mount the Gateway. Put wall anchors in the holes.
• Insert screws into the wall anchors, leaving 3/16 in. (0.5 cm) of each screw exposed.
2. SETTING UP YOUR TELSTRA GATEWAY PRO™
Important Note:
Place your Telstra Gateway Pro™ vertically on a surface in a central location to your other Wi-Fi
devices to optimise Wi-Fi performance.
• Attach the mounting plate securely to the Gateway and attach to the wall. The Gateway should be
mounted securely and ush against the wall.
Figure 6: Gateway Wall Mounting and Adaptor Plate
Important Note: It is recommended that the Gateway is not placed in a horizontal position.
2.1.2. Horizontal Mounting
Page 11
11
TELSTRA GATEWAY PRO™ USER GUIDE
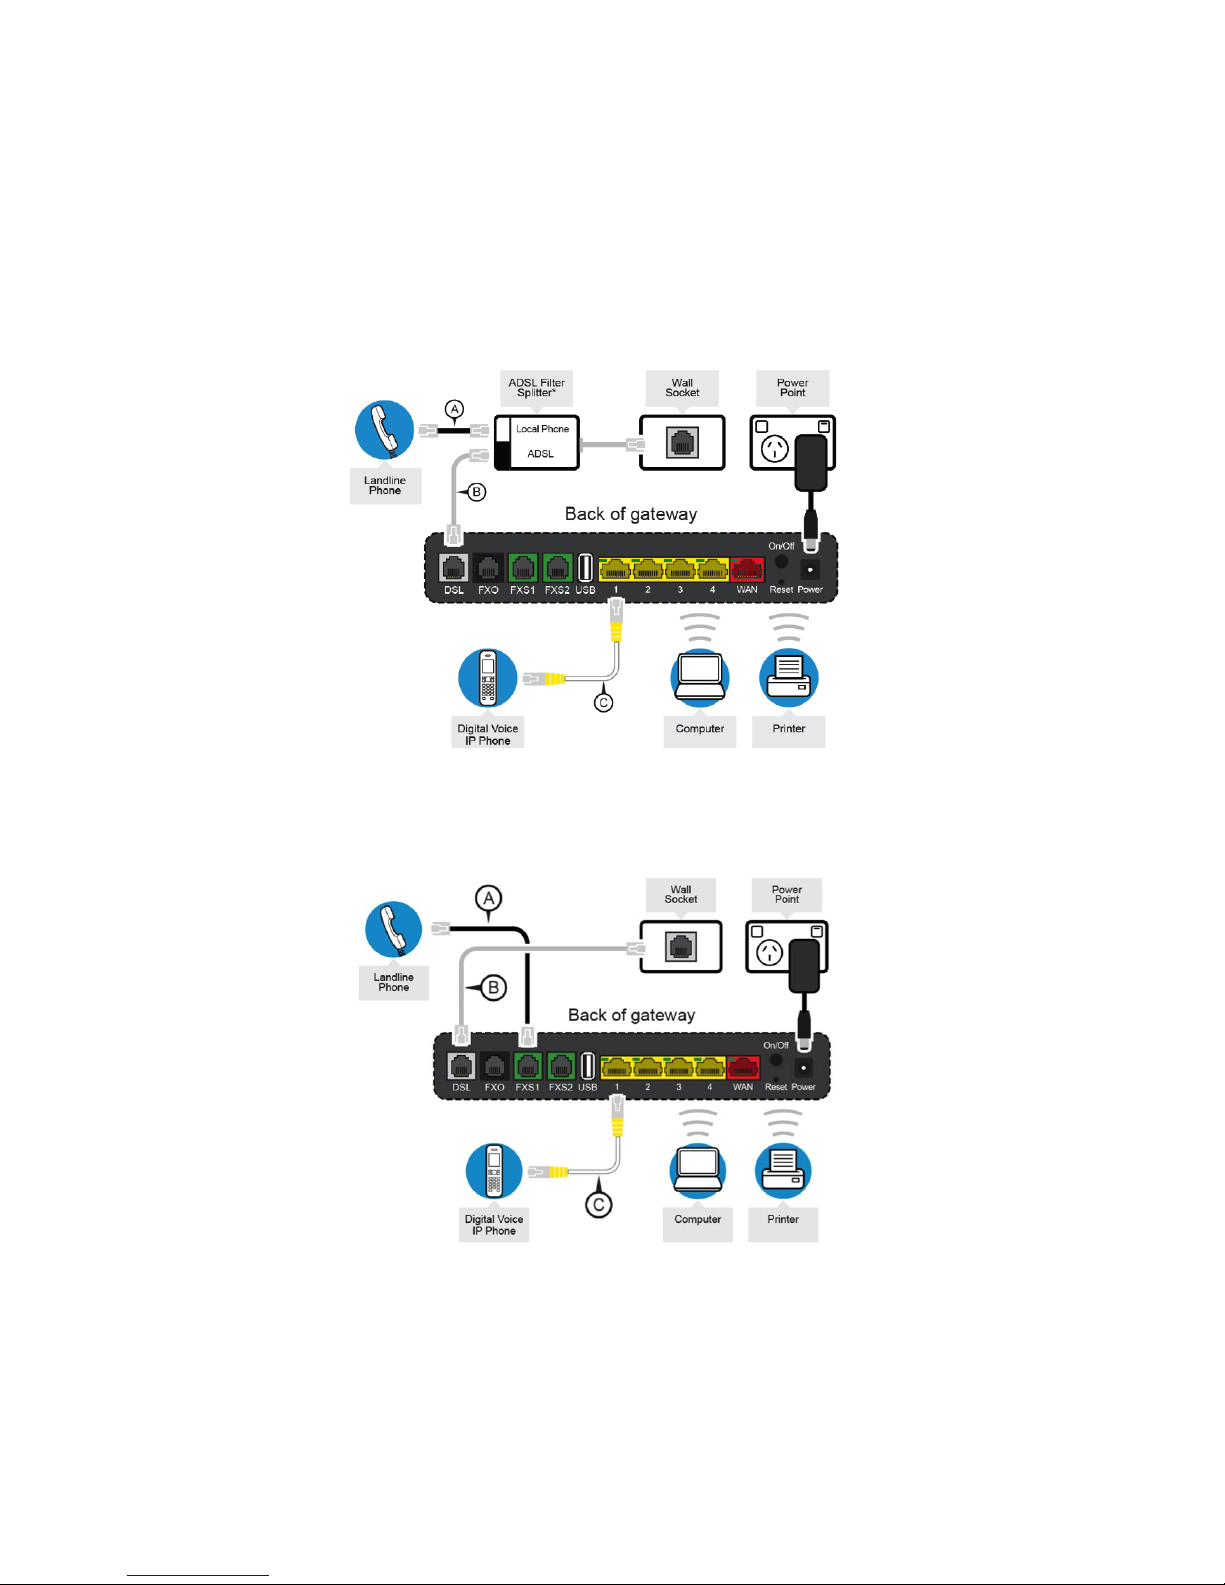
2.2. Setting up your Telstra Gateway Pro™ for ADSL and VDSL
If you don’t have an NBN box at your premises you will be using one of the following connection types:
• ADSL (ADSL, ADSL2 and ADSL2+)
• VDSL (this includes NBN Fibre to the Node and NBN Fibre to the Basement connections)
Figure 7: Telstra Gateway Pro™ Setup for ADSL
Figure 8: Telstra Gateway Pro™ Setup for VDSL
Page 12
12
TELSTRA GATEWAY PRO™ USER GUIDE
You will need a copy of your order completion email and your Wi-Fi Network Security Card to get started.
Your Gateway can be set up in 3 easy steps:
Step 1: Connect the cables as in Figure 7 or Figure 8, depending on your connection type.
Step 2: Connect your devices to the Gateway, either using an Ethernet cable or via Wi-Fi.
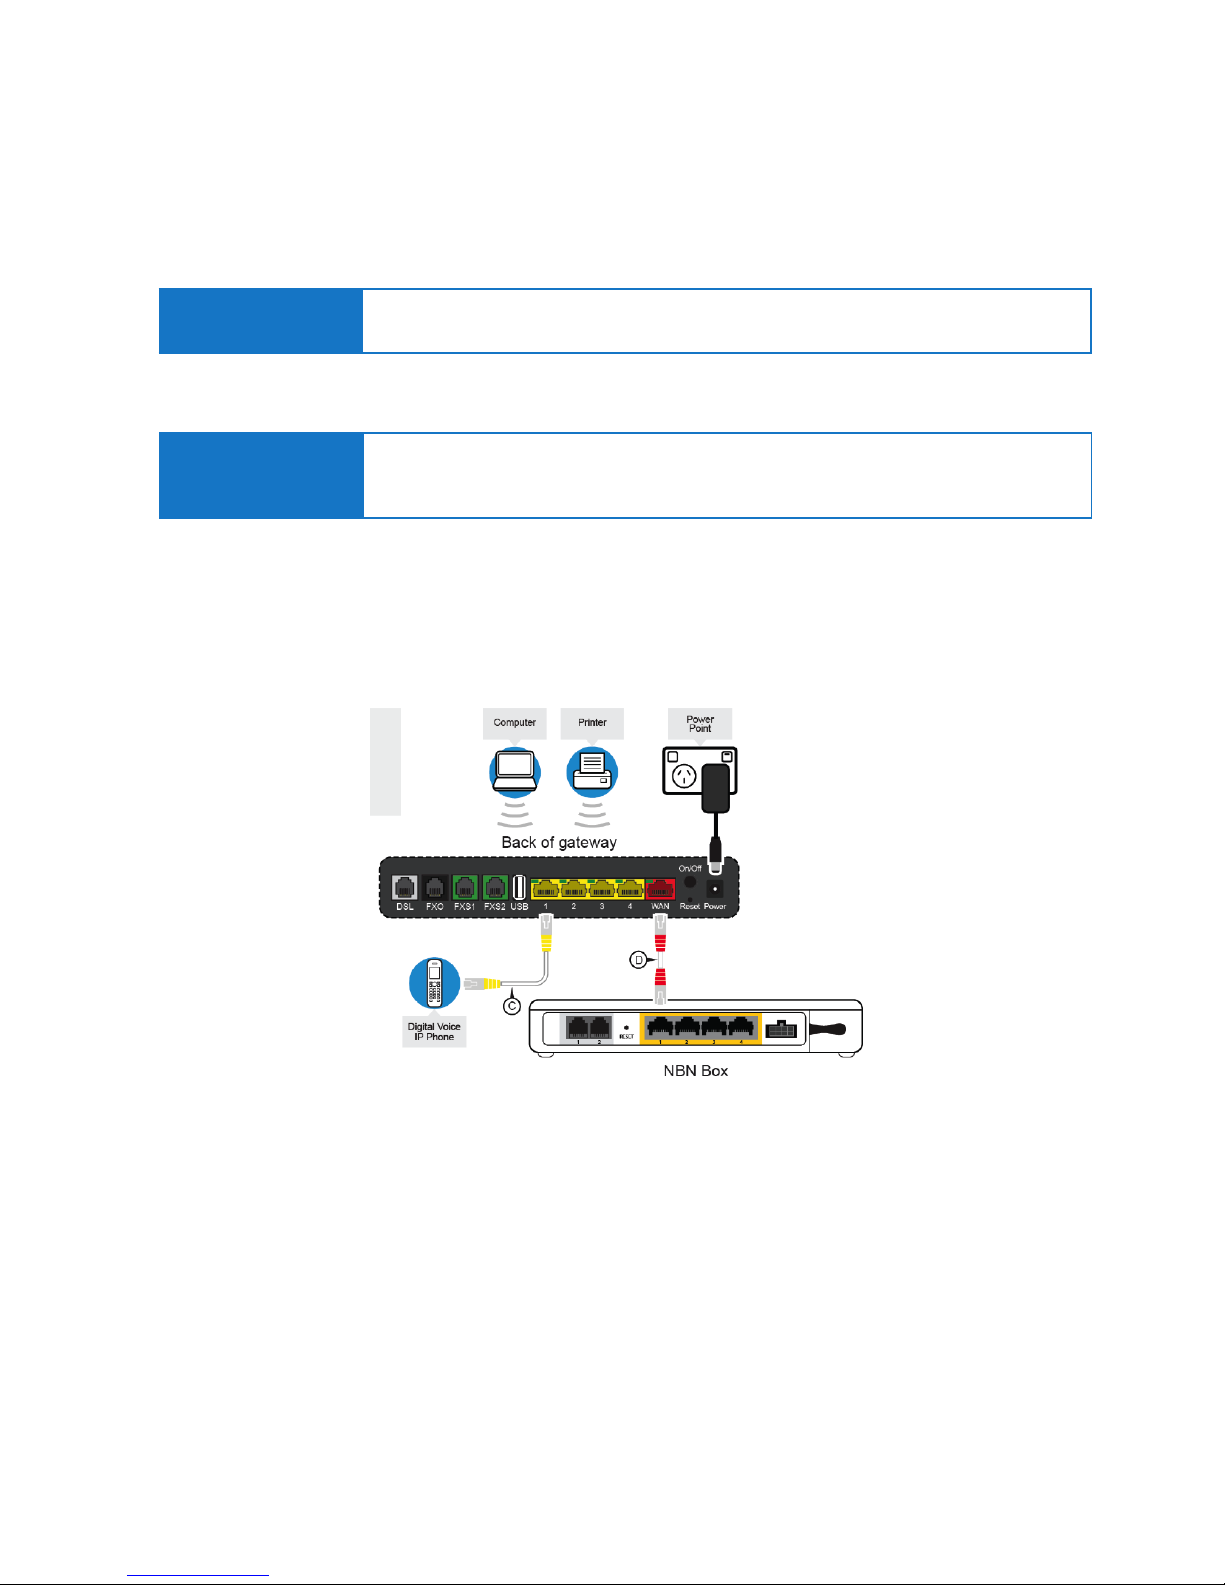
If you do have an NBN box at your premises you will have an NBN Fibre to the Premises (FTTP)
connection. You will need a copy of your order completion email and your Wi-Fi Network Security Card
to get started.
Step 3: Activate your Internet service and voice service using the Setup Wizard.
For more detail on the Setup Wizard screens refer to section 3.1 of this Guide.
2.3. Setting up your Gateway with an NBN box (Fibre to the Premises)
How to:
Your Wi-Fi Network Security card contains the Network names and Network Key to connect
your devices to both the 2.4GHz and 5GHz bands.
How to:
The Setup Wizard can be accessed by either Ethernet or Wi-Fi by typing the Telstra default IP
address, 192.168.15.1, into your preferred browser. This will start the wizard and you can follow
the screens and prompts to complete.
Figure 9: Telstra Gateway Pro™ Setup for NBN (FTTP)
Page 13
13
TELSTRA GATEWAY PRO™ USER GUIDE
Your Gateway can be set up in 3 easy steps:
Step 1: Connect the cables as per Figure 9.
Step 2: Connect your devices to the Gateway, either using an Ethernet cable or via Wi-Fi.
Step 3: Activate your Internet service and voice service using the Setup Wizard.
How to:
Your Wi-Fi Network Security card contains the Network names and Network Key to connect
your devices to both the 2.4GHz and 5GHz bands.
How to:
The Setup Wizard can be accessed by either Ethernet or Wi-Fi by typing the Telstra default IP
address, 192.168.15.1, into your preferred browser. This will start the wizard and you can follow
the screens and prompts to complete.
For more detail on the Setup Wizard screens refer to Section 3.1 of this Guide.
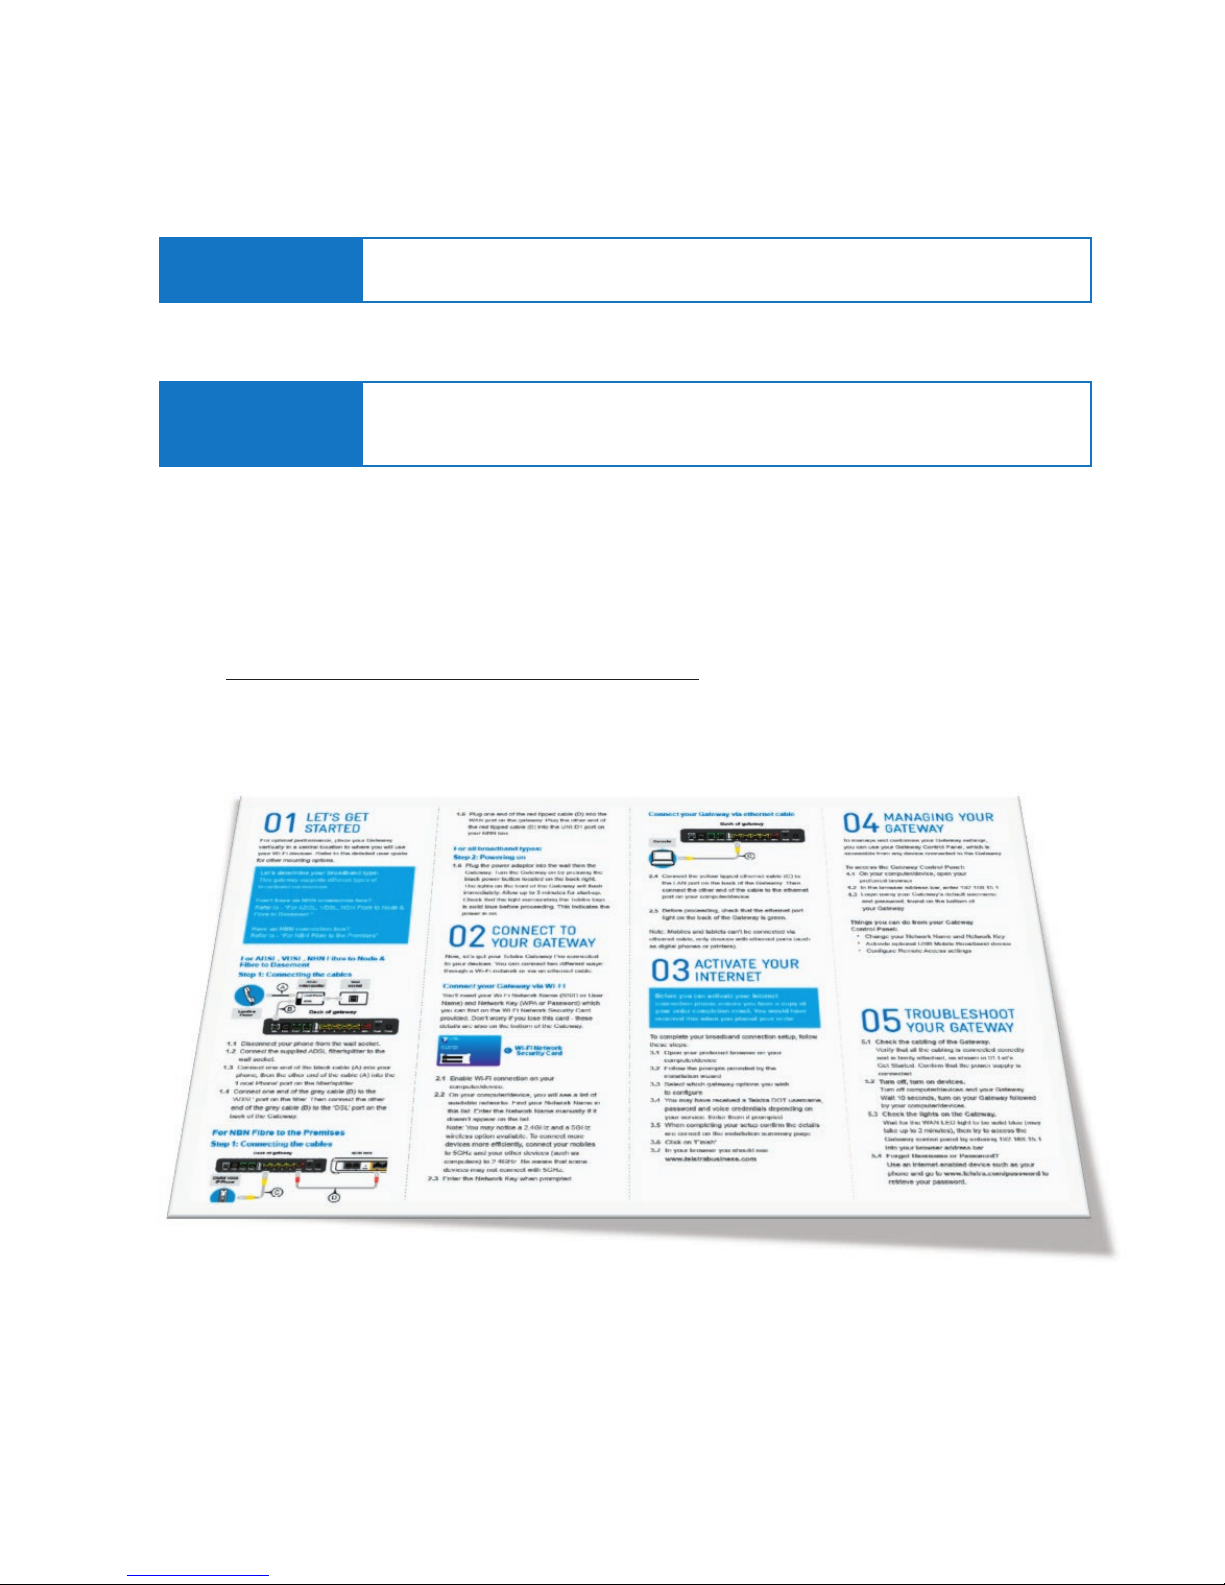
2.4. Telstra Gateway Pro™ Quick Start Guide
The Telstra Gateway Pro™ Quick Start Guide provides a full set of instructions on how to set up your
Gateway. Please refer to the link below to access the Telstra Gateway Pro™ Quick Start Guide:
https://www.telstra.com.au/small-business/bundles/dot
Steps 4 and 5 of the Telstra Gateway Pro™ Quick Start Guide provide details about how you can
manage and troubleshoot your Gateway.
Figure 10: Quick Reference Guide
Page 14
14
TELSTRA GATEWAY PRO™ USER GUIDE
You may need to setup or recongure your Telstra Gateway Pro™, for example when moving
premises, connecting to a new internet service, or after a factory reset. The Telstra Gateway
Pro™ can be congured in 2 ways:
• Using the Installation Wizard immediately after setup.
• Manually through the Control Panel Graphical User Interface (GUI).
In this section, step by step instructions are provided for both methods of setting up the Telstra
Gateway Pro™. The Telstra Gateway Pro™ Control Panel (GUI) is a site that allows you to manage
and customise Gateway settings and features.
3. INITIAL TELSTRA GATEWAY PRO™
CONFIGURATION
When the Telstra Gateway Pro™ is rst set up, either out of the box or after a factory reset (see
Section 6.4), it will detect which network you are on and present you with an installation wizard
that guides you through your internet setup. If you have previously congured your Gateway you
will be presented with a login in screen to the Gateway control panel.
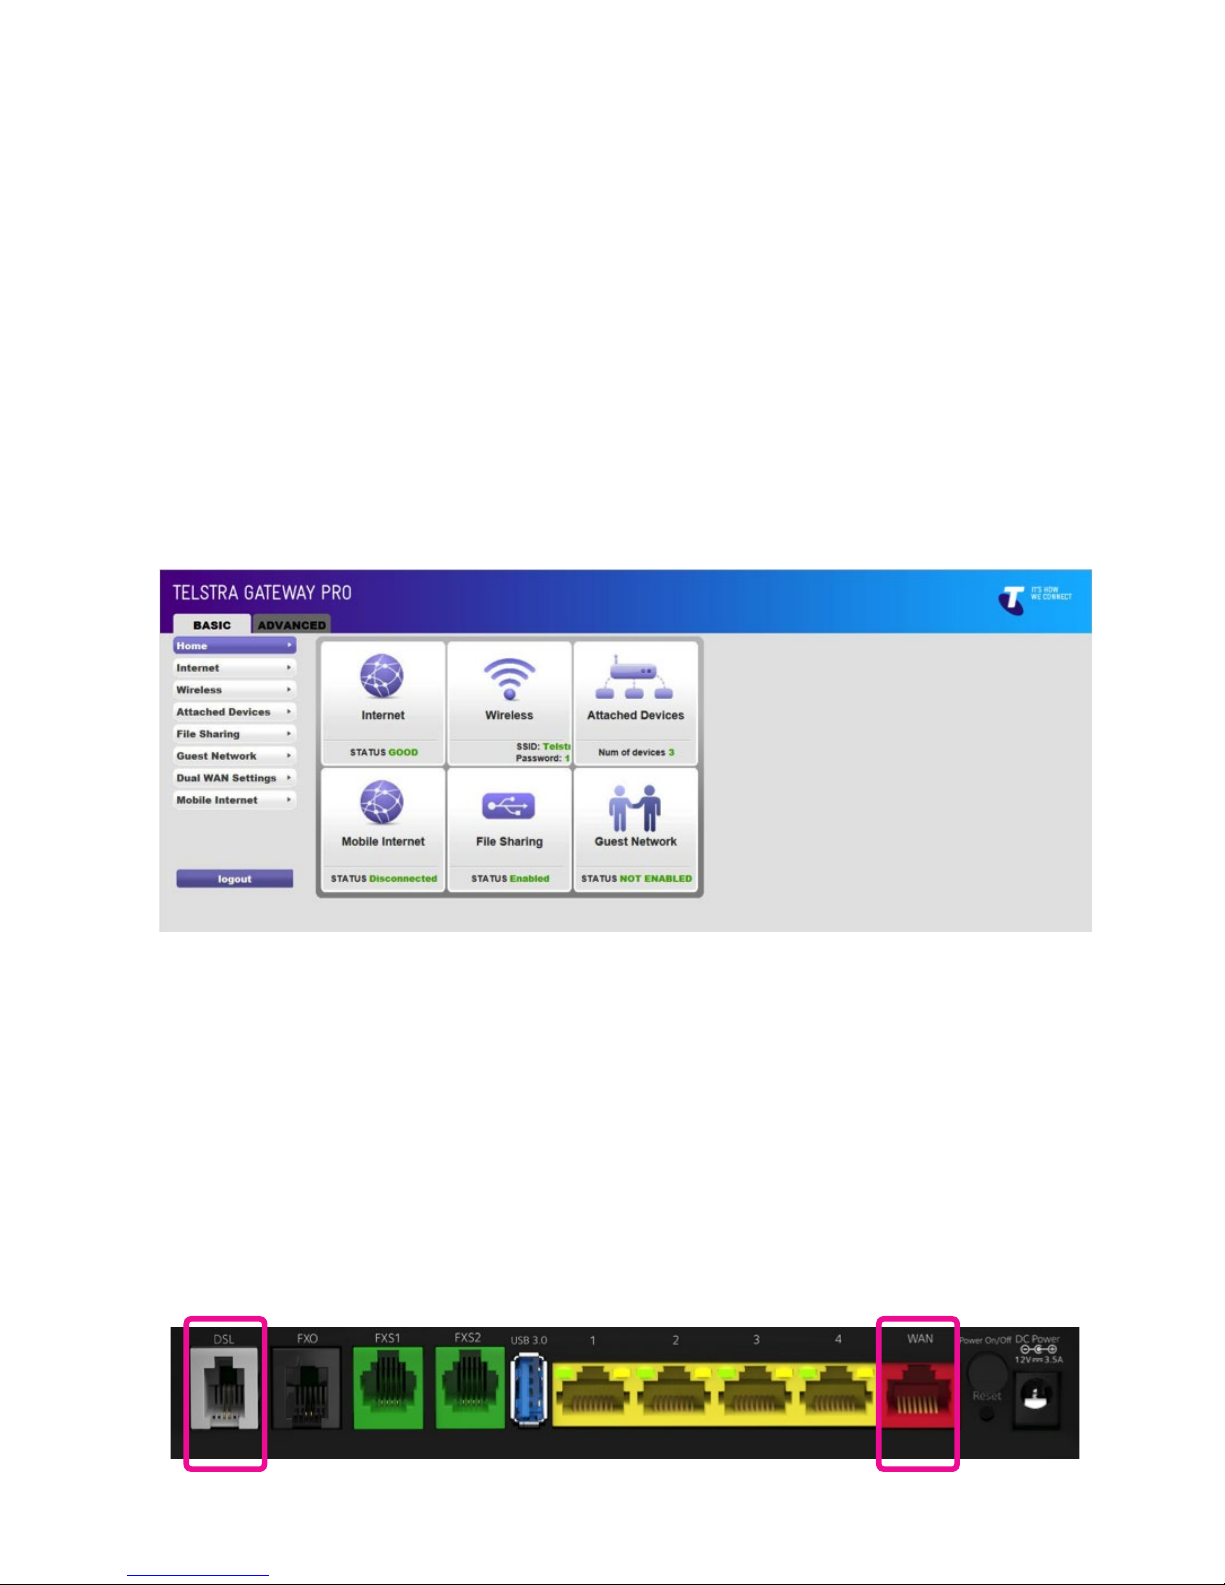
For either an ADSL or VDSL connection ensure your DSL line is plugged into the grey DSL port on
the back of the Telstra Gateway Pro™ and check for sync, the blue WAN LED on the front of the
Gateway should be lit.
For an NBN connection, ensure you have connected your NBN box to the red WAN port on the
back of the Telstra Gateway Pro™ and check the blue WAN LED on the front of the Gateway is lit.
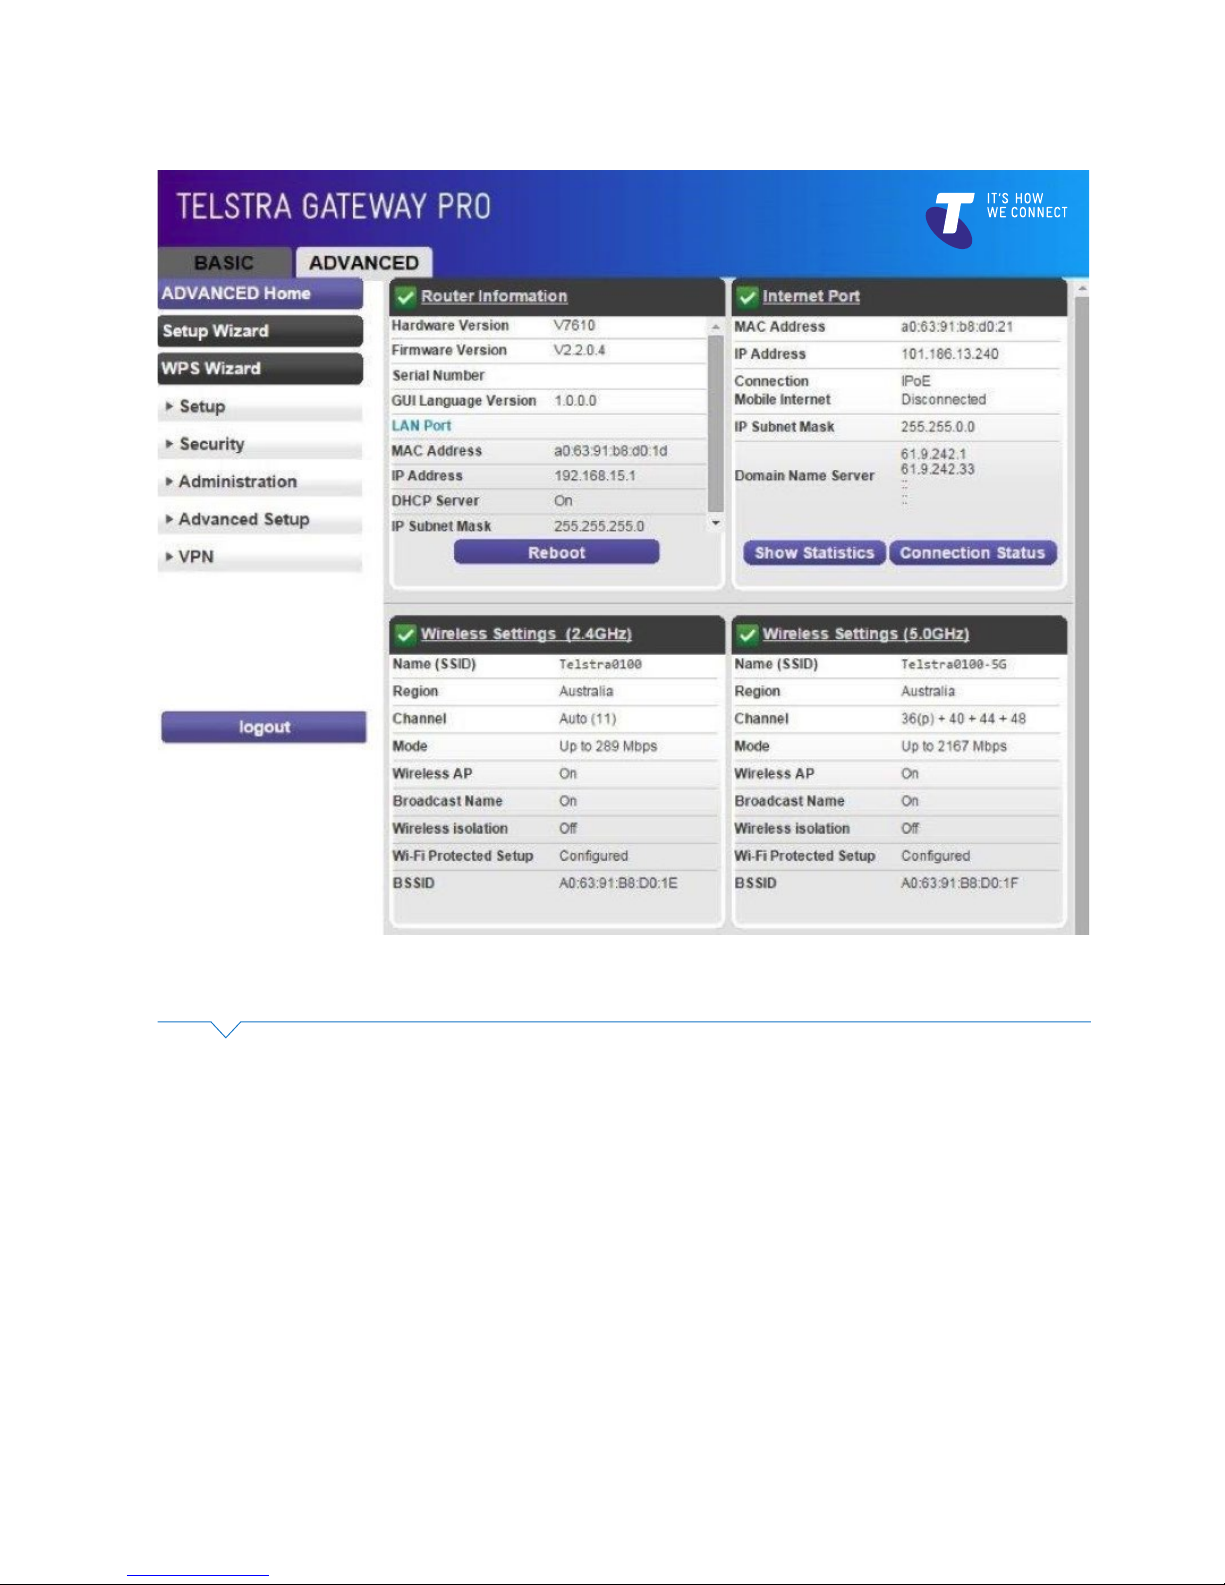
Figure 11: Telstra Gateway Pro™ Control Panel
Figure 12: Telstra Gateway Pro™ WAN and DSL Ports
Page 15
15
TELSTRA GATEWAY PRO™ USER GUIDE
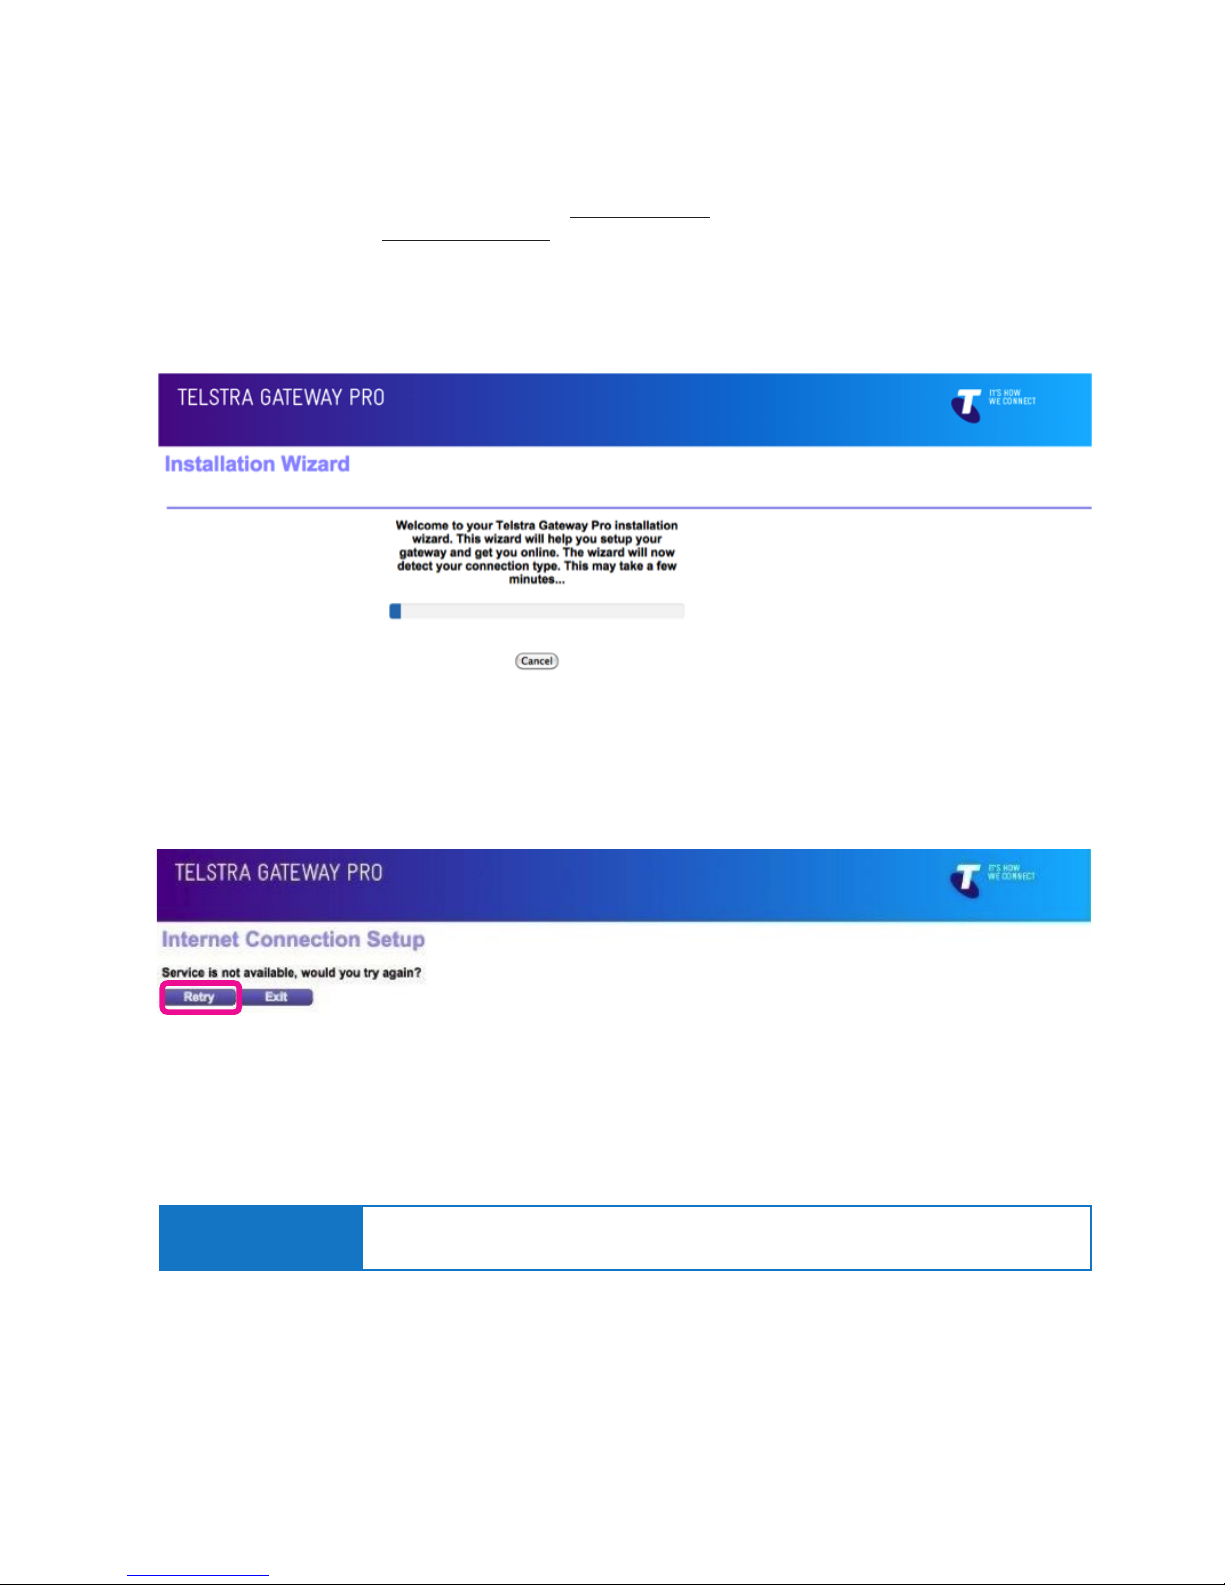
3.1. Initial Setup Using The Installation Wizard
The Installation Wizard can be accessed from any connected device using an internet browser when
visiting any website for the rst time (e.g. www.telstra.com) or by loading the Telstra Gateway Pro™
default IP address http://192.168.15.1.
This will start the auto WAN (internet connection) sensing immediately (Figure 13) on the Gateway and
determine which WAN interface is being used; ADSL, VDSL or Ethernet WAN (NBN FTTP).
Figure 13: Installation Wizard WAN Sensing
Figure 14: Internet Connection Setup Error Screen
• If no Internet Connection is detected the Installation Wizard will show the following screen.
Check that the cabling to the Gateway is correct, and click Retry.
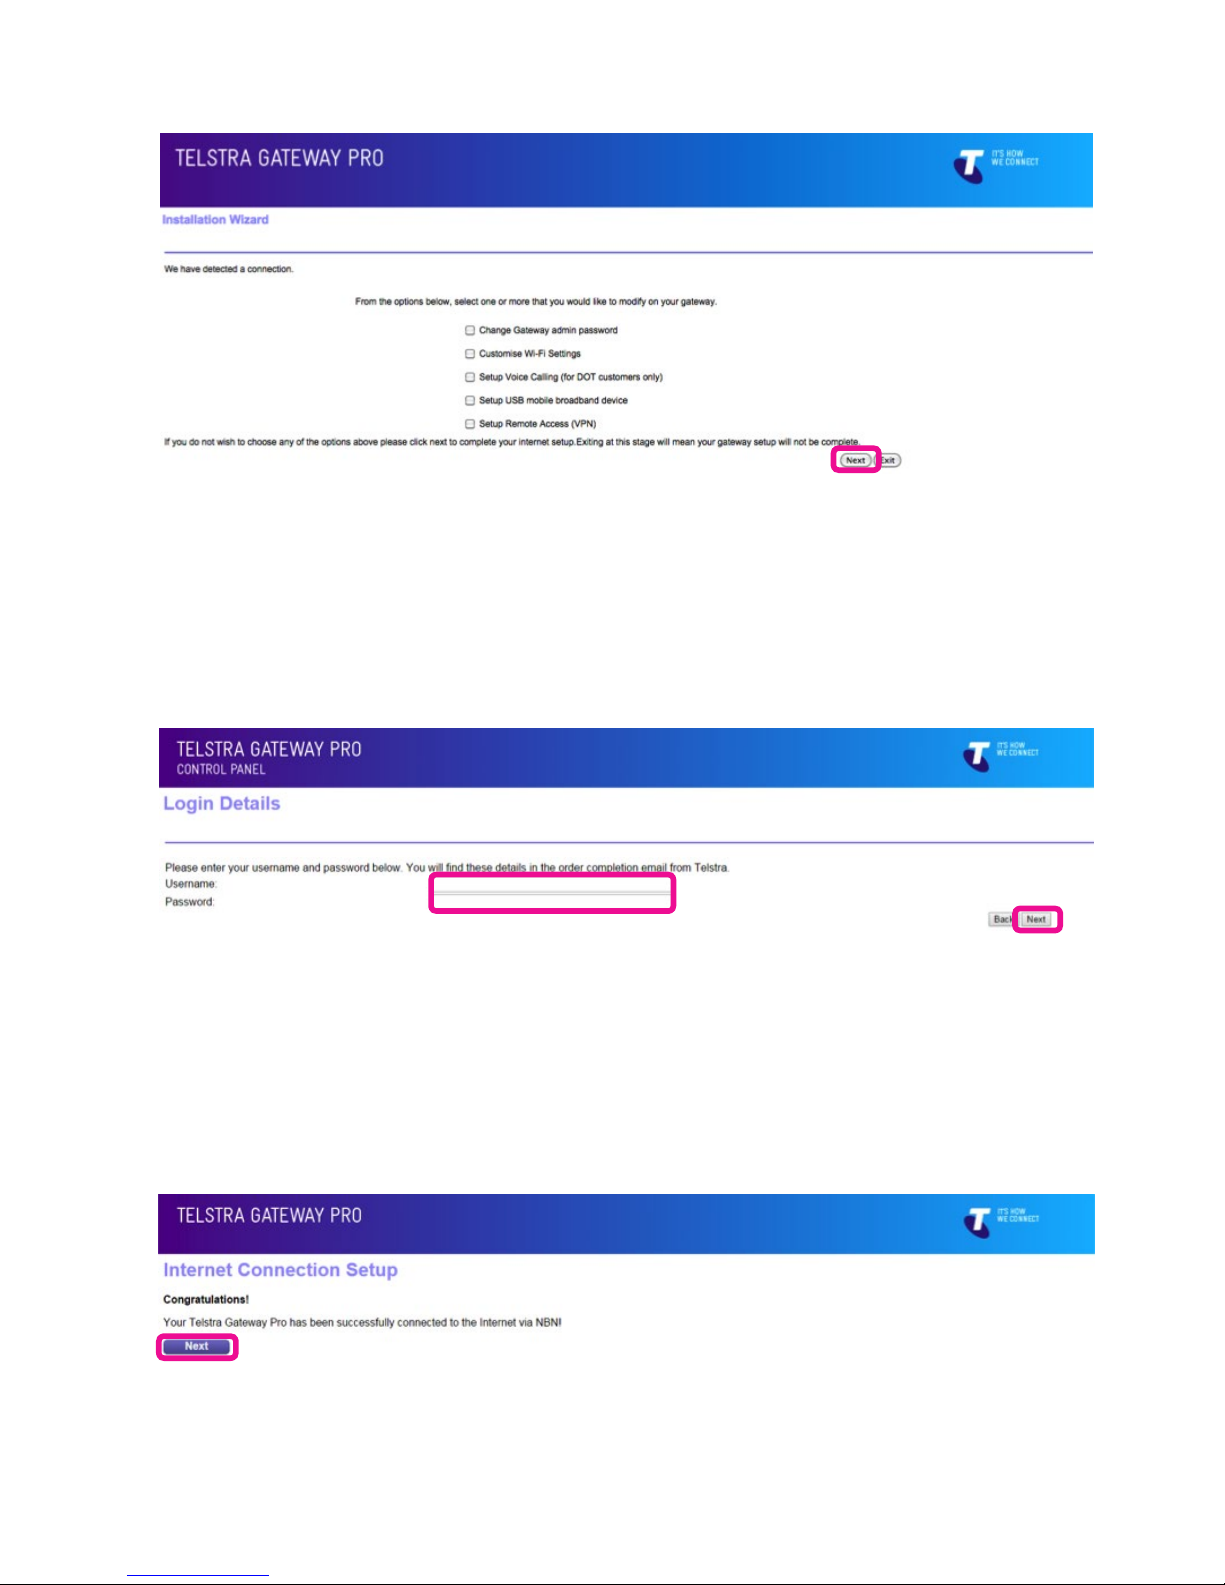
• You will now need to select which options you want to congure (Figure 15).
• When setting up the Gateway for the rst time, click Next.
Important Note:
It is not necessary to set up any of these options for a Telstra Business Broadband (T-Biz)
service unless you want to customise the Wi-Fi settings and/or Admin password.
Page 16
16
TELSTRA GATEWAY PRO™ USER GUIDE
Figure 15: Installation Wizard Setup Options
Figure 16: Username and Password Fields For ADSL
Figure 17: Successful Connection Page
For further information on these options review Section 4 and 5 of this guide before selecting any
additional options you would like to congure and continuing with the installation process.
• For ADSL you now need to enter your ADSL credentials (username & password) which you can nd
in your order completion email from Telstra and click Next.
• For NBN/ VDSL the Gateway will now attempt to establish a connection to the Internet, once successful
it will show you a success page informing you are connected and will then show you an installation
summary page with additional details.
Page 17

17
TELSTRA GATEWAY PRO™ USER GUIDE
If you have selected items to congure follow the wizard through to the summary screen.
• You will now see a summary of the setup. Review any changes you have made and click Finish.
The changes will now be made to the Gateway and additional conguration for voice setup
(if applicable) will be downloaded.
Figure 17: Installation Summary Page
Figure 18: Telstra Business Website
• When installation is complete the Telstra Business Website will load. You are now connected to the
Internet.
To congure your Telstra Gateway Pro™ after the initial setup, follow the steps in Section 3.2.
Page 18

18
TELSTRA GATEWAY PRO™ USER GUIDE
3.2. Conguring Telstra Gateway Pro™ Using the Control Panel (GUI)
The Gateway Control Panel can be accessed through your internet browser via an Ethernet or Wi-Fi
connection using the Telstra default IP address 192.168.15.1. This will bring up the Login screen (Figure
21) and from here you will be able to congure the Telstra Gateway Pro™ to meet your requirements.
To access the Control Panel you need to login with the following details:
• Username: admin
• Password: telstra
Then click Continue.
Figure 19: Gateway Control Panel Login
Figure 20: Control Panel Basic Menu
The Control Panel has two main menu types, Basic and Advanced.
Control Panel Basic Menu
Page 19
19
TELSTRA GATEWAY PRO™ USER GUIDE
Control Panel Advanced Menu
Figure 21: Control Panel Advanced Menu
From each of these menus you will be able to view sub-menus which will provide current details
about the device and also give you the ability to congure changes where appropriate.
Page 20

20
TELSTRA GATEWAY PRO™ USER GUIDE
There are a number of conguration items you can change to manager security, connected devices and
update your connection details. This section provides instructions to complete:
• Changing your Gateway login password.
• Customising your Internet (WAN) connection.
• Customising your Wi-Fi settings to connect new or existing devices.
• Setting up voice calling on your Gateway.
• Connecting devices to your Gateway.
• Setting up a mobile broadband back up device.
4.1. Changing your Gateway login Password
As a security measure you may wish to change your Control Panel username and password settings.
This provides an additional layer of security for your Gateway and business network. You can follow the
steps below to complete this process.
There are two ways to change your Gateway login password, via the Installation Wizard, or in the
Control Panel.
4.1.1. Change Gateway Password Using the Installation Wizard
If you have selected change admin password as part of the installation process using the installation
wizard, complete the following steps:
• Enter the old password into the Old Password eld (the default password is telstra).
• Enter your new password into the New Password and Conrm New Password elds.
• Click Next to continue the Installation Wizard process.
4. FURTHER CONFIGURATION
OF GATEWAY SETTINGS
Figure 22: Wizard Password Screen
Page 21

21
TELSTRA GATEWAY PRO™ USER GUIDE
4.1.2. Change Gateway Password Using the Control Panel
The second method to change the admin password is via the Control Panel Advanced menu.
• To access the Gateway Control Panel page go to 192.168.15.1 in your browser and navigate to
Advanced->Administration -> Set Password.
Complete the following steps to update your password in this process:
• Enter the old password in the Old Password eld (the default password is telstra).
• Enter your new password into the New Password and Repeat New Password elds.
• Click Apply to conrm these changes.
Important Note:
If your new Gateway password is lost, you will need to reset the device and complete the initial
conguration again. ADSL users: Before you reset the Gateway ensure you also have your ADSL
log in details to assist with reconnection to the Internet.
Figure 23: Set Password Advanced Menu Item
Figure 24: Advanced Menu Set Password Screen
Page 22

22
TELSTRA GATEWAY PRO™ USER GUIDE
4.2. Customising your LAN/WAN Settings
If you credentials change (for example if you have moved to new premises) you may need to update your
username and password details for your ADSL connection. You may also need to change your connection
type, if you switch from ADSL to an NBN service. The following steps provide you with an overview of how
to complete these changes.
4.2.1. DSL – Connection and Username/Password
To congure the ADSL connection you will need to enter your Username and Password into the Telstra
Gateway Pro™ Control Panel.
• To access the Gateway Control Panel page go to 192.168.15.1 in your browser and navigate to
Basic>Internet.
Figure 25: Control Panel Basic Screen
Page 23
23
TELSTRA GATEWAY PRO™ USER GUIDE
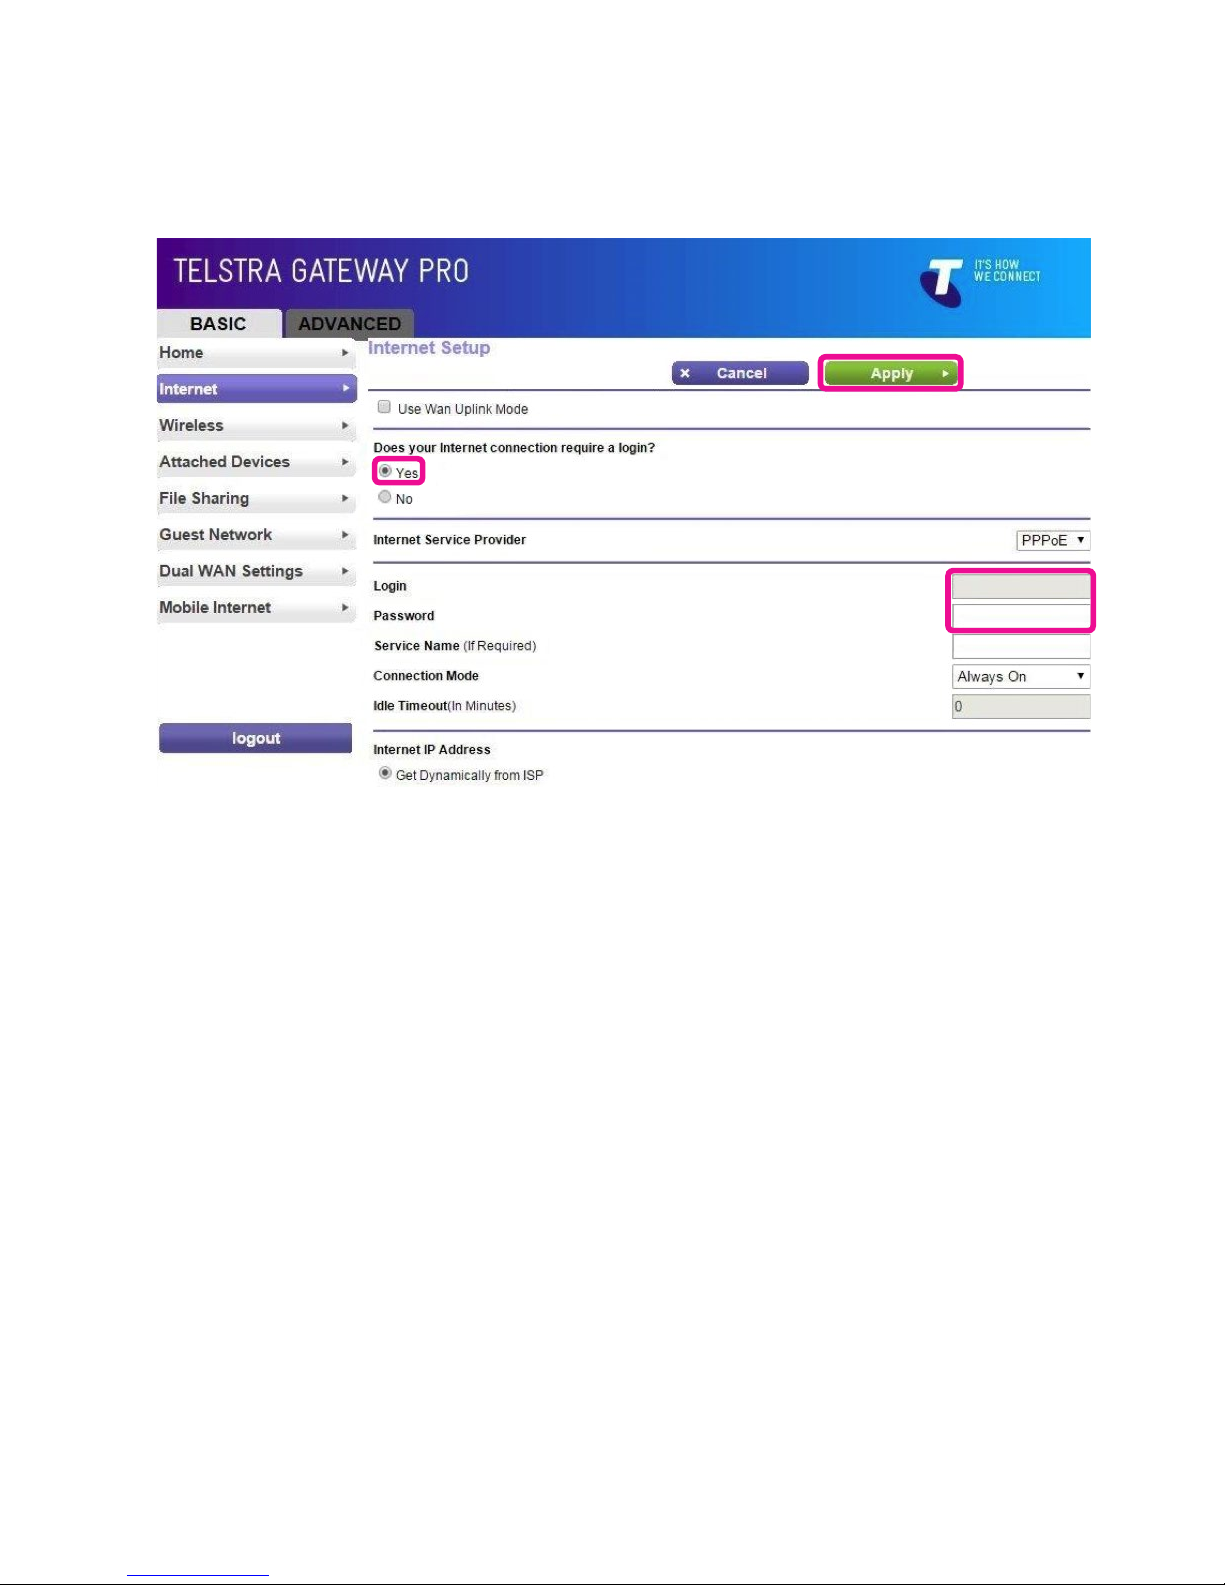
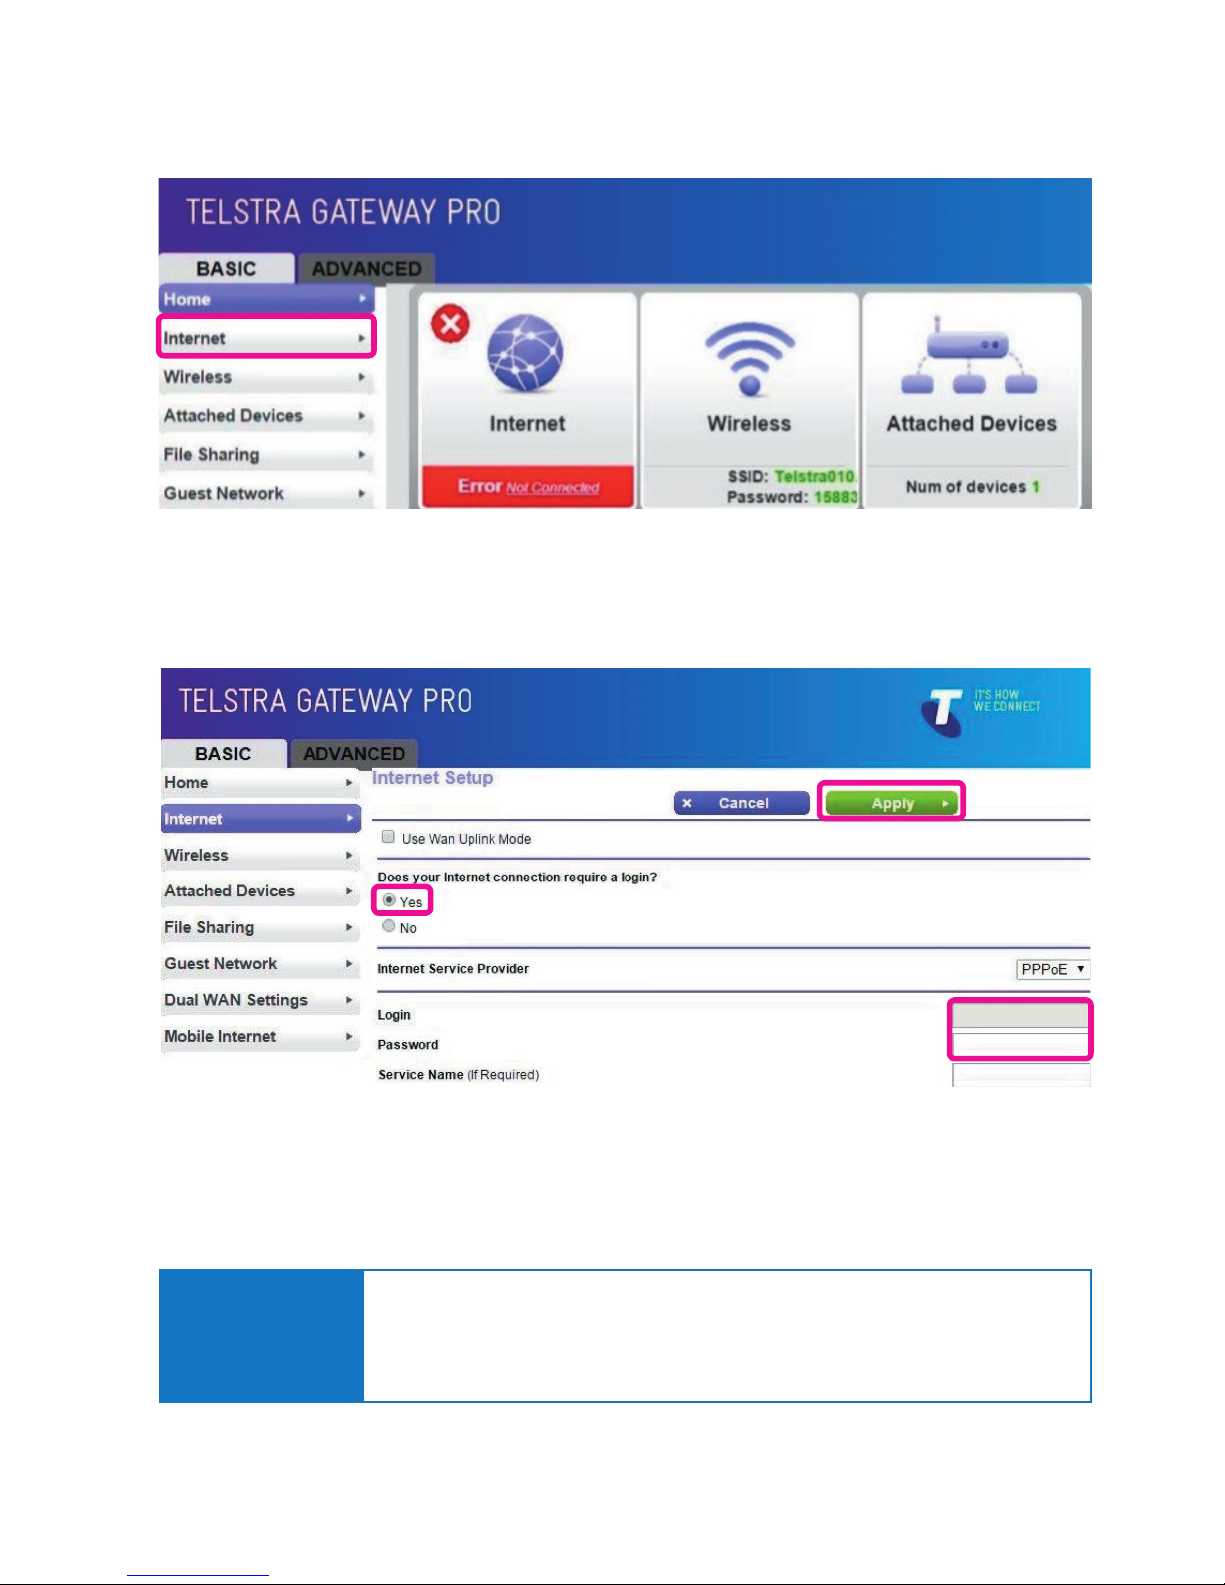
• Ensure the Does your internet connection require a login? has Yes selected and Internet Service
Provider has PPPoE selected.
• Enter your full Username (Login) and case sensitive Password into the correct elds and click Apply.
Figure 26: Internet Settings
Page 24

24
TELSTRA GATEWAY PRO™ USER GUIDE
• Click Home. The Internet icon should show STATUS: GOOD. The Internet LED will also change to blue.
Figure 27: Control Panel Basic Menu- Good Internet Connection
Figure 28: Control Panel Basic Screen
4.2.2. WAN – Connection (NBN)
To congure the NBN connection you will need to access the Telstra Gateway Pro™ Control Panel.
• To access the Gateway Control Panel page go to 192.168.15.1 in your browser and navigate to
Basic>Internet.
Page 25

25
TELSTRA GATEWAY PRO™ USER GUIDE
• Tick Use Wan Uplink Mode and ensure Does your internet connection require a login? has No selected.
Then click Apply.
Figure 29: WAN Setup for NBN
Figure 30: Control Panel Basic Screen
• Click Home. The Internet icon should show STATUS: GOOD. The Internet LED will also change to blue.
Page 26
26
TELSTRA GATEWAY PRO™ USER GUIDE
4.3. Conguring your Gateway Wi-Fi
You may wish to change the default names and passwords for your Wi-Fi network, to reect your
business name. The following information will assist with this process.
4.3.1. Customising Wi-Fi Settings
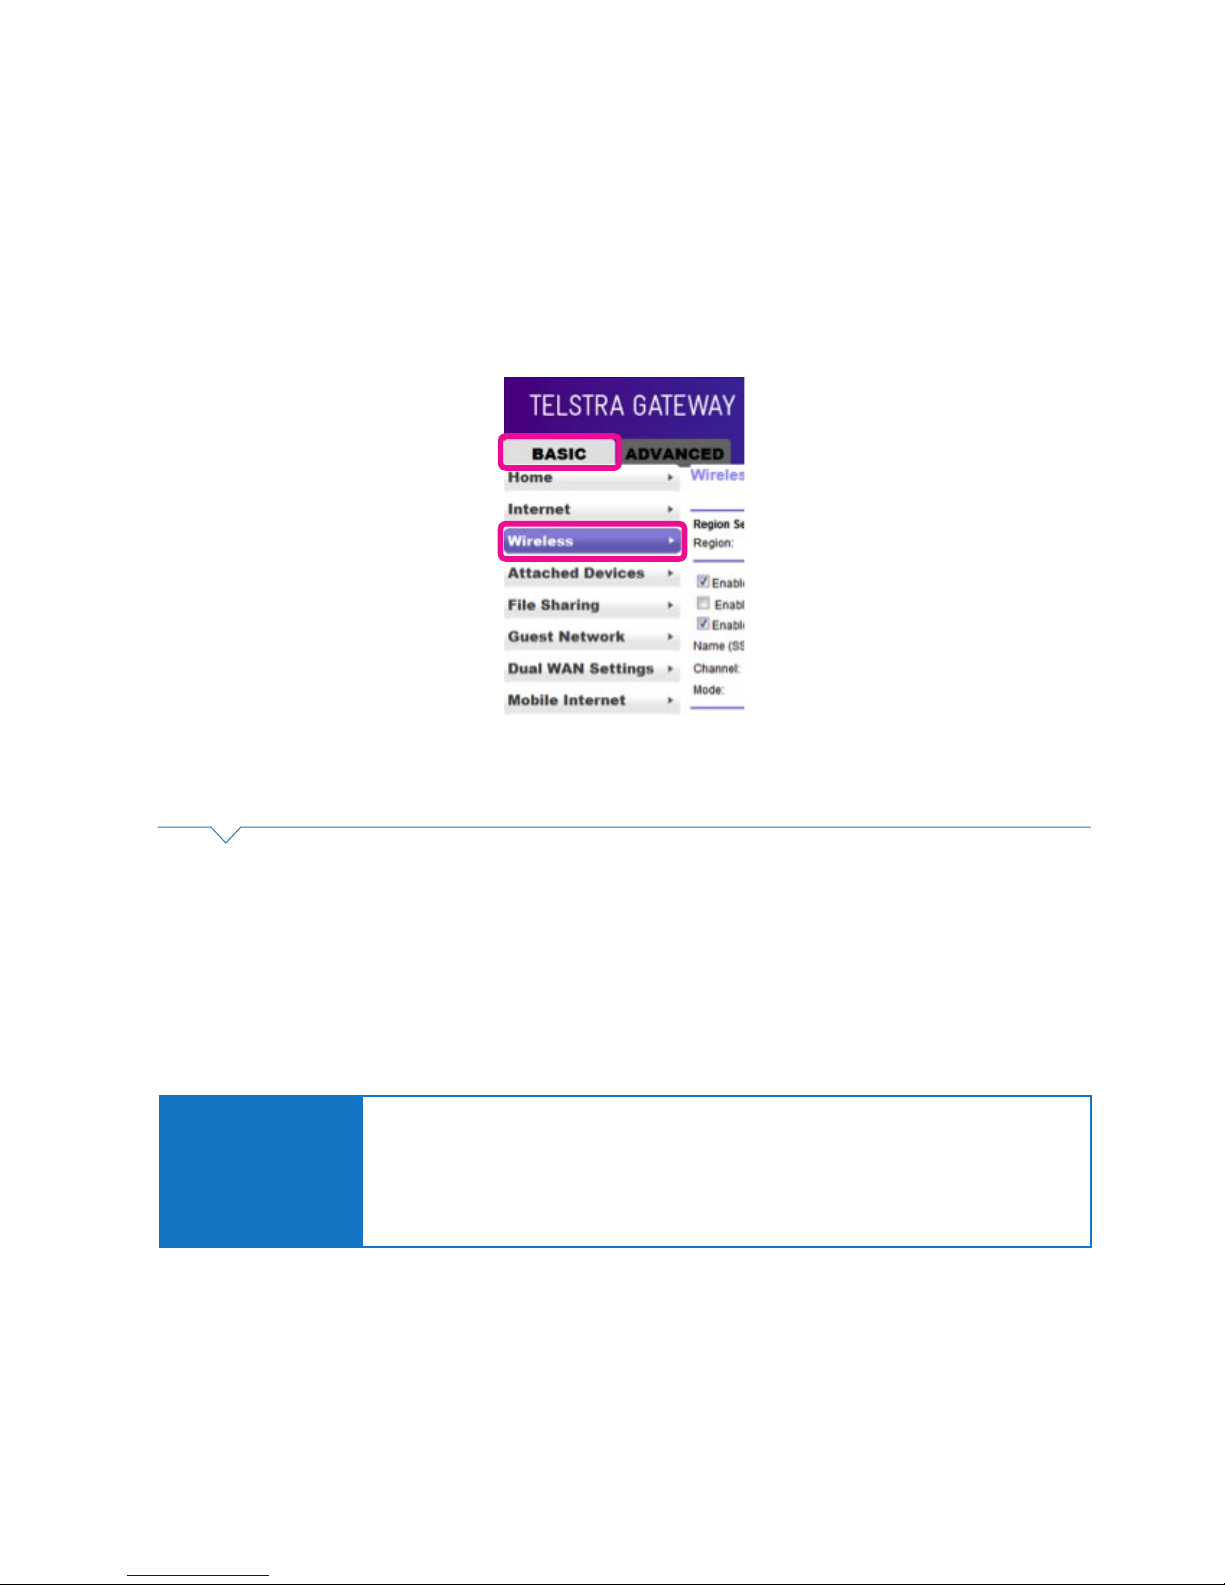
• To access the Gateway Control Panel page go to 192.168.15.1 in your browser and navigate to
Basic->Wireless.
Figure 31: Basic Menu Wireless Settings
On this screen you can update settings for both the 2.4 GHz and 5 GHz Wi-Fi channels including:
• Change the SSID (Gateway’s Wi-Fi name).
• Enable / Disable SSID Broadcast
• Change the 2.4 GHz Channel to reduce interference from other 2.4 GHz devices (e.g. cordless phones).
• Change Encryption Key.
• Change Security Settings.
Important Note:
It may be easier to change the Wi-Fi SSID and channel settings in the Telstra Gateway Pro™
to match those of the Gateway or router you’re replacing.
Doing this will avoid you having to change all the Wi-Fi settings on devices at your premises.
To nd the existing Wi-Fi credentials from the old Gateway or router, refer to the instruction
manual for that device.
Page 27

27
TELSTRA GATEWAY PRO™ USER GUIDE
To congure the Main Wireless LAN settings you will need to make any changes that may be required in the
Wireless Setting screen. Refer to the numbered sections in Figure 34 and the Wireless Settings table for
detailed information about these settings and how to change them:
Figure 32: Basic Menu Wireless Conguration Items
1
2
2
3
3
1
Page 28

28
TELSTRA GATEWAY PRO™ USER GUIDE
4.3.2. Wireless Settings
Item Number
Wireless Settings
Items
Description
1
Enable SSID
Broadcast
If this feature is enabled, the wireless router will broadcast its name
(SSID) to all wireless stations. Stations that have no SSID (or a null
value) can then adopt the correct SSID for connections to this
access point.
Enable Wireless
Isolation
If checked, the wireless client under this SSID can only access
internet and it can't access other wireless clients even under the
same SSID, Ethernet clients or this device. Other clients can't access
the wireless client, either.
Enable WPS
WPS is a network security standard allowing users to easily secure
a wireless home network, and connect wireless client devices
to it, without accessing the device or Gateway conguration
screens, and without even knowing the wireless network's
security key/passphrase.
Name (SSID)
Enter a value of up to 32 alphanumeric characters. The same name
(SSID) must be assigned to all wireless devices in your network.
Channel:
This eld determines which operating frequency will be used.
It should not be necessary to change the wireless channel unless you
notice interference problems with another nearby access point or
wireless device.
Mode:
Select the wireless mode you want to use. The options are:
• Up to 54 Mbps. Legacy Mode, with a maximum speed of up to
54 Mbps for b/g networks.
• Up to 289 Mbps. Neighbour-Friendly Mode, the default, with a
speed of up to 289 Mbps in the presence of neighbouring
wireless networks.
• Up to 600 Mbps. Performance Mode, with a maximum Wireless-N
speed of up to 600 Mbps.
2
Security Options
Select the security option you want to use:
• None - no data encryption (not recommended)
• WEP - Wired Equivalent Privacy, use WEP 64- or
128-bit data encryption
Note: Wi-Fi Protected Setup function is disabled when the security
setting is WEP authentication
• WPA2-PSK [AES] - Wi-Fi Protected Access version 2 with
Pre-Shared Key, use WPA2-PSK standard encryption
with the AES encryption type
• WPA-PSK [TKIP] + WPA2-PSK [AES] - Allow clients using either
WPA-PSK [TKIP] or WPA2-PSK [AES]
3
Security Options
(WPA2-PSK)
Normally this can be left at the default value of Automatic.
It allows adaptors to use either Open System or Shared Key
to do the authentication.
If you want to have better secure authentication, then you can select
Shared Key and your wireless adaptors can only use Shared Key to
connect to this network.
After making any changes click Apply at the top of the Wireless Settings screen and test your connection with a
Wi-Fi connected device.
Page 29

29
TELSTRA GATEWAY PRO™ USER GUIDE
4.4. Setup Voice Calling
The Telstra Gateway Pro™ supports Voice calling for DOT customers. There are two methods to setup
voice calling on the Telstra Gateway Pro™, via the Installation Wizard or in the Gateway Control Panel.
4.4.1. Method One: Using the Installation Wizard
• During the installation process, select the Setup Voice Calling (for DOT customers only) option on the
Installation Wizard screen. Then click Next.
Important Note:
Device ID and Password information for Voice Calling can be found on your order
completion email.
Figure 33: Installation Wizard Menu
Figure 34: Device ID and Password Fields For Voice Calling
• Enter your Device ID and Password details on the Setup Voice Calling screen.
Then click Next. Complete the Installation Wizard process (Section 3.1).
Page 30
30
TELSTRA GATEWAY PRO™ USER GUIDE
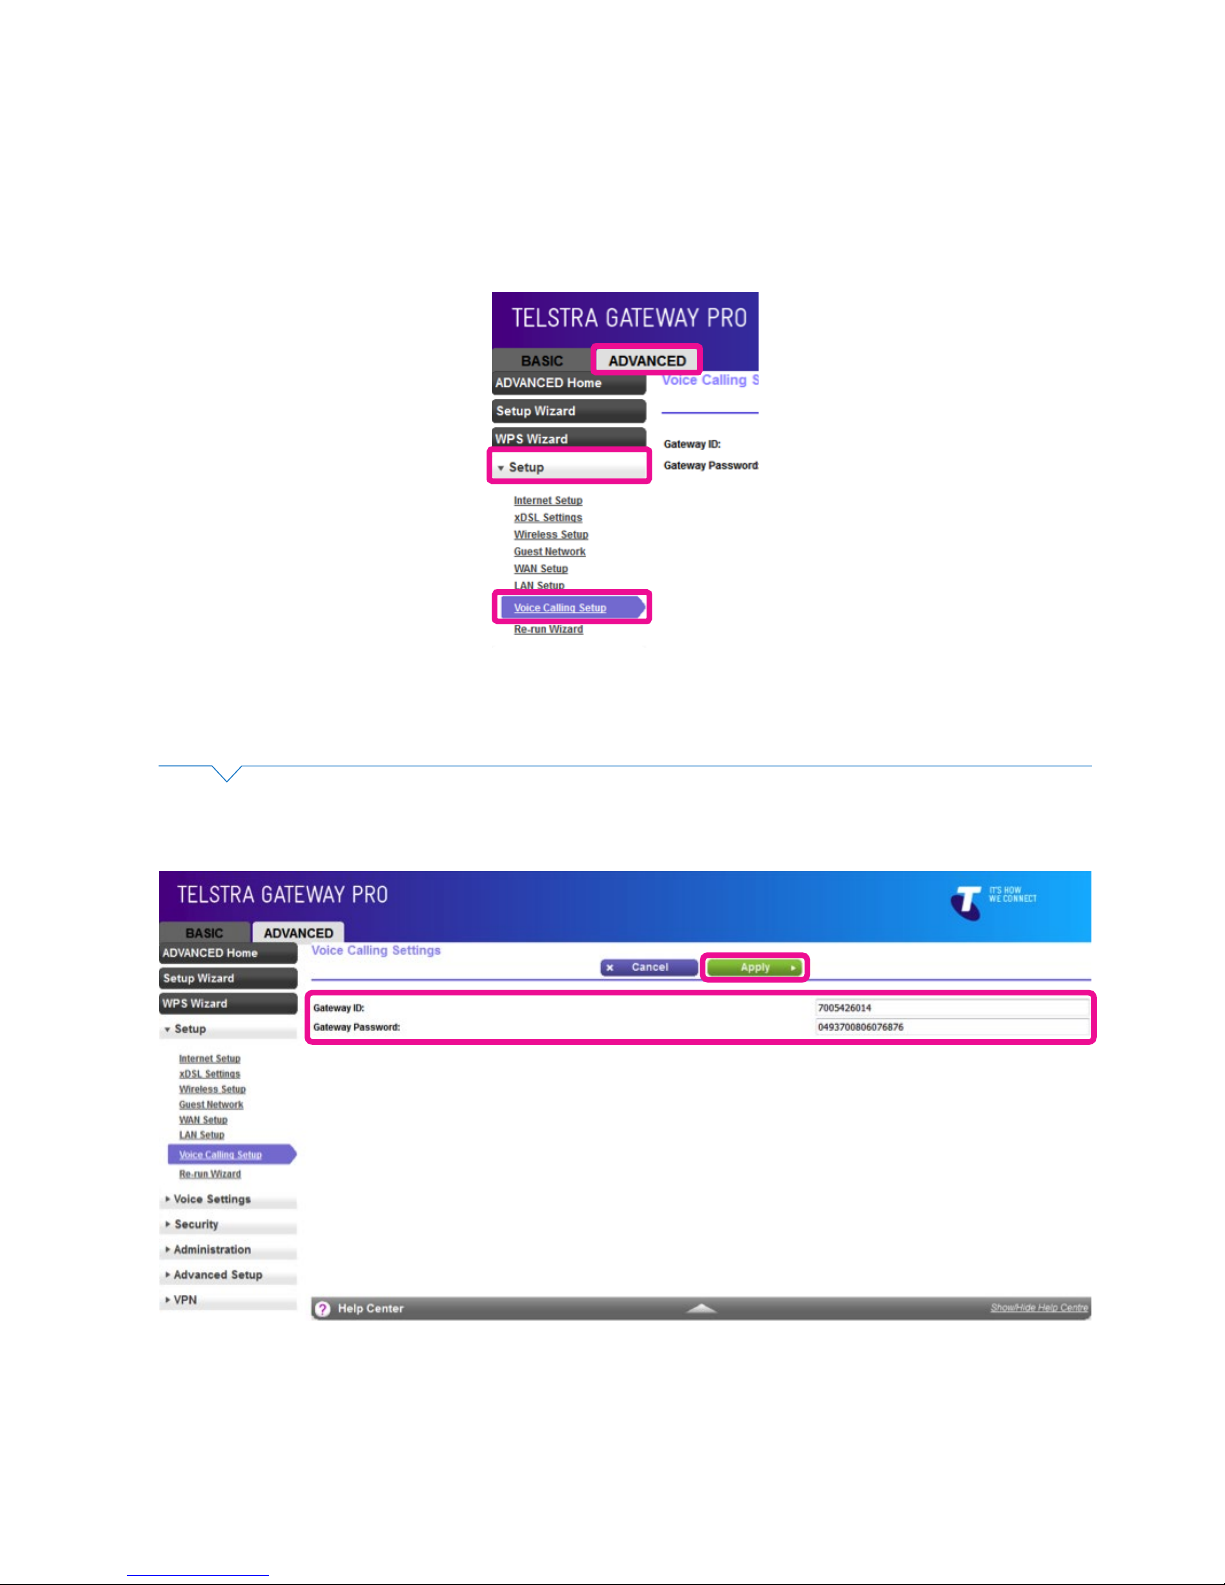
4.4.2. Manual Setup in the Gateway Control Panel
The second method to set up voice calling is in the Gateway Control Panel.
• To access the Gateway Control Panel page go to 192.168.15.1 in your browser and navigate to
Advanced -> Setup -> Voice Calling.
Figure 35: Control Panel Advanced Menu
Figure 36: Gateway ID and Password Information
• Enter your Gateway ID and Gateway Password details on the Voice Calling Settings screen.
Click Apply to save your settings.
Page 31

31
TELSTRA GATEWAY PRO™ USER GUIDE
4.5. Connecting devices to the Telstra Gateway Pro™
You can connect a number of different devices to the Telstra Gateway Pro™ following the setup
information in Section 2 of this guide. In addition Wi-Fi and WPS devices can be connected to the
Gateway using the following instructions.
4.5.1. Connecting via Wi-Fi
The Telstra Gateway Pro™ is delivered with Wi-Fi turned on with a unique Wi-Fi Id and WPA2 Key
(Password). The Id, also known as SSID, and the WPA2 Key, are available on a card provided in the
packaging. Use this information to connect your Wi-Fi enabled devices.
4.5.2. Connecting via WPS
Wireless Protected Setup (WPS) allows you to connect your network devices such as PCs, printers and
mobile devices wirelessly without using a password.
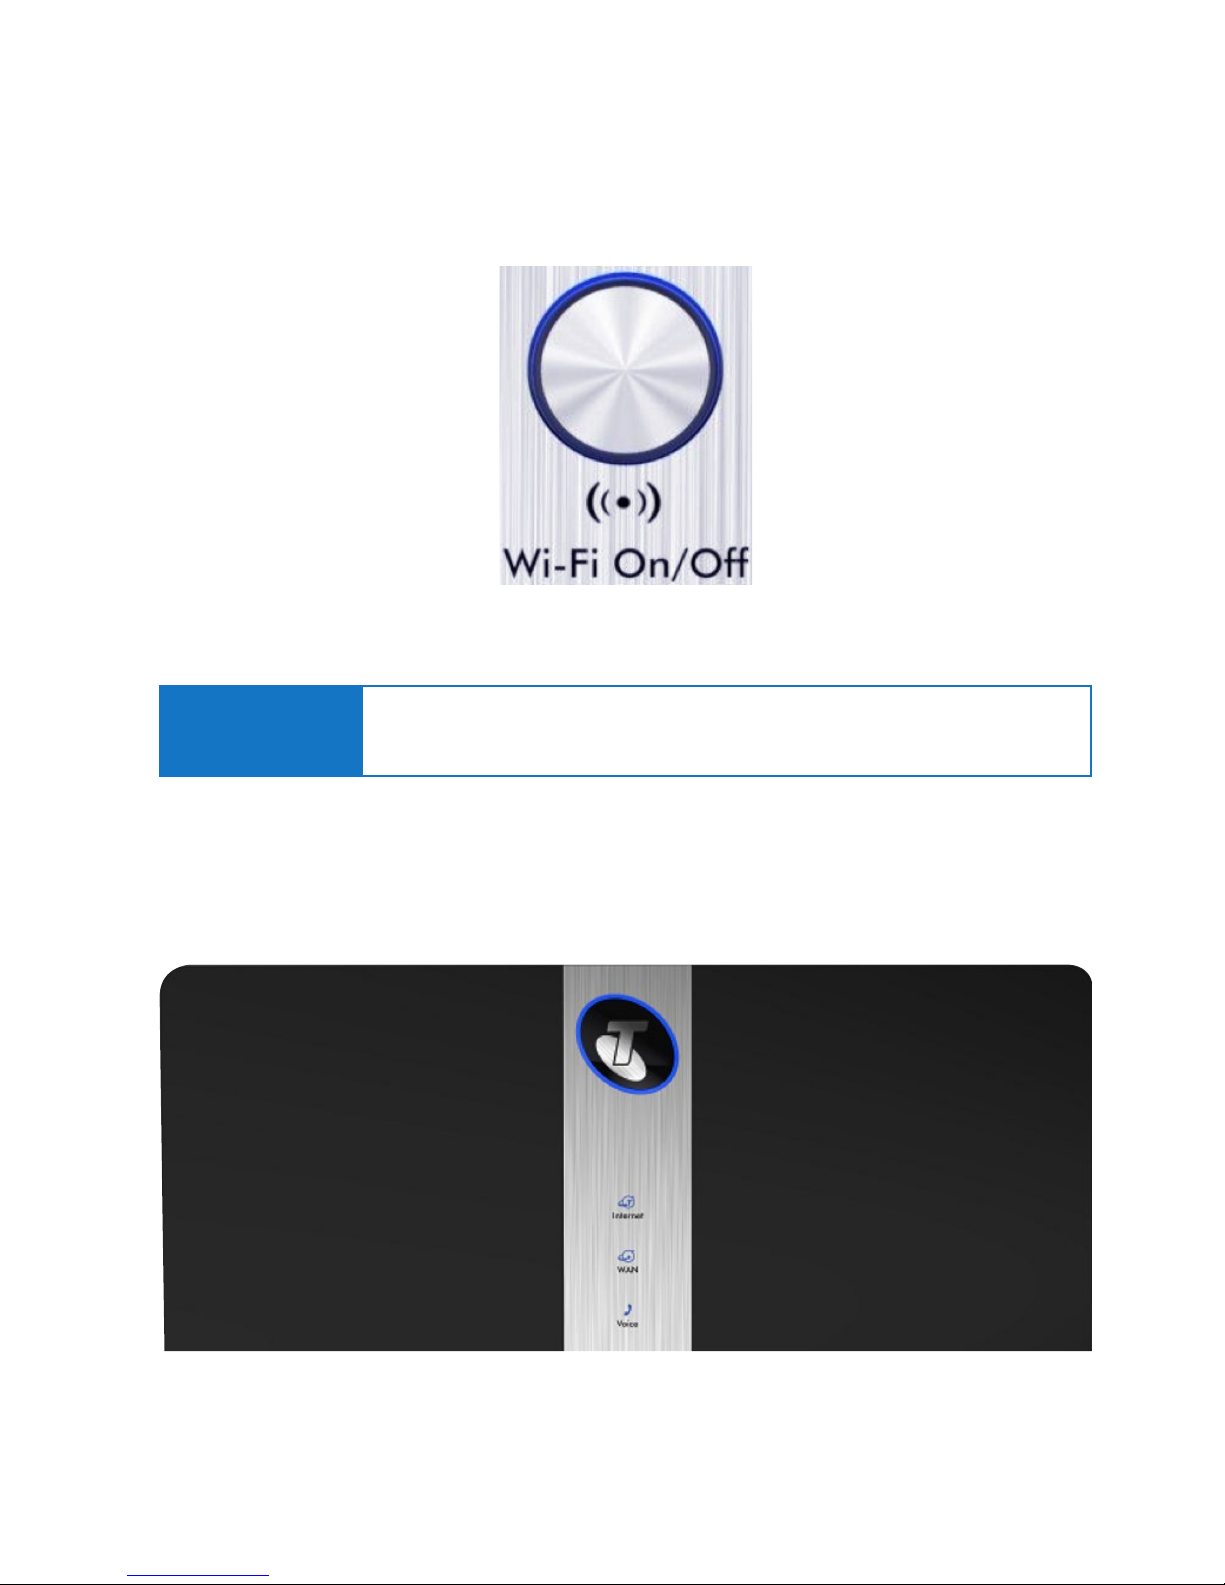
To connect using WPS, hold down the WPS button on the Gateway for three seconds. This temporarily
enables WPS access. Next, enable WPS on your network device (such as your printer or mobile phone).
The device will connect to the network allowing access to your Wi-Fi network.
Figure 37: WPS Button
4.6. Setting up USB Mobile Broadband Backup
A dropout or loss of your internet connection can have consequences for your business such as a loss
of access to internet sites and email. The Telstra Gateway Pro™ has a backup solution available that
provides an alternative path in the unlikely event that your primary internet access is not available.
It is now possible to switch to 4G mobile access when internet connectivity is not available via the main
WAN (ADSL, VDSL or NBN) connection.
By plugging a supported Mobile Broadband USB adapter into the USB port on the side or back of
the Telstra Gateway Pro™, internet connectivity via a 4G network becomes possible. This provides
continuous service while your WAN connection issue is investigated and resolved.
Page 32

32
TELSTRA GATEWAY PRO™ USER GUIDE
Figure 38: USB Port for Mobile Broadband Backup on side or back of device
Figure 39: Basic Menu Mobile Internet
Once you have connected your Mobile Broadband device to the USB port, access and congure it in the
Telstra Gateway Pro™ Control Panel by completing the following steps:
• To access the Gateway Control Panel page go to 192.168.15.1 in your browser and navigate to
Basic ->Mobile Internet.
Or
Page 33

33
TELSTRA GATEWAY PRO™ USER GUIDE
• If there is a SIM PIN enabled on your Mobile USB device, enter it into the SIM PIN eld.
Select the correct APN for your device then click Apply.
Figure 40: Mobile Internet Setup Information
Figure 41: Mobile Info Button
• To check that the mobile broadband device has initiated, click Mobile Info.
Page 34

34
TELSTRA GATEWAY PRO™ USER GUIDE
• A pop-up window will show the mobile device signal strength. Click Close Window.
Figure 42: Mobile Internet Signal Strength
Figure 43: Mobile Internet Connection Status
• To check the device status, click Connection Status.
Page 35

35
TELSTRA GATEWAY PRO™ USER GUIDE
• Click Connection Status. A pop up window will show the Connection State and assigned IP address,
click Close Window.
Figure 44: Connection Status Details
Page 36

36
TELSTRA GATEWAY PRO™ USER GUIDE
There are a number of advanced conguration items you can change to make the most of your Telstra
Gateway Pro™. These changes are most suitable for larger businesses, or those with many Wi-Fi and
wired devices that are already congured to work with a modem or Gateway that the Telstra Gateway
Pro™ will replace. This section provides instructions to assist with:
• Setting up guest Wi-Fi networks.
• Sharing content over your business network using the Telstra Gateway Pro™.
• Changing LAN pool and DHCP settings to match your devices.
• Setting up port forwarding.
• Where to nd information about setting up a VPN.
5.1. Guest Wireless Network Setup
The Telstra Gateway Pro™ has the capability to set up three Wireless Guest networks. You can allow
guest internet only access or internet & local network access to anyone that is provided the Guest SSID
and Wireless Network Keys. These Guest Networks can be enabled and congured by completing the
following steps.
• To access the Gateway Control Panel page go to 192.168.15.1 in your browser and navigate to the
Basic -> Guest Network.
5. ADVANCED SETTINGS
Figure 45: Basic Menu Guest Wireless
• Select either of the Network Proles 1, 2 or 3 wireless access points then enable and congure as required.
To congure the Guest Wireless LAN settings you will need to make any changes that may be required in
the Guest Network Setting screen. Refer to the numbered sections in the Figure 49 and the Guest Wi-Fi
settings table for detailed information about these settings and how to change them.
Page 37

37
TELSTRA GATEWAY PRO™ USER GUIDE
Figure 46: Guest Wi-Fi Conguration
• Setting up the Guest Network follows a similar process to making changes to the Wi-Fi settings
on the Telstra Gateway Pro™.
1
2
4
3
Page 38

38
TELSTRA GATEWAY PRO™ USER GUIDE
5.1.1. Guest Wi-Fi Settings
Item Number
Wireless Settings
Items
Description
1
Wireless Settings
of Prole
This shows the settings and status of the selected prole in the Guest
Wi-Fi Settings screen
2
Enable Guest
Network:
If this check box is checked, then this guest network is enabled.
You and your visitors can connect to your network via the SSID of this
prole.
Enable SSID
Broadcast
If enabled, the Wireless Access Point will broadcast its name (SSID) to
all Wireless Stations. Stations which have no SSID (or a null value) can
then adopt the correct SSID for connections to this Access Point
Enable Wireless
Isolation:
When enabled, devices connected to your guest network can only
access the Internet. They won't be able to access any other devices or
log into your router.
Guest Wireless
Network Name
(SSID):
Enter a value of up to 32 alphanumeric characters. The same Name
(SSID) must be assigned to all wireless devices in your network.
The default SSID is SSIDN+1, N is the prole number, but Telstra
strongly recommends that you change your network’s Name (SSID)
to a different value. This value is also case-sensitive.
3
Security Options • None - no data encryption
• WEP - Wired Equivalent Privacy, use WEP 64- or 128-bit
data encryption
Note: Wi-Fi Protected Setup function is disabled when the security
setting is WEP authentication
• WPA2-PSK [AES] - Wi-Fi Protected Access version 2 with
Pre-Shared Key, use WPA2-PSK standard encryption with the
AES encryption type
• WPA-PSK [TKIP] + WPA2-PSK [AES] - Allow clients using either
WPA-PSK [TKIP] or WPA2-PSK [AES]
4
Password (Network
Key)
Enter a word or group of printable characters in the Passphrase
box. The Passphrase must be constituted of either 8 to 63 ASCII
characters or exactly 64 hex digits.
After making any changes click Apply at the top of the Wireless Settings screen and test your connection
with a Wi-Fi connected device.
5.2. Content Sharing
The Telstra Gateway Pro™ allows you to share the content stored on your USB connected storage device
with other users on your network. You can use the rear USB port or side USB port on the device.
Features
The Telstra Gateway Pro™ has two USB 3.0 ports.
The following le systems are supported:
• NTFS
• FAT32
• FAT16
Page 39

39
TELSTRA GATEWAY PRO™ USER GUIDE
The USB storage device can have up to 10 partitions. If your device has more partitions the extra
partitions will be ignored.
The File Server is enabled by default. The only thing that you need to do is to plug your USB memory stick
or external hard disk in one of the USB ports of your Gateway. The connected storage will be visible on
your network. The table below provides a list of con guration options for connected devices:
Network File Server UPnP AV Media Server
Function
Store and access your data on your local
network
Make media les available for UPnP AV
capable devices like media players and
set-top boxes from your local network.
Access
Read and write
Read-only
Accessible from
Local network
Local network
Type of content shared
All les from all partitions and disks that
are connected*.
All les from the rst partition of the
connected disks*.
*Supported le type information: jpg, jpeg, jpe, png, wav, mp3, wma, m1a, m2a, m4a, mpa, mp4, ts, wmv, mpg, mpv, mpeg,
asf, avi, divx, v, mkv, m2ts, vob, m1v, m2v, m4v, mov, 3gp, pcm, tts. Maximum number of les displayed = 500 including
thumbnail les.
Figure 47: Telstra Gateway Pro™ Back USB Port
Figure 48: Telstra Gateway Pro™ Side USB Port
Page 40

40
TELSTRA GATEWAY PRO™ USER GUIDE
5.3. LAN IP Pool/DHCP Change
The Telstra Gateway Pro™ allows you to recongure the LAN IP pool if required. The following steps
outline how to congure the Gateway to suit existing devices connected on a complex network. If
you have an existing LAN IP range that does not match that of the Gateway’s default LAN IP pool
(192.168.15.1) the following will need to be completed to identify the required LAN IP range.
• For Windows computers:
− Open a command prompt, type in ipcong and press enter.
− The number next to Default Gateway is your current router/gateway IP address.
• For Apple computers:
− Access System Preferences and select Network.
− Select the appropriate port (e.g. Ethernet / Airport) Click Advanced and then the TCP/IP tab.
− The number next to Router is your current router/gateway IP address.
Once you have noted down the new LAN IP address to be used, you are ready to update these details
into the Gateway. Complete the following steps to change the LAN IP pool it in the Gateway:
• Connect your computer to the Gateway via an Ethernet connection. To access the Gateway Control
Panel page go to 192.168.15.1 in your browser and navigate to Advanced> Setup > LAN Setup.
Figure 49: LAN Setup
• Under LAN TCP/IP Setup change the IP Address/IP Subnet Mask to the new range.
Page 41

41
TELSTRA GATEWAY PRO™ USER GUIDE
Figure 50: TCP/IP and DHCP Settings
Figure 51: Port Forwarding
Note: The DHCP starting & ending IP addresses may also be changed if necessary.
• Click Apply and then click OK on the notication pop-up to apply the new settings and reboot the
Gateway.
• After the Gateway has rebooted test the new network settings by trying to log back into the Control Panel
using the new IP address for the Gateway.
5.4. Port Forwarding
Port forwarding allows the Telstra Gateway Pro™ to forward trafc from the Internet to a specic device
that is connected or a specic application on a device. You may require remote access to devices such as
servers, cameras etc. The Gateway allows you to congure these.
Important Note:
The ports referred to in this section are virtual, not physical. You will need the port numbers
that need to be forwarded and the IP addresses of the devices to be forwarded to.
Refer to device documentation for how to access this information.
Complete the following steps to congure port forwarding on the Gateway:
• Connect your computer to the Gateway via an Ethernet connection. To access the Gateway Control
Panel page go to 192.168.15.1 in your browser and navigate to Advanced> Advanced Setup >
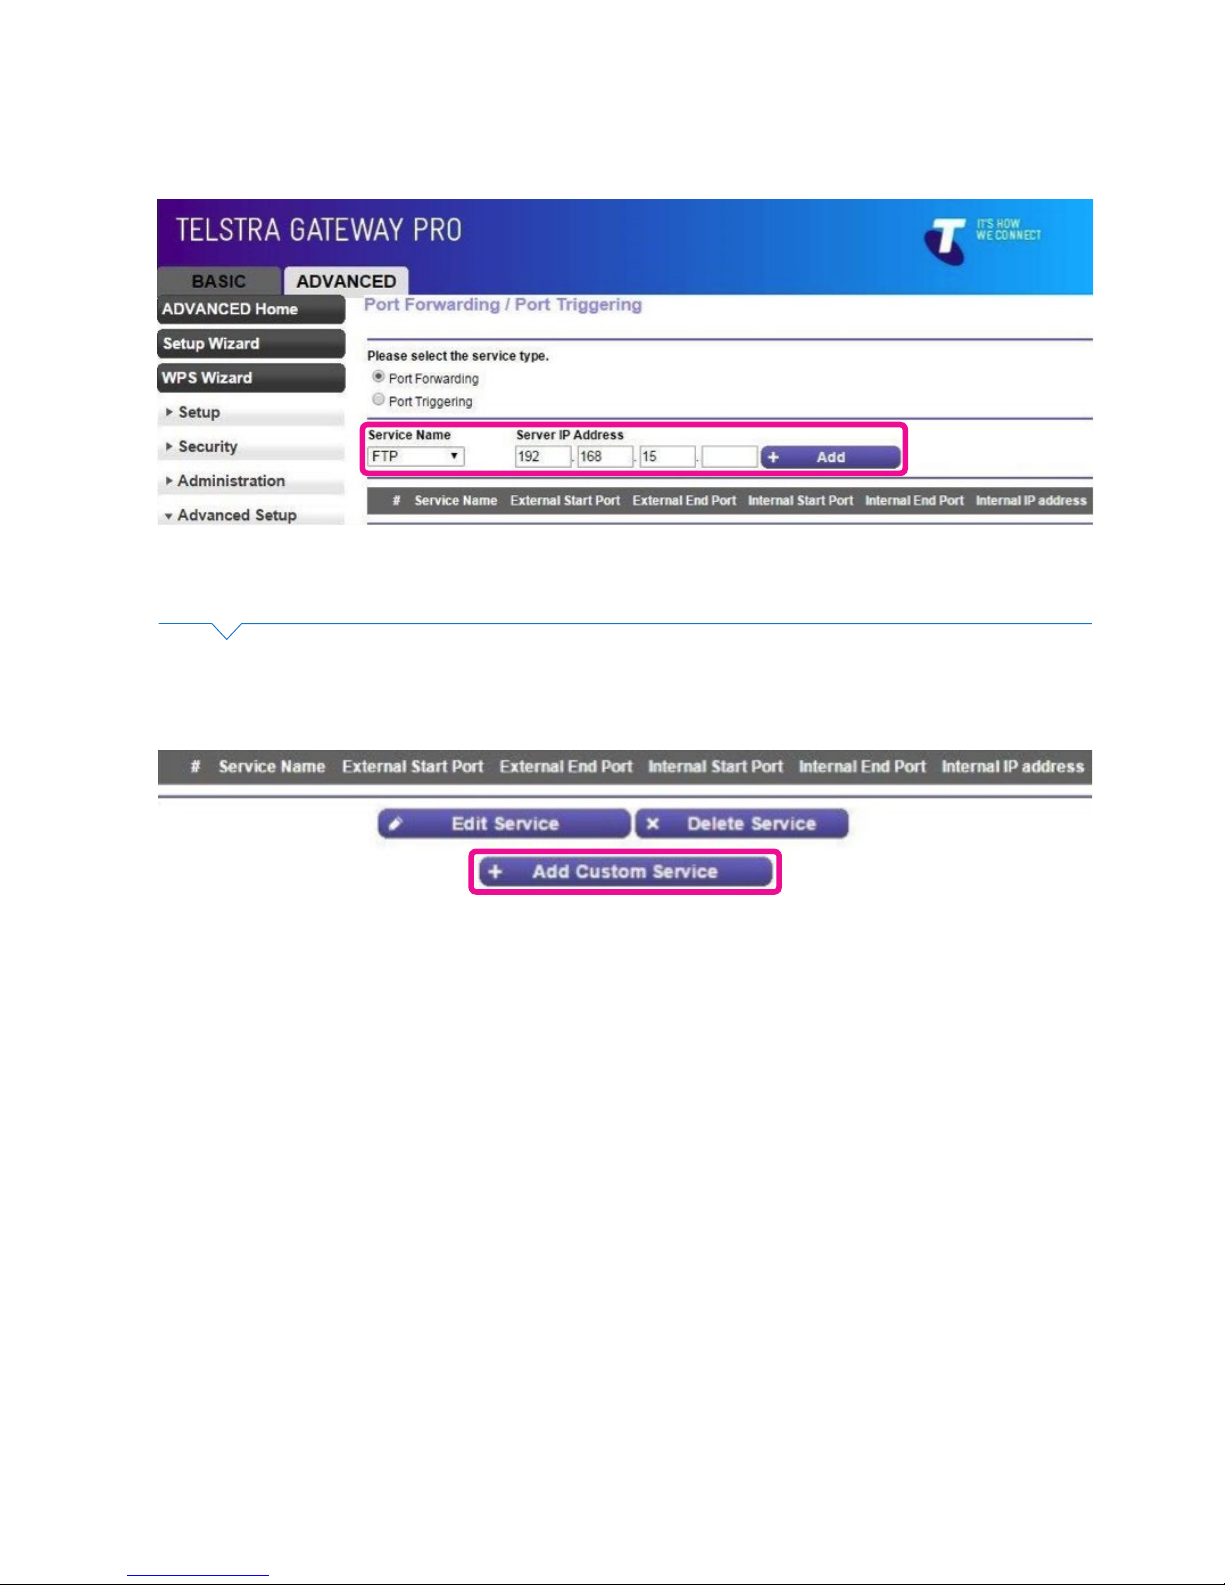
Port Forwarding / Port Triggering.
Page 42
42
TELSTRA GATEWAY PRO™ USER GUIDE
• From the Service Name dropdown box you can select from a number of common applications and
devices. Select the appropriate name and then enter the IP address of the device and click Add.
Figure 52: Port Forwarding Conguration
Figure 53: Add Custom Service
• If the appropriate service is not in the Service Name list you can create a new service by clicking the
Add Custom Service button.
• Enter the following Information:
− Service Name
− Protocol (either UDP, TCP or both)
− External Start and End Port numbers (if only 1 port then the same for both)
− If the same port numbers translate internally or if different port numbers need to be entered.
− IP address of the device on the internal network
• Click Apply.
Page 43

43
TELSTRA GATEWAY PRO™ USER GUIDE
Figure 54: Custom Services
5.5. Secure Remote Access via VPN
The Gateway’s Remote Access feature enables secure access to your business les from home.
Refer to the detailed VPN setup guide for information on how to enable and congure this option:
http://www.telstra.com.au/content/dam/tcom/small-business/bundles/pdf/telstra-gateway-prov7610-conguration-guide.pdf
Page 44

44
TELSTRA GATEWAY PRO™ USER GUIDE
6.1. The Internet is not working or WAN light is off
Sometimes a loss of service can occur and Broadband will temporarily be unavailable on your Telstra
Gateway Pro™, you will presented with the following error screen and the WAN light will be off.
6. TROUBLESHOOTING & GENERAL TIPS
Figure 55: WAN Light
Figure 56: No Internet Connection Notication
Please check that your DSL line or WAN cable has not been unplugged from the Gateway.
Important Note:
If your Internet light is ashing red your Gateway is now operating in mobile broadband failover
mode (if available), you can continue to use the Internet through mobile data.
If your issue is not resolved for an extended period of time please call Telstra support on 132000
and we will assist you further with your issue.
Page 45
45
TELSTRA GATEWAY PRO™ USER GUIDE
6.2. My devices aren’t connecting
Please check that Wi-Fi has been switched on. The Telstra Gateway Pro™ Wi-Fi button will glow blue
if Wi-Fi is enabled.
6.3. There is a red internet light (ADSL)
A red internet light indicates that your DSL port is connected but authentication was unsuccessful.
Figure 57: Wi-Fi Button
Figure 58: Front Panel Internet Light
Important Note:
Ensure that your wireless connection setting is enabled on your connecting device.
If you do not have a wireless adaptor on your connecting device, you may need to
purchase a wireless adaptor.
Page 46
46
TELSTRA GATEWAY PRO™ USER GUIDE
• In the Gateway Control Panel, check if the Internet is connected. Click on the Internet button.
Figure 59: Internet Error
Figure 60: Login and Password Details
• Check your login and password details, and update if required. Apply any changes.
6.4. Re-setting Telstra Gateway Pro™
Important Note:
You should only reset your Gateway as a last option. Try turning the device off and on again,
to see if this resolves the issue rst.
A factory reset will delete all saved information, so ensure you have all of your network login
and password information before completing the following steps.
********
Page 47
47
TELSTRA GATEWAY PRO™ USER GUIDE
There are 2 ways to perform a factory reset on the Telstra Gateway Pro™:
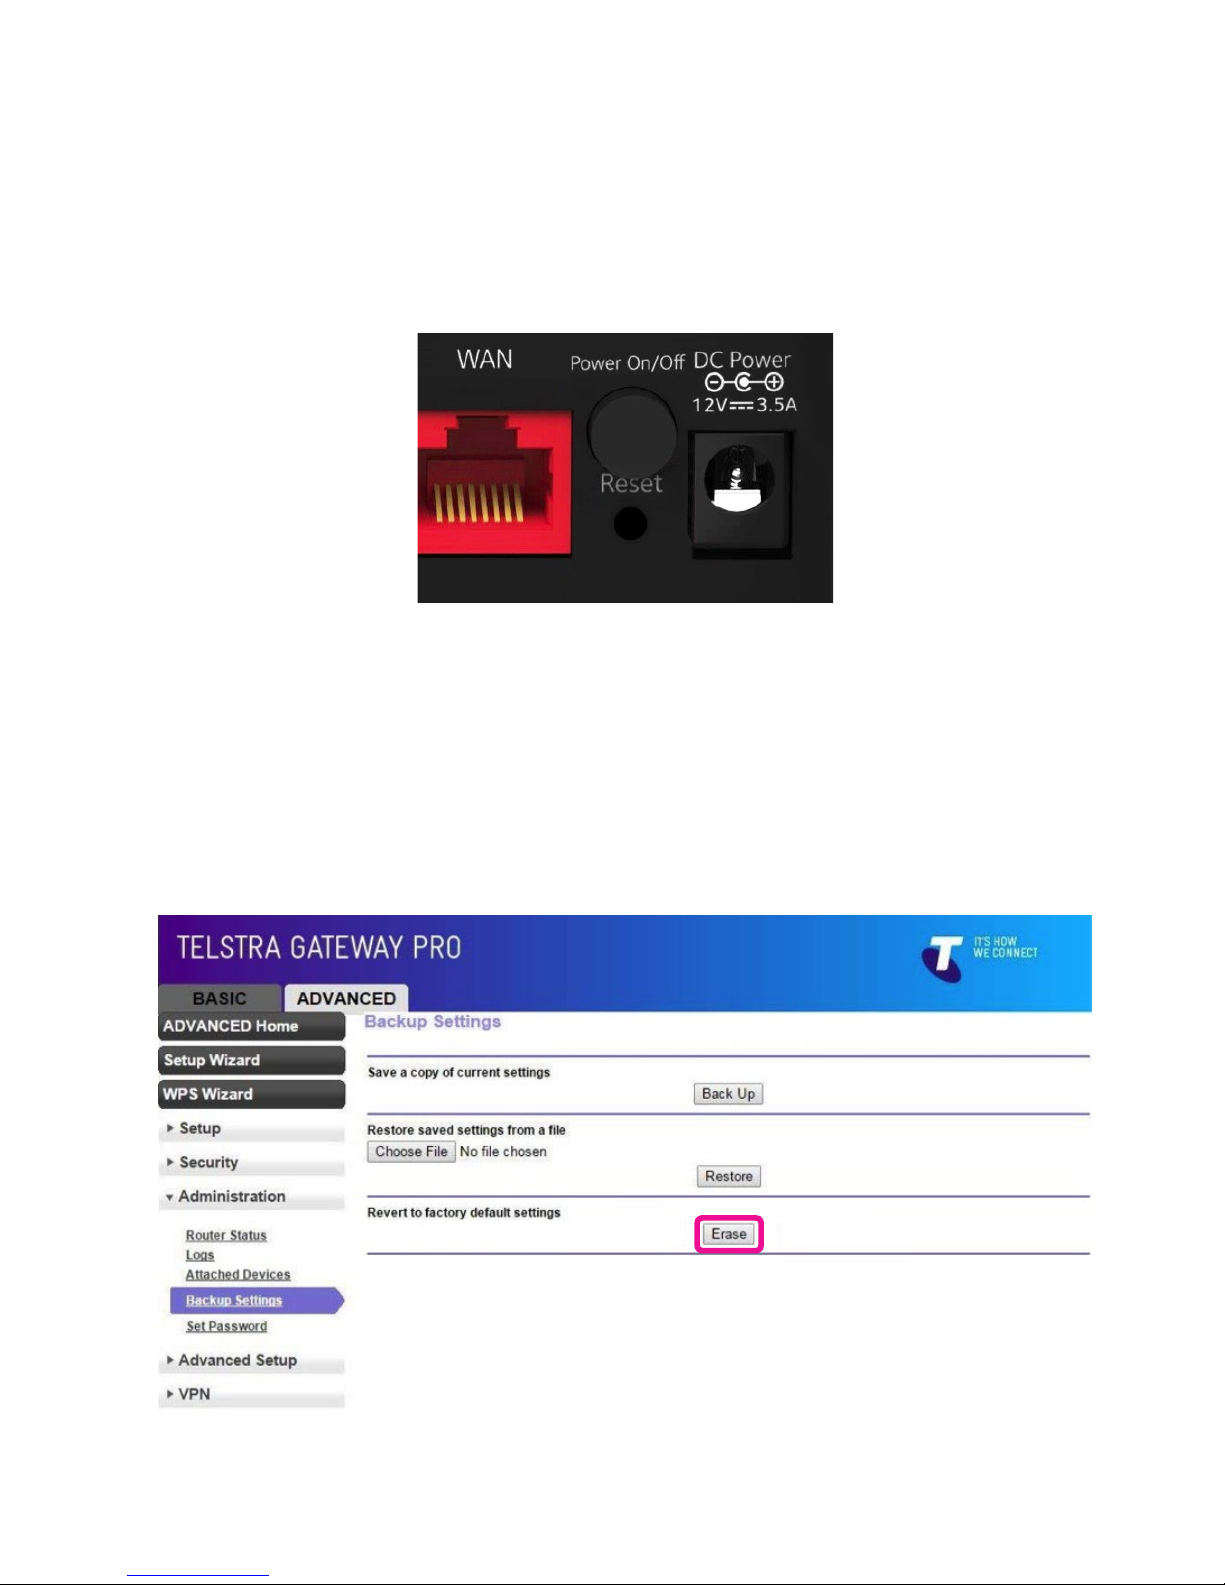
6.4.1. Method One- Hardware reset
• Insert a paper clip into the Reset hole and hold down for 10 seconds until all the lights on the front
panel start ashing. Then release the paper clip.
• The Gateway will reset and reboot.
6.4.2. Method Two-Reset from the Gateway Control Panel
• Log in to the Gateway Control panel. Select Advanced->Administration->Backup Settings and
click Erase.
Figure 61: Reset Hole
Figure 62: Revert To Factory Default Settings
Page 48

48
TELSTRA GATEWAY PRO™ USER GUIDE
• A conrmation screen will load. If you are sure you wish to erase all of the settings on the Gateway,
and reset to factory settings, click Ye s .
• The Reset Progress bar will appear. Once this reset bar has completed, the Gateway will reset and
reboot. You will be returned to the Gateway login screen.
Figure 63: Revert To Factory Default Settings
Figure 64: Reset Progress Screen
Page 49

49
TELSTRA GATEWAY PRO™ USER GUIDE
6.5. Wireless Adaptor Faults
6.5.1. General
Wi-Fi can be negatively affected by interference. Possible sources of interference or connection failure
are listed below:
• A sh tank (or large body of water) between modem and wireless adaptor
• Interference to or from a cordless phone (any device operating at 2.4GHz)
• Interference from fridges, microwave ovens etc.
• Out of date or incorrectly con gured Wi-Fi drivers on a PC
• Need to disable ‘Centrino’ (inbuilt wireless devices that some PCs have)
• If a PC has rewall software, it needs to be con gured to allow the Wi-Fi connection.
The rewall software may need to be deactivated or disabled.
• A wireless adaptor may be faulty
6.5.2. Lights Are Blinking Repeatedly
• The Wireless Adaptor is not associated with the Gateway. Check the SSID and WPA security settings
or reconnect using WPS.
• The Gateway may be out of range. Try moving the device closer to the Gateway.
6.5.3. No Lights Are Lit On The Wireless Adaptor
• The Wireless Adaptor is not inserted securely in the USB port (or USB cable if used) or the A6200
software is not installed.
• Remove and reinsert the Wireless Adaptor.
• Check the Windows device manager to see if the Wireless Adaptor is recognized and enabled. Reinstall
the A6200 software, if necessary.
• Insert the Wireless Adaptor in a different USB port on your computer if one is available
Figure 65: Netgear Wi-Fi USB Adaptor A6200
Page 50

50
TELSTRA GATEWAY PRO™ USER GUIDE
7.1. Devices compatible for use with the Telstra Gateway Pro™
The following devices are compatible with the Telstra Gateway Pro™:
Phones
Cisco SPA525G2 IP Phone
Cisco SPA504G IP Phone
Yealink T42G IP Phone
Yealink T48G IP Phone
Panasonic KX-TPA50 IP DECT Phone only *
Panasonic KX-TGP500 IP DECT Phone with Base
Panasonic KK-TPA60 DECT Phone only*
Panasonic KK-TGP600 IPDECT Phone with Base
Polycom VVX1500 Video Phone
*These phones will work as a secondary handset with a Panasonic TGP500 (TPA50) or
TPA600 (TPA60) DECT base station.
Mobile Broadband USB
Netgear 320U
Huawei 8372
Accessories
Universal Wi-Fi Extender
Powerlink Extender Kit XAVB5401
Netgear Wi-Fi AC Extender MAX
Netgear Wi-Fi USB adaptor AC A6200
Cisco SG 300-10 Ethernet Switch (10-Port with 8 POE)
Netgear 8 Port POE Gigabit Switch
Cisco SPA122 Analogue Adaptor (2-Port ATA)
Cisco SPA8000 Analogue Adaptor (8-Port ATA)
Plantronics CS540A Wireless Headset
7. TECHNICAL SPECIFICATIONS
Page 51

51
TELSTRA GATEWAY PRO™ USER GUIDE
7.2. About the Telstra Gateway Pro™
The Telstra Gateway Pro™ (Netgear V7610) is VDSL Gateway using Wave 2 Wi-Fi with Quad Stream &
MU-MIMO. This Gateway delivers Wi-Fi to multiple devices simultaneously for faster speeds and lower
latencies. Additionally the Gateway offers integrated FXS ports and CAT-IQ 2.0 for SIP based VoIP
connections. Integrated VPN server enables multiple VPN clients for secure connection for remote users
or remote ofce locations.
Netgear’s product sheet on the Telstra Gateway Pro™ can be found on the Telstra DOT site:
http://business.telstra.com.au/t5/DOT-Bundle-Help/ct-p/bundles_and_dot
Standard Interfaces
• One (1) VDSL2+/VDSL/ADSL2+/ADSL port
• One (1) Gigabit Ethernet WAN port
• Four (4) Gigabit Ethernet LAN ports
• 3x3 802.11 b/g/n 2.4GHz Wi-Fi
• 4x4 802.11 a/n/ac 5.0 GHz Wi-Fi
• Two (2) USB 3.0
• Two (2) FXS ports
• One (1) FXO port
• CAT-IQ 2.0
• Visual Indicators – Internet, WAN and
Voice LEDs
• Buttons – Wi-Fi on/off; WPS; DECT
Broadband Internet Service
• VDSL/ADSL Broadband internet service
• Cable/Fiber via Ethernet WAN port
• Mobile Broadband using USB dongle
Physical Specications
• Dimensions: 242.6 x 242.6 x 101mm
• Weight: 845g
• Mounting: Desktop or wall mount
Technical Specications
• VDSL2+/VDSL/ADSL2+/ADSL compliant
DSL interface
• IPoE, PPPoE, Mobile Broadband (for WAN failover)
• Auto-detect WAN interface
• IPV4/IPV6
• VLAN
• MU-MIMO for simultaneous streaming
• Quad-Stream Wave 2 Wi-Fi
• Wi-Fi Protected Access (WPA/WPA2 – PSK)
• Multiple SSID
• Guest Network access
• Broadsoft compliant SIP client
• IPSec VPN Server
• TR069, TR181 based remote conrmation
and management
• QOS for Egress and Ingress trafc
• USB 3.0, 1.5A shared between two ports
• Memory: 128 MB Flash and 256 MB DDR
Package Contents
• Two (2) Ethernet Cables
• One (1) Phone Cable
• One (1) DSL Cable
• One (1) DSL Filter
• Quick Start Guide
• 12 V, 3.5 Amp Power Adaptor
• Wall Mount Brackets
• Wi-Fi Network Security Card
™ are trade marks, and ® registered trade marks of Telstra Corporation Limited (ACN 051 775 556).
Netgear is registered trade mark of Netgear Inc.
500957_WEL0002_02/16
 Loading...