

Page 1
BUILT-IN OVEN
BO950MBSA
User Manual
ENG
SRB
Product images are for illustrative purposes only and may differ from the actual product.
Page 2

ENG
SAFETY INFORMATION
Intended Use
Thank you for buying Tesla Built-in Oven. Before unpacking it, please read these
instruc- tions carefully. Only then will you be able to operate your appliance safely
and correctly. Warmly recommend retain the instruction manual and installation
instructions for future use or for subsequent owners.
The appliance incorporates an earth connection for functional purposes only.
The appliance is only intended to be fitted in a kitchen. Observe the special
installation instructions.
Check the appliance if there is any damage after unpacking it. Do not connect
the appli- ance if it has been damaged. Only a licensed professional may connect
appliances without plugs. Damage caused by incorrect connection is not covered
under warranty. Only use this appliance indoors. The appliance must only be used
for the preparation of food and drink. The appliance must be supervised during
operation.
This appliance may be used by children over the age of 8 and by persons with
reduced physical, sensory or mental capabilities or by persons with a lack of
experience or knowl- edge if they are supervised or are instructed by a person
responsible for their safety how to use the appliance safely and have understood
the associated hazards.
Children must not play with, on, or around the appliance. Children must not clean
the appliance or carry out general maintenance unless they are at least 8 years old
and are being supervised.
Keep children below the age of 8 years old at a safe distance from the appliance
and power cable.
And please always slide accessories into the cavity the right way round.
2
Page 3

WARNING!
ENG
Risk of electric shock!
1. Incorrect repairs are dangerous.
Repairs may only be carried out and
damaged power cables replaced
by one of our trained after-sales
technicians. If the appliance is
defective, unplug the appliance from
the mains or switch off the circuit
breaker in the fuse box. Contact the
aftersales service.
2. The cable insulation on electrical
appliances may melt when touching
hot parts of the appliance. Never bring
electrical appliance cables into contact
with hot parts of the appliance.
3. Do not use any highpressure cleaners
or steam cleaners, which can result in
an electric shock.
4. A defective appliance may cause
electric shock. Never switch on a
defective appliance. Unplug the
appliance box. Contact the after-sales
service.
Risk of burns!
1. The appliance becomes very hot.
Never touch the interior surfaces of the
appliance or the heating elements.
2. Always allow the appliance to cool
down.
3. Keep children at a safe distance.
4. Accessories and ovenware become
very hot. Always use oven gloves to
remove acces sories or ovenware from
the cavity.
5. Alcoholic vapors may catch fire
in the hot cooking compartment.
Never prepare food containing large
quantities of drinks with high alcohol
content. Only use small quanti ties of
drinks with high alcohol content. Open
the appliance door with care.
Risk of scalding!
1. The accessible parts become hot
during operation. Never touch the hot
parts. Keep children at a safe distance.
2. When you open the appliance door,
hot steam can escape. Steam may
not be visible, depending on its
temperature. When opening, do not
stand too close to the appliance. Open
the appliance door carefully. Keep
children away.
3. Water in a hot cavity may create hot
steam. Never pour water into the hot
cavity.
Risk of injury!
1. Scratched glass in the appliance door
may develop into a crack. Do not
use a glass scraper, sharp or abrasive
cleaning aids or detergents.
2. The hinges on the appliance door
move when opening and closing the
door, and you may be trapped. Keep
your hands away from the hinges.
Risk of fire!
1. Combustible items stored in the
cavity may catch fire. Never store
combustible items inthe cavity. Never
open the appliance door if there is
smoke inside. Switch of the appliance
and unplug it from the circuit breaker
in the fuse box.
2. A draught is created when the
appliance door is opened.
Greaseproof paper may come into
contact with the heating element and
catch fire. Do not place greaseproof
paper loosely over accessories during
preheating. Always weight down the
greaseproof paper with a dish or a
baking tin. Only cover the surface
required with greaseproof paper.
3
Page 4

ENG
Greaseproof paper must not protrude
over the accessories.
Hazard due to magnetism!
Permanent magnets are used in the
control panel or in the ectronic implants,
e.g. heart pacemakers or insulin pumps.
Wearers of electronic implants must stay
at least 10 cm away from the control
panel.
Causes of Damage
1. Accessories, foil, greaseproof paper or
ovenware on the cavity floor: do not
place accessories on the cavity floor.
Do not cover the cavity floor with any
sort of foil or greaseproof paper. Do
not place ovenware on the cavity floor
if a temperature of over 50 ºC has been
set. This will cause heat to accumulate.
The enamel will be damaged.
2. Aluminum foil: Aluminum foil in the
cavity must not come into contact
with the door glass. This could cause
permanent discoloration of the door
glass.
3. Silicone pans: Do not use any
silicone pans, or any mats, covers or
accessories that contain silicone. The
oven sensor may be damaged.
4. Water in a hot cooking compartment:
do not pour water into the cavity
when it is hot. This will cause steam.
The temperature change can cause
damage to the enamel.
5. Moisture in the cavity: Over an
extended period of time, moisture in
the cavity may lead to corrosion. Allow
the appliance to dry after use. Do not
keep moist food in the closed cavity for
extended periods of time. Do not store
food in the cavity.
6. Cooling with the appliance door
open: Following operation at high
temperatures, only allow the appliance
to cool down with the door closed.
Do not trap anything in the appliance
door. Even if the door is only left open
a crack, the front of nearby furniture
may become damaged over time.
Only leave the appliance to dry with
the door open if a lot of moisture
was produced while the oven was
operating.
7. Fruit juice: when baking particularly
juicy fruit pies, do not pack the baking
tray too generously. Fruit juice dripping
from the baking tray leaves stains that
cannot be removed. If possible, use the
deeper universal pan.
8. Extremely dirty seal: If the seal is very
dirty, the appliance door will no longer
close properly during operation.
The fronts of adjacent units could be
damaged. Always keep the seal clean.
9. Appliance door as a seat, shelf or
worktop: Do not sit on the appliance
door or place or hang anything on
it. Do not place any cookware or
accessories on the appliance door.
10. Inserting accessories: depending on
the appliance model, accessories can
scratch the door panel when closing
the appliance door. Always insert the
accessories into the cavity as far as they
will go.
11. Carrying the appliance: do not carry or
hold the appliance by the door handle.
The door handle cannot support the
weight of the appliance and could
break.
12. If you use the residual heat of the
switched keep food warm, a high
moisture content inside the cavity can
occur. This may lead to condensation
and can cause corrosion damage of
your high quality appliance as well as
harm your kitchen. Avoid condensation
by opening the door or use “Defrost”
mode.
4
Page 5
INSTALLATION
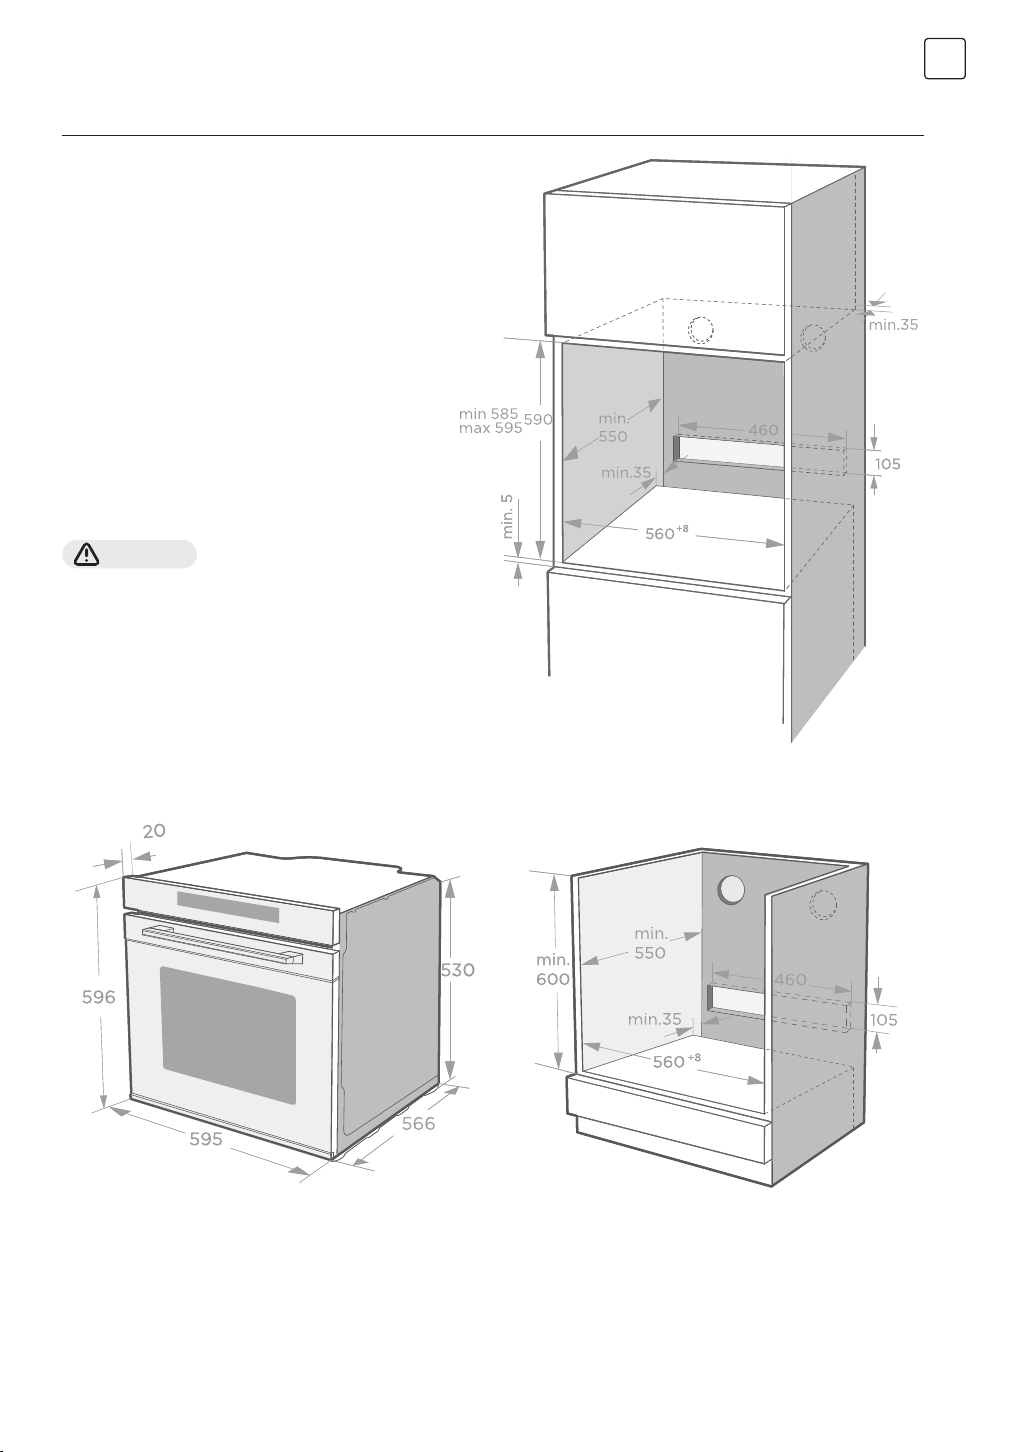
To operate this appliance safe , please be sure
that it has been installed to a professional
standard respecting the installation instructions .
Damages occur because of incorrect installation
are not within the warranty.
While doing the installation , please wear
protective gloves to prevent yourself from getting
cut by sharp edges .
Check the appliance if there is any damage
before installation and do not connect the
appliance if there is .
Before turning on the appliance , please clean up
all the packaging materials and adhe- sive film
from the appliance
The dimensions attached are in mm.
It is necessary to have the plug accessible or
incorporate a switch in the fixed wiring, in order
to disconnect the appliance from the supply after
installation when necessary.
WARNING!
The appliance must not be installed behind a
decorative door in order to avoid
overheating.
ENG
.
.
5
Page 6
ENG
OPERATING THE APPLIANCE
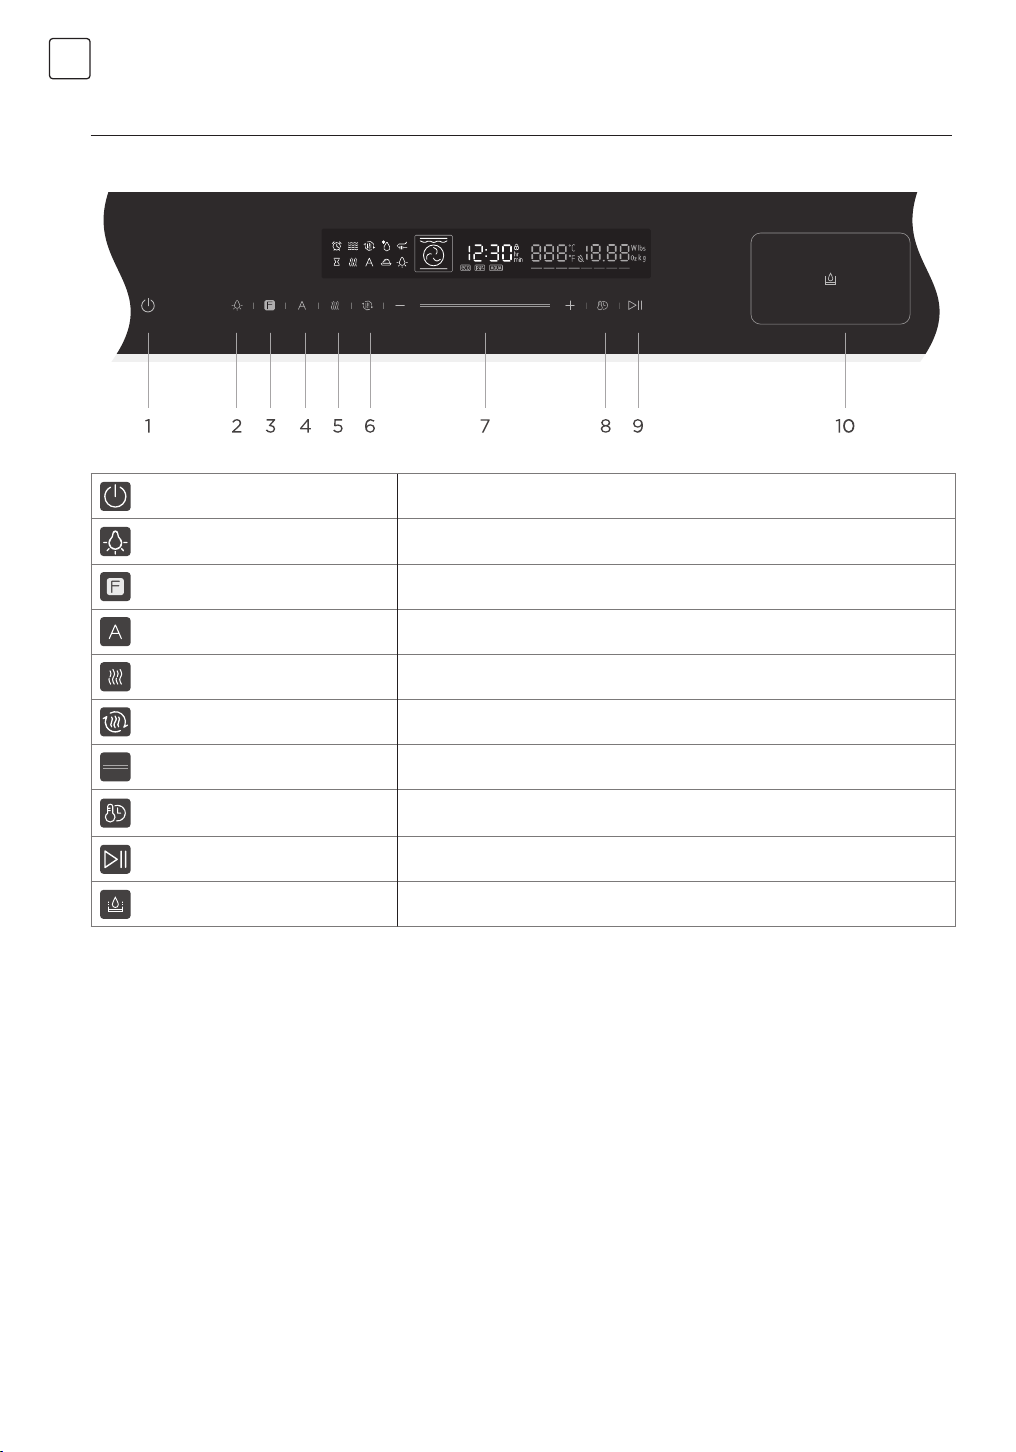
Component
1. Cancel Cancel
2. Lamp ON / OFF Switch on and off the lamp.
3. Oven – Function Press this symbol to change heating mode
4. AUTO Use this to choose auto menu or descaling and cleaning.
5. Steam Steam: Manual adding of steam
6. Quick preheat Use this to have a quick preheat.
7. Slider Slide it to change the adjustment values shown in the display.
8. Duration & Clock Setting
Temperature Setting
9. Start / Pause Start and pause the cooking process.
10. Water box Water box for steam function, the box will pop-up after press it.
Set a duration time then select function & set clock in standby mode. Press to
set temperature.
Before using the appliance
First using for the first time
Before using the appliance to prepare food for the first time, you must clean the cavity and accessories.
1. Remove all stickers, surface protection foils and transport protection parts.
2. Remove all accessories and the side-racks from the cavity.
3. Clean the accessories and the side-racks thoroughly using soapy water and a dish cloth or soft brush.
4. Ensure that the cavity does not contain any leftover packaging, such as polystyrene pellets or wooden piece which may
cause risk of fire
5. Wipe the smooth surfaces in the cavity and the door with a soft, wet cloth.
6. To remove the new-appliance smell, heat up the appliance when empty and with the oven door closed.
7. Keep the kitchen highly ventilated while the appliance is heating up first time. Keep children and pets out of the kitchen
during this time. Close the door to the adjacent rooms.
8. Adjust the settings indicated. You can find out how to set the heating type and the temperature in the next section.
6
Page 7
Settings Temperature Time
Heating Mode 250ºC 1h
After the appliance has cooled down:
1. Clean the smooth surfaces and the door with soapy water and a dish cloth.
2. Dry all surfaces
3. Install the side-racks
Setting the time
Before the oven can be used, the time should be set.
1. After the oven has been electrically connected, touch the clock symbol
slider or “+/-“symbol.
2. Touch clock symbol
3. Touch clock symbol
NOTE: The clock has a 24 hour display.
again then you can set time in minutes by slider or “+/-“symbol.
to finish the setting
then you can set time of day in hours by
Types of heating
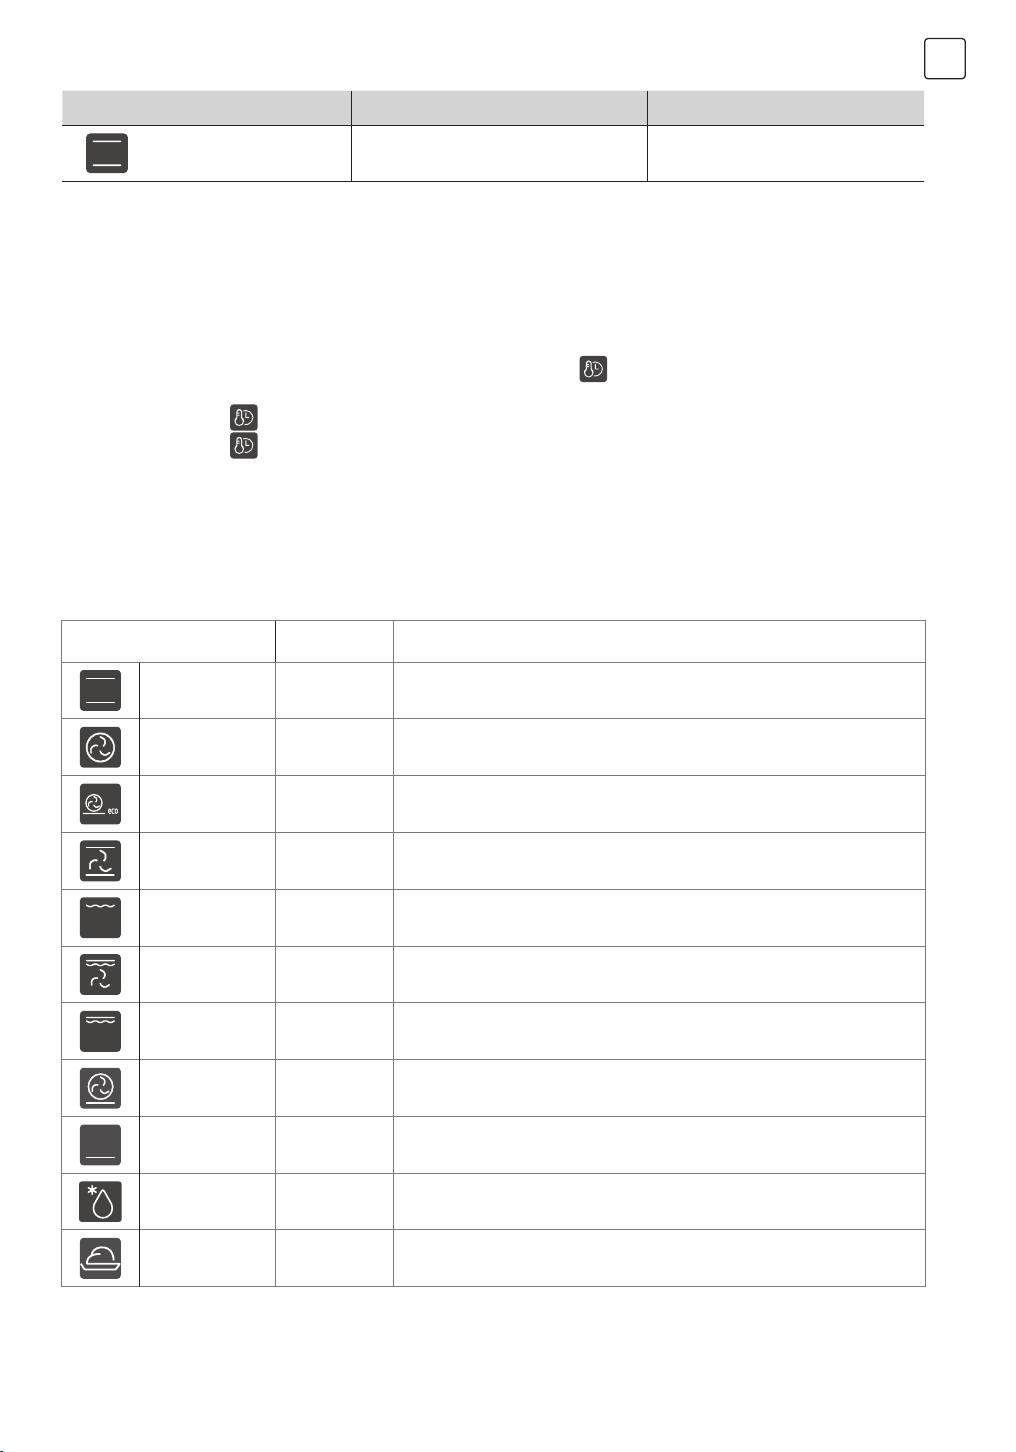
Your appliance has various operating modes which make your appliance easier to use. To enable you to find the correct type
of heating for your dish, we have explained the di°erences and scopes of application here.
ENG
Types of Heating Temperature Use
Conventional 30~250ºC
Convection 50~250ºC
ECO 140~240ºC For energy-saved cooking.
Conventional
+ Fan
Radiant Heat 150~250ºC
Double Grill +
Fan
Double Grill 150~250ºC For grilling flat items and for browning food.
Pizza 50~250ºC
Bottom Heat 30~220ºC
Defrost _ For gently defrosting frozen food.
50~250ºC
50~250ºC
For traditional baking and roasting on one level. Especially suitable for
cakes with moist toppings.
For baking and roasting on one or more levels. Heat comes from the ring
heater surrounding the fan evenly.
For baking and roasting on one or more levels. The fan distributes the heat
from the heating elements evenly around the cavity.
For grilling small amounts of food and for browning food. Please put the
food in the center part under the grill heating element.
For grilling flat items and for browning food. The fan distributes the heat
evenly around the cavity.
For pizza and dishes which need a lot of heat from underneath. The
bottom heater and ring heater will work.
For add extra browning to the bases of pizzas, pies, and pastries. Heating
come from the bottom heater.
Dough Proving 30~45ºC For making yeast dough and sourdough to prove and culturing yogurt.
7
Page 8
ENG
Types of additional function Temperature Time
Meat Probe 50ºC~100ºC
CAUTION!
NOTE
1. To defrost big portions of food, it is possible to remove the side-racks and place the container on the cavity floor
2. To warming tableware, it is beneficial to remove the side-racks and the heating modes “Hot Air Grilling” and “Fan
Heating” with temperature setting of 50°C are useful. “Hot Air Grilling” should be used, if more than half of the cavity floor
is covered by the tableware
3. Due to an optimum evenness of heat distribution inside the cavity during “Fan Heat- ing”, the fan will work at certain times
of the heating process, to guaranty the best possible performance.
If you open the appliance door during an on-going operation, the operation will be paused. Please be
especially careful with the risk of burns.
For helping baking meat like steak
and chicken.
Cooling fan
The cooling fan switches on and off as required. The hot air escapes above the door.
CAUTION!
Do not cover the ventilation slots. Otherwise, the appliance may overheat.
To make the appliance cools down more quickly after the operation, the cooling fan may continue to
run for a period afterwards.
Using your appliance
Cooking with oven
1. After the oven has been electrically connected, touch the oven-function symbol to select functions, use the slider or
“</>” symbol to set cooking temperature.
2. Touch Start / Pause symbol
3. During the cooking process, you can touch
NOTE: After temperature setting, you can touch clock symbol
“+/-“symbol.
oven begin to work, if not, oven will back to clock after 10 minutes.
to cancel it.
to set the cooking duration time, you can set it by slider or
Quick preheat
You can use quick preheat to shorten the preheat time. When you select a function, touch the quick preheat symbol ,the
mark of quick preheat in the screen will light up. If this function can’t quick preheat, then there will be a “beep”, there is no
quick preheat in defrost and dough proving.
Change during cooking
During the period of appliance operating, you can change the heating type setting and temperature setting by oven-function
or slider. After the change, if there no other action after 6 seconds the oven will heat as what you changed.
If you want change cooking duration time in the cooking process, please touch
After the change, if there no other action after 6 seconds the oven will work as what you changed .
When you want cancel the cooking process, please touch
NOTE
CAUTION!
Changing modes/temperature/rest cooking time may have some negative influences on the result of
cooking, we warmly recommend you not to do so unless you are well experienced on cooking.
After the appliance switched on, it becomes very hot especially inside the cavity. Never touch the
interior surfaces of the appliance or the heating elements. Use oven gloves to remove accessories or
ovenware from the cavity, and allow the appliance to cool down. Keep children at a safe distance at the
same time to avoid the injury of burns.
8
and change it by slider or “+/-“symbol.
Page 9
Childproof lock
Your appliance has a childproof lock so that children cannot switch it on accidentally or change any settings.
When you give a long press for 3 seconds, childproof lock is activated. A long press for 3 seconds again the oven is unlocked.
You can activate and deactivate childproof lock when the oven is work or not. Give
switch on and of off the childproof lock. When the childproof is on, there will be a in the status bar.
a long press for 3 seconds you can
Meat probe
1. Your oven has a probe function. When you insert the probe into the probe hole in the oven cavity, the screen will display
"Prob".
2. Press the "
3. Press the "<" or ">" key or the slider bar to adjust the probe temperature.
4. Press the "
5. When the centre temperature of the food reaches the probe setting, the buzzer will sound 5 times and the screen will
display "End".
NOTE
1. During cooking, open the oven door or press " " to pause cooking.
2. During cooking, press the "<" or ">" key or the slide bar to change the probe temperature
" key to select the function.
" key to start cooking.
Steam
1. When oven is under standby status, press steam key can add steam after mode is set.
2. Steam can be manually add by pressing steam key during cooking.
3. When oven is under standby status, press steam key can set steam mode and add steam for cooking. Steam level default
setting as level 1.
ENG
NOTE
Steam has three levels, amount of steam increase with increase of level. Press steam key for once the level will be 1. Press
twice will set level 2 and three time for level 3. Whatever level is chosen, light on screen right will show the level (L01/L02/
L03). Press steam key for four times will cancel adding of steam and icon for steam and steam level will off .
Due to vibration caused by transportation, water box may be pop-up status after opening the package. Remember pushing it
back.
Water box
Add water
Method 1
1. Press the water box, take out the entire
water box and add water
2. Press the water box, pull out the water box halfway
and add water
9
Page 10
ENG
Water box
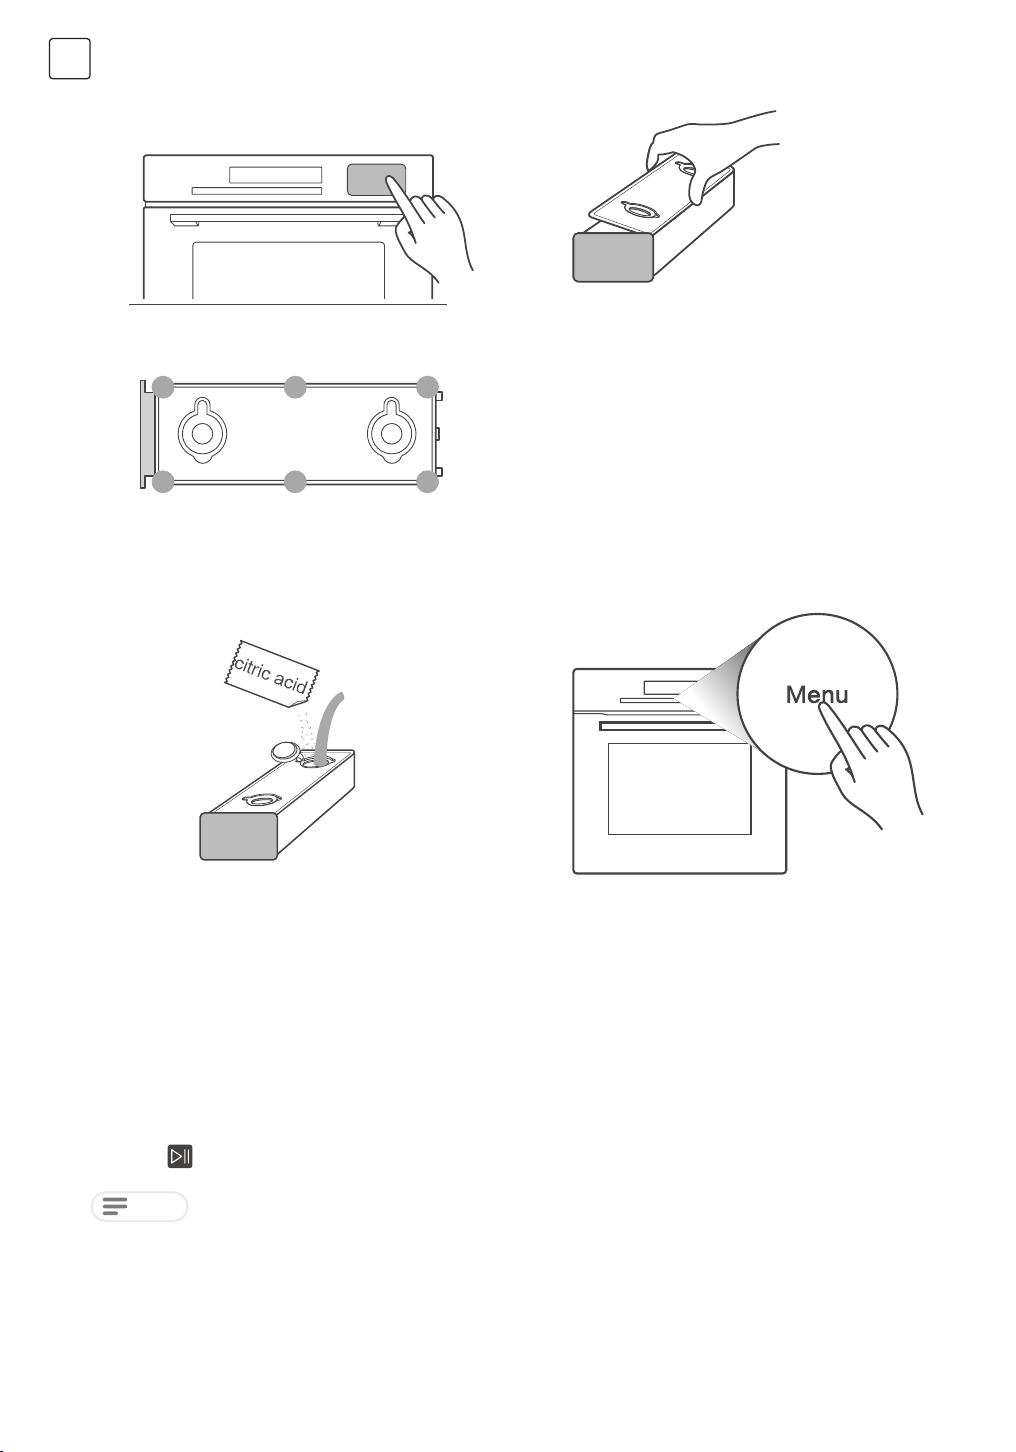
Clean water box
1. Press water box and take it out
Smart cleaning
2. Take out water box cover and clean the box
3. Fit the cover and sealing gasket, press blue points
showed on the picture. Avoid stuck cause by fixing
displacement
1. Take out water box cover and add half bag
citric acid.
2. Press menu key one time under standby or clock
running status, then slide slider to left or press – key
enter descaling mode.
Steam cleaning function
This function use steam to soften scales inside the cavity which make the cavity easier to clean.
1. Power up the system, Push and take out water box. Inject 1000ml fresh water into the water box.
2. Push the water tank into the appropriate location of the appliance.
3. In standby mode, touch "A "button for several times until the screen display "A11" which means the oven enters steam
clean function. Time area shows default time "05:00min".
4. Press "
Time of steam clean cannot be adjusted. Press pause key or open door the clean process will paused. Close the door and
press start key cleaning process will restart.
" to start the program.
NOTE
10
Page 11
Auto Scale Removal Function
For best cleaning results, we recommend that you use detergent sodium citrate, which were randomly for descaling steam
oven. Follow the manufacturer's instructions on the packaging. It is suggested that descaling function should be used after
the steam function has been run for 20 hours.
1. Power up the system, remove the water tank, inject 1000ml of fresh water into the water tank, adding a pack of descaling
agent.
2. Push the water tank into the appropriate location of the appliance.
3. In standby mode, touch" "button for several times until the screen display "A10" which means the oven enters auto scale
removal function. "min" and default time "40:00" lighten, tank icon show the current water level ( Water, lack of water, full
of water ), other icons disappear.
4. Press "
5. When the remained time counts down to 10:00, the program is paused and reminds lack of water. Take out the water
tank and pour the water in the tank. Thoroughly clean the water tank.
6. Replace the water, repeat steps 3 to 4.
The descaling process shall not be shut down. If the descaling process shut down before the end, the entire program must
be started from step 3.
" to start the program.
NOTE
ACCESSORIES
Your appliance is accompanied by a range of accessories. Here, you can find an overview of the accessories included and
information on how to use them correctly.
ENG
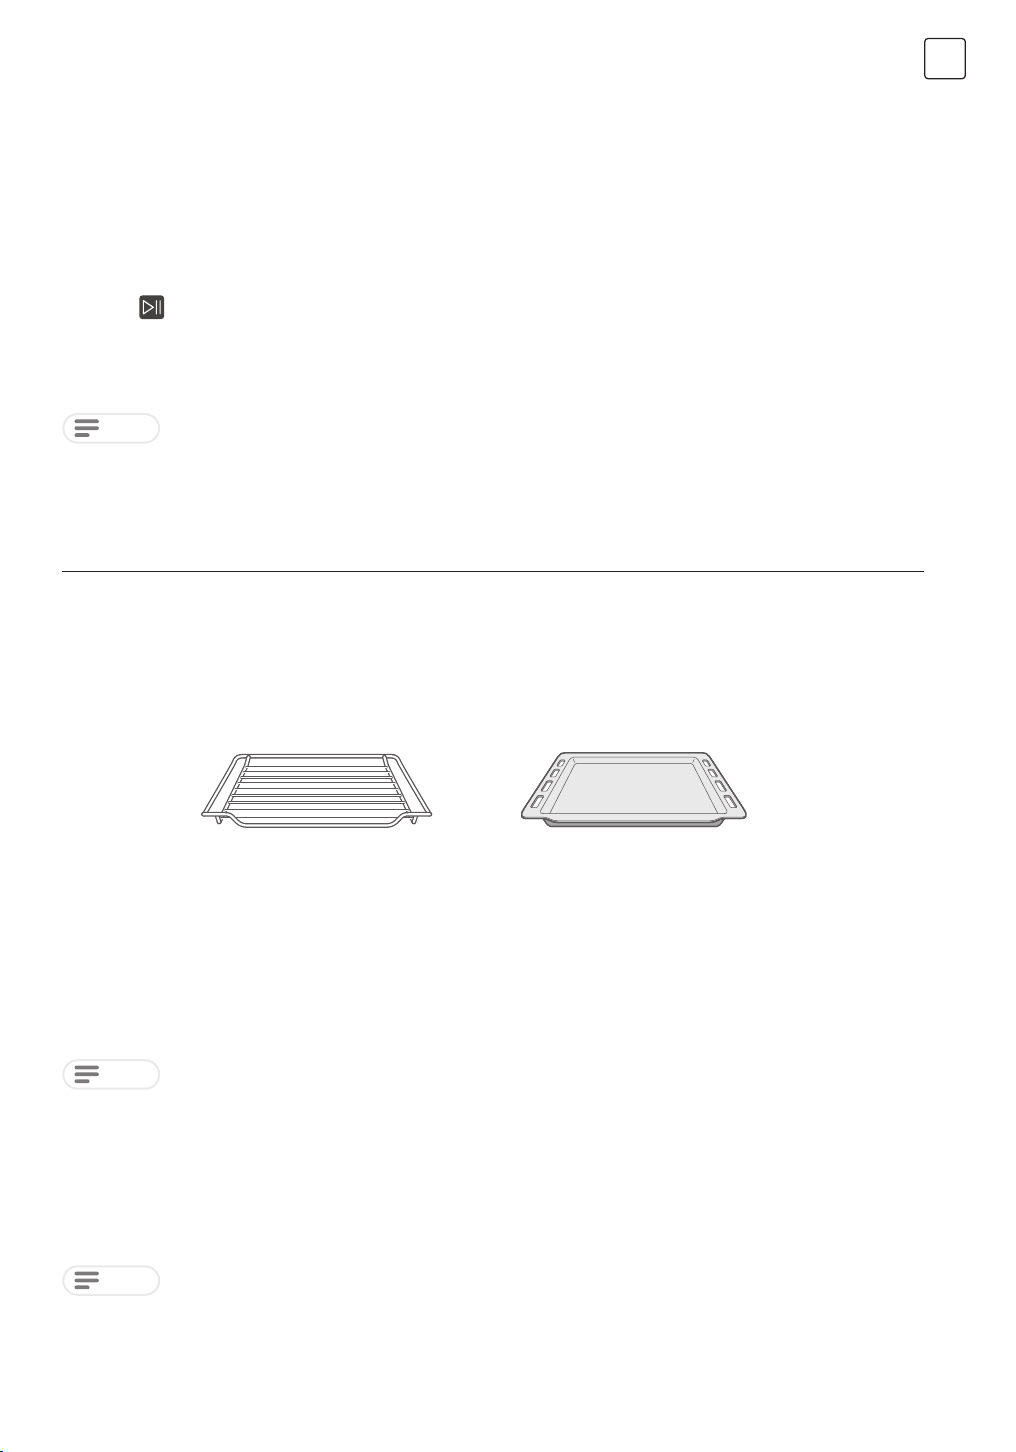
Accessories included
Your appliance is equipped with the following accessories:
Wire Rack
For ovenware, cake tins and
ovenproof dishes. For roasts and
grilled food
You can use the tray to place liquid or cooking food with juice.
Only use original accessories. They are specially adapted for your appliance.
You can buy accessories from the after-sales service, from specialist retailers or online.
NOTE
The accessories may deform when they become hot. This does not affect their function. Once they have cooled down again,
they regain their original shape.
Inserting accessories
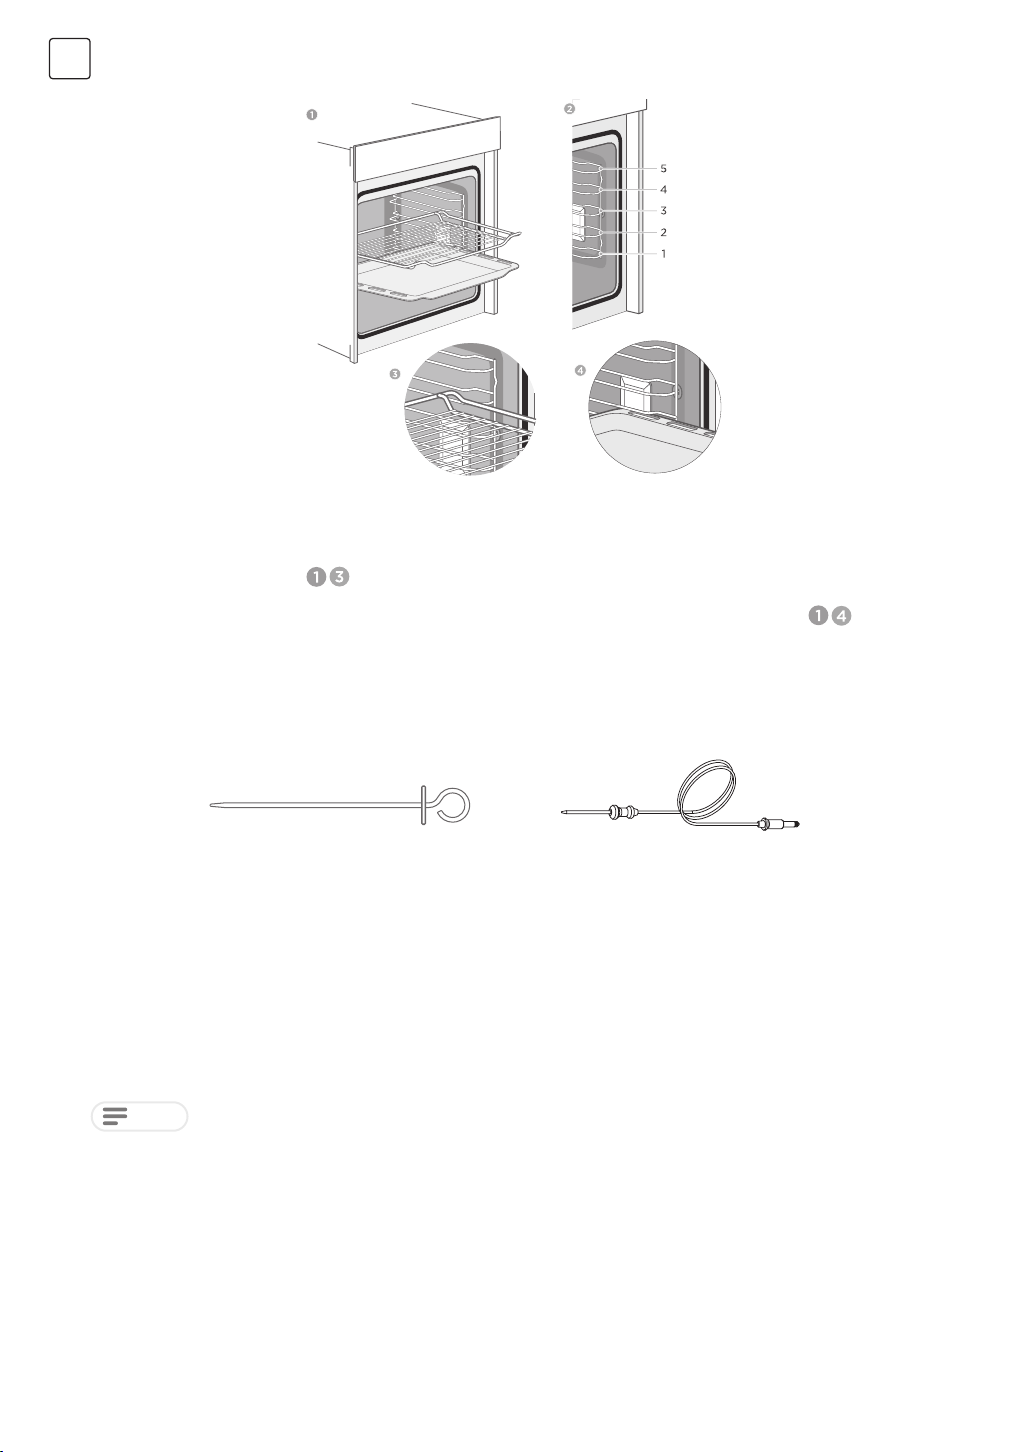
The cavity has five shelf positions. The shelf positions are counted from the bottom up. The accessories can be pulled out
approximately halfway without tipping.
Baking Tray
For tray bakes and small baked
products.
NOTE
1. Ensure that you always insert the accessories into the cavity the right way round.
2. Always insert the accessories fully into the cavity so that they do not touch the appliance door.
11
Page 12
ENG
Locking function
Accessories can be approximately pulled halfway out until they lock in place. The locking function prevents accessories from
tilting with the gravity of food and accessories themselves while they get pulled out. Accessories should be inserted into
cavity correctly for the tilt protection.When inserting the wire rack, ensure the wire rack is onto the right
facing direction like the picture
When inserting the backing tray, ensure the backing tray is onto the right facing direction like the picture .
Optional accessories
You can buy optional accessories from the after-sales service, from specialist retailers or online. Accessories below are
available to be purchased , and you are also welcome to see your sales brochures for more details.
For making some barbecue like meat
Barbecue stick
and vegetables;
Insert the probe into the center of meat
or poultry. Away from fat or bone
Meat probe
Inserting accessories:
Barbecue sticks are only suitable with rotary system , when using barbecue sticks , put them onto the wire rack of rotary
system . And before inserting accessories into cavity , please insure all the food is well put ,then slightly insert them into level
2 of the cavity.
NOTE
1. The rotary system is not continuously rotating, you can choose to make it turned during the process of cooking based on
the performance of food. Make sure you have dressed with heat insulating gloves and be careful with the heat rushing
out while opening the door of the oven. The rotary system can make 90 degree rotations and probably you don’t even
need to turn it at all.
2. The barbecue sticks are dangerous with cuspidal heads, please make sure children and disabled people are away with
them. And check sticks are not into the convention cover before oven gets turned on cause this will make damage to
oven and could hurt people also.
3. We strongly suggest to use level 2 of cavity, top + bottom heating function to bake while using rotary system and
barbecue sticks.
When purchasing, please always quote the exact order number of the optional accessory.
12
Page 13
ENERGY EFFICIENT USE
1. Remove all accessories, which are not necessary during the cooking & baking process.
2. Do not open the door during the cooking & baking process.
3. If you open the door during cooking & baking, switch the mode to “Lamp”. (Without change the temperature setting)
4. Decrease the temperature setting in not fan assisted modes to 50°C at 5min to 10min before end of cooking & baking
time. So you can use the cavity heat to complete the process.
5. Use “Fan Heating”, whenever possible.
6. You can reduce the temperature by 20°C to 30°C. You can cook and bake using “Fan Heating” on more than one level at
the same time.
7. If it is not possible to cook and bake diferent dishes at the same time, you can heat one after the other to use the preheat
status of the oven.
8. Do not preheat the empty oven, if it is not required.
If necessary put the food into the oven immediately after reaching the temperature indicated by switching of the
indicator light the first time.
9. Do not use reflective foil, like aluminum foil to cover the cavity floor.
10. Use the timer and or a temperature probe whenever possible.
11. Use dark matt finish and light weighted baking molds and containers. Try not to use heavy accessories with shiny
surfaces, like stainless steel or aluminum.
ENVIRONMENT
ENG
The packaging is made for protect your new appliance against
damages during transport. The materials used are selected carefully
and should be recycled. Recycling reduces the use of raw materials
and waste. Electrical and electronic appliances often contain valuable materials. Please do not dispose of it with your household waste.
HEALTH
Acrylamide occurs mainly by heating up starchy food (i.e. potato, French fries, bread) to very high temperatures over long
times.
Tips
1. Use short cooking times.
2. Cook food to a golden yellow surface color, do not burn it to dark brown colors.
3. Bigger portions have less acrylamide.
4. Use “Fan Heating” mode if possible.
5. French fries: Use more than 450g per tray, place them evenly spread and turn them time by time. Use the product
information if available to get the best cooking result.
13
Page 14
ENG
MAINTENANCE YOUR APPLIANCE
Cleaning Agent
With good care and cleaning, your appliance will retain its appearance and remain fully functioning for a long time to come.
We will explain here how you should correctly care for and clean your appliance.
To ensure that the different surfaces are not damaged by using the wrong cleaning agent, observe the information in the
table. Depending on the appliance model, not all of the areas listed may be on/in your appliance.
CAUTION!
Risk of surface damage
Do not use:
1. Harsh or abrasive cleaning agents.
2. Cleaning agents with a high alcohol content.
3. Hard scouring pads or cleaning sponges.
4. High-pressure cleaners or steam cleaners.
5. Special cleaners for cleaning the appliance while it is hot.
Wash new sponge cloths thoroughly before use.
Tip
Highly recommended cleaning and care products can be purchased through the after-sales service.
Observe the respective manufacturer’s instructions.
Area Appliance exterior Cleaning
Hot soapy water:
Clean with a dish cloth and then dry with a soft cloth.
Appliance exterior Stainless steel
front
Remove flecks of limescale, grease, starch and albumin (e.g. egg white)
immediately.
Corrosion can form under such flecks
Special stainless steel cleaning products suitable for hot surfaces are available
from our after-sales service or from specialist retailers. Apply a very thin layer of the
cleaning product with a soft cloth.
Hot soapy water:
Plastic
Painted surfaces
Clean with a dish cloth and then dry with a soft cloth. Do not use glass cleaner or a
glass scraper.
Hot soapy water:
Clean with a dish cloth and then dry with a soft cloth.
Hot soapy water:
Control panel
Clean with a dish cloth and then dry with a soft cloth. Do not use glass cleaner or a
glass scraper.
Hot soapy water:
Door panels
Clean with a dish cloth and then dry with a soft cloth.
Do not use a glass scraper or a stainless steel scouring pad.
Hot soapy water:
Door handle
Enamel surfaces and self-cleaning
surfaces
Clean with a dish cloth and then dry with a soft cloth.
If descaler comes into contact with the door handle, wipe it off immediately.
Otherwise, any stains will not be able to be removed.
Observe the instructions for the surfaces of the cooking com- partment that follow
the table.
Hot soapy water:
Glass cover for the interior lighting
Clean with a dish cloth and then dry with a soft cloth.
If the cooking compartment is heavily soiled, use oven cleaner.
14
Page 15
ENG
Door seal
Do not remove
Stainless steel door cover
Hot soapy water:
Clean with a dish cloth. Do not scour.
Stainless steel cleaner:
Observe the manufacturer’s instructions.
Do not use stainless steel care products. Remove the door cover for cleaning.
Hot soapy water:
Accessories
Rails
Soak and clean with a dish cloth or brush.
If there are heavy deposits of dirt, use a stainless steel scouring pad.
Hot soapy water:
Soak and clean with a dish cloth or brush.
Hot soapy water:
Pull-out system
Meat thermometer
NOTE
1. Slight differences in color on the front of the appliance are caused by the use of different materials, such as glass, plastic
and metal.
2. Shadows on the door panels, which look like streaks, are caused by reflections made by the interior lighting.
3. Enamel is baked on at very high temperatures. This can cause some slight color variation. This is normal and does not
affect operation. The edges of thin trays cannot be completely enameled. As a result, these edges can be rough. This
does not impair the anti-corrosion protection.
4. Always keep the appliance clean and remove dirt immediately so that stubborn deposits of dirt do not build up.
Clean with a dish cloth or a brush.
Do not remove the lubricant while the pull-out rails are pulled out. It is best to clean
them when they are pushed in.
Do not clean in the dishwasher.
Hot soapy water:
Clean with a dish cloth or a brush. Do not clean in the dishwasher.
Tips
1. Clean the cooking compartment after each use. This will ensure that dirt cannot be baked on.
2. Always remove flecks of lime scale, grease, starch and albumin (e.g. egg white) immediately.
3. Remove flecks of food with sugar content immediately, if possible, when the fleck is still warm.
4. Use suitable ovenware for roasting, e.g. a roasting dish.
APPLIANCE DOOR
With good care and cleaning, your appliance will retain its appearance and remain fully functional for a long time to come.
This will tell you how to remove the appliance door and clean it.
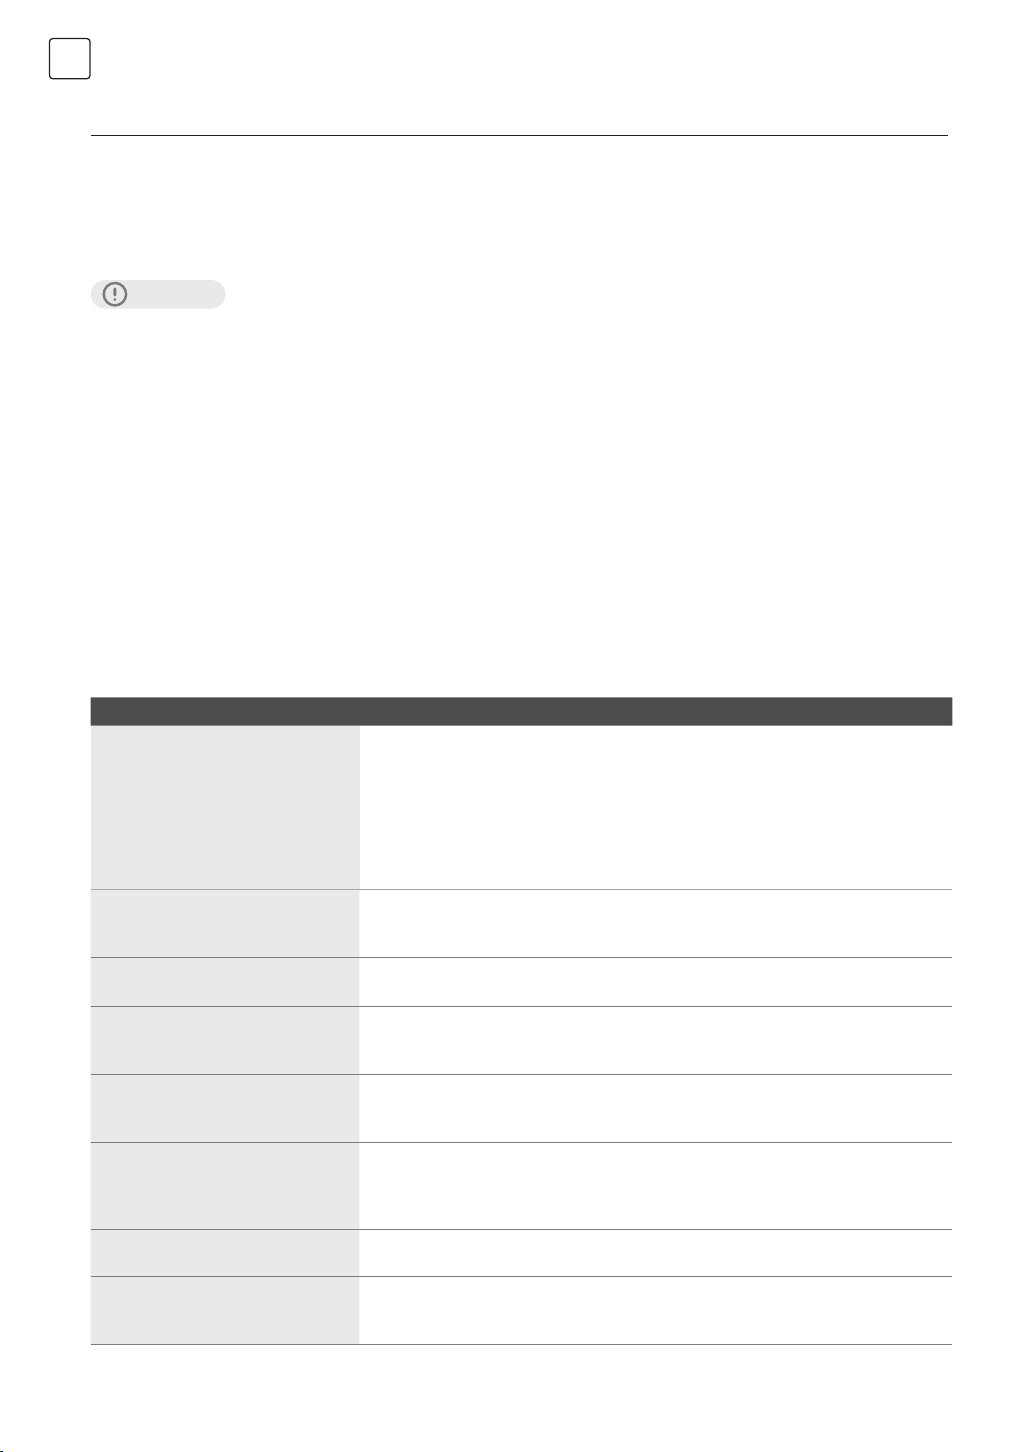
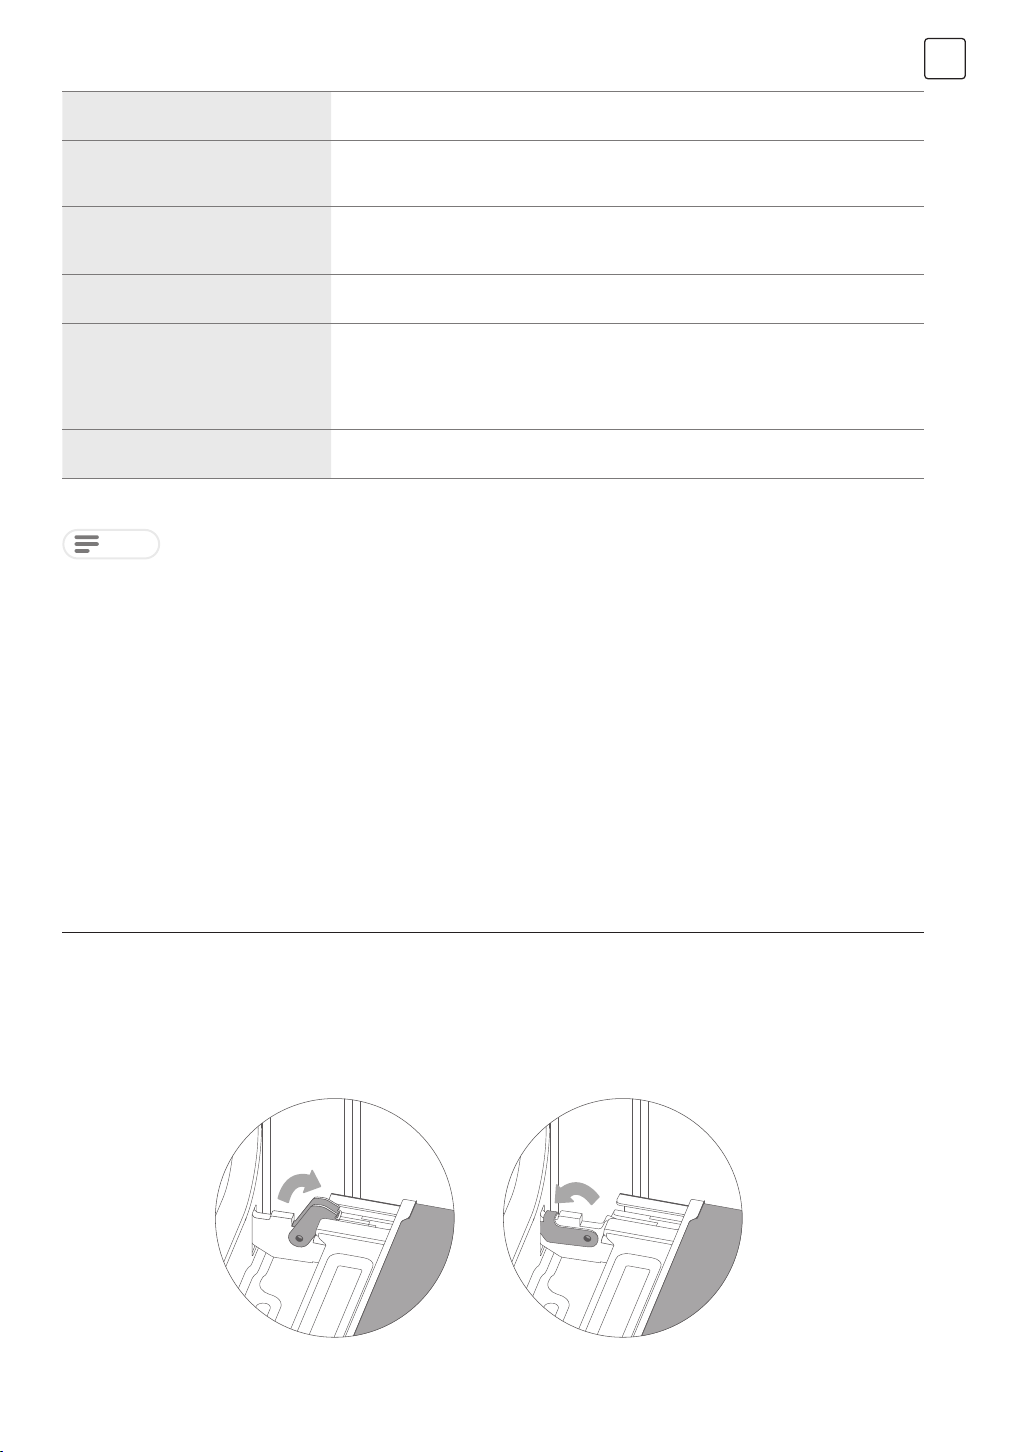
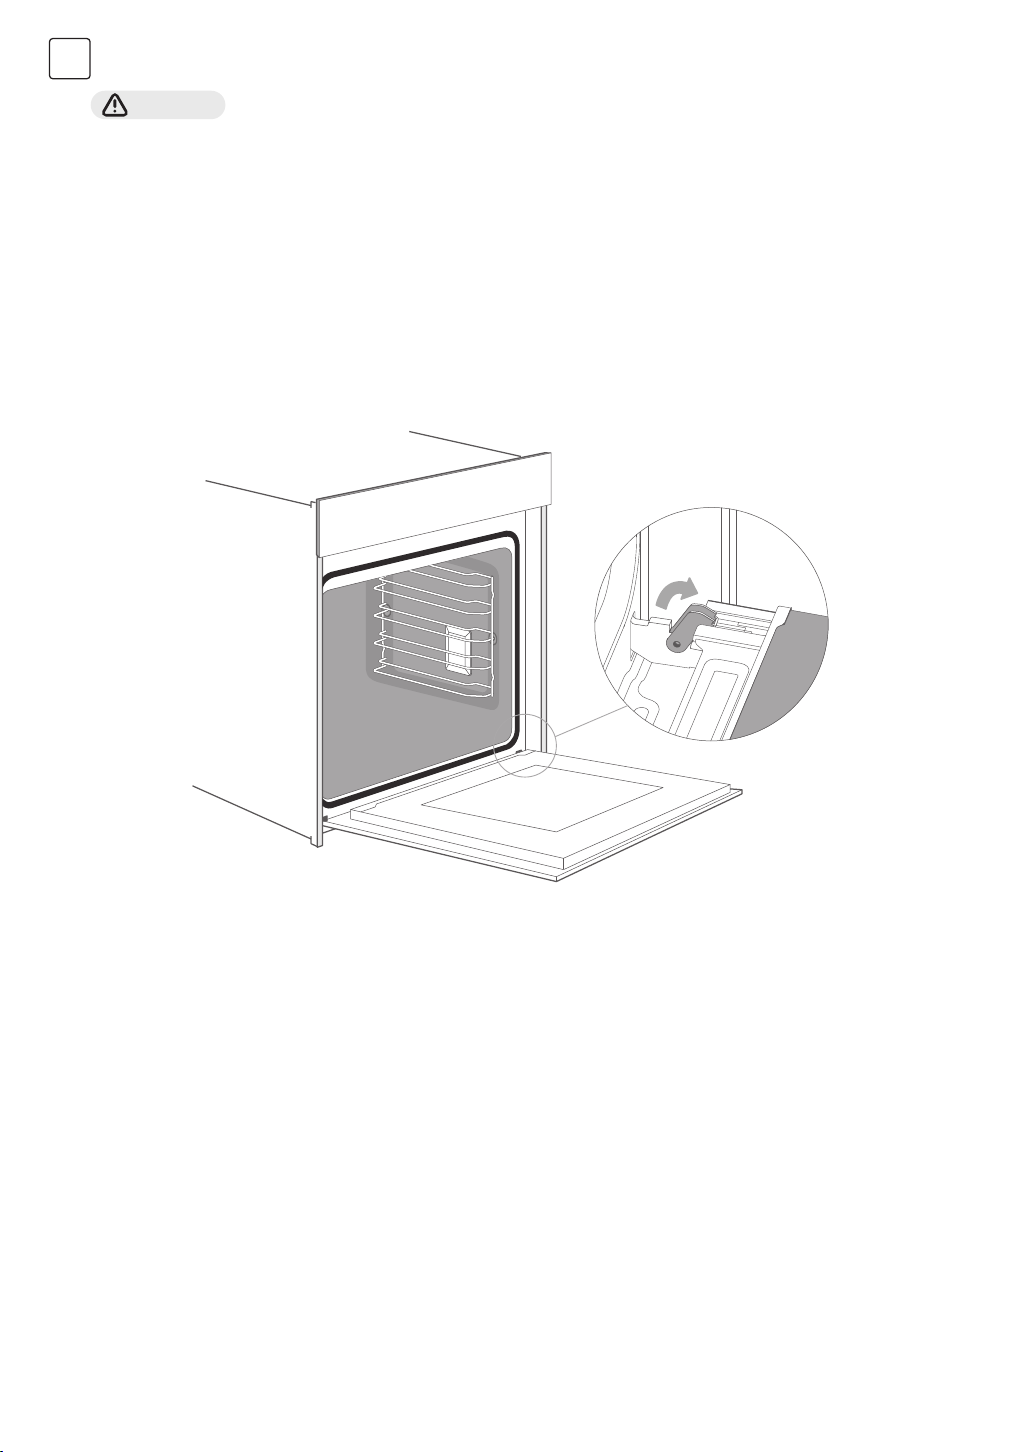
For cleaning purposes and to remove the door panels, you can detach the appliance door. The appliance door hinges each
have a locking lever.
When the locking levers are closed, the appliance door is secured in place. It cannot be detached. When the locking levers
are open in order to detach the appliance door, the hinges are locked. They cannot snap shut.
15
Page 16
ENG
WARNING!
Risk of injury!
1. If the hinges are not locked, they can snap shut with great force. Ensure that the locking levers are always fully closed or,
when detaching the appliance door, fully open.
2. The hinges on the appliance door move when opening and closing the door, and you may be trapped. Keep your hands
away from the hinges.
Removing the appliance door
1. Open the appliance door fully.
2. Fold open the two locking levers on the left and right
3. Close the appliance door as far as the limit stop.
4. With both hands, grip the door on the left- and right-hand side, and pull it out upwards.
Fitting the appliance door
Reattach the appliance door in the opposite sequence to removal.
1. When attaching the appliance door, ensure that both hinges are placed right onto the installing holes of the front panel
of the cavity.
Ensure that the hinges are inserted into the correct position. You must be able to insert them easily and without
resistance. If you can feel any resistance, check that the hinges are inserted into the holes right.
2. Open the appliance door fully. While opening the appliance door, you can make another check if the hinges are onto the
right position. If you make the fitting wrong, you will not be able to make the appliance door fully opened.
Fold both locking levers closed again.
3. Close the cooking compartment door. By the same time , we warmly recommend you to check one more time , if the
door is onto the right position and if the ventilation slots are not half-sealed .
16
Page 17
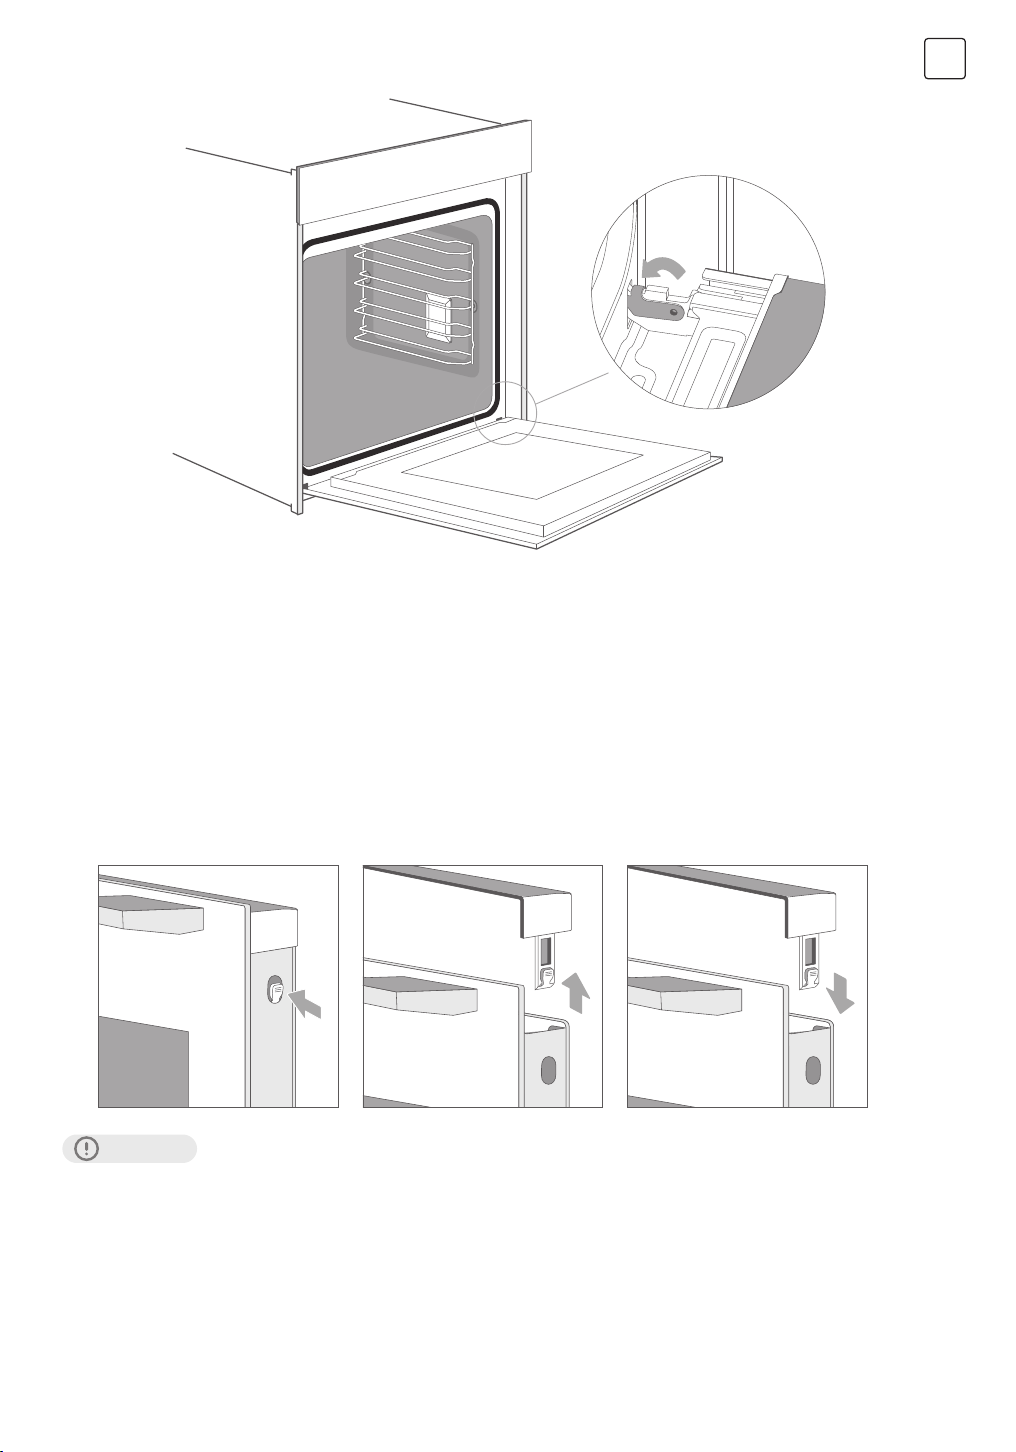
Removing the door cover
The plastic inlay in the door cover may become discolored. To carry out thorough cleaning, you can remove the cover.
ENG
Remove the appliance door like instructed above.
1. Press on the right and left side of the cover.
2. Remove the cover.
3. After removing the door cover , that rest parts of the appliance door can be easily taken has finis ed , put the cover back
in place and press on it until it clicks audibly into place.
4. Fitting the appliance door and close it.
CAUTION!
While the appliance door is well installed, the door cover can also be taken off, by this time.
1. Removing the door cover means to set the inner glass of the appliance door free, the glass can be easily moved and
cause damage or injury.
2. As removing the door cover and inner glass means to reduce the overall weight of the appliance door. The hinges can be
easier to be moved when closing the door and you may be trapped. Keep your hands away from the hinges.
Because of the 2 points above, we strongly recommend you not to remove the door cover unless the appliance door
removed. Damage caused by incorrect operation is not covered under warranty.
17
Page 18
ENG
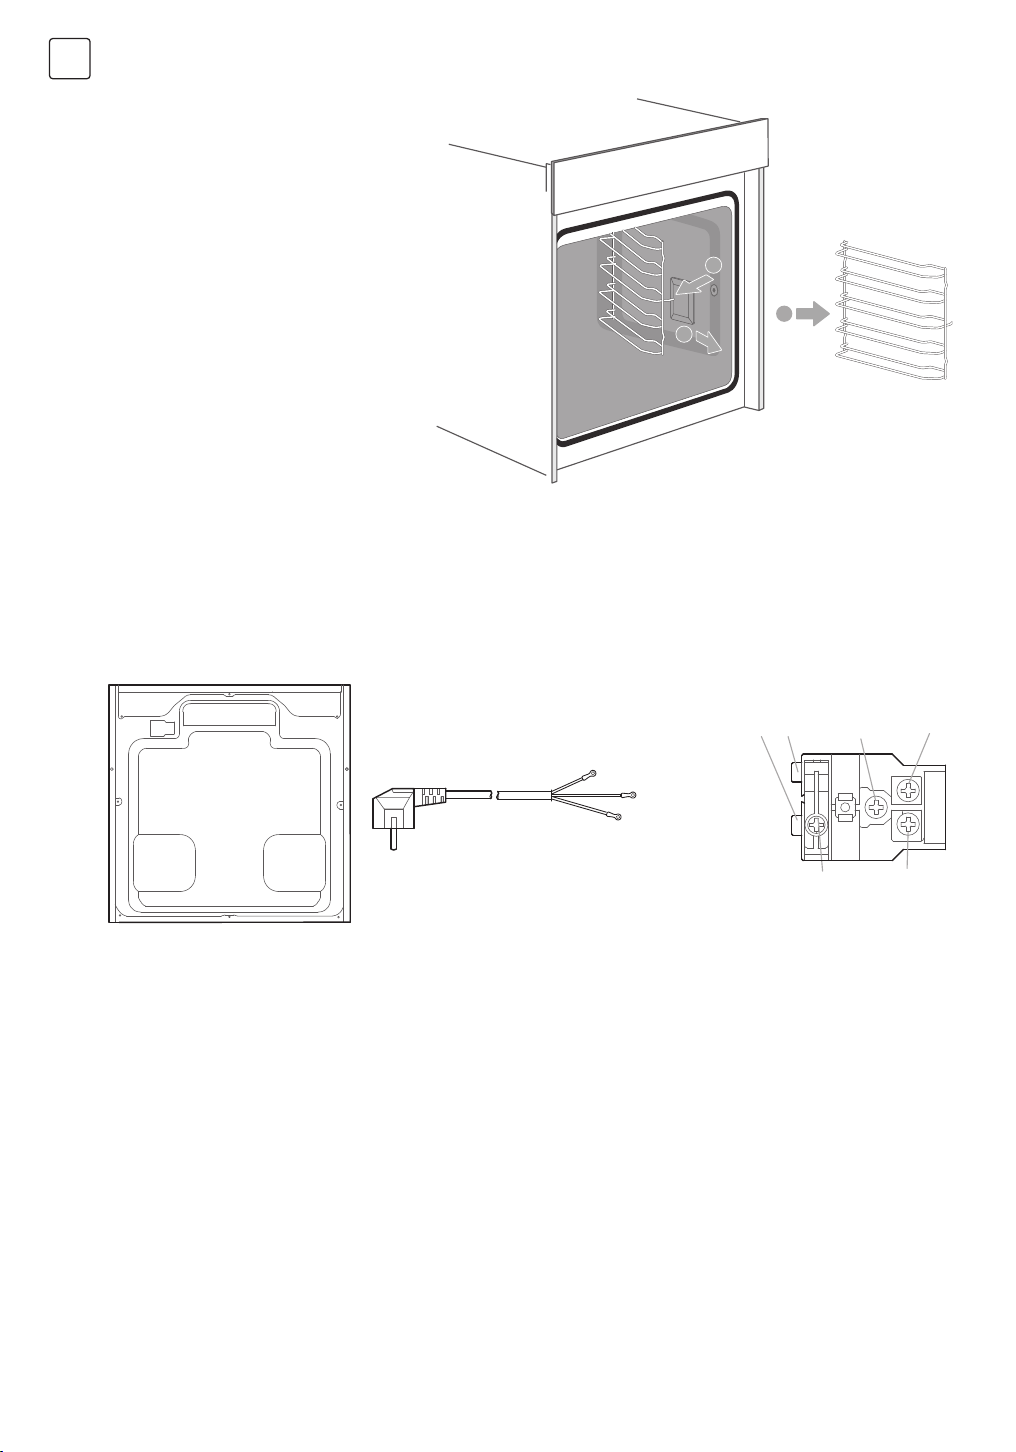
Rails
When you want have a good cleaning for the
rails and cavity, you can remove the shelves and
clean it. In this way your appliance will retain its
appearance and remain fully functional for a
long time to come.
Detaching and refitting the rails Inserting the
holders
Attaching the rails
Change the power cord
Position A show the terminal box position on the back of the back outer case and it’s closed.
Steps: a. cut off the power, use small f at screwdriver to open two snap 1, 2.
b. use Phillips crew driver to take off screws 3, 4, 5 and 6.
c. change the new power cord , fix the yellow/green wire on 3, brown wire on 4, blue wire on 5.
d. twist screw 6 closed the terminal box cover finish the changing.
1
3
2
A
brown {L}
yellow/green
power cord
back outer case terminal box
blue {N}
21
3
4
5
18
Page 19
CURE YOUR APPLIANCE WHEN NEEDED
If a fault occurs, before calling the after-sales service, please ensure that is not because of incorrect operations and refer to the
fault table, attempt to correct the fault yourself. You can often easily rectify technical faults on the appliance yourself.
If a dish does not turn out exactly as you wanted, you can find many tips and instruc tions for preparation at the end of the
operating manual.
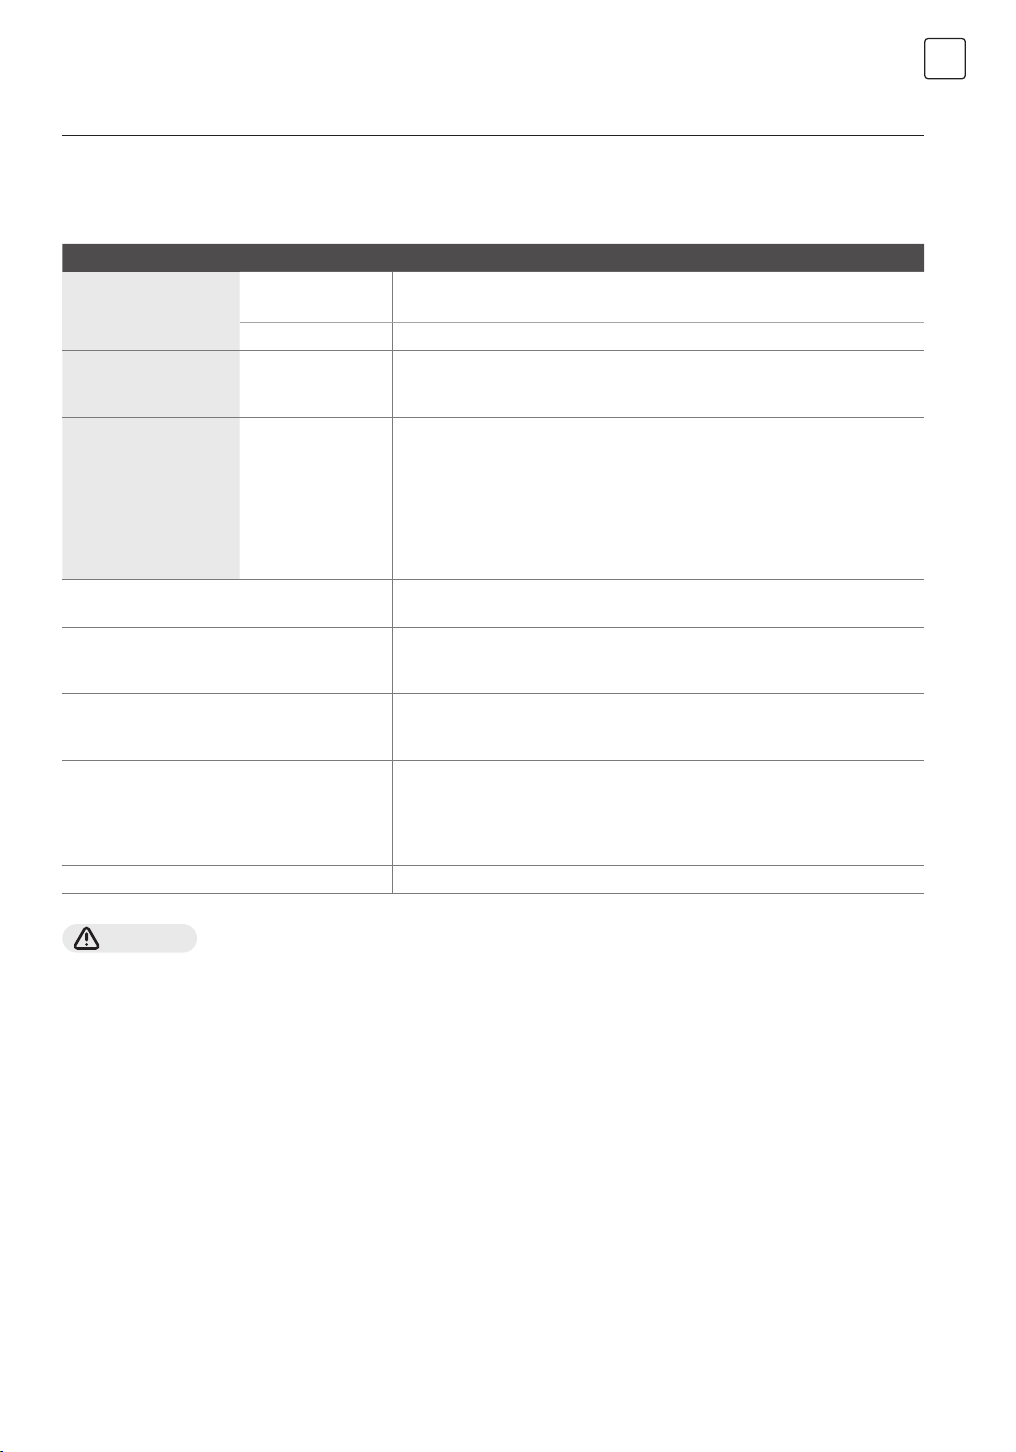
Fault Possible Cause Notes/remedy
ENG
The appliance does not
work.
Knobs have fallen out
of the support in the
control panel.
Knobs can no longer
be turned easily.
Fan does not work all the time in the mode:
“Fan Heating”
After a cooking process a noise can be heard
and a air flow in the near of the control panel
can be observed.
Food is undercooked within the time
specified in the recipe.
Uneven browning
The lamp doesn’t turn on The lamp needs to be replaced.
Faulty fuse. Check the circuit breaker in the fuse box.
Power cut Check whether the kitchen light or other kitchen appliances are working.
Knobs have been
acci- dentally
disengaged.
There is dirt under
knobs
Knobs can be removed.
Simply place knobs back in their support in the control panel and push
them in so that they engage and can be turned as usual.
Knobs can be removed.
To disengage knobs, simply remove them from the support.
Alternatively, press on the outer edge of knobs so that they tip and can be
picked up easily.
Carefully clean the knobs using a cloth and soapy water. Dry with a soft cloth.
Do not use any sharp or abrasive materials. Do not soak or clean in the
dishwasher.
Do not remove knobs too often so that the support remains stable.
This is a normal operation due to the best possible heat distribution and
best possible performance of the oven.
The cooling fan is still working, to prevent high moisture conditions in the
cavity and cool down the oven for your convenience. The cooling fan will
switch off automatically.
A temperature different from the recipe is used. Double check the
temperatures. The ingredient quantities are different to the recipe. Double
check the recipe.
The temperature setting is too high, or the shelf level could be optimized.
Double check the recipe and settings. The surface finish and or color and
or material of the baking ware were not the best choice for the select- ed
oven function. When use radiant heat, such as “Top & Bottom Heating”
mode, use matt finished, dark colored and light weighted oven ware.
WARNING!
Risk of electric shock!
Incorrect repairs are dangerous. Repairs may only be carried out and damaged power cables replaced by one of our trained
after-sales technicians. If the appliance is defec- tive, unplug the appliance from the mains or switch off the circuit breaker in
the fuse box. Contact the after-sales service.
Maximum operating time
The maximum operating time of this appliance is 9 hours, to prevent that you forget shot off the power.
Cooking compartment bulbs
To light the interior of your cooking compartment, your appliance has one or more long- life LED bulbs.
However, if ever an LED bulb or the bulb's glass cover is defective, call the after-sales service. The lamp cover must not be
removed.
19
Page 20
ENG
CUSTOMER SERVICE
Our after-sales service is there for you if your appliance needs to be repaired. We will always find an appropriate solution.
Please contact the dealer where you by this appl - ance. When calling us, please give the model number and S/N so that we
can provide you with the correct advice. The rating plate bearing these numbers can be found when you open the appliance
door.
SPECIFICATIONS
Rated voltage 220-240V~
Rated frequency 50Hz-60Hz
Electric power 3.15 kW
WARNING!
This appliance shall be installed in accordance with the regulations in force and only used in a well ventilated space. Read the
instructions before installing or using this appliance.
NOTE
Please note that a visit from an after-sales service engineer is not free of charge, even during the warranty period.
Rely on the professionalism of the manufacturer. You can therefore be sure that the repair is carried out by trained service
technicians who carry original spare parts for your appliances.
Above, thank you again for buying Tesla Built-in Oven, and we wish that our appliance will bring you delicious food and
happy life.
20
Page 21

TIPS AND TRICKS
ENG
You want to cook your own
recipe
Is the cake baked ready?
The cake loses massive
volume during cooling down
after baking
The height of the cake is in the
middle much higher than at
the outer ring
The cake is too brown at the
top
The cake is too dry Use a 10°C higher set temperature (this may lead to a shorter cooking time)
The food is good looking but
the humidity inside is too high
The browning is uneven
The cake is less browned on
the bottom
Baking on more than one
level at the same time: One
shelf is darker than the other.
Condensing water during
baking
Which kind of baking ware
can be used?
Try to use settings of similar recipes first and optimize the cooking process due to the
result.
Put a wooden stick inside the cake about 10 minutes before the given baking time is
reached. If there is no raw dough at the stick after pulling out, the cake is ready.
Try to lower the temperature setting by 10°C and double check the food preparing
instructions regarding the mechanical handling of the dough.
Do not grease the outer ring of the spring form.
Use a lower shelf level and or use a lower set temperature (this may lead to a longer
cooking time)
Use a 10°C lower set temperature (this may lead to a longer cooking time) and double
check the recipe.
Use a 10°C lower set temperature (this may lead to a longer cooking time). Use the “Top &
Bottom Heating” mode on one level.
Choose a level down
Use a fan assisted mode for baking at more than one level and take out the trays
individually when ready. It is not necessary that all trays are ready at the same time.
Steam is part of baking and cooking and moves normally out of the oven together with the
cooling air flow. This steam may condensate at different surfaces at the oven or near to the
oven and build water droplets. This is a physical process and cannot be avoid completely.
Every heat resistant baking ware can be used. It is recommended not to use aluminum in
direct contact with food, especially when it is sour.
Please ensure a good fitting between container and lid.
How to use the grill function?
How to keep clean the oven
during grilling ?
The heating element in all
grilling modes are switching
on and off over the time.
How to calculate the oven
settings, when the weight of a
roast is not given by a recipe?
What happens if a fluid is
poured to a food in the oven
during the baking or cooking
process?
Preheat the oven for 5 minutes and place the food in the level given by this manual.
Close the oven door when you use any grilling mode. Do not use the oven when the door
is open, except for load / remove / check the food.
Use the tray filled with 2 liter of water in at level 1. Nearly all fluids drip down from the
food placed on the rack will captured by the tray.
It is a normal operation and depends on the temperature setting.
Choose the settings next to the roast weight and change the time slightly.
Use a meat probe if possible to detect the temperature inside the meat.
Place the head of the meat probe carefully in the meat, due to the manufacturer
instructions.
Make sure, that the head of the probe is placed in the middle of the biggest part of the
meat, but not in the near of a bone or hole.
The fluid will boil and steam will arise as a normal physical process.
Please be careful, because the steam is hot. See also “Condensing water during baking”
for more information. If the fluid contains alcohol, the boiling process will be quicker and
can lead to flames in the cavity. Make sure, that the oven door is closed during such kind
of processes. Please control the baking or cooking process carefully. Open the door very
gentle and only if necessary.
21
Page 22

ENG
AUTO MENU CHART
Menu Display Press Times Mode Temp.in °C Duration in minutes
Roast chicken midwing C01 1 Convection 250 30-35
Grilled shrimp C02 2 Convection 250 30-35
Pizza A01 3 Convection 200 30-40
Croissant bread A02 4 Convection 180 40-50
Cookies A03 5 Convection 160 30-35
Roast beef A04 6
Sponge Cake A05 7 Conventional 175 80-85
Cod fis A06 8 Convection 250 70-80
Millefoglie of potato
yellow and purple
Roasted chicken with
potatoes novelle
Roast beef perfect A09 11 Convection
Descaling A10 12 - - 40
Clean A11 13 - - 5
A07 9 Convection
A08 10 Convection
Double Grill+
Fan
250 70-80
1 80 35
200 5
250 15
200 25
250 5
120 50
TYPICAL RECIPES
CAKE Form Level Mode Temp.in °C
Sponge Cake (simple) in a
Box shape
Sponge Cake (simple) in a
Box shape
Sponge Cake with Fruits in a
round Form
Sponge Cake with Fruits on
a Tray
Raisins Brioche Muffin form 2 Conventional 220
Gugelhupf (with Yeast) Tra y 1 Conventional 150
Muffins Muffin form 1 Conventional 160
Muffins Muffin form 1 Conventional with Fan 150
Apple Yeast Cake on a Tray Tray 1 Conventional with Fan 160
Box 2 Conventional with Fan 170 50
Box 1 Conventional 140 70
Round form 1 Conventional with Fan 150 50
Tra y 1 Conventional 140 70
22
Duration in
p.h.t.:19:00
b.t.: 11:00
p.h.t.:11:00
b.t.:60:00
p.h.t.: 8:30
b.t.: 30:00
p.h.t.: 8:30
b.t.: 30:00
p.h.t.: 10:00
b.t.: 42:30
minutes
Page 23

ENG
CAKE Form Level Mode Temp.in °C
Water Sponge Cake ( 6 Eggs) Spring form 1 Conventional 160
Water Sponge Cake ( 4 Eggs) Spring form 1 Conventional 160
Water sponge Cake Spring form 1 Convention 160 35
Apple Yeast Cake on a Tray Tray 2 Conventional with Fan 150
Hefezopf (Callah) Tra y 2 Conventional with Fan 150 40
Small Cakes 20 Tray 2 Convention 150 36
Small Cakes 40 Tray 2+4 Convention 150
Butter Yeast Cake Tray 2 Conventional 150
Shortbread Tray 2 Conventional 170
Shortbread 2 Trays Tr a y 2+4 Conventional with Fan 160
Vanilla Cookies Tra y 2 Conventional 160
Vanilla Cookies Tra y 2+4 Conventional with Fan 150
p.h.t.: 9:30
b.t.: 41:00
p.h.t.: 9:00
b.t.: 26:00
p.h.t.: 8:00
b.t.: 42:00
p.h.t:10:00
b.t.:34:00
p.h.t.: 8:00
b.t.: 30:00
p.h.t.: 8:00
b.t.: 13:00
p.h.t:8:20
b.t.: 12:00
p.h.t.: 8:00
b.t.: 10:00
p.h.t.:8:00
b.t.: 14:00
BREAD Form Level Mode Temp.in °C
White Bread ( 1 kg Flour) Box
shape
White Bread ( 1 kg Flour) Box
shape
Fresh Pizza (thin) Tray 2 Conventional 170
Fresh Pizza (thick) Tray 2 Conventional 170
Fresh Pizza (thick) Tray 2 Conventional with Fan 170
Bread Tra y 1 Convention 190
Box 1 Conventional 170
Box 1 Conventional with Fan 170
p.h.t.: 9:20
b.t.: 50:00
p.h.t.: 12:00
b.t.: 45:00
p.h.t.: 9:30
b.t.: 21:00
p.h.t.: 10:00
b.t.: 45:00
p.h.t.:8:00
b.t.: 41:00
p.h.t:9:00
b.t.:30:00
MEAT Form Level Mode Temp.in °C
Beef Tender Loin 1,6 kg Tra y 2 Double Grill with fan 180 55
Meatloaf 1 kg Meat Tra y 1 Conventional 180 75
Chicken 1 kg Tra y
Fish (2,5 kg ) Tray 2 Conventional 170 70
Ribs Tomahawk Cooked B.T. Tra y 3 Convention 120 85
Pork Roast of the neck (1,2kg ) Tra y 1 Convention 160 82
Chicken 1,7kg Tray
L2:Rack
L1:Tray
L2:Rack
L1:Tray
Double Grill with fan 180 50
Convention 180 78
Duration in
minutes
Duration in
minutes
Duration in
minutes
NOTE
p.h.t means preheat time, b.t. means baking time.
23
Page 24
ENG
AUTOMATIC RECIPES
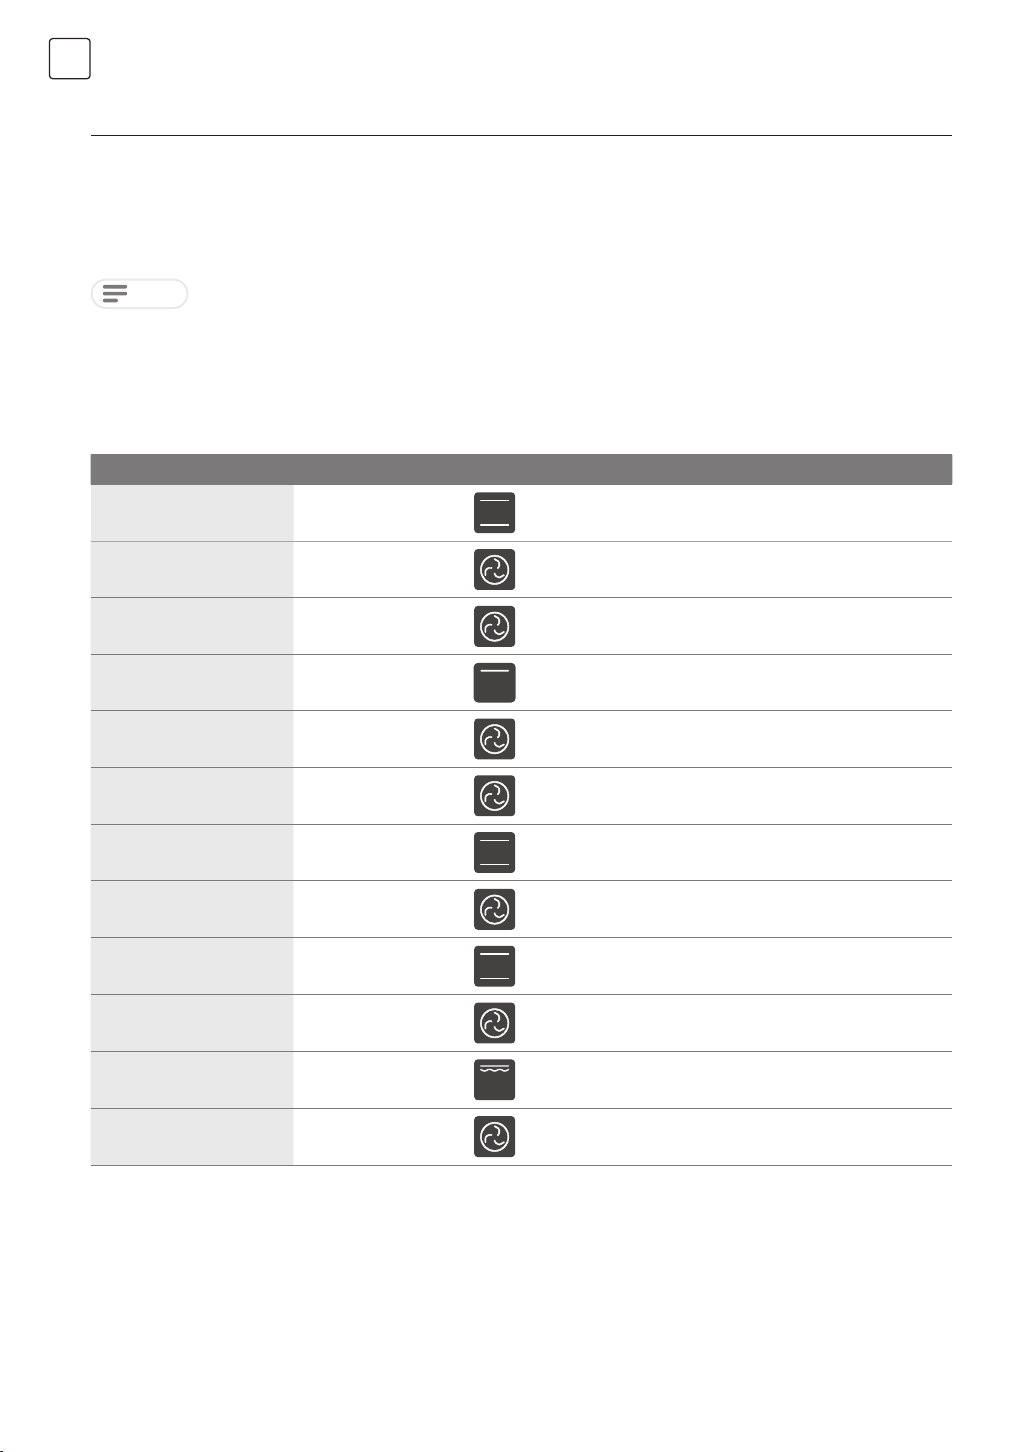
This appliance have a lot of automatic recipes, you can get perfect dishes easily by follow the tips in the display.
1. Please prepare food and ingredient.
2. In standby mode, touch "A " button once to activate auto menu mode; touch "- " or "+ " , you can choose different types
of cooking menu.(C01 to C02, A01 to A11)
3. There are 11 kinds of recipes in five categories, you can select as you need.
NOTE
1. Please follow the instructions in the display, or you maybe can’t get a perfect cooking result.
2. During the automatic cooking, you can pause the process.
3. Please don’t open the door unless it is necessary by instructions in display, because it will cool down the cavity.
TEST FOOD ACCORDING TO EN 60350-1
RECIPES Accessories F ºC Level Time (min) Pre-heat
Sponge cake Springform Φ26cm 170 1 30-35 No
Sponge cake Springform Φ26cm
Small cake 1 tray
Small cake 1 tray
Small cake 2 trays
Cheese cake Springform Φ26cm
Apple pie Springform Φ20cm
Apple pie Springform Φ20cm
Bread 1 tray
Bread 1 tray
Toast Rack
Chicken Rack & tray
160 1 30-35 No
150 2 30-40 Yes
150 2 40-50 Yes
150 L2&L4 30-35 Yes
150 1 70-80 No
170 1 80-85 No
160 1 70-80 No
210 1 30-35 Yes
190 1 30-35 Yes
Max 5 6-8 Yes 5min
180 Rack 2 Tray 1 75-80 Yes
1. In chicken recipe, begin with the backside on top and turn the Chicken after 30 min. to the top side
2. Use a dark, frosted mold and place it on the rack
3. Take out the trays at the moment, when the food is ready, even when it is not at the end of the given baking time.
4. Choose the lower temperature and check after the shortest time, given in the table.
5. If using the tray to capture fluids dripping from the food placed on the rack during any grilling mode, the tray should be
set to level 1 and filled with some water
6. The burger patties should turned around after 2/3 of the time.
24
Page 25
ENERGY EFFICIENCY ACCORDING TO EN 60350-1
Please note the following information:
1. The measurement is carried out in the “ECO” mode to determine the data regarding the forced air mode and the labelclass.
2. The measurement is carried out in the “Top & Bottom Heating” mode to determine the data regarding the conventional
mode.
3. During the measurement only the necessary accessory is in the cavity. All other parts have to be removed.
4. The oven is installed as described in the installation guide and placed in the middle of the cabinet.
5. It is necessary for the measurement to close the door like in the household, even when the cable disturbs the sealing
function of the gasket during the measurement. To make sure, that there are ni negative effects regarding the disturbed
sealing due to the energy data, it is necessary to close the door carefully during the measure- ment. It is may be required
to use a tool to guaranty the sealing of the gasket like in the household, where no cable disturbs the sealing function.
6. The determination of the cavity volume carried out for the usage “Defrost” as described on page 14. To ensure an
efficient use of the oven, all accessories including side-racks are removed.
COOKING BY ECO MODE
ECO mode is heat by bottom and ring heater, with this mode you can save energy during cooking.
RECIPES Accessories ºC Level Time (min) Pre-heat
Challah 1 tray 180 1 45-50 No
Pork Roast 1 tray 200 1 80-85 No
Clafouti Cherry Cake Round form 200 1 55-60 No
Beef Roast 1.3kg 1 tray 200 1 80-85 No
Brownies Rack and glass plate 180 1 55-60 No
Potato Gratin Rack and round plate 180 1 65-70 No
Lasagne Rack and glass plate 180 1 75-80 No
Cheese Cake Springform Φ20cm 160 1 80-90 No
ENG
DATASHEET (EU 65/2014 & EU 66/2014)
Mass of the Oven 45kg
No of Cavities 1
Heat Source Electric
Usable Volume 72L
ECelectric, cavity (Conventional) 1.06kWh/cycle
ECelectric, cavity (Forced Air) 0.63kWh/cycle
EEICavity 74
Energy E˝ciency Class (A+++ to D) A+
25
Page 26

SRB
INFORMACIJE O BEZBEDNOSTI
Namena
Hvala vam što ste kupili Tesla ugradnu rernu. Pre nego što je raspakujete, molimo
vas da pažljivo pročitate ova uputstva. Tek tada ćete moći da koristite svoj aparat
bezbedno i ispravno.
Toplo preporučujemo da sačuvate priručnik za upotrebu i uputstva za instalaciju za
buduću upotrebu ili za naredne vlasnike.
Aparat je namenjen isključivo za ugradnju u kuhinju. Poštujte posebna uputstva za
instalaciju.
Proverite aparat da li ima oštećenja nakon raspakivanja. Ne povezujte aparat ako je
oštećen. Samo ovlašćeni stručnjak može povezati aparate bez utikača. Oštećenja
nastala nepravilnim povezivanjem nisu pokrivena garancijom. Ovaj aparat koristite
isključivo unutra.
Aparat se sme koristiti samo za pripremu hrane i pića. Aparat mora biti pod
nadzorom tokom rada. Ovaj aparat mogu koristiti deca starija od 8 godina i
osobe sa smanjenim fizičkim, senzornim ili mentalnim sposobnostima ili osobe
sa nedostatkom iskustva ili znanja, ako su pod nadzorom ili su uputstva dobili od
osobe odgovorne za njihovu bezbednost o tome kako bezbedno koristiti aparat i
razumeju povezane opasnosti.
Deca ne smeju da se igraju sa aparatom, na njemu ili oko njega. Deca ne smeju da
čiste aparat ili obavljaju opšte održavanje osim ako nisu starija od 8 godina i nisu
pod nadzorom.
Držite decu mlađu od 8 godina na sigurnoj udaljenosti od aparata i strujnog kabla.
Molimo vas da uvek pravilno umetnete dodatke u rernu.
26
Page 27

UPOZORENJE!
SRB
Opasnost od električnog udara!
1. Neispravne popravke su opasne.
Popravke mogu izvršavati samo naši
obučeni tehničari za postprodajnu
podršku, kao i zamenjivati oštećene
naponske kablove. Ako je aparat
neispravan, isključite ga iz struje ili
isključite osigurač u razvodnoj kutiji.
Kontaktirajte servis za postprodajnu
podršku.
2. Izolacija kablova na električnim
aparatima može se otopiti kada
dođe u kontakt sa vrućim delovima
aparata. Nikada ne dovodite kablove
električnih aparata u kontakt sa vrućim
delovima aparata.
3. Ne koristite čistače sa visokim
pritiskom ili paročistače, jer to može
dovesti do električnog udara.
4. Neispravan aparat može izazvati
električni udar. Nikada ne uključujte
neispravan aparat. Isključite aparat
iz struje. Kontaktirajte servis za
postprodajnu podršku.
Opasnost od opekotina!
1. Aparat postaje veoma vruć. Nikada ne
dodirujte unutrašnje površine aparata
ili grejne elemente.
2. Uvek dozvolite aparatu da se ohladi.
3. Držite decu na sigurnoj udaljenosti.
4. Dodaci i posude za pečenje postaju
veoma vruće. Uvek koristite rukavice
za pečenje prilikom vađenja dodataka
ili posuda iz šupljine.
5. Alkoholne pare mogu se zapaliti u
vrućem prostoru za kuvanje. Nikada
ne pripremajte hranu koja sadrži
velike količine napitaka sa visokim
sadržajem alkohola. Koristite samo
male količine napitaka sa visokim
sadržajem alkohola. Pažljivo otvorite
vrata aparata.
Opasnost od opekotina vrelom
tečnošću!
1. Pristupačni delovi postaju vrući
tokom rada. Nikada ne dodirujte
vruće delove. Držite decu na sigurnoj
udaljenosti.
2. Kada otvorite vrata aparata, vruća para
može iscuriti. Para možda nije vidljiva,
u zavisnosti od njene temperature.
Prilikom otvaranja ne stojte previše
blizu aparata. Pažljivo otvorite vrata
aparata. Držite decu podalje.
3. Voda u vrućoj rerni može stvoriti vruću
paru. Nikada ne sipajte vodu u vruću
rernu.
Opasnost od povreda!
1. Ogrebano staklo na vratima aparata
može se razviti u pukotinu. Ne koristite
stakleni strugač, oštre ili abrazivne
sredstava za čišćenje ili deterdžente.
2. Šarke na vratima aparata se pomeraju
prilikom otvaranja i zatvaranja vrata,
i možete se zaglaviti. Držite ruke
podalje od šarki.
Opasnost od požara!
1. Zapaljivi predmeti skladišteni u
rerni mogu se zapaliti. Nikada ih ne
ostavljajte. Nikada ne otvarajte vrata
aparata ako ima dima unutra. Isključite
aparat i isključite ga iz osigurača u
razvodnoj kutiji.
2. Prilikom otvaranja vrata aparata stvara
se određeno strujanje. Papir za pečenje
može doći u kontakt sa grejnim
elementom i zapaliti se. Ne postavljajte
papir za pečenje labavo preko dodataka
tokom podgrevanja. Uvek pritisnite
27
Page 28

SRB
papir za pečenje posudom ili plehom.
Papirom za pečenje pokrijte samo
površinu koja je potrebna. Papir za
pečenje ne sme da viri preko dodataka.
Opasnost od magnetizma!
1. Trajni magneti se koriste u kontrolnoj
ploči ili u elektronskim implantima,
npr. srčanim pejsmejkerima ili insulin
pumpama. Ljudi sa elektronskim
implantima moraju se držati najmanje
10 cm dalje od kontrolne ploče.
Uzroci oštećenja
1. Dodaci, folija, papir za pečenje ili
posude za pečenje na dnu rerne: ne
postavljajte dodatke na dno rerne.
Ne prekrivajte dno rerne bilo kojom
vrstom folije ili papira za pečenje.
Ne postavljajte posude za pečenje
na dno rerne ako je postavljena
temperatura iznad 50 ºC. Ovo će
izazvati nakupljanje toplote. Emajl će
biti oštećen.
2. Aluminijumska folija: Aluminijumska
folija u rerni ne sme doći u kontakt
sa staklom vrata. Ovo može izazvati
trajno promenu boje stakla vrata.
3. Silikonske posude: Ne koristite
silikonske posude, niti podloge,
poklopce ili dodatke koji sadrže
silikon. Senzor u rerni može biti
oštećen.
4. Voda u vrućem prostoru za kuvanje:
ne sipajte vodu u rernu kada je
vruća. Ovo će izazvati paru. Promena
temperature može oštetiti emajl.
5. Vlaga u rerni: Dugotrajna vlaga u rerni
može dovesti do korozije. Dozvolite
aparatu da se osuši nakon korišćenja.
Ne čuvajte vlažnu hranu u zatvorenoj
rerni duži vremenski period. Ne
skladištite hranu u rerni.
6. Hlađenje sa otvorenim vratima
aparata: Nakon rada na visokim
temperaturama, dozvolite aparatu
da se hladi samo sa zatvorenim
vratima. Ne zaglavljujte ništa u vratima
aparata. Čak i ako su vrata samo malo
otvorena, prednja strana obližnjeg
nameštaja može se vremenom
oštetiti. Ostavite aparat da se osuši sa
otvorenim vratima samo ako je tokom
rada rerne proizvedeno mnogo vlage.
7. Voćni sok: prilikom pečenja posebno
sočnih voćnih pita, ne punite pleh
previše. Voćni sok koji kaplje sa
pleha ostavlja mrlje koje se ne mogu
ukloniti. Ako je moguće, koristite
dublji univerzalni pleh.
8. Ekstremno prljava guma: Ako je guma
veoma prljava, vrata aparata se neće
više ispravno zatvarati tokom rada.
Prednje strane susednih jedinica
mogu biti oštećene. Uvek održavajte
gumu čistom.
9. Vrata aparata kao sedište, polica ili
radna površina: Ne sedite na vratima
aparata niti postavljajte ili kačite bilo
šta na njih. Ne stavljajte posuđe ili
dodatke na vrata aparata.
10. Umetanje dodataka: u zavisnosti
od modela aparata, dodaci mogu
ogrebati panel vrata prilikom
zatvaranja aparata. Uvek umetnite
dodatke u rernu koliko god mogu da
idu.
11. Nošenje aparata: ne nosite i ne držite
aparat za ručku vrata. Ručka vrata ne
može podržati težinu aparata i može
se slomiti.
12. Ako koristite preostalu toplotu
aparata da držite hranu toplom, može
doći do visoke vlažnosti unutar rerne.
To može dovesti do kondenzacije
i može uzrokovati koroziju vašeg
visokokvalitetnog aparata, kao i
oštetiti vašu kuhinju. Izbegavajte
kondenzaciju otvaranjem vrata ili
28
koristite režim "Odmrzavanje".
Page 29
INSTALLATION
Da biste bezbedno koristili ovaj aparat,
molimo vas da se uverite da je instaliran prema
profesionalnim standardima, u skladu sa
uputstvima za instalaciju. Oštećenja koja nastanu
usled nepravilne instalacije nisu pokrivena
garancijom.
Tokom instalacije, molimo vas da nosite zaštitne
rukavice kako biste se zaštitili od povreda oštrim
ivicama.
Proverite da li uređaj ima oštećenja pre instalacije
i ne povezujte ga ako ih ima.
Pre uključivanja, molimo vas da uklonite sve
pakovne materijale i lepljivu foliju sa aparata.
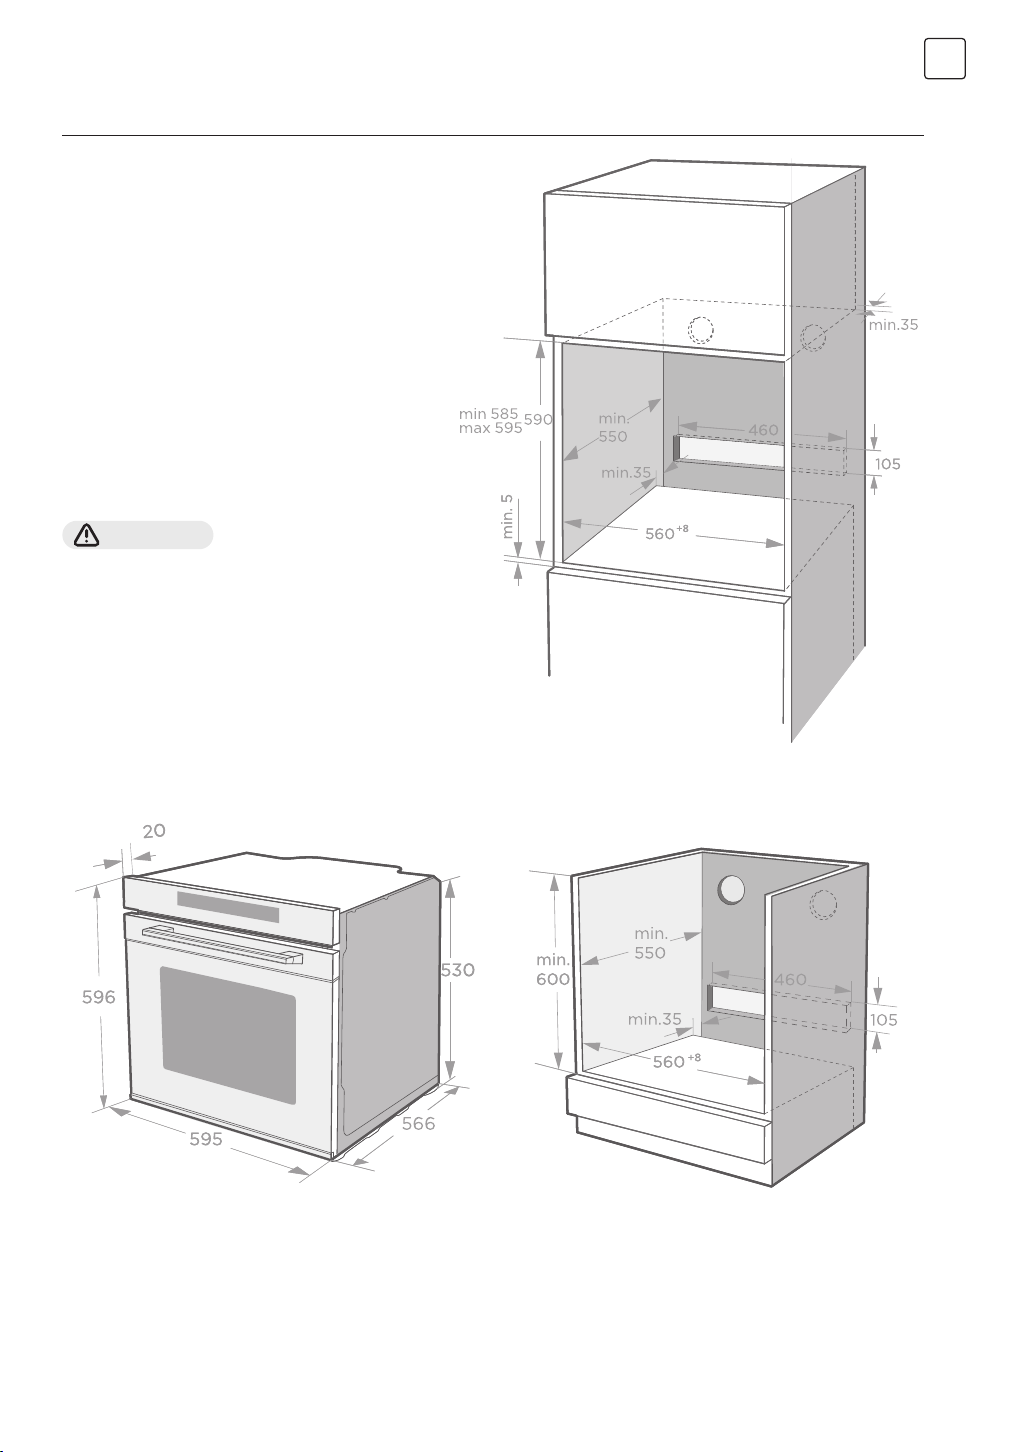
Priložene dimenzije su u mm.
Neophodno je da utičnica bude dostupna ili
da se u fiksnom električnom instalaciji ugradi
prekidač kako bi se aparat mogao isključiti iz
napajanja nakon instalacije kada je to potrebno.
UPOZORENJE!
Aparat se ne sme instalirati iza dekorativnih
vrata kako bi se izbeglo pregrevanje.
SRB
.
.
29
Page 30
SRB
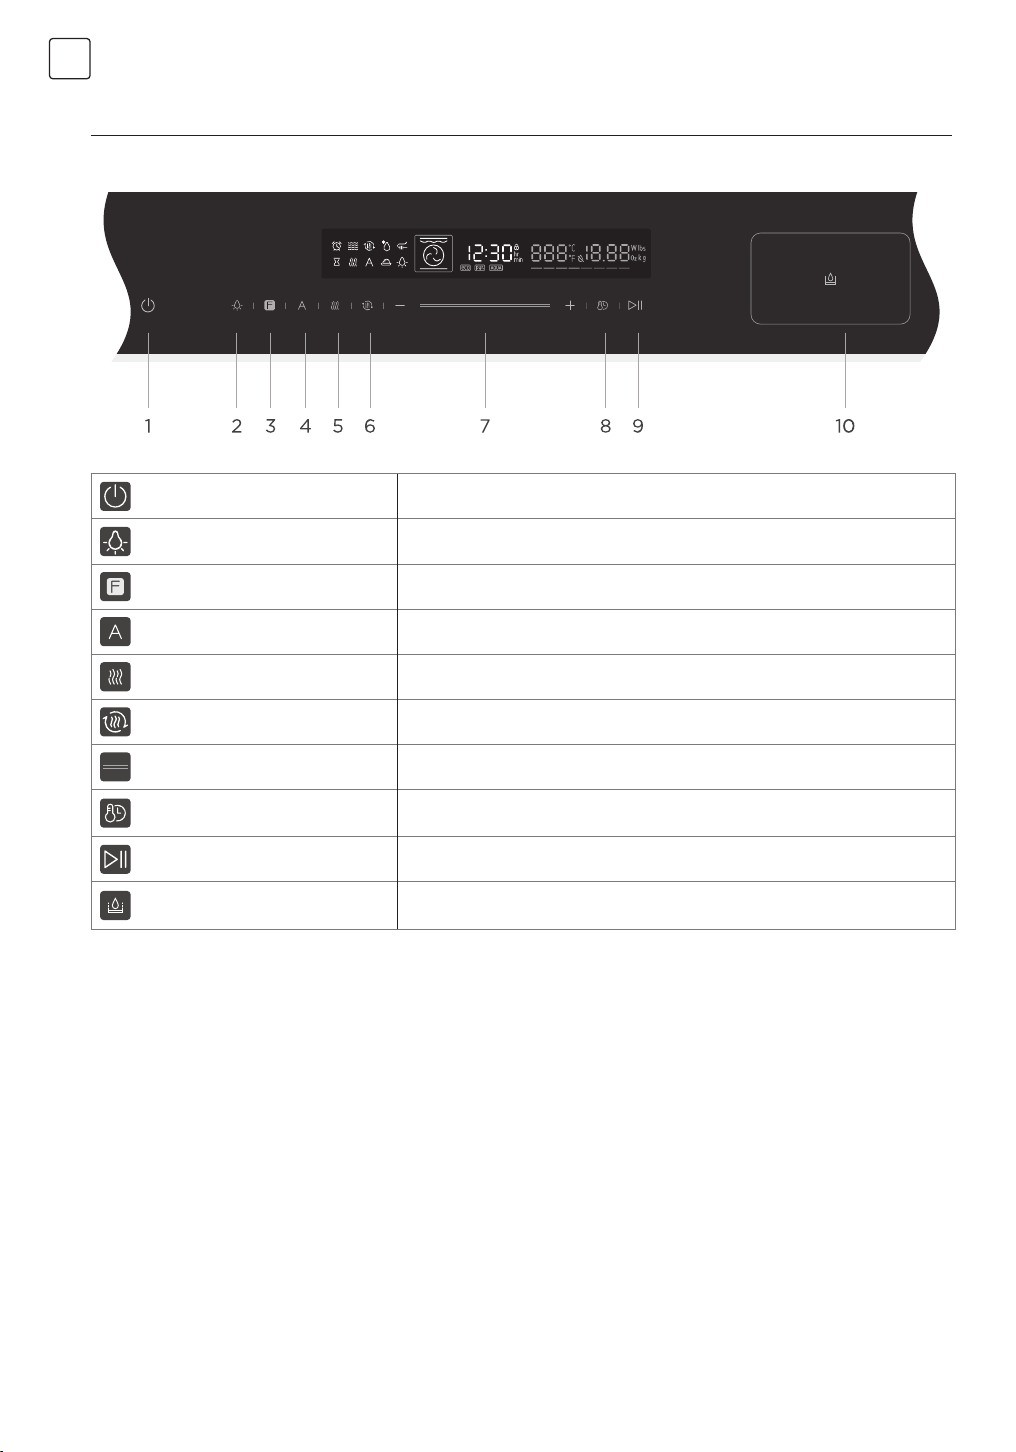
KORIŠĆENJE APARATA
Komponenta
1. Otkaži Otkaži
2. Lampa Uključeno / Isključeno Uključite i isključite lampu.
3. Rerna – Funkcija Pritisnite ovaj simbol da promenite režim grejanja.
4. AUTO Koristite ovo da izaberete automatski meni ili uklanjanje kamenca i čišćenje.
5. Para Para: Ručno dodavanje pare.
6. Brzo prethodno zagrevanje Koristite ovo za brzo prethodno zagrevanje
7. Klizni regulator Pomerite da promenite vrednosti podešavanja prikazane na ekranu.
8. Podešavanje trajanja i sata
Podešavanje temperature
9. Pokreni / Pauziraj Pokrenite i pauzirajte proces kuvanja.
10. Posuda za vodu
Podesite vreme trajanja, zatim izaberite funkciju i podesite sat u režimu
mirovanja. Pritisnite da podesite temperaturu.
Posuda za vodu: Posuda za funkciju pare, posuda će iskočiti nakon što je
pritisnete.
Pre korišćenja aparata
Prvo korišćenje
Pre nego što prvi put upotrebite aparat za pripremu hrane, potrebno je da očistite unutrašnjost i pribor.
1. Uklonite sve nalepnice, zaštitne folije i delove za zaštitu tokom transporta.
2. Uklonite sav pribor i bočne police iz unutrašnjosti.
3. Temeljno operite pribor i bočne police koristeći sapunicu i krpu za sudove ili meku četku.
4. Proverite da unutrašnjost ne sadrži ostatke ambalaže, kao što su stiropor ili drveni delovi koji mogu izazvati rizik od
požara.
5. Obrišite glatke površine u unutrašnjosti i vrata mekom, vlažnom krpom.
6. Da biste uklonili miris novog aparata, zagrejte aparat kada je prazan i sa zatvorenim vratima rerne.
7. Održavajte kuhinju dobro ventilisanom dok se aparat prvi put zagreva. Držite decu i kućne ljubimce van kuhinje tokom
ovog vremena. Zatvorite vrata ka susednim prostorijama.
8. Podesite naznačene postavke. Možete saznati kako da podesite tip grejanja i temperaturu u sledećem odeljku.
30
Page 31
Podešavanja Temperatura Vreme
Režim grejanja 250ºC 1h
Nakon što se aparat ohladi:
1. Operite glatke površine i vrata sapunicom i krpom za sudove.
2. Osušite sve površine.
3. Postavite bočne police.
Podešavanje vremena
Pre nego što se rerna može koristiti, vreme treba da se podesi.
1. Nakon što je rerna povezana na struju, dodirnite simbol sata
desnog dugmeta.
2. Ponovo dodirnite simbol sata
3. Dodirnite simbol sata
NAPOMENA: Sat ima 24-satni prikaz.
zatim možete podesiti vreme u minutima okretanjem desnog dugmeta.
da završite podešavanje.
zatim možete podesiti vreme u satima okretanjem
Tipovi grejanja
Vaš aparat ima različite radne režime koji olakšavaju njegovu upotrebu. Da bismo vam omogućili da pronađete odgovarajući
tip grejanja za vaše jelo, ovde smo objasnili razlike i oblasti primene.
SRB
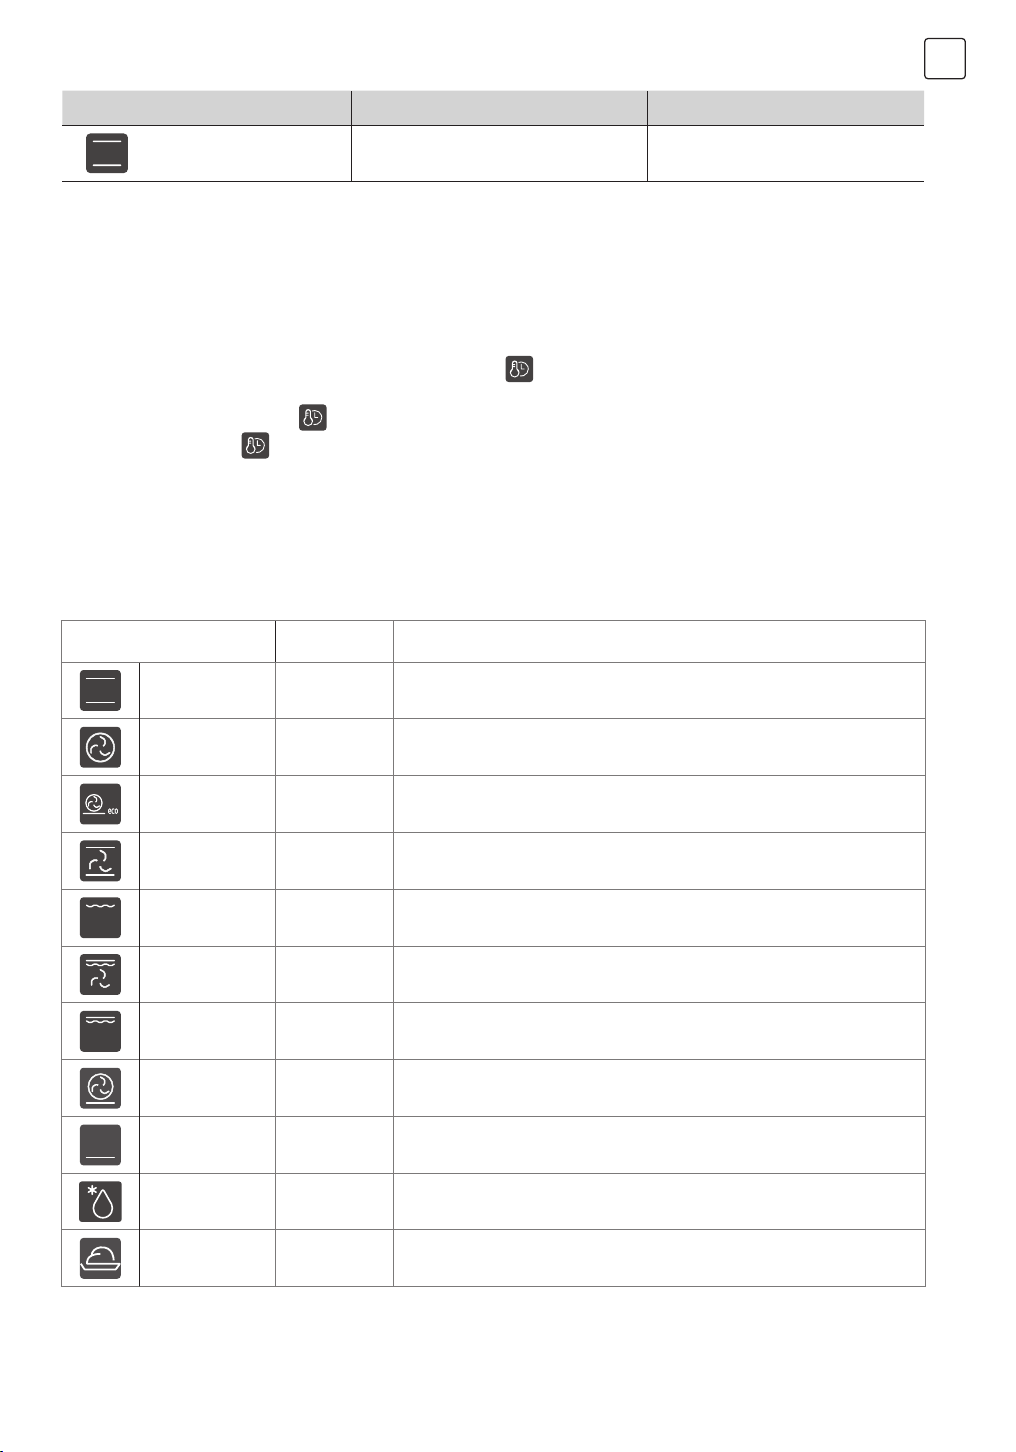
Tipovi grejanja Temperatura Upotreba
Konvencionalno 30~250ºC
Konvekcija 50~250ºC
ECO 140~240ºC Za kuvanje uz uštedu energije.
Konvencionalno
+ Ventilator
Vazdušna toplota 150~250ºC
Dupli roštilj +
Ventilator
Dupli roštilj 150~250ºC
Pizza 50~250ºC
Donje grejanje 30~220ºC
Odmrzavanje _ Za nežno odmrzavanje smrznute hrane.
50~250ºC
50~250ºC
Za tradicionalno pečenje i pečenje na jednom nivou. Posebno pogodno za
kolače sa vlažnim prelivima.
Za pečenje i pečenje na jednom ili više nivoa. Toplota dolazi iz prstenastog
grejača koji ravnomerno okružuje ventilator.
Za pečenje i pečenje na jednom ili više nivoa. Ventilator ravnomerno
raspoređuje toplotu iz grejača po unutrašnjosti.
Za grilovanje manjih količina hrane i za pečenje hrane do zlatno smeđe
boje. Molimo stavite hranu u srednji deo ispod grejača.
Za grilovanje ravnih komada hrane i za pečenje hrane do zlatno smeđe
boje. Ventilator ravnomerno raspoređuje toplotu po unutrašnjosti.
Za grilovanje ravnih komada hrane i za pečenje hrane do zlatno smeđe
boje.
Za pizzu i jela kojima je potrebna velika količina toplote s donje strane.
Donji grejač i prstenasti grejač će raditi.
Za dodatno pečenje podloge za picu, pita i peciva. Toplota dolazi iz
donjeg grejača.
Fermentacija 30~45ºC
Za pravljenje testa od kvasca i kiselog testa za fermentaciju i za kultivisanje
jogurta.
31
Page 32
SRB
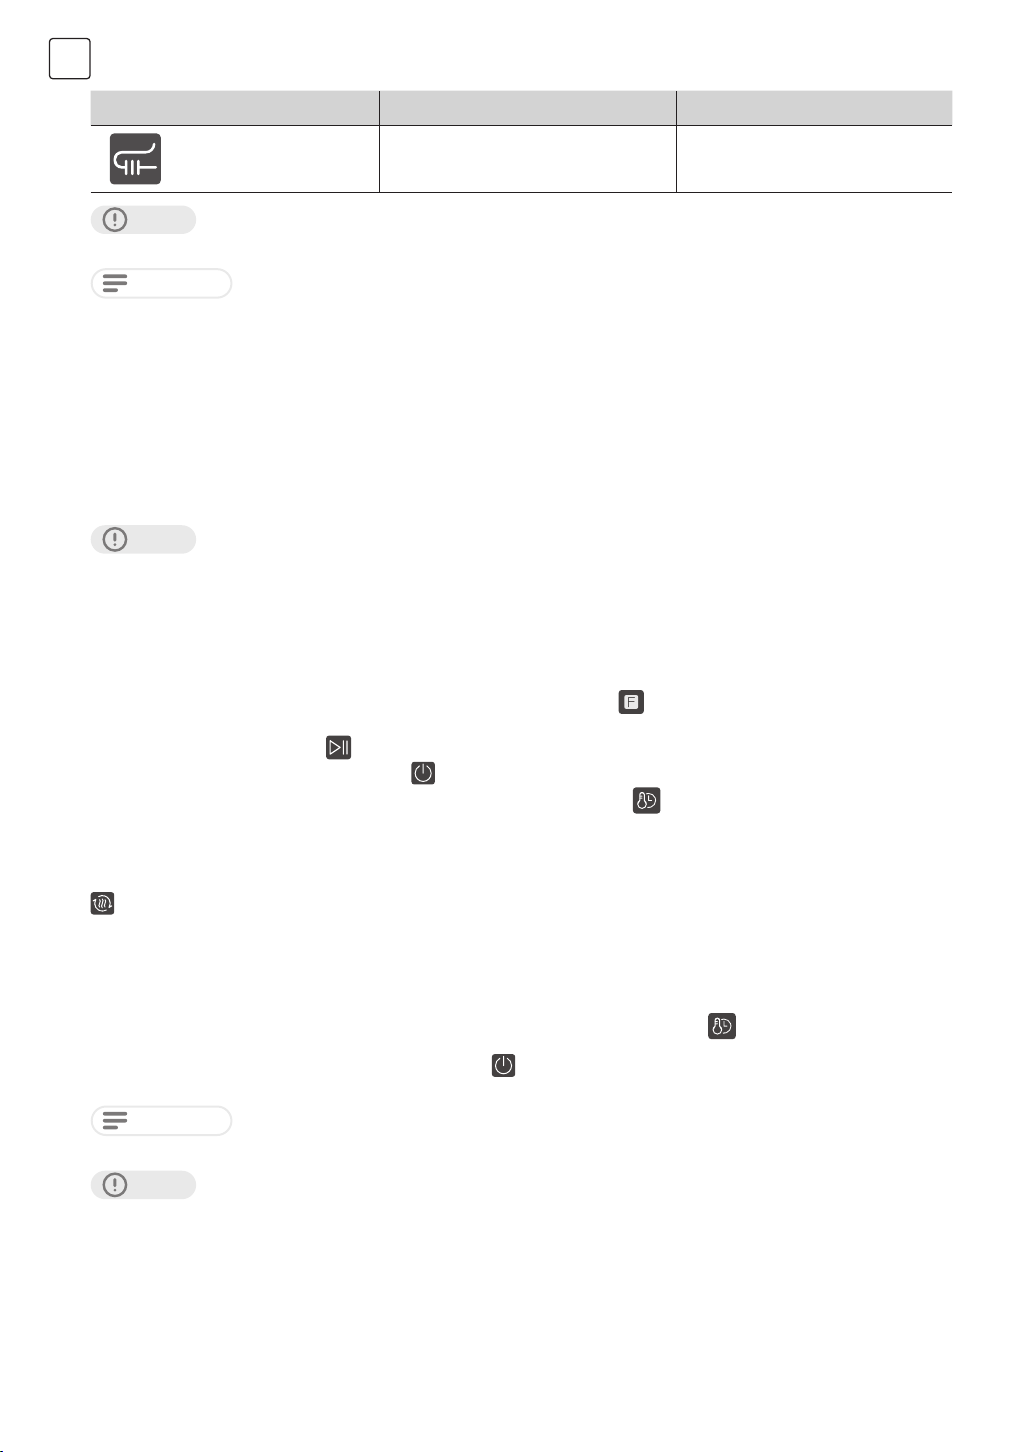
Tipovi dodatnih funkcija Temperatura Vreme
Sonda za meso 50ºC~100ºC
OPREZ!
NAPOMENA
1. Za odmrzavanje velikih porcija hrane, moguće je ukloniti bočne police i staviti posudu na dno unutrašnjosti.
2. Za zagrevanje posuđa, korisno je ukloniti bočne police, a režimi grejanja “Vrući vazduh” i “Grejanje ventilatorom” sa
podešavanjem temperature na 50°C su korisni. “Vrući vazduh” treba koristiti ako je više od polovine dna unutrašnjosti
pokriveno posuđem.
3. Zbog optimalne ravnomernosti raspodele toplote unutar unutrašnjosti tokom “Grejanja ventilatorom”, ventilator će raditi
u određenim trenucima grejanja kako bi se obezbedila što bolja efikasnost.
Ako otvorite vrata uređaja tokom rada, operacija se neće pauzirati. Molimo vas da budete posebno
oprezni zbog rizika od opekotina.
Za pomoć pri pečenju mesa poput
bifteka i piletine.
Ventilator za hlađenje
Ventilator za hlađenje se uključuje i isključuje po potrebi. Vruć vazduh izlazi iznad vrata.
OPREZ!
Ne prekrivajte ventilacione otvore. U suprotnom, aparat može da se pregreje.
Da bi se aparat brže ohladio nakon rada, ventilator za hlađenje može nastaviti da radi još neko vreme.
Korišćenje vašeg uređaja
Priprema hrane u rerni
1. Nakon što je rerna povezana na struju, dodirnite simbol za funkcije rerne da biste izabrali funkcije, koristite klizač ili
simbol “</>” da podesite temperaturu kuvanja.
2. Dodirnite simbol Start / Pauza
3. Tokom procesa kuvanja, možete dodirnuti
NAPOMENA: Nakon podešavanja temperature, možete dodirnuti simbol sata
možete ga podesiti pomoću klizača ili simbola “</>”.
da rerna počne da radi, ako ne, rerna će se vratiti na sat nakon 10 minuta.
da otkažete.
da biste podesili vreme trajanja kuvanja,
Brzo zagrevanje
Možete koristiti brzo zagrevanje da skratite vreme predgrevanja. Zatim izaberite funkciju, dodirnite simbol brzog zagrevanja
a oznaka brzog zagrevanja na ekranu će se upaliti. Ako ova funkcija ne može da se brzo zagreje, čuće se "bip". Funkcije
odmrzavanja, fermentacije i “ECO” ne mogu se brzo zagrevati.
Izmena tokom kuvanja
Tokom rada aparata možete promeniti podešavanje tipa grejanja i podešavanje temperature putem funkcije rerne ili klizača.
Nakon promene, ako ne bude drugih akcija nakon 6 sekundi, rerna će raditi prema onome što ste promenili.
Ako želite da promenite vreme trajanja kuvanja tokom procesa kuvanja, molimo dodirnite
ili simbola “</>”. Nakon promene, ako ne bude drugih akcija nakon 6 sekundi, rerna će raditi prema onome što ste promenili.
Kada želite da otkažete proces kuvanja, molimo dodirnite .
NAPOMENA
OPREZ!
Menjanje režima/temperature/vremena odmora kuvanja može negativno uticati na rezultat kuvanja,
toplo preporučujemo da to ne radite osim ako nemate dovoljno iskustva u kuvanju.
Nakon što se aparat isključi, postaje veoma vruć, posebno unutrašnjost. Nikada ne dodirujte unutrašnje
površine aparata ili grejače. Koristite rukavice za rernu da uklonite pribor ili posude iz unutrašnjosti
i sačekajte da se aparat ohladi. Držite decu na sigurnoj udaljenosti kako biste izbegli povrede od
opekotina.
32
i izmenite ga pomoću klizača
Page 33
Zaključavanje za decu
Vaš aparat ima funkciju zaključavanje za decu kako bi se sprečilo da deca slučajno uključe aparat ili promene bilo koja
podešavanja. Kada pritisnete dugme dugim pritiskom od 3 sekunde, zaključavanje za decu se aktivira. Ponovnim dugim
pritiskom od 3 sekunde, rerna se otključava.
Možete aktivirati i deaktivirati zaključavanje za decu kada rerna radi ili ne. Dajte
ili isključili zaključavanje za decu. Kada je zaključavanje za decu aktivirano, u statusnoj traci će se prikazati
dug pritisak od 3 sekunde da biste uključili
Sonda za meso
1. Vaša rerna ima funkciju sonde. Kada umetnete sondu u otvor za sondu u šupljini rerne, ekran će prikazati "Prob".
2. Pritisnite taster "
3. Pritisnite taster "<" ili ">" ili pomerite kliznu traku da prilagodite temperaturu sonde.
4. Pritisnite taster "
5. Kada temperatura u sredini hrane dostigne podešavanje sonde, zvučnik će se oglasiti 5 puta, a ekran će prikazati "End".
NAPOMENA
1. Tokom kuvanja, otvorite vrata rerne ili pritisnite " " da pauzirate kuvanje.
2. Tokom kuvanja, pritisnite taster "<" ili ">" ili pomerite kliznu traku da promenite temperaturu sonde.
" da izaberete funkciju.
" da započnete kuvanje.
Para
1. Kada je rerna u režimu mirovanja, pritiskom na dugme za paru možete dodati paru nakon što je režim podešen.
2. Pritisnite dugme za paru tokom kuvanja da ručno dodate paru.
3. Kada je rerna u režimu mirovanja, pritiskom na dugme za paru možete postaviti režim pare i dodati paru za kuvanje.
Podrazumevani nivo pare je nivo 1.
SRB
NAPOMENA
Para ima tri nivoa, količina pare se povećava sa povećanjem nivoa. Pritiskom na dugme za paru jednom postavlja se nivo
1. Pritiskom dva puta postavlja se nivo 2, a tri puta za nivo 3. Bez obzira koji nivo je odabran, svetlo na desnoj strani ekrana
prikazuje nivo (L01/L02/L03). Pritiskom na dugme za paru četvrti put isključuje se dodavanje pare i ikonica za paru i nivo pare
se gase.
Zbog vibracija tokom transporta, kutija za vodu može ispasti nakon otvaranja paketa. Ne zaboravite da je vratite nazad.
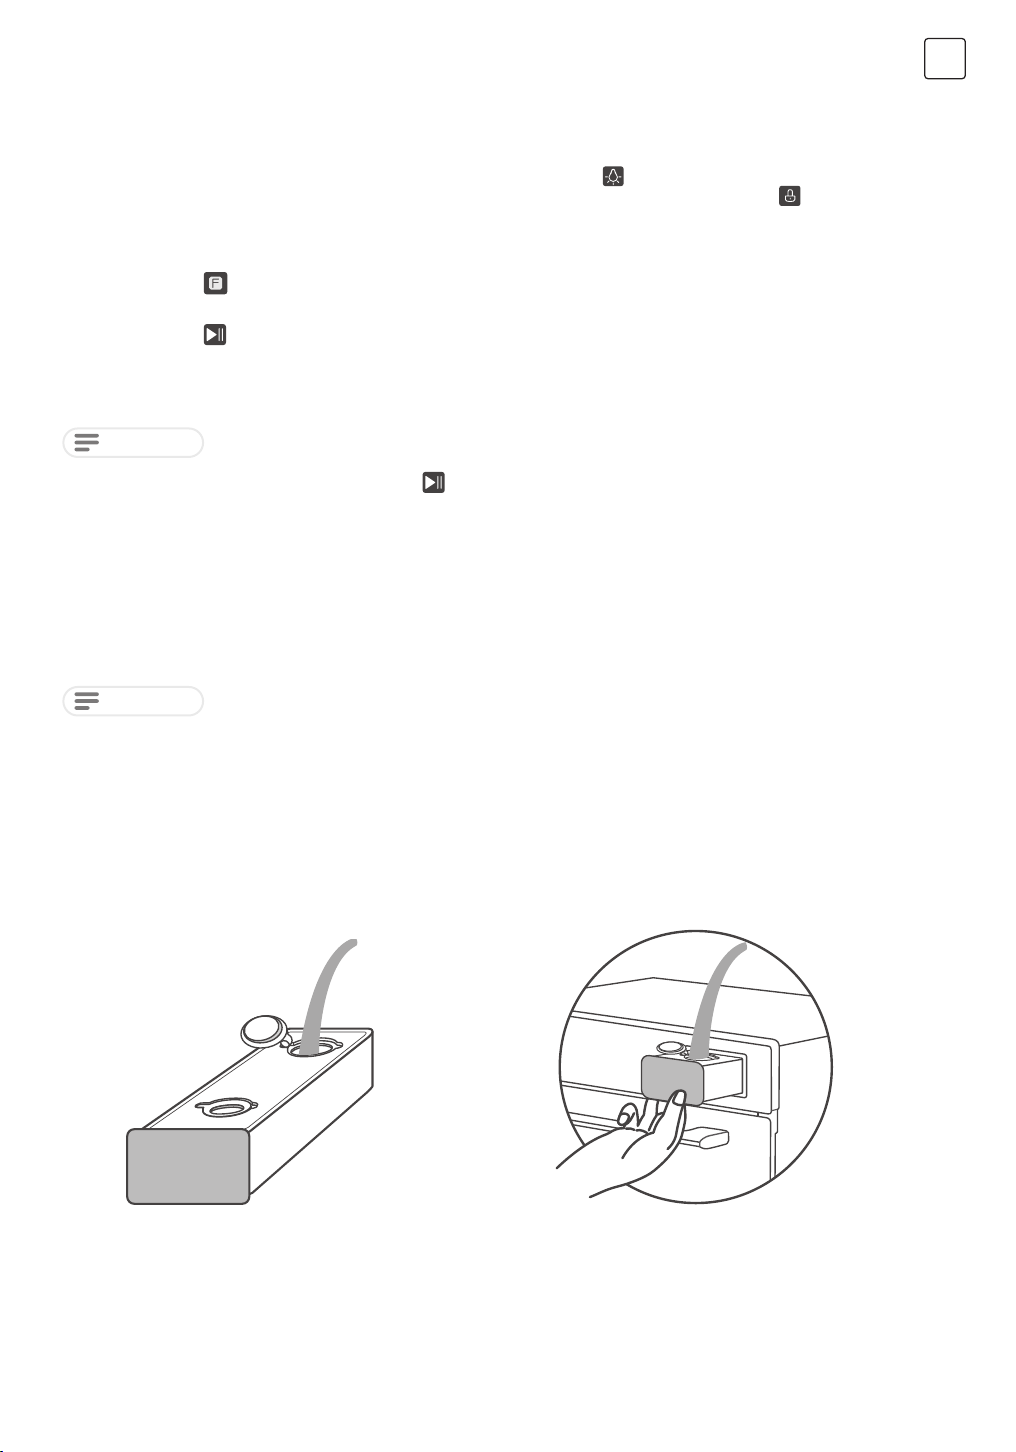
Kutija za vodu
Dodajte vodu
Metod 1
1. Pritisnite kutiju za vodu, izvadite celu kutiju i
dodajte vodu.
2. Pritisnite kutiju za vodu, izvucite je do pola i dodajte
vodu.
33
Page 34
SRB
Kutija za vodu
Čišćenje kutije za vodu
1. Pritisnite kutiju za vodu i izvadite je
Pametno čišćenje
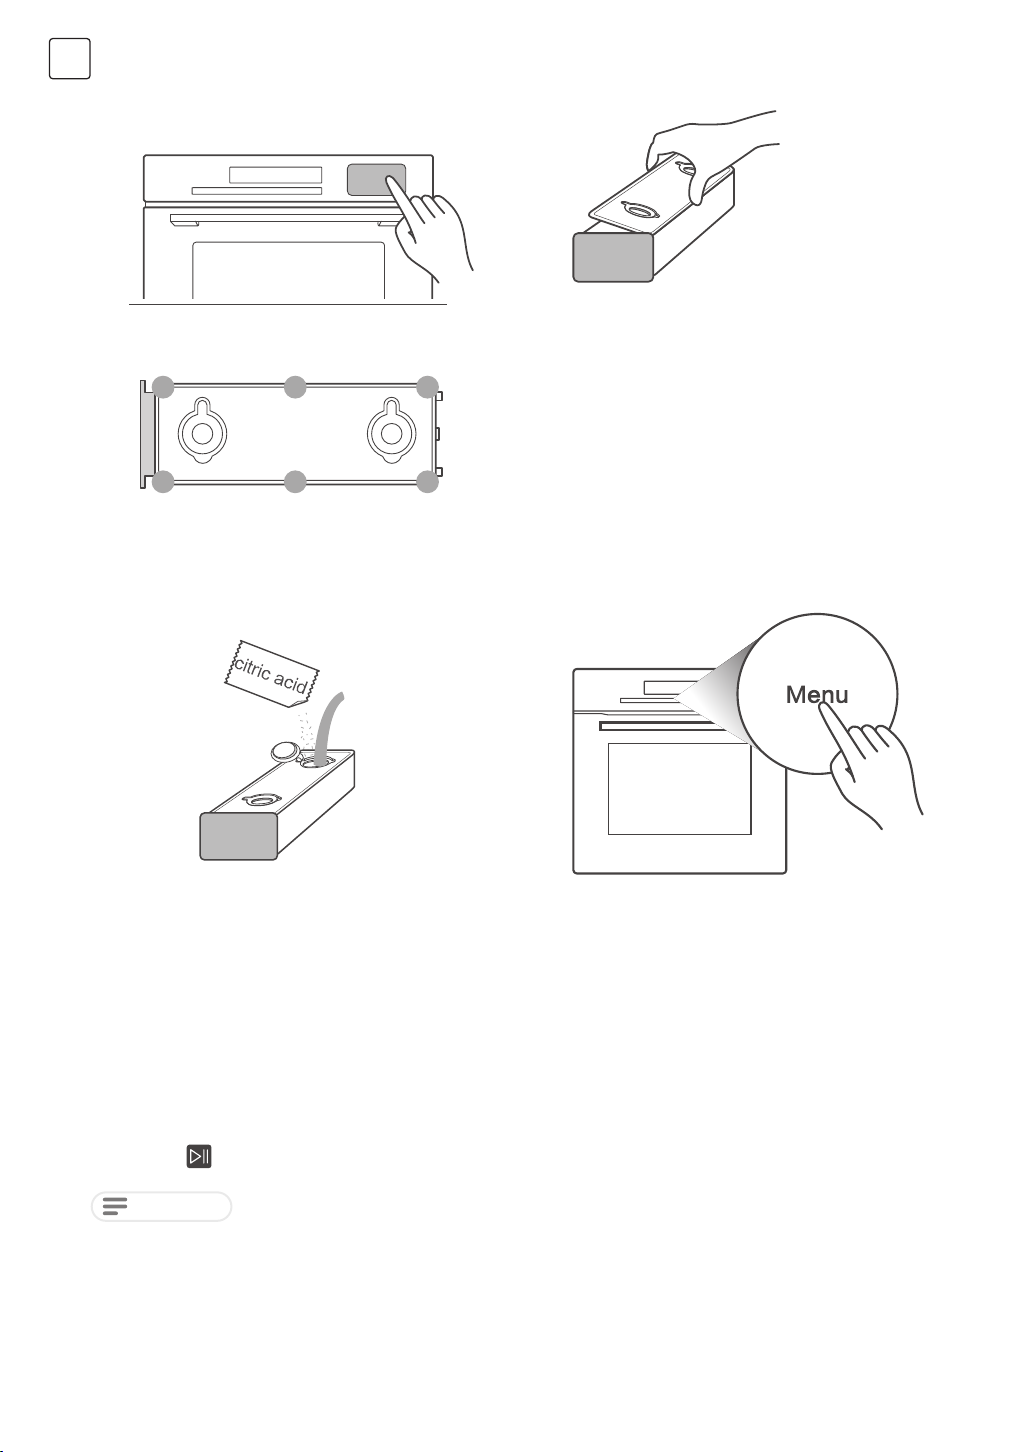
2. Skinite poklopac kutije za vodu i očistite kutiju.
3. Vratite poklopac i zaptivnu gumu, pritisnite plave tačke
prikazane na slici. Izbegnite zaglavljivanje uzrokovano
pomeranjem pri postavljanju.
1. Skinite poklopac kutije za vodu i dodajte
pola kesice limunske kiseline.
2. Pritisnite taster za meni jednom u režimu mirovanja ili
kada sat radi, zatim prevucite klizač ulevo ili pritisnite
taster – za ulazak u režim uklanjanja kamenca.
Funkcija čišćenja parom
This function use steam to soften scales inside the cavity which make the cavity easier to clean.
1. Uključite sistem, pritisnite i izvadite rezervoar za vodu. Ulijte 1000 ml sveže vode u rezervoar za vodu.
2. Stavite rezervoar za vodu na odgovarajuće mesto u aparatu.
3. U režimu pripravnosti dodirnite dugme "A" nekoliko puta dok se na ekranu ne prikaže "A11", što znači da je rerna ušla u
funkciju čišćenja parom. Vremenski prikaz pokazuje podrazumevano vreme "05:00min".
4. Pritisnite"
NAPOMENA
Vreme čišćenja parom ne može se prilagoditi. Pritiskom na dugme pauza ili otvaranjem vrata, proces čišćenja će biti pauziran.
Zatvorite vrata i pritisnite dugme za start da biste ponovo pokrenuli proces čišćenja.
" da započnete program.
34
Page 35
Funkcija automatskog uklanjanja kamenca
Za najbolje rezultate čišćenja, preporučujemo korišćenje deterdženta natrijum-citrata, koji je slučajno odabran za uklanjanje
kamenca iz rerne. Pratite uputstva proizvođača na pakovanju. Preporučuje se da se funkcija uklanjanja kamenca koristi nakon
što je funkcija pare korišćena 20 sati.
1. Uključite sistem, uklonite rezervoar za vodu, ulijte 1000 ml sveže vode u rezervoar za vodu, dodajući pakovanje sredstva
za uklanjanje kamenca.
2. Umetnite rezervoar za vodu na odgovarajuće mesto uređaja.
3. U režimu mirovanja, dodirnite "A" dugme nekoliko puta dok se na ekranu ne prikaže "A10", što znači da rerna ulazi
u funkciju automatskog uklanjanja kamenca. "min" i podrazumevano vreme "40:00" će se osvetliti, ikona rezervoara
prikazuje trenutni nivo vode (voda, nedostatak vode, pun rezervoar), ostale ikone nestaju.
4. Pritisnite"
5. Kada preostalo vreme odbroji na 10:00, program će biti pauziran i prikazaće nedostatak vode. Uklonite rezervoar za vodu
i napunite vodu u rezervoaru. Temeljno očistite rezervoar za vodu.
6. Zamenite vodu, ponovite korake 3 do 4.
NAPOMENA
Proces uklanjanja kamenca ne sme biti prekinut. Ako se proces uklanjanja kamenca prekine pre kraja, ceo program mora biti
pokrenut od koraka 3.
" da biste započeli program.
DODATNA OPREMA
Vaš uređaj dolazi sa nizom dodataka. Ovde možete pronaći pregled dodataka koji su uključeni i informacije o tome kako ih
pravilno koristiti.
SRB
Dodaci koji su uključeni
Vaš uređaj je opremljen sledećim dodacima:
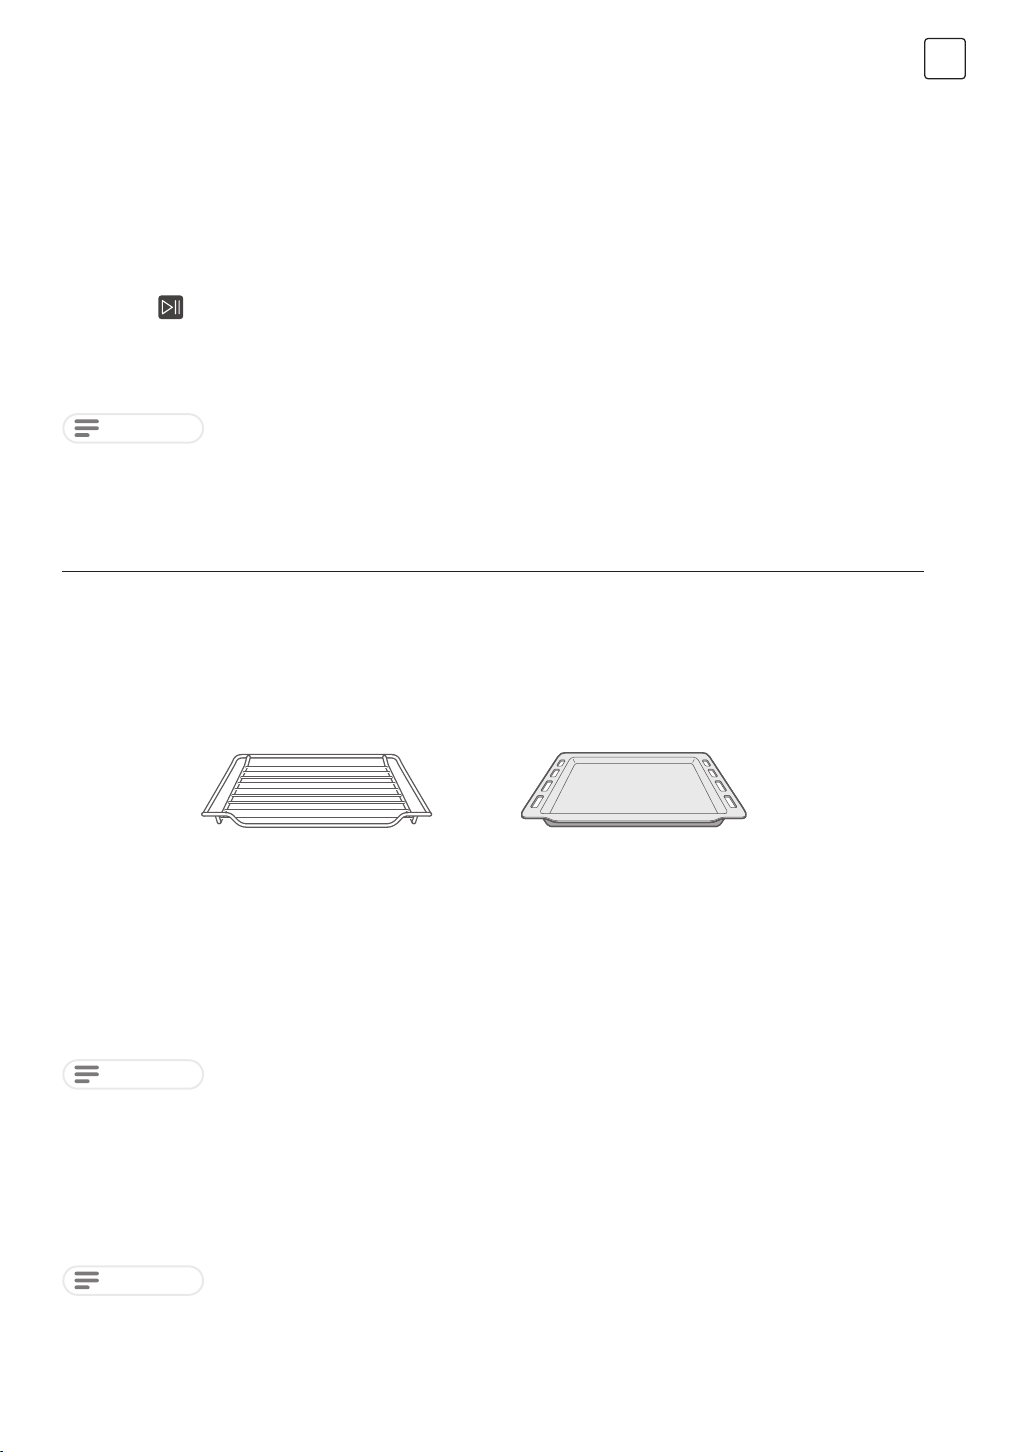
Žičana polica
Za posude za pečenje, kalupe za
kolače i vatrostalne posude. Za
pečenje i grilovanje hrane.
Možete koristiti pleh za stavljanje tečnosti ili kuvanih jela sa sosom.
Koristite samo originalne dodatke. Oni su posebno prilagođeni vašem aparatu.
Dodatke možete kupiti i naknadno, kod specijalizovanih prodavaca ili online.
NAPOMENA
Dodaci se mogu deformisati kada postanu vrući. To ne utiče na njihovu funkciju. Kada se ponovo ohlade, vraćaju svoj
prvobitni oblik.
Postavljanje dodataka
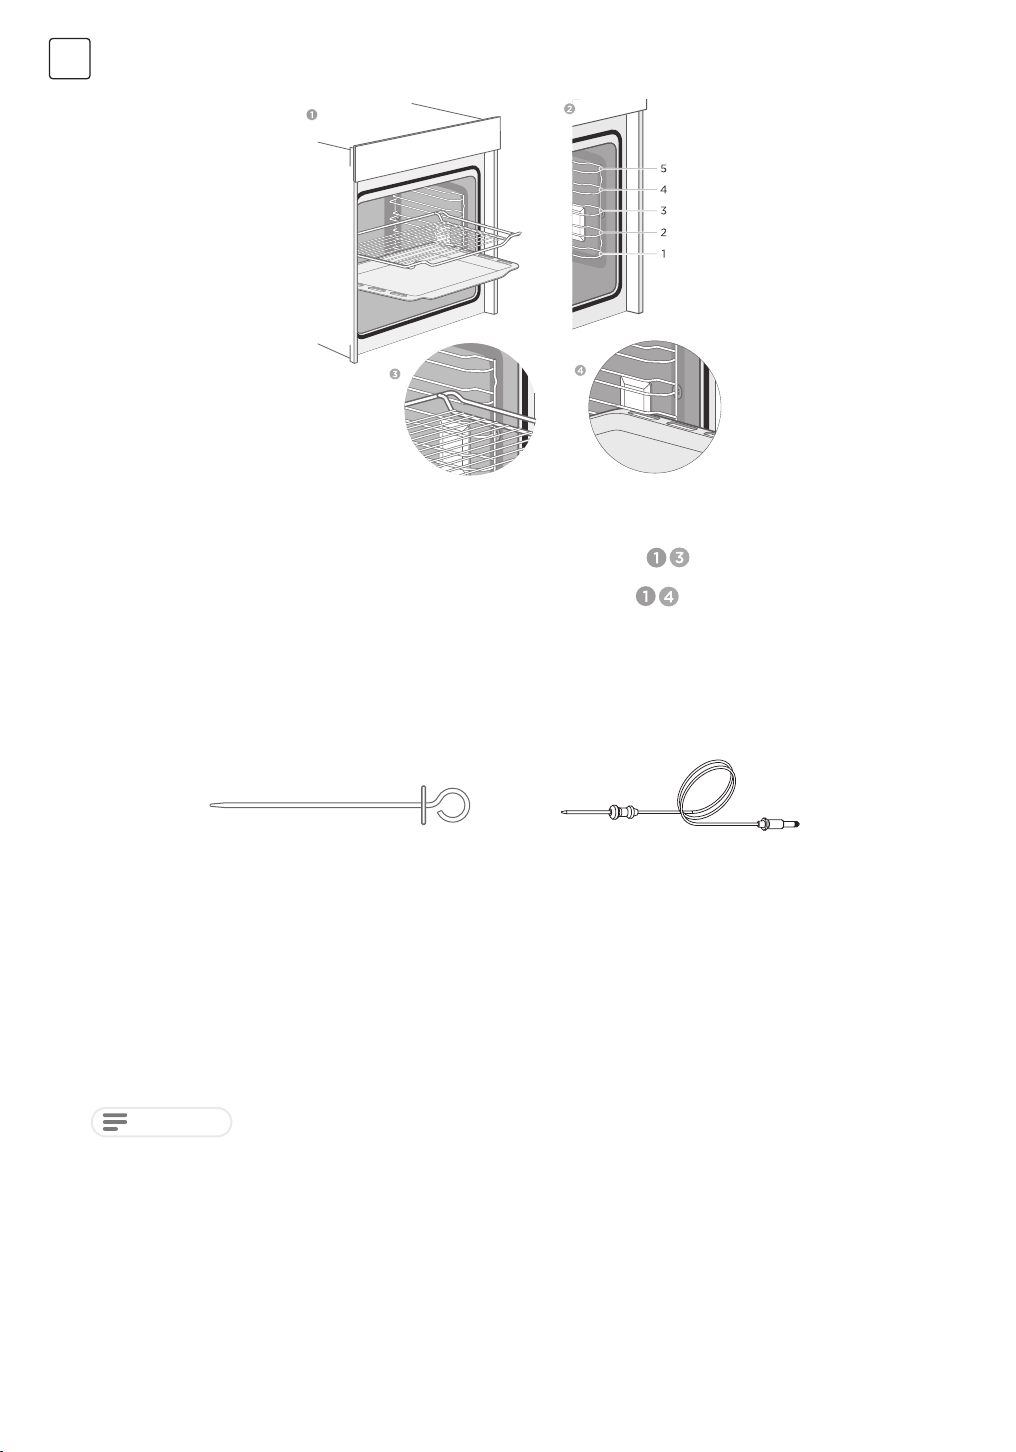
Unutrašnjost ima pet pozicija za police. Pozicije za police se broje od dna prema vrhu. Dodaci se mogu izvući približno do
polovine bez prevrtanja.
Pleh za pečenje
Za pečenje u plehu i male pečene
proizvode.
NAPOMENA
1. Pobrinite se da uvek umetnete dodatke u unutrašnjost na pravilan način.
2. Uvek potpuno umetnite dodatke u unutrašnjost kako se ne bi dodirivali sa vratima aparata.
35
Page 36
SRB
Funkcija zaključavanja
Pribor se može otprilike izvući do polovine dok se ne zaključa na mestu. Funkcija zaključavanja sprečava da pribor se nagne
pod težinom hrane i samog pribora dok se izvlači. Pribor treba pravilno umetnuti u komoru radi zaštite od naginjanja. Kada
umetnete rešetku, uverite se da je rešetka okrenuta u pravom smeru kao na slici.
Kada ubacujete podlogu, uverite se da je podloga u pravom smeru kao na slici .
Optional accessories
You can buy optional accessories from the after-sales service, from specialist retailers or online. Accessories below are
available to be purchased , and you are also welcome to see your sales brochures for more details.
For making some barbecue like meat
Barbecue stick
and vegetables;
Insert the probe into the center of meat
or poultry. Away from fat or bone
Meat probe
Ubacivanje dodataka:
Ražnjevi za roštilj su pogodni samo za rotacioni sistem. Kada koristite ražnjeve za roštilj, stavite ih na žičanu policu rotacionog
sistema. Pre nego što umetnete dodatke u unutrašnjost, pobrinite se da je svo hrane dobro postavljeno, a zatim ih lagano
umetnite na nivo 2 unutrašnjosti.
NAPOMENA
1. Rotacioni sistem se ne rotira neprekidno; možete odabrati da ga uključite tokom procesa kuvanja na osnovu performansi
hrane. Uverite se da nosite rukavice za toplotnu izolaciju i budite oprezni sa vrućinom koja izlazi prilikom otvaranja vrata
rerne. Rotacioni sistem može napraviti rotacije od 90 stepeni i verovatno nećete ni morati da ga okrećete.
2. Ražnjevi za roštilj su opasni zbog šiljastih vrhova; molimo vas da se pobrinete da deca i osobe sa invaliditetom budu
daleko od njih. Takođe proverite da ražnjevi nisu u konvencionalnom poklopcu pre nego što rerna bude uključena, jer bi
to moglo oštetiti rernu i povrediti ljude.
3. Snažno preporučujemo da koristite nivo 2 unutrašnjosti, funkciju gornjeg + donjeg grejanja za pečenje dok koristite
rotacioni sistem i ražnjeve za roštilj.
Prilikom kupovine, molimo vas da uvek navedete tačan broj narudžbine opcionih dodatka.
36
Page 37
ENERGETSKI EFIKASNA UPOTREBA
1. Uklonite sve dodatke koji nisu neophodni tokom procesa kuvanja i pečenja.
2. Ne otvarajte vrata tokom procesa kuvanja i pečenja.
3. Ako otvorite vrata tokom kuvanja i pečenja, prebacite režim na "Lampu". (Bez promene podešavanja temperature)
4. Smanjite podešavanje temperature u režimima bez ventilatora na 50°C 5 do 10 minuta pre kraja vremena kuvanja i
pečenja. Tako možete iskoristiti toplotu iz unutrašnjosti da završite proces.
5. Koristite "Grejanje ventilatorom", kad god je to moguće.
6. Možete smanjiti temperaturu za 20°C do 30°C. Možete kuvati i peći koristeći "Grejanje ventilatorom" na više od jednog
nivoa u isto vreme.
7. Ako nije moguće kuvati i peći različita jela u isto vreme, možete zagrevati jedno nakon drugog kako biste iskoristili status
prethodnog zagrevanja rerne.
8. Ne zagrevajte praznu rernu, ako to nije neophodno. Ako je potrebno, stavite hranu u rernu odmah nakon dostizanja
temperature koju označava svetlo indikatora pri prvom gašenju.
9. Ne koristite reflektujuću foliju, kao što je aluminijumska folija, za prekrivanje dna unutrašnjosti.
10. Koristite tajmer i/ili sondu za temperaturu kad god je to moguće.
11. Koristite kalupe i posude sa tamnim mat površinama i laganom težinom. Pokušajte da ne koristite teške dodatke sa
sjajnim površinama, kao što su nerđajući čelik ili aluminijum.
ŽIVOTNA SREDINA
SRB
Pakovanje je napravljeno da zaštiti vaš novi uređaj od oštećenja
tokom transporta. Korišćeni materijali su pažljivo odabrani i treba ih
reciklirati. Recikliranje smanjuje upotrebu sirovina i otpada. Električni
i elektronski uređaji često sadrže vredne materijale. Molimo vas da ih
ne odlažete sa vašim kućnim otpadom.
ZDRAVLJE
Akrilamid se uglavnom javlja zagrevanjem skrobne hrane (npr. krompir, pomfrit, hleb) na veoma visokim temperaturama
tokom dužih vremenskih perioda.
Saveti
1. Koristite kraće vreme kuvanja.
2. Kuvajte hranu do zlatno žute boje, ne pecite je do tamno smeđe boje.
3. Veće porcije imaju manje akrilamida.
4. Koristite režim "Ventilaciono grejanje" ako je moguće.
5. Pomfrit: Koristite više od 450g po plehu, rasporedite ih ravnomerno i povremeno ih prevrnite. Koristite informacije o
proizvodu ako su dostupne kako biste dobili najbolje rezultate kuvanja.
37
Page 38

SRB
ODRŽAVANJE VAŠEG UREĐAJA
Sredstvo za čišćenje
Uz pravilno održavanje i čišćenje, vaš uređaj će zadržati svoj izgled i ostati u punoj funkciji dugo vremena. Ovde ćemo
objasniti kako pravilno da brinete o svom uređaju i da ga čistite.
Da biste osigurali da različite površine ne budu oštećene upotrebom pogrešnog sredstva za čišćenje, pridržavajte se
informacija u tabeli. U zavisnosti od modela uređaja, nije nužno da se svi navedeni delovi nalaze na/ili u vašem uređaju.
OPREZ!
Rizik od oštećenja površine
Ne koristite:
1. Gruba ili abrazivna sredstva za čišćenje.
2. Sredstva za čišćenje sa visokim sadržajem alkohola.
3. Tvrde četke za ribanje ili sunđere za čišćenje.
4. Čistače pod visokim pritiskom ili paročistače.
5. Posebna sredstva za čišćenje namenjena za čišćenje uređaja dok je vruć.
Temeljno operite nove sunđere pre upotrebe.
Savet
Preporučeni proizvodi za čišćenje i održavanje mogu se kupiti putem postprodajnog servisa. Pridržavajte se uputstava
odgovarajućeg proizvođača.
Spoljna površina uređaja Čišćenje
Topla sapunica:
Očistite krpom za sudove, a zatim osušite mekom krpom.
Spoljašnjost uređaja Prednja strana
od nerđajućeg čelika
Plastika
Ofarbane površine
Kontrolna tabla
Paneli vrata
Ručka vrata
Emajlirane površine i samočisteće
površine
Stakleni poklopac unutrašnjeg
osvetljenja
Odmah uklonite fleke od kamenca, masti, skroba i albumina (npr. belance).
Korozija se može formirati ispod takvih fleka.
Posebni proizvodi za čišćenje nerđajućeg čelika, pogodni za vruće površine,
dostupni su putem našeg postprodajnog servisa ili kod specijalizovanih prodavaca.
Nanesite vrlo tanak sloj sredstva za čišćenje mekom krpom.
Topla sapunica:
Očistite krpom za sudove, a zatim osušite mekom krpom. Ne koristite sredstvo za
čišćenje stakla ili strugač za staklo.
Topla sapunica:
Očistite krpom za sudove, a zatim osušite mekom krpom.
Topla sapunica:
Očistite krpom za sudove, a zatim osušite mekom krpom. Ne koristite sredstvo za
čišćenje stakla ili strugač za staklo.
Topla sapunica:
Očistite krpom za sudove, a zatim osušite mekom krpom.
Ne koristite strugač za staklo ili sunđer od nerđajućeg čelika.
Topla sapunica:
Očistite krpom za sudove, a zatim osušite mekom krpom.
Ako sredstvo za uklanjanje kamenca dođe u kontakt s ručkom vrata, odmah ga
obrišite. U suprotnom, fleke neće moći da se uklone.
Pridržavajte se uputstava za površine komore za kuvanje koja slede u tabeli.
Topla sapunica:
Očistite krpom za sudove, a zatim osušite mekom krpom.
Ako je komora za kuvanje jako prljava, koristite sredstvo za čišćenje rerne.
38
Page 39
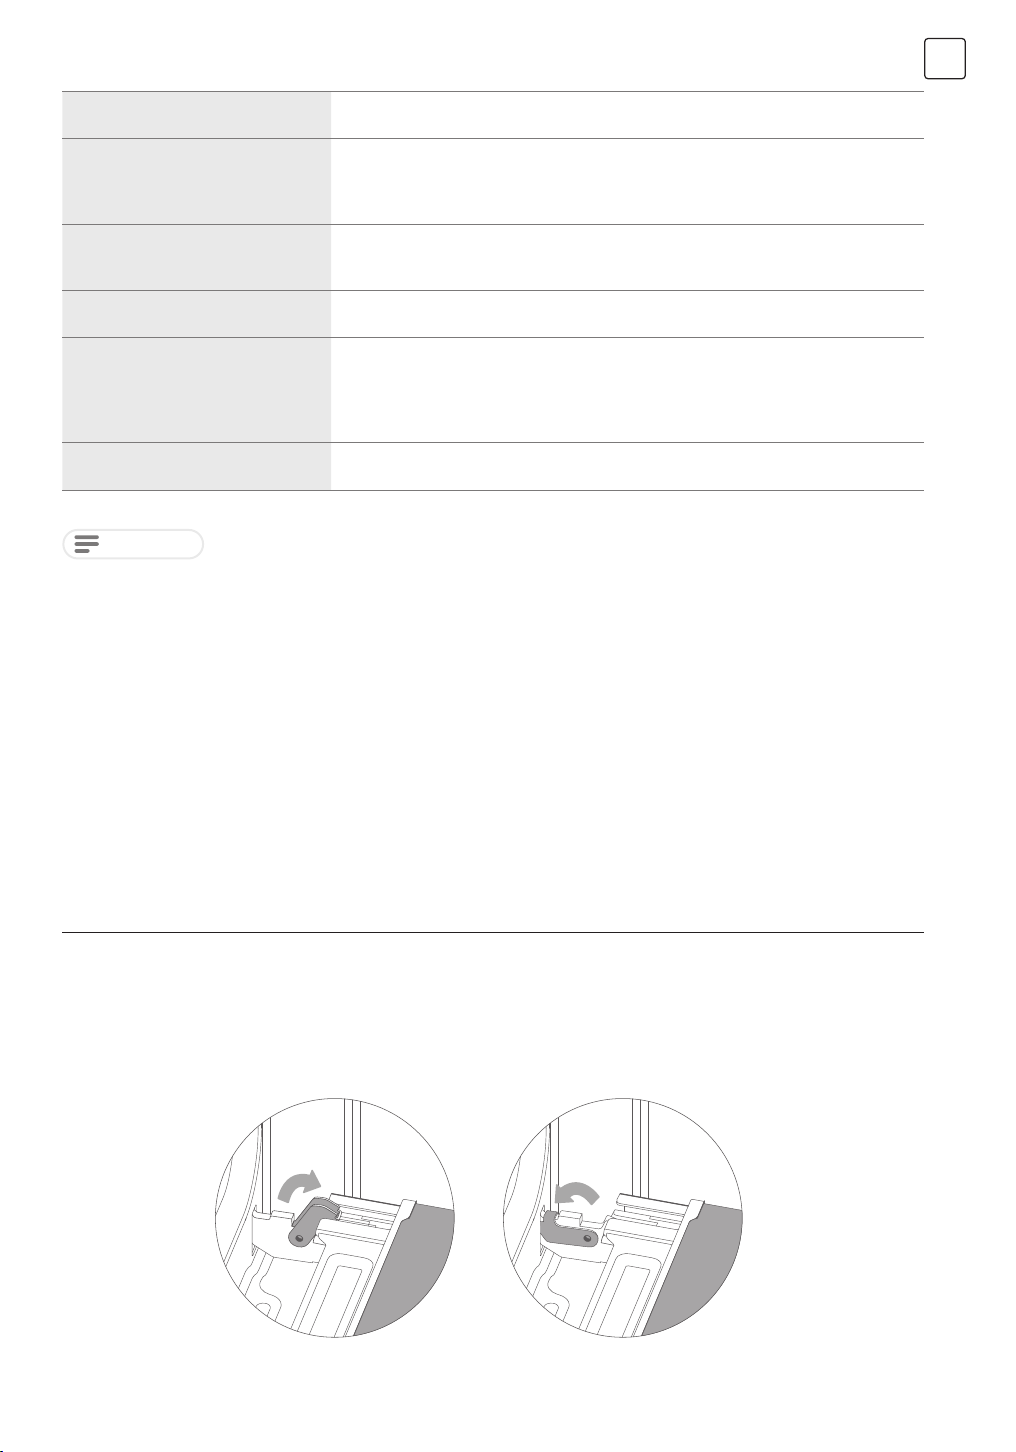
SRB
Zaptivka vrata
Ne uklanjajte
Poklopac vrata od nerđajućeg čelika
Pribor
Šine
Sistem izvlačenja
Termometar za meso
NAPOMENA
1. Blage razlike u boji na prednjoj strani uređaja uzrokovane su upotrebom različitih materijala, kao što su staklo, plastika i
metal.
2. Senke na panelima vrata, koje izgledaju kao tragovi, uzrokovane su refleksijama koje pravi unutrašnje osvetljenje.
3. Emajl se peče na veoma visokim temperaturama. To može uzrokovati male varijacije u boji. To je normalno i ne utiče na
rad. Ivice tankih plehova ne mogu biti potpuno emajlirane. Kao rezultat toga, te ivice mogu biti grube. To ne narušava
zaštitu od korozije.
4. Uvek održavajte uređaj čistim i odmah uklonite prljavštinu kako ne bi došlo do nakupljanja tvrdih naslaga prljavštine.
Topla sapunica:
Očistite krpom za sudove. Ne ribajte.
Sredstvo za čišćenje nerđajućeg čelika:
Pridržavajte se uputstava proizvođača.
Ne koristite proizvode za negu nerđajućeg čelika. Uklonite poklopac vrata radi
čišćenja.
Topla sapunica:
Namočite i očistite krpom za sudove ili četkom.
Ako ima jakih naslaga prljavštine, koristite sunđer od nerđajućeg čelika.
Topla sapunica:
Namočite i očistite krpom za sudove ili četkom.
Topla sapunica:
Očistite krpom za sudove ili četkom.
Ne uklanjajte lubrikant dok su šine za izvlačenje izvučene. Najbolje je očistiti ih kada
su uvučene.
Ne perite u mašini za sudove.
Topla sapunica:
Očistite krpom za sudove ili četkom. Ne perite u mašini za sudove.
Saveti
1. Očistite komoru za kuvanje nakon svake upotrebe. Ovo će osigurati da prljavština ne može da se zapeče.
2. Uvek odmah uklonite fleke od kamenca, masti, skroba i albumina (npr. belance).
3. Odmah uklonite fleke od hrane koja sadrži šećer, ako je moguće, dok je fleka još topla.
4. Koristite posude pogodne za rernu, npr. posudu za pečenje.
VRATA UREĐAJA
Uz pravilno održavanje i čišćenje, vaš uređaj će zadržati svoj izgled i ostati potpuno funkcionalan dugo vremena. Ovo će vam
objasniti kako da uklonite vrata uređaja i očistite ih.
U svrhu čišćenja i uklanjanja panela vrata, možete odvojiti vrata uređaja. Svaka šarka vrata uređaja imaj polugu za
zaključavanje.
Kada su poluge za zaključavanje zatvorene, vrata uređaja su fiksirana na mestu. Ne mogu se odvojiti. Kada su zaključavajuće
poluge otvorene kako bi se odvojila vrata uređaja, šarke su zaključane. Ne mogu se zatvoriti.
39
Page 40
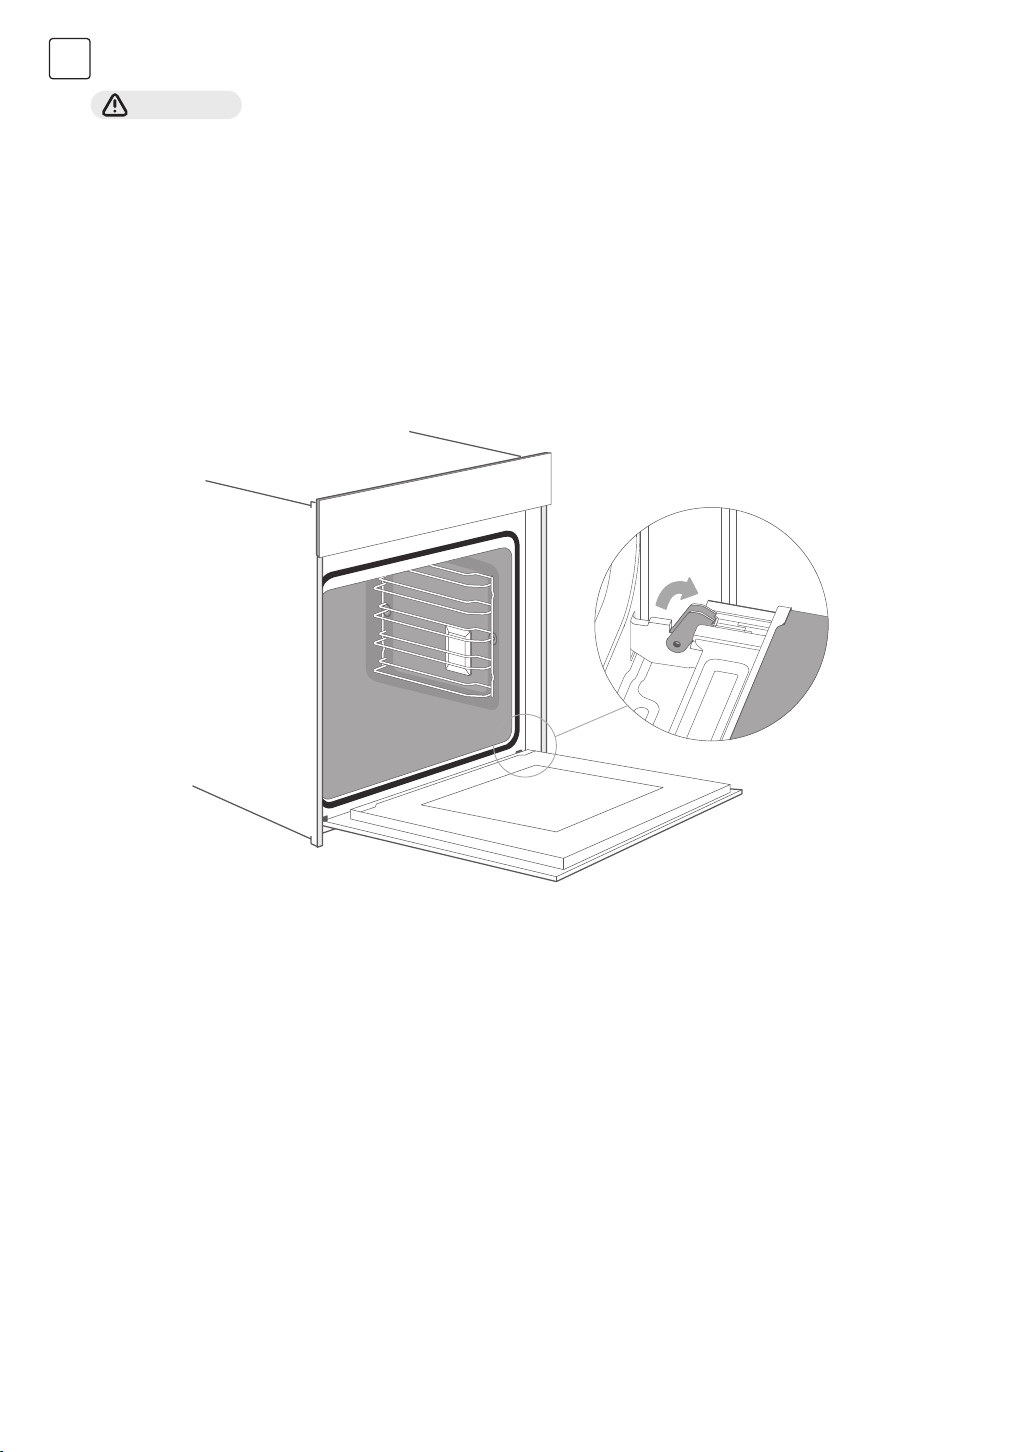
SRB
UPOZORENJE!
Rizik od povreda!
1. Ako šarke nisu zaključane, mogu se brzo zatvoriti s velikom snagom. Osigurajte da su zaključavajuće poluge uvek
potpuno zatvorene ili, kada uklanjate vrata uređaja, potpuno otvorene.
2. Šarke na vratima uređaja se kreću prilikom otvaranja i zatvaranja vrata, i možete se zaglaviti. Držite ruke podalje od šarki.
Uklanjanje vrata uređaja
1. Potpuno otvorite vrata uređaja.
2. Preklopite dve zaključavajuće poluge levo i desno.
3. Zatvorite vrata uređaja do graničnika.
4. Obema rukama uhvatite vrata sa leve i desne strane, i povucite ih nagore.
Postavljanje vrata uređaja
Ponovo postavite vrata uređaja u obrnutom redosledu u odnosu na uklanjanje.
1. Prilikom postavljanja vrata uređaja, osigurajte da su obe šarke pravilno postavljene u otvorima na prednjoj strani komore.
2. Proverite da su šarke umetnute u ispravan položaj. Morate moći da ih umetnete lako i bez otpora. Ako osetite bilo kakav
otpor, proverite da li su šarke pravilno umetnute u rupe.
3. Potpuno otvorite vrata uređaja. Dok otvarate vrata uređaja, možete još jednom proveriti da li su šarke u pravom položaju.
Ako napravite grešku prilikom postavljanja, nećete moći potpuno otvoriti vrata uređaja.
4. Ponovo preklopite obe zaključavajuće poluge.
5. Zatvorite vrata komore za kuvanje. U isto vreme, toplo preporučujemo da još jednom proverite da li su vrata u pravom
položaju i da li su ventilacione rešetke polu-zapečaćene.
40
Page 41
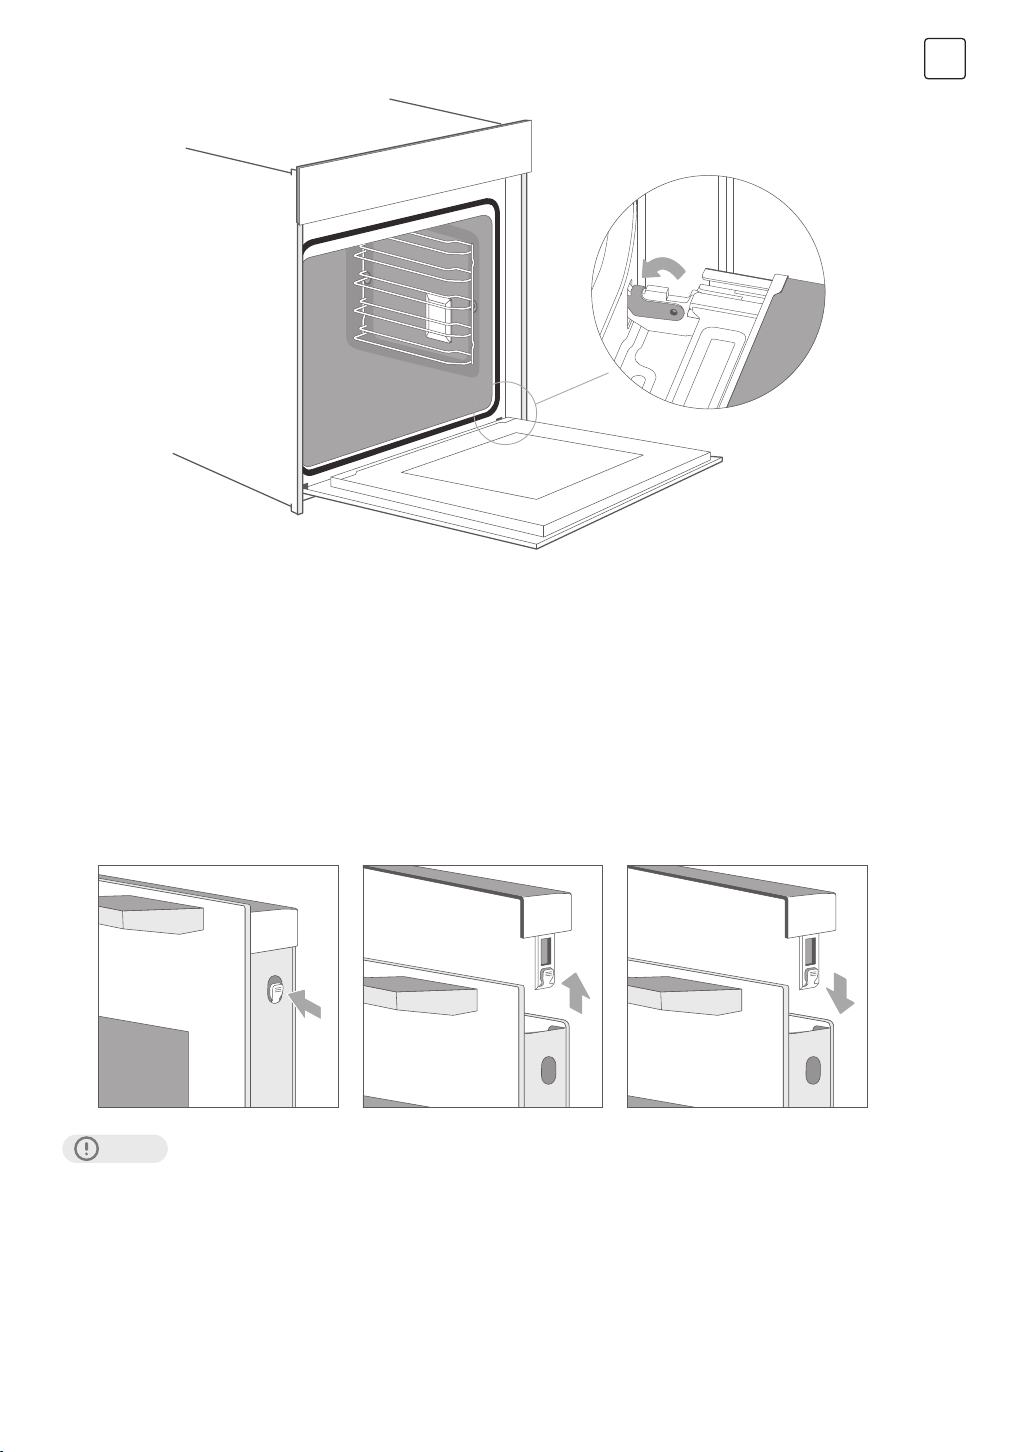
Uklanjanje poklopca vrata
Plastični umetak u poklopcu vrata može izbledeti. Da biste izvršili temeljno čišćenje, možete ukloniti poklopac.
SRB
Uklonite vrata uređaja kao što je objašnjeno iznad.
1. Pritisnite sa desne i leve strane poklopca.
2. Uklonite poklopac.
3. Nakon uklanjanja poklopca vrata, ostale delove vrata uređaja lako možete uzeti, kada je završeno, stavite poklopac nazad
na mesto i pritisnite ga dok ne čujete da se čvrsto zaključa.
4. Postavite vrata uređaja i zatvorite ih.
OPREZ!
Dok su vrata uređaja pravilno postavljena, poklopac vrata takođe može biti uklonjen, u tom trenutku.
1. Uklanjanje poklopca vrata znači osloboditi unutrašnje staklo vrata uređaja; staklo se može lako pomerati i izazvati
oštećenje ili povredu.
2. Uklanjanjem poklopca vrata i unutrašnjeg stakla smanjuje se ukupna težina vrata uređaja. Šarke se mogu lakše pomerati
prilikom zatvaranja vrata i možete se zaglaviti. Držite ruke podalje od šarki.
Zbog gore navedenih razloga, toplo preporučujemo da ne uklanjate poklopac vrata osim ako vrata uređaja nisu uklonjena.
Oštećenja prouzrokovana pogrešnim radom nisu pokrivena garancijom.
41
Page 42
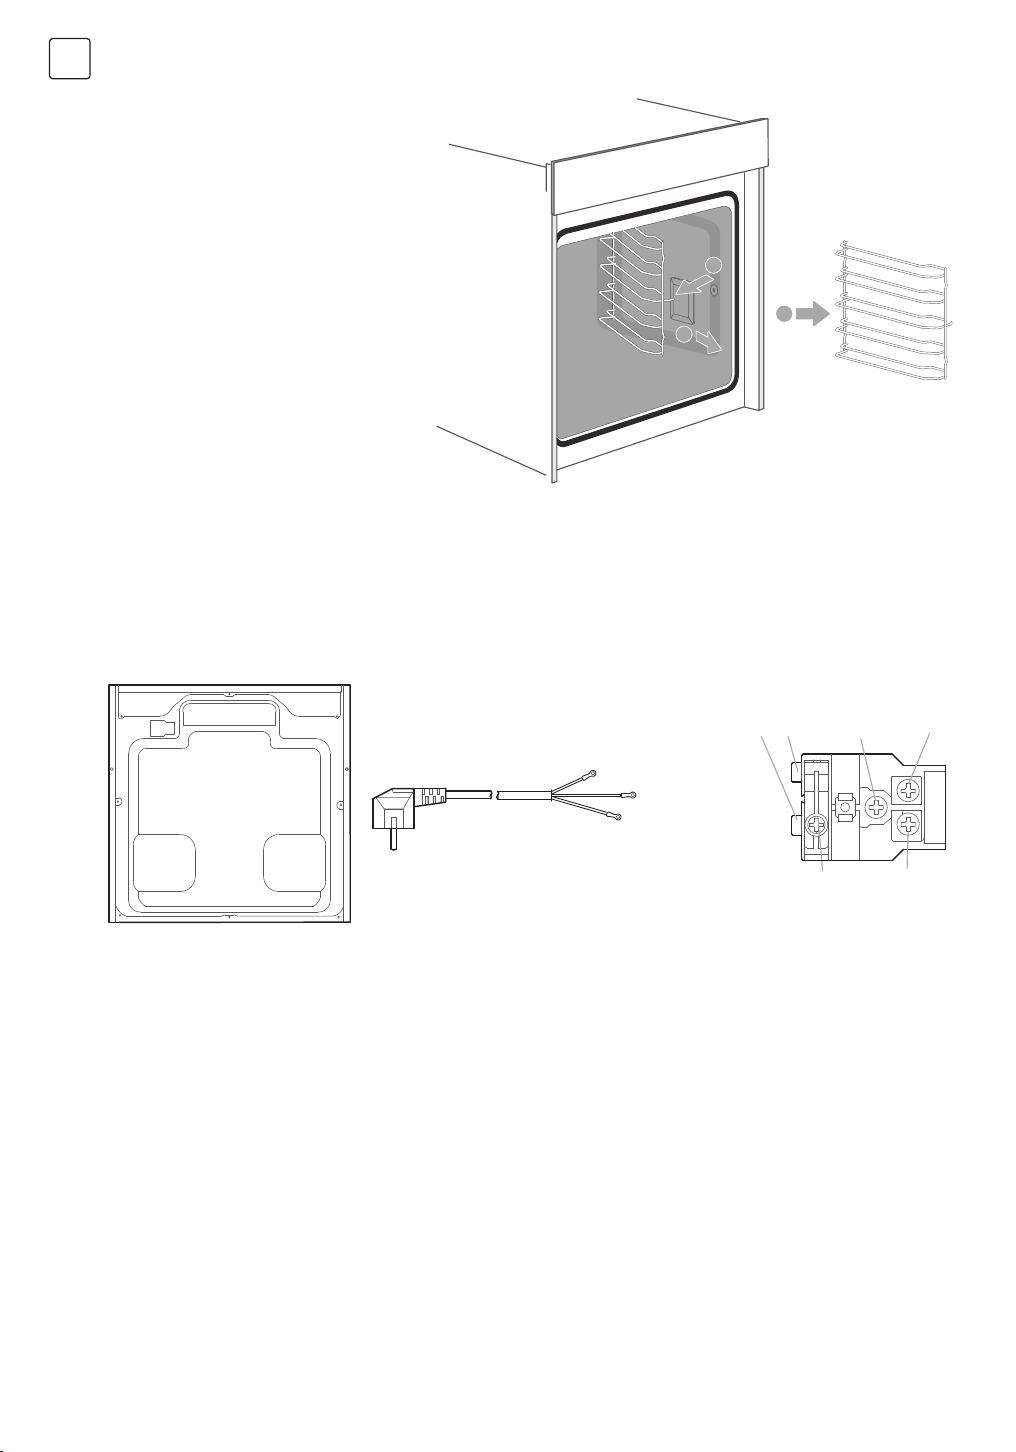
SRB
Šine
Kada želite temeljno očistiti šine i komoru,
možete ukloniti police i očistiti ih. Na taj način
će vaš uređaj zadržati svoj izgled i ostati
potpuno funkcionalan dugo vremena.
Odvajanje i ponovno postavljanje šina
Umetanje držača
Priključivanje šina
1
3
2
Zamena kabla za napajanje
Pozicija A prikazuje položaj priključne kutije na zadnjoj strani spoljnog kućišta i ona je zatvorena. Koraci: a. Isključite struju,
koristite mali odvijač za otvaranje dva klika 1, 2.
b. Koristite Philips odvijač da skinete šrafove 3, 4, 5 i 6.
c. Zamenite novi napojni kabl, pričvrstite žutu/zelenu žicu na 3, smeđu žicu na 4, plavu žicu na 5.
d. Zavrnite šraf 6 da zatvorite poklopac priključne kutije i završite zamenu.
A
braon {L}
žuta/zelena
kabl za napajanje
spoljno zadnje kućište priključna kutija
plava {N}
21
3
4
5
42
Page 43
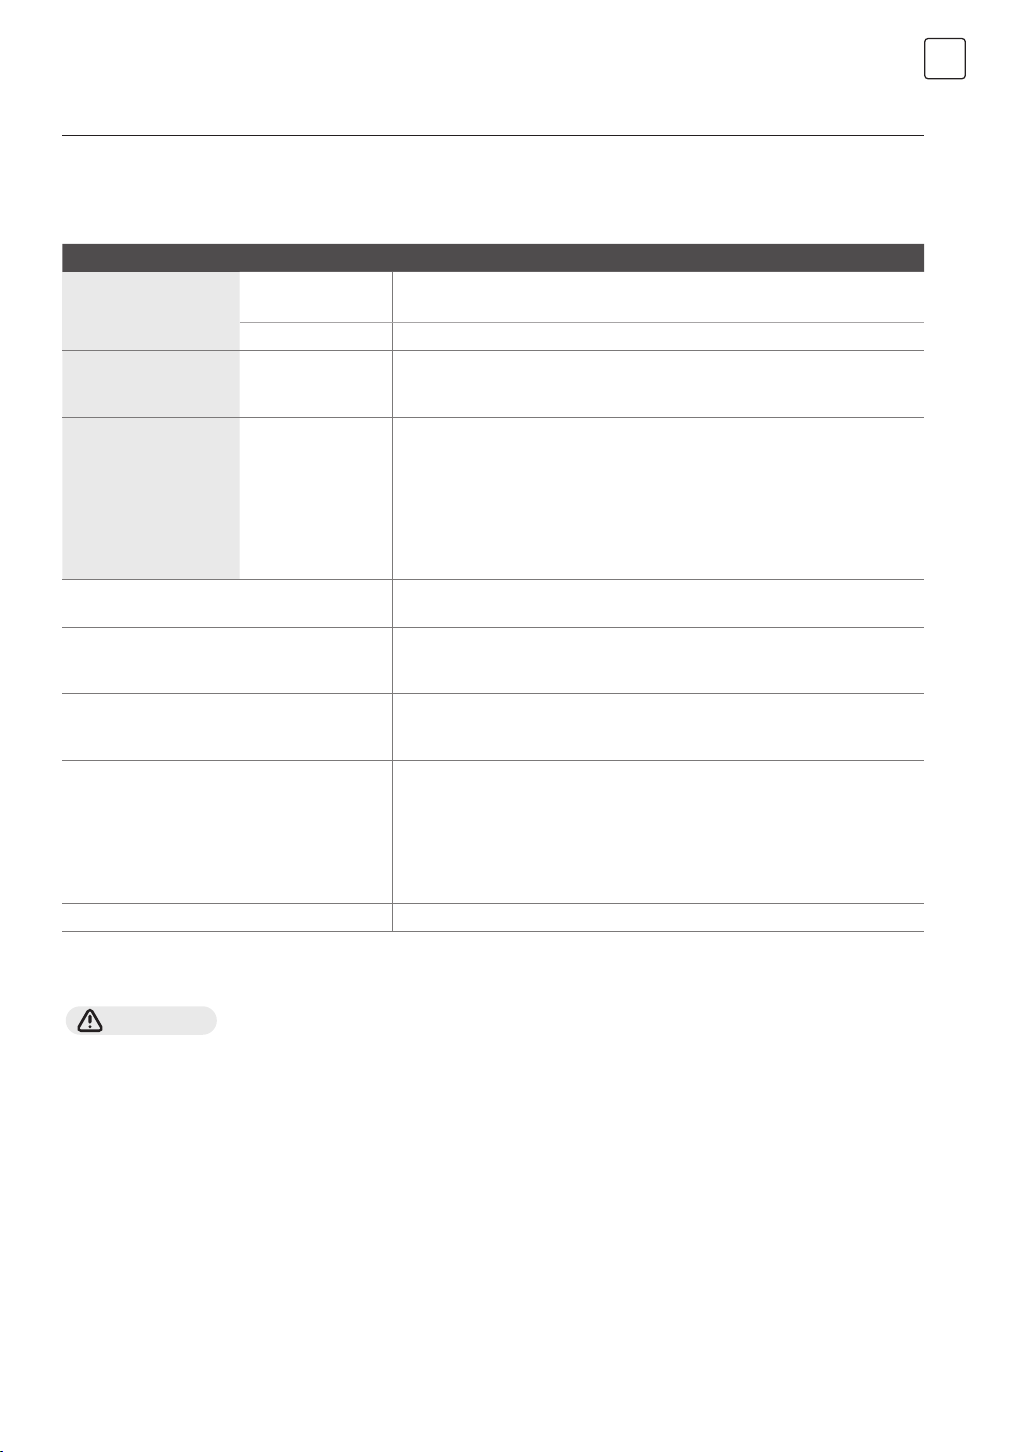
POPRAVITE SVOJ UREĐAJ KADA JE TO POTREBNO
Ako dođe do kvara, pre nego što pozovete servis postprodaje, molimo vas da se uverite da to nije zbog pogrešnih operacija i
da se oslonite na tabelu kvarova, pokušajte da sami ispravite kvar. Često možete lako ispraviti tehničke kvarove na uređaju.
Ako jelo ne ispadne tačno onako kako ste želeli, možete pronaći mnogo saveta i uputstava za pripremu na kraju uputstva za
rad.
Greška Mogući uzrok Napomene/popravka
Neispravan
Aparat ne radi.
Dugmići su ispali iz
nosača na kontrolnoj
tabli.
Dugmići se više ne
mogu lako okretati.
Ventilator ne radi non-stop u režimu:
“Grejanje ventilatorom”.
Nakon kuvanja može se čuti buka, a može se
primetiti i protok vazduha u blizini kontrolne
table.
Hrana nije dovoljno skuvana u vremenu
navedenom u receptu.
Nejednako pečenje.
Lampa se ne uključuje. Lampa treba da se zameni.
osigurač.
Isključenje struje. Proverite da li svetlo u kuhinji ili drugi kućni aparati rade.
Dugmići su slučajno
isključeni.
Ispod dugmića ima
prljavštine.
Proverite osigurač u razvodnoj kutiji.
Dugmići se mogu ukloniti.
Samo stavite dugmiće nazad u njihov nosač na kontrolnoj tabli i pritisnite ih
kako bi se uključili i mogli okretati kao obično.
Dugmići se mogu ukloniti.
Da biste isključili dugmiće, jednostavno ih uklonite iz nosača.
Alternativno, pritisnite spoljašnju ivicu dugmića tako da se nagnu i mogu se
lako podići.
Pažljivo očistite dugmiće koristeći krpu i sapunicu. Osušite mekom krpom.
Ne koristite oštre ili abrazivne materijale. Ne umačite i ne perite u mašini za
sudove.
Ne uklanjajte dugmiće previše često kako bi nosač ostao stabilan.
Ovo je normalna operacija zbog najbolje moguće raspodele toplote i
najboljih mogućih performansi rerne.
Hladni ventilator još uvek radi kako bi sprečio visoku vlažnost unutar
komore i rashladio rernu radi vaše udobnosti. Hladni ventilator će se
automatski isključiti.
Koristi se temperatura koja se razlikuje od one u receptu. Ponovo proverite
temperature.
Količine sastojaka se razlikuju od onih u receptu. Ponovo proverite recept.
Podešavanje temperature je previše visoko, ili nivo police može biti
optimizovan. Ponovo proverite recept i podešavanja.
Površinska obrada i/ili boja i/ili materijal posuđa za pečenje nisu bili najbolji
izbor za izabranu funkciju rerne.
Kada koristite vazdušnu toplotu, kao što je režim “Gornje i donje grejanje”,
koristite posuđe za pečenje sa mat završnom obradom, tamne boje i
lakšeg materijala.
SRB
UPOZORENJE!
Opasnost od strujnog udara!
Nepravilne popravke su opasne. Popravke mogu obavljati samo naši obučeni tehničari za postprodajnu podršku, kao i
zamenu oštećenih naponskih kablova. Ako je aparat neispravan, isključite aparat iz struje ili isključite osigurač u razvodnoj
kutiji. Kontaktirajte servis za posleprodajnu podršku
Maksimalno vreme rada
Maksimalno vreme rada ovog aparata je 9 sati, ukoliko se desi da zaboravite da isključite struju.
Sijalice u kuhinjskom odeljku
Da biste osvetlili unutrašnjost vašeg kuhinjskog odeljka, vaš uređaj ima jednu ili više LED sijalica dugog veka.
Međutim, ako je LED sijalica ili stakleni poklopac sijalice oštećen, pozovite servis posle prodaje. Poklopac lampe se ne sme
skidati.
43
Page 44
SRB
KORISNIČKA PODRŠKA
Naša služba za postprodajnu podršku je tu za vas ako vašem uređaju zatreba popravka. Uvek ćemo pronaći odgovarajuće
rešenje. Molimo vas da kontaktirate trgovca kod kojeg ste kupili ovaj uređaj. Kada nas pozovete, navedite model i serijski broj
kako bismo vam mogli pružiti tačne informacije. Oznaku sa ovim brojevima možete pronaći kada otvorite vrata uređaja.
SPECIFIKACIJE
Nazivni napon 220-240V~
Nazivna frekvencija 50Hz-60Hz
Električna snaga 3.15 kW
UPOZORENJE!
Ovaj aparat treba da se instalira u skladu sa važećim propisima i koristi samo u dobro ventilisanom prostoru. Pročitajte
uputstva pre instalacije ili korišćenja ovog aparata.
NAPOMENA
Molimo vas da imate na umu da poseta tehničara iz servisne službe nije besplatna, čak ni tokom garantnog perioda.
Oslonite se na profesionalnost proizvođača. Stoga možete biti sigurni da će popravku izvršiti obučeni servisni tehničari koji
imaju originalne rezervne delove za vaše aparate.
Hvala vam još jednom što ste kupili Tesla ugradnu rernu i želimo vam da naš aparat donese ukusnu hranu i srećan život.
44
Page 45

SAVETI I TRIKOVI
SRB
Želite da pripremite svoj
recept
Da li je torta pečena?
Torta gubi veliki volumen
tokom hlađenja nakon
pečenja.
Visina torte je u sredini mnogo
veća nego na spoljašnjem
prstenu
Torta je previše smeđa na vrhu
Torta je previše suva Povećajte temperaturu za 10°C (to može dovesti do kraćeg vremena kuvanja).
Hrana izgleda dobro, ali je
vlažnost unutra previsoka.
Pečenje je nejednako.
Torta je manje smeđa na dnu. Izaberite nivo niže.
Pečenje na više od jednog
nivoa u isto vreme: Jedna
polica je tamnija od druge.
Kondenzovana voda tokom
pečenja.
Koju vrstu posuđa za pečenje
možete koristiti?
Pokušajte prvo da koristite podešavanja sličnih recepata i optimizujte proces kuvanja u
zavisnosti od rezultata.
Stavite drveni štapić unutar torte oko 10 minuta pre nego što istekne dato vreme pečenja.
Ako na štapiću nema sirovog testa nakon što ga izvučete, torta je spremna.
Pokušajte da smanjite podešavanje temperature za 10°C i dvostruko proverite uputstva za
pripremu hrane u vezi sa mehaničkim rukovanjem testom.
Ne podmazujte spoljašnji prsten kalupa za tortu.
Koristite niži nivo police ili koristite nižu postavljenu temperaturu (to može dovesti do
dužeg vremena kuvanja).
Smanjite temperaturu za 10°C (to može dovesti do dužeg vremena kuvanja) i dvostruko
proverite recept.
Smanjite temperaturu za 10°C (to može dovesti do dužeg vremena kuvanja). Koristite
režim “Gornje i donje grejanje” na jednom nivou.
Koristite režim sa ventilatorom za pečenje na više od jednog nivoa i izvadite plehove
pojedinačno kada su gotovi. Nije neophodno da svi plehovi budu gotovi u isto vreme.
Para je deo pečenja i kuvanja i normalno izlazi iz rerne zajedno sa hladnim protokom
vazduha. Ova para može kondenzovati na različitim površinama u rerni ili u njenoj blizini i
formirati kapljice vode. Ovo je fizički proces i ne može se potpuno izbeći.
Može se koristiti svako posuđe otporno na toplotu. Preporučuje se da se aluminijum ne
koristi u direktnom kontaktu sa hranom, posebno kada je kiselina prisutna.
Osigurajte dobru prilagodljivost između posude i poklopca.
Kako koristiti funkciju grila?
Kako održavati rernu čistom
tokom grilovanja?
Grejni element u svim
režimima grilovanja se
uključuje i isključuje tokom
vremena
Kako izračunati podešavanja
rerne kada težina pečenja nije
navedena u receptu?
Šta se dešava ako se tečnost
sipa na hranu u rerni tokom
procesa pečenja ili kuvanja?
Zagrejte rernu 5 minuta i stavite hranu na nivo koji je dat u ovom priručniku. Zatvorite vrata
rerne kada koristite bilo koji režim grilovanja. Ne koristite rernu kada su vrata otvorena,
osim kada dodajete, uklanjate ili proveravate hranu.
Koristite pleh napunjen sa 2 litra vode na prvom nivou. Gotovo sve tečnosti koje kaplju sa
hrane postavljene na rešetku biće sakupljene u plehu.
To je normalna operacija i zavisi od podešavanja temperature.
Izaberite podešavanja pored težine pečenja i malo promenite vreme.
Koristite termometar za meso ako je moguće da biste otkrili temperaturu unutar mesa.
Pažljivo stavite glavu termometra za meso u meso, u skladu sa uputstvima proizvođača.
Uverite se da je glava termometra smeštena u sredini najvećeg dela mesa, ali ne blizu
kosti ili šupljine.
Tečnost će ključati i para će se pojaviti kao normalan fizički proces. Molimo vas da budete
oprezni, jer je para vruća. Takođe, pogledajte odeljak “Kondenzovana voda tokom
pečenja” za više informacija. Ako tečnost sadrži alkohol, proces ključanja će biti brži i može
dovesti do plamena u unutrašnjosti. Uverite se da su vrata rerne zatvorena tokom takvih
procesa. Molimo vas da pažljivo kontrolišete proces pečenja ili kuvanja. Otvorite vrata vrlo
pažljivo i samo ako je neophodno.
45
Page 46

SRB
TABELA AUTO MENIJA
MENI Displej
Pečena piletina srednje
krilo
Grilovani škampi C02 2 Konvencionalni 250 30-35
Pica A01 3 Konvencionalni 200 30-40
Kroasan A02 4 Konvencionalni 180 40-50
Kolačići A03 5 Konvencionalni 160 30-35
Pečena govedina A04 6
Biskvit A05 7 Konvencionalni 175 80-85
Riba bakalar A06 8 Konvencionalni 250 70-80
Millefoglie od žutog i
ljubičastog krompira
Pečena piletina sa
mladim krompirom
Savršeno pečena
govedina
Uklanjanje kamenca A10 12 - - 40
Čišćenje A11 13 - - 5
C01 1 Konvencionalni 250 30-35
A07 9 Konvencionalni
A08 10 Konvencionalni
A09 11 Konvencionalni
Broj
pritiskanja
Mod
Dupli roštilj +
ventilator
Temp. u
°C
250 70-80
1 80 35
200 5
250 15
200 25
250 5
120 50
Trajanje u minutima
TIPIČNI RECEPTI
TORTA Forma Nivo Mod
Biskvit (jednostavan)
pravougaonog oblika
Biskvit (jednostavan)
pravougaonog oblika
Biskvit sa voćem
okruglog oblika
Biskvit sa voćem u plehu Pleh 1 Konvencionalni 140 70
Brioš sa suvim grožđem Kalup za mafine 2 Konvencionalni 220
Gugelhupf (sa kvascem) Pleh 1 Konvencionalni 150
Mafini Kalup za mafine 1 Konvencionalni 160
Mafini Kalup za mafine 1
Biskvit od jabuke sa
kvascem u plehu
Vlažni biskvit (6 jaja)
Pravougaoni kalup 2
Pravougaoni kalup 1 Konvencionalni 140 70
Okrugli kalup 1
Pleh 1
Kalup s odvojivim
dnom
1 Konvencionalni 160
Konvencionalni sa
ventilatorom
Konvencionalni sa
ventilatorom
Konvencionalni sa
ventilatorom
Konvencionalni sa
ventilatorom
46
Temp. u
°C
170 50
150 50
150
160
Trajanje u
minutima
p.h.t.:19:00
b.t.: 11:00
p.h.t.:11:00
b.t.:60:00
p.h.t.: 8:30
b.t.: 30:00
p.h.t.: 8:30
b.t.: 30:00
p.h.t.: 10:00
b.t.: 42:30
p.h.t.: 9:30
b.t.: 41:00
Page 47

SRB
TORTA Forma Nivo Mod
Vlažni biskvit (4 jaja)
Vlažni biskvit
Biskvit od jabuke sa
kvascem u plehu
Hefezopf (halva) Pleh 2
Mali kolači 20 Pleh 2 Konvencionalni 150 36
Mali kolači 40 Pleh 2+4 Konvencionalni 150
Biskvit sa puterom Pleh 2 Konvencionalni 150
Keks Pleh 2 Konvencionalni 170
Keks 2 pleha Pleh 2+4
Vanilice Pleh 2 Konvencionalni 160
Vanilice Pleh 2+4
Kalup s odvojivim
dnom
Kalup s odvojivim
dnom
Pleh 2
1 Konvencionalni 160
1 Konvencionalni 160 35
Konvencionalni sa
ventilatorom
Konvencionalni sa
ventilatorom
Konvencionalni sa
ventilatorom
Konvencionalni sa
ventilatorom
HLEB Forma Nivo Mod
Beli hleb (1 kg brašna)
pravougaonog oblika
Beli hleb (1 kg brašna)
pravougaonog oblika
Sveža pizza (tanka) Pleh 2 Konvencionalni 170
Sveža pizza (debela) Pleh 2 Konvencionalni 170
Sveža pizza (debela) Pleh 2
Hleb Pleh 1 Konvencionalni 190
Pravougaoni kalup 1 Konvencionalni 170
Pravougaoni kalup 1
Konvencionalni sa
ventilatorom
Konvencionalni sa
ventilatorom
MESO Forma Nivo Mod
Goveđi biftek 1,6 kg Pleh 2
Mesna štruca 1 kg mesa Pleh 1 Konvencionalni 180 75
Piletina 1 kg Pleh
Riba (2,5 kg ) Pleh 2 Konvencionalni 170 70
Rebra tomahawk kuvana
B.T.
Pečeni svinjski vrat 1.2 kg Pleh 1 Konvencionalni 160 82
Piletina 1,7kg Pleh
Pleh 3 Konvencionalni 120 85
L2:Rešetka
L1:Pleh
L2:Rešetka
L1:Pleh
Dvojni roštilj sa
ventilatorom
Dvojni roštilj sa
ventilatorom
Konvencionalni 180 78
Temp. u
°C
150
150 40
160
150
Temp. u
°C
170
170
Temp. u
°C
180 55
180 50
p.h.t.: 9:00
b.t.: 26:00
p.h.t.: 8:00
b.t.: 42:00
p.h.t:10:00
b.t.:34:00
p.h.t.: 8:00
b.t.: 30:00
p.h.t.: 8:00
b.t.: 13:00
p.h.t:8:20
b.t.: 12:00
p.h.t.: 8:00
b.t.: 10:00
p.h.t.:8:00
b.t.: 14:00
p.h.t.: 9:20
b.t.: 50:00
p.h.t.: 12:00
b.t.: 45:00
p.h.t.: 9:30
b.t.: 21:00
p.h.t.: 10:00
b.t.: 45:00
p.h.t.:8:00
b.t.: 41:00
p.h.t:9:00
b.t.:30:00
Trajanje u
minutima
Trajanje u
minutima
Trajanje u
minutima
NOTE
p.h.t. znači vreme prethodnog zagrevanja, b.t. znači vreme pečenja.
47
Page 48
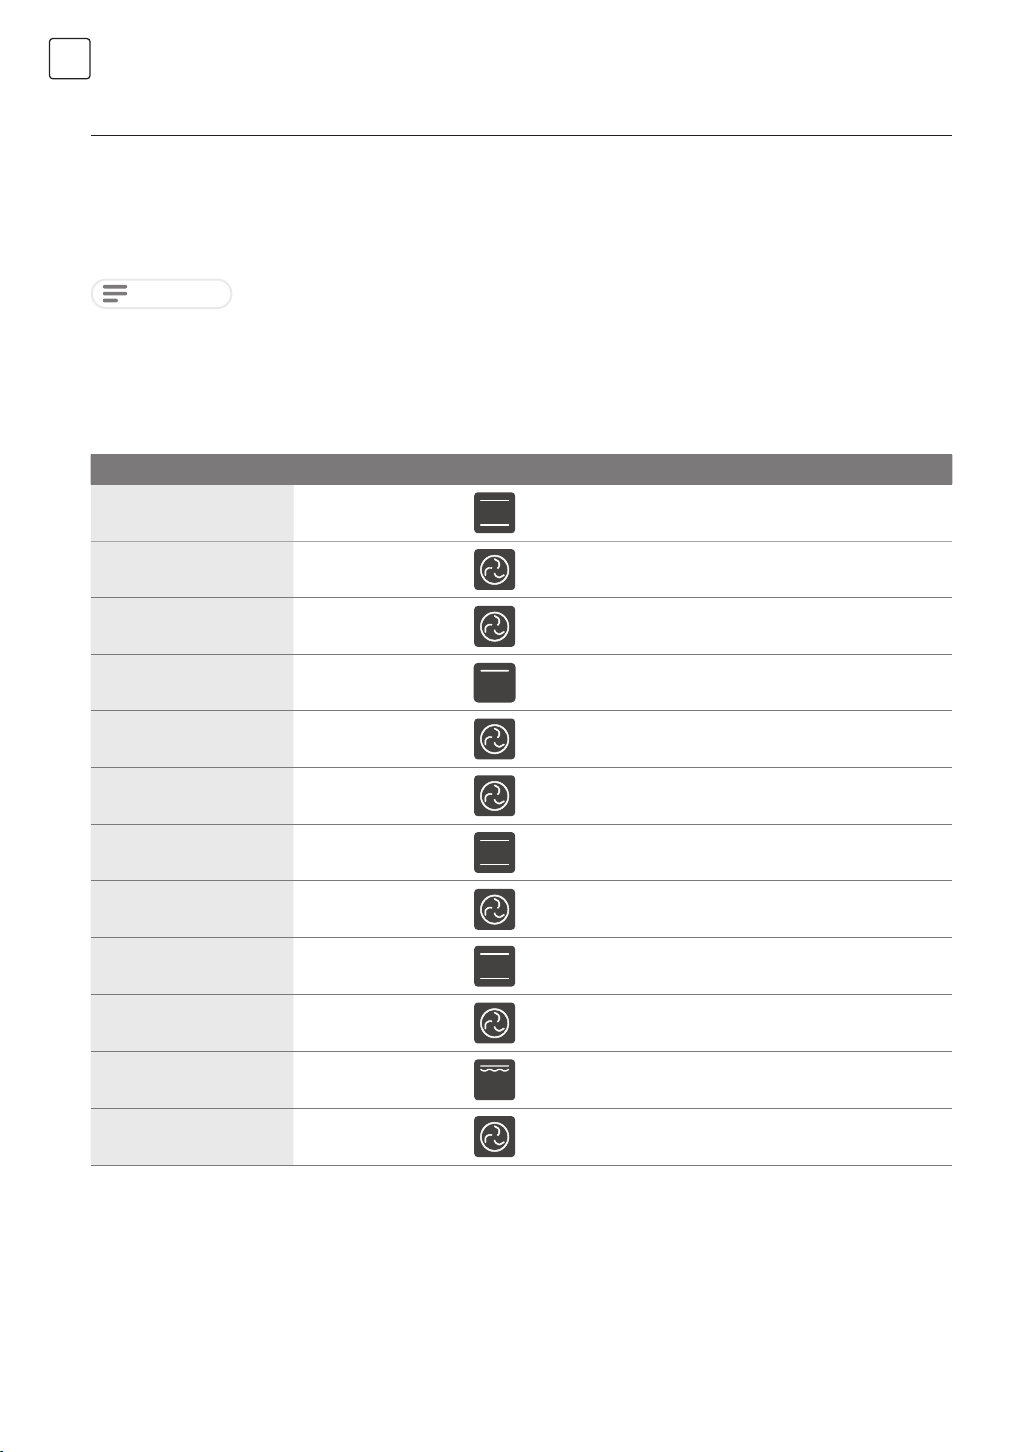
SRB
AUTOMATSKI RECEPTI
Ovaj aparat ima mnogo automatskih recepta, možete lako dobiti savršena jela prateći savete na ekranu.
1. Pripremite hranu i sastojke.
2. U režimu mirovanja, dodirnite dugme "A" jednom da aktivirate režim automatskog menija; dodirnite dugme "-" ili "+", da
biste izabrali različite tipove kuvarskih menija. (C01 do C02, A01 do A11)
3. Postoji 11 vrsta recepata u pet kategorija, možete izabrati prema svojim potrebama.
NAPOMENA
1. Molimo vas da pratite uputstva na ekranu, ili možda nećete moći da dobijete savršen rezultat kuvanja.
2. Tokom automatskog kuvanja, možete pauzirati proces.
3. Molimo vas da ne otvarate vrata osim ako to nije neophodno prema uputstvima na ekranu, jer će to ohladiti prostor.
TESTIRAJTE HRANU U SKLADU SA EN 60350-1
Recepti Dodaci F ºC Nivo Vreme (min) Zagrevanje
Biskvit
Kalup za tortu
Φ26cm
170 1 30-35 Ne
Biskvit
Mala torta
Mala torta
Mala torta
Cheese cake
Pita sa jabukama
Pita sa jabukama
Hleb
Hleb
Tost
Piletina
Kalup za tortu
Φ26cm
1 pleh
1 pleh
2 pleha
Kalup za tortu
Φ26cm
Kalup za tortu
Φ20cm
Kalup za tortu
Φ20cm
1 pleh
1 pleh
Rešetka
Rešetka & pleh
160 1 30-35 Ne
150 2 30-40 Da
150 2 40-50 Da
150 L2&L4 30-35 Da
150 1 70-80 Ne
170 1 80-85 Ne
160 1 70-80 Ne
210 1 30-35 Da
190 1 30-35 Da
Max 5 6-8 Da 5min
180
Rešetka 2
Pleh 1
75-80 Da
1. U receptu za piletinu, počnite sa donjom stranom na vrhu i okrenite piletinu nakon 30 minuta na gornju stranu.
2. Koristite tamnu, matiranu formu i stavite je na rešetku.
3. Izvadite plehove u trenutku kada je hrana gotova, čak i kada nije na kraju predviđenog vremena pečenja.
4. Izaberite nižu temperaturu i proverite nakon najkraćeg vremena navedenog u tabeli.
5. Ako koristite pleh za hvatanje tečnosti koja kaplje sa hrane postavljene na rešetku tokom bilo kog režima pečenja, pleh
treba postaviti na nivo 1 i napuniti malo vodom.
6. Pljeskavice treba okrenuti nakon 2/3 vremena
48
Page 49
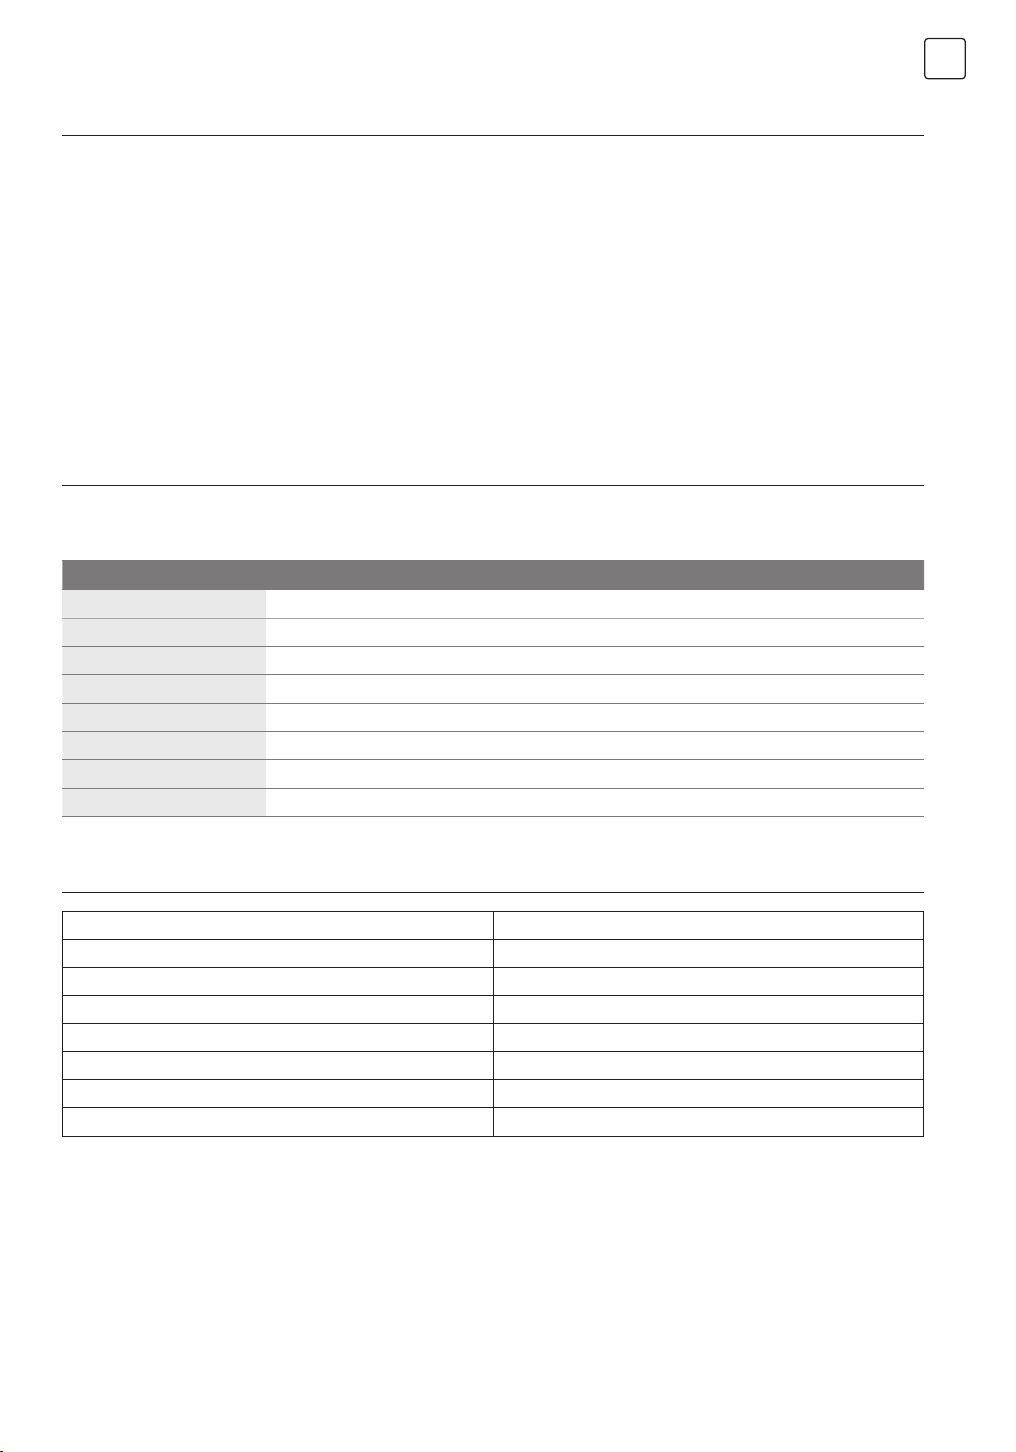
ENERGETSKA EFIKASNOST U SKLADU SA EN 60350-1
Molimo vas da obratite pažnju na sledeće informacije:
1. Merenje se vrši u “ECO” režimu kako bi se utvrdili podaci o režimu forsiranog vazduha i klasi oznake.
2. Merenje se vrši u režimu “Gornje i Donje Grejanje” kako bi se utvrdili podaci o konvencionalnom režimu.
3. Tokom merenja u šupljini se nalazi samo neophodan pribor. Svi ostali delovi moraju biti uklonjeni.
4. Rerna je instalirana kao što je opisano u vodiču za instalaciju i postavljena je u sredini ormara.
5. Potrebno je da se tokom merenja zatvore vrata kao u domaćinstvu, čak i kada kabl ometa funkciju brtvljenja gumice
tokom merenja. Da bi se osiguralo da nema negativnih efekata u vezi sa poremećenim brtvljenjem zbog energetskih
podataka, neophodno je pažljivo zatvoriti vrata tokom merenja. Možda će biti potrebno koristiti alat kako bi se osiguralo
brtvljenje gumice kao u domaćinstvu, gde nijedan kabl ne ometa funkciju.
6. Određivanje zapremine šupljine se vrši za korišćenje funkcije “Odmrzavanje” kako je opisano na strani 14. Da bi se
osigurala efikasna upotreba rerne, svi pribori, uključujući bočne rešetke, su uklonjeni.
KUVANJE U ECO REŽIMU
ECO režim se greje pomoću donjeg i prstenastog grejača, uz ovaj režim možete uštedeti energiju tokom
kuvanja.
RECEPTI Dodaci ºC Nivo Vreme (min) Zagrevanje
Halva
Svinjsko pečenje
Kolač sa višnjama (Klafuti)
Goveđe pečenje 1.3kg
Braunis
Gratinirani krompir
Lazanja
Cheese Cake
1 pleh
1 pleh
Okrugli kalup
1 pleh
Rešetka i staklena ploča
Rešetka i okrugla ploča
Rešetka i staklena ploča
Kalup za tortu Φ20cm
180 1 45-50 Ne
200 1 80-85 Ne
200 1 55-60 Ne
200 1 80-85 Ne
180 1 55-60 Ne
180 1 65-70 Ne
180 1 75-80 Ne
160 1 80-90 Ne
SRB
LISTA PODATAKA (EU 65/2014 & EU 66/2014)
Masa rerne 45kg
Broj šupljina 1
Izvor toplote Električni
Iskoristiva zapremina 72L
EC električna, šupljina (konvencionalna) 1.06kWh/ciklus
EC električna, šupljina (forsirani vazduh) 0.63kWh/ciklus
EEI šupljina 74
Klasa energetske efikasnosti (A+++ do D) A+
49
Page 50

tesla.info
 Loading...