

Page 1
Product images are for illustrative purposes only and may differ from the actual product.
BUILT-IN
ELECTRIC
OVEN
BO600MB
User Manual
Page 2
2
ENG
ACKNOWLEDGMENT
SAFETY HINTS
Thank you for purchasing our product. We hope you enjoy using the many features and benefits it provides.
Before using this product please study this entire Instruction Manual carefully. Keep this manual in a safe place
for future reference. Ensure that other people using the product are familiar
with these instructions as well.
• Do not use the oven unless you are wearing something on your feet. Do not touch the oven with wet or
damp hands or feet.
• For oven: Oven door should not be opened often during the cooking period.
• The appliance must be installed by an authorized technician and put into use. The producer is
not responsible for any damage that might be caused by defective placement, and installation by
unauthorized personnel.
• When the door or drawer of oven is open do not leave anything on it, you may unbalance your appliance
or break the door.
• Some parts of appliance may keep its heat for a long time; it is required to wait for it to cool down before
touching the points that are exposed to the heat directly.
• If you will not use the appliance for a long time, it is advised to plug it off.
• When the oven is first switched on, it may give off an unpleasant smell. This is due to the bonding agent
used for the insulating panels within the oven. Please run up the new empty product with the conventional
cooking function, 250 ºC, 90 minutes to clean oil impurities inside the cavity.
• During the first use, it is completely normal that there will be a slight smoke and odors. If it does occur, you
merely have wait for the smell to clear before putting food into the oven.
• Please use the product under the open environment.
• The appliance and its accessible parts become hot during use. Care should be taken to avoid touching
heating elements. Children less than 8 years of age should be kept away unless continuously supervised.
• If the surface is cracked, switch off the appliance to avoid the possibility of electric shock.
• This appliance can be used by children aged 8 years and above and persons with reduced physical,
sensory or mental capabilities or lack of experience and knowledge if they have been given supervision or
instruction concerning use of the appliance in a safe way and understand the hazards involved. Children
should not play with the appliance. Cleaning and user maintenance should not be made by children
without supervision.
• During use, the appliance becomes very hot. Care should be taken to avoid touching heated elements
inside the oven.
• Do not allow children to go near the oven when it is operating, especially when the grill is on.
• Ensure that the appliance is switched off before replacing the oven lamp to avoid the possibility of electric
shock.
• The means for disconnection must be incorporated in the fixed wiring in accordance with the wiring
specifications.
• Children should be supervised to ensure that they do not play with the appliance.
• This appliance is not intended for use by persons (including children) with reduced physical, sensory or
mental capabilities, or lack of experience and knowledge, unless they have been given supervision or
instruction concerning use of the appliance by person responsible for their safety.
• Accessible parts may become hot during use. Young children should be kept away.
• An all-pole disconnection means must be incorporated in the fixed wiring in accordance with the wiring
rules.
• If the supply cord is damaged, it must be replaced by the manufacturer, its service agent or similarly
qualified persons in order to avoid a hazard.
• Do not use harsh abrasive cleaners or sharp metal scrapers to clean the oven door glass since they can
scratch the surface, which may result in shattering of the glass.
• A steam cleaner is not to be used.
• The appliances are not intended to be operated by means of an external timer or separate remote- control
system.
• The instructions for ovens that have shelves shall include details indicating the correct installations of the
shelves.
WARNING!
Page 3
3
ENG
FITTING THE OVEN INTO THE KITCHEN UNIT
IMPORTANT
DECLARATION OF COMPLIANCE
HOW TO USE
PRODUCT DESCRIPTION
Fit the oven into the space provided in the kitchen unit; it may be fitted underneath a work top or into an
upright cupboard. Fix the oven in position by screwing into place, using the two fixing holes in the frame. To
locate the fixing holes, open the oven door and look inside. To allow adequate ventilation, the measurements
and distances adhered to when fixing the oven.
If the oven is to work properly, the kitchen housing must be suitable. The panels of the kitchen unit that are
next to the oven must be made of a heat resistant material. Ensure that the glues of units that are made of
veneered wood can withstand temperatures of at least 120 ºC. Plastics or glues that cannot withstand such
temperatures will melt and deform the unit, once the oven has been lodged inside the units, electrical parts
must be completely insulated. This is a legal safety requirement. All guards must be firmly fixed into place so
that it is impossible to remove them without using special tools. Remove the back of the kitchen unit to ensure
an adequate current of air circulates around the oven. The hob must have a rear gap of at least 45 mm.
When you have unpacked the oven, make sure that it has not been damaged
in any way. If you have any doubts at all, do not use it: contact a professionally
qualified person. Keep packing materials such as plastic bags, polystyrene, or
nails out of the reach of children because these are dangerous to children.
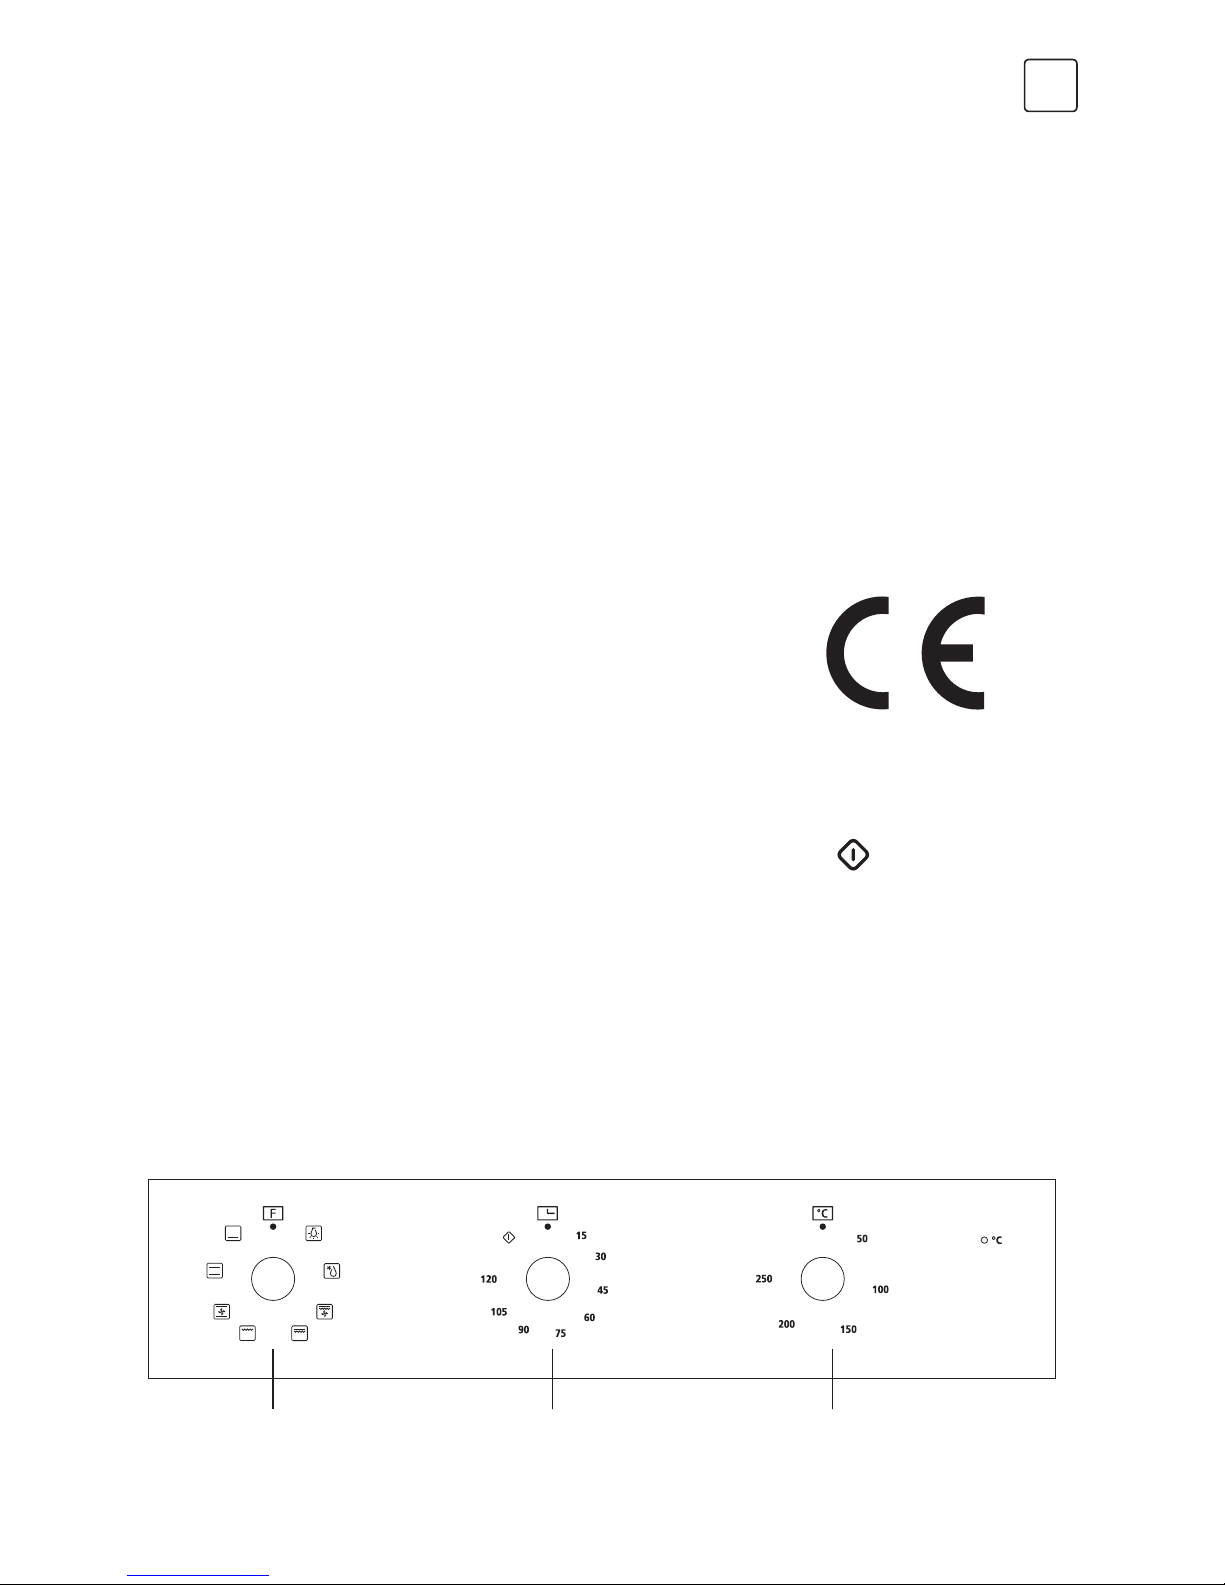
• If you don’t need to set the cooking time, turn the time knob counterclockwise to “
“, the timer will not
return to “ 0 “ automatically and the oven will keep in power-on state.
• If you need to set the cooking time, turn the timer knob clockwise to the time you need. When the set
cooking time is reached, the timer will return to “ 0 “ automatically with the sound of “ Ding, Ding, Ding “
and the oven will power-off.
• Set functions by turning the function knob to desired function. Set the temperature by turning the
temperature knob.
• The oven will automatically start cooking after function, time and temperature are set.
• If the oven is not in use, always set all the knobs to “ 0 “.
Function Knob Timer knob Temperature Knob
Page 4
4
ENG
Symbol Function description
Oven Lamp: Enables the user to observe the progress of cooking without opening the door.
Oven lamp will light up for all cooking functions.
Defrost: The circulation of air at room temperature enables quicker thawing of frozen food
(without the use of any heat). It’s a gentle but quick way to speed up the defrosting time and
thawing of ready-made dishes, cream filled products and etc.
Bottom heater: Heat is applied only from the bottom side of the oven. Use this option for
browning the bottom side of food. This function is suitable for slow cooking recipes or for
warming up meals.
Conventional cooking: Heaters from the upper and lower side uniformly heat the exposed
food. Baking and roasting is possible only at single level.
Convention with fan: The top and bottom heating element work with a fan. The food that is
cooking is evenly and quickly cooked all around.
Grill-small: This cooking method is normal grilling, utilizing the inner part only of the top
heating element, which directs heat downwards onto the food.
Double grill: The inner and outer heating element in the top of the oven are working.
Suitable for grilling larger quantities.
Double grill with fan (at the rear panel): The inner and outer heating element in the top of
the oven are working with a fan as well. It is suitable for grilling large amounts of meat.
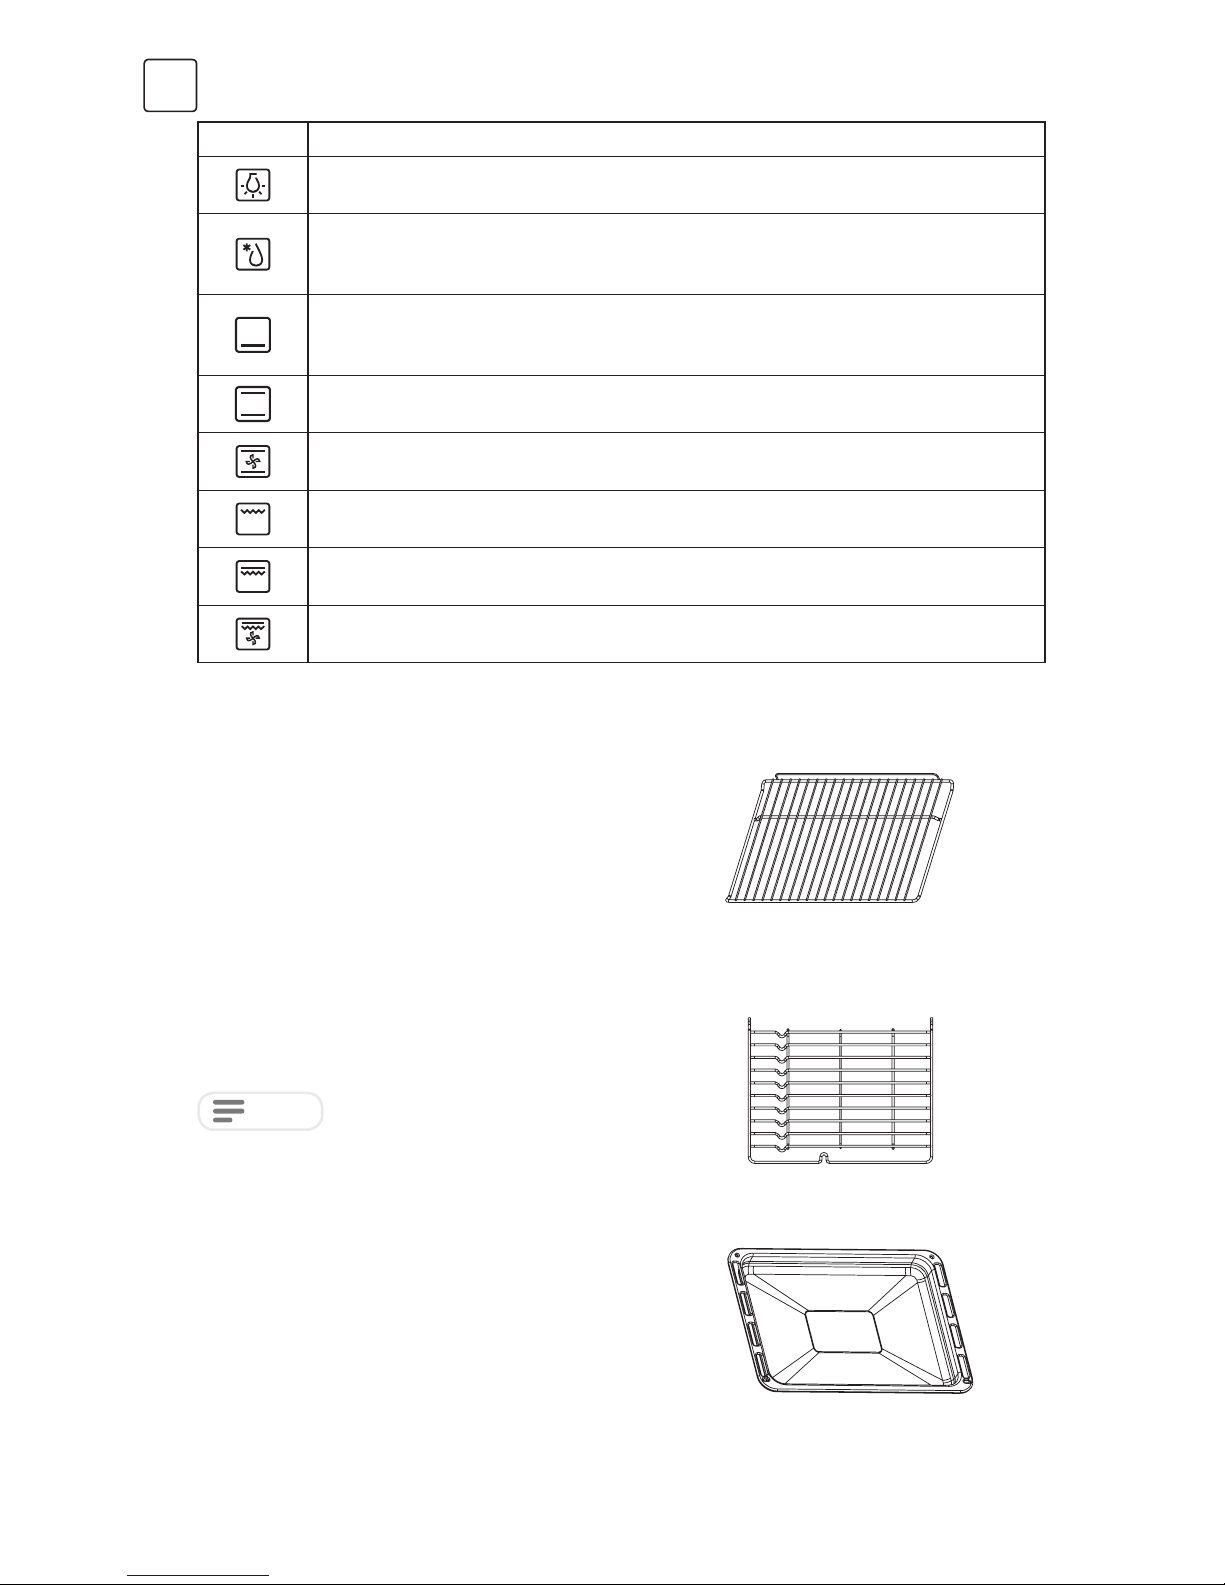
ACCESSORIES
Wire shelf: For grill, dishes, cake pan with items
Slider bracket: For cooking larger size food, these shelf
support rails on the right and left sides of the oven can be
removed, dishes and tray can be put on the oven floor,
using functions as Radiant grilling, Double grilling, Double
grill with fan.
When placing dishes on the oven floor, please DO NOT use
functions with bottom heater to prevent heat gathering at
bottom. (only for specific models)
Universal pan: For cooking large quantities of food such
as moist cakes, pastries, frozen food etc., or for collecting
fat/ spillage and meat juices.
NOTE
Page 5
5
ENG
When placing dishes on the oven floor, please DO NOT use
functions with bottom heater to prevent heat gathering at
bottom. (only for specific models)
Telescopic runner: Some models might come with
telescopic runners to facilitate the use of oven. These
telescopic runners and slider brackets could be
disassembled by unscrewing the screws used to fix it. After
disassembled, dishes and trays can be put on the oven
floor, using functions as Radiant grilling, Double grilling,
Double grill with fan.
NOTE
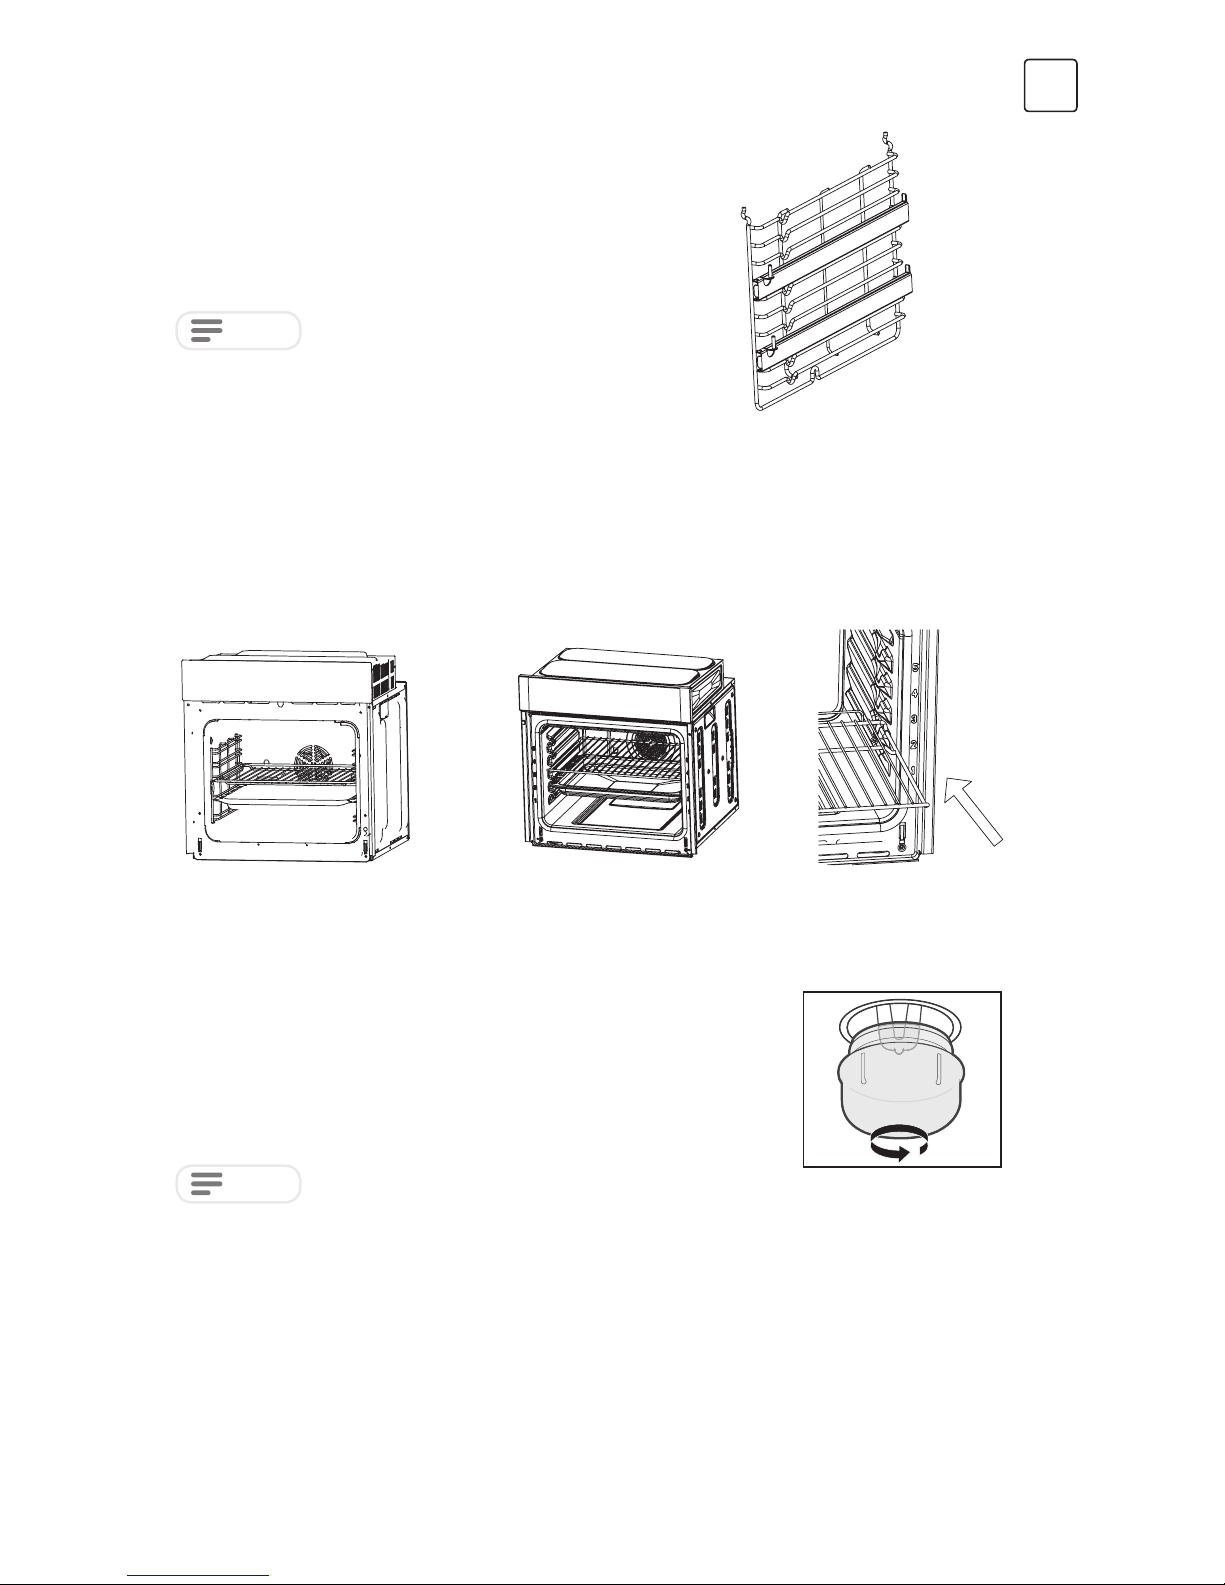
SHELF PLACEMENT WARNING
BULB REPLACEMENT
OR
To ensure the oven shelves operate safely, correct placement of the shelves between the side rail is
imperative. Shelves and the pan only can be used between the first and fifth layers.
The Shelves should be used with the right direction; it will ensure that during careful removal of the
shelf or tray, hot food items should not slide out.
For replacement, process as follows:
1. Disconnect power from the mains outlet or switch off the circuit
breaker of the unit’s mains outlet.
2. Unscrew the glass lamp cover by turning it counter-clockwise
(note, it may be stiff) and replace the bulb with a new one of the
same type.
3. Screw the glass lamp cover back in place.
NOTE
Only use 25-40W/220V-240V, T300°C halogen lamps.
Page 6

6
ENG
SECURING THE OVEN TO THE CABINET
1. Fit oven into the cabinet recess.
2. Open the oven door.
3. Secure the oven to the kitchen cabinet with two distance
holders “ A “ which fit the holes in the oven frame and fit
the two screws “ B “.
When cooking is finished, if the temperature
of ventilating openings is over 70 degrees, the
cooling fan will continue working. The cooling
fan will not stop working until the temperature
becomes lower than 60 degrees.
VENTILATING OPENINGS
Ventilating openings
CONNECTION OF
THE OVEN
The number of accessories included depends on the particular appliance purchased.
Remark:
1. Only plus deviations are admissible for all dimension.
2. The cabinet is not included the power switch or socket.
NOTE
INSTALLATION
Page 7

7
ENG
Separate the glass carefully by lifting
it approximately 25°.
Push the glass into the position
indicated by the arrow. Gently
pull the glass out of the socket.
After pulling out the inner
glass, please take out
the middle layer glass.
Glass
Rubber
REMOVING THE DOOR FROM THE OVEN
A removable door allows full access to entire interior of the oven for easier and quicker maintenance.
When cleaning is completed, reverse the above procedures to return the door to its original position.
To remove the door, open the door
to the maximum angle. Then pull the
buckle at the door hinge backward.
Close the door to an angle
approximately 15°. Lift up and
slowly pull the door out from
the oven.
Place the door flatwise with
door top cover towards
yourself, put your hands on
the glass and pull it towards
the oven.
Page 8

8
ENG
CLEANING AND MAINTENANCE
For the sake of good appearance and reliability, keep the unit clean. The modern design of the unit facilitates
maintenance to a minimum. The parts of the unit which come into contact with food have to be cleaned
regularly.
• Before any maintenance and cleaning, disconnect the power. Set all controls in the OFF position.
• Wait until the inside of the unit is not hot but only slightly warm - cleaning is easier than when warm. Clean
the surface of the unit with a damp cloth, soft brush or fine sponge and then wipe dry. In case of heavy
soiling, use hot water with non- abrasive cleaning product.
• For cleaning the glass of the oven door, do not use abrasive cleaners or sharp metal scrapers, these can
scratch the surface or lead to the glass being damaged.
• Never leave acidic substances (lemon juice, vinegar) on stainless steel parts.
• Do not use a high pressure cleaner for cleaning the unit. The baking pans may be washed in mild
detergent.
This appliance is marked according to the European directive 2012/19/EU on Waste Electrical and
Electronic Equipment (WEEE).
By ensuring this product is disposed correctly, you will help prevent potential negative consequences for
the environment and human health, which could otherwise be caused by inappropriate waste handling of
this product. The symbol on the product indicates that this product may not be treated as household waste.
Instead it shall be handed over to the applicable collection point for the recycling of electrical and electronic
equipment. Disposal must be carried out in accordance with local environmental regulations for waste
disposal. For more detailed information about treatment, recovery and recycling of this product, please contact
your local city office, your household waste disposal service or the shop where you purchased the product.
Page 9

9
SRB
ZAHVALNOST
BEZBEDNOSNI SAVETI
Hvala Vam što ste kupili naš proizvod. Nadamo se da ćete uživati u korišćenju mnogih funkcija i pogodnosti
koje pruža. Pre upotrebe proizvoda, pažljivo proučite kompletno Korisničko uputstvo. Sačuvajte ovo korisničko
uputstvo za buduću upotrebu. Uverite se da i drugi ljudi koji koriste ovaj proizvod budu upoznati sa ovim
uputstvom.
• Ne upotrebljavajte rernu ako na stopalima nemate obuću. Ne dodirujte rernu mokrim ili vlažnim rukama ili
stopalima.
• Za rernu: Vrata rerne ne treba često otvarati tokom perioda pripremanja hrane.
• Uređaj mora da postavi i u rad pusti ovlašćeno tehničko lice. Proizvođač nije odgovoran za bilo kakvu štetu
koju može da izazove neispravno postavljanje uređaja, kao i postavljanje od strane neovlašćenog lica.
• Ne stavljajte ništa na vrata ili fioke rerne kada su otvorena, jer možete poremetiti ravnotežu svog uređaja ili
polomiti vrata.
• Neki delovi uređaja mogu dugo zadržati toplotu; pre nego što dodirnete delove koji se direktno
zagrevaju, sačekajte da se ohlade.
• Ukoliko uređaj nećete koristiti tokom dužeg vremenskog perioda, savetuje se da ga isključite iz struje.
• Pri prvom uključivanju rerne, može se osetiti neprijatan miris. Uzrok tome je sredstvo koje se koristi za
povezivanje izolacionih panela u rerni. Da biste očistili nečistoće od ulja u pećnici, uključite novi uređaj,
prazne pećnice, na standardni program pečenja od 250°C, u trajanju od 90 minuta.
• Potpuno je normalno da se, tokom prve upotrebe, pojavi malo dima i da se osete mirisi. Ako do toga
dođe, jednostavno sačekajte da, pre stavljanja hrane u rernu, miris nestane.
• Ne stavljajte uređaj u skučeni prostor.
• Uređaj i njegovi dostupni delovi postaju vrući tokom upotrebe. Povedite računa da ne dodirujete grejne
elemente. Decu mlađu od 8 godina treba držati dalje od uređaja sem ako nisu pod stalnim nadzorom.
• Ako je površina naprsla, isključite uređaj kako biste izbegli mogućnost pojave strujnog udara.
• Uređaj mogu da upotrebljavaju deca starija od 8 godina, kao i osobe sa umanjenim fizičkim, čulnim ili
mentalnim sposobnostima ili osobe bez iskustva i znanja ukoliko su pod nadzorom ili ukoliko su dobili
uputstva o bezbednoj upotrebi uređaja i shvataju opasnosti koje upotreba istog nosi. Deca ne treba da se
igraju uređajem. Deca ne treba da obavljaju čišćenje i održavanje uređaja bez nadzora.
• Tokom upotrebe uređaj postaje veoma vruć. Povedite računa da ne dodirujete grejne elemente unutar
rerne.
• Ne dozvolite deci da prilaze rerni dok je ona u upotrebi, pogotovo kada je uključen program za roštiljanje.
• Pre zamene sijalice u rerni, uverite se da je uređaj isključen iz struje kako biste izbegli mogućnost pojave
strujnog udara.
• Prekidač mora biti sastavni deo fiksnih električnih instalacija u skladu sa specifikacijama o električnim
instalacijama.
• Deca treba da budu pod nadzorom kako se ne bi igrala uređajem.
• Nije predviđeno da ovaj uređaj koriste osobe (uključujući i decu) sa umanjenim fizičkim, čulnim ili
mentalnim sposobnostima ili osobe bez iskustva i znanja, sem ukoliko su pod nadzorom ili ukoliko su
dobili uputstva o upotrebi uređaja od strane osobe koja je odgovorna za njihovu bezbednost.
• Dostupni delovi tokom upotrebe mogu postati vreli. Držite malu decu dalje od uređaja.
• Prekidač svih polova utikača mora biti sastavni deo fiksnih električnih instalacija u skladu sa pravilima o
električnim instalacijama.
• Ukoliko je priključni kabl oštećen, njegovu zamenu mora da obavi proizvođač, servis koji je proizvođač
angažovao ili lica sa sličnim kvalifikacijama, kako bi se izbegla opasnost.
• Ne upotrebljavajte oštra abrazivna sredstva za čišćenje ili oštre metalne strugače za čišćenje staklenih vrata
rerne, jer mogu da ogrebu površinu, što može dovesti do lomljenja stakla.
• Nemojte koristiti paročistač.
• Nije predviđeno da se ovim uređajem upravlja preko eksternih tajmera ili zasebnog sistema daljinske
kontrole.
• Uputstva za rerne sa policama sadrže detaljne podatke u kojima se navodi kako na ispravan način postaviti
police.
UPOZORENJE!
Page 10

10
SRB
UGRADNJA RERNE U KUHINJSKI ELEMENT
VAŽNO
DEKLARACIJA O USKLAĐENOSTI
UPOTREBA
OPIS PROIZVODA
Ugradite rernu u kuhinjski element, u za to predviđeno mesto; može se ugraditi ispod radne ploče ili
u uspravni ormar. Pričvrstite rernu tako što ćete je zašrafiti koristeći dva otvora za pričvršćivanje, koja se
nalaze na okviru. Da biste pronašli otvore za pričvršćivanje, otvorite vrata rerne i pogledajte unutra. Prilikom
pričvršćivanja rerne, povedite računa o odgovarajućim merama i rastojanjima kako biste obezbedili
adekvatnu ventilaciju.
Neophodno je obezbediti prikladno kuhinjski element kako bi rerna radila na odgovarajući način. Površine
kuhinjskog elemenata koji se nalaze uz rernu moraju biti napravljene od termootpornih materijala. Proverite
da li je lepak u okviru elemenata napravljenih od furniranog drveta može da izdrži temperaturu od najmanje
120°C. Plastični delovi i lepak koji ne mogu izdržati pomenutu temperaturu će se otopiti i deformisati element.
Kada se rerna postavi u element, električne delove je neophodno potpuno izolovati. Ovo je pravni zahtev koji
se odnosi na bezbednost. Svi štitnici moraju biti dobro pričvršćeni kako bi se onemogućilo njihovo skidanje
bez upotrebe specijalnih alata. Da biste se uverili da vazduh adekvatno cirkuliše oko rerne, uklonite zadnji deo
kuhinjskog elementa. Prostor između rerne i zadnjeg dela police ne sme biti manji od 45 mm.
Nakon što raspakujete rernu, uverite se da nema nikakvih oštećenja. Ako imate
bilo kakve sumnje, nemojte je koristiti; kontaktirajte kvalifikovanu osobu koja se
profesionalno bavi servisiranjem. Ambalažu, kao što su plastične kese, polistirol
ili ekseri, držite van domašaja dece, jer su ovi predmeti opasni po njih.
• Ukoliko nemate potrebu za podešavanjem vremena pripreme hrane, okrenite dugme tajmera u smeru
suprotnom od smera kazaljke na satu do ikonice “
“. Tajmer se neće automatski vratiti na vrednost
„0“, a rerna će ostati u režimu uključeno. Ukoliko je potrebno da podesite vreme pripreme hrane, okrenite
dugme tajmera u smeru kazaljke na satu do vrednosti koja Vam je potrebna.
• Kada podešeno vreme pripreme hrane istekne, tajmer će se automatski vratiti na vrednost „0“, što će biti
propraćeno zvučnim signalom, a rerna će se isključiti.
• Opcije podešavajte tako što ćete dugme za opcije okrenuti do željene opcije.
• Temperaturu podešavajte okretanjem dugmeta za temperaturu.
• Nakon što podesite opciju, vreme i temperaturu, rerna će automatski započeti pripremu hrane.
• Kada ne upotrebljavate rernu, svu dugmad uvek postavite na vrednost „0“.
Dugme za opcije Dugme tajmera Dugme za temperaturu
Page 11

11
SRB
Simbol Opis opcije
Lampa za rernu: Omogućava korisniku da prati postupak pripreme hrane bez otvaranja
vrata. Lampa za rernu će svetleti prilikom upotrebe svih opcija za pripremu hrane.
Odleđivanje: Cirkulisanje vazduha na sobnoj temperaturi omogućava brže otapanje
zamrznute hrane (bez ikakvog zagrevanja). Ovo predstavlja blag, ali brz način skraćivanja
vremena potrebnog za odleđivanje i otapanje gotovih jela, proizvoda punjenih kremom itd.
Donji grejač: Toplota se emituje samo sa donjeg dela rerne. Upotrebljavajte ovu opciju
da zapečete donju stranu hrane. Ova opcija je pogodna za recepte koji zahtevaju sporu
pripremu, kao i za podgrevanje obroka.
Konvencionalni način pripreme hrane: Gornji i donji grejač ujednačeno zagrevaju izloženu
hranu. Hranu je moguće peći samo na jednom nivou.
Konvencionalni način pripreme hrane sa ventilatorom: Uključeni su i gornji i donji grejač, uz
upotrebu ventilatora. Hrana se sa svih strana peče ujednačeno i brzo.
Mali roštilj: Ovaj način pripreme hrane podrazumeva običan roštilj, pri čemu se koristi samo
unutrašnji deo gornjeg grejača, čime se toplota usmerava naniže, ka hrani.
Dvostruki roštilj: Uključeni su unutrašnji i spoljašnji grejač na gornjem delu rerne. Pogodno
za roštiljanje veće količine hrane.
Dvostruki roštilj sa ventilatorom (na zadnjem delu komore): Uključeni su unutrašnji i
spoljašnji grejač na gornjem delu rerne, kao i ventilator. Pogodno za roštiljanje velike količine
mesa.
DODATNA OPREMA
Žičana polica: Za roštiljanje, posuđe, pleh uz elemente za
pečenje i roštiljanje.
Bočni nosač: Ovi nosači polica, koji se nalaze sa desne i leve
strane rerne, mogu se skinuti prilikom pripreme velike količine
hrane, a posude i polica se mogu staviti na dno rerne, pri čemu
se upotrebljavaju opcije Radiant grilling (Ravnomerno roštiljanje),
Double grilling (Dvostruko roštiljanje) i Double grilling with fan
(Dvostruko roštiljanje sa ventilatorom).
Kada postavljate posuđe na dno rerne, NEMOJTE koristiti opcije sa
aktiviranim donjim grejačem, kako se dno rerne ne bi pregrejalo.
(samo za određene modele).
NAPOMENA
Univerzalni pleh: Za pripremu velike količine hrane, kao što su
sočni kolači, peciva, smrznuta hrana itd., ili za sakupljanje masnoće/
sokova i sokova od mesa.
Page 12

12
SRB
Kada postavljate posuđe na dno rerne, NEMOJTE koristiti
opcije sa aktiviranim donjim grejačem, kako se dno rerne
ne bi pregrejalo. (samo za određene modele)
Teleskopske vođice: Neki modeli olakšavaju upotrebu rerne
pomoću teleskopskih vođica. Ove teleskopske vođice, kao i
bočne nosače, možete razmontirati odvijanjem šrafova kojima
su pričvršćeni. Kada ih uklonite, posude i policu možete staviti
na dno rerne, pri čemu se upotrebljavaju opcije Radiant grilling
(Ravnomerno roštiljanje), Double grilling (Dvostruko roštiljanje) i
Double grilling with fan (Dvostruko roštiljanje sa ventilatorom).
NAPOMENA
UPOZORENJE U VEZI SA POSTAVLJANJEM
POLICA
ZAMENA SIJALICE
Kako biste bili sigurni da su police rerne obezbeđene, odgovarajuće postavljanje polica na bočne nosače je
od ključne važnosti. Police i pleh se mogu postavljati isključivo između prvog i petog nivoa.
Police treba postavljati u odgovarajućem pravcu, jer se time sprečava da, prilikom pažljivog vađenja police,
vrela hrana sklizne na pod.
Prilikom zamene, pratite sledeće korake:
1. Isključite uređaj iz struje ili isključite osigurač kojim se kontroliše
utičnica na koju je jedinica povezana.
2. Odšrafite stakleni poklopac za lampu u smeru suprotnom
od kazaljke na satu (napomena, možda je zaglavljen zbog
naslaga) i zamenite sijalicu novom, istog tipa.
3. Ponovo zašrafite stakleni poklopac za lampu.
Upotrebljavajte samo halogene sijalice od 25-40W/220V-240V, T300ºC.
ILI
NAPOMENA
Page 13

13
SRB
PRIČVRŠĆIVANJE RERNE ZA UGRADNI PROSTOR
1. Smestite rernu u otvor ugradnog prostora.
2. Otvorite vrata rerne.
3. Pričvrstite rernu za ugradni prostor u kuhinji pomoću
dva odbojnika „A“, koji odgovaraju otvorima u okviru
rerne, i pričvrstite pomoću dva šrafa „B“.
Kada završite sa postupkom pripreme hrane, a
ukoliko je temperatura u ventilacionim otvorima
preko 70 stepeni, ventilator za rashlađivanje će
nastaviti da radi. Ventilator za rashlađivanje neće
prestati da radi sve dok se temperatura ne spusti
ispod 60 stepeni.
VENTILACIONI OTVORI
Ventilacioni otvori
POVEZIVANJE RERNE
Broj dodatnih elemenata dostavljenih uz uređaj zavisi od uređaja koji ste kupili.
Primedba:
1. Kod svih dimenzija, dozvoljena su samo odstupanja šira od uređaja.
2. Prekidač ili utičnica ne treba da se nalaze u ugradnom prostoru.
UGRADNJA
NAPOMENA
Page 14

14
SRB
Pažljivo odvojite staklo podižući ga za
približno 25º.
Guranjem postavite staklo u
položaj pokazan strelicom na
slici. Nežno izvucite staklo iz
ležišta.
Nakon što izvučete unutrašnje
staklo, izvadite i srednji sloj
stakla na način prikazan na slici.
Staklo
Guma
SKIDANJE VRATA SA RERNE
Vrata koja se skidaju omogućavaju potpuni pristup čitavoj unutrašnjosti rerne radi lakšeg i bržeg održavanja.
Kada završite sa čišćenjem, pratite gore navedena uputstva obrnutim redosledom kako biste vrata vratili u
originalni položaj.
Da biste skinuli vrata, otvorite ih pod
najvećim mogućim uglom. Zatim
povucite kopču na šarki vrata unazad.
Zatvorite vrata pod uglom od
približno 15º. Vrata podignite i
polako ih izvucite iz rerne.
Postavite vrata tako da
stoje poravnato, sa gornjim
poklopcem okrenutim ka
sebi, stavite šake na staklo i
povucite ga ka rerni.
Page 15

15
SRB
ČIŠĆENJE I ODRŽAVANJE
Održavajte čistoću proizvoda kako bi dobro izgledao i nastavio da pouzdano radi. Moderni dizajn proizvoda
potrebu za održavanjem svodi na minimum. Neophodno je redovno čistiti delove proizvoda koji dolaze u
dodir sa hranom.
• Pre svakog postupka održavanja i čišćenja, isključite uređaj iz struje.
• Sve kontrolne tipke podesite u položaj OFF (ISKLJUČENO).
• Sačekajte sve dok se unutrašnjost proizvoda ne rashladi i ne postane sasvim malo topla. Postupak čišćenja
će biti lakši nego kada je proizvod zagrejan.
• Površine proizvoda najpre očistite vlažnom krpom, mekom četkom ili finim sunđerom, a zatim ih obrišite
suvom krpom. Ukoliko je izuzetno zaprljan, proizvod čistite vrućom vodom u koju ste stavili neabrazivno
sredstvo za čišćenje.
• Prilikom čišćenja stakla na vratima rerne, ne upotrebljavajte abrazivna sredstva za čišćenje ili oštre metalne
strugače, jer mogu da ogrebu površinu ili dovedu do oštećenja stakla.
• Nikada ne ostavljajte kisele supstance (limunov sok, sirće) na delovima od nerđajućeg čelika.
• Nemojte čistiti proizvod uređajima za čišćenje koji rade pod visokim pritiskom. Plehove za pečenje možete
prati u blagom deterdžentu.
Ovaj uređaj je označen u skladu sa Evropskom direktivom 2012/19/EU o Odlaganju električne i elektronske
opreme (Waste Electrical and Electronic Equipment, WEEE).
Pravilnim odlaganjem ovog proizvoda, pomoćićete u sprečavanju pojave potencijalnih negativnih posledica
po životnu sredinu i zdravlje ljudi, koje bi se inače javile usled neodgovarajućeg odlaganja ovog proizvoda.
Simbol na ovom proizvodu ukazuje na to da se ovaj proizvod ne sme tretirati kao otpad iz domaćinstva. Umesto
toga, potrebno ga je predati na sabirnom mestu za recikliranje električne i elektronske opreme. Odlaganje se
mora obavljati u skladu sa lokalnim propisima o odlaganju otpada u životnoj sredini. Za više informacija o
tretmanu, ponovnom iskorišćenju i recikliranju ovog proizvoda, kontaktirajte lokalno predstavništvo u svom
gradu, svoju kompaniju za odlaganje otpada iz domaćinstva ili maloprodajni objekat u kome ste ovaj proizvod
kupili.
Page 16

tesla.info
 Loading...