

Page 1
TESLA SMART ROBOT
VACUUM LASER AI200
USER MANUAL
EN
DE
CZ
SK
PL
HU
SL
1
Page 2

Safety Instructions
Before using this product, read the following safety instructions and follow all conventional
safety precautions. Read this manual carefully, and keep it properly.
Any operation not conforming to this manual may cause damage to this product.
Cautions
1.Only authorized technicians can disassemble this product. Users are not recommended to
disassemble this product by themselves.
2.Use only the power adapter provided by the manufacturer for this product. Use of other
adapters may cause damage to this product.
3.Do not touch wires, sockets, or power adapter when your hands are wet.
4.Do not roll the curtain or body parts into the product drive wheel.
5.Keep this product away from cigarettes, lighters and other open flames.
6.Clean the product after charging.
7.Do not bend the wire excessively, or place heavy objects and sharp objects over the machine.
8.This product is intended for indoor use. Do not use it outdoors.
9.Do not sit on the product.
10.Do not use this product in a humid environment, such as the bathroom.
11.Before using this product, remove all vulnerable items (such as glasses and lamps) on the
ground, as well as articles that may entangle the edge brush and suction channel (such as
wires, paper, and curtains).
12.Do not place the product in a place where it is easy to fall off (such as tables and chairs).
13.Check carefully that the power adapter is connected with the socket before use; otherwise
the battery may be damaged.
14.To prevent tripping over the product, inform other members of the house when the product is working.
15.When the dust box is full, empty the dust box before using this product.
16.The operating temperature of this product is 0°C to 40°C.
17.Do not use this product in a high temperature environment.
18.Remove the battery from the product before scrapping it.
19.When removing the battery, make sure that the product is disconnected from the power
supply.
20.Properly recycle the waste batteries.
Warnings
1.Use only the original rechargeable battery and docking station provided by the manufacturer. Do not use non-rechargeable batteries. For battery specifications, see „Product Specifications“.
2.Do not use the product in an environment with open flames or fragile products.
3.Do not use the product in an extremely hot (above 40°C) or extremely cold (below 0°C)
environment.
4.Keep the hair, clothes, fingers and other parts of the human body away from the opening or
operating parts of the product.
5.Do not use the product on wet or water-filled ground.
6.Do not use the product to vacuum any items that may block the product, such as stones
and waste paper.
7.Do not use the product to vacuum any flammable materials, such as gasoline and toner
used in printers or copying machines. Do not use the product in clean areas with flammable
materials.
8.Do not use the product to vacuum any burning items, such as cigarettes, matches, ashes
and other items that may cause fire.
9.Do not place any articles at the suction port. Do not use the product when the suction port
is blocked. Remove the dust, cotton wool and hair from the suction port to ensure smooth air
circulation at the suction port.
10.Handle the power cord with care to avoid damage. Do not use the power cord to drag or
pull the product and its docking station, use the power cord as a handle, clamp the power
cord in the door gap, or pull the power cord at sharp corners. Do not run the product over
the power cord. Keep the power cord away from heat sources.
11.Do not use a damaged docking station.
12.Even if the product is severely damaged, do not burn the product, as the product battery
may explode.
The laser ranging sensor complies with IEC 60825-1:2014 class 1 laser product standard and
does not produce dangerous laser radiation.
2
Page 3

Table of Contents
Safety Instructions 2
Product and its Accessories 4
Product Composition 5
Installation 6
Descriptionof App Icons and Buttons 8
Preparations 10
Charging the Main Unit 11
Product Use/ Start cleaning 12
Use Instructions 13
Using the Water Tank 17
Parts Maintenance - Dust Box 18
Parts Maintenance - Water Tank and Mopping Cloth 21
Parts Maintenance - Roller Brush and Side Brush 22
EN
Parts Maintenance - Charging electrode, anti-fall sensor, drive wheel and omnidirectional wheel 23
Troubleshooting 24
Product Specifications 27
3
Page 4
Product and Accessories
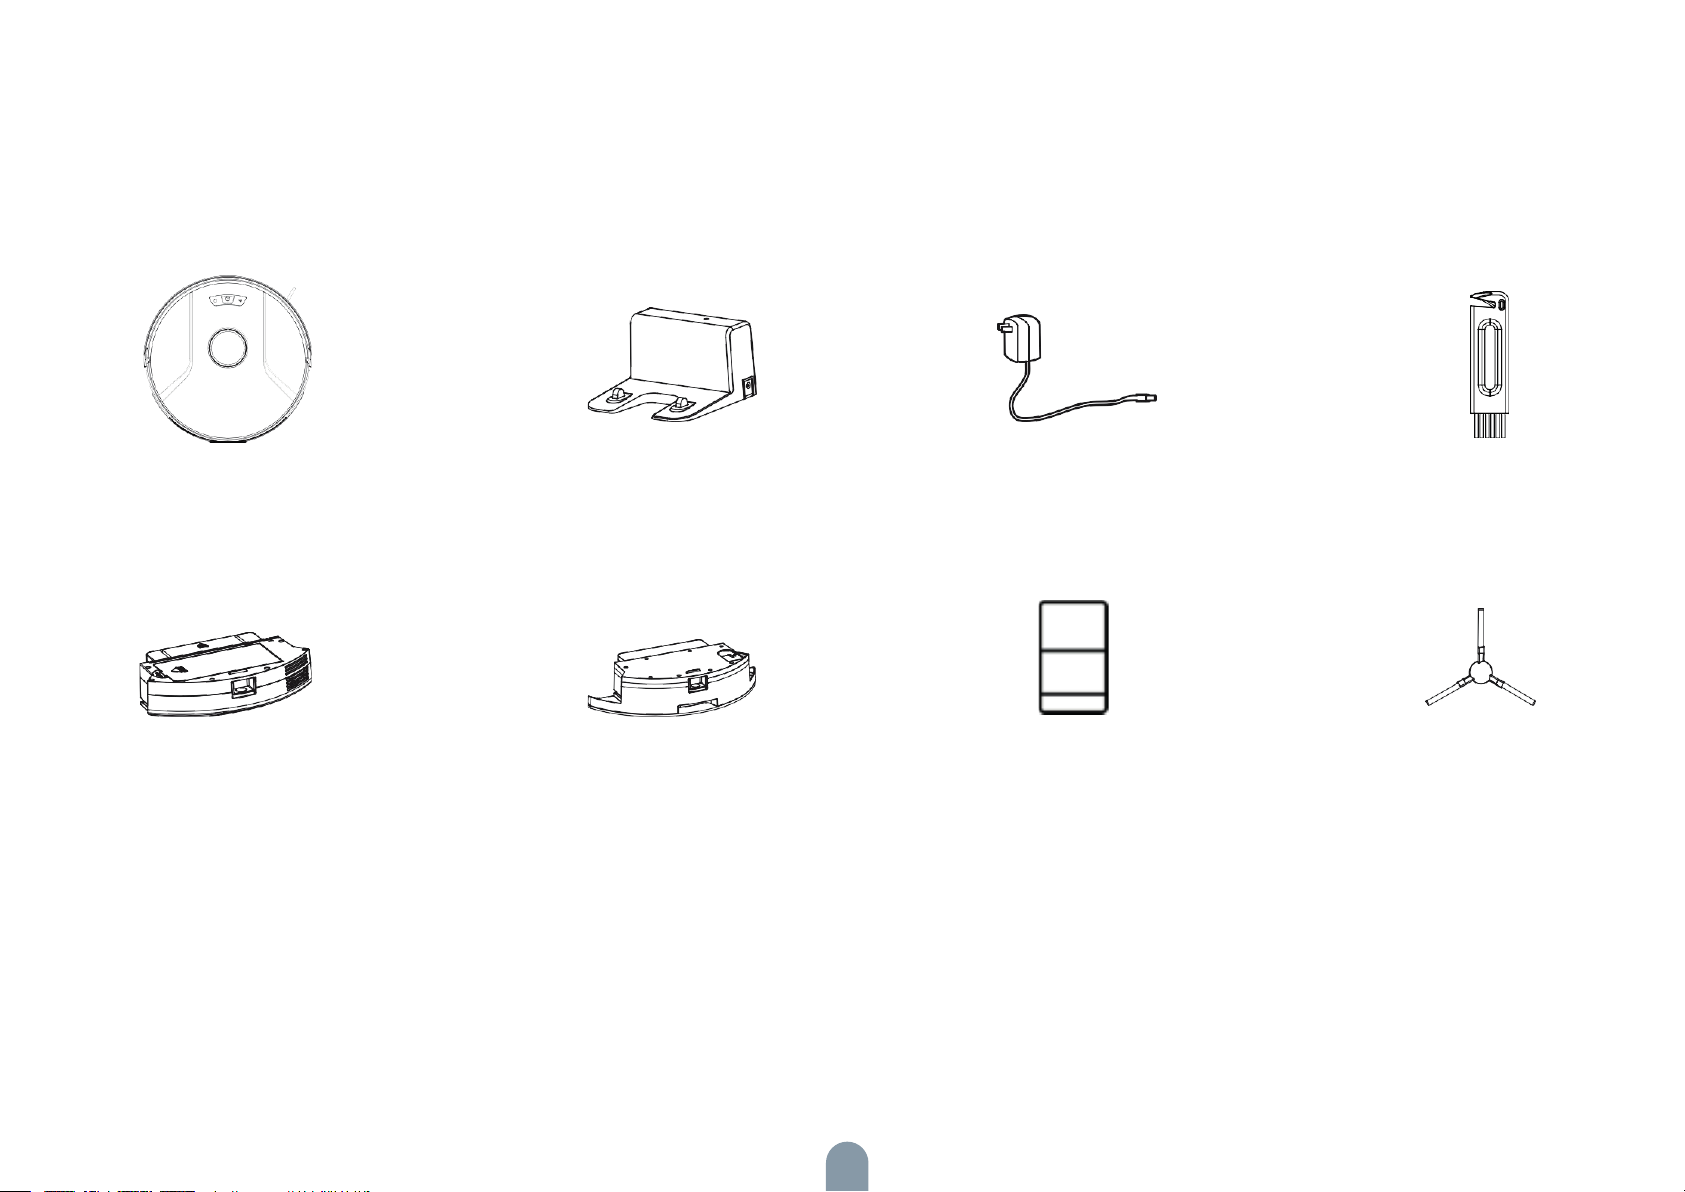
Main unit
Dust box
Docking station
Water tank
Power adapter Cleaning brush
Instructions Manual
Side brush (1 sets)
4
Page 5
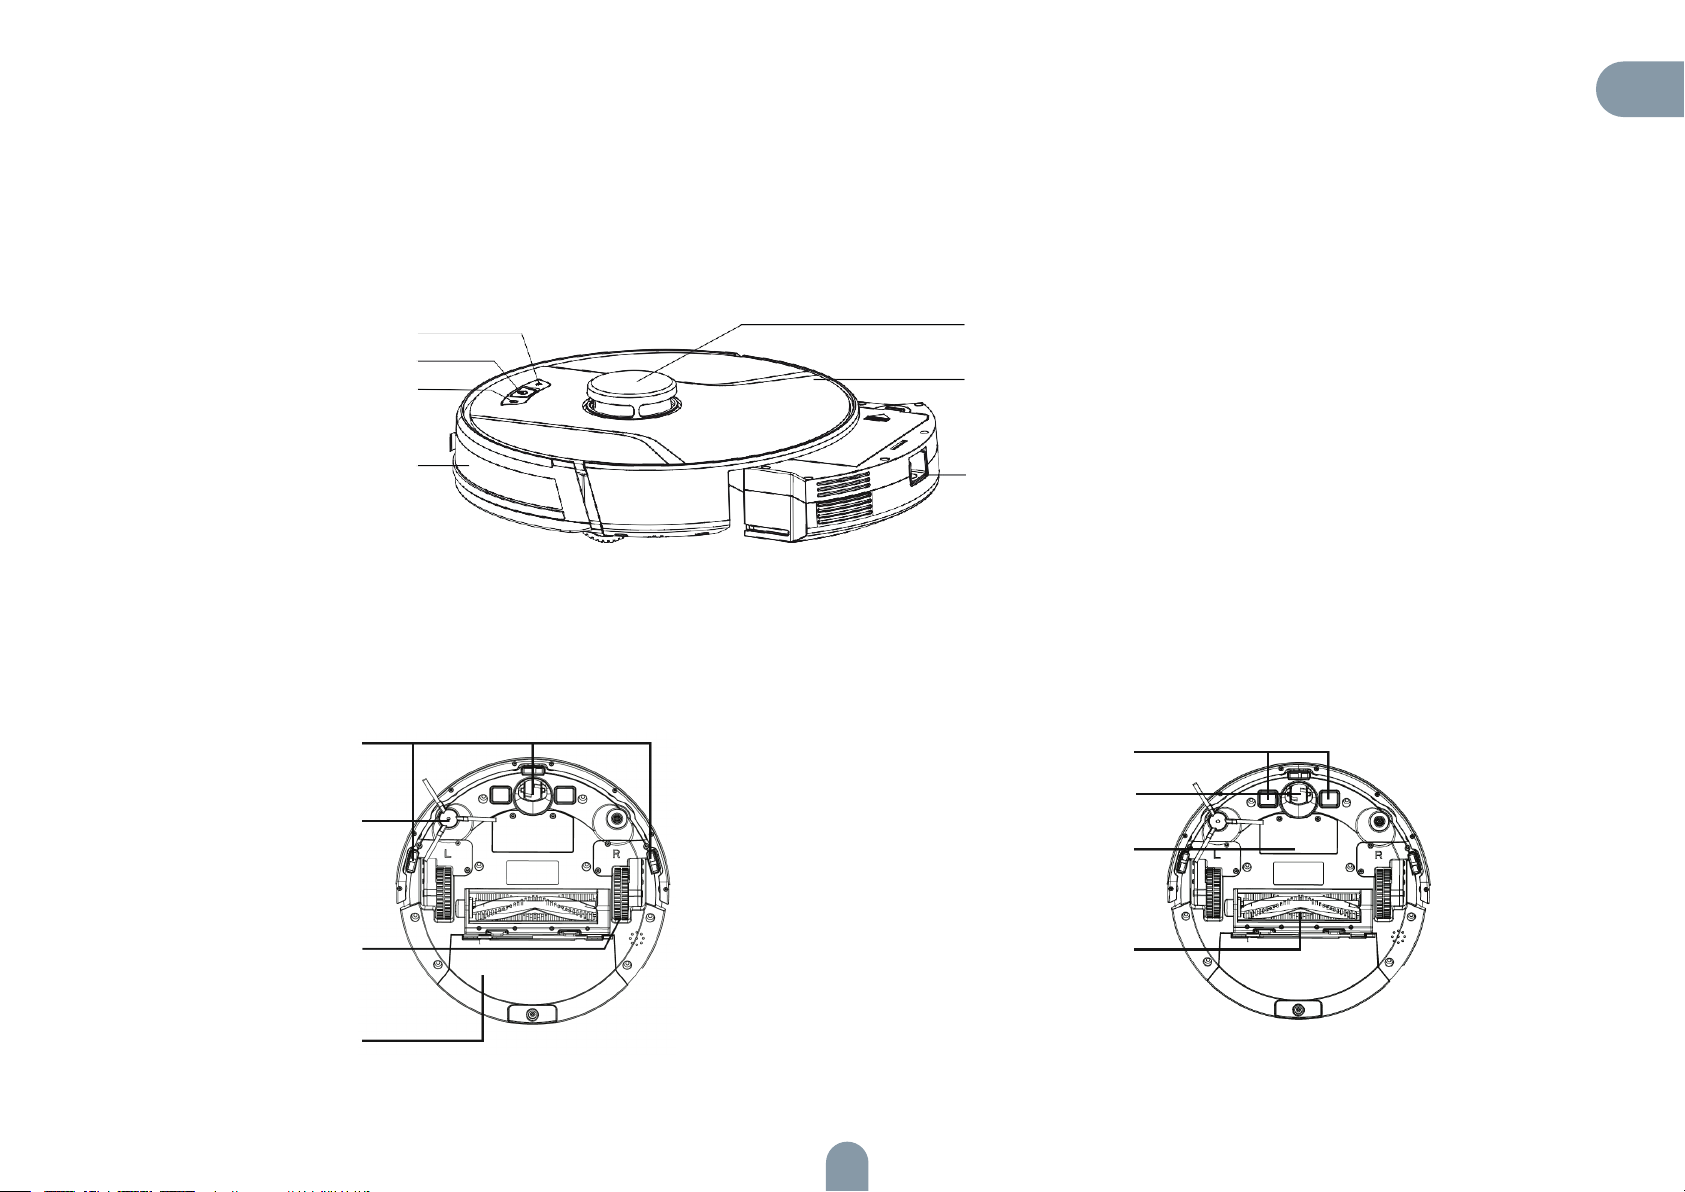
Product Composition
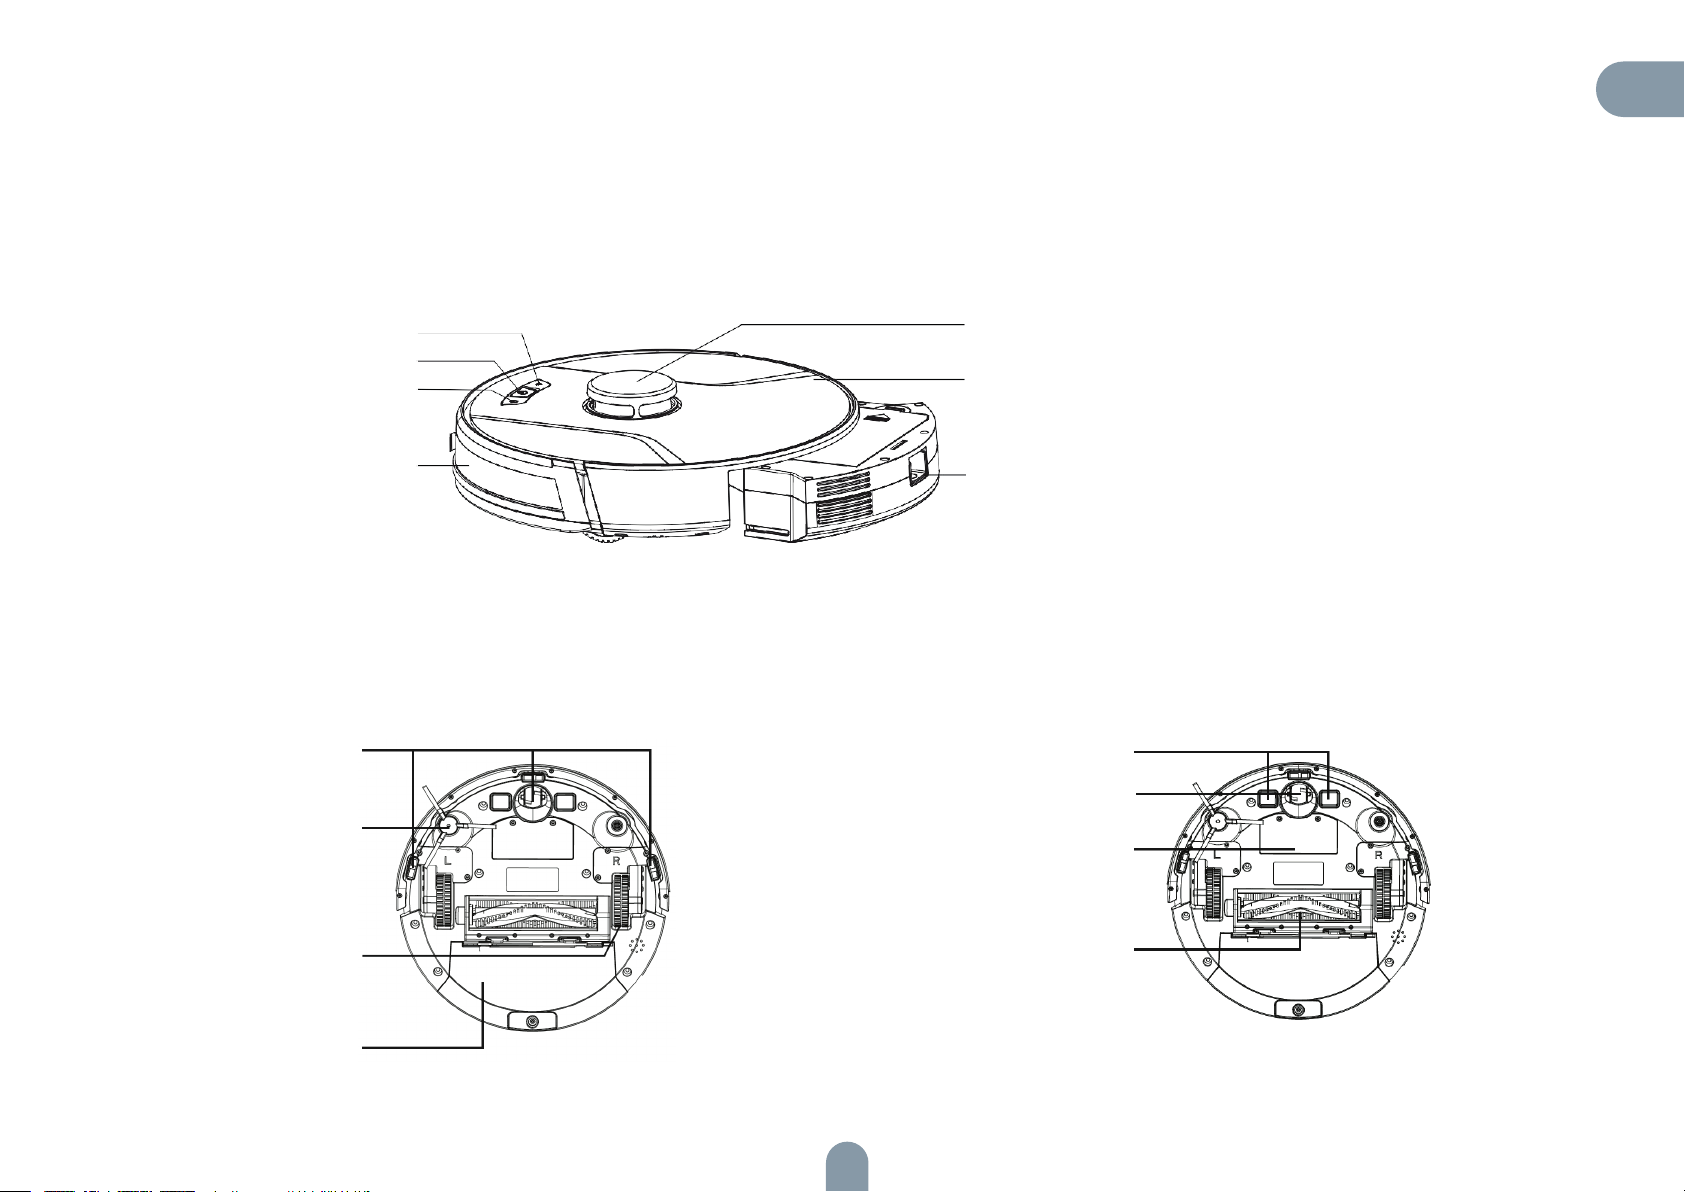
Front view
EN
Rear view
Wi-Fi button
On/Pause button
Return to docking
station button
Omnidirectional
lens
Anti-fall sensor
Side brush
Cover
Laser head
Dust box button
Charging electrode
Omnidirectional wheel
Battery
Drive wheel
Dust box
Roller brush assembly
5
Page 6
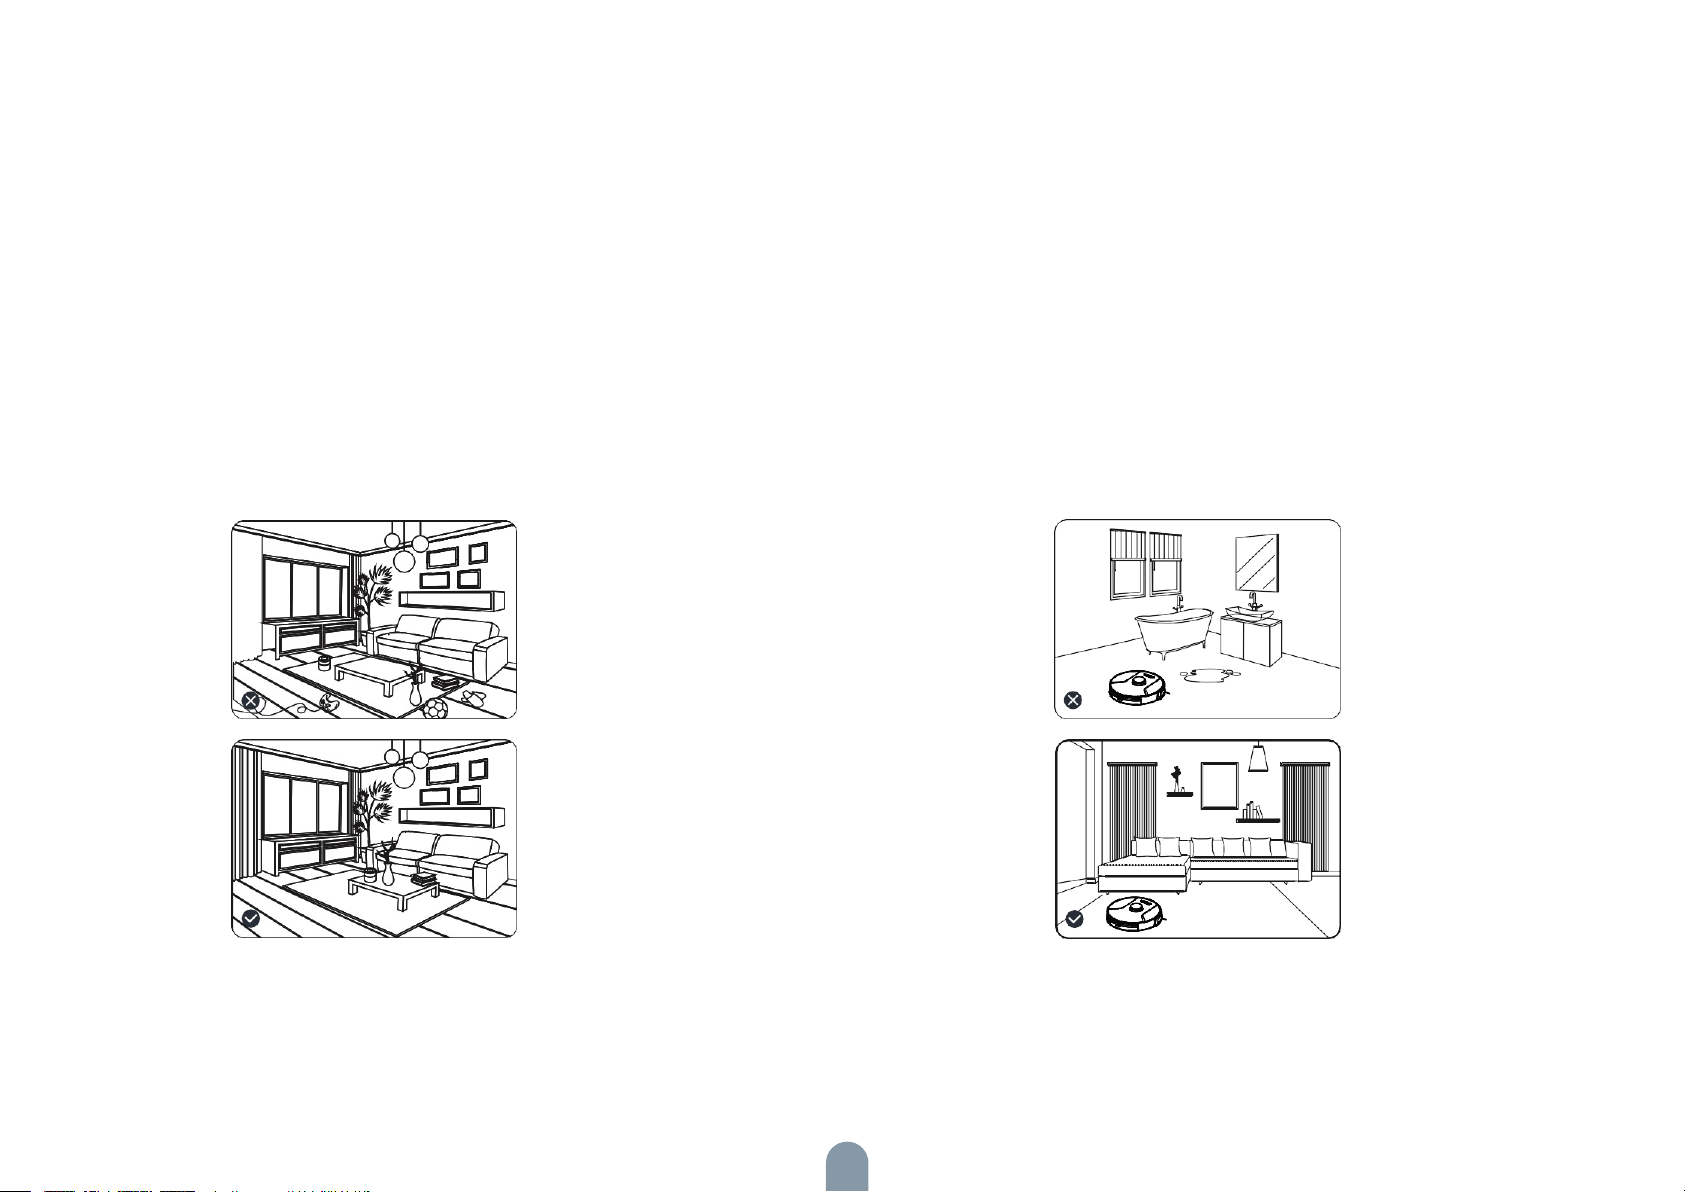
Installation
Notes
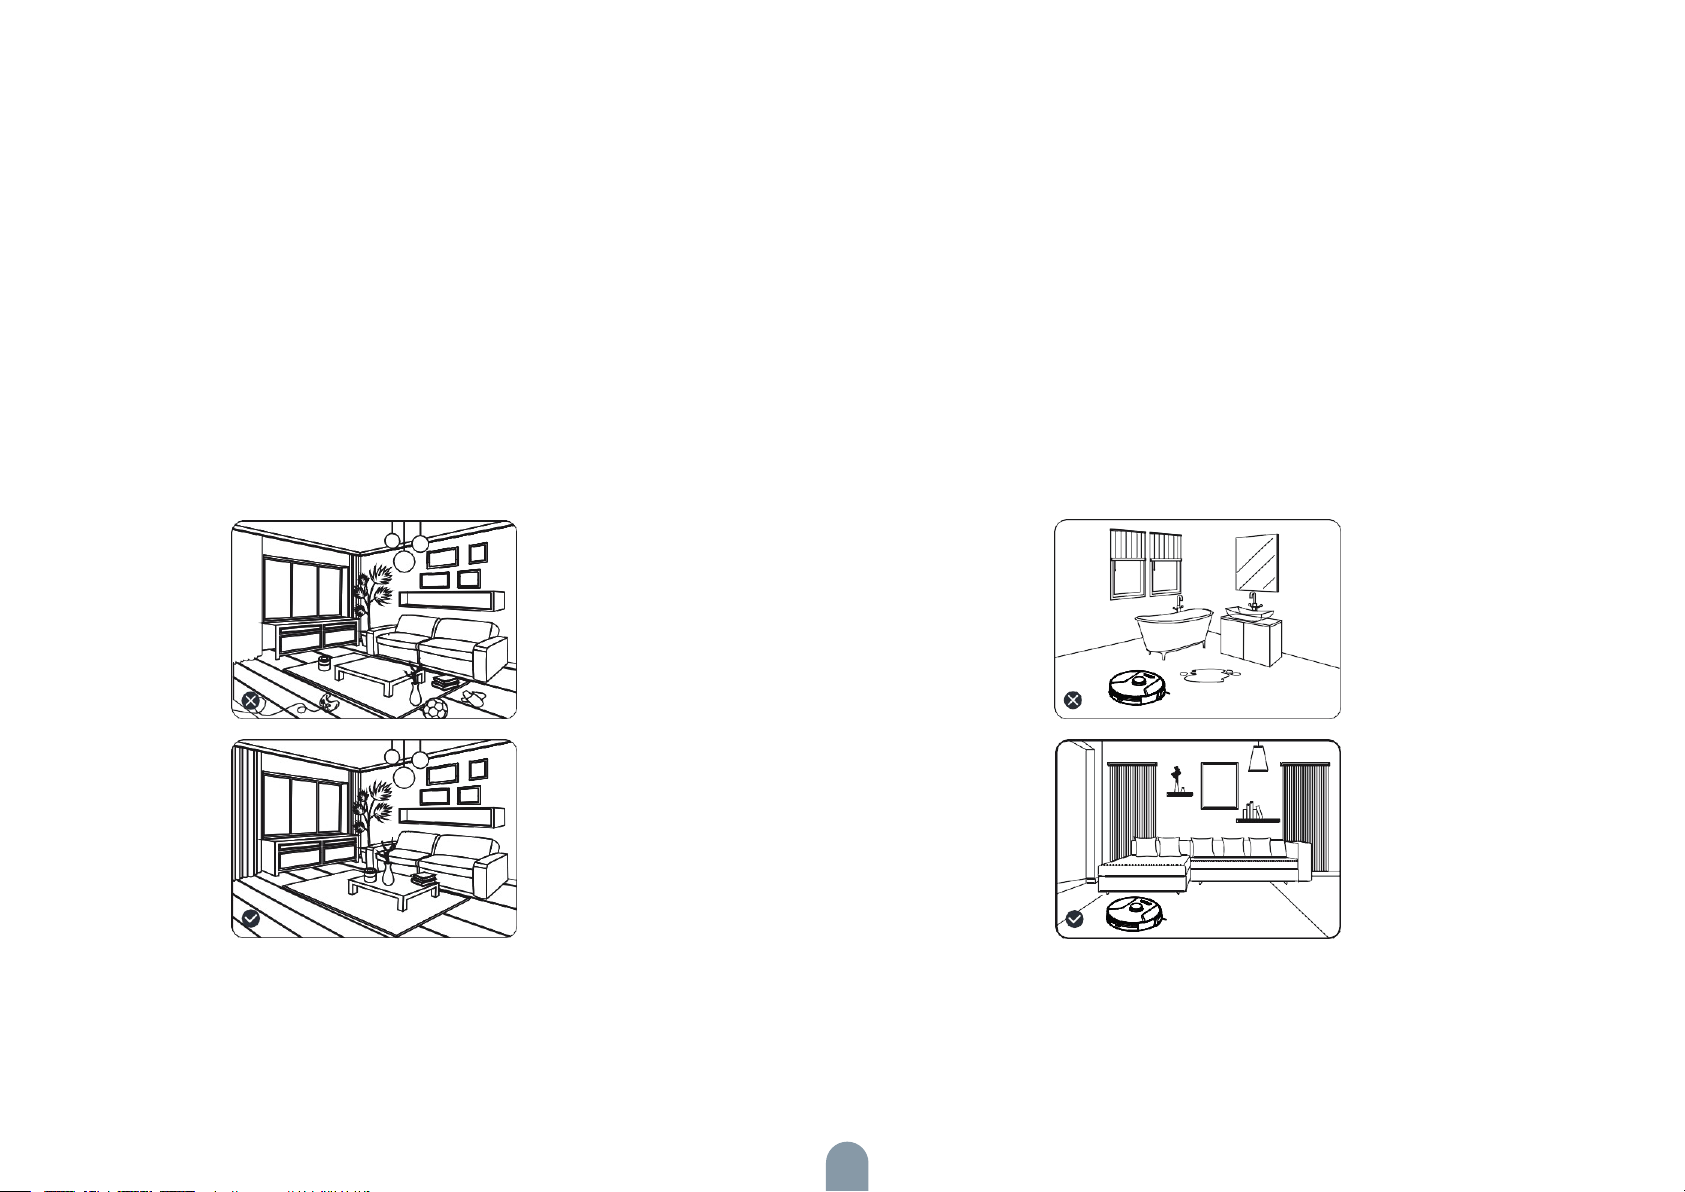
1. Before starting the vacuum cleaner, clean up wires and sundries
scattered on the ground, and remove easy-to-fall, fragile, valuable
and potentially dangerous items. Avoid being entangled, jammed,
dragged, or knocked down by the main unit; otherwise, personal
or property damage may be caused.
2. Avoid using this product in the wading area; otherwise, the
fan may be damaged, affecting the performance of the vacuum
cleaner.
6
Page 7
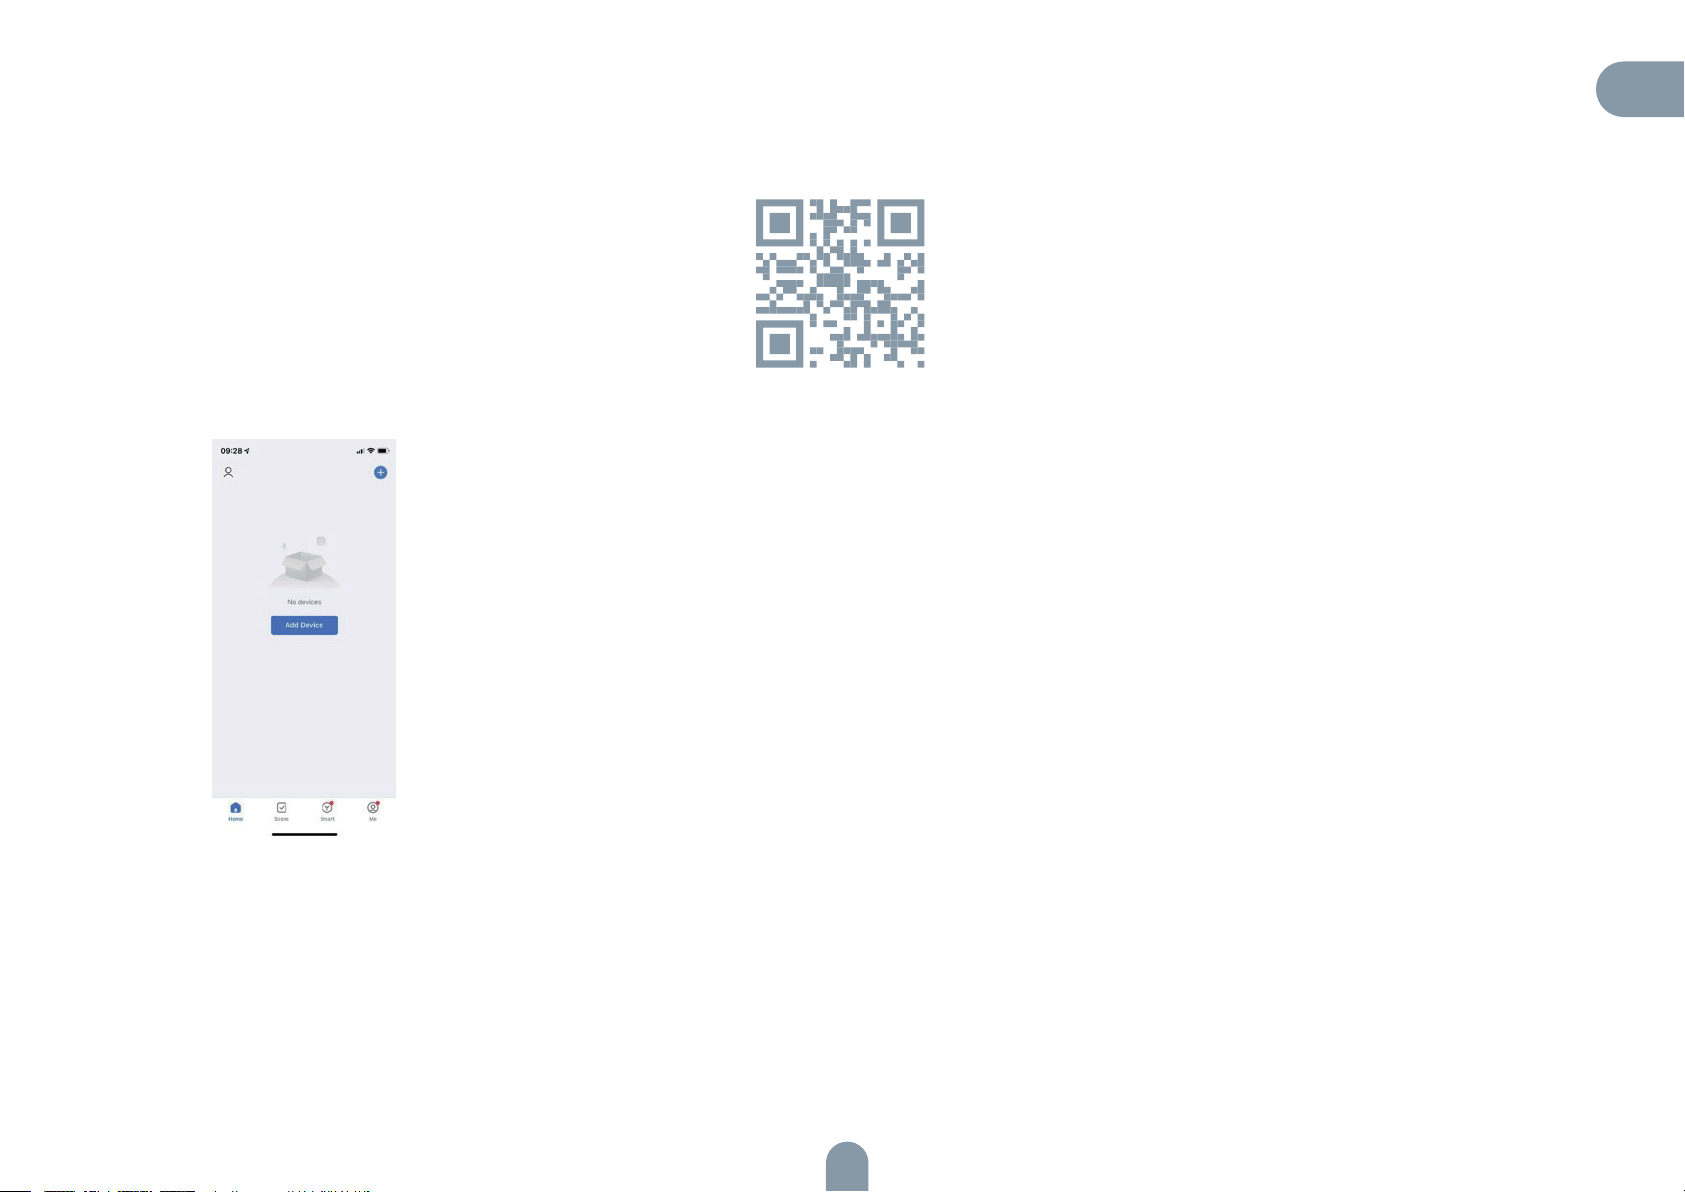
Installation
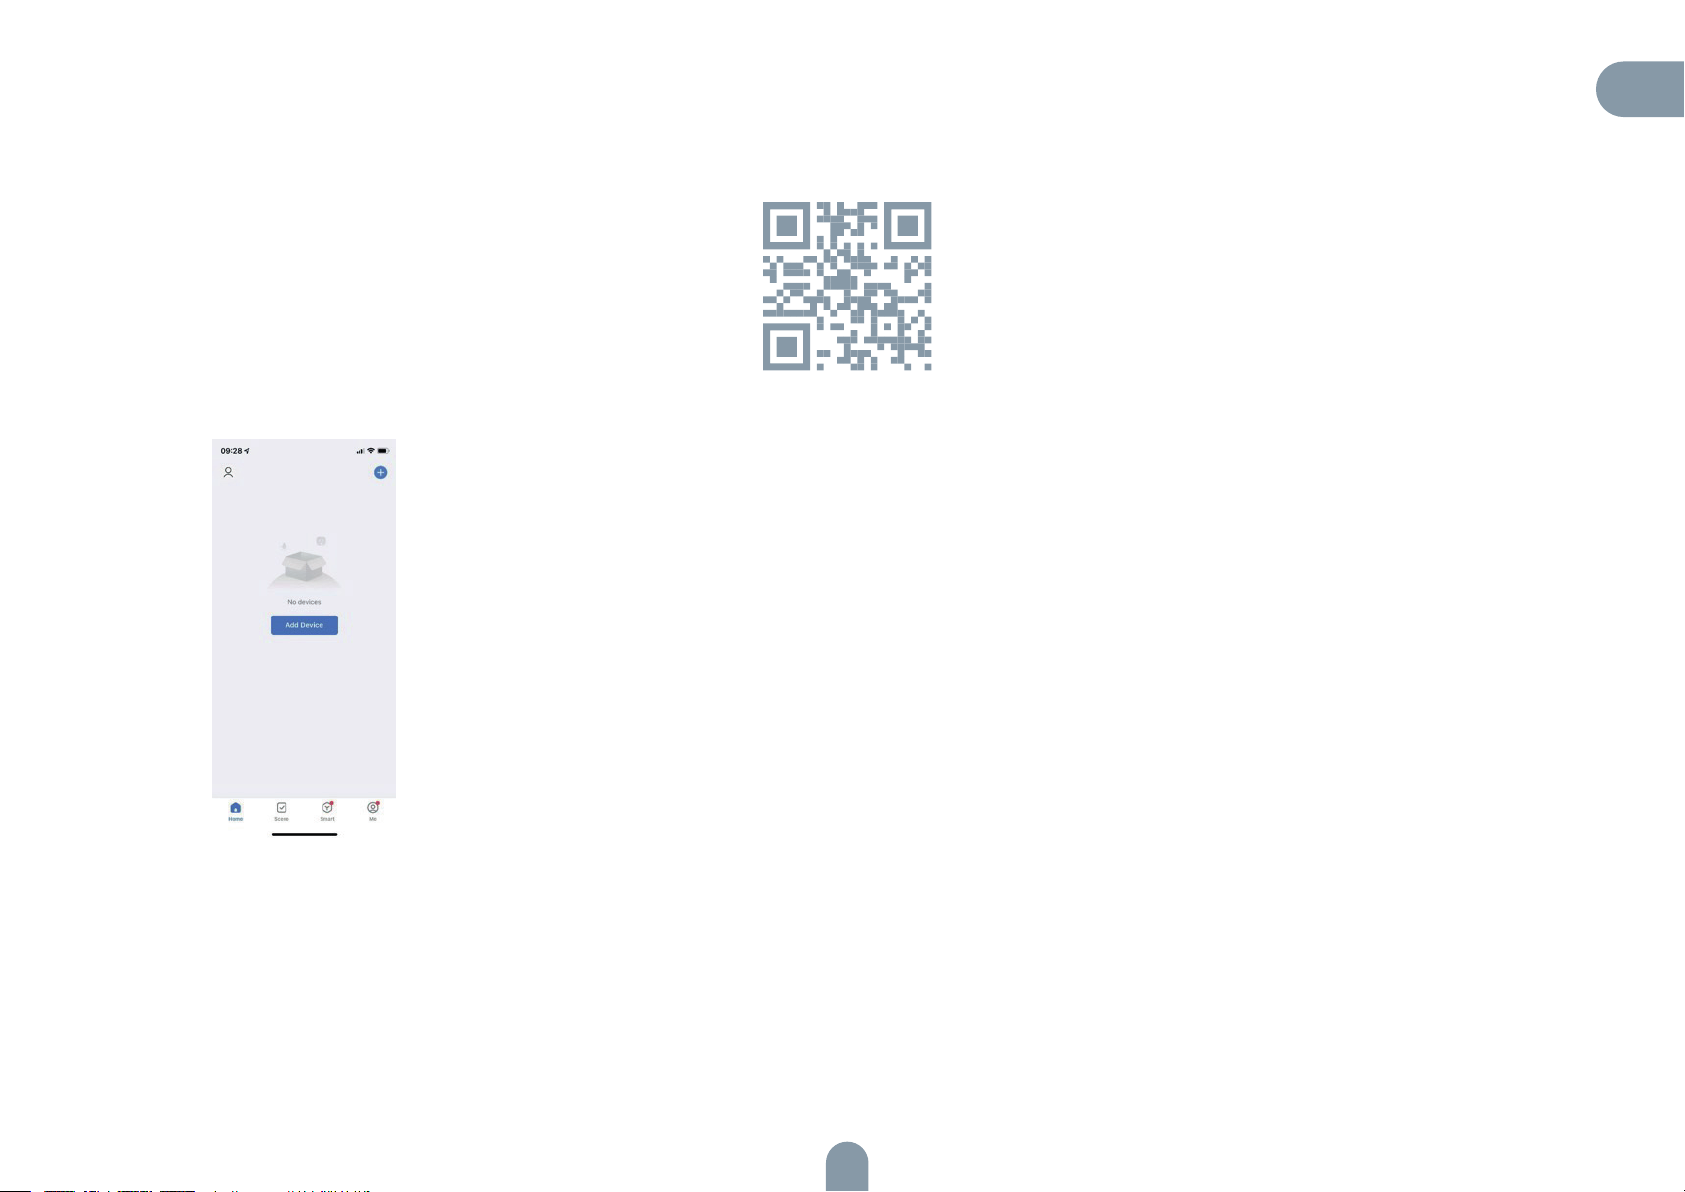
1. Download the TESLA Smart from your APP store, register and log in the APP. Make sure that Wi-Fi is 2.4GHz before network connection.
2. Preparation: tap “+” on upper-right corner to add your robot.
EN
7
Page 8
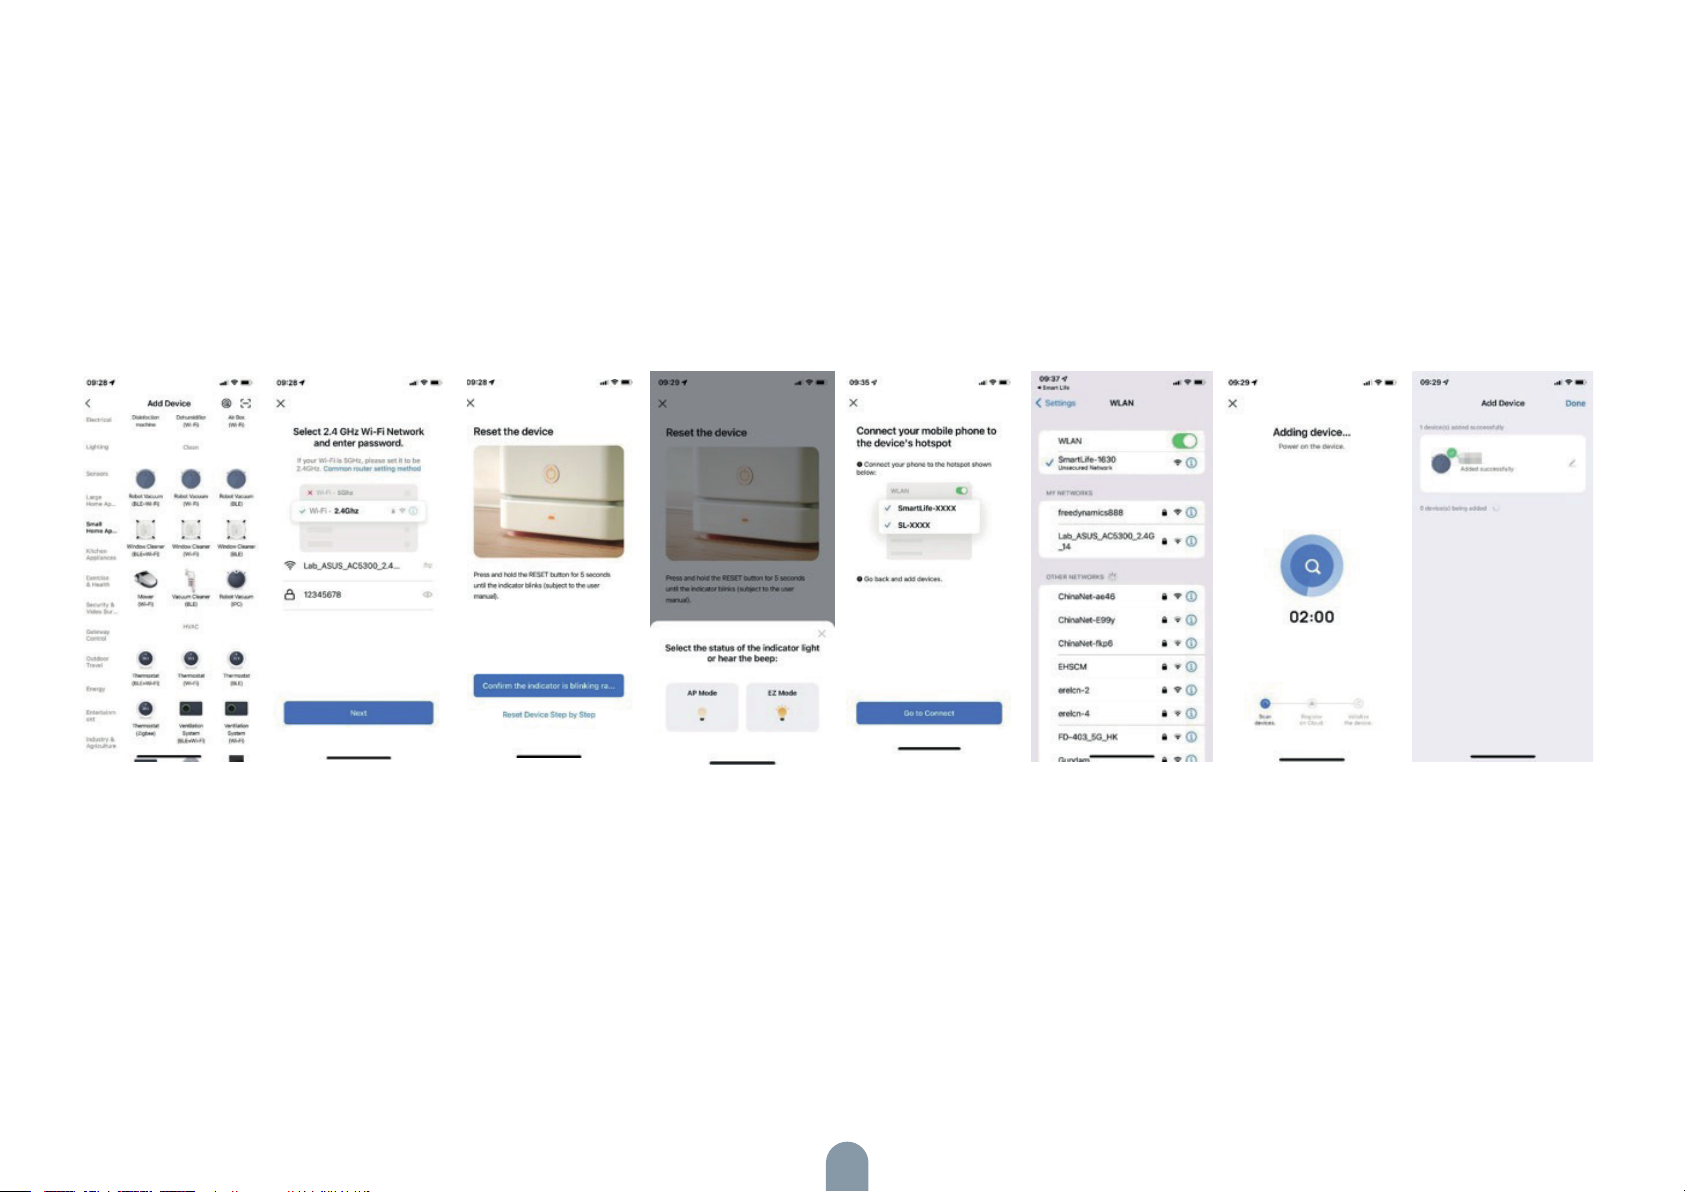
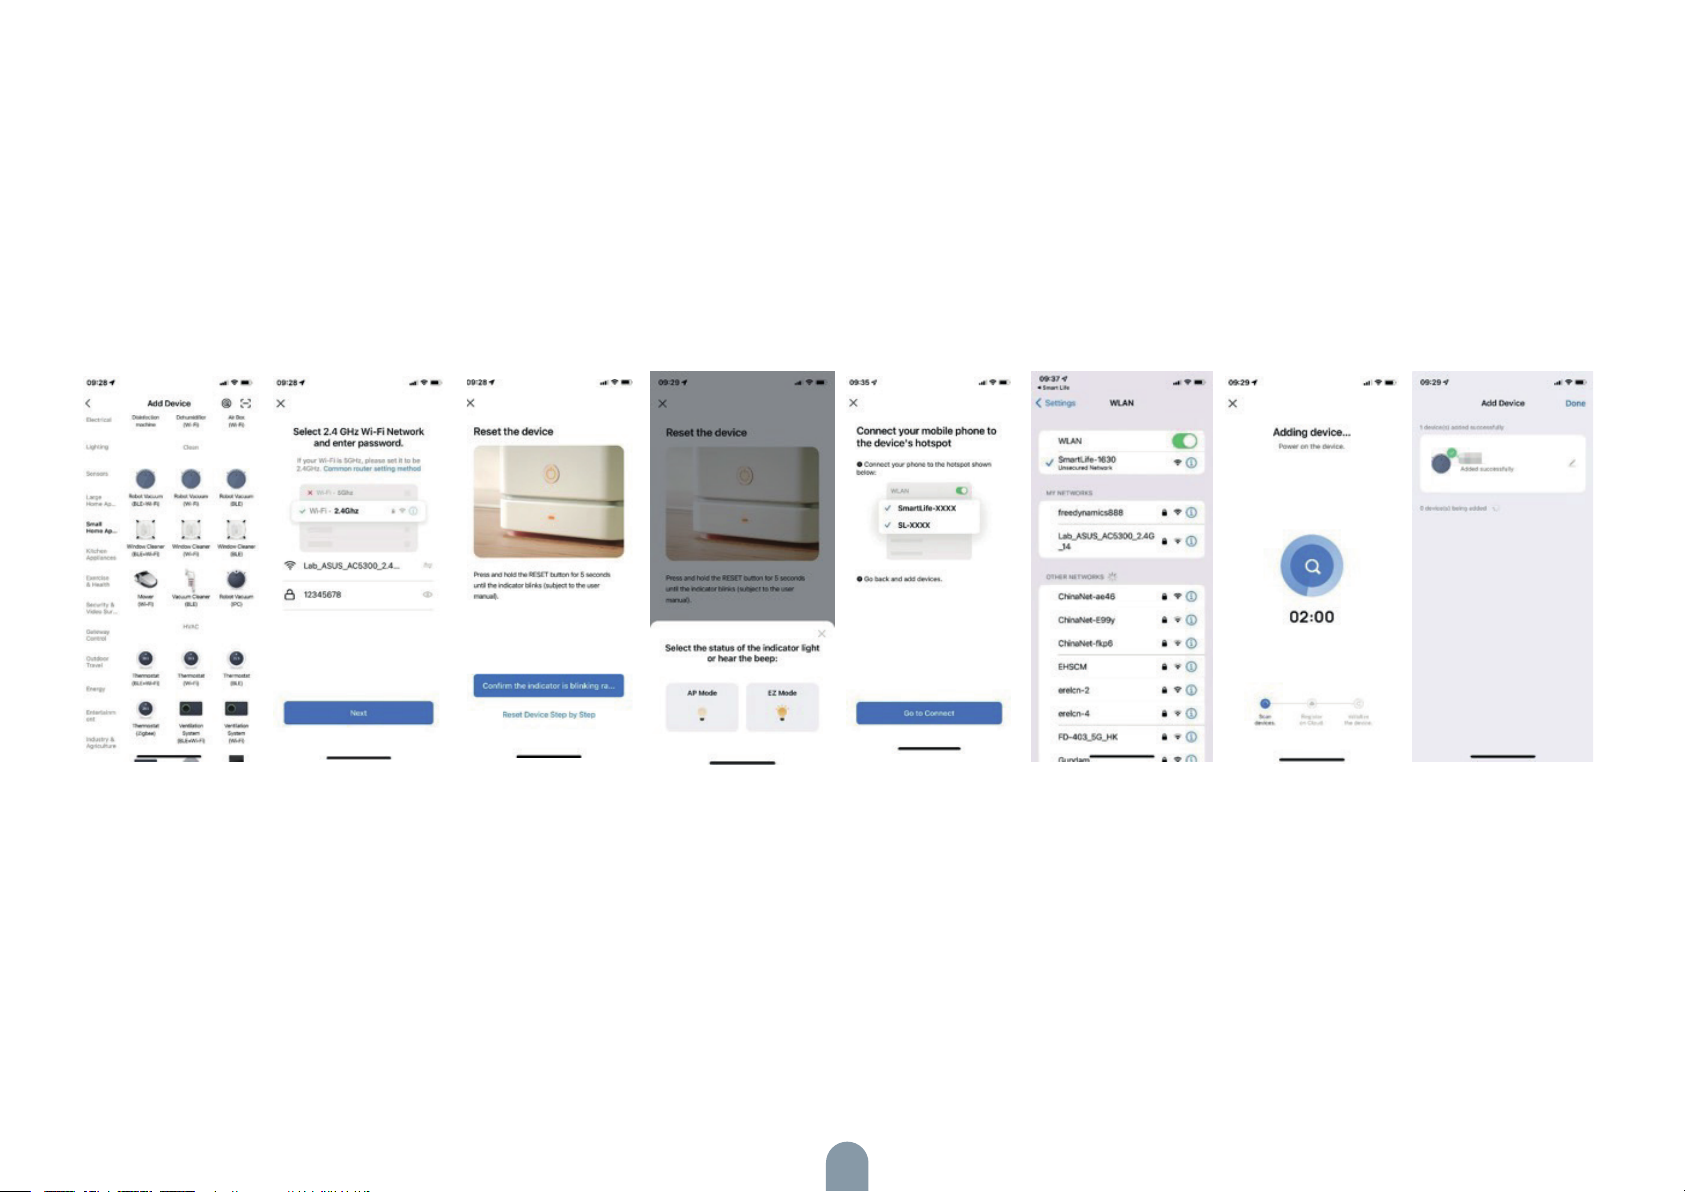
3. The device supports AP mode:
- Choose “Robot Vacuum (Wi-Fi)” in the Small Home Appliance column.
- Make sure that Wi-Fi is 2.4GHz and input correct Wi-Fi password.
- Press and hold the Wi-Fi button on robot for 3s’, make sure that Wi-Fi indicator light is flashing. Tick “Confirm the indicator is flashing rapidly” in the APP interface, click
“Next” and choose AP mode in the pop-up window.
- Find password-less hot-spot which started with SmartLife-XXXX in your Wi-Fi list and click to connect it. After successfully connecting to the hot-spot, return back to the
TESLA Smart APP, the APP will automatically jump to the robot connection interface. Wait for the connection and the robot can be operated after the connection is done.
8
Page 9
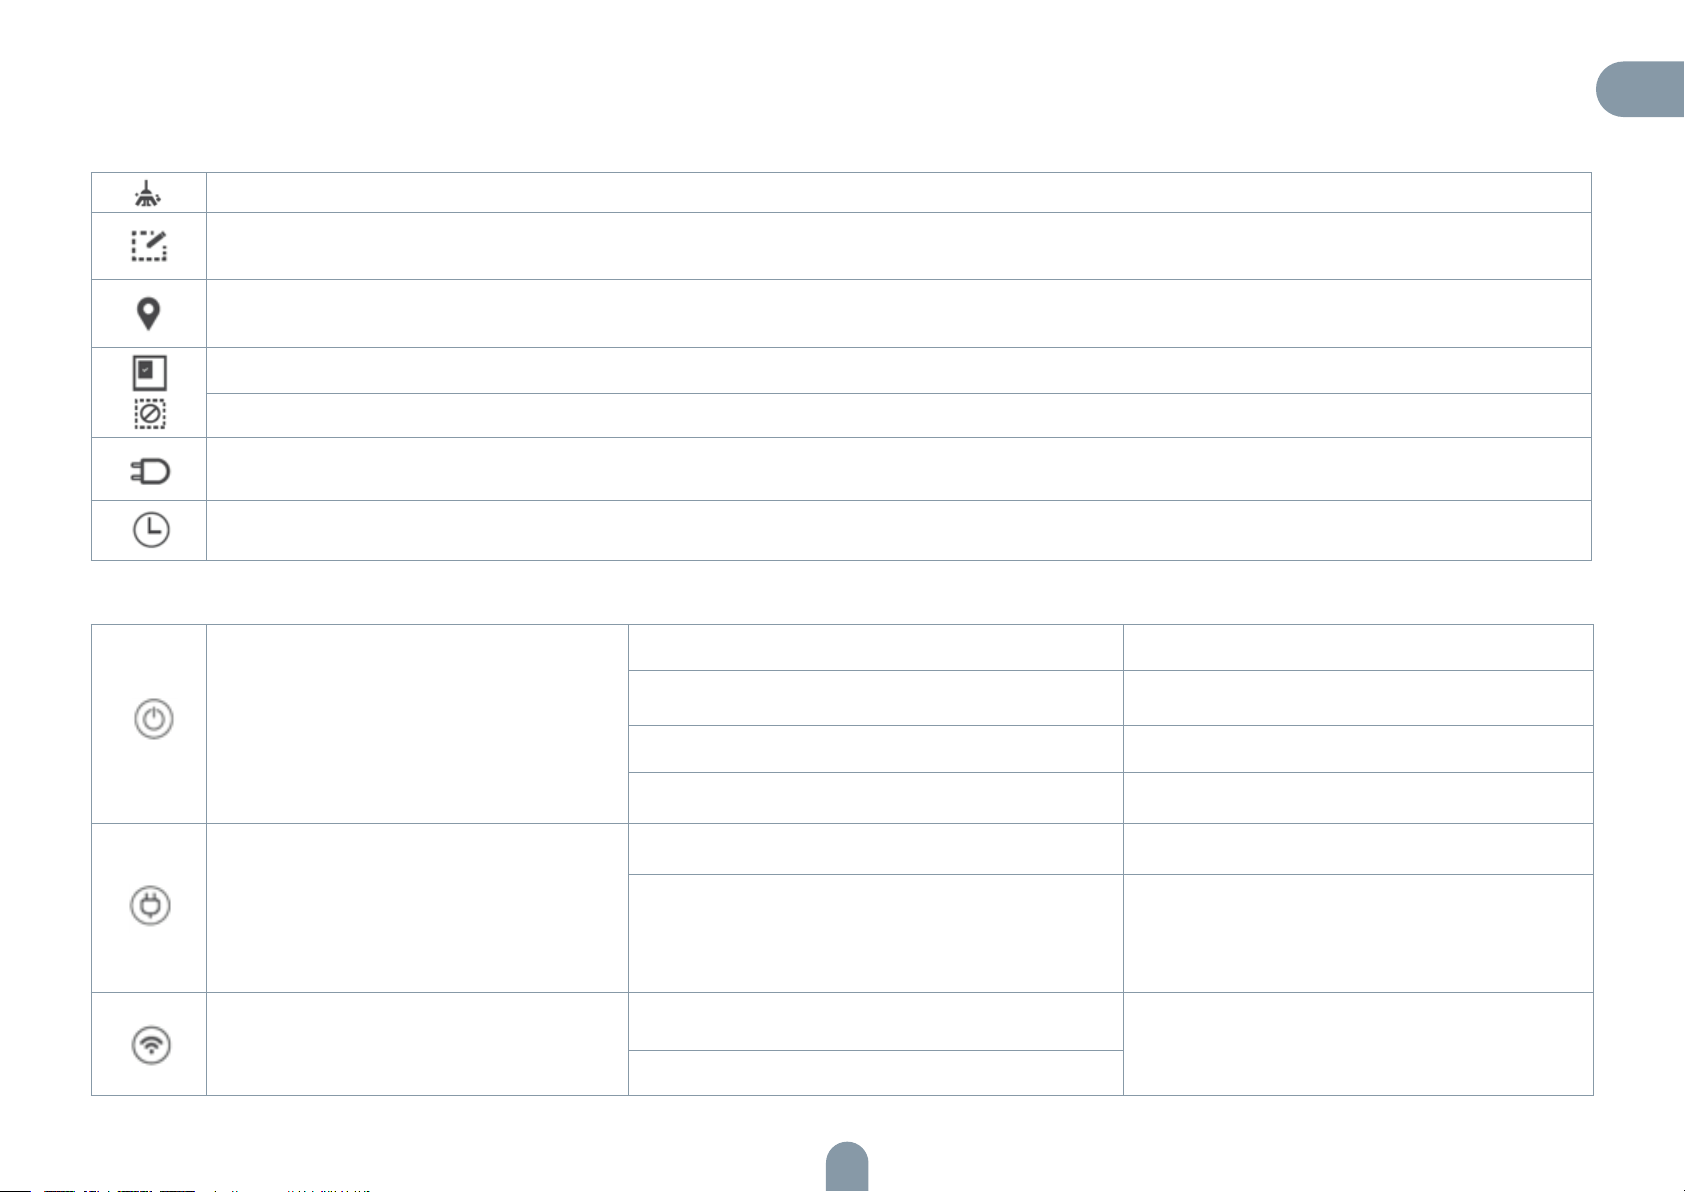
Description of App Icons and Buttons
Icons and Descriptions
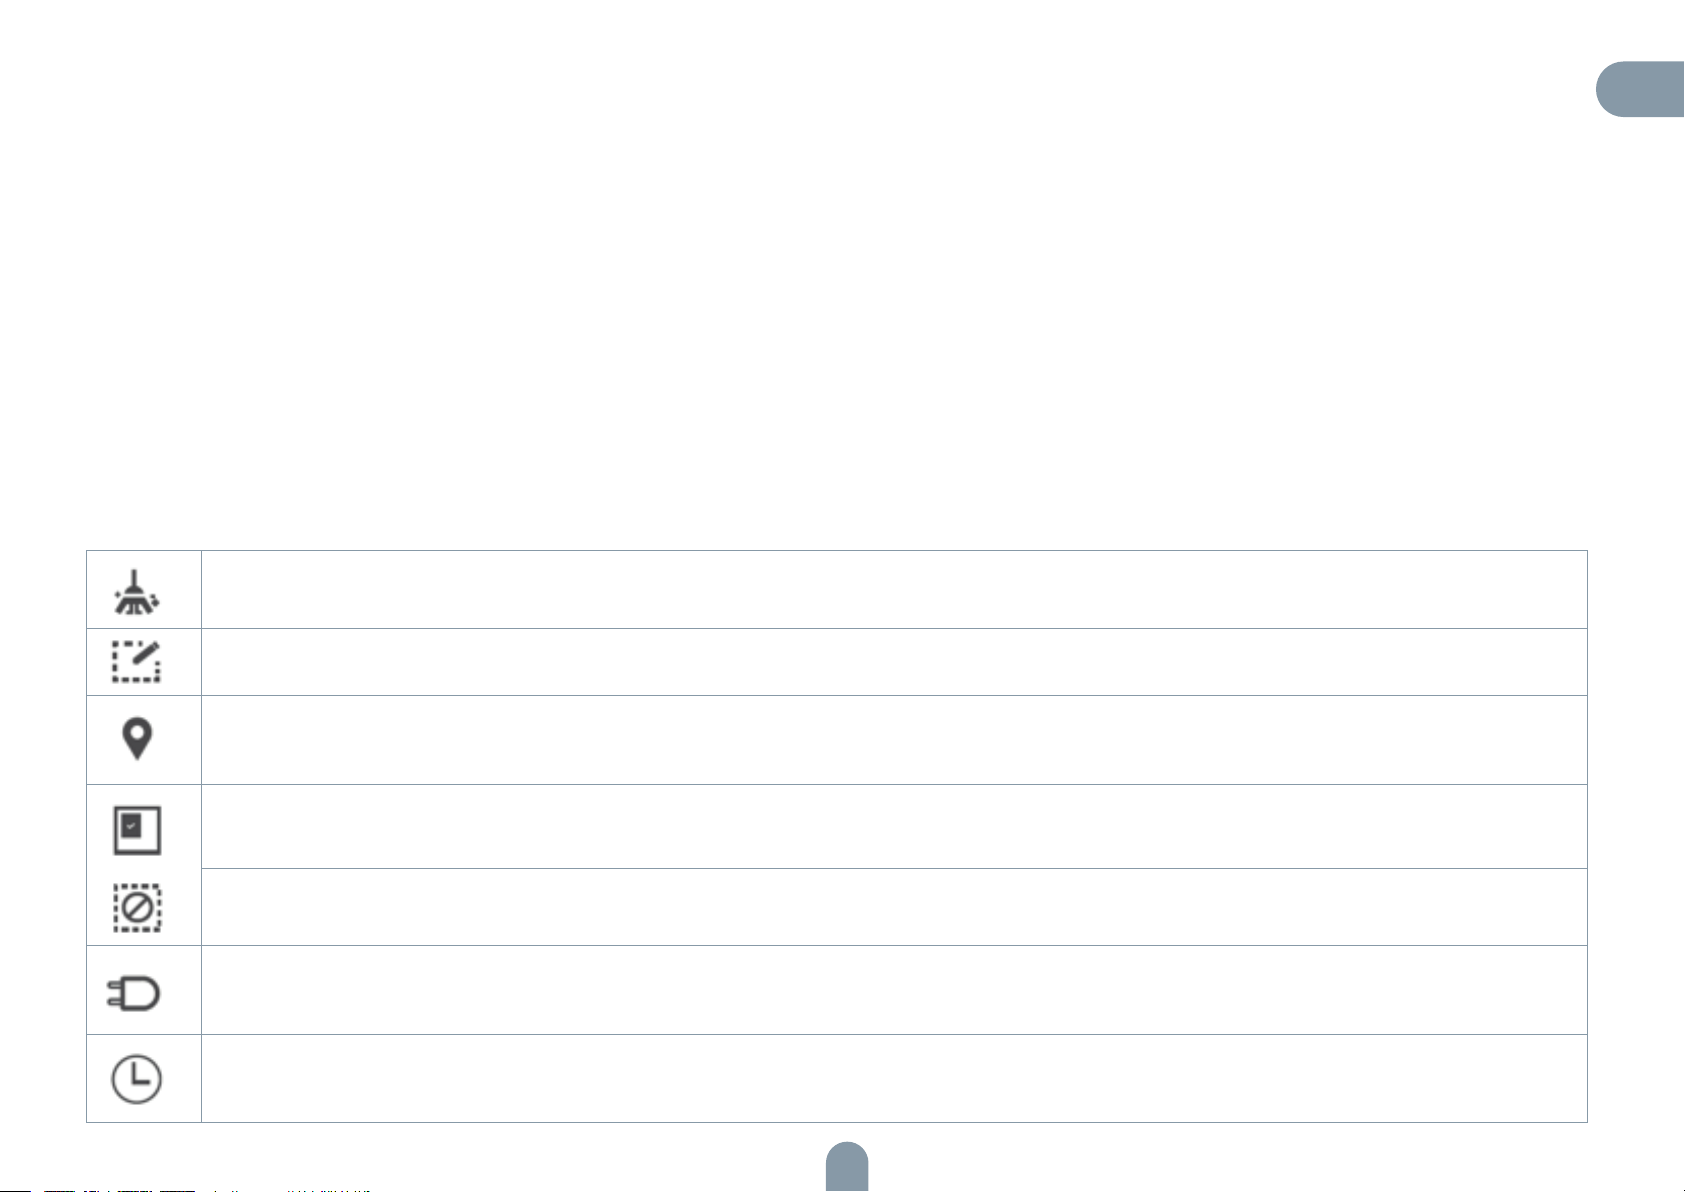
Entire house cleaning: The vacuum cleaner generates a map of the entire house through sensor scanning, and automatically plans the optimal cleaning path.
Configured zone cleaning: You can configure a zone in a certain place on the app map. Then, the vacuum cleaner will automatically move to the zone for
cleaning.
PIN N GO: You can specify a point on the app map. Then, the vacuum cleaner will automatically move to the point,and clean the 1.6mx1.6m zone centered
on this point. You can click or drag on the map to set the target point.
Selected zone cleaning: After the vacuum cleaner generates a map of the entire house, you can select one or more zones for cleaning through the app.
Set a restricted zone for cleaning.
Return to docking station: When this icon is steady on, the vacuum cleaner automatically returns to the docking station for charging. When this icon blinks,
the vacuum cleaner stops returning to the docking station.
Scheduled mode: You can make a reservation to carry out a scheduled cleaning task in 24 hours within 7 days through the app.
Button Description Function Function Description
EN
Power button
„Return to docking station“ button
Wi-Fi button
Press this button to power on the machine.
Press and hold this button to power off the machine.
Press this button to plan the cleaning path. Press this button for 300ms.
Press this button to pause. Press this button for 300ms.
Press this button to return to the docking station. Press this button for 300ms.
Press this button during the „return to docking station“
process to pause this process.
Wi-Fi fast connection
(EZ mode)
Press this button during the „return to docking station“
process to pause this process.
Hotspot pairing (AP mode)
9
Press and hold this button for 3s to power on the
machine
Press and hold this button for 3s to power off the
machine.
Press this button for 300ms.
Press and hold this button for 3s.
Page 10
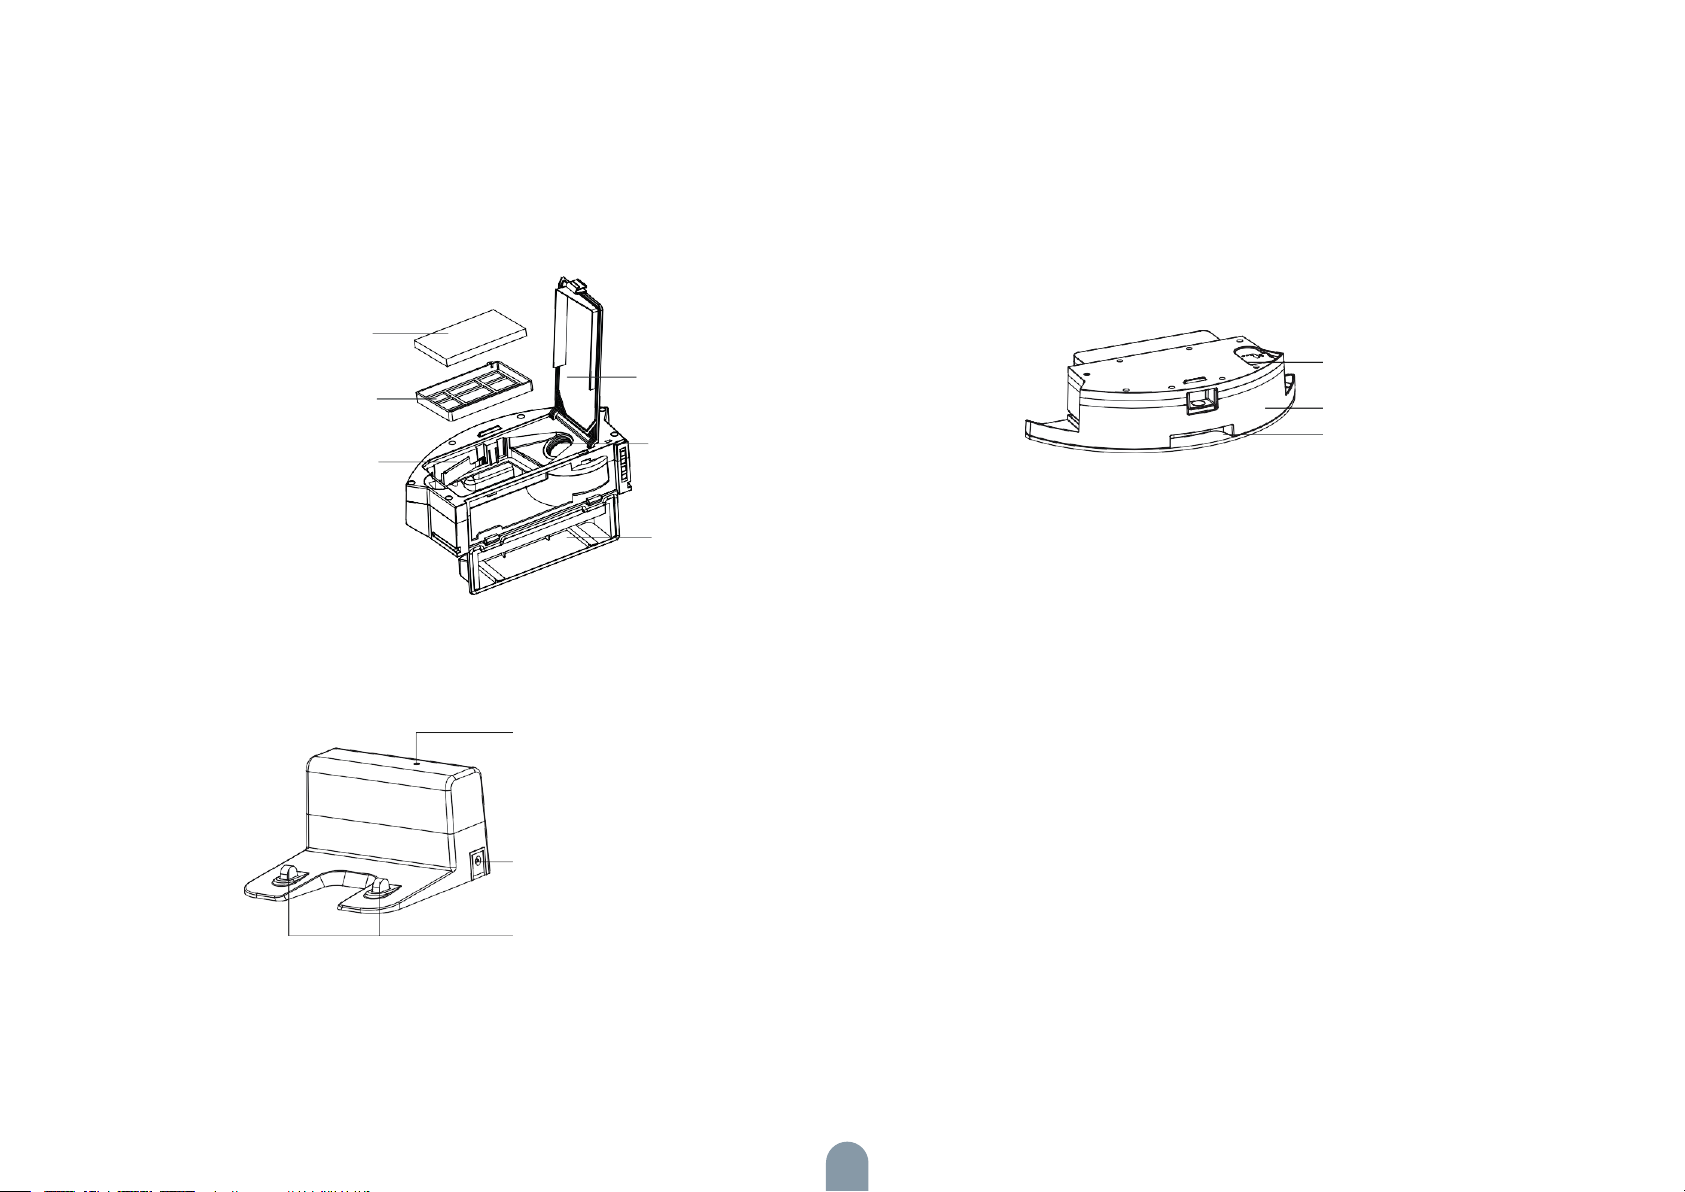
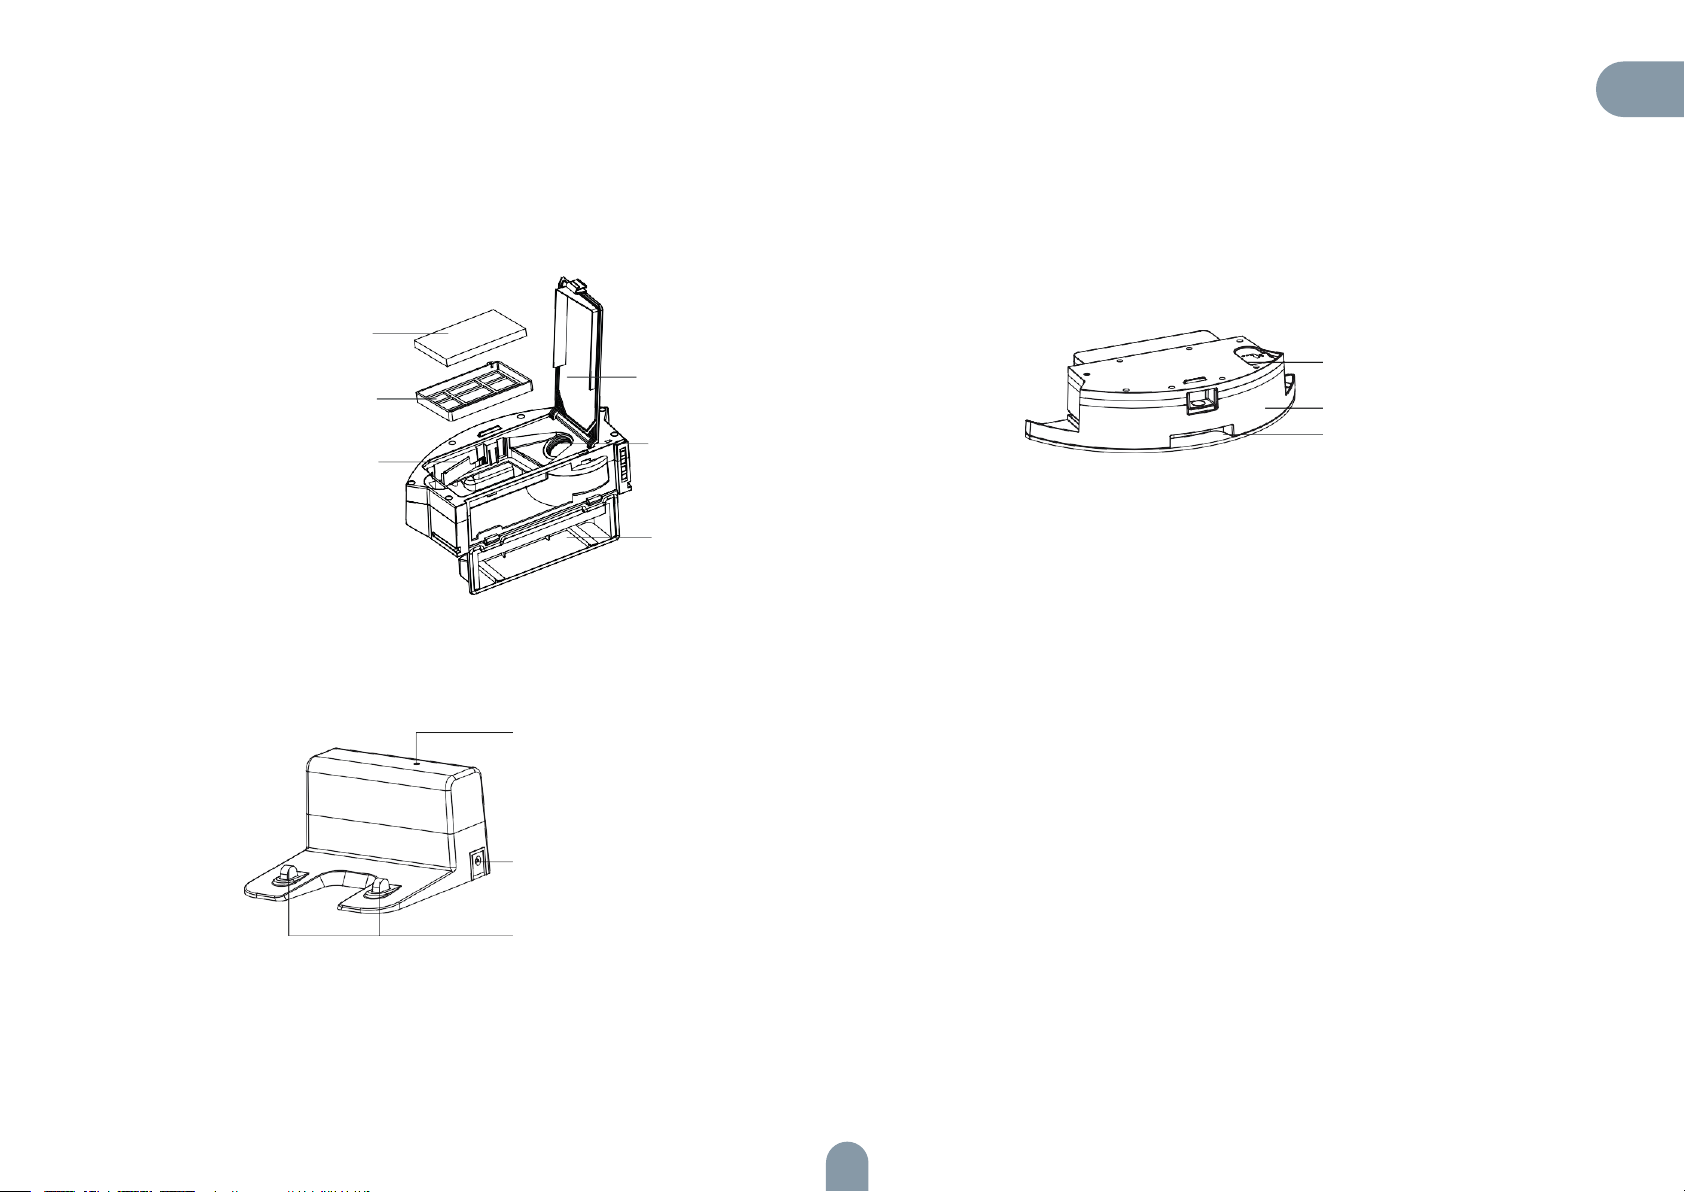
Dust Box, Water Tank, and Mopping Cloth Assembly
HEPA filter
Prefilter
Sheet metal of the
dust box
HEPA filter cover
Conductive shrapnel
of the dust box
Side cover of the
dust box
Water inlet
Water tank
Mopping cloth
Signal indicator
DC connector
Charging electrode
10
Page 11
Preparations
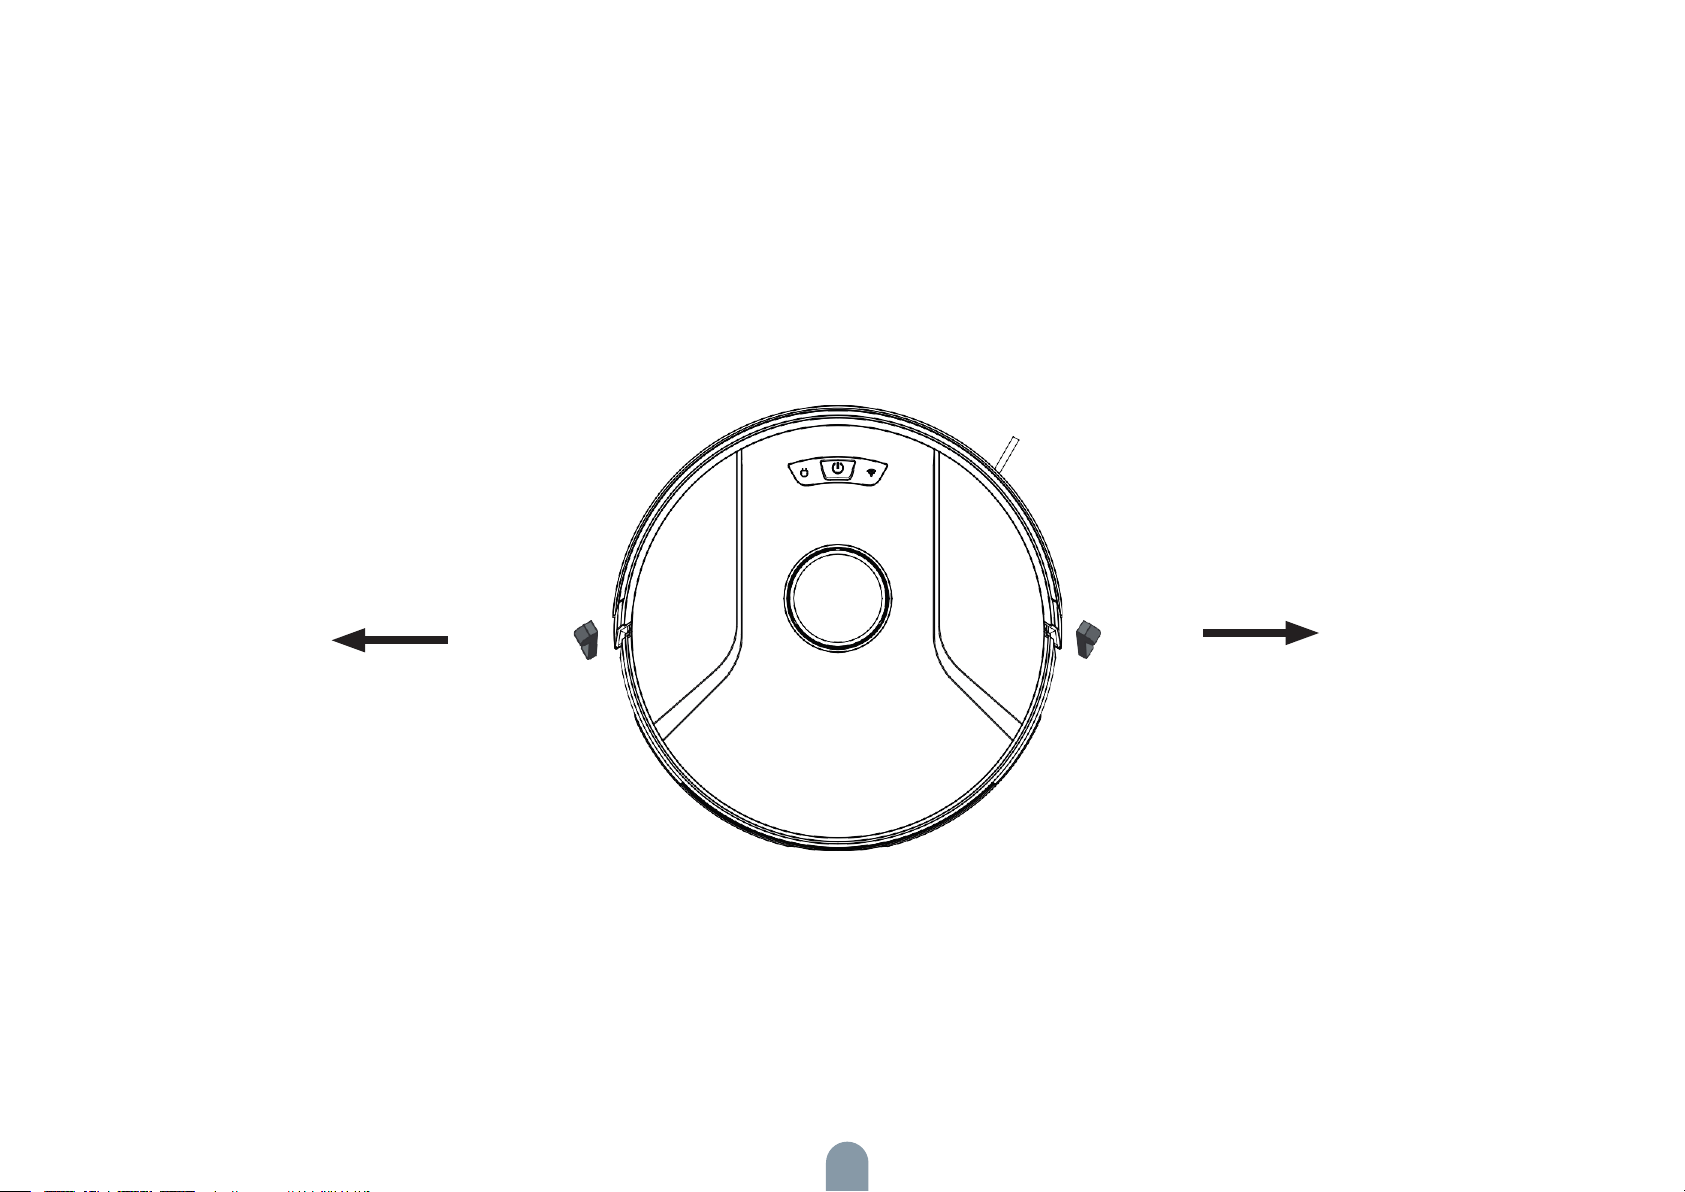
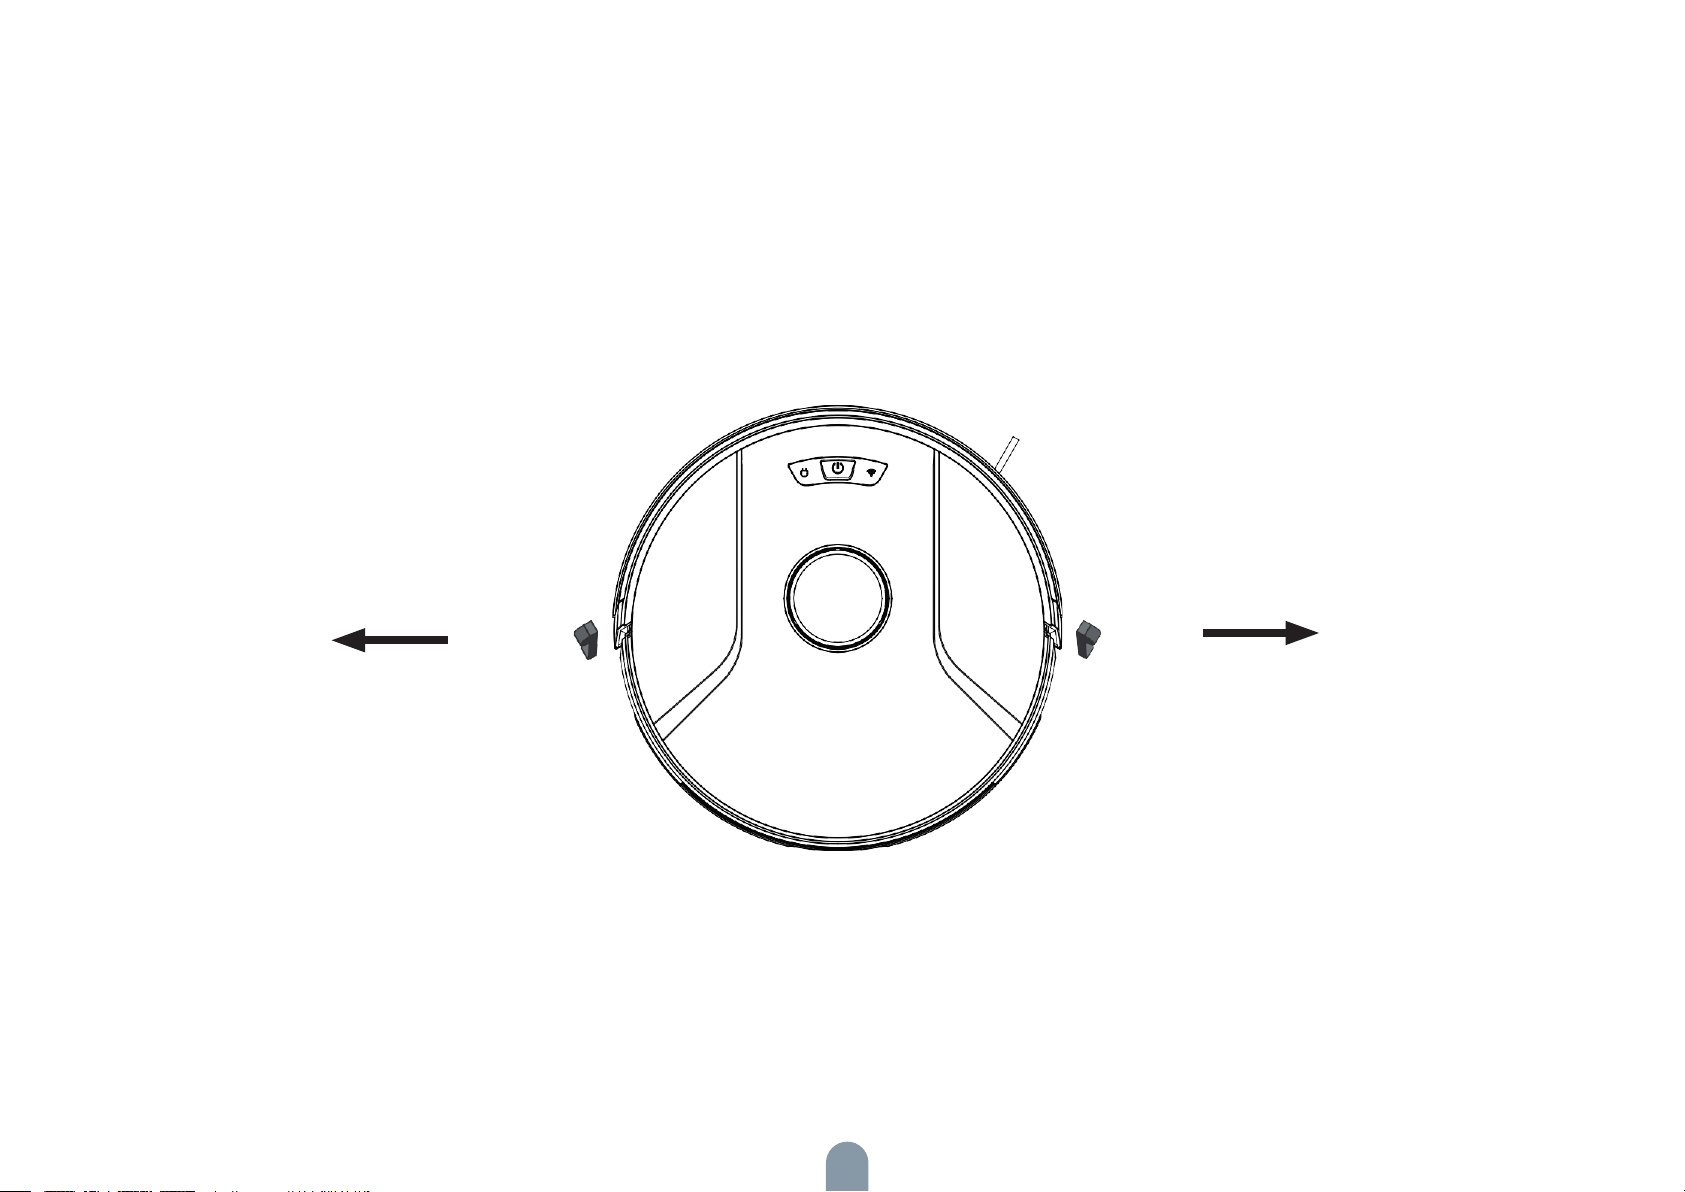
Remove the protective strip
Before using the main unit, remove the protective strip from the main unit.
11
Page 12
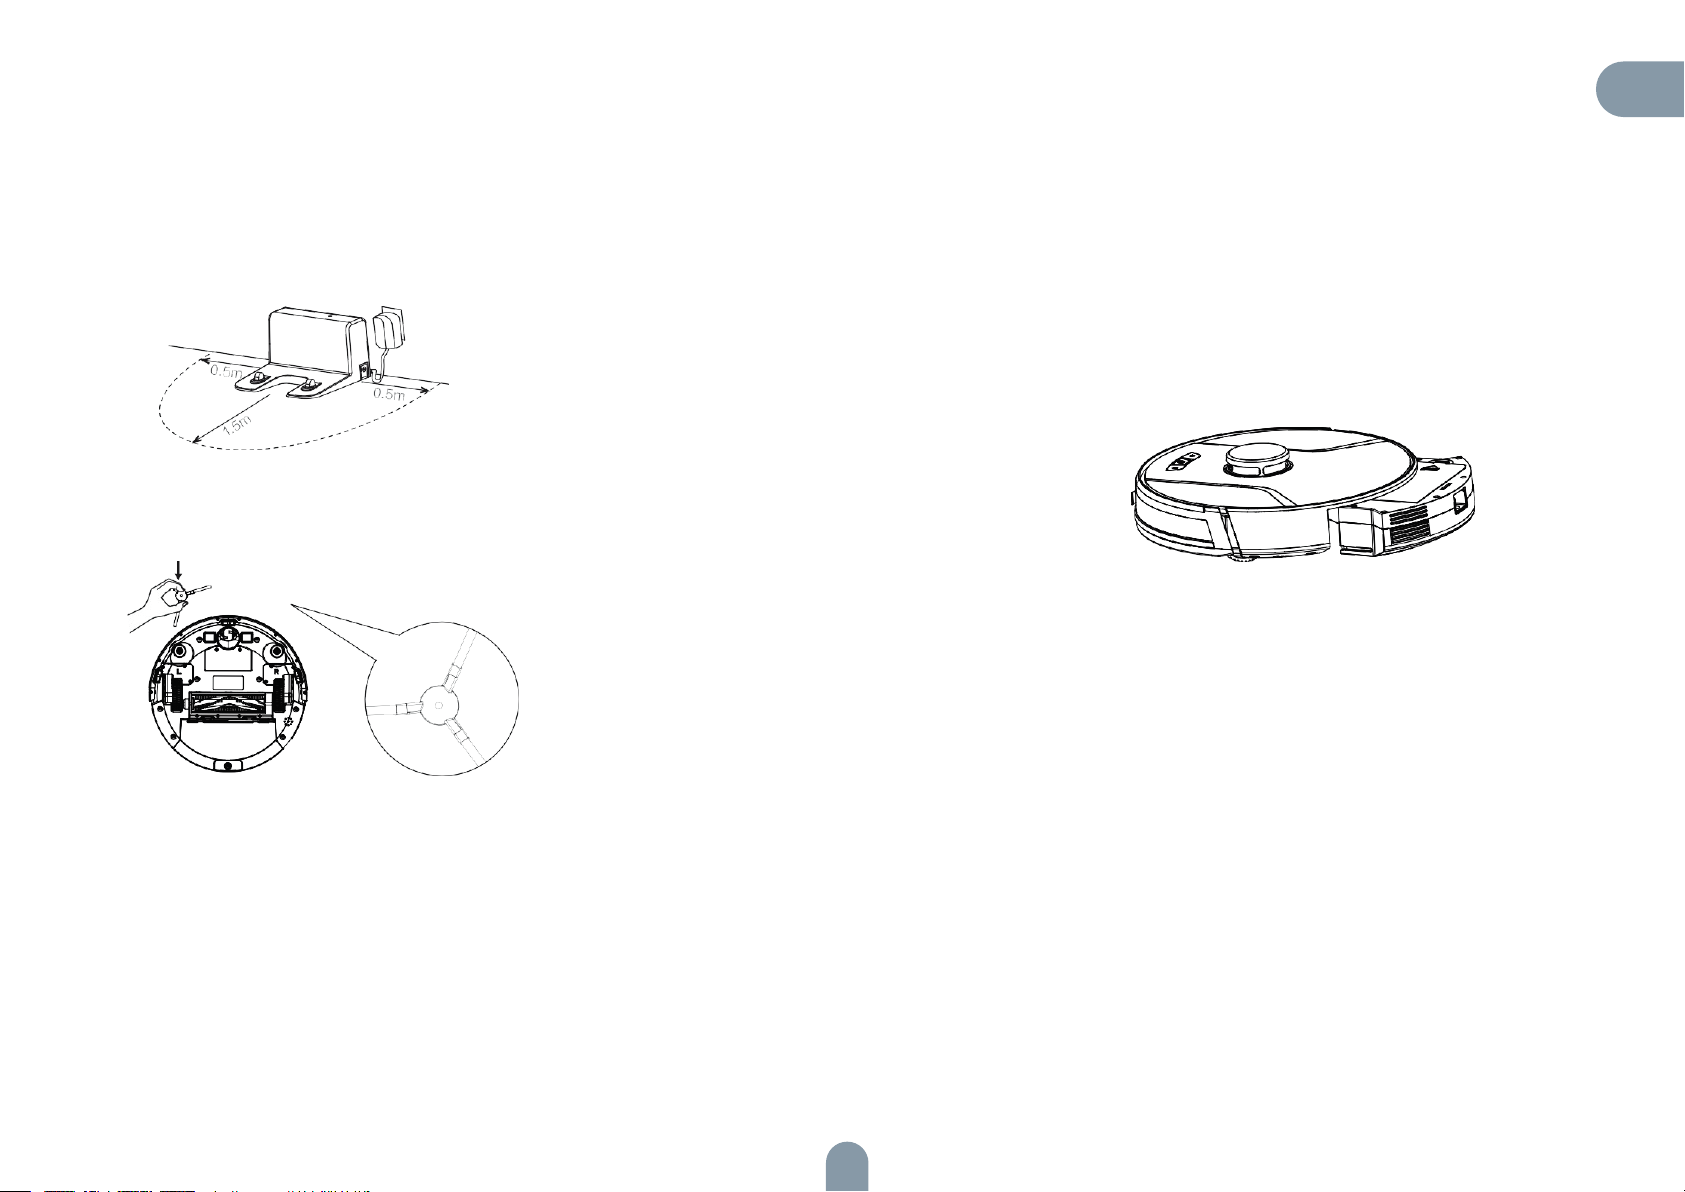
Charging the Main Unit
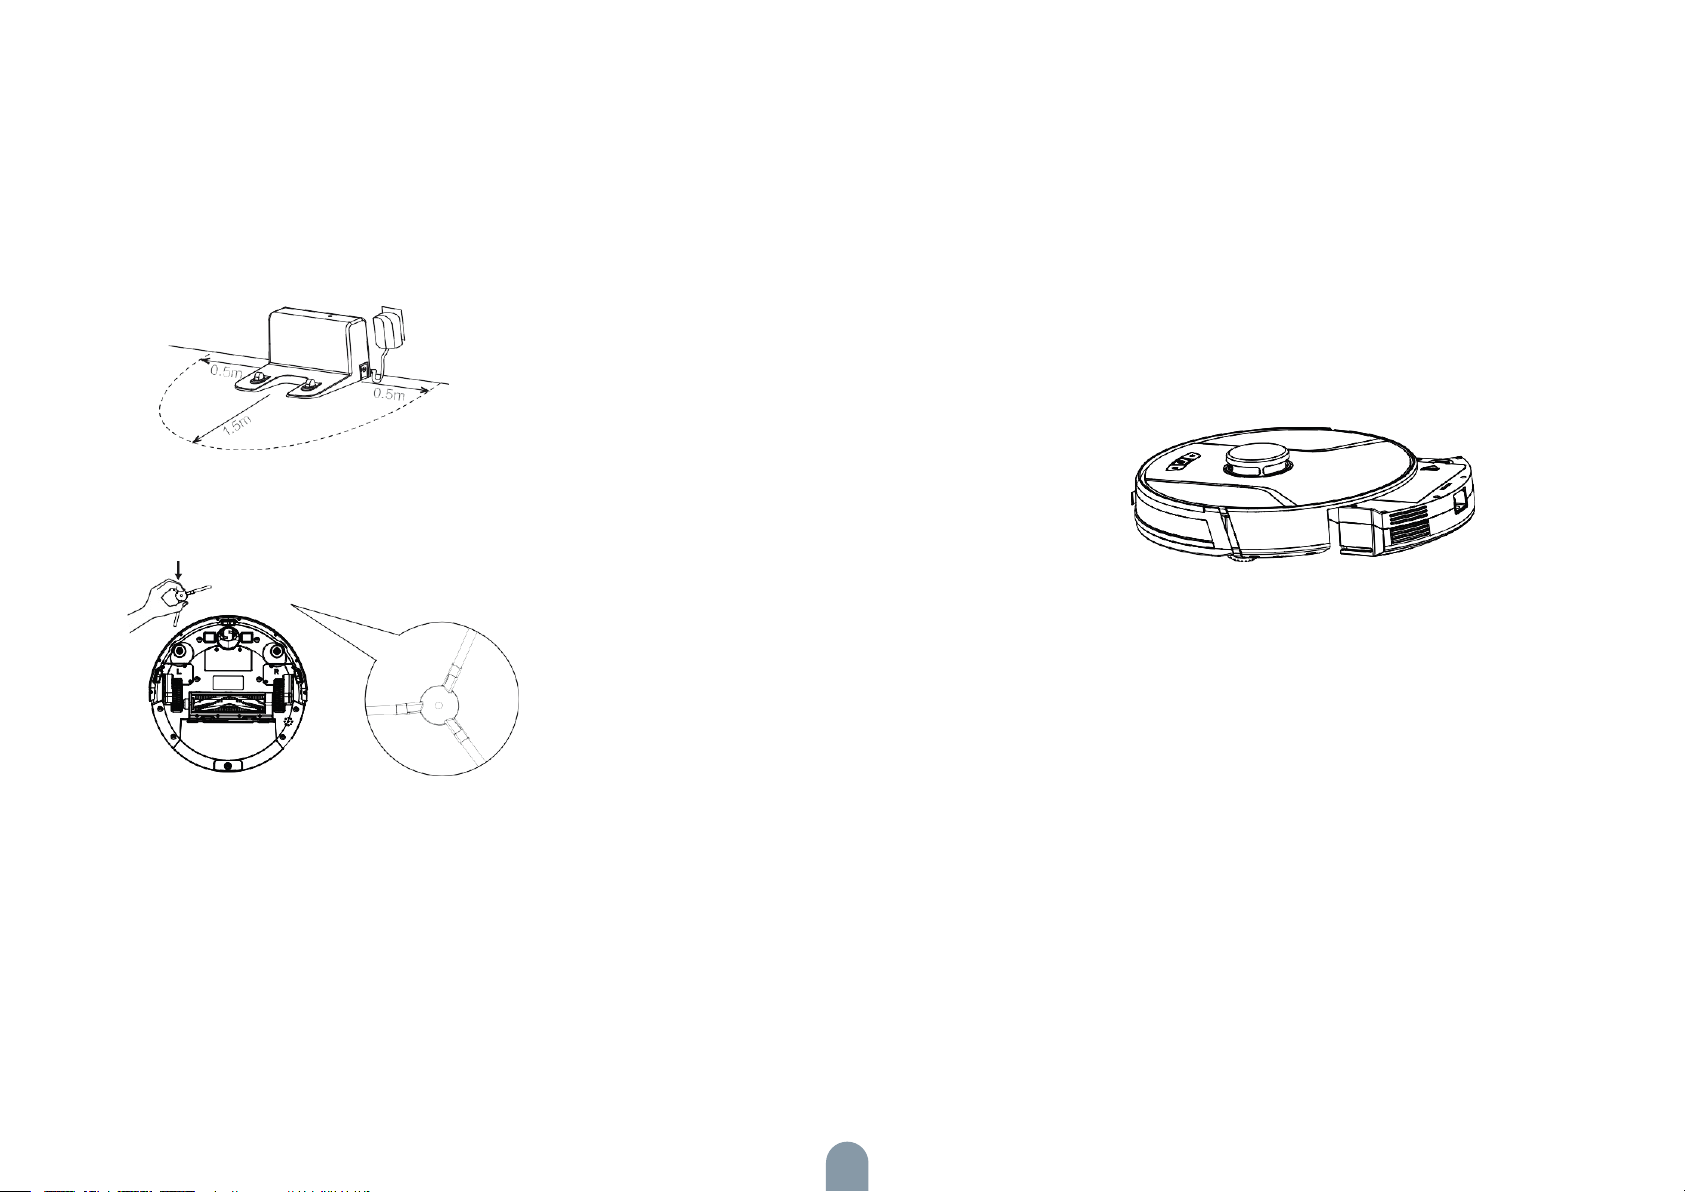
1. Place the docking station on the flat ground against
the wall. Do not place any articles 0.5m to the left and
right of the docking station and 1.5m in front of the
docking station.
2. Connect the docking station to the power supply.
3. Install the left and right side brushes.
4. Place the main unit on the docking station to charge
the main unit. During charging, the indicator blinks.
When charging is completed, the indicator is steady
on. It takes about 4-5 hours to fully charge the main
unit.
During the cleaning process, the main unit automatically checks its
power level. If the power is insufficient, the main unit activates the
„Return to docking station“ mode, and automatically returns to the
docking station for charging.
Alternatively, you can tap the „Return to docking station“ button
in the app to activate the „Return to docking station“ mode of the
main unit.
Note:
Do not use the docking station in a highly reflective environment
such as the environment exposed to direct sunlight or with mirrors
nearby.
To ensure the normal working time of the main unit, fully charge
the main unit before use. The charging time is about 4-5 hours.
To ensure the safety of charging and prevent the damp cloth from
damaging the floor, remove the water tank before charging the
main unit.
12
Page 13
Product Use/ Start cleaning
For different cleaning needs, this product has a variety of cleaning methods to choose from. Various cleaning methods can be activated through the robot, remote control or
APP.
Auto Cleaning
Applicable scenarios: The most commonly used cleaning method, the robot cleans the whole house in a Zig-zag path according to the actual home environment.
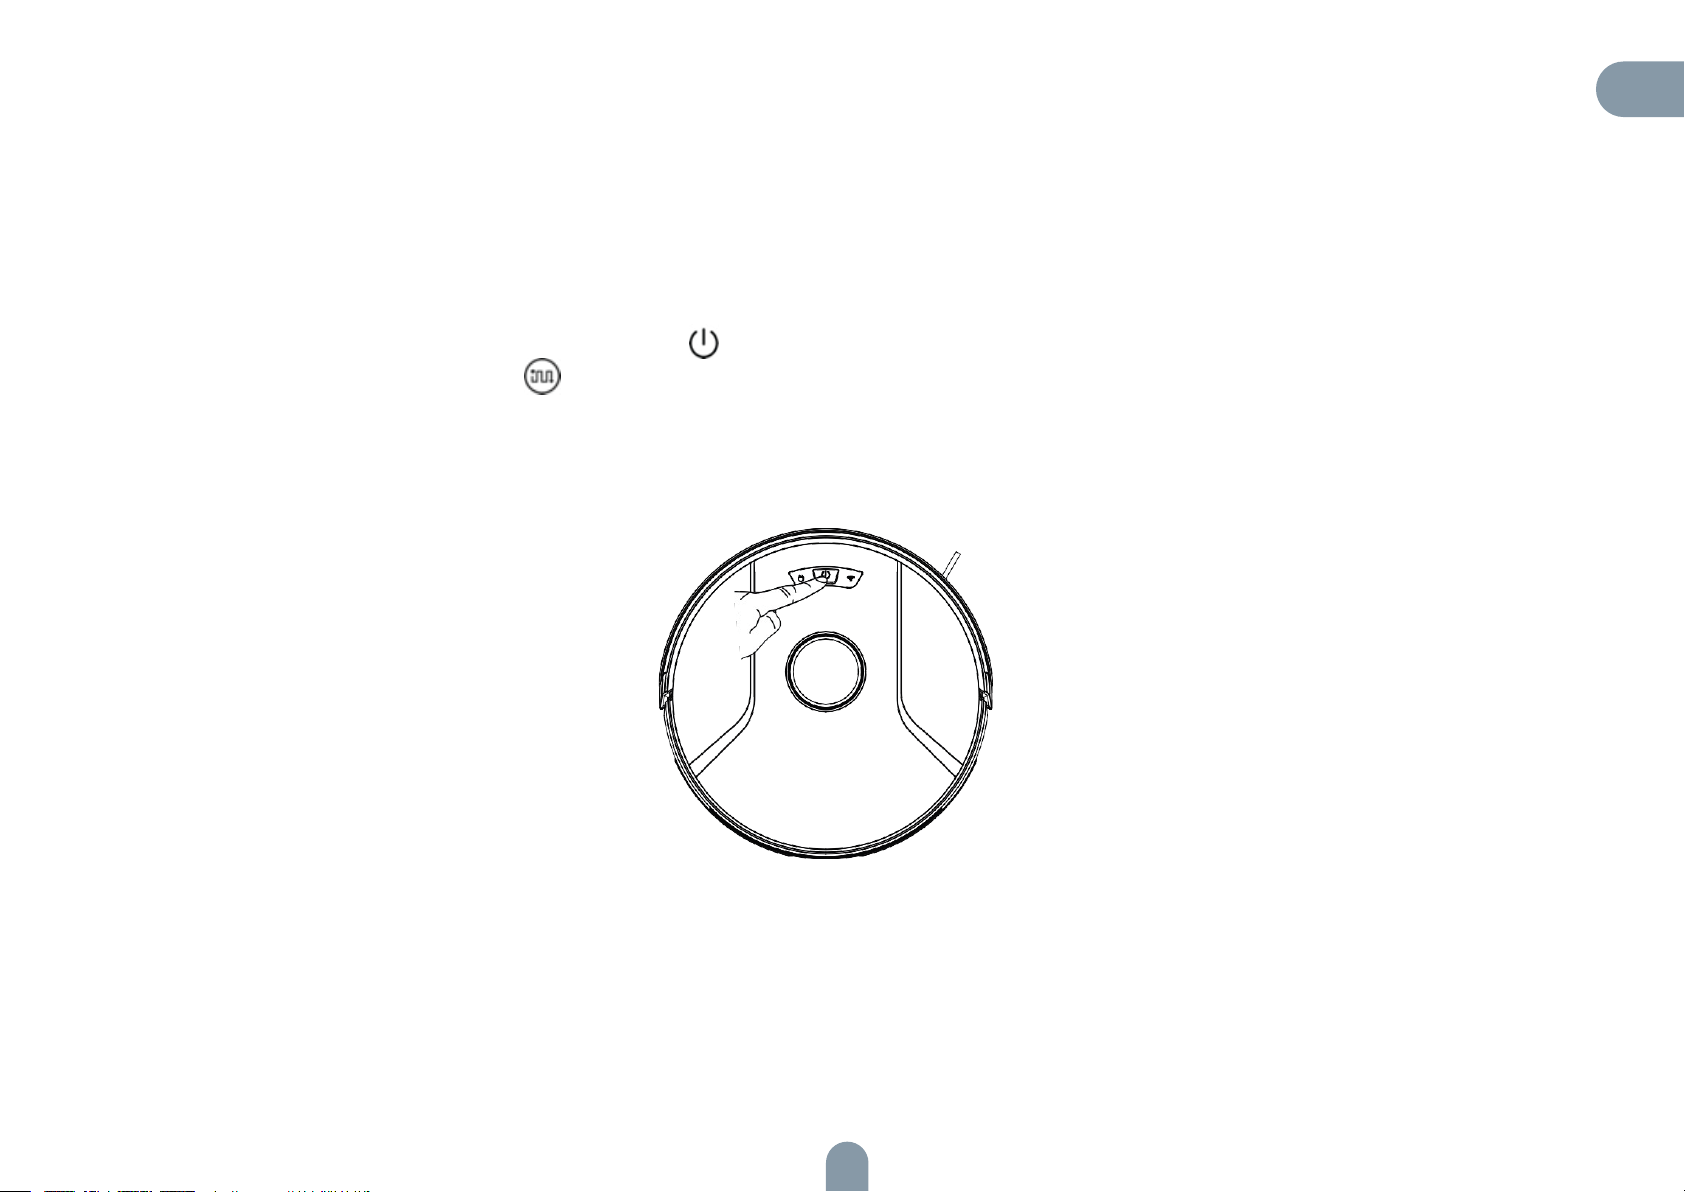
Setting method: In the shutdown state, long press the Power button , the robot indicator light is on to indicate that the device is turned on; Then short press the button
or click the remote control Auto Cleaning button , the robot starts automatic cleaning.
EN
13
Page 14
Use Instructions
Power on and off the machine
Tap and hold the button to power on the machine. Then, the power indicator is on, and the vacuum cleaner enters the standby state. When the vacuum
cleaner is in a static state, press and hold the button to power off the machine and stop the current cleaning task.
Tip: The vacuum cleaner in charging state cannot be powered off.
Start cleaning
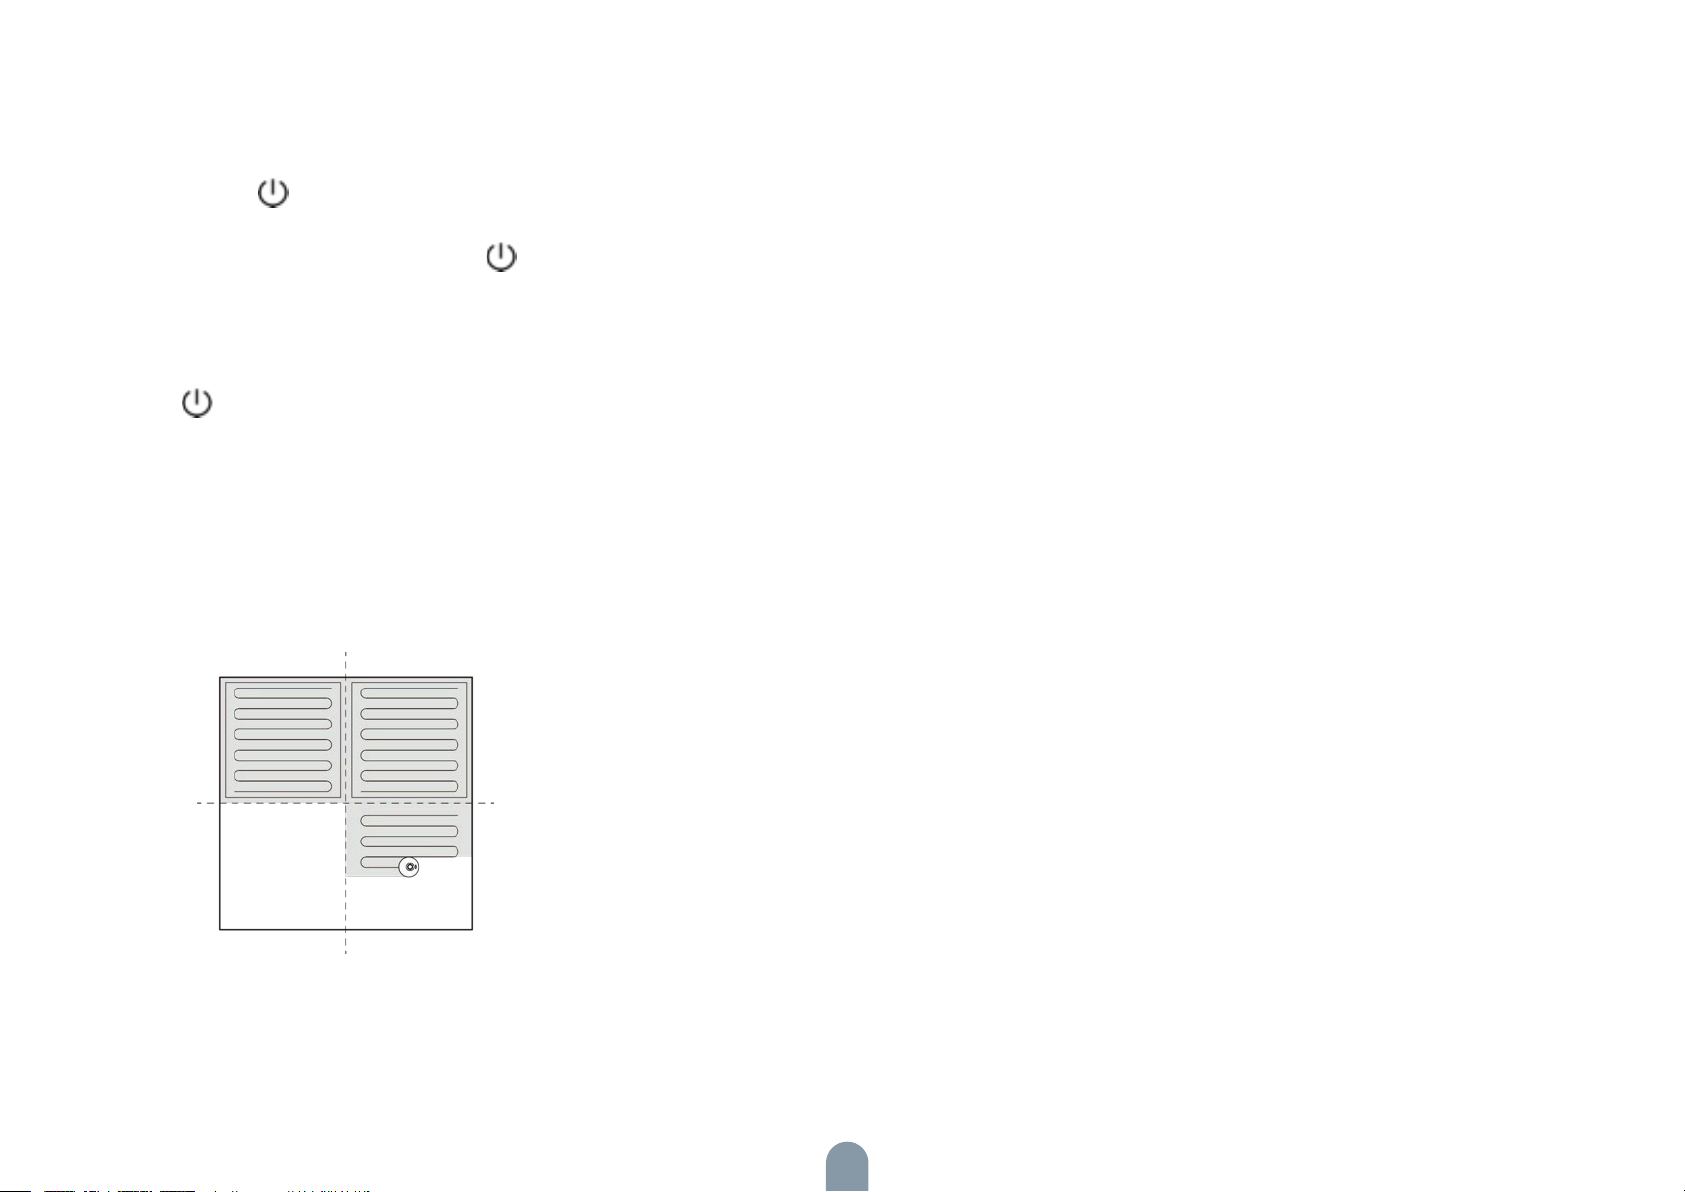
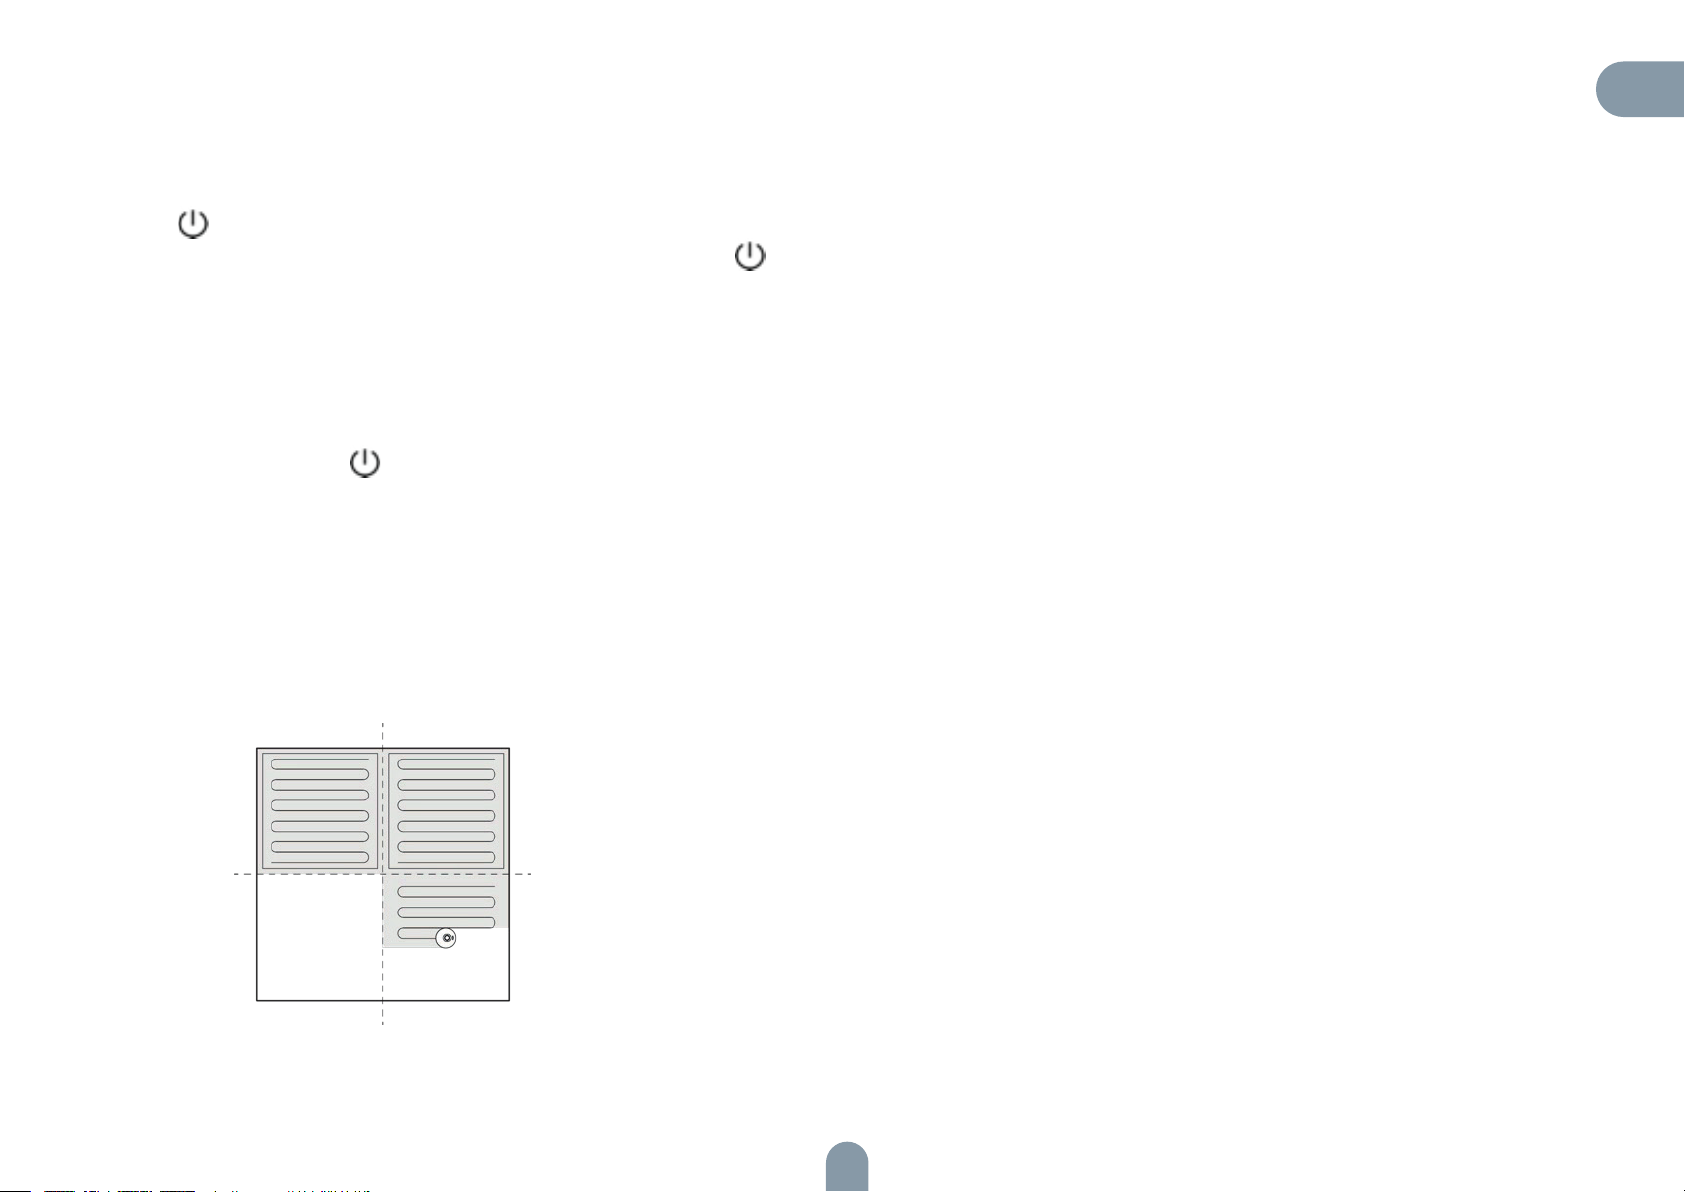
Press the button to start cleaning. Then, the vacuum cleaner dynamically
plans the cleaning route according to the map generated after scanning, and
completes cleaning of different zones one by one. In each zone, the vacuum cleaner first sweeps the floor along the wall, and then moves in zigzag mode to clean
the remaining part of the zone in an orderly and efficient manner.
Zone 1: Cleaned
Zone 2: Cleaned
Tips:
•If the power is too low, the vacuum cleaner cannot start cleaning. Therefore,
charge the vacuum cleaner before starting it.
•Before cleaning, tidy up all kinds of wires on the ground (including the power cord
of the docking station). Otherwise, the vacuum cleaner may drag the wires while
cleaning, which may cause power failures of other electric appliance or damage to
items or wires.
•If the cleaning area is less than 2 square meters, the vacuum cleaner will clean the
area twice by default.
•If the power is insufficient in the cleaning process, the main unit will automatically
return to the docking station for charging. After the power is sufficient, the main unit
will automatically return to the interrupted point to continue cleaning (ensure that
you have enabled the resumable cleaning function).
Zone 4: To be cleaned
Zone 3: Cleaning
14
Page 15
Pause cleaning
If you need to add water to the water tank or wash the mopping cloth while the vacuum cleaner is working, press the button to pause. You can press the button to continue cleaning, or press the button to return to the docking station
and stop the current cleaning task.
Tip:
If the vacuum cleaner fails to find the docking station, it automatically returns to
the starting point. In this case, you need to manually put the vacuum cleaner back
to the docking station.
EN
Tip:
In pause state, if the vacuum cleaner returns to the docking station for charging,
the current cleaning task is stopped.
Enter the sleep mode
If no operation is performed in 10 minutes, the vacuum cleaner automatically enters the sleep mode, and the power indicator blinks every several seconds. In sleep
mode, you can press any button to wake up the vacuum cleaner.
Tips:
•When the vacuum cleaner is being charged at the docking station, it cannot enter
the sleep mode.
•If the sleep time exceeds 12 hours, the vacuum cleaner automatically powers off
Charge the vacuum cleaner
Auto mode: After completing cleaning, the vacuum cleaner automatically returns
to the docking station for charging.
Manual mode: In pause state, you can press the button to activate the „Return
to docking station“ mode.
When the vacuum cleaner is being charged, the power indicator blinks in breathing manner.
Faulty state
If the vacuum cleaner encounters a fault while working, the power indicator blinks
quickly in red, and a voice prompt is generated. For details about troubleshooting
method, see „Troubleshooting“.
Tips:
•In faulty state, if no operation is performed in 10 minutes, the vacuum cleaner
automatically enters the sleep mode.
•In faulty state, if the vacuum cleaner returns to the docking station for charging,
the current cleaning task is stopped.
15
Page 16
Reset the Wi-Fi settings
If your mobile phone fails to connect to the vacuum cleaner due to reasons such
as change of router settings and password forgotten, re-pair the vacuum cleaner
with the mobile phone according to the Wi-Fi connection instructions.
Set a restricted zone or virtual wall
You can use the mobile app to set a restricted zone or virtual wall. After the setting
is completed, the vacuum cleaner will not enter the restricted zone or cross the
virtual wall for cleaning.
Tip:
If the vacuum cleaner is in wait-to-connect state for more than 2 minutes, its Wi-Fi
function is automatically disabled. To reconnect the vacuum cleaner to your mobile phone, reset the Wi-Fi settings.
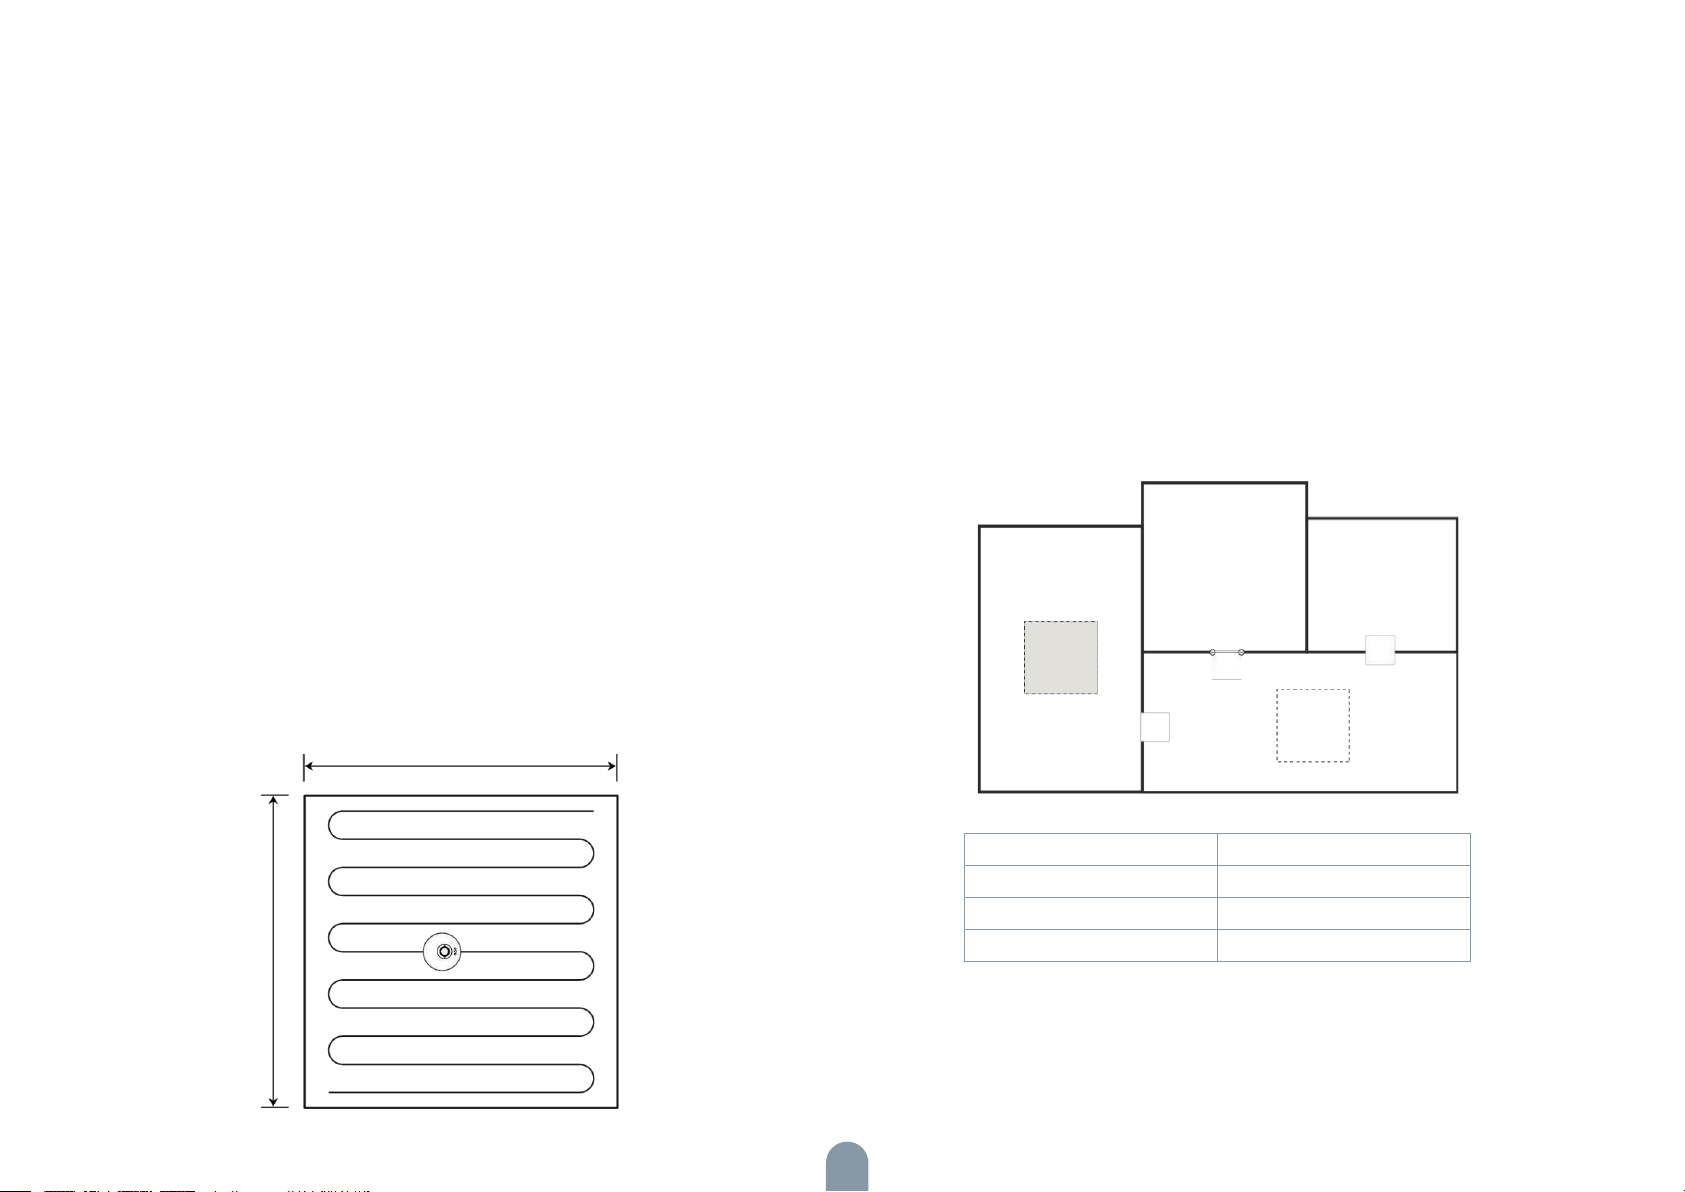
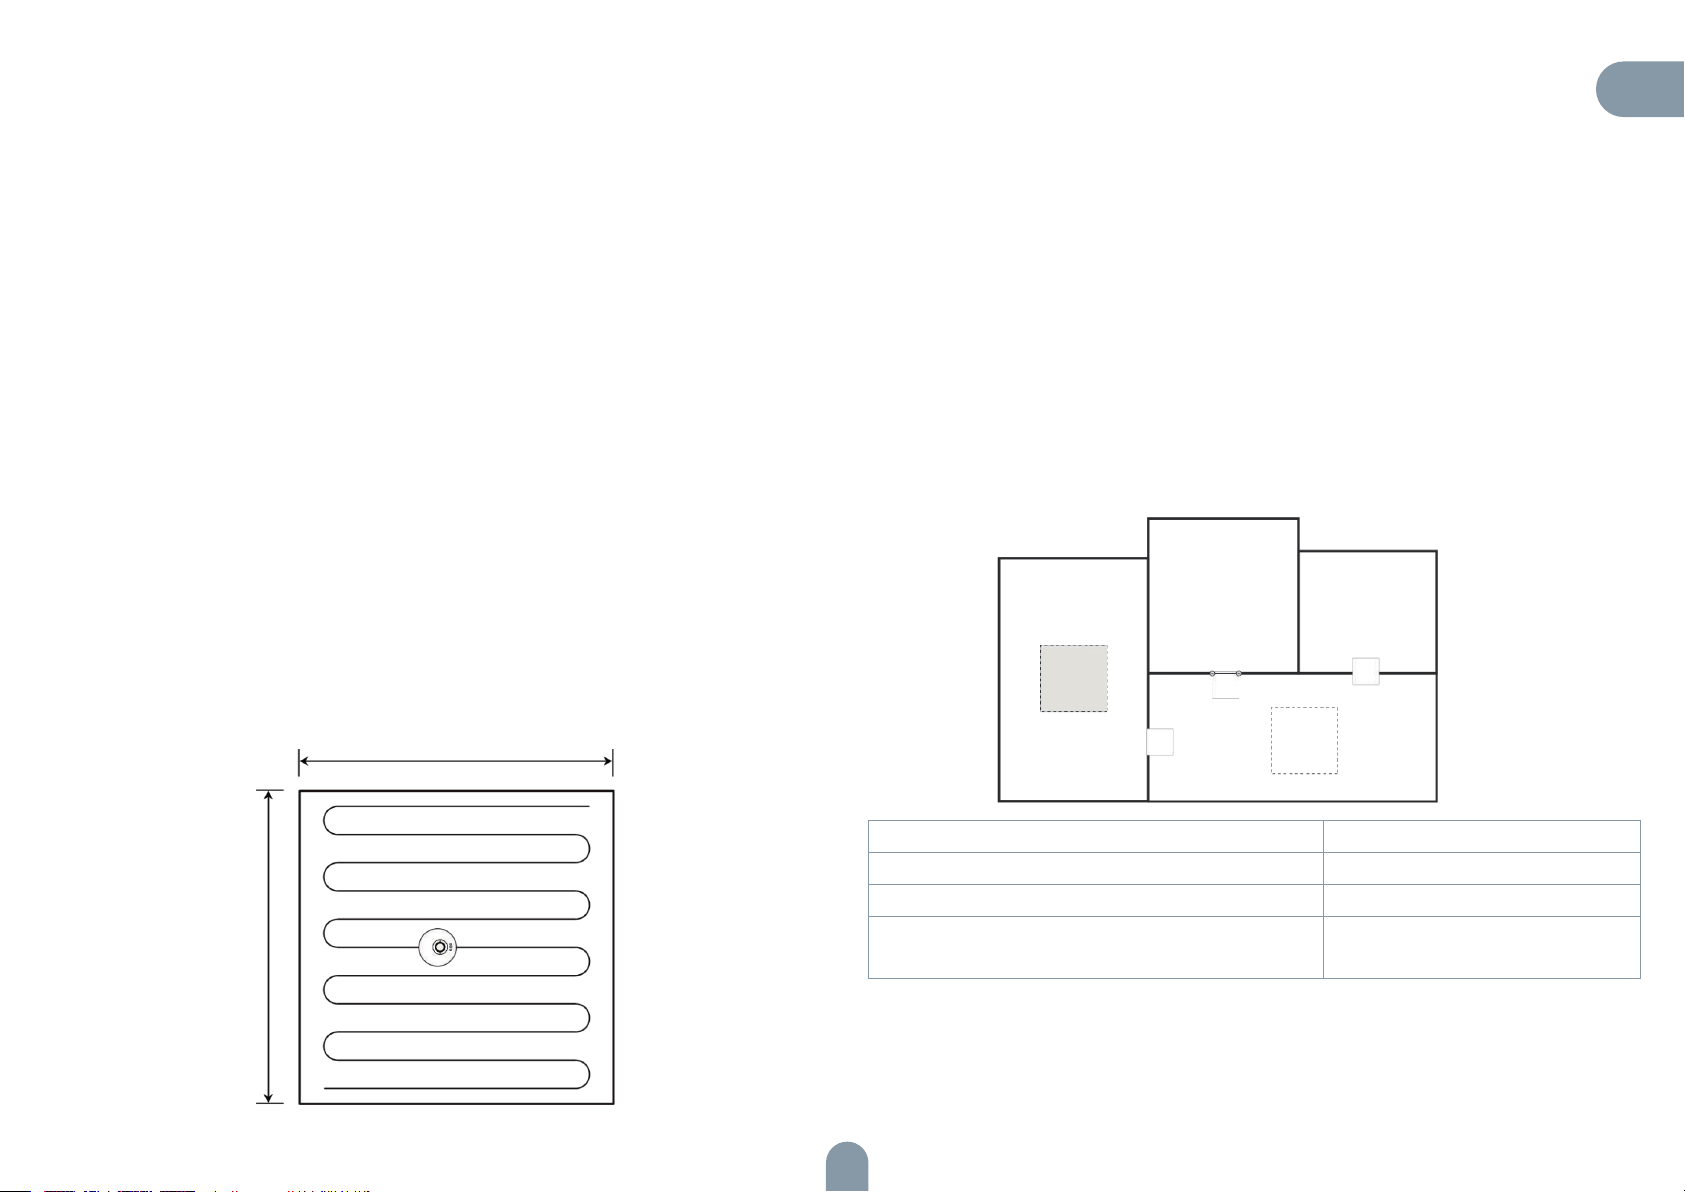
PIN N GO
You can use the mobile app to specify a target point on the map. The vacuum
cleaner will automatically plan the route and move to the specified point. If you
specify a target point in the app when the vacuum cleaner is in standby or pause
state, the vacuum cleaner will clean the 1.6mx1.6m square zone centered on this
point. After cleaning, the vacuum cleaner will automatically return to the starting
point and stop working.
Tip:
If you activate partial cleaning when the vacuum cleaner is in pause state, the
current cleaning task will be stopped.
1,6 m
Tips:
•Before using this function, you need to enable the map save mode for the vacuum cleaner in the mobile app.
•This function is only used to divide cleaning zones, but cannot be used to block
dangerous zones.
•If the vacuum cleaner is moved or there are significant changes in the home
environment, the map may become invalid and the settings of the virtual wall or
restricted zone may be lost.
Restricted
zone for
mopping
Virtual wall
Restricted
zone for
cleaning
1,6 m
Real-time map update Volume adjustment
Cleaning record viewing Map management
Robot voice changing Firmware update
Robot positioning Robot status viewing
Tip:
The functions and details of the app may change slightly due to continuous development and upgrade of the app. The specific functions and details of the app are
subject to the actual version.
16
Page 17

Selected zone cleaning
You can use the mobile app to select one or more zones for cleaning. The vacuum
cleaner will clean one or more rooms based on the zone that you select on the
app map.
Tips:
• Before using this function, you need to enable the map save mode for the vacuum cleaner in the mobile app, and the vacuum cleaner has already generated a
map for cleaning.
• After cleaning starts, the main unit may move to a place beyond the selected
zone. Make sure that you have cleared the obstacles on the ground around the
selected zone, which cannot be used for safety isolation.
Scheduled cleaning
You can use the mobile app to set the scheduled cleaning time. When the specified time arrives, the vacuum cleaner will automatically start cleaning, and return to
the docking station after it completes cleaning.
Configured zone cleaning
You can use the mobile app to configure a zone for cleaning. The vacuum cleaner
will start cleaning based on the zone that you plan in the mobile app.
Cleaning mode
You can use the mobile app to select the Energy saving, Standard, and Strong mode.
The Standard mode is selected by default.
DND mode
During the Do-Not-Disturb (DND) period, the vacuum cleaner will not automatically
continue cleaning or play the voice prompt. The power indicator dims. You can use
the mobile app to disable the DND mode, or change the DND time range.
EN
Tip:
After cleaning starts, the main unit may move to a place beyond the configured
zone. Make sure that you have cleared the obstacles on the ground around the
configured zone, which cannot be used for safety isolation.
17
Page 18
Using the Water Tank
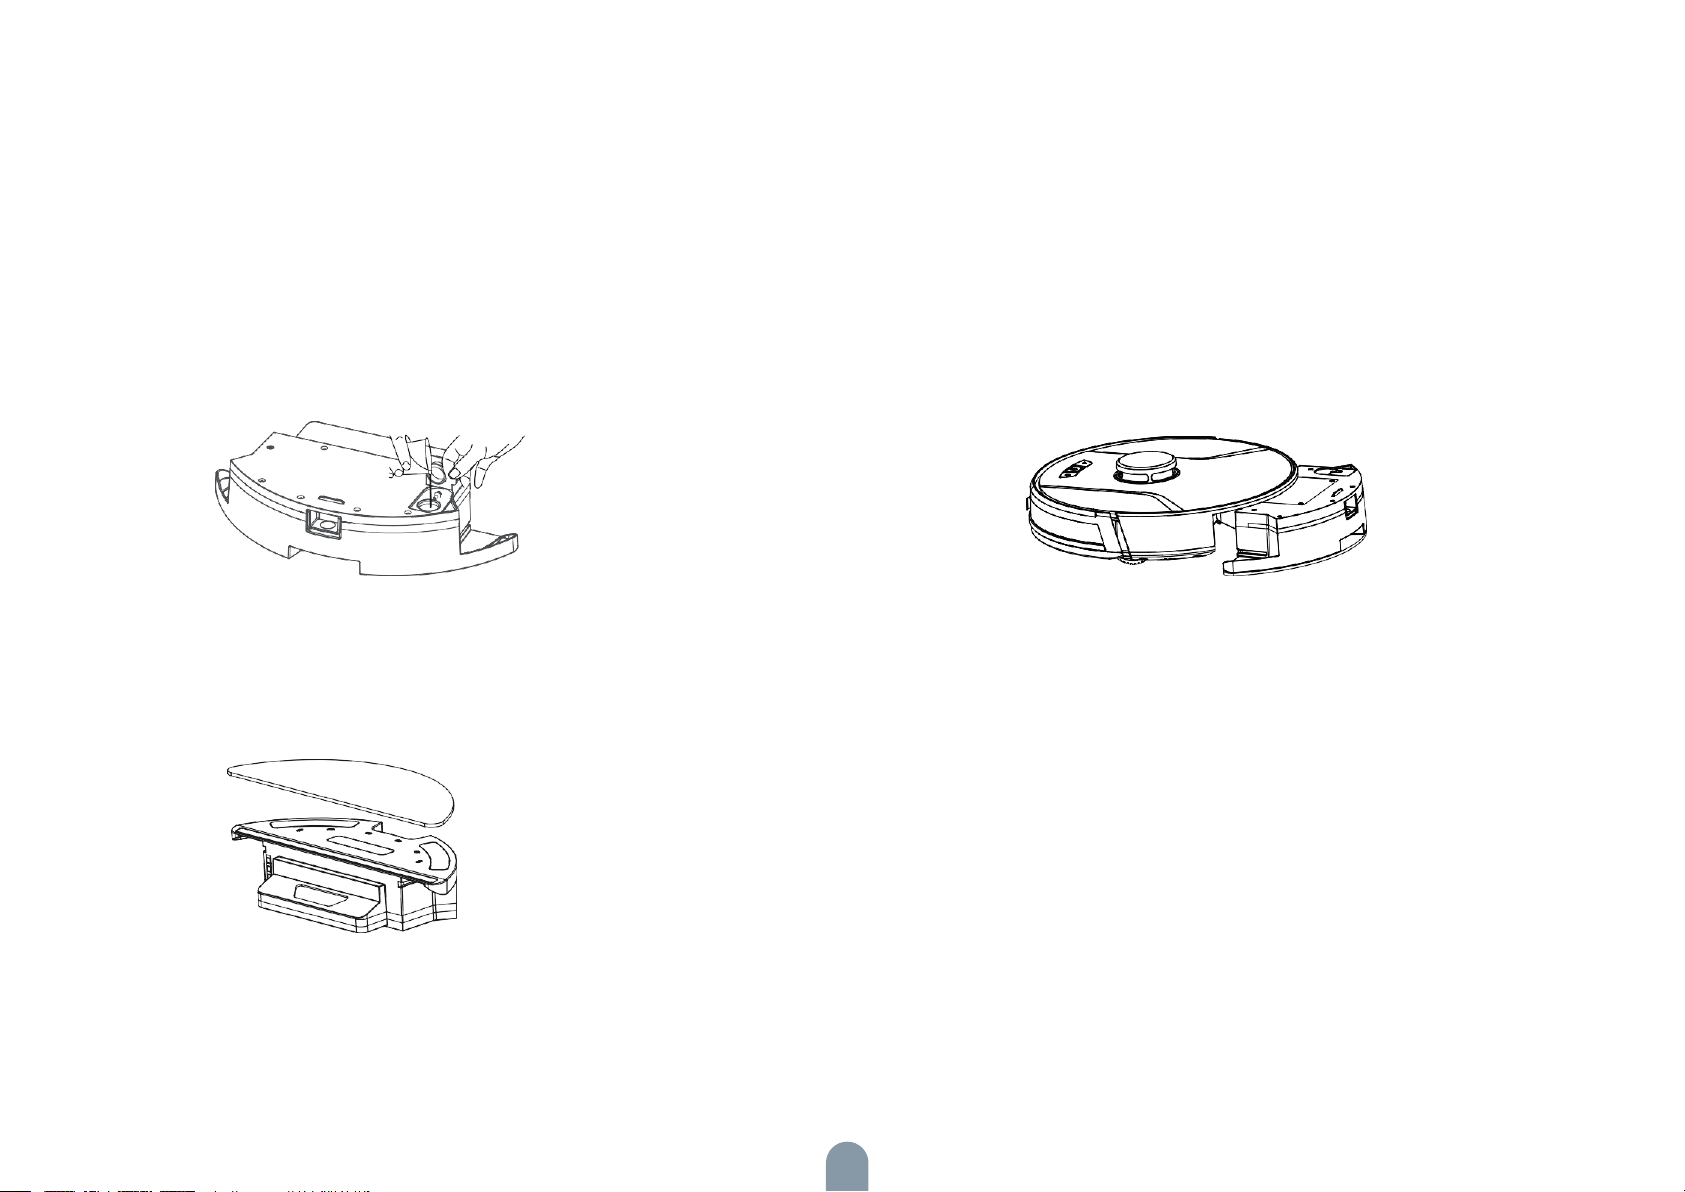
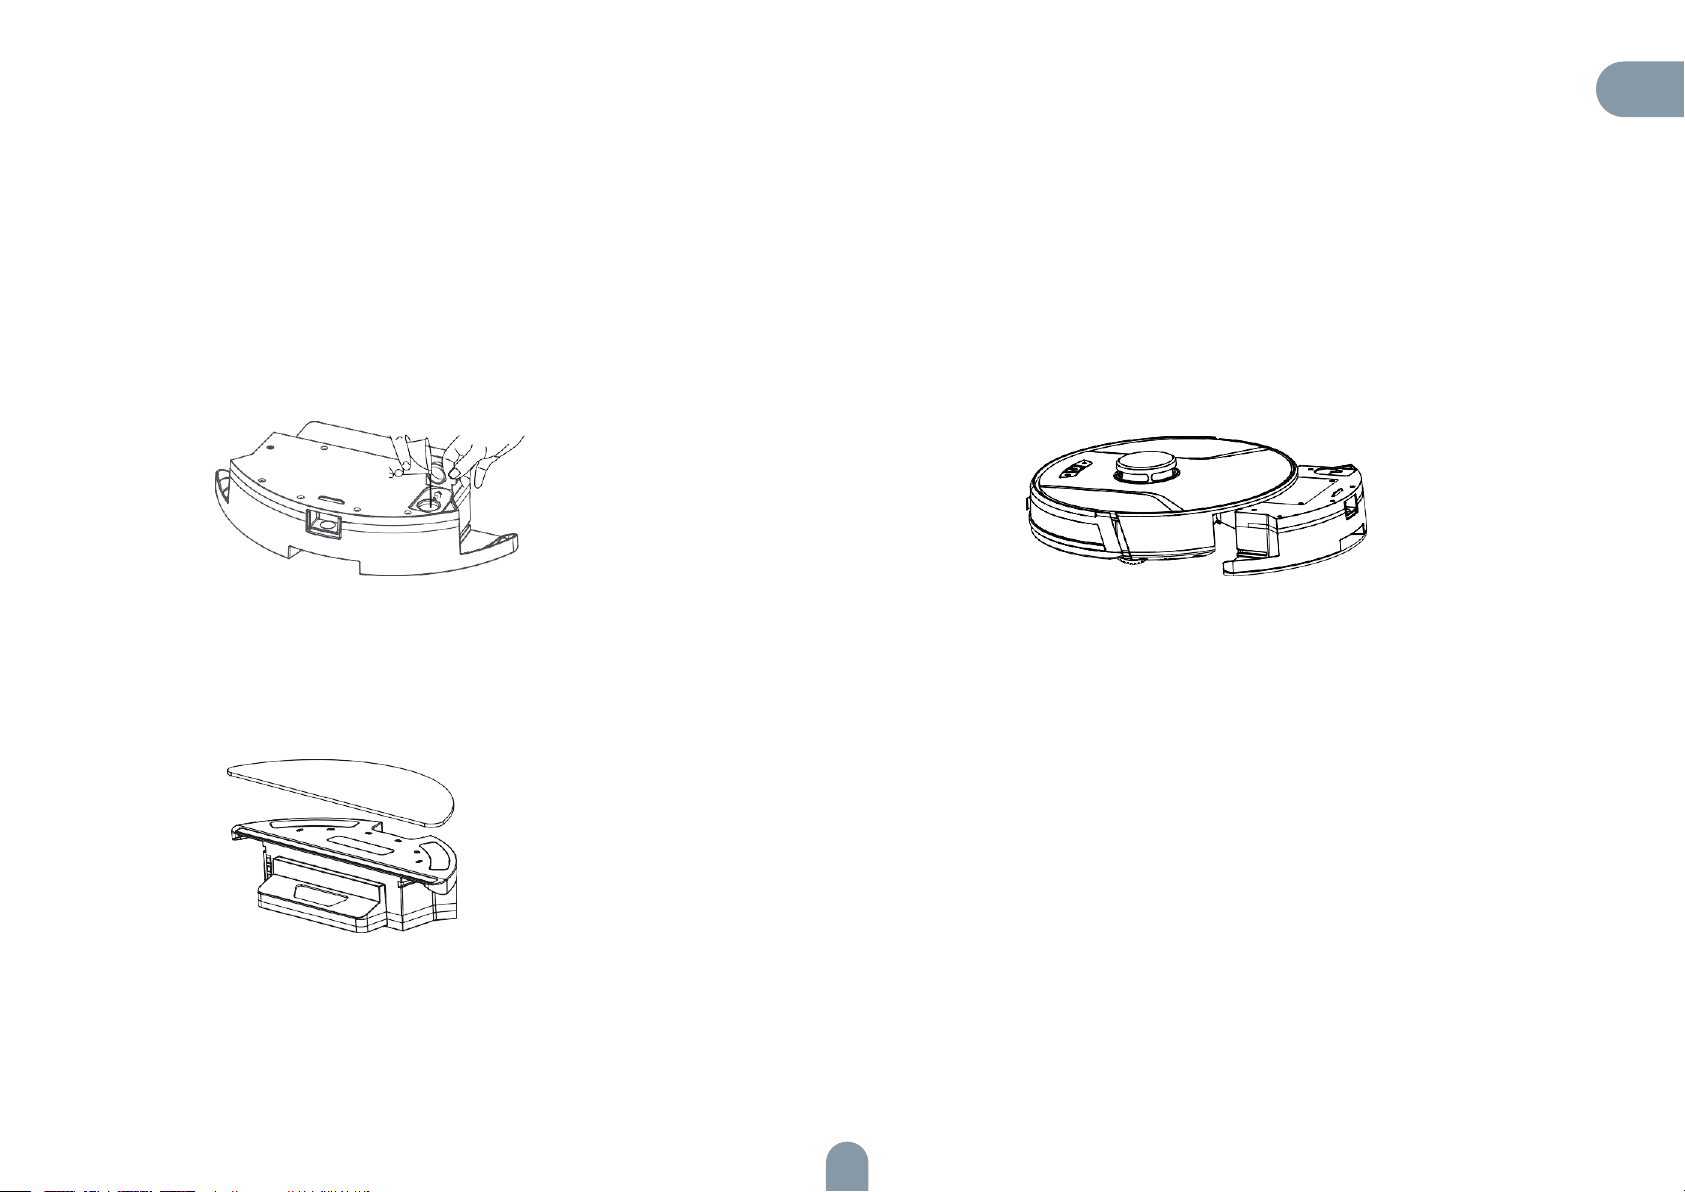
• Do not use the mopping function on a carpet.
• After mopping the floor, empty the water tank in time and remove the cloth.
1. Add water.
2. Install the cloth.
3. Install the water tank assembly and
Start mopping the floor.
18
Page 19

Parts Maintenance — Dust Box
Regular maintenance
To achieve the best cleaning effect, clean and maintain the main unit regularly according to the table below. Determine the frequency of cleaning and maintenance
according to your use habits.
Recommended cleaning and maintenance frequency:
Component of the Main Unit Cleaning Frequency Replacement Frequency
Filter Every week Every 2 months
Roller brush Every week Every 6 to 12 months
Side brush Every month Every 3 to 6 months, or when it is obviously damaged
EN
Roller brush cover Every month
Sensor Every month /
Charging electrode Every month /
Omnidirectional wheel Every month /
Every 3 to 6 months, or when the rubber silicon strip on
the roller brush cover is obviously damaged
19
Page 20
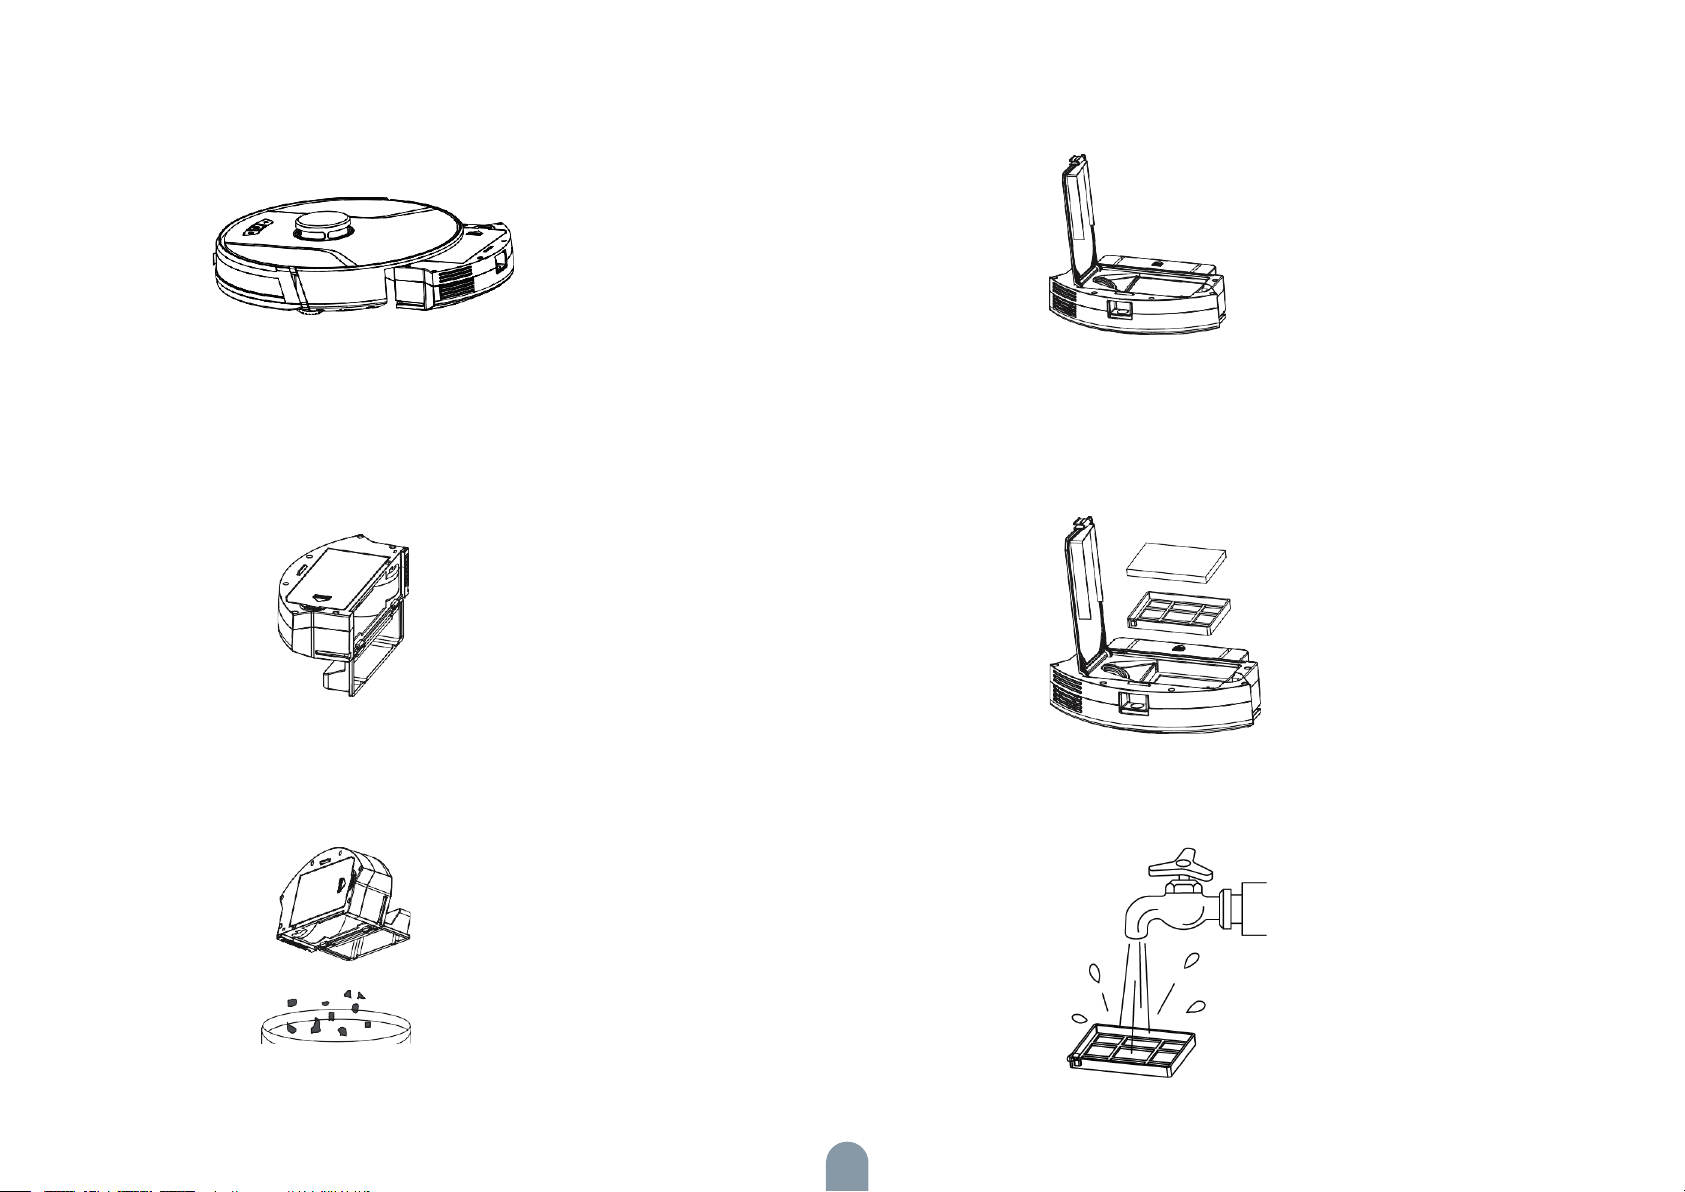
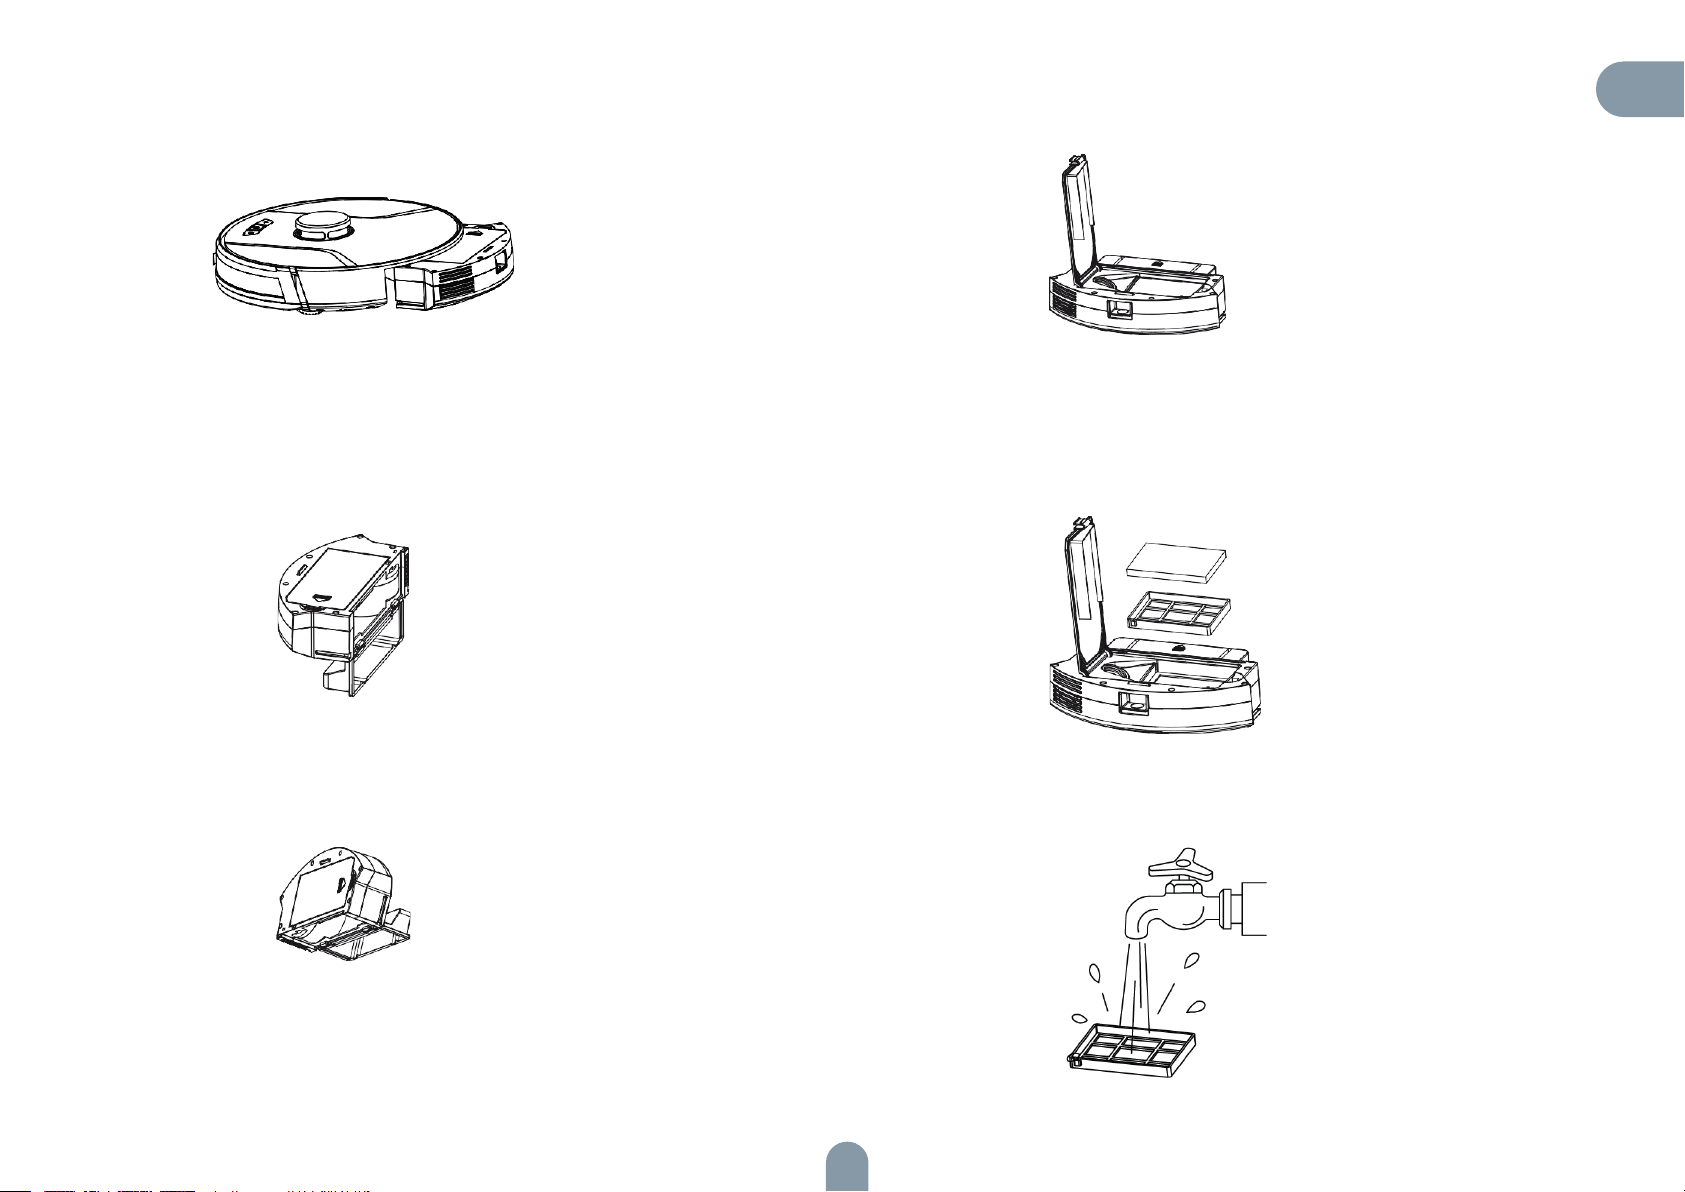
1. Press down the button on the dust box to remove the dust box. 4. Open the HEPA filter cover.
2. Open the side cover of the dust box.
3. Dump the trash.
5. Take out the HEPA filter and prefilter. Tap the HEPA filter to remove
dust. Water washing is not recommended for the HEPA filter.
6. Wash the prefilter.
20
Page 21
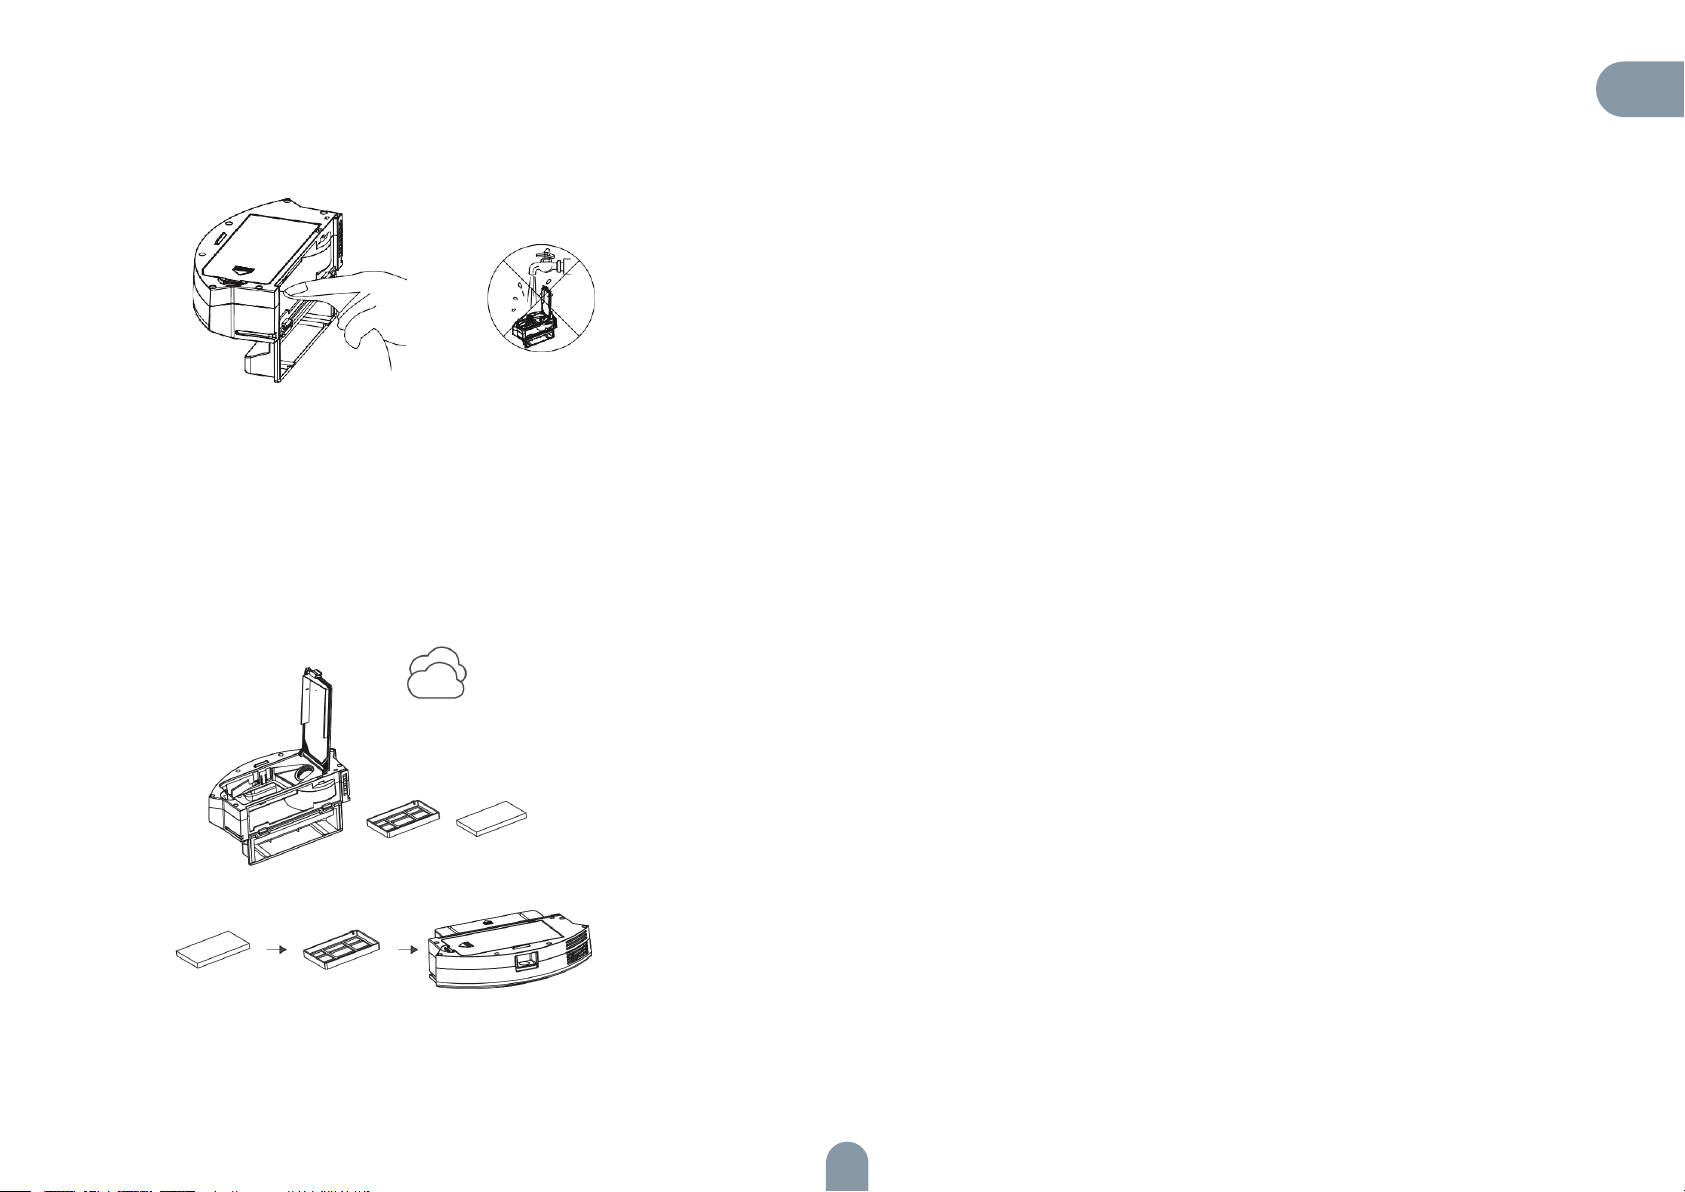
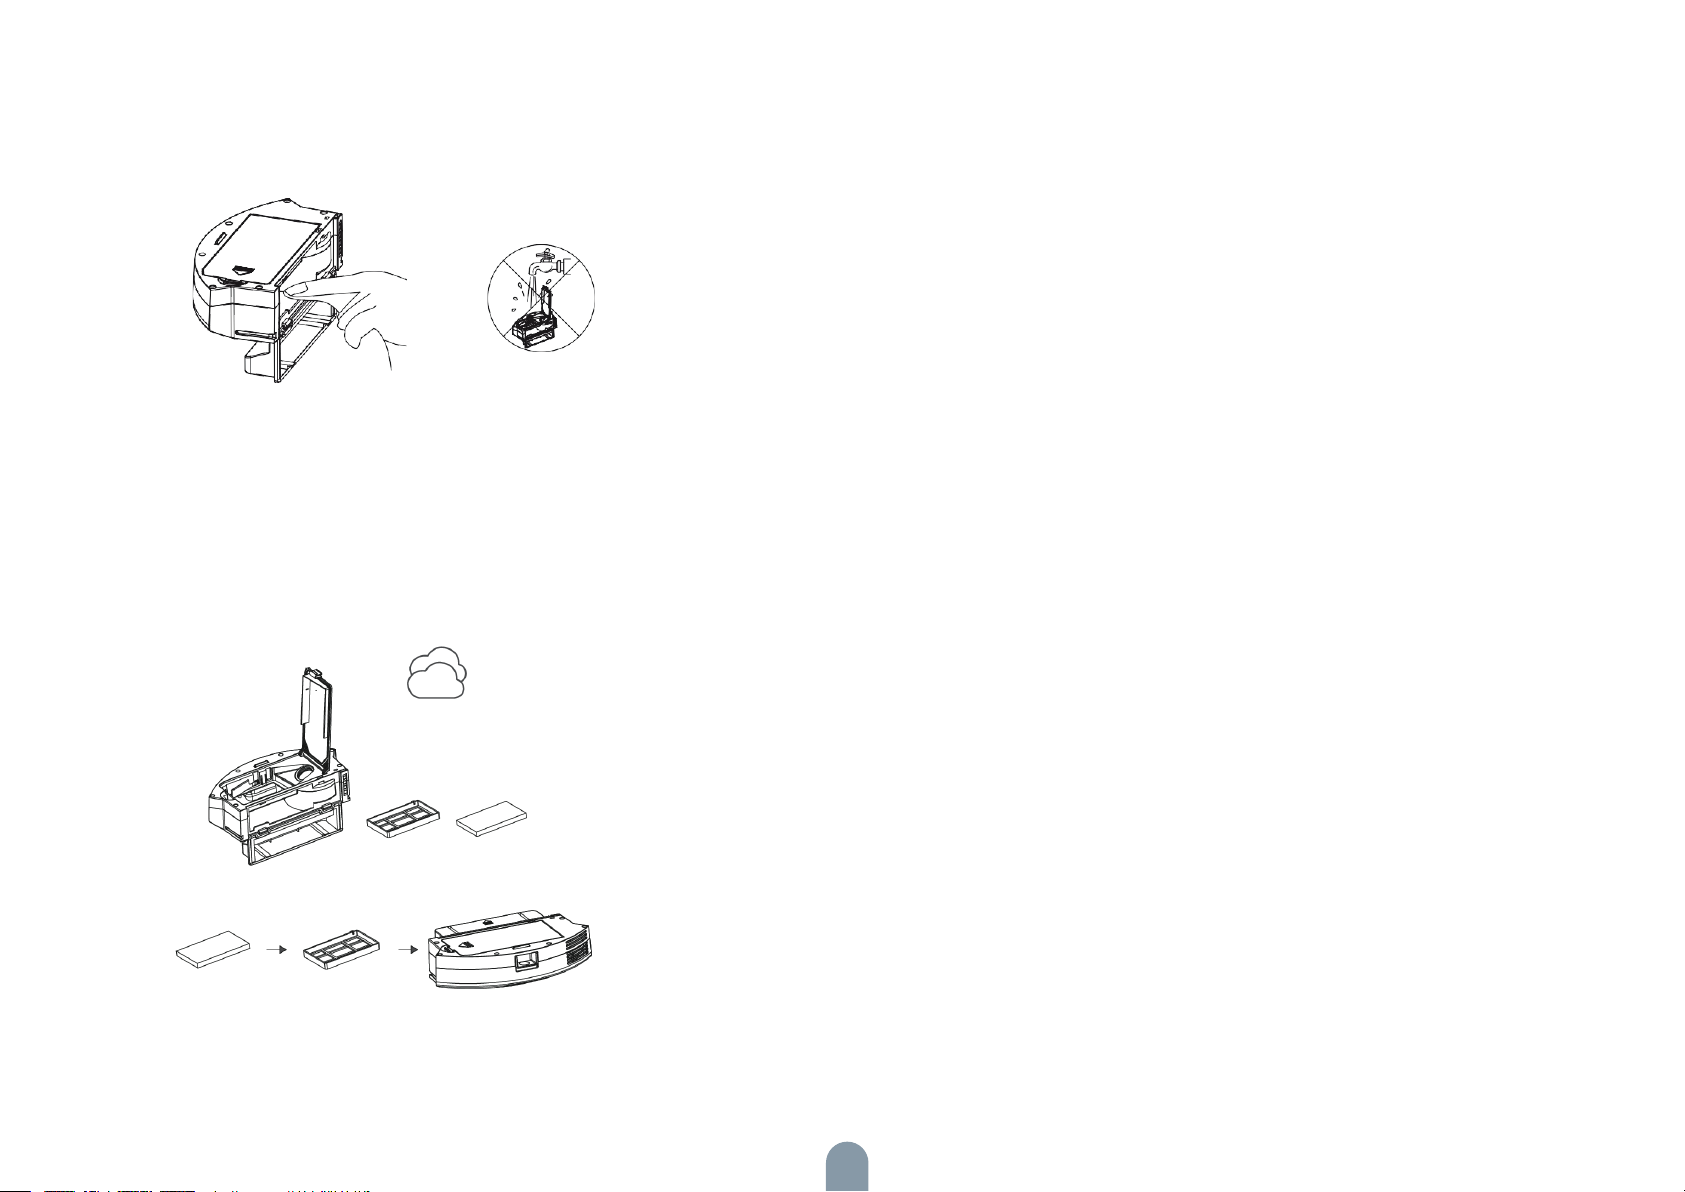
7. Wipe the dust box clean with a cloth. Do not wash the dust box with water.
8. Dry the dust box and filter components, and keep them dry to ensure
their service life.
Note: It is recommended that you wash the prefilter every 15 to 30 days.
The maximum service life of the HEPA filter is 3 months.
A. Install the prefilter and HEPA filter back to the dust box.
Note: 1. Before installing filters, ensure that the prefilter and HEPA filter
are dry.
2. Do not expose the prefilter and HEPA filter to the sunlight.
B. Close the cover of the dust box, and install the dust box on the main
unit.
Note: Do not wash the dust box with water.
EN
21
Page 22
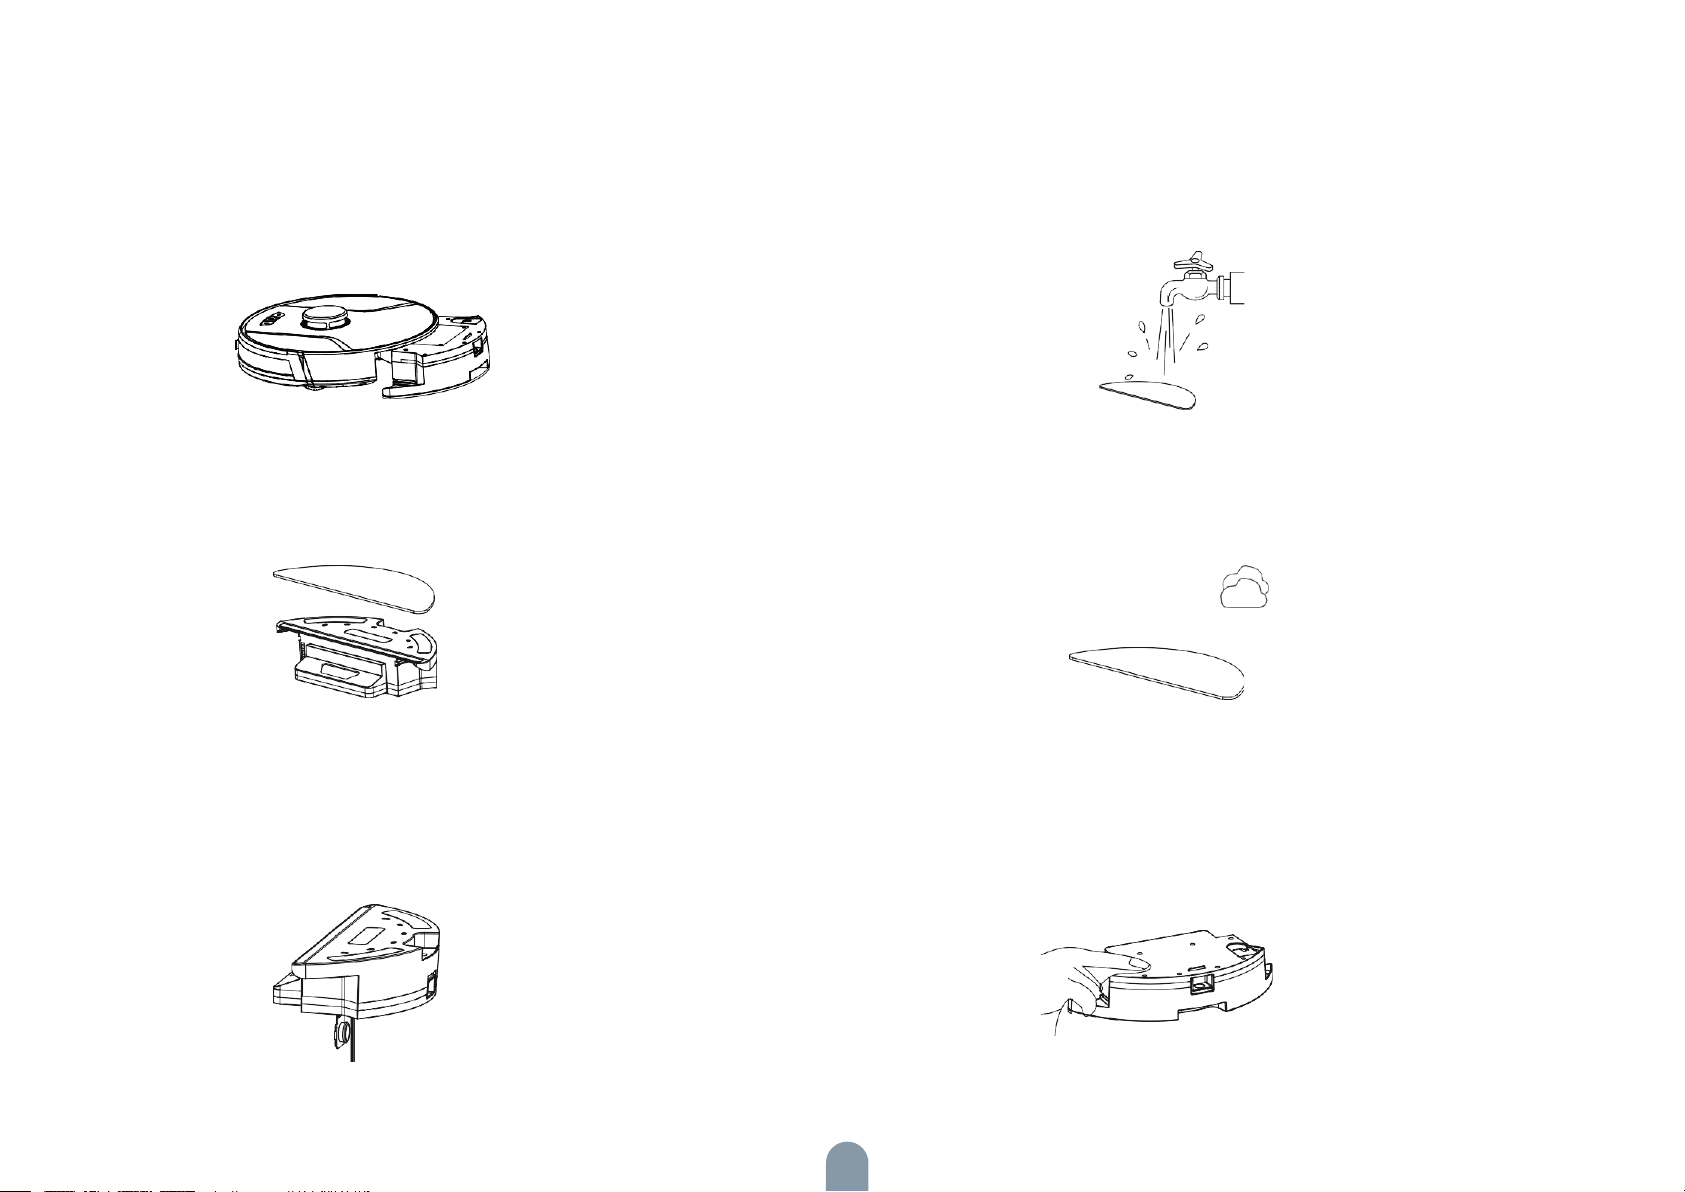
Parts Maintenance - Water Tank and Mopping Cloth
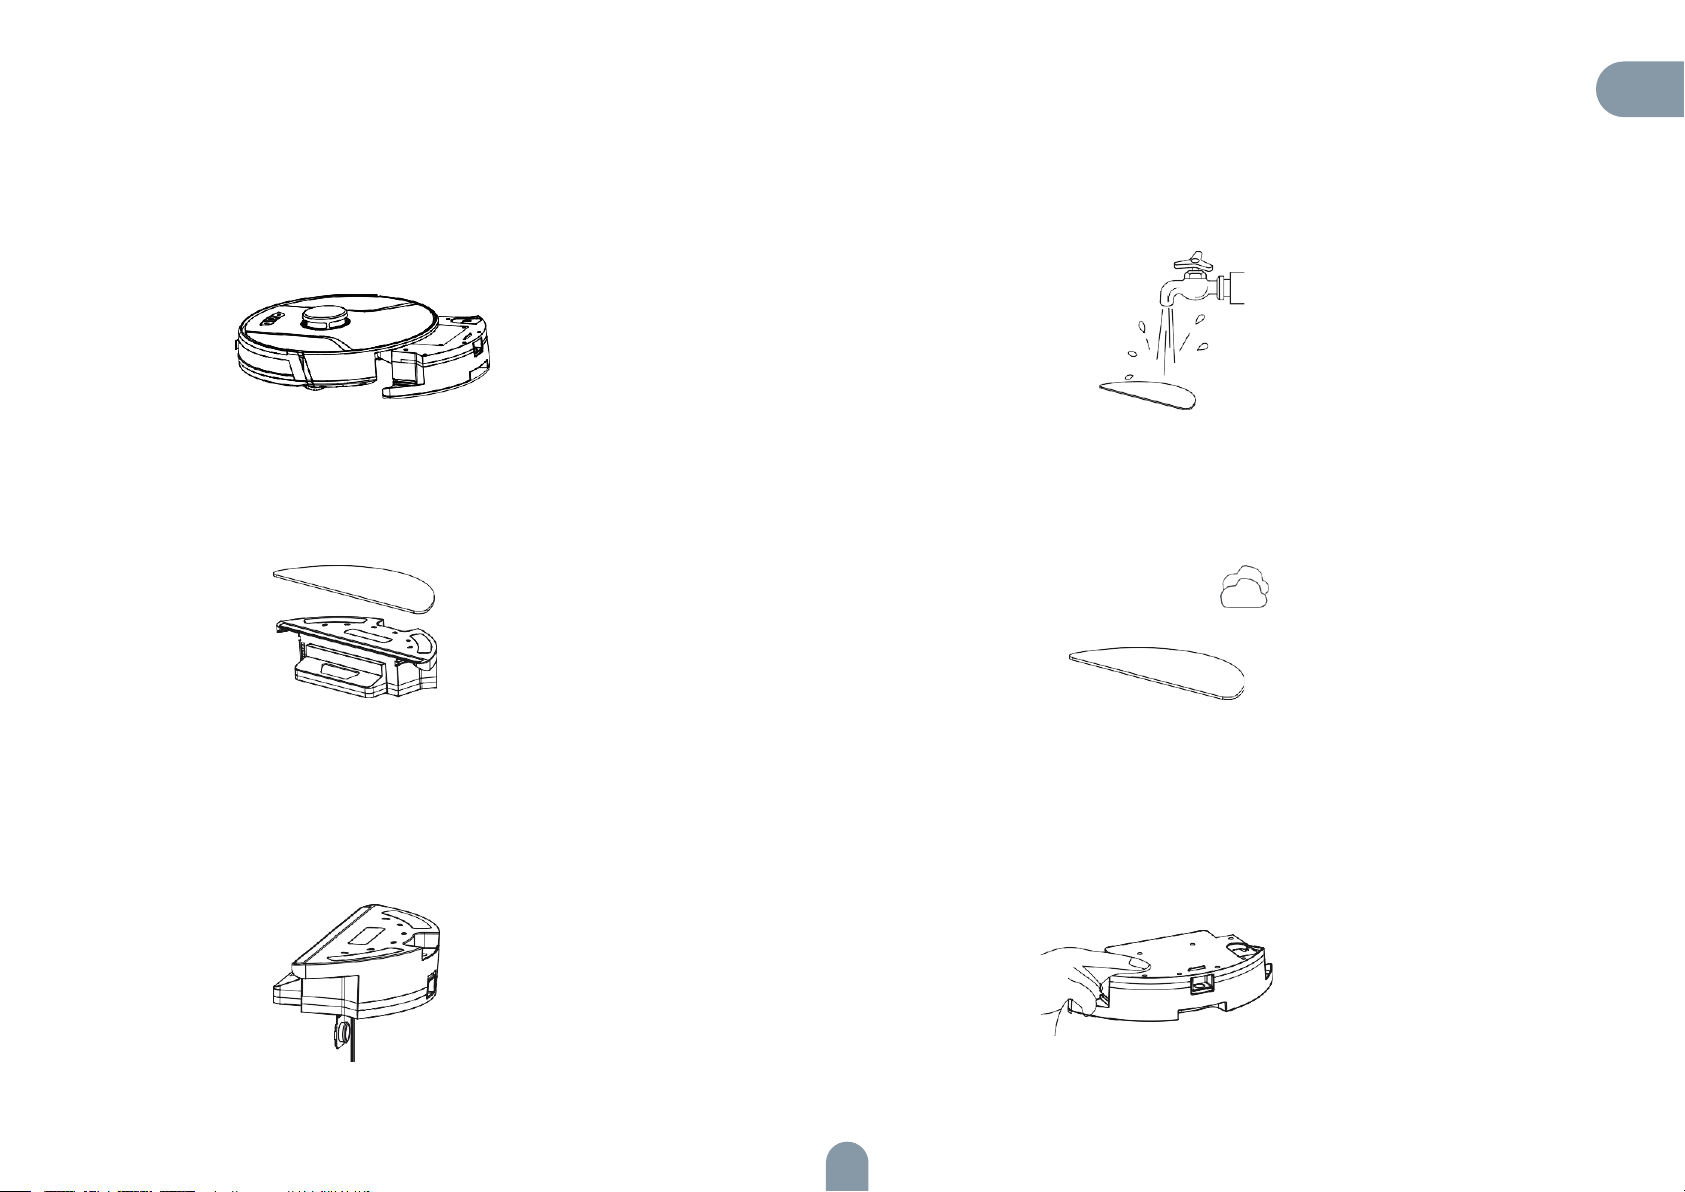
1. Take out the water tank assembly. 4. Clean the mopping cloth.
2. Take out the mopping cloth. 5. Dry the mopping cloth.
3. Empty the water tank. 6. Dry or air dry the water tank.
22
Page 23
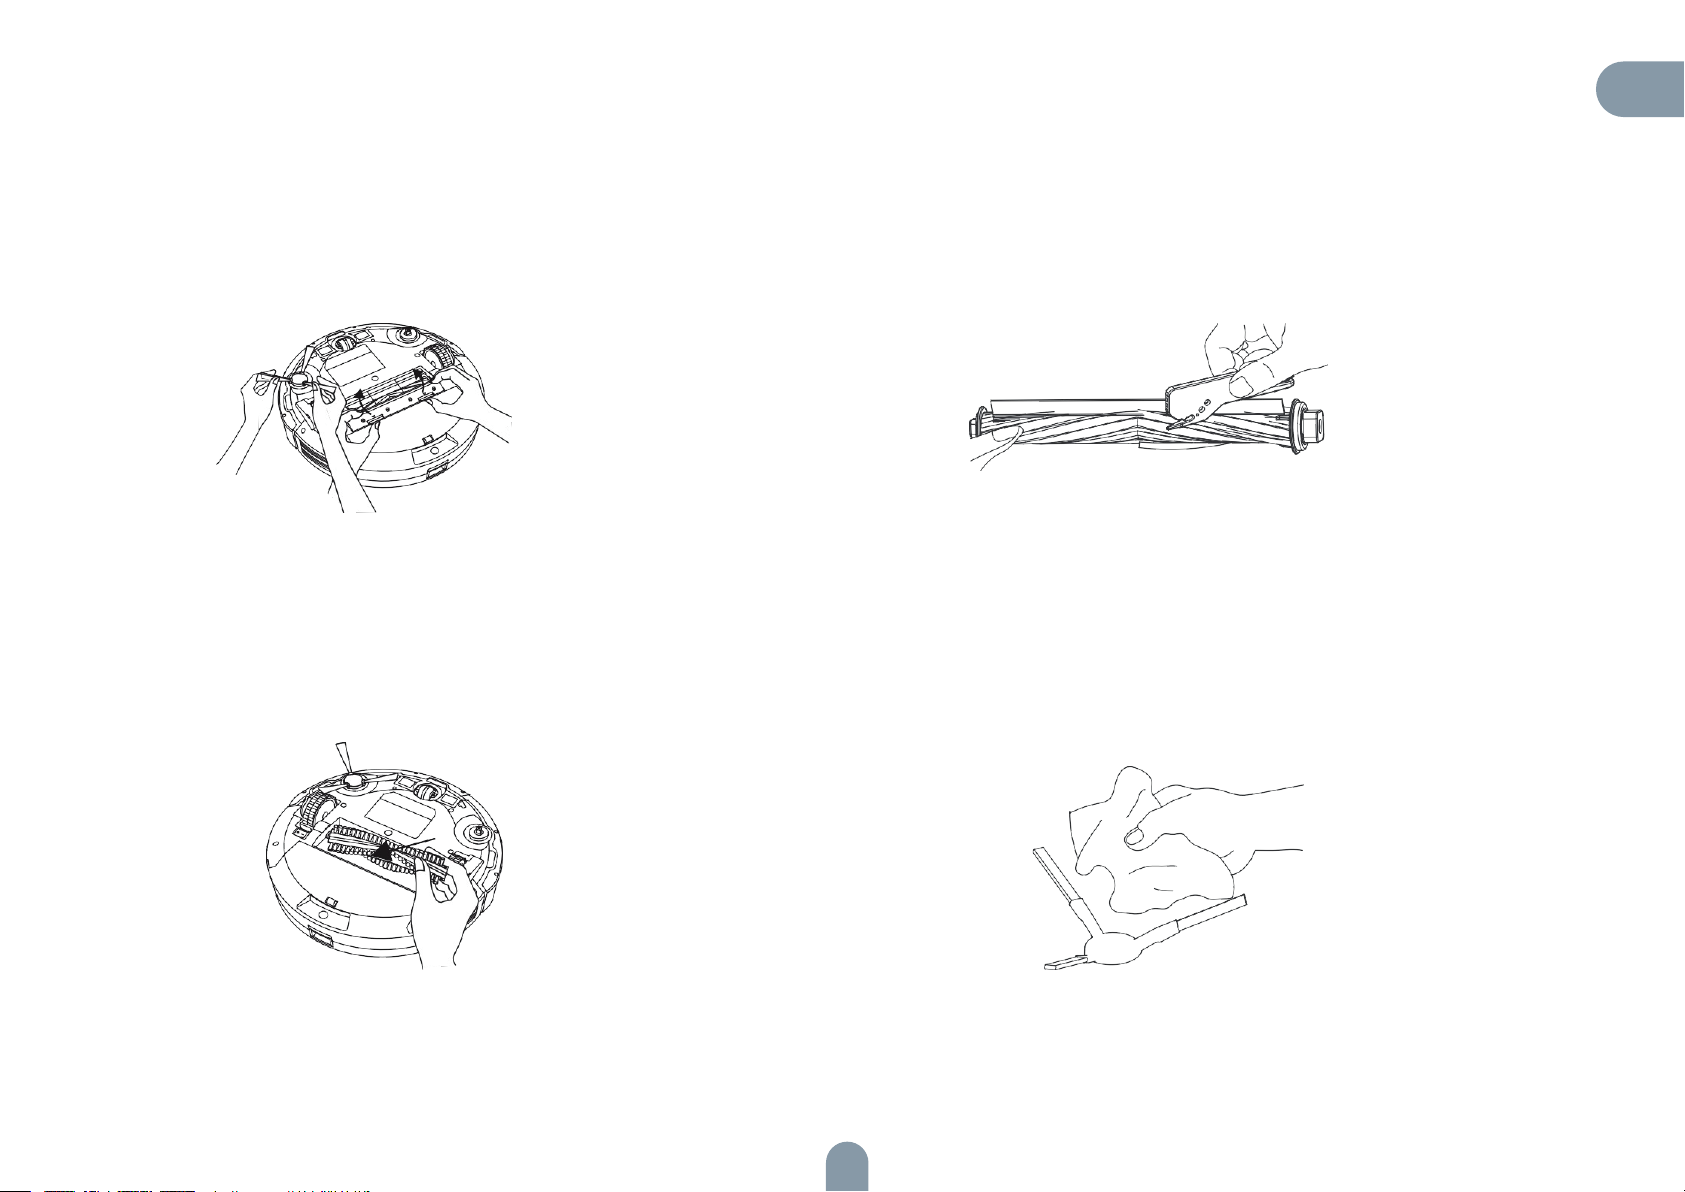
Parts Maintenance - Roller Brush and Side Brush
1. Open the roller brush cover assembly. 3. Use a tool to clean the tangled hair.
2. Take out the roller brush shaft. 4. Clean the side brushes
EN
23
Page 24
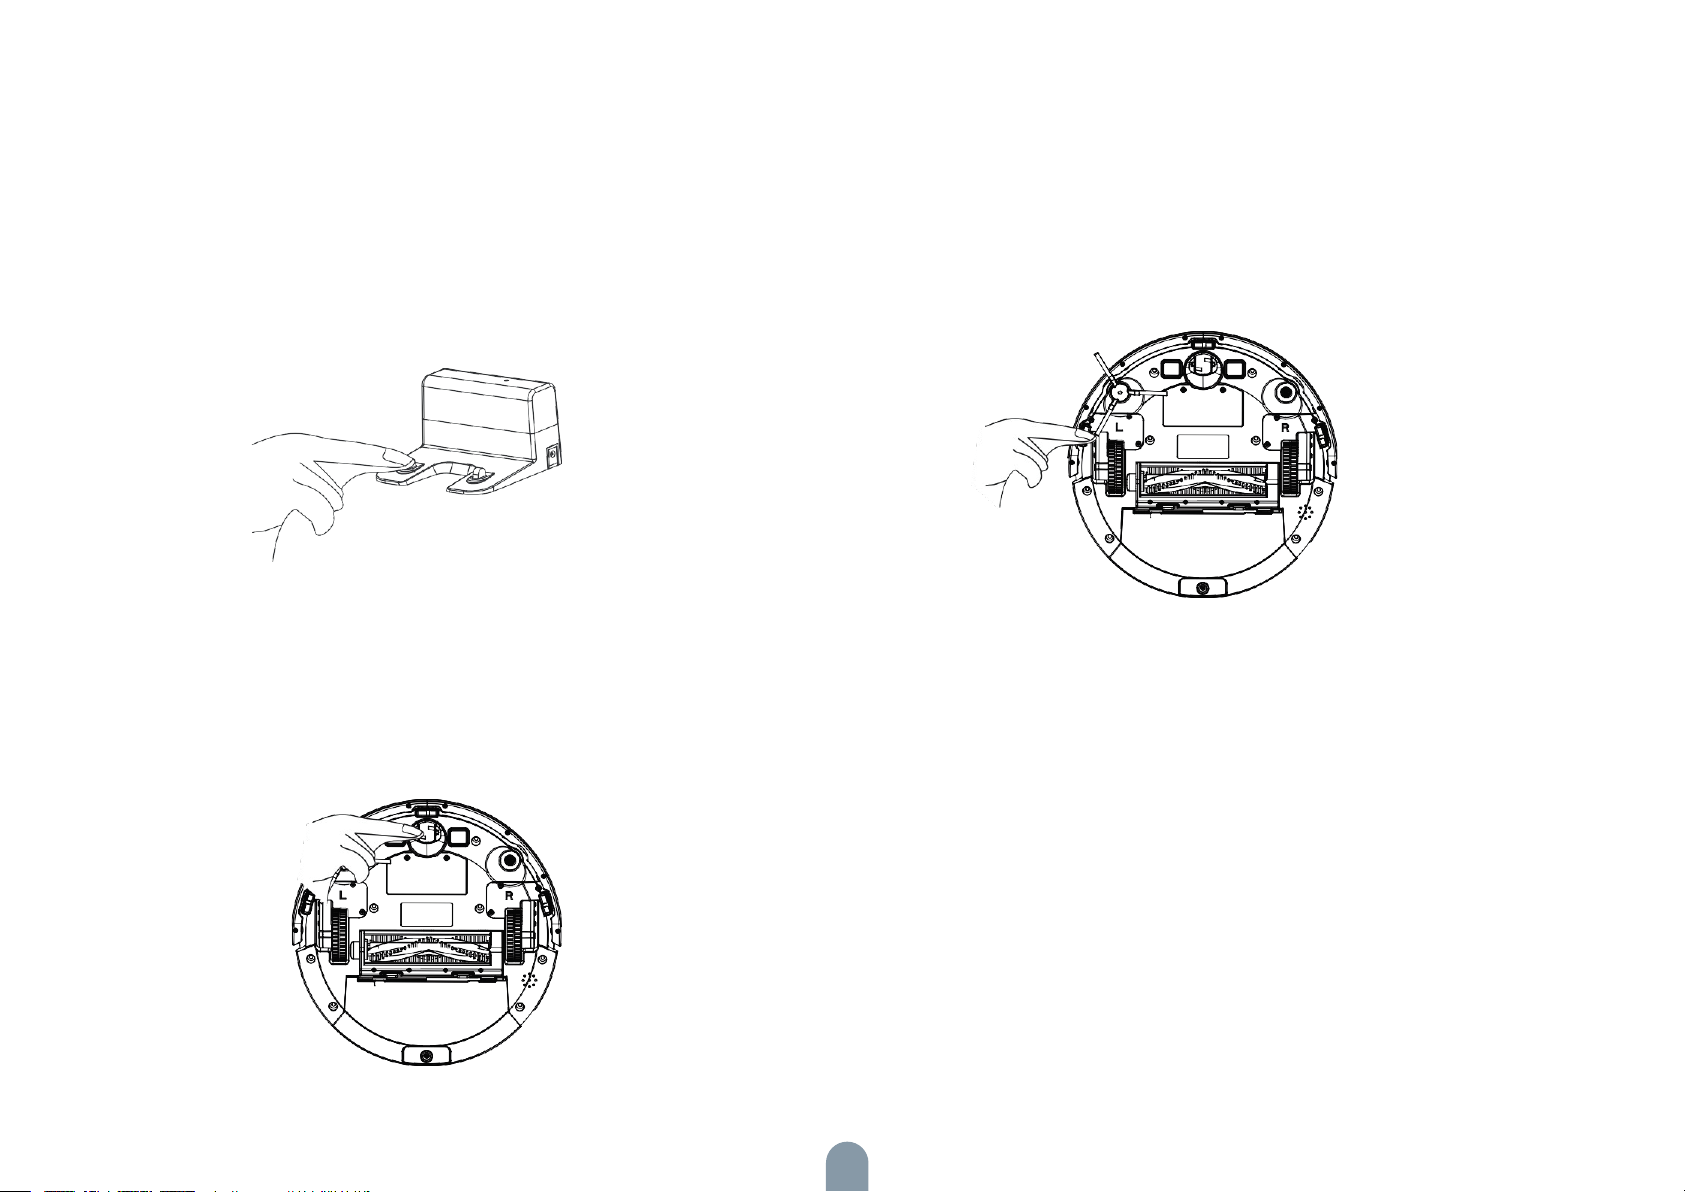
Parts Maintenance - Charging electrode, anti-fall sensor, drive wheel
and omnidirectional wheel
1. Clean the charging electrode. 3. Clean the anti-fall sensor.
2. Clean the drive wheel and omnidirectional wheel.
24
Page 25

Troubleshooting
If the vacuum cleaner encounters a fault while working, the power indicator blinks quickly in red, and a voice prompt is generated. In this case, rectify the fault by
referring to the table below.
Error Prompt Solution
Error 1: Laser head is blocked or stuck, please check. The laser ranging sensor is blocked or jammed by a foreign object. Remove the ob-
struction or foreign object. If the obstruction or foreign object cannot be removed,
move the main unit to a new position and then start it.
Error 2: Collision sensor get stuck,please check the collision sensor The bumper is stuck. Tap the bumper for several times to remove the foreign object.
If there is no foreign object, move the main unit to a new position and then start it.
Error 3:Right wheel suspended, please remove the robot in a new place then start
again.
Error 4: Anti-fall sensor is blocked,please check and clean anti-fall sensor. The main unit is suspended. Please move the main unit to a new position and then
Error 5: Side brush is entangled, please clean the side brush. The side brushes may be entangled with foreign objects. Please disassemble and
Error 6:Right/left wheel is entangled, please clean the right/left wheel. The wheel may be entangled with foreign objects. Please clean the wheel and start
Error 7: The robot is trapped, please remove the robot The main unit may be stuck. Please remove the obstacles around the main unit.
The wheel is suspended. Please move the main unit to a new position and then start
it.
start it. This fault may occur when the cliff sensor is too dirty. Please wipe the cliff
sensor clean.
clean the side brushes.
the main unit again.
EN
Error 8: Low battery, please charge.. The power is insufficient. Please charge the vacuum cleaner before using it.
Error 9:Charging problem. please check. The battery temperature is too high or too low. Please wait and use the vacuum
cleaner after the battery temperature becomes normal.
Error 10: Wall sensor is blocked, please check The wall sensor is covered by dust. Please wipe the wall sensor.
Error 11: Uneven floor,please remove the robot in a new place then start again. It is detected that the main unit is tilted upon startup. Please place the main unit on
an even ground and restart it.
Error 12: Top cover of laser is blocked or stuck, please check The laser pressure sensor is pressed or stuck. Please move the vacuum cleaner to a
new position and then restart it.
25
Page 26

Troubleshooting
Fault Solution
The battery power is insufficient. Please use the vacuum cleaner after charging it on
Failed to power on the machine
Failed to charge the machine
Slow charging
Failed to return to the docking station
Abnormal behavior The vacuum cleaner is powered off and then on again.
There is abnormal noise during cleaning.
The cleaning performance is degraded, or ash is dropped.
The Wi-Fi network cannot be connected.
Scheduled cleaning cannot be carried out.
the docking station.
The battery temperature is too high or too low. Please use the vacuum cleaner when
the ambient temperature is 0°C to 40°C.
The docking station is not connected to the power supply. Please make sure that
both ends of the docking station power cord are properly connected.
The docking station is not in proper contact with the main unit. Please clean the docking station shrapnel and the charging contact of the main unit.
Check whether the docking station indicator is on.
When used in a high or low temperature environment, the main unit will automatically decrease the charging speed to extend the battery life.
The charging contact area may be dirty. Please clean the area with a dry cloth.
There are too many obstacles around the docking station. Please place the docking
station in an open area.
The main unit is too far away from the docking station. Try to place the main unit near
the docking station.
The roller brush, side brushes, or main wheel may be entangled with foreign objects.
Clean them after powering off the vacuum cleaner.
The omnidirectional wheel is covered by dust or is entangled during cleaning. It is
recommended that you use a screwdriver to pull it out and rinse it.
The dust box is full. Clean the dust box.
The filter is blocked. Clean the filter.
The Wi-Fi function is not activated. Reset the Wi-Fi connection, and try again.
The Wi-Fi signal is not good. Ensure that the main unit is located in a place with good
Wi-Fi signals.
The Wi-Fi connection is abnormal. Reset the Wi-Fi settings, download the mobile
app of the latest version, and try to connect to the Wi-Fi network again.
The Wi-Fi network suddenly cannot be connected. The family router settings may be
incorrect. In this case, contact the customer service for help.
The power is insufficient. Scheduled cleaning will be started only when the remaining
power is more than 20%.
26
Page 27

EN
Is any power consumed if the vacuum cleaner always stays at the docking station?
Is it necessary to charge the battery for 16 hours when the vacuum cleaner is used for
the first three times?
The mopping module does not output water or the water output is small.
The power is insufficient during cleaning. After the vacuum cleaner returns to the
docking station for charging, it does not continue cleaning.
The vacuum cleaner cannot return to the docking station after partial cleaning or
after its position is moved.
The vacuum cleaner misses some areas when cleaning.
The power consumption is extremely low when the vacuum cleaner always stays at
the docking station. This helps to keep the battery in the best performance.
The lithium battery does not have a memory effect. It can be used instantly after it is
fully charged. There is no need to wait 16 hours.
Check whether there is any water in the water tank. Use the mobile app to set the
water output to the maximum value.
Install the mopping cloth and mop stand properly according to the manual.
Check whether the main unit is in DND mode. The vacuum cleaner will not continue
cleaning in DND mode.
The vacuum cleaner will not continue cleaning if the main unit is manually put back
to the docking station.
The vacuum cleaner will re-generate a map after partial cleaning or after it is moved
far away.
If the main unit is far away from the docking station, the main unit may fail to return
to the docking station by itself. In this case, manually put the main unit back to the
docking station.
The wall sensor or cliff sensor may get dirty. It is recommended that you wipe the
sensors using a soft dry cloth.
27
Page 28
Product Specifications
Category
Structure
Battery
Cleaning parameters
Item Specification
Diameter 330 mm
Height 96 mm
Net weight 2.7 kg
Voltage 14.4 V
Battery 2600 mAh rechargeable lithium battery
Dust box capacity 600 ml
Charging type Auto charging and manual charging
Charging time About 270 minutes
Cleaning time About 100 minutes
Main unit Rated power (W) 28
28
Page 29
INFORMATION ABOUT DISPOSAL AND RECYCLING
This product is marked with the symbol for separate collection. The product must be disposed of in accordance with the regulations for disposal of electrical and electronic
equipment (Directive 2012/19/EU on waste electrical and electronic equipment). Disposal together with regular municipal waste is prohibited. Dispose of all electrical and
electronic products in accordance with all local and European regulations at the designated collection points which hold the appropriate authorisation and certification in
line with the local and legislative regulations. Correct disposal and recycling help to minimise impacts on the environment and human health. Further information regarding
disposal can be obtained from the vendor, authorised service centre or local authorities.
EU DECLARATION OF CONFORMITY
Hereby, Tesla Global Limited declares that the radio equipment type TSL-VC-AI200 is in compliance with EU directives.
The full text of the EU declaration of conformity is available at the following internet address: tsl.sh/doc
Connectivity: WIFI 802.15.4
Frequency band: 2.400 - 2.480 GHz
Max. radio-frequency power (EIRP): < 20 dBm
EN
Producent
Tesla Global Limited
Far East Consortium Building,
121 Des Voeux Road Central
Hong Kong
www.teslasmart.com
29
Page 30

30
Page 31
TESLA SMART ROBOT
VACUUM LASER AI200
BENUTZERHANDBUCH
EN
DE
CZ
SK
PL
HU
SL
Page 32

Sicherheitshinweise
Vor dem Gebrauch dieses Produkts lesen Sie die folgenden Sicherheitshinweise durch und halten Sie alle üblichen Sicherheitsmaßnahmen ein.
Lesen Sie dieses Benutzerhandbuch vorsichtig durch und bewahren Sie es zum späteren Gebrauch auf.
Die Nichtbeachtung dieses Benutzerhandbuchs kann zur Beschädigung des Produkts führen.
Hinweis
1.Dieses Produkt darf nur von autorisierten Technikern zerlegt werden. Die Benutzer sollten
nicht versuchen, das Produkt selbst zu zerlegen.
2.Benutzen Sie nur den Speiseadapter, der vom Hersteller dieses Produkts angeliefert wird.
Andere Adapter können das Produkt beschädigen.
3.Berühren Sie die Kabel, Steckdosen oder den Speiseadapter nicht mit nassen Händen.
4.Achten Sie darauf, dass in das Antriebsrad des Produkts die Gardinen nicht verwickelt werden und dass darin keine Körperteile eingeklemmt werden.
5.Bewahren Sie das Produkt außer der Reichweite der Zigaretten, der Feuerzeuge und anderer Quellen der offenen Flamme auf.
6.Reinigen Sie das Produkt nach der Aufladung.
7.Biegen Sie das Kabel nicht und bringen Sie auf das Gerät keine schweren oder scharfen
Gegenstände an.
8.Dieses Produkt ist für den Gebrauch im Innenraum bestimmt. Benutzen Sie es nicht
draußen.
9.Setzen Sie sich auf das Produkt nicht.
10.Benutzen Sie das Produkt in keinem feuchten Umfeld, wie z. B. ein Badezimmer ist.
11.Vor dem Gebrauch des Produkts beseitigen Sie zerbrechliche Gegenstände (Gläser,
Lampen usw.) und Gegenstände, die sich um die Seitenbürste und um die Saugöffnung (z. B.
Kabel, Papiere, Gardinen usw.) aufwickeln können, von dem Fußboden.
12.Bringen Sie das Produkt nicht auf die Stelle, woher es einfach fallen könnten, (z. B. auf
Tische und Stühle) an.
13.Überprüfen Sie vor dem Gebrauch, ob der Speiseadapter zur Steckdose ordentlich angeschlossen ist, anderenfalls könnte es zur Beschädigung der Batterie kommen.
14.Machen Sie übrige Haushaltsmitglieder aufmerksam, dass das Produkt arbeitet, damit sie
darüber unglücklicherweise nicht stolpern.
15.Wenn der Staubbehälter voll ist, entleeren Sie ihn vor dem nächsten Gebrauch des Produkts.
16.Die Betriebstemperatur der Batterie liegt im Bereich von 0 °C bis 40 °C.
17.Benutzen Sie das Produkt in dem Umfeld mit hohen Temperaturen nicht.
18.Vor der Entsorgung des Produkts nehmen Sie die Batterien heraus.
19.Vergewissern Sie sich vor dem Herausnehmen der Batterie, dass das Produkt von der
Speisequelle abgetrennt ist.
20.Recyceln Sie die Gebrauchtbatterien ordentlich.
Warnung
1.Benutzen Sie nur wiederaufladbare Originalbatterien und Ladestation, die von dem Hersteller geliefert werden. Benutzen Sie keine nichtwiederaufladbaren Batterien. Die Spezifikationen der Batterie finden Sie in der Sektion „Produktspezifikation“.
2.Benutzen Sie das Produkt nicht im Umfeld, wo sich die Quelle eines offenen Feuers oder
zerbrechliche Gegenstände befinden.
3.Benutzen Sie das Produkt im Umfeld mit extrem hohen (über 40 °C) oder extrem niedrigen
(unter 0 °C) Temperaturen nicht.
4.Halten Sie die Haare, die Bekleidung, die Finger und alle anderen Körperteile außerhalb der
Reichweite der Öffnungen und der beweglichen Teile des Staubsauger-Roboters.
5.Benutzen Sie das Produkt auf dem nassen Fußboden oder auf dem Fußboden nicht, auf der
eine große Wassermenge vergossen ist.
6.Benutzen Sie das Produkt zum Saugen der Gegenstände nicht, die es blockieren könnten,
wie kleine Steine und Abfallpapiere sind.
7.Benutzen Sie das Produkt zum Saugen der brennbaren Materialien nicht, wie das Benzin
oder Tinten aus Druckern und Kopiermaschinen sind. Benutzen Sie das Produkt zur Reinigung
des Raums nicht, wo sich brennbare Materialien befinden.
8.Benutzen Sie das Produkt zum Saugen der brennenden Gegenstände nicht, wie Zigaretten,
Streichhölzer, Asche usw. sind, welche die Entstehung eines Brands verursachen könnten.
9.Legen Sie in die Saugöffnung keine Gegenstände ein. Benutzen Sie das Produkt nicht,
wenn die Saugöffnung blockiert ist. Beseitigen Sie von der Saugöffnung den Staub, die Watte
und die Haare, Sie sichern so eine kontinuierliche Luftzirkulation durch die Saugöffnung ab.
10.Manipulieren Sie mit dem Speisekabel vorsichtig, damit Sie es nicht beschädigen. Benutzen Sie das Speisekabel zum Ziehen des Produkts oder der Ladestation nicht, tragen Sie das
Produkt an dem Speisekabel nicht, klemmen Sie das Speisekabel in die Tür nicht und führen
sie es an den scharfen Kanten und Ecken nicht. Verhindern Sie, dass das Produkt über den
Speiseadapter überfährt. Halten Sie den Speiseadapter außerhalb der Reichweite der Wärmequellen.
11.Benutzen Sie die Ladestation nicht, wenn sie beschädigt ist.
12.Werfen Sie das Produkt nicht ins Feuer, auch wenn es schwerwiegend beschädigt wäre,
weil die Batterie des Produkts explodieren kann.
32
Page 33

Inhaltsverzeichnis
Sicherheitshinweise 30
Produkt und dessen Zubehör 32
Produktzusammensetzung 33
Installation 34
Staubbehälter, Wasserbehälter und Baugruppe des Mopptuchs 38
Vorbereitung 39
Aufladung der Haupteinheit 40
Benutzung des Produkts / Start der Reinigung 41
Gebrauchshinweise 42
Nutzung des Wasserbehälters 46
Wartung - Staubbehälter 47
Wartung - Rollen- und Seitenbürste 50
Wartung - Ladeelektrode, Sensor gegen Absturz, Antriebsrad und Allrichtungsrad 52
DE
Problemlösung 53
Produktspezifikation 56
33
Page 34
Produkt und dessen Zubehör
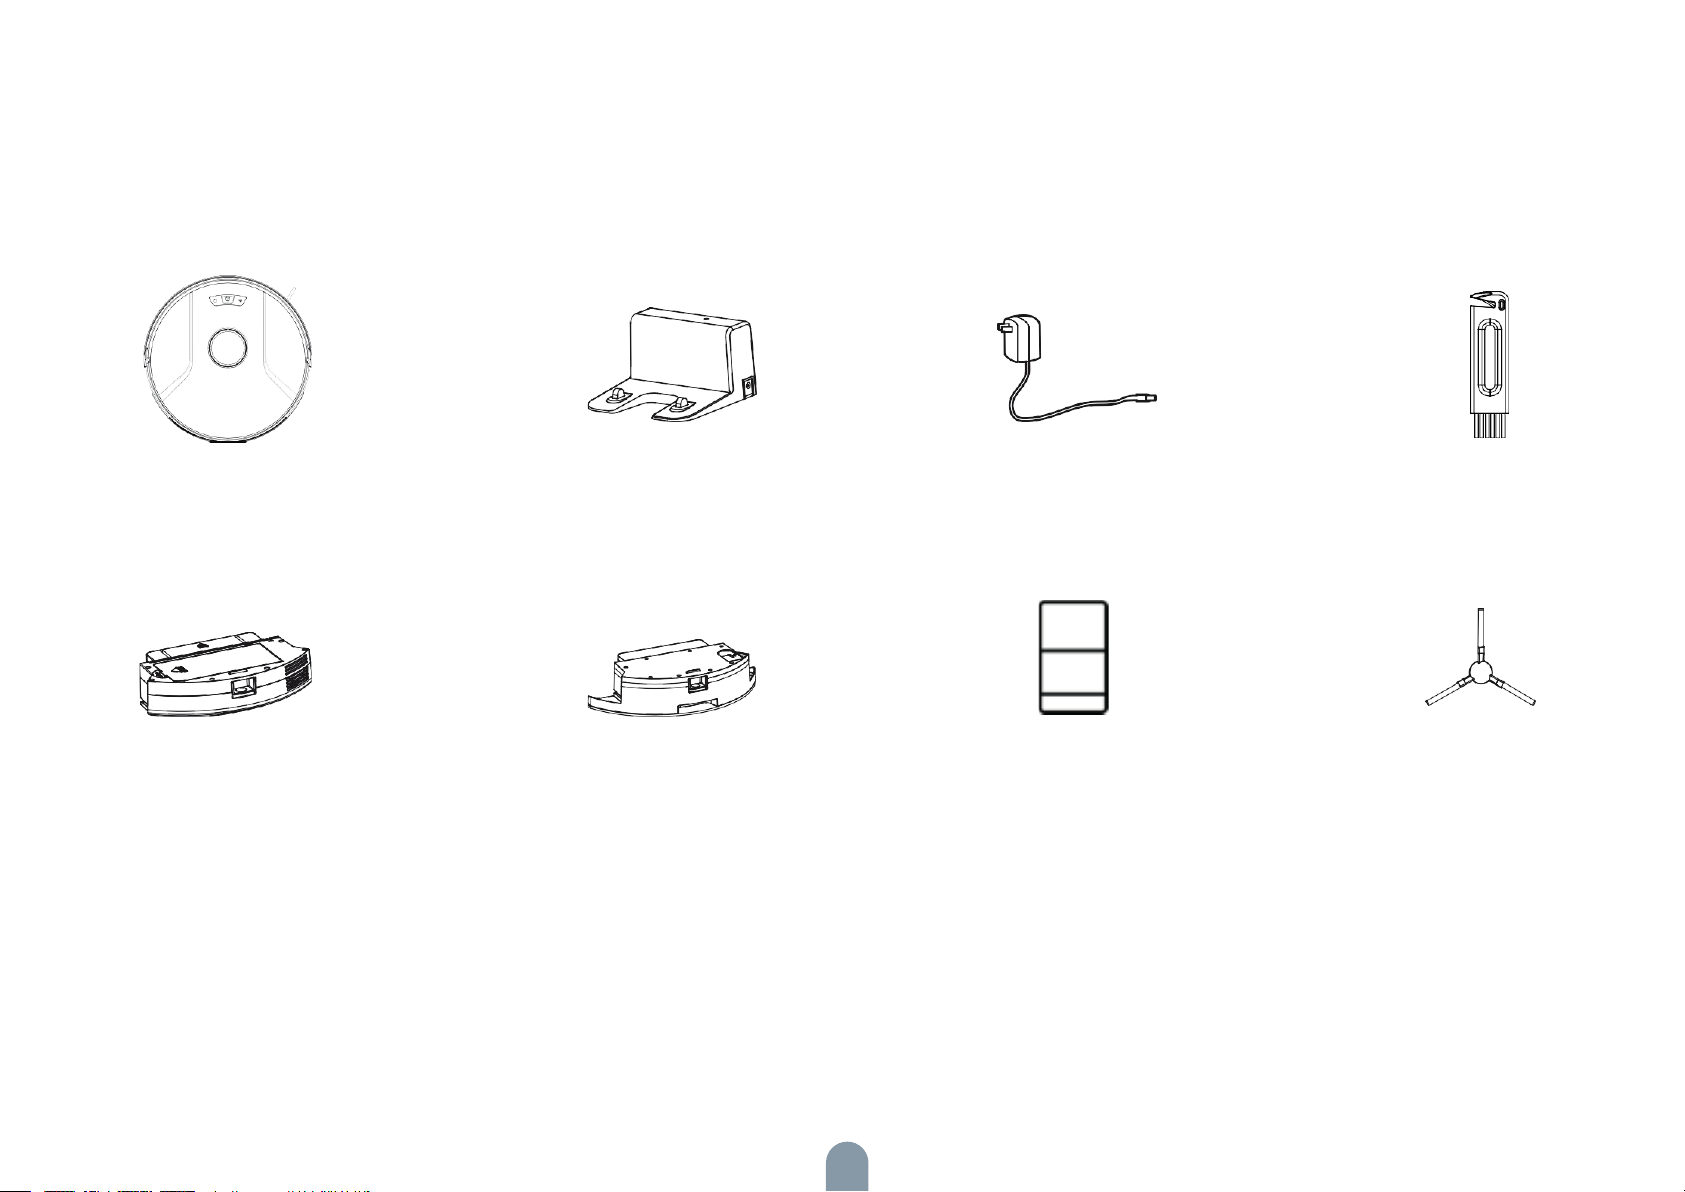
Haupteinheit
Staubbehälter Seitenbürste (1 Sets)
Speisestation
Wasserbehälter Benutzerhandbuch
Speiseadapter Reinigungsbürste
34
Page 35
Produktzusammensetzung
Frontansicht
DE
Wi-Fi-Netz-Taste
Einschalten/Pause-Taste
Taste zur Rückkehr
in die Ladestation
Allrichtungsobjektiv
Rückansicht
Sensor gegen Absturz Ladeelektrode
Allrichtungsrad
Seitenbürste
Gehäuse
Laserkopf
Taste des Staubbehälters
Batterie
Antriebsrad
Staubbehälter
Baugruppe der Rollenbürste
35
Page 36
Installation
Anmerkungen
1. Vor der Ingangsetzung des Staubsauger-Roboters beseitigen
Sie Kabel und geringfügige auf dem Fußboden herumliegende
Gegenstände und instabile, zerbrechliche, wertvolle und potentiell
gefährliche Gegenstände. Verhindern Sie, dass sich der Staubsauger verwickelt, verklemmt und dass er hinter sich etwas zieht oder
etwas umkippt, anderenfalls kann es zur Verletzung der Personen
oder zur Beschädigung des Vermögens kommen.
2. Benutzen Sie das Produkt im feuchten Umfeld nicht, anderenfalls kann es zur Beschädigung des Lüfters und zur folgenden
Herabsetzung der Leistung des Staubsauger-Roboters kommen.
36
Page 37
Installation
1. Laden Sie die TESLA Smart-App aus dem App Store herunter, registrieren Sie sich und melden Sie sich bei der App an. Vergewissern Sie sich vor der Verbindung mit dem
Netzwerk, dass die Wi-Fi-Frequenz 2,4 GHz beträgt.
Vorbereitung: Klicken Sie auf das „+“ in der oberen rechten Ecke, um Ihren Roboter hinzuzufügen.
DE
37
Page 38
3. Das Gerät unterstützt den Zugangspunktmodus:
- Wählen Sie „Robot Vacuum (Wi-Fi)“ (Saugroboter (Wi-Fi) in der Spalte Small Home Appliance
(Kleine Haushaltsgeräte).
- Vergewissern Sie sich, dass die Wi-Fi-Frequenz 2,4 GHz beträgt und geben Sie das richtige Wi-Fi-Passwort ein.
- Halten Sie die Wi-Fi-Taste am Roboter 3 Sekunden lang gedrückt, um zu bestätigen, dass der Wi-Fi-Anzeiger blinkt. Markieren Sie „Confirm the indicator is flashing rapidly“ (Bestätigen Sie, dass der Anzeiger schnell blinkt) auf der App-Benutzeroberfläche, klicken Sie auf „Next“ (Weiter) und wählen Sie im Pop-up-Fenster den Zugangspunktmodus (AP) aus.
- Suchen Sie einen Wi-Fi-Zugangspunkt ohne Passwort auf Ihrer Wi-Fi-Liste, der mit SmartLife-XXXX beginnt, und klicken Sie auf, um eine Verbindung herzustellen. Nach
erfolgreicher Verbindung mit dem Zugangspunkt kehren Sie zur TESLA Smart-App zurück. Die App wechselt automatisch zur Verbindungsschnittstelle des Roboters. Warten
Sie auf die Verbindung; Sie können den Roboter steuern, sobald die Verbindung hergestellt ist.
38
Page 39
Installation
Laden Sie die App Tesla Smart herunter, klicken Sie auf das Symbol „+“, fügen Sie das Hausgerät hinzu und wählen Sie das 2,4GHz Wi-Fi-Netz aus. Geben Sie den Namen
und das Passwort des Wi-Fi-Netzes ein, klicken Sie auf „Next“ („Nächste“) und schließen Sie den Staubsauger an das Wi-Fi-Netz an. Sie können das Wi-Fi-Netz auf eine der
folgenden Weisen konfigurieren:
1. Schneller Anschluss an das Wi-Fi-Netz: Drücken Sie und halten Sie die Wi-Fi-Netz-Taste für 3 Sekunden. Das Gerät piepst, es wechselt in den Modus EZ und die Kontrollleuchte des Wi-Fi-Netzes beginnt schnell zu blinken. Nachfolgend können Sie das Gerät hinzufügen und es mit der App paaren.
Sobald die Nachricht über den erfolgreichen Anschluss erscheint, können Sie das Gerät mittels der App betätigen.
2. Paaren mit Hilfe des Hotspots: Drücken Sie und halten Sie die Wi-Fi-Netz-Taste für 6 Sekunden. Das Gerät piepst alle 3 Sekunden. Nachdem das Gerät zweimal piepst,
wechselt es in den Modus AP und die Kontrollleuchte des Wi-Fi-Netzes beginnt langsam zu blinken. Der Modus des Paarens in der App ist jetzt von dem Modus EZ in den
Modus AP umzuschalten. Nachfolgend können Sie den Namen und das Passwort des Wi-Fi-Netzes eingeben und auf „Go to Connect“ („Zum Anschluss gehen“) klicken.
Wählen Sie den Hotspot SmartLife-XXXX ohne Passwort aus. Dieser Hotspot wird nach dem Anschluss des Geräts an Ihr Wi-Fi-Netz gebildet. Nach dem Anschluss des Geräts an den Hotspot kehren Sie in die App Tesla Smart zurück. Die App lenkt Sie auf den Bildschirm mit der Nachricht „Connect your mobile phone to the device‘s hotspot“
(„Das Mobiltelefon zum Hotspot des Geräts anschließen“) automatisch um. Sobald die Nachricht über den erfolgreichen Anschluss erscheint, können Sie das Gerät mittels
der App betätigen.
Beschreibung der Bildzeichen und Tasten der App
Bildzeichen und Beschreibungen
Reinigung des ganzen Haushalts: Der Staubsauger-Roboter scannt mit Hilfe der Sensoren und generiert nachfolgend die Raumkarte des ganzen Haushalts
und plant automatisch die optimale Reinigungstrecke.
Reinigung einer bestimmten Zone: Sie können auf der Raumkarte der App eine Reinigungszone einer bestimmten Stelle einstellen. Der Staubsauger-Roboter
verschiebt sich nachfolgend automatisch auf die jeweilige Stelle und er reinigt sie.
DE
PIN N GO (Reinigung vor Ort): Sie können eine konkrete Stelle auf der Raumkarte der App bestimmen. Der Staubsauger-Roboter verschiebt sich nachfolgend auf die bestimmte Stelle und um diese Stelle herum reinigt er den Raum mit der Größe von 1,6 x 1,6 m. Durch ein Klicken oder durch das Überziehen auf
der Raumkarte stellen Sie den Zielpunkt ein.
Reinigung der ausgewählten Zonen: Nachdem der Staubsauger die Raumkarte des ganzen Haushaltes generiert, können Sie in der App eine Zone oder mehrere Zonen auswählen, die Sie räumen wollen.
Stellen Sie die ausgeschlossene Zone der Reinigung ein.
Rückkehr in die Ladestation: Wenn dieses Bildzeichen leuchtet, kehrt der Staubsauger-Roboter in die Ladestation automatisch zurück, damit er sich auflädt.
Wenn dieses Bildzeichen blinkt, unterbricht der Staubsauger-Roboter die Rückkehr in die Ladestation.
Modus der geplanten Reinigung: Mittels der App können Sie die Reinigung jederzeit am Tag bis für 7 Tage im Voraus planen.
39
Page 40

Taste Beschreibung Betätigungstasten Funktionsbeschreibung
Einspeisung-Taste
Taste zur Rückkehr in die Ladestation
Durch das Drücken dieser Taste schalten Sie das Gerät
ein.
Durch das Drücken und Halten dieser Taste schalten
Sie das Gerät aus.
Durch das Drücken dieser Taste planen Sie die Reini-
gungsstrecke.
Durch das Drücken dieser Taste halten Sie das Gerät
an.
Durch das Drücken dieser Taste senden Sie den Staub-
sauger-Roboter in die Ladestation zurück.
Durch das Drücken dieser Taste während der Rückkehr
des Staubsauger-Roboters in die Ladestation halten
Sie ihn an.
Schneller Anschluss an das Wi-Fi-Netz (Modus EZ) Drücken Sie und halten Sie diese Taste für
Durch das Drücken und Halten dieser Taste für die
Dauer von 3 Sekunden schalten Sie das Gerät ein.
Durch das Drücken und Halten dieser Taste für die
Dauer von 3 Sekunden schalten Sie das Gerät aus.
Drücken Sie die Taste
Drücken Sie die Taste
Drücken Sie die Taste
Drücken Sie die Taste
3 Sekunden.
Wi-Fi-Netz-Taste
Paaren mit Hilfe des Hotspots (Modus AP) Drücken Sie und halten Sie diese Taste für
6 Sekunden.
40
Page 41
Staubbehälter, Wassertank und Reinigungstuch
HEPA-Filter
DE
Vorfilter
Leitender Teil des
Staubbehälters
Abdeckung des
HEPA-Filters
Leitender Teil des
Staubbehälters
Seitenabdeckung
des Staubbehälters
Kontrollleuchte des
Signals
DC-Stecker
Ladeelektrode
Water inlet
Water tank
Mopping cloth
41
Page 42
Vorbereitung
Beseitigen Sie das Schutzband
Vor dem Gebrauch der Haupteinheit beseitigen Sie darauf das Schutzband.
42
Page 43
Aufladung der Haupteinheit
DE
Bringen Sie die Ladestation auf den ebenen Fußboden an die Wand an.
Bringen Sie in den Raum mit der Größe von 0,5 m an den Seiten und 1,5 m
vor der Ladestation keine Gegenstände an.
2. Schließen Sie die Ladestation an die Speisequelle an.
3. Installieren Sie die linke und rechte Seitenbürste.
4. Bringen Sie die Haupteinheit in die Ladestation an und lasse Sie sie
aufladen.
Die Kontrollleuchte blinkt während der Aufladung.
Sobald die Aufladung abgeschlossen ist, hört die Kontrollleuchte auf zu
leuchten. Die volle Aufladung der Haupteinheit dauert ca. 6,5 Stunden.
Während der Reinigung kontrolliert die Haupteinheit automatisch
das Ladeniveau. Wenn die Batterie beginnt sich zu entladen, aktiviert die Haupteinheit den Modus „Rückkehr in die Ladestation“ und
sie kehrt in die Ladestation automatisch zurück um aufzuladen.
Oder Sie können die Taste zur Rückkehr in die Ladestation in der
App drücken und so den Modus „Rückkehr in die Ladestation“
manuell aktivieren.
Anmerkung:
Sichern Sie ab, dass sich die Ladestation außerhalb der Reichweite
des direkten Sonnenlichts und der Reflexgegenstände, z. B. der
Spiegel, befindet.
Vor dem Gebrauch lassen Sie die Haupteinheit voll aufladen, Sie
sichern so die Standardbetriebsdauer des
Geräts ab. Die Aufladung dauert ca. 6,5 Stunden.
Vor der Aufladung der Haupteinheit nehmen Sie den Wasserbehälter heraus, Sie sichern so den sicheren Ablauf der Aufladung
ab und verhindern die unerwünschte
Beschädigung.
43
Page 44
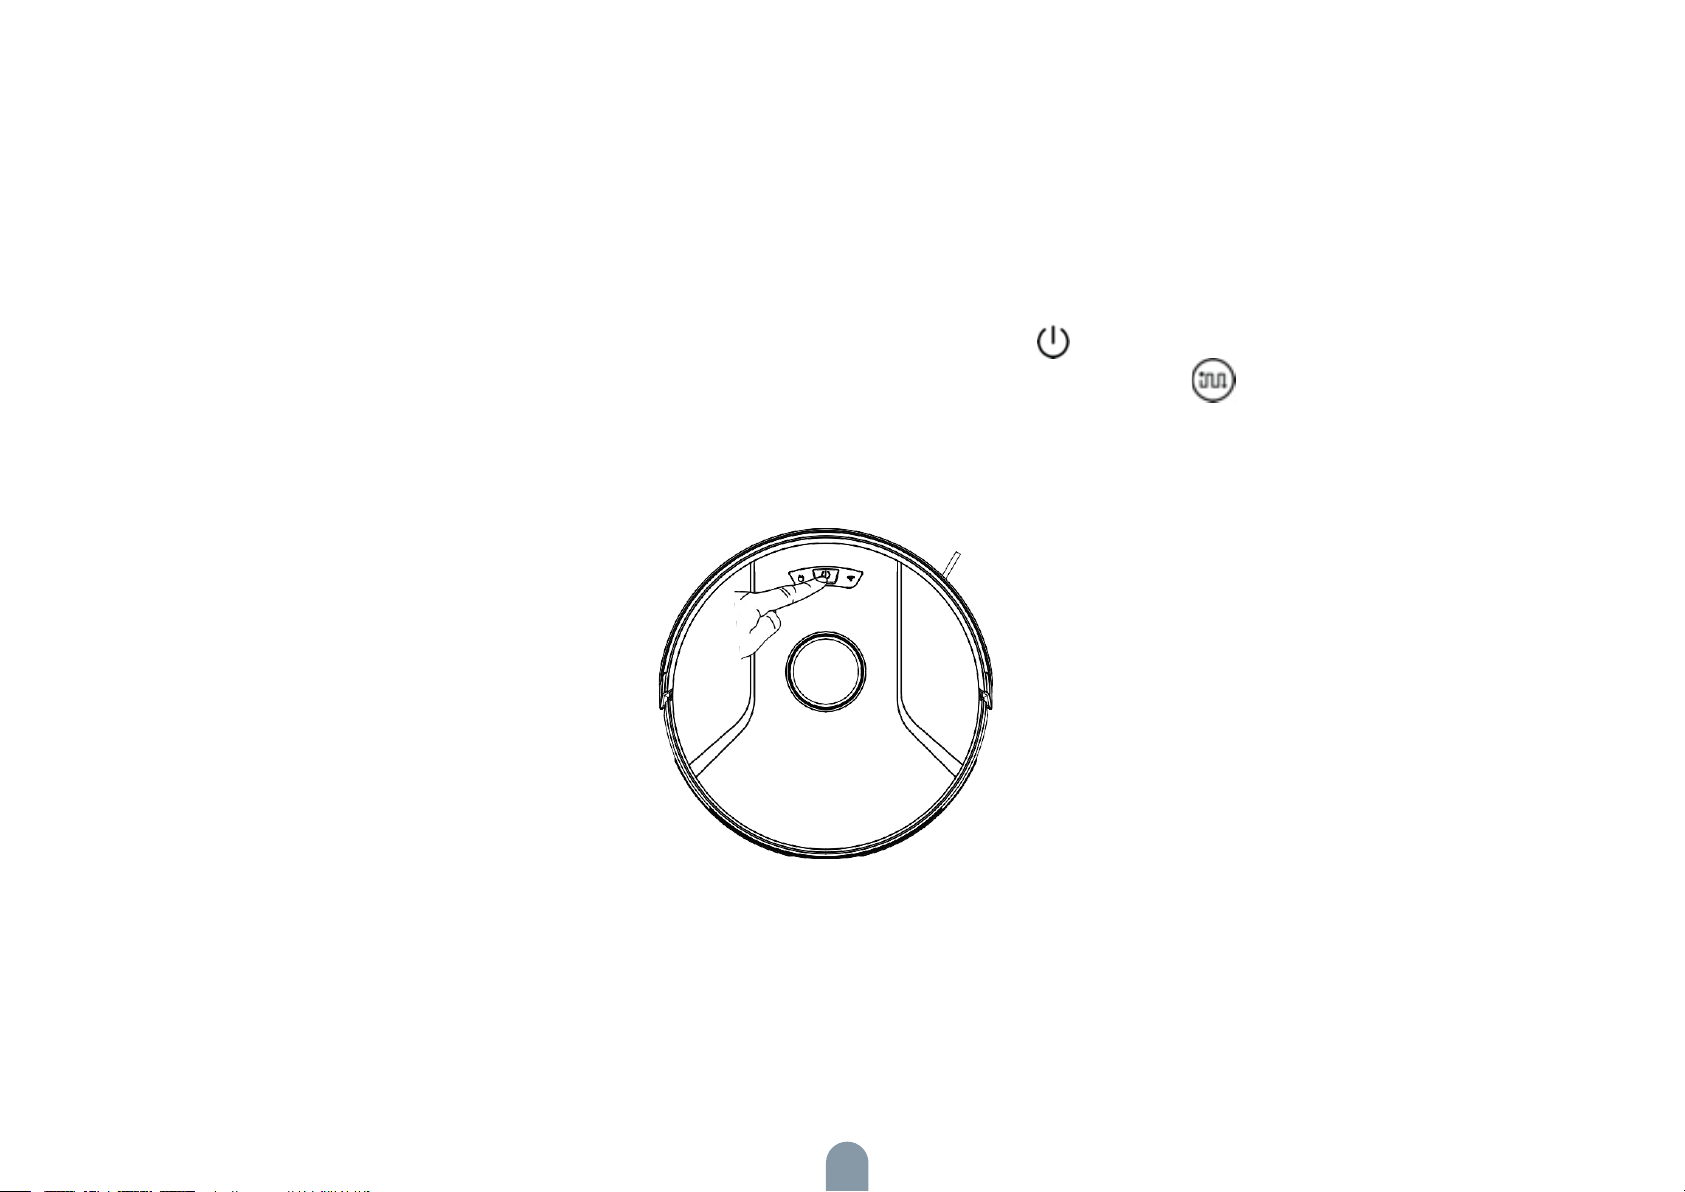
Benutzung des Produkts / Start der Reinigung
Verschiedene Möglichkeiten der Reinigung können Sie mit Hilfe des Staubsauger-Roboters, der Fernbedienung oder der App eingeben.
Automatischer Modus
Benutzung: Der am häufigsten benutzte Reinigungsmodus, bei dem der Staubsauger-Roboter den ganzen Haushalt auf der Strecke in der Form des Buchstaben S aufräumt.
Einstellung: Wenn der Staubsauger-Roboter ausgeschaltet ist, drücken Sie die Einspeisung-Taste so lange , bis die Kontrollleuchte aufleuchtet, was bedeutet, dass
das Gerät eingeschaltet ist. Drücken Sie nachfolgend kurz die Taste oder klicken Sie auf die Taste des automatischen Modus auf der Fernbedienung und der
Staubsauger beginnt die Reinigung automatisch.
44
Page 45
Gebrauchshinweise
DE
Einschalten und Ausschalten des Staubsauger-Roboters
Wenn Sie den Staubsauger-Roboter einschalten wollen, drücken und halten Sie
die Taste . Es leuchtet die Kontrollleuchte der Einspeisung auf und der Staubsauger wechselt in den Bereitschaftsmodus. Durch das Drücken der Taste des
angehaltenen Staubsauger-Roboters schalten Sie das Gerät aus und Sie beenden
die verlaufende Reinigung.
Anmerkung: Ein sich aufladender Staubsauger-Roboter kann nicht ausgeschaltet
werden.
Start der Reinigung
Durch das Drücken der Taste starten sie die Reinigung. Der Staubsauger-
-Roboter plant dann nach der generierten Raumkarte die Reinigungsstrecke und
räumt die einzelnen Haushaltszonen schrittweise auf. Der Staubsauger saugt in
jeder Zone den Fußboden entlang der Wände und nachfolgend räumt er mit den
Bewegungen in der Form des Buchstabens S die übrige Fläche gründlich und
effektiv auf.
Zone 1: Aufgeräumt
Zone 2: Aufgeräumt
Anmerkungen:
• Wenn die Batterie des Staubsauger-Roboters ausgeladen ist, kann der Staubsauger die Reinigung nicht aufnehmen. Deshalb lassen Sie den Staubsauger vor der
Reinigung aufladen.
• Vor der Reinigung räumen Sie vom Fußboden alle Kabel (einschließlich des Speisekabels der Ladestation) ab. Anderenfalls kann der Staubsauger-Roboter die Kabel
aufwickeln und so andere Stromgeräte von der Einspeisung abtrennen oder die
Gegenstände oder Kabel beschädigen.
• Falls die zur Reinigung bestimmte Fläche kleiner als 2 m2 ist, reinigt der Staubsauger diese Fläche zweimal (Ausgangseinstellung).
• Wenn die Batterie des Staubsauger-Roboters während der Reinigung beginnt sich
auszuladen, kehrt der Staubsauger in die Ladestation automatisch zurück, damit er
sich auflädt. Sobald die Batterie genügend aufgeladen ist, kehrt der Staubsauger
automatisch auf die Stelle zurück, wo er die Reinigung unterbrochen hat, und er
beendet sie (sichern Sie ab, dass die Funktion der Erneuerung der Reinigung erlaubt
wird).
Zone 4: Es wird aufgeräumt
Zone 3: Es erfolgt die Reinigung
45
Page 46
Anhalten der Reinigung
Wenn Sie während der Reinigung das Wasser in den Wasserbehälter nachfüllen
müssen oder wenn Sie das Mopptuch waschen müssen, drücken Sie die Taste ,
wodurch Sie den Staubsauger-Roboter anhalten. Wenn Sie wollen, dass der
Staubsauger das Aufräumen fortsetzt, drücken Sie die Taste , oder drücken
Sie die Taste , wodurch Sie die verlaufende Reinigung beenden und den
Staubsauger-Roboter in die Ladestation zurück senden.
Anmerkung:
Wenn der angehaltene Staubsauger-Roboter in die Ladestation zurückkehrt, damit
er sich auflädt, wird die verlaufende Reinigung aufgehoben.
Übergang in den Schlafmodus
Nach dem Stillstand von 10 Minuten wechselt der Staubsauger-Roboter automatisch in den Schlafmodus (die Kontrollleuchte der Einspeisung blinkt regelmäßig).
Wenn Sie den Staubsauger erneut erwecken wollen, drücken Sie eine beliebige
Taste.
Anmerkungen:
•Der sich aufladende Staubsauger kann in den Schlafmodus nicht wechseln.
•Nach 12 Stunden im Schlafmodus wird der Staubsauger automatisch ausgeschaltet.
Die Kontrollleuchte der Einspeisung des sich aufladenden Staubsaugers pulsiert
langsam.
Anmerkung:
Wenn es den Staubsauger-Roboter nicht gelingt, die Ladestation zu finden, kehrt
er in die Ausgangsposition automatisch zurück. In diesem Fall ist es nötig, den
Staubsauger in die Ladestation manuell anzubringen.
Störung
Wenn der Staubsauger-Roboter während der Reinigung eine Störung aufzeichnet,
beginnt die Kontrollleuchte der Einspeisung, schnell rot zu blinken, und Sie hören
einen Sprachhinweis. Mehr Informationen über die Problemlösung finden Sie in
der Sektion „Problemlösung“.
Anmerkungen:
•Wenn Sie innerhalb von 10 Minuten nach der Feststellung der Störung keine
Aktion durchführen, wechselt der Staubsauger-Roboter automatisch in den Schlafmodus.
•Wenn der angehaltene Staubsauger-Roboter, der eine Störung festgestellt hat, in
die Ladestation zurückkehrt, damit er sich auflädt, wird die verlaufende Reinigung
aufgehoben.
Laden Sie den Staubsauger auf.
Automatischer Modus: Nach der Beendigung der Reinigung kehrt der Staubsauger-Roboter in die Ladestation automatisch zurück, damit er sich auflädt.
Manueller Modus: Wenn Sie den angehaltenen Staubsauger-Roboter in die Ladestation zurücksenden wollen, drücken Sie die Taste .
46
Page 47
Zurücksetzen der Einstellung des Wi-Fi-Netzes
Wenn sich Ihr Mobiltelefon infolge der Änderung des Routers oder des vergessenen Passworts an den Staubsauger-Roboter nicht anschließt, gehen Sie
nach den Hinweisen für den Anschluss an das Wi-Fi-Netz vor und paaren Sie den
Staubsauger mit dem Mobiltelefon erneut.
Anmerkung:
Wenn der Staubsauger-Roboter auf den Anschluss länger als 2 Minuten wartet,
wird seine Funktion des Wi-Fi-Netzes automatisch ausgeschaltet. Wenn Sie den
Staubsauger an das Mobiltelefon erneut anschließen wollen, machen Sie den
Reset der Einstellung des Wi-Fi-Netzes.
PIN N GO (Reinigung vor Ort)
Mittels der mobilen App kann man den Zielpunkt auf der Raumkarte bestimmen.
Der Staubsauger-Roboter plant nachfolgend automatisch die Strecke und verschiebt sich zum jeweiligen Punkt. Wenn Sie mittels der App den Zielpunkt des
Staubsaugers bestimmen, der sich in dem Bereitschaftsmodus befindet oder der
angehalten ist, räumt der Staubsauger den Raum um diesen Platz in der Größe von
1,6 m x 1,6 m auf. Nach der Beendigung der Reinigung kehrt der Staubsauger in
die Ausgangsposition automatisch zurück.
Anmerkung:
Wenn Sie diesen Reinigungsmodus bei dem angehaltenen Staubsauger starten,
beendigen Sie die verlaufende Reinigung.
1,6 m
Einstellung einer ausgeschlossenen Zone oder einer virtuellen
Wand
Mittels der mobilen App kann man eine ausgeschlossene Zone oder eine virtuelle Wand einstellen. Der Staubsauger-Roboter betritt nachfolgend während der
Reinigung die ausgeschlossene Zone nicht / er überschreitet die Grenze nicht,
welche die virtuelle Wand bestimmt.
Anmerkungen:
•Vor dem Gebrauch dieser Funktion ist es nötig, die Funktion der automatischen
Speicherung der Raumkarte zu genehmigen.
•Diese Funktion wird nur zur Bestimmung der Reinigungszonen genutzt, es ist
nicht möglich, sie zur Blockierung der gefährlichen Zonen zu benutzen.
•Wenn Sie den Staubsauger-Roboter versetzen oder wenn es zu einer grundsätzlichen Änderung in der Gestaltung des Haushaltes kommt, kann die Raumkarte die
Gültigkeit verlieren und die Einstellung der virtuellen Wände oder der ausgeschlossenen Zonen wird verloren.
Ausgeschlossene Zone für das
Wischen
Virtuelle Wand
Ausgeschlossene Zone
für die Reinigung
DE
1,6 m
Aktualisierung der Raumkarte in der Realzeit Einstellung der Lautstärke
Abbildung der Aufzeichnungen der Reinigung Verwaltung der Raumkarte
Änderung der Stimme des Staubsauger-Roboters Aktualisierung der Firmware
Anbringung des Staubsauger-Roboters Abbildung des Zustands des
Staubsauger-Roboters
Anmerkung:
Die Funktionen und die Details der App können sich infolge der ständigen Entwicklung und der Aktualisierungen mäßig unterscheiden. Maßgebend sind konkrete
Funktionen und Details der aktuellen Version der App.
47
Page 48

Reinigung der ausgewählten Zonen
Mittels der App kann man eine Zone oder mehrere Zonen auswählen, die Sie
aufräumen wollen. Der Staubsauger-Roboter räumt nachfolgend einen Raum oder
mehrere Räume auf, die Sie in der App ausgewählt haben.
Anmerkungen:
•Vor dem Gebrauch dieser Funktion ist es nötig, die Funktion der automatischen
Speicherung der Raumkarte zu genehmigen, und der Staubsauger-Roboter muss
ebenfalls eine generierte Raumkarte der Reinigung besitzen.
•Nach dem Start der Reinigung verschiebt sich der Staubsauger hinter die ausgewählte Zone. Beseitigen Sie vom Fußboden um die ausgewählte Zone herum
alle eventuellen Hindernisse (mit der Ausnahme der Hindernisse, die zur Verhinderung der Bewegung des Staubsaugers dienen).
Geplante Reinigung
Mittels der mobilen App kann man die Zeit der geplanten Reinigung einstellen.
In der jeweiligen Zeit startet der Staubsauger-Roboter automatisch die Reinigung
und nach deren Beendigung kehrt er in die Ladestation zurück.
Anmerkung:
Nach dem Start der Reinigung verschiebt sich der Staubsauger hinter die konfigurierte Zone. Beseitigen Sie vom Fußboden um die konfigurierte Zone herum alle eventuellen Hindernisse (mit der Ausnahme der Hindernisse, die zur Verhinderung der
Bewegung des Staubsaugers dienen).
Modus der Reinigung
In der App kann man den Spar-, üblichen und leistungsfähigen Modus auswählen.
Der Ausgangsmodus ist der übliche Modus.
Modus Nicht stören
Während des Modus Nicht stören wird der Staubsauger-Roboter die Reinigung nicht
automatisch fortsetzen oder die Sprachhinweise abspielen. Das Licht der Kontrollleuchte der Einspeisung wird abgeblendet sein. Mittels der App kann man den Modus
Nicht stören ausschalten oder seinen Zeitabschnitt ändern.
Reinigung einer bestimmten Zone
Mittels der App kann man eine Zone einstellen, die Sie aufräumen wollen. Der
Staubsauger-Roboter räumt nachfolgend die Zone auf, die Sie in der App ausgewählt haben.
48
Page 49
Nutzung des Wasserbehälters
•Benutzen Sie die Wischfunktion nicht für die Reinigung der Teppiche.
•Nach dem Wischen des Fußbodens leeren Sie den Wasserbehälter aus und nehmen Sie das Mopptuch ab.
DE
1. Füllen Sie den Behälter mit dem Wasser auf.
2. Installieren Sie das Mopptuch.
3. Installieren Sie die Baugruppe des Wasserbehälters und
starten Sie das Wischen.
49
Page 50

Wartung - Staubbehälter
Regelmäßige Wartung
Zur Erreichung der möglichst guten Ergebnisse reinigen Sie den Staubsauger-Roboter regelmäßig und führen Sie
dessen Wartung nach den Hinweisen in der unten angegebenen Tabelle durch. Wählen Sie die Frequenz der Reinigung
und der Wartung nach dem Gebrauch des Geräts aus.
Empfohlene Frequenz der Reinigung und der Wartung:
Teil der Haupteinheit Frequenz der Reinigung Frequenz des Austausches
Filter Jede Woche Alle 2 Monate
Rollenbürste Jede Woche Alle 6-12 Monate
Seitenbürste Jeden Monat Alle 3-6 Monate oder wenn sie sichtbar beschädigt ist
Alle 3-6 Monate oder wenn die Dichtung der Abdec-
Abdeckung der Rollenbürste Jeden Monat
Sensor Jeden Monat /
kung der Rollenbürste aus dem Silikongummi sichtbar
beschädigt ist
Ladeelektrode Jeden Monat /
Allrichtungsrad Jeden Monat /
50
Page 51
1. Drücken Sie die Taste auf dem Staubbehälter und nehmen Sie sie heraus 4. Öffnen Sie die Abdeckung des HEPA-Filters.
DE
2. Öffnen Sie die Seitenabdeckung des Staubbehälters.
3. Leeren Sie den Staubbehälter aus.
5. Nehmen Sie den HEPA-Filter und den Vorfilter heraus. Klopfen Sie auf
den HEPA-Filter, damit Sie den Staub daraus beseitigen. Wir empfehlen
nicht, den HEPA-Filter mit Wasser abzuspülen.
6. Waschen Sie den Vorfilter.
51
Page 52
7. Wischen Sie den Staubbehälter mit dem Tuch ab. Spülen Sie den Staubbehälter
mit dem Wasser nicht ab.
8. Lassen Sie den Staubkasten und die Filterkomponenten vollständig
trocknen und halten Sie sie trocken, Sie verlängern so ihre Lebensdauer.
Anmerkung: Wir empfehlen, den Vorfilter alle 15-30 Tage zu waschen.
Die maximale Lebensdauer eines HEPA-Filters beträgt 3 Monate.
A. Installieren Sie den Vorfilter und den HEPA-Filter in den Staubbehälter
zurück.
Anmerkung:
1. Vergewissern Sie sich vor der Installation der Filter, dass der Vorfilter
und der HEPA-Filter trocken sind.
2. Setzen Sie den Vorfilter und den HEPA-Filter dem direkten Sonnenlicht nicht aus.
B. Schließen Sie die Abdeckung des Staubbehälters und installieren Sie
den Behälter in die Haupteinheit zurück.
Anmerkung: Spülen Sie den Staubbehälter mit dem Wasser nicht ab.
52
Page 53
Wartung - Wasserbehälter und Mopptuch
1. Nehmen Sie die Baugruppe des Wasserbehälters heraus. 4. Bereinigen Sie das Mopptuch.
2. Nehmen Sie das Mopptuch ab. 5. Lassen Sie das Mopptuch trocknen.
DE
3. Leeren Sie den Wasserbehälter aus. 6. Wischen Sie den Wasserbehälter trocken ab oder lassen Sie ihn
trocknen.
53
Page 54
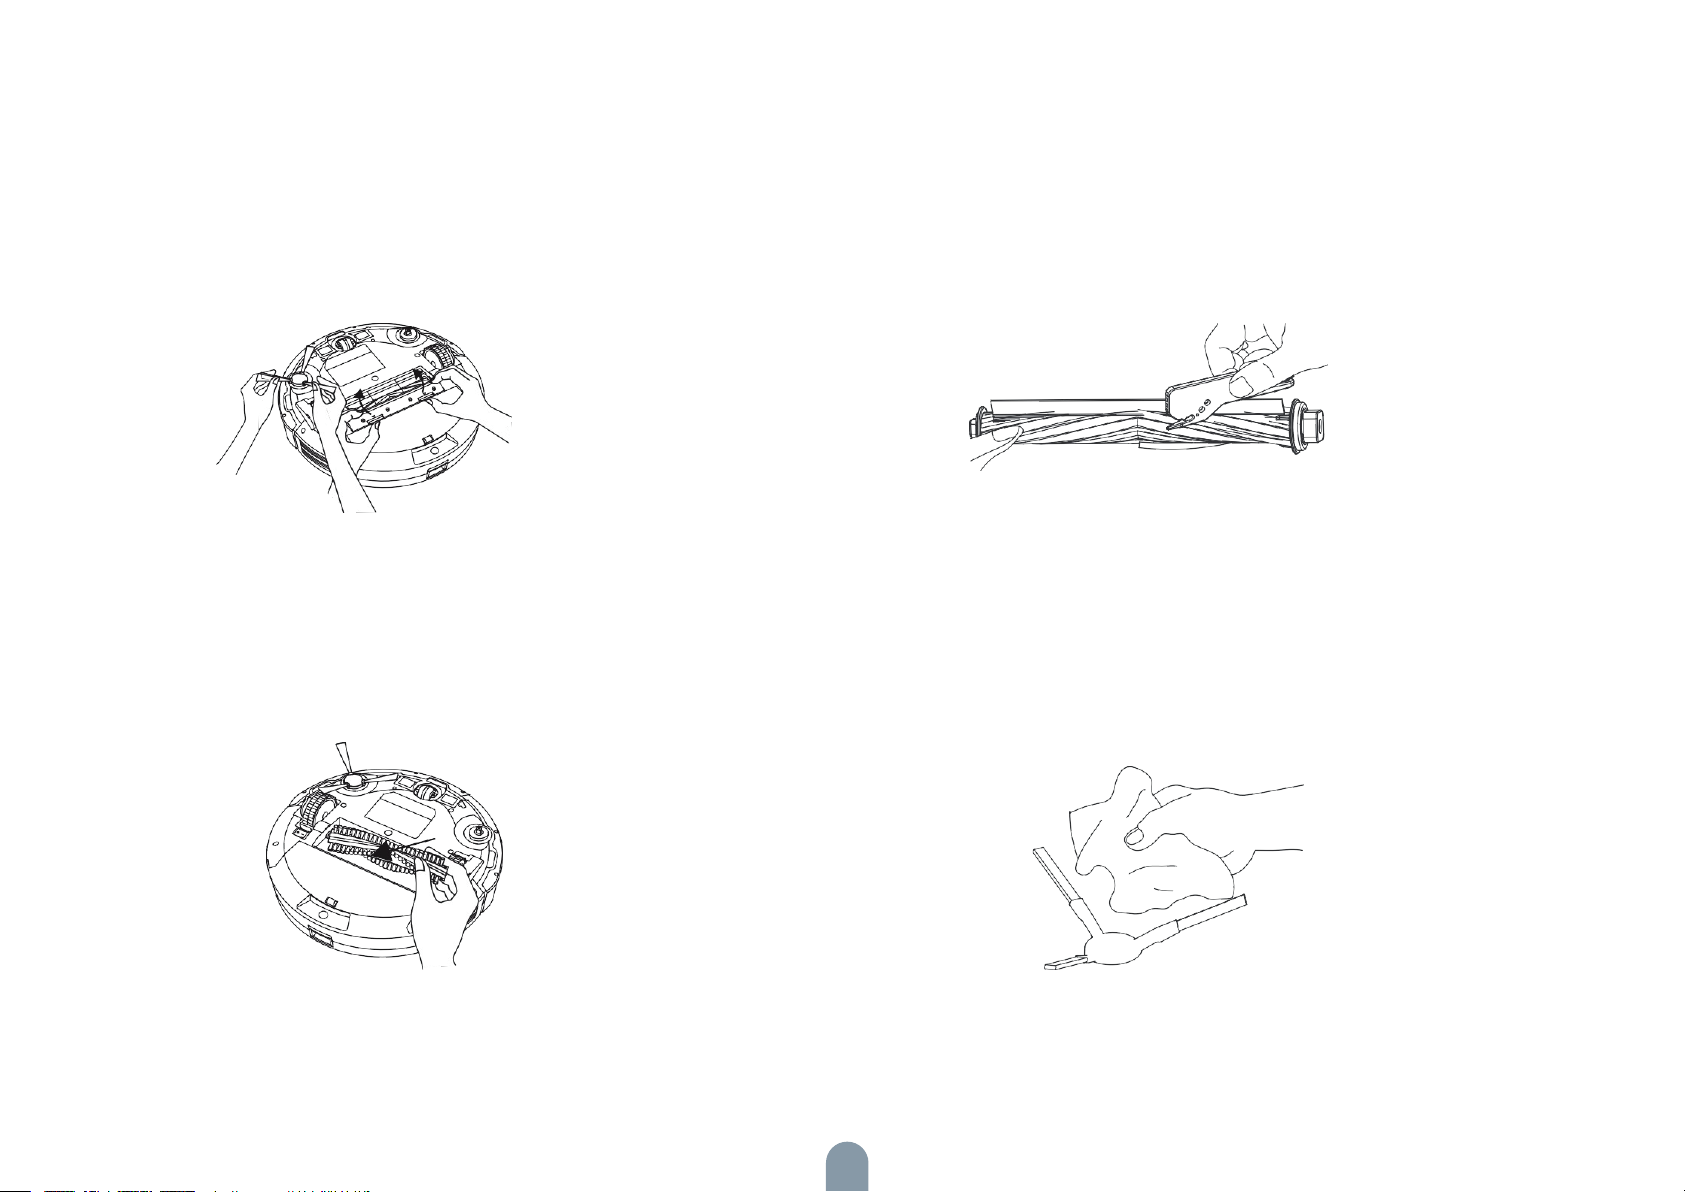
Wartung - Rollen- und Seitenbürste
1. Öffnen Sie die Abdeckung der Rollenbürste. 3. Bereinigen Sie die Bürste von den aufgewickelten Haaren mittels eines
Werkzeugs.
2. Nehmen Sie die Welle der Rollenbürste heraus. 4. Bereinigen Sie die Seitenbürsten.
54
Page 55
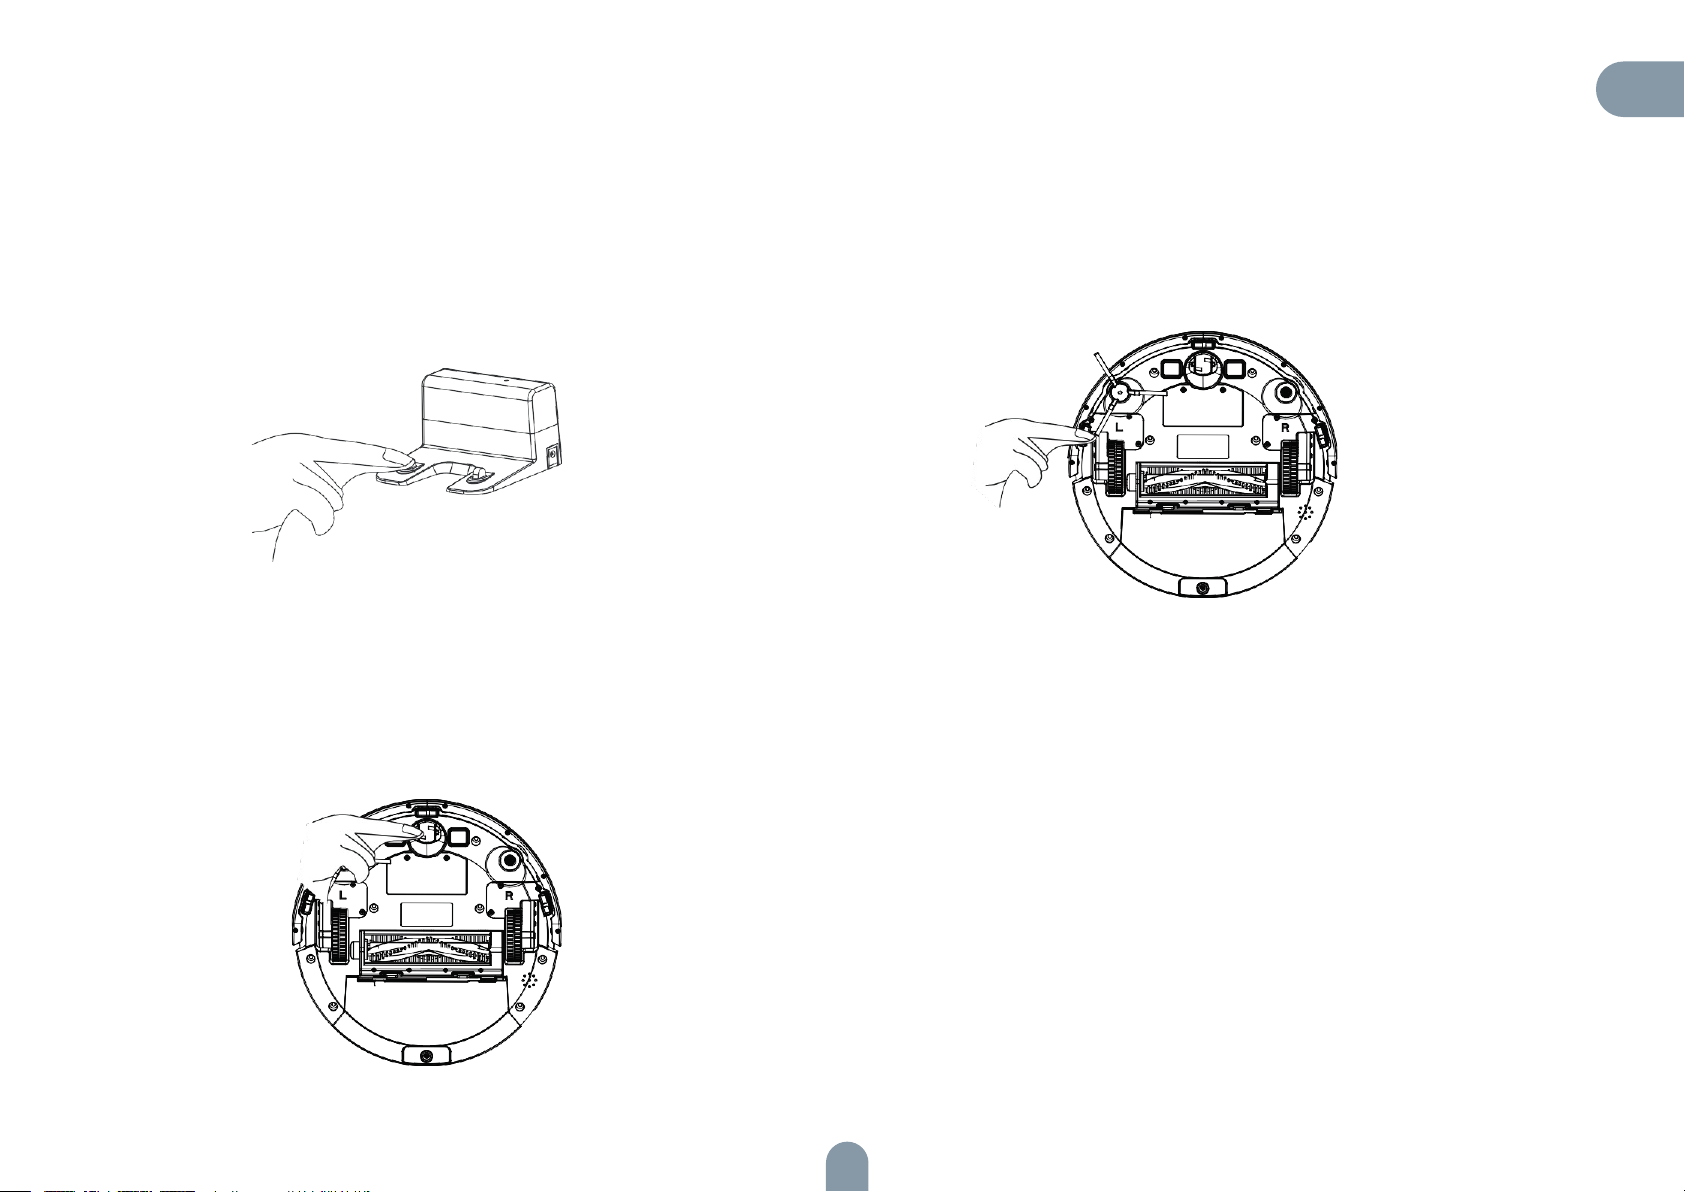
Wartung - Ladeelektrode, Sensor gegen Absturz, Antriebsrad und Allrichtungsrad
1. Bereinigen Sie die Ladeelektrode. 3. Bereinigen Sie den Sensor gegen Absturz.
2. Bereinigen Sie das Antriebs- und Allrichtungsrad.
DE
55
Page 56

Problemlösung
Wenn der Staubsauger-Roboter während der Reinigung eine Störung aufzeichnet, beginnt die Kontrollleuchte der Einspeisung, schnell rot zu blinken, und Sie hören
einen Sprachhinweis. In diesem Fall gehen Sie nach den Hinweisen in der unten angegebenen Tabelle vor und beseitigen Sie das Problem.
Fehler Lösung
Fehler 1: Der Laserkopf ist blockiert oder verklemmt, überprüfen Sie ihn. Der Laserfernsensor ist blockiert oder infolge der Verwicklung eines fremden Ge-
genstandes verklemmt. Beseitigen Sie das Hindernis oder den fremden Gegenstand.
Wenn es nicht möglich ist, das Hindernis oder den fremden Gegenstand zu beseitigen, übertragen Sie die Haupteinheit auf eine andere Stelle und starten Sie sie.
Fehler 2: Der Antikollisionssensor hat sich verklemmt, überprüfen Sie ihn. Der Stoßpuffer hat sich verklemmt. Klopfen Sie auf den Stoßpuffer und beseitigen
Sie den fremden Gegenstand. Wenn in dem Stoßpuffer kein fremder Gegenstand ist,
übertragen Sie die Haupteinheit auf eine andere Stelle und starten Sie sie.
Fehler 3: Gerade das Rad ist über dem Niveau des Fußbodens, übertragen Sie die
Haupteinheit auf eine andere Stelle und starten Sie sie erneut.
Fehler 4: Der Sensor gegen Absturz ist blockiert, überprüfen Sie ihn und bereinigen
Sie ihn.
Fehler 5: An der Seitenbürste sind aufgewickelte Schmutzigkeiten, bereinigen Sie sie. In den Seitenbürsten konnten fremde Gegenstände stecken bleiben. Zerlegen Sie
Fehler 6: An dem rechten/linken Rad sind aufgewickelte Schmutzigkeiten, bereinigen
Sie sie.
Fehler 7: Der Staubsauger-Roboter blieb stecken, übertragen Sie ihn auf eine andere
Stelle.
Fehler 8: Schwache Batterie, laden Sie den Staubsauger-Roboter auf. Schwache Batterie. Laden Sie den Staubsauger vor der Nutzung auf.
Das Rad ist über dem Niveau des Fußbodens. Übertragen Sie die Haupteinheit auf
eine andere Stelle und starten Sie sie.
Die Haupteinheit ist über dem Niveau des Fußbodens. Übertragen Sie die Haupteinheit auf eine andere Stelle und starten Sie sie. Dieser Fehler kann ebenfalls auf den
verschmutzten Sensor gegen Absturz aufmerksam machen. Wischen Sie den Sensor
gegen Absturz ab.
und bereinigen Sie die Seitenbürsten.
Um das Rad herum können aufgewickelte fremde Gegenstände sein. Bereinigen Sie
das Rad und starten Sie die Haupteinheit erneut.
Die Haupteinheit konnten stecken bleiben. Beseitigen Sie die Hindernisse aus der
Umgebung der Haupteinheit.
Fehler 9: Problem mit der Aufladung, überprüfen Sie das Laden. Die Temperatur der Batterie ist zu hoch oder zu niedrig. Warten Sie, bis die Tempe-
ratur der Batterie auf den Normalwert zurückkehrt, und starten Sie den Staubsauger-
-Roboter erneut.
Fehler 10: Der Sensor der Wände ist blockiert, überprüfen Sie ihn. Der Sensor der Wände ist mit dem Staub abgedeckt. Wischen Sie den Sensor der
Wände ab.
Fehler 11: Unebener Fußboden, übertragen Sie die Haupteinheit auf eine andere
Stelle und starten Sie sie erneut.
Fehler 12: Die obere Abdeckung des Lasers ist blockiert oder verklemmt, überprüfen
Sie sie.
Die Haupteinheit war beim Starten geneigt. Legen Sie die Haupteinheit auf den ebe-
nen Fußboden und starten Sie sie erneut.
Der Laserdrucksensor des Drucks ist gedrückt oder blockiert. Übertragen Sie den
Staubsauger-Roboter auf eine andere Stelle und starten Sie ihn erneut.
56
Page 57

Problemlösung
Fehler Lösung
Schwache Batterie. Laden Sie den Staubsauger-Roboter auf und starten Sie ihn nach-
Es ist nicht möglich, den Staubsauger-Roboter einzuschalten.
Es ist nicht möglich, das Gerät aufzuladen.
Langsames Aufladen
Der Staubsauger-Roboter ist in die Ladestation nicht zurückgekehrt.
Außergewöhnliches Verhalten Schalten Sie den Staubsauger-Roboter aus und nachfolgend ein.
Der Staubsauger-Roboter gibt während der Reinigung den außergewöhnlichen Lärm.
Die Reinigungsleistung des Staubsauger-Roboters ist herabgesetzt / der Staubsauger
lässt den Schmutz hinter sich.
Es ist nicht möglich, den Staubsauger-Roboter an das Wi-Fi-Netz anzuschließen.
Es ist nicht möglich, die geplante Reinigung durchzuführen.
folgend.
Die Temperatur der Batterie ist zu hoch oder zu niedrig. Benutzen Sie den Staubsauger-Roboter im Umfeld mit der Temperatur zwischen 0 °C bis 40 °C.
Die Ladestation ist an die Einspeisung nicht angeschlossen. Vergewissern Sie sich,
dass die beiden Enden des Speisekabels der Ladestation ordentlich angeschlossen
sind. Schlechter Kontakt zwischen der Ladestation und der Haupteinheit. Bereinigen
Sie die Metallteile der Ladestation und den Ladekontakt der Haupteinheit.
Überprüfen Sie, ob die Kontrollleuchte der Ladestation leuchtet.
Beim Gebrauch im Umfeld mit der hohen oder niedrigen Temperatur setzt die Haupteinheit automatisch die Ladegeschwindigkeit herab, damit die Lebensdauer der
Batterie verlängert wird.
Der Bereich des Ladekontakts kann verschmutzt sein. Bereinigen Sie diesen Bereich
mit einem trockenen Tuch.
Um die Ladestation herum gibt es zu viele Hindernisse. Bringen Sie die Ladestation in
einen mehr freien Raum an.
In der Rollenbürste, in den Seitenbürsten oder im Hauptrad konnten fremde Gegenstände stecken bleiben. Schalten Sie den Staubsauger-Roboter aus und bereinigen
Sie ihn. Das Allrichtungsrad ist mit dem Staub umhüllt oder es sind darauf Schmutzigkeiten aufgewickelt. Nehmen Sie das Rad mit Hilfe des Schraubenziehers heraus und
spülen Sie es ab.
Der Staubbehälter ist voll. Leeren Sie den Staubbehälter aus und bereinigen Sie ihn.
Blockierter Filter. Reinigen Sie den Filter. Um die Rollenbürste herum sind aufgewickelte fremde Gegenstände. Bereinigen Sie die Rollenbürste.
Die Funktion des Wi-Fi-Netzes des Staubsauger-Roboters ist nicht eingeschaltet.
Machen Sie den Reset des Anschlusses an das Wi-Fi-Netz und versuchen Sie es noch
einmal. Schlechte Qualität des Signals des Wi-Fi-Netzes. Bringen Sie die Einheit in
den Bereich mit dem guten Signal des Wi-Fi-Netzes an.
Nicht standardmäßiger Anschluss an das Wi-Fi-Netz: Machen Sie den Reset der Einstellung des Wi-Fi-Netzes, laden Sie die neueste Version der mobilen App herunter
und versuchen Sie, sich erneut anzuschließen.
Plötzlicher Unterbrechung des Anschlusses an das Wi-Fi-Netz. Unrichtige Einstellung
des Routers. Wenden Sie sich an den Kundenservice.
Schwache Batterie. Die geplante Reinigung wird nur dann gestartet, wenn die Batterie mindestens auf 20 % aufgeladen ist.
DE
57
Page 58

Verbraucht der Staubsauger-Roboter die Energie, wenn er in der Ladestation gelassen ist?
Ist es vor den ersten drei Nutzungen nötig, den Staubsauger-Roboter für die Dauer
von 16 Stunden aufladen zu lassen?
Das Moppmodul gibt kein Wasser aus oder es gibt nur eine sehr kleine Menge Wasser aus.
Schwache Batterie während der Reinigung. Der Staubsauger-Roboter setzt danach,
als er in die Ladestation zurückgekehrt ist, die Reinigung nicht fort.
Der Staubsauger-Roboter kann in die Ladestation nach der Beendigung der Reinigung vor Ort (PIN IN GO) oder danach, als die Ladestation versetzt wurde, nicht
zurückkehren.
Der Staubsauger-Roboter hat während der Reinigung einige Stellen ausgelassen.
Wenn der Staubsauger in der Ladestation immer gelassen ist, verbraucht er nur eine
sehr kleine Menge Energie. Er hilft so die möglichst gute Leistung der Batterie erhalten.
Die Lithium-Batterie hat keinen Speichereffekt. Sobald sie voll aufgeladen ist, ist es
möglich, sie zu nutzen. Es ist nicht nötig, 16 Stunden zu warten.
Überprüfen Sie, ob es das Wasser im Wasserbehälter gibt. Stellen Sie mittels der App
die Wasserausgabe auf den Maximalwert ein.
Installieren Sie das Mopptuch und den Halter nach den angegebenen Weisungen.
Überprüfen Sie, ob sich der Staubsauger-Roboter in dem Modus Nicht stören nicht
befindet. Wenn sich der Staubsauger-Roboter in dem Modus Nicht stören befindet,
wird er die Reinigung nicht fortsetzen. Wenn der Staubsauger-Roboter in die Ladestation manuell angebracht wurde, wird er die Reinigung nicht fortsetzen.
Der Staubsauger-Roboter generiert nach der Beendigung der Reinigung vor Ort
oder danach, als die Ladestation versetzt wurde, die Raumkarte des Haushalts erneut.
Wenn sich der Staubsauger-Roboter von der Ladestation zu weit befindet, ist es
möglich, dass er darin nicht automatisch zurückkehren kann. In diesem Fall bringen
Sie ihn in die Ladestation manuell an.
Der Sensor der Wände oder der Sensor gegen Absturz können verschmutzt sein.
Wischen Sie die Sensoren mit einem weichen trockenen Tuch ab.
58
Page 59
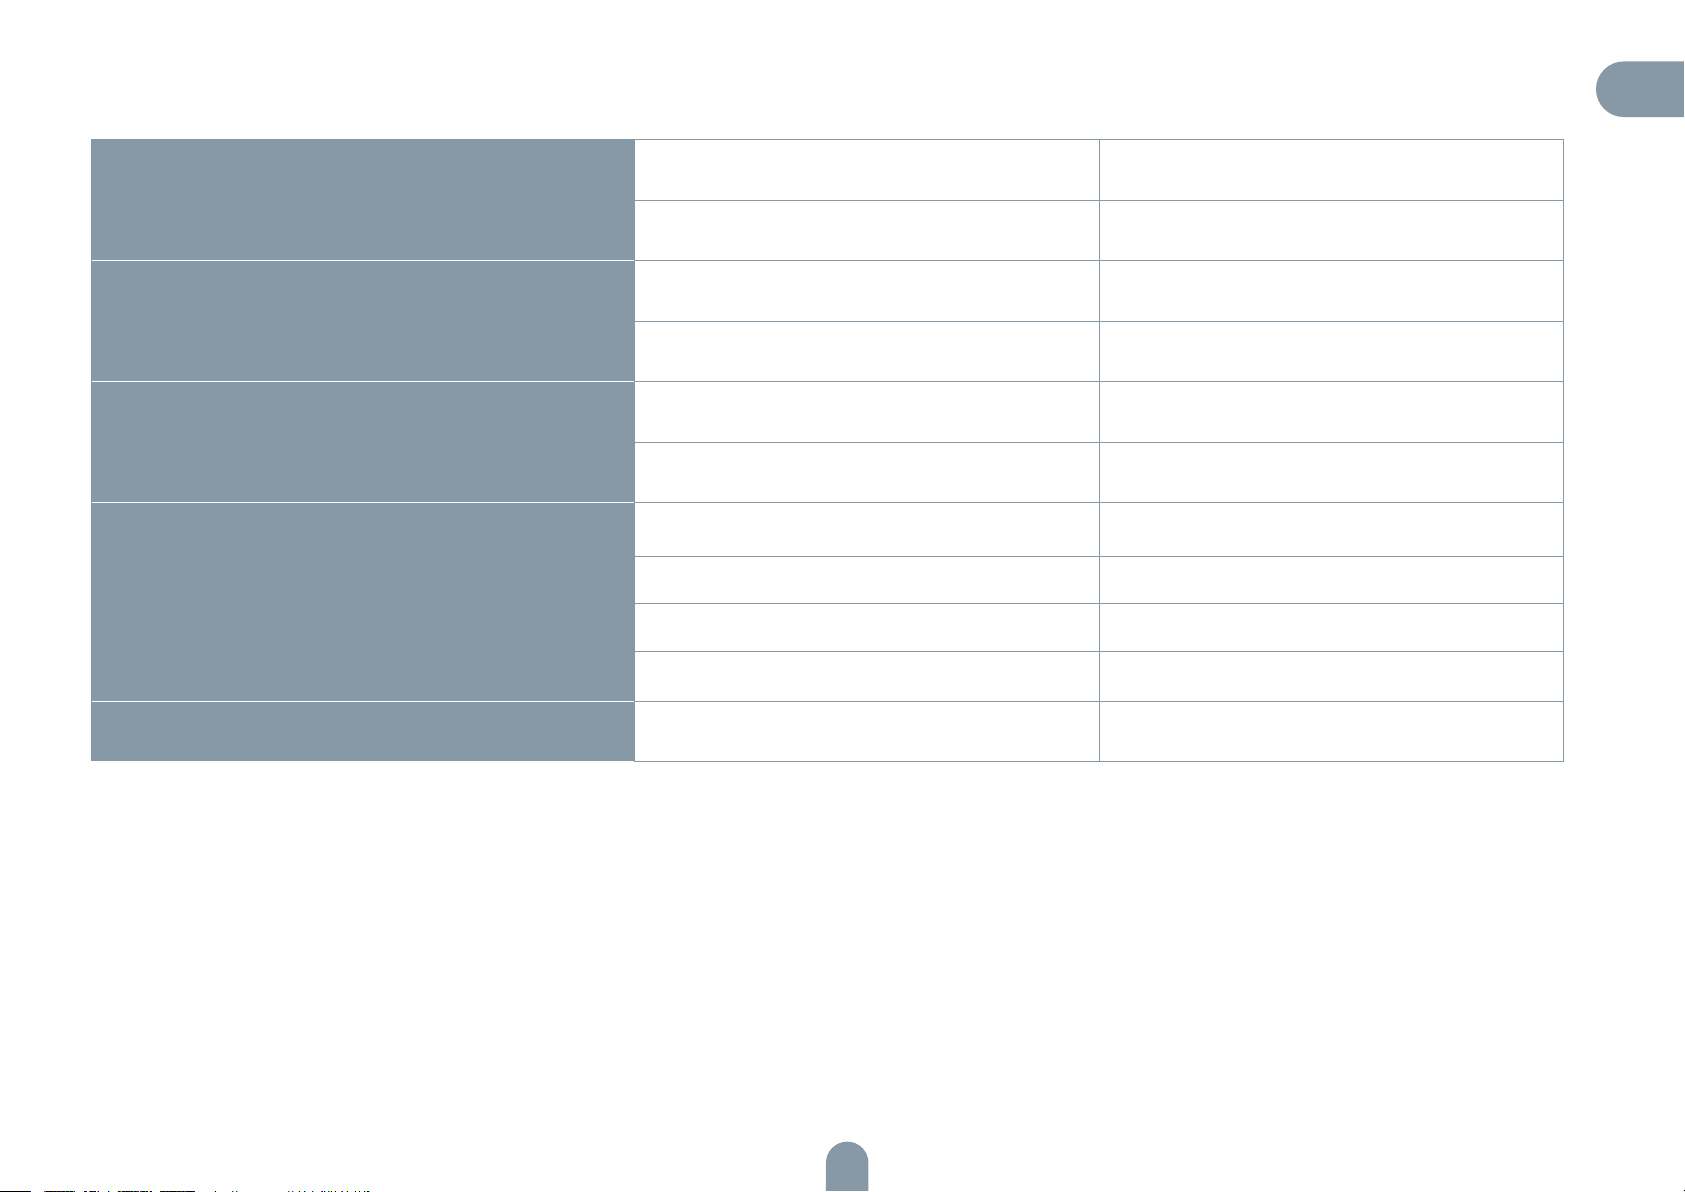
Product Specifications
Kategorie
Konstruktion
Batterie
Parameter der Reinigung
DE
Parameter Spezifikation
Durchmesser 330 mm
Höhe 96 mm
Nettogewicht 2,7 kg
Spannung 14,4 V
Batterie Wiederaufladbare Lithium-Batterie 2600 mAh
Volumen des Staubbehälters 600 ml
Typ der Aufladung Automatische oder manuelle Aufladung
Ladedauer Ca. 270 Minuten
Reinigungsdauer Ca. 100 Minuten
Haupteinheit Nennleistung (W) 28
Aufgrund der kontinuierlichen Produktentwicklung können die technischen Daten vom tatsächlichen Produkt abweichen.
Unser Unternehmen behält sich das Recht vor, das Produkt zu aktualisieren.
59
Page 60
INFORMATIONEN ÜBER DIE ENTSORGUNG UND WIEDERVERWERTUNG
Dieses Produkt ist mit einem Symbol für die getrennte Sammlung gekennzeichnet. Das Produkt muss im Einklang
mit den Vorschriften für die Entsorgung von elektrischen und elektronischen Geräten (Richtlinie 2012/19/EU über
elektrische und elektronische Geräteabfälle) entsorgt werden. Eine Entsorgung über den normalen Hausmüll
ist unzulässig. Alle elektrischen und elektronischen Produkte müssen im Einklang mit allen örtlichen
und europäischen Vorschriften an dafür vorgesehenen Sammelstellen, die über eine entsprechende Genehmigung
und Zertifizierung gemäß den örtlichen und legislativen Vorschriften verfügen entsorgt werden. Die richtige
Entsorgung und Wiederverwertung hilft dabei die Auswirkungen auf die Umwelt und die menschliche Gesundheit
zu minimieren. Weitere Informationen zur Entsorgung erhalten Sie von Ihrem Verkäufer, der autorisierten
Servicestelle oder bei den örtlichen Ämtern.
EU-KONFORMITÄTSERKLÄRUNG
Hiermit erklärt Tesla Global Limited, dass der Funkanlagentyp TSL-VC-AI200 der Richtlinie 2014/53/EU entspricht.
Der vollständige Text der EU-Konformitätserklärung ist unter der folgenden Internetadresse verfügbar: tsl.sh/doc
Konnektivität: WIFI 802.15.4
Frequenzband: 2.400 - 2.480 GHz
Max. Sendeleistung. (EIRP): < 20 dBm
Produzent
Tesla Global Limited
Far East Consortium Building,
121 Des Voeux Road Central
Hong Kong
www.teslasmart.com
60
Page 61
TESLA SMART ROBOT
VACUUM LASER AI200
EN
DE
CZ
SK
PL
HU
SL
UŽIVATELSKÁ PŘÍRUČKA
Page 62

Bezpečnostní pokyny
Před použitím tohoto produktu si přečtěte následující bezpečnostní pokyny a dodržujte všechna obvyklá bezpečnostní opatření.
Pozorně si přečtěte tuto uživatelskou příručku a uschovejte ji pro budoucí použití.
Nedodržení pokynů této uživatelské příručky může vést k poškození produktu.
Upozornění
1.Tento produkt smí rozebírat pouze autorizovaní technici. Uživatelé by se neměli pokoušeli
produkt sami rozebírat.
2.Používejte pouze napájecí adaptér dodaný výrobcem tohoto produktu. Jiné adaptéry mohou produkt poškodit.
3.Nedotýkejte se kabelů, zásuvek nebo napájecího adaptéru mokrýma rukama.
4.Dbejte na to, aby se do hnacího kolečka produktu nenamotaly záclony nebo nepřiskříply
části těla.
5.Uchovávejte produkt mimo dosah cigaret, zapalovačů a jiných zdrojů otevřeného ohně.
6.Po nabíjení produkt vyčistěte.
7.Kabel neohýbejte a na spotřebič neumisťujte těžké nebo ostré předměty.
8.Tento produkt je určen pro vnitřní použití. Nepoužívejte jej venku.
9.Nesedejte si na produkt.
10.Nepoužívejte produkt ve vlhkém prostředí, jako je např. koupelna.
11.Před použitím produktu ze země odstraňte křehké předměty (sklenice, lampy atd.) a předměty, které se mohou namotat kolem bočního kartáče a sacího otvoru (např. kabely, papíry,
záclony atd.).
12.Neumisťujte produkt na místo, ze kterého by mohl snadno spadnout (např. na stoly a židle).
13.Před použitím zkontrolujte, zda je napájecí adaptér řádně připojen k zásuvce, v opačném
případě by mohlo dojít k poškození baterie.
14.Upozorněte ostatní členy domácnosti, že produkt pracuje, aby o něj nešťastnou náhodou
nezakopli.
15.Pokud je zásobník na prach plný, před dalším použitím produktu jej vyprázdněte.
16.Provozní teplota baterie je od 0 °C do 40 °C.
17.Nepoužívejte produkt v prostředí s vysokými teplotami.
18.Před likvidací produktu vyjměte baterii.
19.Před vyjmutím baterie se ujistěte, že je produkt odpojen od zdroje napájení.
20.Použité baterie řádně zrecyklujte.
Varování
1.Používejte pouze originální dobíjecí baterie a nabíjecí stanici dodané výrobcem. Nepoužívejte nenabíjecí baterie. Specifikace baterie naleznete v sekci „Specifikace produktu“.
2.Nepoužívejte produkt v prostředí, kde se nachází zdroj otevřeného ohně nebo křehké
předměty.
3.Nepoužívejte produkt v prostředí s extrémně vysokými (nad 40 °C) nebo extrémně nízkými
(pod 0 °C) teplotami.
4.Vlasy, oblečení, prsty a všechny další části těla udržujte z dosahu otvorů a pohyblivých částí
robotického vysavače.
5.Nepoužívejte produkt na mokré podlaze nebo na podlaze, na které je rozlité velké množství
vody.
6.Nepoužívejte produkt k vysávání předmětů, které by jej mohly blokovat, jako jsou kamínky a
odpadový papír.
7.Nepoužívejte produkt k vysávání hořlavých materiálů, jako je benzín nebo inkousty tiskáren
a kopírek. Nepoužívejte produkt k úklidu prostoru, kde se nachází hořlavé materiály.
8.Nepoužívejte produkt k vysávání hořících předmětů, jako jsou cigarety, zápalky, popel atd.,
které by mohly způsobit vznik požáru.
9.Nevkládejte žádné předměty do sacího otvoru. Nepoužívejte produkt, pokud je sací otvor
zablokovaný. Ze sacího otvoru odstraňte prach, vatu a vlasy, zajistíte tak plynulou cirkulaci
vzduchu sacím otvorem.
10.S napájecím kabelem manipulujte opatrně, abyste jej nepoškodili. Nepoužívejte napájecí
kabel k tahání produktu nebo nabíjecí stanice, nenoste produkt za napájecí kabel, nepřivírejte
napájecí kabel do dveří a neveďte jej kolem ostrých hran a rohů. Zamezte, aby produkt přejížděl přes napájecí adaptér. Udržujte napájecí adaptér mimo dosah zdrojů tepla.
11.Nepoužívejte nabíjecí stanici, pokud je poškozená.
12.Nevhazujte produkt do ohně, i kdyby byl vážně poškozený, jelikož baterie produktu může
vybouchnout.
Laserový dálkový senzor je v souladu s požadavky normy IEC 60825-1:2014 pro laserová zařízení třídy 1 a nevyzařuje nebezpečné laserové záření.
62
Page 63

Obsah
Bezpečnostní pokyny 59
Produkt a jeho příslušenství 61
Složení produktu 62
Instalace 63
Popis ikonek a tlačítek aplikace 65
Zásobník na prach, nádržka na vodu a sestava mopovacího hadříku 67
Příprava 68
Nabíjení hlavní jednotky 69
Použití produktu / Spuštění úklidu 70
Pokyny k použití 71
Použití nádržky na vodu 75
Údržba - Zásobník na prach 76
Údržba - Nádržka na vodu a mopovací hadřík 79
CZ
Údržba - Válečkový a boční kartáč 80
Údržba - Nabíjecí elektroda, senzor proti pádu, hnací kolečko a všesměrové kolečko 81
Řešení problémů 82
Specifikace produktu 85
63
Page 64
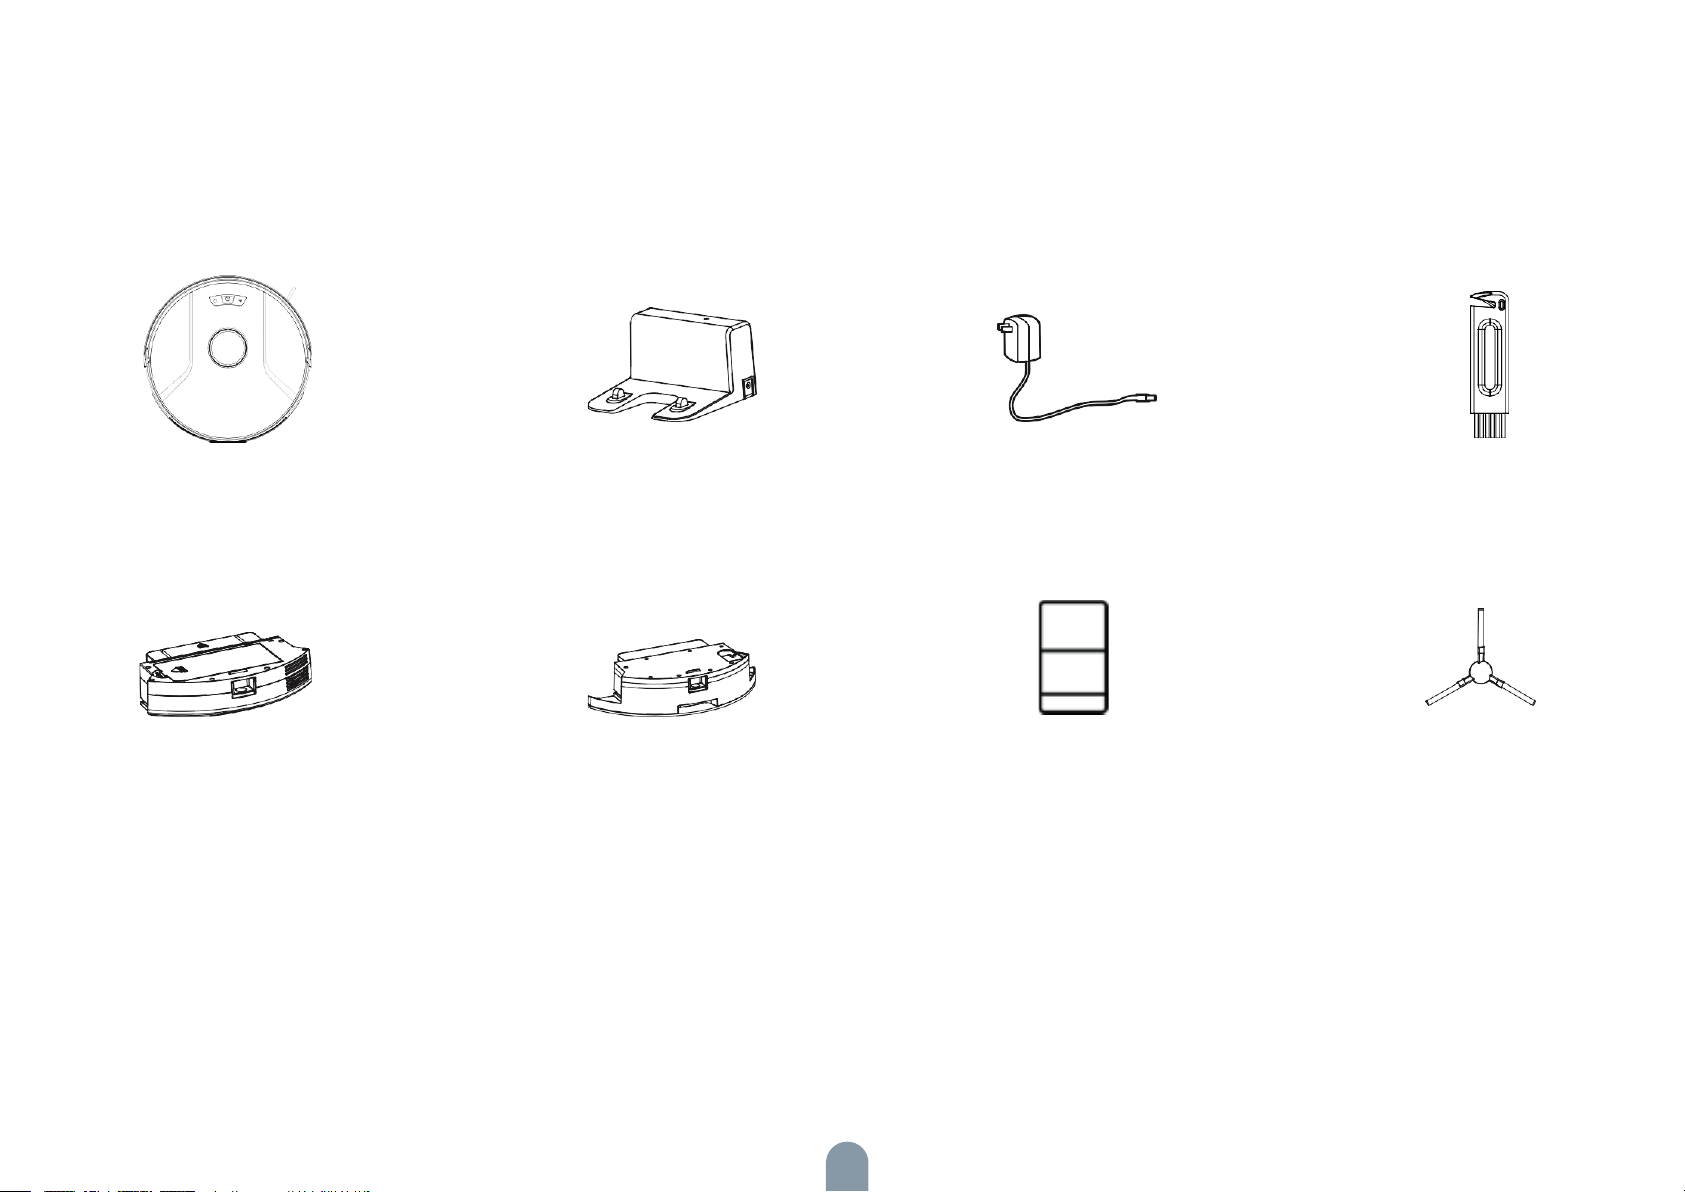
Produkt a jeho příslušenství
Hlavní jednotka
Zásobník na prach Boční kartáč (1 sady)
Nabíjecí stanice
Nádržka na vodu Uživatelská příručka
Napájecí adaptér Čisticí kartáček
64
Page 65
Složení produktu
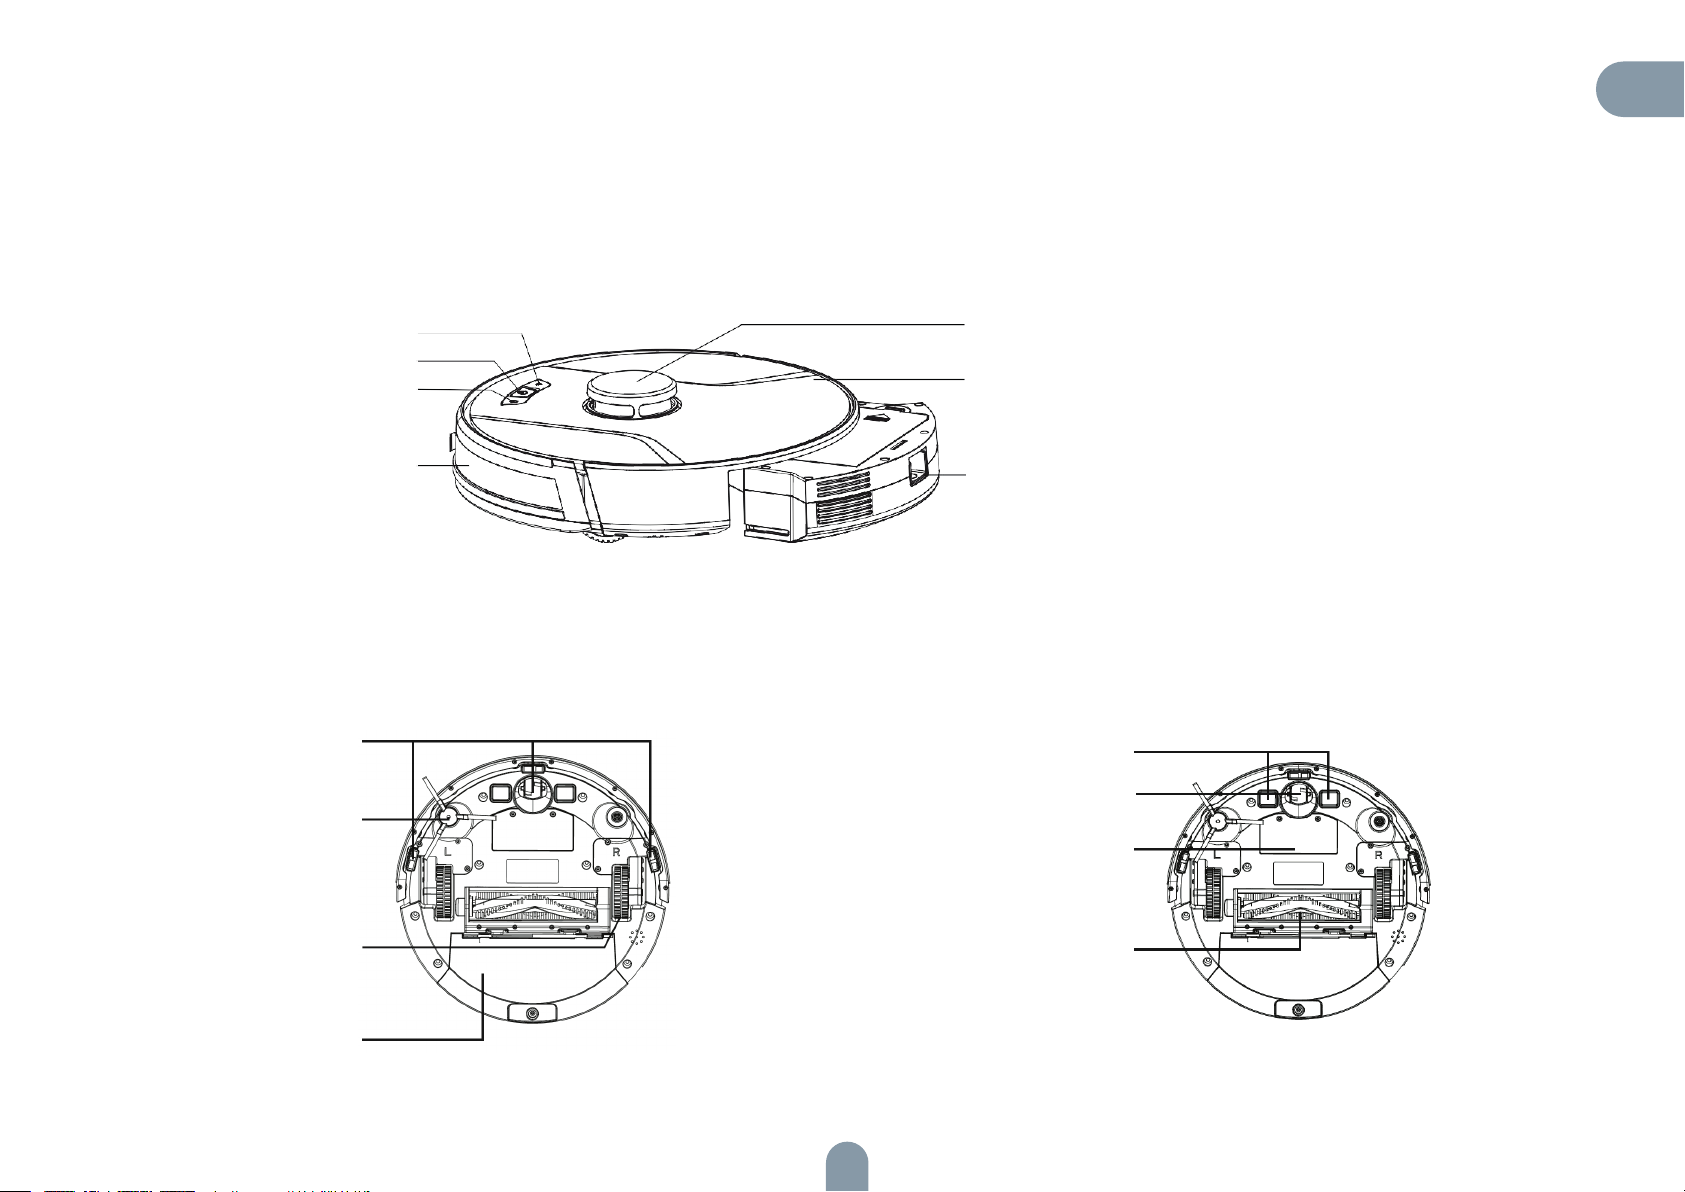
Přední pohled
CZ
Tlačítko Wi-Fi sítě
Tlačítko Zapnout/Pauza
Tlačítko pro návrat
do nabíjecí stanice
Všesměrový objektiv
Zadní pohled
Senzor proti pádu
Boční kartáč
Kryt
Laserová hlava
Tlačítko zásobníku na prach
Nabíjecí elektroda
Všesměrové kolečko
Baterie
Hnací kolečko
Zásobník na prach
Sestava válečkového kartáče
65
Page 66
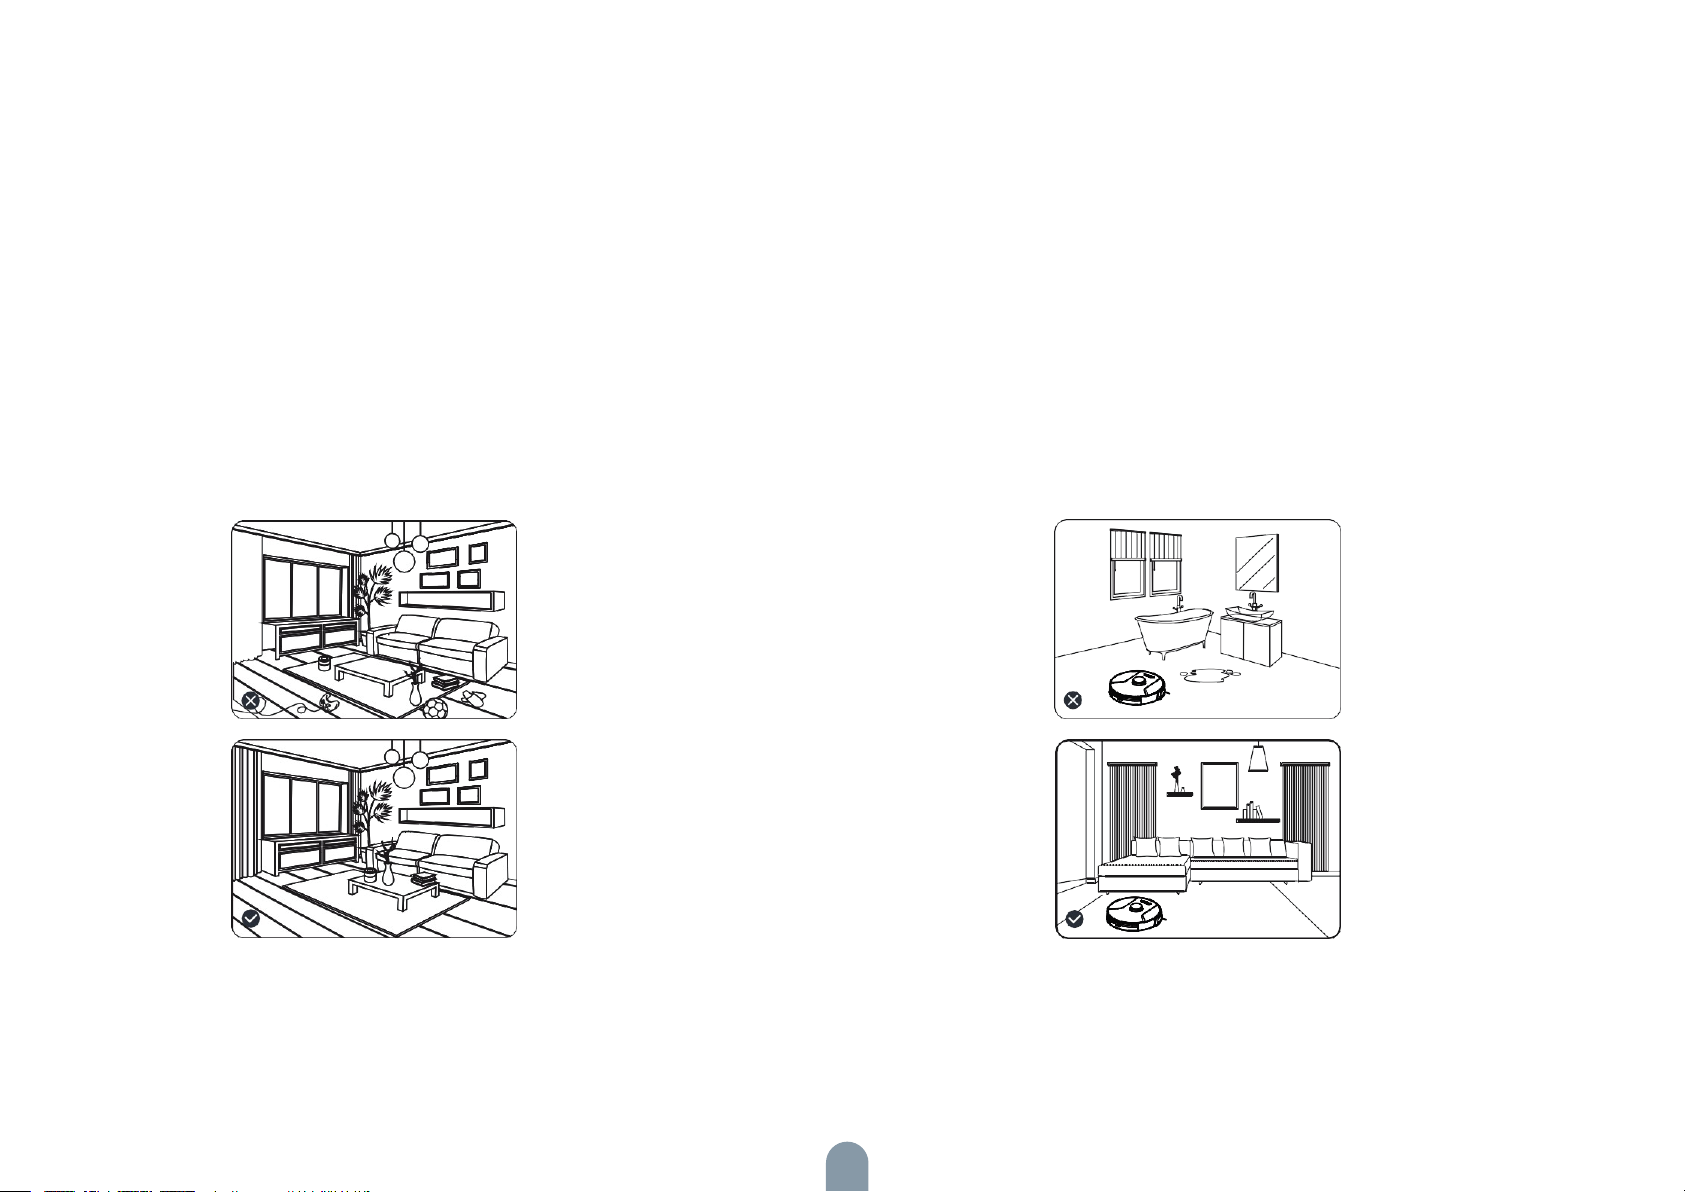
Instalace
Poznámky
1. Před spuštěním robotického vysavače odstraňte kabely a drobné předměty roztroušené po zemi a nestabilní, křehké, cenné a
potenciálně nebezpečné předměty. Zabraňte, aby se vysavač
zamotal, zasekl, něco za sebou táhl nebo něco převrhl, v opačném
případě může dojít ke zranění osob nebo poškození majetku.
2. Nepoužívejte produkt ve vlhkém prostředí, v opačném případě
může dojít k poškození ventilátoru a následnému snížení výkonu
robotického vysavače.
66
Page 67
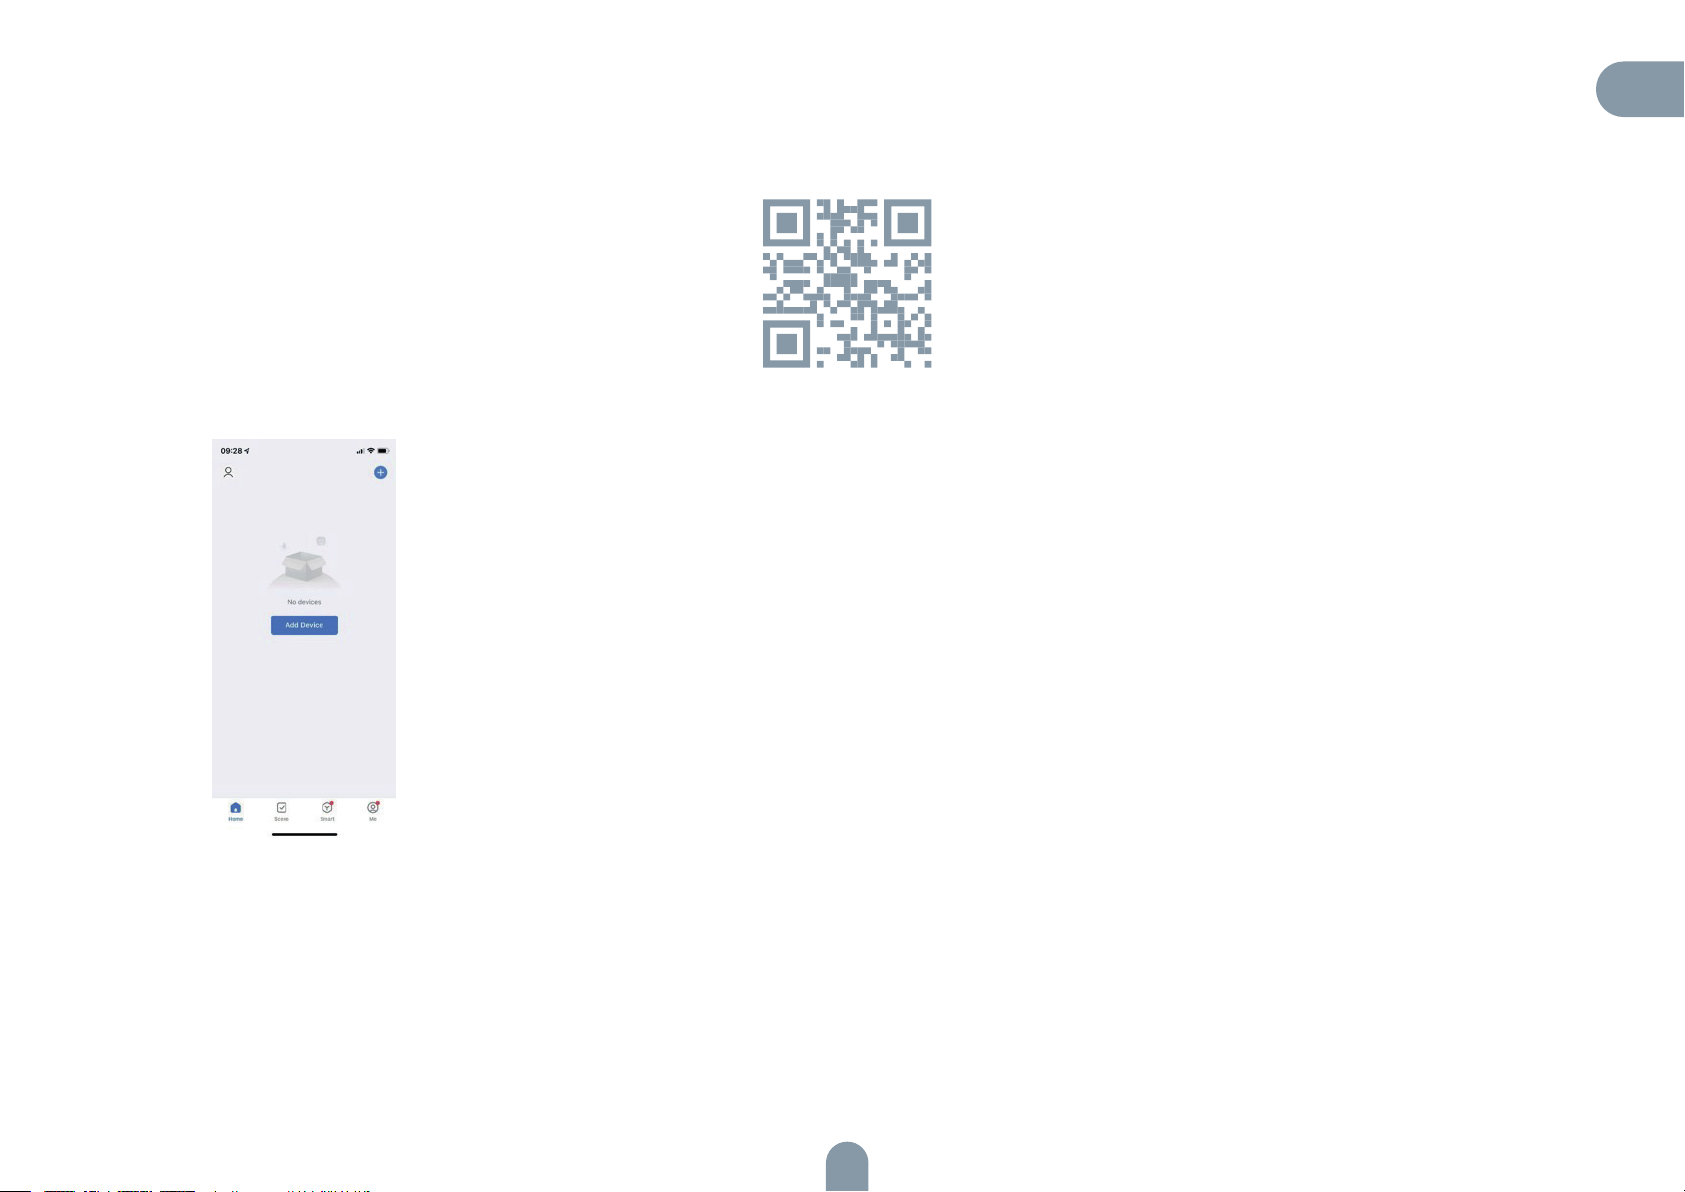
Instalace
1. Stáhněte si aplikaci TESLA Smart z App Store, zaregistrujte se a přihlaste se. Ujistěte se, že Wi-Fi síť, ke které se chcete připojit, je 2,4GHz.
2. Chcete-li přidat váš robotický vysavač, klikněte na „+“ v pravém horním rohu.
CZ
67
Page 68
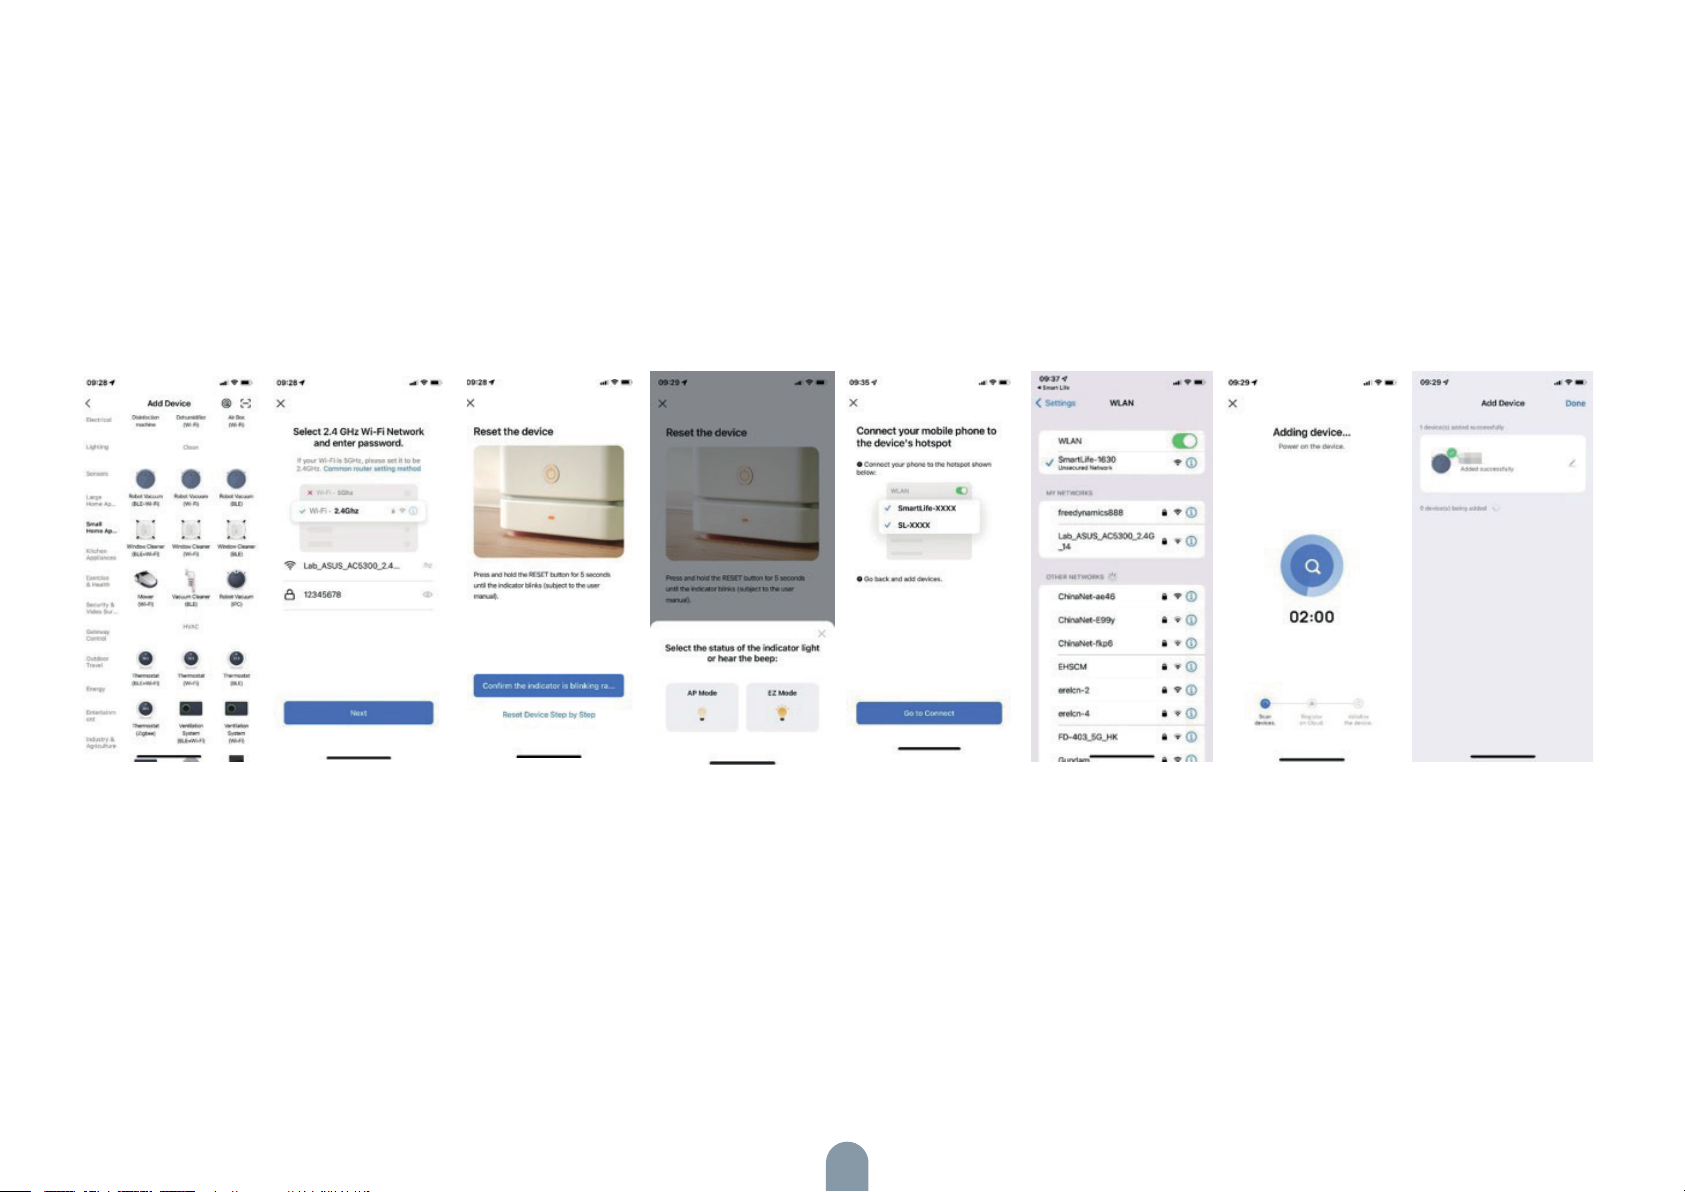
3. Zařízení podporuje režim AP:
- Ve sloupečku Small Home Appliance vyberte „Robot Vacuum (Wi-Fi)“ („Robotický vysavač (Wi-Fi)“).
- Ujistěte se, že máte k dispozici 2,4GHz Wi-Fi síť a zadejte správné heslo.
- Stiskněte a na 3 sekundy podržte tlačítko Wi-Fi sítě na robotickém vysavači, dokud nezačne blikat. V rozhraní aplikace zaškrtněte „Confirm the indicator is flashing rapidly“
(„Potvrzuji, že kontrolka rychle bliká“), klikněte na „Next“ („Další“) a ve vyskakovacím okénku zvolte režim AP.
- Vyhledejte v seznamu dostupných Wi-Fi sítí nezaheslovaný hotspot s názvem SmartLife-XXXX, klikněte na něj
a vyčkejte na připojení. Po úspěšném připojení k hotspotu se vraťte zpět do aplikace TESLA Smart, aplikace automaticky přejde do rozhraní pro připojení robotického vysavače. Počkejte na připojení a po dokončení připojení můžete robotický vysavač začít ovládat pomocí aplikace.
68
Page 69
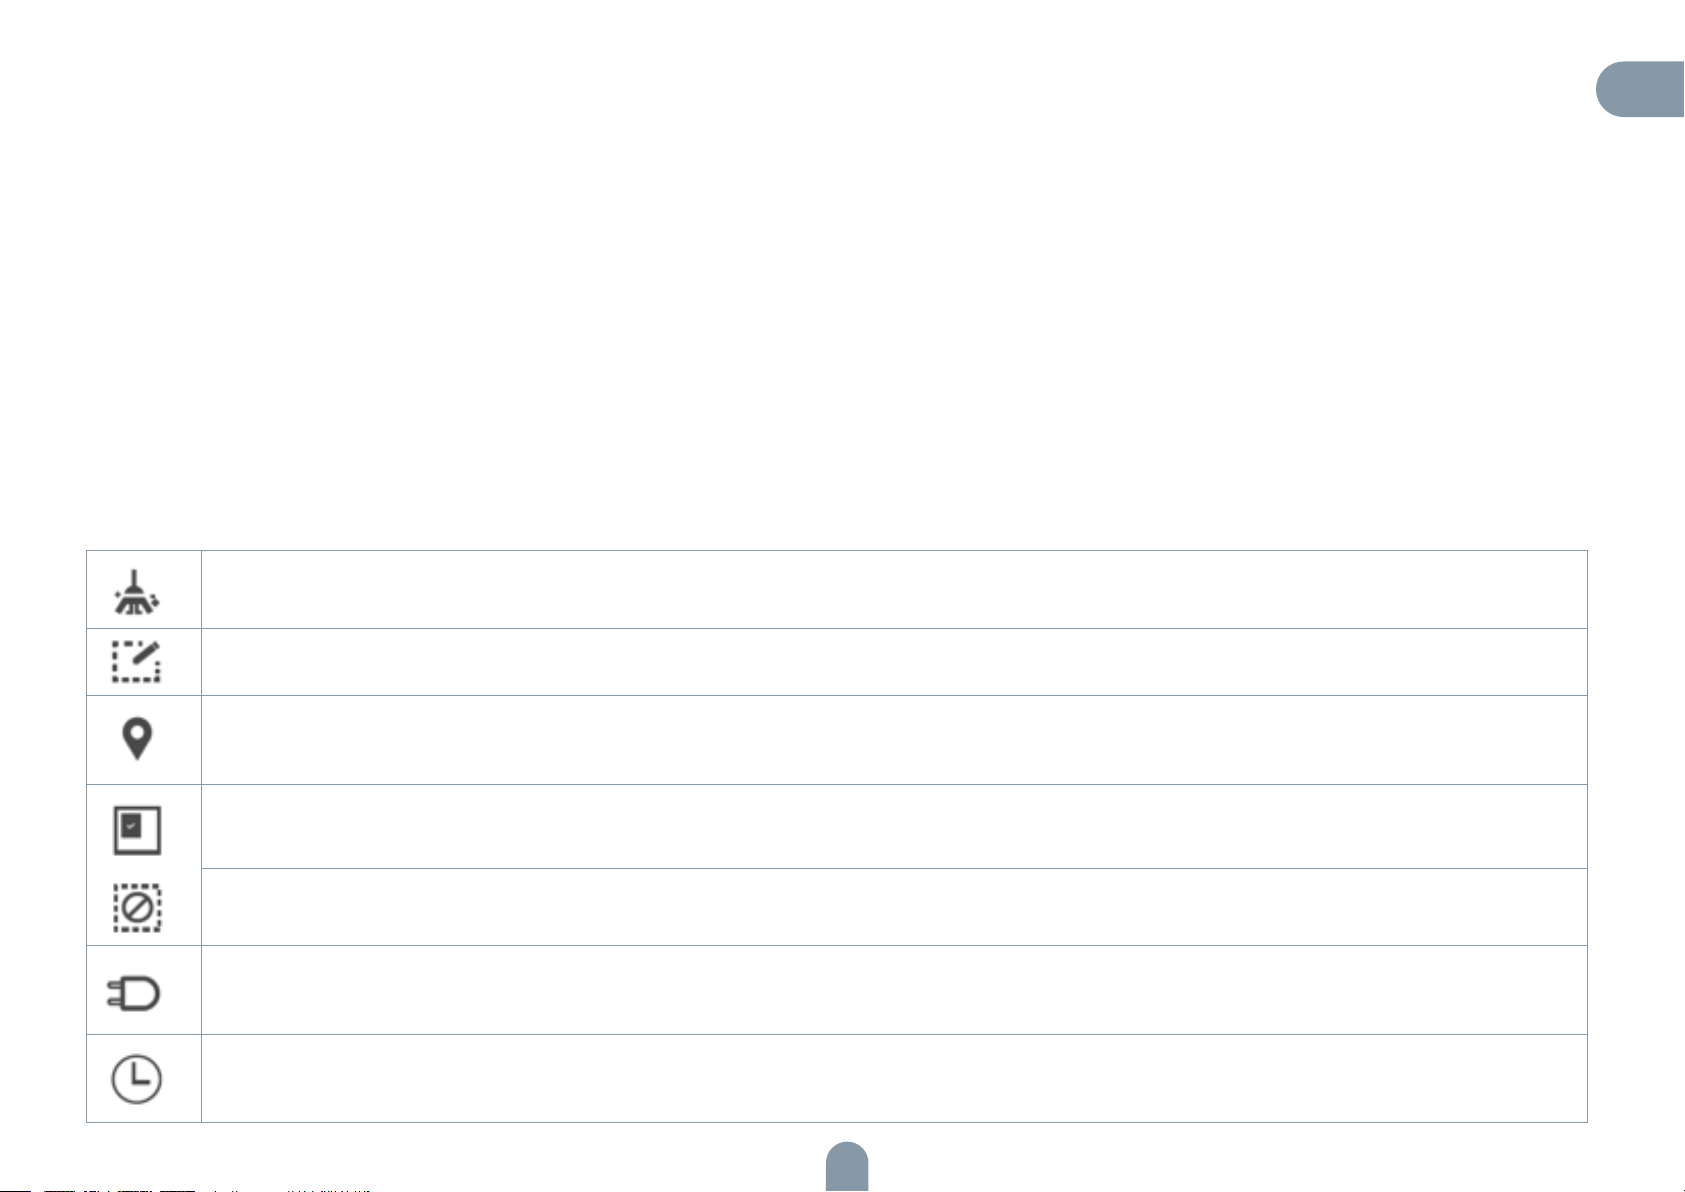
Instalace
Stáhněte si aplikaci Tesla Smart, klikněte na symbol „+“, přidejte domácí spotřebič a vyberte 2,4GHz Wi-Fi síť. Zadejte název a heslo Wi-Fi sítě, klikněte na „Next“ („Další“) a
připojte vysavač k Wi-Fi síti. Wi-Fi síť můžete nakonfigurovat jedním z následujících způsobů:
1. Rychlé připojení k Wi-Fi síti: Stiskněte a po dobu 3 sekund podržte tlačítko Wi-Fi sítě. Přístroj zapípá, přejde do režimu EZ a kontrolka Wi-Fi sítě začne rychle blikat. Následně můžete přístroj přidat a spárovat jej s aplikací.
Jakmile se zobrazí zpráva o úspěšném připojení, můžete přístroj ovládat prostřednictvím aplikace.
2. Párování pomocí hotspotu: Stiskněte a po dobu 6 sekund podržte tlačítko Wi-Fi sítě. Přístroj každé 3 sekundy zapípá. Poté, co přístroj dvakrát zapípá, přejde do režimu AP
a kontrolka Wi-Fi sítě začne pomalu blikat. Režim párování v aplikaci je nyní nutné přepnout z režimu EZ do režimu AP. Následně můžete zadat název a heslo Wi-Fi sítě a kliknout na „Go to Connect“ („Přejít k připojení“). Vyberte hotspot SmartLife-XXXX bez hesla. Tento hotspot se vytvoří po připojení přístroje k vaší Wi-Fi síti. Po připojení přístroje
k hotspotu se vraťte do aplikace Tesla Smart. Aplikace vás automaticky přesměruje na obrazovku se zprávou „Connect your mobile phone to the device‘s hotspot“ („Připojit
mobilní telefon k hotspotu zařízení“). Jakmile se zobrazí zpráva o úspěšném připojení, můžete přístroj ovládat prostřednictvím aplikace.
Popis ikonek a tlačítek aplikace
Ikonky a popisy
Úklid celé domácnosti: Robotický vysavač pomocí senzorů naskenuje a následně vygeneruje mapu celé domácnosti a automaticky naplánuje optimální trasu
úklidu.
Úklid určité zóny: Můžete nastavit zónu úklidu určitého místa na mapě aplikace. Robotický vysavač se následně automaticky přesune na dané místo a uklidí jÍ.
CZ
PIN N GO (Úklid na místě): Můžete určit konkrétní místo na mapě aplikace. Robotický vysavač se následně přesune na určené místo a kolem tohoto místa
uklidí prostor o velikosti 1,6 x 1,6 m. Klepnutím nebo přetažením na mapě nastavíte cílový bod.
Úklid vybraných zón: Poté, co vysavač vygeneruje mapu celé domácnosti, můžete v aplikaci vybrat jednu nebo více zón, které si přejete uklidit.
Nastavte vyloučenou zónu úklidu.
Návrat do nabíjecí stanice: Pokud tato ikonka svítí, robotický vysavač se automaticky vrátí do nabíjecí stanice, aby se nabil. Pokud tato ikonka bliká, robotický
vysavač přeruší návrat do nabíjecí stanice.
Režim plánovaného úklidu: Prostřednictvím aplikace můžete naplánovat úklid kdykoli během dne až na 7 dní dopředu.
69
Page 70

Tlačítko Popis Ovládací tlačítka Popis funkcí
Stisknutím tohoto tlačítka přístroj zapnete. Stisknutím a podržením tohoto tlačítka po dobu 3
sekund přístroj zapnete.
Stisknutím a podržením tohoto tlačítka přístroj vypnete. Stisknutím a podržením tohoto tlačítka po dobu 3
sekund přístroj vypnete.
Tlačítko napájení
Tlačítko pro návrat do nabíjecí stanice
Tlačítko Wi-Fi sítě
Stisknutím tohoto tlačítka naplánujete trasu úklidu. Stiskněte tlačítko
Stisknutím tohoto tlačítka přístroj pozastavíte. Stiskněte tlačítko
Stisknutím tohoto tlačítka pošlete robotický vysavač
zpět do nabíjecí stanice.
Stisknutím tohoto tlačítka během návratu robotického
vysavače do nabíjecí stanice jej pozastavíte.
Rychlé připojení k Wi-Fi síti (režim EZ) Stiskněte a po dobu 3 sekund podržte toto tlačítko.
Párování pomocí hotspotu (režim AP) Stiskněte a po dobu 6 sekund podržte toto tlačítko.
Stiskněte tlačítko
Stiskněte tlačítko
70
Page 71
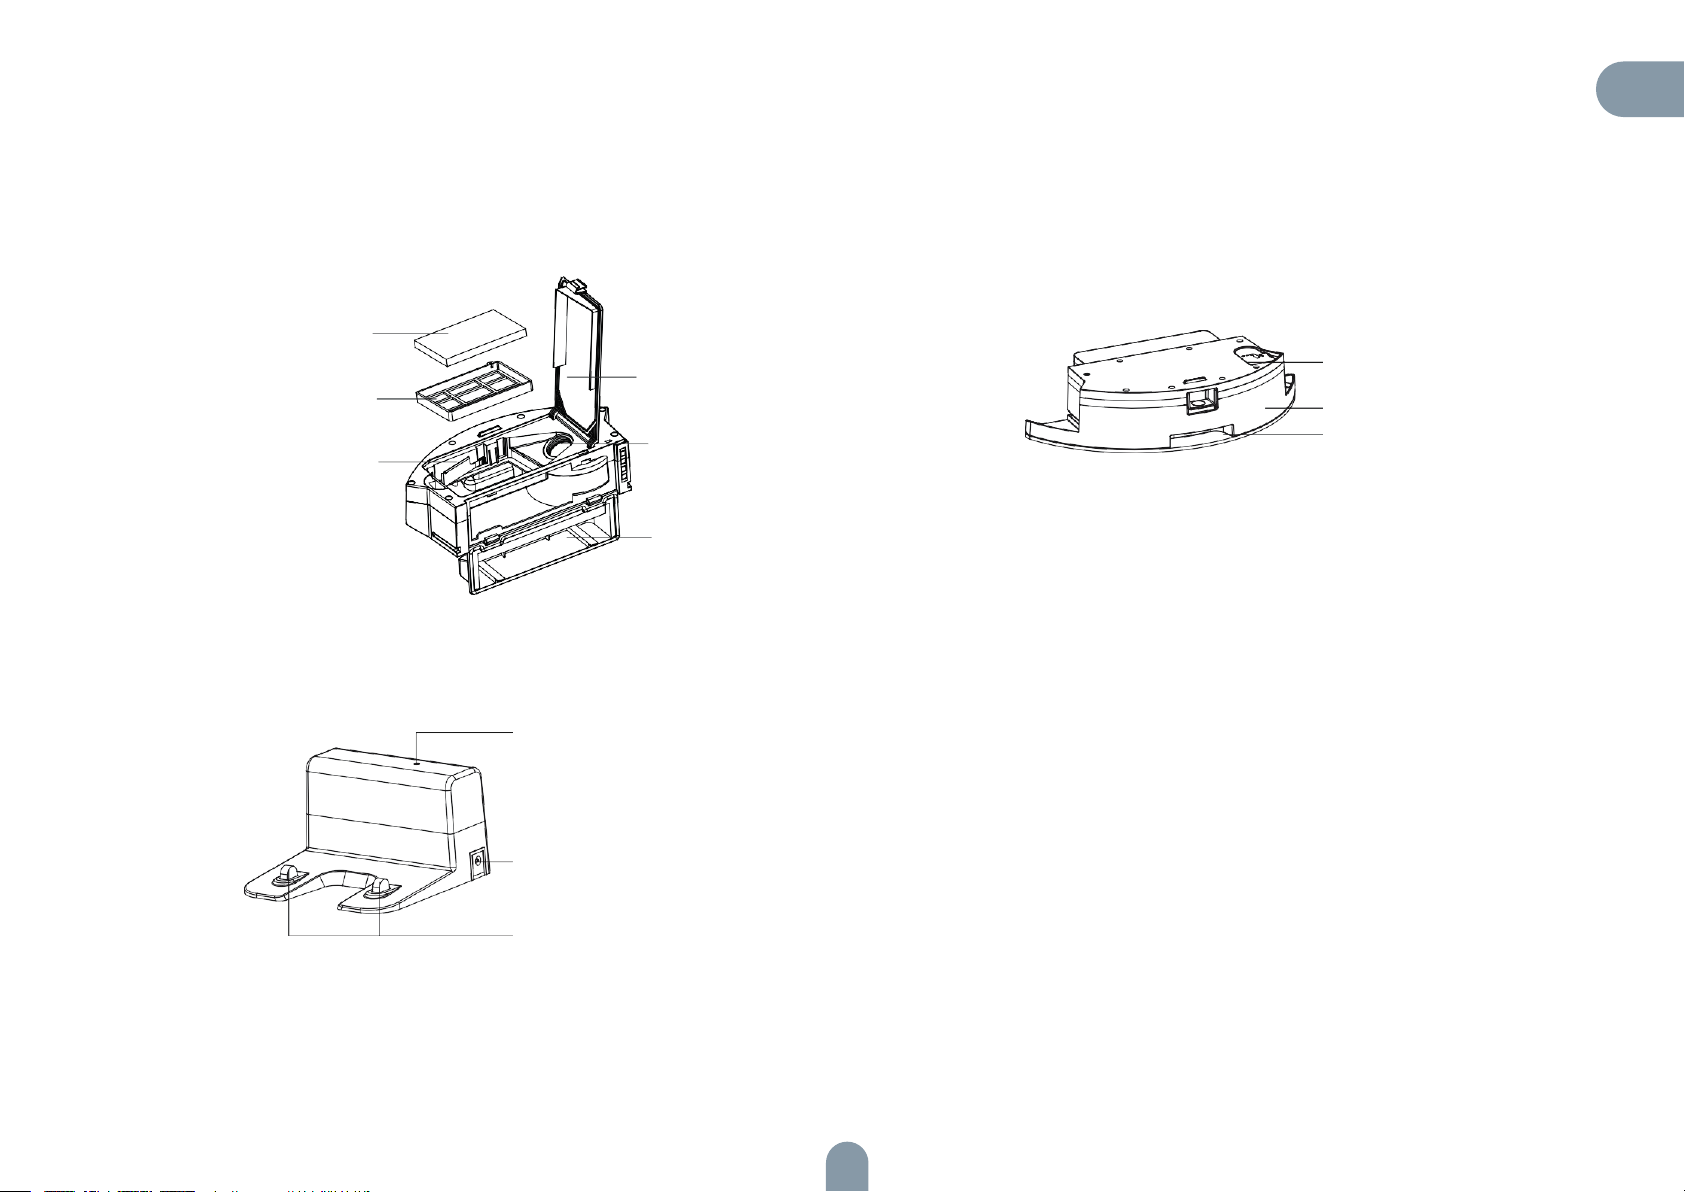
Zásobník na prach, nádržka na vodu a sestava mopovacího hadříku
HEPA filtr
CZ
Primární filtr
Plech zásobníku
na prach
Kontrolka signálu
DC konektor
Nabíjecí elektroda
Kryt HEPA filtru
Vodivá část zásobníku na
prach
Boční kryt
zásobníku na prach
Přívod vody
Nádržka na vodu
Mopovací hadřík
71
Page 72
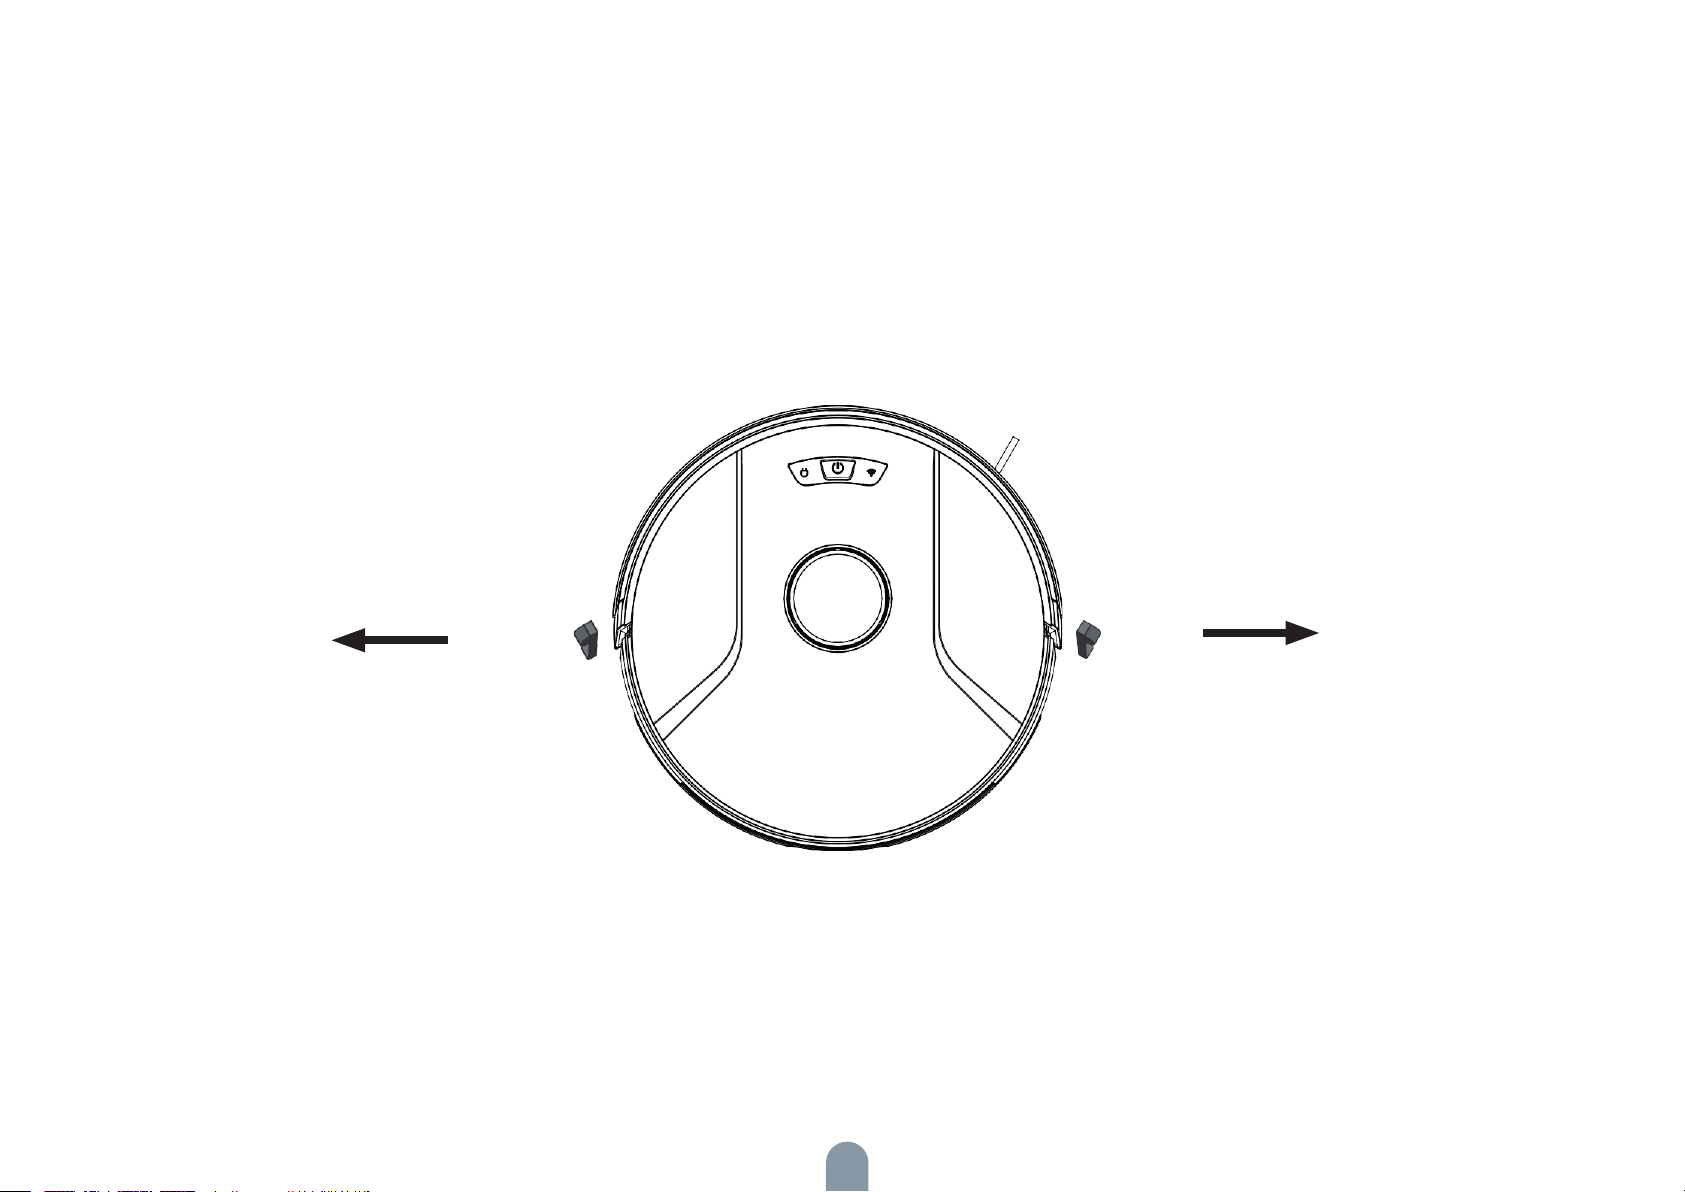
Příprava
Odstraňte ochranný pásek
Před použitím hlavní jednotky z ní odstraňte ochranný pásek.
72
Page 73
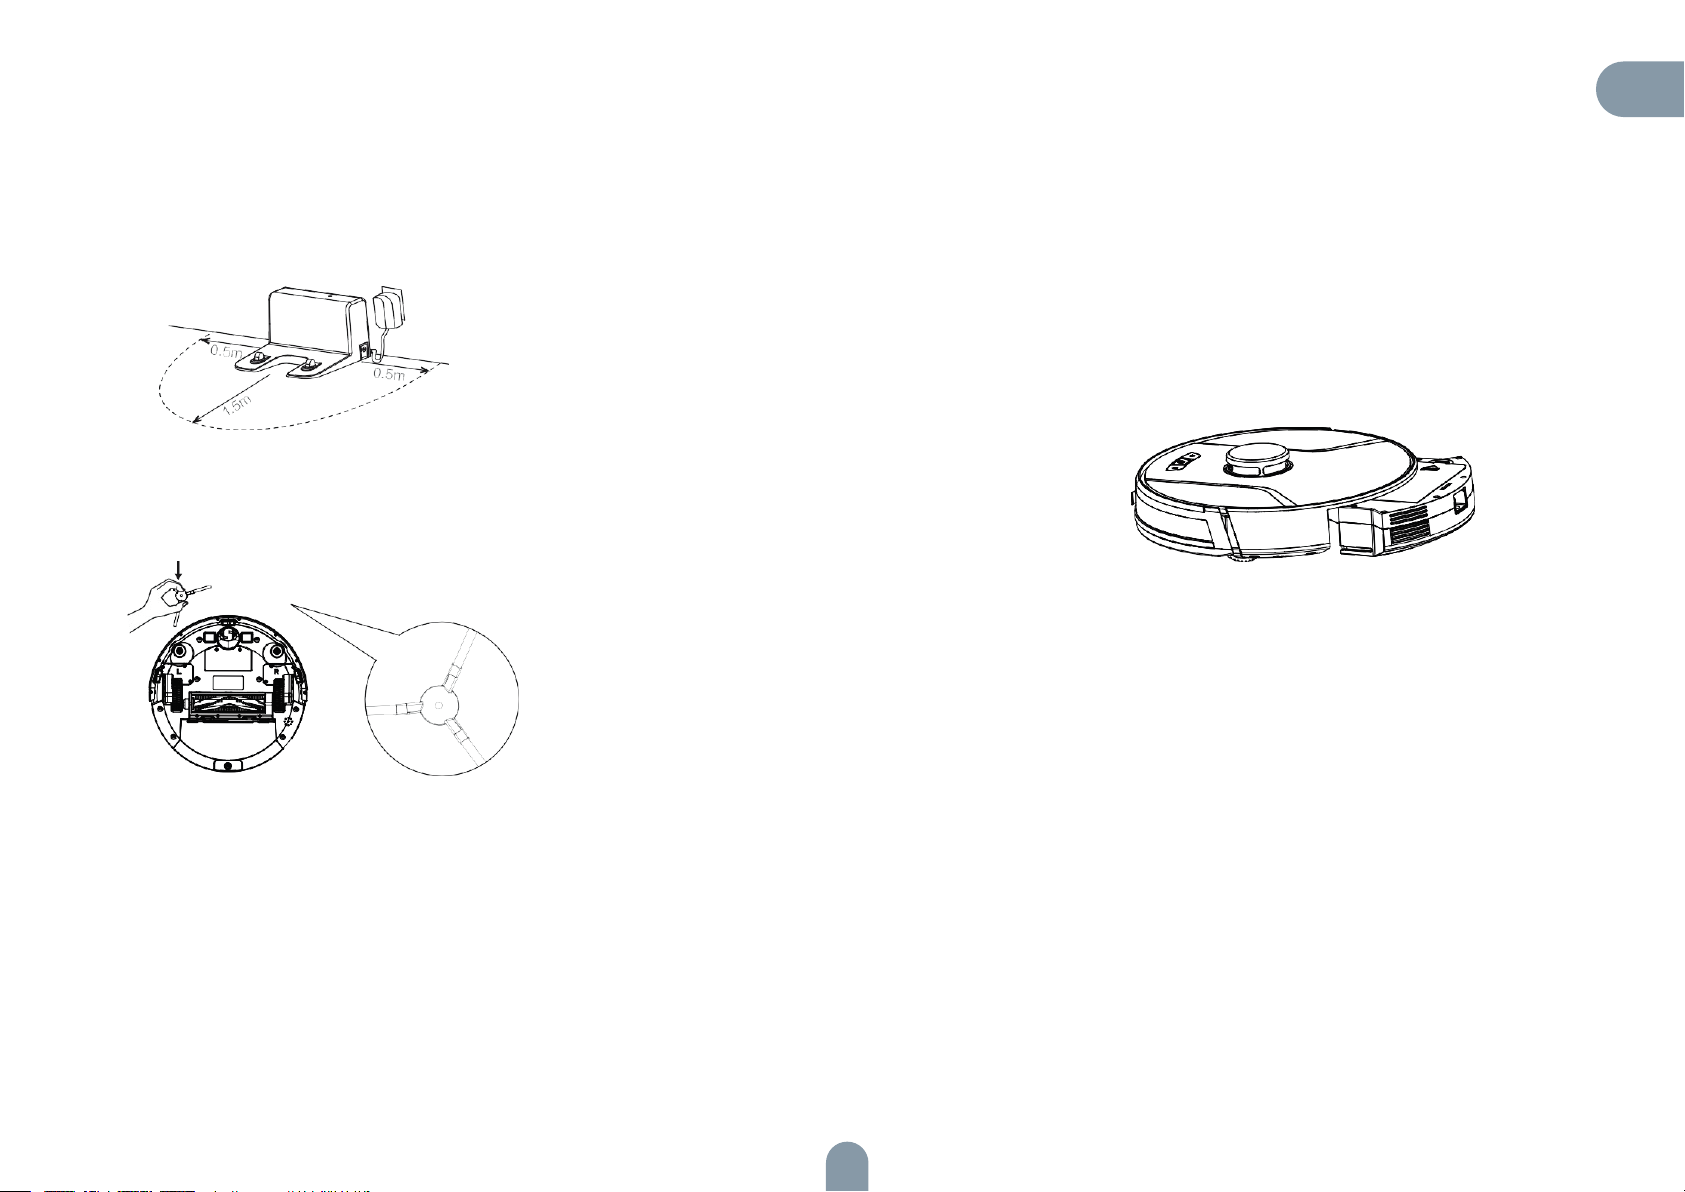
Nabíjení hlavní jednotky
CZ
1. Umístěte nabíjecí stanici na rovnou zem ke zdi. Do prostoru o velikosti
0,5 m po stranách a 1,5 m před nabíjecí stanicí neumisťujte žádné předměty.
2. Připojte nabíjecí stanici ke zdroji napájení.
3. Nainstalujte levý a pravý boční kartáč.
4. Umístěte hlavní jednotku do nabíjecí stanice a nechte ji nabít.
Kontrolka během nabíjení bliká.
Jakmile je nabíjení dokončeno, kontrolka zůstane svítit. Plné nabití hlavní
jednotky trvá cca 4,5 hodin.
Během úklidu, hlavní jednotka automaticky kontroluje úroveň nabití. Pokud
se baterie začne vybíjet, hlavní jednotka aktivuje režim „Návrat do
nabíjecí stanice“ a automaticky se vrátí do nabíjecí stanice, aby se
nabila.
Nebo můžete stisknout tlačítko pro návrat do nabíjecí stanice v
aplikaci a aktivovat tak režim „Návrat do nabíjecí stanice“ manuálně.
Poznámka:
Zajistěte, aby se nabíjecí stanice nacházela mimo dosah přímého
slunečního světla a reflexních předmětů, např. zrcadel.
Před použitím nechte hlavní jednotku plně nabít, zajistíte tak standardní provozní dobu přístroje. Nabíjení trvá cca 4,5 hodin.
Před nabíjením hlavní jednotky vyjměte nádržku na vodu, zajistíte
tak bezpečný průběh nabíjení a zabráníte, nechtěnému poškození.
73
Page 74
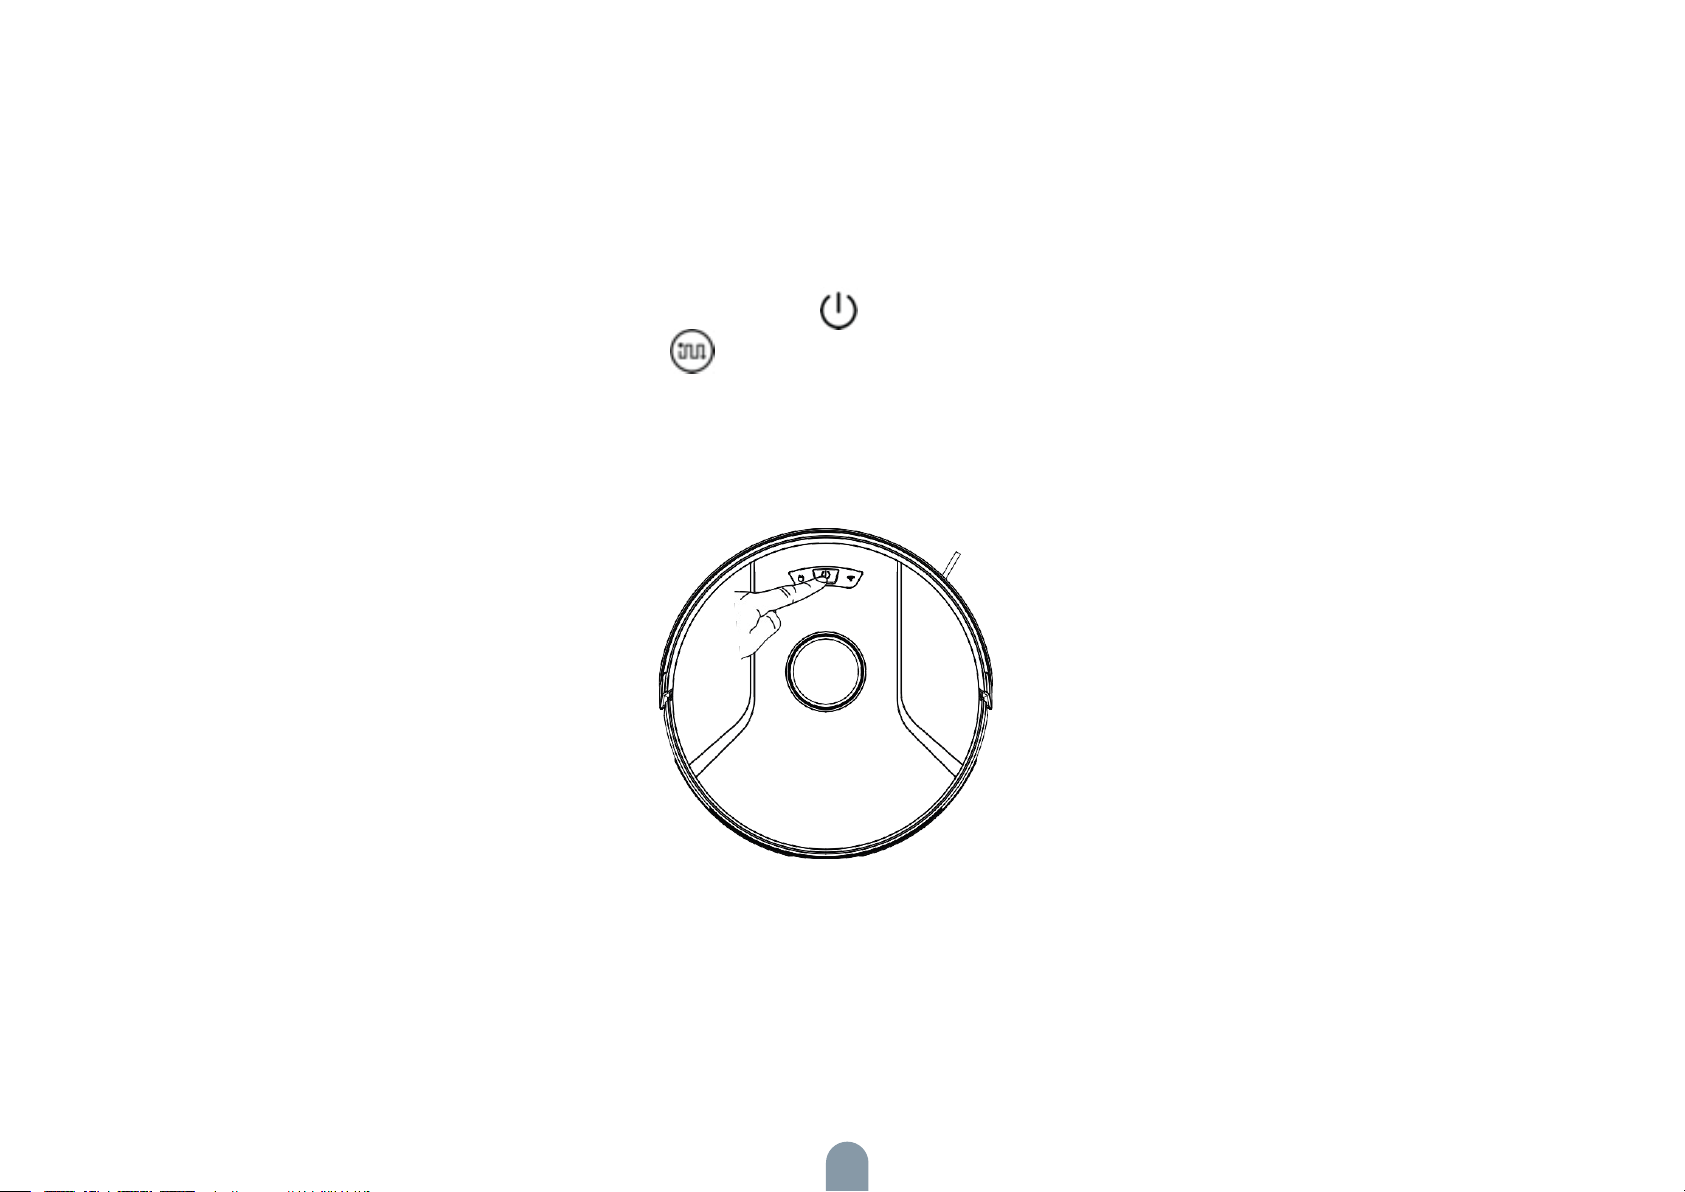
Použití produktu / Spuštění úklidu
Rozličné možnosti úklidu můžete zadávat pomocí robotického vysavače, dálkového ovládání nebo aplikace.
Automatický režim
Použití: Nejčastěji používaný režim úklidu, při kterém robotický vysavač uklidí celou domácnost po trase ve tvaru písmene S.
Nastavení: Pokud je robotický vysavač vypnutý, dlouze stiskněte tlačítko napájení , dokud se nerozsvítí kontrolka, což znamená že je přístroj zapnutý. Následně krátce
stiskněte tlačítko nebo klikněte na tlačítko automatického režimu na dálkovém ovládání a vysavač automaticky spustí úklid.
74
Page 75
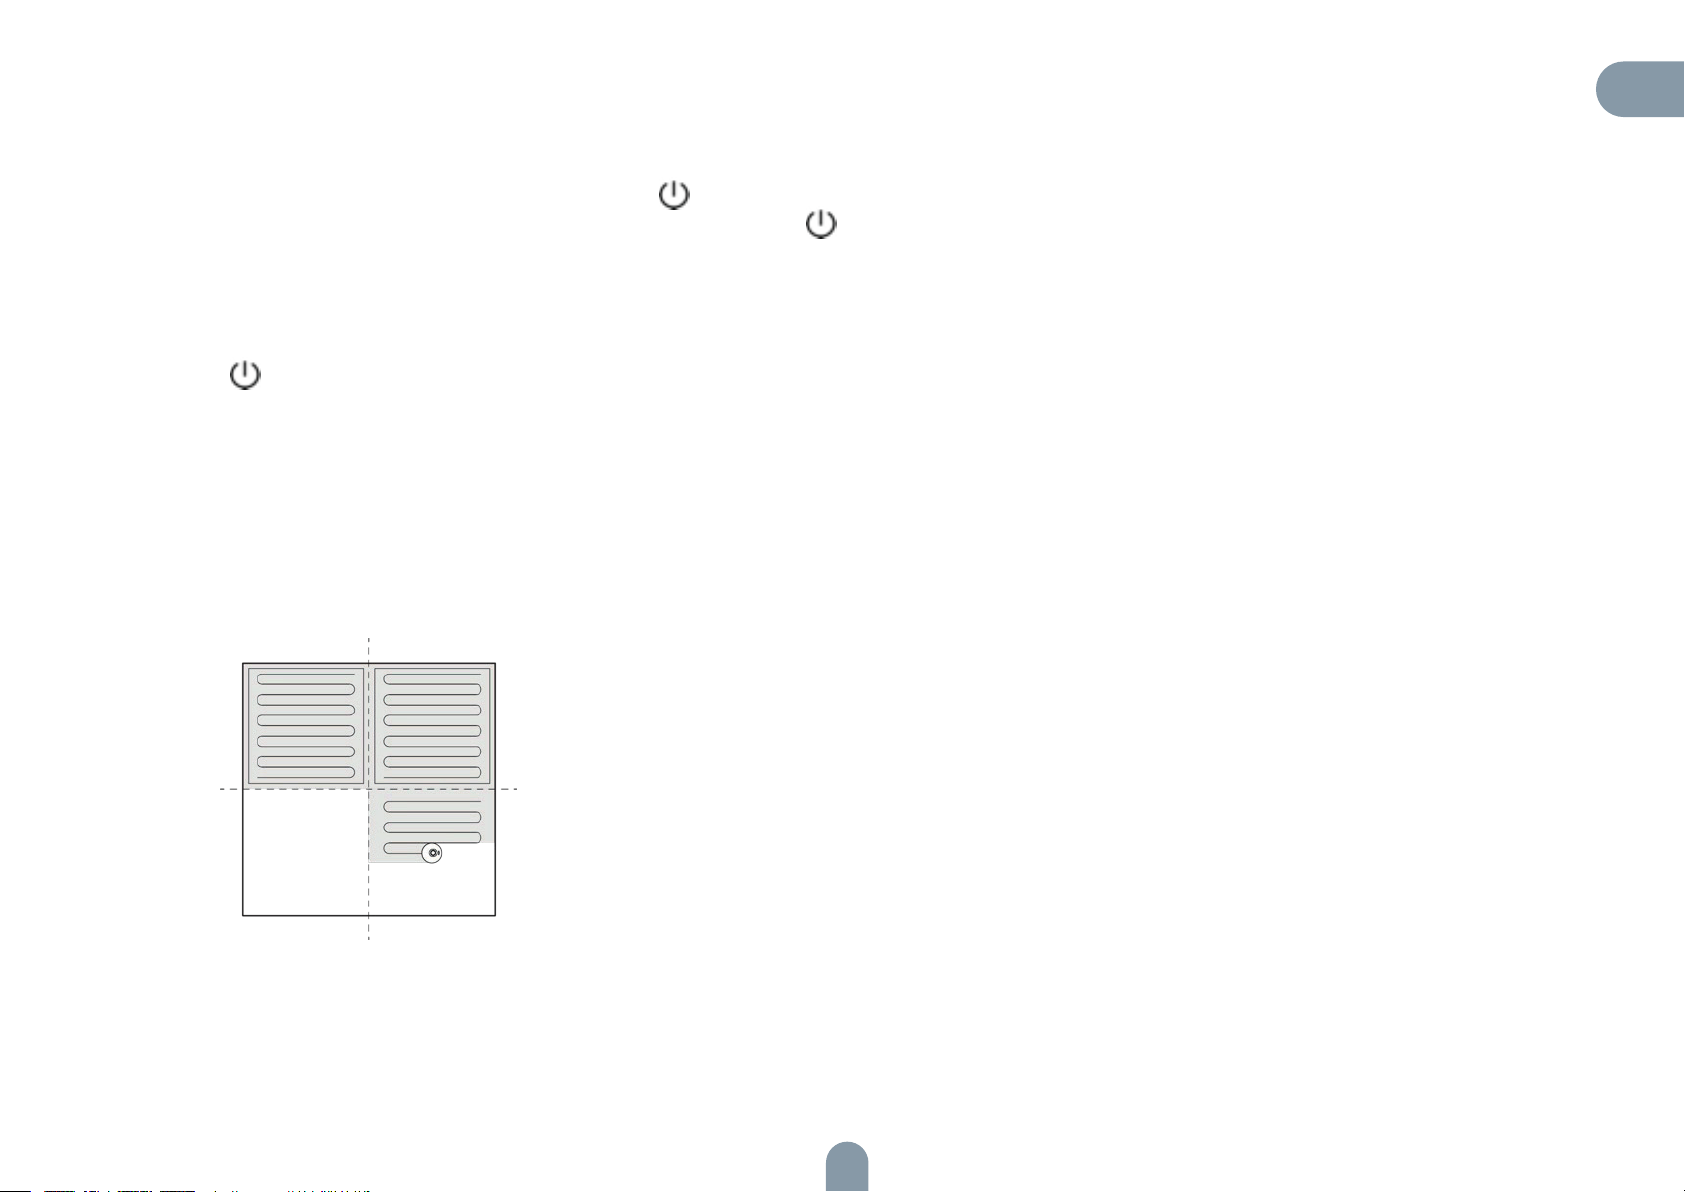
Pokyny k použití
CZ
Zapnutí a vypnutí robotického vysavače
Chcete-li robotický vysavač zapnout, stiskněte a podržte tlačítko . Rozsvítí se
kontrolka napájení a vysavač přejde do pohotovostního režimu. Stisknutím tlačítka
zastaveného robotického vysavače přístroj vypnete a ukončíte probíhající úklid.
Poznámka: Nabíjející se robotický vysavač nelze vypnout.
Spustit čištění
Stiskem tlačítka spustíte úklid. Robotický vysavač následně dle vygenerované mapy naplánuje trasu úklidu a postupně uklidí jednotlivé zóny domácnosti. V
každé zóně vysavač nejprve vysaje podlahu podél zdí a následně pohyby ve tvaru
písmene S důkladně a efektivně uklidí zbývající plochu.
Anmerkungen:
Zóna 1: Uklizená
Zóna 2: Uklizená
Poznámky:
• Pokud je baterie robotického vysavače vybitá, vysavač nemůže zahájit úklid. Proto
před úklidem nechte vysavač nabít.
• Před úklidem z podlahy ukliďte všechny kabely (včetně napájecího kabelu nabíjecí
stanice). V opačném případě může robotický vysavač kabely namotat a odpojit tak
jiné elektrické spotřebiče od napájení nebo poškodit předměty nebo kabely.
• Pokud je plocha určená k úklidu menší než 2 m2, vysavač tuto plochu vyčistí dvakrát (výchozí nastavení).
• Pokud se baterie robotického vysavače začne během úklidu vybíjet, vysavač se automaticky vrátí do nabíjecí stanice, aby se nabil. Jakmile je baterie dostatečně nabitá,
vysavač se automaticky vrátí na místo, kde úklid přerušil, a dokončí jej (zajistěte, aby
byla povolena funkce obnovy úklidu).
Zóna 4: Bude uklizena
Zóna 3: Probíhá úklid
75
Page 76
Pozastavení úklidu
Pokud během úklidu potřebujete přidat vodu do nádržky na vodu nebo vyprat
mopovací hadřík, stiskněte tlačítko , čímž robotický vysavač pozastavíte.
Chcete-li, aby vysavač pokračoval v úklidu, stiskněte tlačítko , nebo stiskněte
tlačítko , čímž ukončíte probíhající úklid a pošlete robotický vysavač zpět do
nabíjecí stanice.
Poznámka:
Pokud se pozastavený robotický vysavač vrátí do nabíjecí stanice, aby se nabil,
probíhající úklid bude zrušen.
Přechod do režimu spánku
Po 10 minutách nečinnosti robotický vysavač automaticky přejde do režimu spánku (kontrolka napájení pravidelně bliká). Chcete-li vysavač opět probudit, stiskněte
libovolné tlačítko.
Poznámky:
• Nabíjející se vysavač nemůže přejít do režimu spánku.
• Po 12 hodinách v režimu spánku se vysavač automaticky vypne.
Poznámka:
Pokud se robotickému vysavače nepodaří nabíjecí stanici najít, automaticky se vrátí
do výchozí pozice. V tomto případě je nutné vysavač do nabíjecí stanice umístit
manuálně.
Porucha
Pokud robotický vysavač během úklidu zaznamená poruchu, kontrolka napájení
začne rychle červeně blikat a uslyšíte hlasové upozornění. Více informací o řešení
problémů naleznete v sekci „Řešení problémů“.
Poznámky:
• Pokud během 10 minut po zjištění poruchy neprovedete žádnou akci, robotický
vysavač automaticky přejde do režimu spánku.
• Pokud se pozastavený robotický vysavač, který zjistil poruchu, vrátí do nabíjecí
stanice, aby se nabil, probíhající úklid bude zrušen.
Nabijte vysavač.
Automatický režim: Po dokončení úklidu se robotický vysavač automaticky vrátí do
nabíjecí stanice, aby se nabil.
Manuální režim: Chcete-li pozastavený robotický vysavač poslat zpět do nabíjecí
stanice, stiskněte tlačítko .
Kontrolka napájení nabíjejícího vysavače pomalu pulzuje.
76
Page 77
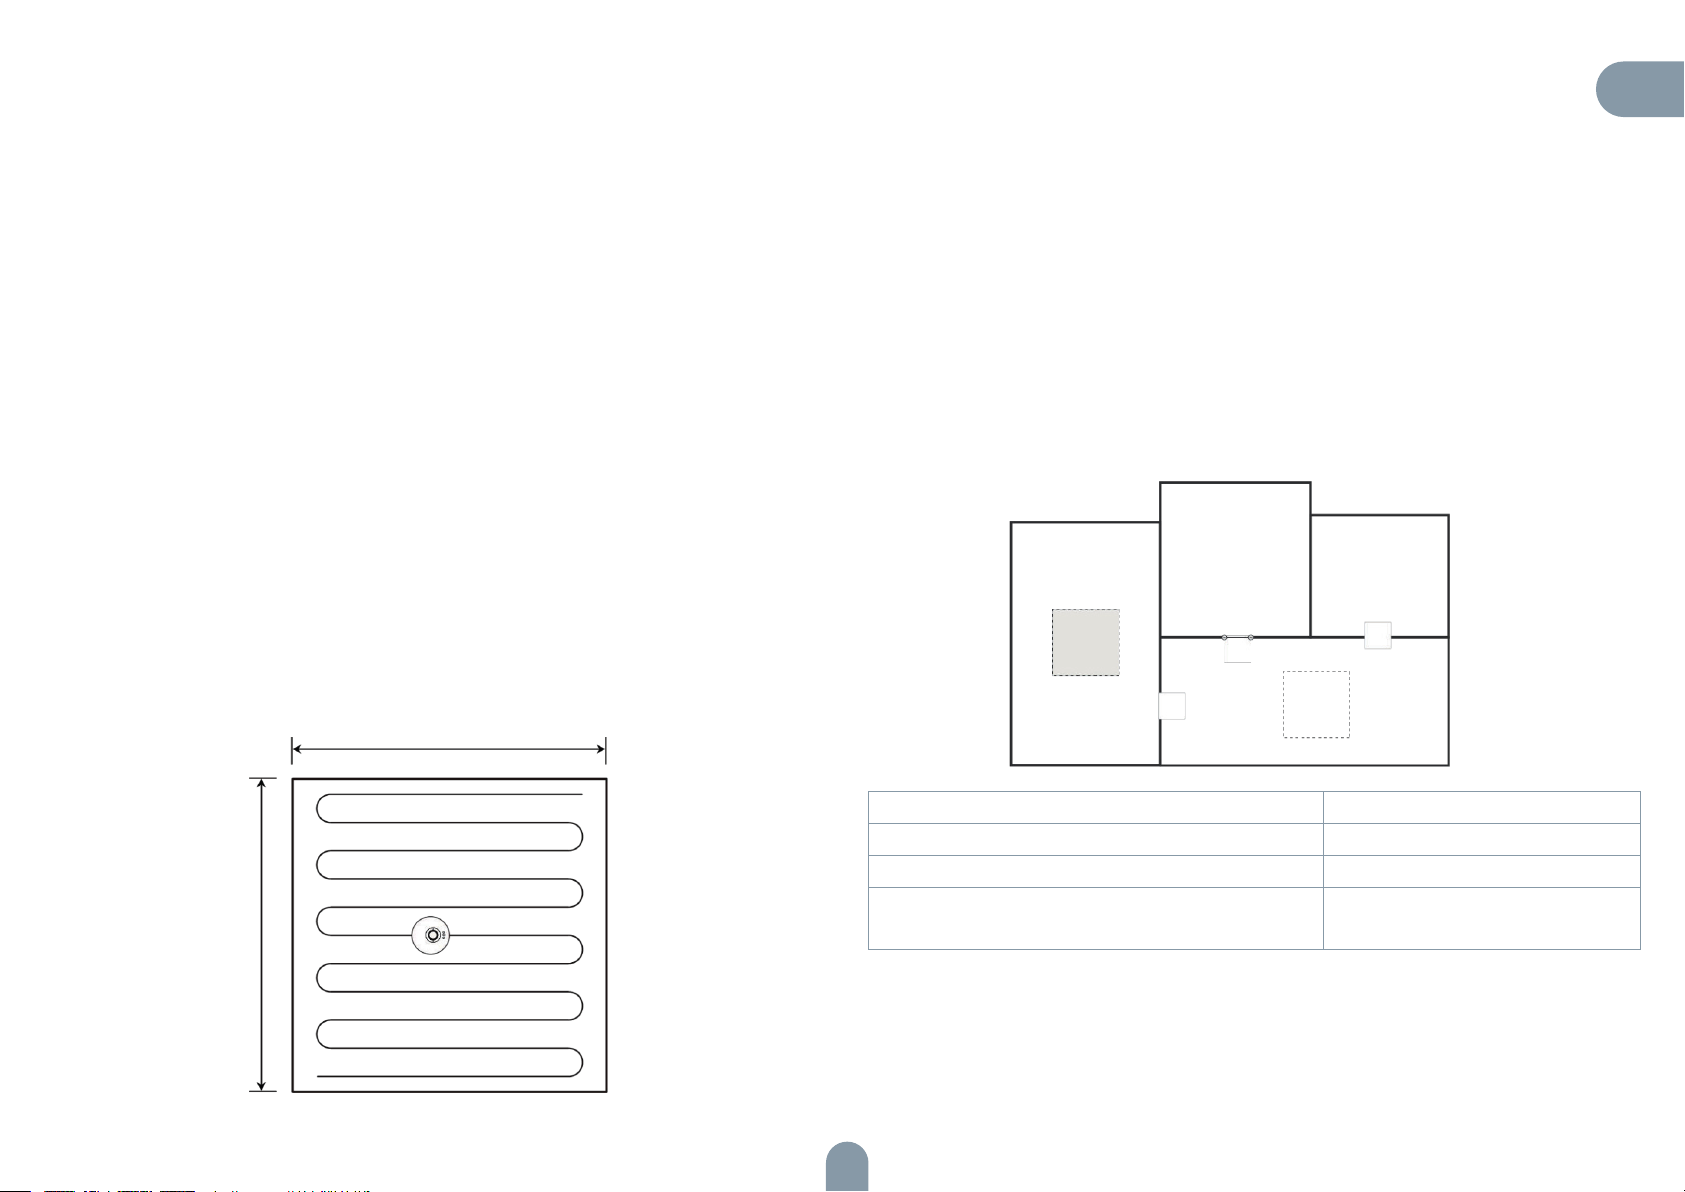
Resetování nastavení Wi-Fi sítě
Pokud se váš mobilní telefon v důsledku změny routeru nebo zapomenutého hesla
nepřipojí k robotickému vysavači, postupujte podle pokynů pro připojení k Wi-Fi
síti a znovu spárujte vysavač s mobilním telefonem.
Nastavení vyloučené zóny nebo virtuální zdi
Prostřednictvím mobilní aplikace lze nastavit vyloučenou zónu nebo virtuální zeď.
Robotický vysavač následně během úklidu nevstoupí do vyloučené zóny / nepřekročí hranici, kterou vymezuje virtuální zeď.
CZ
Poznámka:
Pokud robotický vysavač čeká na připojení déle než 2 minuty, jeho funkce Wi-Fi
sítě se automaticky vypne. Chcete-li vysavač opět připojit k mobilnímu telefonu,
resetujte nastavení Wi-Fi sítě.
PIN N GO (Úklid na místě)
Prostřednictvím mobilní aplikace lze určit cílový bod na mapě. Robotický vysavač
následně automaticky naplánuje trasu a přesune se k danému bodu. Pokud prostřednictvím aplikace určíte cílový bod vysavači, který je v pohotovostním režimu
nebo pozastavený, vysavač kolem tohoto místa uklidí prostor o velikosti 1,6 m x 1,6
m. Po dokončení úklidu se vysavač automaticky vrátí do výchozí pozice.
Poznámka:
Pokud tento režim úklidu spustíte u pozastaveného vysavače, ukončíte probíhající
úklid.
1,6 m
1,6 m
Poznámky:
• Před použitím této funkce je nutné v aplikaci povolit funkci automatického ukládání mapy.
• Tato funkce se používá pouze k vymezení zón úklidu, nelze ji použít k blokování
nebezpečných zón.
• Pokud robotický vysavač přemístíte nebo dojde k zásadní změně uspořádání
domácnosti, mapa může pozbýt platnosti a nastavení virtuálních zdí nebo vyloučených zón bude ztraceno.
Vyloučená zóna
pro vytírání
Virtuální zeď
Vyloučená zóna pro
úklid
Aktualizace mapy v reálném čase Nastavení hlasitosti
Zobrazení záznamů úklidu Správa mapy
Změna hlasu robotického vysavače Aktualizace firmwaru
Umístění robotického vysavače Zobrazení stavu robotického
vysavače
Poznámka:
Funkce a detaily aplikace se mohou v důsledku neustálého vývoje a aktualizací
mírně lišit. Rozhodující jsou konkrétní funkce a detaily aktuální verze aplikace.
77
Page 78

Úklid vybraných zón
Prostřednictvím aplikace lze vybrat jednu nebo více zón, které si přejete uklidit.
Robotický vysavač následně uklidí jednu nebo více místností, které jste v aplikaci
vybrali.
Režim úklidu
V aplikaci lze vybrat úsporný, běžný a výkonný režim. Výchozím režimem je běžný
režim.
Poznámky:
• Před použitím této funkce je nutné v aplikaci povolit funkci automatického ukládání mapy a robotický vysavač rovněž musí mít vygenerovanou mapu úklidu.
• Po spuštění úklidu se vysavač přesune za vybranou zónu. Z podlahy kolem
vybrané zóny odstraňte všechny případné překážky (vyjma překážek sloužících k
zamezení pohybu vysavače).
Plánovaný úklid
Prostřednictvím mobilní aplikace lze nastavit čas plánovaného úklidu. V daný čas
robotický vysavač automaticky spustí úklid a po jeho dokončení se vrátí do nabíjecí
stanice.
Úklid určité zóny
Prostřednictvím aplikace lze nastavit zónu, kterou si přejete uklidit. Robotický vysavač následně uklidí zónu, kterou jste v aplikaci vybrali.
Poznámka:
Po spuštění úklidu se vysavač přesune za nakonfigurovanou zónu. Z podlahy kolem nakonfigurované zóny odstraňte všechny případné překážky (vyjma překážek
sloužících k zamezení pohybu vysavače).
Režim nerušit
Během režimu nerušit nebude robotický vysavač automaticky pokračovat v úklidu
nebo přehrávat hlasová upozornění. Světlo kontrolky napájení bude ztlumené. Prostřednictvím aplikace lze režim nerušit vypnout nebo změnit jeho časový úsek.
78
Page 79
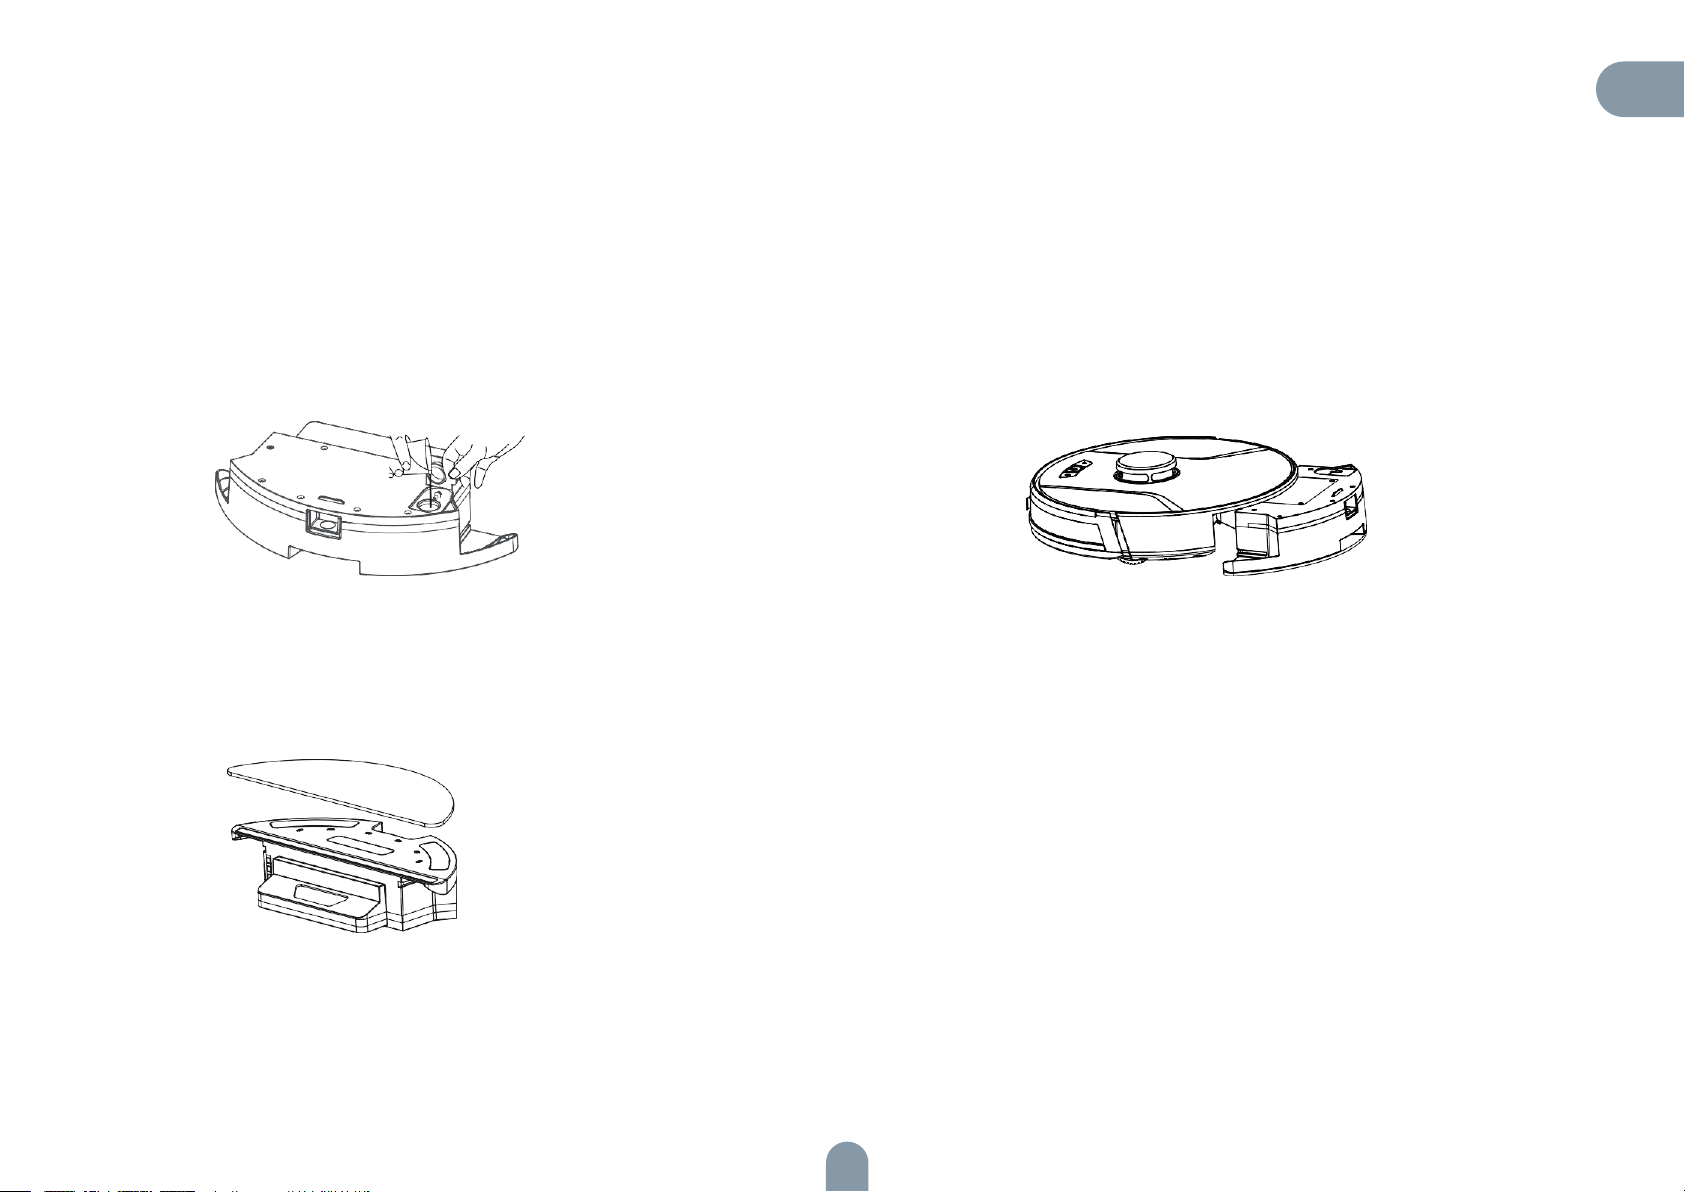
Použití nádržky na vodu
•Nepoužívejte funkci vytírání pro úklid koberců.
•Po vytření podlahy nádržku na vodu vyprázdněte a sejměte mopovací hadřík.
CZ
1. Naplňte nádržku vodou.
2. Nainstalujte mopovací hadřík.
3. Nainstalujte sestavu nádržky na vodu a spusťte vytírání.
79
Page 80

Údržba - Zásobník na prach
Běžná údržba
Pro dosažení co nejlepších výsledků pravidelně čistěte a provádějte údržbu robotického vysavače dle pokynů v níže
uvedené tabulce. Frekvenci čištění a údržby zvolte dle používání přístroje.
Doporučená frekvence čištění a údržby:
Díl hlavní jednotky Frekvence čištění Frekvence výměny
Filtr Každý týden Každé 2 měsíce
Válečkový kartáč Každý týden Každých 6-12 měsíců
Boční kartáč Každý měsíc
Kryt válečkového kartáče Každý měsíc
Senzor Každý měsíc /
Nabíjecí elektroda Každý měsíc /
Všesměrové kolečko Každý měsíc /
Každých 3-6 měsíců, nebo pokud je viditelně
Každých 3-6 měsíců, nebo pokud je těsnění krytu
válečkového kartáče ze silikonové gumy viditelně
poškozený
poškozené
80
Page 81
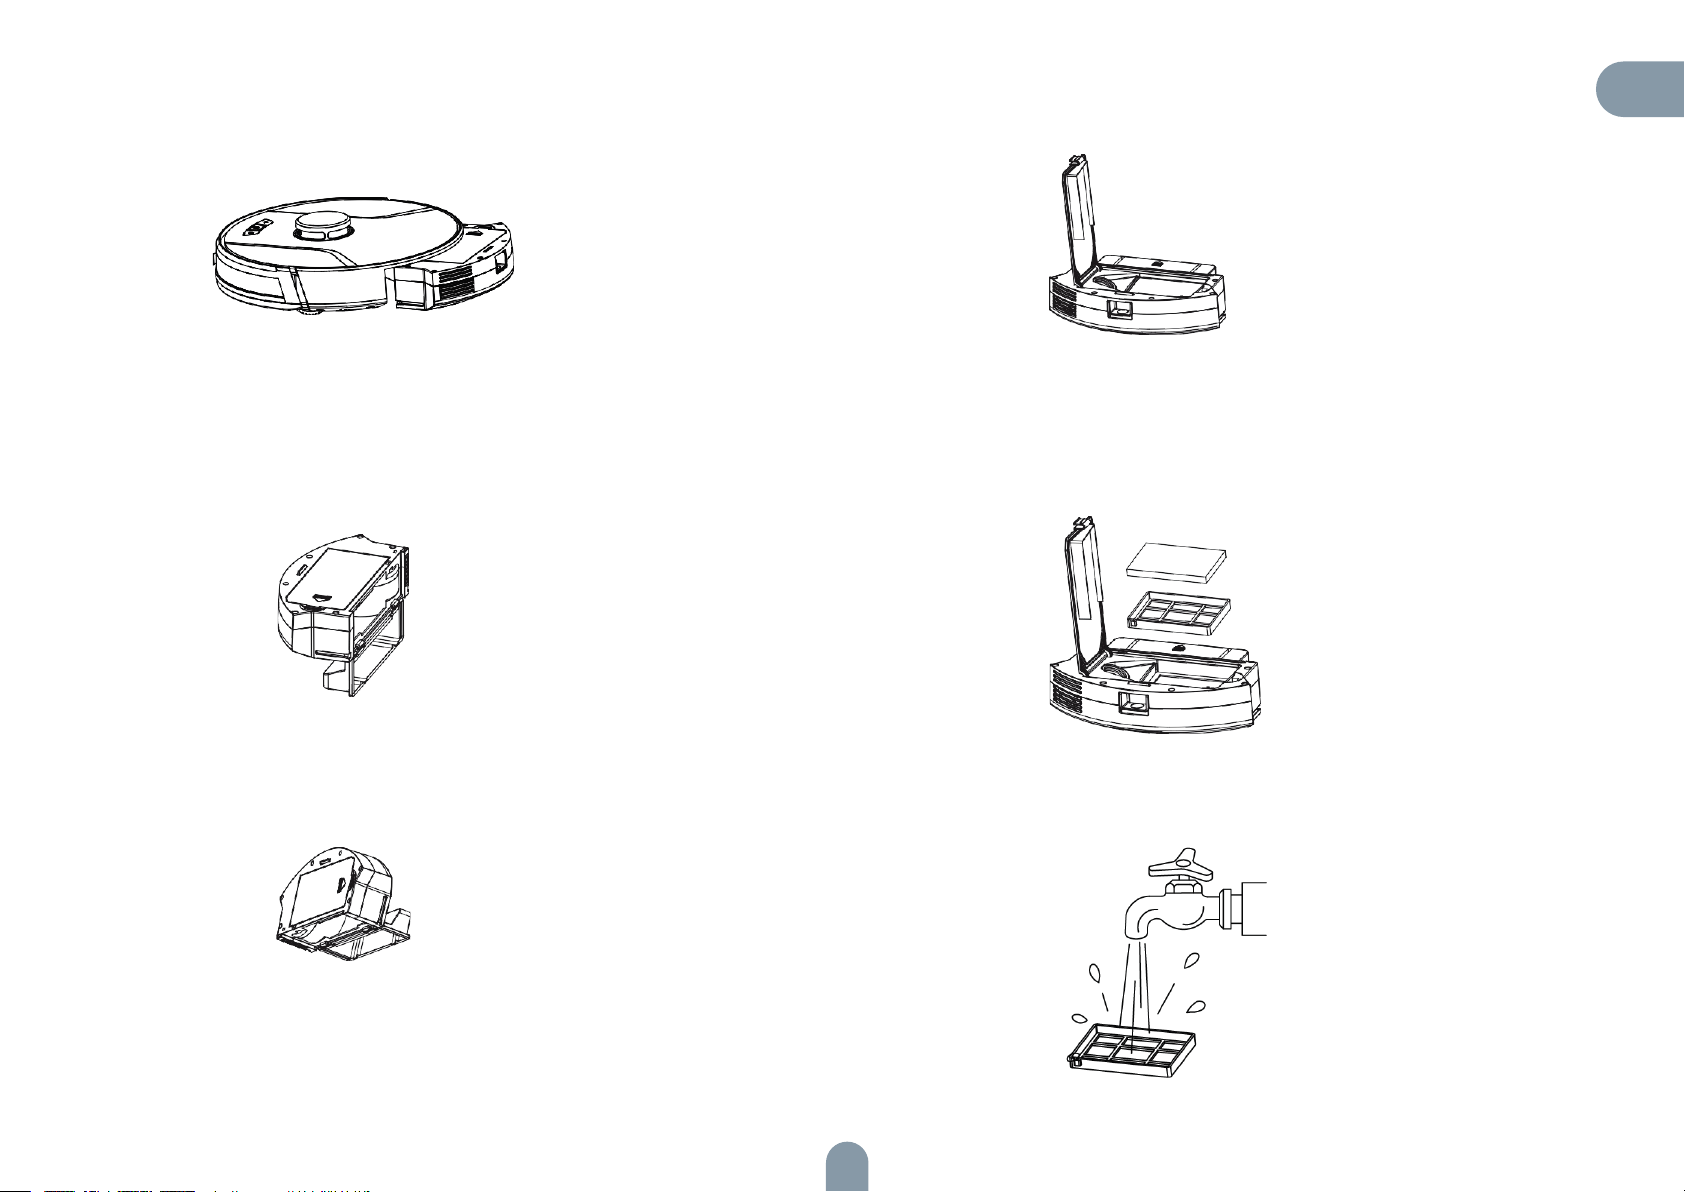
1. Stiskněte tlačítko na zásobníku na prach a vyjměte jej. 4. Otevřete kryt HEPA filtru.
CZ
2. Otevřete boční kryt zásobníku na prach.
3. Vyprázdněte zásobník na prach.
5. Vyjměte HEPA filtr a předfiltr. Poklepejte na HEPA filtr, abyste z něj odstranili prach. HEPA filtr nedoporučujeme omývat vodou.
6. Umyjte předfiltr.
81
Page 82
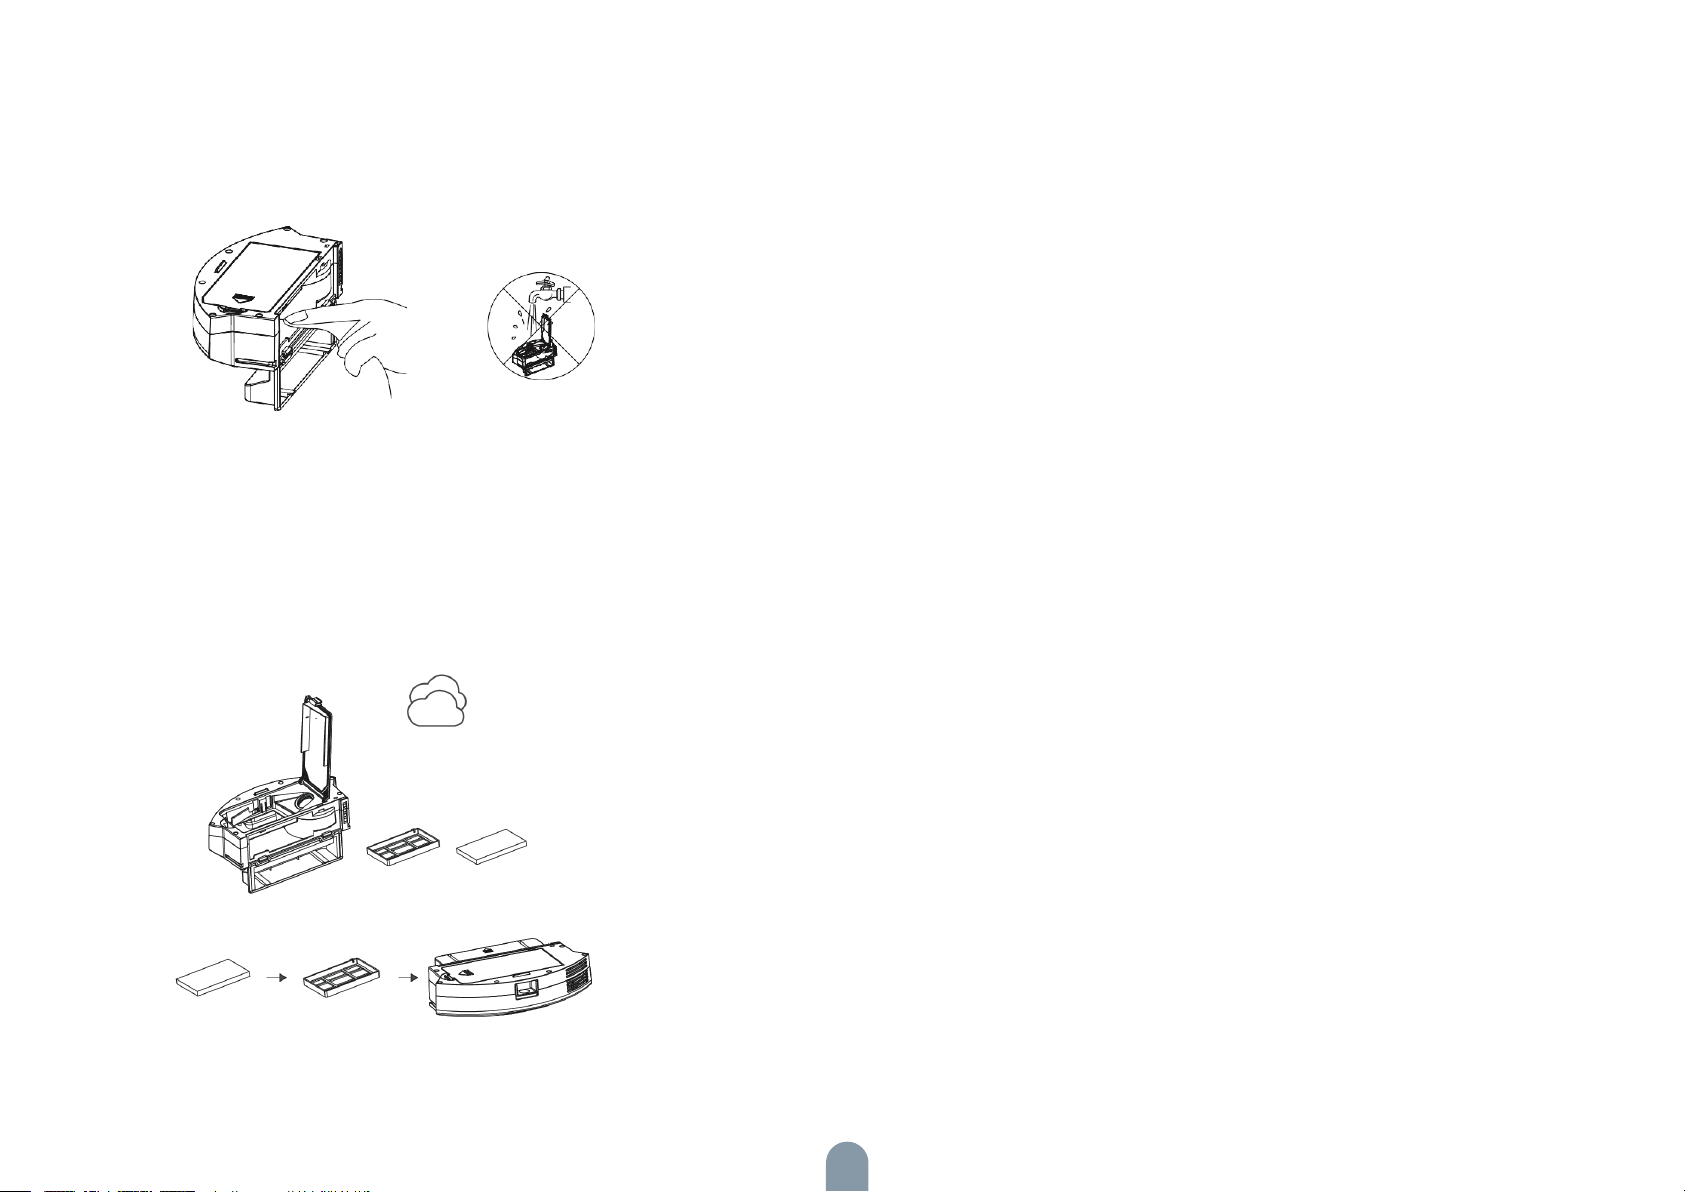
7. Otřete zásobník na prach hadříkem. Neumývejte zásobník na prach vodou.
8. Nechte prachovou schránku a filtrační komponenty zcela uschnout a
udržujte je suché, prodloužíte tak jejich životnost.
Poznámka: Předfiltr doporučujeme každých 15-30 dnů umýt. Maximální
životnost HEPA filtru jsou 3 měsíce.
A. Nainstalujte předfiltr a HEPA filtr zpět do zásobníku na prach.
Poznámka:
1. Před instalací filtrů se ujistěte, že předfiltr a HEPA filtr jsou suché.
2. Nevystavujte předfiltr a HEPA filtr přímému slunečnímu záření.
B. Zavřete kryt zásobníku na prach a nainstalujte zásobník zpět do hlavní
jednotky.
Poznámka: Neumývejte zásobník na prach vodou.
82
Page 83
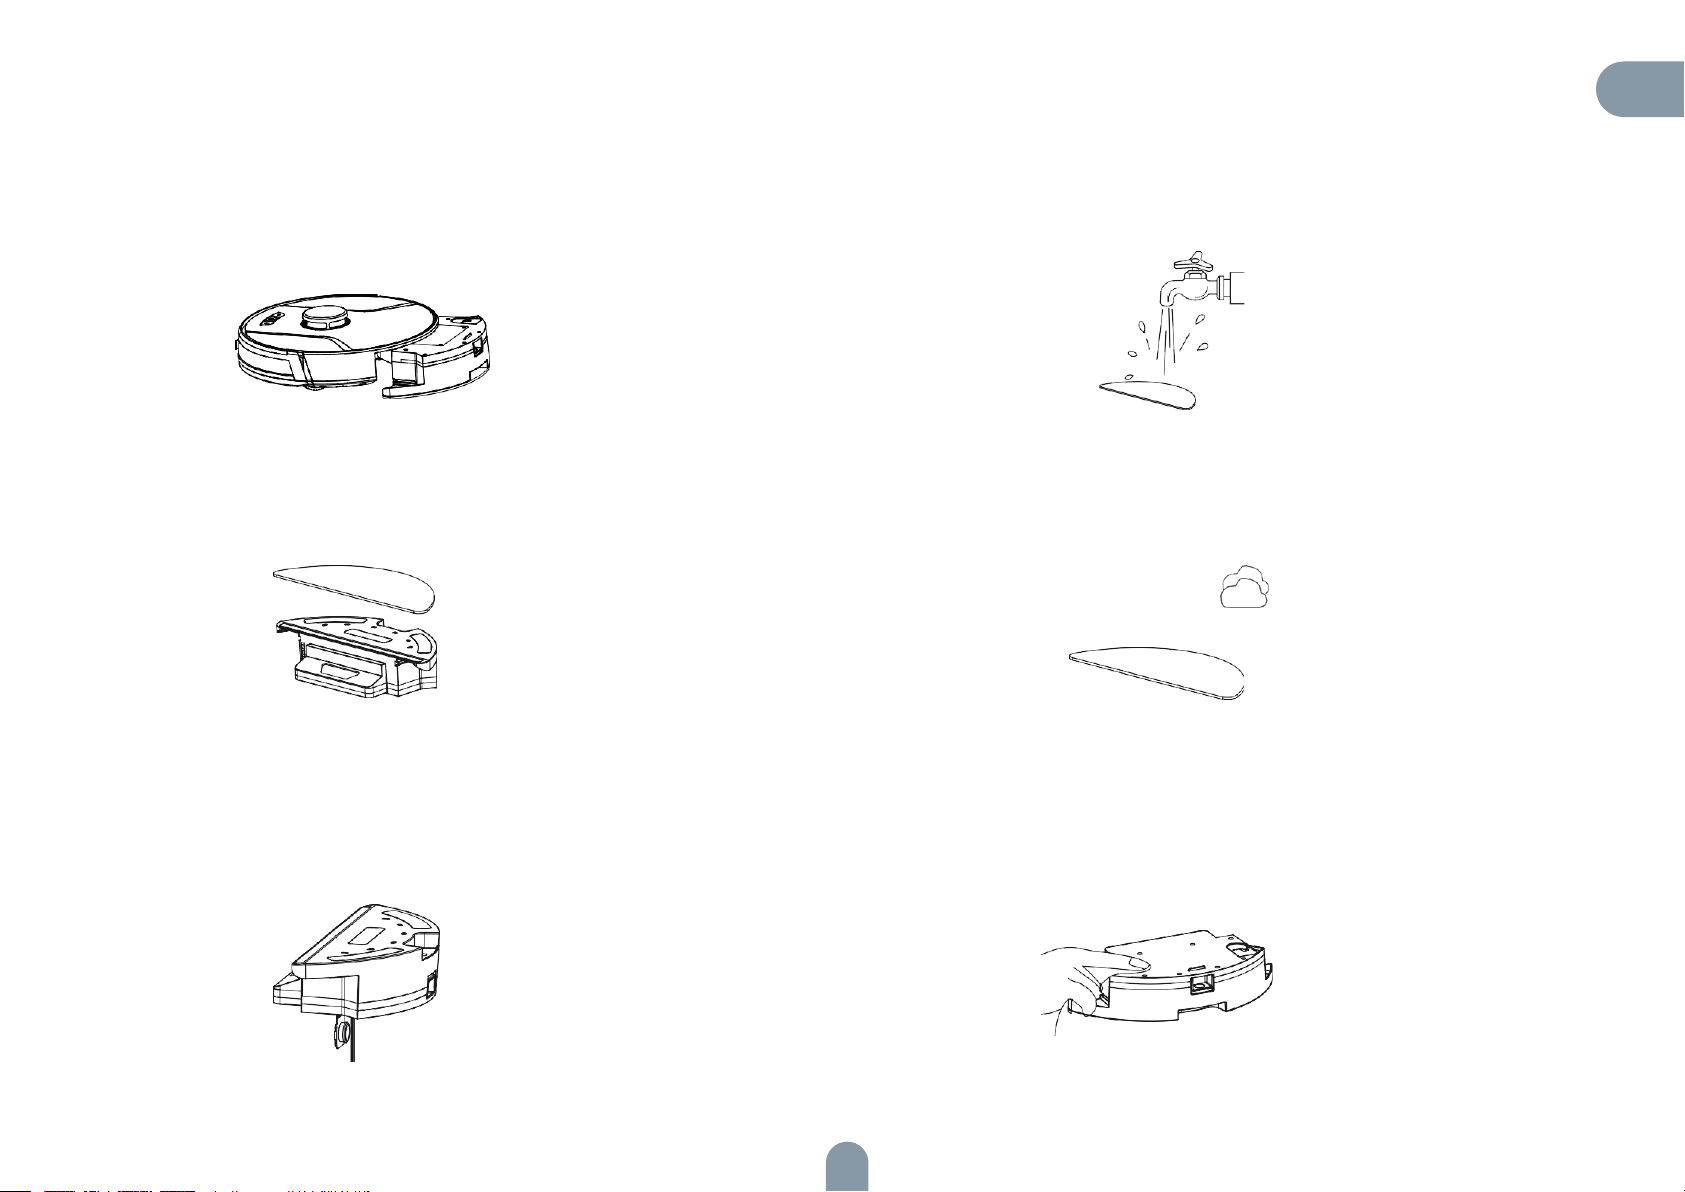
Údržba - Nádržka na vodu a mopovací hadřík
1. Vyjměte sestavu nádržky na vodu. 4. Očistěte mopovací hadřík.
2. Sejměte mopovací hadřík. 5. Nechte mopovací hadřík uschnout.
CZ
3. Vyprázdněte nádržku na vodu. 6. Otřete nádržku na vodu do sucha nebo ji nechte uschnout.
83
Page 84
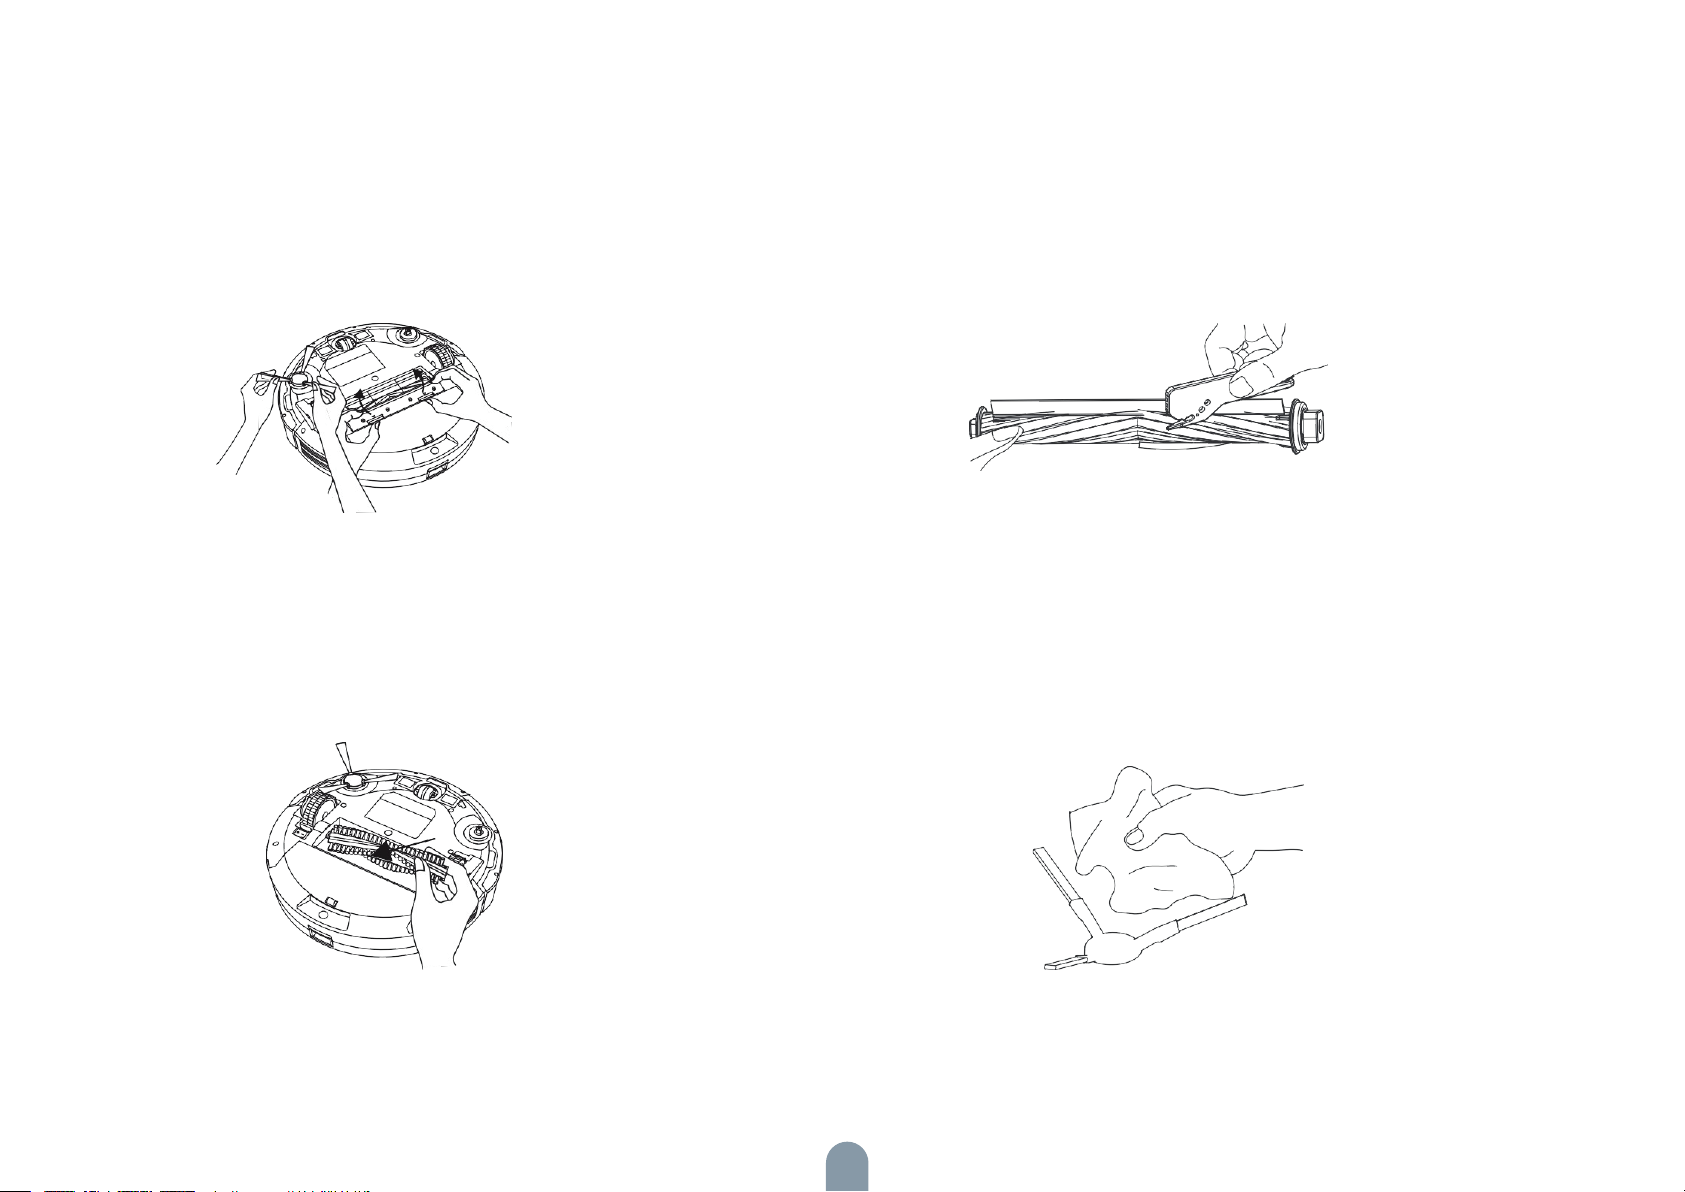
Údržba - Válečkový a boční kartáč
1. Otevřete kryt sestavy válečkového kartáče. 3. Pomocí nástroje očistěte kartáč od namotaných vlasů.
2. Vyjměte hřídel válečkového kartáče. 4. Očistěte boční kartáče.
84
Page 85
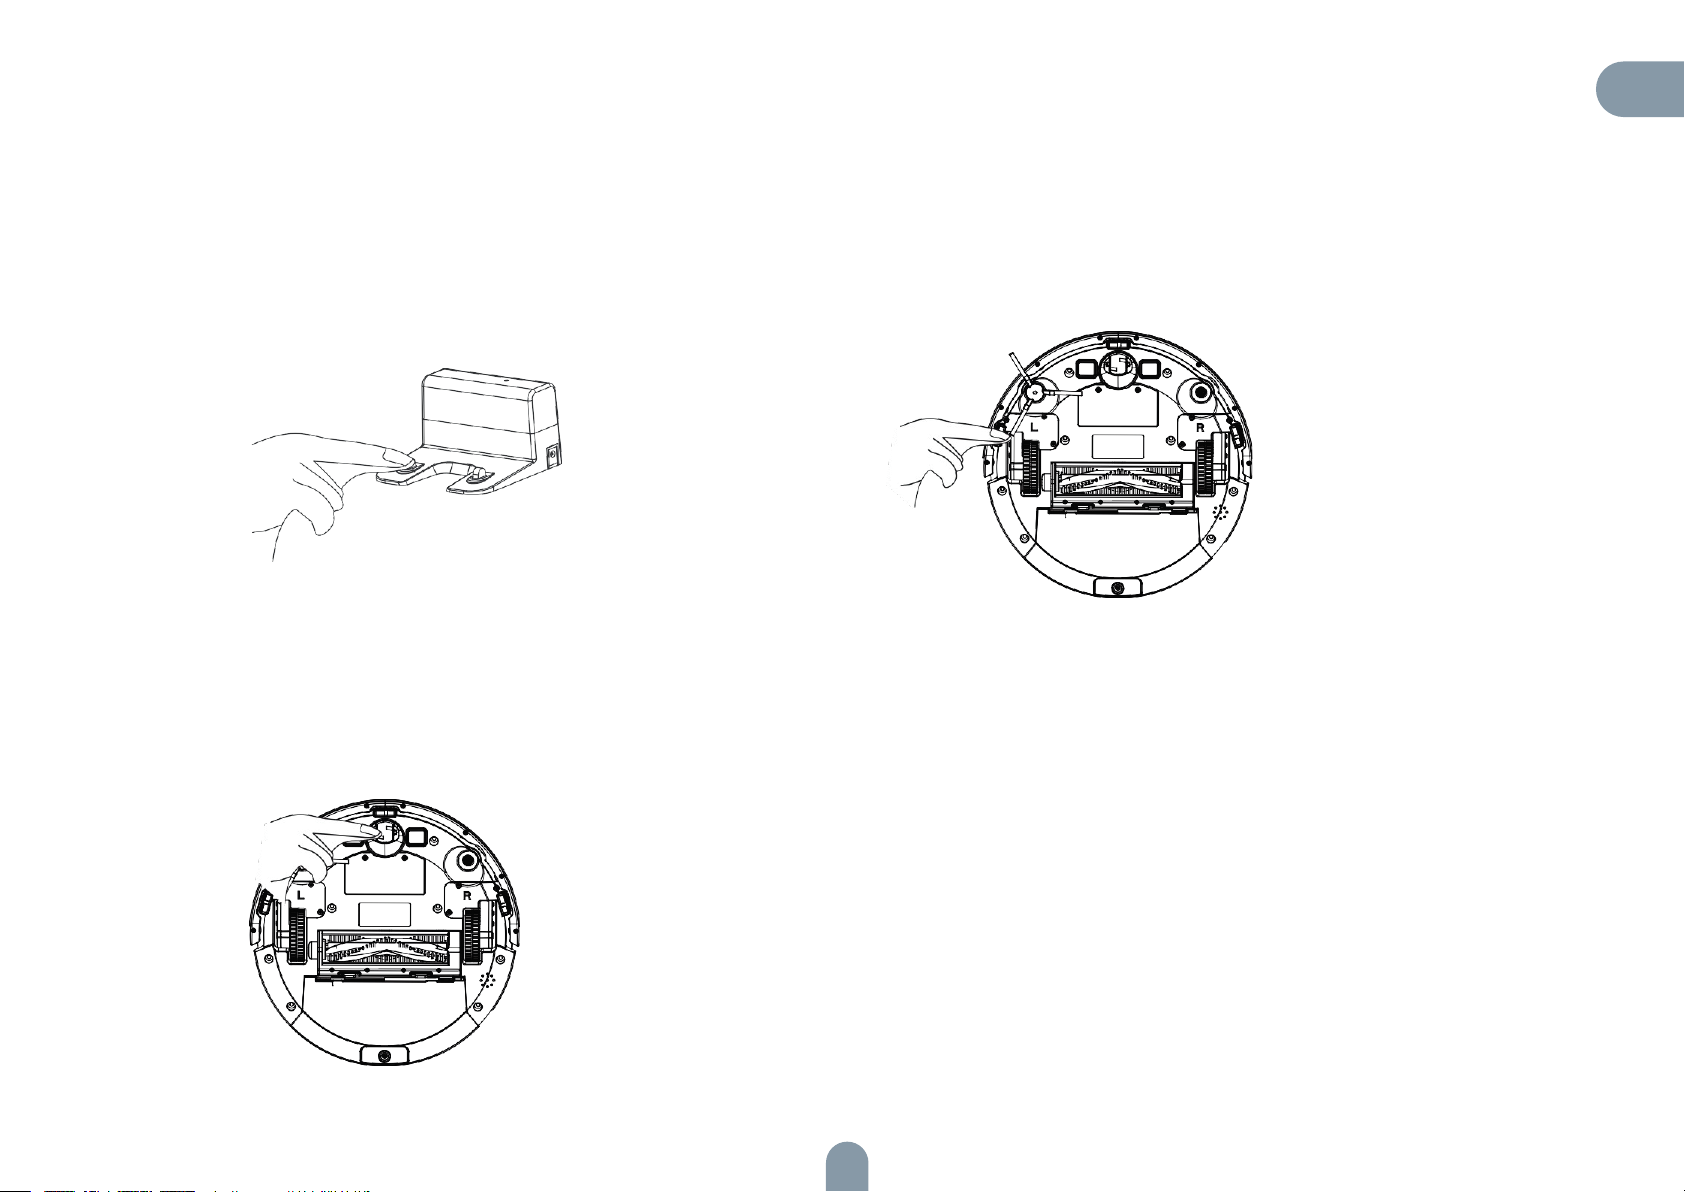
Údržba - Nabíjecí elektroda, senzor proti pádu, hnací kolečko a všesměrové kolečko
1. Očistěte nabíjecí elektrodu. 3. Očistěte senzor proti pádu.
2. Očistěte hnací a všesměrové kolečko.
CZ
85
Page 86

Řešení problémů
Pokud robotický vysavač během úklidu zaznamená poruchu, kontrolka napájení začne rychle červeně blikat a uslyšíte hlasové upozornění. V tomto případě postupujte
podle pokynů v níže uvedené tabulce a problém odstraňte.
Chyba Řešení
Chyba 1: Laserová hlava zablokovaná nebo zaseknutá, zkontrolujte ji. Laserový dálkový senzor je zablokovaný nebo zaseknutý v důsledku uvíznutí cizího
předmětu. Odstraňte překážku nebo cizí předmět. Pokud překážku nebo cizí předmět
nelze odstranit, přeneste hlavní jednotku na jiné místo a spusťte ji.
Chyba 2: Antikolizní senzor se zasekl, zkontrolujte jej. Nárazník se zasekl. Poklepejte na nárazník a odstraňte cizí předmět. Pokud v nárazní-
ku není žádný cizí předmět, přeneste hlavní jednotku na jiné místo a spusťte ji.
Chyba 3: Pravé kolečko je nad úrovní země, přeneste hlavní jednotku na jiné místo a
znovu ji spusťte.
Chyba 4: Senzor proti pádu je zablokovaný, zkontrolujete jej a očistěte. Hlavní jednotka je nad úrovní země. Přeneste hlavní jednotku na jiné místo a spusťte ji.
Chyba 5: Na bočním kartáči jsou namotané nečistoty, očistěte jej. V bočních kartáčích mohly uvíznout cizí předměty. Rozeberte a očistěte boční kartá-
Chyba 6: Na pravém/levém kolečku jsou namotané nečistoty, očistěte jej. Kolem kolečka mohou být namotané cizí předměty. Očistěte kolečko a opět spusťte
Chyba 7: Robotický vysavač uvízl, přeneste jej na jiné místo. Hlavní jednotka mohla uvíznout. Odstraňte překážky z okolí hlavní jednotky.
Kolečko je nad úrovní země. Přeneste hlavní jednotku na jiné místo a spusťte ji.
Tato chyba může rovněž upozorňovat na zašpiněný senzor proti pádu. Otřete senzor
proti pádu.
če.
hlavní jednotku.
Chyba 8: Slabá baterie, nabijte robotický vysavač. Slabá baterie. Před použitím vysavač nabijte.
Chyba 9: Problém s nabíjením, zkontrolujte nabíjení. Teplota baterie je příliš vysoká, nebo příliš nízká. Počkejte, než se teplota baterie vrátí
do normálu, a opět spusťte robotický vysavač.
Chyba 10: Senzor stěn je zablokovaný, zkontrolujte jej. Senzor stěn je pokryt prachem. Otřete senzor stěn.
Chyba 11: Nerovná podlaha, přeneste hlavní jednotku na jiné místo a znovu ji spusťte. Hlavní jednotka byla při spuštění nakloněna. Položte hlavní jednotku na rovnou pod-
lahu a znovu ji spusťte.
Chyba 12: Vrchní kryt laseru je zablokovaný nebo zaseknutý, zkontrolujte jej. Laserový tlakový senzor tlaku stlačený nebo zablokovaný. Přeneste robotický vysavač
na jiné místo a znovu jej spusťte.
86
Page 87

Řešení problémů
Chyba Řešení
Slabá baterie. Nabijte robotický vysavač a následně jej spusťte.
Robotický vysavač nelze zapnout.
Přístroj nelze nabít.
Pomalé nabíjení
Robotický vysavač se nevrátil do nabíjecí stanice.
Neobvyklé chování Robotický vysavač vypněte a následně zapněte.
Teplota baterie je příliš vysoká, nebo příliš nízká. Robotický vysavač používejte v prostředí o teplotě mezi 0 °C až 40 °C.
Nabíjecí stanice není připojena k napájení. Ujistěte se, že oba konce napájecího
kabelu nabíjecí stanice jsou řádně připojené.
Špatný kontakt mezi nabíjecí stanicí a hlavní jednotkou. Očistěte kovové části nabíjecí
stanice a nabíjecí kontakt hlavní jednotky.
Zkontrolujte, zda svítí kontrolka nabíjecí stanice.
Při použití v prostředí s vysokou nebo nízkou teplotou hlavní jednotka automaticky
sníží rychlost nabíjení, aby se prodloužila životnost baterie.
Oblast nabíjecího kontaktu může být zašpiněná. Očistěte tuto oblast suchým hadříkem.
Kolem nabíjecí stanice je příliš mnoho překážek. Umístěte nabíjecí stanici do volnějšího prostoru.
Hlavní jednotka je příliš daleko od nabíjecí stanice. Přeneste hlavní jednotku blíže k
nabíjecí stanici.
CZ
Robotický vysavač vydává během úklidu neobvyklý hluk.
Čisticí výkon robotického vysavače je snížen / vysavač za sebou zanechává nečistoty.
Robotický vysavač nelze připojit k Wi-Fi síti.
Nelze provést plánovaný úklid.
Ve válečkovém kartáči, bočních kartáčích nebo hlavním kolečku mohly uvíznout cizí
předměty. Vypněte robotický vysavač a očistěte je.
Všesměrové kolečko je obaleno prachem nebo jsou na něm namotány nečistoty.
Pomocí šroubováku kolečko vyjměte a opláchněte.
Zásobník na prach je plný. Vyprázdněte a očistěte zásobník na prach.
Zablokovaný filtr Vyčistěte filtr.
Kolem válečkového kartáče jsou namotané cizí předměty. Očistěte válečkový kartáč.
Funkce Wi-Fi sítě robotického vysavače není zapnutá. Resetujte připojení k Wi-Fi síti
a zkuste to znovu.
Špatná kvalita signálu Wi-Fi sítě. Umístěte jednotku do oblasti s dobrým signálem
Wi-Fi sítě.
Nestandardní připojení k Wi-Fi síti. Resetujte nastavení Wi-Fi sítě, stáhněte nejnovější
verzi mobilní aplikace a zkuste se znovu připojit.
Náhlé přerušení připojení k Wi-Fi síti. Nesprávné nastavení routeru. Obraťte se na
zákaznický servis.
Slabá baterie. Plánovaný úklid bude spuštěn, pouze pokud je baterie nabita alespoň
z 20 %.
87
Page 88
Spotřebovává robotický vysavač energii, pokud je vždy ponechán v nabíjecí stanici?
Pokud je vysavač vždy ponechán v nabíjecí stanici, spotřebovává pouze velmi malé
množství energie. Pomáhá tak udržovat co nejlepší výkon baterie.
Je před prvními třemi použitími nutné robotický vysavač nechat nabíjet po dobu 16
hodin?
Mopovací modul nevydává vodu, nebo pouze velmi malé množství vody.
Slabá baterie během úklidu. Robotický vysavač poté, co se vrátil do nabíjecí stanice,
aby se nabil, nepokračuje v úklidu.
Robotický vysavač se nemůže vrátit do nabíjecí stanice po dokončení úklidu na místě
(PIN N GO) nebo poté, co byla nabíjecí stanice přesunuta.
Robotický vysavač během úklidu vynechal některá místa.
Lithiová baterie nemá paměťový efekt. Jakmile je plně nabitá, lze ji ihned použít. Není
nutné čekat 16 hodin.
Zkontrolujte, zda je v nádržce na vodu voda. Prostřednictvím aplikace nastavte výdej
vody na maximum.
Nainstalujte mopovací hadřík a držák dle uvedených pokynů.
Zkontrolujte, zda robotický vysavač není v režimu nerušit. Pokud je robotický vysavač
v režimu nerušit, nebude pokračovat v úklidu.
Pokud byl robotický vysavač manuálně umístěn do nabíjecí stanice, nebude pokračovat v úklidu.
Robotický vysavač po dokončení úklidu na místě nebo poté, co byla nabíjecí stanice
přesunuta, znovu vygeneruje mapu domácnosti.
Pokud se robotický vysavač nachází příliš daleko od nabíjecí stanice, je možné, že se
do ní nebude moci automaticky vrátit. V tomto případě jej do nabíjecí stanice umístěte manuálně.
Senzor stěn nebo senzor proti pádu mohou být zašpiněné. Otřete senzory měkkým
suchým hadříkem.
88
Page 89
Specifikace produktu
Kategorie
Konstrukce
Baterie
Parametry úklidu
CZ
Parametr Specifikace
Průměr 330 mm
Výška 96 mm
Čistá hmotnost 2,7 kg
Napětí 14,4 V
Baterie Dobíjecí lithiová baterie 2600 mAh
Objem zásobníku na prach 600 ml
Typ nabíjení Automatické nebo manuální nabíjení
Doba nabíjení Cca 270 minut
Čas čištění Cca 100 minut
Hlavní jednotka Jmenovitý výkon (W) 28
Vzhledem k neustálému vylepšování našich produktů jsou rozhodující specifikace skutečného produktu.
Naše společnost si vyhrazuje právo produkt aktualizovat.
89
Page 90
INFORMACE O LIKVIDACI A RECYKLACI
Všechny produkty s tímto označením je nutno likvidovat v souladu s předpisy pro likvidaci elektrických
a elektronických zařízení (směrnice 2012/19/EU). Jejich likvidace společně s běžným komunálním
odpadem je nepřípustná. Všechny elektrické a elektronické spotřebiče likvidujte v souladu se všemi místními
i evropskými předpisy na určených sběrných místech s odpovídajícím oprávněním a certifikací dle místních
i legislativních předpisů. Správná likvidace a recyklace napomáhá minimalizovat dopady na životní prostředí
a lidské zdraví. Další informace k likvidaci získáte u prodejce, v autorizovaném servisu nebo u místních úřadů.
EU PROHLÁŠENÍ O SHODĚ
Tímto společnost Tesla Global Limited prohlašuje, že typ rádiového zařízení TSL-VC-AI200 je v souladu se směrnicí
2014/53/EU. Úplné znění EU prohlášení o shodě je k dispozici na této internetové adrese: tsl.sh/doc
Konektivita: WIFI 802.15.4
Kmitočtové pásmo: 2.400 - 2.480 GHz
Max. radiofrekvenční výkon (EIRP): < 20 dBm
Výrobce
Tesla Global Limited
Far East Consortium Building,
121 Des Voeux Road Central
Hong Kong
www.teslasmart.com
90
Page 91
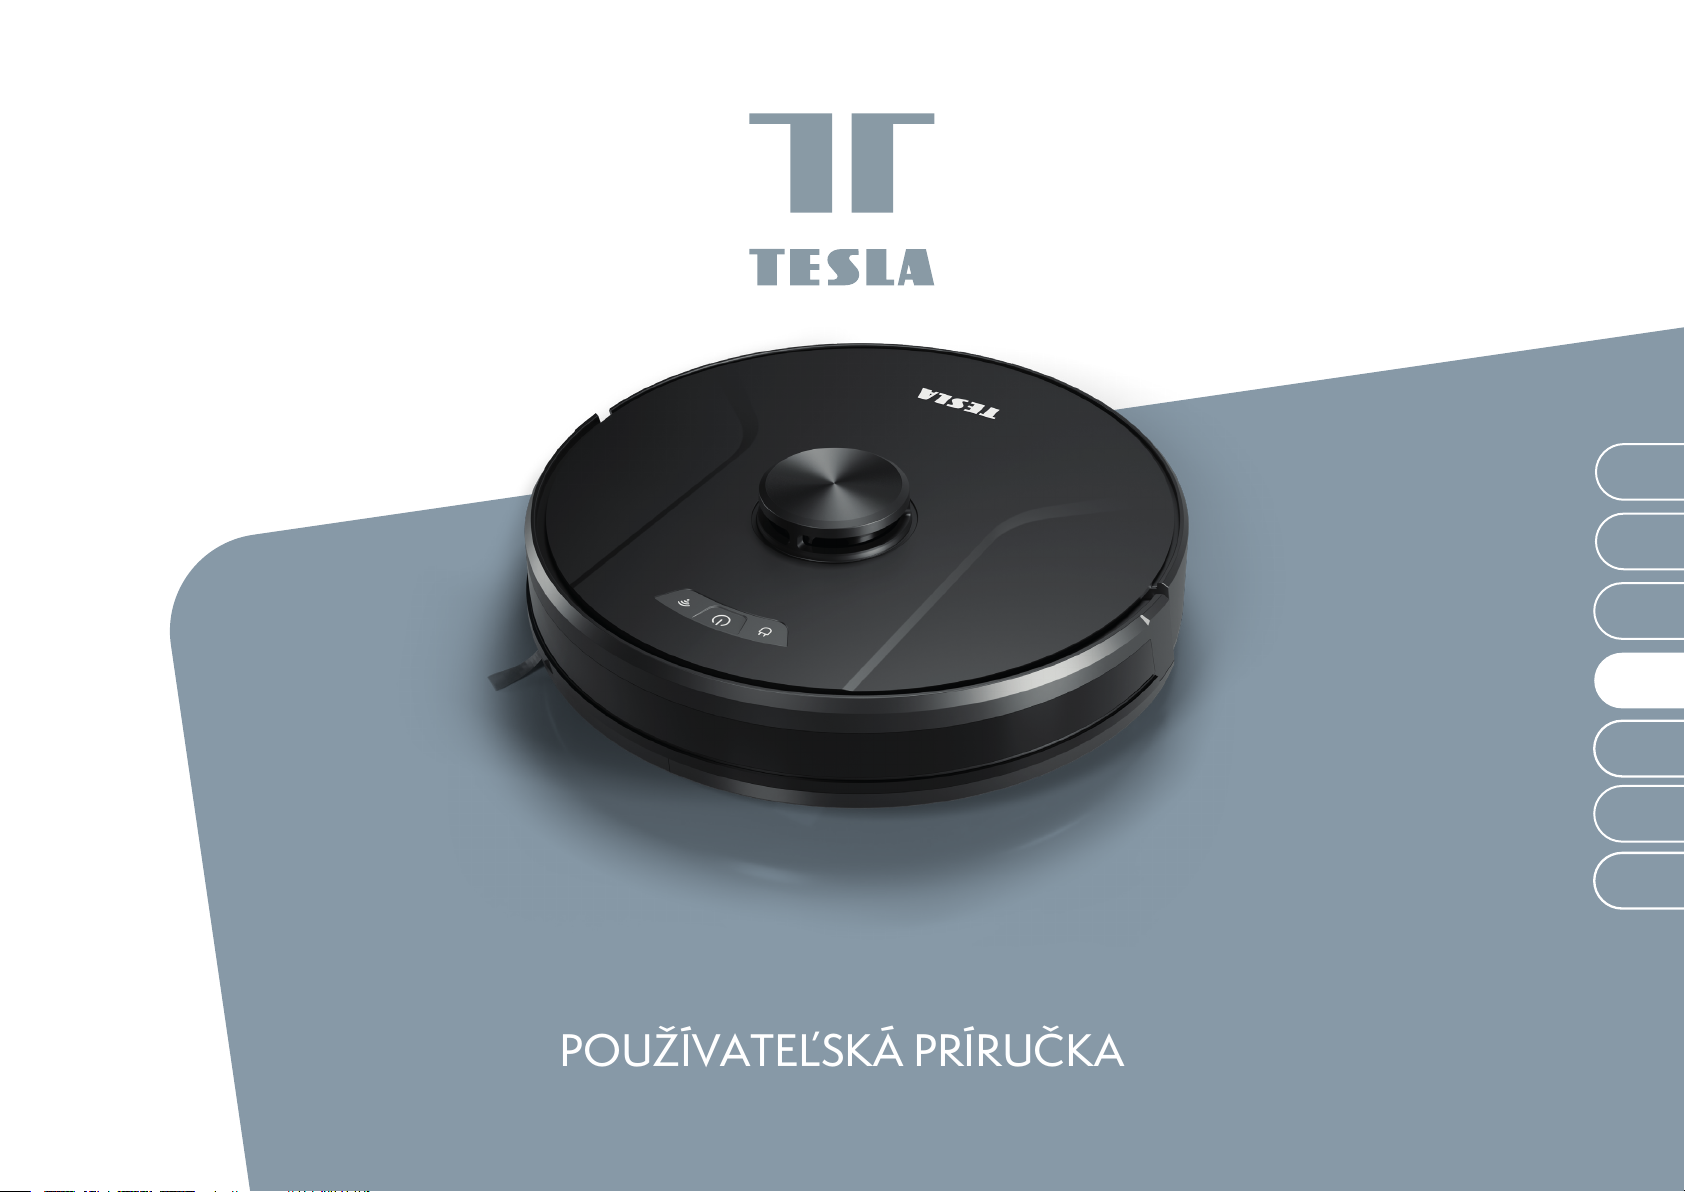
TESLA SMART ROBOT
VACUUM LASER AI200
EN
DE
CZ
SK
PL
HU
SL
POUŽÍVATEĽSKÁ PRÍRUČKA
Page 92

Bezpečnostné pokyny
Pred použitím tohto výrobku si prečítajte nasledujúce bezpečnostné pokyny a dodržujte všetky obvyklé bezpečnostné opatrenia.
Pozorne si prečítajte túto užívateľskú príručku a odložte si ju pre budúce použitie.
Nedodržanie pokynov tejto používateľskej príručky môže viesť k poškodeniu výrobku.
Upozornenie
1.Tento výrobok môžu rozoberať iba autorizovaní technici. Používatelia by sa nemali pokúšať
výrobok sami rozoberať.
2.Používajte iba napájací adaptér dodaný výrobcom tohto výrobku. Iné adaptéry môžu výrobok poškodiť.
3.Nedotýkajte sa mokrými rukami káblov, zásuviek ani napájacieho adaptéra.
4.Dávajte pozor, aby sa do hnacieho kolieska výrobku nenamotali záclony alebo nepriškripli
časti tela.
5.Výrobok skladujte mimo dosahu cigariet, zapaľovačov a iných zdrojov otvoreného ohňa.
6.Po nabíjaní výrobok vyčistite.
7.Kábel neohýbajte a na spotrebič neumiestňujte ťažké alebo ostré predmety.
8.Tento výrobok je určený na použitie v interiéri. Nepoužívajte ho vonku.
9.Na výrobok si nesadajte.
10.Výrobok nepoužívajte vo vlhkom prostredí, napr. v kúpeľni.
11.Pred použitím výrobku z podlahy odstráňte krehké predmety (poháre, lampy atď.) a tiež
predmety, ktoré sa môžu namotať okolo bočnej kefy a sacieho otvoru (káble, papiere, záclony
atď.).
12.Výrobok neumiestňujte na miesto, z ktorého by mohol ľahko spadnúť (napr. na stoly a
stoličky).
13.Pred použitím skontrolujte, či je napájací adaptér dobre pripojený k zásuvke, v opačnom
prípade by mohlo dôjsť k poškodeniu batérie.
14.Upozornite ostatných členov domácnosti, že výrobok pracuje, aby oň nešťastnou náhodou
nezakopli.
15.Ak je zásobník na prach plný, pred ďalším použitím výrobku ho vyprázdnite.
16.Prevádzková teplota batérie je od 0 °C do 40 °C.
17.Výrobok nepoužívajte v prostredí s vysokou teplotou.
18.Pred likvidáciou výrobku vyberte batériu.
19.Pred vybratím batérie sa ubezpečte, že výrobok je odpojený od zdroja napájania.
20.Použité batérie riadne zrecyklujte.
Varovanie
1.Používajte iba originálne dobíjacie batérie a nabíjaciu stanicu dodanú výrobcom. Nepoužívajte batérie, ktoré nemožno dobiť. Špecifikáciu batérie nájdete v sekcii „Špecifikácia
výrobku“.
2.Výrobok nepoužívajte v prostredí, kde sa nachádza zdroj otvoreného ohňa alebo krehké
predmety.
3.Výrobok nepoužívajte v prostredí s extrémne vysokou (nad 40 °C) ani extrémne nízkou (pod
0 °C) teplotou.
4.Vlasy, oblečenie, prsty a všetky ďalšie časti tela udržujte mimo dosahu otvorov a pohyblivých častí robotického vysávača.
5.Výrobok nepoužívajte na mokrej podlahe ani na podlahe, na ktorej je rozliate veľké množstvo tekutiny.
6.Výrobok nepoužívajte na vysávanie predmetov, ktoré by ho mohli zablokovať, ako sú kamienky a odpadový papier.
7.Výrobok nepoužívajte na vysávanie horľavých materiálov, ako je benzín alebo atrament do
tlačiarní a kopírok. Výrobok nepoužívajte na čistenie priestoru, kde sa nachádzajú horľavé
materiály.
8.Výrobok nepoužívajte na vysávanie horiacich predmetov, ako sú cigarety, zápalky, popol
atď., čo by mohlo spôsobiť vznik požiaru.
9.Do sacieho otvoru nevkladajte žiadne predmety. Výrobok nepoužívajte, ak je sací otvor
zablokovaný. Zo sacieho otvoru odstráňte prach, vatu a vlasy, zaistíte tak plynulú cirkuláciu
vzduchu cez sací otvor.
10.S napájacím káblom manipulujte opatrne, aby ste ho nepoškodili. Napájací kábel nepoužívajte na ťahanie výrobku alebo nabíjacej stanice, výrobok nenoste za napájací kábel, napájací
kábel nepritvárajte do dverí a neveďte ho okolo ostrých hrán a rohov. Zabráňte, aby výrobok
prechádzal cez napájací adaptér. Napájací adaptér udržujte mimo dosahu zdrojov tepla.
11.Nepoužívajte nabíjaciu stanicu, ak je poškodená.
12.Výrobok nevhadzujte do ohňa, aj keby bol vážne poškodený, lebo batéria výrobku môže
vybuchnúť.
Senzor laserového dosahu je v súlade s normou IEC 60825-1: 2014 1. triedy pre laserové výrobky a nevytvára nebezpečné laserové žiarenie.
92
Page 93

Obsah
Bezpečnostné pokyny 89
Výrobok a jeho príslušenstvo 90
Zloženie výrobku 91
Inštalácia 92
Popis ikoniek a tlačidiel aplikácie 94
Zásobník na prach, nádržka na vodu a zostava mopovacej handričky 96
Príprava 97
Nabíjanie hlavnej jednotky 98
Použitie výrobku / Spustenie vysávania 99
Pokyny na používanie 100
Použitie nádržky na vodu 104
Údržba - Zásobník na prach 105
Údržba - Nádržka na vodu a mopovacia handrička 108
SK
Údržba - Valčeková a bočná kefa 109
Údržba - Nabíjacia elektróda, senzor proti pádu, hnacie koliesko a všesmerové koliesko 110
Riešenie problémov 111
Špecifikácia výrobku 114
93
Page 94
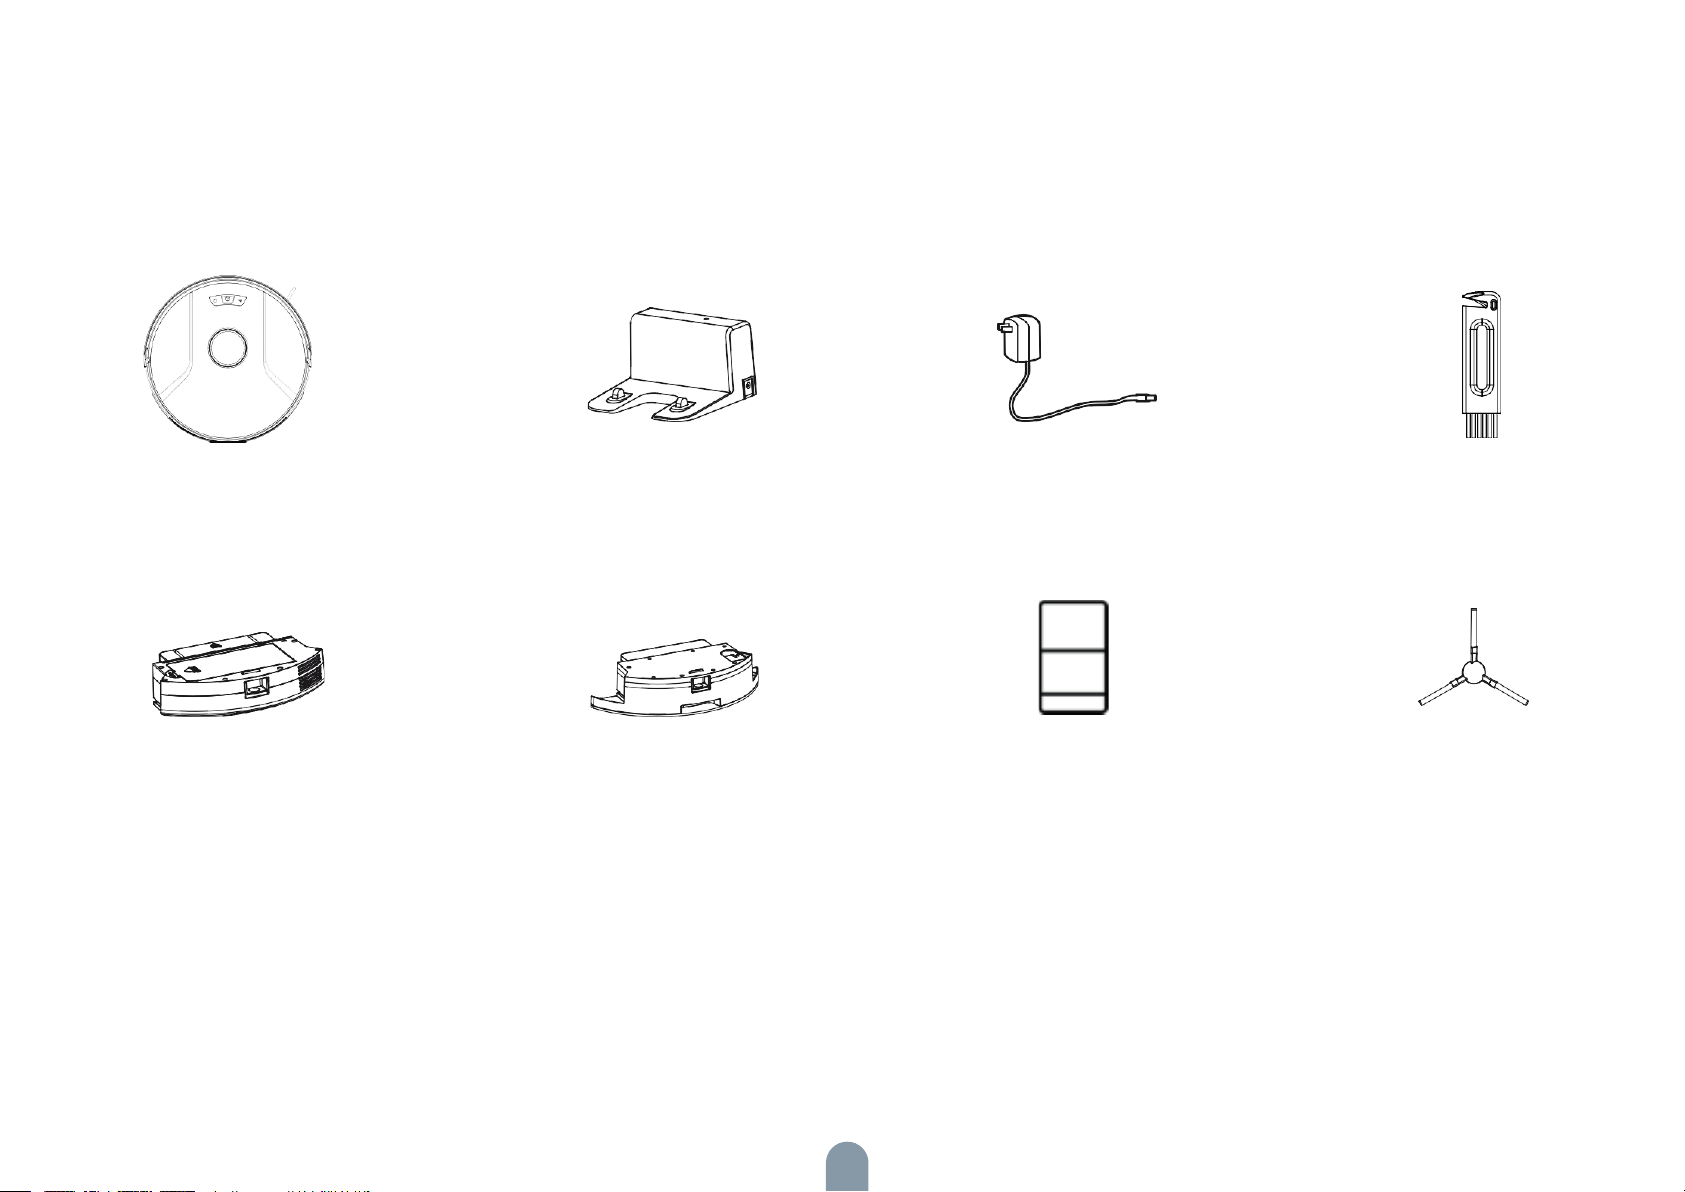
Výrobok a jeho príslušenstvo
Hlavná jednotka
Zásobník na prach
Nabíjacia stanica
Nádržka na vodu Používateľská príručka
Napájací adaptér Čistiaca kefka
Bočná kefa (1 sady)
94
Page 95
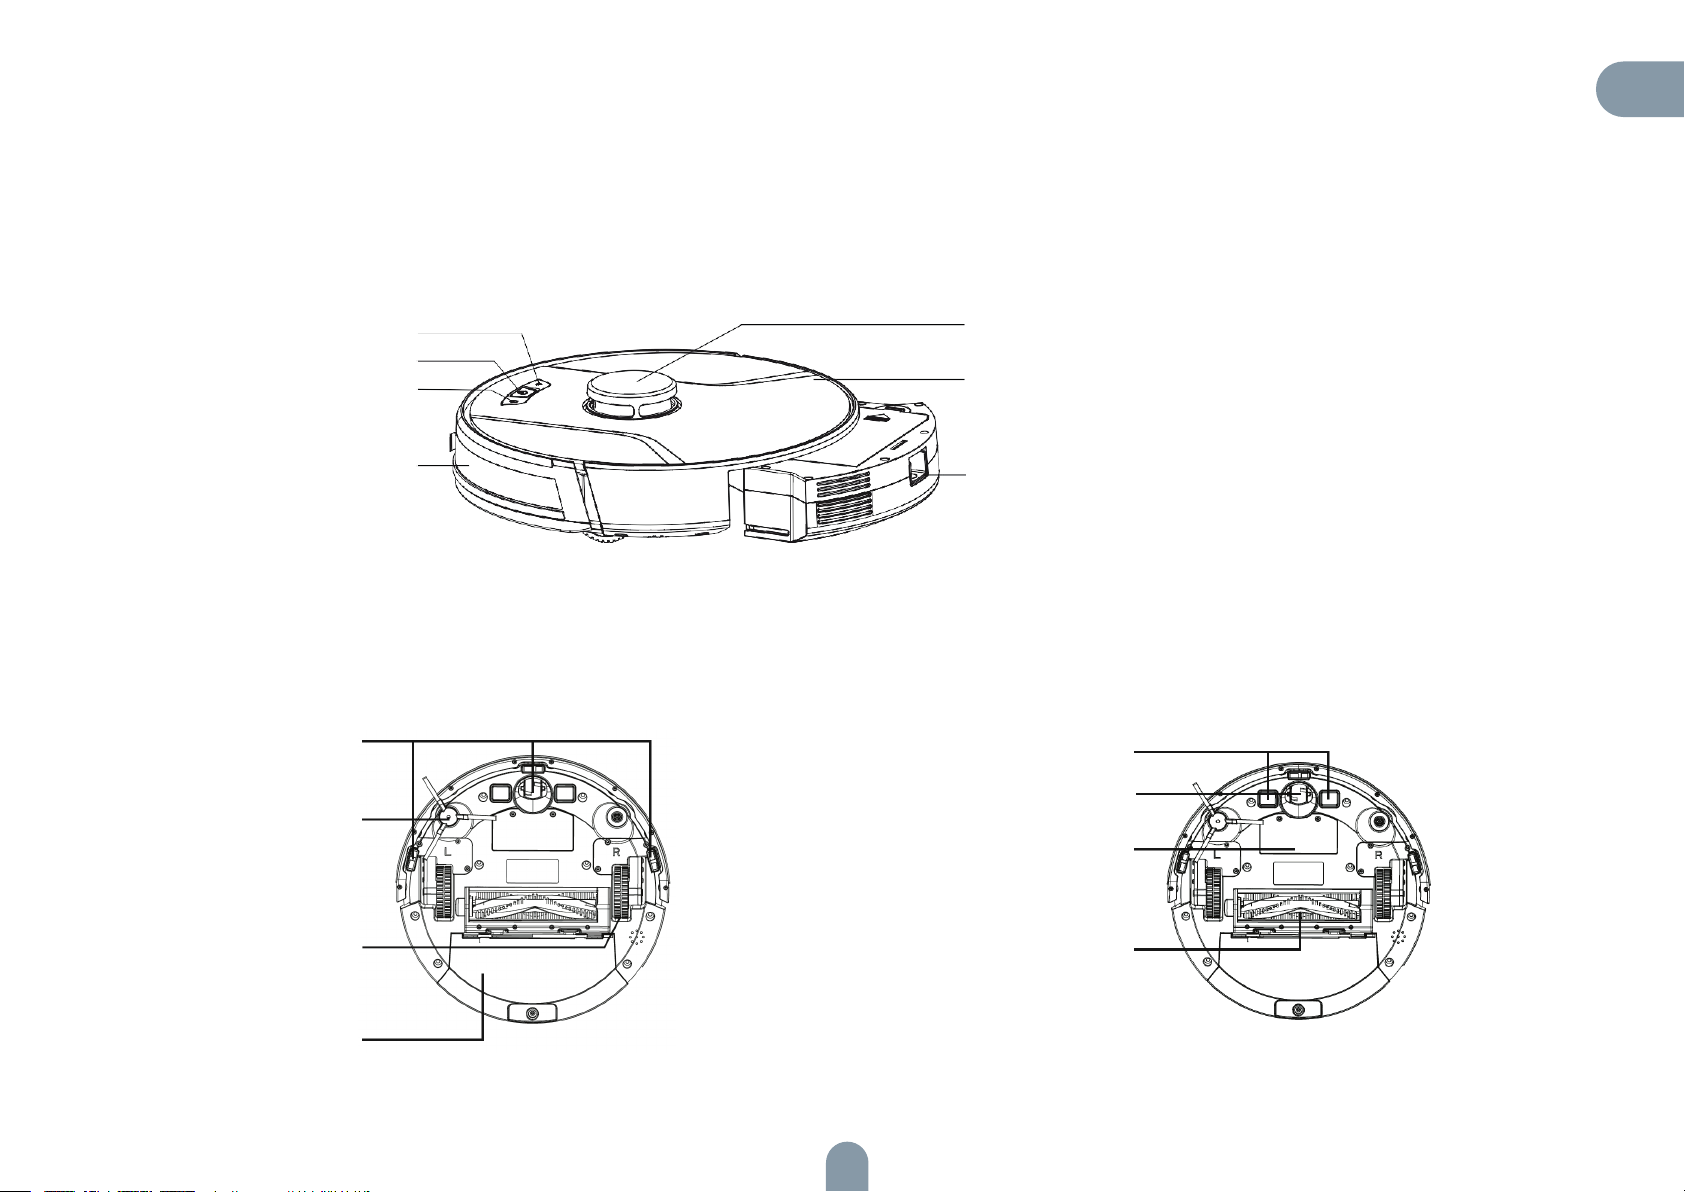
Zloženie výrobku
Predný pohľad
SK
Tlačidlo Wi-Fi siete
Tlačidlo Zapnúť/Pauza
Tlačidlo pre návrat
do nabíjacej stanice
Všesmerový objektív
Zadný pohľad
Senzor proti pádu
Bočná kefa
Kryt
Laserová hlava
Tlačidlo zásobníka na prach
Nabíjacia elektróda
Všesmerové koliesko
Bateria
Hnacie koliesko
Zásobník na prach
Zostava valčekovej kefy
95
Page 96
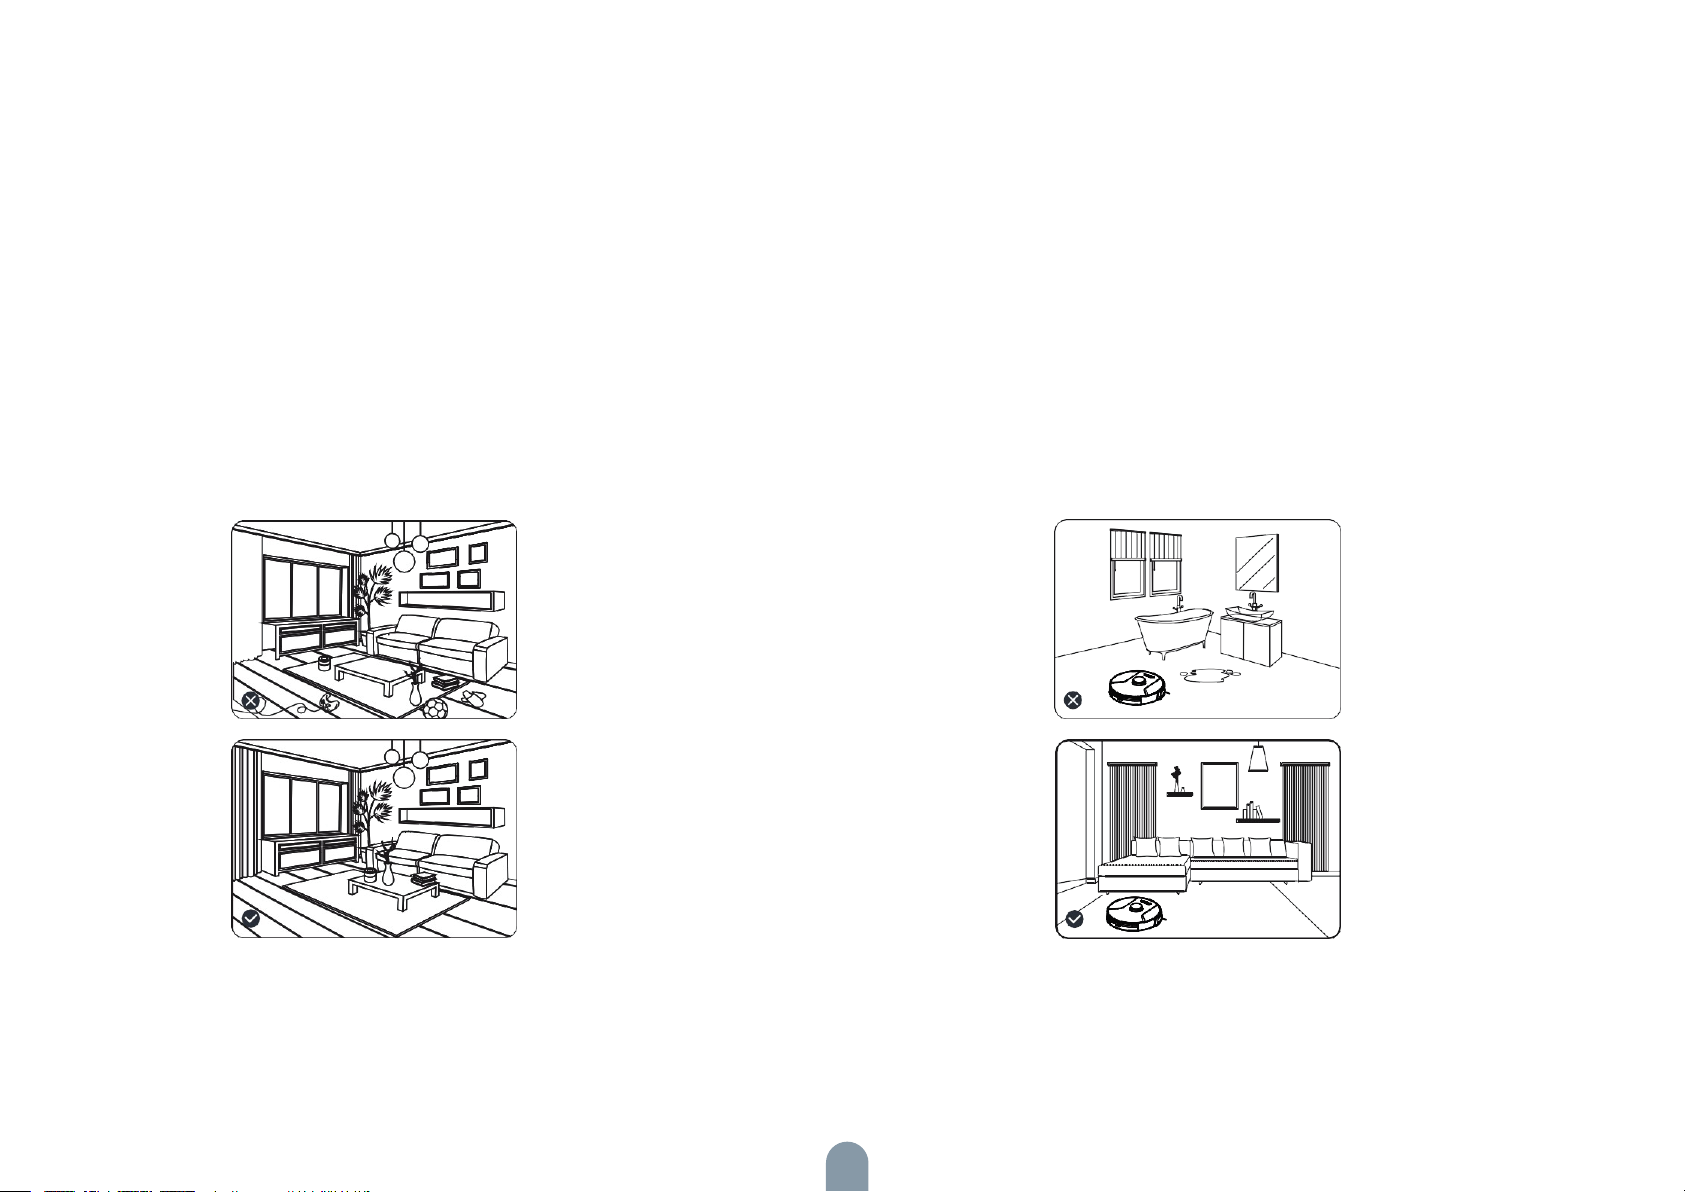
Inštalácia
Poznámky
1. Pred spustením robotického vysávača odstráňte káble a drobné
predmety roztrúsené po zemi a nestabilné, krehké, cenné a potenciálne nebezpečné predmety. Zabráňte, aby sa vysávač zamotal,
zasekol, niečo za sebou ťahal alebo niečo prevrhol, v opačnom
prípade môže dôjsť k zraneniu osôb alebo poškodeniu majetku.
2. Výrobok nepoužívajte vo vlhkom prostredí, v opačnom prípade
môže dôjsť k poškodeniu ventilátora a následnému zníženiu výkonu robotického vysávača.
96
Page 97
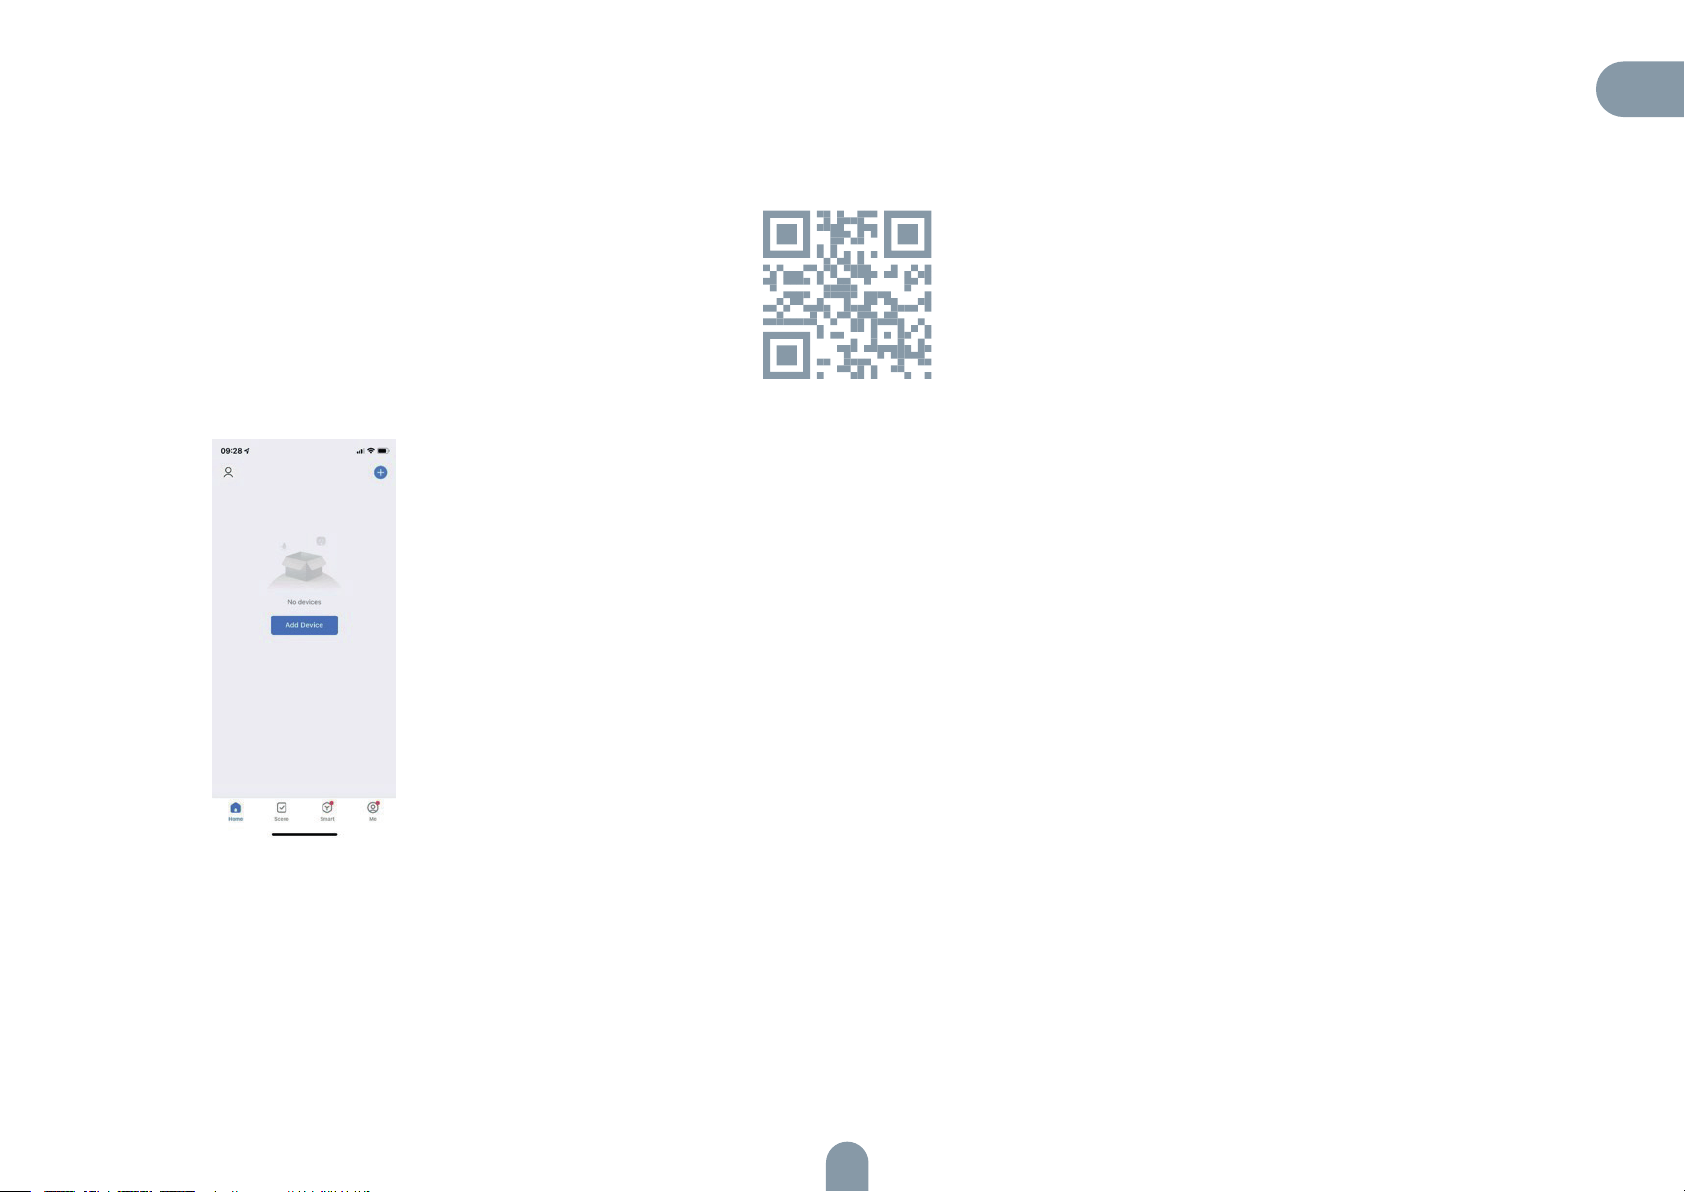
Inštalácia
1. Stiahnite si aplikáciu TESLA Smart z obchodu s aplikáciami, zaregistrujte sa a prihláste sa do aplikácie. Pred pripojením k sieti sa uistite, že frekvencia Wi-Fi je 2,4 GHz.
2. Príprava: kliknutím na + v pravom hornom rohu pridáte svojho robota.
SK
97
Page 98
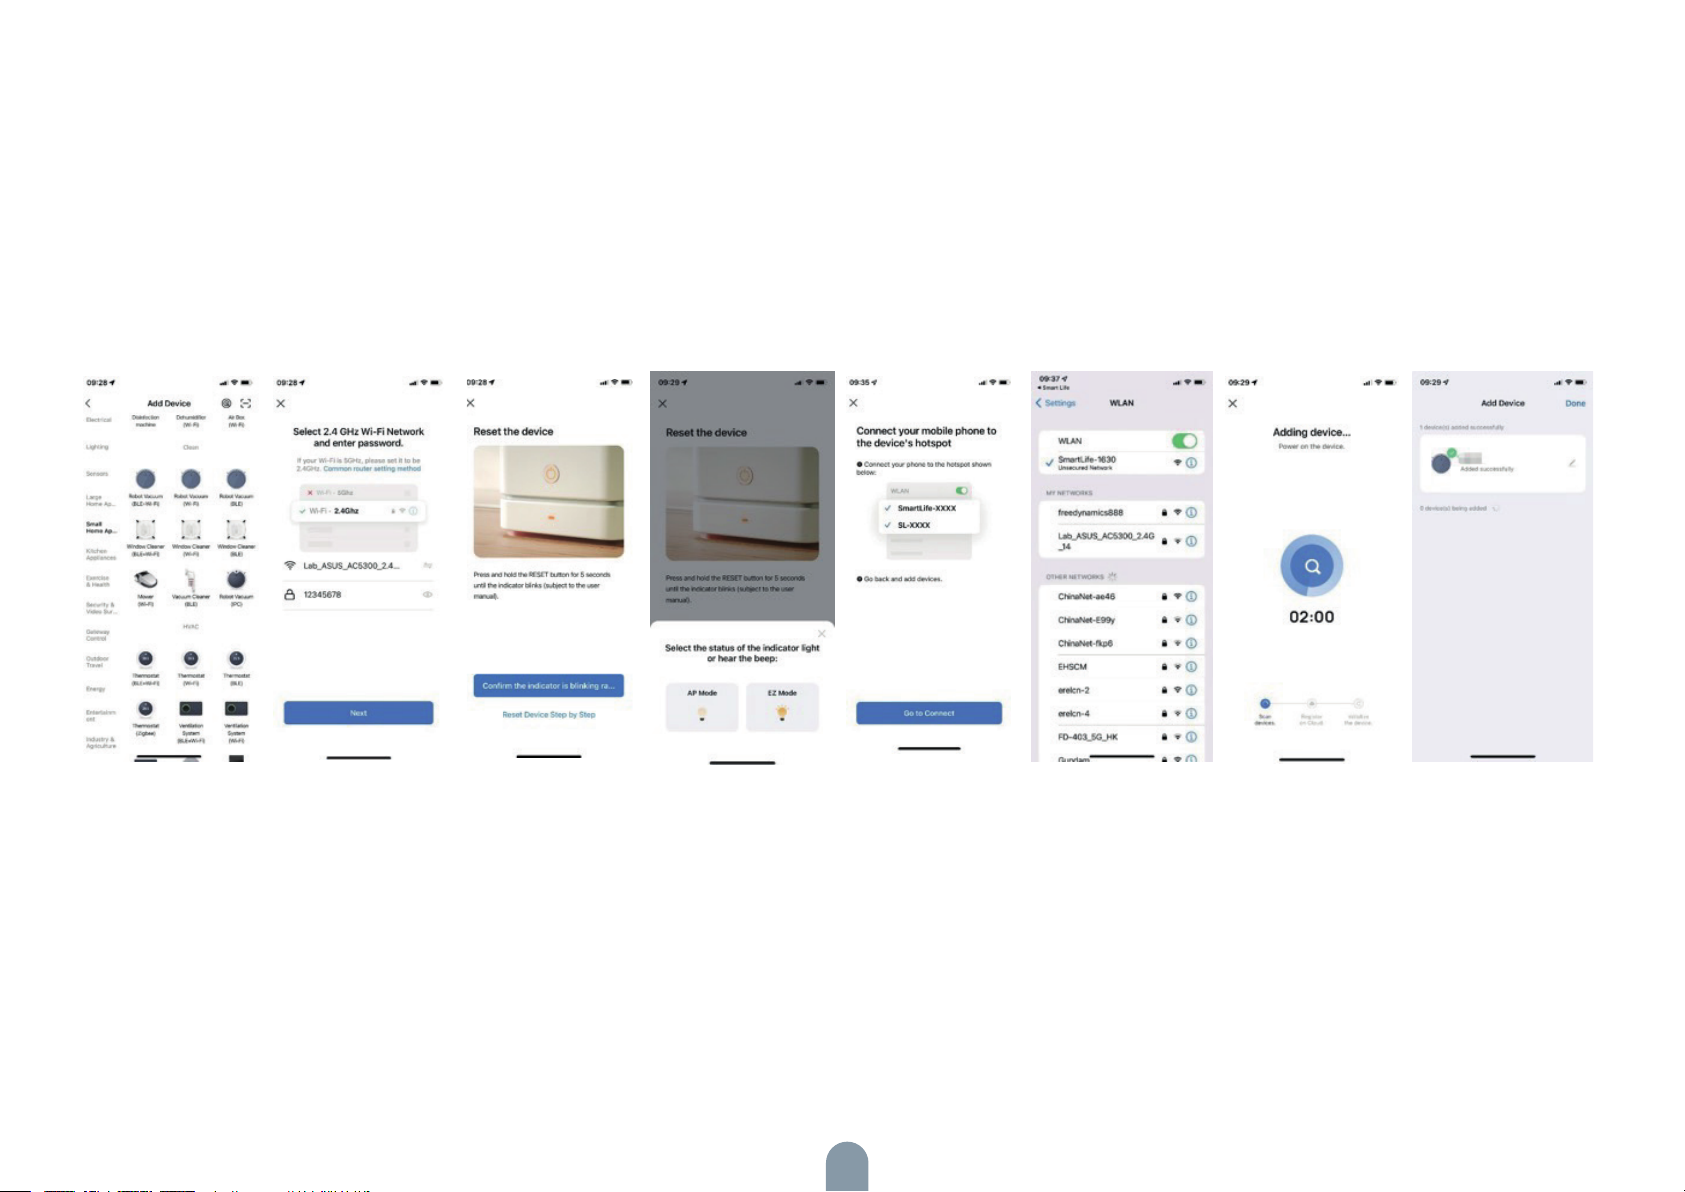
3. Zariadenie podporuje režim prístupového bodu:
- V stĺpci Small Home Appliance (Malé domáce spotrebiče) vyberte možnosť Robot Vacuum (Wi-Fi) (robotický vysávač (Wi-Fi).
- Uistite sa, že frekvencia Wi-Fi je 2,4 GHz, a zadajte správne heslo Wi-Fi.
- Stlačte a podržte tlačidlo Wi-Fi na robote na 3 sekundy, uistite sa, že indikátor Wi-Fi bliká. V rozhraní aplikácie označte Confirm the indicator is flashing rapidly (Potvrdiť, že
indikátor rýchlo bliká, kliknite na Next (Ďalej) a vo vyskakovacom okne vyberte režim prístupového bodu (AP).
- Nájdite vo svojom zozname hotspot Wi-Fi bez hesla, ktorý začína na SmartLife-XXXX, a kliknutím sa pripojte. Po úspešnom pripojení k prístupovému bodu by ste sa mali
vrátiť do aplikácie TESLA Smart aplikácia sa automaticky prepne na rozhranie pripojenia robota. Počkajte na pripojenie; po dokončení pripojenia budete môcť ovládať robota.
98
Page 99
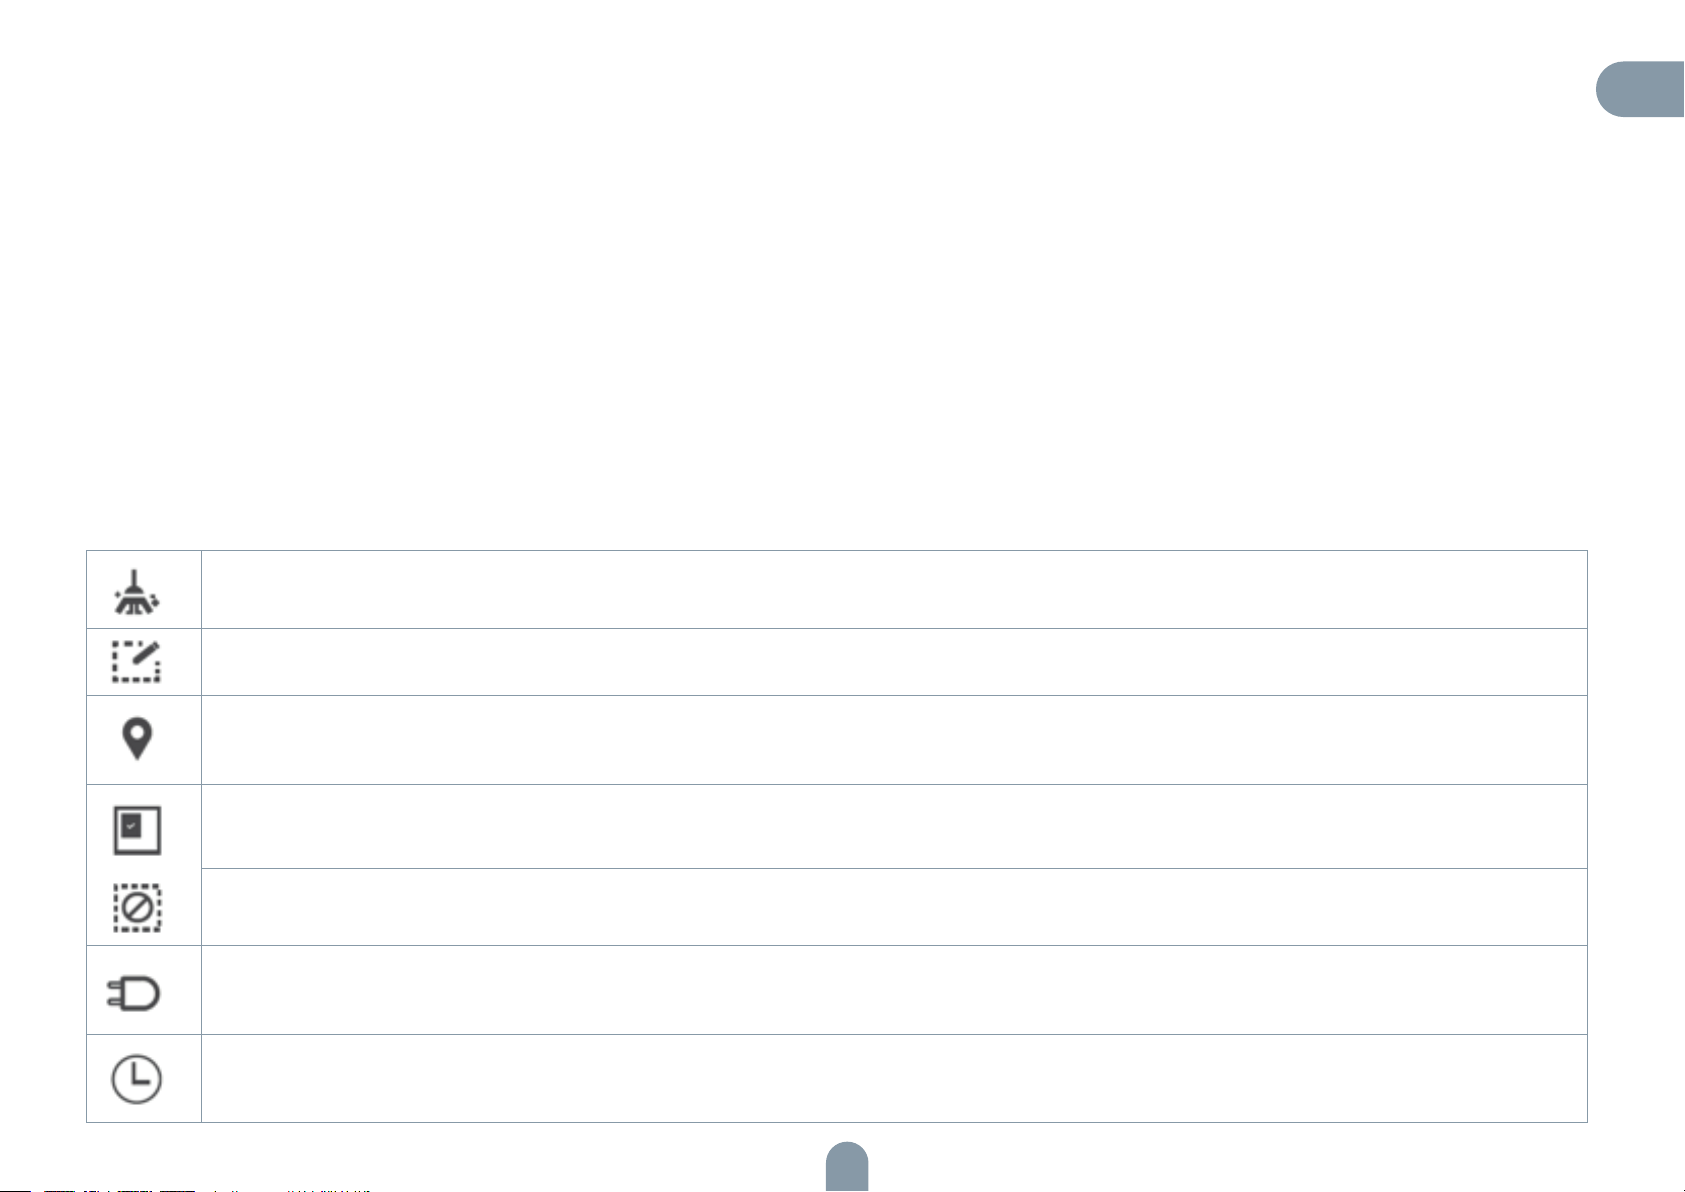
Inštalácia
Stiahnite si aplikáciu Tesla Smart, kliknite na symbol „+“, pridajte domáci spotrebič a vyberte 2,4GHz Wi-Fi sieť. Zadajte názov a heslo Wi-Fi siete, kliknite na „Next“ („Ďalšie“)
a vysávač pripojte k Wi-Fi sieti. Wi-Fi sieť môžete nakonfigurovať jedným z nasledujúcich spôsobov:
1. Rýchle pripojenie k Wi-Fi sieti: Stlačte a na 3 sekundy podržte tlačidlo Wi-Fi siete. Prístroj zapípa, prejde do režimu EZ a kontrolka Wi-Fi siete začne rýchlo blikať. Potom
môžete pridať prístroj a spárovať ho s aplikáciou.
Keď sa zobrazí správa o úspešnom pripojení, prístroj môžete ovládať pomocou aplikácie.
2. Párovanie pomocou hotspotu: Stlačte a na 6 sekúnd podržte tlačidlo Wi-Fi siete. Prístroj každé 3 sekundy zapípa. Keď prístroj dvakrát zapípa, prejde do režimu AP a kontrolka Wi-Fi siete začne pomaly blikať. Režim párovania v aplikácii teraz treba prepnúť z režimu EZ do režimu AP. Potom môžete zadať názov a heslo Wi-Fi siete a kliknúť na
„Go to Connect“ („Prejsť k pripojeniu“). Vyberte hotspot SmartLife-XXXX bez hesla. Tento hotspot sa vytvorí po pripojení prístroja k vašej Wi-Fi sieti. Po pripojení prístroja k
hotspotu sa vráťte do aplikácie Tesla Smart. Aplikácia vás automaticky presmeruje na obrazovku so správou „Connect your mobile phone to the device‘s hotspot“ („Mobilný
telefón pripojiť k hotspotu zariadenia“). Keď sa zobrazí správa o úspešnom pripojení, prístroj môžete ovládať pomocou aplikácie.
Popis ikoniek a tlačidiel aplikácie
Ikonky a popisy
Vysávanie celej domácnosti: Robotický vysávač pomocou senzorov naskenuje a potom vygeneruje mapu celej domácnosti a automaticky naplánuje optimálnu trasu vysávania.
Vysávanie určitej zóny: Na mape aplikácie môžete nastaviť zónu vysávania určitého miesta. Robotický vysávač sa potom automaticky presunie na dané miesto
a povysáva ho.
SK
PIN N GO (Vysávanie na mieste): Môžete určiť konkrétne miesto na mape aplikácie. Robotický vysávač sa potom presunie na určené miesto a okolo tohto
miesta povysáva priestor veľkosti 1,6 x 1,6 m. Klepnutím alebo pretiahnutím na mape nastavíte cieľový bod.
Vysávanie vybraných zón: Keď vysávač vygeneruje mapu celej domácnosti, v aplikácii môžete vybrať jednu alebo viac zón, ktoré chcete povysávať.
Nastavte vylúčenú zónu vysávania.
Návrat do nabíjacej stanice: Ak táto ikonka svieti, robotický vysávač sa automaticky vráti do nabíjacej stanice, aby sa nabil. Ak táto ikonka bliká, robotický vysávač preruší návrat do nabíjacej stanice.
Režim plánovaného vysávania: Pomocou aplikácie môžete naplánovať vysávanie kedykoľvek počas dňa až na 7 dní dopredu.
99
Page 100

Tlačidlo Popis Ovládacie tlačidlá Popis funkcií
Stlačením tohto tlačidla prístroj zapnete. Stlačením a podržaním tohto tlačidla na 3 sekundy
prístroj zapnete.
Stlačením a podržaním tohto tlačidla prístroj vypnete. Stlačením a podržaním tohto tlačidla na 3 sekundy
prístroj vypnete.
Tlačidlo napájania
Tlačidlo pre návrat do nabíjacej stanice
Tlačidlo Wi-Fi siete
Stlačením tohto tlačidla naplánujete trasu vysávania. Stlačte tlačidlo
Stlačením tohto tlačidla prístroj zastavíte. Stlačte tlačidlo
Stlačením tohto tlačidla pošlete robotický vysávač späť
do nabíjacej stanice.
Stlačením tohto tlačidla počas návratu robotického
vysávača do nabíjacej stanice ho zastavíte.
Rýchle pripojenie k Wi-Fi sieti (režim EZ) Stlačte a na 3 sekundy podržte toto tlačidlo.
Párovanie pomocou hotspotu (režim AP) Stlačte a na 6 sekúnd podržte toto tlačidlo.
Stlačte tlačidlo
Stlačte tlačidlo
100
 Loading...