

Page 1
SERIES
3
49K309BF
LED TV
OPERATING
INSTRUCTION
ENG
BiH/CG
SLO SRB
Page 2
ENG
BiH/CG
SLO
SRB
OPERATING INSTRUCTION
Please read these instructions before operating
your set and retain them for future reference.
UPUTSTVO ZA UPOTREBU
Prije upotrebe uređaja pročitati ova uputstva
i zadržati ih radi kasnijih referenci.
NAVODILA ZA UPORABO
Pred uporabo pozorno preberite navodila
in jih shranite za morebitno uporabo v prihodnosti.
UPUTSTVO ZA UPOTREBU
Pre upotrebe uređaja pročitati ova uputstva
i zadržati ih radi kasnijih referenci.
Page 3
SAFETY WARNING AND NOTICE
Thanks for choosing the high-performance and multifunctional intelligent LED TV produced by our company. This
precious thing will bring you better audiovisual enjoyment. The design of this product has given consideration to
factors affecting personal safety, and the product itself has gone through strict tests prior to delivery. However, improper
operation may result in electric shock and fire disaster. To ensure safety, prolong the service life of this product, and
make sure the best performance of this product can be given full play to, please read the manual and marking label
carefully before using it and comply with the following safety instructions. Please keep the user manual for later use.
ENG
WARNING ATTENTION
Indicate the behaviours that must be prohibited
May result in casualties
Indicate the operations that must be performed
May result in personal injury
or property losses
UNDER FOLLOWING CONDITIONS:
• Power failure or unstable voltage.
• Abnormal sound or smell from the device.
• AC power cord is damaged.
• TV set is damaged due to falling off, knock or impact.
• Any liquid or foreign matters enter into the TV set.
If coal gas or other flammable gases leak, do not unplug the power cord of the TV set or other electric
appliances; instead, close the valve of the gas immediately and open the doors and windows.
Turn off the TV set
immediately, unplug the
power cord from the
power outlet, and contact
authorized maintenance
personnel.
WARNING
• Only use 100-240VAC, 60/50Hz power supply.
• This TV must be connected to a three pin socket outlet for safety.
• All cables can be connected or pull out only after power supply is turned off.
• Do not fix the TV set on instable position, or else it may cause falling off, damage, or even fire.
• Do not put the TV set in the environment:
1. With direct sunshine, moisture, overheating, undercooling or heavy dust;
2. With flammable or explosive substance;
3. With flammable or corrosive gas;
4. In bathroom, kitchen, etc.
• Do not use damaged or improper power socket, and ensure that the plug and socket are connected properly.
• Keep the power plug and socket free of dust and metal pieces.
• Do not damage the power cord:
1. It is prohibited to refit the power cord;
2. Do not put heavy object on the power cord;
3. Keep the power cord away from heat source;
4. Do not drag the power cord when unplugging.
• Do not connect too many appliances to one power strip, or else it may cause fire due to high power
consumption.
• Do not let open flame (e.g. lit candle) approach the TV set, or else it may cause electric shock or fire.
• Do not put the container filled with water on the TV set, to avoid electric shock or fire caused by water drop of
splashing.
• Do not penetrate any sharp object, metal or liquid into the signal connector or air vents, to avoid short circuit
and product damage as well as electric shock.
• The slots on the case is designed to release heat so as to assure that all inside components will not reach an
extra high temperature and can work normally for a long time. Please do not cover the holes while place it.
3
Page 4
ENG
Do not touch the plug with wet hands, or else it may cause electric shock.
Do not turn on the TV set in thunderstorm weather; instead, unplug the power plug and antenna connector to
avoid lightning strike.
Do not disassemble the TV set by yourself, or else it may cause electric shock or fire. Contact qualified
personnel for maintenance.
ATTENTION
• Do not let children climb onto the TV set.
• Keep the small accessories away from children’s reach to avoid swallowing.
• If the TV set won’t be used for a long time, please turn off the device and unplug the power cord.
• Before cleaning the TV set, unplug the power cord and wipe with soft cloth; do not use chemical reagents and avoid
foreign substances entering into the device. The incorrect cleaning (such as cleaning fluid, water, etc) may lead to
damage of product’s appearance, erasing products printing information, even flow into the machine and damage
components, cause machine can not display.
• To adjust the position or angle of the TV set, please disconnect all wires and move slowly to avoid falling off.
• Do not rub with hard object, knock at, bend or squeeze the screen.
• Do not use machine immediately after transfering machine to the places with high temperature from low temperature,
which will cause fogging inside machine and failures.
• If the screen is broken and the liquid splashes on skin, please wash with clean water immediately for 15 minutes, and
go to see your doctor.
• To carry the TV set with hands, please grasp the corners and hold the bottom; do not apply force on the panel.
• Displaying the same image for a long time or active image with fixed words, icons will leave “image persistence” on
screen which will not disappear after powering off for a long time. This undesirable phenomenon is not covered by
warranty.
• Healthy TV watching:
1. Watch in appropriate light; poor light or long time watching may hurt your eyes.
2. Adjust the volume appropriate to avoid hurting your hearing.
• Unplug the power cord of the device to cut off the power supply.
• If a power plug or appliance coupler is used as disconnecting device, it should ensure easy operation.
• Power plug shall be connected reliably. Loose power plugs may cause sparkle and fire.
• All the technical specifications in the user’s manual and on the packaging are subject to changes without prior notice.
If there is slight deviation between the user’s manual and actual operation, the latter shall prevail.
The terms HDMI and HDMI High-Definition Multimedia Interface, and the HDMI Logo are
trademarks or registered trademarks of HDMI Licensing Administrator, Inc. in the United
States and other countries.
MOUNTING AND CONNECTING
Packing list
1. The TV set. 2. User Manual. 3. Remote control. 4. Power cord (or attached to TV set).
5. Component transfer cable (optional).
Mounting the TV set
Tips on Installation
• The TV set should be mounted near the AC power socket for easy plugging and unplugging.
• For your safety, please select appropriate wall mount bracket or base.
• To avoid hurt, it is required to place the TV set on stable plane, or fix on firm wall.
4
Page 5
• Ask qualified personnel to mount the TV set on the wall. Improper mounting may result in instable TV set.
• Do not place the TV set at any place susceptible to mechanical vibration.
• Do not place the TV set at any place that insects may enter.
• Do not mount the TV set against air conditioner, or else the internal panel of the display may condense moisture and
cause failure.
• Do not place the TV set at any place with strong magnetic field, or else it may be interfered with and damaged by
electromagnetic wave.
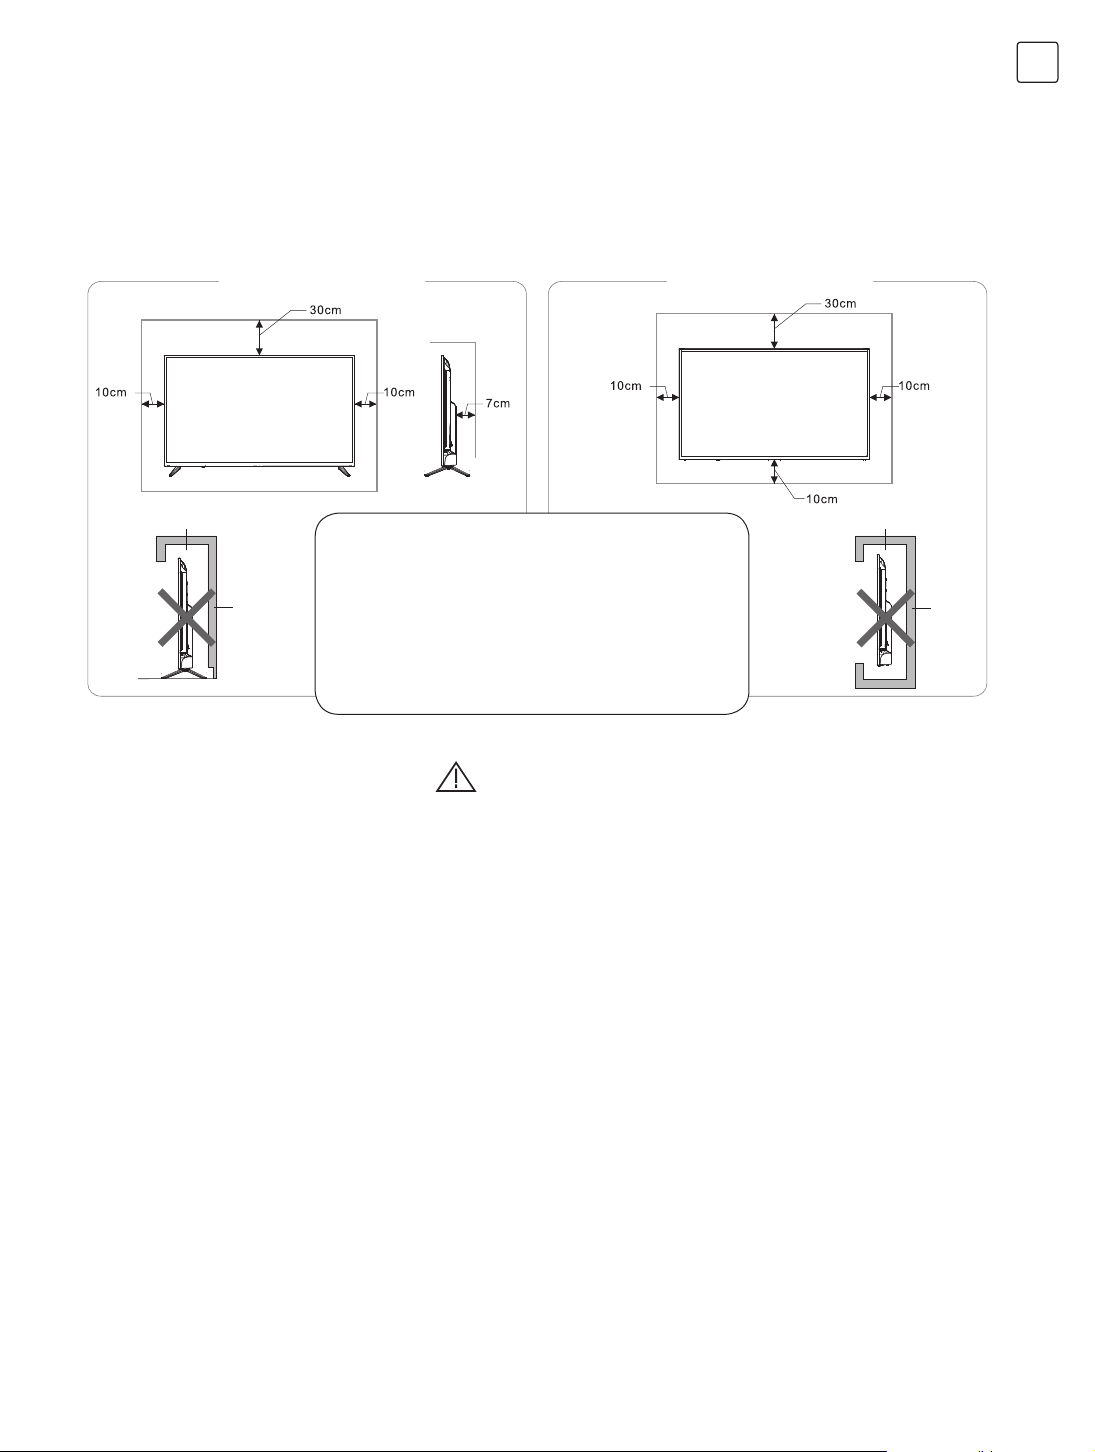
Mount on the base Mount on the wall
ENG
Obstructs the air circulation Obstructs the air circulation
• Please keep this space at least around the TV,
as shown in the figure.
Wall Wall
• Do not cover the air vents or insert any object
into the enclosure.
• Do not put the device in limited space, e.g.
bookcase or embedded closet, unless the TV
set is properly ventilated.
Ventilation
WARNING
Never place a television set in an unstable location. A television set may fall, causing serious personal injury or death.
Many injuries, particularly to children, can be avoided by taking simple precautions such as:
• Using cabinets or stands recommended by the manufacturer of the television set.
• Only using furniture that can safely support the television set.
• Ensuring the television set is not overhanging the edge of the supporting furniture.
• Not placing the television set on tall furniture (for example, cupboards or bookcases) without anchoring both the
furniture and the television set to a suitable support.
• Not placing the television set on cloth or other materials that may be located between the television set and
supporting furniture.
• Educating children about the dangers of climbing on furniture to reach the television set or its controls.
If your existing television set is being retained and relocated, the same considerations as above should be applied.
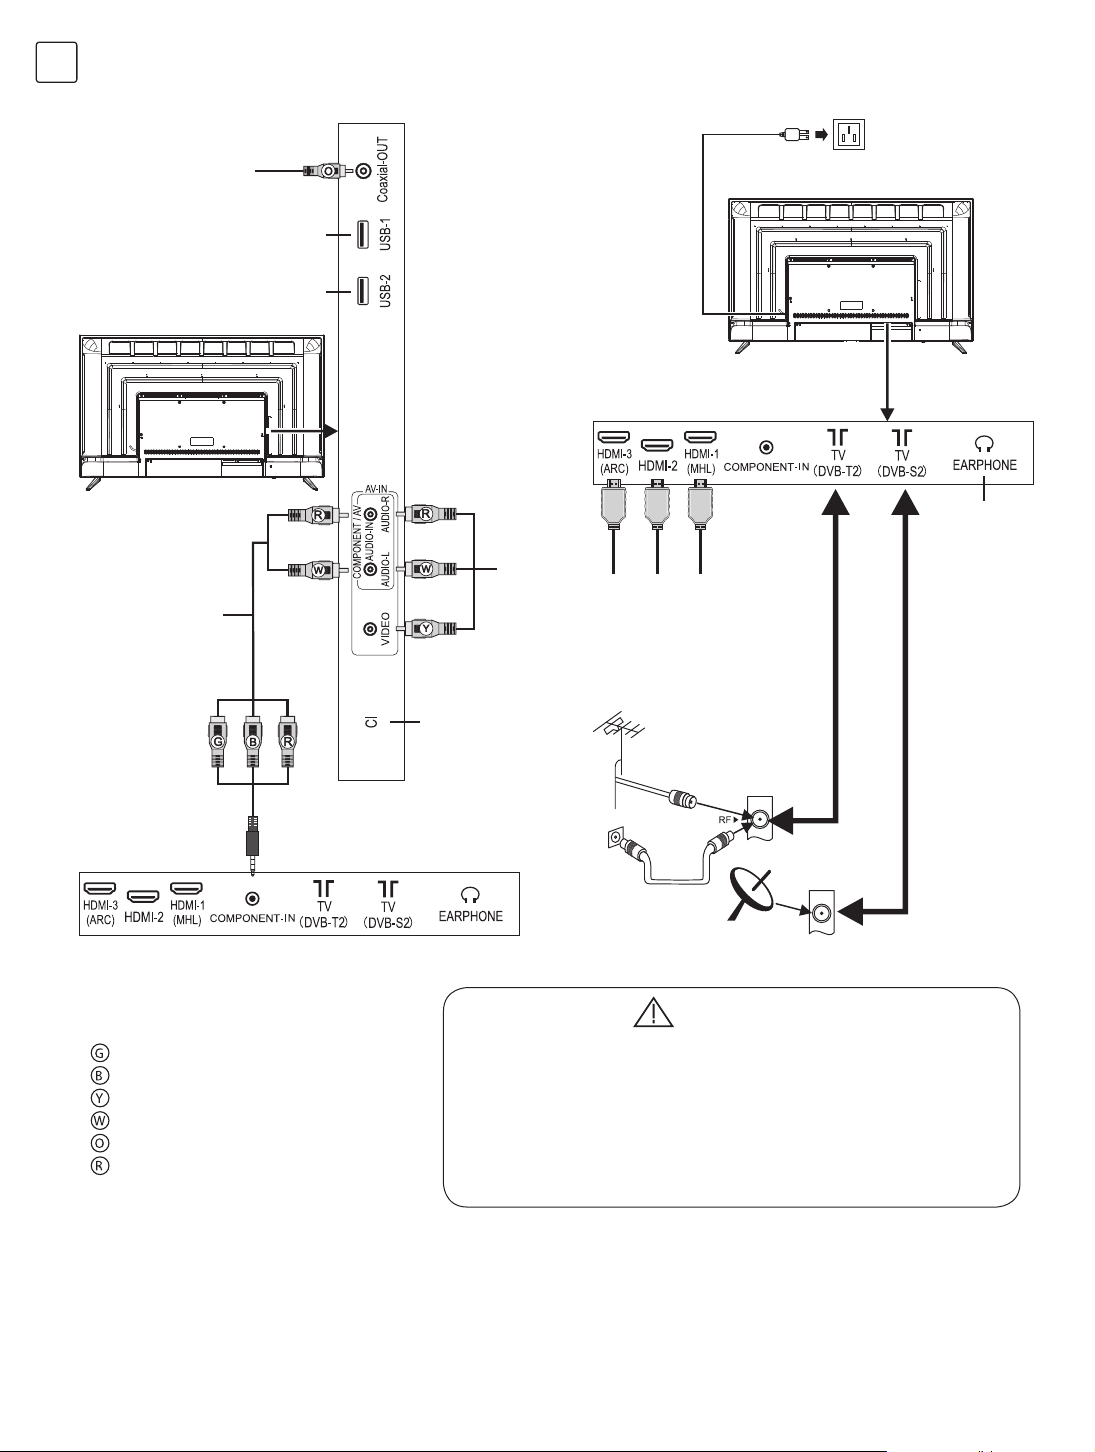
Connecting peripheral equipment
Remarks:
1. USB interfaces support peripheral equipment, including USB mass storage device.
2. When you need to connect the device which support the MHL function, please select the HDMI-1 interface. (MHL
function is optional, and please refer to the device.)
3. When you need to connect the device which support the ARC function, please select the HDMI-3 interface.
4. HDMI connector can realize DVI connector function with external HDMI/DVI commutator.
5. The peripheral equipment and cables described in this manual should be purchased separately.
5
Page 6
ENG
Coaxial Output
Component Input
USB1 Interface
USB2 Interface
CI Card Port
AV Input
HDMI 2 Input
HDMI 3 Input
To power socket
(100-240VAC, 60/50Hz)
Earphone Port
HDMI 1 Input
Green (Y signal cable)
Blue (Pb/Cb signal cable)
Yellow (VIDEO signal cable)
White (AUDIO-L signal cable)
Orange (Coaxial signal cable)
Red (AUDIO-R and Pr/Cr signal cables)
Warning
When connecting outdoor antenna to signal port of the TV set,
please turn off the main power switch of the TV set first. Do not
approach the outdoor antenna to high voltage mains power line
to avoid electric shock. The wired network antenna connected
to this TV set must be isolated from the protective grounding, or
else it will cause fire or other hazards.
6
Page 7
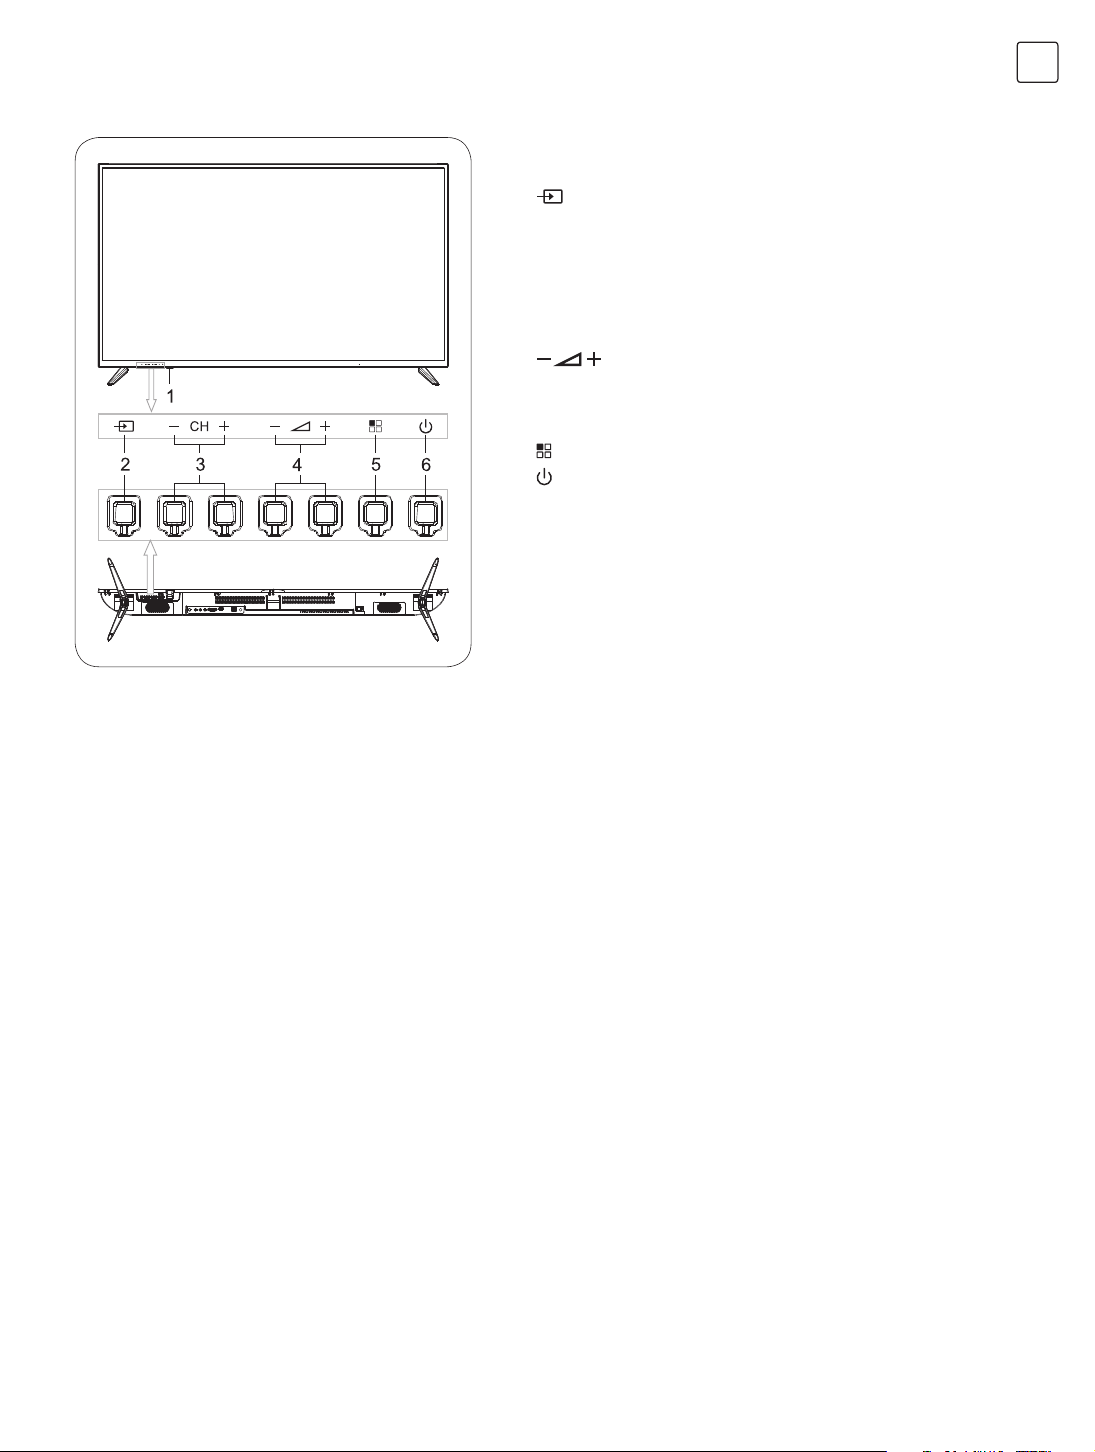
CONTROL PANEL KEYS
1. Power LED indicator and remote receiving window.
(SOURCE): Press this key to enter the menu to select
2.
signal source; during OSD menu operations, press this
key to confirm the operation, with the same function as
the [OK] key on the remote control.
3. – CH + (CH-/CH+): Channel down/up key; during OSD
menu operation, press the keys to select items, with the
same function as the / key on the remote control.
4.
OSD menu operation, press the keys to adjust the analog
value, with the same function as the t/u key on the
remote control.
5.
6.
Remark: Different models may have different appearances;
please refer to the actual device.
(VOL-/VOL+): Volume down/up key; during
(MENU): Press this key to show the setup menu.
Standby: To switch the TV on or back to standby.
ENG
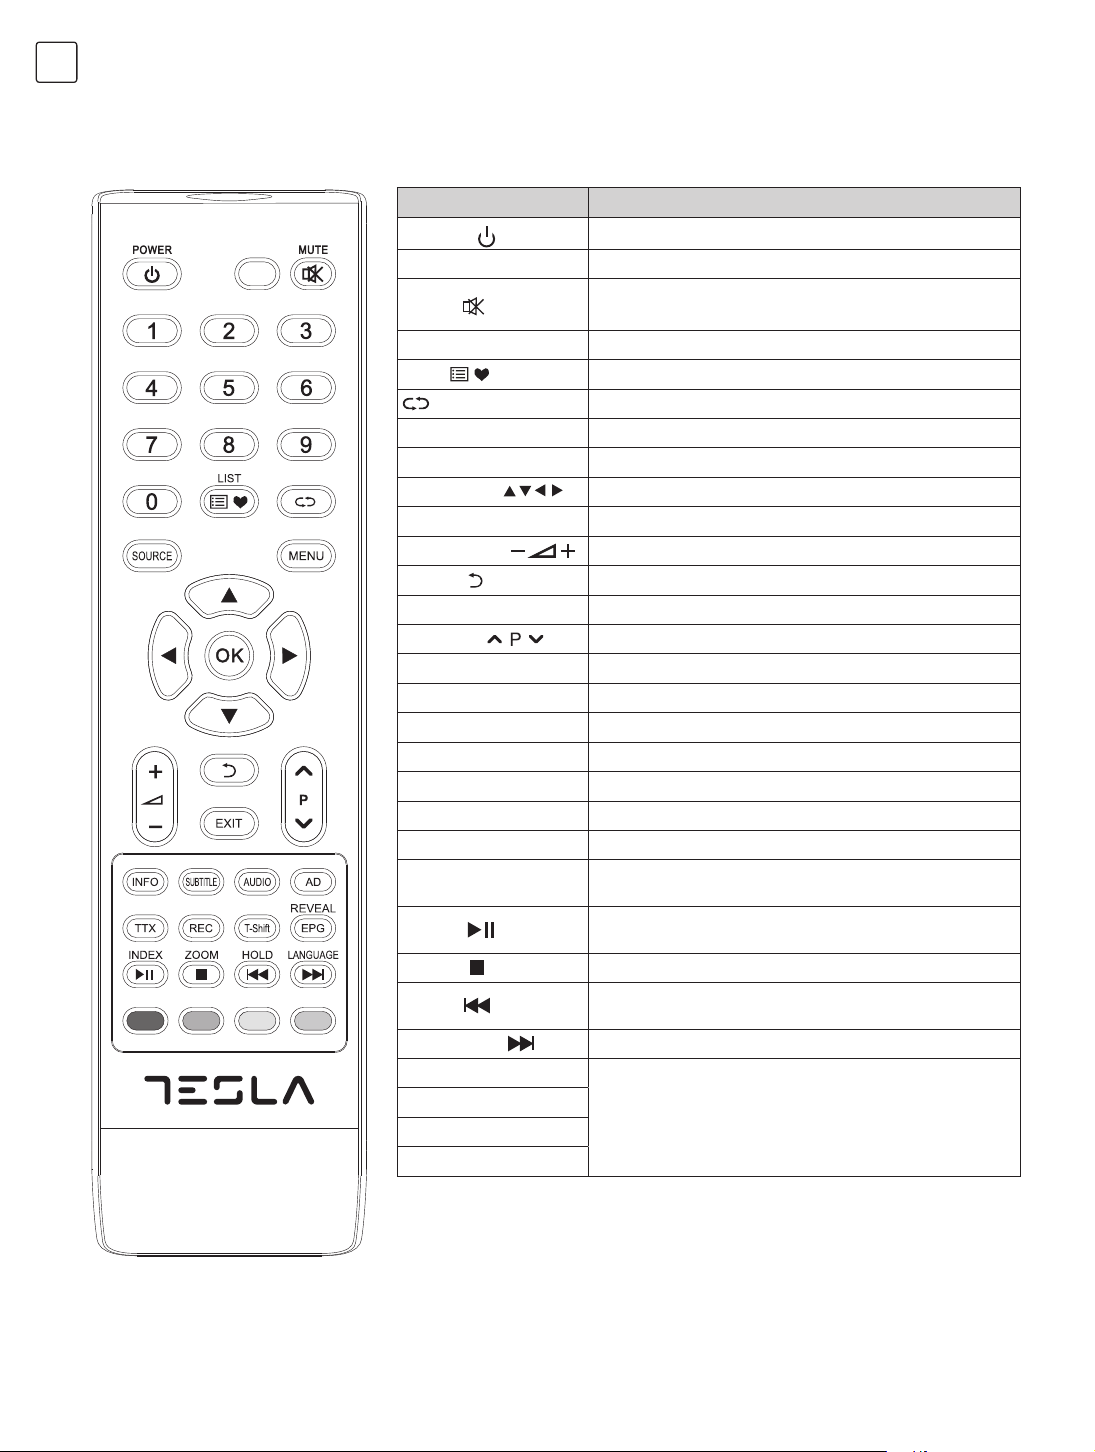
REMOTE CONTROL
Remote control battery installation method
Remove the battery compartment cover and insert two AAA (No. 7, 1.5V) batteries; make sure the polarity of the
batteries is in compliance with the polarity mark ‘’+’’ and ‘’-’’ in the battery compartment of the remote control.
Precautions for use of remote control
• The remote control should be pointed at the remote control sensor during operation. An object placed between the
remote control and the remote control sensor may impede normal operation.
• The remote control should be prevented from strenuous vibration. Besides, please do not set or place the remote
control under direct sunshine, as heating power may result in deformation of the remote control.
• Remote control failure may occur when the remote control sensor of the main unit is under direct sunshine or strong
lighting; in this case, please change the angle of lighting or this TV set, or operate the remote control near the remote
control sensor.
• Low battery will influence the remote control distance, in which case, the battery should be replaced with a new one. If
the remote control is going to be idle for a long time or the battery runs out, please take the battery out to prevent the
remote control from being corroded by battery leakage which may result in damage and failure of the remote control.
• Please do not use batteries of different types. It is not allowed to use old and new batteries together; the batteries
should be replaced in pair.
• Please do not throw the batteries into fire or charge or decompose the batteries; do not charge, short-circuit,
disassemble/assemble, heat or burn used batteries. Please dispose the waste batteries pursuant to relevant
regulations on environmental protection.
7
Page 8
ENG
Remote Control Key Instruction
Note: The appearance of the remote control may be different from this diagram; please refer to the real object as
standard.
Keys Function Description
Switch between working and standby status.
Switch the display mode.
Turn on/off the sound.
16:9
POWER (
16:9
MUTE ( )
)
Number keys (0~9)
LIST (
)
Enter numbers or select channel.
View program list.
Return to last watching channel.
SOURCE Select the signal source. (only in TV mode)
MENU Show the OSD menu.
Cursor keys ( , , , )
Select items or adjust values.
OK Confirm the operation.
Turn up/down the volume.
VOL+/VOL- (
Return ( )
)
Return to previous page.
EXIT Exit the current interface
CH+/CH- (
) Change program channel.
INFO Show the information of the TV program.
SUBTITLE Select subtitle language.
AUDIO
Select audio language.
AD Turn on/off the associated audio.
TTX Open teletext mode.
REC Record programme.
T-Shift Time shift in DTV mode.
REVEAL (EPG)
INDEX ( )
ZOOM ( )
HOLD ( )
LANGUAGE ( )
Displays the hidden text in teletext mode.
(Electronic channel instructions.)
Displays the index page in teletext mode.
(Play/pause function in multimedia).
Adjust the teletext size. (Stop function in multimedia)
Hold the displays at the current page.
(Last file in multimedia).
Change teletext language. (Next file in multimedia).
Red key
Green key
Yellow key
Special function key
Blue key
8
Page 9
BASIC OPERATIONS
Remark
1. The keys operation refers to remote control operation, for panel control keys operation please refer to ‘’Panel Control
Keys’’ operation explanation.
2. Menu Operation Instruction in this manual is explained according to TV mode. The operations in other modes are
similar to the one in TV mode, and users can take it as reference.
3. Before power-on platform, please make sure that the power supply is stable.
Turning on/Standby
ENG
Plug power cord into the electrical socket. Press ‘’
operate this step), then press [
wish and press [OK] key to confirm. Press []/ [] key to select DVB Type and press [OK] key to next step.
In display showing interface, press [t]/[u] key to select Tune Type which you wish, then press [] key and you can select
country where you are by pressing []/ []/[t]/[u] key. Next, press [OK] key to confirm(If you select France, you need
to set a password. and you need to select BW when several countries were chosen), and the machine starts automatic
searching channel. (If the selected DVB Type is DVB-C, you need to set Tuning Mode as Network or Full. When you set
it as Network, you need to press []/ [] key to select Frequency, Modulation, Network ID and Symbol Rate. Then
press [t]/[u] key to adjust the items. Finally, select Search and press [OK] key to starts scanning.)
In power on state, press [
Special Tips: This device adopts energy saving technology. If there is no signal input in power on state, it will enter
standby state automatically in five minutes; The device will enter standby state automatically at specified sleep time;
] key to turn on the TV. Press []/ []/[t]/[u] key to select the OSD language which you
] key to switch to standby mode.
‘’ button on the TV set (If it doesn’t have this button, you needn’t
Signal source selection
You can connect various devices to the TV set and view high quality images. If the video device has HDMI, AV and other
video output ports. You can select one of them and connect to corresponding input ports of the TV set. After connected,
turn on the device and press [SOURCE] key, then menu of signal source will be displayed on the screen. Press the []/
[] key to select the input signal, and press [OK] key to confirm
Menu operation description
Press [MENU] key to show the main menu on the screen:
1. Press [t]/[u] key to select a menu from CHANNEL, PICTURE, SOUND, TIME, OPTION, LOCK.
2. Press []/ [] key to select an item in the menu.
3. Press [OK] key to enter the submenu.
4. Press [t]/[u] key to adjust the value or setting.
5. When the main menu shows on the screen, press [
return to previous menu when the TV display the submenu.
6. During menu operation, the icons of invalid options will change into grey.
]/[MENU] key to exit the main menu; Press [ ]/[MENU] key to
Note: The default password for the lock system is 0000.
Program scanning
Tune the programs before watching the TV for the first time. Before scanning, please make sure that the antenna has
been connected properly and select Antenna Type which want to choose. The following example channel searching
Tune Type is under DVB-T.
9
Page 10
ENG
Auto Tuning
Press [MENU] key, and select CHANNEL > Auto Tuning, then press [OK] key. Next, press [t]/[u] key to select Tune
Type: DTV+ATV, DTV, ATV. Press [] key, then you can select country where you are by pressing []/ []/[t]/[u] key
and the machine starts auto tuning after pressing [OK] key. (If you select France, you must enter the password. And you
need to select BW when several countries were chosen). If you choose DTV+ATV, the screen displays ‘’Do you want to
skip ATV tuning?’’ by pressing [ ] key during auto tuning ATV channel. Press [t] key to confirm, then the machine starts
automatic searching DTV channel, or press [u] key to cancel. During auto tuning DTV channel, the screen displays ‘’Do
you want to skip DTV Tuning?’’ by pressing [ ] key. Press [t] key to confirm, or press [u] key to cancel.
DTV Manual Tuning (In DTV signal source)
Press [MENU] key, Select CHANNEL> DTV Manual Tuning, Press [OK] key to enter DTV Manual Tuning menu, Press
[t]/[u] key to select channel, then press [OK] key to confirm. During the search you may press [ ] key to interrupt the
search and return to the last menu.
ATV Manual Tuning (In ATV signal source)
Press [MENU] key, Select CHANNEL > ATV Manual Tuning, Press [OK] key to enter ATV Manual Tuning menu, Press
[]/ [] key to select Sound System, Color System, Current CH, and press [t]/[u] key to select which you wish. Select
Search, press [t]/[u] key to search for low frequency or high frequency. After searching, select Fine-Tune and press [t]/
[u] key to tune for low frequency or high frequency. During manual searching, you can press [ ] key to interrupt the
search and return to the last menu.
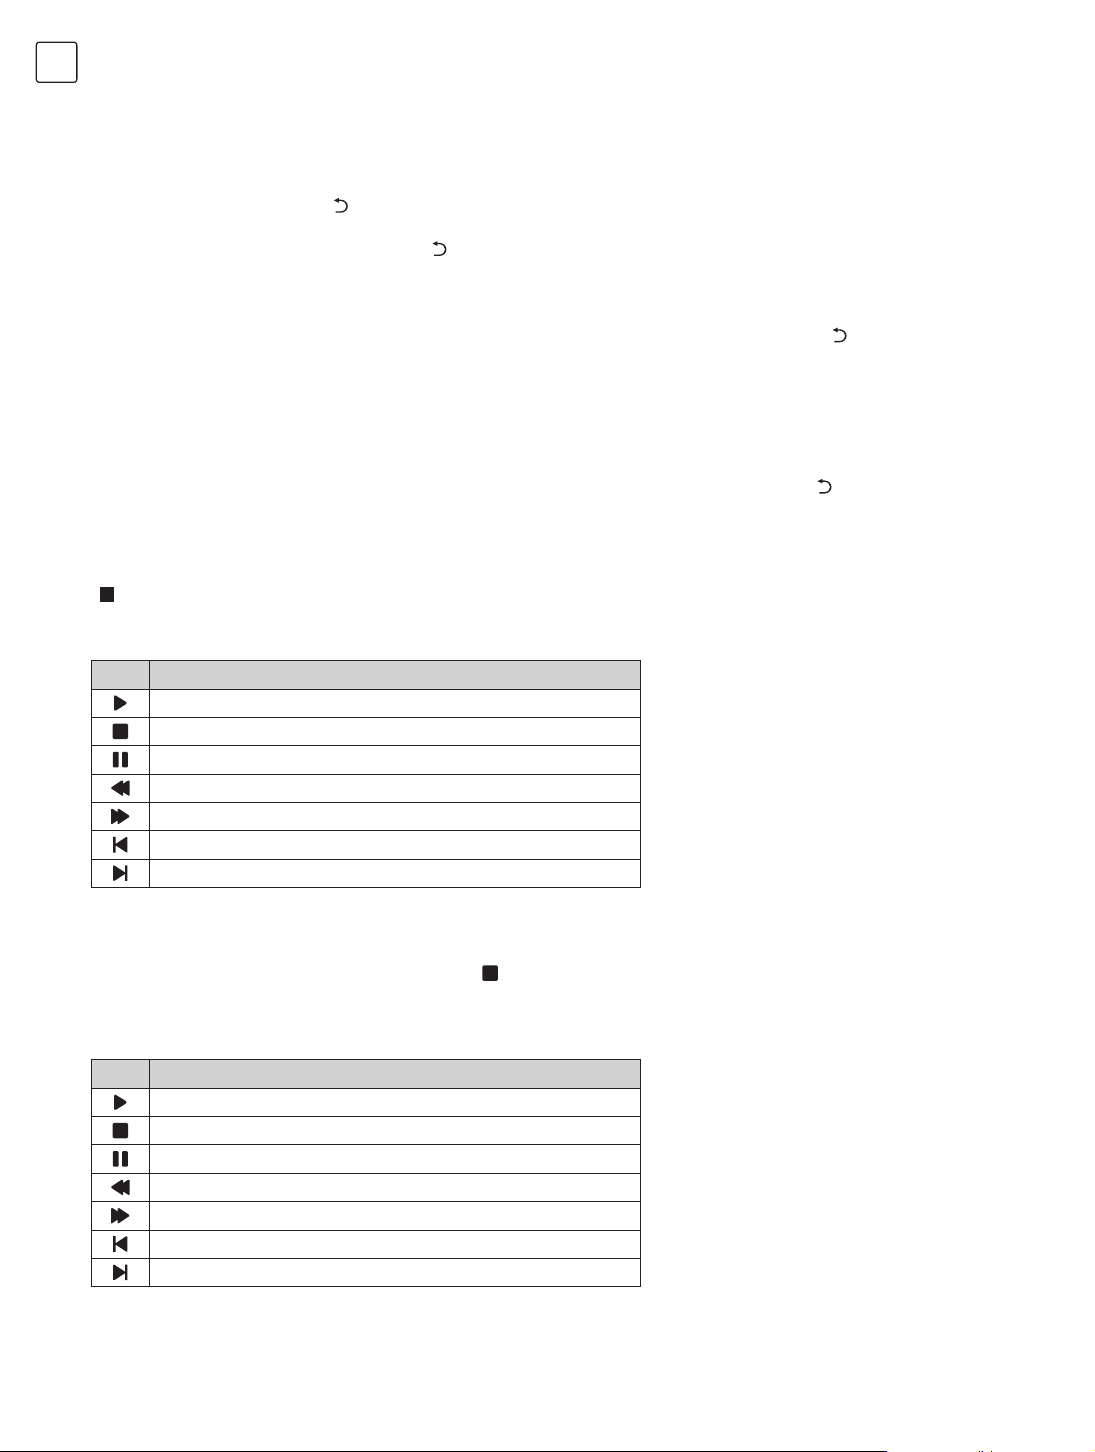
REC option
In DTV mode, Press [REC] key, REC option menu shows on the screen, and system begins recording right now. Press
[ ] key to stop and quit recording; Press [MENU] key and select OPTION > Recorded List, then you can select the file
you want to play, and press [OK] key to play it.
Icon Description
Play: Play.
Stop: Stop and quit.
Pause: Pause.
FB: Fast back, press [INDEX] key to play normally.
Note: The recording function can only
support memorizer with FAT32 file system.
Memorizer with other file systems need to
be formatted; Before formatting memorizer,
back-up useful data because the content of
memorizer can not recover after formatting.
FF: Fast forward, press [INDEX] key to play normally.
FB 30s: Make a 30S jump forward.
FF 30s: Make a 30S jump backward.
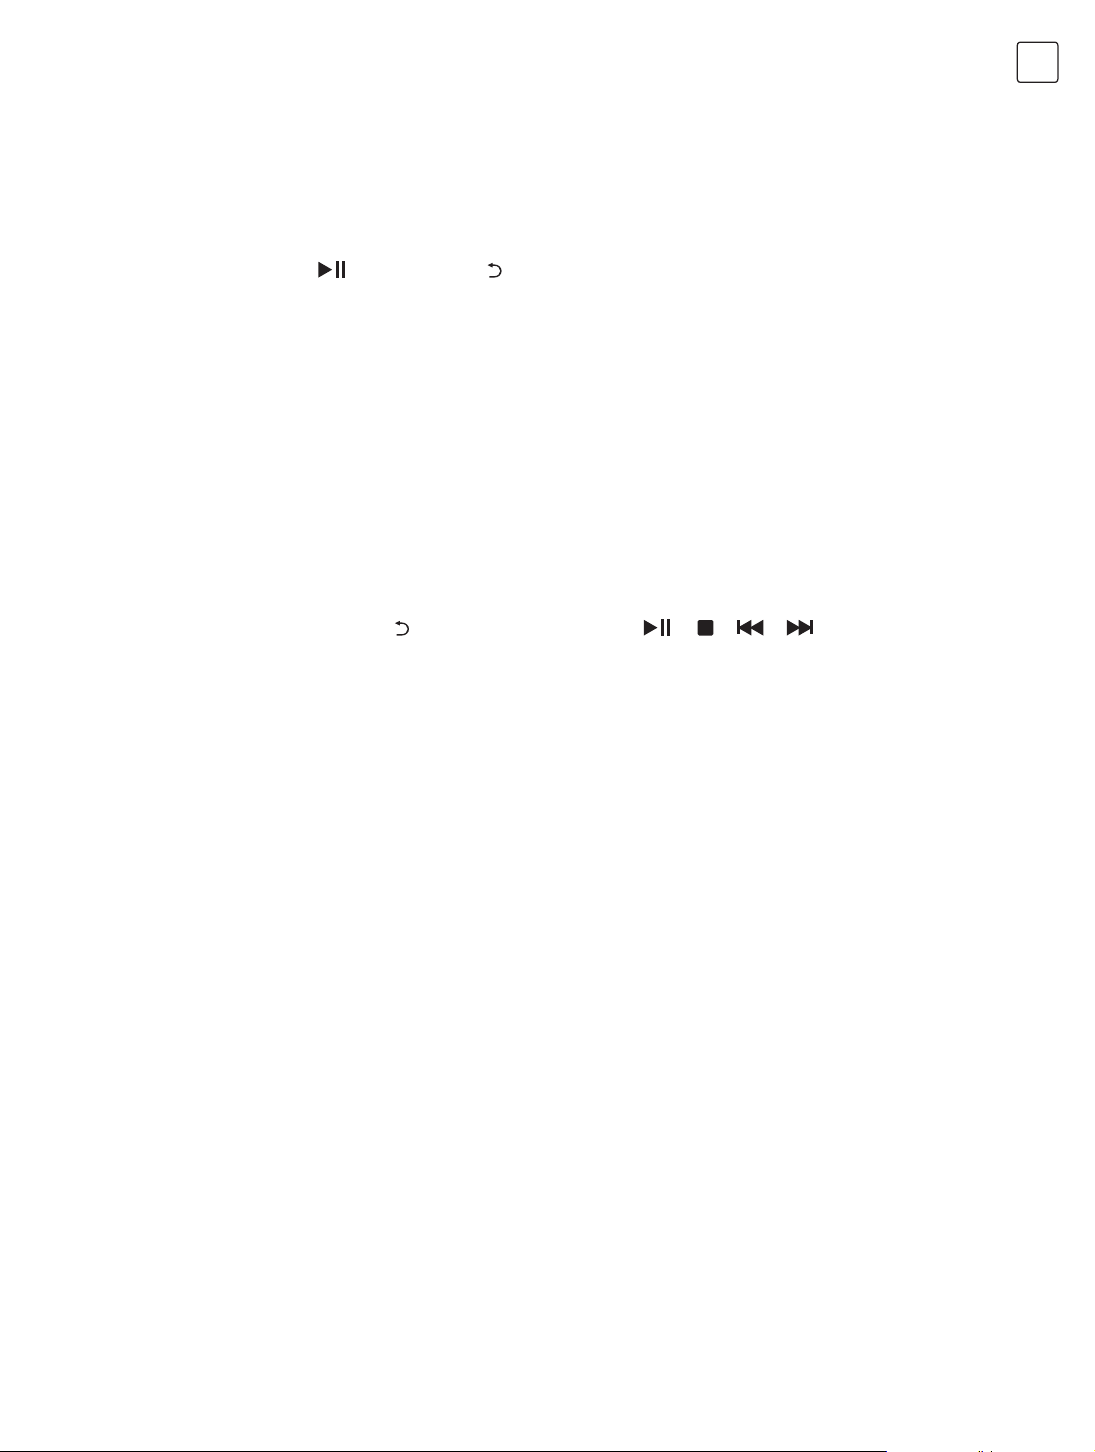
Time Shift option
In DTV mode, Press [T-shift] key, Time Shift option menu shows on the screen and the program is in suspended state.
Press [INDEX] key to resume play program. Press [
] key to stop and quit time-shift.
When user leaves program for a short time, time-shift function can suspend and cache the playing program to U disk.
When user resumes playing, the program can continue to be played.
Icon Description
Play: Play.
Stop: Stop and quit.
Pause: Pause.
FB: Fast back, press [INDEX] key to play normally.
FF: Fast forward, press [INDEX] key to play normally.
FB 30s: Make a 30S jump forward.
FF 30s: Make a 30S jump backward.
10
Page 11
Multimedia player
Press [SOURCE] key, then press []/ [] key to select USB and press [OK] key to enter. Select the file type from Movie,
Music, Photo.
Playing Files in local disk device: Before playing files in the local disk, insert the USB mass storage device into the USB
interface.
Select local disk device in the file directory and press [OK] key to enter. Select Return in the directory, press [OK] key to
return to previous folder. Select the target folder and press [OK] key to enter the folder. Then press []/ []/[t]/[u] to
select the target file and press [ ] to play it. Press [ ] key to return to the desktop.
Attention:
1. Nonstandard USB devices can’t be recognized probably; in this case, please replace a standard USB device;
2. The stream media system has certain restriction on the format of files; the playing will be abnormal if it is out of the
system restriction;
3. Do not remove the USB device while playing, or else the system or device may have problem; Before replace the
USB device, please turn off the machine’s power supply;
4. The system supports standard USB1.1 and USB2.0 devices, such as USB mass storage devices and removable hard
disks;
5. The maximum output current of the USB port of this device is 500mA, and the self-protection will be enabled if it is
beyond this limit; please use external power supply if an external device of higher current will be connected;
6. The system is complicated; when it is reading or playing files, the screen may be still or certain functions may be
invalid due to the compatibility and stability of the USB device; in this case, please turn off the device and re-initialize
the system.
Press [INFO] key can display or hide toolbar, While playing, select the menu option which you want, and press [OK] key
to perform the operation; you can press [
control to perform shortcut operation.
] key to exit playing, or press [ ]/[ ]/[ ]/[ ] key on the remote
ENG
TROUBLESHOOTING
• Snowflake spots occur in the TV images and there is
noise in accompanying sound.
1. Check if the antenna plug is loose or the cable is in
good condition.
2. Check the antenna type (VHF/UHF).
3. Adjust the direction and position of the antenna.
4. Try to use signal enhancer.
• There is neither display nor sound on the screen. The
indication light is not on.
Check if the power line is connected.
• Dotted line or strip disturbance occurs in TV images.
Do not use electric hair dryer aside the TV set and adjust the
antenna direction to reduce disturbance.
• Double images occur on the TV screen.
1. Use high oriented antenna.
2. Adjust the direction of the antenna.
• The images are colorless.
Enter “Picture” setting to increase color saturation.
• The TV has no accompanying sound.
1. Adjust the volume to a proper degree.
2. Press [MUTE] key on the remote control to cancel mute
mode.
• No signal input images show on the machine screen.
The indicator light is blinking.
1. Check if the signal connecting cable is loose or falls off.
Reconnect it.
2. The computer may be in standby mode, please reboot.
• The remote control distance is short or out of control.
1. Remove the object to avoid blocking the remote control
receiving window.
2. Replace the battery.
• Machine is slow, system crash, can’t operate the
machine.
Disconnect the power supply first, and connect the power
supply after about 1-2 minutes, then turn on the TV again.
11
Page 12
ENG
TECHNICAL SPECIFICATIONS
Master unit
Max. Resolution 1920×1080
Best Resolution 1920×1080@60Hz
Power Supply 100-240VAC 60/50Hz
Power Consumption of Speaker 8W+8W
OPERATING ENVIRONMENT
Temperature
RH 10%~85%
Atmospheric pressure 86kPa~106kPa
STORAGE ENVIRONMENT
Temperature -20°C~55°C
RH 5%~95%
Atmospheric pressure 86kPa~106kPa
DIMENSION (L×W×H) AND WEIGHT
Excluding base Unpacking: 1103×83×642(mm
Including base
5°C~40°C
Unpacking: 1103×261×698(mm
Packing: 1210×175×744(mm3) Net
Weight: 9.7kg
Gross Weight: 12.5kg
Technical specifications for TV
1. Supported standard:
ATV: PAL D/K, I, B/G; SECAM D/K, B/G;
DTV: DVB-T/T2/C.
2. Antenna input: 75Ω coax, unbalanced.
3. AV video input: 75Ω, 1±0.1Vp-p, RCA terminal.
4. AV audio input: 20KΩ, 0.2~2Vrms.
5. HDMI video input: 480i, 480P, 576i, 576P, 720P, 1080i, 1080P.
3
)
3
)
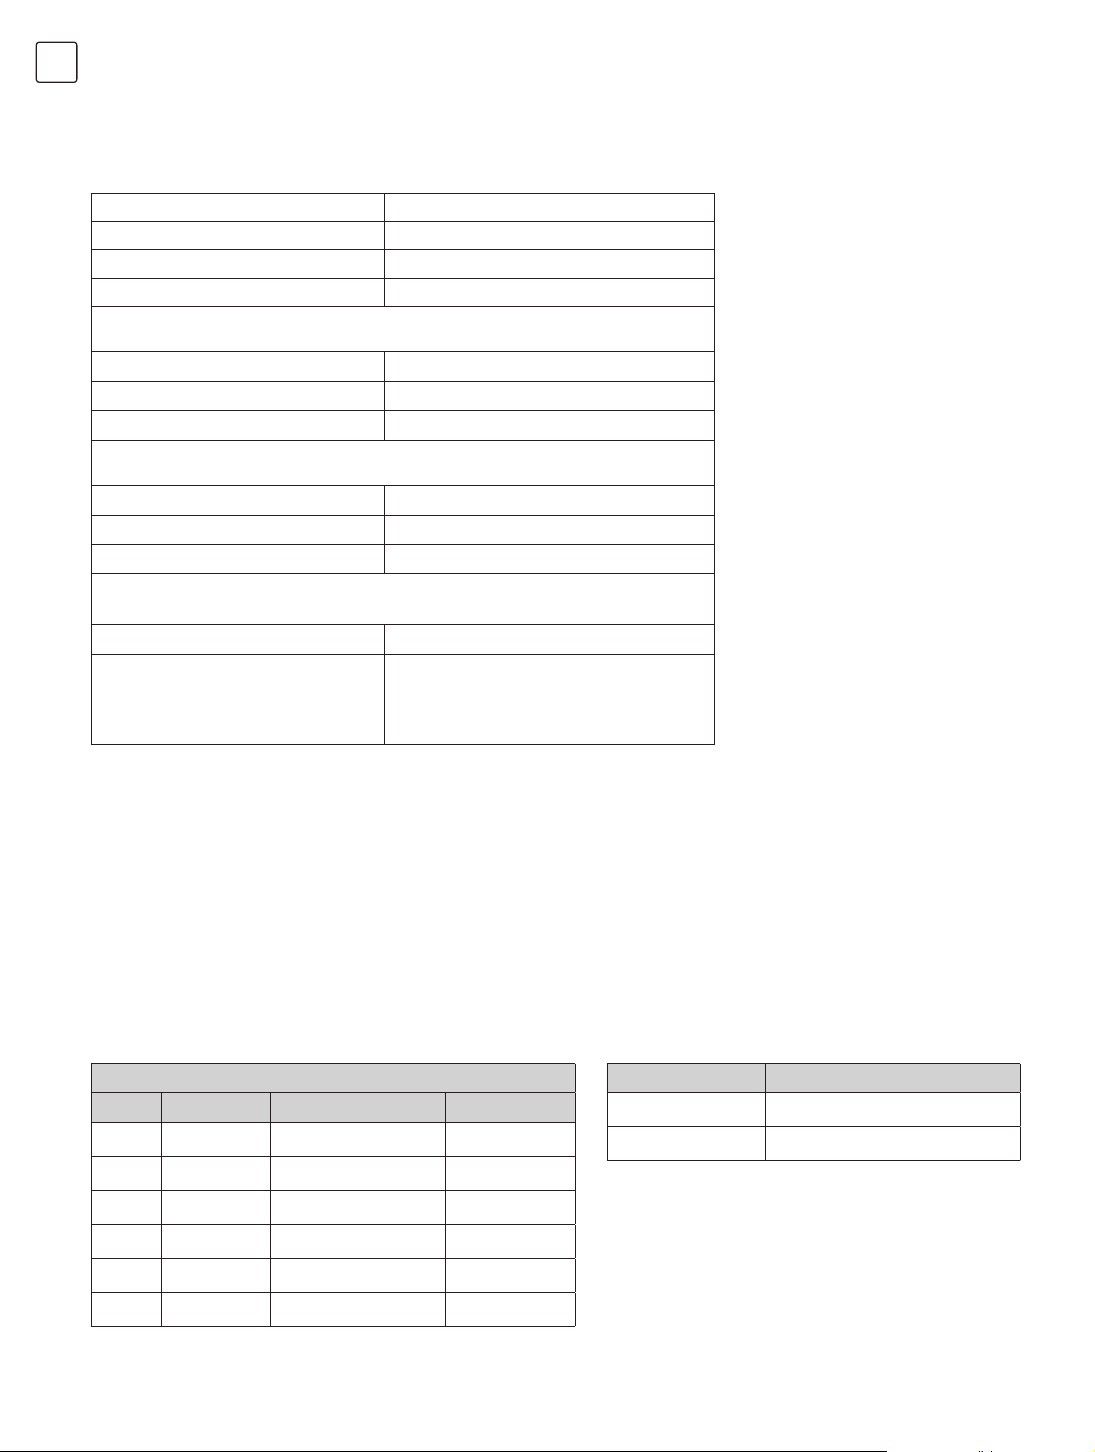
HDMI display mode Power management
VESA mode
NO. Mode Resolution Refresh rate
1
2
3
4
5 WXGA 1600×900 60Hz
6
VGA 640×480 60Hz
SVGA 800×600 60Hz
XGA 1024×768 60Hz
SXGA 1280×1024 60Hz
WUXGA 1920×1080 60Hz
12
Mode Power Consumption
Normal working
Standby
≤110W
≤0.5W
Page 13
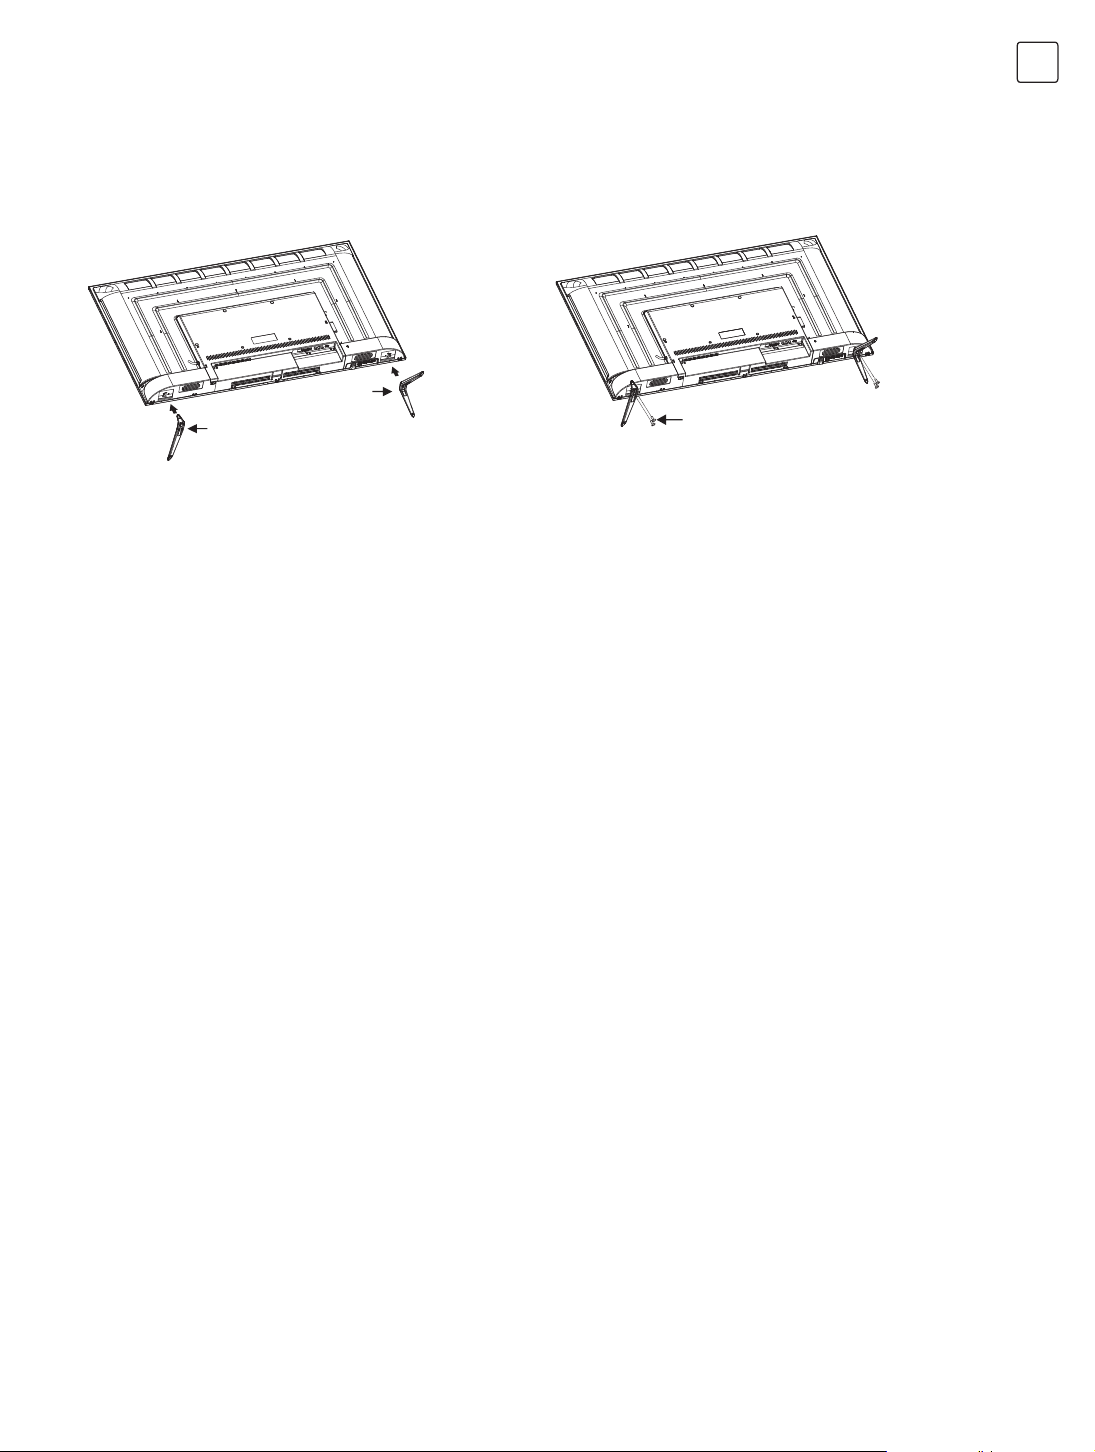
BASE INSTALLATION INSTRUCTIONS
Put the machine flat first, distinguish left and right base and base installation front and back direction, then install
the base in the bottom of the machine back cover as arrow direction in figure. Align screw holes, then fasten screws
(notice that base module has to be adjusted at figure status, otherwise it cannot be installed in.)
Base-L
Base-R
Remark: The actual base and machine appearance may be different from pictures; please refer to the actual device.
Screws
ENG
13
Page 14

BiH/CG
BEZBJEDNOSNA UPOZORENJA I NAPOMENE
Hvala Vam, što ste izabrali multifunkcionalni, pametni LED TV visokih performansi, koji je proizvela naša kompanija. Ova
dragocjena stvar će vam pružiti bolje audio-vizuelno uživanje. Tokom dizajniranja ovog proizvoda, u obzir su uzeti faktori
koji utiču na ličnu bezbjednost, i proizvod je bio podvrgnut strogim testovima prije dostave. Ipak, nepropisno korištenje
može dovesti do strujnog udara i požara. Kako biste osigurali bezbjednost, produžili životni vijek ovog uređaja i postarali
se da tokom reprodukcije uređaj pruži najbolje performanse, molimo Vas da pažljivo pročitate ovo korisničko uputstvo i
specifikaciju prije korištenja, i da pratite sljedeća bezbjedonosna uputstva. Molimo Vas, čuvajte ovo korisničko uputstvo
radi kasnije upotrebe.
UPOZORENJE UPOZORENJE
Navedite ponašanja, koja moraju biti
zabranjena
Može dovesti do povreda
Navedite operacije, koje moraju biti izvedene
Može doći do lične povrede
ili oštećenja imovine
POD SLJEDEĆIM USLOVIMA
• Nestanak struje ili nestabilan napon.
• Neobičan zvuk ili neprijatan miris iz uređaja.
• AC priključni kabl je oštećen.
• TV uređaj je oštećen zbog pada, udarca ili primjene sile.
• Ukoliko bilo kakva tečnost ili strana materija uđe u TV uređaj.
Ukoliko dođe do curenja jamskog gasa ili drugih zapaljivih gasova, ne izvlačite priključni kabl TV uređaja ili
drugih električnih uređaja; umjesto toga, odmah zatvorite ventil gasa i otvorite vrata i prozore.
Odmah isključite
TV uređaj, izvucite
priključni kabl iz utičnice
i kontaktirajte osobu
ovlaštenu za održavanje.
UPOZORENJE
• Koristite samo napajanje 100-240VAC, 60/50Hz
• Radi bezbjednosti, ovaj TV uređaj mora biti povezan na utičnicu tipa G sa tri pina.
• Svi kablovi mobu biti povezani ili izvučeni samo nakon što je priključni kabl isključen.
• Ne postavljajte TV uređaj na nestabilnu površinu, u suprotnom može doći do pada, oštećenja ili čak požara.
• Ne postavljajte TV uređaj u okruženje:
1. Koje je direktno izloženo sunčevim zracima, vlazi, prekomjernoj toploti, prekomjernoj hladnoći ili velikoj
količini prašine;
2. Sa zapaljivim ili eksplozivnim supstancama;
3. Zapaljivim ili korozivnim gasovima;
4. U kupatilo, kuhinju, itd.
• Ne koristite oštećenu ili neodgovarajuću utičnicu, i pobrinite se da utikač i utičnica budu ispravno povezani.
• Pobrinite se da na utikaču i utičnici nema prašine i metalnih dijelova.
• Nemojte oštetiti priključni kabl:
1. Prepravljanje priključnog kabla je zabranjeno;
2. Ne stavljajte teške predmete na priključni kabl;
3. Držite priključni kabal dalje od izvora toplote;
4. Ne vucite priključni kabal kada ga izvlačite iz utičnice.
• Ne povezujte previše uređaja na jedan produžni kabal, inače može doći do požara zbog velike potrošnje
energije.
• Ne dozvolite da se otvoreni plamen (npr. upaljena svijeća) približi TV uređaju, inače može doći do strujnog
udara ili požara.
• Ne stavljajte posude napunjene vodom na TV uređaj, kako biste izbjegli strujni udar ili požar, koji može nastati
zbog kapanja ili prskanja vode.
• Ne gurajte nikakav oštar predmet, metal ili tečnost u konektore signala ili vetilacione otvore, kako biste izbjegli
kratak spoj i oštećenje uređaja, kao i strujni udar.
• Otvori na ramu su dizajnirani tako da oslobađaju toplotu, kao i da osiguraju, da nijedna unutrašnja komponenta
ne dostigne veoma visoku temperaturu, kako bi mogle da rade normalno duže vremena. Molimo vas, ne
pokrivajte otvore tokom postavljanja.
14
Page 15
Ne dirajte utikač vlažnim rukama, u suprotnom može doći do strujnog udara.
Ne uključujte TV uređaj tokom grmljavine, umjesto toga, izvucite utikač i konektor antene kako biste izbjegli
udar groma.
Ne rasklapajte TV uređaj na svoju ruku, u suprotnom može doći do strujnog udara ili požara. Za održavanje
kontaktirajte kvalifikovanu osobu.
UPOZORENJE
• Ne puštajte djecu da se penju na TV uređaj.
• Držite sitan pribor van domašaja djece, kako ih ne bi progutala.
• Ukoliko TV uređaj neće biti korišten duže vremena, molimo Vas da isključite uređaj i izvučete priključni kabal.
• Prije čišćenja TV uređaja, izvucite priključni kabal i očistite mekanom tkaninom; ne koristite hemijske reagense i
pobrinite se da strane materije ne uđu u uređaj. Neispravno čišćenje (kao što je tečnost za čišćenje, voda itd.) može
dovesti do oštećenja izgleda proizvoda, brisanja štampanih informacija na proizvodu, a njihov ulazak u uređaj može
oštetiti komponente, jer uređaj ne može to pokazati.
• Kako biste podesili poziciju ili ugao TV uređaja, molimo Vas da odvojite sve kablove i polako pomjerate uređaj, kako bi
se izbjegao pad.
• Ekran ne brišite grubim predmetima, ne udarajte ga, ne savijajte i ne pritiskajte ekran.
• Ne koristite uređaj odmah nakon njegovog prenosa na mjesto s visokom temperaturom iz mjesta sa niskom
temperaturom, jer bi to moglo dovesti do magljenja unutar uređaja i kvara.
• Ukoliko je ekran slomljen i dođe do prskanja tečnosti po koži, molimo Vas da nakon toga odmah izaperete 15 minuta
čistom vodom, i posjetite svog doktora.
• Kako biste TV uređaj prenijeli na rukama, molimo vas, da stegnete uglove i držite dno uređaja; ne primjenjujte silu na
tablu.
• Prikazivanje iste slike duže vremena ili pokretnih slika sa stalnim riječima ili ikonama će dovesti do “otpornosti slike” na
ekranu, koja neće nestati ni nakon što se uređaj isključi na duže vrijeme. Garancija ne pokriva ovu neželjenu pojavu.
• “Zdravo” gledanje televizije:
1. Gledajte pri odgovarajućem osvjetljenju; slabo osvjetljenje ili dugo gledanje može prouzrokovati bol očiju.
2. Prilagodite zvuk na odgovarajući nivo, kako biste izbjegli povredu sluha.
• Izvucite priključni kabal uređaja, kako biste prekinuli napajanje električnom energijom.
• Ukoliko se utikač ili spojnica uređaja koristi za isključivanje, to bi moglo obezbijediti jednostavan rad uređaja.
• Utikač treba da bude povezan ispravno. Labavi utikači mogu dovesti do varničenja i požara.
• Sve tehničke specifikacije u ovom korsiničkom uputstvu i na pakovanju su podložne promjenama prije prethodnog
obavještenja. Ukoliko postoji odstupanje između korisničkog uputstva i stvarnog rada, ovo drugo će prevagnuti.
BiH/CG
Termini HDMI i HDMI multimedijski interfejs visoke definicije, i HDMI logo su zaštitni znaci ili
registrovani zaštitni znaci HDMI organa za izdavanje dozvole, Inc. u Sjedinjenim Američkim
državama i drugim državma.
POSTAVLJANJE I POVEZIVANJE
Spisak opreme
1. TV uređaj. 2. Korisničko uputstvo. 3. Daljinski upravljač.
4. Priključni kabal (ili povezan na TV uređaj). 5. Prenosni kabal za komponente (neobavezan).
Postavljanje TV uređaja
Savjeti za instalaciju
• TV uređaj mora biti postavljen blzu AC utičnice zbog lakog povezivanja i isključivanja.
• Zbog vaše bezbjednosti, molimo Vas da izaberete odgovarajući zidni nosač ili postolje.
• Kako biste izbjegli povrede, potrebno je da TV uređaj postavite na stabilnu ravnu površinu ili da ga postavite na čvrst zid.
15
Page 16

BiH/CG
• Pitajte kvalifikovanu osobu da postavi TV uređaj na zid. Neispravno postavljanje može dovesti do nestabilnosti TV
uređaja.
• Ne postavljajte TV uređaj na mjesto podložno mehaničkoj vibraciji.
• Ne postavljajte TV uređaj na mjesto, na koje mogu ući insekti.
• Ne postavljajte TV uređaj uz klima uređaj, u suprotnom unutrašnja ploča ekrana može kondenzovati vlagu i izazvati kvar.
• Ne postavljajte TV uređaj blizu jakog magnetnog polja, u suprotnom magnetni talas može prouzrokovati smetnje i
oštećenje.
Postavljanje na postolje Postavljanje na zid
Sprječava protok vazduha Sprječava protok vazduha
• Molimo Vas da prazan prostor držite bar oko
TV uređaja, kao što je prikazano na skici.
Zid Zid
• Ne pokrivajte ventilacione otvore i ne
postavljajte nikakve predmete u kućište.
• Ne postavljajte uređaj na ograničen prostor,
npr. police ili ugradbene ormare, osim ako TV
uređaj nema odgovarajuću ventilaciju.
Ventilacija
UPOZORENJE
Nikad ne postavljajte TV uređaj na nestabilno mjesto. TV uređaj može pasti, što može dovesti do ozbiljnih povreda ili
smrti. Mnoge povrede, prije svega djece, mogu biti izbjegnute preduzimanjem jednostavnih mjera predostrožnosti, kao
što su:
• Korištenje elemenata i postolja koje je proporučio proizvođač TV uređaja.
• Korištenje samo onog nameštaja, koji može bezbjedno držati TV uređaj.
• Obezbjeđivanje da TV uređaj nije isturen preko ivice nameštaja koji ga drži.
• Ne postavljanje TV uređaja na visok namještaj (na primjer ormari ili police za knjige) bez ućvršćivanja i namještaja i TV
uređaja odgovarajućom podrškom.
• Ne postavljanje TV uređaja na tkaninu ili druge materijale koji mogu biti postavljeni između TV uređaja i namještaja
koji ga drži.
• Podučavanje djece o opasnostima od penjanja na namještaj, kako bi se dohvatio TV uređaj ili njegove komande.
Ukoliko svoj postojeći TV uređaj zadržavate i premještate, treba da primjenite iste gore navedene korake.
Povezivanje periferne opreme
Napomena:
1. USB interfejsi podržavaju perifernu opremu, uključujući i USB uređaj za masovno skladištenje podataka.
2. Kada treba da povežete uređaj, koji podržava MHL funkciju, molimo Vas da izaberete HDM-1 interfejs. (MHL funkcija
je opcionalna, i molimo Vas da pogledate svoj uređaj).
3. Kada treba da povežete uređaj, koji podržava ARC funkciju, molimo Vas da izaberete HDMI-3 interfejs.
4. HDMI konektor može prepoznati DVI funkciju s eksternim HDMI/DVI adapterom.
5. Periferna oprema i kablovi opisani u ovom korisničkom uputstvu se moraju kupiti odvojeno.
16
Page 17

BiH/CG
Koaksijalni izlaz
Ulaz za komponente
USB1 interfejs
USB2 interfejs
AV ulaz
Ulaz za CI karticu
HDMI 2 ulaz
HDMI 3 ulaz
U utičnicu
(100-240VAC, 60/50Hz)
Ulaz za slušalice
HDMI 1 ulaz
Zeleni (kabal Y signala)
Plavi (kabal Pb/Cb signala)
Žuti (kabal VIDEO signala)
Bijela (kabal AUDIO-L signala)
Narandžasta (Kabal koaksijalnog signala)
Crveni (kablovi AUDIO-R i Pr/Cr signala)
Upozorenje
Kada povezujete spoljašnju antenu na ulaz za signal na TV
uređaju, molimo Vas da prvo isključite glavni prekidač za
napajanje TV uređaja. Ne približavajte spoljašnju antenu
električnom vodu visokog napona, kako biste izbjegli strujni
udar. Žičana antena povezana na ovaj TV uređaj mora biti
izolovana zaštitnim uzemljenjem, ili može doći do požara ili
opasnosti.
17
Page 18

BiH/CG
KONTROLNI TASTERI TABLE
1. LED indikator napona i prijemnik signala daljinskog
upravljača.
(IZVOR): Pritisnite ovo dugme kako biste ušli u
2.
izborni meni i izabrali izvor signala; tokom OSD operacija
izbornog menija, pritisnite ovog dugme kako biste
potvrdili operaciju, s istom funkcijom kao i [OK] dugme
da daljinskom upravljaču.
3. – CH + (CH-/CH+): Dugme za biranje kanala gore/
dole; tokom OSD operacija izbornog menija, pritisnite
dugmad, kako biste izabrali elemente s istim funkcijama
kao i []/[ ] dugmad na daljinskom upravljaču.
4.
zvuka; tokom OSD operacije izbornog menija, pritisnite
dugmad kako biste prilagodili analogne vrijednosti, s
istim funkcijama kao [t]/[u] dugmad na daljinskom
upravljaču.
5.
meni za podešavanje.
6.
ili ga vratili u stanje pripravnosti.
Napomena: Uređaj se razlikuje u zavisnosti od modela i
stvarni proizvod ima prednost.
(VOL-/VOL+): Dugme za pojačavanje/stišavanje
(MENU): Pritisnite ovo dugme, kako bi se pokazao
Standby (Stanje pripravnosti): Kako biste uključili TV
DALJINSKI UPRAVLJAČ
Postupak postavljanja baterije daljinskog upravljača
Uklonite poklopac pregrade za bateriju i postavite dvije AAA (br. 7, 2.5V) baterije; pobrinite se da polaritet baterija bude
u skladu s oznakama polariteta “+” i “-” u pregradi za bateriju na daljinskom upravljaču.
Mjere predostrožnosti za korištenje daljinskog upravljača
• Daljinski upravljač treba uperiti ka senzoru za daljinski upravljač tokom rada. Predmet koji se nalazi između daljinskog
upravljača i senzora za daljinski upravljač može spriječiti normalan rad.
• Daljinski upravljač treba čuvati od snažnih vibracija. Pored toga, molimo vas da daljinski upravljač ne postavljate ili
smještate pod direktnu sunčevu svjetlost, jer zagrijavanje može dovesti do deformacije daljinskog upravljača.
• Do kvara daljinskog upravljača može doći kada je senzor daljinskog upravljača glavnog dijela pod direktnom
sunčevom svjetlosti; u tom slučaju, molimo vas zamjenite ugao osvjetljenja ovog TV uređaja, ili koristite daljinski
upravljač u blizini senzora daljinskog upravljača.
• Nizak nivo baterije će uticati na udaljenost daljinskog upravljača, u kom slučaju, bateriju treba zamjeniti novom.
Ukoliko se daljinski upravljač neće koristiti duže vrijeme ili se baterije potroše, molimo Vas da izvadite baterije, kako
biste spriječili koroziju daljinskog upravljača, prouzrokovanu curenjem baterije, što bi moglo dovesti do oštećenja ili
kvara daljinskog upravljača.
• Molimo vas da ne koristite različite baterije. Nije dozvoljeno koristiti zajedno stare i nove baterije; baterije treba
mijenjati u paru.
• Molimo Vas ne bacajte baterije u plamen, niti ih punite ili razgrađujte baterije; ne punite, ne izazivajte kratak spoj,
ne rastavljajte/spajajte, zagijavajte i ne palite korištene baterije. Molimo Vas, odložite iskorištene baterije u skladu sa
odgovarajućim uredbama o zaštiti životne sredine.
18
Page 19

Dugmad daljinskog upravljača.
Napomena: Izgled daljinskog upravljača može biti drugačiji od ove skice; molimo Vas, smatrajte stvarni predmet
standardom.
Dugmad Funkcija
Uključivanje uređaja i prebacivanje u stanje
pripravnosti.
Mijenjanje režima prikaza.
16:9
POWER (
16:9
)
BiH/CG
MUTE ( )
Dugmad s brojevima
(0~9)
LIST (
)
Uključite/Isključite zvuk.
Unesite brojeve ili izaberite kanal.
Pogledajte listu programa.
Vratite se na poslednji gledani kanal.
SOURCE Izaberite izvor signala. (samo u TV režimu)
MENU Prikaz OSD izbornog menija.
Dugmad za
upravljanje (
, , , )
Izaberite elemente ili prilagodite vrijednosti.
OK Potvrdite operaciju.
Pojačavanje/stišavanje zvuka.
VOL+/VOL- (
Return ( )
)
Vratite se na prethodnu stranu.
EXIT Izađite iz trenutnog interfejsa.
CH+/CH- (
) Promjenite kanal.
INFO Prikaz informacija TV programa.
SUBTITLE Izaberite jezik titla.
AUDIO
Izaberite jezik zvučnog prenosa.
AD Uključite/Isključite odgovarajući zvuk.
TTX Uključite režim teleteksta.
REC Snimanje programa.
T-Shift Promjena vremena u DTV režimu.
REVEAL (EPG)
INDEX ( )
ZOOM ( )
HOLD ( )
LANGUAGE ( )
Pokazuje sakriveni tekst u teletekst režimu.
(Uputstva u vezi sa elektronskim kanalom.)
Pokazuje stranu indeksa u u režimu teleteksta.
(Pusti/Pauziraj funkcija u multimediji)
Podesite veličinu teleteksta.
(Funkcija zaustavljanja u multimediji)
Zadrži ekran na trenutnoj stranici.
(Poslednji fajl u multimediji).
Promjenite jezik teleteksta. (Sljedeći fajl u multimediji).
Crveno dugme
Zeleno dugme
Žuto dugme
Dugme za specijalne funkcije
Plavo dugme
19
Page 20

BiH/CG
OSNOVNE OPERACIJE
Napomena
1. Rad dugmadi se odnosi na rad daljinskog upravljača, za rad kontrolnih tastera ekrana, molimo Vas pogledajte
odjeljak “Kontrolni tasteri ekrana” za objašnjenje rada.
2. Radna uputstva izbornog menija u ovom korisničkom uputstvu su objašnjena u slučaju TV režima. Operacije u
drugim režimima su slične onim u TV režimu, i korisnici ih mogu koristiti kao orijentir.
3. Prije uključivanja uređaja, molimo Vas, pobrinite se da je izvor napajanja strujom stabilan.
Uključivanje/Stanje pripravnosti
Priključite priključni kabal na utičnicu. Pritisnite ‘’
da obavite ovaj korak), zatim pritisnite [ ] dugme, kako biste uključili TV. Pritisnite[]/ []/[t]/[u] dugme, kako biste
izabrali OSD jezik koji želite i pritisnite dugme [OK] , kako biste potvrdili. Pritisnite []/ [] dugme, kako biste izabrali
DVB tip i pritisnite dugme [OK], kako biste prešli na sljedeći korak.
Na ekranu koji pokazuje interfejs, pritisnite [t]/[u] dugme, da biste izabrali Vrstu pretrage koju želite, zatim pritisnite
[] dugme i možete izabrati državu u kojoj ste pritiskom na []/ []/[t]/[u] dugme. Zatim, pritisnite dugme [OK] da
biste potvrdili (Ukoliko izaberete Francusku, morate podesiti lozinku i morate izabrati BW kada je izabrano više država),
i uređaj će automatski tražiti kanale. (Uliko je izabrani DVB tip DVB-C, morate postaviti Režim zvuka na Mreža ili Puno.
Kada ga podesite kao Mrežu, morate da pritisnete []/ []dugme, kako biste izabrali frekvenciju, modulaciju, ID
mreže i Vrednost simbola. Zatim pritisnite [t]/[u] dugme, kako biste podesili elemente. Konačno, izaberite Traži i
pritisnite [OK] dugme, kako bi započelo pretraživanje. )
Kada je uređaj uključen, pritisnite [ ] dugme, kako bi uređaj prešao u stanje pripravnosti.
Posebni saveti: Ovaj uređaj je u skladu sa tehnologijom uštede energije. Ukoliko nema signala kada je uređaj uključen,
on će automatski preći u režim pripravnosti u roku od pet minuta; Uređaj će ući u stanje pripravnosti automatski u
vrijeme za to određeno.
‘’ dugme na TV uređaju (Ukoliko nema ovog dugmeta, ne morate
Odabir izvora signala
Možete povezati različite uređaje na TV uređaj i gledati slike visokog kvaliteta. Ukoliko video uređaj ima HDMI, AV ili
drugi ulaz za video. Možete izabrati jedan od njih i povezati sa odgovarajućim ulazom za unos na TV uređaju. Nakon što
se poveže, uključite uređaj i pritisnite dugme [SOURCE], zatim će se meni izvora signala pokazati na ekranu. Pritsnite
dugme []/ [] kako biste izabrali unos signala, i pritisnite dugme [OK], kako biste potvrdili.
Opis operacija izbornog menija
Pritisnite dugme [MENU] kako bi se na ekranu pokazao glavni meni:
1. Pritisnite [t]/[u] kako biste izabrali meni PROGRAMA, SLIKE, ZVUKA, VREMENA, OPCIJE, ZAKLJUČAVANJA.
2. Pritisnite []/ [] dugme, da bi ste izabrali element u meniju.
3. Pritisnite dugme [OK] kako biste ušli u podmeni.
4. Pritisnite dugme [t]/[u] kako biste prilagodili vrijednost ili postavku.
5. Kada se glavni meni prikaže na ekranu, pritisnite dugme [
dugme [
6. Tokom ove operacije, ikone nedostupnih opcija će postati sive.
Napomena: Podrazumijevana lozinka za sistem zaključvanja je 0000.
]/[MENU] , kako biste se vratili na prethodni meni, kada TV pokaže podmeni.
]/[MENU] kako biste izašli iz glavnog menija; Pritisnite
Pretraživanje programa
Podesite programe prije gledanja televizije po prvi put. Prije pretraživanja, molimo Vas, pobrinite se, da je antena
ispravno povezana i da je izabrana vrsta antene koju želite da koristite. Sljedeći primjer pretrage kanala za Vrstu
pretrage je pod DVB-T.
20
Page 21

Automatska pretraga
Pritisnite dugme [MENU], i izaberite KANAL > automatska pretraga, zatim pritisnite dugme [OK]. Zatim pritisnite
dugme [t]/[u], kako biste izabrali vrstu pretrage. DTV+ATV, DTV, ATV. Pritisnite dugme [] , zatim možete izabrati
državu, u kojoj ste, pritiskom dugmeta []/ []/[t]/[u] i uređaj će početi automatsku pretragu nakon pritiska [OK]
dugmeta. (Ukoliko izaberete Francusku, morate uneti lozinku. I treba da izaberete BW kada je izabrano više država.)
Ukoliko izaberete DTV+ATV, uređaj će pokazati “Da li želite da preskočite ATV pretragu?”, pritiskom [ ] dugmeta
tokom automatske pretrage ATV kanala. Pritisnite dugme [t] , kako biste potvrdili, a zatim će uređaj početi da
automatski pretražuje DTV kanale, ili pritisnite [u]dugme, kako biste prekinuli. Tokom automatske pretrage DTV kanala,
ekran prikazuje “Da li želite da preskočite DTV pretragu?”, pritiskom [ ] dugmeta. Pritisnite [t]dugme, kako biste
potvrdili, ili pritisnite [u] dugme, kako biste prekinuli.
DTV ručna pretraga (U DTV izvoru signala)
Pritisnite dugme [MENU] , izaberite KANAL> DTV ručna pretraga, pritisnite dugme [OK] kako biste ušli u meni DTV
ručne pretrage , pritisnite[t]/[u] dugme, kako biste izabrali kanal, zatim pritisnite dugme [OK] za potvrdu. Tokom
pretrage možete pritisnuti [ ] dugme, kako biste prekinui pretragu i vratili se na prethodni meni.
ATV ručna pretraga (U ATV izvoru signala)
Pritisnite [MENU] dugme, izaberite KANAL> ATV ručna pretraga, pritisnite [OK] dugme kako biste ušli u meni ATV
ručne pretrage, pritisnite []/ [] dugme, kako biste izabrali zvučni sistem, sistem boja, trenutni kanal, i pritisnite
[t]/[u] dugme, da biste izabrali šta želite. Izaberite “Pretraga”, pritisnite [t]/[u] dugme, da biste izabrali nisku
frekvenciju ili visoku frekvenciju. Nakon pretrage, izaberite opciju fina pretraga i pritisnite [t]/[u] dugme, da biste
izabrali nisku frekvenciju ili visoku frekvenciju. Tokom ručne pretrage, možete pritisnuti [ ] dugme, kako biste prekinuli
pretragu i vratili se u prethodni meni.
Opcija snimanja
U DTV režimu, pritisnite [REC] dugme, meni opcije snimanja će se pokazati na ekranu, i sistem će odmah početi da
snima. Pritisnite[ ] dugme, kako biste zaustavili i napustili snimanje; Pritisnite [MENU] dugme i izaberite OPCIJA>
Lista snimaka, zatim možete izabrati datoteku koju želite da reprodukujete i pritisnite dugme [OK] za reprodukciju.
BiH/CG
Ikona Opis
Reprodukcija: Reprodukcija.
Zaustavljanje: Zaustavi i napusti.
Pauza: Pauziraj.
FB: Brzo nazad, pritisnite dugme [INDEX] za normalnu reprodukciju.
FF: Brzo napred, pritisnite dugme [ INDEX] za normalnu reprodukciju.
FB 30s: Napravite preskok unapred od 30s.
FF 30s: Napravite preskok unazad od 30s.
Napomena: Funkcija snimanja
može da podrži samo pamtioca
sa FAT32 sistemom datoteka.
Pamtilac s drugim sistemima
datoteka mora biti formatiran;
Pre formatiranaj pamtioca,
napravite rezervnu kopiju korisnih
informacija, jer sadržaj pamtioca
ne može biti povraćen nakon
formatiranja.
Opcija pomeranja vremena
U DTV režimu, pritisnite [T-shift] dugme, meni opcije pomeranja vremena će se pojaviti na ekranu i program će biti
zaustavljen. Pritisnite [INDEX] dugme, kako biste nastavili reprodukciju. Pritisnite [
] dugme, kako biste zaustavili i izašli
iz promjene vremena. Kada korisnik napusti program na kratko vrijeme, funkcija promjene vremena može zaustaviti i
sačuvati reprodukovani program na U disku. Kada korisnik nastavi reprodukciju, program može biti reprodukovan.
Ikona Opis
Reprodukcija: Reprodukcija.
Zaustavljanje: Zaustavi i napusti.
Pauza: Pauziraj.
FB: Brzo nazad, pritisnite dugme [INDEX] za normalnu reprodukciju.
FF: Brzo napred, pritisnite dugme [ INDEX] za normalnu reprodukciju.
FB 30s: Napravite preskok unapred od 30s.
FF 30s: Napravite preskok unazad od 30s.
21
Page 22

BiH/CG
Multimedijalni plejer
Pritisnite [SOURCE] dugme, zatim pritisnite []/ [] dugme, kako biste izabrali USB i pritisnite [OK] dugme da biste
ušli. Izaberite vrstu datoteke fIlm, muzika, fotografija.
Reprodukcija datoteka na uređaju lokalnog diska: Prije reprodukcije datoteka na loklanom disku, ubacite USB uređaj
za masovno skladištenje podataka u USB interfejs.
Izaberite lokalni disk u direktorijumu datoteka i pritisnite [OK] dugme kako biste ušli. Pritisnite povratak u direktorijum,
pritisnite [OK] dugme i vratite se na prethodnu fasciklu. Izaberite ciljanu fasciklu i pritisnite [OK] dugme, kako biste ušli
u nju. Zatim pritisnite []/ []/[t]/[u] da biste izabrali ciljanu datoteku i pritisnite [ ], da biste je reprodukovali.
Pritisnite [ ] dugme, kako biste se vratili na početni ekran.
Upozorenje:
1. Nestandarni USB uređaji vjerovatno neće biti prepoznati; u tom slučaju, molimo Vas zamijenite ga standardnim USB
uređajem
2. Sistem prenosa media ima određena ograničenja u pogledu formata datoteka; reprodukcija će biti neuobičajena
ukoliko je format izvan sistemskih ograničenja;
3. Ne uklanjajte USB uređaj tokom reprodukcije, ili će sistem ili uređaj možda imati problem; Prije zamjene USB
uređaja, molimo Vas, isključite uređaj s napajanja električnom energijom;
4. Sistem podržava standardne USB1.1 i USB2.0 uređaje, kao što su USB uređaji za masovno skladištenje podataka i
eksterni hard diskovi;
5. Maksimalna radna struja USB ulaza ovog uređaja je 500mA, i sopstvena zaštita će biti aktivirana ukoliko je radna
struja iznad ovog limita; molimo Vas, koristite spoljno napajanje električnom energijom ukoliko povezujete spoljnji
uređaj koji ima višu radnu struju;
6. Sistem je komplikovan; kada čita ili reprodukuje fajlove, ekran može biti zamrznut ili će neke funkcije biti
onemogućene zbog kompatibilnosti i stabilnosti USB uređaja; u tom slučaju, molimo Vas, isključite uređaj i ponovo
pokrenite sistem.
Pritisak na dugme [INFO] može prikazati ili sakriti traku sa alatkama tokom reprodukcije, izaberite opciju menija koju
želite, i pritisnite dugme [OK] kako biste izveli operaciju; možete pritisnuti [
pritisnuti dugme [
]/[ ]/[ ]/[ ] na daljinskom upravljaču, kako biste skraćeno izveli ovu operaciju.
] dugme, kako biste izašli iz reprodukcije, ili
OTKLANJANJE KVAROVA
• Bijele tačke se pojavljuju na TV slikama i prati ih buka.
1. Provjerite da li je povezana antena olabavljena i da li je
kabal u dobrom stanju.
2. Provjerite tip antene (VHF/UHF).
3. Podesite smjer i položaj antene.
4. Pokušajte da koristite pojačivač signala.
• Na ekranu nema ni slike ni tona. Svjetlo indikatora nije
uključeno.
Provjerite da li je uređaj povezan na napajanje električnom
energijom.
• Smetnja u vidu isprekidane linije ili trake se javlja na
TV slikama.
Ne koristite električni fen za kosu pored TV uređaja i
podesite smjer antene, kako biste smanjili smetnje.
• Na ekranu se pojavljuju duple slike.
1. Koristite antenu s dobrom orijentacijom.
2. Podesite smjer antene.
• Slike su bezbojne.
Uđite u podešavanje “Slika” kako biste povećali intenzitet
boja.
• Televiziju ne prati zvuk.
1. Podesite ton na odgovarajući stepen.
2. Pritisnite [MUTE] dugme na daljinskom upravljaču, kako
biste prekinuli režim isključivanja zvuka.
• Signal ulaznih slika se ne prikazuje na ekranu uređaja.
Svjetlo indikatora treperi.
1. Provjerite da li je kabal za povezivanje signala labav ili je
ispao. Ponovo ga povežite.
2. Računar je možda u stanju pripravnosti, molimo Vas, da
ga ponovo pokrenete.
• Udaljenost daljinskog upravljača je veoma mala ili je
van kontrole.
1. Uklonite predmet, kako biste izbjegli blokiranje
prijemnika signala daljinskog upravljača.
2. Zamjenite bateriju.
• Uređaj radi sporo, pad sistema, uređaj ne može da
radi.
Prvo prekinite napajanje električnom energijom zatim
ponovo uspostavite napajanje, nakon 1-2 minute, zatim
ponovo uključite TV.
22
Page 23

TEHNIČKE SPECIFIKACIJE
Glavni dio
Maks. Rezolucija 1920×1080
Najbolja rezolucija 1920×1080@60Hz
Napajanje 100-240VAC 60/50Hz
Potrošna energije zvučnika 8W+8W
RADNO OKRUŽENJE
BiH/CG
Temperatura
RH 10%~85%
Atmosferski pritisak 86kPa~106kPa
OKRUŽENJE
Temperatura
RH 5%~95%
Atmosferski pritisak 86kPa~106kPa
DIMENZIJE (D׊×V) I MASA
Bez postolja Raspakovano: 1103×83×642(mm3)
Sa postoljem
5°C~40°C
-20°C~55°C
Raspakovano: 1103×261×698(mm
Neraspakovano: 1210×175×744(mm3)
Neto masa: 9.7kg
Bruto masa: 12.5kg
Tehničke specifikacije TV uređaja
1. Podržani standard:
ATV: PAL D/K, I, B/G; SECAM D/K, B/G;
DTV : DVB-T/T2/C.
2. Ulaz antene: 75Ω osno, nebalansirano.
3. AV video ulaz: 75Ω, 1±0.1Vp-p, RCA terminal.
4. AV audio ulaz: 20KΩ, 0.2~2Vrms.
5. HDMI video ulaz: 480i, 480P, 576i, 576P, 720P, 1080i, 1080P.
3
)
HDMI režim prikaza Upravljanje napajanjem
VESA režim
BR. Režim Rezolucija
1
2
3
4
5 WXGA 1600×900 60Hz
6
VGA 640×480 60Hz
SVGA 800×600 60Hz
XGA 1024×768 60Hz
SXGA 1280×1024 60Hz
WUXGA 1920×1080 60Hz
Osvježavanje
ekrana
23
Režim Potrošnja energije
Normalan rad
Stanje pripravnosti
≤110W
≤0.5W
Page 24

BiH/CG
UPUTSTVA ZA POSTAVLJANJE POSTOLJA
Prvo uređaj postavite na ravnu površinu, odredite lijevu i desnu nožicu postolja, prednji i zadnji pravac, zatim postavite
postolje na dno uređaja sa zadnje strane, prema smjeru strelice sa skice. Poravnajte rupe za zavrtnje, zatim pričvrstite
zavrtnje (imajte na umu da modul mora biti prilagođen kao što je prikazano na slici, inače ne može biti instaliran.)
Postolje-L
Postolje-D
Napomena: Izgled pravog postolja i uređaja mogu se razlikovati od slike; molimo Vas, pogledajte stvarni uređaj.
Zavrtanj
24
Page 25

VARNOSTNA OPOZORILA IN OPOMBE
Zahvaljujemo se Vam, da ste izbrali večnamenski, pametni LED TV sprejemnik visoke zmogljivosti, ki ga je izdelala
naša družba. Ta dragoceni predmet vam bo nudil boljše zvočno-slikovne užitke. Med zasnovo tega proizvoda so bili
upoštevani faktorji, ki vplivajo na osebno varnost, sam proizvod pa je pred dostavo prestal stroge preizkuse. Kljub temu
pa lahko nepravilna uporaba povzroči udar električnega toka in požar. Da bi zagotovili varnost, podaljšali življenjsko
dobo te naprave in poskrbeli, da bo naprava med predvajanjem kar najbolje delovala prosimo, da pozorno preberete
ta navodila za uporabo in specifikacijo še pred začetkom uporabe naprave in da upoštevate varnostna navodila v
nadaljevanju. Prosimo Vas, da ta navodila za uporabo shranite za kasnejšo uporabo.
SLO
OPOZORILO POZOR!
Navedba prepovedanega obnašanja
Lahko pride do poškodb.
Navedba postopkov, ki jih je potrebno opraviti.
Lahko pride do poškodb oseb ali
stvari.
ČE SE POJAVIJO NASLEDNJI POGOJI:
• Pomanjkanje elektrike ali nestabilna napetost.
• Neobičajen zvok ali neprijeten vonj iz naprave.
• Poškodovan napajalni električni kabel.
• TV naprava je poškodovana zaradi padca, udarca ali uporabe sile.
• Če v TV napravo prodre tekočina ali kakšna druga snov.
Če pride do puščanja zemeljskega ali drugih plinov ali drugih vnetljivih hlapov, ne izvlecite priključnega kabla
TV naprave ali drugih električnih naprav; namesto tega, nemudoma zaprite ventil plina in odprite vrata in okna.
Takoj izklopite TV napravo,
izvlecite priključni kabel
iz vtičnice in pokličite
pooblaščeno osebo za
vzdrževanje.
OPOZORILO
• Uporabite samo napajalno napetost 100-240VAC, 60/50Hz
• Zaradi varnosti mora biti ta TV naprava priključena na vtičnico tipa G s tremi kontakti.
• Vse kable lahko priklapljate in odklapljate samo pri izklopljenem priključnem kablu.
• Ne postavljajte TV naprave na nestabilno površino, saj lahko sicer pride do njenega padca, poškodbe ali celo
požara.
• Ne postavljajte TV naprave na mesta:
1. ki so direktno izpostavljena sončnim žarkom, vlagi, prekomerni toploti, prekomernemu mrazu ali veliki količini
prahu;
2. kjer so prisotne eksplozivne in vnetljive snovi;
3. v bližini vnetljivih ali korozivnih plinov;
4. v kopalnico, kuhinjo, itd.
• Ne uporabljajte poškodovane ali neustrezne vtičnice, in poskrbite, da bosta vtič in vtičnica pravilno povezana.
• Poskrbite, da na vtiču in vtičnici ni prahu ali kovinskih delcev.
• Ne priklapljajte poškodovanega kabla:
1. Predelave priključnega kabla so prepovedane;
2. Na priključni kabel ne postavljajte težkih predmetov;
3. Priključni kabel ne sme biti v bližini virov toplote;
4. Pri izvlečenju iz vtičnice primite vtič, ne kabla.
• Ne priklapljajte preveč naprav na en električni podaljšek, saj lahko prevelika poraba energije povzroči požar.
• Ne dovolite, da se odprti plamen (npr. goreča sveča) približa TV napravi, saj lahko sicer pride do udara
električnega toka ali požara.
• Ne postavljajte posode z vodo na TV napravo, da bi preprečili možnost udara električnega toka ali požara, ki
lahko nastane zaradi kapljanja ali pršenja vode.
• V signalne priključke in prezračevalne odprtine ne potiskajte ostrih predmetov, kovin ali tekočin, da bi preprečili
kratek stik, poškodbo naprave ali udar električnega toka.
• Odprtine na okvirju so oblikovane tako, da odvajajo toploto in preprečijo prekomerno segrevanje vseh
komponent v napravi ter s tem zagotavljajo pogoj za dolgotrajno normalno delovanje. Prosimo, da teh odprtin
pri postavljanju ne zakrijete.
25
Page 26

SLO
Vtiča ne prijemajte z vlažnimi rokami, saj lahko sicer pride do udara električnega toka.
Ne vključujte TV naprave med grmenjem, ampak izvlecite vtič električnega napajalnega kable in priključek
antene, da preprečite udar strele.
Sami ne razstavljajte TV naprave, saj lahko pride do udara električnega toka ali požara. Za vzdrževanje pokličite
strokovno usposobljeno osebo.
OPOZORILO
• Ne pustite, da otroci plezajo na TV napravo.
• Hranite drobne dodatke iz dosega otrok, tako da jih ne morejo pogoltniti.
• Če TV-naprava ne bo uporabljena dalj časa, izklopite napravo in odstranite priključni kabel iz vtičnice.
• Pred čiščenjem TV naprave, izvlecite priključni kabel in napravo očistite z mehko krpo; ne uporabljajte kemičnih čistil
in pazite, da tuje snovi ne zaidejo v napravo. Nepravilno čiščenje (tekočina, voda itd.) lahko privede do pomanjkljivosti
pri izgledu naprave, izbrisa tiskanih informacij na proizvodu, vdor tujkov v napravo pa lahko povzroči može poškodbo
elementov, ki ni vidna.
• Pred spreminjanjem položaja ali kota TV naprave, prosimo da odstranite vse kable in napravo počasi pomikate, da ne
bi pri tem padla.
• Zaslona ne brišite z grobimi predmeti, ne tolcite po njem, ne zvijajte ga in ne pritiskajte nanj.
• Naprave ne uporabljajte neposredno po njenem prenosu iz okolja z nizko temperaturo v okolje z visoko temperaturo,
saj bi morebitno nastajanje kondenzata v napravi lahko povzročilo okvaro.
• Če se zaslon zlomi in pri tem pride do pršenja tekočine po koži, jo prosimo takoj izpirajte s čisto vodo vsaj 15 minut in
potem obiščite svojega zdravnika.
• Pri ročnem prenosu TV naprave, jo čvrsto primite za vogale in dno naprave; na ploščo ne delujte s silo.
• Prikazovanje iste slike dalj časa ali gibljivih slik z istimi stvarmi ali ikonami bo na zaslonu povzročilo »odsev slike«, ki ne
bo izginil niti po daljšem izklopu naprave. Garancija tega neželenega pojava ne pokriva
• »Zdravo« gledanje televizije:
1. Televizijo glejte v primerno razsvetljenem okolju; slaba osvetlitev ali dolgotrajno gledanje lahko povzroči bolečine v
očeh.
2. Prilagodite zvok na ustrezno raven, da preprečite okvaro sluha.
• Za prekinitev napajanja z električno energijo izvlecite priključni kabel naprave.
• Če za izključitev uporabite vtič in vtičnico na napravi, to lahko zagotovi enostavno rokovanje z napravo.
• Vtič mora biti pravilno povezan. Ohlapni vtiči lahko povzročijo iskrenje in požar.
• Pridržujemo si pravico do sprememb vseh tehničnih podatkov v tem navodilu z uporabo in na pakiranju brez
predhodnega obvestila. Če pride do odstopanja med navodilom za uporabo in dejanskim delovanjem, obvelja
slednje.
Izrazi HDMI in HDMI multimedijski vmesnik visoke ločljivosti in logotip HDMI so zaščiteni
znaki ali registrirani zaščitni znaki HDMI organa za izdajo dovoljenj, Inč. v Združenih državah
Amerike in drugih državah.
POSTAVITEV IN POVEZOVANJE
Seznam opreme
1. TV naprava. 2. Navodilo za uporabo. 3. Daljinski krmilnik.
4. Priključni kabel (ali že povezan v TV napravo). 5. Prenosni kabel za komponente (neobvezno).
Postavitev TV naprave
Nasveti za postavitev
• TV naprava mora biti postavljen blizu omrežne vtičnice zaradi lažjega priklopa in odklopa.
• Zbog vaše varnosti vam priporočamo izbiro ustreznega stenskega nosilca ali podstavka.
• Zaradi preprečevanja poškodb mora biti TV naprava postavljena na stabilno ravno površino ali pritrjena na čvrsto steno.
26
Page 27

• Za pravilno pritrditev na steno se posvetujte s strokovno usposobljeno osebo. Nepravilna postavitev lahko privede do
nestabilnosti TV naprave.
• TV naprave ne postavljajte na mesta, ki so podvržena mehanskim tresljajem.
• Ne postavljajte TV naprave na mesto, kjer lahko vanjo zaidejo žuželke.
• Ne postavljajte TV naprave blizu klimatske naprave, saj lahko tam notranja plošča zaslona kondenzira vlago in povzroči
okvaro.
• Ne postavljajte TV naprave v bližini močnega magnetnega polja, saj lahko močno magnetno valovanje povzroča
motnje in poškodbe.
Postavitev na podnožje Pritrditev na steno
SLO
Preprečuje pretok zraka Preprečuje pretok zraka
• Prosimo, da zagotovite prazen prostor okoli TV
naprave, najmanj tako, kot je prikazano na skici.
Zid Zid
• Ne pokrivajte prezračevalnih odprtin in ob
ohišje ne postavljajte nobenih predmetov.
• Naprave ne postavljajte na omejena mesta,
npr. police ili vgradne omare, razen če ima TV
naprava ustrezno prezračevanje.
Prezračevanje
OPOZORILO
Nikoli ne postavljajte TV naprave na nestabilno mesto. TV naprava lahko pade, kar lahko povzroči hude poškodbe ali
smrt. Mnoge poškodbe, predvsem otrok, se lahko preprečijo z enostavnimi preventivnimi ukrepi, kot so:
• Uporaba elementov in podstavka po priporočilu proizvajalca TV naprave.
• Uporaba le tistega pohištva, ki lahko varno nosi TV napravo.
• Poskrbite, da TV naprava ne sega preko roba nosilnega pohištva.
• Ne postavljanje TV naprave na visoko pohištvo (na primer omare ali knjižne police, ali pa napravo in pohištvo ustrezno
pritrdite.
• Ne postavljanje TV naprave na tkanino ali druge materiale, ki bi se nahajali med TV napravo in nosilnim pohištvom.
• Poučite otroke o nevarnostih pri plezanju na pohištvo, da bi dosegli TV napravo ali njegove krmilne element.
Po vsaki postavitvi ali premikanju TV naprave izvedite vse zgoraj navedene korake.
Povezovanje periferne opreme
Opomba:
1. USB vmesniki podpirajo periferno opremo, vključno z USB napravo za masivno skladiščenje podatkov.
2. Pri priklopu naprave, ki podpira MHL funkcijo izberite HDM-1 vmesnik. (MHL funkcija je opcijska zato preverite, ali jo
vaša naprava ima).
3. Pri priklopu naprave, ki podpira ARC izberite HDMI-3 vmesnik.
4. HDMI priključek lahko prepozna DVI funkcijo z zunanjim HDMI/DVI adapterjem.
5. V tem navodilu opisano periferno opremo in kable je potrebno nabaviti posebej.
27
Page 28

SLO
Koaksialni izhod
Vhod za komponente
USB1 vmesnik
USB2 vmesnik
AV vhod
Vhod za CI kartico
To power socket
(100-240VAC, 60/50Hz)
Earphone Port
HDMI 1 vhod
HDMI 2 vhod
HDMI 3 vhod
Zeleni (kabel Y signala)
Plavi (kabel Pb/Cb signala)
Rumeni (kabel VIDEO signala)
Beli (kabel AUDIO-L signala)
Oranžni (Kabel koaksialnega signala)
Rdeči (kabli AUDIO-R in Pr/Cr signala)
Opozorilo
Ko povezujete zunanjo anteno na vhod za signal na TV napravi,
najprej izključite glavno stikalo za napajanje TV naprave.
Priključka zunanje Antene ne približujte kablu visoke napetosti,
da ne sprožite udara električnega toka. Žična antena, ki je
povezana na to TV napravo mora biti izolirana in imeti zaščitno
ozemljitve, saj lahko drugače pride do požara ali nevarnosti.
28
Page 29

KONTROLNE TIPKE NA PLOŠČI
1. LED indikator napetosti in sprejemnik signala daljinskega
krmilnika.
(VIR): Pritisnite to tipko za vstop v izbirni meni in
2.
izbiro vira signala; pri izbiri s krmilne plošče (OSD),
pritisnite to tipko tudi za potrditev izbire, saj ima enako
funkcijo kot tipka [OK] na daljinskem krmilniku.
3. – CH + (CH-/CH+):Tipka za izbiro kanala gor/dol izbiri s
krmilne plošče (OSD), pritisnite to tipko tudi za potrditev
izbire, saj ima enako funkcijo kot tipka /na daljinskem
krmilniku.
4.
plošče (OSD), pritisnite to tipko tudi za nastavitev
analogne funkcije, saj ima enako funkcijo kot tipka
[t]/[u] na daljinskem krmilniku.
5.
nastavitve.
6.
vrnitev v stanje pripravljenosti.
Opomba: Prikazana naprava se lahko razlikuje glede na
model, prednost ima dejanska naprava.
(VOL-/VOL+): Tipka za glasnost; izbiri s krmilne
(MENU): Pritisnite to tipko za prikaz menija za
Standby (Stanje pripravljenosti): Za vklop TV ali za
SLO
DALJINSKI KRMILNIK
Postopek vstavljanja baterije daljinskega krmilnika
Snemite pokrov predala za baterijo in vstavite dve AAA (Št. 7, 1,5V) baterije; pri tem pazite, da je polariteta baterij v
skladu z oznakami “+” in “-” v predalu za baterijo daljinskega krmilnika.
Previdnostni ukrepi pri uporabi daljinskega krmilnika
• Daljinski krmilnik mora biti usmerjen proti tipalu signala iz daljinskega krmilnika med prenosom ukazov. Predme, ki se
nahaja med daljinskim krmilnikom in tipalom signala na napravi, lahko preprečuje njegovo delovanja.
• Daljinskega krmilnika ne izpostavljajte močnim tresljajem. Ne sme biti izpostavljen neposrednim sončnim žarkom, saj
se lahko segreje in izobliči.
• Če sije sonce direktno na tipalo signala na TV napravi, to lahko moti delovanje daljinskega krmilnika; v takem primeru
spremenite kot vpada sončnih žarkov ali pa uporabljajte daljinski krmilnik iz neposredne bližine.
• Ko bo nizek nivo napetosti baterij bo vplival na razdaljo delovanja daljinskega krmilnika, jih je potrebno zamenjati
z novimi. Če krmilnika dalj časa ne boste uporabljali ali pri praznih baterijah, le-te odstranite iz krmilnika, saj tako
preprečite korozijo krmilnika zaradi iztekanja iz baterij, kar lahko poškoduje ali pokvari daljinski krmilnik.
• Prosimo, da ne uporabljate različnih baterij. Prav tako ni dovoljena hkratna uporaba stare in nove baterije; baterije
morat zamenjati naenkrat.
• Prosimo, da baterij ne vržete v plamen, jih ne polnite niti razgradite, ne povzročajte kratkega stika na njih, jih ne
razstavljajte, ne spajajte, ne segrevajte in ne zažigajte. Prosimo, da iztrošene baterije neškodljivo odstranite v skladu z
ustreznimi predpisi o zaščiti okolja.
29
Page 30

SLO
Tipke daljinskega krmilnika.
Opomba: Prikazan izgled daljinskega krmilnika se lahko razlikuje glede na model, prednost ima dejanska naprava.
Tipka Funkcija
Vklop naprave. Preklapljanje v stanje pripravljenosti.
Zamenjava načina prikaza.
Vklop/izklop zvoka
16:9
POWER (
16:9
MUTE ( )
)
Tipke s številkami (0~9)
LIST (
)
Za vnos številk ali izbiro kanala.
Pogled v seznam programov.
Povratek na zadnji gledani kanal.
SOURCE Izbira vira signala. (samo v TV načinu dela)
MENU Prikaz OSD (zaslonskega) izbirnega menija.
Tipke za krmiljenje
, , , )
(
Izbira elementa ali prilagoditev vrednosti.
OK Potrditev ukaza
Povečanje/zmanjšanje glasnosti zvoka.
VOL+/VOL- (
Nazaj ( )
)
Vrnitev na predhodno stran.
EXIT (Izhod) Izhod iz trenutnega vmesnika.
CH+/CH- (
) Spreminjanje kanala.
INFO Prikaz informacij o TV programih.
SUBTITLE Izbira jezika za podnapise.
AUDIO
Izbira jezika zvočnega prenosa.
AD Vklop/Izklop ustreznega zvoka.
TTX Vklop delovanja teleteksta.
REC Snemanje programa.
T-Shift Sprememba časa u DTV načinu dela.
REVEAL (EPG)
INDEX ( )
ZOOM ( )
HOLD ( )
LANGUAGE (Jezik)
)
(
Prikazuje skrito besedilo pri delovanju teleteksta.
(Navodila glede elektronskega kanala.)
Prikazuje stran indeks pri u delovanju teleteksta.
(Pusti/Pavziraj funkcija v multimediji)
Povečanje velikosti teleteksta.
(Funkcija zaustavljanja v multimediji)
Zadrži zaslonski prikaz na trenutni strani.
(Zadnja datoteka v multimediji).
Sprememba jezika teleteksta.
(Naslednja datoteka v multimediji).
Rdeč tipka
Zelena tipka
Rumena tipka
Tipke za posebne funkcije.
Modra tipka
30
Page 31

OSNOVNI POSTOPKI
Opomba
1. Opis tipk se nanaša na tipke na daljinskem krmilniku, za pojasnite v delovanja tipk na zaslonu prosimo poglejte
poglavje »Krmilne tipke zaslona«.
2. Navodila za delo v izbirnem meniju v teh navodilih za uporabo so pojasnjena za TV način dela. Postopki v drugih
načinih dela so podobni in uporabniki lahko napisano uporabijo kot usmeritev.
3. Pred vklopom naprave poskrbite za vir stabilne omrežne napetosti.
Vklop/Stanje pripravljenosti
SLO
Priključite priključni kabel v omrežno vtičnico. Pritisnite tipko ‘’
pritisnite tipko [
[OK] za potrditev. Pritisnite tipko []/ [] za izbiro tipa DVB tip in pritisnite tipko [OK] za prehod na naslednji korak.
Na zaslonu je prikazan vmesnik, pritisnite tipko [t]/[u] za izbiro želenega Načina iskanj, potem pritisnite tipko [] in
lahko s pritiskom na tipke []/ []/[t]/[u] izberete državo, v kateri ste. Potem pritisnite tipko [OK] za potrditev Če
izberete Francijo, morate nastaviti geslo in izbrati BW, če ste izbrali več držav), zdaj bo naprava sama poiskala TV kanal.
(Če je izbrani DVB tipa DVB-C, morate nastaviti Režim zvoka na Mreža ali Polno. Pri nastavitvi kot Mreža, morate
pritisniti tipko []/ [] za izbiro frekvence, modulacije in ID mreže i Vrednost simbolov. Potem pritisnite tipko [t]/[u]
za nastavitev elementov. Končno, izberite Išči in pritisnite tipko [OK] z začetek iskanja. )
Ko je naprava vklopljena, pritisnite tipko [
Posebni nasveti: Ta naprava je skladna s tehnologijo za varčevanje z energijo. Če ni signala pri vklopljeni napravi, se bo
naprava po petih minutah avtomatsko postavila v stanje pripravljenosti, kjer bo ostala za že določen čas;
] za vklop TV. Pritisnite tipko []/ []/[t]/[u] za izbiro želenega jezika OSD (v menijih) in pritisnite tipko
] za prehod v stanje pripravljenosti.
‘’na TV napravi, če nima te tipke, to ni potrebno), potem
Izbira vira signala
Na TV napravo lahko priključite različne naprave na zaslonu gledati njihovo sliko v visoki kakovosti. Če ima naprava vhod
HDMI, AV ali drugi video izhod, ga lahko izberete in povežete z ustreznim vhodom TV naprave. Po povezavi vklopite
napravo in pritisnite tipko [SOURCE], potem se bo meni vira signala pokazal na zaslonu. Pritisnite tipko []/ [] za
izbiro vnosa signala in za potrditev pritisnite tipko [OK].
Opis postopkov izbirnega menija
Pritisnite tipko [MENU] in na zaslonu se prikaže glavni meni:
1. Pritisnite [t]/[u] za izbiro menija PROGRAMA, SLIKE, ZVOKA, ČASA, OPCIJE, ZAKLEPANJA.
2. Pritisnite tipko []/ [] za izbiro elementa v meniju.
3. Pritisnite tipko [OK] za vstop v podmeni.
4. Pritisnite tipko [t]/[u] za prilagoditev vrednosti ali postavke.
5. Ko se na zaslonu prikaže glavni, pritisnite tipko [
za vrnitev na predhodni meni, ko TV pokaže podmeni.
6. Med tem postopkom se barva ikon nedostopnih Opcij spremeni v sivo.
]/[MENU] za izhod iz glavnega menija; Pritisnite tipko[ ]/[MENU],
Opomba: Vnaprej nastavljeno geslo za sistem zaklepanja je 0000.
Iskanje po programih
Najprej prvič nastavite programe pred prvim gledanjem. Pred iskanjem po programih se prepričajte, da je antena
pravilno priključena in da je na napravi izbrana vrsta antene, ki jo želite uporabiti. Naslednji primer iskanja programa za
Način iskanja je pod DVB-T.
31
Page 32

SLO
Avtomatsko iskanje
Pritisnite tipko [MENU], in izberite KANAL > avtomatsko iskanje, potem pritisnite tipko [OK]. Potem pritisnite tipko
[t]/[u] , za izbiro načina iskanja. DTV+ATV, DTV, ATV. Pritisnite tipko[], potem lahko izberete državo, v kateri ste, po
pritisku tipke []/ []/[t]/[u] in pritisku tipke [OK] bo naprava začela avtomatsko iskanje. (Če izberete Francijo, morate
vpisati geslo. Če je izbrano več držav morate izbrati BW.) Če izberete DTV+ATV, bo naprava vprašala »Želite preskočiti
ATV iskanje?«, med avtomatskim iskanjem ATV kanalov pritisnite tipko [ ]. Pritisnite tipko [t] za potrditev in potem Bo
naprava začela avtomatsko iskati DTV kanale, ali pa pritisnite tipko [u] tipko za prekinitev. Med avtomatskim iskanjem
DTV kanalov je na zaslonu prikazano »Želite preskočiti DTV iskanje?«, to lahko storite s pritiskom tipke [ ]. Pritisnite
tipko [t] za potrditev ali tipko [u] za prekinitev.
DTV ročno iskanje (U DTV izvoru signala)
Pritisnite tipko [MENU], izberite KANAL> DTV ročno iskanje, pritisnite tipko [OK] za vstop v meni DTV ročnega iskanja,
pritisnite tipko[t]/[u], za izbiro kanala, potem pritisnite tipko [OK] za potrditev. Med iskanjem lahko pritisnete tipko [ ]
tipko za prekinitev iskanja in vrnitev v predhodni meni.
ATV ročno iskanje (Pri ATV viru signala)
Pritisnite tipko [MENU], izberite KANAL> ATV Ročno iskanje, pritisnite tipko [OK] za vstop v meni ATV ročnega
iskanja, pritisnite tipko []/ [] za izbiro zvočnega sistema, sistema barv, trenutnega kanala, in pritisnite tipko [t]/[u] za
izbiro želenega. Izberite “Iskanje”, Pritisnite tipko [t]/[u] za izbiro nizke frekvence ali visoke frekvence. Po iskanju izberite
opcijo fino iskanje in pritisnite tipko [t]/[u] za izbiro nizke aloi visoke frekvence. Med ročnim iskanjem lahko pritisnete
tipko [ ] za prekinitev iskanja in vrnitev v predhodni meni.
Opcija snemanja
V DTV načinu dela pritisnite tipko [REC], na zaslonu se pokaže meni opcije snemanja in sistem nemudoma začne
snemati. Pritisnite tipko [ ] za ustavitev in zapustitev snemanja; Pritisnite tipko [MENU] in izberite OPCIJA> Seznam
posnetkov, potem lahko izberete datoteko, ki jo želite predvajati in pritisnite tipko [OK] za predvajanje.
Ikona Opis
Predvajanje: Predvajanje.
Zaustavitev: Zaustavi in zapusti.
Pavza: Pavziraj.
FB: Hitro nazaj, pritisnite tipko [INDEX] za normalno predvajanje.
FF: Hitro naprej, pritisnite tipko [INDEX] za normalno predvajanje.
FB 30s: Napravite preskok naprej za 30 sekund.
FF 30s: Napravite preskok nazaj za 30 sekund.
Opomba: Funkcija snemanja
lahko podpira samo pomnilni
medij s FAT32 sistemom datotek.
Pomnilni medij z drugimi sistemi
datotek mora biti formatiran;
Pred formatiranjem pomnilnega
medija izdelajte rezervno kopij
koristnih informacij, saj Predhodne
vsebine pomnilnega medija
po formatiranju ne morete več
priklicati.
Opcija spreminjanja nastavitve časa
V DTV režimu, pritisnite tipko [T-shift] in na zaslonu se pojavi meni opcije spreminjanja nastavitve časa, program pa
se ustavi. Pritisnite tipko [INDEX] tipko za nastavljanje prikazovanja. Pritisnite tipko [
] tipko, za zaustavitev in izhod iz
spreminjanja nastavitve časa. Ko uporabnik zapusti program za kratek čas, lahko funkcija spremembe nastavitve časa
ustavi in shrani prikazovan program na U disku. Ko uporabnik nadaljuje predvajanje je mogoče nadaljevati predvajanje
programa.
Ikona Opis
Predvajanje: Predvajanje.
Zaustavitev: Zaustavi in zapusti.
Pavza: Pavziraj.
FB: Hitro nazaj, pritisnite tipko [INDEX] za normalno predvajanje.
FF: Hitro naprej, pritisnite tipko [INDEX] za normalno predvajanje.
FB 30s: Napravite preskok naprej za 30 sekund.
FF 30s: Napravite preskok nazaj za 30 sekund.
32
Page 33

Multimedijski predvajalnik
Pritisnite tipko [SOURCE], potem pritisnite tipko []/ [] za izbiro USB in pritisnite tipko [OK] za vstop v meni. Izberite
vrsto datoteke film, glasba, fotografija.
Predvajanje datotek na napravi z lokalnega diska: Pred predvajanjem datotek na lokalnem disku, vnesite USB
napravo za masovno skladiščenje podatkov v USB vmesnik. Izberite lokalni disk u direktoriju datotek in pritisnite tipko
[OK] za vstop. Pritisnite Vrnitev v direktorij, in pritisnite tipko [OK] ter se vrnite v predhodno mapo. Izberite ciljno mapo
in pritisnite tipko [OK] za vstop vanjo. potem pritisnite[]/ []/[t]/[u] za izbiro ciljne datoteke in pritisnite tipko [ ] ,
za predvajanje. Pritisnite tipko [ ] za vrnitev na začetni zaslonski prikaz.
Opozorilo:
1. Nestandardne USB naprave verjetno ne bodo prepoznane; v tem primeru nestandardno napravo zamenjajte s
standardno.
2. Sistem prenosa medijev ima določene omejitve glede formata datotek; če je format izven sistemskih omejitev, bo
predvajanje nenavadno;
3. Med predvajanjem ne odstranjujte USB naprave, saj lahko sistem ali naprava zaide v težave; pred zamenjavo USB
naprave prosimo izklopite električno energijo;
4. Sistem podpira standardne USB1.1 i USB2.0 naprave, kot so USB naprave za množično skladiščenje podatkov in
zunanji trdi diski;
5. Maksimalni delovni tok USB vhoda te naprave je 500 mA, pri njegovem preseganju se sproži lastna zaščita; če
povezujete napravo z višjim delovnim tokom, uporabite zanjo zunanji USB napajalnik;
6. Sistem je kompliciran; ko čita ali predvaja datoteke lahko zaslon »zmrzne« ali pa bodo nekatere funkcije
onemogočene zaradi kompatibilnosti in stabilnosti USB naprave; v tem primeru vas prosimo, da napravo izklopite in
ponovno vklopite (resetirate).
Pritisk na tipko [INFO] prikaže ali skrije trak z orodji in med predvajanjem na njem izberite želeno opcijo menija ter za njeno
izvedbo pritisnite tipko [OK]; za izhod iz predvajanja pritisnite tipko [
daljinskem krmilniku za skrajšano izvedbo tega postopka.
], ali pa pritiskajte tipke [ ]/[ ]/[ ]/[ ] na
SLO
ODPRAVA OKVAR
• V TV sliki se pojavljajo bele pike spremljane s
šumenjem.
1. Preverite, ali se je povezana antena premaknila in ali je
kabel v dobrem stanju.
2. Preverite tip antene (VHF/UHF).
3. Nastavite smer in položaj antene.
4. Poskusite uporabiti ojačevalnik antenskega signala.
• Na zaslonu ni slike, niti tona, lučka indikatorja ne sveti.
Preverite ali je naprava povezana na električno napetost.
• Na TV sliki se pojavljajo motnje kot pretrgani trakovi
ali črte.
V bližini TV naprave n uporabljajte električnih fenov za lase
in ponastavite usmeritev antene zaradi zmanjšanja motenj.
• Na zaslonu se pojavljajo dvojne slike.
1. Uporabljajte dobro usmerjeno anteno.
2. Nastavite smer antene.
• Slike su brez barve.
Pojdite na postopek nastavljanja slike »Slika« in povečajte
intenzivnost barv.
• Televizija nima zvoka.
1. Nastavite jakost zvoka na primerno jakost.
2. Pritisnite tipko [MUTE] na daljinskem krmilniku za
prekinitev izklopa zvoka.
• Signal vhodne slike se ne prikazuje na zaslonu
naprave. Lučka indikatorja utripa.
1. Preverite ali je vtič kabla za priklop signala ohlapen ili je
izpadel. Ponovo ga vtaknite v vtičnico.
2. Računalnik je morda u stanju pripravljenosti, prosimo,
da ga ponovno poženete.
• Oddaljenost daljinskega krmilnika je zelo majhna ali
pa izven dosega.
1. Umaknite predmet, ki blokira sprejemnik signala
daljinskega krmilnika.
2. Zamenjajte baterijo.
• Naprava dela počasi, sistem pada, naprava ne more
delovati.
Najprej prekinite napajanje z električno energijo, potem ga
ponovno vzpostavite čez 1-2 minuti in ponovno vklopite TV.
33
Page 34

SLO
TEHNIČNE SPECIFIKACIJE
Glavni del
Največja ločljivost 1920×1080
Najboljša ločljivost 1920×1080@60Hz
Napajanje 100-240VAC 60/50Hz
Potrošna energije zvočnikov 8W+8W
DELOVNO OKOLJE:
Temperatura
Relativna vlažnost zraka 10%~85%
Zračni tlak 86kPa~106kPa
OKOLJE:
Temperatura -20°C~55°C
Relativna vlažnost zraka 5%~95%
Zračni tlak 86kPa~106kPa
DIMENZIJE (D׊×V) I MASA
Brez podnožja Razpakirano: 1103×83×642(mm
S podnožjem
5°C~40°C
Razpakirano: 1103×261×698(mm
V embalaži: 1210×175×744(mm3)
Neto masa: 9.7kg
Bruto masa: 12.5kg
Tehnični podatki TV naprave
1. Podprti standardi:
ATV: PAL D/K, I, B/G; SECAM D/K, B/G;
DTV : DVB-T/T2/C.
2. Vhod antene: 75 Ω koaksialno, nebalansirano.
3. AV video vhod: 75Ω, 1±0.1Vp-p, RCA terminal.
4. AV avdio vhod: 20KΩ, 0.2~2Vrms.
5. HDMI video vhod: 480i, 480P, 576i, 576P, 720P, 1080i, 1080P.
3
)
3
)
HDMI režim prikaza Upravljanje napajanjem
VESA režim
BR. Režim Ločljivost
1
2
3
4
5 WXGA 1600×900 60Hz
6
VGA 640×480 60Hz
SVGA 800×600 60Hz
XGA 1024×768 60Hz
SXGA 1280×1024 60Hz
WUXGA 1920×1080 60Hz
Pogostost
osveževanja
34
Režim Potrošnja energije
Normalno delovanje
Stanje pripravljenosti
≤110W
≤0.5W
Page 35

NAVODILA ZA MONTAŽO PODNOŽJA
Najprej postavite napravo na ravno površino, določite levo in desno nožico podnožja, smer naprej in nazaj, potem
vtaknite podnožje v dno naprave z zadnje strani v smeri puščice, kot je prikazano na skici. Poravnajte odprtine za vijake
in vijake privijte (upoštevajte, da mora biti modul postavljen, kot je prikazano na skici, sicer ga ni mogoče pritrditi.)
Podnožje-L
Podnožje-D
Opomba: Izgled dejanskega podnožja in naprave se lahko razlikujeta od slike; prosimo Vas, poglejte dejansko napravo.
Vijaki
SLO
35
Page 36

SRB
BEZBEDNOSNA UPOZORENJA I NAPOMENE
Hvala Vam, što ste izabrali multifunkcionalni, pametni LED TV visokih performansi, koji je proizvela naša kompanija. Ova
dragocena stvar će vam pružiti bolje audio-vizuelno uživanje. Tokom dizajniranja ovog proizvoda, u obzir su uzeti faktori
koji utiču na ličnu bezbednost, i proizvod je bio podvrgnut strogim testovima pre dostave. Ipak, nepropisno korišćenje
može dovesti do strujnog udara i požara. Kako biste osigurali bezbednost, produžili životni vek ovog uređaja i postarali
se da tokom reprodukcije uređaj pruži najbolje performanse, molimo Vas da pažljivo pročitate ovo korisničko uputstvo
i specifikaciju pre korišćenja, i da pratite sledeća bezbedonosna uputstva. Molimo Vas, čuvajte ovo korisničko uputstvo
radi kasnije upotrebe.
UPOZORENJE UPOZORENJE
Navedite ponašanja, koja moraju biti
zabranjena
Može dovesti do povreda
Navedite operacije, koje moraju biti izvedene
Može doći do lične povrede
ili oštećenja imovine
POD SLEDEĆIM USLOVIMA:
• Nestanak struje ili nestabilan napon.
• Neobičan zvuk ili neprijatan miris iz uređaja.
• AC priključni kabl je oštećen.
• TV uređaj je oštećen zbog pada, udarca ili primene sile.
• Ukoliko bilo kakva tečnost ili strana materija uđe u TV uređaj.
Ukoliko dođe do curenja jamskog gasa ili drugih zapaljivih gasova, ne izvlačite priključni kabl TV uređaja ili
drugih električnih uređaja; umesto toga, odmah zatvorite ventil gasa i otvorite vrata i prozore.
Odmah isključite
TV uređaj, izvucite
priključni kabl iz utičnice
i kontaktirajte osobu
ovlašćenu za održavanje.
UPOZORENJE
• Koristite samo napajanje 100-240VAC, 60/50Hz
• Radi bezbednosti, ovaj TV uređaj mora biti povezan na utičnicu tipa G sa tri pina.
• Svi kablovi mobu biti povezani ili izvučeni samo nakon što je priključni kabl isključen.
• Ne postavljajte TV uređaj na nestabilnu površinu, u suprotnom može doći do pada, oštećenja ili čak požara.
• Ne postavljajte TV uređaj u okruženje:
1. Koje je direktno izloženo sunčevim zracima, vlazi, prekomernoj toploti, prekomernoj hladnoći ili velikoj
količini prašine;
2. Sa zapaljivim ili eksplozivnim supstancama;
3. Zapaljivim ili korozivnim gasovima;
4. U kupatilo, kuhinju, itd.
• Ne koristite oštećenu ili neodgovarajuću utičnicu, i pobrinite se da utikač i utičnica budu ispravno povezani.
• Pobrinite se da na utikaču i utičnici nema prašine i metalnih delova.
• Nemojte oštetiti priključni kabl:
1. Prepravljanje priključnog kabla je zabranjeno;
2. Ne stavljajte teške predmete na priključni kabl;
3. Držite priključni kabl dalje od izvora toplote;
4. Ne vucite priključni kabl kada ga izvlačite iz utičnice.
• Ne povezujte previše uređaja na jedan produžni kabl, inače može doći do požara zbog velike potrošnje
energije.
• Ne dozvolite da se otvoreni plamen (npr. upaljena sveća) približi TV uređaju, inače može doći do strujnog udara
ili požara.
• Ne stavljajte posude napunjene vodom na TV uređaj, kako biste izbegli strujni udar ili požar, koji može nastati
zbog kapljanja ili prskanja vode.
• Ne gurajte nikakav oštar predmet, metal ili tečnost u konektore signala ili vetilacione otvore, kako biste izbegli
kratak spoj i oštećenje uređaja, kao i strujni udar.
• Otvori na ramu su dizajnirani tako da oslobađaju toplotu, kao i da osiguraju, da nijedna unutrašnja komponenta
ne dostigne veoma visoku temperaturu, kako bi mogle da rade normalno duže vremena. Molimo vas, ne
pokrivajte otvore tokom postavljanja.
36
Page 37

Ne dirajte utikač vlažnim rukama, u suprotnom može doći do strujnog udara.
Ne uključujte TV uređaj tokom grmljavine, umesto toga, izvucite utikač i konektor antene kako biste izbegli
udar groma.
Ne rasklapajte TV uređaj na svoju ruku, u suprotnom može doći do strujnog udara ili požara. Za održavanje
kontaktirajte kvalifikovanu osobu.
UPOZORENJE
• Ne puštajte decu da se penju na TV uređaj.
• Držite sitan pribor van domašaja dece, kako ih ne bi progutala.
• Ukoliko TV uređaj neće biti korišćen duže vremena, molimo Vas da isključite uređaj i izvučete priključni kabl.
• Pre čišćenja TV uređaja, izvucite priključni kabl i očistite mekom tkaninom; ne koristite hemijske reagense i pobrinite
se da strane materije ne uđu u uređaj. Neispravno čišćenje (kao što je tečnost za čišćenje, voda itd.) može dovesti
do oštećenja izgleda proizvoda, brisanja štampanih informacija na proizvodu, a njihov ulazak u uređaj može oštetiti
komponente, jer uređaj ne može to pokazati.
• Kako biste podesili poziciju ili ugao TV uređaja, molimo Vas da odvojite sve kablove i polako pomerate uređaj, kako bi
se izbegao pad.
• Ekran ne brišite grubim predmetima, ne udarajte ga, ne savijajte i ne pritiskajte ekran.
• Ne koristite uređaj odmah nakon njegovog prenosa na mesto s visokom tematurom iz mesta sa niskom
temperaturom, jer bi to moglo dovesti do magljenja unutar uređaja i kvara.
• Ukoliko je ekran slomljen i dođe do prskanja tečnosti po koži, molimo Vas da nakon toga odmah izaperete 15 minuta
čistom vodom, i posetite svog doktora.
• Kako biste TV uređaj preneli na rukama, molimo va, da stegnete uglove i držite dno uređaja; ne primenjujte silu na
tablu.
• Prikazivanje iste slike duže vremena ili pokretnih slika sa stalnim rečima ili ikonama će dovesti do “otpornosti slike” na
ekranu, koja neće nestati ni nakon što se uređaj isključi na duže vreme. Garancija ne pokriva ovu neželjenu pojavu.
• “Zdravo” gledanje televizije:
1. Gledajte pri odgovarajućem osvetljenju; slabo osvetljenje ili dugo gledanje može prouzrokovati bol očiju.
2. Prilagodite zvuk na odgovarajući nivo, kako biste izbegli povredu sluha.
• Izvucite priključni kabl uređaja, kako biste prekinuli napajanje električnom energijom.
• Ukoliko se utikač ili spojnica uređaja koristi za isključivanje, to bi moglo obezbediti jednostavan rad uređaja.
• Utikač treba da bude povezan ispravno. Labavi utikači mogu dovesti do varničenja i požara.
• -Sve tehničke specifikacije u ovom korsiničkom uputstvu i na pakovanju su podložne promenama pre prethodnog
obaveštenja. Ukoliko postoji odstupanje između korisničkog uputstva i stvarnog rada, ovo drugo će prevagnuti.
SRB
Termini HDMI i HDMI multimedijski interfejs visoke definicje, i HDMI logo su zaštitni znaci ili
registrovani zaštitni znaci HDMI organa za izdavanje dozvole, Inc. u Sjedinjenim Američkim
državama i drugim državma.
POSTAVLJANJE I POVEZIVANJE
Spisak opreme
1. TV uređaj. 2. Korisničko uputstvo. 3. Daljinski upravljač.
4. Priključni kabl (ili povezan na TV uređaj). 5. Prenosni kabl za komponente (neobavezan).
Postavljanje TV uređaja
Saveti za instalaciju
• TV uređaj mora biti postavljen blzu AC utičnice zbog lakog povezivanja i isključivanja.
• Zbog vaše bezbednosti, molimo Vas da izaberete odgovarajući zidni nosač ili postolje.
• Kako biste izbegli povrede, potrebno je da TV uređaj postavite na stabilnu ravnu površinu ili da ga postavite na čvrst zid.
37
Page 38

SRB
• Pitajte kvalifikovanu osobu da postavi TV uređaj na zid. Neispravno postavljanje može dovesti do nestabilnosti TV
uređaja.
• Ne postavljajte TV uređaj na mesto podložno mehaničkoj vibraciji.
• Ne postavljajte TV uređaj na mesto, na koje mogu ući ineskti.
• Ne postavljajte TV uređaj uz klima uređaj, u suprotnom unutrašnja ploča ekrana može kondenzovati vlagu i izazvati kvar.
• Ne postavljajte TV uređaj blizu jakog magnetnog polja, u suprotnom magnetni talas može prouzrokovati smetnje i
oštećenje.
Postavljanje na postolje Postavljanje na zid
Sprečava protok vazduha Sprečava protok vazduha
• Molimo Vas da prazan prostor držite bar oko
TV uređaja, kao što je prikazano na skici.
Zid Zid
• Ne pokrivajte ventilacione otvore i ne
postavljajte nikakve predmete u kućište.
• Ne postavljajte uređaj na ograničen prostor,
npr. police ili ugradne ormare, osim ako TV
uređaj nema odgovarajuću ventilaciju.
Ventilacija
UPOZORENJE
Nikad ne postavljajte TV uređaj na nestabilno mesto. TV uređaj može pasti, što može dovesti do ozbiljnih provreda ili
smrti. Mnoge povrede, pre svega dece, mogu biti izbegnute preduzimanjem jednostavnih mera predostrožnosti, kao
što su:
• Korišćenje elemenata i postolja koje je proporučio proizvođač TV uređaja.
• Korišćenje samo onog nameštaja, koji može bezbedno držati TV uređaj.
• Obezbeđivanje da TV uređaj nije isturen preko ivice nameštaja koji ga drži.
• Ne postavljanje TV uređaja na visok nameštaj (na primer ormari ili police za knjige) bez ućvršćivanja i nameštaja i TV
uređaja odgovarajućom podrškom.
• Ne postavljanje TV uređaja na tkaninu ili druge materijale koji mogu biti postavljeni između TV uređaja i nameštaja koji
ga drži.
• Podučavanje dece o opasnostima od penjanja na nameštaj, kako bi se dohvatio TV uređaj ili njegove komande.
Ukoliko svoj postojeći TV uređaj zadržavate i premeštate, treba da primenite iste gore navedene korake.
Povezivanje periferne opreme
Napomena:
1. USB interfejsi podržavaju perifernu opremu, uključujući i USB uređaj za masovno skladištenje podataka.
2. Kada treba da povežete uređaj, koji podržava MHL funkciju, molimo Vas da izaberete HDM-1 interfejs. (MHL funkcija
je opcionalna, i molimo Vas da pogledate svoj uređaj).
3. Kada treba da povežete uređaj, koji podržava ARC funkciju, molimo Vas da izaberete HDMI-3 interfejs.
4. HDMI konektor može prepoznati DVI funkciju s eksternim HDMI/DVI adapterom.
5. Periferna oprema i kablovi opisani u ovom korisničkom uputstvu se moraju kupiti odvojeno.
38
Page 39

SRB
Koaksijalni izlaz
Ulaz za komponente
USB1 interfejs
USB2 interfejs
AV ulaz
Ulaz za CI karticu
HDMI 2 ulaz
HDMI 3 ulaz
U utičnicu
(100-240VAC, 60/50Hz)
Ulaz za slušalice
HDMI 1 ulaz
Zeleni (kabl Y signala)
Plavi (kabl Pb/Cb signala)
Žuti (kabl VIDEO signala)
Bela (kabl AUDIO-L signala)
Narandžasta (Kabl koaksijalnog signala)
Crveni (kablovi AUDIO-R i Pr/Cr signala)
Upozorenje
Kada povezujete spoljašnju antenu na ulaz za signal na TV
uređaju, molimo Vas da prvo isključite glavni prekidač za
napajanje TV uređaja. Ne približavajte spoljašnju antenu
električnom vodu visokog napona, kako biste izbegli strujni udar.
Žičana antena povezana na ovaj TV uređaj mora biti izolovana
zaštitnim uzemljenjem, ili može doći do požara ili opasnosti.
39
Page 40

SRB
KONTROLNI TASTERI TABLE
1. LED indikator napona i prijemnik signala daljinskog
upravljača.
(IZVOR): Pritisnite ovo drugme kako biste ušli u
2.
izborni meni i izabrali izvor signala; tokom OSD operacija
izbornog menija, pritisnite ovog dugme kako biste
potvrdili opraciju, s istom funkcijom kao i [OK] dugme da
daljinskom upravljaču.
3. – CH + (CH-/CH+): Dugme za biranje kanala gore/
dole; tokom OSD operacija izbornog menija, pritisnite
dugmad, kako biste izabrali elemente s istim funkcijama
kao i []/[ ] dugmad na daljinskom upravljaču.
4.
zvuka; tokom OSD operacij izbornog menija, pritisnite
dugmad kako biste prilagodili analogne vrednosti, s
istim funkcijama kao [t]/[u] dugmad na daljinskom
upravljaču.
5.
meni za podešvanje.
6.
ili ga vratili u stanje pripravnosti.
Napomena: Uređaj se razlikuje u zavisnosti od modela i
stvarni proizvod ima prednost.
(VOL-/VOL+): Dugme za pojačavanje/stišavanje
(MENU): Pritisnite ovo dugme, kako bi se pokazao
Standby (Stanje pripravnosti): Kako biste uključiti TV
DALJINSKI UPRAVLJAČ
Postupak postavljanja baterije daljinskog upravljača
Uklonite poklopac pregrade za bateriju i postavite dve AAA (br. 7, 2.5V) baterije; pobrinite se da polaritet batierija bude
u skladu s oznakama polariteta “+” i “-” u pregradi za bateriju na daljinskom upravljaču.
Mere predostrožnosti za korišćenje daljinskog upravljača
• Daljinski upravljač treba uperiti ka senzoru za daljinski upravljač tokom rada. Predmet koji se nalazi između daljinskog
upravljača i senzora za daljinski upravljač može sprečiti normalan rad.
• Daljinski upravljač treba čuvati od snažnih vibracija. Pored toga, molimo vas da daljinski upravljač ne postavljate ili
smeštate pod diretknu sunčevu svetlost, jer zagrevanje može dovesti do deformacije daljinskog upravljača.
• Do kvara daljinskog upravljača može doći kada je senzor daljinskog upravljača glavnog dela pod direktnom
sunčevom svetlosti; u tom slučaju, molimo vas zamenite ugao osvetljenja ovog TV uređaja, ili koristite daljinski
upravljač u blizini senzora daljinskog upravljača.
• Nizak nivo baterije će uticati na udaljenost daljinskog upravljača, u kom slučaju, bateriju treba zameniti novom. Ukoliko
se daljinski upravljač neće koristiti duže vreme ili se baterije potroše, molimo Vas da izvadite baterije, kako biste
sprečili koroziju daljinskog upravljača, prouzrokovanu curenjem baterije, što bi moglo dovesti do oštećenja ili kvara
daljinskog upravljača.
• Molimo vas da ne koristite raziličite baterije. Nije dozvoljenjo koristiti zajedno stare i nove baterije; baterije treba
menjati u paru.
• Molimo Vas ne bacajte baterije u plamen, niti ih punite ili razgrađujte baterije; ne punite, ne izazivajte kratak spoj, ne
rastavljajte/spajajte, zageravajte i ne palite korišćenje baterije. Molimo Vas, odložite iskorišćene baterije u skladu sa
odgovarajućim uredbama o zaštiti životne sredine.
40
Page 41

Dugmad daljinskog upravljača.
Napomena: Izgled daljinskog upravljača može biti drugačiji od ove skice; molimo Vas, smatrajte stvarni predmet
standardom.
Dugmad Funkcija
Uključivanje uređaja i prebacivanje u stanje
pripravnosti.
Menjanje režima prikaza.
16:9
POWER (
16:9
)
SRB
MUTE ( )
Dugmad s brojevima
(0~9)
LIST (
)
Uključite/Isključite zvuk.
Unesite brojeve ili izaberite kanal.
Pogledajte listu programa.
Vratite se na poslednji gledani kanal.
SOURCE Izaberite izvor signala. (samo u TV režimu)
MENU Prikaz OSD izbornog menija.
Dugmad za
upravljanje (
, , , )
Izaberite elemente ili prilagodite vrednosti.
OK Potvrdite operaciju.
Pojačavanje/stišavanje zvuka.
VOL+/VOL- (
Return ( )
)
Vratite se na prethodnu stranu.
EXIT Izađite iz trenutnog interfejsa.
CH+/CH- (
) Promenite kanal.
INFO Prikaz informacija TV programa.
SUBTITLE Izaberite jezik titla.
AUDIO
Izaberite jezik zvučnog prenosa.
AD Uključite/Isključite odgovarajući zvuk.
TTX Uključite režim teleteksta.
REC Snimanje programa.
T-Shift Promena vremena u DTV režimu.
REVEAL (EPG)
INDEX ( )
ZOOM ( )
HOLD ( )
LANGUAGE ( )
Pokazuje sakriveni tekst u teletekst režimu.
(Uputstva u vezi sa elektronskim kanalom.)
Pokazuje stranu indeksa u u režimu teleteksta.
(Pusti/Pauziraj funkcija u multimediji)
Podesite veličinu teleteksta.
(Funkcija zaustavljanja u multimediji)
Zadrži ekran na trenutnoj stranici.
(Poslednji fajl u multimediji).
Promenite jezik teleteksta. (Sledeći fajl u multimediji).
Crveno dugme
Zeleno dugme
Žuto dugme
Dugme za specijalne funkcije
Plavo dugme
41
Page 42

SRB
OSNOVNE OPERACIJE
Napomena
1. Rad dugmadi se odnosi na rad daljinskog upravljača, za rad kontrolnih tastera ekrana, molimo Vas pogledajte
odeljak “Kontrolni tasteri ekrana” za obajšnjenje rada.
2. Radna uputstva izbornog menija u ovom korisničkom uputstvu su objašnjenja u slučaju TV režima. Operacije u
drugim režimima su slične onim u TV režimu, i korisnici ih mogu koristiti kao orijentir.
3. Pre uključivanja uređaja, molimo Vas, pobrinite se da je izvor napajanja strujom stabilan.
Uključivanje/Stanje pripravnosti
Priključite priključni kabl na utičnicu. Pritisnite ‘’
da obavite ovaj korak), zatim pritisnite [ ] dugme, kako biste uključili TV. Pritisnite[]/ []/[t]/[u] dugme, kako biste
izabrali OSD jezik koji želite i pritisnite dugme [OK] , kako biste potvrdili. Pritisnite []/ [] dugme, kako biste izabrali
DVB tip i pritisnite dugme [OK], kako biste prešli na sledeći korak.
Na ekranu koji pokazuje interfejs, pritisnite [t]/[u] dugme, da biste izabrali Vrstu pretrage koju želite, zatim pritisnite
[] dugme i možete izabrati državu u kojoj ste pritiskom na []/ []/[t]/[u] dugme. Zatim, pritisnite dugme [OK] da
biste potvrdili (Ukoliko izaberete Francusku, morate podesiti lozinku i morate izabrati BW kada je izabrano više država),
i uređaj će automatski tražiti kanale. (Uliko je izabrani DVB tip DVB-C, morate postaviti Režim zvuka na Mreža ili Puno.
Kada ga podesite kao Mrežu, morate da pritisnete []/ []dugme, kako biste izabrali frekvenciju, modulaciju, ID
mreže i Vrednost simbola. Zatim pritisnite [t]/[u] dugme, kako biste podesili elemente. Konačno, izaberite Traži i
pritisnite [OK] dugme, kako bi započelo pretraživanje. )
Kada je uređaj uključen, pritisnite [ ] dugme, kako bi uređaj prešao u stanje pripravnosti.
Posebni saveti: Ovaj uređaj je u skladu sa tehnologijom uštede energije. Ukoliko nema signala kada je uređaj uključen,
on će automatski preći u režim pripravnosti u roku od pet minuta; Uređaj će ući u stanje pripravnosti automatski u vreme
za to određeno.
‘’ dugme na TV uređaju (Ukoliko nema ovog dugmeta, ne morate
Odabir izvora signala
Možete povezati različite uređaje na TV uređaj i gledati slike visokog kvaliteta. Ukoliko video uređaj ima HDMI, AV ili
drugi ulaz za video. Možete izabrati jedan od njih i povezati sa odgovarajućim ulazom za unos na TV uređaju. Nakon što
se poveže, uključite uređaj i pritisnite dugme [SOURCE], zatim će se meni izvora signala pokazati na ekranu. Pritsnite
dugme []/ [] kako biste izabrali unos signala, i pritisnite dugme [OK], kako biste potvrdili.
Opis operacija izbornog menija
Pritisnite dugme [MENU] kako bi se na ekranu pokazao glavni meni:
1. Pritisnite [t]/[u] kako biste izabrali meni PROGRAMA, SLIKE, ZVUKA, VREMENA, OPCIJE, ZAKLJUČAVANJA.
2. Pritisnite []/ [] dugme, da bi ste izabrali element u meniju.
3. Pritisnite dugme [OK] kako biste ušli u podmeni.
4. Pritisnite dugme [t]/[u] kako biste prilagodili vrednost ili postavku.
5. Kada se glavni meni prikaže na ekranu, pritisnite dugme [
dugme [
6. Tokom ove operacije, ikone nedostupnih opcija će postati sive.
Napomena: Podrazumevana lozinka za sistem zaključvanja je 0000.
]/[MENU] , kako biste se vratili na prethodni meni, kada TV pokaže podmeni.
]/[MENU] kako biste izašli iz glavnog menija; Pritisnite
Pretraživanje programa
Podesite programe pre gledanja televizije po prvi put. Pre pretraživanja, molimo Vas, pobrinite se, da je antena ispravno
povezana i da je izabrana vrsta antene koju želite da koristite. Sledeći primer pretrage kanala za Vrstu pretrage je pod
DVB-T.
42
Page 43

Automatska pretraga
Pritisnite dugme [MENU], i izaberite KANAL > automatska pretraga, zatim pritisnite dugme [OK]. Zatim pritisnite
dugme [t]/[u], kako biste izabrali vrstu pretrage. DTV+ATV, DTV, ATV. Pritisnite dugme [] , zatim možete izabrati
državu, u kojoj ste, pritiskom dugmeta []/ []/[t]/[u] i uređaj će početi automatsku pretragu nakon pritiska [OK]
dugmeta. (Ukoliko izaberete Francusku, morate uneti lozinku. I treba da izaberete BW kada je izabrano više država.)
Ukoliko izaberete DTV+ATV, uređaj će pokazati “Da li želite da preskočite ATV pretragu?”, pritiskom [ ] dugmeta
tokom automatske pretrage ATV kanala. Pritisnite dugme [t] , kako biste potvrdili, a zatim će uređaj početi da
automatski pretražuje DTV kanale, ili pritisnite [u]dugme, kako biste prekinuli. Tokom automatske pretrage DTV kanala,
ekran prikazuje “Da li želite da preskočite DTV pretragu?”, pritiskom [ ] dugmeta. Pritisnite [t]dugme, kako biste
potvrdili, ili pritisnite [u] dugme, kako biste prekinuli.
DTV ručna pretraga (U DTV izvoru signala)
Pritisnite dugme [MENU] , izaberite KANAL> DTV ručna pretraga, pritisnite dugme [OK] kako biste ušli u meni DTV
ručne pretrage , pritisnite[t]/[u] dugme, kako biste izabrali kanal, zatim pritisnite dugme [OK] za potvrdu. Tokom
pretrage možete pritisnuti [ ] dugme, kako biste prekinui pretragu i vratili se na prethodni meni.
ATV ručna pretraga (U ATV izvoru signala)
Pritisnite [MENU] dugme, izaberite KANAL> ATV ručna pretraga, pritisnite [OK] dugme kako biste ušli u meni ATV
ručne pretrage, pritisnite []/ [] dugme, kako biste izabrali zvučni sistem, sistem boja, trenutni kanal, i pritisnite
[t]/[u] dugme, da biste izabrali šta želite. Izaberite “Pretraga”, pritisnite [t]/[u] dugme, da biste izabrali nisku
frekvenciju ili visoku frekvenciju. Nakon pretrage, izaberite opciju fina pretraga i pritisnite [t]/[u] dugme, da biste
izabrali nisku frekvenciju ili visoku frekvenciju. Tokom ručne pretrage, možete pritisnuti [ ] dugme, kako biste prekinuli
pretragu i vratili se u prethodni meni.
Opcija snimanja
U DTV režimu, pritisnite [REC] dugme, meni opcije snimanja će se pokazati na ekranu, i sistem će odmah početi da
snima. Pritisnite[ ] dugme, kako biste zaustavili i napustili snimanje; Pritisnite [MENU] dugme i izaberite OPCIJA>
Lista snimaka, zatim možete izabrati datoteku koju želite da reprodukujete i pritisnite dugme [OK] za reprodukciju.
SRB
Ikona Opis
Reprodukcija: Reprodukcija.
Zaustavljanje: Zaustavi i napusti.
Pauza: Pauziraj.
FB: Brzo nazad, pritisnite dugme [INDEX] za normalnu reprodukciju.
FF: Brzo napred, pritisnite dugme [ INDEX] za normalnu reprodukciju.
FB 30s: Napravite preskok unapred od 30s.
FF 30s: Napravite preskok unazad od 30s.
Napomena: Funkcija snimanja
može da podrži samo pamtioca
sa FAT32 sistemom datoteka.
Pamtilac s drugim sistemima
datoteka mora biti formatiran;
Pre formatiranaj pamtioca,
napravite rezervnu kopiju korisnih
informacija, jer sadržaj pamtioca
ne može biti povraćen nakon
formatiranja.
Opcija pomeranja vremena
U DTV režimu, pritisnite [T-shift] dugme, meni opcije pomeranja vremena će se pojaviti na ekranu i program će biti
zaustavljen. Pritisnite [INDEX] dugme, kako biste nastavili reprodukciju. Pritisnite [
] dugme, kako biste zaustavili i
izašli iz promene vremena. Kada korisnik napusti program na kratko vreme, funkcija promene vremena može zaustaviti i
sačuvati reprodukovani program na U disku. Kada korisnik nastavi reprodukciju, program može biti reprodukovan.
Ikona Opis
Reprodukcija: Reprodukcija.
Zaustavljanje: Zaustavi i napusti.
Pauza: Pauziraj.
FB: Brzo nazad, pritisnite dugme [INDEX] za normalnu reprodukciju.
FF: Brzo napred, pritisnite dugme [ INDEX] za normalnu reprodukciju.
FB 30s: Napravite preskok unapred od 30s.
FF 30s: Napravite preskok unazad od 30s.
43
Page 44

SRB
Multimedijalni plejer
Pritisnite [SOURCE] dugme, zatim pritisnite []/ [] dugme, kako biste izabrali USB i pritisnite [OK] dugme da biste
ušli. Izaberite vrstu datoteke fIlm, muzika, fotografija.
Reprodukcija datoteka na uređaju lokalnog diska: Pre reprodukcije datoteka na loklanom disku, ubacite USB uređaj
za masovno skladištenje podataka u USB interfejs.
Izaberite lokalni disk u direktorijumu datoteka i pritisnite [OK] dugme kako biste ušli. Pritisnite povratak u direktorijum,
pritisnite [OK] dugme i vratite se na prethodnu fasciklu. Izaberite ciljanu fasciklu i pritisnite [OK] dugme, kako biste ušli
u nju. Zatim pritisnite []/ []/[t]/[u] da biste izabrali ciljanu datoteku i pritisnite [ ], da biste je reprodukovali.
Pritisnite [ ] dugme, kako biste se vratili na početni ekran.
Upozorenje:
1. Nestandarni USB uređaji verovatno neće biti prepoznati; u tom slučaju, molimo Vas zamenite ga standardnim USB
uređajem
2. Sistem prenosa media ima određena ograničenja u pogledu formata datoteka; reprodukcija će biti neuobičajena
ukoliko je format izvan sistemskih ograničenja;
3. Ne uklanjajte USB uređaj tokom reprodukcije, ili će sistem ili uređaj možda imati problem; Pre zamene USB uređaja,
molimo Vas, isključite uređaj s napajanja električnom energijom;
4. Sistem podržava standardne USB1.1 i USB2.0 uređaje, kao što su USB uređaji za masovno skladištenje podataka i
eksterni hard diskovi;
5. Maksimalna radna struja USB ulaza ovog uređaja je 500mA, i sopstvena zaštita će biti aktivirana ukoliko je radna
struja iznad ovog limita; molimo Vas, koristite spoljno napajanje električnom energijom ukoliko povezujete spoljnji
uređaj koji ima višu radnu struju;
6. Sistem je komplikovan; kada čita ili reprodukuje fajlove, ekran može biti zamrznut ili će neke funkcije biti
onemogućene zbog kompatibilnosti i stabilnosti USB uređaja; u tom slučaju, molimo Vas, isključite uređaj i ponovo
pokrenite sistem.
Pritisak na dugme [INFO] može prikazati ili sakriti traku sa alatkama tokom reprodukcije, izaberite opciju menija koju
želite, i pritisnite dugme [OK] kako biste izveli operaciju; možete pritisnuti [
pritisnuti dugme [
]/[ ]/[ ]/[ ] na daljinskom upravljaču, kako biste skraćeno izveli ovu operaciju.
] dugme, kako biste izašli iz reprodukcije, ili
OTKLANJANJE KVAROVA
• Bele tačke se pojavljuju na TV slikama i prati ih buka.
1. Proverite da li je povezana antena olabavljena i da li je
kabl u dobrom stanju.
2. Proverite tip antene (VHF/UHF).
3. Podesite smer i položaj antene.
4. Pokušajte da koristite pojačivač signala.
• Na ekranu nema ni slike ni tona. Svetlo indikatora nije
uključeno.
Proverite da li je uređaj povezan na napajanje električnom
energijom.
• Smetnja u vidu isprekidane linije ili trake se javlja na
TV slikama.
Ne koristite električni fen za kosu pored TV uređaja i
podesite smer antene, kako biste smanjili smetnje.
• Na ekranu se pojavljuju duple slike.
1. Koristite antenu s dobrom orijentacijom.
2. Podesite smer antene.
• Slike su bezbojne.
Uđite u podešavanje “Slika” kako biste povećali intenzitet
boja.
• Televiziju ne prati zvuk.
1. Podesite ton na odgovarajući stepen.
2. Pritisnite [MUTE] dugme na daljinskom upravljaču, kako
biste prekinuli režim isključivanja zvuka.
• Signal ulaznih slika se ne prikazuje na ekranu uređaja.
Svetlo indikatora treperi.
1. Proverite da li je kabl za povezivanje signala labav ili je
ispao. Ponovo ga povežite.
2. Računar je možda u stanju pripravnosti, molimo Vas, da
ga ponovo pokrenete.
• Udaljenost daljinskog upravljača je veoma mala ili je
van kontrole.
1. Uklonite predmet, kako biste izbegli blokiranje
prijemnika signala daljinskog upravljača.
2. Zamenite bateriju.
• Uređaj radi sporo, pad sistema, uređaj ne može da
radi.
Prvo prekinite napajanje električnom energijom zatim
ponovo uspostavite napajanje, nakon 1-2 minute, zatim
ponovo uključite TV.
44
Page 45

TEHNIČKE SPECIFIKACIJE
Glavni deo
Maks. Rezolucija 1920×1080
Najbolja rezolucija 1920×1080@60Hz
Napajanje 100-240VAC 60/50Hz
Potrošna energije zvučnika 8W+8W
RADNO OKRUŽENJE
SRB
Temperatura
RH 10%~85%
Atmosferski pritisak 86kPa~106kPa
OKRUŽENJE
Temperatura
RH 5%~95%
Atmosferski pritisak 86kPa~106kPa
DIMENZIJE (D׊×V) I MASA
Bez postolja Raspakovano: 1103×83×642(mm3)
Sa postoljem
5°C~40°C
-20°C~55°C
Raspakovano: 1103×261×698(mm
Neraspakovano: 1210×175×744(mm3)
Neto masa: 9.7kg
Bruto masa: 12.5kg
Tehničke specifikacije TV uređaja
1. Podržani standard:
ATV: PAL D/K, I, B/G; SECAM D/K, B/G;
DTV : DVB-T/T2/C.
2. Ulaz antene: 75Ω osno, nebalansirano.
3. AV video ulaz: 75Ω, 1±0.1Vp-p, RCA terminal.
4. AV audio ulaz: 20KΩ, 0.2~2Vrms.
5. HDMI video ulaz: 480i, 480P, 576i, 576P, 720P, 1080i, 1080P.
3
)
HDMI režim prikaza Upravljanje napajanjem
VESA režim
BR. Režim Rezolucija
1
2
3
4
5 WXGA 1600×900 60Hz
6
VGA 640×480 60Hz
SVGA 800×600 60Hz
XGA 1024×768 60Hz
SXGA 1280×1024 60Hz
WUXGA 1920×1080 60Hz
Osvežavanje
ekrana
45
Režim Potrošnja energije
Normalan rad
Stanje pripravnosti
≤110W
≤0.5W
Page 46

SRB
UPUTSTVA ZA POSTAVLJANJE POSTOLJA
Prvo uređaj postavite na ravnu površinu, odredite levu i desnu nožicu postolja, prednji i zadnji pravac, zatim postavite
postolje na dno uređaja sa zadnje strane, prema smeru strelice sa skice. Poravnajte rupe za zavrtnje, zatim pričvrstite
zavrtnje (imajte na umu da modul mora biti prilagođen kao što je prikazano na slici, inače ne može biti instaliran.)
Postolje-L
Postolje-D
Napomena: Izgled pravog postolja i uređaja mogu se razlikovati od slike; molimo Vas, pogledajte stvarni uređaj.
Zavrtanj
46
Page 47

Page 48

www.tesla.info
 Loading...