

Page 1
LED TV
OPERATING
INSTRUCTION
ENG ALB BiH BG CG HR HU MK RO SLO SRB
SERIES
3
32K307BH
40K307BF
43K307BF
Page 2
OPERATING INSTRUCTION
Please read these instructions before operating
your set and retain them for future reference.
UDHËZIM PËR PËR
Ju lutemi lexonie këtë udhëzim para përdorimit të
pajisjë suaj dhe ruajeni për nevoja plotësuese eventuale.
UPUTSTVO ZA UPOTREBU
Prije upotrebe uređaja pročitati ova uputstva
i zadržati ih radi kasnijih referenci.
UPUTE ZA KORIŠTENJE
Prije korištenja uređaja pažljivo pročitati
upute i sačuvati ih za buduću upotrebu.
KEZELÉSI UTASÍTÁ
Kérjük, a készülék használata előtt olvassa el ezeket az
utasításokat, és őrizze ezeket meg későbbi betekintésre.
NAVODILA ZA UPORABO
Pred uporabo pozorno preberite navodila
in jih shranite za morebitno uporabo v prihodnosti.
INSTRUCȚIUNI DE UTILIZARE
Vă rugăm să citiți aceste instrucțiuni înainte de a folosi
televizorul și păstrați-le pentru referințe ulterioare.
UPUTSTVO ZA UPOTREBU
Pre upotrebe uređaja pročitati ova uputstva
i zadržati ih radi kasnijih referenci.
УПАТСТВО ЗА КОРИСТЕЊЕ
Ве молиме прочитајте го ова упатство пред да го
инсталирате и употребувате вашиот уред.
ИНСТРУКЦИИ ЗА ЕКСПЛОАТАЦИЯ
Моля, прочетете тези инструкции, преди да използвате
устройството и ги запазете за бъдещи справки.
ALB
ENG
BiH/CG
HR
HU
MK
BG
SLO
RO
SRB
Page 3

1
ENG
Features . . . . . . . . . . . . . . . . . . . . . . . . . . . . . . . . . . . 1
Safety Warning and Notice . . . . . . . . . . . . . . . . . . 2
Mounting and Connecting . . . . . . . . . . . . . . . . . . 3
Packing list . . . . . . . . . . . . . . . . . . . . . . . . . . . . . . 3
Mounting the TV set. . . . . . . . . . . . . . . . . . . . . . 3
Connecting peripheral equipment . . . . . . . . 4
Control Panel Keys. . . . . . . . . . . . . . . . . . . . . . . . . . 7
Remote Control . . . . . . . . . . . . . . . . . . . . . . . . . . . . 8
General Operating Instructions . . . . . . . . . . . . .10
Power On . . . . . . . . . . . . . . . . . . . . . . . . . . . . . .10
Standby. . . . . . . . . . . . . . . . . . . . . . . . . . . . . . . .10
Signal Source Selection . . . . . . . . . . . . . . . . .11
Menu Operation Instruction . . . . . . . . . . . . .11
CHANNEL. . . . . . . . . . . . . . . . . . . . . . . . . . . . . .11
PICTURE . . . . . . . . . . . . . . . . . . . . . . . . . . . . . . .12
SOUND . . . . . . . . . . . . . . . . . . . . . . . . . . . . . . . . 13
OPTIONS . . . . . . . . . . . . . . . . . . . . . . . . . . . . . . 14
TIME. . . . . . . . . . . . . . . . . . . . . . . . . . . . . . . . . . .14
LOCK. . . . . . . . . . . . . . . . . . . . . . . . . . . . . . . . . . 15
REC option. . . . . . . . . . . . . . . . . . . . . . . . . . . . . 15
Time-shift option. . . . . . . . . . . . . . . . . . . . . . . . 16
EPG option. . . . . . . . . . . . . . . . . . . . . . . . . . . . .16
Hotel Function (optional) . . . . . . . . . . . . . . . . 16
USB Media Function . . . . . . . . . . . . . . . . . . . .17
Simple troubleshooting. . . . . . . . . . . . . . . . . . . . 19
Technical Specifications. . . . . . . . . . . . . . . . . . . .20
Base Installation Instructions. . . . . . . . . . . . . . . .21
CONTENTS
FEATURES
1. High-quality LED backlight LED screen, energy saving, environment-friendly, ultra-thin, with brilliant features.
2. With built-in high quality speakers that will give you pure audio-visual enjoyment and save your table space.
3. Has many connectors. You can directly connect your DVD, vidicon etc. to appropriate input connectors and enjoy
beautiful image. The product can be used as a computer monitor with VGA and HDMI connectors. Also it can be
used as a TV device when you insert the antenna.
4. Much faster response time completely eliminates shadow on picture. Seeing film and playing game will be more
fluent.
5. Enough colours.
6. Wider viewing angle, higher brightness, higher contrast, lower consumption.
7. Intelligent image mode and sound mode offer you intelligent audiovisual effect.
8. Built-in the latest digital comb filter, which makes image clearer. The internal 3D De-Interlace technique can totally
eliminate the screen dithering caused by interlace signals.
9. Has perfect timing functions, you can set time to turn off. It will also be turned off in state of no signals.
10. Automatic operation is made convenient with a telecontrol device.
11. Auto-setup function helps you set the image to best performance in several seconds in VGA mode.
12. Auto colour balance adjustment technology equips your device with the best colour setting for all different
kinds of display adapters in VGA mode.
13. Automatic noise reduction can significantly eliminate background noise caused by menu interference and the noise
caused by weak signals, making the picture on the screen clear.
14. Supports USB interface.
15. Supports H.264 FULL HD receiver and supports PVR functionality.
16. Ultra-thin and super narrow design
Page 4

2
ENG
Warning Attention
May result in casualties
Indicate the behaviours that must be prohibited
May result in personal injury or
property losses
Indicate the operations that must be performed
SAFETY WARNING AND NOTICE
Thank you for choosing the LED TV with LED backlight made by our company, a valuable product with excellent quality
and multiple functions. This device will bring you more audiovisual enjoyment. Its design ensures user’s safety. All
devices are strictly tested before leaving factory. However, incorrect use can lead to electric shock or fire. In order to
ensure safety and extend its life, please read the manual and marking label carefully before using it and comply with the
following safety instructions. Please keep the user manual for later use.
WARNING
• Power failure or unstable voltage.
• Abnormal sound or smell coming from the device.
• Damaged AC power cord.
• Damages to the TV set due to falling off, knocking or impact.
• Liquid or foreign matters entering into the TV set.
• Only use 240VAC 60/50Hz power supply.
• This TV must be connected to a three pin socket outlet for safety.
• All cables can be connected or disconnected only after power supply is turned off.
• Do not fix the TV set on instable position, or else it may cause falling off, damage, or even fire.
• Do not put the TV set in the environment:
1. With direct sunshine, moisture, overheating, undercooling or heavy dust;
2. With flammable or explosive substances;
3. With flammable or corrosive gases;
4. In bathroom, kitchen, etc.
• Do not use damaged or improper power socket, and ensure that the plug and socket are connected
properly.
• Keep the power plug and socket free from dust and metal pieces.
• Do not damage the power cord:
1. It is prohibited to refit the power cord;
2. Do not put heavy objects on the power cord;
3. Keep the power cord away from heat sources;
4. Do not drag the power cord when unplugging.
• Do not connect too many appliances to one power strip, or else it may cause fire due to high power
consumption.
• Do not put open flame (e.g. lit candle) near the TV set, or else it may cause electric shock or fire.
• Do not put the container filled with water on the TV set, to avoid electric shock or fire caused by water splash.
• Do not insert any sharp objects, metals or liquids into the signal connector or air vents, to avoid short circuit and
product damage as well as electric shock.
• The slots on the case are designed to release heat, prevent all inside components from reaching extra high
temperatures and to enable long-term normal operation. Please do not cover the holes during the positioning.
Turn off the TV set
immediately, unplug the
power cord from the
power outlet, and contact
authorized maintenance
personnel.
If coal gas or other flammable gases leak, do not unplug the power cord of the TV set or other electric
appliances; instead, close the valve of the gas immediately and open the doors and windows.
Under Following Conditions:
Page 5
3
ENG
ATTENTION
Mounting and Connecting
Packing list
Mounting the TV set
• Do not let children climb onto the TV set.
• Keep the small accessories away from children’s reach to avoid swallowing.
• If the TV set is not going to be used for a long time, please turn off the device and unplug the power cord.
• Before cleaning the TV set, unplug the power cord and wipe with soft cloth; do not use chemical reagents and avoid
situations in which foreign substances can enter the device. The incorrect cleaning agents (such as cleaning fluid,
water, etc) can damage product’s appearance, erase information provided on the product, even enter the device and
damage components and result in the device inability to display programme.
• To adjust the position or angle of the TV set, please disconnect all wires and move them slowly to avoid falling off.
• Do not rub with hard objects and do not hit, bend or squeeze the screen.
• Do not use device immediately after transferring it from low to high temperature environment as this can cause
condensation inside your device and its failure.
• If the screen breaks and the liquid splashes on your skin, immediately wash with clean water for 15 minutes and visit
your doctor.
• To carry the TV set with hands, please grasp its bottom corners; do not apply force on the panel.
• When the same image or active image with fixed words is displayed for a long time, icons will leave image
persistence on screen which will not disappear long after powering off. This undesirable effect is not covered by
warranty.
• Healthy TV watching:
1. Watch in appropriate light; poor light or long-term watching can hurt your eyes.
2. If a headset is used, adjust the volume appropriately to avoid hurting your hearing.
• Unplug the power cord of the device to cut off the power supply.
• If a power plug or appliance coupler is used as a disconnecting device, easy operation should be ensured.
• Power plug should be connected firmly. Loose power plugs may cause sparkle and fire.
• All the technical specifications stated in the user manual and on the package are subject to changes without prior
notice. If there are slight deviations between the user manual and actual operation, consider the latter to be valid.
Do not touch the plug with wet hands, or else it may cause electric shock.
Do not turn on the TV set in thunderstorm weather; instead, unplug the power plug and antenna connector to
avoid lightning strike.
Do not disassemble the TV set by yourself as this can cause electric shock or fire. Contact qualified personnel
for maintenance.
1. The TV set. 2. User Manual. 3. Remote control. 4. Power cord (or attached to TV set).
5. Component Transfer Cable (Optional)
• The TV set should be mounted near the AC power socket for easy plugging and unplugging.
• For your safety, please select appropriate wall mount bracket or base.
• To avoid injuries, place the TV set on a stable surface or fix it on a firm wall.
• Ask qualified personnel to mount the TV set on the wall. Improper mounting may result in instable TV set.
Page 6
4
ENG
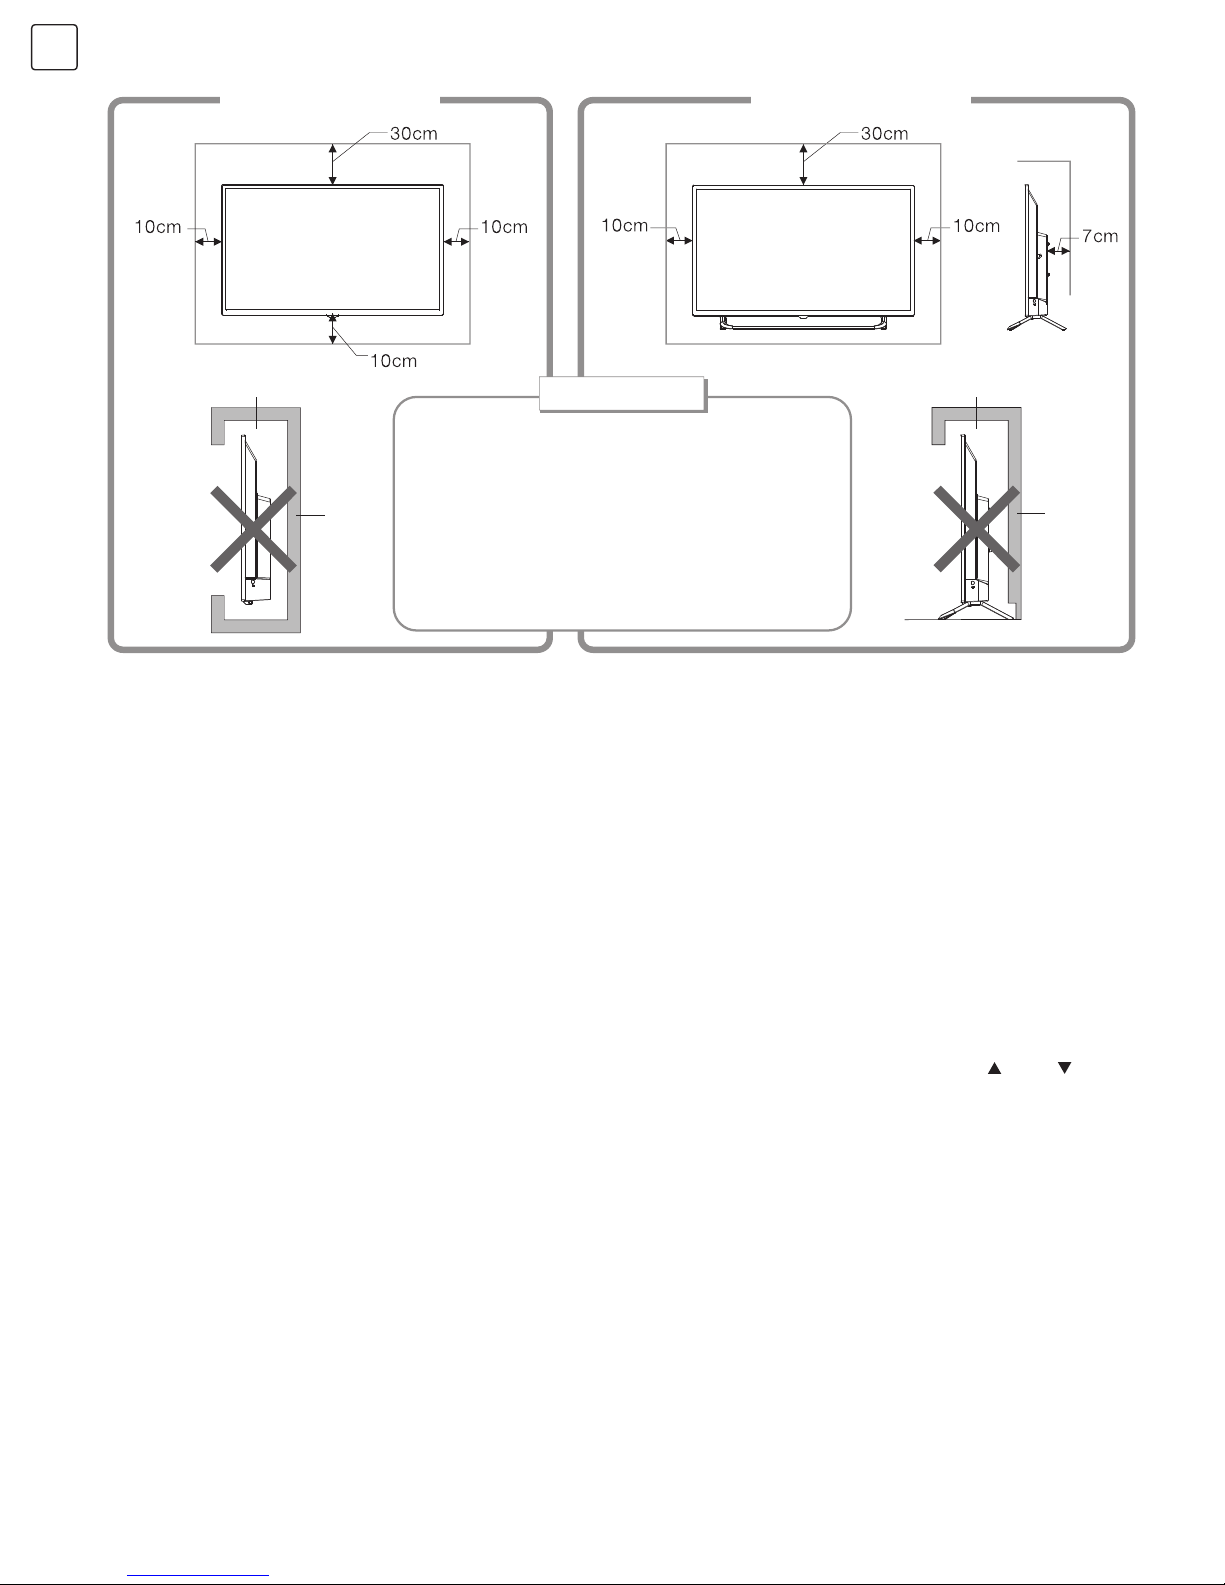
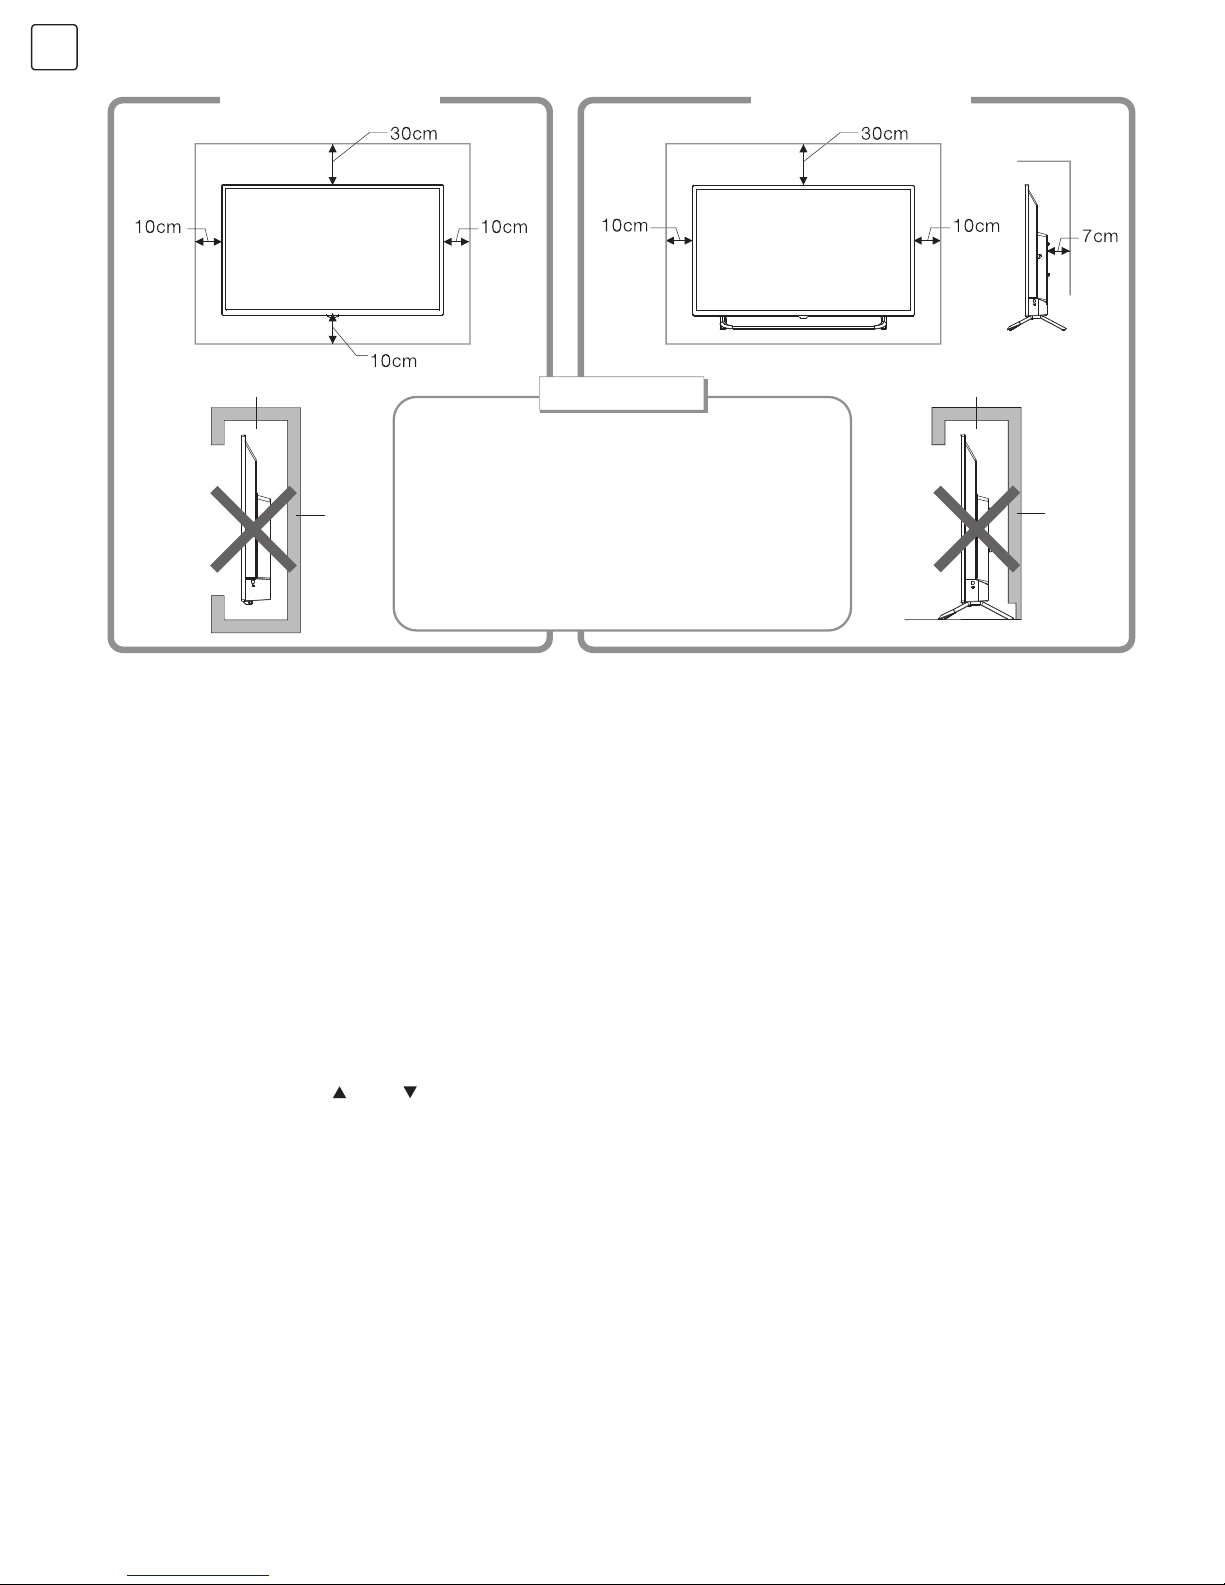
Mount on the wall
Ventilation
Obstructs the air circulation
Obstructs the air circulation
Wall
Wall
Mount on the base
• Please keep the minimum space around the
TV as shown in the figure.
• Do not cover air vents or insert any objects
into the enclosure.
• Do not put the device in limited space, e.g.
bookcases or embedded closets, unless the
TV set is properly ventilated.
TIPS ON INSTALLATION
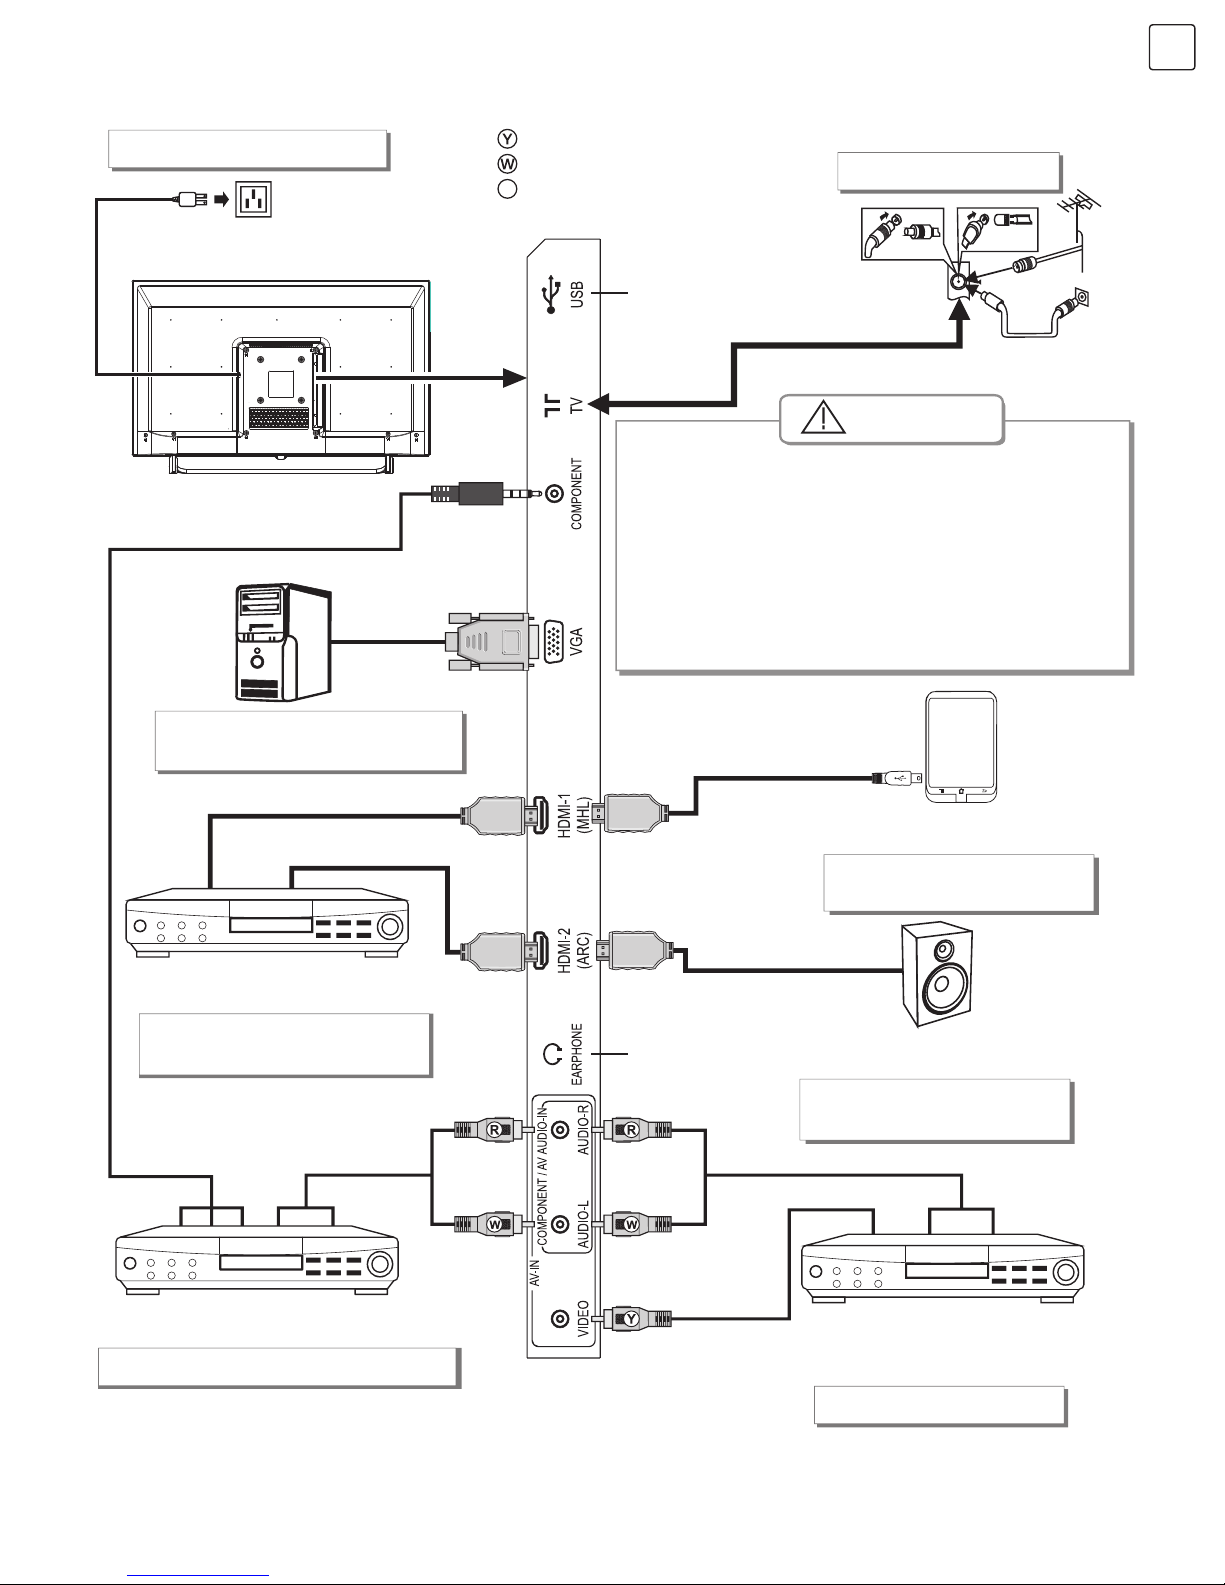
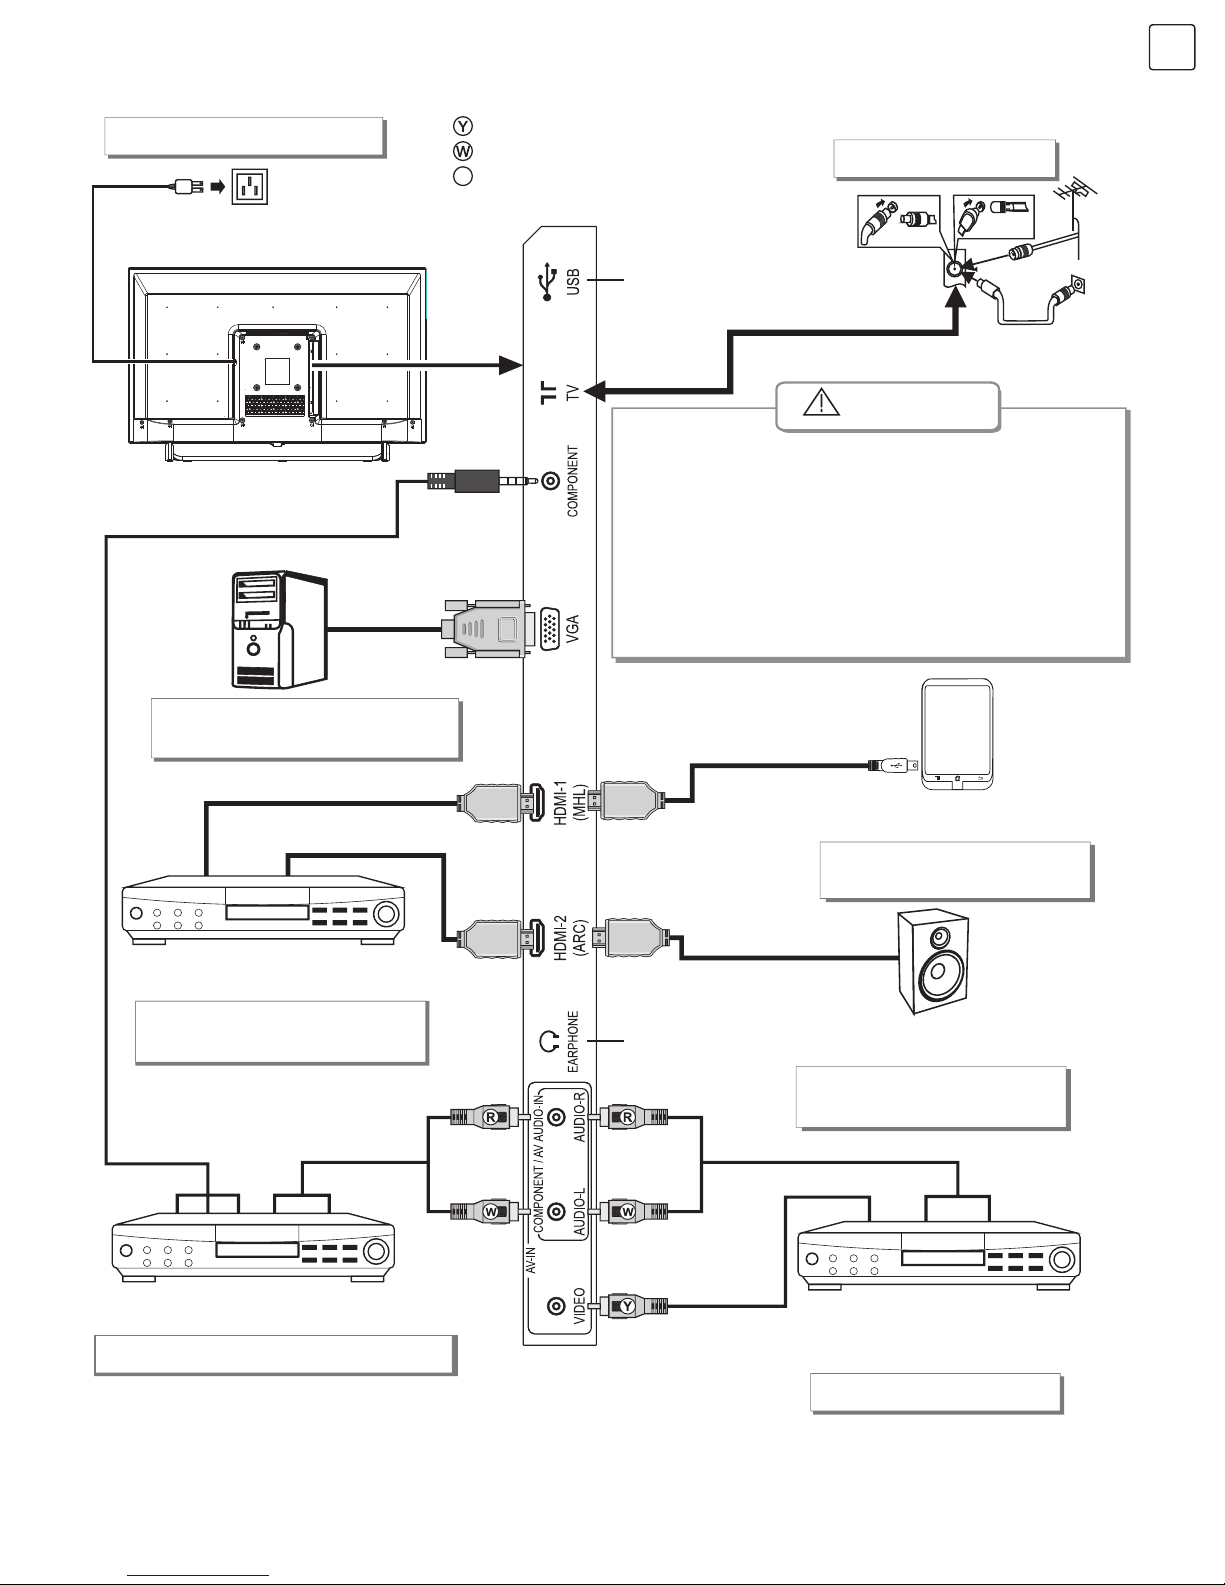
Connecting peripheral equipment
You can connect various devices to the TV set and view high quality images. If a video device has HDMI, AV, PC and
other output/input ports, select one of them and connect to the corresponding input or output ports of the TV set. After
connecting it, press the “SOURCE”” key and signal source menu will be displayed on the screen. Press “ ” and “ ” key
to select the input signal and press “OK” key to confirm. The connecting mode is shown in the figure.
Remarks:
1. After connecting to equipment with MHL function, please select HDMI1 as input signal source.
2. ARC function is optional, please refer to the device.
3. COMPONENT interface is optional, please refer to the device.
4. If there is a COMPONENT interface, component and AV share AUDIO-IN interface.
5. The peripheral equipment and cables described in this manual should be purchased separately.
• Do not place the TV set in an area with mechanical vibrations.
• Do not place the TV set in an area where insects may enter.
• Do not mount the TV set against air conditioner as internal panel of the display can condense and cause failure.
• Do not place the TV set in an area with strong magnetic field as electromagnetic waves can interfere with it and
damaged it.
Page 7
5
ENG
To power socket
(100-240VAC 60/50Hz)
Yellow (Video signal cable)
White(AUDIO-L signal cable)
Red (AUDIO-R signal cables)
USB interface
Earphone port
Video cable
YPbPr/YCbCr cable
VGA cable
Connect to the AV device
with HDMI interface
Mobile phone or other
equipment with MHL function
Connect to the audio devices
with ARC function
Connect to the devices
with AV output interface
(e.g. DVD, VCR, game console)
Connect to the device with
YPbPr/YCbCr output interface
HDMI signal cable
MHL signal cable
Audio cable
HDMI signal cable
HDMI signal cable
Audio cable
Power cord
Connecting power supply
Antenna connection
VGA input connection
HDMI input connection
YPbPr/YCbCr input connection
MHL function connection
AV input connection
ARC function connection
When connecting outdoor antenna to signal port of
the TV set, please turn off the main power switch of
the TV set first. Do not place the outdoor antenna
near high voltage main power line to avoid electric
shock. The wired network antenna connected to
this TV set must be isolated from the protective
grounding; otherwise it will cause fire or other
hazards.
R
Warning
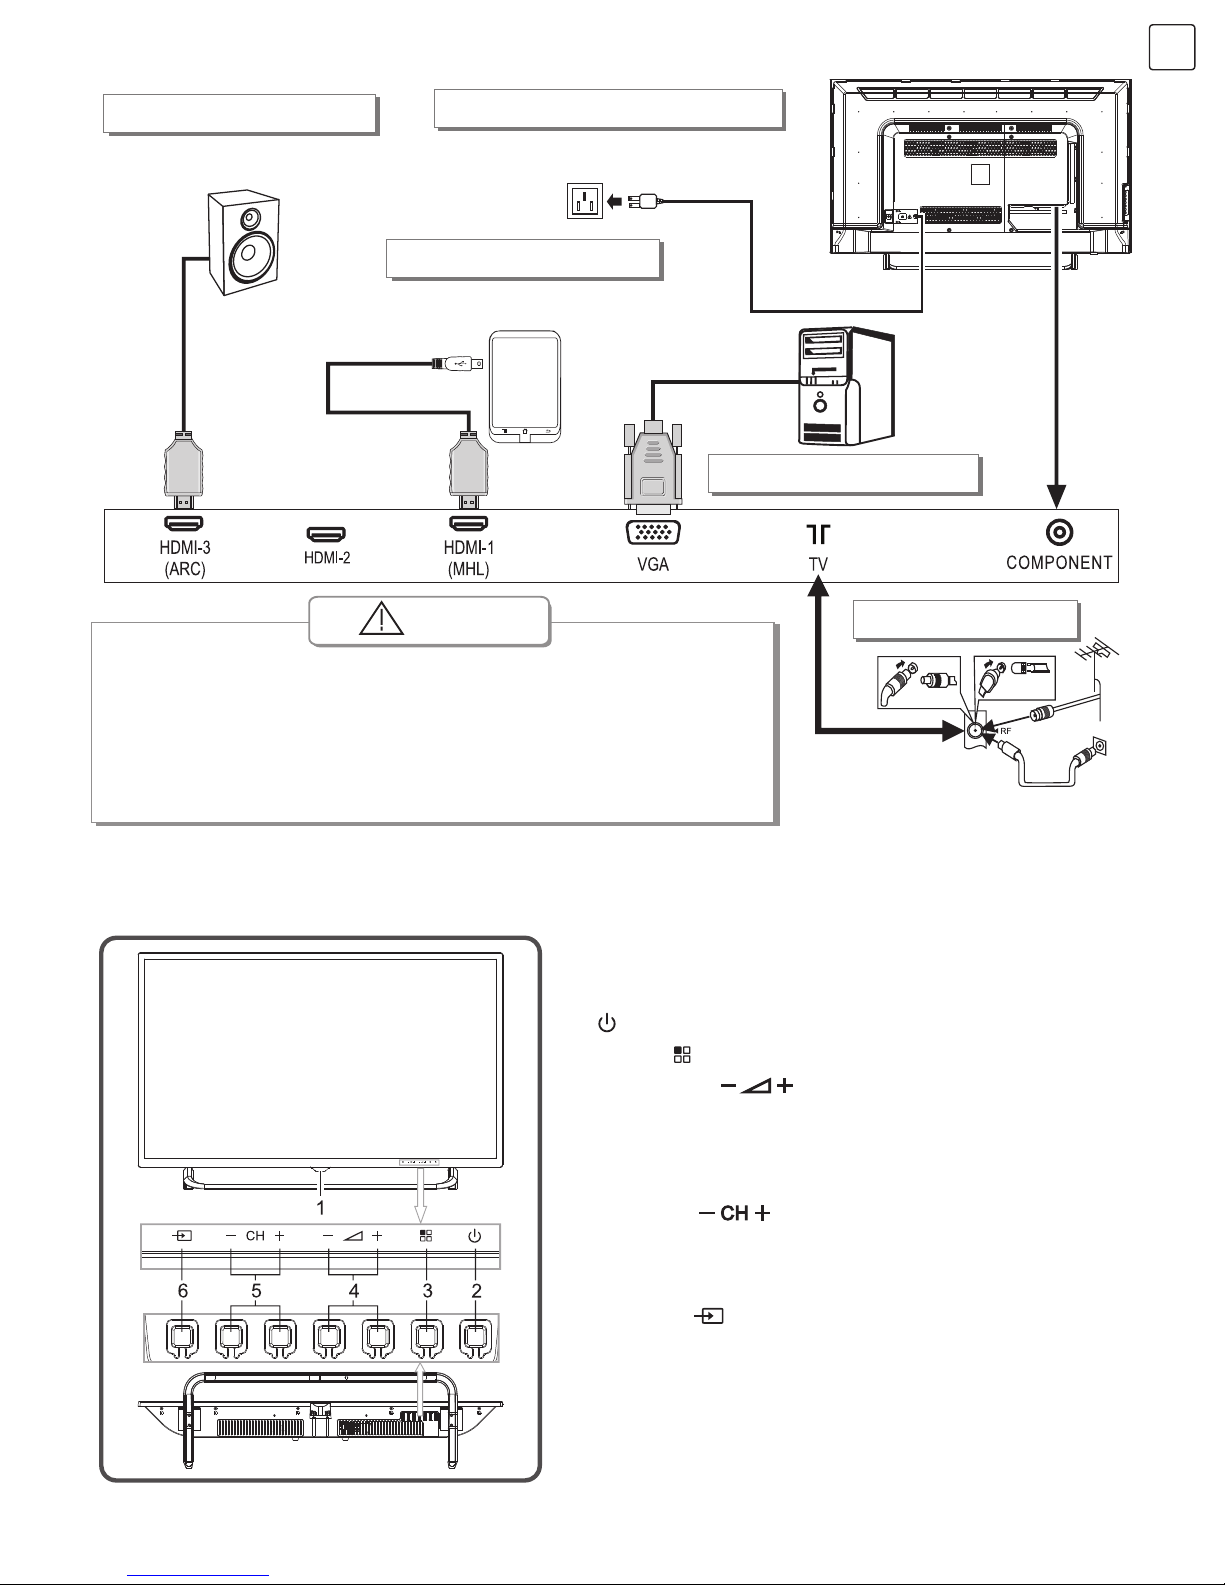
32”/40”
Page 8

6
ENG
43”
Coaxial cable
Connect to the audio amplifier
with coaxial interface.
Coaxial-OUT connection
USB1 interface
USB2 interface
CL card port
Yellow (Video signal cable)
White(AUDIO-L signal cable)
Orange (Coaxial signal cable)
Red (AUDIO-R signal cables)
R
YPbPr/YCbCr input connection
Connect to the device with
YPbPr/YCbCr output interface
Earphone port
Video cable
Audio cable
YPbPr/YCbCr cable
Connect to the AV device
with HDMI interface
Connect to the devices
with AV output interface
(e.g. DVD, VCR, game console)
HDMI signal cable
HDMI signal cable
HDMI signal cable
Audio cable
HDMI input connection
AV input connection
Remarks:
1. After connecting to equipment with MHL function, please select
HDMI1 as input signal source.
2. ARC function is optional, please refer to the device.
3. COMPONENT interface is optional, please refer to the device.
4. If there is a COMPONENT interface, component and AV share
AUDIO-IN interface.
5. The peripheral equipment and cables described in this manual
should be purchased separately.
Page 9
7
ENG
To power socket
(100-240VAC 60/50Hz)
VGA cable
Mobile phone or other
equipment with MHL function
Connect to the audio devices
with ARC function
HDMI signal cable
MHL signal cable
Power cord
Connecting power supply
Antenna connection
VGA input connection
MHL function connection
ARC function connection
When connecting outdoor antenna to signal port of the TV set, please
turn off the main power switch of the TV set first. Do not place the
outdoor antenna near high voltage main power line to avoid electric
shock. The wired network antenna connected to this TV set must be
isolated from the protective grounding; otherwise it will cause fire or
other hazards.
Warning
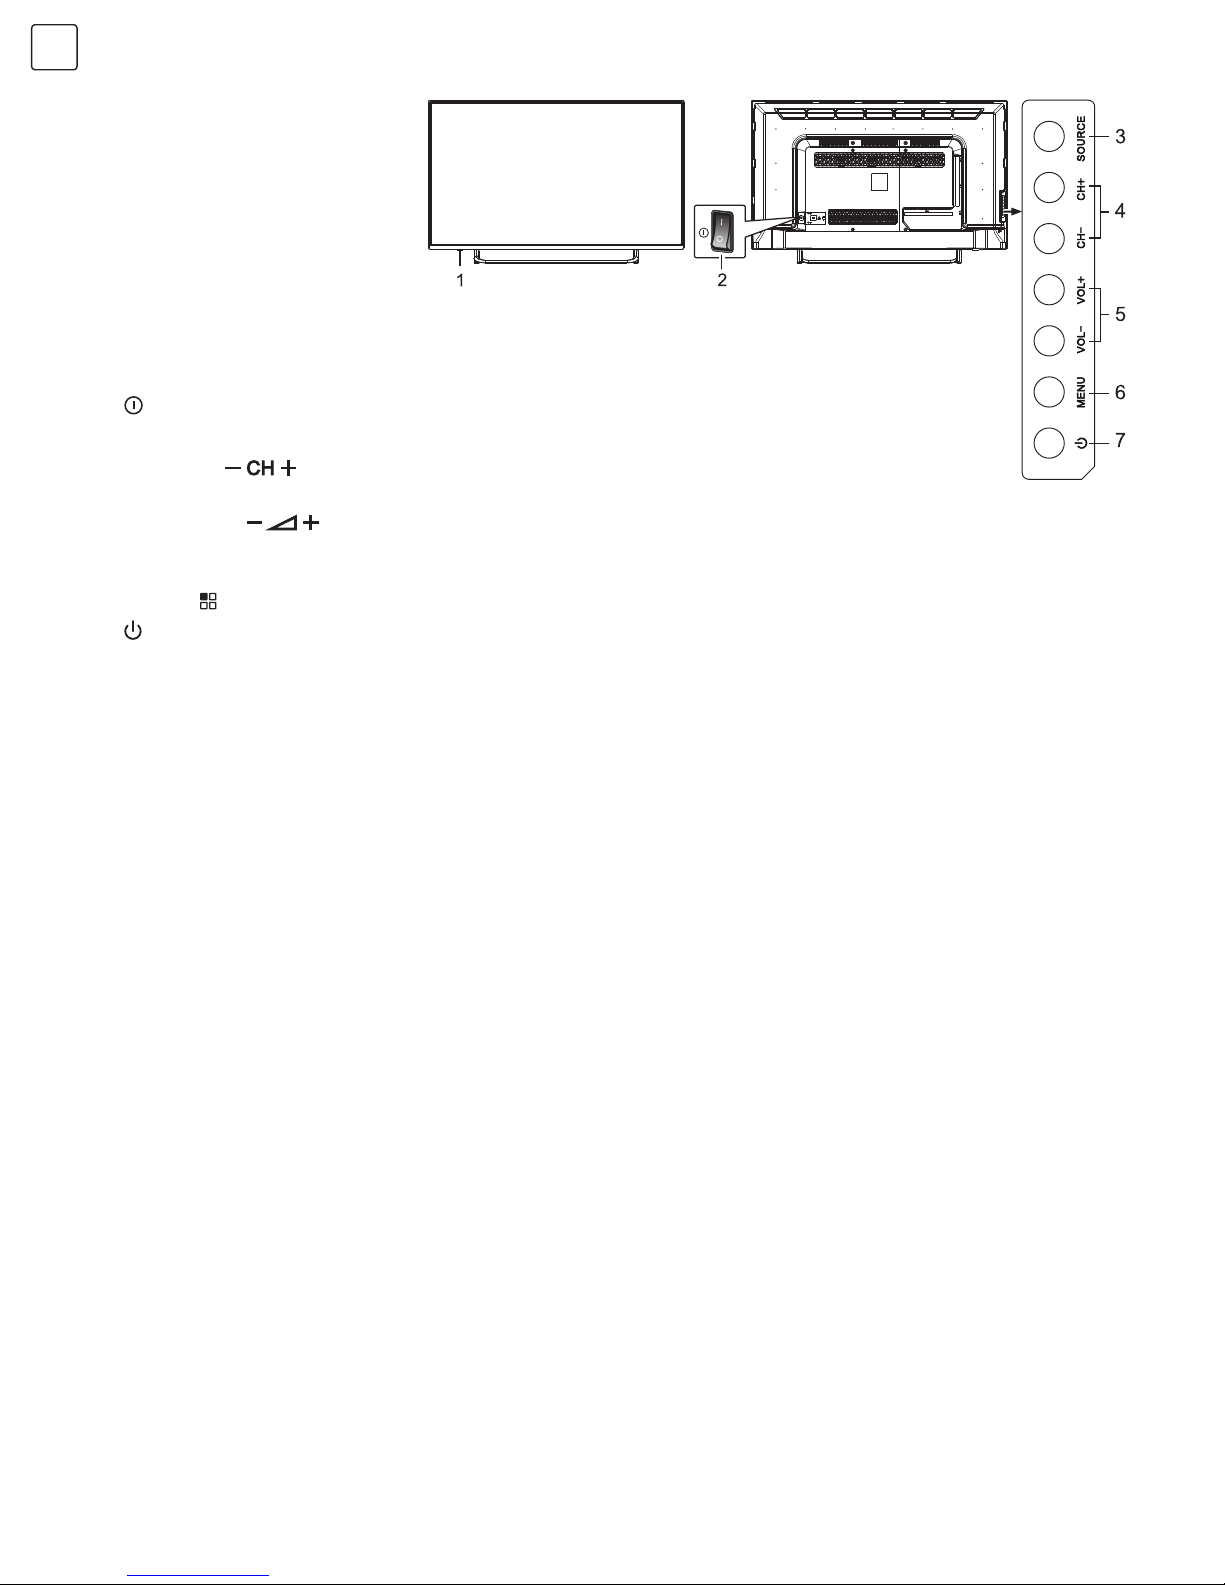
Control Panel Keys
1. Power LED indicator and remote receiving window.
2.
Standby: To switch the TV on or back to standby.
3. MENU (
): Press this key to enter main menu.
4. VOL-, VOL+ (
): Press these two keys to add
or reduce volume. In OSD menu, press the two keys to
adjust the analogue value of the selected item. These
keys have the same functions as t / u key on the remote
control.
5. CH-, CH+ (
): Press these two keys to select the
channel. In OSD menu, press the two keys, sharing the
function with / key on the remote control, to adjust
the items.
6. SOURCE (
): Press this key to enter the menu of signal
source and choose signal source.
Note: Different models may have different appearances;
please refer to the actual device.
32”/40”
Page 10
8
ENG
Remote Control
Remote control battery installation method
Precautions for use of remote control
Take off the cover of battery box, insert two AAA batteries with 1.5 volts, and adjust with the polarity of the remote
control battery box.
1. When using the remote control you should point it to the remote-control inductive window. The objects between the
remote control and inductive window may hinder normal operation.
2. Do not expose the remote control to fierce vibrations. Furthermore, do not expose the remote control to direct
sunlight, for the thermal energy will cause the distortion of the remote control.
3. If the remote-control inductive window of the main device is exposed to direct sunlight or intense illumination, the
remote control can malfunction; please change the angle of illumination or this device, or approach the inductive
window to operate the remote control.
4. Low battery voltage influences the remote control distance. You should replace the battery. If you do not use the
remote control for long or if the battery is exhausted, please take out the battery, in order to avoid battery leakage
causing corrosion of the remote control and its damage.
5. Do not use different batteries. Combining new and old batteries is not allowed. You should use batteries in pair.
6. Do not throw batteries into fire, do not charge or disassemble, especially do not charge, assemble or disassemble,
heat or burn used batteries. Please observe the related environmental protection regulations on used batteries.
1. Power LED indicator and remote receiving window.
2.
Power switch (optional): Press „ I “ end to turn power on, and press „O“ end to turn power off.
3. SOURCE: Press this key to enter the menu of signal source and choose signal source.
4. CH-, CH+ (
): Press these two keys to select the channel. In OSD menu, press the two keys,
sharing the function with / key on the remote control, to adjust the items.
5. VOL-, VOL+ (
): Press these two keys to add or reduce volume. In OSD menu, press the two
keys to adjust the analogue value of the selected item. These keys have the same functions as t / u
key on the remote control.
6. MENU (
): Press this key to enter main menu.
7.
Standby: To switch the TV on or back to standby.
Note: Different models may have different appearances; please refer to the actual device.
43”
Page 11

9
ENG
Remote Control Key Instruction
Note: Appearance of the remote control can differ from the one shown in the figure. Adjust the provided information to
match the actual remote control.
Name Function Description
POWER (
)
Switching the receiver in and out of standby mode.
WIDE (16:9)
Switching picture ratio.
MUTE ( )
Switching off sound when viewing programme.
Numerical
Entering numbers.
F1 Picture freeze on or off.
Channel list ( )
Searching through channel list.
SMART S Smart sound mode selection.
SMART P Smart image mode selection.
Cursor key
(
, , , )
Moving cursor up/down/left/right across menu items or
change date of EPG.
OK Confirmation of current settings.
VOL+/VOL- Press to adjust the volume.
MENU Press this key to display menu.
SOURCE Press this key to display signal source selection menu.
CH+/CH-
Channel changing keys. Changing different pages of
current channel EPG.
INFO Displaying current programme information.
REC Programme recording.
Return ( )
Press this key to return to the last channel watched.
L/R Selecting NICAM mode (in ATV signal source)
INDEX ( )
In DTV mode, press “INDEX” key to display a list of
recorded programmes.
ZOOM ( )
In DTV mode, press “ZOOM” key to zoom aspect ratio
if there is a graphic display; if there are no graphic
displays and USB port is connected to memory, press
this key to delay broadcast of currently played television
programmes.
REVEAL ( ),
TTX (
),
HOLD (
),
LIST (
),
LANGUAGE (
),
RADIO (
)
For teletext operation or USB operation.
Red key Muti-function red key.
SUBTITLE
(Green key)
Teletext green key or displaying subtitle message if current
channel has subtitle option.
FAV (Yellow key)
Teletext yellow key or Favourite key used for setting or
displaying your favourite programmes.
EPG (Blue key)
Teletext blue key, or showing the Electronic Program Guide
of current channel during no-menu state.
Page 12
10
ENG
Remote control user manual about teletext
TeleText: Press ‘’Teletext’’ key, it loops in 3 modes: Mix Display > Text Mode > TeleText Off.
Thereinto: TText Mode is Automatic Mode. In Automatic mode, the system automatically selects TOP, Fastext, or Default
mode as appropriate, depending on the data being received. In Text Mode or Mix Display, press number 0~9, “/’’
key to select text page.
Reveal: All hidden characters are displayed for 6 seconds.
Hold: Toggle hold on or off for current display pages. If the page is not held, it will become held, which will prevent its
update. If the page is currently held, the hold will be removed thus allowing the page to update. When the page is held,
this is indicated by a Hold prompt.
Index: In Fastext mode, request the index page if the index link is valid, or the Packet 8/30 initial page if valid, or page
100. In TOP mode, if the Hitlist option is enabled, toggle the system between the current text page and the Hitlist menu;
otherwise, request page 100. In List mode, reset the list of preferred pages either to that of the current channel as read
from the EEPROM if fitted, or to the default list (pages 100, 101, 102, 899), and request the first page in the list. In Default
mode, request the Packet 8/30 initial page if valid, or page 100.
List: Toggle between L ist mode and the current acquisition mode (Fastext, TOP, or Default).
Red, Green, Yellow, Blue: Request the associated page in the display block according to the acquisition mode. In TOP
Hitlist mode, the Red, Green, and Blue commands control selections from the Hitlist menu, while the Yellow command is
ignored.
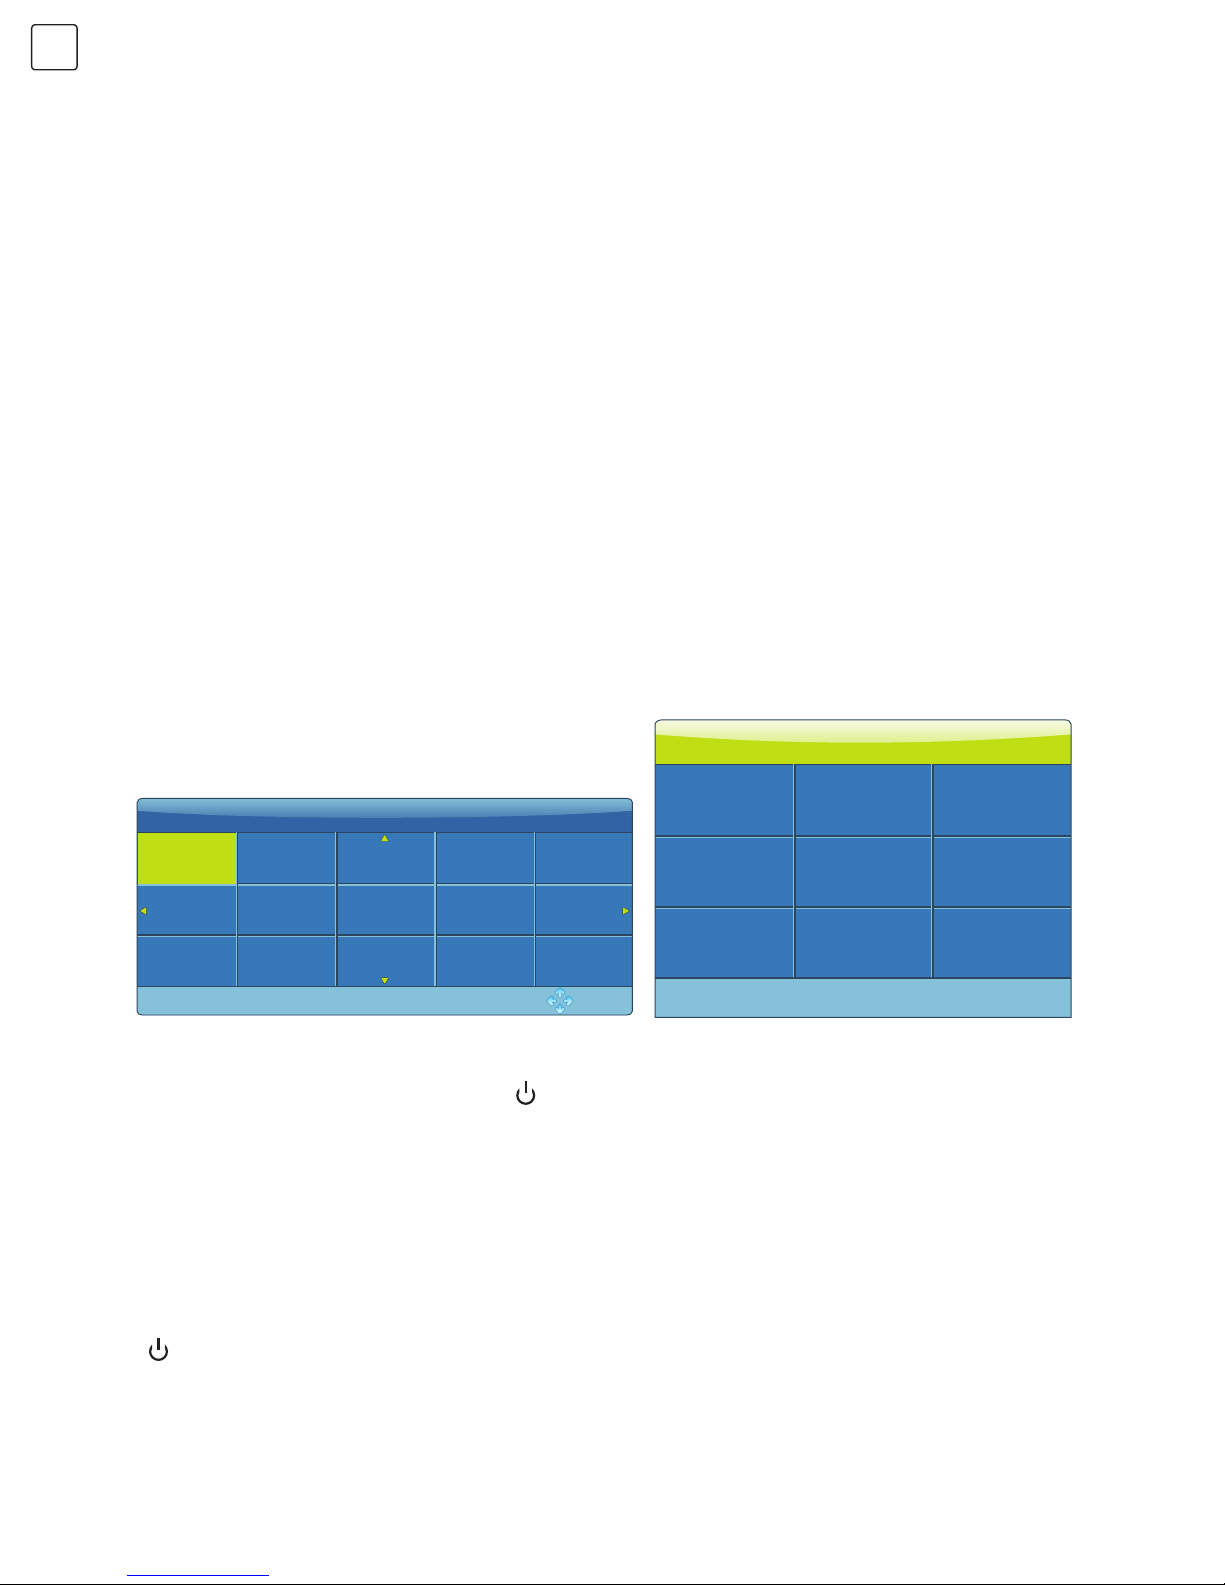
General Operating Instructions
Power On
Standby
Fig. 1 Fig. 2
Before switching on the device, please make sure that the power supply is stable and that the antenna cable is well
connected.
Plug the power cord into electrical socket. Press “
” key on the remote control or on the TV set to turn on the TV. ‘’Please
select an OSD Language’’ menu (Fig.1) is displayed on the screen. Press “//t/u’’ key on the remote control to
select desired language, then press “OK” key on the remote control to confirm. “Select DVB type’’is displayed on
the screen. Press “/” key on the remote control to select desired DVB type, then press “OK” key to continue to
the next step (Fig.2). (The provided example shows channel searching DVB type under DVB-T.) Press “t/u” key to
select Tune Type: DTV + ATV, ATV, DTV. Press “” key. You can select country where you are by pressing “//t/u”,
then press “OK” key to confirm.The device will initiate auto tuning.
Press “
” key on the remote control, TV will be in standby.
Special Attention:
1. The TV set will automatically switch to standby if there is no signal input for 5 minutes after switching the TV on.
2. The TV set will automatically switch to standby when the preset time for turning off is reached.
3. If you do not use it for a long time, please turn off the power supply of the device. Do not let the device work
in standby state for a long time.
OK: Enter
Please select an OSD Language
Eng lis h
Cro ati an
Dut ch
Rus sia n
Ara bic
Far si
Spa nis h
Ita lia n
Fre nch
Ger man
Por tug uese
Pol ish
Tune Type
Germany
MENU: Return
Greece
Hungary
DT V + ATV
Netherlands
Norway
Poland
Italy
Ireland
Luxembourg
Page 13
11
ENG
Press “SOURCE” key either on the remote control or on the panel. ‘’Input Source’’ will be displayed on the screen
(Fig.3). Then press “/’’ key on remote control or “CH+/CH-” key on the panel to select the signal source. Press
“OK”key on the remote control and the TV will replace the current signal source with the source you selected.
(Note: YPBPR signal source is optional, please refer to the device.)
Press “MENU” key on the remote control or on the panel. The screen will display the main menu (Fig.4).
1. Press “t/u” key on the remote control or “VOL+/VOL-” key on the panel to select the adjustment sort menu,
which includes 6 sorts: CHANNEL, PICTURE, SOUND, OPTION, TIME, LOCK.
2. Press “ /” key on the remote control or “CH+/CH-” key on the panel to select what you want to adjust in
sort menu.
3. Press “OK” key on the remote control to set or enter into next menu.
4. Press “MENU” key to exit the main menu when the TV displays the Main Menu. Press “MENU” key to return to the
previous menu when the TV displays the sub-menu. Press “SOURCE” key to display the signal source menu.
5. During the operation, the options which cannot be adjusted at current mode will be hidden automatically and the
colour of these options will be changed into gray.
6. Menu Operation Instructions provided in this manual is explained according to TV mode. The operations in other
modes are similar to the one in TV mode. Users can take it as reference.
Note: “ //t/u’’ keys in this Manual stand for the direction cursor keys on the remote control unless specifically
defined otherwise. The operating instructions in the text below are all based on keys on the remote control. Please
understand the keys on the panel by yourself.
Press “MENU” key and CHANNEL menu will be displayed on the screen (Fig.4). Press “/” key to select the item you
want to adjust or set.
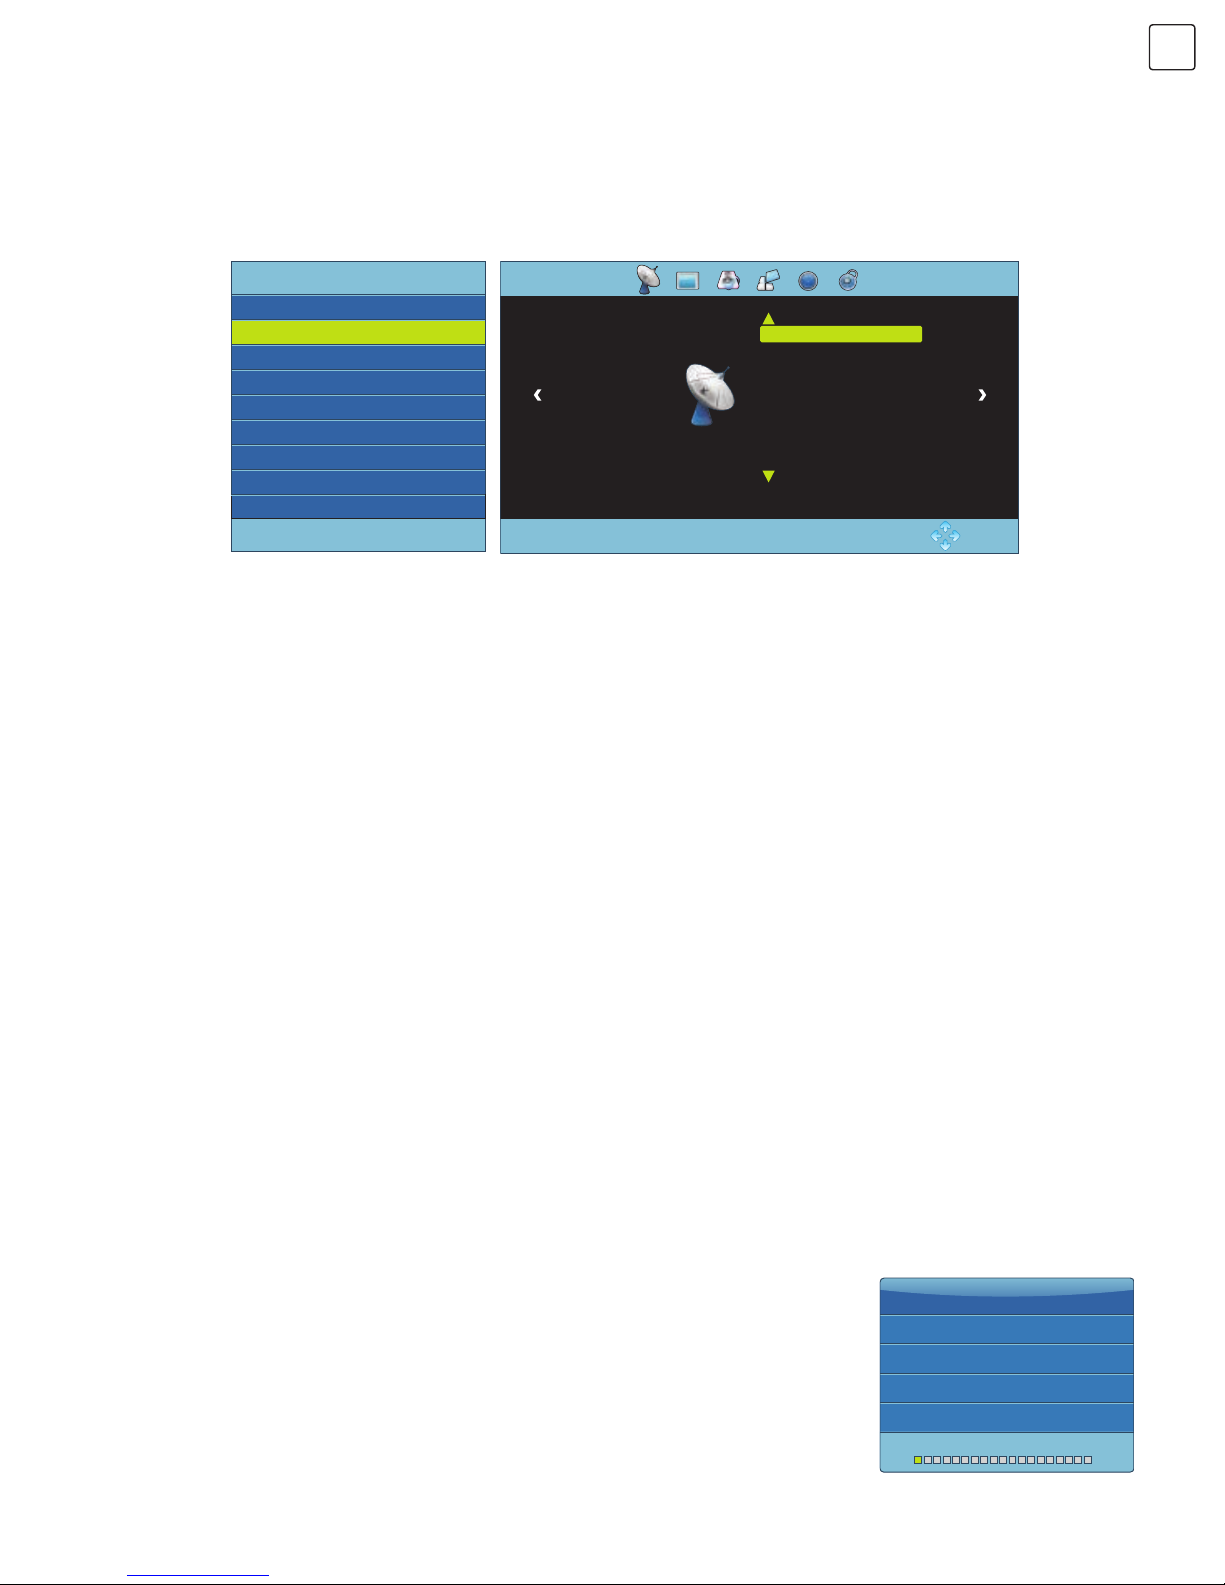
Auto Tuning
Press “MENU” key and CHANNEL menu will be displayed on the screen. Press “/”
keys to select Auto Tuning. Press “OK” key and the ‘’DVB Select type’’ will be displayed
on the screen. Press “/” keys on the remote control to select desired DVB type,
then press “OK” key to continue to the next step (Fig.2). (The provided example shows
channel searching DVB type under DVB-T.) Press “t/u” keys to select Tune Type: DTV
+ ATV, ATV, DTV. Press “” key. You can select desired country by pressing “//t/u”,
then press “OK” key to confirm. The device will start auto tuning (Fig.5). During the auto
tuning, you can press “MENU” key to return and exit auto tuning.
Signal Source Selection
Menu Operation Instruction
CHANNEL
Fig. 3 Fig. 4
Fig. 5
Input Source
DTV
AV
YPB PR
HDM I 1
HDM I 2
VGA
USB
ATV
OK:Enter
Auto Tu ning
CHANNEL
DTV Manual Tuning
ATV Manual Tuning
Programme Edit
Signal Information
OK: Enter
MENU: Return
1 %... 63.25 MHz
MENU
Exit
Channel Tuning
ATV
DTV
Radio
Data
0 Programme(s)
0 Programme(s)
0 Programme(s)
0 Programme(s)
:
:
:
:
Page 14
12
ENG
DTV Manual Tuning
Press “MENU” key and CHANNEL menu will be displayed on the screen. Press
“/” key to select DTV Manual Tuning. Press “OK” key to enter into DTV
Manual Tuning menu (Fig.6). Press “t/u” key to select channel, then press “OK”
key to conduct search. After searching, the DTV Manual Tuning menu will close
automatically.
ATV Manual Tuning
Press “MENU” key and CHANNEL menu will be displayed on the screen. Press
“/” key to select ATV Manual Tuning. Press “OK” key to enter ATV Manual
Tuning menu (Fig.7). Press “/” key to select the Current CH. Press “t/u”
key to search manually. After searching, you can save the searched channel to
other positions. At this time, press “t/u” key to select Storage To, and then
press “/” key to choose the channel number. After selecting Fine-Tune,
press“t/u” key to tune from low frequency or high frequency.
During manual searching, you can also press “MENU” key to interrupt the search
and return to the last menu.
Programme Edit
Press “MENU” key and CHANNEL menu will be displayed on the screen. Press
“/” key to select Programme Edit . Press “OK” key to enter Programme Edit
menu (Fig.8), then press “/” key to select the channel you want to edit.
Delete: : Select a channel and press “Red” key to delete it.
Move: Select a channel and press “Green” key, press “/” key to select the
channel position where you want to move the channel. Press “OK” key to
confirm. You can press “MENU” key to return last menu.
Favourite: Choose a channel and press “Yellow” key. Favourite icon will
appear behind the selected channel. Press “Yellow”key again to cancel it. Press
“MENU” key to return main menu.
Skip: Select a channel and press “Blue” key. SKIP icon will appear behind the
selected channel. Press “Blue” key again to cancel it. Press “MENU” key to return
to main menu.
Signal Information
Press “MENU” key and CHANNEL menu will be displayed on the screen. Press
“/” key to select Signal Information. Press “OK” key to enter into Signal
Information menu. You can look through signal information.
Note: Before you press “MENU” key, please select the input source first. You can
select it only in DTV mode.
Press “MENU” key and CHANNEL menu will be displayed
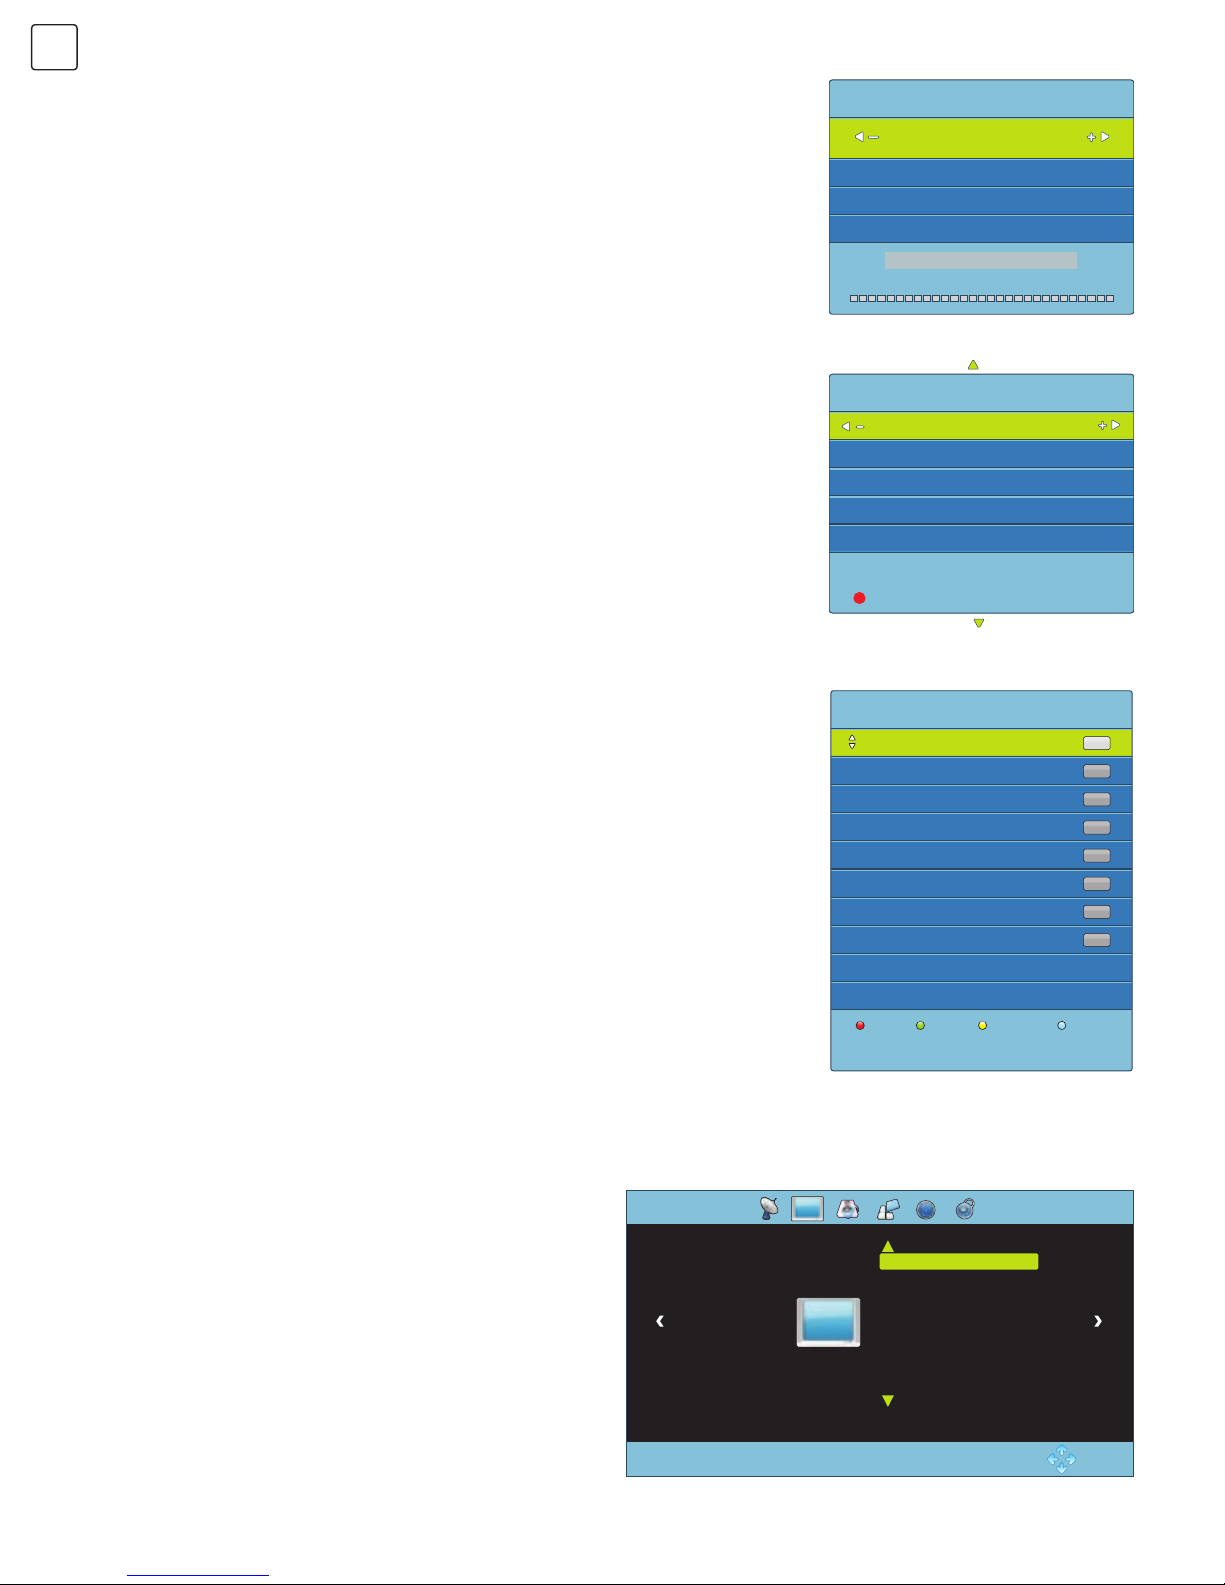
on the screen. Press “t/u” key to select PICTURE (Fig.9),
then press “/” key to choose the item you want to adjust
or set.
Picture Mode: Press “OK” key to enter into Picture Mode
submenu. Press “/” key to select item want to adjust or
set.
PICTURE
DTV Manual Tuning
UHF CH 21
Bad
Normal Good
NO SIGNAL
ATV Manual Tuning
Frequ ency 175.25 MHz
Storage To 1
DK
Current CH 1
Search
Fine-Tune
MENU: Return
Save
OK: Enter
1 C-01
2 S-42
3 C-06
4 C-11
5 S-11
6 S-13
7 C-21
8 C-51
MENU: Return
Programme Edit
Delete
Move
Skip
Favourite
ATV
ATV
ATV
ATV
ATV
ATV
ATV
ATV
Fig. 6
Fig. 7
Fig. 8
Fig. 9
Picture Mode User
Color Temperature Standard
Aspect Ratio Full
Noise Reduction Middle
PC Setting
PICTURE
OK: Enter
MENU: Return
Page 15
13
ENG
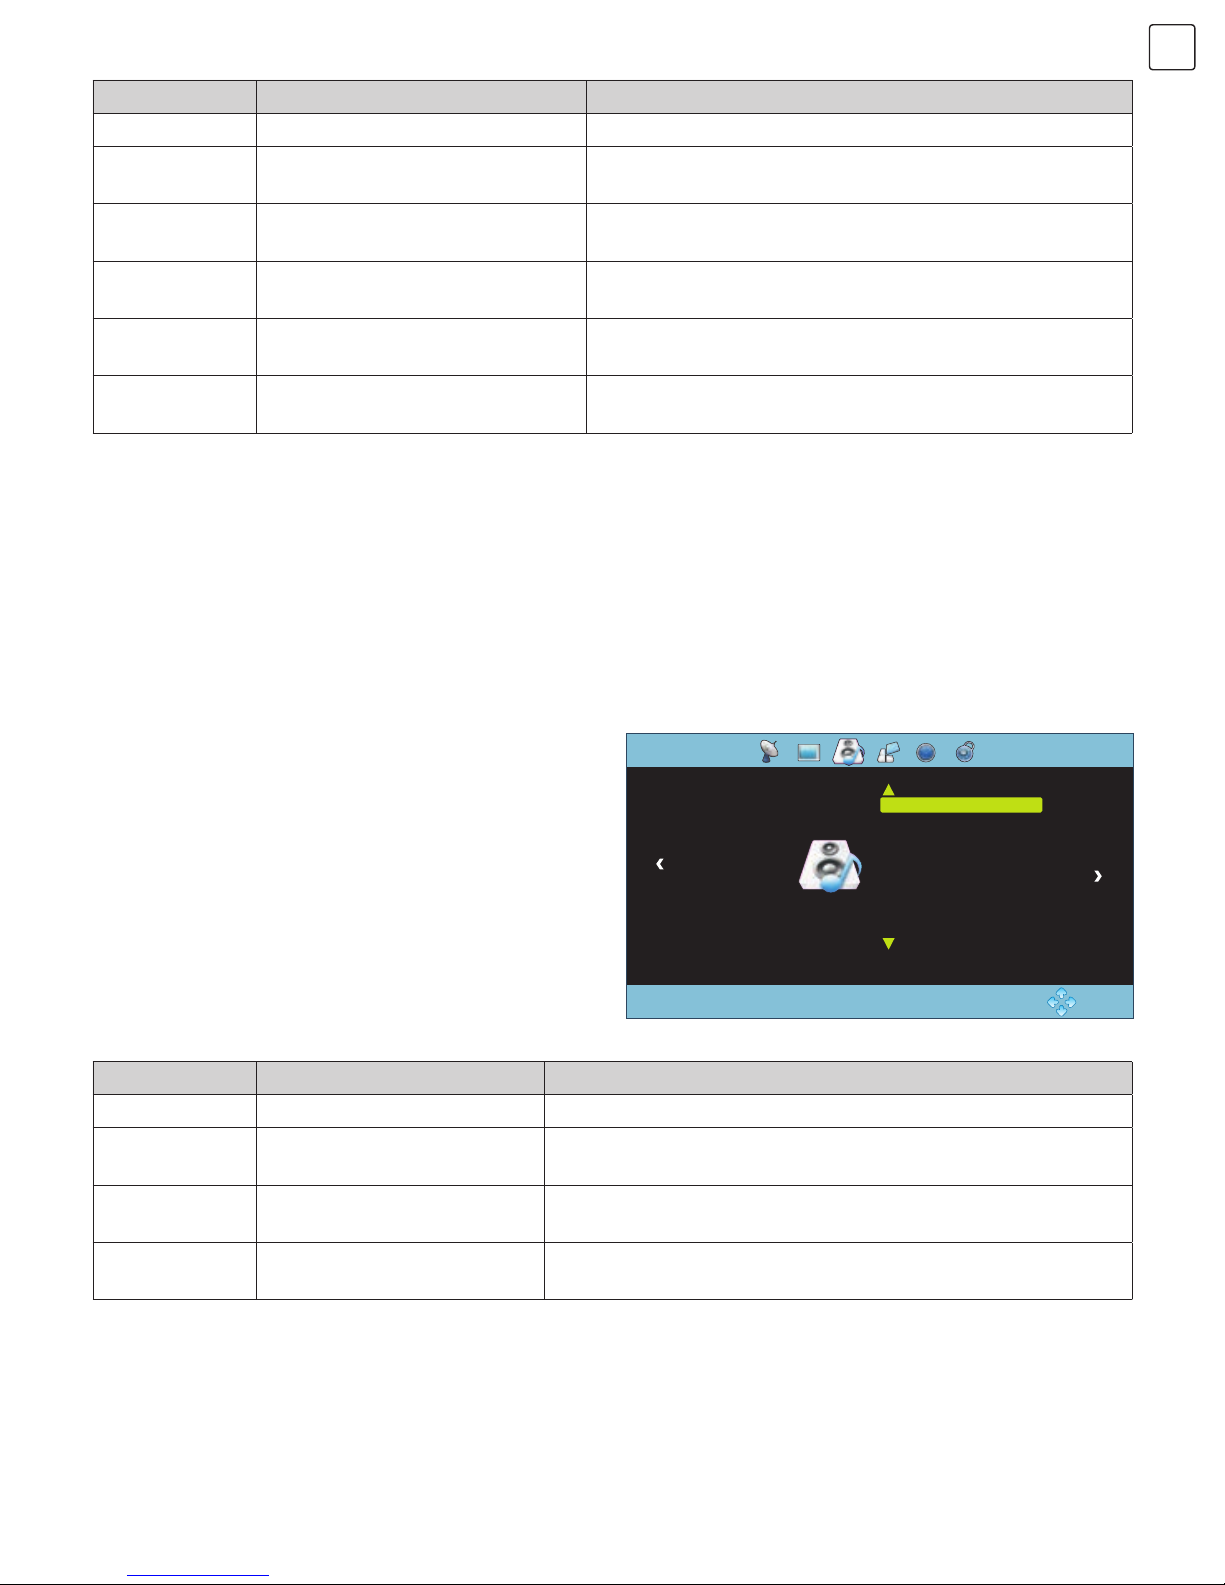
Press “MENU” key and CHANNEL menu will be
displayed on the screen. Press “t/u” key to select
SOUND (Fig.10), then press “/” key to select the
item you want to adjust or set.
Sound Mode: Press “OK” key to enter Sound Mode
submenu. Press “/” key to select item you want to
adjust or set.
Surround Sound: Press “OK” key to enter Surround Sound submenu. Press “/” key to select surround sound mode:
Off, Surround, SRS Trusurround XT.
AD Switch: Press “OK” key to enter AD Switch submenu. Press “t/u” key to select ‘’On’’ or ‘’Off’’. If you select
‘’On’’, you can adjust AD volume by pressing “t/u” key (only available in DTV).
SOUND
Fig. 10
OK: Enter
MENU: Return
Sound Mode Music
Surround Sound Off
AD Switch Off
SOUND
Item Function Description
Picture Mode Selecting picture mode “Standard”, “Soft”, “User Dynamic” four modes.
Contrast Adjusting contrast of whole picture Increasing analogue value increases Contrast;
Decreasing analogue value decreases Contrast (0~ 100).
Brightness Adjusting brightness and black
level of whole picture
Increasing analogue value increases brightness;
Decreasing analogue value decreases brightness (0~ 100).
Saturation Adjusting colour depth of images Increasing analogue value increases green;
Decreasing analogue value increases purple (0~100).
Sharpness Adjusting sharpness of whole
picture
Increasing analogue value increases definition;
Decreasing analogue value decreases definition (0~100).
Tint Adjusting tint of whole picture Increase the analogue value to improve the depth;
Decrease the analogue value to reduce the depth (0 ~100).
Item Function Description
Sound Mode Selecting Sound Temperature “Standard”, “Music”, “Movie”, “User” five modes.
Treble Adjusting treble value
Increasing analog value increases treble;
Decreasing analog value decreases treble (0~100).
Bass Adjusting bass value
Increasing analogue value increases bass;
Decreasing analogue value decreases bass (0~100).
Balance
djusting balance between left
and right speaker
Increasing analogue value decreases left volume;
Decreasing analogue value decreases right volume (L50 ~R50).
Note: Tint can be adjusted only in NTSC system.
Color Temperature: Press “OK” key to enter Colour Temperature submenu. Press “t/u” key to select colour
temperature mode: Standard, Warm, Cool.
Aspect Ratio: Press “OK” key to enter Aspect Ratio submenu. Press “/” key to select aspect ratio mode: Auto, 4:3,
Full, Film, Subtitle, PC Mode.
Noise Reduction: Press “OK” key to enter Noise Reduction submenu. Press “/” key to select Noise Reduction
mode: Off, Low, Middle, High.
Page 16
14
ENG
OPTIONS
TIME
Press “MENU” key and CHANNEL menu will be
displayed on the screen. Press “t/u“ key to select
OPTIONS (Fig.11), then press “/” key to select the
item you want to adjust or set.
OSD Language: Press “OK” key to enter OSD
language submenu. Press “//t/u’’ key to select
desired language. Press “MENU” key to return to the
previous menu.
Note: The operation method of the Audio Language is the
same as that of OSD Language (Only available in DTV).
Hearing Impaired: Press “OK” key to select “On” or “Off”
(only available in DTV).
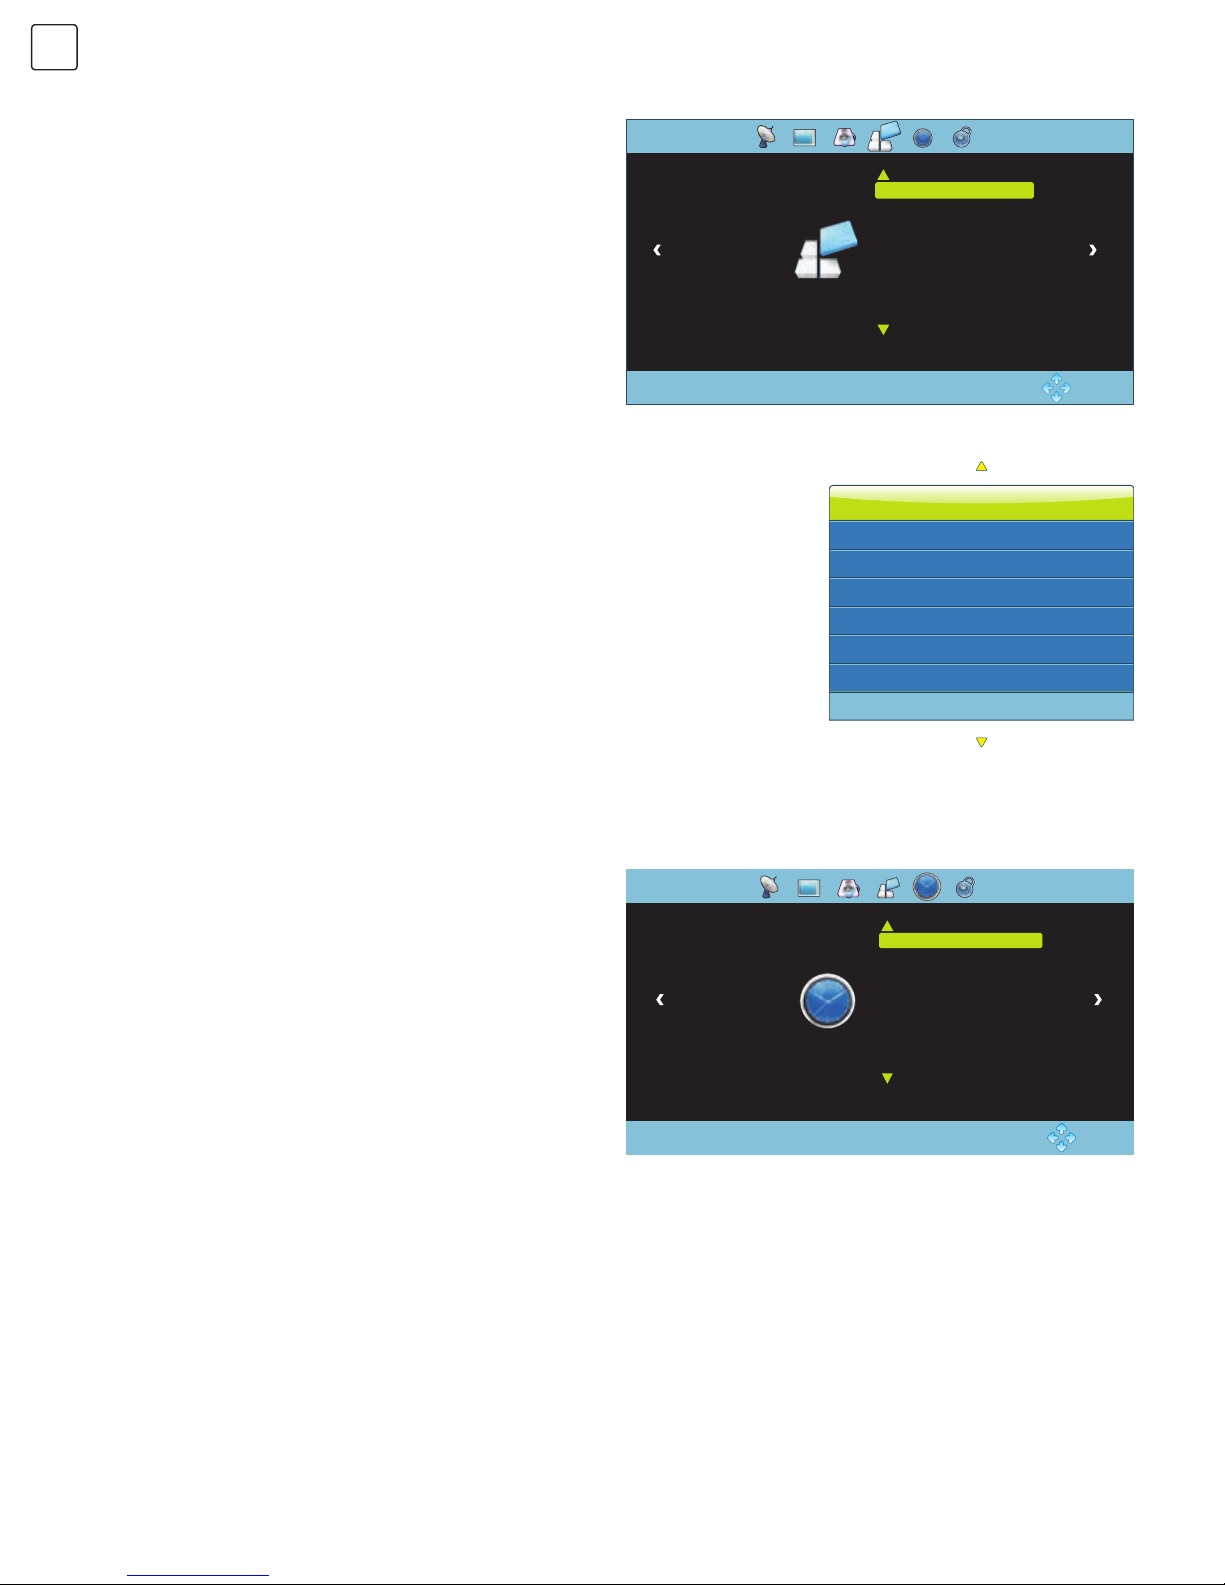
Press “MENU” key and CHANNEL menu will be displayed
on the screen. Press “t/u“ key to select TIME (Fig.13),
then press “/” key to select the item you want to
adjust or set.
Clock: When in DTV input source, the clock will be
synchronized with TV programme.
Off Time: Press “OK” key to enter Off Time submenu.
Press “/” key to select Off Time, Hour and Minute,
then press “t/u“ key to adjust the off timer values. The
TV will switch off automatically at the time you select.
Note: You can set Hour and Minute only if the Off Time is not in ‘’Off’’ mode.
On Time: Press “OK” key to enter On Time submenu. Press “/” key to select On Time, Hour and Minute,
Source, Channel, Volume, then press “t/u“ key to adjust value to set the on timer values. The TV will switch on
automatically and tune to the mode of your choice at the time you select.
Sleep Timer: Press “OK” key to enter Sleep Time submenu. Press “/” key to select sleep time: Off, 10min, 20min,
30min, 60min, 90min, 120min, 180min, 240min.
Time Zone: Press “OK” key to enter into Time Zone submenu. Press “//t/u’’ key to select your time zone. (Only
available in DTV).
PVR File System: Press “OK” key to enter PVR File System submenu
(Fig.12). Choose storage disc in “select disc” submenu. Press “/” key to select
“Check PVR File System” and, after pressing “OK” key, the device will initiate the
check. After a successful check, press “MENU” key to exit the menu. Press “REC”
key to record.
Note: Insert a U disc into the device interface before operating the PVR File System
function.
Restore User Default: After pressing “OK” key, “Are you sure?” will be displayed
on the screen. Press “t“ key to resume to the factory setting or “u key to cancel
the current operation.
Blue Screen: Press “OK” key to select “On” or “Off”. Open or close Blue Screen function.
Software Update (USB): Update software by a U disc.
OSD Language
Audio Language English
Hearing Impaired Off
PVR File System
Restore User Default
Blue Screen On
Software Update(USB)
OPTION
English
OK: Enter
MENU: Return
OK: Enter
MENU: Return
Clock
Off Time Off
On Time Off
Sleep Timer Off
Time Zone Berlin +1
TIME
-- -- -- --
Check PVR File System
Format
Free Record Limit
USB Disk
Time Shift Size
Speed
Start
6 Hr.
Select Disk
C:
Fig. 11
Fig. 13
Fig. 12
Page 17
15
ENG
LOCK
REC option
Press “MENU” key and CHANNEL menu will be
displayed on the screen. Press “t/u“ key to select
LOCK. After pressing “OK” key, press Numerical key
to input default password 0000 and enter LOCK menu
(Fig.14). Then press “/” key to select the item you want
to adjust or set.
Lock System: Press “OK” key to select “On” or “Off”.
Block program option can work when Lock System option
is activated.
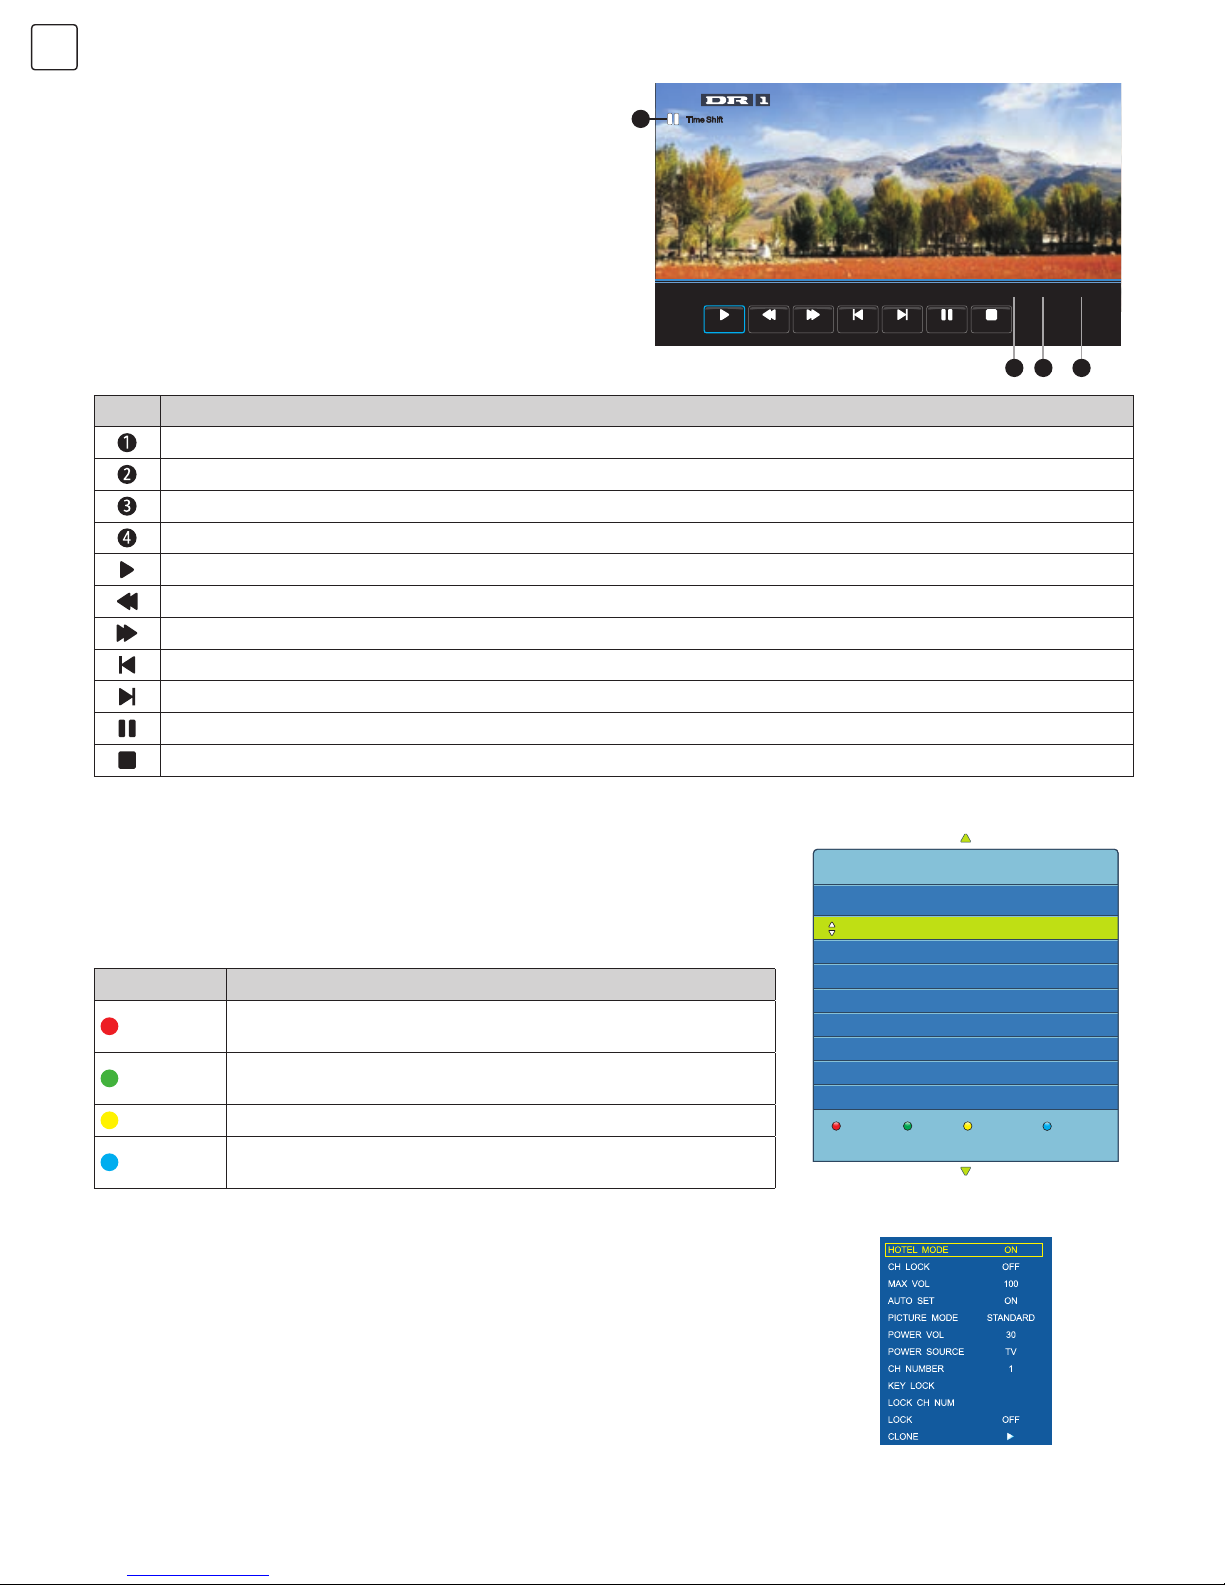
In DTV mode, press “REC” key and REC option menu
will be displayed on the screen (Fig.15). The system will
immediately start recording. Press “REVEAL” key to
stop and quit recording. After completing the recording
process, press “INDEX” key and the recorded list will pop
up. Select the file you want to play. You can read the file
information by pressing ‘’Green’’ key or you can delete it
by pressing “Red” key. Press “OK” key to play it.
Note: The recording function can only support memory
devices with Fat32 file system. Memory devices with other
file systems need to be formatted. Before formatting a
memory device, back-up useful data because the content
of memory devices cannot be recovered after formatting.
Set Password: Press “OK” key and “Set Password” dialogue box will appear on the screen. Press the numerical
key to input old password, input new password twice to complete the password change and return to last menu.
Note: Please make sure you remember your new password after changing. Otherwise, the system will lock forever.
Block Program: Press “OK” key and “Block Program” menu will appear on the screen. Press “/” key to select the
channel that you want to lock, and then press the green key to lock or unlock. Finally press “MENU” key to exit menu
operation.
OK: Enter
MENU: Return
Lock System
Set Password
Block Program
LOCK
[00:00:29]
14:21
Pla y FB FF FB 30 S FF 30 S Pau se Stop
(0003:10:24)
Fig. 14
Fig. 15
Icon Description
Indicates that the system is recording a programme.
Indicates the current programme number.
Indicates the recorded programme duration.
Indicates the longest duration that a U disc can provide (relevant to the capacity of U disc)
Indicates the current programme time.
Play: Select this icon. Press "OK" key to play the video or set A-B repeat.
FB: Select this icon. Press "OK" key to fast back. Press "INDEX" key to play normally.
FF: Select this icon. Press "OK" key to fast forward. Press "INDEX" key to play normally.
FB 30s: Select this icon. Press "OK" key to play backward 30 seconds.
FF 30s: Select this icon. Press "OK" key to play forward 30 seconds.
Pause: Select this function. Press "OK" key to play or pause.
Stop: Select this icon. Press "OK" key to stop and quit the display window.
Page 18
16
ENG
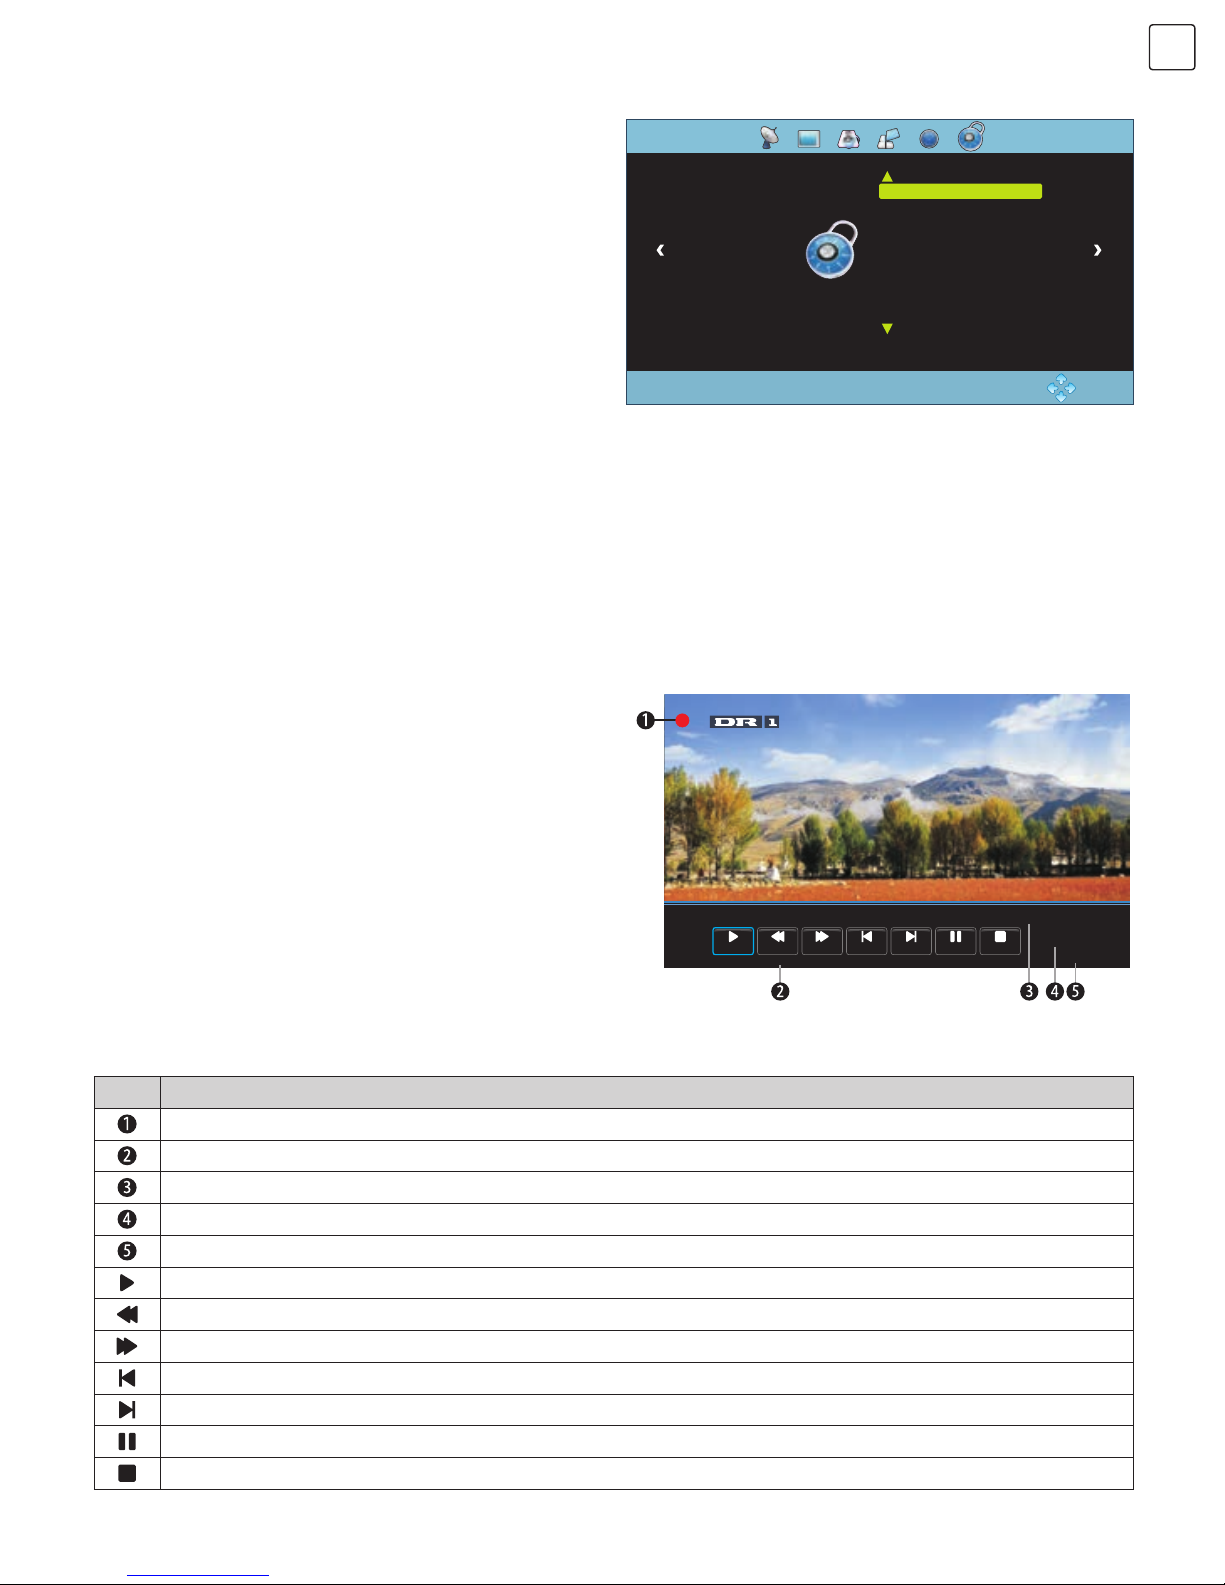
Time-shift option
EPG option
Hotel Function (optional)
In DTV mode, press “ZOOM” key. Time-shift option
menu will be displayed on the screen (Fig. 16) and the
programme will be in suspended state. Press “INDEX”
key to resume the programme. Press “REVEAL” key to
stop and quit time-shift. When user leaves programme for
a short time, time-shift function can suspend and cache
the playing programme to a U disc. The programme
can be resumed when user decides to play it.
In DTV mode, press “EPG” key and EPG option menu will be displayed on the
screen (Fig.17). User can perform the following operations with the red, green,
yellow, and blue multifunction keys.
Press “MENU” key on the remote control to display the main TV menu and
then press “4578” on the remote control to display the hotel function menu.
Press “Up/DOWN” key to enter the menu and select the item you want to
adjust. Then press “Left/Right” key to adjust the value or state (Fig. 18).
[00:00:00/00:00:08/01:20:00]
14:23
Pla y FB FF FB 30 S FF 30 S Pau se St op
Time Shift
342
1
Fig. 16
Fig. 17
Fig. 18
Icon Description
Indicates that the programme is in suspended state.
Indicates the Current programme time.
Indicates the time when the programme was suspended.
Indicates the longest cache time that a U disc can provide.
Play: Select this icon. Press "OK" key to play the video or set A-B repeat.
FB: Select this icon. Press "OK" key to fast back. Press "INDEX" key to play normally.
FF: Select this icon. Press "OK" key to fast forward. Press "INDEX" key to play normally.
FB 30s: Select this icon. Press "OK" key to play backward 30 seconds.
FF 30s: Select this icon. Press "OK" key to play forward 30 seconds.
Pause: Select this function. Press "OK" key to play or pause.
Stop: Select this icon. Press "OK" key to stop and quit the display window.
Icon Description
Record
Press the red key to enter the sub-menu. You can choose the
time of the programme you want to record.
Info
Press the green key to display the detailed information about
the programme.
Schedule
Press the yellow key to see your previous settings.
Remind
Press the blue key to set the time when you want to be
reminded about the programme you want to see.
PROGRAMME GUIDE
TIME
Record
Info
Schedule Remind
MENU:Return
31 Aug
14:23
1 DR1
2 DR2
3 Tegnsprogstol...
4 TV 2 (Fyn)
No Information
Folk og fae (32)
Ingen tegnsprogstolkning
Vild med dig
ON
D
Page 19
17
ENG
USB Media Function
Please insert USB storage device into USB interface of TV and press
“SOURCE” key. “Input Source” menu will be displayed on the screen.
Then press “/” key to select USB. Press “OK” key to enter USB
(Fig.19).
PHOTO MUSIC MOVIE TEXT
USB 2.0
Fig. 19
Icon Description
Play/Pause: Press “t/u“ key to select this function. Press "OK" key to play or pause.
Prev.: Press “t/u“ key to select this function. Press "OK" key to read the previous photo.
Next: Press “t/u“ key to select this function. Press "OK" key to read the next photo.
Stop: Press “t/u“ key to select this function. Press "OK" key to stop playing and to return to the previous
menu.
Repeat: Press “t/u“ key to select this function. Press "OK" key to select Repeat 1 or Repeat ALL or Repeat
None.
Random Off: Press “t/u“ key to select this function. Press "OK" key to turn on/off random playing.
Music: Press “t/u“ key to select this function. Press “OK” key to play background music. (Music and photos
should be placed in the same folder, or you can select a piece of music from your music file first.)
Note:
1. USB function supports file formats with video file/sound file/graphic file/text file. Certain nonstandard USB storage
devices may not be recognised. Please replace these with a standard USB storage device.
2. When playing a file, streaming media system has certain limitations for each format. If a file exceeding the system
limit is played, then its reproduction will be wrong.
3. Do not pull out USB storage devices while the system is working. This may cause problems to the system or
equipment.
4. The system supports USB1.1 and USB2.0 connector and the standard transport protocol, such as U discs and
removable hard disc storage devices. USB device file format must be FAT or FAT32. It does not support NTFS.
5. The USB interface of this TV set can supply a voltage of 5V and the maximum current is 500mA; accurate
identification of the multimedia player will be affected when a storage device over 500mA is used, which is a normal
phenomenon.
Remote Control Shortcut Keys
The “INDEX”, “ZOOM”, “REVEAL”, “TTX”, “HOLD”, “LIST”, “LANGUAGE”, “RADIO” keys on the remote control
are used for USB operation.
Press “t/u“ key to select the adjustment sort menu, which includes 4 sorts: PHOTO, MUSIC, MOVIE, TEXT.
Press “t/u“ key to select PHOTO. Then press “OK” key to read your photo documents. Press “//t/u’’ key to select
photo and press “OK” key (After the photo was selected, the file lower right corner displays a red hook. You can choose
photos to join them to the playlist.). Press “INDEX” key on the remote control to play. If you do not choose anything,
the device will automatically join all the photos from the file in a playlist.
Note: The operation method of the MUSIC, MOVIE and TEXT are the same as that of PHOTO. Please refer to PHOTO
options.
Basic Function: When displaying photos, press “INFO” key. A toolbar will be displayed at the bottom of the screen.
(Press “” key to hide toolbar)
Page 20
18
ENG
Icon Description
Playlist: Press “t/u“ key to select this function. Press “OK” key to view playlist.
Info. : Press “t/u“ key to select this function. Press “OK” key to view photo information, including
resolution, size and so on.
Rotate: Press “t/u“ key to select this function. Press “OK” key to rotate photos clockwise.
Rotate: Press “t/u“ key to select this function. Press “OK” key to rotate photos counter-clockwise.
Zoom In: Press “t/u“ key to select this function. Press “OK” key to enlarge photos.
Zoom Out: Press “t/u“ key to select this function. Press “OK” key to reduce photos.
Move View: If photo exceeds the screen, use this function to move across the photo.
FB: Press “t/u“ key to select this function. Press “OK” key to fast back. Press "INDEX" key to play normally.
FF: Press “t/u“ key to select this function. Press “OK” key to fast forward. Press "INDEX" key to play
normally.
MUTE: Press “t/u“ key to select this function. Press “OK” key to fast back. Press "MUTE" key to switch off
sound.
Goto Time: Press “t/u“ key to select this function. Press “OK” key to select the time to play.
Set A-B repeat: Press “t/u“ key to select this function. Press “OK” key to set A and B. The film will be
repeated during A to B interval.
Slow Forward: Press “t/u“ key to select this function. Press “OK” key to slow down play speed.
Press “INDEX” key to play normally.
Step Forward: Press “t/u“ key to select this function. Press “OK” key to play step by step. Press “INDEX”
key to play normally.
Aspect Ratio: Press “t/u“ key to select this function. Press “OK” key to select Auto, 4:3, Full.
Page 21

19
ENG
Simple troubleshooting
Symptom Cause Solution
Snowflake speckle and
sound noise.
1. Antenna cable connector is loose,
cable is damaged.
2. Antenna cable type does not match.
3. Direction or position of antenna is
incorrect.
4. Signal is weak.
1. Check if the antenna cable connector plug is
loose and if the cable is perfect.
2. Check antenna cable type (VHF/UHF)
3. Adjust direction or position of antenna.
4. Attempt to use signal amplifier.
TV image is better, but
has noise.
Antenna cable connector is loose,
cable is damaged.
Check if the antenna cable connector plug is
loose and check cable condition.
No image. No sound.
Power plug is loose, or power supply is
not connected.
Check if the power cord is well connected.
TV image has stripes.
Signal is exposed to interference, such
as car, neon light, electric blower etc.
Do not use electric blower around the device
and adjust antenna cable direction to reduce
interference.
TV image has shadows.
1. TV signal is reflected against a valley
or building.
2. Direction of antenna is incorrect.
1. Use high directional antenna.
2. Adjust direction of antenna.
TV has no sound.
1. Volume setting is too low.
2. Sound is muted.
1. Adjust volume to proper value.
2. Press “MUTE” key on remote control to
eliminate mute.
Computer does not
display anything and
it does not prompt
any signal input, red
indicator LED twinkling.
Signal cable is loose or disconnected.
Check if the signal cable is loose or
disconnected, and reconnect it.
Remote control distance
is short; it loses control.
1. Receive window of remote control is
covered by objects.
2. The battery energy of remote control
is too low.
1. Remove objects obstructing the receiver
window of remote control.
2. Change batteries.
Computer display is
faint.
1. Adjustment is incorrect.
2. Display mode is incorrect.
1. Use auto-adjustment function.
2. Use recommended mode.
Computer display image
does not fill the screen.
1. Adjustment is incorrect.
2. Display mode is incorrect.
1. Use Auto-adjustment function.
2. Enter “PICTURE” to adjust horizontal or
vertical position.
3. Use recommended mode.
Noise Signals while
turning off.
Electrical discharge while turning off. It is normal.
Cannot operate this
device.
Exterior influence, for example
lightning, static electricity and so on,
which can potentially interfere with
normal operation of this device.
First disconnect the power supply and reconnect
it after about 1-2 minutes, then turn on the TV
again.
Page 22
20
ENG
Technical Specifications
Panel size
32" 40” 43”
Screen size - diagonal
81cm 102cm 109cm
Screen resolution
1366×768 1920×1080 1920×1080
Pixel Pitch (mm)
0.51075×0.51075 0.45735×0.4494 0.4902×0.4902
Active Area (mm)
697.685×392.256 878.112×485.352 941.184×529.416
Audio output power (L+R)
6W +6W 6W +6W 8W +8W
Working voltage
100-240V~ 50/60Hz
Rated power
consumption
Normal working ≤55W ≤55W ≤75W
Standby ≤0.5W ≤0.5W ≤0.5W
Dimensions Excluding base
(LxHxW mm)
730×430×77 904x521x82 968x567x78
Dimensions Including base (mm) 730×474×193 904x571x222 968x616x222
Net Weight (kg)
4.0 6.5 8.0
Gross Weight (kg)
5.2 8.5 10.0
Operating environment
5°~40°; RH: 10%~85%; atmospheric pressure: 86kPa~104kPa
Storage environment
-20°~55°; RH: 5%~95%; atmospheric pressure: 86kPa~104kPa
Supported Systems
ATV: PAL D/K, I, B/G, SECAM D/K, B/G, L
DTV: DVB-T/C/T2
TV (RF)
75Ω Imbalance
AV Video-Input
75Ω, 1±0.1VP-P, RCA
AV Audio-Input
20KΩ, 0.2~2V RMS
HDMI Video Input
480i, 480p, 576i, 576p, 720p, 1080i, 1080p
Page 23
21
ENG
Base Installation Instructions
Different bases follow different installation methods. Please choose the appropriate installation method according to
the actual situation.
Place the TV on a flat working table. Put the TV base at the bottom of the device as shown by arrows on the picture.
Adjust the base in a way that the holes on it are aligned with the holes at the bottom of the TV, then fasten the screw.
Remark: The actual base and device appearance may be different from pictures; please refer to the actual device.
Base
Screws
Page 24

22
ENG
Page 25

23
ALB
Karakteristikat. . . . . . . . . . . . . . . . . . . . . . . . . . . . . 23
Kujdes për sigurim dhe informacione . . . . . . . 24
Montimi dhe lidhja . . . . . . . . . . . . . . . . . . . . . . . . 25
Përmbajtja e amballazhës. . . . . . . . . . . . . . . .25
Montimi i televizorit . . . . . . . . . . . . . . . . . . . . .25
Lidhja e pajisjeve periferike . . . . . . . . . . . . . . 26
Butonat panele kontrolluesë. . . . . . . . . . . . . . . .29
Telekomanda . . . . . . . . . . . . . . . . . . . . . . . . . . . . . 30
Instrukcione të përgjithshme për përdorim . .32
Kyçur . . . . . . . . . . . . . . . . . . . . . . . . . . . . . . . . . . 32
Stendbaj . . . . . . . . . . . . . . . . . . . . . . . . . . . . . . .32
Zgjedhja e sinjalit burimor . . . . . . . . . . . . . .33
Udhëzim për t`u drejtuar me menun . . . . .33
KANAL. . . . . . . . . . . . . . . . . . . . . . . . . . . . . . . . . 33
FOTOGRAFIA . . . . . . . . . . . . . . . . . . . . . . . . . . 34
ZËRI . . . . . . . . . . . . . . . . . . . . . . . . . . . . . . . . . . . 35
Opsion . . . . . . . . . . . . . . . . . . . . . . . . . . . . . . . .36
KOHA. . . . . . . . . . . . . . . . . . . . . . . . . . . . . . . . . .36
MBYLLJA . . . . . . . . . . . . . . . . . . . . . . . . . . . . . . 37
Opsioni për inçizim REC. . . . . . . . . . . . . . . . . 37
Opsinoni kohor me zhvendosje . . . . . . . . . .38
EPG alternativat. . . . . . . . . . . . . . . . . . . . . . . . . 38
Funksionet hotelerike (alternativat) . . . . . . .38
Funksionet USB Medija . . . . . . . . . . . . . . . . . 39
Diagnostifikimi i thjeshtë i defekteve . . . . . . . . 41
Specifikacione teknike . . . . . . . . . . . . . . . . . . . . . 42
Udhëzime të përgjithëshme për përdorim. . . 43
Përmbajtja
KARAKTERISTIKAT
1. Cilësi të lartë në sfond LED ndriçim në ekran LED, kursim të energjisë, mbrojtje të mjedisit jetësor, ultra-e hollë,
karakteristika të shkëlqyera.
2. Zotëron antiparlant të brendshëm me cilësi të lartë që do t’ju japin kënaqësi të pastër audiovizuale dhe nuk do t`ju
marrin vend në tavolinën tuaj.
3. Ka kyçje shumë ideale, ashtu që ju mund të lidheni direkt DVD, VIDICON tuaj dhe komponente të tjera për argëtim
të kyçjës për hyrje, duke ua mundësuar kënaqësinë e fotografisë së bukur. Produkti mund të përdoret si një monitor
kompjuteri me VGA dhe HDMI konektor. Ajo mund të përdoret gjithashtu si një televizion kur ju futni antenë.
4. Kohë shumë më të shpejtë në përgjigje për të eliminuar hijen në fotografi. Shikimi i filmave dhe luajtja e lojërave
mund të jenë më të rrjedhshëm.
5. Ngjyra të mjaftueshme.
6. Kënd të gjerë shikimi, shkëlqim të lartë, kontrast të lartë, konsum më të ulët.
7. Regjim inteligjent i fotografisë dhe i zërit mund t`u ofrojnë efekt inteligjente audiovizuale.
8. Bashkangjitur filteri i ri, dixhital i kombinuar, i cili e bën imazhin e qartë. Teknika e brendshme 3D i gërshetimit mund
të eliminoi plotësisht ankthin e ekranit të shkaktuar nga sinjalet gërshetues.
9. Posedon funkcionim të shkëlqyer pë tajming, kështuqë mund ta caktoni kohën për çkyçje.
10. Po ashtu, do të çkyçet nëse nuk ka sinjal.
11. I menaxhuar automatikisht, i përshtatur për pajisje telekomand.
12. Funkcionim automatik për rregullim për t`ju ndihmuar të vëni pamje me perfomanca më të mira për disa sekonda në
regjim VGA.
13. Teknologjia e rregullimit automatik të ballansit të ngjyrave i mundëson televizorit tuaj që të vëndos ngjyra më të mira
për të gjitha llojet e adapterave për shfaqe në regjim VGA.
14. Teknika automatike për zvogëlimin e zhurmës në masë të madhe mund ta eliminojë zhurmën e pasme të shkaktuar
nga përzierja e menus dhe zhurmën e shkaktuar nga sinjalet e dobëta me qëllim që të bëhet pamja e qartë e
ekranit.
15. Mbështetje për USB interfejs.
16. Mbështetje për H.264 FULL HD resiverin dhe mbështet PVR funkcionalitetin.
17. Ultra-i hollë dhe dizajn super të ngushtë.
Page 26
24
ALB
Kujdes Veni re
Mund të rezultojë me
ngjarje të pakënaqura
Tregon sjellje për të cila doemos duhet ndaluar
Mund të rezultojë me dëmtim
personal ose humbje të pasurisë
Tregon operacione të cilat doemos duhet të
kryhen
KUJDES PËR SIGURIM DHE INFORMACIONE
Ju faleminderit për zgjedhjen tuaj të LED televizorit me sfond LED ndriçim të përpunuar nga kompania jonë, produkt
i vlefshëm me cilësi të shkëlqyera dhe më shumë karakteristika. Ky TV do t’ju sjellë më shumë kënaqësi audiovizuale.
Dizajni i tij mund të garantojë sigurinë e përdoruesit. Të gjitha televizorët testohen rreptësisht para se të del nga fabrika.
Por përdorimi i pavend mund të rezultojë në goditje elektrike ose zjarri. Për të siguruar sigurinë dhe jetëgjatësinë, ju
lutem lexoni manualin para përdorimit dhe ndiqni udhëzimet e mëposhtme të sigurisë. Ju lutemi ruani manualin për të
përdorim të më vonshëm.
KUJDES
• Ndërprerja e rrymës elektrike ose tensioni jostabil.
• Zë apo erë jo normale nga pajisje.
• AC kablloja është e dëmtuar.
• TV-seti është i dëmtuar nga ramja, goditja ose shtypja
• Lëng ose diçka tjetër e future në TV-setin.
• Të përdorën burime elektrike vetëm prej 100-240VAC 60/50Hz.
• Kjo TV pajisje doemos duhet të kyçet me prizë të murit me tri hyrje, përshkak të sigurimit.
• Të gjitha kabllot mund të lidhën ose të tërhiqen vetëm nëse furnizuesi me energji elektrike është i çkyçur.
• Mos e vendosni televizorin në pozicion jostabil, ose në vend tjetër që mund të shkaktohet ramje, dëmtim ose
zjarr.
• Mos e vendosni televizorin në mjedisin jetësor:
1. Direkt në rreze dielli, lagështi dhe nxehtësi të madhe, temperatura të ftohta apo pluhur;
2. Me supstanca zjarri apo eksplozivi;
3. Me gaz zjarri apo korozin;
4. Në banjo, kuzhinë etj.
• Mos përdorni prizë të dëmtuar ose të parregulltë dhe të jeni të sigurt se në mënyrë të rregullt jeni kyçur me
rrymen elektrike.
• Ruajeni kyçsin dhe prizën pa pluhur dhe pjesëza metalike.
• Mos e dëmtoni kabllon furnizuese:
1. Ndalohet riaprimi i kabllos furnizuese;
2. Mos leni mjete të rënda në afërsi të kabllos për furnizim;
3. Ruajeni kabllon për furnizim larg nga burimet e nxehtësisë;
4. Mos e tërhiqni kallon kur është e çkyqur.
• Mos kyçni shumë aparate në një kabllo për furnizim, sepse ajo mund të shkaktojë zjarr përshkak të harxhimit
të madhë të energjisë.
• Mos lejoni flakë të hapur (p.sh. qiri), për të ardhur më afër në TV, pasi kjo mund të shkaktojë goditje elektrike
ose zjarr.
• Mos vëni enë të mbushur me ujë në pajisjen, për të shmangur goditjen elektrike ose zjarrin e shkaktuar nga
pikat e ujit.
• Mos bëni birë me objekt të mprehtë, i metalt apo lëngët në lidhësin e sinjalit apo hapjet e ajrit, për t`iu
shmangur lidhjës së shkurtër dhe dëmtimit të produktit, si dhe shokut elektrik.
• Hapjet e kutisë janë të dizajnuara në mënyrë që të lejojë lirimin e ngrohjes, për të siguruar që të gjithë
komponentët të mos arrijnë temperaturë shumë të lartë dhe mund të punojnë normal në kohë më të gjatë.
Menjëherë çkyçe
televizorin, Nxjerre kabllon
prej rrymës dhe kontaktoni
personin e autorizuar për
mirëmbajtje.
Nëse rrjedh gaz karboni ose gaze të tjera të ndezshme, mos e shkëputni kabllon nga TV ose pajisje të tjera
elektrike; në vend të kësaj, menjëherë mbyllni vintilin e gazit dhe hapni dyert dhe dritaret.
Me kushtet vijuese:
Page 27
25
ALB
VËNI RE
Montimi dhe lidhja
Përmbajtja e amballazhës
Montimi i televizorit
• Mos lejoni fëmijët të ngjiten mbi televizor.
• Ruani pajisjet e vogla nga të prekurit e fëmijëve, për t`i shmangur gëlltitjes.
• Nëse televizori juaj nuk do të përdorët për një kohë të gjatë, Ju lutemi fikeni ate dhe largoje kabllon e furnizimit
me rrymë nga priza.
• Para pastrimit të televizionit, largo kabllon e energjisë dhe fshijë me një leckë të butë; mos përdorni reagentse
kimike dhe shmanguni substancave të tjera që hyjnë në pajisje. Pastrim të parregulltë (siç është pastrimi me, ujë, etj.)
mund të dëmtojë pamjen e produktit, fshirjes informacionin shtypura të produktit, madje lëngu mund të depërtojë në
televizor dhe t`i dëmtojë komponentët televizive dhe të shkaktoi dëme telivizorit që të mos ketë pamje.
• Për të rregulluar pozicionin apo këndin e televizorit, Ju lutemi të hiqni nga priza të gjitha kabllot dhe lëvizni
ngadalë.
• Ekrani nuk mund të fshihet me objekt të fortë, për të mos gërvishet ose shtypet.
• Mos e përdorni televizorin menjëherë pas transferimit të tij nga një vend me temperaturë të ulët, në një vend
me temperaturë të lartë, sepse kjo do të shkaktojë defekte të brendshme, mjegullim.
• Nëse ekrani është thyer dhe mbi lëkurën tuaj bien pikat të lëngshme, ju lutem menjëherë brenda 15 minutash
t`i lani me ujë të pastër dhe të shkoni për kontrollë te mjeku juaj.
• Për të transferuar me duar televizorin, ju lutem kapeni në qoshet dhe mbanie fundin; Asnjë forcë mos përdor
ndaj panelit.
• Për të shfaqur pamjen e njëjtë për një kohë më të gjatë apo pamje aktive me fjalë fikse, në ekran do të shfaqet
ikona “Pamje të qëndrueshme”, që një kohë të gjatë nuk do të zhduket pas çkyçjes. Ky fenomen i padëshiruar nuk
është i mbuluar garancion.
• Shikim të shëndetshëm të televiziorit:
1. Shikoni me shkëlqim të duhur; një kohë të gjatë shikimi në dritë të ulët mund t`i dëmtojë sytë .
2. Nëse përdorën kufje, përshtatni fuqinë përkatëse të zërit për të shmangur dëmtimin e dëgjimit tuaj
• Çkyçe kabllon për furnizim me energji elektrike në pajisjen për të ndërprerë furnizimin me energjisë elektrike.
• Në qoftë se përdorët en-kabllo apo T-zhvillues për çkyçje të pajisjes duhet të siguroni përdorim të lehtë.
• Kablloja duhet fortë të lidhet. Lidhjet e lirshme mund të shkaktojnë shkëndia dhe zjarr.
• Të gjitha specifikimet teknike në udhëzim manual dhe paketim janë subjekt për të ndryshuar pa paralajmërim. Nëse
ka një devijim të vogël në mes të manualit të udhëzimeve dhe procedures së vërtetë, e dyta do të merret parasysh.
Ju lutem mos i mbuloni hapjet. Mos e prekni prizën me duar të lagura, pasi kjo mund të shkaktojë goditje
elektrike.
Mos e kyç televizorin kur ka bubullima; në vend të kësaj, largo furnizuesin e energjisë elektrike nga prize dhe
largoni antenën nga rrjeti për t`iu shmangur goditjës nga rrufeja.
Mos e çmontoni vetë TV sepse ajo mund të shkaktojë goditje elektrike ose zjarr. Kontaktoni personelin e
kualifikuar të mirëmbajtjes.
1. Televizor. 2. Doracak për përdorim 3. Telekomanda.
4. Kabllo për furnizim (ose është e bashkangjitur me televizorin). 5. Kabllo komponental për transfer (Opcioni)
• Televizori duhet të jetë i vendosur në afërsi të prizës për rrymë për kyçje dhe çkyçje të saj të lehtë.
• Për sigurimin tuaj, Ju lutemi, zgjidhni mbështetje përkatëse të murit ose shtresë të poshtme.
• Që t`u largohuni lëndimeve është e nevojshme që televizorin ta vendopsni në sipërfaqe stabile, ose fortë ta forconi në mur.
• Angazhoni personel të kualifikuar që ta përforcojnë televizorin në mur. Montimi joadekuat mund të rezultojë me televizor
jostabil.
Page 28
26
ALB
Montimi në mur
Ventilimi
Qarkullimi i ajrit i penguar
Qarkullimi i ajrit i penguar
Muri
Muri
Montimi në shtresë
• Ju lutem vini re këtë hapësirë të paktën në
lidhje me televizorin, siç tregohet në foto .
• Të mos mbulohen hapjet për ajrim dhe të
mos lihet pranë tyre asnjë gjësend.
• Të mos vëhet në vend të kufizuar, psh. raft për
libra ose shkafi i bashkangjitur, përpos nëse
televizori ka ventilim të rregulltë.
KËSHILLA PËR INSTALIM
Lidhja e pajisjeve periferike
Ju mund të lidheni pajisje të ndryshme në TV dhe të shikoni imazhe me cilësi të lartë. Nëse pajisja video ka një HDMI,
AV, dhe porte kompjuterike dhe të tjera dalje / hyrje, ju mund të zgjidhni një prej tyre dhe ta lidhni ate në hyrjen e duhur
apo portin e prodhimit në TV. Pas lidhjes, shtypni butonin “SOURCE”, pastaj në ekran do të shfaqet një meny e sinjaleve
burimore. Shtypni butonat “ ” dhe “ ” për të zgjedhur sinjalin hyrës dhe shtypni “OK” për të konfirmuar. Metoda e
lidhjes është treguar në figurë.
Vërejtje:
1. Kur lidhet me pajisje me funkcion MHL, Ju lutemi zgjedhni HDMI1si sinjal hyrës burimor.
2. ARC funkcioni është opcion, andaj Ju lutemi ta përcjellni pajisjen.
3. Interfejsi COMPONENT është opcion, andaj Ju lutemi ta shikoni pajisjen.
4. Kur ka interfejs COMPONENT, kompenenta dhe AV e ndajnë interfejsin AUDIO-IN.
5. Pajisja periferike dhe kabllot të përshkruara në këtë doracak për përdorim, duhet ndaras të merren.
• Mos e vendosni televizorin në vende që janë të ndishme në vibracionin mekanik.
• Mos e vendosni televizorin në vend ku mund të hyjnë insektet.
• Të mos vendoset televizori në vend kundrejt erkondishës, sepse në panelin e brendshëm mund të shkaktohet lagështi
dhe të vijë deri te defekti.
• Të mos vendoset televizori në vend me fushë të fuqishme magnetike, sepse i njejti mund të jetë i penguar dhe i
dëmtuar përshkak të valeve elektromagnetike.
Page 29
27
ALB
Afër prizës
(100-240VAC 60/50Hz)
E verdhë (kabllo me video sinjal)
E bardhë (AUDIO-kabllo për sinjal të majtë)
E kuqe (AUDIO-kabllo për sinjal të djathtë)
USB interfejs
Porta për dëgjueset
Video kabllo
YPbPr/YCbCr kabllo
VGA
kabllo
Lidhja me pajisje AV me
interfejs HDMI
Celular ose pajisje tjetër me
funkcion MHL
Lidhja e pajisjeve
audio me funkcion ARC
Lidhja e pajisjeve me AV interfejs
dalse (psh.. DVD, VCR, konzoll pë
lojra)
Lidhja e pajisjeve me
YPbPr/YCbCr output interface
HDMI kabllo sinjali
MHL kabllo sinjali
Audio kabllo
HDMI kabllo sinjali
HDMI kabllo sinjali
Audio kabllo
Kabllo rryme
Lidhja e furnizuesit
Lidhja me antenën
Lidhja me hyrjen VGA
Lidhja me hyrje HDMI
Lidhja me hyrje YPbPr/YCbCr
Lidhja me funkcion MHL
Lidhja me hyrje AV
Lidhja me funkcionin ARC
Kur lidh antenë të jashtme me porten për sinjal të
televizorit, ju lutemi së pari fikni furnizuesin kryesor
të televizorit. Mos e afroni antenën e jashtme në
vijën e furnizimit me energji elektrike me tension të
lartë, në mënyrë që të shmanget goditja elektrike.
Antena e lidhur me televizorin duhet të jetë e izoluar
me mbrojtëse adekuate, sepse përndryshe ajo do të
shkaktojë zjarr ose rreziqe të tjera.
R
Kujdes
32”/40”
Page 30

28
ALB
43”
Kabllo koaksiale
Lidhu me audio-përforcues me
interfejs koaksial
Lidhje e jashtme – koaksiale
Portë për CL-kartelë
E verdhë (kabllo me video sinjal)
E bardhë (AUDIO-kabllo për sinjal të majtë)
Portokall (kabllo me sinjal koaksial)
E kuqe (AUDIO-kabllo për sinjal të djathtë)
R
Lidhja me hyrje YPbPr/YCbCr
Lidhja e pajisjeve me
YPbPr/YCbCr output interface
Video kabllo
Audio kabllo
YPbPr/YCbCr kabllo
Lidhja e pajisjeve me AV
interfejs dalse (psh.. DVD, VCR,
konzoll pë lojra)
HDMI kabllo sinjali
HDMI kabllo sinjali
HDMI kabllo sinjali
Audio kabllo
Lidhja me hyrje HDMI
Lidhja me hyrje AV
Vërejtje:
1. Kur lidhet me pajisje me funkcion MHL,
Ju lutemi zgjedhni HDMI1si sinjal hyrës
burimor.
2. ARC funkcioni është opcion, andaj Ju lutemi
ta përcjellni pajisjen.
3. Interfejsi COMPONENT është opcion,
andaj Ju lutemi ta shikoni pajisjen.
4. Kur ka interfejs COMPONENT, kompenenta
dhe AV e ndajnë interfejsin AUDIO-IN.
5. Pajisja periferike dhe kabllot të përshkruara
në këtë doracak për përdorim, duhet
ndaras të merren.
Lidhja me pajisje AV me
interfejs HDMI
Porta për
dëgjueset
USB1 interfejs
USB2 interfejs
Page 31

29
ALB
Celular ose pajisje tjetër me
funkcion MHL
Afër prizës
(100-240VAC 60/50Hz)
VGA kabllo
HDMI kabllo sinjali
MHL kabllo sinjali
Kabllo rryme
Lidhja e furnizuesit
Lidhja me antenën
Lidhja me hyrjen VGA
Lidhja me funkcion MHL
Kur lidh antenë të jashtme me porten për sinjal të televizorit, ju lutemi
së pari fikni furnizuesin kryesor të televizorit. Mos e afroni antenën
e jashtme në vijën e furnizimit me energji elektrike me tension të
lartë, në mënyrë që të shmanget goditja elektrike. Antena e lidhur
me televizorin duhet të jetë e izoluar me mbrojtëse adekuate, sepse
përndryshe ajo do të shkaktojë zjarr ose rreziqe të tjera.
Kujdes
Lidhja me funkcionin ARC
Lidhja e pajisjeve
audio me funkcion ARC
Butonat panele kontrolluesë
1. LED indikatori për furnizim dhe dritare përpranim të
pritjës së largët.
2.
Stendbaj: Të kyçet në TV ose të kthehet në stendbaj.
3. MENU (
): Shtypni këtë buton që të ktheheni në menun
kryesore.
4. VOL-, VOL+ (
): Shtypni këta butone për ta
zmadhuar ose zvogluar zërin. Në OSD menu, shtypni
të dy butonat për përshtatshmëri të vlerës analoge të
elementit të zgjedhur, të cilët i kanë të njëjtat funkcione si
t / u butonat e telekomandës.
5. CH-, CH+ (
): Shtypni këta dy butone për të
zgjedhur kanal. Në OSD menu, shtypni të dy butonat
për përshtatshmëri të parametrat, të cilat i kanë të njëjtat
funkcione si t / u butonat e telekomandës
6. SOURCE (
): Shtypni këtë buton që të hyni në menun
e sinjalit burimor dhe zgjedhni burimin e sinjalit.
Shënim: Modelet e ndryshme mund të kenë pamje të
ndryshme të jashtme; Ju lutemi merrni pajisjen e vërtetë.
32”/40”
Page 32

30
ALB
Telekomanda
Metoda e instalimit të baterisë së telekomandës
Masat e kujdesshmërisë për përdorim të telekomandës
Hapeni kapakun e kutisë së baterive dhe vendosni dy AAA bateri prej 1,5 volt në përputhshmëri me polaritetin e kutisë
së baterive të telekomandës.
1. Kur e përdorni telekomandën ju duhet ta drejtoni kah dritarja induckive për kontrollë të largët. Objektet në mes të
telekomandës dhe dritarës induktive mund të pengojë funksionimin normal.
2. Telekomanda nuk mund të ndikohet nga vibracionet. Përveç kësaj, nuk do të vendosni apo vënë telekomandën në
rrezet e diellit direkte, sepse nxehtësia do të shkaktojë shtrembërim të telekomandës.
3. Kur dritarja induktive për komandim të largët të televizorit është nën rrezet e diellit direkte apo ndriçim intensiv,
komanda e largët nuk do të punojë, pra, Ju lutemi të ndryshoni kendin e ndriçimit apo televizorin, apo t’i dritaren
induktive për të vepruar me telekomandë.
4. Kur tensioni i baterisë është i pamjaftueshëm, ajo ndikon në distancën e telekomandës, kështu që ju duhet ta
zëvendësoni atë me një bateri të re; kur nuk e përdorni telekomandën për një kohë të gjatë apo bateria është e
zbrazët, ju lutem hiqni baterinë për të parandaluar rrjedhjen e baterisë duke shkaktuar dëme telekomandës dhe për
këtë arsye ajo nuk do funksionoi.
5. Mos përdorni bateri të ndryshme. Përdorimi i kombinuar i baterive të vjetra dhe të reja nuk është e lejuar dhe duhet
të përdorni të njëjtën lloj të baterive.
6. Mos i hidhni bateritë në zjarr, rimbushni ose shpërbëni, në veçanti të mbushen, të palosen dhe të çmontohen ose
djegie e baterive të përdorura. Ju lutem ndiqni dispozitat për mbrojtjen e mjedisit për hudhjen e baterive.
43”
1. LED indikatori për furnizim dhe dritare përpranim të pritjës së largët.
2.
Ndërprerësi i energjisë (opsional): Shtyp skajin „I“ për ta ndezur, dhe „O“ për ta fikur.
3. SOURCE (
): Shtypni këtë buton që të hyni në menun e sinjalit burimor dhe zgjedhni burimin e
sinjalit.
4. CH-, CH+ (
): Shtypni këta dy butone për të zgjedhur kanal. Në OSD menu, shtypni të
dy butonat për përshtatshmëri të parametrat, të cilat i kanë të njëjtat funkcione si t / u butonat e
telekomandës.
5. VOL-, VOL+ (
): Shtypni këta butone për ta zmadhuar ose zvogluar zërin. Në OSD menu,
shtypni të dy butonat për përshtatshmëri të vlerës analoge të elementit të zgjedhur, të cilët i kanë të
njëjtat funkcione si t / u butonat e telekomandës.
6. MENU (
): Shtypni këtë buton që të ktheheni në menun kryesore.
7.
Stendbaj: Të kyçet në TV ose të kthehet në stendbaj.
Shënim: Modelet e ndryshme mund të kenë pamje të ndryshme të jashtme; Ju lutemi merrni pajisjen e vërtetë.
Page 33

31
ALB
Instrukcione për butonat e telekomandës
Vëni re: Pamja e telekomandës mund të jetë ndryshe nga kjo në foto, përshkak të praktikimit.
Emri Përshkrimi i funkcionit
POWER ( )
Butoni për kyçje, çkyçje ose regjim stendbaj.
WIDE (16:9) Butoni në raport me fotografinë.
MUTE (
)
Ndalni zërin kur shihni program.
Numerical Numri hyrës.
F1 Kyçje dhe çkyçje për ngrirje të fotografisë.
Channel list (
)
Pasqyra e listës së kakanleve.
SMART S Zgjedhje intelekte të regjimit të zërit.
SMART P Zgjedhje intelekte të regjimit të fotografisë.
Cursor key
(
, , , )
Lëvizni me shigjetat lart/posht/majtas/djathtas në menun
kryesore ose ta ndërroni datën e EPG.
OK Për konfirmim të funkcionit rrjedhës.
VOL+/VOL- Shtypni për përshtatshmëri të fuqisë së zërit.
MENU Shtypni këtë buton për t`u shfaqur menuja.
SOURCE
Shtypni këtë buton për të shfaqur menunë për zgjedhjen
e sinjalit.
CH+/CH-
Butone për të ndryshuar kanale. Për të ndryshuar faqe të
ndryshme në një kanal të rrjedhës EPG
INFO Ekrani informative për programin rrjedhës.
REC Program për inçizim.
Return (
)
Shtyp këtë buton për t`u kthyer në kanalin paraprak që e
keni parë.
L/R Selekcionimi i regjimit NICAM (nën ATV burim të sinjalit)
INDEX (
)
Në regjimin DTV, shtypni butonin ''INDEX'' për shfaqe të
listës të programeve të inçizuara.
ZOOM (
)
Në regjimin DTV, shtypni ‘’ZOOM’’ për të rritur raportin
kur ekran është me shfaqe grafike; Kur nuk ka shfaqe
grafike, dhe porta USB është i lidhur me memorinë, shtypni
‘’ZOOM’’ për shtyrjen e transmetimit të programeve
televizive që janë shfaqur aktualisht.
REVEAL (
),
TTX ( ),
HOLD ( ),
LIST ( ),
LANGUAGE ( ),
RADIO ( )
Për përdorim të teleteksit ose USB.
Red key Butoni i kuq me shumë funkcione.
SUBTITLE
(Butoni i gjelbërt)
Butoni i gjelbërt i teleteksit apo shfaqe e përkthimit kur
kanali rrjedhës ka opcion për përkthim.
FAV (Butoni i verdhë)
Teletext butoni i verdhë ose butoni i preferuar për të
vendosur ose të shihni programet tuaja të preferuara.
EPG (Butoni i kaltërtë)
Teletext butoni i kaltërtë, ose për të shfaqur udhëzuesin
elektronik i programit për kanalin rrjedhës për kohën të
statusit pa menu
Page 34

32
ALB
Udhëzim për telekst të telekomandës
TeleText: Shtyp butonin ‘’Teletext’’. Ndërrohen 3 regjime: Ekran i përzier > Tekst regjimi > Teletekst e çkyçur.
Thereinto: Tekst regjimi është zgjidhur automatikisht. Në mënyrë automatike, sistemi automatikisht selekton LART, teksti
shpejtë, ose mënyrën standarde, sipas nevojës, varësisht nga të dhënat e marra. Në tekst regjim ose ekran të përzier
numër pritinete 0 ~ 9 butoni “/’’ për të zgjedhur anën tekstuale.
Reveal: Shfaqe e të gjitha shenjave të fshehura në afat prej 6 sekonda.
Hold: Mbaj të kyçur apo të çkyçur faqen rrjedhëse në ekran. Nëse faqja nuk është ruajtur, ajo do të bëhet e ruatur, duke i
penguar të njëjtat që të jenë të azhuruara. Kur faqeje është ruajtur aktualisht, ruajtja do të hiqet me çka do të mundësojë
që faqeja të azhurohet. Kur faqeja është ruajtur, kjo tregohet nga urdhëres Hold.
Index: Në regjimin teksti i shpejtë, kërkon faqe të indeksuar, nëse lidhja e indeksuar është valide, apo nëse Paketi
8/30 e faqës fillestare është valide,ose faqeja 100. Në regjimin LART, nëse Hitlist opcioni është i mundur, realizohet
ndryshimi i sistemit në mes të faqës rrjedhëse tekstit dhe menus Hitlist; bë të kundërtën kërkon faqen 100. Në regjim
Listën, e rivendos listën të faqeve paraprakisht të dhëna ose të kanalit rrjedhës ashtu siç është lexuar nga EEPROM, nëse
është bashkangjitur ose e listës standarde (faqet 100, 101, 102, 899), dhe e kërkon faqen e parë të listës. Në regjimin
Standarde e kërkon faqen e parë Paket 8/30 nëse është valide, ose faqa 100.
List: Bën zgjedhje në mes të regjim Listës dhe regjimit momental (Teksti i shpejtë, LART ose Standarde).
Red, Green, Yelloë, Blue: Kërkon faqe të lidhur në bllokun e shfaqeve sipas regjimit parritjës. Në regjimin TOP Hitlist,
selektohet e kuqeja, e gjelberta dhe e kaltërta e kontrollës komanduese nga menuja Hitlist, ndërsa komanda e verdhë
injorohet.
Instrukcione të përgjithshme për përdorim
Kyçur
Stendbaj
Foto. 1 Foto. 2
Para kyçjës së platformës, Ju lutemi siguroheni është stabil furnizuesi dhe se kablloja e antenës është mirë e lidhur.
Futeni kabllon në prizë. Shtypni butonin „
“ e telekomandës apo të televizorit për ta kyçur televizorin. Në ekran
shfaqet menuja „Ju lutemi zgjedhni OSD gjuhë“‘ (Foto.1), shtypni butpnin „//t/u“ e telekomandës për
ta zgjedhur gjuhën të cilën Ju e dëshironi, pastaj e shtypni butonin „OK“ të telekomandës për ta konfirmuar
selektimin, në ekran shfaqet „Zgjedhja e tipit DVB“. Shtypni butonin „/“ e telekomandës për të zgjedhur tipin e
DVB të dëshiruar, e pastaj shtypni butonin „OK“ për hapin e ardhshëm (Foto. 2). (Shembulli vijues kanali në kërkim
të tip DVB është nën DVB-T). Shtypni butonin „t/u“ për të zgjedhur llojin e hapjës: DTV + ATV, ATV, DTV, dhe
shtypni butonin „“. Ju mund të selektoni vendin ku jeni, me shtypjen e „//t/u“ pastaj shtypni butonin „OK“
për konfirmim dhe televizori do filloi me hapje automatike.
Shtypni butonin “
” në telekomandë dhe televizori do të jetë në qëtësi (ashtuquajtur. regjim stand by).
Kujdes i veçantë:
1. Televizori në mënyrë automatike do të përcillet në regjim stand by nëse mbrenda 5 minutave nuk ka sinjal hyrës pas
kyçjes së televizorit.
2. Televisori në mënyrë automatike do të transferohet në regjim stand by pasi të kaloj koha e caktuar për çkyçje.
3. Nëse nuk e shfrytëzoni një kohë më të gjatë, çkyçeni televizorin nga rryma elektrike.
Mos lejoni që televizori të punojë në regjimin stand by për kohë më të gjatë.
OK: Enter
Please select an OSD Language
Eng lish
Cro atian
Dut ch
Rus sian
Ara bic
Far si
Spa nish
Ita lian
Fre nch
Ger man
Por tugue se
Pol ish
Tune Type
Germany
MENU: Return
Greece
Hungary
DT V + ATV
Netherlands
Norway
Poland
Italy
Ireland
Luxembourg
Page 35

33
ALB
Shtypni butonin „SOURCE (Burim)” ose në telekomandë ose në panel. „Burim hyrës“ do të paraqitët në ekran
(Fotografia.3). Pastaj shtypni butonin „/“ në telekomandë ose butonin „CH+/CH-“ në panel që të zgjedhni burim të
sinjalit. Shtypni butonin „OK“ (Në rregull) në telekomandë dhe televizori do ta kyç burimin e sinjalit rrjedhor në burimin
që ju keni përzgjedhur. (Verejtje: sinjali burimor н YPbPr është opsion dhe ju lutemi që ti referohen pajisjes.)
1. Shtypni butonin „MENU (MENY)” në telekomandë ose në panel. Në ekran do të paraqitet menyja kryesore (Foto.4).
2. Shtypni butonin„t/u“ në telekomandë ose butonin „VOL+/VOL-“ në panel që të zgjedhni menynë të llojit të
përshtatjes, e cila përfshin 6 lloje: KANAL, FOTOGRAFI, ZËRI, OPSIONI, KOHA, MBYLLJA.
3. Shtypni butonin „ /“ në telekomandë ose butonin „CH+/CH-“ në panel që të zgjedhni çdo gje që eshtë e
nevojshme për t’iu përshtatur llojit të menysë .
4. Shtypni butonin „OK“ në telekomandë që të vendosni ose të hyni në menynë e rradhës.
5. Shtypni butonin „MENU“ që të dilni nga menyja kryesore atëherë kur televizori e paraqet menynë kryesore; Shtypni
butonin „MENU“ që të ktheheni në menynë e meparshme atëherë kur televizori paraqet nënmeny; Shtypni
butonin „SOURCE“ që të paraqitet meny me sinjal burimi.
6. Përgjatë punës, të zgjedhurat të cilat nuk mund të përshtaten në regjimin vijues do të jenë automatikisht të fshehura
dhe ngjyra e të zgjedhurave do të ndryshojë në ngjyrë të kaltër.
7. Udhëzimi për përdorim me meny në këtë manual është sqaruar në pajtueshmëri me regjimin e televizorit. Përdorimi
në regjimet tjera është i ngjashëm me atë të regjimit të televizorit. Shfrytëzuesit mund ta marrin të njejtën si
referencë.
8. Vërejtje: Butonet “ //t/u’’ në këtë manual kanë të bejnë me kahjen e butoneve të telekomandes, përvec nëse
janë të definuara konkretisht. Instrukcionët operative të dhena më poshtë në tekst janë të gjitha të bazuara në
butonet e telekomandes. Ju lutemi, ti kuptoni vetë butonet e panelit.
Shtypni butonin „MENU“ dhe paraqitet në ekran menyja KANAL (Foto.4). Shtypni butonin “/” që të zgjedhni
parametrin të cilin dëshironi ta përshtatni ose vendosni.
Konfigurimi automatik
Shtypni butonin „MENU“ dhe paraqitet në ekran menyja KANAL shtypni butonin
„/“ që të zgjedhni konfigurim automatikë. Shtypni butonin „OK“, në ekran paraqitet
„Zgjedhni llojin DVB“; shtypni butonin „/“ në telekomandë që të zgjedhni lloj të DVB
që e deshironi, pastaj shtypni butonin „OK“ për hapin e rradhës (Foto 2). (Shembulli i
rradhës për kërkim të programit nga lloji DVB është nën DVB-T). Shtypni butonin „t/u“
që të zgjidhni llojin e konfigurimit DTV + ATV, ATV, DTV, dhe shtypni butonin „“ dhe
mund të zgjedhni vendin në të cilin gjindeni, duke shtypur „//t/u“ , e pastaj shtypni
butonin „OK“ që të përdëftoni zgjedhjen dhe televizori do të filloj mejonfigurimin
automatikë (Foto.5). Përgjatë konfigurimit automat, mund ta shtypni butonin „MENU“ që
të ktheheni dhe dilni nga konfigurimi automatikë.
Zgjedhja e sinjalit burimor
Udhëzim për t`u drejtuar me menun
KANAL
Foto. 3 Foto. 4
Foto. 5
Input Source
DTV
AV
YPB PR
HDM I 1
HDM I 2
VGA
USB
ATV
OK:Enter
Auto Tu ning
CHANNEL
DTV Manual Tuning
ATV Manual Tuning
Programme Edit
Signal Information
OK: Enter
MENU: Return
1 %... 63.25 MHz
MENU
Exit
Channel Tuning
ATV
DTV
Radio
Data
0 Programme(s)
0 Programme(s)
0 Programme(s)
0 Programme(s)
:
:
:
:
Page 36

34
ALB
Konfigurimi manual DTV
Shtypni butonin „MENU“ dhe paraqitet menuja KANAL në ekran.shtypni butonin
„/“ që të zgjedhni konfigurimin manualë DTV . Shtypni butonin „OK“ që të
hyni në DTV. Manual për menynë e konfigurimit (Foto.6). Shtypni butonin „t/u“
që të zgjedhni kanal, e pastaj shtypni butonin „OK“ që të përformohet kërkimi.
Pas kërkimit, DTV Manuali për meny për konfigurim manualë paraqitet në
mënyrë automatike.
Konfigurimi manual ATV
Shtypni butonin „MENU“ dhe paraqitet menyja KANAL: në ekranë. Shtypni
butonin „/“ që të zgjedhni konfigurim manual ATV. Shtypni butonin „OK“
që të hyni në ATV Manualin për menynë e konfigurimit (Foto.7). Shtypni butonin
„/“ që të zgjedhni programin vijues, Shtypni butonin „t/u“ që të zgjedhni
program që ju e deshironi, pastaj zgjedhni Search (Kërko), pastaj shtypni
butonin „t/u“ që të përformoni konfigurimin manual. Pas kërkimit mund ta
ruani programin e kërkuar në pozicion tjetër. Në këtë moment, shtypni butonin
„/“ që të zgjedhni Storage To (Depono në), dhe pastaj shtyp butonin që
të përzgjidhni numrin e programit. Pas përzgjedhjes së Fine-Tune (cilësimit
Fine) shtypni butonin „t/u“ që të rregulloni prej frekuences së ulet në të lartë.
Përgjatë kërkimit manual, poashtu mund të shtypni butonin „MENU“ që ta
ndaloni kërkimin dhe të ktheheni në menynë e fundit.
Rregullimi i programit
Shtypnin butonin „MENU“ dhe paraqitet menyja KANAL në ekran. Shtypni
butonin „/“ që të zgjedhni Programme Edit (Rregullimi i programit). Shtypni
butonin „OK“ që të hyni në menynë e rregullimit të programit (Foto.8), pastaj
Shtypni butonin „/“ që të zgjedhni programin që doni ta rregulloni.
Fshij: Kur ta përzgjedhni programin, shtypni butonin „Red (E kuqe) që ta fshini.
Zhvendos: Pas përzgjedhjes se programit, shtypni butonin „Green“(E gjelbert)
„/“ që të zgjedhni pozicionin e programit në të cilin dëshironi ta zhvendosn,
pastaj shtypni butonin „OK“ për përdëftim. Mund të shtypni butonin „MENU“që
të ktheheni në menynë e fundit.
Të preferuara: Pas përzgjedhjes së program, shtypni „Yellow (E verdhë),
ikona Favourite (Të preferuara) paraqitet pas programit të zgjedhur, përseri
shtypni butonin „Yellow“që ta anuloni të njejtin. Shtypni butonin „MENU“ që të
ktheheni në menynë kryesore.
Kapërce: Pas përzgjedhjes se programit, shtypni butonin „Blue” (I kaltër), ikona
SKIP (Kapërce) paraqitet pas programit që është zgjedhur, përsëri shtypni butonin
„Blue“ që të ktheheni në menynë kryesore.
Informatë për sinjalin
Shtypni butonin „MENU“ dhe paraqitet menyja KANAL në ekran. Shtypni
butonin „/“ që të zgjedhni menynë me informata për sinjalin. Shtypni
butonin „OK“ që të hyni në menynë për informata për sinjalin . Mund ti
shqyrtoni informatat për sinjalet.
Verejtje: Para se ta Shtypni butonin „MENU“, Ju lutëmi së pari të zgjedhni burim
hyrës. Vetëm në regjimin DTV mund ta zgjedhni të njejtin.
Shtypni butonin „MENU“ dhe paraqitet menyja KANAL
në ekran. Shtypni butonin „t/u„ që të zgjedhni PICTURE /
FOTOGRAFIA/ (Foto.9), pastaj shtypni butonin „/“ që të
zgjedhni parametrin që deshironi ta përshtatni ose vendosni.
Regjimi i fotografise: Shtypni butonin „OK“ që të hyni
në nënmenynë Picture Mode (Regjimi i fotografis). Shtypni
butonin „/“ që të zgjedhni artikullin që dëshironi ta
përshtsatni ose vendosni.
FOTOGRAFIA
DTV Manual Tuning
UHF CH 21
Bad
Normal Good
NO SIGNAL
ATV Manual Tuning
Frequ ency 175.25 MHz
Storage To 1
DK
Current CH 1
Search
Fine-Tune
MENU: Return
Save
OK: Enter
1 C-01
2 S-42
3 C-06
4 C-11
5 S-11
6 S-13
7 C-21
8 C-51
MENU: Return
Programme Edit
Delete
Move
Skip
Favourite
ATV
ATV
ATV
ATV
ATV
ATV
ATV
ATV
Foto. 6
Foto. 7
Foto. 8
Foto. 9
Picture Mode User
Color Temperature Standard
Aspect Ratio Full
Noise Reduction Middle
PC Setting
PICTURE
OK: Enter
MENU: Return
Page 37

35
ALB
Shtypni butoni „MENU“ dhe paraqitet menyja KANAL
në ekran. Shtypni butonin që të zgjedhni SOUND/
ZËRI/VOLUMI/ (Foto.10), pastaj shtypni butonin „t/u“
që të zgjedhni parametrin që deshironi ta përshtatni
ose vendosni.
Regjimi i tingullit: Shtypni butonin „OK“ që të hyni
në nënmeny Sound Mode (Regjimi i tingullit). Shtypni
butonin „/“ që të zgjedhni parametrin që deshironi
ta përshtatni ose rivendosni.
Zëri përreth: Shtypni butonin „OK“ që të hyni në nënmeny Surround Sound (Zëri përreth). Shtypni butonin “/” që
të zgjedhni regjim të tingullit: i çkyçur, përreth, SRS Tru Surround XT.
AAD kyçje: Shtypni butonin „OK“ që të hyni në nënmeny AD Switch (AD kyçje). Shtypni butonin “t/u” që të zgjedhni
„On“ose „Off“(„i kyçur“ose „i çkyçur“), kur zgjedhni „On“, mund të përshtatni AD fuqinë e zërit me shtypjen e butonit
“t/u”. (Në dispozicion vetëm në DTV).
ZËRI
Foto. 10
OK: Enter
MENU: Return
Sound Mode Music
Surround Sound Off
AD Switch Off
SOUND
Artikull Funksioni Përshkrimi
Regjimi i
fotografisë
Zgjedhni regjim të fotografise Katër regjime: „Standard“, „I butë“, „Shfrytëzues“, „Dinamik“
Kontrasti
Përshtatja e kontrastit në
gjithe fotografinë
Me zmadhimin e vlerës analoge rritet kontrasti;
Me zvogelimin e vlerës analoge zvogëlohet kontrasti (0~100).
Ndriçimi
Përshtatja e ndricimit dhe të
zezës në fotografi
Me zmadhimin e vlerës analoge rritet ndricimi kontrasti;
Me zvogelimin e vlerës analoge zvogëlohet ndricimi (0~100).
Ngopshmeri
Përshtatja e thellësise së
ngjyrave të fotografisë
Me zmadhimin e vlerës analoge rritet thellesia;
Me zvogelimin e vlerës analoge zvogëlohet thellesia (0~100).
Mprehtësi
Përshtatja e mprehtësise se
tëre fotografise
Me zmadhimin e vlerës analoge rritet definimi;
Me zvogelimin e vlerë analoge zvogëlohet definimi (0~100).
Nuanca
Përshtatja e nijansave e tëre
fotografise. Me zmadhimin e
vleres analoge rritët kontrasti
Me zmadhimin e vlerës analoge rritet ngjyra e gjelbert;
Me zvogelimin e vlerës analoge zvogëlohet ngjyra purpur (0~100).
Parametër Funksioni Përshkrimi
Regjimi i tingullit
Zgjedhni temperaturen e
ngjyrës
Pesë regjime: „Standard“, „Muzikal“, „Filmik“, „Shfrytëzues“.
Tone të larta
Përshtatja e vlerës se
toneve të larta
Me zmadhimin e vlerës analoge rriten tonet e larta;
Me zvogëlimin e vleres analoge zvogelohen tonet e larta (0~100).
Bas
Përshtatja e vlerës se
toneve të ulëta
Me zmadhimin e vlerës analoge rriten tonet e ulëta;
Me zvogëlimin e vlerës analoge zvogëlohen tonet e ulëta (0~100).
Ekuilibrim
Përshtat ekuiliber të zërit të
majtë dhe të djathtë
Me zmadhimin e vleres analoge zvogelohet fuqia e zërit të majtë;
Me zvogëlimin e vlerës analoge zvogëlohen fuqia e zërit të djathtë (L50~R50).
Vërejtje: Nuanca mund të përshtatet vetëm në sistemin NTS.
Temperatura e ngjyrës: Shtypni butonin „OK“ që të hyni në nënmeny Color Temperature (Temperatura e ngjyres).
Shtypni butonin „t/u“ që të zgjedhni regjim të temperatures së ngjyres: Standard, I nxehtë, I ftohët.
Raporti/Krahasimi i fotografise: Shtypni butonin „OK“ që të hyni në nënmeny Aspect Ratio (Raport /krahasim).
Shtypni butonin „/“ që të zgjedhni regjim të krahasimit: Automatik 4: 3, I plotë, Film, Përkthim, PC regjim.
Zvogëlimi i zhurmës: Shtypni butonin „OK“ që të hyni në nënmeny Noise Reduction (Zvogëlimi i shushuritjes/
zhurmes). Shtypni butonin „/“ që të zgjedhni regjim për zvogëlimin e zhurmës: i çkyqur, i ulët, i mesëm, i lartë.
Page 38

36
ALB
Opsion
KOHA
Shtypni butonin „MENU“ dhe paraqitet menyja KANAL
në ekran, shtypnibutonin „t/u“ që të zgjedhni OPTION
/OPSION/ (Foto.11), pastaj shtypni butonin „/“ që
të zgjedhni parametrin që dëshironi ta përshtatni ose
rivendosni.
OSD gjuha: Shtypni butonin „OK“ që të hyni në nënmeny
OSD language (OSD gjuha).Shtypni butonin „//t/u“
që të zgjedhni gjuhën që dëshironi. Shtypni butonin
„MENU” që të ktheheni në menynë e mëparshme.
Verejtje: Metoda e punës se audio gjuhës është e njejtë me
OSD gjuhën (Në dispozicion vetëm në DTV).
Shtypni butonin „MENU“ dhe paraqitet menyja KANALI në
ekran. Shtypni butonin „t/u“ që të zgjedhni TIME /KOHA/
(Foto.13), pastaj shtypni butonin „/“ që të zgjedhni
parametrin që deshironi ta përshtatni ose vendosni.
Ora: Atëherë kur DTV është si burim hyrësora do të jetë e
sinkronizuar me programin televiziv.
Koha e çkyçur: Shtypni butonin „OK“ që të hyni në
nënmeny Off Time /Kohë e çkyçur). Shtypni butonin „/“
që të zgjedhni Kohë e çkyçur, Ora dhe Minuta, pastaj
shtypni „t/u“ që ta vendosni vlerën e kohës për çkyçje, me
çka në mënyrë automatike televizori do të çkyçet në kohën
e zgjedhur.
Vërejtje: Mund të aktivizoni orën dhe minutat vetëm nëse „Off Time“nuk është nën regjimin “Off “.
Koha e kyçur: Shtypni butonin „OK“ që të hyni në nënmeny On Time (Koha e kyçur). Shtypni butonin „/“ që të
zgjedhni Koha e kyçur, Ora dhe minuta, Burim, Kanali, Volumi, e pastaj shtypni butonin „t/u“ që ta aktivizoni vlerën e
kohës per kyçje , me çka në mënyre automatike televizori do të kyçet dhe do të vendoset në regjim sipas zgjedhjes suaj
në Kohën që e keni përzgjedhur.
Koha/Numërues për gjumë: Shtypni butonin „OK“ që të hyni ne nënmeny Sleep Time (Koha e gjumit). Shtypni
butonin „/“ që të zgjedhni Kohën për gjumë: E çkyçur, 10min, 20min, 30min, 60min, 90min, 120min, 180min,
240min.
Zona kohore: Shtypni butonin „OK“ që të hyni ne nënmeny Time Zone (Zona kohore). Shtypni butonin „//t/u“ që
të zgjedhni zonën tuaj kohore. (Në dispozicion vetëm në DTV).
Individë me dëgjim të kufizuar: Shtypni butonin „OK“ që të zgjedhni „On“ose
„Off /„i kyçur“ose „i çkyçur“/. ((Në dispozicion vetëm në DTV
PVR sistem datotekash: Shtypni butonin „OK“ që të hyni në nënmeny PVR File
System /PVR system datotekash/ (Foto.12). Shtypni butonin „/“ që të zgjedhni
“Check PVR File System” („Kontrolloni PVR sistem datotekash“), pastaj televizori
fillon me kontrollin me shtypjen e butonit „OK“. Pas kontrollit të suksesshëm,
shtypni butonin „MENU“ që të dilni nga menyja. Shtypni butonin „REC për incizim.
Verejtjte: Futni U disk faqen ndermjetëse të televizorit para se të komandoni me
funksionin PVR sistem datotekash.
Kthimi i rivendosjes së shfrytëzuesit: Në ekran paraqitet „A jeni të sigurtë?“
me shtypjen e butonit „OK“. Mund ta shtypni butonin „t“ që të vazhdoni me
rivendosje fabrike ose të shtypni butonin „u“ që ta anuloni operacionin në vijim.
Ekran i kaltër: Shtypni butonin „OK“ që të zgjedhni „On“ose „Off“(„i kyçur ose „i çkyçur“). Hapeni ose mbyllen
funksionin Blue Screen (Ekran i kaltërt).
Azhurim i softverit (USB): Azhuronie softverin me U disk.
OSD Language
Audio Language English
Hearing Impaired Off
PVR File System
Restore User Default
Blue Screen On
Software Update(USB)
OPTION
English
OK: Enter
MENU: Return
OK: Enter
MENU: Return
Clock
Off Time Off
On Time Off
Sleep Timer Off
Time Zone Berlin +1
TIME
-- -- -- --
Check PVR File System
Format
Free Record Limit
USB Disk
Time Shift Size
Speed
Start
6 Hr.
Select Disk
C:
Foto. 11
Foto. 13
Foto. 12
Page 39

37
ALB
MBYLLJA
Opsioni për inçizim REC
Shtypni butonin „MENU“ dhe paraqitet meny KANALI
në ekran. Shtypni butonin „t/u“ që të zgjedhni LOCK
(MBYLLJA). Pas shtypjes së butonit „OK“, shtypni butonin
numeric që të vendosni kod adekuat 0000 për hyrje në
meny LOCK (Foto.14), dhe pastaj shtypni butonin „/“
që të përzgjedhni parametër që dëshironi ta përshtatni
ose vendosni.
Sistem për mbyllje: Shtypni butonin „OK“ që të zgjedhni
„On“ ose „Off“, Blok opsioni programor mund të punojë
atëherë kur e njejta është e numëruar .
Vendosja e kodit: Shtypni butonin „OK“, pastaj në ekran parqitet dritare dijalog „Set Password“(Vendose
kodin). Shtypni butonin numerik që të shënoni kodin e vjetër dhe e shënoni dy herë kodin e ri me qëllim që të
performohet ndërrimi i kodit dhe të ktheheni në menynë e fundit. Vërejtje: Ju letemi të jeni të sigurt se do ta
mbani mend kodin tuaj të ri pas ndërrimit. Në të kundërtën, sistemi do të mbyllet përgjithmonë, atëhere kur sistemi
për mbyllje do të jetë i aktivizuar.
Blok Programa: Shtypni butonin „OK“, pastaj në ekran paraqitet menyja „Block Program“ (Blok programa). Shtypni
butonin „/“ që të zgjedhni kanal që dëshironi ta mbyllni dhe pastaj shtypni butonin e gjelbërt për mbyllje dhe
hapje, në fund shtypni butonin „MENU“ që të dilni nga operacioni meny.
OK: Enter
MENU: Return
Lock System
Set Password
Block Program
LOCK
[00:00:29]
14:21
Pla y FB FF FB 30 S FF 30 S Pau se St op
(0003:10:24)
Foto. 14
Foto. 15
Parametri Përshkrimi
Tregon se sistemi e inçizon programin.
Tregon numrin vijues të programit.
Tregon kohëzgjatje të programit të inçizuar.
Tregon kohëzgjatjen më të gjatë që U disku mund ta sigurojë (në pajtueshmëri me kapacitetin e U diskut)
Tregon kohën vijuese të programit.
Play: Zgjidhni këtë ikonë, shtypni butonin „OK“ që të tregohet videoja ose të vendoset A-B përsëritje.
FB: Zgjidhni këtë ikonë, shtypni butonin „OK“ për kthim të shpejtë, shtypni butonin „INDEX“ që të tregojë në mënyrë normale.
FF: Zgjidhni këtë ikonë, shtypni butonin „OK“ për mbështjellje përpara, shtypni butonin „INDEX“ që të tregohet normalisht
FB 30s: Zgjidhni këtë ikonë, shtypni butonin „OK“ që të tregoj 30 sekonda mbrapa.
FF 30s: Zgjidhni këtë ikonë, shtypni butonin „OK“ që të tregoj 30 sekonda para.
Pause: Zgjidhni këtë ikonë, shtypni butonin „OK” për të treguar ose pauzë.
Stop: Zgjidhni këtë ikonë, shtypni butonin „OK“ për ndërprerje dhe braktisje të dritares për reproduktim
Në regjimin DTV, shtypni butonin „REC“ INÇIZIM) dhe
paraqitet në ekran menyja „Opsioni për inçizim“ (Foto.15),
dhe në atë moment sistemi fillon të inçizojë. Shtypni butonin
„REVEAL“ (PARAQIT/TREGO) që të ndaloni dhe braktisni
inçizimin; Pas mbarimit të inçizimit, shtypni butonin „INDEX“
(INDEKS) dhe do të paraqitet lista e materijaleve të inçizuara,
zgjedhni shënimin që dëshironi të tregohet, mund të lexoni
të dhëna për shënimin me shtypjen e butonit “GREEN” (i
gjelbërt) ose ta fshini me shtypjen e butonit „Red“ (i kuq).
Shtypni butonin „OK“ që të tregohet e njejta.
Vërejtje: Funksioni për inçizim mund të suportojë vetëm
pajisje memorike me FAT32 sistem datotekash. Pajisjet tjera
memorike me system datotekash tjerë duhet të jenë të
formatuar; Para se të formatoni pajisjen memorike bëni backup të të dhënave, pasi që përmbajtja e pajisjes memorike nuk
mund të kthehet pas formatimit.
Page 40

38
ALB
Opsinoni kohor me zhvendosje
EPG alternativat
Funksionet hotelerike (alternativat)
Në regjimin DTV, shtypni butonin „ZUM“ dhe në ekran
paraqitet menyja e „Time-shift option“ /Opsion kohor
për zhvendosje/ (Foto.16) dhe programi është në
gjendje të pezulluar. Shtypni butonin „INDEX“ (Indeks)
që të vazhdojë prezantimi i programit. Shtypni butonin
„REVEAL“(Paraqit/Trego) për ndalim dhe braktisje të
opsionit kohor për zhvendosje. Atëherë kur shfrytëzuesi
e braktis programin për kohë të shkurtë, funskioni i
opsionit kohor për zhvendosje mund të ndërpritet dhe ta
kopjojë programin që tregohet në U diskun. Atëherë kur
shfrytëzuesi vazhdon me prezantim, programi mund të
vazhdohet me prezantim.
Në modalitetin DTV, shtypni butonin „EPG“ në ekran shfaqet menuja EPG
alternativat (foto.17). Përdoruesi mund ta ndjek opsionin për më shumë
funksione nëpërmes butonave me ngjyra të kuqe, të gjelbërt, të verdhë dhe të
kaltërtë.
Shtypni butonin „MENU“ në telekomandë që t’u paraqitet “TV Menu” kryesore,
dhe pastaj shtypni „4578“ në telekomandë që t’ju paraqitet menuja e
funksioneve hotelerike. Shtypni butonin „Up/DOWN“ (lart/poshtë) për të hyrë
në menu dhe pastaj përzgjidhni artikullin që dëshironi dhe shtypni butonin
„Left/Right“ (majtas/djathtas) për t`u përshtatur me vlerën ose situatën.
(foto.18).
[00:00:00/00:00:08/01:20:00]
14:23
Pla y FB FF FB 30 S FF 30 S Pau se St op
Time Shift
342
1
Foto. 16
Foto. 17
Foto. 18
Parametri Përshkrimi
Tregon se programi është në gjendje të pezulluar.
Tregon Kohën vijuese të programit.
E tregon Kohën kur programi është i pezulluar
Tregon Kohën më të gjatë të kopjimit që U disku mund ta sigurojë.
Play: Zgjidhni këtë ikonë, shtypni butonin „OK“ për prezantimin e videos ose që të vendoset A-B përsëritje.
FB: Zgjidhni ikonën, shtypni butonin „OK“ për kthim të shpejt, shtypni butonin „INDEX“ për tu shfaqur në mënyrë normale.
FF: Zgjidhni ikonën, shtypni butonin „OK“ për rrotullim të shpejt përpara, shtypni butonin „INDEX“ për tu shfaqur në mënyrë normale.
FB 30s: Zgjidhni ikonën, shtypni butonin „OK“ për tu shfaqur më pas 30 sekonda..
FF 30s: Zgjidhni ikonën, shtypni butonin „OK“, për tu shfaqur më para 30 sekonda.
Pause: Zgjidhni ikonën, shtypni butonin „OK“ për tu treguesi ose pauza.
Stop: Zgjidhni ikonën, shtypni butonin „OK“ për ndalesë ose largim nga dritajrja riprodhuese.
Parametri Përshkrim
Incizim
Shtypni butonin e kuq që të fitoni qaje në nënmeny. Mund
të gjidhni kohë në takim për të inçizuar atë që dëshironi.
Informim
Shtypni butonin e gjelbërt që të mësoni detaje më të
hollësishme mbi programin.
Rënditja
Shtypni butonin e verdhë për të parë parametrat që keni
bërë më parë.
Përkujtuesi
Shtypni butonin e kaltër për të vendosur kohën kur ju
dëshironi t’ ju kujtoj për programin që dëshironi të shihni.
PROGRAMME GUIDE
TIME
Record
Info
Schedule Remind
MENU:Return
31 Aug
14:23
1 DR1
2 DR2
3 Tegnsprogstol...
4 TV 2 (Fyn)
No Information
Folk og fae (32)
Ingen tegnsprogstolkning
Vild med dig
ON
D
Page 41

39
ALB
Funksionet USB Medija
Ju lutemi, fusni një kartë memorike USB në sipërfaqen e USB në
televizor dhe më pas shtypni butonin „SOURCE“ (Burim), pastaj në
ekran do të paraqitet menuja „Input Source“ (burim hyrjeje). Pastaj
shtypni butonin „/“ për të përzgjedhur USB. Shtypni butonin „OK“
për të hyrë në USB (foto .19).
PHOTO MUSIC MOVIE TEXT
USB 2.0
Foto. 19
Ikonica Opis
Play/Pause: Shtypni butonin „t/u“ për ta përzgjedhur këtë funksion, shtypni butonin „OK“ për riprodhim
dhe pushim.
Prev.: Shtypni butonin „t/u“ për ta përzgjedhur këtë funksion, shtypni butonin „OK“, që ta shikoni
fotografinë paraprake.
Next: Shtypni butonin „t/u“ për ta përzgjedhur këtë funksion, shtypni butonin „OK“, që ta shikoni
fotografinë e ardhëshme.
Stop: Shtypni butonin „t/u“ për ta përzgjedhur këtë funksion, shtypni butonin „OK“, për ta ndaluar
riprodhimin dhe të ktheheni në menynë paraprake.
Repeat: Shtypni butonin „t/u“ për ta përzgjedhur këtë funksion, shtypni butonin „OK“ , për të
përzgjedhur Përsërit 1, Përsërit Gjithçka ose Mos përsërit Asgjë.
Vërejtje:
1. USB funksioni përmban format me regjistrim video/zë/grafik dhe tekst. Në disa USB pajisje jo-standarte për ruajtje/,
mund të paraqitet situatë e mosnjohjes. Ju lutem ta zëvendësoni me USB-Standarte për ruajtje
2. Striming medium sistemi për riprodhim të regjistrimeve për çdo format përmban kufizime të caktuara, gjithnjë e më
tepër nga kufinjt e sistemit, atëherë riprodhimi nuk mund të jetë në rregull.
3. Të mos tërhiqet sistemi USB për ruajtje kur sistemi riprodhon sepse mund të paraqiten probleme te sistemi ose
pajisja.
4. Sistemi posedon USB.1 dhe USB 2.0 lidhje, protokolli standart për transport, ashtu siç është disku U dhe hard disku
lëvizës, si pajisje për ruajtje, forma e artikullit për ruajtje në pajisjet USB, patjetër duhet të jenë FAT ose FAT32, nuk e
mban NTFS.
5. Hyrja (prizë) USB në këtë television mund të sigurojë tension prej 5V, ndërsa energjija maksimale është 500m;
identifikimi i saktë i një player multimedial do të jetë i saktë nëse shfrytëzohet pajisje mbi 500mA që është një situatë
normale.
Shkurtesat në testaturën e telekomandës
Butonat “INDEX”, “ZOOM”, “REVEAL”, “TTX”, “HOLD”, “LIST”, “LANGUAGE”, “RADIO” shfrytëzohen për të
kontrolluar me USB.
Shtypni butonin „t/u“ që të zgjidhni menunë për adoptim të udhëzimeve, e cila përfshinë 4 lloje: PHOTO (fotografi),
MUSIC (muzikë), MOVIE (video), TEXT (tekst).
Shtypni butonin „t/u“ për të përzgjedhur PHOTO. Pastaj shtypni butonin „OK“ për t`u lexuar foto-dokumentet.
Shtypni butonin „//t/u“ për të përzgjedhur fotografi dhe shtypni „OK“ (pas përzgjedhjes së fotografisë, qoshja e
djathtë poshtë tregon një shtëpizë të kuqe, mund të përzgjidhni fotografi që të paraqiten në play-listën. Shtypni butonin
„INDEX“ (Indeks) në telekomandë që të paraqitet. Nëse asgjë nuk mund të përzgjedhësh atëherë televizioni në mënyrë
automatike do të inkorporojë të gjitha fotografitë në një play-list.
Vërejtje: Metodat e punës për muzikën, filmin dhe tekstin janë identike si me fotografitë. Ju lutem thirruni në opsionet
PHOTO.
Funksioni themelor: Pas paraqitjes së fotografive, shtypni butonin „INFO“ dhe pastaj mjetet do të paraqiten nën ekran.
(Shtypni butonin „“ për t`u fshehur mjeti).
Page 42

40
ALB
Icon Description
Random Off: Shtypni butonin „t/u“ për ta përzgjedhur këtë funksion, shtypni butonin „OK“, për të
ndezur/fikur ripodhimin momental.
Music: Shtypni butonin „t/u“ për ta përzgjedhur këtë funksion, shtypni butonin „OK“, për të riprodhuar
muzikë në sfond. (Muzika dhe fotografitë duhet të jenë rënditur në dosjen e njejtë, ose fillimisht duhet të
përzgjidhni ndonjë muzikë nga datoteka muzikore)
Playlist: Shtypni butonin „t/u“ për ta përzgjedhur këtë funksion, shtypni butonin „OK“, që të paraqitet
play-lista.
Info.: Shtypni butonin „t/u“ për ta përzgjedhur këtë funksion, shtypni butonin „OK“, që të paraqiten
informacione mbi fotografinë si rezulucioni, madhësija etj.
Rotate: Shtypni butonin „t/u“ për ta përzgjedhur këtë funksion, shtypni butonin „OK“ për të qarkulluar
fotografia në drejtim të akrepave të orës.
Rotate: Shtypni butonin „t/u“ për ta përzgjedhur këtë funksion, shtypni butonin „OK“ për të qarkulluar
fotografia në drejtim të kundër të akrepave të orës.
Zoom In: Shtypni butonin „t/u“ për ta përzgjedhur këtë funksion, shtypni butonin „OK“, për tu zmadhuar
fotografia.
Zoom Out: Shtypni butonin „t/u“ për ta përzgjedhur këtë funksion, shtypni butonin „OK“, për tu
zvogëluar fotografia.
Move View: Nëse fotografija është e madhe sa e tejkalon ekranin, mund të përdorni këtë funksion për të
lëvizur fotografinë.
FB: Shtypni butonin „t/u“ për ta përzgjedhur këtë funksion, shtypni butonin „OK“, për kthim të shpejtë
Shtypni butonin “INDEX“ për ripordhim normal.
FF: Shtypni butonin „t/u“ për ta përzgjedhur këtë funksion, shtypni butonin „OK“, për kthim të shpejt
përpara. Shtypni butonin „INDEX“ për riprodhim normal.
MUTE: Shtypni butonin „t/u“ për ta përzgjedhur këtë funksion, shtypni butonin „OK“, për kthim të shpejt.
Shtypni butonin „MUTE“ që ta fikni zërin.
Goto Time: Shtypni butonin „t/u“ për ta përzgjedhur këtë funksion, shtypni butonin „OK“, për zgjedhjen
e kohës për ripordhim.
Set A: Shtypni butonin „t/u“ për ta përzgjedhur këtë funksion, shtypni butonin „OK“, për rregullshmëri A
dhe B, filmi do të riprodhohet mes intervaleve kohore prej A deri në B.
Slow Forëard: Shtypni butonin „t/u“ për ta përzgjedhur këtë funksion, shtypni butonin „OK“, për
ngadalësim të shpëjtësisë së ripordhimit. Shtypni butonin „INDEX“, për ripordhim normal.
Step Forward: Shtypni butonin „t/u“ për ta përzgjedhur këtë funksion, shtypni butonin „OK“, për
riprodhim hap pas hapi. Shtypni butonin „INDEX“, për ripordhim normal.
Aspect Ratio: Shtypni butonin „t/u“ për ta përzgjedhur këtë funksion, shtypni butonin „OK“ për të
zgjedhur Auto (automatike), 4:3, Full (tërsisht)
Page 43

41
ALB
Diagnostifikimi i thjeshtë i defekteve
Simptomi Faktori Zgjidhja
Njolla në formë të fjollës
dhe zhurmë.
1. Lidhja e kabllos së antenës është i
ngadaltë. Kabllo është e dëmtuar.
2. Tipi i kabllos nuk përshtatet
3. Pozicioni dhe drejtimi I antenës nuk
është i mirë.
4. Sinjali është e dobët.
1. Kontrolloni nëse lidhja e kabllos së antenës
është i lirë, pavarsisht nëse kablloja është
perfekte ose jo.
2. Shfrytëzoni kabllo të tipit (VHF / UHF)
3. Rregulloni drejtimin apo pozicionin e antenës.
4. Mundohuni të përdorni një përforcues sinjali.
Fotografija në televizor
është e mirë, por ka
përshpëritje
Sinjali e kabllos së antenës është i
ngadaltë. Kabllo është e dëmtuar.
Kontrolloni lidhjen e kabllos së antenës nëse
është e forcuar sa duhet. Kontrolloni gjendjes e
kabllos.
Nuk ka fotografi. Nuk
ka zë.
Kablloja është e lirë ose mbushja nuk
është e lidhur.
Kontrolloni nëse kablloja eletrike është e lidhur
si duhet.
Fotografija në televizor
ka vija.
Sinjali i është nënshtruar ndonjë
pengese, nga veturat, dritat e neonit,
ventilator elektrik , etj.
Mos shfrytëzoni ventilator elektrik rreth
televizionit. Përshtatni drejtimin e antenës duke
zvogëluar pengesat.
Fotografija në televizor
ka hije.
1. Sinjali televizionit reflektohet në
hapsirë të lirë ose ndërtesë.
2. Drejtimi i antenës është jo i sakt.
1. Përdorni një antenë të lartë-drejtuar.
2. Përshtateni drejtimin e antenës.
Televizori nuk ka zë.
1. Fuqia e zërit është lënë në nivel
shumë të ulët.
2. Zëri është çkyçur
1. Përshtatnie lartësinë në vlerën përkatëse.
2. Shtypni butonin „MUTE” të telekomandës për
të eliminuar regjimin e çkyçjës.
Kompjutor pa ekran dhe
nuk ka sinjal të shpejtë
prurës, ndryçon verdhë
dhe LED kuq indicator.
Kablloja e sinjalit është shumë e lirë
ose ka dalë.
Kontrolloni nëse kablloja e sinjalit është e lirë apo
jo, nëse ajo ka ra, vendosnie përsëri atë.
Distanca e
telekomandës është e
shkurtër por e humb
kontrollën.
1. Procesori për pranim të telekomanës
është i mbuluar me gjësende.
2. Energjia e baterisë së telekomandës
është në nivelin më të ulët.
1. Largoni mjetët të cilët pengojnë dritarën për
pranim të telekomandës.
2. Ndërronie baterinë.
Ekrani i kompjuterit
është i dobët.
1. Përshtatja nuk është e saktë.
2. Nuk është i saktë regjimi i ekranit.
1. Përdorni funkcionin e hapjës automatike.
2. Shfrytëzoni regjimin e rekomanduar.
Fotoja e ekranit të
kompjutorit nuk e
mbulon tërë ekranin.
1. Përshtatja nuk është e saktë.
2. Nuk është i saktë regjimi i ekranit
1. Përdorni funkcionin e hapjës automatike.
2. Futni „PICTURE“ (FOTOGRAFI) për të
përshtatur pozitën horizontale dhe vertikale.
3. Shfrytëzoni regjimin e rekomanduar.
Sinjale të zhurshme
gjatë çkyçjës.
Shkarkim elektrik gjatë çkyçjës. Kjo është normale.
Nuk mund të punojë
televizori.
Ndikimi i jashtëm, si rrufeja, elektriciteti
statik dhe kështu me radhë, të cilat
ndoshta e pengojnë funksionimin
normal të këtij televizori.
Së pari fikni furnizimin dhe lidhni kabllojen e
rrymës në një prizë elektrike tjetër për rreth 1-2
minuta, pastaj përsëri kyçni televizorin.
Page 44

42
ALB
Specifikacione teknike
Madhësia e panelit
32" 40” 43”
Madhësia e ekranit - dijagonale
81cm 102cm 109cm
Ija në ekran
1366×768 1920×1080 1920×1080
Madhësia e pikselit (mm)
0.51075×0.51075 0.45735×0.4494 0.4902×0.4902
Sipërfaqeja active (mm)
697.685×392.256 878.112×485.352 941.184×529.416
Fuqia audio dalëse (L+R)
6W +6W 6W +6W 8W +8W
Furnizimi
100-240V~ 50/60Hz
Energjia
nominale
harxhuese
Puna normale ≤55W ≤55W ≤75W
Stendbaj (Pritje) ≤0.5W ≤0.5W ≤0.5W
Dimensionet Pa bazë (SHxVxD mm) 730×430×77 904x521x82 968x567x78
Dimensionet Me bazë (SHxVxD mm)
730×474×193 904x571x222 968x616x222
Neto pesha (kg)
4.0 6.5 8.0
Bruto pasha (kg)
5.2 8.5 10.0
Ambienti i punës
Temperatura: 5°~40°; RH: 10%~85%; shtypja atmosferike: 86kPa~104kPa
Vendi për skladim
Temperatura: -20°~55°; RH: 5%~95%; shtypja atmosferike: 86kPa~104kPa
Sisteme të mbështetura
ATV: PAL D/K, I, B/G, SECAM D/K, B/G, L
DTV: DVB-T/C/T2
TV (RF)
75Ω mosbalancimi
AV Video-hyrje
75Ω, 1±0.1VP-P, RCA
AV Audio-hyrje
20KΩ, 0.2~2V RMS
HDMI Video-hyrje
480i, 480p, 576i, 576p, 720p, 1080i, 1080p
Page 45

43
ALB
Udhëzime të përgjithëshme për përdorim
Baza të ndryshme kanë metoda të ndryshme instalimi, Ju lutemi, zgjedhni metodin adekuat të instalimit në
përputhshmëri të gjendjës faktike.
Vendosni TV në sipërfaqe të sheshtë, siç tregohet në foto, në mënyrë pjesa e poshtme e televizorit të del jashtë skajit.
Rregulloni mbajtësin në pjesën e poshtme të pajisjes siç tregohet nga shigjeta në foto, rregullonie ashtu që hapja e
mbajtësit dhe televizori të përputhen, e pastaj shtërgoni vidat.
Shënim: Baza aktuale dhe pamja e televizorit mund të jenë të ndryshme në raport me këta në fotografi; Ju lutemi
përdorni pajisje të vërtetë.
Themelore
Vidë
Page 46

44
ALB
Page 47

45
BIH/CG
Karakteristike . . . . . . . . . . . . . . . . . . . . . . . . . . . . .45
Upozorenja i napomene o bezbijednosti . . . .46
Montiranje i povezivanje . . . . . . . . . . . . . . . . . . .47
Sadržaj paketa. . . . . . . . . . . . . . . . . . . . . . . . . .47
Postavljanje TV seta . . . . . . . . . . . . . . . . . . . . .47
Povezivanje periferne opreme . . . . . . . . . . .48
Tasteri kontrolnog panela . . . . . . . . . . . . . . . . . .51
Daljinski upravljač . . . . . . . . . . . . . . . . . . . . . . . . . 52
Opšte uputstvo za upravljanje . . . . . . . . . . . . . .54
Uključivanje . . . . . . . . . . . . . . . . . . . . . . . . . . . . 54
Režim pripravnosti (Standby). . . . . . . . . . . . . 54
Izbor izvora signala. . . . . . . . . . . . . . . . . . . . . . 55
Uputstvo za upravljanje menijem . . . . . . . . .55
KANAL (CHANNEL) . . . . . . . . . . . . . . . . . . . . .55
SLIKA (PICTURE) . . . . . . . . . . . . . . . . . . . . . . . .56
ZVUK (SOUND) . . . . . . . . . . . . . . . . . . . . . . . . .57
OPCIJE (OPTIONS) . . . . . . . . . . . . . . . . . . . . .58
VRIJEME (TIME). . . . . . . . . . . . . . . . . . . . . . . . . 58
ZAKLJUČAVANJE (LOCK) . . . . . . . . . . . . . . . 59
Opcija snimanja (REC option) . . . . . . . . . . . .59
Opcija time-shift snimanja . . . . . . . . . . . . . . . 60
EPG opcija . . . . . . . . . . . . . . . . . . . . . . . . . . . . . 60
Hotelski režim (opcionalno) . . . . . . . . . . . . . .60
USB medijski režim. . . . . . . . . . . . . . . . . . . . . .61
Otklanjanje jednostavnih problema . . . . . . . . .63
Tehničke specifikacije. . . . . . . . . . . . . . . . . . . . . . 64
Uputstvo za montiranje postolja . . . . . . . . . . . . 65
Sadržaj
KARAKTERISTIKE
1. LED monitor sa pozadinskim osvetljenjem visokog kvaliteta, štedi energiju, štiti životnu sredinu, ultra tanak, izuzetnih
karakteristika.
2. Sa ugrađenim zvučnicima visokog kvaliteta koji će Vam pružiti potpuno audio-vizuelno uživanje i uštediti prostor na
Vašoj polici.
3. Sa mnoštvom priključaka. Možete direktno povezati vaš DVD, vidikon i druge uređaje na odgovarajuće ulazne
priključke i uživati u predivnoj slici. Proizvod se može koristiti kao monitor za računar sa VGA i HDMI priključcima.
Osim toga, kada ga povežete sa antenom, može se upotrebljavati i kao TV uređaj.
4. Daleko brže vrijeme reakcije potpuno eliminiše sijenke na slici, što gledanje filma i igranje igrica čini mnogo
prirodnijim.
5. Dovoljan broj boja.
6. Širi ugao posmatranja, veća osvijetljenost, veći kontrast, smanjena potrošnja.
7. Pametni režimi slike i zvuka vam pružaju pametni audio-vizuelni efekat.
8. Sa ugrađenom najnovijom verzijom digitalnog filtera boja, koji sliku čini jasnijom. 3D deinterlejsing, koji je sastavni
dio uređaja, može potpuno da eliminiše treperenje slike izazvano interlejs signalima.
9. Posjeduje izvanredne funkcije podešavanja vremena. Možete da podesite vrijeme isključivanja. Osim toga, isključiće
se i u slučaju kada ne prima signal.
10. Automatsko upravljanje se lako obavlja pomoću uređaja za daljinsko upravljanje.
11. Funkcija automatskog podešavanja vam omogućava da u VGA režimu sliku podesite tako da nakon nekoliko
sekundi dobijete najbolje moguće rezultate.
12. Automatska promjena balansa boja na vašem uređaju omogućava najkvalitetnije podešavanja boja za razne uređaje
za reprodukciju u VGA režimu.
13. Automatsko uklanjanje šuma može u značajnoj mjeri eliminisati pozadinski šum nastao usled interferencije menija ili
usljed slabog signala, što sliku na ekranu čini jasnom.
14. Podržava USB interfejs.
15. Podržava H.264 FULL HD prijemnik i podržava PVR funkciju.
16. Ultra tankog i izuzetno uskog dizajna
Page 48

46
BIH/CG
Upozorenje Pažnja
Može da dovede do
nesrećnih slučajeva
Ukazati na ponašanja koja je potrebno zabraniti
Može da dovede do povreda i
gubitka imovine
Ukazati na postupke koje je potrebno obaviti
UPOZORENJA I NAPOMENE O BEZBIJEDNOSTI
Hvala Vam što ste izabrali ovaj LED TV sa LED pozadinskim osvetljenjem, vrijedan proizvod naše kompanije, odličnog
kvaliteta i velikog broja funkcija. Ovaj uređaj će Vam pružiti više audio-vizuelnog uživanja. Njegov dizajn garantuje
bezbijednost korisnika. Prije nego što napuste fabriku, svi uređaji prolaze kroz rigorozna ispitivanja. Ipak, neodgovarajući
način upotrebe može da dovede do električnog udara ili požara. Kako biste osigurali bezbijedno rukovanje uređajem i
produžili njegov životni vijek, pažljivo pročitajte ovo uputstvo i oznake na uređaju prije nego što počnete da ga koristite, i
pridržavajte se instrukcija u vezi sa bezbijednošću. Sačuvajte ovo korisničko uputstvo za buduću upotrebu.
UPOZORENJE
• Nestanak struje ili nestabilna voltaža.
• Neuobičajeni zvuci ili mirisi koji dolaze iz uređaja.
• Oštećen AC kabl za napajanje.
• Oštećenja na TV setu usljed pada, obaranja ili udarca.
• Ukoliko tečnost ili strana tela dospiju u unutrašnjost TV seta.
• Koristite isključivo napon od 240VAC 60/50Hz.
• Radi bezbijednosti, priključite ovaj TV na utičnicu sa uzemljenjem.
• Kablove možete priključiti ili isključiti jedino kada je uređaj isključen.
• Ne stavljajte TV set na nestabilna mesta jer može doći do njegovog pada, oštećenja, pa čak i požara.
• Nemojte postavljati TV set na mesta:
1. Direktno izložena sunčevim zracima, sa vlagom, previsokom ili preniskom temperaturom ili velikom
količinom prašine;
2. Sa zapaljivim ili eksplozivnim supstancama;
3. Sa zapaljivim ili korozivnim gasovima;
4. U kupatilo, kuhinju i slično.
• Ne koristite oštećene ili neodgovarajuće utičnice i provjerite da li su utikač i utičnica povezani na
odgovarajući način.
• Vodite računa da na utikaču i u utičnici nema prašine ili metalnih djelića.
• Ne oštećujte kabl za napajanje:
1. Zabranjeno je prepravljanje kabla za napajanje;
2. Ne stavljajte teške predmete na kabl za napajanje;
3. Držite kabl za napajanje dalje od izvora toplote;
4. Ne vucite kabl za napajanje prilikom njegovog izvlačenja iz utičnice.
• Ne priključujte previše uređaja na isti produžni kabl jer usljed povećanog opterećenja može doći do požara.
• Ne ostavljajte otvoreni plamen (npr. upaljenu svijeću) blizu TV seta jer može doći do nastanka električnog
udara ili požara.
• Kako biste izbegli pojavu električnog udara ili požara nastalog usljed prosipanja vode, ne stavljajte posudu
sa vodom na TV set.
• Da biste izbjegli kratki spoj i oštećenje proizvoda, ali i električni udar, ne ubacujte oštre predmete, metal ili
tečnost u priključak za antenu ili ventilacione otvore.
• Prorezi na kućištu dizajnirani su da ispuštaju toplotu i omoguće hlađenje svih unutrašnjih komponenata, kako
one ne bi razvile izuzetno visoke temperature i kako bi mogle da tokom dužeg vremenskog perioda rade
normalno. Prilikom pozicioniranja uređaja, ne prekrivajte ove proreze.
Odmah isključite TV set,
izvucite kabl za napajanje
iz utičnice i kontaktirajte
kvalifikovano osoblje koje
se bavi održavanjem.
Ukoliko dođe do curenja plina ili drugih zapaljivih gasova, ne izvlačite kabl za napajanje TV seta niti kablove
drugih električnih uređaja; umjesto toga, odmah zatvorite ventile za gas i otvorite vrata i prozore.
Pri sljedećim uslovima:
Page 49

47
BIH/CG
PAŽNJA
Montiranje i povezivanje
Sadržaj paketa
Postavljanje TV seta
• Ne dozvolite djeci da se penju na TV set.
• Držite sitnu dodatnu opremu van dohvata djece kako je djeca ne bi progutala.
• Ukoliko ne koristite TV set tokom dužeg vremenskog perioda, isključite uređaj i izvucite utikač iz utičnice.
• Prije nego što počnete da čistite TV set, izvucite utikač iz utičnice i obrišite mekom krpom; ne upotrebljavajte hemijske
reagense i izbjegavajte situacije u kojima strane materije mogu da dospiju u uređaj. Neodgovarajuća sredstva za
čišćenje (kakva su tečnost za čišćenje, voda i dr.) mogu da oštete spoljašnji izgled proizvoda, izbrišu informacije
naznačene na proizvodu, čak i da dospiju u unutrašnjost uređaja i oštete komponente, što bi za rezultat imalo
nemogućnost uređaja da prikazuje program.
• Prilikom podešavanja pozicije i ugla TV seta, izvucite sve žice i polako ih prenesite kako biste spriječili padanje.
• Ne trljajte čvrstim objektima, ne udarajte, ne savijajte i ne stežite ekran.
• Ne uključujte uređaj čim ga donesete iz prostorije sa niskom u prostoriju sa visokom temperaturom jer ovo može
stvoriti kondenz u unutrašnjosti uređaja i dovesti do kvara.
• Ukoliko se ekran polomi i Vaša koža dođe u dodir sa tečnošću, odmah isperite ugroženo mjesto čistom vodom u
trajanju od 15 minuta i posjetite svog ljekara.
• Ukoliko TV set prenosite rukama, uhvatite donje uglove uređaja; ne pritiskajte ekran.
• Prilikom dugotrajnog emitovanja iste slike ili aktivne slike koju prate nepromijenjene riječi, ove nepromijenjene ikonice
zadržaće se na ekranu tokom dužeg vremenskog perioda i neće nestati dugo nakon što isključite uređaj. Garancija ne
pokriva ovo neželjeno dejstvo.
• Zdravo gledanje TV-a:
1. Gledajte pri odgovarajućem svjetlu; slaba osvijetljenost ili dugotrajno gledanje TV-a mogu da oštete Vaše oči.
2. Ukoliko koristite slušalice, podesite jačinu zvuka na odgovarajući način kako biste izbjegli oštećenja sluha.
• Da prekinete dovod napona, izvucite kabl za napajanje uređaja iz utičnice.
• Ukoliko utikač ili utičnicu koristite kao sredstvo za isključivanje, povedite računa da se njima može lako baratati.
• Utikač treba da bude čvrsto povezan. Razlabavljeni utikači mogu da izazovu pojavu varnica i požara.
• Sve tehničke specifikacije navedene u korisničkom uputstvu i na pakovanju mogu da budu izmijenjene bez
prethodnog obaviještenja. Ukoliko postoje manje razlike između podataka iz korisničkog uputstva i realnog korištenja
uređaja, za važeće će se uzimati ovi drugi.
Ne dodirujte utikač vlažnim rukama jer može doći do električnog udara.
Ne uključujte TV set tokom olujnog vremena; umjesto toga, izvucite utikač iz utičnice i izvucite priključak za
antenu kako biste izbjegli udar groma.
Ne rasklapajte TV set samostalno jer to može dovesti do nastanka električnog udara ili požara. Kontaktirajte
kvalifikovano osoblje koje se bavi održavanjem.
1. TV set. 2. Korisničko uputstvo. 3. Daljinski upravljač.
4. Kabl za napajanje (ili može da bude povezan na TV set) 5. Komponentni kabl (opcionalno)
• TV set treba postaviti u blizini AC utikača kako bi se omogućilo jednostavno uključivanje i isključivanje.
• Radi sopstvene bezbijednosti, izaberite odgovarajući zidni nosač ili stalak.
• Kako biste izbjegli povrijeđivanje, TV set postavite na stabilnu površinu ili ga pričvrstite na jak zid.
• Zatražite od kvalifikovanog osoblja da TV set pričvrsti na zid. TV set pričvršćen na neodgovarajući način može da bude
nestabilan.
Page 50

48
BIH/CG
Pričvršćivanje na zid
Rashlađivanje
Spriječava protok vazduha
Spriječava protok vazduha
Zid
Zid
Postavljanje na stalak
• Ostavite dovoljno prostora oko TV-a na način
prikazan na slici.
• Ne prekrivajte otvore za vazduh i ne stavljajte
predmete u kućište.
• Ne stavljajte uređaj u zatvoreni prostor, npr.
u police za knjige ili ugrađene ormare, osim
u slučaju da obezbijedite odgovarajuće
hlađenje TV seta.
SAVJETI ZA INSTALIRANJE
Povezivanje periferne opreme
Na ovaj TV set možete da povežete različite uređaje i da gledate slike visokog kvaliteta. Ukoliko video uređaj poseduje
HDMI, AV, PC ili neki drugi izlazni/ulazni port, odaberite jedan od njih i povežite ga sa odgovarajućim izlaznim ili ulaznim
portom na TV setu. Nakon povezivanja, pritisnite taster „IZVOR“ (SOURCE), a na ekranu će se pojaviti meni za izvor
signala. Da izaberete ulazni signal, pritisnite “ ” ili “ ”, a zatim taster „OK“ radi potvrde. Način povezivanja prikazan je na
slici.
Napomene:
1. Prilikom povezivanja na opremu sa MHL funkcijom, izaberite HDMI1 kao ulazni izvor signala.
2. ARC funkcija je opcionalna , pogledajte uređaj.
3. Interfejs za komponentni video signal je opcionalan, pogledajte uređaj.
4. Ukoliko postoji interfejs za komponentni video signal, komponentni video signal i AV dijele AUDIO-IN interfejs.
5. Periferna oprema i kablovi opisani u ovom uputstvu posebno se kupuju.
• Ne stavljajte TV set u prostoriju sa mehaničkim vibracijama.
• Ne stavljajte TV set u prostoriju u koju mogu da uđu insekti.
• Ne postavljajte TV set uz klima uređaj jer unutrašnji panel ekrana može da kondenzuje i dovede do kvara.
• Ne stavljajte TV set u prostoriju sa jakim magnetnim poljem jer elektromagnetni talasi mogu da ga ometaju i oštete.
Page 51

49
BIH/CG
Ka utičnici
(100-240VAC 60/50Hz)
Žuta (kabl za video signal)
Bijela (kabl za AUDIO-L signal)
Crvena (kabl AUDIO-D signal)
USB interfejs
Port za slušalice
Video kabl
YPbPr/YCbCr kabl
VGA kabl
Povežite na AV uređaj
sa HDMI interfejsom
Mobilni telefon ili druga
oprema sa MHL funkcijom
Povežite na audio uređaje
sa ARC funkcijom
Povežite na uređaje sa AV izlaznim
interfejsom (npr. DVD, VCR, konzola
za igrice)
Povežite na uređaj sa
YPbPr/YCbCr izlaznim interfejsom
Kabl za HDMI signal
Kabl za MHL signal
Audio kabl
Kabl za HDMI signal
Kabl za HDMI signal
Audio kabl
Kabl za napajanje
Povezivanje sa napajanjem
Priključak za antenu
Priključak za ulazni VGA
signal
Povezivanje na uređaj sa
HDMI ulazom
Povezivanje YPbPr/YCbCr ulaza
Povezivanje uređaja sa
MHL funkcijom
Povezivanje AV ulaza
Povezivanje uređaja sa
ARC funkcijom
Prilikom povezivanja spoljašnje antene na signalni
port TV seta, najprije isključite glavni prekidač za
napajanje TV seta. Kako biste izbegli električni
udar, držite dalje spoljašnju antenu od glavne linije
napajanja visokog napona. Neophodno je izolovati
žičanu mrežastu antenu povezanu na ovaj TV set
od uzemljenja, inače će izazvati požar ili druge
opasnosti.
R
Upozorenje
32”/40”
Page 52

50
BIH/CG
USB1 interfejs
Povežite na uređaje sa AV
izlaznim interfejsom (npr.
DVD, VCR, konzola za igrice)
Povežite na uređaj sa
YPbPr/YCbCr izlaznim interfejsom
Povezivanje YPbPr/YCbCr ulaza
Povezivanje AV ulaza
43”
Koaksijalni kabl
Povežite se na audio pojačalo sa
koaksijalnim interfejsom.
Koaksijalni izlaz
USB2 interfejs
Otvor za CL karticu
Žuta (kabl za video signal)
Bijela (kabl za AUDIO-L signal)
Narančasta (kabl za koaksijalni signal)
Crvena (kabl AUDIO-D signal)
R
Port za slušalice
Video kabl
Audio kabl
YPbPr/YCbCr kabl
Povežite na AV uređaj
sa HDMI interfejsom
Kabl za HDMI signal
Kabl za HDMI signal
Kabl za HDMI signal
Audio kabl
Povezivanje na uređaj sa
HDMI ulazom
Napomene:
1. Prilikom povezivanja na opremu sa MHL
funkcijom, izaberite HDMI1 kao ulazni izvor
signala.
2. ARC funkcija je opcionalna , pogledajte uređaj.
3. Interfejs za komponentni video signal je
opcionalan, pogledajte uređaj.
4. Ukoliko postoji interfejs za komponentni video
signal, komponentni video signal i AV dijele
AUDIO-IN interfejs.
5. Periferna oprema i kablovi opisani u ovom
uputstvu posebno se kupuju.
Page 53

51
BIH/CG
Ka utičnici
(100-240VAC 60/50Hz)
VGA kabl
Mobilni telefon ili druga
oprema sa MHL funkcijom
Povežite na audio uređaje
sa ARC funkcijom
Kabl za HDMI signal
Kabl za MHL signal
Kabl za napajanje
Povezivanje sa napajanjem
Priključak za antenu
Priključak za ulazni VGA
signal
Povezivanje uređaja sa
MHL funkcijom
Povezivanje uređaja sa
ARC funkcijom
Prilikom povezivanja spoljašnje antene na signalni port TV seta,
najprije isključite glavni prekidač za napajanje TV seta. Kako biste
izbegli električni udar, držite dalje spoljašnju antenu od glavne linije
napajanja visokog napona. Neophodno je izolovati žičanu mrežastu
antenu povezanu na ovaj TV set od uzemljenja, inače će izazvati požar
ili druge opasnosti.
Upozorenje
Tasteri kontrolnog panela
32”/40”
Page 54

52
BIH/CG
Daljinski upravljač
Stavljanje baterija u daljinski upravljač
Mjere opreza prilikom korištenja daljinskog upravljača
Skinite poklopac ležišta za baterije, umetnite dvije AAA baterije od 1,5 volt i pravilno ih postavite prema polovima ležišta
za baterije daljinskog upravljača.
1. Prilikom upotrebe daljinskog upravljača, usmjerite ga ka prijemniku signala daljinskog upravljača. Predmeti koji se
nađu između daljinskog upravljača i prijemnika signala mogu da onemoguće normalno funkcionisanje.
2. Ne izlažite daljinski upravljač snažnim vibracijama. Osim toga, ne izlažite daljinski upravljač direktnoj sunčevoj
svjetlosti jer termička energija sunca dovodi do deformacije daljinskog upravljača.
3. Ukoliko je prijemnik signala daljinskog upravljača glavnog uređaja izložen direktnoj sunčevoj svjetlosti ili jarkom
osvijetljenju može doći do nepravilnosti u radu daljinskog upravljača; promijenite ugao osvjetljenja ili ugao uređaja,
ili priđite prijemniku signala kako biste mogli da koristite daljinski upravljač.
4. Oslabljene baterije utiču na domet daljinskog upravljača. Zamijenite baterije. Ukoliko daljinski upravljač ne koristite
tokom dužeg vremenskog perioda ili ukoliko su baterije ispražnjene, uklonite baterije kako biste spriječili njihovo
curenje koje dovodi do korozije daljinskog upravljača i do njegovog oštećenja.
5. Ne upotrebljavajte različite baterije. Nije dozvoljeno kombinovati nove sa starim baterijama; koristite isti par baterija.
6. Ne bacajte baterije u vatru, ne punite i ne rasklapajte ih. Naročito nemojte puniti, sklapati i rasklapati, zagrijavati ili
sagorijevati upotrebljene baterije. Poštujte odgovarajuće propise o zaštiti okoline u vezi sa upotrebljenim baterijama.
1. LED indikator napona i prijemnik signala daljinskog upravljača.
2.
Prekidač za napajanje (opcionalno): Pritisnite “I” za uključivanje i pritisnite “O” za isključivanje.
3. IZVOR (SOURCE
): Da uđete u meni za izvor signala i odaberete izvor signala, pritisnite ovaj
taster.
4. CH-, CH+ (
): Da izaberete kanal, pritisnite jedan od ova dva tastera. Ova dva tastera, koja
imaju istu funkciju kao i tasteri /na daljinskom upravljaču, možete koristiti za podešavanja stavki u
OSD meniju.
5. VOL-, VOL+ (
): Da povećate ili smanjite jačinu zvuka, pritisnite neki od ova dva tastera. Da
podesite analognu vrjiednost izabrane stavke u OSD meniju, pritisnite jedan od ova dva tastera. Ovi
tasteri imaju istu funkciju kao i tasteri t / u na daljinskom upravljaču.
6. MENI (MENU
): Da uđete u glavni meni, pritisnite ovaj taster.
7.
Pripravnost (Standby): Za ponovno uključivanje TV-a ili vraćanje u režim pripravnosti.
Napomena: Različiti modeli mogu da imaju različiti izgled; pogledajte uređaj koji imate.
43”
Page 55

53
BIH/CG
Uputstvo za tastere daljinskog upravljača
Napomena: Izgled daljinskog upravljača može se razlikovati od onog prikazanog na ovoj slici. Prilagodite navedene
podatke daljinskom upravljaču koji imate.
Naziv Opis funkcije
NAPAJANJE (POWER )
Uključivanje i isključivanje režima pripravnosti na
prijemniku.
ŠIROKO (WIDE 16:9) Uključivanje formata slike.
ISKLJUČIVANJE ZVUKA
(MUTE
)
Isključivanje zvuka prilikom gledanja programa.
Numerički tasteri Unošenje brojeva.
F1 Uključivanje ili isključivanje zamrzavanja slike.
Lista kanala
(Channel list
)
Pregled liste kanala.
SMART S Odabiranje režima pametnog zvuka (smart sound).
SMART P Odabiranje režima pametne slike (smart image).
Taster za navigaciju
(
, , , )
Kretanje gore /dole/lijevo/desno po meniju ili promjena
datuma u okviru EPG-a.
OK Potvrđivanje trenutno unešenih podešavanja.
VOL+/VOL- Pritisnite da biste podesili jačinu zvuka.
MENI (MENU) Pritisnite ovaj taster za prikaz menija.
IZVOR (SOURCE) Pritisnite ovaj taster za prikaz menija za izbor izvora signala.
CH+/CH-
Tasteri za promjenu kanala. Promjena trenutno odabrane
EPG stranice.
INFORMACIJE (INFO) Prikazivanje informacija o trenutno odabranom programu.
REC Snimanje programa.
Vraćanje
(Return
)
Pritisnite ovaj taster za vraćanje na poslednji kanal koji ste
pratili.
L/R Odabiranje NICAM režima (u okviru ATV izvora signala)
INDEKS (INDEX
)
U DTV režimu, pritisnite taster „INDEKS” (INDEX) za
prikazivanje liste snimljenog programa.
ZUMIRANJE
(ZOOM
)
U DTV režimu, pritisnite taster „ZUMIRANJE“ (ZOOM) da
biste uvećali sliku prilikom gledanja fotografije; ukoliko ne
gledate fotografiju, a USB port je povezan sa memorijom,
pritisnite ovaj taster da odložite emitovanje televizijskog
programa koji se trenutno prikazuje.
SKRIVENI PODACI (REVEAL
), TELETEKST
(TTX ), ZADRŽAVANJE
(HOLD ), LISTA KANALA
(LIST ),
JEZIK (LANGUAGE ),
RADIO ( )
Za rad u okviru teleteksta ili USB-a.
Crveni taster Višenamjenski crveni taster.
TITL (SUBTITLE, zeleni
taster)
Zeleni taster za teletekst ili prikazivanje titlova onda kada
trenutno odabrani kanal ima mogućnost prikaza titlova.
FAV (žuti taster)
Žuti taster za teletekst ili taster za omiljene programe kojim
se podešavaju ili prikazuju Vaši omiljeni programi.
EPG (plavi taster)
Plavi taster za teletekst ili taster za prikazivanje elektronskog
programskog vodiča trenutno odabranog kanala kada se
ne nalazite u meniju.
Page 56

54
BIH/CG
Korisničko uputstvo za daljinski upravljač u teletekst režimu
Teletekst (TeleText): Pritiskom na taster „Teletekst“ ostvaruje se pristup u 3 režima: Kombinovani prikaz (Mix Display) >
Režim teleteksta (Text Mode) > Teletekst isključen (TeleText Off).
Thereinto: Režim teleteksta je Automatski režim. U Automatskom režimu, sistem automatski bira TOP, Fastext ili Default
(fabrički podešen) režim zavisno od podataka koje prima. U okviru „Režima teleteksta“ (Text Mode) ili „Kombinovanog
prikaza“ (Mix Display), da odaberete stranicu teleteksta, pritisnite broj 0~9, taster “/’’.
Skriveni podaci (Reveal): Svi skriveni podaci se prikazuju u trajanju od 6 sekundi.
Zadržavanje (Hold): Naizmjeničnim pritiskanjem tastera „zadržavanje uključeno“ (hold on) ili „zadržavanje isključeno“
(hold off) uključite ili isključite prikaz trenutno odabranih stranica. Ukoliko stranica nije zadržana, ona će to postati, što će
onemogućiti njeno ažuriranje. Ukoliko je stranica u datom trenutku zadržana, opcija „zadržavanje“ će se isključiti, čime će
se omogućiti njeno ažuriranje. Ukoliko je stranica zadržana, ovo je jasno naznačeno oznakom „Zadržavanje“ (Hold).
Indeks (Index): U „Fastext“ režimu, odaberite indeks stranicu ukoliko je link za indeks validan, početnu stranu Paketa
8/30 ukoliko je validna, ili odaberite stranicu 100. U TOP režimu, ukoliko je aktivirana opcija „Hit lista“ (Hitlist), možete
naizmjenično birati trenutno aktivnu stranicu teleteksta i meni opcije „Hit lista“ (Hitlist); u suprotnom, odaberite stranu
100. U režimu „Lista“, resetujte listu omiljenih stranica bilo na onu koja se odnosi na trenutno aktivni kanal prema
EEPROM-u, ukoliko je podešen, ili na fabrički podešenu listu (stranice 100, 101, 102, 899), i odaberite prvu stranicu sa
liste. U režimu fabričkog podešavanja (Default), odaberite početnu stranu Paketa 8/30, ukoliko je dostupna, ili stranu 100.
Lista (List): Naizmjenično birajte režim „Lista“ i režim trenutne akvizicije (Fastext, TOP, ili Režim fabričkog podešavanja
(Default)).
Crveni, Zeleni, Žuti, Plavi: Odaberite stranicu povezanu sa odgovarajućim tasterom u okviru prikazanog bloka zavisno
od režima akvizicije. U režimu „TOP Hit lista“ (Hitlist), crveni, zeleni i plavi taster omogućavaju biranje opcija iz menija „Hit
lista“ (Hitlist), dok je žuti taster neaktivan.
Opšte uputstvo za upravljanje
Uključivanje
Režim pripravnosti (Standby)
Slika 1 Slika 2
Prije nego što uključite uređaj, provjerite da li je napajanje stabilno i da li je kabl za antenu dobro povezan.
Priključite kabl za napajanje u električnu utičnicu. Da uključite TV, pritisnite taster „
“ na daljinskom upravljaču ili
na TV setu. Na ekranu je prikazan meni „Izaberite OSD jezik“ (slika 1). Da izaberete željeni jezik, pritisnite taster
„//t/u“ na daljinskom upravljaču, a zatim pritisnite taster „OK’“ radi potvrde izbora. Na ekranu stoji „Izaberite
tip DVB režima“. Da izaberete željeni tip DVB režima, pritisnite taster „/“ na daljinskom upravljaču, a zatim
pritisnite taster „OK“ da pređete na sledeći korak (slika 2). (Prikazan je primer traženja kanala u DVB režimu za
DVB-T.) Pritisnite taster „t/u“ da izaberete tip podešavanja: DTV + ATV, ATV, DTV. Pritisnite taster „“. Pritiskom
na „//t/u“ možete da odaberete državu u kojoj se nalazite, a zatim pritisnite taster „OK“ radi potvrde izbora.
Uređaj će započeti sa automatskom pretragom.
Pritiskom na taster “
” na daljinskom upravljaču, TV će ući u režim pripravnosti.
Posebno obratite pažnju
1. TV set će automatski preći u režim pripravnosti ukoliko ne dobija signal u periodu od 5 minuta od trenutka uključivanja
TV-a.
2. TV set će automatski preći u režim pripravnosti onog trenutka kada istekne prethodno podešeno vrijeme gašenja.
3. Ukoliko ne koristite uređaj tokom dužeg vremenskog perioda, isključite napajanje uređaja. Ne dozvolite da uređaj
bude u režimu pripravnosti tokom dužeg vremenskog perioda.
OK: Enter
Please select an OSD Language
Eng lish
Cro atian
Dut ch
Rus sian
Ara bic
Far si
Spa nish
Ita lian
Fre nch
Ger man
Por tugue se
Pol ish
Tune Type
Germany
MENU: Return
Greece
Hungary
DT V + ATV
Netherlands
Norway
Poland
Italy
Ireland
Luxembourg
Page 57

55
BIH/CG
Pritisnite taster „IZVOR“ (SOURCE) bilo na daljinskom upravljaču, bilo na uređaju. Na ekranu će biti prikazano „Izvor
ulaznog signala“ (Input Source) (slika 3). Zatim pritisnite taster „/“ na daljinskom upravljaču ili taster „CH+/CH-“ na
uređaju kako biste izabrali izvor signala. Pritisnite taster „OK“ na daljinskom upravljaču i TV će izvor signala koji je do tog
trenutka upotrebljavan zamijeniti izvorom koji ste odabrali. (Napomena: Izvor YPBPR signala je opcionalan, pogledajte
vaš uređaj.)
1. Pritisnite taster „MENI“ (MENU) bilo na daljinskom upravljaču, bilo na uređaju. Na ekranu će se pojaviti glavni meni
(slika 4).
2. Pritisnite taster „t/u“ na daljinskom upravljaču ili taster „VOL+/VOL-“ na uređaju kako biste izabrali meni za
podešavanje opcija koji sadrži 6 opcija: „KANAL“, „SLIKA“, „ ZVUK“, „OPCIJE“, „VRIJEME“, „ZAKLJUČAVANJE“.
3. Da izaberete ono što želite da podesite u meniju za podešavanje opcija, pritisnite taster „ /“ na daljinskom
upravljaču ili taster „CH+/CH-“ na uređaju.
4. Pritisnite taster „OK“ na daljinskom upravljaču da podesite ili da uđete u sledeći meni.
5. Kada je na TV-u prikazan glavni meni, pritisnite taster „MENI“ (MENU) da izađete iz glavnog menija. Kada je na
TV-u prikazan pod-meni, pritisnite taster „MENI“ (MENU) da se vratite na prethodni meni. Pritisnite taster „IZVOR“
(SOURCE) da dobijete prikaz menija izvora signala.
6. Tokom rada, elementi koji se u datom režimu ne mogu podešavati biće automatski skriveni, a njihova boja će se
promjeniti u sivu.
7. Uputstvo za upravljanje menijem u okviru ovog uputstva odnosi se na rad u TV režimu. Rad u drugim režimima je
sličan radu u okviru TV režima. Korisnici ga mogu uzeti kao primer.
8. Napomena: Taster “ //t/u’’ navedeni u ovom uputstvu odnose se na pravce tastera za navigaciju daljinskog
upravljača osim ukoliko nije posebno definisano drugačije. Dole navedeno uputstvo za rad u celosti je zasnovano na
tasterima daljinskog upravljača. Molimo vas da funkcije tastera na uređaju sami shvatite.
Pritisnite taster „MENI“ (MENU) i na ekranu će se pojaviti meni „KANAL“ (slika 4). Pritisnite taster “/” da izaberete
stavku koju želite da doterate ili podesite.
Automatsko traženje (Auto Tuning)
Pritisnite taster „MENI“ (MENU) i na ekranu će se pojaviti meni „KANAL“. Pritisnite taster
„/“ da izaberete automatsko traženje. Pritisnite taster „OK“ i na ekranu će se pojaviti
„Izaberite tip DVB režima“. Pritisnite taster „/“ na daljinskom upravljaču kako biste
izabrali željeni tip DVB režima, a zatim pritisnite taster „OK“ kako biste prešli na sledeći
korak (Slika 2). (Prikazan je primjer traženja kanala u DVB režimu za DVB-T.) Pritisnite
taster „t/u“ da izaberete tip podešavanja: DTV + ATV, ATV, DTV. Pritisnite taster „“.
Pritiskom na „//t/u“ možete da odaberete željenu državu, a zatim pritisnite taster
„OK“ radi potvrde izbora. Uređaj će započeti sa automatskim traženjem (slika 5). Tokom
automatskog traženja, možete da pritisnete taster „MENI“ (MENU) kako biste se vratili
nazad i izašli iz automatskog traženja.
Izbor izvora signala
Uputstvo za upravljanje menijem
KANAL (CHANNEL)
Slika 3 Slika 4
Slika 5
Input Source
DTV
AV
YPB PR
HDM I 1
HDM I 2
VGA
USB
ATV
OK:Enter
Auto Tu ning
CHANNEL
DTV Manual Tuning
ATV Manual Tuning
Programme Edit
Signal Information
OK: Enter
MENU: Return
1 %... 63.25 MHz
MENU
Exit
Channel Tuning
ATV
DTV
Radio
Data
0 Programme(s)
0 Programme(s)
0 Programme(s)
0 Programme(s)
:
:
:
:
Page 58

56
BIH/CG
Ručno traženje u DTV režimu (DTV Manual Tuning)
Pritisnite taster „MENI“ (MENU) i na ekranu će se pojaviti meni „KANAL“. Da
odaberete ručno traženje u DTV režimu, pritisnite taster „/“. Pritisnite taster
„OK“ da uđete u meni Ručno traženje u DTV režimu (slika 6). Pritisnite taster
„t/u“ kako biste odabrali kanal, a zatim pritisnite taster „OK“ da pokrenete
pretragu. Nakon pretraživanja, meni Ručno traženje u DTV režimu će se
automatski zatvoriti.
Ručno traženje u ATV režimu (ATV Manual Tuning)
Pritisnite taster „MENI“ (MENU) i na ekranu će se pojaviti meni „KANAL“. Da
odaberete ručno traženje u ATV režimu, pritisnite taster „/“. Pritisnite taster
„OK“ da uđete u meni Ručno traženje u ATV režimu (slika 7). Pritisnite taster
„/“ da biste označili trenutno odabrani kanal. Pritisnite taster „t/u“ za
ručnu pretragu. Nakon pretraživanja, pronađeni kanal možete da sačuvate na
bilo kojoj drugoj poziciji. U ovom trenutku, pritisnite taster „t/u“ kako biste
odabrali „Sačuvaj na“ (Storage To), a zatim pritisnite taster „/“ da odaberete
broj kanala. Nakon što izaberete „Fino podešavanje“ (Fine-Tune), pritisnite
taster „t/u“ da obavite pretragu niske ili visoke frekvencije. Tokom ručnog
pretraživanja, možete da pritisnete taster „MENI“ (MENU) kako biste prekinuli
pretragu i vratili se u prethodni meni.
Editovanje programa (Programme Edit)
Pritisnite taster „MENI“ (MENU) i na ekranu će se pojaviti meni „KANAL“. Pritisnite
taster „/“ da odaberete editovanje programa. Pritisnite taster „OK“ kako biste
ušli u meni „Editovanje programa“ (slika 8), a zatim pritisnite taster„/“ kako
biste odabrali kanal koji želite da editujete.
Brisanje (Delete): Izaberite kanal i pritisnite crveni taster da biste ga obrisali.
Premiještanje (Move): Izaberite kanal i pritisnite zeleni taster, a zatim i taster
„/“ kako biste izabrali poziciju na koju želite da premijestite izabrani kanal.
Pritisnite taster „OK“ radi potvrde izbora. Da se vratite u prethodni meni, pritisnite
taster „MENI“ (MENU).
Omiljeni kanali (Favourite): Izaberite kanal i pritisnite žuti taster. Iza izabranog
kanala pojaviće se ikonica omiljenog kanala. Da poništite izbor, ponovo pritisnite
žuti taster. Da se vratite u glavni meni, pritisnite taster „MENI“ (MENU).
Preskakanje (Skip): Izaberite kanal i pritisnite plavi taster. Iza izabranog kanala
pojaviće se ikonica preskakanja kanala. Da poništite izbor, ponovo pritisnite plavi
taster. Da se vratite u glavni meni, pritisnite taster „MENI“ (MENU).
Podaci o signalu (Signal Information)
Pritisnite taster „MENI“ (MENU) i na ekranu će se pojaviti meni „KANAL“. Da
izaberete opciju „Podaci o signalu“, pritisnite taster „/“. Da uđete u meni
„Podaci o signalu“, pritisnite taster „OK“. Možete da pregledate podatke o signalu.
Napomena: Prije nego što pritisnete taster „MENI“ (MENU), izaberite izvor
ulaznog signala. Izvor ulaznog signala možete izabrati jedino u DTV režimu.
Pritisnite taster „MENI“ (MENU) i na ekranu će se pojaviti
meni „KANAL“. Da izaberete opciju SLIKA, pritisnite taster
„t/u„ (slika 9), a zatim pritisnite taster „/“ kako biste
izabrali stavku koju želite da dotjerate ili podesite.
Režim prikaza slike (Picture Mode): Da uđete u pod-meni
„Režim prikaza slike“, pritisnite taster „OK“. Da izaberete
stavku koju želite da dotjerate ili podesite, pritisnite taster
„/“.
SLIKA (PICTURE)
DTV Manual Tuning
UHF CH 21
Bad
Normal Good
NO SIGNAL
ATV Manual Tuning
Frequ ency 175.25 MHz
Storage To 1
DK
Current CH 1
Search
Fine-Tune
MENU: Return
Save
OK: Enter
1 C-01
2 S-42
3 C-06
4 C-11
5 S-11
6 S-13
7 C-21
8 C-51
MENU: Return
Programme Edit
Delete
Move
Skip
Favourite
ATV
ATV
ATV
ATV
ATV
ATV
ATV
ATV
Slika 6
Slika 7
Slika 8
Slika 9
Picture Mode User
Color Temperature Standard
Aspect Ratio Full
Noise Reduction Middle
PC Setting
PICTURE
OK: Enter
MENU: Return
Page 59

57
BIH/CG
Pritisnite taster „MENI“ (MENU) i na ekranu će se
pojaviti meni „KANAL“. Da izaberete opciju ZVUK,
pritisnite taster „t/u“ (slika 10), a zatim pritisnite taster
„/“ kako biste izabrali stavku koju želite da dotjerate
ili podesite.
Režim podešavanja zvuka (Sound Mode): Da uđete
u pod-meni „Režim podešavanja zvuka“, pritisnite
taster „OK“. Da izaberete stavku koju želite da dotjerate
ili podesite, pritisnite taster „/“.
Zvuk okruženja (Surround Sound): Da uđete u pod-meni „Zvuk okruženja“, pritisnite taster „OK“. Da izaberete
jedan od ponuđenih režima zvuka okruženja: „isključeno“ (Off), „okruženje“ (Surround) ili SRS Trusurround XT,
pritisnite taster “/” .
AD prekidač (AD Switch): Da uđete u pod-meni „AD prekidač“, pritisnite taster „OK“. Da izaberete „uključeno“ (On)
ili „isključeno“ (Off), pritisnite taster“t/u”„ “. Ako izaberete opciju „uključeno“, AD možete podesiti pritiskom na taster
“t/u” (dostupno jedino u DTV režimu).
ZVUK (SOUND)
Slika 10
OK: Enter
MENU: Return
Sound Mode Music
Surround Sound Off
AD Switch Off
SOUND
Stavka Funkcija Opis
Režim prikaza slike
(Picture Mode)
Odabir režima prikaza
slike
Standardno (Standard), blago (Soft), lično (User), dinamično
(Dynamic), četiri režima.
Kontrast (Contrast) Podešavanje kontrasta
cijele slike
Povećanjem analogne vrijednosti povećava se kontrast;
Smanjenjem analogne vrijednosti smanjuje se kontrast (0~ 100).
Osvjetljenje
(Brightness)
Podešavanje osvjetljenja
i nivoa crnog cijele slike
Povećanjem analogne vrijednosti povećava se osvetljenje;
Smanjenjem analogne vrijednosti smanjuje se osvetljenje (0~ 100).
Zasićenje
(Saturation)
Podešavanje dubine
boja slike
Povećanjem analogne vrijednosti povećava se intenzitet zelene boje;
Smanjenjem analogne vrijednosti smanjuje se intenzitet ljubičaste
(0~100).
Oštrina
(Sharpness)
Podešavanje oštrine
cijele slike
Povećanjem analogne vrijednosti povećava se definisanost;
Smanjenjem analogne vrijednosti smanjuje se definisanost (0~100).
Nijansa
(Tint)
Podešavanje nijanse
cijele slike
Povećanjem analogne vrijednosti povećavate dubinu;
Smanjenjem analogne vrijednosti umanjujete dubinu (0 ~100).
Stavka Funkcija Opis
Režim podešavanja
zvuka (Sound Mode)
Odabir temperature
zvuka
Standardno (Standard), Muzika (Music), Film (Movie), Lično (User), pet režima.
Visoki (Treble)
Podešavanje vrijednosti
visokih tonova
Povećanjem analogne vrijednosti povećava se vrijednost visokih tonova;
Smanjenjem analogne vrijednosti smanjuje se vrijednost visokih tonova (0~ 100).
Bas (Bass)
Podešavanje vrijednosti
niskih tonova
Povećanjem analogne vrijednosti povećava se vrijednost niskih tonova;
Smanjenjem analogne vrijednosti smanjuje se vrijednost niskih tonova (0~ 100).
Balans (Balance)
Podešavanje balansa
između lijevog i
desnog zvučnika
Povećanjem analogne vrijednosti smanjuje se jačina lijevog zvučnika;
Smanjenjem analogne vrijednosti smanjuje se jačina desnog zvučnika (L50~
R50).
Napomena: Nijansa se može podešavati jedino u NTSC sistemu.
Temperatura boja (Colour Temperature): Da uđete u pod-meni „Temperatura boja“, pritisnite taster „OK“. Da
izaberete jedan od ponuđenih režima temperature boja: „standardno“ (Standard), „toplo“ (Warm) ili „hladno“ (Cool),
pritisnite taster „t/u“.
Format slike (Aspect Ratio): Da uđete u pod-meni „Format slike“, pritisnite taster „OK“. Da izaberete jedan od
ponuđenih režima formata slike: „automatski“ (Auto), „4:3“, „cijeli ekran“ (Full), „film“ (Film), „titlovi“ (Subtitle) ili „PC“,
pritisnite taster „/“.
Umanjenje šuma (Noise Reduction): Da uđete u pod-meni „Umanjenje šuma“, pritisnite taster „OK“. Da izaberete
jedan od ponuđenih režima umanjenja šuma: „isključeno“ (Off), „slabo“ (Low), „srednje“ (Middle) ili „jako“ (High),
pritisnite taster „/“.
Page 60

58
BIH/CG
OPCIJE (OPTIONS)
VRIJEME (TIME)
Pritisnite taster „MENI“ (MENU) i na ekranu će se pojaviti
meni „KANAL“. Da izaberete opciju „OPCIJE“, pritisnite
taster „t/u“ (slika 11), a zatim pritisnite taster „/“ kako
biste izabrali stavku koju želite da dotjerate ili podesite.
OSD jezik (OSD Language): Da uđete u pod-meni „OSD
jezik“, pritisnite taster „OK“. Da izaberete željeni jezik,
pritisnite taster „//t/u“. Da se vratite u prethodni meni,
pritisnite taster „MENI“ (MENU).
Napomena: Postupak upravljanja „Jezikom zvuka“ (Audio
Language) je isti kao i postupak upravljanja „OSD jezikom“
(dostupno jedino u DTV režimu).
Pritisnite taster „MENI“ (MENU) i na ekranu će se pojaviti
meni „KANAL“. Da izaberete opciju „VRIJEME“, pritisnite
taster „t/u“ (slika 13), a zatim pritisnite taster „/“ kako
biste izabrali stavku koju želite da dotjerate ili podesite.
Sat (Clock): Kada je DTV izvor ulaznog signala, sat će biti
sinhronizovan sa TV programom.
Automatsko isključivanje (Off Time): Da uđete u podmeni „Automatsko isključivanje“, pritisnite taster „OK“.
Da izaberete i sat i minut, pritisnite taster „/“, a zatim
pritisnite taster „t/u“ kako biste podesili vrednosti tajmera.
TV će se automatski isključiti u izabranom trenutku.
Napomena: Sat i minut možete podesiti jedino kada opcija automatskog isključivanja nije u režimu „isključeno“ (Off).
Automatsko uključivanje (On Time): Da uđete u pod-meni „Automatsko uključivanje“, pritisnite taster „OK“. Da
izaberete sat i minut, izvor, kanal i jačinu zvuka, pritisnite taster „/“, a zatim pritisnite taster „t/u“ kako biste podesili
vrijednosti tajmera. TV će se automatski uključiti u izabranom trenutku i u izabranom režimu.
Automatsko gašenje (Sleep Timer): Da uđete u pod-meni „Automatsko gašenje“, pritisnite taster „OK“. Pritisnite
taster „/“ da izaberete jednu od opcija: „isključeno“ (Off), 10 min, 20 min, 30 min, 60 min, 90 min, 120 min, 180 min,
240 min.
Vremenska zona (Time Zone): Da uđete u pod-meni „Vremenska zona“, pritisnite taster „OK“. Da odaberete vašu
vremensku zonu, pritisnite taster „//t/u“ (dostupno jedino u DTV režimu).
Osobe sa oštećenim sluhom (Hearing Impaired): Da izaberete opciju
„uključeno“ („On“) ili „isključeno“ („Off“), pritisnite taster „OK“ (dostupno jedino
u DTV režimu).
PVR sistem datoteka (PVR File System): Da uđete u pod-meni „PVR sistem
datoteka“ (slika 12), pritisnite taster „OK“. Izaberite disk za čuvanje podataka u
pod-meniju „izbor diska“ (select disc). Da izaberete opciju „Provera PVR sistema
datoteka“ (Check PVR File System), pritisnite taster „/“ i, nakon što pritisnete taster
„OK“, uređaj će početi da vrši provjeru. Nakon uspješne provjere, pritisnite taster
„MENI“ (MENU) da izađete iz datog menija. Za snimanje, pritisnite taster „REC“.
Napomena: Prije nego što započnete rad u okviru funkcije „PVR datotečni sistem“,
povežite USB disk na interfejs uređaja.
Vraćanje na korisničke fabričke vrijednosti (Restore User Default): Nakon
što pritisnete taster „OK“, na ekranu će se pojaviti „Da li ste sigurni?“ („Are
you sure?“). Pritisnite taster „t“ da biste nastavili sa uspostavljanjem fabričkih
vrijednosti ili pritisnite taster „u“ da poništite operaciju koja je u toku.
Plavi ekran (Blue Screen): Da izaberete „uključeno“ (On) ili „isključeno“ (Off), pritisnite taster „OK“. Otvorite ili
zatvorite funkciju „Plavi ekran“.
Ažuriranje softvera (USB) (Software Update(USB)): Ažurirajte softver koristeći USB disk.
OSD Language
Audio Language English
Hearing Impaired Off
PVR File System
Restore User Default
Blue Screen On
Software Update(USB)
OPTION
English
OK: Enter
MENU: Return
OK: Enter
MENU: Return
Clock
Off Time Off
On Time Off
Sleep Timer Off
Time Zone Berlin +1
TIME
-- -- -- --
Check PVR File System
Format
Free Record Limit
USB Disk
Time Shift Size
Speed
Start
6 Hr.
Select Disk
C:
Slika 11
Slika 13
Slika 12
Page 61

59
BIH/CG
ZAKLJUČAVANJE (LOCK)
Opcija snimanja (REC option)
Pritisnite taster „MENI“ (MENU) i na ekranu će se pojaviti
meni „KANAL“. Da izaberete opciju zaključavanja, pritisnite
taster „t/u“. Nakon što pritisnete taster „OK“, pritisnite
numerički taster da biste uneli fabričku šifru 0000 i ušli u
meni „ZAKLJUČAVANJE“ (slika 14). Zatim pritisnite taster
„/“ da izaberete stavku koju želite da doterate ili
podesite.
Sistem zaključavanja (Lock System): Da izaberete opciju
„uključeno“ (On) ili „isključeno“ (Off), pritisnite taster
„OK“. Opcija blokiranja programa (Block programme)
može da funkcioniše kada je aktivirana opcija „Sistem
zaključavanja“.
Podešavanje lozinke (Set Password): Pritisnite taster „OK“ i na ekranu će se pojaviti prozor za dijalog „Podesite
lozinku“ (Set Password). Da unesete staru lozinku, pritisnite numeričke tastere i, da biste kompletirali promjenu lozinke,
dva puta unesite novu lozinku. Vratite se u prethodni meni. Napomena: Povedite računa da zapamtite Vašu novu lozinku
nakon promjene. U suprotnom, sistem će ostati zauvek zaključan.
Blokiranje programa (Block Programme): Pritisnite taster „OK“ i na ekranu će se pojaviti meni „Blokiranje
programa“. Pritisnite taster „/“ da izaberete kanal koji želite da zaključate, a onda pritisnite zeleni taster za
zaključavanje ili otključavanje. Na kraju, pritisnite taster „MENI“ (MENU) kako biste napustili ovu opciju.
OK: Enter
MENU: Return
Lock System
Set Password
Block Program
LOCK
[00:00:29]
14:21
Pla y FB FF FB 30 S FF 30 S Pau se St op
(0003:10:24)
Slika 14
Slika 15
Ikonica Opis
Pokazuje da sistem snima program.
Prikazuje broj trenutno izabranog programa.
Prikazuje trajanje snimljenog programa.
Prikazuje maksimalno trajanje koje dati USB disk može da podrži (odnosi se na kapacitet USB diska)
Prikazuje vreijme trajanja trenutno izabranog programa.
Reprodukovanje (Play): Označite ovu ikonicu. Pritisnite taster „OK“ za reprodukovanje video sadržaja ili za podešavanje ponavljanja
programa od trenutka A do trenutka B (A-B repeat).
Brzo premotavanje unatrag (FB): Označite ovu ikonicu. Pritisnite taster „OK“ za brzo premotavanje unatrag. Pritisnite taster „INDEKS“
(INDEX) za normalno reprodukovanje.
Brzo premotavanje unaprijed (FF): Označite ovu ikonicu. Pritisnite taster „OK“ za brzo premotavanje unapred. Pritisnite taster „INDEKS“
(INDEX) za normalno reprodukovanje.
Brzo premotavanje 30 sekundi unatrag (FB 30s): Označite ovu ikonicu. Pritisnite taster „OK“ za brzo premotavanje 30 sekundi unatrag.
Brzo premotavanje 30 sekundi unaprijed (FF 30s): Označite ovu ikonicu. Pritisnite taster „OK“ za brzo premotavanje 30 sekundi
unaprijed.
Pauza (Pause): Označite ovu funkciju. Pritisnite taster „OK“ da pokrenete ili pauzirate reprodukovanje.
Zaustavljanje (Stop): Označite ovu ikonicu. Pritisnite taster „OK“ da zaustavite i napustite prozor za reprodukovanje.
U DTV režimu, pritisnite taster „REC“ i na ekranu će se pojaviti
meni opcije snimanja (slika 15). Sistem će istog trenutka
započeti snimanje. Da zaustavite i napustite snimanje, pritisnite
taster „SKRIVENI PODACI“ (REVEAL). Po završetku snimanja,
pritisnite taster „INDEKS“ (INDEX) nakon čega će se pojaviti
lista snimljenog programa. Izaberite datoteku koju želite da
pokrenete. Podatke o datoteci možete pročitati pritiskom na
zeleni taster ili ih možete obrisati pritiskom na crveni taster. Da
započnete reprodukciju, pritisnite taster „OK“.
Napomena: Funkcija snimanja podržava samo memorijske
uređaje sa Fat32 datotečnim sistemom. Memorijske uređaje
sa drugim datotečnim sistemima potrebno je formatirati. Prije
nego što formatirate memorijski uređaj, napravite kopiju korisnih
podataka, jer se sadržaj memorijskih uređaja nakon formatiranja
ne može povratiti.
Page 62

60
BIH/CG
Opcija time-shift snimanja
EPG (Vodič kroz elektronske programe) opcija
Hotelski režim (opcionalno)
U DTV režimu, pritisnite taster „ZUMIRANJE“ (ZOOM).
Na ekranu će se pojaviti meni time-shift opcije (slika 16), a
program će biti odložen. Da nastavite sa reprodukovanjem
programa, pritisnite taster „INDEKS“ (INDEX). Da
zaustavite i napustite opciju time-shift snimanja, pritisnite
taster „SKRIVENI PODACI“ (REVEAL). Ukoliko korisnik
nakratko napusti program, time-shift funkcija omogućava
odlaganje i čuvanje programa koji je u toku na USB disk.
Reprodukovanje programa se može nastaviti kada korisnik
to poželi.
U DTV režimu, pritisnite taster „EPG“ i meni EPG opcije će se pojaviti na ekranu
(slika 17). Korisnik može da obavlja slijedeće operacije pomoću crvenog,
zelenog, žutog i plavog višenamjenskog tastera.
Pritisnite taster „MENI“ (MENU) na daljinskom upravljaču kako biste dobili
prikaz glavnog menija TV-a, a zatim na daljinskom upravljaču pritisnite „4578“
za prikaz menija hotelskog režima. Pritisnite taster „Gore/DOLE“ (Up/DOWN)
da uđete u meni i izaberete stavku koju treba da podesite. Zatim pritisnite taster
„Levo/Desno“ (Left/Right) da podesite vrijednosti ili stanje (slika 18).
[00:00:00/00:00:08/01:20:00]
14:23
Pla y FB FF FB 30 S FF 30 S Pau se St op
Time Shift
342
1
Slika 16
Slika 17
Slika 18
Ikonica Opis
Pokazuje da je program odložen.
Prikazuje vrijeme programa koji je u toku.
Prikazuje vrijeme odlaganja programa.
Prikazuje maksimalno vrijeme čuvanja koje USB disk može da omogući.
Reprodukovanje (Play): Označite ovu ikonicu. Pritisnite taster „OK“ za reprodukovanje video sadržaja ili za podešavanje ponavljanja
programa od trenutka A do trenutka B (A-B repeat).
Brzo premotavanje unatrag (FB): Označite ovu ikonicu. Pritisnite taster „OK“ za brzo premotavanje unatrag. Pritisnite taster „INDEKS“
(INDEX) za normalno reprodukovanje.
Brzo premotavanje unaprijed (FF): Označite ovu ikonicu. Pritisnite taster „OK“ za brzo premotavanje unaprijed. Pritisnite taster
„INDEKS“ (INDEX) za normalno reprodukovanje.
Brzo premotavanje 30 sekundi unatrag (FB 30s): Označite ovu ikonicu. Pritisnite taster „OK“ za brzo premotavanje 30 sekundi unatrag.
Brzo premotavanje 30 sekundi unaprijed (FF 30s): Označite ovu ikonicu. Pritisnite taster „OK“ za brzo premotavanje 30 sekundi
unaprijed.
Pauza (Pause): Označite ovu funkciju. Pritisnite taster „OK“ da pokrenete ili pauzirate reprodukovanje.
Zaustavljanje (Stop): Označite ovu ikonicu. Pritisnite taster „OK“ da zaustavite i napustite prozor za reprodukovanje.
Ikonica Opis
Snimanje
(Record)
Pritisnite crveni taster da biste ušli u pod-meni. Možete
da izaberete vrijeme emitovanja programa koji želite da
snimite.
Informacije
(Info)
Pritisnite zeleni taster za prikaz detaljnih podataka o
programu.
Raspored
(Schedule)
Pritisnite žuti taster da pogledate svoja prethodna
podešavanja.
Podsetnik
(Remind)
Pritisnite plavi taster da podesite vrijeme podsećanja na
program koji želite da pogledate.
PROGRAMME GUIDE
TIME
Record
Info
Schedule Remind
MENU:Return
31 Aug
14:23
1 DR1
2 DR2
3 Tegnsprogstol...
4 TV 2 (Fyn)
No Information
Folk og fae (32)
Ingen tegnsprogstolkning
Vild med dig
ON
D
Page 63

61
BIH/CG
USB medijski režim
Priključite USB memorijski uređaj na USB interfejs TV-a i pritisnite taster
„IZVOR“ (SOURCE). Na ekranu će se pojaviti meni „Izvor ulaznog
signala“. Zatim pritisnite taster „/“ da izaberete USB. Pritisnite taster
„OK“ da uđete u USB memoriju (slika 19).
PHOTO MUSIC MOVIE TEXT
USB 2.0
Slika 19
Ikonica Opis
Reprodukovanje/Pauza (Play/Pause): Pritisnite taster „t/u“ da biste odabrali ovu funkciju. Za
reprodukovanje ili pauzu, pritisnite taster „OK“.
Prethodno (Prev.): Pritisnite taster „t/u“ da biste odabrali ovu funkciju. Da učitate prethodnu fotografiju,
pritisnite taster „OK“.
Sledeće (Next): Pritisnite taster „t/u“ da biste odabrali ovu funkciju. Da učitate sljedeću fotografiju,
pritisnite taster „OK“.
Zaustavljanje (Stop): Pritisnite taster „t/u“ da biste odabrali ovu funkciju. Da zaustavite reprodukovanje i
vratite se u prethodni meni, pritisnite taster „OK“.
Ponavljanje (Repeat): Pritisnite taster „t/u“ da biste odabrali ovu funkciju. Da izaberete opciju
„Ponavljanje 1 stavke“ (Repeat 1) ili „Ponavljanje SVEGA“ (Repeat ALL) ili „Bez ponavljanja“ (Repeat
None), pritisnite taster „OK“.
Isključeno nasumično reprodukovanje (Random Off): Pritisnite taster „t/u“ da biste odabrali ovu
funkciju. Da uključite/isključite nasumično reprodukovanje, pritisnite taster „OK“.
Napomena:
1. USB režim podržava datotečne formate sa video datotekama/audio datotekama/grafičkim datotekama/tekstualnim
datotekama. Može doći do neprepoznavanja određenih nestandardnih USB memorijskih uređaja. Zamijenite ih
standardnim USB memorijskim uređajem.
2. Sistem strujanja medija prilikom reprodukovanja datoteke pokazuje određena ograničenja kod svakog od formata.
Ukoliko se reprodukuje datoteka koja je veća od ograničenja sistema, reprodukovanje će biti pogrešno.
3. Ne vadite USB memorijske uređaje dok rade u okviru sistema. Ovo može da dovede do pojave problema u sistemu i
opremi.
4. Sistem ima USB1.1 i USB2.0 priključak i standardni prenosni protokol, kakav su USB diskovi i prenosivi hard diskovi.
Datotečni format na USB uređajima treba da bude FAT ili FAT32. Ne podržava NTFS.
5. USB interfejs ovog TV seta može da omogući napon od 5V i maksimalnu struju od 500mA; upotreba memorijskog
uređaja koji zahtijeva više od 500mA uticaće na tačnu identifikaciju mulitedijalnog uređaja za reprodukciju, što se
obično dešava.
Tasteri za prečice na daljinskom upravljaču
Tasteri „INDEKS“ (INDEX), „ZUMIRANJE“ (ZOOM), „SKRIVENI PODACI“ (REVEAL), „TELETEKST“ (TTX),
„ZADRŽAVANJE“ (HOLD), „LISTA KANALA“ (LIST), „JEZIK“ (LANGUAGE) i „RADIO“ na daljinskom upravljaču
koriste se prilikom upravljanja USB-om.
Pritisnite taster „t/u“ da odaberete meni podešavanja opcija, koji uključuje 4 opcije: FOTOGRAFIJA (PHOTO), MUZIKA
(MUSIC), FILM (MOVIE), TEKST (TEXT).
Pritisnite taster „t/u“ da odaberete opciju „FOTOGRAFIJA“ (PHOTO). Zatim pritisnite taster “OK” da učitate vaše
fotografije. Pritisnite taster „//t/u“ da označite fotografiju, a zatim taster „OK“ (Nakon odabira fotografije, u donjem
desnom uglu datoteke pojaviće se crvena kukica. Možete da odaberete fotografije koje će ući na listu.). Pritisnite taster
„INDEKS“ (INDEX) na daljinskom upravljaču za reprodukovanje. Ukoliko ne izaberete ništa, uređaj će automatski
napraviti listu od svih fotografija iz datoteke.
Napomena: Način upravljanja opcijama „MUZIKA“ (MUSIC), „FILM“ (MOVIE) i „TEKST“ (TEXT) isti je kao i način upravljanja
opcijom „FOTOGRAFIJA“ (PHOTO). Pogledajte opciju „FOTOGRAFIJA“ (PHOTO).
Osnovne funkcije: Prilikom reprodukovanja fotografija, pritisnite taster „INFORMACIJE“ (INFO). U dnu ekrana
pojaviće se alatna traka (Da sakrijete alatnu traku, pritisnite taster „“).
Page 64

62
BIH/CG
Icon Description
Muzika (Music): Pritisnite taster „t/u“ da biste odabrali ovu funkciju. Za reprodukovanje pozadinske
muzike pritisnite taster „OK“. “. (Muzika i fotografije treba da budu smještene u okviru istog foldera ili
možete da najprije izaberete muziku iz datoteke u kojoj držite muziku.)
Lista za reprodukovanje (Playlist): Pritisnite taster „t/u“ da biste odabrali ovu funkciju. Za prikaz liste za
reprodukovanje, pritisnite taster „OK“.
Informacije (Info. ): Pritisnite taster „t/u“ da biste odabrali ovu funkciju. Za prikaz informacija o fotografiji,
uključujući rezoluciju, format i drugo, pritisnite taster „OK“.
Rotiranje (Rotate): Pritisnite taster „t/u“ da biste odabrali ovu funkciju. Da rotirate fotografije u smijeru
kazaljke na satu, pritisnite taster „OK“.
Rotiranje (Rotate): Pritisnite taster „t/u“ da biste odabrali ovu funkciju. Da rotirate fotografije u smijeru
suprotnom od kazaljke na satu, pritisnite taster „OK“.
Uvećavanje fotografije (Zoom In): Pritisnite taster „t/u“ da biste odabrali ovu funkciju. Da uvećate
fotografije, pritisnite taster „OK“.
Umanjivanje fotografije (Zoom Out): Pritisnite taster „t/u“ da biste odabrali ovu funkciju. Da umanjite
fotografije, pritisnite taster „OK“.
Kretanje po fotografiji (Move View): Ukoliko je fotografija veća od površine ekrana, koristite ovu funkciju
kako biste se kretali po fotografiji.
Brzo premotavanje unatrag (FB): Pritisnite taster „t/u“ da biste odabrali ovu funkciju. Za brzo
premotavanje unatrag, pritisnite taster „OK“. Za normalnu reprodukciju, pritisnite taster „INDEKS“ (INDEX).
Brzo premotavanje unaprijed (FF): Pritisnite taster „t/u“ da biste odabrali ovu funkciju. Za brzo
premotavanje unaprijed, pritisnite taster „OK“. Za normalnu reprodukciju, pritisnite taster „INDEKS“
(INDEX).
ISKLJUČIVANJE ZVUKA (MUTE): Da isključite zvuk, pritisnite taster „ISKLJUČIVANJE ZVUKA“ (MUTE).
Odabir vremena reprodukovanja (Goto Time): Pritisnite taster „t/u“ da biste odabrali ovu funkciju. Da
odaberete vrijeme reprodukovanja, pritisnite taster „OK“.
Ponavljanje programa od trenutka A do trenutka B (Set A-B repeat): Pritisnite taster „t/u“ da biste
odabrali ovu funkciju. Da podesite A i B, pritisnite taster „OK“. Film će se ponavljati u vremenskom periodu
između A i B.
Sporo premotavanje unaprijed (Slow Forward): Pritisnite taster „t/u“ da biste odabrali ovu funkciju. Da
usporite brzinu reprodukovanja, pritisnite taster „OK“.
Za normalnu reprodukciju, pritisnite taster „INDEKS“ (INDEX).
Preskakanje unaprijed (Step Forward): Pritisnite taster „t/u“ da biste odabrali ovu funkciju. Za
reprodukovanje korak po korak, pritisnite taster „OK“.
Za normalnu reprodukciju, pritisnite taster „INDEKS“ (INDEX).
Format slike (Aspect Ratio): Pritisnite taster „t/u“ da biste odabrali ovu funkciju. Da odaberete opciju
„automatski“ (Auto), „4:3“ ili „cijeli ekran“ (Full), pritisnite taster „OK“.
Page 65

63
BIH/CG
Otklanjanje jednostavnih problema
Simptom Uzrok Rješenje
Snijeg na ekranu i
prisustvo šuma u zvuku.
1. Razlabavljen priključak kabla za
antenu, oštećen kabl.
2. Neodgovarajući kabl za antenu.
3. Neodgovarajući pravac ili pozicija
antene.
4. Slab signal.
1. Provjerite da li je priključak kabla za antenu
razlabavljen i da li je kabl u savršenom stanju.
2. Provjerite tip kabla za antenu (VHF/UHF)
3. Podesite pravac ili poziciju antene.
4. Pokušajte da koristite pojačavač signala.
TV slika je bolja, ali je
prisutan šum.
Razlabavljen priključak kabla za antenu,
oštećen kabl.
Provjerite da li je priključak kabla za antenu
razlabavljen i provjerite stanje kabla.
Nema slike. Nema zvuka.
Utikač je razlabavljen ili nije povezan na
napajanje.
Provjerite da li je kabl za napajanje dobro
povezan.
Linije na TV slici.
Došlo je do ometanja signala, čiji uzrok
može da bude auto, neonsko svetlo,
električna duvaljka i dr.
Da biste smanjili stepen ometanja, ne
upotrebljavajte električnu duvaljku u blizini
uređaja i podesite pravac kabla antene.
Sjenke na TV slici.
1. TV signal se odbija o kotlinu ili
zgradu.
2. Antena nije postavljena u
odgovarajućem pravcu.
1. Koristite usmjerenu antenu.
2. Podesite pravac antene.
TV ne emituje zvuk.
1. Podešena vrjiednost jačine zvuka je
preniska.
2. Zvuk je isključen.
1. Podesite jačinu zvuka na odgovarajuće
vrijednosti.
2. Da ukinete isključivanje zvuka, pritisnite
taster „ISKLJUČIVANJE ZVUKA“ (MUTE) na
daljinskom upravljaču.
Računar ne šalje sliku
ekranu i ne emituje
ulazni signal; crveni LED
indikator treperi.
Signalni kabl je razlabavljen ili je
nepovezan.
Provjerite da li je signalni kabl razlabavljen ili
nepovezan i ponovo ga povežite.
Domet daljinskog
upravljača je mali;
daljinski upravljač ne
radi.
1. Prijemnik signala daljinskog
upravljača je zaklonjen predmetima.
2. Baterije daljinskog upravljača su
oslabile.
1. Sklonite predmete koji zaklanjaju prijemnik
signala daljinskog upravljača.
2. Zamijenite baterije.
Slika koju šalje računar
je slaba.
1. Podešavanje nije obavljeno na
ispravan način.
2. Neodgovarajući režim ekrana.
1. Koristite funkciju automatskog podešavanja
(auto-adjustment).
2. Koristite preporučeni režim.
Slika koju šalje računar je
manja od ekrana.
1. Podešavanje nije obavljeno na
ispravan način.
2. Neodgovarajući režim ekrana.
1. Koristite funkciju automatskog podešavanja
(auto-adjustment).
2. Uđite u meni „SLIKA“ (PICTURE) da biste
podesili horizontalne ili vertikalne vrijednosti.
3. Koristite preporučeni režim.
Šum pri isključivanju. Električno pražnjenje pri isključivanju. Ovo je normalno.
Nemoguće je upravljati
uređajem.
Spoljašnji uticaji, na primer munje,
statički elektricitet i slično, koji
potencijalno mogu da ometaju
normalan rad ovog uređaja.
Najprije prekinite napajanje, pa ga povežite
nakon približno 1-2 minuta, a zatim ponovo
uključite TV.
Page 66

64
BIH/CG
Tehničke specifikacije
Veličina ekrana
32" 40” 43”
Veličina ekrana - dijagonala
81cm 102cm 109cm
Rezolucija ekrana
1366×768 1920×1080 1920×1080
Veličina piksela (mm)
0.51075×0.51075 0.45735×0.4494 0.4902×0.4902
Aktivna zona (mm)
697.685×392.256 878.112×485.352 941.184×529.416
Snaga audio izlaza (L+D)
6W +6W 6W +6W 8W +8W
Radni napon
100-240V~ 50/60Hz
Deklarisana
potrošnja
Normalan rad ≤55W ≤55W ≤75W
Režim pripravnosti ≤0.5W ≤0.5W ≤0.5W
Dimenzije bez postolja
(Š x V x D mm)
730×430×77 904x521x82 968x567x78
Dimenzije sa postoljem
(Š x V x D mm)
730×474×193 904x571x222 968x616x222
Neto težina (kg)
4.0 6.5 8.0
Bruto težina (kg)
5.2 8.5 10.0
Radni uslovi
Temperatura: 5°~40° ; RV: 10%~85%; atmosferski pritisak: 86kPa~104kPa
Uslovi skladištenja: temperatura
-20°~55°; RV: 5%~95%; atmosferski pritisak: 86kPa~104kPa
Podržani sistemi
ATV: PAL D/K, I, B/G, SECAM D/K, B/G, L
DTV: DVB-T/C/T2
TV (RF)
75Ω nebalansiran
AV Video-Ulaz:
75Ω, 1±0.1VP-P, RCA
AV Audio-Ulaz
20KΩ, 0.2~2V RMS
HDMI Video ulaz
480i, 480p, 576i, 576p, 720p, 1080i, 1080p
Page 67

65
BIH/CG
Uputstvo za montiranje postolja
Za različita postolja postoje različiti načini montiranja. Izaberite odgovarajući način montiranja prema realnom stanju.
Položite TV na ravnu površinu kao što je prikazano na slici, tako da dno televizora izlazi van ivice. Prislonite postolje na donju
stranu uređaja kao što pokazuju strelice na slici, namjestite tako da se otvori na postolju i televizoru poklapaju, a zatim
pričvrstite šarafe.
Napomena: Izgled postolja i uređaja koji imate može da se razlikuje od onog prikazanog na slici; pogledajte uređaj koji
imate.
Postolje
Šara
Page 68

66
BIH/CG
Page 69

67
BG
ФУНКЦИИ. . . . . . . . . . . . . . . . . . . . . . . . . . . . . . . .67
BПРЕДУПРЕЖДЕНИЕ ЗА БЕЗОПАСНОСТ .68
Монтиране и свързване . . . . . . . . . . . . . . . . . . 69
Съдържание на опаковката . . . . . . . . . . . . 69
Монтиране на телевизора . . . . . . . . . . . . . 69
СЪВЕТИ ПРИ МОНТАЖ . . . . . . . . . . . . . . . . . . .70
Свързване на периферно оборудване 70
Бутони на контролния панел. . . . . . . . . . . . . .73
Дистанционно управление . . . . . . . . . . . . . . . 74
Общи инструкции за експлоатация . . . . . . .76
Включване на захранването . . . . . . . . . . . 76
Режим на готовност . . . . . . . . . . . . . . . . . . . . 76
Избор на източник на сигнал . . . . . . . . . . 77
Channel (Канал) . . . . . . . . . . . . . . . . . . . . . . . .77
PICTURE (КАРТИНА). . . . . . . . . . . . . . . . . . . . 78
ЗВУК . . . . . . . . . . . . . . . . . . . . . . . . . . . . . . . . . . 79
OPTIONS (Опци) . . . . . . . . . . . . . . . . . . . . . . .80
ВРЕМЕ. . . . . . . . . . . . . . . . . . . . . . . . . . . . . . . . . 80
LOCK (ЗАКЛЮЧВАНЕ) . . . . . . . . . . . . . . . . . 81
Опция REC . . . . . . . . . . . . . . . . . . . . . . . . . . . .81
Time-shift option
(Опция за смяна на време) . . . . . . . . . . . . . 82
Опция EPG (ЕПУ) . . . . . . . . . . . . . . . . . . . . . .82
Функция “Хотел” (допълнителна) . . . . . . .82
Функция за USB носител . . . . . . . . . . . . . . . 83
Опростено отстраняване на
неизправности . . . . . . . . . . . . . . . . . . . . . . . . . . .85
Технически спецификации. . . . . . . . . . . . . . . . 86
Инструкции за монтаж на стойката. . . . . . . . 87
Содржина
ФУНКЦИИ
1. Висококачествен светодиоден екран със светодиодна подсветка, пестящ енергия, съобразен с околната среда,
свръхтънък, с изключителни функции.
2. С вградени висококачествени високоговорители, които ще ви осигурят кристално чисто аудио-визуално
преживяване и ще запазите пространството върху масата.
3. Има много конектори Можете директно да свържете DVD, vidicon и т.н. към съответните входни конектори и да се
наслаждавате на красиво изображение. Продуктът може да се използва като монитор с на компютър с помощта на
VGA и HDMI конектори. Също така, той може да се използва и като телевизор, когато поставите антената.
4. Много по-бързото време за реакция напълно премахва сянката на картината. Гледането на филм и игра ще бъде
още по-реалистично
5. Достатъчно цветове.
6. По-широк ъгъл за гледане, по-висока яркост, по-висок контраст, по-нисък разход на енергия.
7. Интелигентният режим на изображение и звук ви предлагат интелигентен аудиовизуален ефект.
8. Вграден е най-новия цифров гребенов филтър, който прави изображението по-ясно. Вътрешната технология 3D
De-Interlace може напълно да премахне обезцветяването на екрана, причинено от неясни сигнали.
9. Притежава отлични функции за синхронизиране, можете да зададете време, за да се изключи. Той ще се изключи и
когато няма сигнал.
10. Автоматичната работа е удобна с устройство за дистанционно управление.
11. Функцията за автоматична настройка ви помага да настроите оптимално изображението само за няколко секунди
в режим VGA.
12. Технологията за автоматично регулиране на баланса на цветовете осигурява възможно най-добрата настройка на
цветовете за всички видове адаптери за дисплей в режим VGA.
13. Автоматичното подтискане на шума може значително да премахне фоновия шум, дължащ се на смущения в
менюто и шума, причинен от слаби сигнали, което прави картината на екрана ясна.
14. Поддържа USB интерфейс.
15. Поддържа H.264 FULL HD приемник и поддържа функция PVR (Персонален видео запис).
16. Изключително тънка и свръхтясна конструкция
Page 70

68
BG
ПРЕДУПРЕЖДЕНИЕ
ВНИМАНИЕ
Може да доведе до
произшествия
Показва поведение, което трябва да бъде
забранено
Може да доведе до нараняване
или материални щети
Показва операциите, които трябва да бъдат
изпълнени
BПРЕДУПРЕЖДЕНИЕ ЗА БЕЗОПАСНОСТ
Благодарим ви, че избрахте светодиодния телевизор със светодиодна подсветка, направен от нашата компания
- ценен продукт с отлично качество и много функции. Този уред ще ви донесе още по-голямо аудиовизуално
удоволствие. Неговата конструкция гарантира безопасна експлоатация. Всички устройства са преминали строги
изпитания, преди да напуснат фабричния конвейр. Въпреки това, неправилна експлоатация може да доведе до
токов удар или пожар. За да осигурите безопасност и да удължите неговия срок за експлоатация, моля, прочетете
внимателно ръководството и обозначителния етикет, преди да използвате уреда и спазвайте следните инструкции за
безопасност. Моля, запазете ръководството за експлоатация за по-нататъшно използване.
ПРЕДУПРЕЖДЕНИЕ
• Прекъсване на електрозахранването или нестабилно
напрежение.
• Необичаен звук или миризма, идващи от уреда.
• Повреден кабел за променливотоково захранване.
• Повреда на телевизора поради падане, блъскане или удар.
• Течност или чужди тела, проникнали в телевизора.
• Използвайте само захранване с номинал 240VAC 60/50Hz.
• Този телевизор трябва да се включва в контакт с с три извода от съображения за безопасност.
• Всички кабели могат да се свързват или разкачват само след изключване на електрозахранването.
• Не поставяйте телевизора в нестабилно положение, защото това може да причини падане, повреда или
дори пожар.
• Не поставяйте телевизора в среда:
1. с пряка слънчева светлина, влага, прегряване, прекалено ниски температури или сериозно запрашаване;
2. със запалими или експлозивни вещества;
3. с възпламеними или корозивни газове;
4. в баня, кухня и др.
• Не използвайте повреден или неподходящ захранваща електрически контакт и се уверете, че щепселът и
контактът са свързани правилно.
• Поддържайте захранващия щепсел и контакт без прах и метални частици.
• Не повреждайте захранващия кабел:
1. Ремонт на захранващия кабел е забранен;
2. Не поставяйте тежки предмети върху захранващия кабел;
3. Пазете захранващия кабел от източници на топлина;
4. Не дърпайте захранващия кабел, когато го изключвате.
• Не свързвайте твърде много уреди към един и същ разклонител, защото това може да причини пожар
поради високо потребление на електроенергия.
• Не поставяйте източник на открит пламък (напр. запалена свещ) в близост до телевизора, защото това може
да причини токов удар или пожар.
• Не поставяйте съд, пълен с вода, върху телевизора, за да избегнете токов удар или пожар, причинен от
разливане на вода.
• Не слагайте никакви остри предмети, метали или течности във вентилационните отвори на сигналния
конектор ог, за да избегнете късо съединение и повреда на продукта, както и токов удар.
• Прорезите по корпуса са предназначени за освобождаване на топлина, за да не се позволи на всички
вътрешни компоненти да достигнат изключително високи температури и да се осигури дългосрочна
нормална работа. Моля, не покривайте отворите по време на поставяне на телевизора.
Изключете телевизора
незабавно, извадете
захранващия кабел от
контакта и се свържете с
оторизиран сервиз.
В случай на теч на газ за бита или други запалими газове, не изключвайте захранващия кабел на телевизора или
други електрически уреди; вместо това незабавно затворете клапана на газта и отворете вратите и прозорците.
ПРИ СЛЕДНИТЕ УСЛОВИЯ:
Page 71

69
BG
ВНИМАНИЕ
МОНТИРАНЕ И СВЪРЗВАНЕ
Съдържание на опаковката
Монтиране на телевизора
• Не позволявайте на деца да се катерят по телевизора.
• Дръжте малките принадлежности далеч от деца, за да избегнете поглъщане.
• Ако телевизорът няма да се използва дълго време, моля, изключете уреда и извадете захранващия кабел.
• Преди почистване на телевизора, изключете захранващия кабел и го избършете с мека кърпа; не използвайте
химически почистващи препарати и избягвайте ситуации, в които чужди вещества могат да проникнат в уреда.
Неподходящи почистващи препарати (като почистващи течности, вода и др.) могат да повредят външния вид на
телевизора, да изтрият предоставената информация за продукта, да проникнат в уреда, да повредят компоненти
и да доведат до невъзможност за показване на програмите.
• За да настроите положението или ъгъла за гледане на телевизора, моля, изключете всички кабели и ги
преместете бавно, за да избегнете тяхното падане.
• Не търкайте екрана с твърди предмети и не удряйте, не огъвайте и не го притискайте.
• Не използвайте уреда непосредствено след преместването му от среда с ниска към среда с висока температура,
тъй като това може да доведе до кондензация в уреда и последваща повреда.
• Ако екранът се счупи и течността попадне върху кожата, веднага я промийте с чиста вода за 15 минути и посетете
вашия лекар.
• За пренасяне на телевизора на ръце, моля, хванете долните ъгли; не прилагайте никаква сила върху панела.
• Когато едно и също изображение или активно изображение с неподвижни думи се показва за дълго време,
иконите ще останат на екрана постоянно и няма да изчезнат дълго след изключване на захранването. Този
нежелан ефект не се покрива от гаранцията.
• Здравословно гледане на телевизия:
1. гледайте при подходящо осветление; лошо осветление или продължително гледане може да навреди на очите.
2. Ако използвате слушалки, регулирайте силата на звука по подходящ начин, за да избегнете увреждане на слуха.
• Изключете захранващия кабел на уреда, за да прекъснете захранването.
• Ако електрически щепсел или свързващо устройство се използва за изключване, трябва да се осигури лесно
боравене.
• Захранващият щепсел трябва да е свързан надеждно. Нестабилно поставени захранващи щепсели могат да
предизвикат искрене и пожар.
• Всички технически спецификации, посочени в ръководството за потребителя и върху опаковката, подлежат на
промяна без предизвестие. Ако има незначителни различия между ръководството за потребителя и реалното
функциониране, считайте последното за валидно.
Не докосвайте щепсела с мокри ръце, защото това може да предизвика токов удар.
Не включвайте телевизора по време на гръмотевични бури; вместо това, изключете захранващия щепсел и
конектора на антената, за да избегнете удар от светкавица.
Не разглобявайте телевизора сами, тъй като това може да причини токов удар или пожар. За поддръжка се
обръщайте към квалифициран техник.
1. Телевизор. 2. Ръководство на потребителя. 3. Дистанционно управление.
4. Захранващ кабел (или прикрепен към телевизора). 5. Преходен кабел за компоненти (незадължителен)
• Телевизорът трябва да се монтира в близост до електрозахранващия контакт с цел лесно включване и изключване.
• За ваша безопасност, моля, изберете подходяща конзола за монтаж върху стена или основа.
• За да избегнете наранявания, поставете телевизора върху стабилна повърхност или го монтирайте върху здрава
стена.
• За монтаж на телевизора върху стената се обърнете към квалифициран техник. Неправилен монтаж може да доведе
до нестабилно положение на телевизора.
Page 72

70
BG
Монтаж върху стена
Вентилация
Пречи на въздушната циркулация
Пречи на въздушната циркулация
Fal
Fal
Монтаж върху основа
• Моля, оставете минимално пространство около
телевизора, както е показано на фигурата.
• Не покривайте вентилационните отвори и не
слагайте никакви предмети в корпуса.
• Не поставяйте уреда в ограничено
пространство, напр. библиотеки или вградени
гардероби, освен ако не е осигурена
подходяща вентилация за телевизора
СЪВЕТИ ПРИ МОНТАЖ
Свързване на периферно оборудване
Към телевизора можете да свържете различни устройства и да гледате висококачествени изображения. Ако видео
устройството разполага с HDMI, AV, PC и други изходящи/входящи портове, изберете един от тях и го свържете към
съответните входящи или изходящи портове на телевизора. След като го свържете, натиснете бутона “SOURCE”
(Източник) и на екрана ще се покаже менюто на източника на сигнал. Натиснете бутона “
” и “ ”, за да изберете
входящия сигнал и натиснете “OK”, за да потвърдите. Режимът на свързване е показан на фигурата.
Забележка:
1. След свързване към оборудване с функция MHL (Мобилна връзка с висока разделителна способност), моля
изберете HDMI1 като източник на входящ сигнал.
2. Функцията ARC (Реверсивен звуков канал) е по избор, моля, вижте устройството.
3. Интерфейс COMPONENT (Компонент) е по избор, моля, вижте устройството.
4. Ако има интерфейс COMPONENT (Компонент), компонентът и AV (Аудио-видео) споделят интерфейс AUDIO-IN
(Аудио вход).
5. Периферното оборудване и кабелите, описани в това ръководство, трябва да се закупят отделно.
• Не поставяйте телевизора в зона с механични вибрации.
• Не поставяйте телевизора в зона,в която могат да проникнат насекоми.
• Не монтирайте телевизора срещу климатик, тъй като вътрешният панел на дисплея може да кондензира и да
причини повреда.
• Не поставяйте телевизора в зона със силно магнитно поле, тъй като електромагнитните вълни могат да предизвикат
смущения и да го повредят.
Page 73

71
BG
С електрически контакт
(100-240V~ 60/50Hz)
Жълт (кабел за видео сигнал)
Бял (кабел за AUDIO-L (ляв аудио) сигнал)
Червен (кабел за AUDIO-R (десен аудио)
сигнал)
USB интерфейс
Порт за слушалки
Видео кабел
YPbPr/YCbCr кабел
VGA кабел
Свързване с AV устройството
чрез HDMI интерфейс
Мобилен телефон или друго оборудване с функция MHL
(Мобилна връзка с висока разделителна способност)
Свързване с аудио устройства с
функция ARC (Реверсивен звуков канал)
Свързване с устройствата с AV
(аудио-видео) изходящ интерфейс (например
DVD, VCR (видеокасетофон), игрова конзола)
Свързване с уреда чрез YPbPr/
YCbCr изходящ интерфейс
HDMI сигнален кабел
MHL сигнален кабел
Аудиокабел
HDMI сигнален кабел
HDMI сигнален кабел
Аудиокабел
Захранващ кабел
Свързване на електрозахранване
Връзка с антена
Връзка с VGA вход
Връзка с HDMI вход
Връзка с YPbPr/YCbCr вход
MHL сигнален кабел
Връзка с AV вход
Връзка с функция ARC
При свързване на външна антена със сигналния порт
на телевизора, първо изключете главния прекъсвач на
захранването на телевизора. Не поставяйте външната
антена близо до електрическата мрежа за високо
напрежение, за да избегнете токов удар. Антената
за кабелна мрежа, свързана към този телевизор,
трябва да бъде изолирана от защитното заземяване; в
противен случай това ще предизвика пожар или други
опасности.
R
ПРЕДУПРЕЖДЕНИЕ
32”/40”
Page 74

72
BG
43”
Коаксијален кабел
Поврзете на аудиозасилувачот
со коаксијален интерфејс.
Излезен коаксијален
приклучок
USB1 интерфейс
USB2 интерфейс
Порт за CI карта
Жълт (кабел за видео сигнал)
Бял (кабел за AUDIO-L (ляв аудио) сигнал)
Оранжев (коаксиален сигнален кабел)
Червен (кабел за AUDIO-R
(десен аудио) сигнал)
R
Връзка с YPbPr/YCbCr вход
Свързване с уреда чрез YPbPr/
YCbCr изходящ интерфейс
Порт за
слушалки
Видеокабел
Аудиокабел
YPbPr/YCbCr кабел
Свързване с AV устройството
чрез HDMI интерфейс
Свързване с устройствата с AV
(аудио-видео) изходящ интерфейс
(например DVD, VCR (видеокасетофон),
игрова конзола)
HDMI сигнален кабел
HDMI сигнален кабел
HDMI сигнален кабел
Аудиокабел
Връзка с HDMI вход
Връзка с AV вход
Забележка:
1. След свързване към оборудване с функция
MHL (Мобилна връзка с висока разделителна
способност), моля изберете HDMI1 като
източник на входящ сигнал.
2. Функцията ARC (Реверсивен звуков канал) е
по избор, моля, вижте устройството.
3. Интерфейс COMPONENT (Компонент) е по
избор, моля, вижте устройството.
4. Ако има интерфейс COMPONENT
(Компонент), компонентът и AV (Аудио-видео)
споделят интерфейс AUDIO-IN (Аудио вход).
5. Периферното оборудване и кабелите,
описани в това ръководство, трябва да се
закупят отделно.
Page 75

73
BG
С електрическия контакт
(100-240VAC 60/50Hz)
VGA кабел
Мобилен телефон или друго оборудване с функция MHL
(Мобилна връзка с висока разделителна способност)
Свързване с аудио устройства с функция ARC
(Реверсивен звуков канал)
HDMI сигнален кабел
MHL сигнален кабел
Захранващ кабел
Връзка с електрозахранване
Връзка с антена
Връзка с VGA вход
Връзка с функция MHL
Връзка с функция ARC
При свързване на външна антена със сигналния порт на телевизора,
първо изключете главния прекъсвач на захранването на телевизора.
Не поставяйте външната антена близо до електрическата мрежа за
високо напрежение, за да избегнете токов удар. Антената за кабелна
мрежа, свързана към този телевизор, трябва да бъде изолирана
от защитното заземяване; в противен случай това ще предизвика
пожар или други опасности.
ПРЕДУПРЕЖДЕНИЕ
БУТОНИ НА КОНТРОЛНИЯ ПАНЕЛ
32”/40”
1. Светодиоден индикатор за захранване и прозорче за
дистанционно приемане.
2.
Режим на готовност: За включване на телевизора или
връщането му обратно в режим на готовност.
3. МЕНЮ (
): Натиснете този бутон, за да влезете в главното
меню.
4. VOL-, VOL+ (
): Натиснете тези два бутона, за
да увеличите или намалите силата на звука. В меню
OSD (Екранно меню) натиснете двата бутона, за да
настроите аналоговата стойност на избрания елемент.
Тези бутони имат същите функции като бутоните t / u на
дистанционното управление.
5. CH-, CH+ (
):Натиснете тези два бутона, за да
изберете канала. В меню OSD (Екранно меню) натиснете
двата бутона, при споделяне на функцията с бутон / на
дистанционното управление за да настроите елементите.
6. Източник (
): Натиснете този бутон, за да влезете в
менюто на източника на сигнал и изберете източника на
сигнал.
Забележка: Различните модели могат да имат различен вид;
моля, вижте вашия уред.
Page 76

74
BG
ДИСТАНЦИОННО УПРАВЛЕНИЕ
Метод за поставяне на батериите в дистанционното управлениеч
Предпазни мерки при използване на дистанционно управление
Свалете капака на отсека за батериите, поставете две батерии тип ААА 1,5 волта и регулирайте с полярността,
отбелязана на отсека за батериите в дистанционното управление.
1. Когато използвате дистанционното управление, трябва да го насочите към индуктивното прозорче за дистанционното
управление. Предметите между дистанционното управление и индуктивното прозорче могат да попречат на
нормалната работа на телевизора.
2. Не подлагайте дистанционното управление на силни вибрации. Освен това, не излагайте дистанционното управление
на директна слънчева светлина, защото топлинната енергия ще предизвика деформиране на дистанционното
управление.
3. Ако индуктивното прозорче за дистанционно управление на основния уред е изложено на пряка слънчева светлина
или интензивно осветление, дистанционното управление може да се повреди; моля, променете ъгъла на осветеност
на това устройство или приближете индуктивното прозорче за работа с дистанционното управление.
4. Ниско напрежение на батериите оказва влияние на дистанционното управление. Трябва да смените батериите. Ако
дълго време не използвате дистанционното управление или ако батериите са изтощени, ги извадете, за да избегнете
изтичане на електролит от батериите, което причинява корозия на дистанционно управление и последващо
повреждане.
5. Не използвайте различни батерии. Не се позволява комбиниране на стари използвани и нови батерии. Трябва да
използвате батериите по двойки.
6. Не хвърляйте батерии в огън, не ги зареждайте и не ги разглобявайте, и най-вече не зареждайте, не монтирайте и
не разглобявайте, не загрявайте и не горете използвани стари батерии. Моля, спазвайте съответните разпоредби за
опазване на околната среда, които се отнасят до използвани батерии.
1. Светодиоден индикатор за захранване и прозорче за дистанционно приемане.
2.
Бутон на захранването (по избор): Натиснете „ I “, за да включите захранването и натиснете „ “,
за изключите захранването.
3. ИЗТОЧНИК: Натиснете този бутон, за да влезете в менюто на източника на сигнал и изберете
източника на сигнал.
4. CH-/CH+ (
): Натиснете тези два бутона, за да изберете канала. В меню OSD (Екранно
меню) натиснете двата бутона, при споделяне на функцията с бутон / на дистанционното
управление за да настроите елементите.
5. VOL-, VOL+ (
): Натиснете тези два бутона, за да увеличите или намалите силата на звука.
В меню OSD (Екранно меню) натиснете двата бутона, за да настроите аналоговата стойност на
избрания елемент. Тези бутони имат същите функции като бутоните t / u на дистанционното
управление.
6. МЕНЮ (
): Натиснете този бутон, за да влезете в главното меню.
7.
Режим на готовност: За включване на телевизора или връщането му обратно в режим на
готовност.
Забележка: Различните модели могат да имат различен вид; моля, вижте вашия уред.
43”
Page 77

75
BG
Основни инструкции за дистанционното управление
Забележка: Външният вид на дистанционното управление може да се различава от показания на фигурата.
Използвайте предоставената информация така, че да съответства на реалното дистанционно управление.
Име Описание на функция
POWER (
)
Влизане и излизане в/от режим на готовност на приемника.
WIDE (16:9)
Промяна на формат на изображението.
MUTE ( )
Изключване на звука при гледане на програма.
Цифрова
Въвеждане на цифри.
F1
Включване или изключване на стоп-кадър.
Списък
на каналите (
)
Търсене в списъка с канали.
SMART S
Избор на интелигентен режим за звука.
SMART P
Избор на интелигентен режим за картината.
Бутон на курсора
( , , , )
Преместване на курсора нагоре/надолу/наляво/надясно през
елементите на менюто или промяна на датата на EPG.
OK
Потвърждаване на текущите настройки.
VOL+/VOL-
Натиснете, за да регулирате силата на звука.
MENU
Натиснете този бутон, за да се покаже менюто.
SOURCE
Натиснете този бутон, за да се покаже менюто за избиране на
източник на сигнал.
CH+/CH-
Бутони за смяна на канала. Промяна на различни страници от
ЕПУ на текущия канал.
INFO
Показване на информация за текущата програма.
REC
Записване на програма.
Връщане ( )
Натиснете този бутон, за да се върнете към последния гледан
канал.
L/R
Избиране на режим NICAM (при източник на ATV сигнал)
INDEX ( )
В режим DTV натиснете бутона "INDEX" (Показалец), за да се
покаже списък със записаните програми.
ZOOM ( )
В режим DTV натиснете "ZOOM" (Мащабиране), за да
увеличите съотношението на екрана, ако има графичен
дисплей; ако няма графични изображения и USB портът
е свързан с паметта, натиснете този бутон, за да забавите
излъчването на текущо възпроизвежданите телевизионни
програми.
REVEAL ( ),
TTX (
),
HOLD (
),
LIST (
),
LANGUAGE (
),
RADIO (
)
За работа с телетекст или работа с USB.
Червен бутон
Многофункционален червен бутон.
SUBTITLE
(Зелен бутон)
Зеленият бутон на телетекста или показване на съобщение за
субтитри, ако текущият канал има опция за субтитри.
FAV (Жълт бутон)
Жълтият бутон на телетекста или бутон "Предпочитани" се
използва за настройка или за показване на предпочитаните
от вас програми.
EPG (Син бутон)
Синият бутон на телетекста или показване на Електронния
програмен указател (ЕПУ) за текущия канал по време на
състояние без меню.
Page 78

76
BG
Ръководство на дистанционното управление за телетекст
TeleText (Телетекст): Натиснете бутон “Teletext” (Телетекст), той превключва между 3 режима: Mix Display
(Комбинирано показване) > Text Mode (Текстов режим) > TeleText O (Изключен телетекст).
Thereinto: Режимът за телетекст е автоматичен режим. В автоматичен режим системата автоматично избира TOP
(Отгоре), Fastext (Бърз текст) или режим по подразбиране, в зависимост от получаваните данни. В текстов режим или
режим за комбинирано показване, натиснете цифров бутон 0~9, “/” за да изберете текстова страница.
Reveal (Разкриване): Всички скрити знаци се показват за 6 секунди.
Hold (Задържане): Превключване между задържане или изключване на задържане за текущо показвани страници.
Ако страницата не се задържа, тя ще се задържи, което ще попречи на нейното актуализиране. Ако страницата
се задържа в момента, задържането ще бъде премахнато, което ще позволи актуализиране на страницата. Когато
страницата се задържа, това се обозначава с подкана за задържане.
Index (Показалец): В режим Fastext (Бърз текст), задайте страницата с показалец, ако връзката за показалеца е
валидна, или началната страница на Packet 8/30, ако е валидна, или стр. 100. В режим TOP, ако опцията Hitlist (Списък
с хитове) е активирана, превключете системата между текущата текстова страница и менюто Hitlist (Списък с хитове);
в противен случай задайте страница 100. В режим “List” (Списък), върнете списъка с предпочитани страници към този
на текущия канал, така както е разчетен от EEPROM (електрически изтриваема програмируема памет само за четене),
ако има такава, или към списъка по подразбиране (страници 100,101,102,899) и задайте първата страница в списъка. В
режим “Default” (По подразбиране) задайте началната страница на Packet 8/30, ако е валидна, или стр. 100.
List (Списък): Превключва между режима List (Списък) и режима на текущо приемане (Fastext, TOP или по
подразбиране).
Червен, Зелен, Жълт, Син: Задайте съответната страница на дисплея в зависимост от режима на приемане. В режим
TOP Hitlist червения, зеления и синия бутон контролират избора от менюто Hitlist, докато жълтият бутон се игнорира.
ОБЩИ ИНСТРУКЦИИ ЗА ЕКСПЛОАТАЦИЯ
Включване на захранването
Режим на готовност
Сл. 1 Сл. 2
Преди да включите устройството, уверете се, че захранването е постоянно и кабелът на антената е свързан добре.
Включете захранващия кабел в електрически контакт. Натиснете бутона “
“ на дистанционното управление или на
телевизора, за да включите телевизора. На екрана се показва меню (Фиг. 1) “Please select an OSD Language” (Моля,
изберете език на екранното меню). Натиснете бутон “//t/u” на дистанционното управление, за да изберете
желания език, след което натиснете “OK” на дистанционното управление, за да потвърдите. На екрана се показва
“Select DVB type” (Изберете DVB тип). Натиснете бутон “/” на дистанционното управление, за да изберете
желания тип DVB, а след това натиснете “OK”, за да продължите към следващата стъпка (Фиг. 2). (Представеният
пример показва търсене на канали тип DVB при DVB-T.) Натиснете бутона “t/u”, за да изберете Tune Type (Тип фина
настройка): DTV + ATV, ATV, DTV. Натиснете бутон “”. Можете да изберете държавата, в която се намирате, като
натиснете “//t/u”, а след това натиснете “OK”, за да потвърдите. Уредът ще започне автоматична фина настройка.
Натиснете бутон “
” на дистанционното управление, телевизорът ще бъде в режим на готовност.
Специално внимание:
1. Телевизорът автоматично ще премине в режим на готовност, ако няма входен сигнал за период от 5 минути след
включване на телевизора.
2. Телевизорът автоматично ще премине в режим на готовност, когато настъпи предварително зададеното време за
изключване.
3. Ако не използвате телевизора за дълъг период от време, изключете захранването на уреда. Не оставяйте уреда в
режим на готовност за дълго време.
OK: Enter
Please select an OSD Language
Eng lish
Cro atian
Dut ch
Rus sian
Ara bic
Far si
Spa nish
Ita lian
Fre nch
Ger man
Por tugue se
Pol ish
Tune Type
Germany
MENU: Return
Greece
Hungary
DT V + ATV
Netherlands
Norway
Poland
Italy
Ireland
Luxembourg
Page 79

77
BG
Натиснете бутона “SOURCE” (Източник) на дистанционното управление или на контролния панел на телевизора. На
екрана ще се покаже “Input Source” (Входящ източник) (Фиг.3). След това натиснете бутон “/” на дистанционното
управление или бутона “CH+/CH-” на контролния панел на телевизора, за да изберете източника на сигнал. Натиснете
бутона “OK” на дистанционното управление и телевизорът ще замени текущия източник на сигнал с избрания от вас
източник. (Забележка: Източник на сигнал YPBPR е по избор, моля, вижте устройството.)
Натиснете бутона “MENU” (Меню) на дистанционното управление или на контролния панел на телевизора. На екрана
ще се покаже главното меню (фиг.4).
1. Натиснете бутона “t/u” на дистанционното управление или бутона “VOL+/VOL-” на контролния панел, за да
изберете менюто за избор на настройки, което включва 6 вида избор: CHANNEL (Канал), PICTURE (Картина), SOUND
(Звук), OPTION (Опция), TIME (Време), LOCK (Заключване).
2. Натиснете бутон “ /” на дистанционното управление или бутона “CH+/CH-” на контролния панел на телевизора,
за да изберете какво искате да настроите в менюто за избор.
3. Натиснете бутона “OK” на дистанционното управление, за да зададете или влезете в следващото меню.
4. Натиснете бутон “MENU” (Меню), за да излезете от главното меню, когато телевизорът показва Main Menu (Главно
меню). Натиснете бутон “MENU” (Меню), за да се върнете в предишното меню, когато телевизорът показва
подменюто. Натиснете бутон “SOURCE” (Източник), за да се покаже източника на сигнал.
5. По време на операцията опциите, които не могат да се настроят в текущия режим, ще се скрият автоматично, а
цветът на тези опции ще се промени в сив.
6. Инструкциите за работа с менюто, описани в това ръководство, са обяснени според режим TV (Телевизор).
Операциите в други режими са подобни на тези в режим TV (Телевизор). Потребителите могат да го използват за
справка.
Забележка: Бутоните “//t/u” в това ръководство означават бутони за посока на курсора на дистанционното
управление, освен ако не е определено друго. Инструкциите за работа в текста по-долу се базират на бутоните на
дистанционното управление. Моля, запознайте се сами с бутоните на контролния панел на телевизора.
Натиснете бутон “MENU” (Меню) и на екрана ще се покаже меню CHANNEL (Канал) (Фиг. 4). Натиснете бутона „ /“,
за да изберете елемента, който искате да настроите или зададете.
Auto Tuning (Автоматична настройка)
Натиснете бутон “MENU” (Меню) и на екрана ще се покаже меню CHANNEL. Натиснете
бутона „/“, за да изберете Auto Tuning (Автоматична настройка). Натиснете бутон
“OK” и на екрана ще се покаже меню “DVB Select type” (Избор на тип DVB). Натиснете
бутони „/“ на дистанционното управление, за да изберете желания тип DVB, а след
това натиснете “OK”, за да продължите към следващата стъпка (Фиг. 2). (Представеният
пример показва търсене на канали тип DVB при DVB-T.) Натиснете бутона “t/u”, за да
изберете Tune Type (Тип настройка): DTV + ATV, ATV, DTV. Натиснете бутон “”. Можете
да изберете желаната държава, като натиснете “//t/u, а след това натиснете “OK”,
за да потвърдите. Уредът ще започне автоматична настройка (Фиг. 5) По време на
автоматичната фина настройка можете да натиснете бутона “MENU” (Меню), за да се
върнете и да излезете от автоматичната фина настройка.
Избор на източник на сигнал
Инструкции за работа с менюто
Channel (Канал)
Сл. 3 Сл. 4
Сл. 5
Input Source
DTV
AV
YPB PR
HDM I 1
HDM I 2
VGA
USB
ATV
OK:Enter
Auto Tu ning
CHANNEL
DTV Manual Tuning
ATV Manual Tuning
Programme Edit
Signal Information
OK: Enter
MENU: Return
1 %... 63.25 MHz
MENU
Exit
Channel Tuning
ATV
DTV
Radio
Data
0 Programme(s)
0 Programme(s)
0 Programme(s)
0 Programme(s)
:
:
:
:
Page 80

78
BG
DTV Manual Tuning (Ръчна настройка на DTV)
Натиснете бутон “MENU” (Меню) и на екрана ще се покаже меню CHANNEL (Канал)
(Фиг. 4). Натиснете бутона “/”, за да изберете DTV Manual Tuning (Ръчна настройка
на DTV). Натиснете бутон “OK”, за да влезете в менюто DTV Manual Tuning (Ръчна
настройка на DTV) (Фиг.6). Натиснете бутона “t/u”, за да изберете канал, а след това
натиснете бутон “OK”, за да търсите. След завършване на търсенето, менюто DTV
Manual Tuning (Ръчна настройка на DTV) автоматично ще се затвори.
ATV Manual Tuning (Ръчна настройка на ATV)
Натиснете бутон “MENU” (Меню) и на екрана ще се покаже меню CHANNEL
(Канал). Натиснете бутона “/”, за да изберете ATV Manual Tuning (Ръчна
настройка на ATV). Натиснете бутон “OK”, за да влезете в менюто ATV Manual Tuning
(Ръчна настройка на ATV) (Фиг.7). Натиснете бутона “/”, за да изберете Current
CH (Текущ канал). Натиснете бутона “t/u”, за да изберете ръчно търсене. След
завършване на търсенето можете да запазите търсения канал в други позиции. В
този момент натиснете бутона “t/u”, за да изберете Storage To (Съхранение в), а
след това натиснете “/”, за да изберете номера на канала. След като изберете
Fine-Tune (Фина настройка), натиснете бутон “t/u”, за да настроите от ниска честота
или от висока честота.
По време на ръчното търсене можете също така да натиснете бутона “MENU”, за да
прекъснете търсенето и да се върнете в последното меню.
Programme Edit (Редактиране на програма)
Натиснете бутон “MENU” (Меню) и на екрана ще се покаже меню CHANNEL
(Канал). Натиснете бутона “/”, за да изберете Programme Edit (Редактиране
на програма). Натиснете бутона “OK”, за да влезете в менюто Programme Edit
(Редактиране на програма) (Фиг. 8), а след това натиснете бутона “/”, за да
изберете канала, който искате да редактирате.
Delete (Изтриване): Изберете канал и натиснете “Червения” бутон, за да го
изтриете.
Move (Преместване): Изберете канал и натиснете “Зеления” бутон, натиснете
бутона “/”, за да изберете позицията на канала, в която искате да преместите
канала. Натиснете бутона “OK”, за да потвърдите. Можете да натиснете бутона
“MENU” (Меню), за да се върнете в последното меню.
Favourite (Предпочитан): Изберете канал и натиснете “Жълтия” бутон. Иконата
за предпочитания ще се покаже зад избрания канал. За отмяна натиснете отново
“Жълтия” бутон. Натиснете бутон “MENU” (Меню), за да се върнете в главното
меню.
Skip (Пропускане): Изберете канал и натиснете “Синия” бутон. Иконата SKIP
(Пропускане) ще се покаже зад избрания канал. За отмяна натиснете отново
“Синия” бутон. Натиснете бутон “MENU” (Меню), за да се върнете в главното меню.
Signal Information (Информация за сигнал)
Натиснете бутон “MENU” (Меню) и на екрана ще се покаже меню CHANNEL
(Канал). Натиснете бутона “/”, за да изберете Signal Information (Информация
за сигнал). Натиснете бутон “OK”, за да влезете в менюто Signal Information
(Информация за сигнал). Можете да разгледате информацията за сигнала.
Забележка: Преди да натиснете бутона “MENU”, първо изберете входящия източник. Можете да го изберете само в
режим DTV.
Натиснете бутон “MENU” (Меню) и на екрана ще се покаже
меню CHANNEL (Канал). Натиснете бутон “t/u”, за да
изберете PICTURE (Картина) (Фиг.9), а след това натиснете
бутон “/”, за да изберете елемента, който искате да
настроите или зададете.
Picture Mode (Режим на картина): Натиснете бутон
“OK”, за да влезете в подменюто Picture Mode (Режим на
картина). Натиснете бутона “/”, за да изберете елемент,
който искате да настроите или зададете.
PICTURE (КАРТИНА)
DTV Manual Tuning
UHF CH 21
Bad
Normal Good
NO SIGNAL
ATV Manual Tuning
Frequ ency 175.25 MHz
Storage To 1
DK
Current CH 1
Search
Fine-Tune
MENU: Return
Save
OK: Enter
1 C-01
2 S-42
3 C-06
4 C-11
5 S-11
6 S-13
7 C-21
8 C-51
MENU: Return
Programme Edit
Delete
Move
Skip
Favourite
ATV
ATV
ATV
ATV
ATV
ATV
ATV
ATV
Сл. 6
Сл. 7
Сл. 8
Сл. 9
Picture Mode User
Color Temperature Standard
Aspect Ratio Full
Noise Reduction Middle
PC Setting
PICTURE
OK: Enter
MENU: Return
Page 81

79
BG
Натиснете бутон “MENU” (Меню) и на екрана ще се
покаже меню CHANNEL (Канал). Натиснете бутон
“t/u”, за да изберете SOUND (Звук) (Фиг.10), а след
това натиснете бутон “/”, за да изберете елемента,
който искате да настроите или зададете.
Sound Mode (Режим на звука): Натиснете бутон
“OK”, за да влезете в подменюто Sound Mode (Режим
на звука). Натиснете бутона “/”, за да изберете
елемент, който искате да настроите или зададете.
Surround Sound (Съраунд звук): Натиснете бутон “OK”, за да влезете в подменюто Surround Sound (Съраунд звук).
Натиснете бутона “/”, за да изберете режим за съраунд звук: O (Изкл.), Surround (Съраунд), SRS Trusurround XT.
AD Switch (Превключвател на AD): Натиснете бутон “OK”, за да влезете в подменюто AD Switch (Превключвател на
AD). Натиснете бутон t/u, за да изберете “On” (Вкл.) или “O” (Изкл.). Ако изберете “On” (Вкл.), можете да настроите
силата на звука на AD чрез натискане на бутон “t/u” (достъпен само в DTV).
ЗВУК
Сл. 10
OK: Enter
MENU: Return
Sound Mode Music
Surround Sound Off
AD Switch Off
SOUND
Елемент Функция Описание
Picture Mode (Режим
на картина)
Избиране на режима на
картината
Четири режима “Стандартен”, “Размит”, “Потребителски”, “Динамичен”
Contrast (Контраст)
Настройване на контраста
на цяла картина
Увеличаване на аналоговата стойност увеличава контраста; намаляване
на аналоговата стойност намалява контраста (0~100).
Brightness (Яркост)
Настройване на яркостта и
нивото на черния цвят на
цялата картина
Увеличаване на аналоговата стойност увеличава яркостта; намаляване на
аналоговата стойност намалява яркостта (0~100).
Saturation
(Наситеност)
Настройване на
дълбочината на цветовете
на картината
Увеличаване на аналоговата стойност увеличава зеления цвят;
намаляване на аналоговата стойност увеличава лилавия цвят (0~100).
Sharpness (Рязкост)
Настройване на рязкостта
на цяла картина
Увеличаване на аналоговата стойност увеличава разделителната
способност; намаляване на аналоговата стойност намалява
разделителната способност (0~100).
Tint (Оттенък)
Настройване на оттенъка
на цяла картина
Увеличете аналоговата стойност, за да подобрите дълбочината; намалете
аналоговата стойност, за да намалите дълбочината (0~100).
Елемент Функция Описание
Sound Mode (Режим
на звука)
Избиране на температура
на звука
Пет режима "Стандартен", "Музика", "Филм", "Потребител".
Treble (Високи
честоти)
Настройка на стойността на
високите честоти
Увеличаване на аналоговата стойност увеличава високите честоти;
намаляване на аналоговата стойност намалява високите честоти
(0~100).
Bass (Ниски честоти)
Настройване на стойността
на ниските честоти
Увеличаване на аналоговата стойност увеличава ниските честоти;
намаляване на аналоговата стойност намалява ниските честоти (CM
00).
Balance (Баланс)
Настройване на баланса
между левия и десния
високоговорител
Увеличаване на аналоговата стойност намалява силата на звука отляво;
намаляването на аналоговата стойност намалява силата на звука
отдясно (L50 ~ R50).
Color Temperature (Температура на цвят): Натиснете бутон “OK”, за да влезете в подменюто Colour Temperature
(Температура на цвят). Натиснете бутон “t/u”, за да изберете режим за температура на цвета. Standard (Стандартна),
Warm (Топла), Cool (Студена).
Aspect Ratio (Съотношение на картината): Натиснете бутон “OK”, за да влезете в подменюто Aspect Ratio
(Съотношение на картината). Натиснете бутона “/”, за да изберете режим за съотношение на картината: Auto
(Автоматично), 4:3, Full (Пълно), Film (Филм), Subtitle (Субтитри), PC Mode (Компютър).
Noise Reduction (Намаляване на смущения): Натиснете бутон “OK”, за да влезете в подменюто Noise Reduction
(Намаляване на смущения). Натиснете бутона “/”, за да изберете режим за намаляване на смущения: O (Изкл.),
Low (Ниско), Middle (Средно), High (Високо).
Page 82

80
BG
OPTIONS (Опци)
ВРЕМЕ
Натиснете бутон “MENU” (Меню) и на екрана ще се покаже
меню CHANNEL (Канал). Натиснете бутон “t/u”, за да
изберете OPTIONS (Опции) (Фиг.11), а след това натиснете
бутон “/”, за да изберете елемента, който искате да
настроите или зададете.
OSD Language (Език на извеждане на меню на екрана):
Натиснете бутон “OK”, за да влезете в подменюто OSD
language (Език на извеждане на меню на екрана). Натиснете
бутон “//t/u” , за да изберете желания език. Натиснете
бутон “MENU” (Меню), за да се върнете в предишното меню
Забележка: Методът на работа на Audio Language (Език
на аудио) е същият като този на OSD Language (Език на
извеждане на меню на екрана)(достъпен само в DTV).
Натиснете бутон “MENU” (Меню) и на екрана ще се покаже
меню CHANNEL (Канал). Натиснете бутон “t/u”, за да
изберете TIME (Време) (Фиг.11), а след това натиснете бутон
“/”, за да изберете елемента, който искате да настроите
или зададете.
Clock (Часовник): При входящ източник DTV, часовникът
ще се синхронизира с телевизионна програма.
O Time (Време за изключване): Натиснете бутон “OK”,
за да влезете в подменюто O Time (Време за изключване).
Натиснете бутона “/”, за да изберете Час и Минути за
изключване, след това натиснете “t/u”, за да настроите
стойностите на таймера за изключване. Телевизорът ще се
изключи автоматично в часовото време, което сте избрали.
Забележка: Можете да зададете час и минута, само ако времето за изключване не е в режим “O” (Изкл.).
On Time (Време за включване): Натиснете бутон “OK”, за да влезете в подменюто On Time (Време за включване).
Натиснете бутона “/”, за да изберете Час и Минути за включване на телевизора, Източник, Канал и Сила на звука, след
това натиснете “t/u”, за да настроите стойностите на таймера за включване. Телевизорът ще се включи автоматично и ще
се настрои на желания режим в часовото време, което сте избрали.
Sleep Timer (Таймер за заспиване): Натиснете бутон “OK”, за да влезете в подменюто Sleep Time (Време за за заспиване).
Натиснете бутона “/”, за да изберете времето за заспиване: O (Изключен), 10 мин., 20 мин., 30 мин., 60 мин., 90 мин.,
120 мин., 180 мин., 240 мин..
Time Zone (Часова зона): Натиснете бутон “OK”, за да влезете в подменюто Time Zone (Часова зона). Натиснете бутон
“//t/u” , за да изберете часовата зона. (Налична само в режим DTV)
Hearing Impaired (Увреден слух): Натиснете бутона “OK”, за да изберете “On”
(Вкл.) или “O” (Изкл.) (само на DTV).
PVR File System (Файлова система на PVR): Натиснете бутон “OK”, за да
влезете в подменюто PVR File System submenu (Файлова система на PVR) (Фиг. 12).
Изберете диск за съхранение в подменю “select disc” (избор на диск). Натиснете
бутона “/”, за да изберете “Check PVR File System” (Проверка на файлова
система на PVR), а след натискане на бутона “OK” уредът ще започне проверката.
След успешна проверка натиснете бутона “MENU” (Меню), за да излезете от
менюто. Натиснете бутона “REC” за запис.
Забележка: Поставете диск U в интерфейса на устройството, преди да
използвате функцията PVR Fife System (Файлова система на PVR).
Restore User Default (Възстановяване на потребителски настройки): След като
натиснете бутон “OK”, съобщението “Сигурни ли сте? “ ще се покаже на екрана.
Натиснете бутона “t”, за да се върнете към фабричната настройка или бутона “u”,
за да отмените текущата операция.
Blue Screen (Син екран): Натиснете бутон “OK”, за да изберете “On” (Вкл.) или “O” (Изкл.). Отваряне или затваряне на
функцията за син екран.
Software Update (Софтуерна актуализация) (USB): Актуализиране на софтуера от U диск.
OSD Language
Audio Language English
Hearing Impaired Off
PVR File System
Restore User Default
Blue Screen On
Software Update(USB)
OPTION
English
OK: Enter
MENU: Return
Check PVR File System
Format
Free Record Limit
USB Disk
Time Shift Size
Speed
Start
6 Hr.
Select Disk
C:
Сл. 11
OK: Enter
MENU: Return
Clock
Off Time Off
On Time Off
Sleep Timer Off
Time Zone Berlin +1
TIME
-- -- -- --
Сл. 13
Сл. 12
Page 83

81
BG
LOCK (ЗАКЛЮЧВАНЕ)
Опция REC
Натиснете бутон “MENU” (Меню) и на екрана ще се
покаже меню CHANNEL (Канал). Натиснете бутон “t/u”,
за да изберете LOCK (Заключване). След натискане на
бутона “OK”, натиснете цифровия бутон, за да въведете
стандартната парола 0000 и да влезете в меню LOCK
(Заключване) (Фиг. 14). След това натиснете бутона “/”,
за да изберете елемента, който искате да настроите или
зададете.
Lock System (Блокиране на система): Натиснете бутон
“OK”, за да изберете “On” (Вкл.) или “O” (Изкл.). Опцията
за блокиране на програма може да работи, когато
опцията Lock System Блокиране на система) е активирана.
Set Password (Задаване на парола): Натиснете бутона “OK” и на екрана ще се покаже диалоговият прозорец “Set
Password” (Задаване на парола). Натиснете цифровия бутон, за да въведете старата парола, въведете нова парола два
пъти, за да завършите промяната на паролата и да се върнете в последното меню.
Забележка: Моля, след промяната се уверете, че сте запомнили новата парола. В противен случай системата ще се
блокира завинаги.
Block Program (Блокиране на програма): Натиснете бутона “OK” и на екрана ще се покаже диалоговият прозорец
“Block Program” (Блокиране на програма). Натиснете бутона “/”, за да изберете канала, който искате да блокирате,
а след това натиснете зеления бутон, за да го блокирате или разблокирате. Натиснете бутон MENU (Меню), за да
излезете от менюто.
OK: Enter
MENU: Return
Lock System
Set Password
Block Program
LOCK
[00:00:29]
14:21
Pla y FB FF FB 30 S FF 30 S Pau se St op
(0003:10:24)
Сл. 14
Сл. 15
Икона Описание
Показва, че системата записва програма.
Показва номера на текущата програма.
Показва продължителността на записаната програма.
Показва най-дългата продължителност, която U диск може да осигури (съответства на капацитета на U диска)
Показва времето на текущата програма.
Play (Възпроизвеждане): Изберете тази икона. Натиснете бутона "OK", за да възпроизведете видеоклипа или да зададете A-B
повторение.
FB: Изберете тази икона. Натиснете бутона "OK" за бързо превъртане назад. Натиснете бутона "INDEX" за стандартно
възпроизвеждане.
FF: Изберете тази икона. Натиснете бутона "OK" за бързо превъртане напред. Натиснете бутона "INDEX" за стандартно
възпроизвеждане.
FB 30s: Изберете тази икона. Натиснете бутона "OK" за възпроизвеждане с 30 сек. назад.
FF 30s: Изберете тази икона. Натиснете бутона "OK" за възпроизвеждане с 30 сек. напред.
Pause (Пауза): Изберете тази функция. Натиснете бутона "OK" за възпроизвеждане или пауза.
Stop (Спиране): Изберете тази икона. Натиснете бутона "OK", за да спрете и да излезете от показвания прозорец.
В режим DTV натиснете бутона “REC” и на екрана ще се появи
менюто за избор на запис (Фиг.15). Системата ще започне да
записва веднага. Натиснете бутона “REVEAL” (Разкриване), за
да спрете и и излезете от режима за запис. След завършване
на процеса на записване, натиснете бутона “INDEX” и ще се
появи списъка със записи.. Изберете файла, който искате да
възпроизведете. Можете да прочетете информацията за файла
чрез натискане на “Зеления” бутон или да я изтриете чрез
натискане на клавиша “Червения” бутон. Натиснете бутона
“OK” за да възпроизведете файла.
Забележка: Функцията за запис може да поддържа само
устройства с памет с файлова система Fat32. Устройствата
с памет с други файлови системи трябва да се форматират.
Преди да форматирате устройство с памет, архивирайте
полезните данни, защото след форматирането съдържанието
на устройствата с памет не може да се възстановява.
Page 84

82
BG
Time-shift option
(Опция за смяна на време)
Опция EPG (ЕПУ)
Функция “Хотел” (допълнителна)
В режим DTV натиснете бутона “ZOOM” (Мащабиране).
Mенюто с опция за смяна на времето ще се покаже на екрана
(Фиг.16) и програмата ще е в преустановено състояние.
Натиснете бутона “INDEX”, за да възстановите програмата.
Натиснете бутона “REVEAL” (Разкриване), за да спрете и и
излезете от смяна на времето. Когато потребител излезе
от програмата за кратък период от време, функцията за
смяна на времето може да спре временно и да съхрани
възпроизвежданата програма в USB диск. Програмата може да
се възстанови, когато потребителят реши да я възпроизведе.
В режим DTV натиснете бутона “EPG” и на екрана ще се появи менюто с опция
за EPG (ЕПУ) (Фиг.17). Потребителят може да изпълнява следните операции с
червения, зеления, жълтия и синия многофункционален бутон.
Натиснете бутона “MENU” (Mеню) на дистанционното управление, за да
се покаже главното меню на телевизора, а след това натиснете “4578” на
дистанционното управление, за да се покаже менюто с функцията за хотел.
Натиснете бутона “Up/DOWN” (Нагоре/Надолу), за да влезете в менюто и да
изберете елемента, който искате да настроите. След това натиснете бутона
“Left/Right” (Ляво/Дясно), за да настроите стойността или състоянието (Фиг. 18)
[00:00:00/00:00:08/01:20:00]
14:23
Pla y FB FF FB 30 S FF 30 S Pau se St op
Time Shift
342
1
Сл. 16
Сл. 17
Сл. 18
Икона Описание
Показва, че програмата е в преустановено състояние.
Показва времето на текущата програма.
Показва времето, когато програмата е била преустановена.
Показва най-голямото време за съхранение, което може да осигури USB диск.
Play (Възпроизвеждане): Изберете тази икона. Натиснете бутона "OK", за да възпроизведете видеоклипа или да зададете A-B
повторение.
FB: Изберете тази икона. Натиснете бутона "OK" за бързо превъртане назад. Натиснете бутона "INDEX" за стандартно
възпроизвеждане.
FF: Изберете тази икона. Натиснете бутона "OK" за бързо превъртане напред. Натиснете бутона "INDEX" за стандартно
възпроизвеждане.
FB 30s: Изберете тази икона. Натиснете бутона "OK"за възпроизвеждане с 30 сек. назад.
FF 30s: Изберете тази икона. Натиснете бутона "OK" за възпроизвеждане с 30 сек. напред.
Pause (Пауза): Изберете тази функция. Натиснете бутона "OK" за възпроизвеждане или пауза.
Stop (Спиране): Изберете тази икона. Натиснете бутона "OK", за да спрете и да излезете от показвания прозорец.
Икона Описание
Запис
Натиснете червения бутон, за да влезете в подменюто.
Можете да изберете часовото време на програмата,
която искате да запишете.
Информация
Натиснете зеления бутон, за да видите подробна
информация за програмата.
График
Натиснете жълтия бутон, за да видите вашите
предишни настройки.
Напомняне
Натиснете синия бутон, за да зададете времето, когато
искате да ви бъде напомнено за програмата, която
искате да гледате.
PROGRAMME GUIDE
TIME
Record
Info
Schedule Remind
MENU:Return
31 Aug
14:23
1 DR1
2 DR2
3 Tegnsprogstol...
4 TV 2 (Fyn)
No Information
Folk og fae (32)
Ingen tegnsprogstolkning
Vild med dig
ON
D
Page 85

83
BG
Функция за USB носител
Моля, поставете USB устройство за съхранение в USB интерфейса на
телевизора и натиснете бутона “SOURCE” (Източник). На екрана ще се
покаже меню “Input Source” (Входящ източник). След това натиснете
бутона “/”, за да изберете USB. Натиснете бутона “OK”, за да
влезете в USB устройството. (Фиг. 19)
PHOTO MUSIC MOVIE TEXT
USB 2.0
Сл. 19
Икона Описание
Play/Pause (Възпроизвеждане/пауза): Натиснете бутон "t/u" , за да изберете тази функция. Натиснете
бутона "OK" за възпроизвеждане или пауза.
Prev. (Пред.): Натиснете бутон "t/u", за да изберете тази функция. Натиснете бутон "OK" за разчитане на
предишната снимка.
Next (Следващ): Натиснете бутон "t/u", за да изберете тази функция. Натиснете бутон "OK" за разчитане
на следващата снимка.
Stop (Спиране): Натиснете бутон "t/u", за да изберете тази функция. Натиснете бутона "OK", за да спрете
възпроизвеждането и да се върнете в предишното меню.
Repeat (Повторение): Натиснете бутон "t/u", за да изберете тази функция. Натиснете бутона "OK", за
да изберете Repeat 1 (Повторение на 1) или Repeat ALL (Повторение на всички) или Repeat None (Без
повторение).
Random O (Изкл. Възпроизвеждане в случаен ред): Натиснете бутон "t/u”, за да изберете тази
функция. Натиснете бутона "OK", за да включите/изключите възпроизвеждане в случаен ред.
Забележка:
1. USB функцията поддържа файлови формати за видео файлове/аудио файлове/графични файлове/текстови
файлове. Някои нестандартни USB устройства за съхранение могат да не бъдат разпознати. Заменете ги със
стандартно USB устройство за съхранение.
2. При възпроизвеждане на файл, системата за поточно предаване на мултимедийни файлове има определени
ограничения за всеки формат. Ако се възпроизвежда файл, надхвърлящ ограничението на системата,
възпроизвеждането му ще бъде погрешно.
3. Не вадете USB устройство за съхранение, докато системата работи. Това може да предизвика проблеми в
системата или оборудването.
4. Системата поддържа USB1.1 и USB2.0 конектор и стандартен транспортен протокол, като U дискове и сменяеми
устройства за съхранение на твърди дискове. Файловият формат на USB устройството трябва да е FAT или FAT32.
Формат NTFS не се поддържа.
5. USB интерфейсът на този телевизор може да подава захранващо напрежение от 5V, а максималният ток е
500mA; точната идентификация на съответния мултимедиен плейър ще се наруши, ако се използва устройство за
съхранение над 500 mA, което е нормално явление.
Бутони за бърз достъп на дистанционното управление
За работа с USB се използват бутоните “INDEX”, “ZOOM”, “REVEAL”, “TTX”, “HOLD”, “LIST”, “LANGUAGE”, “RADIO”.
Натиснете бутон “t/u”, за да изберете менюто за подреждане на настройките, което включва 4 типа: PHOTO (Снимка),
MUSIC (Музика), MOVIE (Филм), TEXT (Текст).
Натиснете бутон “t/u”, за да изберете PHOTO (Снимка). След това натиснете бутона “OK” за разчитане на снимките.
Натиснете бутона “
//t/u”, за да изберете снимка и натиснете бутона “OK” (След като сте избрали снимката,
долният десен ъгъл на файла показва червена кука. Можете да изберете снимки, за да ги добавите към списъка за
възпроизвеждане). Натиснете бутона “INDEX” (Показалец) на дистанционното управление за възпроизвеждане. Ако
не изберете нищо, устройството автоматично ще добави към всички снимки от файла в списъка за възпроизвеждане.
Забележка: Методът на работа за MUSIC, MOVIE и TEXT е същият като този за PHOTO. Моля, направете справка с
опциите за PHOTO.
Основна функция: При показване на снимки, натиснете бутона “INFO”. В долната част на екрана се показва лента с
инструменти. (Натиснете бутона “”, за да скриете лентата с инструменти)
Page 86

84
BG
Икона Описание
Music (Музика): Натиснете бутон "t/u", за да изберете тази функция. Натиснете бутона "OK" за
възпроизвеждане на музикален фон. (Музиката и снимките трябва да се поставят в една и съща папка или
първо можете да изберете музикален запис от музикалния файл.)
Playlist (Списък за възпроизвеждане): Натиснете бутон "t/u", за да изберете тази функция. Натиснете
бутона "OK", за да разгледате списъка за възпроизвеждане.
Info (Информация): Натиснете бутон "t/u", за да изберете тази функция. Натиснете бутона "OK", за да
видите информация за снимката, включително разделителна способност, размер и т.н.
Rotate (Завъртане): Натиснете бутон "t/u", за да изберете тази функция. Натиснете бутона "OK", за да
завъртите снимката по часовниковата стрелка.
Rotate (Завъртане): Натиснете бутон "t/u", за да изберете тази функция. Натиснете бутона "OK", за да
завъртите снимката обратно на часовниковата стрелка.
Zoom in (Увеличаване на мащаба): Натиснете бутон "t/u", за да изберете тази функция. Натиснете
бутона "OK", за да увеличите снимките.
Zoom out (Намаляване на мащаба): Натиснете бутон "t/u", за да изберете тази функция. Натиснете
бутона "OK", за да намалите снимките.
Move View (Преместване на изглед): Ако снимката е по-голяма от екрана, използвайте тази функция, за
да се придвижите в снимката.
FB: Натиснете бутон "t/u", за да изберете тази функция. Натиснете бутона "OK" за бързо превъртане
назад. Натиснете бутона "INDEX" за стандартно възпроизвеждане.
FF: Натиснете бутон "t/u", за да изберете тази функция. Натиснете бутона "OK" за бързо превъртане
напред. Натиснете бутона "INDEX" за стандартно възпроизвеждане.
MUTE (Изключване на звука): Натиснете бутон "t/u", за да изберете тази функция. Натиснете бутона
"OK" за бързо превъртане назад. Натиснете бутона "MUTE", за да изключите звука.
Goto Time (Време за действие): Натиснете бутон "t/u", за да изберете тази функция. Натиснете бутона
"OK", за да изберете времето за възпроизвеждане.
Set A-B repeat (Задаване на повторение от А до В): Натиснете бутон "t/u", за да изберете тази функция.
Натиснете бутона "OK", за да зададете A и B. Филмът ще се повтори в интервала от А до В.
Slow Forward (Бавно напред): Натиснете бутон "t/u", за да изберете тази функция. Натиснете
бутона "OK", за да забавите скоростта на възпроизвеждане. Натиснете бутона "INDEX" за стандартно
възпроизвеждане.
Step Forward (Стъпка напред): Натиснете бутон "t/u", за да изберете тази функция. Натиснете бутона
"OK" за възпроизвеждане стъпка по стъпка. Натиснете бутона "INDEX" за стандартно възпроизвеждане.
Aspect Ratio (Съотношение на картината): Натиснете бутон "t/u", за да изберете тази функция.
Натиснете бутон "OK”, за да изберете Auto (Автоматично), 4:3, Full (Пълно).
Page 87

85
BG
ОПРОСТЕНО ОТСТРАНЯВАНЕ НА НЕИЗПРАВНОСТИ
Симптом Причина Решение
Снежинки на екрана и
шум.
1. Кабелния конектор на антената е
разхлабен, кабелът е повреден.
2. Неподходящ тип кабел на антената.
3. Неправилна насоченост или
положение на антената.
4. Сигналът е слаб.
1. Проверете дали конекторът на кабела на
антената е хлабав и дали кабелът е изправен.
2. Проверете типа на кабела на антената (VHF/
UHF)
3. Регулирайте насочеността или положението
на антената.
4. Опитайте да използвате усилвател за
сигнала.
Картината на телевизора
е по-добра, но има шум.
Кабелния конектор на антената е
разхлабен, кабелът е повреден.
Проверете дали конекторът на кабела на
антената е хлабав и проверете състоянието на
кабела.
Няма картина. Няма звук.
Захранващият щепсел е хлабав или
електрозахранването не е включено.
Проверете дали електрозахранващият кабел е
свързан добре.
Картината е на ивици.
Сигналът е подложен на смущения,
например от автомобил, неонова
светлина, електрически вентилатор и
т.н.
Не използвайте електрически вентилатор около
телевизора и коригирайте посоката на кабела на
антената, за да намалите смущенията.
Картината има сенки.
1. Телевизионният сигнал се отразява
в долина или сграда.
2. Неправилна насоченост на
антената.
1. Използвайте висока насочена антена.
2. Регулирайте насочеността на антената.
Телевизорът няма звук.
1. Настройката за сила на звука е
твърде ниска.
2. Звукът е заглушен.
1. Регулирайте силата на звука до подходящата
стойност.
2. Натиснете бутона “MUTE” на дистанционното
управление, за да спрете изключването на
звука.
Компютърът не показва
нищо и не подсказва
за входящ сигнал,
червеният светодиоден
индикатор примигва.
Сигналният кабел е хлабав или не е
включен.
Проверете дали сигналният кабел е разхлабен
или не е включен и го свържете отново.
Разстоянието за
дистанционно
управление е късо; губи
се възможността за
управление.
1. Прозорчето за приемане на сигнал
от дистанционно управление е
закрито от предмет(и).
2. Твърде слабо напрежение на
батериите на дистанционното
управление.
1. Отстранете предмети, които пречат на
прозорчето за приемане на сигнал от
дистанционното управление.
2. Сменете батериите.
Екранът на компютъра
е слаб.
1. Настройката е неправилна.
2. Режим за визуализация е
неправилен.
1. Използвайте функцията за автоматична
настройка.
2. Използвайте препоръчания режим.
Изображението от
компютъра не запълва
екрана.
1. Настройката е неправилна.
2. Режим за визуализация е
неправилен.
1. Използвайте функцията за автоматична
настройка.
2. Влезте в “PICTURE”, за да регулирате
хоризонталната или вертикалната позиция.
3. Използвайте препоръчания режим.
Шум при изключване.
Електрично ослободување при
исклучување.
Тоа е нормално.
Уредът не може да се
управлява.
Външни смущения, като например
светкавици, статично електричество
и т.н., които потенциално могат да
попречат на нормалната работа на
този уред.
Първо изключете захранването и го включете
отново след около 1-2 минути, след което
включете телевизора отново.
Page 88

86
BG
ТЕХНИЧЕСКИ СПЕЦИФИКАЦИИ
Размери 32 инча 40 инча 43 инча
Размер на екрана - диагонал 81 см 102 см 109 см
Разделителна способност на екрана 1366×768 1920×1080 1920×1080
Гъстота на пикселите (мм) 0,51075×0,51075 0,45735×0,4494 0,4902×0,4902
Активна зона (мм) 697,685×392,256 878,112×485,352 941,184×529,416
Изходяща мощност на звука (Отляво
+ Отдясно)
6W+6W 6W+6W 8W+8W
Работно напрежение 100-240V~50/60Hz
Номинална
мощност на
потребление
Нормална работа ≤55W ≤55W ≤75W
Режим на готовност ≤0,5W ≤0,5W ≤0,5W
Размери без стойката (Д × В × Ш мм) 730×430×77 904×521×82 968×565×78
Размери със стойката (мм) 730×474×193 904×571×222 968×615×222
Нетно тегло (кг) 4,0 6,5 8,0
Брутно тегло (кг) 5,2 8,5 10,0
Работна среда 5°~40°; Отн. влажност: 10%~85%; атмосферно налягане: 86kPa~106kPa
Среда за съхранение -20°~55°; Отн. влажност: 5%~95%; атмосферно налягане: 86kPa~106kPa
Поддържани системи:
ATV: PAL D/K, I, B/G, SECAM D/K, B/G, L
DTV: DVB-T/C/T2
TV(RF) 75Ω дисбаланс
AV видео вход 75Ω,1±0.1VP-P, RCA
AV аудио вход 20KΩ, 0.2~2V RMS
HDMI видео вход 480i, 480p, 576i, 576p, 720p, 1080i ,1080p
Page 89

87
BG
ИНСТРУКЦИИ ЗА МОНТАЖ НА СТОЙКАТА
Различните стойки имат различни методи за монтиране. Моля, изберете подходящия метод за монтаж според
реалните условия.
Поставете телевизора на равна работна маса. Поставете стойката на телевизора в долната част на уреда, както е
показано със стрелки на снимката. Поставете стойката така, че отворите в нея да се подравнят с отворите в долната
част на телевизора, а след това затегнете винта.
Забележка: Реалният външен вид на стойката и уреда може да се различава от илюстрациите; моля, имайте предвид
реалния уред..
Потпора
Завртки
Page 90

Page 91

89
HR
OSNOVNE ZNAČAJKE . . . . . . . . . . . . . . . . . . . . 67
SIGURNOSNE UPUTE I MJERE OPREZA. . . . .68
Montiranje i povezivanje . . . . . . . . . . . . . . . . . . .69
Sadržaj pakiranja: . . . . . . . . . . . . . . . . . . . . . . .69
Monitiranje televizora:. . . . . . . . . . . . . . . . . . .69
Povezivanje periferne opreme . . . . . . . . . . .70
Tipke sučelja . . . . . . . . . . . . . . . . . . . . . . . . . . . . . .73
Daljinski upravljač . . . . . . . . . . . . . . . . . . . . . . . . . 74
Opća uputstva . . . . . . . . . . . . . . . . . . . . . . . . . . . . 76
Uključeno . . . . . . . . . . . . . . . . . . . . . . . . . . . . . .76
STANDBAY (Stanje pripravnosti). . . . . . . . . .76
Odabir izvora signala. . . . . . . . . . . . . . . . . . . . 77
Rad u glavnom izborniku . . . . . . . . . . . . . . . .77
KANAL. . . . . . . . . . . . . . . . . . . . . . . . . . . . . . . . . 77
SLIKA (PICTURE) . . . . . . . . . . . . . . . . . . . . . . . .78
ZVUK (SOUND) . . . . . . . . . . . . . . . . . . . . . . . . .79
OPCIJE (OPTIONS) . . . . . . . . . . . . . . . . . . . . .80
VRIJEME (TIME). . . . . . . . . . . . . . . . . . . . . . . . . 80
ZAKLJUČAVANJE (LOCK) . . . . . . . . . . . . . . . 81
Opcija snimanja (REC option) . . . . . . . . . . . .81
TIME-SHIFT OPTION . . . . . . . . . . . . . . . . . . . .82
EPG OPCIJA . . . . . . . . . . . . . . . . . . . . . . . . . . .82
Hotelski mod (opciono) . . . . . . . . . . . . . . . . .82
USB Media funkcija . . . . . . . . . . . . . . . . . . . . . 83
Rješavanje jednostavnih problema. . . . . . . . . .85
Tehničke specifikacije. . . . . . . . . . . . . . . . . . . . . . 86
Osnovne upute za instalaciju . . . . . . . . . . . . . . . 87
Sadržaj
OSNOVNE ZNAČAJKE
1. LED zaslon s pozadinskim osvjetljenjem visoke kvalitete; ušteda energije; zaštita okoliša; ultra tanak zaslon; izuzetnih
karakteristike.
2. Ugrađeni zvučnici visoke kvalitete pružit će Vam potpuni audiovizualni doživljaj i uštedjet će prostor na Vašoj polici.
3. Mnoštvo priključaka pruža Vam mogućnost povezivanja DVD-a, vidikona i drugih uređaja na odgovarajuće ulazne
priključke. Proizvod se može koristiti i kao monitor računala s VGA i HDMI konektorima. Osim toga, kada ga povežete
s antenom, može se upotrebljavati i kao TV uređaj.
4. Puno brže vrijeme reakcije u potpunosti će eliminirati sjene na slici, što gledanje filmova i igranje igrica čini
prirodnijim.
5. Prekrasan panel boja.
6. Širi kut gledanja, veca svjetlina, veci kontrast, manja potrošnja.
7. Inteligentna mogućnost podešavanja slike i zvuka nudi Vam prekrasan audiovizualni učinak.
8. Najnoviji integrirani digitalni filter sliku čini još jasnijom. Unutarnja 3D tehnika u potpunosti će eliminirati
podrhtavanje zaslona uzrokovano ispreplitanjem signala.
9. Mogućnost prilagoavanja vremena za isključivanje prema vlastitim preferencijama.
10. Automatsko upravljanje daljinskim uređajem.
11. Automatsko prilagođavanje funkcija omogućava Vam da u VGA načinu rada već za nekoliko sekundi dobijete
najbolju moguću sliku.
12. Automatska tehnologija podešavanja ravnoteže boja za razlicite vrste zaslona u VGA nacinu rada.
13. Automatska ‘denoise’ tehnika (tehnika uklanjanja šuma) znatno eliminira pozadinsku buku uzrokovanu smetnjama
slabijeg signala, što sliku na zaslonu čini jasnijom.
14. Podržava USB sučelje.
15. Podržava H.264 Full HD prijemnik i podržava PVR funkciju.
16. Ultra-tanki i super uski dizajn.
Page 92

90
HR
Upozorenje Pažnja
Može dovesti do
nesretnih slučajeva!
Ova oznaka upućuje na ponašanja koja su
zabranjena.
Može dovesti do tjelesnih
ozljeda i gubitka posjeda.
Ova oznaka ukazuje na operacije koje se
moraju provesti.
SIGURNOSNE UPUTE I MJERE OPREZA
Hvala vam što ste odabrali LED TV s LED pozadinskim osvjetljenjem, vrijedan i kvalitetan proizvod s višestrukim
funkcijama. Ovaj uređaj donijet će Vam više audiovizualnog užitka, a njegov dizajn pružit će sigurnost korisniku. Svi
uređaji su strogo testirani prije napuštanja tvornice. No, neodgovarajuća i pogrešna uporaba može dovesti do strujnog
udara ili požara. Kako bi osigurali pouzdanu primjenu i produžili vijek trajanja uređaja, pažljivo pročitajte upute prije
korištenja i pridržavajte se sljedećih sigurnosnih uputa. Molimo sačuvajte priručnik i za kasniju uporabu.
UPOZORENJE
• Nestanak struje ili nestabilan napon.
• Neuobičajen zvuk ili čudan miris iz uređaja.
• Mrežni kabel je oštećen.
• TV prijemnik je oštećen zbog pada, udaranja ili nekog drugog
neposrednog utjecaja.
• Prodiranje tekućine ili stranih tijela u TV prijemnik.
• Ovaj uređaj namijenjen je za rad na napajanju 100-240VAC 60/50Hz.
• Zbog sigurnosti, priključite ovaj TV na utičnicu sa uzemljenjem.
• Kablove možete priključiti ili isključiti jedino kada je uređaj isključen.
• Nemojte ostavljati TV prijemnik na nestabilnom položaju, to može dovesti do padanja, oštećenja ili čak
požara.
• Nemojte postavljati TV prijemnik u vanjsko okruženje:
1. Izravnog sunca, vlage, pregrijavanja, pothlađivanja ili prašine;
2. Uz zapaljive ili eksplozivne tvari;
3. Blizu zapaljivog plina ili korozivnih plinova;
4. U kupaonici, kuhinji, itd
• Nemojte koristiti oštećene ili nepravilne utičnice, te osigurajte da su utikač i utičnica ispravno spojeni.
• Držite utikač i utičnicu dalje od prašine i metalnih dijelova.
• Nemojte oštetiti mrežni kabel:
1. Zabranjeno je popravljati kabel za napajanje;
2. Ne stavljajte teške predmete na kabel za napajanje;
3. Držite mrežni kabel dalje od izvora topline;
4. Ne povlačite kabel napajanja prilikom iskopčavanja.
• Nemojte spajati previše uređaja na jedan kabel, to može izazvati požar zbog visoke potrošnje struje.
• Ne dopustite da otvoreni plamen (npr. zapaljena svijeća) priđe TV prijemniku, moglo bi doći do strujnog
udara ili požara.
• Kako biste izbjegli pojavu električnog udara ili požara nastalog uslijed prosipanja vode, ne ostavljajte posudu
sa vodom na TV set.
• Da biste izbjegli kratki spoj i oštećenje proizvoda, ali i električni udar, ne ubacujte oštre predmete, metal ili
tekućinu u
• priključak za antenu ili ventilacijske otvore.
• Prorezi na kućištu dizajnirani su da ispuštaju toplinu i omogućuju hlađenje svih unutrašnjih komponenata,
kako one ne bi razvile izuzetno visoke temperature i kako bi mogle tijekom dužeg vremenskog perioda raditi
normalno. Prilikom pozicioniranja uređaja, ne prekrivajte ove proreze.
Odmah isključite uređaj;
iskopčajte ga iz struje i
kontaktirajte servis.
Ako primjetite curenje plina ili druge zapaljive tekućine, ne odspajajte mrežni kabel TV prijemnika ili drugih
električnih aparata; umjesto toga, odmah zatvorite ventil plina i otvorite vrata i prozore.
POSTUPCI U SLJEDEĆIM SITUACIJAMA:
Page 93

91
HR
PAŽNJA
Montiranje i povezivanje
Sadržaj pakiranja:
Monitiranje televizora:
• Nemojte dopustiti djeci da se penju na TV prijemnik.
• Držite male dodatke dalje od dohvata djece kako bi se izbjeglo gutanje.
• Ako televizor nećete koristiti dulje vrijeme, isključite uređaj i iskopčajte kabel za napajanje.
• Prije čišćenja TV prijemnika, odspojite kabel za napajanje i obrišite mekom krpom; nemojte koristiti kemijske reagense
i izbjegnite ulazak stranih tvari u uređaj. Pogrešno čišćenje (kao što su tekućine za čišćenje, voda, itd) mogu dovesti do
oštećenja izgleda proizvoda, brisanja informacija o proizvodu,ali čak i protok u uređaj i oštećenja komponenti.
• Za podešavanje položaja ili kut TV prijemnika, molimo vas isključite sve kabele i krećite se polako kako bi se izbjegao
pad.
• Nemojte trljati tvrdim predmetom, kucati, savijati ili stiskati ekran.
• Nemojte koristiti uređaj odmah nakon prijenosa uređaja na mjesto visokih temperatura s mjesta niske temperature, to
bi moglo uzrokovati zamagljivanje unutar uređaja i kvarove.
• Ako je zaslon slomljen te ako tekućina prsne na kožu, isperite s čistom vodom odmah oko 15 minuta, i idite kod svog
liječnika.
• Ako nosite TV u rukama, molimo uhvatite ga za uglove i držite dno; ne primjenjujte silu.
• Prikazivanje nepomične slike (npr. logotipa ekrana koji vrši emitiranje, zaslonskog izbornika, scene iz videoigre) tijekom
duljeg vremena može oštetiti ekran i ‘’urezivanje slike’’. Jamstvo ne pokriva takvo urezivanje slike u ekran.
• Zdravo gledanje TV prijemnika:
1. Gledajte pri odgovarajućem svijetlu; slaba svjetlost ili dugo gledanje u tv prijemnik može oštetiti oči.
2. Ako se koriste slušalice, podesite glasnoću na odgovarajuću kako bi se izbjeglo oštećenje sluha.
• Za prekid napona, izvucite kabel za napajanje uređaja iz utičnice.
• Utikač mora biti pouzdano povezan. Gubitak mrežnog utikača može uzrokovati frcanje iskri i požar.
• Sve tehničke specifikacije u korisničkom priručniku i na ambalaži podložni su promjenama bez prethodne najave. Ako
postoji neznatno odstupanje između korisničkog priručnika i stvarnog rada, potonji će prevladati.
Ne dirajte mokrim rukama uređaj jer bi moglo doći do električnog šoka.
Ne uključujte TV prijemnik za vrijeme nevremena; umjesto toga, odspojite utikač i priključak za antenu kako bi
izbjegli udar groma.
Nemojte rasklapajte TV prijemnike sami, moglo bi doći do strujnog udara ili požara. Kontaktirajte kvalificirano
osoblje za održavanje.
1. Televizor. 2. Korisničke upute. 3. Daljinski upravljač.
4. Kabel za napajanje 5. Prijenosni kabel (opciono))
• TV prijemnik treba montirati blizu AC utičnice za jednostavno uključivanje i isključivanje.
• Radi vaše sigurnosti, molimo vas odaberite odgovarajući zidni nosač ili baze.
• Kako biste izbjegli nesreću, potrebno je postaviti TV prijemnik na stabilno postolje ili fiksirati na čvrstom zidu.
• Pitajte kvalificirano osoblje kako montirati TV na zid. Nepravilno postavljanje može dovesti do nestabilnog TV
prijamnika.
Page 94

92
HR
Pričvršćivanje na zid
VENTILACIJA
Spriječava protok zraka
Spriječava protok zraka
Zid Zid
Postavljanje na stalak
• Molimo vas ostavite prostora oko TV
prijamnika, kao što je prikazano na slici.
• Nemojte prekrivati ventilacijske otvore ili
umetati strana tijela u ograđeni prostor.
• Ne stavljajte uređaj na ograničen prostor, npr
policu za knjige ili ugradbene ormare,osim
ako je TV prijemnik ispravno ventiliran.
SAVJETI ZA INSTALACIJU
Povezivanje periferne opreme
Možete spojiti razne uređaje na TV i gledati slike visoke kvalitete. Ako video uređaj ima HDMI, AV, PC i drugi izlaz / ulazni
priključci. Možete odabrati jedan od njih i spojiti na odgovarajući ulaz ili izlaz TV prijemnika. Nakon što su povezani,
pritisnite SOURCE tipku, a zatim izbornik signala koji će biti prikazan na displeju zaslona. Pritisnite “ ” ili “ ” za odabir
ulaznog signala i pritiskom na tipku “OK” za potvrdu. Povezivanje je prikazano na slici.
Napomene:
1. Prilikom povezivanja na opremu sa MHL funkcijom, izaberite HDMI1 kao ulazni izvor signala.
2. ARC funkcija je opciona, pogledajte na uređaju.
3. Komponentno sučelje je opciono, pogledajte na uređaju.
4. Ukoliko postoji sučelje za komponenti video signal, komponenti video signal i AV dijele AUDIO-IN sučelje.
5. Periferna oprema i kabeli opisan u ovom priručniku trebaju se kupiti zasebno.
• Ne stavljate TV uređaj na mjesto koje je podložno mehaničkim vibracijama.
• Ne stavljate TV uređaj na mjesto gdje je dostupan ulaz kukcima.
• Nemojte montirati TV prijemnik nasuprot klime, jer unutarnja ploča zaslona može kondenzirati vlagu i uzrokovati kvar.
• Nemojte postavljati TV prijemnik na mjestu s jakim magnetskim poljem, jer može biti ometan i oštećen
elektromagnetskim valovima.
Page 95

93
HR
Utičnica
(100-240VAC 60/50Hz)
Žuta (Video kabel)
Bijela (Audio L-kabel)
Crvena (Audio-R kabel)
USB sučelje
Ulaz za slušalice
Video kabel
YPbPr/YCbCr kabel
VGA kabel
Povežite na AV uređaj
sa HDMI sučeljem.
Mobilni uređaj ili druga oprema s
MHL funkcijom
Povežite na audio uređaje
sa ARC funkcijom
Povežite na ureaje sa AV izlaznim
sučeljem (npr. DVD, VCR,
konzola za igrice)
Povežite na uređaj sa
YPbPr/YCbCr izlaznim sučeljem.
HDMI-1 kabel
MHL kabel
Audio kabel
HDMI kabel
HDMI-2 kabel
Audio kabel
Strujni kabel
Povezivanje sa napajanjem
Priključak za antenu
Priključak za ulazni
VGA signal
Povezivanje na uređaj
sa HDMI ulazom
Povezivanje YPbPr/YCbCr ulaza
Povezivanje uređaja sa
MHL funkcijom
Povezivanje AV ulaza
Povezivanje uređaja sa
ARC funkcijom
Prilikom povezivanja vanjske antene na signalni
port TV seta, najprije isključite glavni prekidač za
napajanje TV seta. Kako biste izbjegli električni
udar, držite dalje vanjsku antenu od glavne linije
napajanja visokog napona. Neophodno je izolirati
žičanu mrežastu antenu povezanu na ovaj TV set
od uzemljenja, inače će izazvati požar ili druge
opasnosti.
R
Upozorenje
32”/40”
Page 96

94
HR
43”
Koaksijalni kabel
Povežite se na audio pojačalo s
koaksijalnim sučeljem.
Koaksijalni izlaz
USB1 sučelje
USB2 sučelje
Otvor za karticu CL
Žuta (Video kabel)
Bijela (Audio L-kabel)
Narančasta (kabel za koaksijalni signal)
Crvena (Audio-R kabel)
R
Povezivanje YPbPr/YCbCr ulaza
Povežite na uređaj sa
YPbPr/YCbCr izlaznim sučeljem.
Ulaz za slušalice
Video kabel
Audio kabel
YPbPr/YCbCr kabel
Povežite na AV uređaj
sa HDMI sučeljem.
Povežite na ureaje sa AV
izlaznim sučeljem (npr. DVD,
VCR, konzola za igrice)
HDMI kabel
HDMI kabel
HDMI kabel
Audio kabel
Povezivanje na uređaj
sa HDMI ulazom
Povezivanje AV ulaza
Napomene:
1. Prilikom povezivanja na opremu sa MHL
funkcijom, izaberite HDMI1 kao ulazni izvor
signala.
2. ARC funkcija je opciona, pogledajte na
uređaju.
3. Komponentno sučelje je opciono, pogledajte
na uređaju.
4. Ukoliko postoji sučelje za komponenti video
signal, komponenti video signal i AV dijele
AUDIO-IN sučelje.
5. Periferna oprema i kabeli opisan u ovom
priručniku trebaju se kupiti zasebno.
Page 97

95
HR
Utičnica
(100-240VAC 60/50Hz)
VGA kabel
Mobilni uređaj ili druga oprema s
MHL funkcijom
Povežite na audio uređaje
sa ARC funkcijom
HDMI kabel
MHL kabel
Strujni kabel
Povezivanje sa napajanjem
Priključak za antenu
Priključak za ulazni
VGA signal
Povezivanje uređaja sa
MHL funkcijom
Povezivanje uređaja sa
ARC funkcijom
Prilikom povezivanja vanjske antene na signalni port TV seta, najprije
isključite glavni prekidač za napajanje TV seta. Kako biste izbjegli
električni udar, držite dalje vanjsku antenu od glavne linije napajanja
visokog napona. Neophodno je izolirati žičanu mrežastu antenu
povezanu na ovaj TV set od uzemljenja, inače će izazvati požar ili
druge opasnosti.
Upozorenje
Tipke sučelja
1. Snaga LED indikatora i daljinsko upravljanje.
2.
Standby: Tipka prebacuje između uobičajenog i
standby moda.
3. MENU
: Tipka za biranje izbornika.
4. VOL-, VOL+ (
): Pritisnite ove dvije tipke za
pojačavanje ili stišavanje glasnoće. U OSD meniju,
pritisnite ove dvije tipke za podešavanje analogne
vrijednosti odabranih predmeta, koji imaju iste funkcije
kao tipka na daljinskom upravljaču.
5. CH-, CH+ (
): Pritisnite ove dvije tipke da
odaberete program. U OSD meniju, pritisnite ove dvije
tipke za podešavanje odabranih predmeta, koji imaju
iste funkcije kao tipka na daljinskom upravljaču.
6. SOURCE
: Pritisnite ovu tipku da uđete u meni izvora
signala i izaberite izvor signala.
Napomena: Različiti modeli mogu imati različite
karakteristike; molimo Vas pogledajte aktualni uređaj
32”/40”
Page 98

96
HR
Daljinski upravljač
Postupak instalacije baterije na daljinskom upravljaču
Mjere upotrebe korištenja daljinskog upravljača:
Skinite poklopac od baterija, uzmite dvije 1.5V AAA baterije i prilagodite polaritet na daljinskom upravljaču sa
baterijama.
1. Kada koristite daljinski upravljač trebali biste ga uputiti prema LED indikatoru.
2. Nemojte dopustiti da daljinski upravljač prima žestoke vibracije. Osim toga, nemojte ostavljati daljinski upravljač
ispod direktnog sunčevog svjetla jer će toplina naštetiti daljinskom upravljaču.
3. Kada je daljinski upravljač pod direktnim sunčevim svjetlom ili intenzivnim osvjetljenjem možda neće raditi pravilno.
4. Kada je napon baterije slab, to utječe na daljinu upravljanja daljinskog upravljača, trebali biste zamjeniti baterije.
Ukoliko daljinski upravljač ne koristite tijekom dužeg vremenskog perioda ili ukoliko su baterije ispražnjene, uklonite
baterije kako biste spriječili njihovo curenje koje dovodi do korozije daljinskog upravljača i oštećenja..
5. Nemojte koristiti različite baterije. Mješavina korištenja novih i starih baterija nije dopuštena, te bi trebalo koristiti isti
par baterija.
6. Ne bacajte baterije u vatru, ne punite i ne rasklapajte ih. Naročito nemojte puniti, sklapati i rasklapati, zagrijavati
ili sagorijevati upotrebljavane baterije. Poštujete odgovarajuće propise o zaštiti okoline u vezi sa upotrebljavanim
baterijama.
7. Molimo promotrite povezane odredbe o zaštiti okoliša iskorištenih baterija.
1. Snaga LED indikatora i daljinsko upravljanje.
2.
Prekidač za napajanje (opcijski): Pritisnite tipku “I” za uključivanje i pritisnite tipku “O” za
isključivanje.
3. SOURCE
: Pritisnite ovu tipku da uđete u meni izvora signala i izaberite izvor signala.
4. CH-, CH+ (
): Pritisnite ove dvije tipke da odaberete program. U OSD meniju, pritisnite ove
dvije tipke za podešavanje odabranih predmeta, koji imaju iste funkcije kao tipka na daljinskom
upravljaču.
5. VOL-, VOL+ (
): Pritisnite ove dvije tipke za pojačavanje ili stišavanje glasnoće. U OSD
meniju, pritisnite ove dvije tipke za podešavanje analogne vrijednosti odabranih predmeta, koji
imaju iste funkcije kao tipka na daljinskom upravljaču.
6. MENU
: Tipka za biranje izbornika.
Standby: Tipka prebacuje između uobičajenog i standby moda.
Napomena: Različiti modeli mogu imati različite karakteristike; molimo Vas pogledajte aktualni uređaj.
43”
Page 99

97
HR
Instrukcije o tipkama daljinskog upravljača
Napomena: Izgled daljinskog upravljača može se razlikovati od onog prikazanog na ovoj slici. Prilagodite navedene
podatke daljinskom upravljaču koji imate.
Naziv Opis funkcije
POWER ( )
Uključite prijemnik iz stanja čekanja.
WIDE (16:9) Zamijenite omjer slike.
MUTE (
)
Isključuje zvuk dok gledate televizor.
Numerical Numeričke tipke
F1 Slika se smrzava prilikom paljenja ili isključivanja.
Channel list (
)
Pogledajte popis kanala.
SMART S Pametan izbor načina reprodukcije zvuka.
SMART P Pametan izbor načina rada slike.
Cursor key
(
, , , )
Pomicanje pokazivača gore / dolje / lijevo / desno u stavku
izbornika ili datum promjene EPG.
OK Potvrđivanje trenutne postavke.
VOL+/VOL- Stisnite za podešavanje glasnoće.
MENU Pritisnite tipku da podesite izbornik.
SOURCE Birajte izvor signala.
CH+/CH- Birajte prethodni kanal.
INFO Pokazuje informacije trenutnog programa.
REC Snima program.
Return (
) Pritisnite ovu tipku da se vratite na zadnji gledani program.
L/R Odaberite način NICAM (pod ATV izvorom signala)
INDEX (
)
U DTV modu, pritisnite INDEKS tipku za prikaz popisa snimljenih
programa.
ZOOM (
)
U DTV modu, pritisnite ZOOM tipku za povećavanje slike na
zaslonu; Kada nema grafičkog prikaza i USB priključak je spojen
na memoriju, pritisnite tipku za odgodu emitiranja televizijskog
programa koji se trenutno prikazuje.
REVEAL (
),
TTX ( ),
HOLD ( ),
LIST ( ),
LANGUAGE ( ),
RADIO ( )
Za teletekst ili USB.
Red key Multifunkcijska crvena tipka.
SUBTITLE
(Green key)
Teletekst zelena tipka ili zaslonska poruka, kada trenutni kanal ima
opciju za prijevod.
FAV (Yellow key)
Teletekst žuta tipka ili Najdraža tipka, postavite ili prikažite svoje
omiljene programe.
EPG (Blue key)
Teletekst plava tipka ili pokazuje programski vodič elektronskog
trenutnog kanala tijekom NO-menu stanja.
Page 100

98
HR
Uputstva za upotrebu daljinskog upravljača za teletekst
TeleText: Pritisnite „teletekst“ tipku, prikazuje se u 3 načina: Mix Display > tekstualnom modu > Teletekst Off.
Thereinto: Način Teksta je automatski način rada. U automatskom načinu rada, sustav automatski odabire TOP, FASTEXT
ili zadani način po potrebi, ovisno o podacima koje prima. U teletekst modu ili Mix Display, pritisnite broj 0 ~ 9, “/’’ za
odabir teksta stranice.
Reveal (Otkrij): Prikazuje skrivene znakove na 6 sekundi.
Zadržavanje (Hold): Naizmjeničnim pritiskanjem tipke „zadržavanje uključeno“ (hold on) ili „zadržavanje isključeno“
(hold off) uključite ili isključite prikaz trenutno odabranih stranica. Ukoliko stranica nije zadržana, ona će to postati, što će
onemogućiti
njeno ažuriranje. Ukoliko je stranica u tom trenutku zadržana, opcija „zadržavanje“ će se isključiti, čime će se omogućiti
njeno
ažuriranje. Ukoliko je stranica zadržana, ovo je jasno naznačeno oznakom „Zadržavanje“ (Hold).
Indeks: U „Fastext“ režimu, odaberite indeks stranicu ukoliko je link za indeks valjan, početnu stranu Paketa 8/30
ukoliko je valjana, ili odaberite stranicu 100. U TOP režimu, ukoliko je aktivirana opcija „Hit lista“ (Hit list), možete
naizmjenično birati trenutno aktivnu stranicu teleteksta i meni opcije „Hit lista“ (Hit list); u suprotnom, odaberite
stranu 100. U režimu „Lista“,resetirajte listu omiljenih stranica bilo na onu koja se odnosi na trenutno aktivni kanal
prema EEPROM-u, ukoliko je podešen, ili na tvornički podešenu listu (stranice 100, 101, 102, 899), i odaberite
prvu stranicu sa liste. U režimu tvorničkog podešavanja (Default), odaberite početnu stranu Paketa 8/30, ukoliko je
dostupna, ili stranu 100.
List (Popis): Prebacivanje između popisa čekanja i trenutnog načina stjecanja (FASTEXT TOP ili zadano).
Crvena, zelena, žuta, plava: Zahtjev za povezanom stranicom u bloku prikazuje se prema načinu stjecanja. U TOP
najposjećenijih modova, crvena, zelena, plava i naredbe kontrole odabiru se iz izbornika najposjećenijih, a žuta naredba
se ignorira.
Opća uputstva
Uključeno
STANDBAY (Stanje pripravnosti)
Slika 1 Slika 2
Prije uključenja u struju, molimo provjerite je li napajanje stabilno; je li antenski kabel dobro priključen.
Uključite kabel za napajanje u električnu utičnicu. Pritisnite „
“ na daljinskom upravljaču ili na TV prijemniku uključite
TV. Zaslon “Molimo odaberite OSD JEZIK” izbornika (slika 1), pritisnite „//t/u“ na daljinskom upravljaču za
odabir jezika koji želite i pritisnite „OK” na daljinskom upravljaču za potvrdu, prikaz na zaslonu “DVB odaberite
tip”, pritisnite „/“ na daljinskom upravljaču za odabir DVB tip koji želite, zatim pritisnite „OK“ za sljedeći korak
(Sl.2). (Sljedeći primjer- kanal potrazi tip DVB pod DVB-T.) Pritisnite „t/u“ za odabir Tune Tip: DTV + ATV, ATV,
DTV i pritisnite „“, možete odabrati zemlju u kojoj ste pritiskom „//t/u“, zatim pritisnite „OK“ za potvrdu, TV
prijemnik počinje automatsko ugađanje.
Pritisnite “
” tipku na daljinskom upravljaču, televizor će otići u stanje pripravnosti.
Posebna pozornost:
1. Televizor će automatski otići u stanje pripravnosti ako nema ulaznog signala 5 minuta od paljenja uređaja.
2. Televizor će automatski otići u stanje pripravnosti kada je unaprijed zadano vrijeme za isključivanje uređaja.
3. Ukoliko ne namjeravate koristiti televizor dulje vrijeme ne stavljajte ga u stand by način rada.
OK: Enter
Please select an OSD Language
Eng lish
Cro atian
Dut ch
Rus sian
Ara bic
Far si
Spa nish
Ita lian
Fre nch
Ger man
Por tugue se
Pol ish
Tune Type
Germany
MENU: Return
Greece
Hungary
DT V + ATV
Netherlands
Norway
Poland
Italy
Ireland
Luxembourg
 Loading...