

Page 1

SERIES 3
32S367BHS
40S367SFS
LED TV
OPERATING
INSTRUCTION
ENG AL
HU IT MK RO SLO SRB
BiH/
CG
BG DE FR HR
Page 2

ENG
AL
OPERATING INSTRUCTION
Please read these instructions before operating
your set and retain them for future reference.
UDHËZIM PËR PËR
Ju lutemi lexonie këtë udhëzim para përdorimit të
pajisjë suaj dhe ruajeni për nevoja plotësuese eventuale.
BiH/CG
BG
DE
FR
HR
HU
IT
MK
UPUTSTVO ZA UPOTREBU
Prije upotrebe uređaja pročitati ova uputstva
i zadržati ih radi kasnijih referenci.
ИНСТРУКЦИИ ЗА ЕКСПЛОАТАЦИЯ
Моля, прочетете тези инструкции, преди да използвате
устройството и ги запазете за бъдещи справки.
BETRIEBSANLEITUNGEN
Bitte lesen Sie diese Anweisungen, bevor Sie Ihr Gerät in Betrieb
nehmen, und bewahren Sie sie zum späteren Nachschlagen auf.
MODE D’EMPLOI
Veuillez lire ces instructions avant d’utiliser votre appareil et
conservez-les pour pouvoir les consulter ultèrieurement.
UPUTE ZA KORIŠTENJE
Prije korištenja uređaja pažljivo pročitati
upute i sačuvati ih za buduću upotrebu.
KEZELÉSI UTASÍTÁ
Kérjük, a készülék használata előtt olvassa el ezeket az
utasításokat, és őrizze ezeket meg későbbi betekintésre.
ISTRUZIONI D’USO
Leggere queste istruzioni prima di utlizzare il set e
conservarle per riferimento futuro.
УПАТСТВО ЗА КОРИСТЕЊЕ
Ве молиме прочитајте го ова упатство пред да го
инсталирате и употребувате вашиот уред.
RO
SLO
SRB
INSTRUCIUNI DE UTILIZARE
Vă rugăm să citiți aceste instrucțiuni înainte de a folosi
televizorul și păstrați-le pentru referințe ulterioare.
NAVODILA ZA UPORABO
Pred uporabo pozorno preberite navodila
in jih shranite za morebitno uporabo v prihodnosti.
UPUTSTVO ZA UPOTREBU
Pre upotrebe uređaja pročitati ova uputstva
i zadržati ih radi kasnijih referenci.
Page 3

Contents
WARNINGS AND PRECAUTIONS. . . . . . . . . . . . . . . . . . . . . . . . . . . . . . . . . . . .4
POSITIONING THE TV SET . . . . . . . . . . . . . . . . . . . . . . . . . . . . . . . . . . . . . . . . . .7
PANEL BUTTONS . . . . . . . . . . . . . . . . . . . . . . . . . . . . . . . . . . . . . . . . . . . . . . . . 10
TERMINALS. . . . . . . . . . . . . . . . . . . . . . . . . . . . . . . . . . . . . . . . . . . . . . . . . . . . . . 11
REMOTE CONTROL FUNCTIONS . . . . . . . . . . . . . . . . . . . . . . . . . . . . . . . . . 12
PERSONAL VIDEO RECORDING (REC). . . . . . . . . . . . . . . . . . . . . . . . . . . . . 14
ELECTRONIC PROGRAMME GUIDE (EPG) . . . . . . . . . . . . . . . . . . . . . . . . . 15
INITIAL SETUP & HOME FEATURES . . . . . . . . . . . . . . . . . . . . . . . . . . . . . . . . 16
MENU CONTROL . . . . . . . . . . . . . . . . . . . . . . . . . . . . . . . . . . . . . . . . . . . . . . . . 18
Menu Operation. . . . . . . . . . . . . . . . . . . . . . . . . . . . . . . . . . . . . . . . . . . . . . . 18
Picture . . . . . . . . . . . . . . . . . . . . . . . . . . . . . . . . . . . . . . . . . . . . . . . . . . . . . . . . 18
Sound . . . . . . . . . . . . . . . . . . . . . . . . . . . . . . . . . . . . . . . . . . . . . . . . . . . . . . . . 18
Installation . . . . . . . . . . . . . . . . . . . . . . . . . . . . . . . . . . . . . . . . . . . . . . . . . . . . 19
Setup . . . . . . . . . . . . . . . . . . . . . . . . . . . . . . . . . . . . . . . . . . . . . . . . . . . . . . . . . 21
Time. . . . . . . . . . . . . . . . . . . . . . . . . . . . . . . . . . . . . . . . . . . . . . . . . . . . . . . . . . 22
Advanced. . . . . . . . . . . . . . . . . . . . . . . . . . . . . . . . . . . . . . . . . . . . . . . . . . . . . 23
Network . . . . . . . . . . . . . . . . . . . . . . . . . . . . . . . . . . . . . . . . . . . . . . . . . . . . . . 23
USB CONTROL . . . . . . . . . . . . . . . . . . . . . . . . . . . . . . . . . . . . . . . . . . . . . . . . . . 23
USB Menu. . . . . . . . . . . . . . . . . . . . . . . . . . . . . . . . . . . . . . . . . . . . . . . . . . . . . 23
Reminder When Using the USB Player . . . . . . . . . . . . . . . . . . . . . . . . . . . 23
Movie Menu. . . . . . . . . . . . . . . . . . . . . . . . . . . . . . . . . . . . . . . . . . . . . . . . . . . 24
Music Menu . . . . . . . . . . . . . . . . . . . . . . . . . . . . . . . . . . . . . . . . . . . . . . . . . . . 25
Photo Menu . . . . . . . . . . . . . . . . . . . . . . . . . . . . . . . . . . . . . . . . . . . . . . . . . . . 25
TROUBLESHOOTING. . . . . . . . . . . . . . . . . . . . . . . . . . . . . . . . . . . . . . . . . . . . . 26
SPECIFICATIONS. . . . . . . . . . . . . . . . . . . . . . . . . . . . . . . . . . . . . . . . . . . . . . . . . 28
ENG
Note
1. The graphics in this manual are only for reference.
2. Your TV’s OSD may be slightly different with that shown in this manual.
3. The information in this document is subject to change without notice.
The manufacturer accepts no liability for damage resulting directly or indirectly from faults,
incompleteness or discrepancies between the user manual and the product described.
4. In dry environment due to static electricity, the product may be restart and return to the
main OSD interface, USB player interface or the previous source mode, please continue to
operate the TV as your will.
3
Page 4

ENG
WARNINGS AND PRECAUTIONS
Note: Read all of the instructions before operating the set. Keep these instructions well for
later use.
• Read these instructions -All the safety and operating instructions should be read before this
product is operated.
• Keep these instructions - The safety and operating instructions should be retained for future
reference.
• Heed all warnings - All warnings on the appliance and in the operating instructions should
be adhered to.
• Follow all instructions- All operating and use instructions should be followed.
• Do not use this apparatus near water - The appliance should not be used
near water or moisture - for example, in a wet basement or near a swimming pool, and the
like.
• Clean only with dry cloth.
• Do not block any ventilation openings. Install in accordance with the manufacturer's
instructions.
• Do not install near any heat sources such as radiators, heat registers, stoves, or other
apparatus (Including amplifiers) that produce heat.
• Do not defeat the safety purpose of the polarized or grounding plug. A polarized plug
has two blades with one wider than the other. A grounding plug has two blades and a
third grounding prong. The wide blade or the third prong is provided for your safety. If the
provided plug does not fit into your outlet, consutt an electrician for replacement of the
obsolete outlet.
• Protect the power cord from being walked on or pinched particularly at the plugs,
convenience receptacles, and at the point where they exit from the apparatus.
• Only use attachments/accessories specified by the manufacturer.
• Use only with the cart, stand, tripod, bracket, or table specified by the manufacturer,
or sold with the apparatus. When a cart or rack is used, use caution when moving the
cart/apparatus combination to avoid injury from tip-over.
• Unplug the apparatus during lightning storms or when unused for long periods of time.
• Refer all servicing to qualified personnel. Servicing is required when the apparatus has
been damaged in any way, such as power supply cord or plug is damaged, liquid has been
spilled or objects have fallen into the apparatus, the apparatus has been exposed to rain or
moisture, does not operate normally, or has been dropped.
• CAUTION: These servicing instructions are for use by qualified service personnel only. To
reduce the risk of electric shock, do not perform any servicing other than that contained in
the operating instructions unless you are qualified to do so.
• Do not install this equipment in a confined or building-in space such as a book case or
similar unit, and remain a well ventilation conditions at open site. The ventilation should not
be impeded by covering the ventilation openings with items such as newspaper, tablecloths, curtains etc.
•
Caution – To prevent electric shock hazard, replace grille.
• Please refer the information on rear enclosure for electrical and safety information before
installing or operating the apparatus.
• To reduce the risk of fire or electric shock, do not expose this apparatus to rain or moisture.
The apparatus shall not be exposed to dripping or splashing and that no objects filled with
liquids, such as vases, shall be placed on the apparatus.
• For the terminals marked with symbol of "
" may be of sufficient magnitude to constitute a
4
Page 5

risk of electric shock. The external wiring connected to the terminals requires Installation by
an instructed person or the used of ready-made leads or cords.
• To prevent injury, this apparatus must be securely attached to the floor/wall in accordance
with the installation instructions.
• Danger of explosion if battery is incorrectly replaced. Replace only with the same or
equivalent type.
• The battery (battery or batteries or battery pack) shall not be exposed to excessive heat such
as sunshine, fire or the like.
• Excessive sound pressure from earphones and headphones can cause hearing loss.
Listening to music at high volume levels and for extended durations can damage one's
hearing. In order to reduce the risk of damage to hearing, one should lower the volume to a
safe, comfortable level, and reduce the amount of time listening at high levels.
• The mains plug/appliance coupler/direct plug-in adapter is used as disconnect device, the
disconnect device shall remain readily operable.
• When not in use and during movement, please take care of the power cordset, e.g. tie up
the power cordset with cable tie or something like that. It shall be free from sharp edges
and the like that can cause abrasion of the power cordset. When put into use again, please
make sure the power cord set being not damaged, If any damages found, please look for
the service person to replace the power cord set specified by the manufacturer or have the
same characteristics as the original one.
• Attention should be drawn to environmental aspects of battery disposal.
• No naked flame sources, such as lighted candles, should be placed on the apparatus. To
prevent the spread of fire, keep candles or other open flames away from the apparatus at all
times.
• If the apparatus don’t have the symbol
in its rating label and its power cord has
three pins, it means protective earthing connection is needed. The apparatus should be
connected to a mains socket outlet with a protective earthing connection.
• The following information are recommended to be included as far as applicable where
applicable:
ENG
Refers to alternating current (AC)
Refers to direct current (DC)
Refers to ClassII equipment
Refers to stand-by
Refers to pow er ON.
Refers to dangerous voltage
• Warning for Apparatus containing COIN/BUTTON CELL BATTERIES (Below instruction only
used for the apparatus containing a user-replaceable coin/button cell battery)
5
Page 6
ENG
WARNING
Do not ingest the battery, Chemical Bum Hazard (The remote control supplied with) This
product contains a coin/button cell battery. If the coin/button cell battery is swallowed, it
can cause severe Internal burns in just 2 hours and can lead to death.Keep new and used
batteries away from children. If the battery compartment does not close securely, stop
using the product and keep it away from children .If you think batteries might have been
swallowed or placed inside any part of the body, seek immediate medical attention.
WEEE Directive
Correct Disposal of this product. This marking indicates that this product should not
be disposed with other household wastes throughout the EU. To prevent possible harm to
the environment or human health from uncontrolled waste disposal, recycle it responsibly
to promote the sustainable reuse of material resources. To return your used device,
please use the return and collection systems or contact the retailer where the product was
purchased. They can taka this product for environmental safe recycling.
CAUTION
RISK OF ELECTRIC SHOCK
DO NOT OPEN
This lightning flash with arrowhead symbol within an equilateral triangle is intended to
alert the user to the presence of non-insulated "dangerous voltage" within the product's
enclosure that may be of sufficient magnitude to constitute a risk of electric shock. To
reduce the risk of electric shock. Do not remove cover (or back). No user serviceable parts
inside. Refer to qualified service personnel. The exclamation point within an equilateral
triangle is intended to alert the user to the presence of important operating and
maintenance instructions in the literature accompanying the appliance.
6
Page 7
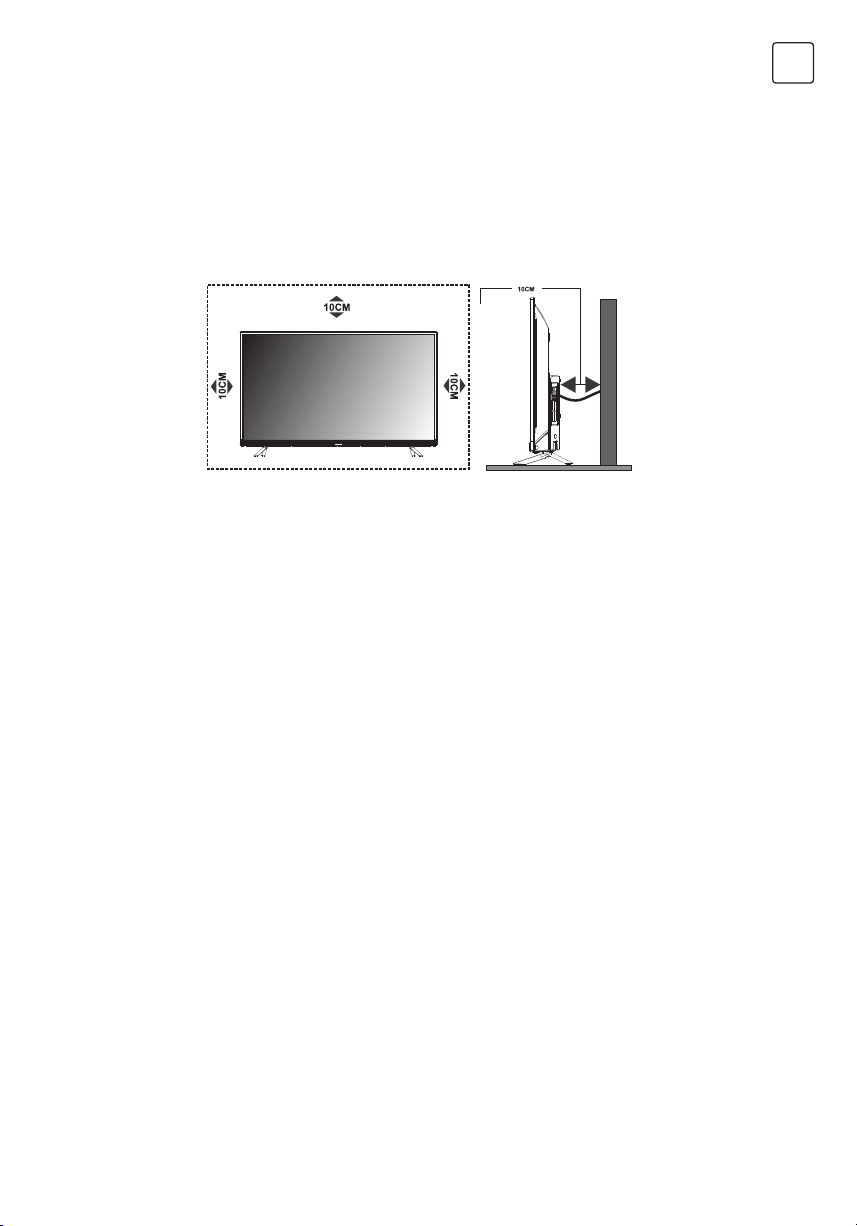
POSITIONING THE TV SET
• Install Display on solid horizontal surface such as a table or desk. For ventilation, leave a
space of at least 10 cm free all around the set. To prevent any faul and unsafe situations,
please do not place any objects on top of the set. This apparatuscan beused in tropical and/
or moderate climates.
• Fixing the rear of enclosure to wall. Below picture is different from actual item, thus it s only
for reference. (only for some regions)
Never place a television set in an unstable location. A television set may fall, causing serious
personal injury or death. Many injuries, particularly to children, can be avoided by taking
simple precautions such as:
• Using cabinets or stands recommended by the manufacture of the television.
• Only using furniture that can safely support the television.
• Ensuring the television is not overhanging the edge of the supporting furniture.
• Not placing the television on tall furniture (for example, cupboards or bookcases) without
anchoring both the furniture and the television set to a suitable support.
• Not placing the television set on cloth or other materials that may be located between the
television set and supporting furniture.
• Educating children about the dangers of climbing on furniture to reach the television or its
controls.
If your existing television set is being retained and relocated, the same considerations as
above should be applied (Only for the TV with mass exceed 7 kg).
ENG
7
Page 8

ENG
• An optional wall mount can be used with your television. Consult with your local dealer for a
wall mount that supports the VESA standard used by your TV model.
Carefully attach the wall mount bracket at the rear of the TV. Install the wall mount bracket on
a solid wall perpendicular to the floor. If you are attaching the TV to other building materials,
please contact qualified personnel to install the wall mount.
Detailed instructions will be included with the wall mount. Please use a wall mount bracket
where the device is adequately secured to the wall with enough space to allow connectivity
to external devices.
CAUTION
• Disconnect the power before moving or installing the TV. Otherwise electric shock may
occur.
• Remove the stand before installing the TV on a wall mount by performing the stand
attachment in reverse.
• If you install the TV on a ceiling or slanted wall, it may fall and result in severe injury. Use an
authorized wall mount and contact the local dealer or qualified personnel. Otherwise it is
not covered by the warranty.
• Do not over tighten the screws as this may cause damage to the TV and void your warranty
• To prevent injury, this apparatus must be securely attached to the floor/wall in accordance
with the installation instructions.
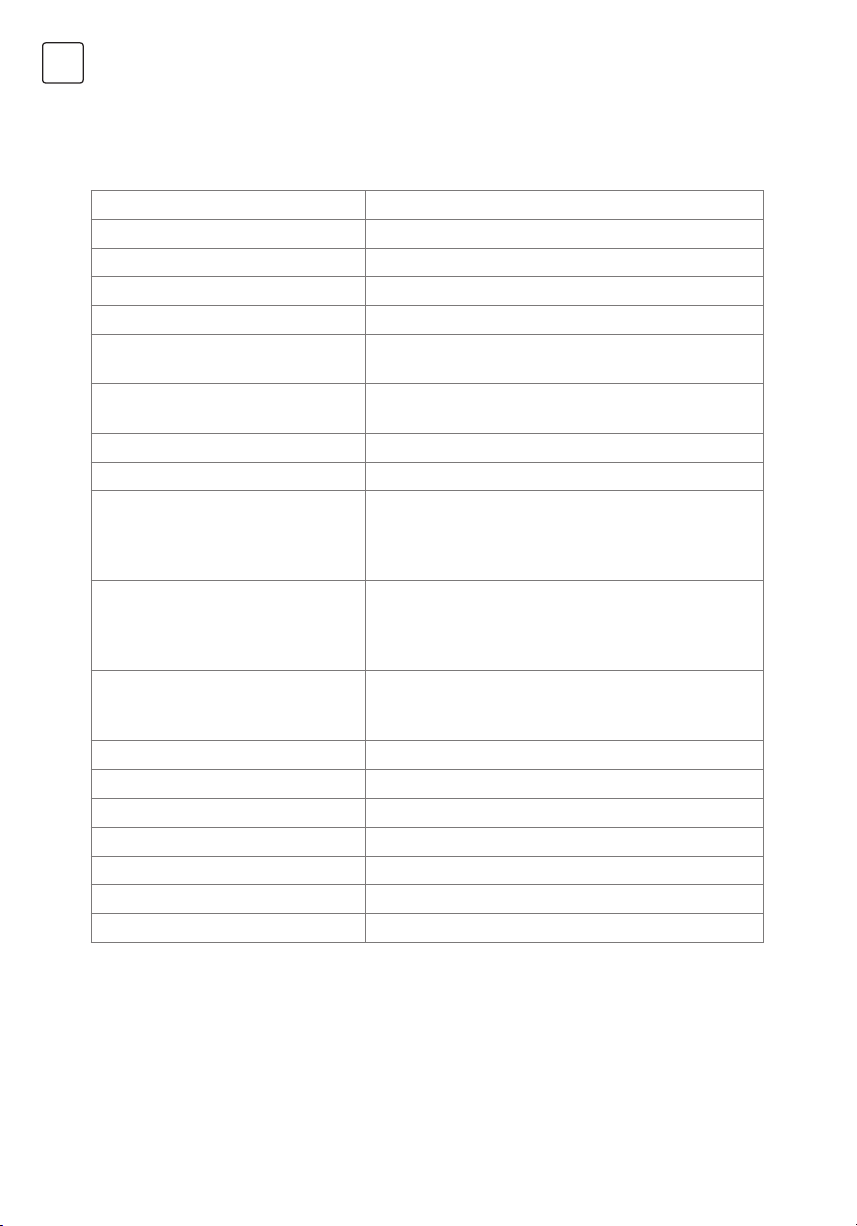
• Use the screws and wall mounts that meet the following specifications. Any damages or
injuries by misuse or using an improper accessory are not covered by the warranty.
Model Size: 32" Top Down
Diameter (mm) "E" M4 M4
Screw
Screw
Depth (mm)
“D”
Quantity 2 2
VESA (AxBxC) 100x100x100
Model Size: 40" Top Down
Diameter (mm) "E" M6 M6
Depth (mm)
“D”
Quantity 2 2
VESA (AxBxC) 200x100x200
Max 9 9
Min 6 6
Max 20 15
Min 12 7
8
Page 9

Note:
1) The pictures are for reference only.
2) For the TV sets with terminals towards the wall, in order to leave enough space to use the
terminals, a rubber cushion is needed together with the screw to fix the wall mount. It is a
small hollow pillar whose internal diameter is 8mm, external diameter is 18mm and height
is 30mm.
Operating Environment
• Do not install this device in confined spaces such as bookcases or similar units.
• Do not use the set in damp and cold areas. Protect the set from overheating.
• Keep away from direct sunlight.
• Do not use the set in dusty areas.
• Do not place candles to accessible, open areas to avoid flammable foreign material from
entering the TV.
Precautions for Using Remote Control
• Use the remote control by pointing it towards the remote sensor. The items between the
remote control and the remote sensor will interfere with the normal operation.
• Do not expose the remote control to violent vibrations. Also, do not splash liquid on the
remote control and do not place the remote control in high humidity areas.
• Do not expose the remote control to direct sunlight which can cause deformation of the unit
due to heat.
• When the remote sensor is exposed to direct sunlight or strong light, the remote control will
not work. If this is the case, please change the light direction or the position of the TV, or use
the remote control closer to the remote sensor.
ENG
Precautions for Using Battery
Inadequate use of batteries may cause leakage. Therefore, please follow the steps below and
use them with care.
1. Please note the batteries polarity to avoid short circuit.
2. If the battery voltage is insufficient, which affects the remote control range, you should
replace used batteries with the new ones. Remove batteries from the remote control unit if
you do not intend to use it for a long time.
3. Do not use different types of batteries (for example, manganese and alkaline batteries)
together.
4. Do not put the batteries into fire. Do not charge or disassemble batteries.
5. Please dispose of batteries in accordance with the relevant environmental protection
regulations.
6. WARNING: The batteries (battery pack or batteries installed) shall not be exposed to
excessive heat such as sunshine, fire or the like.
Remote Control Battery Replacement
Place two AAA batteries in the remote control battery compartment, making sure that the
polarity markings inside the compartment are matched.
9
Page 10
ENG
PANEL BUTTONS
Note: The images are intended for reference only.
Bottom view
Rocker Button
Press middle button:
1. In standby mode, press it to turn on the TV;
2. Without OSD, press it to access source menu; press and hold for 5 seconds to turn the TV
to standby;
3. With OSD, short press it to confirm a selection; long press it to return or exit a menu /
submenu.
Push left: decrease volume or go to left.
Push right: increase volume or go to right.
Push forward: channel down or go to below.
Push backward: channel up or go to above.
10
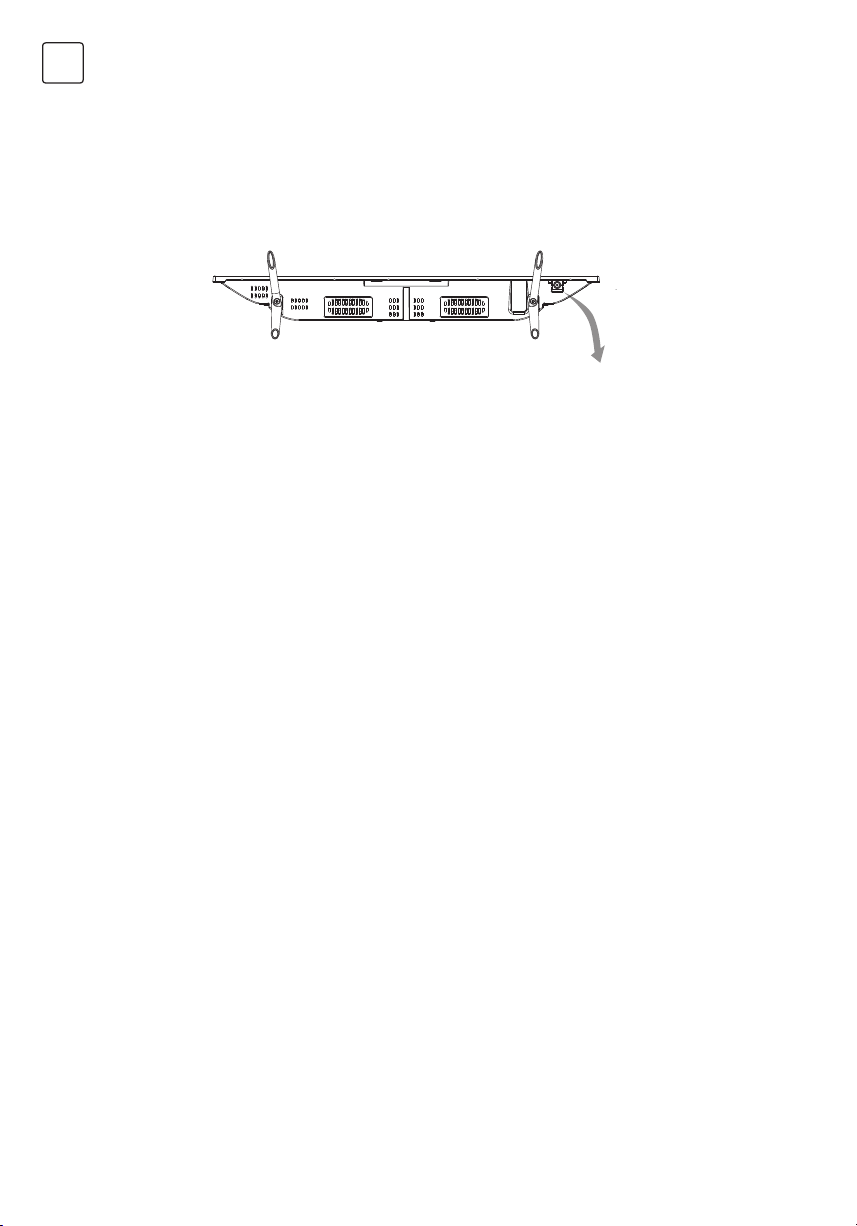
Page 11

TERMINALS
Note: The terminals may differ by model and regions, and please select the terminals basd on
your purchased TV set.
LAN: Network part
AV IN (AUDIO L/R & VIDEO):Connect video and audio signal from signal source such as
DVD.
HDMI1/2: Connect HDMI input signal from signal source such as DVD.
DIGITAL AUDIO:Use a SPFIF cable to output your TV audio signal to a compatible audio
receiver.
EARPHONE: Audio output, speakers will be muted when earphone is plugged in.
USB 1/2: USB port.
AIR/CABLE/LNB: Connect a coaxial cable ro receive signal from the antenna, cable or
sattelite.
SERVICE: Debuuging port only for professional technician.
CI: CI card port.
ENG
11
Page 12
ENG
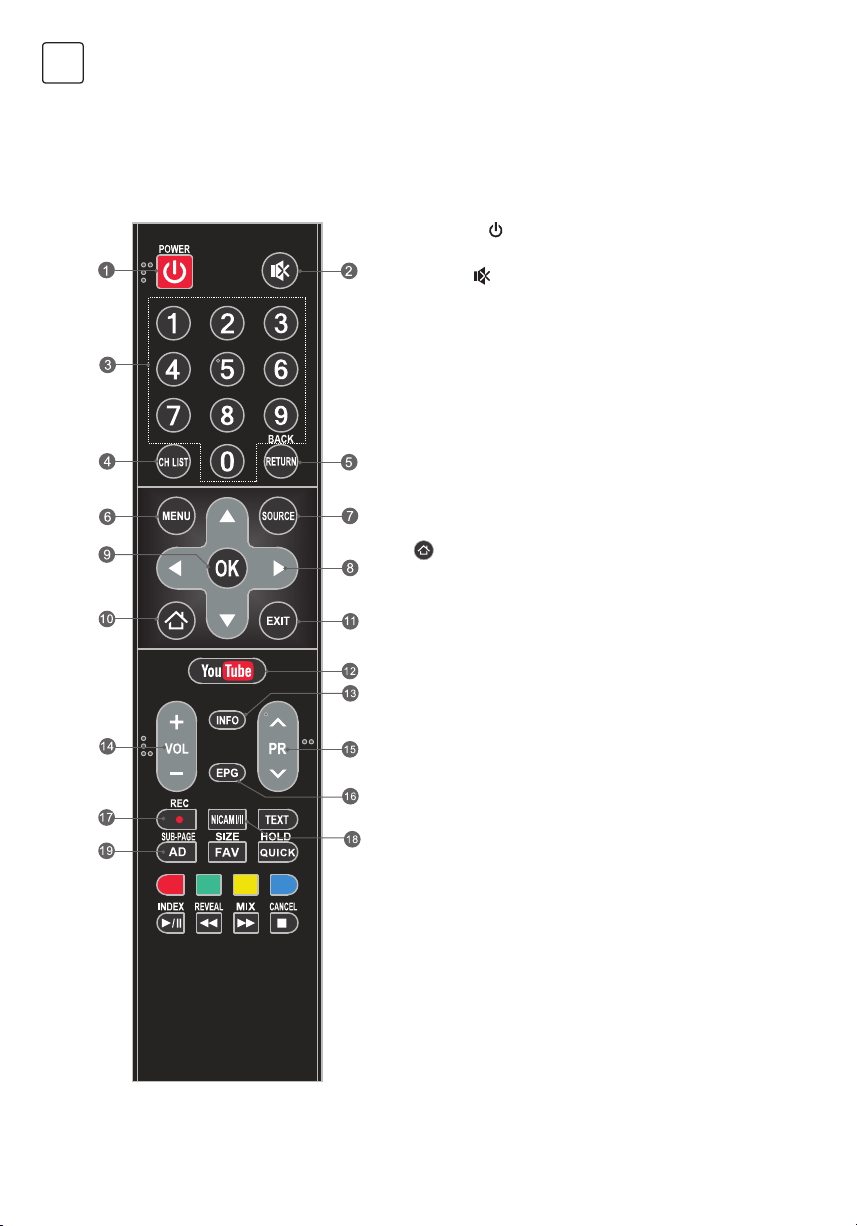
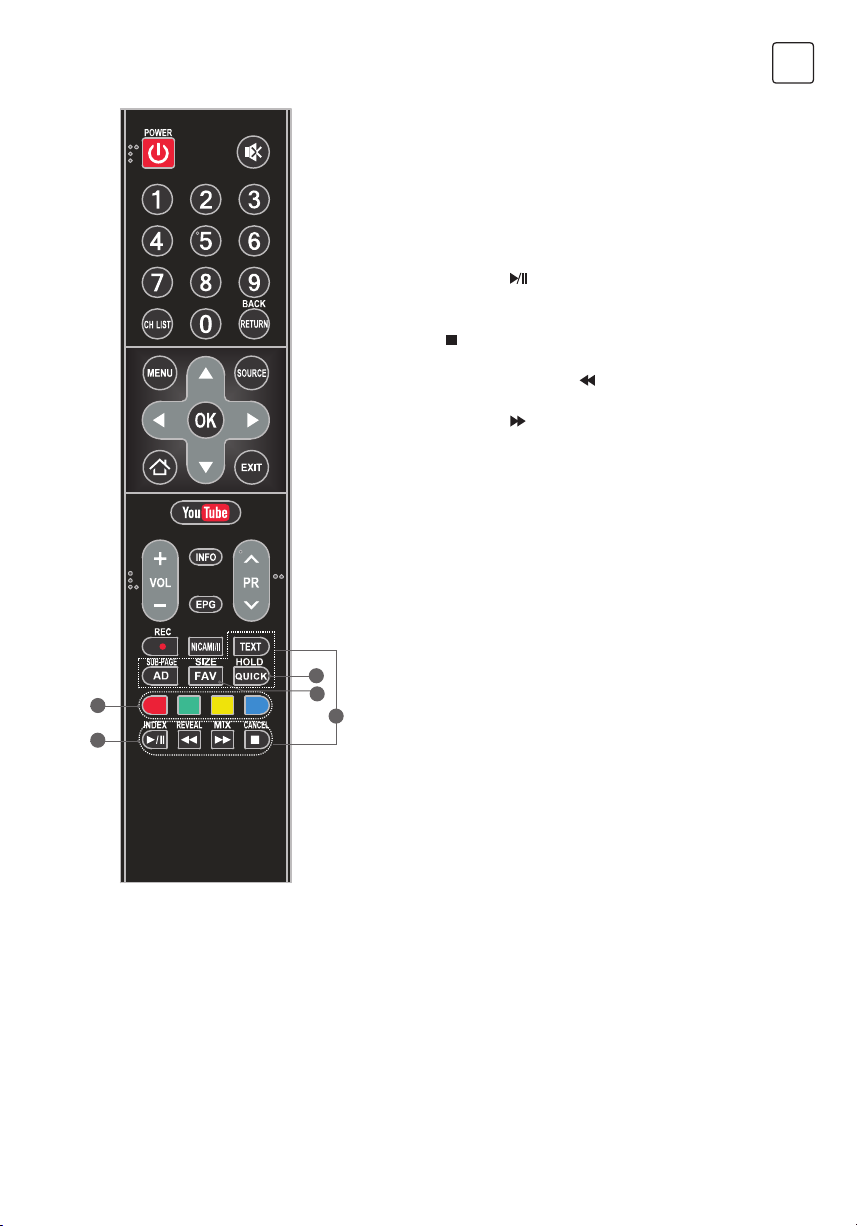
REMOTE CONTROL FUNCTIONS
Remote Control
1. POWER ( ) Press to turn the TV on or to put it
in standby.
2. MUTE (
volume.
3. Numeric buttons Choose channel directly.
4. CH LIST Press to enter the channel list.
5. RETURN (BACK) Press to go back to a
previously viewed channel.
6. MENU Enter the menu options.
7. SOURCE Select the input source mode.
8. Up/Down/Left/Right ( // /)
Navigate through the menu.
9. OK Confirm the selection.
10.
HOME Press this button will access the
home page, you can use the smart features and
media player etc.
11. EXIT Exit the current menu.
12. YouTube Access the YouTube.
13. INFO Display information about current source.
14. Volume Up/Down (VOL+/VOL-)
Adjust the volume level.
15. Program Up/Down (PR+/PR-)
Change programs up or down.
16. EPG Press to display the current EPG
information in DTV mode.
17. Record (REC) Press to record the current
programme (available in DTV mode only).
18. NICAM Press to select desired sound output
depending on the broadcasting channel.
19. AD (Audio Description)
Press to turn on audio description. Narrator will
describe to blind or visually impaired viewers
what is happening on the screen. Press again
to turn this function off (available in DTV mode
only).
) Press to mute or restore the
12
Page 13
ENG
20. FAV. (Favorite Channel)
Press to view your assigned favourite channels.
Press Up/Down buttons to move through your
assigned favourite channels. Press OK to confirm.
21. QUICK Access the quick menu.
22. Color buttons Press to execute the fast-link
function in TV or DTV mode.
23. USB Play Control Buttons
Play & Pause (
)
Press to pause playback, then press again to
continue playback.
Stop ( )
Press to stop playback.
Fast Backward Button ( )
Press to fast reverse.
Fast Forward ( )
Press to fast forward.
24. TELETEXT BUTTONS
TEXT Press to enter or exit the teletext menu.
SIZE Enlarge the teletext display: Press this
button once to enlarge upper half of the screen.
Press this button again to enlarge lower half of
the screen. Press this button again to return to
normal screen size.
HOLD
Press to hold the teletext page on screen without
update and changes. Press again to release the
21
22
23
20
24
hold state.
SUB-PAGE
Press this button to enter or exit subpage mode (if
subpage is available). Press Red / Green button to
select the desired subpage.
INDEX Press this button to display index page.
REVEAL
Press this button to display concealed information,
such as solutions to riddles or puzzles. Press gain
to remove the information from the display.
MIX
Press this button to superimpose the teletext
over the TV programme. Press again to return to
normal teletext
CANCEL
Press this button to temporarily return to TV
programme while searching for a Teletext page.
When the search is done, the page number will
be displayed on the upper left of the screen.
Press again to return to the Teletext page.
Note: Some buttons may be invalid for some models. When you press such buttons, they
will not respond or there will be a display „Not available“ on the screen.
13
Page 14
ENG
PERSONAL VIDEO RECORDING (REC)
In DTV mode and with a USB device properly plugged in, you can record the channel you are
watching and view at a later, more convenient time. Use it to record a program when your
viewing is interrupted or delayed.
IMPORTANT NOTE:
1. The REC function may not be available for some regions.
2. Please insert an external high-speed storage devices into the appropriate USB port at the
back of the TV, and make sure the device has enough free space.
3. Before the recording, suggest to format your USB device to ensure the operating speed. In
Option menu, select “REC File System” to format the USB device.
4. During the recording, do not change channels or operate another function.
5. If the signal is interrupted or removed, the recording will stop until the signal is established.
This may cause you to lose program content.
6. Please do not turn the TV OFF during recording. This will make the TV exit the REC and
turn to standby.
7. The file recorded can only be used in this TV, any copy communication is strictly prohibited.
8. Use high-quality mobile device to record HD programs, otherwise the videos will be
jammed during the playback.
9. Back up all of the data in the USB storage device in case data was lost due to an
unexpected accident. We do not assume any liability for the losses by misuse or
malfunction. Data backup is consumer’s responsibility.
10. Only in DVB-T/T2 &DVB-C input source, record files can be played from REC_LIST.
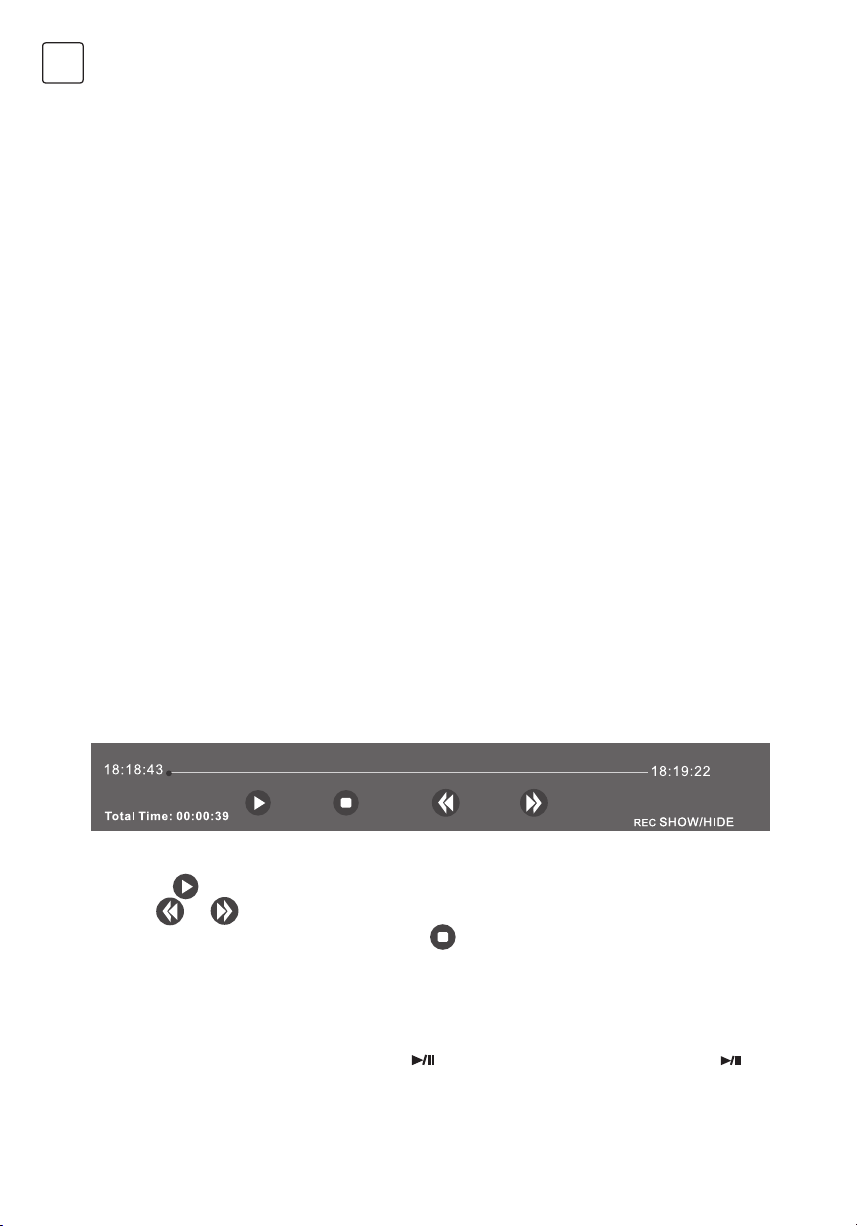
Instant one-touch recording and playback
Press REC button to start the recording, at the same time below control bar will show at the
bottom of the screen.
• Want to watch the recorded video while recording the program, press left direction button
to select
Select
• If want to stop and exit the recording, select and press OK button.
Timeshift
Time-shift is the recording of television programs to a storage medium (such as your USB
device) for viewing at a later, more convenient time. Use it to record a program when your
viewing is interrupted or delayed. If you want to leave a while and watch the program
without missing the contents, you can press
button again to start watching when you come back.
and press OK button, the recorded video will start playing.
or can fast backward or fast forward the playing.
button to stop the program, and press
14
Page 15
Note:
1. Before time-shift, you’d better format the USB device to ensure the enough space for
recording.
2. You can also set the preset time of recording in EPG function (Refer to next page).
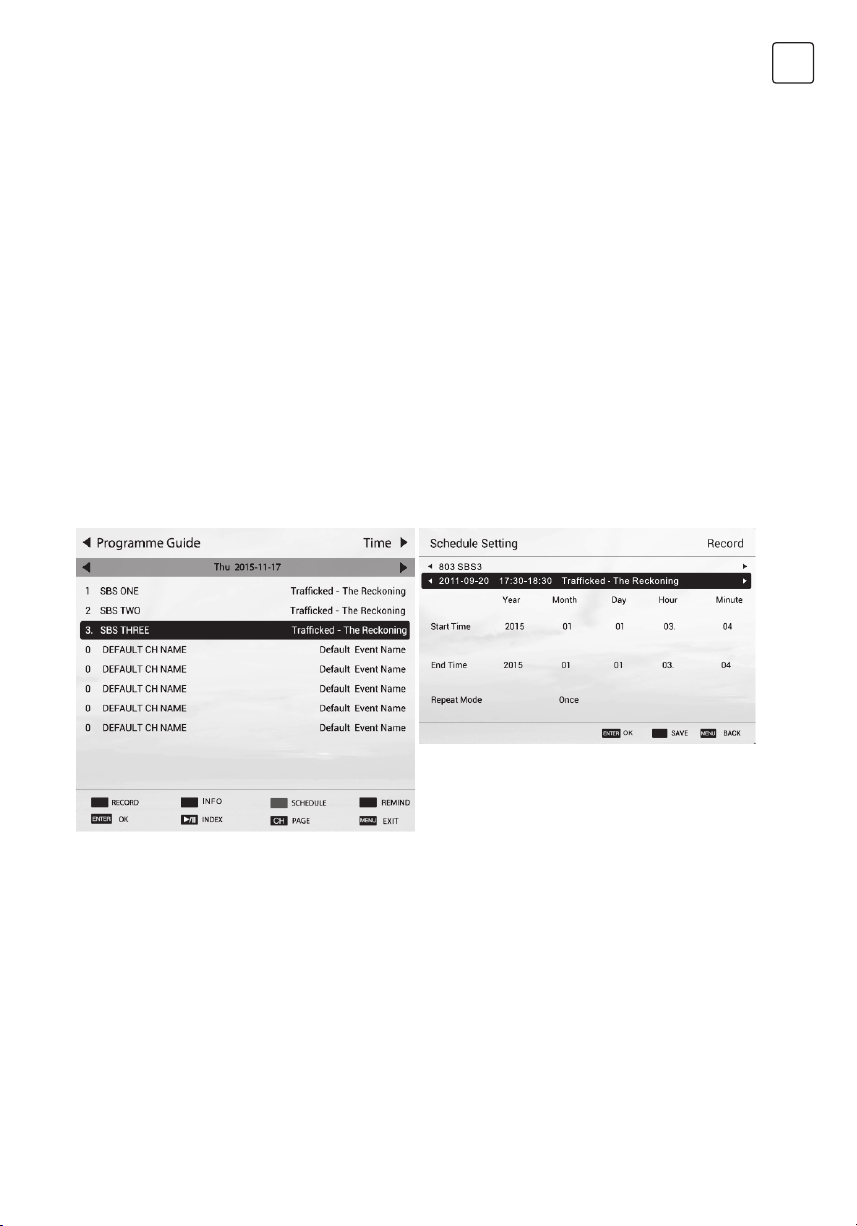
ELECTRONIC PROGRAMME GUIDE (EPG)
EPG stands for Digital Electronic Programme Guide. It is supplied by the programme providers
and offers information about the programmes to be broadcast. You can access it in digital
mode by pressing the EPG button on the remote control.
1. Press the EPG button to enter the EPG interface. Current date and time will be displayed
on the second bar from the top. On the list below, the channel you are currently watching
will be highlighted.
2. To check programmes to be broadcast in future, scroll up using the button to the date
field. Use the button to select the date you want to check.
3. Press the button to scroll up to the top bar in the display, then press the button to
select “Time”, you can check the program list of a channel of someday.
ENG
Schedule
Press the yellow button to display the
recording schedule list. You can delete an
appointment by press the red button.
Reminder
Press the blue button to display a reminder
menu. You can set up the remind time and
repeat mode.
Recorder
Press the RED button to display the schedule
setting menu. By using navigation buttons, set
the schedule time by highlight the number of
year, month, day, hour or minute and press
OK button, then use up and down buttons
to adjust the number. Using same method to
set up the repeat mode, and then select
SAVE” button to save the setting.
Info
Press the GREEN button to show information
about the selected program.
15
Page 16

ENG
INITIAL SETUP & HOME FEATURES
Initial setup
The first time you power on the TV, there will show a setup wizard, press ENTER button to
start and finish following steps:
Step 1 Select the OSD language as you need;
Step 2 Select the environment between “HOME” and “STORE”;
Step 3 Select the country;
Step 4 Set up the TV clock (time setting), default is “Auto Sync”;
Step 5 Read the legal statements;
Step 6 Set up the network configuration;
Step 7 Start auto tuning to search for programs, when finished, the programs will be
stored into memories and the initial setup will be completed.
NOTE: Before power on the TV, you need to connect the TV signal cable to the tuner
terminal well on the back of the TV.
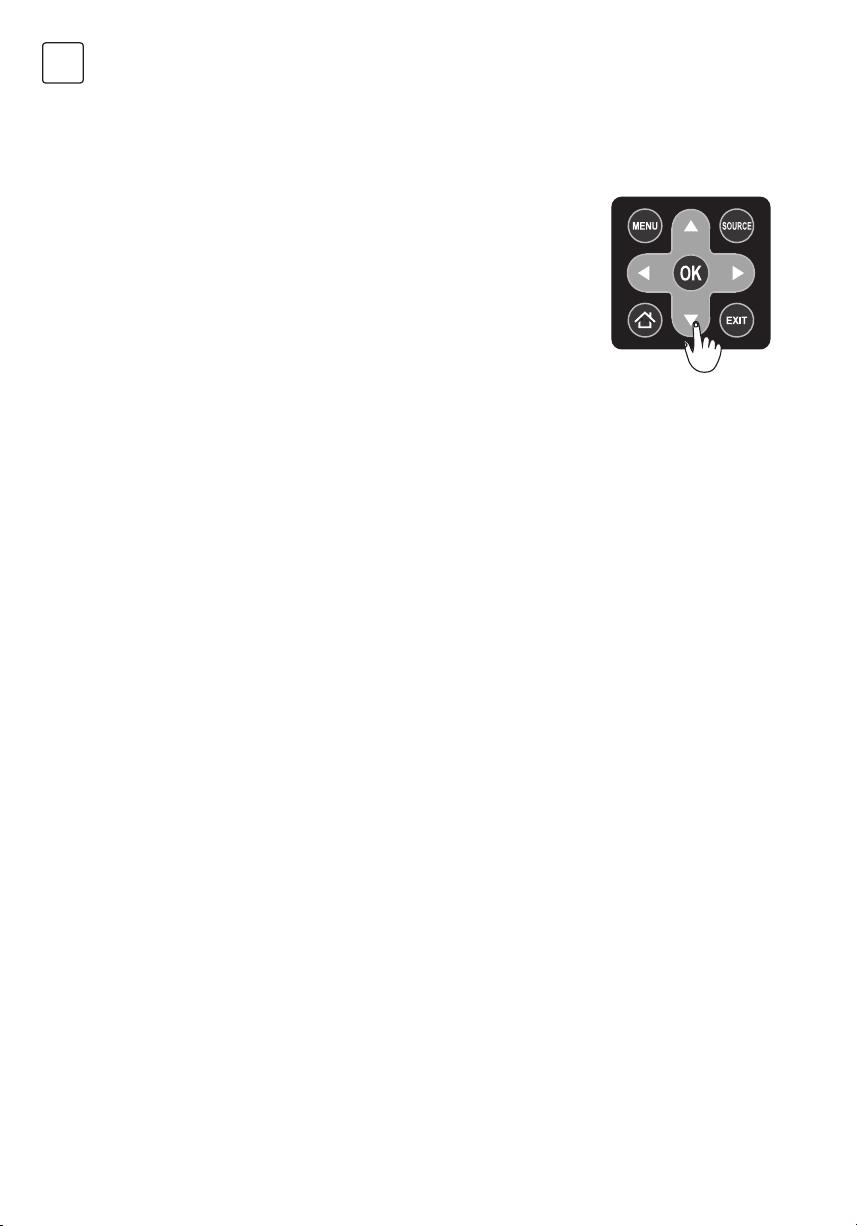
Home
Press Home button to access the home page. Use navigation and OK buttons to select
and access a shortcut.
Mirashare (May not be available on some models)
Without a data cable, open the Wi-Fi button on your mobile phone, then select “Mirashare”
on the home screen after pressing HOME button, contents on your mobile phone will be
shared to the TV, you can enjoy the big screen viewing experience.
STEPS:
1. Open the miracast function of your mobile phone;
2. Find the TV name on the mobile phone and select it, the TV will pop out a dialog, accept
it to connect Mirashare function, the contents on your mobile phone will be played on the
TV.
Note: For some models, after selecting the TV name, the mobile phone and the TV can
connect automatically.
Source
Select input source.
Network Applications
Such social applications as YouTube are provided for you.
For example, select the Facebook icon on the home page, press OK can access.
TV Browser
Select the TV Browser icon on the home page and press OK to access the internet surfing.
Features include speed dial and bookmarks etc.
Note:
1. The browser may not support some web pages or videos due to network failure,
difference of regions or service interruption, which has nothing to do with the TV.
2. If the current page is still not fully opened (progress bar is not completed), other page is
selected directly, the previous page won’t be saved in history.
16
Page 17

Media Player
Connect a USB device to the TV and select the Media Player on the home page, you can play a
video/music/photo file in your USB on the TV.
Opera TV
It is an on-line application store made for TV. Open it you can experience various types
of apps, such as News & Weather, Nature & Travel, Kids, Lifestyle, Sports, Music, Live TV &
Video, Games, Movies & TV etc.
Home Media (May not be available)
Sharing videos, music and pictures in your mobile phone or PC to the TV, you need to connect
the TV and your device to the same network.
Note 1 Some of the applications on the home page may not be available on some models,
and this manual doesn’t include the operation instructions of all applications on the home
screen.
Note 2 If service providers upgrade or modify their servers, applications such as YouTube and
Facebook may not function on this Television.
Note 3 Your remote control may not be compatible well with some network applications or fail
due to service interruption, that has nothing to do with this TV.
Note 4
Privacy Policy (may not be available): To protect your personal data and compliance with the
legal provisions. You have the possibility to revoke at any time the acceptance of the privacy
poliyy in the menu of your Tesla TV. If the cancellation is active, no connection is established to
the Internet.
Note 5
Network application contents and services are controlled by network application
providers by means of networks and transmission facilities, which are subject to
alteration, suspension, removal, termination or interruption, or invalid access at any
time without further notice in that the manufacturer is unable to control or to be
informed of the aforesaid change. The manufacturer makes a further declaration that it
disclaims any responsibility or liability arising from customer’s failure to use the
network application contents and services caused by, including but not limited to,
failure of network connection or communication lines, technological updates, or the
alteration, suspension, interruption, termination, disabling, or removal of any contents
or services by the network application providers etc.
ENG
17
Page 18
ENG
MENU CONTROL
For lasting update and upgrade, below descriptions of menu settings may not be in
compliance with your TV, this is normal and the actual content on your TV shall govern.
Menu Operation
Press “MENU” key to enter the main menu .
Press the [ ] / [ ] key to select a menu.
Press the [] / [] key to select a menu.
Press “OK” key to enter the item.
Press “MENU” key to exit the item.
Note: The below menu options are under TV sources.
Picture
Picture Mode: Select the appropriate picture mode for different purposes.
Backlight: Adjust backlight parameter of the TV.
Color Temperature: Select the overall color tone of the picture.
Dynamic Noise Reduction: Choose between Off, Low, Middle and Strong.
MPEG Noise Reduction: Choose between Off, Low, Middle and Strong.
Aspect Ratio: Select the appropriate display mode for different purposes. Some options
may not be available under some sources and video content.
Dynamic Contrast: Set to On or Off as desired.
Picture Sensor: This feature adjusts the screen brightness automatically when the
brightness of the image changes. If the image is at night, the screen will turn darker
automatically; if the image is at daytime, the screen will turn brighter automatically.
Film Mode: Set to On or Off as desired.
Picture Reset: Reset the picture settings to default values.
Sound
Sound Mode Setting: Choose between Standard, Music, Movie, Sport, User.
Balance: Control the sound balance between the right and left speaker.
Auto Volume: Choose between On and Off.
Surround Sound: Help to create rich and wider sound from stereo sound sources.
Analog Audio Output: This feature is used for selection of Headphone and Line Out.
Plug in a headphone to the headphone terminal of the TV, and you can listening through
the headphone.
Digital Audio Output: This feature is used for selection of Auto and PCM. When connect
a digital audio amplifier to the digital audio out terminal of the TV, select this feature from
SOUND menu and then select the audio output mode.
Audio HDMI: Select the HDMI audio mode, options include: Auto, Digital and Analog.
Audio Description (May not be available): Turn on or turn off the Audio description.
When turn on the audio description, a narrator will describe what is happening on the
screen for blind or visually impaired viewers.
Sound Reset: Reset the sound settings to default values.
18
Page 19
Installation
Program Edit
Edit the programs. You can press colored buttons on the remote control to skip programs,
delete programs , and add programs to the favorite list by pressing FAV button.
5V Antenna Power
This option is only available in DVB-T/T2 source, select On to supply power for the TV’s
antenna; Select Off to turn off this function.
CI Information (Only available in DTV mode)
Enables the user to select from the CAM-provided menu. Select the CI menu based on the
menu PC Card.
Signal Information
Showing the information of current DTV channel.
Auto Tuning
Select corresponding source from the source list before starting the auto tuning.
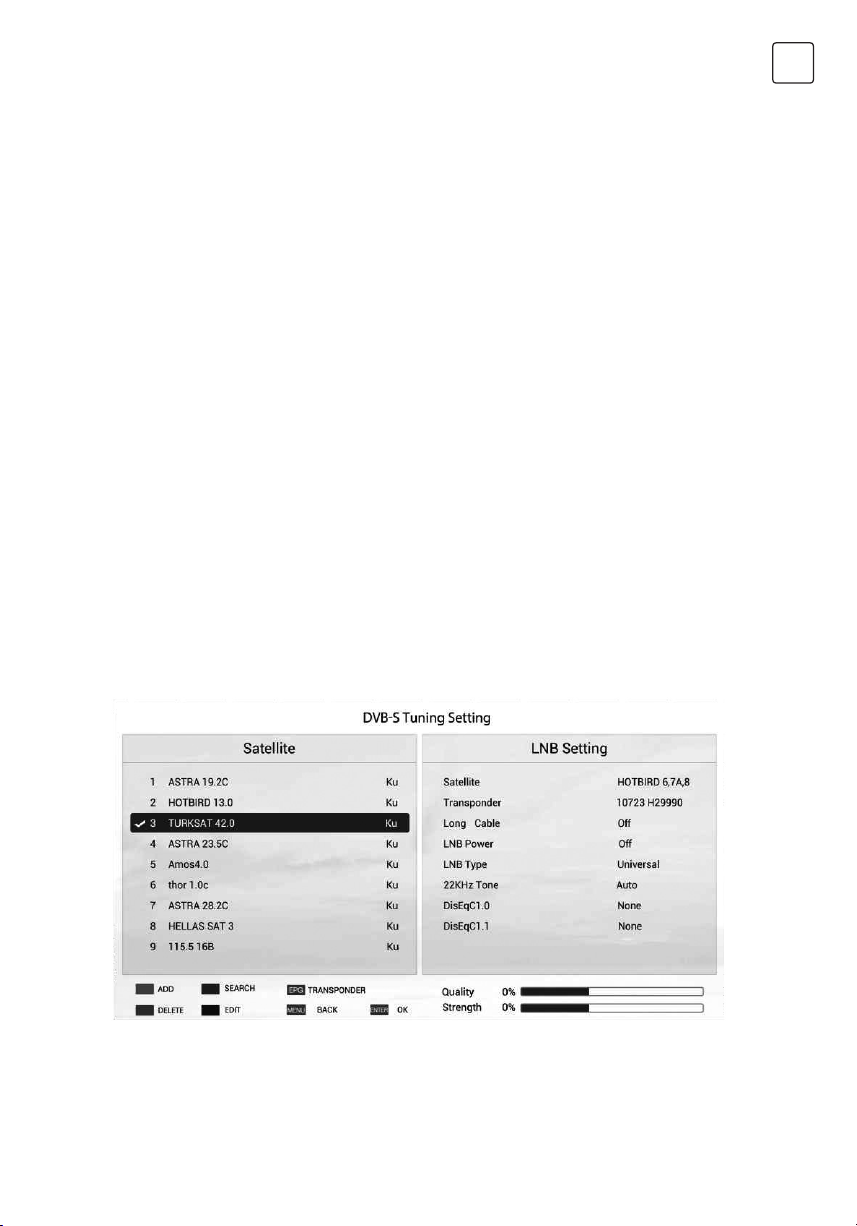
• DVB-S/S2 Auto Tuning
Satellite Dish Settings (Step 1-3, refer to Fig1 and Fig2)
A set of satellite dish settings must be configured for each wanted satellite before
performing a channel scan.
Satellite - Select the satellite for this TV.
Long Cable - Increase LNB power.
LNB Type - Make sure the LNB type is corresponding to your dish.
LNB Power - Enable or disable the power supply for the LNB.
22KHz - Select the 22KHz to set 22K switch to ON/OFF. The auto mode is used to switch
22KHz on or off depending on the LNB type.
DiSEqC1.0/1.1 - Select the DiSEqC mode for the selected LNB.
Unicable/IF Freq/ Set Position - Setting the unicable parameter depend on your disk.
ENG
Fig. 1
19
Page 20
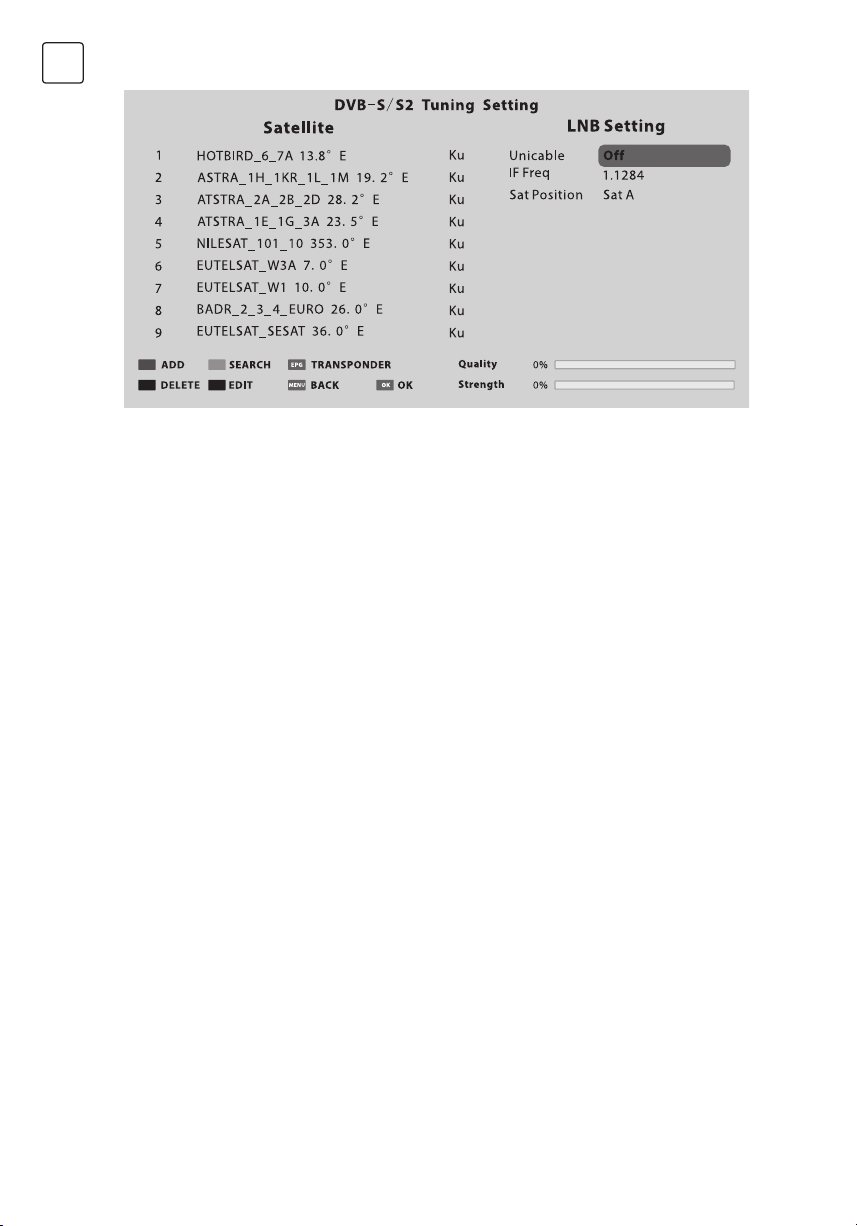
ENG
Fig. 2
Step 1 Press MENU button and select INSTALLATION menu. Select DVB-S/S2 auto
tuning and press OK button, the screen will show as Fig1, and the default satellite will
be highlighted.
Step 2 Press OK button to confirm the selected satellite.
Step 3 Press button to switch to LNB setting, press button to highlight LNB Type
and press OK button to set up this parameter.
Step 4 Check if the 22KHz Tone, DiSEqC1.0/1.1 is corresponding to the selected
satellite, if not, highlight and press OK button to set up the right parameter. (Refer to Fig 2)
After the above steps are finished, press the blue button to search for channels.
• DVB-T/T2 or DVB-C or ATV Auto Tuning
Select DVB-T/T2 (or DVB-C/ ATV) Auto Tuning to search the programs automatically Before
searching, you may need to select the country or set up the scan menu. If you want to stop
the auto search, press MENU or EXIT button, a exiting dialog is popped out.
• Press to confirm exit.
• Press to continue searching.
DVB-T/T2 or DVB-C Manual Tuning
Search and store programs manually, first select the corresponding source before starting
search.
1. In Installation menu, select DVB-T/T2 (or DVB-C) manual tuning and press OK to access
the searching interface, first select the country.
2. Second press or to set up relevant parameters such as scan mode, scan scope etc.,
and then select Search and press or to start the search.
3. The search stops when a program is found and this program will be stored in the current
channel position. If you want to stop the search, press MENU button.
20
Page 21

ATV Manual Tuning
In ATV mode, select ATV Manual Tuning and press OK button to access.
1. Use direction buttons to highlight and set up Storage To 1 (maybe other number), Color
System, Sound System and Current Channel. Then select search and press or to start
the search.
• Press for the unit to search towards higher frequency;
• Press for the unit to search towards lower frequency;
2. When a program is found, press the red button to stored it at the current channel position.
If you want to stop the search, press MENU button.
• Fine-Tune
Use to make small adjustments to tuning of an individual channel. Fine-tune is not
necessary under normal conditions. However, in area of inferior broadcast conditions
where adjustments is necessary for a better picture and sound, use fine-tune.
1. Select a channel that you want to fine tune.
2. In Installation menu, select ATV Manual Tuning and press to highlight Fine-Tune.
3. Press or to fine tune until the best possible picture and sound are obtained.
Setup
OSD Language: Select your desired OSD language.
Audio Language: Set the primary or secondary digital audio language corresponding
to the signal.
Subtitle Language: Select the subtitle language.
Hearing Impaired: This feature is helping hearing-impaired users to understand the
programs by showing the relevant graphic information (similar to subtitle but not subtitle)
on the screen. You need to turn on the switch before using this feature.
Teletext Language: Select the teletext language as your desire.
REC File System: If you want to use this function, you must receive a digital program and
plug a USB disk.
Note:
Suggest to use a high speed mobile hard disk, or your TV may get stuck when using
the REC and time shift function.
HDMI CEC: Link and control both the TV and its external devices by connecting the
external device to the HDMI port of the TV.
HDMI CEC - Turn on or off HDMI CEC function.
Auto Standby - Turn the TV to standby automatically.
Device List - When HDMI CEC is on, you check the device list of connecting to the TV.
Location: Select the location mode of playing at home or at store, when select “Store”,
you can turn on the sticker demo.
Presentation: Turn on or turn off the sticker demo and USB demo.
USB demo:
1. Required settings: Add “AutoDemo.txt” txt file at the root directory of a USB device,and
then write the route of videos need to be played on the TV, each route needs a line break.
2. When “USB Demo” is set up as “On”, the TV will automatically play the videos in the
“AutoDemo.txt”, after played all videos, TV will go back to play the previous watching
program. After five mintues, the TV will cycle playing wrote videos and program.
3. The route should be wrote in English or numbers, otherwise the TV can’t identify it.
ENG
21
Page 22

ENG
Software Update:
1. Software update (USB)
Firstly download and save the upgrading software into a USB device, secondly connect the
USB device to a TV USB port, thirdly access “Setup” menu and select “Software update”, then
select “Software update (USB)” to start the upgrading process. When finished, the TV will
restart automatically.
NOTE: Do not power off the TV during the software upgrading process, otherwise the TV
may not work, and the customer should be responsible.
2. Software Update (Network)
Connect the TV to the internet and you can upgrade the TV system or a network application
on the TV.
NOTE: “Network Upgrade” may not be available for some regions.
3. Software Update (OAD) (Only for some regions and only available in DVB-T mode)
Select it to update the TV system software over the air.
Advanced Option: Set up “Fast Boot” and “Wake on Network” function.
Blue Screen: When Blue Screen is set to On, the screen will turn blue and the sound will
be muted when there is no signal received.
User Reset: Reset the menu settings to default values.
Legal Statements: Relevant legal statements.
Time
Clock: Set up the TV clock, time zone and summer time.
Clock mode - Options include Auto and Manual. When select “Auto”, the TV clock
will synchronize with the real time digital TV signal. When select “Manual”, you
need to manually set up the clock time, including setting up the number of year,
month, date, hour and minute.
Time zone - Select the time zone according to your location.
Summer time (Daylight saving time)- You can turn on or turn off this function.
Off Timer: The feature allows you to set the TV to turn off automatically at a regular time.
On Timer: The feature allows you to set the TV to turn on automatically to a preset input
or volume.
Sleep Timer: Set the automatic off time of the TV.
Automatic Power down: Set up the time to automatically turn off the TV on condition
that there is no operation.
Continuous viewing timer: To prevent watching TV continuously for long periods of
time, you can set a message to appear that suggests that the viewer takes a break. This
is especially useful for preventing children from watching TV for long periods of time.
From TIME menu select Continuous Viewing Timer and set the time. When the set time
has passed, a message suggesting the viewer takes a break appears. Press OK or EXIT to
clear the message.
22
Page 23

Advanced
Lock System: Input the initial password (0000) to access this feature, select “on”, the
following feature such as “Set password”, “Block channel”, “Parental control” and “Panel
lock” will be activated; select “off”, the above mentioned three features will be inactivated.
If you forget the password, try use the super password (8899) to access.
Set password: Reset the password of the lock system.
Block channel (Only in TV mode): Block the channels (programs) not suitable for your
children.
Parental Control (Only in TV mode): Allows you to password restrict access to shows
programs based on their parental rating.
Panel Lock: To disable the bottom keys on the TV. All buttons on the remote control can
still be used.
Network
Wireless Connection
1. Select “Wireless Connection” and press OK button, and then set “WLAN Switch” on;
2. Wait a few seconds, the wi-Fi spots will be shown on the list, select and press OK button to
open the interface of inputting password.
3. Use navigation buttons to input the password, when finished, press the green button on
the remote control to start the connection.
Wired Connection
1. Connect the network cable to the LAN port at the back of the TV;
2. Access main menu and select network sub-menu.
3. Select “Wired Connection”, and then select “Auto Input”, wait a few seconds, the network
configuration will be finished successfully.
Note: Before getting started, make sure that your router is working well.
ENG
USB CONTROL
USB Menu
You can view movie, music and photo files from your USB storage devices.
4. Connect USB storage device to USB input terminal.
5. Press Home button and select “Media Player”.
MOVIE: Play movies from USB.
MUSIC: Play music from USB.
PHOTO: View photos from USB.
Reminder When Using the USB Player
1. Some USB storage devices may not be compatible to operate smoothly with this TV.
2. Back up all of the data in the USB storage device in case data was lost due to an
unexpected accident. We do not assume any liability for the losses by misuse or
malfunction. Data backup is consumer’s responsibility.
23
Page 24
ENG
3. For large file sizes, the loading speed may be slightly longer.
4. The recognition speed of a USB storage device may depend on each device.
5. When connecting or disconnecting the USB storage device, ensure that the TV is not in
USB mode otherwise the USB storage device or the files stored in it may be damaged.
6. Please use only a USB storage device which is formatted in FAT16, FAT32, NTFS file system
provided with the Windows operating system. In case of a storage device formatted as a
different utility programme which is not supported by Windows, it may not be recognized.
7. When using a USB Hard Disk Drive which requires electric power source, ensure its power
does not exceed 500mA. If the power of the USB hard Disk exceed 500mA, the TV system
may be changed into standby mode, you should pull away the USB hand Disk and restart
the TV system.
8. An “Not support” message will be displayed if the file format is unsupported or corrupted
9. FHD big picture needs longer time to process, which is not caused by the TV. Please be
patient to wait.
10. This TV may not support some multimedia files changed and upgraded as the change of
encoding format or other technical advances.
Movie Menu
1. Press / to select MOVIE. Press OK to enter.
2. Press / or / to select the desired folder and Press OK to open the folder, press
/
to start playing.
3. Press
4. Press “EXIT” to the previous menu screens.
to stop movie playing and return to movie list.
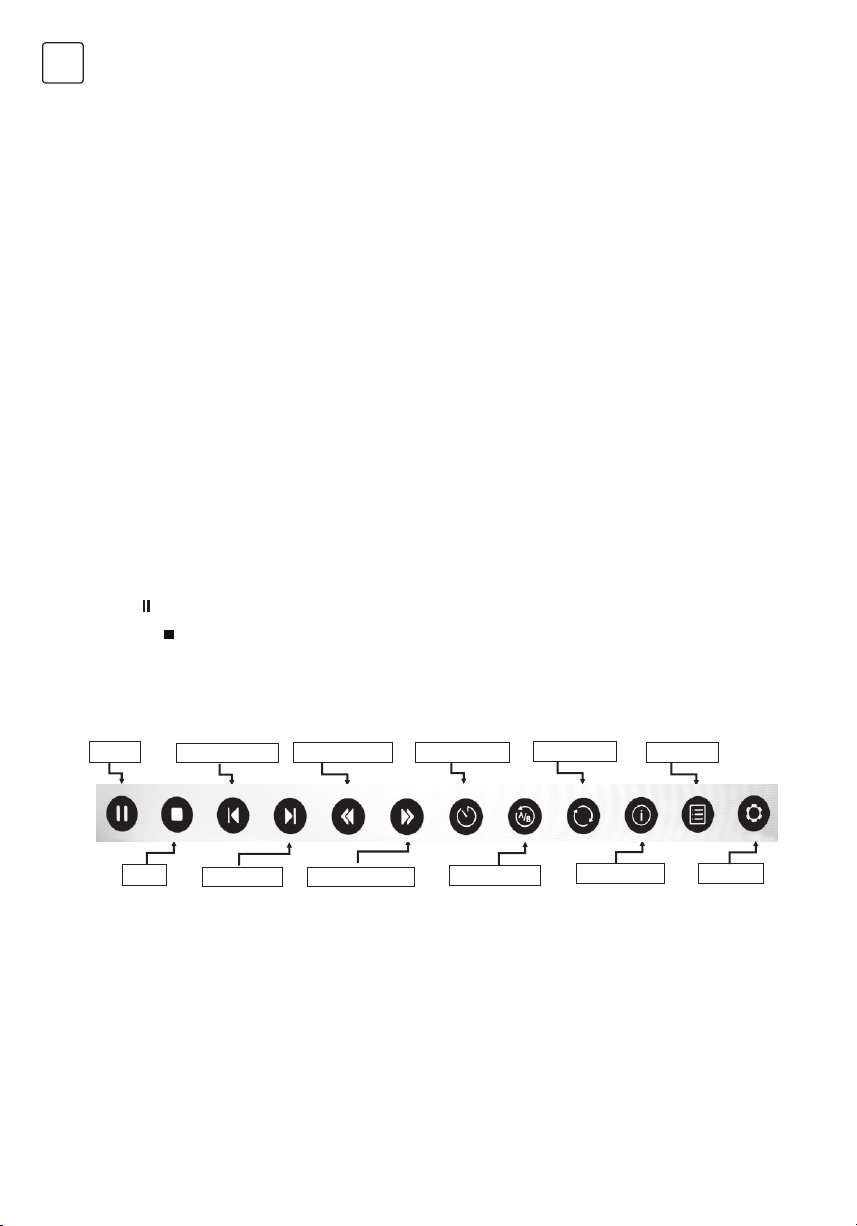
Movie Control Bar
Pause
Skip Previous Fast Reverse Time Search Play Mode Play List
Stop
Skip Next
Fast Forward
A/B Repeat
Information Settings
- Press [ MENU ] to display Movie Control Bar while playing the movie.
- Press [ ] / [ ] to select the desired settings.
- Press [ MENU ] to exit from Movie Control Bar.
24
Page 25
Music Menu
1. Press / to select MUSIC. Press OK to enter.
2. Press / or / to select the desired folder and Press OK to open the folder, press
/
to start playing.
3. Press
4. Press “EXIT” to the previous menu screens.
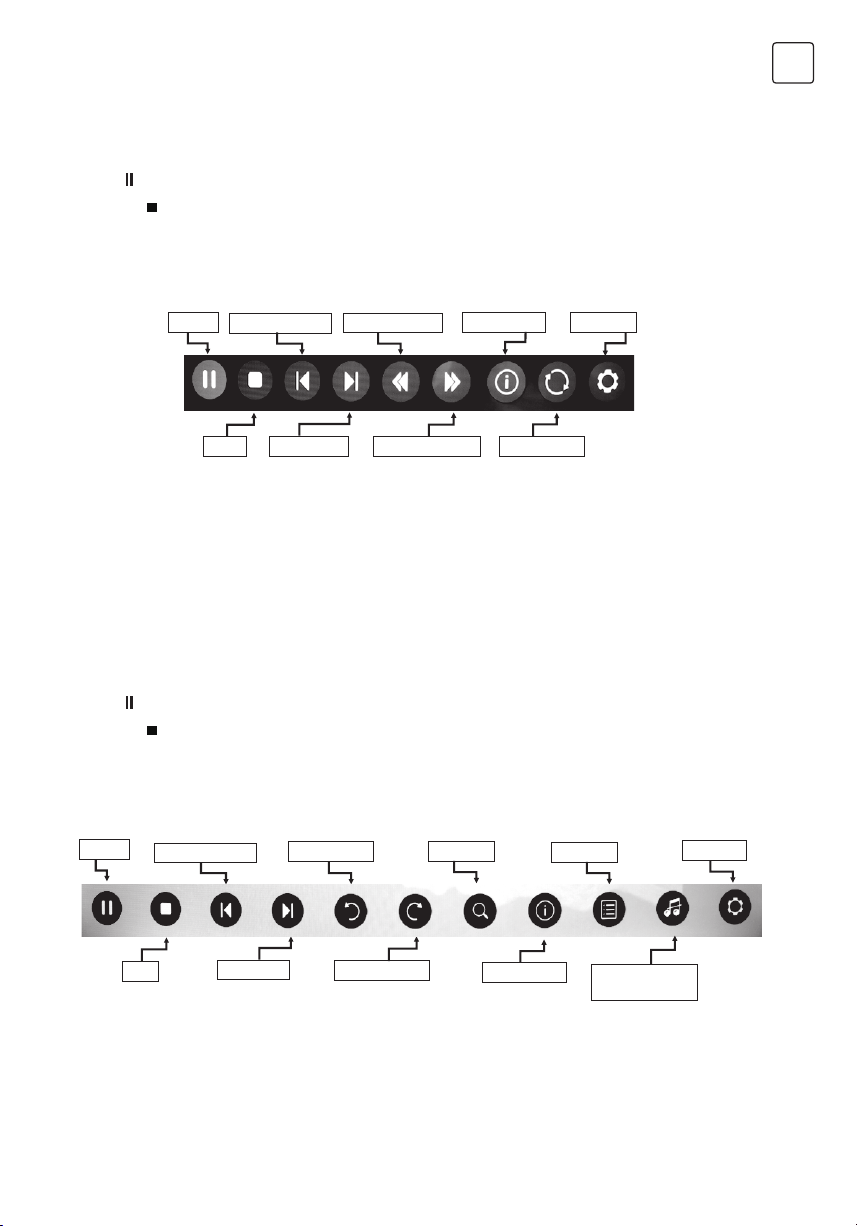
Music Control Bar
to stop music playing and return to music list.
ENG
Pause
Skip Previous
Stop
Fast Reverse
Information Settings
Play ModeSkip Next Fast Forward
- Press [ MENU ] to display Music Control Bar while playing the music.
- Press [ ] / [ ] to select the desired settings.
- Press [ MENU ] to exit from Music Control Bar.
Photo Menu
1. Press / to select PHOTO. Press OK to enter.
2. Press / or / to select the desired folder and Press OK to open the folder, press
/
to start playing.
3. Press
4. Press “EXIT” to the previous menu screens.
Photo Control Bar
Pause
to stop photo playing and return to photo list.
Skip Previous
Rotate CW
Zoom
Play List
Settings
Stop
Skip Next
Rotate CCW
Information
- Press [ MENU ] to display Photo Control Bar during photo slide show.
- Press [ ] / [ ] to select the desired settings.
- Press [ MENU ] to exit from Info bar.
25
Background
music
Page 26

ENG
TROUBLESHOOTING
Before calling a service technician, review following information for possible causes and
solutions for the problem you are experiencing.
Symptom Solution
Remote control does not
work.
Poor signal This is usually caused by interference from cell phones,
No picture, No sound 1. Check the signal source.
Abnormal picture 1. For no color or bad picture quality, you may:
Normal picture, no sound 1. If no sound, unmute or increase the sound volume.
Audio is normal but video is
abnormal.
Video is normal but audio is
abnormal.
Network failure 1. Check if the router works well.
1. Check the remote sensor on the remote control.
2. Change the batteries.
3. Batteries are not installed correctly.
4. Main power is not connected.
walkie-talkie, automotive ignition system; neon, electric drill
or other electronic equipment or radio interference sources.
2. Plug another electrical device into the outlet to make
sure it is working or turned on.
3. Power plug is bad contact with the outlet.
4. Check the signal.
• Adjust the color option in menu settings.
• Keep the TV at a sufficient distance from other
electronic products.
• Try another channel, maybe exist broadcasting signal
problem.
2. Bad TV signal (Display mosaic or snowflakes)
• Check the signal cable and adjust the antenna.
• Fine tune the channel.
• Try another channel.
2. Open the sound menu and adjust “Balance”.
3. Check if a headphone has been inserted in, if so, pull out
the headphone.
1. The media file maybe damaged, Check if the file can be
played on the PC.
2. Check if video and audio codec is supported.
1. The media file maybe damaged, Check if the file can be
played on the PC.
2. Check if video and audio codec is supported.
2. For models need ing USB dongle to connect to internet,
check if the USB dongle is inserted well.
3. Make sure the TV has connected to the router
successfully.
26
Page 27

Symptom Solution
Web page can not be
displayed completely.
1. Flash is not supported.
2. Supported formats: JPEG, PNG, GIF, BMP, WMV (ASF),
WMA, MP3 and MP4.
Browser is foreced to be
shut down.
Web page include too many large pictures, thus lead to
insufficient memory and close the browser.
Note: If the problem persists after solutions, please contact your local support centre. What
the troubleshooting list describe is only for reference, the actual problem may differ from it.
ENG
27
Page 28
ENG
SPECIFICATIONS
Tesla TV 32S367BHS
Screen size - diagonal 81cm
Screen resolution 1366x768
Audio output power (L+R) 6W + 6W
Working voltage 100-240V~ 50/60Hz
Rated power consumption 60W
Dimensions with stand
(W x H x D mm)
Dimensions without stand
(W x H x D mm)
Net weight with stand 4.0kg
Net weight without stand 3.9kg
Environment
(only for Tropical climates zone):
Environment
(only for Moderate climates zone)
System DTV: DVB-T/T2/C/S/S2
Preset programmes ATV: 100; DTV: 1000
Status displaying method On screen display
Function adjustment indicator Menu display
Language of OSD Multiple options
RF aerial input 75 ohm unbalanced
AV video input 75 ohm, 1.0Vp-p, RCA
AV audio input 10k ohm, 0.5Vrms
733.4x474x167.7
733.4x438.5x85.1
Working temperature: 5°C~45°C
Working humidity: 20%~80%
Storage temperature: -15°C~50°C
Storage humidity: 10%~90%
Working temperature: 5°C~35°C
Working humidity: 20%~80%
Storage temperature: -15°C~45°C
Storage humidity: 10%~90%
TV: PAL-BG/DK/I, SECAM-BG/DK
AV: PAL, SECAM, NTSC
28
Page 29

Tesla TV 40S367BFS
Screen size - diagonal 101cm
Screen resolution 1920x1080
Audio output power (L+R) 6W + 6W
Working voltage 100-240V~ 50/60Hz
Rated power consumption 74W
Dimensions with stand
(W x H x D mm)
Dimensions without stand
(W x H x D mm)
906.5x209.0x574.5
906.5x84.9x525.9
Net weight with stand 6.6kg
Net weight without stand 6.4kg
Environment
(only for Tropical climates zone):
Working temperature: 5°C~45°C
Working humidity: 20%~80%
Storage temperature: -15°C~50°C
Storage humidity: 10%~90%
Environment
(only for Moderate climates zone)
Working temperature: 5°C~35°C
Working humidity: 20%~80%
Storage temperature: -15°C~45°C
Storage humidity: 10%~90%
System DTV: DVB-T/T2/C/S/S2
TV: PAL-BG/DK/I, SECAM-BG/DK
AV: PAL, SECAM, NTSC
Preset programmes ATV: 100; DTV: 1000
Status displaying method On screen display
Function adjustment indicator Menu display
Language of OSD Multiple options
RF aerial input 75 ohm unbalanced
AV video input 75 ohm, 1.0Vp-p, RCA
AV audio input 10k ohm, 0.5Vrms
ENG
29
Page 30

ENG
LICENCES
The terms HDMI and HDMI High-Definition Multimedia Interface,
and the HDMI Iogo are trademarks or registered trademarks of HDMI
Licensing LLC in the United States and other countries.
Manufactured under license from Dolby Laboratories.
Dolby, Dolby Audio and the double-D symbol are DOLBY AUDIO trademarks of
Dolby Laboratories.
30
Page 31

Përmbajtja
PARALAJMËRIME DHE MASA PARAPRAKE. . . . . . . . . . . . . . . . . . . . . . . . . 32
POZICIONI I TV-SË. . . . . . . . . . . . . . . . . . . . . . . . . . . . . . . . . . . . . . . . . . . . . . . . 35
BUTONAT E PANELIT. . . . . . . . . . . . . . . . . . . . . . . . . . . . . . . . . . . . . . . . . . . . . 38
TERMINALET . . . . . . . . . . . . . . . . . . . . . . . . . . . . . . . . . . . . . . . . . . . . . . . . . . . . 39
FUNSKIONET E TELEKOMANDËS . . . . . . . . . . . . . . . . . . . . . . . . . . . . . . . . . 40
REC (VIDEO INCIZIME PERSONALE) . . . . . . . . . . . . . . . . . . . . . . . . . . . . . . . 42
EPG (GUIDË ELEKTRONIKE E PROGRAMIT) . . . . . . . . . . . . . . . . . . . . . . . . 43
KONFIGURIME FILLESTARE & HOME KARAKTERISTIKA . . . . . . . . . . . . . 44
MENU KONTROLLI. . . . . . . . . . . . . . . . . . . . . . . . . . . . . . . . . . . . . . . . . . . . . . . 46
Menu Operimi. . . . . . . . . . . . . . . . . . . . . . . . . . . . . . . . . . . . . . . . . . . . . . . . . 46
Fotografia. . . . . . . . . . . . . . . . . . . . . . . . . . . . . . . . . . . . . . . . . . . . . . . . . . . . . 46
Zëri . . . . . . . . . . . . . . . . . . . . . . . . . . . . . . . . . . . . . . . . . . . . . . . . . . . . . . . . . . . 46
Instalimi. . . . . . . . . . . . . . . . . . . . . . . . . . . . . . . . . . . . . . . . . . . . . . . . . . . . . . . 47
Konfigurime. . . . . . . . . . . . . . . . . . . . . . . . . . . . . . . . . . . . . . . . . . . . . . . . . . . 49
Koha. . . . . . . . . . . . . . . . . . . . . . . . . . . . . . . . . . . . . . . . . . . . . . . . . . . . . . . . . . 50
Avancuar. . . . . . . . . . . . . . . . . . . . . . . . . . . . . . . . . . . . . . . . . . . . . . . . . . . . . . 51
Rrjeti. . . . . . . . . . . . . . . . . . . . . . . . . . . . . . . . . . . . . . . . . . . . . . . . . . . . . . . . . . 51
USB KONTROLLI . . . . . . . . . . . . . . . . . . . . . . . . . . . . . . . . . . . . . . . . . . . . . . . . . 51
USB Menu. . . . . . . . . . . . . . . . . . . . . . . . . . . . . . . . . . . . . . . . . . . . . . . . . . . . . 51
Këshillues i këndshëm gjatë përdorimit të USB player . . . . . . . . . . . . . 51
Movie Menu. . . . . . . . . . . . . . . . . . . . . . . . . . . . . . . . . . . . . . . . . . . . . . . . . . . 52
Menuja e muzikës. . . . . . . . . . . . . . . . . . . . . . . . . . . . . . . . . . . . . . . . . . . . . . 53
Menuja e fotove . . . . . . . . . . . . . . . . . . . . . . . . . . . . . . . . . . . . . . . . . . . . . . . 53
DIAGNOSTIKIMI . . . . . . . . . . . . . . . . . . . . . . . . . . . . . . . . . . . . . . . . . . . . . . . . . 54
SPECFIKACIONE. . . . . . . . . . . . . . . . . . . . . . . . . . . . . . . . . . . . . . . . . . . . . . . . . 56
ALB
Vërejtje
1. Grafikat në këtë manual janë vetëm për referencë.
2. OSD e TV-së suajmund të jetë pak më ndryshe me këtë manual.
3. Informacioni në këtë document është subjekt ndryshimi pa paralëjmërim.
Prodhuesi nuk pranon asnjë përgjegjësi për dëmin që rezulton direct ose indirect nga
gabimet, dhe mungesa e plotësisë ose mospërputhje në mes manualit dhe përdoruesit të
produktit të përshkruar.
Në hapësira të thata për shkak të energjisë elektrike statike, produkti mund të restartohet dhe
të kthehet në interfesjin kryesor OSD, interfejs pejeri i USB ose në gjendjen paraprake, Ju
lutemi vazhdoni me operimin në TV ashtu si dëshironi.
31
Page 32

ALB
PARALAJMËRIME DHE MASA PARAPRAKE
Shënim: Lexo të gjitha instruksionet para se të operoni me pajisjen. Mbani këto udhëzime
edhe për përdorim të mëvonshëm.
• Lexo këto instruksione–Të gjitha instruksionet e operimit dhe të sigurisë duhet të lexohen
para se produkti të përdoret.
• Ruaj këto instruksione- Instruksionet e sigurisë dhe operimit duhet të ruhen për referencë në
të ardhme.
• Kujdesuni për të gjitha paralajmërimet–Të gjitha paralajmërimet në pajisjen dhe në
instruksionet e operimit duhet të respektohen.
• Ndiqni instruksionet- Të gjitha instruksionet e operimit dhe përdorimit duhet të ndiqen.
• Mos e përdor këtë aparat afër ujit–Aparati nuk duhet të përdoret afër ujit ose lagështie-për
shembull, në një bodrum të lagësht ose afër një pishine dhe të ngjashme.
• Pastro vetëm me lecka të thara.
• Mos blloko asnjë hapje ventilimi.Instaoe në përputhje me instruksionet e prodhuesit.
• Mos e instalo afër burime nxehjeje si radiatorë, regjistra nxehtësie, soba ose aparate tjera
(duke përfshirë amplifikatorë) që prodhojnë nxehtësi.
• Mos e humbni qëllimin e prizes së polarizuar ose të tokëzimit. Një prize e polarizuar ka dy
tehe njëra më e gjerë se tjetra. Tehu i gjerë os bishti i tretë është për sigurinë tuaj.Nëse
priza e pajisur nuk përshtatet në prizën tuaj, konsulltohuni me elektricist për zëvendësimin e
daljes së vjetër.
• Mbro kordonin e rrymës nga ecja mbi të ose preje në kryesisht në prizat, enë për komoditet
dhe në pikën ku dalin nga aparati.
• Përdorni vetëm bashkangjitje/aksesorë të specifikuar nga prodhuesi.
• Përdoreni vetëm karrocë, stend, trekëmbësh, kllapa ose tabllo e specifikuar nga
prodhuesi e cila shitet me aparatin.Kur përdoren karroca ose rrafte, keni kujdes kur
lëvizni kombinimine karrocave/aparateve për të shmangur dëmtimet nga mbingarkesa.
• Shkëputeni aparatin gjatë stuhive me rrufe ose kur nuk përdoret për periudha të gjata
kohore.
• Referojuni gjithë serviseve të personelit të kualifikuar. Servisimi kërkohet kur aparati është
dëmtuar në çfarë do mënyre, siç është dëmtimi i kordonit të furnizimit me energji ose priza,
lëngu është derdhur ose objektet kanë rënë në aparat, aparati është ekspozuar ndaj shiut
ose lagështirës, nuk funksionon normalisht ose është hedhur.
• KUJDES: Këto udhëzime servisimi janë për përdorim vetëm nga personeli i kualifikuar i
shërbimit.Për të zvogëluar rrezikun e goditjes elektrike, mos kryeni asnjë shërbim tjetër
përveç atij që përmbajnë udhëzimet e përdorimit nëse nuk jeni të kualifikuar për ta bërë
këtë.
• Mos e instaloni këtë pajisje në një hapësirë të mbyllur ose në ndërtim, si një libër rast ose
njësi të ngjashme, dhe të mbeten kushte të ventilimit të mirë në vend të hapur. Ventilimi nuk
duhet të pengohet duke mbuluar hapjet e ventilimit me artikuj të tilla si gazeta, pëlhurat e
tavolinave, perde etj.
•
KUJDES – Për të parandaluar shok elektrik, ndërroni grilën.
• Ju lutemi referohuni informacioneve në në kapakun e pasëm për informacionet elektrike
dhe të sigurisë përpara instalimit ose përdorimit të aparatit.
• Për të zvogëluar rrezikun e zjarrit ose goditjes elektrike, mos e ekspozoni këtë aparat në shi
apo lagështi.
• Aparati nuk duhet të ekspozohet ndaj të pikuarit ose spërkatjes dhe se asnjë objekt i
mbushur me lëngje, të tilla si vazo, nuk duhet të vendosen në aparat.
• Për terminalet të shenjuara me simbole "
" mund të jenë me permasa të mjaftueshme për
32
Page 33

të bërë rrezik të goditjes elektrike. Instalimi i jashtëm i lidhur me terminalet, kërkon instalim
nga një person i udhëzuar ose përdorimi i litarëve të gatshëm.
• Për të parandaluar dëmtimin, ky aparat duhet të jetë i lidhur mire me dyshemenë/murin në
përputhje me udhëzimet e instalimit.
• Rrezik shpërthimi nëse bacteria është zëvendësuar gabimisht.Zëvendësoni vetëm me të njëtjin
lloj ose ekuivalent.
• Bateria (bateria ose bateritë ose paketa e baterisë) nuk duhet të ekspozohet ndaj nxehtësisë së
tepruar, si rrezet e dielli, zjarri ose të ngjashme.
• Presioni i tepërt i zërit nga kufjet dhe kufjet mund të shkaktojnë humbje të dëgjimit. Dëgjimi i
muzikës në nivel të lartë vëllimi dhe gjatë mund të dëmtojë dëgjimin e dikujt.Për të zvogëluar
rrezokun e dëmtimit të dëgjimit, duhet të ulni volumin në një nivel të sigurt dhe të duhur dhe të
zvogëloni sasinë e kohës duke dëgjuar në nivele të larta.
• Priza kryesore/bashkuesja e pajisjes/përshtatësi i drejtpërdrejtë në adapter përdoret si pajisje
e shkyçjes, pajisja e shkyçjes duhet të jetë e gatshme për t’u përdorur.
• Kur nuk është në përdorim dhe gjatë lëvizjes, ju lutemi kujdeseni për telat e energjisë, p.sh.
lidhni telin e energjisë me lidhësin kabblo ose diçka të tillë. Ajo duhet të jetë e lire nga tehet e
mprehta dhe të ngjashme që mund të shkaktojnë konsumimin e telave të energjisë.
• Kur e vendosni përsëri në përdorim, sigurohuni që kordoni i rrymës të mos jetë i dëmtuar.Nëse
keni gjetur ndonjë dëmtim, kërkoni që personi i shërbimit ta zëvendësojë grupin e kordonit të
energjisë të specifikuar nga prodhuesi ose të ketë të njëjtat karakteristika si origjinali.
• Kujdes duhet të ketë nga aspekti mjedisor i deponimit të baterive.
• Asnjë burim zjarri, si qirinj të ndezur, nuk duhet të vendosen në aparat.Për të parandaluar
përhapjen e zjarrit, mbani qirinjtë e ndezur ose zjarre tjera të hapura larg aparatit në çdo kohë.
• Nëse pajisja nuk ka simbolin
në etiketën e tij të vlerësimit dhe kordoni i saj i energjisë ka
tri këmbë, kjo do të thotë lidhja mbrojtëse e tokëzimit është e nevojshme. Një apparat me të
ndërtimit duhet të jetë i lidhur me një prize në rrjetin fole me një lidhje mbrojtëse tokëzimit.
• Rekomandohet që të përfshihen informacionet e mëposhtme për aq sa janë të zbatueshme
aty ku aplikohen:
ALB
I referohet rrymës alternative (AC) .
I referohet drejtimit aktual (DC).
I referohet pajisjeve të klasës II.
I referohet gjendjes së pushimit.
I referohet ndezjes ON.
I referohet tensionit të rrezikshëm
• Paraljamërim për Aparatrt që përmbajnëMONEDHA/ BUTON CELL BATERITË (Instruksionet
e mëposhtme përdoren vetëm për aparatin që përmban një bateri monedhe për përdorim
zëvendësues).
33
Page 34

ALB
KUJDES
Mos e ngrini baterinë, Ndotjae Bumit kimik (Telekomanda e furnizuar me)
Ky produkt përmban një cell bateri të monedhës/butonave. Nëse monedha/butoni cell
baterisë gëlltitet, mund të shkaktojë djegie të rënda të brendshme në vetëm 2 orë dhe
mund të shkatojë vdekja.Mbani bateritë e reja dhe të vjetra larg fëmijëve.Nëse bateria
nuk mbyllet si duhet, mos e përdorni produktin dhe mbajeni larg fëmijëve. Nëse mendoni
se materitë mund të jenë gëlltitur ose vendosur brenda trupit, kërkoni menjëherë kujdes
mjekësor.
WEEE Direktivat
“Vendosja korrekte e këtij produkti.Kjo shenjë tregon që ky product nuk duhet të
deponohet me mbetje tjera shtëpiake në të gjithë BE-në.
Për të parandaluar dëmtimin e mundshëm të mjedisit ose shëndetit të njeriut nga hedhja
e pakontrolluar e mbeturinave, reciklimi i përgjegjshëm për të promovuar ripërdorim
të qëndrueshëm të burimeve materiale.Për të kthyer pajisjen tuaj të përdorur, ju lutemi
përdorni sistemet e kthimit dhe mbledhjes ose kontaktoni shitësin ku është blerë produkti.
Ata mund ta marrin këtë product për riciklim të sigurt mjedisor.
CAUTION
RISK OF ELECTRIC SHOCK
DO NOT OPEN
Ky blic me simbolin e shigjetës brenda një trekëndëshi barabrinjës ka për qëllim të
lajmarojë përdoruesin për praninë “tensionit të rrezikshëm” jo të izoluar brenda kufijve
të produktit që mund të jetë e përmasave të mjaftueshme për të krijuar rrezik të goditjes
elektrike. Për të zvogëluar rrezikun e goditjes elektrike.Mos e hiqni kapakun (ose mbrapa).
Nuk ka pjesë të përdorshme të përdoruesit brenda. Referojuni personelit të kualifikuar të
shërbimit. Pika e thirrjes brenda një trekëndëshi barabrinjës ka për qëllim të paralajmërojë
përdoruesin për praninë e instruksioneve të rëndësishme të përdorimit dhe mirëmbajtjes
në literaturën që shoqëron pajisjen.
34
Page 35

POZICIONI I TV-SË
• Vendosni Ekranin mbi sipërfaqe të ngurtë horizontale siç është tabloja ose tavolina. Për
ajrosje, lini një hapësirë të lire prej 10 cm rreth pajisjes. Për të parandaluar ndonjë situatë të
pakëndshme, ju lutemi mos vendosni mjete mbi televizorin. Ky mund të përdoret në klimë
tropikale ose të moderuar
• Fiksimi në mur i pjesës së pasme të televizorit. Në fotografinë më poshtë, paraqitet një
artikull i ndryshëm nga artikulli i vërtetë, prandaj shërben vetëm për referencë (vetëm për
disa rajone).
Mos e vendos asnjëherë televizorin në një lokacion jo stabël. Televizori ndoshta mund të
rrëzohet dhe mund të shkaktojë lëndime serioze trupore dhe vdekje. Shumë lëndime,
kryesisht të fëmijëve, mund të shmangen duke marrë masa paraprake të thjeshta si:
• Përdorimi i kabineteve ose stendave te rekomanduara nga prodhuesi I televizorit.
• Përdorim të mobiljeve që sigurt e mbajnë televizorin.
• Duke u siguruar që televizori nuk është mbi ose buzë mobiljeve mbështetëse.
• Mos e vendosni televizorin në mobilje të larta (për shembull, dollapë ose arkiva) pa
ankorimin e mobiljeve dhe televizorit në një mbështetje të përshtatshme.
• Mos e vendosni televizorin në rroba apo materiale të tjera që mund të vendosen midis
televizorit dhe mobiljeve mbështetëse.
• Duke edukuar fëmijët rreth rreziqeve gjatë ngjitjes në mobilje për të arritur televizorin ose
kontrollet e tij.
Nëse pajisja e telvizorit tuaj të mëparshën ruhet dhe zhvendoset, duhet të zbatohen të njëjtat
përmasa si më sipër (vetëm për TV me masë të tejkalojë 7 kg).
ALB
35
Page 36

ALB
• Një montim në mur shtesë mund të përdoret me televizorin tend. Konsultohuni me shitësin
tuaj lokal për një montim në mur që mbështet standardin VESA të përdorur nga TV modeli
juaj. Vendosni me kujdes mbërthesen e montimir në mur në pjesën e pasme të televizorit.
Instaloni majtësen e montimir në një mur të ngurtë pingul në dysheme. Nëse e ngjitni
televizorin me material tjera ndërtimore, ju lutemi kontaktoni stafin e kualifikuar për instalime
në mur. Udhëzime të hollësishme do të përfshihen me montimin në mur. Ju lutemi përdorni
një mbajtës për montim në mur ku pajisja është siguruar në mënyrë adekuate në mur me
hapësirë të mjaftueshme për të lejuar lidhjen me pajisjet e jashtme.
KUJDES
• Ndaleni rrymën para se të lëvizni ose instaloni televizorin. Përdnryshe mund të ndodh shoku
elektrik.
• Hiqni pajisjen para se të instaloni televizorin në një mbajtëse në mur, duke venosur
mbështetësen në pjesën e pasme.
• Nëse instaloni TV-në një tavan ose mur të pjerrët, mund të bjerë dhe të shkaktojë lëndime të
rënda.Përdorni një mbajtëse muri të autorizuar dhe kontaktoni shitësin local ose personelin
e kualifikuar, përndryshe nuk mbulohet nga garancioni.
• Mos i shtrëngoni vidhat shumë sepse kjo mund të dëmtojë TV-në dhe të anulojë
garancionin tuaj.
• Për të parandaluar dëmtime, ky aparat duhe të lidhet mire me dyshemenë/murin në
përputhje me udhëzimet e instalimit.
• Përdorni vidha dhe montime muri që plotësojnë specifikacionet e mëposhtme. Çdo dëmtim
ose lëndim nga keqpërdorimi i pavëmendshëm nuk mbulohet nga garancioni.
Model Size: 32" Top Down
Diameter (mm) "E" M4 M4
Screw
Screw
Depth (mm)
“D”
Quantity 2 2
VESA (AxBxC) 100x100x100
Model Size: 40" Top Down
Diameter (mm) "E" M6 M6
Depth (mm)
“D”
Quantity 2 2
VESA (AxBxC) 200x100x200
Max 9 9
Min 6 6
Max 20 15
Min 12 7
36
Page 37

Shënim:
1) Fotot janë vetëm për referencë.
2) Për TV-të me terminale drejt murit, me qëllim të lënit hapësirë të mjaftueshme për
terminalet, një gomë është e nevojshme bashkë më vidhën për të rregulluar montimin në
mur. Ka një shtyllë e vogël e hollë, diametri i brendshëm i së cilës është 8 mm, i jashtmi
18mm dhe lartësia 30mm.
Mjedisi i punës
• Mos e instaloni këtë pajisje në vend të kufizuar siç janë raftet apo të ngjajshme me ta.
• Mos e përdorni pajisjen në vende me lagështi ose të ftohta
• Ruanie nga nxehtësia e lartë.
• Ruanie nga drita direkte e diellit.
• Mos e përdorni pajisjen në ambient me pluhur.
• Mos leni qiri në afërsi dhe ambient të hapur, kjo për t`i ikur ndezjës së materialeve tjera që
kanë kontakt me TV aparatin.
Masat paraprake për përdorimin e telekomandës
• Përdornie telekomandën në mënyrë duke e drejtuar kah senzori për telekomandë.
• Objektet në mes të telekomandës dhe senzorit janë pengesë për punën normale.
• Mos e ekspononi telekomandën në vibracione të forta. Po ashtu mos e lagni dhe mos e leni
në vende me lagështi.
• Mos e ekspononi telekomandën direkt në rrezet e diellit, kjo mund të shkaktojë deformim të
saj.
• Kur senzori për telekomandë është i eksponuar direkt në dritën diellit, ose ndonjë drite të
fortë, telekomanda nuk do punojë.
• Në këtë rast, Ju lutemi ndryshoni drejtimin e dritës ose pozicionin e televizorit apo përdornie
telekomandën më afër senzorit për telekomandë.
ALB
Masat paraprake për përdorimin e baterisë
Përdorimi joadekuat i baterive mund të shkaktojë skadim. Për këtë ju lutemi që t`i përcjellni
hapat vijues dhe t`i përdorni me kujdes.
1. Keni kujdes në polaritetin e baterive me qëllim që t`i ikni elekticitetit të shkurtë .
2. Nëse tensioni I baterisë është i dobësuar, gjë e cila ndikon në domenin e telekomandës
duhet t`i ndryshoni bateritë e përdorura me ato te reja. Tërësisht largoni bateritë, nëse nuk
planifikoni që t`i shfrytëzoni më gjatë.
3. Mos përdorni lloje të ndryshme të baterive (si përshembull, bateri magnetike dhe alkalike)
së bashku.
4. Mos i hudhni bateritë në zjarr. Mos i mbushni apo i çmontoni bateritë.
5. Hudhni bateritë në përputhshmëri me dispozitat për mbrojtjen e mjedisit jetësor.
6. KUJDES: Bateritë (pakoja e baterive apo bateritë e instaluara) nuk duhet të ekspozohen
ndaj temperaturave të larta, p.sh. nuk duhet të lihen në diell e as të ekspozohen ndaj zjarrit
apo burimeve të ngjashme të nxehtësisë.
Ndërrimi i baterive të telekomandës
Vëni dy bateri AAA në pjesën për bateri në telekomandë, duke u siguruar se shenjat e
polaritetit janë në vendin e duhur
37
Page 38

ALB
BUTONAT E PANELIT
Shënim: Grafikonet janë vetëm për prezantim.
Pamja nga pas
Rocker Butoni
Shtyp butonin e mesëm:
1. Në modalitetin e pritjes,shtypeni atë për t’u kthyer nëTV;
2. PaOSD, shtypni shkurt për rë ryrë në menynë kryeosre;shtyp dhe prit 5 sekonda për të
kthyer TV-në në gjendjen e pauzës;
3. MeOSD,shtypje e shkurtër për të konfirmuar një zgjidhje;shtypeni më gjatë për të shkuar
në menu/submenu.
Shtyj në të majtë: Zvogëlo zërin oseshko në të majtë.
Shtyj në të djathtë: Rrit zërin ose shko në të djathtë.
Shtyj para: kanali pas ose shko poshtë.
Shtyj mbrapa: kanali para os shko lartë.
38
Page 39

TERMINALET
Vini re: Terminalet mund të ndryshojnë sipas modelit dhe rajonit. Ju lutemi të përzgjidhni
terminalet që janë të përshtatshme për televizorin që keni blerë.
LAN: Porta për lidhje në rrjet
AV IN (AUDIO L/R & VIDEO): Për të lidhur sinjalin video dhe audio që vjen nga një
burim sinjali, p.sh. pajisje për DVD.
HDMI1/2: Për të lidhur sinjalin hyrës HDMI, që vjen nga një burim sinjali, p.sh. pajisje për
DVD.
DIGITAL AUDIO: Përdorni një kabllo SPFIF për të nxjerrë sinjalin audio nga televizori dhe
për ta dërguar atë te një marrës audio të përshtatshëm.
EARPHONE: Porta e sinjalit audio. Altoparlantët do të çaktivizohen kur të lidhni kufjet.
USB 1/2: Porta USB.
AIR/CABLE/LNB: Për të lidhur një kabllo koaksiale për të marrë sinjal nga antena ose
nga televizioni kabllor apo satelitor.
SERVICE: Porta e riparimit. Të përdoret vetëm nga tekniku profesionist.
CI: Porta e kartave CI.
ALB
39
Page 40

ALB
FUNSKIONET E TELEKOMANDËS
Telekomanda
1. KONTROLLI ( ) Shtyp për të ndezurTVose
standby.
2. PA ZË (
rivendosur volumin.
3. Butoni i numrave Zgjidh direkt kanalin.
4. CH LIST Shtyp për hyrje në listën e kanaleve.
5. KTHEHU(PAS) Shtyp për t’u kthyer në kanalin
paraprak.
6. MENU Hap menuopsionet.
7. BURIMI Selektoinputin e burimit.
8. Lart/Poshtë/Majtas/Djathtast ( // /)
Navigo menunë
9. OK Konfirmo zgjidhjen.
10.
HOME Shtyp këtë buton do të hyni në
faqen kryesore,mund të përdorni smart tipare
dhemedia playeretj.
11. DIL (EXIT) Dil nga menuja aktuale.
12. YouTube HynnëYouTube.
13. INFO Informacion në ekran në lidhje me
burimin e tanishëm.
14. VolumiLartë/Poshtë(VOL+/VOL-)
Rregullo volumin poshtë ose lartë.
15. ProgramLartë/Poshtë(PR+/PR-)
Ndrysho programet poshtë ose lartë.
16. EPG Shtyp që të shfaqet informata në lidhje
meEPG aktuale nëDTVformën.
17. REC(Incizo) Shtyp për të incizuar programin
aktual(Punon vetëm në formatinDTV).
18. NICAM Shtyp për të zgjedhur zërimin e
dëshriuar në varësi të kanalit të transmetimit.
19. AD (Audio Description)
Shtyppër të ndezur përshkrimin me
zë,njënarratordo të përshkruaj se çfarë
ndodh nëekranpër të verbërit ose me shikim
të dëmtuar, shtyp përsëri do të fiket (E
disponueshme vetëm në formatin DTV).
) Shtzp për pa zë ose për të
40
Page 41

ALB
20. FAV
Shtyp për të pare kanalin e favorit tuajin.
Shtypbutonat Poshtë/Lartëpër të shkuar në
kanaler tuaja favorite, shtypOKpërkonfirmim.
21. SHPEJTË Hyn në menunë e shpejtë.
22. Butonat me ngjyra Shtypni për kryerjen e
funksionit të shpejtë në formatin TVoseDTV.
23. USB Play Kontroll Butonat Play & Pause (
)
Shtyp për pauzë, Shtyp përsëri pët të rifiluar.
Stop ( )
Shtyp për të stopuar programin
Butoni për kthim të shpejtë ( )
Presstofastreverse.
Shpejt përpara ( )
Shtyp për të shkuar shpejtë para.
24. TELETEKSTBUTONAT
TEKST Shtyp për të hyrë ose dale në menunë e
teletekstit.
MADHËSIA Zmadho shfaqjen e tekstit:Shtyp
një here këtë buton për të zmadhuar gjysmën e
sipërme të ekranit.Shtyp përsëri këtë butonpër
të zmadhuar gjysmën e poshtme të ekranit.
Shtyp përsëri këtë butonpër të rifilluar madhësinë
normae të ekranit.
PRIT
Shtyp për të mbajtur faqen teletekstit në ekran pa
azhurim dhe ndryshime.Shtyp përsëri për të liruar
21
22
23
20
24
gjendjen në mbajtje.
SUB-FAQE
Shtyp këtë buton për të hyrë ose dale në formatin
e sub faqes(nëse subfaqja është në dispozicion).
Shtypbutonat e Kuq/Gjelbërpër të selektuar
subfaen e dëshiruar.
INDEX Shfaqindexfaqen
ZBULO
Zbulo informacion të fshehur të tillë si solucione
të riddlesosepuzzlesose hiqeni informacionin nga
ekran.
MIX
Mbivendos teletextin mbi TV programën, ose kthe
teletekstin në formën normale.
ANULO
Kthehu nëTVprogramënpërkohësisht derisa
kërkoni një faqe teleteksti.Kur është kry kërkimi,
numri I faqes shfaqet sipër majtë në ekran.Shtypni
përsëri për t’u kthyer në fqen e telekstit.
Vini re: Në disa modele, disa butona mund të mos kryejnë funksione. Kur i shtypni këta
butona, ata ose nuk japin asnjë komandë, ose shfaqin në ekran mesazhin “Not available” (i
padisponueshëm).
41
Page 42

ALB
REC (VIDEO INCIZIME PERSONALE)
Në formën DTV lidh siç duhet një pajisje të USB, dhe ju mund të regjistroni për ta parë më
vonë kanalin që ju e shikoni,në një kohë më të përshtatshme.Përdoreni atë për të regjistruaar
një program, atëherë kur ju keni ndërprerë ose jeni vonuar në shikimin e programit.
SHËNIM I RËNDËSISHËM:
1. Funksioni REC mund të mos funksionojë për disa rajone.
2. Ju lutem futeni një pajisje të jashtme për ruajtje me shpejtësi të lartë në një port uSB
adekuat mbas TV-së,dhe sigurohu që pajisja të ketë vend të mjaftueshëm të lirë.
3. Para regjistrimit,sugjerohet të formatoni pajisjen tuaj të USB-së për të siguruar shpejtësinë
e veprimit. NëOptionmenunë,selekto“RECFileSystem”për tëformatuar pasjisjen e USB-së.
4. Gjatë incizimit,mos ndryshoni kanale ose të operoni funsion tjetër.
5. Nëse sinjali është ndërprerë ose hequr,incizimi do të stopohet deri kur sinjali të vijë.
6. Kjo mund të shkaktojë humbjen e përmbajtjes së programit.
7. Ju lutem mos e fikni TV gjatë incizimit.Kjo do të shkaktojë dalje nga TV dhe kthimi në
gjendjen e pauzës.
8. Skeda e incizuar mund të përdoret vetëm në këtëTV,çdo kopje është e ndaluar rreptësisht.
9. Përdor pajsije mobile të cilësisë së lartë për të incizuarHDprogramet,përndryshe videot do
të ngecin gjatë ri-lsëhimit.
10. Kopjo të gjitha të dhënat në skedarin e Usb në rast se të dhënat humpben gjatë një
aksidenit të papritur. Ne nukmarrim përgjegjësi për humbjet nga keqpërdorimi ose
mosfunksionimi. Kopje e të dhënave është Përgjegjësi e konsumatorit.
11. Vetëm në burimet input DVB-T/T2 &DVB-C, skedarët e incizuar mund ë luhen prej REC_LIST.
Regjistrimi Instant dhe Playback
Shtypni butonin [REC] për të nisur incizimin,në të njëjtën kohë poshtë në shiritin e kontrollit në
fund të ekranit, ikona STOP është e theksuar.
• Dëshironi ta shihni videon e incizuar deri sa incizoni program, shtypni drejtimin e butonit të
majtë për të selektuar
• Selekto ose
• Nëse dëshironi ta stoponi incizimin dhe të dilni, selekto
Timeshift
Ndryshimi i kohës është incizimi i programeve televizive në një skedar mesatar(si pajisja eUSB)
për ta parë më vonë,në një kohë më të përshtatshme.Përdoreni këtë për të incizuar program
atëherë kur pamjajuaj pengohet ose je vnuar.Nëse dëshironi ta leni një koh dhe të shihni
programin pa humbur momentet, mund të shtypni
shtypni butonin përsëri për të filluar programin kur ktheheni.
ose mund shpejt të shkoni prapa ose para.
dhe shtyp butonint OK ,videoja e incizuar do të fillojë të shfaqet.
dhe shtyp OK butonin.
butonin për të stopuar programin,dhe
42
Page 43

Shënim:
1. Para ndryshimit të kohës, më mirë të formatoni pajisjen e USB për të siguruar hapësirë të
mjaftueshme për regjsitrim.
2. Gjithashtu mund të vendosni kohën paraprake të regjistrimit në funksion të EPG
(Referojuni në faqen tjetër).
EPG (GUIDË ELEKTRONIKE E PROGRAMIT)
EPGqëndron për Gudië dixhitale elektronike të programit.Është e furnizuar nga ofruesit e
programeve dhe të ofron informacion në lidhje me programet që do të transmetohen.Mund
të hyni në mënyrë dixhitale duke shtypur buotnin EPG në telekomandë.
1. Shtyp butonin EPGpër të sjellë në interfejs. Shiriti i dytë nga lartë do të shfaq datën dhe
orën aktuale. Në listën e mëposhtme, kanalin të cilin e shikoni në moment do te theksohet.
2. Për të kontrolluar programet që do të transmetohen në datën e ardhshme , lëviz lartë
me butonin kah fusha e datës.Përdorbutonin për të selektuar datën që dëshironi të
kontrolloni.
3. Shtyp butonin për të lëvizur lartë në fillim të ekranit, pastaj shtyp butonin për të
zgjedhur“Time”, ju mund të shihni listën e programit të ndonjë kanali të një dite.
ALB
Orari
Shtyp butonin e verdhëpër t’u shfaqur lista e
orarit.Mund të fshini një takim duke e shtypur
butonin e kuq.
Mba mend
Shtyp butoninblu për t’u shfaqur menuja e
kujtesës. Mund ta konfiguroni
Regjistrues
Shtyp butonin RED për t’u shfaqurmenuja
e cilsëimeve.Duke përdorur butonat e
navigimit, vendos kohën e orarit duke nxjerrë
në pah vitin, muajin, ditën, orën ose minutin
dhe shtyp OK butonin, pastaj përdorbutonat
lartë dhe poshtë
për të rregulluar numrin. Duke përdorur
metodën e njëjtë për të rregulluar formën e
përsëritjes, pastaj selekto butonin “SAVE” për
të ruajtur cilsëimet.
Info
Shtyp buotnin GREEN për të shfaqur
informacionin në lidhje me programin e
selektuar.
43
Page 44

ALB
KONFIGURIME FILLESTARE & HOME KARAKTERISTIKA
Konfigurime fillestare
Herën e parë që ndizni TV-në,do të shfaqet një kornizë për konfigurim, shtyp
butoninENTERpër të nisur dhe mbaruar hapat në vijim:
Hapi1Selektogjuhën e OSDsipas nevojës tënde;
Hapi2Selekto mjedinsin në mes“HOME”dhe“STORE”;
Hapi3Selekto shtetin;
Hapi4Konfiguro orën eTV-së(cilësimet e kohës),parazgjedhja është“AutoSync”;
Hapi5Lexo deklaratat juridike;
Hapi6Rregullo konfigurimin e rrjetit;
Hapi7 Startoakordimin për të kërkuar programet,kur të përfundojë,programetdo të ruhen në
memoriet dhe konfigurimi fillestar do të përfundojë.
SHËNIM: Para ndezjes sëTV, ju duhet lidheni mirë me sinjalin e në terminalin akordues në
pjesën e pasme të TV-së.
Home
Shtyp butoninHomepër të hyrë në faqen fillestare.Përdor navigmin dhe selekto butonat OK
dhe hyni në shkurtoren.
Mirashare (Ndoshta nuk janë në disa modele)
Pa një kabllo për të dhënat, hap butonin e Wi-Fi në celularin tuaj, pastaj selekto “Mirashare”
në ekranin pasi shtypni butonin HOME, përmbajtet në celularin tuaj do të shpërndahen në TV,
munt ë shijoni ekranin e madh duke pare përvojat.
HAPAT:
1. Hapni funksinin miracast në celularin;
2. Gjej emrin e TV-së në cellular dhe selekto atë, në TV do të hapet njëdialog, prano atë për
t’u lidhur me funksionin e Mirashare, përmbajtjet e celularit tuaj do të luajnë në TV.
Shënim: Për disa modele, pasi që zgjidhni emrin e TV, celulari dhe TV mund të lidhen
automatikisht.
Burime
Selekto inputet e burimit.
Aplikacionet e rrjetit
Të tilla si aplikacionetsociale si YouTube janë siguruar për ju.
Për shembull, selekto ikonën e Facebooknë ekran, shtyp OK për të hyrë.
TV Browser (TV Shfletues)
Selekto ikonën e TVBrowsernë faqen kryesore dhe shtyp OKpër të hyrë në sërf internet.
Karakteristikat përfshijnë kërkim të shpejtë dhe faqeshënuesë etjetc.
Shënim:
1. Shfletuesi ndoshta nuk i pranon disa ueb faqe ose video për shkak të mosfunksionimit të
internetit, gjë që nuk ka të bëjë me TV-në.
2. Nëse faqja aktuale ende nuk është hapur tërësisht (progres bari nuk është
kompletuar),faqja tjetër është selektuar direct, faqja e mëparshme nuk do të ruhet në
histori.
44
Page 45

Media Player
Lidh një pasjisje USB meTVdhe selektoMediaPlayer në faqen kryesore,mund të shihni
njëvideo/muzikë/foto prejUSB suaj nëTV.
Opera TV
Është një aplikacion onlajn i bërë për TV-në.Hapeni atë dhe mund të shihni eksperienca të
ndryshme të aplikacioneve, siNews&Weather,Nature&Travel,Kids,Lifestyle,Sports,Music,
LiveTV&Video,Games,Movies&TVetj.
Home Media (May not be available)
Shpërndarja e videove, muzikës dhe fotove në celularin tuaj ose prej PC në TV, ju duhet të
lidhni TV-në dhe pasjisjen tuaj me të njëjtin rrjet.
Shënim1 Disa prej aplikacioneve në faqen kryesore mund të mos jenë në disa modele, dhe ky
manual nuk përfshin instrukrsione veprimi të të gjitha aplikacioneve në ekran.
Shënim 2 Nëse ofruesi i shërbimeve përmirëson ose ndryshon serverat, apllikacionet si
YouTube and Facebook mund të mos funksionojnë në këtëTelevizor.
Shënim 3 Telekomanda juaj mund të mos jetë e përshtatshme mirë me disa aplikacione ose
nuk punon për shkak të ndërprjes së shërbimit, kjo nuk ka të bëjë me këtëTV.
Shënim 4
Politika e privatësisë (mund të mos jetë e disponueshme): Kjo shërben për të mbrojtur të
dhënat tuaja personale dhe për të vepruar në pajtim me dispozitat ligjore. Ju keni mundësi
ta anuloni në çdo kohë pëlqimin që keni dhënë për politikën e privatësisë në menynë e
televizorit tuaj “Tesla”. Nëse anulimi është aktiv, pajisja nuk do të lidhet me internetin.
Shënim 5
Përmbajtjet dhe shërbimet e aplikacionit të rrjetit janë të kontrolluara nga ana e ofruesit
të aplikacionit përmes mjeteve të rrjetit dhe objekteve transmetuese,të cilat janë subjekt
ndryshimi, pezullimi, heqje, mbarim ose ndërprerje, ose qasje e pavlefshme në çdo kohë
pa njoftim paraprak ku prodhuesi nuk është në gjendje t’i kontrollojë ose të informohet për
ndryshimin e lartëpërmendur. Prodhuesi lëshon një deklaratë paraprake ku hedh poshtë çdo
përgjegjësi ose detyrim që lind nga dështimi i konsumatorit gjatë përdorimit të përmbajtjeve
të internet aplikacioneve dhe shërbimeve të shkaktuara, duke përfshirë por jo të kufizuara
në, dështimin e lidhjes ose linjat e komunikimit, konfigurimet teknologjike, ose ndryshime,
pezullim, mbarim, nëdrprerje, çaktivizimi, ose heqje të ndonjë përmbajtje ose shërbim nga
ofruesit të aplikacioneve të internetit etj.
ALB
45
Page 46

ALB
MENU KONTROLLI
Lidhur me përditësimet dhe përmirësimet softuerike afatgjata, përshkrimet e mëposhtme të
cilësimeve në meny mund të mos vlejnë për televizorin tuaj. Kjo gjë është normale. Televizori
juaj do të përdorë softuerët që i janë instaluar nga prodhuesi.
Menu Operimi
ShtypMENU për të hyrë në menunë kryesore.
Shtyp çelësin [ ] / [ ] për të selektuar një menu.
Shtyp çelësin [] / [] për të selektuar submenu.
Shtyp OK butoninpër të hyrë në objektin.
Shtyp MENU butonin për të dale nga objekti.
Shënim: Opsionet e menusë më poshtë janënën TV burimet.
Fotografia
Lloji fotografisë: Selekto formatin e duhur të fotografisë për qëllime të ndryshme.
Dritat e pasme: Rregullo parametrin e dritës së pasme të TV.
Temperatura e ngjyrës: Selektongjyrën e përtgjithshme të zërit të fotografisë.
Reduktimi i zhurmës: Zgjidh mesOff,Pak,Mesatardhe i Fortë.
MPEGReduktim zhurme: Zgjidh mesOff,Pak,Mesatardhe i Fortë.
Raporti pamjes: Selekto formën e duhur të ekranit për qëllime të ndryshme. Disa
opsione ndoshta nuk janë në dispozicion nën disa burime dhe video përmbajtje.
Kontrasti dinamik: Vendosni nëOnoseOffsi dëshironi.
Senzori i fotografisë: Ky funksion rregullon ndriçimin e ekranit automatikisht kur
shkëlqimi i fotografive ndryshon.Nëse imazhi është natën, ekrani automatikisht do
të bëhet më i errët; nëse imazhi është ditën, ekrani automatikisht do të bëhet më i
ndritshëm.
Format Filmi:Vendosni nëOnoseOffsi dëshironi.
Rivendos fotografinë: rivendos cilësimet e fotografisë të vlerave të parazgjedhura.
Zëri
Formati i zërit: Zgjidh mesStandard,Musik,Film,Sport,Përdorues.
Ekuilibrimi: kontrollo ekuilibrin e zërit në mes autoparlantit të majtë dhe të djathtë.
AutoVolumi: ZgjidhmesOndheOff.
Teknologjia “surround sound” (ambienti zanor): ndihmon në krijimin e ambienteve
zanore të pasura dhe të shumëllojshme, duke përdorur burime zanore “stereo”.
Analog Audio Output: ky tipar është përdorur për zgjedhjen e Kufjeve dhe Line Out. Vë
plugun e kufjeve në terminalin e kufjeve në TV, dhe ju mund tl dëgjoni përmes kufjeve.
DixhitalAudioOutput: Ky tipar është për zgjidhjen eAutodhePCM.Kur lidhni një
përforcues audio dixhital të TV, zgjidhni këtë funksion nga menuja SOUND dhe pastaj
zgjidhni modalitetin audio.
AudioHDMI: SelektomodalitetinHDMIaudio,opsionet
përfshijnë:Auto,DixhitaldheAnalog.
Audiopërshkrimi(Mund të mos jetë në dispozicion):Ndiz ose fik Audiopërshkrimin.
Kur ndezni audiopërshkrimin,njënarratordo të përshkrauj çfarë ndodh në ekran për
persona të verbër ose me pamje të dëmtuar.
Rivendosje zëri: Rivendos cilsëimet e zërit në vlerat e paracaktuara.
46
Page 47

Instalimi
Redaktim programi
Redakto programet.Mund t’i shtypni butonat mengjyrë në telekomandë për tëkaluar
programet, fshini programet. Dhe të shtoni programe në istën tuaj të preferuar duke shtypur
FAV butonin.
Fuqia e antenës 5V
Ky opsion është në dispozicion vetëm nëDVB-Tburimin,selektoOnpër të furnizuar energji për
antenën eTV-së;SelektoOffpër t’u ktyher në këtë funksion.
CI Informacioni(në dispozicion në formatin DTV)
U lejon përdoruesëve të selektojnë nga menuja e siguruar CAM. Selekto menunë CI bazuar në
menunë PC Card.
Informacion sinjali
Tregon të dhënat e DTV kanalit aktual.
Akordim automatik
Selekto burimin e dëshiruardesiredsourcenga lista e burimeve para fillimit të akordimit
automatik.
• DVB-S/S2 Akordim auomatik
Cilësimet e pjatës së Satelitit (Hapi1-3,referohetFig1)
Vendosja e cilësimeve të kursit të satelitit patjetër të konfigurohen për secilin satelit të
kërkuar më parë, kryerjen e skanimiti të kanalit.
Sateliti – Selekto satelitin për këtëTV.
Kabllo e gjatëe – Rrit fuqinë LNB.
LNBType – Sigurohu që tipi LNB i përgjigjet pjatës suaj.
LNBFuqia – Aktivizoni ose çaktivizoni furnizimin me energji elektrike për LNB.
22KHz - Selekto22KHzpër të vendosur22Kpër të kaluar nëON/OFF.Auto formati për on
ose off përdoret 22KHz, varet nga lloji i LNB.
DiSEqC1.0/1.1 – Selekto formatin DiSEqCLNB e selektuar.
Unicable/IF Freq/ Set Position –Cilëso parametrin e unikablos në varësi të diskut tuaj.
ALB
Fig. 1
47
Page 48

ALB
Fig. 2
Hapi 1 Shtyp butonin MENU dhe selekto menunë INSTALIM. Selekto DVB-S/S2 auto
redaktim dhe shtyp OK butonin, ekrani do të shfaqet si në Fig1, dhe sateliti i caktuar do te
sinjalizohet.
Hapi 2 Shtyp OK butoninpër të konfimuar staelitin e selektuar.
Hapi 3 Shtyp butoninpër t’u lidhur në LNB cilësimet, shtyp butonin për të nënvizuar
LNB Typedhe shtyp OK butonin për të rregulluar këtë parametër.
Hapi 4 Kontrollo nëse 22KHz Tone, DiSEqC1.0/1.1 korrespondon me satelitin e selekturar,
nëse jo, nënvizo dhe shtyp OK butonin për të rregulluar parametrin e duhur. (Referohu në
Fig2)
Para se hapat e fundit të mbarojnë,shtypni blubutonin për të kërkuar kanalet.
• DVB-T/T2 ose DVB-C ose ATV Auto redaktim
SelektoDVB-T/T2(oseDVB-C/ATV)Autoredaktimpër të kërkuar automatikisht programet.
Para kërkesës,ndoshta do t’ju duhet të selektoni shtetin ose formartin e tunerit.Nëse
dëshironi të stoponi kërkimin automatik, shtypnibutoninMENU ose butoninEXIT,një dialog
i daljes del jashtë.
• Shtyppër të konfirmuar daljen.
• Shtyppër të vazhduar kërkimin.
DVB-T/T2 ose DVB-C Akordimi Manual
Kërko dhe ruaj programet në mënyrë manuale, pike së pari selekto burimin e duhur para se të
filloni kërkimin.
1. Nëmenunë Installation, selekt DVB-T/T2 (or DVB-C) akordim manual dhe shtyp OK për
t’u qasur në interfejsin e kërkimit, pike së pari zgjidh shtetin.
2. Pastajshtyp ose për të rregulluar parametrat relevant të tillë si modalitetin e skanimit,
qëllimin e skanimit etj., dhe pastaj selektoKërkodhe shtyp ose për të filluar kërkimin.
3. Kërkimi ndalon kur programi është gjetur dhe ky program do të ruhet në pozicionin aktual
të kanalit. Nëse deëshironi të ndaloni kërkimin, shtypeni butonin MENU.
48
Page 49

ATV Akordim Manual
Në formatinATV, selekto ATV Akordinimin Manualdhe shtyp butonins OK për qasje.
1. Shfaqetdhe shtyp osepër të selektuar Ruaj në1(ndoshta numër tjetër),TV Sistemdhenr.
kanalit.pastajselektokërkodhe shtyppër të filluar kërkimin.
• Shtyppërnjësi për të kërkuar frekuencë më të lartë;
• Shtyppërnjësi për të kërkuar frekuencë më të ulët;
2. Kur një program është gjetur, shtyp butonin e kuq për ta ruajtur atë në pozicionin aktual të
kanalit.Nëse deëshironi të ndaloni kërkimin, shtypeni butoninMENU.
• Sintoinizim
Përdor për të bërë ndryshime të vogla për akordim të një kanali individual.Sintonizimi nuk
është i nevojshëm në kushte normale.Mirëpo,në zonë të kushteve inferiore të transmetimit
ku rregullimet janë të nevojshme për një footografi dhe zë më të mirë, përdorni
sintonizimin.
1. Selekto kanalin që dëshironi ta sintonizoni.
2. Në menunëInstallation, selekto ATVAkordim Manualdhe shtyp për t’u shfaqur
Sintonizimi.
3. Shtyposepër të sontonizuar deri sa te fitohet fotografia dhe zërimi më i mirë.
Konfigurime
OSDGjuha:Selekto OSD gjuhën tënde që dëshiron.
Audio Gjuha:Vendos gjuhën audio dixhitale primare ose sekondare që i korrespondon
sinjalit.
Gjuha e Subtitleve:Selekto gjuhën e subtitlit.
Dëgjim i dobët: ky funksion ndihmon përdoruesit me dëgjim të dobët që t’i kuptojnë
programet duke u shfaqur një informacion përkatës në grafik (ngjashëm me titrat, por jo
titra)në ekran. Ju duhet të të ndizni sviçin para se ta përdorni këtë funksion.
Gjuha e teletekstit: Selekto gjuhën e dëshiruar në teletekst.
REC File System: Nëse dëshrioni të përdorni këtë funskion,duhet të pranoni program
dichital dhe lidhje USB.
Shënim:Sugjerohet të përdorni hard disk me shpejtësi të madhe, ose Tvmund të ngarkohet
duke përdorur REC dhe funksionin Timeshift.
HDMI CEC: Lidh dhe kontrollo të dy pajisjet TV dhe sistemin e jashtëm të tij duke lidhur
pajisjen e jashtme me portin HDMI të TV-së.
HDMI CEC –Ndiz ose fuk funksionin HDMI CEC.
Auto Standby –Lësho TV-në automatikisht nëstandby.
Lista e pajisjeve- Kur HDMI CEC është ndezur,kontrollo listen e pajisjeve për lidhje në TV.
Lokacioni: Selektomodalitetin e loakacionit për të luajtur në shtëpi ose dyqan, kur
selekton “Dyqan”,ju mund të ktheni në demo afishen.
Prezantimi: Fik ose ndize demo afishen dhe demo USB.
USB demo:
1. Cilësimet e kërkuara: Shto “AutoDemo.txt” txt file në direktorinë kryesore të një pajisjeje
USB, dhe pastaj shkruaj rrugën e videove që duhet të luajnë në TV, secila rrugë ka nevojë
për një vizë ndarjeje.
2. Kur “USB Demo” ështënë “On”, TV-ja automatikisht luan videot në “AutoDemo.txt”, pasi
që janë luajtur të gjitha videot, TV do të kthehet ta luaj programin që e keni qenë duke e
shikuar. Pas pesë minutash, TV do të regjistrojë videot e luajtura dhe programin.
3. Rruga duhet të shkruhet në Anglisht ose me numra, përndryshe TV nuk do ta identifikojë atë.
ALB
49
Page 50

ALB
Përditësimi i softuerit:
1. Përditësimi i softuerit (USB)
2. Së pari shkarko dhe ruaj softuerin e përmirësuar në nj pajisje USB, së dytilidhe pajisjen
e USBme portin USB në TV, së treti qasju menusë “Përditësim” dhe selekto “Përditësim i
softuerit”, pastaj selekto “Përditësim i softuerit (USB)” për të startuar procesi i përmirësimit.
Kur të mbarojë, TV automatikisht do të restartohet.
SHËNIM: Mos e fik TV gjatë procesit të përmirësimit, përndryshe TV ndoshta nuk do të
punojëk, dhe klienti është përgjegjës.
3. Përditësimi i sodtuerit (Rrjeti)
Lidhu në TV me internet dhe ju mund ta përmirësoni TV sistemin ose aplikacionin e rrjetit
në TV.
SHËNIM: “Përmirësim Rrjeti” ndoshta nuk është në dispozicion për disa rajone.
Përditësim i softuerit (OAD) (vetëm për disa rajone dhe i disponueshëm vetëm në
modalitetin DVB-T) Selekto atë për të përditësuar softuerin e TV sistemitmbi ajrin.
Opsion I avancuar: Përditësofunksionin “Fast Boot” and “Wake on Network” .
Ekrani blu: Kur ekrani Blu ështëOn, ekrani do të kthehet në blu dhe zëri do të humbet
kur nuk pranohet sinjal.
Rivendosje e përdoruesit: Rivendos menunë e cilësimeve në vlerat e paracaktuara.
Deklarat ligjore: Deklarata ligjore përkatëse.
Koha
Ora: Rregullo orën në clock, zonën e kohës dhe kohën verore.
Mënyra e orës–opsionet përfshijnë Auto dhe Manual.Kur selektoni “Auto”, ora e TV do të
sinkronizohet me kohën reale të dixhital TV. Kur selektoni “Manual”, duhet që ta rregulloni
vetë kohën, duke përfshirë edhe numrin e vitit, muajit, datën, orën dhe minutën
Zona e kohës– Selekto zonën e kohësconform lokacionit tënd.
Koha verore(Ruajtja e orës verore)-Ju mund ta ndizni ose fikni këtë funksion.
Kohëmatësi fikur: ky tipar mundëson për ta fikur automatikisht TV-në në kohë të rregullt.
Kohëmatësi ndezur:ky tipar mundëson për ta ndezur automatikisht TV-në në kohë të
rregullt në një input të caktuar ose volumi.
Sleep Timer: Vendos automatikisht kohën e fikjes në TV.
Fikje automatike: Vendos kohën automatikisht për të fikur TV në kushte që aty nuk ka
operacione.
Shikim i vazhdueshëm i kohëmatësit: Për të parandaluar shikim të TV-së pëeriudha
të gjata kohore, ju mund të vendosni një mesazh që ju sugjeron se shikuesi merr një
pushim. Kjo veçanërisht është e dobishme për parandalimin e fëmijëve që të shikojnë
gjatë TV.Nga menuja KOHA selektoni Kohëmatësin për Shikim të Vazhdueshëm dhe
vendosni kohën.Kur koha e vendosur kalon, një mesazh sugjeron shikuesin për të marrë
një pushim.Shtyp OK ose EXIT për të pastruar mesazhin.
50
Page 51

Avancuar
Sistemi i bllokimit:Selekto Onpër të lejuar tre objekte të menusë, do të ju kërkohet
fjalëkalimi.Fjalëkalimi i parazgjedhur është0000, selekto “on”, tipari i ardhshëm si “Vendos
fjalëkalimin”, “Bloko kanal”, “Kontroll prindërore” dhe “Bllokim Paneli”do të aktivizohen;
Selekto “off”, tri objektet e sipërpërmendura do të ç’aktivizohen. Nëse keni harruar
fjalëkalimin, mundohu me super fjalëkalimin (8899) për të hyrë.
Vendos Fjalëkalimin:përdor për të ndryshuar Fjalëkalimin aktual të bllokimit.
Bllokim Programi(Vetëm nëTVformatin):Ju lejon përmes fjalëkalimit të bllokoni qasjen
në kanale të veçantë.
Udhëzue prindëror (Vetëm nëTVformatin):Ju lejon përmes fjalëkalimit të bllokoni
programeve që janë nëvlerësimin prindëror.
Bllokim Paneli: Për të çaktivizuar çelësin e mëposhtëm në TV. Të gjitha butonat në
telekomandën akoma mund të përdoren.
Rrjeti
Wireless Lidhja
1. Selekto “Wireless Connection” dheshtyp butoninOK, dhe pastaj vendos “WLAN Switch”
on; Prisni disa sekonda,wi-Fishenja do të shfaqenë listë,selekto dhe shtypbutonin OKpër të
hapur grafën e futjes së fjalëkalimit.
2. Përdor butonin navigues për të futur fjalëkalimin, kur mbaron, shtyp butonin e gjelbër në
telekomandë për të filluar lidhja.
Rrjeti me tela
1. Lidheni kabllon e rrjetit në portinLANnë pjesën e pasme tëTV-së;
2. Hyn në menunë kryesore dhe selekto nën menunë e rrjetit.
3. Selekto“WiredNetwork”,dhe pastaj selekto“AutoInput”,prisni disa sekonda,konfigurimi i
rrjetit do të kryhet me sukses.
ALB
Shënim: Para se të startojë, sigurohu që ruteri juaj punon mirë.
USB KONTROLLI
USB Menu
Mund të shihni filma, muzikë dhe foto nga pajisja e USB-së tuaj.
4. Lidhni pajisjen e USB në input terminalin.
5. Shtyp butoninHomedheselekto“MediaPlayer”.
FILM:Shih filma nga USB.
MUZIKË:Ndëgjo muzikë nga USB.
FOTO:Shihfoto ngaUSB.
Këshillues i këndshëm gjatë përdorimit të USB player
1. Disa pajisje tëUSBmund të mos jenë kompaktiblë për operim të mirë me këtëTV.
2. Kopjo të gjitha të dhënat në USBnë rast se të dhënat humben për shkak të ndonjë
aksidenti të papritur.Kopjimi i të dhënave është përgjegjësi e konsumatorrit.
51
Page 52

ALB
3. Për skedarë me madhësi më të madhe,shpejtësia e shkarkimit mund të jetë pak më e
gjatë.
4. Njohja e shpejtësisë e një pajisje USB për ruajtje mund të varet nga çdo pajisje.
5. Kur lidhni ose shkëputni pajisjen e ruajtjes USB, sigurohuni që TV nuk është në formatin
USB, përndryshe pajisja USB ose dokumentet tjera të ruajtura mund të dëmtohen.
6. Ju lutemi përdorni një pajisje USB e cila është e formatuar në FAT16, FAT32, NTFS fajl
sistemin i siguruar nga Windows sistemin për operim. Në rast se një pajisje ruajtjeje e
formatuar si program tjetër përdorues i cili nuk mbështetet nga Windows, ndoshta nuk
mund të njihet
7. Kur prëdorninjëUSBHardDiskDrivei cili krëkn burim energjie elektrike, sigurohuni që
fuqia e saj të mos kalojë500mA.Nëse fuqia eUSBhardDiskkalon500mA,TVsistemi do të
ndërrohet në gjendjen e pauzës,ju duhet të tërhiqni diskun e dorës të USB dhe të rinisni
sistemin e TV.
8. Njëmesazhë “Dokument i pambështetut” do të shfaqet nëse file formati nuk mbështetet
ose është i falsifikuar.
9. FHDfotot e mëdhaja kanë nevojë për më shumë kohë për procesim,e cila nuk është për
fajin e TV.Ju lutem jini të qetë të prisni.
10. KjoTVndoshta nuk mbështet disa fotografi multimedia të ndryshuara dhe të përmirësuara
si ndryshimi i formatit të kodimit ose përparimet tjera teknike.
Movie Menu
1. Shtyp / për të selektuarFILM.Shtyp OK për të hyrë.
2. Shtyp / ose / për të selektuar folderin e dëshiruar dhe shtyp OK për të hap
folderin, /
3. Shtyp
të mëparshme.
4. Shtyp”EXIT”në menunë e ekraneve të mëparshme.
shtyppër të filluar filmi.
për të stopuar filmin dhe dërgoe në listën. 4.Shtyp”EXIT”në menunë e ekraneve
Movie Control Bar
Pauzë
Skip Previous Fast Reverse Time Search Play Mode Play List
Stop
Skip Next
Fast Forward
A/B Repeat
Information Settings
- Shtyp [ MENU ] për t’u shfaqurshiriti i Kontrollit të filmit duke luajtur filmi.
- Shtyp [ ] / [ ] për të zgjedhur cilësimet e dëshiruara.
- Shytp [ MENU ] për të dalë nga shiriti i kontrollit të filmit.
52
Page 53

Menuja e muzikës
1. Shtyp / për të zgjedur MUZIKË. Shtyp OK për të hyrë.
2. Press / ose / për të zgjedhur dosjen e dëshiruar dhe shtyp OK për të hapur
dsijen, press /
3. Press
për të stopuar muzikën dhe kthehu në listën e muzikave.
4. Shtyp”EXIT”në menutë paraprake në ekran.
Shiriti kontrollues i muzikës
për të filluar.
ALB
Pause
Skip Previous
Stop
Fast Reverse
Information Settings
Play ModeSkip Next Fast Forward
- Shtyp [MENU] për të shfaqur Shiritin Kontrollues të muzikës duke luajtur muzika.
- Shtyp [ ] / [ ] për të selektuar cilësimet e dëshiruara.
- Shtyp [MENU] për të dale nga Shiriti i Kontrollit të muzikës.
Menuja e fotove
1. Shtyp / për të zhgjedhur FOTO. Shtyp OK për të hyrë.
2. Shtyp / ose / për të zgjedhur dojsen e dshiruar dhe shtyp OK për të hapur
dojsen, shtyp /
3. Shtyp
për të stopuar fotot dhe kthehu në foto listën.
4. Shtyp “EXIT”në menutë parapreake në ekran.
Shiriti kontrollues i fotove
Pause
Skip Previous
për të filluar.
Rotate CW
Zoom
Play List
Settings
Stop
Skip Next
Rotate CCW
Information
Background
music
- Shtyp [MENU] për t’u shfaqur shirit i Kontrollit të Fotove gjatë shfaqjes në slajd të tyre.
- Shtyp [ ] / [ ] për të zgjedhur cilësimet e dëshiruara.
- Shtyp [MENU] për të dalë nga Info shiriti.
53
Page 54

ALB
DIAGNOSTIKIMI
Para se të thirrni një teknik shërbimesh, shqyrtoni informacioet e mëposhtme për shkaqet e
mundshme dhe solucionet e problemit që ju e përjetoni.
Probleme Zgjidhja dhe spjegimi
Telekomanda nuk
funksionon
Sinjal i dobët Ky problem zakonisht shkaktohet nga ndërhyrja e celularëve,
Nuk ka fotografi, nuk ka zë 1. Verifikoni burimin e sinjalit.
Fotografi jonormale 1. Për mungesë ngjyre kualitet të dobët të fotografisë, ju
Fotografi normale, nuk ka zë 1. Nëse nuk ka zë, shtyp kyç/çkyç të zërit ose rrit volumin e
Paraqitet mesazhi „kjo
skedë është e dëmtuar“
ose zëri është normal, kurse
fotografia është jonormale.
Paraqitet mesazhi “nuk
suportohet audio" ose
fotografia është normale,
por jo edhe zëri.
1. Kontrolloni senzorin e telekomandës.
2. Ndëroni bateritë.
3. Bateritë nuk janë të vendosura në mënyrë korrekte.
4. Pajisja nuk është e lidhur me korrentin.
radio valë, sisteme për ndeyjen e automjeteve, llambat e
neonit, trapan elektrik, ose pajisje të tjera elektronike ose
burime të radio interferencës.
2. Lidhni ndonjë pajisje tjetër elektrike në prizë që të
verifikoni nëse punon ose i kyçur.
3. Koka e prizës është në kontakt të dobët me prizën
4. Verifikoni sinjalin.
mund të:
• përshtatni opcionin e ngjyrave në menu
• televizori të jetë në distancë të mjaftueshme nga
produktet tjera elektronike.
• ndërroni kanalin, ndoshta ka problem me sinjalin
transmetues
2. TV-sinjal i dobët (mozaik ose ndërprerje borë)
• verifikoni kabllonë e sinjalit dhe përshtateni antenën
• bëj rregullim të kanalit me kërkim preciz.
• provoni një kanal tjetër.
zërit.
2. Hapni menunë e zërit dhe përshtatni „Balance“
3. Verifikoni nëse ka kufje të lidhura. Nëse po, largoni kufjet
1. Skeda mediale mund të jetë e dëmtuar. Verifikoni nëse
skeda mund të luhet në kompjutor.
2. Verifikoni nëse mbështetet kodeku për audio dhe video.
1. Skeda mediale mund të jetë e dëmtuar. Verifikoni nëse
skeda mund të luhet në kompjutor.
2. Verifikoni nëse mbështetet kodeku për audio dhe video.
54
Page 55

Probleme Zgjidhja dhe spjegimi
Rrjeti nuk funksionon 1. Verifikoni nëse punon transmetuesi.
2. Te modelet, ku duhet të kyçet pajisja USB për t’u
konektuar me internetin, verifiko nëse është e lidhur siç
duhet pajisja USB.
3. Verifikoni nëse është lidhur Televizori siç duhet me
transmetuesin.
Ueb-faqja nuk paraqitet e
plotë.
1. „Flash“ nuk suportohet.
2. Formate që suportohen: JPEG, PNG, GIF, BMP, WMV
(ASF), WMA, MP3 и MP4.
Shfletuesi mbyllet vetvetiu. Ueb-faqja përmban fotografi tepër të mëdhaja dhe nuk ka
memorje të mjaftueshme për të ekzektuar, prandaj shfletuesi
mbyllet vetvetiu.
Vërejtje: Nëse problemi shfaqet edhe pas zbatimit të zgjidhjeve, drejtohuni te qendra e
lokalitetit për ndihmë.
ALB
55
Page 56

SPECFIKACIONE
Tesla TV 32S367BHS
Madhësia e ekranit-diagonale: 81cm
Rezolucioni i ekranit: 1366x768
Audio autput fuqia (L+R): 6W + 6W
Voltazha e punës: 100-240V~ 50/60Hz
Fuqia e vlerës konsumuese 60W
Dimensionet (WxHxD)me qëndrim 733.4x474x167.7
Dimensionet (WxHxD)pa qëndrim 733.4x438.5x85.1
Pesha neto me qëndrim 4.0kg
Pesha neto pa qëndrim 3.9kg
Mjedisi
(vetëm për zonat me klimë
tropikale):
Mjedisi
(vetëm për zonat me klimë të
Moderuar):
Sistem DTV: DVB-T/T2/C/S/S2
Programe paraprake ATV: 100; DTV: 1000
Status shfaq metodën Në ekran
Indikatori i rregullimit të funksionit Shfaqje në Menu
Gjuha eOSD Opsione të shumta
RF aerial input 75 ohm unbalanced
AV video input 75 ohm, 1.0Vp-p, RCA
AV audio input 10k ohm, 0.5Vrms
Temperatura punuese: 5°C~45°C
Lagështia punuese: 20%~80%
Temperatura e ruajtjes: -15°C~50°C
Lagështia e ruajtjes:10%~90%
Temperatura punuese:5°C~35°C
Lagështia punuese:20%~80%
Temperatura e ruajtjes: -15°C~45°C
Lagështia e ruajtjes:10%~90%
TV: PAL-BG/DK/I, SECAM-BG/DK
AV: PAL, SECAM, NTSC
Page 57

Tesla TV 40S367BFS
Madhësia e ekranit-diagonale: 101cm
Rezolucioni i ekranit: 1920x1080
Audio autput fuqia (L+R): 6W + 6W
Voltazha e punës: 100-240V~ 50/60Hz
Fuqia e vlerës konsumuese 74W
Dimensionet (WxHxD)me qëndrim 906.5x209.0 x574.5
Dimensionet (WxHxD)pa qëndrim 906.5 x84.9 x525.9
Pesha neto me qëndrim 6.6kg
Pesha neto pa qëndrim 6.4kg
Mjedisi
(vetëm për zonat me klimë
tropikale):
Temperatura punuese: 5°C~45°C
Lagështia punuese: 20%~80%
Temperatura e ruajtjes: -15°C~50°C
Lagështia e ruajtjes:10%~90%
Mjedisi
(vetëm për zonat me klimë të
Moderuar):
Temperatura punuese:5°C~35°C
Lagështia punuese:20%~80%
Temperatura e ruajtjes: -15°C~45°C
Lagështia e ruajtjes:10%~90%
Sistem DTV: DVB-T/T2/C/S/S2
TV: PAL-BG/DK/I, SECAM-BG/DK
AV: PAL, SECAM, NTSC
Programe paraprake ATV: 100; DTV: 1000
Status shfaq metodën Në ekran
Indikatori i rregullimit të funksionit Shfaqje në Menu
Gjuha eOSD Opsione të shumta
RF aerial input 75 ohm unbalanced
AV video input 75 ohm, 1.0Vp-p, RCA
AV audio input 10k ohm, 0.5Vrms
ALB
57
Page 58

ALB
LICENCAT
Termet HDMI dhe HDMI Multimedia me definicion të lartë
Interfejs, dhe HDMIIogo janë marka tregtare të regjistruara të
HDMI Licensing LLC në SHBA dhe vendet tjera.
Licensuar nën Dolby Laboratories. Dolby, Dolby Audio dhe Dolby
Laboratories.
58
Page 59

SADRŽINA
UPOZORENJA I MJERE OPREZA . . . . . . . . . . . . . . . . . . . . . . . . . . . . . . . . . . 60
POSTAVLJANJE TV UREĐAJA . . . . . . . . . . . . . . . . . . . . . . . . . . . . . . . . . . . . . 63
TASTERI NA TV UREĐAJU . . . . . . . . . . . . . . . . . . . . . . . . . . . . . . . . . . . . . . . . 66
PRIKLJUČCI. . . . . . . . . . . . . . . . . . . . . . . . . . . . . . . . . . . . . . . . . . . . . . . . . . . . . . 67
FUNKCIJE DALJINSKOG UPRAVLJAČA . . . . . . . . . . . . . . . . . . . . . . . . . . . . 68
REC (PERSONALNO VIDEO SNIMANJE) . . . . . . . . . . . . . . . . . . . . . . . . . . . 70
EPG (ELEKTRONSKI PROGRAMSKI VODIČ). . . . . . . . . . . . . . . . . . . . . . . . . 71
POČETNO PODEŠAVANJE I GLAVNE FUNKCIJE . . . . . . . . . . . . . . . . . . . 72
UPRAVLJANJE MENIJEM . . . . . . . . . . . . . . . . . . . . . . . . . . . . . . . . . . . . . . . . . 74
Rukovanje menijem . . . . . . . . . . . . . . . . . . . . . . . . . . . . . . . . . . . . . . . . . . . . 74
Slika . . . . . . . . . . . . . . . . . . . . . . . . . . . . . . . . . . . . . . . . . . . . . . . . . . . . . . . . . . 74
Zvuk . . . . . . . . . . . . . . . . . . . . . . . . . . . . . . . . . . . . . . . . . . . . . . . . . . . . . . . . . . 74
Instalacija . . . . . . . . . . . . . . . . . . . . . . . . . . . . . . . . . . . . . . . . . . . . . . . . . . . . . 75
Podešavanje. . . . . . . . . . . . . . . . . . . . . . . . . . . . . . . . . . . . . . . . . . . . . . . . . . . 77
Vrijeme . . . . . . . . . . . . . . . . . . . . . . . . . . . . . . . . . . . . . . . . . . . . . . . . . . . . . . . 78
Napredno. . . . . . . . . . . . . . . . . . . . . . . . . . . . . . . . . . . . . . . . . . . . . . . . . . . . . 79
Mreža. . . . . . . . . . . . . . . . . . . . . . . . . . . . . . . . . . . . . . . . . . . . . . . . . . . . . . . . . 79
UPRAVLJANJE USB UREĐAJEM . . . . . . . . . . . . . . . . . . . . . . . . . . . . . . . . . . . 79
USB meni . . . . . . . . . . . . . . . . . . . . . . . . . . . . . . . . . . . . . . . . . . . . . . . . . . . . . 79
Podsjetnik prilikom upotrebe USB plejera. . . . . . . . . . . . . . . . . . . . . . . . 79
Meni filmova . . . . . . . . . . . . . . . . . . . . . . . . . . . . . . . . . . . . . . . . . . . . . . . . . . 80
Meni muzike. . . . . . . . . . . . . . . . . . . . . . . . . . . . . . . . . . . . . . . . . . . . . . . . . . . 81
Meni fotografija. . . . . . . . . . . . . . . . . . . . . . . . . . . . . . . . . . . . . . . . . . . . . . . . 81
RJEŠAVANJE PROBLEMA. . . . . . . . . . . . . . . . . . . . . . . . . . . . . . . . . . . . . . . . . 82
SPECIFIKACIJE. . . . . . . . . . . . . . . . . . . . . . . . . . . . . . . . . . . . . . . . . . . . . . . . . . . 84
BiH/CG
Napomena
1. Grafički prikazi u okviru ovog uputstva služe samo kao ilustracije.
2. Ekranski prikaz (OSD) na TV uređaju može se razlikovati od prikazanog u ovom uputstvu.
3. Informacije iz ovog dokumenta podliježu promjenama bez prethodne obavijesti.
Proizvođač ne snosi odgovornost za oštećenja nastala kao izravni ili posredni rezultat
pogrešnih ili nepotpunih informacija ili neusaglašenosti između uputstva za upotrebu i
opisanog proizvoda.
4. U suhom okruženju, zbog statičkog elektriciteta, proizvod se može restartovati i vratiti
na glavni OSD interfejs, interfejs USB plejera ili prethodni režim izvora. U ovom slučaju,
molimo, nastaviti s korišćenjem TV uređaja
59
Page 60

BiH/CG
UPOZORENJA I MJERE OPREZA
Napomena: Prije uporabe uređaja u cijelosti pročitajte ova uputstva. Čuvajte ove upute i za
kasniju upotrebu.
• Pročitajte ova uputstva – Prije upotrebe uređaja treba pročitati sva bezbjednosna uputstva i
uputstva za upotrebu.
• Čuvajte ova uputstva – Bezbjednosna i uputstva za upotrebu treba sačuvati za buduću
upotrebu.
• Obratite pažnju na upozorenja – Treba se pridržavati svih upozorenja istaknutih na uređaju i
u uputstvima za korištenje.
• Pratite uputstva – Treba pratiti sva operativna i uputstva za korištenje.
• Ne koristite ovaj aparat blizu vode – Uređaj ne bi trebalo koristiti blizu vode ili izvora vlage,
na primjer, u vlažnom podrumu, blizu bazena i slično.
• Čistiti isključivo suhom tkaninom.
• Ne blokirati otvore za ventilaciju. Instalirati u skladu s uputstvima proizvođača.
• Ne postavljajte uređaj blizu izvora toplote kao što su radijatori, grijalice, peći ili slični aparati
(uključujući i pojačala) koji proizvode toplotu.
• Ne zanemarujte bezbjednosnu svrhu polarizovanog ili uzemljenog utikača. Polarizovani
utikač ima dva jezička, pri čemu je jedan širi od drugog. Uzemljeni utikač ima dva jezička
i pin za uzemljenje. Široki jezičak ili treći pin postoje zbog vaše bezbjednosti. Ukoliko
isporučeni utikač ne odgovara vašoj utičnici, obratite se električaru radi zamjene zastarjele
utičnice.
• Zaštite kabl za napajanje od gaženja i nagnječenja, naročito kod utikača, utičnice i na mjestu
gdje izlazi iz aparata.
• Koristiti isključivo pribor/dodatke određene od strane proizvođača.
• Koristiti samo na polici s točkićima, postolju, tronošcu, nosaču ili stolu koji su
određeni/ označeni od strane proizvođača ili onima koje se prodaju uz uređaj. Pri
upotrebi kolica ili stalka treba paziti, naročito prilikom pomjeranja stalka i aparata
zajedno kako bi se izbjegle povrede uslijed prevrtanja.
• Isključiti aparat tokom grmljavine ili ukoliko se ne koristi duži vremenski period.
• Za sve popravke obratite se kvalificiranom osoblju. Popravka je potrebna u slučaju oštećenja
bilo koje vrste, kao što je oštećenje kabla za napajanje ili utikača, ukoliko se tekućina prospe
na uređaj ili neki predmet upadne u njega, ako je uređaj bio izložen kiši ili vlazi, ako ne
funkcioniše normalno ili je ispušten prilikom nošenja.
• UPOZORENJE: Ova uputstva za servisiranje su samo za kvalificirano servisno osoblje. Da
bi se smanjio rizik od električnog udara niko osim za to kvalificiranih osoba ne bi trebalo da
obavlja servisiranje koje nije opisano u uputstvu za upotrebu.
• Opremu nemojte instalirati u ograničenim ili ograđenim prostorima kao što su police
za knjige i slični komadi namještaja; uređaju je potrebno otvoreno mjesto sa slobodnim
protokom vazduha. Ventilacija ne bi smjela biti onemogućena prekrivanjem ventilacionih
otvora predmetima poput novina, stolnjaka, zavjesa i slično.
•
Oprez – Potrebno je zamijeniti rešetke da bi se spriječio strujni udar.
• Molimo da prije instalacije i upotrebe aparata obratite pažnju na informacije o električnoj
bezbjednosti na dnu kućišta.
• Aparat ne izlagati kiši ili vlazi kako bi se spriječio rizik od požara ili električnog udara.
• Aparat ne bi smeo da bude izložen kapanju ili prskanju i na njemu ne bi trebalo da stoje
predmeti, kao što su vaze, koji su ispunjeni tečnošću.
60
Page 61

• Priključci označeni simbolom " " mogu biti dovoljno visokog napona da predstavljaju rizik
od električnog udara. Instalaciju spoljnog ožičenja povezanog na ovakve priključke treba da
obavi stručno lice ili treba koristiti gotove vodove ili kablove.
• Aparat se mora pričvrstiti na pod/zid na bezbjedan način u skladu s uputstvima za
postavljanje kako bi se spriječilo povređivanje.
• Postoji opasnost od eksplozije ako je baterija nepravilno zamijenjena. Bateriju zamijeniti
istim ili odgovarajućim tipom baterija.
• Bateriju (jednu bateriju ili više baterija ili pakovanje baterija) ne izlagati prekomjernoj toploti
kao što su sunčeva svjetlost, vatra i slično.
• Pretjerano glasan zvuk iz slušalica može uzrokovati gubitak sluha. Slušanje glasne muzike
tokom dužeg vremenskog perioda može oštetiti sluh. Da biste smanjili rizik od oštećenja
sluha trebalo bi da smanjite jačinu zvuka na bezbjedan, ugodan nivo i smanjite vremenske
periode provedene u slušanju glasne muzike.
• Mrežni utikač i utičnica treba da budu lako dostupni ukoliko se koriste za isključivanje
uređaja.
• Kada ne koristite uređaj ili ga pomjerate, vodite računa o kablovima, npr. uvežite ih vezicama
za kablove ili nečim sličnim. Pazite da ne dođu u dodir s oštrim ivicama ili nečim sličnim što
bi moglo izazvati njihovo oštećenje. Prilikom ponovne upotrebe provjerite da li su kablovi
oštećeni. Ukoliko primjetite bilo kakva oštećenja pozovite servisera kako bi oštećene
kablove zamijenio onima koje proizvođač preporučuje u specifikaciji ili nekim drugim koji
posjeduju iste funkcije kao i originalni.
• Prilikom odlaganja baterija treba obratiti pažnju na zaštitu životne sredine.
• Uređaju ne treba pristupati s otvorenim plamenom, npr. upaljenom svijećom. Kako biste
spriječili širenje požara, uvijek držite svijeće ili druge izvore vatre dalje od ovog proizvoda.
• Ako uređaj među svojim oznakama nema simbol
i njegov kabel ima trofazni utikač,
znači da je potrebno i zaštitno uzemljenje. Uređaj treba priključiti na mrežnu utičnicu koja
ima zaštitno uzemljenje.
• Preporučljivo je da se sljedeće informacije primjenjuju gdje god je to moguće:
BiH/CG
Odnosi se na naizmjeničnu struju (AC)
Odnosi se na jednosmjernu struju (DC)
Odnosi se na opremu klase II
Odnosi se na stanje mirovanja
Odnosi se na Uključeno
Odnosi se na visok napon
• Upozorenje za aparate koji sadrže OKRUGLE/DUGME BATERIJE (uputstva koja slijede
odnose se na aparate koji sadrže zamjenjive okrugle/dugme baterije)
61
Page 62

BiH/CG
UPOZORENJE
Baterije ne gutati, postoji opasnost od hemijskih opekotina
(daljinski upravljač se isporučuje s njima). Ovaj proizvod sadrži okrugle/dugme baterije.
Ako se okrugla/dugme baterija proguta može uzrokovati ozbiljne unutrašnje opekotine za
samo dva sata i dovesti do smrti. Nove i upotrebljavane baterije držati podalje od djece.
Ako se ležište za baterije ne može dobro zatvoriti treba prestati s korišćenjem proizvoda
i držati ga podalje od djece. Potražite medicinsku pomoć čim posumnjate da je došlo do
gutanja baterija ili da su dospjele u bilo koji dio tijela.
Direktiva OEEO
Pravilno odlaganje ovog proizvoda. Ovom oznakom se ukazuje na to da ovaj
proizvod u zemljama EU ne bi trebalo odlagati s ostalim otpadom iz domaćinstva. Da biste
spriječili nastanak potencijalne opasnosti po životnu sredinu ili ljudsko zdravlje uslijed
nekontrolisanog odlaganja otpada, otpad odgovorno reciklirajte kako biste unaprijedili
održivu ponovnu upotrebu ovog izvora materijala. Za vraćanje polovnog uređaja koristite
sistem za vraćanje i sakupljanje ili kontaktirajte maloprodaju u kojoj je proizvod kupljen. Oni
će se postarati da proizvod bude recikliran na način koji ne šteti okolišu.
CAUTION
RISK OF ELECTRIC SHOCK
DO NOT OPEN
Simbol munje sa strelicom u jednakostraničnom trouglu upozorava korisnika na prisustvo
neizolovanog „opasnog napona“ u kućištu proizvoda koji može biti dovoljne jačine da
predstavlja rizik od električnog udara. Da biste smanjili rizik od električnog udara ne
uklanjajte poklopac (ili zadnju stranu) uređaja. Servisiranje povjerite samo obučenim
serviserima. Uzvičnik u jednakostraničnom trouglu ima za cilj da upozori korisnika
na postojanje važnih uputstava za korišćenje i servisiranje u literaturi koja se dobija s
uređajem.
62
Page 63

POSTAVLJANJE TV UREĐAJA
• Postavite uređaj na čvrstu horizontalnu podlogu poput stola ili pulta. Ostavite slobodan
prostor od najmanje 10 cm za slobodan protok vazduha. Da biste spriječili pojavu grešaka
ili nebezbjednih situacija ne stavljajte nikakve predmete na uređaj. Ovaj uređaj se može
upotrebljavati u tropskim i/ili umjerenim klimatskim zonama.
• Učvršćivanje stražnjeg dijela kućišta na zid. Donja slika se razlikuje od stvarnog artikla te služi
samo za referencu. (Samo za neka tržišta.)
Televizor nikad ne postavljajte na nestabilnu poziciju. Televizor može pasti i prouzrokovati
ozbiljne povrede ili smrt. Mnoge povrede, naročito djece, mogu se izbjeći jednostavnim
mjerama predostrožnosti kao što su:
• Korišćenje namještaja ili stalaka preporučenim od strane proizvođača televizora.
• Korišćenje isključivo namještaja koji će bezbjedno držati uređaj.
• Postavljanje televizora tako da njegove ivice ne prelaze preko ivica namještaja na kom stoji.
• Ne postavljati televizor na visoke komade namještaja ( npr. kredence ili police za knjige) bez
učvršćivanja i namještaja i televizora na odgovarajući oslonac.
• Ne stavljajte tkanine niti bilo kakve druge materijale između televizora i namještaja na kom
stoji.
• Upoznajte djecu o opasnostima od penjanja na namještaj kako bi dosegnuli televizor ili
njegove komande.
Ako je vaš postojeći televizijski uređaj bio zadržan ili pomjeran, trebalo bi da primijenite gore
navedene mjere predostrožnosti (samo za TV uređaje teže od 7 kg).
BiH/CG
63
Page 64

BiH/CG
• Za vaš TV uređaj možete koristiti opcioni zidni držač. Konsultujte se s prodavcem u vezi
sa zidnim držačem koji je u skladu s VESA standardima koje koristi vaš model TV uređaja.
Pažljivo pričvrstite zidni držač na stražnji dio TV uređaja. Postavite držač na čvrsti zid koji je
okomit u odnosu na pod. Kontaktirajte kvalificirano osoblje da montira držač ukoliko želite
da bude pričvršćen na druge materijale . Detaljna uputstva dolaze u paketu s držačem.
Koristite one zidne držače kod kojih će uređaj biti adekvatno obezbijeđen na zidu s dovoljno
prostora da je omogućeno povezivanje s eksternim uređajima.
PAŽNJA
• Prije pomjeranja ili instaliranja TV uređaja isključite struju . U suprotnom postoji opasnost od
električnog udara.
• Pomjerite stalak prije postavljanja TV uređaja na zid tako što ćete ga gurati.
• Ako postavljate TV na plafon ili nagnut zid on može pasti i uzrokovati ozbiljne povrede.
Koristite autorizovani držač i kontaktirajte lokalnog prodavca ili kvalificirano osoblje. U
suprotnom garancija neće važiti.
• Nemojte pretjerano pričvršćivati šrafove, jer to može oštetiti TV uređaj i poništiti garanciju.
• Da biste spriječili povrede, ovaj aparat mora biti bezbjedno pričvršćen za pod/zid u skladu s
uputstvima za postavljanje.
• Koristite šarafe i zidne nosače koju udovoljavaju sledećim specifikacijama. Garancija ne
pokriva nadostatke ili štetu uzrokovanu zloupotrebom ili upotrebom nepravilne opreme.
Veličina modela: 32’’ Vrh Dno
Prečnik (mm) "E" M4 M4
Šraf
Šraf
Dubina (mm)
“D”
Količina 2 2
VESA (AxBxC) 100x100x100
Veličina modela: 40’’ Vrh Dno
Prečnik (mm) "E" M6 M6
Dubina (mm)
“D”
Količina 2 2
VESA (AxBxC) 200x100x200
Max 9 9
Min 6 6
Max 20 15
Min 12 7
64
Page 65

Napomena:
1) Slike služe samo kao ilustracija.
2) Za postavljanje TV uređaja s terminalima okrenutim ka zidu potreban je i gumeni jastuk uz
šraf prilikom fiksiranja postolja na zidu kako bi se obezbedilo dovoljno prostora za upotrebu
terminala. To je mali šupalj stub čiji je unutrašnji prečnik 8 mm, spoljašnji 18 mm, a visina 30
mm
Radna sredina
• Ne stavljajte ovaj uređaj u zatvoreni prostor poput police za knjige ili sličnog komada
namještaja.
• Ne koristite uređaj u vlažnom i hladnom okruženju. Zaštitite uređaj od pregrevanja.
• Držite dalje od direktnog utijecaja sunca.
• Ne koristite uređaj u okruženju koje sadrži prašinu.
• Da zapaljivi strani materijal ne bi dospjeo u TV uređaj, ne stavljajte svijeće u pristupačne,
otvorene dijelove.
Mjere opreza prilikom upotrebe daljinskog upravljača
• Koristite daljinski upravljač tako što ćete ga usmjeriti ka senzoru za daljinski upravljač.
Predmeti koji se nađu između daljinskog upravljača i senzora ometaće normalan rad.
• Ne dozvolite da daljinski upravljač bude izložen snažnim vibracijama. Osim toga, ne polivajte
daljinski upravljač i ne ostavljajte ga na mjesta sa velikom vlagom.
• Ne izlažite daljinski upravljač direktnom utijecaju sunca, koje može da dovede do njegovog
deformisanja uslijed visokih temperatura.
• Ako je senzor daljinskog upravljača direktno izložen zracima sunca ili intenzivnoj svjetlosti,
daljinski upravljač neće funkcionisati. Ukoliko je to slučaj, promjenite pravac svjetlosti ili
poziciju TV uređaja, ili približite daljinski upravljač senzoru.
BiH/CG
Mjere opreza prilikom upotrebe baterije
Neadekvatna upotreba baterija dovešće do njihovog curenja. Pratite sijledeće korake i pažljivo
rukujte njima.
1. Obratite pažnju na polove baterija kako biste izbjegli kratak spoj.
2. Ukoliko su baterije oslabljene, što utiče na domet daljinskog upravljača, trebalo bi ih
zamjeniti novim baterijama. Uklonite baterije iz daljinskog upravljača ukoliko ne planirate
da ga koristite tokom dužeg vremenskog perioda.
3. Ne upotrebljavajte različite tipove baterija (na primjer, manganske i alkalne baterije)
istovremeno.
4. Ne stavljajte baterije u vatru. Ne punite, odnosno ne rasklapajte baterije.
5. Odlažite baterije u skladu sa važećim propisima o zaštiti životne sredine.
6. UPOZORENJE: Bateriju (jednu ili više baterija ili paket baterija) ne treba izlagati pretjerano
visokim temperaturama koje stvaraju sunčeve zrake, vatra i slično.
Zamjena baterija daljinskog upravljača
Postavite dvije AAA baterije u ležište za baterije daljinskog upravljača, vodeći računa o
polovima unutar ležišta.
65
Page 66

BiH/CG
TASTERI NA TV UREĐAJU
Napomena Grafički prikazi služe samo kao ilustracije.
Prikaz odozdo
Prekidač
Pritisnuti taster u sredini:
1. U režimu stanja pripravnosti pritisak na ovaj taster uključuje TV;
2. Ako nema ekranskog prikaza (OSD-a) kratkim pritiskom se pristupa osnovnom meniju;
pritisak od 5 sekundi vraća TV u režim stanja pripravnosti;
3. Ako ima ekranskog prikaza (OSD) kratkotrajnim pritiskom se potvrđuje izbor; dužim
pritiskom se vraća ili izlazi iz menija /podmenija.
Lijevi dio tastera: smanjivanje zvuka ili pomjeranje ulijevo.
Desni dio tastera: pojačavanje zvuka ili pomjeranje udesno.
Gornji dio tastera: mijenjanje kanala ili pomjeranje prema dolje.
Donji dio tastera: mijenjanje kanala ili pomjeranje prema gore.
66
Page 67

PRIKLJUČCI
Napomena: Priključci se mogu razlikovati po modelu i tržištima, odaberite priključke na
temelju TV prijemnika koji ste kupili.
LAN: Mreža
AV IN (AUDIO L/D I VIDEO): Povezivanje ulaza za audio i video signal s izvorom signala
kao što je DVD.
HDMI1/2: Povezivanje priključka za HDMI signal s izvorom signala kao što je DVD.
DIGITALNI AUDIO: Povežite SPFIF kabl na TV izlaz za signal zvuka na kompatibilni
prijemnik zvuka.
SLUŠALICE : Audio izlaz. Kada su priključene slušalice, zvučnici neće emitirati zvuk.
USB 1/2: USB priključak.
AIR/CABLE/LNB: Spojite koaksijalni kabl za primanje signala s antene, kablovske
televizije ili satelita.
USLUGE: Priključak za uklanjanje pogrešaka. Samo profesionalno osoblje.
CI: Ulaz za CI karticu.
BiH/CG
67
Page 68

BiH/CG
FUNKCIJE DALJINSKOG UPRAVLJAČA
Daljinski upravljač
1. POWER (UKLJUČIVANJE/ISKLJUČIVANJE ( )
Pritisnuti za uključivanje TV uređaja ili za stavljanje
u stanje pripravnosti..
2. ISKLJUČIVANJE ZVUKA (
isključivanje zvuka ili za vraćanje zvuka na
prethodnu jačinu.
3. Numerički tasteri Direktno biranje kanala.
4. CH LIST Pritisnuti za pristup listi kanala.
5. RETURN (POVRATAK) Pritisnuti za vraćanje na
prethodni kanal.
6. MENU (MENI) Otvara opcije menija.
7. SOURCE (IZVOR) Za biranje režima izvora
ulaznog signala.
8. Gore/dolje/lijevo/desno ( // /)
Kretanje kroz meni.
9. OK Potvrđivanje izbora.
10.
POČETNA STRANICA Pritiskom na ovaj taster
pristupa se početnoj stranici, biraju pametne
funkcije ili medija plejer itd.
11. EXIT (IZLAZ) Izlaz iz trenutnog menija.
12. YouTube Pristup aplikaciji Youtube.
13. INFO (INFORMACIJE) Prikaz informacija o
trenutnom izvoru.
14. VOL+/VOL- (Povećavanje/smanjivanje jačine
zvuka) Podešavanje jačine zvuka.
15. PR+/PR-(Sljedeći/prethodni program)
Promjena kanala na sljedeći ili prethodni.
16. EPG (Elektronski programski vodič) Pritisnuti
za prikaz trenutnih EPG informacija u DTV režimu
rada.
17. REC(Snimanje) Pritisnuti za snimanje trenutnog
programa (Radi samo u DTV režimu rada).
18. NICAM Pritisnuti za izbor željenog načina
emitovanja zvuka u zavisnosti od kanala koji se
emituje.
19. AD Pritisnuti za paljenje zvučnog opisa, narator
će za slijepe i slabovide osobe opisivati ono što
se dešava na ekranu. Ponovni pritisak gasi opciju
(dostupno samo u DTV režimu rada).
) Pritisnuti za
68
Page 69

BiH/CG
20. FAV (OMILJENO) Pritisnuti za prikaz omiljenih
kanala. Pritisnuti taster gore/dolje za kretanje kroz
omiljene kanale, pritisnuti OK za potvrđivanje.
21. QUICK (BRZO) Pristupa brzom meniju.
22. Tasteri u boji Pritisnuti za brzo pristupanje
određenim funkcijama u TV ili DTV režimu rada.
23. Kontrolni tasteri za reprodukciju s USB-a
Play & Pause (Reprodukcija & Pauza (
)
Pritisnuti za pauziranje reprodukcije sadržaja,
ponovnim pritiskom reprodukcija se nastavlja.
Stop ( )
Pritisnuti za zaustavljanje reprodukcije.
Taster za brzo premotavanje unazad ( )
Pritisnuti za brzo premotavanje unazad
Taster za brzo premotavanje unaprijed ( )
Pritisnuti za brzo premotavanje unaprijed.
24. TASTERI ZA TELETEKST
TEXT (TEKST)
Pritisnuti za ulazak ili izlazak iz menija teleteksta.
SIZE (VELIČINA): Povećavanje ekrana teleteksta:
Pritisnuti ovaj taster jednom za povećavanje
gornje polovine ekrana. Pritisnuti taster ponovo za
povećavanje donje polovine ekrana. Pritisnuti ovaj
taster ponovo za povratak na normalnu veličinu
ekrana.
HOLD (ZADRŽAVANJE): Pritisnuti za zadržavanje
stranice teleteksta na ekranu bez ažuriranja i
21
22
23
20
24
promjena. Pritisnuti ponovo za prekid zadržavanja
stranice.
SUB-PAGE (PODSTRANICA): Pritisnuti taster
za ulazak ili izlazak iz režima podstranice (ako je
podstranica dostupna). Pritisnuti crveni/zeleni
taster za izbor željene podstranice.
INDEX (INDEKS) Prikazuje stranicu indeksa.
REVEAL (SKRIVENI PODACI) Prikazuje skrivene
informacije kao što su rješenja zagonetki ili
slagalica ili sklanja informacije s ekrana.
MIX (MIKS) Prikazuje stranicu teleteksta preko
TV programa ili omogućava povratak na normalni
režim rada teleteksta.
CANCEL (ODUSTANI) Omogućava privremeni
povratak na TV program dok se vrši pretraga
stranice teleteksta. Kada je pretraga završena, u
gornjem lijevom uglu ekrana prikazaće se broj
stranice. Pritisnuti ponovo za povratak na stranicu
teleteksta.
Napomena: Neke tipke mogu biti nevažeće za neke modele. Kada pritisnite takvu tipku,
neće biti odaziva ili će se na ekranu prikazati natpis „Nije na raspolaganju“.
69
Page 70

BiH/CG
REC (PERSONALNO VIDEO SNIMANJE)
U DTV režimu i s pravilno uključenim USB uređajem mogu se snimati kanali koji se gledaju
i prikazivati se kasnije, u vrijeme koje više odgovara korisniku. Funkciju koristiti za snimanje
programa kada se mora prekinuti ili odložiti gledanje.
VAŽNA NAPOMENA:
1. Funkcija REC (snimanje) možda nije na raspolaganju na svim tržištima.
2. Umetnuti eksterni uređaj za skladištenje podataka koji podržava velike brzine prijenosa u
odgovarajući USB priključak na stražnjoj strani TV-a i provjeriti da li uređaj ima dovoljno prostora.
3. Predlažemo formatiranje USB uređaja prije snimanja kako bi se osigurala dovoljna radna
brzina. U meniju opcija odabrati opciju „Sistem datoteka za REC“ kako bi se pristupilo
formatiranju USB uređaja.
4. Ne mijenjati kanale i ne koristiti druge funkcije tijekom snimanja.
5. Ukoliko je signal isprekidan ili uklonjen snimanje će se zaustaviti dok se signal ponovo ne
uspostavi. Ovo može uzrokovati gubitak programskog sadržaja.
6. Nemojte gasiti TV prijemnik tokom snimanja. TV će u tom slučaju prijeći iz režima
personalnog video snimanja (REC) u stanje pripravnosti.
7. Snimljeni fajlovi mogu se koristiti samo na ovom TV uređaju, bilo kakvo kopiranje je strogo
zabranjeno.
8. Koristiti visoko kvalitetne mobilne uređaje za snimanje programa u visokoj rezoluciji (HD), u
suprotnom može doći do zamrzavanja slike tiijekom reprodukcije video datoteke.
9. Sve podatke čuvati na USB uređaju za skladištenje podataka kako se ne bi izgubili usljed
neočekivanih situacija. Ne snosimo nikakvu odgovornost za gubitke nastale pogrešnom
upotrebom ili usljed kvara. Čuvanje rezervnih kopija podatak je isključivo odgovornost korisnika.
10. Fajlovi sa liste personalnog video snimanja (REC_LIST) mogu se reprodukovati samo u
ulaznom izvoru DVB-T/T2 &DVB-C.
Trenutno snimanje i reprodukcija
Pritisnuti taster SNIMI (REC) da bi se pokrenulo snimanje. Na dnu ekrana prikazaće se
kontrolna traka.
• Ukoliko se želi gledati snimljeni video tijekom snimanja programa pritisnuti lijevu stranu
tastera za biranje
za brzu reprodukciju unazad ili unaprijed.
• Ukoliko se želi zaustavljanje i izlazak iz snimanja odabrati i pritisnuti taster OK.
Vremensko pomjeranje
Vremensko pomjeranje je snimanje televizijskog programa na medij za skladištenje podataka
(kao što je USB uređaj) za naknadno gledanje u prikladnije vrijeme. Funkciju koristiti za
snimanje programa kada se mora prekinuti ili odložiti gledanje. Ukoliko se korisnik želi udaljiti
na neko vrijeme, a pritom gledati program bez propuštanja sadržaja, treba pritisnuti
za zaustavljanje programa, te ponovo pritisnuti taster za početak gledanja po povratku.
i taster OK i počeće reprodukcija snimljenog videa. Pritisnuti ili
taster
70
Page 71

Napomena:
1. Prije upotrebe funkcije vremenskog pomjeranja predlažemo da se uradi formatiranje USB
uređaja kako bi se osiguralo dovoljno prostora za snimanje.
2. Takođe, može se unaprijed odrediti vrijeme snimanja pomoću funkcije EPG (pogledati
sljedeću stranicu).
EPG (ELEKTRONSKI PROGRAMSKI VODIČ)
EPG je skraćenica za digitalni elektronski programski vodič (Digital Electronic Program Guide).
Ovu uslugu nude distributeri televizijskog programa i ona daje informacije o programima koji
će biti emitovani. Funkciji se može pristupiti iz digitalnog režima tako što će se pritisnuti taster
EPG na daljinskom upravljaču.
1. Pritisnuti taster EPG kako bi se pristupilo EPG interfejsu. U drugoj traci od vrha biće
prikazani podaci o o trenutnom datumu i vremenu. Na listi ispod biće označen program
koji se trenutno prati.
2. Za provjeru programa koji će biti emitovani u narednom periodu pomaknuti se pomoću
tastera polja za datume. Koristiti taster da bi se označio datum koji se želi provjeriti.
3. Pritisnuti taster , do najviše trake na ekranu, zatim pritisnuti taster za odabir vremena.
Na ovaj način može se provjeriti spisak programa na kanalu tog dana.
BiH/CG
Raspored
Pritisnite ŽUTU tipku za prikaz liste
rasporeda za snimanje. Za brisanje snimanja
pritisnite crvenu tipku.
Podsjetnik
Za prikaz menija podsjetnika pritisnite PLAVU
tipku. Možete odrediti vrijeme podsjetnika i
način ponavljanja.
Snimanje
Pritisnite CRVENU tipku za prikaz menija za
raspored. Pomoću navigacionih tipki odredite
vrijeme na rasporedu s isticanjem brojeva
za godinu, mjesec, dan, sat ili minutu, a
zatim pritisnite tipku ENTER te nakon toga
upotrebom tipki za gore i dolje prilagodite
broj. Istom metodom podesite način
ponavljanja i odaberite tipku SAČUVAJ (SAVE)
kako biste sačuvali podešavanja.
Informacije
Pritisnite ZELENU tipku za prikaz podataka o
izabranom programu.
71
Page 72

BiH/CG
POČETNO PODEŠAVANJE I GLAVNE FUNKCIJE
Početno podešavanje
Kada se TV uređaj prvi put uključi prikazaće se čarobnjak za podešavanje. Pritisnuti OK za
početak i obaviti sljedeće korake:
1. korak – Odabrati jezik OSD menija;
2. korak –Odabrati sredinu između opcija „Početna stranica“ i „Trgovina“; 3. korak – Odabrati
državu;
4. korak – Podesiti sat na TV uređaju (Podešavanje vremena); 5. korak – Pročitati pravne izjave;
6. korak – Podesiti internet konekciju;
7. korak – Pokrenuti automatsko podešavanje za traženje programa. Po završetku postupka
programi će biti sačuvani u memoriji i time će biti završena početna podešavanja.
NAPOMENA: Prije uključivanja TV-a potrebno je uključiti TV signalni kabl na priključak tjunera
na stražnjoj strani TV-a.
Početna stranica
Pritisnuti taster Početna stranica kako bi se pristupilo početnoj stranici. Koristiti tastere za
navigaciju i taster OK za biranje i pristup prečici.
Opcija Mirashare (Na nekim modelima nije dostupna ova opcija)
Ukoliko se radi bez kabla pritisnuti taster Wi-Fi na mobitelu, odabrati opciju „Mirashare“ na
početnom ekranu nakon pritiskanja tastera POČETNA STRANICA i sadržaj s mobitela biće
podijeljen s TV uređajem tako da se može uživati u iskustvu gledanja na velikom ekranu.
KORACI:
1. Otvoriti funkciju Miracast na mobitelu;
2. Pronaći ime TV uređaja i odabrati ga, na TV-u će se pojaviti iskačući prozor; potrebno je
prihvatiti povezivanje s funkcijom Mirashare i sadržaj s mobitela reproduciraće se na TV-u.
Napomena: Na nekim modelima, nakon što se izabere ime TV-a, doći će do automatskog
povezivanja mobitela i TV uređaja.
Izvor
Odabrati ulazni izvor.
Mrežne aplikacije
Na raspolaganju su društvene aplikacije kao što su Y ouTube.
Na primjer, odabrati ikonu Facebook na početnoj stranici i pritisnuti OK za pristup.
TV pretraživač
Odabrati ikonu TV pretraživač na početnoj stranici i pritisnuti OK za pristup surfanju
internetom. Funkcije uključuju brzo biranje, obeleživače itd.
Napomena:
1. Pretraživač možda ne podržava neke internet stranice ili prikazivanje videa zbog nestabilne
mreže, razlika u regijama ili prekidima usluge, što nema nikakve veze s ovim TV uređajem.
2. Ukoliko se trenutna stranica nije do kraja otvorila (traka toka nije ispunjena), druga strana se
izravno bira, a prethodna neće biti sačuvana u istoriji.
Medija plejer
Spojiti USB uređaj s TV-om i na početnoj stranici odabrati Medija plejer; tako da se na
televizoru mogu prikazivati fajlovi (snimci/muzika/fotografije) s USB uređaja.
72
Page 73

TV trgovina Opera
To je onlajn trgovina napravljena za televizore. Preko nje se mogu nabaviti različite vrste
aplikacija, kao vijesti i vrijeme, priroda i putovanja, aplikacije za djecu, stil života, sportovi,
muzika, TV i video uživo, igre, filmovi i TV i slično.
Kućni mediji (opcija možda nije dostupna)
Da bi se snimci, muzika i fotografije dijelili s mobitela ili računara na TV potrebno je povezati TV
i ove uređaje na istu mrežu.
Napomena 1: Neke od aplikacija na početnoj strani nisu dostupne na svim modelima, a ovo
uputstvo ne sadrži instrukcije za sve aplikacije na početnom ekranu.
Napomena 2: Ako mrežni provajderi nadograde ili modifikuju svoje servere, aplikacije kao što
su YouTube i Facebook možda neće raditi na ovom uređaju.
Napomena 3: Daljinski upravljač možda neće biti kompatibilan u potpunosti s nekim mrežnim
aplikacijama ili neće raditi zbog prekida u usluzi i to nema nikakve veze sa ovim TV uređajem.
Napomena 4
Pravila o privatnosti (postoji mogućnost da nisu na raspolaganju): Za zaštitu vaših osobnih
podataka i poštovanje zakonskih odredbi. U bilo kom trenutku imate mogućnost otkazati
prihvatanje pravila o privatnosti u meniju svog uređaja Tesla TV. Ukoliko to učinite, uređaj se
neće povezati s internetom.
Napomena 5
Sadržaji mrežnih aplikacija i usluga koje kontrolišu pružaoci usluga mrežnih aplikacija pomoću
mreža i postrojenja za prijenos predmet su izmjena, suspenzije, uklanjanja, prestanka,
prekida ili neuspješnog pristupa u bilo koje vrijeme bez prethodnog obavještenja, a
proizvođač nije u mogućnosti da kontroliše ili bude informisan o prethodno navedenim
promjenama. Proizvođač izjavljuje da se odriče bilo kakve odgovornosti koja proizlazi iz
neuspješnog korišćenja sadržaja mrežnih aplikacija i usluga od strane kupca, uključujući, ali
ne ograničavajući se samo na neuspjeh mrežne veze ili komunikacionih linija, tehnoloških
promjena, odnosno promjene, obustave, prekida, onemogućavanja ili uklanjanja bilo kakvog
sadržaja ili usluga od strane dobavljača mrežnih aplikacija itd.
BiH/CG
73
Page 74

BiH/CG
UPRAVLJANJE MENIJEM
Donji opisi postavki menija za trajno ažuriranje i nadogradnju možda nisu u skladu s Vašim
televizorom, to je uobičajeno i to uređuje stvarni sadržaj Vašeg televizora.
Rukovanje menijem
Pritisnuti taster MENI (MENU) za ulazak u glavni meni.
Pritisnuti taster [ ] / [ ] da bi se odabrao meni.
Pritisnuti taster[] / [] da bi se odabrao podmeni.
Pritisnuti taster OK za ulazak u željenu stavku.
Pritisnuti taster MENI (MENU) za izlazak iz stavke.
Napomena: Opcije menija u nastavku nalaze se pod TV izvorima.
Slika
Režim slike: Odabrati prikladni režim slike.
Pozadinsko osvjetljenje: Podesiti parametre pozadinskog osvetljenja na TV-u.
Temperatura boje: Odabrati opšti ton boje slika.
Dinamičko smanjenje šuma: Odabrati Isključeno, Nisko, Srednje ili Jako.
Smanjenje šuma MPEG: Odabrati Isključeno, Nisko, Srednje ili Jako.
Razmjera/Odnos širina:visina: Odabrati prikladan režim slike za različite svrhe. Neke
opcije nisu dostupne pod nekim izvorima i video sadržajima.
Dinamički kontrast: Po želji podesiti na Upaljeno ili Ugašeno.
Senzor slike: Ova funkcija automatski podešava osvjetljenost ekrana kada se
osvjetljenost slike promeni. Ako je slika noćna, ekran će automatski potamnjeti; ako je
slika dnevna, ekran će automatski posvijetliti.
Režim filma: Po želji podesiti na Upaljeno ili Ugašeno.
Resetovanje slike: Vraća podešavanja slike na podrazumijevane vrijednosti.
Zvuk
Podešavanje režima zvuka: Odabrati neku od opcija: Standardno, Muzika, Film, Sport,
Korisnik.
Balans: Kontroliše balans zvuka između desnog i lijevog zvučnika.
Automatska jačina zvuka: Odabrati opcije Uključeno ili Isključeno.
Prostorno ozvučenje: Pomaže u stvaranju bogatijeg i šireg zvuka izvora stereo zvuka.
Analogni audio izlaz: Ova funkcija se koristi za izbor opcije Slušalice i Izlazna linija.
Ubaciti slušalice u priključak za slušalice na TV-u da bi se moglo slušati preko njih.
Digitalni audio izlaz: Ova funkcija se koristi za izbor opcija Automatski i PCM. Nakon
povezivanja digitalnog pojačala na priključak za audio izlaz na TV uređaju odabrati ovu
funkciju iz menija ZVUK, a zatim odabrati režim audio izlaza.
Audio HDMI: Izbor režima zvuka HDMI ima tri opcije: automatski, digitalno i analogno.
Zvučni opis (možda nije dostupan): Uključiti ili Isključiti opciju Audio opis. Kada je zvučni
opis uključen, narator će za slijepe i slabovide osobe opisivati ono što se dešava na
ekranu.
Resetovanje zvuka: Vraća podešavanja zvuka na podrazumijevane vrijednosti.
74
Page 75

Instalacija
Uređivanje programa
Urediti programe. Pritiskanjem tastera u boji na daljinskom upravljaču mogu se preskakati i
brisati programi, a korišćenjem tastera OMILJENO (FAV) i dodavati programi na listu omiljenih
programa.
Napajanje antene od 5V
Ova opcija je dostupna samo s izvorom signala DVB-T/T2. Da bi se omogućilo napajanje TV
antene potrebno je pritisnuti Uključeno. Odabrati Isključeno da bi se isključila ova funkcija.
CI informacije (dostupno samo u DTV režimu)
Opcija omogućava korisniku da bira u okviru menija modula uslovnog pristupa (CAM).
Odabrati CI meni prema meniju PC kartice.
Informacije o signalu
Za prikaz informacija o DTV kanalu koji se trenutno prati.
Automatsko podešavanje
Prije početka automatskog podešavanja odabrati željeni izvor.
• DVB-S/S2 Automatsko podešavanje
Podešavanja satelitske antene (za korake 1–3 pogledati sliku1 i sliku2)
Konfigurisati podešavanja satelitske antene za svaki satelit koji se želi prije započinjanja
pretrage kanala.
Satelit – Odabrati satelit za ovaj TV uređaj.
Dugi kabl – Povećava LNB napajanje.
LNB tip – Provjeriti da li LNB tip odgovara anteni.
LNB napajanje – Omogućava ili onemogućava napajanje za LNB.
22KHz - Odabrati 22KHz da bi se 22K prekidač prebacivao na UKLJUČENO/ISKLJUČENO
(ON/OFF). Ovaj automatski režim se koristi za uključivanje ili isključivanje prekidača 22KHz
u zavisnosti od LNB tipa.
DiSEqC1.0/1.1 – Odabrati DiSEqC režim za odabrani LNB.
Unicable/IF Frekv/ Podešeni položaj – Podešavanje parametara za Unicable zavisi od
diska.
BiH/CG
Slika 1
75
Page 76

BiH/CG
Slika 2
Korak 1 Pritisnuti taster MENI (MENU) i odabrati meni INSTALACIJA. Odabrati DVB-S/S2
automatsko podešavanje i pritisnuti taster OK, na satelitu će se prikazati isto što i na slici 1, a
podrazumevani satelit biće istaknut.
Korak 2 Pritisnuti taster OK za potvrđivanje odabranog satelita.
Korak 3 Pritisnuti taster za prebacivanje na LNB podešavanja, pritisnuti taster za
označavanje LNB tipa i pritisnuti taster OK za podešavanje parametara.
Korak 4 Provjeriti da li signal 22KHz, DiSEqC1.0/1.1 odgovara odabranom satelitu. Ukoliko
ne odgovara, označiti ga i pritisnuti taster OK za podešavanje pravih parametara. (Odnosi se
na sliku 2)
Nakon obavljenih navedenih koraka, pritisnuti plavi taster za traženje kanala.
• DVB-T/T2 ili DVB-C ili ATV Automatsko podešavanje
Odabrati DVB-T/T2 (ili DVB-C/ ATV) Automatsko podešavanje da bi se pokrenulo
automatsko pretraživanje programa. Možda će biti neophodno da se podesi meni za
pretragu ili izabere država prije pretrage. Ako se želi zaustaviti automatska pretraga
pritisnuti MENI (MENU) ili taster IZLAZ (EXIT) i pojaviće se prozor za dijalog o napuštanju
pretrage.
• Pritisnuti za potvrđivanje izlaska.
• Pritisnuti za nastavak pretraživanja.
DVB-T/T2 ili DVB-C Ručno podešavanje
Ručno pretraživanje i čuvanje programa. Prije pretrage odabrati odgovarajući izvor.
1. U meniju Instalacija odabrati DVB-T/T2 (ili DVB-C) ručno podešavanje i pritisnuti OK da bi
se pristupilo interfejsu za pretragu; prije toga je potrebno odabrati državu.
2. Ponovo pritisnuti ili podesiti relevantne parametre kao što su režim skeniranja, opseg
skeniranja itd., a zatim odabrati Traži i pritisnuti ili da bi započela pretraga.
3. Pretraga se zaustavlja kada se pronađe program, a program će biti sačuvan na kanalu
na kom se trenutno nalazi. Ako se želi zaustavljanje pretrage potrebno je pritisnuti taster
MENI (MENU).
76
Page 77

Ručno podešavanje analogne televizije (ATV)
U režimu rada analogne televizije (ATV) odabrati Podešavanje analogne televizije i pritisnuti
taster OK da bi mu se pristupilo.
1. Koristiti tastere za navigaciju za označavanje ili podešavanje opcija Skladištenje u 1 (ili neki
drugi broj), Sistem boja, Ozvučenje ili Trenutni kanal. Zatim odabrati Traži i pritisnuti ili
da bi se započelo pretraživanje.
• Pritisnuti za pretragu viših frekvencija;
• Pritisnuti za pretragu nižih frekvencija;
2. Kada je program pronađen pritisnuti crveni taster da bi ostao sačuvan na kanalu na kom se
trenutno nalazi. Ako se pretraga želi zaustaviti potrebno je pritisnuti taster MENI (MENU).
• Precizno podešavanje
Koristiti za mala prilagođavanja u podešavanjima pojedinačnih kanala. Precizno
podešavanje nije neophodno u normalnim uslovima. Koristiti precizno podešavanje u
uslovima lošeg emitovanja kada su neophodna podešavanja da bi se dobila bolja slika ili
zvuk.
1. Odabrati kanal koji se želi podesiti.
2. U meniju Instalacija odabrati Ručno podešavanje analogne televizije (ATV) i pritisnuti
da bi se označilo Precizno podešavanje.
3. Pritisnuti ili za precizno podešavanje sve dok se ne dobiju najbolji mogući slika i zvuk.
Podešavanje
Jezik za OSD: Odabrati jezik koji se želi za OSD.
Jezik zvuka: Podesiti primarni ili sekundarni digitalni jezik zvuka koji odgovara signalu.
Jezik titlova: Odabrati jezik titlova.
Osobe s oštećenim sluhom: Ova funkcija pomaže korisnicima s oštećenim sluhom da
shvate programe tako što im prikazuje relevantne grafičke informacije (koji liče na titlove)
na ekranu.Ovu funkciju je potrebno aktivirati prije upotrebe.
Jezik teleteksta: Odabrati jezik teleteksta po želji.
Sistem datoteka za REC: Da bi se koristila ova funkcija potrebno je primati digitalni
program i priključiti USB uređaj.
Napomena: Predlažemo upotrebu brzog mobilnog hard diska, u suprotnom može doći
do kočenja TV-a prilikom upotrebe opcija personalnog video snimanja i vremenskog
pomjeranja.
HDMI CEC: Priključivanjem eksternih uređaja na HDMI port na TV uređaju omogućava se
povezivanje i istovremeno upravljanje i TV-om i eksternim uređajima.
HDMI CEC – Uključiti ili isključiti funkciju HDMI CEC.
Automatsko stanje pripravnosti – Upaliti automatsko stanje pripravnosti na TV-u.
Spisak uređaja – Kada je funkcija HDMI CEC uključena provjeriti spisak uređaja povezanih s
TV-om.
Lokacija: Odabrati sredinu u kojoj će se koristiti TV. Opcije uključuju Početnu stranicu i
Trgovinu.Ukoliko se izabere Trgovina može se uključiti Demo naljepnica.
Prezentacija: Upaliti ili ugasiti Demo naljepnicu i USB demo.
USB demo:
1. Potrebna podešavanja: Dodati „AutoDemo.txt“ txt fajl na glavni direktorijum USB uređaja, a
zatim napisati adresu foldera do videa koji se želi prikazivati na TV uređaju. Prije svake adrese
treba stajati prazna linija.
BiH/CG
77
Page 78

BiH/CG
2. Kada je „USB demo“ podešen na „Uključeno“ TV će automatski reprodukovati video
u „AutoDemo.txt“. Nakon reprodukcije svih snimaka TV će nastaviti sa reprodukcijom
programa koji je prethodno gledan. Nakon pet minuta TV će ciklično reprodukovati
zapisane programe.
3. Adrese je potrebno pisati na engleskom jeziku ili brojevima, u suprotnom TV ih neće
identificirati.
Ažuriranje softvera:
1. Ažuriranje softvera (USB)
Potrebno je, kao prvo, preuzeti i sačuvati nadograđen softver na USB uređaj; drugo –
povezati USB uređaj sa TV-om preko USB porta; treće – pristupiti meniju za podešavanje
i odabrati „ažuriranje softvera“, zatim odabrati „Ažuriranje softvera (USB)“ da bi proces
nadogradnje počeo. Po završetku ovih radnji TV će se automatski restartovati.
NAPOMENA: Ne isključujte TV tokom procesa nadogradnje softvera, u suprotnom, TV možda
neće raditi i korisnik će biti odgovoran.
2. Ažuriranje softvera (mrežno)
Povezati TV na internet da bi se mogao nadograditi TV sistem ili mrežna aplikacija na TV-u.
NAPOMENA: „Mrežno ažuriranje“ može biti nedostupno u nekim oblastima.
3. Ažuriranje softvera (OAD) (Samo za neke oblasti i dostupno samo u režimu DVB-T). Odabrati
za apdejtovanje sistema TV uređaja preko vazduha.
Napredna opcija: Podesiti funkcije „Brzo pokretanje“ i „Buđenje mreže“.
Plavi ekran: Kada je plavi ekran podešen na Uključeno, ekran će poplavjeti i zvuk će biti
prigušen kada nema signala.
Korisničko resetovanje: Resetovanje podešavanja na podrazumijevane vrijednosti.
Pravne izjave: Relevantne pravne izjave.
Vrijeme
Sat: Podesiti sat na TV-u, vremensku zonu i ljetnje računanje vremena.
Režim sata – Opcija uključuje automatsko i ručno. Kada se odabere „Automatsko“, sat na TV-u
se sinhronizuje s realnim digitalnim TV signalom. Kada se odabere „Ručno“ potrebno je ručno
podesiti sat i vrijeme, uključujući i podešavanja godine, mjeseca, datuma, sati i minuta.
Vremenska zona – Odabrati vremensku zonu prema lokaciji.
Ljetnje vreme (Ljetnje računanje vremena) – Ova funkcija se može uključiti ili isključiti.
Tajmer za isključivanje: Ova funkcija omogućava da podesite TV da se automatski
isključuje u određeno vrijeme.
Tajmer za uključivanje: Funkcija omogućava automatsko uključivanje TV uređaja u
određeno vrijeme i s određenom jačinom zvuka.
Tajmer za mirovanje: Podešavanje automatskog prebacivanja TV uređaja u stanje
mirovanja.
Automatsko isključivanje napajanja: Ova funkcija omogućava podešavanje TV-a za
automatsko isključivanje u uslovima kada se ne koristi.
Tajmer za kontinuirano gledanje: Da bi se spriječilo gledanje TV-a neprekidno tokom
dužih vremenskih perioda može se podesiti da se pojavljuje poruka koja sugeriše da bi
gledalac trebalo da napravi pauzu.
Ovo je naročito korisno za sprječavanje djece da gledaju TV duži vremenski period. Iz menija
VRIJEME odabrati opciju Tajmer za kontinuirano gledanje i podesiti vrijeme. Kada istekne
vremenski period koji je podešen pojavljuje se poruka koja sugeriše da bi gledalac trebalo da
napravi pauzu. Pritisnuti OK ili IZLAZ da bi se uklonila poruka.
78
Page 79

Napredno
Sistem zaključavanja: Unijeti početnu lozinku (0000) da bi se pristupilo funkciji, odabrati
„Uključeno“ i biće aktivirane sljedeće funkcije „Postavi lozinku“, „Blokiraj kanal“,
„Roditeljski nadzor“ i „Zaključavanje panela“; odabrati „Isključeno“ i tri navedene
funkcije biće deaktivirane. Ukoliko je korisnik zaboravio lozinku, koristiti super lozinku
(8899) da bi se pristupilo. Postavljanje lozinke: Resetovati lozinku sistema za zaključavanje.
Blokiranje kanala (samo u TV režimu): Blokirati kanale (programe) koji nisu pogodni za
djecu.
Roditeljski nadzor (samo u TV režimu): Uz pomoć lozinke omogućava ograničavanje
pristupa programima koji nisu prikladni za djecu.
Zaključavanje panela: Onesposobljava tastere na TV uređaju. Svi tasteri na daljinskom
upravljaču mogu se i dalje koristiti
Mreža
Bežična veza
1. Odabrati opciju „Bežična veza“ i pritisnuti taster OK, a zatim odabrati opciju „Uključi
WLAN“;
2. Sačekati nekoliko sekundi dok se pojavi spisak Wi-Fi pristupnih točaka. Odabrati i pritisnuti
taster OK da bi se otvorio interfejs za unos lozinke.
3. Koristiti tastere za navigaciju da bi se unijela lozinka. Kada se završi s unosom lozinke
pritisnuti zeleni taster na daljinskom upravljaču kako bi se uspostavila veza.
Žična veza
1. Priključiti mrežni kabl na LAN priključak na stražnjoj strani televizora;
2. Pristupiti glavnom meniju i odabrati podmeni za mreže.
3. Odabrati opciju „Žična mreža“, a zatim „Automatski unos“, sačekati nekoliko sekundi i
konfiguracija mreže biće uspješno završena.
BiH/CG
Napomena: Prije započinjanja ovog postupka provjeriti da li ruter pravilno radi.
UPRAVLJANJE USB UREĐAJEM
USB meni
Sa USB uređaja za skladištenje podataka mogu se prikazivati filmovi, muzika i fotografije.
1. Povezati USB uređaj za skladištenje podataka u USB ulazni priključak.
2. Pritisnuti taster Početna strana i odabrati „Medija plejer“.
FILM: Reprodukcija filmova s USB-a
MUZIKA: Reprodukcija muzike s USB-a.
FOTOGRAFIJA: Pregled fotografija s USB-a.
Podsjetnik prilikom upotrebe USB plejera
4. Neki USB uređaji za skladištenje podataka možda neće biti u potpunosti kompatibilni s
ovim TV-om.
79
Page 80

BiH/CG
5. Sve podatke čuvati na USB uređaju za skladištenje podataka kako se ne bi izgubili usljed
neočekivanih situacija. Ne snosimo nikakvu odgovornost za gubitke nastale pogrešnom
upotrebom ili usljed kvara. Izrada rezervne kopije podataka je odgovornost korisnika.
6. Učitavanje velikih fajlova može potrajati malo duže.
7. Brzina prepoznavanja USB uređaja za skladištenje podataka može se razlikovati kod
pojedinačnih uređaja.
8. Postarati se da se TV ne nalazi u USB režimu prilikom povezivanja ili isključivanja USB
uređaja za skladištenje podataka, u suprotnom može doći do oštećenja USB uređaja za
skladištenje podataka ili datoteka koje se skladište na njemu.
9. Koristiti isključivo USB uređaj za skladištenje podataka sa sistemom datoteka FAT16,
FAT32, NTFS koji se koristi za operativni sistem Windows. Uređaj za skladištenje podataka
koji je formatiran u nekom drugom sistemu za datoteke koji Windows ne podržava možda
neće biti prepoznat.
10. Prilikom upotrebe USB hard diska postarati se da jačina struje za napajanje ne pređe 500
mA. Ako jačina struje pređe 500mA TV će preći u režim mirovanja i biće potrebno isključiti
USB hard disk i restartovati TV uređaj.
11. Ako format datoteke nije podržan ili je datoteka neispravna pokazaće se poruka
„Nepodržana datoteka“.
12. Za obradu FHD slike potrebno je više vremena i to nema veze s TV uređajem. Molimo za
strpljenje.
13. Ovaj TV uređaj možda ne podržava neke multimedijalne datoteke zbog promjena u
formatu šifrovanja ili tehničkog napretka.
Meni filmova
1. Pritisnuti / da bi se odabrao FILM. Pritisnuti OK za ulazak.
2. Pritisnuti / ili / za odabir foldera koji se želi i pritisnuti OK da bi se otvorio
folder, pritisnuti /
3. Pritisnuti
za zaustavljanje reprodukcije filma i vraćanje na listu filmova.
da započne reprodukcija.
4. Pritisnuti IZLAZ za pristup prethodnim ekranima menija.
Kontrolna traka za filmove
Pauza
Stop
Preskoči
prethodno
Preskoči
sljedeće
Brzo premotavanje
unazad
Brzo premotavanje
unaprijed
Vremensko
pretraživanje
A/B Ponavljanje
Način
reprodukcije
Informacije Podešavanja
reprodukciju
Spisak za
- Pritisnuti [ MENI ] za prikaz Kontrolne trake za filmove za vrijeme reprodukcije filma.
- Pritisnuti [ ] / [ ] za izbor željenih podešavanja.
- Pritisnuti [ MENI (MENU)] za izlaz iz Kontrolne trake za filmove
80
Page 81

Meni muzike
1. Pritisnuti / da bi se odabrala opcija MUZIKA. Pritisnuti OK za ulazak.
2. Pritisnuti / ili / za izbor foldera koji se želi i pritisnuti OK da bi se otvorio folder,
pritisnuti /
3. Pritisnuti
4. Pritisnuti IZLAZ za pristup prethodnim ekranima menija.
Kontrolna traka za muziku
da započne reprodukcija.
za zaustavljanje reprodukcije muzike i vraćanje na listu muzike.
BiH/CG
Pauza
Stop
Preskoči
prethodno
Preskoči
sljedeće
Brzo premotavanje
unazad
Premotaj
unaprijed
Informacije
Način
reprodukcije
Podešavanja
- Pritisnuti [ MENI ] za prikaz Kontrolne trake za muziku u toku reprodukcije muzike.
- Pritisnuti [ ] / [ ] za izbor željenih podešavanja.
- Pritisnuti [ MENI (MENU)] za izlazak iz Kontrolne trake za muziku.
Meni fotografija
1. Pritisnuti / za izbor FOTOGRAFIJE. Pritisnuti OK za ulazak.
2. Pritisnuti / ili / da bi se odabrao folder koji se želi i pritisnuti OK za otvaranje
foldera, pritisnuti /
3. Pritisnuti
za zaustavljanje reprodukcije fotografija i vraćanje na listu fotografija.
4. Pritisnuti IZLAZ (EXIT) za pristup prethodnim ekranima menija.
Kontrolna traka za fotografije
Preskoči
Pauza
prethodno
da započne reprodukcija.
Rotiraj CW
Zumiraj
Lista za
reprodukciju
Podešavanja
Stop
Preskoči
sljedeće
Rotiraj CCW
Informacije
Muzička
podloga
- Pritisnuti [ MENI (MENU) ] kako bi se tokom dijaprojekcije prikazala Kontrolna traka za fotografije.
- Pritisnuti [ ] / [ ] za izbor željenih podešavanja.
- Pritisnuti [ MENI ] za izlaz iz Trake s informacijama
81
Page 82

BiH/CG
RJEŠAVANJE PROBLEMA
Prije pozivanja lokalnog servisera pročitati sljedeće informacije o mogućim uzrocima i
rješenjima problema koji su se pojavili
Problemi Rješenja i objašnjenja
Daljinski upravljač ne radi 1. Provjeriti senzor na daljinskom upravljaču
2. Zamijeniti baterije.
3. Baterije nisu postavljene na odgovarajući način.
4. Uređaj nije povezan na napajanje.
Loš signal Ovo obično nastaje usljed ometanja koja izazivaju mobiteli,
voki-tokiji, sistemi za pokretanje automobila, uključene
neonske lampe, električne bušilice ili drugi električni
uređaji.
Nema slike. Nema zvuka 1. Provjeriti izvor signala.
2. Uključiti neki drugi električni uređaj u utičnicu kako bi
provjerilo da li utičnica radi i da li je pod naponom.
3. Loš kontakt utikača s utičnicom.
4. Provjeriti izvor signala.
Nenormalna slika 1. Ako nema boja ili je kvalitet slike loš probati:
• Prilagoditi opcije boja u podešavanjima menija.
• Pobrinuti se da je televizor na dovoljnoj udaljenosti od
ostalih električnih uređaja.
• Pokušati promijeniti kanal, možda se radi o problemu
emitovanja signala.
2. Loš TV signal (ometanja ili snijeg):
• Provjeriti kabl i prilagoditi antenu
• Namjestiti program pomoću opcije fino podešavanje.
• Prebaciti na neki drugi kanal.
Normalna slika, nema zvuka 1. Ako nema zvuka pritisnuti Isključivanje/uključivanje zvuka
ili pojačati zvuk.
2. Otvoriti meni za zvuk i podesiti „Balans“.
3. Provjeriti da slučajno nisu uključene slušalice, ako jesu,
isključiti ih.
Zvuk je normalan, ali slika
nije.
Slika je normalna, ali zvuk
nije
1. Moguće je da je datoteka oštećena. Provjeriti može li se
datoteka reprodukovati na računaru.
2. Provjeriti da li su podržani video i audio kodeci.
1. Moguće je da je datoteka oštećena. Provjeriti može li se
datoteka reprodukovati na računaru.
2. Provjeriti da li su podržani video i audio kodeci.
82
Page 83

Problemi Rješenja i objašnjenja
Mreža ne radi 1. Provjeriti radi li ruter.
2. Kod modela koji za priključivanje na internet koriste USB
modem, provjeriti da li je pravilno uključen USB modem.
3. Provjeriti da li je TV uspješno povezan s ruterom
Internet stranica nije u
potpunosti prikazana
1. „Fleš“ nije podržan.
2. Podržani formati: JPEG, PNG, GIF, BMP, WMV (ASF),
WMA, MP3 i MP4.
Pretraživač se sam zatvara Internet stranica sadrži prevelike slike i memorija nije
dovoljno velika za njihovo prikazivanje pa se pretraživač sam
zatvara.
Napomena: Ukoliko se problem nastavi nakon primjene svih navedenih rješenja kontaktirati
lokalni centar za podršku. Nabrojano u ovoj tabeli za rješavanje problema služi samo kao
preporuka; stvarni problem se može razlikovati od navedenih.
BiH/CG
83
Page 84

BiH/CG
SPECIFIKACIJE
Tesla TV 32S367BHS
Veličina ekrana - dijagonala 81cm
Rezolucija ekrana 1366x768
Snaga audio izlaza (L+D) 6W + 6W
Radni napon 100-240V~ 50/60Hz
Deklarisana potrošnja 65W
Dimenzije (Š x V x D mm) sa
postoljem
Dimenzije (Š x V x D mm) bez
postolja
Neto težina sa postoljem 4.0kg
Neto težina bez postolja 3.9kg
Sredina
(samo za uslove tropskih klimatskih
zona):
Sredina
(samo za uslove umijerenih
klimatskih zona):
Sistem DTV: DVB-T/T2/C/S/S2
Prikaz programa ATV: 100; DTV: 1000
Status prikazivanja metoda Prikaz na ekranu
Indikator podešavanja funkcija Prikaz menija
Jezik ekranskog prikaza Više opcija
RF serijski ulaz 75 ohm nebalansirano
AV video ulaz 75 ohm, 1.0Vp-p, RCA
AV audio ulaz 10k ohm, 0.5Vrms
733.4x474x167.7
733.4x438.5x85.1
Temperatura prilikom rada: 5°C~45°C
Vlažnost vazduha prilikom rada: 20%~80%
Temperatura prilikom skladištenja: -15°C~50°C
Vlažnost vazduha prilikom skladištenja: 10%~90%
Temperatura prilikom rada: 5°C~35°C
Vlažnost vazduha prilikom rada: 20%~80%
Temperatura prilikom skladištenja: -15° C~45°C
Vlažnost vazduha prilikom skladištenja: 10%~90%
TV: PAL-BG/DK/I, SECAM-BG/DK
AV: PAL, SECAM, NTSC
84
Page 85

Tesla TV 40S367BFS
Veličina ekrana - dijagonala 101cm
Rezolucija ekrana 1920x1080
Snaga audio izlaza (L+D) 6W + 6W
Radni napon 100-240V~ 50/60Hz
Deklarisana potrošnja 74W
Dimenzije (Š x V x D mm) sa
postoljem
Dimenzije (Š x V x D mm) bez
postolja
906.5 x 209.0 x 574.5
906.5 x 84.9 x 525.9
Neto težina sa postoljem 6.6 kg
Neto težina bez postolja 6.4 kg
Sredina
(samo za uslove tropskih klimatskih
zona):
Temperatura prilikom rada: 5°C~45°C
Vlažnost vazduha prilikom rada: 20%~80%
Temperatura prilikom skladištenja: -15°C~50°C
Vlažnost vazduha prilikom skladištenja: 10%~90%
Sredina
(samo za uslove umijerenih
klimatskih zona):
Temperatura prilikom rada: 5°C~35°C
Vlažnost vazduha prilikom rada: 20%~80%
Temperatura prilikom skladištenja: -15° C~45°C
Vlažnost vazduha prilikom skladištenja: 10%~90%
Sistem DTV: DVB-T/T2/C/S/S2
TV: PAL-BG/DK/I, SECAM-BG/DK
AV: PAL, SECAM, NTSC
Prikaz programa ATV: 100; DTV: 1000
Status prikazivanja metoda Prikaz na ekranu
Indikator podešavanja funkcija Prikaz menija
Jezik ekranskog prikaza Više opcija
RF serijski ulaz 75 ohm nebalansirano
AV video ulaz 75 ohm, 1.0Vp-p, RCA
AV audio ulaz 10k ohm, 0.5Vrms
BiH/CG
85
Page 86

BiH/CG
LICENCE
HDMI i HDMI High-Definition Multimedia Interface i logo DHMI
su zaštitni znaci ili registrovani zaštitni znaci HDMI licensing LLC u
Sjedinjenim Američkim Državama i drugim zemljama.
Proizvedeno po licenci Dolby Laboratories.
Dolby, Dolby Audio i simbol duplo D su zaštitni znaci Dolby Laboratories.
86
Page 87

СЪДЪРЖАНИЕ
СЪДЪРЖАНИЕ . . . . . . . . . . . . . . . . . . . . . . . . . . . . . . . . . . . . . . . . . . . . . . . . . . 87
ПРЕДУПРЕЖДЕНИЯ И ПРЕДПАЗНИ МЕРКИ . . . . . . . . . . . . . . . . . . . . . . 88
ПОЗИЦИОНИРАНЕ НА ТЕЛЕВИЗОРА . . . . . . . . . . . . . . . . . . . . . . . . . . . . 91
ПАНЕЛНИ БУТОНИ. . . . . . . . . . . . . . . . . . . . . . . . . . . . . . . . . . . . . . . . . . . . . . 94
TEРМИНАЛИ . . . . . . . . . . . . . . . . . . . . . . . . . . . . . . . . . . . . . . . . . . . . . . . . . . . . 95
ФУНКЦИИ ЗА ДИСТАНЦИОННО УПРАВЛЕНИЕ . . . . . . . . . . . . . . . . . . 96
ЗАПИСВАНЕ НА ЛИЧНО ВИДЕО (REC) . . . . . . . . . . . . . . . . . . . . . . . . . . . 98
ЕЛЕКТРОННА НАРЪЧНА ПРОГРАМА (EPG) . . . . . . . . . . . . . . . . . . . . . . . 99
ПЪРВОНАЧАЛНИ НАСТРОЙКИ И ФУНКИЦИИ . . . . . . . . . . . . . . . . . . 100
КОНТРОЛ НА МЕНЮТО . . . . . . . . . . . . . . . . . . . . . . . . . . . . . . . . . . . . . . . . 102
Работа в менюто . . . . . . . . . . . . . . . . . . . . . . . . . . . . . . . . . . . . . . . . . . . . . 102
Снимка. . . . . . . . . . . . . . . . . . . . . . . . . . . . . . . . . . . . . . . . . . . . . . . . . . . . . . 102
Звук . . . . . . . . . . . . . . . . . . . . . . . . . . . . . . . . . . . . . . . . . . . . . . . . . . . . . . . . . 102
Инсталация. . . . . . . . . . . . . . . . . . . . . . . . . . . . . . . . . . . . . . . . . . . . . . . . . . 103
Настройки. . . . . . . . . . . . . . . . . . . . . . . . . . . . . . . . . . . . . . . . . . . . . . . . . . . 105
Време . . . . . . . . . . . . . . . . . . . . . . . . . . . . . . . . . . . . . . . . . . . . . . . . . . . . . . . 106
Повече . . . . . . . . . . . . . . . . . . . . . . . . . . . . . . . . . . . . . . . . . . . . . . . . . . . . . . 107
Мрежа . . . . . . . . . . . . . . . . . . . . . . . . . . . . . . . . . . . . . . . . . . . . . . . . . . . . . . 107
USB КОНТОЛ. . . . . . . . . . . . . . . . . . . . . . . . . . . . . . . . . . . . . . . . . . . . . . . . . . . 107
USB Meню . . . . . . . . . . . . . . . . . . . . . . . . . . . . . . . . . . . . . . . . . . . . . . . . . . . 107
Меню за филми. . . . . . . . . . . . . . . . . . . . . . . . . . . . . . . . . . . . . . . . . . . . . . 108
Меню за музика. . . . . . . . . . . . . . . . . . . . . . . . . . . . . . . . . . . . . . . . . . . . . . 109
Меню на снимки . . . . . . . . . . . . . . . . . . . . . . . . . . . . . . . . . . . . . . . . . . . . . 109
ОТСТРАНЯВАНЕ НА ПРОБЛЕМИ. . . . . . . . . . . . . . . . . . . . . . . . . . . . . . . . 110
СПЕЦИФИКАЦИЯ . . . . . . . . . . . . . . . . . . . . . . . . . . . . . . . . . . . . . . . . . . . . . . 112
BG
Забележка
1. Графиките в това ръководство са само за справка.
2. OSD на телевизора може да е малко по-различно от това, показано в това ръководство.
3. Информацията в този документ подлежи на промяна без предизвестие. Производителят
не поема отговорност за щети, произтичащи пряко или косвено от недостатъци,
непълноти или несъответствия между ръководството за потребителя и описания продукт.
4. В суха среда, дължаща се на статично електричество, продуктът може да се рестартира и
да се върне към основния OSD интерфейс, USB интерфейс плейър или предишния режим
източник, моля, продължете да работите на телевизора по свое желание.
87
Page 88

BG
ПРЕДУПРЕЖДЕНИЯ И ПРЕДПАЗНИ МЕРКИ
Забележка: Прочетете тези инструкции – Всички инструкции за безопасност и експлоатация
трябва да бъдат прочетени преди работа с този продукт.
• Запазете тези инструкции – Инструкциите за безопасност и експлоатация трябва да бъдат
запазени за бъдеща справка.
• Обърнете внимание на всички предупреждения – Всички предупреждения на уреда и в
инструкциите за експлоатация трябва да се спазват.
• Спазвайте всички инструкции – Всички инструкции за експлоатация и употреба трябва да
се спазват.
• Не използвайте този уред близо до вода – Уредът не трябва да се използва близо до
вода или влага, например в мокро мазе или в близост до плувен басейн и други подобни
помещения.
• Почиствайте само със суха кърпа.
• Не блокирайте отворите за вентилация. Монтирайте в съответствие с инструкциите на
производителя.
• Да не се монтира близо до източници на топлина като радиатори, отоплителни регистри,
печки или други устройства (включително усилватели), които произвеждат топлина.
• Не нарушавайте безопасността на поляризирания или заземителния щепсел.
Поляризираният щепсел разполага с две клеми, като едната е по-широка от другата.
Заземителният щепсел разполага с две клеми и трети заземителен зъб. Широката клема
или третият зъб е предоставен за Ваша безопасност. Ако предоставеният щепсел не влиза
във Вашия контакт, консултирайте се с електротехник за подмяна на остарелия контакт.
• Защитете захранващия кабел срещу минаване върху него или прищипване, особено
при щепсела, гнездата и в точката, където излиза от устройството. Използвайте само
приспособления/аксесоари, посочени от производителя.
• Използвайте само с количката, стойката, статива, скобата или масата, посочени от
производителя или продавани с устройството. При използване на количка или рафт
бъдете внимателни при придвижване на количката/устройството, за да избегнете
нараняване при преобръщане.
• Извадете щепсела на устройството от контакта по време на гръмотевични бури или ако не
се използва продължително време.
• Обслужването трябва да се извършва от квалифициран персонал. Обслужването се
изисква, когато устройството е било повредено по какъвто и да е начин, например ако
захранващият кабел или щепселът са повредени, течността е разлята или предмети са
паднали в уреда, апаратът е бил изложен на дъжд или влага, не работи нормално, или е
бил отпаднат.
• ВНИМАНИЕ: Тези инструкции за обслужване са предназначени само за квалифициран
сервизен персонал. За да намалите риска от токов удар, не извършвайте никаква друга
сервизна дейност освен тази, която се съдържа в ръководството за експлоатация, освен ако
не сте квалифицирани да го направите.
• Не инсталирайте това оборудване в затворено или вградено пространство, като например
рафт за книги или подобно, и оставете добре вентилационни условия на открито място.
Вентилацията не трябва да се възпрепятства чрез покриване на вентилационните отвори с
елементи като вестници, покривки за маса, завеси и др.
•
ВНИМАНИЕ – За да избегнете опасност от токов удар, подменете решетката.
• Моля, обърнете внимание на информацията за задната кутия за електрическа и безопасна
информация, преди да инсталирате или работите с уреда.
• За да намалите риска от пожар или токов удар, не излагайте устройството на дъжд или
влага. Апаратът не трябва да се излага на капки или пръскане и не трябва да се поставят
предмети, пълни с течности, като вази.
88
Page 89

• За терминалите, обозначени със символ " "може да са с достатъчна величина, за да
представляват риск от токов удар . Външното окабеляване, свързано към клемите, изисква
инсталиране от обучен упълномощен човек или използване на готови проводници или
кабели.
• За да предотвратите наранявания, този апарат трябва да бъде здраво закрепен към пода /
стената в съответствие с инструкциите за монтаж.
• Опасност от експлозия при неправилна подмяна на батерията. Заменете само със същия или
еквивалентен тип.
• Батерията (батерията или батериите или батерията) не трябва да се излага на прекомерна
топлина, като например слънчево греене, огън или други подобни.
• Прекомерното звуково налягане от слушалки и слушалки може да доведе до загуба на
слуха. Слушането на музика при високи нива на звука и за по-дълъг период от време може да
увреди слуха ви. За да се намали рискът от увреждане на слуха, трябва да намалите силата на
звука до безопасно и удобно ниво и да намалите времето за слушане на високи нива.
• Съединителят за захранващ кабел / уред за свързване / директен адаптер за включване се
използва като устройство за разединяване, устройството за разединяване трябва да е готово
за работа.
• Когато нее в употреба и по време на движение, моля, погрижете се за кабела за захранване,
напр. закачете захранващия кабел с кабелна връзка или нещо подобно. Не трябва да има
остри ръбове и подобни, които могат да причинят износване на захранващия кабел. При
повторно пускане в експлоатация, моля, уверете се, че комплектът захранващ кабел не
е повреден. Ако откриете каквито и да било повреди, моля, потърсете сервиз, който да
смени комплекта захранващи кабели, определен от производителя, или да има същите
характеристики като оригиналния.
• Трябва да се обърне внимание на екологичните аспекти на изхвърлянето на батериите.
• На апарата не трябва да се поставят източници на открит пламък, като запалени свещи. За да
предотвратите разпространението на пожар, винаги съхранявайте свещи или други открити
пламъци от апарата.
• Ако апаратът няма символа
три щифта, това означава, че е необходима защитна заземяваща връзка. Апаратът трябва да
бъде свързан към електрически контакт с защитно заземяване.
на неговия рейтинг етикет и неговият захранващ кабел има
• Следва да се посочи следната информация, доколкото е приложимо, когато е приложимо:
BG
Отнася се за променлив ток (AC)
Отнася се на постоянен ток (DC)
Отнася се за оборудване от клас II
Отнася се на режим на готовност
Отнася се за включване
Отнася се за опасно напрежение
• Предупреждение за апаратура, съдържаща батерии тип “монети” (под инструкциите,
използвани само за апаратура, съдържаща заменяема от потребителя монета / бутон
батерия)
89
Page 90

BG
ПРЕДУПРЕЖДЕНИЕ
Не гълтайте батерията, опасност от химическо изгаряне (Предоставена с дистанционното
управление) Този продукт съдържа батерия тип монета/бутон. Поглъщането на батерията
тип монета/бутон може да причини сериозни вътрешни изгаряния само за 2 часа и може
да доведе до смърт. Съхранявайте новите и използваните батерии далеч от деца. Ако
отделението за батерии не се затваря добре, спрете да използвате продукта и го пазете
от деца. Ако смятате, че батериите са погълнати или са поставени в някоя част от тялото,
незабавно потърсете медицинска помощ.
Директива WEEE
Правилно изхвърляне на този продукт. Тази маркировка указва, че този продукт
не трябва да се изхвърля с други битови отпадъци в целия ЕС. За да се предотврати
евентуална вреда на околната среда или на човешкото здраве от неконтролирано
изхвърляне на отпадъци, рециклирайте отговорно, за да насърчите устойчивото повторно
използване на материални ресурси. За да върнете Вашето използвано устройство, моля,
използвайте системите за връщане и прибиране или се свържете с търговеца, от когото
сте закупили продукта. Можете да отведете този продукт за екологично рециклиране.
CAUTION
RISK OF ELECTRIC SHOCK
DO NOT OPEN
Тази светкавица със символ на стрелка в рамките на равностранен триъгълник е
предназначена да предупреди потребителя за наличието на неизолирано “опасно
напрежение” в рамките на корпуса на продукта, което може да бъде достатъчно, за
да представлява опасност от токов удар. За да намалите опасността от токов удар. Не
махайте капака (или задната част). Вътре няма части с възможност за обслужване от
потребителя. Направете справка с квалифициран сервизен персонал. Удивителният знак
в рамките на равностранен триъгълник е предназначен да предупреди потребителя
относно наличието на важни инструкции за експлоатация и поддръжка в документите,
придружаващи уреда.
90
Page 91

ПОЗИЦИОНИРАНЕ НА ТЕЛЕВИЗОРА
• Монтирайте дисплея върху здрава хоризонтална повърхност като маса или бюро. За
вентилация оставете място от най-малко 10 cm около телевизора. За да предотвратите
грешка или опасни ситуации, моля, не поставяйте никакви предмети върху телевизора.
Това устройство може да се използва в тропически и/или умерени климатични условия.
• Закрепване на задната част на корпуса към стената. По-долу картината се различава от
актуалната позиция, затова тя е само за справка. (само за някои региони)
Никога не поставяйте телевизора на нестабилно място. Телевизорът може да падне,
причинявайки сериозни телесни повреди или смърт. Много наранявания, особено за деца,
могат да бъдат избегнати, като се вземат прости предпазни мерки като:
• Използване на шкафове или стойки, препоръчани при производството на телевизора.
• Използвайте само мебели, които безопасно могат да поддържат телевизора.
• Уверете се, че телевизорът не надвишава ръба на поддържащите мебели.
• Не поставяйте телевизора върху високи мебели (например шкафове или библиотеки), без
да закрепвате както мебелите, така и телевизора към подходяща опора.
• Не поставяйте телевизора върху плат или други материали, които могат да бъдат
разположени между телевизора и поддържащите мебели.
• Обучете децата за опасностите от катерене по мебели за достигане до телевизора или
неговия контрол.
Ако вашият съществуващ телевизор е запазен и преместен, трябва да се спазват същите
съображения като горе (Само за телевизора с маса над 7 кг).
BG
91
Page 92

BG
• Може да се използва допълнителен монтаж на стена за вашия телевизор. Консултирайте
се с местния дилър за монтаж на стена, който поддържа стандарта VESA, използван от
телевизионния ви модел.
• Внимателно прикрепете скобата за монтаж на стената в задната част на телевизора.
Монтирайте скобата за монтаж на стена на солидна стена, перпендикулярна на пода. Ако
свързвате телевизора към други строителни материали, моля свържете се с квалифициран
персонал, за да инсталирате монтирането на стена.
• Подробни инструкции ще бъдат включени с монтаж на стена. Моля, използвайте скоба
за монтиране на стена, където устройството е достатъчно закрепено към стената, с
достатъчно място, за да позволи свързването към външни устройства.
Предупреждение
• Изключете захранването, преди да преместите или инсталирате телевизора. В противен
случай може да възникне токов удар.
• Свалете стойката, преди да инсталирате телевизора на стенен монтаж, като извършите
закрепването на стойката в обратна посока.
• Ако инсталирате телевизора на таван или наклонена стена, той може да падне и да доведе
до тежки наранявания. Използвайте оторизиран монтаж на стена и се свържете с местния
търговец или квалифициран персонал. В противен случай тя не е покрита от гаранцията.
• Не затягайте винтовете, тъй като това може да повреди телевизора и да анулира
гаранцията
• За да предотвратите наранявания, този апарат трябва да бъде здраво закрепен към пода /
стената в съответствие с инструкциите за монтаж.
• Използвайте винтове и стойки за стена, които отговарят на следните спецификации. Всяко
увреждане или нараняване от злоупотреба или използване на неподходящ аксесоар не се
покрива от гаранцията.
Размер на модела: 32" Горе Долу
Диаметър (mm) "E" M4 M4
Завинтване
Завинтване
Дълбочина
(mm) “D”
Количество 2 2
VESA (AxBxC) 100x100x100
Размер на модела: 40" Горе Долу
Диаметър (mm) "E" M6 M6
Дълбочина
(mm) “D”
Количество 2 2
VESA (AxBxC) 200x100x200
Макс 9 9
Мин 6 6
Макс 20 15
Мин 12 7
92
Page 93

Забележка:
1) Снимките са само за справка.
2) За телевизорите с клеми към стената, за да оставите достатъчно място за използване на
клемите, е необходима гумена възглавница заедно с винта за фиксиране на монтажната
стена. Това е малка кухина, чийто вътрешен диаметър е 8 мм, външният диаметър е 18 мм и
височината му е 30 мм.
Работна среда
• Не инсталирайте това устройство в затворени пространства, като библиотеки или подобни
единици.
• Не използвайте комплекта във влажни и студени помещения. Защитете комплекта от
прегряване.
• Да се пази от пряка слънчева светлина.
• Не използвайте комплекта в прашни пространства.
• Не поставяйте свещи на достъпни, открити места, за да избегнете влизането на запалими
чуждестранни материали в телевизора.
Предпазни мерки за използване на дистанционното управление
• Използвайте дистанционното управление, като го насочите към сензора за дистанционно
управление. Елементите между дистанционното управление и сензора за дистанционно
управление ще повлияят на нормалната работа.
• Не излагайте дистанционното управление на силни вибрации. Също така, не разпръсквайте
течност на дистанционното управление и не поставяйте дистанционното управление в
зони с висока влажност.
• Не излагайте дистанционното управление на пряка слънчева светлина, която може да
причини деформация на уреда поради топлина.
• Когато сензорът за дистанционно управление е изложен на пряка слънчева светлина или
силна светлина, дистанционното няма да работи. Ако това е така, променете посоката на
светлината или позицията на телевизора или използвайте дистанционното управление поблизо до сензора за дистанционно управление.
BG
Предпазни мерки за използване на батерията
Неадекватното използване на батериите може да доведе до изтичане. Затова, моля,
следвайте стъпките по-долу, и да ги използватйте много внимателно.
1. Обърнете внимание на полярността на батериите, за да избегнете късо съединение.
2. Ако напрежението на батерията е недостатъчно, което засяга обхвата на дистанционното
управление, трябва да замените използваните батерии с новите. Извадете батериите от
дистанционното, ако не възнамерявате да ги използвате дълго време.
3. Не използвайте различни видове батерии (например манган и алкални батерии) заедно.
4. Не поставяйте батериите в огън. Не зареждайте и не разглобявайте батериите.
5. Моля, изхвърлете батериите в съответствие със съответните разпоредби за опазване на
околната среда.
6. ПРЕДУПРЕЖДЕНИЕ: Батериите (акумулаторната батерия или инсталираните батерии)
не трябва да се излагат на прекомерна топлина като слънчево греене, огън или други
подобни.
Смяна на батерията на дистанционното управление
Поставете две AAA батерии в отделението за батериите на дистанционното управление, като
се уверите, че маркировките на полярността в купето са съчетани.
93
Page 94

BG
ПАНЕЛНИ БУТОНИ
Забележка: Изображенията са предназначени само за справка.
Изглед отдолу
Rocker Button
Натиснете средния бутон:
1. В режим на готовност натиснете бутона, за да включите телевизора;
2. Без OSD, натиснете за достъп до менюто на източника; натиснете и задръжте за 5 секунди,
за да включите телевизора в режим на готовност;
3. С екранното меню натиснете кратко бутона, за да потвърдите избора си; дълго натиснете,
за да се върнете или излезете от меню / подменю.
Натиснете наляво: намалете силата на звука или отидете наляво.
Натиснете надясно: увеличете силата на звука или отидете надясно.
Натиснете напред: канал надолу или отидете надолу.
Натиснете назад: канал нагоре или отидете нагоре.
94
Page 95

TEРМИНАЛИ
Забележка: Терминалите може да се различават по модела и регионите и моля, изберете
терминалите, които се базират на закупения телевизор.
LAN: мрежова част
AV IN (AUDIO L / R & VIDEO): Свържете видео и аудио сигнал от източник на сигнал,
например DVD.
HDMI1 / 2: Свържете HDMI входен сигнал от източник на сигнал, например DVD.
Цифров аудио: Използвайте SPFIF кабел, за да изведете аудио сигнала на телевизора си в
съвместим аудио приемник.
EARPHONE: Аудио изход, високоговорителите ще бъдат заглушени, когато слушалката е
включена.
USB 1/2: USB порт.
ВЪЗДУХ / КАБЕЛ / LNB: Свържете коаксиален кабел за приемане на сигнал от антената,
кабела или спътника.
СЕРВИЗ: Отстраняване на порт само за професионален техник.
CI: Порт CI карта.
BG
95
Page 96

BG
ФУНКЦИИ ЗА ДИСТАНЦИОННО УПРАВЛЕНИЕ
Дистанционно управление
1. POWER ( ) Натиснете, за да включите
телевизора или за режим на готовност.
2. MUTE (
или за възстановяване на звука.
3. Бутони с цифри Директен избор на канал.
4. CH LIST Натиснете за достъп до списъка с канали.
5. RETURN (BACK) Натиснете, за да се върнете на
предишния гледан канал.
6. MENU Отваряне на опциите на менюто.
7. SOURCE Избор на режим на източник на вход.
8. Нагоре/надолу/наляво/надясно ( // /)
Навигация в менюто.
9. OK Потвърдете избора
10.
се отвори началната страница, можете да
използвате интелигентни функции и мултимедиен
плейър и т.н.
11. EXIT Излезане от текущото меню.
12. YouTube Достъп до YouTube.
13. INFO Показва информация за текущия източник.
14. Volume Up/Down (VOL+/VOL-) Регулирайте сила
на звука
15. Program Up/Down (PR+/PR-) Сменете
програмите нагоре или надолу
16. EPG Натиснете, за да покаже текущата
информация за EPG в режим DTV.
17. Record (REC) Натиснете, за да запишете текущата
програма (достъпна само в режим DTV).
18. NICAM Натиснете, за да изберете желания звуков
сигнал в зависимост от канала за излъчване.
19. AD (Audio Description)
Натиснете, за да включите аудио описанието.
Разказвачът ще опише на зрителите или
зрителите с увредено зрение какво се случва на
екрана. Натиснете отново, за да изключите тази
функция (достъпна само в режим DTV).
) Натиснете за заглушаване на звука
HOME С натискането на този бутон ще
96
Page 97

21
22
23
20
Забележка: Някои бутони може
да са невалидни за някои модели.
Когато натиснете такива бутони, те
няма да реагират или ще се появи
екран “Not available” на екрана.
20. FAV Натиснете, за да видите вашите избрани
любими канали. Натиснете бутоните за нагоре /
надолу, за да преминете през избраните от вас
любими канали. Натиснете OK, за да потвърдите.
21. QUICK Достъп до бързото меню.
22. Color buttons Натиснете, за да изпълните
функцията за бързо свързване в режим TV или
DTV.
23. БУТОНИ ЗА УПРАЖЛЕНИЕ НА
ВЪЗПРОИЗВЕЖДАНЕ ПРЕЗ USB (
Натиснете за спиране на възпроизвеждането,
след това натиснете отново, за да продължите
възпроизведането.
Stop ( )
Натиснете за спиране на възпроизвеждане.
Бутон за бързо превъртане напред ( )
Натиснете за да преминете назад.
Бутон за бързо превъртане назад ( )
Натиснете за да преминете напред.
24. БУТОНИ ЗА ТЕЛЕТЕКСТ
TEXT Press to enter or exit the teletext menu.
SIZE Увеличаване на телетекста: Натиснете този
бутон веднъж, за да увеличите горната половина
на екрана. Натиснете отново този бутон, за
да увеличите долната половина на екрана.
Натиснете този бутон отново, за да се върнете
към нормалния размер на екрана
HOLD
Натиснете, за да задърьите страницата на
телетекста на екрана без да актуализирате и да се
променя. Натсинете отновоза да освободите.
24
SUB-PAGE
Натиснете този бутон за да влезете или излезете
От режим на подстраници (ако 23 подстраница
е налична). Натиснете червения бутон, за да
изберете желаната страница.
INDEX Press this button to display index page.
REVEAL
Натиснете този бутон, за да видите скрита
информация, като например решения за загадки
или пъзели. Натиснете gain , за да изтриете
информацията от дисплея.
MIX
Натиснете този бутон, за да насложите телетекста
по телевизионната програма. Натиснете отново,
за да се върнете към нормалния телетекст
CANCEL
Натиснете този бутон, за да се върнете
временно в телевизионна програма, докато
търсите телетекстна страница. Когато приключи
търсенето, номерът на страницата ще се покаже
в горния ляв ъгъл на екрана. Натиснете отново, за
да се върнете към страницата Телетекст.
BG
)
97
Page 98

BG
ЗАПИСВАНЕ НА ЛИЧНО ВИДЕО (REC)
В режим DTV и с правилно включено USB устройство можете да записвате канала, който
гледате и гледате по-късно, когато ви е по-удобно. Използвайте го, за да запишете програма,
когато гледането е прекъснато или забавено.
ВАЖНА ЗАБЕЛЕЖКА:
1. Възможно е функцията REC да не е достъпна за някои региони.
2. Моля, поставете външни устройства за бързо съхранение в подходящия USB порт на гърба на
телевизора и се уверете, че устройството има достатъчно свободно място.
3. Преди да направите записа, препоръчваме да форматирате USB устройството, за да осигурите
скоростта на работа. В менюто Опции изберете “REC File System”, за да форматирате USB
устройството.
4. По време на записа не променяйте каналите и не работете с друга функция.
5. Ако сигналът бъде прекъснат или премахнат, записът ще спре, докато сигналът не бъде установен.
Това може да доведе до загуба на програмното съдържание.
6. Моля, не изключвайте телевизора по време на запис. Това ще накара телевизора да излезе от режим
REC и да влезе в режим на готовност.
7. Записаният файл може да се използва само на този телевизор, всякакво копиране е строго
забранено.
8. Използвайте висококачествено мобилно устройство за запис на HD програми, в противен случай
видеоклиповете ще бъдат засечени по време на възпроизвеждане.
9. Направете резервно копие на всички данни в USB устройството за съхранение в случай, че данните
са загубени поради неочаквана авария. Ние не носим отговорност за загубите поради злоупотреба
или неизправност. Защитата на данните е отговорност на потребителя.
10. Само в DVB-T / T2 & DVB-C входен източник, записващите файлове могат да се възпроизвеждат от
REC_LIST.
Незабавно записване и възпроизвеждане с едно докосване
Натиснете бутона REC, за да започнете записването, в същото време контролната лента ще
се появи в долната част на екрана.
• Искате да гледате записаното видео, докато записвате програмата, натиснете левия
бутон на посоката, за да изберете (play)и натиснете бутона OK, записаното видео ще
започне да се възпроизвежда. Избирайки
или можете бързо да превъртате
напред или назад.
• Ако искате да спрете и да излезете от записа, изберете
и натиснете бутона OK.
Смяна на времето
Смяната на времето е запис на телевизионни програми на носител за съхранение (като вашето
USB устройство) за гледане по-късно, когато ви е по-удобно . Използвайте го, за да запишете
програма, когато гледането е прекъснато или забавено. Ако искате да излезнете известно време и
да гледате програмата без да изгубите съдържанието, можете да натиснете бутона за да спрете
програмата, и отново натиснете бутона за да започнете да гледате, когато се върнете.
98
Page 99

Забележки:
1. Преди смяната на времето, по-добре форматирайте USB устройството, за да се уверите,
че има достатъчно място за запис.
2. Можете също така да зададете предварително зададено време за запис в EPG функцията
(Вижте следващата страница).
ЕЛЕКТРОННА НАРЪЧНА ПРОГРАМА (EPG)
EPG означава Дигитално електронно програмно ръководство. Предоставя се от
доставчиците на програми и предлага информация за програмите, които ще бъдат
излъчвани. Можете да получите достъп до него в цифров режим, като натиснете бутона EPG
на дистанционното управление.
1. Натиснете бутона EPG, за да влезете в EPG интерфейса. Текущата дата и час ще се
покажат на втората лента отгоре. В списъка по-долу, каналът, който гледате понастоящем,
ще бъде откроен.
2. За да проверите програмите, които ще бъдат излъчвани в бъдеще, превъртете нагоре,
като използвате бутона към полето за дата. Използвайте бутона , за да изберете
датата, която искате да проверите.
3. Натиснете бутона за да превъртите до горната лента на дисплея, след което натиснете
бутона , за да изберете “Time”, можете да проверите списъка с програми на някой
канал.
BG
Разписание
Натиснете жълтия бутон, за да се покаже
списъкът с график за запис. Можете да
изтриете среща, като натиснете червения
бутон.
Напомяне
Натиснете синия бутон, за да се
покаже меню за напомняне.
Можете да настроите времето за
напомняне и режимът на повторение.
Записващо устройство
Натиснете червения бутон, за да се покаже
менюто за настройка на графика. С помощта
на бутоните за навигация настройте часа
на планиране като маркирате номера на
годината, месеца, деня, часа или минутата и
натиснете бутона OK, след това използвайте
бутоните нагоре и надолу
за да настроите номерата. Използвайте
същия метод, за да настроите режима на
повторение и след това изберете “SAVE “, за
да запазите настройката.
Информация
Натиснете зеления бутон, за да видите
информация за избраната програма.
99
Page 100

BG
ПЪРВОНАЧАЛНИ НАСТРОЙКИ И ФУНКИЦИИ
Първоначалната настройка
Когато включите телевизора за първи път, ще се покаже помощник за настройка, натиснете
бутона ENTER, за да започнете и завършите следните стъпки:
Стъпка 1 Изберете език на екранното меню, който ви е необходим;
Стъпка 2 Изберете средата между “HOME” и “STORE”;
Стъпка 3 Изберете страната;
Стъпка 4 Настройте телевизионния часовник (настройка на часа), по подразбиране е
“Автоматично синхронизиране”;
Стъпка 5 Прочетете правните изявления;
Стъпка 6 Настройте мрежовата конфигурация;
Стъпка 7 Започнете автоматичното настройване, за да търсите програми, когато приключите,
програмите ще бъдат съхранени в паметта и първоначалната настройка ще бъде завършена.
Забележка: Преди да включите телевизора, трябва да свържете кабела на телевизионния
сигнал към терминала на тунера и на гърба на телевизора.
Начало
Натиснете бутона Начало за достъп до началната страница. Използвайте бутона за навигация
и битона OK, за да изберете и имате достъп по пряк път.
Mirashare (може да не е налице при някои модели)
Без кабел за данни отворете бутона Wi-Fi на мобилния си телефон, след което изберете
“Mirashare” на началния екран, след като натиснете бутона “HOME”, съдържанието на
мобилния ви телефон ще бъде споделено с телевизора, и можете да се насладите на
преживяването на голям екран.
СТЪПКИ:
1. Отворете Miracast функция на мобилния си телефон;
2. Намерете името на телевизора в мобилния телефон и го изберете, телевизора ще изведе
диалогов прозорец, ще го приеме, за да се свърже функцията Mirashare, съдържанието на
мобилния ви телефон ще се възпроизведе на телевизора.
Забележка: При някои модели, след избиране на името на телевизора, мобилният телефон
и телевизорът могат да се свързват автоматично.
Източник
Изберете източник на вход.
Мрежови приложения
Такива социални приложения като YouTube сa предоставени на вас.
Например, изберете иконата Facebook на началната страница и натиснете OK, за да получите
достъп.
Tелевизионен браузър
Изберете иконата TV Browser на началната страница и натиснете OK за достъп до
сърфирането в интернет. Функциите включват бързо набиране и отметки и т.н.
Забележка:
1. Браузърът може да не поддържа някои уеб страници или видеоклипове поради неуспех
на мрежата, различие в регионите или прекъсване на услугата, което няма нищо общо с
телевизора.
2. Ако текущата страница все още не е напълно отворена (лентата за изпълнение не е
завършена), директно се избира друга страница, предишната страница няма да бъде
запазена в историята избрани директно, предишната страница няма да бъде запазена в
историята.
100
 Loading...