

Page 1
LED TV
OPERATING
INSTRUCTION
ENG AL BiH CG HR MK SLO SRB
SERIES 3
32S307WH
Page 2

OPERATING INSTRUCTION
Please read these instructions before operating
your set and retain them for future reference.
UDHËZIM PËR PËR
Ju lutemi lexonie këtë udhëzim para përdorimit të
pajisjë suaj dhe ruajeni për nevoja plotësuese eventuale.
UPUTSTVO ZA UPOTREBU
Prije upotrebe uređaja pročitati ova uputstva
i zadržati ih radi kasnijih referenci.
UPUTE ZA KORIŠTENJE
Prije korištenja uređaja pažljivo pročitati
upute i sačuvati ih za buduću upotrebu.
NAVODILA ZA UPORABO
Pred uporabo pozorno preberite navodila
in jih shranite za morebitno uporabo v prihodnosti.
UPUTSTVO ZA UPOTREBU
Pre upotrebe uređaja pročitati ova uputstva
i zadržati ih radi kasnijih referenci.
УПАТСТВО ЗА КОРИСТЕЊЕ
Ве молиме прочитајте го ова упатство пред да го
инсталирате и употребувате вашиот уред.
AL
ENG
BiH/CG
HR
MK
SLO
SRB
Page 3

3
ENG
Note
1. The graphics and data in this manual are only for reference.
2. You TV’s OSD may be slightly different with that shown in this manual.
3. The information in this document is subject to change without notice. The manufacturer
accepts no liability for damage resulting directly or indirectly from faults, incompleteness
or discrepancies between the user manual and the product described.
4. In dry environment due to static electricity, the product may restart and return to the main
OSD interface, USB player interface or the previous source mode. It is normal and please
continue to operate the TV as your will.
Contents
WARNINGS AND PRECAUTIONS. . . . . . . . . . . . . . . . . . . . . . . . . . . . . . . . . . . .4
PANEL BUTTONS . . . . . . . . . . . . . . . . . . . . . . . . . . . . . . . . . . . . . . . . . . . . . . . . 10
TERMINALS. . . . . . . . . . . . . . . . . . . . . . . . . . . . . . . . . . . . . . . . . . . . . . . . . . . . . . 10
REMOTE CONTROL FUNCTIONS . . . . . . . . . . . . . . . . . . . . . . . . . . . . . . . . . 11
RECORDER (REC) . . . . . . . . . . . . . . . . . . . . . . . . . . . . . . . . . . . . . . . . . . . . . . . . 14
ELECTRONIC PROGRAM GUIDE (EPG) . . . . . . . . . . . . . . . . . . . . . . . . . . . . 15
MENU SETTINGS. . . . . . . . . . . . . . . . . . . . . . . . . . . . . . . . . . . . . . . . . . . . . . . . . 16
Menu Operation (DTV Mode) . . . . . . . . . . . . . . . . . . . . . . . . . . . . . . . . . . . 16
Picture . . . . . . . . . . . . . . . . . . . . . . . . . . . . . . . . . . . . . . . . . . . . . . . . . . . . . . . . 16
Sound . . . . . . . . . . . . . . . . . . . . . . . . . . . . . . . . . . . . . . . . . . . . . . . . . . . . . . . . 16
Channel. . . . . . . . . . . . . . . . . . . . . . . . . . . . . . . . . . . . . . . . . . . . . . . . . . . . . . . 16
Option. . . . . . . . . . . . . . . . . . . . . . . . . . . . . . . . . . . . . . . . . . . . . . . . . . . . . . . . 18
Lock . . . . . . . . . . . . . . . . . . . . . . . . . . . . . . . . . . . . . . . . . . . . . . . . . . . . . . . . . . 19
USB CONTROL . . . . . . . . . . . . . . . . . . . . . . . . . . . . . . . . . . . . . . . . . . . . . . . . . . 20
USB Menu. . . . . . . . . . . . . . . . . . . . . . . . . . . . . . . . . . . . . . . . . . . . . . . . . . . . . 20
Play Movie . . . . . . . . . . . . . . . . . . . . . . . . . . . . . . . . . . . . . . . . . . . . . . . . . . . . 21
Play Music. . . . . . . . . . . . . . . . . . . . . . . . . . . . . . . . . . . . . . . . . . . . . . . . . . . . . 22
Browse Photo . . . . . . . . . . . . . . . . . . . . . . . . . . . . . . . . . . . . . . . . . . . . . . . . . 23
TROUBLESHOOTING. . . . . . . . . . . . . . . . . . . . . . . . . . . . . . . . . . . . . . . . . . . . . 24
SPECIFICATIONS. . . . . . . . . . . . . . . . . . . . . . . . . . . . . . . . . . . . . . . . . . . . . . . . . 25
LICENSE. . . . . . . . . . . . . . . . . . . . . . . . . . . . . . . . . . . . . . . . . . . . . . . . . . . . . . . . . 26
Page 4

4
ENG
WARNINGS AND PRECAUTIONS
Read all of the instruction before operating the set. Keep the instruction for later use.
• Read these instructions – All the safety and operating instructions should be read before this
product is operated.
• Keep these instructions – The safety and operating instructions should be retained for future
reference.
• Read all warnings – All warnings on the appliance and in the operating instructions should
be adhered to.
• Follow all instructions – All operating and use instructions should be followed.
• Do not use this apparatus near water – The appliance should not be used near water or
moisture – for example, in a wet basement or near a swimming pool, and the like.
• Clean only with dry cloth.
• Do not block any ventilation openings. Install in accordance with the manufacturer’s
instructions.
• Do not install near any heat sources such as radiators, heat registers, stoves, or other
apparatus (including amplifiers) that produce heat.
• Do not defeat the safety purpose of the polarized or grounding plug. A polarized plug
has two blades with one wider than the other. A grounding plug has two blades and a
third grounding prong. The wide blade or the third prong is provided for your safety. If the
provided plug does not fit into your outlet, consult an electrician for replacement of the
obsolete outlet.
• Protect the power cord from being walked on or pinched particularly at the plugs,
convenience receptacles, and at the point where they exit from the apparatus.
• Only use attachments/accessories specified by the manufacturer.
• Use only with the cart, stand, tripod, bracket, or table specified by the manufacturer,
or sold with the apparatus. When a cart or rack is used, use caution when moving the
cart/apparatus combination to avoid injury from tip-over.
• Unplug the apparatus during lightning storms or when unused for long periods of time.
• Refer all servicing to qualified personnel. Servicing is required when the apparatus has
been damaged in any way, such as power supply cord or plug is damaged, liquid has been
spilled or objects have fallen into the apparatus, the apparatus has been exposed to rain or
moisture, does not operate normally, or has been dropped.
• CAUTION: These servicing instructions are for use by qualified service personnel only.
To reduce the risk of electric shock, do not perform any servicing that contained in the
operating instructions unless you are qualified to do so.
• Do not install this equipment in a confined or building-in space such as a book case or
similar unit, and remain a well ventilation conditions at open site. The ventilation should not
be impeded by covering the ventilation openings with items such as newspaper, tablecloths, curtains etc.
•
Caution – To prevent electric shock hazard, replace grille.
• Please refer the information on exterior bottom enclosure for electrical and safety
information before installing or operating the apparatus.
• To reduce the risk of fire or electric shock, do not expose this apparatus to rain or moisture.
• The apparatus shall not be exposed to dripping or splashing and that no objects filled with
liquids, such as vases, shall be placed on the apparatus.
Important Safety Instructions
Page 5
5
ENG
• For the terminals marked with symbol of “ ” may be of sufficient magnitude to constitute a
risk of electric shock. The external wiring connected to the terminals requires installation by
an instructed person or the used of ready-made leads or cords.
• To prevent injury, this apparatus must be securely attached to the floor/wall in accordance
with the installation instructions.
• Danger of explosion if battery is incorrectly replaced. Replace only with the same or
equivalent type.
• The battery (battery or batteries or battery pack) shall not be exposed to excessive heat such
as sunshine, fire or the like.
• LExcessive sound pressure from earphones and headphones can cause hearing loss.
Listening to music at high volume levels and for extended durations can damage one’s
hearing. In order to reduce the risk of damage to hearing, one should lower the volume to
a safe, comfortable level, and reduce the amount of time listening at high levels. (Only for
German).
• The mains plug/appliance coupler/direct plug-in adapter is used as disconnect device, the
disconnect device shall remain readily operable.
• When not in use and during movement, please take care of the power cordset, e.g. tie up
the power cordset with cable tie or something like that. It shall be free from sharp edges
and the like that can cause abrasion of the power cordset. When put into use again, please
make sure the power cordset being not damaged, If any damages found, please look for
the service person to replace the power cordset specified by the manufacturer or have the
same characteristics as the original one.
• Attention should be drawn to environmental aspects of battery disposal.
• No naked flame sources, such as lighted candles, should be placed on the apparatus. To
prevent the spread of fire, keep candles or other open flames away from the apparatus at all
times.
• The mains plug/appliance coupler/direct plug-in adapter is used as disconnect device, the
disconnect device shall remain readily operable.Using cabinets or stands recommended by
the manufacturer of the television.
• When not in use and during movement, please take care of the power cordset, e.g. tie up
the power cordset with cable tie or something like that. It shall be free from sharp edges
and the like that can cause abrasion of the power cordset. When put into use again, please
make sure the power cordset being not damaged, If any damages found, please look for
the service person to replace the power cordset specified by the manufacturer or have the
same characteristics as the original one.
• Attention should be drawn to environmental aspects of battery disposal.
• No naked flame sources, such as lighted candles, should be placed on the apparatus. To
prevent the spread of fire, keep candles or other open flames away from the apparatus at all
times.
• If the apparatus have the symbol
in its rating label and the power cord has two pins, it
means that the equipment is a Class II or double insulated electrical appliance. It has been
designed in such a way that it does not require a safety connection to electrical earth.
Page 6
6
ENG
WARNING
Do not ingest the battery, Chemical Burn Hazard
(The remote control supplied with) This product contains a coin/button cell battery. If the
coin/button cell battery is swallowed, it can cause severe Internal burns in just 2 hours and
can lead to death.
Keep new and used batteries away from children. If the battery compartment does not
close securely, stop using the product and keep it away from children.
If you think batteries might have been swallowed or placed inside any part of the body,
seek immediate medical attention.
Warning for Apparatus containing COIN / BUTTON CELL BATTERIES
(Below instruction only used for the apparatus containing a user-replaceable coin/button cell
battery)
CAUTION
RISK OF ELECTRIC SHOCK
DO NOT OPEN
• This lightning flash with arrowhead symbol within an equilateral triangle is intended to
alert the user to the presence of non-insulated “dangerous voltage” within the product’s
enclosure that may be of sufficient magnitude to constitute a risk of electric shock.
• To reduce the risk of electric shock. Do not remove cover (or back). No user serviceable
parts inside. Refer to qualified service personnel.
• The exclamation point within an equilateral triangle is intended to alert the user to
the presence of important operating and maintenance instructions in the literature
accompanying the appliance
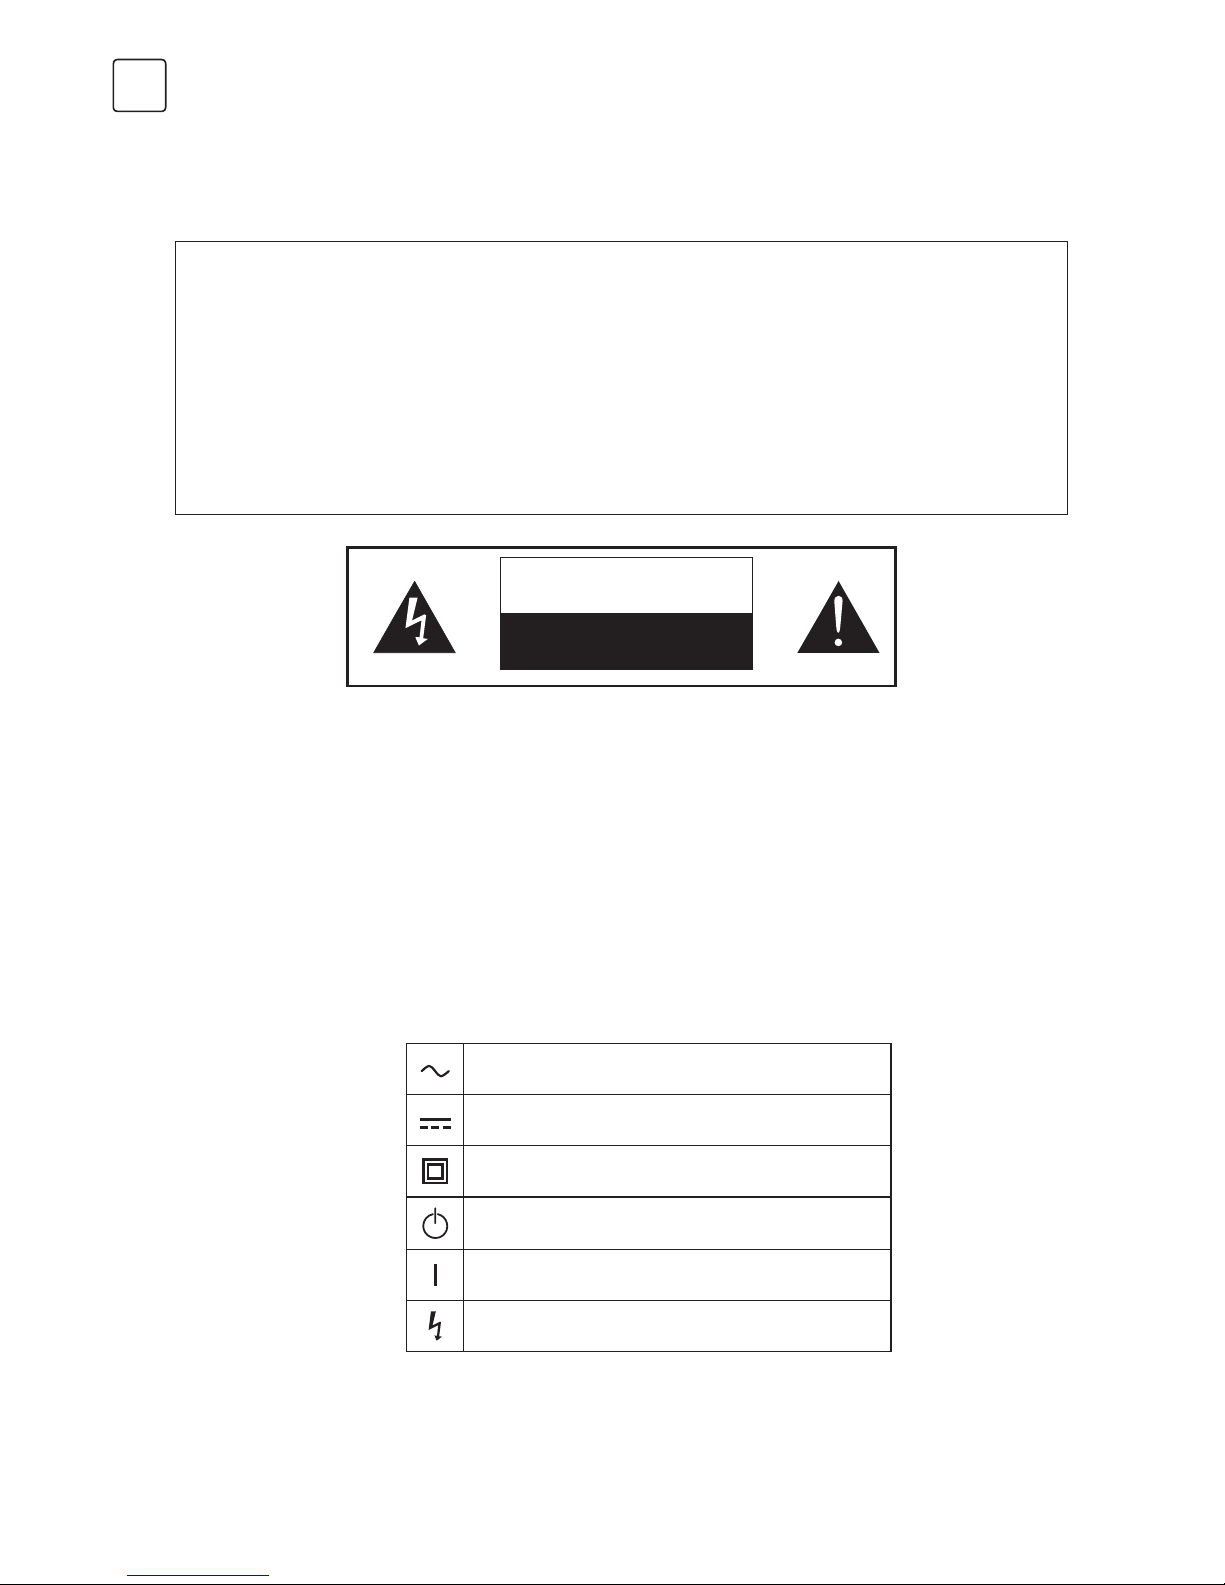
• The following information are recommended to be included as far as applicable where
applicable:
Refers to alternating current (AC)
Refers to direct current (DC)
Refers to ClassII equipment
Refers to stand-by
Refers to pow er ON.
Refers to dangerous voltage
Page 7
7
ENG
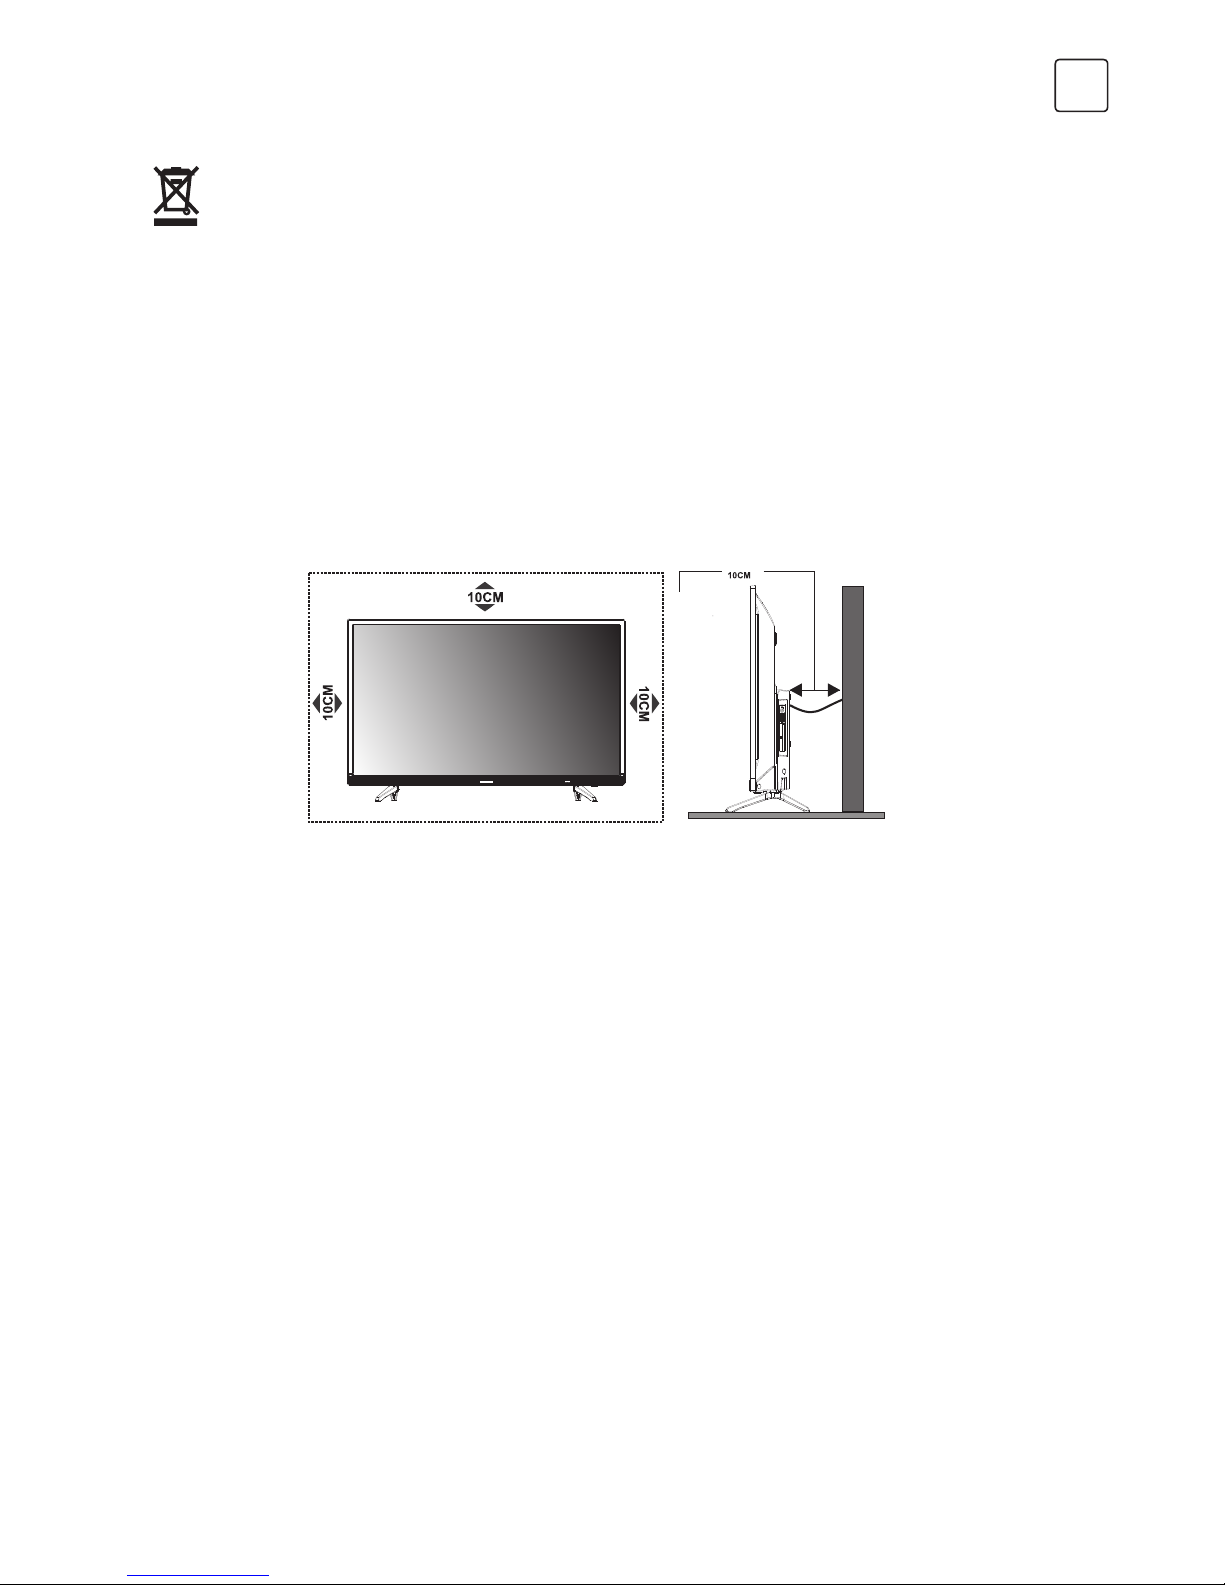
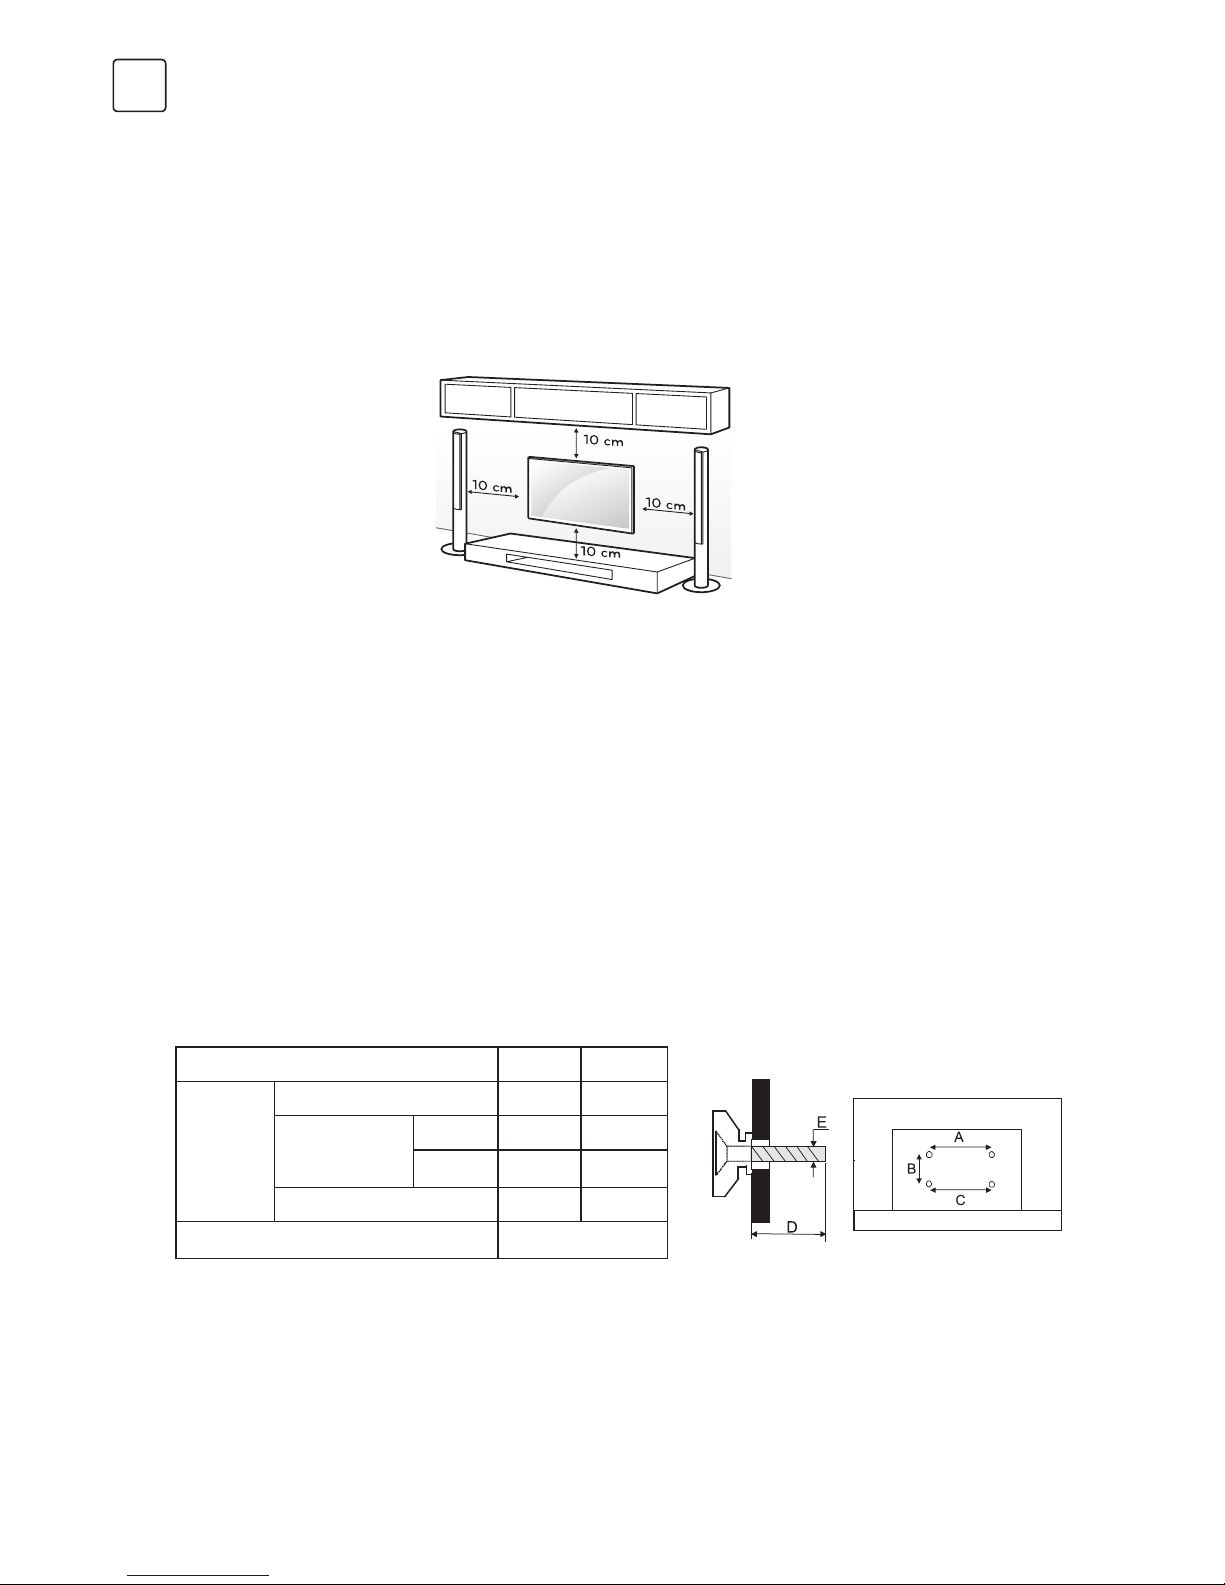
• Install Display on solid horizontal surface such as a table or desk. For ventilation, leave a
space of at least 10cm free all around the set. To prevent any fault and unsafe situations,
please do not place any objects on top of the set. This apparatus can be used in tropical
and/or moderate climates.
• Never place a television set in an unstable location. A television set may fall, causing serious
personal injury or death. Many injuries, particularly to children, can be avoided by taking
simple precautions such as:
• Using cabinets or stands recommended by the manufacture of the television.
• Only using furniture that can safely support the television.
• Ensuring the television is not overhanging the edge of the supporting furniture.
• Not placing the television on tall furniture (for example, cupboards or bookcases) without
anchoring both the furniture and the television set to a suitable support.
• Not placing the television set on cloth or other materials that may be located between the
television set and supporting furniture.
• Educating children about the dangers of climbing on furniture to reach the television or
its controls.
If your existing television set is being retained and relocated, the same considerations as
above should be applied (Only for the TV with mass exceed 7 kg)
Correct Disposal of this product. This marking indicates that this product should not
be disposed with other household wastes throughout the EU. To prevent possible harm to
the environment or human health from uncontrolled waste disposal, recycle it responsibly to
promote the sustainable reuse of material resources. To return your used device, please use
the return and collection systems or contact the retailer where the product was purchased.
They can take this product for environmental safe recycling.
WEEE Directive
Positioning of the TV Set
Note: The pictures are for reference only.
Page 8
8
ENG
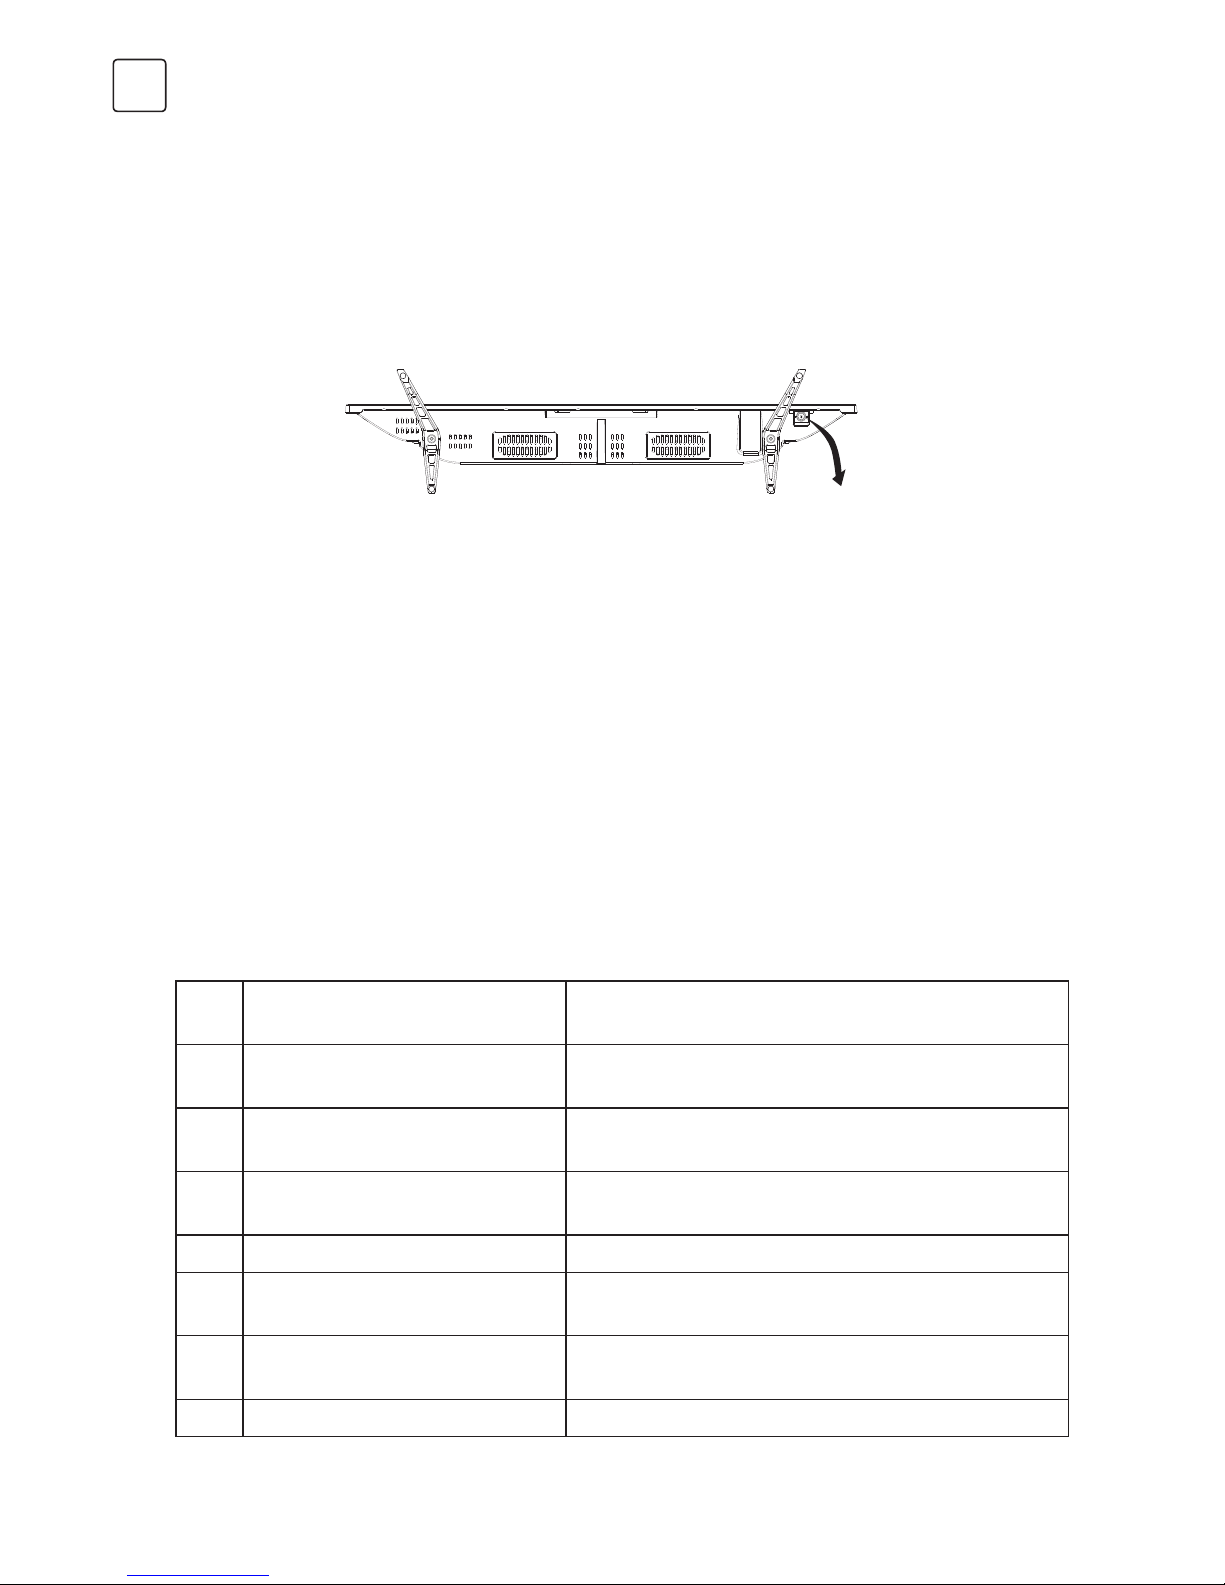
An optional wall mount can be used with your television. Consult with your local dealer for a
wall mount that supports the VESA standard used by your TV model. Carefully attach the wall
mount bracket at the rear of the TV. Install the wall mount bracket on a solid wall perpendicular
to the floor. If you are attaching the TV to other building materials, please contact qualified
personnel to install the wall mount. Detailed instructions will be included with the wall mount.
Please use a wall mount bracket where the device is adequately secured to the wall with
enough space to allow connectivity to external devices.
• Disconnect the power before moving or installing the TV. Otherwise electric shock may
occur.
• Remove the stand before installing the TV on a wall mount by performing the stand
attachment in reverse.
• If you install the TV on a ceiling or slanted wall, it may fall and result in severe injury. Use an
authorized wall mount and contact the local dealer or qualified personnel. Otherwise it is
not covered by the warranty.
• Do not over tighten the screws as this may cause damage to the TV and void your warranty.
• To prevent injury, this apparatus must be securely attached to the floor/wall in accordance
with the installation instructions.
• Use th e screws and wall mounts that meet the following specifications. Any damages or
injuries by misuse or using an improper accessory are not covered by the warranty.
Note:
1) The pictures are for reference only.
2) For the TV sets with terminals towards the wall, in order to leave enough space to use the
terminals, a rubber cushion is needed together with the screw to fix the wall mount. It is a
small hollow pillar whose internal diameter is 8mm, external diameter is 18mm and height
is 30mm.
Mounting on a Wall
CAUTION
Model Size: 32" Top Down
Screw
Diameter (mm) "E" M4 M4
Depth (mm)
“D”
Max 9 9
Min 6 6
Quantity 2 2
VESA (AxBxC) 100x100x100
Page 9

9
ENG
• Do not install this equipment in a confined space such as a bookcase or similar unit.
• Do not use the set near damp, and cold areas, protect the set from overheating.
• Keep away from direct sunlight.
• Do not use the set near dust place.
• Do not attach candle to accessible opening area, to avoid flammable foreign material from
entering the TV.
• Use the remote control by pointing it towards the remote sensor. The items between the
remote control and the remote sensor will interfere the normal operation.
• Do not make remote control vibrate violently. Also, do not splash liquid on the remote
control, also do not put the remote control in high humidity place.
• Do not place remote control under direct sunlight which will cause deformation of the unit
by heat.
• When the remote sensor is under direct sunlight or strong lighting, the remote control will
do not work. If so please change the lighting or TV’s position, or operate the remote control
closer to the remote sensor.
Improper using of the battery will cause leakage. So please do as the following methods and
use carefully.
1. Please note the batteries’ polarity, to avoid short circuit.
2. When the battery’s voltage is insufficient which affect the use range, you should replace new
battery. Remove the batteries from the remote control unit if you do not intend to use it for a
long time.
3. Do not use different types of batteries( for example, Manganese and Alkaline batteries)
together.
4. Do not put the battery into fire, and charge or decompose the battery.
5. Please dispose batteries abide by relevant environmental protection regulation.
6. WARNING: The batteries (battery pack or batteries installed) shall not be exposed to
excessive heat such as sunshine, fire or the like.
Place two AAA size batteries in the remote controls battery compartment, making sure to
match the polarity markings inside the compartment.
Operating Environment
Precautions For Using Remote Control
Precautions For Using Battery
Install Remote Control Battery
Page 10
10
ENG
PANEL BUTTONS
Note: The images are intended for reference only.
Rocker Button
Bottom view
TERMINALS
Note: Please select the terminals according to your actual TV set.
Press middle button:
1. In standby mode, press it to turn on the TV;
2. Without OSD, short press it to access source menu; long press to turn the TV to standby;
3. With OSD, short press it to confirm a selection; long press it to return or exit.
Push left: decrease volume or go to left.
Push right: increase volume or go to right.
Push forward: channel up or go to above.
Push backward: channel down or go to below.
Rocker Button
1 Video & Audio L/R
Connect audio and video signal from signal source
such as DVD.
2 HDMI1/MHL &HDMI2
Connect HDMI input signal from signal source
such as DVD. HDMI1 supports MHL function.
3 DIGITAL AUDIO
Use a SPDIF cable to output the TV audio signal to
a compatible audio receiver.
4 EARPHONE
Audio output, speakers will be muted when
earphone is plugged.
5 USB USB port
6 LNB/AIR/CABLE
Connect a coaxial cable to receive signal from the
antenna, cable or satellite.
7 SERVICE
Debugging interface only for professional
technician.
8 CI CI card port.
Page 11
11
ENG
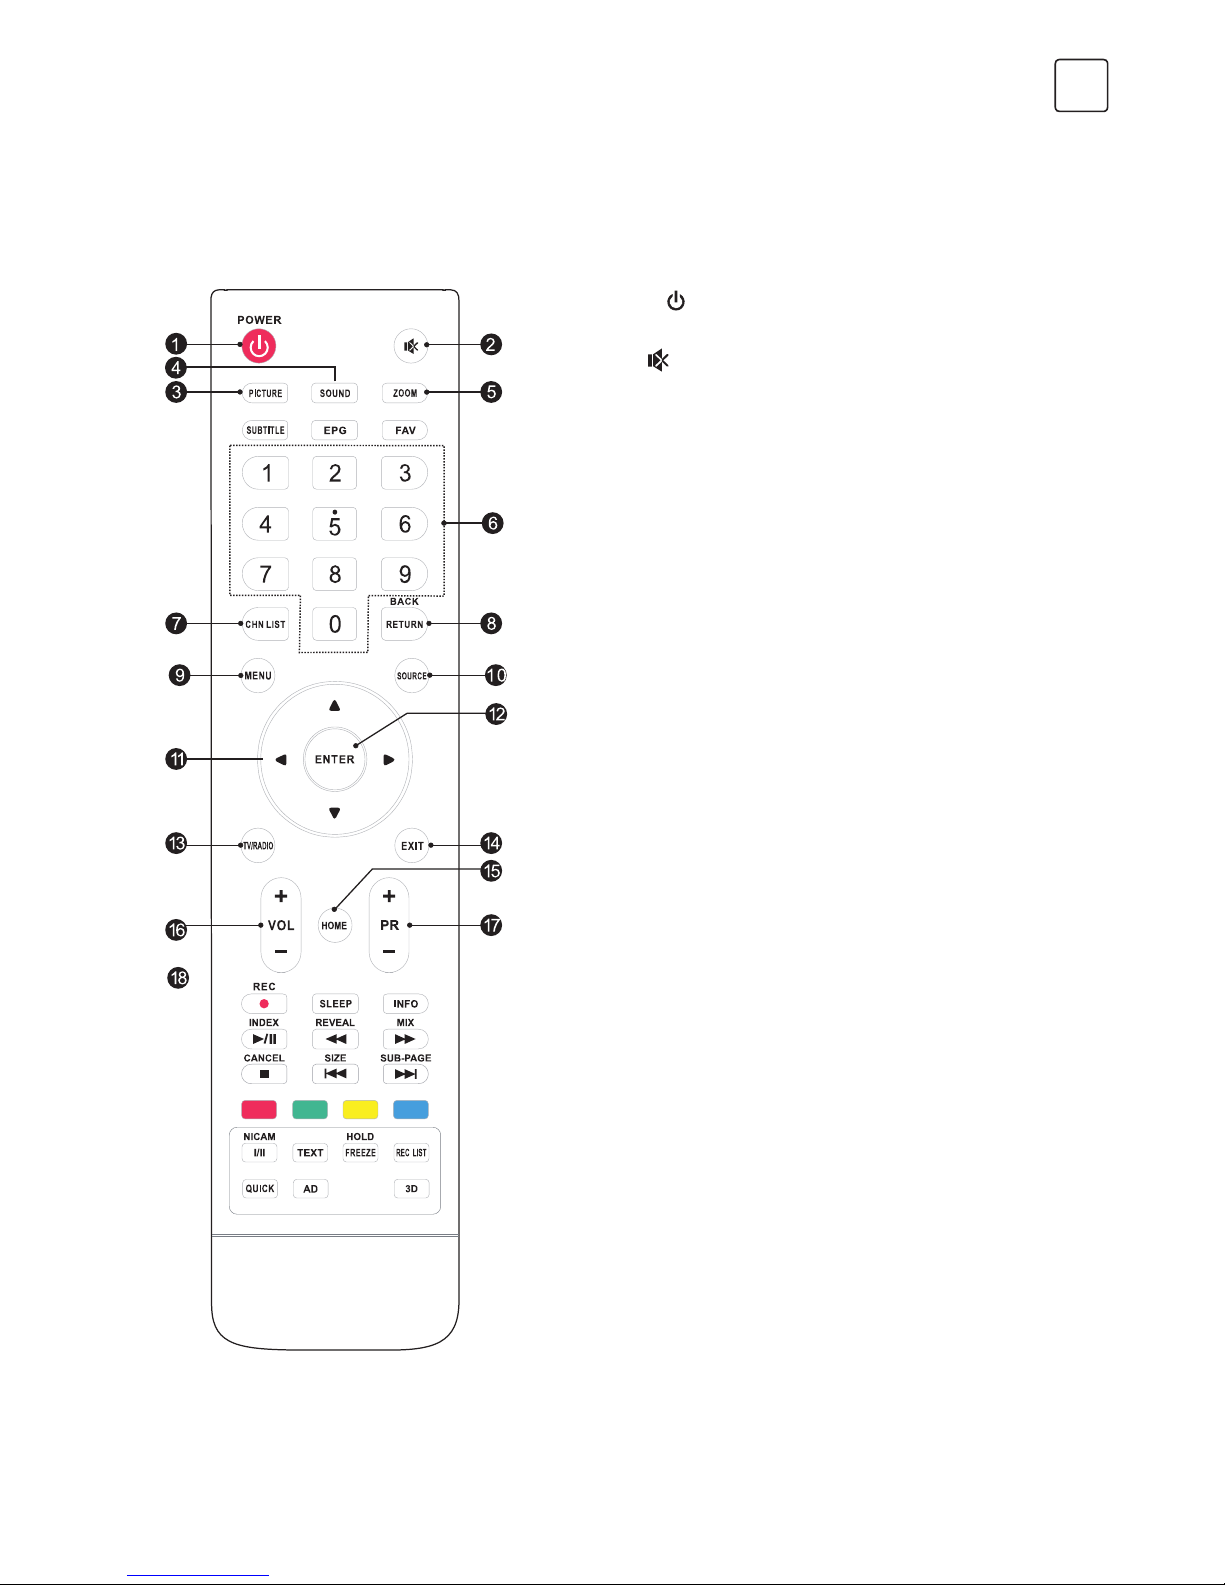
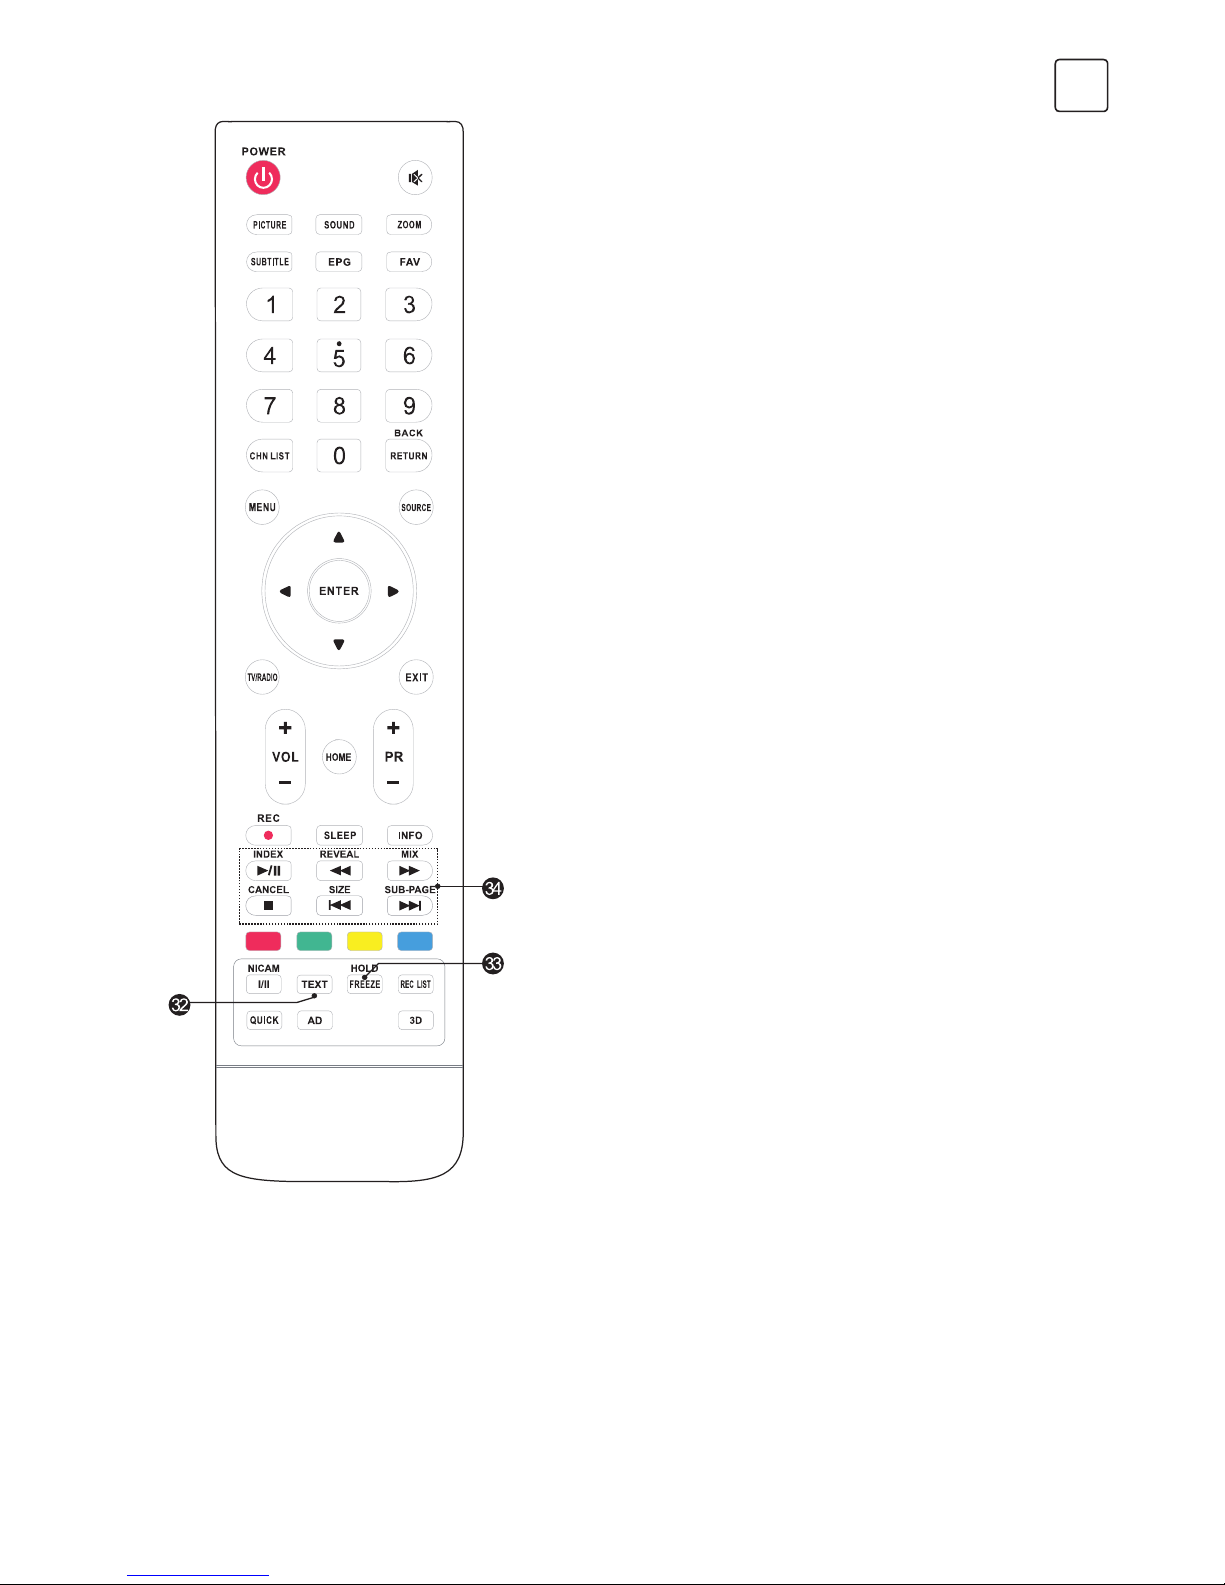
REMOTE CONTROL FUNCTIONS
Remote Control
1. POWER ( ) Press to turn the TV on or to put it
in standby.
2. MUTE (
) Press to mute or restore the
volume.
3. PICTURE Change picture mode.
4. SOUND Change sound mode.
5. Zoom Change aspect ratio.
6. Numeric buttons Choose channel directly.
7. CHN LIST Press to enter the channel list.
8. RETURN (BACK) Press to go back to a
previously viewed channel.
9. MENU Open the menu options.
10. SOURCE Select the input source mode.
11. Up/Down/Left/Right ( // /)
Navigate through the menu.
12. ENTER Confirm the selection.
13. TV/RADIO Switch between TV and radio.
14. EXIT Exit the current menu.
15. HOME Enter the home desktop. If your TV don’t
have HOME function, this button will not work.
16. Volume Up/Down (VOL+/VOL-)
Adjust the volume level.
17. Program Up/Down (PR+/PR-)
Change programs up or down.
18. SLEEP Select the sleep time, such as 10min,
20min etc.
Page 12
12
ENG
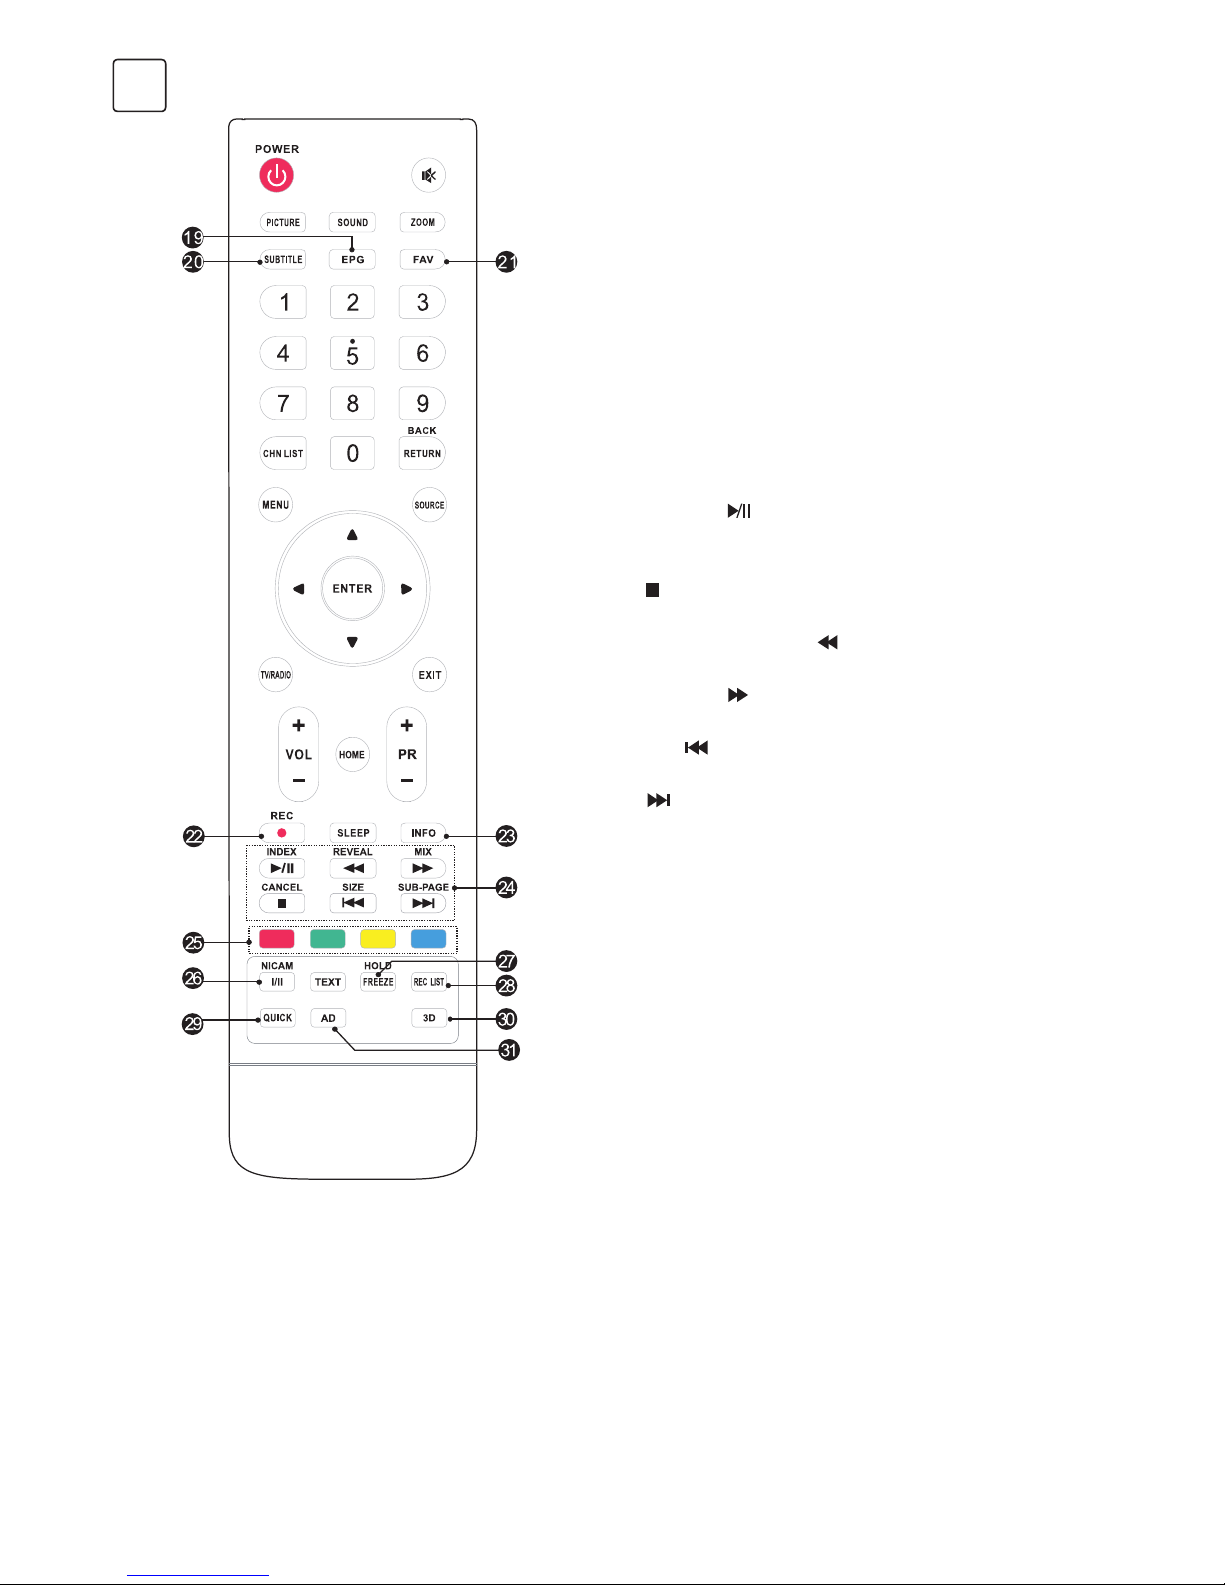
19. EPG Press to display the current EPG
information in DTV mode.
20. SUBTITLE Enable/disable subtitles in DTV/USB
mode.
21. FAV. (Favorite Channel)
Press to view your assigned favourite channels.
Press Up/Down buttons to move through your
assigned favourite channels. Press ENTER to
confirm.
22. Record (REC) Press to record the current
programme (available in DTV mode only).
23. INFO Display information about current source.
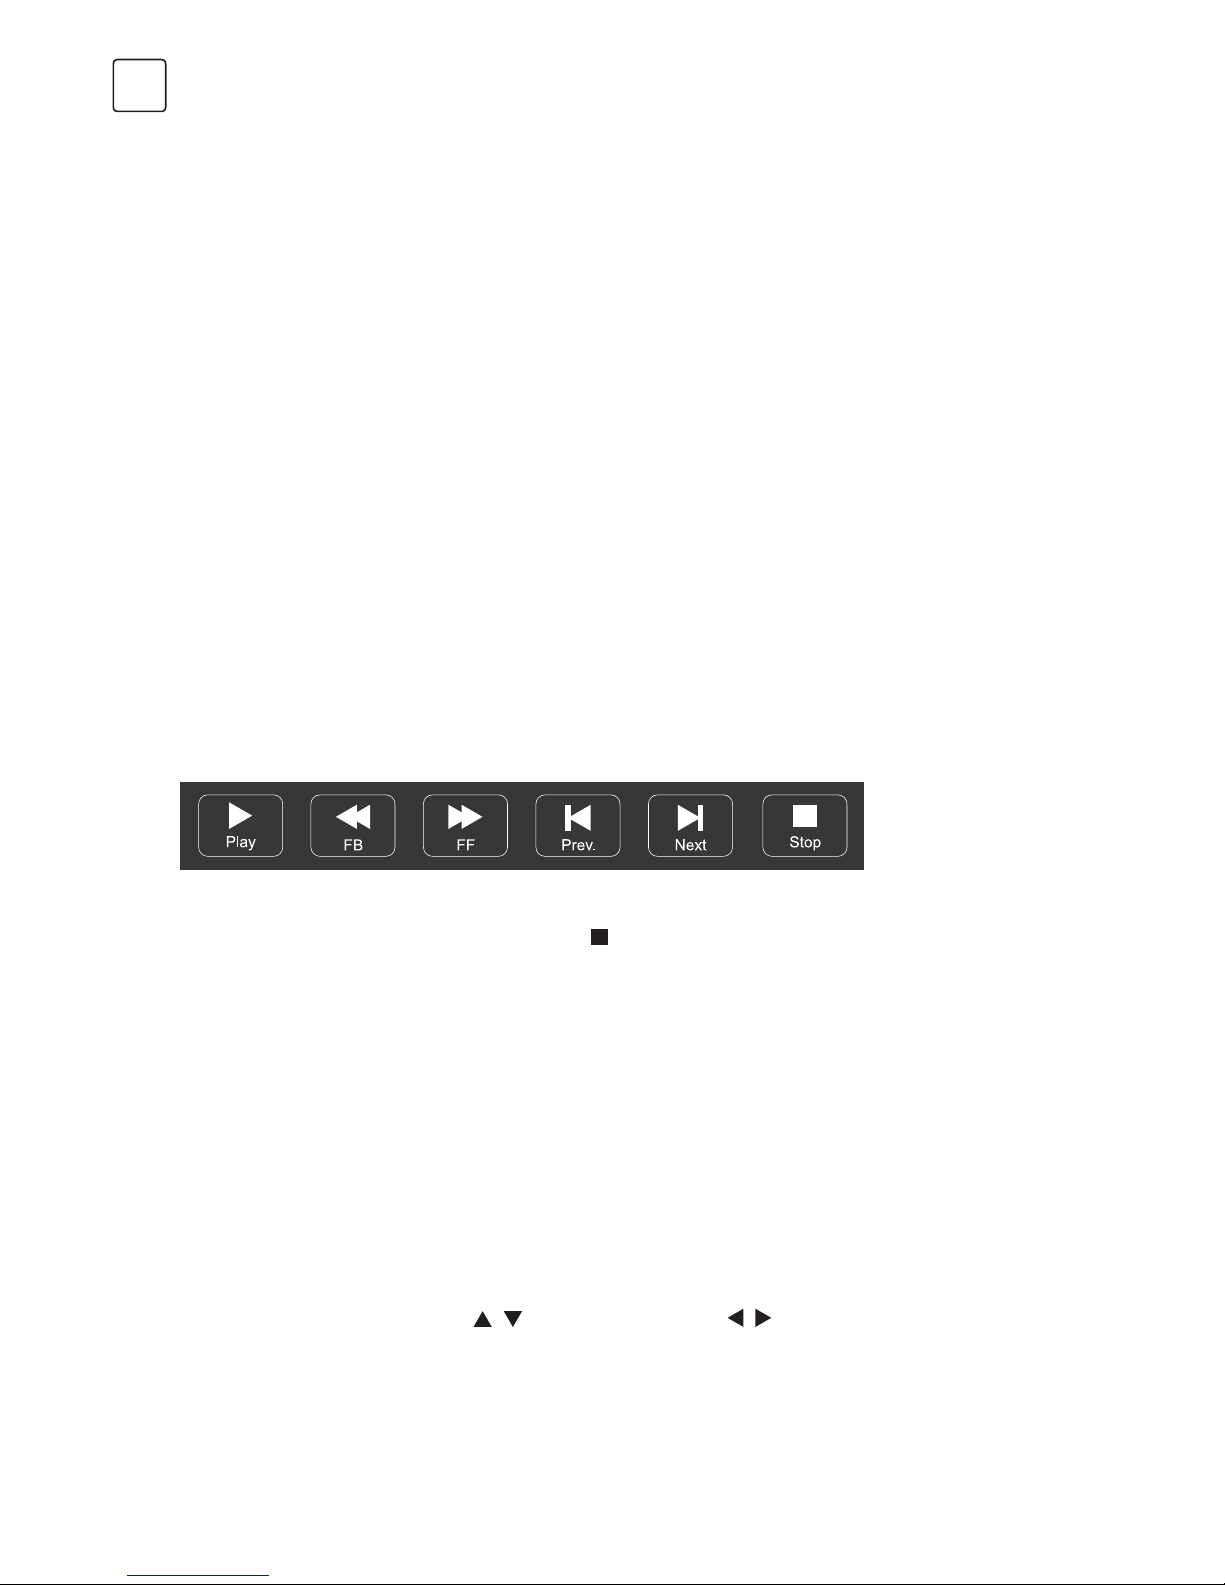
24. USB Play Control Buttons
Play & Pause (
)
Press to pause playback, then press again to
continue playback.
Stop ( )
Press to stop playback.
Fast Backward Button ( )
Press to fast reverse.
Fast Forward ( )
Press to fast forward.
Previous ( )
Press to play the previous file.
Next ( )
Press to play the next file.
25. Color buttons Press to execute the prompt
function in TV or DTV mode.
26. NICAM Press to select desired sound output
depending on the broadcasting channel.
27. FREEZE (HOLD) Freeze the picture on the
screen (Not available in USB mode).
28. REC LIST Display the recording file list.
29. QUICK No function.
30. 3D No function.
31. AD (Audio Description) Press to turn on audio
description, a narrator will describe what is
happening on the screen for blind or visually
impaired viewers. press again will turn it off
(Only available in DTV mode).
Page 13
13
ENG
TELETEXT BUTTONS
32. TEXT Press to enter or exit the teletext menu.
33. HOLD
Press to hold the teletext page on screen
without update and changes. Press again to
release the hold state.
34. Other Buttons
SIZE Enlarge the teletext display: Press this
button once to enlarge upper half of the screen.
Press this button again to enlarge lower half of
the screen. Press this button again to resume to
normal screen size.
REVEAL Press this button to display concealed
information, such as solutions to riddles or
puzzles. Press again to remove the information
from the display.
MIX
Press this button to superimpose the teletext
over the TV program. Press again to return to
normal teletext mode.
SUB-PAGE
Press this button to enter or exit subpage mode
(if subpage is available). Press Red / Green
buttons to select the desired subpage.
INDEX Press this button to display index page.
CANCEL
Press this button to return to TV program
temporarily while searching for a Teletext page.
When the search is done, the page number will
be displayed on the upper left of the screen.
Press again to return to the Teletext page.
Page 14
14
ENG
RECORDER (REC)
Instant one-touch recording and playback
Timer recording
IMPORTANT NOTES:
1. For any type of recording with this television, you must have connected an external device
to the appropriate USB port at the back of the television to record on.
2. The USB device must be FAT32 format.
3. For the first time using the USB device to record on the this TV, suggest to format the USB
device on the TV before you start the recording.
4. Make sure you are watching DTV program.
5. Use high-quality mobile device to record HD programs, otherwise the videos will be
jammed during the playback.
6. Back up all of the data in the USB storage device in case data was lost due to an
unexpected accident. We do not assume any liability for the losses by misuse or
malfunction. Data backup is consumer’s responsibility.
1. Please insert the an external high-speed storage device, and make sure the device has
enough free space.
2. Select the TV program and channel you wish to record.
3. Press REC button to enter into REC mode and start recording. REC control bar on the
screen shows as below, you can select the appropriate settings as your desire.
4. If the REC function can not be realized, try to format your USB device.
5. If you wish to stop the recording, press [
] button and the recording will stop.
There are two ways to set the timer to record a television program.
If you know the programming details:
1. Go to the channel that will broadcast the program you want to record.
2. Press the EPG button on your remote control to bring up the EPG interface. The channel
you are watching will be highlighted on the screen that appears.
3. Press the RED button on the remote control, then enter into the program details on the
recorder menu by pressing
/ to select an item and / to change the setting. For
example, if the program starts at 8:30pm on the same day, enter: 30 in the space for
MINUTES, 20 in the space for HOURS (a 24 hour clock applies), and then the relevant date.
Use the same method for entering the finish time.
Note: (A) During the record mode, you cannot change channels or select another function.
(B) If the signal is interrupted or removed while in record, the recording will stop until
the signal is established. This may cause you to lose program content.
Page 15
15
ENG
ELECTRONIC PROGRAM GUIDE (EPG)
EPG stands for Digital Electronic Program Guide. It is supplied by the program providers and
offers information about the programs to be broadcast. You can access it in digital mode by
pressing the EPG button on the remote control.
1. Press the EPG button to bring up the EPG interface. The second bar from the top will
display the current date and time. On the list below, the channel you are currently watching
will be highlighted.
2. Before you can view any EPG information, you have to ‘activate’ every channel for which
you want to view program information. To do this, use the
/ buttons to select a channel,
then press ENTER to confirm.
3. To check programs to be broadcast on a future date, scroll up with the
button to the
date field. Use the button to select the date you want to check.
4. Press the Index (
) button to scroll up to the top bar in the display, then press the
button to select the channel List. The second bar will then display one of your available
channels.
5. Go to the channel and use the
/ buttons to select the channel for which you want to
view information. After a brief moment, the program information will appear.
6. Use the
/ buttons to scroll through the time slots.
7. Press MENU button to exit the EPG menu.
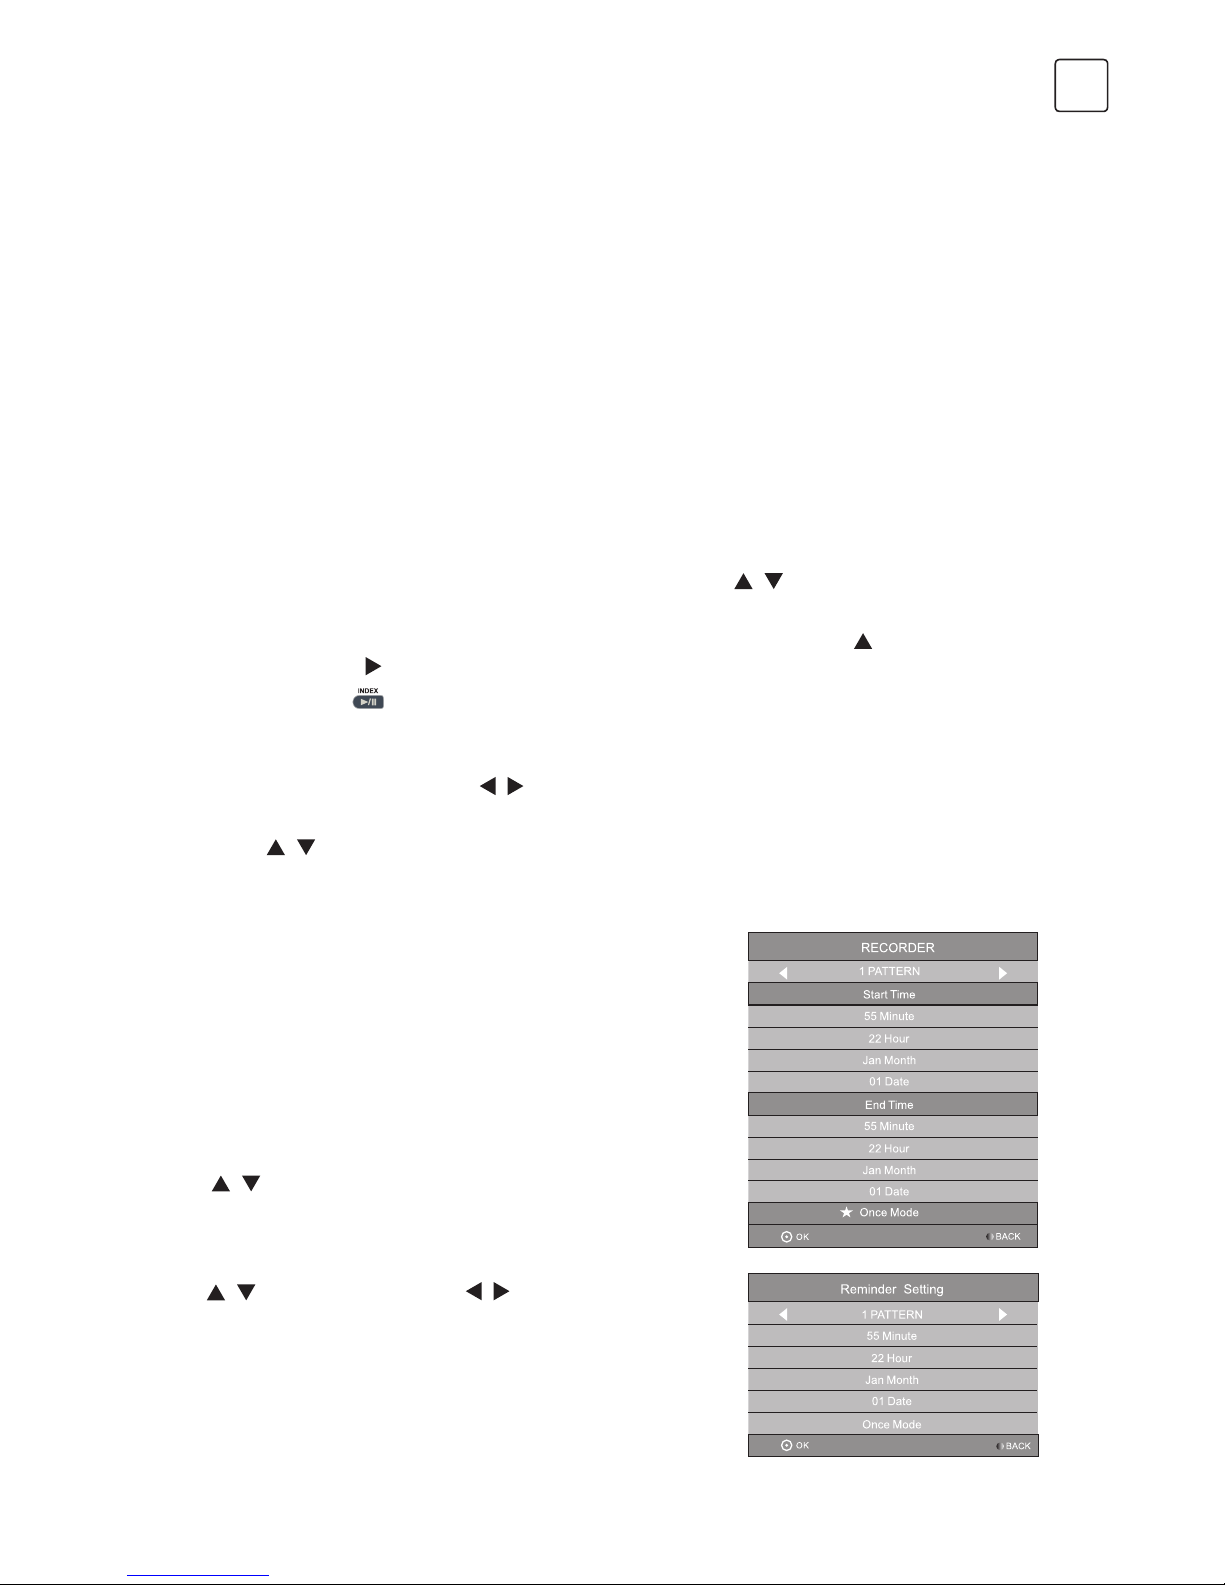
Recorder
Press the RED button to display the recorder menu (right).
See detailed information about the different ways of
recording with the television onto a USB device.
Info
Press the GREEN button to show information about the
selected program.
Schedule
Press the YELLOW button to display the Schedule List.
Press
/ to select an event, press the RED button to
delete an Event.
Remind
Press the BLUE button to display a reminder menu.
Press
/ to select an item and / to change the
setting.
Press ENTER to add the reminder event to the schedule
list. An updated schedule list will be shown.
4. Choose the appropriate recording mode: once, every day or weekly.
5. Press ENTER to confirm your selection. A schedule of all your recordings (the schedule list)
will appear. See EPG function for more on the schedule.
If you are browsing the EPG, Follow the steps on EPG function page.
Page 16

16
ENG
MENU SETTINGS
Menu Operation (DTV Mode)
Press "MENU" key to enter the main menu .
Press the [ ] / [ ] guide key to select desired item.
Press "ENTER" key to enter the item.
Press [
] / [ ] and ENTER buttons to select the submenus.
Press "MENU" key to exit the item.
Note: Some options may be not available under some sources.
Picture
Picture Mode: Select the automatic picture control mode. Choices are Dynamic,
Standard, Mild and User.
Color Temperature: Select the overall color tone of the picture. Choices are Cool,
Medium, Warm and User.
Aspect Ratio: Select the aspect ratio (display proportions) according to your video signal
type or preference. Choices are 16: 9/4: 3/Just Scan /Zoom1/ Zoom2.
Noise Reduction: Eliminates noise in the picture. Choices are Off/Low/Middle/High.
MPEG NR: Eliminates noise generated while creating digital picture signals. Choices are
Off/Low/Middle/High.
Sound
Sound Mode: Select your favorite sound mode for each input. Choices are Standard/
Music/Movie/Sports/User.
Bass: Adjusts the lower frequency of the sound.
Treble: Adjusts the higher frequency of the sound.
Balance: Control the sound balance between the right and left loudspeaker.
Auto Volume: Adjust the volume corresponding to the input audio level. Contain On
and Off.
Surround Sound: Helps to create rich and wider sound from stereo sound sources.
AD Switch (Only available in DTV mode): Turn on the Audio description, you can
activate the setting of AD volume. When turn on the audio description, a narrator will
describe what is happening on the screen for blind or visually impaired viewers.
SPDIF Mode (May not be available): Select the SPDIF mode: Auto or PCM.
Channel
Auto Tuning
Select DVB-T or DVB-C and press ENTER button to go to the next step. Select country or scan
type and then search and store programmes automatically. If you want to stop the auto search,
press MENU button or EXIT button and exit dialog box will pop out.
• Press to confirm exit.
• Press to continue searching.
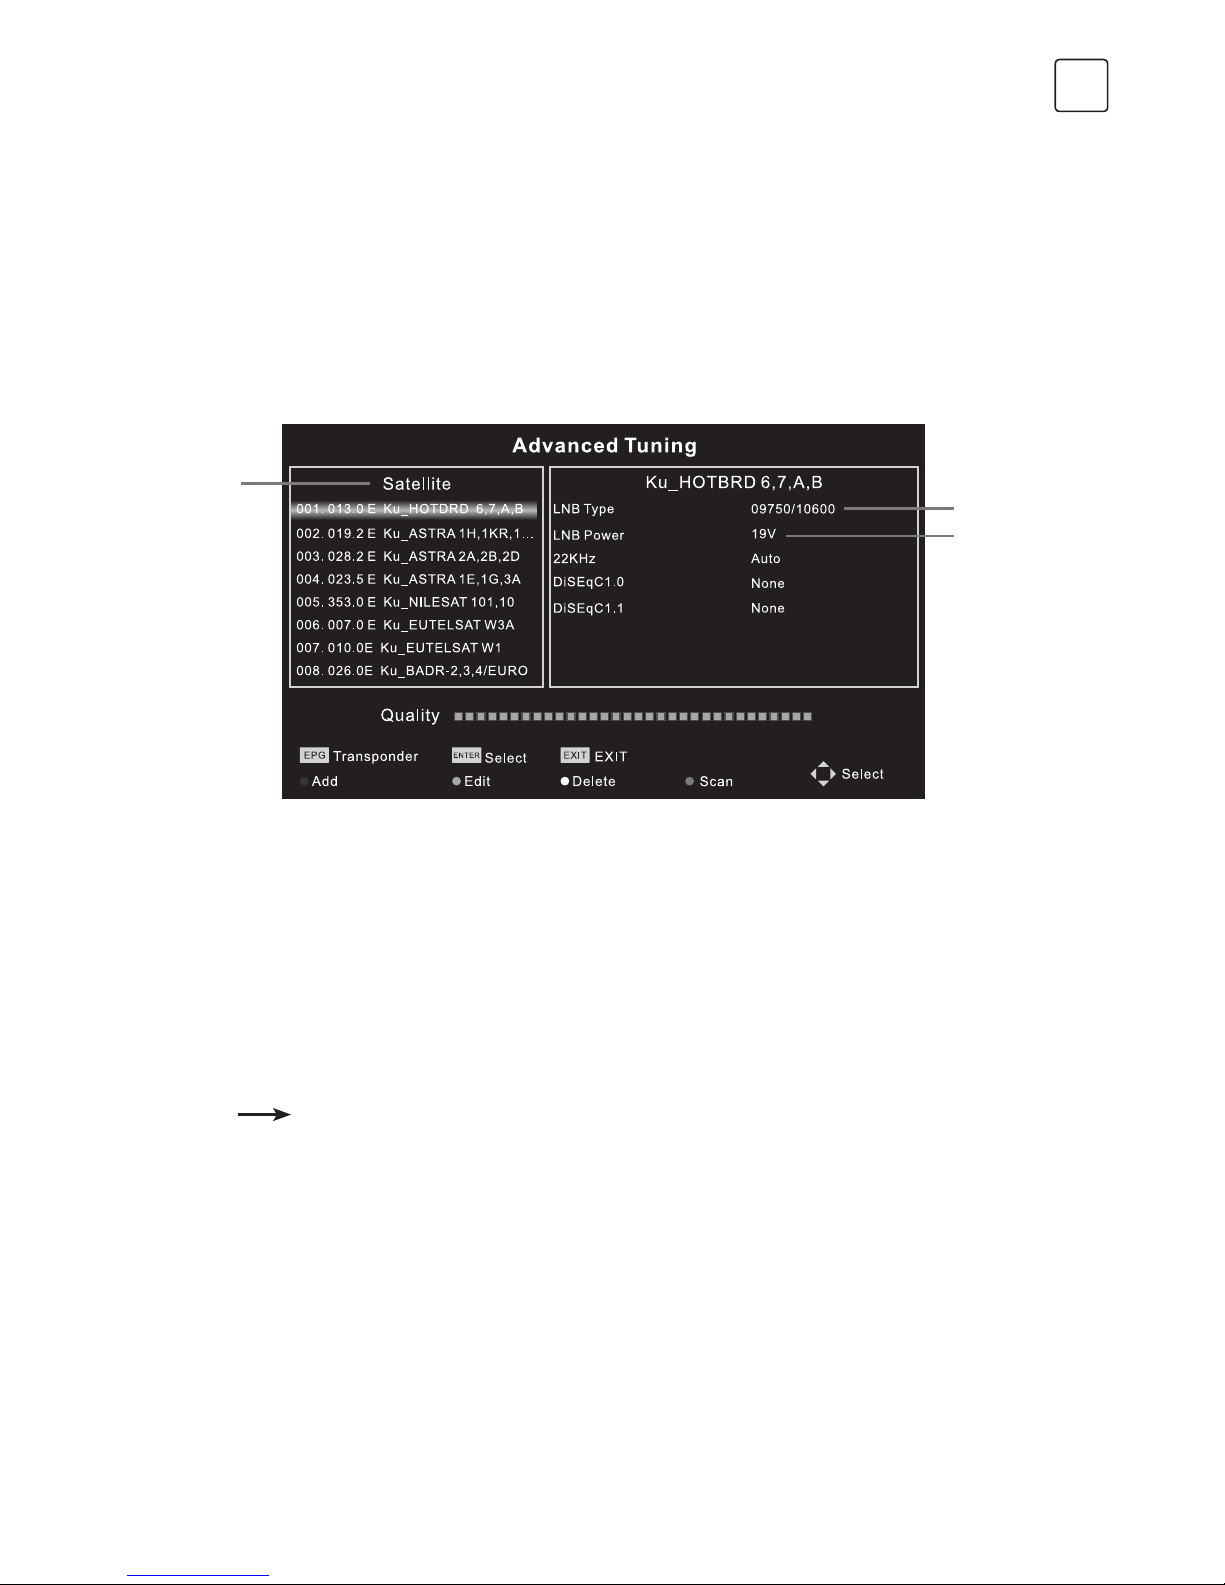
Advanced Tuning
Access the satellite settings essential for programme searching through DVB-S source.
Page 17
17
ENG
Satellite Dish Settings (Step 1-3, refer to Fig. 1)
A set of satellite dish settings must be configured for each wanted satellite before
performing a channel scan.
Satellite - Select the satellite for this TV.
LNB Type - Make sure the LNB type is appropriate for your dish.
LNB Power - Enable or disable power supply for the LNB.
22KHz - Select the 22KHz to set 22K switch to ON/OFF. Use auto mode to switch 22KHz
on or off depending on the LNB type.
DiSEqC1.0/1.1 - Select the DiSEqC mode for the selected LNB.
Fig. 1
Step 2
Step 1
Step 3
Step 1: Highlight Satellite and press ENTER to access the satellite list and select the desired
one.
Step 2: Highlight LNB Type and press ENTER to select the LNB type.
Step 3: Make sure that 22KHz, DiSEqC1.0/1.1 switch corresponds to the selected satellite.
After completing the above steps, press the blue button to search for the channels.
DTV Manual Tuning
Search and store programmes manually.
Channel
DTV Manual Tuning
Select the source type (DVB-T or DVB-C) and search digital programmes manually. In the
Channel menu, select DTV Manual Tuning and press ENTER button to access.
1. Press or to select channel number and then press ENTER to start the search.
2. The search stops when programme is found and this program will be stored in the current
channel position. If you want to stop the search, press the MENU button.
ATV Manual Tuning
First select the source type of ATV. Then select ATV Manual Tuning in the Channel menu and
press ENTER button to access.
1. Highlight and press or tto select Storage To 1 (or any other number), Sound System
or Channel number. Then select Search and press ENTER to start the search.
Page 18

18
ENG
• Press for the unit to search towards higher frequency;
• Press for the unit to search towards lower frequency;
2. The search stops when programme is found. This programme will be stored in the current
channel position. If you want to stop the search, press the MENU button.
Fine-Tune
Use it to make small adjustments to tuning of each individual channel. Fine-tune is not
necessary under normal conditions. However, in area with poor broadcast conditions,
where adjustments are necessary to improve picture and sound, use the fine-tune option.
1. Select the channel that you want to fine tune.
2. In Channel menu, select ATV Manual Tuning and press to highlight Fine-Tune.
3. Press or to fine-tune until the best possible picture and sound are obtained.
Program Edit
Edit the programmes. You can press colour buttons on the remote control to skip programmes,
rename and delete programmes or move programmes, and add programmes to the favourite
list by pressing FAV button.
Signal Information
Display of the current DTV channel information.
CI Information
Allowing the user to select from the CAM-provided menu. Select the CI menu according to the
menu PC Card.
5V Antenna Power
This option is only available with DVB-T source. Select On to supply power to the TV antenna.
Select Off to turn off this function.
Software Update (OAD) (only for some regions)
Select On to allow the TV to update the system software over the air. Choosing Off will turn off
this function.
OAD Tuning (only for some regions)
When software update (OAD) is off, this option is disabled. Choosing OAD scan involves
scanning channels to find the OAD update information.
LCN ON/OFF (Only for some regions)
When tuning programs, select ON, the channel list is sorted according to LCN; select OFF, the
channel list is sorted according to the default order.
Option
OSD Language
Select the OSD language.
Audio Languages / Subtitle Languages (Note 1)
Select the desired language.
Page 19

19
ENG
TTX Language
Select TTX language for different regions.
Time
Can setup Auto Sync, Clock, Time Zone, Summer Time, Sleep Timer and Auto Sleep.
HDMI CEC
Press to enter submenus.
HDMI CEC – Turn on or off the HDMI CEC function.
Auto Standby – Turn the TV to standby automatically.
Device List – When HDMI CEC is on, check the list of devices connected to the TV.
REC File System (Note1)
If you want to use this function, you must have received a digital program and connected
a USB disk.
EWS Local Postal Codes(Only for some regions)
The Emergency Warning System defined by DVB provides the necessary mecha
Restore Default
Restore user setting to default.
Software Update (USB)
Connect USB device storing the software that has to be upgraded to upgrade the TV system.
Note:
1. Audio Languages/ Subtitle languages /REC File System only works under DVB-S /DVB-C /
DVB-T mode.
2. User data on this TV will lose completely after operating the feature of Restore Deafault.
3. Do not power off the TV during the software upgrading process, otherwise the TV may not
work, and the customer should be responsible.
Lock
Lock System
Input the initial password (0000) to access this feature. Choose “on” and the features
“Set password”, “Block programme” and “Parental guidance” will be activated. Choose “off”
and the above mentioned three features will become inactive. If you forget the password, you
can also input the super password (8899) to enter into the lock system.
Set Password
Reset the password.
Block Programme
Block the desired programmes.
Parental Guidance
Choose the programmes appropriate for children to watch.
Hotel Mode (Only for some regions)
Only for hotel use.
Page 20

20
ENG
USB CONTROL
USB Menu
Press Source menu and select USB button. You can play movie, music and photo files from
your USB storage devices.
1. Connect USB storage device to USB input terminal and select the types of media on the
home page: MOVIE, MUSIC and PHOTO.
2. Press [ENTER] button, the screen will show the connected USB device. Press [ENTER]
button again to view the file folders and files.
3. Press [] / [] or [] / [] to select folder. Press [ENTER] to open folders and select files,
then press [ENTER] to tick them. Highlight the one you want to play first, press [/
]
tostart playing. To start playing directly, select a file and press [/ ].
4. Press [
] to stop playing and return to upper lever folder.
5. Continuously press [RETURN] to go back to upper lever folder.
6. Use the above steps to select and play another media type.
Reminder When Using the USB Player
1. Some USB storage devices may not be compatible to operate smoothly with this TV.
2. Back up all of the data in the USB storage device in case data was lost due to an
unexpected accident. We do not assume any liability for the losses by misuse or
malfunction. Data backup is consumer's responsibility.
3. For large file sizes, the loading speed may be slightly longer.
4. The recognition speed of a USB storage device may depend on each device.
5. When connecting or disconnecting the USB storage device, make sure the TV is not in USB
mode otherwise the USB storage device or the files stored in it may be damaged.
6. Please use only a USB storage device which is formatted in FAT16, FAT32, NTFS file system
provided with the Windows operating system. In case of a storage device formatted as a
different utility program which is not supported by Windows, it may not be recognized.
7. When using a USB Hard Disk Drive which requires electric power source, ensure its power
does not exceed 500mA. If the power of the USB hard Disk exceed 500mA, the TV system
will be changed into standby mode, you must pull out the USB hand Disk and restart the
TV system.
8. An "Unsupported File" message will be displayed if the file format is unsupported or the
file is corrupted.
9. FHD big picture needs longer time to process, which is not caused by the TV. Please be
patient to wait.
10. This TV may not support some multimedia files changed and upgraded as the change of
encoding format or other technical advances.
Page 21
21
ENG
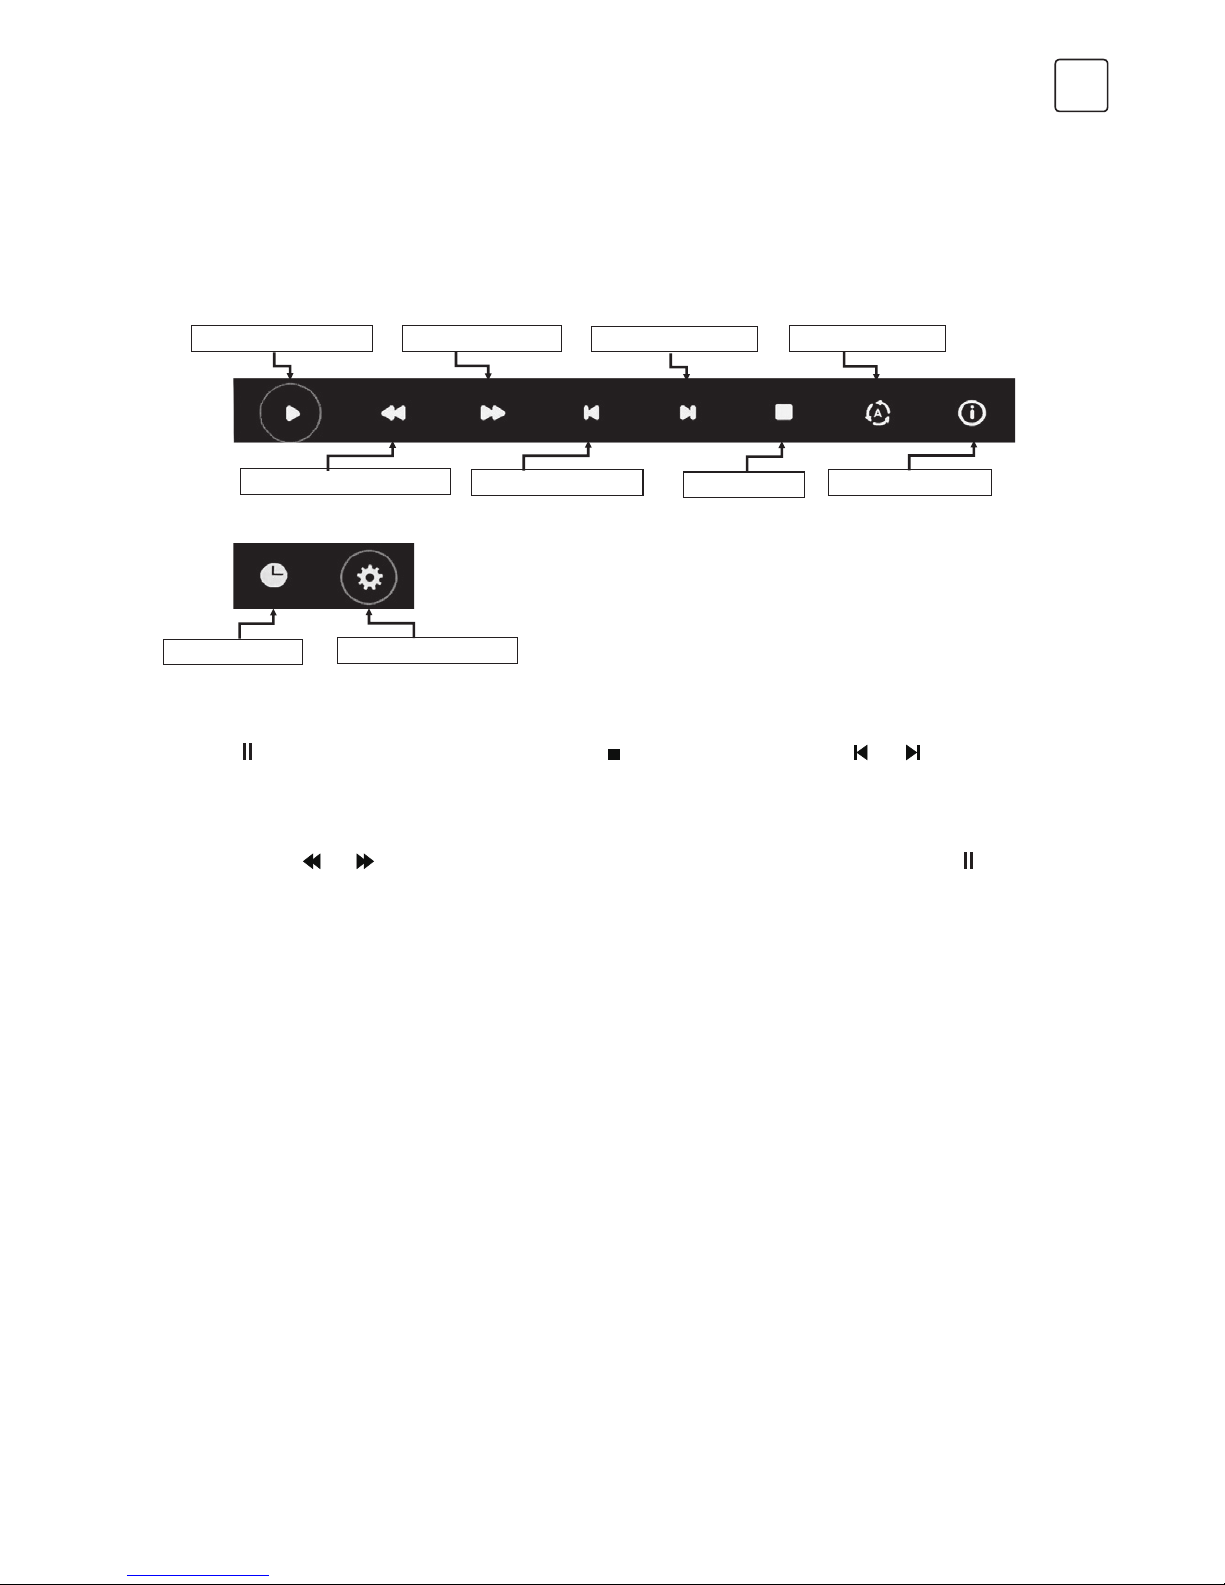
Play Movie
Press [ INFO ] / [ ] to display/ exit from the below Menu Bar. Press USB control buttons on
the remote control to do relevant operations.
Play & Pause/Stop/Prev./Next
Press [/
] to play or pause the playing; press [ ] to stop playing; press [ ] / [ ] to play the
previous or the next video file. You can also press [ ] / [ ] to highlight one of the four icons
and, after pressing [ ENTER ], the TV will respond accordingly.
Fast Reverse / Fast Forward
Press and hold [
] / [ ] for several seconds to reach the desired point, then press [/ ]
button to start playing from the new position.
Play Mode
Highlight the corresponding icon and press [ ENTER ] to switch to another play mode.
Information
Highlight the corresponding icon and press [ ENTER ] to view the information of the playing
video.
Go to time
Skip to specific point by entering time information. Highlight the corresponding icon and
press [ ENTER ] to go to “Input search time” screen. Press [ ] / [ ] to move the cursor and
use the number buttons to insert the time. Press [ ENTER ], the TV will start playing from the set
time.
Aspect Ratio
Highlight the option and press [ ENTER ] to select the display mode.
Play & Pause
Stop
Skip Next
Fast Forward
Information
Skip Previous
Fast Backward
Go to Time Aspect Ratio
Play Mode
Movie Control Bar
Page 22
22
ENG
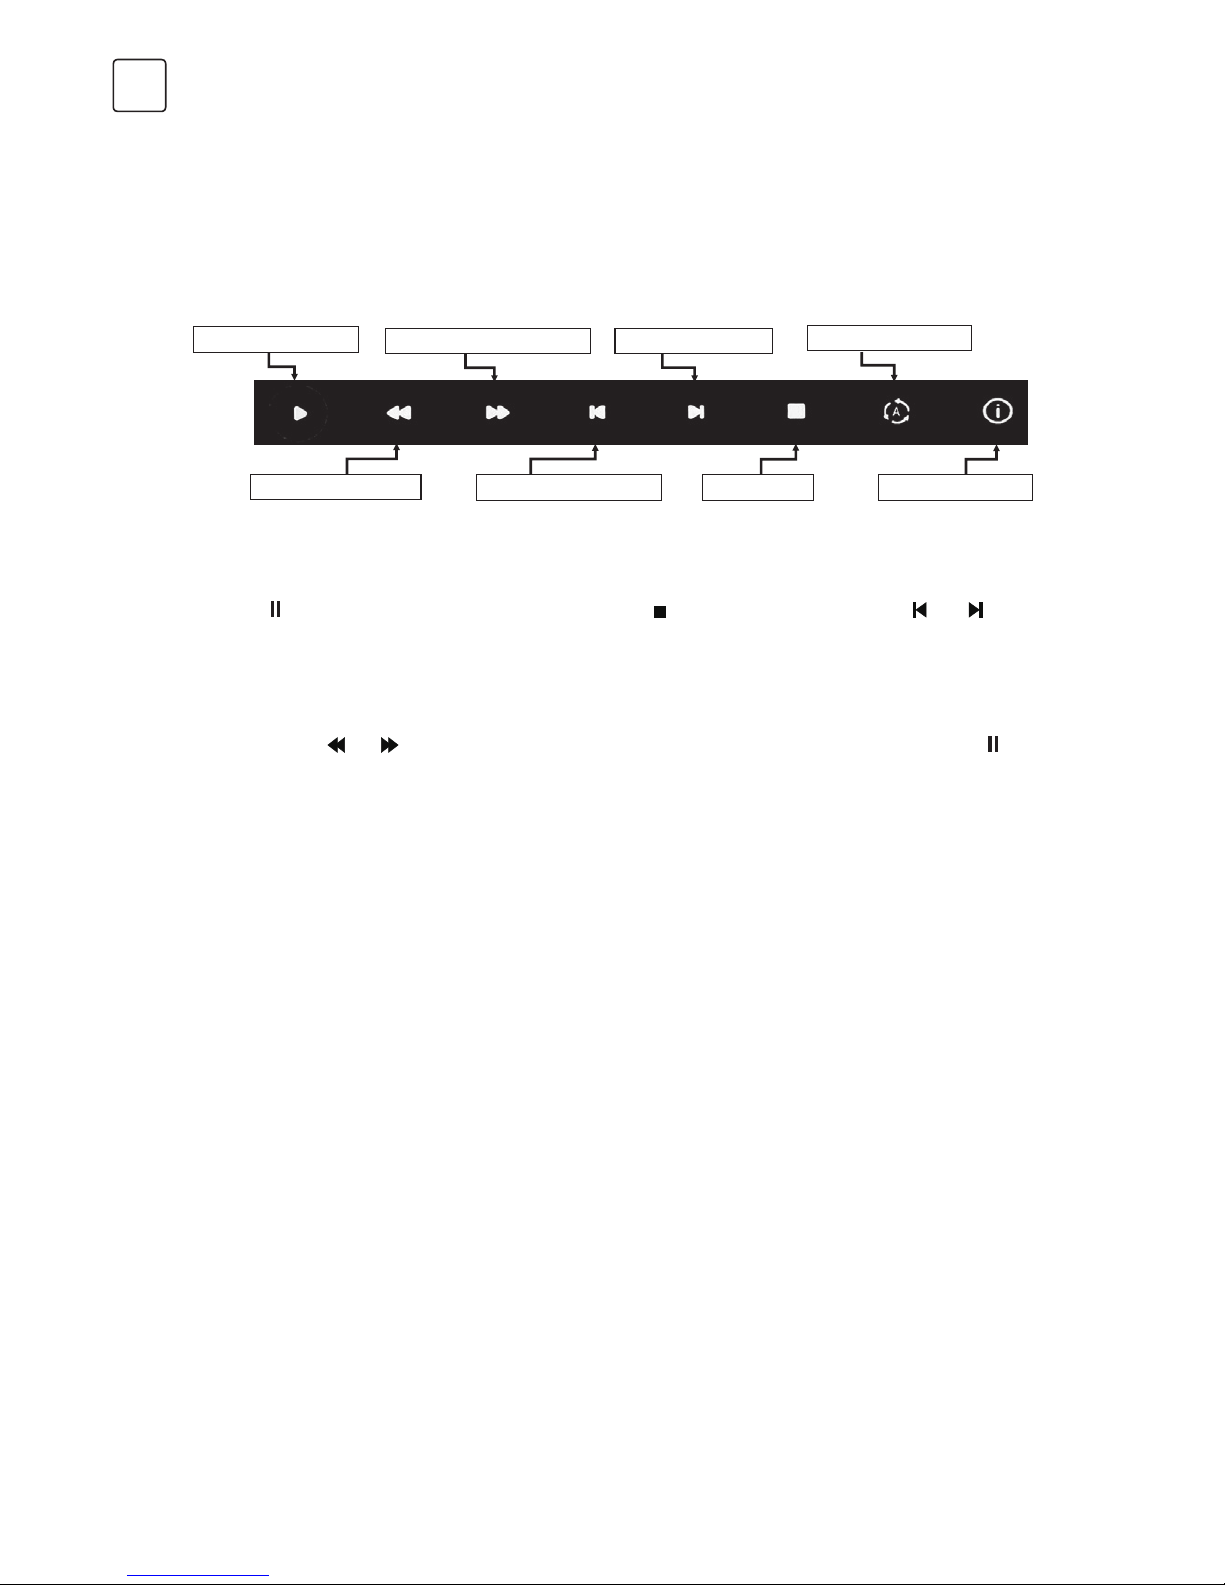
Play Music
MUSIC CONTROL BAR
Play & Pause / Stop / Previous / Next
Press [/
] to play or pause the playing; press [ ] to stop playing; press [ ] / [ ] to
play the previous or the next music file. You can also press [ ] / [ ] tto highlight the
corresponding icon on the control bar and, after pressing [ ENTER ], the TV will respond
accordingly.
Fast Forward / Fast Backward
Press and hold [
] / [ ] for several seconds to reach the desired point, then press [/ ] on
the remote control to start playing from the new position.
Play Mode
Highlight the icon and press [ ENTER ] to switch to another play mode.
Information
Highlight the corresponding icon and press [ ENTER ] to check the information of the playing
music.
Press [ INFO ] / [ ] to display / exit from the below Menu Bar. Press USB control buttons on
the remote control to perform the relevant operations.
Play & Pause
Stop
Skip Next
Fast Forward
Information
Skip PreviousFast Backward
Play Mode
Page 23
23
ENG
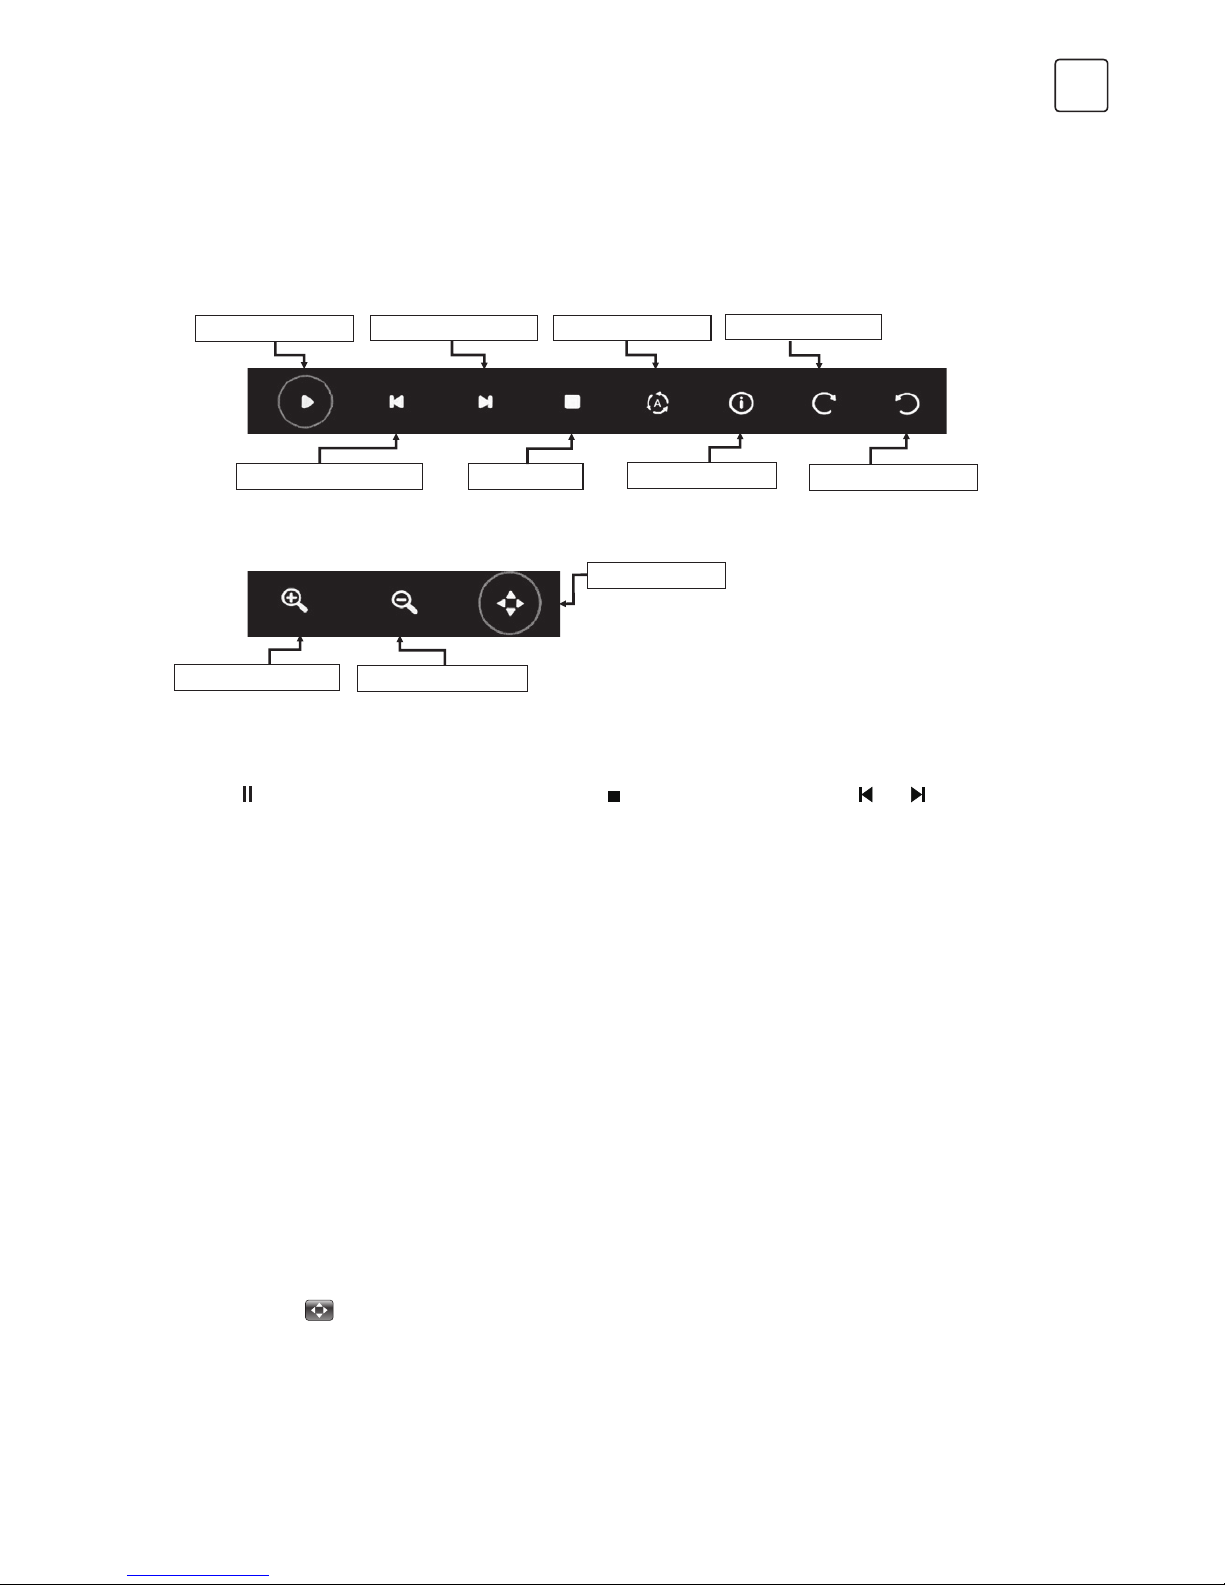
Browse Photo
PHOTO CONTROL BAR
Play & Pause / Stop / Previous / Next
Press [/
] to play or pause the playing; press [ ] to stop playing; press [ ] / [ ] to play
the previous or the next picture. You can also press [ ] / [ ] to highlight the corresponding
icon on the control bar and, after pressing [ ENTER ], the TV will respond accordingly.
Play Mode
Highlight the icon and press [ ENTER ] to switch to another play mode.
Rotate
Highlight the corresponding icon on the menu bar and press [ ENTER ] to rotate the picture
90 degrees clockwise or counter clockwise.
Info.
Highlight the corresponding icon and press [ ENTER ] to check the information regarding the
viewed photo.
Zoom In / Zoom Out
Highlight the corresponding icon on the menu bar and press [ ENTER ] to zoom in / zoom out
of the image.
Move View
When the image is magnified, use this function for convenient check. Highlight this icon,
press [ ENTER ] button, then press left/right/up/down button to move the image.
Note:
Move function (
) is only available when image is enlarged.
Press [ INFO ] / [ ] to display / exit from the below Menu Bar. Press USB control buttons on
the remote control to perform the relevant operations.
Play & Pause
Stop
Skip Next Rotate CW
Rotate CCWInformationSkip Previous
Zoom In
Move View
Zoom Out
Play Mode
Page 24

24
ENG
TROUBLESHOOTING
Before calling a service technician, review following information for possible causes and
solutions for the problem you are experiencing.
NO PICTURE, NO SOUND
1. Check if the fuse or circuit breaker is
working.
2. Plug another electrical device into the
outlet to make sure it is working or
turned on.
3. Poor power plug contact with the outlet.
4. Check the signal source.
NO COLOR
1. Change the colour system.
2. Adjust the saturation.
3. Try another channel. Black-white program
may be received.
REMOTE CONTROL DOES NOT WORK
1. Change the batteries.
2. Batteries are not installed correctly.
3. Main power is not connected.
NO PICTURE, NORMAL SOUND
1. Adjust the brightness and contrast.
2. Broadcasting failure may happen.
NORMAL PICTURE, NO SOUND
1. Press the volume up button to increase
volume.
2. Volume is set to mute, press MUTE to
restore sound.
3. Change the sound system.
4. Broadcasting failure may happen.
UNORDERLY RIPPLES ON THE PICTURE
It is usually caused by local interference,
such as cars, daylight lamps and hair
dryers. Adjust the antenna to minimize the
interference.
BLANK SCREEN IN PC MODE
(only for models with PC terminals)
Perhaps the TV cannot recognize the PC set
resolution. Choosing the best resolution or
other standard resolutions for the Windows
system is recommended. Set refresh rate to
60Hz.
SNOWY DOTS AND INTERFERENCE
If the antenna is located in the fringe area of
television signal where the signal is weak, the
picture may be marred by dots. When the
signal is extremely weak, it may be necessary
to install a special antenna to improve the
reception.
1. Adjust the position and orientation of the
indoor/outdoor antenna.
2. Check the connection of antenna.
3. Fine tune the channel.
4. Try another channel. Broadcasting failure
may happen.
IGNITION
Black spots or horizontal streaks appear, or
the picture flutters or drifts. This is usually
caused by interference from car ignition
system, neon lamps, electric drills, or other
electrical appliance.
GHOST
Ghosts are caused by the television signal
which follows two paths. One is the direct
path, the other is reflected off tall buildings,
hills, or other objects. Changing the direction
or position of the antenna may improve the
reception.
RADIO FREQUENCY INTERFERENCE
This interference produces moving ripples or
diagonal streaks, and in some cases, loss of
contrast in the picture. Detect and remove
the radio interference source.
Note:
If the problem persists after applying the
solutions, please contact your local support
centre.
Page 25
25
ENG
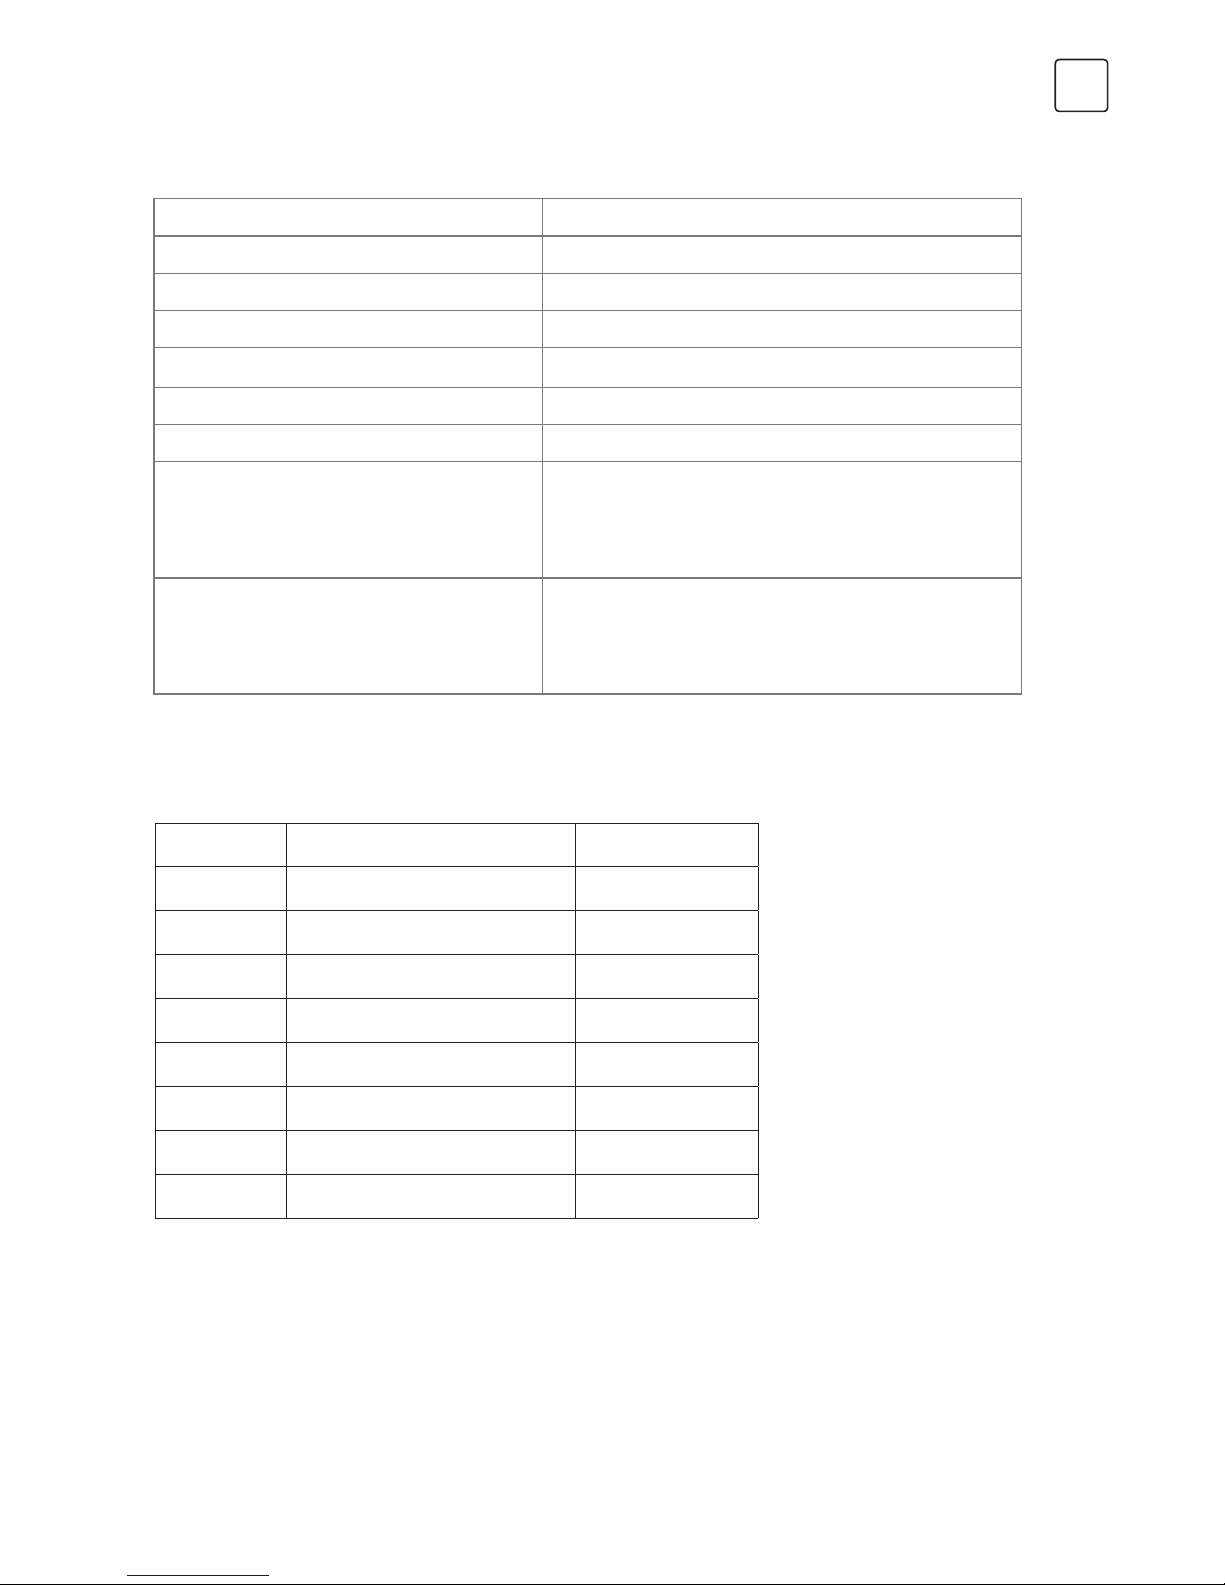
SPECIFICATIONS
ACCESSORIES
Screen size - diagonal 81cm
Screen resolution 1366x768
Rated power consumption 60W
Dimensions (W x H x D) with stand 733.4 X 480 X 167.7mm
Dimensions (W x H x D) without stand 733.4 X 438.5 X 85.1mm
Net weight with stand: 4.0kg
Net weight without stand: 3.9kg
Environment
(only for Tropical climates zone):
Working temperature: 5°C~45°C
Working humidity: 20%~80%
Storage temperature: -15°C~50°C
Storage humidity: 10%~90%
Environment
(only for Moderate climates zone)
Working temperature: 5°C~35°C
Working humidity: 20%~80%
Storage temperature: -15°C~45°C
Storage humidity: 10%~90%
No. Name Quantity
1 Remote Control 1
2 Battery 2
3 Stand 2
4 Screw 2
5 AC Line Cord 1
6 User Manual 1
7 Stand Installation 1
8 Warranty Card 1
Note: For some models, AC Line Cord may be already connected with the TV set
and can’t be removed.
Page 26

26
ENG
LICENSE
Manufactured under license from Dolby Laboratories.
Dolby, Dolby Audio and the double-D symbol are trademarks of
Dolby Laboratories.
The terms HDMI and HDMI High-Definition Multimedia Interface,
and the HDMI logo are trademarks or registered trademarks of
HDMI Licensing LLC in the United States and other countries.
Page 27

27
ALB
PARALJMËRIME DHE MASA PARAPRAKE . . . . . . . . . . . . . . . . . . . . . . . . . . 28
BUTONI . . . . . . . . . . . . . . . . . . . . . . . . . . . . . . . . . . . . . . . . . . . . . . . . . . . . . . . . . 34
TERMINALI . . . . . . . . . . . . . . . . . . . . . . . . . . . . . . . . . . . . . . . . . . . . . . . . . . . . . . 34
FUNKSIONET E TELEKOMANDËS . . . . . . . . . . . . . . . . . . . . . . . . . . . . . . . . . 35
REGJISTRUES (REC). . . . . . . . . . . . . . . . . . . . . . . . . . . . . . . . . . . . . . . . . . . . . . 38
ELECTRONIC PROGRAM GUIDE (EPG) . . . . . . . . . . . . . . . . . . . . . . . . . . . . 39
MENU KONTROLLI. . . . . . . . . . . . . . . . . . . . . . . . . . . . . . . . . . . . . . . . . . . . . . . 40
Menu Operimi (DTV Mode) . . . . . . . . . . . . . . . . . . . . . . . . . . . . . . . . . . . . . 40
Fotografia . . . . . . . . . . . . . . . . . . . . . . . . . . . . . . . . . . . . . . . . . . . . . . . . . . . . . 40
Zëri . . . . . . . . . . . . . . . . . . . . . . . . . . . . . . . . . . . . . . . . . . . . . . . . . . . . . . . . . . 40
Kanali. . . . . . . . . . . . . . . . . . . . . . . . . . . . . . . . . . . . . . . . . . . . . . . . . . . . . . . . . 40
Opsione . . . . . . . . . . . . . . . . . . . . . . . . . . . . . . . . . . . . . . . . . . . . . . . . . . . . . . 42
Bllokimi . . . . . . . . . . . . . . . . . . . . . . . . . . . . . . . . . . . . . . . . . . . . . . . . . . . . . . . 43
USB KONTROLLI . . . . . . . . . . . . . . . . . . . . . . . . . . . . . . . . . . . . . . . . . . . . . . . . . 44
USB Menu. . . . . . . . . . . . . . . . . . . . . . . . . . . . . . . . . . . . . . . . . . . . . . . . . . . . . 44
Këshillues i këndshëm gjatë përdorimit të USB player . . . . . . . . . . . . . 44
Filma menu . . . . . . . . . . . . . . . . . . . . . . . . . . . . . . . . . . . . . . . . . . . . . . . . . . . 45
Play Muzikë. . . . . . . . . . . . . . . . . . . . . . . . . . . . . . . . . . . . . . . . . . . . . . . . . . . . 46
ShfletoFoto. . . . . . . . . . . . . . . . . . . . . . . . . . . . . . . . . . . . . . . . . . . . . . . . . . . . 47
DIAGNOSTIKIMI . . . . . . . . . . . . . . . . . . . . . . . . . . . . . . . . . . . . . . . . . . . . . . . . . 48
SPECIFIKIME. . . . . . . . . . . . . . . . . . . . . . . . . . . . . . . . . . . . . . . . . . . . . . . . . . . . . 49
LICENCA . . . . . . . . . . . . . . . . . . . . . . . . . . . . . . . . . . . . . . . . . . . . . . . . . . . . . . . . 50
Shënim
1. Grafikat në këtë manual janë vetëm për referencë.
2. OSD e TV-së suajmund të jetë pak më ndryshe me këtë manual.
3. Informacioni në këtë document është subjekt ndryshimi pa paralëjmërim. Prodhuesi
nuk pranon asnjë përgjegjësi për dëmin që rezulton direct ose indirect nga gabimet, dhe
mungesa e plotësisë ose mospërputhje në mes manualit dhe përdoruesit të produktit të
përshkruar.
Në hapësira të thata për shkak të energjisë elektrike statike, produkti mund të restartohet dhe
të kthehet në interfesjin kryesor OSD, interfejs pejeri i USB ose në gjendjen paraprake, Ju
lutemi vazhdoni me operimin në TV ashtu si dëshironi.
Përmbajtja
Page 28

28
ALB
PARALJMËRIME DHE MASA PARAPRAKE
Lexoni të gjitha udhëzimet para se të veproni. Mbani këtë udhëzim edhe për përdorim të
mëvonshëm.
• Lexoni këto udhëzime – Të gjitha këto sigurime dh udhëzime përdorimi duhet të lexohen
para se produkti të vihet në përdorim.
• Ruajini këto udhëzime – Të gjitha udhëzimet e sigurisë dhe operimit duhet të ruhen për
reference në të ardhmen.
• Dëgjoni të gjitha vërejtjet – Të gjitha vërejtjet e aplikimit dhe udhëzimet e përdorimit duhet
të respektohen.
• Ndiq këto udhëzime – Të gjitha udhëzimet e operimit dhe përdorimit duhet të ndiqen dhe
të përdoren të gjitha.
• Mos e përdor këtë apparat afër ujit – Pajisja nuk duhet të përdoret afër ujit ose lagështi – për
shembull, në bodrume të lagështa ose afër pishinës.
• Pastroe vetëm me leckë të thatë.
• Mos blloko ndonjë hapje ventilimi, Instalojeni në përputhje me instruksionet e prodhuesit.
• Mos e instalo afër burimeve të nxehta si radiator, not install near any heat sources such as
radiators, regjistrues nxehtësie, soba ose aparate tjera (duke përfshirë amplifikatorë) që
prodhojnë nxehtësi.
• Mos injoroni qëllimin e sigurisë së prizes së polarizuar ose tokëzimit. Një prizë e polarizuarka
dy tehe me një më të gjerë se tjetri. Priza e tokëzimit ka dy tehe dhe një dhëmb të tretë
tokëzimi. Dhëmbi i gjerë ose i treti është dhënë për sigurinë tuaj.Nëse priza e siguruar nuk i
përshtatet prizes suaj, konsultohuni me një elektricist për ndërrimin e prizës së vjetër.
• Ruajeni kordonin e rrymës nga ecja mbi të ose hiq nga fytyra sidomos në prizat elektrike,
prizat dhe në pikën ku ka dalje nga aparati.
• Përdorni vetëmbashkëngjitjet/akseosaret e specifikuara ose të siguruara nga prodhuesi..
• Përdorini vetëm qerre, bartës, trekëmbësh, kllapa, ose tabelë e specifikuar nga
prodhuesi, ose shiten me aparatin.Kur përdoret një karrocë ose raft, kini kujdes kur
lëvizni kombinimin karrocë/aparat për shmangien nga dëmtimi.
• Hiq nga priza aparatin gjatë rrufeve ose kur nuk përdoret për periudha të gjata kohore.
Referohuni të gjitha serviseve me personel të kualifikuar.Servisi është i nevojshëm kur
aparati është dëmtuar në ndonjë mënyrë, të tilla si kabllo furnizimi me energji elektrike ose
priza është e dëmtuar, lëngje të derdhura ose objekte që kanë rënë mbi aparatin, aparati
është i ekspozuar në shi dhe lagështi, nuk funksionon normalisht, ose ka rënë.
• KUJDES: Këto udhëzime janë për përdorim vetëm nga personeli i kualifikuar. Për të
reduktuar rrezikun e goditjes elektrike, mos bëni asnjë servisim që nuk ceket në udhëzimet
operative për ta bërë atë.
• Mos e instaloni këtë pajisje në kufi ose hapësira si rrafte librash ose të ngjashme, dhe mbani
mire kushtet e ventilimit në pjesë të hapura.Ventilimi nuk duhet të pengohet nga mbulimi i
hapjes për ventilim me sende, të tilla si gazeta, lloj lloj pëlhurash, perde etj.
•
Kujdes–për të parandaluar rrezikun e elektro shokut, zëvendësoni grilën.Please refer
the information on exterior bottom enclosure for electrical and safety information before
installing or operating the apparatus.
• Ju lutem referojuni informacionit shtojcës në pjesën e pasme eksterne për informacione
elektrike dhe të sigurisë para instalimit ose funksionimit të aparatit.
• Për të reduktuar rreziikun nga zjarri ose goditje elektrike, mos e ekspozoni pajisjen në shi
ose lagështi.
Udhëzime të rëndësishme sigurie
Page 29

29
ALB
• Aparati nuk duhet të ekspozohet ndaj pikimeve dhe spërkatjeve me ujë dhe pa objekte të
mbushura me lëngje, të tilla si vazo, mund të vendosen në aparat.
• Për terminalete shënuara me simbolin “
” mund të jetë me magnitudë të mjaftueshme për
rrezik nga goditja elektrike. Instalimet elektrike të jashtme të lidhura me terminalet kërkon
instalim nga një person adekuat ose të përdorura të gatshme me pista ose tela.
• Për të parandaluar dëmtimin, ky apparat duhet të bashkangjitet në mënyrë të sigurt në mur
në përputhje me udhëzimet e instalimit.
• Rreziku nga shpërthimi nëse bateria është zhvendosur gabimisht. Zëvendëso vetëm me të
njëjtën ose lloj ekuivalent.
• Bateria (bateria ose pakoja e baterive) nuk duhet të ekspozohen në nxehtësi të tepruar siç
janë dielli, zjarri ose të ngjashme.
• Dëgjimi i muzikës me nivel të lartë të zërit dhe kohë të gjatë mund tia dëmtojë dëgjimin
dikujt tjetërPër të zvogëluar rrezikun e dëmtimit të dëgjimit, duhet të ulet vëllimi në nivel të
sigurt, të rehatshëm, dhe të zvogëlohet sasia e kohës e dëgjimit me zë të lartë. (Vetëm për
Gjermani).
• Fishet kryesore ose pajisjet lidhëse bashkuese direkte/ adapter është përdorur simjet
shkëputjeje, mjeti për shkëputje do të mbetet i gatshëm për përdorim.
• Kur nuk është në përdorim dhe gjatë lëvizjes, ju lutemi kini kujdes me telat e energjisë, p.sh.
lidheni deri te teli energjisë me kabllo lidhëse ose diçka të tillë. Duhet të jetë e lire nga tehe
të mprehta dhe të ngjashme që mund të shkaktojnë gërvishje të telave të energjisë. Kur
të vëni në përdorim përsëri, ju lutem sigurohuni që teli energjisë nuk është dëmtuar, nëse
është gjetur ndonjë dëmtim, ju lutem kërkoni seriviserin për të zëvendësuar telat e energjisë
të specifikuar nga ana e prodhuesit ose të ketë të njëjtat karakteristika si origjinali.
• Duhet kushtuar vëmendje aspekteve mjedisore të dispozicionit të baterisë.Përdorimi i
aparatit në klima të moderuara.
• Nuk duhet të ketë burime flake, të tilla si qirinj të ndezur të vendosur mbi aparatin. Për të
parandaluar përhapjen e zjarrit, duhet gjithmonë të mbani larg nga ky product qirinjtë ose
burime tjera flake.
• Nëse aparati ka simbolin
dhe kordoni ka dy kunja për energji,do të thotë që pasjisja
është e një Klase II ose aplikim i dyfishtë izolimi elektrik. Është proektuar në atë mënyrë që
nuk kërkon një lidhje të sigurtë në elektrikë tokësore.
Page 30
30
ALB
KUJDES
Mos e brej baterinë,
(Telekomanda e furnizuar me rrezik për djegie kimike) Ky produkt përmban një qelizë
bateri si monedhë/buton. Nëse bateria qelizë monedhë/buton gëlltitet, brenda dy orëve
mund shkaktojë djegie të brendshme dhe mund të çojë deri në vdekje.
Mba larg fëmijëve bateritë e vjetra dhe të reja.Nëse kupeja e baterisë nuk mbyllet
mire, ndaloni të përdorni produktin dhe mbajeni larg fëmijëve.
Nëse mendon se bateritë mund të jenë gëlltitur ose gjenden Brenda pjesëve të trupit,
kërko kujde të menjëhershëm mjekësor.
Paralajmërimpër Aparatetqë përmbajnë COIN / BUTTON CELLBATTERIES
CAUTION
RISK OF ELECTRIC SHOCK
DO NOT OPEN
• Kjo dritë shenjëzuese me shenjën e shigjetës brenda një trekëndëshi barabrinjës ka për
qëllim ta lajmërojë përdoruesin për prani të “tensionit të rrezikshëm” jo të izoluar brenda
kufijve të produktit që mund të jetë me përmasa të mjaftueshme pët të pasur rrezik të
goditjes elektrike.
• Për të zvogëluar rrezikun e goditjes elektrike, mos e hiqni kapakun (ose prapa). Nuk ka pjesë
të përdorshme të përdoruesit Brenda, Referojuni personelit të kualifikuar të shërbimit.
• Pika e thirrjes në një trekëndësh barabrinjës ka për qëllim të paralajmërojë përdoruesin për
praninë e udhëzimeve të rëndësishme të përdorimit dhe mirëmbajtjes në literaturën që
shoqëron pajisjen.
• Informacionet në vijim rekomandohen të përfshihen sit ë zbatueshme ku mund të zbatohen:
I referohet rrymës alternative (AC)
I referohet rrymës direkte (DC)
I referohet pajisjeve të klasës II
I referohet stand-by
I referohet për të ndezurON.
I referohet tensionit të rrezikshëm
Page 31

31
ALB
• Instaloni Ekranin në sipërfaqe solide horizontale të tilla si tavolinë ose tryzezë. Për ajrosje,
lëreni hapësirë të lir ë më së paku 10cm rreth setit. Për të parandaluar ndjonjë prishje dhe
situate të pasigurta, ju lutem mos vendosni objekte mbi setin. Ky aparat mund të përdoret
në klima tropikale dhe/ose të moderuara.
• Asnjëherë mos vendosni televizorin në një vend jo stabël. Televizori mund të bjerë, duke
shkaktuar lëndime të rënda personave ose vdekje. Shumë lëndime, veçanërisht për fëmijët,
mund të shmangen duke marrë masa paraprake, të thjeshta si:
• Përdorni kabinete ose tavolinë të rekomanduar nga prodhuesi i televizorit.
• Përdorni vetëm ashtu mobilje që fort mund të sigurojnë televizorin.
• Sigurohuni setelevizori nuk është varur përmbi tehut të mobiljes mbështetëse.
• Mos vendosni televizorin në mobilje të gjatë (për shembull, dollapë ose rafte) pa
ankorimin e të dy mobiljeve dhe telvizorin në një mbështetje të përshtatshme.
• Mos vendosni televizorin në lecka ose material tjera të vendosura në mes televizorit dhe
mobiljeve mbështetëse.
• Edukoni fëmijët për rreziqet e ngjitjes në mobilje për ta kapur televizorin ose kontrollet e
saj.
If your existing television set is being retained and relocated, the same considerations as
above should be applied (Only for the TV with mass exceed 7 kg)
Vendosja korrekte e këtij produkti.Kjo shenjë tregon se ky produkt nuk duhet të hidhet
me mbeturinat tjera shtëpiake në tërë EU-në. Për të parandaluar ndotjen e mundshëm
të mjedisit ose shëndetiti njerëzor nga hedhja e pakontrolluar në mbeturina.Për të kthyer
pajisjen tuaj të përdorur, ju lutem përdoreni dhe sistemin e kthimit dhe grumbullim it ose
kontaktoni shitsin ku produkti është blerë.Ata mund ta marrin produktin për riciklim të sigurt
mjedisor.
WEEE Direktivat
Pozicionimi iTV Setit
Shënim: Fotografia është vetëm për referencë.
Page 32

32
ALB
Një montim në mur mund të përdoret me televizorin tuaj. Konsulto shitësin tuaj lokal për
montimet në mur që mbështesin VESA standardet të përdorura për TV modelin tuaj. Me
kujdes mbërtheni kllapën në pjesën e pasme.Instaloni kllapën në një mur të ngurt pingul në
dysheme. Nëse e varni TV në materiale tjera ndërtimore, ju lutemi kontaktoni personelin e
kualifikuar për ta instaluar në mur. Instruksione më të detajuara do të përfshihen me montimin
në mur. Ju lutemi përdorni kllapën për në mur ku pasjijsa është e siguruar në mënyrë të duhur
me hapësira të mjaftueshme për të lejuar lidhjen me pajisjet e jashtme.
• Çaktivizo rrymën elektrike para levizjes ose instalimit të TV. Përndryshe mund të ketë elektro
shok.
• Hiq stendën para instalimit të TV në montim muri duke shtojcën prapa.
• Nëse e instaloni TV në tavan ose mur të pjerrët, mund të bjerë dhe të shkaktojë disa
dëmtime. Përdorni një mur të sigurt dhe kontaktoni shitësin tuaj lokal. Përndryshe nuk është
e mbuluar me garancionin.
• Mos i shtërngoni shumë vidat se mund të shkatkojnë dëm në TV dhe ta anulojnë garancën
tuaj.
• Për të parandaluar dëmtim, ky aparat patjetër sigurt të ngjitet në dysheme/mur në pajtim
me instruksionet e installimit.
Shënim:
1) Fotografitë janë vetëm për referim.
2) Për TV me terminale drejt muri,me qëllim për të lënë hapësirë të mjaftueshme për të
përdorur terminalet, nevojitet një jastëk gome së bashku me vidën për të rregulluar
montimin në mur. Është një shtyllë e vogël me diameter të brendshëm prej 8mm, diameter
të jashtëm18mmdhe lartësi prej 30mm.
Montimi në mur
KUJDES
Model Size: 32" Top Down
Screw
Diameter (mm) "E" M4 M4
Depth (mm)
“D”
Max 9 9
Min 6 6
Quantity 2 2
VESA (AxBxC) 100x100x100
Page 33

33
ALB
• Mos e instaloni këtë pajisje në hapësira të kufizuara si raft librash ose të ngjashme. Mos e
përdorni setin pranë zonave me lagështira, të ftohta, mbrojeni setin nga mbinxehja.
• Mbajeni larg nga rrezet e diellit direkt.
• Mos e përdorni setin afër vendeve me pluhur.
• Mos afroni qirinj në zonën e hapur të kapshme, për të shmangur materialet e jashtme të
djegshme nga hyrja në TV.
• Përdoreni telekomandën duke e drejtuar kah sensori i telekomandës. Sendet mes
telekomandës dhe sensorit pengojnë në funksionimin normal.
• Mos e bëni telekomandën me vibrim të tepërt. Gjithashtu, mos e spërkatni me lëngje
telekomandën, dhe mos e vendosni telekomandën në vende të lagështisë së lartë.
• Mos e vendosni telekomandën direkt nën rrezet e diellit se shkakton deformimin e aparatit
nga i nxehti.
• Kur sensori i telekomandës është direkt nën rrezet e diellit ose ndriçim të fortë, telekomanda
nuk do të punojë. Nëse është kështu, ju lutem ndryshoni ndriçimin ose pozicionin e TV-së,
ose punoni me telekomandën më afër sensorit të telekomandës.
Përdorimi jo i drejtë i baterisë do të shkaktojë dëmtim. Kështu që ju lutemi veproni sipas
metodave në vijim dhe përdoreni me kujdes.
1. Ju lutem vini re polarizimin e baterisë, për të shmangur qarkun e shkurtër.
2. Kur tensioni i baterisë është i mangët ndikon në gamën e përdorimit. Duhet të zëvendësoni
me bateri të re. Hiqni bateritë nga telekomanda nëse nuk kendi ndërmend ta përdorni atë
për një kohë të gjatë.
3. Mos përdorni bashkë lloje të ndryshme të baterive (p.sh. bateri të Manganit dhe Alkalinit).
4. Mos evendosni baterinë mbi zjarr, dhe ta mbushni ose të dekompozoni baterinë.
5. Ju lutem hidhni baterinë sipas rregullores përkatëse për mbrojtjen e mjedisit.
6. KUJDES: Bateritë (paketë baterie ose bateri të instaluara) nuk duhet të ekspozohen ndaj
nxehtësisë së tepruar siç janë drita e diellit, zjarri dhe të ngjashme.
Vendosni dy bateri me madhësi AAAnë kupenë për bateri në telekomandën,duke u siguruar
që të përputhen shenjat e polarizimit brenda.
Operimi i Mjedisit
Masat paraprake për përdorimin e telekomandës
Masat paraprake për përdorimin e baterisë
Instalimi i baterisë së telekomandës
Page 34

34
ALB
BUTONI
Shënim: Grafikonet janë vetëm për prezantim.
Rocker Butoni
Pamje nga pas
TERMINALI
Shënim: Ju lutemi selektoni terminalet konform setit actual të TV-së suaj
Shtyp butonin e mesëm:
1. Në modalitetin e pritjes,shtypeni atë për t’u kthyer nëTV;
2. Pa OSD, shtypni shkurt për rë ryrë në menynë kryeosre;shtyp dhe prit 5 sekonda për të
kthyer TV-në në gjendjen e pauzës;
3. MeOSD,shtypje e shkurtër për të konfirmuar një zgjidhje;shtypeni më gjatë për të shkuar në
menu/submenu.
Shtyj në të majtë: Zvogëlo zërin oseshko në të majtë.
Shtyjnë të djathtë: Rrit zërin ose shko në të djathtë.
Shtyj para: kanali para ose shko lartë.
Shtyj mbrapa: kanali pas ose shko poshtë.
Rocker Butoni
1 Video & Audio L/R
Konekto audiodhevideosinjalinngaburimi i sinjalit
si DVD.
2 HDMI1/MHL &HDMI2
KonektoHDMIinputsinjalin nga burimi i sinjalit
siDVD.HDMI1funskioni mbështetësMHL.
3 AUTO DIGJITAL
Përdornjë kabllo SPDIFpër të dale në sinjalin audio
të TVnë një audio resiver kompaktibël .
4 KUFJET
Audioautput,autoparlantët do të shuhen kur kufjet
janë të lidhura kur ju zgjidhni kufjet.
5 USB USB port
6 LNB/AIR/KABLLO
Konekto një kabllo koaksiale për të pranuar sinjal
nga antena, kabllo ose satelit.
7 SERVIS Debugging iterfejs vetëm për teknikët profesionist.
8 CI CIkartport.
Page 35

35
ALB
FUNKSIONET E TELEKOMANDËS
Telekomanda
1. POWER ( ) Shtyp për të ndezur TV ose
standby.
2. PA ZË (
) Shtyp për pa zë ose të rivendosni
zërin.
3. FOTOGRAFIA Ndrysho formën e fotografisë.
4. ZËRI Ndrysho mënyrën e zërit.
5. Zmadhim Ndryshoni raportin e pamjes.
6. Numri i butonave Zgjidh kanalin direkt.
7. CHN LISTA Shtyp për të hyrë në listen e
kanaleve.
8. KTHEHU (PAS) Shtyp për t’u kthyer në kanalin
paraprak.
9. MENU Hap menu opsionet.
10. SOURCE Select the input source mode.
11. Selekto inputin e burimit ( // /)
12. ENTER Konfirmo zgjidhjen.
13. TV/RADIO Kalo mesTV dhe radio.
14. DIL (EXIT) Dil nga menuja aktuale.
15. HOME Shkruani detskopin tuaj. NëseTV juaj
nuk e ka funskioninHOME, kybuton nuk dop të
funksionojë.
16. Volume Lartë/Poshtë(VOL+/VOL-)
Rregullo volumin poshtë ose lartë.
17. Program Lartë/Poshtë(PR+/PR-)
Ndrysho programet poshtë ose lartë.
18. SLEEP- (GJUMË)
Selektokohën e gjumit, si 10min, 20min etj.
Page 36

36
ALB
19. EPG Shtyp që të shfaqet informata në lidhje
meEPG aktuale në DTV formën.
20. TITRAT Aktivizo/çaktivizotitratnë formën DTV/
USB.
21. FAV. (Favorite Channel)
Shtypbutonat Poshtë/Lartëpër të shkuar në
kanaler tuaja favorite, shtyp OK përkonfirmim.
22. Incizo(REC) Shtyp për të incizuar programin
aktual (Punon vetëm në formatin DTV).
23. INFO Shfaq informacion rreth burimit aktual.
24. USB Play Control Buttons
Play & Pause (
)
Shtyp për të pauzuar programin,shtyp përsëri
për të vazhduar programi.
Stop ( )
Shtyp për të stopuar programin.
Fast Backward Button ( )
Shtyp për kthim të shpejtë.
Fast Forward ( )
Shtyp për të shkuar shpejtë para.
Previous ( )
Shtyp për të luajtur fajli paraprak.
Next ( )
Shtyp për të leshuar fajlin tjetër.
25. Butonat me ngjyrë Shtypni për kryerjen e
funksionit të shpejtë në formatin TVoseDTV.
26. NICAM Shtyppër të selektuar zërin e dëshiruar
në varësi porej kanalit të transmetimit.
27. FREEZE (NGRI-MBA) Ngri fotografinë në ekran
(Nuk është e disponueshme në formatin USB).
28. REC LISTA Shfaq listen e regjistrimeve.
29. QUICK Nuk funksionon.
30. 3D Nuk funksionon.
31. AD (Audio Përshkrimi) Shtyp për të
ndezur audio përshkrimin, një narrator do
të përshkruajë çfarë ndodh në ekran për të
verbërit ose persona me pamje të dëmtuar.
shtyp përsëri dhe do të fiket (E disponueshme
vetëm në formatin DTV).
Page 37

37
ALB
BUTONAT E TELETEKSTIT
32. TEKST Shtyp për të hyrë ose dale në menunë e
teletekstit.
33. HOLD
Shtyp për të mbajtur faqen teletekstit në ekran
pa azhurim dhe ndryshime.Shtyp përsëri për të
liruar gjendjen në mbajtje.
34. Butona tjerë
MADHËSIA Zmadho shfaqjen e tekstit:Shtyp
një here këtë buton për të zmadhuar gjysmën
e sipërme të ekranit.Shtyp përsëri këtë
butonpër të zmadhuar gjysmën e poshtme të
ekranit.Shtyp përsëri këtë butonpër të rifilluar
madhësinë normae të ekranit.
REVEAL Shtypni këtë buton për të shfaqur
informacione të fshehura, të tilla si riddles
osepuzzles. Shtyp përsëri për të larguar
informacionin nga ekrani.
MIX
Mbivendos teletextin mbi TV programën, ose
kthe teletekstin në formën normale.
SUB-PAGE
Shtyp këtë buton për të hyrë ose dale në
formatin e sub faqes(nëse subfaqja është në
dispozicion).Shtypbutonat e Kuq/Gjelbërpër të
selektuar subfaen e dëshiruar.
INDEX Shtyp këtë buton për t’u shfaqur faqja
index.
ANULO
Shtyp këtë buton për t’u kthyer në TV program
in përkohësisht derisa kërkoni një faqe
teleteksti. Kur është kry kërkimi, numri I faqes
shfaqet sipër majtë në ekran.Shtypni përsëri për
t’u kthyer në faqen e telekstit.
Page 38

38
ALB
REGJISTRUES (REC)
Regjistrim çasti me një prekje dhe rishikim
Kohëmatës regjistrimi
SHËNIME TË RËNDËSISHME:
1. Për çdo lloj regjistrimi me këtë televizor, duhet të lidhni një pajisje të jashtme në portin e
duhut të USB në pjesën e pasme të televizorit për të regjistruar.
2. Pajisja e USB patjetër të jetë e formatit FAT32.
3. Nëse e përdorni për here të parë pajisjen e USB në TV, ju sugjerojmë ta formatoni USB
para se të filloni të regjistroni.
4. Sigurohuni se shihni DTV program.
5. Përdor kualitet të lartë pajisje mobile për të incizuar HD programe, përndryshe videot do
të bllokohen gjatë riprodhimit.
6. Kopjo të gjitha të dhënat për sklladim në pajisjen e USB në rast se të dhënat humben për
gjatë të ndonjë incidenti të papritur. Ne nuk mbajmë asnjëp përgjegjësi për humbjen nga
keqpërdorimi.Ruajtja e të dhënave është përgjegjësi e klientit.
1. Ju lutemi futni një pajisje të jashtme të ruajtjes me shpejtësi të lartë dhe sigurohuni që
pajisja të ketë hapësirë të mjaftueshme.
2. Selekto TV programin dhe kanalin që dëshironi të incizoni.
3. Shtyp butonin REC për të hyrë në formën REC dhe fillo regjistrimin. Shiriti i kontrollit REC
në ekran paraqitet si më poshtë, ju mund të selektoni azhurimin e duhur sipas.
4. Nëse funksioni REC nuk mund të realizohet, mundohu ta formatosh pajisjen tuaj të USB.
5. Nëse dëshironi të stoponi regjistrimin, shtzpeni butonin [
] dhe nregjistrimi do të
stopohet.
Ka dy mënyra për të vendosur kohëmatësin e regjistrimit për të incizuar program televiziv.
Nëse ju dini detajet e programimit:
1. Shkoni në kanalin që do transmetojë programin që dëshironi ta incizoni.
2. Shtypenibutonin EPG në telekomandën tuaj për të sjell interfejsin EPG. Kanalin që ju
shikoni do të shenjëzohet në ekranin që shfaqet.
3. Shtypbutonin RED në telekomandë, pastaj hyni në detajet e programij në menunë e
regjistrimit duke shtypur
/ për të selektuar një send dhe / për të ndryshuar
përditësimin. Për shembull,nëse programi starton më ora 8:30pm të së njëjtës ditë, fut:30
në hapësirën për MINUTAT, 20 n ë hapësirën për HOURS (zbatohet ora 24 orëshe), dhe
pastaj datën e duhur. Përdor të njëtjën metodë për të hyrë dhe rregulluar kohën.
Shënim: (A) Gjatë formës së regjistrimit, ju nuk mund të ndryshoni kana lose të selektoni
funkiosn tjetër.
(B) Nëse sinjali është ndërprerë ose mënjanuar gjatë regjistrimit, regjistrimi do të
ndalet deri sa sinjali të rregullohet. Kjo mund të shkaktojë humbje të përmbajtjes së
programit.
Page 39

39
ALB
ELECTRONIC PROGRAM GUIDE (EPG)
EPG qëndron për Gudië dixhitale elektronike të programit. Është e furnizuar nga ofruesit e
programeve dhe të ofron informacion në lidhje me programet që do të transmetohen. Mund
të hyni në mënyrë dixhitale duke shtypur buotnin EPG në telekomandë.
1. Shtyp butonin EPG për të sjellë në interfejs. Shiriti i dytë nga lartë do të shfaq datën dhe
orën aktuale. Në listën e mëposhtme, kanalin të cilin e shikoni në moment do të theksohet.
2. Para se të shihni çdo informacion të EPG, ju duhet të ‘aktivizoni’ secilin kanal që dëshironi
të shihni informatat e programit.Për të bërë këtë, përdorni
/ butonat për të slektuar
kanal, pastaj shtyp ENTER për të konfirmuar.
3. Për të kontrolluar programet që do të transmetohen në datën e ardhshme, lëviz lartë
me
butonin kah fusha e datës.Përdorbutonin për të selektuar datën që dëshironi të
kontrolloni.
4. Shtyp Index (
) butonpër të levizur lartë në krye të ekranit, pastaj shtyp butonin për të
selektuar Listën e kanaleve.Shiriti i dytë do të shfaqeti në kanalet tuaja në dispozicion.
5. Shko në kanalin dhe përdor butonat
/ për të selektuar kanalin që dëshironi të keni më
shumë informata.Pas një momenti të shkurtër do të shfaqet informata për programin.
6. Përdoror
/ butonatpër të levizur nëpër kohën elektronike.
7. Shtyp butonin MENU për të dale nga EPG menu.
Recorder
Shtypbutonin RED për t’u shfaqurmenuja e regjistrimit
(djathtas). Shih informata detajuese në lidhje me mënyrat e
ndryshme të regjistrimit me televizor në pajisje të USB.
Info
Shtyp buotnin GREEN për të shfaqur informacionin në
lidhje me programin e selektuar.
Orari
Shtyp butonin e VERDHË për t’u shfaqur lista e orarit.
Shtyp
/ për të selektuar një ngjarje, shtyp butonin
RED dhe fshi Ngjarjen.
Remind
Shtyp butonin BLU për t’u shfaqur menuja e kujtesës.
Shtyp / të selektuar një artikull dhe / për të
ndryshuar përditësuar.
Shtyp ENTER për të shtuar kujtesë për ngjarje në listen e
orarit. Një listë e orarit e azhurnuar do tëp shfaqet.
4. Zgjidh mënyrën e duhur të regjistrimit: një here, çdo ditë ose në javë.
5. Shtyp ENTER për të konfirmuar selektimin.Orari i të gjitha regjistrimeve tuaja do të shfaqet
(lista me orar). Shih funksionin EPG për më tepër orarë.
Nëse ju shfletoni EPG, Ndiqni hapat në faqen e funksionit të EPG.
Page 40

40
ALB
MENU KONTROLLI
Zëri
Kanali
Fotografia
Menu Operimi(DTV Mode)
Shtypni MENYNË butonin “MENU” për të hyrë në menynë kryesore.
Shtypni butonat dërgues [ ] / [ ] për të zgjedhur pika të dëshiruara.
Shtypni HYRJE “ENTER” për të hyrë në artikull.
Shtypni [ ] / [ ]/ [] / [], dhe butonat ENTER për të zgjedhur nënmenynë.
Shtyp”MENU” për të dale nga artikulli.
Shënim: Disa ospione ndoshta nuk janë të disponueshme nën disa burime.
Lloji I fotografisë: Selekto kontrollin automatik të mënyrës për fotografi. Zgjidhjet
janëDinamike, Standarde, E butëdhe Prëdoruese.
Temperatura e ngjyrës: Selekto ngjyrën e përtgjithshme të zërit të fotografisë. Zgjidhjet janë e
lezetshme, e mesme, e nxehët dhe përdoruese.
Aspect Ratio: Selektoaspect ratio (proprocionet e ekranit) conform video sinjalit tënd ose
preferencës. Zgjidhjet jan16: 9/4: 3/Just Scan /Zoom1/ Zoom2.
Reduktimi i zhurmës: Elimino poteret në fotografi. Zgjidhjet janë Off/Dobët/Mesatare/ Fortë
MPEG NR: Elimino poteret që gjenerohen përgjatë krijimit të sinjalit dixhital të fotografisë.
Zgjidhjet janëOff/Dobët/Mesatare/ Fortë.
Formati i zërit: Selekto formatin tend të dëshiruar për çdo input. Zgjidhjet janëStandarde/
Muzikë/Film/ Sporte/Përdorues.
Bass: Rregullo frekuencën më të ulët të zërit.
Treble: Rregullo frekuencën më të lartë të zërit.
Balance: Kontrollo balansimin e zërit mes altoparlantit të majtë dhe të djathtë.
Auto Volumi: Rregullo volumin që i përshtatet nivelit të audio inputit. PërmbanOn dheOff.
Suraund Zërimi: Ndihmon për të krijuar tinguj të pasur dhe më të gjerë nga burimet e zërit
stereo.
AD Switch (E disponueshme vetëm në formatinDTV): Duke ndezur Audio përshkrimin,
mund të aktivizoni cilësimet e AD volumit. Kur ndizniaudio përshkrimin, një narrator do të
përshkruajë se çfarë ndodh në ekran për personat e verbër ose me pamje të dëmtuar.
SPDIF Formati (Ndoshta nuk është i disponueshëm): SelektoformatinSPDIF:Auto osePCM.
Sintonizimi automatik
Selekto DVB-Tose DVB-C dhe shtypbutonin ENTER për t’iu qasur hapit tjetër, pastaj selekto
shtetin ose sken tipin, pastaj kërko dhe skllado programet automatikisht. Nëse dëshironi të
stoponi kërkimin atuomatik, shtyp butonin MENU ose butonin EXIT, një dijalog i daljes është
shfaqur jashtë.
• Shtypni për ta konfirmuar daljen.
• Shtypni për të vazhduar me kërkimin.
Sintonizim i avancuar
Hyni në cilësimet satelitore thelbësore për kërkimin e programeve përmes burimitDVB-S.
Page 41

41
ALB
Cilësimet e Pjatave satelitore (hapi1-3, referohu nëFig1)
Një sërë parametrash të pjatave satelitore duhet të konfigurohen për çdo satelit të kërkuar
përpara se të kryeni një skanim kanali.
Satelliti–Selekto satelitinpër këtë TV.
LNB Tipi–Sigurohuni qëLNB tipi i përgjigjet pjatës tënde.
LNB Fuqia-Aktivizoni ose çaktivizoni furnizimin me energji elektrike për LNB.
22KHz - Selekto22KHzpër të vendosur22Kpër të kaluar nëON/OFF.Auto formati për on
ose off përdoret 22KHz, varet nga lloji i LNB.
DiSEqC1.0/1.1 –Selekto formatinDiSEqC për LNB-në e selektuar.
Fig. 1
Hapi 2
Hapi 1
Hapi 3
Hapi 1 Shenjo Satellit dheshtyp ENTER për të hyrë në listen e satelitit dhe përzgjidhni një.
Hapi 2 Shenjo LNB Tip indheshtyp ENTER për të selektuar tipin e LNB.
Hapi 3 Sigurohuni që 22KHz,DiSEqC1.0/1.1 switch korrespondon me satelitin e
përzgjedhur.
Pas përfundimit të hapave të lartëshënuar, shtypeni butonin blu për të kërkuar kanalet.
DTV Akordimi Manual
Kërko dhe ruaj programet në mënyrë manuale.
Kanal
DTV Akordim manual
Selekto tipin e burimit (DVB-ToseDVB-C) dhekërko programet me dorë. Në menunë e
Kanalit, selekto DTV Akordim Manual dheshtyp butonin ENTER për të hyrë.
1. Shtyp ose të selektuar nr. tëkanalit, pastaj shtyp ENTER për të nisur kërkimin.
2. Kërkimi ndalon kur programi është gjetur dhe ky program do të ruhet në pozicionin aktual
të kanalit.Nëse deëshironi të ndaloni kërkimin, shtypeni butonin MENU.
ATV Akordim Manual
Së pari selekto burmin e tipit të ATV. Pastaj menunë e Kanalit, selekto ATV Akordimin Manual
she shtyp butonin ENTER për të hyrë.
1. Shfaqetdhe shtyp ose për të selektuarRuaj në 1 (ndoshta numër tjetër), Sistemi I
Zëritdhe nr.i kanalit, pastaj selektosearchdhe shtyp ENTER për të filluar kërkimi.
Page 42

42
ALB
• Shtyp për njësi për të kërkuar frekuencë më të lartë;
• Shtyp për njësi për të kërkuar frekuencë më të ulët;;
2. Kërkimi ndalon kur një program është gjetur dhe ky program ruhet në pozitën e kanalit
aktual. Nëse dëshironi të ndaloni kërkimin, shytp butonin MENU.
Sintonizim
Përdor për të bërë ndryshime të vogla për akordim të një kanali individual.Sintonizimi nuk
është i nevojshëm në kushte normale.Mirëpo,në zonë të kushteve inferiore të transmetimit
ku rregullimet janë të nevojshme për një footografi dhe zë më të mirë, përdorni
sintonizimin.
1. Selekto kanalin që dëshironi ta sintonizoni.
2. Në Kanalmenunë, selekto ATV Akordimin Manual dhe shtyp për t’u shfaqur
sintonizimi
3. Shtyp ose për të sontonizuar deri sa te fitohet fotografia dhe zërimi më i mirë.
Redaktimi I Programit
Redakto programet.Ju mund të shtypni butonat me ngjyra në telekomandë për të kaluar
programet, riemëroni dhe fshini programet ose të mënjanoni programe, dhe të shtoni
programe në listen e preferuar duke shtypur butonin FAV.
Informacion për sinjalin
Shfaqjja e informacionit të kanali aktualDTV.
CI Informacioni
Mundëson përdoruesit të zgjedhë nga CAM menuja e ofruar. Selekto menunëCI bazuar në
menunë PC Card.
Fuqia e Antenës 5V
Ky opsion është në dispozicion vetëm nëDVB-Tburimin,selektoOnpër të furnizuar energji për
antenën eTV-së;SelektoOffpër t’u ktyher në këtë funksion.
Përditësimi i Softuerit(OAD) (Vetëm për disa rajone)
Selekto On për të lejuar TV të përditësojë sistemet e softuerit përmes ajrit. SelektoOff dhe ky
funksion do të fiket.
OAD Akordimi(Vetëm për disa rajone)
Kur përditësimi i softuerit(OAD) ështëoff, ky opsion është i paktivizuar. Selekto skaniminOAD
që do të thotë skano kanalet e gjetura në përditësimin e informative tëOAD.
LCN ON/OFF (Vetëm për disa rajone)
Kur akorodohen programet, selektoON,lista e kanaleve renditet sipasLCN; selekto OFF, lista e
kanaleve renditet sipas renditjes së parazgjedhur.
Opsione
OSD Gjuha
SelektoOSD gjuhën.
Audio Gjuhët/Gjuhët e titrave (Shënim1)
Selekto gjuhën e dëshiruar.
Page 43

43
ALB
TTX Gjuha
SelektoTTX gjuhën për rajone të ndryshme.
Koha
Mund të regullosh Auto Sync, Ora,Time Zone, Koha verore, KohëmatësidheAuto Sleep.
HDMI CEC
Shytp për të hyrë nësubmenutë.
HDMI CEC -Ndiz ose fik funksionin HDMI CEC.
Auto Standby -LëshoTV automatikisht nëstandby kur ju e fikni pajisjenCEC si dhe DVD.
Lista e pajisjeve - Kur HDMI CEC është ndezur,kontrollo listen e pajisjeve për lidhje në TV.
REC File System(Shënim 1)
Nëse dëshironi ta përdorni këtë funksion, patjetër të pranoni program dichital dhe një USB
disq i lidhur.
EWS Kodi local postal(Vetëm për disa rajone)
Sistemi i paralajmërimit të Emergjenës i përcaktuar nga DVB siguron mekanizmat e nevojshëm
për shpërndarjen e informative relevante tek publiku i gjerë në rast emergjence.
Rivendos parazgjedhjet
Rivendos cilësimet e përdoruesit në të parazgjedhura.
Përditësimi i softuerit (USB)
Konekto një pajisje USB me përmirësimin e softuerit për të përmirësuar sistemin e TV-së.
Shënim:
1. Audio Gjuhët/Titrave/REC File System funksionojnë vetëm nën formatinDVB-S/DVB-C /
DVB-T.
2. Të dhënat e shfrytëzuesit në këtëTV tërësisht do të humben pas operimit të karakteristikave
të Rivendosjes së Parazgjedhjeve.
3. Mos e fik TV gjatë procesit të përmirësimit, përndryshe TV ndoshta nuk do të punojëk, dhe
klienti është përgjegjës.
Bllokimi
Sistemi I bllokimit
Vendos fjalëkalimin fillestar(0000) për të hyrë në këtëveçori, Selekto On për të lejuar tre
objekte të menusë, do të ju kërkohet fjalëkalimi.Fjalëkalimi i parazgjedhur është0000, selekto
“on”, tipari i ardhshëm si “Vendos fjalëkalimin”, “Bloko kanal”, “Kontroll prindërore” dhe “Bllokim
Paneli”do të aktivizohen; Selekto “off”, tri objektet e sipërpërmendura do të ç’aktivizohen. Nëse
keni harruar fjalëkalimin, mundohu me super fjalëkalimin (8899) për të hyrë.
VendosFjalëkalimin
Rivendosni fjalëkalimin.
BllokoProgramin
Bllokoni programin që ju dëshironi.
Udhëzues Parental
Vendosni këtë për të udhëzuar programet që fëmijët duhet t’i shohin.
Hotel Mode(Vetëm për disa rajone)
Vetëm për shfrytëzim të hoteleve.
Page 44

44
ALB
USB KONTROLLI
USB Menu
Shtyp Source menu dhe selekto butonin USB, Mund të shihni filma, muzikë dhe foto nga
pajisja e USB-së tuaj.
1. Lidhni pajisjen e USB në input terminalindhe selekto llojin e medias në home page: FILM,
MUZIK Ëdhe FOTO.
2. Shtyp butonin [ENTER], në ekran do të shfaqet pajisje e konektuar e USB, shtyp
përsëri butonin [ENTER] për t’i pare skedarët dhe dosjet..
3. Shtyp [] / [] ose [] / [] tpër të selektuar një dosje, shtyp [ENTER ] për të hapur
dosjen dhe selekto fajlin, pastaj shtyp [ENTER ] për të shënuar ato, pastaj shenjëzo njërën
që ti dëshiron të hapet e para, shtyp [/
] që të hapet ; ose selekto një dosje dhe shtyp
[/ ] për të filluar direct hapja.
4. Shtyp [
] për të stopuar hapja dhe kthehuni në dosjen në nivelin e lartë.
5. Vazhdimishtshtypni [RETURN] për t’u kthyer në dosjen në nivelin e lartë
6. Ripërsërit për të selektuar dhe të luaj një lloj tjetër media.
Këshillues i këndshëm gjatë përdorimit të USB player
1. Disa pajisje tëUSBmund të mos jenë kompaktiblë për operim të mirë me këtëTV.
2. Kopjo të gjitha të dhënat në USBnë rast se të dhënat humben për shkak të ndonjë
aksidenti të papritur.Kopjimi i të dhënave është përgjegjësi e konsumatorrit.
3. Për skedarë me madhësi më të madhe,shpejtësia e shkarkimit mund të jetë pak më e
gjatë.
4. Njohja e shpejtësisë e një pajisje USB për ruajtje mund të varet nga çdo pajisje.
5. Kur lidhni ose shkëputni pajisjen e ruajtjes USB, sigurohuni që TV nuk është në formatin
USB, përndryshe pajisja USB ose dokumentet tjera të ruajtura mund të dëmtohen.
6. Ju lutemi përdorni një pajisje USB e cila është e formatuar në FAT16, FAT32, NTFS fajl
sistemin i siguruar nga Windows sistemin për operim. Në rast se një pajisje ruajtjeje e
formatuar si program tjetër përdorues i cili nuk mbështetet nga Windows, ndoshta nuk
mund të njihet.
7. Kur prëdorninjëUSBHardDiskDrivei cili krëkn burim energjie elektrike, sigurohuni që
fuqia e saj të mos kalojë500mA.Nëse fuqia eUSBhardDiskkalon500mA,TVsistemi do të
ndërrohet në gjendjen e pauzës,ju duhet të tërhiqni diskun e dorës të USB dhe të rinisni
sistemin e TV.
8. Një mesazhë “Dokument i pambështetur” do të shfaqet nëse file formati nuk mbështetet
ose është i falsifikuar.
9. FHD fotot e mëdhaja kanë nevojë për më shumë kohë për procesim,e cila nuk është për
fajin e TV.Ju lutem jini të qetë të prisni.
10. Kjo TV ndoshta nuk mbështet disa fotografi multimedia të ndryshuara dhe të përmirësuara
si ndryshimi i formatit të kodimit ose përparimet tjera teknike.
Page 45

45
ALB
Filma menu
Shtyp [ INFO ] / [ ] për të shfaqur/ dalur nga Menu Bar e mëposhtme. Shtypbutonin e USB
në telekomandën për të kryer operimet e duhura.
Play & Pauzë/Stop/Parap. /Tjetra
Shtyp [/
] për të luajtur ose pauzë; shtyp [ ] për të stopuar luajtjen;shtyp [ ] / [ ] për
të luajtur video fajli paraprak ose tjetri.Gjithasht mund të shtypni [ ] / [ ] për të shenjëzuar
njërën nga katër ikonat, dhe pastaj shtyp [ ENTER ],TV do të përgjigjet në përputhshmëri.
Shpejt Pas /Shpejt para
Shtyp dhe mba [
] / [ ] për disa sekonda për të lëshuar progresin siç ju dëshiron, pastaj
shtyp butonin [/
] për të filluar të luajë prej një pozite të re.
Play Formati
Shenjo ikonën përkatëse dhe shtypni [ ENTER ] për të kaluar në një regjim tjetër të luajtjes.
Informacion
Shenjo ikonën përkatëse dhe shtypni [ ENTER ] për të pare informacionin e videos që luan.
Shko te koha
Kalo në pikën specifike sipas kohës së hyrjes. Shenjo ikonën përkatëse dhe shtyp [ENTER]
për të hapur ekranin e kërkimit tëInput. Shtyp [ ] / [ ] për të lëvizur kursorin dhe përdorni
butonat e numrave për të future kohën. Shtyp [ENTER ], TV-ja do të fillojë nga vendosja e
kohës.
Aspect Ratio
Shenjo butonin dhe shtyp [ ENTER ] për të selektuar mënyrën e shfaqjes.
Luaj& Pauzë
Stop
KaloTjetrë
Shpejt para
Informacion
KaloParaprakja
Shpejt pas
Shko te Koha Aspect Ratio
Play Mënyra
Shiriti kontrollit për filma (Movie Bar)
Page 46

46
ALB
Play Muzikë
SHIRITI KONTROLLIT TË MUZIKËS
Play & Pauzë/Stop/Parapraken/Tjetrën
Shtyp [/
] ] për të luajtur ose pauzë; shtyp [ ] për të luajtur; shtyp [ ] / [ ] për të
luajtur muzika paraprake ose tjetra. Oseshtyp [ ] / [ ] për të shenjuar ikonën përkatëse
në shiritin kontrollues, dhe pastaj shtyp [ENTER ],TV do të përgjigjet në përputhshmëri.
Shpejt Pas /Shpejt para
Shtyp dhe mba [
] / [ ] për disa sekondapër të nxjerrë progresin e luajtur siç dëshironi ju,
më pas shtypnu [/
] në telekomandën për të nisur luajtjen nga pozicioni i ri.
Play Formati
Shenjo ikonën dhe shtyp [ ENTER ] për të kaluar në një lloj tjetër të luajtjes.
Informacion
Shenjo ikonën përkatëse dhe shtypni [ ENTER ] për të pare informacionin e muzikës që luan.
Shtyp [ INFO ] / [ ] për t’u shfaqur / dalur nga Menu Bar e mëposhtme. Shtyp butonin e
USB në telekomandën për të kryer operimet e duhura.
Luaj & Pauzë
Stop
Kalo Tjetër
Shpejt para
Informacion
Kalo Parapr.Shpejt Pas
Play Mënyra
Page 47

47
ALB
ShfletoFoto
SHIRITI KONTROLLUES PËR FOTO
Play & Pauzë/Stop/Parapraken/Tjetrën
Shtyp [/
] për të luajtur ose pauzë; shtyp [ ] ] për të luajtur; shtyp [ ] / [ ] për të luajtur
fotografia paraprake ose tjetra. Ose shtyp [ ] / [ ] për të shenjuar ikonën përkatëse në
shiritin kontrollues, dhe pastaj shtyp [ENTER ],TV do të përgjigjet në përputhshmëri.
Play Formati
Shenjo ikonën dhe shtyp [ ENTER ] për të kaluar në një lloj tjetër të luajtjes.
Rrotullo
Shenjo ikonën përkatëse në shiritin kontrollues dheshtyp [ENTER ] për të rrotulluar
fotografinë 90 shkallë në drejtim të akrepave tl orës ose në drejtim të kundërt.
Info.
Shenjo ikonën përkatëse dhe shtypni [ ENTER ] për të pare informacionin e fotografisë që
luan.
ZmadhimIn/Zmadhim Out
Shenjo ikonën përkatëse në shiritin kontrollues dheshtyp [ENTER ] për të zmadhuar in/out
fotografisë.
Zhvendos pamjen
Kur imazhi zmadhohet, përdorni këtë funksion për kontroll të përshtatshëm. Shenjo këtë
ikonë, shtyp butonin [ENTER ], pastaj shtyp butoni majtas/djathtas/lartë/poshtë/për të lëvizur
fotografinë.
Shënim:
Funksioni i zhvendosjes ( ) është i disponueshëm vetëm kur fotografia është zmadhuar.
Shtyp [ INFO ] / [ ] për t’u shfaqur / dalur nga Menu Bar e mëposhtme. Shtyp butonin e
USB në telekomandën për të kryer operimet e duhura.
Play & Pauzë
Stop
Kalo Tjetrën Rotullo CW
Rotullo CCW
Informacion
Kalo Parap.
Zmadho In
Zhvendos
pamjen
Zmadho Out
Play Formati
Page 48

48
ALB
DIAGNOSTIKIMI
Para se të thirrni një teknik shërbimesh, shqyrtoni informacioet e mëposhtme për shkaqet e
mundshme dhe solucionet e problemit që ju e përjeton.
NUK KA FOTOGRAFI, NUK KA ZË
1. Kontrollo nëse siguresa punon
2. Kyçni një paisje tjetër elektrike në dalje,
që të siguroheni nëse punon ose është e
kyçur.
3. Konektim(lidhje) i dobët i rrymës me
siguresën.
4. Kontrollo burimin e sinjalit
NUK KA NGJYRË
1. Ndryshojeni sistemin e ngjyrave.
2. Përshtateni tepricën.
3. Provoheni një kanal tjetër. Ka mundësi që
të pranoni një program bardhë e zi.
TELEKOMANDA NUK PUNON
1. Ndryshoni bateritë.
2. Bateritë nuk janë të vendosura në formën
e duhur.
3. Paisja nuk është e lidhur me mbushsin.
NUK KA FOTOGRAFI, NUK KA ZË
1. Përshtateni dritën e kontrastit
2. Mund të ketë ndërprerje në emitim.
FOTOGRAFI NORMALE, NUK KA ZË
1. Shtypeni sustën për rritjen e zërit.
2. Zëri është i çkyçur. Përsëri që ta aktivizoni,
shtypeni MUTE.
3. Ndryshoni sistemin e zërit.
4. Mund të ketë ndërprerje në emitim.
VALËZIM TË ÇRREGULLT TË FOTOFRAFISË
Zakonisht shkaktohet nga përzieriet lokale,
si automobila, llamba të neonit, tharëse
flokësh. Përshtateni antenën që të zvogëlohet
përzierja.
EKRAN I ZBRAZËT MODULI PC
(vetëm me module për PC lidhje)
Mundet që televizioni të mos njohë
rezolucionin e vendosur në kompjuterin
tuaj personal. Rekomandohet përzgjedhja e
rezolucionit më të mirë ose ndonjë rezolucion
standard për Windows sistemin. Përshtateni
shpejtësinë për freskim në 60Hz.
FOTOGRAFIA ME FJOLLA DHE
NDËRPRERJE
Nëse antenna është e vendosur në zonën
kufitare me sinjalin televiziv, ku sinjali është
i dobët, fotografia mund të jetë e mbuluar
me pika. Kur sinjali është ekremisht i dobët,
patjetër duhet të instaloni antenë speciale për
të përmirësuar marrësin.
1. Përshtateni pozicionin dhe orientimin e
antenës të jashtme/brendëshme
2. Kontrollo nëse antena është e lidhur.
3. Vendoseni kanalin në opsionin për kërkim
të mirë.
4. Provoni një kanal tjetër. Mund të ketë
problem me emitimin.
PËRZIERJA ME PAJISJE TJERA
Paraqiten pika të zeza ose vija horizontale ose
fotografia dridhet.
Kjo në fakt ndoth për shkak të përzierjes së
valëve nga paisjet e automobilave, llambave
të neonit, gërmues elektrik dhe paisje tjera
elektrike
FOTOGRAFI E DYFISHT
Fotografia e dyfisht shkaktohet nga sinjali
televiziv i cili ndjek dy rrugë. Njëra është rruga
e drejtpërdrejt ndërsa tjetra ndërhyen nga
ndërtesat e larta, kodra ose objekte të tjera.
Ndryshimi i drejtimit ose pozicionit të antenës
mund të përmirësoj marrësin.
PËRZIERJA ME RADIOFREKUENCAT
Kjo përzierje shkakton valë ose vija dijagonale
ndërsa në disa raste fërkim me kontrastin e
fotografisë. Gjeni shkakun e problemit dhe
largojeni burimin e raduio frekuencave.
Shënim:
Nëse problemi vazhdon, edhe pse ju keni
provuar të gjitha këto zgjidhje, kontaktoni
qendrën lokale për përkrahje.
Page 49

49
ALB
SPECIFIKIME
Voltazha e punës 81cm
Ija në ekran 1366x768
Fuqia e vlerës konsumuese 60W
Dimensionet (WxHxD)me qëndrim 733.4 X 480 X 167.7mm
Dimensionet (WxHxD)pa qëndrim 733.4 X 438.5 X 85.1mm
Pesha neto me qëndrim 4.0kg
Pesha neto pa qëndrim 3.9kg
Mjedisi
(vetëm për zonat me klimë tropikale):
Temperatura gjatë punës: 5°C~45°C
Lagështia e ajrit gjatë punës: 20%~80%
Temperature gjatë magazinimit: -15°C~50°C
Lagështia gjatë magazinimit: 10%~90%
Zona
(vetëm për vendet me klimë të butë)
Temperatura gjatë punës: 5°C~35°C
Lagështia e ajrit gjatë punës: 20%~80%
Temperature gjatë magazinimit: -15° C~45°C
Lagështia gjatë magazinimit: 10%~90%
AKSESORË
Nu. Titull Sasi
1 Telekomandë 1
2 Bateri 2
3 Mbajtëse 2
4 Vidhos 2
5 Linja e rrjetit AC 1
6 Manuali i perdoruesit 1
7 Mbajtëse instalimi 1
8 Garanci 1
Shënim: Për disa modele, linja e rrjetit AC mund të jetë e lidhur tashmë me
televizorin dhe nuk mund të hiqet.
Page 50

LICENCA
Prodhuar sipas licencës nga Dolby Laboratoritë.
Dolby, DolbyAudio dhedyD symboliështë marka tregtare eDolby
Laboratorive.
Nocionet HDMI dhe HDMI High-Definition Multimedia Interface,
dheHDMI logo janë marka tregtare ose e regjistruar e HDMI
Licensing LLC në SHBA dhe shtet tjera.
Page 51

51
BiH/CG
Napomena
1. Grafički prikazi i podaci u ovom uputstvu služe samo kao ilustracije.
2. Ekranski prikaz (OSD) na vašem TV uređaju može se razlikovati od prikazanog u ovom
uputstvu.
3. Informacije iz ovog dokumenta podliježu izmjenama bez prethodnog obavještenja.
Proizvođač ne snosi odgovornost za oštećenja nastala kao direktni ili indirektni rezultat
pogrešnih ili nepotpunih informacija ili neusaglašenosti između uputstva za upotrebu i
opisanog proizvoda.
4. U suhom okruženju, zbog statičkog elektriciteta, proizvod se može restartovati ivratiti na
glavni OSD interfejs, interfejs USB plejera ili prethodni režim izvora. Ovo je normalno i
molimo da nastavite s korištenjem TV uređaja.
SADRŽAJ
MJERE UPOZORENJA I PREDOSTROŽNOSTI. . . . . . . . . . . . . . . . . . . . . . . 52
TIPKE. . . . . . . . . . . . . . . . . . . . . . . . . . . . . . . . . . . . . . . . . . . . . . . . . . . . . . . . . . . . 58
PRIKLJUČCI. . . . . . . . . . . . . . . . . . . . . . . . . . . . . . . . . . . . . . . . . . . . . . . . . . . . . . 58
FUNKCIJE DALJINSKOG UPRAVLJAČA . . . . . . . . . . . . . . . . . . . . . . . . . . . . 59
SNIMAČ (REC) . . . . . . . . . . . . . . . . . . . . . . . . . . . . . . . . . . . . . . . . . . . . . . . . . . . 62
ELEKTRONSKI PROGRAMSKI VODIČ (EPG). . . . . . . . . . . . . . . . . . . . . . . . . 63
PODEŠAVANJA U OKVIRU MENIJA . . . . . . . . . . . . . . . . . . . . . . . . . . . . . . . 64
Meni operacija (DTV režim) . . . . . . . . . . . . . . . . . . . . . . . . . . . . . . . . . . . . . 64
Slika . . . . . . . . . . . . . . . . . . . . . . . . . . . . . . . . . . . . . . . . . . . . . . . . . . . . . . . . . . 64
Zvuk . . . . . . . . . . . . . . . . . . . . . . . . . . . . . . . . . . . . . . . . . . . . . . . . . . . . . . . . . . 64
Kanal . . . . . . . . . . . . . . . . . . . . . . . . . . . . . . . . . . . . . . . . . . . . . . . . . . . . . . . . . 64
Opcije . . . . . . . . . . . . . . . . . . . . . . . . . . . . . . . . . . . . . . . . . . . . . . . . . . . . . . . . 66
Zaključavanje. . . . . . . . . . . . . . . . . . . . . . . . . . . . . . . . . . . . . . . . . . . . . . . . . . 67
UPRAVLJANJE USB-OM . . . . . . . . . . . . . . . . . . . . . . . . . . . . . . . . . . . . . . . . . . 68
USB meni . . . . . . . . . . . . . . . . . . . . . . . . . . . . . . . . . . . . . . . . . . . . . . . . . . . . . 68
Podsjetnik prilikom upotrebe USB plejera . . . . . . . . . . . . . . . . . . . . . . . . 68
Reprodukcija filmova. . . . . . . . . . . . . . . . . . . . . . . . . . . . . . . . . . . . . . . . . . . 69
Reprodukcija muzike . . . . . . . . . . . . . . . . . . . . . . . . . . . . . . . . . . . . . . . . . . . 70
Pregledač fotografija . . . . . . . . . . . . . . . . . . . . . . . . . . . . . . . . . . . . . . . . . . . 71
RJEŠAVANJE PROBLEMA. . . . . . . . . . . . . . . . . . . . . . . . . . . . . . . . . . . . . . . . . 72
SPECIFIKACIJE. . . . . . . . . . . . . . . . . . . . . . . . . . . . . . . . . . . . . . . . . . . . . . . . . . . 73
LICENCA . . . . . . . . . . . . . . . . . . . . . . . . . . . . . . . . . . . . . . . . . . . . . . . . . . . . . . . . 74
Page 52

52
BiH/CG
MJERE UPOZORENJA I PREDOSTROŽNOSTI
Pročitajte uputstva u cijelosti prije korištenja uređaja. Sačuvajte ova uputstva za kasniju
upotrebu.
• Pročitajte ova uputstva – Prije upotrebe uređaja treba pročitati sva bezbjednosna uputstva i
uputstva za upotrebu.
• Čuvajte ova uputstva – Bezbjednosna i uputstva za upotrebu treba sačuvati za buduću
upotrebu.
• Obratite pažnju na upozorenja – Treba se pridržavati svih upozorenja istaknutih na uređaju i
u uputstvima za korištenje.
• Pratite uputstva – Treba pratiti sva operativna i uputstva za korištenje.
• Ne koristite ovaj aparat blizu vode – Uređaj ne bi trebalo koristiti blizu vode ili izvora vlage,
na primjer, u vlažnom podrumu, blizu bazena i slično.
• Čistiti isključivo suhom tkaninom.
• Ne blokirati otvore za ventilaciju. Instalirati u skladu s uputstvima proizvođača.
• Ne postavljajte uređaj blizu izvora toplote kao što su radijatori, grijalice, peći ili slični aparati
(uključujući i pojačala) koji proizvode toplotu.
• Ne zanemarujte bezbjednosnu svrhu polarizovanog ili uzemljenog utikača. Polarizovani
utikač ima dva jezička, pri čemu je jedan širi od drugog. Uzemljeni utikač ima dva jezička
i pin za uzemljenje. Široki jezičak ili treći pin postoje zbog vaše bezbjednosti. Ukoliko
isporučeni utikač ne odgovara vašoj utičnici, obratite se električaru radi zamjene zastarjele
utičnice.
• Zaštite kabl za napajanje od gaženja i nagnječenja, naročito kod utikača, utičnice i na mjestu
gdje izlazi iz aparata.
• Koristiti isključivo pribor/dodatke određene od strane proizvođača.
• Koristiti samo na polici s točkićima, postolju, tronošcu, nosaču ili stolu koji su određeni/
označeni od strane proizvođača ili onima koje se prodaju uz uređaj. Pri upotrebi kolica
ili stalka treba paziti, naročito prilikom pomjeranja stalka i aparata zajedno kako bi se
izbjegle povrede uslijed prevrtanja.
• Isključiti aparat tokom grmljavine ili ukoliko se ne koristi duži vremenski period. Za sve
popravke obratite se kvalificiranom osoblju. Popravka je potrebna u slučaju
• oštećenja bilo koje vrste, kao što je oštećenje kabla za napajanje ili utikača, ukoliko se
tekućina prospe na uređaj ili neki predmet upadne u njega, ako je uređaj bio izložen kiši ili
vlazi, ako ne funkcioniše normalno ili je ispušten prilikom nošenja.
• UPOZORENJE: Ova uputstva za servisiranje su samo za kvalificirano servisno osoblje. Da bi
se smanjio rizik od električnog udara niko osim za to kvalificiranih osoba ne bi trebalo da
obavlja servisiranje koje nije opisano u uputstvu za upotrebu.
• Opremu nemojte instalirati u ograničenim ili ograđenim prostorima kao što su police
za knjige i slični komadi namještaja; uređaju je potrebno otvoreno mjesto sa slobodnim
protokom vazduha. Ventilacija ne bi smjela biti onemogućena prekrivanjem ventilacionih
otvora predmetima poput novina, stolnjaka, zavjesa i slično.
•
Oprez – Potrebno je zamijeniti rešetke da bi se spriječio strujni udar.
• Molimo da prije instalacije i upotrebe aparata obratite pažnju na informacije o električnoj
bezbjednosti na dnu kućišta.
• Aparat ne izlagati kiši ili vlazi kako bi se spriječio rizik od požara ili električnog udara.
• Aparat ne bi smeo da bude izložen kapanju ili prskanju i na njemu ne bi trebalo da stoje
predmeti, kao što su vaze, koji su ispunjeni tečnošću
Important Safety Instructions
Page 53

53
BiH/CG
• Priključci označeni simbolom “ ” mogu biti dovoljno visokog napona da predstavljaju rizik
od električnog udara. Instalaciju spoljnog ožičenja povezanog na ovakve
• priključke treba da obavi stručno lice ili treba koristiti gotove vodove ili kablove.
• Aparat se mora pričvrstiti na pod/zid na bezbjedan način u skladu s uputstvima za
postavljanje kako bi se spriječilo povređivanje.
• Postoji opasnost od eksplozije ako je baterija nepravilno zamijenjena. Bateriju zamijeniti
istim ili odgovarajućim tipom baterija.
• Bateriju (jednu bateriju ili više baterija ili pakovanje baterija) ne izlagati prekomjernoj toploti
kao što su sunčeva svjetlost, vatra i slično.
• Pretjerano glasan zvuk iz slušalica može uzrokovati gubitak sluha. Slušanje glasne muzike
tokom dužeg vremenskog perioda može oštetiti sluh. Da biste smanjili rizik od oštećenja
sluha trebalo bi da smanjite jačinu zvuka na bezbjedan, ugodan nivo i smanjite vremenske
periode provedene u slušanju glasne muzike. (Samo za Njemačku).
• Mrežni utikač i utičnica treba da budu lako dostupni ukoliko se koriste za isključivanje
uređaja.
• Kada ne koristite uređaj ili ga pomjerate, vodite računa o kablovima, npr. uvežite ih vezicama
za kablove ili nečim sličnim. Pazite da ne dođu u dodir s oštrim ivicama ili nečim sličnim što
bi moglo izazvati njihovo oštećenje. Prilikom ponovne upotrebe provjerite da li su kablovi
oštećeni. Ukoliko primjetite bilo kakva oštećenja pozovite servisera kako bi oštećene
kablove zamijenio onima koje proizvođač preporučuje u specifikaciji ili nekim drugim koji
posjeduju iste funkcije kao i originalni.
• Prilikom odlaganja baterija treba obratiti pažnju na zaštitu životne sredine.
• Uređaju ne treba pristupati s otvorenim plamenom, npr. upaljenom svijećom. Kako biste
spriječili širenje požara, uvijek držite svijeće ili druge izvore vatre dalje od ovog proizvoda.
• Ako uređaj ima simbol
u klasnim oznakama i kabl za napajanje ima dva jezička, to znači
da se radi o opremi klase II ili duplo izolovanom električnom aparatu koji je tako dizajniran
da ne zahtjeva bezbjednosno povezivanje na električno uzemljenje.
Page 54

54
BiH/CG
UPOZORENJE
Baterije ne gutati, postoji opasnost od hemijskih opekotina
(daljinski upravljač se isporučuje s njima). Ovaj proizvod sadrži okrugle/dugme baterije.
Ako se okrugla/dugme baterija proguta može uzrokovati ozbiljne unutrašnje opekotine za
samo dva sata i dovesti do smrti.
Nove i upotrebljavane baterije držati podalje od djece. Ako se ležište
za baterije ne može dobro zatvoriti treba prestati s korišćenjem proizvoda
i držati ga podalje od djece. Potražite medicinsku pomoć čim posumnjate da je
došlo do gutanja baterija ili da su dospjele u bilo koji dio tijela.
Upozorenje za aparate koji sadrže OKRUGLE/DUGME BATERIJE
(uputstva koja slijede odnose se na aparate koji sadrže zamjenjive okrugle/dugme baterije)
OPREZ
OPASNOST OD
ELEKTRIČNOG UDARA.
• Simbol munje sa strelicom u jednakostraničnom trouglu upozorava korisnika na prisustvo
neizolovanog „opasnog napona“ u kućištu proizvoda koji može biti dovoljne jačine da
predstavlja rizik od električnog udara.
• Da biste smanjili rizik od električnog udara ne uklanjajte poklopac (ili zadnju stranu) uređaja.
Servisiranje povjerite samo obučenim serviserima.
• Uzvičnik u jednakostraničnom trouglu ima za cilj da upozori korisnika na postojanje važnih
uputstava za korišćenje i servisiranje u literaturi koja se dobija s uređajem.
• Preporučljivo je da se sljedeće informacije primjenjuju gdje god je to moguće:
Odnosi se na naizmjeničnu struju (AC)
Odnosi se na jednosmjernu struju (DC)
Odnosi se na opremu klase II
Odnosi se na stanje mirovanja
Odnosi se na Uključeno
Odnosi se na visok napon
Page 55

55
BiH/CG
• Postavite uređaj na čvrstu horizontalnu podlogu poput stola ili pulta. Ostavite slobodan
prostor od najmanje 10 cm za slobodan protok vazduha. Da biste spriječili pojavu grešaka
ili nebezbjednih situacija ne stavljajte nikakve predmete na uređaj. Ovaj uređaj se može
upotrebljavati u tropskim i/ili umjerenim klimatskim zonama.
• Televizor nikad ne postavljajte na nestabilnu poziciju. Televizor može pasti i prouzrokovati
ozbiljne povrede ili smrt. Mnoge povrede, naročito djece, mogu se izbjeći jednostavnim
mjerama predostrožnosti kao što su:
• Korišćenje namještaja ili stalaka preporučenim od strane proizvođača televizora.
• Korišćenje isključivo namještaja koji će bezbjedno držati uređaj.
• Postavljanje televizora tako da njegove ivice ne prelaze preko ivica namještaja na kom stoji.
• Ne postavljati televizor na visoke komade namještaja ( npr. kredence ili police za knjige)
bez učvršćivanja i namještaja i televizora na odgovarajući oslonac.
• Ne stavljajte tkanine niti bilo kakve druge materijale između televizora i namještaja na kom
stoji.
• Upoznajte djecu o opasnostima od penjanja na namještaj kako bi dosegnuli televizor ili
njegove komande.
Ako je vaš postojeći televizijski uređaj bio zadržan ili pomjeran, trebalo bi da primijenite gore
navedene mjere predostrožnosti (samo za TV uređaje teže od 7 kg).
Pravilno odlaganje ovog proizvoda. Ovom oznakom se ukazuje na to da ovaj proizvod
u zemljama EU ne bi trebalo odlagati s ostalim otpadom iz domaćinstva. Da biste spriječili
nastanak potencijalne opasnosti po životnu sredinu ili ljudsko zdravlje uslijed nekontrolisanog
odlaganja otpada, otpad odgovorno reciklirajte kako biste unaprijedili održivu ponovnu
upotrebu ovog izvora materijala. Za vraćanje polovnog uređaja koristite sistem za vraćanje
i sakupljanje ili kontaktirajte maloprodaju u kojoj je proizvod kupljen. Oni će se postarati da
proizvod bude recikliran na način koji ne šteti okolišu.
WEEE Direktiva
Postavljanje TV uređaja
Pažnja: Prikazi služe isključivo kao primjer.
Page 56

56
BiH/CG
Za vaš TV uređaj možete koristiti opcioni zidni držač. Konsultujte se s prodavcem u vezi sa
zidnim držačem koji je u skladu s VESA standardima koje koristi vaš model TV uređaja. Pažljivo
pričvrstite zidni držač na stražnji dio TV uređaja. Postavite držač na čvrsti zid koji je okomit u
odnosu na pod. Kontaktirajte kvalificirano osoblje da montira držač ukoliko želite da bude
pričvršćen na druge materijale . Detaljna uputstva dolaze u paketu s držačem. Koristite one
zidne držače kod kojih će uređaj biti adekvatno obezbijeđen na zidu s dovoljno prostora da je
omogućeno povezivanje s eksternim uređajima.
• Prije pomjeranja ili instaliranja TV uređaja isključite struju . U suprotnom postoji opasnost od
električnog udara.
• Pomjerite stalak prije postavljanja TV uređaja na zid tako što ćete ga gurati.
• Ako postavljate TV na plafon ili nagnut zid on može pasti i uzrokovati ozbiljne povrede.
Koristite autorizovani držač i kontaktirajte lokalnog prodavca ili kvalificirano osoblje. U
suprotnom garancija neće važiti.
• Nemojte pretjerano pričvršćivati šrafove, jer to može oštetiti TV uređaj i poništiti garanciju.
• Da biste spriječili povrede, ovaj aparat mora biti bezbjedno pričvršćen za pod/zid u skladu s
uputstvima za postavljanje.
• Koristite šrafove i zidne nosače koji odgovaraju navedenim specifikacijama. Garan
cija ne pokriva štete ili povrede uzrokovane pogrešnom upotrebom ili korišćenjem
neodgovarajućeg pribora.
Napomena:
1) Slike služe samo kao ilustracija.
2) Za postavljanje TV uređaja s terminalima okrenutim ka zidu potreban je i gumeni jastuk uz
šraf prilikom fiksiranja postolja na zidu kako bi se obezbedilo dovoljno prostora za upotrebu
terminala. To je mali šupalj stub čiji je unutrašnji prečnik 8 mm, spoljašnji 18 mm, a visina 30 mm.
Montaža na zid
PAŽNJA
Veličina modela: 32’’ Vrh Dno
Šraf
Prečnik (mm) "E" M4 M4
Dubina (mm)
“D”
Max 9 9
Min 6 6
Količina 2 2
VESA (AxBxC) 100x100x100
Page 57

57
BiH/CG
• Ne postavljajte ovu opremu u ograničeni prostor kao što su police za knjige ili njima sličan
namještaj. Ne koristite uređaj u blizini vlažnih i hladnih područja i štitite ga od pregrijavanja.
Držati dalje od direktne sunčeve svjetlosti.
• Uređaj ne koristiti blizu prašnjavih mjesta.
• Ne stavljajte svijeće na pristupačne otvorene dijelove kako zapaljivi materijal ne bi dospio u
unutrašnjost TV uređaja.
• Koristite daljinski upravljač tako što ćete ga usmjeriti ka senzoru za daljinsko upravljanje.
Predmeti koji se nađu između daljinskog upravljača i senzora ometaće normalan rad.
• Ne dozvolite da daljinski upravljač bude izložen snažnim vibracijama. Osim toga, ne
polivajte daljinski upravljač i ne ostavljajte ga na mjestima koja su izložena velikoj vlazi.
• Ne izlažite daljinski upravljač direktnom uticaju sunca koje može uzrokovati njegovo
deformisanje uslijed visokih temperatura.
• Daljinski upravljač neće funkcionisati kada je izložen direktnoj sunčevoj svetlosti ili jakom
osvetljenju. Ukoliko se ovo desi, promijenite osvjetljenje ili poziciju TV uređaja ili približite
daljinski upravljač senzoru.
Neadekvatna upotreba baterije prouzrokovat će njeno curenje. Pratite sljedeće metode i
pažljivo rukujte baterijama.
1. Obratite pažnju na polaritet baterija kako biste izbjegli kratak spoj.
2. Slabljenje baterija utiče na domet daljinskog upravljača, pa bi ih trebalo zamijeniti novim
baterijama kad se to desi. Uklonite baterije iz daljinskog upravljača ukoliko ne planirate da
ga koristite tokom dužeg vremenskog perioda.
3. Ne upotrebljavajte različite tipove baterija (na primjer, manganske i alkalne) istovremeno.
4. Ne stavljajte baterije u vatru, ne punite ih i ne rasklapajte na delove.
5. Molimo, odlažite baterije u skladu s važećim propisima o zaštiti okoliša.
UPOZORENJE: Baterije (pakovanje baterija ili postavljene baterije) ne bi smjele biti izložene
prekomjernoj toploti koju proizvode sunčeva svjetlost, vatra i slično.
Stavite dvije baterije veličine AAA u ležište za baterije na daljinskom upravljaču, vodeći pri tom
računa o oznakama za polaritet unutar ležišta.
Radno okruženje
Mjere opreza prilikom upotrebe daljinskog upravljača
Mjere opreza prilikom upotrebe baterije
Stavljanje baterija u daljinski upravljač
Page 58

58
BiH/CG
TIPKE
Napomena: Ilustracija služi samo kao referenca
Tipka za napajanje
Pogled odozdo
PRIKLJUČCI
Napomena: Molimo izaberite priključke u skladu s vašim TV uređajem.
Pritisnuti tipku u sredini:
1. U režimu pripravnosti pritisak na tipku uključuje TV;
2. Ako nema OSD menija, kratkim pritiskom otvara se osnovni meni, duži pritisak stavlja TV u
režim pripravnosti;
3. U slučaju postojanja OSD menija, kratkim pritiskom potvrđujete izbor; dužim pritiskom
isključujete TV.
Lijevi dio tipke: smanjivanje zvuka ili pomijeranje ulijevo.
Desni dio tipke: povećavanje zvuka ili pomijeranje udesno.
Gornji dio tipke: mijenjanje kanala ili pomijeranje prema gore.
Donji dio tipke: mijenjanje kanala ili pomijeranje prema dolje.
Tipka za napajanje
1 Video & Audio L/R
Povežite audio i video signal s izvorom signala kao
što je DVD.
2 HDMI1/MHL &HDMI2
Povežite HDMI ulaz s izvorom signala kao što je
DVD. HDMI1 podržava funkciju MHL.
3 Digitalni zvuk
Povežite SPDIF kabl na TV izlaz za signal zvuka na
kompatibilni prijemnik zvuka.
4 SLUŠALICE
Audio izlaz i zvučnici biće mutirani kada se uključe
slušalice.
5 USB USB ulaz
6 LNB/AIR/CABLE
Povežite koaksijalni kabl za primanje signala s
antene, kablovske televizije ili satelita.
7 SERVISIRANJE
Otklanjanje grešaka na interfejsu radi samo
profesionalno osoblje.
8 CI CI ulaz za karticu
Page 59

59
BiH/CG
FUNKCIJE DALJINSKOG UPRAVLJAČA
Daljinski upravljač
1. POWER (UKLJUČI/ISKLJUČI) ( ) Pritisnite
za uključivanje TV-a ili za stavljanje u režim
pripravnosti.
2. ISKLJUČIVANJE ZVUKA (
) Pritisnite za
isključivanje zvuka ili za vraćanje na prethodnu
jačinu.
3. PICTURE (SLIKA) Promjena režima slike.
4. SOUND (ZVUK) Promjena režima zvuka.
5. Zoom (Zumiranje) Za promjenu formata slike.
6. Numeričke tipke Za direktno biranje kanala.
7. CHN LIST (LISTA KANALA) Pritisnite da biste
ušli u listu kanala.
8. RETURN (POVRATAK) Pritisnite za povratak na
prethodni kanal.
9. MENU (MENI) Pritisnite za ulazak u opcije
menija.
10. IZVOR (SOURCE) Za biranje režima izvora
ulaznog signala.
11. Gore/Dolje/Lijevo/Desno ( // /)
Za navigaciju po meniju.
12. ENTER (UNOS) Za potvrdu izbora.
13. TV/RADIO Za prebacivanje na TV ili radio.
14. EXIT (IZLAZ) Za izlazak iz menija u kom se
trenutno nalazite.
15. HOME (POČETNA STRANICA) Za ulazak
na početnu stranicu za početne i napredne
funkcije. Ako vaš TV uređaj nema opciju HOME,
ova tipka neće raditi.
16. VOL+/VOL- (Pojačavanje/snižavanje zvuka)
Podešavanje zvuka.
17. PR+/PR- (Program gore/dolje)
Mijenjanje programa nagore ili nadolje.
18. STANJE MIROVANJA Odaberite vrijeme stanja
mirovanja, npr. 10 min, 20 min. i sl.
Page 60

60
BiH/CG
19. EPG (ELEKTRONSKI PROGRAMSKI VODIČ)
Pritisnuti za prikaz trenutnih EPG informacija u
DTV režimu rada.
20. TITLOVI Omogući/onemogući titlove u DTV/
USB režimu rada.
21. OMILJ. (Omiljeni kanali) Pritisnuti za prikaz
kanala koje ste odredili kao omiljene.
Pritisnuti tipku gore/dolje da biste prošli kroz
kanale određene kao omiljene, pritisnuti ENTER
za potvrdu izbora.
22. Snimanje (REC) Pritisnuti za snimanje
postojećeg programa (radi samo u DTV režimu
rada).
23. INFO Prikazati informacije o trenutnom izvoru.
24. Tipke za USB reprodukciju
Reprodukcija i pauza (Play & Pause) (
)
Pritisnuti za pauziranje reprodukcije sadržaja,
pritisnuti ponovo za nastavak reprodukcije.
Stop ( )
Pritisnuti za zaustavljanje reprodukcije
Tipka za brzo premotavanje unazad ( )
Pritisnuti za brzo premotavanje unazad.
Brzo premotavanje unaprijed ( )
Pritisnuti za brzo premotavanje unaprijed.
Prethodno ( )
Pritisnuti za reprodukciju prethodnog fajla.
Sljedeće ( )
Pritisnuti za reprodukciju sljedećeg fajla.
25. Obojene tipke Pritisnuti za brzo pristupanje
određenim funkcijama u TV ili DTV režimu rada.
26. NICAM Pritisnuti za izbor željenog načina
emitovanja zvuka u zavisnosti od kanala koji se
emituje.
27. HOLD (FREEZE) Zamrzavanje slike na ekranu
(nije dostupno u USB režimu rada).
28. REC LIST (LISTA SNIMANJA)
Prikaz liste snimljenih fajlova.
29. QUICK (BRZO) Nema funkciju.
30. 3D Nema funkciju.
31. AD (Audio deskripcija)
Pritisnuti da bi se upalila audio deskripcija.
Narator će za slepe i slabovide osobe opisivati
što se dešava na ekranu. Pritisnite ponovo da
biste isključili ovu opciju (dostupno samo u DTV
režimu rada).
Page 61

61
BiH/CG
TIPKE ZA TELETEKST
32. TEXT Pritisnite da biste ušli ili izašli iz menija
teleteksta.
33. HOLD (ZADRŽAVANJE)
Pritisnite da biste zadržali stranicu teleteksta
na ekranu bez ažuriranja i promjena. Pritisnite
ponovo da biste prekinuli zadržavanje stranice.
34. Ostale tipke
SIZE (VELIČINA) Povećavanje prikaza
teleteksta: Pritisnite tipku jednom za povećanje
gornje polovine ekrana. Pritisnite tipku ponovo
da biste povećali donju stranu ekrana. Pritisnite
tipku ponovo da biste vratili normalnu veličinu
ekrana.
REVEAL (SKRIVENI PODACI) Pritisnite ovu
tipku za prikaz skrivenih informacija, kao što su
rešenja zagonetki ili slagalica. Pritisnite ponovo
da biste uklonili ove informacije s ekrana.
MIX (MIKS)
Pritisnite tipku za prikaz stranice teleteksta preko
TV programa. Pritisnite ponovo da biste vratili u
normalan režim rada teleteksta.
SUB-PAGE (PODSTRANICA)
Pritisnite ovu tipku za ulazak ili izlazak iz režima
podstranice (ako je podstranica dostupna).
Pritisnite tipku crveno/zeleno za izbor željene
podstranice.
INDEX Pritisnite tipku za prikaz stranice indeksa.
CANCEL (ODUSTAJANJE)
Pritisnite ovu tipku da biste privremeno vratili TV
program dok pretražujete stranicu teleteksta.
Kada je pretraga završena, broj strane će se
pojaviti u gornjem lijevom uglu ekrana. Pritisnite
ponovo da biste vratili na stranicu teleteksta.
Page 62

62
BiH/CG
SNIMAČ (REC)
Instant snimanje i reprodukcija na jedan dodir
Snimanje s tajmerom
VAŽNE NAPOMENE:
1. Za bilo koju vrsta snimanja morate povezati spoljašnji uređaj na odgovarajući USB
priključak na zadnjoj strani televizora da biste snimali.
2. USB uređaj mora biti formata FAT32.
3. Kada prvi put koristite USB uređaj za snimanje na ovom TV uređaju, predlažemo vam da ga
formatirate na TV-u prije početka snimanja.
4. Provjerite da li gledate DTV program.
5. Koristite mobilne uređaje visokog kvaliteta za snimanje HD programa inače će se vaši
snimci prekidati tokom reprodukcije.
6. Sačuvajte rezervne kopije svih podataka na USB uređaju za skladištenje podataka kako
biste spriječili njihovo gubljenje uslijed neočekivanih nezgoda. Ne snosimo nikakvu
odgovornost za gubljenje podataka uslijed zloupotrebe ili kvara. Pravljenje rezervne kopije
podataka je odgovornost korisnika.
1. Ubacite brzi eksterni uređaj za skladištenje podataka i provjerite da li na njemu ima
dovoljno prostora.
2. Izaberite TV program i kanal koji želite da snimite.
3. Pritisnite tipku REC da biste ušli u režim snimanja i započeli snimanje. Na ekranu će se
pojaviti traka za snimanje kao što je prikazano ispod i možete izabrati odgovarajuća
podešavanja.
4. Ukoliko funkcija snimanja ne radi, formatirajte vaš USB uređaj.
5. Ako želite da zaustavite snimanje, pritisnite tipku [
] i snimanje će se zaustaviti.
Postoje dva načina za podešavanje tajmera za snimanje televizijskog programa.
Ukoliko znate detalje programiranja:
1. Idite na kanal koji će emitovati program koji želite da snimite.
2. Pritisnite tipku EPG na daljinskom upravljaču da biste postavili EPG interfejs. Kanal koji
gledate biće istaknut na ekranu koji se pojavi.
3. Pritisnite tipku RED na daljinskom upravljaču i uđite u detalje programa u meniju za
snimanje pritiskom na
/ da biste izabrali stavku / da biste promijenili podešavanja.
Na primjer, ako program počinje u 20:30 istog dana, unesite: 30 u prostor MINUTI, 20
u prostor SATI (pojavit će se 24-časovni sat), a zatim odgovarajući datum. Na isti način
unesite vrijeme završetka snimanja.
Napomena: (A) Tokom režima snimanja ne možete mijenjati kanale ili birati druge funkcije.
(B) Ako se signa prekida ili nestaje tokom snimanja, snimanje će se zaustaviti dok
se signal ponovo ne uspostavi. Ovo može uzrokovati gubljenje programskog
sadržaja.
Page 63

63
BiH/CG
ELEKTRONSKI PROGRAMSKI VODIČ (EPG)
EPG je skraćenica za digitalni elektronski programski vodič (Digital Electronic Program Guide).
Ovu uslugu nude distributeri televizijskog programa i ona daje informacije o programima koji
će biti emitirani. Funkciji možete pristupiti iz digitalnog režima tako što ćete pritisnuti tipku EPG
na daljinskom upravljaču.
1. Pritisnite tipku EPG kako bi pristupili EPG interfejsu. U drugoj traci od vrha prikazat će
se podaci o trenutnom datumu i vremenu. Na listi ispod biće označen program koji se
trenutno prati.
2. Prije nego što vidite bilo koje EPG informacije treba da ‘aktivirate’ sve one kanale za koje
želite da vidite programske informacije. Da biste ovo uradili, koristite /tipke za biranje
kanala
/ , a zatim pritisnite ENTER da biste potvrdili.
3. Za provjeru programa koji će se emitovati u budućnosti, idite nagore tipkom
do polja za
datum. Koristite tipku da biste izabrali datum koji želite da provjerite.
4. Pritisnite tipku Index (
) da biste se pomjerili nagore do gornje trake na ekranu, zatim
pritisnite tipku da izaberete listu kanala. Druga traka će pokazivati neki od dostupnih
kanala.
5. Idite na kanal i koristite tipke
/ da biste izabrali kanal za koji želite da vidite informacije.
Posle kratkog vremena pojavit će se informacije o programu.
6. Koristite tipke
/ da prođete kroz termine.
7. Pritisnite tipku MENU da izađete iz EPG menija.
Snimač
Pritisnite CRVENU tipku za prikaz menija snimača (desno).
Pogledajte detaljne informacije o različitim načinima
snimanja s TV uređaja na USB uređaj.
Info
Pritisnite ZELENU tipku za prikaz informacija o izabranom
programu.
Raspored
Pritisnite ŽUTU tipku za prikaz liste rasporeda.
Pritisnite
/ za izbor događaja, pritisnite CRVENU
tipku za brisanje događaja.
Podsjetnik
Pritisnite PLAVU tipku za prikaz menija podsjetnika.
Pritisnite
/ za izbor stavke i / za promjenu
podešavanja.
Pritisnite tipku ENTER da biste dodali događaj u podsjetnik
na listu rasporeda. Prikazat će se ažurirana lista rasporeda.
4. Koristite odgovarajući režim snimanja: jednom, svakog dana ili sedmično.
5. Pritisnite ENTER da biste potvrdili vaš izbor. Pojavit će se raspored svih vaših snimanja (lista
snimaka). Za više podataka pogledajte funkciju EPG u rasporedu.
Ako pretražujete EPG, pratite sljedeće korake na stranici funkcije EPG.
Page 64

64
BiH/CG
PODEŠAVANJA U OKVIRU MENIJA
Zvuk
Kanal
Slika
Meni operacija (DTV režim)
Pritisnite taster MENI (MENU) kako biste pristupili glavnom meniju.
Pritisnite tastere za navođenje [ ] / [ ] kako biste označili željenu stavku.
Pritisnite taster UNOS (ENTER) kako biste odabrali stavku.
Pritisnite tastere [ ] / [ ]/ [] / [], a zatim UNOS (ENTER) da odaberete podmenije.
Pritisnite taster MENI (MENU) da izađete iz stavke.
Napomena: Neke opcije mogu biti nedostupne pod nekim izvorima.
Režim slike
Izaberite automatski režim kontrole slike. Izbori su Dinamički, Standardni, Blagi i Korisnički.
Temperatura boje
Izaberite uopšteni ton boje slike. Izbori su Hladno, Srednje, Toplo i Korisnički.
Odnos širina/visina
Izaberite odnos širina/visina (proporcije ekrana) u skladu sa vašim tipom video signala ili
preferencijama. Možete izabrati između 16 opcija: 9/4: 3/Samo skeniraj / Povećaj1/Povećaj2.
Smanjenje šuma
Eliminiše šum na slici. Izbori su Isključeno/Nisko/Srednje/Visoko.
MPEG NR
Eliminiše generiranu buku uz stvaranje digitalnog signala. Možete odabrati Isključeno/Nisko/Srednje/Visoko.
Režim zvuka
Izaberite omiljeni režim zvuka za svaki ulaz. Možete odabrati Standardno/Muzika/Film/
Sport/Korisnik.
Niski tonovi
Podesite niske frekvencije zvuka.
Visoki tonovi
Podesite više frekvencije zvuka.
Balans
Kontroliše balans zvuka između desnog i lijevog zvučnika.
Automatska jačina zvuka
Podešava jačinu zvuka u skladu s nivoom ulaznog zvuka. Možete odabrati Uključi ili Isključi.
Prostorni zvuk
Pomaže u stvaranju bogatijeg i šireg zvuka izvora stereo zvuka.
Uključivanje AD (dostupno samo u DTV režimu rada)
Uključivanjem Audio deskripcije možete aktivirati podešavanja jačine zvuka AD. Kada se uključi
audio deskripcija, narator će za slepe i slabovide osobe opisivati ono šta se dešava na ekranu.
Režim SPDIF (možda nije dostupan)
Izaberite SPDIF režim: Automatski ili PCM.
Automatsko podešavanje
Izaberite DVB-T ili DVB-C i pritisnite tipku ENTER da biste pristupili sljedećem koraku, zatim
izaberite zemlju ili vrstu skeniranja, a zatim pretražujte i automatski čuvajte programe. Ako želite
da zaustavite automatsko pretraživanje, pritisnite tipku MENU ili tipku EXIT i pojaviće se prozor
za dijalog
Page 65

65
BiH/CG
• Pritisnite da potvrdite izlazak.
• Pritisnite da nastavite pretraživanje.
Napredno podešavanje
Pristupite glavnim satelitskim podešavanjima da biste pretraživali programe preko DVB-S
izvora.
Podešavanja satelitske antene (koraci 1-3 se odnose na Sliku1)
Set satelitske antene mora biti podešen za svaki željeni satelit prije skeniranja kanala.
Satelit – Izaberite satelit za ovaj TV uređaj.
Tip LNB – Provjerite da li LNB tip odgovara vašoj anteni.
LNB napajanje – Omogućava ili onemogućava napajanje za LNB.
22KHz – Izaberite 22KHz da podesite 22K prekidač na UKLJUČI/ISKLJUČI. Automatski
režim postavlja prekidač 22KHz na Upaljeno ili Ugašeno u zavisnosti od LNB tipa.
DiSEqC1.0/1.1 – Izaberite DiSEqC režim za izabrani LNB.
Slika 1
Korak 2
Korak 1
Korak 3
Korak 1: Označite Satelit i pritisnite ENTER da biste pristupili listi satelita i izabrali jedan.
Korak 2: Označite Tip LNB i pritisnite ENTER da biste izabrali tip LNB.
Korak 3: Provjerite da li je prekidač 22KHz, DiSEqC1.0/1.1 odgovarajući za izabrani
satelit. Kada završite prethodne korake pritisnite plavu tipku za pretraživanje kanala.
Ručno podešavanje DTV
Ručno pretražujte i čuvajte programe.
Kanal Ručno podešavanje DTV
Izaberite vrstu izvora (DVB-T ili DVB-C) i ručno pretražujte digitalne programe. U meniju kanala
izaberite Ručno podešavanje DTV i pritisnite tipku ENTER da biste pristupili.
1. Pritisnite ili izaberite kanal br., a zatim pritisnite ENTER da biste započeli pretraživanje.
2. Pretraživanje se zaustavlja kada je program pronađen i taj program biće sačuvan na
trenutnoj poziciji. Ako želite da zaustavite pretraživanje pritisnite tipku MENU.
Page 66

66
BiH/CG
Ručno podešavanje ATV
Prvo izaberite vrstu izvora za ATV. Zatim u meniju kanala izaberite Ručno podešavanje ATV i
pritisnite tipku ENTER da biste pristupili.
1. Označite i pritisnite ili izaberite Sačuvati u 1 (ili možda neki drugi broj), Ozvučenje i
kanal br. Zatim izaberite Pretraživanje i pritisnite ENTER da započnete pretraživanje.
• Pritisnite da biste pretraživali više frekvencije;
• Pritisnite da biste pretraživali niže frekvencije
2. Pretraživanje prestaje kada se pronađe program koji će biti sačuvan na trenutnoj poziciji
kanala. Ako želite da zaustavite pretraživanje, pritisnite tipku MENU.
Fine-Tune
Koristite za mala prilagođavanja podešavanja pojedinačnih kanala. Precizno podešavanje
nije neophodno u normalnim uslovima. Međutim, u područjima slabih uslova emitiranja
neophodno je koristiti prilagođavanja da bi se dobili bolji zvuk i slika.
1. Izaberite kanal koji želite precizno podesiti.
2. U meniju kanala izaberite Ručno podešavanje ATV i pritisnite da označite Precizno
podešavanje
3. Pritiskajte ili dok ne dobijete najbolju moguću sliku i zvuk.
Uređivanje programa
Uređuje programe. Možete pritiskati tipke u boji na daljinskom upravljaču da biste preskakali
programe,preimenovali programe, obrisali ih ili pomjerili i dodavali ih na listu omiljenih
pritiskanjem tipke FAV.
Informacije o signalu
Pokazuje informacije o trenutnom DTV kanalu.
CI informacije
Omogućava korisniku da bira u okviru menija modula uslovnog pristupa (CAM) . Izabrati CI
meni prema meniju PC kartice.
Napajanje antene od 5V
Ova opcija je dostupna samo u DVB-T izvoru, izaberite UKLJUČI da biste obezbijedili
napajanje TV antene; Izaberite ISKLJUČI da biste isključili ovu opciju.
Ažuriranje softvera (OAD) (samo za neka područja)
Izaberite Uključi da biste omogućili TV uređaju da ažurira sistem putem vazduha. Izaberite
Isključi da biste isključili ovu funkciju.
OAD prilagođavanje (samo za neka područja)
Ova opcija je onemogućena kada je ažuriranje softvera (OAD) isključeno. Biranje OAD
skeniranja znači da idete na skeniranje kanala da biste pronašli informacije potrebne za OAD
ažuriranje.
LCN UKLJUČI/ISKLJUČI (samo za neka područja)
Kada podešavate programe izaberite UKLJUČI i lista kanala će se sortirati prema LCN;
izaberite ISKLJUČI i lista kanala će se sortirati prema podrazumevanom redoslijedu.
Opcije
Jezik za OSD
Izaberite jezik za OSD.
Jezici zvučnog zapisa / Jezici titlova (Napomena1)
Izaberite po želji.
Jezik teleteksta
Izaberite jezik za različita područja.
Page 67

67
BiH/CG
Vrijeme
Možete birati između: Automatsko sinhronizovanje, Sat, Vremenska zona, Ljetnje vrijeme,
Tajmer za mirovanje i Automatsko mirovanje.
HDMI CEC
Pritisnite da biste ušli u podmenije.
HDMI CEC – Uključite ili isključite funkciju HDMI CEC.
Automatsko stanje pripravnosti – Prebacuje TV uređaj u automatsko stanje pripravnosti kada su
isključeni CEC uređaji kao što je DVD.
Spisak uređaja – Kada je HDMI CEC upaljen provjerite spisak uređaja koji su povezani na TV.
REC Sistem datoteka (Napomena1)
Ako želite da koristite ovu funkciju morate primati digitalni program i spojiti USB disk.
Lokalni poštanski brojevi (samo za neka područja)
Sistem hitnog upozorenja definisan od strane DVB provajdera je neophodan mehanizam za
distribuiranje relevantnih informacija u javnost u slučaju vanrednih situacija.
Vraćanje na podrazumijevanu vrijednost
Vraća korisnička podešavanja na podrazumijevanu vrijednost.
Ažuriranje softvera
Povežite USB uređaj s nadograđenim softverom kako biste nadogradili TV sistem.
Napomena:
1. Jezik zvučnog zapisa/Jezici titlova/ Sistem snimanja radi samo u DVB-S /DVB-C/DVB-T
režimu.
2. Korisnički podaci na ovom TV uređaju biće izgubljeni nakon vraćanja na podrazumijevanu
vrijednost (Restore Default).
3. Ne isključujte TV uređaj u toku procesa nadogradnje softvera, u suprotnom, TV možda neće
raditi, a za to će biti odgovoran korisnik.
Zaključavanje
Zaključavanje sistema
Unesite početnu lozinku (0000) da biste pristupili ovoj funkciji i izaberite „Uključi“; aktivirat
će se funkcije poput „Postavi lozinku“, „Blokiraj program“ i „Roditeljski nadzor“; ako izaberete
„Isključi“ tri spomenute funkcije biće inaktivirane. Ako zaboravite lozinku možete uneti i super
lozinku (8899) da biste pristupili zaključavanju sistema.
Postavljanje lozinke
Resetovanje lozinke.
Blokiranje programa
Blokirajte programe po želji.
Roditeljski nadzor
Pristupite za izbor programa dostupnih za decu.
Hotelski režim (samo u nekim područjima)
Samo za hotelsku upotrebu.
Page 68

68
BiH/CG
UPRAVLJANJE USB-OM
USB meni
Pristupite meniju izvora i odaberite USB tipku da biste reprodukovali filmove, muziku ili fajlove
s fotografijama s vašeg USB uređaja za skladištenje podataka.
1. Povežite USB uređaj na USB ulazni priključak i izaberite vrstu medija na početnoj stranici:
FILM, MUZIKA i FOTOGRAFIJE
2. Pritisnite tipku [ENTER] ] i na ekranu će se pojaviti spojeni USB uređaj, pritisnite tipku
[ ENTER ] ponovo za prikaz liste foldera i fajlova.
3. Pritisnite [] / [] ili [] / [] da biste izabrali folder, zatim [ ENTER ] da biste ga otvorili i
izabrali fajlove, pa ponovo [ ENTER ] da biste ih označili. Markirajte onaj koji želite prvi da
reprodukujete, pritisnite [/
] za početak reprodukcije ili izaberite fajl i pritisnite [/ ] da
bi reprodukcija odmah počela.
4. Pritisnite [
] za prekid reprodukcije i vraćanje na folder.
5. Pritiskajte kontinuirano [RETURN] da biste se vratili na gornji nivo direktorijuma.
6. Ponovite za izbor i reprodukciju sljedeće vrste medija.
Podsjetnik prilikom upotrebe USB plejera
1. Neki USB memorijski uređaji mogu biti u određenoj mjeri nekompatibilni s ovim uređajem.
2. Čuvajte rezervne kopije svih podataka na USB uređaju za skladištenje podataka kako
biste spriječili njihovo gubljenje uslijed neočekivanih nezgoda. Ne snosimo nikakvu
odgovornost za gubljenje podataka uslijed zloupotrebe ili kvara. Čuvanje podataka je
odgovornost korisnika.
3. Učitavanje većih fajlova može duže potrajati.
4. Brzina prepoznavanja USB memorijskog uređaja može zavisiti od individualnog uređaja.
5. Prilikom povezivanja ili uklanjanja USB memorijskog uređaja provjerite da li je TV uređaj
u USB režimu rada. U suprotnom može doći do oštećenja USB memorijskog uređaja ili
datoteka koje se na njemu nalaze.
6. Koristite isključivo USB memorijske uređaje formatirane u FAT16, FAT32, NTFS sistemima
datoteka ukoliko koristite operativni sistem Windows. Ukoliko je memorijski uređaj
formatiran u nekom drugom sistemu datoteka koji Windows ne podržava, postoji
mogućnost da neće biti prepoznat.
7. Postarajte se da jačina struje za napajanje ne pređe 500 mA prilikom korišćenja USB hard
diska. Ako jačina struje pređe 500 mA, TV će preći u režim mirovanja i biće potrebno
isključiti USB hard disk i restartovati TV uređaj.
8. Ako format datoteke nije podržan ili je datoteka neispravna pokazat će se poruka
„Nepodržana datoteka“.
9. Za obradu HD slike potrebno je više vremena i to nema veze s TV uređajem. Molimo za
strpljenje.
10. Ovaj TV uređaj možda ne podržava neke multimedijalne datoteke zbog promjena u
formatu šifrovanja ili tehničkog napretka.
Page 69

69
BiH/CG
Reprodukcija filmova
Pritisnite [ INFO ] / [ ] za prikaz / izlaz iz trake sa menijima. Pritisnite tipke za upravljanje USB-
om na daljinskom upravljaču kako biste obavili relevantne operacije.
Reprodukcija i Pauza/Zaustavi/ Pret. /Sljedeće
Pritisnite [/
] za početak reprodukcije ili pauziranje, pritisnite [ ] za prestanak reprodukcije,
pritisnite [
] / [ ] za reprodukciju prethodnog ili sljedećeg video fajla. Možete također
pritisnuti [ ] / [ ] za markiranje jedne od četiri ikonice, a zatim pritisnite [ ENTER ], TV će
odgovoriti u skladu s tim.
Brzo premotavanje unazad/brzo premotavanje unaprije
Pritisnite i držite [
] / [ ] ] nekoliko sekundi da dođete do dijela reprodukcije do kog želite, a
zatim pritisnite tipku [/ ] da započnete reprodukciju s nove pozicije.
Režim reprodukcije
Markirajte odgovarajuću ikonicu i pritisnite [ ENTER ] za prelazak na drugi režim reprodukcije.
Informacije
Markirajte odgovarajuću ikonicu i pritisnite [ ENTER ] za prikaz informacija o onome što se
reprodukuje.
Idi na Vrijeme
Unošenjem vremena dođite do te određene tačke. Markirajte odgovarajuću ikonicu i pritisnite
[ ENTER ] da biste otvorili Unos pretrage vremena. Pritisnite [ ] / [ ] da biste pomjerili
kursor, a za unošenje vremena koristite numeričke tipke. Pritisnite [ ENTER ] i TV uređaj će
započeti reprodukciju od vremena koje je postavljeno.
Odnos širina/visina
Markirajte tipku i pritisnite [ ENTER ] da biste izabrali režim prikaza.
Reprodukuj i Pauza
Zaustavi
Preskoči Sljedeće
Brzo premotavanje
unaprijed
Informacije
Preskoči prethodno
Brzo premotavanje unazad
Idi na Vrijeme Odnos širina/visina
Reprodukuj Režim
Kontrolna traka za filmove
Page 70

70
BiH/CG
Reprodukcija muzike
KONTROLNA TRAKA ZA MUZIKU
Reprodukcija i Pauza/Zaustavi/Prethodno/Sljedeće
Pritisnite [/
] za reprodukovanje ili pauziranje; pritisnite [ ] za zaustavljanje
reprodukcije; pritisnite [
] / [ ] za reprodukciju prethodne ili sledeće muzike. Možete
pritisnuti i [ ] / [ ] da biste markirali odgovarajuću ikonicu na kontrolnoj traci, a zatim
pritisnuti [ ENTER ], TV će reagovati u skladu s tim.
Brzo premotavanje unaprijed/Brzo premotavanje unazad
Pritisnite i držite [
] / [ ] ] nekoliko sekundi da biste došli do dijela do kog želite, a zatim
pritisnit [/
] na daljinskom upravljaču da biste započeli s reprodukcijom s nove pozicije.
Režim reprodukcije
Markirajte ikonicu i pritisnite [ ENTER ] da biste prebacili u drugi režim reprodukcije.
Informacije
Markirajte odgovarajuću ikonicu i pritisnite [ ENTER ] da biste provjerili informacije o
reprodukciji muzike.
Pritisnite [ INFO ] / [ ] ] za prikaz / izlaz iz trake sa menijima. Pritisnite tipke za upravljanje
USB-om na daljinskom upravljaču kako biste obavili relevantne operacije.
Reprodukcija
Zaustavi
Preskoči Sljedeće
Brzo premotavanje unaprijed
Informacije
Preskoči Prethodno
Brzo premotavanje unazad
Režim reprodukcije
Page 71

71
BiH/CG
Pregledač fotografija
KONTROLNA TRAKA ZA FOTOGRAFIJE
Reprodukcija & Pauza/Zaustavi/Prethodno/Sljedeće
Pritisnite [/
] za reprodukciju ili pauziranje; pritisnite [ ] za zaustavljanje reprodukcije;
pritisnite [
] / [ ] za reprodukciju prethodne ili sledeće slike. Možete pritisnuti i [ ] / [ ]
da biste markirali odgovarajuću ikonicu na kontrolnoj traci, a zatim pritisnuti [ ENTER ], TV će
reagovati u skladu s tim.
Režim reprodukcije
Markirajte ikonicu i pritisnite [ ENTER ] da biste prebacili u drugi režim reprodukcije.
Rotiraj
Markirajte odgovarajuću ikonu na kontrolnoj traci menija i pritisnite [ ENTER ] da biste rotirali
sliku 90 stepeni u smjeru kazaljke na satu ili suprotnom.
Info.
Markirajte odgovarajuću tipku i pritisnite [ ENTER ] da biste provjerili informacije o fotografiji
koja se reprodukuje.
Povećavanje/Smanjivanje
Markirajte odgovarajuću ikonicu na kontrolnoj traci i pritisnite [ ENTER ] za povećavanje i
smanjivanje slike.
Premjesti prikaz
Koristite ovu funkciju kada je slika uvećana za praktičnu provjeru. Markirajte ikonu, pritisnite
tipku [ ENTER ], zatim pritisnite tipku lijevo/desno/gore/dolje da biste pomjerili sliku.
Napomena:
Premjesti prikaz (
) je dostupno samo kada je slika uvećana.
Pritisnite [ INFO ] / [ ] za prikaz izlaz iz trake sa menijima. Pritisnite tipke za upravljanje USB-
om na daljinskom upravljaču kako biste obavili relevantne operacije.
Reprodukcija i Pauza
Zaustavi
Preskoči Sljedeće
Rotiraj u smjeru kazaljke na satu
Rotate CCW
Informacije
Preskoči Prethodno
Povećaj
Premjesti prikaz
Smanji
Režim reprodukcije
Rotiraj u smjeru suprotnom od
smjera kazaljki na satu
Page 72

72
BiH/CG
RJEŠAVANJE PROBLEMA
Prije nego što pozovete tehničara pogledajte naredne informacije o mogućim uzrocima i
rješenjima problema koji imate.
NEMA SLIKE, NEMA ZVUKA
1. Provijerite da li radi osigurač ili sklopka.
2. Uključite neki drugi električni uređaj u
utičnicu kako biste se uverili da utičnica
radi i da je pod naponom.
3. Loš kontakt utikača sa utičnicom.
4. Provijerite izvor signala.
NEMA BOJA
1. Promenite sistem boja.
2. Podesite zasićenost.
3. Provijerite situaciju na nekom drugom
kanalu. Možda primate crno-beli program.
DALJINSKI UPRAVLJAČ NE RADI
1. Zamjenite baterije.
2. Baterije nisu postavljene na odgovarajući
način.
3. Uređaj nije povezan na napajanje.
NEMA SLIKE, NORMALAN ZVUK
1. Podesite osvetljenost i kontrast.
2. Možda je došlo do prekida u emitovanju
programa.
NORMALNA SLIKA, NEMA ZVUKA
1. Pritisnite taster za pojačavanje zvuka kako
biste povećali jačinu zvuka.
2. Zvuk je isključen. Da ponovo uključite
zvuk, pritisnite ISKLJUČIVANJE ZVUKA
(MUTE).
3. Promijenite sistem zvuka.
4. Možda je došlo do prekida u emitovanju
programa.
EFEKAT NEUREĐENIH TALASA NA SLICI
Obično je izazvan lokalnim ometanjima čiji
su izvor automobili, dnevne lampe i fenovi
za kosu. Podesite antenu tako da ometanja
svedete na minimum.
PRAZAN EKRAN U PC REŽIMU
(samo kod modela sa priključcima za PC)
Postoji mogućnost da TV uređaj ne može da
prepozna rezoluciju podešenu na PC uređaju.
Preporučuje se odabir idealne rezolucije ili
drugih rezolucija standardnih za Windows
sistem. Podesite brzinu osvežavanja na 60Hz.
SLIKA SA SNEGOM I OMETANJIMA
Ukoliko se antena nalazi u graničnom dometu
televizijskog signala u kome je signal slab,
sliku može pokvariti pojava tačkica. Ukoliko je
signal izuzetno slab, može se javiti potreba za
instaliranjem specijalne antene za popravljanje
prijema.
1. Podesite poziciju i orijentaciju sobne/
spoljne antene.
2. Provijerite da li je antena povezana.
3. Podesite kanal pomoću opcije fino
podešavanje.
4. Prebacite na neki drugi kanal. Možda je
došlo do prekida u emitovanju programa.
UKLJUČIVANJE DRUGIH UREĐAJA
Javljaju se crne tačkice ili horizontalne linije, ili
slika treperi ili klizi. Ovo obično nastaje uslijed
ometanja koja izazivaju sistemi za startovanje
automobila, uključivanje neonske lampe,
električne bušilice, ili drugih električnih uređaja.
DUPLA SLIKA
Dupla slika nastaje kada televizijski signal
prati dvije putanje. Jedna predstavlja direktnu
putanju, dok se druga odbija od visokih
zgrada, brda ili drugih predmeta. Promena
orijentacije ili pozicije antene može da popravi
prijem signala.
OMETANJA KOJA IZAZIVAJU RADIO
FREKVENCIJE
Ova ometanja za rezultat imaju talase ili
dijagonalne linije koje se kreću po slici, a,
u određenim slučajevima, čak i gubitak
kontrasta na slici. Pronađite i uklonite izvor
ovog tipa ometanja.
Napomena:
Ukoliko se problem nastavi nakon što
primenite sva prikazana rešenja, kontaktirajte
svoj lokalni centar za podršku.
Page 73

73
BiH/CG
SPECIFIKACIJE
Radni napon 81cm
Rezolucija 1366x768
Procijenjena potrošnja 60W
Dimenzije (Š x V x D) sa stalkom: 733.4 X 480 X 167.7mm
Dimenzije (Š x V x D) bez stalka: 733.4 X 438.5 X 85.1mm
Neto težina sa stalkom: 4.0kg
Neto težina bez stalka: 3.9kg
Okoliš
(samo za tropsku klimatsku zonu):
Radna temperatura: 5°C~45°C
Vlažnost vazduha prilikom rada: 20 %~80 %
Temperatura skladištenja: -15°C~50°C
Vlažnost vazduha prilikom skladištenja: 10 %~90 %
Okoliš
(samo za umjerene klimatske zone):
Radna temperatura: 5°C~35°C
Vlažnost vazduha pri radu: 20 %~80 %
Temperatura skladištenja: -15°C~45°C
Vlažnost vazduha prilikom skladištenja: 10 %~90 %
DODACI
Br. Naziv Količina
1 Daljinski upravljač 1
2 Baterija 2
3 Postolje 2
4 Vijak 2
5 Kabel za struju AC 1
6 Uputstva za upotrebu 1
7 Montaža postolja 1
8 Garantni list 1
Napomena: Kod nekih modela kabel za struju je možda već spojen s televizorom
i ne može se ukloniti.
Page 74

74
BiH/CG
LICENCA
Proizvedeno po licenci Dolby Laboratories.
Dolby, Dolby Audio i simbol duplo D su zaštitni znaci Dolby
Laboratories.
HDMI i HDMI High-Definition Multimedia Interface i logo DHMI
su zaštitni znaci ili registrovani zaštitni znaci HDMI licensing LLC u
Sjedinjenim Američkim Državama i drugim zemljama.
Page 75

75
HR
Napomena
1. Grafički prikazi i podaci u okviru ovih uputa služe samo kao ilustracija.
2. Ekranski prikaz (OSD) na Vašem TV uređaju može se razlikovati od prikazanog u okviru ovih
uputa.
3. Podaci navedeni u ovom dokumentu podliježu promjeni bez prethodne obavijesti. Proizvođač
ne prihvaća odgovornost za oštećenja nastala kao posredni ili neposredni rezultat pogrešnih ili
nepotpunih informacija ili neusuglašenosti između korisničkih uputa i opisanog proizvoda.
4. Može se dogoditi da ćete u suhom okolišu zbog statičkog elektriciteta morati ponovno
pokrenuti proizvod i vratiti ga na glavno OSD sučelje, sučelje USB reproduktora ili prethodni
način izvora, nakon toga možete upotrebljavati TV prema svom nahođenju.
SADRŽINA
UPOZORENJA I MJERE OPREZA . . . . . . . . . . . . . . . . . . . . . . . . . . . . . . . . . . 76
TIPKE. . . . . . . . . . . . . . . . . . . . . . . . . . . . . . . . . . . . . . . . . . . . . . . . . . . . . . . . . . . . 82
PRIKLJUČCI. . . . . . . . . . . . . . . . . . . . . . . . . . . . . . . . . . . . . . . . . . . . . . . . . . . . . . 82
FUNKCIJE DALJINSKOG UPRAVLJAČA . . . . . . . . . . . . . . . . . . . . . . . . . . . . 83
SNIMAČ (REC) . . . . . . . . . . . . . . . . . . . . . . . . . . . . . . . . . . . . . . . . . . . . . . . . . . . 86
ELEKTRONSKI PROGRAMSKI VODIČ (EPG). . . . . . . . . . . . . . . . . . . . . . . . . 87
POSTAVKE IZBORNIKA . . . . . . . . . . . . . . . . . . . . . . . . . . . . . . . . . . . . . . . . . . . 88
Funkcioniranje izbornika (DTV Mode) . . . . . . . . . . . . . . . . . . . . . . . . . . . . 88
Slika . . . . . . . . . . . . . . . . . . . . . . . . . . . . . . . . . . . . . . . . . . . . . . . . . . . . . . . . . . 88
Zvuk . . . . . . . . . . . . . . . . . . . . . . . . . . . . . . . . . . . . . . . . . . . . . . . . . . . . . . . . . . 88
Kanal . . . . . . . . . . . . . . . . . . . . . . . . . . . . . . . . . . . . . . . . . . . . . . . . . . . . . . . . . 88
Opcije . . . . . . . . . . . . . . . . . . . . . . . . . . . . . . . . . . . . . . . . . . . . . . . . . . . . . . . . 90
Zaključavanje. . . . . . . . . . . . . . . . . . . . . . . . . . . . . . . . . . . . . . . . . . . . . . . . . . 91
UPRAVLJANJE USB-OM . . . . . . . . . . . . . . . . . . . . . . . . . . . . . . . . . . . . . . . . . . 92
USB izbornik. . . . . . . . . . . . . . . . . . . . . . . . . . . . . . . . . . . . . . . . . . . . . . . . . . . 92
Podsjetnik pri uporabi USB reproduktora . . . . . . . . . . . . . . . . . . . . . . . . 92
Reprodukcija filmova. . . . . . . . . . . . . . . . . . . . . . . . . . . . . . . . . . . . . . . . . . . 93
Reprodukcija glazbe . . . . . . . . . . . . . . . . . . . . . . . . . . . . . . . . . . . . . . . . . . . 94
Pregledavanje slika. . . . . . . . . . . . . . . . . . . . . . . . . . . . . . . . . . . . . . . . . . . . . 95
OTKLANJANJE POTEŠKOĆA . . . . . . . . . . . . . . . . . . . . . . . . . . . . . . . . . . . . . 96
SPECIFIKACIJE. . . . . . . . . . . . . . . . . . . . . . . . . . . . . . . . . . . . . . . . . . . . . . . . . . . 97
LICENCA . . . . . . . . . . . . . . . . . . . . . . . . . . . . . . . . . . . . . . . . . . . . . . . . . . . . . . . . 98
Page 76

76
HR
UPOZORENJA I MJERE OPREZA
Prije uporabe uređaja u cijelosti pročitajte ove upute. Čuvajte ove upute i za kasniju uporabu.
• Pročitajte ove upute - Sve upute o sigurnosti i uporabi treba pročitati prije nego što koristite
ovaj proizvod.
• Čuvajte ove upute - Upute za sigurnost i uporabu morate čuvati za buduće potrebe.
• Obratite pažnju na sva upozorenja - Morate se pridržavati svih upozorenja i uputa za ovaj
uređaj.
• Slijedite sve upute - Morate slijediti sve upute za uporabu i korištenje.
• Uređaj nemojte koristiti u blizini vode - Uređaj se ne smije koristiti u blizini vode ili na
vlažnom mjestu - primjerice, u vlažnom podrumu ili blizu bazena i slično.
• Uređaj čistite samo suhom krpom.
• Nemojte blokirati ventilacijske otvore. Uređaj instalirajte u skladu s uputama proizvođača.
• Uređaj nemojte postavljati u blizini izvora topline, poput radijatora, grijalica, peći i ostalih
uređaja (uključujući i pojačala) koji stvaraju toplinu.
• Nemojte onesposobiti sigurnosnu namjenu polariteta ili utikača za uzemljenje. Polarizirani
utikač ima dva kontakta, od kojih je jedan širi od drugoga. Utikač za uzemljenje ima dva
radna kontakta i treći kontakt za uzemljenje. Širi ili treći kontakt predviđen je za vašu
sigurnost. Ako utikač ne odgovara vašoj utičnici, obratite se električaru radi zamjene
zastarjele utičnice.
• Zaštitite mrežni kabel kako se po njemu ne bi gazilo, odnosno da ne bi dolazilo do
probadanja kabela, posebno pri utikaču i na mjestu gdje on izlazi iz uređaja.
• Koristite isključivo one kabele / dodatnu opremu koju preporučuje ili dostavlja proizvođač.
• Koristite samo kolica, stalke, stative, nosače ili stolove koje preporučuje proizvođač
ili koji se prodaju uz uređaj. Kada koristite kolica, pazite tijekom premještanja kolica,
odnosno uređaja kako biste izbjegli ozljede u slučaju da se kolica prevrnu.
• Isključite uređaj tijekom olujnog nevremena ili ako ga nećete upotrebljavati dulje vrijeme.
Svaki popravak trebaju obaviti ovlašteni serviseri. Servis je potreban kada je uređaj na bilo
koji način
• oštećen, primjerice u slučaju oštećenja kabela za napajanje ili utikača, ako se prolije bilo
kakva tekućina ili ako na uređaj padnu bilo kakvi predmeti te ako je uređaj izložen kiši ili vlazi,
ako ne radi ispravno ili ako padne.
• PAŽNJA: Ove servisne upute odnose se samo na kvalificirano servisno osoblje. Kako bi se
smanjila opasnost od električnog udara, nemojte obavljati bilo kakve popravke koje nisu
navedene u uputama za uporabu, osim ako ste za to kvalificirani.
• Uređaj ne postavljajte u zatvoreni prostor poput polica za knjige ili slične komade
namještaja. Uređaj mora uvijek stajati na dobro provjetrenom mjestu. Ventilacija ne smije
biti onemogućena prekrivanjem ventilacijskih otvora predmetima poput novina, stolnjaka,
zavjesa i dr.
•
Oprez! Kako biste spriječili električni udar, zamijenite rešetku.
• Molimo da prije instalacije i upotrebe aparata obratite pažnju na informacije o električnoj
sigurnosti na dnu kućišta.
• Kako biste smanjili rizik od požara ili električnog udara, ne izlažite uređaj utjecaju kiše i vlage.
• Uređaj ne bi trebalo izlagati doticaju s bilo kakvim tekućinama. Na uređaj se ne smiju stavljati
predmeti ispunjeni tekućinama, poput vaza i sličnog.
Značajne sigurnosne instrukcije
Page 77

77
HR
• Priključci označeni simbolom “ ” mogu imati dovoljno visok napon da predstavljaju rizik
od električnog udara. Instalaciju vanjskog ožičenja povezanog na ovakve priključke treba
prepustiti stručnoj osobi ili treba koristiti već gotove vodove ili kabele.
• Kako bi se spriječilo povrjeđivanje, uređaj treba na siguran način pričvrstiti na zid / pod u
skladu s uputama za postavljanje.
• Opasnost od eksplozije ako baterija nije zamijenjena na odgovarajući način. Baterije
zamijenite isključivo istim ili odgovarajućim tipovima baterija.
• Bateriju (jednu ili više baterija ili baterijski paket) ne treba izlagati pretjerano visokim
temperaturama koje stvaraju sunčeve zrake, vatra i slično.
• Previsok zvučni pritisak sa slušalica može dovesti do gubitka sluha. Glasno slušanje glazbe
tijekom dužih razdoblja može oštetiti sluh. Kako biste umanjili rizik od oštećenja sluha,
smanjite jačinu zvuka na sigurnu, ugodnu razinu i smanjite razdoblja provedena u slušanju
glasne glazbe. (Samo za Njemačku).
• Ako se za isključivanje uređaja koriste mrežni utikač ili utičnica, trebaju biti lako dostupni.
• Ako ne koristite uređaj, odnosno tijekom njegova prenošenja, vodite računa o kabelima,
npr. povežite ih vezicama za kabele ili nečim sličnim. Obratite pažnju kako ne biste došli u
dodir s oštrim rubovima ili nečim sličnim što bi moglo izazvati oštećenje kabela. Tijekom
ponovne uporabe provjerite jesu li kabeli oštećeni. Ako primijetite bilo kakva oštećenja,
pozovite servisera kako bi zamijenio oštećene kabele kabelima koje proizvođač preporučuje
u specifikaciji ili nekim drugim koji imaju iste značajke kao i originalni.
• Pri odlaganju baterija treba obratiti pažnju na zaštitu životnog okoliša.
• Uređaju ne treba pristupati s otvorenim plamenom, npr. upaljenom svijećom. Kako biste
spriječili širenje požara, uvijek držite svijeće ili druge izvore vatre dalje od ovog proizvoda.
• Ako se na naljepnici oznake ocjenjivanja nalazi simbol
i kabel za napajanje ima dva
jezička, to znači da je riječ o uređaju II. klase, odnosno dvostruko izoliranom električnom
uređaju. Projektiran je tako da ne zahtijeva sigurnosne veze s uzemljenjem.
Page 78

78
HR
UPOZORENJE
Bateriju ne smijete progutati jer postoji opasnost od kemijskih opeklina.
(Daljinski upravljač isporučen s) ovim proizvodom sadrži baterije u obliku kovanica. Ako
progutate bateriju u obliku kovanice, to može prouzrokovati
unutarnje opekline koje u roku od samo dva sata mogu prouzrokovati smrt.
Nove i korištene baterije držite podalje od djece. Ako se pretinac za bateriju ne zatvara
čvrsto, prestanite koristiti proizvod i držite ga
podalje od djece.
Ako mislite da su baterije progutane ili
gurnute u bilo koji dio tijela, molimo vas da odmah potražite liječničku pomoć.
Upozorenje za uređaje koji sadržavaju baterije u obliku kovanice
(Donje upute su namijenjene samo uređajima koje sadržavaju baterije u obliku kovanice koje
može zamijeniti sam korisnik.)
PAŽNJA
OPASNOST OD STRUJNOG
UDARA! NE OTVARAJTE!
• Simbol munje sa strelicom u jednakostraničnom trokutu upozorava korisnika na prisustvo
neizoliranog „opasnog napona“ u kućištu proizvoda koji može biti dovoljne jačine da
predstavlja rizik od električnog udara.
• Da biste smanjili rizik od električnog udara ne uklanjajte poklopac (ili zadnju stranu) uređaja.
Servisiranje povjerite samo obučenim serviserima.
• Uskličnik u jednakostraničnom trokutu ima za cilj da upozori korisnika na postojanje važnih
uputa za uporabu i servisiranje u literaturi koja se dobiva s uređajem.
• Preporučljivo je da se sljedeće informacije primjenjuju gdje god je to moguće:
Odnosi se na naizmjeničnu struju (AC)
Odnosi se na jednosmjernu struju (DC)
Odnosi se na opremu klase II
Odnosi se na stanje mirovanja
Odnosi se na Uključeno
Odnosi se na visok napon
Page 79

79
HR
• Postavite TV uređaj na čvrstu horizontalnu površinu poput stola ili pulta. Za protok zraka
ostavite slobodan prostor oko uređaja od najmanje 10 cm. Kako biste spriječili pojavu
neodgovarajućih i nesigurnih situacija, preko uređaja ne stavljajte nikakve predmete. Ovaj
uređaj može se upotrebljavati i u tropskim i / ili umjerenim klimatskim zonama.
• Televizor nikad ne postavljajte na nestabilnu poziciju. Televizor može pasti i prouzrokovati
ozbiljne povrede ili smrt. Mnoge povrede, naročito djece, mogu se izbjeći jednostavnim
mjerama predostrožnosti kao što su:
• Koristite ormariće ili stalke preporučene od strane proizvođača televizora.
• Koristite samo namještaj koji će sigurno držati televizor.
• Pobrinite se da televizor ne nadvisuje rub nosivog namještaja.
• Televizor ne stavljajte na visoko pokućstvo (primjerice na ormare i police s knjigama) bez
pričvršćivanja tog komada pokućstva i televizora na odgovarajući potporanj.
• Ne postavljajte televizor na tekstilne ili druge materijale koji su postavljeni između
televizora i pratećeg namještaja.
• Upoznajte djecu s opasnostima koje postoje, ako se penju na pokućstvo kako bi
dosegnuli televizor ili njegove kontrole.
Ako je vaš postojeći televizijski uređaj bio zadržan ili pomjeran, trebalo bi da primijenite gore
navedene mjere predostrožnosti (samo za TV uređaje teže od 7 kg).
Odgovarajuće odlaganje ovog proizvoda. Ovom oznakom ukazuje se na to da ovaj
proizvod u zemljama EU ne treba odlagati zajedno s ostalim otpadom iz domaćinstva. Kako
biste spriječili nastanak potencijalne opasnosti po životni okoliš ili ljudsko zdravlje prilikom
nekontroliranog odlaganja otpada, otpad odgovorno reciklirajte kako biste unaprijedili
održivu ponovnu uporabu ovog izvora materijala. Za vraćanje polovnog uređaja koristite
sustav za vraćanje i sakupljanje ili se obratite maloprodajnom prodavaču kod kojeg ste
proizvod kupili. On će se pobrinuti za recikliranje proizvoda na način koji ne šteti okolišu.
WEEE Direktiva
Postavljanje TV uređaja
Pažnja: Prikazi služe isključivo kao primjer.
Page 80

80
HR
Za vaš TV uređaj možete koristiti opcijski zidni držač. Savjetujte se s prodavateljem u vezi
zidnog držača koji je u skladu s VESA standardima koje koristi vaš model TV uređaja. Pažljivo
pričvrstite zidni držač na zadnji dio TV uređaja. Postavite držač na čvrsti zid postavljen vertikalno
u odnosu na pod. Ako želite držač pričvrstiti na druge materijale kontaktirajte kvalificirano
osoblje kako bi ga montirali. Detaljne upute su u paketu s držačem. Koristite one zidne držače
kod kojih će uređaj biti prikladno osiguran na zidu s dovoljno prostora za omogućivanje
povezivanja s vanjskim uređajima.
• Isključite struju prije pomicanja ili instaliranja TV uređaja. U suprotnom postoji opasnost od
električnog udara.
• Pomaknite stalak prije postavljanja TV uređaja na zid tako što ćete ga gurati.
• Ako postavljate TV na strop ili nagnut zid on može pasti i uzrokovati ozbiljne povrede.
Koristite autorizirani držač i kontaktirajte lokalnog prodavatelja ili kvalificirano osoblje. U
suprotnom jamstvo neće vrijediti.
• Nemojte pretjerano pričvršćivati vijke jer to može oštetiti TV uređaj i poništiti jamstvo.
• Kako biste spriječili povrede, ovaj uređaj mora biti sigurno pričvršćen za pod/zid u skladu s
uputama za postavljanje.
• Koristite vijke i zidne nosilice koje odgovaraju navedenim specifikacijama. Jamstvo
ne pokriva štete ili povrede prouzrokovane pogrešnom uporabom ili korištenjem
neodgovarajućeg pribora.
Napomena:
1) Prikazi služe isključivo kao primjer.
2) Za postavljanje TV uređaja s terminalima okrenutim ka zidu potreban je i gumeni jastuk
uz vijak prilikom fiksiranja postolja na zidu kako bi se osiguralo dovoljno prostora za uporabu
terminala. To je mali šupalj stup čiji je unutrašnji promjer 8 mm, vanjski 18 mm, a visina 30 mm.
Postavljanje na zid
PAŽNJA
Veličina modela: 32’’ Gore Dolje
Vijak
Promjer (mm) "E" M4 M4
Dubina (mm)
“D”
Max 9 9
Min 6 6
Količina 2 2
VESA (AxBxC) 100x100x100
Page 81

81
HR
• Uređaj ne postavljajte u zatvoreni prostor poput polica za knjige ili sličnih komada
namještaja. Ne koristite uređaj blizu vlažnih i hladnih područja. Zaštitite uređaj od
pregrijavanja. Ne izlažite ga izravnom utjecaju sunca.
• Ne koristite uređaj u okruženju koje sadrži prašinu.
• Kako zapaljivi strani materijal ne bi dospio u TV uređaj, ne stavljajte svijeće u pristupačne,
otvorene dijelove.
• Koristite daljinski upravljač tako da ga usmjerite prema senzoru za daljinski upravljač.
Predmeti koji se nađu između daljinskog upravljača i senzora ometat će normalan rad.
• Ne dopustite da daljinski upravljač bude izložen snažnim vibracijama. Osim toga, ne
polijevajte daljinski upravljač i ne ostavljajte ga na mjestima izloženima velikoj vlazi.
• Ne izlažite daljinski upravljač izravnom utjecaju sunca, koje može uzrokovati njegovo
deformiranje uslijed visokih temperatura.
• Ako je senzor daljinskog upravljača izravno izložen zrakama sunca ili intenzivnoj svjetlosti,
daljinski upravljač neće funkcionirati. Ako je o tome riječ, promijenite pravac svjetlosti ili
poziciju TV uređaja ili približite daljinski upravljač senzoru.
Neadekvatna uporaba baterija dovest će do njihova curenja. Pratite sljedeće korake i pažljivo
rukujte njima.
1. Obratite pažnju na polaritet baterija kako biste izbjegli kratak spoj.
2. Ukoliko su baterije oslabljene, što utječe na domet daljinskog upravljača, trebalo bi ih
zamijeniti novim baterijama. Uklonite baterije iz daljinskog upravljača ako ga ne planirate
koristiti tijekom dužeg razdoblja.
3. Ne upotrebljavajte različite tipove baterija (primjerice, manganske i alkalne baterije)
istovremeno.
4. Ne stavljajte baterije u vatru. Ne punite, odnosno ne rasklapajte baterije.
5. Odlažite baterije u skladu s važećim propisima o zaštiti životnog okoliša.
6. UPOZORENJE: Bateriju (jednu ili više baterija ili baterijski paket) ne treba izlagati pretjerano
visokim temperaturama koje stvaraju sunčeve zrake, vatra i slično.
Postavite dvije AAA baterije u ležište za baterije daljinskog upravljača, vodeći računa o
polaritetu unutar ležišta.
Radno okruženje
Mjere opreza prilikom uporabe daljinskog upravljača
Mjere opreza tijekom uporabe baterije
Zamjena baterija daljinskog upravljača
Page 82

82
HR
TIPKE
Napomena: Slika služi samo kao prikaz.
Prekidač
Pogled odozdo
PRIKLJUČCI
Napomena: Molimo izaberite priključke u skladu s vašim TV uređajem.
Pritisnite tipku u sredini:
1. U stanju pripravnosti pritisak na tipku uključuje televizor;
2. Ako nema OSD (On Screen Display) izbornika, kratkim pritiskom otvara se osnovni izbornik;
duži pritisak će TV staviti u način pripravnosti;
3. U slučaju postojanja OSD izbornika, kratkim pritiskom potvrđujete izbor; dužim pritiskom
vraćate se ili izlazite iz izbornika / podizbornika.
Lijevi dio tipke: smanjenje zvuka ili pomicanje ulijevo.
Desni dio tipke: povećanje zvuka ili pomicanje udesno.
Gornji dio tipke: mijenjanje kanala ili pomicanje prema gore.
Donji dio tipke: mijenjanje kanala ili pomicanje prema dolje.
Prekidač
1 Video i audio L/D
Povezivanje videa i audia s izvorom signala kakav
je DVD.
2 HDMI1/MHL I HDMI2
Povezivanje ulaza za videosignal s izvorom signala
kakav je DVD. HDMI1 podržava funkciju MHL.
3 DIGITALNI AUDIO
Povežite SPDIF kabl na TV izlaz za signal zvuka na
kompatibilni prijemnik zvuka.
4 SLUŠALICE
Audioizlaz. Kada su priključene slušalice, zvučnici
neće emitirati zvuk.
5 USB USB priključak.
6 LNB/AIR/KABL
Spojite koaksijalni kabel za primanje signala s
antene, kabelske televizije ili satelita.
7 USLUGE
Uklanjanje pogrešaka na sučelju radi samo
profesionalno osoblje.
8 CI Ulaz za karticu CI.
Page 83

83
HR
FUNKCIJE DALJINSKOG UPRAVLJAČA
Daljinski upravljač
1. POWER (UKLJUČI/ISKLJUČI) ( ) Pritisnite
Pritisnite za uključivanje TV-a ili za stanje
pripravnosti.
2. ISKLJUČIVANJE ZVUKA (
) Pritisnite za
isključivanje zvuka ili za vraćanje na prethodnu
jačinu.
3. PICTURE (SLIKA) Promjena načina slike.
4. SOUND (ZVUK) Promjena načina zvuka.
5. Zoom (Zumiranje) Za promjenu formata slike.
6. Numeričke tipke Za izravno biranje programa.
7. CHN LIST (LISTA KANALA) Pritisnite za listu
kanala.
8. RETURN (POVRATAK) Pritisnite za povratak na
prethodni kanal.
9. MENU (IZBORNIK) Za ulazak u opcija
izbornika.
10. IZVOR (SOURCE) Za biranje načina izvora
ulaznog načina rada.
11. Gore/Dolje/Lijevo/Desno ( // /)
Za kretanje po izborniku.
12. ENTER (UNOS) Za potvrdu izbora.
13. TV/RADIO Za prebacivanje na TV ili radio.
14. EXIT (IZLAZ) Za izlazak iz izbornika u kojemu se
trenutno nalazite.
15. HOME (POČETNA STRANICA) Za ulazak
na početnu stranicu za početne i napredne
funkcije. Ako vaš TV uređaj nema opciju HOME,
ova tipka neće raditi.
16. VOL+/VOL- (Pojačavanje/smanjivanje jačine
zvuka) Za podešavanje jačine zvuka.
17. PR+/PR- (Program sljedeći / prethodni)
Za mijenjanje programa na sljedeći ili
prethodni.
18. STANJE MIROVANJA (SLEEP) Odabir stanja
mirovanja (za na primjer 10 min, 20 min, itd.).
Page 84

84
HR
19. EPG (ELEKTRONSKI PROGRAMSKI VODIČ)
Pritisnite za prikaz trenutačnih EPG informacija u
DTV načinu rada.
20. PODNAPISI (SUBTITLE) Za uključivanje/
isključivanje podnapisa u DTV/USB načinu.
21. FAV (Omiljeni kanali) Pritisnite za prikaz omiljenih
programa koje ste označili. Pritisnite tipke gore /
dolje za kretanje svojim omiljenim kanalima i tipku
ENTER za potvrdu.
22. Snimanje (REC) Pritisnite kako biste snimili
program koji se trenutačno emitira (dostupno
samo u DTV režimu).
23. INFORMACIJE (INFO) Pritisnite za prikaz
informacija o trenutnom izvoru signala.
24. Kontrolne tipke za reproduciranje s USB-a
Reproduciranje i pauziranje (Play & Pause) (
)
Pritisnite kako biste pauzirali reprodukciju sadržaja.
Za nastavak reprodukcije ponovo pritisnite ovu
tipku.
Stop ( )
Pritisnite kako biste prekinuli reprodukciju.
Tipka za brzo premotavanje unazad ( )
Pritisnite kako biste brzo premotali sadržaj unazad.
Brzo premotavanje unaprijed ( )
Pritisnite kako biste brzo premotali sadržaj
unaprijed.
Prethodno ( )
Pritisnite kako biste pokrenuli reprodukciju
prethodne datoteke.
Sljedeće ( )
Pritisnite kako biste pokrenuli reprodukciju
slijedeće datoteke.
25. Obojene tipke Pritisnite kako biste brzo pristupili
određenim funkcijama u TV ili DTV načinu rada.
26. NICAM Pritisnite kako biste izabrali željeni izlaz za
zvuk u zavisnosti od kanala koji se emitira.
27. ZADRŽAVANJE (HOLD) Za zadržavanje slike na
zaslonu (nije dostupno u USB načinu).
28. LISTA SNIMLJENIH DATOTEKA Pritisnite za prikaz
liste snimljenih datoteka.
29. BRZO (QUICK) Nema funkciju.
30. 3D Nema funkciju.
31. Audio opis (AD) Pritisnite kako biste uključili audio
opis. Pripovjedač će za slijepe ili osobe s oštećenim
vidom opisivati što se događa na zaslonu. Kako
biste isključili ovu funkciju, ponovo pritisnite istu
tipku. (Na raspolaganju samo u načinu DTV).
Page 85

85
HR
KONTROLNE TIPKE ZA TELETEKST
32. TEXT Pritisnite kako biste ušli u ili izašli iz
izbornika teleteksta.
33. ZADRŽAVANJE (HOLD)
Pritisnite kako biste na zaslonu zadržali stranicu
teleteksta bez bilo kakvih ažuriranja ili promjena.
Kako bi prekinuli zadržavanje stranice, ponovo
pritisnite istu tipku.
34. Ostale tipke FORMAT (SIZE)
Za uvećanje prikaza teleteksta: Pritisnite tipku
jednom kako biste uvećali gornju polovicu
zaslona. Pritisnite istu tipku još jednom kako
biste uvećali donju polovicu zaslona. Ponovo
pritisnite tipku kako biste se vratili na normalni
format zaslona.
SKRIVENI PODACI (REVEAL)
Pritisnite ovu tipku za prikazivanje skrivenih
informacija poput rješenja za zagonetke ili
slagalice. Kako bi uklonili informacije sa zaslona,
ponovo pritisnite istu tipku.
KOMBINIRANI PRIKAZ (MIX)
Pritisnite ovu tipku kako biste preko TV
programa dobili prikaz teletekst stranice. Kako
biste se vratili u normalan teletekst način,
ponovo pritisnite ovu tipku.
PODSTRANICA (SUB-PAGE)
Pritisnite ovu tipku za uključivanje / isključivanje
podstranice (ako je dostupna). Za izbor željene
podstranice pritisnite crvenu / zelenu tipku.
INDEKS (INDEX)
Za prikaz stranice indeksa, pritisnite ovu tipku.
ODUSTANI (CANCEL)
Pritisnite ovu tipku kako biste se privremeno
vratili na prikaz TV programa dok se vrši
pretraga stranice teleteksta. Po završetku
pretrage, u gornjem lijevom kutu zaslona
pojavit će se broj stranice. Kako biste se vratili
na stranicu teleteksta, ponovo pritisnite ovu
tipku.
Page 86

86
HR
SNIMAČ (REC)
Trenutačno snimanje i reproduciranje jednim dodirom
Snimanje timerom
VAŽNE NAPOMENE:
1. Za bilo koju vrsta snimanja morate povezati vanjski uređaj na odgovarajući USB priključak
na zadnjoj strani televizora, kako bi mogli snimali.
2. USB uređaj mora biti formata FAT32.
3. Kada prvi put koristite USB uređaj za snimanje na ovom TV uređaju, predlažemo vam da ga
formatirate na TV-u prije početka snimanja.
4. Provjerite gledate li DTV program.
5. Za snimanje programa u visokoj rezoluciji (HD) koristite visokokvalitetne mobilne uređaje.
U suprotnom, tijekom reprodukcije videodatoteka može doći do zamrzavanja slike.
6. Čuvajte rezervne kopije svih podataka s USB memorijskog uređaja kako ih ne biste izgubili
uslijed neočekivanih situacija. Ne prihvaćamo nikakvu odgovornost za gubitke nastale
uslijed pogrešne uporabe ili kvarova. Korisnik je odgovoran za čuvanje rezervnih kopija
podataka.
1. Umetnite vanjski uređaj za pohranu koji podržava velike brzine prijenosa i provjerite ima li
uređaj dovoljno slobodnog prostora.
2. Izaberite TV program i kanal koji želite snimiti.
3. Pritisnite tipku REC kako biste ušli u režim snimanja i započeli snimanje. Na zaslonu će se
pojaviti traka za snimanje kao što je prikazano ispod i tu možete izabrati odgovarajuća
podešavanja.
4. Ukoliko funkcija snimanja ne radi, formatirajte vaš USB uređaj.
5. Ako želite zaustaviti snimanje, pritisnite tipku [
] i snimanje će se zaustaviti.
Postoje dva načina za podešavanje timera za snimanje televizijskog programa.
Ukoliko znate detalje programiranja:
1. Idite na kanal koji će prikazivati program koji želite snimiti.
2. Pritisnite tipku EPG na daljinskom upravljaču kako biste pristupili EPG sučelju. Na listi ispod
bit će označen program koji trenutačno pratite.
3. Pritisnite crveno dugme na daljinskom upravljaču i uđite u detalje programa u meniju za
snimanje pritiskom na
/ dkako biste izabrali stavku i / da biste promijenili
podešavanja. Na primjer, ako program počinje u 20:30 istog dana, unesite: 30 u prostor
MINUTI, 20 u prostor SATI (pojavit će se 24-časovni sat), a zatim odgovarajući datum. Na
isti način unesite vreme završetka snimanja.
Napomena: (A) Tijekom snimanja ne možete mijenjati kanale, odnosno koristiti druge funkcije.
(B) Ako je signal isprekidan ili uklonjen, snimanje će se zaustaviti dok se signal
ponovno ne uspostavi. To može uzrokovati gubitak programskog sadržaja.
Page 87

87
HR
ELEKTRONSKI PROGRAMSKI VODIČ (EPG)
EPG je skraćenica koja označava Elektronički programski vodič (Digital Electronic Program
Guide). Ovu uslugu nude distributeri televizijskog programa i ona daje informacije o
programima koji će biti emitirani. Možete mu pristupiti iz digitalnog režima pritiskom na tipku
EPG na daljinskom upravljaču.
1. Pritisnite tipku EPG kako biste pristupili EPG sučelju. U drugoj traci od vrha bit će prikazani
podaci o trenutnom datumu i vremenu. Na listi ispod bit će označen program koji
trenutačno pratite.
2. Prije nego što vidite bilo koje EPG informacije treba ‘aktivirati’ sve one kanale za koje želite
vidjeti programske informacije. Kako biste to učinili, koristite
/ tipke za biranje kanala, a
zatim pritisnite ENTER za potvrđivanje.
3. Za provjeru programa koji će se emitirati u budućnosti, idite na gore tipkom
do polja za
datum. Za izbor datuma koji želite provjeriti koristite tipku .
4. Pritisnite tipku Index (
) za pomicanje do najviše trake na zaslonu, a zatim pritisnite tipku
za odabir vremena. Druga će traka pokazivati neki od dostupnih kanala.
5. Idite na kanal i koristite
/ tipke kako biste izabrali kanal za koji želite vidjeti informacije.
Poslije kratkog vremena pojavit će se informacije o programu.
6. Koristite tipke
/ kako biste pregledali termine. Pritisnite tipku IZBORNIK (MENU) kako
biste izašli iz EPG izbornika.
Snimanje
Pritisnite CRVENU tipku za prikaz izbornika za snimanje
(desno). Pogledajte detaljne informacije o različitim
načinima snimanja s televizora na USB uređaj.
Informacije (Info)
Pritisnite ZELENU tipku za prikaz podataka o izabranom
programu.
Raspored
Pritisnite ŽUTU tipku za prikaz popisa rasporeda za
snimanje. Pritisnite
/ za izbor događaja, pritisnite
CRVENU tipku za brisanje događaja.
Podsjetnik
Za prikaz izbornika podsjetnika pritisnite PLAVU tipku.
Pritisnite
/ za izbor stavke / za promjenu
podešavanja. Pritisnite tipku ENTER kako biste dodali
podsjetnik za događaj na listu rasporeda. Prikazat će se
ažurirana lista rasporeda.
4. Koristite odgovarajući režim snimanja: jednom, svakog dana ili tjedno.
5. Pritisnite ENTER kako biste potvrdili vaš izbor. Pojavit će se raspored svih vaših snimanja
(popis snimaka). Za više podataka pogledajte funkciju EPG u rasporedu.
Ako pretražujete EPG, pratite sljedeće korake na stranici funkcije EPG.
Page 88

88
HR
POSTAVKE IZBORNIKA
Zvuk
Kanal
Slika
Funkcioniranje izbornika (DTV Mode)
Pritisnite tipku IZBORNIK (MENU) kako biste pristupili glavnom izborniku.
Pritisnite tipke [ ] / [ ] kako biste označili željenu stavku.
Pritisnite tipku UNOS (ENTER) kako biste odabrali stavku.
Pritisnite tipke [ ] / [ ]/ [] / [], i tipku ENTER za izbor podizbornika.
Pritisnite tipku IZBORNIK (MENU) kako biste izašli iz stavke.
Napomena: Neke opcije mogu biti nedostupne pod nekim izvorima.
Način prikaza slike:
Izaberite automatski način prikaza slike. Izbori su Dinamički, Standardni, Umjereni i Korisnički.
Temperatura boje:
Odaberite ukupni ton boje slike. Izbori su Hladno, Srednje, Toplo i Korisnički.
Format slike:
Izaberite format slike (proporcije zaslona) u skladu s vašim tipom videosignala ili preferencijama. Možete
izabrati između opcija: 9/4: 3 / Samo skeniraj / Zoom1 / Zoom2.
Smanjenje šuma:
Smanjuje šum na slici. Postoji mogućnost odabira isključeno / nisko / srednje / visoko.
MPEG NR
Eliminira generiranu buku uz stvaranje digitalnog signala. Možete odabrati Isključeno / Nisko / Srednje /
Visoko.
Način zvuka
Izaberite omiljeni režim zvuka za svaki ulaz. Možete odabrati Standardno / Muzika / Film / Sport / Korisnik.
Niski tonovi
Podesite niske frekvencije zvuka.
Visoki tonovi
Podesite više frekvencije zvuka.
Tonski balans
Za nadzor tonskog balansa između lijevog i desnog zvučnika.
Automatska jačina zvuka
Podešava jačinu zvuka u skladu s nivoom ulaznog zvuka. Uključuje opcije Uključeno i Isključeno.
Prostorno ozvučenje
Pomaže u stvaranju bogatijeg i šireg zvuka izvora stereozvuka.
AD prekidač (Dostupno samo u DTV načinu rada)
Uključivanjem Audioopisa možete aktivirati podešavanja jačine zvuka AD.
Ako uključite audioopis, pripovjedač će za slijepe ili osobe s oštećenim vidom opisivati što se događa na
zaslonu.
Način SPDIF (postoji mogućnost da funkcija ne postoji):
Odaberite SPDIF način: Automatski ili PCM.
Automatsko podešavanje
Izaberite DVB-T ili DVB-C i pritisnite tipku ENTER kako biste pristupili sljedećem koraku, zatim izaberite
zemlju ili vrstu skeniranja, a zatim pretražujte i automatski čuvajte programe. Ukoliko želite prekinuti
automatsku pretragu, pritisnite tipku IZBORNIK (MENU) ili tipku IZLAZ (EXIT) i pojavit će se prozor za
dijalog o napuštanju pretrage.
Page 89

89
HR
• Pritisnite kako biste potvrdili izlazak iz izbornika.
• Pritisnite kako biste nastavili s pretragom.
Napredno podešavanje
Pristupite glavnim satelitskim podešavanjima kako biste pretraživali programe preko DVB-S
izvora.
Podešavanja satelitske antene (koraci 1-3 se odnose na Sliku1)
Prije nego što započnete pretragu kanala, konfigurirajte podešavanja satelitske antene za svaki
željeni satelit.
Satelit - Za odabir satelita za ovaj TV uređaj.
LNB tip - Provjerite odgovara li tip LNB-a vašoj anteni.
LNB napajanje - Uključite ili isključite napajanje za LNB.
22 KHz - Odaberite 22 KHz kako biste podesili prekidač od 22 K na UKLJUČENO /
ISKLJUČENO. Koristite automatski režim kako biste uključili ili isključili 22 KHz, zavisno od
tipa LNB-a.
DiSEqC1.0/1.1 - Odaberite režim DiSEqC za izabrani LNB.
Slika 1
Korak 2
Korak 1
Korak 3
Korak 1: Označite Satelit i pritisnite UNOS (ENTER) kako biste pristupili listi satelita i
odabrali željeni.
Korak 2: Označite LNB tip i pritisnite UNOS (ENTER) kako biste odabrali tip LNB-a.
Korak 3: Uvjerite se da 22KHz, DiSEqC1.0/1.1 prekidač odgovara odabranom satelitu.
Nakon što izvršite prethodne korake, pritisnite plavu tipku za pretraživanje kanala.
Ručna pretraga DTV signala
Ručno pretražujte i čuvajte programe.
Kanal
Ručna pretraga DTV signala
Izaberite vrstu izvora (DVB-T ili DVB-C) i ručno pretražujte digitalne programe. U izborniku
kanala izaberite Ručno podešavanje DTV i pritisnite tipku ENTER kako biste mu pristupili.
1. Pritisnite ili kako biste odabrali broj kanala, označite Traži i nakon toga pritisnite UNOS
(ENTER) kako biste počeli s pretraživanjem.
2. 2 Pretraga se zaustavlja po nalaženju kanala i ovaj će program biti sačuvan na trenutačnoj
poziciji kanala. Ako želite zaustaviti pretragu, pritisnite tipku IZBORNIK (MENU).
Page 90

90
HR
Ručna pretraga ATV signala
Prvo izaberite vrstu izvora za ATV. Zatim u izborniku kanala izaberite Ručno podešavanje ATV i
pritisnite tipku ENTER kako biste mu pristupili.
1. Označite i pritisnite ili izaberite Sačuvati u 1 (ili možda neki drugi broj), Ozvučenje
i broj kanala. Nakon toga odaberite Traži i pritisnite UNOS (ENTER) kako biste započeli
pretragu.
• Pritisnite kako biste pokrenuli pretragu prema višoj
• Pritisnite kako biste pokrenuli pretragu prema nižoj frekvenciji.
2. Pretraga se zaustavlja po nalaženju kanala i ovaj će program biti sačuvan na trenutačnoj
poziciji kanala. Ako želite zaustaviti pretragu, pritisnite tipku IZBORNIK (MENU)
Fino podešavanje
Koristite ovu opciju kako biste obavili manje izmjene tijekom pretrage svakog zasebnog
kanala. Pri normalnim uvjetima, fino podešavanje nije neophodno. Međutim, u područjima
s lošim uvjetima emitiranja signala, u kojima su podešavanja neophodna radi poboljšanja
kvalitete slike i zvuka, koristite opciju finog podešavanja.
1. Odaberite kanal u okviru kojega želite obaviti fino podešavanje.
2. U okviru izbornika Program, odaberite Ručna pretraga ATV signala i pritisnite kako
biste označili Fino podešavanje.
3. Pritisnite ili za fino podešavanje sve dok ne dobijete najbolju moguću sliku ili zvuk.
Uređivanje programa
Za uređivanje programa. Za preskakanje, preimenovanje, brisanje ili premještanje programa
možete pritisnuti obojene tipke daljinskog upravljača, a za dodavanje listi omiljenih programa
pritisnite tipku omiljeni programi (FAV).
Informacije o signalu
Za prikaz podataka o DTV kanalu koji trenutačno pratite.
Informacije CI
Ova opcija omogućava korisniku odabir u okviru izbornika modula uvjetnog pristupa (CAM).
Odaberite CI izbornik prema izborniku PC kartice.
Napajanje antene od 5 V
Ova opcija je dostupna jedino s izvorom DVB-T signala. Kako bi omogućili napajanje TV
antene, pritisnite Uključeno. Da isključite ovu funkciju, odaberite Isključeno.
Softverska ažuriranja (OAD) (Samo za određena područja)
Odaberite Uključeno kako biste softveru sistema omogućili ažuriranje putem zraka. Ukoliko
odaberete Isključeno, isključit ćete ovu funkciju.
OAD prilagođavanje (samo za neka područja)
Ukoliko je softversko ažuriranje (OAD) isključeno, ova opcija je onemogućena. Odabir OAD
pretrage podrazumijeva pretraživanje kanala radi pronalaženja OAD podataka za ažuriranje.
LCN UKLJUČI / ISKLJUČI (samo za neka područja)
Kada podešavate programe, izaberite UKLJUČI i lista kanala raspodijelit će se prema LCN;
izaberite ISKLJUČI i lista kanala raspodijelit će se prema podrazumijevanom redoslijedu.
Opcije
OSD jezik
Odaberi OSD jezik.
Audiojezik / Jezik podnapisa (Napomena 1)
Odberite prema vašim željama.
Page 91

91
HR
TTX jezik
Odaberite jezik teleteksta za različite regije.
Vrijeme
Podešavati možete Automatsko sinkroniziranje, Sat, Vremensku zonu, Ljetno računanje
vremena, Stanje mirovanja i Automatsko mirovanje.
HDMI CEC
Pritisnite za ulaz u podizbornike.
HDMI CEC - Uključite ili isključite funkciju HDMI CEC.
Automatsko stanje pripravnosti – Uključite automatsko stanje pripravnosti na TV-u kada
isključite uređaj CEC kao što je na primjer DVD.
Spisak uređaja - Kada je funkcija HDMI CEC uključena provjerite spisak uređaja povezanih s
TV-om.
REC Sustav datoteka (Napomena 1)
Ako želite koristiti ovu funkciju, morate primati digitalni program i spojiti USB disk.
EWS Lokalni poštanski brojevi(samo za neka područja)
Sustav hitnog upozorenja, koji definira DVB opskrbljivač, neophodan je mehanizam za
distribuiranje relevantnih informacija u javnost u slučaju izvanrednih situacija.
Vraćanje tvorničkih postavki
Vraćanje na tvorničke postavke.
Ažuriranje programske opreme (USB)
Povežite USB uređaj s nadgrađenom programskom opremom kako biste nadgradili TV sustav.
Napomena:
1. Jezik zvučnog zapisa / Jezici podnapisa / Sustav snimanja radi samo u DVB-S
/DVB-C/DVB-T načinu.
2. Korisnički podaci na ovom TV uređaju bit će izgubljeni nakon vraćanja na podrazumijevanu
vrijednost (Restore Default).
3. Tijekom procesa ažuriranja softvera ne isključujte televiziju jer postoji mogućnost da TV više
neće raditi, za što će biti odgovoran korisnik.
Zaključavanje
Sustav zaključavanja
Unesite početnu zaporku (0000) kako biste pristupili funkciji. Izaberite „Uključeno“ i aktivirat
će se sljedeće funkcije „Postavi zaporku“, „Blokiraj kanal“, „Roditeljski nadzor“ i „Zaključavanje
panela“; odaberite „Isključeno“ i sve tri navedene funkcije bit će deaktivirane. Ukoliko
zaboravite zaporku, pokušajte pristupiti glavnom zaporkom 8899.
Postavljanje zaporke
Resetiranje zaporke.
Blokiranje kanala
Odberite blokirane kanale prema vašim željama.
Roditeljski nadzor
Odaberite kanale koje mogu gledati i djeca.
Hotelski režim (samo u nekim područjima).
Samo za uporabu u hotelima.
Page 92

92
HR
UPRAVLJANJE USB-OM
USB izbornik
Pritisnite izbornik Izvora i odaberite tipku USB kako bi sa svog USB uređaja za pohranjivanje
mogli reproducirati filmove, glazbu i datoteke fotografija.
1. Povežite USB uređaj na USB ulazni priključak i izaberite vrstu medija na početnoj stranici:
FILM, GLAZBA i FOTOGRAFIJE
2. Pritisnite tipku [ ENTER ] i na zaslonu će se pojaviti spojeni USB uređaj, pritisnite tipku
[ENTER ] ponovo za prikaz liste mapa i datoteka.
3. Pritisnite [] / [] ili [] / [] kako biste izabrali mapu, zatim [ ENTER ] kako biste je
otvorili i izabrali datoteke, pa ponovo [ ENTER ] kako biste ih označili. Markirajte onu koju
želite prvu reproducirati, pritisnite [/
] kako bi reprodukcija odmah počela.
4. Pritisnite [
] za prekid reprodukcije i vraćanje na mapu.
5. Pritiskujte kontinuirano tipku [RETURN] kako biste se vratili na prethodnu mapu.
6. Ponovite za izbor i reprodukciju sljedeće vrste medija.
Podsjetnik pri uporabi USB reproduktora
1. Neki USB memorijski uređaji u određenoj mjeri mogu biti nekompatibilni s ovim TV
uređajem.
2. Čuvajte rezervne kopije svih podataka s USB memorijskog uređaja kako ih ne biste izgubili
uslijed neočekivanih situacija. Ne prihvaćamo nikakvu odgovornost za gubitke nastale
uslijed pogrešne uporabe ili kvarova. Korisnik je odgovoran za čuvanje rezervnih kopija
podataka.
3. Učitavanje velikih datoteka može trajati određeno vrijeme.
4. Brzina prepoznavanja USB memorijskog uređaja može zavisiti od individualnog uređaja.
5. Prilikom povezivanja ili uklanjanja USB memorijskog uređaja provjerite je li TV uređaj u USB
načinu rada. U suprotnom, može doći do oštećenja USB memorijskog uređaja ili datoteka
koje se na njemu nalaze.
6. Koristite isključivo USB memorijske uređaje formatirane u FAT16, FAT32, NTFS sustavima
datoteka ako koristite Windowsov operacijski sustav. Ako je memorijski uređaj formatiran
u nekom drugom sustavu datoteka, koji Windows ne podržava, postoji mogućnost da ne
bude prepoznat.
7. Prilikom korištenja vanjskog tvrdog diska za čiji je rad potrebno napajanje strujom,
provjerite je li za uređaj potrebno više od 500 mA. Ako je za vanjski tvrdi disk potrebno više
od 500 mA, TV će biti u stanju pripravnosti. Izvucite eksterni tvrdi disk i resetirajte TV.
8. Na ekranu će se pojaviti poruka „Nepodržana datoteka” ukoliko format datoteke nije
podržan ili ukoliko je datoteka oštećena.
9. Za obradu velikih slika potpune visoke definicije (FHD) potrebno je više vremena, na što TV
uređaj nema nikakav utjecaj. Molimo Vas za strpljenje.
10. Postoji mogućnost da ovaj TV uređaj ne podržava određene multimedijske datoteke koje
su izmijenjene i nadgrađene na način koji podrazumijeva promjenu kodiranog formata ili
druga tehnološka unapređenja.
Page 93

93
HR
Reprodukcija filmova
Pritisnite [ INFO ] / [ ] za prikaz / izlaz iz trake s izbornicima. Pritisnite tipke za upravljanje
USB-om na daljinskom upravljaču kako biste obavili relevantne operacije.
Reprodukcija & Pauza / Zaustavi / Pret. / Sljedeće
Pritisnite [/
] za početak reprodukcije ili pauziranje; pritisnite [ ] za prestanak reprodukcije;
pritisnite [
] / [ ] ] za reprodukciju prethodne ili sljedeće videodatoteke. Možete također
pritisnuti [ ] / [ ] za označavanje jedne od četiri ikonice, a zatim pritisnite [ ENTER ], TV će
reagirati u skladu s tim.
Brzo premotavanje unaprijed / unazad
Pritisnite i držite [
] / [ ] ] ] nekoliko sekundi kako biste došli do dijela reprodukcije do kojeg
želite, a zatim pritisnite tipku [/ ] za početak reprodukcije s nove pozicije.
Način reprodukcije
Označite odgovarajuću ikonicu i pritisnite [ ENTER ] za prelazak na drugi način reprodukcije.
Informacije
Označite odgovarajuću ikonicu i pritisnite [ ENTER ] za prikaz informacija o onome što se
reproducira.
Preskoči na vrijeme
Unošenjem vremena preskočite do te određene točke. Označite odgovarajuću ikonicu i
pritisnite [ ENTER ] kako biste otvorili Unos pretrage vremena. Pritisnite [ ] / [ ] kako biste
pomaknuli kursor, a za unošenje vremena koristite tipke s brojevima. Pritisnite [ ENTER ] i TV
uređaj započet će reprodukciju od vremena koje je postavljeno.
Format slike
Označite tipku i pritisnite [ ENTER ] kako biste izabrali način prikaza.
Kontrolna traka za filmove
Stop
Preskoči slijedeće
Informacije
Preskoči prethodno
Brzo premotavanje unazad
Preskoči na vrijeme Format slike
Način reprodukcije
Reproduciranje i pauziranje
Brzo premotavanje
prema naprijed
Page 94

94
HR
Reprodukcija glazbe
KONTROLNA TRAKA ZA GLAZBU
Reprodukcija i Pauza / Zaustavi / Prethodno / Sljedeće
Pritisnite [/
] za reproduciranje ili pauziranje; pritisnite [ ]za zaustavljanje reprodukcije;
pritisnite [
] / [ ] za reprodukciju prethodne ili sljedeće glazbe. Možete pritisnuti i [ ] /
[ ] kako biste označili odgovarajuću ikonicu na nadzornoj traci, a zatim pritisnuti [ENTER],
TV će reagirati u skladu s tim.
Brzo premotavanje unazad / unaprijed
Pritisnite i držite [
] / [ ] ] nekoliko sekundi kako biste došli do dijela do kojeg želite, a zatim
pritisnite [/
] na daljinskom upravljaču kako biste započeli s reprodukcijom s nove pozicije.
Način reprodukcije
Označite ikonicu i pritisnite [ ENTER ] kako biste prebacili u drugi način reprodukcije.
Informacije
Markirajte odgovarajuću ikonicu i pritisnite [ ENTER ] kako biste provjerili informacije o
reprodukciji glazbe.
Pritisnite [ INFO ] / [ ] ] za prikaz / izlaz iz trake s izbornicima. Pritisnite tipke za upravljanje
USB-om na daljinskom upravljaču kako biste obavili relevantne operacije.
Brzo premotavanje
prema naprijed
Brzo premotavanje unazad
Preskoči slijedeće
Preskoči prethodno Stop Informacije
Način reprodukcije
Reproduciranje i
pauziranje
Page 95

95
HR
Pregledavanje slika
KONTROLNA TRAKA ZA FOTOGRAFIJE
Reprodukcija i Pauza / Zaustavi / Prethodno / Sljedeće
Pritisnite [/
] zza reprodukciju ili pauziranje; pritisnite [ ] za zaustavljanje reprodukcije;
pritisnite [
] / [ ] za reprodukciju prethodne ili sljedeće slike. Možete pritisnuti i[ ] / [ ]
kako biste označili odgovarajuću ikonicu na nadzornoj traci, a zatim pritisnuti [ ENTER ], TV će
reagirati u skladu s tim.
Način reprodukcije
Označite ikonicu i pritisnite [ ENTER ] kako biste prebacili u drugi način reprodukcije.
Rotiraj
Označite odgovarajuću ikonu na nadzornoj traci izbornika i pritisnite [ ENTER ] kako biste
rotirali sliku 90 stupnjeva u smjeru kazaljke na satu ili suprotnom.
Informacije
Označite odgovarajuću tipku i pritisnite [ ENTER ] kako biste provjerili informacije o fotografiji
koja se reproducira.
Približavanje slike / Udaljavanje slike
Označite odgovarajuću ikonicu na nadzornoj traci i pritisnite [ ENTER ] za povećanje i
smanjivanje slike.
Premjesti prikaz
Koristite ovu funkciju kada je slika uvećana za praktičnu provjeru. Označite ikonu, pritisnite
tipku [ ENTER ], zatim pritisnite tipku lijevo / desno / gore / dolje kako biste pomaknuli sliku.
Napomena:
Funkcija Premjesti prikaz (
) dostupna je samo kada je slika uvećana.
Pritisnite [ INFO ] / [ ] za prikaz / izlaz iz trake s izbornicima. Pritisnite tipke za upravljanje USB-
om na daljinskom upravljaču kako biste obavili relevantne operacije.
Stop
Preskoči sljedeće
Rotiraj CW
Informacije
Preskoči prethodno
Približavanje slike
Filmski pogled
Udaljavanje slike
Način reprodukcije
Rotiraj CCW
Reproduciranje i
pauziranje
Page 96

96
HR
OTKLANJANJE POTEŠKOĆA
Prije nego što pozovete tehničara, pregledajte sljedeće informacije, kako biste uočili moguće
uzroke i rješenja poteškoća koje vam se mogu dogoditi.
NEMA SLIKE, NEMA ZVUKA
1. Provjerite jesu li osigurač i prekidač
ispravni.
2. Uključite neki drugi električni uređaj u
utičnicu kako biste provjerili je li uključena
i ispravna.
3. Provjerite kontakt utikača i utičnice.
4. Provjerite izvor signala.
NEMA BOJA
1. Provjerite sustav boja.
2. Podesite zasićenje boje.
3. Pokušajte s drugim kanalom. Crno-bijeli
program može biti primljen.
DALJINSKI UPRAVLJAČ NE RADI
1. Promijenite baterije.
2. Baterije nisu pravilno umetnute.
3. Baterije nisu pravilno postavljene.
NEMA SLIKE, NORMALAN ZVUK
1. Podesite osvjetljenje i kontrast.
2. Emitiranje može biti neuspješno.
NORMALNA SLIKA, NEMA ZVUKA
1. Pritisnite tipku za pojačavanje zvuka kako
biste pojačali zvuk.
2. Zvuk je isključen, pritisnite MUTE kako
biste ga povratili.
3. Promijenite sustav zvuka.
4. Emitiranje može biti neuspješno.
VALOVI NA SLICI
Uglavnom ih izazivaju lokalne smetnje kao
što su automobili, svjetiljke ili sušila za kosu.
Podesite antenu kako biste minimalizirali
smetnje.
PRAZAN EKRAN U PC REŽIMU RADA
(samo za modele s PC terminalima)
Moguće je da TV uređaj ne prepoznaje
rezoluciju računala. Predlažemo da
promijenite na najbolju rezoluciju ili drugu
standardnu rezoluciju sustava Windows.
Podesite učestalost osvježavanja na 60 Hz.
SNJEŽNE TOČKICE I SMETNJE
Ako se antena nalazi u području u kojem
je televizijski signal slab, slika može biti
poremećena točkicama. Kada je signal
iznimno slab, može biti neophodno instalirati
specijalnu antenu kako bi se poboljšao prijam..
1. Podesite poziciju i orijentaciju unutrašnje /
vanjske antene.
2. Provjerite konekciju antene.
3. Fino podesite kanal.
4. Pokušajte s drugim kanalom. Emitiranje
može biti neuspješno.
UKLJUČIVANJE DRUGIH UREĐAJA
Pojavljuju se crne točke ili horizontalne pruge
ili slika leluja i pomiče se. Ovo je uglavnom
uzrokovano smetnjama od sustava paljenja
automobila, neonskim lampama, električnim
bušilicama ili drugim električnim uređajima.
DUH
Duhove uzrokuje televizijski signal koji ima
dva puta. Prvi je izravan put, drugi se odbija o
visoke zgrade, brda i druge predmete. Prijam
možete poboljšati mijenjanjem pravca ili
položaja antene.
SMETNJE U RADIOFREKVENCIJI
Ove smetnje uzrokuju valove ili dijagonalne
pruge i, u nekim slučajevima, gubljenje
kontrasta na slici. Otkrijte o čemu je riječ i
uklonite izvor radiointerferencije.
Napomena:
Ako se problem nastavlja nakon navedenih
rješenja, molimo, pozovite lokalni centar za
podršku.
Page 97

97
HR
SPECIFIKACIJE
Radna voltaža: 81cm
Rezolucija 1366x768
Ocijenjena potrošnja struje: 60W
Dimenzije (Š x V x D) s postoljem: 733.4 X 480 X 167.7mm
Dimenzije (Š x V x D) bez postolja: 733.4 X 438.5 X 85.1mm
Neto težina s postoljem: 4.0kg
Neto težina bez postolja: 3.9kg
Okoliš
(samo za tropska klimatska
područja):
Radna temperatura: 5°C~45°C
Radna vlažnost: 20 %~80 %
Temperatura pohrane: -15°C~50°C
Vlažnost pohrane: 10 %~90 %
Okoliš
(samo za umjerena klimatska
područja):
Radna temperatura: 5°C~35°C
Radna vlažnost: 20 %~80 %
Temperatura pohrane: -15°C~45
Vlažnost pohrane: 10 %~90 %
DODACI
Br. Naziv Količina
1 Daljinski upravljač 1
2 Baterija 2
3 Postolje 2
4 Vijak 2
5 Kabel za struju AC 1
6 Upute za uporabu 1
7 Montaža postolja 1
8 Jamstveni list 1
Napomena: kod nekih modela kabel za struju je možda već spojen s televizorom
i ne može se ukloniti.
Page 98

98
HR
LICENCA
Proizvedeno po licenciji Dolby Laboratories.
Dolby, Dolby Audio i simbol DD zaštitni su znaci Dolby Laboratories.
HDMI i HDMI High-Definition Multimedia Interface i logo DHMI
zaštitni su znaci ili registrirani zaštitni znaci HDMI licensing LLC u
Sjedinjenim Američkim Državama i drugim zemljama.
Page 99

99
МК
Напомена
1. Графичките прикази и податоците во прирачников се само за консултации.
2. Екранската слика на телевизорот може да биде малку поразлична од тоа што е
прикажано во прирачникот.
3. Информациите во овој документ се подложни на промени без претходна најава.
Производителот не прифаќа никаква одговорност за оштетувања поради директни или
индиректни грешки, нецелосност или неусогласеност помеѓу прирачникот и опишаниот
производ.
4. Во сува околина и поради статичкиот електрицитет, производот може да се престартува
и да се врати на главниот OSD-интерфејс, интерфејсот од УСБ-репродукторот
или претоходниот изворен режим. Тоа е нормално и продолжете да го користите
телевизорот како што сакате.
СОДРЖИНА
ПРЕДУПРЕДУВАЊА И МЕРКИ ЗА ПРЕТПАЗЛИВОСТ . . . . . . . . . . . . 100
КОПЧЕ. . . . . . . . . . . . . . . . . . . . . . . . . . . . . . . . . . . . . . . . . . . . . . . . . . . . . . . . . 106
ТЕРМИНАЛ . . . . . . . . . . . . . . . . . . . . . . . . . . . . . . . . . . . . . . . . . . . . . . . . . . . . 106
ФУНКЦИИ НА ДАЛЕЧИНСКИОТ УПРАВУВАЧ. . . . . . . . . . . . . . . . . . . . 107
СНИМАЧ (REC) . . . . . . . . . . . . . . . . . . . . . . . . . . . . . . . . . . . . . . . . . . . . . . . . . 110
ЕЛЕКТРОНСКИ ПРОГРАМСКИ ВОДИЧ (EPG) . . . . . . . . . . . . . . . . . . . . 111
ПОСТАВКА НА МЕНИТО. . . . . . . . . . . . . . . . . . . . . . . . . . . . . . . . . . . . . . . . 112
Работење со менито (DTV-режим) . . . . . . . . . . . . . . . . . . . . . . . . . . . . 112
Слика . . . . . . . . . . . . . . . . . . . . . . . . . . . . . . . . . . . . . . . . . . . . . . . . . . . . . . . 112
Sound (Звук) . . . . . . . . . . . . . . . . . . . . . . . . . . . . . . . . . . . . . . . . . . . . . . . . . 112
Channel (Канал) . . . . . . . . . . . . . . . . . . . . . . . . . . . . . . . . . . . . . . . . . . . . . . 112
Опција . . . . . . . . . . . . . . . . . . . . . . . . . . . . . . . . . . . . . . . . . . . . . . . . . . . . . . 114
Заклучување. . . . . . . . . . . . . . . . . . . . . . . . . . . . . . . . . . . . . . . . . . . . . . . . . 115
УСБ-КОНТРОЛА. . . . . . . . . . . . . . . . . . . . . . . . . . . . . . . . . . . . . . . . . . . . . . . . 116
УСБ-мени. . . . . . . . . . . . . . . . . . . . . . . . . . . . . . . . . . . . . . . . . . . . . . . . . . . . 116
Потсетник кога да го користите УСБ-репродукторот. . . . . . . . . . 116
Репродуцирај филм . . . . . . . . . . . . . . . . . . . . . . . . . . . . . . . . . . . . . . . . . . 117
Репродуцирај музика . . . . . . . . . . . . . . . . . . . . . . . . . . . . . . . . . . . . . . . . 118
Пребарувај фотографии . . . . . . . . . . . . . . . . . . . . . . . . . . . . . . . . . . . . . 119
РЕШАВАЊЕ ПРОБЛЕМИ . . . . . . . . . . . . . . . . . . . . . . . . . . . . . . . . . . . . . . . 120
СПЕЦИФИКАЦИИ . . . . . . . . . . . . . . . . . . . . . . . . . . . . . . . . . . . . . . . . . . . . . . 121
ЛИЦЕНЦА. . . . . . . . . . . . . . . . . . . . . . . . . . . . . . . . . . . . . . . . . . . . . . . . . . . . . . 122
Page 100

100
МК
Предупредувања и мерки за претпазливост
Прочитајте ги сите упатства пред да работите со комплетот. Чувајте ги упатствата за
подоцнежна употреба.
• Прочитајте ги овие упатства – треба да ги прочитате сите упатства за употреба и безбедност
пред да го користите производот.
• Чувајте ги упатствата – упатствата за употреба и безбедност треба да се зачуваат за идна
консултација.
• Водете сметка за сите предупредувања – треба да се почитуваат сите предупредувања за
апаратот и тие од упатството за употреба.
• Следете ги сите упатства – треба да се почитуваат сите упатства за работење и употреба.
• Не користете го апаратот блиску до вода – Уредот не треба да се користи блиску до вода
или влага – на пример во влажна визба, до базен за пливање и слично.
• Чистете само со сува крпа.
• Не блокирајте ги отворите за проветрување. Инсталирајте според упатствата на
производителот.
• Не инсталирајте во близина на извори на топлина, како што се радијатори, топлински
регистри, печки или други слични апарати (вклучувајќи засилувачи) што произведуваат
топлина.
• Не компромитирајте ја безбедносната цел на поларизираниот приклучок или на
приклучокот за заземјување. Поларизираниот приклучок има две ленти од кои едната
е поширока од другата. Приклучокот за заземјување има две ленти и трет крак за
заземјување. Широката лента или кракот за заземјување е за ваша безбедност. Доколку
доставениот приклучок не се вклопува во отворот за излез, консултирајте се со електричар
за замена на застарениот отвор за излез.
• Заштитете го струјниот кабел за да не се гази врз него или да се потфаќа во приклучоците и
на местото каде излегува од апаратот.
• Користете само прилози/галантерија наведени од производителот.
• Користете само со количка, статив, трипод, држач или маса наведена од производителот
или се продава заедно со апаратот. Кога се користи количка или решетка, внимавајте
кога ја поместувате количката или таа заедно со апаратот за да се избегнат повреди
од врвот на горниот дел.
• Исклучете го апаратот кога грми или кога не се користи долго време.
Сервисирањето на сите делови нека го врши квалификуван персонал. Сервисирањето е
потребно кога е некако оштетен апаратот,
• како на пример, оштетен струен кабел или струен приклучок, течност навлегла во апаратот
или е изложен на дожд или влага, не работи нормално или паднал.
• ВНИМАНИЕ: овие упатства за сервисирање важат само за квалификуван сервисен
персонал. За да се намали ризикот од струен удар, не вршете сервисирање според
наведеното во упатството за употреба, освен ако не сте кваликувани за таква работа.
• Не инсталирајте ја опремава во стеснет простор или ѕиден плакар, како што се полици за
книги или слично место, туку треба да има добро проветрување на отворено место. Не
смее да се спречи проветрување со покривање на вентилациските отвори со предмети,
како што се весник, прекривки, завеси и слично.
•
Внимание – за да спречите опасност од струен удар, заменете ја решетката..
• Прочитајте ги информациите на задниот дел во врска со информации за електриката и
безбедноста пред да го инсталирате или да работите со апаратот.
• За да го намалите ризикот од пожар или струен удар, не изложувајте го апаратот на дожд
или влага.
ВАЖНИ БЕЗБЕДНОСНИ УПАТСТВА
 Loading...