

Tesla 3 2018 Owner's Manual
MODEL 3
OWNER'S MANUAL
NORTH AMERICA

The Model 3 Owner's Manual is available on the touchscreen.
To view it, touch Controls > Service > Owner's Manual or
access it after touching the Tesla "T".
More information about your Model 3 and the latest version of
this document is available at www.tesla.com/teslaaccount.
To contact Tesla, call 1-877-79TESLA (1-877-798-3752).
DOCUMENT APPLICABILITY
Features released in the most recent versions of software may not be described in this document but are
described in Release Notes. Display Release Notes on the touchscreen by touching the Tesla “T” at the top
center of the touchscreen, then touching the Release Notes link. If information provided in this document
conflicts with information in the Release Notes, the Release Notes take precedence.
ILLUSTRATIONS
The illustrations provided in this document are for demonstration purposes only. Depending on vehicle
options, software version and market region, the information displayed on the touchscreen in your
vehicle may appear slightly different.
ROD
P
UCT SPECIFICATIONS
specifications
All
However,
printing.
product modifications at any time. To communicate any inaccuracies or omissions in this document,
please send an email to: ownersmanualfeedback@tesla.com.
©2012-2018 TESLA, INC.
All information in this document and all vehicle software is subject to copyright and other intellectual
property rights of Tesla, Inc. and its licensors. This material may not be modified, reproduced or copied, in
whole or in part, without the prior written permission of Tesla, Inc. and its licensors. Additional
information is available upon request. The following are trademarks or registered trademarks of Tesla, Inc.
in the United States and other countries:
TESLA TESLA MOTORS
descriptions
and
because
contained
continuous
MODEL S MODEL X
ROADSTER MODEL 3
in this
improvement
ent ar
docum
is a goal at Tesla, we reserve the right to make
e veri
fied
to
be
accurate
at
the time of

Contents
Overview.............................................................2
Interior Overview.........................................................................2
Exterior Overview.......................................................................3
Touchscreen Overview..............................................................4
Opening and Closing..................................... 6
Keys..................................................................................................6
Doors............................................................................................... 9
Windows........................................................................................ 11
Rear Trunk....................................................................................12
Front Trunk..................................................................................14
Interior Storage and Electronics..........................................16
Seating and Safety Restraints...................18
Front and Rear Seats............................................................... 18
Seat Belts......................................................................................21
Child Safety Seats....................................................................24
Airbags.........................................................................................30
Driving...............................................................34
Profiles............................................................................ 34
Driver
Steering Wheel..........................................................................36
Mirrors...........................................................................................38
Starting and Powering
Gears.............................................................................................. 41
Car Status....................................................................................42
Lights............................................................................................ 45
Wipers and Washers...............................................................48
Brakes...........................................................................................49
Traction Control......................................................................... 51
Park Assist...................................................................................52
Vehicle Hold............................................................................... 54
Getting Maximum Range.......................................................55
Rear View Camera....................................................................56
Cabin Camera.............................................................................57
Autopilot.......................................................... 58
About Autopilot........................................................................58
Trac-Aware Cruise Control.................................................61
Autosteer.....................................................................................67
Auto Lane Change...................................................................70
Autopark...................................................................................... 72
Lane Assist..................................................................................74
Collision Avoidance Assist.................................................... 76
Speed Assist...............................................................................79
O....................................................39
Maintenance................................................... 112
Maintenance Schedule........................................................... 112
Tire Care and Maintenance...................................................113
Cleaning.......................................................................................119
Wiper Blades and Washer Jets..........................................122
Fluid Reservoirs.......................................................................124
Jacking and Lifting.................................................................126
Parts and Accessories........................................................... 127
Specifications............................................... 130
Identification Labels.............................................................. 130
Vehicle Loading........................................................................131
Dimensions and Weights..................................................... 134
Subsystems............................................................................... 136
Wheels and Tires.....................................................................138
Roadside Assistance..................................145
Contacting Roadside Assistance......................................145
Instructions for Transporters..............................................146
Consumer Information.............................. 150
Easter Eggs...............................................................................150
About this Owner Information............................................151
Disclaimers.................................................................................152
Reporting Safety Defects.................................................... 154
Declarations of Conformity.................................................155
Using the Touchscreen.................................81
Controls and Settings.............................................................. 81
Climate Controls.......................................................................86
Media and Audio...................................................................... 90
Phone............................................................................................ 93
Maps and Navigation.............................................................. 95
Using Voice Commands.........................................................99
Security Settings.................................................................... 100
HomeLink® Universal Transceiver.......................................101
Connecting to Wi-Fi.............................................................. 103
Software Updates...................................................................104
Charging.........................................................105
Electric Vehicle Components.............................................105
Battery Information............................................................... 107
Charging Instructions............................................................108
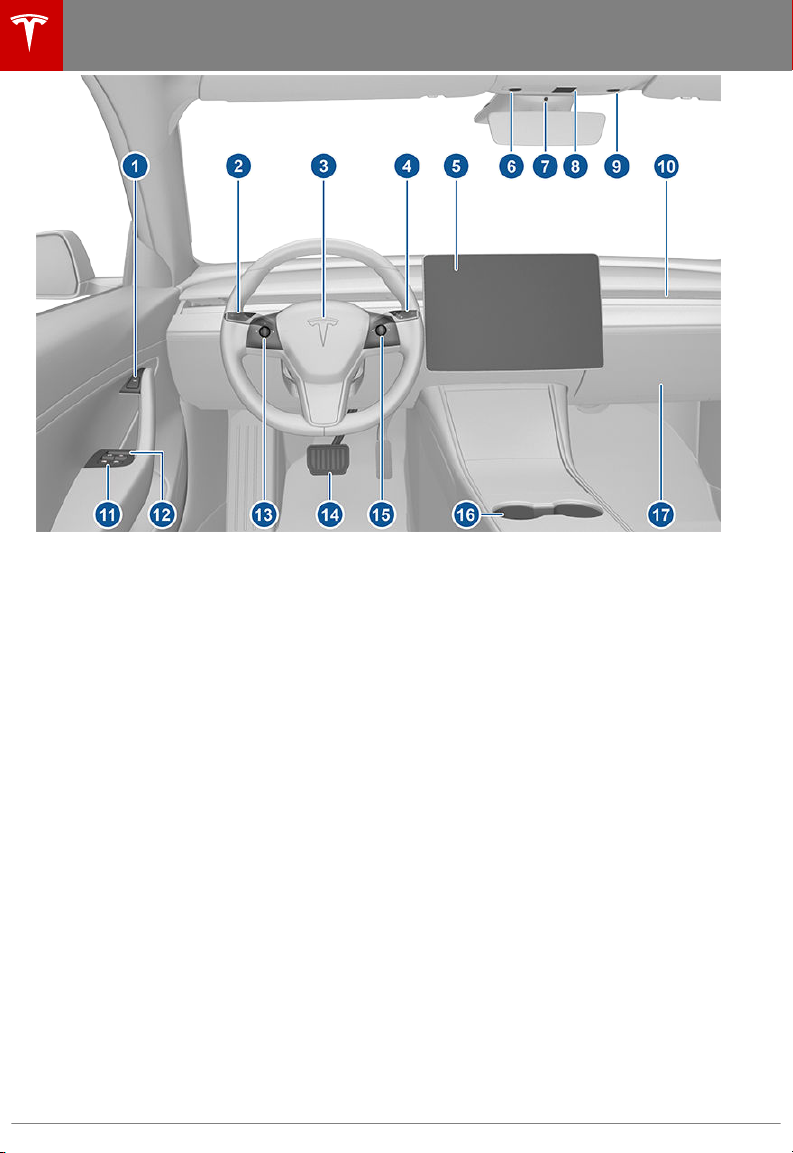
Interior Overview
1. Door open button (Opening Doors from the Interior on page 9)
2. High beams (High Beam Headlights on page 45), turn signals (Turn Signals on page 46),
and wipers and washers (Wipers and Washers on page 48)
3. Horn (Horn on page 37)
4. Gear selector (Shifting Gears on page 41),
Cruise Control on page 61), and Autosteer (Autosteer on page 67)
5. Touchscreen (Touchscreen Overview on page 4)
6. Driver dome light (Lights on page 45)
7. Cabin camera (Cabin Camera on page 57)
8. Hazard warning
9. Passenger dome light (Lights on page 45)
10. Climate control vent (see Climate Controls on page 86)
11. Power window switches (Windows on page 11)
12. Manual door release (Opening Doors from the Interior on page 9)
13. Left scroll button (Scroll Buttons on page 36)
14. Brake pedal (Brakes on page 49)
15. Right scroll button (Scroll Buttons on page 36)
16. Center console (Interior Storage and Electronics on page 16)
17. Glovebox (Glovebox on page 16)
flashers (Hazard Warning Flashers on page 47)
Trac-Aware Cruise Control (Trac-Aware
2 Model 3 Owner's Manual
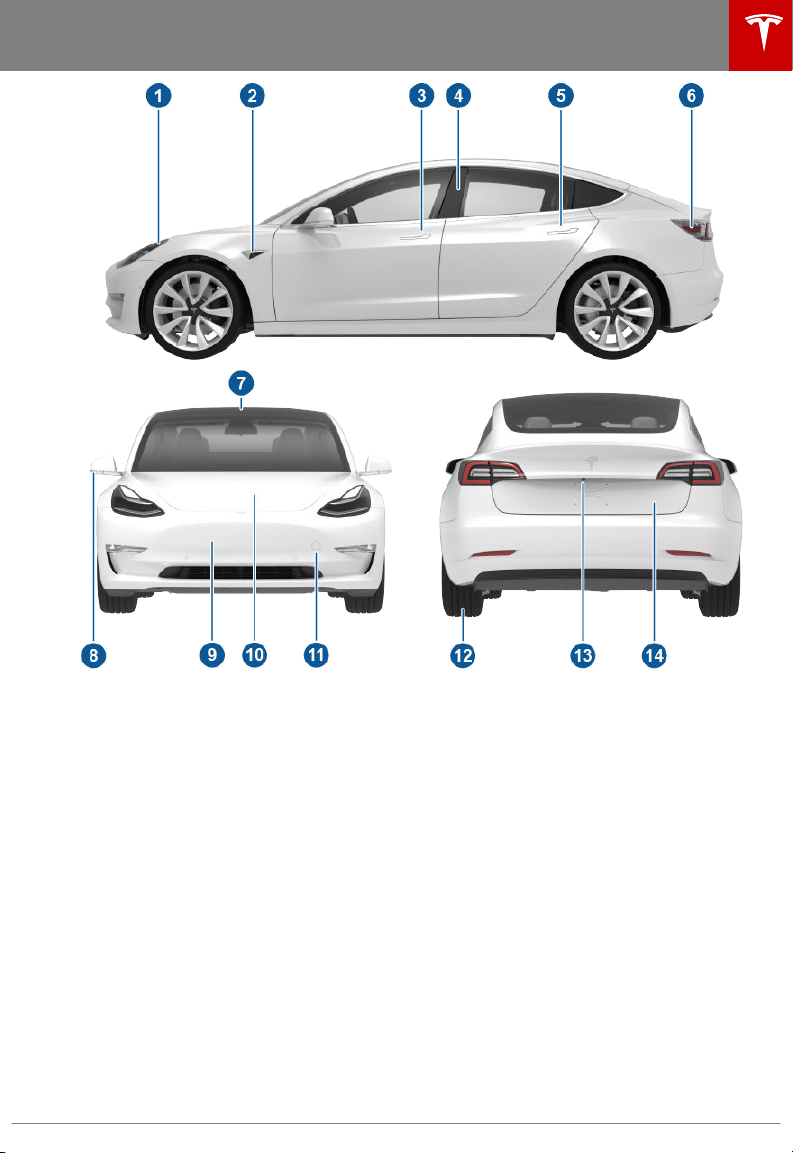
Exterior Overview
1. Exterior lights (Lights on page 45)
2. Autopilot camera (About Autopilot on page 58)
3. Front door handle (Using Exterior Door Handles on page 9)
4. Key card sensor (Keys on page 6), Autopilot camera (About Autopilot on page 58)
5. Rear door handle (Using Exterior Door Handles on page 9)
6. Charge port (Charging Instructions on page 108)
7. Autopilot cameras (About Autopilot on page 58)
8. Exterior mirrors (Mirrors on page 38)
9. Radar sensor (hidden from view) (About Autopilot on page 58)
10. Hood/front trunk (Front Trunk on page 14)
11. Tow eye cover (Instructions for Transporters on page 146)
12. Wheels and tires (Wheels and Tires on page 138)
13. Rear view camera (Rear View Camera on page 56)
14. Rear trunk (Rear Trunk on page 12)
Overview 3
Touchscreen Overview
The features and information you need to drive Model 3 are displayed on the touchscreen. When
driving, the touchscreen displays driving-related information such as driving speed, vehicle range,
warnings, etc. The touchscreen is used to control many features that, in traditional cars, are
controlled using physical buttons (for example, adjusting mirrors). You can also use the
touchscreen to customize Model 3 to suit your preferences.
Warning: Always pay attention to road and trac conditions when driving. To minimize driver
distraction and ensure the safety of vehicle occupants as well as other road users, avoid using
the touchscreen to adjust settings while the vehicle is in motion.
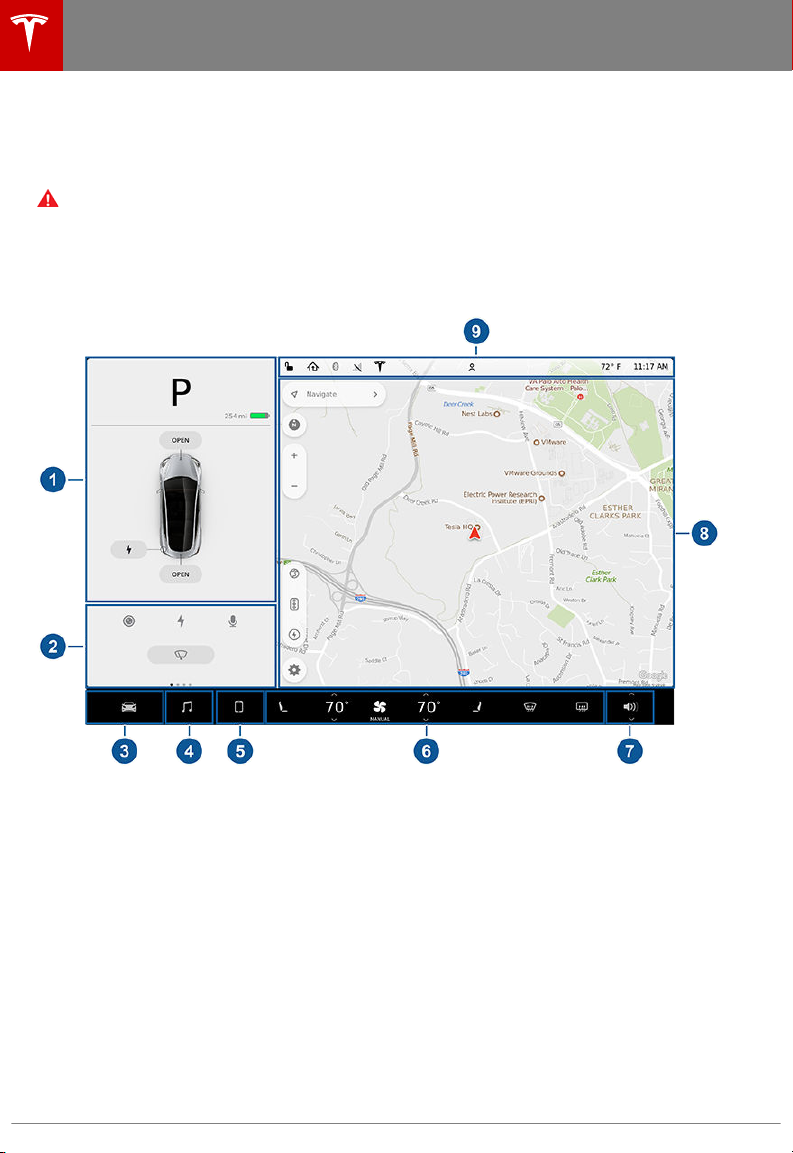
The main areas of the touchscreen are summarized here:
Note: The image below is provided for demonstration purposes only. Depending on vehicle
options, software version and market region, your touchscreen may appear slightly
dierent.
1. Car Status. This area dynamically displays the current status of Model 3 as you drive, park,
open doors, turn lights on, etc. Monitor this area when driving as it displays important
information such as driving speed and warning messages (see Car Status on page 42).
When the car is in Park, you can open the trunks or charge port door.
2. Cards. This area automatically updates to display certain information such as incoming calls,
seatbelt reminders, current state of the wipers, etc. Additionally, you can swipe to the right or
left to scroll through cards that you can use to quickly access:
• Rear view camera (see Rear View Camera on page 56), charging status (see Charging
Instructions on page 108), and voice commands (see Using Voice Commands on page
99).
• Wipers (see Wipers on page 48).
• Trips. You can display distance driven, energy usage and energy
time, or since Model 3 was last charged. You can also display this information for up to
two trips. Touch ... in the top right corner of a trip to rename or reset a trip.
• Tire Pressures. Display tire pressures or view cautions or warnings related to pressures
that are not within acceptable limits (see Tire Care and Maintenance on page 113).
3. Controls. Touch to control features and customize Model 3 to suit your preferences (see
Controls and Settings on page 81).
4 Model 3 Owner's Manual
eciency starting at any

Touchscreen Overview
4. Media Player (see Media and Audio on page 90).
5. Phone (see Phone on page 93).
6. Climate Controls (see Climate Controls on page 86).
7. Volume Control (see Volume Control on page 90).
8. Navigation (see Maps and Navigation on page 95).
Note: When you touch Controls, the controls and settings window displays on top of this
navigation window (see Controls and Settings on page 81). To close the window and see the
map, touch Controls again.
9. This area on the top of the touchscreen displays the time, outdoor temperature, vehicle
information (the Tesla "T"), network strength, Bluetooth® status, and passenger airbag status.
It also provides shortcuts to lock/unlock the vehicle and to access settings for features such
as HomeLink®, Driver
touch it to see warning messages that are in eect.
Note: The airbag status symbol displays in the top right corner of the touchscreen only when
Model 3 is powered on, ready to drive, and the airbag is turned
30).
The Tesla "T"
Touch the Tesla "T" at the top center of the touchscreen to display:
• Vehicle name (see Naming Your Vehicle on page 85).
• Battery size.
• Odometer.
• Vehicle
• Version of software currently installed on your Model 3.
• Release notes associated with the currently-installed software version.
• This owner's manual.
• One-touch access to call Tesla Customer Support and Roadside Assistance.
• One-touch access to all discovered Easter Eggs (see Easter Eggs on page 150).
Identification Number (VIN).
Profiles, software updates, and Wi-Fi. If you see an exclamation mark,
o (see Airbags on page
Overview 5

Keys
Two Types of Keys
Instead of a key fob, Model 3 supports two
types of keys:
• Authenticated phone - communicates
with Model 3 using Bluetooth. Supports
automatic locking and unlocking as well as
several other functions using the Tesla
mobile app. An authenticated phone is the
preferred key because you never need to
remove it from your pocket or purse.
• Key card - communicates with Model 3
short range radio-frequency
(RFID) signals. The key card is used to
"authenticate" your phone to work with
Model 3. In situations where your
authenticated phone has a dead battery,
or is lost or stolen, use your key card to
unlock, drive, and lock Model 3.
Phone
Using your phone is the most convenient way
to access your Model 3. As you approach, your
phone's Bluetooth signal is detected and
doors unlock when you press a door handle.
Likewise, when you exit and walk away with
the phone, doors automatically lock (provided
the Walk Away Lock feature is turned on, as
described in Walk Away Lock on page 10).
Before you can use a phone to access Model 3,
follow these steps to authenticate it:
1. Download the Tesla mobile app to your
phone.
2. Log into the Tesla mobile app using your
Tesla Account user name and password.
Note: You must remain logged in to your
Tesla Account to use your phone to access
Model 3.
3. Ensure that your phone's Bluetooth
setting is turned on.
Note: Model 3 communicates with your
phone using Bluetooth. To authenticate
your phone or use it as a key, the phone
must be powered on and Bluetooth must
be enabled. Keep in mind that your phone
must have enough battery power to run
Bluetooth and that many phones disable
Bluetooth when the battery is low.
4. Ensure that Allow Mobile Access
(Controls > Safety & Security > Settings >
Allow Mobile Access) is enabled.
identification
5.
In the Tesla mobile app, touch PHONE
KEY then touch START to search for your
Model 3.
When your Model 3 is detected, the
mobile app asks you to tap your key card.
6. Tap the key card against the Model 3 card
reader on the door pillar or center console
(see Key Card on page 7).
When Model 3 detects your key card, the
mobile app
been successfully authenticated. Touch DONE.
If the key card is not successfully scanned
within approximately 30 seconds, the mobile
app displays an error message. Touch PHONE
KEY on the app again to retry.
Model 3 can store up to 19 keys (authenticated
phones or key cards) simultaneously. To view a
list of keys that can currently access Model 3,
or to remove a phone, touch Controls > Locks
(see Managing Keys on page 7).
Note: Authenticating your phone allows you
to use it as a key to access Model 3. To use the
phone hands-free, access your phone's
contacts, play media from it, etc., you must
also pair and connect to it using the Bluetooth
settings (see Phone on page 93).
Note: Model 3 can connect to three phones
simultaneously. Therefore, if more than one
phone is detected and you want to use, or
authenticate, a
other connected phone(s) out of range or turn
o its Bluetooth setting.
Note: Unlike the mobile app, once a phone has
been authenticated, it no longer requires an
internet connection to communicate with
Model 3. Authenticated phones communicate
with Model 3 using Bluetooth.
Note: Although Bluetooth typically
communicates over distances of up to
approximately 30 feet (9 meters),
performance can vary based on the phone you
are using, environmental interference, etc.
Note: If multiple vehicles are linked to the
Tesla Account, you must switch the mobile
app to the Model 3 that you want to access
before you can use the phone as a key.
confirms that your phone has
dierent phone, move the
6 Model 3 Owner's Manual
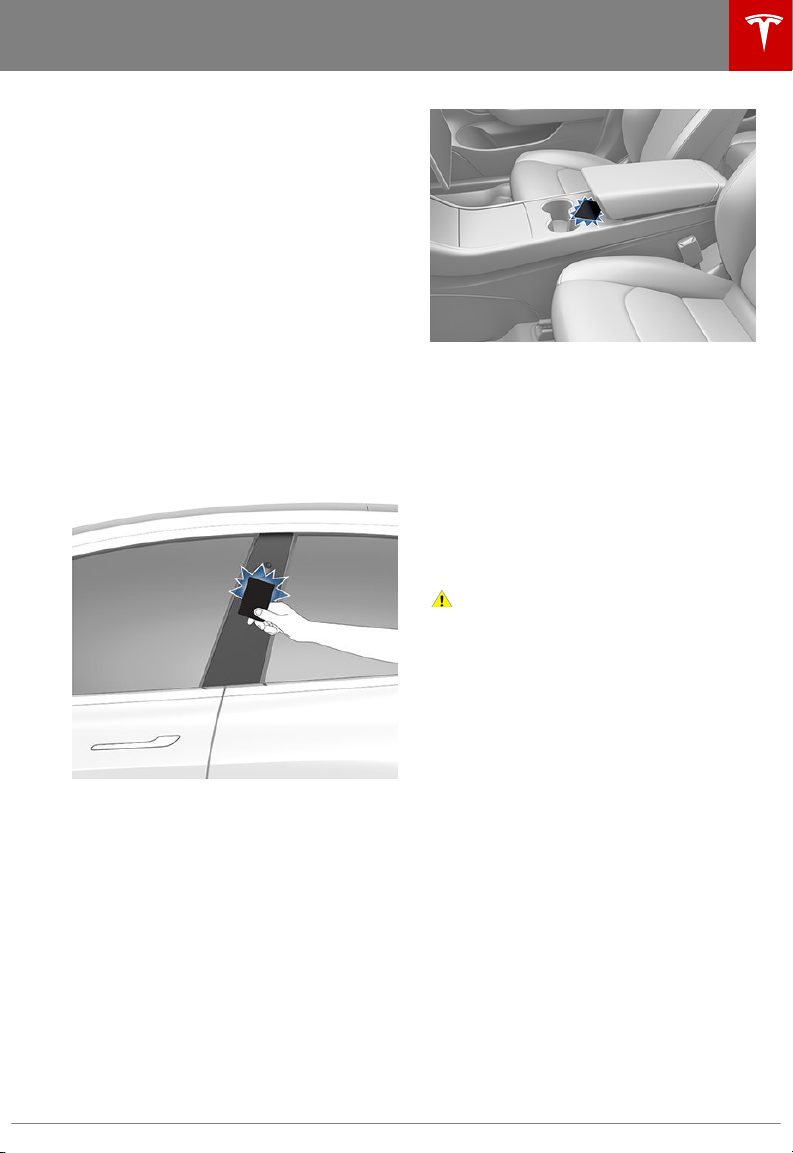
Key Card
Tesla provides you with two Model 3 key
cards, designed to fit in your wallet. Model 3
reads a key card only when placed within very
close proximity (an inch or two) to one of its
card readers. Card readers are located on the
driver's side door pillar and on the center
console.
To use a key card to unlock or lock Model 3,
position the card as illustrated and tap it
against the card reader located below the
Autopilot camera on the driver's side door
pillar. When Model 3 detects the key card, the
exterior lights
(if equipped with the premium package and
Fold Mirrors is on), and the doors unlock or
lock.
Note: You may need to physically touch the
driver's side door pillar with the key card, and
you may need to hold it against the
transmitter for one or two seconds.
flash, the mirrors unfold or fold
Keys
Note: You must position the key card within
an inch or two of a card reader to allow Model
3 to read it. You may need to physically touch
the center console or driver's side door pillar
with the key card, and you may need to hold it
against the transmitter for one or two
seconds.
Note: Walk Away Lock operates only when
using an authenticated phone. When you walk
away from Model 3 carrying only your key
card, Model 3 does not automatically unlock/
lock, even if this feature is turned on (see Walk
Away Lock on page 10).
Caution: Always carry your key card with
you in your purse or wallet to use as a
backup in case your authenticated phone
has a dead battery, or is lost or stolen.
Managing Keys
To display a list of all keys that can access
Model 3, touch Controls > Locks.
When you no longer want a phone to access
Model 3 (for example, you lost it or upgraded
Once inside, power up Model 3 by pressing the
brake pedal within two minutes of scanning
the key card (see Starting and Powering
on page 39). If you wait longer than two
minutes, you must re-authenticate by placing
the key card near the card reader located
behind the cup holders on the center console.
When your key card is detected, your two
minute authentication period restarts.
Opening and Closing 7
O
to a new one), touch its associated trash icon
to remove it. When you remove a phone, the
Tesla mobile app displays a
Note: The list of keys is hidden when Model 3
is in Valet mode.
notification.
Mobile App
In addition to using the mobile app to
authenticate a phone as your Model 3 key, you
can use it to:
• Lock or unlock Model 3 doors and trunks
remotely.
• Check charging progress and receive
notifications when charging has started,
has been interrupted, is near completion,
or is complete.

Keys
• Heat or cool Model 3 before driving (even
when it is parked in a garage).
• Locate Model 3 with directions, or monitor
its movement across a map.
• Flash the exterior lights or honk the horn
to find Model 3 when parked.
• Enable/disable Valet mode.
• Start Model 3 remotely.
• Receive
• Receive
Note: To allow the mobile app to
communicate with Model 3, the phone must
be connected to the internet and mobile
access must be enabled (touch Controls >
Safety & Security > Settings > Allow Mobile
Access on the touchscreen).
Note: If multiple vehicles are linked to the
Tesla Account, you must switch to the Model 3
that you want to access in the mobile app
before the phone can be used as a key.
Note: To take advantage of new and improved
features, download updated versions of the
mobile app as they become available.
notifications if the security alarm
is triggered.
notifications when a software
update is available or scheduled (see
Software Updates on page 104).
Caution: Tesla does not support the use
of third party applications to contact
Model 3.
8 Model 3 Owner's Manual
Keyless Locking and Unlocking
Locking and unlocking Model 3 is easy and
convenient. Just carry your authenticated
phone with you. Model 3 recognizes the
presence of an authenticated phone and
automatically unlocks when you press a door
handle, and locks when you leave (see Walk
Away Lock on page 10).
Note: If you don't have your authenticated
phone with you (or if the phone's battery is
dead or its Bluetooth setting is turned
place the key card against the driver's side
door pillar to manually unlock or lock Model 3
(see Keys on page 6).
o),
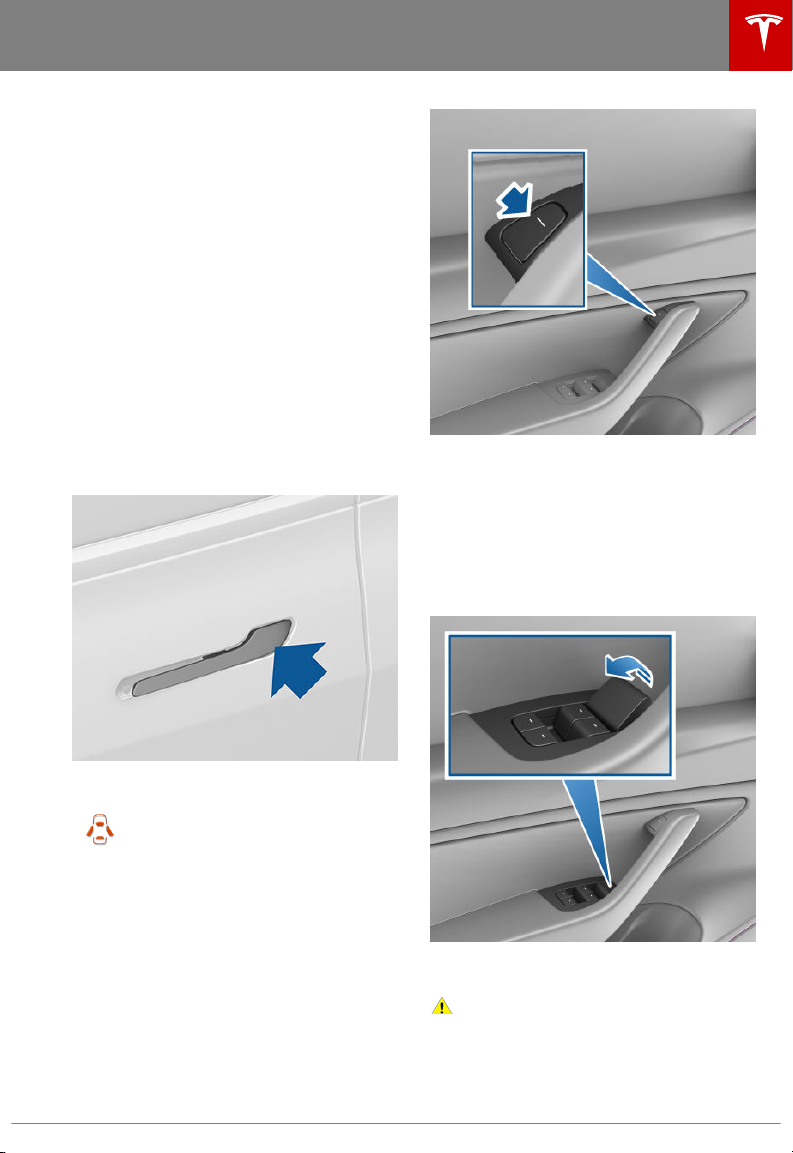
Using Exterior Door Handles
Use your thumb to push the wide part of the
door handle. The handle pivots toward you,
and you can open the door by pulling the
handle or pulling the edge of the door.
Doors
Note: To prevent children from opening the
rear doors, turn on child protection locks (see
Child Protection Lock on page 10).
In the unlikely situation that Model 3 has no
power, these electrically powered buttons at
the top of the door handles no longer work.
Instead, pull up the manual door release
located in front of the window switches on the
front doors.
The handle retracts automatically.
When a door or trunk is open, the
touchscreen displays the Door Open
indicator light.
Opening Doors from the Interior
Model 3 doors are electrically powered. To
open a door while sitting inside, press the
button located at the top of the interior door
handle.
Opening and Closing 9
Note: Only front doors are equipped with a
manual door release.
Caution:
designed to be used only in situations
when Model 3 has no power. Whenever
Model 3 has power, use the button
located at the top of the interior door
handle.
The manual door release is

Doors
Interior Locking and Unlocking
While sitting inside Model 3, you can lock and
unlock all doors and trunks by touching the
lock icon on the touchscreen (you do not need
an authenticated phone or key card).
The icon changes to indicate
whether doors are locked or
unlocked.
You can also unlock the doors by pressing the
Park button on the end of the gear selector a
second time. Pressing this button once
engages the Park gear and pressing it again
unlocks the doors.
Walk Away Lock
Doors and trunks can automatically lock
whenever you walk away carrying your
authenticated phone. When the doors lock,
the exterior lights
fold (if equipped with the premium package
and Fold Mirrors is on).
Model 3 does not automatically lock if:
• An authenticated phone is detected inside
Model 3.
• You are not using an authenticated phone
as the key and walk away carrying the key
card. When using the key card you must
manually lock Model 3 by tapping the key
card against the door pillar (see Keys on
page 6).
• A door or trunk is not fully closed.
To turn this feature on or
Locks > Settings > Walk Away Lock.
Note: If all doors are closed and Model 3 was
automatically unlocked by your authenticated
phone, walk-away locking is temporarily
suspended for one minute. If you open a door
within this minute, it will not re-lock until all
the doors are closed and you have walked
away with the authenticated phone.
flash once and the mirrors
o, touch Controls >
Unlock on Park
When you stop Model 3 and engage the Park
gear, you can choose to unlock all doors. To
turn this feature on or
Locks > Settings > Unlock on Park.
Note: If set to OFF, you can unlock all doors
by pressing the Park button a second time
after engaging the Park gear.
o, touch Controls >
Child Protection Lock
Model 3 has child protection locks on the rear
doors to prevent them from being opened
using the interior release buttons. On the
touchscreen, touch Controls > Locks > Child
Lock.
Note: It is recommended that you turn child
protection locks on whenever children are
seated in the rear seats.
10 Model 3 Owner's Manual
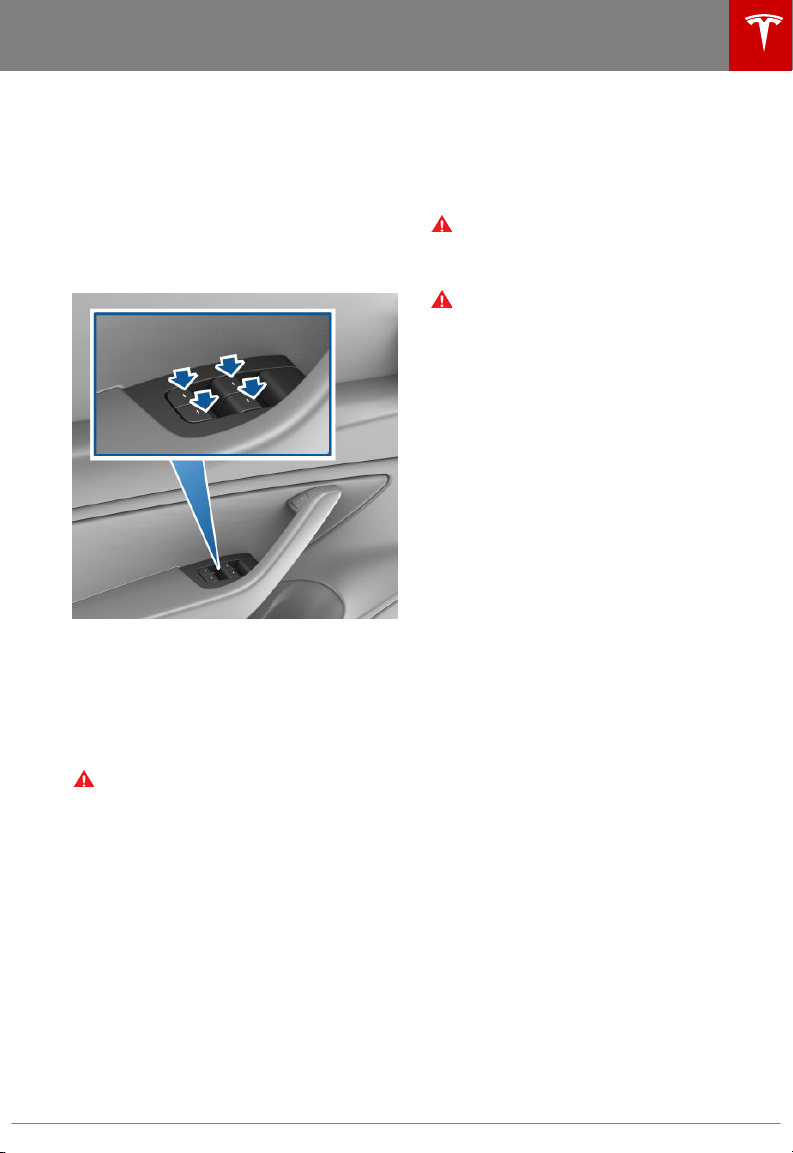
Windows
Opening and Closing
Press down on a switch to lower the
associated window. Window switches operate
at two levels:
• To lower a window fully, press the switch
all the way down and immediately release.
• To lower a window partially, press the
switch gently and release when the
window is where you want it.
Similarly, pull a switch to raise the associated
window:
• To raise a window fully, pull the switch all
the way up and immediately release.
• To raise a window partially, pull the switch
gently and release when the window is
where you want it.
Warning:
the driver’s responsibility to ensure that
all occupants, especially children, do not
have any body parts extended through
the window’s opening. Failure to do so
can cause serious injury.
Before closing a window, it is
Locking Rear Windows
To prevent passengers from using the rear
window switches, touch Controls > Quick
Controls > Window Lock. To unlock the rear
windows, touch Window Lock again.
Warning: To ensure safety, it is
recommended that you lock the rear
window switches whenever children are
seated in the rear seats.
Warning: Never leave children
unattended in Model 3.
Opening and Closing 11
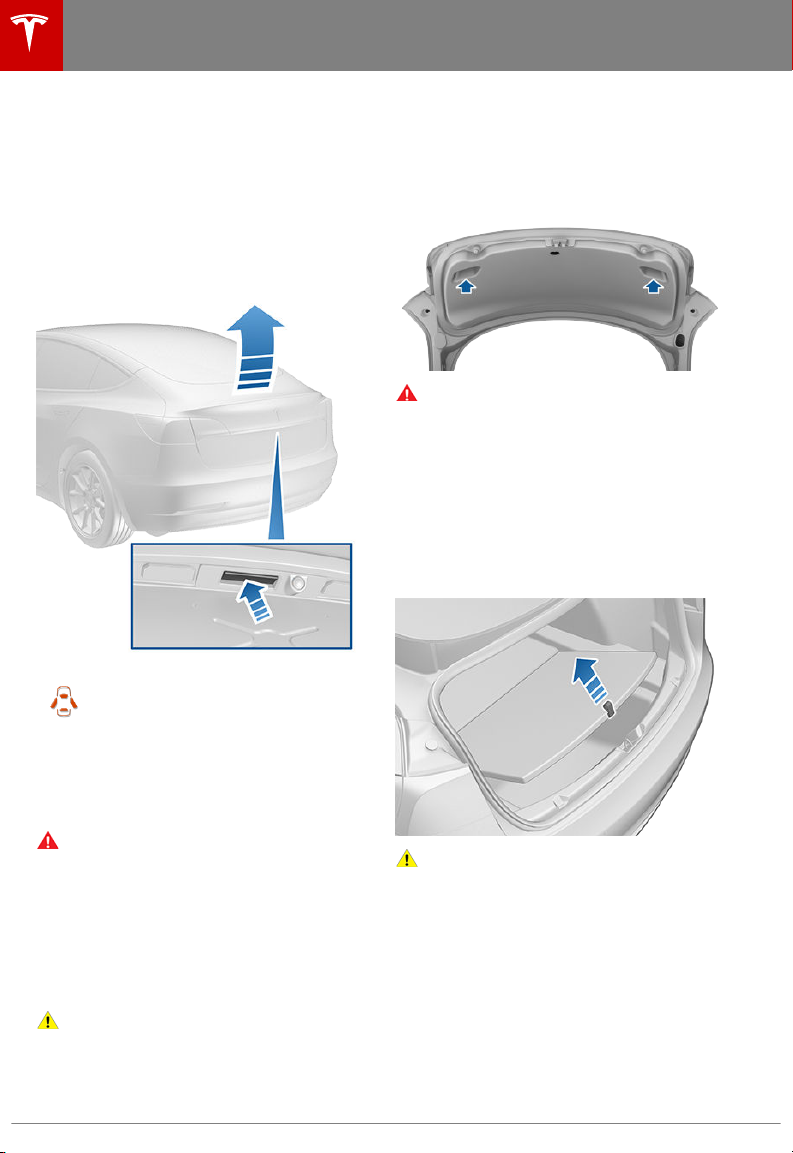
Rear Trunk
Opening
To open the rear trunk, do one of the following
then pull the rear trunk open:
• Touch the associated OPEN button on the
touchscreen.
• Touch the trunk button on the mobile app.
• With Model 3 unlocked, press the switch
located under the rear trunk's exterior
handle.
When a door or trunk is open, the
touchscreen displays the Door Open
indicator light.
Closing
To close the rear trunk, push it downward until
you hear the latch click into place.
Note: Model 3 is equipped with pull cups to
assist with lowering the rear trunk.
Warning: Before driving, ensure that the
trunk is securely latched in the fullyclosed position by lifting up on the
bottom edge and confirming there is no
movement.
Accessing the Cargo Area
To access the cargo area inside the rear trunk,
pull up the strap at the rear of the cargo cover.
You can then fold the cargo cover forward or
remove it from Model 3.
To open the trunk from inside Model 3 in the
unlikely situation that Model 3 has no power,
see Interior Emergency Trunk Release on page
12.
Warning:
rear trunk, it is important to check that
the area around the trunk is free of
obstacles (people and objects).
Load Limits
Secure all cargo before moving Model 3, and
place heavy cargo in the lower trunk
compartment.
Caution:
more than 130 lbs (60 kg) on the rear
load floor (above the lower trunk
compartment) or more than 130 lbs (60
kg) in the lower trunk compartment.
Doing so can cause damage.
12 Model 3 Owner's Manual
Before opening or closing the
To avoid damage, never load
Caution: Never load more than 130 lbs
(60 kg) on the rear load floor (above the
lower trunk compartment) or more than
130 lbs (60 kg) in the lower trunk
compartment. Doing so can cause
damage.
Interior Emergency Trunk Release
An illuminated mechanical release located
inside the rear trunk allows you to open the
rear trunk from the inside if Model 3 has no
electrical power. This mechanical release also
allows a person locked inside to get out.
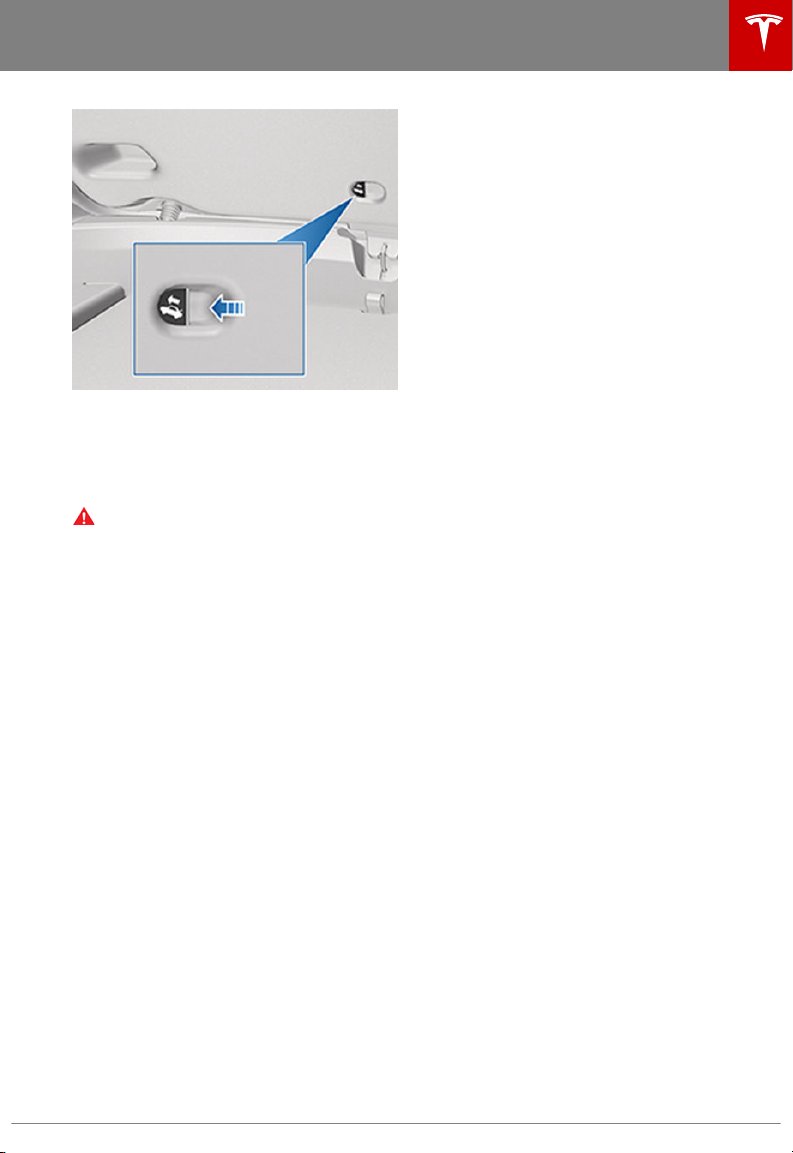
1. Firmly push the illuminated button in the
direction of the arrow to release the latch.
2. Push the rear trunk open.
Note: The button glows for several hours after
a brief exposure to ambient light.
Warning: Do not allow children to play
inside the trunk or become locked inside.
An unrestrained child could suer serious
injury or death in a crash. A child could
suer heat exhaustion if trapped in the
vehicle, especially without climate control
on.
Rear Trunk
Opening and Closing 13
Front Trunk
Opening
To open the front trunk:
1. Ensure that the area around the hood is
free of obstacles.
2. Touch the associated OPEN button on the
touchscreen or touch the front trunk
button on the mobile app.
3. Pull the hood up.
When a door or trunk is open, the
touchscreen displays the Door Open
indicator light.
Warning: Before opening or closing the
hood, it is important to check that the
area around the hood is free of obstacles
(people and objects). Failure to do so
may result in damage or serious injury.
Note: The front trunk locks whenever closed
and you lock Model 3 using the touchscreen,
mobile app, key card, you leave Model 3
carrying your authenticated phone (if WalkAway Lock is turned on), or if Valet mode is
active (see Valet Mode on page 34).
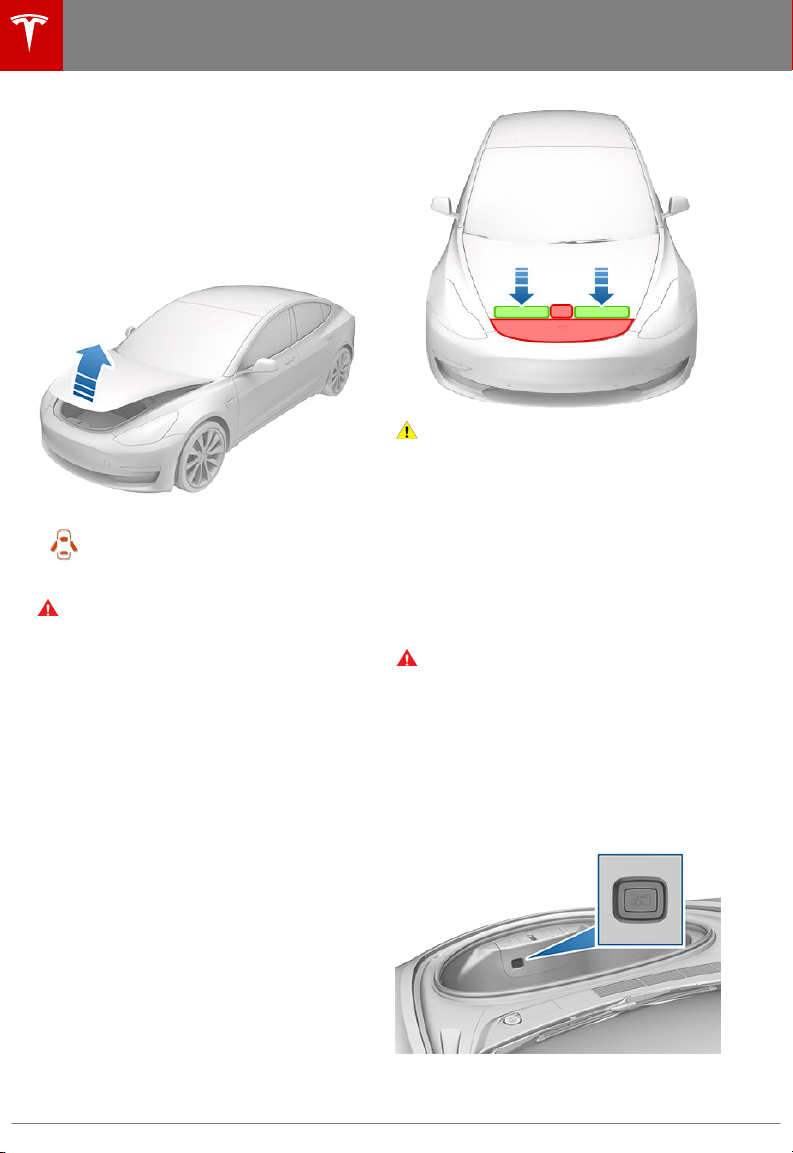
Closing
The Model 3 hood is not heavy enough to
latch under its own weight and applying
pressure on the front edge or center of the
hood can cause damage.
To properly close the hood:
1. Lower the hood until the striker touches
the latches.
2. Place both hands on the front of the hood
in the areas shown (in green), then press
down
3. Carefully try to lift the front edge of the
firmly to engage the latches.
hood to ensure that it is fully closed.
Caution:
• Apply pressure only to the green
• Do not close the hood with one hand.
• Do not apply pressure to the front
• Do not slam or drop the hood.
Warning: Before driving, you must ensure
that the hood is securely latched in the
fully closed position by carefully trying to
lift the front edge of the hood upward
and confirming there is no movement.
To prevent damage:
areas shown. Applying pressure to
the red areas can cause damage.
Doing so applies concentrated force
in one area and can result in a dent or
crease.
edge of the hood. Doing so can
crease the edge.
Interior Emergency Release
An illuminated interior release button inside
the front trunk allows a person locked inside
to get out.
Press the interior release button to open the
front trunk, then push up on the hood.
14 Model 3 Owner's Manual
Front Trunk
Note: The interior release button glows
following a brief exposure to ambient light.
Warning: People should never climb
inside the front trunk. Never shut the
front trunk when a person is inside.
Warning: Care should be taken to ensure
that objects inside the front trunk do not
bump against the release button, causing
the trunk to accidentally open.
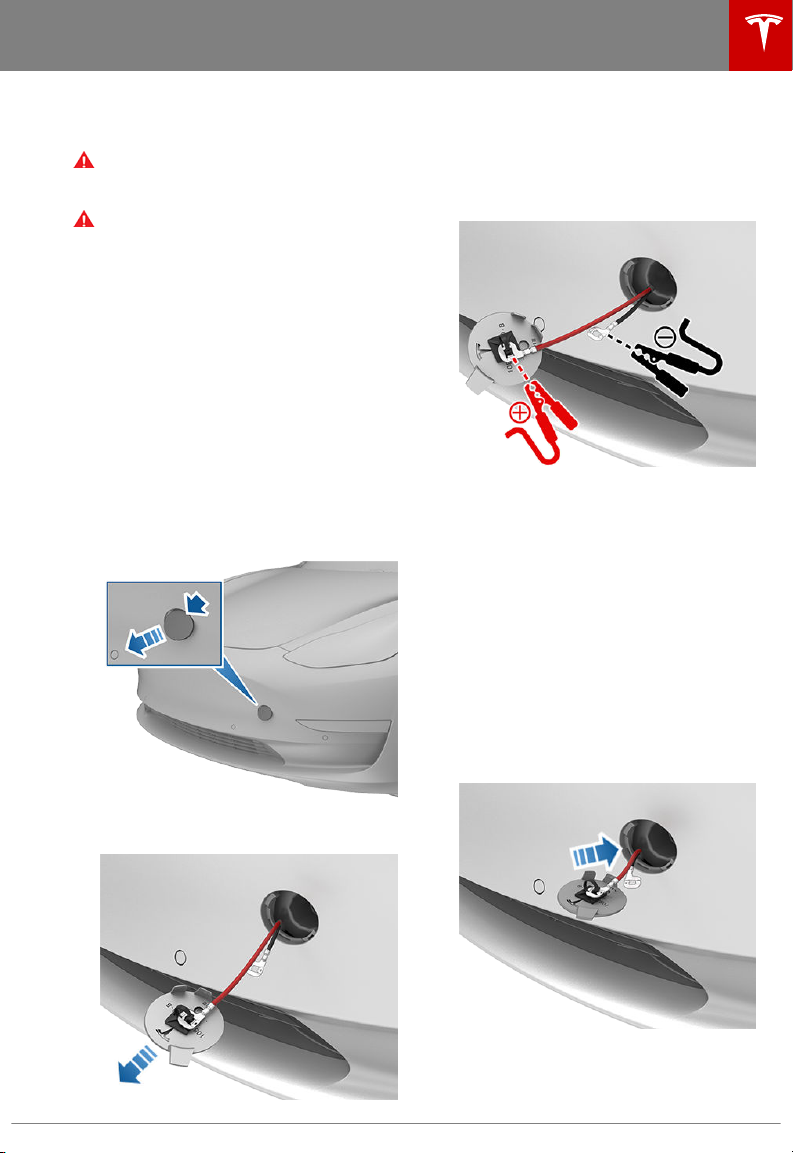
Opening with No Power
In the unlikely event that Model 3 has no 12V
power, you will be unable to open the front
trunk using the touchscreen or mobile app. To
open the front trunk in this situation:
1. Locate an external 12V power supply
(such as a portable jump starter).
2. Release the tow eye cover by pressing
firmly on the top right perimeter of the
cover until it pivots inward, then gently
pulling the raised section toward you.
Note: The tow eye cover is connected to
the vehicle's red positive (+) terminal.
4.
Connect the 12V power supply's red
positive (+) cable to the red positive (+)
terminal.
5. Connect the 12V power supply's black
negative (-) cable to the black negative (-)
terminal.
Note: Applying external 12V power to
these terminals only releases the hood
latches. You cannot charge the 12V
battery using these terminals.
6. Turn on the external power supply (refer
to the manufacturer’s instructions). The
hood latches are immediately released
and you can now open the hood to access
the front trunk area.
7. Disconnect both cables, beginning with
the black negative (-) cable.
8. If pulling Model 3 onto a
not replace the tow eye cover yet.
Otherwise, replace the tow eye cover by
inserting the wires into the tow eye
opening and aligning the tow eye cover
into position and turning it into place.
flatbed truck, do
3. Pull the two wires out of the tow eye
opening to expose both terminals.
Opening and Closing 15

Interior Storage and Electronics
Glovebox
To open the glovebox, touch Controls >
Glovebox on the bottom corner of the
touchscreen. The glovebox automatically
opens and its light turns on.
To close the glovebox, push it upward until it
clicks into its closed position.
Note: If you leave the glovebox open for
approximately five minutes, its light
automatically turns
Note: The glovebox locks whenever closed
and you lock Model 3 using the mobile app,
key card, you leave Model 3 carrying your
authenticated phone (if Walk-Away Lock is
turned on), or if Valet mode is active (see
Valet Mode on page 34). It does not lock
when Model 3 is locked by touching the lock
icon on the touchscreen.
Warning:
glovebox closed to prevent injury to a
passenger if a collision or sudden stop
occurs.
o.
When driving, keep the
To open the main storage compartment, pull
its cover upward.
Open the other storage compartment or
access the phone dock by pressing firmly near
the cover's opening edge. To close a storage
compartment, push its cover down gently.
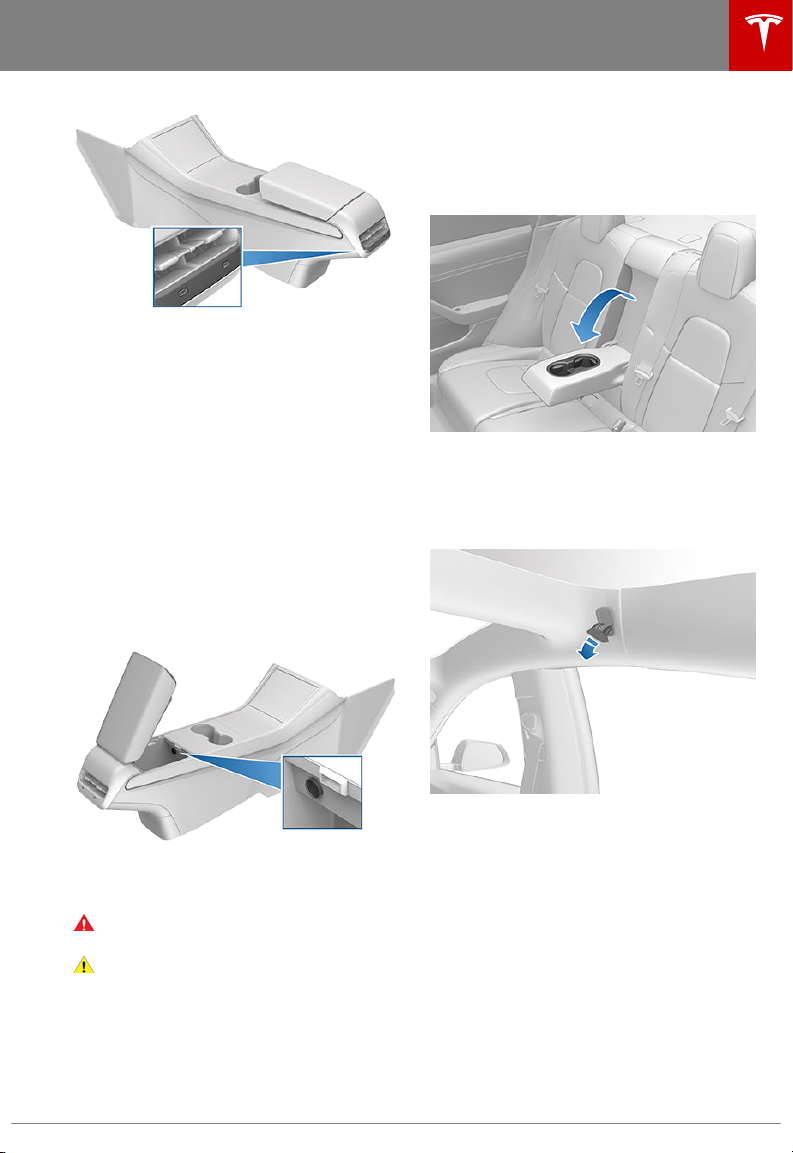
USB Ports - Premium Package
Model 3 has two USB ports located under the
phone dock in the front compartment of the
center console. These ports can be used to
connect and charge your phone as well as
play audio
USB device (see Playing Media from Devices
on page 92).
Lift the phone dock upward to access the USB
ports. You can route the USB cable through
the openings in the phone dock.
files stored on the phone or on a
Center Console - Premium Package
In addition to housing an RFID transmitter that
reads the key card (see Key Card on page 7),
the center console includes cup holders, two
storage compartments, and a phone dock for
two phones (or other devices).
16 Model 3 Owner's Manual
Two additional USB ports are located in the
rear of the center console. Passengers in the
rear seats can use these ports to charge their
USB-connected devices. Media Player does
not communicate with the rear USB ports.
Interior Storage and Electronics
Note: Always use USB 2.0 compliant cables
when connecting devices to the USB ports.
Using non-compliant cables can result in
slower charging and, if plugged into either of
the front two ports, can result in potential
connection problems when trying to access
media
files on the device.
Note: Do not connect multiple devices using a
USB hub. This can prevent connected devices
from charging or from being recognized by
Media Player.
12V Power Socket
Your Model 3 has a power socket located in
the center console's rear compartment. Power
is available whenever the touchscreen is
powered on.
Rear Console
Your Model 3 has a rear console integrated in
the center of the rear seat back. Pull the
console down to access the rear cup holders,
or use it as an armrest.
Coat Hangers
Your Model 3 has a coat hanger on each side
of the vehicle in the rear row. Push the coat
hanger to release it. Push it again to retract it.
Additional Interior Storage Areas
The power socket is suitable for accessories
requiring up to 12A continuous draw (16A
peak).
Warning:
accessory’s connector can become hot.
Caution: Do not attempt to jump start
Model 3 using the 12V power socket.
Doing so can result in damage.
Opening and Closing 17
The power socket and an
Your Model 3 has these additional storage
areas:
• Storage compartments are located below
the armrest on the door panels.
• If equipped with the premium package,
storage pockets are located at the back of
the front seats.
Front and Rear Seats
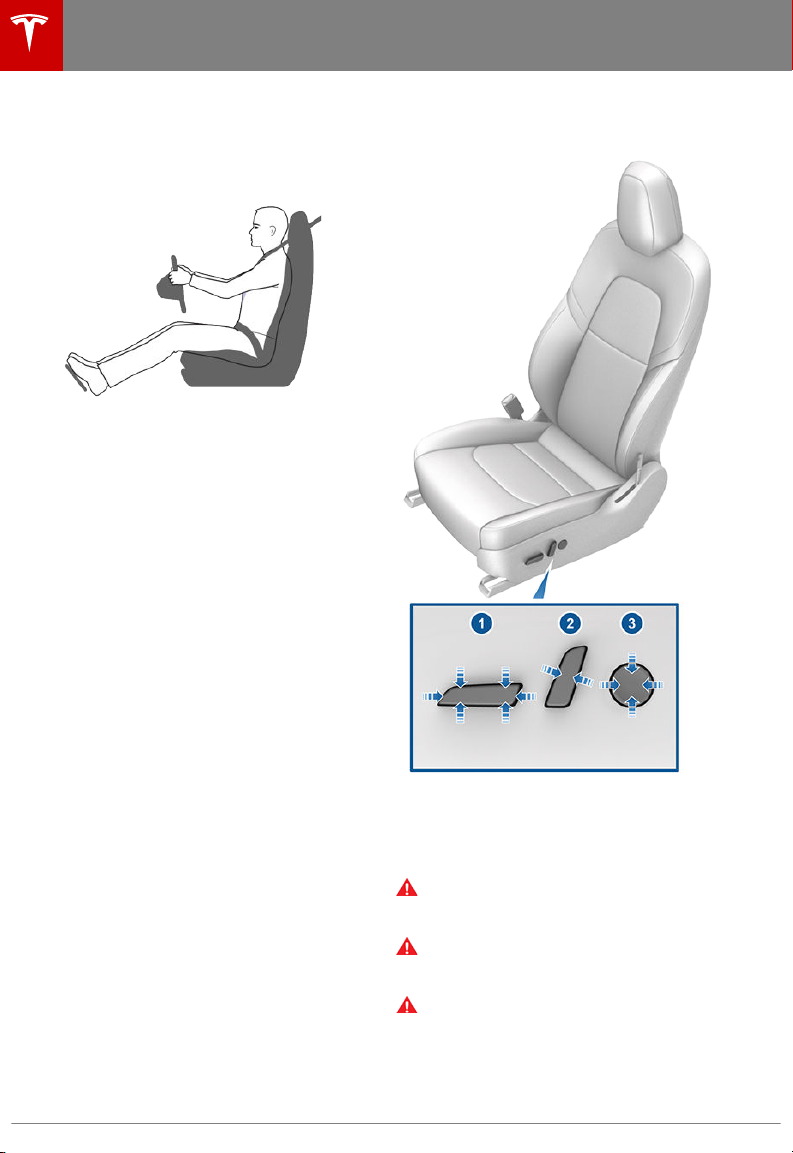
Correct Driving Position
The seat, head support, seat belt and airbags
work together to maximize your safety. Using
these correctly ensures greater protection.
Position the seat so you can wear the seat belt
correctly, while being as far away from the
front airbag as possible:
1. Sit upright with both feet on the
the seat back reclined no more than 30
degrees.
2. Make sure you can easily reach the pedals
and that your arms are slightly bent when
holding the steering wheel. Your chest
should be at least 10 inches (25 cm) from
the center of the airbag cover.
3. Place the shoulder section of the seat belt
mid-way between your neck and your
shoulder. Fit the lap section of the belt
tightly across your hips, not across your
stomach.
Model 3 seats include integrated head
supports that cannot be adjusted or removed.
floor and
Adjusting the Front Seats Premium Package
1. Move seat forward/backward and adjust
the seat’s height and tilt angle up/down.
2. Adjust backrest.
3. Adjust lumbar support.
Warning:
check that the area around the seat is
free of obstacles (people and objects).
Warning: Do not adjust seats while
driving. Doing so increases the risk of a
collision.
Warning: Riding in a moving vehicle with
the seat back reclined can result in
serious injuries in a collision, as you could
slide under the lap belt or be propelled
into the seat belt. Ensure your seat back
is reclined no more than 30 degrees when
the vehicle is moving.
18 Model 3 Owner's Manual
Before adjusting a front seat,
Front and Rear Seats
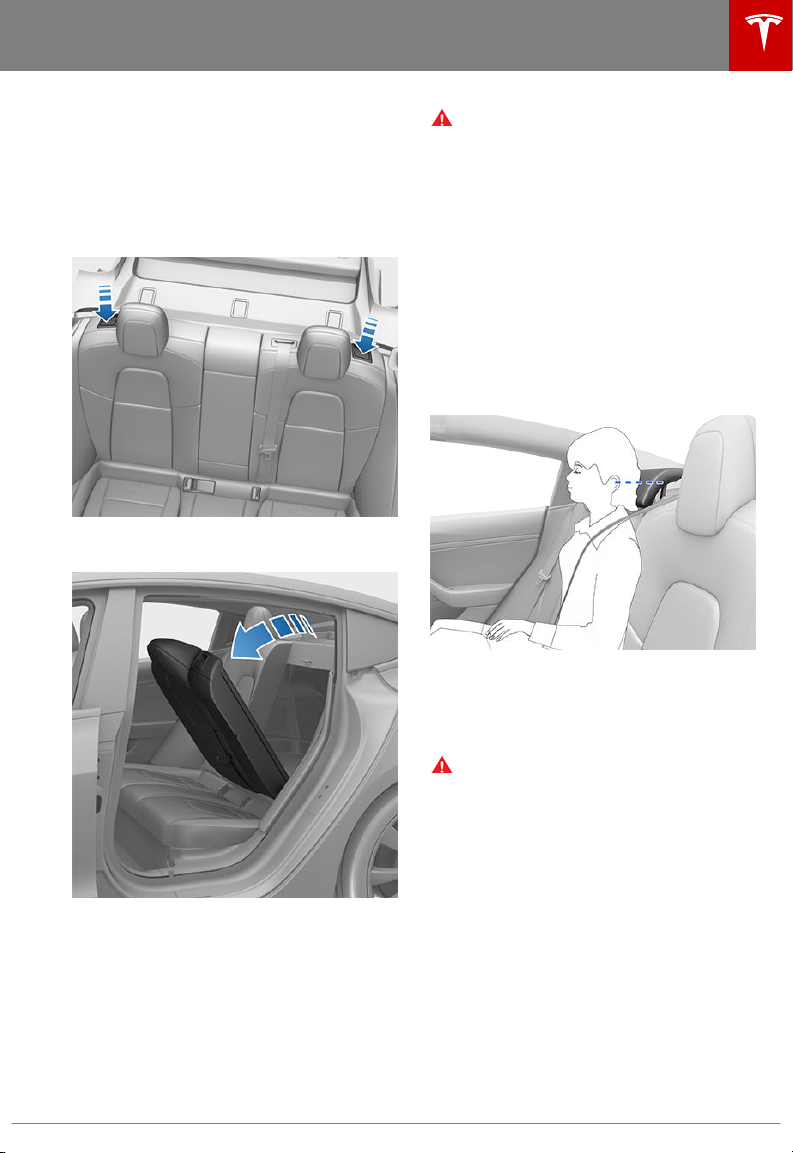
Folding Rear Seats
Model 3 has a split rear seat that can fold
forward.
Before folding, remove items from the seats
and the rear footwell. To allow the rear seat
backs to fold completely
move the front seats forward.
To fold a rear seat, pull the corresponding
lever and fold the seat forward.
flat, you may need to
Warning:
are locked in their upright position.
Failure to do so increases the risk of
injury.
Always ensure the seat backs
Head Supports
The front seats and outer rear seats include
integrated head supports that are not
adjustable.
The rear center seat includes an adjustable
head support that can be raised, lowered, or
removed. The head support should always be
raised and locked into position (so that the
center is aligned with the center of the ears)
when occupied by a passenger that is not in a
child safety seat.
The head support in the rear center seat
should always be lowered when a seat belt
retained child safety seat is installed. See
Raising/Lowering the Rear Center Head
Support on page 19.
Warning:
are positioned correctly before sitting in,
or operating, Model 3 to minimize the risk
of severe injury or death in the event of a
collision.
Ensure that all head supports
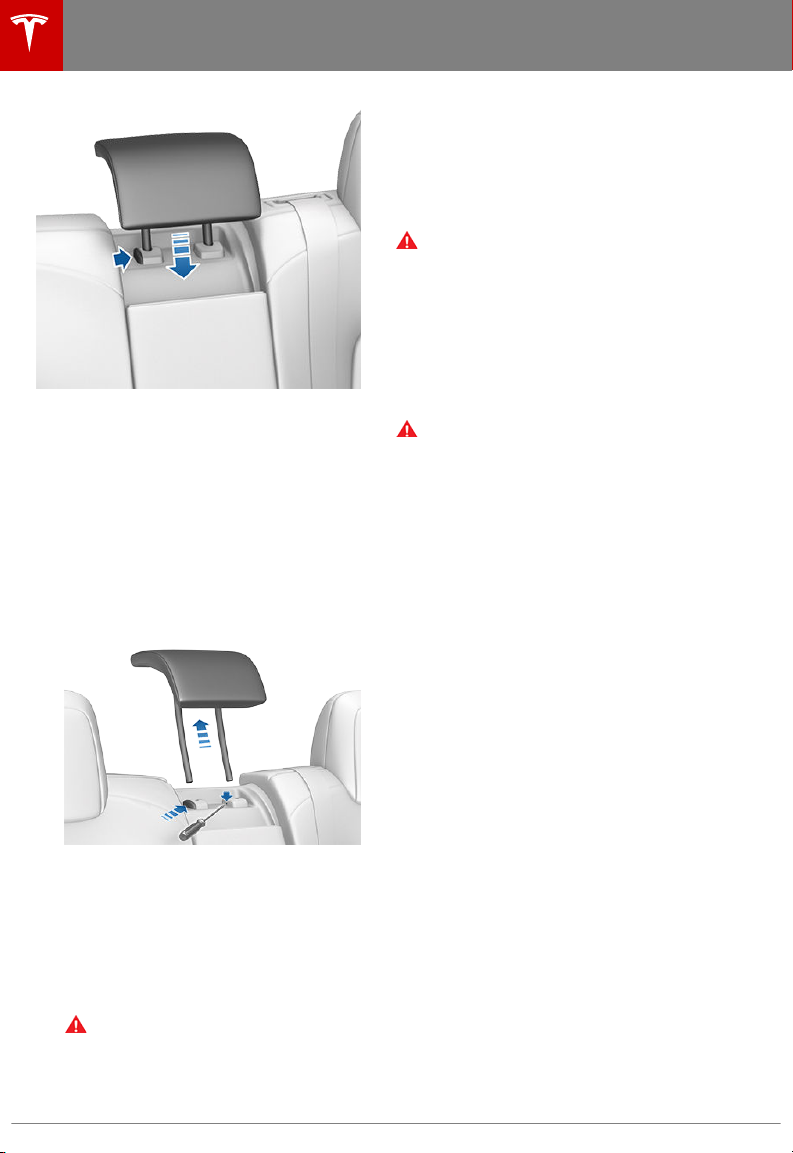
Raising/Lowering the Rear Center Head Support
To raise the head support, lift it until you hear
Raising Rear Seats
Before raising a rear seat, make sure that the
seat belts are not trapped behind the
backrest.
Pull the seat back upward until it locks into
place.
To
confirm that the seat back is locked in the
upright position, try pulling it forward.
Seating and Safety Restraints 19
it click into place. Push down on the head
support to ensure that it is secure.
To lower the head support, press and hold the
button on the outer base of the right post and
press the head support down.
Front and Rear Seats
Removing/Installing the Rear Center Head Support
To remove the head support:
1. Raise the head support (see Raising/
Lowering the Rear Center Head Support
on page 19).
2. Press and hold the button on the outer
base of the right post.
3. Insert a short,
flat head screwdriver) into the opening on
the inside base of the left post and pull
the head support upwards.
flat object (such as a small
Seat Heaters
The front and rear seats are equipped with
heating pads that operate at three levels from
3 (highest) to 1 (lowest). To operate the seat
heaters, see Operating Seat Heaters on page
89.
Warning: To avoid burns resulting from
prolonged use, individuals who have
peripheral neuropathy, or whose capacity
to feel pain is limited because of diabetes,
age, neurological injury, or some other
condition, should exercise caution when
using the climate control system and seat
heaters.
Seat Covers
Warning: Do not use seat covers in Model
3. Doing so could restrict deployment of
the seat-mounted side air bags if a
collision occurs. It can also reduce the
accuracy of the occupant detection
system.
To install the head support:
1. With the front of the head support facing
forward, insert both posts into the
corresponding holes on the backrest.
2. Press down on the head support until you
hear it click into place.
3. Pull up on the head support to ensure that
it is secure.
Warning:
support is installed properly before
anyone occupies the rear center seat.
Failure to do so increases the risk of
injury or death if a collision occurs.
20 Model 3 Owner's Manual
Ensure that the head

Wearing Seat Belts
Using seat belts and child safety seats is the
most eective way to protect occupants if a
collision occurs. Therefore, wearing a seat belt
is required by law in most jurisdictions.
Both the driver and passenger seats are
equipped with three-point inertia reel seat
belts. Inertia reel belts are automatically
tensioned to allow occupants to move
comfortably during normal driving conditions.
To securely hold child safety seats, all
passenger seating positions are equipped with
an automatic locking retractor (ALR) that, by
pulling the seat belt beyond the length
needed for a typical adult occupant, locks the
belt into place until the seat belt is unbuckled
(see Installing Seat Belt Retained Child Seats
on page 26).
The seat belt reel automatically locks to
prevent movement of occupants if Model 3
experiences a force associated with hard
acceleration, braking, cornering, or an impact
in a collision.
The seat belt reminder on the
touchscreen alerts you if a seat belt
for an occupied seat is not fastened.
If the belt remains unfastened, the
reminder
chime sounds. If all occupants are
buckled up and the reminder stays
on, re-fasten seat belts to ensure
they are correctly latched. Also
remove any heavy objects (such as a
briefcase) from an unoccupied seat.
If the reminder light continues to
stay on, contact Tesla.
flashes and an intermittent
Seat Belts
3.
Insert the latch plate into the buckle and
press together until you hear a click
indicating it is locked in place.
4. Pull the belt to check that it is securely
fastened.
5. Pull the diagonal part of the belt toward
the reel to remove excess slack.
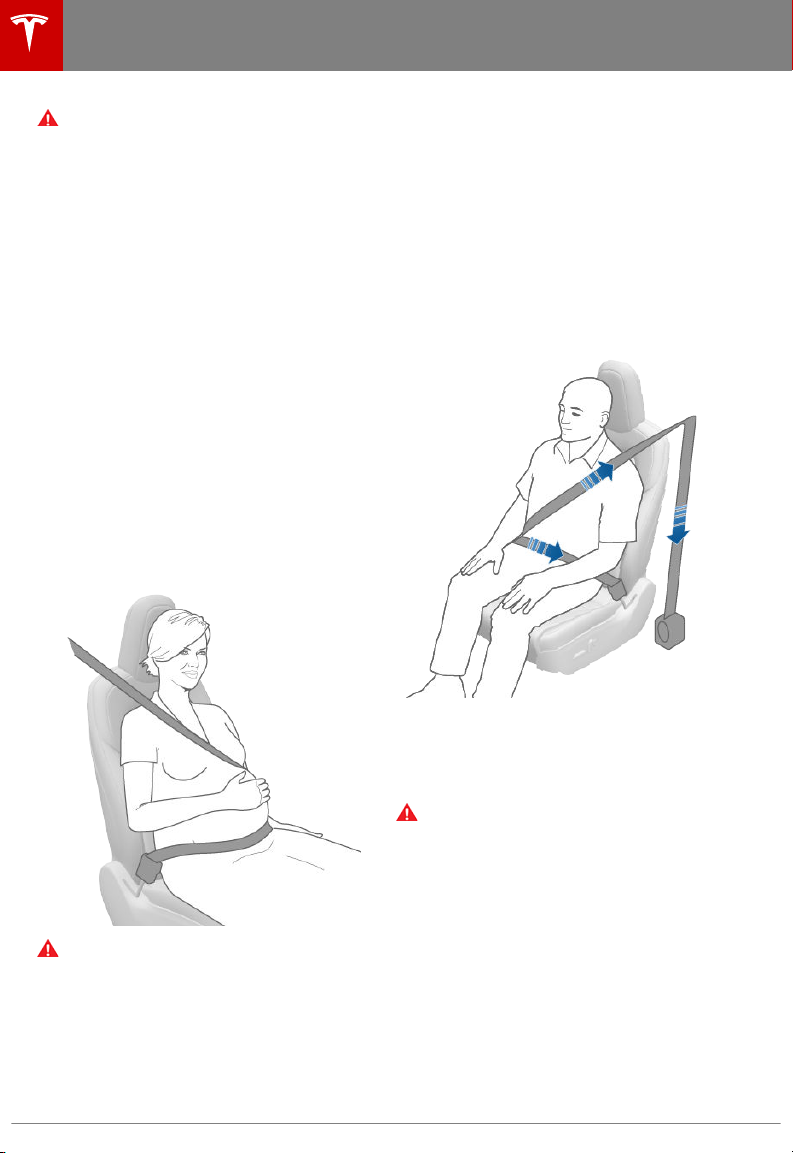
To Adjust the Shoulder Anchor Height
Model 3 is equipped with an adjustable
shoulder anchor for each front seat to ensure
that the seat belt is positioned correctly. The
seat belt should lay
of your collar bone while in the correct driving
position (see Correct Driving Position on page
18). Adjust the height of the shoulder anchor if
the seat belt is not positioned correctly:
1. Press and hold the button on the shoulder
anchor to release the locking mechanism.
2. While holding the button, move the
shoulder anchor up or down as necessary
so that the seat belt is positioned
correctly.
flat across the mid-point
To Fasten a Belt
1. Ensure correct positioning of the seat (see
Correct Driving Position on page 18).
2. Draw the belt out smoothly, ensuring the
belt lays
mid-point of your collar bone, between
the neck and shoulder.
Seating and Safety Restraints 21
flat across the pelvis, chest and
3. Release the button on the shoulder anchor
so that it locks into position.
4. Without pressing the button, pull on the
seat belt webbing and attempt to move
the shoulder anchor downwards to check
that it is locked into position.
Seat Belts
Warning: Ensure that the seat belt is
positioned correctly and that the
shoulder anchor is locked into position
before driving. Riding in a moving vehicle
with the seat belt positioned incorrectly
or with the shoulder anchor not locked
into position can reduce the eectiveness
of the seat belt in a collision.
To Release a Belt
Hold the belt near the buckle to prevent the
belt from retracting too quickly, then press the
button on the buckle. The belt retracts
automatically. Ensure there is no obstruction
that prevents the belt from fully retracting.
The belt should not hang loose. If a seat belt
does not fully retract, contact Tesla.
Wearing Seat Belts When Pregnant
Do not put the lap or shoulder sections of the
seat belt over the abdominal area. Wear the
lap section of the belt as low as possible
across the hips, not the waist. Position the
shoulder portion of the belt between the
breasts and to the side of the abdomen.
Consult your doctor for
specific guidance.
Seat Belt Pre-tensioners
The front seat belts are equipped with
pre‑tensioners that work in conjunction with
the airbags in a severe frontal collision. The
pre‑tensioners automatically retract both the
seat belt anchor and the seat belt webbing,
reducing slack in both the lap and diagonal
portions of the belts, resulting in reduced
forward movement of the occupant.
The rear outboard seats are equipped with
shoulder pre-tensioners to retract the seat
belt webbing to reduce forward movement of
the occupant.
If the pre-tensioners and airbags did not
activate in an impact, this does not mean they
malfunctioned. It usually means that the
strength or type of force needed to activate
them was not present.
Warning:
tensioners have been activated, they must
be replaced. After any collision, have the
airbags, seat belt pre-tensioners and any
associated components checked and, if
necessary, replaced.
Warning: Never place anything between
you and the seat belt to cushion the
impact in the event of a collision.
22 Model 3 Owner's Manual
Testing Seat Belts
To confirm that seat belts are operating
correctly, perform these three simple checks
on each seat belt.
1. With the seat belt fastened, give the
webbing nearest the buckle a quick pull.
The buckle should remain securely locked.
Once the seat belt pre-

Seat Belts
2. With the belt unfastened, unreel the
webbing to its limit. Check that unreeling
is free from snags, and visually check the
webbing for wear. Allow the webbing to
retract, checking that retraction is smooth
and complete.
3. With the webbing half unreeled, hold the
tongue plate and pull forward quickly. The
mechanism should lock automatically and
prevent further unreeling.
If a seat belt fails any of these tests, contact
Tesla immediately.
For information about cleaning seat belts, see
Seat Belts on page 120.
Seat Belt Warnings
Warning: Seat belts should be worn by all
occupants at all times, even if driving for
a very short distance. Failure to do so
increases the risk of injury or death if a
collision occurs.
Warning: Secure small children in a
suitable child safety seat (see Child
Safety Seats on page 24). Always follow
the child safety seat manufacturer's
instructions when installing.
Warning: Ensure that all seat belts are
worn correctly. An improperly worn seat
belt increases the risk of injury or death if
a collision occurs.
Warning: Do not wear seat belts over
hard, fragile or sharp items in clothing,
such as pens, keys, eyeglasses, etc. The
pressure from the seat belt on such items
can cause injury.
Warning: Seat belts should not be worn
with any part of the strap twisted.
Warning: Each seat belt assembly must
be used by one occupant only. It is
dangerous to put a seat belt around a
child being carried on an occupant’s lap.
Warning: Seat belts that have been worn
in a collision must be inspected or
replaced by Tesla, even if damage to the
assembly is not obvious.
Warning: Seat belts that show signs of
wear (such as fraying), or have been cut
or damaged in any way, must be replaced
by Tesla.
Warning: Avoid contaminating a seat
belt’s components with any chemicals,
liquids, grit, dirt or cleaning products. If a
seat belt fails to retract or latch into the
buckle, it must be replaced immediately.
Contact Tesla.
Warning: Do not make modifications or
additions that can prevent a seat belt
mechanism from taking up slack, or that
can prevent a seat belt from being
adjusted to remove slack. A slack belt
greatly reduces occupant protection.
Warning: Do not make modifications that
can interfere with the operation of a seat
belt, or that can cause a seat belt to
become inoperable.
Warning: When seat belts are not in use,
they should be fully retracted and not
hanging loose. If a seat belt does not fully
retract, contact Tesla.
Seating and Safety Restraints 23
Child Safety Seats
Guidelines for Seating Children
Your Model 3 seat belts are designed for adults and larger children. You must restrain infants and
small children in the rear row seats only, and you must use a suitable child safety seat appropriate
for the child’s age, weight, and size.
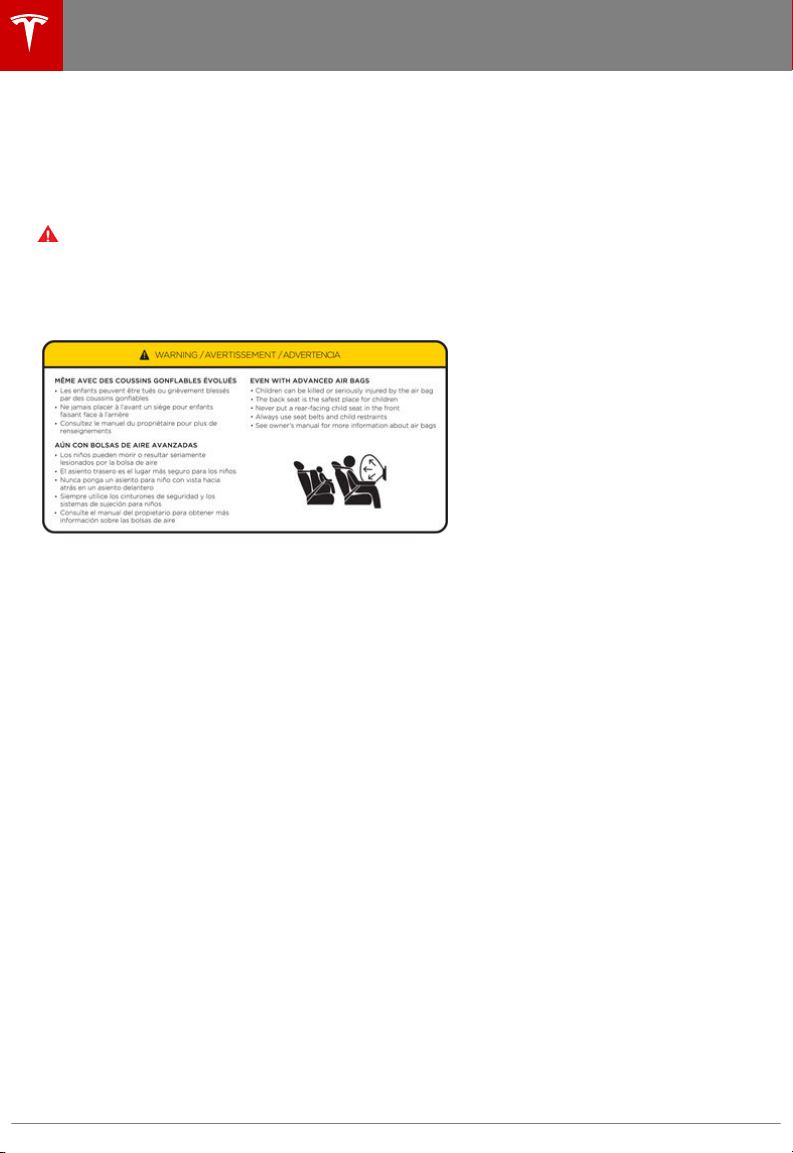
Never use child safety seats in the front row passenger seat.
Warning: Never seat a child on a seat with an ACTIVE AIRBAG in front of it. DEATH or
SERIOUS INJURY to the child can occur.
Refer to the following label fitted to the sun visors.
Note: The image shown below is representative only and may not be identical to the label in your
vehicle.
24 Model 3 Owner's Manual
Child Safety Seats
Choosing a Child Safety Seat
All children age 12 and under should ride in the rear (second row) seats. Always use a child safety
seat suitable for a young child’s age and weight.
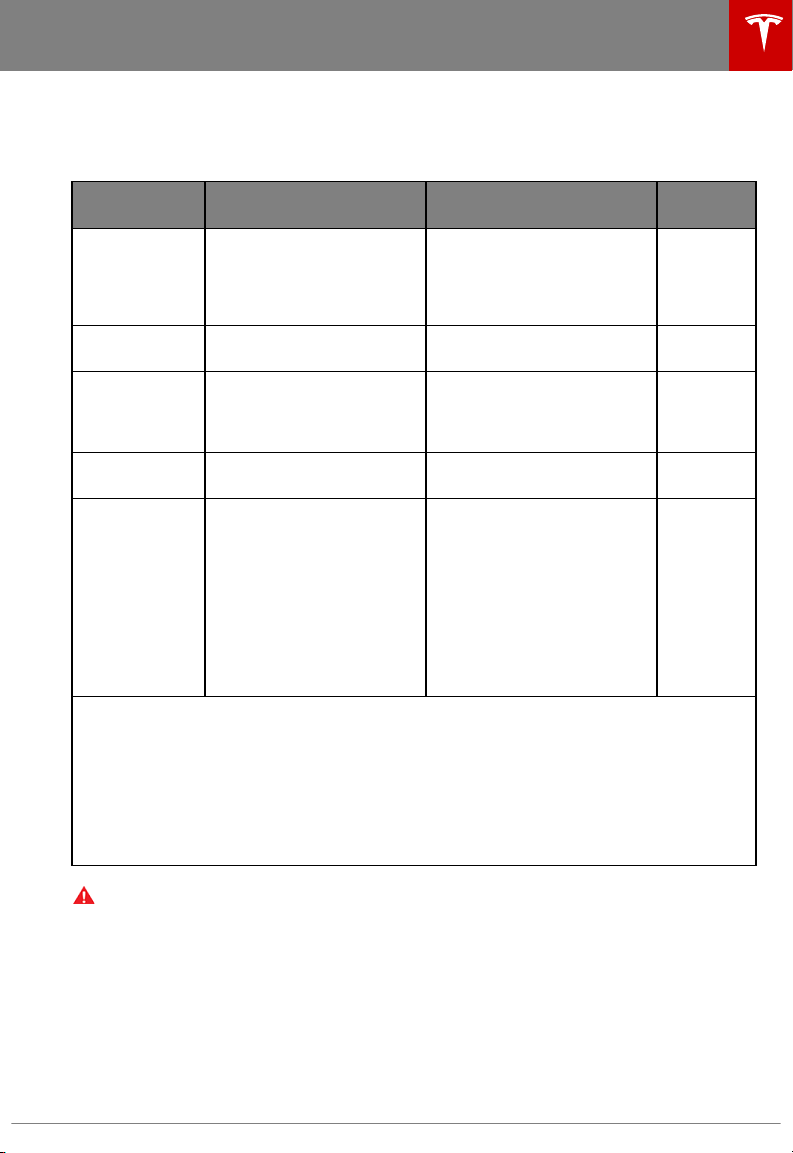
Infants Toddlers Young
Age Birth to 1 year* Over 1 year* 4 years and
Weight Up to at least 20 lbs (9 kg)* Over 20 lbs (9 kg) (minimum)
Type of child
safety seat
Seat position Rear facing only* Forward facing* Forward
Recommended
attachment
method
* Many child safety seats currently available allow children to ride rear-facing using the child
safety seat’s integrated 5-point harness for a longer period of time BASED UPON SPECIFIC
HEIGHT AND WEIGHT LIMITS. Keep your child in a rear facing seat for as long as possible.
CHECK THE CHILD SAFETY SEAT MANUFACTURER’S INSTRUCTIONS AND CAREFULLY
FOLLOW ALL INSTRUCTIONS
** LATCH - Lower Anchors and Tethers for Children. In Canada, this is also called Lower
Universal Anchorage System (LUAS), or CANFIX.
*** Subject to instructions provided by the child safety seat manufacturer.
Rear facing (or convertible) Forward facing (or
If combined weight of child
and safety seat is up to
65 lbs (29 kg), attach using
either LATCH** (lower anchor
only) or the seat belt only.***
If combined weight of child
and safety seat is over 65 lbs
(29 kg), attach using the seat
belt only.***
and up to 40 lbs (18 kg)*
convertible)*
If combined weight of child
and safety seat is up to 65 lbs
(29 kg), attach using either
LATCH** (both lower anchors
and top tether anchor), or the
seat belt and upper tether
strap.*** If combined weight of
child and safety seat is over
65 lbs (29 kg), attach using the
seat belt and upper tether
strap.***
children
older, and
less than 57
in. (145 cm)
tall
Over 40 lbs
(18 kg)
Seat belt
retained
booster
seat
facing
Attach
booster
seats using
the seat
belt only.
Warning: Laws that govern how and where children should be carried when traveling in a
vehicle are subject to change. It is the driver’s responsibility to keep up to date on, and
comply with, all current regulations in the region(s) where Model 3 is driven. To check the
child passenger safety laws for states in the U.S., go to: http://www.ghsa.org/html/stateinfo/
laws/childsafety_laws.html.
Seating and Safety Restraints 25

Child Safety Seats
Seating Larger Children
If a child is too large to fit into a child safety
seat, but too small to safely fit into the
standard seat belts, use a booster seat
appropriate for the child’s age and size.
Carefully follow the manufacturer’s
instructions to secure the booster seat.
Installing Child Safety Seats
There are two general methods used to install
child safety seats:
• Seat belt retained - these seats are
secured using the vehicle’s seat belts (see
Installing Seat Belt Retained Child Seats
on page 26).
• LATCH retained - these seats can attach
to anchor bars built into the vehicle’s rear
seats (see Installing LATCH Child Seats on
page 26).
Check the child safety seat manufacturer’s
instructions and the table at Child Safety
Seats on page 24 to determine which
installation method to use. Some child safety
seats can be installed using either method.
Always follow the child safety seat
manufacturer’s instructions.
Note:
An automatic locking retractor
disengages only when the seat belt is
unbuckled and fully retracted. The belt can
then be worn as a normal belt, sliding freely in
and out and locking tight only in an
emergency. Once disengaged, the belt must
be fully extended to re-engage the locking
mechanism whenever you install a child safety
seat.
Always follow the detailed instructions
provided by the child safety seat
manufacturer. General guidelines are provided
below.
1. Place the child safety seat in Model 3, and
fully extend the seat belt. Route and
buckle the seat belt in accordance with
the child safety seat manufacturer’s
instructions.
Installing Seat Belt Retained Child
Seats
First, make sure that the child safety seat is
appropriate for the weight, height, and age of
the child.
Avoid dressing the child in bulky clothing and
do not place any objects between the child
and the restraint system.
Adjust harnesses for every child, every trip.
To securely hold child safety seats, all
passenger seating positions are equipped with
an automatic locking retractor (ALR) that, by
pulling the seat belt beyond the length
needed for a typical adult occupant, locks the
belt into place until the seat belt is unbuckled
and the webbing is fully retracted. The ALR
mechanism operates as a ratchet, winding in
slack and preventing the seat belt from
extending any further until it has been
completely rewound. When installing a child
safety seat, engage the belt's automatic
locking retractor by pulling the seat belt
webbing until it is fully extended. The ALR
system engages only when the seat belt is at
its maximum extension point.
26 Model 3 Owner's Manual
2. Allow the seat belt to retract, and remove
all slack in the seat belt while firmly
pushing the child safety seat into the
Model 3 seat.
3. If the seat belt retained child safety seat
has an upper tether, attach it to the back
of the seat (see Attaching Upper Tether
Straps on page 27).
Installing LATCH Child Seats
Lower LATCH anchors are provided in the
second row outboard seats. The anchors are
located between the seat's back rest and rear
cushion. The exact location of each anchor is
identified by a child safety seat identification
button, illustrated below. The button is located
on the seat back, directly above its associated
anchor.

Install LATCH child safety seats in the
outboard seating positions only. Use only a
seat belt retained seat in the center position.
Child Safety Seats
Once installed, test the security of the
installation before seating a child. Attempt to
twist the child safety seat from side to side
and try to pull it away from the seat, then
check to ensure the anchors remain securely
in place.
Note: Lower LATCH anchors should not be
used with child seats or booster seats that
have an integrated safety belt in situations
where the combined weight of the child plus
the child restraint is more than 65 lbs (29 kg).
In these situations, use the safety belt instead.
Attaching Upper Tether Straps
If an upper tether strap is provided, attach its
hook to the anchor point located on the shelf
behind the rear seating positions.
Warning: Tighten upper tether straps
according to the instructions provided by
the manufacturer of the child safety seat.
Warning: USE ONLY SEAT BELT
RETAINED CHILD SAFETY SEATS IN THE
CENTER SEATING POSITION.
To install a LATCH child safety seat, slide the
safety seat latches onto the anchor bars until
they click into place. Carefully read and follow
the instructions provided by the child safety
seat manufacturer.
Seating and Safety Restraints 27
To access an anchor point, press down on the
back of its cover.
Child Safety Seats
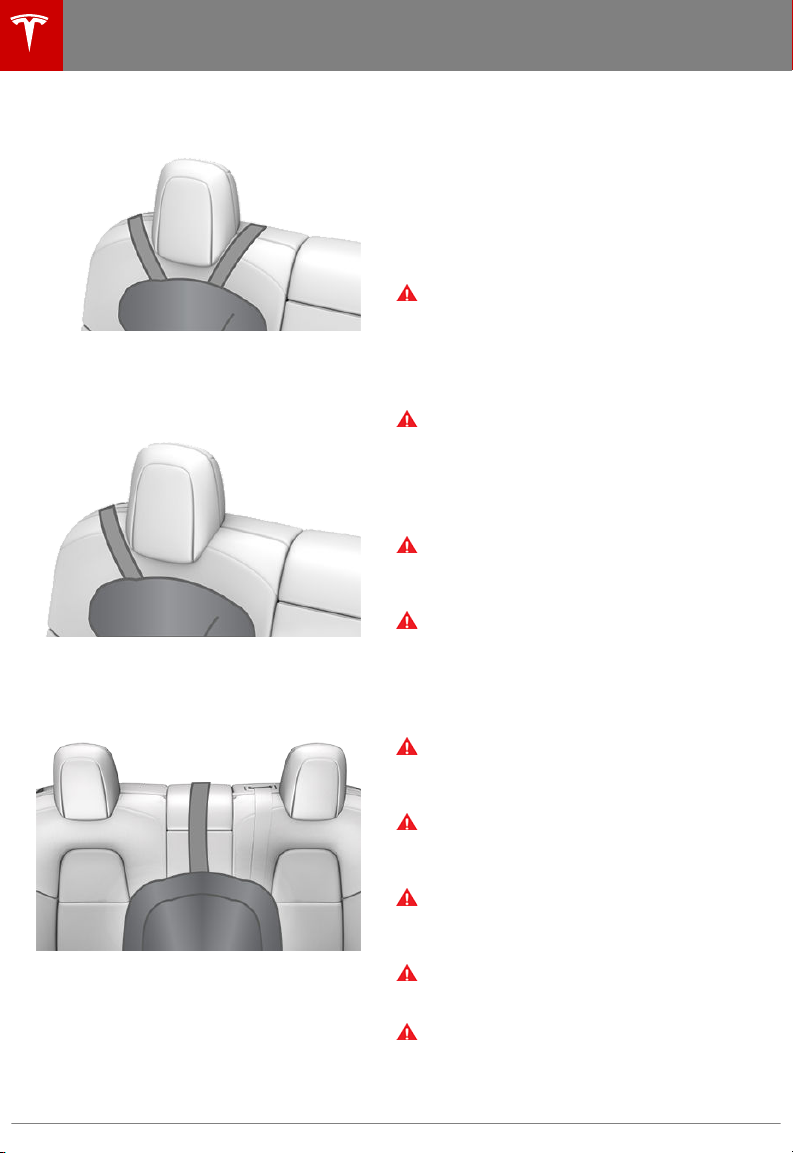
For dual-strap tethers, position a strap on
each side of the head support.
For single-strap tethers at the outboard
seating positions, run the strap over the
outside-facing side of the head support (i.e.
same side of the head support as the seat belt
retraction mechanism).
For a single-strap tether in the center seating
position, fully lower the head support (see
Raising/Lowering the Rear Center Head
Support on page 19) and run the strap over
the top center of the head support.
Testing a Child Safety Seat
Before seating a child, always make sure the
child safety seat is not loose:
1. Hold the child safety seat by the belt path
and try to slide the safety seat from side
to side and front to back.
2.
If the seat moves more than one inch
(2.5 cm), it is too loose. Tighten the belt or
reconnect the LATCH retained child safety
seat.
3. If you are unable to reduce slack, try a
dierent seat location or try another child
safety seat.
Child Safety Seat Warnings
Warning: Extreme hazard! Do not seat a
child on the front passenger seat even if
you are using a child safety seat. This seat
has an airbag in front of it. Although this
airbag is disabled when Model 3 detects a
lightweight passenger, do not rely on
technology to protect your child.
Warning: Child restraint systems are
designed to be secured in vehicle seats
by lap belts or the lap belt portion of a
lap-shoulder belt. Children could be
endangered in a crash if their child
restraints are not properly secured in the
vehicle.
Warning: According to collision statistics,
children are safer when properly
restrained in the rear seating positions
than in the front seating positions.
Warning: Do not use a forward facing
child safety seat until your child weighs
over 20 lbs (9 kg) and can sit
independently. Up to the age of two, a
child's spine and neck are not suciently
developed to avoid injury in a frontal
impact.
Warning: Do not allow a baby or infant to
be held on a lap. All children should be
restrained in an appropriate child safety
seat at all times.
Warning: To ensure children are safely
seated, follow all instructions provided in
this document and by the manufacturer
of the child safety seat.
Warning: Children should ride in a rear
facing child safety seat using the seat’s
integrated 5-point harness for as long as
possible.
Warning: Do not use seat belt extenders
on a seat belt that is being used to install
a child safety seat or booster seat.
Warning: When seating larger children,
make sure the child's head is supported
and the child’s seat belt is properly
adjusted and fastened. The shoulder
portion of the belt must be away from the
28 Model 3 Owner's Manual
 Loading...