

Page 1
--- 1 ---
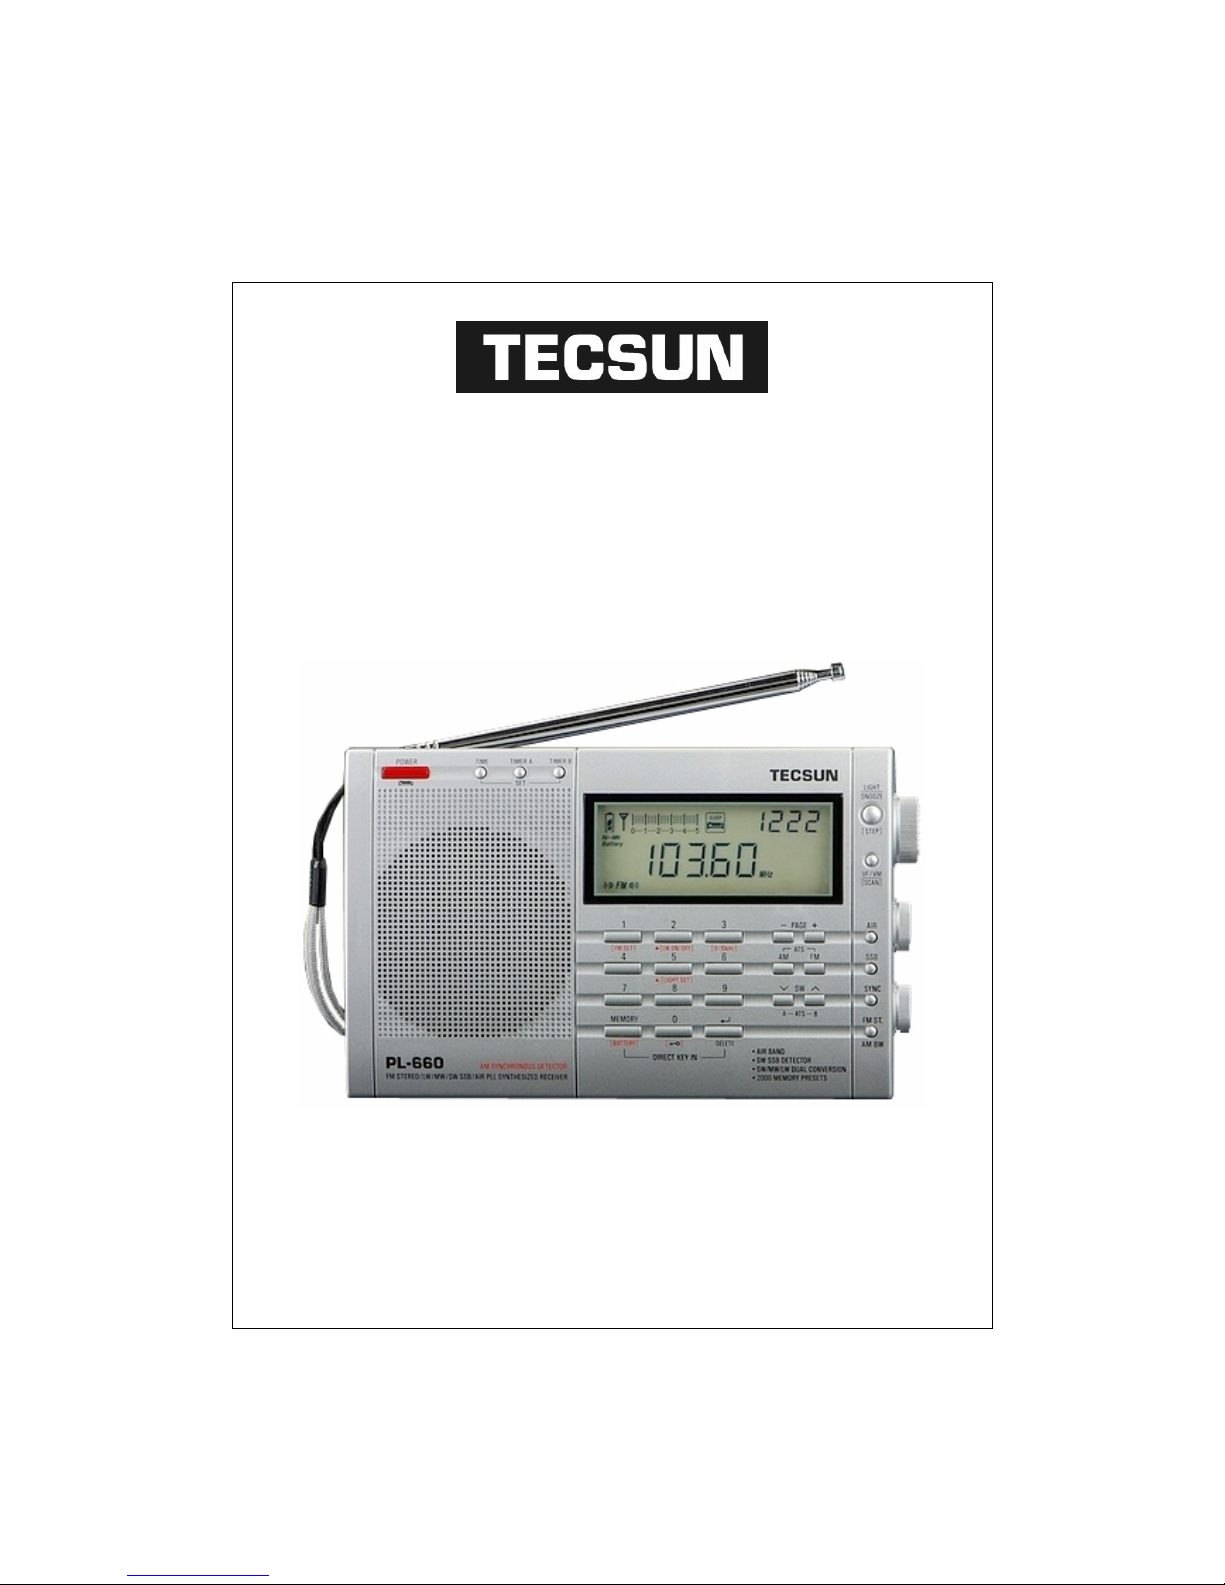
TECSUN ELECTRONIC IND. LTD.
TECSUN PL-660
PLL SYNTHESIZED RECEIVER
FM STEREO / MW / LW / SW-SSB / AIR BAND
OPERATION MANUAL
RN3AMM - 2010
Page 2

. -- 2 --
TABLE OF CONTENTS
TABLE OF CONTENTS …………………………………………………………………. 2
FEATURES ……………………………………………………… ……………………………... 4
CONTROL LOCATIONS ……………………………………………………………….. 5
LCD DISPLAY ……………………………………………… ………………………………... 7
HOW TO TURN ON/OFF THE RADIO …………………………………………. 9
TUNE IN STATIONS ……………………………………………………………………… 11
METHOD 1: MANUAL STATION TUNING ……………………………….
11
METHOD 2: AUTO BROWSE STATION ……………………………………
11
METHOD 3: DIRECT KEYPAD ENTRY …………………………………….
12
WORKING WITH STATION MEMORIES …………………………………… 13
METHOD 1: STORING STATION MANUALLY ………………………...
13
METHOD 2: SEMI-AUTOMATIC STORING STATION ……………..
13
METHOD 3: ATS (AUTO TUNING STORAGE) ………………………….
14
FM ATS ………………………………………………………… ……………………..
14
MW/LW ATS ………… ……………………………………………………………..
14
SW ATS ………………………………………………………………………………..
14
HOW TO SELECT DIFFERENT MEMORY PAGE ……………………...
15
DELETE MEMORY …………………… ………………………………………………
15
METHOD 1: DELETE SINGLE MEMORY MANUALLY ……...
15
METHOD 2: SEMI-AUTO DELETE MEMORY …………………….
16
METHOD 3: DELETE ALL MEMORY WITHIN THE PAGE ...
16
LISTENING TO STORED STATIONS …………………………………………... 17
METHOD 1: MEMORY TUNING MANUALLY …………………………
17
METHOD 2: AUTO BROWSE MEMORY …………………………………...
17
METHOD 3: DIRECT KEY IN MEMORY ADDRESS …………………
17
SLEEP FUNCTION ………………………………………………………………………… 18
CLOCK SETTING ………………………………………………………………………….. 18
ALARM SETTING (By Radio only) ………………………………………………... 19
SETTING THE ALARM STATION ……………………………………………..
19
SETTING THE ALARM TIME ……………………………………………………
19
SNOOZE FUNCTION …………………… ……………………………………………….. 20
INTELLIGENT LIGHT FUNCTION ……………………………………………... 20
TURN ON/OFF THE BACKLIGHT ……………………………………………..
20
SETTING TUNING STEP ………………………………………………………………. 21
FM ST. (FM STEREO) ……………………………………………………………………. 21
AM BW (BANDWIDTH) ………………………………………………………………… 22
ANT. GAIN ……………………………………………………………………………………... 22
Page 3

-- 3 -- .
TABLE OF CONTENTS
TONE CONTROL …………………………………………………………………………... 22
KEY-LOCK FUNCTION ………………………………………………………………... 23
INTELLIGENT CHARGING FUNCTION …………………………………….. 23
SINGLE SIDE BAND (SSB) ………………………………… …………………………. 23
SYNCHRONOUS DETECTOR ……………………………………… ………………. 24
HOW TO IMPROVE FM / SW RECEPTION ……………………………… … 24
SYSTEM SETTING (In Power Off Mode) ………………………………………. 25
SETTING FM FREQUENCY RANGE …………………………………………
25
TURN ON/OFF THE LW …………………………………………………………….
25
SETTING MW (AM) TUNING STEP …………………………………………..
25
TURN ON/OFF THE INTELLIGENT AUTO LIGHTING …………….
25
TURN ON/OFF THE CHARGING FUNCTION …………………………...
25
Using Regular Batteries for power supply ………………………………..
25
Using Rechargeable Batteries for power supply ………………………..
25
RESET PROCEDURE ………………… ………………………………………………….. 26
IMPORTANT MATTERS FOR USING BATTERIES …………………… 26
TROUBLE SHOOTING ………………………………………………………………….. 27
SPECIFICATIONS …………… ……………………………………………………………. 29
NOTES …………………………………………………………………………… ………………. 31
Page 4

. -- 4 --
FEATURES
· FM-Stereo/MW/LW/SW/SSB/AIR band (118-137 MHz) World Receiver with
high sensitivity and selectivity
· Easy operation and with high quality acoustic sound
· Worldwide FM band coverage from 76 MHz to 108 MHz
· Shortwave single-sideband (SSB) with upper sideband (USB) and lower sideband
(LSB)
· Synchronous detection and dual conversion technology are applied on AM band.
(Major improvement on receiver's sensitivity, selectivity, anti-inter-modulation,
and channel interference)
· External antenna jack for FM/SW
· 3 levels sensitivity selector (High/Medium/Low)
· Multi Tuning Methods:
- Auto Tuning Storage (ATS)
- Auto Scan Tuning with 5 seconds Pre-listening funct ion
- Manual Tuning
- Direct keypad Entry
· Store up to 2000 stations (manually, semi-automatic and fully automatic)
- 100 memories for FM/AM/Longwave/Air Band
- 200 memories for Shortwave
- 200 memories for SSB
- 1200 memories for various bands (12 pages x 100 memories)
· Acoustic speaker with treble/bass tone control switch (FM Stereo via earphone)
· Easy to use wit h multi-functional control knob, which is for setting timer,
frequency tuning, select the page and memory
· Dual timer to turn on the preset radio station.
· Adjustable timer (1~120 minutes) for radio power off automatically (adjustable
timer can be switch off for long period of listening)
· 9K/10K Tuning step for MW
· DX/Normal/Local Antenna Gain
· Back Light and Snooze Function
· Signal Strength & Battery Consumption Display
· Direct Reset Function
· 4 x AA (UM3) size batteries, DC-6V
· Dimension: 187 x 114 x 33 mm
Page 5
-- 5 -- .
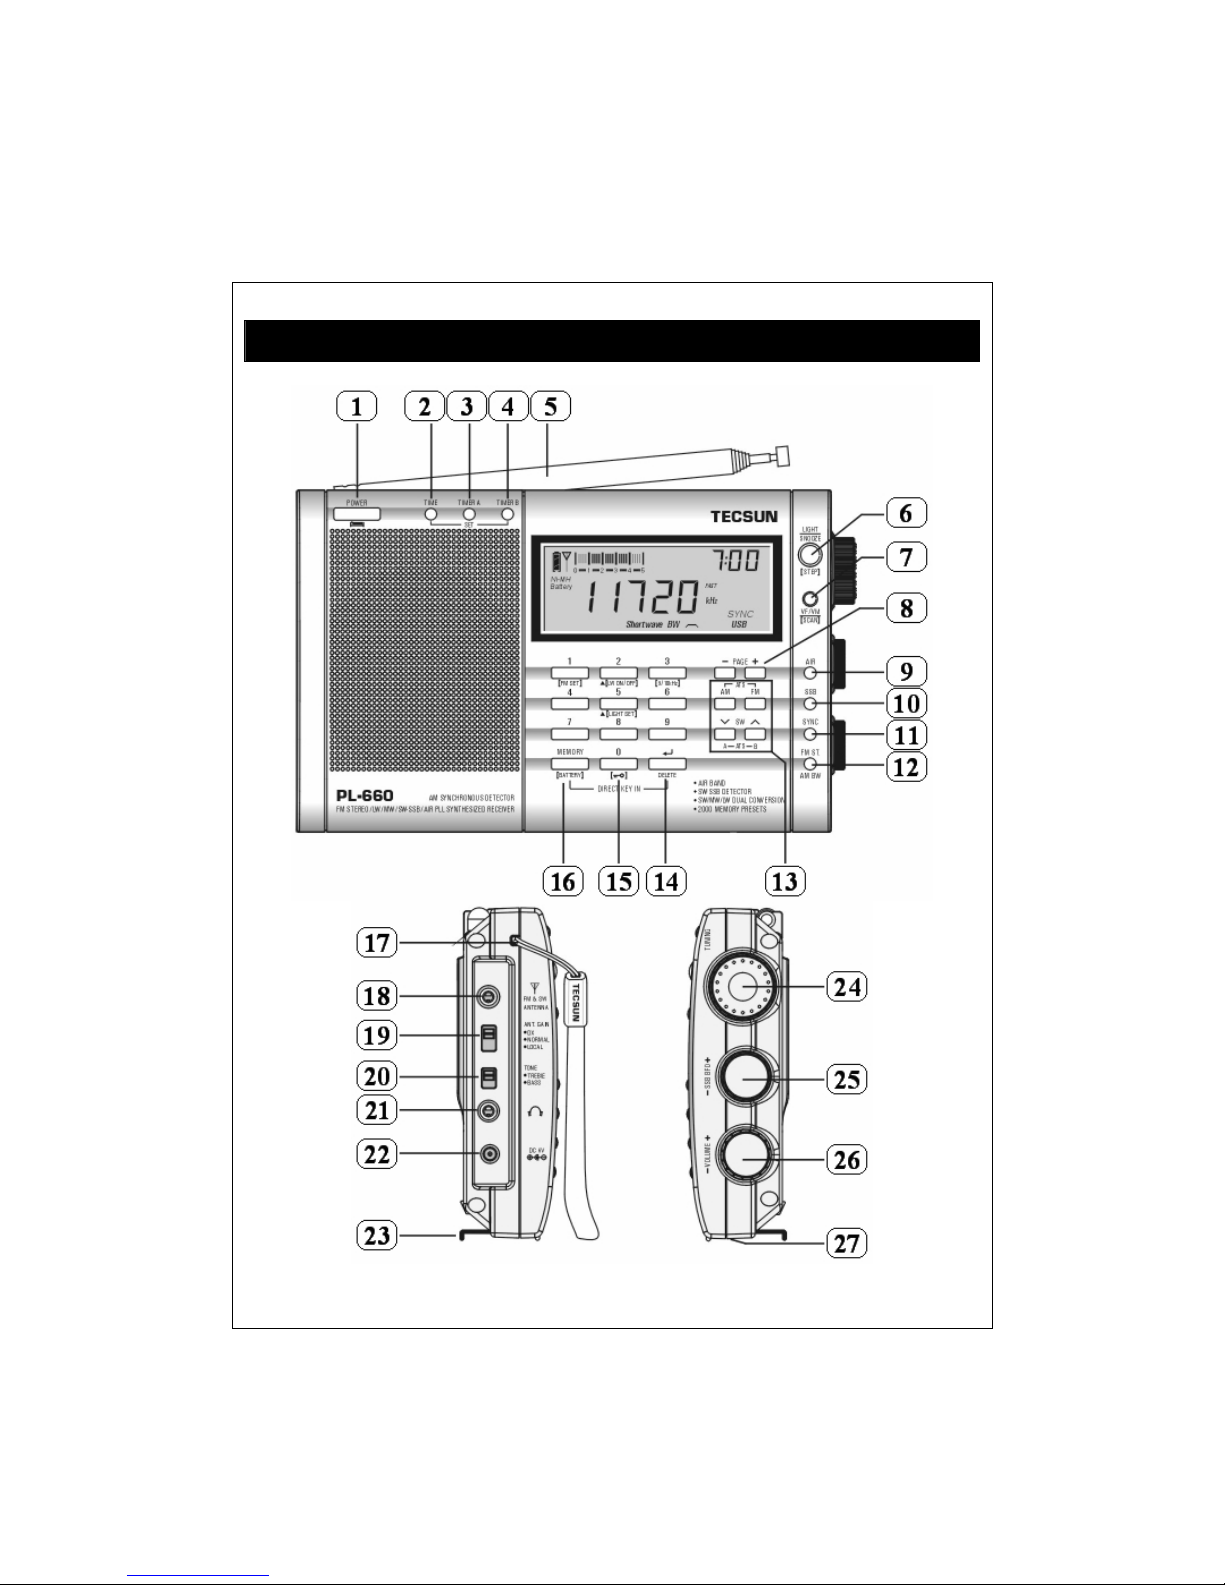
CONTROL LOCATIONS
Page 6

. -- 6 --
CONTROL LOCATIONS
1. Power / Sleep button
2. Time set button
3. Timer A Alarm set button
4. Timer B Alarm set button
5. FM & SW Telescopic Antenna
6. Light / Snooze / Step button
7. VF / VM / SCAN
8. -/+ PAGE buttons
9. Air Band button
10. Single Side Band (SSB) button
11. Synchronous (SYNC) button
12. FM. ST & AM BW select button
13. FM / AM (MW, LW) / SW Band & ATS buttons
14. Delete / Enter button
15. Key lock button
16. Memory / Battery button
17. Hand Carry Belt
18. FM / SW Antenna Jack
19. ANT Gain (DX / Normal / Local) switch
20. Treble / Bass Tone Control
21. Earphone Jack
22. DC 6V Jack
23. Metal Stand
24. Tuning Knob
25. SSB BFO knob
26. Volume knob
27. Reset button
Note: For the silk-printing in red or orange on radio with brackets, it means that you
can only operate it when radio is off.
Page 7
-- 7 -- .
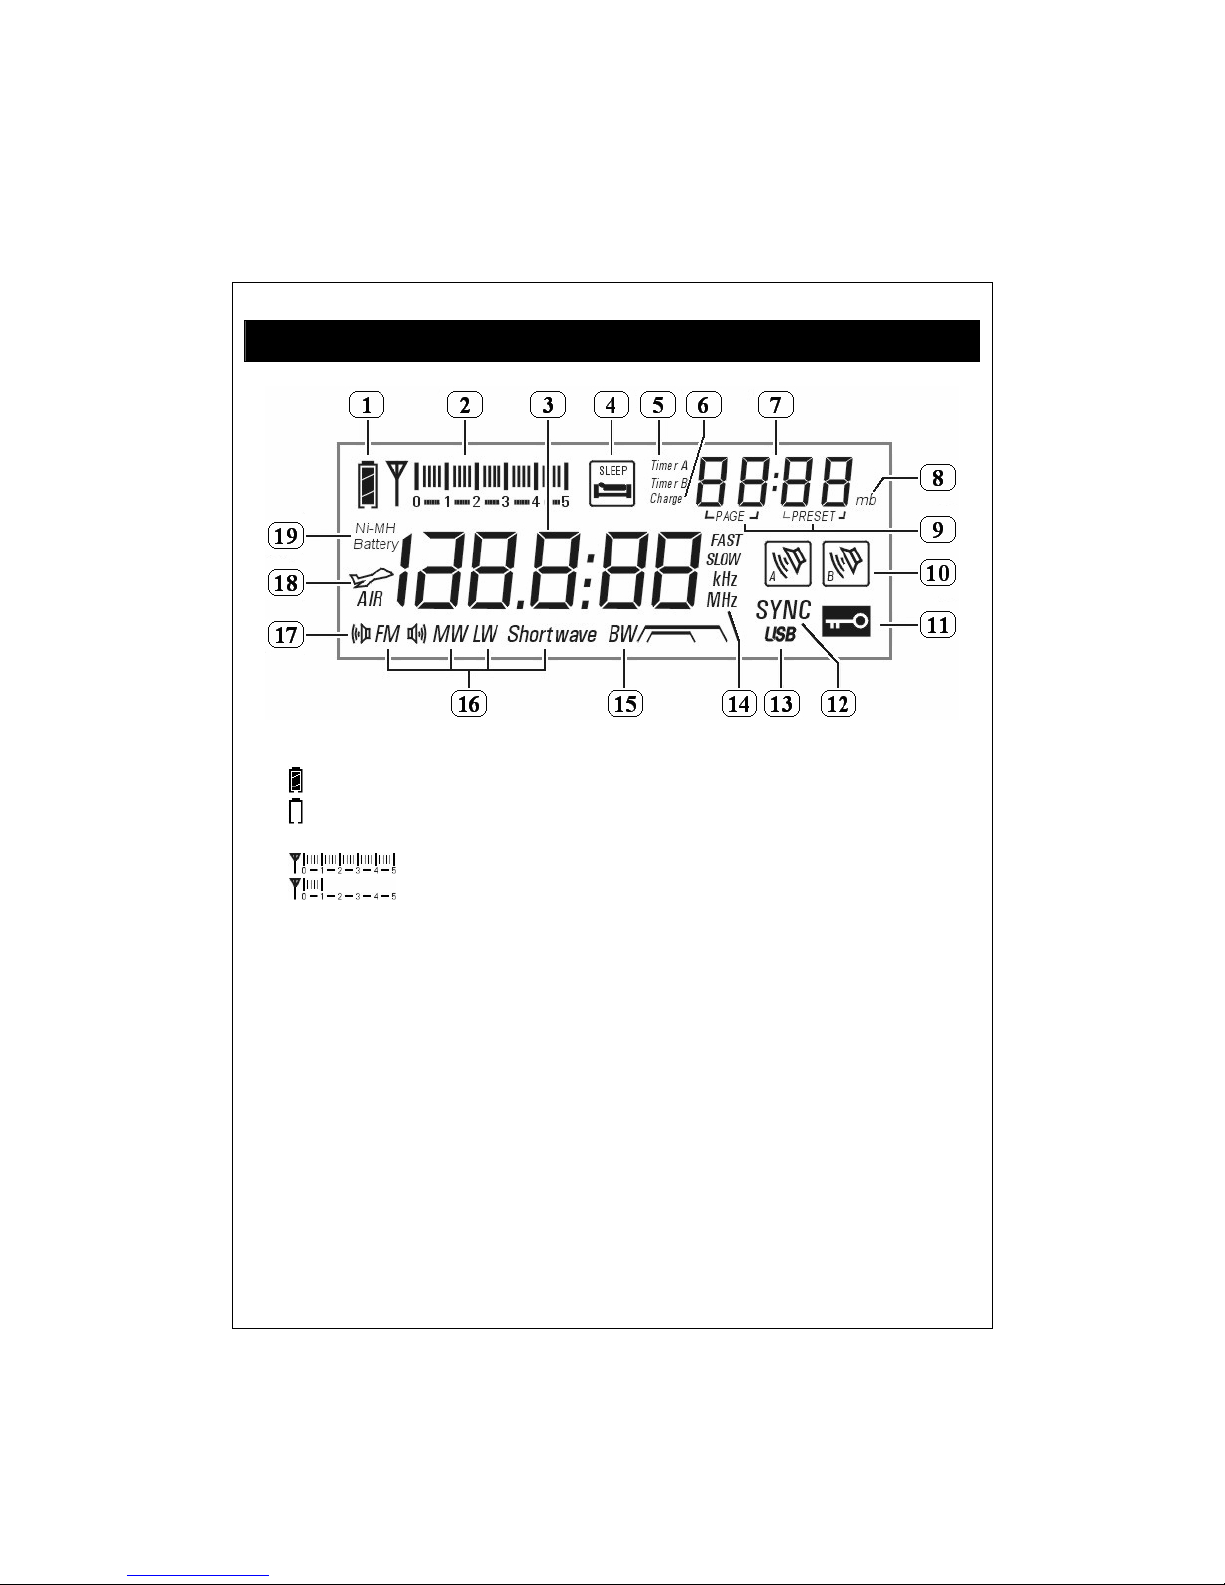
LCD DISPLAY
1. Battery Consumption indicator
: Full
: Empty
2. Signal Strength indicator
: Strong Signal
: Weak Signal
3. Digital Number Display:
With radio off: Time & System settings
With radio on: Frequency or Error display
4. Sleep timer indicator
5. Alarm Timer A or B - Timer indicator
6. Charging Indicator
7. Digital Number Display:
With radio off: preset alarm time and charging time
With radio on: time, page & memory address, SW meter band displays.
8. SW meter band indicator
9. PAGE: Memory Page number
PRESET: Memory Address number
10. Alarm Timer A or B - On/Off indicator
11. Key-Lock indicator
12. Synchronous band detection
Page 8
. -- 8 --
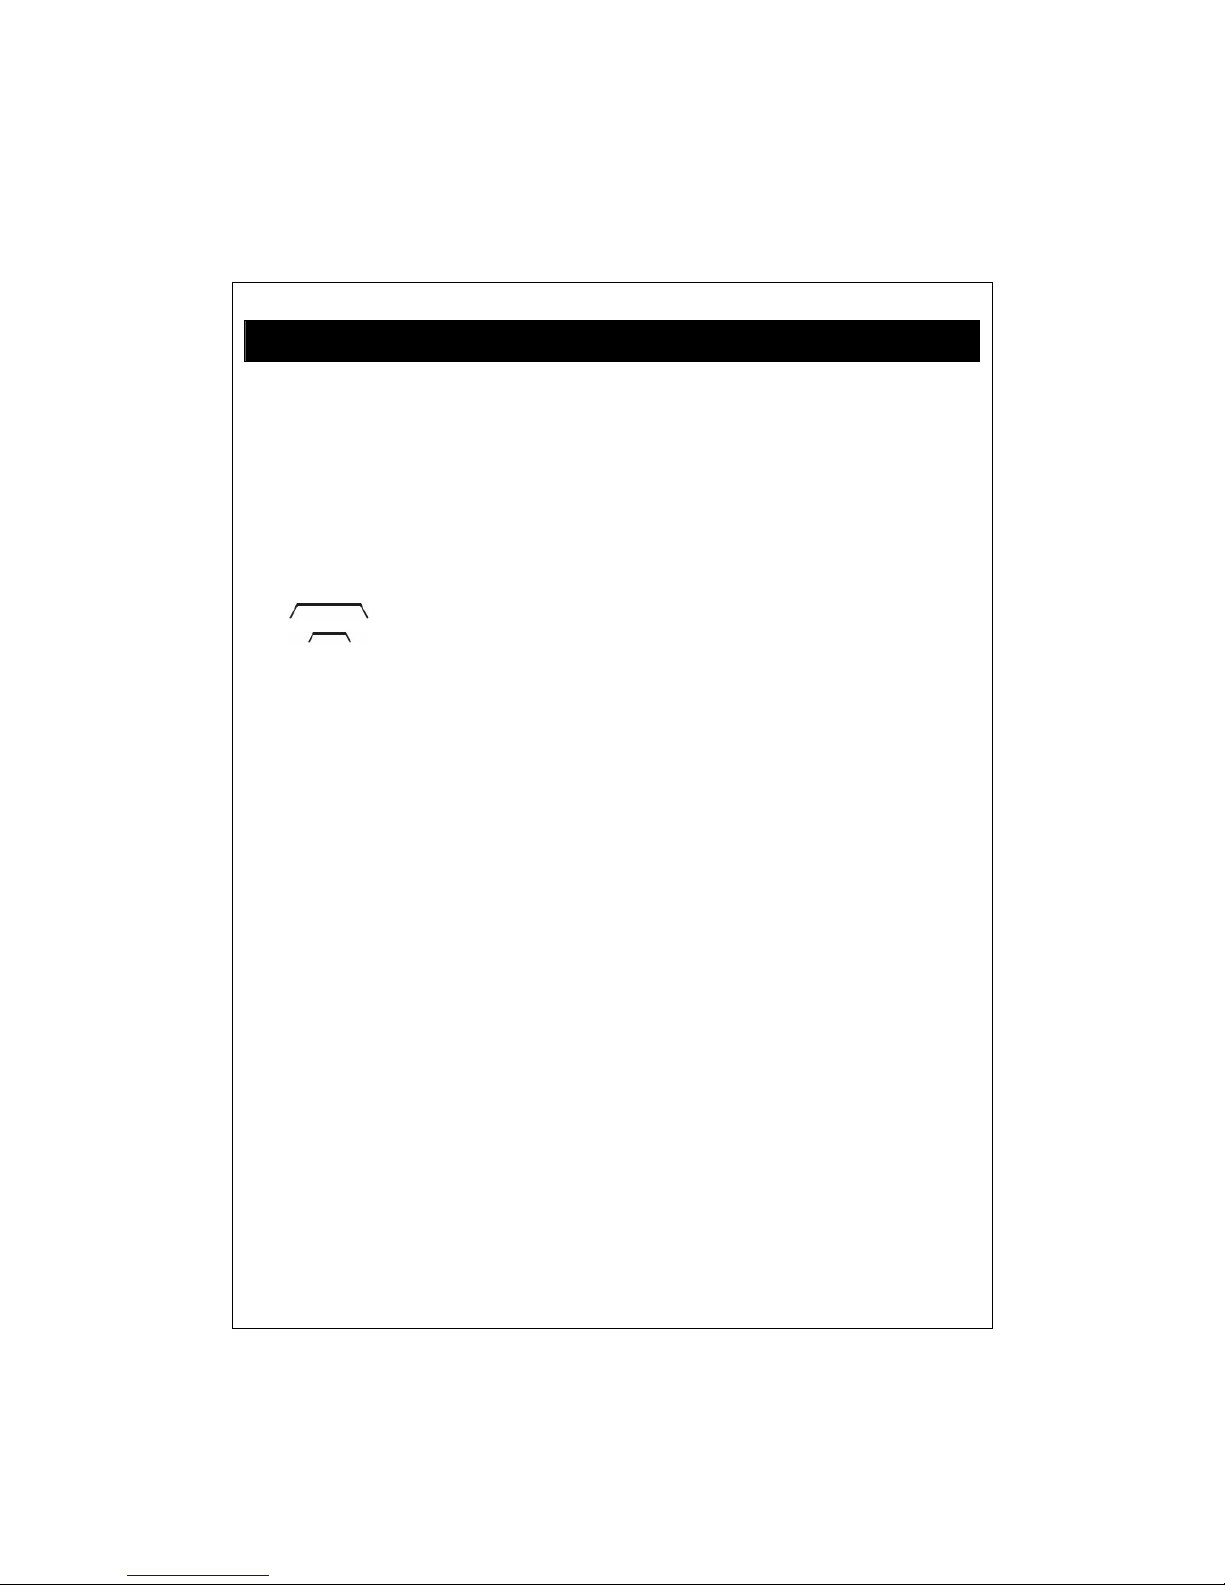
LCD DISPLAY
13. Single Side Band (SSB) indicator
USB: Upper Side Band
LSB: Lower Side Band
14. Tuning Speed:
Slow: Slow Tuning
Fast: Fast Tuning
KHz: frequency unit for MW, LW & SW
MHz: frequency unit for FM
15. AM Band width indicator
: AM Wide band
: AM Narrow band
16. FM, MW, LW and SW Band indicator
17. FM Stereo indicator
18. Air Band indicator
19. NiMH Rechargeable Battery indicator
Page 9
-- 9 -- .
HOW TO TURN ON/OFF THE RADIO
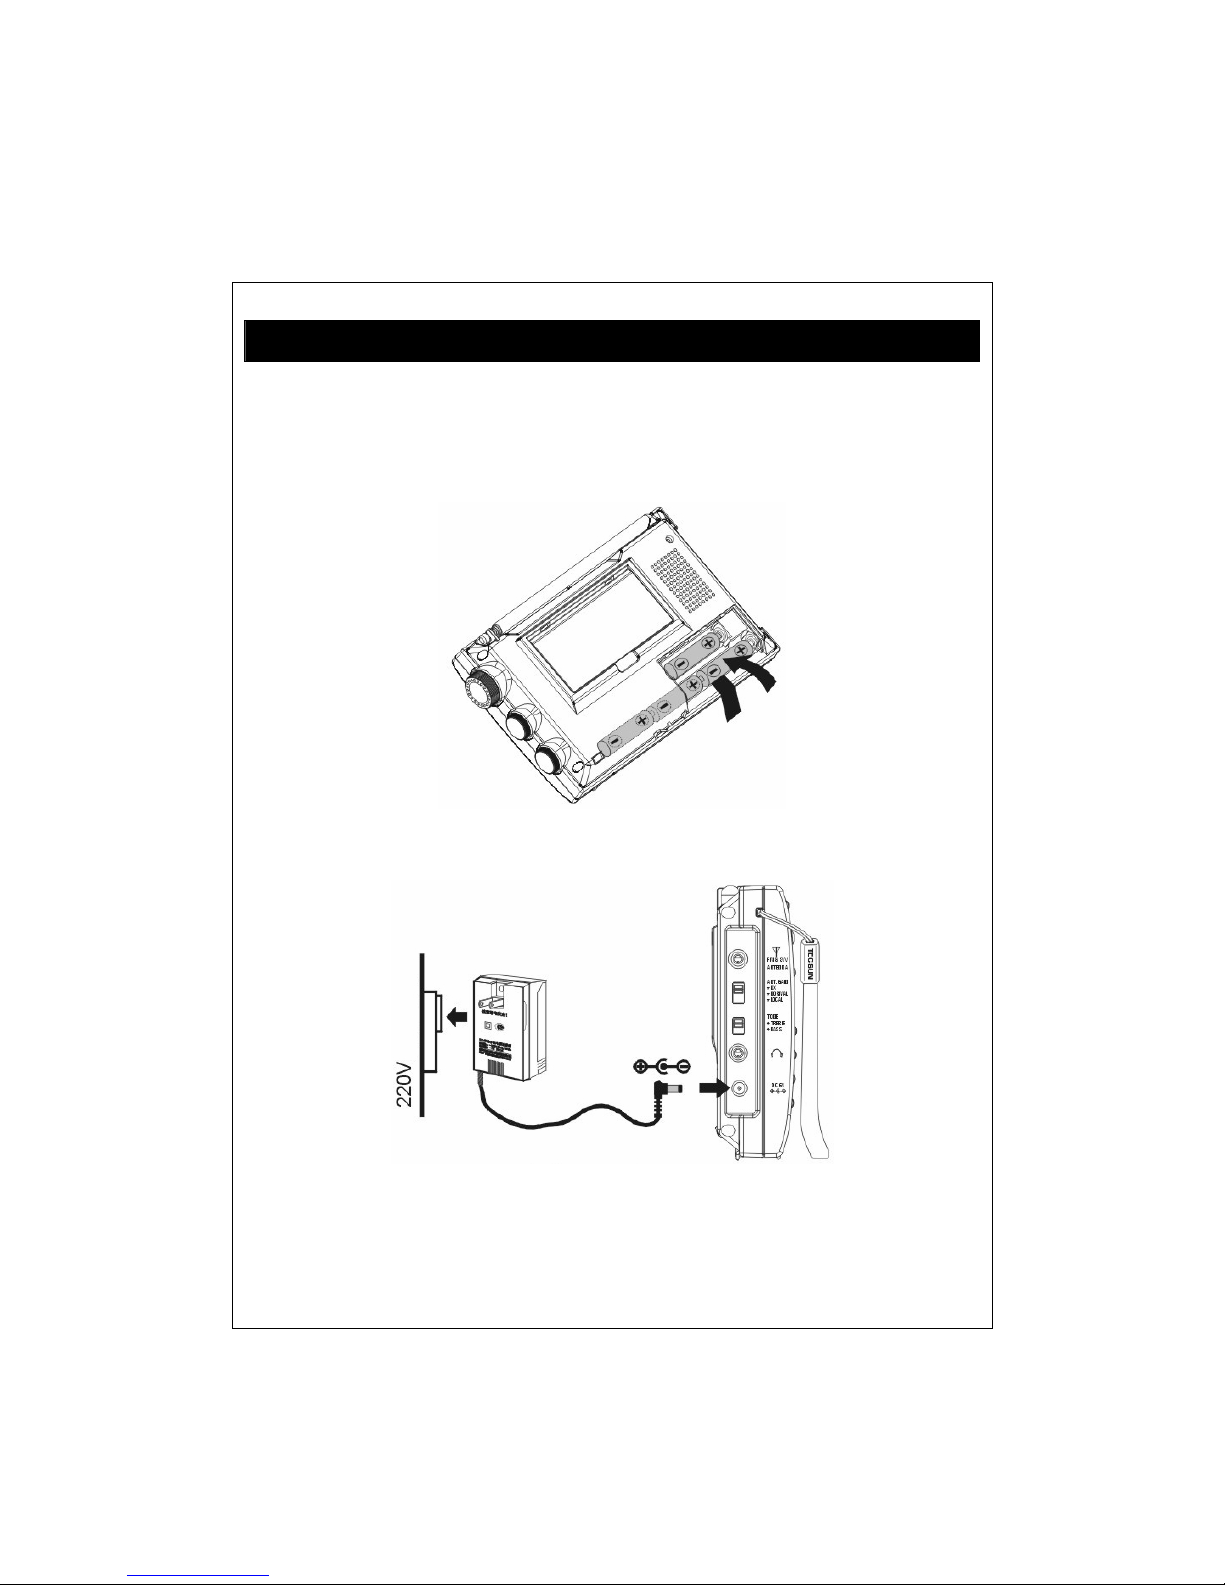
1. Open the battery compartment located on the back of the unit; install 4 x UM3AA
alkaline batteries observing the battery polarity diagram on the back of the radio.
Close the battery door.
Connect the unit to the regulated power supply.
Page 10

. -- 10 --
HOW TO TURN ON/OFF THE RADIO
2. Press on the [POWER] button to turn on the radio.
Note:
If the radio is unable to turned on, please check if the batteries were installed
correctly, battery capacity is sufficient or the lock function had been applied with
" " displays on the screen (press & hold the [ ] button to unlock).
Long press on the power button to adjust the sleep timer setting.
Page 11
-- 11 -- .
TUNE IN STATIONS
Press the [POWER] button to turn on your radio, then select your desired band by
pressing [FM], [AM], SW [ ] / [ ], or [AIR] button. In case of receiving
FM/AIR/SW broadcasting, fully extend the telescopic antenna for a better reception.
When receiving MW and LW broadcasting, please rotate the radio or change it's
location to achieve optimum reception. You can rotate the [VOLUME] knob to
adjust to appropriate volume.
Now, you can turn into your favorite stations with any of the below tuning methods:
METHOD 1; MANUAL STATION TUNING
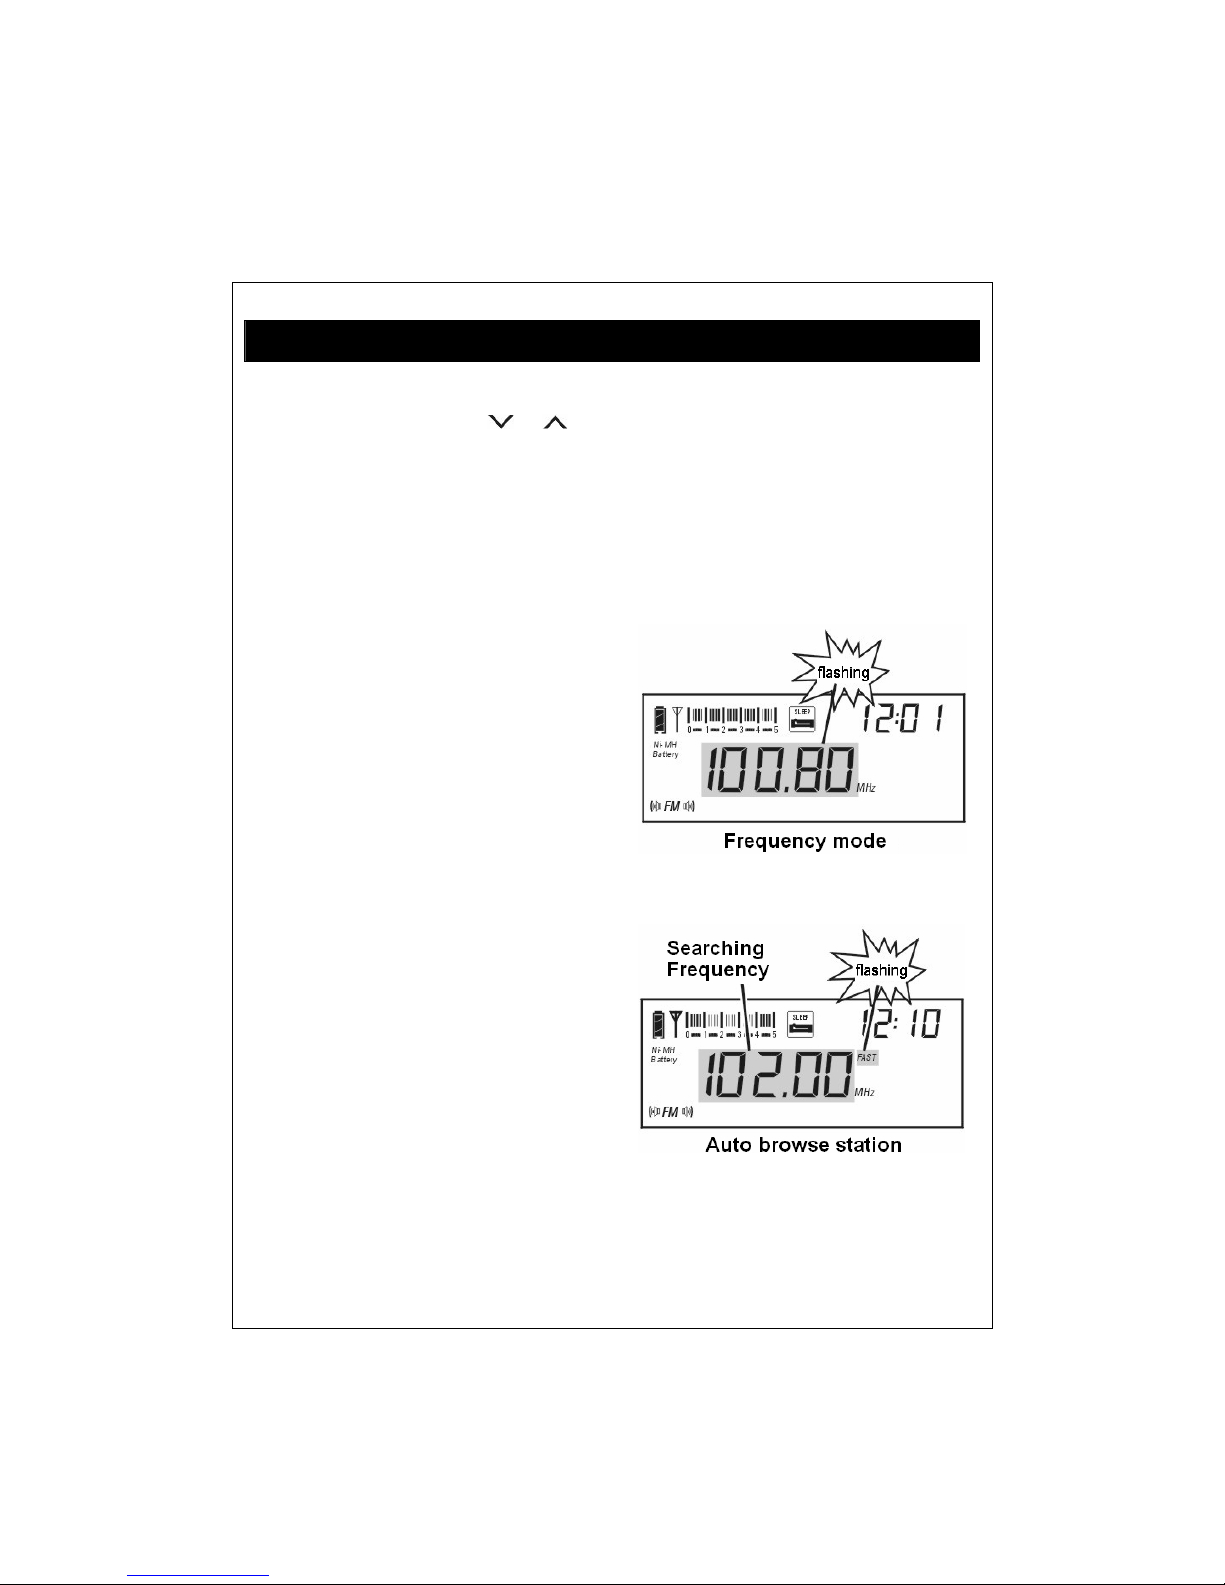
Press the [VF/VM] button to switch into
frequency mode with fr equency short-flash
on the display, and then rotate the
[TUNING] knob to select your desired
station.
METHOD 2: AUTO BROWSE STATION
1. Press the [VF/VM] button with
frequency short-flash on the display to
switch into frequency mode.
2. Press & hold the [VF/VM] button to
scan from one station to another,
staying on each station for about 5
seconds.
3. To stop the auto browse function,
simply rotate the [TUNING] knob or
press on the [VF/VM] button again to
confirm on your desired station.
Page 12

. -- 12 --
TUNE IN STATIONS
Notes:
1. While operating the "Auto Browse Station" function, you can press the
[MEMORY] button anytime to store the station into memory, and the radio will
keep on auto browsing the next available station.
2. The "Auto Browse Station" function can't be employed under Air band and SW
SSB states.
METHOD 3: DIRECT KEYPAD ENTRY
1. Press the [VFA/M] button with frequency flashing on the display to switch into
frequency mode.
2. Press the numeric keys [ 0 ] - [ 9 ] to enter the station frequency directly.
Notes:
1. Ignor e the decimal point for FM band when inputting the frequency numbers. For
example, FM 89.3 MHz, just enter [ 8 ] [ 9 ] [ 3 ].
2. If the entered frequency rate is not within the covering area, the display would
display "
" (error) symbol.
Page 13
-- 13 -- .
WORKING WITH STATION MEMORIES
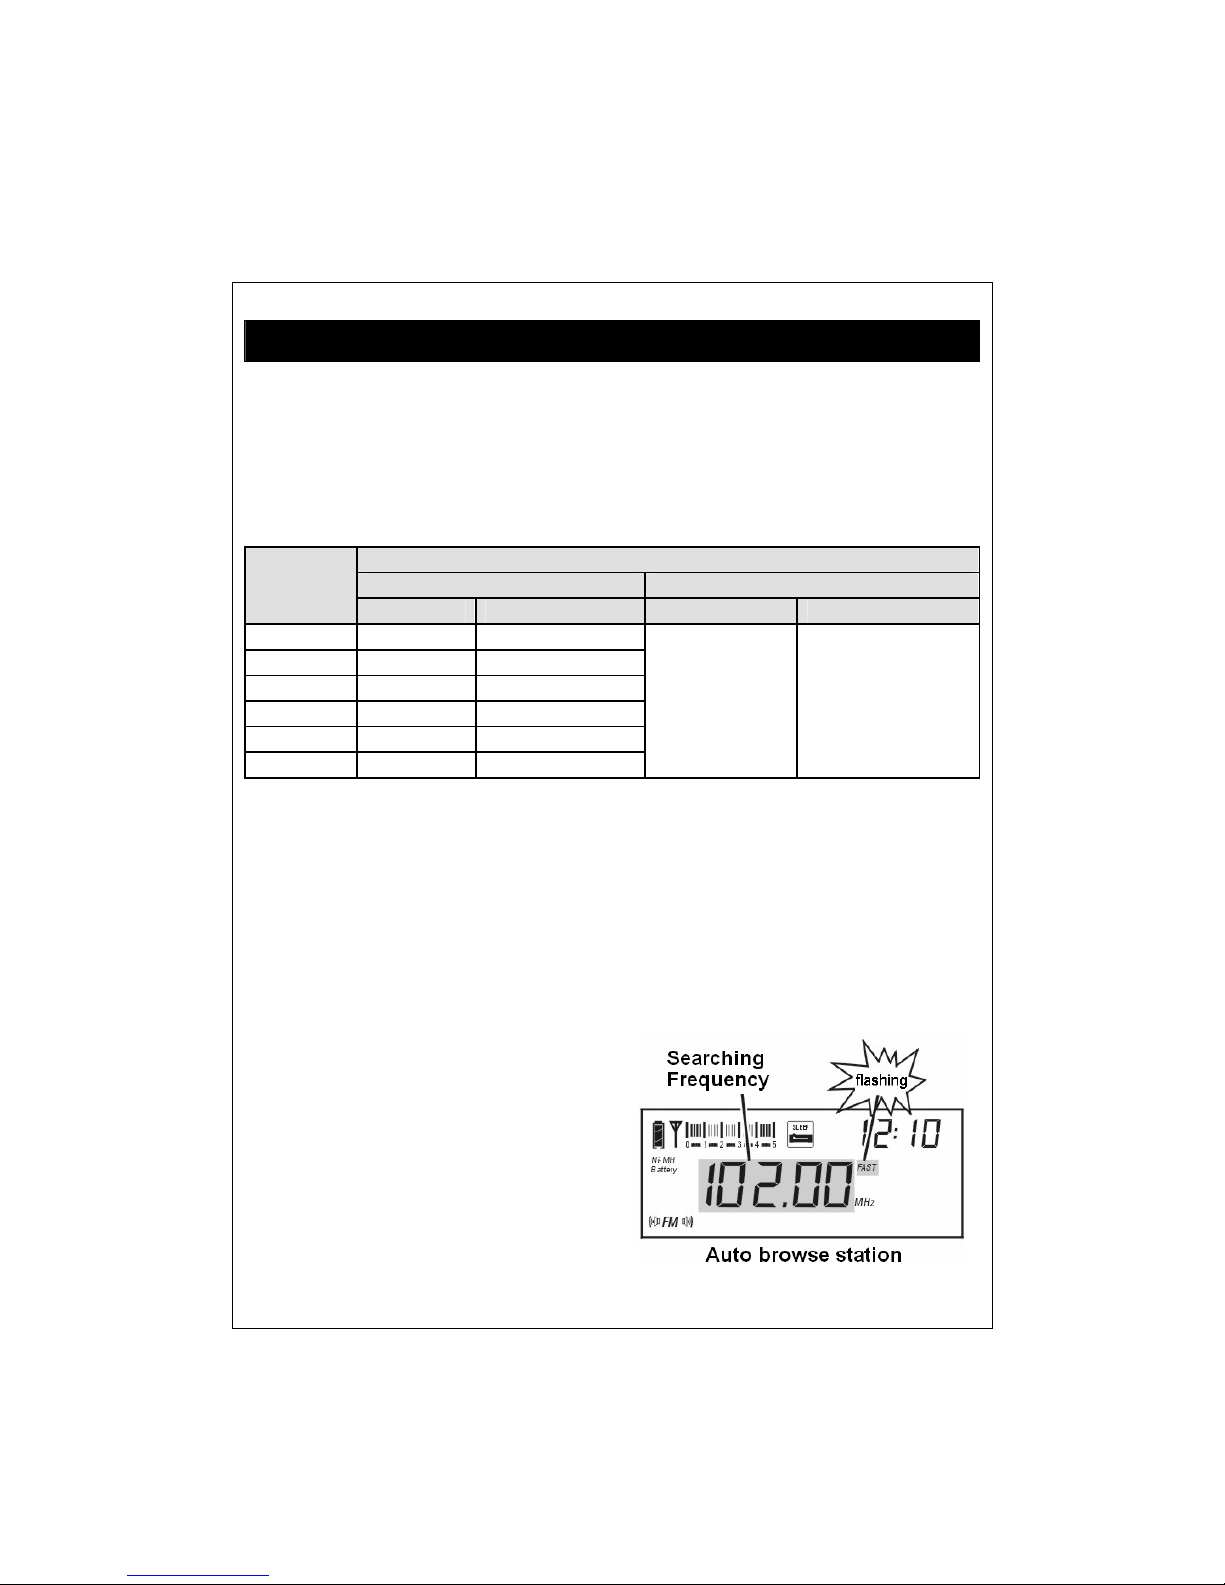
There are 2000 memories for PL-660, which has great flexibility of memor y storage.
Please note the chart below:
1. Memory PAGE 0, rioted as [P0], consists of 800 memories, 100 assigned for
FM/MW/LW, 200 for SW & SSB and 100 for AIR BAND.
2. Memory PAGE 1~12, noted as P1, P2, etc., each page consists of 100 memories,
in total 2000 memories.
MEMORY
Memory for each Band (800) Memory among all Band (1200)
BAND
PAGE P0 ATS PAGE 01~12 ATS
FM 100 V
MW 100 V
LW 100 V
SW 200 V
SSB 200 X
AIR 100 X
Each Memory
Page can store
100 Memories.
ATS is available
for all Memory
Page (except SSB
& Air Band)
METHOD 1: STORING STATION MANUALLY
1. Press the [FM], [MW/LW] or [SW] button for band selection, then tune into
your desired station.
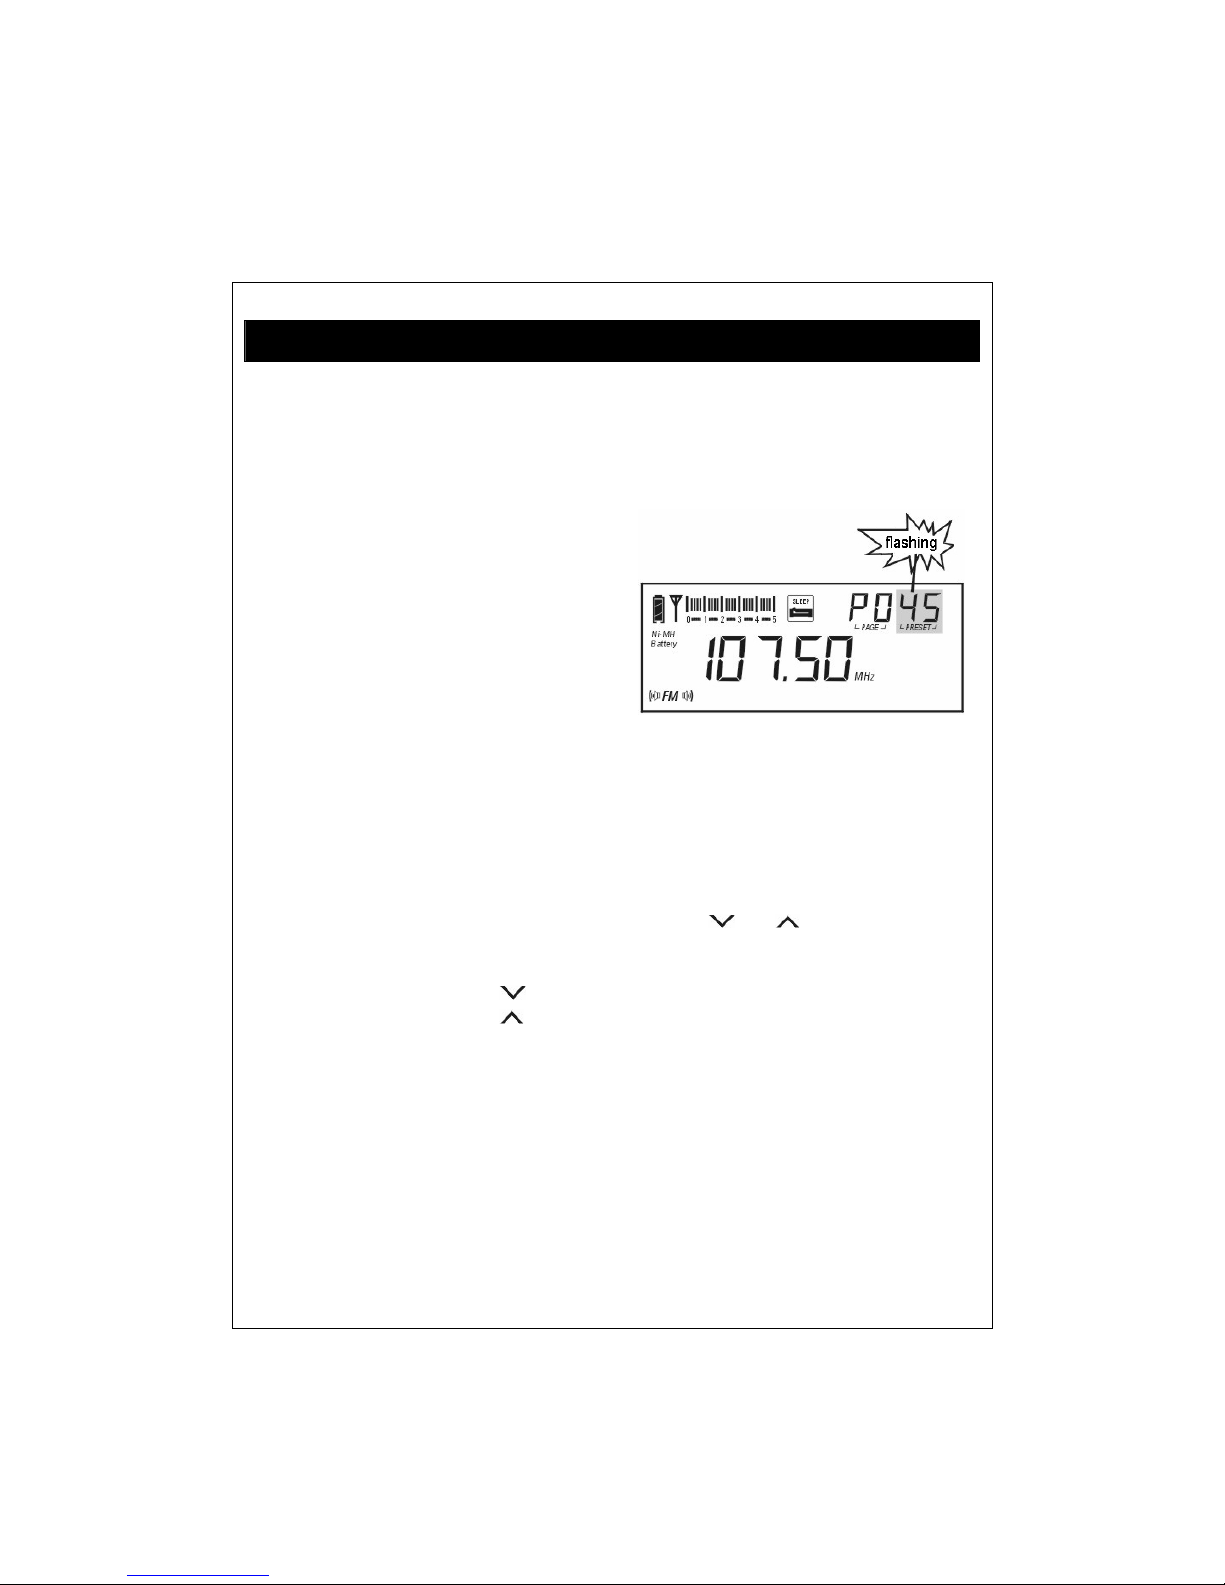
2. Press the [MEMORY] button with the next available "Memory Address"
flashing.
3. Rotate the [TUNING] knob to specify the storing memory address.
4. Press the [MEMORY] button again to confirm. You can also wait for 3 seconds
to auto store the station into memory.
METHOD 2: SEMI-AUTOMATIC STORING STATION
While operating the "Auto Browse Station"
(refer to page 11) function, you can simply
press the [MEMORY] button to store the
station into memory to avoid unwanted
stations.
Page 14
. -- 14 --
WORKING WITH STATION MEMORIES
METHOD 3: ATS (AUTO TUNING STORAGE)
FM ATS:
1. Fully extend the telescopic antenna and
press the [FM] button to select FM
band.
2. Press & hold the [FM] button with
"PRESET" flashing and the
frequency start running, then you can
scan and store the available stations
within the memories. When the
frequency stop running, it means the
ATS operation has been completed;
you can rotate the [TUNING] knob
searching for those scanned and stored
stations.
MW/LW ATS:
1. Press the [AM] button to select MW/LW band.
2. Press & hold the [AM] button for ATS MW or LW.
SW ATS:
Fully extend the telescopic antenna and press the SW [
] or [ ] button to select
SW band. There are two modes for SW ATS tuning:
Mode A: Press & hold the [
] button to ATS the stations within all meter bands
Mode B: Press & hold the [
] button to ATS the stations within present meter
band only.
Notes:
1. During ATS process in FM, MW / LW or SW (mode A), pre-stored radio stations
will be replaced automatically by the new searched stations.
2. With ATS in SW (mode B), those existing memories will not be replaced; all the
newly found radio stations would be stored in the blank memor ies addresses.
3. If there is too many interference in you surrounding or many mirror/blank station
being stored during ATS, you should contract the telescopic antenna (FM & SW)
or rotate the radio (MW & LW) for better location. You can also push the [ANT.
GAIN] button to the position "NORMAL" or "LOCAL" to restart ATS.
Page 15
-- 15 -- .
WORKING WITH STATION MEMORIES
HOW TO SELECT DIFFERENT MEMORY PAGE
1. Press the [FM], [MW/LW] or [SW] button
for band selection, then tune into your
desired station.
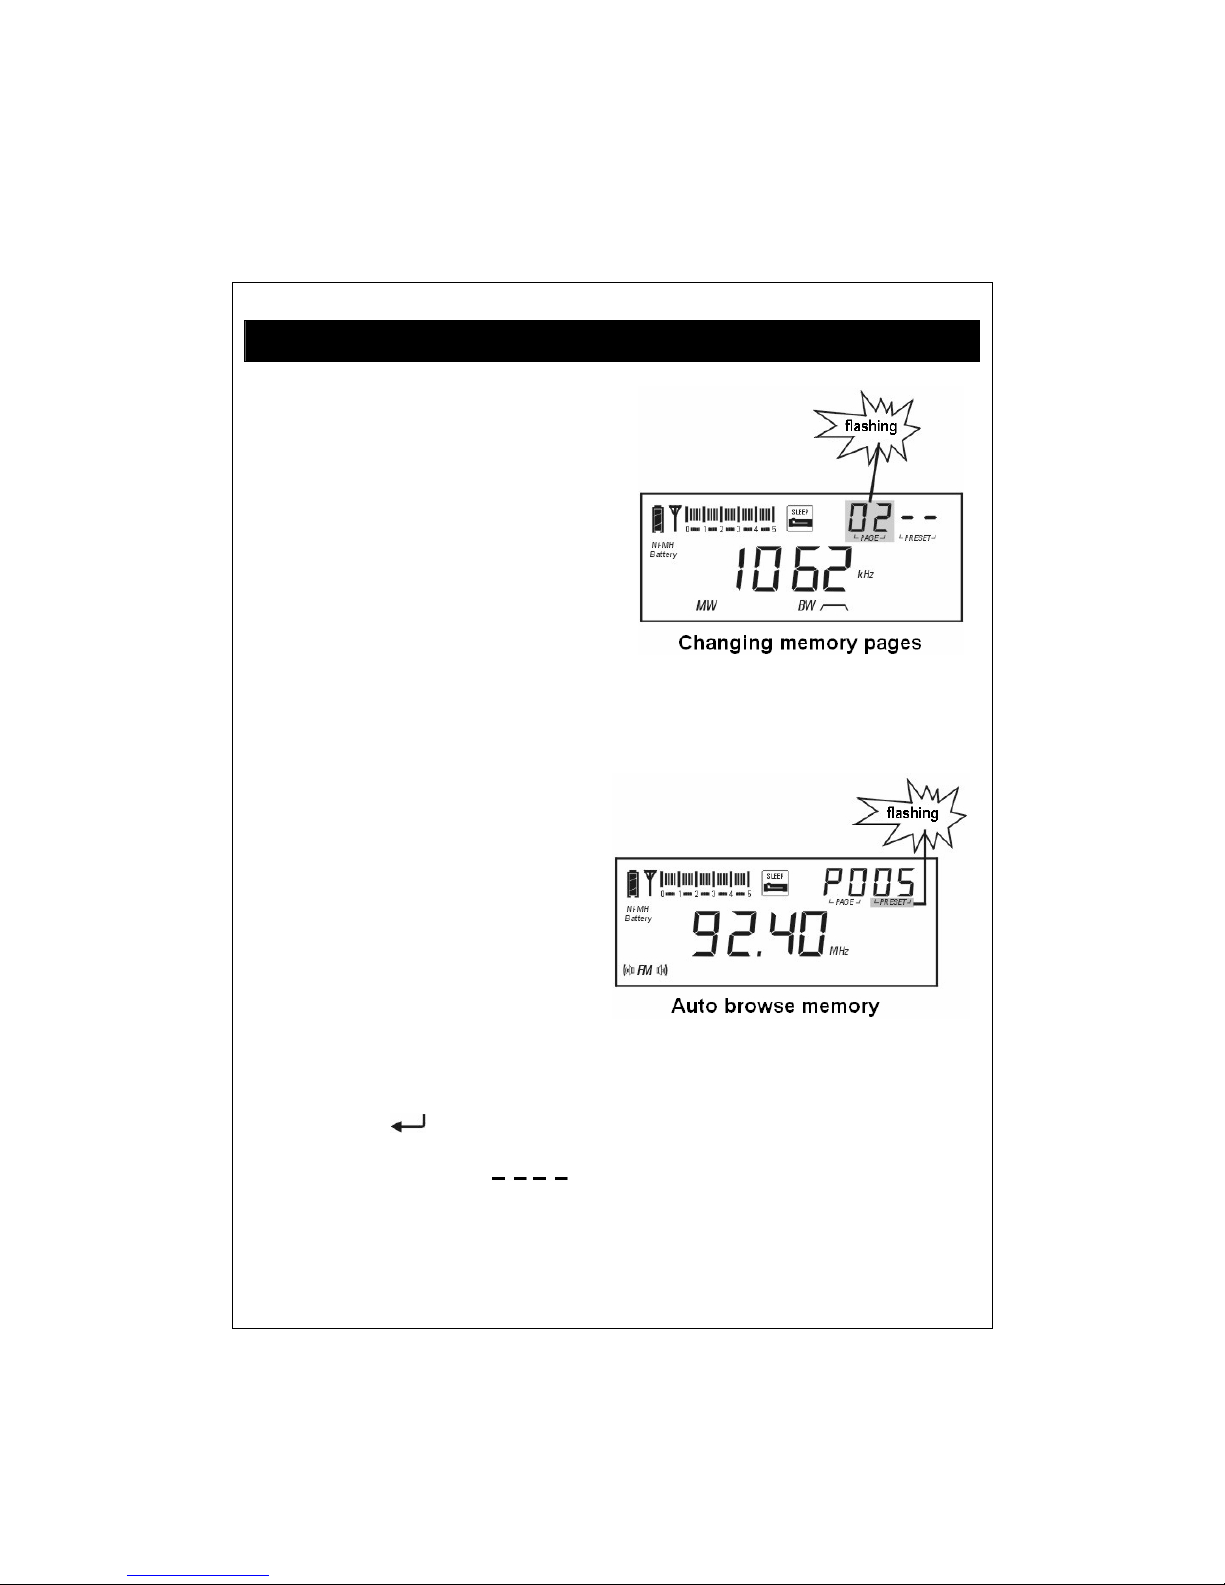
2. Press the [MEMORY] button with
memory address flashing on the upper right
corner
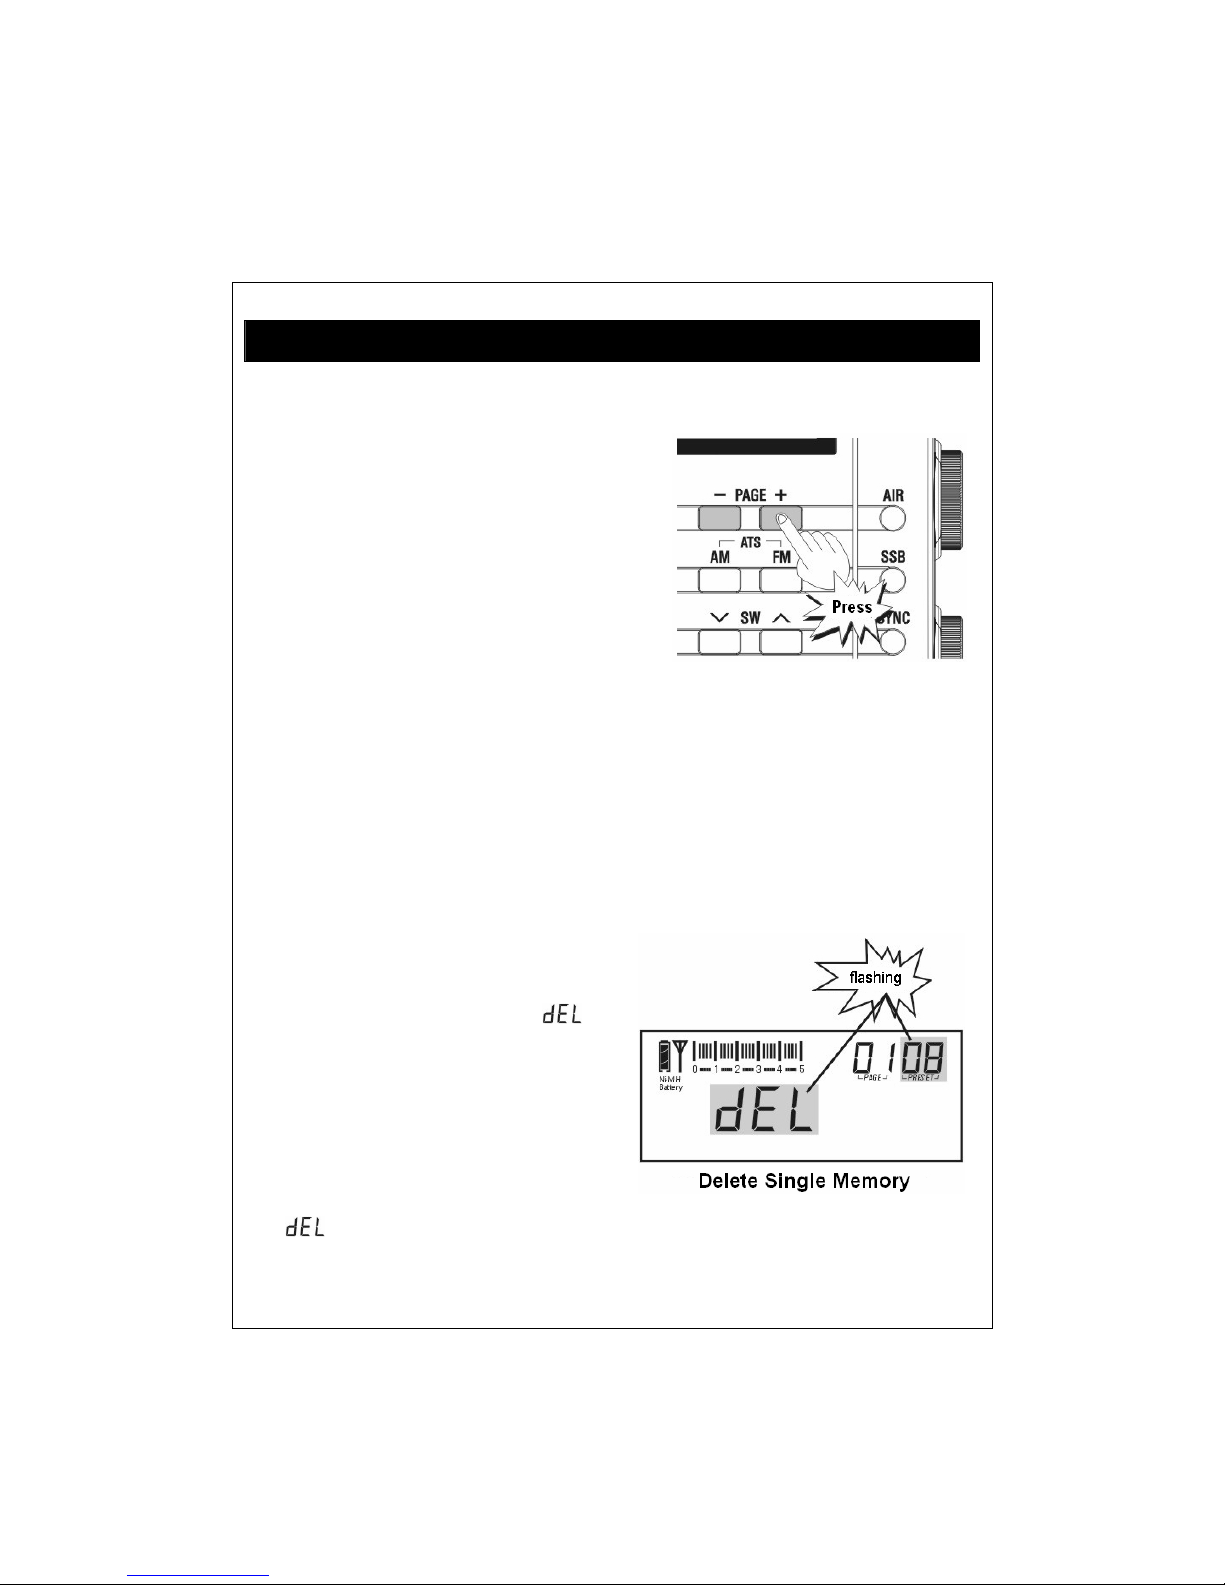
3. Press the [ - PAGE + ] button to choose
your desired memory PAGE, then rotate
the [TUNING] to select your preference
memory address.
4. Press the [MEMORY] button again to
confirm or wait for 3 seconds to auto store
the station into memory.
DELETE MEMORY
Press the [VF/VM] button with "Memory address" showing on upper right corner of
the display to ent er the [Memory] mode, and then follow below methods to delete
those unwanted stations
METHOD 1: DELETE SINGLE MEMORY MANUALLY
Rotate the [TUNING] knob to select the
memory that you want to delete, press &
hold the [DELETE] button with "
"
flashing; then press the [DELETE] button
to remove the unwa nted memory address.
Note:
If " " is flashing more than 3 seconds without confirmation, it will exit the delete
function automatically.
Page 16
. -- 16 --
WORKING WITH STATION MEMORIES
METHOD 2: SEMI-AUTO DELETE MEMORY
Press and hold the [VF/VM] to auto browse stations, then you can press the
[DELETE] button anytime to direct delete the unwanted station; the radio will keep
on auto browsing the next available station until you press any other button to stop
this function.
METHOD 3: DELETE ALL MEMORY WITHIN THE PAGE
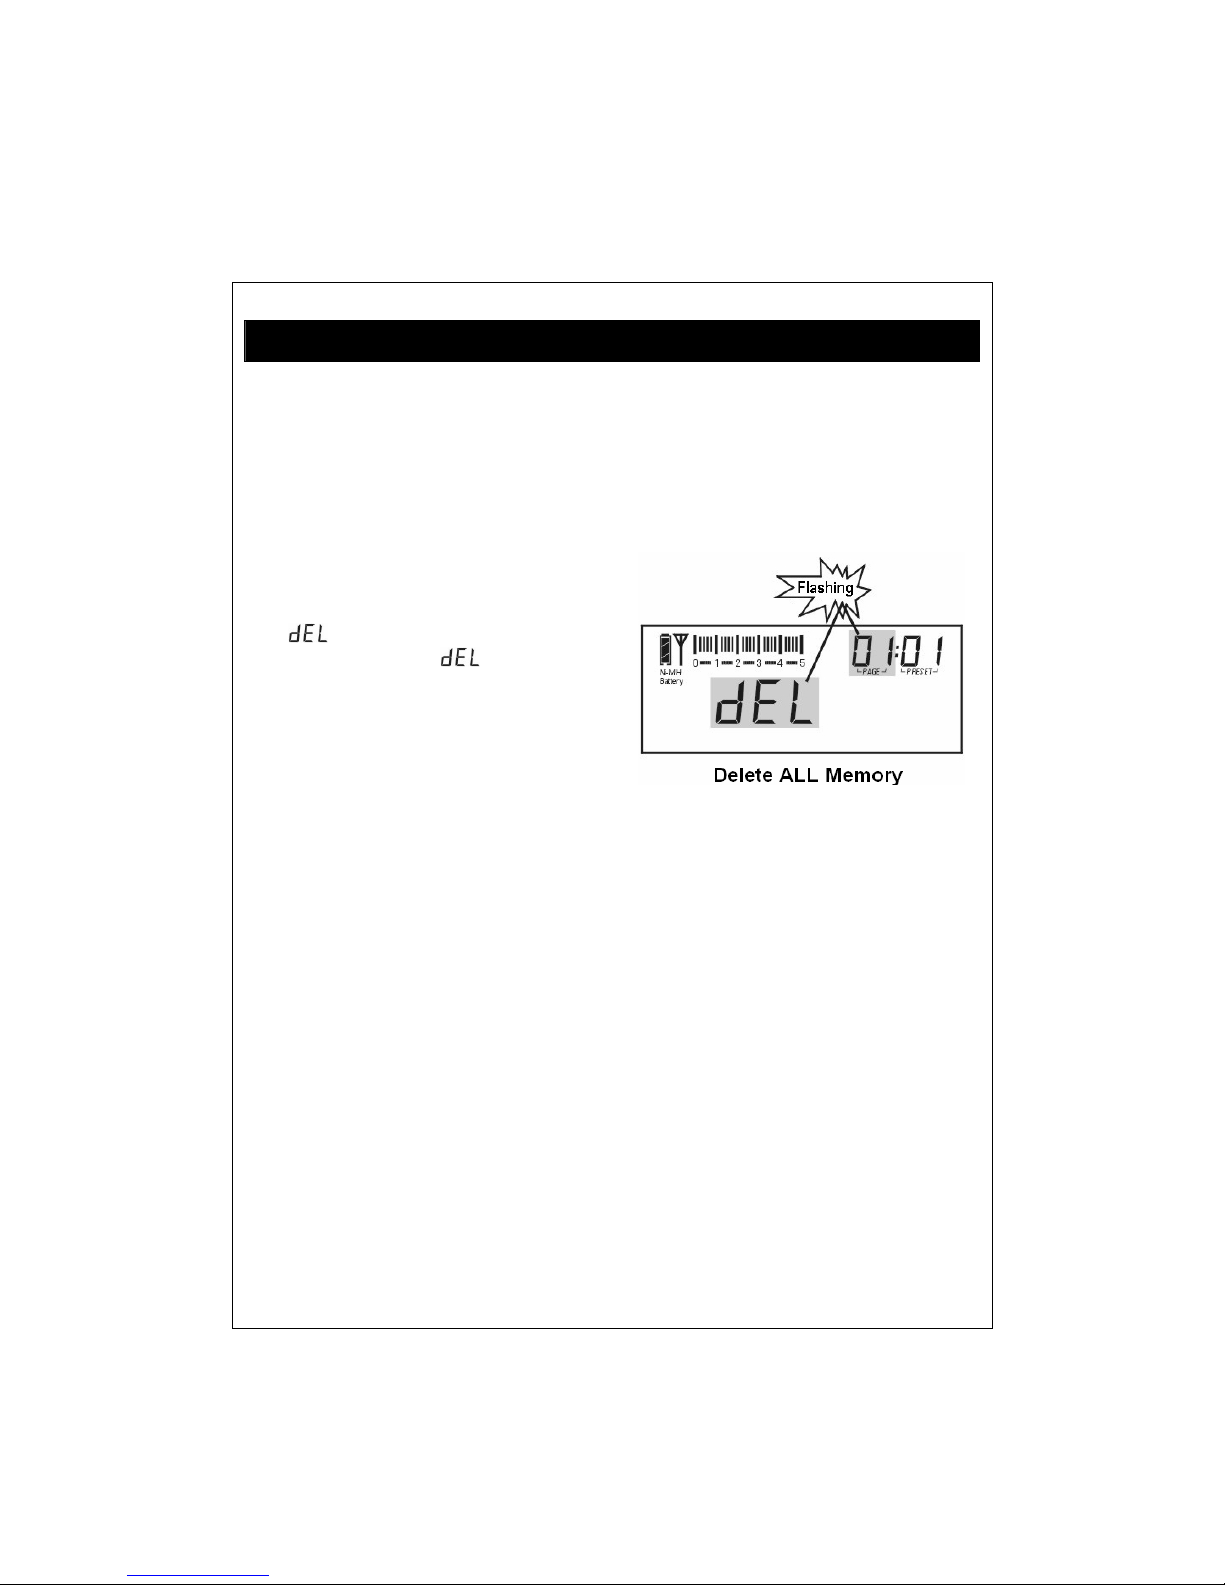
Press & hold the [DELETE] button for 3
seconds and notice both "Memor y address"
& "
" flashing, then follow with
"Memory Page" and "
" flashing on
the upper right corner of display. Press the
[DELETE] button again to delete all
memory within the selected page.
Note:
If the [DELETE] button has not been pressed within 3 seconds to confirm, it will exit
the delete function automatically.
Page 17
-- 17 -- .
LISTENING TO STORED STATIONS
Select band and then press the [VF/VM]
button with "Memory address" shows on
the upper right corner of display to enter
the [Memory] mode, press the
[ - PAGE + ] button to select your desired
page, then apply any of below three tuning
methods to tune around those st ored
stations:
METHOD 1: MEMORY TUNING MANUALLY
Rotate the [TUNING] knob to tune around the stored station.
METHOD 2: AUTO BROWSE MEMORY
Press & hold the [VF/VM] button until
"PRESET" flashing to auto scan from
one memor y to another, staying on each
station for about 5 seconds. To stop auto
search memory, simply rotate the
[TUNING] knob or to press on
[VF/VM] button again.
METHOD 3: DIRECT KEY IN MEMORY ADDRESS
Press the numeric keys [ 0 ] - [ 9 ] to enter the memory addr ess directly, and then
press again the [
] button to confirm.
Note: If the display shows " " symbol after entering the number, it means
the entered memory page/address does not exist.
Page 18
. -- 18 --
SLEEP FUNCTION
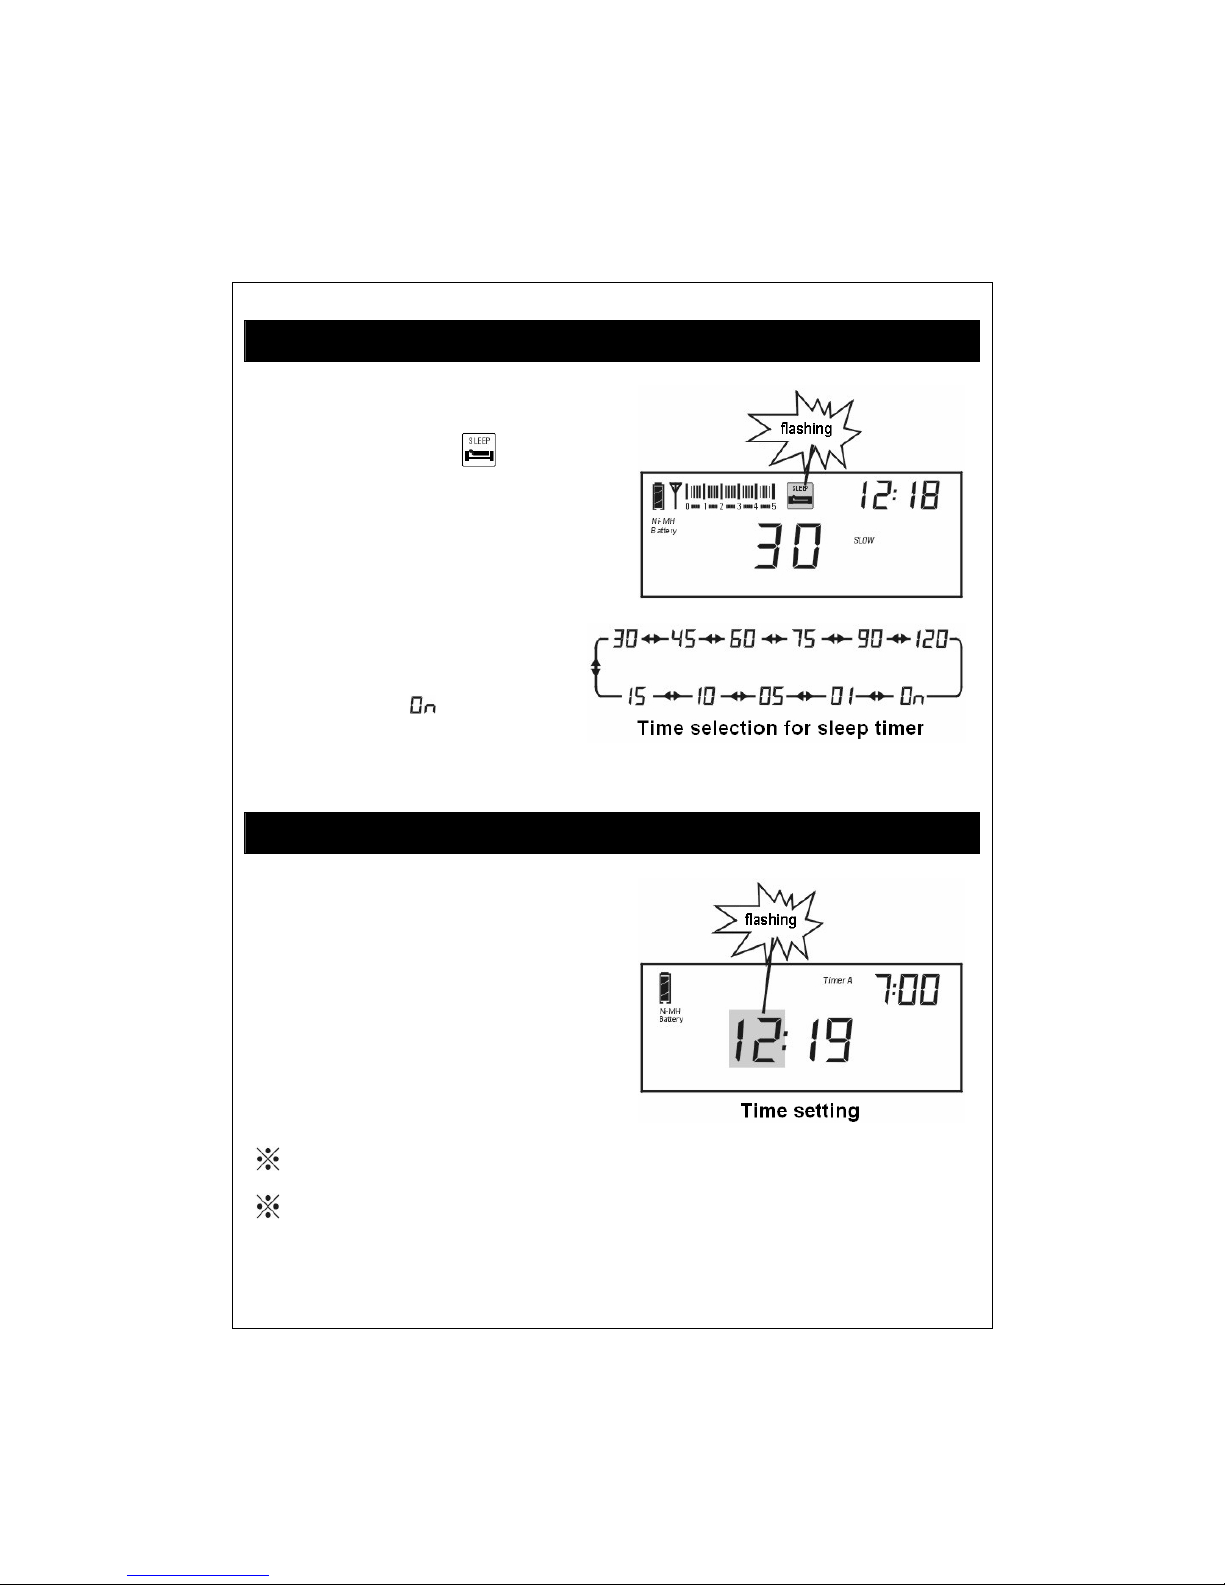
1. Press & hold the [POWER] button
with the symbol of " " flashing on
the display to enter sleep timer mode.
2. Rotate the [TUNING] knob
immediately to select sleep timer
from 1 ~ 120 minutes or select
permanently "
" (radio will be
turned on after 1 second).
Note: Default setting for the sleep timer is 30 minutes.
CLOCK SETTING
1. Press & hold the [TIME] button wit h
hour flashing, then rotate the
[TUNING] knob to adjust the hour.
2. Press the [TIME] button with minutes
flashing, and then rotate the
[TUNING] knob to adjust the minute.
3. Press again the [TIME] button to
confirm the setting.
If the [TIME] button has not been pressed again within 3 seconds, the unit will
automatically confirm the setting.
You can direct key in the number to set the hour/minutes instead of rotating the
[TUNING] knob.
Page 19
-- 19 -- .
ALARM SETTING (By Radio only)
SETTING THE ALARM STATION:
1. Turn on the radio, then tune into your favorite station for alarm by radio and
adjust your desired alarm volume level.
2. Press the [MEMORY] button and then immediately press the [TIMER A] or
[TIMER B] button and notice "
" or " " flashing on the display to confirm
the preset alarm station.
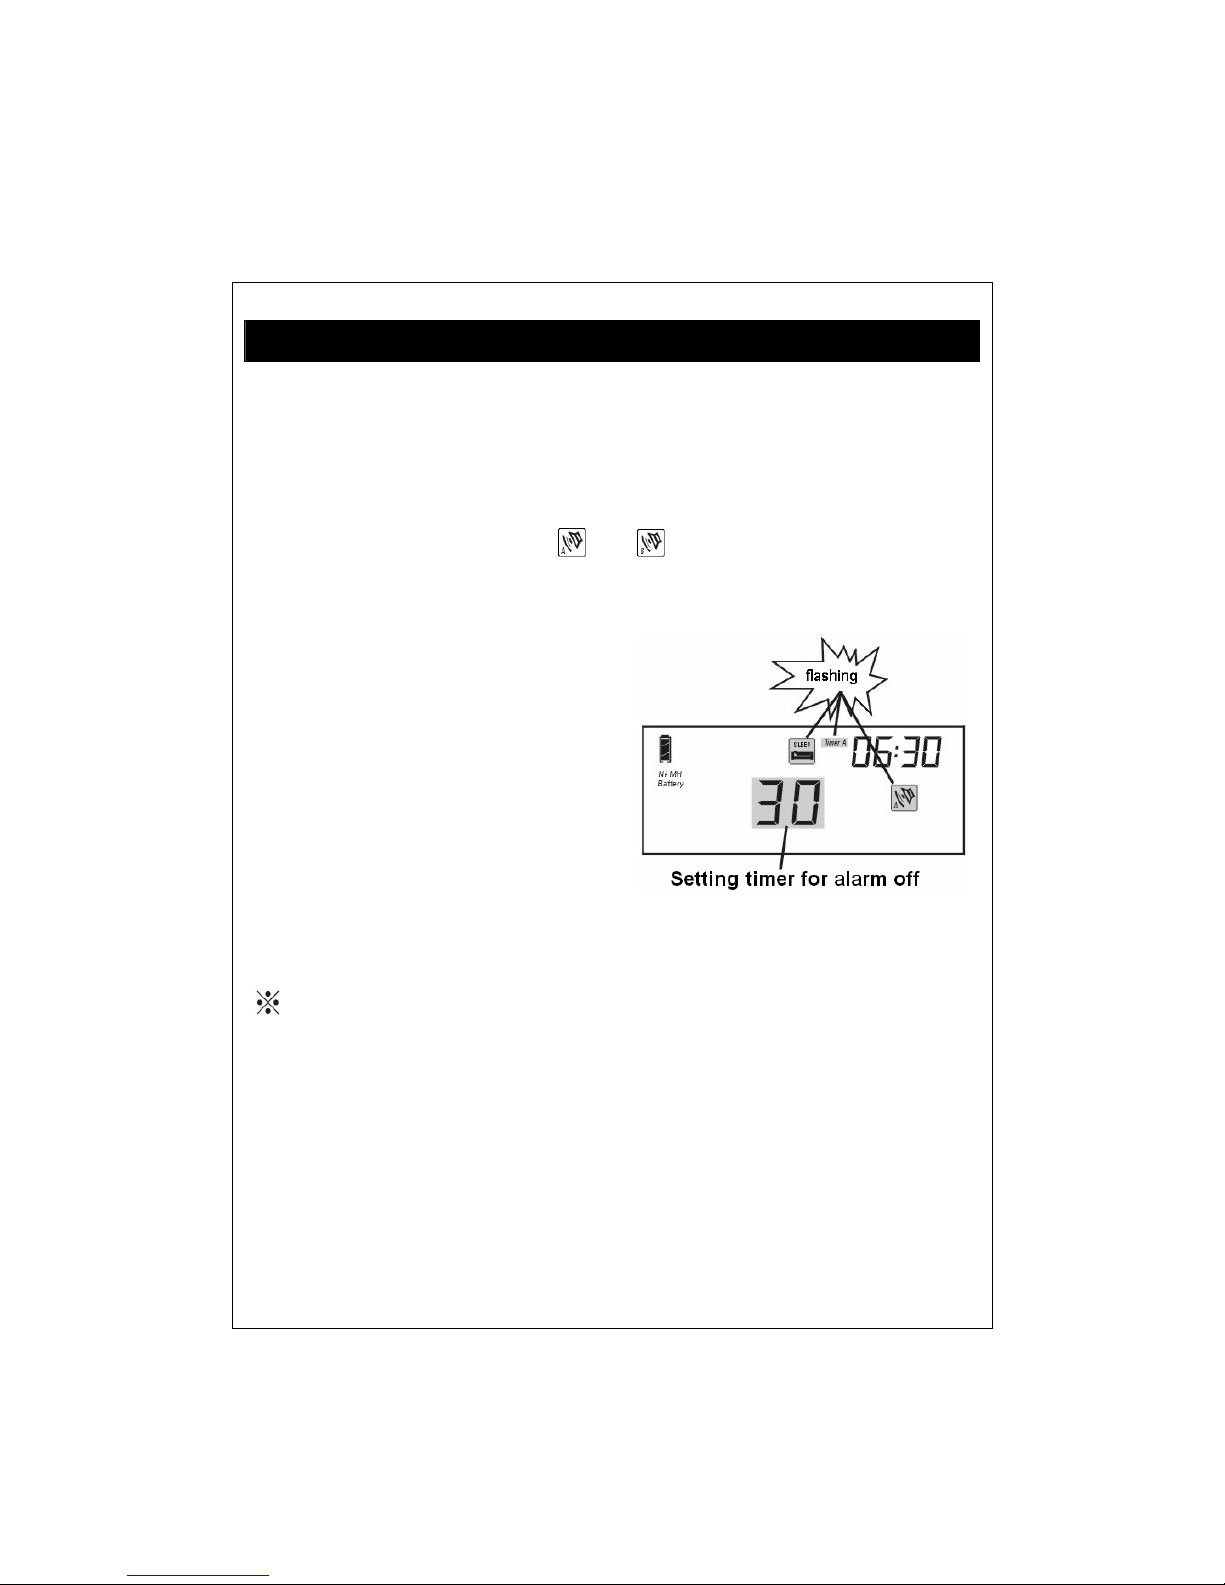
SETTING THE ALARM TIME
1. Press & hold the [TIMER A] button
with hour flashing in the upper right
corner of display, then rotate the
[TUNING] knob to adjust the hour.
2. Press the [TIMER A] button with
minutes flashing, and then rotate the
[TUNING] knob to adjust the minute.
3. Press the [TIMER A] button again,
then rotate the [TUNING] knob to
select from 1 ~ 90 minutes to set the
Alarm Off Timer.
4. Press the [TIMER A] button to
confirm the setting.
If the [TIMER A] button has not been pressed again within 3 seconds, the unit
will automatically confirm the alarm setting.
Note: The unit will turn on automatically and switch to the preset alarm station and
time. It will also be turned off automatically when it reaches the preset time.
Page 20
. -- 20 --
SNOOZE FUNCTION
When the preset alarm is activated, you can press the [LIGHT/SNOOZE] button
with "
" or " " flashing in order to turn off the alarm temporarily, but the unit
will turn on again after 5 minutes later.
Notes:
1. You can press the [TIMER A] or [TIMER B] button repeatedly to turn on/off
the alarm by radio.
If the symbol "
" or " " shows on the display, it means the alarm by radio
was activated, otherwise, it isn't activated.
2. If the preset alarm is activated, press the [POWER] button once to continuously
listen to the radio; press it twice to turn off the radio.
3. If the preset alarm is activated when you are listening to the radio, it will auto
switch to the preset alarm station.
INTELLIGENT LIGHT FUNCTION
This radio has an intelligent lighting function with which the backlight would be on
for 3 seconds when operating any keys or knobs.
TURN ON/OFF THE BACKLIGHT:
Press the [LIGHT/SNOOZE] button to illuminate the LCD for 3 seconds; press &
hold the [LIGHT/SNOOZE] button for permanently illumination.
Press it again to turn off the backlight.
Notes:
1. When the unit is powered by the battery, please try to avoid setting the backlight
to permanent illumination so as to reduce power consumption.
2. When the unit is turned off, the permanent illumination function will be turned
off automatically as well.
Page 21
-- 21 -- .
SETTING TUNING STEP
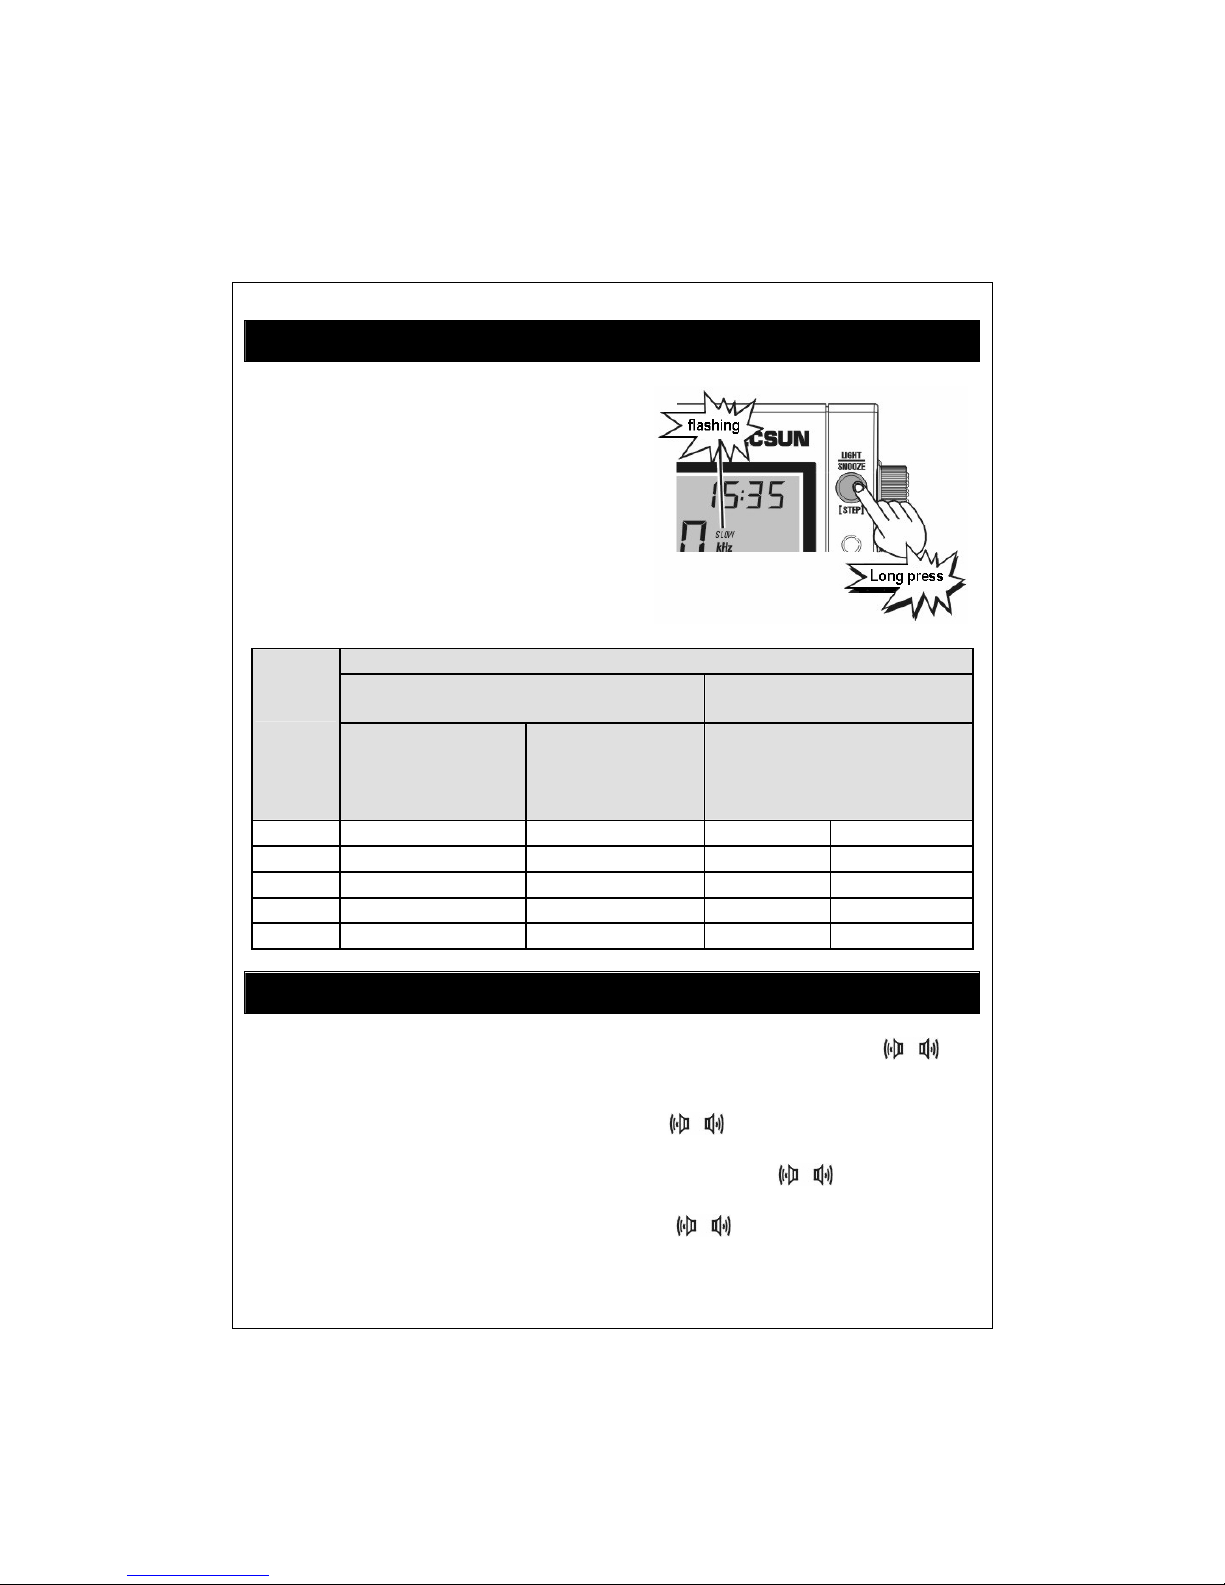
The intelligent tuning step function is
activated by default. You can also press &
hold the [STEP] button to select fast / slow
tuning with radio on. FAST/SLOW tuning is
shown in the chart below for each band.
TUNING STEP
FAST/SLOW TUNING STEP
("Fast/Slow" flashing on display)
SLOW TUNING STEP
("Slow" flashing on display)
BAND
Slowly rotate the
[TUNING] knob
with "Slow"
indicates on display
Quickly rotate the
[TUNING] knob
with "Fast"
indicates on display
Quickly / Slowly rotate the
[TUNING] knob
FM 0.01 MHz 0.1 MHz 0.01 MHz 0.01 MHz
MW 1 kHz 9 kHz / 10 kHz 1 kHz 1 kHz
LW 1 kHz 9 kHz 1 kHz 1 kHz
SW 1 kHz 5 kHz 1 kHz 1 kHz
AIR 1 kHz 25 kHz 1 kHz 1 kHz
FM ST. (FM STEREO)
1. While listening to FM stereo stations, press the [FM ST.] button with " "
appears in the display to activate the "STEREO" listening. If the received FM
broadcast signal is too weak, it is recommendable to turn off the stereo function
by pressing the [FM ST.] button again with "
" disappears.
2. While listening to FM stereo stations by speaker, it is recommendable to turn off
the stereo function by pressing the [FM ST.] button with " " disappears to
improve sound quality.
3. The stereo function will not be activated and " " will not appear if the FM
station is not stereo broadcasting.
Page 22
. -- 22 --
AM BW (BANDWIDTH)
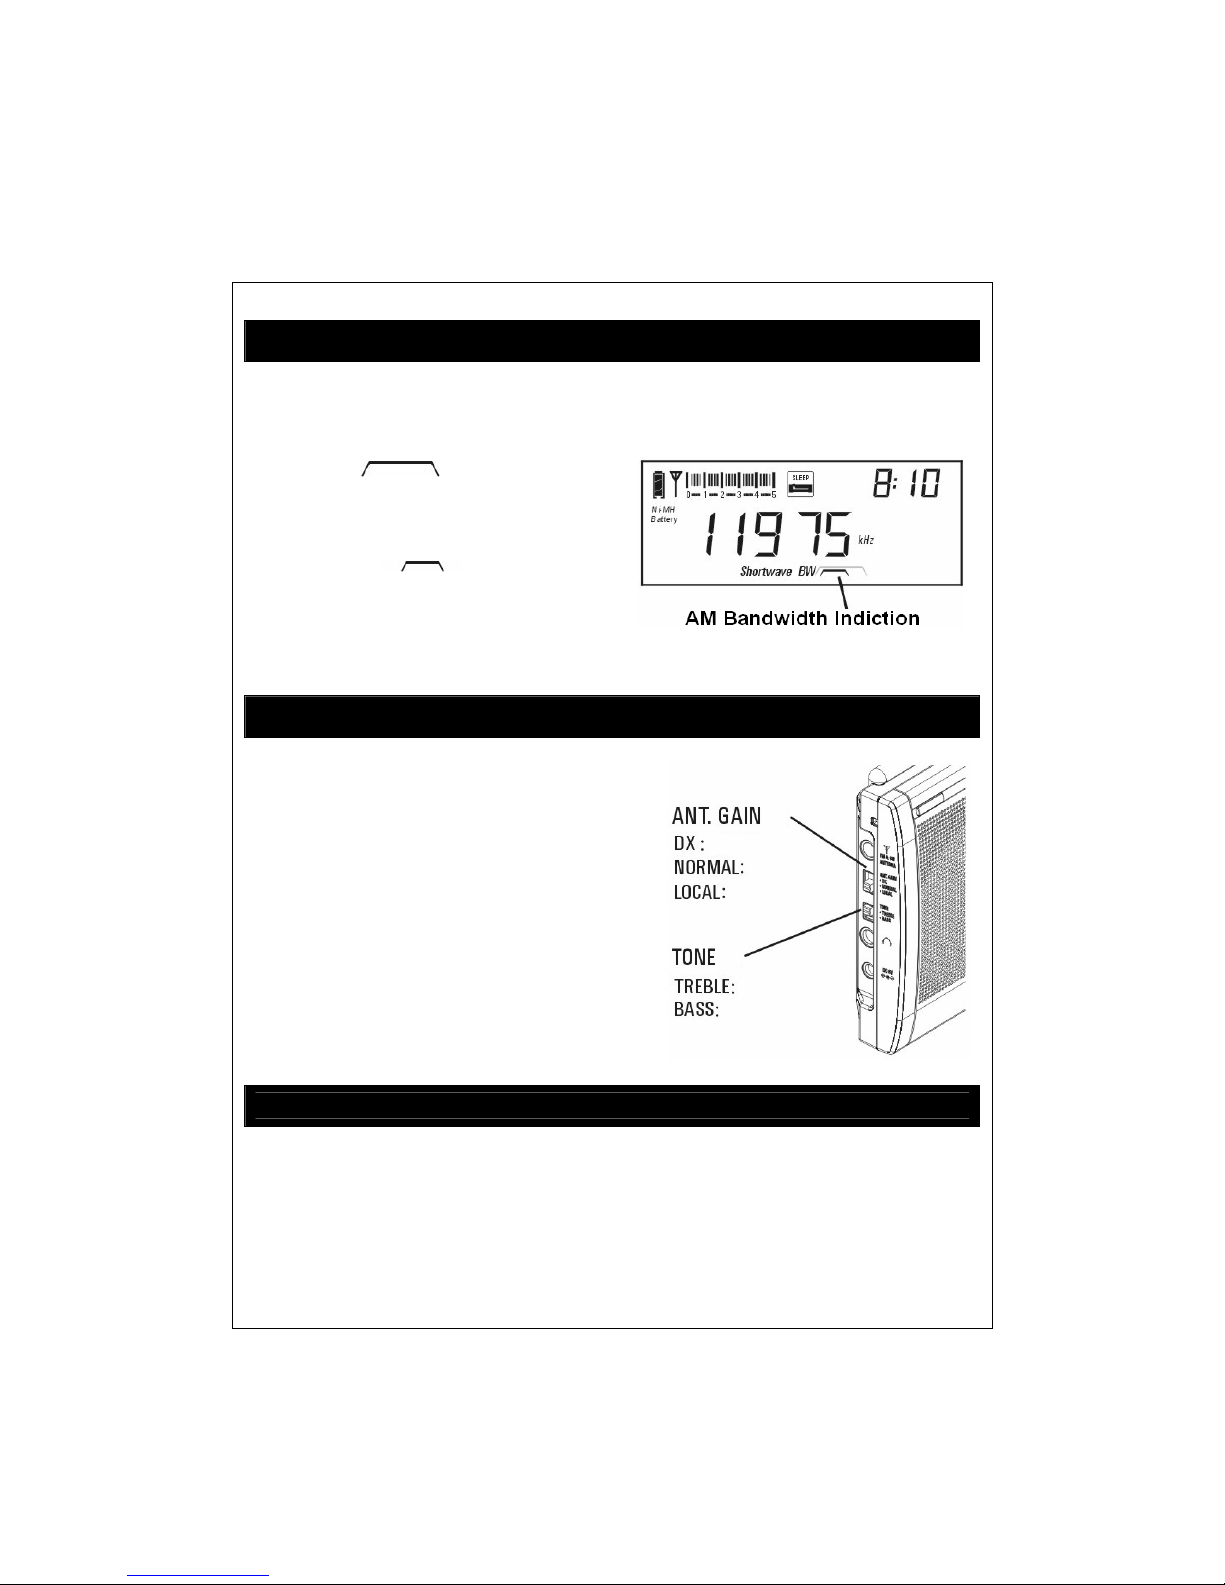
Press the [AM BW] button to select your desired bandwidth for MW, LW, SW, and
SSB.
Wide Band
It has better audio fidelity when receiving
strong signals or local stations.
Narrow Band
It is suitable to receive weak & long distant
station as narrow band is able to limit the
interference from adjacent strong signal
and reduce the background noise.
ANT. GAIN
Push the [ANT. GAIN] switch to "DX"
position for normal listening. But when
listening to the stations with strong signal or
strong electrical interference, push the
[ANT.GAIN] switch to either "NORMAL"
or "LOCAL" position to reduce background
nois e or interference.
TONE CONTROL
Push the [TONE] switch upward for "TREBLE" listening, downward or "BASS"
tone.
Page 23
-- 23 -- .
KEY-LOCK FUNCTION
To activate the key lock function, press & hold the [ ] button with " "
appears on display. Press & hold it again with " " disappears to deactivate the
key lock function.
INTELLIGENT CHARGING FUNCTION
With radio off, install 4 x UM3 (AA) rechargeable batteries to activate the built-in
charging fu nction.
Use the external adaptor to connect the radio for charging. The symbol " " will
advance from the bottom to top during power charging. It stops when batteries are
fully charged.
For Alkaline batteries, please switch off the rechargeable function. (Press the
[BATTERY] button until the "
" is disappear at the top left corner of LCD when
the radio is at off mode)
Notes:
1. Insist to use up all power of rechargeable batteries before charging again. This
could extend the usage time of battery and keep them in good conditions.
2. 4 pcs of batteries to be used as a group and don't separate them for other usage
and mix using those batteries with different power capacity.
3. Please don't charge on any non-rechargeable battery in the radio, this will cause a
hazard or damage to your radio.
4. Please do not use any other external adapter with different voltage.
SINGLE SIDE BAND (SSB)
1. In Shortwave mode, press the [SSB] button repeatedly to select Upper Side Band
(USB) or Lower Side Band (LSB).
· "USB" showing on the display indicates USB selection.
· "LSB" showing on the display indicates LSB selection.
· "USB" and "LSB" disappearing means switching to SW.
2. Suggest to key in the SSB frequency directly
3. Then fine tune the [SSB BFO] knob to achieve better sound fidelity.
Page 24
. -- 24 --
SYNCHRONOUS DETECTOR
When receiving AM broadcasting, if there is interference from adjacent strong
signals, you can activate the SYNC function to improve the reception.
1. Press the [SYNC] button to select between " " or " " for optimum
recept ion.
2. To deactivate the SYNC function, just press the [SYNC] button repeatedly with
the symbols "
" and " " dispearing.
Notes:
1. The standard model of receiving AM station is the best normally. If there is
distortion, or interfering within the AM station, please try to adjacent station
signals by activating the Synchronous detection function, it can improve the
recept ion.
2. If the "SYNC" symbol keeps flashing, it indicates that the radio signal is too
weak or the frequency is deviant. It is recommended to exit the synchronization
detection function as it is not able to function properly.
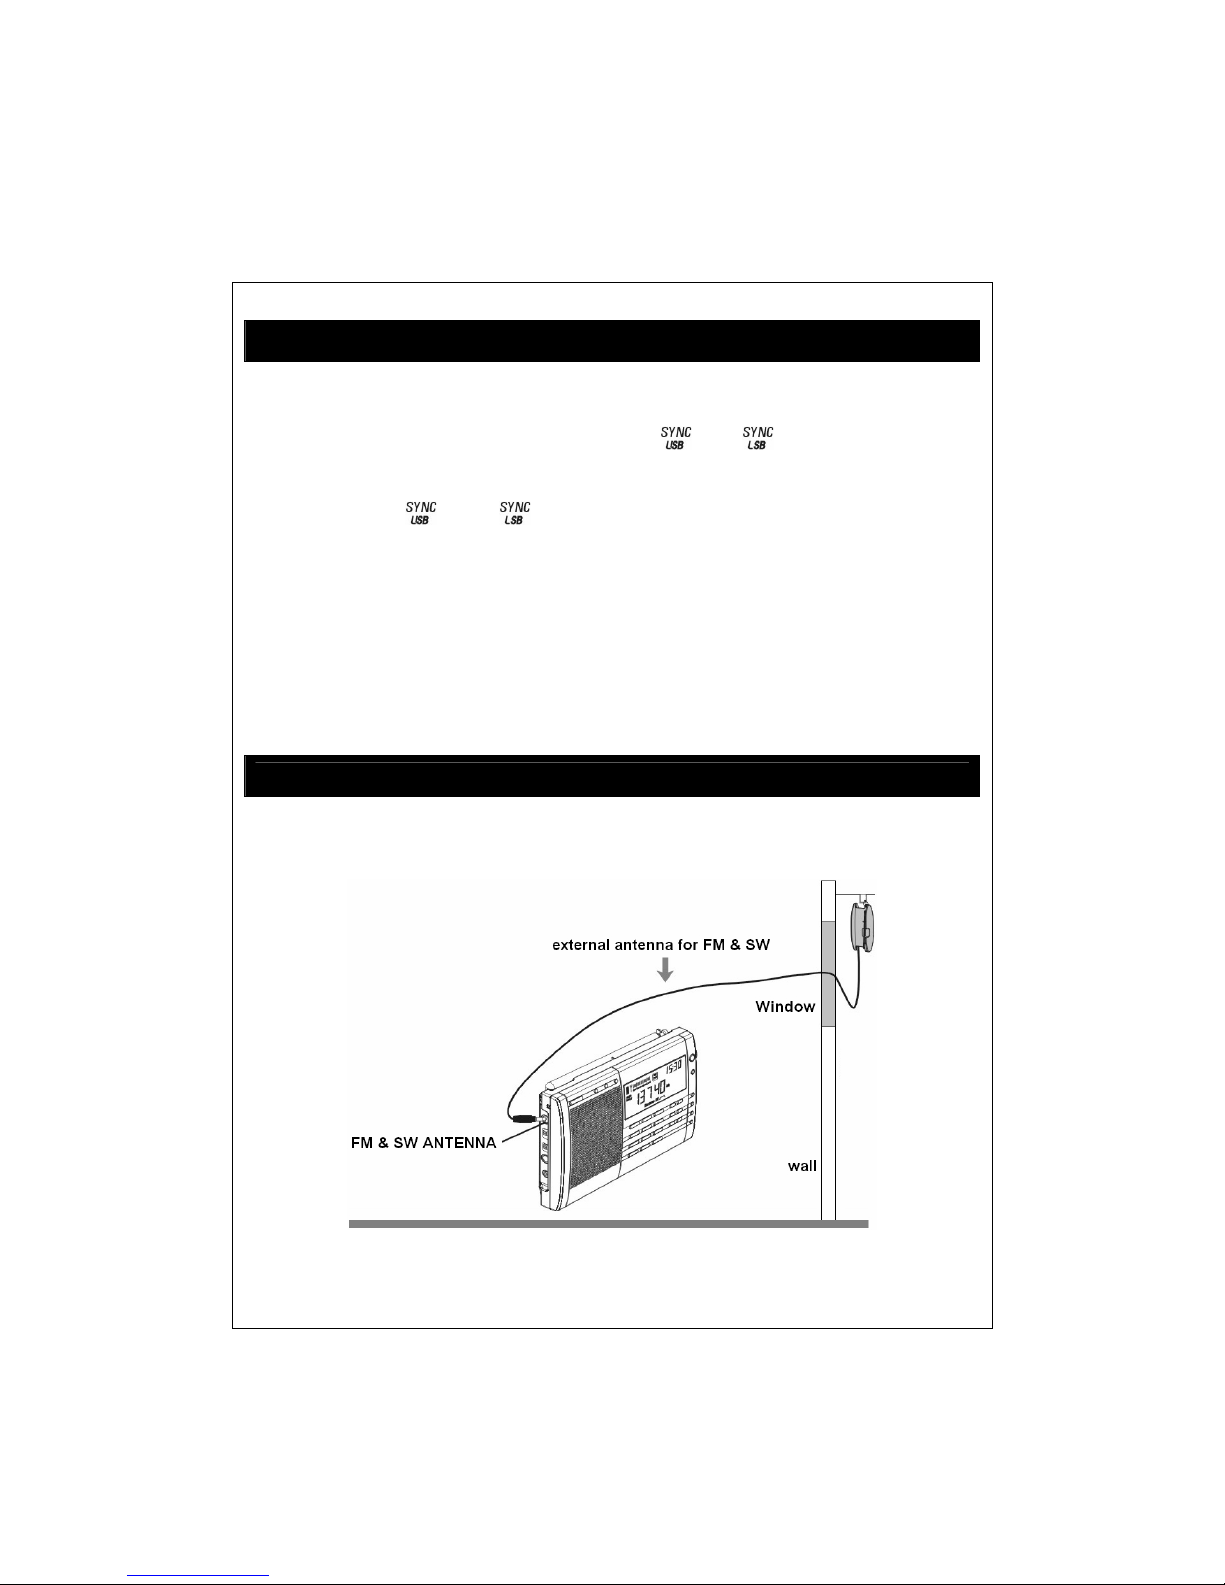
HOW TO IMPROVE FM / SW RECEPTION
Use the external wire antenna plug into the [FM & SW ANTENNA] jack, and then
hang the other end outside the window for better FM and SW reception.
Caution: Do not install any external antenna at the area with thunder & lighting!
Page 25

-- 25 -- .
SYSTEM SETTING (In Power Off Mode)
SETTING FM FREQUENCY RANGE:
Press & hold the [FM SET] button until 88-108 MHz, 76-108 MHz or 87-108 MHz
appears in the display. Quickly keep on pressing the [FM SET] button to select
suitable frequ ency range for your local FM.
TURN ON/OFF THE LW:
Press & hold the [AM] button until "LW ON" or "LW OFF" appears in the display
to turn ON or OFF the LW respectively.
SETTING MW (AM) TUNING STEP:
Press & hold [9/10 kHz] button until "9 kHz" or "10 kHz" appears in the display to
select your desired AM tuning step.
TURN ON/OFF THE INTELLIGENT AUTO LIGHTING
Factory default of intelligent auto lighting function is ON, with which the backlight
would be on for 3 seconds when operating any keys or knobs.
To deactivate the Auto lighting function, press & hold the [LIGHT SET] button with
the "OFF" shows in the display; press & hold the [LIGHT SET] button again with
"ON" shows up to activate it.
Note:
After shutting down the intelligent auto lighting function, the
[LIGHT/SNOOZE] key can still be operated to turn on/off the
backlight
TURN ON/OFF THE CHARGING FUNCTION
Using Regular Batteries for power supply:
In radio off mode, press & hold the [BATTERY] key with "CHA OFF" showing up
& "Ni-MH Battery" disappearing to activate the consumption display of regular
batteries and turn off the built-in charging system.
Using Rechargeable Batteries for power supply:
Turn off the radio, press & hold the [BATTERY] key with "CHA ON" and
"Ni-MH Battery" showing up to activate the consumption display of rechargeable
batteries and turn on the built-in charging function.
Page 26
. -- 26 --
SYSTEM SETTING (In Power Off Mode)
Note:
This radio is default to use rechargeable batteries for power supply. In case of
using regular batteries, you should switch the radio system to regular
batteries mode in order to show the correct power capacity.
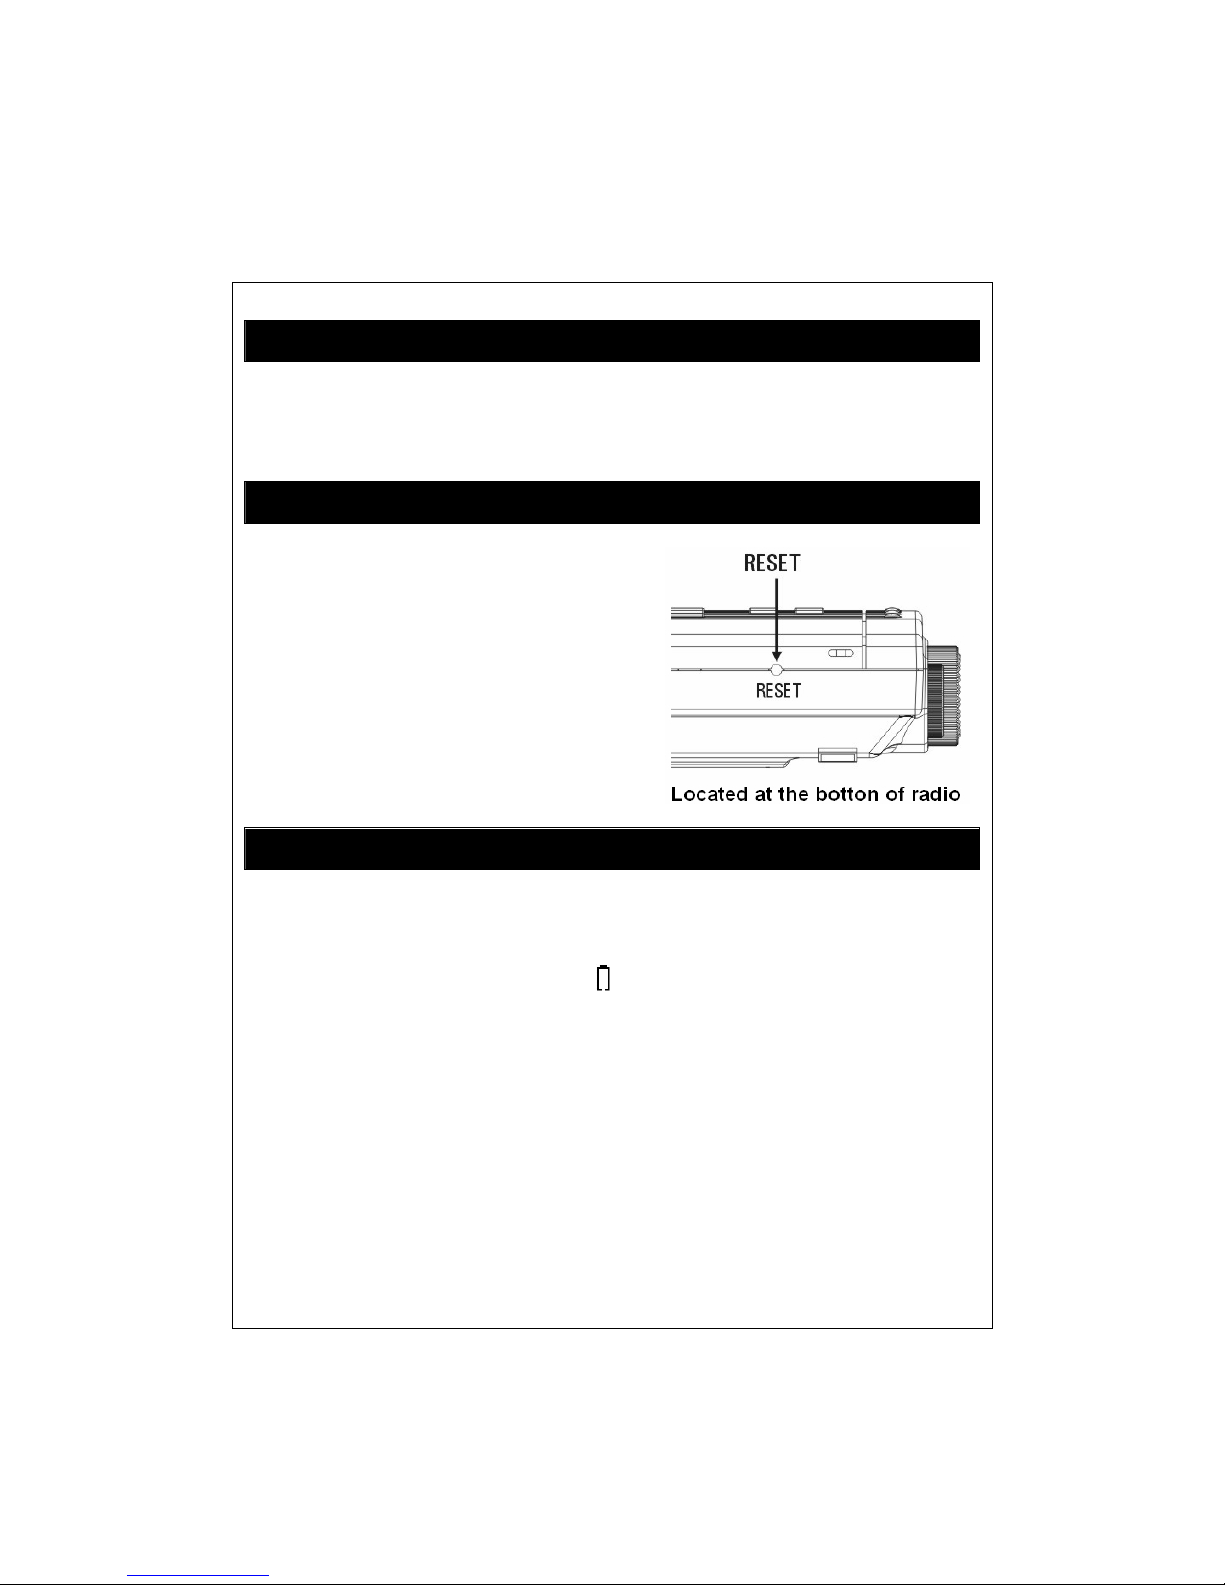
RESET PROCEDURE
If the radio does not fu nction properly, you
can perfor m a reset by using a pointed object
such as straightened paper clip, into the
[RESET] hole in the bottom of the unit, and
gently press and release.
Note: Station memory will not be removed
after you push the reset button.
IMPORTANT MATTERS FOR USING BATTERIES
1. The Clock memory will be gone if the unit has no power supplied by either
batteries or adaptor for a long time, but the pre-stored frequencies will still be
kept.
2. When the battery power is low, the " " symbol in the display will flash to alert
you for changing new batteries. And it will turns off automatically when the
power is gone.
3. Mix using the used & new batteries would cause damage of radio and incorrect
display of power capacity.
4. In order to avoid leakage, always remove the batteries when the unit will not be
used for a long period of time.
Page 27
-- 27 -- .
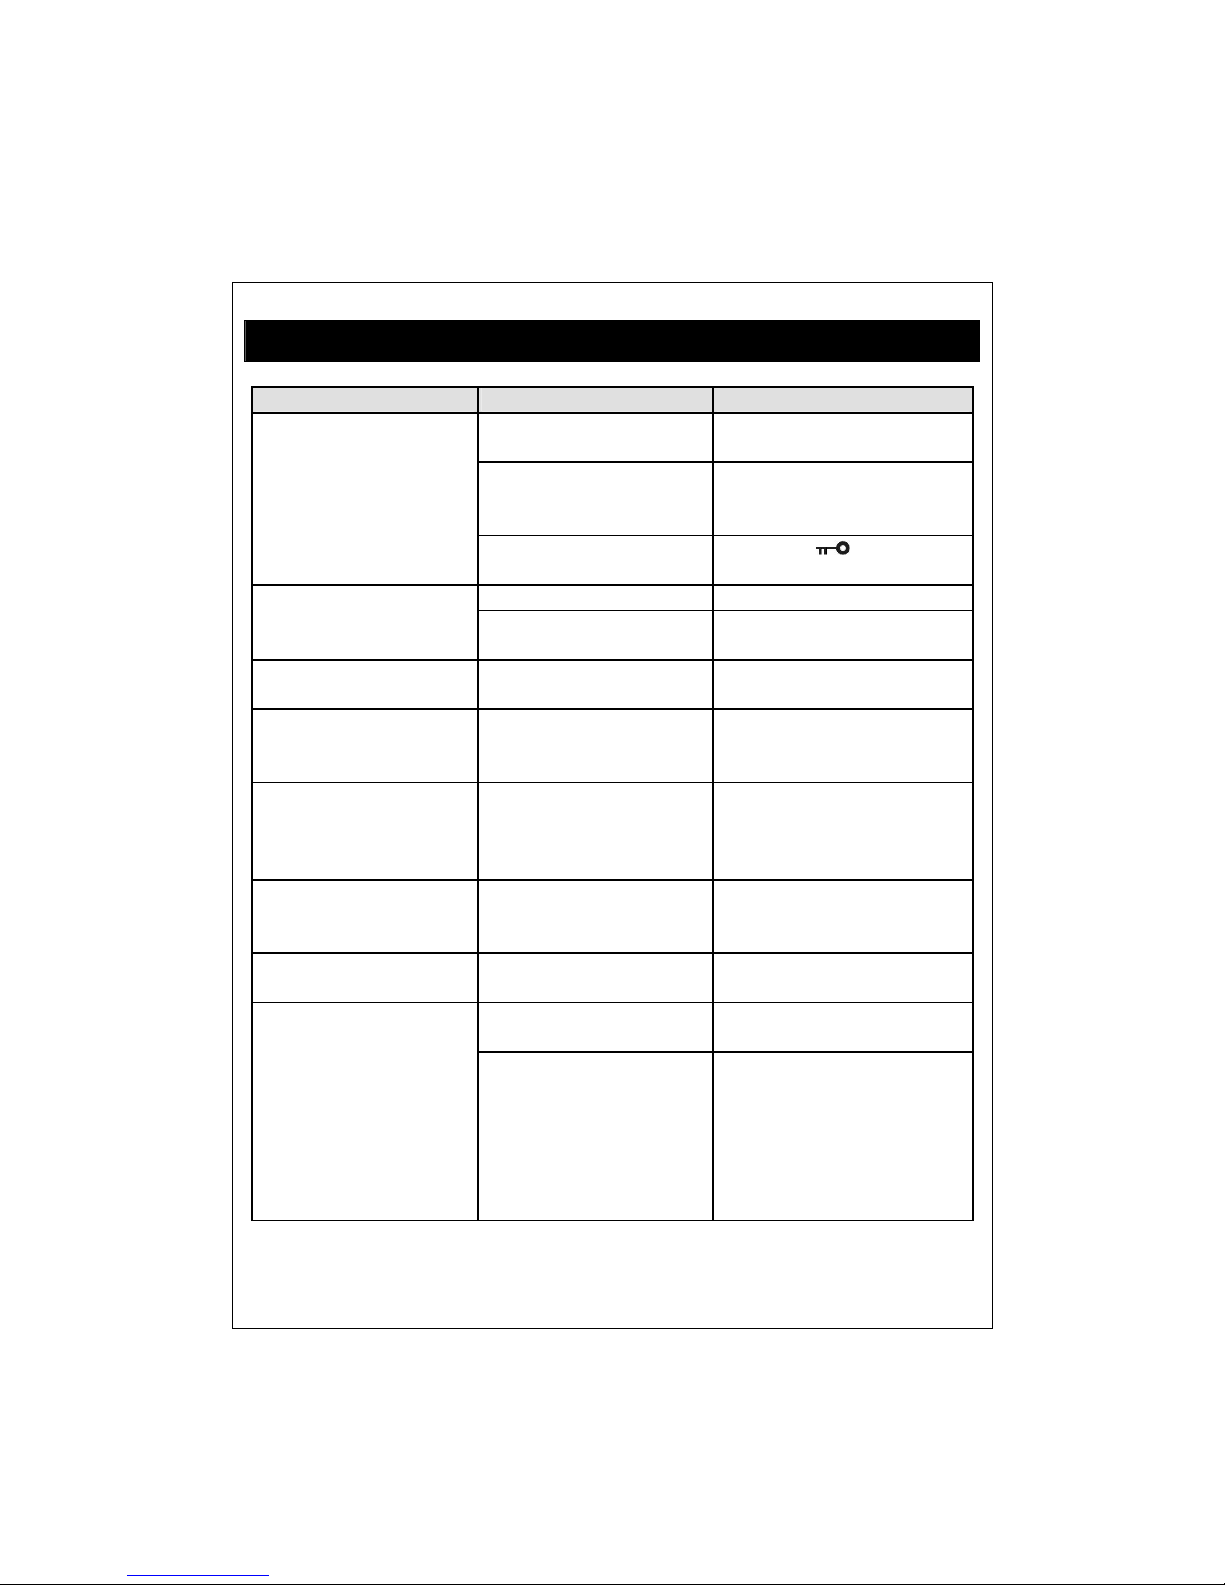
TROUBLE SHOOTING
QUESTIONS ANSWERS SOLUTIONS
- Batteries have no power - Replace all batteries with
new one.
- Installing batteries
incorrectly
- Observing the polarities of
battery, then re-install all
batteries again.
Can not turn on the radio.
- Key knob function is
being activated.
- Press the [ ] button to
deactivated it.
- Batteries have no power - Replace all batteries.Radio turn off while
listening.
- Sleep timer is being
activated.
- Turn on the radio again.
During ATS, some
station
cannot be stored.
- Frequency of stations are
too weak.
- Search the station manually
Some stored station with
noise.
- There is interference near
by your area.
- Low down the antenna or
move to other location and try
again.
Only limited FM stations
can be received.
- FM frequency might be
set as 76~90 MHz
accidentally.
- Turn off the radio, press &
hold the [FM SET] button to
select the accurate FM
frequency range.
Poor AM reception in
USA.
- USA is using 10 kHz
AM
tuning step not 9 kHz.
- Turn off the radio press the
[9/10kHz] button to select
accurate tuning step.
The sound of SW SSB
broadcasting is too low.
The default bandwidth is
Narrow band.
Press the [AM BW] button to
select the Wide band.
- Did not set the proper
radio station for the alarm.
- Preset your alarm station
properly
When the alarm is on,
there is only noise with
the broadcast.
- Or there is no
broadcasting at that radio
station.
- Or you are in another city
where does not have a
radio station for your
preset frequency.
- Make sure it has radio
broadcast in your location.
Page 28
. -- 28 --
TROUBLE SHOOTING
QUESTIONS ANSWERS SOLUTIONS
The charging time
becomes shorter and
shorter.
The chargeable batteries
getting old.
Replace the old rechargeable
batteries with new ones.
Radio malfunction. This may caused by
interference, and the
computer microchip does
not function properly.
Remove all batteries, then
reload again.
If it is still not working,
please press on the reset
button with a pointed object.
Page 29

-- 29 -- .
SPECIFICATIONS
1. Frequency Range:
FM: 76 ~ 108 / 87 ~ 108 MHz Step: 0.01 MHz / 0.1 MHz
MW: 522 ~ 1620 / 520 ~ 1710 kHz
Tuning Step: 9K for North America or other countries / 10K for South America
LW: 100 ~ 519 kHz Step: 1 kHz / 9 kHz
SW: 1711 ~ 29999 kHz Step: 1 kHz / 5 kHz
AIR:118 ~ 137MHz Step: 1 kHz / 25 kHz
2. Sensitivity
FM (S/N=30 dB) Less than 3 µV
MW (S/N=26 dB) Less than 1 mV/m
LW (S/N=26 dB) Less than 5 mV/m
SW (S/N=26 dB) Less than 20 µV
SSB (S/N=10 dB) Less than 1 µV
AIR (S/N=10 dB) Less than 5 µv
3. Selectivity
FM > 30 dB (±200 kHz)
MW/LW > 40 dB (±9 kHz)
SW > 40 dB (±5 kHz)
4. S/N Ratio
FM Less than 60 dB
MW/LW Less than 45 dB
SW Less than 50 dB
5. AM Frequency
SSB, AM 1st IF: 55.845 MHz
2nd IF: 455 kHz
FM: 10.7 MHz
6. FM Stereo crosstalk Less than 20 dB
7. Output Power
Speaker > 450 mW
Earphone > 10 mW
Page 30

. -- 30 --
SPECIFICATIONS
8. Station Memory 2000M in total
800 memories for each band:
FM: 100M
MW: 100M
LW: 100M
SW: 200M
SSB: 200M
AIR: 100M
1200 memories for 12 memory pages (each page 100 memories)
9. Alarm Mode: alarm by radio only (2 pre-settings)
10. Quiescent Current
FM < 50 mA
MW/LW < 70 mA
SW < 70 mA
SSB < 70 mA
AIR < 70 mA
Standby < 80 µA
11. Speaker: D 77 mm / 16 Ω / 1W Cone speaker
12. Earphone Jack: 3.5 mm, 32 Ω , Stereo type
13. Power supply:
Battery: UM3 or AA x 4
External adaptor: DC 6 V, ≥ 300 mA
14. Unit Dimensions: approx. 187 (W) x 114 (H) x 33 (D) mm
15. Weight: 470 g (Batteries not included)
Page 31

-- 31 -- .
NOTES
Page 32

. -- 32 --
NOTES
Page 33

-- 33 -- .
NOTES
Page 34

. -- 34 --
NOTES
 Loading...