

Page 1
For household use
Table of Contents
Thank you for your purchase.
Before using this product,
please read this instruction
manual and use the product
correctly.
After reading the manual,
please keep it close at hand
for easy reference.
Instruction
Manual
LOCK
OPEN
Vacuum Cold & Hot All-in-One Blender
Product Number: TMV3000SEA
Using the vacuum
processing function
Using the vacuum
storage function
Using the heat
processing function
Using the mixing
processing function
Using the
powderizing function
Using the pulse button
Using the stirring rod
9~
14
15
~
18
19
~
22
23
・
24
25
・
26
27
28
………
…………
………
………
………
…………
……………
Safety Warnings
Part names and functions
Specifications
1~4
5~8
8
……………
…
……………………
About error notification
Maintenance
29・30
31
~
36
……
………………
Troubleshooting
Recipes
37
38
…………………
…………………………
Cold
Soup
mL
1800
1600
1400
1200
1100
800
2000
1750
15
00
125
0
100
0
75
0
mL
Soymilk/Milk
Soymilk/Milk
Food
MAX
MIN
1000
500
1500
2000
mL
Page 2
1
This appliance shall not be used by
children. Keep the appliance and its
cord out of reach of children.
Or, please do not use the product
while children are nearby.
Children should be supervised to
ensure that they do not play with the
appliance.
Do not place disassembled parts or
packaging within reach of children.
This appliance is not intended for use
by persons (including children) with
reduced physical, sensory or mental
capabilities, or lack of experience
and knowledge, unless they have
been given supervision or instruction
concerning use of the appliance by a
person responsible for their safety.
The disassembly, repair, or alteration
of the product should only be done by
a repair engineer.
The appliance must not be immersed
in water. Please do not allow water to
come into contact with the main body.
Do not plug or unplug the power cord
or operate the product with wet hands.
Do not get the electrodes wet, or use
the product while they are wet.
Avoid spillage on the connector.
Do not use the product under any of the
following states, as the power cord may be
broken due to long-term use or improper use.
●
When the power cuts out during use
●
When the power cord is twisted and
won’t return to its original state
●
When the base of the power cord
has been deformed or damaged
●
When the connection of the plug to
the outlet is loose
Do not use the product with power
other than AC 220-240 V.
Do no
t handle the power cord in any of
the following ways.
●
Damaging the power cord.
●
Bending it forcedly ●Twisting it
●
Pulling it ●Putting heavy items on it
●
Putting it close to a hot item
●
Tucking it ●Making alterations to it
●
Using it while having it tied in a bundle
●
Wrapping the power cord around the main body
This product is a Y-type connection.
If the power cord is damaged, it must
be replaced by the manufacturer, its
service agent, or similarly qualified
persons in order to avoid a hazard.
Keep the appliance 10cm or more away
from walls and furniture during use to keep
the exhaust vent from being blocked.
●
Before using this product, please read these precautions and use the product
correctly.
●
The precautions shown below are provided to ensure safe product use and to
prevent harm to the user and those nearby, as well as to prevent property
damage. Therefore, the precautions should always be followed.
Warning
Safety Warnings
Detailed information on cleaning the appliance can be found
in the section Maintenance.
Page 3

2
Caution
Safety Warnings
Please plug and unplug the power
cord only after confirming that the
power is OFF.
Please hold the power plug itself when
you pull the cord out from the outlet.
Always unplug the power plug from
the outlet after using.
Always disconnect the appliance from
the supply if it is left unattended and
before assembling, disassembling or
cleaning.
Before approaching moving parts or
changing accessories, turn off the
power and unplug the power cord.
Never touch the electrodes or push
them with a rod or other item.
Do not put foreign objects into the
electrodes.
Remove the bottle set from the main
body after the cutter rotation has come
to a complete stop.
Do not put fingers into any of the
processing bottles after they have
been attached
to the main body.
Do not touch the cutter, as it is very
sharp.
Be careful when handling the sharp
cutter blades, emptying the container
and during cleaning.
Do not operate the appliance when the
cover or cover cap are not attached.
Do not place or remove the cover or
cover cap during operation.
Do not move the appliance during operation.
Do not use in an unstable place.
Never perform no-load running.
Do not use the unit with ingredients of an
amount less than the minimum amount.
Do not insert more ingredients than the
maximum quantity. (Please see p. 8)
Do not use unusable ingredients.
Please adhere to the runtime limitations.
(Please see p. 8)
Do not store food other than those
processed using vacuum blending by
means of vacuum storage.
Do not use any container or part other than
those meant for the purpose intended.
Do not use the tumbler for freezer storage.
There is no anti-bacterial effect with
the vacuum storage feature, so
carrying the tumbler for prolonged
periods should be avoided.
For storage, place in a refrigerator and
consume as soon as possible.
Do not get the bottom of any
processing bottle wet. Do not soak
any processing bottle in water.
Do not use a dishwasher or dryer for
any parts other than the tumbler.
Please do not use benzine, thinner,
metal scrubbing brushes, polishing
powder, or chemical-containing cloths
for cleaning the product.
D
o not use for purposes other than
processing.
Do not use for industrial purposes.
Page 4

3
Safety Warnings
When Using the Vacuum Function
If foreign matter is sucked into the main body along with air during
vacuum processing or vacuum storing, a failure may occur. Please
use the product by complying with the following instructions.
Caution
To prevent failures
Potential foreign matter
sucked into the main body
Powdered items
(roasted soybean flour, cocoa powder,
powdered sugar, protein, etc.)
Steam
Liquid material attached to the
cover, etc.
Air bubbles and bubbles from
mixed ingredients
Ingredients that are prone to produce
air bubbles or other bubbles
●
Ingredients that contain a lot of air,
such as ice cream, apples, etc.
●
Ingredients in which bubbles easily
expand, such as milk, soy milk,
dairy products, etc.
●
Ingredients containing leavening
agents
●
Completely dissolve in liquid
before adding.
●
Use mixer processing with the
heat processing bottle.
●
Please use ingredients that have
cooled down to at least below 40˚C.
●
Check the cover sets before each
use, and clean the underside of the
container cover/tumbler cover if any
liquids or other substances are present.
1.Check the maximum volumes for
the vacuum processing bottle
and tumbler on p.11 and p.16, and
please follow the listed volumes.
2.When moving contents to the
tumbler after vacuum processing,
pour gently to prevent frothing.
3.Do not store contents using
the vacuum storage function
that have not been vacuum
processed with this product.
When the vacuum processing bottle and tumbler are decompressed
internally, bubbles are sometimes produced, as air contained within
ingredients may rise up as bubbles.
Usually there will be no issues if the content is under the maximum
volume (please see p.11 and p.16), but in the unlikely event that foam
seems that it will ris
e up to the cover during decompression, immediately
press the Cancel/Release button to stop the appliance.
Page 5

4
Safety Warnings
When Using the Heat Processing Function
Please follow the precautions below, because the entire
bottle set reaches high temperatures.
The Heat Processing Bottle is only to be used with this
appliance.
Warning
• Always process volumes at or below the maximum volume of the
processing bottle. Boiling water may fly out.
• Do not use in the vicinity of walls, furniture, items vulnerable to
heat, or ignitable items.
• Do not touch the heat processing bottle or cover during
processing.
Steam will exit from the cover cap, so do not approach it with the
face or hands, or look into the cover.
• When removing the bottle set and opening the cap after
processing, use oven mitts or similar and be careful of burning.
Do not touch with bare hands until it has sufficiently cooled.
• Be careful with the main body coupler after use, as it will be hot.
• Be careful if hot liquid is poured into the blender as it can be
ejected out of the appliance due to a sudden steaming.
• The statement of the surface of the heat processing bottle is
influenced by residual heat after use.
Page 6
5
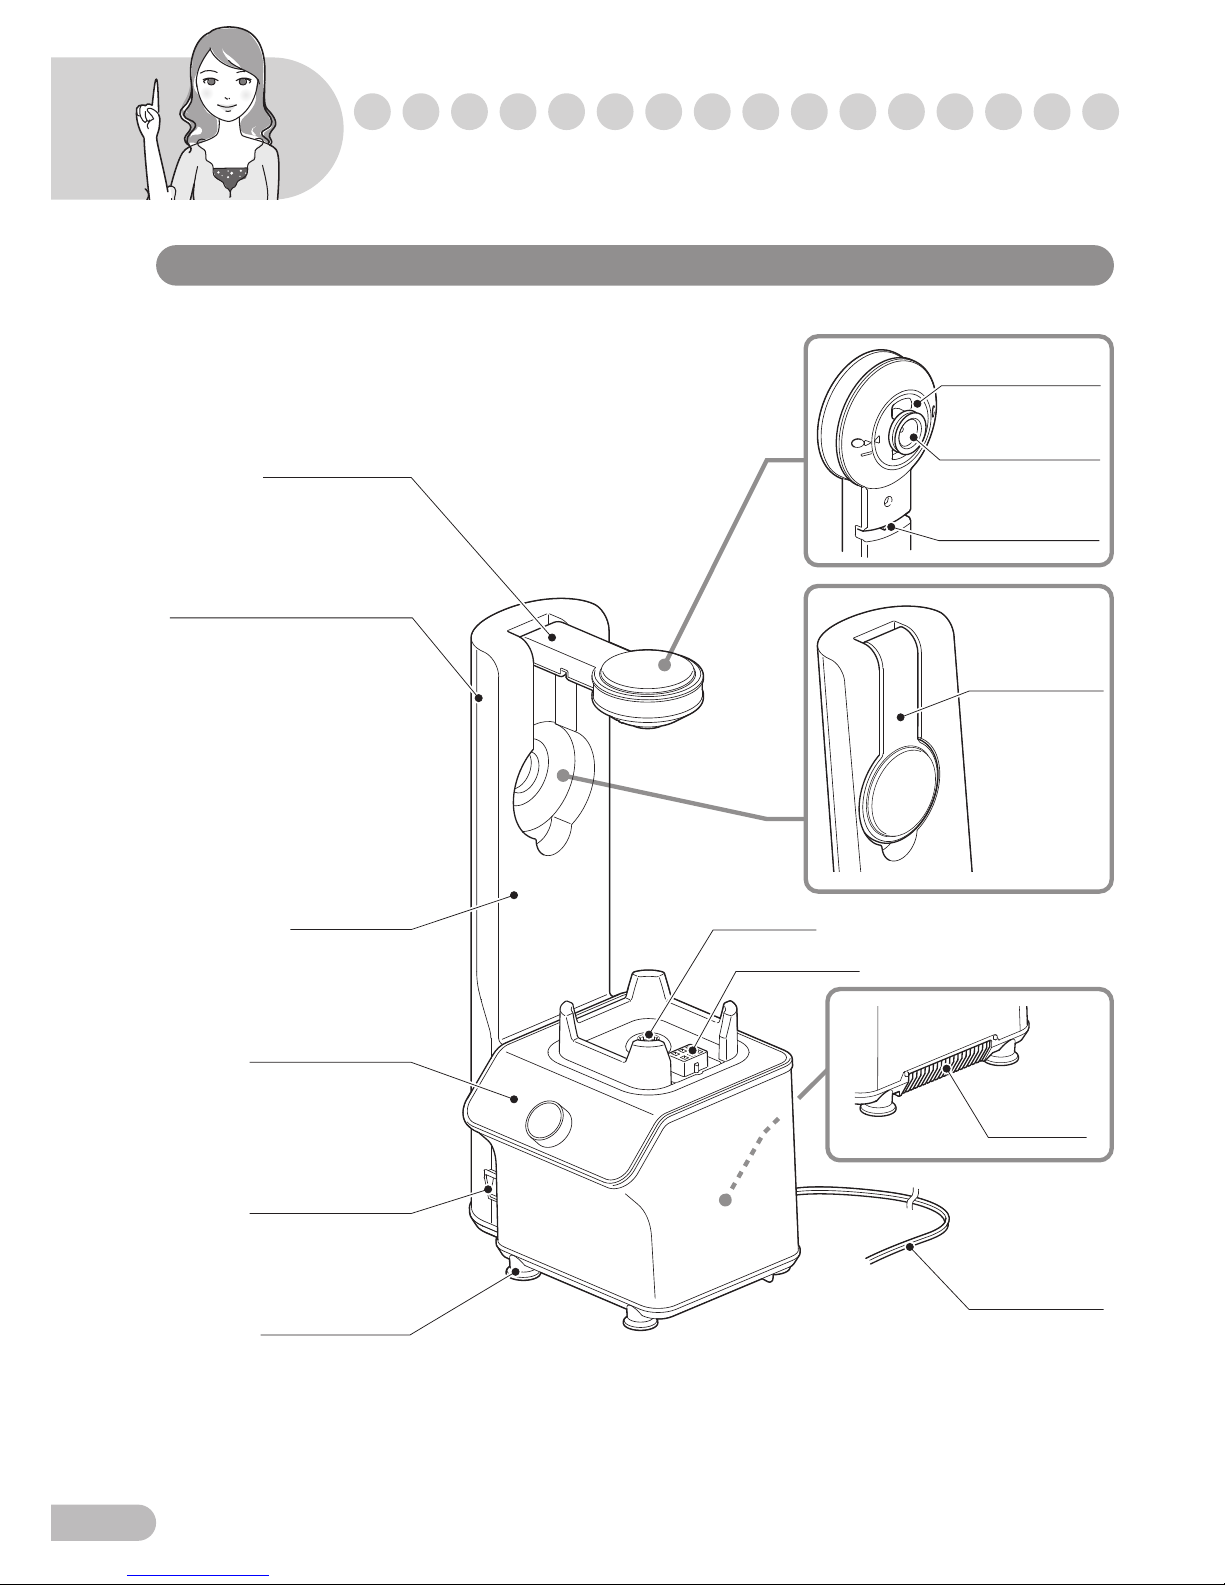
Main body
V
acuum arm,
storage
position
Power cord
Suction port
Safety switch
Main body
Control panel
Vacuum arm
Power switch
Indicator
Four lamps indicate the
vacuuming and heating
state of progress.
(Vacuuming: blue,
heating: red) They
change one at a time
from blinking to steady
on, and when all are
fully lit, vacuuming and
heating are complete.
(not removable)
Arm cover
(w/ suction port)
Electrode
Coupler
Exhaust
vent
Suction port
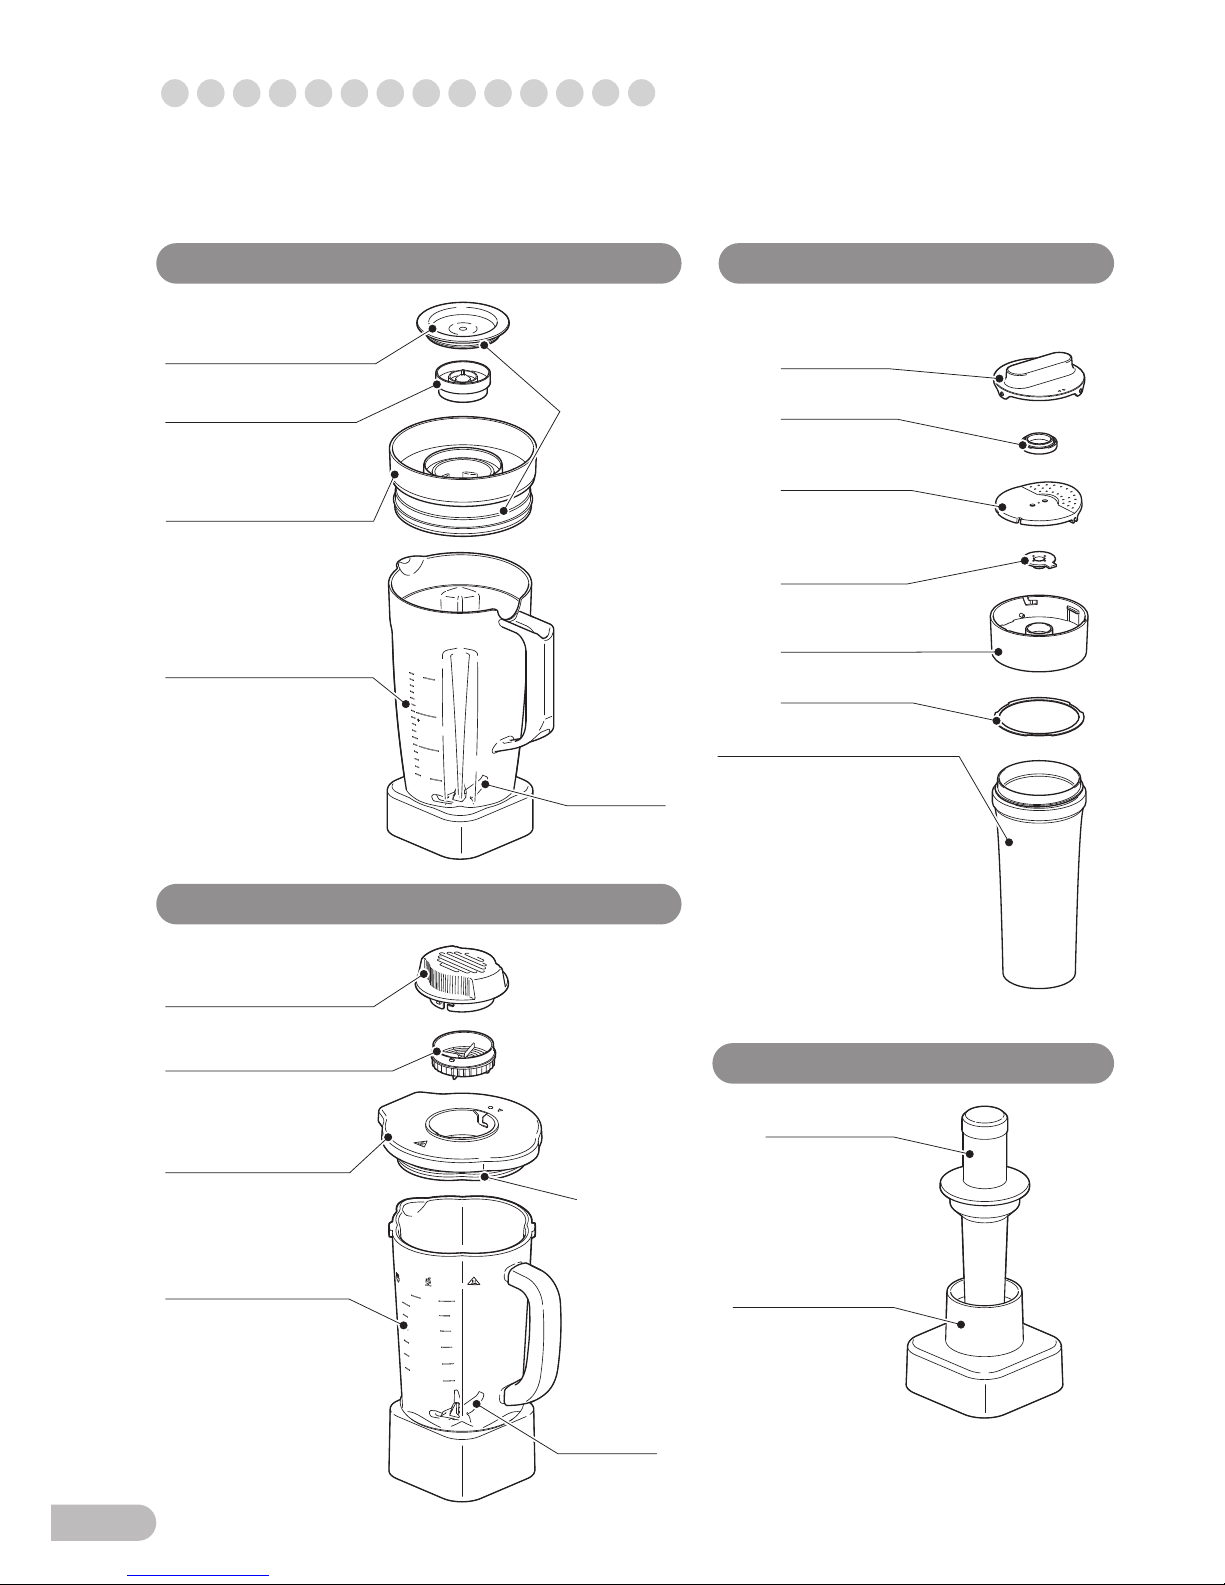
Part names and functions
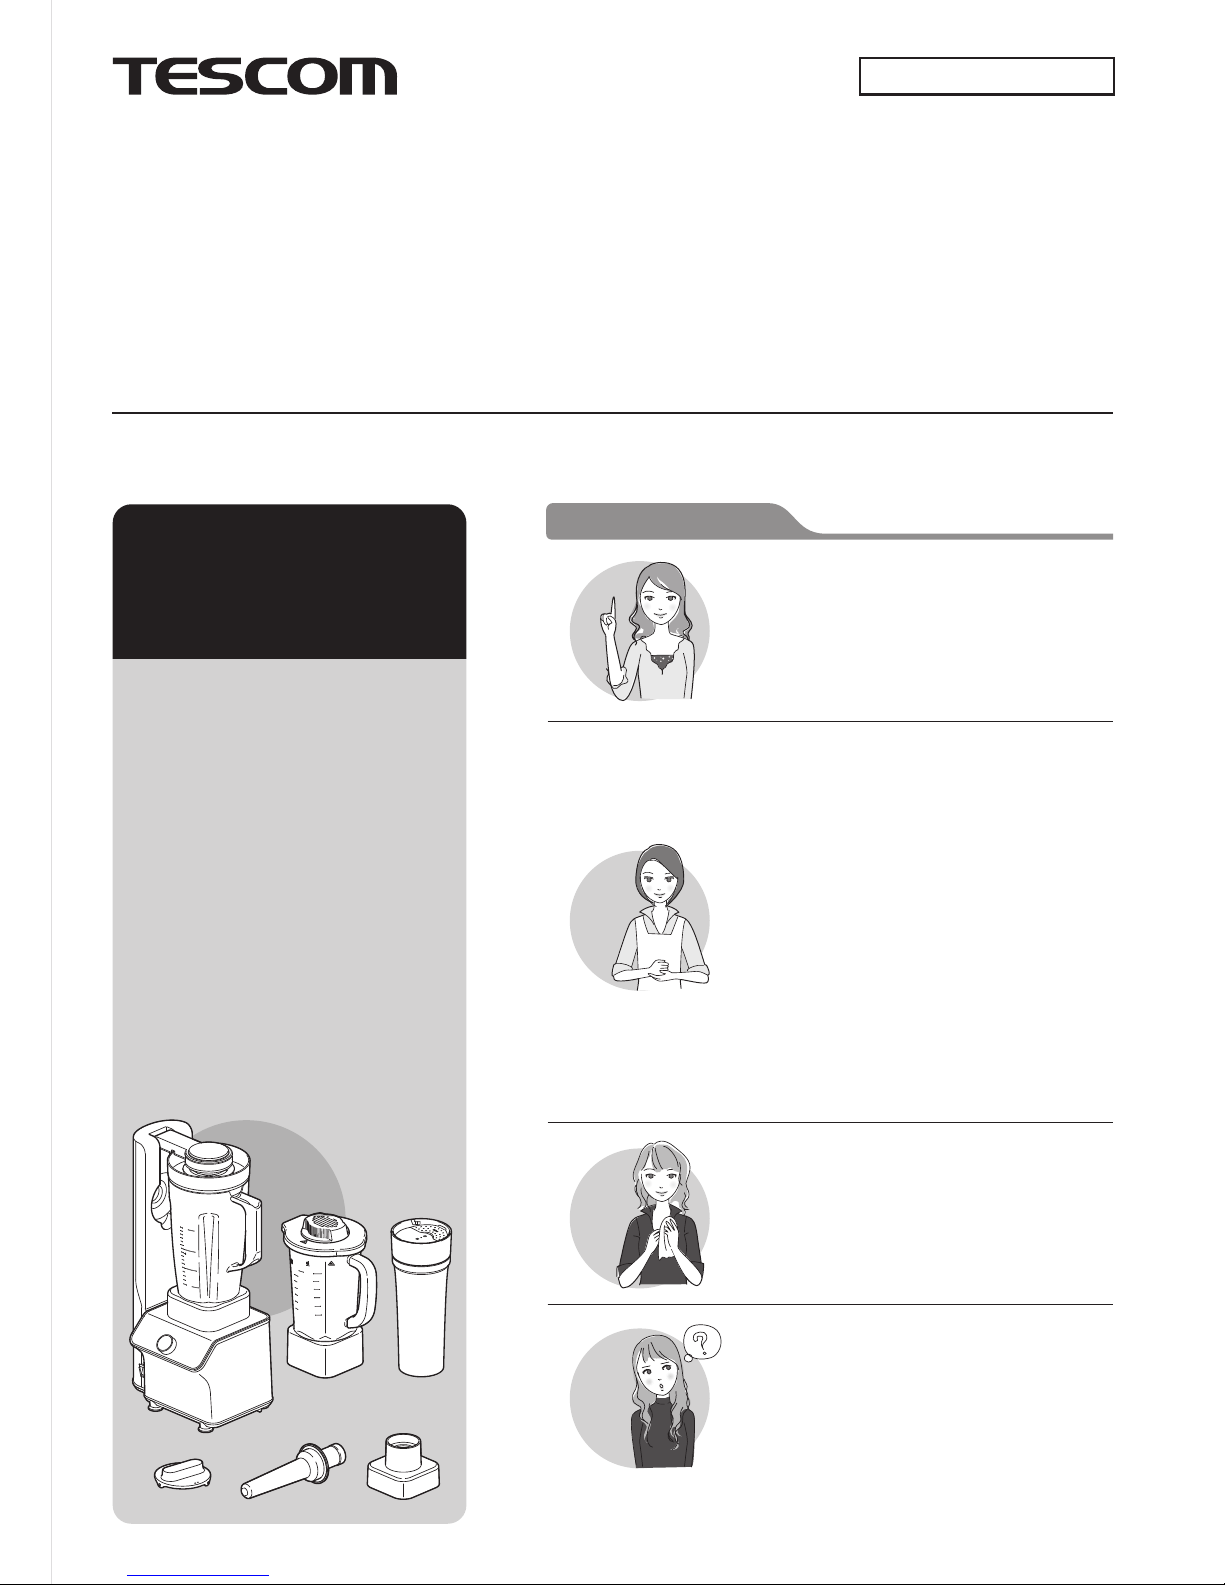
First, please check to see if the package has all the necessary parts and accessories.
The seal material is already attached to the applicable parts.
Page 7
6
Control panel
The cutter only rotates while you hold the button down.
Use when there is not enough stirring. (Please see p. 27)
Press to start operation.
Temporarily stops or releases stopping if pressed during operation.
Press to remove vacuum arm after vacuum processing or vacuum storage.
Stops processing if pressed during operation.
Course
When making fruit and vegetable smoothies
/When vacuum-storing in the tumbler
When making soup
When making baby food
When making homemade soy milk
When crushing nuts and other ingredients
When making smoothies with
frozen fruit, etc.
When setting the rotation speed
and stirring time
Heat
processing
bottle
Vacuum
processing
bottle
Manual course
Frozen course
Smoothie course
Powderizing course
Paste course
Soup course
Soy milk course
Usable
Usable
Usable
Usable
UsableUsable
Usable
Usable
Usable
Usable
The outside edge turns.
The center is the selection button.
Cancel/Release
button
Display
window
Dial Pulse button
Start/Stop button
Timer display lamp
Rotation level display lamp
Selection course lamp
Error notification lamp
(Please see pp. 29–30)
Part names and functions
Page 8
7
Vacuum Processing Bottle Set
Heat Processing Bottle Set
Tumbler base
Tumbler set
LOCK
OPEN
Soymilk/Milk
Soymilk/Milk
Food
MAX
MIN
1000
500
1500
2000
mL
Cold
Soup
mL
1800
1600
1400
1200
1100
800
2000
1750
15
00
125
0
100
0
75
0
mL
VACUUM
FRESH
PUSH
Stirring rod
Tumbler base
Vacuum processing
bottle
Vacuum processing
bottle cover
Float
Vacuum processing
bottle cover cap
Seals
cannot be
removed.
Not
removable.
Cutter
Heat processing
bottle
Heat processing
bottle cover
Inner cap
Heat processing
bottle cover cap
Seals
cannot be
removed.
Not
removable.
Made with
heat-resistant glass
Cutter
Tumbler
cover cap
Cap seal
Tumbler
Releasing
mechanism
Releasing
mechanism
seal
Tumbler
cover
Cover seal
Has double surface
configuration in which the
exterior surface separates
from the interior surface.
There is a seal between the
two surfaces which is the
same as the cover seal.
When the seal becomes
loose, please make sure it
is securely in place before
usage. (Please see p.32)
When not in use, the stirring rod
can be set upright.
When you use the blender for the first time or when using it after it has been stored for a while, please wash
all parts other than the main body before use. (Please see pp. 31–36)
Part names and functions
Two sets included.
Page 9

8
Tumbler set
Specifications
Part names and functions
• Stirring rod • Spatula • Cleaning brush
The specifications of the product and its parts are subject to change without notice.
TMV3000SEA
Product number
220-240V~ 50-60Hz
Power source
Blending: 1150W-1350W
Heating:
850W-1000W
Power
consumption
Vacuum blending function/blending function
:
Milling function:
Vacuum storage function:
Allow 1 minutes of downtime
after every 2 minutes of usage,
for up to 20 minutes total.
1 minute of use,
10 minutes rest
Allow 3 minutes of downtime
after using the function 3 times.
Run-time
limitations
Container
capacity
Vacuum Cold & Hot All-in-One Blender
Name of product
1.2m
Length of cord
Vacuum processing bottle:
Heat processing bottle:
Tumbler:
Max. 2,000 ml, min. 500 ml
Max. 2,000 ml, min. 750 ml
(for non-heat processing)
Max. 1,800 ml, min. 800 ml
(for heat processing)
Max. 400 ml
Page 10
9
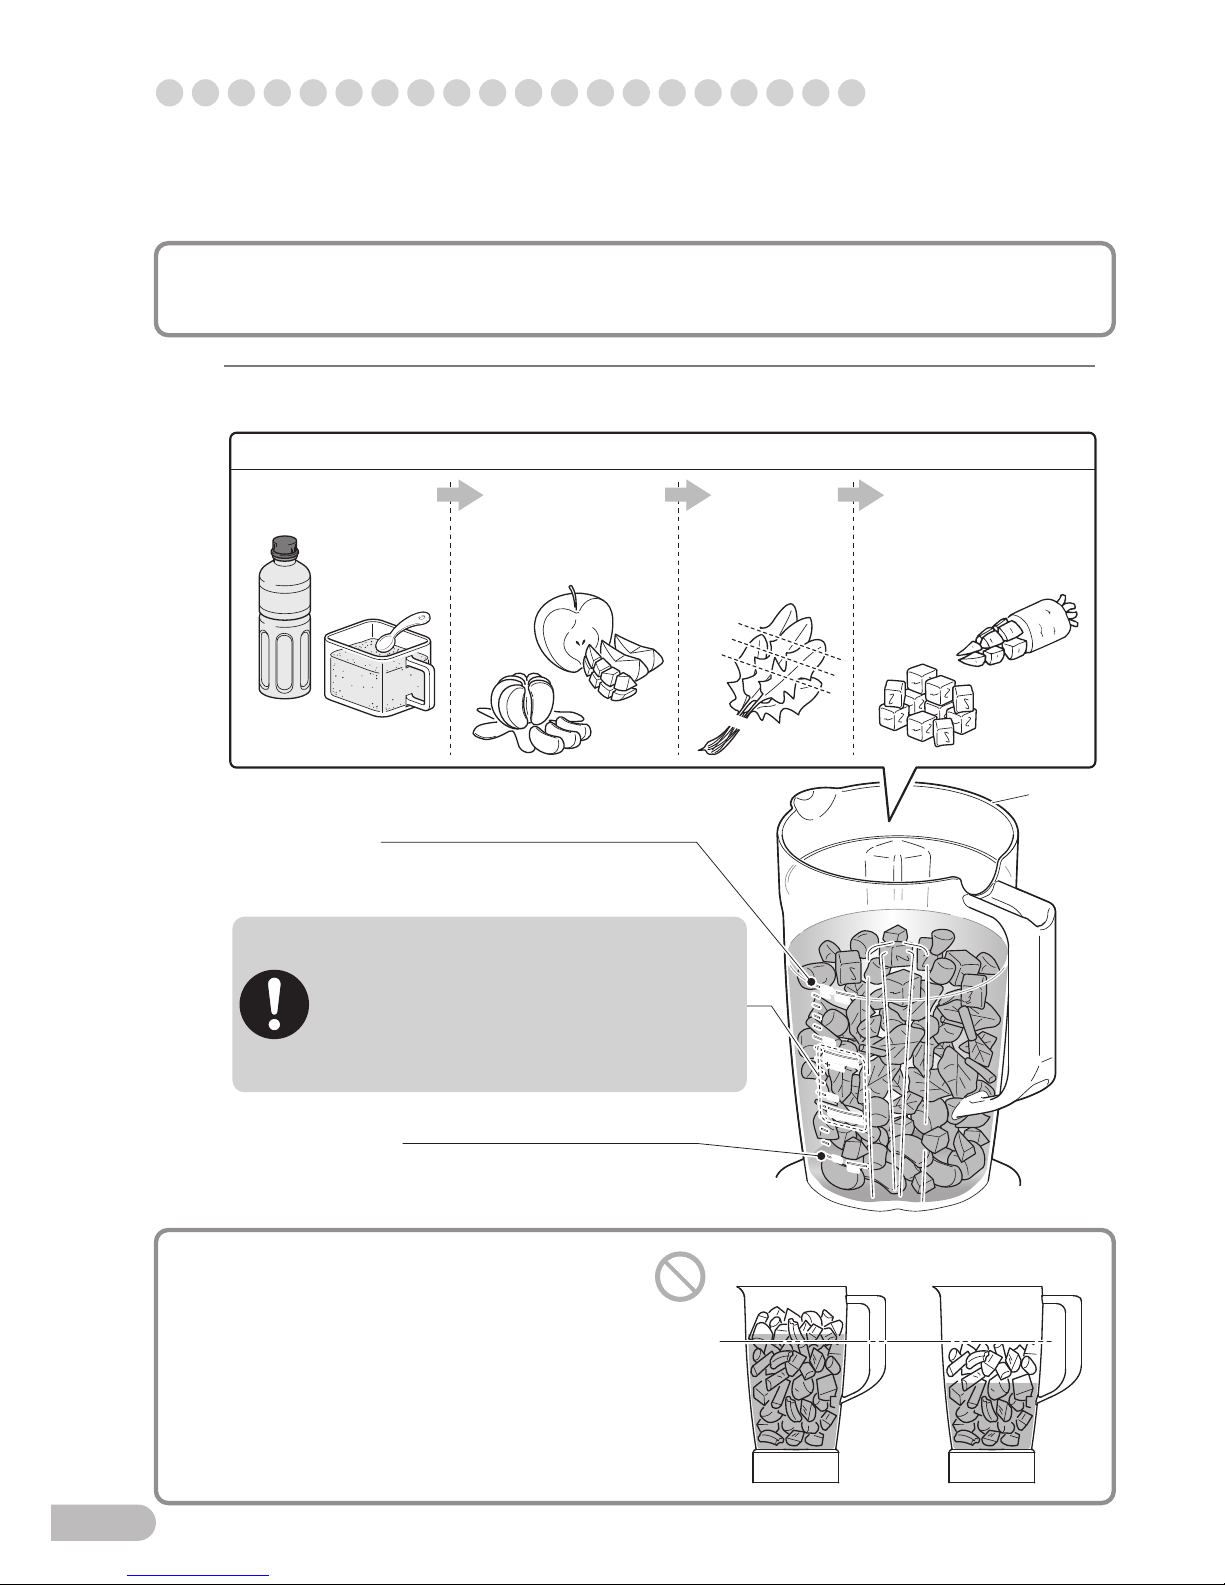
Preparation of ingredients
Unusable ingredients (causes of failure)
Cold
Soup
mL
1800
1600
1400
1200
1100
800
2000
1750
15
00
125
0
100
0
75
0
mL
ミキサーは材料をきざむ・水分の少ないものをまぜる・こねる・ペーストを作るといった
用途(ハンバーグ・ギョーザのタネなど)には使えません。
故障の原因となります。
The blender should not be used for mincing ingredients, blending ingredients with little moisture,
kneading, or preparing paste-like food (e.g. hamburger meat, dumpling stuffing, liquid diet foods,
etc.), etc. Doing so may cause failure.
Using the vacuum processing function
★Ingredients with
a temperature
higher than 40℃
★Meat or fish
★Flour such as
wheat flour
★Hard or dry ingredients
· Frozen food (excluding fruit)
· Commercially available ice
· Dried bonito or dried soybeans
· Dried fruit, etc.
★Sticky ingredients
★Fruit
Thick-peel fruit should be
peeled, cored, or seeded,
and cut into sizes of 3 cm
by 3 cm.
Bananas should be cut into
round slices with a thickness of about 3 cm.
★Citrus fruit
These should be peeled,
separated into sections, and
seeded.
★Warm ingredients
These should be
cooled down to
below 40℃.
★Ice
Prepare ice cubes of about 2.5 cm by 2.5 cm
using a standard ice cube tray.
* The number of ice cubes that can be used at
one time is ten or less.
★Hard ingredients such as carrots
Cut into 3 cm by 3 cm pieces.
★Leafy vegetables, such as spinach
The stems should be cut
off, and the leaves
should be cut into
pieces with a width of
about 3 cm.
When you want to use
more than the normal
amount, the pieces should be cut smaller.
★Frozen fruit
They should be cut smaller than 3 cm by 3 cm,
and should be frozen.
* Items which have frozen together in clumps
should first be broken apart before being
added.
★Powdered foodstuffs
(Please see p.10. For items that are difficult to dissolve,
use the heat processing bottle and follow the processing
procedure on pp. 23-24.
Page 11
10
Advice on processing
Using powdered
ingredients
(cocoa powder, roasted
soybean flour, powdered
sugar, protein powders,
etc.)
When you use these with the vacuum blending function, they should
previously be mixed with liquid and dissolved completely in a
separate container, and then, they should be processed within the
same maximum amount as for milk or soymilk. (Please see p.11.)
* Please do not put materials mixed by shaking because that may
cause a failure due to the suction of bubbles.
For powders that are difficult to dissolve completely, mix after moving
the contents to a different container after processing, or use the heat
processing bottle (pp.23-24) to process.
Use of the vacuum blending function may cause a failure because
lumps of flour or flour remaining without being dissolved may burst in
the container during decompression and suctioned into the main
body with air.
Preparing without adding
water or other liquids
To prevent the unit from going idle liquids such as water are
necessary, but when ingredients themselves provide enough moisture
you can perform processing without any liquid.
·
Point to note:
(1)
Please use soft and moist ingredients as a base (those from which
you can make juice by simply crushing them with your hands).
Examples: Citrus fruit, tomatoes, watermelons, grapes, melons,
kiwis, etc.
Ingredients not suitable as a base: Pineapples, apples, etc.
(2) Please use a base ingredient of more than half (in weight) the
total amount.
(3) Put the ingredients into the blender container in the order of base
ingredient, leafy vegetables, ingredients with little moisture, and
ice or frozen fruit, etc.
Using commercially
produced juices instead
of water
Commercially produced juices may be used.
However, since milk-based beverages bubble easily, when processing
such beverages using the vacuum blending function, the maximum
amounts used for milk and soy milk should be used. (Please see p. 11)
Making soup
When you use boiled potatoes, you should add adequate liquid
because sticking will occur during processing. Please add liquid at
an amount more than 1.5 times (in weight) the solid. When the sticking
is too strong, the blender may stop due to an error. In such cases,
please follow the procedures shown on pp. 29 - 30.
Using the vacuum processing function
Page 12
11
Soymilk/Milk
Soymilk/Milk
Food
MAX
MIN
1000
500
1500
2000
mL
Soymilk/Milk
Soymilk/Milk
Food
MAX
MIN
1000
500
1500
2000
mL
Maximum amount (2,000 ml)
Minimum amount (500 ml)
The amount of ingredients
should not fall below this line.
The amount of ingredients
should not exceed this line.
When you use the vacuum blending function
with soymilk, milk, dairy, or powder solutions:
(1) Add milk, soymilk, etc. without exceeding
the “Soymilk/Milk” line.
(2) Add other ingredients without exceeding
the “Soymilk/Milk + Food” line.
Vacuum
processing
bottle
Maximum amount
Overfilling
1
Vacuumize the interior of the vacuum processing bottle and process with the vacuum blending function.
Initial oxidation can be curbed and the progress of oxidation can be delayed by removing air before
stirring the ingredients.
Please view the container
from the side, and when
the ingredients exceed the line,
remove some with a long
utensil, etc., instead of
pushing it down.
Using the vacuum processing function
(1) Liquid ingredients,
seasonings, etc.
Please put
ingredients in gently,
instead of forcing
them into the
container.
(3)Leafy
vegetables
Order for adding ingredients
(2)Ingredients with
high moisture
content and
soft ingredients
(4)Hard ingredients,
ingredients with low
moisture content,
honey, ice/frozen fruit
Add the prepared ingredients (please see p. 9) to the vacuum processing bottle.
Page 13

12
ON
Soymilk/Milk
Soymilk/Milk
Food
MAX
MIN
1000
500
1500
2000
mL
MAX
2000
mL
Container cover
Gasket
Upward
Downward
Vacuum arm
Set
upright
Container
cover cap
4
Insert the power plug into the outlet, and then turn ON the power
by pushing the power switch.
Using the vacuum processing function
3
Mount on the main body.
(1) Move the vacuum arm into a vertical
position, and mount the bottle set into the
main body straight down, as shown in the
diagram.
(2) Push down the vacuum arm.
Failure warning
Do not mount the bottle on a slant.
This may damage the main body.
* Vacuum: A state of pressure that is lower than atmospheric pressure
2
Cover it securely.
(1) Attach the container cover, and place the
gasket in the middle.
*If there are foreign objects or moisture on the cover set, wipe the set off.
(2) Press down on the container
cover cap to securely attach it.
Page 14

13
Turn to change
Press to select
5
Select a course and process.
Course
Smoothie course
Frozen course
Manual course
(1) Turn the dial to switch on the or lamp
for the course you will use.
1.Turn the dial to switch on the , and press
the center of the dial to select.
(blinking light will change to a steady light)
2.Turn the dial to select the item to set,
and press the center of the dial to decide.
(Changes in order from stirring time to rotation speed.)
3.Change the numbers of the display window by turning
the dial, and press the center of the dial to select.
4.Press the Start/Stop button to process.
*
Turn the dial during processing to change the rotation speed.
:
Stirring time can be set in 10-second units from
10 to 120 seconds. (Not including rest time.)
:
Rotation speed can be set from 1 (low speed) to
10 (high speed).
(2) Press the Start/Stop button to process.
Operation procedures
Approximate
rotation speed settings
Volume
in use
Rotation
speed
500-1000ml:
1000-1500ml:
1500-2000ml:
3-6
4-7
5-10
* If the rotation speed
is too high for the
ingredients, they
may scatter and stick
to the bottle.
The lamp
for the set
item will be a
steady light
If the appliance makes a double-beat alarm sound, the error lamp is lit,
and operation stops, see pp. 29-30 for handling instructions.
Using the vacuum processing function
·
After the air has been removed from inside the bottle, the appliance will stir until the timer reaches 0,
and stop automatically.
(Regular rest periods are included during stirring.)
·
Press the Start/Stop button to temporarily stop or restart while processing.
*The appliance cannot be temporarily stopped until the cutter begins turning.
If the appliance has been temporarily stopped for five minutes, you will be notified with a beeping sound.
If another five minutes pass without restarting, the appliance will be in error and will stop operating.
·
Press the Cancel/Release button to complete operation during processing.
Operation will stop, and the vacuum arm will be disconnected.
Page 15

14
Soymilk/Milk
Soymilk/Milk
Food
MAX
MIN
1000
500
1500
2000
mL
Soymilk/Milk
Soymilk/Milk
Food
MAX
MIN
1000
500
1500
2000
mL
Press
(2)
(1)
Vacuum arm
Finger grip section
Using the vacuum processing function
6
Remove the bottle set from the main body after the cutter has fully
stopped rotating.
*When stirring is insufficient, after stopping the appliance
(before removing the vacuum arm), use the pulse button or
set it to manual mode to use.
Failure warning
Do not lift the bottle up at an angle.
This may damage the main body.
(1) Press the Cancel/Release button.
(2) Set the vacuum arm vertically after
checking that it has risen up slightly.
*Do not forcibly remove the vacuum arm
from the cover.
(3) Lift the bottle set straight up.
The vacuum processing bottle cannot be
used for storage.
See p. 15 for vacuum-storing
processed foods.
When removing the cover, place the vacuum
processing bottle on a stable surface, firmly hold
it down, and remove from the finger grip section
located above the handle.
After using, turn off the power and unplug the power cord.
Clean the bottle set immediately.
Page 16

15
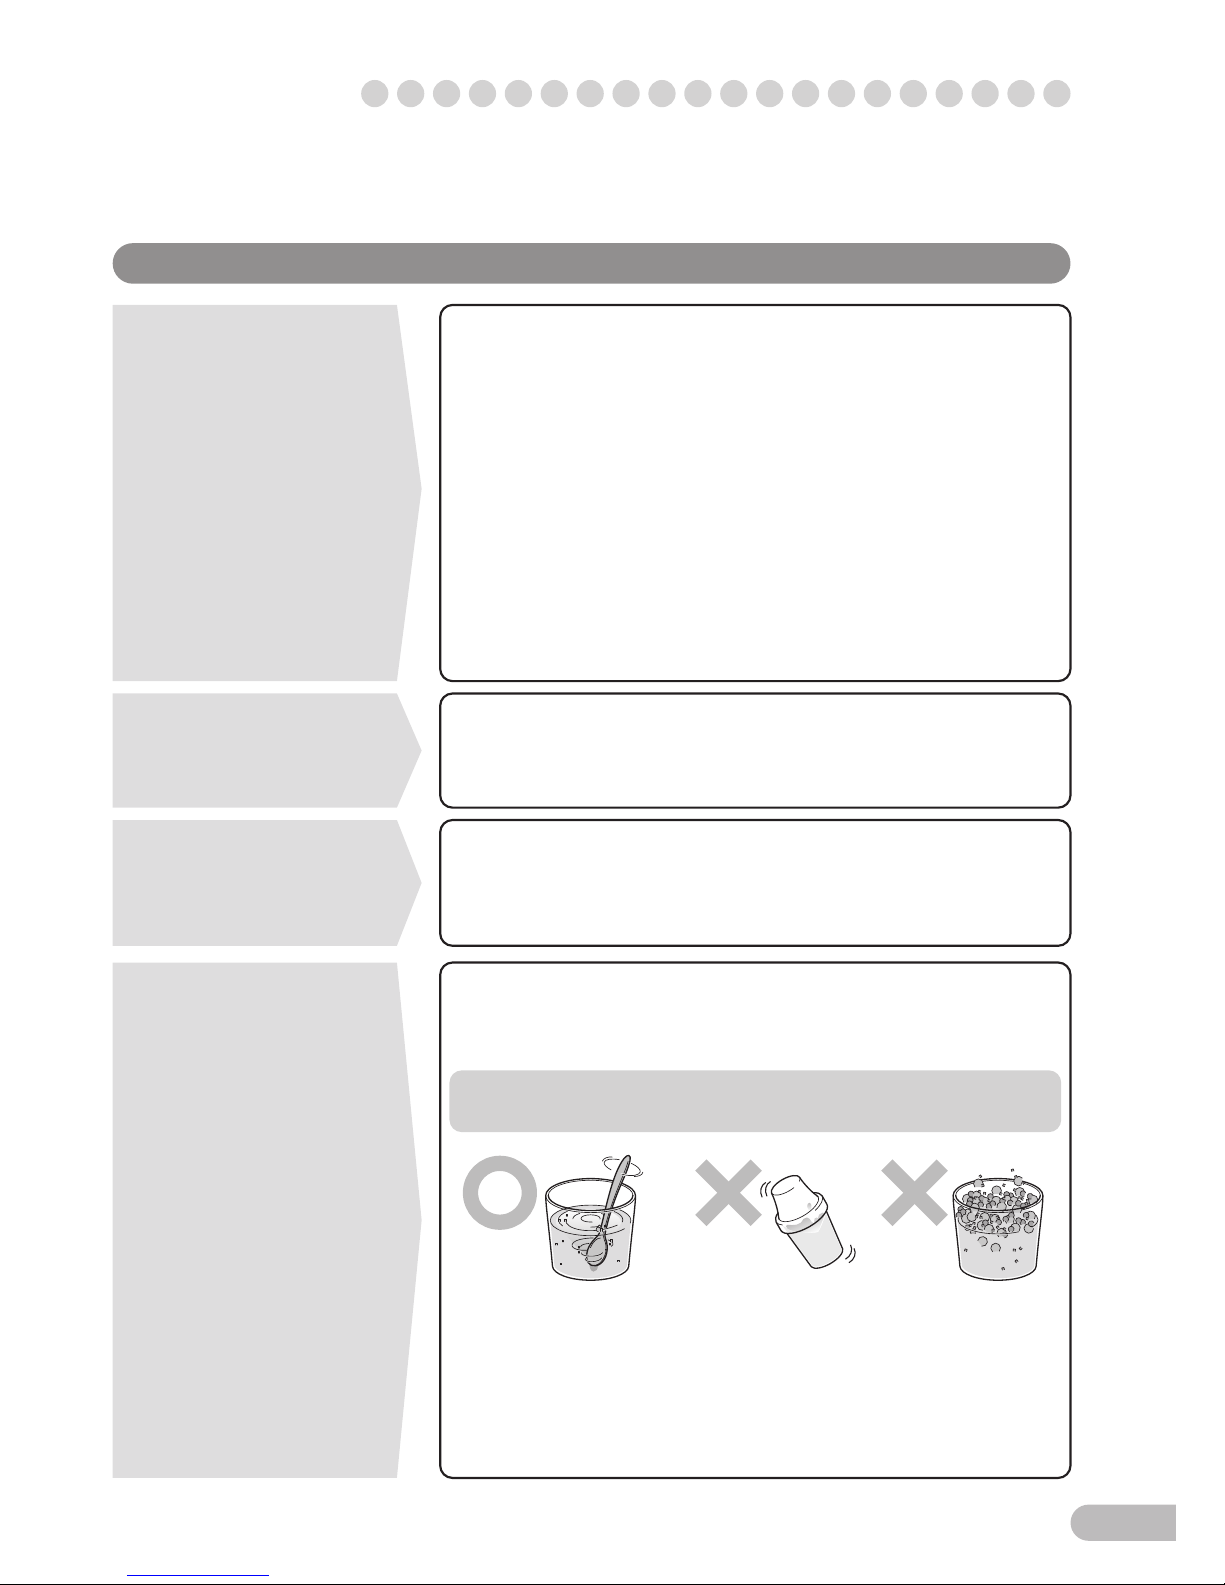
Point to note:Point to note:
CLICK
Align the parts.
Align the protruding
sections of the tumbler
cover with the grooves
in the cover seal.
Cap seal
Releasing
mechanism seal
The knob will
protrude from
the frame.
Cover seal
Tumbler cover
Releasing
mechanism
Tumbler
cover cap
Releasing
mechanism
Tumbler
cover
VACUUM FRESH
portion
Groove
Protruding
part
·
Cover seal: Attach to the groove in the underside of the tumbler cover.
●
There is no front or back to the cover seal.
1
Attach each seal.
·
Cap seal:
Mount to the center of the underside
of the tumbler cover cap.
·
Releasing mechanism seal:
Mount to the center of the underside
of the releasing mechanism.
This function is used for the later storage of smoothies, etc., already made using the
vacuum blending function.
Freshness can be maintained since substances are stored by vacuumizing* the tumbler internally.
2
This has no anti-bacterial effect. You must store the smoothie in a refrigerator.
Depending on the ingredient combination, the food may separate during storage.
Using the vacuum storage function
Fit the seal securely so
that it does not jut out.
Attach the releasing mechanism to the tumbler cover.
(1) Insert the releasing mechanism such that the
protruding part on the PUSH portion side of
the releasing mechanism is fitted under the
protruding part inside of the tumbler cover.
(2) Push down the other side and
insert it by firmly pressing both
sides of first then on the
VACUUM FRESH portion .
Page 17

16
PUSH
LOCK
OPEN
Do not shake the container.
Do not tilt the container.
Causes of failure
(1)
(2)
(3)
Do not attach
the tumbler cover cap.
Tumbler
set
Vacuum
arm
Maximum amount (400 ml)
Tumbler
5
Insert the power plug into the outlet, and then turn ON the power by
pushing the power switch.
4
Mount on the main body.
*When vacuum-storing
leftover liquid again, clean
the cover before storage.
3
Slowly pour the smoothie made with the vacuum blending function into
the tumbler so that it does not foam, and place the cover.
(1) Move the vacuum arm into a
vertical position, and mount the
tumbler base into the main body.
(2) Place the tumbler set on the
tumbler base.
(3) Push down the vacuum arm.
Do not store contents using
the vacuum storage function
that have not been vacuum
processed with this product.
Using the vacuum storage function
* Vacuum: A state of pressure that is lower than atmospheric pressure
Rotating
Page 18

17
Vacuum arm
Tumbler
set
Tumbler
base
6
Vacuum-store the contents.
· The vacuum arm will disconnect after the air has been removed from inside
the tumbler and it has been made into a vacuum.
· Press the Cancel/Release button to complete operation during processing.
Pressing once will stop operation, and pressing twice will disconnect the
vacuum arm.
If the appliance makes a double-beat alarm sound, the error lamp is lit,
and operation stops, see pp. 29-30 for handling instructions.
7
When operation is complete, remove the tumbler set from the main body.
(1) Set the vacuum arm vertically after
checking that it has risen up
slightly.
(2) Remove the tumbler set and
the tumbler base.
(1) Turn the dial to switch on the smoothie course lamp .
(2) Press the Start/Stop button to store.
After using, turn off the power and unplug the power cord.
To store, always place the tumbler in the refrigerator.
Using the vacuum storage function
Page 19

18
LOCK
OPEN
LOCK
OPEN
LOCK
OPEN
LOCK
OPEN
CLICK
Press
Rotate
(2)
(3)
Align
the
parts
Tumbler
cover cap
PUSH portion
Grasp here
8
Attach the tumbler cover cap.
(1) Align the protrusions on the
tumbler cover cap with the
grooves on the tumbler cover.
(1) Rotate the tumbler cover cap
in the direction of the arrow in
the illustration.
(2) Rotate the tumbler cover cap in
the direction of the arrow in the
illustration.
* Be sure to securely attach the tumbler cover after drinking from the tumbler.
A tumbler which has undergone vacuum storage is
decompressed internally.
Follow the below procedures to remove the tumbler cover to
drink from the tumbler.
Using the vacuum storage function
Opening the tumbler
(2) Push the PUSH section of the
releasing mechanism.
(Air will enter the tumbler and it
will cease to be a vacuum.)
(3) Grasp the tumbler at the top and
remove the tumbler cover by
rotating in the direction of the
arrow in the illustration.
Page 20

19
Unusable ingredients (causes of failure)
Preparation of ingredients
Turn
PUSH portion
Heat processing
bottle cover cap
Protruding part
Groove
You can choose from three courses to process.
●Soy milk course: for processing ingredients that froth easily when heated or
stirred, such as legumes and corn.
●Soup course: for smooth ingredients that do not froth easily, and for making
soup using hard ingredients that need to be stewed for a long
time. (For processing liquids that are relatively difficult to burn)
●Paste course: can be used for making paste-like soups and baby food. For
viscous ingredients and for making food with high density, like
curry. (For processing liquids that are relatively easy to burn)
1
Attach the inner cap to the heat processing bottle cover cap.
Align and fix the protruding part of the inner cap to groove B on the heat processing bottle
cover cap, and attach by turning it in the direction of the arrow in the diagram.
Using the heat processing function
Soy milk course, soup course
★Thick liquids such as milk
★Ingredients processed in a mixer
(high-density liquids)
★Powdered items such as flour
★Highly dense foods such as curry
Paste course
★Bones ★Ingredients that froth easily
★Hard beans such as
soy beans, grains
Set in water for at least 8 hours,
until soft.
★Meat and fish
Remove hard sections such as
bones and cartilage, and cut into
3 cm cubes.
★Hard ingredients such as carrots
Cut into 3 cm by 3 cm pieces.
★Leafy vegetables, such as spinach
The stems should be cut off, and the leaves should be
cut into pieces with a width of about 3 cm.
When you want to use
more than the normal amount,
the pieces should be cut smaller.
★Ingredients that become highly viscous
when stewed, such as mochi rice
★Using ingredients only (no water)
★Bones
Page 21

20
Cold
Soup
mL
1800
1600
1400
1200
1100
800
2000
1750
15
00
125
0
100
0
75
0
mL
Cold
Soup
mL
1800
1600
1400
1200
1100
800
2000
1750
15
00
125
0
100
0
75
0
mL
Cold
Soup
mL
1800
1600
1400
1200
1100
800
2000
1750
15
00
125
0
100
0
75
0
mL
Cold
Soup
mL
1800
1600
1400
1200
1100
800
2000
1750
15
00
125
0
100
0
75
0
mL
Minimum amount: 800ml
Maximum amount: 1400ml
Heat
processing
bottle
Maximum
amount
Overfilling
Spout
opening side
Cover cap
Heat processing bottle cover
Align.
(1)
(2)
(3)
Using the heat processing function
2
Place the prepared ingredients (please see p. 9) into the heat processing
bottle, first solids, then liquids.
*Always add liquid. Without liquid, the ingredients
will burn and may damage the appliance.
*For rice and other ingredients that absorb
a great deal of water when cooked,
process after adding at least twice as
much water as the ingredient.
Please view the container
from the side, and when the
ingredients exceed the line,
remove some with a long
utensil, etc., instead of
pushing it down.
3
Place the cover.
(1) Align the heat processing bottle spout
and the heat processing bottle's
"opening side" as shown, and place the
cover on the bottle.
(2) Attach the cover cap you
assembled in Step 1 to the center of
the heat processing bottle.
Turn
Page 22

21
Cold
Soup
mL
1800
1600
1400
1200
1100
800
2000
1750
15
00
125
0
100
0
75
0
mL
On
Vacuum arm
Fold
4
Fold the vacuum arm, and mount the bottle to the main body
in the direction shown in the diagram.
5
Insert the power plug into the outlet, and then turn ON the power
by pushing the power switch.
Failure warning:
Do not mount the bottle at an angle.
This may damage the main body.
6
Select a course to process.
Press the Start/Stop button to temporarily stop or restart while processing.
If the appliance has been temporarily stopped for five minutes, you will be notified with a
beeping sound. If another five minutes pass without restarting, the appliance will be in error
and will stop operating.
Press the Cancel/Release button to complete operation during processing.
If the appliance makes a double-beat alarm sound, the error lamp is lit,
and operation stops, see pp. 29-30 for handling instructions.
Turn the dial and switch on the course lamp / / that you want to use.
Press the Start/Stop button to process.
Do not touch the bottle set. Do not place the face or
hands near the cover.
This may cause burning.
Using the heat processing function
Page 23

2222
Cold
Soup
mL
1800
1600
1400
1200
1100
800
2000
1750
15
00
125
0
100
0
75
0
mL
7
When operation has stopped, wear oven mitts to prevent burning, and
remove the bottle set from the main body by lifting it straight upward.
*When stirring is insufficient,
use the pulse button or set it
to manual mode to use.
The timer can be set for heat processing. Processing starts automatically
when the set time arrives.
1. Set up the bottle using the procedure in Steps 1 through 5 for heat
processing, and turn on the power.
2. Turn the dial to switch on the course lamp / / that you
want to use, and press the center of the dial to select.
(Blinking light will change to steady light.)
3. Turn the dial to the process start time and set it.
The time can be set at 30-minute intervals for 30 minutes to 10 hours, and
at 1-hour intervals from 10 to 12 hours.
4. Press the center of the dial to select.
5. Press the Start/Stop button, and check that the timer display lamp has
started blinking.
Using the timer
When setting the timer to process, do not use raw food,
ingredients that spoil easily, or things that need to be refrigerated.
Take caution as these ingredients will be left at room temperatures
until the start of processing.
After using, turn off the power and unplug the power cord.
Clean the bottle set immediately.
Failure warning
Do not mount the bottle at an angle.
This may damage the main body.
Using the heat processing function
Page 24

23
Cold
mL
1800
1600
1400
1200
1100
800
1750
15
00
125
0
100
0
75
0
Cold
mL
1800
1600
1400
1200
1100
800
1750
15
00
125
0
100
0
75
0
2000mL2000
mL
SoupSoup
Maximum amount
(2000ml)
Minimum amount
(750ml)
The amount of
ingredients should not
fall below this line.
The amount of
ingredients should
not exceed this line.
Heat
processing
bottle
Maximum
amount
Overfilling
Using the mixing processing function
This function stirs the contents without turning the interior of the bottle into a vacuum.
With this function, you can make smoothies or other mixes using things that cannot be
used in vacuum processing, such as difficult-to-dissolve powders, warm ingredients,
and ingredients that froth easily.
1
Place prepared ingredients into the heat processing bottle.
See the vacuum processing pages (p. 9 and p. 11) for information about
ingredients and the order of adding them to the bottle.
2
Place the cover, mount the bottle to the main body with the vacuum arm
folded down, and turn on the power.
(Please see pp. 20-21)
Please view the container
from the side, and when
the ingredients exceed the
line, remove some with a
long utensil, etc., instead
of pushing it down.
3
Select a course to process.
· The appliance will stir until the timer reaches zero, and stop automatically.
(The appliance will stop to rest periodically during the stirring process.)
· If the stirring is insufficient, use the pulse button after it stops. (Please see p. 27)
· Press the Start/Stop button to temporarily stop or restart while processing.
If the appliance has been temporarily stopped for five minutes, you will be notified with a
beeping sound. If another five minutes pass without restarting, the appliance will be in error
and will stop operating.
· Press the Cancel/Release button to complete operation during processing.
Page 25

24
Cold
Soup
mL
1800
1600
1400
1200
1100
800
2000
1750
15
00
125
0
100
0
75
0
mL
4
When operation has stopped,
wear oven mitts to prevent burning,
and remove the bottle set
from the main body by lifting it
straight upward.
Using the mixing processing function
After using, turn off the power and
unplug the power cord.
Clean the bottle set immediately.
Turn to change
Press to select
Course
Smoothie course
Frozen course
Manual course
(1) Turn the dial to switch on the or lamp
for the course you will use.
1.Turn the dial to switch on the , and press
the center of the dial to select.
(blinking light will change to a steady light)
2.Turn the dial to select the item to set,
and press the center of the dial to decide.
(Changes in order from stirring time to rotation speed.)
3.Change the numbers of the display window by turning
the dial, and press the center of the dial to select.
4.Press the Start/Stop button to process.
*
Turn the dial during processing to change the rotation speed.
:
Stirring time can be set in 10-second units from
10 to 120 seconds. (Not including rest time.)
:
Rotation speed can be set from 1 (low speed) to
10 (high speed).
(2) Press the Start/Stop button to process.
Operation procedures
Approximate
rotation speed settings
Volume
in use
Rotation
speed
500-1000ml:
1000-1500ml:
1500-2000ml:
3-6
4-7
5-10
* If the rotation speed
is too high for the
ingredients, they
may scatter and stick
to the bottle.
The lamp
for the set
item will be a
steady light
If the appliance makes a double-beat alarm sound, the error lamp is lit,
and operation stops, see pp. 29-30 for handling instructions.
Failure warning
Do not mount the bottle at an angle.
This may damage the main body.
Page 26

25
Unusable ingredients
Preparation of ingredients
Less than 1 minute
Cold
mL
1800
1600
1400
1200
1100
800
1750
15
00
125
0
100
0
75
0
Cold
mL
1800
1600
1400
1200
1100
800
1750
15
00
125
0
100
0
75
0
2000mL2000
mL
SoupSoup
Heat processing
bottle
Approximate volume per use
Add enough ingredients to
cover the cutter.
Using the powderizing function
1
Place ingredients into the heat processing bottle.
With this function, you can crush hard objects and turn them into powder.
The powderizing function can be used for 1 minute at a time.
After using it for 1 minute continuously or in total,
please only use it again after allowing the appliance to rest
for at least 30 minutes. Otherwise, this may damage the appliance.
For ingredients with moisture content,
parch them in a frying pan or microwave
them to remove the water, and let cool.
Cut large or long ingredients into 3 cm
cubes.
★Ice, frozen foods (Use the pulse button to crush ice. Please see p. 27)
★Grains (uncooked rice, adlay, etc.)
★Non-food items
★Items that are too hard (dried goods, unboiled legumes, etc.)
★Dietary fiber items (ginger, etc.)
*If too many oily ingredients are
added, there may be difficulty
in breaking them down.
Page 27

26
Cold
Soup
mL
1800
1600
1400
1200
1100
800
2000
1750
15
00
125
0
100
0
75
0
mL
4
When operation has stopped, remove the bottle set from the main body by
lifting it straight up.
2
lace the cover, mount to the main body with the vacuum arm folded down,
and turn on the power. (Please see pp. 19-21)
3
Select the powderizing course to process.
If the appliance makes a double-beat alarm sound, the error lamp is lit,
and operation stops, see pp. 29-30 for handling instructions.
After using, turn off the power and
unplug the power cord.
Clean the bottle set immediately.
· If the ingredients stick to the inside of the bottle during processing, stop operation
temporarily and push them down with the spatula accessory or other tool.
· To cut more finely, use the pulse button. (Please see p. 27)
Turn the dial and switch on the powderizing course lamp .
Press the Start/Stop button to process.
Using the powderizing function
Failure warning
Do not mount the bottle at an angle.
This may damage the main body.
Page 28

27
Less than 1 minute
(3)
(1)
(2)
Press
Turn
Blinking light
(2)
(1)
Light on
Press
Using the pulse button
When continuing to use the appliance after automatic
operation has stopped for any course.
*This function will not operate for more than 1 minute.
To stir for a longer period, set a stirring time using the manual course.
* To continue using after vacuum processing, use
before removing the vacuum arm.
(1) Check that the manual course light is on
after the course operation has finished.
(2) Press the pulse button.
· The cutter will rotate as long as the button is
being pressed.
When using the pulse button only.
(1) Put the ingredients into each bottle,
and mount to the main body.
(2) Turn the dial and switch on .
(3) Press the pulse button.
· The cutter will rotate as long as the button is
being pressed.
· To make crushed ice, press for one second
and release, and repeat this action several times.
* It is not possible to use the vacuum blending
function directly after stirring with the pulse button.
Remove the bottle temporarily, clean the cover,
and re-mount it to the main body.
If the appliance makes a double-beat alarm sound, the error lamp is lit,
and operation stops, see pp. 29-30 for handling instructions.
With this function, the cutter rotates only while the pulse button is being pressed.
This function is useful when a smoothie has started to separate,
or for adding more stirring for a short period of time.
You can also make crushed ice with the pulse button.
Page 29

28
Soup
Cold
mL
1800
1600
1400
1200
1100
800
2000
1750
mL
15
00
125
0
100
0
75
0
Cold
Soup
mL
1800
1600
1400
1200
1100
800
2000
1750
15
00
125
0
100
0
75
0
mL
Cold
Soup
mL
1800
1600
1400
1200
1100
800
2000
1750
15
00
125
0
100
0
75
0
mL
Cold
Soup
mL
1800
1600
1400
1200
1100
800
2000
1750
15
00
125
0
100
0
75
0
mL
Cold
Soup
mL
1800
1600
1400
1200
1100
800
2000
1750
15
00
125
0
100
0
75
0
mL
Cold
Soup
mL
1800
1600
1400
1200
1100
800
2000
1750
15
00
125
0
100
0
75
0
mL
Heat processing
bottle cover cap
Stirring rod
Stirring rod
Tumbler base
Press
3
Attach the heat processing bottle cover cap and press the Start/Stop
button to restart.
1
Press the Start/Stop button to stop operation.
2
When the rotation comes to a complete stop, remove the heat processing
bottle cover cap and mount the stirring rod.
With the stirring rod, you can mix in ingredients that have stuck to the inside
of the bottle during processing.
The stirring rod cannot be used during heat processing. This may cause burning.
Mix the processing contents with the stirring rod.
*Never insert anything other than the stirring rod.
Using the stirring rod
The stirring rod can be inserted
into the tumbler base.
Page 30

29
ResponseCause
Display
number
(1)
Check number
(2)
Press
One lamp is blinking.
Bottle
mounting
error
Unable to
create a
vacuum
Unable to
process
Temperature
abnormality
About error notification
1
Check the number displayed, then press the Cancel/Release button to cancel.
(When it cannot be cancelled, turn the power switch to OFF.
●
Do not move the main body or bottle
during processing.
*This may cause burning or damage.
The vacuum arm or vacuum
processing bottle was removed
during vacuum processing.
●
Do not fold down the vacuum arm
when using the vacuum function.
●
Fold down the vacuum arm when
mounting the heat processing bottle.
●
Place the cover.
●
Mount the cover such that the flat side
is facing the vacuum arm side.
●
Firmly attach the cover so that there
are no openings.
●
Correctly assemble the cover.
The heat processing bottle cover
was removed during processing.
The heat processing bottle has
been mounted without folding
down the vacuum arm.
The cover is off.
The vacuum processing bottle
has been mounted with the
vacuum arm folded down.
●
Reset the orientation of the bottle
following the procedure 3 on p. 12.
The vacuum processing bottle
has been mounted facing the
wrong direction.
The cover is not firmly attached.
The cover has not been
assembled correctly.
E21
E22
E11
E23
E24
If a different error number is displayed from the ones listed here,
stop use immediately and ask for help at the store.
The heat processing bottle cover
is on backwards.
Page 31

3030
ResponseCause
Display
number
2
Turn the power switch OFF, and pull out the power plug from the outlet.
3
Remove the bottle set/tumbler set from the main body.
4
Check the following causes and respond accordingly.
*If the appliance still cannot be fixed, ask for help at the store.
About error notification
●
Clean the cover, and if the ingredients
are frothing, remove the froth.
Froth has entered the float section of
the vacuum processing bottle cover.
E31
●
Allow 30 minutes or more of downtime.
* Please adhere to the runtime limitations.
The runtime limitation has
passed, and the appliance was
used continuously for an
extended period of time.
E41
10 minutes have passed since
operation has been temporarily
stopped.
E34
●
Stop use immediately, turn off the
power, and wait until the bottle cools.
The appliance is heating while
empty.
E50
•
E52
●
Stop use immediately. If the burnt
ingredients in the bottle cannot be
washed away, ask for help at the store.
The contents of the bottle are
burning.
●
Clean the cover and the suction port
of the main body.
Froth or ingredients have been
sucked into the main body.
(This may cause damage.)
E32
●
Move the contents of the bottle to
another container, and
-
remove any ingredients that cannot be used.
-decrease the amount of ingredients to
below capacity.
-cut the ingredients into smaller pieces.
-add water or other liquids.
The appliance is having
difficulty stirring, whether from
ingredients that are too hard,
too many, or too large, or from
too little water.
E33
●
Move the contents of the bottle to
another container, and remove the
ingredients that are caught on the cutter.
●
Operation will be reset, so please
start over.
Ingredients are caught on the
cutter.
Page 32

31
Before product maintenance
Soymilk/Milk
Soymilk/Milk
Food
MAX
MIN
1000
500
1500
2000
mL
Cold
Soup
mL
1800
1600
1400
1200
1100
800
2000
1750
15
00
125
0
100
0
75
0
mL
(3)
(1)
(2)
Press
Turn
Blinking light
Maintenance
•Please never forget to turn OFF the power and pull out the power plug from
the outlet before you begin product maintenance.
•If the bottom surface of any bottle, or the electrodes in the main body get wet,
this will damage the appliance.
Do not get it wet, or splash water on it.
When the product is heavily soiled, please perform primary washing following the procedures below.
1
Follow the procedures on pp. 11-12
(vacuum processing bottle) or
pp. 19-20 (heat processing bottle).
2
Run the appliance for a few seconds.
3
Remove the bottle set from the main body after the
cutter has fully stopped rotating.
4
Turn off the power by pressing the power switch,
and pull out the power plug from the outlet.
5
Dismount the cover, discard the water (or the lukewarm water),
rinse the container lightly with water, disassemble the product,
and ensure the care of each part.
·
Please adjust the operating time depending
on the degree of soiling.
(1) Turn the dial.
(2) Check that is blinking.
(3) Press the pulse button.
Cold or lukewarm water
(up to 40˚C):
about 1/3 of the bottle
Neutral kitchen detergent
: a few drops
Place the above ingredients into the bottle set,
attach it to the main body, and turn on the power.
Page 33

32
Align
●
REMOVE
●
ATTACH
Arm cover
Arm cover
Vacuum arm
Arm cover
Tumbler base
REMOVE
Turn
Turn
ATTACH
Squeeze out a soft cloth soaked in soapy water or a neutral
detergent diluted with water and wipe down the main body.
Wipe down the suction port with a well-squeezed
damp cloth, without using detergent.
The arm cover may be removed and washed with water when there is an Ingredient
Error and it is suspected that ingredients were suctioned, or when soiling is a concern.
Avoid water exposure
Please be careful not to get the main body wet because it
cannot be washed with water. Otherwise, failure may occur.
Maintenance procedures for the main body
Caution
Do not pull and remove the suction port.
After cleaning, attach to the main body
after absorbing any moisture well and allowing to dry completely.
Turn until the
positions are aligned.
Align and attach the protruding part of the vacuum arm and the groove of the arm cover,
and turn and attach in the direction shown by the arrow in the diagram.
If it is difficult to turn,
use the tumbler base.
* Ensure that no fibers from
the cloth are left behind.
(1) Attach the protruding part of the tumbler
base to the groove in the arm cover.
(2) Remove by rotating in the direction
of the arrow in the illustration.
Maintenance
Page 34

33
Cold
Soup
mL
1800
1600
2000
1750
mL
Vacuum processing
bottle cover cap
Vacuum processing
bottle cover
Vacuum processing
bottle
Heat processing
bottle
Heat processing
bottle cover
Inner cap
Heat processing
bottle cover cap
Float
Maintenance
Maintenance procedures for each bottle
How to remove each part
●Vacuum processing bottle set
Remove the vacuum processing bottle cover
from the vacuum processing bottle.
Remove the vacuum processing bottle cover
cap from the bottle cover that has been
removed, and remove the float.
*The seals of the vacuum processing bottle cover and
vacuum processing bottle cover cap cannot be removed.
*The seal of the heat processing bottle cover
cannot be removed.
●Heat processing bottle set
Remove the heat processing bottle cover from
the heat processing bottle.
Remove the heat processing bottle cover cap
from the center of the cover.
Turn the inner cap in the direction shown by the
arrow in the diagram, and remove it from the
heat processing bottle cover cap.
(2)
(1)
REMOVE
Turn
Page 35

34
Vacuum processing
bottle cover cap
Maintenance
Please wipe the cover after shaking
it well because water easily pools
in the hole in the center.
Maintenance
Wash each part with a sponge using neutral detergent,
and rinse it well with water or lukewarm water (lower than 40˚C).
After performing maintenance,
wipe all parts carefully, dry them sufficiently,
and re-assemble them.
Prohibition
Do not get the bottom of the bottle wet.
Do not splash with water.
This may cause damage.
* Remaining moisture might promote rust or mold.
Wash with a sponge and neutral detergent,
and rinse in cold or lukewarm water (up to 40˚C).
Maintenance procedures for the stirring rod
Either wipe down with a squeezed-out soft cloth
soaked in soapy water or a neutral detergent
diluted with water, or clean with sponge using
neutral detergent, and rinse well.
Maintenance procedures for the tumbler base
Page 36

35
REMOVE
LOCK
OPEN
Press
Rotate
the exterior
surface
Tumbler
cover cap
underside
Releasing
mechanism
underside
Finger tab
Seal
PUSH portion
Grasp here
Maintenance
Maintenance procedures for the tumbler set
How to remove each part
(1) Remove the tumbler cover cap from
the tumbler cover by rotating it in the
direction of the arrow in the illustration.
(2) Press the PUSH portion of the releasing
mechanism, and remove by pulling from
the other side that springs up.
(3) Remove all seals. (3 total)
(4) When using a dishwasher/dryer to
wash the tumbler, separate the interior
surface from the exterior surface by
rotating the exterior surface in the
direction of the arrow in the illustration.
(5) Remove the seal (same as the cover
seal) that is attached to the tumbler's
interior surface.
★
Cap seal
★Releasing
mechanism seal
★Cover seal
Remove using a fine pointed
object, such as a toothpick.
Remove using a fine pointed
object, such as a toothpick.
Remove by pulling
from finger tab.
* Do not separate during
normal usage or when
washing by hand.
Page 37

36
Post-maintenance
VACUUM
FRESH
PUSH
Close
Releasing
mechanism
Tumbler
cover
Attach
the seal inside
After performing maintenance, wipe all
parts carefully, dry them sufficiently, and
re-assemble them.
For the tumbler, attach the seal, and
attach the interior surface to the exterior
surface by closing tightly.
Maintenance
Wash each part with a sponge using neutral detergent,
and rinse it well with water or lukewarm water (lower
than 40℃).
Water may enter between the exterior surface and the
interior surface of the tumbler when they are not closed
tightly or when the tumbler is soaked in water, etc.
In such cases, disassemble the exterior surface of the
tumbler from the interior surface and allow both to dry
thoroughly.
*Remaining moisture might promote mold.
Please wipe the cover after shaking
it well because water easily pools in
the hole in the center.
Maintenance
Dishwasher/dryer usage
★Dishwasher/dryer safe items
・Tumbler (exterior surface/interior surface/inner seal)
Dishwasher/dryers with specifications exceeding 80ºC cannot be used.
Disassemble the exterior surface from the interior surface, remove the seal, and wash in
accordance with your dishwasher/dryer's manual.
Page 38

37
When Handling methodProbable causes
Troubleshooting
Check the following items, and if the appliance is still in a bad condition, stop use
immediately and ask for help at the store.
Even if you push the button,
the product doesn’t operate.
The product has stopped operation.
(The error notification lamp illuminates.)
●
Address the issue by following the
procedures on pp. 29-30.
If these measures do not work and
the error continues, stop use
immediately and ask for help at the
store.
Smoke appears.
The cord has twisted and won’t go back to its
original state.
●
Stop use immediately and ask for
help at the store.
You cannot turn
the power ON.
●
Please re-insert the power plug
into the outlet.
●
The power plug has been
mistakenly pulled out from the
outlet.
Vacuum processing
cannot be done.
(The smoothie course
or frozen course
cannot be selected.)
●
Processing using the manual course
or pulse button. (Because the inside
of the bottle has not been made into
a vacuum, the contents will become
a smoothie made with air.)
●
Temporarily remove the bottle from
the main body, and reset the cover
after cleaning it.
●
Vacuum processing was attempted
after processing or after processing
suspension.
To prevent damage, vacuum
processing cannot be done in the
following circumstances.
• After the pulse button has been
pressed and the ingredients have
been stirred.
• When processing has been
suspended by pressing the
Cancel/Release button after stirring
has started.
• After removing the vacuum arm
when vacuum processing has been
completed.
In order to download this user manual, please visit the TESCOM website below.
▶http://www.tescom-japan.co.jp/global/
Page 39

Page 40

Thank you for your purchase.
Before using this product,
please read this instruction
manual and use the product
correctly.
After reading the manual,
please keep it close at hand
for easy reference.
Vacuum Cold & Hot All-in-One Blender
Product Number: TMV3000SEA
8065-1
Vacuum Cold & Hot All-in-One Blender TMV3000SEA
 Loading...