

Page 1
For household use
Table of Contents
Thank you for your purchase.
Before using this product,
please read this instruction
manual and use the product
correctly. After reading the
manual, please keep it close
at hand for easy reference.
Instruction
Manual
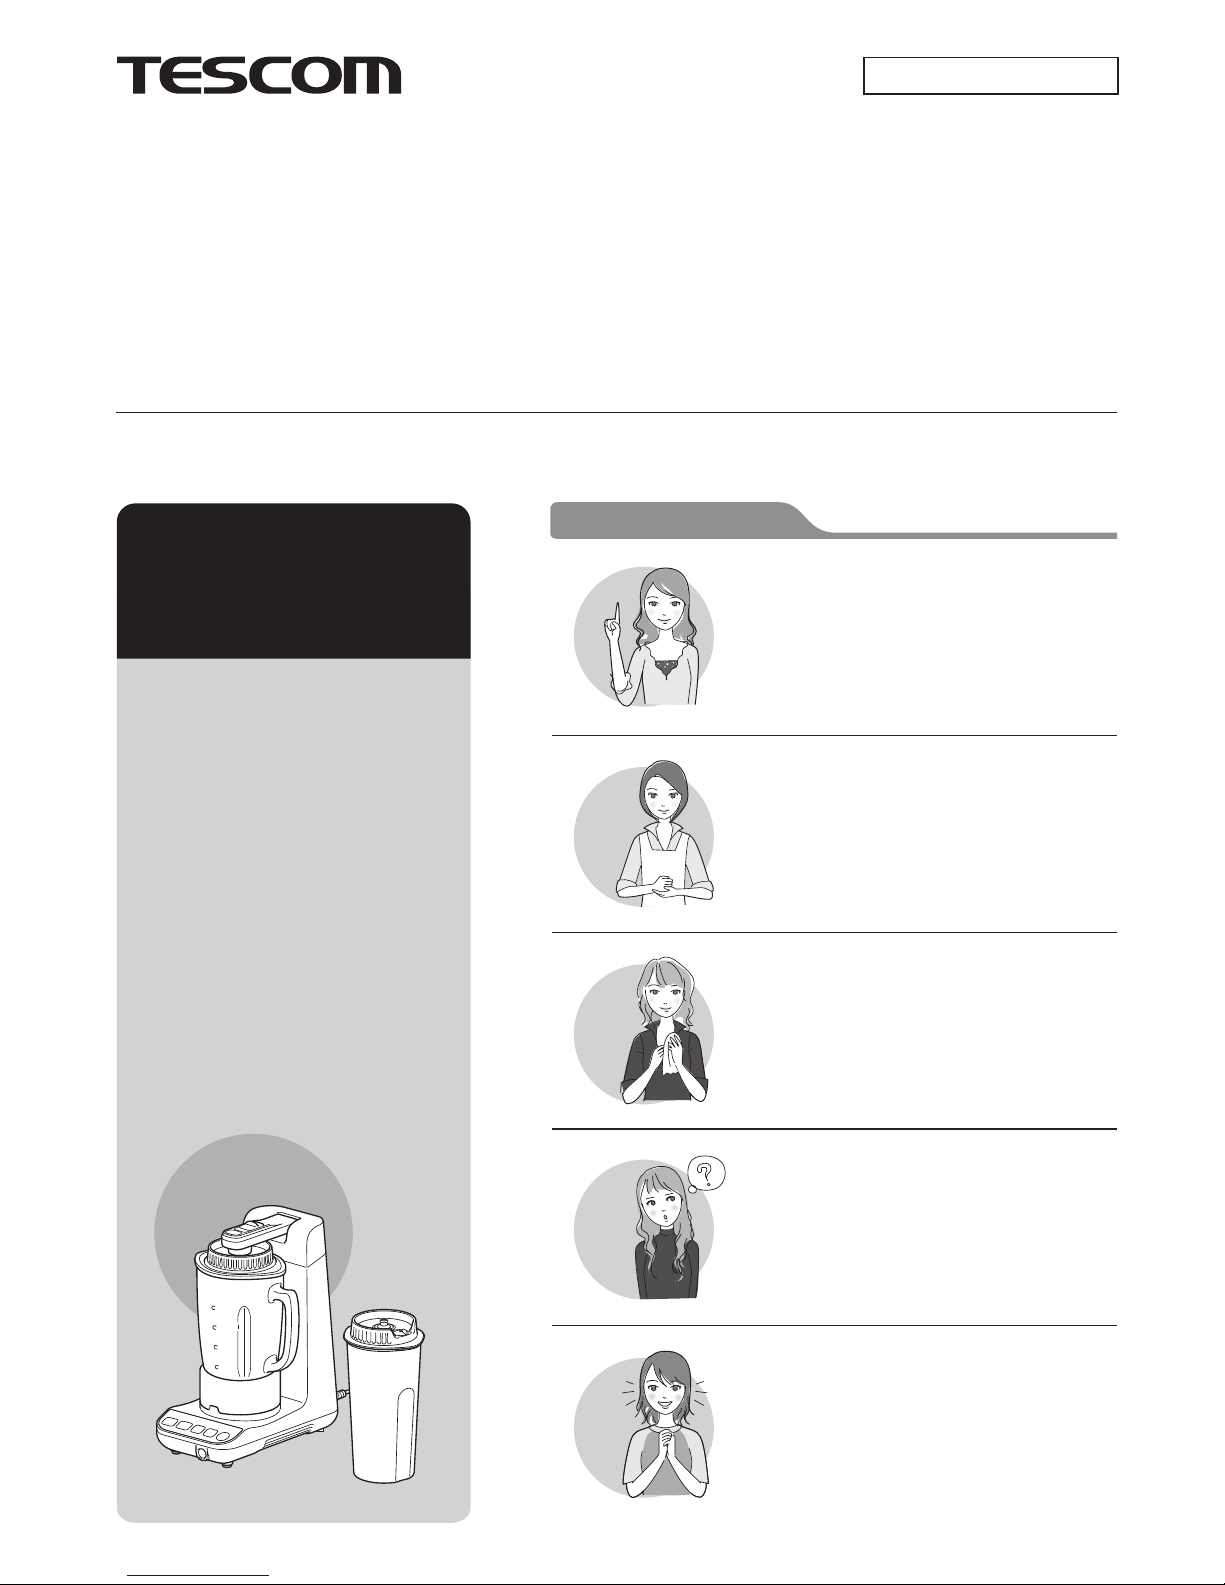
Product Number: TMV1100
Vacuum Blender
Precautions ........................... 1〜4
Locations and functions of parts
...... 5〜6
Before using the product ...... 7〜8
Using the blender ..................9〜
16
Using the vacuum storage function
...17〜
21
Advice on processing ...............
22
Care of the product ............23〜
26
About error notification ......27〜
28
Troubleshooting ........................
29
Specifications ...........................
29
Page 2
1
Precautions
(In the case of the symbol at left,
“Disassembly prohibited.”)
(In the case of the symbol at left,
“The power plug must be
removed from the outlet.”)
Symbols
●Before using this product, please read these precautions and use the product correctly.
●The precautions shown below are provided to ensure safe product use and to prevent harm to the
user and those nearby, as well as to prevent property damage. Therefore, the precautions should
always be followed.
●The precautions are classified as follows.
This symbol is intended to notify the
user of a description regarding
prohibited usage.
This symbol is intended to notify the
user of a description regarding
mandatory actions.
This description applies when it is assumed
that the improper use of the product may
cause death or serious injury
Warning
This description applies when it is assumed
that the improper use of the product may
cause death or serious injury and when the
degree of urgency is high.
Danger
This description applies when it is assumed that
the improper use of the product may cause
injury or property damage.
Caution
Page 3
2
Warning
Precautions
Please do not handle the power cord in any of the
following ways.
Otherwise, fire or electrical shock may occur.
Bending it forcedly
Twisting it
Pulling it
Putting heavy items on it
Putting it close to a hot item
Tucking it
Making alterations to it
Using it while having it tied in a bundle
These conditions may cause fire,
electrical shock, burns, or a short circuit.
Please do not use the product under any of the
following states, as the power cord may be
broken due to long-term use or improper use.
When, during use, the product sometimes works and
sometimes doesn’t
When the power cord is twisted and won’t return to its
original state
When the base of the power cord has been deformed
or damaged
When the connection of the plug to the outlet is loose
Please do not let children use
this product unattended.
Or, please do not use the
product while children are
nearby.
Doing so may cause them
injury.
Please do not use the product with power other
than AC 220-240 V.
Otherwise, fire may result.
Please do not leave the plastic bag packaging
within reach of infants or children.
Doing so may allow them to mistakenly put the bag
over their heads, possibly causing suffocation, etc.
Please do not leave the power plug cover within
reach of infants.
Doing so may cause accident by swallowing.
The disassembly, repair,
or alteration of the
product should only be
done by a repair engineer.
Otherwise, fire or
electrical shock may
occur.
Please do not submerge the
main body in water.
Please do not allow water to
come into contact with the
main body.
Please do not plug and
unplug the power cord with
wet hands.
Doing so may cause
electrical shock.
Prohibition
Prohibition
Prohibition
of
disassembly
Prohibition
of use in
wet areas
Page 4
3
Precautions
After you used the product or when performing
maintenance, please be sure to shut the power
OFF and pull the power plug itself out from the
outlet.
Otherwise, injury may result.
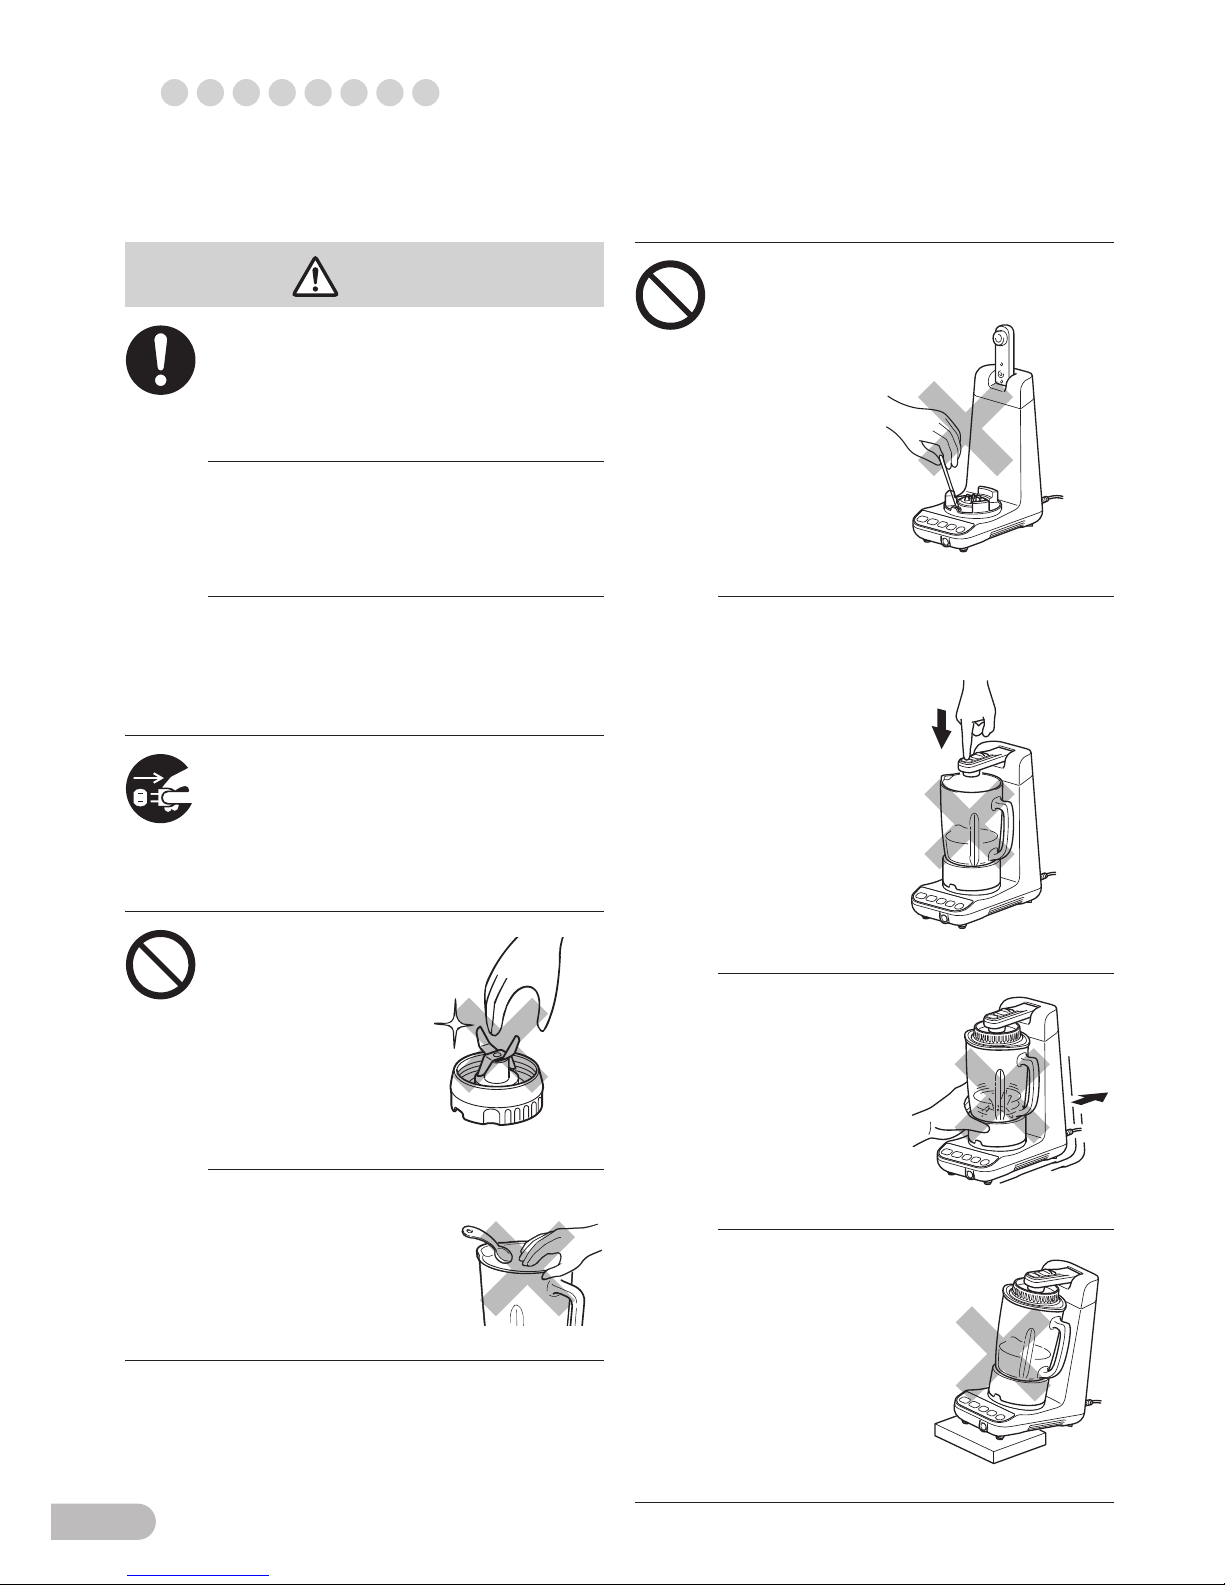
Please do not touch the
cutter, as it is very sharp.
Otherwise, injury
may result.
Please hold the power plug itself when you pull
the cord out from the outlet.
Otherwise, damage to the power plug may result.
Please plug and unplug the power
cord only after confirming that the power is OFF.
Otherwise, injury may result.
Please do not place your
finger or a metal spoon, etc.,
in the blender container.
Doing so may cause
an injury or a failure
in the device.
Please ensure proper care of the cap after
every use of the product.
(Please see pp.23–26.)
Otherwise, product failure may result.
Please do not push the vacuumizing arm from
above when the container unit does not have
the cap in place.
Doing so may
cause failure or
an accident.
Please never directly push the safety switch or
the safety switch
pin with your finger,
a rod, etc.
Doing so may
cause injury
or failure.
Please do not use the unit
at a place that is unstable.
Doing so may cause
an injury or the
breakage of the
product.
Please do not move
the unit during operation.
Doing so may
cause injury.
When the motor is overloaded, the Ingredient check lamp becomes lit.
After transferring the contents of the blender container to another
container, please handle it as below.
As the safety device of the motor is in operation, please allow the unit to rest for more than 30 minutes.
*
The product
stopped operation
when
decompressing the
container interior.
The product
stopped operation
after the cutter
started to rotate.
3
4
Caution
Be sure to
comply
Prohibition
Pulling out
the power
plug
Prohibition
Page 5
44
Precautions
Please do not put the product through a
dishwasher or a dish dryer.
Doing so may cause the breakage of the product.
Please do not use the product for purposes other
than food processing.
Doing so may cause the breakage of the product.
Please do not use the product for professional
use, as it is designed only for household use.
Please do not use any container or part other than
those meant for the purpose intended.
Please never perform
no-load running.
Please do not use the
unit with ingredients
of an amount less than
the minimum amount.
Doing so may cause
the breakage of
the product.
When operation has stopped due
to an excessive amount of
ingredients or other causes,
please do not use the unit
as-is.
Doing so may cause the
breakage of the product.
Please do not let the unit run continuously,
exceeding the rated time.
(Please allow it a rest for the specified period of
time before next operation.)
(Please see p.29.)
Otherwise, product failure may result.
Please do not store food other than those
processed using vacuum blending by means of
vacuum storage.
Doing so may cause the failure of the product.
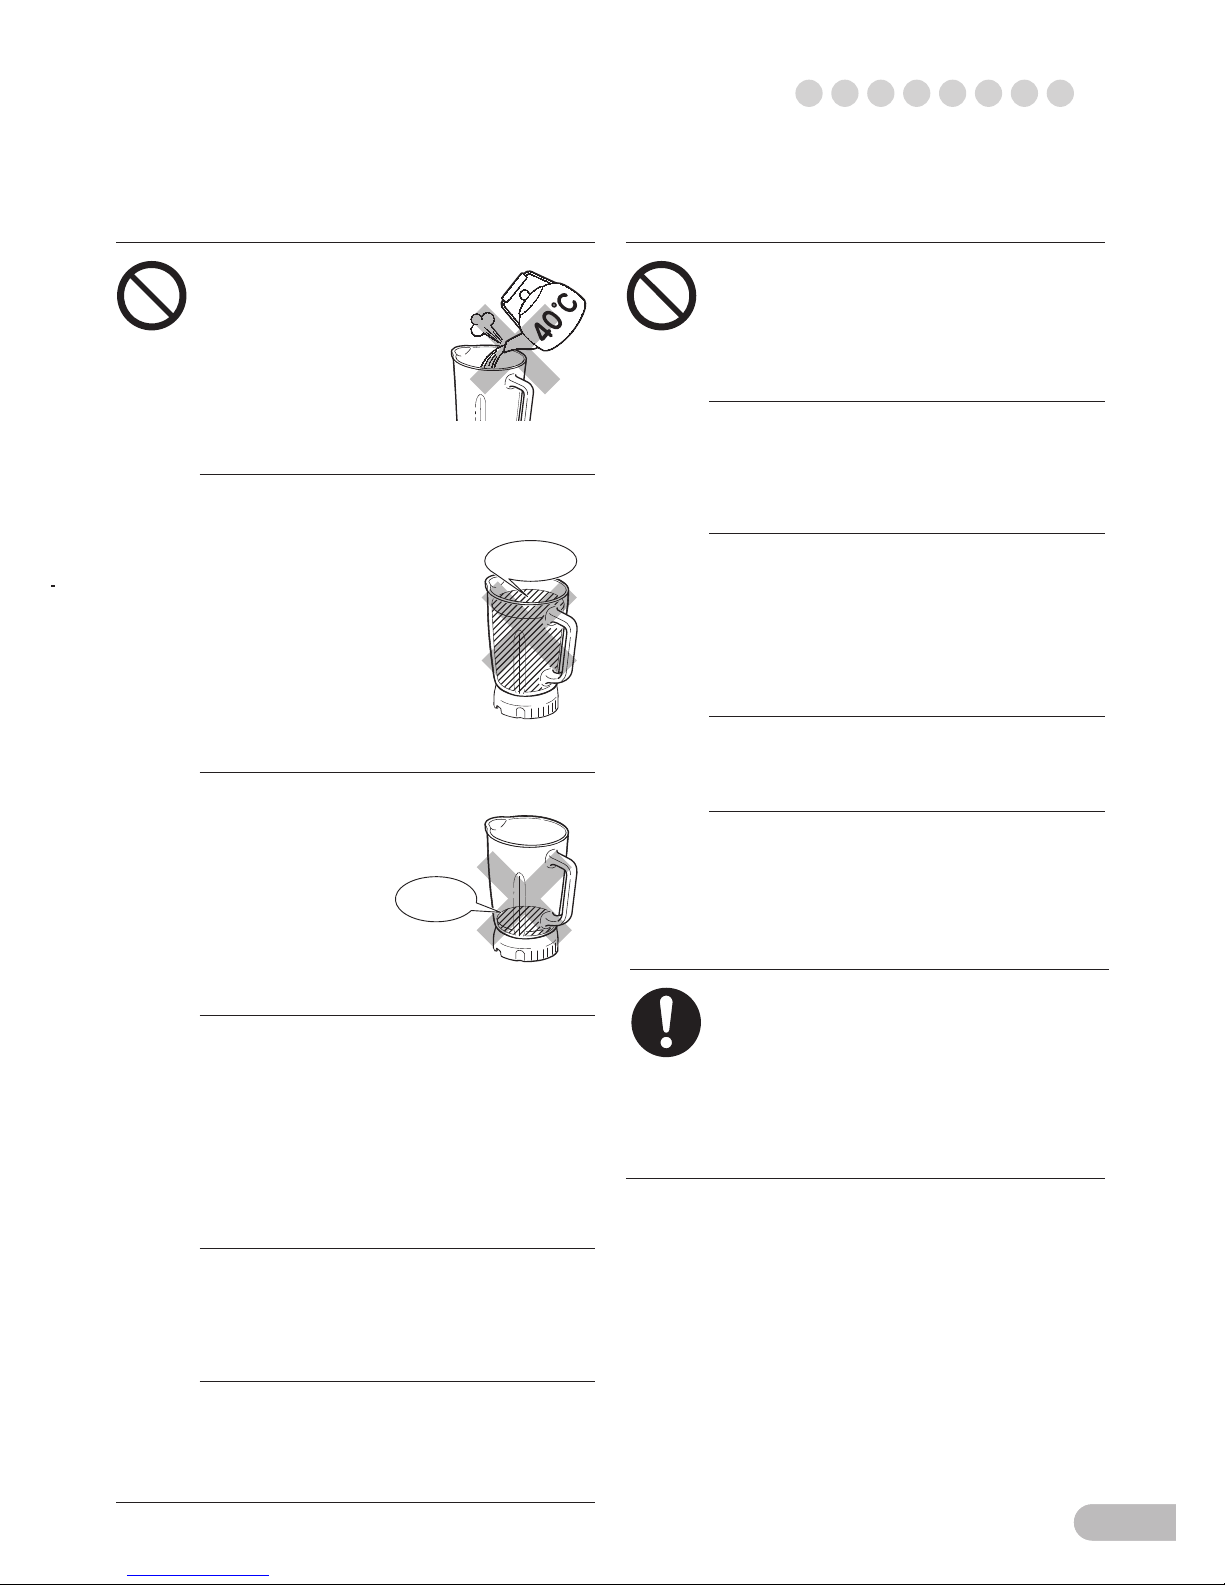
Please do not use unusable ingredients.
(Please see p.11.)
Doing so may cause the breakage of the product.
Please do not put in ingredients of
an amount that exceeds the maximum
scale value.
Doing so may cause the failure of the product.
Blender container: Please see p.12.
Smoothie container: Please see p.19.
Rating capacity
* The illustrations shown in the section for
“Precautions” may differ from the actual product.
Please do not put ingredients
of a temperature higher than
40°C into the containers.
Doing so may cause
injury due to the breakage
of the container or the
failure of the product.
When you store food in the smoothie container
by means of vacuum storage, please store such
in a refrigerator.
Please do not store this in a freezer.
The product does not provide anti-bacterial effect.
Please give special attention to storage.
Prohibition Prohibition
Be sure
to comply
Too many
ingredients
Too little
ingredients
Page 6
Blender container unit
Brush with scraper*
Smoothie container unit
5
Blender container*
Smoothie
container
cover*
Smoothie
container
cover seal*
Smoothie
container*
Please comply with the
maximum amount.
(Please see p.19.)
Cover valve
Blender
cover cap*
Blender cover*
Suction
prevention valve*
Blender
cover seal*
Cap seal*
Inner cap*
Cap seal*
Blender
container seal*
Please comply with
the maximum amount
and the minimum
amount as shown.
(Please see p.12.)
Common part
Common part
Safety
switch pin
Cutter
Attachment guide
Please take care
of the parts so
that used
ingredients, etc.,
do not become
attached.
Blender cover
Smoothie container cover
Container base*
Locations and functions of parts
First, please check to see if the package has all the necessary parts and accessories.
The seal material is already attached to the applicable parts.
(Regarding how to remove the seals from the parts, please see p.24.)
This is used to make smoothies or soups, as well as
to crush ice.(Please see pp. 9–16.)
This is used to store smoothies, etc., that are
made using this product. (Please see pp.17–21.)
This is used to take out mixed ingredients and
to help clean the unit.
The bottom surface of
the container base is not
waterproof.
* This is not a
heat-resistant
container.
* This part is not
made of
heat-resistant
glass.
Disassemble the container (see p.24), wash
each part with a sponge using neutral
detergent, and rinse it well with water or
lukewarm water (lower than 40
2
1
Page 7
Control panel
6
Main body
Recipe book*
Vacuumizing arm
Connection
Power plug
Power cord
Power plug cover
Blending indicator
Error
notification lamp
Cancel button
Release lever
Safety switch
Vacuumizing indicator
Vacuum Blend
button
Vacuum
blender
Automatic
setting
Vacuum
storage
Flash
Blending Cancel
Vacuumizing Blending
Attachment check
Ingredient check
Flash button Blend button
Attachment guide
Power button (power indicator)
Please do not use
detergents, etc.
A sound is emitted after 30 minutes of
non-use, and then the power is
automatically turned OFF.
This turns ON when an
error has occurred
during operation.
Please handle this
situation by following
the procedure shown
on pp.27–28.
This turns ON when
the cutter rotates.
This blinks when decompressing the container interior.
It turns ON when decompression is completed.
Vacuum Storage
button
Please never
push this
directly with
your finger, etc.
You can back-order the parts or accessories marked with an asterisk (*).
Please contact the store of purchase or one of our customer service representatives.(Please see p.30.)
You may also contact us via our website.
Locations and functions of parts
This provides an assortment of smoothie or soup recipes that can be made using this product.
* Please follow the procedures and the amounts prescribed in this book.
The specifications of the product and its parts are subject to change without notice.
Page 8
7
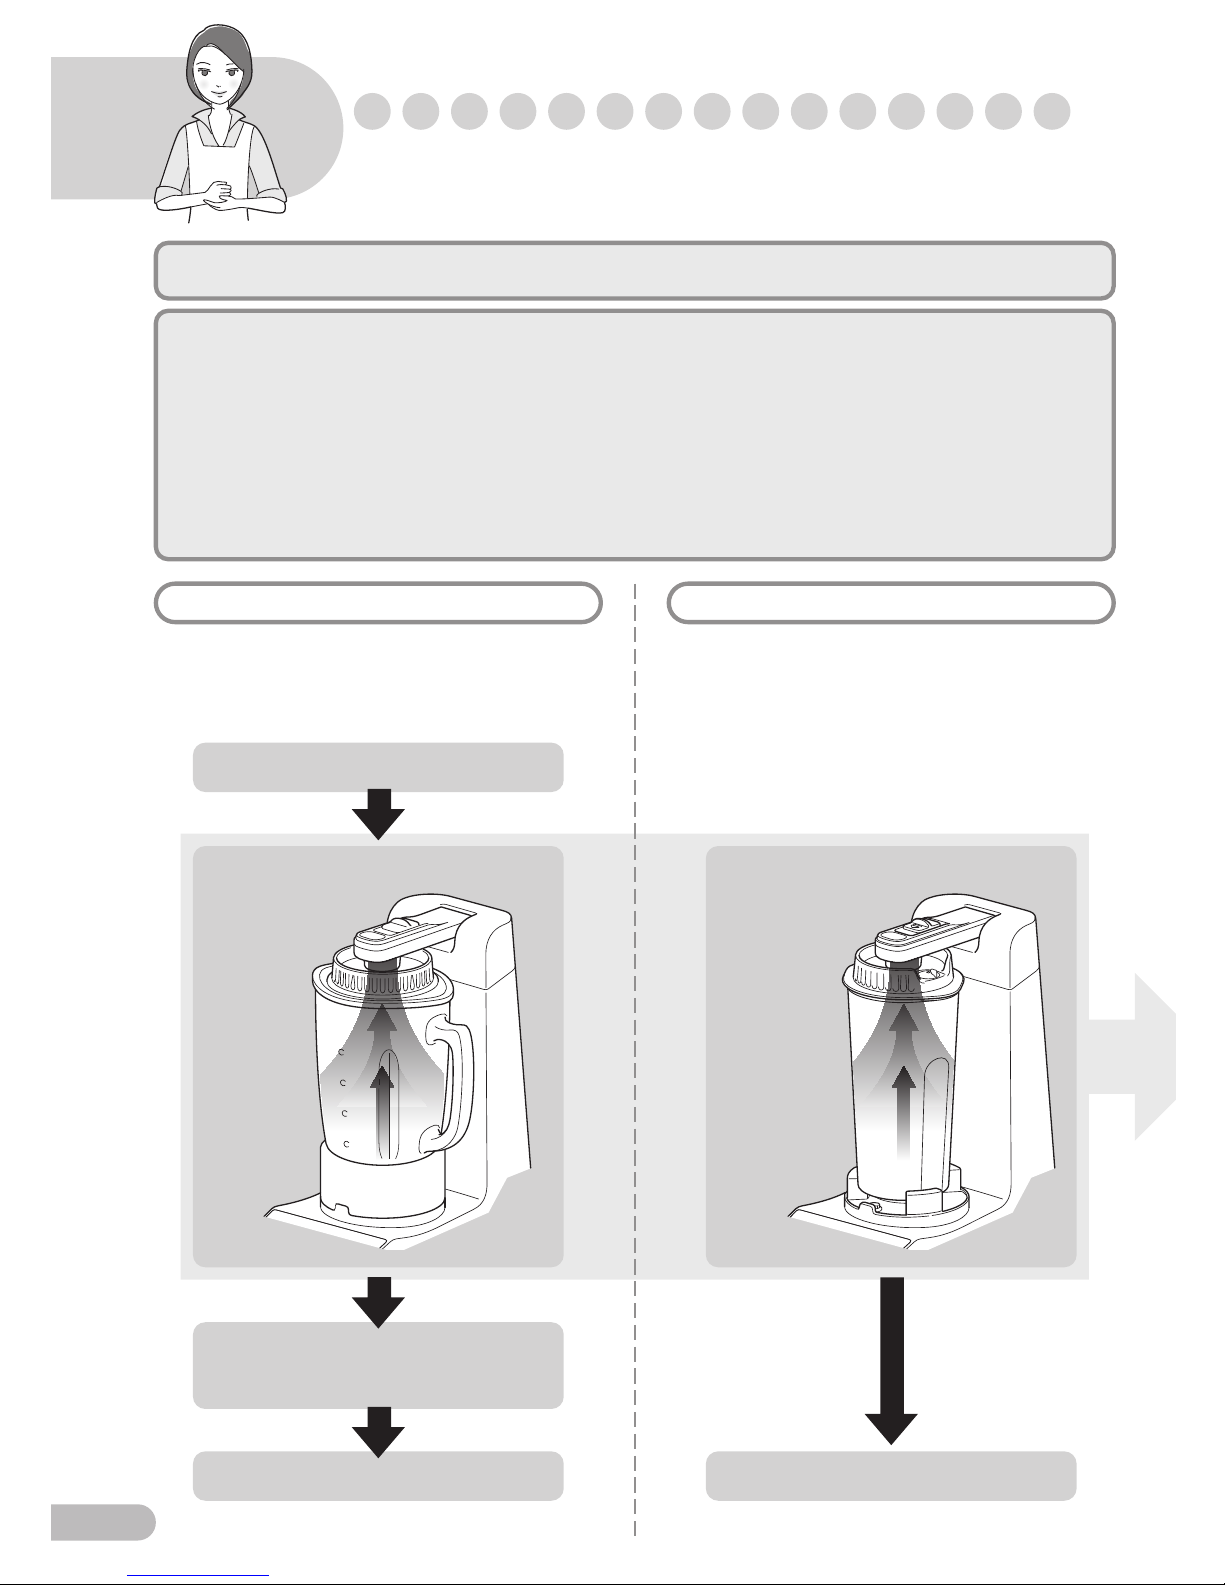
About the vacuum blender
Vacuum blending Vacuum storage
Before using the product
When you push the Vacuum Blend button, the unit
levels the ingredients with a flash blend (once),
decompresses the container interior up to a vacuum
state, processes the food automatically, and stops.
When you push the Vacuum Storage button, the unit
decompresses the container interior up to a vacuum
state and stops automatically.
Traditional blenders allow a lot of air to mix in with the ingredients during blending, and for recipes where
processing/blending is involved, such as smoothies*, food can become oxidized.
On the other hand, vacuum blenders can retard the process of oxidization by controlling incipient
oxidization through vacuumization before blending the ingredients.
In addition, this blender can maintain the freshness of previously processed/blended food that has been
vacuum stored, retarding oxidization, using its vacuum blending function. (However, such foods stored in
a refrigerator should be consumed at the earliest possible opportunity because vacuum storage itself
does not inhibit the growth of bacteria.)
* We refer to a smoothie as a drink made from the blending of fruit or vegetables—not from juicing.
Flash (5 times)
Blending operation (1 minute)
The air in the container
is vacuumed out
through the
vacuumizing
arm.
Decompression of the container interior
Stirring
Automatic stop
Flash (Once)
Automatic stop
The air in the container
is vacuumed
out through the
vacuumizing
arm.
Decompression of the container interior
Page 9
8
* Vacuum: A state of pressure that is lower than atmospheric pressure
To prevent failures
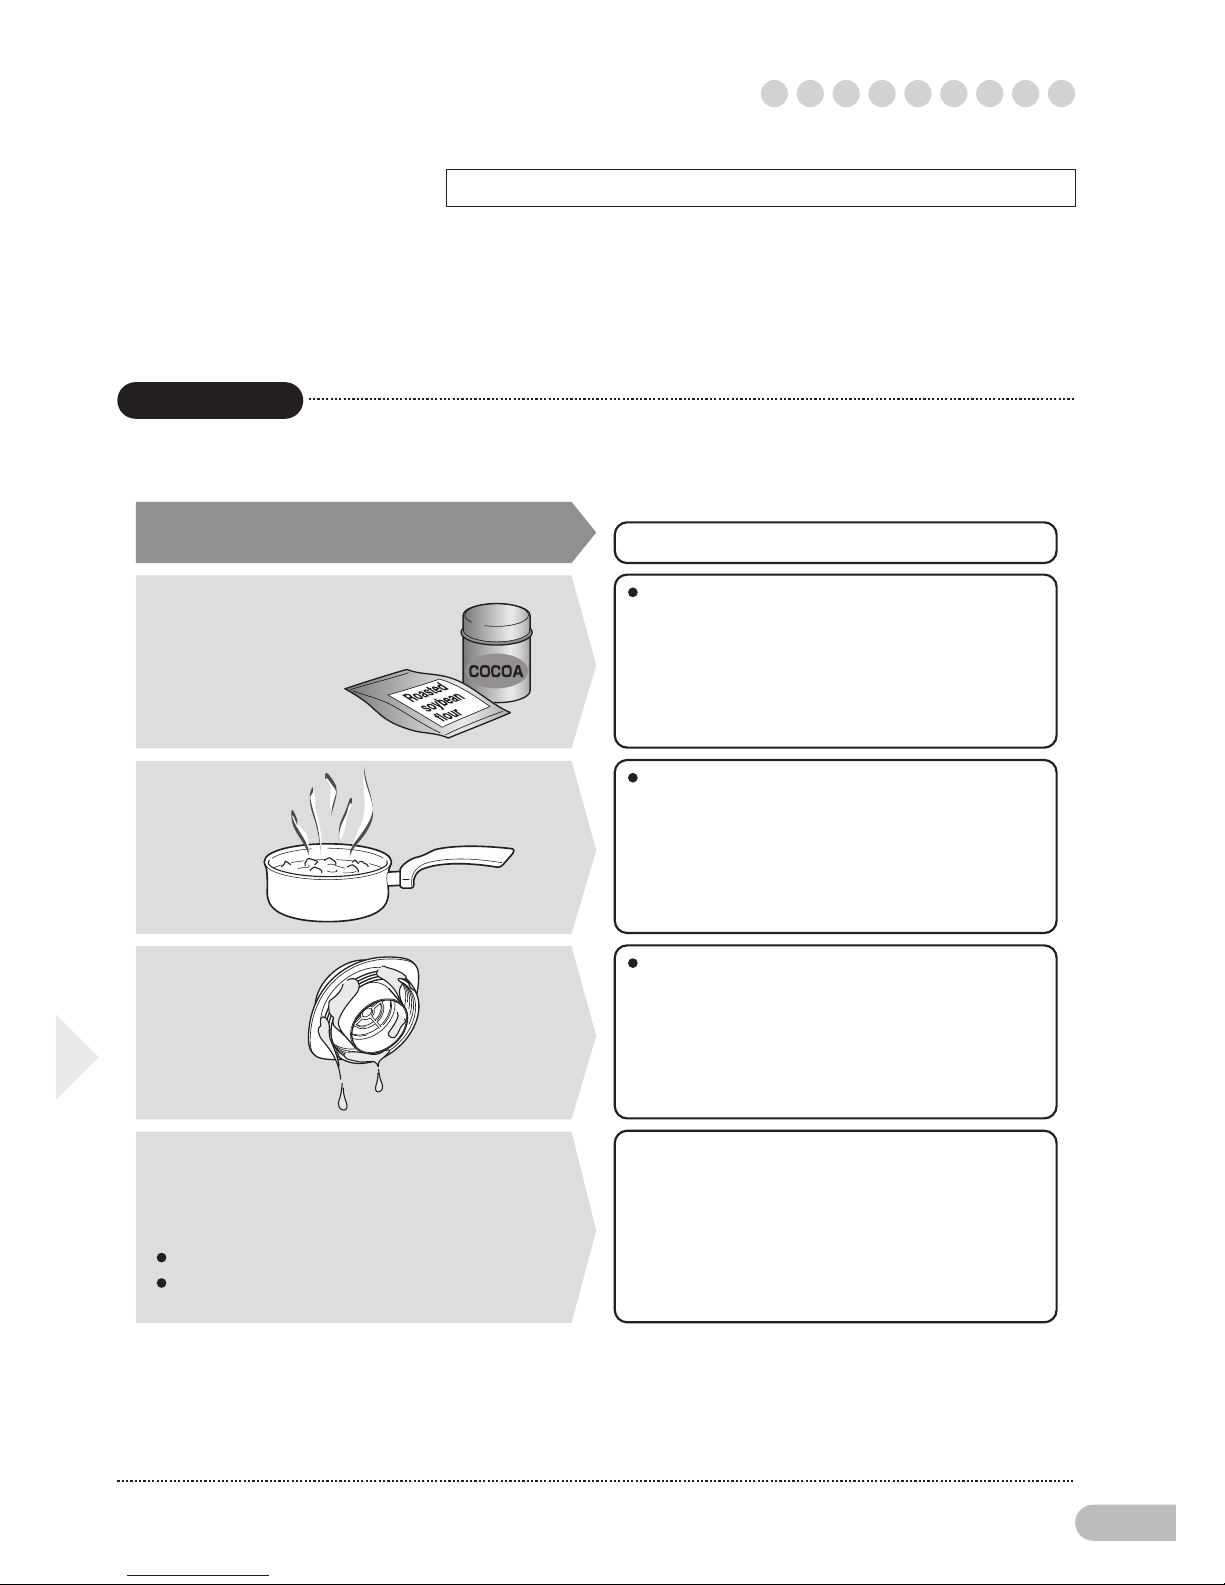
Potential foreign matter
sucked into the main body
Before using the product
If foreign matter is sucked into the main body, a failure may occur.
Please use the product by complying with the following instructions.
When the container interior is decompressed, the air contained in the ingredients may come up as bubbles or
the ingredients may bubble.
An amount less than the maximum amount (prescribed on p.12 and p.19) usually causes no problem.
However, when bubbles are about to reach the cover, please push the Cancel button and stop the operation.
Please process ingredients blended halfway by using the blending function. (Please see p.16.)
Powdered items (roasted
soybean flour, cocoa
powder, powdered sugar,
protein, etc.)
Steam
Liquid
material
attached to
the cover,
etc.
Air bubbles and bubbles from mixed
ingredients
Please use the ingredients after being
processed using the blending function or
after being dissolved completely.
Please see p.22 for details.
Please use ingredients that have cooled
down to at least below 40
O
C. (Otherwise, the
container may break.)
Ingredients that are prone to produce air
bubbles or other bubbles
Ice cream, apples, etc., that contains a lot of air
Milk, soy milk, dairy, etc., in which bubbles
are prone to swell
Please take care of each cover part every
time after use and assemble the unit only
after wiping off any moisture.
1. Please check the maximum amount for the
container prescribed on p.12 and p.19, and
use the unit only by complying with the
capacity.
2. Please decant the liquid to the smoothie
container so that bubbles are not produced.
Please note:
Page 10
9
Point to note:Point to note:
Rotating
Blender
cover
seal
Blender cover seal
Salient part of
the blender
cover
Blender cover
Blender cover cap
Suction prevention valve
Blender cover cap
(reverse side)
Cap seal
Fit the seal into the
groove by pushing it
with your fingers.
When you use the blender for the first time or when using it after it has been
stored for a while, please wash all parts other than the main body before use.
(Please see pp.23–26.)
Using the blender
Please perform assembly after taking due care
and after wiping down any moisture. Adhered
matter such as previous ingredients may cause
an error.
Please never touch the cutter located at the
container base. Otherwise, injury may result.
Please attach each part correctly. Otherwise,
failure, error, or the leakage of the ingredients
used may occur.
Please attach the parts firmly so that no gap is
generated between the blender container and the
container base or between the blender container
and the blender cover.
1
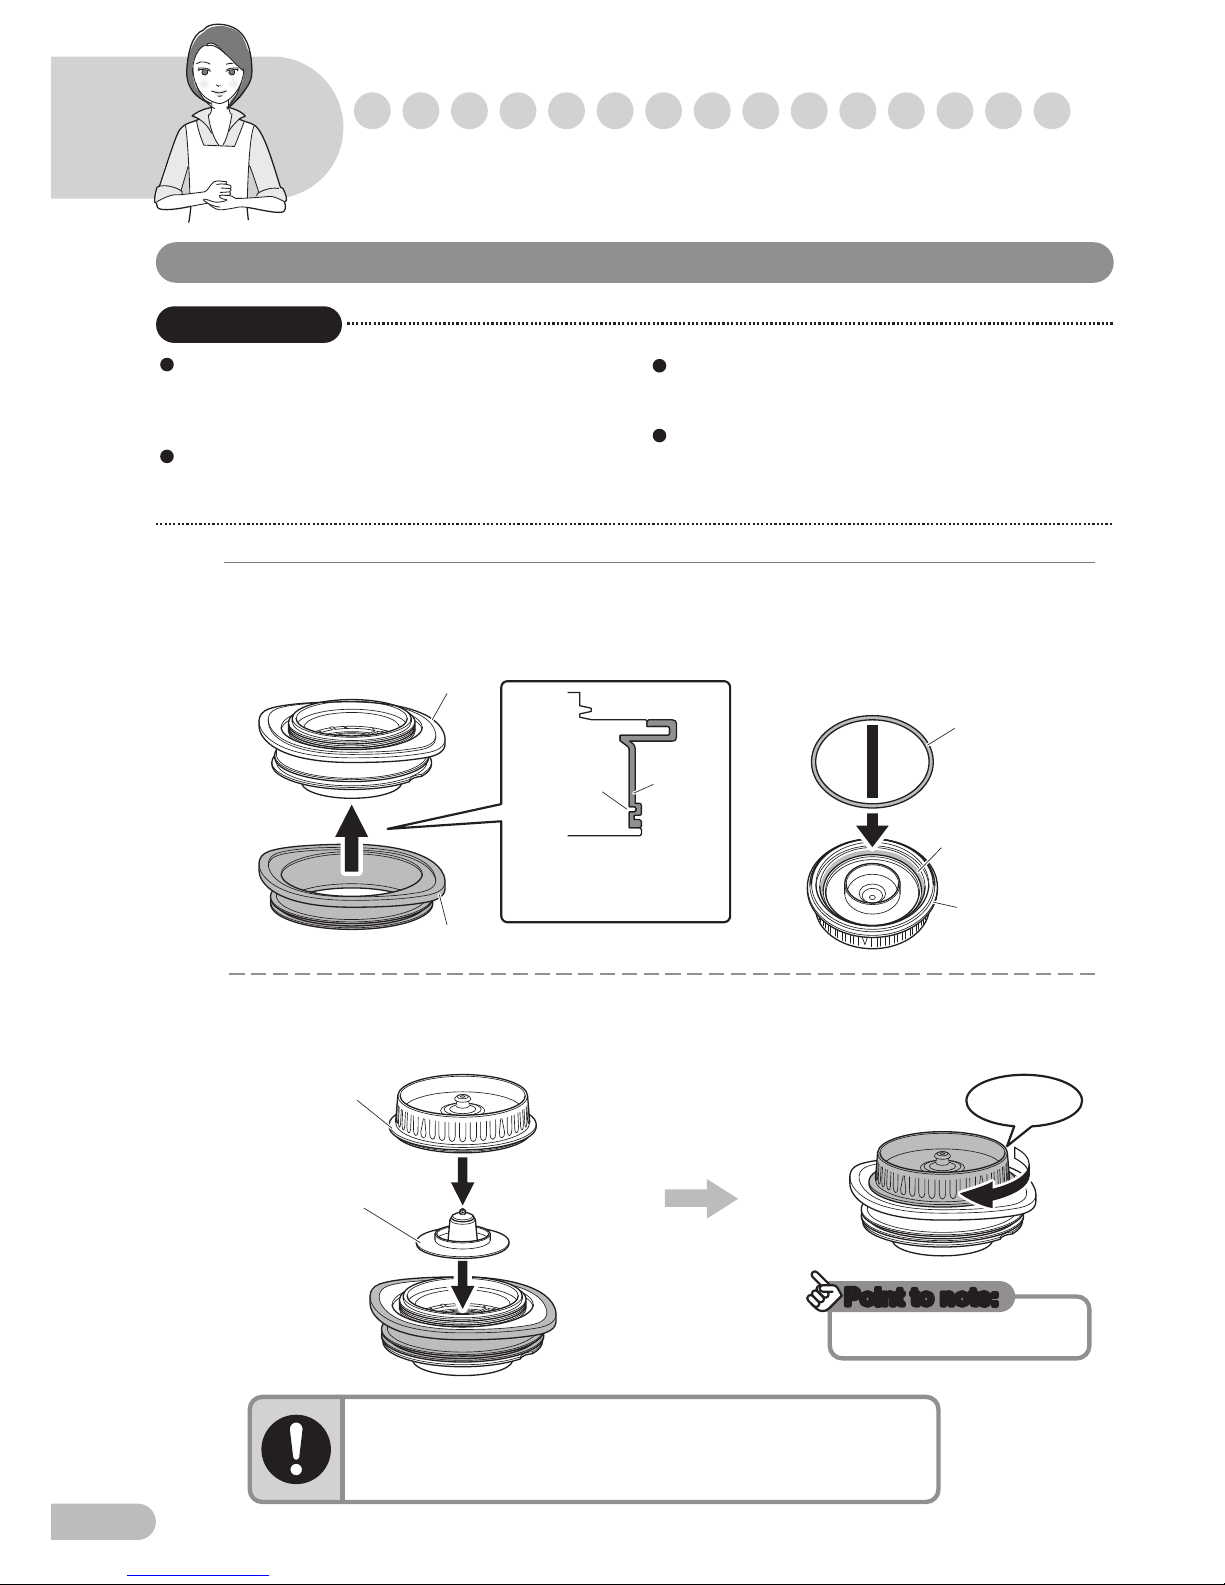
Assemble the blender cover.
Assembling the blender container unit
(1) Attach the blender cover seal to the
blender cover.
(3) Place the suction prevention valve in the
middle of the blender cover, and then
attach the blender cover cap from above.
(2) Attach the cap seal to
the blender cover cap.
(4) Attach the blender cover
cap by rotating it in the
direction of the arrow.
Rotate it until it stops.
Please never forget to attach the suction prevention valve.
Otherwise, the product may break.
“I want to use powdered
ingredients (such as
cocoa, roasted soybean
flour, powdered sugar,
and protein).”
“I want to make thick
smoothies with no water.”
“Can I use commercially
produced milk-based
beverages as a liquid for
the recipe?”
“I want to use frozen fruit.”
“I want to make a
frozen-style smoothie.”
“Can I make soups with it?”
Match the inner groove of
the blender cover seal and
the salient part of the
blender cover.
Please note:
Page 11

10
Point to note:Point to note:
Point to note:Point to note:
Rotating
Blender container
Blender container seal
Container base
Blender cover
Lip
Using the blender
2
Attach the blender container to the container base.
3
Put the ingredients in the blender container, and
then put the blender cover on.
(1) Fit the blender container seal into the
inner groove of the container base.
(2) Fit the blender container into the
container base, and attach it by rotating
it in the direction of the arrow.
(1) Match the shapes of the blender
container and the blender cover.
Fear of injury
Please be careful not to
touch the blade.
* Please do not cover up the hole in the center,
as air needs to pass through the hole.
(2) Fit the blender cover onto the blender container.
Tighten firmly.
Push in both ends of the blender
cover so that it does not slant.
Please seal the
lip completely.
Page 12

11
Unusable ingredients (causes of failure)
Preparation of ingredients
★Ingredients with
a temperature
higher than 40
O
C
★Meat or fish
★Flour such as
wheat flour
★Hard or dry ingredients
・Frozen food (excluding fruit)
・Commercially available ice
・Dried bonito or dried soybeans
・Dried fruit, etc.
★Sticky ingredients
・Boiled red beans
・Japanese yams, etc.
★Powdered foodstuffs
(Please see p.8.)
* In the case of using the
vacuum blending function
The blender should not be used for mincing ingredients, blending ingredients with little moisture,
kneading, or preparing paste-like food (e.g. hamburger meat, dumpling stuffing, liquid diet foods,
etc.), etc. Doing so may cause failure.
In addition, depending on the combination of ingredients or amount of moisture, the operation may be
halted, in order to prevent failure. In such case, please handle the device following the procedure
shown on pp.27–28.
Also, please use the accompanying recipe book and refer to “Advice on processing” on p.22 as a
reference.
★Fruit
Thick-peel fruit should be
peeled, cored, or seeded,
and cut into sizes of 2 cm
by 2 cm.
Bananas should be cut into
round slices with a thickness of about 2 cm.
★Hard ingredients such as carrots
These should be peeled
and cut into slices with a
thickness of about 2–3
mm.
When they are still large,
they should be further cut
into pieces with a width of about 2 cm.
★Leafy vegetables, such as spinach
The stems should be cut
off, and the leaves
should be cut into
pieces with a width of
about 2 cm.
When you want to use
more than the normal
amount, the pieces should be cut smaller.
★Frozen fruit
They should be cut smaller than 2 cm by 2 cm,
and should be frozen.
(Please see p.22.)
★Citrus fruit
These should be peeled,
separated into sections, and
seeded.
★Warm ingredients
These should be
cooled down to
below 40OC.
★Ice
Ice cubes of about 2.5 cm by 2.5 cm made with
an ice cube tray for household use should be
prepared.
* The number of ice cubes that can be used at
one time is six or less.
Using the blender
4
2
3
Page 13

12
Putting the ingredients into the blender container
Capacity of the blender container
Point to note:Point to note:
Maximum amount (780 ml)
Minimum amount (200 ml)
The amount of ingredients
should not fall below this line.
The amount of ingredients should not exceed this
line.
When you use the vacuum blending function
with soymilk, milk, diary, or powder solutions:
(1) The amount of milk, soymilk, etc., should not
exceed the line for the “Maximum amount of
liquid such as soymilk.”
(2) The amount of other ingredients should not
exceed the line for the “Maximum amount
including all ingredients.”
Maximum
You should put the ingredients into the blender container in the
order of liquids, soft food, and hard food.
Using the blender
When you plan to process food without putting liquid ingredients
into the blender container, please see p.22.
(1) Liquid ingredients,
seasonings, etc.
Please put
ingredients in gently,
instead of forcing
them into the
container.
(3)Leafy
vegetables
(2)Ingredients with
high moisture
content and
soft ingredients
(4)Hard ingredients,
ingredients with low
moisture content,
honey, and ice
Do not put too many ingredients
into the blender container.
When you use the vacuum blending function with ingredients that are easy to bubble, such
as soymilk, milk, diary, or powdered solutions, the maximum amount should be 600 ml.
Otherwise, bubbles may be sucked into the main body, which may cause failure.
The amount of ice cream used for the vacuum blending function should be 200 ml or less
at one time because ice cream contains air and swells when it is blended.
Page 14

13
Using the vacuum blending function
Matching
both
guides
(2)
(1)
Attachment guide
Attachment guide
Blender
container
unit
Maximum
amount
Vacuumizing
arm
This is an automatic setting for processing while retarding oxidization, by vacuumizing* the blender
container interior.
Using the blender
Please assemble each part correctly and attach the blender cover firmly. Otherwise, a failure or error may
occur.
You must use the blender with an
amount of ingredients that is less
than the maximum amount.
(Please see p.12.)
Please view the container from the
side, and when the ingredients
exceed the line, remove some with
long utensil, etc., instead of pushing
it down.
1
Put the ingredients into the blender container and attach the blender cover.
(Please see pp.9–10.)
2
Set the container and the cover
into the main body.
* Regarding the ingredients, please follow the description on pp.11–12.
Please take care of each part after use, and put the unit together only after
wiping off any moisture. (Please see p.9 and p.25.)
(1) Stand the vacuumizing arm upright.
2
3
(2) Place the blender container unit on
the main body while matching both
attachment guides.
* Please be careful not to hit the
vacuumizing arm.
Please note:
Page 15

14
Point to note:Point to note:
Pushing
Stop
Lighting up
Lighting up
* Vacuum: A state of pressure that is lower than atmospheric pressure
Using the blender
3
Insert the power plug into the
outlet, and then turn ON the power
by pushing the Power button.
4
Push the Vacuum Blend button.
With a beep, the power indicator lights up.
The process begins in the order of:
decompression of the container interior, flashing
(5 times), automatic blender operation (1 minute),
and completion, with beeping. When you want to
stop operation mid-way, please push the Cancel
button.
When the operation is stopped mid-way with
repeated beeping as a warning, please follow the
procedure shown on pp.27–28.
* With a clicking sound, the vacuumizing
arm is set into the blender cover.
(3) Pull down the vacuumizing arm and
push on it with the palm of your hand.
* When the ingredients bubble while decompressing the container interior and when the
bubbles are about to reach the cover, please push the Cancel button immediately and
stop the operation.
When you have stopped the operation mid-way or when you want to perform further
blending, you can continue processing the ingredients using the blending function.
Using the vacuum blending function in a state where ingredients, etc., are attached
to the blender cover after stopping the operation may cause failure. (To prevent
such a failure, even if you push the Vacuum Blend button after stopping the
operation, the blender will not operate.)
When you use the blender continuously,
please do not forget to pay attention to
the blender container cover.
Page 16

15
Stand it
upright.
While pulling
Blender
container
unit
Release lever
Lighting OFF
Using the blender
5
Remove the blender container from the
main body.
1
2
2
3
The blender container cannot be used for
storage.
When you use the blender continuously, please ensure
proper care regarding the blender cover.
The cover may be hard to remove because the container
interior is decompressed. Please place the blender on a
stable area, such as a table, and remove the cover while
holding it firmly.
(1) Push the Power button to turn OFF the power
after the rotation has stopped completely.
(2) While pulling the release lever,
stand the vacuumizing arm upright.
(3) Remove the blender container.
⇒When you want to apply the vacuum
storage function when making
smoothies, etc., you should follow
the instructions on p.19.
* Please be careful not to hit the
vacuumizing arm.
1
(4) After using the blender, pull the plug out of
the outlet, and ensure proper care
immediately. (Please see pp.23–26.)
Page 17

16
Using the blending function
Making crushed ice
(1) (2) (3)
Using the blender
1
Set the blender container unit into the main body and turn ON the power.
(Please see procedures 1–3 on pp.13–14.)
2
Processing
2
Push the Flash button several
times, with a push of about 1
second, and crush the ice cubes
until they are crushed to your
preference.
3
Remove the blender container from the main body, and take out the
processed ingredients. (Please see procedure 5 on p.15.)
The cutter rotates when the Flash button is pushed.
(1) Push the Flash button several times,
with a push of about 1 second.
Even if you don't push the button, the blender will
stop after 1 minute.
Please wipe off any moisture on the blender container.
(3) Push the Cancel button to stop operation.
(2) Push the Blend button after the
ingredients have started to mix, and
operate the blender until they are
blended to your preference.
* Regarding the ingredients, please follow the description on pp.11–12.
1
Attach the blender container unit, add ice cubes (10 or less) made with an ice
cube tray for household use, and then turn ON the power.
(Please see procedures 1–3 on pp.13–14.)
Please do not apply the vacuum storage function to what has been processed
using the blending function.
Or, please do not process the items again using the vacuum blending function.
Oxidization cannot be retarded because air is already blended into the mix.
In addition, this may cause the failure of the product.
Page 18

17
Pushing in
Smoothie container cover
Center of
the smoothie
container
cover
View from the back
side of the smoothie
container cover
Cover valve
Cover
valve
Cover side
Smoothie
container
cover seal
Smoothie container cover
Placing the back side of the
smoothie container cover up,
attach the seal to this groove.
3
4
* When you attach the cover valve, please pay
attention to the direction of the valve. If the
direction is not correct, the valve may become
hard to remove.
* Please confirm that the cover side
end of the cover valve sits out of the
back side surface of the smoothie
container cover, with a round shape
without being folded.
When you use the blender for the first time or when using it after a period of non-use,
please wash the parts other than the main body before using it. (Please see
pp.23–26.)
Using the vacuum storage function
Please assemble the parts only after performing proper maintenance and after wiping down any moisture.
Adhered matter such as previously used ingredients may cause an error.
Please never forget to attach the cover valve and each seal material, and assemble each part correctly.
Otherwise, failure or error may occur.
Please attach the parts firmly so that no gap is generated between the smoothie container and the smoothie
container cover.
Assembling the smoothie container unit
1
Assemble the smoothie container cover.
(1)
Attach the cover valve by pushing it into the mounting hole of the smoothie container cover.
(2) Attach the smoothie container cover seal to the groove of the smoothie container cover.
Please note:
Page 19

18
Point to note:Point to note:
Point to note:Point to note:
Rotating
Inner cap
Inner cap
Cap seal
Smoothie container
cover (back side)
Attach the seal to
this groove.
Using the vacuum storage function
*
Please do not cover up the hole in the center, as
air needs to be able to pass through the hole.
2
Attach the inner cap.
3
Put your smoothie ingredients, etc.,
into the smoothie container and
cover the container with the
smoothie container cover.
(1) As shown in the illustration,
attach the cap seal to the inner
cap.
(2) Fit the inner cap to the center of the
smoothie container cover.
(3) Attach the inner cap by rotating it in
the direction of the arrow.
Push both ends of the smoothie
container cover down so that the cover
does not slant.
Rotate it until it stops.
Page 20

19
Using the vacuum storage function
Maximum amount (780 ml)
The amount of ingredients should not exceed this
line.
When you use the vacuum blending function
with soymilk, milk, diary, or powder solutions:
(1) The amount of milk, soymilk, etc., should not
(2) The amount of other ingredients should not
Maximum
amount (780 ml)
Materials using
soymilk, etc.,
up to this line
(600 ml)
Do not shake the container.
Do not tilt the container.
Maximum
amount
Material made
using soymilk,
etc.
You should put the ingredients into the blender container in the
order of liquids, soft food, and hard food.
When you plan to process food without putting liquid ingredients
into the blender container, please see p.22.
(1) Liquid ingredients,
Using the vacuum storage function
This function is used for the later storage of smoothies, etc., already made using the vacuum storage
function.
Freshness can be maintain because the smoothie is stored in the vacuum* smoothie container.
* This has no anti-bacterial effect. You must store the smoothie in a refrigerator. Depending on the
ingredient combination, the food may separate during storage.
Please do not use ingredients with a temperature higher than 40OC. Or, please do not store the container in
a freezer. Otherwise, container deformation or damage may occur.
Please assemble the smoothie container cover correctly and fit all parts firmly. Otherwise, an error may
occur.
Please do not apply the vacuum storage function to what has not been processed with the vacuum blending
function. Otherwise, a failure may occur.
When you apply the vacuum storage function, please do so carefully so that the smoothies, etc., do not
become adhered to the inner cap. Please pay attention to the following to prevent failure.
・When you attach the smoothie container to the main body,
please do not shake or tilt it.
・When you apply the vacuum storage function to the
remaining contents after opening the smoothie container
and using some of the contents once, and if the smoothie
ingredients, etc., are attached to the inner cap, take proper
care regarding the cover.
1
Put smoothies, etc., made using the vacuum
storage function in the smoothie container and
cover the container with the smoothie container
cover. (Please see pp.17–18.)
* Please do not put materials made using
soymilk, milk, diary, or powdered
solutions up to the maximum amount (780
ml) because they are easy to bubble up
when decompressing the container
interior.
Please pour it slowly to prevent bubbling.
The smoothie container can store the maximum
amount that can be made with the blender
container at one time (780 ml). There is no
minimum limit.
★Capacity of the smoothie container
Please note:
Page 21

20
(2)
(1)
Push
Smoothie
container
unit
Vacuumizing
arm
Lighting up
Lighting up
Using the vacuum storage function
* Vacuum: A state of pressure that is lower than atmospheric pressure
4
Push the Vacuum Storage button.
When the operation stops mid-way with repeated
beeps for warning, please follow the procedures
shown on pp.27–28.
* When the ingredients bubble and when the bubbles are about to reach the cover,
please push the Cancel button immediately and stop the operation.
2
Attach the smoothie container unit to
the main body.
(1) Stand the vacuumizing arm upright.
(2) Place the smoothie container unit on
the main body.
* Please be careful not to hit the
vacuumizing arm.
* With a clicking sound, the vacuumizing arm
becomes attached to the smoothie container
cover.
(3) Pull down the vacuumizing arm and
push it in using the palm of your
hand.
3
Insert the power plug into the outlet, and
turn ON the power by pushing the Power
button.
With a beep, the power indicator lights up.
Page 22

21
Stand it
upright.
While
pulling
Flip the cover
valve to dismount
the cover.
Cover valve
Smoothie
container
unit
Lighting off
Release lever
Using the vacuum storage function
2
3
(1) Place it on a stable area, such as a table.
(2) Allow air into the smoothie container by
flipping the cover valve with your finger.
(3) Dismount the cover while firmly holding the
smoothie container.
6
Store the container in a refrigerator.
Please store the smoothie container upright.
Depending on the combination of ingredients, the food
may separate during storage.
(3) Remove the smoothie container unit.
* Please be careful not to hit the vacuumizing
arm.
(4) After using the smoothie container,
pull the plug out from the outlet.
The cover may be hard to dismount because the
container interior is decompressed. When you drink
a smoothie, etc., from the container, please dismount
the cover following the procedures below.
5
Remove the smoothie container unit
from the main body.
(1) Push the Power button to turn the power
OFF after you hear the beeps.
You will hear a “whooshing” sound.
(2) While pulling the release lever,
stand the vacuumizing arm
upright.
Page 23

22
Advice on processing
“I want to use powdered
ingredients (such as
cocoa, roasted soybean
flour, powdered sugar,
and protein).”
When you use these with the vacuum blending function, they should
previously be mixed with liquid and dissolved completely in a
separate container, and then, they should be processed within the
same maximum amount as for milk or soymilk. (Please see p.12.)
* Please do not put materials mixed by shaking because that
may cause a failure due to the suction of bubbles.
Powdered ingredients that are hard to dissolve completely should be
blended in a separate container after being processed or should be
processed using the blending function (p.16).
Use of the vacuum blending function may cause a failure because
lumps of flour or flour remaining without being dissolved may burst in
the container during decompression and suctioned into the main
body with air.
“I want to make thick
smoothies with no water.”
To prevent the unit from going idle liquids such as water are
necessary, but when ingredients themselves provide enough moisture
you can perform processing without any liquid.
Point to note:
(1) Please use soft and moist ingredients as a base (those from
which you can make juice by simply crushing them with your
hands).
Examples: Citrus fruit, tomatoes, watermelons, grapes, melons,
kiwis, etc.
Ingredients not suitable as a base: Pineapples, apples, etc.
(2) Please use a base ingredient of more than half (in weight) the
total amount.
(3) Put the ingredients into the blender container in the order of base
ingredient, leafy vegetables, ingredients with little moisture, and
ice or frozen fruit, etc.
“Can I use commercially
produced milk-based
beverages as a liquid for
the recipe?”
Yes, you can.
However, milk beverages should be processed at the same maximum
amount as milk or soy milk, as it is easy for such beverages to bubble
up. (Please see p.12.)
“I want to use frozen fruit.”
“I want to make a
frozen-style smoothie.”
“Can I make soups with it?”
You can use frozen fruit at a size smaller than 2 cm by 2 cm.
(When it is frozen as a lump, please separate it into pieces.)
Please never forget to put liquid such as water or other ingredients
into the container at the beginning, with the frozen fruit last. If you put
frozen fruit first, the blender may not operate due to the jamming of
the cutter.
When you use boiled potatoes, you should add adequate liquid
because sticking will occur during processing. Please add liquid at
an amount more than 1.5 times (in weight) the solid. When the sticking
is too strong, the blender may stop due to an error. In such case,
please follow the procedures shown on pp.27–28.
Page 24

23
Before product maintenance
(1) (2)
Please do not use a dishwasher or a dish dryer.
Please be careful not to lose seals, etc.
Please do not use benzine, thinner, metal scrubbing
brushes, polishing powder, or chemical-containing
cloths for cleaning the product.
Care of the product
Please never forget to turn OFF the power and pull out the power plug from the
outlet before you begin product maintenance.
When the product is heavily soiled, please perform primary washing following the procedures below.
1
Following procedures 1–3 on pp.13–14,
attach the blender container unit containing
water or lukewarm water (lower than 40°C), i.e.,
about a third of the container (about 250 ml),
using neutral kitchen detergent, i.e.,
several drops to the main body. Then, turn ON the
power.
2
(1) Operate the product for a few seconds by pushing the Blend button.
(2) Then, stop it by pushing the Cancel button.
3
After the rotation has stopped completely, turn OFF the power by pushing
the Power button, and then dismount the blender container unit from the
main body. (Please see p.15.)
4
Pull out the power plug from the outlet.
5
Dismount the cover, discard the water (or the lukewarm water), rinse the
container lightly with water, disassemble the product, and ensure the care
of each part.
Please adjust the operating time depending on the degree
of soiling.
If foreign matter is sucked into the main body, a failure may occur.
Please use the product by complying with the following instructions.
When the container interior is decompressed, the air contained in the ingredients may come up as bubbles or
the ingredients may bubble.
An amount less than the maximum amount (prescribed on p.12 and p.19) usually causes no problem.
However, when bubbles are about to reach the cover, please push the Cancel button and stop the operation.
Please process ingredients blended halfway by using the blending function. (Please see p.16.)
Powdered items (roasted
soybean flour, cocoa
powder, powdered sugar,
protein, etc.)
Steam
Liquid
material
attached to
the cover,
etc.
Air bubbles and bubbles from mixed
ingredients
Failure warning:
Please never push the Vacuum Blending button during
primary washing. Otherwise, failure may occur.
Please note:
Please note:
Page 25

24
Dismounting each part
Blender containerBlender coverSmoothie container cover
Blender container seal
Container base
Blender cover cap
Blender cover seal
Smoothie container
cover seal
Inner cap
Cap seal
Cover valve
Suction prevention
valve
The part in red cannot be dismounted.
The central part
cannot be
dismounted.
Cap seal
Care of the product
(1) Dismount the
container
base by
rotating it in
the direction
of the arrow.
(2) Dismount the blender container seal
from the container base.
(1) Dismount the blender cover cap by
rotating it in the direction of the arrow,
and then separate each part.
(2) Dismount the blender
cover seal while pulling
it outward.
(1) Dismount the inner cap by rotating it
in the direction of the arrow, and then
separate each part.
(2) Dismount the smoothie container
cover seal while pulling it outward.
(3) Pull out the cover valve by
flipping it.
Fear of injury
Please be careful not to
touch the blade.
*When the cap seal is
hard to be removed,
please pull up the
side of the seal using
a thin cylindrical
object with a point,
such as a toothpick.
*When the cap seal is
hard to be removed,
please pry up the side
of the seal using a
thin cylindrical object
with a point, such as
a toothpick.
Page 26

25
Main body
Blender container unit
Blender container and blender container seal
Container base
Blender cover
Release lever
Vacuumizing indicator
Vacuum Blend
button
Attachment guide
Power button (power indicator)
A sound is emitted after 30 minutes of
non-use, and then the power is
automatically turned OFF.
This blinks when decompressing the container interior.
It turns ON when decompression is completed.
Vacuum Storage
button
Blender container seal
Blender container
Container base
Blender cover
cap
Blender cover
seal
Blender cover
Cap seal
Suction
prevention valve
Care of the product
You can back-order the parts or accessories marked with an asterisk (*).
Please contact the store of purchase or one of our customer service representatives.(Please see p.30.)
You may also contact us via our website.
This provides an assortment of smoothie or soup recipes that can be made using this product.
* Please follow the procedures and the amounts prescribed in this book.
Squeeze out a soft cloth soaked in soapy water
or a neutral detergent diluted with water and
wipe down the main body.
Disassemble the container (see p.24), wash
each part with a
sponge using neutral
detergent, and rinse it
well with water or
lukewarm water (lower
than 40
O
C).
Wash the side with the cutter with the brush
with scraper using neutral detergent, being
careful not to touch the blade, and rinse the
container base well with water or lukewarm
water (lower than 40
O
C). Squeeze out a soft
cloth soaked in soapy water or neutral
detergent diluted with water, and wipe the
back side of the container base.
Disassemble the container (see p.24), wash
each part with a sponge or the
accompanying brush with scraper using
neutral detergent, and rinse it well with
water or
lukewarm
water (lower
than 40
O
C).
No moisture
Please be careful not to get the main body wet
because it cannot be washed with water. Otherwise,
failure may occur.
Please wipe the
connections of the
main body with a
well-squeezed
damp cloth without
using detergent.
Please do not sprinkle water directly on the
back side of the container base or completely
soak and wash the container base. Doing so
might cause an eventual failure due to rust.
No moisture
Please be careful not to get
the back side of the container
base wet because it cannot
be washed with water.
Otherwise, failure may occur.
Please take care regarding
parts around the safety
switch pin.
* Please do
not
completely
soak and
wash the
blender
cover.
You must not use a dishwasher or a dish dryer.
Page 27

26
Smoothie container unit
Smoothie container Smoothie container cover
Post-maintenance
Smoothie container
Smoothie
container
cover
Cover valve
Inner cap
Cap seal
Smoothie
container
cover seal
Smoothie
container cover
Blender cover cap
Care of the product
Disassemble the container (see p.24), wash
each part with a sponge using neutral
detergent, and rinse it well with water or
lukewarm water (lower than 40OC).
Disassemble the cover (see p.24), wash
each part with a sponge or the
accompanying brush with scraper using
neutral detergent,
and rinse it well
with water or
lukewarm water
(lower than
40
O
C).
2
Attach the blender container unit
to the main body and store it in a
place where it is not exposed to
direct sunlight, with adequate
ventilation ensured.
* Remaining moisture might promote rust
or mold.
1
After performing maintenance,
wipe all parts carefully, dry
them sufficiently, and
re-assemble them.
* Please do not
completely
soak and wash
the cover.
Other
ingredients,
etc., may
become
adhered.
Please wipe the cover after shaking it
well because water easily pools in the
hole in the center.
Page 28

27
When the Attachment check lamp is lit
Handling methodProbable causes
(1)
(2)
Check
the lit
lamp.
About error notification
This product stops operation automatically with warning beeps and lighting when it
detects an error.
Please handle it following the procedures below to prevent injury or failure.
1
(1) Check the lit lamp, and (2) push the Cancel button to release the error.
2
Push the Power button to turn OFF the power, and pull out the power plug
from the outlet.
There may be a case where
the Power button lamp blinks
while the error notification
lamp is unlit. Please also
confirm the Power button.
When any part is attached incorrectly, the Attachment check lamp becomes lit.
Have you set the
vacuumizing arm
correctly?
The product stopped
operation soon after you
pushed the Vacuum
Blender button or the
Vacuum Storage button.
The product stopped
operation when
decompressing the
container interior.
Please push the vacuumizing arm with the
palm of your hand until you hear a clicking
sound. (Please see p.14 and p.20.)
Is each cover on
firmly?
Please attach the cover firmly so that no gap is
generated between the container and the cover.
Please cover the blender container lip
completely with the blender container cover.
(Please see p.10.)
Are the blender
container and
container base
assembled
correctly?
Please firmly mount the blender container to
the container base by rotating it completely.
(Please see p.10.)
Please never forget to mount the blender
container seal.
Is each cover
part assembled
correctly?
Please check if there is any absence or
incorrect mounting of seals or parts. (Please
see p.9, p.10, p.17, and p.18.)
Please firmly mount the blender cover cap and
the inner cap by rotating them completely.
Please check if the end of the cover valve
(attached to the smoothie container cover) is
not folded. (Please see p.17.)
Prohibition Prohibition
Page 29

28
When the Ingredient check lamp is lit
When the Power button lamp is lit
Handling methodProbable causes
About error notification
When the motor is overloaded, the Ingredient check lamp becomes lit.
After transferring the contents of the blender container to another
container, please handle it as below.
As the safety device of the motor is in operation, please allow the unit to rest for more than 30 minutes.
*
When you process the ingredients again using the vacuum
blending function, please do so after paying attention to the cover.
There may be ingredients or
bubbles inside the blender cover
cap.
The product
stopped operation
when
decompressing the
container interior.
The product
stopped operation
after the cutter
started to rotate.
Please take good care of the cover and wipe
off any moisture carefully. (Please see p.25.)
Please remove any bubbles inside the
container.
Are you using any hard-to-blend
ingredients (due to overly large
size), or is the liquid dilution too
low, etc.?
Please cut the ingredients into smaller
pieces.
Please add liquid, such as water.
Are you using too many
ingredients?
Please reduce the ingredients used and
comply with the operating capacity of the
blender container. (Please see p.12.)
Are you using ingredients that
are actually unusable?
Please remove any unusable ingredients.
(Please see p.11.)
Are there ingredients stuck
between the cutter parts?
Please dismount the blender container from
the container base (please see p.24) and
remove the stuck matter using a long
slender utensil, etc.
3
Dismount each container
unit from the main body.
(Please see p.15 and p.21.)
4
Check the probable causes below and handle the unit responding to the
causes shown.
* When the problem cannot be fixed nevertheless, please contact the address or phone number shown
on the fancy box, or contact Tescom Co., Ltd. directly (contact info shown on the back cover).
Page 30

29
Specifications
Troubleshooting
Please check the following, and if a problem still persists, please stop operation
immediately and contact the address or phone number shown on the box, or contact
Tescom Co., Ltd. directly (contact info shown on the back cover).
When Handling methodProbable causes
Even if you push the button,
the product doesn’t operate.
The product has stopped
operation. (The power lamp
is blinking.)
Ice is stuck between the parts.
Please remove any ice stuck between the
parts.
The product has been operating
for more than the rated time.
The safety mechanism became
engaged due to a rise in
temperature.
Please allow it to rest for more than 30
minutes.
Please handle the unit following the
procedures shown on pp.27–28. When the
error notification lamp remains lit even after
you've properly handled it, please contact the
address or phone number shown on the box,
or contact Tescom Co., Ltd. directly (contact
info shown on the back cover).
You cannot turn the power ON.
The power plug has been mistakenly
pulled out from the outlet.
Please re-insert the power plug into the outlet.
Water leakage occurs.
The blender container and the
container base are not firmly
connected.
A seal is mounted incorrectly.
Please tighten these completely until the
water leakage stops.
Please assemble them again.
Please see pp.9–10.
Even if you push the Vacuum
Blender button, the product
doesn’t operate.
After blending by pushing the Flash
button and the Blend button, you
accidentally pushed the Vacuum
Blender button. (The protective
function began operating.)
Please perform processing using the
blender function. (Please see p.16.)
Smoke appears.
The cord has twisted and won’t go back to its
original state.
Please stop operation immediately and contact
the address or phone number shown on the
box, or contact Tescom Co., Ltd. directly
(contact info shown on the back cover).
Even if you push the button, the product doesn’t operate.
The product has stopped operation. (The error notification
lamp is lit.)
TMV 1100
Product number
AC 220–240 V, 50–60 Hz
Power source
290 W
Power consumption
9,500 rpm
Rotating speed
Blending function: Repetition of 4 min. operation and 2 min. rest, up to 8 minutes
Vacuum blending function: Repetition of 4 operations and 2 min. rest, up to 8 times
Vacuum storage function: Repetition of 3 operations and 3 min. rest
Rating
Blender container: Max. 780 ml, min. 200 ml
Smoothie container: Max. 780 ml
Container
capacity
Vacuum blender
Name of product
Main body: 2.2 kg
Blender container and
container base: About 1.5 kg
Smoothie container: 340 g
Weight
H327 x W148 x D275 (mm)
Size
1.2m
Length of cord
Prohibition
Page 31

Page 32

Thank you for your purchase.
Before using this product,
please read this instruction
manual and use the product
correctly. After reading the
manual, please keep it close
at hand for easy reference.
Tescom Denki Co.,Ltd.
4217-1 Wada Matsumoto-City, Nagano, Japan
Product Number: TMV1100
Vacuum Blender
Vacuum Blender TMV1100
4423-1
 Loading...