

Page 1

ONLINE UPS
1-3 kVA
Uninterruptible Power Supply System
User Manual
1 phase In / 1 phase Out
NEOLINE PLUS
Page 2
2
USER MANUAL
NEOLINE PLUS � 1/1 � 1-3 kVA � ONLINE UPS
ΠΡΟΣΟΧΗ:
1. Διαβάστε το εγχειρίδιο χρήσης προσεκτικά πριν την εγκατάσταση ή τη λειτουργία
του εξοπλισμού.
2. Για να ισχύσει η εγγύηση θα πρέπει να έχει αποσταλεί η “Φόρμα Εγγύησης” ή να
έχει γίνει εγγραφή στην ιστοσελίδα μας: www.tescom-ups.gr
3. Για να ισχύει η εγγύηση θα πρέπει το σύστημα να επαναφορτίζεται κάθε 2-3
μήνες όταν δεν χρησιμοποιείται.
GR
Παρακαλώ όπως συμμορφωθείτε αυστηρά με όλες τις
προειδοποιήσεις και τις οδηγίες λειτουργίας σε αυτό το
εγχειρίδιο.
Μη λειτουργήσετε αυτή τη μονάδα προτού μελετήσετε
προσεκτικά όλες τις πληροφορίες ασφαλείας και τις
οδηγίες λειτουργίας.
Να αποθηκευτεί το παρόν για μελλοντική χρήση.
Page 3

3
USER MANUAL
NEOLINE PLUS � 1/1 � 1-3 kVA � ONLINE UPS
Περιεχόμενα
1. Σημαντικές οδηγίες ασφαλείας .............................................................. 4
1-1. Μεταφορά και φύλαξη .......................................................................... 4
1-2. Προετοιμασία ........................................................................................ 4
1-3. Εγκατάσταση ......................................................................................... 4
1-4. Χειρισμός ............................................................................................... 5
2. Εγκατάσταση και λειτουργία .................................................................. 5
2-1. Πίσω Όψη UPS Μονάδα πύργου ......................................................... 6
2-2. Προγραμματισμός του UPS ................................................................. 7
3.
Λειτουργίες ............................................................................................... 8
3-1. Λειτουργία κομβίων .............................................................................. 8
3-2. Πίνακας LCD .......................................................................................... 9
3-3. Ηχητικός συναγερμός .......................................................................... 10
3-4. Ορισμοί των συντομογραφιών στην οθόνη LCD ............................... 11
3-5. Ρύθμιση UPS ......................................................................................... 11
3-6. Περιγραφή τρόπου λειτουργίας .......................................................... 14
3-7. Kωδικός αναφοράς σφαλμάτων .......................................................... 15
3-8. Προειδοποιητικές ενδείξεις ................................................................. 15
4. Αντιμετώπιση προβλημάτων ...................................................................
16
5. Φύλαξη και συντήρηση
............................................................................ 17
5-1. Λειτουργία ............................................................................................. 17
5-2. Φύλαξη
................................................................................................... 17
5-3. Συντήρηση ............................................................................................. 18
6. Τεχνικές προδιαγραφές .......................................................................... 18
Page 4

4
USER MANUAL
NEOLINE PLUS � 1/1 � 1-3 kVA � ONLINE UPS
1. Σημαντικές οδηγίες ασφαλείας
Παρακαλώ μεταφέρετε το σύστημα UPS μόνο στην αυθεντική συσκευασία για να το προστατέψετε
τρανταγμούς και χτυπήματα. Το UPS πρέπει να φυλάσσεται σε χώρο καλά αεριζόμενο, χωρίς υγρασία.
1-1. Μεταφορά και φύλαξη
► Παρακαλώ μεταφέρετε οτ σύστημα UPS μόνο στην αυθεντική συσκευασία για να το προστατέψετε
από τρανταγμούς και χτυπήματα. Το UPS πρέπει να φυλάσσεται σε χώρο καλά αεριζόμενο, χωρίς
υγρασία.
1-2. Προετοιμασία
► Ενδέχεται να προκληθεί συμπύκνωση εάν το σύστημα του UPS μεταφερθεί κατευθείαν από κρύο
σε ζεστό περιβάλλον. Το σύστημα UPS πρέπει να είναι εντελώς στεγνό προτού το εγκαταστήσετε.
► Παρακαλώ επιτρέψτε τουλάχιστον 2 ώρες στο σύστημα του UPS για να προσαρμοστεί στο
περιβάλλον.
► Μην εγκαταστήσετε το σύστημα του UPS κοντά σε νερό ή σε υγρά περιβάλλοντα.
► Μην εγκαταστήσετε το σύστημα του UPS κάπου που ενδέχεται να εκτεθεί σε άμεση ακτινοβολία ή
σε κοντινή θέρμανση.
► Μη φράζετε τις τρύπες εξαερισμού στο σώμα του UPS.
1-3. Εγκατάσταση
► Μη συνδέετε συσκευές και μηχανήματα που θα μπορούσαν να υπερφορτώσουν το UPS (π.χ.
εκτυπωτικά μηχανήματα) στις υποδοχές εξόδου ή το τερματικό του UPS.
► Τοποθετήστε καλώδια με τέτοιο τρόπο ώστε να μη μπορεί κανείς να πατήσει ή να σκοντάψει πάνω
σε αυτά.
► Μην εμποδίζετε τα ανοίγματα εξαερισμού στο περίβλημα του UPS. Το UPS πρέπει να είναι
εγκατεστημένο σε τοποθεσία με καλό εξαερισμό. Βεβαιωθείτε ότι υπάρχει αρκετός χώρος σε κάθε
πλευρά για αερισμό.
► Το UPS παρέχει γειωμένο ακροδέκτη στην τελική διαμόρφωση του εγκατεστημένου συστήματος και
ισοδυναμική σύνδεση γείωσης στα εξωτερικά ερμάρια συσσωρευτών UPS.
► Το UPS μπορεί να εγκατασταθεί μόνο από εξειδικευμένο προσωπικό συντήρησης.
► Μία κατάλληλη συσκευή αποσύνδεσης σαν προστασία υποστήριξης βραχυκυκλώματος θα πρέπει
να παρέχεται στην εγκατάσταση καλωδίωσης του κτηρίου.
► Μία αναπόσπαστη συσκευή μεταγωγής έκτακτης ανάγκης η οποία να προστατεύει περαιτέρω
ανεφοδιασμό στο φορτίο από το UPS σε οποιαδήποτε κατάσταση λειτουργίας θα πρέπει να
παρέχεται στην εγκατάσταση καλωδίωσης του κτηρίου.
► Συνδέστε τον αγωγό της γείωσης προτού κάνετε σύνδεση με τον ακροδέκτη της καλωδίωσης του
κτηρίου.
► Η εγκατάσταση και η καλωδίωση θα πρέπει να εκτελεστούν σε συμφωνία με τους τοπικούς
ηλεκτρολογικούς νόμους και κανονισμούς.
Page 5
5
USER MANUAL
NEOLINE PLUS � 1/1 � 1-3 kVA � ONLINE UPS
1-4. Χειρισμός
► Μην αποσυνδέετε το καλώδιο του αγωγού γείωσης του UPS ή τους ακροδέκτες καλωδίωσης του
κτιρίου οποιαδήποτε στιγμή γιατί κάτι τέτοιο δύναται να ακυρώσει την προστατευτική γείωση του
συστήματος του UPS και όλων των συνδεδεμένων φορτίων.
► Το σύστημα του UPS περιλαμβάνει τις δικές του, εσωτερικες μπαταρίες. Οι υποδοχές εξόδου του
UPS ή τα τερματικά εξόδου μπορεί να είναι ηλεκτρολογικά ενεργά ακόμη κι αν το σύστημα του UPS
δεν είναι συνδεδεμένο με την έξοδο καλωδίωσης του κτιρίου.
► Για να αποσυνδέσετε πλήρως το σύστημα του UPS, πρώτα πατήστε το κουμπί “OFF” και μετά
αποσυνδέστε τα κύρια μέρη.
► Βεβαιωθείτε ότι κανένα υγρό ή άλλα ξένα αντικείμενα μπορούν να εισέλθουν στο σύστημα του UPS.
► Το UPS μπορεί να το χειριστεί ο καθένας χωρίς καμία προηγούμενη εμπειρία.
2. Εγκατάσταση και λειτουργία
Υπάρχουν δύο διαφορετικοί τύποι online UPS: τα βασικά και τα μοντέλα ενισχυμένου φορτιστή.
Παρακαλώ ανατρέξατε στον παρακάτω πίνακα μοντέλων.
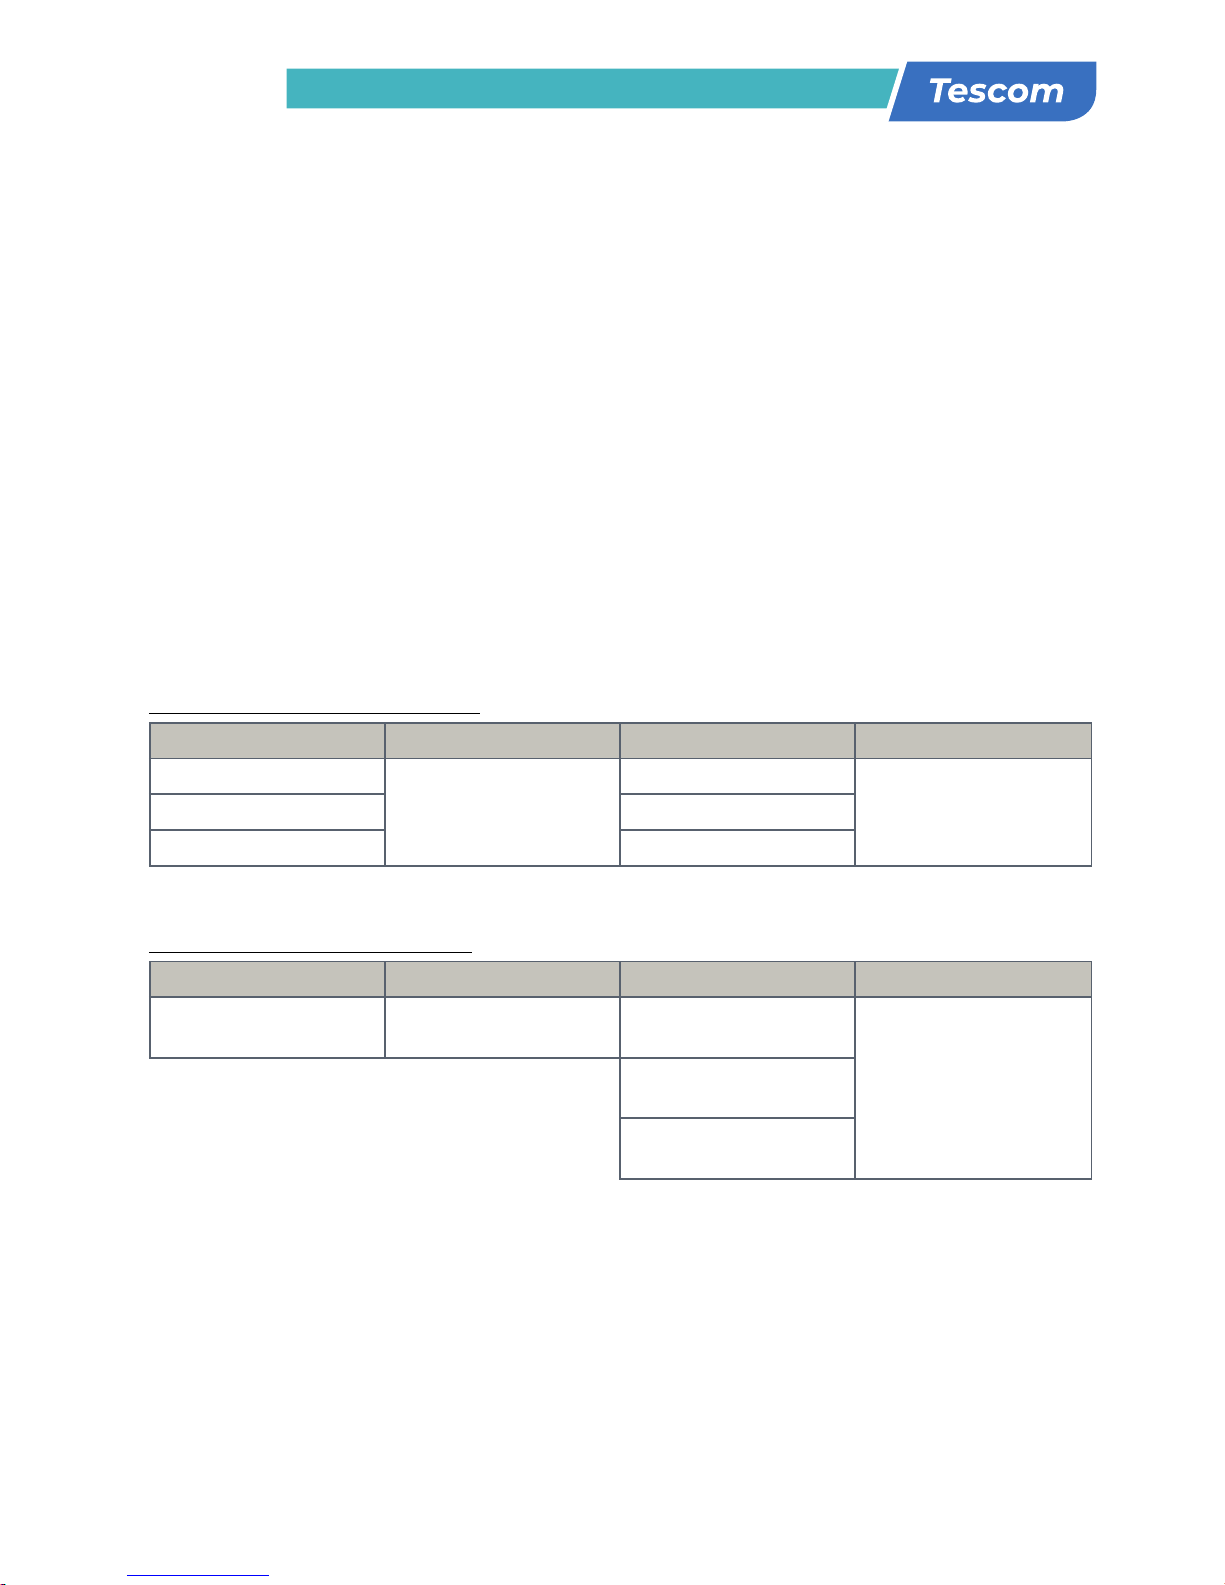
Για τη σειρά: NEOLINE ST+ (Tower)
Μοντέλο Τύπος Μοντέλο Τύπος
1K
Βασικό
Μοντέλο
1KL
Μοντέλο
ενισχυμένου
Φορτιστή
2K 2KL
3K 3KL
Για τη σειρά: NEOLINE RT+ (Rack)
Μοντέλο Τύπος Μοντέλο Τύπος
1KR
Βασικό
Μοντέλο
1KRL
Μοντέλο
ενισχυμένου
Φορτιστή
2KRL
3KRL
Page 6
6
USER MANUAL
NEOLINE PLUS � 1/1 � 1-3 kVA � ONLINE UPS
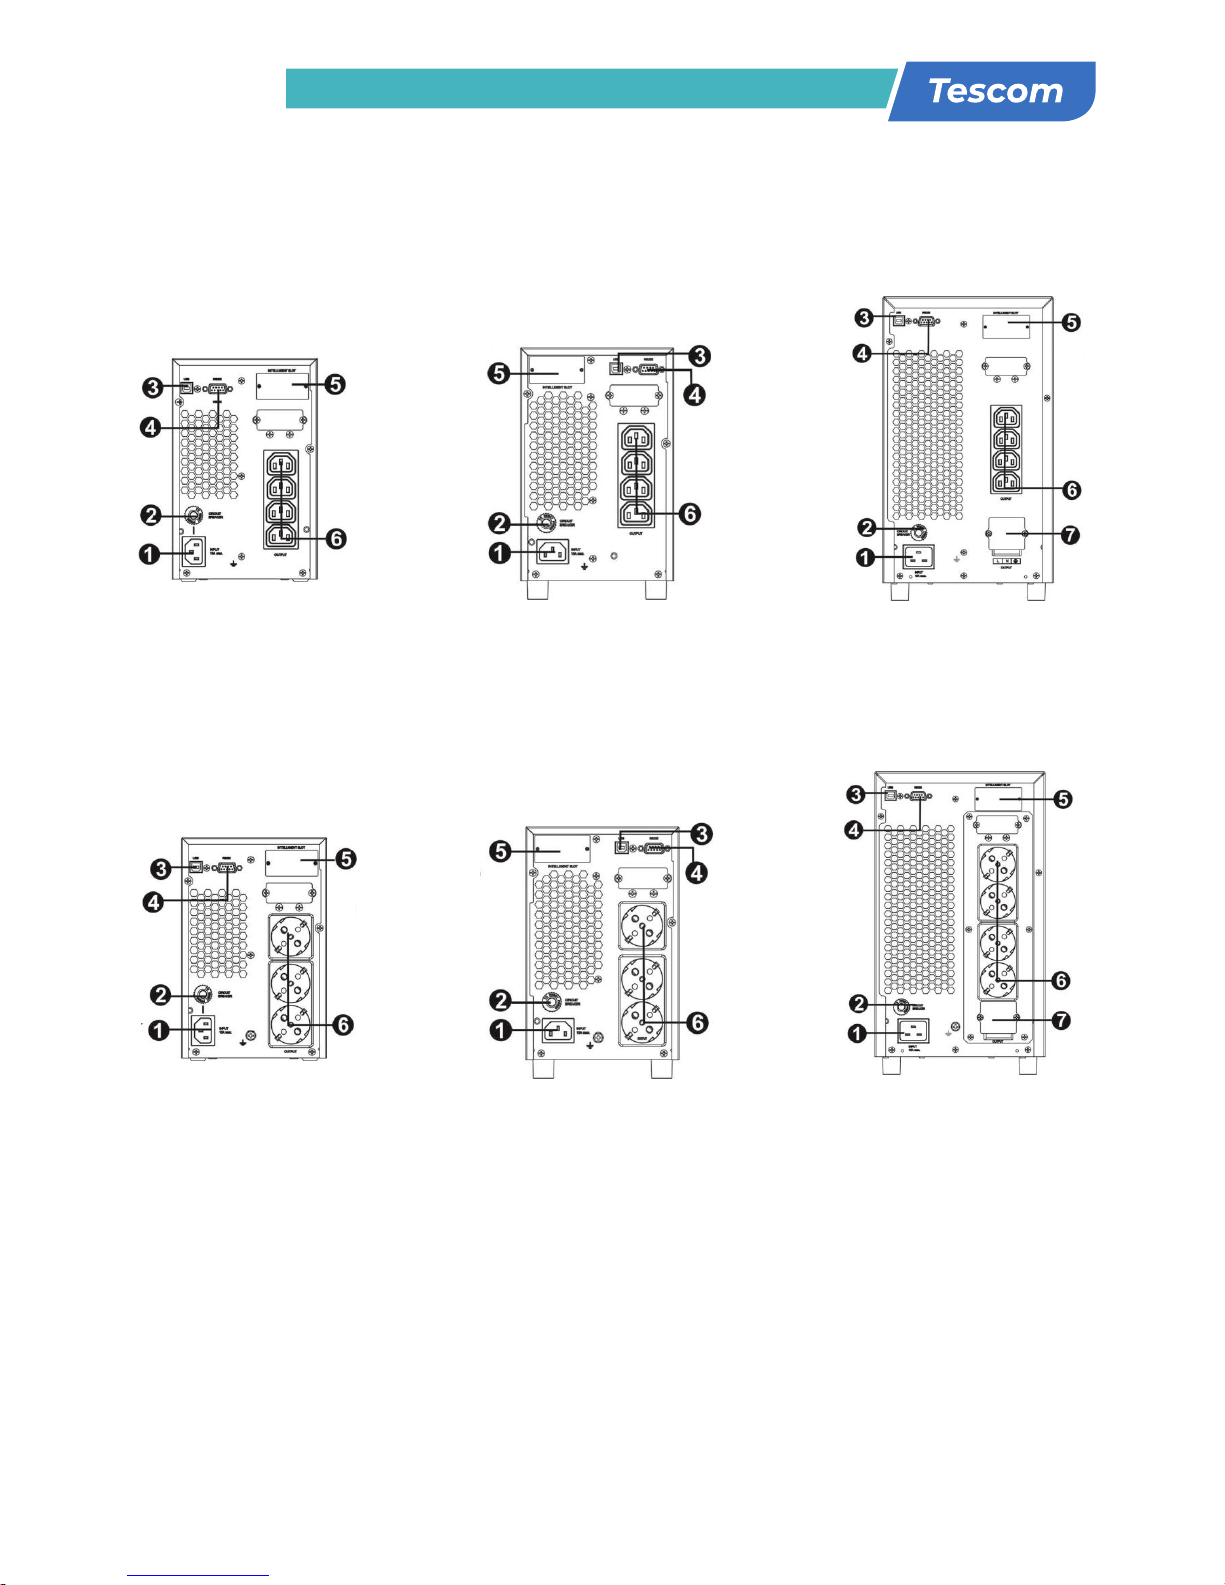
2-1. Πίσω Όψη UPS (μονάδα πύργου)
1. AC είσοδος
2. Διακόπτης κυκλώματος εισόδου
3. USB θύρα επικοινωνίας
4. RS-232 θύρα επικοινωνίας
5. SNMP έξυπνη θύρα
6. Εξωτερική σύνδεση μπαταρίας (διαθέσιμη μόνο για το μοντέλο L)
7. Ρευματοδότες εξόδου
8. Διακόπτης κυκλώματος εξόδου
9. Τερματικό εξόδου
2-1. Πίσω Όψη UPS (μονάδα πύργου)
1K (L) IEC
1K (L) Scuko 2K (L) Scuko 3K (L) Scuko
2K (L) IEC
3K (L) IEC
Page 7
7
USER MANUAL
NEOLINE PLUS � 1/1 � 1-3 kVA � ONLINE UPS
2-2. Προγραμματισμός του UPS
Βήμα 1: UPS σύνδεση εισόδου
Συνδέστε το UPS σε μια διπολική, με τρία σύρματα, γειωμένη πρίζα μόνο. Αποφεύγετε να χρησιμοποιείτε
καλώδια επέκτασης. Το καλώδιο ρεύματος σας παρέχεται μέσα στη συσκευασία του UPS.
Βήμα 2: UPS σύνδεση εξόδου
1. Για εξόδους τύπου πρίζας, απλά συνδέστε τις συσκευές στις υποδοχές.
2. Για εισόδους ή εξόδους τύπου ακροδέκτη, παρακαλώ ακολουθήστε τα παρακάτω βήματα για τη
διαμόρφωση της καλωδίωσης:
α) Μετακινήστε το μικρό κάλυμμα του μπλοκ ακροδεκτών
β) Σας συνιστούμε να χρησιμοποιήσετε καλώδια ρεύματος διατομής 2.5mm2
γ) Με την ολοκλήρωση της διαμόρφωσης καλωδίωσης, παρακαλώ ελέγξτε εάν τα καλώδια
είναι ασφαλώς επικολλημένα.
δ) Τοποθετήστε το μικρό κάλυμμα πίσω στον πίνακα που βρίσκεται στο πίσω μέρος.
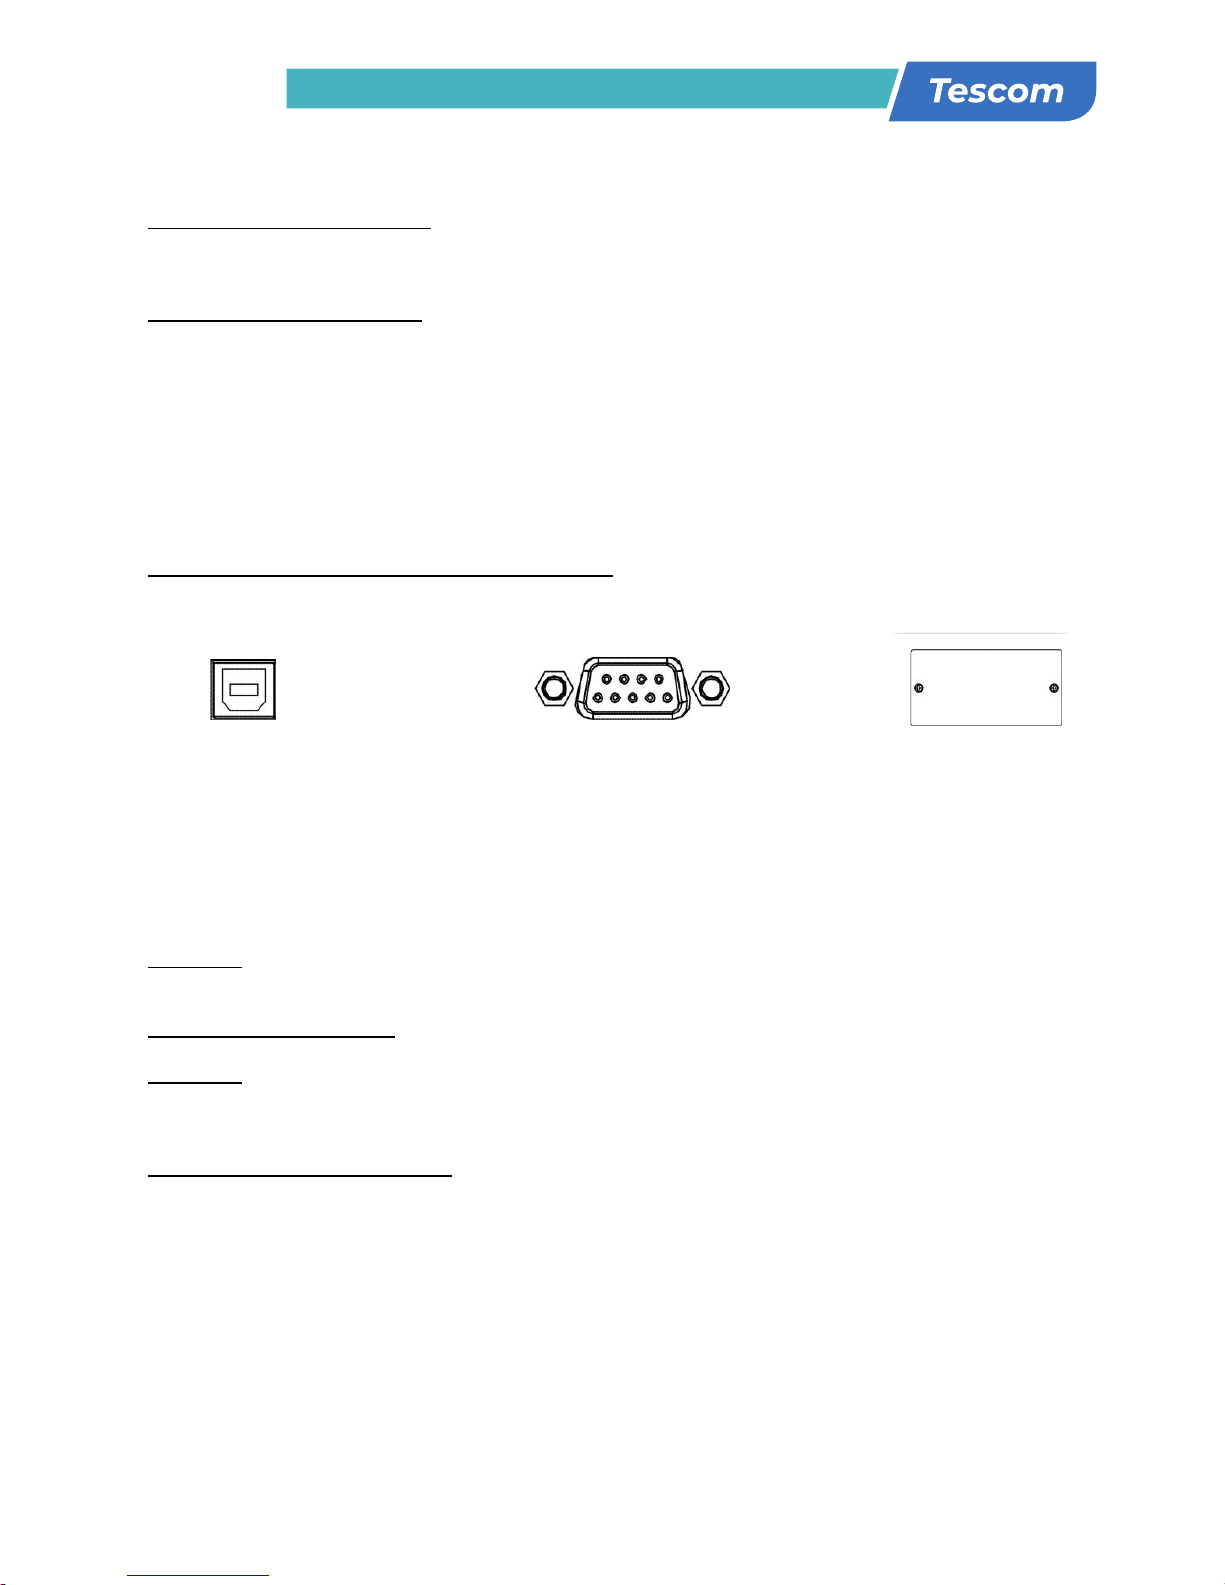
Βήμα 3: Σύνδεση επικοινωνίας Θύρα επικοινωνίας:
Για να επιτρέψετε σε αφύλακτο UPS κλείσιμο/εκκίνηση και παρακολούθηση κατάστασης, συνδέστε τα
καλώδια επικοινωνίας ένα στο τέλος της θύρας USB/RS-232 και το άλλο στη θύρα επικοινωνίας του
PC σας. Με το εγκατεστημένο λογισμικό παρακολούθησης, μπορείτε να προγραμματίσετε το κλείσιμο
εκκίνηση του UPS και να παρακολουθείτε την κατάσταση του UPS μέσω του PC.
Το UPS είναι εξοπλισμένο με έξυπνη θύρα κατάλληλη είτε για SNMP ή AS400 κάρτα. Κατά την
εγκατάσταση είτε της SNMP ή της AS400 κάρτας στο UPS, αυτό θα παρέχει προηγμένη εποικοινωνία
και επιλογές παρακολούθησης.
Σημείωση:Οι θύρες USB και RS-232 δεν μπορούν να λειτουργούν συγχρόνως.
Βήμα 4: Εκκίνηση του UPS
Πιέστε το κουμπί ON/Mute στον μπροστινό πίνακα για 2 δευτερόλεπτα για να δωσετε ενέργεια στο UPS.
Σημείωση: Η μπαταρία φορτιζει πλήρως κατά τη διάρκεια των πέντε πρώτων ωρών κανονικής
λειτουργίας. Μην περιμένετε πλήρη απόδοση μπαταρίας κατά τη διάρκεια αυτής της αρχικής περιόδου
φόρτισης.
Βήμα 5: Εγκατάσταση λογισμικού
Για βέλτιστη προστασία του συστήματος του υπολογιστή σας, εγκαταστήστε το λογισμικό
παρακολούθησης του UPS για να διαμορφώσετε το κλείσιμο του UPS. Μπορείτε να εισάγετε το CD
που σας παρέχεται μέσα στο CD-ROM για να εγκαταστήσετε το λογισμικό παρακολούθησης. Εάν όχι,
παρακαλώ ακολουθήστε τα παρακάτω βήματα για να κατεβάσετε και να εγκαταστήσετε το λογισμικό
παρακολούθησης από το διαδίκτυο:
1. Πηγαίντε στην ηλεκτρονική διεύθυνση http://www.power-software-download.com
2. Πατήστε στο εικονίδιο λογισμικό ViewPower και μετά επιλέξτε το απαιτούμενο για εσάς λειτουργικό
σύστημα για να κατεβάσετε το λογισμικό.
3. Ακολουθήστε τις οδηγίες στην οθόνη για να εγκαταστήσετε το λογισμικό.
4. Όταν γίνει επανεκκίνηση του υπολογιστή σας, το λογισμικό παρακολούθησης θα εμφανιστεί σαν
ένα πορτοκαλί εικονίδιο βελάκι που βρίσκεται στο δίσκο του συστήματος, κοντά στο ρολόι.
Θύρα USB Θύρα RS-232 Έξυπνη θύρα
a) Remove the small cover of the terminal block
b) Suggest using AWG14 or 2.1mm
2
power cords for 3KVA (208/220/230/240VAC models).
Suggest using AWG12-10 or 3.3mm2-5.3mm2power cords for 3KVA
(110/115/120/127VAC models). Please also install a circuit breaker (40A) between the
mains and AC input of UPS in 3KVA (110/115/120127VAC models) for safety operation.
c) Upon completion of the wiring configuration, please check whether the wires are
securely affixed.
d) Put the small cover back to the rear panel.
2
power cords for 3KVA
2
power cords for 3KVA (208/220/230/240VAC models).
2
-5.3mm2power cords for 3KVA
Page 8

8
USER MANUAL
NEOLINE PLUS � 1/1 � 1-3 kVA � ONLINE UPS
Βήμα 6: Εξωτερική σύνδεση μπαταρίας
(μόνο για μοντέλα ενισχυμένου φορτιστή):
Ακολουθείστε το διάγραμμα δεξιά για να πραγματοποιήσετε
εξωτερική σύνδεση μπαταρίας.
3. Λειτουργίες
3-1. Λειτουργία κομβίων
Κουμπί Λειτουργία
ON/Mute
► Ανοίξτε το UPS: Πιέστε και κρατήστε το κουμπί ON/Mute για τουλάχιστον 2
δευτερόλεπτα για να ανοίξετε το UPS.
► Σίγαση του συναγερμού: Όταν το UPS είναι σε κατάσταση μπαταρίας, πιέστε και
κρατήστε αυτό το κουμπί για τουλάχιστον 5 δευτερόλεπτα για να ενεργοποιήσετε
ή να απενεργοποιήσετε το σύστημα συναγερμού. Δεν εφαρμόζεται σε καταστάσεις
όπου υπάρχει προειδοποίηση ή σφάλμα.
► Κουμπί Πάνω: Πιέστε αυτό το κουμπί για να εμφανίσετε την προηγούμενη επιλογή
στην κατάσταση ρυθμίσεων του UPS.
► Αλλαγή σε κατάσταση αυτοελέγχου του UPS: Πιέστε κα κρατήστε το κουμπί ON/
Mute για 5 δευτερόλεπτα για να εισέλθει το UPS σε αυτοέλεγχο καθώς βρίκσκεται
σε λειτουργία AC, λειτουργία ECO, ή λειτουργία μετατροπέα.
OFF/Enter
► Κλείστε το UPS: Πιέστε και κρατήστε αυτό το κουμπί για τουλάχιστον 2
δευτερόλεπτα για να κλείσετε το UPS. Το UPS θα είναι σε κατάσταση αναμονής
κάτω από φυσιολογική λειτουργία ή θα περάσει σε λειτουργία Bypass εάν το Bypass μέσω της ρύθμισης έχει ενεργοποιηθεί πιέζοντας αυτό το κουμπί.
► Κουμπί επιβεβαίωσης επιλογής: Πιέστε αυτό το κουμπί για να επιβεβαιώσετε την
επιλογή στην κατάσταση ρυθμίσεων του UPS.
Select
► Αλλαγή μηνύματος LCD: Πιέστε αυτό το κουμπί για να αλλάξετε το μήνυμα LCD
για την τάση εισόδου, τη συχνότητα εισόδου, την τάση της μπαταρίας, την τάση
εξόδου και τη συχνότητα εξόδου. Θα επιστρέψει πίσω στην αρχική οθόνη όταν
μείνει αδρανές για 10 δευτερόλεπτα.
► Κατάσταση ρυθμίσεων: Πιέστε και κρατήστε αυτό το κουμπί για 5 δευτερόλεπτα
για να εισελθετε στις ρυθμίσεις λειτουργίας του UPS όταν αυτό είναι σε λειτουργία
standby ή bypass.
► Κουμπί κάτω: Πιέστε αυτό το κουμπί για να εμφανίσετε την επόμενη επιλογή στη
λειτουργία ρύθμισης του UPS.
ON/Mute +
Select
► Αλλαγή σε λειτουργία bypass: Όταν η κύρια είσοδος είναι φυσιολογική, πιέστε
τα κουμπιά ON/Mute και Select ταυτόχρονα για 5 δευτερόλεπτα. Έπειτα το UPS
θα εισέλθει σε λειτουργία bypass. Αυτή η ενέργεια δε θα είναι εφιχτή όταν η τάση
εισόδου είναι εκτός του επιτρεπτού εύρους.
Page 9
9
USER MANUAL
NEOLINE PLUS � 1/1 � 1-3 kVA � ONLINE UPS
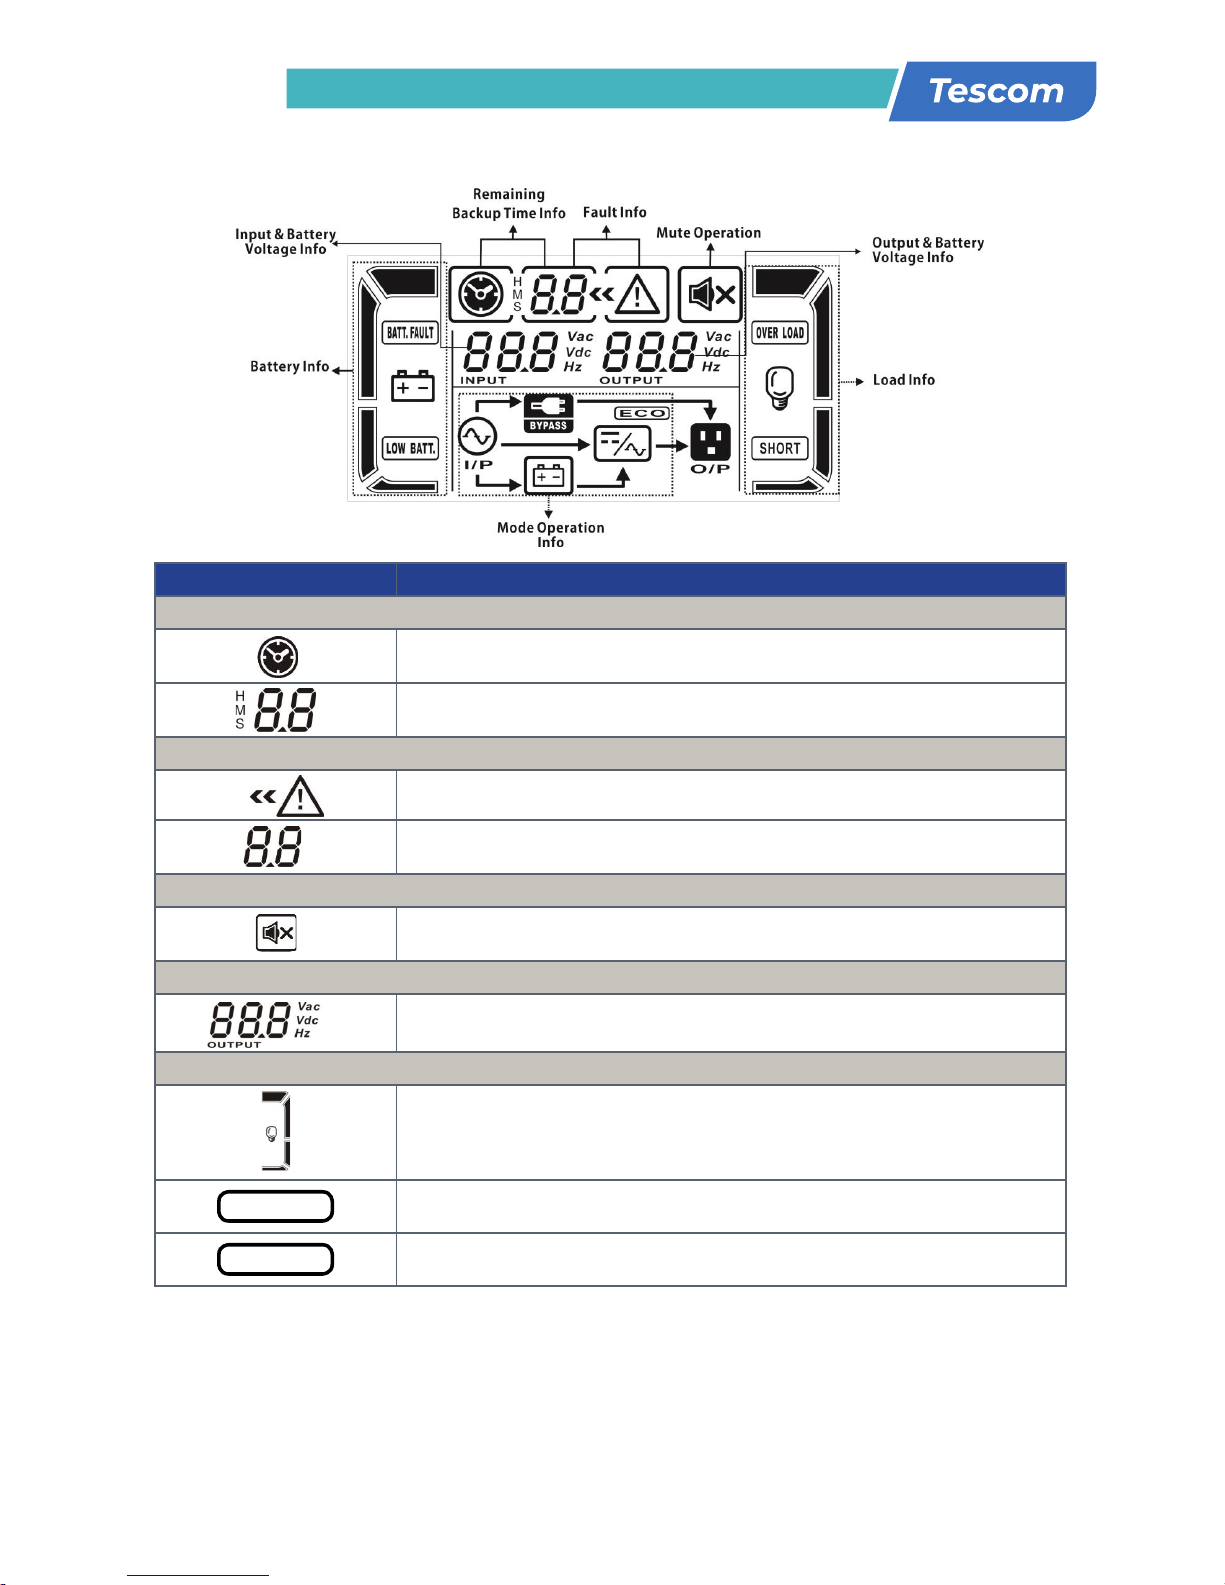
3-2. Πίνακας LCD
Οθόνη Λειτουργία
Πληροφορίες χρόνου
Δείχνει τον υπολειπόμενο χρόνο υποστήριξης σε διάγραμμα πίτας.
Δείχνει σε νούμερα το χρόνο αυτονομίας της μπαταρίας.
H: ώρες, M: λεπτά, S: δευτερόλεπτα
Πληροφορίες σφάλματος
Δείχνει ότι υπάρχει προειδοποίηση και σφάλμα.
Δείχνει τους κωδικούς σφάλματος, και οι κωδικοί βρίσκονται αναλυτικά σε λίστα
στην ενότητα 3-9.
Λειτουργία σίγασης
Δείχνει ότι ο συναγερμός του UPS είναι απενεργοποιημένος.
Πληροφορίες τάσης εξόδου
Δείχνει την τάση εξόδου, τη συχνότητα ή την τάση της μπαταρίας.
Vac: τάση εξόδου, Vdc: τάση μπαταρίας, Hz: συχνότητα εξόδου
Πληροφορίες φορτίου
Δείχνει το επίπεδο του φορτίου από 0-25%, 26-50%, 51-75%, και 76-100%.
OVERLOAD
Δείχνει υπερφόρτωση.
SHORT
Δείχνει ότι το φορτίο ή η έξοδος είναι βραχυκυκλωμένα.
Button
Function
Turn on the UPS: Press and hold ON/Mute button for at least 2 seconds
to turn on the UPS.
Mute the alarm: When the UPS is on battery mode, press and hold this
button for at least 5 seconds to disable or enable the alarm system. But
it’s not applied to the situations when warnings or errors occur.
Up key: Press this button to display previous selection in UPS setting
mode.
Switch to UPS self-test mode: Press and hold ON/Mute button for 5
seconds to enter UPS self-testing while in AC mode, ECO mode, or
converter mode.
Turn off the UPS: Press and hold this button at least 2 seconds to turn
off the UPS. UPS will be in standby mode under power normal or
transfer to Bypass mode if the Bypass enable setting by pressing this
button.
Confirm selection key: Press this button to confirm selection in UPS
setting mode.
Switch LCD message: Press this button to change the LCD message for
input voltage, input frequency, battery voltage, output voltage and
output frequency. It will return back to default display when pausing
for 10 seconds.
Setting mode: Press and hold this button for 5 seconds to enter UPS
setting mode when UPS is in standby mode or bypass mode.
Down key: Press this button to display next selection in UPS setting
mode.
Button
Switch to bypass mode: When the main power is normal, press
ON/Mute and Select buttons simultaneously for 5 seconds. Then UPS
will enter to bypass mode. This action will be ineffective when the
input voltage is out of acceptable range.
Page 10
10
USER MANUAL
NEOLINE PLUS � 1/1 � 1-3 kVA � ONLINE UPS
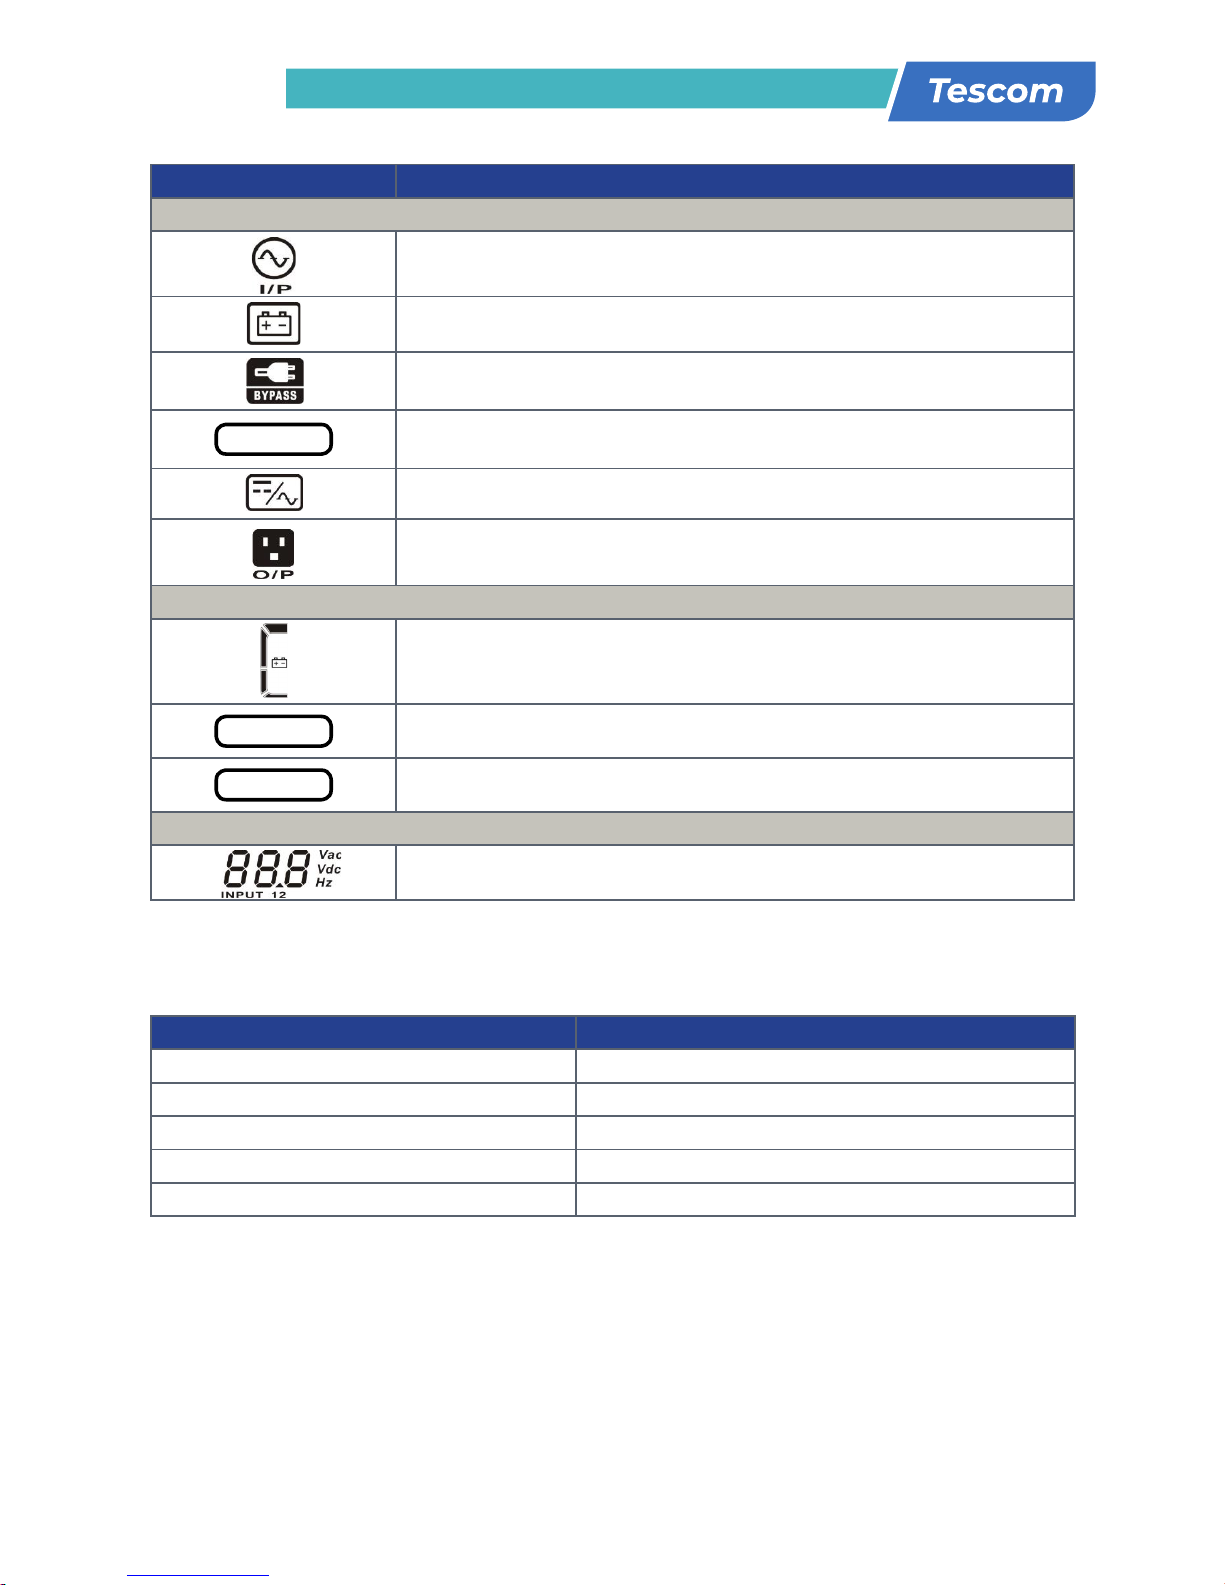
Οθόνη Λειτουργία
Πληροφορίες κατάστασης λειτουργίας
Δείχνει ότι το UPS είναι συνδεδεμένο στην τάση δικτύου.
Δείχνει ότι η μπαταρία λειτουργεί.
Δείχνει ότι το κύκλωμα του bypass λειτουργεί.
E C O
Δείχνει ότι η λειτουργία ECO είναι ενεργοποιημένη.
Δείχνει ότι το κύκλωμα του inverter λειτουργεί.
Δείχνει ότι η έξοδος λειτουργεί.
Πληροφορίες μπαταρίας
Δείχνει το επίπεδο της μπαταρίας από 0-25%, 26-50%, 51-75%, και 76-100%.
BATT. FAULT
Δείχνει ότι η μπαταρία δεν δουλεύει σωστά.
LOW BATT.
Δείχνει χαμηλή φόρτιση της μπαταρίας
Input & Battery voltage information
Δείχνει την τάση εισόδου, τη συχνότητα ή την τάση της μπαταρίας.
Vac: τάση εισόδου, Vdc: τάση μπαταρίας, Hz: συχνότητα εισόδου
3-3. Ηχητικός συναγερμός
Περιγραφή Κατάσταση βομβητή
Λειτουργία μπαταρίας Xτυπάει κάθε 4 δευτερόλεπτα
Χαμηλή μπαταρία Xτυπάει κάθε δευτερόλεπτο
Υπερφόρτωση Xτυπάει 2 φορές ανά δευτερόλεπτο
Σφάλμα Xτυπάει συνεχώς
Λειτουργία bypass Xτυπάει κάθε 10 δευτερόλεπτα
Page 11
11
USER MANUAL
NEOLINE PLUS � 1/1 � 1-3 kVA � ONLINE UPS
3-4. Ορισμοί των συντομογραφιών στην οθόνη LCD
Συντομογραφία οθόνης Περιεχόμενο Ορισμός
ENA
ENA
Ενεργοποίηση
DIS
dis
Απενεργοποίηση
ESC
ESC
Αυτόματο
HLS
HLS
Υψηλή απώλεια
LLS
LLS
Χαμηλή απώλεια
BAT
BAT
Μπαταρία
CF
CF
Μετατροπέας
TP
TP
Θερμοκρασία
CH
CH
Φορτιστής
FU
FU
Μη σταθερή συχνότητα Bypass
EE
EE
EEPROM σφάλμα
3-5. Ρύθμιση UPS
Υπάρχουν τρεις παράμετροι για να ρυθμίσετε το UPS. Ανατρέξτε στο παρακάτω διάγραμμα:
Παράμετρος 1:
Πρόκειται για εναλλακτικά προγράμματα. Ανατρέξτε στον
επόμενο πίνακα για τη ρύθμιση των προγραμμάτων.
Παράμετρος 2 & παράμετρος 3:
Είναι οι επιλογές ρύθμισης ή μέτρησης για κάθε
πρόγραμμα.
Σημείωση:
Παρακαλείσθε να επιλέξετε με τα κουμπία “Up” ή “Down”
για να αλλάξετε τα προγράμματα ή τις παραμέτρους.
3-3. Audible Alarm
Battery Mode
Sounding every 4 seconds
Low Battery
Sounding every second
Overload
Sounding twice every second
Fault
Continuously sounding
Bypass Mode
Sounding every 10 seconds
3-4
. LCD display wordings index
Abbreviation
Display content
Meaning
ENA
Enable
DIS
Disable
ESC
Escape
HLS
High loss
LLS
Low loss
BAT
Battery
CF
Converter
TP
Temperature
CH
Charger
FU
Bypass frequency unstable
EE
EEPROM error
3-5
. UPS Setting
There are three parameters to set up the
UPS.
Parameter 1: It’s for program
alternatives. Refer to below table.
Parameter 2 and parameter 3 are the
setting options or values for each
program.
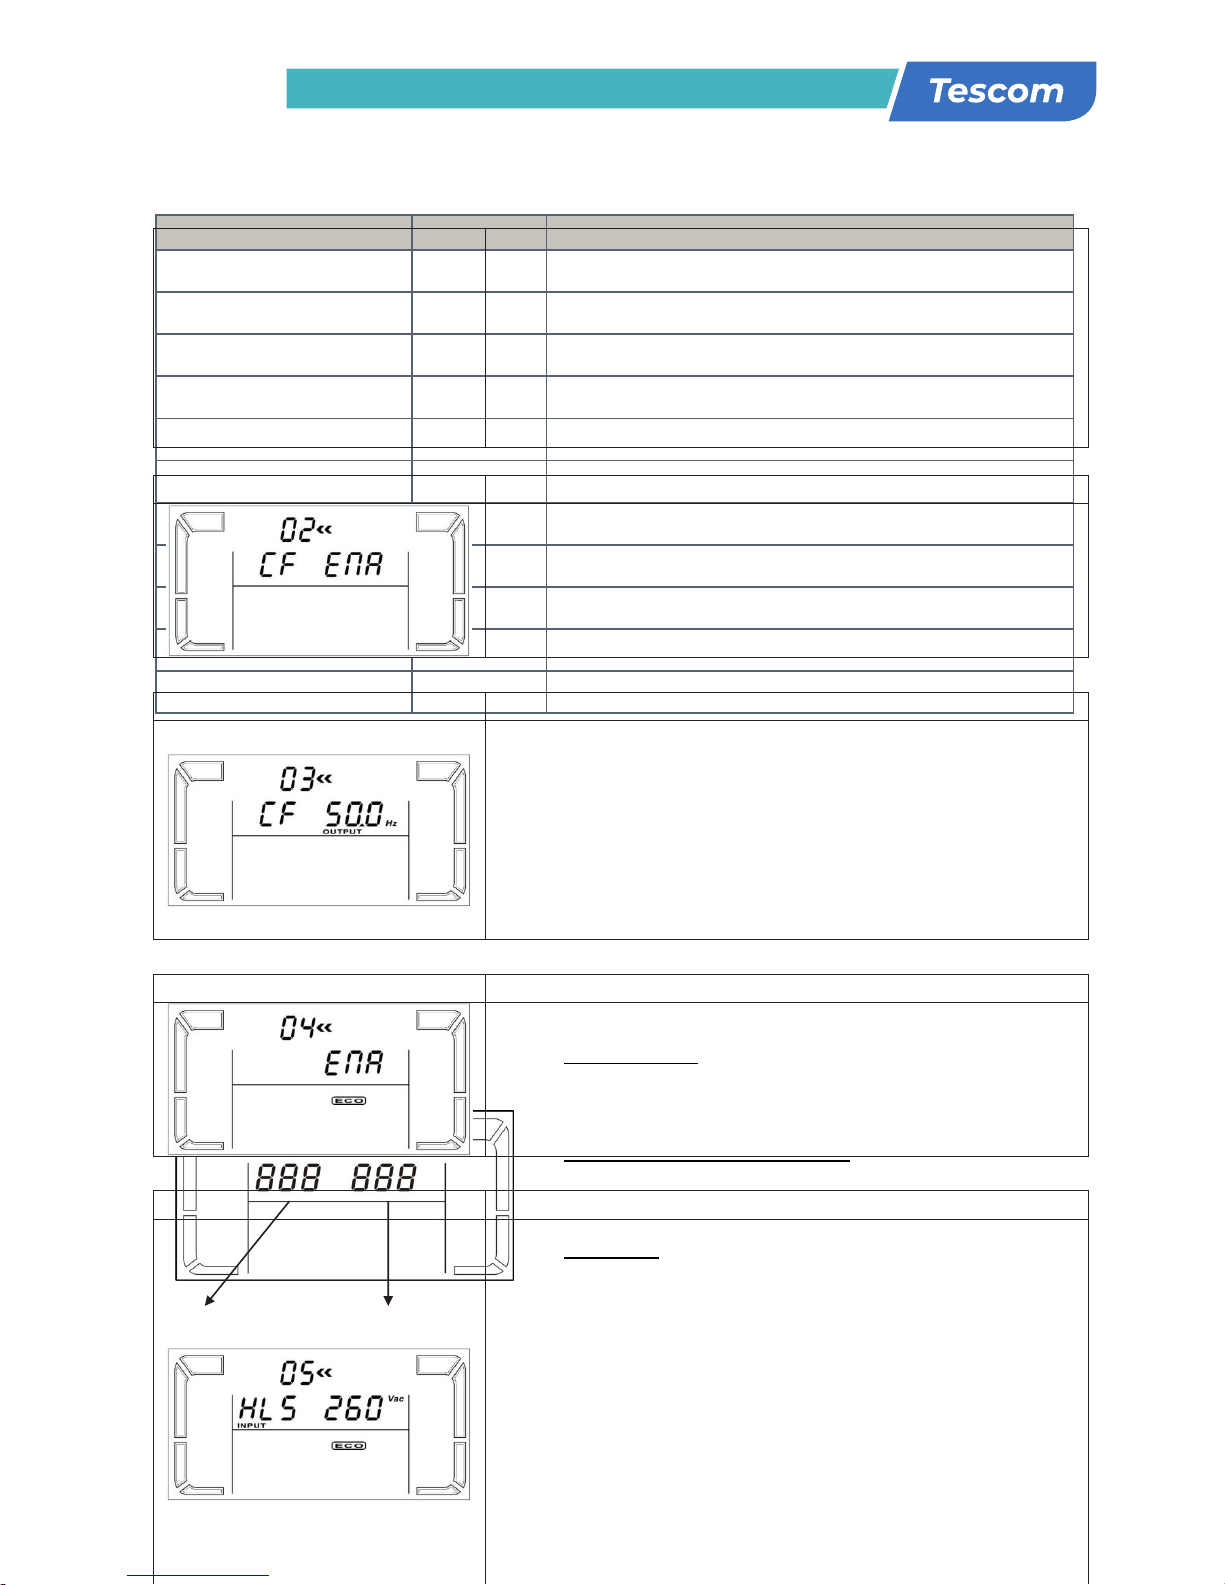
Parameter 1
Parameter 2 Parameter 3
230: presents output voltage is 230Vac (Default)
240: presents output voltage is 240Vac
For 110/150/120/127 VAC models, you may choose the
following output voltage:
110: presents output voltage is 110Vac
115: presents output voltage is 115Vac
120: presents output voltage is 120Vac (Default)
127: presents output voltage is 127Vac
02: Frequency Converter enable/disable
Interface
Setting
Parameter 2 & 3: Enable or disable converter mode. You
may choose the following two options:
CF ENA: converter mode enable
CF DIS: converter mode disable(Default)
03: Output frequency setting
Interface
Setting
Parameter 2 & 3: Output frequency setting.
You may set the initial frequency on battery mode:
BAT 50: presents output frequency is 50Hz
BAT 60: presents output frequency is 60Hz
If converter mode is enabled, you may choose the
following output frequency:
CF 50: presents output frequency is 50Hz
CF 60: presents output frequency is 60Hz
04: ECO enable/disable
Interface
Setting
Parameter 3: Enable or disable ECO function. You may
choose the following two options:
ENA: ECO mode enable
DIS: ECO mode disable (Default)
05: ECO voltage range setting
Interface
Setting
Parameter 2 & 3: Set the acceptable high voltage point
and low voltage point for ECO mode by pressing Down key
or Up key.
HLS: High loss voltage in ECO mode in parameter 2.
For 208/220/230/240 VAC models, the setting range in
parameter 3 is from +7V to +24V of the nominal voltage.
(Default: +12V)
For 110/115/120/127 VAC models, the setting range in
parameter 3 is from +3V to +12V of the nominal voltage.
(Default: +6V)
LLS: Low loss voltage in ECO mode in parameter 2.
For 208/220/230/240 VAC models, the setting range in
parameter 3 is from -7V to -24V of the nominal voltage.
Page 12
12
USER MANUAL
NEOLINE PLUS � 1/1 � 1-3 kVA � ONLINE UPS
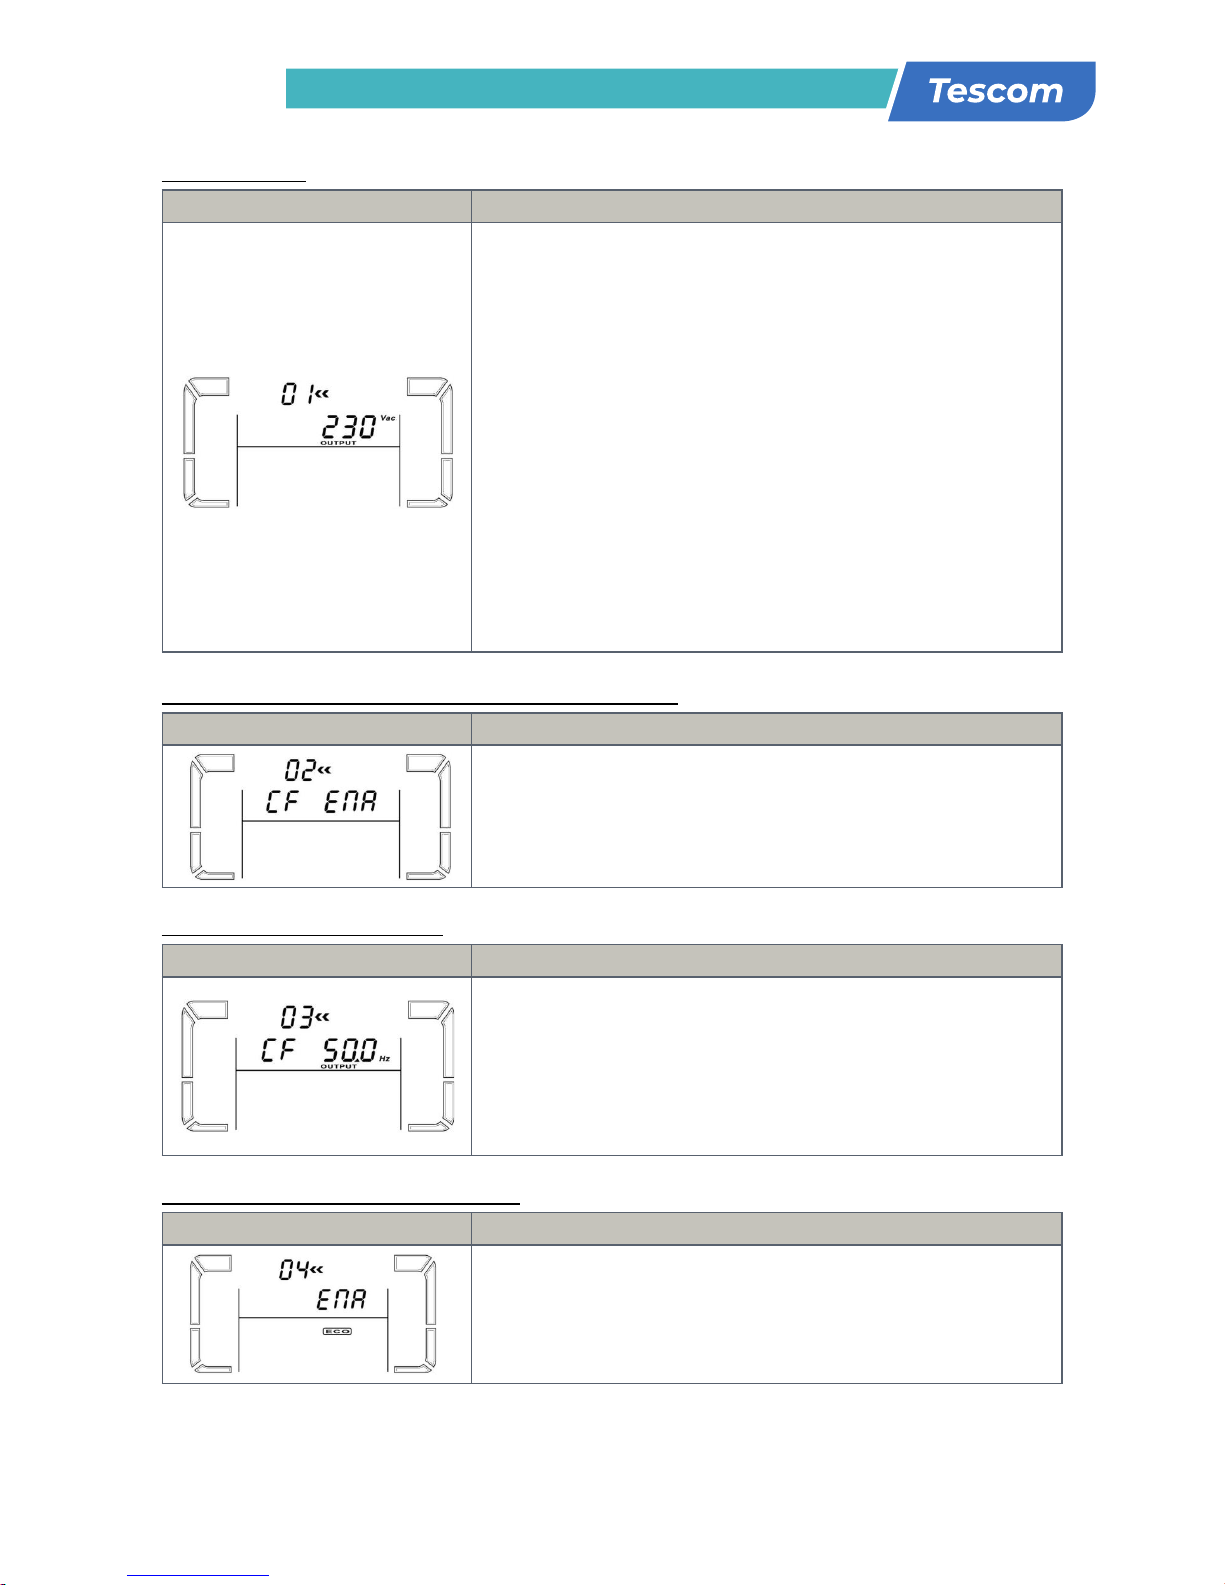
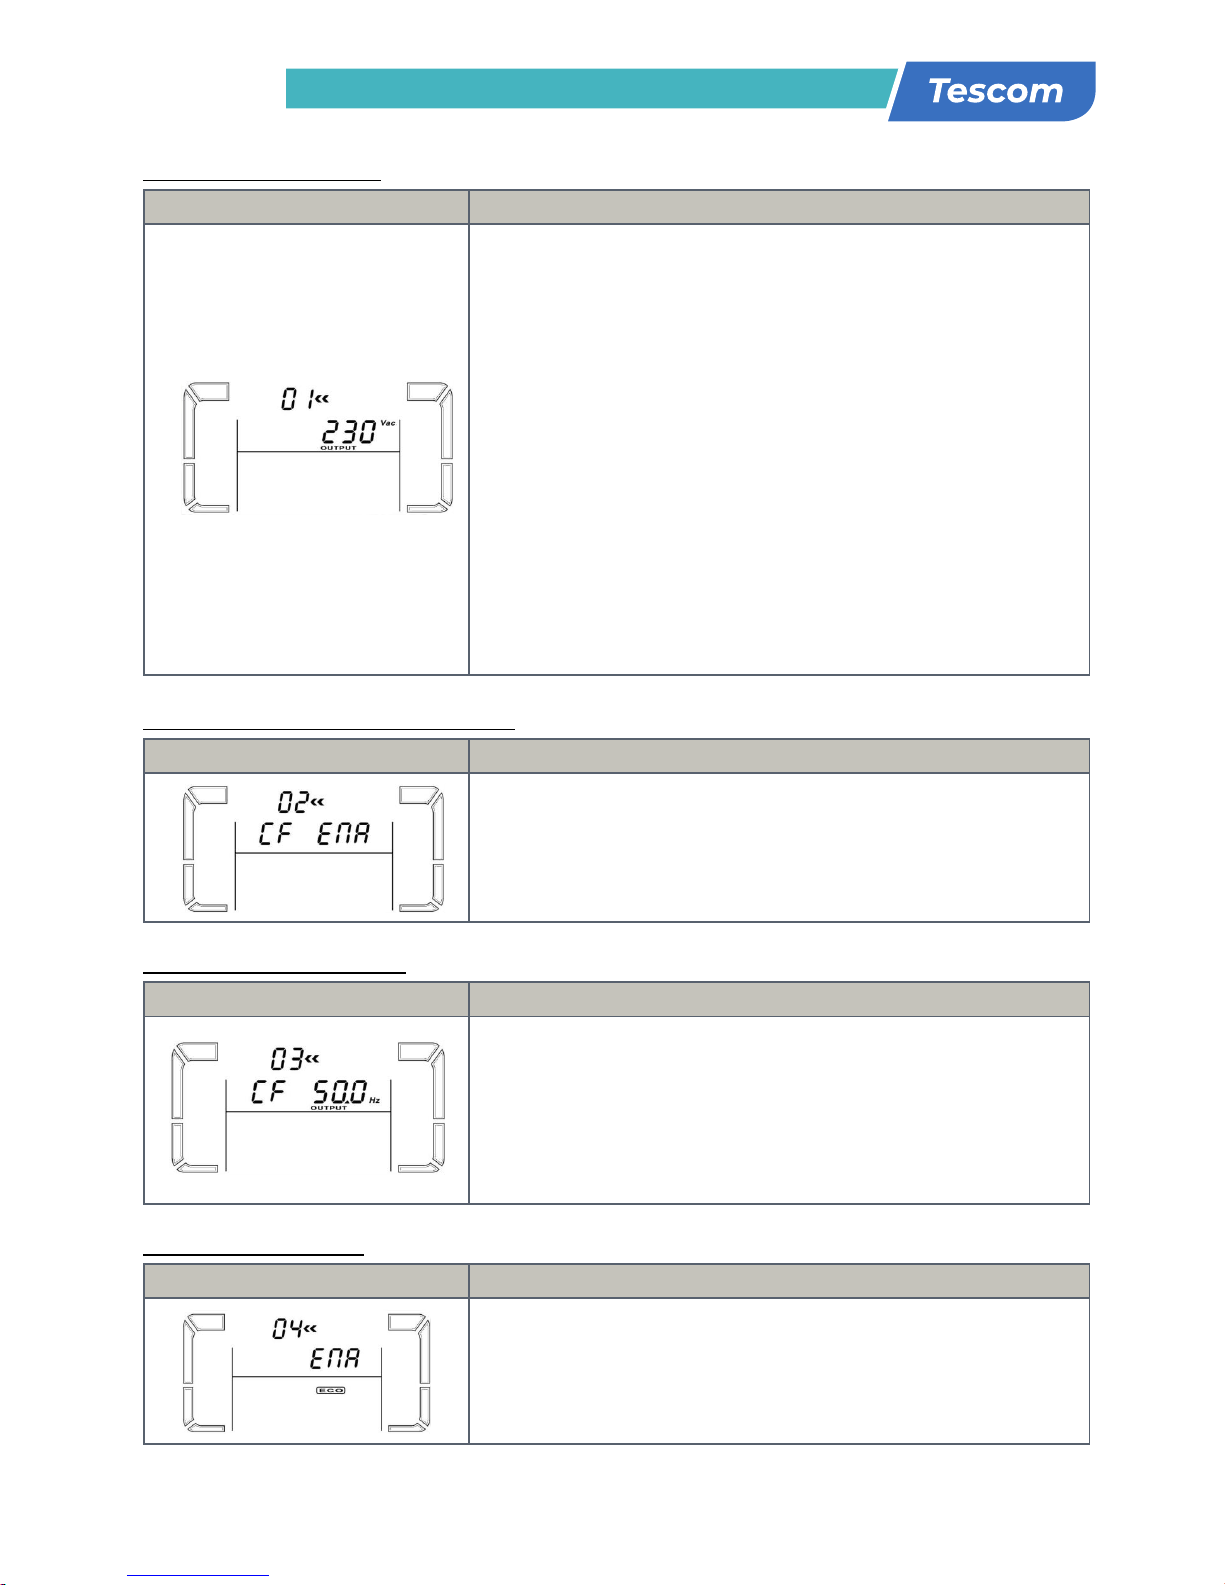
01: Τάση εξόδου
Διεπαφή Ρύθμιση
Παράμετρος 3: Τάση εξόδου
Για μοντέλα 200/208/220/230/240 VAC, μπορείτε να διαλέξετε την
παρακάτω τάση εξόδου:
200: παρουσιάζει την τάση εξόδου να είναι 200Vac
208: παρουσιάζει την τάση εξόδου να είναι 208Vac
220: παρουσιάζει την τάση εξόδου να είναι 220Vac
230: παρουσιάζει την τάση εξόδου να είναι 230Vac
(Default)
240: παρουσιάζει την τάση εξόδου να είναι 240Vac
Για τα μοντέλα 100/110/115/120/127 VAC, μπορείτε να διαλέξετε την
ακόλουθη τάση εξόδου:
100: παρουσιάζει την τάση εξόδου να είναι 100Vac
110: παρουσιάζει την τάση εξόδου να είναι 110Vac
115: παρουσιάζει την τάση εξόδου να είναι 115Vac
120: παρουσιάζει την τάση εξόδου να είναι 120Vac
(Default)
127: παρουσιάζει την τάση εξόδου να είναι 127Vac
02: Συχνότητα μετατροπέα ενεργοποίηση/απενεργοποίηση
Διεπαφή Ρύθμιση
Παράμετρος 2 και 3: Ενεργοποίηση ή απενεργοποίηση λειτουργίας
μετατροπέα. Μπορείτε να διαλέξετε τις ακόλουθες δύο επιλογές:
CF ENA: ενεργοποίηση λειτουργίας μετατροπέα
CF DIS: απενεργοποίηση λειτουργίας μετατροπέα
03: Ρύθμιση συχνότητας εξόδου
Διεπαφή Ρύθμιση
Παράμετρος 2 και 3: Ρύθμιση συχνότητας εξόδου. Μπορείτε να ρυθμίσετε
την αρχική συχνότητα σε λειτουργία μπαταρίας:
ΒΑΤ 50: παρουσιάζει την τάση εξόδου να είναι 50Hz
BAT 60: παρουσιάζει την τάση εξόδου να είναι 60Hz
Εάν η λειτουργία του μετατροπέα είναι ενεργοποιημένη, μπορείτε να
επιλέξετε την ακόλουθη συχνότητα εξόδου:
CF 50: παρουσιάζει την τάση εξόδου να είναι 50Hz
CF 60: παρουσιάζει την τάση εξόδου να είναι 60Hz
04: ECO ενεργοποίηση/απενεργοποίηση
Διεπαφή Ρύθμιση
Παράμετρος 3: Ενεργοποίηση ή απενεργοποίηση λειτουργίας ECO.
Μπορείτε να επιλέξετε τις ακόλουθες δύο επιλογές:
ECO: Ενεργοποίηση λειτουργίας ECO
DIS: Απενεργοποίηση λειτουργίας ECO (Default)
Sounding every 4 seconds
Sounding every second
Sounding twice every second
Continuously sounding
Sounding every 10 seconds
Display content
Meaning
Enable
Disable
Escape
High loss
Low loss
Battery
Converter
Temperature
Charger
Bypass frequency unstable
EEPROM error
There are three parameters to set up the
UPS.
Parameter 1: It’s for program
alternatives. Refer to below table.
Parameter 2 and parameter 3 are the
setting options or values for each
program.
Setting
Parameter 3: Output voltage
For 208/220/230/240 VAC models, you may choose the
following output voltage:
208: presents output voltage is 208Vac
220: presents output voltage is 220Vac
Parameter 1
Parameter 2
Parameter 3
230: presents output voltage is 230Vac (Default)
240: presents output voltage is 240Vac
For 110/150/120/127 VAC models, you may choose the
following output voltage:
110: presents output voltage is 110Vac
115: presents output voltage is 115Vac
120: presents output voltage is 120Vac (Default)
127: presents output voltage is 127Vac
Setting
Parameter 2 & 3: Enable or disable converter mode. You
may choose the following two options:
CF ENA: converter mode enable
CF DIS: converter mode disable(Default)
Setting
Parameter 2 & 3: Output frequency setting.
You may set the initial frequency on battery mode:
BAT 50: presents output frequency is 50Hz
BAT 60: presents output frequency is 60Hz
If converter mode is enabled, you may choose the
following output frequency:
CF 50: presents output frequency is 50Hz
CF 60: presents output frequency is 60Hz
Setting
Parameter 3: Enable or disable ECO function. You may
choose the following two options:
ENA: ECO mode enable
DIS: ECO mode disable (Default)
230: presents output voltage is 230Vac (Default)
240: presents output voltage is 240Vac
For 110/150/120/127 VAC models, you may choose the
following output voltage:
110: presents output voltage is 110Vac
115: presents output voltage is 115Vac
120: presents output voltage is 120Vac (Default)
127: presents output voltage is 127Vac
Setting
Parameter 2 & 3: Enable or disable converter mode. You
may choose the following two options:
CF ENA: converter mode enable
CF DIS: converter mode disable(Default)
Setting
Parameter 2 & 3: Output frequency setting.
You may set the initial frequency on battery mode:
BAT 50: presents output frequency is 50Hz
BAT 60: presents output frequency is 60Hz
If converter mode is enabled, you may choose the
following output frequency:
230: presents output voltage is 230Vac (Default)
240: presents output voltage is 240Vac
For 110/150/120/127 VAC models, you may choose the
following output voltage:
110: presents output voltage is 110Vac
115: presents output voltage is 115Vac
120: presents output voltage is 120Vac (Default)
127: presents output voltage is 127Vac
Setting
Parameter 2 & 3: Enable or disable converter mode. You
may choose the following two options:
CF ENA: converter mode enable
CF DIS: converter mode disable(Default)
Page 13

13
USER MANUAL
NEOLINE PLUS � 1/1 � 1-3 kVA � ONLINE UPS
05: Ρύθμιση εύρους τάσης ECΟ
Διεπαφή Ρύθμιση
Παράμετρος 2 και 3: Ρυθμίστε το επιτρεπτό σημείο υψηλής τάσης και
σημείο χαμηλής τάσης για τη λειτουργία ECO πιέζοντας το κουμπί Down
ή Up.
ΗLS: Υψηλή απώλεια τάσης σε λειτουργία ECO στην παράμετρο 2.
Για μοντέλα 200/208/220/230/240 VAC, το ρυθμιζόμενο εύρος στην
παράμετρο 3 είναι από +7V έως +24V της ονομαστικής τάσης.
(Default: +12V)
Για μοντέλα 100/110/115/120/127 VAC, το ρυθμιζόμενο εύρος στην
παράμετρο 3 είναι από +3V to +12V της ονομαστικής τάσης.
(Default: +6V)
LLS: Xαμηλή απώλεια τάσης σε λειτουργία ECO στην παράμετρο 2.
Για μοντέλα 200/208/220/230/240 VAC, το ρυθμιζόμενο εύρος στην
παράμετρο 3 είναι από -7V έως -24V της ονομαστικής τάσης.
(Default: -12V)
Για μοντέλα 100/110/115/120/127 VAC, το ρυθμιζόμενο εύρος στην
παράμετρο 3 είναι από -3V έως -12V της ονομαστικής τάσης.
(Default: -6V)
06: Bypass ενεργοποίηση/απενεργοποίηση όταν το UPS είναι σβηστό
Διεπαφή Ρύθμιση
Παραμετρος 3: Ενεργοποίηση ή απενεργοποίηση λειτουργίας Bypass.
Μπορείτε να διαλέξετε τις ακόλουθες δύο επλογές:
ENA: Ενεργοποίηση Bypass
DIS: Απενεργοποίηση Bypass (Default)
07: Ρύθμιση εύρους τάσης Bypass
Διεπαφή Ρύθμιση
Παράμετρος 2 και 3: Ρυθμίστε το επιτρεπόμενο σημείο υψηλής τάσης και
το αντίστοιχο χαμηλής τάσης για λειτουργία Bypass πιέζοντας το κουμπί
Down ή Up.
ΗLS: Σημείο υψηλής τάσης Bypass
Για μοντέλα 200/208/220/230/240 VAC:
230-264: ρύθμιση του σημείου υψηλής τάσης στην παράμετρο 3 από
230Vac έως 264Vac. (Default: 264Vac)
Για μοντέλα 100/110/115/120/127 VAC:
120-140: ρύθμιση του σημείου υψηλής τάσης στην παράμετρο 3 από
120Vac έως 140Vac. (Default: 132Vac)
LLS: Σημείο χαμηλής τάσης Bypass
Για μοντέλα 200/208/220/230/240 VAC:
170-220: ρύθμιση του σημείου χαμηλής τάσης στην παράμετρο 3 από
170Vac έως 220Vac. (Default: 170Vac)
Για μοντέλα 100/110/115/120/127 VAC:
85-115: ρύθμιση του σημείου χαμηλής τάσης στην παράμετρο 3 από
85Vac έως 115Vac. (Default: 85Vac)
230: presents output voltage is 230Vac (Default)
240: presents output voltage is 240Vac
For 110/150/120/127 VAC models, you may choose the
following output voltage:
110: presents output voltage is 110Vac
115: presents output voltage is 115Vac
120: presents output voltage is 120Vac (Default)
127: presents output voltage is 127Vac
Setting
Parameter 2 & 3: Enable or disable converter mode. You
may choose the following two options:
CF ENA: converter mode enable
CF DIS: converter mode disable(Default)
Setting
Parameter 2 & 3: Output frequency setting.
You may set the initial frequency on battery mode:
BAT 50: presents output frequency is 50Hz
BAT 60: presents output frequency is 60Hz
If converter mode is enabled, you may choose the
following output frequency:
CF 50: presents output frequency is 50Hz
CF 60: presents output frequency is 60Hz
Setting
Parameter 3: Enable or disable ECO function. You may
choose the following two options:
ENA: ECO mode enable
DIS: ECO mode disable (Default)
Setting
Parameter 2 & 3: Set the acceptable high voltage point
and low voltage point for ECO mode by pressing Down key
or Up key.
HLS: High loss voltage in ECO mode in parameter 2.
For 208/220/230/240 VAC models, the setting range in
parameter 3 is from +7V to +24V of the nominal voltage.
(Default: +12V)
For 110/115/120/127 VAC models, the setting range in
parameter 3 is from +3V to +12V of the nominal voltage.
(Default: +6V)
parameter 3 is from -3V to -12V of the nominal voltage.
(Default: -6V)
Setting
Parameter 3: Enable or disable Bypass function. You may
choose the following two options:
ENA: Bypass enable
DIS: Bypass disable (Default)
Setting
Parameter 2 & 3: Set the acceptable high voltage point
and acceptable low voltage point for Bypass mode by
pressing the Down key or Up key.
HLS: Bypass high voltage point
For 208/220/230/240 VAC models:
235-264: setting the high voltage point in parameter 3
from 235Vac to 264Vac. (Default: 264Vac)
For 110/115/120/127 VAC models:
125-132: setting the high voltage point in parameter 3
from 115Vac to 132Vac(Default: 132Vac)
LLS: Bypass low voltage point
parameter 3 is from -3V to -12V of the nominal voltage.
(Default: -6V)
Setting
Parameter 3: Enable or disable Bypass function. You may
choose the following two options:
ENA: Bypass enable
DIS: Bypass disable (Default)
Page 14
14
USER MANUAL
NEOLINE PLUS � 1/1 � 1-3 kVA � ONLINE UPS
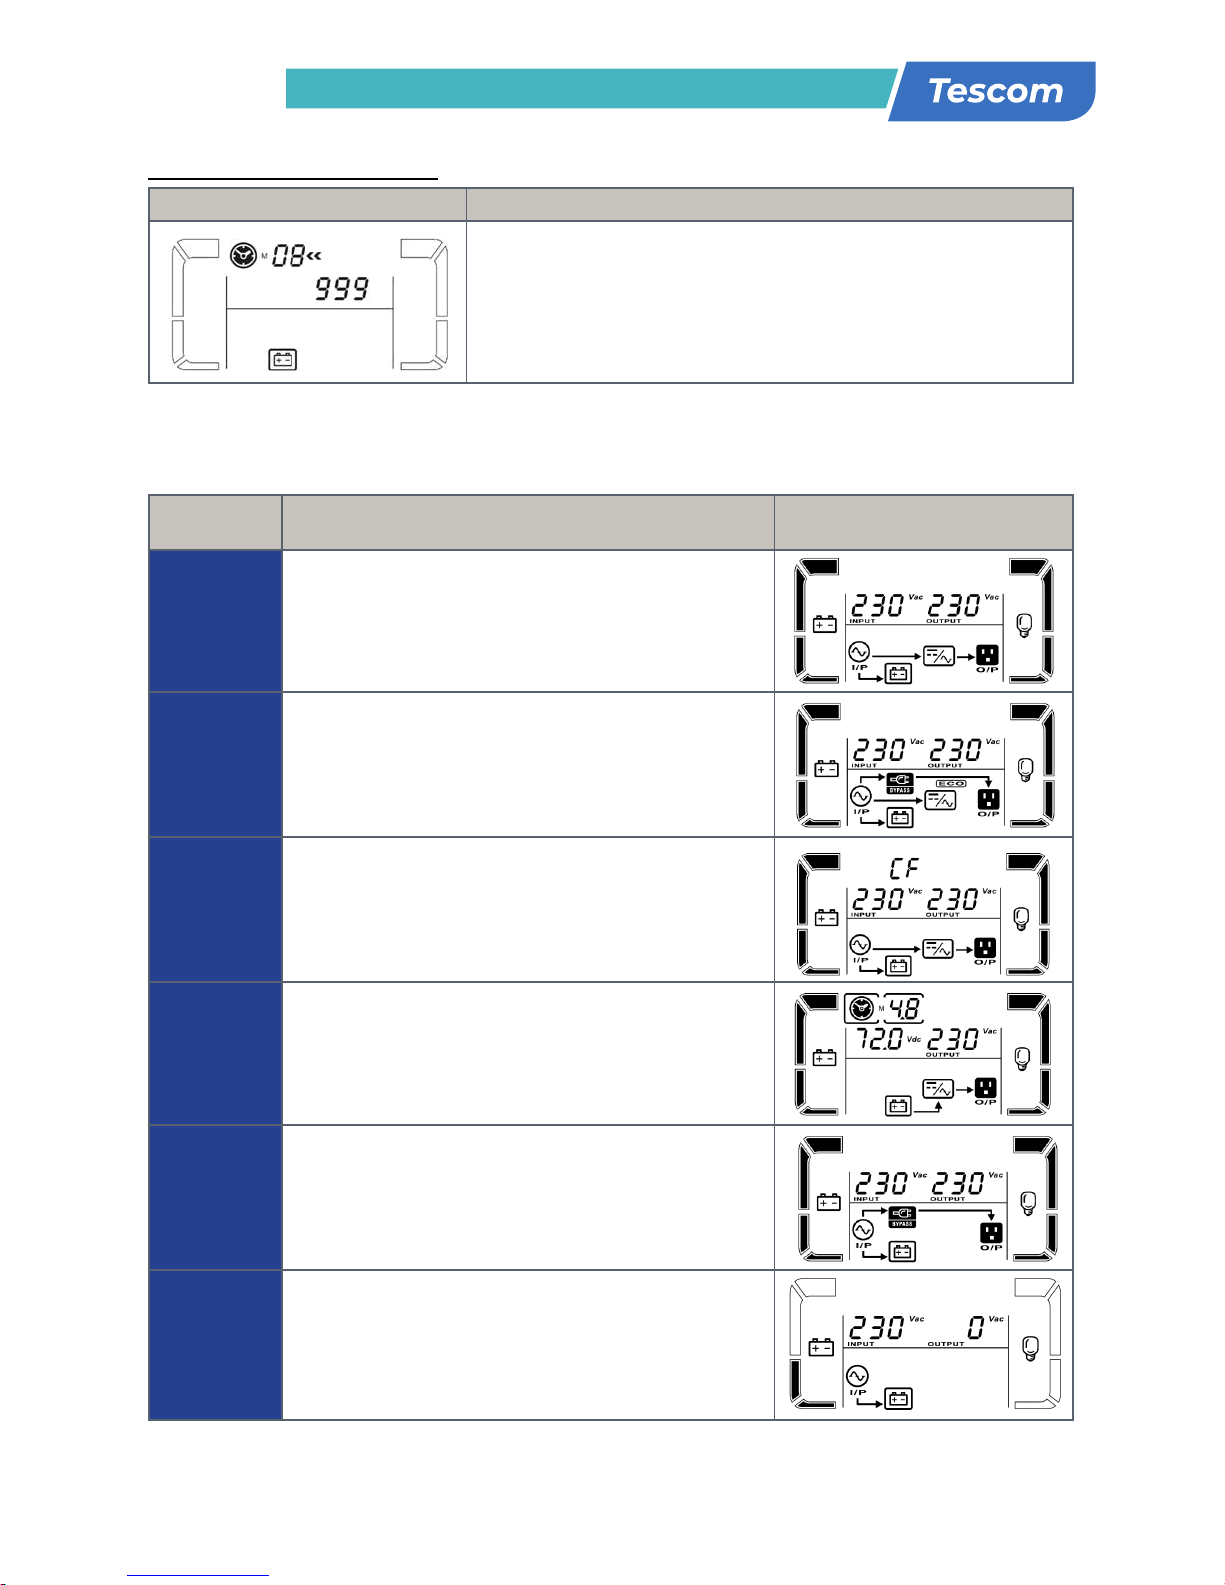
08: Ρύθμιση χρόνου αυτονομίας
Διεπαφή Ρύθμιση
Παράμετρος 3: Ρύθμιση χρόνου υποστήριξης σε λειτουργία μπαταρίας για
γενικές εξόδους.
0-999: Ρύθμιση του χρόνου υποστήριξης σε λεπτά 0-999 για γενικές
εξόδους σε λειτουργία μπαταρίας.
0: Όταν ρυθμίζεται ως “0”, ο χρόνος υποστήριξης θα είναι μόνο 10
δευτερόλεπτα.
00: Έξοδος από τη ρύθμιση
3-6. Περιγραφή τρόπου λειτουργίας
Τρόπος
λειτουργίας
Περιγραφή Οθόνη LCD
Λειτουργία
Online
Όταν η τάση εισόδου είναι εντός του επιτρεπόμενου
εύρους, το UPS θα παρέχει καθαρή και σταθερή AC τάση
στην έξοδο. Το UPS θα φορτίσει επίσης τη μπαταρία σε
λειτουργία online.
Λειτουργία
ECO
Λειτουργία εξοικονόμησης ενέργειας: Όταν η τάση εισόδου
είναι εντός του επιτρεπόμενου εύρους τάσης, το UPS θα
παρακάμψει την τάση δικτύου στην έξοδο για εξοικονόμηση
ενέργειας.
Λειτουργία
συχνότητας
μετατροπέα
Όταν η συχνότητα εισόδου είναι ανάμεσα μεταξύ 40 Hz
και 70 Hz, το UPS μπορεί να ρυθμιστεί σε μια σταθερή
συχνότητα εξόδου, 50 Hz ή 60 Hz. Το UPS σε αυτή την
κατάσταση θα εξακολουθεί να φορτίζει τη μπαταρία.
Λειτουργία
μπαταρίας
Όταν η τάση εισόδου είναι πέραν του επιτρεπόμενου
εύρους ή υπάρξει διακοπή ρεύματος συναγερμός ηχεί
κάθε 4 δευτερόλεπτα, το UPS θα αντλήσει ενέργεια από τη
μπαταρία.
Λειτουργία
Bypass
Όταν η τάση εισόδου είναι εντός του επιτρεπόμενου εύρους
αλλά το UPS είναι υπερφορτωμένο, το UPS θα εισέλθει
σε λειτουργία bypass ή η λειτουργία bypass μπορεί να
ρυθμιστεί από τον μπροστινό πίνακα. Ο συναγερμός
χτυπάει κάθε 10 δευτερόλεπτα.
Λειτουργία
αναμονής
Το UPS είναι κλειστό και δεν υπάρχει παροχή εξόδου, αλλά
μπορεί ακόμη να φορτίσει τις μπαταρίες.
parameter 3 is from -3V to -12V of the nominal voltage.
(Default: -6V)
Setting
Parameter 3: Enable or disable Bypass function. You may
choose the following two options:
ENA: Bypass enable
DIS: Bypass disable (Default)
Setting
Parameter 2 & 3: Set the acceptable high voltage point
and acceptable low voltage point for Bypass mode by
pressing the Down key or Up key.
HLS: Bypass high voltage point
For 208/220/230/240 VAC models:
235-264: setting the high voltage point in parameter 3
from 235Vac to 264Vac. (Default: 264Vac)
For 110/115/120/127 VAC models:
125-132: setting the high voltage point in parameter 3
from 115Vac to 132Vac(Default: 132Vac)
LLS: Bypass low voltage point
For 208/220/230/240 VAC models:
184-225: setting the low voltage point in parameter 3
from 184Vac to 225Vac. (Default: 195Vac)
For 110/115/120/127 VAC models:
98-115: setting the low voltage point in parameter 3 from
98Vac to 115Vac. (Default: 98Vac)
Setting
Parameter 3: Set up backup time on battery mode for
general outlets.
0-999: setting the backup time in minutes from 0-999 for
general outlets on battery mode.
0: When setting as “0”, the backup time will be only 10
seconds.
Page 15

15
USER MANUAL
NEOLINE PLUS � 1/1 � 1-3 kVA � ONLINE UPS
3-7. Kωδικός αναφοράς σφαλμάτων
Συμβάν σφάλματος
Κωδικός
σφάλματος
Εικονίδιο Συμβάν σφάλματος
Κωδικός
σφάλματος
Εικονίδιο
DC Bus σφάλμα εκκίνησης 01 Κανένα Xαμηλή τάση αντιστροφέα 13 Κανένα
DC Bus πάνω από τα
επιτρεπτά όρια
02 Κανένα Μικρή έξοδος αντιστροφέα 14
SHORT
DC Bus κάτω από τα
επιτρεπτά όρια
03 Κανένα
Πολύ υψηλή τάση
μπαταρίας
27
BATT. FAULT
Bus μη σταθερό 04 Κανένα
Πολύ χαμηλή τάση
μπαταρίας
28
BATT. FAULT
DC Bus χαμηλό 05 Κανένα Yπερθέρμανση 41 Κανένα
Σφάλμα ομαλής εκκίνησης
αντιστροφέα
11 Κανένα Yπερφόρτωση 43
OVER LOAD
Yψηλή τάση αντιστροφέα 12 Κανένα
3-8. Προειδοποιητικές ενδείξεις
Προειδοποίηση Εικονίδιο (αναβοσβήνει) Συναγερμός
Χαμηλή μπαταρία
LOW BATT.
Χτύπος ανά δευτερόλεπτο
Υπερφόρτωση
OVER LOAD
Διπλός χτύπος ανά δευτερόλεπτο
Μη συνδεδεμένη μπαταρία
Χτύπος ανά δευτερόλεπτο
Υπερφόρτιση
C
Χτύπος ανά δευτερόλεπτο
Σφάλμα ανεμιστήρα/υπερθέρμανση
Χτύπος ανά δευτερόλεπτο
Σφάλμα φορτιστή
CH
Χτύπος ανά δευτερόλεπτο
Σφάλμα μπαταρίας
BATT. FAULT
Χτύπος ανά δευτερόλεπτο
Τάση bypass εκτός εύρους
Χτύπος ανά δευτερόλεπτο
Μη σταθερή συχνότητα Bypass
FU
Χτύπος ανά δευτερόλεπτο
EEPROM σφάλμα
EE
Χτύπος ανά δευτερόλεπτο
Page 16

16
USER MANUAL
NEOLINE PLUS � 1/1 � 1-3 kVA � ONLINE UPS
4. Αντιμετώπιση προβλημάτων
Εάν το σύστημα του UPS δεν λειτουργεί σωστά, παρακαλείσθε να επιλύσετε το πρόβλημα
χρησιμοποιώντας τον παρακάτω πίνακα.
Σύμπτωμα Πιθανά αίτια Επίλυση
Καμία ένδειξη και συναγερμός
παρόλο που τα κεντρικά μέρη
είναι φυσιολογικά.
Η AC ισχύς εισόδου δεν είναι
συνδεδεμένη σωστά.
Ελέγξτε εάν το καλώδιο ρεύματος
εισόδου είναι σταθερά συνδεδεμένο στα
κύρια μέρη.
Η είσοδος AC input είναι
συνδεδεμένη στην έξοδο του UPS.
Τοποθετήστε το AC καλώδιο ρεύματος
εισόδου σωστά στην AC είσοδο.
Το εικονίδιο
και
αναβοσβήνουν στην οθόνη
LCD και ο συναγερμός χτυπάει
ανά δευτερόλεπτο.
Η εξωτερική ή εσωτερική μπαταρία
είναι συνδεδεμένη λάθος.
Ελέγξτε εάν όλες οι μπαταρίες είναι
συνδεδεμένες σωστά.
Ο κωδικός σφάλματος
παρουσιαζεται ως 27 και το
εικονίδιο
BATT. FAULT
ανάβει
στην οθόνη LCD και ο
συναγερμός χτυπάει συνεχώς.
Η τάση της μπαταρίας είναι
πολύ υψηλή ή ο φορτιστής είναι
χαλασμένος.
Επικοινωνήστε με τον προμηθευτή σας.
Ο κωδικός σφάλματος
παρουσιαζεται ως 28 και το
εικονίδιο
BATT. FAULT
ανάβει
στην οθόνη LCD και ο
συναγερμός χτυπάει συνεχώς.
Η τάση της μπαταρίας είναι
πολύ χαμηλή ή ο φορτιστής είναι
χαλασμένος.
Επικοινωνήστε με τον προμηθευτή σας.
Τα εικονίδια
και
OVER LOAD
αναβοσβήνουν στην οθόνη
LCD και ο συναγερμός
χτυπάει δύο φορές κάθε ένα
δευτερόλεπτο.
Το UPS έχει υπερφορτωθεί.
Αφαιρέστε φορτία από την έξοδο του
UPS.
Το UPS έχει υπερφορτωθεί. Οι
συσκευές που είναι συνδεδεμένες
στο UPS τροφοδοτούνται απευθείας
από το ηλεκτρικό δίκτυο μέσω
Bypass.
Αφαιρέστε φορτία από την έξοδο του
UPS.
Μετά από επαναλαμβανόμενες
υπερφορτώσεις, το UPS είναι
κλειδωμένο στη λειτουργία
Bypass. Οι συνδεδεμένες συσκευές
τροφοδοτούνται απευθείας από τον
κύριο αγωγό.
Αφαιρέστε φορτία πρώτα από την έξοδο
του UPS. Στη συνέχεια, τερματίστε τη
λειτουργία του UPS και επανεκκινήστε
το.
Ο κωδικός σφάλματος
εμφανίζεται ως 43. Το εικονίδιο
OVER LOAD
ανάβει στην οθόνη
LCD και ο συναγερμός χτυπάει
συνεχώς.
Το UPS κλείνει αυτόματα λόγω
υπερφόρτωσης στην έξοδό του.
Αφαιρέστε φορτία από την έξοδο του
UPS και επανεκκινήστε το.
Ο κωδικός σφάλματος
εμφανίζεται ως 14, το εικονίδιο
SHORT
ανάβει στην οθόνη
LCD, και ο συναγερμος
χτυπάει συνεχώς.
Το UPS κλείνει αυτόματα λόγω
βραχυκυκλώματος στην έξοδο.
Ελέγξτε την καλωδίωση εξόδου και
αν οι συνδεδεμένες συσκευές είναι σε
κατάσταση βραχυκυκλώματος.
Page 17

17
USER MANUAL
NEOLINE PLUS � 1/1 � 1-3 kVA � ONLINE UPS
Σύμπτωμα Πιθανά αίτια Επίλυση
Ο κωδικός σφάλματος
παρουσιάζεται ως 01, 02, 03,
04, 05, 11, 12, 13 και 41 στην
οθόνη LCD και ο συναγερμός
χτυπάει διαρκώς.
Παρουσιάστηκε εσωτερικό
σφάλμα UPS. Υπάρχουν δύο
πιθανά αποτελέσματα:
1.
Το φορτίο τροφοδοτείτ
αι
ακόμη, αλλά απευθείας από
το ηλεκτρικό δίκτυο AC μέσω
bypass.
2.
Το φορτίο δεν τροφοδοτείτ
αι
πλέον.
Επικ
οινωνήστε με τον προμηθευτή σας.
Ο χρόνος υποστήριξης της
μπαταρίας είναι μικρότερος
από τη φυσιολογική τιμή.
Οι μπαταρίες δεν είναι πλήρως
φορτισμένες.
Φορτίστε τις μπαταρίες για τουλάχιστον 5
ώρες και μετά ελέγξτε την χωρητικότητα.
Εάν το πρόβλημα εξακολουθεί να υπάρχει,
συμβουλευτείτε τον προμηθευτή σας.
Ελαττωματικές μπαταρίες.
Επικοινωνήστε με τον προμηθευτή σας για
να αντικαταστήσετε τη μπαταρία.
Ο κωδικός σφάλματος
παρουσιάζεται ως 05 στην
οθόνη LCD. Την ίδια στιγμή, ο
συναγερμός χτυπάει συνεχώς
και η έξοδος έχει διακοπεί.
Έχει συμβεί ένα εσωτερικό
σφάλμα στο UPS και το DC BUS
είναι βραχυκυκλωμένο.
Συμβουλευτείτε τον προμηθευτή σας. Εάν
ενεργοποιήσετε ξανά το UPS, μπορεί να
προκληθεί βλάβη στο Mosfet του DC/DC
μετατροπέα.
5. Φύλαξη και συντήρηση
5-1. Λειτουργία
Το σύστημα UPS περιέχει μη επισκευάσιμα από το χρήστη μέρη. Εάν η διάρκεια ζωής της μπαταρίας
(3~5 χρόνια σε 25oC θερμοκρασία περιβάλλοντος) έχει λήξει, οι μπαταρίες πρέπει να αντικατασταθούν.
Σε αυτή την περίπτωση, παρακαλώ επικοινωνήστε με τον προμηθευτή σας.
Βεβαιωθείτε ότι θα παραδώσετε τις χρησιμοποιημένες μπαταρίες
σε εγκαταστάσεις ανακύκλωσης ή να την αποστείλλετε στον
προμηθευτή σας σε αντικατάσταση του υλικού συσκευασίας της
μπαταρίας.
5-2. Φύλαξη
Πριν την αποθήκευση, φορτίστε το UPS για 5 ώρες. Φυλάξτε το UPS καλυμμένο και όρθιο σε δροσερό,
στεγνό μέρος. Κατά τη διάρκεια της αποθήκευσης, ξαναφορτίστε τη μπαταρία ακολουθώντας τις οδηγίες
από τον παρακάτω πίνακα:
Θερμοκρασία φύλαξης Συχνότητα επαναφόρτισης Διάρκεια φόρτισης
-25°C - 40°C Κάθε 3 μήνες 1-2 ώρες
40°C - 45°C Κάθε 2 μήνες 1-2 ώρες
Page 18

18
USER MANUAL
NEOLINE PLUS � 1/1 � 1-3 kVA � ONLINE UPS
5-3. Συντήρηση
►Το σύστημα του UPS λειτουργεί με επικίνδυνες τάσεις. Οι επισκευές πρέπει να διενεργούνται μόνο
από εξειδικευμένο προσωπικό συντήρησης.
► Ακόμη κι όταν η μονάδα αποσυνδεθεί από τους κύριους αγωγούς, τα συστατικά μέρη στο εσωτερικό
του συστήματος του UPS είναι ακόμη συνδεδεμένα στα ράφια των μπαταριών, τα οποία είναι
ενδεχομένως επικίνδυνα.
► Προτού πραγματοποιήσετε οποιοδήποτε είδους επισκευή ή/και συντήρηση, αποσυνδέστε τις
μπαταρίες και βεβαιωθείτε ότι δεν υπάρχει ρεύμα και καμία επικίνδυνη τάση στους ακροδέκτες του
πυκνωτή υψηλής ικανότητας, όπως BUS-πυκνωτές.
► Μόνο άτομα τα οποία είναι εξειδικευμένα σε μπαταρίες και με τα απαραίτητα προληπτικά μέτρα
μπορούν να αντικαταστήσουν τις μπαταρίες και να επιθεωρήσουν τις εργασίες. Μη εξουσιοδοτημένα
άτομα πρέπει να μένουν μακριά από τις μπαταρίες.
► Βεβαιωθείτε ότι δεν υπάρχει καθόλου τάση ανάμεσα στα τερματικά των μπαταριών και ότι υπάρχει
γείωση πριν από οποιαδήποτε συντήρηση ή επισκευή. Σε αυτό το προϊόν, η ταση των μπαταριών
δεν είναι απομονωμένο από την τάση εισόδου. Ανάμεσα στα τερματικά των μπαταριών και τη γείωση
μπορούν να προκληθούν επικίνδυνες τάσεις.
► Οι μπαταρίες μπορούν να προκαλέσουν ηλεκτροπληξία και έχουν υψηλό ρεύμα βραχυκύκλωσης
Παρακαλείσθε να βγάλετε όλα τα ρολόγια χειρός, δαχτυλίδια και άλλα προσωπικά μεταλλικά
αντικείμενα πριν από τη συντήρηση ή την επισκευή και χρησιμοποιήστε μόνο εργαλεία με μονωτικά
χερούλια και λαβές για τη συντήρηση ή την επισκευή.
► Όταν αντικαταστήσετε τις μπαταρίες, εγκαταστήστε τον ίδιο αριθμό και τον ίδιο τύπο μπαταριών.
► Μην επιχειρήσετε να απαλλαγείτε από τις μπαταρίες καίγοντάς τες. Αυτό μπορεί να προκαλέσει
έκρηξη των μπαταριών. Οι μπαταρίες πρέπει να ανακυκλώνονται σωστά σύμφωνα με τους τοπικούς
κανονισμούς.
► Μην ανοίγετε ή καταστρέφετε τις μπαταρίες. Η διαρροή ηλεκτρολύτη μπορεί να προκαλέσει πληγή
στο δέρμα και στα μάτια. Μπορεί να είναι τοξική.
► Παρακαλείσθε να αντικαταστήστε την ασφάλεια μόνο με τον ίδιο τύπο και την ίδια ένταση ώστε να
αποφύγετε τον κίνδυνο πυρκαγιάς.
► Μην αποσυναρμολογείτε το σύστημα του UPS.
Page 19

19
USER MANUAL
NEOLINE PLUS � 1/1 � 1-3 kVA � ONLINE UPS
5-3. Συντήρηση
►Το σύστημα του UPS λειτουργεί με επικίνδυνες τάσεις. Οι επισκευές πρέπει να διενεργούνται μόνο
από εξειδικευμένο προσωπικό συντήρησης.
► Ακόμη κι όταν η μονάδα αποσυνδεθεί από τους κύριους αγωγούς, τα συστατικά μέρη στο εσωτερικό
του συστήματος του UPS είναι ακόμη συνδεδεμένα στα ράφια των μπαταριών, τα οποία είναι
ενδεχομένως επικίνδυνα.
► Προτού πραγματοποιήσετε οποιοδήποτε είδους επισκευή ή/και συντήρηση, αποσυνδέστε τις
μπαταρίες και βεβαιωθείτε ότι δεν υπάρχει ρεύμα και καμία επικίνδυνη τάση στους ακροδέκτες του
πυκνωτή υψηλής ικανότητας, όπως BUS-πυκνωτές.
► Μόνο άτομα τα οποία είναι εξειδικευμένα σε μπαταρίες και με τα απαραίτητα προληπτικά μέτρα
μπορούν να αντικαταστήσουν τις μπαταρίες και να επιθεωρήσουν τις εργασίες. Μη εξουσιοδοτημένα
άτομα πρέπει να μένουν μακριά από τις μπαταρίες.
► Βεβαιωθείτε ότι δεν υπάρχει καθόλου τάση ανάμεσα στα τερματικά των μπαταριών και ότι υπάρχει
γείωση πριν από οποιαδήποτε συντήρηση ή επισκευή. Σε αυτό το προϊόν, η ταση των μπαταριών
δεν είναι απομονωμένο από την τάση εισόδου. Ανάμεσα στα τερματικά των μπαταριών και τη γείωση
μπορούν να προκληθούν επικίνδυνες τάσεις.
► Οι μπαταρίες μπορούν να προκαλέσουν ηλεκτροπληξία και έχουν υψηλό ρεύμα βραχυκύκλωσης
Παρακαλείσθε να βγάλετε όλα τα ρολόγια χειρός, δαχτυλίδια και άλλα προσωπικά μεταλλικά
αντικείμενα πριν από τη συντήρηση ή την επισκευή και χρησιμοποιήστε μόνο εργαλεία με μονωτικά
χερούλια και λαβές για τη συντήρηση ή την επισκευή.
► Όταν αντικαταστήσετε τις μπαταρίες, εγκαταστήστε τον ίδιο αριθμό και τον ίδιο τύπο μπαταριών.
► Μην επιχειρήσετε να απαλλαγείτε από τις μπαταρίες καίγοντάς τες. Αυτό μπορεί να προκαλέσει
έκρηξη των μπαταριών. Οι μπαταρίες πρέπει να ανακυκλώνονται σωστά σύμφωνα με τους τοπικούς
κανονισμούς.
► Μην ανοίγετε ή καταστρέφετε τις μπαταρίες. Η διαρροή ηλεκτρολύτη μπορεί να προκαλέσει πληγή
στο δέρμα και στα μάτια. Μπορεί να είναι τοξική.
► Παρακαλείσθε να αντικαταστήστε την ασφάλεια μόνο με τον ίδιο τύπο και την ίδια ένταση ώστε να
αποφύγετε τον κίνδυνο πυρκαγιάς.
► Μην αποσυναρμολογείτε το σύστημα του UPS.
6. Τεχνικές προδιαγραφές
*1-3KVA: Derate to 80% of capacity in Frequency converter mode and to 80% when the output voltage is adjusted to 100/200/208VAC
6-10KVA: Derate to 60% of capacity in Frequency converter mode and to 90% when the output voltage is adjusted to 208VAC
Product specications are subject to change without further notice
MODEL Neoline Plus 1101ST Neoline Plus 1102ST Neoline Plus 1103ST
TESCOM CODE UPS.0404 UPS.0405 UPS.0406
PHASE Single phase with ground
CAPACITY 1000 VA / 900 W 2000 VA / 1800 W 3000 VA / 2700 W
INPUT
Nominal Voltage 200/208/220/230/240VAC
Voltage Range
120-300 VAC (Based on load at 50%)
180-280 VAC (Based on load at 100%)
Frequency Range 40Hz ~ 70 Hz
Power Factor ≥ 0.99 @ Nominal Voltage (100% load)
OUTPUT
Output Voltage 110/115/120/127VAC or 200/208/220/230/240VAC
Voltage Regulation ± 1%
Frequency Range (Synchronized Range) 47~ 53 Hz or 57 ~ 63 Hz
Frequency Range (Batt. Mode) 50 Hz or 60Hz ± 0.5%
Current Crest Ratio 3:1
Harmonic Distortion ≤ 3 % THD (Linear Load)
Transfer Time
AC Mode to Battery Mode Zero
Inverter to Bypass 4 ms (Typical)
Waveform (Batt. Mode) Pure Sinewave
EFFICIENCY
To AC Mode 88% 89% 90%
To Battery Mode 83% 85% 88%
BATTERY
Standard Model
Battery Type 12 V / 9 AH 12 V / 9 AH 12 V / 9 AH
Numbers 2 4 6
Typical Recharge Time 4 hours recover to 90% capacity
Charging Current (max.) 1.0 A
Charging Voltage 27.4VDC ± 1% 54.7 VDC ±1% 82.1 VDC ±1%
INDICATORS
LCD Load level, Battery level, AC mode, Battery mode, Bypass mode, and Fault indicators
ALARM
Battery Mode Sounding every 4 seconds
Low Battery Sounding every second
Overload Sounding twice every second
Fault Continously sounding
PHYSICAL
Standard Model
Dimension, D x W x H (mm) 282 x 145 x 220 397 x 145 x 220 421 x 190 x 318
Net Weight (kgs) 9,8 17 27,6
ENVIRONMENT
Humidity 20-90 % RH @ 0- 40°C (non-condensing)
Noise Level Less than 50dBA @ 1 Meter
MANAGEMENT
Smart RS-232/USB Supports Windows 2000/2003/XP/Vista/2008/7/8, Linux, Unix, and MAC
Optional SNMP Power management from SNMP manager and web browser
Page 20

20
USER MANUAL
NEOLINE PLUS � 1/1 � 1-3 kVA � ONLINE UPS
EN
ATTENTION:
1. R
ead carefully this manual before before the installation or operation of the UPS.
2. In order to ensure that the warranty is active, please send us the “Warranty
Form” you will find inside or register to: www.tescom.gr
3. Please make sure that your UPS is charged every 2-3 months when it’s
unused in order to avoid warranty issues.
Please comply with all warnings and operating
instructions in this manual strictly.
Do not operate this unit before reading through all
safety information and operating instructions carefully.
Save this manual properly and read carefully the
following instructions before installing the unit.
Page 21

21
USER MANUAL
NEOLINE PLUS � 1/1 � 1-3 kVA � ONLINE UPS
EN
Table of contents
1. Safety and EMC instructions ...................................................................... 22
1-1. Transportation and storage ..................................................................... 22
1-2. Preparation .............................................................................................. 22
1-3. Installation ............................................................................................... 22
1-4. Operation ................................................................................................ 23
2. Installation and setup ................................................................................. 23
2-1. Rear panel view (Tower type) .................................................................. 24
2-2. Setup the UPS ........................................................................................ 25
3. Operations .................................................................................................. 26
3-1. Button operation ...................................................................................... 26
3-2. LCD panel ............................................................................................... 27
3-3. Audible alarm .......................................................................................... 28
3-4. LCD display wordings index .................................................................... 29
3-5. UPS setting ............................................................................................. 29
3-6. Operating mode description ................................................................... 32
3-7. Faults reference code ............................................................................. 33
3-8. Warning indicator .................................................................................... 33
4. Troubleshooting .......................................................................................... 34
5. Storage and maintenance .......................................................................... 35
5-1. Operation ................................................................................................ 35
5-2. Storage ................................................................................................... 35
5-2. Maintenance ............................................................................................ 36
6. Technical specications ............................................................................. 36
Page 22

22
USER MANUAL
NEOLINE PLUS � 1/1 � 1-3 kVA � ONLINE UPS
1. Safety and EMC instructions
Please read carefully the following user manual and the safety instructions before installing the unit or
using the unit!
1-1. Transportation and storage
► Please transport the UPS system only in the original package to protect against shock and impact.
► The UPS must be stored in the room where it is ventilated and dry.
1-2. Preparation
► Condensation may occur if the UPS system is moved directly from cold to warm environment. The
UPS system must be absolutely dry before being installed. Please allow at least two hours for the
UPS system to acclimate the environment.
► Do not install the UPS system near water or in moist environments.
► Do not install the UPS system where it would be exposed to direct sunlight or nearby heater.
► Do not block ventilation holes in the UPS housing.
1-3. Installation
► Do
not connect appliances or devices which would overload the UPS (e.g. big motor-type equipment))
to the UPS output sockets or terminal.
► Place cables in such a way that no one can step on or trip over them.
► Do not block air vents in the housing of UPS. The UPS must be installed in a location with good
ventilation.
► Ensure enough space on each side for ventilation.
► UPS has provided earthed terminal, in the nal installed system conguration, equipotential earth
bonding to the external UPS battery cabinets.
► The UPS can be installed only by qualied maintenance personnel.
► An appropriate disconnect device as short-circuit backup protection should be provided in the
building wiring installation.
► An integral single emergency switching device which prevents further supply to the load by the UPS
in any mode of operation should be provided in the building wiring installation.
► Connect the earth before connecting to the building wiring terminal.
► Installation
and Wiring must be performed in accordance with the local electrical laws and regulations.
Page 23

23
USER MANUAL
NEOLINE PLUS � 1/1 � 1-3 kVA � ONLINE UPS
1-4. Operation
► Do not disconnect the earth conductor cable on the UPS or the building wiring terminals in any time
since this would cancel the protective earth of the UPS system and of all connected loads.
► The UPS system features its own, internal current source (batteries). The UPS output sockets or
output terminal blocks may be electrically live even if the UPS system is not connected to the building
wiring outlet.
► In order to fully disconnect the UPS system, rst press the “OFF” button and then disconnect the
mains.
► Ensure that no liquid or other foreign objects can enter into the UPS system.
► The UPS can be operated by any individuals with no previous experience.
2. Installation and setup
Before installation, please inspect the unit. Be sure that nothing inside the package is damaged. Please
keep the original package in a safe place for future use.
There are two different types of online UPS: standard and long-run models. Please refer to the following
model table.
For NEOLINE ST+ series (Tower)
Model Type Model Type
1K
Standard
Model
1KL
Long-run
Model
2K 2KL
3K 3KL
For NEOLINE RT+ series (Rack)
Model Type Model Type
1KR
Standard
Model
1KRL
Long-run
Model
2KRL
3KRL
EN
Page 24

24
USER MANUAL
NEOLINE PLUS � 1/1 � 1-3 kVA � ONLINE UPS
2-1. Rear panel view (Tower type)
1. AC input
2. Input circuit breaker
3. USB communication port
4. RS-232 communication port
5. SNMP intelligent slot
6. External battery connection (only available for L model)
7. Output receptacles
8. Output circuit breaker
9. Output terminal
2-1. Rear panel view (Tower type)
1K (L) IEC
1K (L) Scuko 2K (L) Scuko 3K (L) Scuko
2K (L) IEC
3K (L) IEC
Page 25

25
USER MANUAL
NEOLINE PLUS � 1/1 � 1-3 kVA � ONLINE UPS
2-2. Setup the UPS
Step 1: UPS input connection
Plug the UPS into a two-pole, three-wire, grounded receptacle only. Avoid using extension cords. The
power cord is supplied in the UPS package.
Step 2: UPS output connection
1. For socket-type outputs, simply connect devices to the outlets.
2. For terminal-type input or outputs, please follow below steps for the wiring conguration:
a) Remote the small cover of the terminal block.
b) Suggest using AWG14 or 2.1mm
2
power cords.
c) Upon completion oF tHe wiring conguration, please check whether the wires are
securely afxed.
d) Put the small cover back to the rear panel.
Step 3: Communication connection:
To allow for unattended UPS shutdown/start-up and status monitoring, connect the communication cable
one end to the USB/RS-232 port and the other to the communication port on your PC. With the monitoring
software installed, you can schedule UPS shutdown/start-up and monitor UPS status through PC.
The UPS is equipped with intelligent slot perfect for either SNMP or AS400 card. When installing either
SNMP or AS400 card in the UPS, it will provide advanced communication and monitoring options.
Note: USB port and RS-232 port can’t work at the same time.
Step 4: Turn on the UPS
Press the ON/Mute button on the front panel for two seconds to power on the UPS.
Note: The battery charges fully during the rst ve hours of normal operation. Do not expect full battery
run capability during this initial charge period..
Step 5: Install software
For optimal computer system protection, install UPS monitoring software to fully congure UPS
shutdown. You may insert provided CD into CD-ROM to install the monitoring software. If not, please
follow steps below to download and install monitoring software from the internet:
1. Go to the website http://www.power-software-download.com
2. Click ViewPower software icon and then choose your required OS to download the software.
3. Follow the on-screen instructions to install the software.
4. When your computer restarts, the monitoring software will appear as an orange plug icon located
5. in the system tray, near the clock.
USB port RS-232 port Intelligent slot
EN
a) Remove the small cover of the terminal block
b) Suggest using AWG14 or 2.1mm
2
power cords for 3KVA (208/220/230/240VAC models).
Suggest using AWG12-10 or 3.3mm2-5.3mm2power cords for 3KVA
(110/115/120/127VAC models). Please also install a circuit breaker (40A) between the
mains and AC input of UPS in 3KVA (110/115/120127VAC models) for safety operation.
c) Upon completion of the wiring configuration, please check whether the wires are
securely affixed.
d) Put the small cover back to the rear panel.
2
power cords for 3KVA
2
power cords for 3KVA (208/220/230/240VAC models).
2
-5.3mm2power cords for 3KVA
Page 26

26
USER MANUAL
NEOLINE PLUS � 1/1 � 1-3 kVA � ONLINE UPS
Step 6: External battery connection
(for Long-run models only):
Follow the right chart to make external battery connection.
3. Operations
3-1. Button operation
Button Function
ON/Mute
►Turn on the UPS: Press and hold ON/Mute button for at least 2 seconds to turn
on the UPS.
► Mute the alarm: When the UPS is on battery mode, press and hold this button for
at least 5 seconds to disable or enable the alarm system. But it’s not applied to the
situations when warnings or errors occur.
► Up key: Press this button to display previous selection in UPS setting mode.
► Switch to UPS self-test mode: Press and hold ON/Mute button for 5 seconds to
enter UPS self-testing while in AC mode, ECO mode, or converter mode.
OFF/Enter
►Turn off the UPS: Press and hold this button at least 2 seconds to turn off the UPS
in battery mode. UPS will be in standby mode under power normal or transfer to
Bypass mode in the Bypass enable setting by pressing this button.
► Conrm selection key: Press this button to conrm selection in UPS setting mode.
Select
► Switch LCD message: Press this button to change the LCD message for input
voltage, input frequency, battery voltage, output voltage and output frequency. It
will return back to default display when pausing for 10 seconds.
► Setting mode: Press and hold this button for 5 seconds to enter UPS setting mode
when UPS is in standby mode or bypass mode.
► Down key: Press this button to display next selection in UPS setting mode.
ON/Mute +
Select
► Switch to bypass mode: When the main power is normal, press ON/Mute and Se-
lect buttons simultaneously for 5 seconds. When UPS will enter to bypass mode.
This action will be ineffective when the input voltage is out of acceptable range.
Page 27

27
USER MANUAL
NEOLINE PLUS � 1/1 � 1-3 kVA � ONLINE UPS
3-2. LCD panel
Display Function
Remaining backup time information
Indicates the remaining backup time in pie chart.
Indicates the remaining backup time in numbers.
H: hours, M: minute, S: second
Fault information
Indicates that the warning and fault occurs.
Indicates the warning and fault codes, and the codes are listed in details in 3-5
section.
Mute operation
Indicates that the UPS alarm is disabled.
Output & Battery voltage information
Indicates the output voltage, frequency or battery voltage.
Vac: output voltage, Vdc: battery voltage, Hz: frequency
Load information
Indicates the load level by 0-25%, 26-50%, 51-75%, and 76-100%.
OVERLOAD
Indicates overload.
SHORT
Indicates the load or the UPS output is short circuit.
EN
Button
Function
Turn on the UPS: Press and hold ON/Mute button for at least 2 seconds
to turn on the UPS.
Mute the alarm: When the UPS is on battery mode, press and hold this
button for at least 5 seconds to disable or enable the alarm system. But
it’s not applied to the situations when warnings or errors occur.
Up key: Press this button to display previous selection in UPS setting
mode.
Switch to UPS self-test mode: Press and hold ON/Mute button for 5
seconds to enter UPS self-testing while in AC mode, ECO mode, or
converter mode.
Turn off the UPS: Press and hold this button at least 2 seconds to turn
off the UPS. UPS will be in standby mode under power normal or
transfer to Bypass mode if the Bypass enable setting by pressing this
button.
Confirm selection key: Press this button to confirm selection in UPS
setting mode.
Switch LCD message: Press this button to change the LCD message for
input voltage, input frequency, battery voltage, output voltage and
output frequency. It will return back to default display when pausing
for 10 seconds.
Setting mode: Press and hold this button for 5 seconds to enter UPS
setting mode when UPS is in standby mode or bypass mode.
Down key: Press this button to display next selection in UPS setting
mode.
Button
Switch to bypass mode: When the main power is normal, press
ON/Mute and Select buttons simultaneously for 5 seconds. Then UPS
will enter to bypass mode. This action will be ineffective when the
input voltage is out of acceptable range.
Page 28

28
USER MANUAL
NEOLINE PLUS � 1/1 � 1-3 kVA � ONLINE UPS
Display Function
Mode operation information
Indicates the UPS connects to the mains.
Indicates the battery is working.
Indicates the bypass circuit is working.
E C O
Indicates the ECO mode is enabled.
Indicates the Inverter circuit is working.
Indicates the output is working.
Battery information
Indicates the Battery level by 0-25%, 26-50%, 51-75% and 76-100%.
BATT. FAULT
Indicates the battery is fault.
LOW BATT.
Indicates low battery level and low battery voltage.
Input & Battery voltage information
Indicates the input voltage or frequency or battery voltage.
Vac: input voltage, Vdc: battery voltage, Hz: input frequency
3-3. Audible alarm
Περιγραφή Κατάσταση βομβητή
Battery Mode Sounding every 4 seconds
Low Battery Sounding every second
Overload Sounding twice every second
Fault Continuously sounding
Bypass Mode Sounding every 10 seconds
Page 29

29
USER MANUAL
NEOLINE PLUS � 1/1 � 1-3 kVA � ONLINE UPS
3-4. LCD display wordings index
Συντομογραφία οθόνης Περιεχόμενο Ορισμός
ENA
ENA
Enable
DIS
dis
Disable
ESC
ESC
Escape
HLS
HLS
High loss
LLS
LLS
Low loss
BAT
BAT
Battery
CF
CF
Converter
TP
TP
Temperature
CH
CH
Charger
FU
FU
Unstable Bypass frequency
EE
EE
EEPROM fault
3-5. UPS setting
There are three parameters to set up the UPS:
Parameter 1:
It’s for program alternatives. There are 8 programs to set
up. Refer to below table.
Parameter 2 and parameter 3:
Are the setting options or values for each program.
Note:
Please choose “Up” or “Down” button to change programs
or parameters.
Parameter 1
Parameter 2 Parameter 3
EN
3-3. Audible Alarm
Battery Mode
Sounding every 4 seconds
Low Battery
Sounding every second
Overload
Sounding twice every second
Fault
Continuously sounding
Bypass Mode
Sounding every 10 seconds
3-4
. LCD display wordings index
Abbreviation
Display content
Meaning
ENA
Enable
DIS
Disable
ESC
Escape
HLS
High loss
LLS
Low loss
BAT
Battery
CF
Converter
TP
Temperature
CH
Charger
FU
Bypass frequency unstable
EE
EEPROM error
3-5
. UPS Setting
There are three parameters to set up the
UPS.
Parameter 1: It’s for program
alternatives. Refer to below table.
Parameter 2 and parameter 3 are the
setting options or values for each
program.
Parameter 1
Parameter 2
Parameter 3
Page 30
30
USER MANUAL
NEOLINE PLUS � 1/1 � 1-3 kVA � ONLINE UPS
01: Output voltage setting
Interface Setting
Parameter 3: Output voltage
For 200/208/220/230/240 VAC models, you may choose the
following output voltage:
200: presents output voltage is 200Vac
208: presents output voltage is 208Vac
220: presents output voltage is 220Vac
230: presents output voltage is 230Vac
(Default)
240: presents output voltage is 240Vac
For 100/110/115/120/127 VAC models, you may choose the following
output voltage:
100: presents output voltage is 100Vac
110: presents output voltage is 110Vac
115: presents output voltage is 115Vac
120: presents output voltage is 120Vac
(Default)
127: presents output voltage is 127Vac
02: Frequency Converter enable/disable
Interface Setting
Parameter 2 & 3: Enable or disable converter mode. You may choose the
following two options:
CF ENA: converter mode enable
CF DIS: converter mode disable
03: Output frequency setting
Interface Setting
Parameter 2 & 3: Output frequency setting. You may set the initial frequency on battery mode:
BAT 50: presents output frequency is 50Hz
BAT 60: presents output frequency is 60Hz
If converter mode is enabled, you may choose the following output
frequency:
CF 50: presents output frequency is 50Hz
CF 60: presents output frequency is 60Hz
04: ECO enable/disable
Interface Setting
Parameter 3: Enable or disable ECO function. You may choose the
following two options:
ENA: ECO mode enable
DIS: ECO mode disable
Sounding every 4 seconds
Sounding every second
Sounding twice every second
Continuously sounding
Sounding every 10 seconds
Display content
Meaning
Enable
Disable
Escape
High loss
Low loss
Battery
Converter
Temperature
Charger
Bypass frequency unstable
EEPROM error
There are three parameters to set up the
UPS.
Parameter 1: It’s for program
alternatives. Refer to below table.
Parameter 2 and parameter 3 are the
setting options or values for each
program.
Setting
Parameter 3: Output voltage
For 208/220/230/240 VAC models, you may choose the
following output voltage:
208: presents output voltage is 208Vac
220: presents output voltage is 220Vac
Parameter 1
Parameter 2
Parameter 3
230: presents output voltage is 230Vac (Default)
240: presents output voltage is 240Vac
For 110/150/120/127 VAC models, you may choose the
following output voltage:
110: presents output voltage is 110Vac
115: presents output voltage is 115Vac
120: presents output voltage is 120Vac (Default)
127: presents output voltage is 127Vac
Setting
Parameter 2 & 3: Enable or disable converter mode. You
may choose the following two options:
CF ENA: converter mode enable
CF DIS: converter mode disable(Default)
Setting
Parameter 2 & 3: Output frequency setting.
You may set the initial frequency on battery mode:
BAT 50: presents output frequency is 50Hz
BAT 60: presents output frequency is 60Hz
If converter mode is enabled, you may choose the
following output frequency:
CF 50: presents output frequency is 50Hz
CF 60: presents output frequency is 60Hz
Setting
Parameter 3: Enable or disable ECO function. You may
choose the following two options:
ENA: ECO mode enable
DIS: ECO mode disable (Default)
230: presents output voltage is 230Vac (Default)
240: presents output voltage is 240Vac
For 110/150/120/127 VAC models, you may choose the
following output voltage:
110: presents output voltage is 110Vac
115: presents output voltage is 115Vac
120: presents output voltage is 120Vac (Default)
127: presents output voltage is 127Vac
Setting
Parameter 2 & 3: Enable or disable converter mode. You
may choose the following two options:
CF ENA: converter mode enable
CF DIS: converter mode disable(Default)
Setting
Parameter 2 & 3: Output frequency setting.
You may set the initial frequency on battery mode:
BAT 50: presents output frequency is 50Hz
BAT 60: presents output frequency is 60Hz
If converter mode is enabled, you may choose the
following output frequency:
230: presents output voltage is 230Vac (Default)
240: presents output voltage is 240Vac
For 110/150/120/127 VAC models, you may choose the
following output voltage:
110: presents output voltage is 110Vac
115: presents output voltage is 115Vac
120: presents output voltage is 120Vac (Default)
127: presents output voltage is 127Vac
Setting
Parameter 2 & 3: Enable or disable converter mode. You
may choose the following two options:
CF ENA: converter mode enable
CF DIS: converter mode disable(Default)
Page 31

31
USER MANUAL
NEOLINE PLUS � 1/1 � 1-3 kVA � ONLINE UPS
05: ECO voltage range setting
Interface Setting
Parameter 2 & 3: Set the acceptable high voltage point and low voltage
point for ECO mode by pressing Down key or Up key.
HLS: High loss voltage in ECO mode in parameter 2.
For 200/208/220/230/240 VAC models, the setting range in parameter 3 is
from +7V to +24V of the nominal voltage.
For 100/110/115/120/127 VAC models, the setting range in parameter 3 is
from +3V to +12V of the nominal voltage.
LLS: Low loss voltage in ECO mode in parameter 2.
For 200/208/220/230/240 VAC models, the setting range in parameter 3 is
from -7V to -24V of the nominal voltage.
For 100/110/115/120/127 VAC models, the setting voltage in parameter 3
is from -3V to -12V of the nominal voltage.
06: Bypass enable/disable when UPS is off
Interface Setting
Parameter 3: Enable or disable Bypass function.You may choose the
following two options:
ENA: Bypass enable
DIS: Bypass disable
07: Bypass voltage range setting
Interface Setting
Parameter 2 & 3: Set the acceptable high voltage point and acceptable
low voltage point for Bypass mode by pressing the Down key or Up key.
HLS: Bypass high voltage point
For 200/208/220/230/240 VAC models:
230-264: setting the high voltage point in parameter 3 from 230Vac to
264Vac.
For 100/110/115/120/127 VAC models:
120-132: setting the high voltage point in parameter 3 from 120Vac to
132Vac
LLS: Bypass low voltage point
For 200/208/220/230/240 VAC models:
170-220: setting the low voltage point in parameter 3 from 170Vac to
220Vac
For 100/110/115/120/127 VAC models:
85-115: setting the low voltage point in parameter 3 from 85Vac to
115Vac.
EN
230: presents output voltage is 230Vac (Default)
240: presents output voltage is 240Vac
For 110/150/120/127 VAC models, you may choose the
following output voltage:
110: presents output voltage is 110Vac
115: presents output voltage is 115Vac
120: presents output voltage is 120Vac (Default)
127: presents output voltage is 127Vac
Setting
Parameter 2 & 3: Enable or disable converter mode. You
may choose the following two options:
CF ENA: converter mode enable
CF DIS: converter mode disable(Default)
Setting
Parameter 2 & 3: Output frequency setting.
You may set the initial frequency on battery mode:
BAT 50: presents output frequency is 50Hz
BAT 60: presents output frequency is 60Hz
If converter mode is enabled, you may choose the
following output frequency:
CF 50: presents output frequency is 50Hz
CF 60: presents output frequency is 60Hz
Setting
Parameter 3: Enable or disable ECO function. You may
choose the following two options:
ENA: ECO mode enable
DIS: ECO mode disable (Default)
Setting
Parameter 2 & 3: Set the acceptable high voltage point
and low voltage point for ECO mode by pressing Down key
or Up key.
HLS: High loss voltage in ECO mode in parameter 2.
For 208/220/230/240 VAC models, the setting range in
parameter 3 is from +7V to +24V of the nominal voltage.
(Default: +12V)
For 110/115/120/127 VAC models, the setting range in
parameter 3 is from +3V to +12V of the nominal voltage.
(Default: +6V)
parameter 3 is from -3V to -12V of the nominal voltage.
(Default: -6V)
Setting
Parameter 3: Enable or disable Bypass function. You may
choose the following two options:
ENA: Bypass enable
DIS: Bypass disable (Default)
Setting
Parameter 2 & 3: Set the acceptable high voltage point
and acceptable low voltage point for Bypass mode by
pressing the Down key or Up key.
HLS: Bypass high voltage point
For 208/220/230/240 VAC models:
235-264: setting the high voltage point in parameter 3
from 235Vac to 264Vac. (Default: 264Vac)
For 110/115/120/127 VAC models:
125-132: setting the high voltage point in parameter 3
from 115Vac to 132Vac(Default: 132Vac)
LLS: Bypass low voltage point
parameter 3 is from -3V to -12V of the nominal voltage.
(Default: -6V)
Setting
Parameter 3: Enable or disable Bypass function. You may
choose the following two options:
ENA: Bypass enable
DIS: Bypass disable (Default)
Page 32

32
USER MANUAL
NEOLINE PLUS � 1/1 � 1-3 kVA � ONLINE UPS
08: Backup time setting for outlets
Interface Setting
Parameter 3: Set up backup time on battery mode for general outlets.
0-999: Setting the backup time in minutes from 0-999 for general outlets
on battery mode.
0: When setting as “0”, the backup time will be only 10 seconds.
999: When setting as “999”, the backup time setting will be disabled.
00: Exit setting.
3-6. Operating mode description
Operating
mode
Description LCD display
Online
mode
When the input voltage is within acceptable range, UPS will
provide pure and stable AC power to output. The UPS will
also charge the battery at online mode.
ECO
mode
Energy saving mode: When the input voltage is within
voltage regulation range, UPS will bypass voltage to output
for energy saving.
Frequency
Converter
mode
When input frequency is within 40Hz to 70Hz, the UPS can
be set at a constant output frequency, 50Hz or 60Hz. The
UPS will still charge battery under this mode.
Battery
mode
When the input voltage is beyond the acceptable range or
power failure and alarm is sounding every 4 second, UPS
will backup power from battery.
Bypass
mode
When input voltage is within acceptable range but UPS is
overload, UPS will enter bypass mode or bypass mode can
be set by front panel. Alarm is sounding every 10 second.
Standby
mode
UPS is powered off and no output supply power, but still
can charge batteries.
parameter 3 is from -3V to -12V of the nominal voltage.
(Default: -6V)
Setting
Parameter 3: Enable or disable Bypass function. You may
choose the following two options:
ENA: Bypass enable
DIS: Bypass disable (Default)
Setting
Parameter 2 & 3: Set the acceptable high voltage point
and acceptable low voltage point for Bypass mode by
pressing the Down key or Up key.
HLS: Bypass high voltage point
For 208/220/230/240 VAC models:
235-264: setting the high voltage point in parameter 3
from 235Vac to 264Vac. (Default: 264Vac)
For 110/115/120/127 VAC models:
125-132: setting the high voltage point in parameter 3
from 115Vac to 132Vac(Default: 132Vac)
LLS: Bypass low voltage point
For 208/220/230/240 VAC models:
184-225: setting the low voltage point in parameter 3
from 184Vac to 225Vac. (Default: 195Vac)
For 110/115/120/127 VAC models:
98-115: setting the low voltage point in parameter 3 from
98Vac to 115Vac. (Default: 98Vac)
Setting
Parameter 3: Set up backup time on battery mode for
general outlets.
0-999: setting the backup time in minutes from 0-999 for
general outlets on battery mode.
0: When setting as “0”, the backup time will be only 10
seconds.
Page 33

33
USER MANUAL
NEOLINE PLUS � 1/1 � 1-3 kVA � ONLINE UPS
3-7. Faults reference code
Fault event Fault code Icon Fault event Fault code Icon
Bus start fail 01 Non Inverter voltage low 13 Non
Bus over 02 Non Inverter output short 14
SHORT
Bus under 03 Non Battery voltage too high 27
BATT. FAULT
Bus unbalance 04 Non Battery voltage too low 28
BATT. FAULT
Bus short 05 Non Over temperature 41 Non
Inverter soft start fail 11 Non Over load 43
OVER LOAD
Inverter voltage high 12 Non
3-8. Warning indicator
Warning Icon (assing) Alarm
Low battery
LOW BATT.
Sounding every second
Overload
OVER LOAD
Sounding twice every second
Battery is not connected
Sounding every second
Over charge
C
Sounding every second
Over temperature
Sounding every second
Charger failure
CH
Sounding every second
Battery fault
BATT. FAULT
Sounding every second
Out of bypass voltage range
Sounding every second
Unstable bypass frequency
FU
Sounding every second
EEPROM error
EE
Sounding every second
EN
Page 34

34
USER MANUAL
NEOLINE PLUS � 1/1 � 1-3 kVA � ONLINE UPS
4. Troubleshooting
If the UPS system does not operate correctly, please solve the problem by using the table below.
Symptom Possible cause Remedy
No indication and alarm even
though the mains is normal.
The AC input power is not connected
well.
Check if input power cord rmly connected to the mains.
The AC input is connected to the
UPS output.
Plug AC input power cord to AC input
correctly.
The icon
and
ashing on LCD display and
alarm is sounding every
second.
The external or internal battery is
incorrectly connected.
Check if all batteries are connected well.
Fault code is shown as 27 and
the icon
BATT. FAULT
is lighting
on LCD display and alarm is
continuously sounding.
Battery voltage is too high or the
charger is fault.
Contact your dealer.
Fault code is shown as 28 and
the icon
BATT. FAULT
is lighting
on LCD display and alarm is
continuously sounding.
Battery voltage is too low or the
charger is fault.
Contact your dealer.
The icon
and
OVER LOAD
is
ashing on LCD display and
alarm is sounding twice every
second.
UPS is overload. Remove excess loads from UPS output.
UPS is overloaded. Devices connected to the UPS are fed directly by the
electrical network via the Bypass.
Remove excess loads from UPS output.
After repetitive overloads, the UPS
is locked in the Bypass mode. Connected devices are fed directly by
the mains.
Remove excess loads from UPS output
rst. Then shut down the UPS and
restart it.
Fault code is shown as 43 and
the icon
OVER LOAD
is lighting
on LCD display and alarm is
continuously sounding.
The UPS shut down automatically
because of overload at the UPS
output.
Remove excess loads from UPS output
and restart it.
Fault code is shown as 14 and
the icon
SHORT
is lighting
on LCD display and alarm is
continuously sounding.
The UPS shut down automatically
because short circuit occurs on the
UPS output.
Check output wiring and if connected
devices are in short circuit status.
Page 35

35
USER MANUAL
NEOLINE PLUS � 1/1 � 1-3 kVA � ONLINE UPS
Symptom Possible cause Remedy
Fault code is shown as 01,
02, 03, 04, 11, 12, 13 and 41
on LCD display and alarm is
continuously sounding.
A UPS internal fault has occurred. There are two possible
results:
1. The load is still supplied,
but directly from
AC power via
bypass.
2. The load is no longer supplied
by power
.
Contact your dealer.
Battery backup time is shorter
than nominal value.
Batteries are not fully charged.
Charge the batteries for at least 5 hours
and then check capacity. If the problem still
persists, consult your dealer.
Batteries defect. Contact your dealer to replace the battery.
Fault code is shown as 05 on
LCD display. At the same time,
alarm is continuously sounding
and output is cut off.
A UPS internal fault has occurred and BUS is short circuit.
Consult your dealer. If the UPS power is on
again before repair, the DC/DC mosfet will
damage.
5. Storage and maintenance
5-1. Operation
The UPS system contains no user-serviceable parts. If the battery service life (3~5 years at 25
o
C
ambient temperature) has been exceeded, the batteries must be replaced. In this case, please contact
your dealer.
Be sure to deliver the spent battery to a recycling facility
or ship it to your dealer
in the replacement battery packing material.
5-2. Storage
Before storing, charge the UPS 5 hours. Store the UPS covered and upright in a cool, dry location.
During storage, recharge the battery in accordance with the following table:
Storage temperature Recharge frequency Charging duration
-25°C - 40°C Every 3 months 1-2 hours
40°C - 45°C Every 2 months 1-2 hours
EN
Page 36

36
USER MANUAL
NEOLINE PLUS � 1/1 � 1-3 kVA � ONLINE UPS
5-2. Maintenance
► The UPS system operates with hazardous voltages. Repairs may be carried out only by qualied
maintenance personnel.
► Even after the unit is disconnected from the mains, components inside the UPS system are still
connected to the battery packs which are potentially dangerous.
► Before carrying out any kind of service and/or maintenance, disconnect the batteries and verify that
no current is present and no hazardous voltage exists in the terminals of high capability capacitor
such as BUS-capacitors.
► Only persons are adequately familiar with batteries and with the required precautionary measures
may replace batteries and supervise operations. Unauthorized persons must be kept well away from
the batteries.
► Verify that no voltage between the battery terminals and the ground is present before maintenance
or repair. In this product, the battery circuit is not isolated from the input voltage. Hazardous voltages
may occur between the battery terminals and the ground.
► Batteries may cause electric shock and have a high short-circuit current. Please remove all
wristwatches, rings and other metal personal objects before maintenance or repair, and only use
tools with insulated grips and handles for maintaining or repairing.
► When replace the batteries, install the same number and same type of batteries.
► Do not attempt to dispose of batteries by burning them. This could cause battery explosion. The
batteries must be rightly deposed according to local regulation.
► Do not open or destroy batteries. Escaping electrolyte can cause injury to the skin and eyes. It may
be toxic.
► Please replace the fuse only with the same type and amperage in order to avoid re hazards.
► Do not disassemble the UPS system.
Page 37

37
USER MANUAL
NEOLINE PLUS � 1/1 � 1-3 kVA � ONLINE UPS
5-2. Maintenance
► The UPS system operates with hazardous voltages. Repairs may be carried out only by qualied
maintenance personnel.
► Even after the unit is disconnected from the mains, components inside the UPS system are still
connected to the battery packs which are potentially dangerous.
► Before carrying out any kind of service and/or maintenance, disconnect the batteries and verify that
no current is present and no hazardous voltage exists in the terminals of high capability capacitor
such as BUS-capacitors.
► Only persons are adequately familiar with batteries and with the required precautionary measures
may replace batteries and supervise operations. Unauthorized persons must be kept well away from
the batteries.
► Verify that no voltage between the battery terminals and the ground is present before maintenance
or repair. In this product, the battery circuit is not isolated from the input voltage. Hazardous voltages
may occur between the battery terminals and the ground.
► Batteries may cause electric shock and have a high short-circuit current. Please remove all
wristwatches, rings and other metal personal objects before maintenance or repair, and only use
tools with insulated grips and handles for maintaining or repairing.
► When replace the batteries, install the same number and same type of batteries.
► Do not attempt to dispose of batteries by burning them. This could cause battery explosion. The
batteries must be rightly deposed according to local regulation.
► Do not open or destroy batteries. Escaping electrolyte can cause injury to the skin and eyes. It may
be toxic.
► Please replace the fuse only with the same type and amperage in order to avoid re hazards.
► Do not disassemble the UPS system.
6. Technical specications
MODEL Neoline Plus 1101ST Neoline Plus 1102ST Neoline Plus 1103ST
TESCOM CODE UPS.0404 UPS.0405 UPS.0406
PHASE Single phase with ground
CAPACITY 1000 VA / 900 W 2000 VA / 1800 W 3000 VA / 2700 W
INPUT
Nominal Voltage 200/208/220/230/240VAC
Voltage Range
120-300 VAC (Based on load at 50%)
180-280 VAC (Based on load at 100%)
Frequency Range 40Hz ~ 70 Hz
Power Factor ≥ 0.99 @ Nominal Voltage (100% load)
OUTPUT
Output Voltage 110/115/120/127VAC or 200/208/220/230/240VAC
Voltage Regulation ± 1%
Frequency Range (Synchronized Range) 47~ 53 Hz or 57 ~ 63 Hz
Frequency Range (Batt. Mode) 50 Hz or 60Hz ± 0.5%
Current Crest Ratio 3:1
Harmonic Distortion ≤ 3 % THD (Linear Load)
Transfer Time
AC Mode to Battery Mode Zero
Inverter to Bypass 4 ms (Typical)
Waveform (Batt. Mode) Pure Sinewave
EFFICIENCY
To AC Mode 88% 89% 90%
To Battery Mode 83% 85% 88%
BATTERY
Standard Model
Battery Type 12 V / 9 AH 12 V / 9 AH 12 V / 9 AH
Numbers 2 4 6
Typical Recharge Time 4 hours recover to 90% capacity
Charging Current (max.) 1.0 A
Charging Voltage 27.4VDC ± 1% 54.7 VDC ±1% 82.1 VDC ±1%
INDICATORS
LCD Load level, Battery level, AC mode, Battery mode, Bypass mode, and Fault indicators
ALARM
Battery Mode Sounding every 4 seconds
Low Battery Sounding every second
Overload Sounding twice every second
Fault Continously sounding
PHYSICAL
Standard Model
Dimension, D x W x H (mm) 282 x 145 x 220 397 x 145 x 220 421 x 190 x 318
Net Weight (kgs) 9,8 17 27,6
ENVIRONMENT
Humidity 20-90 % RH @ 0- 40°C (non-condensing)
Noise Level Less than 50dBA @ 1 Meter
MANAGEMENT
Smart RS-232/USB Supports Windows 2000/2003/XP/Vista/2008/7/8, Linux, Unix, and MAC
Optional SNMP Power management from SNMP manager and web browser
Page 38

 Loading...