

Page 1
Page 2

Table of contents
2
Legal information . . . . . . . . . . . . . . . . . . . . . . . . . . . . . . . . . . . . 11
Operation environment . . . . . . . . . . . . . . . . . . . . . . . . . . . . . . . . . . . . . . . . . . . . . . . . 11
Health and safety information FCC. . . . . . . . . . . . . . . . . . . . . . . . . . . . . . . . . . . . . . 11
FCC/Industry Canada notice . . . . . . . . . . . . . . . . . . . . . . . . . . . . . . . . . . . . . . . . . . . . 12
Important health and safety precautions information . . . . . . . . . . . . . . . . . . . 13
Driving . . . . . . . . . . . . . . . . . . . . . . . . . . . . . . . . . . . . . . . . . . . . . . . . . . . . . . . . . . . . .14
Vehicles equipped with an air bag. . . . . . . . . . . . . . . . . . . . . . . . . . . . . . . . . . . 15
Electronic devices . . . . . . . . . . . . . . . . . . . . . . . . . . . . . . . . . . . . . . . . . . . . . . . . . . 15
Aircraft . . . . . . . . . . . . . . . . . . . . . . . . . . . . . . . . . . . . . . . . . . . . . . . . . . . . . . . . . . . . .16
Blasting areas . . . . . . . . . . . . . . . . . . . . . . . . . . . . . . . . . . . . . . . . . . . . . . . . . . . . . . 16
Potentially explosive atmospheres . . . . . . . . . . . . . . . . . . . . . . . . . . . . . . . . . . 16
Posted facilities. . . . . . . . . . . . . . . . . . . . . . . . . . . . . . . . . . . . . . . . . . . . . . . . . . . . . 17
Power supply. . . . . . . . . . . . . . . . . . . . . . . . . . . . . . . . . . . . . . . . . . . . . . . . . . . . . . . 17
Children. . . . . . . . . . . . . . . . . . . . . . . . . . . . . . . . . . . . . . . . . . . . . . . . . . . . . . . . . . . . 17
Emergency calls . . . . . . . . . . . . . . . . . . . . . . . . . . . . . . . . . . . . . . . . . . . . . . . . . . . . 18
Copyright information . . . . . . . . . . . . . . . . . . . . . . . . . . . . . . . . . . . . . . . . . . . . . . . . . 18
Proprietary Notices. . . . . . . . . . . . . . . . . . . . . . . . . . . . . . . . . . . . . . . . . . . . . . . . . . . . . 19
End User License agreement for Software . . . . . . . . . . . . . . . . . . . . . . . . . . . . . . . 21
Getting started . . . . . . . . . . . . . . . . . . . . . . . . . . . . . . . . . . . . . . 31
In the box. . . . . . . . . . . . . . . . . . . . . . . . . . . . . . . . . . . . . . . . . . . . . . . . . . . . . . . . . . . . . . 31
Insert the SIM card . . . . . . . . . . . . . . . . . . . . . . . . . . . . . . . . . . . . . . . . . . . . . . . . . . . . . 32
Insert the battery . . . . . . . . . . . . . . . . . . . . . . . . . . . . . . . . . . . . . . . . . . . . . . . . . . . . . . 34
Turn on your device for the first time . . . . . . . . . . . . . . . . . . . . . . . . . . . . . . . . . . . 35
Page 3

3
Enter owner information . . . . . . . . . . . . . . . . . . . . . . . . . . . . . . . . . . . . . . . . . . . . 36
Where to go next . . . . . . . . . . . . . . . . . . . . . . . . . . . . . . . . . . . . . . . . . . . . . . . . . . . 37
Basics . . . . . . . . . . . . . . . . . . . . . . . . . . . . . . . . . . . . . . . . . . . . . . . 38
Device at a glance. . . . . . . . . . . . . . . . . . . . . . . . . . . . . . . . . . . . . . . . . . . . . . . . . . . . . . 38
Home screen and Start menu. . . . . . . . . . . . . . . . . . . . . . . . . . . . . . . . . . . . . . . . . . . 40
Touchscreen . . . . . . . . . . . . . . . . . . . . . . . . . . . . . . . . . . . . . . . . . . . . . . . . . . . . . . . . . . .42
Opening and closing applications . . . . . . . . . . . . . . . . . . . . . . . . . . . . . . . . . . . 42
Scrolling . . . . . . . . . . . . . . . . . . . . . . . . . . . . . . . . . . . . . . . . . . . . . . . . . . . . . . . . . . . 43
Selecting . . . . . . . . . . . . . . . . . . . . . . . . . . . . . . . . . . . . . . . . . . . . . . . . . . . . . . . . . . . 45
Moving between folders . . . . . . . . . . . . . . . . . . . . . . . . . . . . . . . . . . . . . . . . . . . . 46
Aligning the touchscreen . . . . . . . . . . . . . . . . . . . . . . . . . . . . . . . . . . . . . . . . . . . 46
Keyboard . . . . . . . . . . . . . . . . . . . . . . . . . . . . . . . . . . . . . . . . . . . . . . . . . . . . . . . . . . . . . . 47
Keyboard keys. . . . . . . . . . . . . . . . . . . . . . . . . . . . . . . . . . . . . . . . . . . . . . . . . . . . . . 47
Navigation area keys. . . . . . . . . . . . . . . . . . . . . . . . . . . . . . . . . . . . . . . . . . . . . . . . 47
Onscreen keyboard. . . . . . . . . . . . . . . . . . . . . . . . . . . . . . . . . . . . . . . . . . . . . . . . . 48
Shortcuts. . . . . . . . . . . . . . . . . . . . . . . . . . . . . . . . . . . . . . . . . . . . . . . . . . . . . . . . . . . 49
Stereo headset with microphone . . . . . . . . . . . . . . . . . . . . . . . . . . . . . . . . . . . . . . . 50
Using your device with a TTY machine . . . . . . . . . . . . . . . . . . . . . . . . . . . . . . . . . . 51
Enabling TTY . . . . . . . . . . . . . . . . . . . . . . . . . . . . . . . . . . . . . . . . . . . . . . . . . . . . . . . 51
Disabling TTY . . . . . . . . . . . . . . . . . . . . . . . . . . . . . . . . . . . . . . . . . . . . . . . . . . . . . . 52
Applications . . . . . . . . . . . . . . . . . . . . . . . . . . . . . . . . . . . . . . . . . . . . . . . . . . . . . . . . . . . 52
Connections . . . . . . . . . . . . . . . . . . . . . . . . . . . . . . . . . . . . . . . . . . . . . . . . . . . . . . . . . . .56
Managing wireless connections . . . . . . . . . . . . . . . . . . . . . . . . . . . . . . . . . . . . . 56
USB connection . . . . . . . . . . . . . . . . . . . . . . . . . . . . . . . . . . . . . . . . . . . . . . . . . . . . 57
Page 4

4
Bluetooth . . . . . . . . . . . . . . . . . . . . . . . . . . . . . . . . . . . . . . . . . . . . . . . . . . . . . . . . . . 58
Wi-Fi . . . . . . . . . . . . . . . . . . . . . . . . . . . . . . . . . . . . . . . . . . . . . . . . . . . . . . . . . . . . . . . 59
Using the device as a modem . . . . . . . . . . . . . . . . . . . . . . . . . . . . . . . . . . . . . . . 60
Beaming . . . . . . . . . . . . . . . . . . . . . . . . . . . . . . . . . . . . . . . . . . . . . . . . . . . . . . . . . . . 62
Using an external antenna . . . . . . . . . . . . . . . . . . . . . . . . . . . . . . . . . . . . . . . . . . 63
Status indicators . . . . . . . . . . . . . . . . . . . . . . . . . . . . . . . . . . . . . . . . . . . . . . . . . . . . . . . 64
Alerts status indicators. . . . . . . . . . . . . . . . . . . . . . . . . . . . . . . . . . . . . . . . . . . . . . 64
Call status indicators. . . . . . . . . . . . . . . . . . . . . . . . . . . . . . . . . . . . . . . . . . . . . . . . 64
Messaging status indicators. . . . . . . . . . . . . . . . . . . . . . . . . . . . . . . . . . . . . . . . . 65
Network status indicators . . . . . . . . . . . . . . . . . . . . . . . . . . . . . . . . . . . . . . . . . . . 65
Battery status indicators . . . . . . . . . . . . . . . . . . . . . . . . . . . . . . . . . . . . . . . . . . . . 66
Synchronization status indicators . . . . . . . . . . . . . . . . . . . . . . . . . . . . . . . . . . . 66
Connectivity status indicators . . . . . . . . . . . . . . . . . . . . . . . . . . . . . . . . . . . . . . . 66
Battery . . . . . . . . . . . . . . . . . . . . . . . . . . . . . . . . . . . . . . . . . . . . . . . . . . . . . . . . . . . . . . . . 67
Charging the battery . . . . . . . . . . . . . . . . . . . . . . . . . . . . . . . . . . . . . . . . . . . . . . . 67
Making the battery last longer . . . . . . . . . . . . . . . . . . . . . . . . . . . . . . . . . . . . . . 68
Managing power settings. . . . . . . . . . . . . . . . . . . . . . . . . . . . . . . . . . . . . . . . . . . 69
Setting the backlight delay . . . . . . . . . . . . . . . . . . . . . . . . . . . . . . . . . . . . . . . . . 69
Caution: Battery safety. . . . . . . . . . . . . . . . . . . . . . . . . . . . . . . . . . . . . . . . . . . . . . 70
Memory card . . . . . . . . . . . . . . . . . . . . . . . . . . . . . . . . . . . . . . . . . . . . . . . . . . . . . . . . . . 72
Inserting a memory card . . . . . . . . . . . . . . . . . . . . . . . . . . . . . . . . . . . . . . . . . . . . 72
Removing a memory card. . . . . . . . . . . . . . . . . . . . . . . . . . . . . . . . . . . . . . . . . . . 73
Global Positioning System. . . . . . . . . . . . . . . . . . . . . . . . . . . . . . . . . . . . . . . . . . . . . . 73
Personalize your device . . . . . . . . . . . . . . . . . . . . . . . . . . . . . . . . . . . . . . . . . . . . . . . . 74
Ring tones and alerts . . . . . . . . . . . . . . . . . . . . . . . . . . . . . . . . . . . . . . . . . . . . . . . 74
Page 5

5
Time, alarms and regional options. . . . . . . . . . . . . . . . . . . . . . . . . . . . . . . . . . . 76
Appearance of the Home screen . . . . . . . . . . . . . . . . . . . . . . . . . . . . . . . . . . . . 77
Setting the text input method . . . . . . . . . . . . . . . . . . . . . . . . . . . . . . . . . . . . . . 79
Setting the shortcut keys . . . . . . . . . . . . . . . . . . . . . . . . . . . . . . . . . . . . . . . . . . . 79
Adjusting the scrolling speed . . . . . . . . . . . . . . . . . . . . . . . . . . . . . . . . . . . . . . . 80
Locking and unlocking the device . . . . . . . . . . . . . . . . . . . . . . . . . . . . . . . . . . . . . . 80
Locking the device with a password. . . . . . . . . . . . . . . . . . . . . . . . . . . . . . . . . 81
Changing or removing the password . . . . . . . . . . . . . . . . . . . . . . . . . . . . . . . . 82
Searching on your device . . . . . . . . . . . . . . . . . . . . . . . . . . . . . . . . . . . . . . . . . . . . . . 82
Care and maintenance . . . . . . . . . . . . . . . . . . . . . . . . . . . . . . . . . . . . . . . . . . . . . . . . . 82
Security . . . . . . . . . . . . . . . . . . . . . . . . . . . . . . . . . . . . . . . . . . . . . . . . . . . . . . . . . . . . . . . 84
Security recommendations . . . . . . . . . . . . . . . . . . . . . . . . . . . . . . . . . . . . . . . . . 84
Phone . . . . . . . . . . . . . . . . . . . . . . . . . . . . . . . . . . . . . . . . . . . . . . . 85
Making and receiving calls . . . . . . . . . . . . . . . . . . . . . . . . . . . . . . . . . . . . . . . . . . . . . 85
Making a call . . . . . . . . . . . . . . . . . . . . . . . . . . . . . . . . . . . . . . . . . . . . . . . . . . . . . . . 85
Answering or ignoring a call . . . . . . . . . . . . . . . . . . . . . . . . . . . . . . . . . . . . . . . . 86
Making a conference call. . . . . . . . . . . . . . . . . . . . . . . . . . . . . . . . . . . . . . . . . . . . 86
Handling multiple calls . . . . . . . . . . . . . . . . . . . . . . . . . . . . . . . . . . . . . . . . . . . . . 87
Making and receiving satellite calls . . . . . . . . . . . . . . . . . . . . . . . . . . . . . . . . . . . . . 88
Switching to the satellite network . . . . . . . . . . . . . . . . . . . . . . . . . . . . . . . . . . . 88
Using the Satellite Signal Optimizer . . . . . . . . . . . . . . . . . . . . . . . . . . . . . . . . . 90
Making a satellite call . . . . . . . . . . . . . . . . . . . . . . . . . . . . . . . . . . . . . . . . . . . . . . . 91
Satellite services . . . . . . . . . . . . . . . . . . . . . . . . . . . . . . . . . . . . . . . . . . . . . . . . . . . . . . .91
Setting and querying call barring for satellite calls . . . . . . . . . . . . . . . . . . . 92
Page 6

6
Querying caller ID status for satellite calls. . . . . . . . . . . . . . . . . . . . . . . . . . . . 93
Setting and querying call forwarding for satellite calls . . . . . . . . . . . . . . . 94
Cellular services. . . . . . . . . . . . . . . . . . . . . . . . . . . . . . . . . . . . . . . . . . . . . . . . . . . . . . . .95
Contacts. . . . . . . . . . . . . . . . . . . . . . . . . . . . . . . . . . . . . . . . . . . . . . . . . . . . . . . . . . . . . . . 96
Adding a contact . . . . . . . . . . . . . . . . . . . . . . . . . . . . . . . . . . . . . . . . . . . . . . . . . . . 97
Assigning a speed dial number to a contact . . . . . . . . . . . . . . . . . . . . . . . . . 97
Assigning a ring tone to a contact . . . . . . . . . . . . . . . . . . . . . . . . . . . . . . . . . . . 98
Finding a contact . . . . . . . . . . . . . . . . . . . . . . . . . . . . . . . . . . . . . . . . . . . . . . . . . . . 98
Call history. . . . . . . . . . . . . . . . . . . . . . . . . . . . . . . . . . . . . . . . . . . . . . . . . . . . . . . . . . . .100
Messaging. . . . . . . . . . . . . . . . . . . . . . . . . . . . . . . . . . . . . . . . . . 102
E-mail . . . . . . . . . . . . . . . . . . . . . . . . . . . . . . . . . . . . . . . . . . . . . . . . . . . . . . . . . . . . . . . .102
Setting up an e-mail account. . . . . . . . . . . . . . . . . . . . . . . . . . . . . . . . . . . . . . .102
Sending an e-mail . . . . . . . . . . . . . . . . . . . . . . . . . . . . . . . . . . . . . . . . . . . . . . . . .106
Setting permissions on an e-mail message . . . . . . . . . . . . . . . . . . . . . . . . . 107
Text messages . . . . . . . . . . . . . . . . . . . . . . . . . . . . . . . . . . . . . . . . . . . . . . . . . . . . . . . .107
Viewing, replying to and forwarding messages. . . . . . . . . . . . . . . . . . . . . . . . .108
Using a signature in messages. . . . . . . . . . . . . . . . . . . . . . . . . . . . . . . . . . . . . . . . .109
Moving or deleting messages . . . . . . . . . . . . . . . . . . . . . . . . . . . . . . . . . . . . . . . . .109
Deleting all text messages . . . . . . . . . . . . . . . . . . . . . . . . . . . . . . . . . . . . . . . . .110
Managing folders . . . . . . . . . . . . . . . . . . . . . . . . . . . . . . . . . . . . . . . . . . . . . . . . . . . . .110
Creating a new folder . . . . . . . . . . . . . . . . . . . . . . . . . . . . . . . . . . . . . . . . . . . . . .110
Renaming or deleting a folder. . . . . . . . . . . . . . . . . . . . . . . . . . . . . . . . . . . . . . 111
Managing messaging accounts . . . . . . . . . . . . . . . . . . . . . . . . . . . . . . . . . . . . . . . .111
Moving between accounts. . . . . . . . . . . . . . . . . . . . . . . . . . . . . . . . . . . . . . . . .111
Page 7

7
Changing account settings. . . . . . . . . . . . . . . . . . . . . . . . . . . . . . . . . . . . . . . . .111
Deleting an e-mail account . . . . . . . . . . . . . . . . . . . . . . . . . . . . . . . . . . . . . . . .112
Internet Explorer. . . . . . . . . . . . . . . . . . . . . . . . . . . . . . . . . . . . 113
Using the browser . . . . . . . . . . . . . . . . . . . . . . . . . . . . . . . . . . . . . . . . . . . . . . . . . . . .113
Camera. . . . . . . . . . . . . . . . . . . . . . . . . . . . . . . . . . . . . . . . . . . . . 115
Taking pictures . . . . . . . . . . . . . . . . . . . . . . . . . . . . . . . . . . . . . . . . . . . . . . . . . . . . . . .115
Picture settings . . . . . . . . . . . . . . . . . . . . . . . . . . . . . . . . . . . . . . . . . . . . . . . . . . . . . . .115
Recording video . . . . . . . . . . . . . . . . . . . . . . . . . . . . . . . . . . . . . . . . . . . . . . . . . . . . . .117
Video settings . . . . . . . . . . . . . . . . . . . . . . . . . . . . . . . . . . . . . . . . . . . . . . . . . . . . . . . .117
Media . . . . . . . . . . . . . . . . . . . . . . . . . . . . . . . . . . . . . . . . . . . . . . 119
Pictures & Videos. . . . . . . . . . . . . . . . . . . . . . . . . . . . . . . . . . . . . . . . . . . . . . . . . . . . . .119
Working with pictures . . . . . . . . . . . . . . . . . . . . . . . . . . . . . . . . . . . . . . . . . . . . .119
Working with videos. . . . . . . . . . . . . . . . . . . . . . . . . . . . . . . . . . . . . . . . . . . . . . .120
Managing pictures and videos . . . . . . . . . . . . . . . . . . . . . . . . . . . . . . . . . . . . .120
Windows Media. . . . . . . . . . . . . . . . . . . . . . . . . . . . . . . . . . . . . . . . . . . . . . . . . . . . . . .120
Library screen . . . . . . . . . . . . . . . . . . . . . . . . . . . . . . . . . . . . . . . . . . . . . . . . . . . . .121
Player screen . . . . . . . . . . . . . . . . . . . . . . . . . . . . . . . . . . . . . . . . . . . . . . . . . . . . . .122
Now Playing screen. . . . . . . . . . . . . . . . . . . . . . . . . . . . . . . . . . . . . . . . . . . . . . . .122
Calendar, tasks, and notes . . . . . . . . . . . . . . . . . . . . . . . . . . . 124
Calendar. . . . . . . . . . . . . . . . . . . . . . . . . . . . . . . . . . . . . . . . . . . . . . . . . . . . . . . . . . . . . .124
Using Calendar . . . . . . . . . . . . . . . . . . . . . . . . . . . . . . . . . . . . . . . . . . . . . . . . . . . .124
Scheduling an appointment . . . . . . . . . . . . . . . . . . . . . . . . . . . . . . . . . . . . . . .125
Page 8

8
Sending a meeting request . . . . . . . . . . . . . . . . . . . . . . . . . . . . . . . . . . . . . . . .125
Viewing a list of meeting participants . . . . . . . . . . . . . . . . . . . . . . . . . . . . . . 126
Tasks . . . . . . . . . . . . . . . . . . . . . . . . . . . . . . . . . . . . . . . . . . . . . . . . . . . . . . . . . . . . . . . . .127
Notes. . . . . . . . . . . . . . . . . . . . . . . . . . . . . . . . . . . . . . . . . . . . . . . . . . . . . . . . . . . . . . . . .128
Office applications . . . . . . . . . . . . . . . . . . . . . . . . . . . . . . . . . . 131
Word Mobile. . . . . . . . . . . . . . . . . . . . . . . . . . . . . . . . . . . . . . . . . . . . . . . . . . . . . . . . . .131
Creating a new document . . . . . . . . . . . . . . . . . . . . . . . . . . . . . . . . . . . . . . . . .131
Unsupported features in Word Mobile. . . . . . . . . . . . . . . . . . . . . . . . . . . . . . 132
Excel Mobile . . . . . . . . . . . . . . . . . . . . . . . . . . . . . . . . . . . . . . . . . . . . . . . . . . . . . . . . . .135
Creating a new workbook. . . . . . . . . . . . . . . . . . . . . . . . . . . . . . . . . . . . . . . . . .135
Unsupported features in Excel Mobile . . . . . . . . . . . . . . . . . . . . . . . . . . . . . . 136
PowerPoint Mobile. . . . . . . . . . . . . . . . . . . . . . . . . . . . . . . . . . . . . . . . . . . . . . . . . . . .139
Viewing a slide show. . . . . . . . . . . . . . . . . . . . . . . . . . . . . . . . . . . . . . . . . . . . . . .139
Unsupported content types for PowerPoint Mobile . . . . . . . . . . . . . . . . . 139
OneNote Mobile . . . . . . . . . . . . . . . . . . . . . . . . . . . . . . . . . . . . . . . . . . . . . . . . . . . . . .140
File and application management. . . . . . . . . . . . . . . . . . . . 142
File Explorer . . . . . . . . . . . . . . . . . . . . . . . . . . . . . . . . . . . . . . . . . . . . . . . . . . . . . . . . . .142
Task Manager . . . . . . . . . . . . . . . . . . . . . . . . . . . . . . . . . . . . . . . . . . . . . . . . . . . . . . . . .142
Synchronization . . . . . . . . . . . . . . . . . . . . . . . . . . . . . . . . . . . . 144
Setting up synchronization software. . . . . . . . . . . . . . . . . . . . . . . . . . . . . . . . . . . 145
Starting and stopping synchronization . . . . . . . . . . . . . . . . . . . . . . . . . . . . . . . . 146
Checking synchronization status . . . . . . . . . . . . . . . . . . . . . . . . . . . . . . . . . . . . . . 146
Synchronizing directly with Exchange Server . . . . . . . . . . . . . . . . . . . . . . . . . .147
Page 9

9
Changing synchronization settings for Exchange Server . . . . . . . . . . . . 147
Synchronizing with an Internet e-mail account. . . . . . . . . . . . . . . . . . . . . . . . . 148
Changing synchronization settings for an Internet e-mail account. . . 148
Synchronizing files . . . . . . . . . . . . . . . . . . . . . . . . . . . . . . . . . . . . . . . . . . . . . . . . . . . .149
Synchronizing favorites . . . . . . . . . . . . . . . . . . . . . . . . . . . . . . . . . . . . . . . . . . . . . . .150
Synchronizing with multiple computers . . . . . . . . . . . . . . . . . . . . . . . . . . . . . . .151
Changing synchronization settings . . . . . . . . . . . . . . . . . . . . . . . . . . . . . . . . . . . .152
Changing the information type settings . . . . . . . . . . . . . . . . . . . . . . . . . . . . 152
Changing the synchronization schedule and peak times . . . . . . . . . . . .153
Backing up and restoring. . . . . . . . . . . . . . . . . . . . . . . . . . . . . . . . . . . . . . . . . . . . . .154
System settings . . . . . . . . . . . . . . . . . . . . . . . . . . . . . . . . . . . . . 156
Software update . . . . . . . . . . . . . . . . . . . . . . . . . . . . . . . . . . . . . . . . . . . . . . . . . . . . . .158
Configuring settings for automatic software updates . . . . . . . . . . . . . . .158
Performing a manual update. . . . . . . . . . . . . . . . . . . . . . . . . . . . . . . . . . . . . . .158
Troubleshooting . . . . . . . . . . . . . . . . . . . . . . . . . . . . . . . . . . . . 160
General. . . . . . . . . . . . . . . . . . . . . . . . . . . . . . . . . . . . . . . . . . . . . . . . . . . . . . . . . . . . . . .160
The device does not respond . . . . . . . . . . . . . . . . . . . . . . . . . . . . . . . . . . . . . .160
The touchscreen is not responding accurately . . . . . . . . . . . . . . . . . . . . . .160
The touchscreen remains active when keyboard is locked . . . . . . . . . . .161
Wi-Fi connection does not work. . . . . . . . . . . . . . . . . . . . . . . . . . . . . . . . . . . .161
Phone . . . . . . . . . . . . . . . . . . . . . . . . . . . . . . . . . . . . . . . . . . . . . . . . . . . . . . . . . . . . . . . .161
Cannot make or receive cellular calls . . . . . . . . . . . . . . . . . . . . . . . . . . . . . . .161
Cannot make or receive satellite calls. . . . . . . . . . . . . . . . . . . . . . . . . . . . . . .162
No sounds available . . . . . . . . . . . . . . . . . . . . . . . . . . . . . . . . . . . . . . . . . . . . . . .163
Page 10

10
Synchronization . . . . . . . . . . . . . . . . . . . . . . . . . . . . . . . . . . . . . . . . . . . . . . . . . . . . . .163
Index. . . . . . . . . . . . . . . . . . . . . . . . . . . . . . . . . . . . . . . . . . . . . . . 165
Technical specifications . . . . . . . . . . . . . . . . . . . . . . . . . . . . . 174
Page 11

11
Legal information
Operation environment
For body worn operation, this phone has been tested to meet RF exposure
guidelines when used with an accessory that contains no metal and which
positions the handset a minimum of 1.5 centimeters (5/8 inch) from the
body. Use of other accessories may not ensure compliance with RF exposure
guidelines.
This device and its antenna must not be co-located or operating in conjunction
with any other antenna or transmitter.
Health and safety information FCC
This EUT has been shown to be capable of compliance for localized specific
absorption rate (SAR) for uncontrolled environment/general population
exposure limits specified in ANSI/IEEE Std. C95.1-1992 and had been tested
in accordance with the measurement procedures specified in FCC/OET
Bulletin 65 Supplement C (2001) and IEEE Std. 1528-2003 Ministry of Health
(Canada), Safety Code 6. The standards include a substantial safety margin
designed to assure the safety of all persons, regardless of age and health.
The exposure standard for wireless mobile phones employs a unit of
measurement known as the Specific Absorption Rate, or SAR. The SAR limit
set by the FCC is 1.6W/kg*.
The highest SAR value reported under these guidelines when use at the ear
is 1.230 W/kg and when correctly worn on the body is 0.950 W/kg.
Page 12

Legal information 12
* In the U.S. and Canada, the SAR limit for mobile phones used by the public is
1.6 watts/kg (W/kg) averaged over one gram of tissue. The standard
incorporates a substantial margin of safety to give additional protection for the
public and to account for any variations in.
FCC/Industry Canada notice
Operation is subject to the following two conditions: (1) this device may not
cause interference, and (2) this device must accept any interference,
including interference that may cause undesired operation of the device.
This device complies with part 15 of the FCC Rules. Operation is subject to
the following two conditions: (1) This device may not cause harmful
interference, and (2) this device must accept any interference received,
including interference that may cause undesired operation. Any changes or
modifications not expressly approved by Elektrobit Inc. could void the user's
authority to operate the equipment.
In USA territories, this equipment is intended for use only with internal
antenna. The use of the device with external antennas is forbidden except
for those antennas included in the FCC filing. For pre-approved external
antennas please visit FCC website and search by the FCC ID of the device:
https://fjallfoss.fcc.gov/oetcf/eas/reports/GenericSearch.cfm
This equipment has been tested and found to comply with the limits for a
Class B digital device, pursuant to part 15 of the FCC Rules. These limits are
designed to provide reasonable protection against harmful interference in a
residential installation. This equipment generates, uses and can radiate
radio frequency energy and, if not installed and used in accordance with the
Page 13

Legal information 13
instructions, may cause harmful interference to radio communications.
However, there is no guarantee that interference will not occur in a
particular installation. If this equipment does cause harmful interference to
radio or television reception, which can be determined by turning the
equipment off and on, the user is encouraged to try to correct the
interference by one or more of the following measures:
• Reorient or relocate the receiving antenna.
• Increase the separation between the equipment and receiver.
• Connect the equipment into an outlet on a circuit different from that to
which the receiver is connected.
• Consult the dealer or an experienced radio/TV technician for help.
Important health and safety precautions information
When using this product, the safety precautions below must be taken to
avoid possible legal liabilities and damages. Retain and follow all product
safety and operating instructions. Observe all warnings in the operating
instructions on the product.
DANGER Only use the batteries, antennas, and chargers approved by Terre-
Star. The use of any other type may be dangerous.
DANGER Allow only authorized personnel to service the phone and its acces-
sories. Unauthorized service can invalidate the warranty.
Page 14

Legal information 14
CAUTION Any modification to this product is prohibited and will void your
warranty. The opening of the unit and use of the components for purposes
not otherwise authorized by this document, including any use in airplanes
or any other Aviation application, is prohibited and will void your warranty.
CAUTION Permanent hearing loss may occur if earphones or headphones are
used at high volume for prolonged periods of time.
NOTE When using your device for prolonged periods of time, such as when
you’re talking on the phone, charging the battery or browsing the web, the
device may become warm. In most cases, this condition is normal and therefore should not be interpreted as a problem with the device.
NOTE Always create a backup of data you want to keep (such as contacts and
calendar notes) before sending your device to a service facility.
Driving
• Check the laws and regulations on the use of mobile phones in the area
where you drive. If you are going to use your phone while driving, please:
– Give full attention to driving.
– Use a Handsfree Solution, if available. Law in many countries requires
vehicle Handsfree Solution. Read the installation instructions carefully before installing a vehicle Handsfree Solution.
– Pull off the road and park before making or answering a call if driving
conditions so require.
Page 15

Legal information 15
• RF energy may affect some electronic systems in motor vehicles such as
car stereo, safety equipment etc. In addition, some vehicle manufacturers do not allow use of mobile phones, unless the installation is
supported by a handsfree kit with an external antenna, in their vehicles.
Check with your vehicle manufacturer's representative to be sure that
your mobile phone will not affect the electronic systems in your vehicle.
Vehicles equipped with an air bag
An air bag inflates with great force. Do not place objects, including either
installed or portable wireless equipment, in the area over the air bag or in
the air bag deployment area. If in-vehicle wireless equipment is improperly
installed and the air bag inflates, serious injury could result.
Electronic devices
Most modern electronic equipment, for example equipment in hospitals
and cars, is shielded from RF energy. However, certain electronic equipment
is not, therefore: Do not use your mobile phone near medical equipment
without requesting permission. Mobile phones may affect the operation of
some implanted cardiac pacemakers and other medically implanted
equipment. Pacemaker patients should be aware that the use of a mobile
phone very close to a pacemaker might cause the device to malfunction.
Avoid placing the phone over the pacemaker, i.e. in your breast pocket.
When using the phone, place it at your ear opposite the pacemaker. If a
minimum distance of 6 inches (15 cm) is kept between the phone and the
pacemaker, the risk of interference is limited. If you have any reason to
suspect that interference is taking place, immediately turn off your phone.
Page 16

Legal information 16
Contact your cardiologist for more information. Some hearing aids might be
disturbed by mobile phones. In the event of such disturbance, you may want
to consult your service provider, or call the customer service line to discuss
alternatives.
Aircraft
• Turn off your mobile phone before boarding any aircraft.
• Do not use it on the ground without crew permission.
• To prevent interference with communication systems, you must not use
your mobile phone while the plane is in the air.
Blasting areas
Turn off your mobile phone when in a blasting area or in areas posted “turn
off two-way radio” to avoid interfering with blasting operations.
Construction crews often use remote control RF devices to set off explosives.
Potentially explosive atmospheres
Turn off your mobile phone when in any area with a potentially explosive
atmosphere. It is rare, but your phone or its accessories could generate
sparks. Sparks in such areas could cause an explosion or fire resulting in
bodily injury or even death. Areas with a potentially explosive atmosphere
are often, but not always, clearly marked. They include fuelling areas, such as
petrol stations, below deck on boats, fuel or chemical transfer or storage
facilities, and areas where the air contains chemicals or particles, such as
grain, dust, or metal powders. Do not transport or store flammable gas,
Page 17

Legal information 17
liquid, or explosives in the compartment of your vehicle, which contains
your mobile phone and accessories.
Posted facilities
Turn your phone OFF in any facility where posted notices so require. Turn off
your device whenever directed by warning signs or instructions.
Power supply
• Connect AC (Power supply) only to designated power sources as marked
on the product.
• To reduce risk of damage to the electric cord, remove it from the outlet
by holding onto the AC adapter rather than the cord.
• Make sure the cord is positioned so that it will not be stepped on, tripped
over or otherwise subjected to damage or stress.
• To reduce risk of electric shock, unplug the unit from any power source
before attempting to clean it.
• The charger must not be used outdoors or in damp areas.
Children
Do not allow children to play with your mobile phone since it contains small
parts that could become detached and create a choking hazard.
Page 18

Legal information 18
Emergency calls
IMPORTANT This phone, like any mobile phone, operates using radio signals,
cellular, satellite and landline networks as well as user-programmed functions, which cannot guarantee connection under all conditions. Therefore
you should never rely solely upon any mobile phone for essential communications (e.g. medical emergencies). Remember, in order to make or receive
calls the phone must be switched on and in a service area with adequate
signal strength. Emergency calls may not be possible on the satellite or on
all cellular phone networks, or when certain network services and/or phone
features are in use. Check with your local service provider.
Some of the services mentioned in this manual are not supported by all
networks or by all service agreements. This also applies to the International
Emergency Number 112. Please contact your network operator or service
provider if you are in doubt whether you can use a particular service or not.
Copyright information
© 2010 TerreStar Networks, Inc. All rights reserved. The information
contained herein is subject to change without notice. TerreStar retains
ownership of and all other rights to the material expressed in this document.
Any reproduction of the content of this document without prior written
permission from TerreStar is prohibited. Product names, logos, brands and
other trademarks featured or referred to within this document are the
property of their respective owners.
Page 19

Legal information 19
The only warranties for TerreStar products and services are set forth in the
express warranty statements accompanying such products and services.
Nothing herein should be construed as constituting an additional warranty.
TerreStar shall not be liable for technical or editorial errors or omissions
contained herein.
Proprietary Notices
THIS PRODUCT IS LICENSED UNDER THE MPEG-4 VISUAL PATENT
PORTFOLIO LICENSE FOR THE PERSONAL AND NON-COMMERCIAL USE OF A
CONSUMER FOR (i) ENCODING VIDEO IN COMPLIANCE WITH THE MPEG-4
VISUAL STANDARD ("MPEG-4 VIDEO") AND/OR (ii) DECODING MPEG-4 VIDEO
THAT WAS ENCODED BY A CONSUMER ENGAGED IN A PERSONAL AND NONCOMMERCIAL ACTIVITY AND/OR WAS OBTAINED FROM A VIDEO PROVIDER
LICENSED BY MPEG LA TO PROVIDE MPEG-4 VIDEO. NO LICENSE IS
GRANTED OR SHALL BE IMPLIED FOR ANY OTHER USE. ADDITIONAL
INFORMATION INCLUDING THAT RELATING TO PROMOTIONAL, INTERNAL
AND COMMERCIAL USES AND LICENSING MAY BE OBTAINED FROM MPEG
LA, LLC. SEE HTTP://WWW.MPEGLA.COM.
THIS PRODUCT IS LICENSED UNDER THE AVC PATENT PORTFOLIO LICENSE
FOR THE PERSONAL AND NON-COMMERCIAL USE OF A CONSUMER TO (i)
ENCODE VIDEO IN COMPLIANCE WITH THE AVC STANDARD ("AVC VIDEO")
AND/OR (ii) DECODE AVC VIDEO THAT WAS ENCODED BY A CONSUMER
ENGAGED IN A PERSONAL AND NON-COMMERCIAL ACTIVITY AND/OR WAS
OBTAINED FROM A VIDEO PROVIDER LICENSED TO PROVIDE AVC VIDEO. NO
LICENSE IS GRANTED OR SHALL BE IMPLIED FOR ANY OTHER USE.
Page 20

Legal information 20
ADDITIONAL INFORMATION MAY BE OBTAINED FROM MPEG LA, L.L.C. SEE
HTTP://WWW.MPEGLA.COM.
This product is protected by certain intellectual property rights of Microsoft.
Use or distribution of such technology outside of this product is prohibited
without a license from Microsoft.
The AMBE+2™ voice compression software included in this product is
protected by intellectual property rights including patent rights, copyrights
and trade secrets of Digital Voice Systems, Inc. This voice compression
technology is licensed solely for use as is within the Communications
Equipment. US Patent Nos. 6,199,037, 6,161,089, 5,826,222, 5,754,974,
5,701,390, 5,715,365, 5,630,011, 5,649,050, 5,247,579, 5,870,405, and
5,226,084.
Supply of this product does not convey a license nor imply any right to
distribute MPEG Layer-3 compliant content created with this product in
revenue-generating broadcast systems (terrestrial, satellite, cable and/or
other distribution channels), streaming applications (via Internet, intranets
and/or other networks), other content distribution systems (pay-audio or
audio-on-demand applications and the like) or on physical media (compact
discs, digital versatile discs, semiconductor chips, hard drives, memory cards
and the like). An independent license for such use is required. For details,
please visit http://mp3licensing.com.
MPEG Layer-3 audio coding technology licensed from Fraunhofer IIS and
Thomson.
Windows and the Windows logo are trademarks of the Microsoft group of
companies. The Bluetooth® word mark and logos are registered trademarks
Page 21

Legal information 21
owned by Bluetooth SIG, Inc. and any use of such marks is under license. The
Wi-Fi CERTIFIED Logo is a certification mark of the Wi-Fi Alliance. Other
trademarks and trade names are those of their respective owners.
End User License agreement for Software
IMPORTANT. READ CAREFULLY: This End User License Agreement
("EULA") is a legal agreement between (a) you and (b) TerreStar Networks Inc.
("TerreStar") and Elektrobit Inc. ("Company"). This EULA applies to the
software included on this device. The software also includes any separate
media on which you received the software. The software on this device
includes software licensed from Microsoft Corporation or its affiliate
("Microsoft") and other third parties. This EULA also applies to any printed
materials, electronic documentation, updates, supplements, Internet-based
services, and support services for this software, unless other terms
accompany those items. If so, those terms apply.
As described below, using some features also operates as your consent
to the transmission of certain standard computer information for
Internet-based services.
By installing, copying, downloading, accessing or otherwise using the
software, including use on this device, you agree to be bound by the
terms of this EULA. If you do not accept the terms in this EULA, do not
use the device or software. Instead, contact your place of purchase to
determine its return policy for a refund or credit.
WARNING: IF THE SOFTWARE CONTAINS VOICE OPERATED TECHNOLOGIES,
THEN OPERATING THIS SOFTWARE REQUIRES USER ATTENTION. DIVERTING
Page 22

Legal information 22
ATTENTION AWAY FROM THE ROAD WHILE DRIVING CAN POSSIBLY CAUSE
AN ACCIDENT OR OTHER SERIOUS CONSEQUENCE. EVEN OCCASIONAL,
SHORT DIVERSIONS OF ATTENTION CAN BE DANGEROUS IF YOUR
ATTENTION IS DIVERTED AWAY FROM YOUR DRIVING TASK AT A CRITICAL
TIME. TERRESTAR, COMPANY AND THEIR LICENSORS AND SUPPLIERS MAKE
NO REPRESENTATIONS, WARRANTIES OR OTHER DETERMINATIONS THAT
ANY USE OF THIS SOFTWARE IS LEGAL, SAFE, OR IN ANY MANNER
RECOMMENDED OR INTENDED WHILE DRIVING OR OTHERWISE OPERATING
A MOTOR VEHICLE.
If you comply with the terms of this EULA, you have the rights below.
1.USE RIGHTS. You may use the software on the single device with which
you acquired the software.
2.ADDITIONAL LICENSING REQUIREMENTS AND/OR USE RIGHTS.
a.Specific Use. You may only use the software for the specific use the device
was designed for.
b.Included Microsoft Programs and Additional Required Licenses.
Except as provided below, the terms of this EULA apply to all Microsoft
programs included with the software. If the license terms with any of those
programs give you other rights that do not expressly conflict with the terms
of this EULA, you also have those rights.
i.This EULA does not grant you any rights with respect to the Windows
Mobile Device Center, Microsoft ActiveSync or Microsoft Outlook 2007 Trial
which are subject to the licenses accompanying those items.
Page 23

Legal information 23
c.Speech Recognition. If the software includes speech recognition
component(s), you understand that speech recognition is an inherently
statistical process and that recognition errors are inherent in the process.
TerreStar, Company or their third party licensors and suppliers shall not be
liable for any damages arising out of errors in the speech recognition
process.
d.Phone Functionality. If the software includes phone functionality, all or
certain portions of the software may be inoperable if you do not have and
maintain a service account with a wireless telecommunication carrier
("Mobile Operator"), or if the Mobile Operator's network is not operating or
configured to operate with the device.
3.SCOPE OF LICENSE. The software is licensed, not sold. This EULA only
gives you some rights to use the software. TerreStar, Company and their
third party licensors and suppliers reserve all other rights. The software is
protected by copyright and other intellectual property laws and treaties.
TerreStar, Company or their third party licensors and suppliers own the title,
copyright and other intellectual property rights in the software. Unless
applicable law gives you more rights despite this limitation, you may use the
software only as expressly permitted in this EULA. In doing so, you must
comply with any technical limitations in the software that allow you to use it
only in certain ways. You may not work around any technical limitations in
the software or reverse engineer, decompile or disassemble the software or
alter, transfer, modify, incorporate into or with other software or create a
derivative work of any part of the software or make more copies of the
software than specified in this EULA or publish the software for others to
copy or rent, lease or lend the software or use the software for commercial
Page 24

Legal information 24
software hosting services or remove any proprietary, copyright, trade secret
or warning legends from software or copies.
Except as expressly provided in this EULA, rights to access the software on
this device do not give you any right to implement Microsoft patents or
other Microsoft intellectual property in software or devices that access this
device.
You may use remote access technologies in the software such as Remote
Desktop Mobile to access the software remotely from a computer or server.
You are responsible for obtaining any licenses required for use of the
protocols to access other software.
4.INTERNET-BASED SERVICES. Microsoft provides Internet-based services
with the software. Microsoft may change or cancel them at any time.
a.Consent for Internet-Based Services. The software features described
below connect to Microsoft or service provider computer systems over the
Internet. In some cases, you will not receive a separate notice when they
connect. You may switch off some of these features or not use them. For
more information about these features, visit http://go.microsoft.com/
fwlink/?LinkId=81931.
By using these features, you consent to the transmission of this
information. Microsoft does not use the information to identify or contact
you.
Device Information.
The following features use Internet protocols, which
send to the appropriate systems device information, such as your Internet
protocol address, the type of operating system, browser and name and
version of the software you are using, and the language code of the device
Page 25

Legal information 25
where you installed the software. Microsoft uses this information to make
the Internet-based services available to you.
• Windows Mobile Update Feature. The Windows Mobile Update feature
provides you the ability to obtain and install software updates on your
device if updates are available. You may choose not to use this feature.
TerreStar and/or your Mobile Operator may not support this feature or an
update for your device.
• Windows Media Digital Rights Management. Content owners use
Windows Media digital rights management technology (WMDRM) to
protect their intellectual property, including copyrights. This software
and third party software use WMDRM to play and copy WMDRMprotected content. If the software fails to protect the content, content
owners may ask Microsoft to revoke the software's ability to use WMDRM
to play or copy protected content. Revocation does not affect other
content. When you download licenses for protected content, you agree
that Microsoft may include a revocation list with the licenses. Content
owners may require you to upgrade WMDRM to access their content.
Microsoft software that includes WMDRM will ask for your consent prior
to the upgrade. If you decline an upgrade, you will not be able to access
content that requires the upgrade.
b.Misuse of Internet-based Services. You may not use these services in
any way that could harm them or impair anyone else's use of them. You may
not use the services to try to gain unauthorized access to any service, data,
account or network by any means.
Page 26

Legal information 26
5.CONSENT TO USE OF DATA. You agree that TerreStar may collect and use
technical information gathered as part of the product support services
related to the software provided to you, if any. TerreStar may use this
information solely to improve its products or to provide customized services
or technologies to you and will not disclose this information in a form that
personally identifies you.
6.DIGITAL CERTIFICATES. The software uses digital certificates in X.509
format. These digital certificates are used for authentication.
7.CONNECTIVITY SOFTWARE. Your device package may include Windows
Mobile Device Center or Microsoft ActiveSync software. If it is included, then
you may install and use it in accordance with the license terms that are
provided with it. If no license terms are provided, then you may install and
use only one (1) copy of the software on a single computer.
8.NETWORK ACCESS. If you are using a network, such as an employer
network, the network administrator may limit features or functionality on
your device.
9.PRODUCT SUPPORT. Contact TerreStar for support options. Refer to the
support number provided with the device.
10.LINKS TO THIRD PARTY WEBSITES. If the software provides links to
third party websites, those links are provided to you only as a convenience,
and the inclusion of any link does not imply an endorsement of the third
party website by TerreStar, Company or Microsoft.
11.BACKUP COPY. You may make one backup copy of the software. You
may use it only to reinstall the software on the device.
Page 27

Legal information 27
12.PROOF OF LICENSE. If you acquired the software on the device, or on a
disc or other media, a genuine Certificate of Authenticity label with a
genuine copy of the software identifies licensed software. To be valid, this
label must be affixed to the device, or included on or in TerreStar's software
packaging. If you receive the label separately, it is not valid.
13.TRANSFER TO A THIRD PARTY. You may transfer the software only with
the device, the Certificate of Authenticity label, and the terms of this EULA
directly to a third party. Before the transfer, that party must agree that the
terms of this EULA apply to the transfer and use of the software. You may not
retain any copies of the software including the backup copy.
14.RESTRICTED USE. The software was designed for systems that do not
require fail-safe performance. You may not use the software in any device or
system in which a malfunction of the software would result in foreseeable
risk of injury or death to any person. This includes operation of nuclear
facilities, aircraft navigation or communication systems and air traffic
control.
15.NO WARRANTIES FOR THE SOFTWARE. The software is not fault
tolerant. The software is provided "as is". You expressly acknowledge
and agree that you bear all risks of using it and that the entire risk as to
satisfactory quality, performance, accuracy and effort is with you.
TerreStar, Company and their third party licensors and suppliers
(collectively referred to as the "Licensors" for the purposes of sections
15 and 16 only) give no express warranties, guarantees or conditions.
Any warranties you receive regarding the software do not originate
from, and are not binding on the Licensors. WHEN ALLOWED BY YOUR
LOCAL LAWS, THE LICENSORS HEREBY DISCLAIM ALL WARRANTIES
Page 28

Legal information 28
AND CONDITIONS WITH RESPECT TO THE SOFTWARE, EITHER EXPRESS,
IMPLIED OR STATUTORY, INCLUDING, BUT NOT LIMITED TO, THE
IMPLIED WARRANTIES AND/OR CONDITIONS OF MERCHANTABILITY,
SATISFACTORY QUALITY, FITNESS FOR A PARTICULAR PURPOSE AND
NON-INFRINGEMENT.
16.LIABILITY LIMITATIONS. Notwithstanding any damages you might
incur, you can recover from the Licensors only direct damages up to
fifty U.S. Dollars (U.S. $50.00), or equivalent in local currency. TO THE
MAXIMUM EXTENT PERMITTED BY APPLICABLE LAW, IN NO EVENT
SHALL THE LICENSORS BE LIABLE FOR ANY SPECIAL, INCIDENTAL,
INDIRECT, OR CONSEQUENTIAL DAMAGES WHATSOEVER (INCLUDING,
BUT NOT LIMITED TO, DAMAGES FOR LOSS OF PROFITS OR
CONFIDENTIAL OR OTHER INFORMATION, FOR BUSINESS
INTERRUPTION, FOR PERSONAL INJURY, FOR LOSS OF PRIVACY
ARISING OUT OF OR IN ANY WAY RELATED TO THE USE OF OR INABILITY
TO USE THE SOFTWARE, OR OTHERWISE IN CONNECTION WITH ANY
PROVISION OF THIS EULA).
This limitation applies to anything related to the software, services,
content (including code) on third party internet sites, or third party
programs, and claims for breach of contract, breach of warranty,
guarantee or condition, strict liability, negligence, or other tort to the
extent permitted by applicable law.
The foregoing limitations, exclusions and disclaimers (including
section 15) also apply even if the Licensors should have been aware of
the possibility of the damages and even if any remedy fails its essential
purpose. The above limitation may not apply to you because your
Page 29

Legal information 29
country may not allow the exclusion or limitation of incidental,
consequential or other damages.
17.EXPORT RESTRICTIONS. The software is subject to United States and
other countries export laws and regulations. You must comply with all
domestic and international export laws and regulations that apply to the
software. These laws include restrictions on destinations, end users and end
use. In particular, the software and related documentation and any
derivatives thereof are not to be (i) downloaded, exported, or re-exported
(including any "deemed export"), directly or indirectly, in violation of such
export laws or (ii) used for any purpose prohibited by the export laws. You
represent and warrant that you (i) are not listed on any U.S. Government list
of restricted or debarred entities, specially designated nationals, or blocked
or denied persons, any unverified list, or any similar list that would prevent
you from acquiring or licensing the software and documentation and (ii) are
not otherwise ineligible to acquire or license the software and
documentation.
18.U.S. GOVERNMENT END USERS. The software is licensed only with
"restricted rights" and as "commercial items" consisting of "commercial
software" and "commercial software documentation" and with only those
rights as are granted to all other end users pursuant to the terms and
conditions herein. Nothing in this EULA requires TerreStar, Company or their
licensors and suppliers to produce or furnish technical data for or to you.
19.TERMINATION. This EULA is effective until terminated. Your rights under
this EULA will terminate automatically without notice if you fail to comply
with any of the terms and conditions of this EULA. Upon termination of this
Page 30

Legal information 30
EULA, you shall cease all use of the software and destroy all copies, full or
partial, of the software.
20.ENTIRE AGREEMENT; SEVERABILITY. This EULA is the entire agreement
between you, TerreStar and Company relating to the software and
supersedes all prior or contemporaneous oral or written communications,
proposals and representations with respect to the software or any other
subject matter covered by this EULA. If any provision of this EULA is held to
be void, invalid, unenforceable or illegal, the other provisions shall continue
in full force and effect.
Page 31
31
Getting started
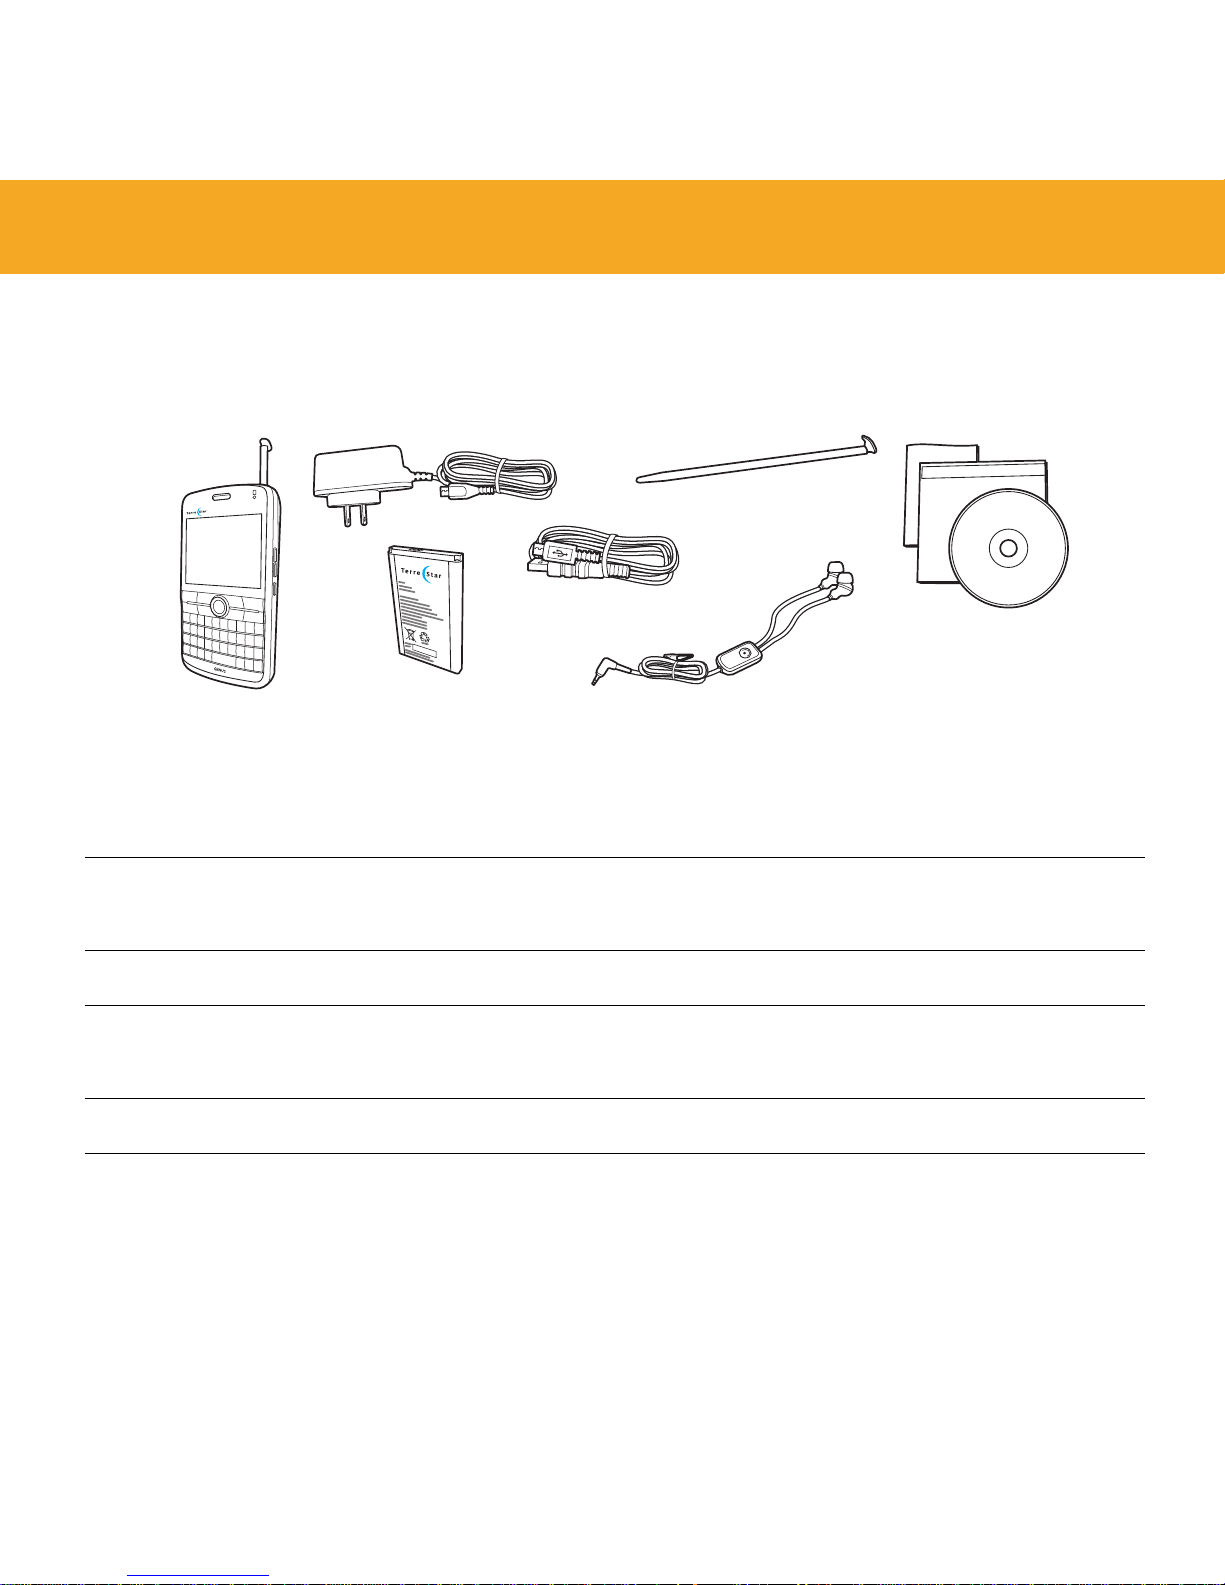
In the box
Device with
stylus
Navigate the touchscreen using the stylus located in
the upper-right corner on the back of the device.
Charger Attach the Micro-USB to your device and then plug into
a standard power outlet to charge your device.
Battery Insert the battery into your device.
USB cable Use the USB cable to connect your device to a computer
to synchronize data.
Spare stylus A spare stylus is provided for your convenience.
Stereo headset
with
microphone
Listen to music and phone calls using the stereo
headset, and talk using the built-in microphone. Press
the button on the headset to answer or end a call.
Spare stylus
Device with stylus
Documentation
Charger
Battery
Stereo headset with microphone
USB cable
Page 32
Getting started 32
Insert the SIM card
Your SIM card stores important information about your device and should
already be inserted in the back of the device. If you need to add or replace
the SIM card, follow these steps:
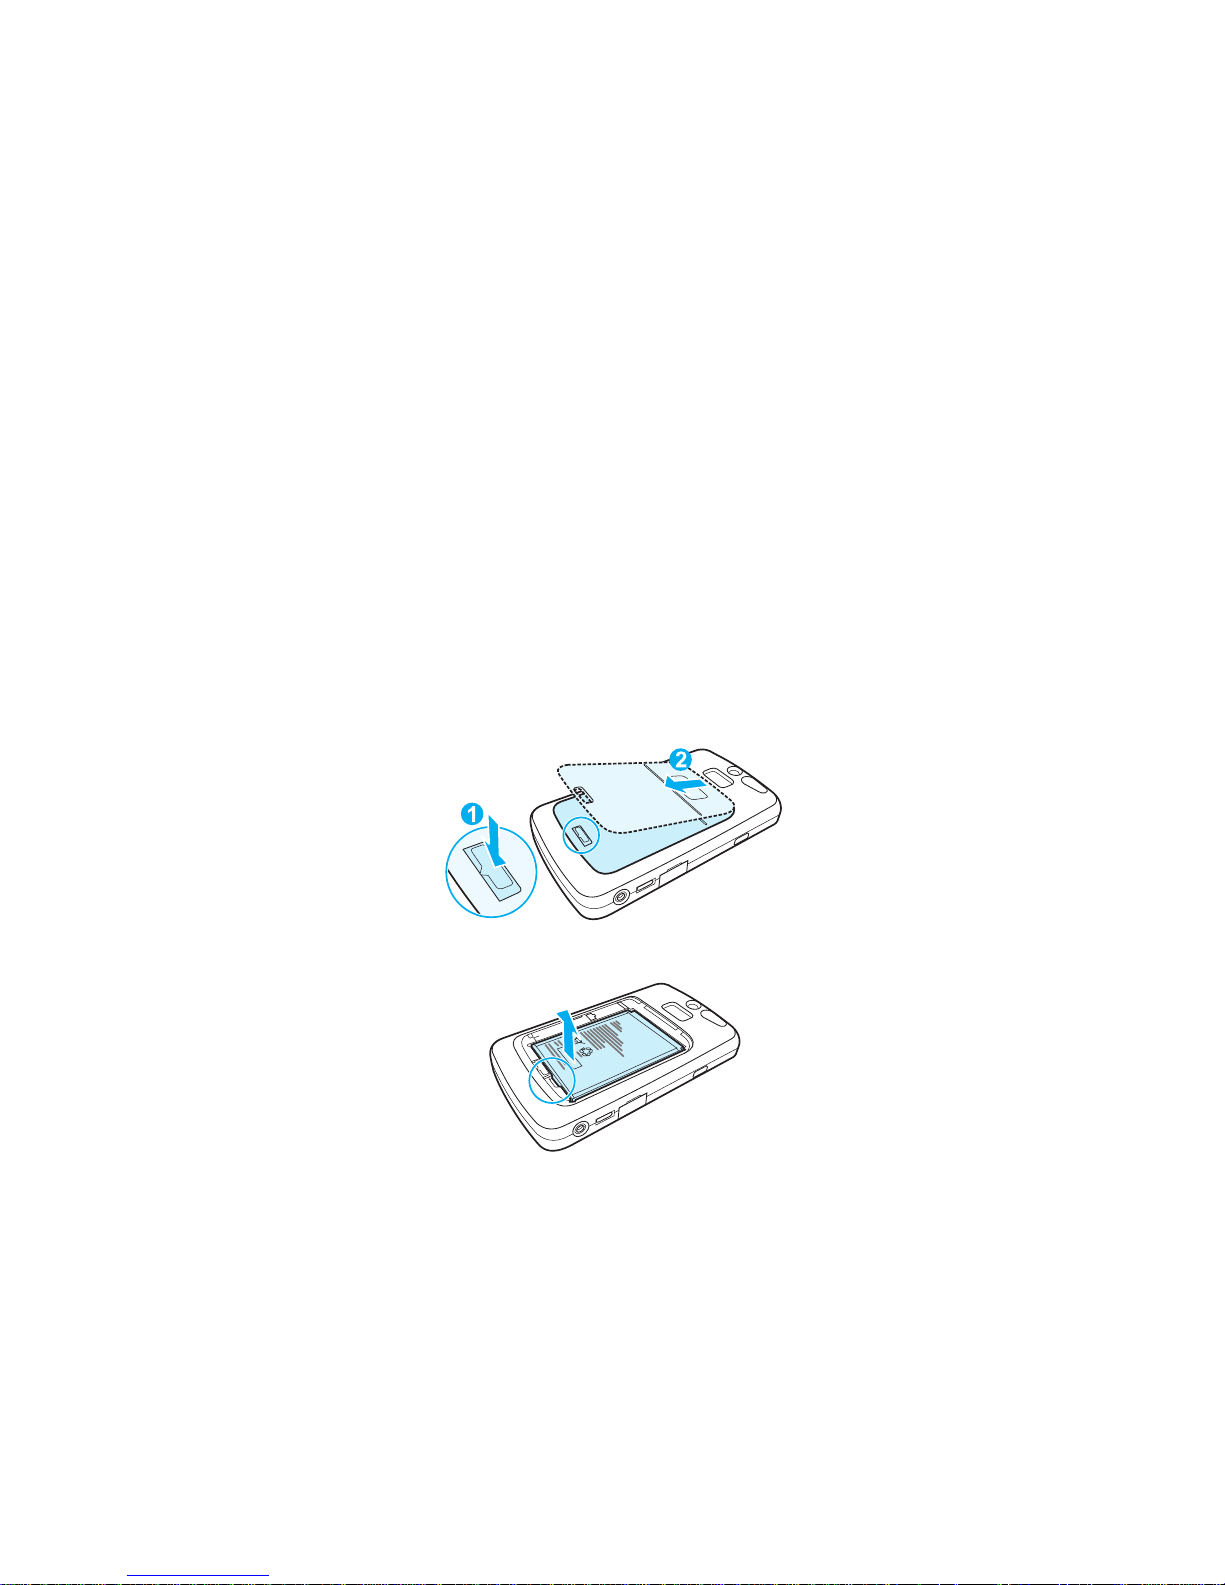
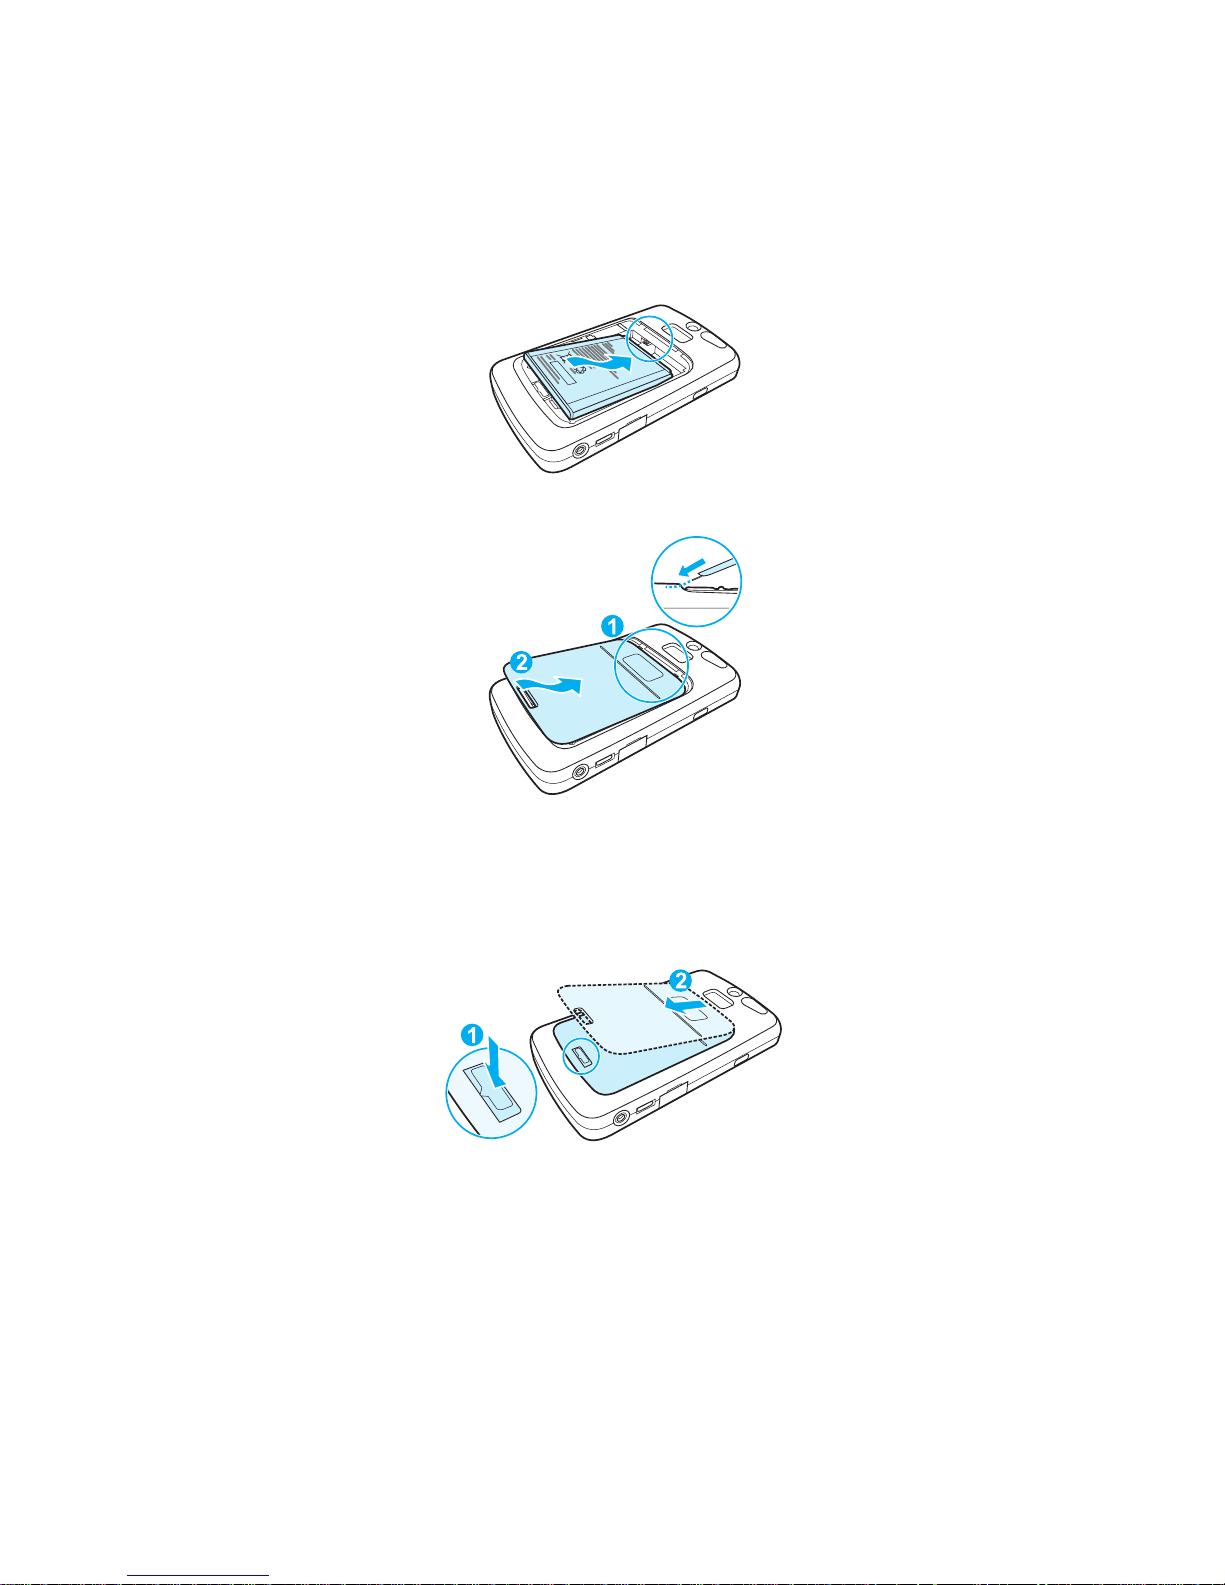
1. Press the cover release button and slide to remove the cover.
2. If the battery is inserted, lift the lower end of the battery and remove it.
Documentation See the Quick Start Guide, the CD-ROM containing the
User Guide, the Establishing a Satellite Connection
leaflet, and the Warranty card for more information on
your device.
Page 33
Getting started 33
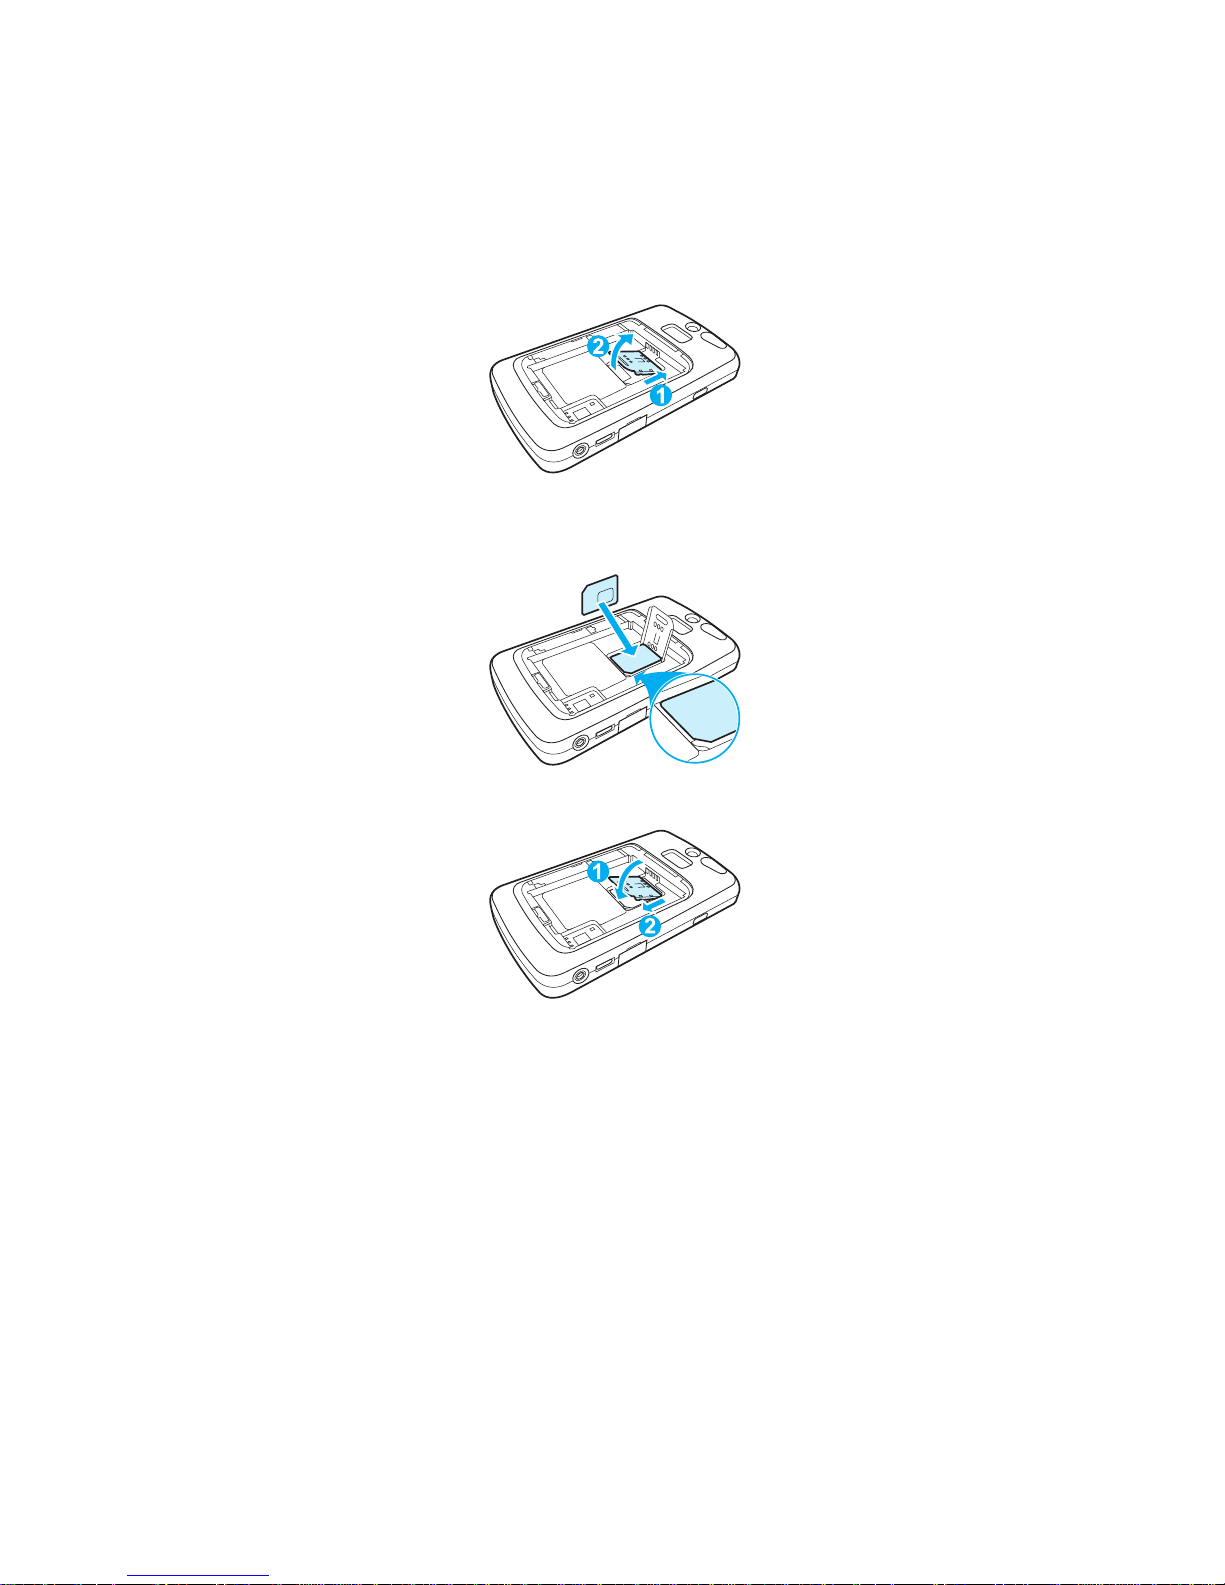
3. Open the SIM card door by sliding up and lifting it.
4. Insert the SIM card so that the metal contacts of the SIM card face down
and its cutoff corner points toward the bottom-right corner of the device.
5. Close the SIM card door and slide it down until it snaps into place.
Ensure the SIM card remains in place when closing the SIM card door.
6. Insert the battery so that the metal contacts of the battery align with the
metal contacts in the device and the battery sticker remains on top.
Page 34
Getting started 34
Press down the lower end of the battery.
7. Slide the cover until it snaps into place.
Insert the battery
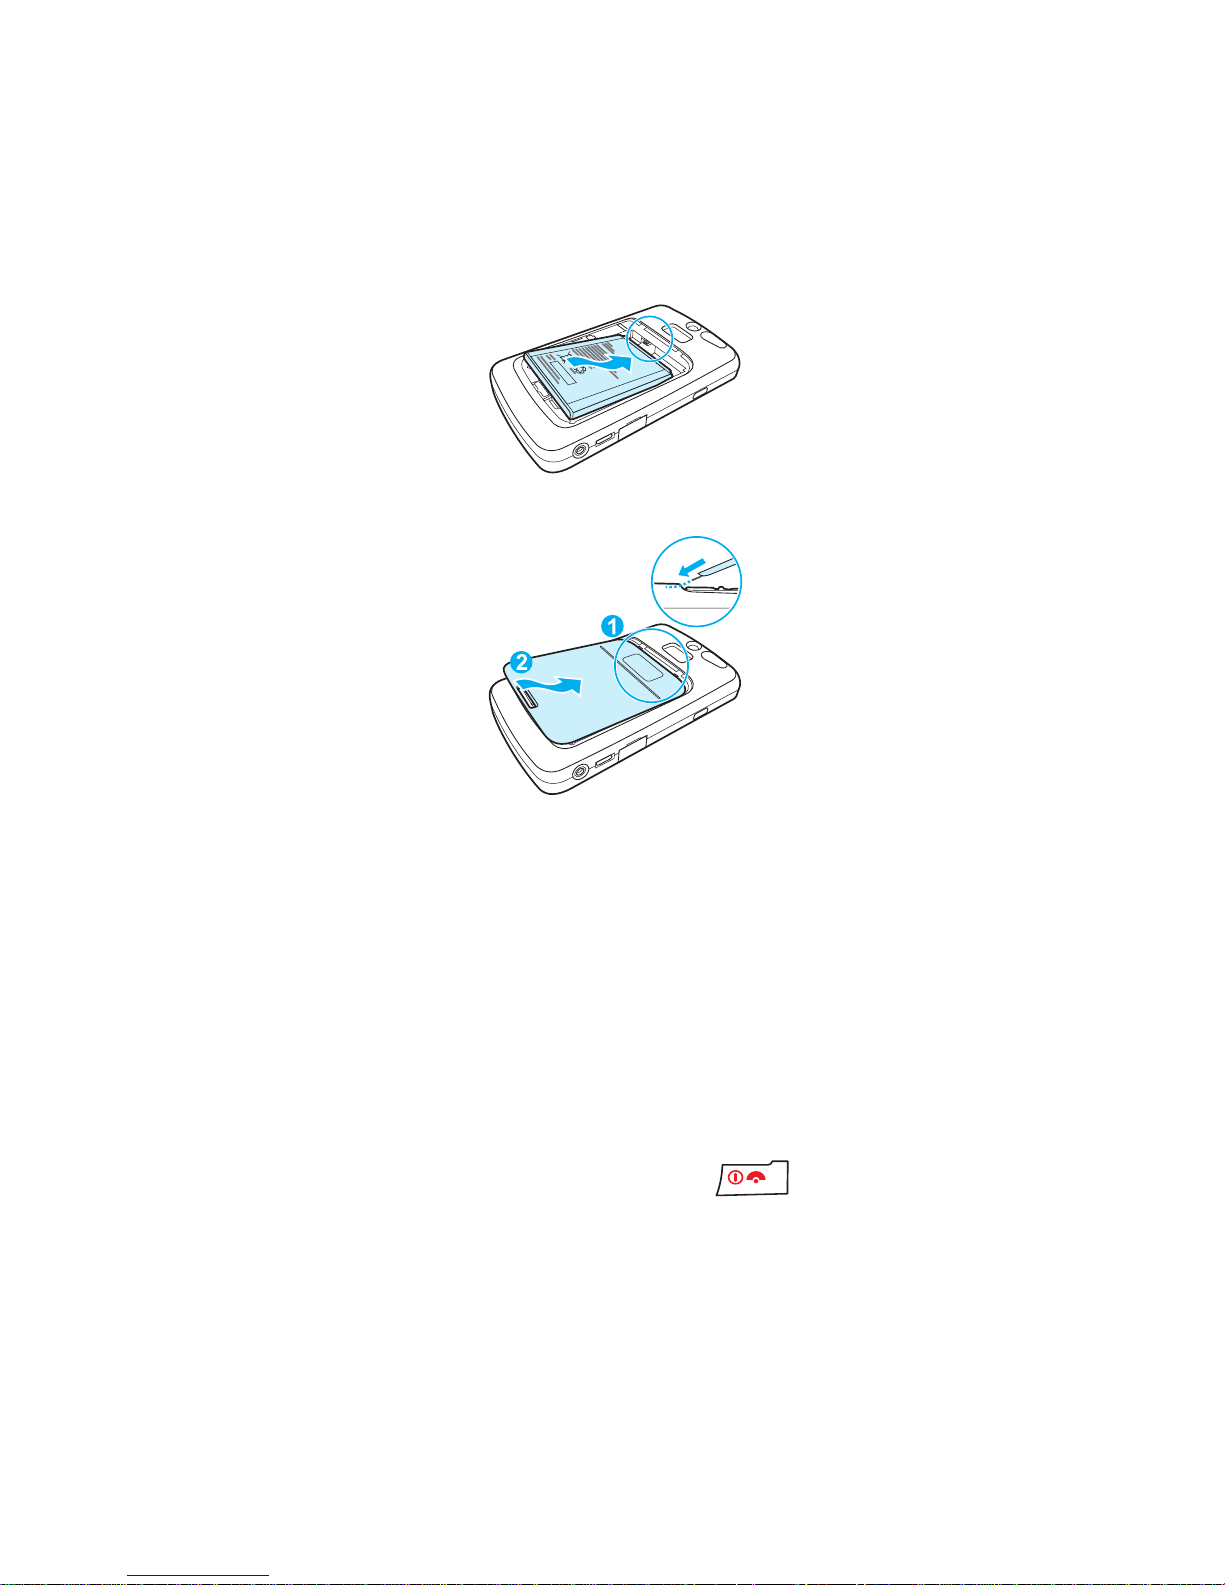
1. Press the cover release button and slide to remove the cover.
2. Insert the battery so that the metal contacts of the battery align with the
metal contacts in the device and the battery sticker remains on top.
Page 35
Getting started 35
Press down the lower end of the battery.
3. Slide the cover until it snaps into place.
The battery is shipped partially charged. Before using the device, it is
recommended that you fully charge the battery. For instructions, see
“Charging the battery” on page 67.
Use only the original device batteries. For more information, see “Caution:
Battery safety” on page 70.
Turn on your device for the first time
1. To turn on your device, press and release .
2. Select the default language on your device.
Page 36

Getting started 36
IMPORTANT Language selection is permanent, and once selected, you
will be able to use only that language on your device.
To set the language for your device, use the navigation key.
3. To align the touchscreen using the stylus, follow the onscreen instruc-
tions.
4. Set the time zone, date, and time for your device, and tap Next.
5. To set a password for your device, tap Next and follow the onscreen
instructions.
To set up the password for your device later, tap Skip. For more informa-
tion, see “Locking the device with a password” on page 81.
6. To set up e-mail for your device, tap Next and follow the onscreen
instructions.
To set up e-mail on your device later, tap Skip. For more information, see
“Setting up an e-mail account” on page 102.
7. The setup is now complete. Tap the screen to begin using your device.
Enter owner information
You can enter owner information which can assist in retrieving your device,
if you lose it.
1. Tap > Settings > Personal > Owner Information.
2. On the Identification tab, enter your personal information.
3. Press .
Page 37

Getting started 37
Where to go next
You have completed the basic setup and can start using your device. To learn
more about your device, see the following topics:
• To learn more about the basic features of your device, see “Basics” on
page 38.
• To set your device to your needs, see “Personalize your device” on page
74.
• To start using the phone, see “Phone” on page 85.
• To learn how to send e-mail and text messages, see “Messaging” on page
102.
• To turn off your device, press and hold . When asked whether you
want to switch off the device, tap Ye s .
Page 38
38
Basics
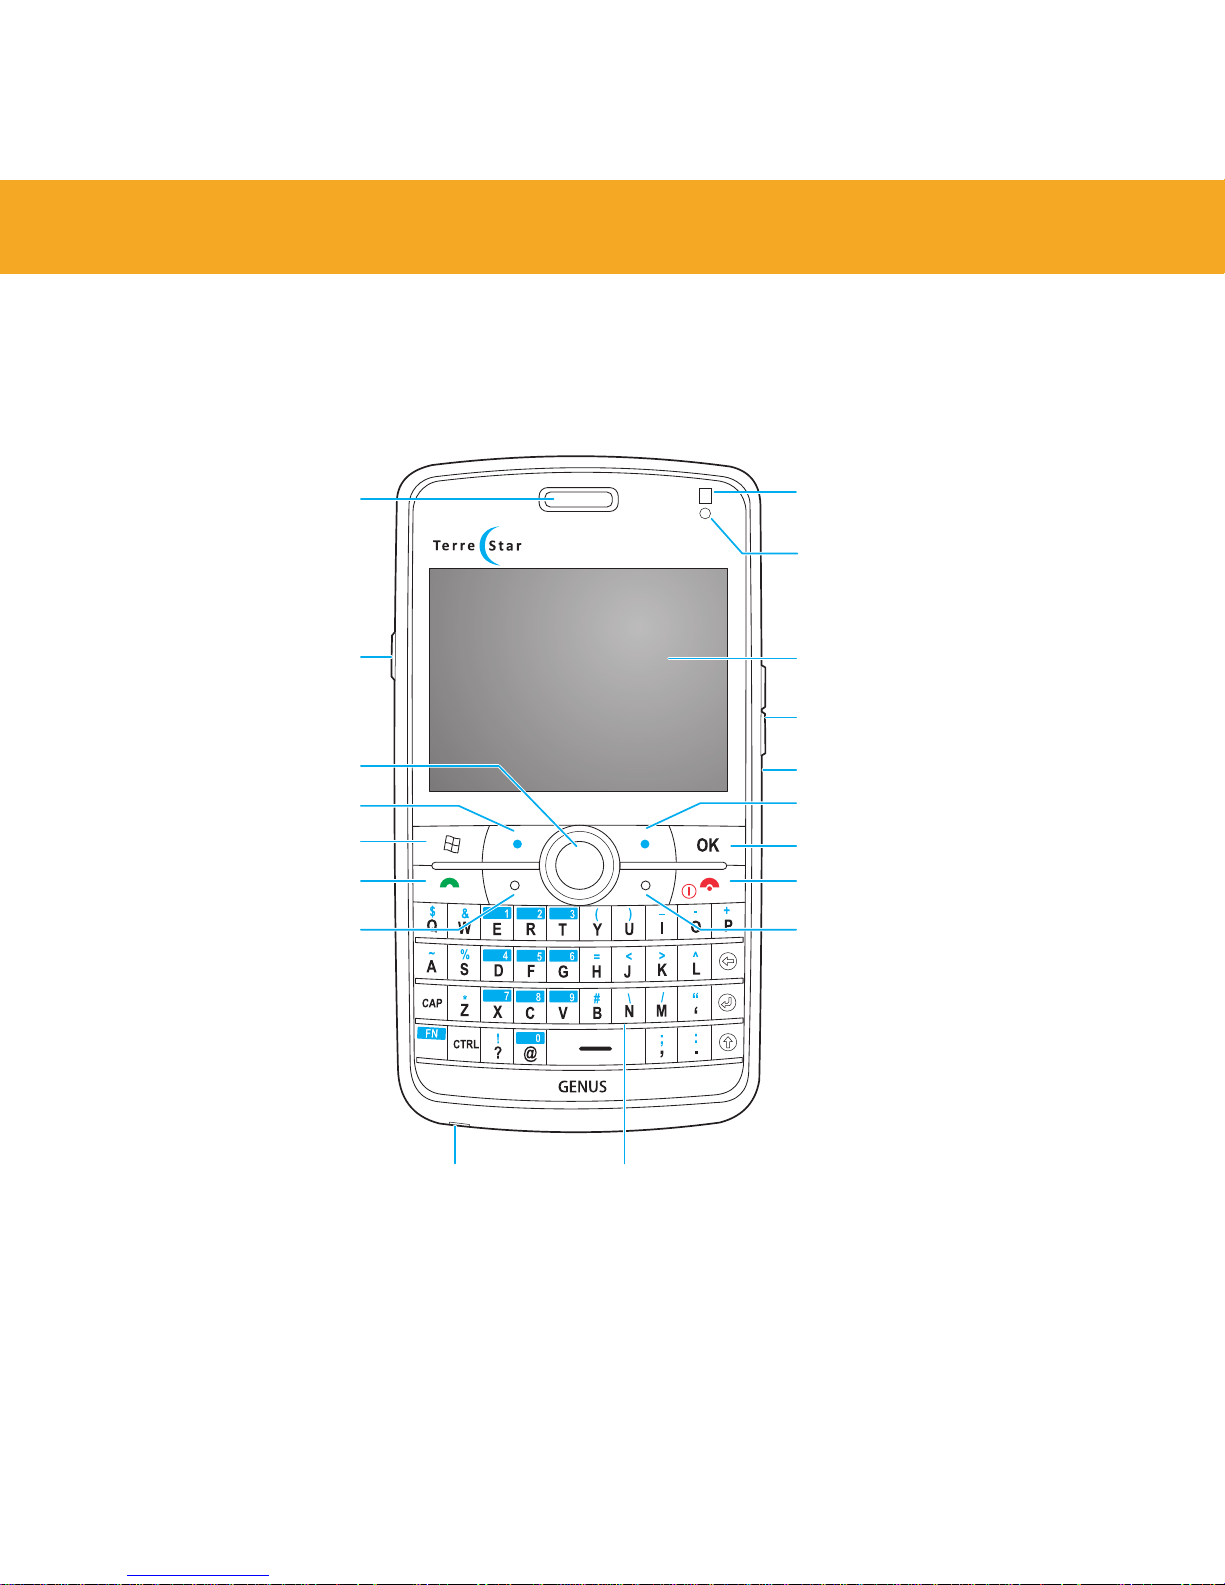
Device at a glance
Screen key
Windows key
Left soft key
Talk/send key
Left shortcut key
Microphone
Keyboard
Charging indicator
Volume up/down keys
Touchscreen
Mute key
Navigation key
OK key
Right soft key
End/power key
Right shortcut key
Earpiece
Light sensor
Page 39
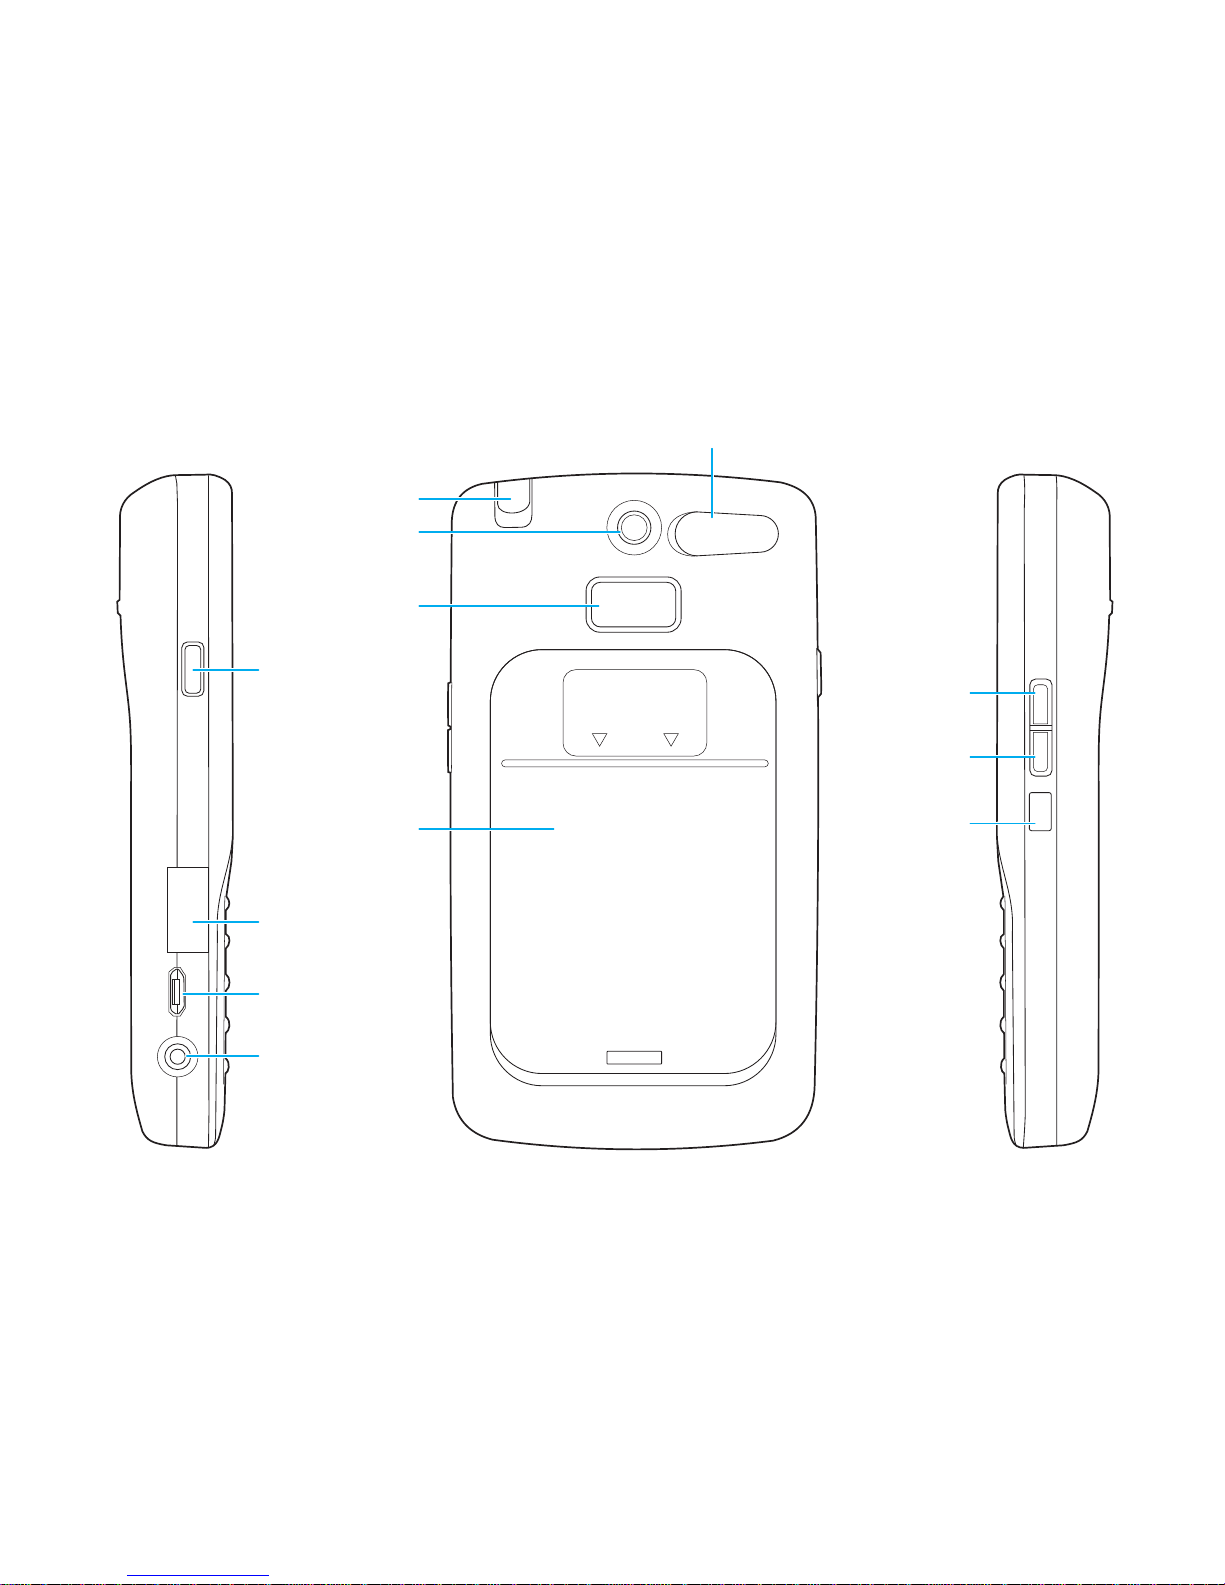
Basics 39
Screen key
MicroSD slot
Micro-USB
connector
Headphone
jack
Volume
Volume
up key
down key
Mute key
KEEP HAND BELOW
THIS LINE DURING
SATELLITE CALLS
Stylus
Speaker
Camera lens
External satellite antenna connector
Battery
cover
Page 40
Basics 40
Home screen and Start menu
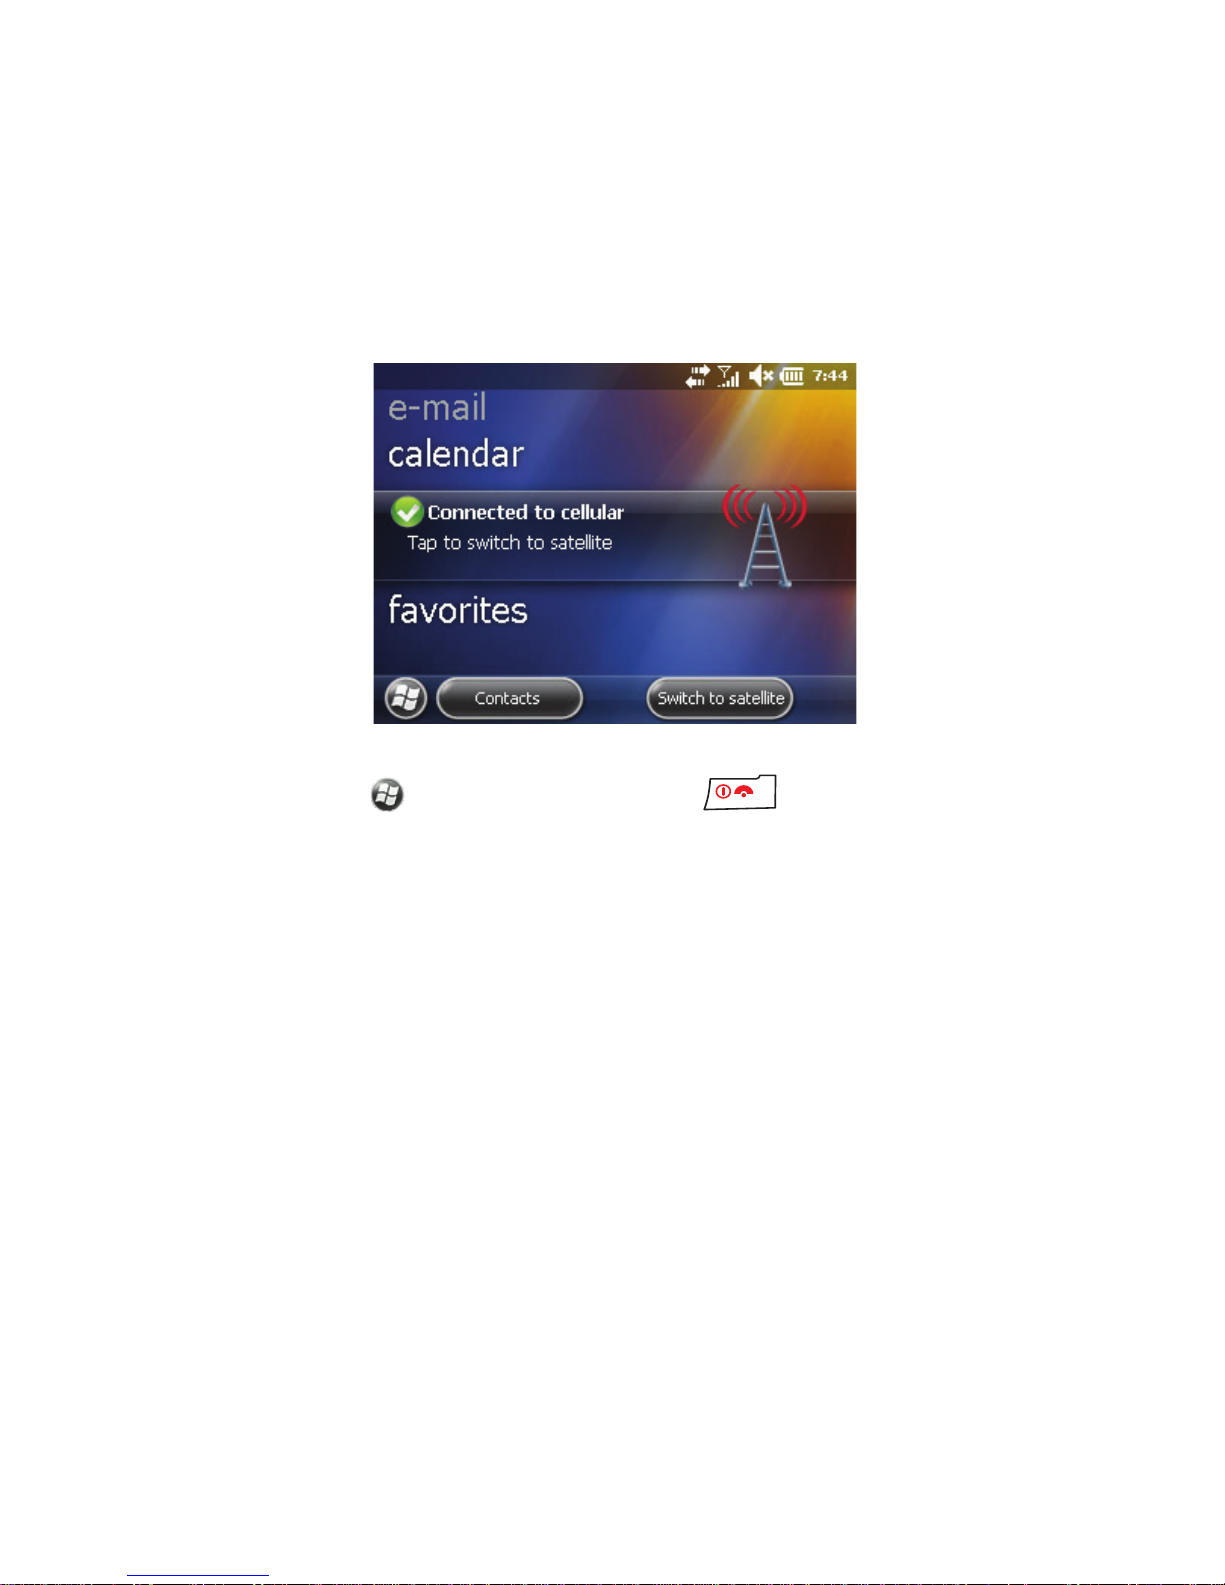
The Home screen is displayed when you turn on the device. You can also
access it by tapping > Home or pressing .
The Home screen contains shortcuts to the most frequently used
applications:
• Pictures: Browse photos and videos stored on your device
• Music: Flip through music albums and play songs
• Getting started: Perform basic tasks by using the Getting started assis-
tant
• Phone: Access the phone functionality
• Voicemail: Access your voicemail
• Clock: Set time and alarms
• Tex t: Read and send text messages
Page 41
Basics 41
• E-mail: Set up an e-mail account and send and receive e-mails
• Calendar: View and create appointments
• Cellular/Satellite: Switch between cellular and satellite network
• Favorites: Access your favorite websites directly from the Home screen
To customize the Home screen, see “Appearance of the Home screen” on
page 77.
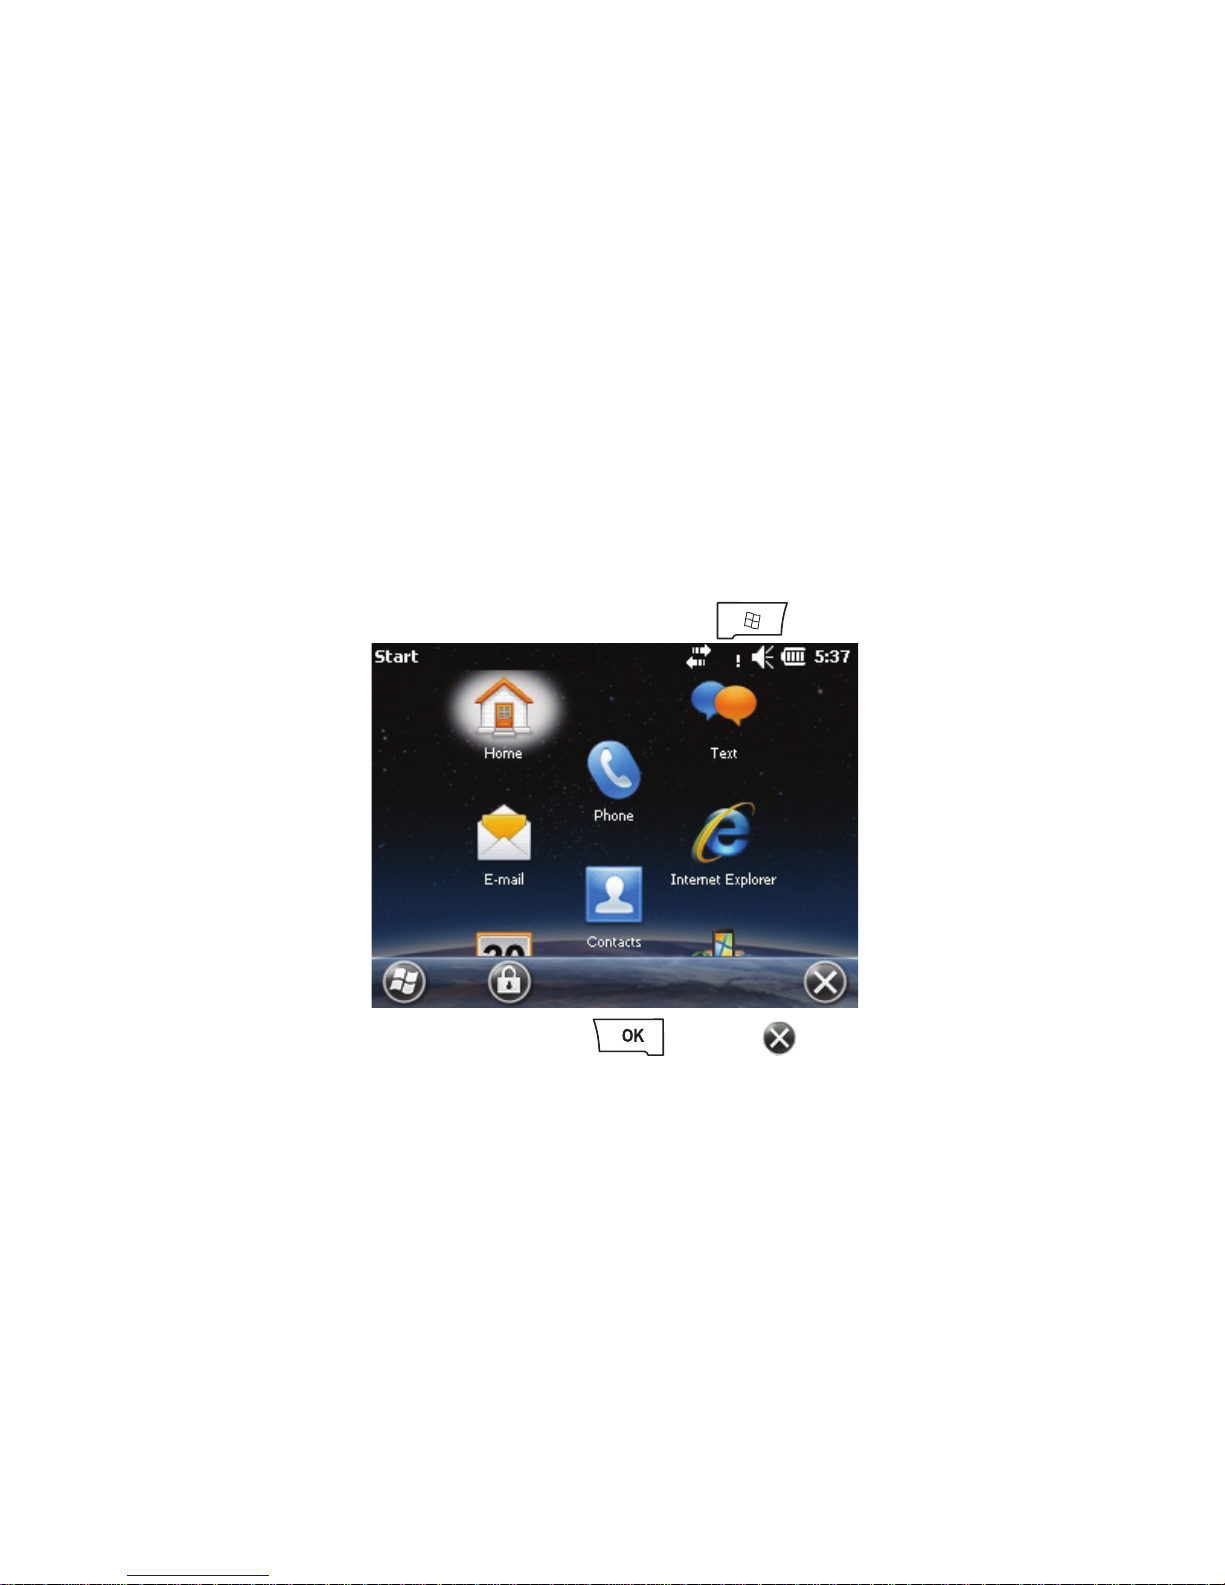
In addition to the Home screen, you can use the Start menu to access
applications. To access the Start menu, press .
To return to the Home screen, press or tap .
When the device screen dims, tap the screen or press any button to turn the
backlight on. You can adjust the backlight dim settings to your preference.
For instructions, see “Setting the backlight delay” on page 69.
To quickly lock touch screen and keyboard, press the screen key on the left
side of the device. To unlock, press the screen key again. You can adjust the
power settings and define when you want the device screen to turn off
Page 42
Basics 42
automatically. For more information, see “Managing power settings” on
page 69.
Touchscreen
Navigate the touchscreen on your device using your finger or the stylus.
Opening and closing applications
To open an application, tap its icon.
You do not need to exit an application to open another or to conserve
memory. The system manages memory automatically.
To close an application, tap .
Page 43
Basics 43
Scrolling
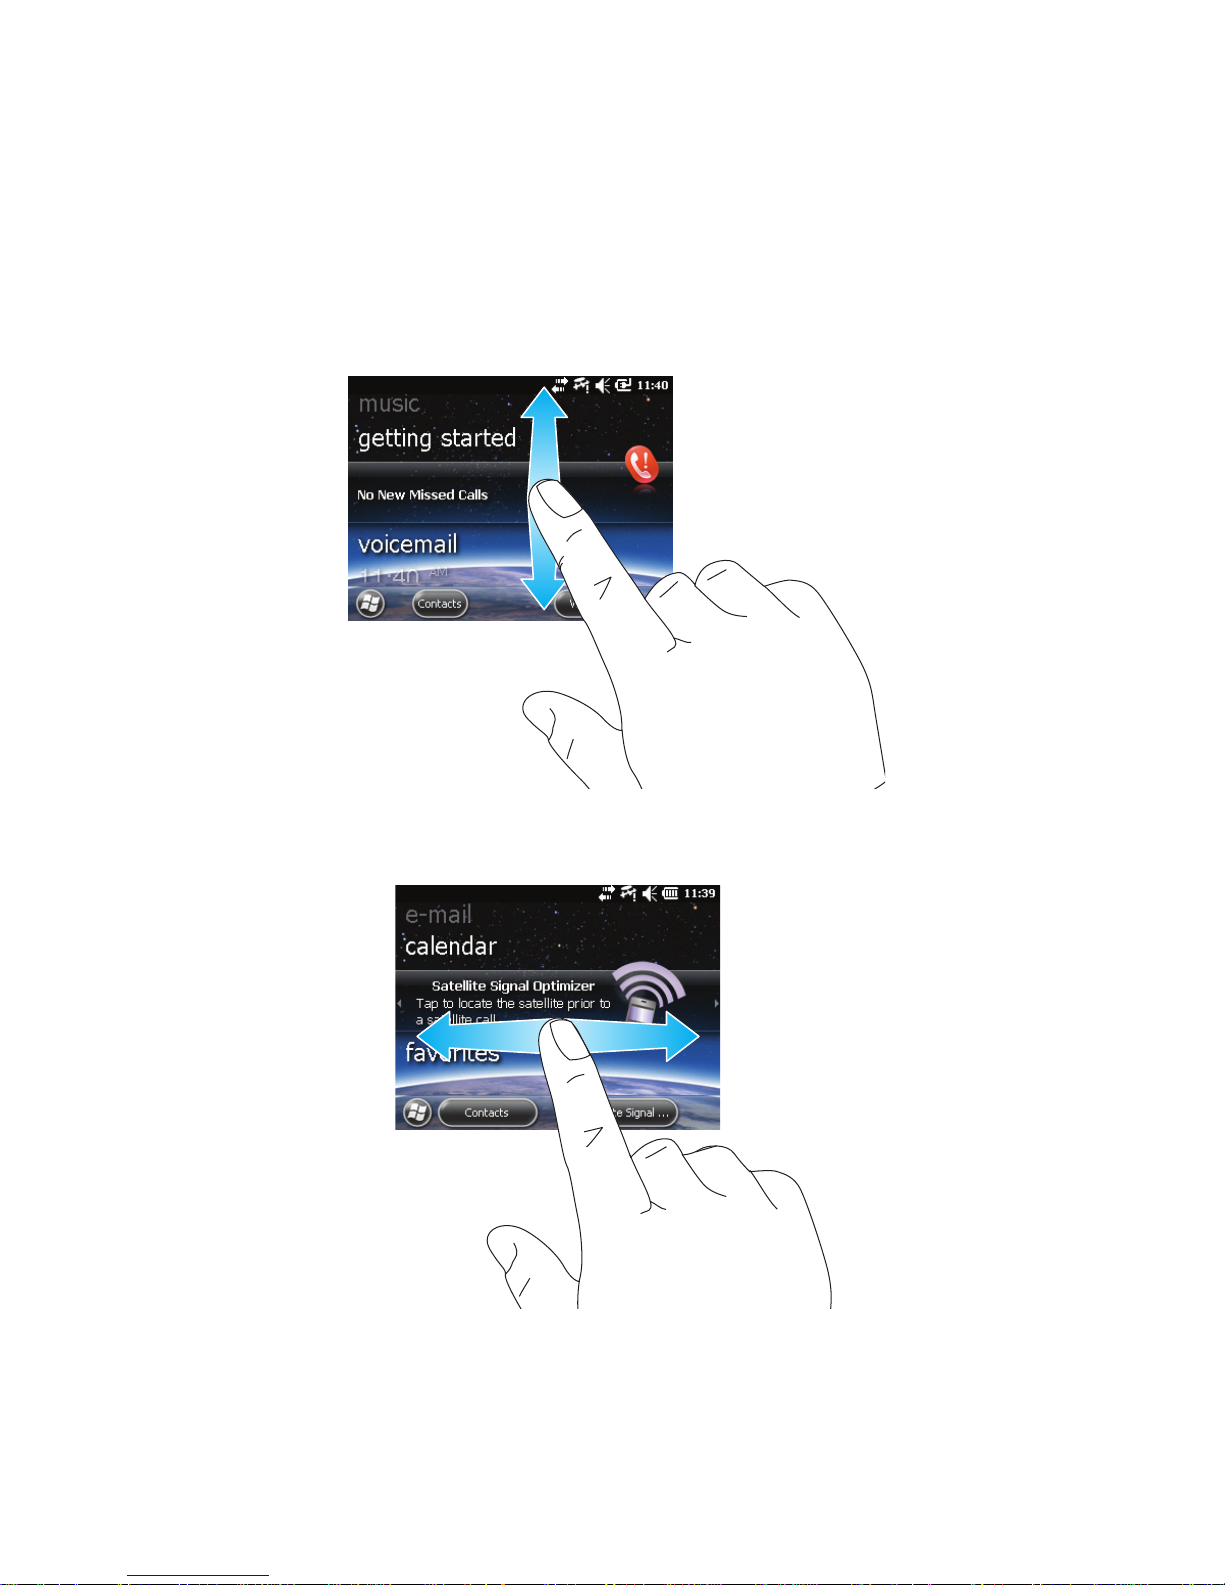
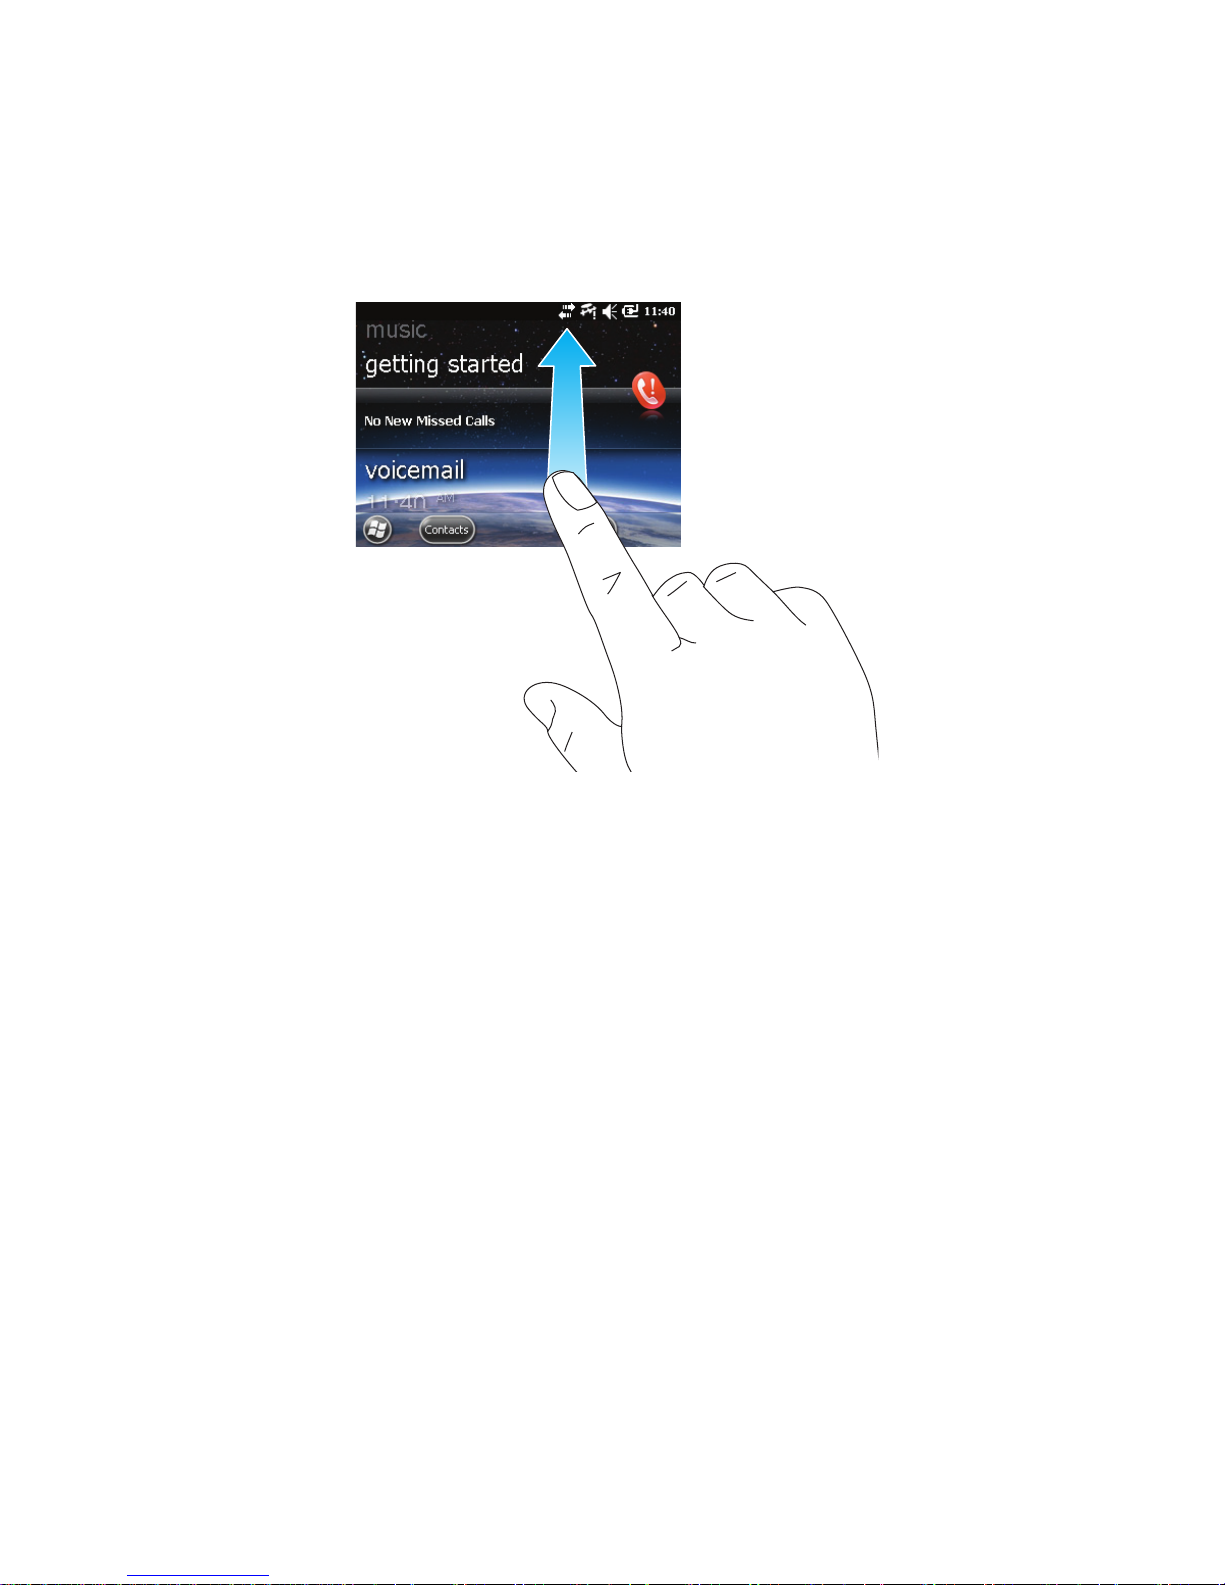
To scroll, tap the screen and drag up or down.
If the item displayed on the screen is wider than the screen, you can pan by
scrolling side to side.
Page 44
Basics 44
To scroll quickly, swipe the screen.
You can wait for the scrolling to come to a stop, or tap the screen to stop it
immediately.
In addition to using the touchscreen, you can also scroll by pressing the rim
of the navigation key.
Page 45
Basics 45
Selecting
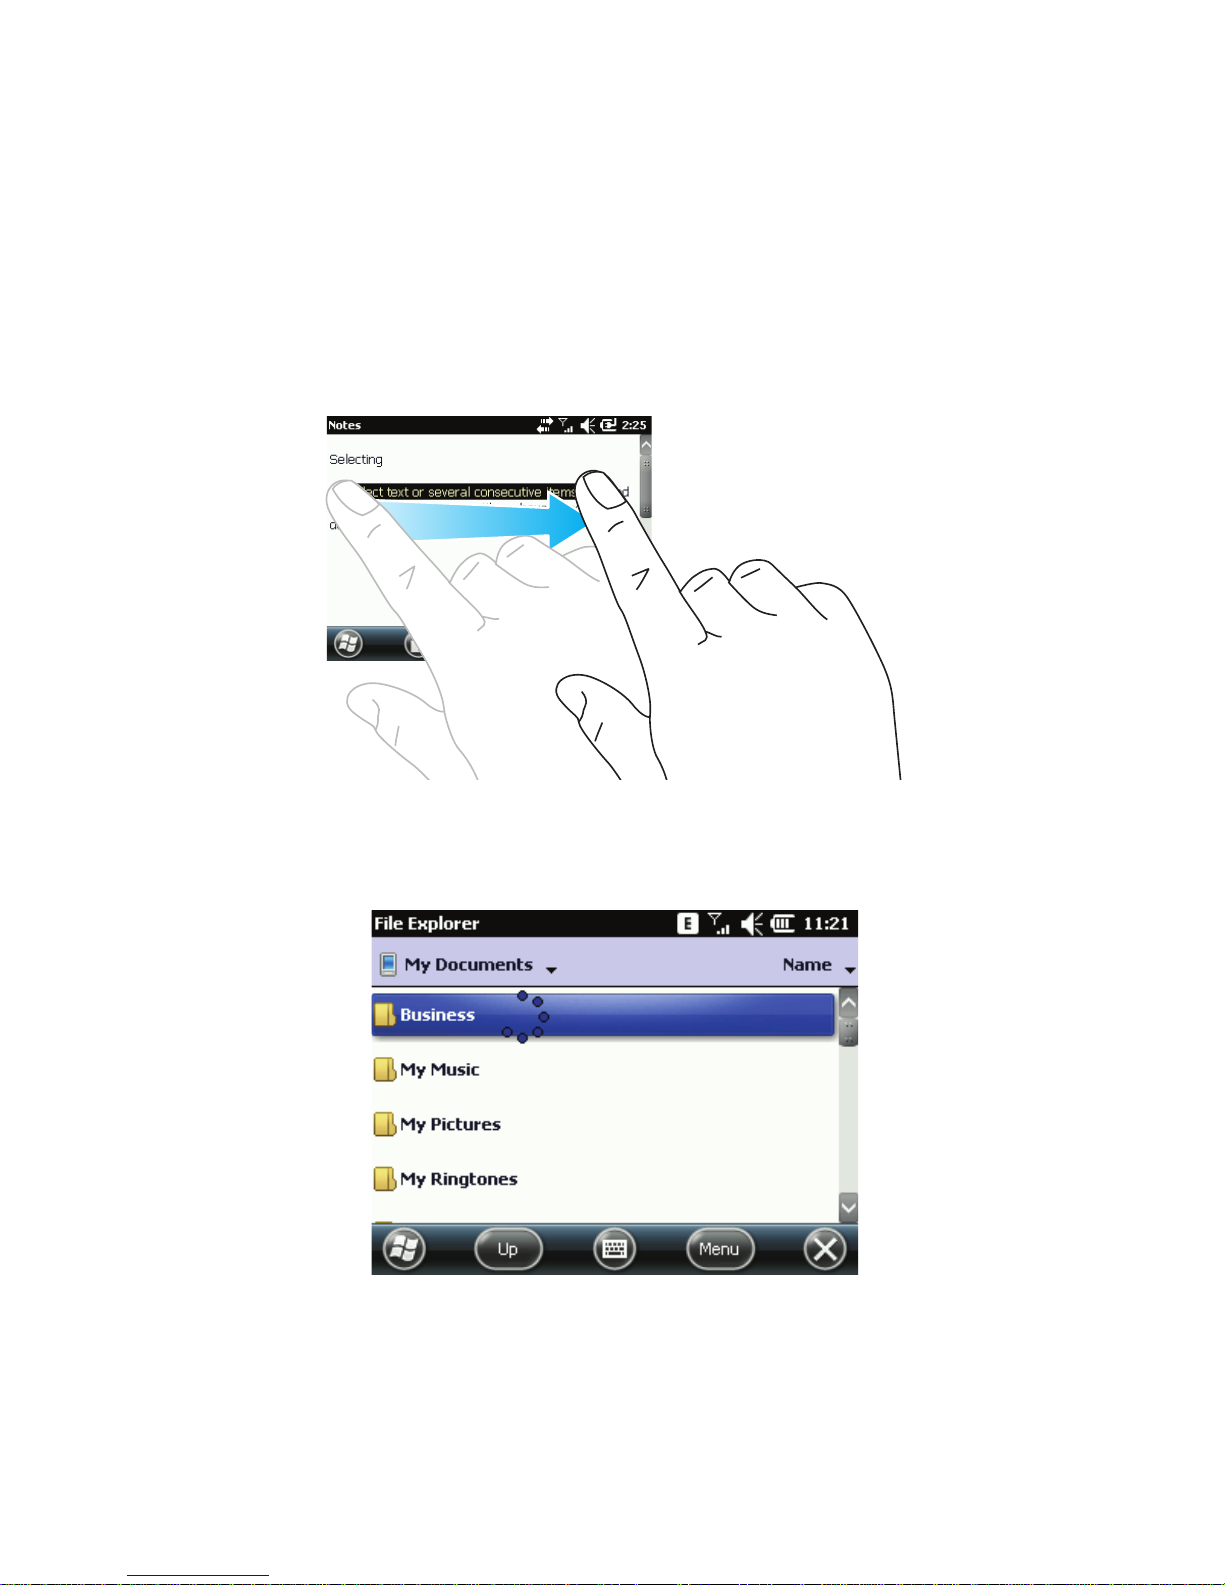
To select text or several consecutive items, tap and drag across the screen
until you have selected all desired items.
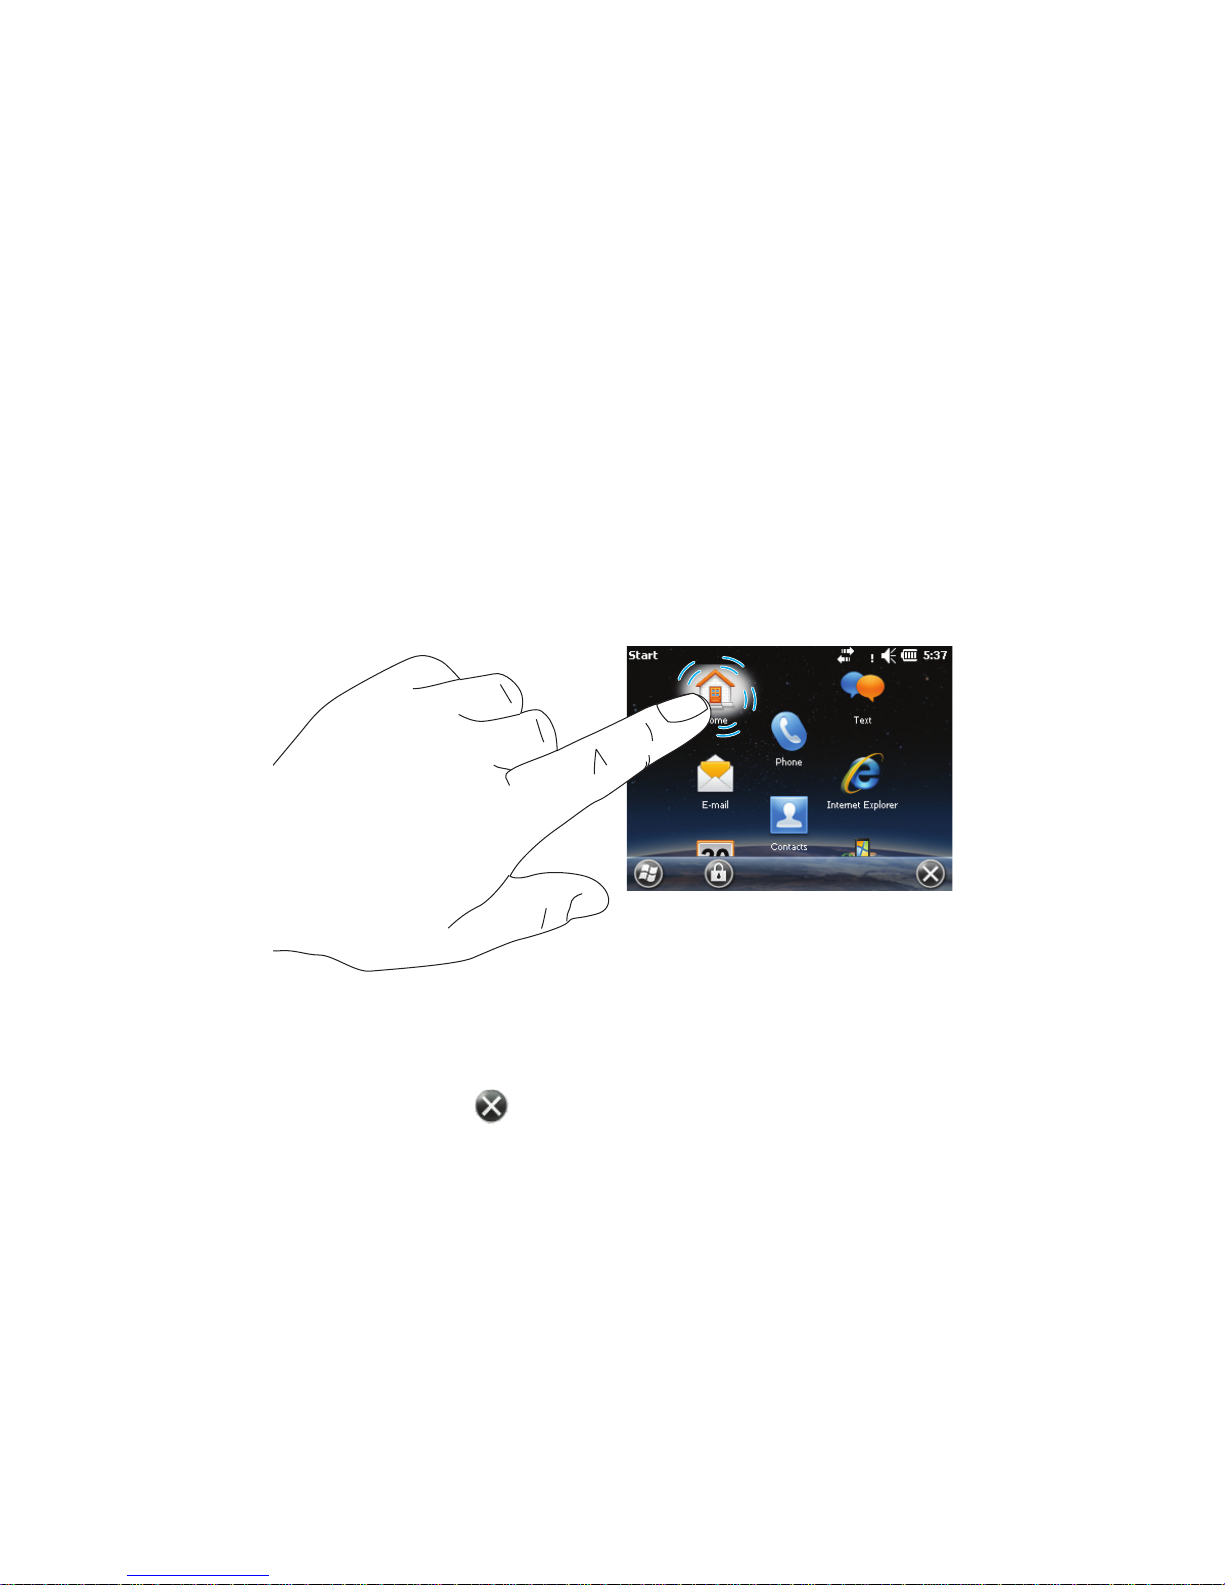
To see a list of actions available for an item, tap and hold the item. An
animation shown in the figure is displayed. Select a desired action from the
pop-up menu.
Page 46
Basics 46
Moving between folders
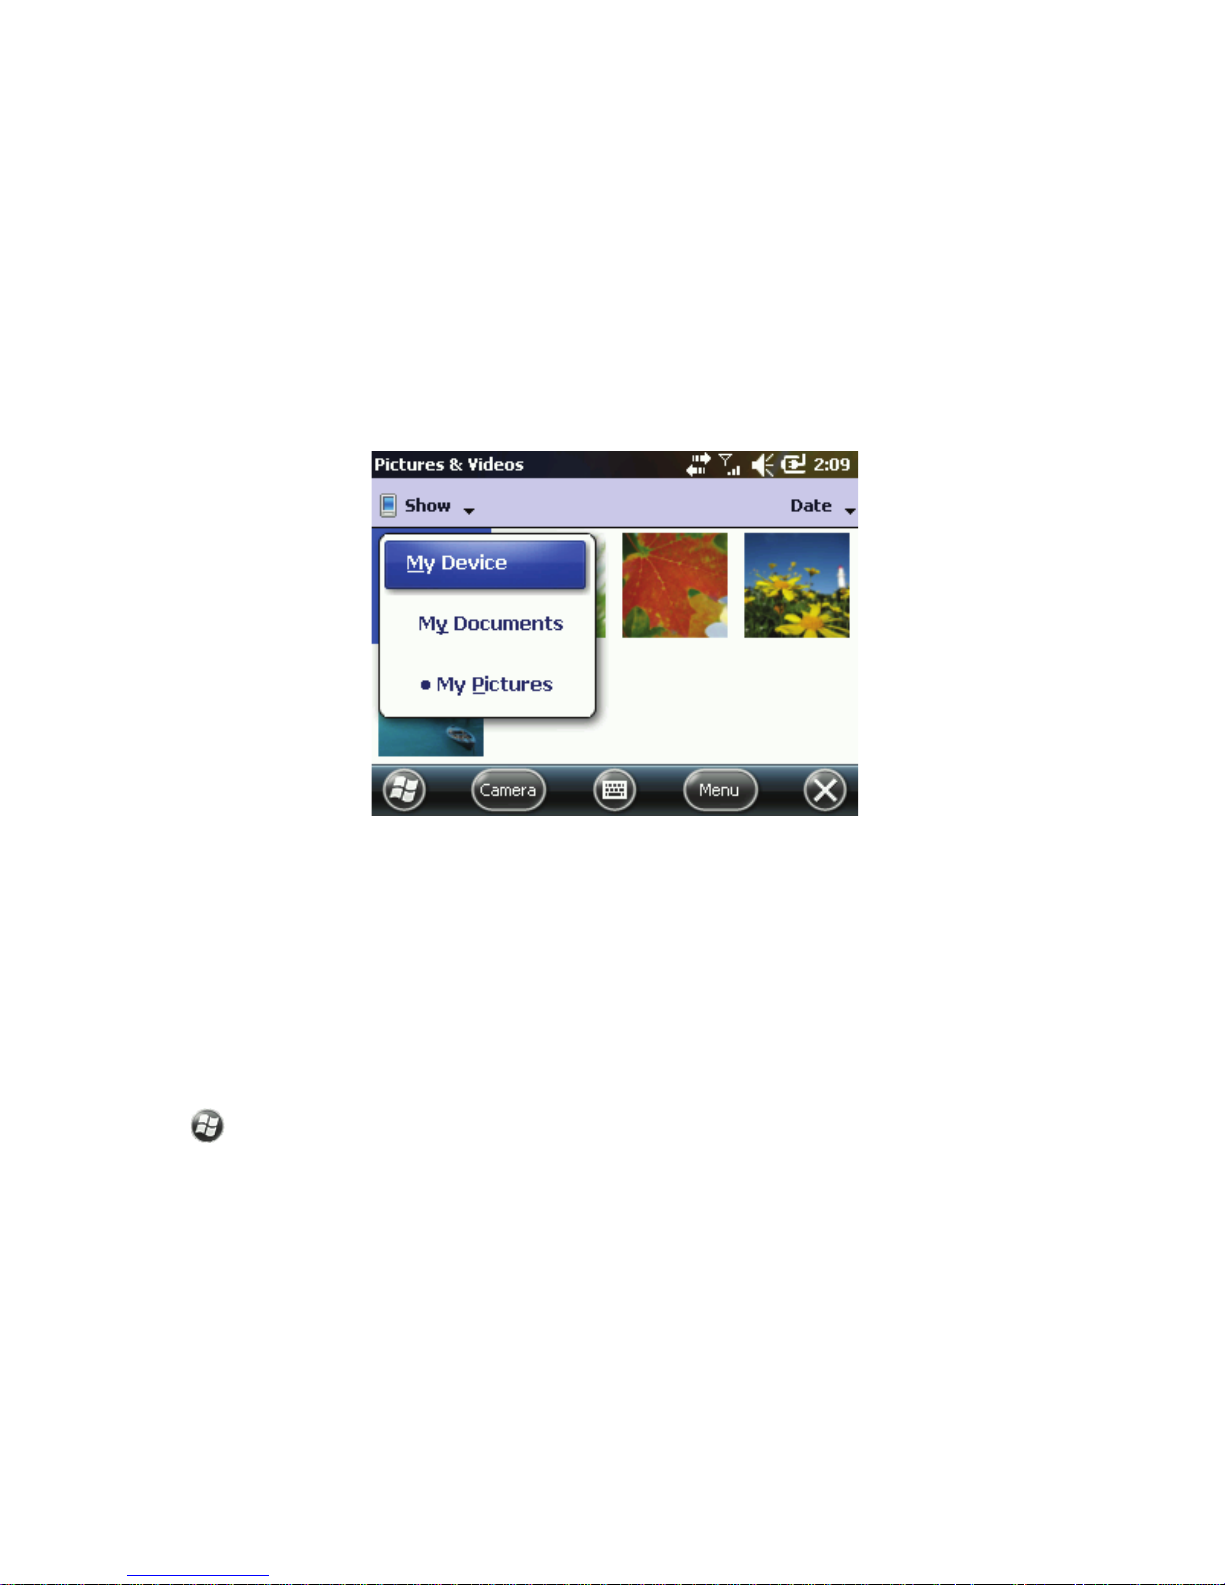
Many applications allow you to move from one folder to another. To move
between folders, tap the drop-down menu icon in the upper-left corner, and
select the folder.
For instructions on how to manage files and folders, see “File Explorer” on
page 142.
Aligning the touchscreen
If the touchscreen does not respond accurately, you may need to align it. We
recommend using the stylus for best results.
1. Tap > Settings > System > Screen, and tap Align Screen.
2. Tap the target on the screen accurately and firmly at each location on the
screen.
When the screen is aligned, the target stops moving and you are automatically returned to Align Screen.
Page 47
Basics 47
Keyboard
Keyboard keys
To enter text and dial numbers, use the device keyboard. Follow these tips:
• To enter a capital letter, press and hold the letter key until it becomes
capitalized, or press and hold and press the letter key.
• To enter only uppercase letters, press . To enter lowercase letters,
press again.
• To enter the blue symbols and numbers, press and hold and enter the
symbol or number. For example, to enter a forward slash (/), press and
hold and press .
• To delete a character to the left of the cursor position, press .
• To make a line break in a multi-line text, press .
• To use keyboard shortcuts, press in combination with the appro-
priate shortcut key (for example +C). See “Shortcuts” on page 49.
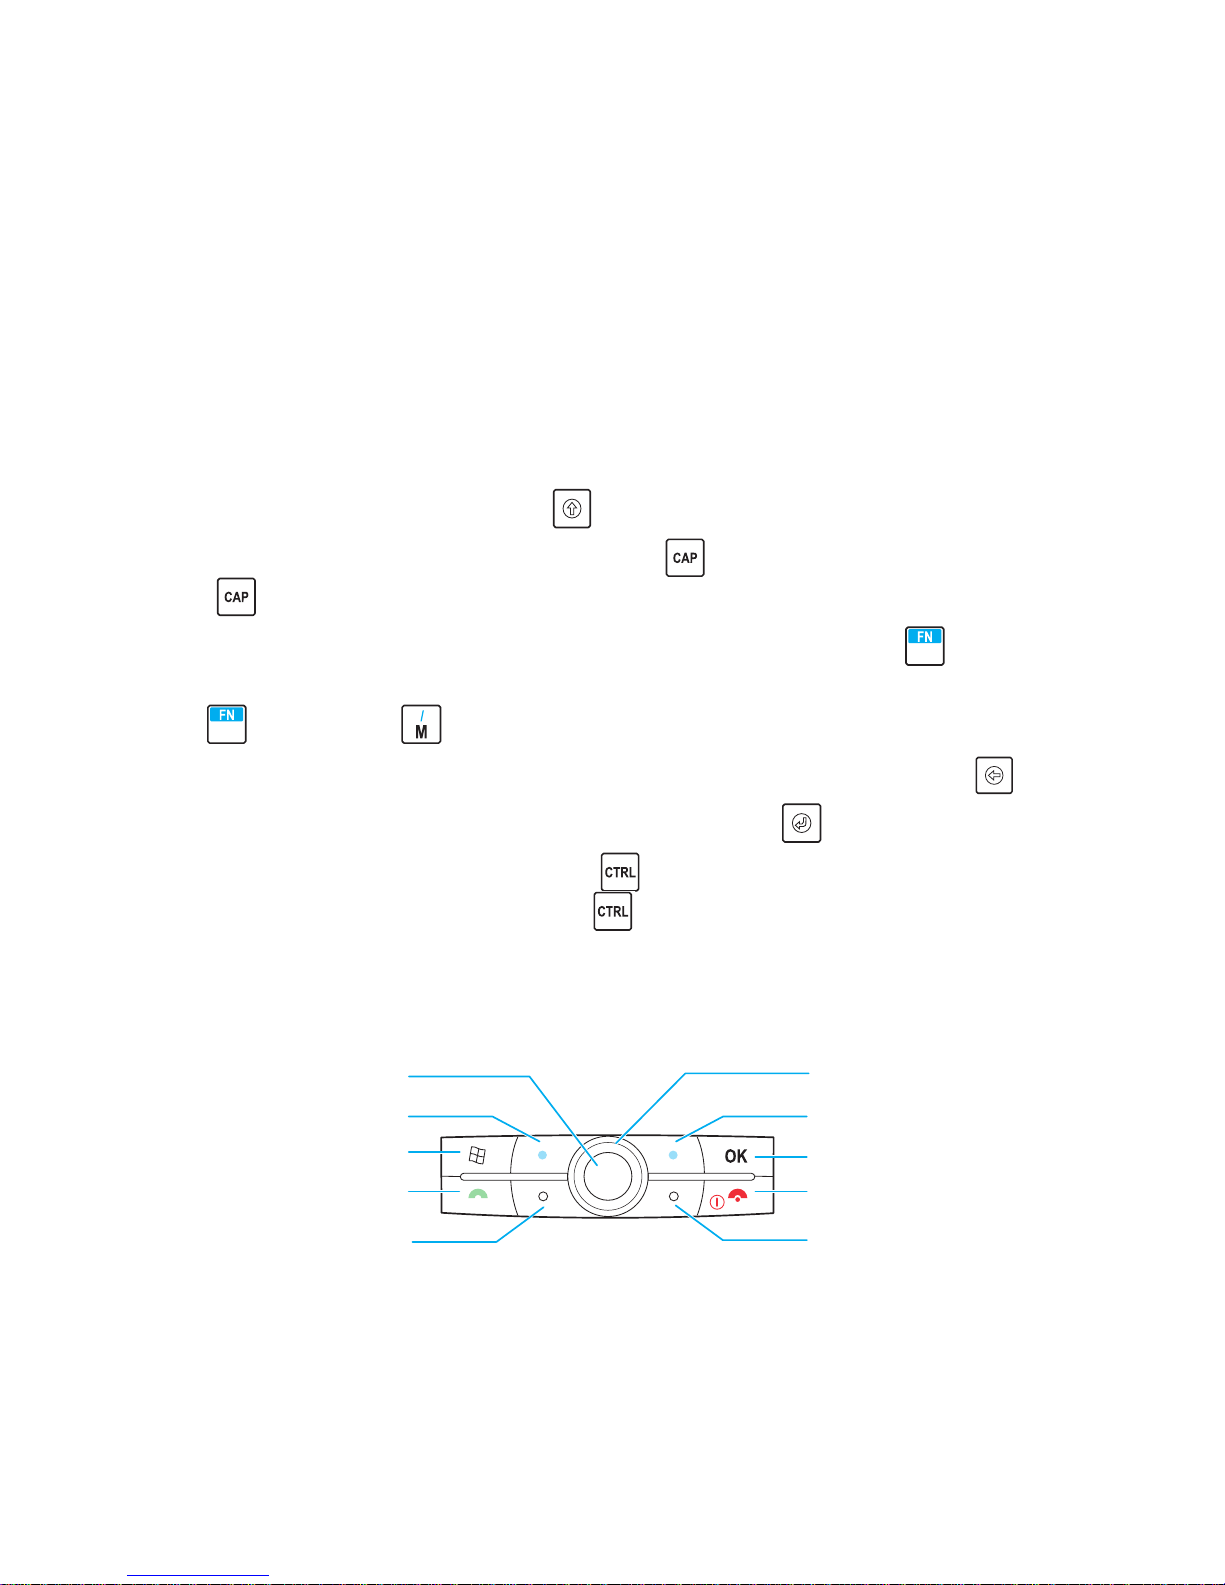
Navigation area keys
Windows key
Left soft key
Talk/send key
Navigation key
OK key
Right soft key
End/power key
Right shortcut key
Navigation rim
Left shortcut key
Page 48
Basics 48
Use navigation area keys to navigate the device and to make calls:
• Press the talk/send key ( ) to start a call or send a message.
• Press the end/power key ( ) to end a call and turn the device on and
off.
• Press the Windows key ( ) to access applications on your device.
• Press the OK key ( ) to confirm actions.
• Press the left shortcut key ( ) to switch network, by default, or set it
to open an application you use frequently. For information on how to set
the left shortcut key, see “Setting the shortcut keys” on page 79.
• Press the navigation rim to move up, down, left and right. Press the
navigation key to open applications and confirm selections. The navigation rim blinks when you have a new message or missed call.
• Press the left and right soft keys to access the option shown on the
device screen above the soft keys.
• Press the right shortcut key ( ) to start the camera, by default, or
set it to open an application you use frequently. For information on how
to set the right shortcut key, see “Setting the shortcut keys” on page 79.
Onscreen keyboard
The onscreen keyboard is available only on screens where you can enter
text.
1. To access the onscreen keyboard, tap at the bottom of the screen.
2. Enter text and numbers by tapping keys on the onscreen keyboard.
Page 49

Basics 49
•Tap 123 to open the numeric and symbolic keyboard.
•Tap Tab to insert spaces or tabs.
•Tap CAP to enter several uppercase letters or symbols.
•Tap Shift to enter a single uppercase letter or symbol.
•Tap Ctl in conjunction with an appropriate character to use keyboard
shortcuts. See “Shortcuts” on page 49.
•Tap áü to access the available Unicode characters. Note that using
Unicode characters reduces the length of text you can enter to about
half.
Shortcuts
Use the following keyboard shortcuts as an alternative to using the menu
commands.
Select all CTRL+A
Bold selected text CTRL+B
Copy CTRL+C
Italicize selected text CTRL+I
Open a new file CTRL+N
Close current application CTRL+Q
Underline selected text CTRL+U
Paste CTRL+V
Page 50
Basics 50
Stereo headset with microphone
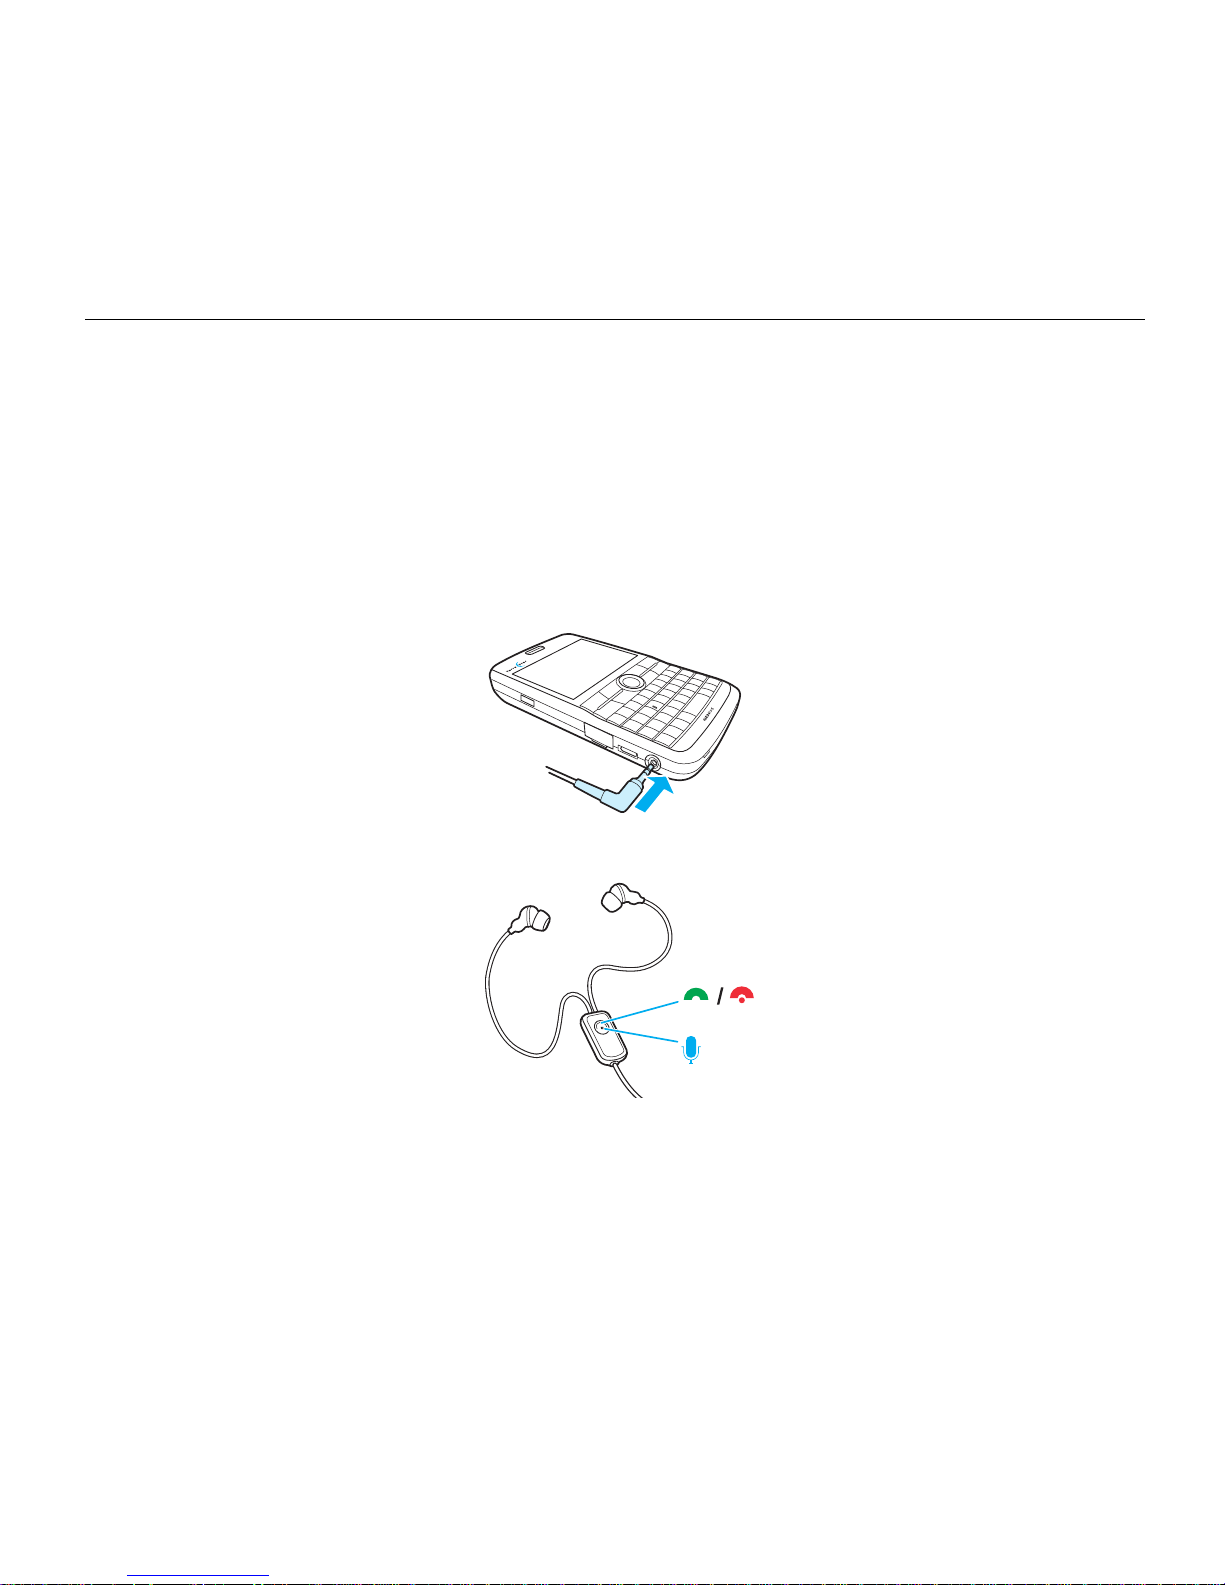
Your device is shipped with a wired stereo headset with an integrated
microphone which allows you to answer calls and listen to music. Plug the
headset into the headset jack on the side of your device.
To answer or end a call, press the button on the headset.
If you receive a call while the headset is plugged in, you can hear the ring
tone both through the headset and the device speaker.
NOTE If you are using a TTY machine with your device, you may have to
change the settings in the Audio jack application to make the headset
Cut CTRL+X
Undo last action CTRL+Z
Page 51

Basics 51
work. For more information, see “Using your device with a TTY machine” on
page 51.
Using your device with a TTY machine
Your device is compatible with Ultratec’s Compact/C TTY and Ameriphone’s
Q90D machines. A TTY (also known as TDD or text telephone) is a
telecommunications machine that allows people who are deaf or hard of
hearing or who have speech or language disabilities to communicate by
phone.
To use your TTY machine, connect it to your device’s headset audio jack
using the TTY adapter provided. For easy access to the TTY functionality, set
the Audio jack application to one of the shortcut keys. For instructions, see
“Setting the shortcut keys” on page 79. Use the headset clip on answer/end
key to answer or end a call.
NOTE When using your device with a TTY machine, make sure the wire of the
headset’s right earphone is behind your neck.
Enabling TTY
1. Tap > Settings > System > Audio jack.
Page 52
Basics 52
2. Select Presume TTY.
3. Press .
When a device is plugged into the audio jack, the phone now expects it to
be a TTY machine. It provides the correct kind of output and disables all
audio modes.
NOTE When you are done using a TTY and want to use a headset, disable TTY
to enable audio modes.
Disabling TTY
1. Tap > Settings > System > Audio jack.
2. Select Presume headset / headphones.
3. Press .
Audio modes are now enabled again.
Applications
Your device comes with many applications. To access applications, tap .
Use Phone to make phone calls and view call history. For more
information, see “Phone” on page 85.
When on cellular network, use Switch to Satellite to switch to
satellite network. For more information, see “Switching to the
satellite network” on page 88.
Page 53
Basics 53
When on satellite network, use Switch to Cellular to switch to
cellular network.
Use Satellite Signal Optimizer to find the strongest satellite signal
when connected to the satellite. For more information, see “Using
the Satellite Signal Optimizer” on page 90.
Use Satellite Tutorial to learn how to use the satellite phone.
Use Tex t to send, receive, and read text messages. For more
information, see “Text messages” on page 107.
Use E-mail to send, receive, and read e-mails. For more
information, see “E-mail” on page 102.
Use Contacts to manage your contact information. For more
information, see “Contacts” on page 96.
Use Internet Explorer to browse the web. For more information,
see “Internet Explorer” on page 113.
Use Calendar to keep track of your appointments. For more
information, see “Calendar” on page 124.
Use Alarms to define alarms. For more information, see “Setting
alarms” on page 76.
Use Tasks to keep track of your tasks. For more information, see
“Tasks” on page 127.
Page 54
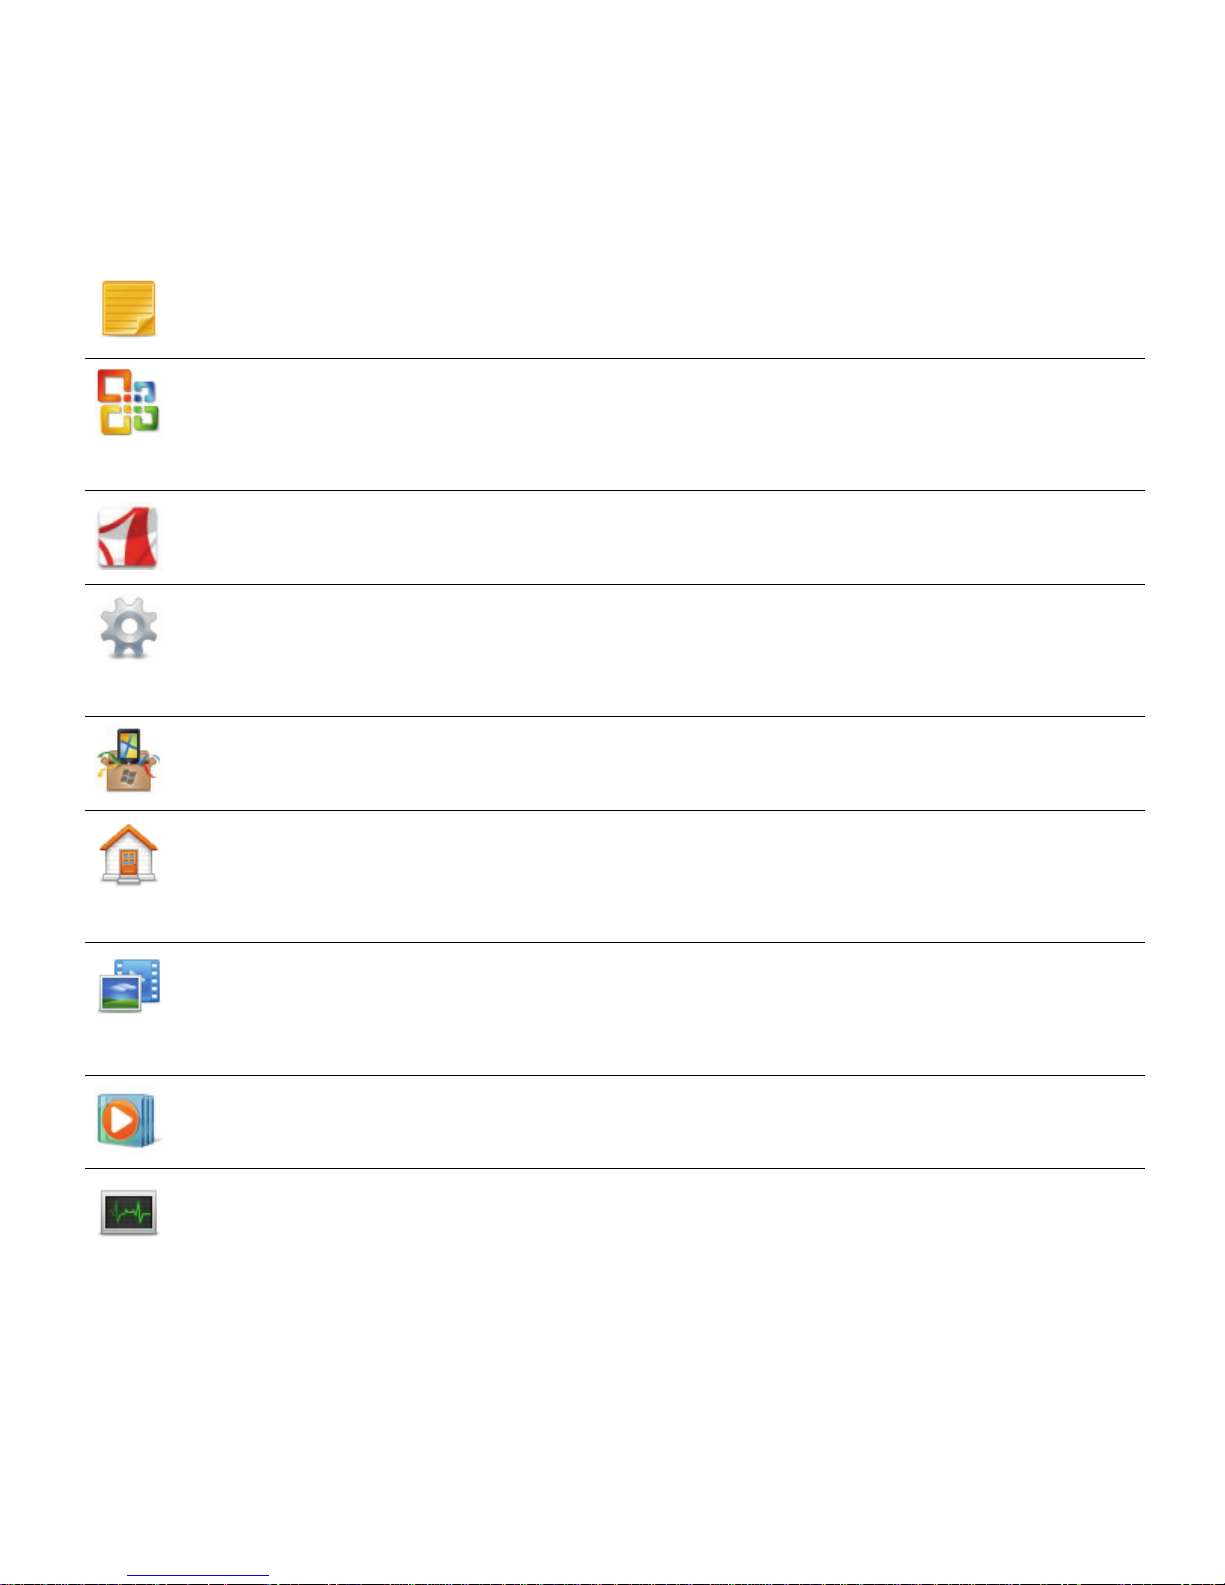
Basics 54
Use Notes to quickly enter, draw or record your thoughts. For more
information, see “Notes” on page 128.
Use Office Mobile to access the Excel Mobile, PowerPoint Mobile,
Word Mobile, and OneNote Mobile applications. For more
information, see “Office applications” on page 131.
Use Adobe Reader LE to view PDF files.
Use Settings to personalize your device and manage settings. For
more information, see “Personalize your device” on page 74 and
“System settings” on page 156.
Use the Getting Started assistant to familiarize yourself with the
basic device features.
Home is the main screen of the device. Use it, for example, to
quickly access the most frequently used applications. For more
information, see “Home screen and Start menu” on page 40.
Use Pictures & Videos to view and organize media files and access
the camera. For more information, see “Pictures & Videos” on page
119.
Use Windows Media to play video and audio files. For more
information, see “Windows Media” on page 120.
Use Task Manager to manage applications and processes running
on your device. For more information, see “Task Manager” on page
142.
Page 55
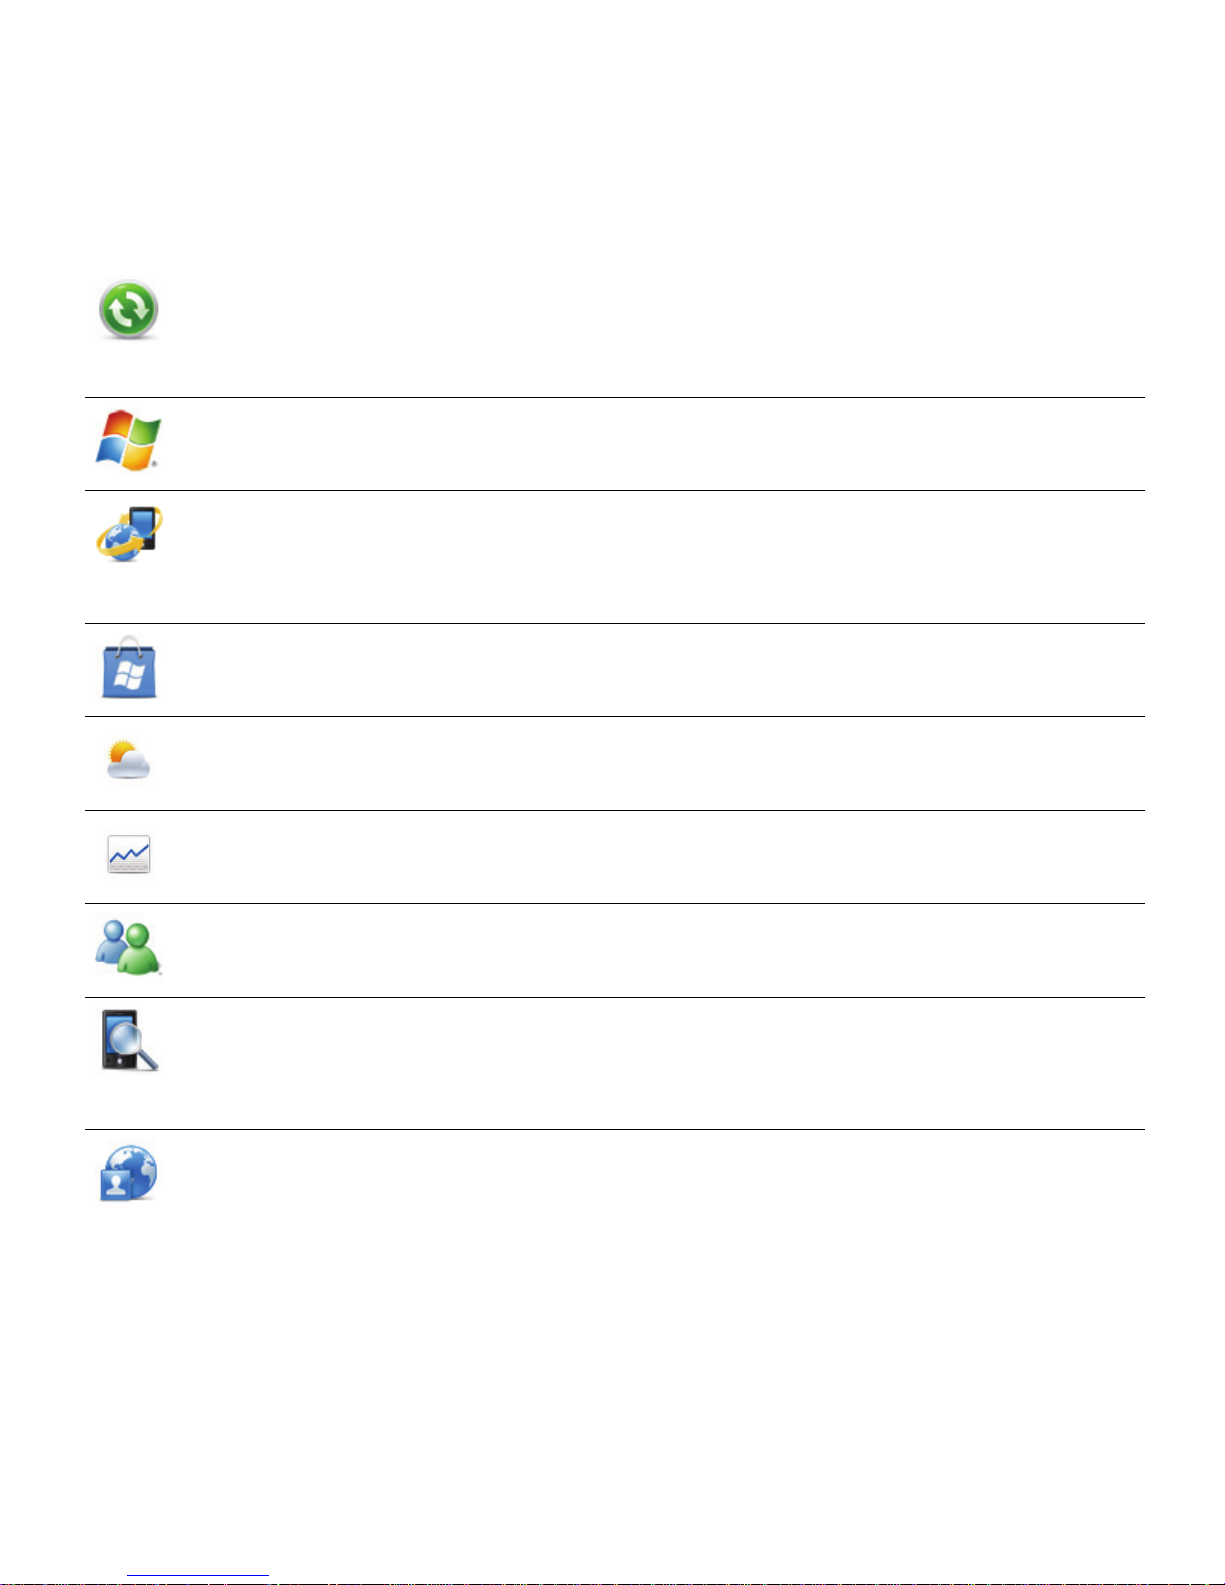
Basics 55
Use ActiveSync to synchronize information between your device
and your computer. For more information, see “Synchronization”
on page 144.
Use Windows Live to access your Windows Live account and
applications.
Use Microsoft My Phone to synchronize the data on your device
to a password-protected web site on a regular basis. For more
information, see myphone.microsoft.com.
Use Marketplace to access Microsoft application store.
Use MSN Weather to access the weather reports and forecast for
locations around the world.
Use MSN Money to access the latest financial quotes for markets in
North America, Europe, and Japan.
Use Messenger to communicate with other Messenger users
through instant messages.
Use Search Phone to search for information and files on your
device. For more information, see “Searching on your device” on
page 82.
Use Internet Sharing to use your device as a modem for a
computer or another device. For more information, see “Using the
device as a modem” on page 60.
Page 56
Basics 56
Connections
You can connect your device to the network and your computer, or pair your
device with other devices using Bluetooth.
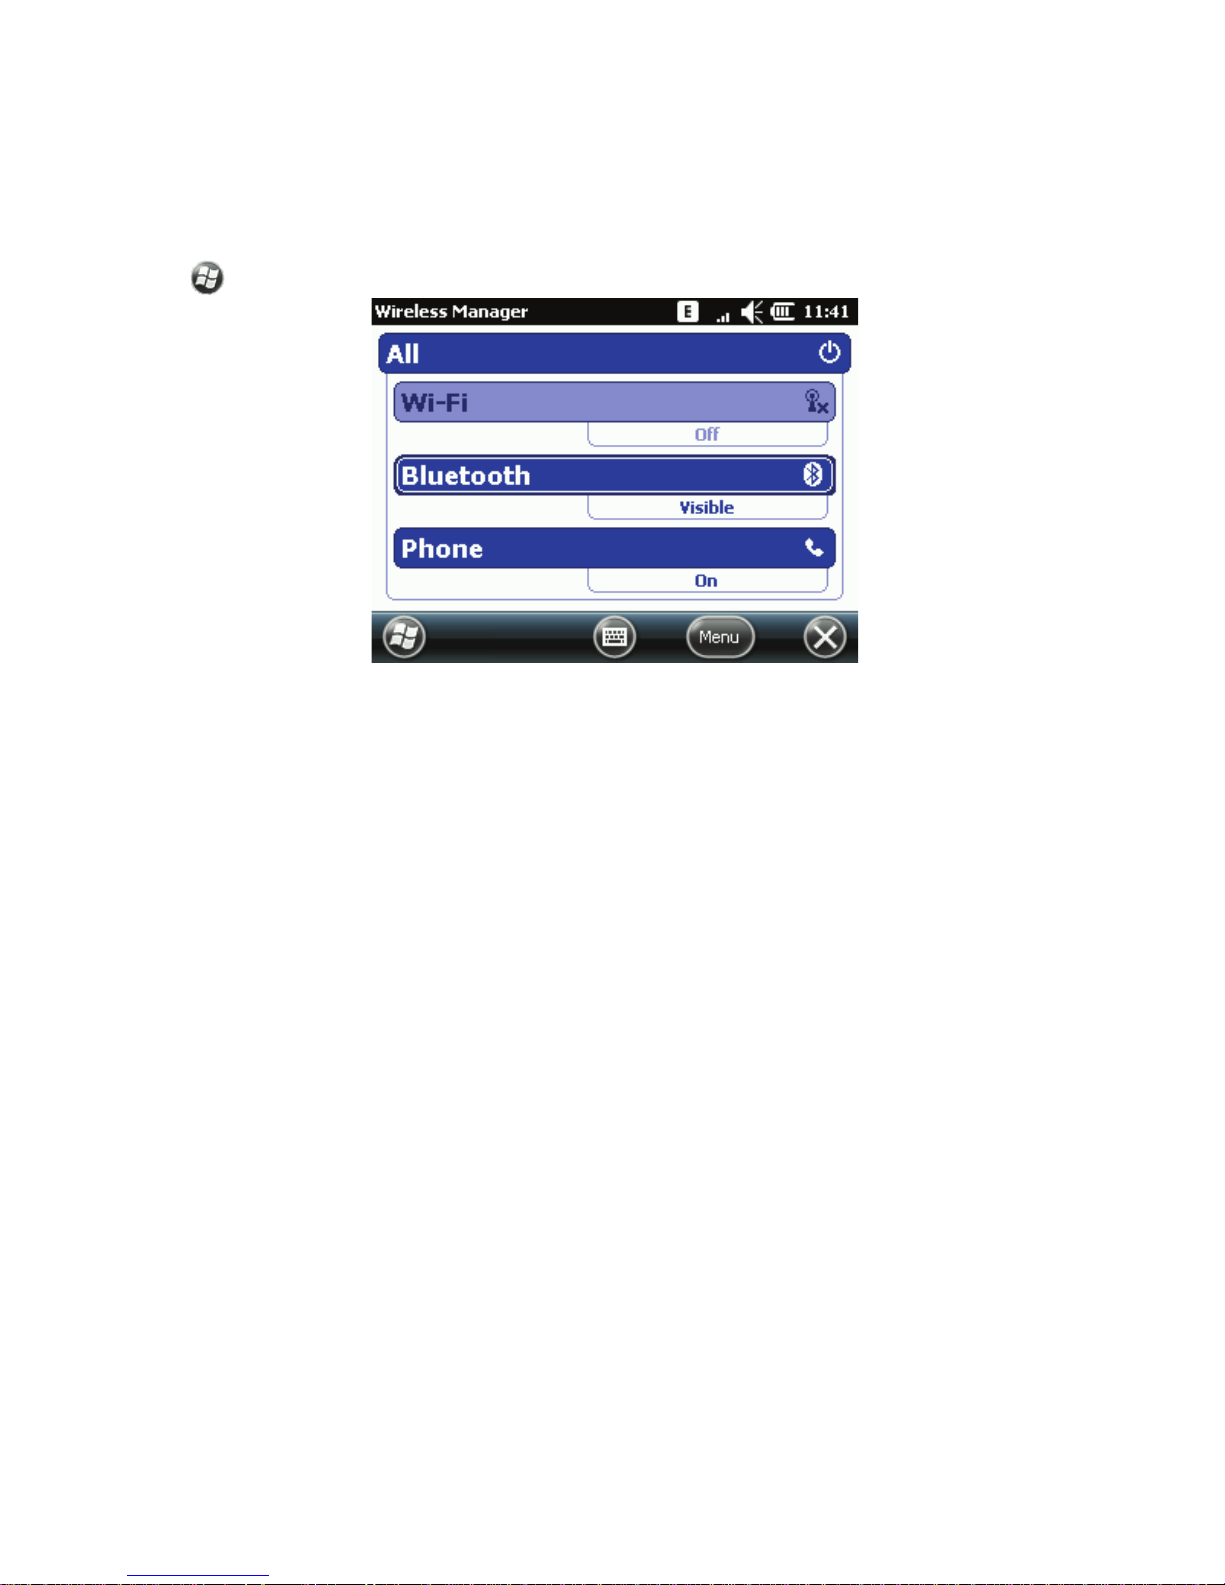
Managing wireless connections
You can turn on and off your wireless connections in a single location, called
Wireless Manager. This integrated interface combines Bluetooth, Wi-Fi, and
Phone.
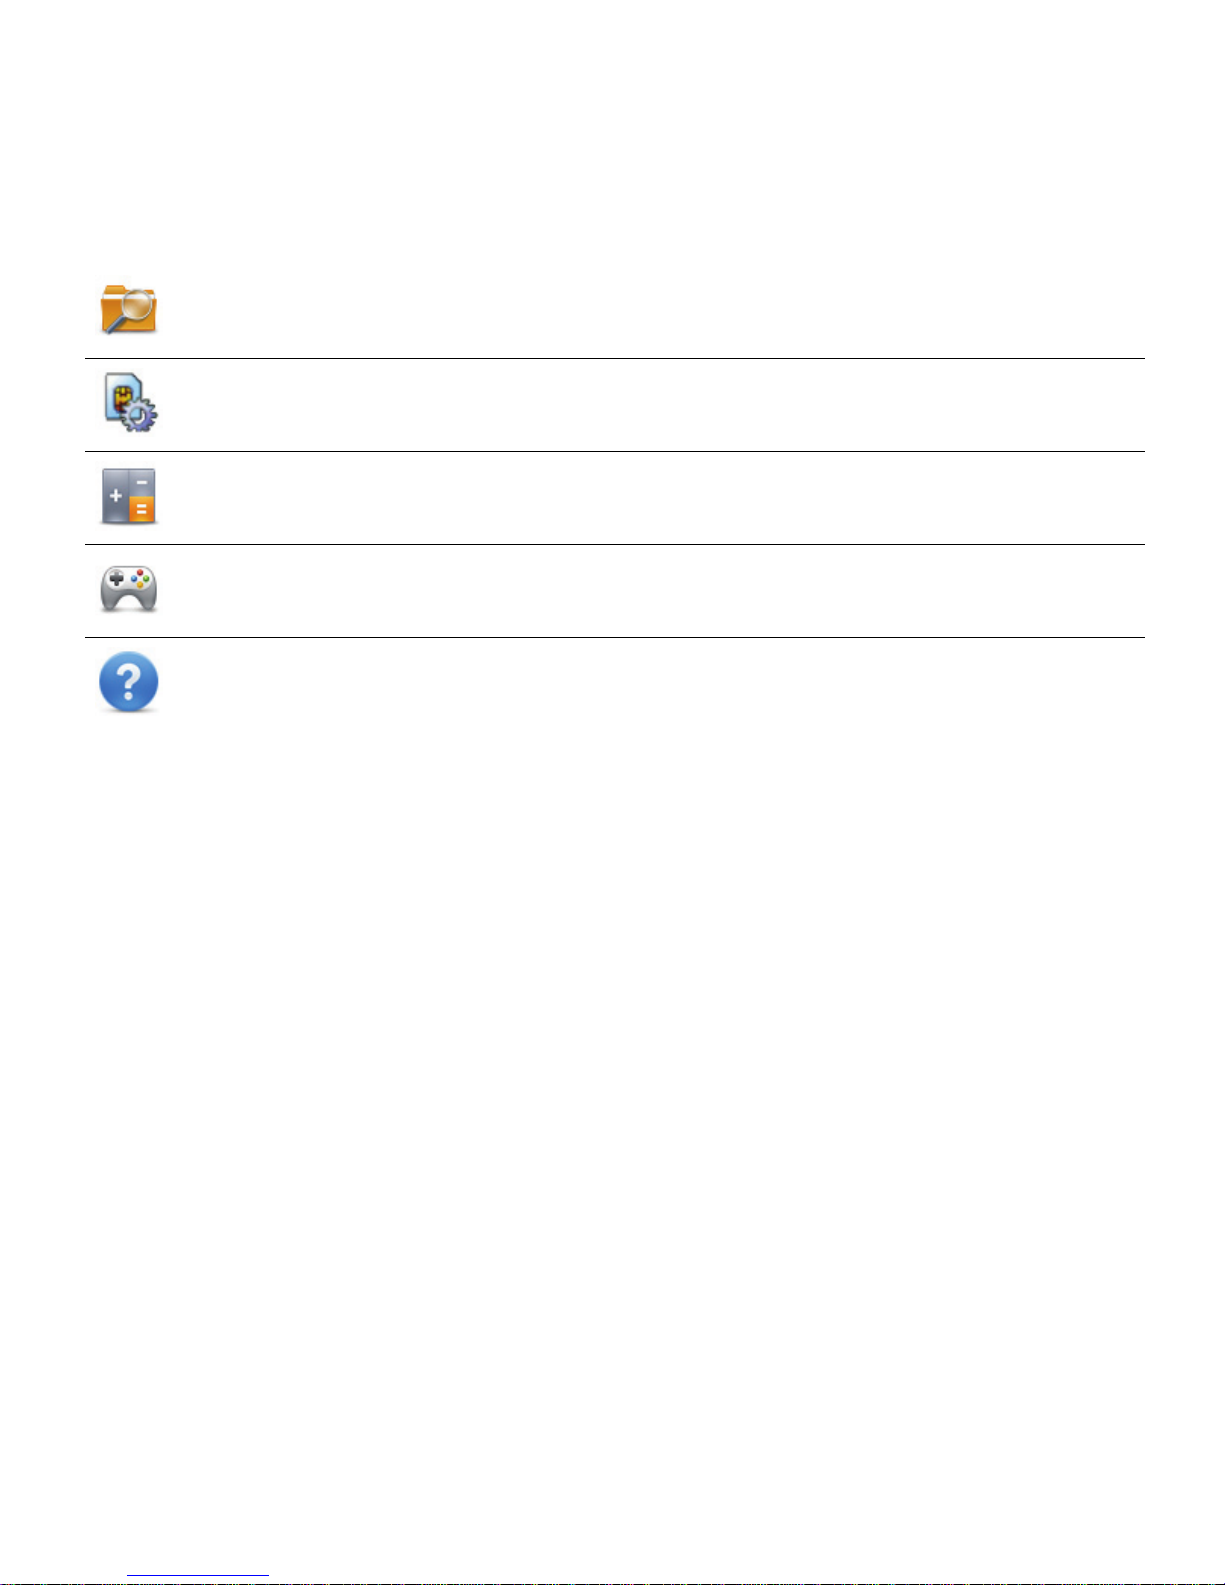
Use File Explorer to view and organize files and folders on your
device. For more information, see “File Explorer” on page 142.
Use SIM Toolkit User Interface (SIMTkUI) to adjust settings and
access services provided by your cellular service provider.
Use Calculator to perform basic mathematical calculations.
Use Games to access the game Solitaire.
Use Help to access help on using your device.
Page 57
Basics 57
1. Tap > Settings > Connections > Wireless Manager.
2. Tap a desired connection type to turn it on or off. If it is turned off, its
background color is lighter and an icon marked with an X is displayed.
To change settings for one of the displayed wireless connection types,
tap Menu, and then tap the type of settings you want to change.
For detailed instructions on how to turn on Bluetooth or Wi-Fi, see
“Bluetooth” on page 58 and “Wi-Fi” on page 59.
USB connection
You can use the USB cable delivered with the device to connect your device
to a computer to synchronize data. To be able to synchronize data, you first
need to install the synchronization software. For instructions, see
“Synchronization” on page 144.
1. Plug the USB cable into the Micro-USB connector on the left side of the
device.
Page 58

Basics 58
2. Connect the other end of the USB cable into the USB port on your
computer.
The connection is established.
If the connection does not work properly, change the USB mode of your
device by tapping > Settings > Connections > USB to PC and select
the Enable advanced network functionality check box.
Bluetooth
Bluetooth is a short-range wireless communications technology. Devices
with Bluetooth capabilities can exchange information over a distance of
about 30 feet (10 meters) without requiring a physical connection.
NOTE When Bluetooth and Wi-Fi are used at the same time, the Wi-Fi connec-
tion may drop temporarily.
Pairing with a Bluetooth device
You can establish a Bluetooth partnership with other Bluetooth-enabled
devices and access other Bluetooth services.
When you turn Bluetooth on, it turns on and off with the device, but you can
also turn Bluetooth off manually.
1. Tap > Settings > Bluetooth, and select the Mode tab.
2. Select the Turn on Bluetooth and Make this device visible to other
devices check boxes.
3. Tap the Devices tab.
4. Tap Add new device.
Page 59

Basics 59
Your device searches for other Bluetooth devices nearby. If you do not
see the device you want to connect with, ensure that it is turned on,
visible, and within close range.
5. Tap the name of the Bluetooth device you want to pair with, and tap
Next.
6. In the Passcode field, enter an alphanumeric passcode of your choice,
and tap Next.
Use the same passcode on both devices.
7. Tap Done.
When a Bluetooth device is connected with another Bluetooth device, is
shown in the status bar.
Ending a Bluetooth partnership
1. Tap > Settings > Bluetooth, and select the Devices tab.
2. Tap and hold the device name.
3. Tap Delete.
4. Confirm the deletion by tapping Ye s .
Wi-Fi
Your device can access the Internet when within range of a Wi-Fi wireless
network.
NOTE Some countries have restrictions on the use of Wi-Fi. For more informa-
tion, contact local authorities.
Page 60

Basics 60
NOTE You cannot use Wi-Fi connection while in a call, when GPRS data
connection is established or when connected to the satellite network.
1. Tap > Settings > Connections > Wi-Fi.
2. If no networks appear in the list automatically, tap Search for Networks
and select the network you want to connect to.
3. In the Connects to list, select The Internet or Work.
4. If the network is hidden, select the This is a hidden network check box.
If you are connecting to another device, select the This is a device-to-
device (ad-hoc) connection check box.
5. Tap Next.
6. Select your Network Authentication settings. The default choices are
often sufficient.
7. Tap Next and then Finish.
If you select a secure network, you have to enter a network key provided
by the network administrator.
Using the device as a modem
With Internet Sharing, you can use your device as a wireless modem for
another device or a computer.
If the synchronization software on the computer is set to allow USB
connections, and you use a USB cable to connect the computer to the
Internet through your device, you may see an error message saying that
Page 61

Basics 61
ActiveSync has lost the USB connection. Disregard this error to continue
connecting your computer to the Internet through your device.
To use Bluetooth as the PC connection, Bluetooth on the device must be
turned on, the device must be visible and you must have a Bluetooth
partnership between the device and the computer.
If you select USB as the PC connection, you must first install Windows Mobile
synchronization software on the computer.
1. Ensure that your data connection is running and that you can access the
Internet from the device.
2. If you use a USB cable to connect your device to the computer, disable
the ActiveSync USB connection as follows:
a On the computer, open the synchronization application, and click
File > Connection Settings.
b Deselect the Allow USB connections check box.
3. Connect your device to the computer using Bluetooth or a USB cable.
4. Tap > Internet Sharing.
5. Select the PC connection type (USB or Bluetooth).
6. Select the network connection that the device should use to connect to
the Internet.
7. Tap Connect.
It takes approximately 30 seconds for the connection to be established.
If you are prompted to turn on Bluetooth, tap Ye s .
Page 62

Basics 62
8. If your connection type is Bluetooth, perform the following steps on the
computer:
aClick Start > Control Panel > Network Connections.
bRight-click Bluetooth Network Connections, and click View Blue-
tooth Network Devices.
c If the device is listed as a Network Access Point, click Connect. If it is
not listed, click Create a new connection and use the New Connec-
tion wizard to add the device to the list.
Beaming
You can beam files and other information such as contacts, appointments,
and tasks to other devices using Bluetooth.
NOTE Files are saved automatically before they are beamed. If a Word docu-
ment or Excel workbook was created on a computer, unsupported content
and formatting may be lost when the files are saved on your device.
If you want your device to detect and receive beams, tap > Settings >
Connections > Beam, and select the Receive all incoming beams check
box. To conserve battery power, enable this setting only when needed.
To beam a file, follow the instructions below.
1. From an application, select the item you want to beam, such as an
appointment in Calendar, a task in Tasks, a contact card in Contacts, or a
file in File Explorer.
Page 63

Basics 63
2. Tap Menu > Beam <type of item>, or in Contacts, tap > Send
Contact > Beam.
3. Select the device to receive the item.
If the device to which you want to beam does not appear in the list, make
sure that device is turned on, visible, and within close range of your
device. Also, make sure that Bluetooth is turned on.
Using an external antenna
You can use an external antenna to improve the strength of the satellite
signal. Tap > Settings > Connections > External Antenna to being
enabling the external antenna for satellite calls.
NOTE For more information on using an external antenna, see the GENUS
External Antenna User Guide.
Page 64
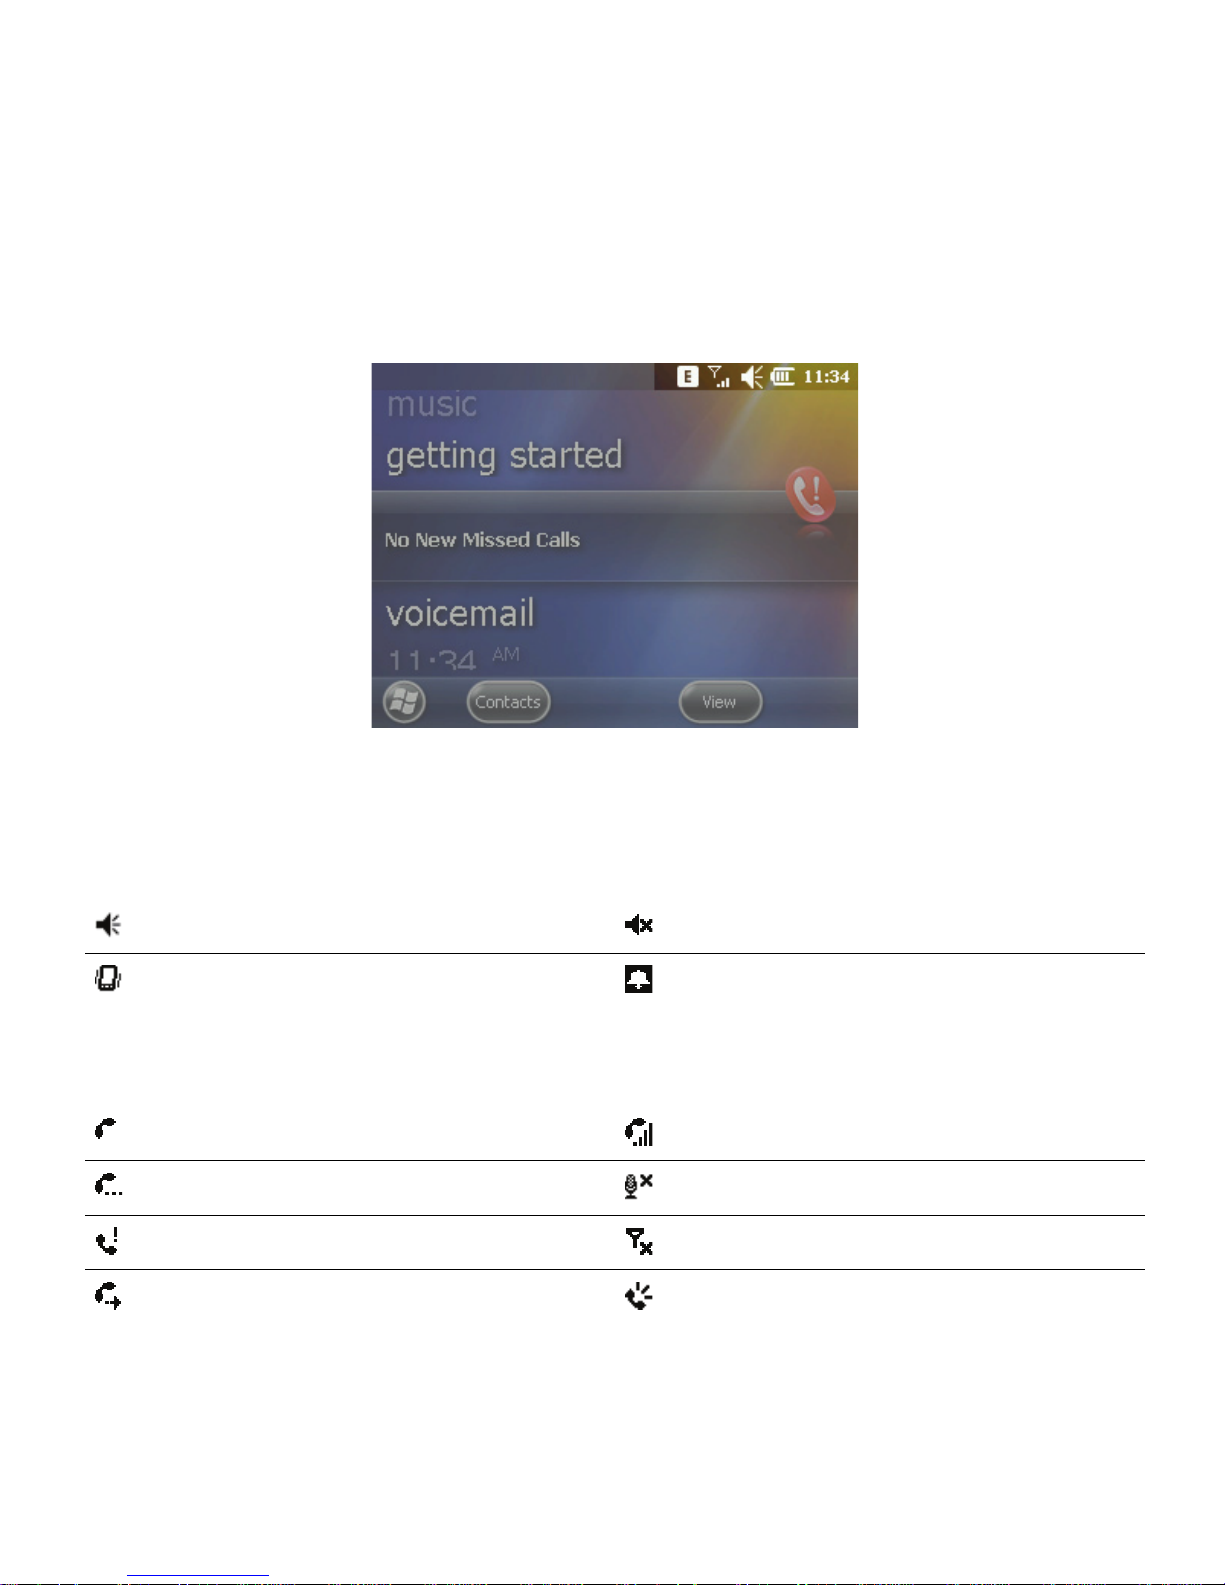
Basics 64
Status indicators
Status indicator icons are displayed at the top of the device screen.
NOTE Some indicators are service provider specific.
Alerts status indicators
Call status indicators
Ringer on Ringer off
Vibrate on Pending alarm
Voice call Voice call in progress
Call on hold Call muted
Missed call Phone function is turned off
Calls are forwarded Speaker on
Page 65
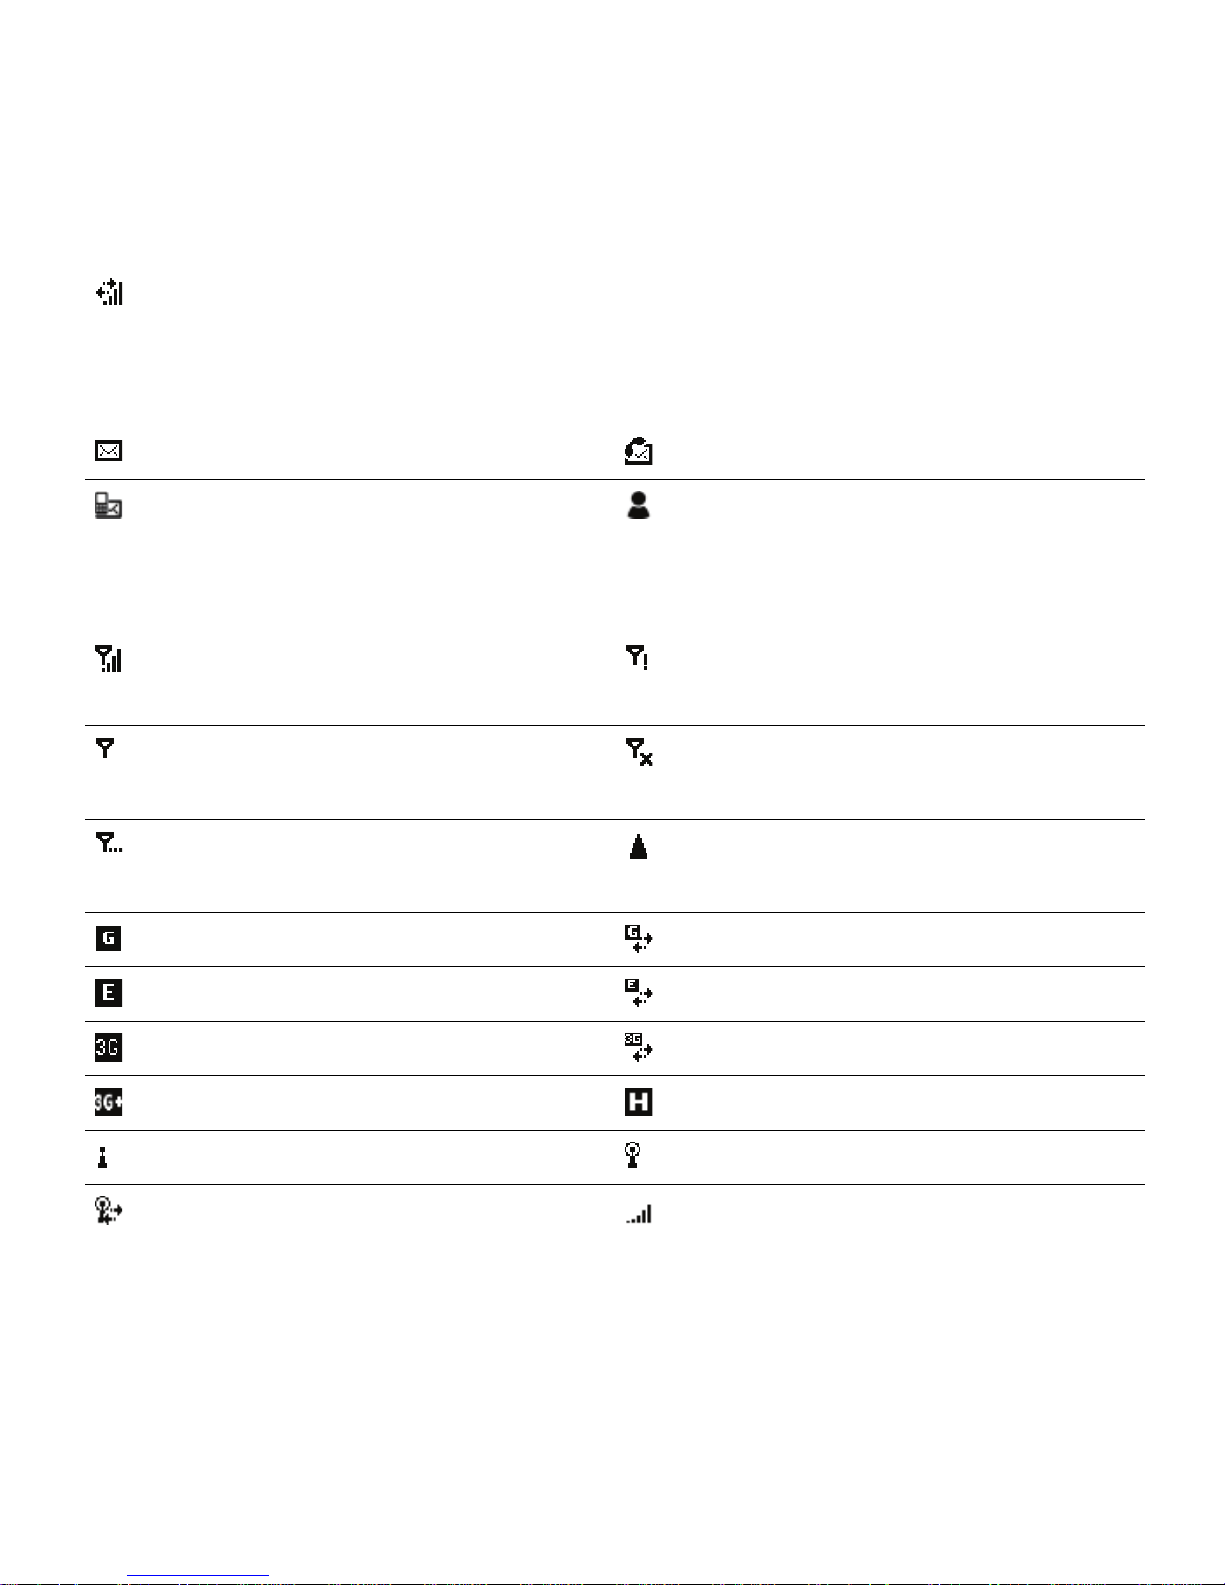
Basics 65
Messaging status indicators
Network status indicators
Data call in progress
New e-mail New voicemail
New text message New instant message
Cellular signal strength No cellular signal, the device has
not yet connected to a network
Phone function is turned on, no
cellular signal
Phone function is turned off
Cellular signal lost, the device is
searching for a cellular signal
Roaming
GPRS available GPRS connected
EDGE available EDGE connected
3G network available 3G connected
3G+ network available HSDPA network available
Wi-Fi active Wi-Fi active and externally visible
Wi-Fi data call Satellite signal strength
Page 66
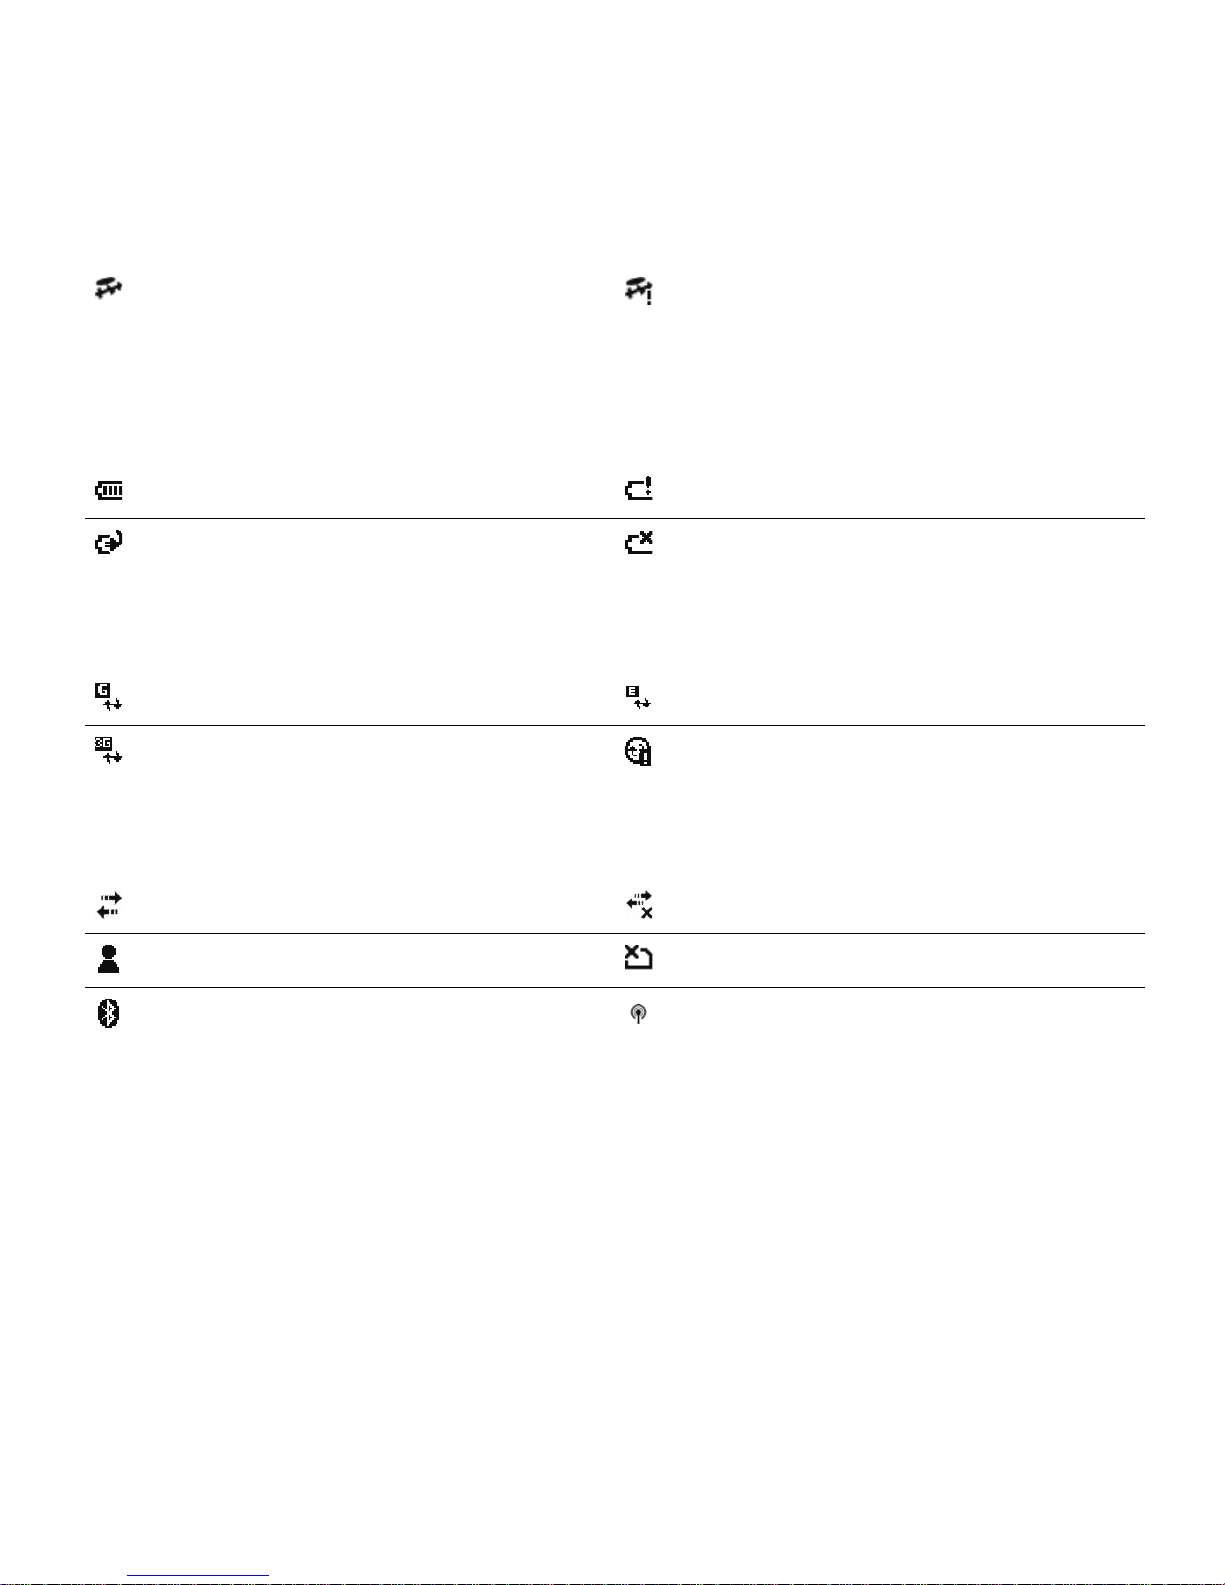
Basics 66
Battery status indicators
Synchronization status indicators
Connectivity status indicators
Connected to the satellite
network
Satellite network enabled, but
not connected to the satellite
Battery level Low battery
Battery charging No battery
ActiveSync over GPRS in use ActiveSync over EDGE in use
ActiveSync over 3G in use Synchronization error
Connection active Connection inactive
New instant message SIM card missing
Connected with another
Bluetooth device
External antenna in use
Page 67
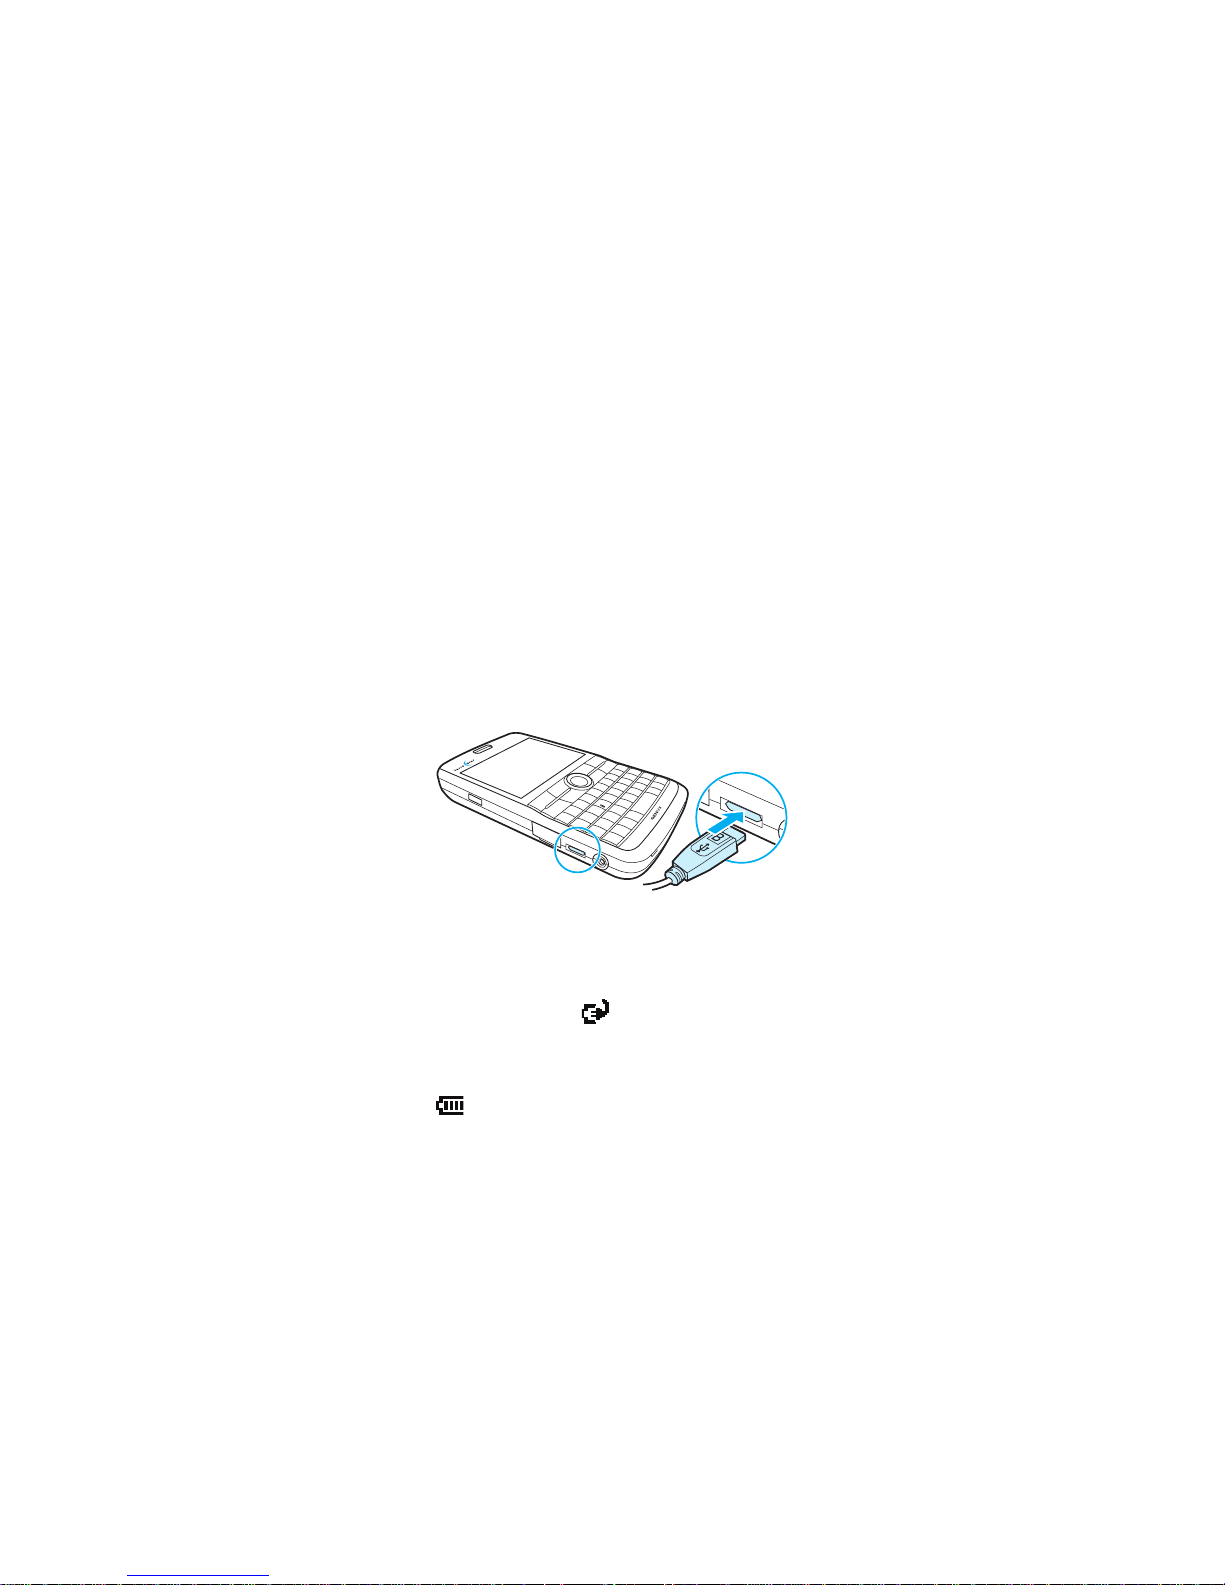
Basics 67
Battery
Charging the battery
New batteries are shipped partially charged. Before you start using your
device, it is recommended that you fully charge the battery.
Use only the original device batteries. For more information, see “Caution:
Battery safety” on page 70.
To charge the battery, plug the provided charger into a standard AC outlet
and the Micro-USB end of the charger into the connector on the left side of
the device.
The charging indicator light in the upper right corner of the device will turn
orange to show that the device is being charged. If the device is turned on
during charging, the charging icon is shown in the screen title bar.
When the battery is fully charged, the charging indicator turns green and
the charging icon shows .
Page 68

Basics 68
Making the battery last longer
How long your battery lasts depends on how you use your device. To view
how much battery power is available, tap > Settings > Power, and select
the Battery tab.
To extend the life of your battery:
• Set your power settings to turn off the device when not in use. For
instructions, see “Managing power settings” on page 69.
• Use the AC charger to plug your device into external power whenever
possible, especially when using a memory card or when using a modem
or other peripherals.
• Adjust the backlight settings. For instructions, see “Setting the backlight
delay” on page 69.
• Searching for networks consumes a lot of power. When you are out of
range of Wi-Fi networks you should turn Wi-Fi off. For instructions, see
“Managing wireless connections” on page 56.
• Turn Bluetooth off when you are not using it. For instructions, see
“Managing wireless connections” on page 56.
• Make the device visible to other devices only when you are trying to
establish a Bluetooth partnership. To make the device invisible, tap >
Settings > Bluetooth, select the Mode tab, and deselect the Make this
device visible to other devices check box.
• Select the Receive all incoming beams setting only while you are trying
to receive beamed files. To set this, tap > Settings > Connections >
Beam.
Page 69

Basics 69
• Lower the ringer volume. For instructions, see “Changing the volume
level” on page 75.
• When synchronizing your device wirelessly, do it less frequently (for
example, once every hour or two, instead of every five minutes). For
instructions, see “Changing synchronization settings” on page 152.
Managing power settings
You can specify power settings for when your device is being operated on
battery power and for when the device is plugged into an external power
source.
1. Tap > Settings > Power, and select the Advanced tab.
2. Select the check box for each condition where you want the device
screen to turn off automatically, and then specify the time delay.
For optimal conservation, specify 3 minutes or less.
3. Press .
Setting the backlight delay
To conserve battery power, you can set the backlight to dim after a specific
amount of time.
1. Tap > Settings > System > Backlight, and select either the Battery
power tab or the External power tab.
Page 70

Basics 70
2. Select the Turn off backlight if device is not used for check box, and
specify the time delay.
3. Press .
Caution: Battery safety
Always observe the following safety guidelines with respect to battery use:
• Do not disassemble or open, crush, bend or deform, puncture or shred
the battery. Improper battery use may result in a fire, explosion or other
hazard.
• Do not modify or remanufacture the battery, attempt to insert foreign
objects into the battery, immerse in or expose to water or other liquids,
expose to fire, explosion or other hazard.
• Only use the battery for the device for which it is intended.
• Charge the battery only using a charger that complies with the battery
standard. Use of an unqualified battery or charger may present a risk of
fire, explosion, leakage, or other hazard.
• Do not short circuit a battery or allow metallic conductive objects to
contact battery terminals.
• Replace the battery only with an original device battery approved by
TerreStar (IEEE std 1725-2006). Use of a non-compliant battery may
present a risk of fire, explosion, leakage or other hazard.
• Promptly dispose of used batteries in accordance with local regulations.
• Battery usage by children should be supervised.
Page 71

Basics 71
• Avoid dropping the device or battery. If you drop the device or its
battery, especially on a hard surface, and suspect damage, take it to a
service center for inspection.
• A new battery, or one that has not been used for a long period of time
could have reduced capacity the first few times it is being used.
• Do not expose your battery to extreme temperatures, never above +140
degrees F (+60 degrees C). For maximum battery capacity use your
battery at room temperature. If the battery is used in cold temperatures
the battery capacity will be reduced.
• The battery can only be charged when the temperature is between
41degrees F (+5 degrees C) and +113 degrees F (+45 degrees C).
• Never place batteries or devices on or in heating devices, such as micro-
wave ovens, stoves, or radiators. Batteries may explode when overheated.
• Turn off your device before removing the battery.
• Do not expose a battery to open flames. This could cause the battery to
explode.
• Do not use the battery pack if it shows signs of rust overheating, leakage
or changes in color or shape.
• Do not allow the battery to be placed into the mouth. Battery electro-
lytes may be toxic if swallowed.
• Avoid charging batteries for more than a week, as overcharging may
shorten battery life.
Page 72
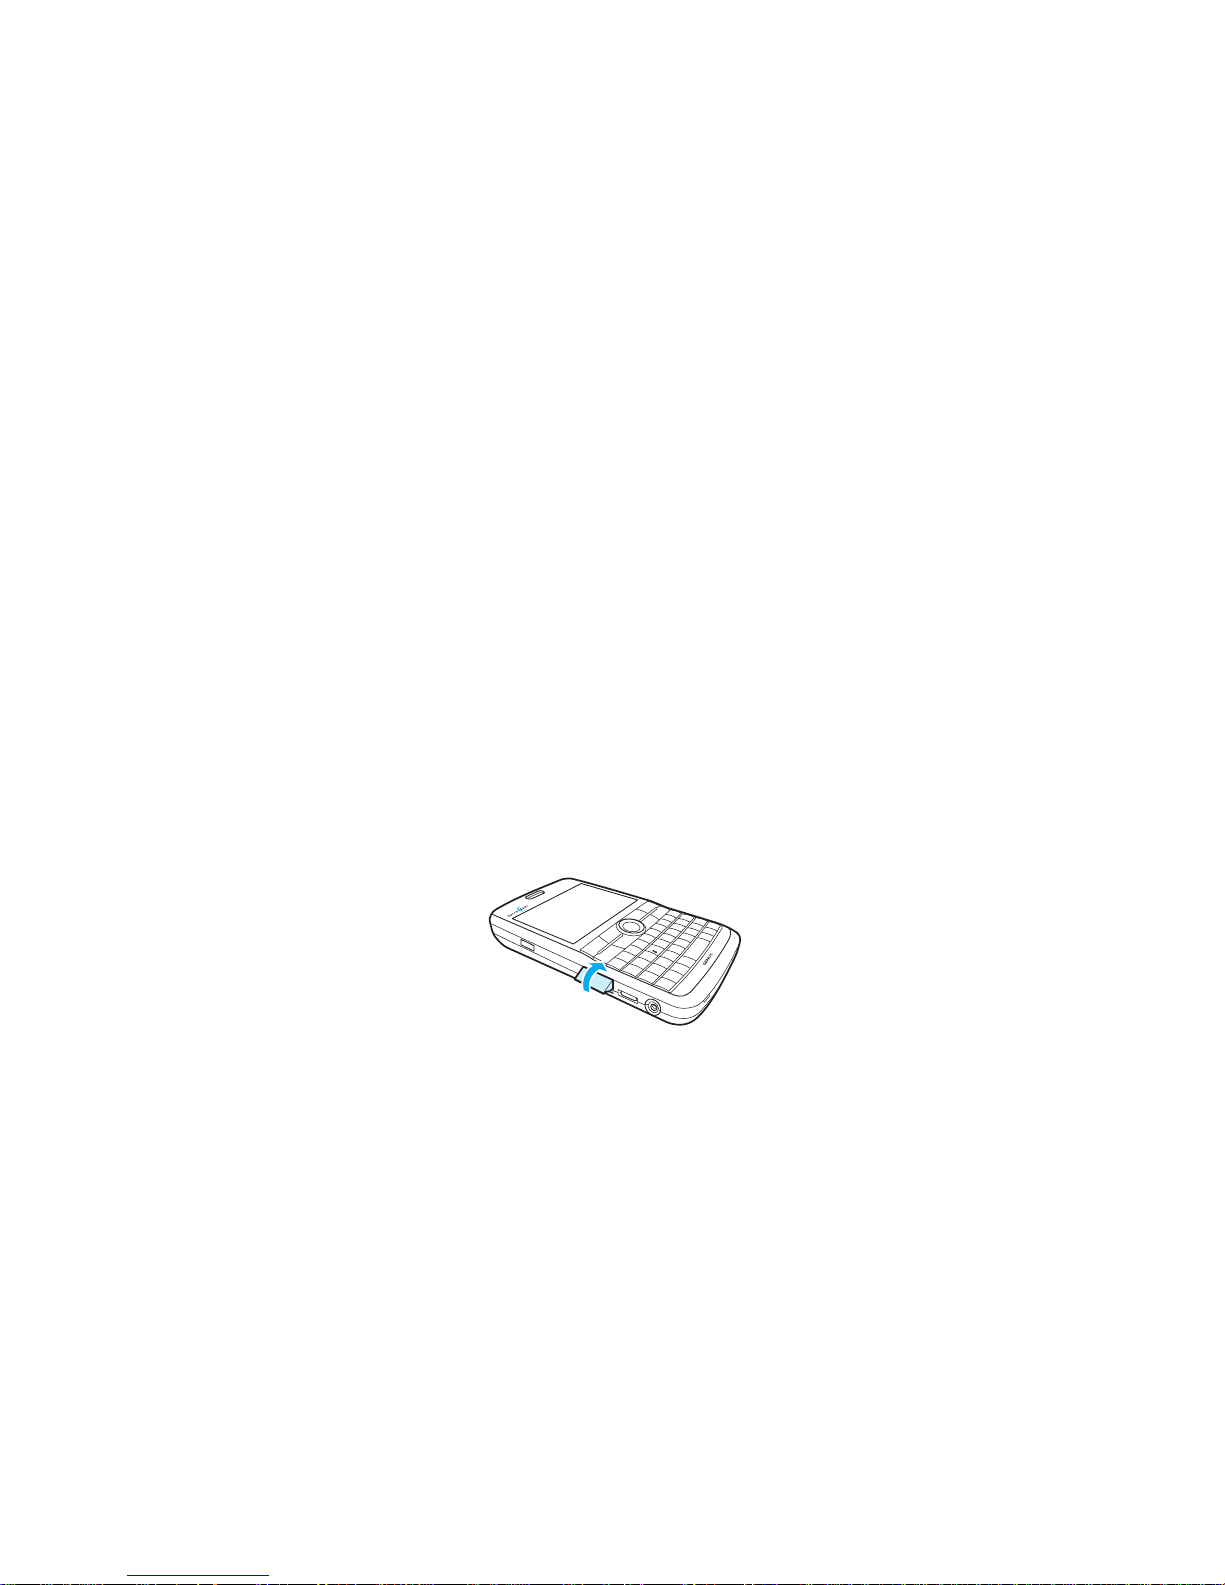
Basics 72
• Over time, unused batteries will discharge and must be recharged before
use.
• Disconnect chargers from power sources when not in use.
Memory card
The storage capacity of your device is 100 MB. Use a microSD memory card
to extend the capacity for storing music, videos, pictures, and documents.
With a microSD card you can expand the memory of your device up to 16 GB.
If you have a memory card, use it as the primary place for storing data.
The memory card is sold separately.
Inserting a memory card
1. Open the memory card slot by lifting the lower edge of its cover.
Page 73
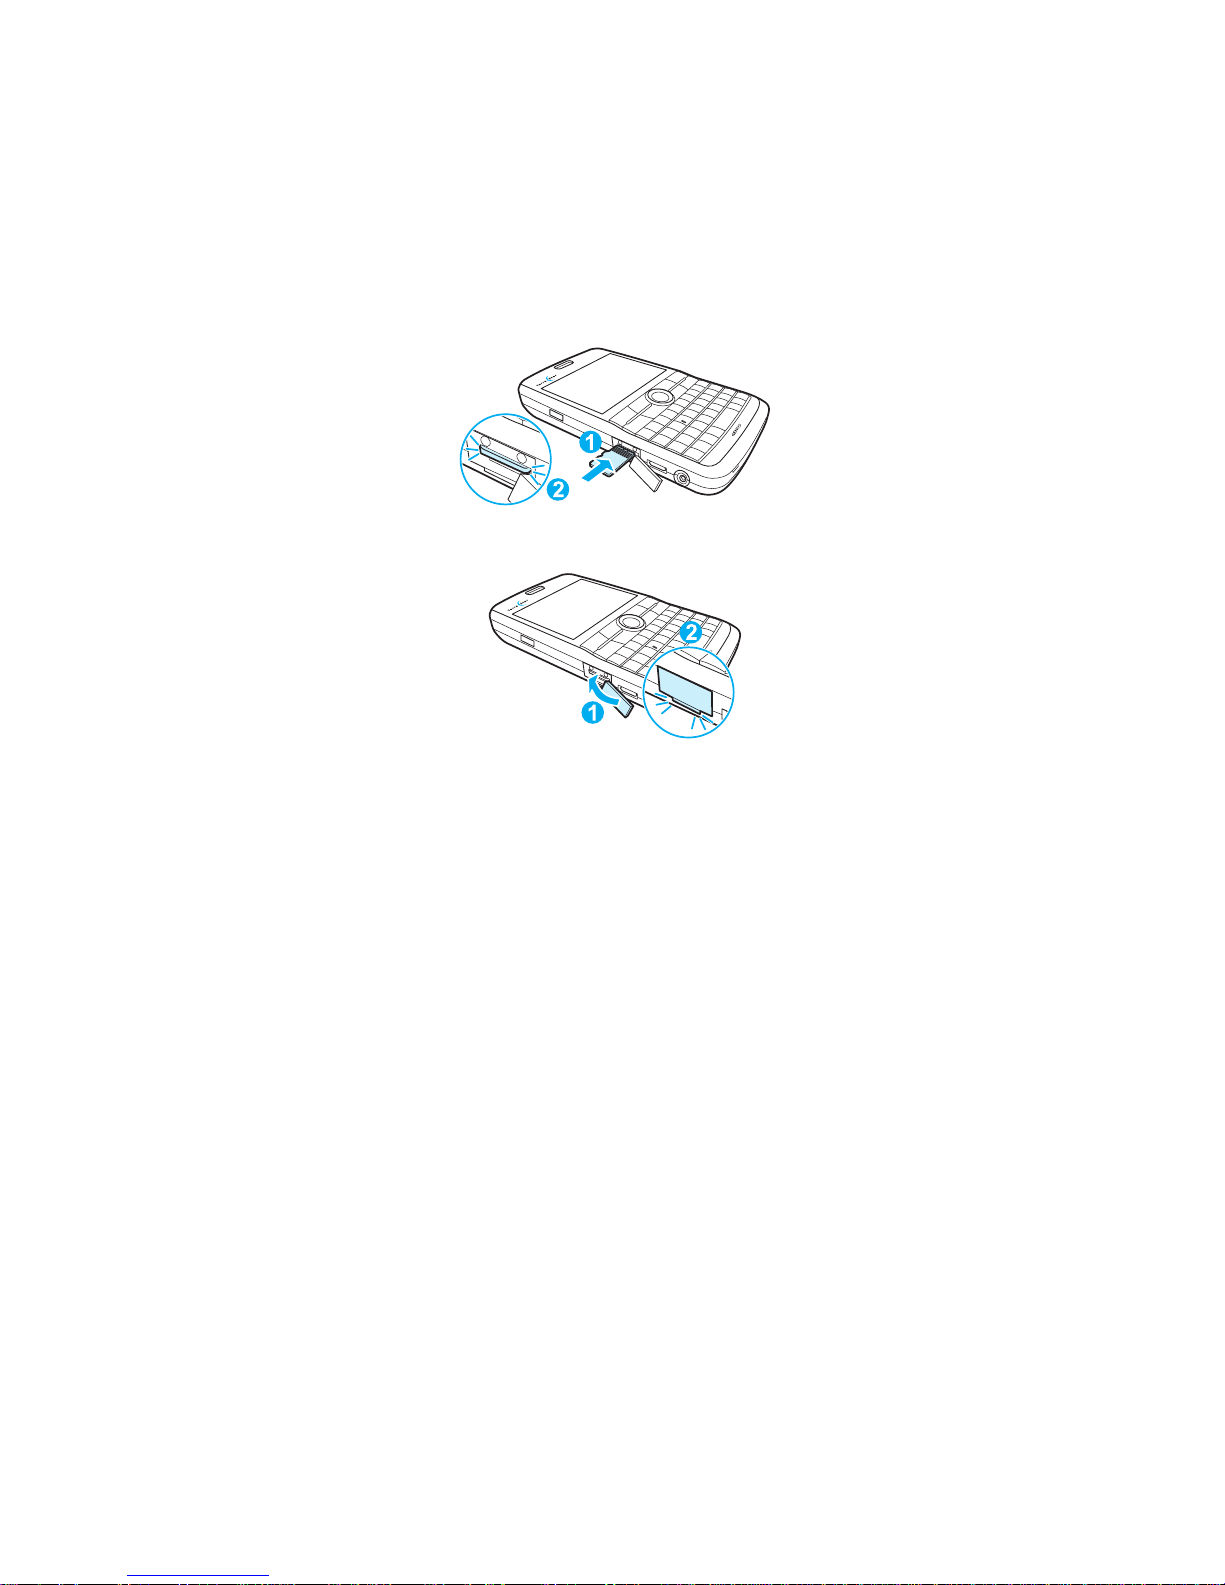
Basics 73
2. Hold the memory card so that its metal contacts point upwards and slide
it into the slot until it clicks into place.
3. Close the cover of the memory card slot by pressing it back into place.
Removing a memory card
1. Open the memory card slot.
2. Push the memory card into the device to release it.
3. Pull out the memory card and close the memory card slot.
Global Positioning System
Your device has a built-in Global Positioning System (GPS) receiver, which
provides location information to map applications and services. To use the
GPS, you must download a location-aware application to your device.
Page 74

Basics 74
Personalize your device
You can personalize your device by defining sounds, time, alarms, regional
options, appearance of the Home screen, shortcut keys, and input methods.
Ring tones and alerts
You can customize the ring type, ring tone, volume level, and the sounds for
events and actions.
Setting the ring type and tone
You have a choice of ring types and tones for incoming calls. To use different
ringtones for different contacts, see “Assigning a ring tone to a contact” on
page 98.
1. Tap > Phone > > Options and select the Sounds tab.
2. Select the ring type from the Ring type drop-down list, and ring tone
from the Ring tone list.
3. Press .
TIP To use custom .wav, .mid, or .wma files as ring tones, use ActiveSync or
Windows Mobile Device Center on your computer to copy the file to the
\\My Documents\My ringtones folder on your device. Then, select the sound
from the Ring tone list.
Note that the maximum file size of the ringtone is 300 KB.
Page 75
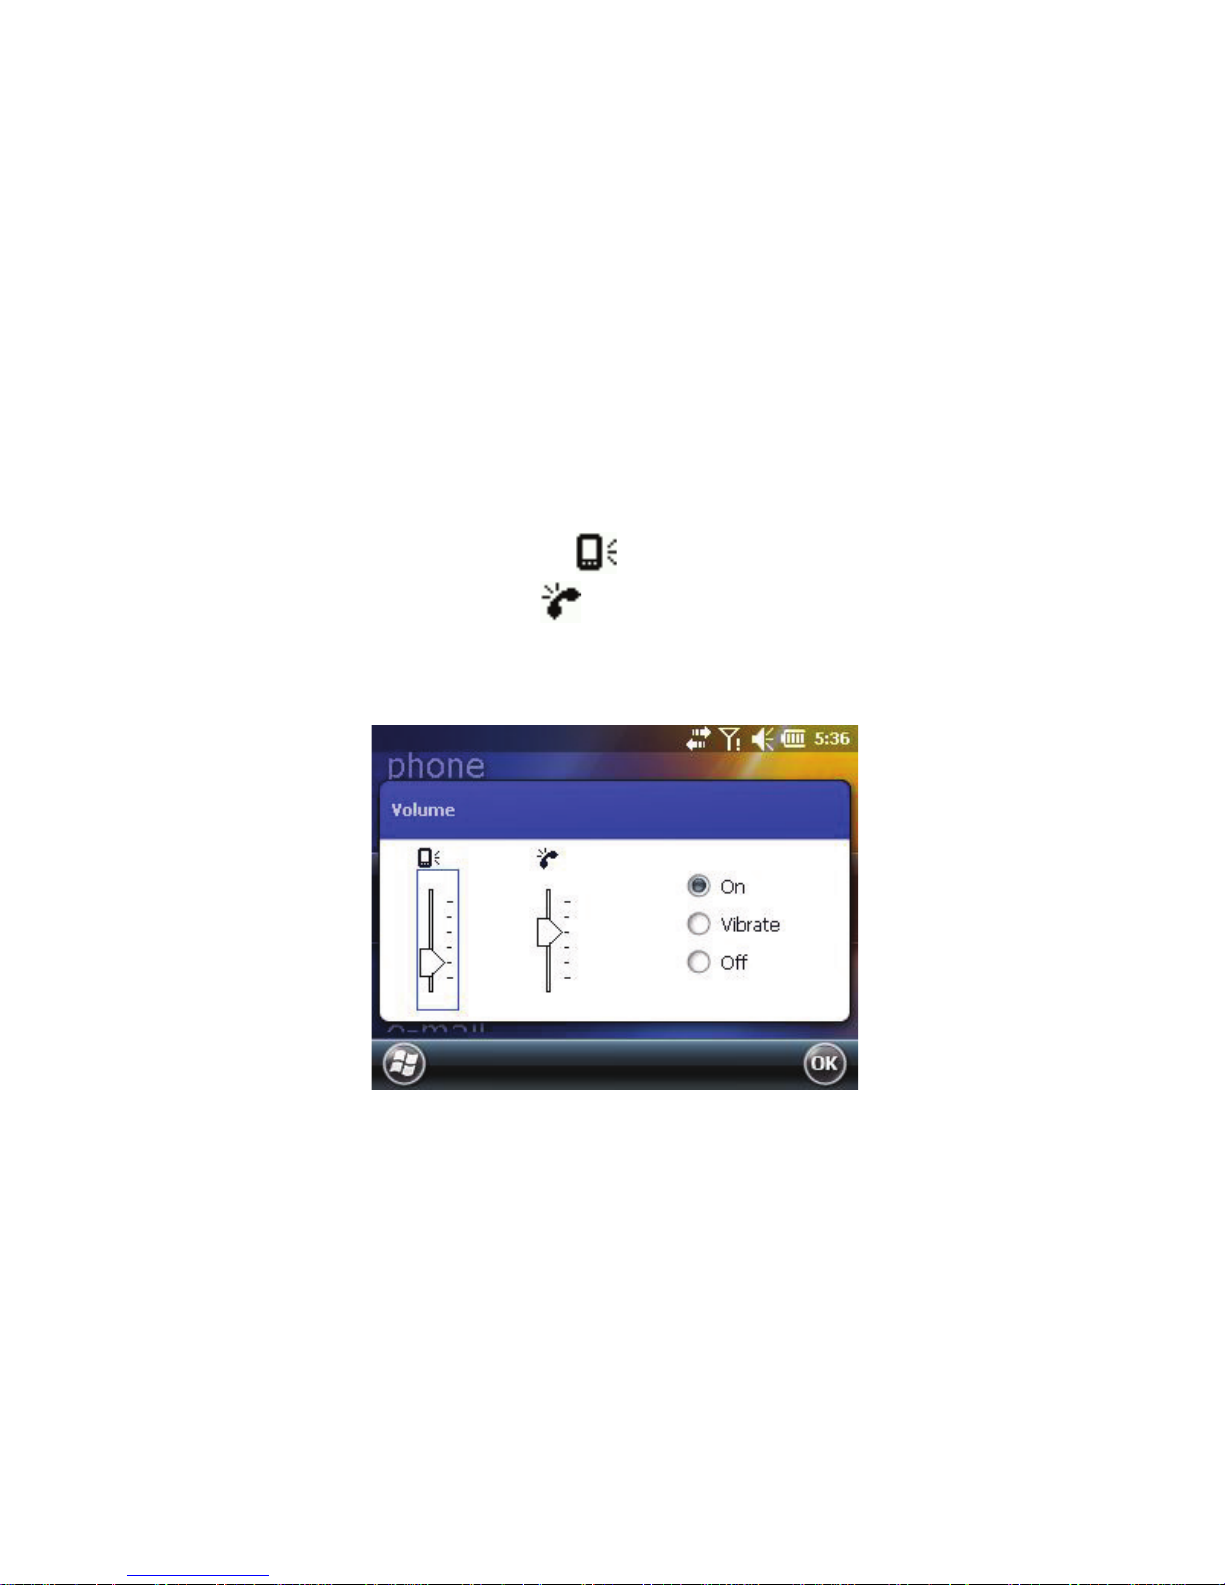
Basics 75
For more information on ActiveSync and Windows Mobile Device Center,
see “Synchronization” on page 144.
Changing the volume level
You can change the device volume in the following ways:
• Press the volume keys on the side of your device:
–Change the device volume ( )
– Change the ring volume ( )
– Turn on the vibrate mode by selecting Vibrate.
– Turn on or off all sounds by selecting On or Off.
• Press the mute key on the side of your device.
Changing the sound and notification settings
You can choose how you want to be notified of events or actions.
Page 76

Basics 76
1. Tap > Settings > Sounds & Notifications.
2. On the Sounds tab, choose how you want to be notified by selecting the
appropriate check boxes.
3. On the Notifications tab, select an event from the Event field, and
choose how you want to be notified by selecting the appropriate check
boxes (for example, a special sound, a message, or a flashing light). If you
clear all of the options, you will still see an icon notifying you of the event.
TIP Turning off sounds and the flashing light helps conserve battery power.
Time, alarms and regional options
Setting date and time
1. Tap > Settings >Clock & Alarms.
2. On the Time tab, set the time zone, date and time.
3. Press and confirm the change.
Setting alarms
You can define up to three alarms.
1. Tap > Settings >Clock & Alarms, and select the Alarms tab.
2. Define an alarm:
aTap <Description> and enter the alarm name.
b Select the days when alarm is active.
Page 77

Basics 77
c Tap the time to set the alarm.
d Tap to define options for the alarm, such as sound type or vibrate
mode.
3. Press .
Setting regional options
Specify your region to set the formatting options for numbers, currency,
time, and date.
1. Tap > Settings >System > Regional Settings.
2. On the Region tab, select your region.
The Region option automatically changes the format of the remaining
options (number, currency, time, and date). If you want to customize the
settings further, tap the appropriate tabs and select the desired options.
3. Press .
Appearance of the Home screen
The Home screen, which is displayed when you turn on your device, can be
customized to your own liking.
Changing the appearance of the Home screen
You can customize the appearance of the Home screen by selecting a theme
for your device and using a picture as a background image.
1. Tap > Settings > Home.
Page 78

Basics 78
2. On the Appearance tab, select the desired theme for your device.
3. To use a picture as a background image, select the Use this picture as
the background check box, tap Browse to view a list of your picture
files, and tap the picture you want to use.
4. Press .
TIP You can select the degree of transparency for the background image. Tap
> Pictures & Videos, open the picture, tap Menu > Set as Home Back-
ground, and then select the transparency level.
Changing the items on the Home screen
You can select which items are shown on the Home screen, modify options
for some of the items, and change their order.
CAUTION It is recommended that you do not personalize items on the Home
screen. If you choose to personalize Home screen items, the Switch to Satel-
lite option will be unavailable on the Home screen, but will still be available
on the Start screen.
1. Tap > Settings > Home, and select the Items tab.
2. Select the items you want to display on the Home screen.
3. To set options for an item, highlight the item, and tap Options. Not all
items have options to set.
Page 79
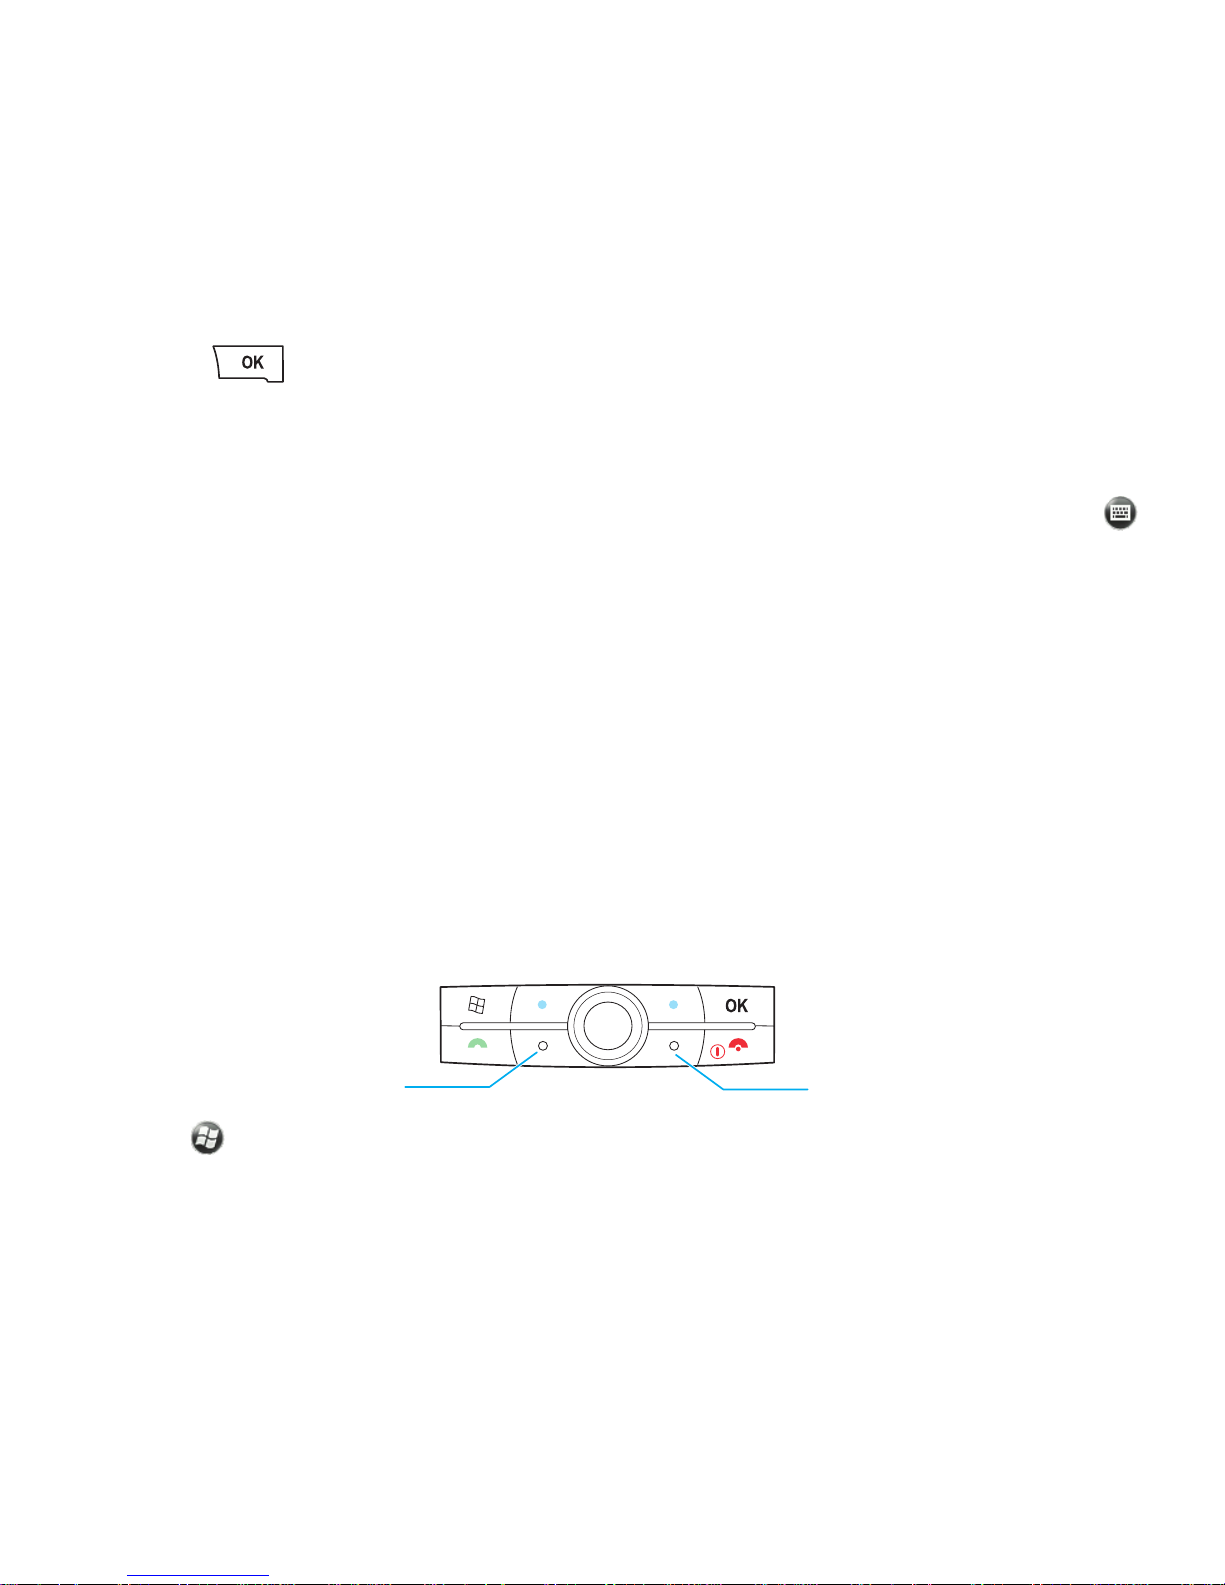
Basics 79
4. To change the order of the items displayed, tap the item and tap Move
Up or Move Down.
5. Press .
Setting the text input method
You can change the text input method within an application by tapping
and selecting the input method.
To enter text using the touchscreen, you can use strokes and the onscreen
keyboard:
•Use Block Recognizer to enter text using single strokes.
•Use Keyboard to enter text using the onscreen keyboard.
•Use Letter Recognizer to enter text using natural character strokes.
Setting the shortcut keys
Your device has two shortcut keys, which you can customize to perform
actions such as opening applications, rotating the screen, and so on.
1. Tap > Settings > Personal > Buttons, and select the Program
Buttons tab.
The current action of the Left or Right shortcut key is shown.
Right shortcut keyLeft shortcut key
Page 80

Basics 80
2. In the Assign a program box, select the application or action you want
to assign.
3. Press .
Adjusting the scrolling speed
1. Tap > Settings > Personal > Buttons, and select the Up/Down
Control tab.
2. To change the time that elapses before scrolling begins, move the Delay
before first repeat slider.
3. To change the time it takes to scroll between items, move the Repeat
rate slider.
4. Press .
Locking and unlocking the device
To prevent accidental input you can lock and unlock the touch screen and
keyboard by pressing the screen key on the left side of the device.
You can lock your device, with or without password. When the device is
locked you can still receive phone calls and text messages.
NOTE You can always make calls to the local emergency services phone
number (for example, 911), even when your device is locked with a password.
Page 81

Basics 81
• To lock the device, tap > .
• To unlock the device, tap , and slide the button to the left or right.
Locking the device with a password
You can prevent unauthorized use of your device by setting it to
automatically lock after a set period of time and by assigning a password for
unlocking.
IMPORTANT Keep track of your password as it cannot be retrieved if
forgotten.
1. Tap > Settings > Lock, and select the Password tab.
2. Check the Prompt if phone unused for check box, and then select the
desired length of time from the drop-down list.
3. Select type of password from the Password type drop-down list.
• Simple PIN is a 4-digit password that uses only the numbers from 0
to 9.
• Strong alphanumeric is a password that can have uppercase and
lowercase letters, numbers, and symbols, such as punctuation marks.
4. Enter the password you want to use, and then confirm the password.
5. Select the Hint tab and enter a phrase that will help you remember the
password if you forget it. Make sure your hint does not allow other
people to guess your password.
6. Press and confirm the change.
Page 82

Basics 82
Changing or removing the password
1. To change or remove the password, tap > Settings > Lock, and enter
your current password.
2. Remove the check from the Prompt if phone unused for check box.
3. Press and confirm the change.
Searching on your device
You can search for files and other information on your device or memory
card by file name or by words located within notes, appointments, contacts,
and tasks.
1. Tap > Search Phone.
2. In the Search for field, enter the file name, word, or information you
want to search for.
When you enter two or more words, the device searches only for items
containing all specified terms.
3. To narrow down your search, select data type from the Type drop-down
list.
4. Tap Search.
5. To open the item, tap its name in the Results list.
Care and maintenance
The following suggestions will help you protect your device:
Page 83

Basics 83
• Avoid dust and other debris from gathering on the connectors or in the
stylus hole.
• Keep the external antenna connector cover plugged when the
connector is not in use.
• When not used, keep the stylus inside the device.
• Gently slide the stylus into the device. Never use force to insert the stylus.
• Use your device between 14 and 131 degrees Fahrenheit or -10 and 55
degrees Celsius.
• Do not keep the device in hot areas for prolonged times. High tempera-
tures can shorten the life of electronic devices and damage batteries.
• Do not keep the device in cold areas. When the device returns to normal
temperature, moisture can form inside and cause damage to the device.
• Keep the device dry. All types of liquids and moisture can damage the
device.
• Use only the supplied and approved accessories.
• As with all sophisticated electronic devices rough treatment could
damage your device.
• Only use a soft damp cloth to clean your device.
• Do not paint your device as the paint could obstruct the earphone,
microphone or any moveable parts and prevent normal use.
• Unplug the device from the wall outlet before cleaning. Do not use liquid
cleaners or aerosol cleaners. Use a damp cloth for cleaning, but do not
use water to clean the LCD screen.
Page 84

Basics 84
• Do not attempt to disassemble your device. The device does not contain
consumer serviceable components. Service should only be performed
by Certified Service Partners.
Security
Like any device connected to a network today, your phone can be
vulnerable to attacks by malicious individuals or software. However, you can
keep your phone safe by observing certain simple security practices.
Security recommendations
• Turn off Bluetooth when you do not need it.
• Set the Bluetooth device in non-discoverable mode.
• Use a Virtual Private Network (VPN) or other secure connection when-
ever possible.
•Use WPA2 for Wi-Fi Protected Access.
• Use virus protection software.
• Do not install software from unknown sources.
• Disable the 4-digit PIN password option and use a strong password for
the phone.
Page 85
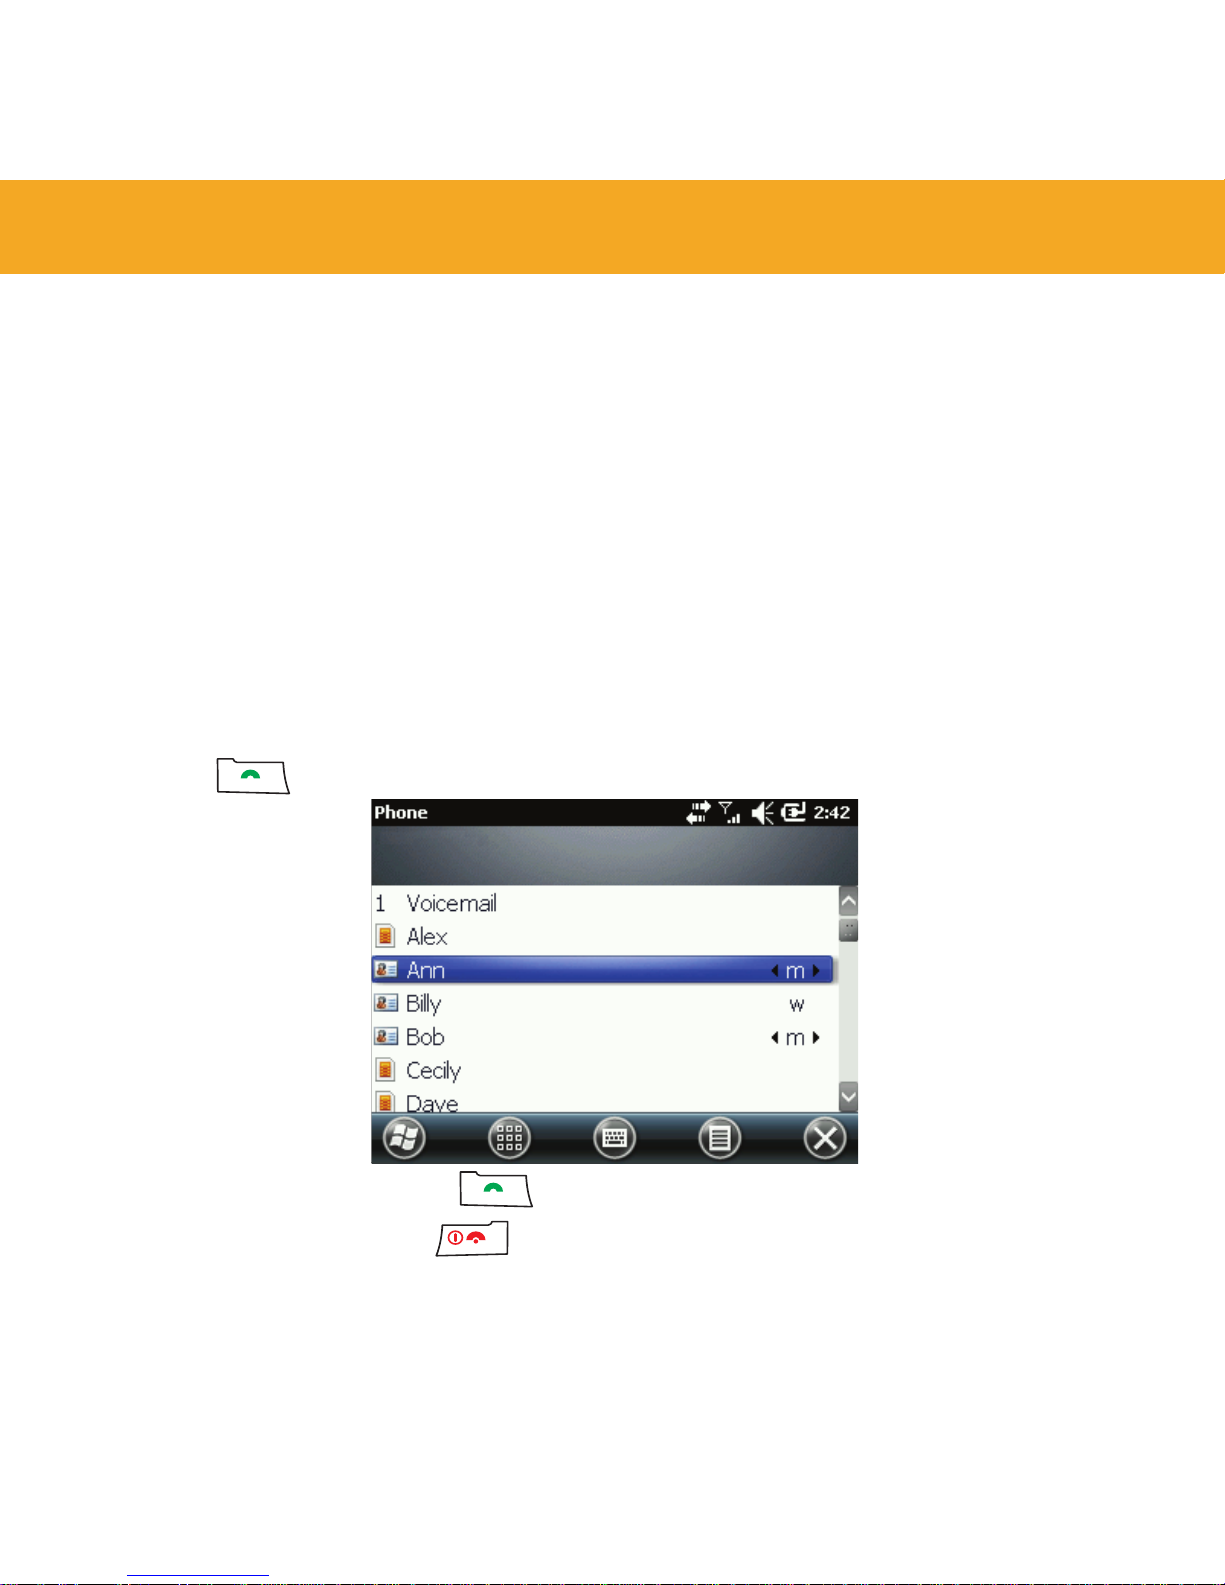
85
Phone
Use the Phone application to make phone calls, set up speed dials, and keep
track of calls. Your service provider may also provide other services such as
voicemail, call forwarding, and caller ID.
Making and receiving calls
You can make calls from the Phone application, Contact list, Home screen,
Speed Dial, and Call History. You can also dial a phone number from an email or text message that contains a hyperlink phone number.
Making a call
1. Press and enter the number you want to call.
2. To make the call, press .
3. To end the call, press .
There are several other ways to make a call:
Page 86
Phone 86
• To make a call from the contact list, tap > Contacts, tap the contact
you want to call, and tap Call.
• To make a call using speed dial, press and hold the speed dial number
assigned to the contact. For instructions on how to assign a speed dial
number, see “Assigning a speed dial number to a contact” on page 97.
• To make a call using a recently dialed phone number, tap > Phone,
and tap a recently dialed number in the list.
• To make a call from an e-mail or text message that contains a hyperlink
phone number, tap the phone number in the message, and tap Call.
To make a call from the Home screen, enter the number using the keyboard,
and press .
Answering or ignoring a call
• To answer a call, tap , or press .
• To ignore a call, tap , or press .
When you ignore a call, your service provider may send the caller to your
voicemail.
To silence the ringer, press the volume key on the side of the device.
Making a conference call
You can create a phone session between yourself and two or more other
parties.
NOTE Conference calls are available only on the cellular network.
Page 87

Phone 87
1. Dial the first number.
2. While you are connected to the first number, tap Hold.
3. Call the second number.
4. Tap Conference.
If you want to talk to one of the parties privately during the call, tap
Private and select the party. To include everyone in the call again, tap
Conference.
5. To add another party, tap Hold, dial the number, and then tap Confer-
ence.
6. When you end the call, all parties are disconnected.
Handling multiple calls
Your device allows you to put a call on hold in order to call another number
or answer an incoming call. If you have more than one call on the line, you
can move from one call to the other.
To be notified about incoming calls when on another call, enable call waiting
with your service provider.
• To put a call on hold to call another number, tap Hold.
• To put the first call on hold and answer an incoming call, tap .
• To move from one call to another, tap Swap.
• To end one call and return to the other call, tap .
Page 88

Phone 88
Making and receiving satellite calls
Before you can make and receive satellite calls, you must switch to the
satellite network. When using the satellite network, making and receiving
calls is the same as when using the cellular network.
NOTE On the satellite network, you cannot make an emergency call (for
example, 911) without a SIM card.
Switching to the satellite network
Before switching to the satellite network, consider the following:
• Position the back of the device toward a clear view of the southern sky.
• Place your hand below the line on the back of the device.
•
IMPORTANT The device does not switch between cellular and satellite
networks automatically.
1. To switch from cellular to satellite network, do one of the following:
• Press .
•Tap > Switch to Satellite.
• On the Home screen, scroll to the Network manager applet and tap
Switch to Satellite.
Page 89
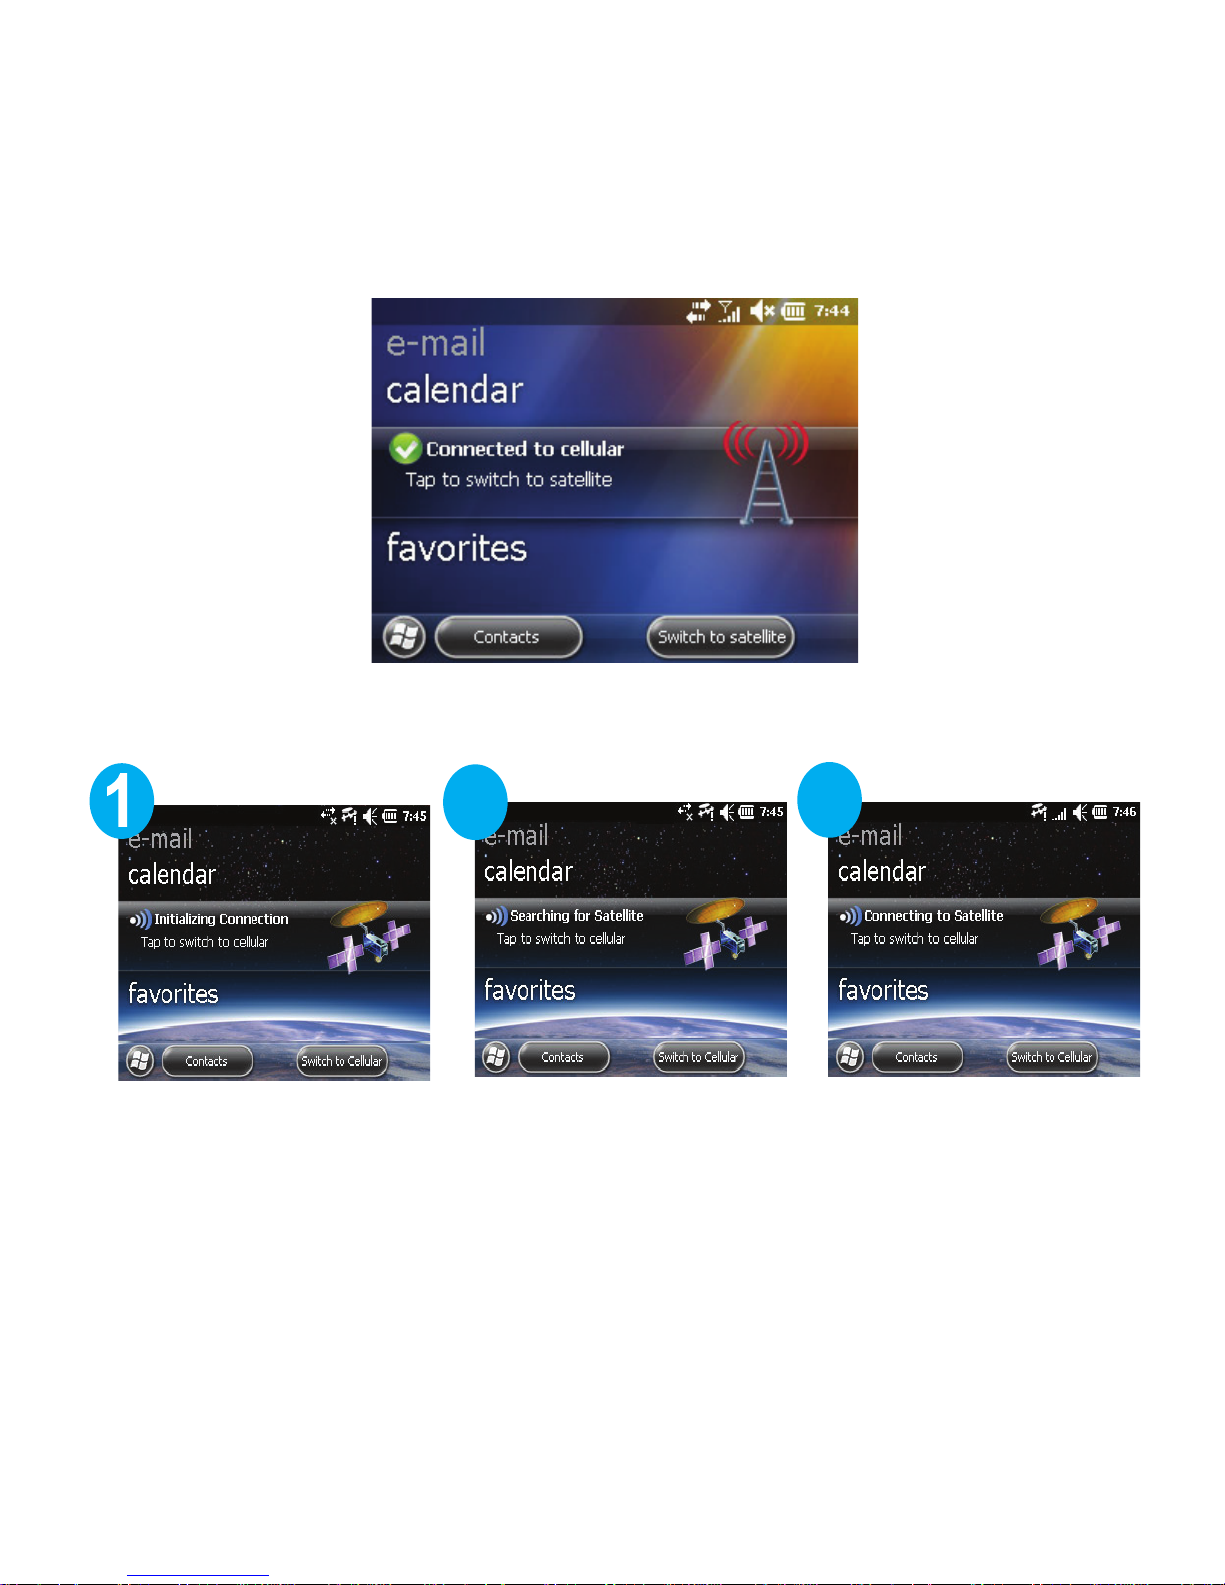
Phone 89
2. Confirm the switch.
During the switch, the device will establish a satellite connection.
2
3
Page 90
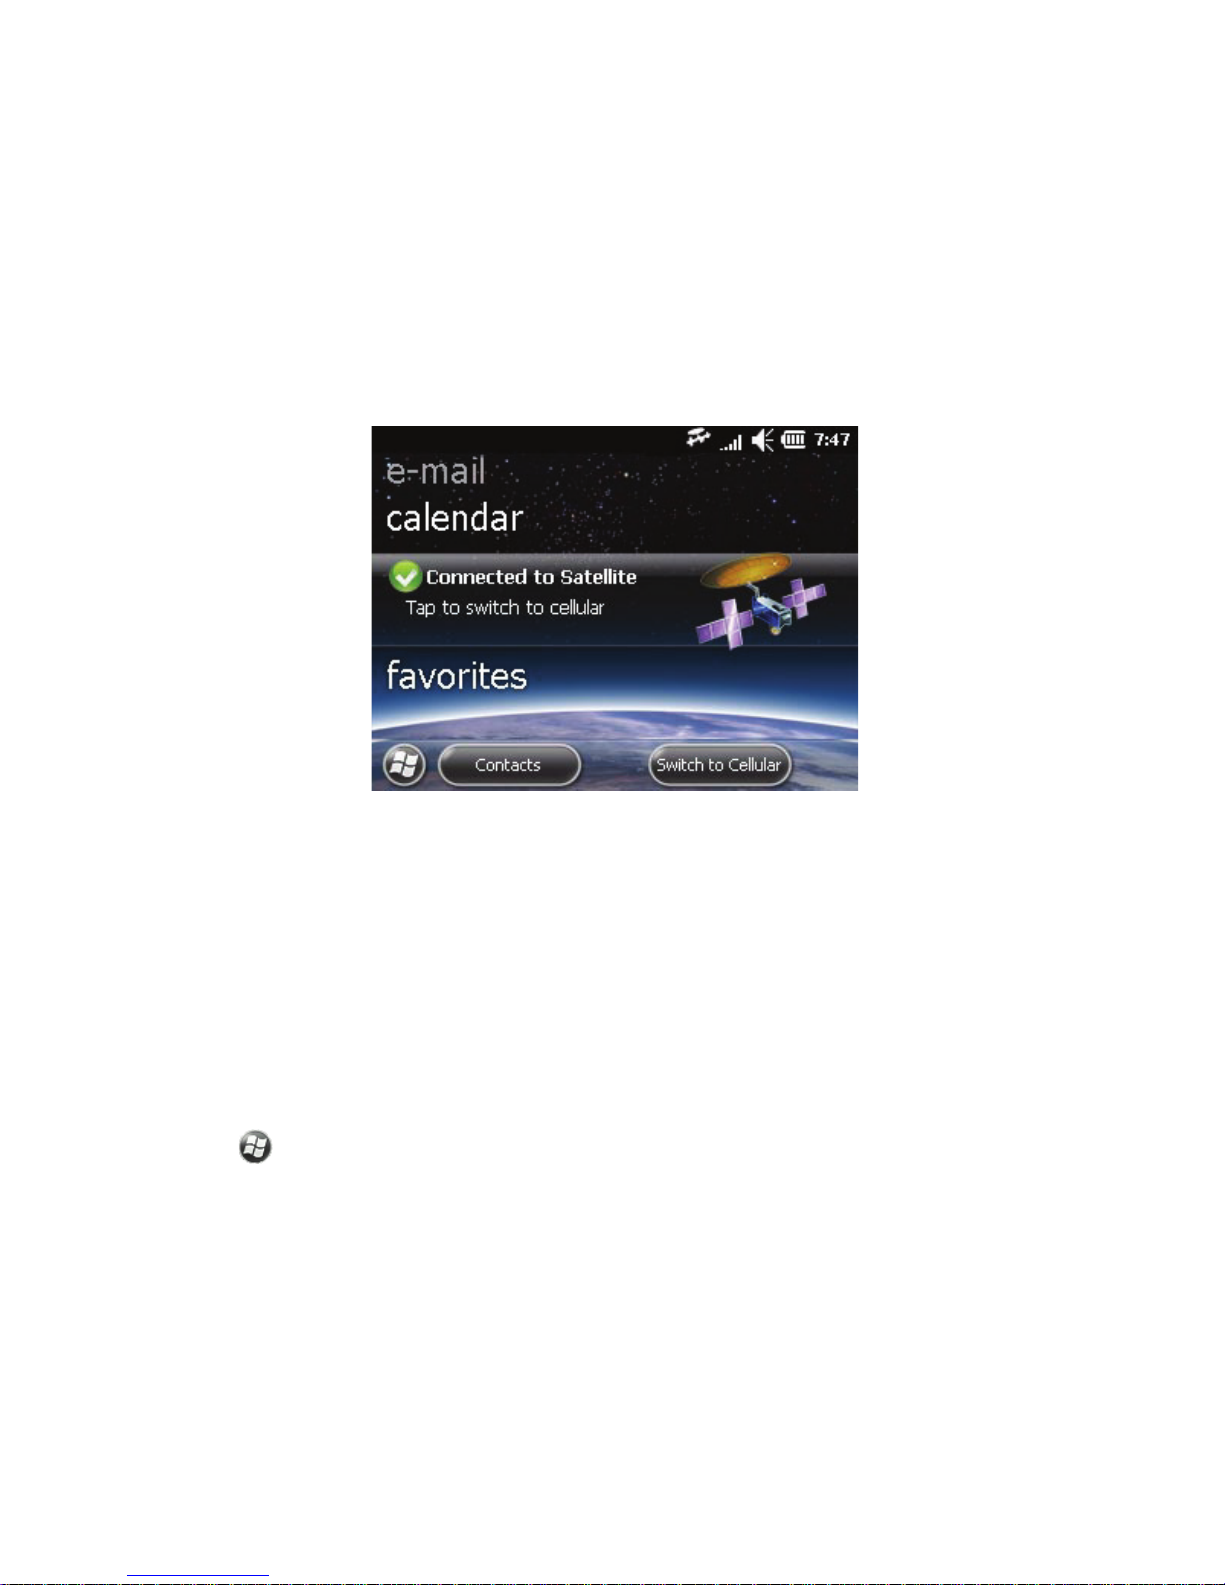
Phone 90
NOTE Switching from cellular to satellite network can take a few
moments.
3. You can start making satellite calls once the device has connected to the
satellite network.
Using the Satellite Signal Optimizer
The Satellite Signal Optimizer indicates the strength of the satellite signal
and helps you align the device to find the strongest signal.
1. To launch the Satellite Signal Optimizer, do one of the following:
• On the Home screen, scroll to the Network manager applet, swipe left
or right and tap Satellite Signal Optimizer.
•Tap > Satellite Signal Optimizer.
2. To get the strongest possible satellite signal, adjust your position until
the satellite signal is at its strongest.
Maintain the same position for the duration of the call.
Page 91
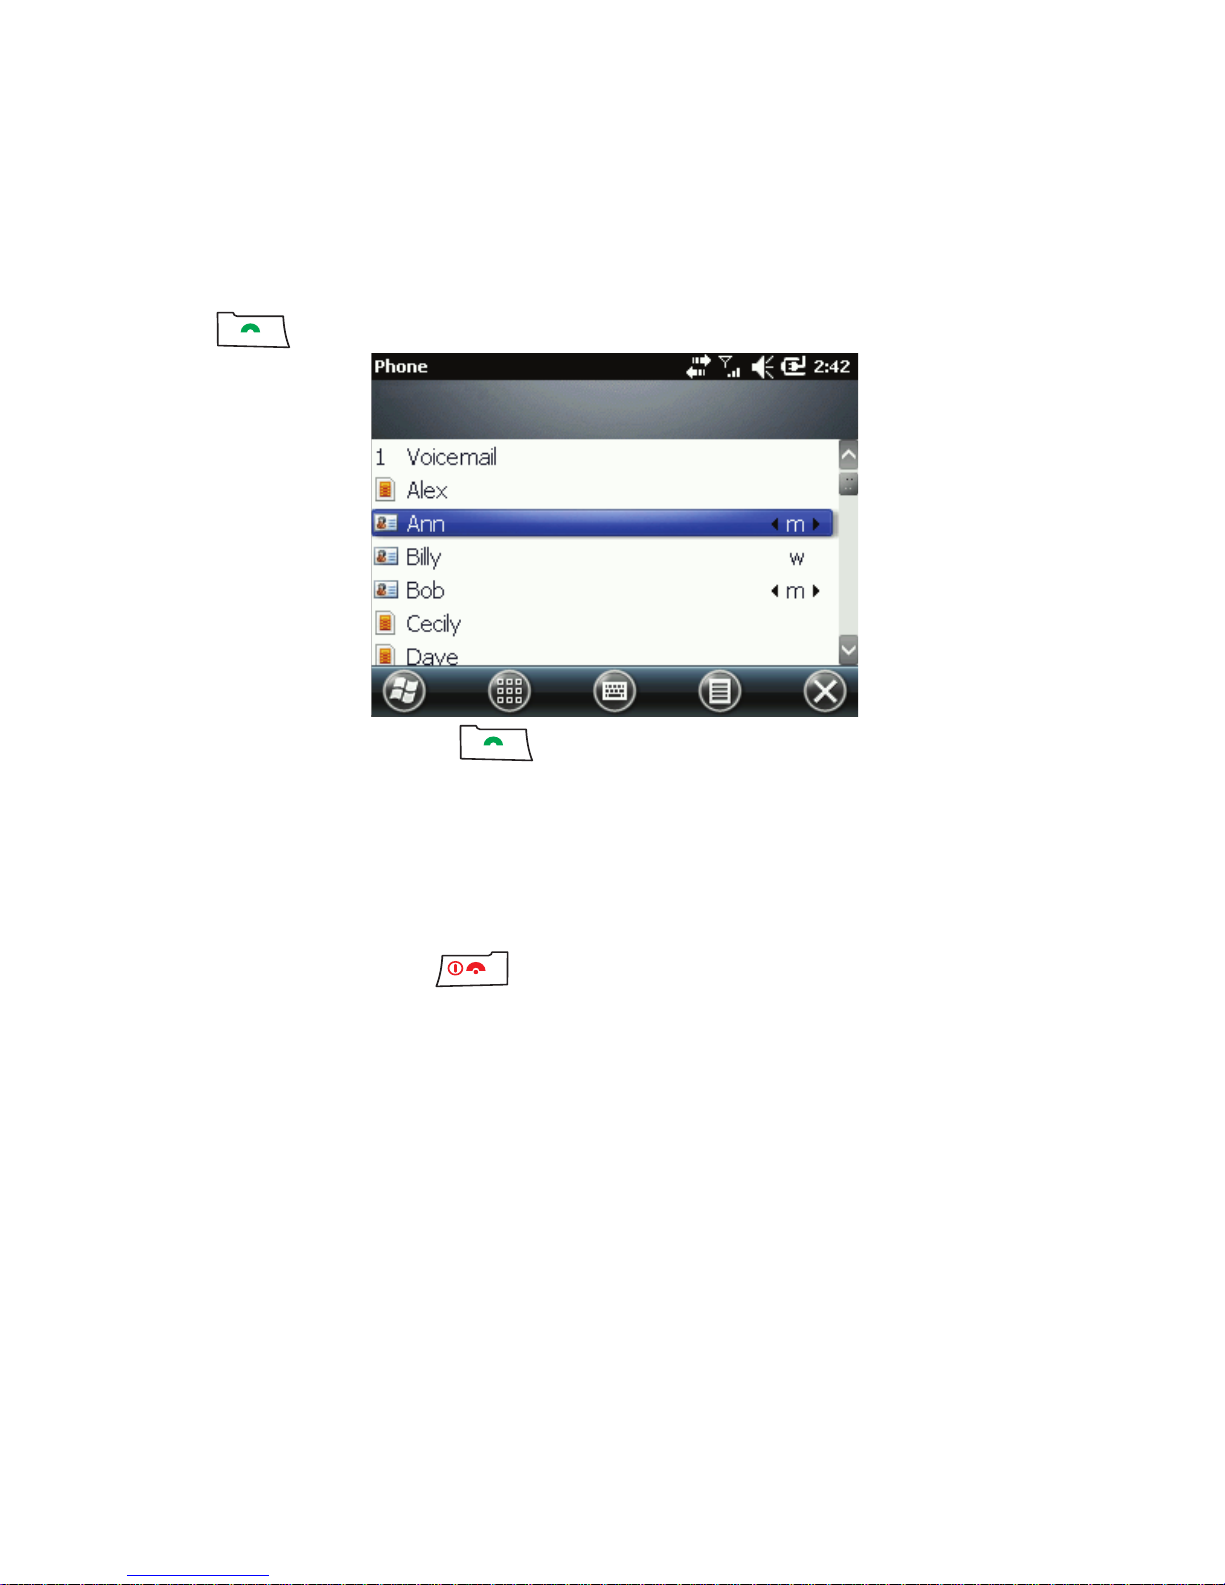
Phone 91
Making a satellite call
1. Press and enter the number you want to call.
2. To make the call, press .
Because the signal travels to the satellite and back, establishing a satellite call can take a few moments.
3. Position your hand below the line on the back of the device. Hold the
device to your right ear using your right hand.
4. To end the call, press .
Satellite services
When using the satellite network, you may retrieve and change the settings
for the following services:
• Call Barring: Block incoming or outgoing calls.
• Caller ID: Find out if you are subscribed to Caller ID service.
Page 92

Phone 92
• Call Forwarding: Define when phone calls are forwarded and to which
number.
To access the satellite services settings, tap > Settings > Personal >
Phone and select the Satellite Services tab.
NOTE
• You cannot change or retrieve the settings while a voice call is in prog-
ress.
• You cannot set call holding, switching, or waiting in the satellite network,
but if you have set them in the cellular network, they also work in the
satellite network. For more information, see “Handling multiple calls” on
page 87.
Setting and querying call barring for satellite calls
Call barring blocks incoming or outgoing calls.
1. Tap > Settings > Personal > Phone, and select the Satellite Services
tab.
2. Select Call Barring, and tap Get Settings.
3. Select the desired action:
• Bar All Outgoing Calls: Block all calls from your phone.
• Bar All Outgoing International Calls: Block all calls to international
numbers.
Page 93

Phone 93
• Bar All Outgoing International Calls Except Home: Block all calls to
international numbers but allow calls to numbers in your own operator’s network. This setting is used while roaming.
• Disable Outgoing Call Barring: Allow calls to be made normally.
• Bar All Incoming Calls: Block all calls to your phone.
• Bar All Incoming Calls While Roaming: Block all calls to your phone
when you are roaming in another operator’s network.
• Disable Incoming Call Barring: Allow calls to your phone.
• Disable All Call Barring: Allow all calls.
4. Tap Next.
5. Select the action you want to perform for the call barring type. You can
either activate, deactivate or check its status.
When you have selected the desired action, tap Next.
6. Enter the call barring password provided by the service provider and tap
Send Settings.
An audio message plays to indicate whether the operation was
successful.
Querying caller ID status for satellite calls
On the satellite network, you can check whether you are subscribed to caller
ID service.
1. Tap > Settings > Personal > Phone, and select the Satellite Services
tab.
Page 94

Phone 94
2. Select Caller ID (Check Status), and tap Send Settings.
An automated system indicates whether you are subscribed to caller ID
service.
Setting and querying call forwarding for satellite calls
Call forwarding forwards all incoming calls to a selected number.
Activating and deactivating call forwarding
1. Tap > Settings > Personal > Phone, and select the Satellite Services
tab.
2. Select Call Forwarding, and tap Get Settings.
3. Select a call forwarding type on the list:
• Forward all incoming phone calls: Forward all calls to your phone.
• Forward phone calls if no answer: Forward calls when you do not
answer your phone.
• Forward phone calls if unavailable: Forward calls if your phone is
not connected to the network.
• Forward phone calls if busy: Forward calls to your phone while the
phone is being used for another call.
4. Tap Next.
5. Select the action you want to perform for the selected call forwarding
type: activate, deactivate, register, delete or check status.
When you select the desired action, tap Next.
Page 95

Phone 95
6. Enter the call barring password provided by the network operator and
click Send Settings.
An audio message plays to indicate whether the operation was
successful.
Setting the call forwarding number
To use call forwarding, you have to define the number where calls are
forwarded.
1. Tap > Settings > Personal > Phone, and select the Satellite Services
tab.
2. Select Call Forwarding, and tap Get Settings.
3. Select the call forwarding option for which you want to define the
number and tap Next.
4. Select Register and tap Next.
5. Type a phone number, and tap Send Settings.
An audio message plays to indicate whether the operation was
successful.
Cellular services
Depending on your cellular service provider, the following services may be
available:
• Call Barring: Block incoming or outgoing calls.
Page 96

Phone 96
• Caller ID: Find out if you are subscribed to caller ID service.
• Call Forwarding: Define when phone calls are forwarded and to which
number.
• Call Waiting: Define if you want to be notified of incoming calls while on
another call.
• Voicemail and Text Messages: Define the phone number for voicemail
and text messages.
• Fixed Dialing: Restrict the device to dial only phone numbers or area
codes specified in the fixed dialing list.
For availability and instructions on how to set up these services, contact
your service provider.
Contacts
Using Contacts you can store a range of information about the people and
businesses with whom you communicate.
For each contact, you can store phone numbers, addresses, e-mail
addresses, and important dates. You can also add a picture or assign a ring
tone to a contact.
From the contact list, you can communicate with people quickly. Tap a
contact in the list for a summary of contact information. From there, you can
call or send a message.
Page 97
Phone 97
If you use Outlook on your computer, you can synchronize contacts
between your device and your computer. For instructions, see
“Synchronization” on page 144.
Adding a contact
1. Tap > Contacts > , and select a contact type.
When you create a SIM contact, the contact information is stored on your
SIM card. When you move the SIM card to another device, your SIM
contacts are moved as well.
2. Enter the contact information.
If your contact list has been filtered by a category when you create a
contact, that category is automatically assigned to the new contact.
3. Press .
TIP If most of the contacts you create have phone numbers that begin with
the same area code, in the contact list, tap > Options, and enter the area
code in the Area code field.
TIP To save an existing contact to your SIM card, open the contact and tap
> Copy Contact > To SI M.
Assigning a speed dial number to a contact
A speed dial number is a number on the device keyboard assigned to a
specific phone number in your Contacts list. You can use the speed dial
Page 98

Phone 98
number to dial that contact quickly. You can set up separate speed dial
numbers for a contact's home, work, and mobile numbers.
1. Tap > Contacts.
2. Select the contact for which you want to set up a speed dial number.
3. If you use more than one phone number for the contact, scroll to the
phone number to which you want to add a speed dial number.
4. Tap > Add to Speed Dial....
5. In the Location drop-down menu, select a number on the device
keyboard.
If you skip this step, the device assigns a number automatically.
6. Press .
Assigning a ring tone to a contact
To identify who is calling you, you can assign a custom ring tone to a contact.
You can assign a ring tone only to Outlook contacts.
1. Tap > Contacts.
2. Select the contact to which you want to assign a ring tone.
3. On the Info tab select Set ringtone.
4. Select the ring tone you want to use and press .
Page 99

Phone 99
Finding a contact
There are several ways to find a contact when your contact list is long.
Finding a contact by name or company
You can locate your contacts by their name or by the company they work for.
1. Tap > Contacts.
2. Select a view:
• To find a contact by name, go the Name view by tapping > View
By > Name.
• To find a contact by company, go the Company view by tapping >
View By > Company.
3. Do one of the following:
• Search by entering a name or company in the provided text box.
• Use the alphabetical index displayed at the top of the contact list. To
view the index, tap > Options, and then select the Show alpha-
betical index check box.
• Filter the list by category. In the contact list, tap > Filter, and then
tap a category you have assigned.
Finding a contact in your company directory
In addition to storing contacts on your device, you can access contact
information from your organization’s company directory. This enables you to
Page 100

Phone 100
quickly add a message recipient from the company directory. Access to the
company directory is available if your organization uses Microsoft Exchange
Server 2003 SP2 or higher, and after you complete your first synchronization
with Exchange Server.
NOTE Your device must be set up with a data connection.
1. Synchronize with Exchange Server, if you have never done so.
2. Do any of the following:
• In Contacts, tap > Company Directory.
• In a new message, tap the To: box. Tap > Add Recipient, and then
tap Company Directory.
• In a new meeting request, tap Attendees > Add Required Attendee,
and then tap Company Directory at the top of the list.
3. Enter the contact name and tap Search.
You can search by the following categories, as long as they are included
in your organization’s company directory:
•First name
•Last name
•E-mail name
• Display name
• E-mail address
• Office location
 Loading...