

Terratek TPDC18134 User Manual

8VHU0DQXDO±3OHDVH
UHDGDQGUHWDLQIRU
IXWXUHUHIHUHQFH
6HHSDJH 9RLUSDJH 9HUODSiJHLQD
&RUGOHVV'ULOO
3HUFHXVHYLVVHXVH
7DODGUDGRUDDWRUQLOODGRUD
*XLGHG¶XWLOLVDWLRQ
±9HXLOOH]OLUHHW
FRQVHUYHUFHJXLGH
SRXUYRXV\UHSRUWHU
XOWpULHXUHPHQW
0DQXDOGHOXVXDULR±
3RUIDYRUOHDHVWH
PDQXDO\JXiUGHORSDUD
UHIHUHQFLDIXWXUD
73'&
(
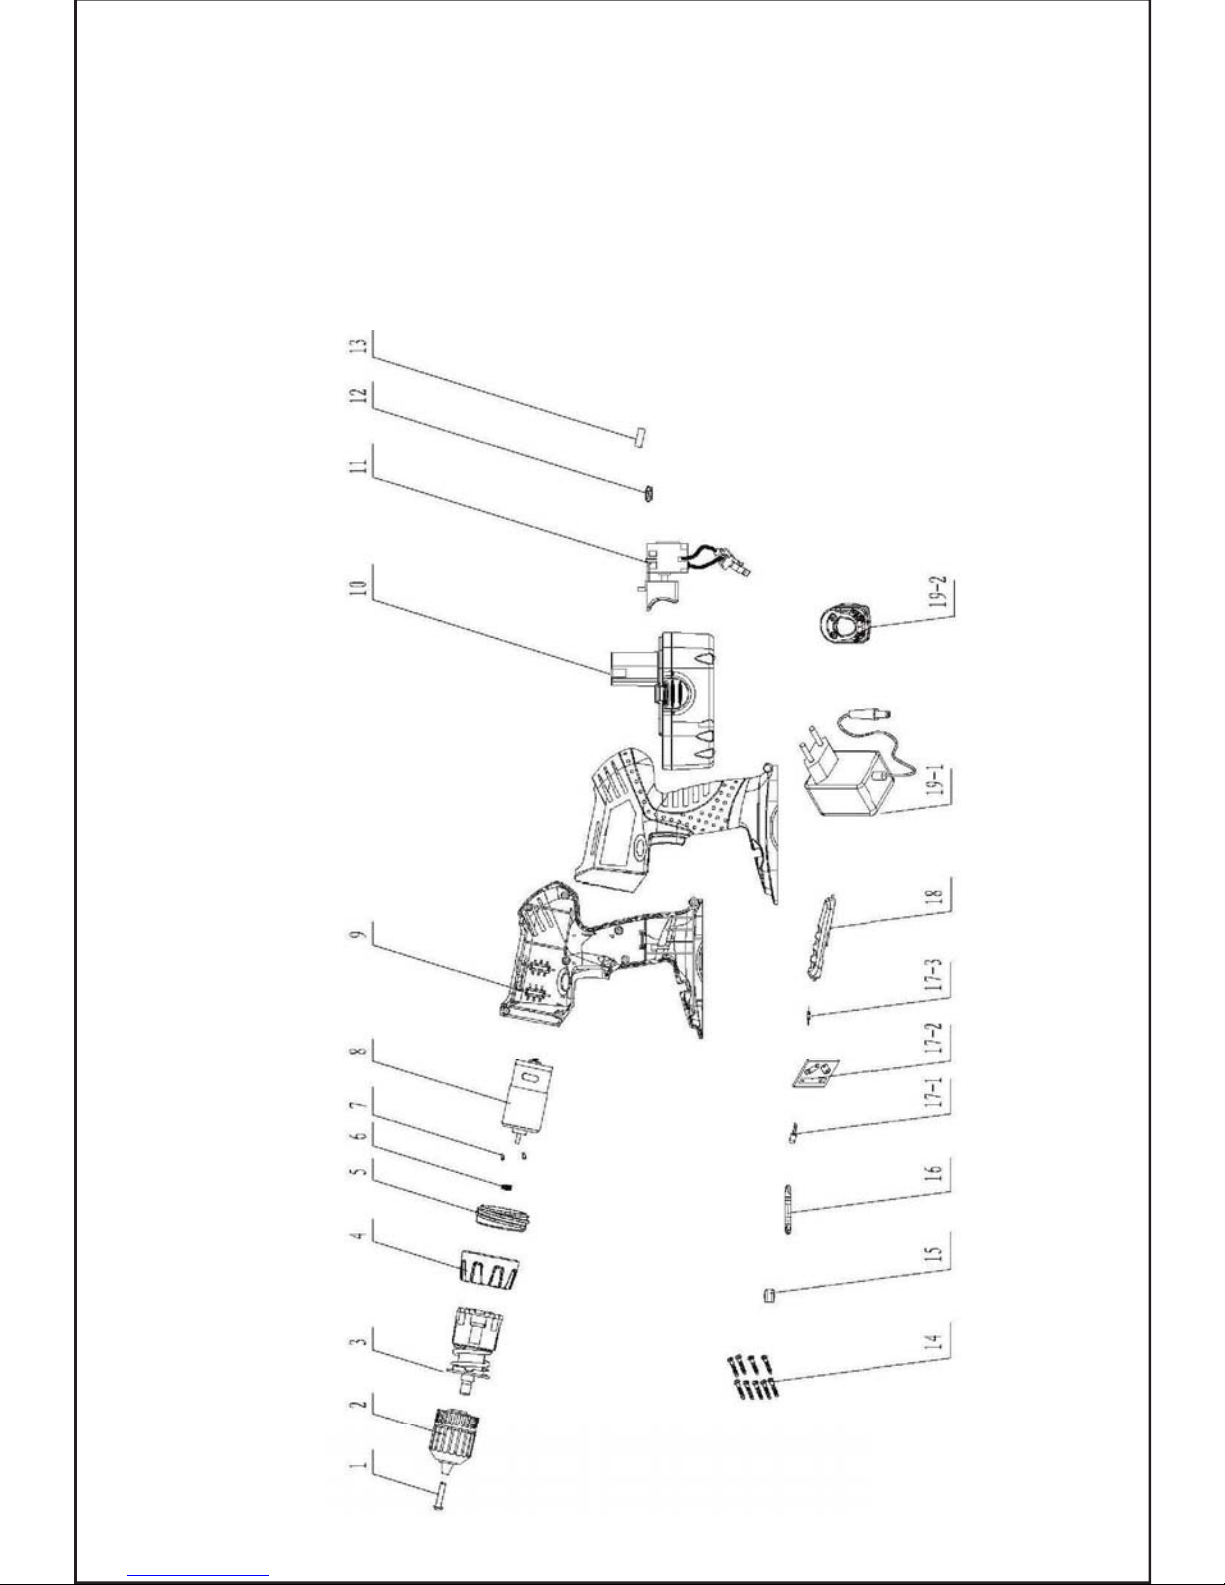
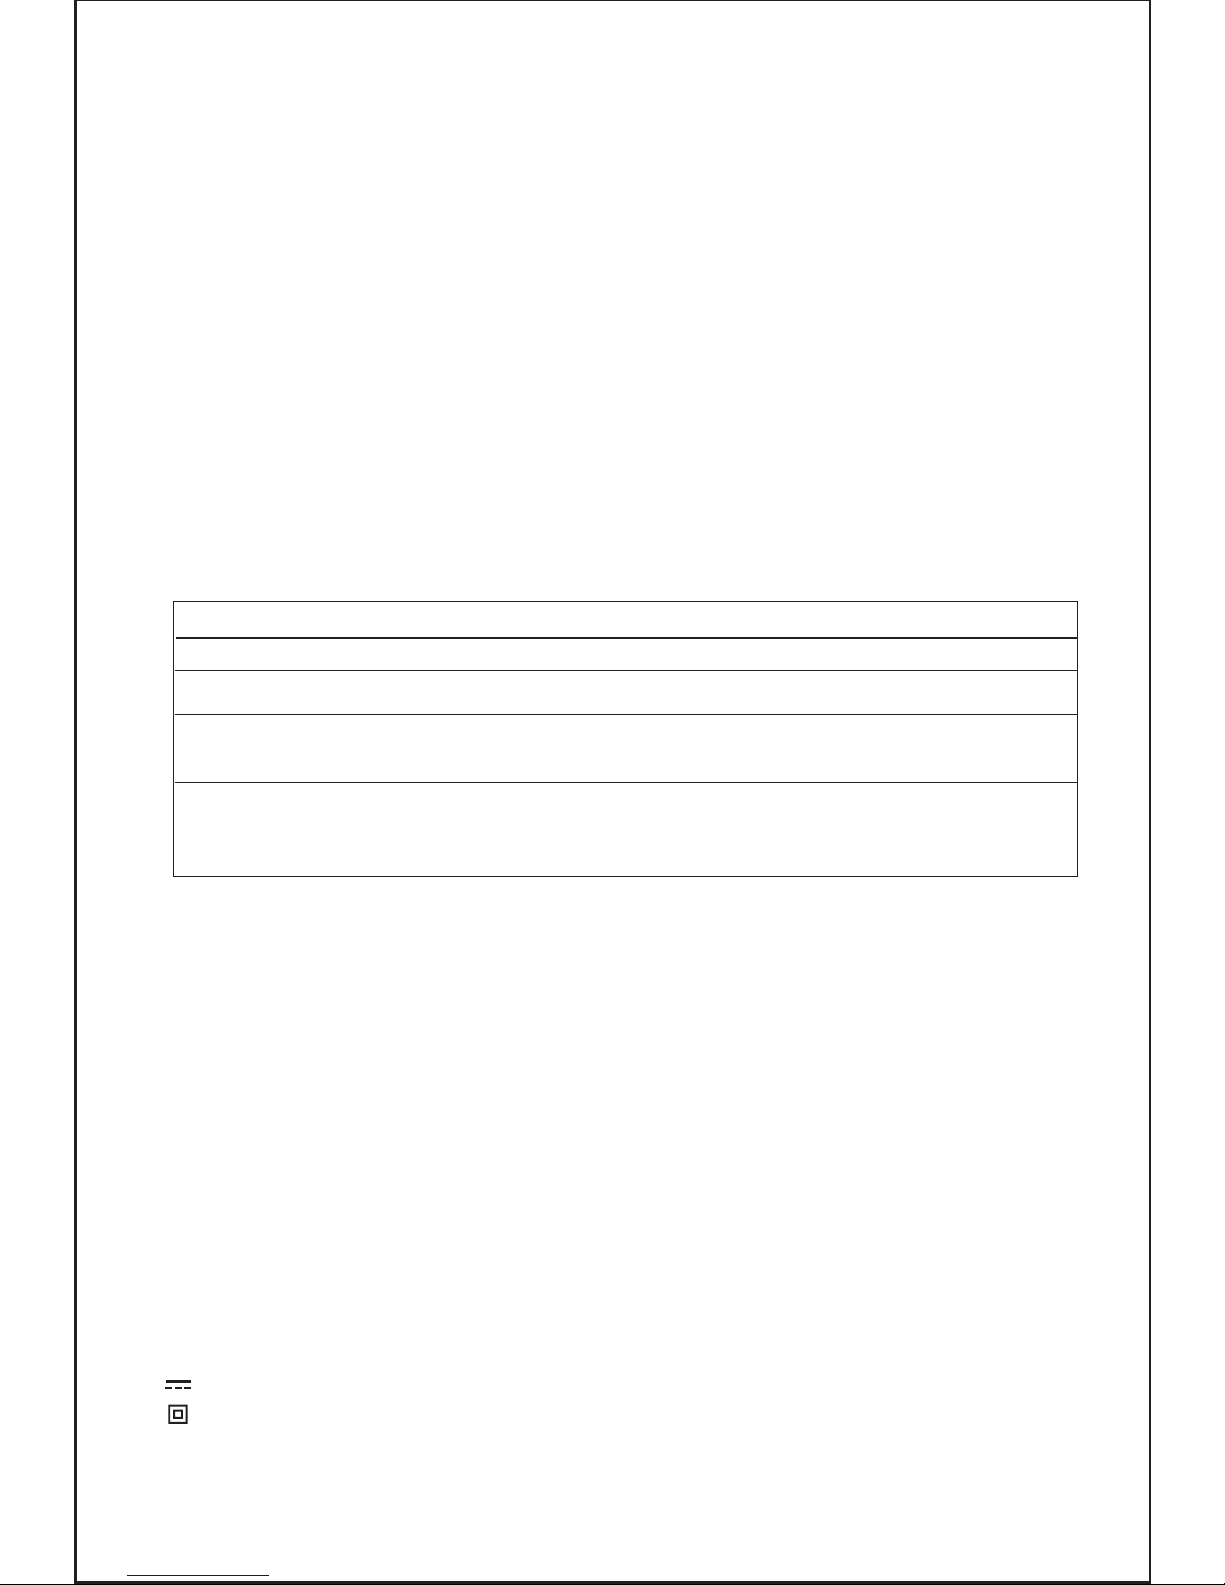
Exploded Assembly Diagram
Éclatés
Dibujo despiezado del conjunto

&KXFN
7RUTXHFRQWUROULQJ
)RU5HY/RFNRXW
2Q2II9DUVSHHGVZLWFK
%DWWHU\
%DWWHU\FOLS
0DQGULQ
7RXUTXHFHUFOH
$YDQW$UULqUH9HUURXLOODJH
0DUFKH$UUrW9LWHVVHYDULDEOH
%DWWHULH
%DWWHULHWRXFKHV
0DQGULO
&LUFORGHWRUVLRQ
$GHODQWH5HYHUVR&LHUUH
(QFHQGLGR$SDJDGR9HORFLGDGYDULDEOH
%DWHULD
%RWyQGHEDWHULD
)LJ5pI5HI

1
Contents
Parts List
Technical Information
Safety Instructions
Using your drill
Maintenance
Warranty
Parts List
1
2
3
4
5
6
7
8
9
10
11
12
13
14
15
16
17
17-1
17-2
17-3
18
19-1
19-2
Anti-screw
Chuck
Gear unit
Torque
Inner torque
Motor gear
Screw
Motor
Shell of machine
Battery
Switch
Handspike
Level bubble
Screw
Clip
Double end bit
LED
Light
Light circuitry board
Resistance
Decorative cover
Adapter
Charger Base
7HFKQLFDO,QIRUPDWLRQ
&RS\ULJKWE\7HUUDWHN,QWO/WG$OOULJKWVUHVHUYHG7KLVPDQXDORUDQ\DUWZRUN
FRQWDLQHGKHUHLQPXVWQRWEHUHSURGXFHGLQDQ\VKDSHRUIRUPZLWKRXWWKHH[SUHVV
ZULWWHQFRQVHQWRI7HUUDWHN,QWO/WG'LDJUDPVZLWKLQWKLVPDQXDOPD\QRWEHGUDZQ
SURSRUWLRQDOO\'XHWRFRQWLQXLQJLPSURYHPHQWVDFWXDOSURGXFWPD\GLIIHUVOLJKWO\
IURPWKHSURGXFWGHVFULEHGKHUHLQ
5HDGWKLVHQWLUHPDQXDOEHIRUHXVLQJWKLV
SURGXFW)DLOXUHWRGRVRFDQUHVXOWLQVHULRXVLQMXU\6DYH
WKLVPDQXDOIRUIXWXUHUHIHUHQFH
9ROWDJH 9'&
%DWWHU\ 1L&G$K
1RORDGVSHHG 530
7RUTXHFRQWURO SRVLWLRQV
&KXFN PP
&KDUJHU KRXUV
:HLJKW1:*:/EV
Important SAFETY Information
This symbol is to warn you of potential personal
injury hazards. Please read carefully the notes along side
this warning to avoid possible injury or death.
General Safety Rules
WARNING! Read all instructions. Failure to follow all instructions listed below may
result in electric shock, fire and/or serious injury. The term “power tool” in all of the
warnings listed refers to corded or cordless power tools.
Work area safety
Read and Keep This Manual
Electrical safety
Before use, ensure that the power outlet you are using matches the plug on your power
tool and that the voltage of the outlet matches that of your power tool.
Only use grounded extension cords with power tools fitted with 3 pin plugs and if using
outdoors ensure any extension cord is suitable for outdoor use.
Always try to avoid body contact with grounded surfaces, such as radiators, cooking
ranges and any other fixed appliance with metal surfaces.
Do not expose your power tool to wet or damp conditions and NEVER use in rain.
Check regularly the power cord of your machine and any extension cord that you
are using for damage.
Keep work area clean and well lit. Cluttered or dark areas invite accidents.
Do not operate power tools in explosive atmospheres, such as in the presence of
flammable liquids, gases or dust. Power tools create sparks which may ignite the
dust or fumes.
Keep children and bystanders away while operating a power tool. Distractions can
cause you to lose control.
Please read carefully all instructions within this manual. Failure to follow all safety
warnings can result in serious personal injury. The term “Power Tool” in all of the
following warnings refers to your mains operated (corded) or battery operated (cordless) power tool
3

Personal safety
Never use your power tool whilst under the influence of alcohol, drugs or medication.
Tiredness can often cause accidents, stay alert.
Never use your power tool without the correct guards in place.
Always use ANSI approved eye protection and dust mask. Non slip safety shoes and
hearing protectors should be worn at all times when using your power tool.
Ensure any dust collecting device supplied with your machine is connected correctly
before use.
Ensure all loose clothing, long hair or jewelry is kept clear of the machine.
Before plugging your power tool into the power outlet ensure the power tool is in the
OFF position.
Check that wrenches or adjusting keys have been removed. Any wrench or key left
attached to a moving part can result in injury.
Power tool use and care.
Service
Keep your power tool clean and well serviced at all times.
Never adjust or service any power tool before disconnecting from the mains electricity
supply.
Always use the correct tool for the job.
Never force the tool to work harder than it is designed to do.
Never use your power tool with broken parts such as switches, guide fences or leg stands.
ALWAYS keep your power tools away from children.
Keep cutting tools sharp to ensure less stress on the motor.
Only have your power tool serviced by a qualified repair agent using manufacturers
recommended parts.
4
Do not carry or pull the machine with the power cord.
Ensure the cord is clear from hot surfaces, oil or sharp objects.
Have your power tool serviced by a qualified repair person using only identical replacement
parts. This will ensure that the safety of the power tool is maintained.
Develop a periodic maintenance schedule for your tool. When cleaning a tool be careful
not to disassemble any portion of the tool since internal wires may be misplaced or
pinched or safety guard return springs may be improperly mounted. Certain cleaning
agents such as gasoline, carbon tetrachloride, ammonia, etc. may damage plastic parts.
When servicing a tool, use only identical replacement parts. Follow instructions in the
Maintenance section of this manual. Use of unauthorized parts or failure to follow
Maintenance Instructions may create a risk of electric shock or injury.
A) Wear eye protection.
B) Keep hands out of the path of cutting tools.
C) Do not operate tool without guards in place.
D) Do not perform any operation freehand.
WARNING: For your own safety read Instruction Manual before operating your power tool.

GENERAL SAFETY INSTRUCTIONS
1. KEEP GUARDS IN PLACE and in working order.
2. REMOVE ADJUSTING KEYS & WRENCHES. Before turning on the power tool, make
sure the keys and adjusting wrenches have been removed.
3. KEEP WORK AREA CLEAN. Cluttered areas and benches invite accidents.
4. ALWAYS REMAIN ALERT WHEN THE TOOL IS IN USE. Inattention on the part of the
operator may lead to serious injury.
5. DON’T USE IN A DANGEROUS ENVIRONMENT. Don’t use power tools in damp or
wet locations or expose them to rain. Keep work area well lit.
6. KEEP CHILDREN AWAY. All visitors should remain at a safe distance from work area.
7. MAKE WORKSHOP CHILD-PROOF with padlocks, master switches or by removing
starter keys.
8. USE THE RIGHT TOOL. Don’t force a tool or attachment to do a job for which it was
not designed.
9. USE THE PROPER EXTENSION CORD. Make sure your extension cord is in good
condition. When using an extension cord, be sure to use one heavy enough to carry the
current your product will draw. An undersized cord will cause a drop in line voltage
resulting in loss of power and overheating. Table (see Table 1) shows the correct size
to use depending on cord length and nameplate ampere rating. If in doubt, use the next
heavier gauge. The smaller the gauge number, the heavier the cord.
10. DON’T FORCE THE TOOL. It has been designed to operate at maximum safety and
performance levels.
11. DO NOT FORCE THE MATERIAL BEING CUT. Always let the tool cut at its own speed.
12. WEAR PROPER APPAREL. Do not wear loose clothing, neckties, rings, bracelets or
other jewelry which may get caught in moving parts. Non-slip foot wear is recommended.
Wear protective hair covering if you have long hair.
13. ALWAYS USE SAFETY GLASSES. Also use face or dust mask for commercial cutting
operations. Everyday eyeglasses only have impact-resistant lenses, they are NOT
safety glasses.
14. SECURE WORK. Use clamps or a vise instead of your hand to hold work when
practical. This safety precaution allows for proper tool operation using both hands.
15. DON’T OVERREACH. Keep proper footing and balance at all times.
16. MAINTAIN TOOLS WITH CARE. Keep tools clean and in good working condition for
maximum safety performance. Follow instructions for lubricating and changing
accessories.
17. DISCONNECT TOOLS BEFORE SERVICING – when changing accessories, such as
blades, bits, cutters, etc.
5
Read this owner's manual completely and make sure you understand all of its
safety guidelines.
E) Never reach around cutting tools.
F) Turn off tool and wait for cutting tools to stop before moving workpiece or changing
settings.
G) Disconnect power(or unplug tool) before changing cutting tools or servicing.

This power tool is supplied with all the relevant safety guards and features, it should
be checked before every operation, this manual should be read and kept in a safe
place. Whilst we warn of all the possible risks attached to using power tools any operator
must have read and understood the manual and apply their own caution and common
sense when using this power tool.
Following this guide will greatly reduce your risk of electric shock or injury.
Grounding Tools
Electrical Powered Connections
Only use qualified repair agents to service this power tool.
Only use qualified electrician to repair any damaged wiring.
NEVER remove the grounding prong from the power tool or extension cord.
Grounding Instructions
Any electric powered tool that is marked “Ground Required”, must be grounded. In the
event of a malfunction or breakdown, grounding provides a path of least resistance for
electric current to reduce the risk of electric shock. Any product that is equipped with an
electric cord having an equipment-grounding conductor and a grounding plug, the plug
must be plugged into a matching outlet that is properly installed and grounded in accordance with all local codes and ordinances.
Do not modify the plug provided. If it will not fit the outlet, have the proper outlet installed
by a qualified electrician.
6
18. REDUCE THE RISK OF UNINTENTIONAL STARTING. Make sure switch is in OFF
position before plugging in.
19. USE RECOMMENDED ACCESSORIES. Consult the owner’s manual for recommended
accessories. The use of improper accessories may increase risk of injury.
20. MAKE SURE YOU USE THE CORRECT TOOL for the job you are doing.
21. NEVER STAND ON TOOL. Serious injury could occur if the tool is tipped or if the
cutting tool is unintentionally contacted.
22. CHECK DAMAGED PARTS. Before further use of the tool, damaged part(s), (i.e.,
guard) should be carefully checked to determine that it will operate properly and perform
its intended function. Check for alignment of moving parts, binding of moving parts,
breakage of parts, mounting and any other condition that may affect the tools operation.
A guard or other part that is damaged should be properly repaired or replaced.
23. Replace damaged blades/cutters immediately. DO NOT USE DAMAGED BLADES/
CUTTERS. They may cause bodily injury.
24. DIRECTION OF FEED. Feed work into the blade/cutter against the direction of rotation
of the blade/cutter only.
25. DO NOT ALTER THE PLUG OR USE A 2-PRONG RECEPTACLE. This tool is equipped
with a 3-prong electrical plug.
26. NEVER LEAVE TOOL RUNNING UNATTENDED. Turn power off. Don’t leave tool until
it comes to a complete stop.
27. Double Insulated tools are equipped with a polarized plug (one blade is wider than the
other). This plug will fit in a polarized outlet only one way. If the plug does not fit fully in
the outlet, reverse the plug. If it still does not fit, contact a qualified electrician to install a
polarized outlet. Do not change the plug in any way. Double Insulation eliminates the
need for the three wire grounded power cord and grounded power supply system.
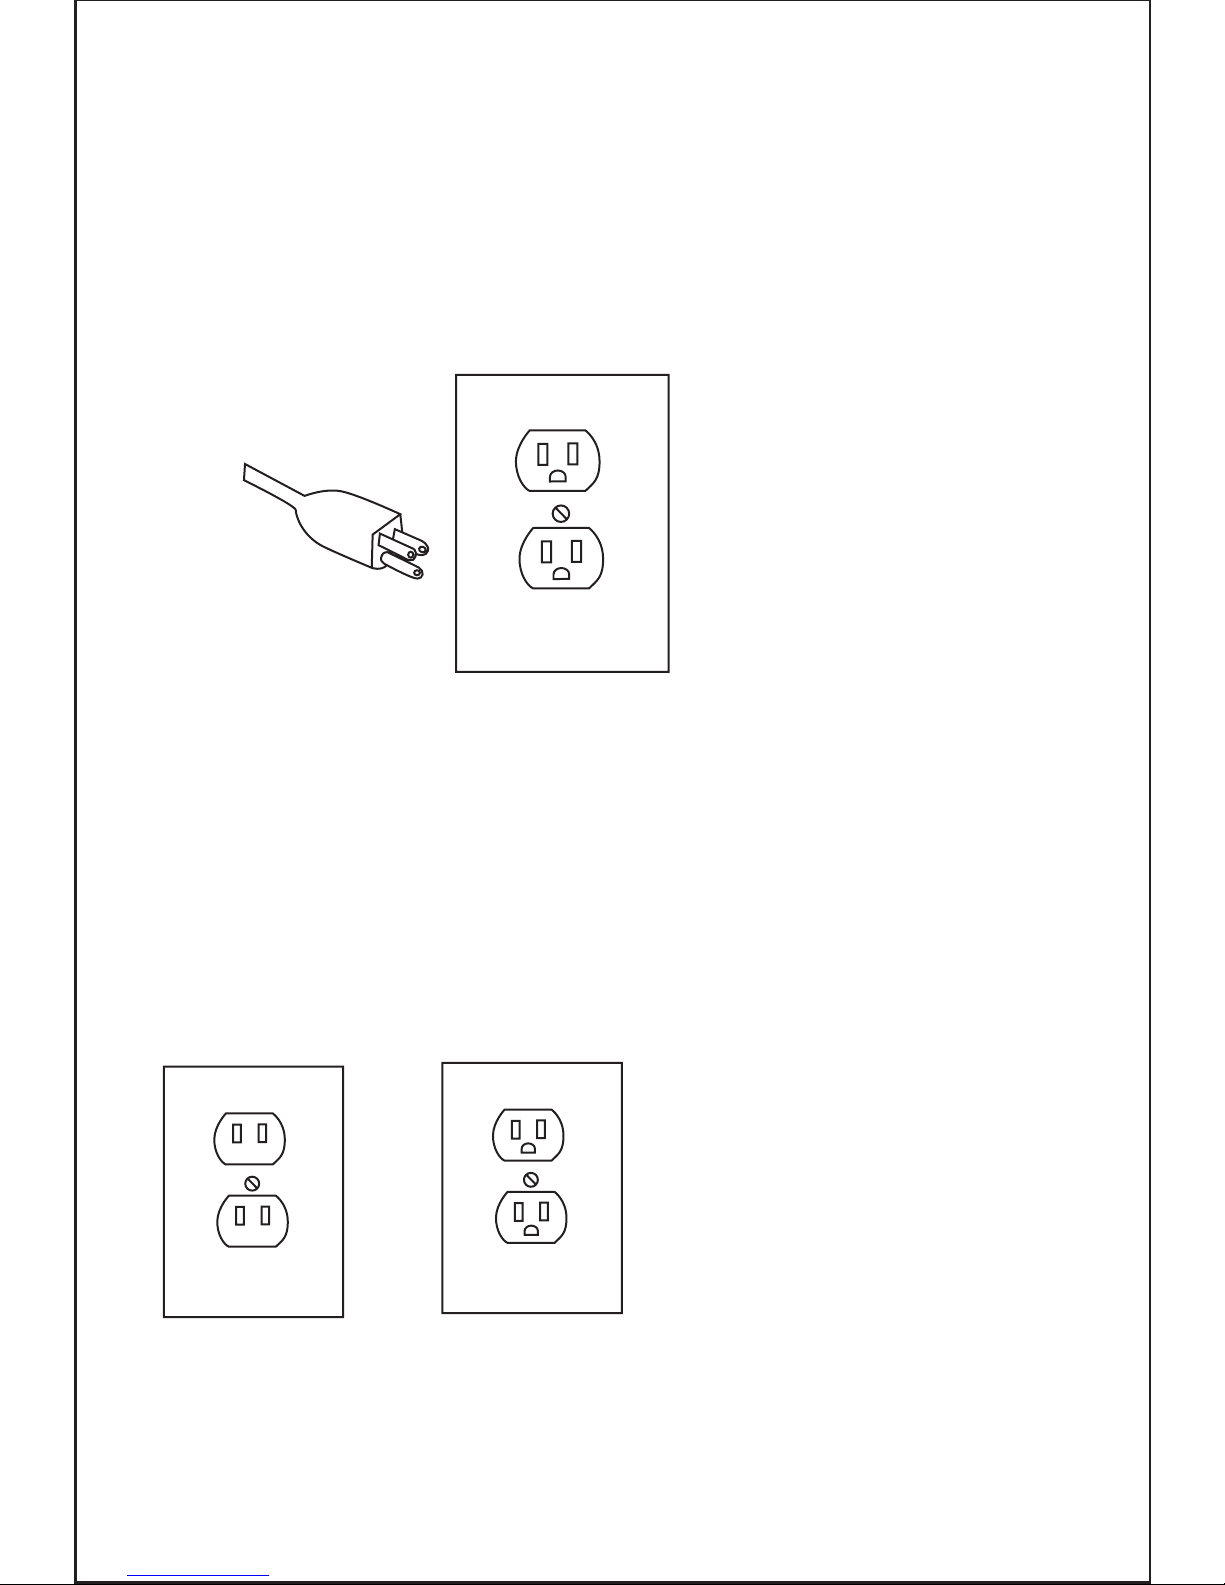
Any electric powered tool that is marked Ground Required must have fitted a three
wired power cord. The main importance of this is the green wire within the cord, this
green wire must at all times be connected to the grounding prong of the plug. This
prong must never be removed or discarded. The green wire Must NEVER be connected to any other prong. The Three prong plug must only be connected to the power
supply through a three prong power outlet.
The Illustration above shows a three prong plug and outlet.
Outlets for 2-Prong Plug
Double Insulated Power Tools
Plug and outlet, 2 prong
3 Prong Plug and Outlet
Check with a qualified electrician or service personnel if the grounding instructions are
not completely understood, or if in doubt as to whether the product is properly grounded.
Repair or replace a damaged or worn cord immediately.
This product is for use on a nominal 120 V circuit and has a grounding plug similar to
the plug illustrated in Table1. Only connect the product to an outlet having the same
configuration as the plug. Do not use an adapter with this product.
7
Any electric powered tool that is marked Double insulated only need a two prong
connection and will be perfectly safe to operate.
Power Extension Cords
These tools do not require grounding as they are fitted with an additional insulation
system internally that complies with all relevant electrical safety standards.
Unlike the three prong tools these tools CAN be connected through outlets suitable
for two prong or three prong plugs.
The Illustration above shows the outlets that this type of tool can be connected to.
Symbols
Any power tool marked ‘Grounding required’ MUST only be connected to a three wire
extension cord. Only double insulated tools can be connected to two wire cords.
When using any extension cord the machine will suffer a power reduction due to the
drop in voltage caused by the length of the cord. This can be partially offset by selecting
extension cords with lower gauge wire.
8
e.g. Cords marked 14 gauge can carry a higher current than cords marked 16 gauge
therefore when linking extension cords make sure each cords wire gauge matches.
Note: Outdoor extension cords used in must carry the letters “W-A” (USA) or “W”
(Canada)
Check all extension cords for damage before use.
Avoid sharp objects.
Do not position the cord where it could be subject to traffic passing over it.
Table 1
MINIMUM GAUGE FOR CORD SETS
Total Length of Cord in Feet(Meter)
0-25 26-50 51-100 101-150
(0-7.6) (7.9-15.2) (15.5-30.5) (30.8-45.7)
Ampere Rating
AWG
0 6 18 16 16 14
18 16 14 12
16 16 14 12
14 12
Not Recommended
6 10
10 12
12 16
More Not More
Than Than
V………………………...volts
A………………………...amperes
Hz……………………….hertz
~………………………...alternating current
…/m………………........revolutions per minute
.................................Direct Current
..................................class II construction (double insulated)
Kg……………………….kilograms
No……………………….No load speed
IMPORTANT: Some of the following symbols may be used on your tool.

Battery use and care
9
A battery operated tool with integral batteries or a separate battery pack must be recharged
only with the specified charger for the battery.
A charger that may be suitable for one type of battery may create a risk of fire when used
with another battery.
Use battery operated tool only with specifically designed battery pack.
Use of any other batteries may create a risk of fire.
NEVER place hands or other body parts near the drill bit or chuck during operation.
Hold the drill by its handle only. Because the cordless driver drill operates by battery power,
be aware of the fact that it can begin to operate at any time.
Charging the battery pack
Charge battery for 3-5 hours only, when you plug battery into the charger the “GREEN”
light will come on, there is no light to indicate the battery is fully charged, charge only
for 3 to 5 hours, unplug charger and remove battery from charger.
Battery charger LED function
Charger plugged in: Red light “ON”
Battery charging: Green light “ON”
WARNING: Improper use of the battery or battery charger can lead to serious injury.
To avoid these injuries:
A) NEVER disassemble the battery.
B) NEVER incinerate the battery, even if it is damaged or is completely worn out.
The battery can explode in a fire.
C) NEVER short-circuit the battery.
D) NEVER insert any objects into the battery charger’s air vents. Electric shock or damage
to the battery charger may result.
E) NEVER charge outdoors. Keep the battery away from direct sunlight and use only
where there is low humidity and good ventilation.
F) NEVER charge when the temperature is below 32°F (0°C) or above 104°F (40°C).
G) NEVER connect two battery chargers together.
H) NEVER insert foreign objects into the hole for the battery or the battery charger.
I) NEVER use a booster transformer when charging.
J) NEVER use an engine generator or DC power to charge.
K) NEVER store the battery or battery charger in places where the temperature may
reach or exceed 104°F (40°C).
L) ALWAYS operate charger on standard household electrical power (120 volts).
Using the charger on any other voltage may overheat and damage the charger.
M)ALWAYS wait at least 15 minutes between charges to avoid overheating the charger.
N)ALWAYS disconnect the power cord from its receptacle when the charger is not in use.
Specific Safety Rules
1) Hold power tools by insulated gripping surfaces when performing an operation where the
cutting tool may contact hidden wiring.

10
Contact with a “live” wire will make exposed metal parts of the tool “live” and shock the
operator.
2) Wear ear protection. Exposure to noise can cause hearing loss.
3) Be aware that this tool is always in an operating condition, since it does not have to be
plugged into an electrical outlet.
4) If the bit becomes jammed, immediately turn the trigger switch off to prevent an overload
which can damage the battery pack or motor. Use reverse to loosen jammed bits.
5) Do NOT operate the Forward/Reverse lever when the trigger switch is on. The battery
will discharge rapidly and damage to the unit may occur.
6) When storing or carrying the tool, set the Forward/Reverse lever to the center position
(switch lock).
7) Do not strain the tool by holding the speed control trigger halfway so that the motor stops.
8) Be careful not to get dust inside the chuck.
9) Do not touch the rotating parts to avoid injury.
10) Do not use the tool continuously for a long period of time. Stop using the tool from time
to time to avoid overheating of the motor.
11) Do not drop the tool.
Carefully remove the product and any accessories from the box. Make sure that all items
listed in the packing list are included.
Unpacking
A) Drill
B) Battery
C) Charger
D) User manual
Package contents
WARNING: Disconnect the plug from the power source before making any assembly,
adjustments or changing accessories. Such preventive safety measures reduce the
risk of starting the tool accidentally.
Functional Description (Fig.1)
To insert simply align with bottom of drill and push until it snaps in place, to remove,
squeeze tabs and pull back.
Battery Pack
Your tool is equipped with a variable speed trigger switch (Fig.1). The tool speed can
be controlled from the minimum to the maximum nameplate RPM by the pressure you
apply to the trigger. Apply more pressure to increase the speed and release pressure
to decrease speed.
The brake operates when the trigger is released and the motor stops immediately.
Operation
On-Off Switch
VARIABLE SPEED CONTROLLED TRIGGER SWITCH

11
Your tool is equipped with a forward/ reversing lever and trigger lock (Fig.1) located
above the trigger. This lever was designed for changing rotation of the chuck, and for
locking the trigger in an “OFF” position to help prevent accidental starts and accidental
battery discharge. For forward rotation, (with chuck pointed away from you) move the
lever to the far left. For reverse rotation move the lever to the far right. To activate trigger
lock move lever to the center “off” position.
FORWARD/REVERSING LEVER & TRIGGER LOCK
Mounting the bit
Loosen the sleeve by turning it toward the left (in the counterclockwise direction as
viewed from the front) to open the clip on the keyless chuck. After inserting a driver bit,
etc., into the keyless drill chuck, tighten the sleeve by turning it toward the right (in the
clockwise direction as viewed from the front).
NOTE: If the sleeve becomes loose during operation, tighten it further.
The tightening force becomes stronger when the sleeve is tightened.
MOUNTING AND DISMOUNTING THE BIT
Loosen the sleeve by turning it toward the left (in the counterclockwise direction as
viewed from the front), and then take out the bit.
DISMOUNTING THE BIT
Place the bit on the work surface and apply firm pressure before starting. Too much
pressure will slow the bit and reduce drilling efficiency. Too little pressure will cause
the bit to slide over the work area and dull the point of the bit. If the tool begins to stall,
reduce pressure slightly to allow the bit to regain speed. If the bit binds, reverse the
motor to free the bit from the workpiece.
DRILLING
By turning the adjustment ring (Fig.1) the required torque can be adjusted. The arrow
aligns with the adjusted state.
The tightening torque is affected by a wide variety of factors including the following.
TORQUE ADJUSTMENT
When the battery pack becomes nearly discharged, the voltage decreases and the
tightening torque drops.
NEVER place hands or other body parts near the drill bit or chuck during operation.
Hold the drill by its handle only. Because the cordless driver drill operates by battery
power, be aware of the fact that it can begin to operate at any time.
When battery pack is not in use, keep it away from other metal objects like paper clips,
coins, keys, nails, screws, or other small metal objects that can make a connection from
one terminal to another. Shorting the battery terminals together may cause burns or a fire.
Voltage
See Fig. 1
Forward/Reverse Switch
 Loading...