

Page 1
Version BT878
Manual (english)
26.08.99
TerraTValue PCI 1
Page 2

CE Declaration
We:
TerraTec Electronic GmbH, Herrenpfad 38, D-41334 Nettetal, Germany
hereby declare that the product:
ReceiverSystem TerraTValue
to which this declaration refers is in compliance with the following standards or standardizing documents:
1. EN 55022
2. EN 50082-1
The following are the stipulated operating conditions and environmental conditions for said compliance:
Residential, business and commercial environments and small-company environments.
This declaration is based on:
Test report(s) of the EMC testing laboratory
TerraTec
EWS
®
ProMedia, SoundSystem Gold, SoundSystem Maestro, SoundSystem Base1, AudioSystem
®
64, AudioSystem EWS88 MT, XLerate, XLerate Pro, Base2PCI, TerraTec 128iPCI, TerraTV+, TerraTV
Radio+, TerraTValue, WaveSystem, MIDI Smart and MIDI Master Pro are trademarks registered by TerraTec
Electronic GmbH Nettetal.
In most cases, the designations used in this handbook for software and hardware are also registered
trademarks and are thus subject to the relevant regulations.
®
©TerraTec
Electronic GmbH, 1994-1999. All rights reserved (26.08.99).
Meticulous care has been exercised in the preparation of all text passages and illustrations in this User
Guide. TerraTec Electronic GmbH and its authors, however, accept no liability, legal or otherwise, for errors
or the consequences of such errors. We reserve the right to technical modifications.
All text passages in this documentation are copyrighted. All rights reserved. No part of this documentation
may be reproduced in any form whatsoever, by photography, microfilming or other process or rendered into
a language/form usable by computers without the prior, written consent of the authors. All rights for use
and propagation by presentation, radio and television are also reserved.
2 TerraTValue
®
Page 3

Contents
Contents ........................................................................................................................................ 3
Introduction ...................................................................................................................................... 5
Key features................................................................................................................................... 6
System Requirements ................................................................................................................... 6
Package Contents.......................................................................................................................... 6
Hardware Overview........................................................................................................................... 7
Installing the Hardware..................................................................................................................... 8
Windows 98 Installation ..................................................................................................................10
Step – 1 .........................................................................................................................................10
Step – 2......................................................................................................................................... 11
Uninstalling the Drivers................................................................................................................ 11
Windows 95 Installation OSR-1 / OSR-2 ..........................................................................................12
Installing the TV Software................................................................................................................12
Important System Settings for Operating the TV Card ....................................................................13
Important Settings for Sound Card Owners..................................................................................14
On the Search for Connections – The Connection of External Devices to the TV Card.....................15
Connecting an External Device with Antenna Out ........................................................................15
Connecting an External Device with Video-Out ............................................................................16
Connecting an External Device with SVHS-Out ............................................................................17
Connecting an External Device with Scart Out .............................................................................18
Attention! -Connecting Audio to the TV Card............................................................................... 20
The TV Software in Detail.................................................................................................................21
The Surface of the TV Software ....................................................................................................21
Shortcut Keys in the TV Software................................................................................................22
Touch of a Button – The Functions of the Right Mouse Button ................................................... 23
Quick Access – The Channel List in the Status Bar...................................................................... 24
Editing Channel Settings ............................................................................................................. 25
Adding Stations Manually ........................................................................................................... 26
The "File" Menu .......................................................................................................................... 27
The "View" Menu ........................................................................................................................ 28
TerraTValue PCI 3
Page 4

The "Channel" Menu................................................................................................................... 29
The "Options" Menu ...................................................................................................................30
Uninstalling the TV Software....................................................................................................... 35
Attention! – Recording Parameters of Video Sequences ................................................................ 36
The Big Picture – Important Information about the Video Format............................................... 36
Less is often More – The Number of Frames per Second to be Recorded ...................................38
More or Less - Determine the Compression ................................................................................ 39
The Right Sound – The Audio Parameters for Video Sequence Recording.................................. 40
In Detail - More Video Recording Settings ...................................................................................41
Attention Trap – Recording a Video Sequence................................................................................ 42
Say Cheese - Recording a Single Frame.......................................................................................... 44
Always Informed – The Teletext Software....................................................................................... 45
The Surface of the Teletext Software .......................................................................................... 45
The Symbol Bar of the Teletext Software .................................................................................... 46
The "File" Menu .......................................................................................................................... 47
The "Teletext" Menu................................................................................................................... 48
Status / Error List - Teletext Decoding ........................................................................................ 50
The TerraTec Hotline........................................................................................................................51
FAQ.................................................................................................................................................. 52
4 TerraTValue
Page 5

Introduction
With the receiver system TerraTValue you have taken the next step towards a new multimedia
future. Watch your favorite television station while comfortably reading teletext, and, at the same
time, let Intel
transmitted over your television signal. Of course, the necessary software is included.
The performance of the included 32-bit applications ensures the completely stable, flicker-free
display of the TV picture on your PC monitor. The view of the display screen can be freely
adjusted up to a size of 768 x 576. If that's not enough, use the full-screen mode for maximum
screen area without distracting menus or tool bars. Are you looking for an interesting program?
The mosaic function can give you a hand by displaying an overview of up to 100 stations
simultaneously for fast navigation through the station jungle.
Forget about tiresome manual station selection. The TV software's scan function automates the
installation of stations without manual intervention. The integrated capture function lets you
make compressed recordings of running programs from a connected video camera or VCR. The
degree of compression is user-definable.
The included teletext software features high-speed display and very convenient handling. Forget
about long waits and keying in page numbers. Simply navigate the world of teletext with your
mouse. An internal buffer of the teletext software directly loads all available teletext pages for the
program currently running, so that these are available to you at the touch of a button.
Ò
IntercastÒ Technology show you selected Internet sites. These can now be
TerraTValue proves itself to be connection-friendly through a coaxial antenna connection (just like
you are used to from your house antenna), a video-in for a video camera or VCR and a SVHS input
for high-grade SVHS components. The no fuss connection of a video camera or webcam to
TerraTValue makes it ideal for video conferencing via the Internet.
TerraTValue PCI 5
Page 6

Key features
· Brooktree 878 chipset
· Intel
Ò
IntercastÒ Technology – Receiving
Internet sites via TV signals
· High-speed teletext – teletext without
delay
· Recording of stills and video sequences
· TV screen scalable up to full screen size
· Multiple-station preview of up to 100
stations simultaneously
· SVHS and video inputs for external video
sources
· Win95/98 compatible
· Ideal for Internet video conferencing
· 2 year warranty
System Requirements
· Pentium 90 MHz
· Windows 95 or 98
· 1 free PCI 2.1 master slot
· Active speakers or a sound card
· 1 free interrupt
If your PC and equipment do not meet these requirements, the TerraTValue will not operate
correctly.
· CD-ROM drive (to install the drivers and
software)
· 1 PCI VGA card with Direct Draw drivers and
Video Overlay support
Package Contents
· TerraTValue Card
· External Audio Cable (for connecting to the
Line-in input of a sound card)
· TerraTValue CD-ROM with drivers,
Ò
TerraTValue Software, Intel
Intercast
Viewer, MS Netmeeting, Videotext
Software, DirectX 6.0, Acrobat Reader
Ò
6 TerraTValue
Page 7
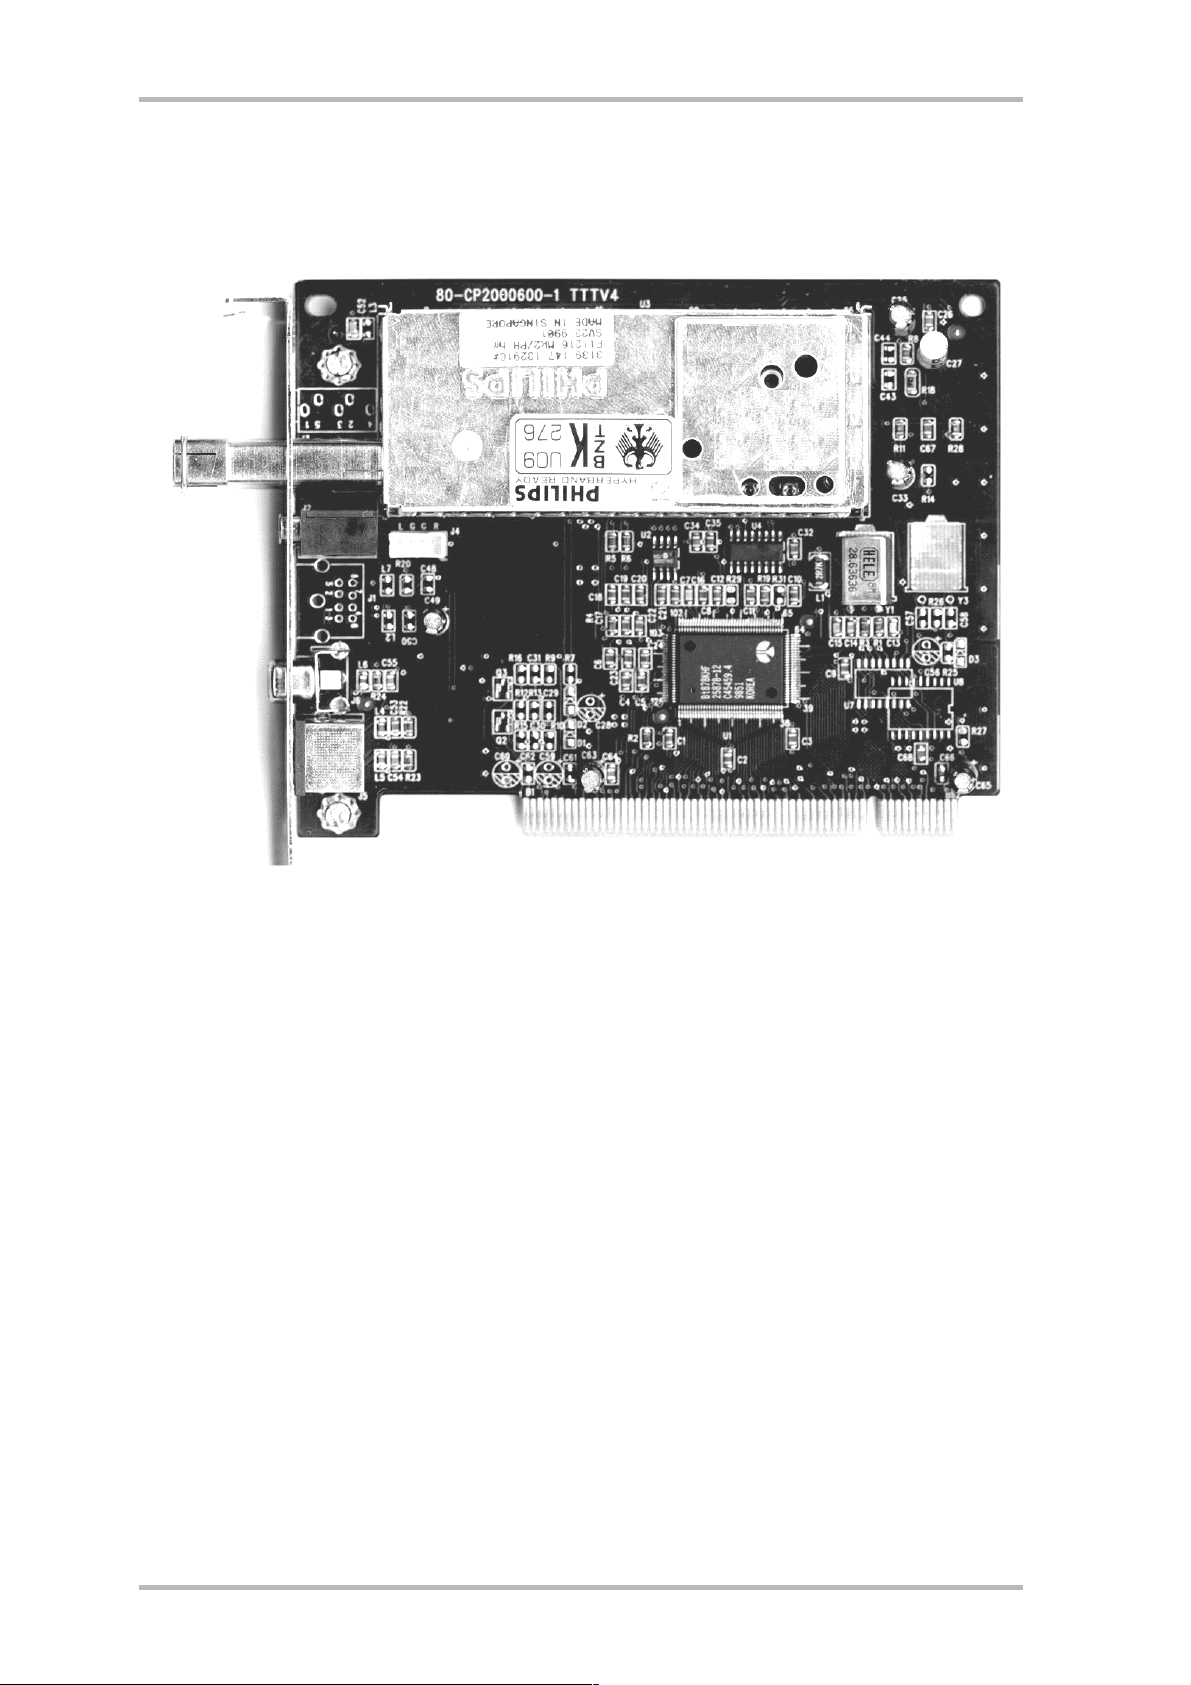
Hardware Overview
SVHS-In
Video-In
Audio-Out
Antenna Terminal
7 TerraTValue
Page 8
Installing the Hardware
Install the hardware as follows:
1. Switch off your PC and all connected peripheral devices, such as printer, monitor and so on.
Leave the AC cord connected for the time being, so that your computer is still grounded.
2. Touch the metal chassis at the rear of the PC to ground yourself and discharge static. Now
unplug the cord from the AC mains socket.
3. Now remove the your PC's casing.
4. Look for a free PCI expansion slot. When selecting the PCI slot, note that TV cards should
not be plugged into PCI slot 1 in conjunction with an AGP graphics card, because PCI slot 1
is always assigned the same interrupt as the AGP slot. This would give both cards the same
interrupt, which can lead to crashes during operation! The numbers assigned to the PCI
slots are listed in your mainboard manual.
5. Carefully remove the card from its packaging and pick it up by the edges with one hand
while your other hand is touching a metal part of the PC. This will ensure that your body is
completely discharged through your computer and the TV card is not damaged.
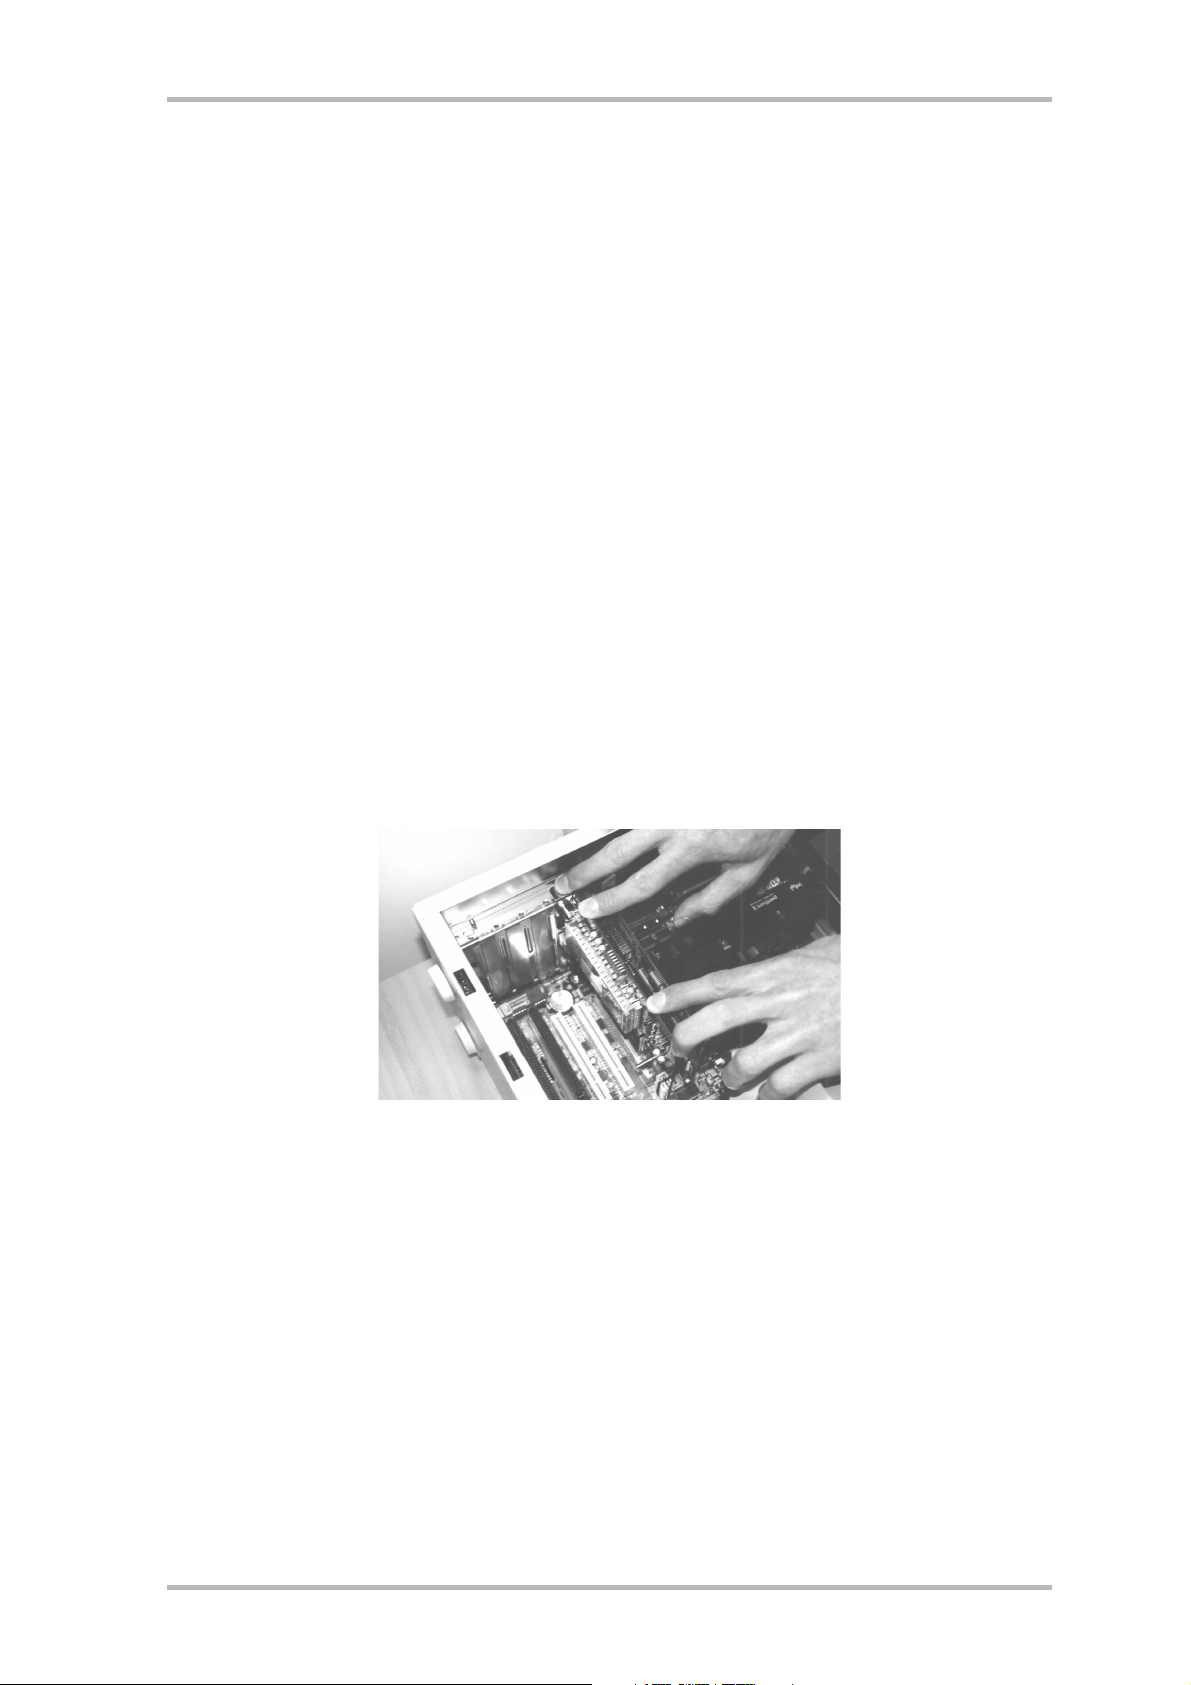
6. Align the holder at the rear of the TV card in the expansion slot in such a way that the card’s
connectors are directly aligned with the slot’s socket (refer to the following illustration).
7. Push the TV card firmly into the slot, ensuring good contact.
8. Fasten the TV card with an appropriate screw.
9. If a sound card is installed, connect the TV card to it using the supplied jack-jack cable. Plug
one end into the audio output of the TV card and the other end into the Line-In terminal on
the sound card (refer to the following illustration).
8 TerraTValue
Page 9
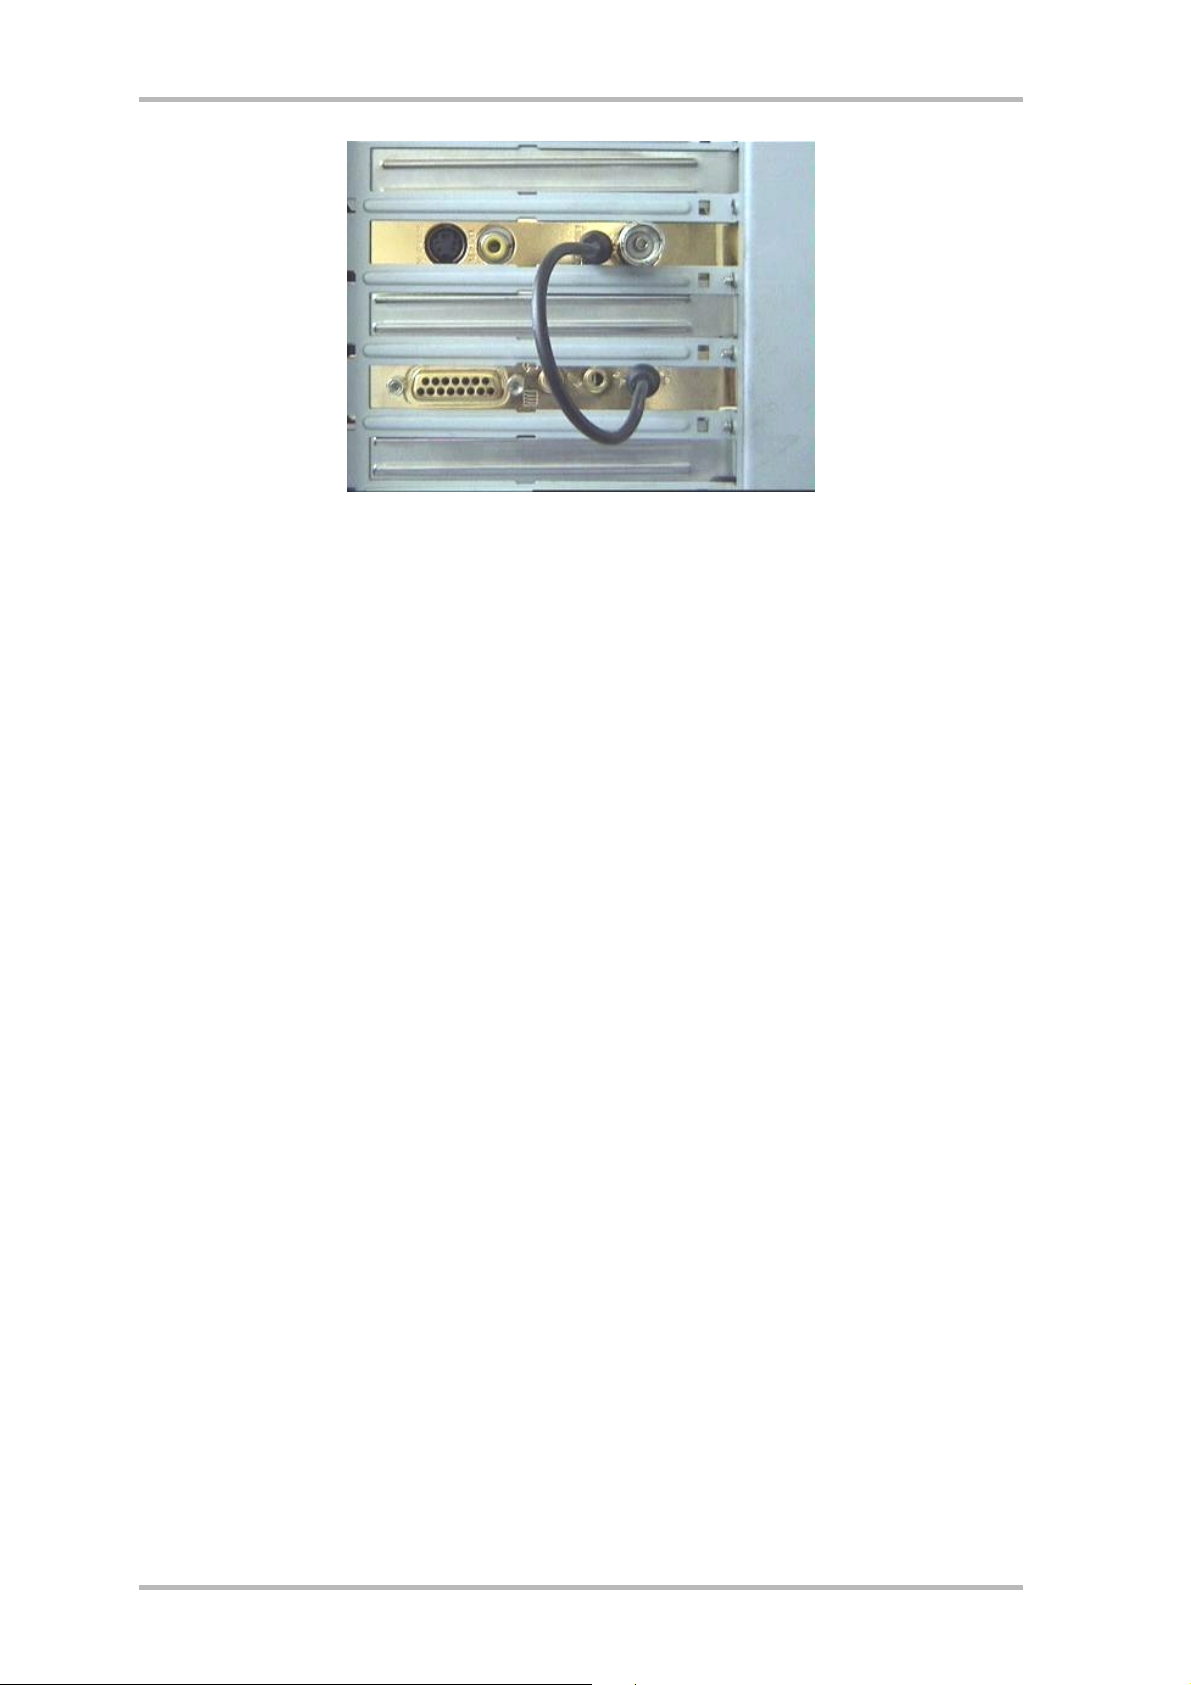
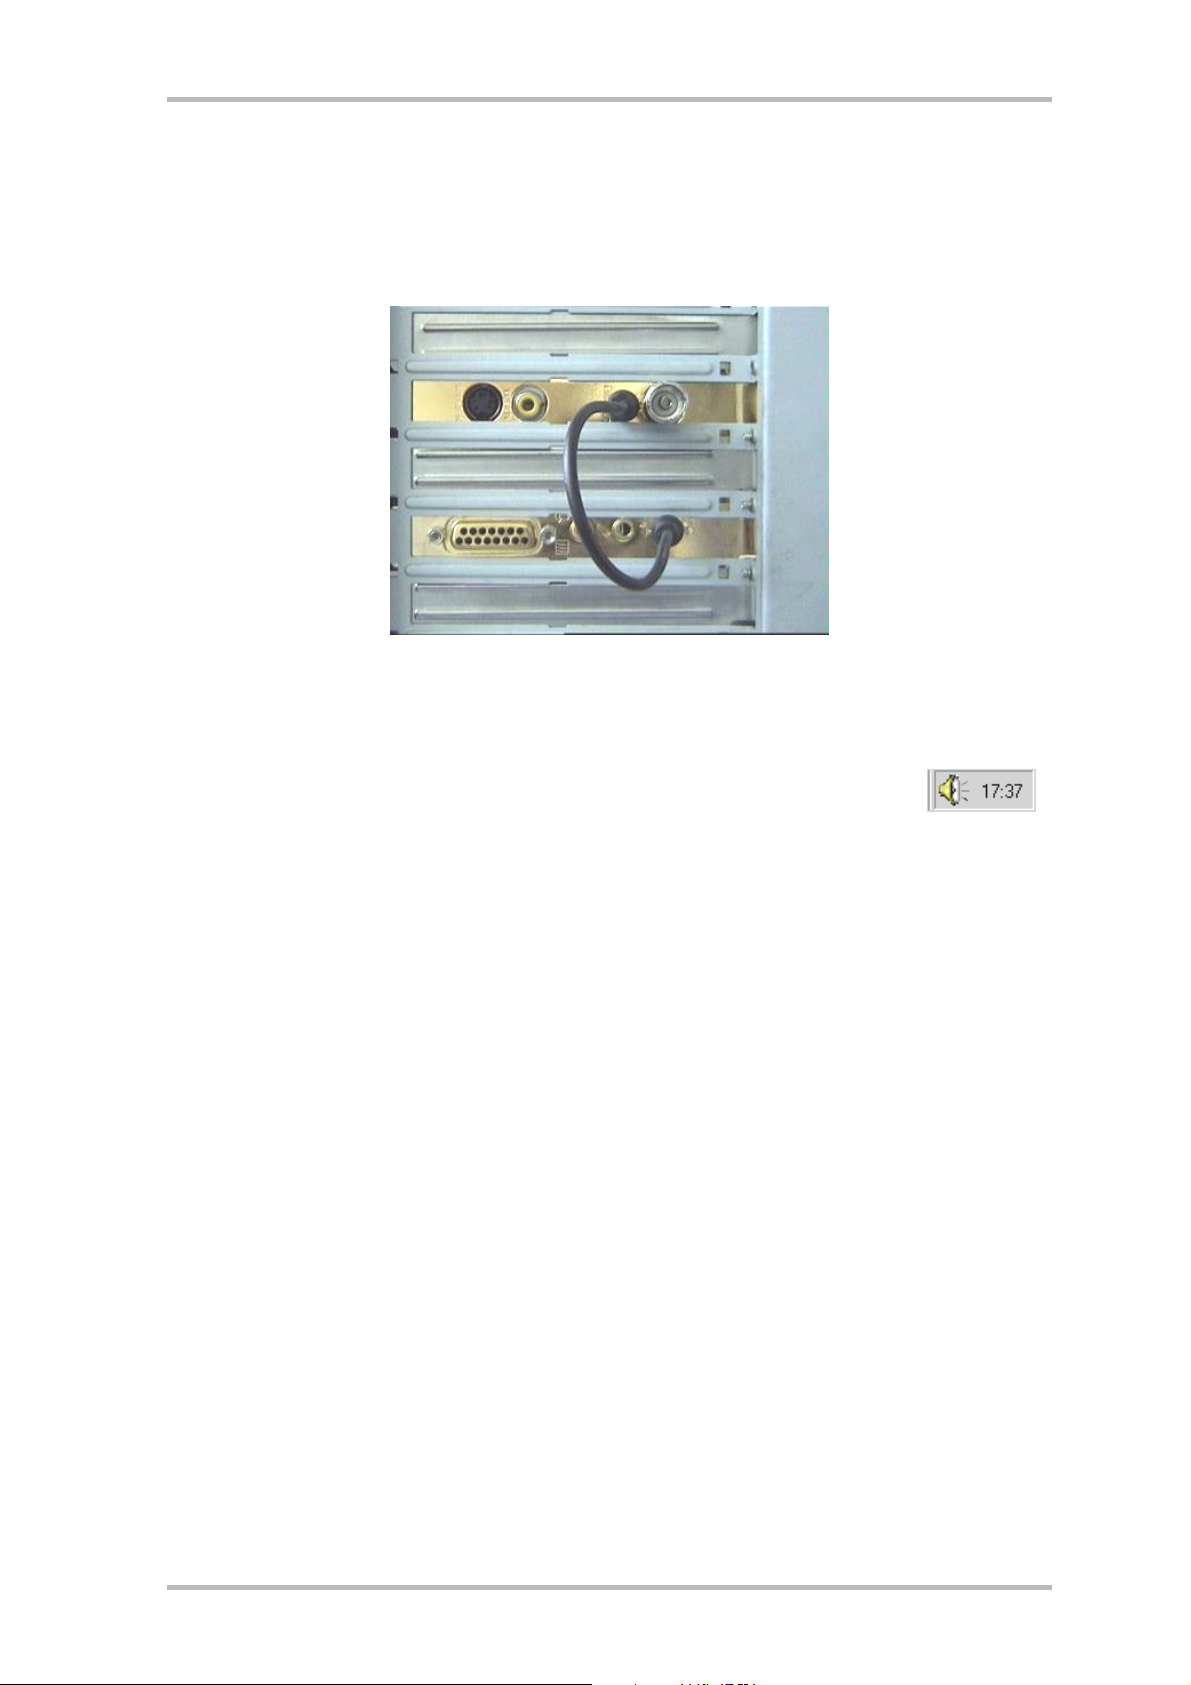
fig. 1: Connect the output of the TV card to the input of the sound card as shown
in this illustration.
If you connect the TV card to the sound card, be sure to read the section called Important
Settings for Sound Card Owners on page 14!
10. Replace the cover of your PC case.
11. Using the supplied adapter, connect the antenna cable (which you would normally connect
to the antenna input terminal on your television) to the antenna terminal on the TV card.
Reconnect the mains and all other cables. Make sure that your speakers are set to low
volume. Start your computer.
TerraTValue 9
Page 10
Windows 98 Installation
Step – 1
1. Install the TerraTValue hardware and start Windows 98.
2. During startup, place the provided TerraTValue CD into your CD-ROM drive.
3. After Windows 98 has started, the TerraTValue is detected as a PCI Multimedia Video
Device. Confirm the message by clicking the Next button.
4. Using the mouse, select the Search for the best driver for the device. (Recommended)
option and confirm your choice by clicking Next.
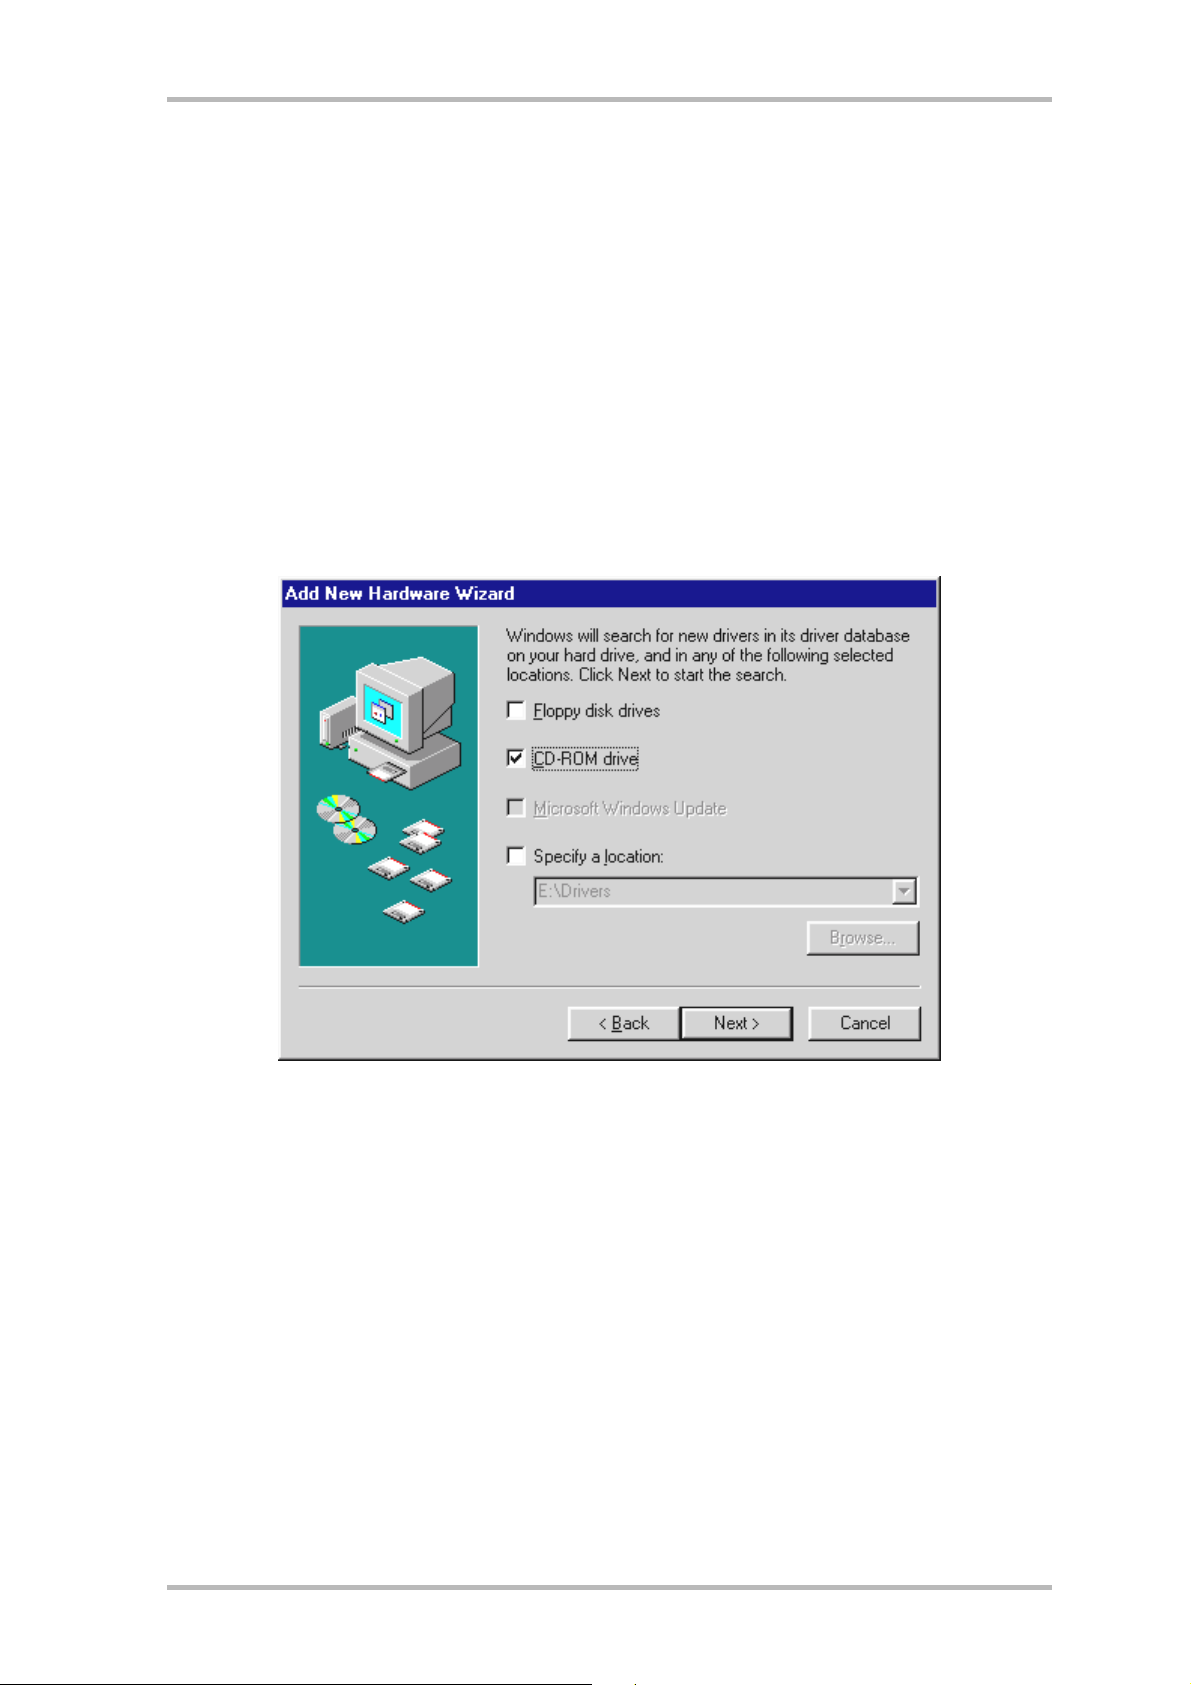
5. Enable the check box next to CD-ROM drive. Confirm this setting by clicking Next.
6. Windows 98 now informs you that it has found the driver for the TerraTValue. Confirm the
message by clicking the Next button. Windows 98 then copies and installs all of the
required driver files.
7. When the installation is complete, Windows 98 informs you that all drivers for the device
have been installed. Confirm the message by clicking the Next button.
10 TerraTValue
Page 11

Step – 2
1. When the first part of the installation is complete, Windows 98 finds a second device called
TerraTValue – Audio Section. Confirm the message by clicking the Next button.
2. Using the mouse, select the Search for the best driver for your device. (Recommended)
option and confirm your choice by clicking Next.
3. Enable the check box next to CD-ROM drive. Confirm this setting by clicking Next.
4. Windows 98 now informs you that it has found the driver for the TerraTValue – Audio
Section. Confirm the message by clicking the Next button. Windows 98 then copies and
installs all of the required driver files.
5. When the installation is complete, Windows 98 informs you that all drivers for the device
have been installed. Confirm the message by clicking the Next button. This concludes the
installation of the drivers.
Uninstalling the Drivers
The easiest way to uninstall the drivers is to use the Uninstall utility which you can find in the
\Drivers\Uninstall directory of your TerraTValue CD or at our Internet site at
www.terratec.net. Uninstall the drivers as follows:
1. To uninstall the TerraTValue drivers, run the Uninstall utility.
2. Click the Uninstall button.
3. Once all drivers have been uninstalled, a message is displayed informing you that the
uninstallation was successful. Confirm the message by clicking the Exit button.
4. This concludes the uninstallation of the TerraTValue drivers.
TerraTValue 11
Page 12

Windows 95 Installation OSR-1 / OSR-2
1. Install the TerraTValue hardware and start Windows 95.
2. During startup insert the TerraTValue CD provided in your CD-ROM drive.
3. After Windows 95 has started, the TerraTValue is detected as a PCI Multimedia Video
Device. Confirm the message by clicking the Next button.
Enter as the installation path, for example E:\Drivers. Confirm by clicking OK. If necessary,
enter the installation path again. If your CD-ROM drive is designated by another letter, you will
have to adjust the path accordingly (for example, G:\Drivers, Z:\Drivers).
Installing the TV Software
TerraTValue includes high-quality, 32-bit TV software, which provides a colorful spectrum of
features and makes the operation of the individual TV functions more convenient. Install the
TV software as follows:
5. Start the TerraTValue Autostarter by placing the TerraTValue CD into your CD-ROM drive or
by running the Autorun.exe file located in the main directory of the CD.
6. Select the language to be used for the installation.
7. To install the TerraTValue software, click the TV software button. Follow the instructions of
the installation program. After installation you will find the TerraTValue software and the
online user manual in the program group TerraTValue.
12 TerraTValue
Page 13

Important System Settings for Operating the TV Card
Observe the following items to ensure that the TV card provides optimal performance:
· The color depth for your graphics board should be set to a minimum of 16 bits or 65536
colors so that the TV image can be displayed in true-to-life color. You can change the color
depth setting for your graphics board under Control Panel > Display. For questions
regarding the configuration of the color depth, refer to the manual provided with your
graphics board.
· The TV card blends the TV/Video data directly into the memory of your graphics board
through the PCI bus. This requires direct access to the hardware of the graphics board.
Because direct access under Windows is only possible through a DirectX driver, your
graphics board must be equipped with a DirectX driver that supports Video Overlay. Video
Overlay refers to the blending of the TV data into the graphics board memory. If you are not
sure whether your graphics board driver supports DirectX, acquire the newest drivers for
your graphics board and then install the newest version of DirectX. The DirectX 6.0 drivers
are provided in the \DirectX directory of the TerraTValue CD!
· If you own a mainboard with VIA or SIS chipset, you should check certain settings in your
system BIOS. If you do not know what chipset is installed on your mainboard, refer to your
mainboard manual or try to locate large, obvious chips on your mainboard and compare
their labels with the following list.
Important:
You might find that the chipset on your mainboard matches one of the chipsets listed in the
following but that the corresponding setting is not available in your BIOS. In this case, try to
activate the corresponding options by acquiring a BIOS update. Another way of accessing the
corresponding settings is by using the TweakBIOS utility, which you can download from the
Internet. This tool allows you to enable hidden BIOS settings.
Chipset Note:
VIA VT82c598 MVP Set the CPU to PCI Write Buffer option to disabled. You can find
this setting in your BIOS under the PnP/PCI-Configuration item.
VIA VT82c598 MVP3 Set the CPU to PCI Write Buffer option to disabled. You can find
this setting in your BIOS under the PnP/PCI-Configuration item.
SIS 5582 Set the Peer Concurrency option to disabled. You can find this
setting in your BIOS under the Chipset Features Setup item.
TerraTValue 13
Page 14
Important Settings for Sound Card Owners
If you have connected the Audio output of the TV card to the Line-In input of your sound card
using the provided jack-jack cable, you will have to make certain settings in the mixer for the
sound card so that you can hear and record the TV/Video tone.
fig. 2: Connect the TV and sound card as illustrated here.
To do so, proceed as follows:
1. Double-click the volume control icon illustrated here which is found on the
taskbar.
2. Be sure that the Mute option under the Line-In slider is not checked and that the Line-In
slider is not at the bottom of its range.
3. Select the Options\Properties menu item.
4. Set the Adjust volume for option to Record. Confirm your choice by clicking OK.
5. Now enable the check box below the Line-In slider and set the Line-In slider to its middle
position. By checking the check box below Line-In, you define the Line-In input of your
sound card as a recording input source. This is required if you want to record a video
sequence with sound!
Close Volume Control to complete the sound card configuration.
14 TerraTValue
Page 15
On the Search for Connections – The Connection of External Devices to the TV Card
In this chapter, you will learn everything you need to know about connecting external devices
such as VCRs, video cameras and satellite receivers. Generally, you can connect external
devices to TerraTValue through the antenna, video or SVHS inputs.
Which connection you can or should use depends on the type of device you want to connect.
So, first of all, check to see which outputs your device has. Refer to the following illustration:
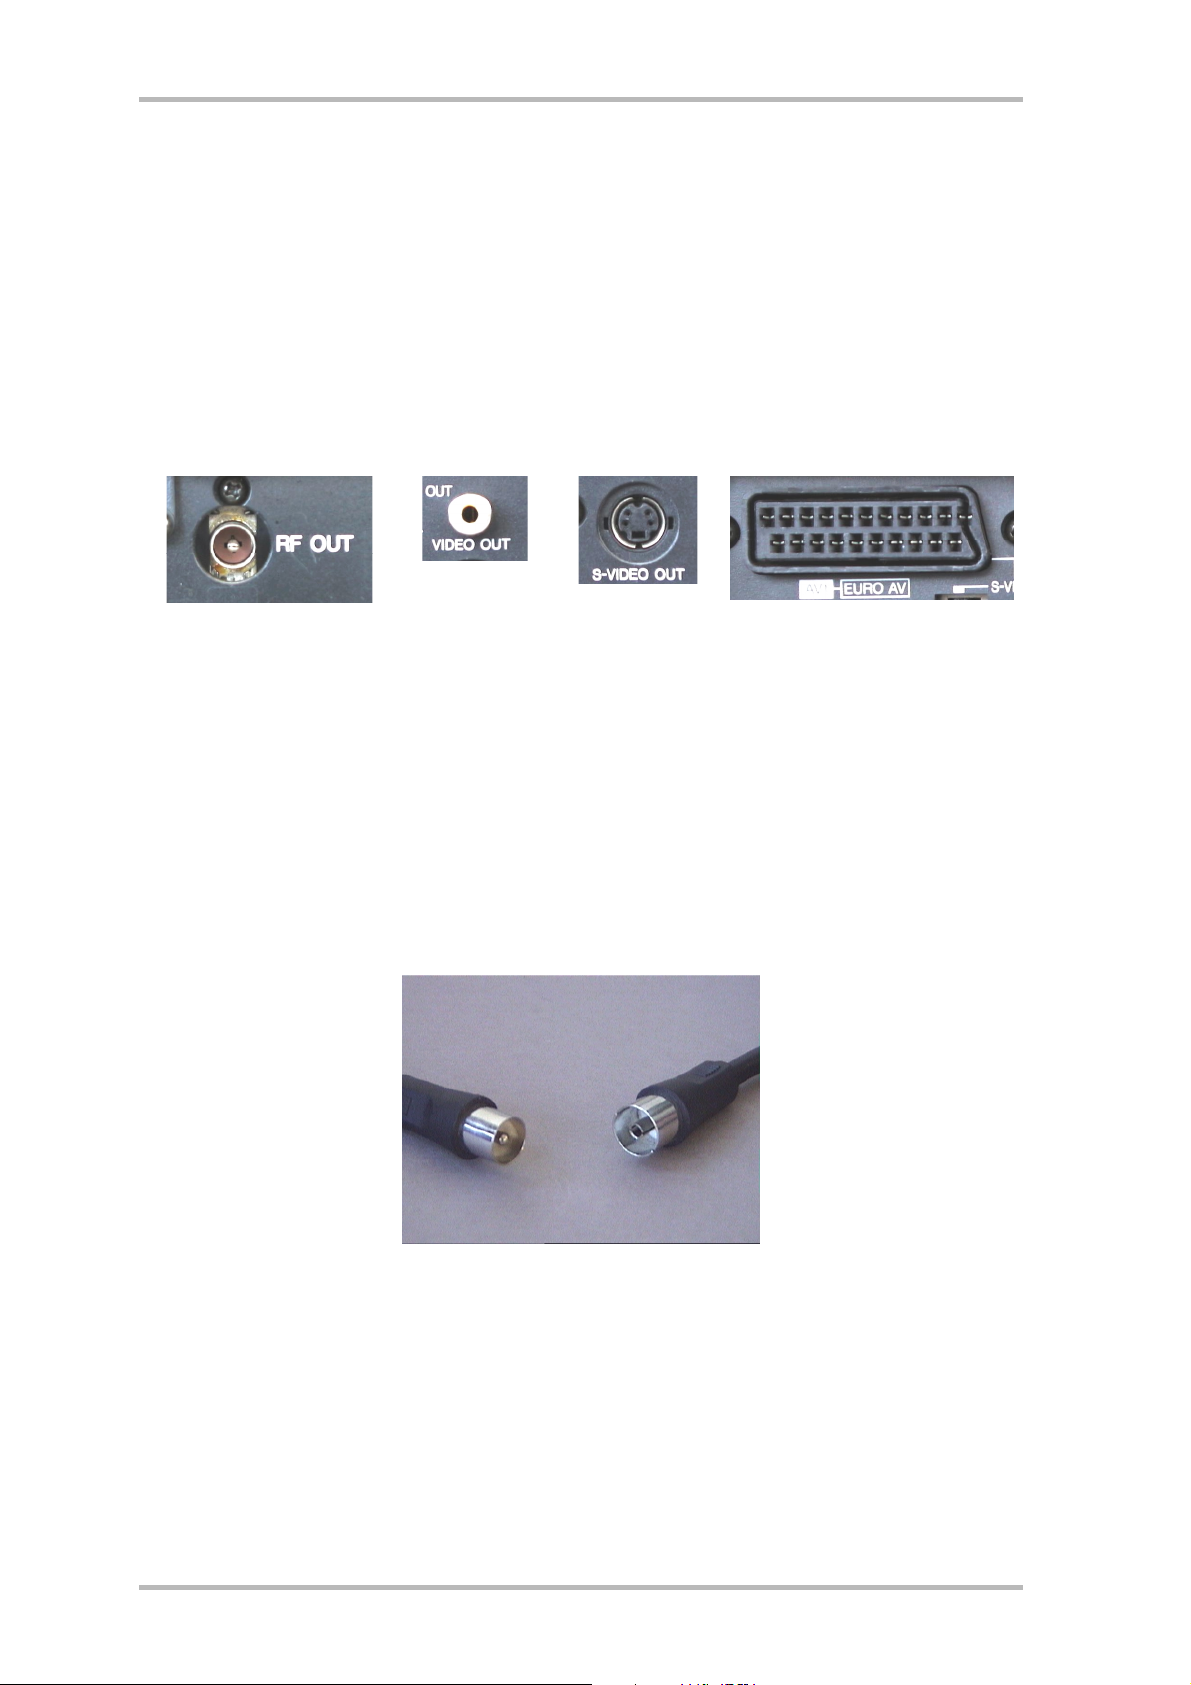
Antenna Out Video-Out SVHS-Out Scart-out
Compare your device to the illustration shown to figure out your connection possibilities. To
connect the device follow one of the following segments. They will provide you with detailed
information on how to proceed with the connection process!
Connecting an External Device with Antenna Out
You can connect external devices with antenna out to the antenna in of the TV card by using a
standard 75 ohm antenna cable (see illustration 3).
fig. 3: 75 ohm antenna cable
TerraTValue 15
Page 16
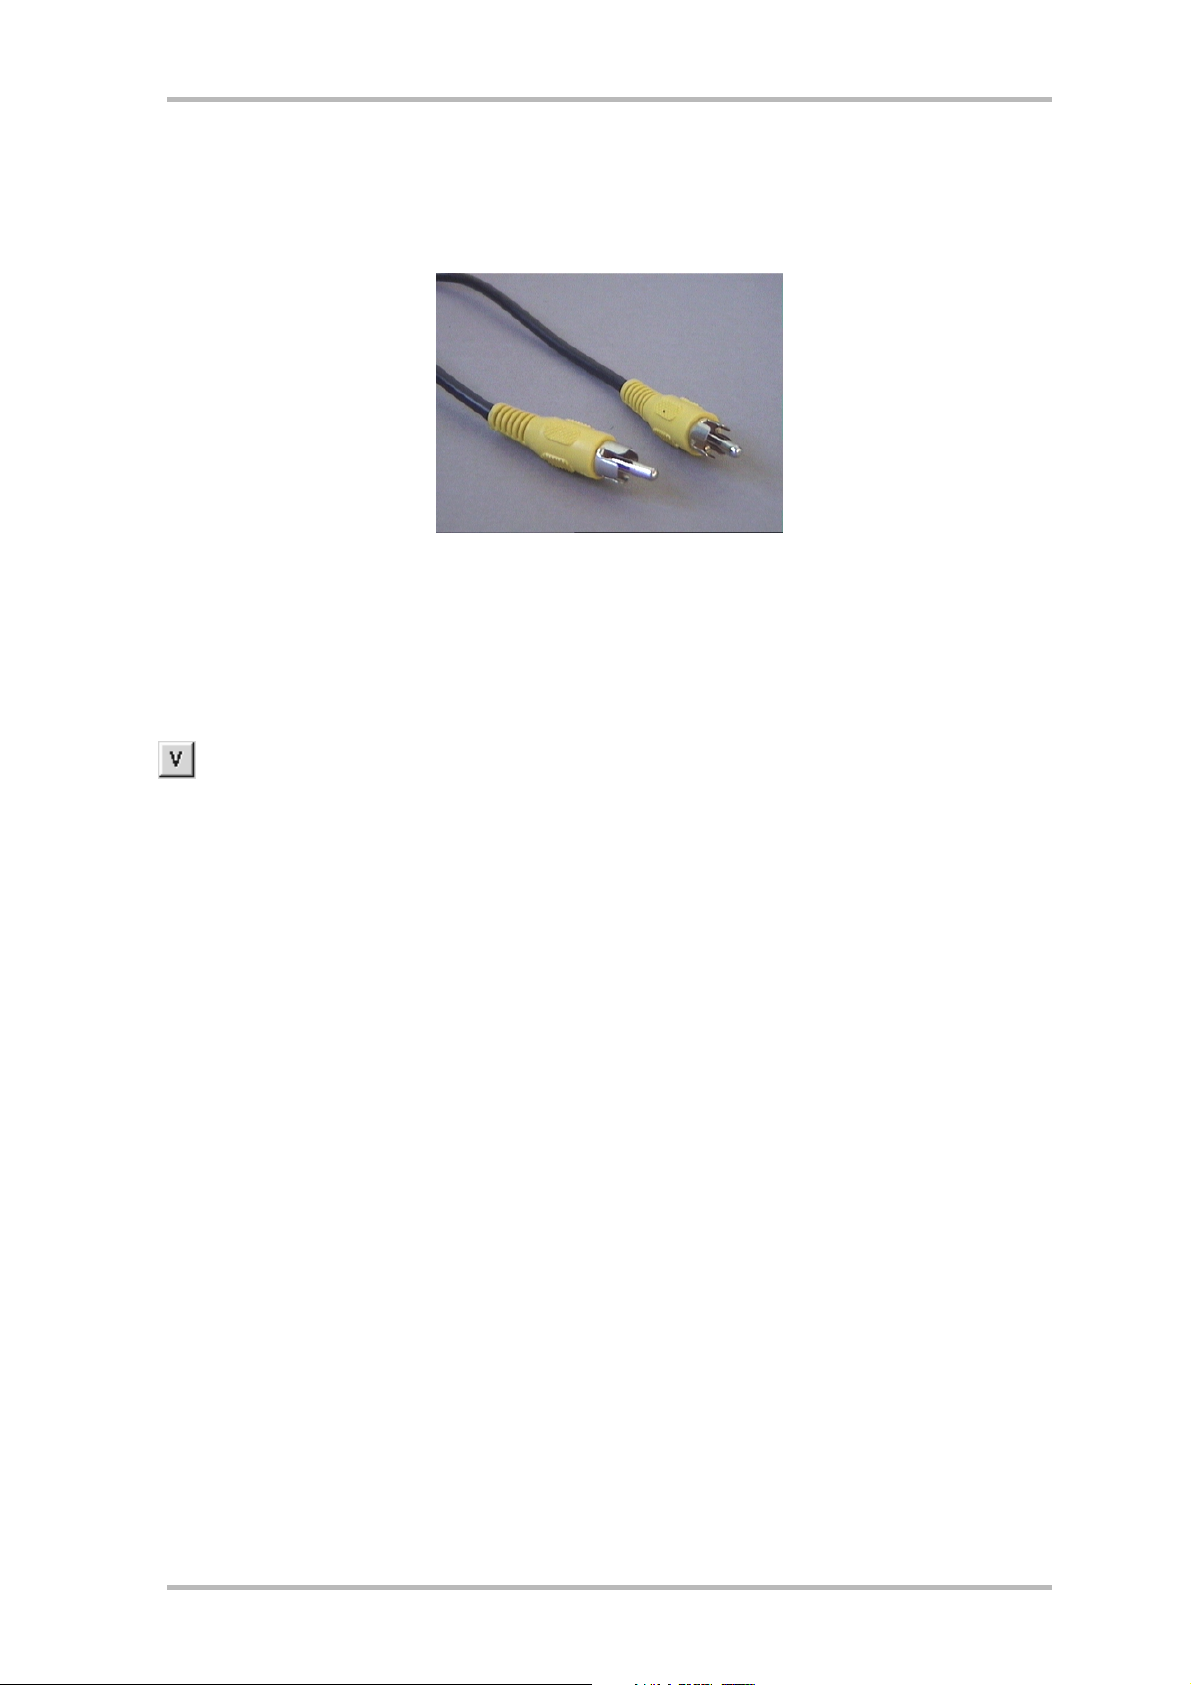
Connecting an External Device with Video-Out
External devices that have a Video-Out port can be connected to the Video-In port of
TerraTValue using a cinch/cinch cable (see the following illustration).
fig. 4: Use this cable to connect a device with a Video-Out port.
Proceed with the cable connection as follows:
1. Plug in the cinch cable with one end in the video out of the external device and the
other end in the video in of the TV card.
2. Under the menu point Options\Video Source in the TV software choose the setting
Composite , so that the video picture of the external device will be shown. You can
also set the video source Composite , by clicking on the V-interface which is shown
on the left side of the symbol bar in the TV software.
NOTE!
When attaching a cinch cable, please read the segment Attention! - Connecting Audio to the
TV Card at the end of this topic.
16 TerraTValue
Page 17
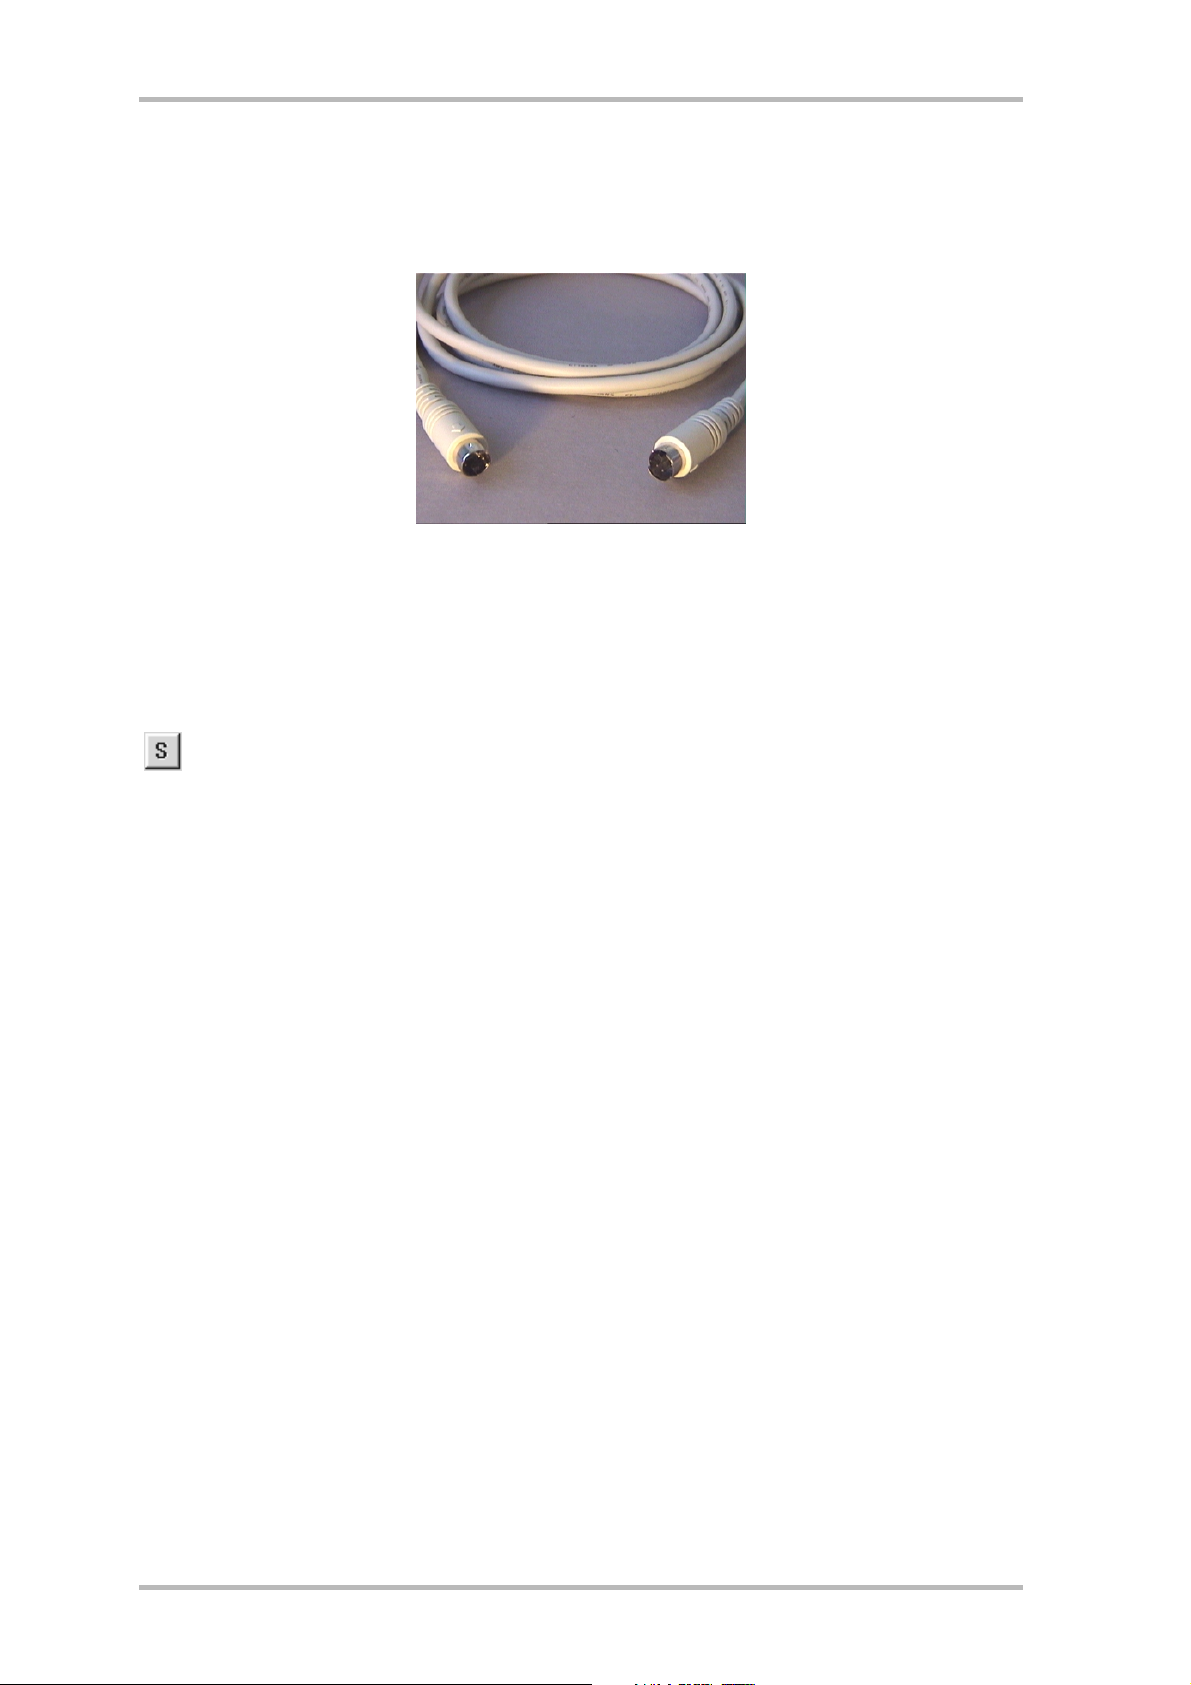
Connecting an External Device with SVHS-Out
External devices that have a SVHS-Out port can be connected to the TV card by using a
connector cable with male plugs on both ends. (see the following illustration)
fig. 5: SVHS/SVHS cable
Proceed with the cable connection as follows:
1. Plug in the SVHS cable with the one end in the SVHS-Out of the device you want to
connect and the other end in the SVHS-In of the TV card.
2. In the TV software under the menu point Options\Video Source choose the setting
SVideo, so that the video picture of the external device is shown. You can also set the
video source SVideo, by clicking on the S-button shown to the left side of the TV
software's symbol bar.
NOTE!
When attaching a SVHS cable, please read the segment Attention! - Connecting Audio to the
TV Card at the end of this topic.
TerraTValue 17
Page 18
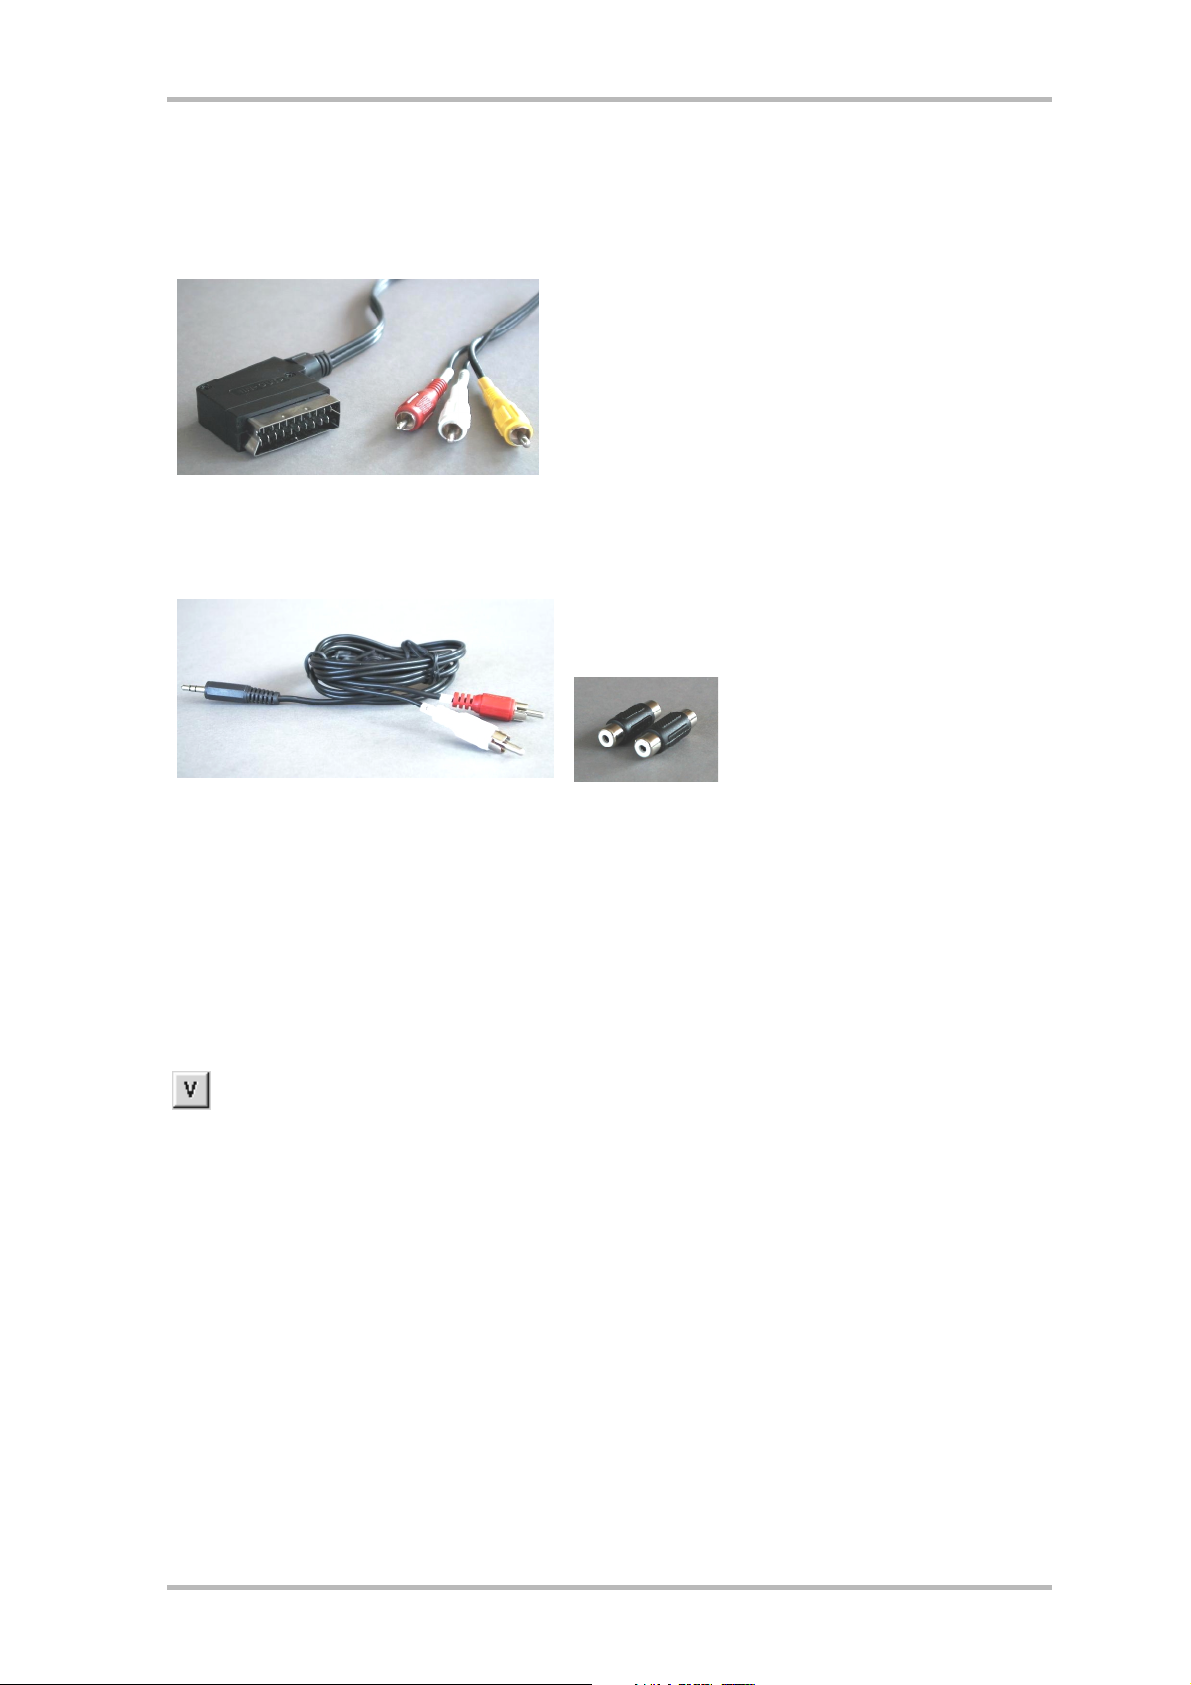
Connecting an External Device with Scart Out
If you want to connect a device that has a scart out, you will need a special adapter cable to
make the connection to the TV cable.
The cable you will need must have a scart port on
one side which you plug into the external device.
The other side will have three male cinch plugs
(see illustration left). The three cinch plugs will
carry the left and right audio signals as well as the
video signal.
Scart cable
y-cable
Proceed with the connection to the TV card as follows:
1. Connect the cinch plug for video with the Video-In of the TV card.
2. Connect the scart cable's left audio and right audio to the two cinch connectors and
the y-cable.
3. Plug in the y-cable's jack plug to the Line-In input of your sound card.
For you be able to connect the left and right audio
cables with the Line-In input of your sound card,
you will need
the other two cinch connectors and a y-cable (see
illustration).
cinch connectors
4. In the TV software under the menu point Options\Video Source choose the setting
Composite, so that the video picture of the external device is shown. You can also set
the video source composite by clicking on the V-button on the left side of the symbol
bar in the TV software.
NOTE!
When attaching a scart cable, please read the following segment Attention! - Connecting
Audio to the TV Card.
18 TerraTValue
Page 19

Important!
When purchasing an appropriate cable, you must pay attention its signal direction. There are
cables for feeds into the VCR (Video-In), and there are cable types for feeds out of the VCR
(Video-Out). Use a cable with the signal direction Video-Out! Preferably, you should buy a
model that allows you to switch from in to out. Appropriate cables can be found at specialty
stores for around EUR 15.
TerraTValue 19
Page 20

Attention! -Connecting Audio to the TV Card
In attaching external devices through the Video-in or SVHS-In ports, you should note, that only
video signals (and not sound) can be transmitted over these two ports. For this reason, you
will need a second cable connection, which goes from the audio-out ports of the external
device to the Line-In input of your sound card. If you don't set up this connection, it won't be
possible to record a video sequence with sound from the external device.
The audio connection can be made most easily using an audio extension cord, which you can
find in any electronics store (see the following illustration). In addition, you will need a socalled y-cable, an extension cable which has two cinch plugs on one end and a mini-jack plug
on the other.
Audio Out
Audio Extension Cord
Y-Cable
Proceed with the installation of the audio connection as follows:
1. Plug in the two male cinch plugs of the audio extension cord to the audio-out ports of the
external device.
2. Connect the two female cinch plugs of the audio extension cord with the y-cable.
3. Plug the mini-jack plug of the y-cable into the Line-In input of your sound card.
Important!
Make sure this audio connection is complete if you want to record a video sequence with
sound from your external device. Also, take a look at the topic Important Settings, to be sure
that your sound card is correctly installed for the recording of a video sequence with sound.
20 TerraTValue
Page 21

The TV Software in Detail
The 32-bit TV software of TerraTValue provided here offers you full control over all integrated
functions. Install channels automatically through channel scan, shoot stills that are then
immediately saved as bmp files or directly record completely compressed video sequences in
real time. So that everything is always in the right picture, you can choose between several
predefined view modes. Set the 4:3 and 16:9 views in the window mode of the TV software, or
set the full-screen mode, so that you can just sit back and relax. The mosaic gives you a quick
overview of all the installed channels and is for that reason an ideal navigational help in the
station jungle.
The Surface of the TV Software
In the following illustration you see the surface of the TV software with a description of the
individual interfaces and their functions:
fig. 6: The Surface of the TV Software
Important!
The loudspeaker symbol and the volume control affect the master controller in the mixer of
your sound card, and this will possibly be switched to mute!
TerraTValue 21
Page 22

Shortcut Keys in the TV Software
The most important functions of the TerraTValue software can also be accessed with the touch
of a button. Use the following keys or key combinations to carry out the individual functions:
Function Keys
Previous Channel Cursor Down
Next Channel Cursor Up
Turn Volume Up Page Up
Turn Volume Down Page Down
Record Single Frame Ctrl+A
Record Video Sequence Ctrl+Y
Full-screen Mode F12
Switch from Full-screen to Normal View Esc
Hide Menu Bars Esc
22 TerraTValue
Page 23

Touch of a Button – The Functions of the Right Mouse Button
If you click on the surface of the TV software with the right mouse button, a context menu
appears which allows you to quickly access a few practical functions of the TV software.
fig. 7: This menu opens when you click on the surface of the TV software with the right mouse button.
TerraTValue 23
Page 24

Quick Access – The Channel List in the Status Bar
The channel list, which you can open with a simple mouse click in the status bar of the TV
software, represents a very quick navigational possibility for everyday use.
fig. 8: The Channel List in the Status Bar
24 TerraTValue
Page 25

Editing Channel Settings
Through the Channel Scan window you have the option of changing your channel settings at
any time. You can, for example, assign a channel name or fine tune the channel if it does not
have optimal picture quality. To change the channel settings, do the following:
1. Open the Channel Scan window under the menu point Channel\Channel Scan.
2. With a mouse click, choose a station from the station list.
3. Click on the Edit button.
4. Enter a name for the channel and/or improve poor picture quality with the fine-tune slider.
fig. 9: Enter the channel settings in this window .
5. Confirm your entry by hitting OK.
TerraTValue 25
Page 26

Adding Stations Manually
If, for example, some stations were not found during the Channel Scan, or if you want to set a
channel yourself, you can do this too through the Channel Scan window. To add a station
manually, proceed as follows:
1. Open the Channel Scan window under the menu point Channel\Channel Scan.
2. Click Add.
3. Enter the station's name and the channel or the frequency of the station and confirm your
entry by hitting OK.
fig. 10: Enter the channel settings in this window.
You can now find the station you just added in the station list along with all the other stations.
26 TerraTValue
Page 27

The "File" Menu
The Menu Point "New Teletext Window"
Through this menu point you can call up a new teletext window of the teletext
software. You can also do this through the symbol bar interface shown here.
The Menu Point "Save As"
After you have shot a frame, you can save it as a bmp file through this menu point. As long as
this point cannot be chosen.
The Menu Point "Exit"
This menu point closes the TV software.
TerraTValue 27
Page 28

The "View" Menu
The Menu Point "Caption"
Through this option you can hide and show the TV software's captions.
The Menu Point "Status Bar"
Through this option you can hide and show the status bar of the TV software.
The Menu Point "View None"
This very useful function hides all of the TV software's window frames that might possibly
disturb you . Use this function in conjunction with the menu point Always on Top! Those who
prefer to use the keyboard can also reach the function Video None by pressing the Esc key.
The Menu Point "Always on Top"
If this menu point is activated, then the TV picture will always be in the forefront and cannot be
covered by other windows. This is a very practical feature if you want to watch TV and work
with another application simultaneously.
The Menu Point "4:3"
With this option you switch the 4:3 side ratio on and off. If you make the TV window
larger or smaller while this side ratio is activated, the TV picture will always be shown
in a 4:3 format. The 4:3 format corresponds to the normal television format.
The Menu Point "16:9"
With this option you switch the 16:9 side ratio on and off. If you make the TV window
larger or smaller while this side ratio is activated, the TV picture will always be shown
in a 16:9 format.
The Menu Point "Full screen"
Through this option you can activate the full screen mode, in which the TV picture
extends over the entire screen surface of you monitor. This mode is excellent for
watching television. To exit full screen, press the Esc key or double click on the TV
picture with your mouse. The full screen mode can also be activated with the symbol
bar button shown.
The Menu Point "Live Video"
This option is important, if you have captured a single frame. That's when the TV
picture freezes and shows you the recorded still. In order to show the TV picture live
once again, simply click on the Live Video interface shown here.
28 TerraTValue
Page 29

The "Channel" Menu
The Menu Point "Channel... "
Through this menu point you can call up the channel list, from which you can pick a
particular station to view. The channel list is very practical to use if you drag its window
next to the TV software. Then changing the channel is only a mouse click away. In this
way, you can zap through all the stations without having to confirm your choice each
time.
The Menu Point "Channel Scan"
Through the menu point Channel Scan you can do an automated station search, manually set
or fine tune the stations.
The Menu Point "Video Device"
With the help of this menu point you can choose a driver for recording. Normally the entry
TerraTValue: MSVideo: Brooktree PCI Video Capture should be selected here, which allows
you to receive a television signal. If you own a webcam with its own record driver, however,
this record driver will also be displayed. Choosing this driver then allows you to use the TV
software as a surface for the webcam. After you have finished, remember to reset the driver.
Otherwise, you will not be able to receive a TV signal.
The Menu Point "Channel Up"
With this menu point you can switch to the next channel.
The Menu Point "Channel Down"
This menu point switches you to the previous channel.
TerraTValue 29
Page 30

The "Options" Menu
The Menu Point "Video Source"
Through the menu point Video Source you can set the video source displayed by the TV
software. The video source selection is always important if you want to record something from
an external VCR or video camera. Additionally, this menu point allows you to set a few picture
parameters such as brightness and contrast as well as set the television standard.
fig. 11: Choose the video source, picture parameters and television standard in this window.
The following settings are available as video sources:
Tuner This setting displays the signal shown by the TV software, which is fed in
through the antenna in of TerraTValue.
Composite If you have set Composite, the TV software displays the signal coming through
the Video-in port.
SVideo With the setting SVideo, the TV software displays the signal coming through
the SVHS-In port.
Under the option Color you can influence the picture parameters of the TV picture. The
possibilities for adjustment:
Brightness Through this controller you can determine the brightness of the TV picture.
Contrast This controller lets you regulate the TV picture's contrast.
Saturation This controller steers the color saturation of the TV picture.
Hue This controller allows you to manipulate the TV picture's hue.
30 TerraTValue
Page 31

NOTE!
The option Video Standard makes it possible for you to choose different television standards.
This only makes sense, for example, if you have an NTSC VCR or camera connected to the TV
card. Then you can choose the setting NTSC under the option Video Standard, so that the
delivered signals can be processed correctly. Make sure that a change in the setting from PAL
B,D,G,H,I only occurs under the conditions mentioned. Otherwise the TV signal reception will
be limited.
The Menu Point "Video Format"
Through the menu point Video Format you can determine the size of the picture to be recorded
and the number of bytes that are to be used per pixel.
fig. 12: In this window, determine the size and number of bytes used for recording.
The setting Image Dimensions
Through the point Image Dimensions you can choose from three resolutions for the capturing
of frames and recording of video sequences:
Resolution Result
Result Video Sequence
Single Frame
192 x 144 OK OK
384 x 288 OK Depending on your system/hard drive capability, it is
possible that dropped frames can occur. For more
information, please read the topic Attention! – Recording
Parameters of Video Sequences in this online manual.
768 x 576 OK Using this resolution always results in dropped frames.
This is because the incoming amounts of data of around 17
MBytes are more than any hard drive currently available
can process.
TerraTValue 31
Page 32

The Setting Image Format
Through this menu point you can determine how many bytes per pixel are used when
capturing a frame or recording a video sequence. Be careful, however. The more bytes you set
to save a pixel, the greater the data yield and the bigger the resulting file will be!
Image Format What it Means for the Recording
32-Bit RGB 4 bytes are saved per pixel
24-Bit RGB 3 bytes are saved per pixel
15-Bit RGB 2 bytes are saved per pixel
BTYUV Low data yield through compression
YUV9 Low data yield through compression
YUV12 Low data yield through compression
NOTE:
Recordings of video sequences made with the BTYUV, YUV9 and YUV12 image formats can
only be played back on systems, on which the TV card's drivers are installed. This is because
these image formats work in conjunction with special compression formats which are matched
to the television hardware. When you prepare a video sequence for use on your system, you
can easily fall back on these special compression formats. If you want to give your video clips
to other PC users, however, then you should use a RGB format!
The Menu Point "Capture Single Frame"
Through this menu point you can capture a single frame of the displayed TV/video
picture. The size of the recorded picture is determined by the parameters set under
Options\Video Format . After you have captured a frame, you can save it as a bmp file
by going under the menu point File/Save As... .
To display the TV/video picture live again after you have captured a frame, simply
press the Live Video key in the symbol bar, which is shown here on the left. You can
also use the key combination Ctrl+A to capture a frame.
32 TerraTValue
Page 33

The Menu Point "Copy to Clipboard"
After you have captured a single frame, you can copy it onto the Windows clipboard by
going to the menu point Copy to Clipboard. From there, the frame can be pasted into
any number of other applications. Pasting can be done by using the key combination
Ctrl-V or the menu point Edit\Paste.
The Menu Point "Video Recording Settings"
This menu point allows you to choose from numerous settings which will have an effect on the
recording of a video sequence. You can find more information on this menu point in the topic
Attention! – Recording Parameters of Video Sequences.
The Menu Point "Compression"
This menu point allows you to choose from numerous compression settings which will have an
effect on the recording of a video sequence. You can find more information on this menu point
in the topic Attention! – Recording Parameters of Video Sequences.
The Menu Point "Record Video"
This menu point starts the recording of a video sequence. You can stop recording the
video sequence at any time by hitting the Esc key or clicking with the mouse on the TV
screen. You can find more information on this menu point in the chapter Attention! –
Recording Parameters of Video Sequences found in this online help..
TerraTValue 33
Page 34

The Menu Point "Mosaic"
The TV software's mosaic offers you a quick overview of up to 100 television stations.
To do this, the mosaic flips through all the stations and captures one frame from every
channel. These frames are listed one after the other and can then be activated with a
mouse click. Once you have found an interesting station, you can maximize it by
doubleclicking.
Start This menu point starts the mosaic.
Best Fit Scales the momentary recording up or down to the optimal size.
Clear Delete allows you to exit the mosaic. This point can only be chosen
Setup Through Setup you can determine the number and also the size of
This point can only be chosen while the mosaic is being displayed.
while the mosaic is being displayed.
the momentary recordings. In addition, you can enter whether or
not the external inputs Video-In and SVHS-In should also be
displayed in the mosaic.
fig. 13: Mosaic Setup.
34 TerraTValue
Page 35

Uninstalling the TV Software
It is very easy to uninstall the TV software. You might have to uninstall the software, for
example, if you receive a new version or if you have difficulty operating the TV card:
1. Call up the control panel and doubleclick on the software symbol.
2. Choose TerraTValue Software from the displayed list.
3. You will be asked to confirm that the software should be uninstalled. Respond with yes.
4. After the uninstall you can install the new TV software or reinstall the existing software.
TerraTValue 35
Page 36

Attention! – Recording Parameters of Video Sequences
There are four important factors you should take into consideration when recording a video
sequence. These factors could have a decisive effect on the amount of data recorded and the
quality of your recording. The deciding factors are:
a.) The video format of the television picture you want to record
b.) The number of frames per second to be recorded
c.) The set compression factor during the recording
d.) The chosen quality of the sound recording.
By knowing the individual factors and their combinations, you will be able to produce optimal
results while keeping your data yield low. Therefore, you should carefully read the following
segment.
The Big Picture – Important Information about the Video Format
Before you start recording anything, you should determine first of all the video format of the
video material you plan to record as well as the number of bytes that should be saved per
pixel. Both parameters can be set under the menu point Options\Video Format. The chosen
video format and the number of bytes used have a decisive effect on the data amounts. The
bigger the set video format is, the more data is accrued! The more bytes per pixel, the more
data!
Current systems, depending on their power, have the capability of recording video sequences
with a maximum video format of up to 352 x 288 pixels without dropping frames. Dropped
frames occur when the data accrued while recording a video sequence can no longer be
processed by the hard drive. In this case, the record function jumps over a few frames and
thereby reduces the amount of data, so that your hard drive can process the information. If the
record function has skipped some frames, the dropped-frame statistics will be displayed for
you after you are done recording.
If the displayed statistics show too many dropped frames, you will not have a very fluid result.
The recorded file will end up being very jumpy and is then, for all practical purposes, not
useful. If you have dropped frames when using a 384x288 video format, you should try
reducing the video format to 192x144 or read the following segment on the number of frames
per second to be recorded and determining compression!
36 TerraTValue
Page 37

Under the menu point Options\Video Format you will find another very important parameter
for recording video sequences. The setting Image Format lets you determine how many bytes
to use to save one pixel of the TV picture. As before, the more bytes per pixel you have, the
greater the data yield when recording. For that reason, take a close look at the following table:
Image Format What it means for the Recording
32-Bit RGB 4 bytes per pixel in the TV picture are saved
24-Bit RGB 3 bytes per pixel in the TV picture are saved
15-Bit RGB 2 bytes per pixel in the TV picture are saved
BTYUV Low data yield through compression
YUV9 Low data yield through compression
YUV12 Low data yield through compression
NOTE:
Recordings of video sequences made with the BTYUV, YUV9 and YUV12 image formats, can
only be played back on systems, on which the TV card's drivers are installed. This is because
these image formats work in conjunction with special compression formats matched to the
television hardware. When you prepare a video sequence for use on your system, you can
easily fall back on these special compression formats. If you want to give your video clips to
other PC users, then you should use a RGB format!
Setting the Video Format for Video Sequence Recording
1. Choose the menu point Options\Video Format an.
2. Image Dimensions allows you to choose the video format you want to use for video
sequence recording. For best results, choose the video format
192 x 144 or 384 x 288 .
3. Image Format also allows you to choose how many bytes to be saved per pixel from the TV
picture (see the above table).
4. Confirm your choice with the OK button.
fig. 14: In this window you can determine the video format and the number of bytes per pixel.
TerraTValue 37
Page 38

Less is often More – The Number of Frames per Second to be Recorded
A video sequence consists of a fast succession of single frames. For our eyes to perceive a fluid
movement, 15 frames must be shown per second. This holds true as well when recording video
sequences. At least 15 frames per second must be recorded to achieve a fluid end result. If you
choose more frames per second to be recorded, the data yield increases while recording. This
might mean you will have to set a smaller video format with higher frame rates. Otherwise, you
will overstep the amount of data your hard drive can handle.
Setting the Frames per Second to be Recorded
You can set the frames to be recorded per second under Options\Video Recording Settings.
Generally, we recommend you leave the preset frame rate of 15 frames per second, as a higher
frame rate will not necessarily lead to a more fluid end result! Additionally, we recommend you
lower the frame rate to 15 frames/second, if you start experiencing dropped frames at higher
frame rates.
fig. 15: In this window you can enter some parameters for video sequence recording.
38 TerraTValue
Page 39

More or Less - Determine the Compression
In the previous two segments you learned that the amount of data received while recording a
video sequence is determined by the size of the video format and the number of frames. The
bigger the video format and the greater the number of frames per second, the more data
accrued. But how can you reduce the amount of data when recording a video sequence?
The answer lies in the different compression processes available to you. Some of them are
Windows Standard compression processes. Others are installed with the TV card's drivers and
are optimally prepared for working together with TerraTValue.
Setting the Compression Process
1. To set the compression process click on the menu point Options\Compression.
2. Now you can choose a compression process from the list displayed. Depending on the
version of Windows you are using or the capabilities of the installed video support, you will
find a number of compression processes in this list. Experiment with the different processes
offered and their settings to find the optimal balance between amount of data and picture
quality that is right for you.
3. Confirm your choice with the OK button.
Important!
You can achieve excellent compression with the compression processes Brooktree ProSumer
Video (32) and Brooktree YUV 411 Raw. Files that are recorded with these processes can only
be played back on a system where they are installed or one that supports these two
compression processes. If you want to play back the produced video sequence on several
different systems, then you should choose another compression process. Cinepak Codec and
Intel Indeo are examples of compression processes that are supported on all systems.
TerraTValue 39
Page 40

The Right Sound – The Audio Parameters for Video Sequence Recording
When recording video sequences with sound, different sound qualities can be set. You can
choose the sound qualities:
· CD Quality
· Radio Quality
· Telephone Quality
· No Audio
for the recording. Be aware that the data yield increases depending on the sound quality you
choose! The selection of sound quality also lets you influence the incoming amounts of data.
This allows you to aim for optimal results according to how you plan to use the recording. For
example, if you want to record a video sequence with sound for use on the Internet, then the
quality of the sound recording is secondary. More important is having a file as small and
compact as possible, and you can only achieve that with the sound quality Telephone or No
Audio.
Another factor in recording sound is the possibility of choosing between stereo and mono.
Please keep in mind, that when you choose Stereo there is always twice as much data coming
in than with the mono setting!
The following tells you how to change the set sound quality:
1. Choose the menu point Options\Video Recording Settings.
2. Determine the quality of the sound to be used when recording a video sequence. Do this by
choosing the option Audio Quality. Keep in mind that the amount of data increases with
better quality.
3. Confirm your choice with the OK button.
fig. 16: Choose the sound quality in this window.
40 TerraTValue
Page 41

In Detail - More Video Recording Settings
You can select two other settings for video sequence recording. One is the selection of a file
name for saving the video sequence and the other a time frame after which the record function
should automatically turn off. To set these, proceed as follows:
1. Choose the menu point Options\Video Recording Settings.
2. Go to the option Record Video. Enter the name of the file to be created and where it is to
go.
3. Under the option Time Limit (Seconds) define a time interval after which the record
function should turn itself off. It's important that the control box On is activated, because
otherwise the time limit will not be activated.
4. Confirm your settings with the OK button.
TerraTValue 41
Page 42

Attention Trap – Recording a Video Sequence
Now that you have learned in the previous segments all about the settings available for
recording a video sequence, you can practice your newly applied knowledge:
1. First of all, go under the menu point Options\Video Source and set the signal source
from which you want to record the video sequence. There, you can choose Tuner, if
you want to record a video sequence from a running television program or, depending
on the type of connection, Composite or SVideo, respectively, if you want to record
from an external device. If you are not sure as to what type of connection your
VCR/camera requires, refer to the topic Connecting External Devices in this online
manual for further information.
2. If necessary, set all parameters such as the number and size of the frames to be
recorded, the number of bytes per pixel, the compression process to be used and the
sound quality of the recording. If you are not sure about which settings to use, please
read the topic Attention– Recording Parameters for Video Sequence Recording. At
first, you can simply keep the preset settings and play with different possibilities
later.
3. Begin recording the video sequence with the key combination Ctrl-Y or by pressing
the record video sequence interface which is shown here to the left.
4. While the recording is in process, you will be able to see the lapsed time in the TV
software's status bar. Pressing the Esc key or clicking with the mouse on the
television screen will stop the recording.
5. As long as you have not changed any of the standard settings, you will be able to find
the newly produced recording in the main directory of your C drive - the hard drive.
You can play back this recording by simply double clicking on the file.
42 TerraTValue
Page 43

Troubleshooting - Video Sequence Recording
1. The recorded video sequence seems jumpy.
In this case, there are several possible solutions:
· Lower the video format to be recorded through the menu pointOptions\Video Format
· Lower the set number of frames per second through the menu point Options\Video
Recording Settings
· By going through the menu point Options\Compression set the compression process to
Brooktree ProSumer Video (32)
Be sure to read the topic Attention Trap – Recording Parameters of Video Sequences in
this online manual.
2. A very high dropped-frame rate is displayed.
· The possible solutions to this problem are the same as with the first point.
3. No sound is being recorded with the video sequence.
For any sound to be recorded, the output of the TV card has to be connected with the input
of the sound card. If the TV card's output is connected to the sound card's input with the
connector cable provided, you should try double clicking on the volume control icon in the
taskbar. There, choose the menu point Options\Properties. Set the Adjust volume for
option to Record and confirm your choice by clicking on OK. Now activate the control box
under the Line-In slider and set the slider to the middle position. Now you should be able to
record with sound.
TerraTValue 43
Page 44

Say Cheese - Recording a Single Frame
1. First, go to the menu point Options\Video Source and set the signal source from
which you want to record the frame. There, choose Tuner, if you want to record a
video sequence from a running television program or choose Composite or. SVideo
respectively, depending on connection type. For example, do you want to record from
an external VCR or camera? If you have questions regarding your VCR or camera
connection, please see the topic Connecting External Devices in this online manual.
2. Determine the size of the frame by going to the menu point Options\Video Format .
3. Use the key combination Ctrl-A to shoot the frame or use the appropriate interface
from the symbol bar shown here on the left.
4. When you have finished shooting your single frame, you can save it directly as a
bmp file by going to the menu point File/Save As .
5. Press the Live-Picture key from the symbol bar to display the television picture live
once again.
44 TerraTValue
Page 45

Always Informed – The Teletext Software
The teletext software offers you actual functions for the world of teletext. Save interesting
teletext pages such as stock tips and recipes directly or print them out. Through the integrated
teletext caching, all pages are loaded in the background and can be accessed at the touch of a
button.
The Surface of the Teletext Software
Here you see the surface of the teletext software, including a description of the individual
interfaces.
TerraTValue 45
Page 46

The Symbol Bar of the Teletext Software
History function
Through these two interfaces you can page through the most recently read teletext
pages, whether forward and back. This history function is also accessible through the
menu point Teletext/History Forward and History Back respectively. These buttons are
grayed out until you have used the Plus or Minus buttons further to the right to scroll
through the pages.
Controlling Subpages
Some teletext pages consist of several subpages. Normally, these are scrolled through at a
fixed interval. Because of this, it can happen that you are not able to read the entire contents
of the subpages. In that case, simply use:
The button Lock Subpage, which stops the current subpage
This button to scroll to the previous subpage
This button to scroll to the next subpage.
Rummaging Around – The Navigation Tools
This button allows you to scroll downwards through the teletext pages.
With this button you can scroll upwards through the teletext pages.
This button brings you back to page 100.
Channels Tool
This button allows you to set another channel. Alternatively, you can set the channel
by clicking with your mouse in the status bar of the teletext software.
fig. 17: Click on the status bar with the left mouse button to open this list.
46 TerraTValue
Page 47

The "File" Menu
The menu point "New window"
This menu point opens a new teletext window for you. This function is practical, for example, if
you want to compare the teletext contents of different channels with one another.
The menu point "Open"
Use this menu point to open up saved teletext pages.
The menu point "Save"
This menu point allows you to save interesting teletext pages directly to the hard drive. To do
this, the teletext software uses its own or an ASCII-compatible format.
The menu point "Save As"
Lets you save teletext pages directly as txt files or in the teletext-software format.
The menu point "Print"
Prints out the teletext page currently displayed to your printer.
The menu point "Print Preview"
This menu point allows you to check the set parameters found under Print without actually
printing anything.
The menu point "Print Setup"
Lets you configure your printer's settings.
The menu point "Recent file"
Opens the most recently opened teletext file. In this way, you have quick and easy access to
the teletext contents you viewed last.
The menu point "Close"
Closes a file that was first saved using the menu point Save.
The menu point "Exit"
Exits the teletext software.
TerraTValue 47
Page 48

The "Teletext" Menu
The menu point "Channels"
Pulls up a list for setting a new station.
The menu point "Teletext Caching"
Lets you set up the buffer for the teletext pages. Teletext caching saves all the teletext pages
to the background allowing you to then access them at the touch of a button.
The menu point "Reveal"
The menu point Teletext/Reveal means that additional normally-hidden data (in fig. 18: that
would be the VPS times) are displayed or not. In fig. 19:, Reveal is disabled.
fig. 18: When Reveal is disabled the VPS times are displayed.
fig. 19: When the Reveal function is activated, no additional data is displayed.
48 TerraTValue
Page 49

The menu point "Lock Subpages"
This menu point is especially practical when a teletext page consists of several subpages.
Normally the individual pages scroll through automatically according to a set interval. To lock
the current subpage, simply activate the menu point Lock Subpage.
The menu point "History Back"
This menu point allows you to flip back through the teletext subpages.
The menu point "History Forward"
This menu point allows you to flip forward through the teletext subpages.
The menu point "Index Page"
This menu point brings you back to the Index Page 100.
The menu point "Next Page"
This menu point lets you flip forward through the teletext pages.
The menu point "Previous Page"
This menu point lets you flip back through the teletext pages.
The menu point "Error List"
The menu point Error List lists any errors that may have occurred while you were working with
the teletext pages.
TerraTValue 49
Page 50

Status / Error List - Teletext Decoding
The three status lights have the following meanings.
Green: The teletext is being decoded or is decoded
Yellow:The teletext cannot be decoded
Red: No teletext signal is being received
Clicking inside this field opens an error log in which you can view past occurring errors.
50 TerraTValue
Page 51

The TerraTec Hotline
If you still have problems or questions, please review all of the instructions in this
documentation first.
If you are certain that you can’t solve your problem without assistance, please call our hotline.
Our friendly support team is available from Monday through Friday from 1 p.m. to 8 p.m.
Central European Time under the number +49 (0) 2157 817914.
Please have the following information handy to ensure that your call is processed quickly:
· Your registration number
· The quickreference
· A printout of your configuration files
· The manual of your motherboard
· A screenshot of your BIOS configuration
If possible, call from within reach of your running computer. Please also note the name of the
support team member who answers your call, as you will need it if you have to return a
defective card.
If you live in one of the countries below, please call the corresponding Hotline number:
U.K. or Ireland Benelux U.S.A.
+44 (0)1600-772333
Monday through Friday
9 a.m. - 5 p.m. (local time)
For all the other countries, please call +49 2157 817914.
Our friendly support team is available from Monday through Friday from 1 p.m. to 8 p.m. (CET).
Another source of help is our Internet support page:
http://www.terratec.net/support.htm
It is also useful to keep all of the information relevant to your computer handy when using this
resource. Providing detailed information about your problem increases the chances of getting
quick assistance.
+31 (0)43 3654758
Monday through Friday
3 p.m. - 6 p.m. (local time)
+1 (949) 487-3774
Monday through Friday
10 a.m. - 5 p.m. (pacific time)
TerraTValue 51
Page 52

FAQ
Question 1:
Your computer crashes when you use the TV software and can only be revived with a restart.
Answer 1:
· First, check in the device manager under 'computer' to see if TerraTValue is on the same
interrupt as another slot card. This can lead to your computer crashing, especially if
TerraTValue is on the same interrupt as a graphics card. In this case, reassign the interrupts
and cards so that no more overlap exists.
· If you are using an AGP graphics card, do not operate TerraTValue in the PCI slot 1, as this
one is always assigned the same interrupt as the AGP slot. This leads to interrupt overlap
and possible computer crashes. In this case, it is better to install the TerraTValue in another
PCI slot. You will find the PCI-slot numbering in your motherboard's manual.
Question 2:
When starting the TV software, you receive the error message "372 Initialization of the device
server - Driver not found?"
Answer 2:
· This error message indicates that the TerraTValue drivers are either not installed or not
installed properly. In this case, uninstall the program. Do this by going to our home page or
to your installation CD in the directory \Drivers\Uninstall. Restart your system. After
restarting your computer you should be able to reinstall your drivers.
52 TerraTValue
Page 53

Question 3:
When starting your computer the error message "No suitable DirectX Provider - Overlay
channel disabled?" appears.
Answer 3:
· This error message appears when your graphic card's installed drivers do not conform to
DirectX. In this case, you should purchase and install the current driver for your graphics
card. If this does not work, try installing the newest version of DirectX. Afterwards, you
shouldn't have any problem running the software. More information on this problem can be
found under Point 5 of this FAQ.
· If you keep getting this error message, ask your graphics card manufacturer if your graphics
card's drivers support DirectX 5.0 or higher and the Video Overlay function.
Question 4:
Why do I need a DirectX graphics card driver with Video Overlay support?
Answer 4:
· As with all the current TV cards with Brooktree 848 or 878 chips, the TV data provided
through TerraTValue is integrated through the PCI bus into the graphics card memory
without going through the CPU. This integration is called Video Overlay. Without this
function the CPU would be responsible for writing all the data into the graphics card
memory. This would make simultaneously watching television and working in other
applications impossible, as the system would be completely overwhelmed. Because Video
Overlay works directly with the graphics card, it is necessary to have a DirectX graphics card
driver to integrate the television data. For this reason, a DirectX graphics card driver with
Video Overlay support is necessary for the smooth operation of TV cards.
TerraTValue 53
Page 54

Question 5:
What is the maximum resolution at which TerraTValue can digitalize video sequences?
Answer 5:
· As with most common TV cards with Brooktree 848 or 878 chips, the TerraTValue can
digitalize video sequences with a maximum resolution of 768x576 pixels. The amount of
data that comes with this video format, however, blows any possibility of having
momentary access to your hard drive. For this reason, dropped frames are common with
this resolution. With the dropped frames, your TV card's driver is trying to control the data
yield just enough so that your hard drive is able to process it. It does this by leaving out just
enough frames to make the data mass manageable. This, of course, has a dramatic effect
on the final results. The more dropped frames there are, the more the final recorded video
sequence will appear to jerk. In this case, only setting a smaller video format
(Options\Video Format) will help. Current systems can record video sequences fluidly with
a maximum video format of 384x288 pixels!
Question 6:
The mouse pointer freezes when working with the TV software.
Answer 6:
· So far, this has only happened when TerraTValue is configured with another slot card on
the same interrupt. If this is the case, then you should simply be able to configure
TerraTValue or the other card to another interrupt. In part, this must happen over the BIOS,
as you will need to assign concrete values to the PCI slots. Do this through the point PCI
Configuration. First, ascertain which cards are in which PCI slots. You can figure this out by
looking directly at your mainboard. There, the individual PCI slots are labeled one after the
other. If you know which slot card is in which PCI slot, you can set these to a certain
interrupt value by assigning a value to the PCI slots in the BIOS. You can find more
information on this in your mainboard's manual.
54 TerraTValue
Page 55

Question 7:
When starting the TV software, you receive the message "The file TV.EXE is linked to:
Export - OLEAUT32.DLL:420"
Answer 7:
· In this case, you are probably working with an older version of Windows 95, which works
with older DLL files. These are responsible for the exchange of data between applications.
The TerraTValue software needs these files for a dynamic exchange of data to take place. To
remedy this problem, simply install Internet Explorer from the TerraTValue driver/software
CD. The necessary files will then be updated during installation, and afterwards, calling up
the TV software should not be cause for any problems.
Question 8:
How much data accrues when recording video sequences?
Answer 8:
· This question cannot be answered in general terms. The following facts must be
considered:
The larger the video format to be recorded, the more data that is involved. The higher the
number of frames per second, the more data. As the screen resolution and the number of
frames per second can be set relatively freely, the accruing data yield is determined by
these factors. With the TV software's standard settings, one minute uses up about 50 MB of
the hard drive.
Question 9:
Won't the radio software still run after updating to a new driver version?
Answer 9:
· In this case, please download the new radio software version 2.52 from our home page.
This version supports the current TV-card drivers.
TerraTValue 55
Page 56

Question 10:
How do I connect my TV card with Linux?
Answer 10:
· You can find information on this on the Internet at
http://www.thp.uni-koeln.de/~rjkm/linux/terra/terra.html.
Question 11:
When recording video I get picture but no sound.
Answer 11:
· For a video sequence to be recorded at all, the output of the TV card has to first be
connected to the Line-In input of your sound card. To do this, use the jack-jack cable
supplied with your TerraTValue package. Once this is secured, you just need to tell your
sound card that it should record sound from the Line-In input. Do this by double clicking on
the volume control icon on the taskbar and then choose the menu point
Options\Properties. Set the Adjust volume for option to Record and confirm your settings
by clicking OK. Activate the control box under the Line-In slider and set that slider to the
middle position. You are now completed the sound card configuration and can now exit the
mixer. Now you should have no problems recording a video sequence with sound.
Question 12:
Can I connect a SAT-LMB (SAT decoder) directly to TerraTValue?
Answer 12:
· No, the TV card needs a separate SAT receiver.
56 TerraTValue
Page 57

Question 13:
Does TerraTValue have a video-out?
Answer 13:
· No, generally TV cards do not have video-out. If you want to produce video material from
your system, you will have to use a graphics card with video-out.
Question 14:
No stations were found during the channel scan.
Answer 14:
· In this case, you are probably using TerraTValue with a satellite receiver. With satellite
receivers, it sometimes happens that they do not broadcast on one channel but rather
between two different channels. This can have a negative influence especially with
receivers with adjustable channel.
Download the current TV software from our home page and try the channel scan again. If
this version does not find any stations, then set All Frequencies as you region and try the
channel scan again. With All Frequencies the channel scan searches all possible
frequencies and should in any case come up with something.
TerraTValue 57
 Loading...