

English Manual
Version: 08.05.02

CE Declaration
We:
TerraTec Electronic GmbH, Herrenpfad 38, D-41334 Nettetal, Germany
hereby declare that the product:
MIDI Master USB
to which this declaration refers is in compliance with the following standards o r stand ard izing
documents:
EN 55022 : 1998
EN 55024 : 1998
EN 61000-3-2 : 2000
EN 61000-3-3 : 1995
The following are the stipulated operating and environmental conditions for said compliance:
Residential, business and commercial environments and small-company environments.
This declaration is based on:
Test report(s) of the EMC testing laboratory
TerraTec® ProMedia, SoundSystem Gold, SoundSystem Maestro, SoundSystem Base 1, SoundSystem DMX,
®
SoundSystemDMX XFire 1024, AudioSystem EWS
XLerate Pro, Base2PCI, TerraTec 12 8iPCI, TerraTec 512i digital, TerraTV+ , TerraTV Radio+, Terr aTValue, VideoSystem
Cameo 600 DV, WaveSystem, TerraCAM USB, TerraCAM USB Pro, TerraCAM iLook, m3po, Phono PreAmp, MIDI
Smart and MIDI Master Pro are trademarks registered by TerraTec
In most cases, the designations used i n this handbook for software and ha rdware are also register ed trademarks
and are thus subject to the relevant regulations.
®
©TerraTec
Electronic GmbH, 1994-2002. All rights reserved (08.05.02).
64, AudioSystem EWS88, AudioSystem EWX24/96, XLerate,
®
Electronic GmbH Nettetal, Germany.
Meticulous care has been exercised in th e preparation of all text passages and illustrations in thi s User Guide.
TerraTec Electronic GmbH an d i ts a uthors, h owever, accep t no liabi lity , legal or other wise, for any err ors or th e consequences of such errors. We reserve the right to technical modifications.
All text passages in this documentation are cop yrighted. All rights reser ved. No par t of this documentation may be
reproduced in any form whatsoever, by photography, microfilming or other process or rendered into a language/form usable by computers without the pri or, written consent of the au thors. All righ ts for use and propag ation by presentation, radio and television are also reserved.
2 MIDI Master USB (English)

Contents
Welcome! ............................................................................................................................. 4
Scope of delivery................................................................................................................. 4
Power supply........................................................................................................................5
Connecting to the computer's USB port / installing the drives ...............................................5
Widows 98 SE installation................................................................................................ 6
Windows ME installation.................................................................................................. 6
Windows 2000 installation ...............................................................................................7
Windows XP installation................................................................................................... 8
Installation for MAC OS 9................................................................................................. 9
Connecting via the MIDI-Out jack.........................................................................................10
The functions of the MIDIMASTER USB.................................................................................11
Pitch bend wheel ............................................................................................................11
Modulation wheel (MIDI controller freely programmable)................................................ 11
Volume control (MIDI controller freely programmable) .................................................... 11
Program selection (selecting an instrument) ................................................................... 11
Bank selection................................................................................................................12
Program and bank selection storage...............................................................................12
Octave selection .............................................................................................................12
Transposing....................................................................................................................12
MIDI transmit channels...................................................................................................12
Key-strike dynamics (velocity curves)..............................................................................13
MIDI-Out via USB.............................................................................................................13
GM (General MIDI) reset..................................................................................................14
Technical data.....................................................................................................................15
System requirements (in USB operation)............................................................................15
MIDI controller list..............................................................................................................16
GM set................................................................................................................................17
MIDI implementation table.................................................................................................18
MIDI Master USB (English) 3
Welcome!
We are pleased that you have chosen a TerraTec product and would like to congratulate you
on your decision. We are certain our product in the years to come will prove very useful to you
and provide you a ton of fun.
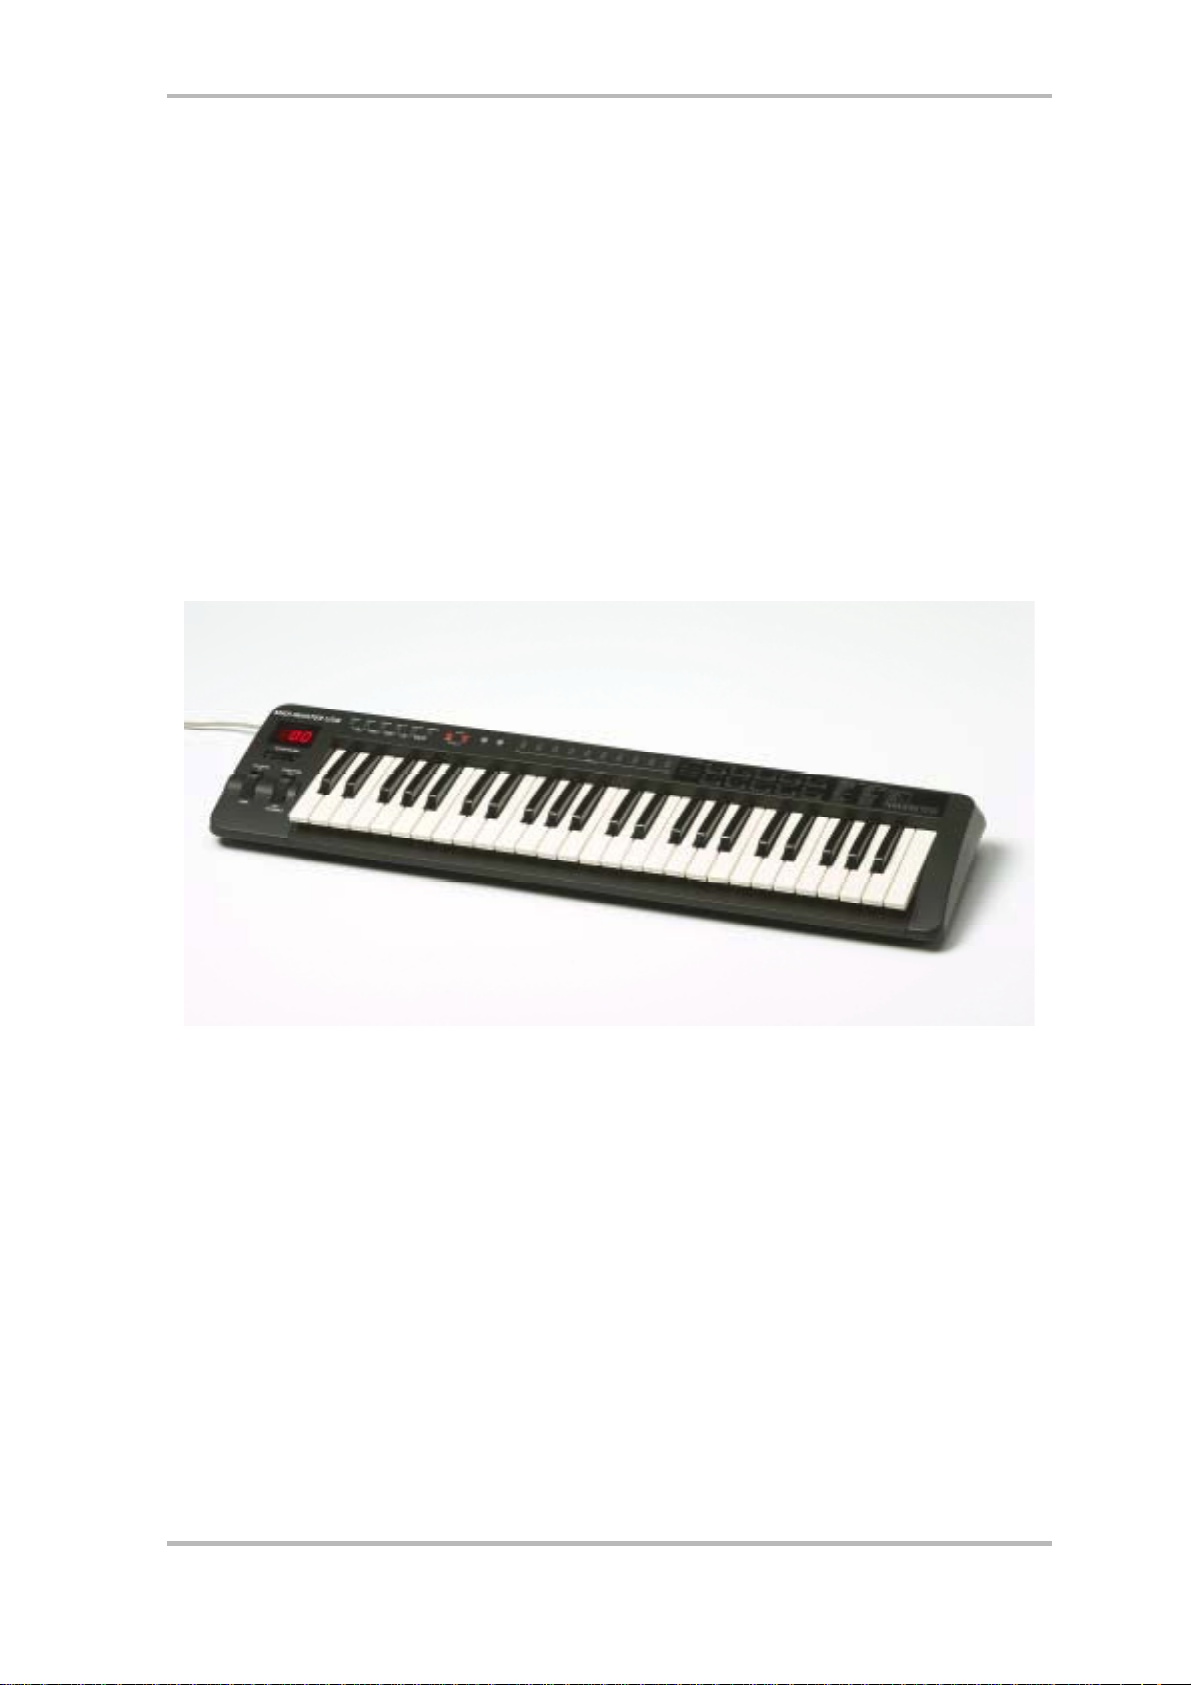
An extremely easy-to-play, touch-sensitive 49-key keyboard with pitch and modulation wheel,
bright LED display and ergonomically placed control sliders and function keys turn the MIDI
MASTER USB into the musical system control center in a home or project stud io. Many meaningful details, such as MIDI controller commands freely assigned to controls, adjustable
curves for key-strike sensitivity, MIDI reset and octave switches as well as a numeric 10-key
keypad are professional features that you will certainly not want to miss any time soon.
The manual provided tells you in complete detail all about the MIDIMASTER USB Keyboard
and how to use it correctly.
Scope of delivery
The scope of delivery of the MIDIMASTER USB is:
1. MIDIMASTER USB Keyboard (MK-249)
2. Operating manual
3. 3-meter USB cable (type A – type B)
4. Customer service card
5. TerraTec registration card
6. Installation and driver CD
4 MIDI Master USB (English)
Power supply
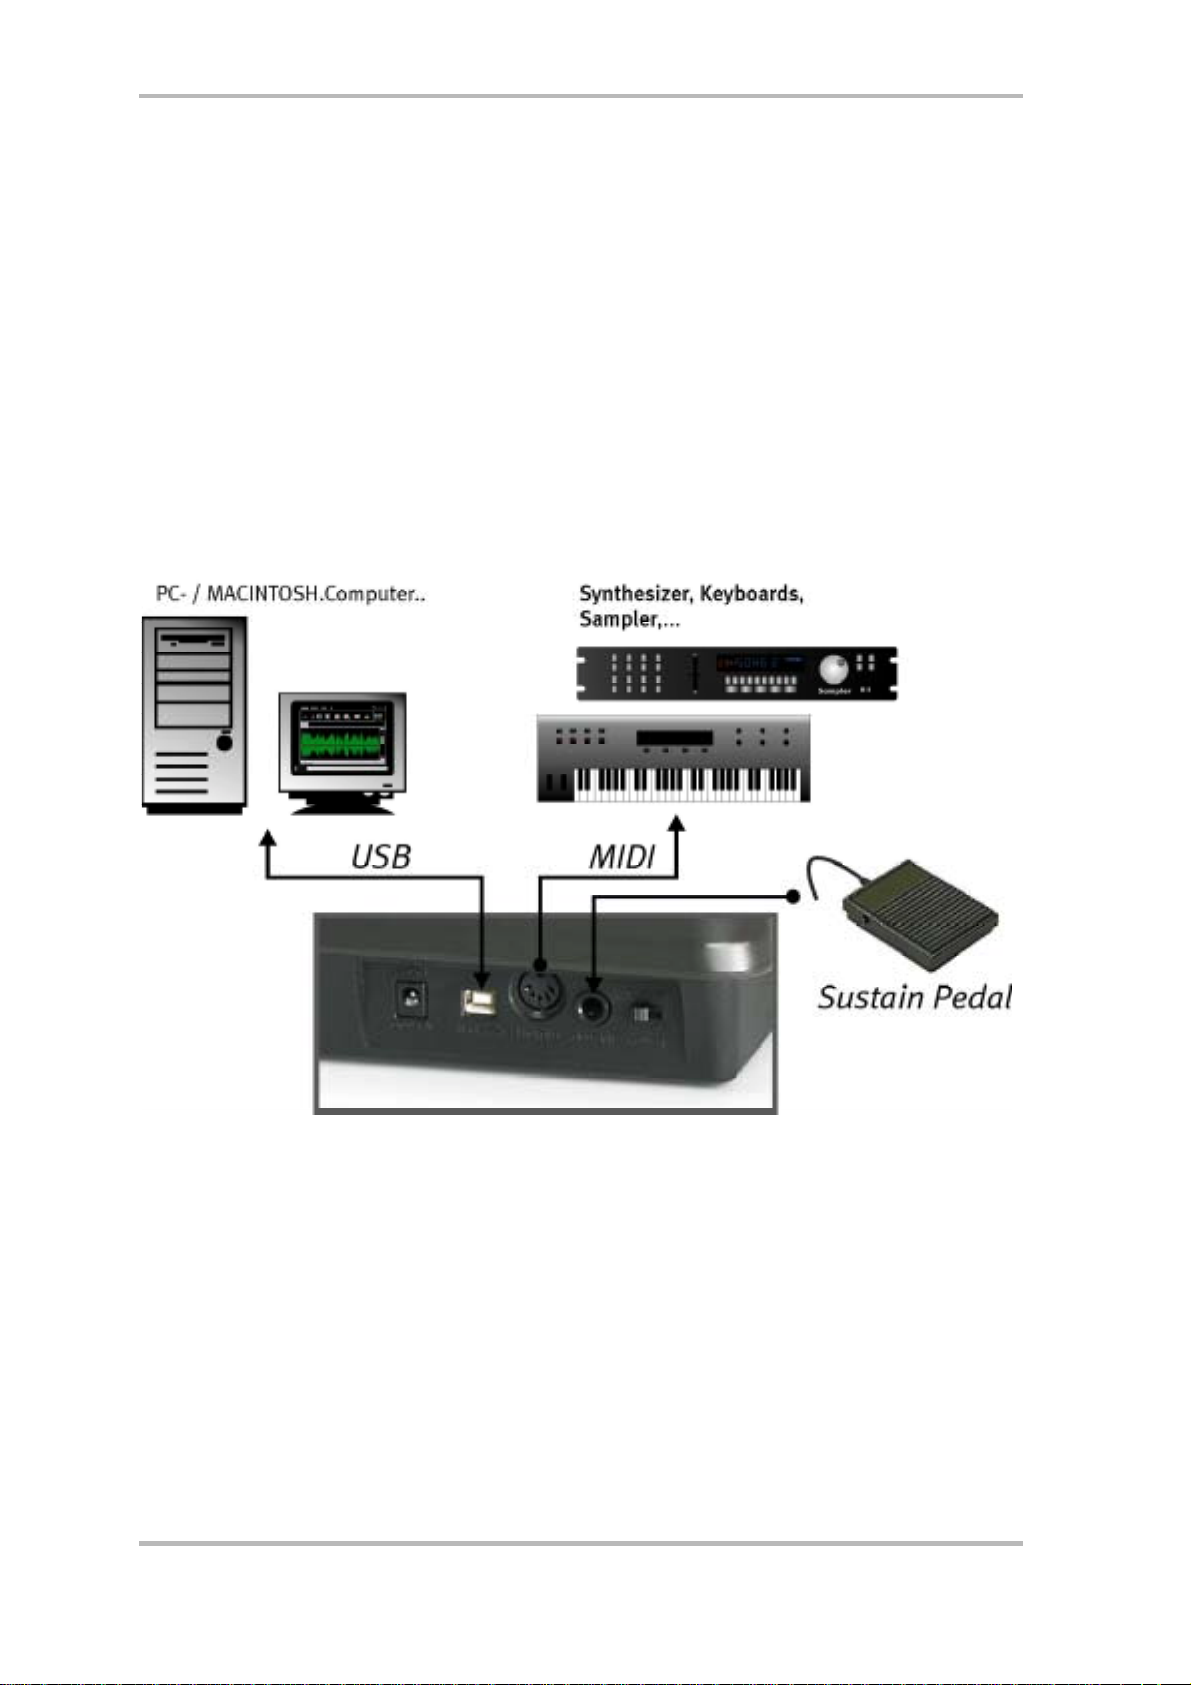
There are various ways to supply power to the keyboard. Normally, you would connect the
keyboard to your computer's USB port. In this case, the MIDIMASTER USB draws its operating
voltage directly through the USB port (bus-powered). If your computer is not equipped with a
USB port, or if you simply want to co nnect the keyboard to external MIDI devices through the
MIDI-out jacks, you can also pl ug in your keyboard using an optional power pack (+9 volts,
DC, not included in delivery).
Connecting to the computer's USB port / instal ling the drives
If your computer has a USB port, you can connect the keyboard to the computer using the USB
cable provided with the keyboard. Both ends of this cable are labeled with the USB symbol.
With the computer switched on, plug the flat terminal (type A) into the computer and the more
rectangular terminal (type B) into the USB jack on the keyboard. Now switch the keyboard on.
The red LED lights up.
The following guides you through the installation of two drivers, which are required to operate
the MIDIMASTER USB with a PC or MAC.
MIDI Master USB (English) 5

Widows 98 SE installation
Insert the MIDIMASTER USB Drivers CD into your CD-ROM drive.
· The first time you switch the keyboard on, Windows displays a message indicating that
the hardware wizard has detected a new hardware component.
· Start searching for the correct driver by clicking “Next”.
· Then select the “Search for the best driver for your device” option and click “Next” again.
· On the next screen, enter the location of the driver as <CD>:\driver\pc\terratecUSBb and
confirm the location by clicking “Next”.
· The next screen tells you that the wizard is loo king for the “TerraTec MIDIMASTER USB”
driver.
· Windows then displays a me ssage that the driver has been inst alled. Confirm by clicking
“Finish”.
· The hardware wizard automatically opens again, beca use now t he second d river ha s t o b e
installed. Repeat the above instructions to install the second driver. Afterwards, the
MIDIMASTER USB Keyboard will be available.
Windows ME installation
Insert the MIDIMASTER USB Drivers CD into your CD-ROM drive.
· The first time you switch the keyboard on, Windows displays a message indicating that
the hardware wizard has detected a new hardware component.
· The select the “Search for the best driver for your device” option and click “Next” again.
· Windows now searches for the driver automatically and installs the best driver for the
device.
· Windows then displays a me ssage that the driver has been inst alled. Confirm by clicking
“Finish”.
· The hardware wizard automatically opens again, beca use now t he second d river ha s t o b e
installed. Repeat the above instructions to install the second driver. Afterwards, the
MIDIMASTER USB Keyboard will be available.
6 MIDI Master USB (English)

Windows 2000 installation
The first time you switch the keyboard on, Windows displays a message indicating that the
hardware wizard has d etected a newly connected USB audio device. Windows automatically
installs a standard Windows driver for the device. When this is complete, reboot the system.”
· Open the Windows Device Manager (Start / Sett ings / Control Panel / System / Hardwa re
/ Device Manager) and double-click the “USB Audio Device” element (labeled with an exclamation point) and check whether the driver is assigned to the MIDIMASTER USB Keyboard (MK-249 USB MIDI Keyboard).
· Select the “Driver” index and then click “Update Driver”. This opens the Hardware Update
Wizard. Click “Next” to begin.
· Select “Display a list of the known drivers for this device... ” and then click “Next”.
· Click “Have Disk” and enter the path for the driver as <CD>:\DRIVER\PC\TERRATECUSBB. If
you like, you can use the “Browse” function to locate the driver.
· On the next screen, select the corresponding “TerraTec MIDI MASTER” element and then
click “Next”.
· The hardware wizard now tells you that it has completed installing the software for this
device. Close the wizard by clicking “Finish”.
· The hardware wizard now informs you that it has found a nother, unknown hardware component. Now select the “Search for a suitable driver for my device...” option and click
“Next”.
· Select “Specify a loc a tion”. Here, enter again th e path to the CD:
<CD>:\DRIVER\PC\TERRATECUSBB and confirm by clicking “Next”.
· When you see the message “The software you are about t o install does not cont ain a Microsoft digital signature...”, click the “Continue Setup” option.
· After the second driver has been successfully installed, click “Finish”.
Afterwards, the MIDIMASTER USB Keyboard will be available.
MIDI Master USB (English) 7

Windows XP installation
The first time you switch the keyboard on, Windows displays a message indicating that the
hardware wizard has detected a newly connected USB audio device. Windows auto matically
installs a standard Wind ows driver for the device. This driver lets you use the keyboard right
away. We recommend, however, using the special MIDIMASTER USB driver that we have provided on the product CD. This driver offers better support, for example when installing
MIDI/USB audio devices later, and furthermore, our driver displays t he drivers (TerraTec MIDI
MASTER USB) and keyboard devices (MK-249 USB MIDI IN/OUT) correctly in the integrated
software application.
For a new installation, follow these steps:
· Open the Windows Device Manager (Start / Sett ings / Control Panel / System / Hardwa re
/ Device Manager) and click the “+” symbol next to “Sound, video and game controllers”.
· Double-click the “USB Audio Device” element and check whether the driver is assigned to
the MIDIMASTER USB Keyboard (MK-249 USB MIDI Keyboard).
· Select the “Driver” index and then click “Update Driver”. This opens the Hardware Update
Wizard.
· Select “Install from a list or specific location” and confirm by clicking “Next”.
· On the next screen, select “Don't search. I will choose the driver to inst all” and again click
“Next”.
· Click “Have Disk” and enter the path for the driver as <CD>:\DRIVER\PC\TERRATECUSBB. If
you like, you can use the “Browse” function to locate the driver.
· On the next screen, select the corresponding “TerraTec MIDI MASTER” element and then
click “Next”.
· When you see the message “…Soft ware has not passed W indow s XP Logo testing… ”, click
the “Continue Anyway” option.
· The hardware wizard now tells you that it has completed inst alling the software for this
device. Close the wizard by clicking “Finish”.
· The hardware wizard now informs you that it has found a nother, unknown hardware component. Again select “Don't search. I will choose the driver to install” and then click
“Next”.
· Select “Search for the best driver in these locations” and “Include this location in the
search”. Here, enter again the path to the driver on the CD:
<CD>:\DRIVER\PC\TERRATECUSBB and confirm by clicking “Next”.
· After the second driver has been successfully installed, click “Finish”.
Afterwards, the MIDIMASTER USB Keyboard will be available.
8 MIDI Master USB (English)

Installation for MAC OS 9
Please ensure that your TerraTec USB MIDI keyboard is NOT connected before proceeding with
the installation of the drivers. If you do not have OMS installed, please run the OMS installer
first (to be found within the OMS folder on the product CD). Once OMS is installed, install the
keyboard Mac USB drivers.
· The SIT (Stuffit) File contains three files which must be copied to two different locations
within your systems folder.
· Please copy the “Terratec MIDI Driver” and the “Terratec MIDI shim” to the Extensions
folder inside the System Folder.
· The third file called “Terratec OMS Driver” needs to be copied to the OMS Folder inside
the System Folder.
· Once you have completed copying t he files please restart your Macintosh. Now connect
your Keyboard to the USB port on your Macintosh. Use the correct USB cable to ensure
that the new drivers are loaded.
· Run the OMS Setup program and select new studio set up. The program will search for the
drivers and once these are located, it will create a studio setup. Save this and make current.
MIDI Master USB (English) 9

Connecting via the MIDI-Out jack
10 MIDI Master USB (English)

The functions of the MIDIMASTER USB
Please note: If more than 5 seconds pass before a key is pressed,
every input menu is automatically closed and the LED display sho ws
the program selection number selected last. If you enter undefined or
invalid values, the last used, valid settings remain intact.
Pitch bend wheel
Moving this wheel sends MIDI pitch bend commands to the connected equipment. This
changes the pitch of the addressed sounds up and down. The distance of the pitch change
can be configured using the tone generator.
Modulation wheel (MIDI controller freely programmable)
Use this wheel to add various effects to your music. This lets you assign various functio ns in
the form of MIDI controllers. To configure the mod ulation wheel for a new effect, press both
“Wheel Assign” buttons at the same time (Memory and Program). The LED display begins to
blink and you can enter the number of the desired MIDI controller using the number keys or,
alternatively, you can use the +/- keys to select the desired number. See page 16 (MIDI controller list) for a list of all common MIDI controllers.
By default, this playing aid is programmed as a modulation wheel.
Volume control (MIDI controller freely programmable)
You can also assign various function in the form o f MIDI controllers to the volume controller.
To configure the volume controller for a new effect, press both “Slider Assign” buttons at the
same time (program and LSB bank). The LED d isplay begins to blink and you can enter the
number of the desired MIDI controller using the number keys or, alternatively, you can use the
+/- keys to select the desired number. See page 16 (MIDI controller list) for a list of all common MIDI controllers.
By default, this playing aid is programmed as a volume controller.
Program selection (selecting an instrument)
To select an instrument on a connected device (such as a sound card or MIDI expander), press
the “Program” button. The LED display begins to blink. Now enter the number of the desired
instrument using the number keys or, alternatively, you can use the + /- keys to select the desired number. See page 17 (GM set) for a list of a common general MIDI (GM) set.
MIDI Master USB (English) 11

Bank selection
To select a new instrument bank on a connected device (such as a sound card or MIDI expander), MSB and/or LSB messages can be sent.
To send the LSB number, press the “BANK LSB” button. The LED display begins to blink. Now
enter the number of the desired instrument using the number keys or, alternatively, you can
use the +/- keys to select the desired number.
To send the MSB number, press the “BANK MSB” button. The LED display begins to blink.
Now enter the number of the desired instrument using the number keys or, alternatively, you
can use the +/- keys to select the desired number.
Program and bank selection storage
Program and bank selection numbers (LSB / MSB) can be stored in the MIDIMASTER USB,
allowing you to send them subsequently using the number keys (0-9).
Select a program, bank LSB or bank MSB number as described in the previous chapter. Then
press the “Memory” keys. The LED display begins to blink. No w press the desired number key
(0-9). Note that the previously selected program and bank selection numbers ar e always assigned together to a single number key.
Octave selection
The “Octave” keys (+/-) shift the tone pitch of the clavier one oct ave up or down respectively.
The LED display shows the pitch of t he shift while you modify the octave. If you press both
“Octave” keys simu ltaneously, the tone is reset to the standard octave.
Transposing
You can transpose the keyboard in 12 halftone steps. To d o so, press the “Transpose” button.
The LED display begins to blink. You ca n now use the + and – keys to transpose the keyboard
by halftone steps. Here, too, the LED display indicates the current value.
If you press both the + and - keys simultaneously, the transposition is reset to the standard
value. Switching the MIDIMASTER USB on always resets the transposition to its standard.
MIDI transmit channels
There are 16 different MIDI channels to which the MIDIMASTER USB ca n transmit MIDI data.
Always make sure that the receiver, for example your external MIDI expander or similar co mputer software, is set to the same channel or, if desired, is set to listen to all 16 channels all
the time. Now enter the number of the desired MIDI transmit channel using the number keys
or, alternatively, you can use the +/- keys to select the desired number.
When the keyboard is switched on, channel 1 is set.
12 MIDI Master USB (English)

Key-strike dynamics (velocity curves)
The keyboard of the MIDIMASTER USB measures the amount of force applied when striking
the keys and sends this data to the external MIDI equipment. Because there is a direct correlation between the strike force and the key acceleration, this is sometimes called the “velocity” measurement.
Through a transmitted velocity cont roller, for example, a connected e-piano can control tone
volume based on the strike force. To allow you to optimally customize the strike force to your
personal playing style, the MIDIMASTER USB 10 (0-9) provides various key-strike characteristics (called velocity curves).
Press the “Wheel Assign” and “Channel” buttons at the same time. The LED display begins
blinking and the currently configured curve is displayed. Now enter t he number of the desired
velocity curve using the number keys or, alternatively, you can use the +/- keys to select the
desired number. Furthermore, you can set the key-strike dynamics to one of three fixed values
(F0-F2), meaning the same velocity value is always transmitted regardless of the strike force.
This can be very useful, for example, when playing in drum sounds.
MIDI-Out via USB
This interesting feature lets you use the MIDI output on the keyboard as a computer USB MIDI
interface. When activated, the MIDI information generated by the keyboard are not sent
through the MIDI-out jack. Since the
USB-MIDI driver of the MIDIMASTER USB can also receive data from the computer, this data is
sent directly to the MIDI-out jack on t he keyboard when the “MIDI-out through USB” functio n
is enabled. This lets you use the MIDIMASTER USB, for example, as a recording keyboard and,
at the same time, as a MIDI interface for other external equipment.
To activate this feature, press the “Bank MSB” and “Transpose” simultaneously and then
press the “+” key. When done correctly, “YES” appears on the LED display. Deactivate the
MIDI Master USB (English) 13

feature by pressing “Bank MSB” and “Transpose” simultaneously and then pressing the “-”
key. This is confirmed with “NO” on the LED display.
GM (General MIDI) reset
Use this function to send a general MIDI reset.
Press and hold the “Bank LSB” and “Bank MSB” keys at the same time for at least 2 seconds.
14 MIDI Master USB (English)

Technical data
· 49 strike-sensitive keys with variable velocity
· Pitch-bend wheel and modulation wheel (controller ass ignable)
· Data entry slider (horizontal, MIDI controller assignable)
· USB MIDI-out interface
· 3 x 7 segment LED display
· Connection for optional sustain pedal
· 10 non-volatile memory positions
· 13 selectable velocity curves
· Integrated demo songs
· Current input (500 mA) via USB
· Connection for optional power supply (9 V DC)
· Transpose function (transposing)
· Octave up/down button
· +/- keys
· 6 function keys
· 10 numeric keys
· USB MIDI driver for Windows 98, SE, ME, Windows 2000 and XP and Mac OS9 with OMS
· 3 m USB cable
· Dimensions: 1,205 x 205 x 84 mm
· Weight: 7.8 lbs. (3.5 kg)
System requirements (in USB operation)
· Windows 98/98SE/ME/2000/XP
· MAC OS9
MIDI Master USB (English) 15

3
3
3
33
34
35
3
37
3
39
4
4
4
MIDI controller list
STAND ARD CO NTRO LLE R NUMB ERS
No. Controller No. Controller No. Controller
00
01
02
03
04
05
06
07
08
09
10
11
12
13
14
15
16
17
18
19
20
21
22
23
24
25
26
27
28
29
Bank Select 43 Expression LSB 86 Controller 86
Modulation 44 Controller 44 87 Controller 87
Breath Control 45 Controller 45 88 Controller 88
Contro ller 3 46 Controller 46 89 Controll er 89
Foot Control 47 Controller 47 90 Controller 90
Porta Time 48 Gen Purpose 1 LSB 91 Reverb Dept h
Data Entry 49 Gen Purpose 2 LSB 92 Tremelo Depth
Channel Volume 50 Gen Purpose 3 LSB 93 Chorus Depth
Balance 51 Gen Purpose 4 LSB 94 Celeste (De-tune)
Controller 9 52 Controller 52 95 Phaser Depth
Pan 53 Controller 53 96 Data Increment
Expression 54 Controller 54 97 Data Decrement
Effects Controller 1 55 Controller 55 98 Non-Reg Param LSB
Effects Controller 2 56 Controller 56 99 Non-Reg Param MSB
Controller 14 57 Controller 57 100 Reg Param LSB
Controller 15 58 Controller 58 101 Reg Param MSB
Gen Purpose 1 59 Controller 59 102 Controller 102
Gen Pu rp ose 2 60 Controller 60 103 Controller 103
Gen Purp o se 3 61 Controller 61 104 Controller 104
Gen Purpose 4 62 Controller 62 105 Controller 105
Contro ller 20 63 Controller 63 106 Controller 106
Controller 21 64 Sustain Pedal 107 Controller 107
Contro lle r 22 65 Portamento 108 Controller 108
Controller 23 66 Sostenuto 109 Controller 109
Contro lle r 24 67 Soft Pedal 110 Controller 110
Controller 25 68 Legato Pedal 111 Controller 111
Controller 26 69 Hold 2 112 Controller 112
Contro lle r 27 70 Sound Variati o n 113 Controll e r 113
Contro ller 2 8 71 Resonance 114 Controlle r 114
Contro ller 2 9 72 Release Time 115 Controller 11 5
Contro ller 3 0 73 Attack Ti me 116 Controller 116
0
Controller 31 74 Cutoff Frequency 117 Controller 117
1
Bank Select LSB 75 Controller 75 118 Controller 118
2
Modulation LSB 76 Controller 76 119 Controller 119
Breath Control LSB 77 Controller 77
Controller 35 78 Controller 78 120 All Sound off
Foot Control LSB 79 Controller 79 121 Reset all Controllers
6
Porta Time LSB 80 Gen Purpose 5 122 Local Control
Data Entry LSB 81 Gen Purpose 6 123 All Notes Off
8
Channel Volume LSB 82 Gen Purpose 7 124 Omni Off
Balance LSB 83 Gen Purpose 8 125 Omni On
0
Contro lle r 41 84 Port am e nt o Co ntrol 126 Mono On (Poly Off)
1
Pan LSB 85 Controller 85 127 Poly On (Mono Off)
2
Channel Mode Mes sages
16 MIDI Master USB (English)

GM set
Piano Bass Reed Synth Effects
0 Acoustic Grand Piano 32 Acoustic Bass 64 Soprano Sax 96 SFX Rain
1 Bright Acoustic Piano 33 Electric F i n ge r ed Bass 65 Alto Sax 97 SFX Soundtra ck
2 Electric grand Piano 34 Electric Picked Bass 66 Tenor Sax 98 SFX Crystal
3 Honky Tonk Piano 35 Fretless Bass 67 Baritone Sax 99 SFX Atmosphere
4 Electric Piano 1 36 Slap Bass 1 68 Oboe 100 SFX Brightness
5 Electric Piano 2 37 Slap Bass 2 69 English Horn 101 SFX Goblins
6 Harpsichord 38 Syn Bass 1 70 Bassoon 102 SFX Echoes
7 Clavinet 39 S n Bass 2 71 Clar inet 103 SFX Sci-fi
Chromatic Percussion Strin s/Orchestra Pie Ethnic
8 Celesta 40 Violin 72 Piccolo 104 Sitar
9 Glockenspiel 41 Viola 73 Flute 105 Banjo
10 Music Box 42 Cello 74 Recorder 106 Shamisen
11 Vibraphone 43 Contrabass 75 Pan Flute 107 Koto
12 Marimba 44 Tremolo Strings 76 Bottle Blow 108 Kalimba
13 Xylophone 45 Pizzicato Strings 77 Shakuhachi 109 Bag Pipe
14 Tubular bells 46 Orchestral Harp 78 Whistle 110 Fiddle
15 Dulcimer 47 Timpani 79 Ocarina 111 Shanai
Organ Ensemble Synth Lead Percussive
16 Drawbar Organ 48 String Ensemble 1 80 Syn Square Wave 112 Tinkle Bell
17 Percussive Organ 49 String Ensemble 2 81 Sy n Sawtooth Wave 113 Agogo
18 Rock Organ (Slow) 82 Syn Calliope 114 Steel Drums
19 Church Organ 50 Syn Strings 1 83 Syn Chiff 115 Woodblock
20 Reed Organ 51 Syn Strings 2 84 Syn Charang 116 Taiko Drum
21 Accordion 52 Ch oir Aahs 85 Syn Voice 117 Melodic Tom
22 Harmonica 53 Voice Oohs 86 Syn Fifths Sawtooth 118 Syn Drum
23 Tango Accordion 54 Syn Choir Wave 119 Reverse Cymbal
55 Orchestral Hit 87 Syn Brass & Lead
Guitar Brass Synth Pad Sound Effects
24 Nylon Acoustic Guitar 56 Trumpet 88 New Age Syn Pad 120 Guitar Fret Noise
25 Steel Acoustic Guitar 57 Trombone 89 Warm Syn Pad 121 Breath Noise
26 Jazz Electric Guitar 58 Tuba 90 Polysynth Syn Pad 122 Seashore
27 Clean Electric Guitar 59 Muted Trumpet 91 Choir Syn Pad 123 Bird Tweet
28 Muted Electric Guitar 60 French Horn 92 Bowed Syn Pad 124 Telephone Ring
29 Overdrive Guitar 61 Brass Section 93 Metal Syn Pad 125 Helicopter
30 Distorted Guitar 61 Syn Brass 1 94 Halo Syn Pad 126 Applause
31 Guitar Harmonics 62 Syn Brass 2 95 Sweep Syn Pad 127 Gun Shot
MIDI Master USB (English) 17

MIDI implementation table
Function
Basic :Default
Channel :Changed
:Default
Mode :Messages
:Altered
Note
Number :True Voice
Velocity :Note ON
:Note OFF
After
Touch
Pitch Bend
Control
Change
Program
Change :True Number
:Key´s
:Ch´s
0,32
1
6
7
64
1-31
33-95
102-121
Transmitted Received
1-16
1-16
--------X
*********
0-127
*********
0
X
X
0
0
0
0-127
*********
Remarks
Bank Select
Modulation
Data Entry
Volume
Hold 1
Mod Wheel
Assign
System Exclusive
:Song Position
Common
System :Clock
Exclusive:Commands
Aux
Messages
Notes:
:Song Select
:Tune
:Local ON/OFF
:All Notes OFF
:Active Sense
:Reset
X
X
X
X
X
X
X
X
0
X
18 MIDI Master USB (English)
 Loading...