

Page 1

User Guide
for Logic fun
Version 4.1
March 2000
English
l
E
Soft- und Hardware GmbH
Page 2

Page 3

Important!
Please read this license agreement before opening the disk
seal!
Copyright
This manual and software described herein are copyrighted ©
1992—2000 by Emagic Soft- und Hardware GmbH (EMAGIC)
with all rights reserved. Under copyright laws this manual and
software may not be duplicated in whole or in part without the
written consent of EMAGIC, except in the normal use of the
software or to make a back-up copy of the original disk.
Limited Warranty
Except to the extent prohibited by applicable law, all implied
warranties made by EMAGIC in connection with this manual
and software are limited in duration to ninety (90) days or the
minimum guarantee period in your state or country from the
date of original purchase, and no warranties, whether express or
implied, shall apply to this product after said period. This
warranty is not transferable—it applies only to the original
purchaser of the software.
EMAGIC makes no warranty, either express or implied, with
respect to this software, its quality, performance, merchantability or fitness for a particular purpose. As a result, this software is
sold “as is”, and you, the purchaser, are assuming the entire risk
as to quality and performance.
In no event will EMAGIC be liable for direct, indirect, special,
incidental or consequential damages resulting from any defect
in the software or documentation. Some states do not allow the
exclusion or limitation of implied warranties or liability for incidental or consequential damages, so the above limitation or
exclusion may not apply to you.
Page 4

License Agreement
Carefully read all the terms and conditions of this license agreement prior to using this package. Use of all or any portion of this
package indicates your agreement to the following terms and
conditions.
EMAGIC grants you, the purchaser, a non-exclusive license to
use the software in this package (the “software”), under the
terms and conditions stated in this agreement.
You may:
1. use the software on a single machine.
2. make one copy of the software solely for back-up purposes.
You may not:
1. make copies of the user manual or the software in whole or
in part except as expressly provided for in this agreement.
2. make alterations or modifications to the software or any
copy, or otherwise attempt to discover the source code of
the software.
3. sub-license, lease, lend, rent or grant other rights in all or
any copy to others.
4. make verbal or media translation of the user manual.
5. make telecommunication data transmission of the software.
Term
This agreement is effective until terminated. You may terminate it at any time by destroying the software together with all
copies in any form. It will also terminate if you fail to comply
with any term or condition in this agreement.
Page 5

User Guide
Authors: Peter Gorges, Jan-Friedrich Conrad, Ronald
Bias, Thorsten Adam
Translation: Bernie Hurst, Matt Bell, Ruthven Martinus
Editing: Jeff Bohnhoff, Robert Hunt,
Layout: Fabian Schmid, Ronald Bias, Thorsten Adam
© 2000 by E
Address: Emagic Inc.
13348 Grass Valley Ave.
Building C, Suite 100
Grass Valley, CA 95945
USA
Tel: +530 477 1051
Fax: +530 477 1052
Net: http://www.emagic.de
eMail: info@emagicusa.com
All Rights Reserved. All Trademarks are the property of their respective owners.
Page 6

Page 7
r
Chapter 1 Features
Chapter 2 Sound Cards and MIDI
Chapter 3 Getting Started
Chapter 4 MIDI Tutorial
Chapter 5 Using Logic fun
Chapter 6 Transport Functions
Chapter 7 Arrange Window
Chapter 8 Audio Basics
Chapter 9 Working with Audio in the Arrange Window
Chapter 10 Mixer and Effects
Chapter 11 The Event List
Chapter 12 The Matrix Editor
Chapter 13 The Score Editor
Chapter 14 The Sample Editor
Chapter 15 Video and MIDI Files
Chapter 16 Use of Key Commands and Mouse, Settings
Chapter 17 Menu Reference
Glossary
Index
User Guide
Version 4.1 7
Page 8

8
Emagic
Logic fun
Page 9
Table of Contents
r
Chapter 1 Features
1.1 Multitrack Recorder . . . . . . . . . . . . . . . . . . . . . . . . . . . . . . . . . . 17
1.2
Flexible Input . . . . . . . . . . . . . . . . . . . . . . . . . . . . . . . . . . . . . . . 18
1.3
Automatic Notation . . . . . . . . . . . . . . . . . . . . . . . . . . . . . . . . . . 18
1.4
GM Supported . . . . . . . . . . . . . . . . . . . . . . . . . . . . . . . . . . . . . . 19
1.5
Multimedia . . . . . . . . . . . . . . . . . . . . . . . . . . . . . . . . . . . . . . . . 19
1.6
Graphical Interface . . . . . . . . . . . . . . . . . . . . . . . . . . . . . . . . . . . 20
1.7
About this Manual . . . . . . . . . . . . . . . . . . . . . . . . . . . . . . . . . . . 20
Chapter 2
Chapter 3
Sound Cards and MIDI
Input Source and Level . . . . . . . . . . . . . . . . . . . . . . . . . . . . 24
Logic Audio Device Setup
LADS—What It Is
Overview
How to Use LADS
Virtual Device Setup
Optimizing Driver Settings
Removing Settings from LADS
2.1
MIDI Installation . . . . . . . . . . . . . . . . . . . . . . . . . . . . . . . . . . . . . 31
Interface Connection
MIDI Cabling
MIDI Inputs/Outputs
MIDI Local Off
Keyboards and Expanders with “To
. . . . . . . . . . . . . . . . . . . . . . . . . . . . . . . . . . . . . . . 27
. . . . . . . . . . . . . . . . . . . . . . . . . . . . . . . . . . . . . . . 31
. . . . . . . . . . . . . . . . . . . . . . . . . . . . . . 26
. . . . . . . . . . . . . . . . . . . . . . . . . . . . . . . . 26
. . . . . . . . . . . . . . . . . . . . . . . . . . . . . . . . 27
. . . . . . . . . . . . . . . . . . . . . . . . . . . . . . 29
. . . . . . . . . . . . . . . . . . . . . . . . . . 29
. . . . . . . . . . . . . . . . . . . . . . . 30
. . . . . . . . . . . . . . . . . . . . . . . . . . . . . . . . . 31
. . . . . . . . . . . . . . . . . . . . . . . . . . . . . . 31
. . . . . . . . . . . . . . . . . . . . . . . . . . . . . . . . . . . 32
Host” Interface . . . . . . 32
Getting Started
3.1 Windows . . . . . . . . . . . . . . . . . . . . . . . . . . . . . . . . . . . . . . . . . . 35
Getting Started With Logic fun
Selecting the MIDI Out Port in the Program
Testing the MIDI Connection
Test the MIDI Out
Logic fun and Multitasking
Launching Logic fun
Launch Logic fun Automatically
3.2
Macintosh . . . . . . . . . . . . . . . . . . . . . . . . . . . . . . . . . . . . . . . . . 38
Launching Logic fun
Choose MIDI Connection
MIDI Time Piece
. . . . . . . . . . . . . . . . . . . . . . . . . . . . . . . . 36
. . . . . . . . . . . . . . . . . . . . . . . . . . . . . . . . . 39
. . . . . . . . . . . . . . . . . . . . . . . . . 35
. . . . . . . . . . . . . 35
. . . . . . . . . . . . . . . . . . . . . . . . 35
. . . . . . . . . . . . . . . . . . . . . . . . . 37
. . . . . . . . . . . . . . . . . . . . . . . . . . . . . . 37
. . . . . . . . . . . . . . . . . . . . . . 37
. . . . . . . . . . . . . . . . . . . . . . . . . . . . . . 38
. . . . . . . . . . . . . . . . . . . . . . . . . . 38
User Guide
Version 4.1
5
Page 10
Table of Contents
Testing the MIDI Connection . . . . . . . . . . . . . . . . . . . . . . . . 40
Test the MIDI-Out
Autoload Song
Start Logic fun automatically
3.3
MacOS/Win: Differences . . . . . . . . . . . . . . . . . . . . . . . . . . . . . . 42
Keyboard and Mouse
Key Commands
Exchanging Songs Between Mac and PC
Menu Bars
. . . . . . . . . . . . . . . . . . . . . . . . . . . . . . . . 40
. . . . . . . . . . . . . . . . . . . . . . . . . . . . . . . . . . 41
. . . . . . . . . . . . . . . . . . . . . . . . 41
. . . . . . . . . . . . . . . . . . . . . . . . . . . . . 42
. . . . . . . . . . . . . . . . . . . . . . . . . . . . . . . . . . 43
. . . . . . . . . . . . . . . 43
. . . . . . . . . . . . . . . . . . . . . . . . . . . . . . . . . . . . . 43
Chapter 4
MIDI Tutorial
4.1 Adapting the Tutorial Song . . . . . . . . . . . . . . . . . . . . . . . . . . . . 45
Load the Tutorial Song
General MIDI Tone Generator
Non GM, Multi-Timbral Tone Generators
Sounds and MIDI Channels
Drum Kit
Starting the Song
4.2
Overview . . . . . . . . . . . . . . . . . . . . . . . . . . . . . . . . . . . . . . . . . . 48
4.3
Tracks and Sequences . . . . . . . . . . . . . . . . . . . . . . . . . . . . . . . . 49
. . . . . . . . . . . . . . . . . . . . . . . . . . . . . . . . . . . . . . . 47
. . . . . . . . . . . . . . . . . . . . . . . . . . . . . . . . . . . . 48
Information Track and Instruments
4.4
Transport Functions . . . . . . . . . . . . . . . . . . . . . . . . . . . . . . . . . . 51
Start Song Positions
Display Current Song Position
Zoom a Window Excerpt
Cycle Mode
Selection
Quantize
Loops
The Toolbox
Mouse Arrow
Undo
. . . . . . . . . . . . . . . . . . . . . . . . . . . . . . . . . . . . . 52
. . . . . . . . . . . . . . . . . . . . . . . . . . . . . . . . . . . . . . . 53
. . . . . . . . . . . . . . . . . . . . . . . . . . . . . . . . . . . . . . . 54
. . . . . . . . . . . . . . . . . . . . . . . . . . . . . . . . . . . . . . . . . 55
. . . . . . . . . . . . . . . . . . . . . . . . . . . . . . . . . . . . 56
. . . . . . . . . . . . . . . . . . . . . . . . . . . . . . . . . . . 56
. . . . . . . . . . . . . . . . . . . . . . . . . . . . . . . . . . . . . . . . . 57
Copies of Sequences
Scissors
. . . . . . . . . . . . . . . . . . . . . . . . . . . . . . . . . . . . . . . . 58
Transposition
. . . . . . . . . . . . . . . . . . . . . . . . . . . . . . . . . . . 58
Your First Recording
Let’s Record!
. . . . . . . . . . . . . . . . . . . . . . . . . . . . . . . . . . . . 60
Saving the Song
4.5
Event List . . . . . . . . . . . . . . . . . . . . . . . . . . . . . . . . . . . . . . . . . . 61
4.6
Matrix Editor . . . . . . . . . . . . . . . . . . . . . . . . . . . . . . . . . . . . . . . 63
. . . . . . . . . . . . . . . . . . . . . . . . . . . . 45
. . . . . . . . . . . . . . . . . . . . . . . 46
. . . . . . . . . . . . . . 46
. . . . . . . . . . . . . . . . . . . . . . . . . 47
. . . . . . . . . . . . . . . . . . . . . . . 50
. . . . . . . . . . . . . . . . . . . . . . . . . . . . . . 51
. . . . . . . . . . . . . . . . . . . . . . . 52
. . . . . . . . . . . . . . . . . . . . . . . . . . . 52
. . . . . . . . . . . . . . . . . . . . . . . . . . . . . . 57
. . . . . . . . . . . . . . . . . . . . . . . . . . . . . . 59
. . . . . . . . . . . . . . . . . . . . . . . . . . . . . . . . . 61
Emagic
6
Logic fun
Page 11
Table of Contents
r
4.7 Score Editor . . . . . . . . . . . . . . . . . . . . . . . . . . . . . . . . . . . . . . . . 65
Display Parameter Box
Style
. . . . . . . . . . . . . . . . . . . . . . . . . . . . . . . . . . . . . . . . . . 66
Text
. . . . . . . . . . . . . . . . . . . . . . . . . . . . . . . . . . . . . . . . . . 66
Print
. . . . . . . . . . . . . . . . . . . . . . . . . . . . . . . . . . . . . . . . . . . . . . 66
. . . . . . . . . . . . . . . . . . . . . . . . . . . . . 66
Chapter 5
Using Logic fun
5.1 Conventions of this Manual . . . . . . . . . . . . . . . . . . . . . . . . . . . . 69
5.2
The Mouse . . . . . . . . . . . . . . . . . . . . . . . . . . . . . . . . . . . . . . . . . 70
Basic functions
Mouse Input
Checkboxes
Pull-down Menus
Mouse as Slider
Using the Mouse for In/Decrementing
Numerical Input
Text Input
Tools and the Toolbox
Effective Range of the Tools
Selecting Tools
Info Line
The Tools
5.3
Window Functions . . . . . . . . . . . . . . . . . . . . . . . . . . . . . . . . . . . 76
Working with Windows
Opening and closing Windows
Setting Window Size
Selecting the Working Area
X/Y Element
Page Scrolling
Zooming
Zooming Selectively
Adjusting the Size of the Window Elements
Menus
Key Commands
Menu Options with “…” in their Title
Dialog Boxes
Window Types
Relationships Between Windows
Catch
Link
. . . . . . . . . . . . . . . . . . . . . . . . . . . . . . . . . . . . . . 70
. . . . . . . . . . . . . . . . . . . . . . . . . . . . . . . . . . . . . . . 70
. . . . . . . . . . . . . . . . . . . . . . . . . . . . . . . . . . . . 70
. . . . . . . . . . . . . . . . . . . . . . . . . . . . . . . . 70
. . . . . . . . . . . . . . . . . . . . . . . . . . . . . . . . . . 71
. . . . . . . . . . . . . . . . . 71
. . . . . . . . . . . . . . . . . . . . . . . . . . . . . . . . . 71
. . . . . . . . . . . . . . . . . . . . . . . . . . . . . . . . . . . . . . 72
. . . . . . . . . . . . . . . . . . . . . . . . . . . . . . . . 73
. . . . . . . . . . . . . . . . . . . . . . . . 73
. . . . . . . . . . . . . . . . . . . . . . . . . . . . . . . . . . 73
. . . . . . . . . . . . . . . . . . . . . . . . . . . . . . . . . . . . . . . 73
. . . . . . . . . . . . . . . . . . . . . . . . . . . . . . . . . . . . . . 74
. . . . . . . . . . . . . . . . . . . . . . . . . . . . . . . 76
. . . . . . . . . . . . . . . . . . . . . . 76
. . . . . . . . . . . . . . . . . . . . . . . . . . . . . . 77
. . . . . . . . . . . . . . . . . . . . . . . . . 77
. . . . . . . . . . . . . . . . . . . . . . . . . . . . . . . . . . . . 78
. . . . . . . . . . . . . . . . . . . . . . . . . . . . . . . . . . . 78
. . . . . . . . . . . . . . . . . . . . . . . . . . . . . . . . . . . . . . . 78
. . . . . . . . . . . . . . . . . . . . . . . . . . . . . . . 78
. . . . . . . . . . . . 79
. . . . . . . . . . . . . . . . . . . . . . . . . . . . . . . . . . . . . . . . 79
. . . . . . . . . . . . . . . . . . . . . . . . . . . . . . . . . . 80
. . . . . . . . . . . . . . . . . 80
. . . . . . . . . . . . . . . . . . . . . . . . . . . . . . . . . . . . 80
. . . . . . . . . . . . . . . . . . . . . . . . . . . . . . . . . . 80
. . . . . . . . . . . . . . . . . . . . . . . . 81
. . . . . . . . . . . . . . . . . . . . . . . . . . . . . . . . . . . . . . . . . 81
. . . . . . . . . . . . . . . . . . . . . . . . . . . . . . . . . . . . . . . . . . . 81
User Guide
Version 4.1
7
Page 12

Table of Contents
5.4 Selection Techniques . . . . . . . . . . . . . . . . . . . . . . . . . . . . . . . . . 82
Selecting Individual Objects
Selecting Several Objects
5.5
Edit Operations . . . . . . . . . . . . . . . . . . . . . . . . . . . . . . . . . . . . . 83
Undo
. . . . . . . . . . . . . . . . . . . . . . . . . . . . . . . . . . . . . . . . . 83
The Clipboard
Cut
Copy
Paste
Clear
5.6
General Functions of the Editors . . . . . . . . . . . . . . . . . . . . . . . . 85
. . . . . . . . . . . . . . . . . . . . . . . . . . . . . . . . . . . . . . 84
. . . . . . . . . . . . . . . . . . . . . . . . . . . . . . . . . . . . . . . . . . . 84
. . . . . . . . . . . . . . . . . . . . . . . . . . . . . . . . . . . . . . . . . . 84
. . . . . . . . . . . . . . . . . . . . . . . . . . . . . . . . . . . . . . . . . . 84
. . . . . . . . . . . . . . . . . . . . . . . . . . . . . . . . . . . . . . . . . . 85
Control Output via MIDI
Automatic Scroll Functions
Deleting Events
. . . . . . . . . . . . . . . . . . . . . . . . . . . . . . . . . . 85
Changing Display Levels in Score
5.7
Key Commands . . . . . . . . . . . . . . . . . . . . . . . . . . . . . . . . . . . . . 86
Special Keys
. . . . . . . . . . . . . . . . . . . . . . . . . . . . . . . . . . . . 87
Key Commands Window
Assigning a Function to a Key
Deleting Assignments
Checking the Function of a Key
Filtering the Display
Finding Key Commands
5.8
Song Administration . . . . . . . . . . . . . . . . . . . . . . . . . . . . . . . . . 89
New Song
. . . . . . . . . . . . . . . . . . . . . . . . . . . . . . . . . . . . . . . . . 90
Autoload Song
. . . . . . . . . . . . . . . . . . . . . . . . . . . . . . . . . . 90
Creating a new Song
Opening Default Song
Loading a Song
. . . . . . . . . . . . . . . . . . . . . . . . . . . . . . . . . . . . . 90
Checking/Repairing Songs
Saving Songs
Closing a Song
Quitting the Program…
. . . . . . . . . . . . . . . . . . . . . . . . . . . . . . . . . . . . . . . 91
. . . . . . . . . . . . . . . . . . . . . . . . . . . . . . . . . . . . . . 91
. . . . . . . . . . . . . . . . . . . . . . . . . . . . . . . 91
. . . . . . . . . . . . . . . . . . . . . . . . . 82
. . . . . . . . . . . . . . . . . . . . . . . . . . . 82
. . . . . . . . . . . . . . . . . . . . . . . . . . . 85
. . . . . . . . . . . . . . . . . . . . . . . . . 85
. . . . . . . . . . . . . . . . . . . . . 86
. . . . . . . . . . . . . . . . . . . . . . . . . . . . . . 87
. . . . . . . . . . . . . . . . . . . . . . . 88
. . . . . . . . . . . . . . . . . . . . . . . . . . . . . 88
. . . . . . . . . . . . . . . . . . . . . . 88
. . . . . . . . . . . . . . . . . . . . . . . . . . . . . . . 89
. . . . . . . . . . . . . . . . . . . . . . . . . . . 89
. . . . . . . . . . . . . . . . . . . . . . . . . . . . . 90
. . . . . . . . . . . . . . . . . . . . . . . . . . . . . 90
. . . . . . . . . . . . . . . . . . . . . . . . . . . . . 91
Chapter 6
Transport Functions
6.1 Transport Window . . . . . . . . . . . . . . . . . . . . . . . . . . . . . . . . . . . 93
Display Options
Indicator Options
Position Slider
Smaller/Larger
Emagic
8
Logic fun
. . . . . . . . . . . . . . . . . . . . . . . . . . . . . . . . . . . . . 93
. . . . . . . . . . . . . . . . . . . . . . . . . . . . . . . . 93
. . . . . . . . . . . . . . . . . . . . . . . . . . . . . . . . . . . 94
. . . . . . . . . . . . . . . . . . . . . . . . . . . . . . . . . . . 94
Page 13
Table of Contents
Parameter Fields and Indicators . . . . . . . . . . . . . . . . . . . . . . . . . 94
Position Indicators
Position Markers (Locators)
Skip Cycle
Tempo
Free Memory
End of Song
Transport Functions
Mode-Buttons
Cycle (Repeat Mode)
6.2
Bar Ruler . . . . . . . . . . . . . . . . . . . . . . . . . . . . . . . . . . . . . . . . . 101
Setting the Song Beginning and End
6.3
Cycle Mode . . . . . . . . . . . . . . . . . . . . . . . . . . . . . . . . . . . . . . . 104
Cycle Bars
. . . . . . . . . . . . . . . . . . . . . . . . . . . . . . . . . . . . . . 95
. . . . . . . . . . . . . . . . . . . . . . . . . . . . . . . . . . . . . . . . 96
. . . . . . . . . . . . . . . . . . . . . . . . . . . . . . . . . . . . . 100
. . . . . . . . . . . . . . . . . . . . . . . . . . . . . . . . . . . . . 104
. . . . . . . . . . . . . . . . . . . . . . . . . . . . . . . . 94
. . . . . . . . . . . . . . . . . . . . . . . . . 95
. . . . . . . . . . . . . . . . . . . . . . . . . . . . . . . . . . . . 96
. . . . . . . . . . . . . . . . . . . . . . . . . . . . . . . . . . . . 98
. . . . . . . . . . . . . . . . . . . . . . . . . . . . . . . . . . 98
. . . . . . . . . . . . . . . . . . . . . . . . . . . . . 100
. . . . . . . . . . . . . . . . . 102
r
Chapter 7
Arrange Window
7.1 Structure of the Arrange Window . . . . . . . . . . . . . . . . . . . . . . 107
Tools
. . . . . . . . . . . . . . . . . . . . . . . . . . . . . . . . . . . . . . . . . . . . 108
7.2
Tracks . . . . . . . . . . . . . . . . . . . . . . . . . . . . . . . . . . . . . . . . . . . 108
Adjusting the Sound of a Track
Selecting an Icon
7.3
Arranging Sequences . . . . . . . . . . . . . . . . . . . . . . . . . . . . . . . . 113
What is a Sequence?
Creating an Empty Sequence
Shifting Sequences in Time
Copying Sequences
Moving/Copying onto another Track
Changing the Length of a Sequence
…Using a Finer Grid
Dividing Sequences
Merging Sequences
Muting Sequences
Soloing Sequences
Naming a Sequence
Inserting Events
7.4
Sequence Parameters . . . . . . . . . . . . . . . . . . . . . . . . . . . . . . . . 118
Quantize
Loop
Transpose
Velocity
User Guide
Version 4.1
. . . . . . . . . . . . . . . . . . . . . . . . . . . . . . . . . . . . . . 119
. . . . . . . . . . . . . . . . . . . . . . . . . . . . . . . . . . . . . . . . . 119
. . . . . . . . . . . . . . . . . . . . . . . . . . . . . . . . . . . . . . . 121
. . . . . . . . . . . . . . . . . . . . . . . . . . . . . . . . 111
. . . . . . . . . . . . . . . . . . . . . . . . . . . . . 113
. . . . . . . . . . . . . . . . . . . . . . . . . . . . . . 114
. . . . . . . . . . . . . . . . . . . . . . . . . . . . . 115
. . . . . . . . . . . . . . . . . . . . . . . . . . . . . . 116
. . . . . . . . . . . . . . . . . . . . . . . . . . . . . . 117
. . . . . . . . . . . . . . . . . . . . . . . . . . . . . . 117
. . . . . . . . . . . . . . . . . . . . . . . . . . . . . . 117
. . . . . . . . . . . . . . . . . . . . . . . . . . . . . 117
. . . . . . . . . . . . . . . . . . . . . . . . . . . . . . . . . 118
. . . . . . . . . . . . . . . . . . . . . . . . . . . . . . . . . . . . . 120
. . . . . . . . . . . . . . . . . . . . . 110
. . . . . . . . . . . . . . . . . . . . . . 113
. . . . . . . . . . . . . . . . . . . . . . . . 113
. . . . . . . . . . . . . . . . . 114
. . . . . . . . . . . . . . . . . 114
9
Page 14
Table of Contents
Delay . . . . . . . . . . . . . . . . . . . . . . . . . . . . . . . . . . . . . . . . 121
7.5
Quantization . . . . . . . . . . . . . . . . . . . . . . . . . . . . . . . . . . . . . . 122
Setting the Quantization Value
Quantization: Operation
The Different Types of Quantization
No Quantizing
Standard Quantization
. . . . . . . . . . . . . . . . . . . . . . . . . . . . . . . . . . 123
. . . . . . . . . . . . . . . . . . . . . . . . . . . 123
Quantization to Odd Tuplets
Swing Quantization
Mixed Quantization
7.6
Reset Functions . . . . . . . . . . . . . . . . . . . . . . . . . . . . . . . . . . . . 125
. . . . . . . . . . . . . . . . . . . . . . . . . . . . . . 124
. . . . . . . . . . . . . . . . . . . . . . . . . . . . . . 125
For Hanging notes—Panic Function
Maximum Volume
. . . . . . . . . . . . . . . . . . . . . . . . . . . . . . . 125
. . . . . . . . . . . . . . . . . . . . . 122
. . . . . . . . . . . . . . . . . . . . . . . . . . 123
. . . . . . . . . . . . . . . . . . . . . 123
. . . . . . . . . . . . . . . . . . . . . . . 124
. . . . . . . . . . . . . . . . . . 125
Chapter 8
8.1
8.2
8.3
Audio Basics
What You Need to Know . . . . . . . . . . . . . . . . . . . . . . . . . . . . . 127
Basic Principles and Terminology . . . . . . . . . . . . . . . . . . . . . . . 127
Audio File
Regions
Anchor
Audio Track
Audio Object
Sample Editor
Production . . . . . . . . . . . . . . . . . . . . . . . . . . . . . . . . . . . . . . . . 130
Starting a Recording
Basic Operation
In General . . . . . . . . . . . . . . . . . . . . . . . . . . . . . . . . . . . . . . . . 134
Tempo and Timeline
Data Formats
. . . . . . . . . . . . . . . . . . . . . . . . . . . . . . . . . . . . . . . . 127
. . . . . . . . . . . . . . . . . . . . . . . . . . . . . . . . . . . . . . . . . . 128
. . . . . . . . . . . . . . . . . . . . . . . . . . . . . . . . . . . . . . . . . . 129
. . . . . . . . . . . . . . . . . . . . . . . . . . . . . . . . . . . . . . . 129
. . . . . . . . . . . . . . . . . . . . . . . . . . . . . . . . . . . . . . 129
. . . . . . . . . . . . . . . . . . . . . . . . . . . . . . . . . . . . . 130
. . . . . . . . . . . . . . . . . . . . . . . . . . . . . . . . 130
Setting a Path
Selecting the Audio Track
Arming Tracks
Stereo Recording
Levels
. . . . . . . . . . . . . . . . . . . . . . . . . . . . . . . . . . . . . . . . 131
Starting to Record
. . . . . . . . . . . . . . . . . . . . . . . . . . . . . . . . . . 130
. . . . . . . . . . . . . . . . . . . . . . . . . 131
. . . . . . . . . . . . . . . . . . . . . . . . . . . . . . . . . . 131
. . . . . . . . . . . . . . . . . . . . . . . . . . . . . . . . 131
. . . . . . . . . . . . . . . . . . . . . . . . . . . . . . . 132
. . . . . . . . . . . . . . . . . . . . . . . . . . . . . . . . . . . . 132
Sample Editor
Automation of Audio
Summary
. . . . . . . . . . . . . . . . . . . . . . . . . . . . . . . . . . 133
. . . . . . . . . . . . . . . . . . . . . . . . . . . . 133
. . . . . . . . . . . . . . . . . . . . . . . . . . . . . . . . . . . . . 133
. . . . . . . . . . . . . . . . . . . . . . . . . . . . . . . . 134
. . . . . . . . . . . . . . . . . . . . . . . . . . . . . . . . . . . . . . 134
Audio files and their Formats
Sample Rate
. . . . . . . . . . . . . . . . . . . . . . . . . . . . . . . . . . . 135
. . . . . . . . . . . . . . . . . . . . . . . 134
10
Emagic
Logic fun
Page 15
Table of Contents
r
Stereo File Formats . . . . . . . . . . . . . . . . . . . . . . . . . . . . . . 135
Chapter 9
Working with Audio in the Arrange Window
9.1 Regions . . . . . . . . . . . . . . . . . . . . . . . . . . . . . . . . . . . . . . . . . . 137
Generating Regions
Dividing Regions
Deleting Regions
Deleting a Recording
Copying Regions
Creating A New Region
Looping Regions
Moving Regions
Fine Movements
Changing Borders
Region Parameter Box
Name
. . . . . . . . . . . . . . . . . . . . . . . . . . . . . . . . . . . . . . . . 140
Loop
. . . . . . . . . . . . . . . . . . . . . . . . . . . . . . . . . . . . . . . . . 140
Delay
. . . . . . . . . . . . . . . . . . . . . . . . . . . . . . . . . . . . . . . . 141
Region Anchor
9.2
Recording . . . . . . . . . . . . . . . . . . . . . . . . . . . . . . . . . . . . . . . . 142
Setting Tracks to Record Audio
Recording Modes
Standard Recording with Count-in
Manual Drop Recording
After Recording, Please Note…
Bounce to Disk
. . . . . . . . . . . . . . . . . . . . . . . . . . . . . . . . . 137
. . . . . . . . . . . . . . . . . . . . . . . . . . . . . . . . 138
. . . . . . . . . . . . . . . . . . . . . . . . . . . . . . . . 138
. . . . . . . . . . . . . . . . . . . . . . . . . . . . . 138
. . . . . . . . . . . . . . . . . . . . . . . . . . . . . . . . . . . 139
. . . . . . . . . . . . . . . . . . . . . . . . . . . 139
. . . . . . . . . . . . . . . . . . . . . . . . . . . . . . . . 139
. . . . . . . . . . . . . . . . . . . . . . . . . . . . . . . . . . . . 139
. . . . . . . . . . . . . . . . . . . . . . . . . . . . . . . . 140
. . . . . . . . . . . . . . . . . . . . . . . . . . . . . . . . . . 140
. . . . . . . . . . . . . . . . . . . . . . . . . . . . . . . 140
. . . . . . . . . . . . . . . . . . . . . . . . . . . . . . . . . . . . . 141
. . . . . . . . . . . . . . . . . . . . . . . . 142
. . . . . . . . . . . . . . . . . . . . . . . . . . . . . . . . . . . 142
. . . . . . . . . . . . . . . . . . 143
. . . . . . . . . . . . . . . . . . . . . . . . . . 143
. . . . . . . . . . . . . . . . . . . . . 143
. . . . . . . . . . . . . . . . . . . . . . . . . . . . . . . . . . . . . 144
Chapter 10
Mixer and Effects
10.1 An Adaptive Track Mixer . . . . . . . . . . . . . . . . . . . . . . . . . . . . . 145
Resetting Parameters
10.2
The MIDI Channel Strips . . . . . . . . . . . . . . . . . . . . . . . . . . . . . . 146
Switching Sound Programs
Controller
Choosing Other Controllers
Controller Numbers of the Mixer Controls
Extended GM, GS and XG Functions
10.3
The Audio Channel Strips . . . . . . . . . . . . . . . . . . . . . . . . . . . . . 151
Display Features
User Guide
Version 4.1
. . . . . . . . . . . . . . . . . . . . . . . . . . . . . . . . 146
. . . . . . . . . . . . . . . . . . . . . . . . 147
. . . . . . . . . . . . . . . . . . . . . . . . . . . . . . . . . . . . . 148
. . . . . . . . . . . . . . . . . . . . . . . . 148
. . . . . . . . . . . . . 149
. . . . . . . . . . . . . . . . . 150
. . . . . . . . . . . . . . . . . . . . . . . . . . . . . . . . . . . . 151
11
Page 16
Table of Contents
The Level Meter . . . . . . . . . . . . . . . . . . . . . . . . . . . . . . . . 151
Volume Level Control
Mute
. . . . . . . . . . . . . . . . . . . . . . . . . . . . . . . . . . . . . . . . . 152
Solo for Audio Tracks
Pan/Balance
. . . . . . . . . . . . . . . . . . . . . . . . . . . . . . . . . . . 152
Equalizer (EQ)
Bus Sends
. . . . . . . . . . . . . . . . . . . . . . . . . . . . . . . . . . . . . 153
Arming Tracks
Stereo Objects
. . . . . . . . . . . . . . . . . . . . . . . . . . . . . . . . . . . . . 153
Configuring a Stereo Object
10.4
Bouncing . . . . . . . . . . . . . . . . . . . . . . . . . . . . . . . . . . . . . . . . . 154
Options in the Bounce Dialog Window
10.5
The Effects . . . . . . . . . . . . . . . . . . . . . . . . . . . . . . . . . . . . . . . . 155
AVerb
. . . . . . . . . . . . . . . . . . . . . . . . . . . . . . . . . . . . . . . . 155
Chorus
. . . . . . . . . . . . . . . . . . . . . . . . . . . . . . . . . . . . . . . . . . . 156
10.6
Mixer Automation . . . . . . . . . . . . . . . . . . . . . . . . . . . . . . . . . . 156
. . . . . . . . . . . . . . . . . . . . . . . . . . . . 151
. . . . . . . . . . . . . . . . . . . . . . . . . . . . 152
. . . . . . . . . . . . . . . . . . . . . . . . . . . . . . . . . . 152
. . . . . . . . . . . . . . . . . . . . . . . . . . . . . . . . . . 153
. . . . . . . . . . . . . . . . . . . . . . . 153
. . . . . . . . . . . . . . . 154
Chapter 11
11.1
11.2
11.3
11.4
12
The Event List
Opening the Event List . . . . . . . . . . . . . . . . . . . . . . . . . . . 159
Structure
Display
Operation . . . . . . . . . . . . . . . . . . . . . . . . . . . . . . . . . . . . . . . . 161
Scrolling
Selection Techniques
Special Selection Functions
Event Editing . . . . . . . . . . . . . . . . . . . . . . . . . . . . . . . . . . . . . . 162
Adding Events
Duplicating Events
Moving Events
Altering Values
Altering the Values of Several Events
Numerical Value Input
Event List Structure . . . . . . . . . . . . . . . . . . . . . . . . . . . . . . . . . 164
Position
Status
Cha
Num, Val
Length/Info
Event Type Structure . . . . . . . . . . . . . . . . . . . . . . . . . . . . . . . . 166
Note Events
Emagic
Logic fun
. . . . . . . . . . . . . . . . . . . . . . . . . . . . . . . . . . . . . . 159
. . . . . . . . . . . . . . . . . . . . . . . . . . . . . . . . . . . . . . . . . . . 160
. . . . . . . . . . . . . . . . . . . . . . . . . . . . . . . . . . . . . . 161
. . . . . . . . . . . . . . . . . . . . . . . . . . . . . 161
. . . . . . . . . . . . . . . . . . . . . . . . 161
. . . . . . . . . . . . . . . . . . . . . . . . . . . . . . . . . . 162
. . . . . . . . . . . . . . . . . . . . . . . . . . . . . . . 162
. . . . . . . . . . . . . . . . . . . . . . . . . . . . . . . . . 163
. . . . . . . . . . . . . . . . . . . . . . . . . . . . . . . . . 163
. . . . . . . . . . . . . . . . . 163
. . . . . . . . . . . . . . . . . . . . . . . . . . . . 164
. . . . . . . . . . . . . . . . . . . . . . . . . . . . . . . . . . . . . . . 164
. . . . . . . . . . . . . . . . . . . . . . . . . . . . . . . . . . . . . . . . 165
. . . . . . . . . . . . . . . . . . . . . . . . . . . . . . . . . . . . . . . . . . 165
. . . . . . . . . . . . . . . . . . . . . . . . . . . . . . . . . . . . . . 165
. . . . . . . . . . . . . . . . . . . . . . . . . . . . . . . . . . . . 165
. . . . . . . . . . . . . . . . . . . . . . . . . . . . . . . . . . . . 166
Page 17
Table of Contents
r
Program Change Events . . . . . . . . . . . . . . . . . . . . . . . . . . 167
Pitch Bend Events
Control Change Events
Aftertouch Events
Poly Pressure Events
. . . . . . . . . . . . . . . . . . . . . . . . . . . . . . . 168
. . . . . . . . . . . . . . . . . . . . . . . . . . . 168
. . . . . . . . . . . . . . . . . . . . . . . . . . . . . . . 169
. . . . . . . . . . . . . . . . . . . . . . . . . . . . . 169
Chapter 12
12.1
12.2
Chapter 13
13.1
13.2
The Matrix Editor
Opening the Matrix Editor . . . . . . . . . . . . . . . . . . . . . . . . . 171
Display . . . . . . . . . . . . . . . . . . . . . . . . . . . . . . . . . . . . . . . . . . . 172
Position
. . . . . . . . . . . . . . . . . . . . . . . . . . . . . . . . . . . . . . . 172
Velocity
. . . . . . . . . . . . . . . . . . . . . . . . . . . . . . . . . . . . . . . 172
Editing Notes . . . . . . . . . . . . . . . . . . . . . . . . . . . . . . . . . . . . . . 173
Creating Notes
Duplicating Notes
Moving Notes
Setting a finer Grid
Copying Notes
Altering Lengths
Altering the Lengths of Several Notes
Simultaneously . . . . . . . . . . . . . . . . . . . . . . . . . . . . . . . . . 174
Making Notes the Same Length
Altering the Velocity
Deleting
Selection Techniques
Quick selection of Event Editor
. . . . . . . . . . . . . . . . . . . . . . . . . . . . . . . . . . . . . 173
. . . . . . . . . . . . . . . . . . . . . . . . . . . . . . . 173
. . . . . . . . . . . . . . . . . . . . . . . . . . . . . . . . . . . . . 173
. . . . . . . . . . . . . . . . . . . . . . . . . . . . . . 173
. . . . . . . . . . . . . . . . . . . . . . . . . . . . . . . . . . . . . 174
. . . . . . . . . . . . . . . . . . . . . . . . . . . . . . . . 174
. . . . . . . . . . . . . . . . . . . . 174
. . . . . . . . . . . . . . . . . . . . . . . . . . . . . 175
. . . . . . . . . . . . . . . . . . . . . . . . . . . . . . . . . . . . . . . . . . 175
. . . . . . . . . . . . . . . . . . . . . . . . . . . . . . . . 175
. . . . . . . . . . . . . . . . . . . . . . . . . 176
The Score Editor
Opening the Score Edit Window . . . . . . . . . . . . . . . . . . . . . . . 177
General Appearance of the Score Edit Window . . . . . . . . . . . . 178
Important Elements of the Score Edit Window
View Menu
Moving the Borders between the Different Areas
Parameter Boxes
The Main Working Area
Logic fun’s Notation Concept . . . . . . . . . . . . . . . . . . . . . . . . . . 180
Staff Display in Relation to Position and
Length of Sequences in the Arrange Window . . . . . . . . . . . . . 181
Logic fun’s Basic Elements for Score Display
. . . . . . . . . . . . . . . . . . . . . . . . . . . . . . . . . . . . 178
. . . . . . . . . . . . . . . . . . . . . . . . . . . . . . . . 179
. . . . . . . . . . . . . . . . . . . . . . . . . . 179
. . . . . . . . . 178
. . . . . . . 179
. . . . . . . . . . . . . . . 181
User Guide
Version 4.1
13
Page 18
Table of Contents
The Display Parameter Box . . . . . . . . . . . . . . . . . . . . . . . . 181
Score Styles
Input Methods in the Score Edit Window
13.3
MIDI Real Time Recording in the Score Window . . . . . . . . . . . . 182
13.4
Mouse Input . . . . . . . . . . . . . . . . . . . . . . . . . . . . . . . . . . . . . . 183
Input
MIDI Channel and Velocity of Inserted Notes
Insert Quantization
13.5
The Partbox—Inserting Notes . . . . . . . . . . . . . . . . . . . . . . . . . . 185
Ties
. . . . . . . . . . . . . . . . . . . . . . . . . . . . . . . . . . . . . . . . . . . . . 185
Triplets
. . . . . . . . . . . . . . . . . . . . . . . . . . . . . . . . . . . . . . . . . . . 186
Automatic Rest Display
Key Signatures and Key Signature Changes
Time Signatures and Time Signature Changes
13.6
Move, Copy and Paste in the Score Edit Window . . . . . . . . . . . 188
Moving/Copying with the Mouse
Move/Copy with Cut, Copy & Past
. . . . . . . . . . . . . . . . . . . . . . . . . . . . . . . . . . . . 182
. . . . . . . . . . . . . . . . . 182
. . . . . . . . . . . . . . . . . . . . . . . . . . . . . . . . . . . . . . . . . 184
. . . . . . . . . . . 184
. . . . . . . . . . . . . . . . . . . . . . . . . . . . . . 184
. . . . . . . . . . . . . . . . . . . . . . . . . . . . . . 186
. . . . . . . . . . . . . . . 186
. . . . . . . . . . . . . 187
. . . . . . . . . . . . . . . . . . . 188
e
via the Clipboard . . . . . . . . . . . . . . . . . . . . . . . . . . . . . . . . 189
13.7
Editing Notes . . . . . . . . . . . . . . . . . . . . . . . . . . . . . . . . . . . . . . 190
Changes in the Event Parameter Box
Notes
. . . . . . . . . . . . . . . . . . . . . . . . . . . . . . . . . . . . . . . . 190
Changing Several Selected Objects
. . . . . . . . . . . . . . . . . . . . 190
Simultaneously in
the Event Parameter Box . . . . . . . . . . . . . . . . . . . . . . . . . . . . . 191
Deleting Objects in the Score Window
13.8
The Display Parameter Box . . . . . . . . . . . . . . . . . . . . . . . . . . . . 192
Different Settings within the Same Staff
Default Settings for New Sequences
. . . . . . . . . . . . . . . . . . . 191
. . . . . . . . . . . . . . 192
. . . . . . . . . . . . . . . . . 192
Changing the Settings for
Several Sequences Simultaneously . . . . . . . . . . . . . . . . . . . 193
Rhythmic Interpretation of Sequences
The Parameters in the Display Parameter Box
13.9
Score Styles . . . . . . . . . . . . . . . . . . . . . . . . . . . . . . . . . . . . . . . 196
Assigning Score Styles to Sequences
Distance between Staves
. . . . . . . . . . . . . . . . . . . . . . . . . . . . . 197
Using the Multi-Stave Score Style “Piano”
13.10
Display Levels . . . . . . . . . . . . . . . . . . . . . . . . . . . . . . . . . . . . . . 198
. . . . . . . . . . . . . . . . 193
. . . . . . . . . . . . . . 194
. . . . . . . . . . . . . . . . . 197
. . . . . . . . . . . . . . . . 197
Changing between Single Sequence and
Full Score Display . . . . . . . . . . . . . . . . . . . . . . . . . . . . . . . 198
Muted Sequences or Tracks in the Score Display
13.11
Adapting MIDI Sequences for Score Printout . . . . . . . . . . . . . . 199
13.12
Printout . . . . . . . . . . . . . . . . . . . . . . . . . . . . . . . . . . . . . . . . . . 201
. . . . . . . . 199
14
Emagic
Logic fun
Page 19
Table of Contents
r
Chapter 14 The Sample Editor
14.1 The Sample Editor . . . . . . . . . . . . . . . . . . . . . . . . . . . . . . . . . . 203
14.2
Layout of the Sample Editor . . . . . . . . . . . . . . . . . . . . . . . . . . . 204
14.3
Display . . . . . . . . . . . . . . . . . . . . . . . . . . . . . . . . . . . . . . . . . . . 205
Overview
Relationship between the Windows
Waveform Display
14.4
Using the Sample Editor . . . . . . . . . . . . . . . . . . . . . . . . . . . . . . 208
Controlling Playback
Selection Commands
Working with Regions in the Sample Editor
Edit Commands
14.5
Functions . . . . . . . . . . . . . . . . . . . . . . . . . . . . . . . . . . . . . . . . . 213
. . . . . . . . . . . . . . . . . . . . . . . . . . . . . . . . . . . . . . . . . 205
Overview Functions
Catch Mode
Link Mode
Scaling the Display
The Amplitude Axis and Time Axis
Playing from the Overview Display
Playing the Entire Audio File
Playing the Current Selection
Playing After a Specified Point
Cycle Playback
Selecting All Audio Files
Manual Selection
The Selection Parameter Field
Normalize
Silence
. . . . . . . . . . . . . . . . . . . . . . . . . . . . . . . . . . . . . 206
. . . . . . . . . . . . . . . . . . . . . . . . . . . . . . . . . . . . . 213
. . . . . . . . . . . . . . . . . . . . . . . . . . . . . . . . . . . . . . . 214
. . . . . . . . . . . . . . . . . . . . . . . . . . . . . . 205
. . . . . . . . . . . . . . . . . . . . . 206
. . . . . . . . . . . . . . . . . . . . . . . . . . . . . . . . . . . 206
. . . . . . . . . . . . . . . . . . . . . . . . . . . . . . . . . . 207
. . . . . . . . . . . . . . . . . . . . . . . . . . . . . . 207
. . . . . . . . . . . . . . . . . . . 207
. . . . . . . . . . . . . . . . . . . . . . . . . . . . . . . . 208
. . . . . . . . . . . . . . . . . . . 208
. . . . . . . . . . . . . . . . . . . . . . . 209
. . . . . . . . . . . . . . . . . . . . . . 209
. . . . . . . . . . . . . . . . . . . . . . 209
. . . . . . . . . . . . . . . . . . . . . . . . . . . . . . . . . 209
. . . . . . . . . . . . . . . . . . . . . . . . . . . . . . . . 209
. . . . . . . . . . . . . . . . . . . . . . . . . . 209
. . . . . . . . . . . . . . . . . . . . . . . . . . . . . . . 210
. . . . . . . . . . . . . . . . . . . . . . 210
. . . . . . . . . . . . . . . 210
. . . . . . . . . . . . . . . . . . . . . . . . . . . . . . . . . . . . 211
Chapter 15
Video and MIDI Files
15.1 Playing Digital Video Files . . . . . . . . . . . . . . . . . . . . . . . . . . . . . 215
Video on Windows PC
Video on a Macintosh
Transport Functions of the Scroll Bar
Transport Functions of the Position Pointer
15.2
MIDI Files . . . . . . . . . . . . . . . . . . . . . . . . . . . . . . . . . . . . . . . . . 217
Preparing a Song for MIDI File Conversion
Saving the Song as a MIDI File
Saving Individual Sequences as a MIDI File
User Guide
Version 4.1
. . . . . . . . . . . . . . . . . . . . . . . . . . . . . . . 215
. . . . . . . . . . . . . . . . . . . . . . . . . . . . . . . 215
. . . . . . . . . . . . . . . . . 216
. . . . . . . . . . . . 217
. . . . . . . . . . . . . 218
. . . . . . . . . . . . . . . . . . . . . . 218
. . . . . . . . . . . . . 218
15
Page 20
Table of Contents
Saving Songs as SMF Format 0 . . . . . . . . . . . . . . . . . . . . . 218
Importing MIDI Files
. . . . . . . . . . . . . . . . . . . . . . . . . . . . . 219
Chapter 16
Chapter 17
Use of Key Commands and Mouse, Settings
16.1 Keyboard Command Symbols . . . . . . . . . . . . . . . . . . . . . . . . . 221
16.2
Key Commands . . . . . . . . . . . . . . . . . . . . . . . . . . . . . . . . . . . . 222
16.3
Using the Mouse . . . . . . . . . . . . . . . . . . . . . . . . . . . . . . . . . . . 223
16.4
Settings . . . . . . . . . . . . . . . . . . . . . . . . . . . . . . . . . . . . . . . . . . 223
Song Settings
Global Preferences
Initializing the Preferences…
. . . . . . . . . . . . . . . . . . . . . . . . . . . . . . . . . . . . . . 223
. . . . . . . . . . . . . . . . . . . . . . . . . . . . . . . . . . 225
. . . . . . . . . . . . . . . . . . . . . . . 225
Menu Reference
17.1 Apple Menu . . . . . . . . . . . . . . . . . . . . . . . . . . . . . . . . . . . . . . . 227
17.2
File Menu . . . . . . . . . . . . . . . . . . . . . . . . . . . . . . . . . . . . . . . . . 227
17.3
Edit Menu . . . . . . . . . . . . . . . . . . . . . . . . . . . . . . . . . . . . . . . . 227
17.4
Track Menu in the Arrange Window . . . . . . . . . . . . . . . . . . . . 228
17.5
Options Menu . . . . . . . . . . . . . . . . . . . . . . . . . . . . . . . . . . . . . 228
Settings
Tempo
Others
Send to MIDI
In the Score Window
17.6
View Menu in the Sore Editor . . . . . . . . . . . . . . . . . . . . . . . . . 229
17.7
Windows Menu . . . . . . . . . . . . . . . . . . . . . . . . . . . . . . . . . . . . 230
17.8
Help Menu . . . . . . . . . . . . . . . . . . . . . . . . . . . . . . . . . . . . . . . . 230
. . . . . . . . . . . . . . . . . . . . . . . . . . . . . . . . . . . . . . . . . . 228
. . . . . . . . . . . . . . . . . . . . . . . . . . . . . . . . . . . . . . . . . . . 228
. . . . . . . . . . . . . . . . . . . . . . . . . . . . . . . . . . . . . . . . . . . 228
. . . . . . . . . . . . . . . . . . . . . . . . . . . . . . . . . . . . . . 229
. . . . . . . . . . . . . . . . . . . . . . . . . . . . . . . . 229
Glossary . . . . . . . . . . . . . . . . . . . . . . . . . . . . . . . . . . . . . . . . 231
16
Index . . . . . . . . . . . . . . . . . . . . . . . . . . . . . . . . . . . . . . . . . . . 237
Emagic
Logic fun
Page 21
Chapter 1
Features
Specifications of any software mentioned in this manual are subject to change
without notice.
r
1.1 Multitrack Recorder
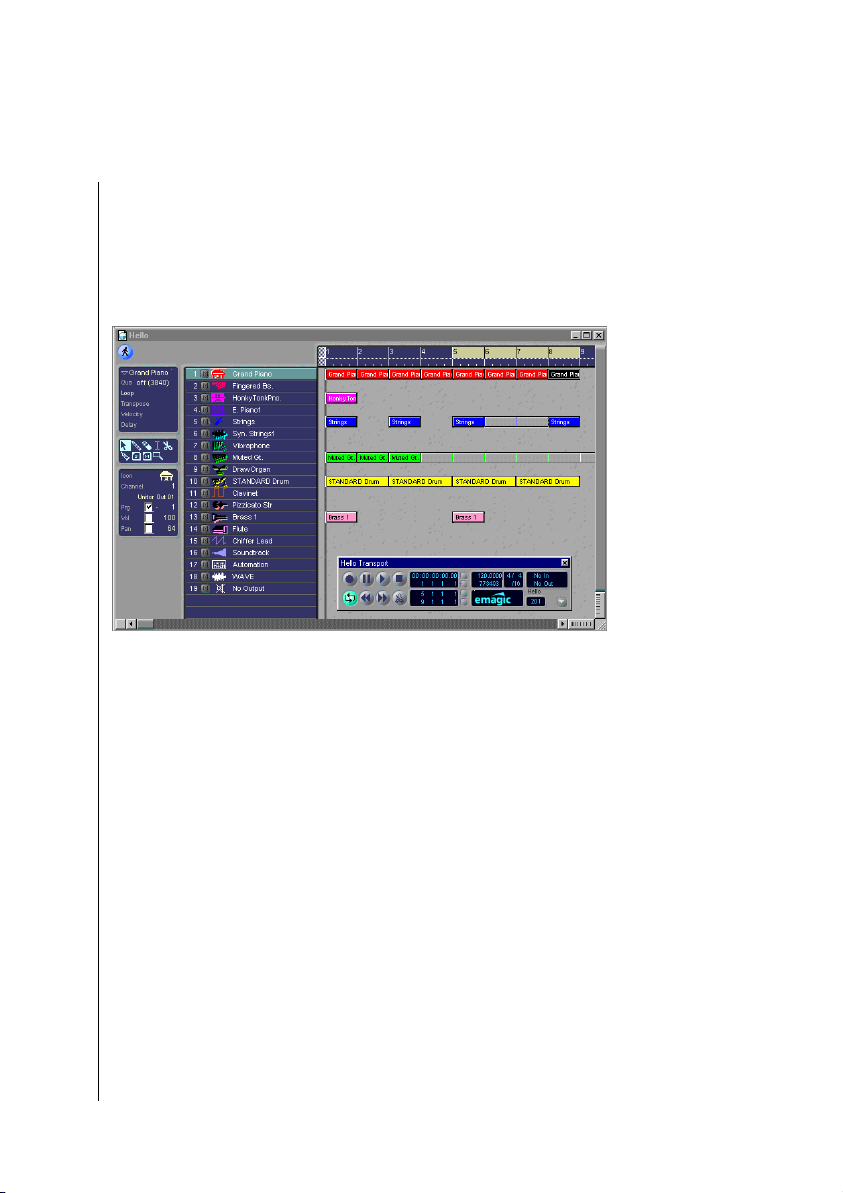
One of the main components of Logic fun is the MIDI multitrack recorder. You record ecord multiple tracks, as though you
were in a professional studio, and as you record the next one,
listen to the tracks that you just recorded.
Logic fun offers you many ways to alter and refine your
recorded material at a later time. You can move the tracks
around in the Arrange window, give the MIDI tracks a different
sound, or divide them into blocks (sequences). You can cut,
copy, move, transpose, or correct (quantize) rhythmically.
The three editor windows give you complete control of your
recordings. Whether you are changing the length, or dynamic
User Guide
Version 4.1
17
Page 22
Chapter 1
Features
strength of a single note in the Event editor, or entering entire
scores in the Score editor—it’s all easy and fast with Logic fun.
1.2 Flexible Input
There are several ways of entering notes into Logic fun. Everything is available, from real-time recording to manual note
entry; the possibilities are endless.
You can use Logic fun simply to record real-time MIDI performances, or as a conventional notation system by inputting your
scores on the screen with the mouse.
Logic fun offers you every possibility; you decide which ones to
use. You may control the program either with the mouse or the
computer keyboard; all functions can be carried out using the
mouse, and the majority can be adapted to meet your needs via
keyboard commands, which can be programmed as desired.
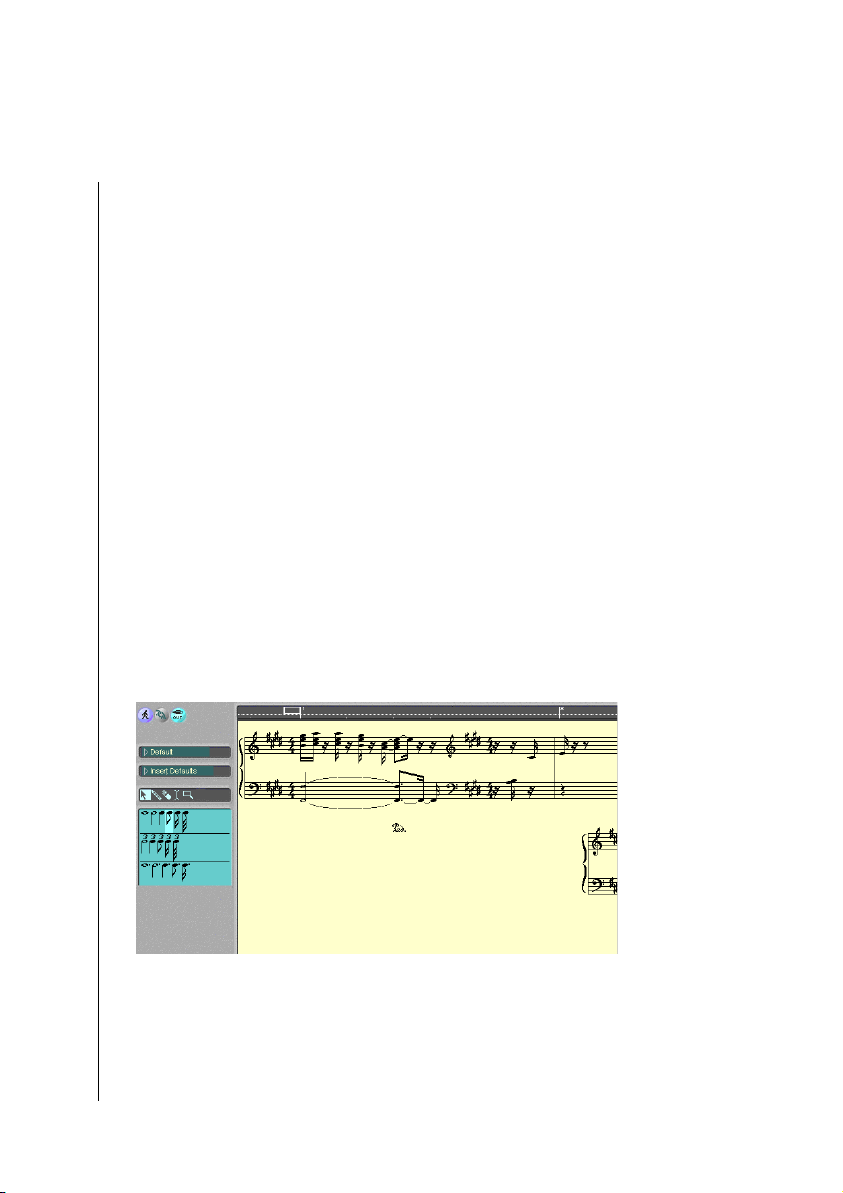
1.3 Automatic Notation
If you prefer working in musical notation to piano roll, or event
list editing, you can edit your songs in the Score editor. There,
you can view your sequences as conventional musical notation.
You can insert, move, or transpose notes easily using the mouse.
Logic fun offers a range of functions with which you can adapt
Emagic
18
Logic fun
Page 23
GM Supported
r
the appearance of the score to your liking, from the notes themselves, to the size of your windows.
Of course you can also print out your songs.You can also create
a PostScript file, and continue to edit the scores which were
created in Logic fun, with word-processing or layout programs.
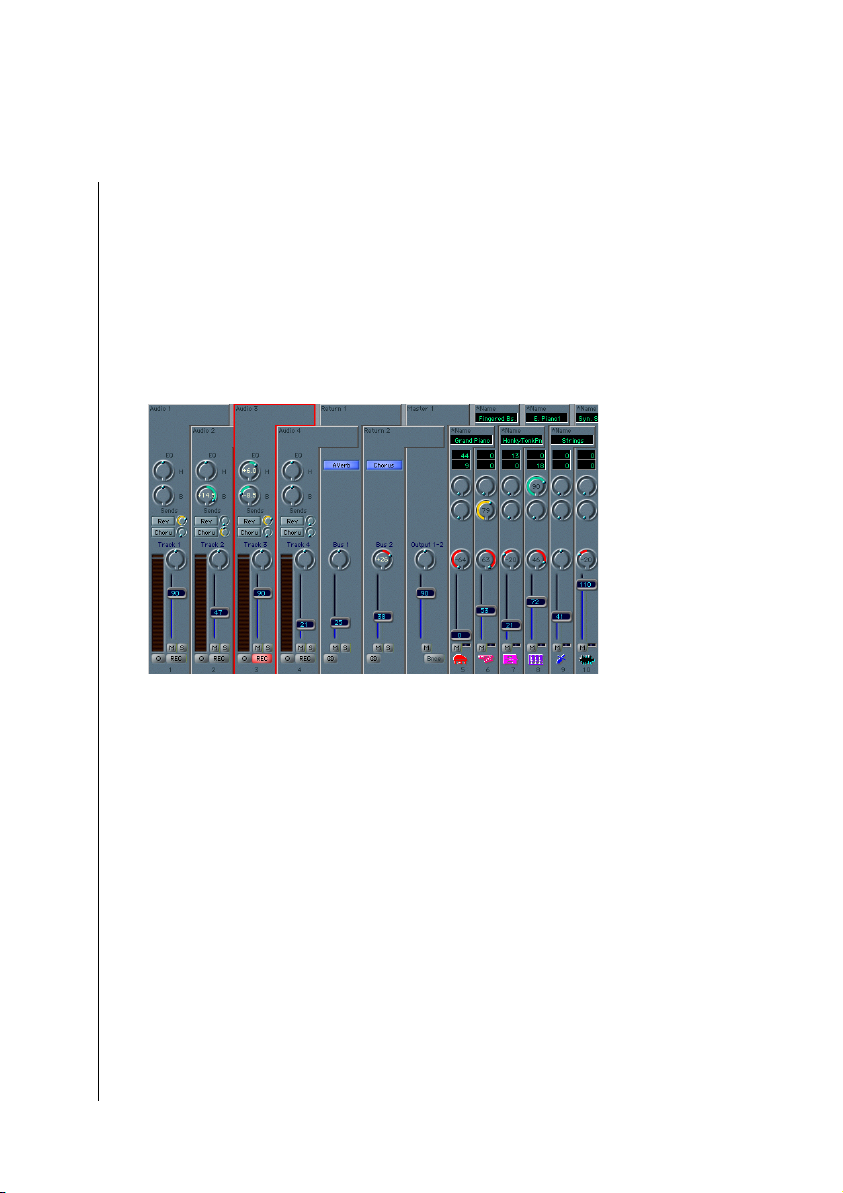
1.4 GM Supported
If you use a GM-compatible tone generator connected to your
computer, you can control its functions remotely from the
Mixer window. Selecting sounds, controlling the volume, or
adding chorus or reverb etc. is as easy as can be. Logic fun also
supports the GS- (Roland), or the XG standard (Yamaha). With
these devices, more sound and effect parameters can be
remote-controlled, for example, the filter frequency.
The Mixer thus becomes your virtual mixing console on screen,
allowing you to automate your GM device from Logic fun.
1.5 Multimedia
Logic fun can load and play digital videos in FunI format
(Windows) or QuickTime format (Macintosh). The picture
runs synchronously with Logic fun’s song position. You can add
User Guide
Version 4.1
19
Page 24

Chapter 1
Features
music to commercials, or videos of your vacation, without using
a video recorder. Sounds or jingles start concurrently with the
frame.
1.6 Graphical Interface
Logic fun features a clearly structured graphical user interface.
All operations can be done quickly and directly, using the
mouse.
You can open the windows, and place them anywhere on the
screen. You can adjust all elements in the windows as you like;
the windows can be enlarged or reduced. To make the most of
your screen, you can open as many windows simultaneously as
you want. Next to the track list in the Arrange window, for
example, you can simultaneously open an Event list and Score
editor for the same material.
As Logic fun plays the song for you, the notes e.g. are displayed
in the Score Window. Whatever you hear, you see at the same
time. If there is a wrong note, just fix it, while Logic fun continues to run. It does not get any easier than this.
Logic fun’s menus are well organized and make sure that you
only see the functions that you may need. This way, the menu
lists remain orderly, and you can find whatever function you
need faster.
1.7 About this Manual
The headings in this manual are arranged according to the
•
names of the functions in the program. This way, you can
quickly find specific functions in the table of contents.
Located in the appendix of this manual is an index, in which
•
you can look up keywords.
The Menu List, found in the appendix, offers an overview of
•
all menu items.
Emagic
20
Logic fun
Page 25

About this Manual
The glossary explains the meaning of specialized terms. If
•
you do not find a term there, you can look it up in the index,
and read about it in the corresponding section of the manual.
r
User Guide
Version 4.1
21
Page 26

Chapter 1
Features
22
Emagic
Logic fun
Page 27
r
Chapter 2
Sound Cards and MIDI
Sound Card
Your sound card must support the 16bit/44.1kHz standard (“CD
quality”). Recording at lower than 16bit resolution is not possible, due to Logic fun’s professional audio quality requirements.
This also applies to the 44.1kHz sampling rate. Other sampling
rates are not supported.
Full duplex or Overdub Mode
Ensure that your chosen sound card supports “full duplex” or
“overdub” mode. “Full duplex” means that the soundcard is
able to record, while playing back at the same time. This ability
is really mandatory, even for the most basic of recording applications.
If you are still undecided on which soundcard to choose for your
system, its full duplex ability should be one of the most important considerations.
If your current card does not support full duplex, you may be
able to upgrade it using a more recent driver (depending on the
hardware, of course). Be sure however, that it meets the 16bit/
44.1kHz requirements for both recording and playback.
If your card supports full duplex, but only allows recording at
lower than 16bit resolution, your recordings will suffer from
poor sound quality. In this case you should disable full duplex
operation using the “Logic Audio Device Setup” program (see
page 26). This does mean that simultaneous playback is now
disabled during recording, but Logic fun will now record at the
full 16bit resolution—you really owe it to your ears.
User Guide
Version 4.1
23
Page 28
Chapter 2
Sound Cards and MIDI
Hard Disk
In order to successfully use Logic fun with audio hardware, you
need a hard disk with an average access time no greater than
10ms , and a minimum data throughput of 3MB/s.
Modern hard disk drives generally meet these requirements
and do not need any further attention in this regard.
Input Source and Level
Monitors & Sound Control Panel
To use the Logic fun AV functions, you need to select an audio
input source from the control panel, and set the sample rate to
44.1kHz. If you are using the older control panel “Sound”, you
also need to select “16 bit” and “Stereo”, and make sure that
the sampling rate of 44.1kHz is selected. You cannot operate
the system with 22.5kHz sampling rate or 8 bit depth.
TM
Volume
The Volume sliders in the Monitors & Sound control panel are
placed after Logic fun’s output (output object). This means
that Logic fun’s output object can only control the full output
dynamic range if the Volume slider in the control panel is set to
Emagic
24
Logic fun
TM
Page 29
r
maximum. Please check this setting if you feel Logic fun’s
input or output is too low.
Volume Control
The Windows Accessory program “Volume Control” provides
control of the following:
Playback Level
•
Record (input) Level
•
Input source selection
•
It can be found via the Start menu: Start > Programs > Acces-
sories > Multimedia > Volume Control, or on Windows 98 via
Start > Programs > Accessories > Entertainment > Volume
Control.
As an example, this illustration shows the control panel using
the SoundBlaster AWE-32 sound card, by CreativeLabs. You
will find similar utilities for hardware from other manufacturers.
The playback level of recordings is controlled via the “Wave”
slider.
This control is placed after Logic fun’s output (output object).
This means that Logic fun’s output object can only control the
full output dynamic range if this slider is set to maximum.
You can also change to an independent mixer control that
allows you to set the input level for each input source via
Options > Properties > Recording.
User Guide
Version 4.1
25
Page 30

Chapter 2
Sound Cards and MIDI
Disable each input source that you don’t plan to record from
(usually everything except the line-in).
The line-in will usually give the best results. Make sure you
avoid the sound card’s microphone input, especially with
cheaper cards. It is a better idea to use an external mic preamplifier, such as that on a mixing desk, and then record via the
line input.
The Volume control can be accessed more easily if you check
the option Show Volume Control on Taskbar in Control Panel >
MultiMedia > Audio—this will place a loudspeaker icon on the
taskbar, which will reveal a master volume control with a single
click, while a double click will open the complete mixer.
Logic Audio Device Setup
The tool “Logic fun Audio Device Setup” (LADS), which can
be activated from the Logic folder in the Windows Start menu, is
of essential importance for the best possible setup of your audio
hardware in Logic fun. Although Logic fun usually recognizes
most of the currently available sound and audio recording cards,
it is still better in most cases to optimize Logic fun to your individual audio setup, by using LADS. This is especially true, if
several sound cards or a Multi-I/O card are installed in your
computer.
Hint
Hint
Since LADS is automatically run during Logic fun’s installation, you only have to start
it separately if you encounter problems concerning the communication between
Logic fun and your audio hardware, or after you have installed new hardware.
LADS—What It Is
LADS helps you to take care of the following tasks:
Determining whether the installed audio hardware has been
•
recognized correctly by the system.
Enabling audio hardware in Logic fun.
•
Emagic
26
Logic fun
Page 31
r
Fine-tuning, to help Logic fun to take full advantage of the
•
performance capabilities of audio hardware and the
computer.
Overview
LADS first analyzes which audio drivers are installed in your
system, and includes all these in a list which you can choose
from. These audio drivers are called system drivers. You can now
create Virtual Devices, using entries from that list.
Please note: Only those system drivers which you have
assigned to Virtual Devices are available for use within Logic fun.
The major advantage of this principle is that in the case of most
multi-I/O audio cards, each stereo connection pair has its own
driver instance. This means that there are separate sytem driver
entries for each stereo input and output pair for these cards.
With LADS, several of these system drivers can conveniently
be “built” into one Virtual Device, which can now be integrated
into Logic fun’s audio setup.
If there are two sound cards in your computer, but you would
like to use the second card only for MIDIplayback, using its
built-in MIDI synth,you can use LADS to make the audio
driver of the first card the only one available for audio purposes
in Logic fun. This would prevent the unnecessary display of
the audio drivers of the second card (its MIDI driver will still be
available).
How to Use LADS
Whenever you start LADS, it will check the computer for installed audio hardware.
Depending on the installed devices, this can take some time.
All the control elements of LADS can be found in a single
window. Basically, all you do there is to choose and configure
those system audio drivers which are to be used in Logic fun.
User Guide
Version 4.1
27
Page 32

Chapter 2
Sound Cards and MIDI
LADS’ user interface is divided into two areas: The “System
devices” list contains all system drivers which are currently
enabled in Windows’ audio setup. In the area Parameters of the
system devices (directly below the “System Device” area) you
can see some of the properties of the driver, such as number of
channels, bit depth and sampling rate.
You cannot add a driver containing zero channels to a Virtual Device.
On the left side there is the “Virtual Devices” list, which lists
those drivers that are available for use in Logic fun. A double-
click on a driver name or choosing “Add” after highlighting it
adds this driver to the currently displayed Virtual Device.
Clicking on “Remove” will remove any selected driver from
the Virtual Device again.
Removing a driver (or any other action in LADS, for that matter) is only affects Logic
fun, not Windows itself—the system driver will not be deleted, and is still available
for other purposes under Windows.
In the “Parameters” area (lower left), you can define various
characteristics of the Virtual Device. These are described
below, and also in the online help. It is also possible to save the
current LADS setup (“Export” button) and load it again later
Emagic
28
Logic fun
Page 33

r
(“Import” button). A detailed description of all functions and
their use can be found in the online-help for LADS, which can
be activated by clicking on the “Help” button.
If you happen to make a mistake while using LADS, or if you are not sure if you
chose the correct settings, you should click on the Cancel button to quit LADS. This
way, all changes will be discarded. Clicking on the “OK” button will save the
changes and quit LADS.
Also ASIO devices appear in the driver list.
Virtual Device Setup
Setting up a Virtual Device is quite easy:
1. Create a Virtual Device by clicking on “New”.
2. Assign it a name by clicking on “Rename”, and entering the
desired name.
3. One after another, double-click on all system driver names
in the System devices list which you want to be part of that
Virtual Device.
4. Quit LADS with OK and start Logic fun. The new Virtual
Device can now be selected in the PC AV section of Logic
fun’s dialog window Audio Hardware & Drivers.
Optimizing Driver Settings
The combination of operating system, sound card drivers and
audio hardware often results in time delays, which can affect
Logic fun’s response time in a negative way. This delay, also
called latency, is system-inherent and cannot be fully avoided.
However, the “Granulation” parameter in LADS enables
Logic fun to take better advantage of a fast computer and of
high-quality audio hardware.
The optimization of this parameter is not absolutely necessary to provide full func-
tionality in Logic fun. Only experienced users should use this function, since wrong
granulation settings can cause problems during audio playback.
User Guide
Version 4.1
29
Page 34

Chapter 2
Sound Cards and MIDI
The default settings of this parameter aim at stable and trouble-free system performance. However, if you are using a fast
computer and good audio hardware, you can diminish the
latency of your system by experimenting with the Granulation
parameter: A low granulation value will result in better sounding playback of volume changes. But if granulation is set too
low, the computer and operating system might not be able to
perform all tasks “in time”, resulting in short dropouts and
unwanted noises. So for proper optimization, it is necessary to
find a good balance between low granulation and safe audio
playback performance. Proceed as described below:
Set up LADS as described above. Take your time!
•
Lower the granulation value in steps of approximately 50
•
milliseconds.
Quit LADS, start Logic fun and test the audio playback.
•
If all audio is played backwithout problems, you can try to
•
further diminish the granulation value. Don’t forget the
previous value.
If dropouts or other problems occur during audio playback,
•
choose a higher granulation value again.
Up-to-date PCI sound cards, like the Sound Blaster Live! allow a granulation of
approximately 200 milliseconds. For professional PCI cards an even shorter value
may work. Please note that the Granulation parameter is not available for DirectSound drivers.
Removing Settings from LADS
If you have changed settings in the Logic Audio Device Setup
(LADS), you can remove your changes. By clicking on Remove
all you can remove all settings made. You can restore the system
to as it was right after Logic fun’s installation by clicking on Full
Rescan.
Emagic
30
Logic fun
Page 35

MIDI Installation
r
2.1 MIDI Installation
Interface Connection
Please consult your soundcard or MIDI interface manual for
information on its correct connection. The most common ways
to add MIDI functionality to computers are:
Multiport MIDI interfaces, including separate devices like
•
the Emagic’s Unitor 8 / MkII or AMT 8.
Sound card with MIDI interface (Windows).
•
via a General MIDI module or keyboards’ integrated inter-
•
face, usually labeled as “To Host”.
MIDI Cabling
MIDI Inputs/Outputs
If your computer has an internal or external MIDI port, or has a
MIDI capable soundcard connected, hook the keyboard
“MIDI Out” to the computer’s “MIDI In” (on the interface,
soundcard etc.). If the keyboard can generate its own sounds,
connect the computer’s “MIDI Out” to the keyboard’s “MIDI
In”. If your computer (or the MIDI device) offers more than
one MIDI output, connect any other tone generators to these.
If the computer only has one MIDI output, you need to
connect the second tone generator’s MIDI In to the keyboard’s
MIDI Thru port. A third device can be connected to the
second’s MIDI Thru, and so on. The MIDI Thru port always
delivers a copy of the signals coming into the device’s MIDI In.
It is preferable, however, to use a direct connection from a
computer’s MIDI Out to a device, rather than chaining too
many devices, one after another. This is because timing problems may occur in the chain, if many MIDI commands are sent
in a short time, due to the slight delays introduced by each
MIDI In to MIDI Thru transaction. If your computer also has
User Guide
Version 4.1
31
Page 36

Chapter 2
Sound Cards and MIDI
several MIDI inputs, you can connect the MIDI outputs of
other MIDI expanders there.
When using Editor/Librarian programs like Emagic’s SoundDiver, it is important to
connect the MIDI Outs from other keyboardless expanders to the multiport interface’s MIDI inputs, so that their data can be sent to the computer. For use with Logic
fun, however, it will be sufficient to simply connect the keyboard MIDI Out to the
computer’s MIDI In, and wire the computer’s MIDI Output to any tone generating
devices.
MIDI Local Off
If your keyboard has an internal sound source, it is important
that you stop the keyboard from generating sounds directly
from its own keyboard. If you buy a new keyboard that is to be
used without a sequencer, and connect it straight to an amplifier, you would expect the device to make a sound when you
press its keys—in other words the keyboard is connected to the
sound generator. However, you do not want this when using the
keyboard with a sequencer. In this scenario, the keyboard is
used as the computer’s input device, while the computer will
play the various connected tone generators, be they the
keyboard’s own sound generator, or any other connected sound
modules. If you wanted to control and record another sound
module with your keyboard, its own sounds would get in the
way—which is why the keyboard must be separated from its
own internal sound generator. This function is known as “Local
Off”, and can be set directly at your keyboard. The sequencer
will speak to your keyboard’s tone generator just like any other
connected, keyboardless sound module.
If you cannot find the “Local” function under your keyboard’s MIDI menu, consult
its manual as how best to proceed for sequencer use. Some keyboards allow you to
select from among “Local”, “MIDI” or “Both” for each of their so-called “Parts”—
in this case, the “MIDI” setting is equivalent to “Local Off”.
Keyboards and Expanders with “To Host” Interface
A “To Host” interface, which allows a direct connection to the
computer, can be found on many of the more cost-effective
MIDI sound modules, as well as on many entry-level
Emagic
32
Logic fun
Page 37

MIDI Installation
r
keyboards. This in effect is a simple integrated MIDI interface,
with one MIDI In, and one MIDI Out for the computer. An
instrument with a “To Host” interface is controlled directly;
the MIDI In and Out serve as MIDI connections for the
computer, to allow further instruments, such as another
keyboard to be connected. This proves very cost-effective for
entry level setups, which may include only one keyboard and
another sound module. The expense of a dedicated computer
MIDI interface, or card is not initially required.
If you are working with such a module, first install the driver
software supplied by the manufacturer.
Connect the keyboard’s MIDI Out to the sound module’s
MIDI In, and the module’s MIDI Out to the keyboard’s MIDI
In (assuming it can generate sounds). Connect the “To Host”
interface to the computer, usually to a serial port.
User Guide
Version 4.1
33
Page 38

Chapter 2
Sound Cards and MIDI
34
Emagic
Logic fun
Page 39

r
Chapter 3
Getting Started
3.1 Windows
Getting Started With Logic fun
Double-click the Logic fun icon, or select Logic fun from
Start>Programs>Emagic>Logic fun, in the Start Menu, to
launch the program. Your MIDI interfaces and your sound cards
are recognized at startup, and all internal connections and
settings are automatically established. If you have installed
several MIDI cards in your computer, you can use any of them.
Each time Logic fun starts up, it searches for installed MIDI
interfaces so that a new card is automatically available the next
time Logic fun starts up.
After a short time, you will see an empty Arrange window, and
the main menu bar.
Selecting the MIDI Out Port in the Program
You can select the MIDI port for each track separately. To do so,
select the desired track, and go to the Instrument parameter
box, located just below the Toolbox, on the left side of the
Arrange window. Click-hold in the field just below the “Channel” assignment field. You will see a flip menu listing all the
MIDI out ports available on your system. Select the one you
want, and release the mouse button.
Testing the MIDI Connection
You should then test to make sure that the connections
between Logic fun and your MIDI system are working
smoothly.
User Guide
Version 4.1
Tip
35
Page 40

Chapter 3
Getting Started
First, test to see if your MIDI keyboard transmits.
Open the Transport Window by choosing “Open Transport
•
Window” in the window menu or press “F11”.
You can see the MIDI monitor in the upper right-hand
•
corner of the Transport window.
If there is no activity, the display will show “No In/ No Out”.
•
Now play a couple of notes on your MIDI keyboard.
•
In place of “No In”, the received events should now be
•
displayed.
If this is not the case, test the following:
•
Is the MIDI-Out connection of the keyboard connected
•
correctly with the MIDI-In of your computer?
Is the cable working properly?
•
Test the MIDI Out
Now test to see if Logic fun is sending MIDI events to your
tone generators.
Call up File> Open, and select the Tutorial Song (TUTO-
•
RIAL.LSO) from the file selection box.
Set the MIDI out port for each of the tracks, as described
•
above.
Click on the PLAY button in the Transport Window or press
•
0 on the numeric keypad of the computer.
The Tutorial Song will run, and the second line of the MIDI
•
indicator should show the sent events.
If this is not the case, test
•
whether you are using a good MIDI cable.
•
whether you connected the MIDI-In of your tone generator
•
to the MIDI-Out of the interface.
Emagic
36
Logic fun
Page 41

Windows
r
File Extensions
Logic fun can load or save files in both its own native file
format, or as Standard MIDI files, for use with other programs.
You can recognize the type of file from the following extensions:
Type of File Extension Description Created from
Song ∗.LSO Song File Logic fun when the
menu field “Save” is
called up in the file menu
Standard
MIDI File
Logic fun and Multitasking
Logic fun can be operated in conjunction with other MIDI
programs. If you switch over to another program, Logic fun
continues to run in the background. For this to work, your
MIDI interface must use a multi client driver. If you have any
questions about this, contact the manufacturer of your interface
for information.
∗.MID Song file in the
standard MIDI
file format
external sequencers can
be imported into Logic
fun or from Logic fun
with Export
Launching Logic fun
The installation program automatically creates a program group
“Logic fun” under Programs > Emagic, in the Start Menu.
Here you will find Logic fun itself, and the de-installation
program. You may launch Logic fun by simply highlighting the
program icon in this menu.
Launch Logic fun Automatically
If you add Logic fun to the program group “Startup” from the
Start Menu, then Logic fun starts up automatically when
Windows is launched. Create a shortcut to Logic fun in this
User Guide
Version 4.1
37
Page 42

Chapter 3
Getting Started
folder. You may also drag the prgram to the Desktop instead, if
you prefer to launch from there.
You have now correctly installed Logic funLogic fun, and have
set it up to connect with your MIDI system. Everything is now
ready for you to work through the tutorial. This series of exercises will help you to become acquainted with Logic fun.
3.2 Macintosh
Launching Logic fun
This is how you usually start up Logic fun:
1. Double-click the program’s icon, or
2. Click on the program’s icon and choose File> Open, or press
Co.
As long as you are working through the manual, we recommend
that you start Logic fun directly with the Tutorial Song.
3. Double-click the Tutorial Song icon.
Logic fun will launch with the Tutorial Song loaded.
Choose MIDI Connection
First, let Logic fun know which port of your Macintosh is
connected to your MIDI interface.
In the Option Menu, call up Settings > MIDI Interface
•
Communication…
The Global Preferences dialog box appears.
TM
38
Emagic
Logic fun
Page 43

Macintosh
r
Serial Prefs
Parameter for the MIDI interface ports
You can activate one of three ports here:
Choose the USB, the modem port or the printer port.
•
When you have chosen one port, Logic funLogic fun automatically turns off the other ports.
Logic fun tests automatically to see whether a MIDI interface
is connected to the specified port and is operable. If no MIDI
interface is recognized, a dialog box appears.
Starting up without MIDI interface: If you want to test Logic fun
“dry”—that is without MIDI interface and tone generator—
simply disable all ports by choosing “off.”
MIDI Time Piece
Logic fun directly supports the “MIDI Time Piece” (MTP)
interface from the manufacturer “Mark Of The Unicorn”, as
well as MTP-compatible interfaces:
Enable the options “Check For MTP” and “Fast Speed” in
•
Global Preferences.
Unlike LOGIC, Logic fun cannot separately address the different MIDI Outputs of MTP compatible interfaces.
The “Fast Speed” mode can be switched off—for instance with
longer SySex transmissions, if you have any problems with
MIDI Communications.
User Guide
Version 4.1
Important!
39
Page 44

Chapter 3
Getting Started
Testing the MIDI Connection
You should now make sure that the connection between Logic
fun and your MIDI system is working properly.
1. Launch Logic fun.
First, test to see if your MIDI keyboard transmits.
2. Open the Transport Window by selecting Open Transport in
the window menu, or press C7
You can see the MIDI indicator in the upper right-hand corner
of the Transport Window.
If there is no activity, the display will show “No In/ No Out”.
3. Now play a couple of notes on your MIDI keyboard.
In place of “No In”, the received events should now be
displayed.
If this is not the case, test the following:
4. Is the MIDI-Out connection of the keyboard connected
correctly with the MIDI-In of your computer?
Is the cable working properly?
•
Did you choose the correct port in Global Preferences?
•
Test the MIDI-Out
Now test to see if Logic fun is sending MIDI events to your
tone generators.
1. Choose File> Open, and select the tutorial song in the fileselection box.
It is loaded and displayed on the screen.
2. Click on the PLAY button in the Transport Window, or
press 0 on the computer’s numeric keypad.
The tutorial will run, and the second line of the MIDI indicator
should show the sent events.
Emagic
40
Logic fun
Page 45

Macintosh
r
If this is not the case, see if you have enabled the modem port
or the printer port in Global Preferences. If you have not,
enable the port to which your MIDI interface is connected.
Autoload Song
You can select a song with which Logic fun is automatically
loaded. This song can contain your own preferred song settings
and window layouts.
Proceed as follows:
1. Create a new song.
2. Adjust the song settings according to your preferences.
3. Save the song with the file name “Autoload” (quotes
excluded).
To save the song, select “Save” in the file menu and enter
“Autoload” in the dialog box.
You can also create an alias for any song, and start Logic fun
directly by double-clicking the alias.
Start Logic fun automatically
You can have Logic fun open automatically every time your
Macintosh starts up. If you want, you can also have a song start
automatically.
Proceed as follows:
1. Create an alias of Logic fun, or the desired song.
2. Drag the alias with your mouse into the folder “Startup
Items”, in the system folder.
Logic fun will be started up automatically the next time you
turn your system on.
Logic fun is now properly installed and configured for your
system.
User Guide
Version 4.1
Tip
41
Page 46

Chapter 3
Getting Started
3.3 MacOS/Win: Differences
Logic fun for Macintosh and for Windows is basically the same.
The controls for both versions are practically identical.
However, because of some differences between the operating
systems, there are some slight variations in Logic fun between
the two platforms.
When you first look at it, you will notice that we have used two
symbols to identify the Macintosh and Windows versions:
This symbol identifies a function that is only on Windows.
•
This symbol characterizes a function that is only on Macin-
•
tosh.
TM
Keyboard and Mouse
Unlike the Macintosh mouse, a Windows mouse has a right
mouse button. Also, the position of some special keys is slightly
different between the systems.
There is a table with explanations for the symbols used in this
book for hot keys. This is located in the section, Hot Key
Symbols.
Look at the table and note which keys and/or mouse functions
for Windows are replaced and how.
Function Logic fun
Multiple selection S + click S + click
Mouse copy func-
tions
Emagic
42
Logic fun
Windows
ç hold down O hold down
Logic fun Macintosh
Page 47

MacOS/Win: Differences
r
Function Logic fun
Using tools right mouse button C and mouse
Specific mouse func-
tions
Windows
‚ + mouse
ç + mouse
A + mouse
Logic fun Macintosh
S + mouse
C + mouse
O + mouse
Key Commands
The predefined function codes for menu items are, as usual,
displayed directly behind the menu item. In addition, you can
define your own function codes for almost all of the Logic fun
functions. These are also displayed in the menus.
Exchanging Songs Between Mac and PC
Unlike Windows, Macintosh does not use file extensions. You
can, however, transfer songs back and forth between Macintosh
and Windows versions without any problem. When you are
transferring a song from a Macintosh to a Windows version, it is
important that you add the file extensions, which are discussed
above in the section named File Extensions. You can do this
either on the Macintosh or on the PC, when you are finished.
Songs created with Logic fun for Windows can be opened in
Logic fun for Macintosh under “Import.”
Tip
Menu Bars
The menu bars of Logic fun for Windows and Logic fun for
Macintosh are similar. While the Macintosh version has local
menus in the different windows, the main menu of the
Windows version changes accordingly.
User Guide
Version 4.1
43
Page 48

Chapter 3
Getting Started
44
Emagic
Logic fun
Page 49

r
Chapter 4
MIDI Tutorial
This chapter introduces you to the features of Logic fun by
using examples. It touches upon all of Logic fun’s important
functions. You will learn, for instance, how to arrange a song,
record a sequence, or prepare your arrangement for printing.
In order to follow the examples you should:
install Logic fun
•
have a General MIDI tone generator or an equivalent multi-
•
timbral device connected to your computer’s MIDI interface.
4.1 Adapting the Tutorial Song
As you work through this chapter and the next, use the
provided tutorial song. This song is configured for general
MIDI tone generators. Of course, you will not have any problems using the song with tone generators that do not follow the
GM specification. The only difference when using a non-GM
device, is that you will have to set the sounds and the MIDI
channels manually the first time you run the song, and you may
have to transpose some tracks. If this is necessary, be sure to
save your changes, so that you don’t have to redo your edits.
Load the Tutorial Song
You can start the Tutorial Song by
double-clicking the “Tutorial” song icon in the Logic fun
•
folder, or
starting Logic fun, call up File> Open, and choose the Tutorial
•
Song.
User Guide
Version 4.1
45
Page 50

Chapter 4
MIDI Tutorial
You should now be looking at the following screen:
Arrangement window with tutorial song
General MIDI Tone Generator
The program change, volume, and pan settings for this song are
optimized for GM tone generators, and are transmitted to your
device via MIDI. This happens automatically, if you play the
song from the beginning. These settings are found in a separate
sequence at the beginning of the song. Since delays can occur
with some synthesizers when they receive program change
data, you should then mute this sequence.
To mute the program changes, select the mute tool from the
toolbox, and use it to click on the sequence named “GM SetUp”. The sequence is now shown reversed, and a small circle is
now in front of the name.
Non GM, Multi-Timbral Tone Generators
If you do not have a, you need to consider the following points:
One prerequisite is, for example, that the sounds listed in the
table are available. If necessary, find similar sounds in your own
device.In addition, the drum kit’s note assignemt needs to
match that of the GM drum map(previously Roland drum
map), otherwise, the percussion passages will be reproduced
with the wrong drum sounds. Adjust the appropriate reception
channels in your multi-timbral synthesizer, and assign the
listed sounds specified in the table. If you need to rearrange
Emagic
46
Logic fun
Page 51
Adapting the Tutorial Song
your Drum kit, consider the percussion instruments listed in
the table, as well.
Sounds and MIDI Channels
MIDI
Function Sound Possible Name Vol Pan
Ch.
1 chord combination
piano/E piano
2 bass normal E bass Pick Bass, Rock
3 accents muted E guitar Mute Guitar, Slap
4 melody long dying
away melodic
sound
5 carpet string section Slow Strings, Pad 90 0
6 accents wind section Brass Section 80 L
7 solo flute-like solo
sound
10 drums GM-compati-
ble drum set
Electric Grand, LA
Grand
Bass, E Bass
Guitar
Synthbell 100 0
Stream, div.
“Solo”
GM Kit 110 0
110 0
127 0
127 R
120 0
r
Drum Kit
Here is a list of percussion instruments used by the tutorial
song, and their locations. (C3 = No. 60).
Note Instrument
C1 Kick
D1 Snare (normal)
E1 Snare (hi)
F1 Tom lo
F#1 HHT closed
G1 Tom mid
User Guide
Version 4.1
47
Page 52

Chapter 4
MIDI Tutorial
Note Instrument
G#1 HHT closed
short
A1 Tom hi
A#1 HHT open
C#2 Crash
D#2 Ride
E2 Ride Bell
Since transposition and relative volume are only automatically
correct with GM sounds, you should let the song run through a
couple of times, and see how it sounds with your instrument,
after you have assigned compatible sounds. Go ahead and try
opening Window > Mixer and use the faders to set the volume,
if needed.
Starting the Song
You probably want to listen to the Tutorial Song first. Just push
≠ on the numeric keyboard. To jump back to the beginning of
the song, push ‰, on the numeric keypad, twice.
4.2 Overview
After you open the tutorial song, you will see the following
components on the screen. This example is on a Macintosh:
Tip
48
Emagic
Logic fun
Page 53

Tracks and Sequences
r
12
3
9
8
7
6
Catch Button This is where you control
1
the Catch function of Logic fun. With Catch
turned on, the screen follows the song
position.
Main menu bar This is where you find
2
global functions, e.g. for saving and loading
songs or for opening various windows.
Bar ruler The bar ruler displays
3
MicroLogic’s time axis for you; here you can
set markers with the mouse, or jump to any
desired place in a song.
Arrange area, with sequences A track
4
may contain any number of sequences.
Sequences contain the actual data, such as
notes, controller data, etc. The data can be
edited in a variety of ways.
Zoom buttons If you click on the
5
telescope buttons, you can alter the
magnification factor of the window’s
contents and thus adapt to your screen.
4
Transport window The transport
6
window performs the same functions as the
transport field, but can be located at any
desired point of the screen and is variable in
size. A “slider” permits rapid approach from
far removed song positions.
Track column It is in the track column
7
that you determine the MIDI channel for
each track. It is likewise here that you can
swap tracks, insert them or delete them.
Toolbox You can select a particular tool
8
from this box in order to be able to edit
sequences, notes or other data in a variety of
ways.
Sequence parameter box The
9
sequence parameter box is where
quantization, transposition and other
aspects of the playback for a sequence can
be non-destructively edited.
5
4.3 Tracks and Sequences
To start with, Logic fun offers the usual elements found in a
Windows or Macintosh program—the main menu bar, and various windows that you can open and close, move and adjust to
size. After you load a song, you should see the Arrange window,
as seen above. This is where you record and arrange your songs.
Like a multitrack tape machine, Logic fun also works on the
User Guide
Version 4.1
49
Page 54

Chapter 4
MIDI Tutorial
basis of tracks. You can see and access the tracks in the Arrange
window.
Narrow objects known as “sequences” are found on the tracks.
A sequence represents an individual recording, or “take”. Each
time you record, a sequence will be created in the track you
recorded to. The sequence is like a container, so to speak,
which contains the actual MIDI data. This data can be notes as
well as control data, program changes, or even sysex for your
MIDI tone generators.
Tracks with sequences
You can see that with Logic fun, there are many more possibilities than with a traditional tape machine.
Information Track and Instruments
Take a closer look at the “track plan”.
On track 1, you can see the sequences “A intro”, “B groove”,
and subsequent entries. “No Output” is displayed in the track
column of track 1. This is a “dummy track”, which does not
contain any notes. The sequences on this track are only markers for the various song parts and, for the time being, are empty.
As you continue to work through this section, you will learn
about other advantages to using an information track in your
own songs..
Instruments for the tutorial song are found on the remainder of
the tracks: piano on track 2, bass on track 3, guitar on track 4,
and so forth.
The MIDI channel for each track is visible in the track column.
In addition, an icon is displayed there for each track. This
shows which instrument is in use.
Emagic
50
Logic fun
Page 55

Transport Functions
r
4.4 Transport Functions
The second, smaller window, which Logic fun shows after loading the song, is the Floating Transport window. It is laid out like
the control surface of a tape machine, and is used for operating
the Play and Record functions. In addition, you can change the
tempo settings and engage Cycle.
Let’s start the song. Instead of clicking the Play button, you can
also press = on your numeric keypad.
You can hear that the song is not completely arranged, and still
contains some inconsistencies. As you continue to work
through this chapter, you will finish arranging the song, add a
few details, and correct any mistakes.
In this section, you will learn to start and limit passages, and
listen to places in the song—in short, to “navigate” in the song.
Try out the buttons in the upper row of the transport field.
•
You already are familiar with functions from tape machines
or cassette recorders.
Start Song Positions
There are several ways to jump to specific song positions.
In the upper field of the Arrange window, you can see the bar
ruler.
Click at various places in the lower field of this ruler; you
•
immediately jump to that position. At the same time, a gray
line appears. This is the song position line (SPL)—in the
most generalsense, it is comparable with the position of the
tape on a traditional recording device.
User Guide
Version 4.1
51
Page 56

Chapter 4
MIDI Tutorial
Engage Play. Now click on the bar ruler, and hold the left
•
mouse button. You can move to any position, and listen by
moving the song position line.
If you know to which location you would like to go, you can
enter this position directly with the “locators”. To the right and
next to the transport buttons, Logic fun shows the current song
position, in both absolute time and as musical measures.
Click on the song position indicator, and hold the mouse
•
button. Place the song position at “17 1 1 1” and start playback. Logic fun now plays starting at measure 17.
Display Current Song Position
If you manually enter song positions, the window view that you
see will not necessarily correspond to what you hear. You can,
however, guarantee that these two things will always match.
Click on the catch button on the upper left in the transport
•
field, and the window excerpt follows the song position line
again.
The window viewwill update, as soon as the song position line
leaves the visible field, only if the catch function has been
enabled:
Zoom a Window Excerpt
You can view the entire song in the window by using the two
telescope buttons on the upper right edge of the window:
Click on the left half of the horizontal zoom button until you
can see all of the sequences in the window.
Cycle Mode
In cycle mode, you can cause a section of the song to repeat for
as long as Play is engaged, in order to edit a sequence, for
instance, or record new tracks in a specific section of the song.
Two “locators” can be used for this. These are position markers
Emagic
52
Logic fun
Page 57

Transport Functions
r
that mark the left and right boundary of a loop. They are found
directly to the right of the bottom row of transport control
buttons.
First, turn on the cycle mode. To do this, click on the cycle
button in the Transport window. It is now displayed blue.
Pay attention to the cycle bars in the measure ruler:
You can move this by grabbing it in the middle. The right and
left boarders can be changed bygrabbing one of the bottom
corners of the bar, and moving it. When Cycle is engaged,
pressing Stop twice will take the SPL to the beginning of the
cycle zone, rather than the beginning of the song..
Selection
Let’s become more familiar with the selection options. In order
to edit objects in Logic fun—be it sequences or notes—we
have to first select them. All functions and operations are
carried out only on those items that are highlighted or
“selected”.
Click on a sequence. The sequence will highlight, indicating
•
it is selected. Let’s go one step further by selecting several
sequences.
Hold S down, and click on Anwältin: second sequence.
•
This is additionally selected.
While pressing the S button, click on the gray area, keep
•
the mouse button pressed and drag a “lasso” over some other
sequences.
The selection is now reversed—all sequences except for those
•
previously selected are now selected.
User Guide
Version 4.1
53
Page 58

Chapter 4
MIDI Tutorial
Try out the selection functions with other sequences. You are
now familiar with the most essential Logic funn techniques. In
4.4 Selecting Objects, you can learn more about the selection
functions.
Quantize
Quantizing is the rhythmic correction of notes, by means of a
grid. Logic fun thereby moves all of the notes exactly to their
correct grid positions. We will test this by using the “Groove
Real-time” sequence as an example. The timing in this
sequence is slightly off, so you will use quantization to correct
it.
You can hear this most clearly by enabling the Metronome.
To do this, click on the metronome button in the Transport
•
window. It is on the lower right. This is how to enable the
metronome.
Logic fun now sends a metronome note on channel 10 to your
GM tone generator. Solo the drum sequence, as described
above. You can now hear that the groove is not completely
clean.
In the Sequence parameter box, click-hold in the line Qua.
•
From the resulting flip menu, select the setting 16D Swing,
and release the mouse button. The quantizesetting is now
displayed in the Sequence parameter box. If you play the
sequence now, it sounds rhythmically perfect.
Go ahead and try out other quantize values, for example 16,
•
24, or 7-tuplet, in order to hear the effects of quantizing
Look at the quantize settings of the various song parts. You will
notice that the swing factors—characterized by the alphabetic
character—are chosen differently. The groove factor can therefore be varied so that choruses sound like they have more swing
in them than verses do, for example.
Emagic
54
Logic fun
Page 59

Transport Functions
r
Loops
Loops are automatic repetitions of a sequence. The loop function enables you to repeat a passage as many times as you wish,
without having to copy it.
Let’s add a cabasa to the tutorial song. This cabasa is only in the
chorus and in section C, but is no longer in the grove section. A
sequence by the name of cabasa is already on track 10; however,
it is still muted.
Click on the sequence with the mute tool. The sequence is
•
unmuted, and selected.
Now turn the loop in the Sequence Parameter box to ON. You
should now see the following screen:
This sequence will now be repeated until the end of the song.
Of course, we want to stop it before then.
This is how it works: a loop is repeated until it comes across
another sequence on this track. To “turn off” the cabasa at the
desired place, place an empty sequence at the beginning of
section C.
Select the pencil tool, click in the cabasa track at position 25 1
1 1. Logic fun inserts a new, empty sequence. The screen
should now look like this:
The cabasa will stop playing at measure 25.
Finally, we will copy the new cabasa part to the groove section.
While pressing the S key, click on the cabasa sequence, and
the “stop” sequence. They have now both been selected.
In the Windows version, press the ç key. In the Mac version
press the O key. Click on the cabasa sequence, and drag the
User Guide
Version 4.1
55
Page 60

Chapter 4
MIDI Tutorial
entire section to measure 33, while keeping the modifier key
pressed. The entire passage, including the stop sequence, will
be copied, and you’re done.
The Toolbox
In the toolbox, you may select the desired editing tool, by clicking on it with the mouse. In the Windows version, you may
select a second tool with the right mouse button.
Mouse Arrow
Using the mouse arrow—the standard tool—you can move
sequences onto other tracks, or to other positions in the Arrange
window.
Let’s insert a B part in front of the groove section of the Tutorial
song. Half way through the section, we will transpose the B
section by a semitone. To do this, the groove part must first be
moved back eight measures:
Press the mouse button and rubber band select all of the
•
groove section sequences. Grab them, and drag them eight
measures to the right. The position display in front of the
information line serves as a reference point. The information
line should read “41 1 1 1” when you release the mouse
button.
The arrange area should look something like this:
Emagic
56
Logic fun
Page 61
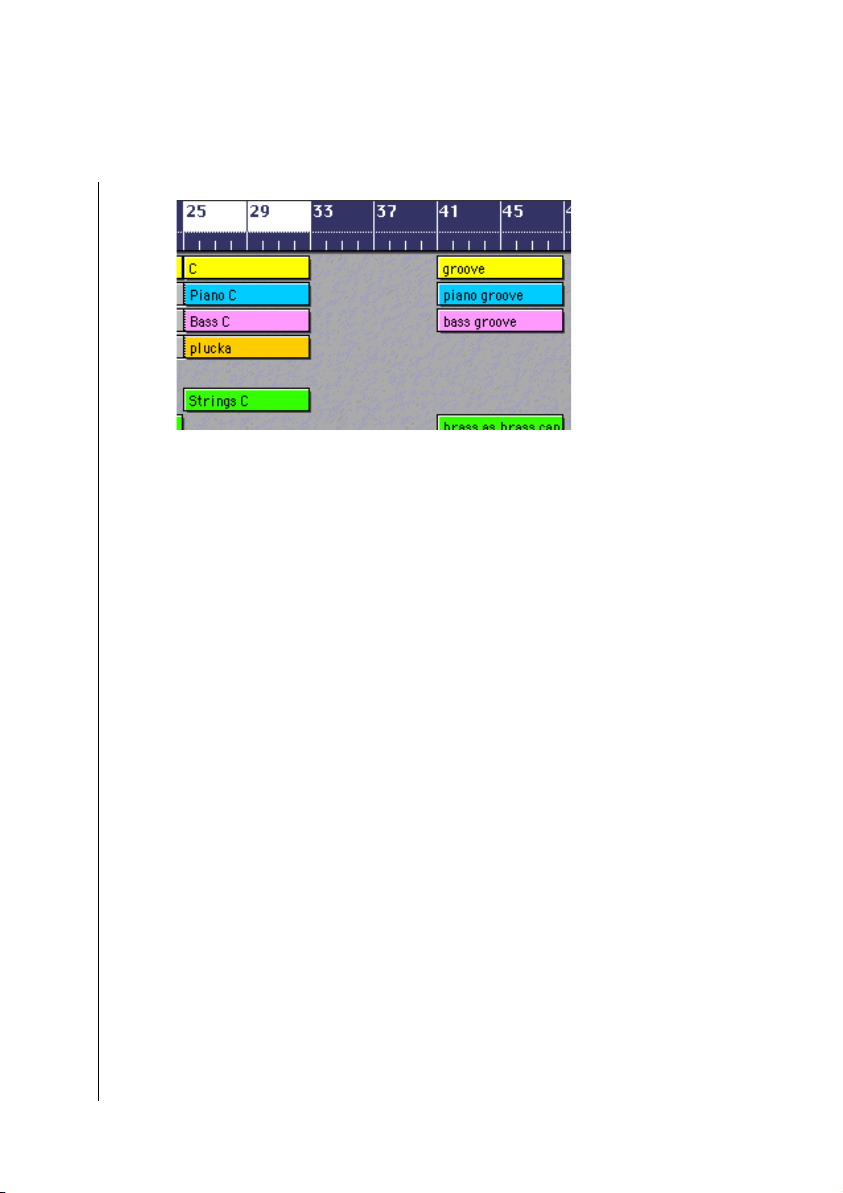
Transport Functions
r
Undo
Did you make a mistake, like not selecting all of the sequences,
or did you move them to the wrong place?
If so, this is a good time to become acquainted with one of the
most important functions in Logic fun: “undo”. With the
“undo” function, you can always undo the last editing step.
Select Edit> Undo. The sequences will be reset to their orig-
•
inal positions. You can now put them where you want.
Copies of Sequences
We will now copy the section “B theme” to the empty area
created when we moved the “groove” section..
Rubber band select the sequences of the “B groove” section.
Press ç (Windows) or O (MacOS) and click-hold on one of
the selected sequences. Move the mouse to the right. A copy of
all of the selected sequences is now dragged with the mouse
pointer. Set these to measure “33 1 1 1”, where they will fill the
space left by moving the “groove” section. The newly created
sequences will have the names of the originals, with the text
“*copied” appended to the end of the name. You decide
whether or not this extension should appear in the sequence’s
name by going to the
… Place an X in fthe checkbox to the left of the line “Add ’Last
Edit Function’ to Sequence Name”, if you want a description
User Guide
Version 4.1
Options > Settings > Global Preferences
57
Page 62

Chapter 4
MIDI Tutorial
of edit operations to edited sequences. If not, remove the X
from the box.
Scissors
Now, let’s cut the sequence we just copied in half, using the
scissors tool. By doing this, we will then be able to transpose the
second half of the section, while leaving the first half in the
original key.
Rubber band select the sequences that were just copied.
•
Select the Scissors tool by clicking the scissors symbol in the
•
toolbox. The mouse pointer is now displayed as ascissors
within the Arrange area.
Click on one of the selected sequences, and hold the mouse
button down. If you hold the mouse button down, and move
the mouse left or right, you can adjust the exact edit position by
means of the information line. Choose the position “37 1 1 1”,
which is measure number 37. When you release the mouse
button, the sequences are cut. Now, you can transpose the
second half of the section.
Rubber band select measures 33 to 49, to select the corresponding passages.
Transposition
Look at the parameter Transpose in the Sequence Parameter box.
Itcontains an aserisk (*). This means that the selected
sequences already show different transposition values. Don’t
worry, the sequence parameters always work relatively; therefore, the transposition differences are maintained.
Grab the asterisk in the transpose line, and move the mouse
•
upward until the value “+ 2” is displayed.
Release the mouse button. The passage has now been trans-
•
posed up a whole tone.
Emagic
58
Logic fun
Page 63

Transport Functions
r
Place the song position line to measure 37 and listen to the
result.
It does not sound particularly good, we still need to do some
fine-tuning.
The percussion sounds somewhat strange at first. This is
because you unknowingly transposed the percussion
sequences, causing the drum note placement to shift. You will
have to undo the transposition for the percussion tracks. To do
so, selected the drum sequnces, and drag the “+2” transpose
setting down, until the line is empty. This indicates no transposition.
Also, the bass in the copied B-section is only a loop that was not
transposed, because it is merely a pointer on the real sequence,
which was not affected by the edit. Therefore, we will have to
copy the the original bass sequence to that location and transpose it.
Your First Recording
The final exercise in the Arrange window is to make your first
recording. To make it fun, you can play a solo over the Csection. There is already a flute solo there, this, however can
certainly be replaced by a better solo. Since you may not play
the solo perfectly on the first try, we’ll set Logic fun so that you
can record several “takes” from which you may select your
favorite.
Step One: Delete the old solo.
Select the eraser from the toolbox and click on the sequence
•
“Flute”. It will be deleted.
Now you can preset the cycle and record parameters. You willprobably want a bit of lead in, before the solo starts, to get ready
to play. You therefore need to extend the cycle to be longer than
the actual recording, that is from 23 1 1 1 to 33 1 1 1. This gives
you two extra measures before section C, which starts at
measure 25.
User Guide
Version 4.1
59
Page 64

Chapter 4
MIDI Tutorial
If you would like to hear the metronome via MIDI:
Open the Options > Settings > Recording Settings window.
•
Enable MIDI click. The metronome is sent on channel 10—the
drum channel.
Confirm by clicking OK.
•
Let’s Record!
Click in the track list on track 8—the one with the small flute
•
icon. This selects it as the recording track. You can now play
the flute sound from your MIDI keyboard.
You can select other tracks to try them out—Logic fun auto-
•
matically addresses the right instrument (MIDITHRU).
Finally, switch back to track 8.
For practice, you can now simply start play by pressing 0 on
•
the numeric keypad, or by clicking on Play. If the solo in E
major is difficult for you, transpose the “MIDITHRU”
simply by transposing -4 to C major. “MIDITHRU” always
appears in place of a sequence name in the Sequence parameter box, when you click on an empty space in the Arrange
window. Any settings you make to the Sequence parameter
box now will be applied to any subsequently recorded
sequences.
Emagic
60
Logic fun
Page 65

Event List
When you are confident enough to record the solo, begin the
•
recording by clicking * on the numeric keypad, or by
pressing Record.
The count-in of one measure, starts, then the cycle zone will
play repeatedly and Logic fun will record. You can play your
solo now.
Let Logic fun continue running. After reaching the right
•
cycle point (measure 33), the SPL will jump back to the left
cycle point (measure 23). At measure 25, the recording
continues and you can record some more notes if you like.
Press the Stop button when you’re done.
Saving the Song
Here’s how to save the tutorial song, with your new solo:
Choose File> Save As…, and enter a new name for the song
•
to be saved as, for instance, “Tutsolo”. When using
Windows, Logic fun automatically assigns the extension “.
LSO”.
r
Load the initial tutorial song for further excercises.
4.5 Event List
In the event list, you can see all MIDI events of a sequence
displayed as an alphanumeric list.
Open the Event List for the sequence, “flute”, by double-
•
clicking with the right mouse button (Windows), or by
holding O down (Macintosh), on the sequence.
User Guide
Version 4.1
61
Page 66

Chapter 4
MIDI Tutorial
The status column displays what type of event it is. Besides the
notes, the sequence contains other types of events. You can
view only certain types of events by using the filter buttons for
various types of events.
Click on each of the buttons, except for the one showing a
slider at the bottom of its range, so that they are displayed in
dark gray.
All that is left in the event list is the control change events.
When finished, enable the view for all of the types of events
•
again. As you click on each button, the events of that type
will re-appear in the list.
We will now insert two program changes in the solo, in order to
change from a flute sound for the solo in the first half,to a
synthesizer sound for the second half..
The solo begins at measure 25. First, we place the program
change for the flute at measure 25.
Set the song position line to 25 1 1 1 in the Arrange window
•
or the transport window. In this way, you determine the position for the event to be inserted.
Select the Pencil tool, and use it to click on the program
•
change symbol. (In the Windows version, you may simply
click with the right mouse button on the Program change
button in the Event List).
Emagic
62
Logic fun
Page 67

Matrix Editor
r
A program change is inserted at position 25.
The program number is in the VAL column. Set this to 73 on a
GM tone generator. If you are not using a GM tone generator,
find a program change that can choose a flute sound.
Now, we will inset a second program change:
Put the song position line to position 29 1 1 1, and click on
•
the 88 symbol again.
Choose value 87 with GM tone generators, or a program change
that selects a synthesizer solo sound.
Switch to the arrow tool again. Filter the view for all event
•
types, except for the program change events.
Your event list should look like the following:
Graphik
If you play the solo now, the second half will have a different
sound. The next time it plays through, the program change at
the beginning of the solo, switches again to the flute sound.
4.6 Matrix Editor
The Matrix editor can be compared to an Arrange window for
notes. Unlike the Arrange w indow, notes in the form of bars are
shown, instead of sequences.
User Guide
Version 4.1
63
Page 68

Chapter 4
MIDI Tutorial
This picture shows the Matrix window for the sequence
“Strings C”.
Open the Matrix editor by holding the ç button
•
(Windows) or the O button (Macintosh), and doubleclicking the sequence “Strings C”.
You can see a keyboard along the left edge of the Matrix
window. By using this keyboard, you can see the pitch of the
notes in the display. A chord is represented by a group of overlapping bars. You can easily recognize that the note lengths of
the second chord are unequal. Also, there is a wrong note in the
4th chord.
Look at this sequence in the Event List as well, by choosing
Windows > Open Event List. These inconsistencies are not so
easily recognizable. Close the event list window again.
Selectnotes from the first chord by rubber band selecting it.
•
Now, grab the lower right corner one of the selected notes,
•
and drag it to measure 26, so that the end of the bar connects
with the beginning of the next chord.
Any edit to the length of one note, will affect all other selected
notes equally in the Matrix editor.
Repeat the process, to lengthen each chord so that it comes
•
up to the beginning of the next. This will create a legato
effect on playback. Choose a larger zoom level to better be
able to edit the events.
Emagic
64
Logic fun
Page 69

Score Editor
Tip
r
The wrong note should now be deleted.
Select the eraser from the toolbox, and use it to click the
•
short note at position 28 1 1 1. The note will disappear.
You are now done editing the strings sequence. Practically
every sequence in the tutorial song contains slight incongruities, which you can easily repair in the Matrix editor. Select
one or two more sequences and edit them as you did with the
String part.
You will probably notice a big difference when optimizing the
lengths of bass sequences.
4.7 Score Editor
Note events can be represented as notation, and can be edited
in the Score editor. You can simply use the Score editor, as well
as the other editors, to correct MIDI events.
Open the Score editor for the sequence “Bass theme”, by
•
double-clicking on it.
The representation of notes is indeed “mathematically correct
“, however, it’s currently barely readable—transposition, key,
and a lot more must be edited. Let’s go ahead and shape this
sequence so that it is ready to print.
User Guide
Version 4.1
65
Page 70

Chapter 4
MIDI Tutorial
Display Parameter Box
Click the check box in the left parameter area next to the term
“Bass theme”. This opens the Display Parameter Box.
Style
The Display Parameter Box contains two functions that you
can use effectively to correct the representation of notes. One
of these is the style. There are 3 preset styles for the most
commonly used transposition of display.
From the Flip menu “Style” select the style “Bass”. The score
looks better immediately:
Text
For printing purposes, you may want to name the note system.
Of course Logic funLogic fun allows you to input text in the
Score editor.
Select the text tool from the toolbox and click onto the field
•
above the clef. A text input box opens. Type “Bass” here,
and press R. The text will appear above the notation
system; you can move the text in small increments with the
mouse.
Yoiu can change the appearance of the text by using Options>
Score Font.
If you have connected and installed a printer onto your
computer, then you can immediately print the displayed page.
Emagic
66
Logic fun
Page 71

Score Editor
r
In the File menu, choose the menu option Print, and confirm
by clicking OK.
In a few minutes, you should be holding a printout of the page
in your hands.
User Guide
Version 4.1
67
Page 72

Chapter 4
MIDI Tutorial
68
Emagic
Logic fun
Page 73

r
Chapter 5
Using Logic fun
This chapter summarizes Logic fun’s general operating functions. But first, a quick word about this manual.
5.1 Conventions of this Manual
Menu Functions
Menu functions are written in this font: Function.
For functions which can be reached via hierarchical menus, the
different menu levels are described as follows: Menu > Menu
entry > Function.
Key Commands
When a function can be operated by a key command of the
same name, you will see this symbol at the side of the text. If
names differ, or if a function is only available as a key
command, its name will be printed like this: Key Command.
X
Options and Parameters
The options you can set from the Preferences, and the parameters in dialog boxes are printed like this: Parameters.
Different parameter values are printed like this: Parameter
value.
Detailed Explanations
Sometimes, detailed explanations will be given for things which you don’t necessarily
need to know about to understand how to use Logic fun. These are printed in this
smaller font.
User Guide
Version 4.1
69
Page 74

Chapter 5
Using Logic fun
5.2 The Mouse
Basic functions
Unless stated otherwise, the left mouse button is the one you
should use whenever “the mouse button” is mentioned.
Clicking
Place the mouse pointer on the object (button, input field, etc.)
and press the mouse button once.
Double-clicking
The same as clicking on an object, but you press the mouse
button twice, in quick succession. You can set the appropriate
time-span for this in the System Controls.
Grabbing or Click-holding
The same as clicking on an object, but you keep the mouse
button held down.
Moving or Dragging
Grab the object and move the mouse (click-holding) to the
desired position.
Mouse Input
Checkboxes
Checkboxes are square boxes which become “checked” when
you click them to activate an option (or function). Click them
again to remove the “check” and deactivate the option.
Pull-down Menus
Pull-down menus open when you grab certain input fields or
buttons. You make a selection within the menu by highlighting
Emagic
70
Logic fun
Page 75

The Mouse
r
the desired item and releasing the button. If you want to choose
an item which is outside the visible section:
move the mouse over the top or bottom edge of the menu;
•
the further you move it, the faster you will scroll through the
menu.
on MacOS: hold down the S key as you do this. You can
•
then let go of the mouse button and use the scroll bar on the
right of the pull-down menu to scroll through it. When the
highlight reaches the entry you want, release the S key
on Windows: click using the right mouse button. You can
•
then let go of both mouse buttons.
Mouse as Slider
You can set practically all the numerical parameters, (even note
values or names) by grabbing the parameter value and moving
the mouse up or down. If the parameter is made up of several
separate numbers (e.g. song position), you can adjust each individually.
Using the Mouse for In/Decrementing
All the parameter values which can be set using the mouse as a
slider (and even some of the flip menu parameters) may also be
increased or decreased in single units by
on MacOS: clicking on the top or bottom half of the value
•
while holding down the ç key.
on Windows: clicking with the left or right mouse buttons
•
while holding down the A key.
Numerical Input
Double-clicking on a numerical parameter value opens an
input field. The previous value will be highlighted, to allow it
to be overwritten by a new entry. You can also use the mouse to
make a partial selection in an input field so that only the high-
User Guide
Version 4.1
71
Page 76

Chapter 5
Using Logic fun
lighted part is overwritten. As long as the input field is open, all
the keys may be used for inputting data only, and may not be
used for key commands.
… by arithmetic
At any time, you can enter numbers by typing in an arithmetical
operation, e.g. “+2” or “-5”, which then simply changes the
current value by that amount.
… as ASCII-symbols
You can also input numbers as ASCII symbols: just put a ` or " in
front of it, and the ASCII code will be input as a number. For
example:
"! gives 33
"a gives 97
This function is particularly useful for entering text in SysEx
strings.
Text Input
You input text names in the same way as numbers, but you only
have to click the name fields once to allow input.
Numbered Names
As you might expect, you can give any number of selected
objects the same name. If the name ends in a number, the
number will automatically be incremented by 1 for each object.
This allows you to name all the sequences on one track quickly.
Disabling automatic numbering
To turn off the automatic numbering, place a space after the
number at the end of the name. All the selected objects will
then end in the same number.
Emagic
72
Logic fun
Page 77

The Mouse
r
Tools and the Toolbox
Logic fun allows recorded data to be handled graphically. This
means that you don’t have to carry out operations by inputting
commands via number tables, but rather by manipulating
graphic “objects”.
When editing objects graphically, you always have two tools
available at the mouse pointer position: one is already active,
the other is activated by the right mouse button (Windows) or
by holding down the C key (MacOS).
You change the currently active tool by clicking on the toolbox.
The mouse pointer then adopts the shape of the tool you click
on, so that you can tell what its function is by looking at the
mouse cursor: the Eraser is used for deleting, the Scissors for
cutting and the Glue tool for merging objects. To assign a tool to
the right mouse button (C key on MacOS), click on the
desired tool in the Toolbox, with the right mouse button (C
key depressed on MacOS).
Effective Range of the Tools
Tools are effective only in the working area of the window
•
they were selected from (you can define individual tools for
each opened window).
A tool basically affects the objects you click on. If the clicked
•
object is already selected, the tool operates on all other
selected objects as well.
Selecting Tools
You select the tool you want to use by clicking on it in the toolbox, either with the left or the right mouse button.
Info Line
When operating many of the tools, an info line appears in the
window for as long as the mouse button is held down. This info
User Guide
Version 4.1
X
73
Page 78
Chapter 5
Using Logic fun
line provides useful feedback about the type of operation you
are performing.
During operations involving arrange objects, the line will look
something like this:
From left to right, the Infoline displays: operation, mouse (or
arrange object) position, arrange object name, track number,
and length of the arrange object.
During operations involving events, the line looks something
like this:
From left to right, the Infoline displays: operation, mouse (or
event) position, event type, event MIDI channel, first data byte
(i.e. the pitch for notes), second data byte (i.e. velocity for
notes), and for notes: length of the note.
The Tools
Pointer
The Pointer is the default tool. The mouse cursor also takes on
this shape outside the working area when you are selecting
from a menu or inputting a value. Within the working area the
Pointer is used for selecting (by clicking on objects), moving
(by grabbing and dragging), copying (by holding down the O
(Mac), or ç (Windows) key and dragging) and editing lengths
(by grabbing the bottom right corner and dragging). Grabbing
and dragging anywhere in the background allows you to
“rubber band” multiple objects.
Pencil
The Pencil is used to add new objects. You can also select, drag,
and alter the length of objects.
Emagic
74
Logic fun
Page 79

The Mouse
r
Eraser
The Eraser deletes clicked objects. When you click on a
selected object all of the currently selected objects are deleted
(as if you had used the B key).
Text Tool
The Text tool is used to name arrange objects or add text to a
musical score.
Scissors
The Scissors are used to split arrange objects, e.g. before copying or moving individual sections.
Glue Tool
The Glue tool is the opposite of the scissors: all selected objects
are merged into a single object, which is given the name and
track position of the first of the objects on the time axis.
Solo Tool
Grabbing with the Solo tool allows you to listen to only selected
objects during playback. Moving the mouse vertically also triggers any events the cursor touches, even when the sequencer is
stopped.
Mute Tool
Clicking on an object with the Mute tool stops it from playing
and places a dot in front of its name, to indicate that it is muted.
You can unmute it by clicking it again with the tool. If multiple
objects are selected, the setting of the object you’ve clicked on
applies to all selected objects.
Zoom Tool
The Zoom tool allows you to zoom in on a section by “rubberbanding” it, right up to the maximum possible window size. To
revert to normal size, single-click on the background with the
User Guide
Version 4.1
75
Page 80

Chapter 5
Using Logic fun
tool. You can also access this function via other tools by holding
down the ç (Mac) or A (Windows) key.
Velocity Tool
In the Matrix editor, you can use the V tool to change the velocity of notes.
5.3 Window Functions
The basic functions of the Logic fun windows are the same as
those in other Macintosh, and Windows application programs.
However, the display options in Logic fun’s windows are far
more extensive.
In Logic fun, you can open different combinations of windows
(even several of the same type) and adjust each one individually. All open windows in a song are constantly updated. This
means that the windows update to follow the song position.
Also, any alterations that you make in one window immediately
update the display of all the other windows you are working
with.
Working with Windows
Opening and closing Windows
All Logic fun windows can be opened via the Windows main
menu. After each menu item you are given the relevant key
command, which allows you to open the window without using
the mouse. You can open as many of the same type of window
as you like.
Every time you use the Windows menu have a quick look at the
key commands—that way you will soon memorize them. You
may also define your own personal key commands.
Emagic
76
Logic fun
Tip
Page 81

Window Functions
r
You close windows by clicking on the close symbol in the top
left (Mac, key command: Cw) or right (Windows, key
command: A£) of the windows.
If you hold down the O key as you click, all the windows of the
active song will be closed.
Setting Window Size
You adjust window size by pulling the lower right-hand corner
of the window, as with any window in the Finder.
As is usual for Windows, you can change window size by positioning the mouse over a Window edge, or corner and pulling.
Maximizing window size
The windows maximize button, in the upper right corner of the
window, toggles the window between its maximum size, and
the size it was before you clicked on the button (Windows >
Zoom Window).
Selecting the Working Area
Scroll Bars
The scroll bars are situated along the right and bottom edges of
a window, if you can only see one section of the working area in
either the vertical or horizontal dimension.
TM
TM
You can move the visible section by clicking the arrows or grabbing and dragging the scroll slider. There are two things to keep
in mind:
The size of the scroll slider in relation to the size of the entire
•
scroll bar corresponds to the size of the visible section in relation to the overall size of the window,
the visible section changes as you move the scroll slider.
•
User Guide
Version 4.1
77
Page 82

Chapter 5
Using Logic fun
X/Y Element
The X/Y element is situated at the bottom left corner of the
window. By grabbing and dragging it you can move the horizontal and vertical window section, as if you were dragging both
scroll bars simultaneously.
Page Scrolling
Use the key commands Page Up, -Down, -Left and -Right to scroll
one page up, down, left or right, as if you had clicked in the grey
region above / below the vertical scroll bar, or to the left / right
of the horizontal scroll bar.
X
The key commands Page Top, -Bottom, -Left most and -Right most
take the visible section of the working area to the top, bottom,
left or right, just as if you had grabbed one of the scroll sliders,
and moved it to one of its extreme positions.
Zooming
The telescope-shaped zoom symbols in a window are used to
zoom in and out of the working area display. Clicking the
smaller side of the telescope symbol reduces the size of the
objects in the display, allowing you to see more objects in the
same space (zoom out). Clicking the larger side enlarges the
objects in the display (zoom in). In some windows, only one
telescope is available, and this then handles both horizontal and
vertical zooming simultaneously.
While “zooming”, the top left selected object is kept in the
visible region, whenever possible.
Zooming Selectively
Zooming In On One Section of the Screen
To enlarge a section of the screen to the size of the whole
window, use the Zoom tool to “rubber band” the section you
want. You can do this more than once.
X
78
Emagic
Logic fun
Page 83

Window Functions
r
Reverting to the Previous Zoom Setting
Click on the background with the Zoom tool. This will return
the zoom to the previous setting. If you have used the Zoom
tool multiple times, then each click on the background will take
the zoom back one step, until you reach the original zoom
setting for the window.
You can call up the Zoom tool functions with any other tool
(other than the pencil) by holding down the ç (Mac) or A
(Windows) key. The pointer will display the previous tool, until
you press the mouse button. As long as the button is pressed, it
will display the Zoom tool.
Adjusting the Size of the Window Elements
If you move the mouse over the top left corner of the Arrange
area, the mouse pointer turns into a crosshair. By dragging it,
you can now adjust the size of the bar ruler, Arrange area, and
Track list. You can also adjust the window elements in the Score
and Matrix Editors using the same method.
Menus
On Windows, Logic fun offers many different menu options,
depending on which window is currently active. Logic fun
follows the standard Windows convention of offering a Main
program window that contains any other local windows. All
menu items are displayed along the top of the Main window,
and the available menu items will change, depending on which
local window is currently active.
On Macintosh, most of the functions are not found in the main
menus, but appear as local menus. These are always in the
menu bars of the Logic fun windows where they are required.
User Guide
Version 4.1
TM
79
Page 84

Chapter 5
Using Logic fun
Key Commands
Some menu functions can be accessed via keystrokes or combinations of keystrokes. The keys (or combinations thereof) are
shown on-screen next to the menu entries.
Please note that you may assign practically any function to any
key you like using the Key Commands window.
Menu Options with “…” in their Title
Three periods, like this: …, next to the menu function title
indicate that the entry does not activate a function immediately, but instead opens a dialog box.
Dialog Boxes
In Dialog boxes, you can hit the highlighted button by pressing
the R key, or by clicking with the mouse.
As is typical in Windows, you can toggle from button to button
with the JK cursor keys.
Window Types
You can open as many windows as you want, including several
of the same type. Even though the contents of all the windows
are constantly updated, only one of the windows ever has the
status of being the “top”, or “active” window. This is the
window which is in the foreground when several normal
windows are overlapping.
The active window can be recognized by its fully-shaded title
bar. The main distinguishing characteristic of this window is
that key commands only affect this window, and not any of the
others.
The only “floating” window offered by Logic fun is the Transport window. This window will never be obscured by another
window, even if you click on a window behind the floating
Transport.
Emagic
80
Logic fun
Page 85
Window Functions
r
Relationships Between Windows
The two buttons at the top left of a window (shown here),
determine its relationship to the song position (Catch), or to
other windows (Link).
Catch
The Catch function means that the visible section of a window
follows the song position as the song plays.
If the button with the walking man on it is lit (i.e. if it is blue),
the window’s display follows the song position as the song
plays. If the button is not lit, the display does not update, even
when the song position line moves past the right edge of the
visible portion of the window.
Automatic Catch Disabling
If you move the visible section manually, Catch is automatically
switched off, so that the new section you have chosen doesn’t
then disappear, as the display is updated to the song position
line.
Autocatch
The function Enable Catch when Sequencer starts (Options >
Settings > Global Preferences…) always enables Catch mode
whenever you press play or pause.
Link
Clicking on the link button activates Link mode. This means
that the window always shows the contents of the object
selected. Selecting a different sequence in the Arrange window
will cause the display of the linked editor to switch to that
sequence.
User Guide
Version 4.1
81
Page 86

Chapter 5
Using Logic fun
5.4 Selection Techniques
Whenever you want to carry out a function on one or more
objects, you have to select the object(s) first. This applies to
arrange objects and individual events alike. Selected objects
are either highlighted, or will flash (in the Score editor).
The selection status of an object applies to all windows. An
object selected in one window will also be selected in all other
windows that display that object. Changing the top window
doesn’t affect the selection (as long as you don’t click on the
background, which deselects everything. Be sure to click on
the window’s title bar).
Selecting Individual Objects
Individual objects may be selected by clicking on them, and
deselected by clicking in the background, or by selecting
another object.
Selecting Alphabetically
The T key selects the next alphabetical object. In the Arrange
window pressing any letter key selects the first object whose
name begins with this letter, providing there is no Key
command assigned to this key.
Selecting Several Objects
To select several non-contiguous objects, hold down S as you
click them. As you click on subsequent objects, the previous
selections are retained. This also works with horizontal or
rubber band selection.
Horizontal Selection
To select all objects in a track, click on the track name in the
Track list. In the same way, you can select all notes of a certain
pitch in the Matrix editor by clicking the relevant key on the
screen keyboard.
Emagic
82
Logic fun
X
Page 87

Edit Operations
r
In Cycle mode, the above selects only the events within the
Cycle zone.
“Rubber-Banding”
To select adjacent objects, click on the background and drag a
“rubber band” over them.
All objects touched, or enclosed by the rubber band will be
selected.
Toggling the Selection Status
When you make any selection (including by rubber band or
horizontal selection), holding down the S key at the same
time will reverse the selection status of the objects (Toggle Selec-
tion).
Selecting All Objects
To select all objects, select Edit > Select All.
Deselecting All Objects
You can deselect all objects by clicking on the background or
using the key command Deselect All.
X
X
X
5.5 Edit Operations
The edit menus for Logic fun’s various windows all take the
same form. The first item is Undo. Below Undo are the typical
clipboard functions(Cut, Copy, Paste) and at the bottom the
selection command Select All.
Undo
Undo allows you to reverse the previous edit. In Options >
Settings > Global Preferences, you can disable the warning
message that normally appears when you activate Undo, by
checking the Disable safety alert for Undo box.
User Guide
Version 4.1
X
83
Page 88

Chapter 5
Using Logic fun
The key command for Undo is Cz (Mac) or çz
(Windows).
The Clipboard
The clipboard is an invisible area of memory into which you cut
or copy selected objects, so that you can paste them to a different position.
The clipboard is independent of any particular song, which
means you can use it to exchange objects between songs.
Cut
All selected objects are removed from their current position and
placed in the clipboard. The previous contents of the clipboard
are overwritten in the process (Cx (Mac) √x (Windows)).
Copy
A copy of all selected objects is placed on the clipboard. The
selected objects are also left in place. Here too, the previous
contents of the clipboard are overwritten (Cc (Mac) √c
(Windows)).
X
X
Paste
All objects from the clipboard are copied to the top window.
The clipboard is not erased in the process (Cv (Mac) √v
(Windows)).
The contents of the clipboard are added at the current song
position (if they are events or arrange objects). The song position is incremented by the length of the pasted objects.
In the Arrange window, the contents of the clipboard are pasted
to the selected track. If events are pasted in the Arrange
window, either a new sequence is created for them, or the
events are added to a selected sequence.
Any objects that existed previously are unchanged.
Emagic
84
Logic fun
X
Page 89

General Functions of the Editors
r
Clear
With Edit > Clear any selected objects are erased. Clear has no
effect on the clipboard and is the same as pressing the B key.
5.6 General Functions of the Editors
Control Output via MIDI
Switching on the MIDI Out button causes MIDI events to be
output when they are added, selected, or edited. This allows
you to audibly monitor every edit, whether you are scrolling
through the Event List (automatic selection) or transposing a
note.
Automatic Scroll Functions
… scrolling to the Song position
The button with the walking man on it activates the Catch
function, which means that the window view will always show
the current song position.
X
… scrolling to the selected event
The key command Scroll to Selection allows you to automatically
move the window, so that the first of the currently-selected
events is visible.
Deleting Events
The basic techniques are the same as for deleting sequences:
the B (delete) or ∂ key deletes all selected events,
•
the Eraser also deletes all selected events, and any events
•
that you click with it (whether previously selected or not).
User Guide
Version 4.1
X
85
Page 90

Chapter 5
Using Logic fun
Changing Display Levels in Score
In the Score Editor, double-clicking on the background takes
you to a higher display level. Unlike the other editors, in the
Score Editor individual events can also be edited in higher
display levels. Double-clicking on a staff (at an empty point)
takes you back to a lower display level.
Don’t worry if all this sounds a bit confusing. In fact, the whole
process of changing levels is much easier to grasp if you simply
try it yourself. Read first, then experiment with the various
editors in one of the Tutorial songs.
5.7 Key Commands
You can activate all Logic fun’s functions via key commands.
The Key Commands window is where you assign key
commands to the keys.
Whenever this manual mentions a key command, this refers to
a command which can be called up by a keystroke. This allows
you to completely customize Logic fun to suit your own working style.
If any function described in this manual is also available via a
key command with the same name you will see this symbol.
Your personal key assignments are stored (together with the
settings of the Preferences pages) in a file called
“Logic Preferences” in your Macintosh’s System folder (in
•
the Preferences folder, to be precise).
“Logic.PRF” in your PC’s Windows folder
•
You should:
make a backup of this file at another location on your hard
•
disk;
make a floppy disk backup of it in case you need to use a
•
Logic fun system on another computer.
Emagic
86
Logic fun
Important!
X
Page 91

Key Commands
When you install updates to your version of Logic fun, your
personal key commands will remain unaltered.
Special Keys
Some keys have special functions:
The modifier keys S, ç, and A (Windows), or ç, O,
•
and C (Mac) can only be used in conjunction with other
keys.
The backspace key (D) has the fixed function “delete
•
selected objects”. It can only be assigned a function in
conjunction with the modifier keys.
The + and _ keys increase or decrease any selected para-
•
meter value in single units. However, they can be assigned
different functions which overwrite this function.
Key Commands Window
r
The Key Commands window can be opened by selecting
Options > Settings > Key Commands.
All the available key commands are listed on the right side.
They are grouped according to the following categories:
Global commands
•
Functions affecting all windows (various windows)
•
User Guide
Version 4.1
X
87
Page 92

Chapter 5
Using Logic fun
Functions affecting Arrange Window and all Editor windows
•
(Arrange various sequence Editors)
Functions for the Arrange window
•
Functions for the Score Editor (Score window)
•
Functions for the Event List Editor (Event window)
•
A symbol in front of the description of the function indicates
that the function is only available as a key command. To the left
you can see the currently assigned key.
Assigning a Function to a Key
Click the Learn Key button.
•
Select the desired function with the mouse.
•
Press the desired key, if necessary together with the desired
•
modifier key(s) (S, ç, and A, or ç, O, and C).
If you want to make another assignment, repeat steps 2 and
•
3.
Deactivate Learn Key!
•
Deleting Assignments
Click on Learn Key.
•
Use the mouse to select the function whose keyyou want to
•
delete.
Press D.
•
To erase more assignments, repeat the second and third
•
steps.
Deactivate the Learn Key button.
•
Checking the Function of a Key
Deactivate Learn Key, and press the key whose function you
want to check. The function will be automatically selected, and
displayed in the middle of the window.
Emagic
88
Logic fun
Page 93

Song Administration
r
Filtering the Display
You can use the Hide Used and Hide Unused buttons to hide all
the used, or unused key commands.
All the other Key Commands window functions remain available for you to use.
Finding Key Commands
Due to the large number of possible key commands, it can
sometimes be difficult to find a particular one. For this reason,
Logic fun offers a Find function, which lets you search for a key
command by typing in its name (or a part thereof).
Simply click in the white space to the right of the Find: button
and enter the string of characters you’re searching for. The
window will display only those key commands containing that
character string (plus the selected command, even if it doesn’t
contain that string) if you then click find or return R.
The Key Commands window remains active, even in Find
mode; you don’t have to leave this mode to continue making
assignments.
The Find function is not case-sensitive, it makes no distiction
between upper, and lower case characters.
The Hide Unused and Hide Used buttons work in combination
with Find. This means you must switch off both in order to see
all the commands that fit the search criteria, regardless of the
commands’ current assignment.
The Find: button switches Find mode off and on. The button is
automatically activated if a string of characters is entered.
5.8 Song Administration
All events, other objects and settings (apart from the Preferences and key commands) are components of a song. Songs are
handled in the File menu.
User Guide
Version 4.1
89
Page 94

Chapter 5
Using Logic fun
New Song
When you first launch Logic fun, it opens a preset standard
song. After just a short time, you will have learned how to make
your own adjustments to the song settings, and will no doubt
want to keep these settings for use in future songs. The best
way to do this is to set up your own “default song”, and save it
in the same folder as the Logic fun program, calling it “Autoload”.
Autoload Song
If there is a song in the Logic fun folder called “Autoload”,
Logic fun will automatically load it when it is booted up. When
you’re ready to start work on a new song, simply save the Autoload somewhere else under a new name using File > Save as…
and begin. This file can then form the basis for your new song.
Creating a new Song
If you select File > New, Logic fun checks to see if an “Autoload” song is available and opens it automatically if it is. If not,
a new default song is created. If an “Autoload” song is available,
you will be asked if another copy of the Autoload song should
be made (to avoid accidentally erasing it) or if a completely new
default song should be created.
X
Opening Default Song
If you hold down the O (Mac) or ç key (Windows) while
selecting File > New, a new default song called “Untitled” will
be opened.
Loading a Song
You use File > Open to bring up a typical file selection box.
Emagic
90
Logic fun
X
X
Page 95

Song Administration
r
Checking/Repairing Songs
If you double-click on the display on the Transport which
shows the remaining number of free events, the memory will
be reconfigured. At the same time, the current song will be
checked for any signs of damage, structural problems and
unused blocks.
If any unused blocks are found—which normally shouldn’t
happen—you will be able to remove these, and repair the song.
Saving Songs
When you select File > Save the current song will be saved with
its current name intact.
If you don’t wish to overwrite the last version of this song saved
under this name (which is what will happen if you just use File
> Save, try using File > Save As…. Here, you can enter a new
name for the song (and select a new directory or even create a
new folder). The next time you save using straight Save, the
new name and file path will be used.
Closing a Song
File > Close closes the currently active song. If you have made
any changes since the last time you saved, Logic fun will ask
you if the song should be re-saved before closing, to preserve
the changes you have made.
Quitting the Program…
Choose File > Quit to leave the program. If you have not yet
saved your last changes, you will be asked if you want to do so
before quitting (press R to save).
X
X
X
User Guide
Version 4.1
91
Page 96

Chapter 5
Using Logic fun
92
Emagic
Logic fun
Page 97

r
Chapter 6
Transport Functions
6.1 Transport Window
The Transport window is a small, floating window in Logic fun,
which contains the controls for operating the playback, cycle,
and other transport functions. The Transport window is called a
“floating window”, because it cannot be obscured by other
windows, it is always on top.
Display Options
You can open the transport window, if it has been closed, by
selecting Windows > Open Transport or çC7.
Indicator Options
If you click-hold on the small downward pointing arrow on the
lower right-hand side of the Transport window, a flip menu will
appear, allowing you to change its layout.
Legend
Here, you can switch on a description of the buttons and
display fields. We recommend that you take advantage of this,
User Guide
Version 4.1
93
Page 98

Chapter 6
Transport Functions
especially in the beginning. This way, you will be able to learn
the ropes more quickly, and avoid errors.
Position Slider
You use this option to activate the “position-slider” on the
bottom edge of the transport window.
The position slider represents the entire length of the song.
With this you can jump to any position in the song almost
immediately, albeit not very accurately. Click on the slider and
hold down the mouse button. When you move the mouse horizontally, the slider will move accordingly. The gray bar tells you
where you are in the song, relative to the entire song length.
The position indicators and the song position line (see below)
are also influenced by this.
Smaller/Larger
The Transport window can be displayed in different sizes,
which you select using smaller/larger. When you start Logic
fun, the Transport field will be opened at its smallest display
size. The parameter Size also allows a direct selection.
Parameter Fields and Indicators
Position Indicators
The position indicators in the Transport window show you the
current song position in two different formats.
The lower portion displays Measure Position, in measures, beats,
diplay format units and clock ticks. How it is divided depends
Emagic
94
Logic fun
Page 99

Transport Window
r
on the time signature, and the Display Format value, which you
can also set in the Transport window (see below). Normally, the
four fields would be (from left to right): measure, quarter notes,
sixteenth notes, ticks.
A tick is the smallest possible subdivision of a measure in which
a sequencer can divide the time axis. In Logic fun a tick is 1⁄
of a note.
Clicking the small gray square button to the right of the indicators sets these to zero.
3840
Position Markers (Locators)
Logic fun allows you to define two locator points. This is analogous to the locator points that can be found on some tape
recorders. They make it possible to automatically go to, or play
certain passages. The locator points, below the position display,
are the cycle locators. With these, you can define a part of the
song to be continuously repeated by Logic fun in cycle mode.
Skip Cycle
When you are playing the song you can skip a passage, which is
useful for trying out the musical effect of various transitions.
Drag out the skip cycle region from right to left in the bar ruler.
If there is already a (normal) cycle region just move the left
locator after the right locator. The skip region is shown as a very
thin strip at the top edge of the bar ruler.
When the SPL reaches the right locator it skips to the left locator (i.e. the “right” and “left” locators swap positions).
Tip
Skip cycle is a quick way of leaving out a passage in an Arrangement, without having to physically delete it from all the tracks,
make a backup, etc. You can also use it when editing, to leave
out those parts of the song which you don’t want to be affected
by the edit.
User Guide
Version 4.1
95
Page 100

Chapter 6
Transport Functions
Tempo
The song tempo is shown in beats per minute (bpm). You can
set the tempo in increments of 1/10000th of a beat, anywhere
from 0.5 to 9999 bpm. The song tempo is then set for the entire
song.
You can make changes to the tempo during the song (ritardando, accelerando), using the tempo list.
Tempo List
In the tempo list, you can insert and edit changes in tempo.
You can enter a tempo event at anyposition. The tempo list
controls the song tempo, and the current tempo is always
displayed in the transport window.
Here’s how to open the tempo list:
Select Options> Tempo > Tempo List from the menu.
•
Here’s how you insert a new tempo event:
1. Set the song position (SPL or transport window) at which
you want to insert the event.
2. Click on the Create button in the tempo list window, or
click on an existing tempo event with the pencil.
Tempo events in the tempo list can be edited or deleted, just as
they would in the event list (see chapter 6.)
Free Memory
This indicator informs you of remaining available memory,
measured in events. If Logic fun warns that there is too little
Emagic
96
Logic fun
 Loading...