

English Manual
Version: 03.01.02

CE Declaration
We:
TerraTec Electronic GmbH, Herrenpfad 38, D-41334 Nettetal, Germany
hereby declare that the product:
DR Box 1
to which this declaration refers is in compliance with the following standards or standardizing
documents:
1. EN 55022 Class B
2. EN 55024
The following are the stipulated operating and environmental conditions necessary for compliance:
Residential, business and commercial environments and small-company environments.
This declaration is based on:
Test report(s) of the EMC testing laboratory
TerraTec® ProMedia, SoundSystem Gold, SoundSystem Maestro, SoundSystem Base 1, SoundSystem
DMX, SoundSystemDMX XFire 1024, AudioSystem EWS
EWX24/96, XLerate, XLerate Pro, Base2PCI, TerraTec 128iPCI, TerraTec 512i digital, TerraTV+, TerraTV
Radio+, TerraTValue, VideoSystem Cameo 600 DV, WaveSystem, TerraCAM USB, TerraCAM USB Pro,
TerraCAM iLook, m3po, Phono PreAmp, MIDI Smart and MIDI Master Pro are registered trademarks of
®
TerraTec
In most cases, the designations used in this handbook for software and hardware are also registered
trademarks and are subject to the relevant regulations.
©TerraTec
Electronic GmbH Nettetal, Germany.
®
Electronic GmbH, 1994-2002. All rights reserved (03.01.02).
®
64, AudioSystem EWS88, AudioSystem
Meticulous care has been exercised in the preparation of all text passages and illustrations in this User
Guide. TerraTec Electronic GmbH and its authors, however, accept no liability, legal or otherwise, for any
errors or the consequences of such errors. We reserve the right to technical modifications.
All text passages in this documentation are copyrighted. All rights reserved. No part of this documentation may be reproduced in any form whatsoever, by photography, microfilming or other process or rendered into a language/form usable by computers without the prior written consent of the authors. All
rights for use and propagation by presentation, radio and television are also reserved.
2 DR Box 1 (English)

Contents
Setup and Connection .......................................................................................................... 4
Unpacking and getting started Quick starting guide...............................................................5
Reception problems? ........................................................................................................5
Operation on the road...........................................................................................................6
Program selection and station buttons..............................................................................7
A detailed view of the menus ............................................................................................7
Operation with stereo equipment ........................................................................................ 12
Operation with the PC .......................................................................................................... 13
Installation and deinstallation of drivers and software ....................................................... 13
Driver installation under Windows 98 SE......................................................................... 13
Driver installation under Windows ME ............................................................................. 15
Driver installation under Windows 2000 ......................................................................... 17
Installing the DR Box application ................................................................................... 20
Deinstalling the DR Box application ............................................................................... 20
Starting the program .......................................................................................................21
Sound reproduction via PC.............................................................................................. 21
User interface................................................................................................................. 22
Digital recordings with DR Box 1 .........................................................................................25
Timer-controlled recordings ............................................................................................27
Listening to a program while recording........................................................................... 28
“Color Settings” dialog box............................................................................................ 29
Version query................................................................................................................. 30
Audio recordings with standard software ....................................................................... 30
Service at TerraTec.............................................................................................................. 36
DR Box 1 (English) 3

Setup and Connection
Front view
Power: On/Off switch
: 3.5 mm stereo jack headphones connection
Bank: Selection of four memory banks, each with 6 program memory locations
1-6: Selection of program memory location 1 through 6
Cursor buttons: Menu operation, initial state:
p q Program selection within an ensemble
t u Headphone volume control
Rear view
Antenna: BNC connector for antenna band III and L band (1.4 GHz)
USB: USB port for PC connection
Digital Out: Digital SPDIF connection for stereo equipment
Line Out: Analog connection (cinch jack) for stereo equipment
Power: 12 V/500 mA stabilized, + on internal conductor
4 DR Box 1 (English)

Unpacking and getting started Quick starting guide
Are you the type of customer who first examines everything with curiosity, intuitively connects
the parts, and consults the manual only after reaching a state of helplessness? We recommend the following steps for a quick start:
· Connect the headphones to the headphone jack.
· Place the antenna with magnetic base on the unit and connect it to the rear of the unit.
· Connect the power supply to the 12 V socket at the rear of the unit and to supply voltage.
· Turn it on! (“Power”)
Four red LEDs next to the “Bank” switch should light up and, except for one, extinguish again.
Next, start the station search by pressing the menu button three times within 3 seconds, followed by t for “Band III” receiving range or u for “L band” receiving range. The unit starts to
play automatically and displays the name of the station chain as well as the current program.
The t and u buttons are used to adjust the headphones volume and p q to scroll through
the programs.
Reception problems?
If reception is poor, only a channel number (number and letter, such as 12D) is displayed at
the end. The unit remains silent since there is no noise in Digital Radio. In this case, you
should find a better location for your antenna by first placing it near a window. If the reception
was previously poor but present, the unit should play. Otherwise, the station search must be
repeated. The search is started as described above by pressing the menu button three times
within 3 seconds, followed by t for “Band III” receiving range or u for “L band” receiving
range. If you still do not have reception, please check to see if your region is serviced by Digital Radio. If your dealer does not have any information about the reception in your region, you
can check online (in English) at http://www.worlddab.org (menu item “DAB worldwide”) and,
in particular for Germany, at http://www.digitalradio-info.de/verbreitung/, how far the expansion of stations in your area has advanced and which programs are available.
Whether an adequately strong signal was received for decoding purposes, can be checked
using the information page (press menu once): The first value in the second row indicates the
reception quality:
DR Box 1 (English) 5

Q1-Q2 should allow for perfect reception.
Q3-Q4 indicates weak reception, which may cause sound interferences.
However, it is possible to have perfect reception with Q3.
Q5-Q6 indicates that a signal is present, but that it is not sufficiently strong for decoding
purposes.
Q7 indicates absolutely no reception.
The bars to the right of the quality number also show the reception quality – the more, the
better. These bars can be used to align the antenna more easily than using the Q value. Adjustment by ear is not possible with Digital Radio since it operates practically interference-free
at a certain threshold – like all digital systems – and not at all below that threshold. A Q3
reception quality with indoor antenna may, therefore, lead to intermittent disruptions while
walking back and forth in front of the antenna. Placing the antenna at a higher location – such
as on a closet – may solve this problem.
Operation on the road
Because the DR Box 1, antenna and magnetic base are so compact, you can always take the
unit with you on a trip. Please connect only the unit's power supply. Damages from operation
with unsuitable power supplies are not covered under warranty. It is possible to operate the
unit using the 12 V car supply voltage via the cigarette lighter; the unit is protected against
overvoltages that may occur in the car supply network.
On principle, Digital Radio is well-suited for reception in moving vehicles. Within a service
area, all stations utilize the same frequency so that it is possible to drive from, for example,
Sheffield to Hull without having to set up a new station. But if you are traveling from Yorkshire
to Lancashire, or if you want to select a local city program, you must first perform a station
search. The unit does not recognize new stations by itself.
To avoid surprises – e,g, the unit “starts blaring” or remains silent – the headphones volume
is always preset to a medium value (42 of 60) when the unit is switched on. Use the t and u
buttons to adjust the headphones volume.
6 DR Box 1 (English)
Program selection and station buttons
After the station search, you can use the p and q buttons to scan the located stations. Each
station chain (“ensemble”) usually contains five to eight stations. A good service with several
ensembles can easily comprise 30+ stations; some of them may be more suitable to your
taste of music or need for information than others. 4 x 6 program memory locations are avaliable for this purpose. Press Bank to select one of the four groups; the unit switches over only
if you also press a program button – until then, however, only the corresponding Bank LED is
flashing.
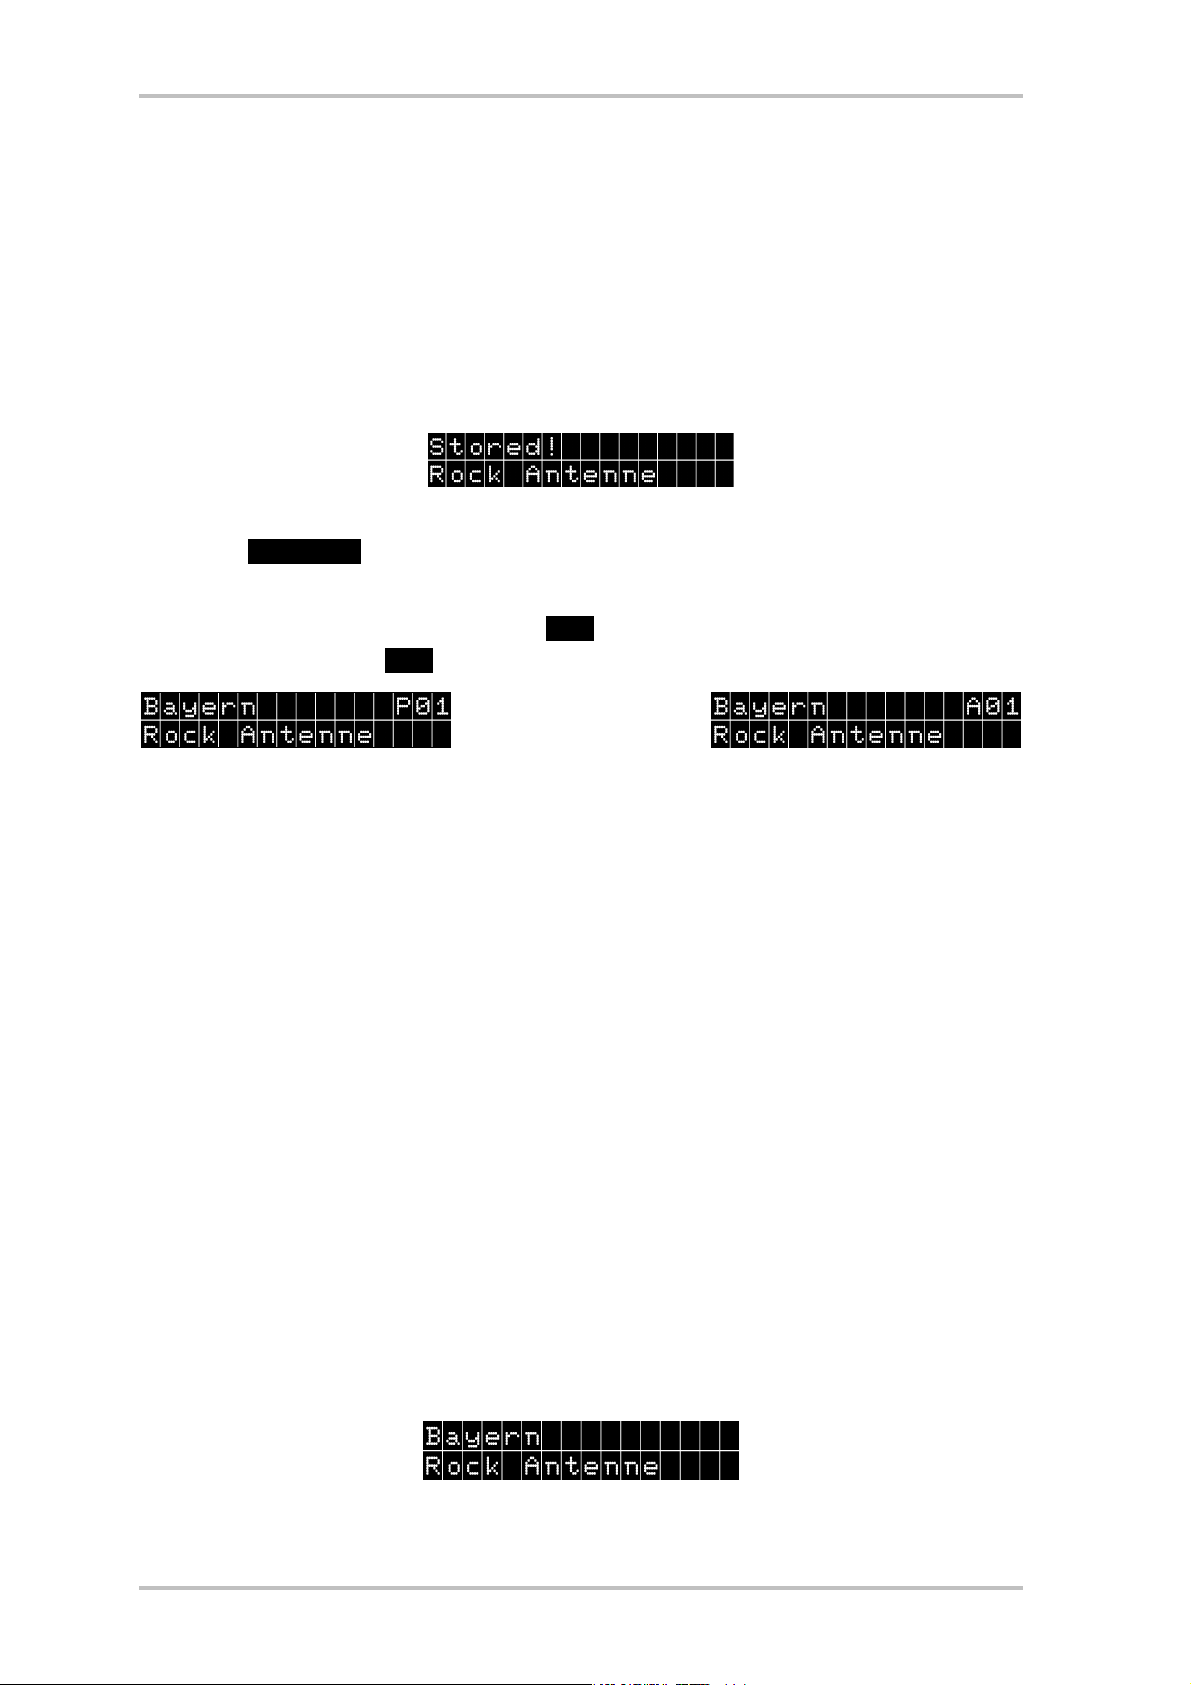
To store a current station search, press and hold the corresponding program button (2–5 seconds) until Stored! appears on the display.
If you are listening to a stored program, it is indicated on the display during subsequent
scanning; for example, instead of showing P07, the unit displays the bank (A through D) and
the memory location, e.g. A02
Program 01 of the ensemble, but not
stored.
Program stored at Bank A and memory loca-
tion 01.
If you are able to receive several program packages at one location (“ensembles”), you can
call them up sequentially using station search and then scan the stations in the package using p and q. If the station search in the respective band (III or L) displays the same package
again as the one at the start, you have discovered all stations. If you store at least one program from an ensemble, you can later switch more easily between program packages instead
of using the station search function.
A detailed view of the menus
To toggle between the three menus of the unit, press the Menu button at brief intervals. The
unit returns to the default setting if no buttons are pressed for approximately ten seconds,
with the exception of menu item 1, the information page.
Default setting
After switching the unit on, it automatically activates the default setting: The first display row
shows the name of the program package (“ensemble”) on the left and the memory location of
the currently selected station on the right. The second row shows the name of the selected
station.
DR Box 1 (English) 7
Information page (first menu level)
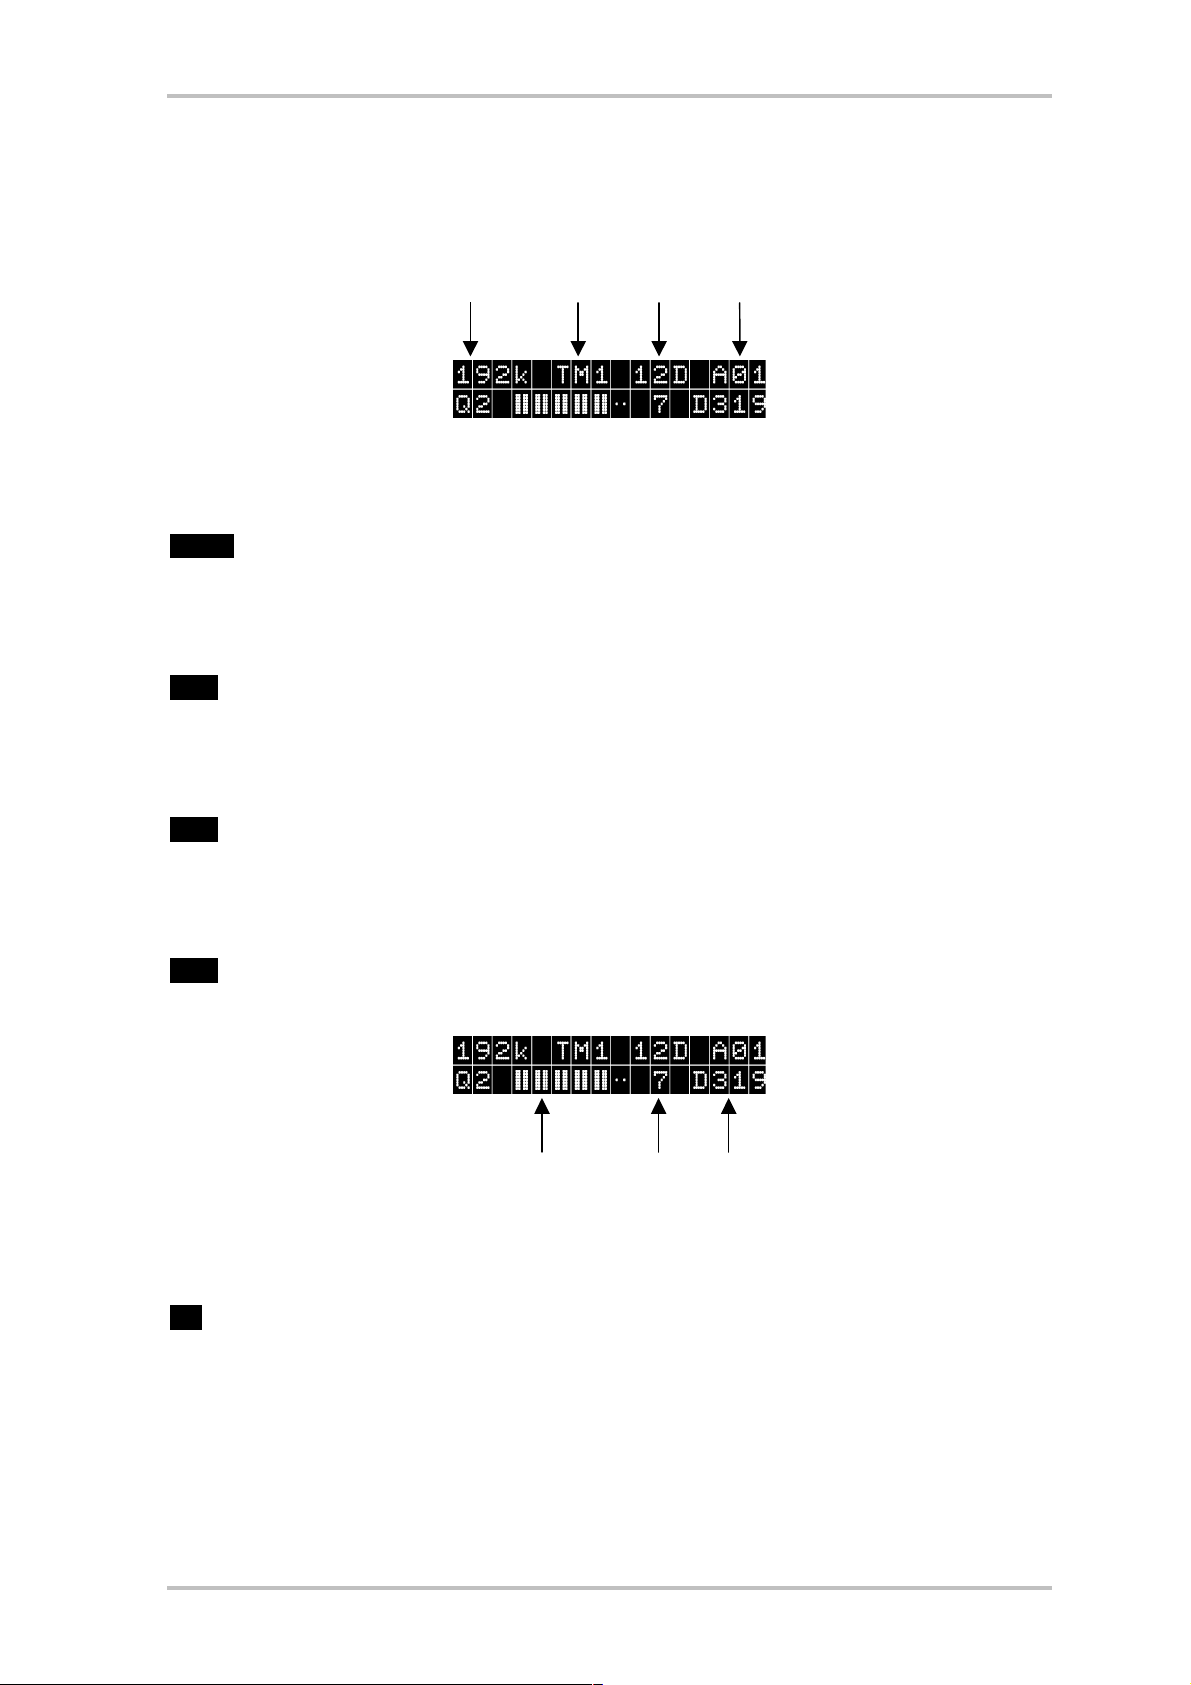
The information page first shows a confusing number of values, but it is a great help for insufficient reception quality. It displays values such as
bit rate, transmission type, reception channel, memory channel
The values in the first row are:
192k is the bit rate at which the current program is transmitted. In this example, the bit rate
is 192 kilobit per second – a relatively high value for Digital Radio which guarantees HiFi stereo reception. Discriminating music is transmitted at this rate. As a rule of thumb: the higher
the bit rate, the higher the sound quality.
TM1 is the transmission mode (1). TM1 through TM4 are available and distinguished through
the internal coding of the signal. Here, the lower mode numbers are located in Band III and
are more immune to interference, while the highest value TM4 does away with interference
immunity the most and, therefore, is used only for satellite and cable reception.
12D is the current reception channel. In VHF television band III, each television channel was
divided into four Digital Radio channels, which explains the channel designations 5A – 5D, 6A
– 6D through 12A – 12D. Only the last channel (13) features 6 subchannels which include 13E
and 13F. In the L band, the unit counts LA through LM.
A01 is the previously selected memory channel. If the station was not saved anywhere, this
field may show P02 for the second program in the currently selected ensemble.
reception quality, status indicator, station identification
The values in the second row are:
Q2 - The Q number represents reception quality with values from 1 to 7:
Q1 and Q2 should always allow for flawless reception: everything should be perfect
Q3 and Q4 indicate weak reception, which may cause sound interferences. Q3 should allow
for flawless reception that may, however, lead to intermittent disruptions during movement in
the room. For this reason, it is recommended experimenting with the placement of the antenna.
8 DR Box 1 (English)
Q5–Q6 indicate that a signal is present (station is located), but that it is not sufficiently strong
for decoding purposes.
Q7 indicates absolutely no reception, that is, a faulty antenna connection, location in an underground parking garage or simply no Digital Radio service in the area in which you are currently located. This may still be the case in remote and rural areas. In mountainous areas,
however, Digital Radio shows significantly better results than regular FM reception since multipath reception due to reflections from mountain ranges does not cause any interferences.
The bars to the right of the quality number also show the reception quality – the more, the
better. These bars can be used to align the antenna more easily than using the Q value. Each
Q value corresponds to two bars, from all bars for Q1 to no bars for Q7. Unfortunately, adjustment by ear is not possible with Digital Radio since it operates practically interference-free at
a certain threshold – like all digital systems – and not at all below that threshold. A Q3 reception quality with indoor antenna may, therefore, lead to intermittent disruptions while walking
back and forth in front of the antenna. Placing the antenna at a higher location – such as on a
closet – may solve this problem.
7 - A single 7 represents a proper synchronized reception – a different value should normally
not appear here.
D319 – is the station identification, which is coordinated throughout Europe. For example,
the Bayern 1 program (which is presently not transmitted on Digital Radio) is D311, Bayern 2 is
D312 up to Bayern 5 which is D315. The special Digital Radio program of the “Bayrische Rundfunk Bayern digital” is D316 and the “Rock-Antenne” as the second program of “Antenne
Bayern” is D319. The regular program of “Antenne Bayern” is D318 and was even broadcast on
DAB during the initial phase of Bavarian Digital Radio.
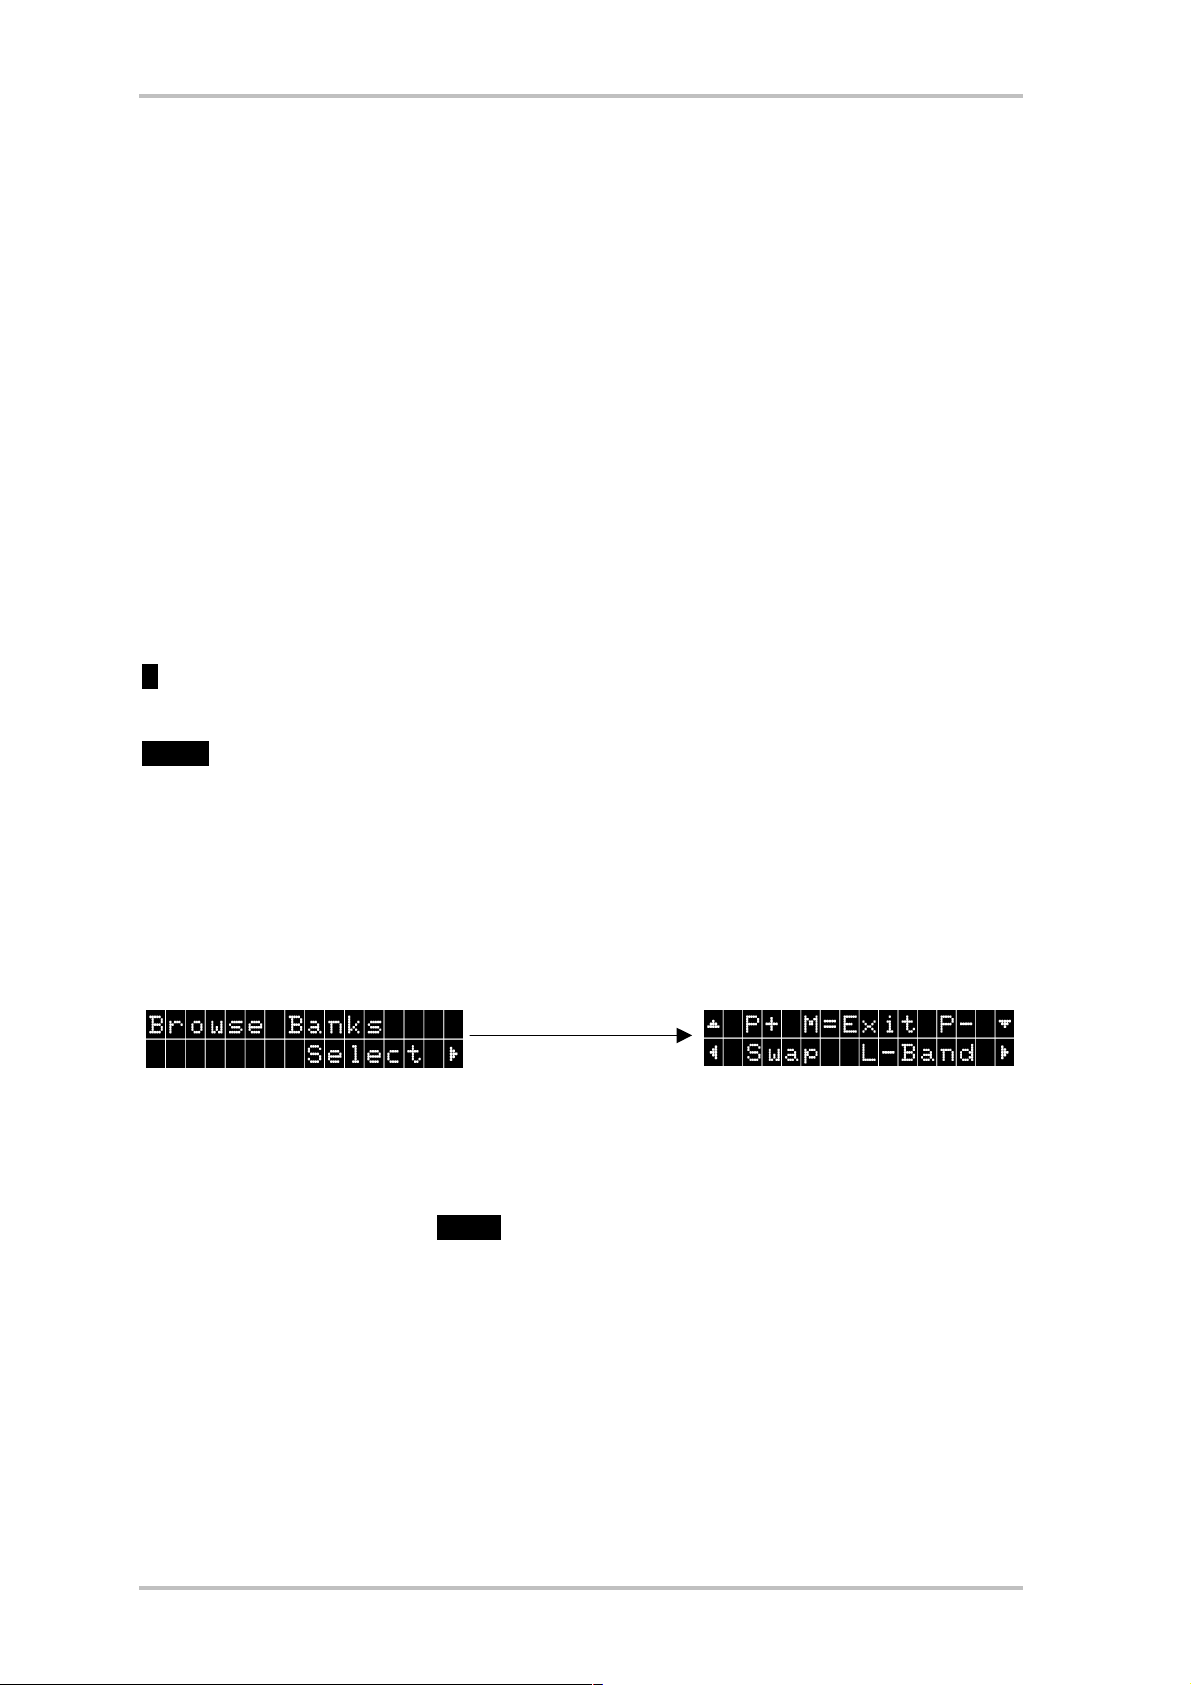
Memory menu (second menu level)
Pressing “Menu” again on the information page (first menu level) and pressing u once displays the memory menu.
Using p and q, you can call up all of the 24 stored stations with their names.
To change the assignment, use Swap to have two stations swap their memory locations.
To do so, press t for the first one, use p and q to search for the station to be swapped, and
press t again.
DR Box 1 (English) 9
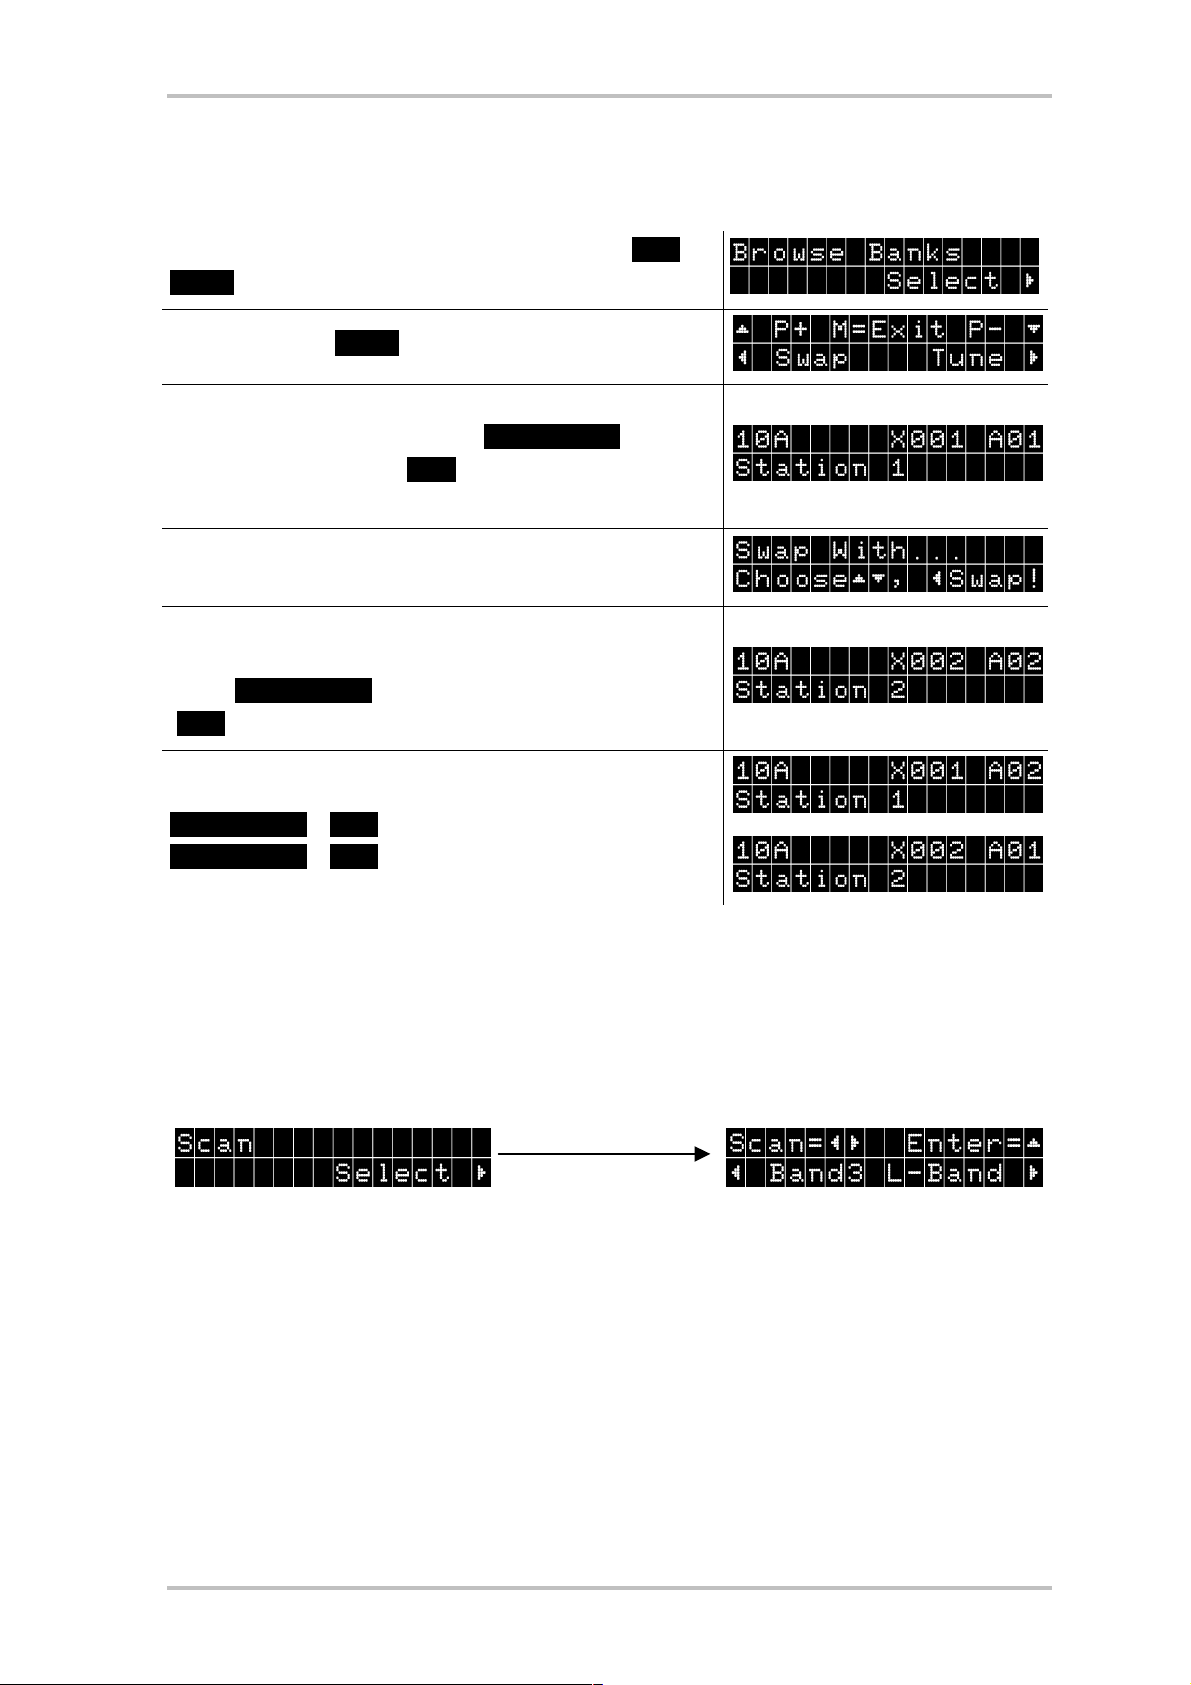
Example:
You would like to swap the memory locations A01 and A02.
To do so, press the Menu button 3 times. Choose Se-
lect by pressing u.
Press t to select Swap.
You can now use p and q to select the first program to
be swapped. The example shows Station 1 at location 1 of memory bank A (A01). Confirm the selection
with t.
The following display shows information about the next
steps.
Use p and q again to select the program which will take
on the memory location of the first one. The example
shows Station 2 at location 2 of memory bank A
(A02). Confirm the selection again with t.
The memory locations have now been swapped.
Station 1 – A02
Station 2 – A01
Press u to display the current memory location, and press “Menu” to leave the menu and
return to normal operation.
The unit will also automatically return to normal operation after a certain period of time from
this level and all other levels.
Station search (third menu level)
Pressing Menu 3 times, followed by u, brings up the station search menu.
Press t to start a station search in band III, press u to do the same in the L band.
Press p to manually enter a receiving channel.
Here, p is used to toggle between band III and L band, t and u to select the desired channel, such as 12D (in band III) or LB (in the L band), and q to switch the receiver to this channel. This allows for specific selection of channels that were not recognized by the station
search.
10 DR Box 1 (English)
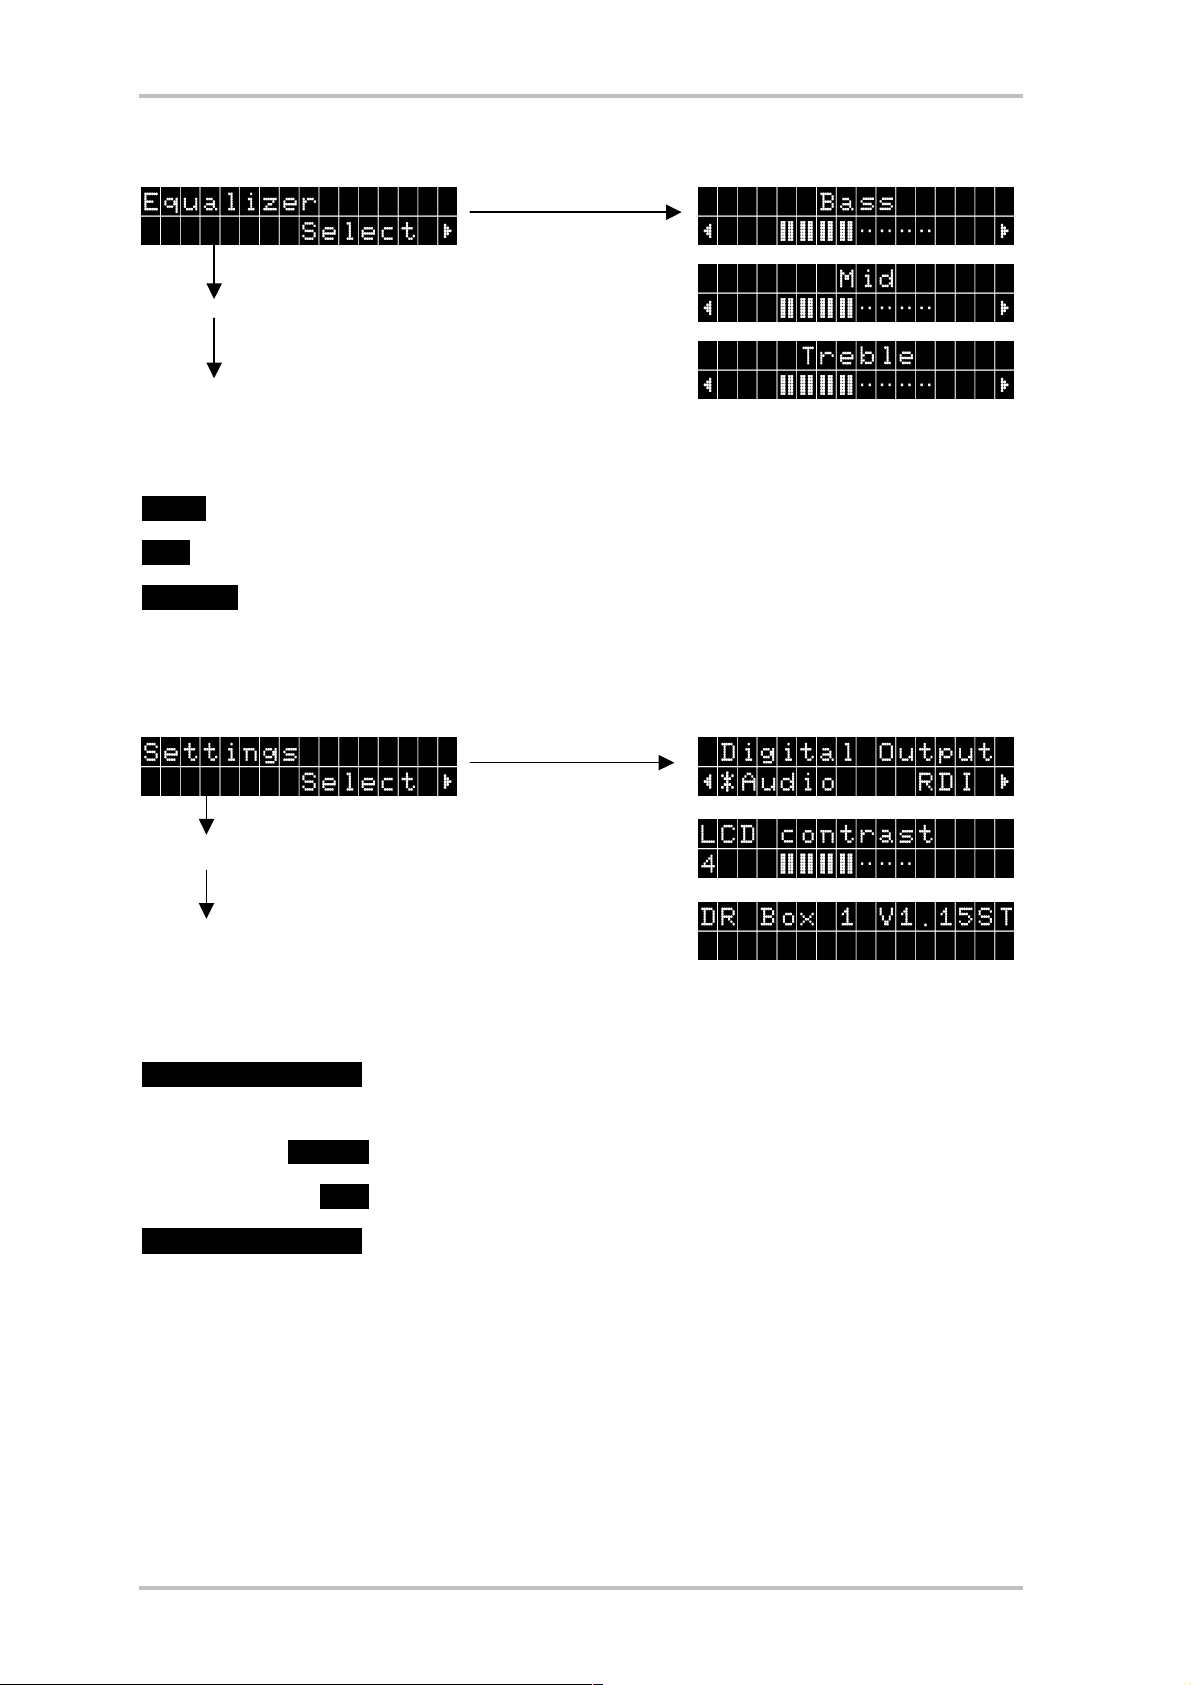
Equalizer (fourth menu level)
After pressing u once and then using t and u, this option allows for adjusting individual
settings for:
Bass (low-frequency range),
Mid (mid-frequency range), and
Treble (high-frequency range).
Press “Menu” to advance. Press q to reset the respective level to its original setting.
Fifth menu level: Settings
Pressing u once displays the settings of the unit. Press “Menu” to jump to the different settings.
Digital Output: t and u can be used here to select the type of data to be fur-
nished by the digital output:
Audio pure audio data for the stereo equipment, or
RDI the complete digital data for optional add-on equipment
LCD contrast: Press t and u to adjust the contrast for the display of your DR
Box 1.
The third item shows the version number of DR Box 1 for PC-independent operation.
DR Box 1 (English) 11

Operation with stereo equipment
Listening to Digital Radio over DR Box 1 with headphones while traveling is already pure enjoyment. But things become a lot more interesting if DR Box 1 is connected to stereo equipment. Even a compact stereo system provides sufficient space for the small unit, and DR Box 1
can be connected at the rear analog via common cinch connectors, or digitally with 48 kHz
scan rate via an optical SPDIF fiber optics connection. The latter variant eliminates all interferences such as hum interferences, and even potential channel crossings (left/right). Unfortunately, today's common amplifiers do not distribute the digital signal to connected equipment. Hence, if you decide to record a Digital Radio broadcast on cassette or MD, an additional analog connection is required; otherwise, either amplifier or recording device will provide no data. Before recording directly from Digital Radio using an MD or CD recorder, the recorder must be able to change its scanning frequency: while MD and CD use a scanning frequency of 44.1 kHz, Digital Radio uses 48 kHz. This applies to all contemporary devices.
Operating DR Box 1 with stereo equipment is identical to operating it while traveling – with
one exception: The volume control is without function – it merely operates on the headphone
output, which may be used independently from the connected equipment.
12 DR Box 1 (English)

Operation with the PC
A PC enables the full potentials of DR Box 1: Digital Radio offers unheard of possibilities!
To do so, DR Box 1 only needs to be connected via USB. Not only does the device become
completely “remote-controlled,” but even audio data is now sent digitally via USB interface –
headphones, cinch or S/PDIF do not have to be connected with the PC or the sound card. This
also offers the opportunity of listening to a program while recording another program from the
same ensemble.
Installation and deinstallation of drivers and software
Driver installation under Windows 98 SE
Please close all applications running in the background and insert the enclosed installation
CD in your CD-ROM drive. If autoplay starts, close it.
To install the drivers, connect DR Box 1 with your PC and switch the box on. Windows reports
that it found a new hardware device.
Click “Next >” and the following window displays:
Select “Search for the best driver for your device (Recommended).”
DR Box 1 (English) 13

Select the “CD-ROM drive” option in this window and click “Next >”.
Confirm the next window by clicking “Next >”.
Conclude the driver installation by clicking “Finish.”
If this message appears, insert the Windows 98 SE – Installation CD in your CD-ROM drive and click “OK”.
Finally, verify the driver installation. For more information, see chapter “Verifying driver installation under Windows 98 SE / ME”
14 DR Box 1 (English)

Driver installation under Windows ME
Insert the supplied installation CD in your CD-ROM drive. If autoplay starts, close it.
To install the drivers, connect DR Box 1 with your PC. Windows reports that it found a new
hardware device.
Select “Automatic search for a better driver (Recommended)”.
Conclude the driver installation by clicking “Finish”.
DR Box 1 (English) 15

Verifying driver installation under Windows 98 SE / ME
Verify the installation by opening the device manager. To do so, click “Start” / “Settings” /
“Control Panel” / “System”.
DR Box can be found under “Sound, video and game controllers”.
16 DR Box 1 (English)

Driver installation under Windows 2000
Please close all applications running in the background and insert the supplied installation
CD in your CD-ROM drive. If autoplay starts, close it.
To install the drivers, connect DR Box 1 with your PC and switch the box on. Windows reports
that it found a new hardware device.
Click “Next”.
Select “Search for a suitable driver for my device (Recommended)”.
DR Box 1 (English) 17

Select only “CD-ROM drives” as the source.
Confirm this window by clicking “Next >”.
Windows 2000 reports that it could not locate a digital signature. A missing digital signature has no
effect on the operation of your DR Box. Confirm the next question on whether to continue the installation
with “Yes”.
18 DR Box 1 (English)
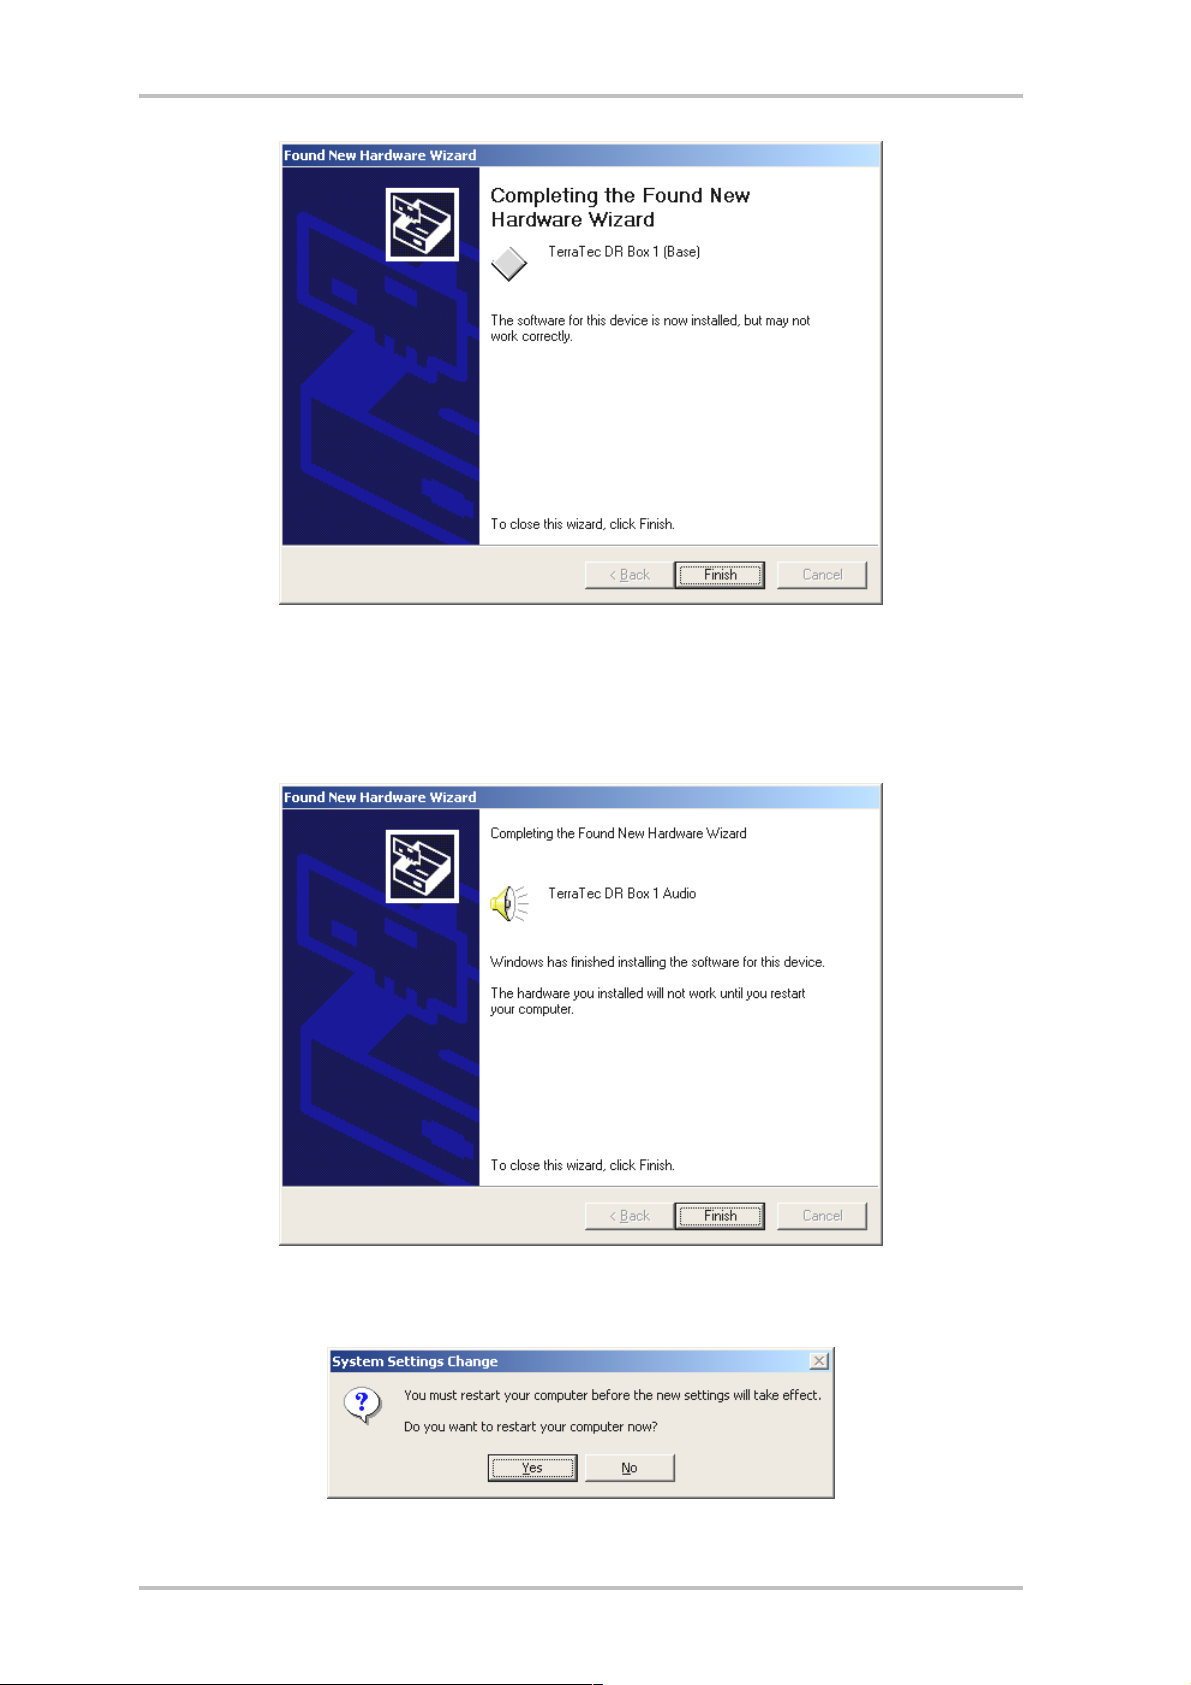
Click “Finish”.
You are once again informed about a missing digital signature. Confirm the question on
whether to continue the driver installation with “Yes”.
Confirm this window by clicking “Finish”.
After successful installation, Windows must be restarted. Click “Yes”.
DR Box 1 (English) 19

Verifying driver installation under Windows 2000
Verify the installation by opening the device manager. To do so, click “Start” / “Settings” /
“Control Panel” / “System”.
DR Box can be found under “Sound, video and game controllers”.
Installing the DR Box application
After inserting the corresponding software CD in your CD-ROM drive, the autoplay function
starts which offers the installation of individual programs.
If autoplay does not start automatically, it may be called up manually. To do so, open Windows Explorer, select the CD-ROM drive and double-click the “autorun.exe” file.
The applications to be installed can now be selected individually. Please remember to install
DirectX first. This allows your system to be updated which is essential for flawless operation
of DR Box 1.
Deinstalling the DR Box application
To deinstall the DR Box 1 application and additional program titles obtained with the purchase of DR Box 1, the following steps should be followed:
Click “Start” / “Settings” / “Control Panel” / “Software”.
The software titles for deinstallation are listed here. Select the corresponding title and click
“Add/Remove...”, which automatically removes the program.
20 DR Box 1 (English)

Starting the program
To listen to Digital Radio via computer, it must be turned on and connected to DR Box 1 via
USB cable. In this case, the display of DR Box 1 changes and shows only the preset headphones volume. The software can be started using the “DR Box” icon on the desktop or clicking “Start”, “Programs” and “DR Box”.
After starting the software, DR Box 1 shows once again the usual display. Please note that not
all functions of DR Box are available for operation with the PC.
Sound reproduction via PC
The headphone connection of DR Box 1 remains functional during operation via PC – you
could also connect your sound card here. But the additional cabling is unnecessary. DR Box
can receive the sound signal directly and in digital form via USB connection, which also allows it to be recorded on the PC. To do so, simply select the “Settings” menu (the two gearwheels icon) and change the audio device from the name of your sound card to Direct Sound
and the name of your sound card. Emulated Direct Sound functions (indicated as “emulated”)
should, however, not be used since they are not powerful enough and could slow down the
system.
DR Box 1 (English) 21

User interface
u
de f g hi
j
t
s
r
q
Recording indicator
d
Recording display
e
Recording button
f
Slide show
g
Reduce window size
h
Station search settings
m
Timer
n
Timer display
o
Station memory
p
Bank selection
q
k
l
m
n
Minimize window
i
Close program
j
Volume control
k
Sound on/off
l
The software appears as a small window which occupies very little desktop space. Hence, it
can also be set to “Always On Top” under Settings so that it will not be covered by any active
window. Using the up arrow (reduce window size) in the top right corner allows the window to
be minimized further.
The volume control on the right and the “Sound on/off” button below apply only to the sound
received via USB and sound card, not to the playback at the outputs (headphones, cinch and
digital output) of DR Box 1.
Even if the unit successfully received stations on its own, the PC software does not have this
information. Hence, a station search is automatically started at the initial start of the program.
This search can also be started manually at a later time using the magnifying glass icon (Sta-
tion search), e.g. after changing the position of the antenna. In comparison to the station
Dynamic Label
r
Data services
s
Station selector
t
Receiving signal strength
u
22 DR Box 1 (English)

search in PC-independent operation, the software station search is automatically performed
on bands III and L and, depending on the number of active stations on these bands, may take
several minutes since every signal received is examined in detail to establish whether it is a
Digital Radio signal or, for example, an analog TV signal.
Upon reception, quality is symbolically represented by the blue bar (receiving signal strength)
above the station selection. The station selection, as known from the unit itself, contains ensemble name and station name. Clicking on the bar to the right of the station display toggles
between stations of an ensemble.
The “Slideshow” window next to the volume control displays frames delivered by the Digital
Radio station. For traffic stations, these are typically reports of traffic congestions, where pure
music stations deliver views inside the studio or covers of albums or CDs. Additional programaccompanying information, such as the title of the song being played, pass along in the “Dynamic Label” text field in the middle of the window. After changing a program, the display is
not updated until new information is received.
“Ensemble” can be used to select the program-accompanying information on all stations of a
search chain by means of a browser interface, whereby the left column shows the specific
data information of the complete ensemble and the right column the program-accompanying
brief information of all programs.
DR Box 1 (English) 23

“Station” displays only the program-accompanying information transmitted last and the current frame of the running program in full size.
The four memory banks A through D with six storable stations each correspond to the 4 x 6
memory locations of the operation without PC. To store the current station, right-click a free
station button using the mouse. Its name then replaces the three dashes. If the station button
already contains a station, it will be overwritten.
24 DR Box 1 (English)

Digital recordings with DR Box 1
Since Digital Radio enters the computer in a computer format using the USB connection, it can
be recorded without loss of quality. To do so, the recording format must first be specified in
the “Settings” menu:
PCM (WAV) uncompressed audio format (16 bit, 48 kHz)
MPEG Audio Layer (MP2) the Digital Radio format (can be played, e.g. using the enclosed
MusicMatch Jukebox)
Alternative format allows you to select alternative formats for recording.
Next, you should specify where you would like to save the recordings so that you can locate
them after the recording is finished. The default directory is “Record” in the program directory
of DR Box 1. Clicking [>>] allows you to create another directory.
Finally, you can specify the time buffered before the recording so that the final seconds prior
to recording are also stored on the hard disk. This feature is usually only part of expensive MD
recorders. Its advantage is: If a song that you sought for a long time suddenly plays without
DR Box 1 (English) 25

prior announcement and you start a recording, the first seconds are usually missing before
you recognize the title and react. DR Box 1 allows access to the past – thus, the song is on the
disk starting at the beginning. This function is the reason why the hard disk remains active
after starting the DR Box 1 software – the specified number of seconds of music is always
buffered to be available if the need arises.
The recording is started using the red recording button below the recording display. The display shows how long you have been recording and the recording indicator flashes red as a
reminder that a recording is in progress. There is no need to remain silent as it is the case in a
recording studio, but you should not forget to stop the recording at the end of the piece of
music or radio broadcast by pressing the recording button a second time. And do not forget
that you can always listen to another station within the same ensemble during the recording.
The DR Box is not affected and continues recording the station where you started.
Would you like to record a different station without missing anything from the current broadcast? If you right-click the recording button with the mouse, the following menu displays:
Simply select the desired station under Stations and the recording starts immediately. The
station you are currently listening to always shows the check mark as the default selection.
26 DR Box 1 (English)

The other options are:
Open last recording This option plays the last recording. It uses the program which
is intended for the file format of the recording. For example,
for MP2 files, the program MusicMatch Jukebox is used.
Open recording directory This option opens the directory in which your recordings are
stored.
Recording options Allows you to vary the recording settings.
WAV
MP2
Alternative format
If you only want to set a different recording format, you do not
have to change to the recording options. The format can directly be selected here.
Timer-controlled recordings
DR Box 1 offers much more than a radio recorder: It also features a timer function which can
be accessed directly via “Settings”
or via “Timer” icon.
The selected recordings can be entered here – optionally once, daily or weekly – just like a
VCR – but much more convenient. You must enter the desired station, start and end time,
desired action – it is also possible to set the unit to playback only, instead of recording, like a
radio alarm – and what should be done after the action concludes: DR Box 1 can also shutdown the computer and turn it off, if necessary!
To create a timer entry, click “Add”, to remove a highlighted entry, click “Delete”.
If the end time entered is earlier than the start time – for example, 23:00 to 01:30 – the software automatically sets it to the desired time – switch-off at 01:30 on the next day.
DR Box 1 (English) 27

Explanation of individual settings
! A check mark below the exclamation mark indicates an active timer entry. If you list
features entries that are out-of-date or invalid (e.g. if you selected yesterday for a
recording), a cross is displayed.
Station Here you select the station to which the following timer settings apply.
From Enter the start time here.
To Enter the end time here.
Mode Select the mode for the recording – either Once, Daily or Weekly.
Day This option tells the software the date or day and time for the upcoming action.
Action You can now select from the list what the DR Box software is supposed to do at the
specified time. You can select among various recording options or simply specify
playback, for example, if you intend to listen to the news of a specific station.
Afterwards
Finally, enter the action to be taken following the timer action. You can play a
sound, close the DR Box software or even shut down the PC. If you select ---, no
action will be taken.
Listening to a program while recording
Just like a VCR, the recording of DR Box 1 is independent of the program currently being
played: If you select a different program in the current ensemble during a recording, the recording continues without interference with the previously specified program. You can check
your current recording session by right-clicking the recording button with the mouse. Even a
timer recording does not interrupt the running program, as long as it is part of the same ensemble as the recording program. However, programs from two different ensembles, such as
the state-wide ensemble “Bayern digital” in band III and the local ensemble “München” in the
L band, cannot be received simultaneously – the receiving section is switched over when the
ensemble is changed. Whether the hardware output, i.e. headphones, cinch and digital outputs – should follow the program change in the software or remain independent, can be
specified in the settings by activating the option “Hardware audio output follows software”.
28 DR Box 1 (English)

“Color Settings” dialog box
The color of the user interface and the control buttons can be changed, if necessary, using the
color button on the settings tab:
On the left side (“Color Settings”), you can select the colors, e.g. for text and background. The
right side (“Demo Controls”) shows the corresponding result. If the new color settings find
your approval, confirm them with “OK”; to return to the existing settings, click “Cancel”.
DR Box 1 (English) 29

Version query
The final tab “About” under settings shows the version of the software.
Audio recordings with standard software
Besides recording Digital Radio using the DR Box application, you can also use other recording programs for this purpose. DR Box is supplied with two programs for this purpose. But
since the programs to not directly communicate with DR Box, it is necessary to start the DR
Box application after system start and select an ensemble. It is, therefore, recommended to
leave the DR Box application open; otherwise you will not be able to listen to the station to be
recorded.
Even if you are familiar with making recordings on the PC, it is recommended that you read
the following lines since you are not using your sound card for recording purposes but, instead, receive the signal via USB connection.
1. WaveLab Lite
This allows you to record Digital Radio as WAV file. The WAV format is an uncompressed audio format that requires a large amount of hard disk capacity, but it
leaves open the possibility of processing the recording without any loss.
Next, you can burn the recording onto a CD, for example, or convert to an MP3 file
(for which you use MusicMatch Jukebox).
2. MusicMatch Jukebox
MusicMatch Jukebox allows you to convert WAV files to MP3 format, as described
above, as well as perform direct recording of Digital Radio to MP3 format which is
recommended due to its small file size (at a factor of 1:11 for CD-comparative quality
in comparison to WAV format) and the possibility to play the files on portable MP3
players.
30 DR Box 1 (English)

Since you may already have a sound card in your computer, it is important that you inform the
programs that you are recording the sound of DR Box 1 and nothing else.
Two options are available which are determined by the program.
1. Programs which offer the existing equipment for selection. For example, this includes WaveLab Lite.
2. Programs that assume that only one device is available for recording, such as MusicMatch Jukebox. These types of programs must be tricked, but more about that
later.
Recording with WaveLab Lite
After installing DR Box 1, WaveLab Lite can be found in the program group with the same
name. Start the program. Next, click the Preferences menu item on the Options menu.
The following window display:
DR Box 1 (English) 31

Under the item “Live input / Recording” at point 1 select the USB audio driver of your DR Box
(DR Box Audio Device). Point 2 should normally show the installation of the playback driver of
your sound card. Depending on your sound card, you may find a different entry than the one
shown in the illustration. The other options are not of interest at this time and should remain
unchanged. The corresponding explanations can be found in the WaveLab Lite online help.
Next, open the recording window by clicking the recording button in WaveLab Lite (the button
with the red dot). The following window display:
32 DR Box 1 (English)

If you intend to perform long recordings, select the option “Create Final File” under since
this will write the recording file directly to your hard disk. For shorter recordings (e.g. one or
several songs), you can also select “Create Temporary File”. The recording is performed as
usual, but the data remains in the working memory of the computer until the recording is
saved.
Set the properties of the file to be created under
. Useful values are:
Stereo, 16 bit and 44.1kHz – For recordings which will be burnt onto a CD after processing. In
this case, the audio signal is modified during the recording, but it is later available in the required CD audio format.
Stereo, 16 bit and 48kHz – For all recordings not intended for CD. In this case, the signal is
not modified.
Now you can start the recording
.
Recording with MusicMatch Jukebox
Preparation:
MusicMatch Jukebox is an application where the audio device must be assigned for Windows
prior to the start of the software.
Windows 98 SE
For this purpose, click “Start” / “Settings” / “Control Panel” / “Multimedia”.
Windows 98 SE
DR Box 1 (English) 33

Windows ME & Windows 2000
Click “Start” / “Settings” / “Control Panel” / “Sounds and multimedia”.
Windows ME
Windows 2000
Next, set up “DR Box Audio Device” as the preferred device for the recording and activate the
option “Use only preferred devices”.
34 DR Box 1 (English)

Start the Jukebox in the MusicMatch program group.
Select the option “Recorder”, “Source” and “System Mixer”.
Click the recording button (red dot) to open the Recorder window.
In the right part of the window, assign a name for the recording
clicking the recording button in the recording window
.
and start the recording by
DR Box 1 (English) 35

Service at TerraTec.
“Rien ne va plus – no more bets” can happen to the best systems. In such a case, the TerraTec-Team is always ready to provide service and support.
Hotline, Mailbox, Internet.
In case of a serious problem – where you can neither solve the problem on your own nor with
the guided help found in this manual, nor with the help of your dealer – please contact us
directly.
The first way should be the Internet: under http://www.terratec.net/
rent answers to frequently asked questions (FAQ) and the latest drivers. All of that is also accessible via our mailbox system.
To call us: +49-(0)2157-8179-24 (analog) and +49-(0)2157-8179-42 (ISDN).
If these options do not provide the necessary help, please contact our phone hotline. You can
also reach us online. To do so, visit us under http://www.terratec.net/support.htm
cases, please have the following information handy:
· Your registration number,
· this documentation,
· a printout of your configuration files,
· the manual of your motherboard, and
· a screen shot of your BIOS configuration.
In addition, it would be helpful to our technicians if you are at your computer during the
phone call to directly carry out tips and tricks. Please do not forget to write down the name of
the respective support technician if you contact our Support Team.
you will always find cur-
. In both
You will need this name if of a defect is present and your card needs to be mailed to us.
36 DR Box 1 (English)
 Loading...