

Page 1
Help file for Sound System DMX 6fire 24/96 (LT/Basic)
and Steinberg’s Cubase SX 1.x
first of all, we would like to mention that Steinberg offers a general tutorial about
Cubase on their website as well as FAQs and knowledge-database.
http://www.steinberg.net/en/?sid=0
Getting started
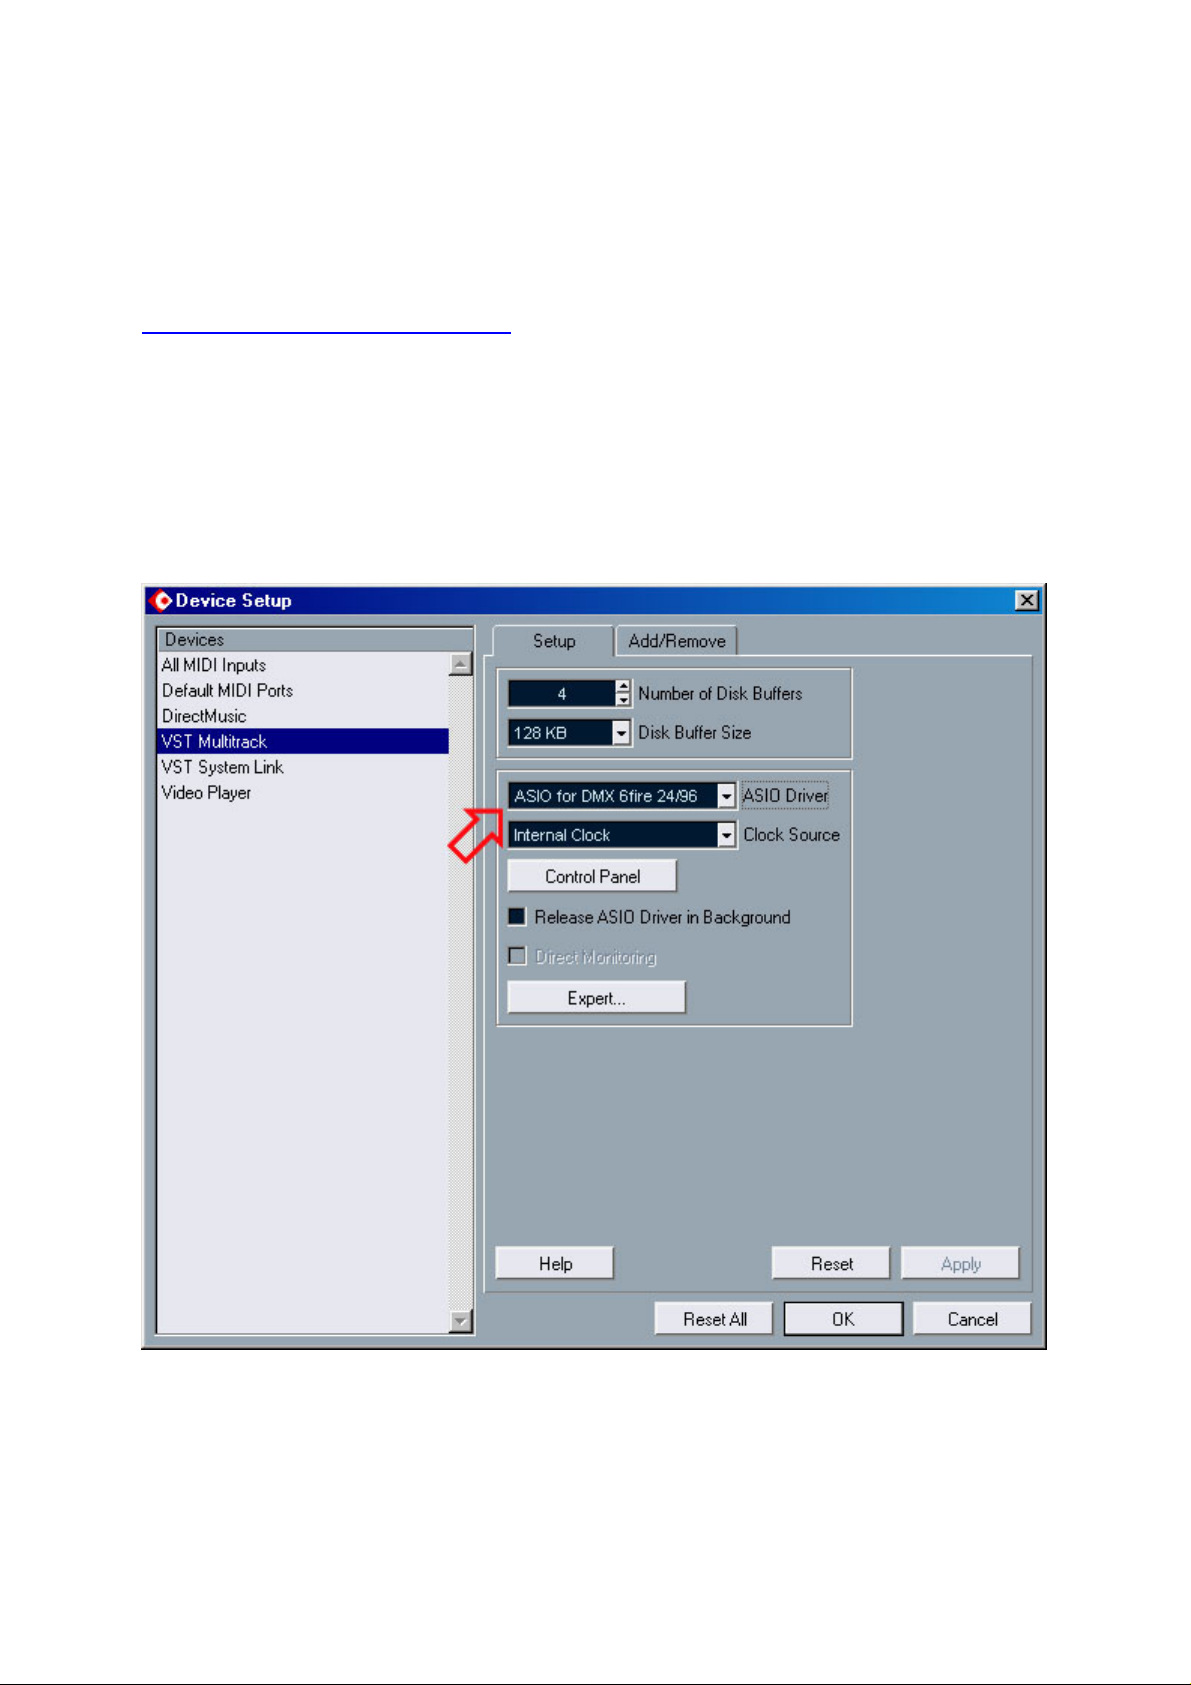
After the first time you start Cubase SX, you of course want to select the ASIO driver
for the card.
To do this, please open the Device Setup window (Devices/ Device Setup) and there,
under VST Multitrack, select “ASIO for DMX 6fire24/96” (the driver is called the same
for all DMX 6fire models).
The ASIO (Audio Streaming Input Output) driver has a special driver architecture
developed by Steinberg which allows a direct communication between audio
hardware and software and avoids the inconvenience of the Windows MME driver.
The advantage of the ASIO driver is the extreme low latency as well as the direct
Page 2
support of multi I/O audiohardware. The actuall ASIO 2.0 specification also allows
multiclient application.
Now lets look at a typical case: The recording!
When the recording has to be done over the Line-in, this one has to be selected in
the DMX 6fire Control Panel (Mixer/Line-in/Front-Rear-Internal). This also applies for
the Mic/Phono and Coax/Optical options in the Mixer tab of the Control Panel.
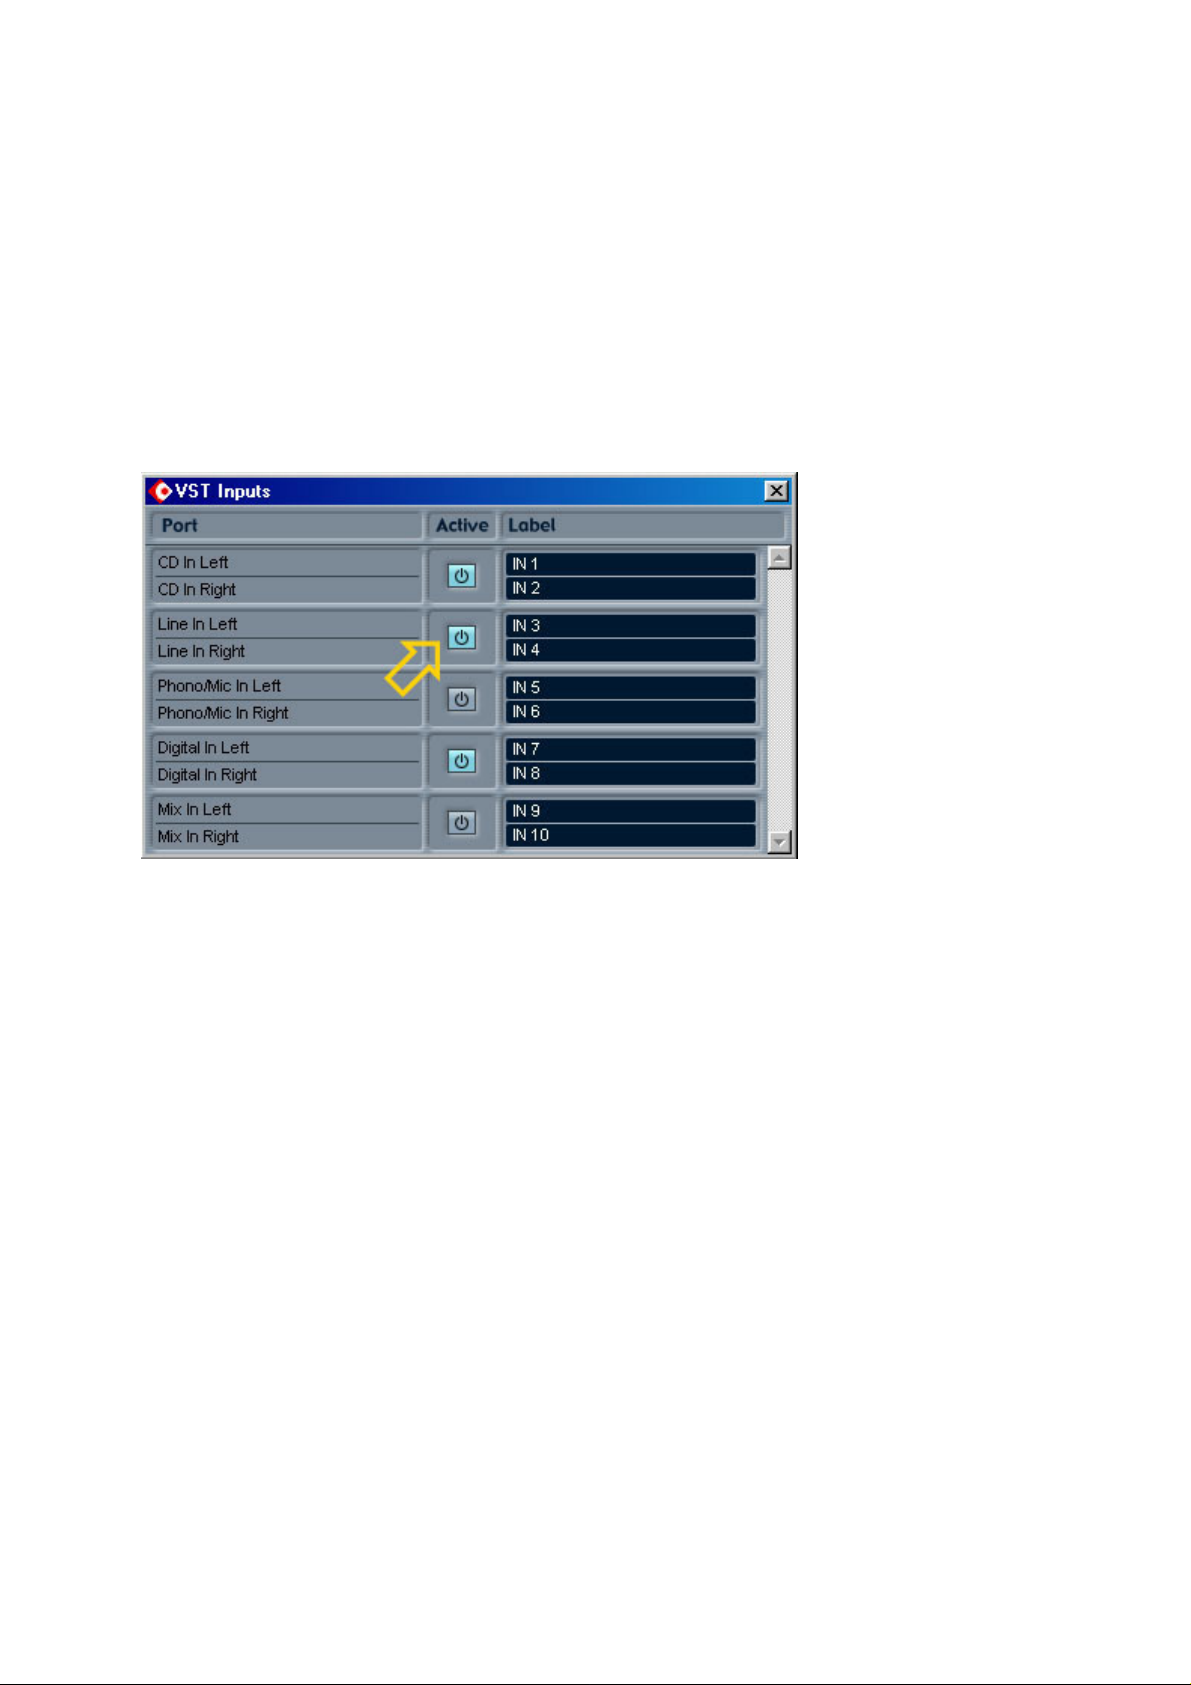
Afterwards, the VST Inputs in Cubase must be set to receive an input.
For this you will need to open the VST Input window:
Here you can select, or in other words, activate the inputs you wish to use on the
card. As default is the CD input selected – therefore if the Line-in is needed as
source for the recording, activate this one by pressing the “active” button.
The Line-in (In 3/4) is now ready to be selected in the audio track of your choice as
recording source. This is explained in the next step…
…
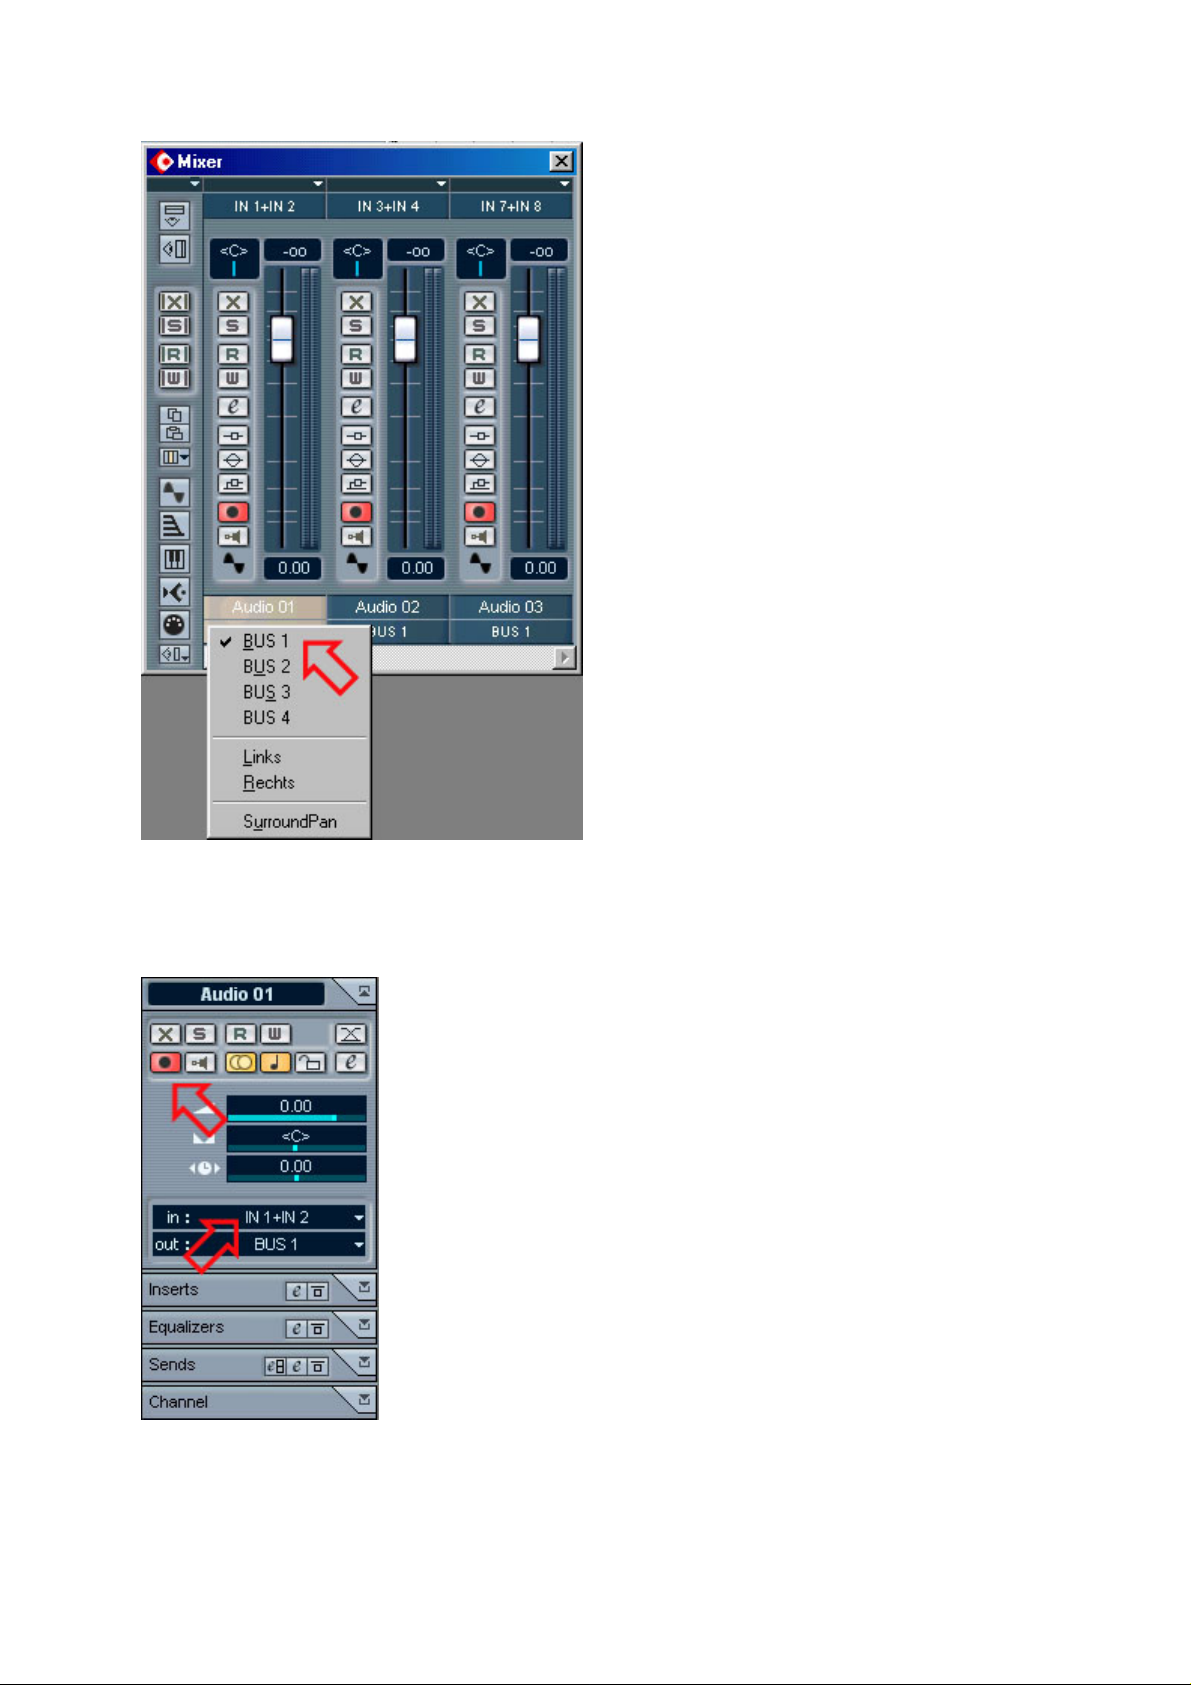
Open the VST Channel Mixer (Devices/Mixer)
Page 3

By pressing the right mouse button, you will open, like showed above, the context
menu. In this menu you can select the Inputs, which have been made available in the
VST Input window (In 3/4 for Line-in left/right) for the different audio tracks.
These settings can of course be done in the VST Inspector:
Additionaly, the record button has to be triggered in the audio tracks where the
recording is done. You can do this either in the VST Inspector or in the audio tracks
settings themselves.
Page 4

The multitrack recording, e.g. the recording of several VST inputs, has been made
easier to handle as in the previous software version, Cubase VST 5.x.
Activate first the inputs in the VST Input window, assign these in the Mixer on the
existing audio tracks and trigger tracks for the recording (see above).
When the setup is made and you are ready to record.
Now, if the recorded or imported audio material additionaly has to heard on different
outputs, you will need to route the signal. This is easily done in the VST Output
window (Devices/VST Output)
Page 5

Cubase SX 1.x recognizes the three analog outputs of the card as separate stereo
outputs. You have the possibility to route audio tracks and VST instruments to the
different outputs of the DMX 6fire. Activating the different Busses will enable the
outputs of the card (analog and digital). Each bus can be assigned to one output:
don’t be irritated by the names given to the outputs (Front Left, Rear Left, Center, …).
Cubase recognizes the outputs as stereo but these are named after the left channel.
Please return to the Cubase Mixer (Devices/Mixer):
Page 6
In the pop-up menu at the bottom, you have the possibility to activate Bus/Output for
each individual audio tracks or select VST Instruments. The same can be done in the
VST Inspector:
The handling of the DMX 6fire is the same for the existing models (24/96, LT, Basic)
but please note that the cards offer different connection possibilities and therefore
some settings/informations are not available.
 Loading...