

Page 1
English Manual
Version 1.1, Status 10.09.99
Page 2
CE declaration
We:
TerraTec Electronic GmbH, Herrenpfad 38, D-41334 Nettetal, Germany
hereby declare that the product:
SoundSystem DMX
to which this declaration refers is in compliance with the following standards or standardizing
documents:
1. EN 55022
2. EN 50082-1
The following are the stipulated operating conditions and environmental conditions for said compliance:
Residential, business and commercial environments and small-company environments.
This declaration is based on:
Test report(s) of the EMC testing laboratory
TerraTec® ProMedia, SoundSystem Gold, SoundSystem Maestro, SoundSystem Base1, AudioSystem
®
64, XLerate, Base2PCI, TerraTec 128iPCI, TerraTV+, WaveSystem, MIDI Smart, and MIDI Master Pro
EWS
are trademarks registered by TerraTec
®
Electronic GmbH Nettetal.
In most cases, the designations used in this handbook for software and hardware are also registered
trademarks and are thus subject to the relevant regulations.
®
©TerraTec
Electronic GmbH, 1994-1999. All rights reserved (10.09.99).
Meticulous care has been exercised in the preparation of all text passages and illustrations in this User
Guide. TerraTec Electronic GmbH and its authors, however, accept no liability, legal or otherwise, for
errors or the consequences of such errors. We reserve the right to technical modifications.
All text passages in this documentation are copyrighted. All rights reserved. No part of this
documentation may be reproduced in any form whatsoever, by photography, microfilming or other
process or rendered into a language/form usable by computers without the prior, written consent of the
authors. All rights for use and propagation by presentation, radio and television are also reserved.
2 SoundSystem DMX
Page 3

For all little rascals.
And those who want to be like them:
http://www.terratec.net/jobs ;-)
SoundSystem DMX 3
Page 4

4 SoundSystem DMX
Page 5

Contents
Greetings and Salutations..........................................................................................................................7
Installation. ............................................................................................................................................... 9
Card Diagram.................................................................................................................................. 10
Connecting the Digital Expansion Module ...................................................................................... 11
Installing the ActiveRadio Module..................................................................................................12
Connecting a WavetableDaughter Board........................................................................................12
Installing the Card. .........................................................................................................................13
Driver Installation........................................................................................................................... 15
Installation in Windows 95A (OSR1).....................................................................................16
Installation in Windows 95B (OSR2).................................................................................... 17
Installation in Windows 98. .................................................................................................19
Uninstalling the Driver in Windows 95 and 98. ....................................................................21
Installing in Windows NT 4.0. ............................................................................................. 22
Driver is installed – this is what it looks like. ...................................................................... 24
The Card Connections and Their Application........................................................................................... 26
Line Outs. .......................................................................................................................................27
The Basics........................................................................................................................... 27
Headphones........................................................................................................................ 28
4 Speakers.......................................................................................................................... 29
The Playback Driver. ........................................................................................................... 29
Speaker Position for optimal 3D Sound. ............................................................................. 30
Internal Output Jack Taps. .................................................................................................. 30
Line Input. ......................................................................................................................................31
The Basics............................................................................................................................31
Connecting and Recording from a Record Player. ................................................................31
Internal Input Jack Taps. ..................................................................................................... 32
Microphone Input. ......................................................................................................................... 33
The Basics........................................................................................................................... 33
Misunderstandings............................................................................................................. 33
Internal Microphone Input Taps.......................................................................................... 34
The Digital Output. ........................................................................................................................ 35
The Basics........................................................................................................................... 35
DIG OUT Mode. ...................................................................................................................36
Copy Protection. ................................................................................................................. 36
Backup................................................................................................................................ 36
The Digital Input.............................................................................................................................37
The Basics........................................................................................................................... 37
Stuff Worth Knowing ..................................................................................................................... 38
AES/EBU to S/PDIF............................................................................................................. 39
S/PDIF to AES/EBU............................................................................................................. 39
The CD Audio Connections............................................................................................................. 40
The Basics........................................................................................................................... 40
The AUX Input................................................................................................................................. 41
The Basics............................................................................................................................41
The Wavetable Connection and Internal Synthesizer..................................................................... 42
Information on the integrated wavetable and the future of sound synthesis...................... 42
The MIDI Driver................................................................................................................... 43
SoundSystem DMX 5
Page 6

The TAD (Telephone Answering Device) Input................................................................................44
The Basics. ..........................................................................................................................44
The Joystick/MIDI Interface............................................................................................................45
The Basics. ..........................................................................................................................45
MIDI.....................................................................................................................................45
The Circuitry of the MIDI Interface.......................................................................................46
The Radio Connection. ...................................................................................................................47
Recording ............................................................................................................................47
Stuff Worth Knowing ...........................................................................................................47
Software Overview. ..................................................................................................................................48
The DMX ControlPanel. ..................................................................................................................49
Basic Operating Instructions ...............................................................................................49
Using the Mouse. ................................................................................................................50
Loading and Saving. ............................................................................................................50
Cool Keys– the hotkeys. ...................................................................................................... 51
Volume Control.................................................................................................................... 51
Mute.................................................................................................................................... 51
Selecting Recording Source................................................................................................. 51
Digital Interface Functions...................................................................................................52
Other Functions...................................................................................................................52
The Playback Window..........................................................................................................53
The Record Window.............................................................................................................54
The Effects...........................................................................................................................55
The PreListen Function. .......................................................................................................55
Surround. ............................................................................................................................56
Settings.......................................................................................................................................... 57
The Right MediaPlayer. ..................................................................................................................58
The 3D Player. ................................................................................................................................59
WaveLab Lite – The Audio editor. ................................................................................................... 61
BuzZ – ThE tRaCker. .......................................................................................................................62
Mixman Studio ES – You become a KeyJayyy! ................................................................................64
The 3D Demos. ...............................................................................................................................65
The HOTSTUFF.!!! Directory. ...........................................................................................................67
3D Audio – The Background. ................................................................................................................... 68
All good things come in twos...............................................................................................68
3D Audio Today ...................................................................................................................69
Perfect? ...............................................................................................................................69
Appendix .................................................................................................................................................. 70
FAQ – Frequently asked questions and their answers. ...................................................................70
Measurement Data......................................................................................................................... 73
TerraTec service .............................................................................................................................73
Hotline, Mailbox, Internet....................................................................................................74
Everything will be OK. ;-) ....................................................................................................75
General Service Conditions .................................................................................................76
Key Word Directory ........................................................................................................................ 77
6 SoundSystem DMX
Page 7

Greetings and Salutations
We are pleased that you have chosen an audio card from TerraTec. We also congratulate you
on your decision because the SoundSystem DMX is a piece of high-quality, state-of-the-art
sound card technology. With this purchase, you have acquired one of the highest-performing
PC products for audio applications that money can currently buy. We are certain that the
SoundSystem will prove to be very useful to you in the years to come and, more importantly,
be a lot of fun as well.
The following provides a brief overview of what's in store for you.
The SoundSystem DMX utilizes the most modern chip technology to provide a multitude of PC
audio applications. These include:
High-quality recording and playback of sounds. The SoundSystem DMX provides you with a
signal-to-noise ratio of around 97dB(A) in analog. "The standard" is considerably under this.
Recording and playback of pure digital sound. The SoundSystem DMX comes equipped with
inputs and outputs in S/PDIF format. This allows you to digitally transfer recordings from a
MiniDisk recorder or DAT to your PC or vice versa. In addition, you have the option of all
currently available sample rates as well as access to settings such as copy protection and
generation bit.
Playback of games and audio applications with different (3D) audio standards. The DMX
compatibility list is really quite impressive. And it sounds good too. With the SoundSystem,
you will no longer have to do without sounds coming from above, below, or even behind when
SoundSystem DMX 7
Page 8

playing games. As the only card of its kind, the SoundSystem DMX also gives you free rein to
experiment with your own 3D audio worlds – active listening is the key!
Impressive connection options. With a total of 2 stereo outputs and 8(!) different inputs, the
SoundSystem DMX is extremely connection-friendly when it comes to additional audio
peripherals. There is also the option of expanding it with a radio module as well as a
wavetable module. Last but not least, analog as well as digital joysticks can be connected and
operated using DirectInput technology.
Software á la carte. The control panel – the nerve center of your DMX – is an item that you will
quickly come to appreciate. Well thought-out user prompting and intuitive controls of all card
settings make everyday use of the SoundSystem as easy as pie. It also comes with lots of
different bundled software to get you started right away. Take the time – it's worth it!
We hope you have lots of fun using the SoundSystem DMX and would like to suggest that you
glance at this hopefully amusing reading material when you get the chance. Along with the
obligatory technical information, we have also prepared some typical examples for you, in
words and illustrations, of its use. We are convinced that even experienced users will be able
to gain some new information here. At the very least you should read the brief notes in this
manual marked by an exclamation point. They contain, for example, a summary of the
following paragraph, advice on important settings, or anything specific to DMX that can make
your everyday sound experience easier.
Thank you very much, have lots of fun and until next time.
... Your TerraTec Team!
8 SoundSystem DMX
Page 9

Installation.
Thanks to PCI and plug&play technology, the installation of your
SoundSystem DMX shouldn't pose a problem.
If you already have experience with installing hardware and software
components in Windows, you can proceed with the installation of this
card without any worries.
For the professionals who want to get started ASAP, here is a short overview:
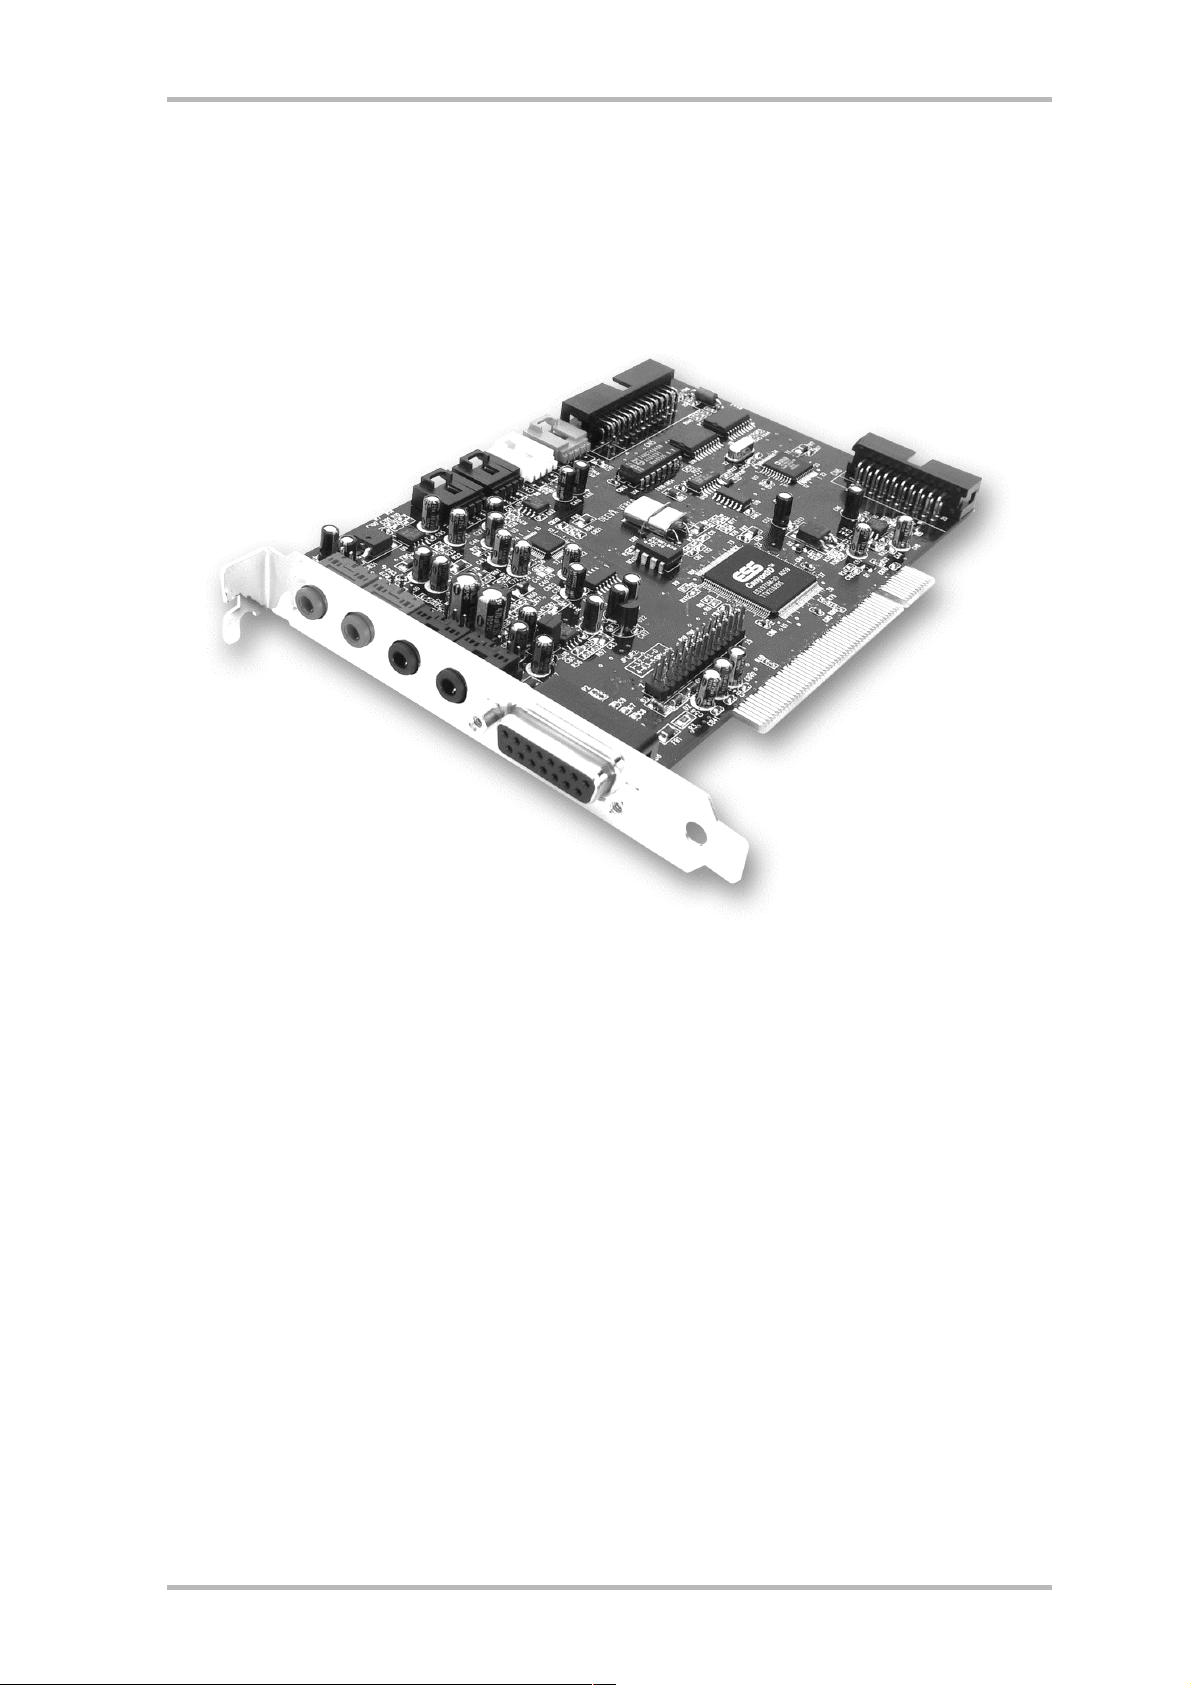
· The SoundSystem DMX is a PCI card (as you no doubt have already seen) and should be
installed as far away from graphic cards or SCSI controllers as possible.
· Don't worry: the connecting cable of the digital interface cannot be inserted incorrectly.
· You need 1 IRQ.
· You need a few free address ranges (usually not a problem).
· Driver installation in Windows follows the standard. The drivers can be found on the
enclosed CD-ROM.
· After installing the driver, take a look at the Device Manager and see if there is an
exclamation point. If you see one, there is a problem. Possible solutions can be found in
the appendix (page 70).
· After driver installation, the software installation starts automatically. The ControlPanel
must be installed.
So much for the short version. A detailed, illustrated description of the installation can be
found in the following section.
SoundSystem DMX 9
Page 10
Card Diagram
i
j
m
l
k
n
h
g
d Game/MIDI port
e OUT 2
f OUT 1
o
f
e
d
j CD 2
k Aux
l TAD
g LINE IN
h Mic IN
i CD 1
10 SoundSystem DMX
m Digital Xtension
n Radio Xtension
o Wavetable Xtension
Page 11
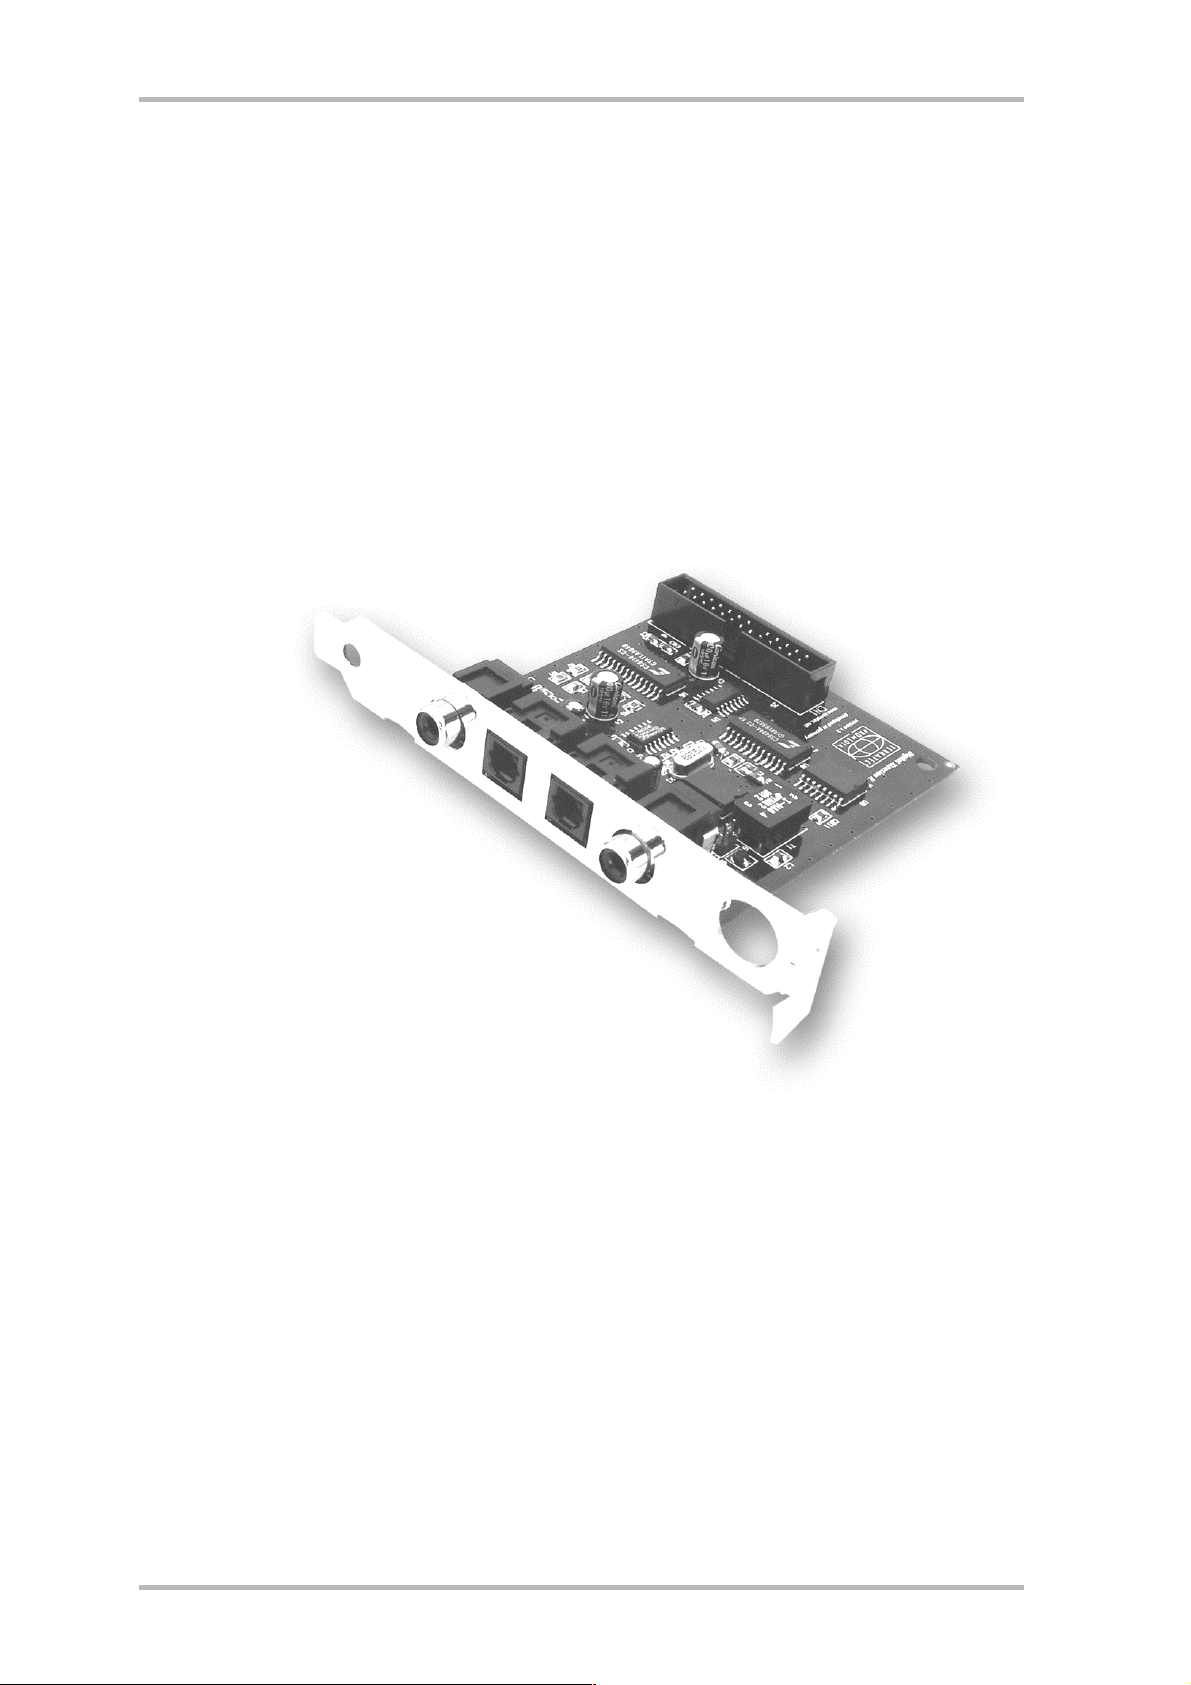
Connecting the Digital Expansion Module
The SoundSystem DMX has an expansion module with connectors for digital devices
corresponding to the S/PDIF standard (e.g., MiniDisk or DATRecorder). If you require these
connectors, the module needs to be inserted into the computer before installing the card. The
digital expansion module does not need to be installed – however, having one around does
have a calming effect.
t
s
r
q
p
p Digital Out (RCA)
q Digital Out (TOS link)
r Digital In (TOS link)
s Digital In (RCA)
t DMX
Connect one end of the flat conductor cable to the card m, connect the other end to the
module t. Because of the design of the cable, it is not possible to make a false connection
without forcing the ends into the slots.
SoundSystem DMX 11
Page 12
Installing the ActiveRadio Module.
If you are the lucky owner of a TerraTec radio module (ActiveRadio) or a Vobis "RadioBoostar",
then you also have the good fortune of being able to use these products with the
SoundSystem DMX. All you have to do is insert the proper plug into the hole labeled "CN6"
(Radio Xtension) on your DMX. Make sure that all of the plug's pins are connected to the
radio module. Both connector rows must be correctly aligned.
A special driver for the radio module is not required. Simply install the radio software found
on the DMX Driver CD. This software can also be used to run the Vobis product. For more
information about software, see the program's online help (press F1 in program).
The volume control of the program being run is contained in the application itself. In Windows
95/98, a separate controller is available on the DMX ControlPanel.
For more information, please see the chapter, "Radio Connection" (page 47).
Connecting a WavetableDaughter Board
If you happen to own a separate wavetable module, for example, a TerraTec WaveSystem, a
module from an older TerraTec card (e.g., Maestro series), or a Yamaha DB50-XG, then these
can also be used with the SoundSystem DMX. All you have to do is insert the 26-pin plug into
the hole labeled "CN1"(Wavetable Xtension) on your DMX. Make sure that all of the plug's
pins are connected to the wavetable module. Both connector rows must be correctly aligned.
Important
The signals of a daughter board docked with the wavetable connector
flow together with the AUX signal. These are not separated
electronically from one another. Therefore, simultaneous operation
should be avoided when possible. If you stick two devices into "one
line", you will experience considerable signal loss of both devices. In
addition, we cannot guarantee that this will not have long-term
negative effect on both devices.
The volume of the wavetable module is controlled on the DMX ControlPanel using the
controller "AUX".
For more information, please see the chapter "The Wavetable Connection" (page 42).
12 SoundSystem DMX
Page 13

Installing the Card.
Before installing the card, make sure that you have already connected any desired expansion
modules such as digital, radio, or wavetable modules (for more information, please see the
sections following page 42ff). Adding these modules later on makes the process more
complicated.
Before installing the sound card, please take note of any special points pertaining to the
configuration of your computer. Also refer to the handbook of your computer and other
expansion cards for their settings.
Please observe the following instructions to ensure a trouble-free installation.
If difficulties arise nevertheless, please reread the relevant chapter in this handbook carefully.
Please call our service hotline if you are still having problems. The phone numbers and hours
of the hotline can be found in the Appendix of this documentation.
Start by making sure that nothing is missing.
The product packaging should contain:
1 TerraTec SoundSystem DMX PCI sound card
1 Driver & Installation CD
1 audio cable (mini-jack to cinch)
1 registration card with the serial number
1 manual
Return the registration card to us at the earliest possible opportunity or register online at
http://www.terratec.net/register.htm
services.
Safety Tip
Before opening the case, unplug the power plug from the wall socket
as well as from the PC.
K==This is important for support and hotline
!
SoundSystem DMX 13
Page 14

And here’s what to do, step by step:
· Switch off your PC and all connected periphery, in other words printer, monitor and so on.
Leave the AC cord connected for the time being, so that your computer is still grounded.
· Touch the metal chassis at the rear of the PC to ground yourself and discharge static. Now
unplug the cord from the AC mains socket.
· Remove the cover from the case of your PC.
· Look for a free PCI expansion slot, remove the screw holding the slot blanking plate and
remove the plate. To ensure the optimal function of your sound card, look for an expansion
slot that is not immediately next to an already-installed card. Some cards, such as video
adapters, can send out signals which can interfere with the sound card.
· Carefully remove the sound card from its packaging and pick it up by the edges with one
hand while your other hand is resting on the metal of the PC case.
This will ensure that your body is completely discharged via your computer without
affecting the sound card. Do not touch the components of the card under any
circumstances.
· Connect any desired internal audio devices to the card such as the digital expansion
module, radio module, wavetable daughter board, or CD drive. Please follow the
corresponding installation instructions.
· Align the holder at the rear of the sound card in the expansion slot in such a way that the
card’s gold-colored connectors are directly in line with the slot’s socket.
· Insert the card into the slot. You might have to press the card firmly into the slot to make a
good contact. Take care to ensure that the contacts are precisely in line, in order to avoid
damaging the sound card or the mainboard in your PC.
· Insert and tighten the screw from the slot cover to secure the sound card in its slot.
· Connect the CD-ROM drive to the sound card with the audio cable. (In general, this cable is
provided with the CD-ROM drive). (Please read the chapter The CD Audio Connections. on
page 40).
· Reinstall the cover of your PC case.
· Connect your speakers or hifi system to the sound card (Please read the chapter The Card
Connections and Their Application. on page 26).
· Reconnect the power plug and all other cables. Make sure that your speakers or hifi system
is set to low volume. Start your computer.
· Continue with the installation in the next chapter Driver Installation. (page 15).
14 SoundSystem DMX
Page 15
Driver Installation.
Currently, the SoundSystem DMX comes with drivers for the following operating systems:
Windows 95 (incl. different service releases), Windows 98, and Windows NT. Before installing,
you must determine which operating system you are using. This is especially true of Windows
95 since there are several versions that are different from one another.
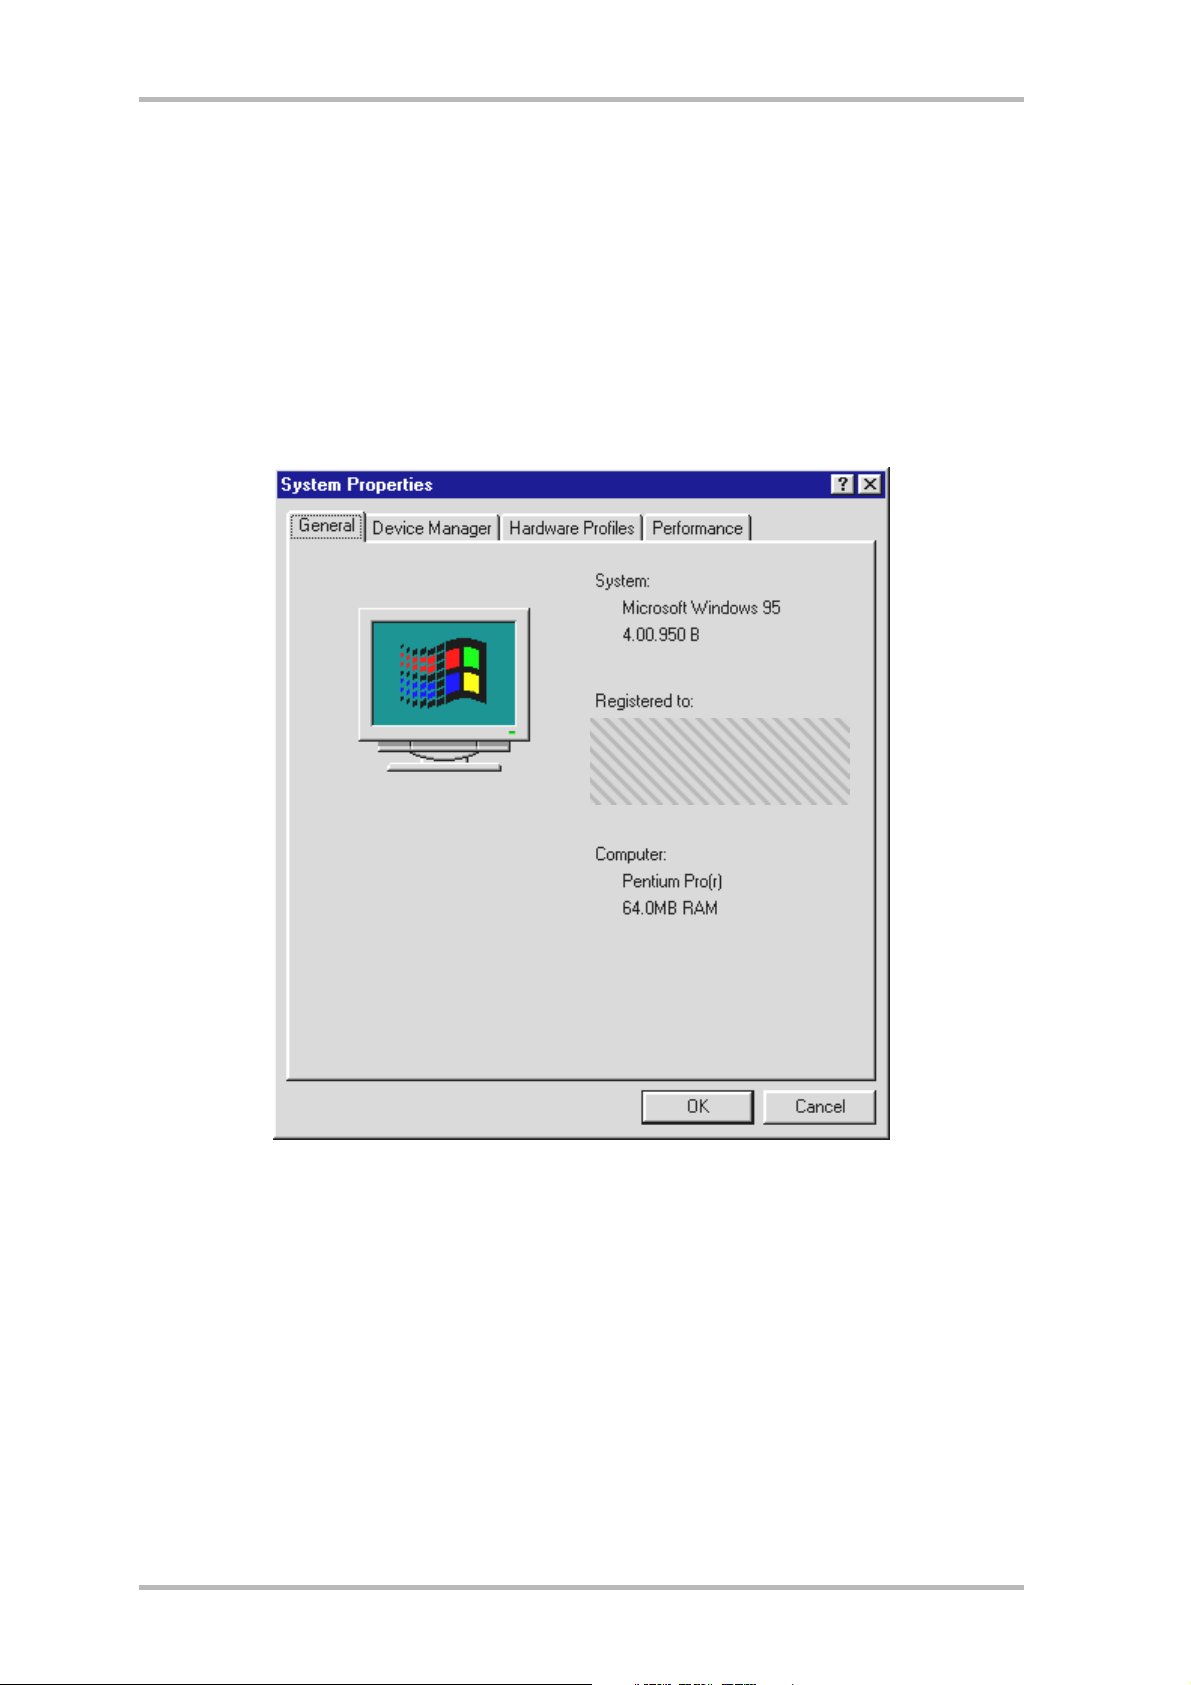
The operating system and version number can be found on the Control Panel under System
Properties.
For example, here we see Windows 95 Release OSR2.
In the following descriptions of driver installation, <CD> stands for the corresponding letter to
which the CD-ROM drive is assigned which holds the SoundSystem DMX Driver CD.
SoundSystem DMX 15
Page 16
Installation in Windows 95A (OSR1).
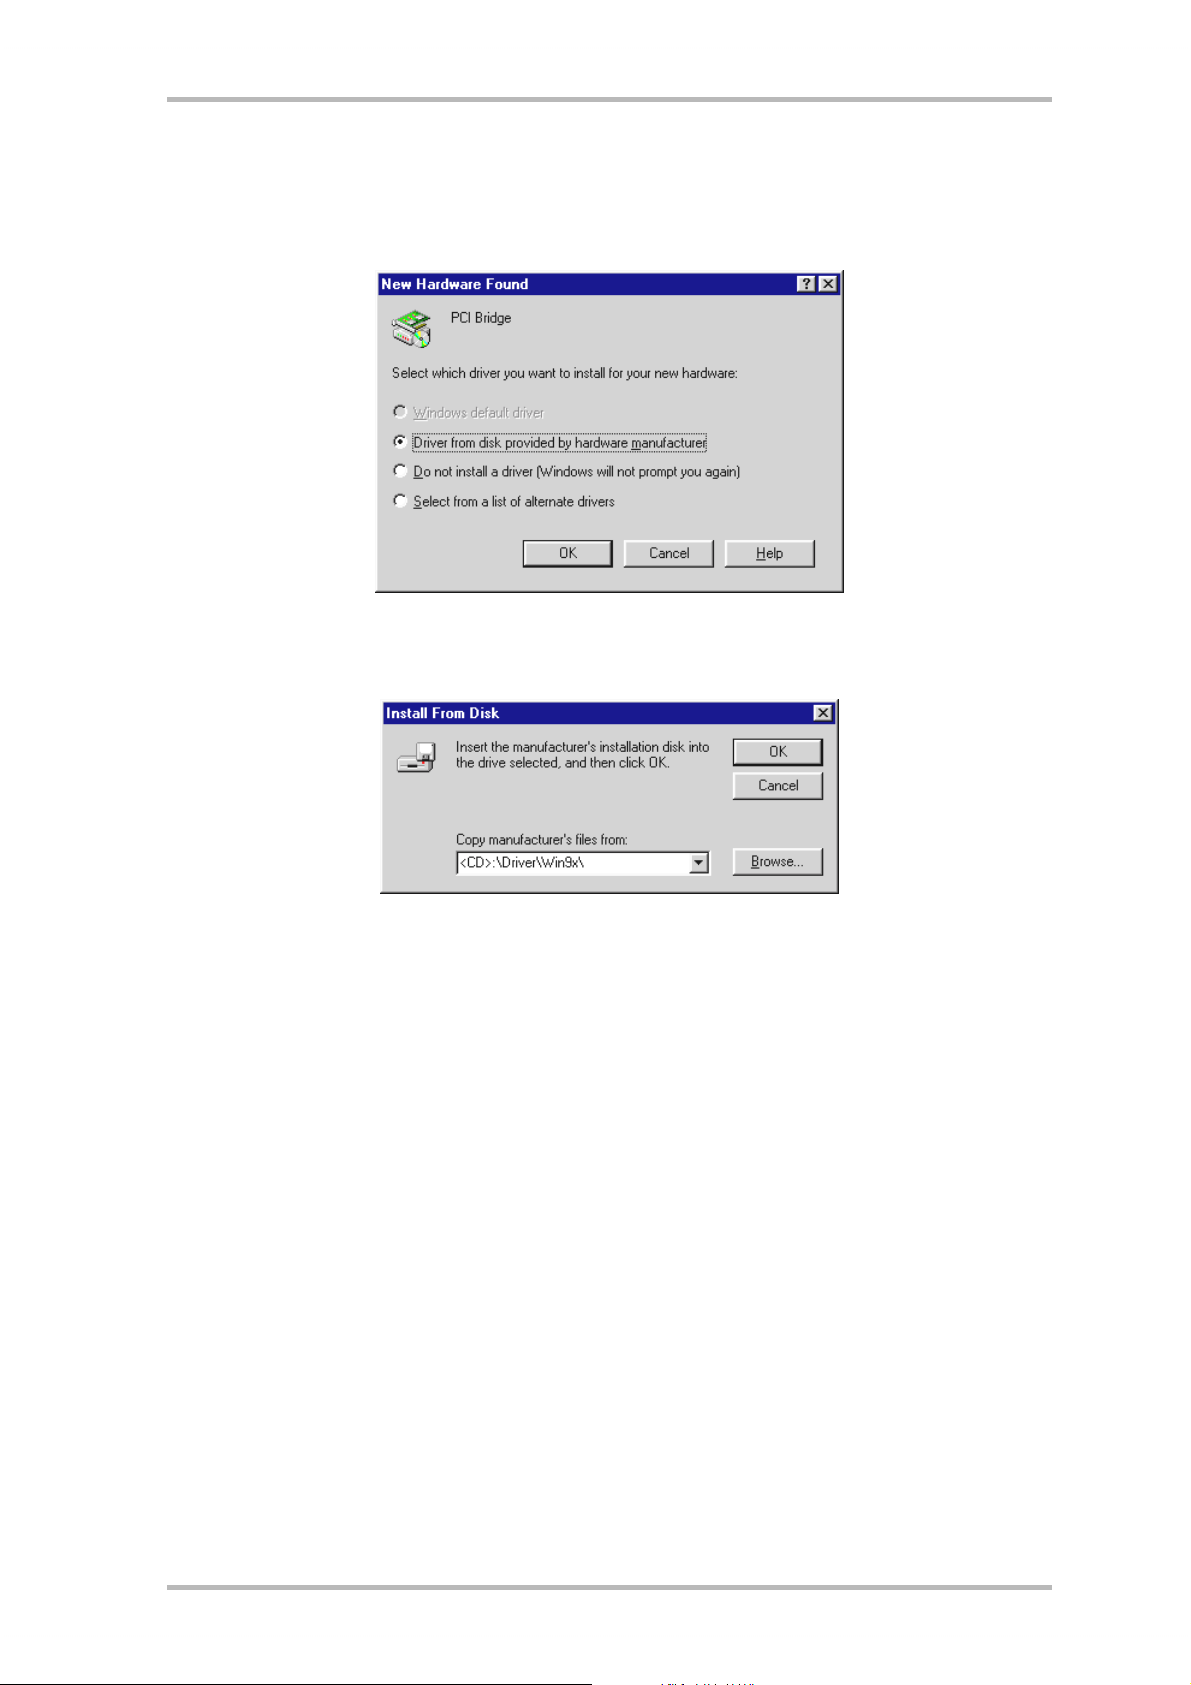
When the SoundSystem DMX is installed, Windows 95A recognizes the card as a new
hardware component and displays the following screen.
Select "Driver from disk provided by hardware manufacturer" and click OK.
A prompt appears from a time when all drivers fit on one disk ;-) .
Enter the path <CD>:\Driver\Win9x\ and click OK.
You could also use the mouse to select the path by clicking Browse.
Windows now installs the driver for you, documenting the process with several install screens.
At this point nothing else should occur. If during this process you are prompted to do
something and you are unsure how to proceed, it is usually best to just press the Enter
key.
If Windows should ask again for a driver file, please refer once more to the above-mentioned
DMX CD directory. It could also be the case that a few other Windows features need to be
installed along with the card (e.g. if this is the first sound card installation for your system).
For this eventuality, please have your Windows CD handy.
After the driver has been successfully installed, the setup for the software installation should
begin automatically. If this is not the case, run Setup directly from the DMX CD.
<CD>:\Applications\Setup.exe
Follow the instructions on the screen. There shouldn't be any problems. You need to install
the DMX ControlPanel in order to be able to continue reading this manual. The other software
is not mandatory, but it's fun and useful.
Continue reading on page 24.
16 SoundSystem DMX
Page 17
Installation in Windows 95B (OSR2).
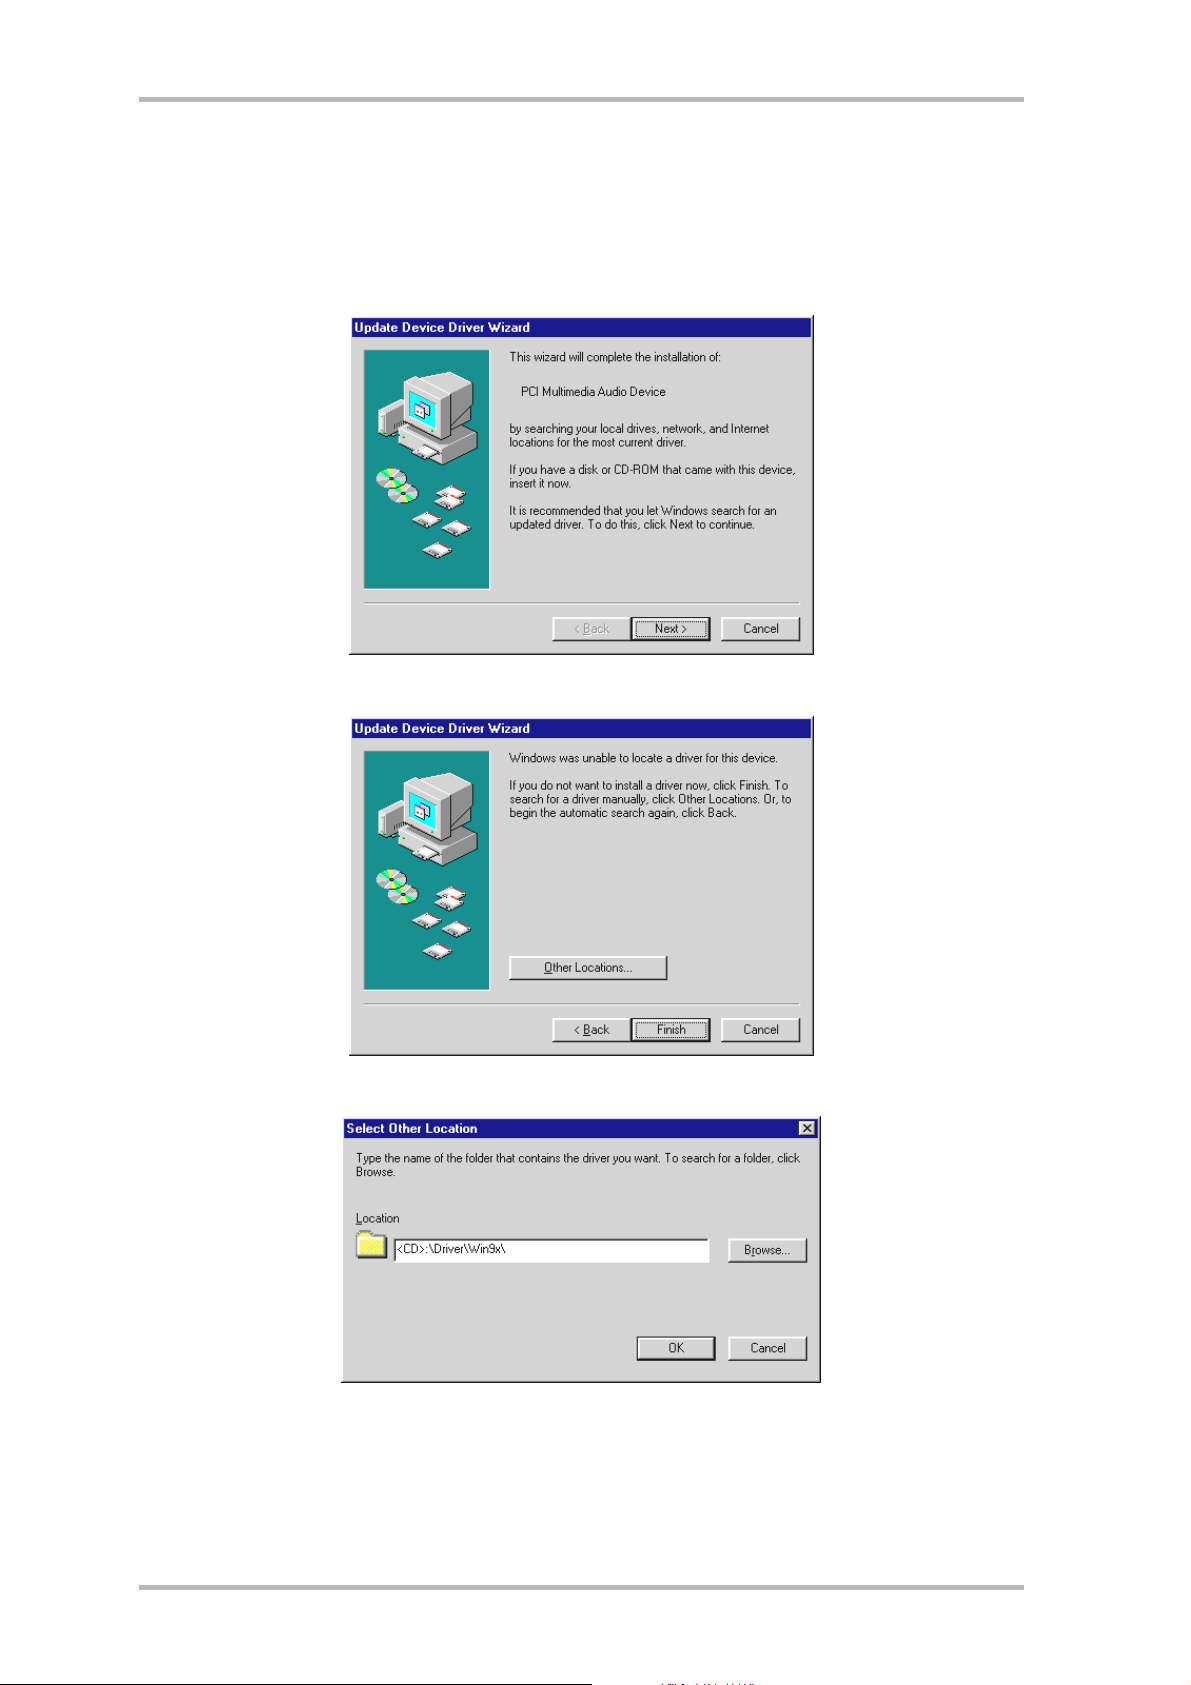
When the SoundSystem DMX is installed, Windows 95B recognizes the card as a new
hardware component and displays the following screen.
Click "Next".
Click "Other Locations".
Enter the path <CD>:\Driver\Win9x\ and click OK.
You could also use the mouse to select the path by clicking Browse... .
SoundSystem DMX 17
Page 18
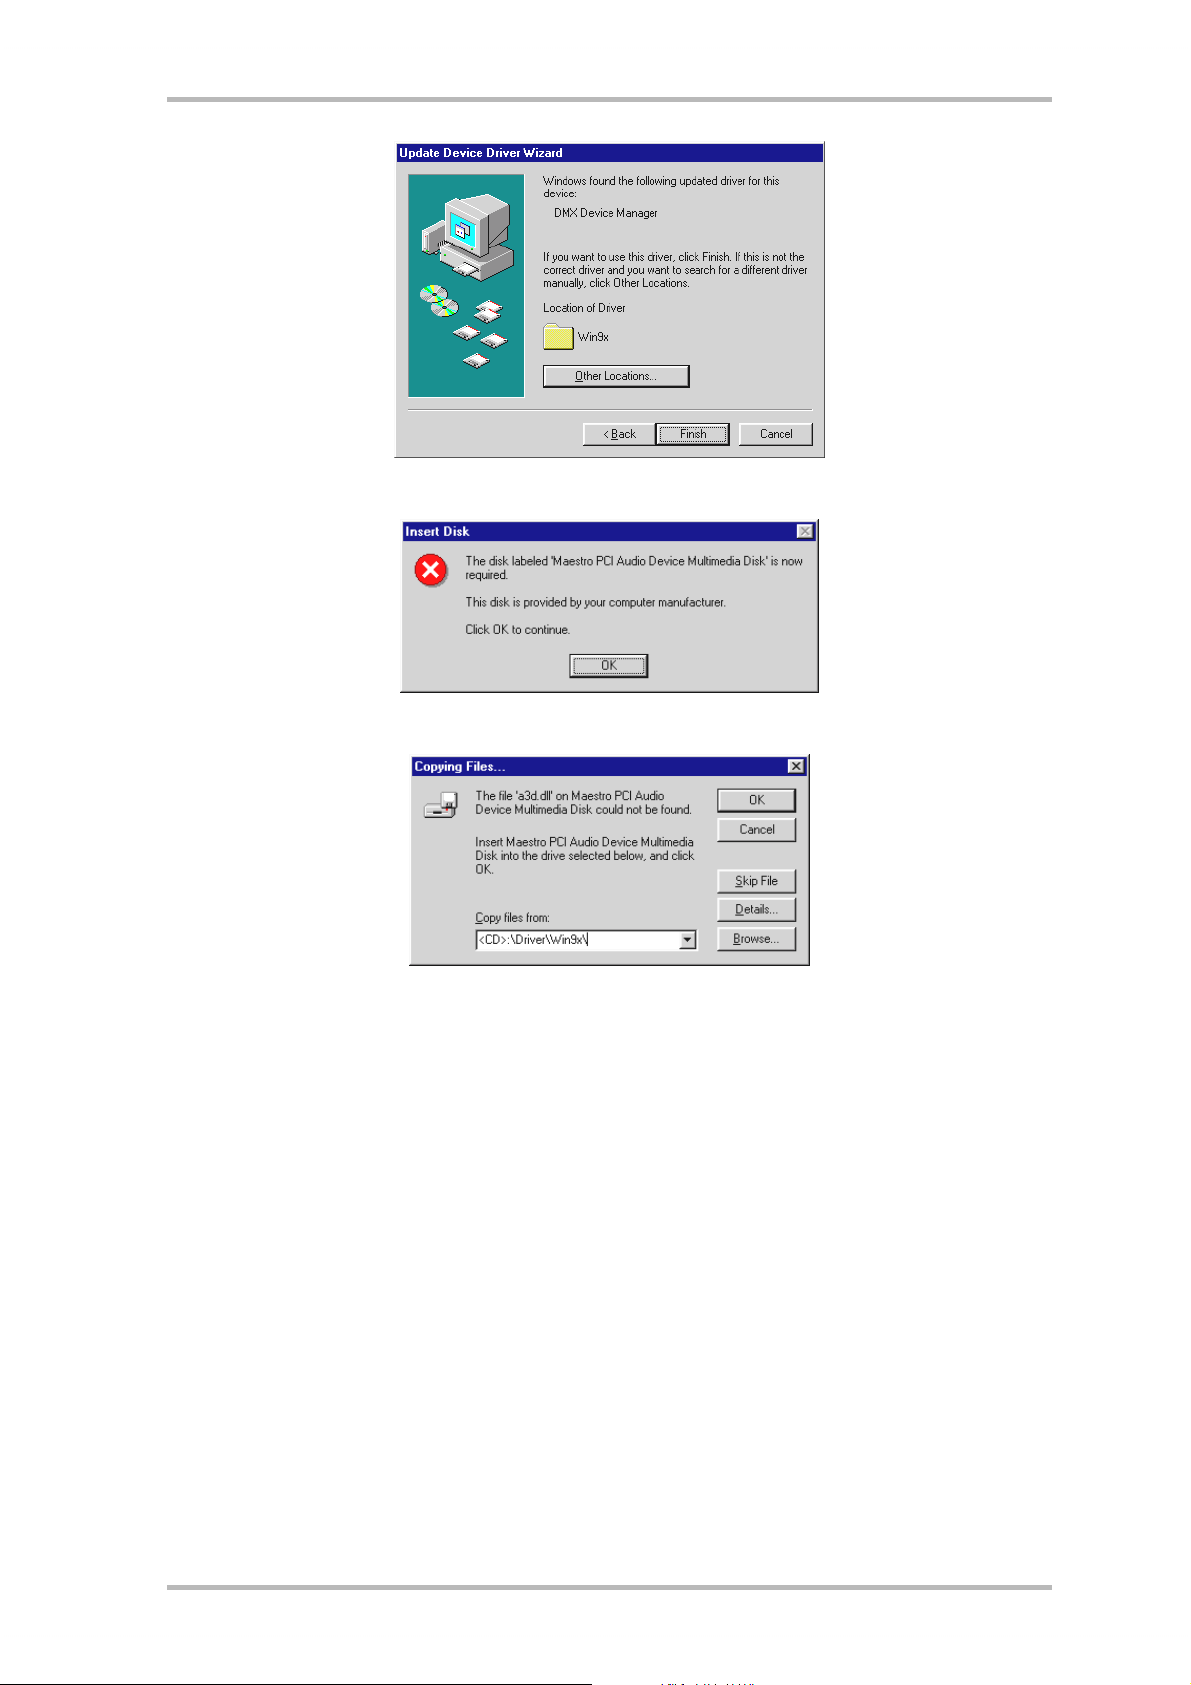
If you have entered the correct path, the driver is located. Click Finish.
If this screen appears, click OK.
Re-enter the path <CD>:\Driver\Win9x\ and click OK. You could also use the mouse to select the
path by clicking Browse... .
Windows now installs the driver for you, documenting the process with several install screens.
At this point nothing else should occur. If during this process you are prompted to do something and you are unsure how to proceed, it is usually best to just press the Enter key.
If Windows should ask again for a driver file, please refer once more to the above-mentioned
DMX CD directory. It could also be the case that a few other Windows features need to be
installed along with the card (e.g. if this is the first sound card installation for your system).
For this eventuality, please have your Windows CD handy.
After the driver has been successfully installed, the setup for the software installation should
begin automatically. If this is not the case, run Setup directly from the DMX CD.
<CD>:\Applications\Setup.exe
Follow the instructions on the screen. There shouldn't be any problems. You need to install the
DMX ControlPanel in order to be able to continue reading this manual. The other software is
not mandatory, but it's fun and useful.
Continue reading on page 24.
18 SoundSystem DMX
Page 19
Installation in Windows 98.
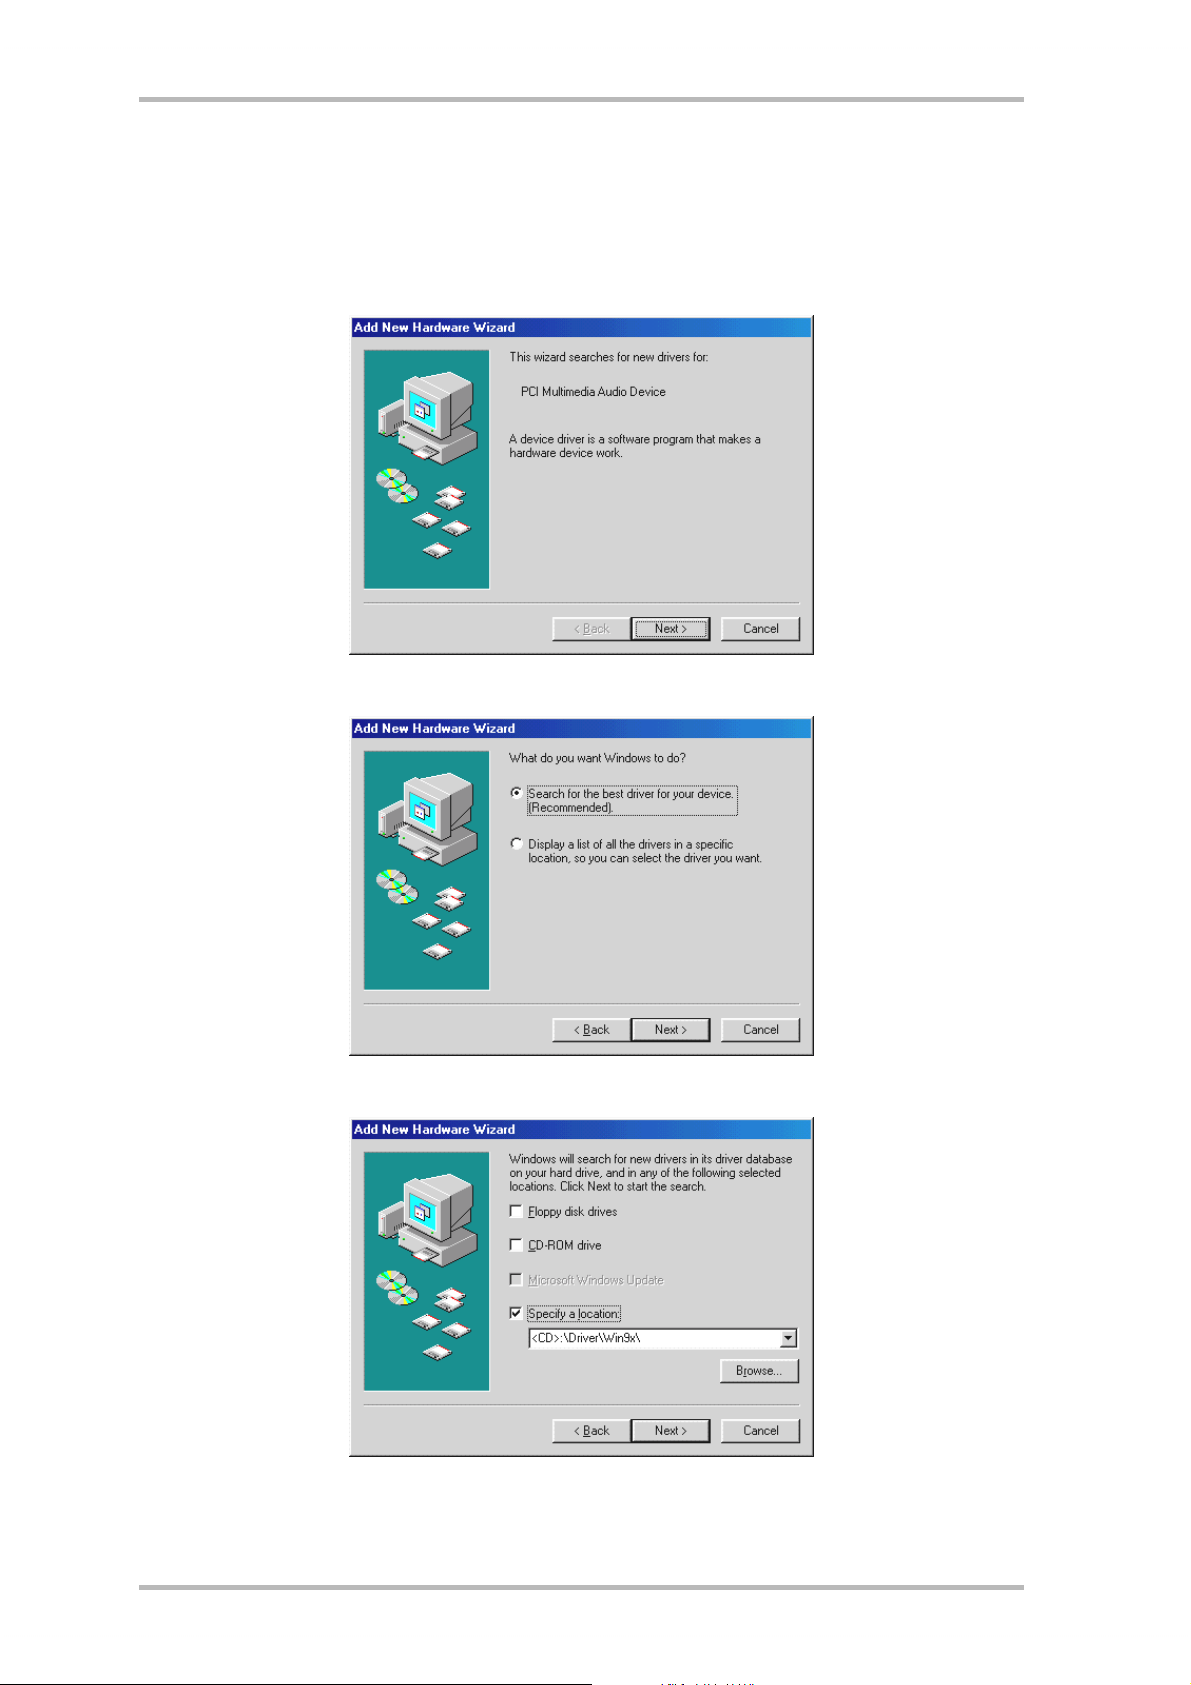
When the SoundSystem DMX is installed, Windows 98 recognizes the card as a new hardware
component and displays the following screen.
Click Next.
Select Search for the best driver for your device and click Next.
Enter the path <CD>:\Driver\Win9x\ and click OK.
SoundSystem DMX 19
Page 20
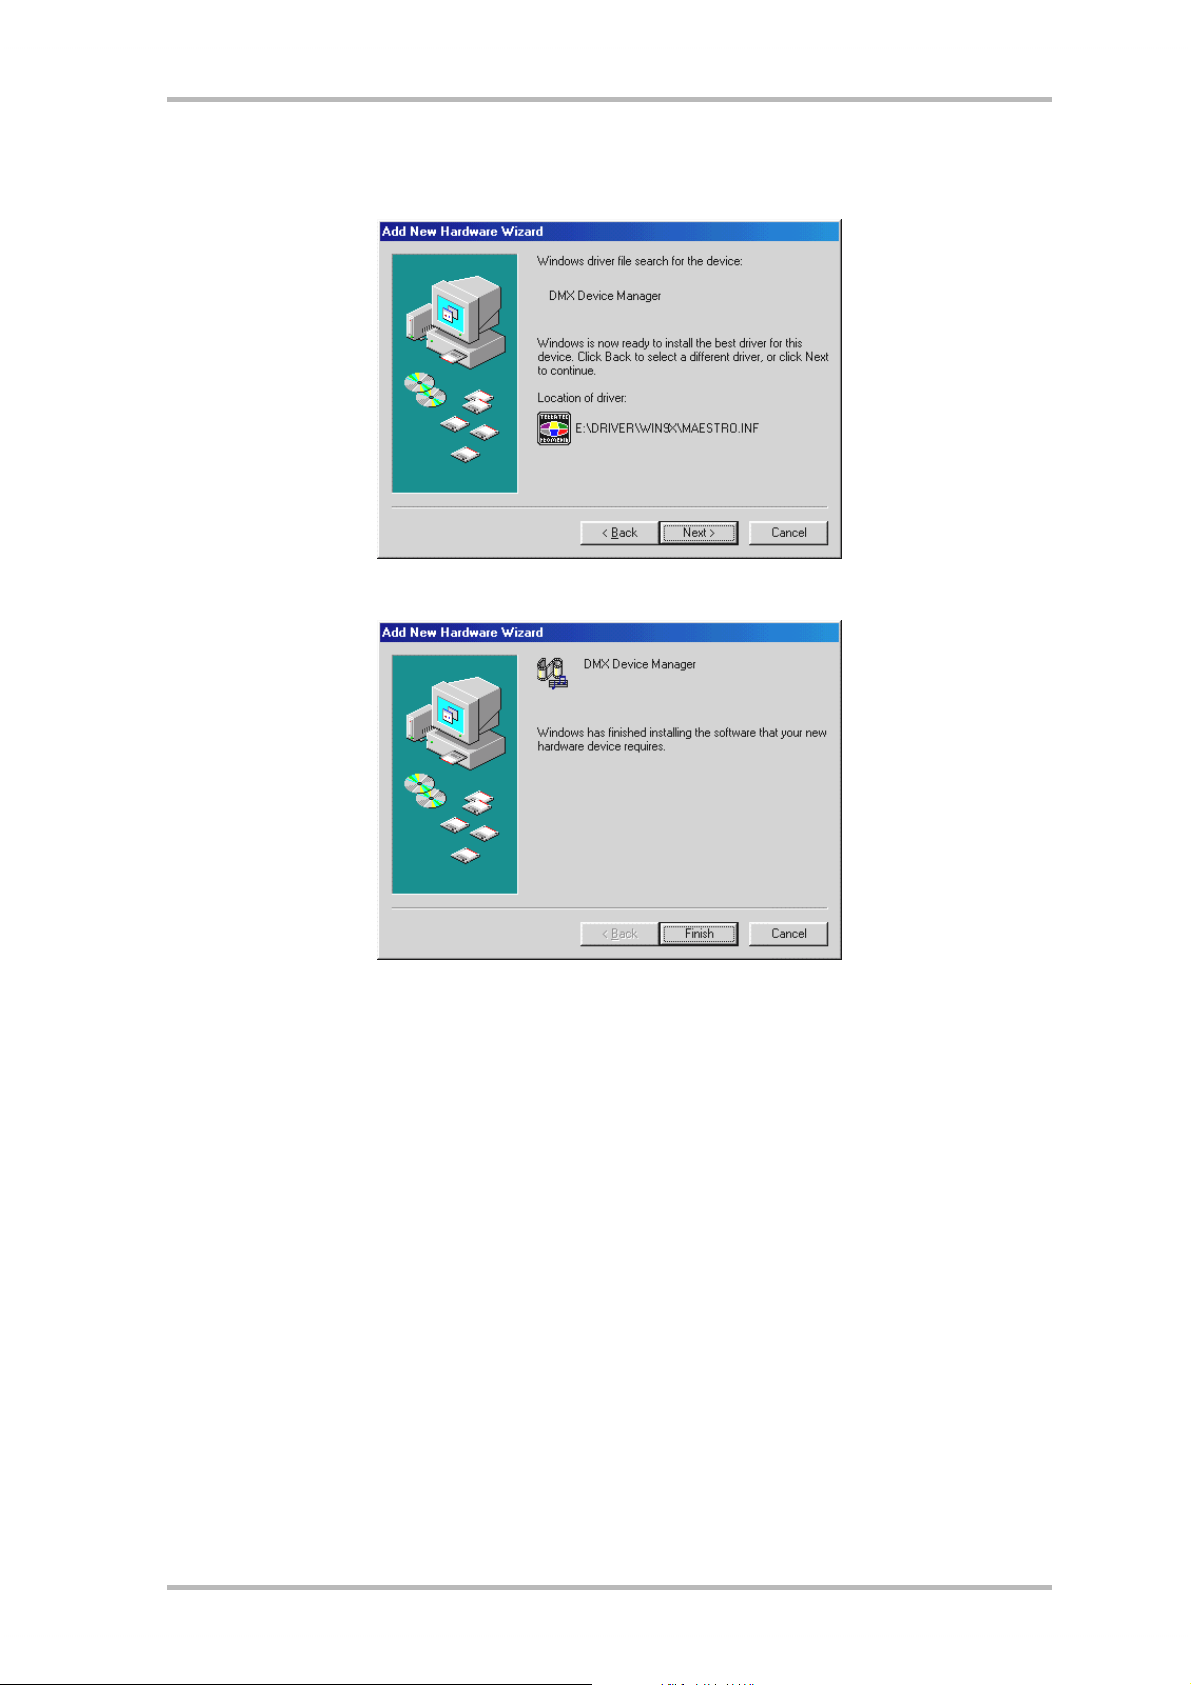
You could also use the mouse to select the path for the best driver for your DMX by clicking
Browse... .
You should also click Next when this screen it reached.
To complete the installation click Finish.
Windows now installs the driver for you, documenting the process with several install screens.
At this point nothing else should occur. If during this process you are prompted to do
something and you are unsure how to proceed, it is usually best to just press the Enter
key.
If Windows should ask again for a driver file, please refer once more to the above-mentioned
DMX CD directory. It could also be the case that a few other Windows features need to be
installed along with the card (e.g. if this is the first sound card installation for your system).
For this eventuality, please have your Windows CD handy.
After the driver has been successfully installed, the setup for the software installation should
begin automatically. If this is not the case, run Setup directly from the DMX CD.
<CD>:\Applications\Setup.exe
Follow the instructions on the screen. There shouldn't be any problems. You need to install
the DMX ControlPanel in order to be able to continue reading this manual. The other software
is not mandatory, but it's fun and useful.
Continue reading on page 24.
20 SoundSystem DMX
Page 21
Uninstalling the Driver in Windows 95 and 98.
If you want to delete the driver from the system, it's best to do this first using the Device
Manager before removing the card. Select the entry DMX Device Manager and click Remove.
That's all.
The software can also be easily removed form your system. On your Control Panel, simply
double-click Software and then Add/Remove Programs and select the program to be deleted.
Select it one after the other and click Add/Remove....
To make absolutely certain, you can locate the files TerraTec DMX.INF and DMXWT.INF in
your Windows directory and delete them. In this way, windows will have forgotten what has
gone before when the next driver version appears ...
SoundSystem DMX 21
Page 22
Installing in Windows NT 4.0.
To install the SoundSystem DMX in Windows NT, you must be logged on as administrator.
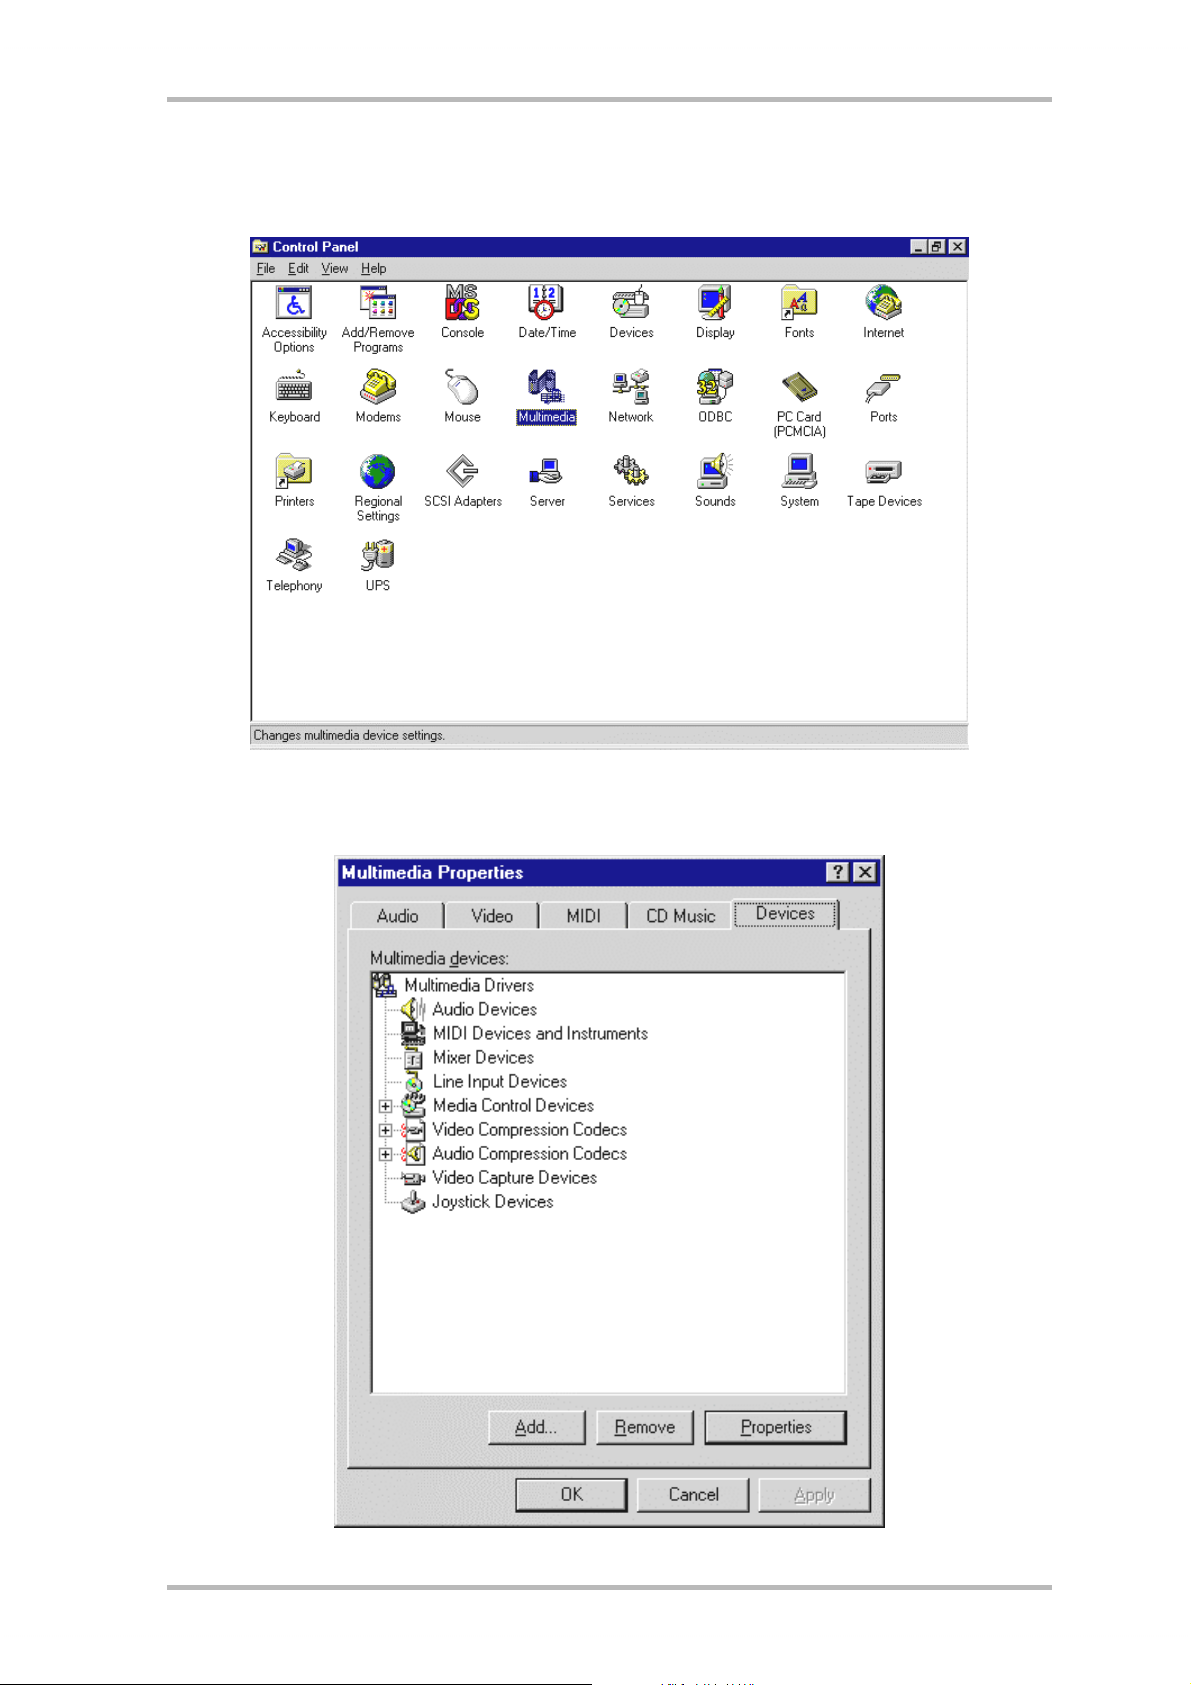
Open the Control Panel and double-click Multimedia and...
select Devices.
22 SoundSystem DMX
Page 23
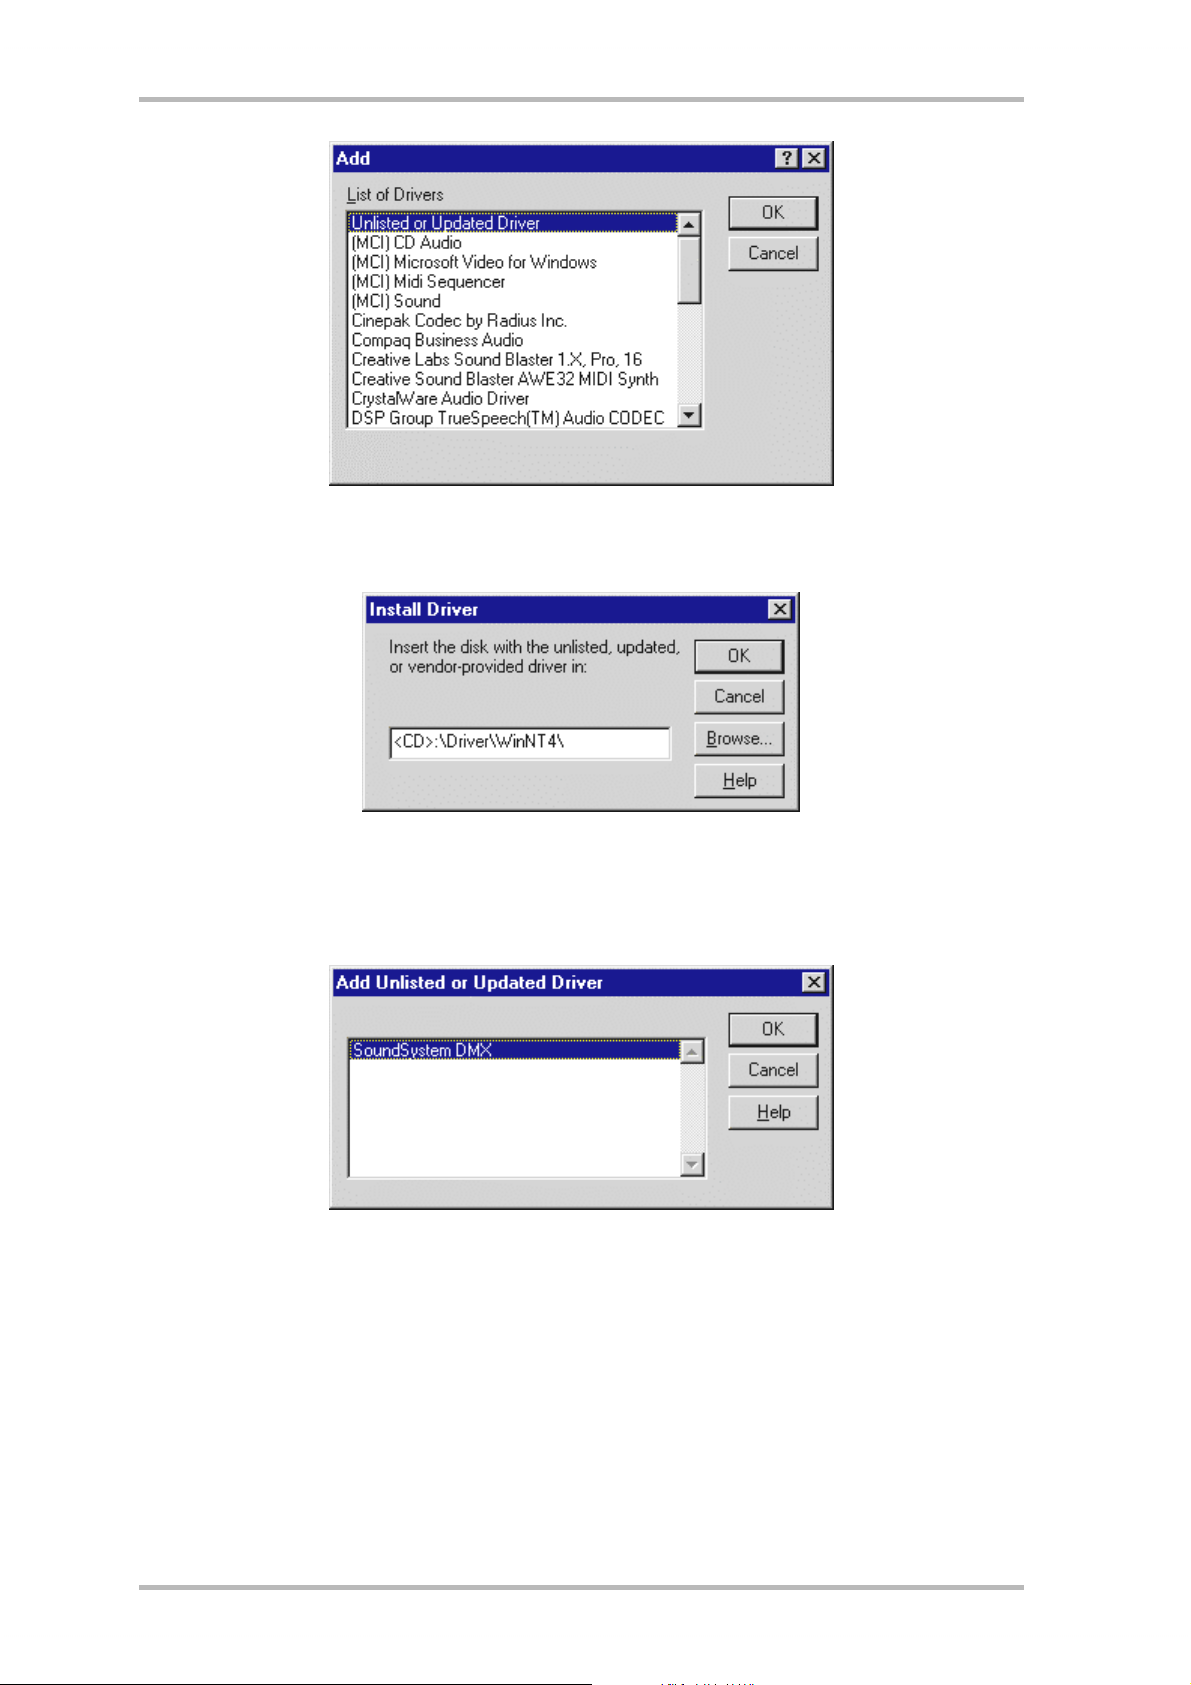
Select Unlisted or Updated Driver and click OK.
Enter the path <CD>:\Driver\WinNT4\ and click OK.
You could also use the mouse to select the path by clicking Browse... .
Select the SoundSystem DMX and click OK.
In the next window, confirm once again that you would like to install the drivers.
After the driver has been successfully installed, the setup for the software installation should
begin automatically. If this is not the case, run Setup directly from the DMX CD.
SoundSystem DMX 23
Page 24
Driver is installed – this is what it looks like.
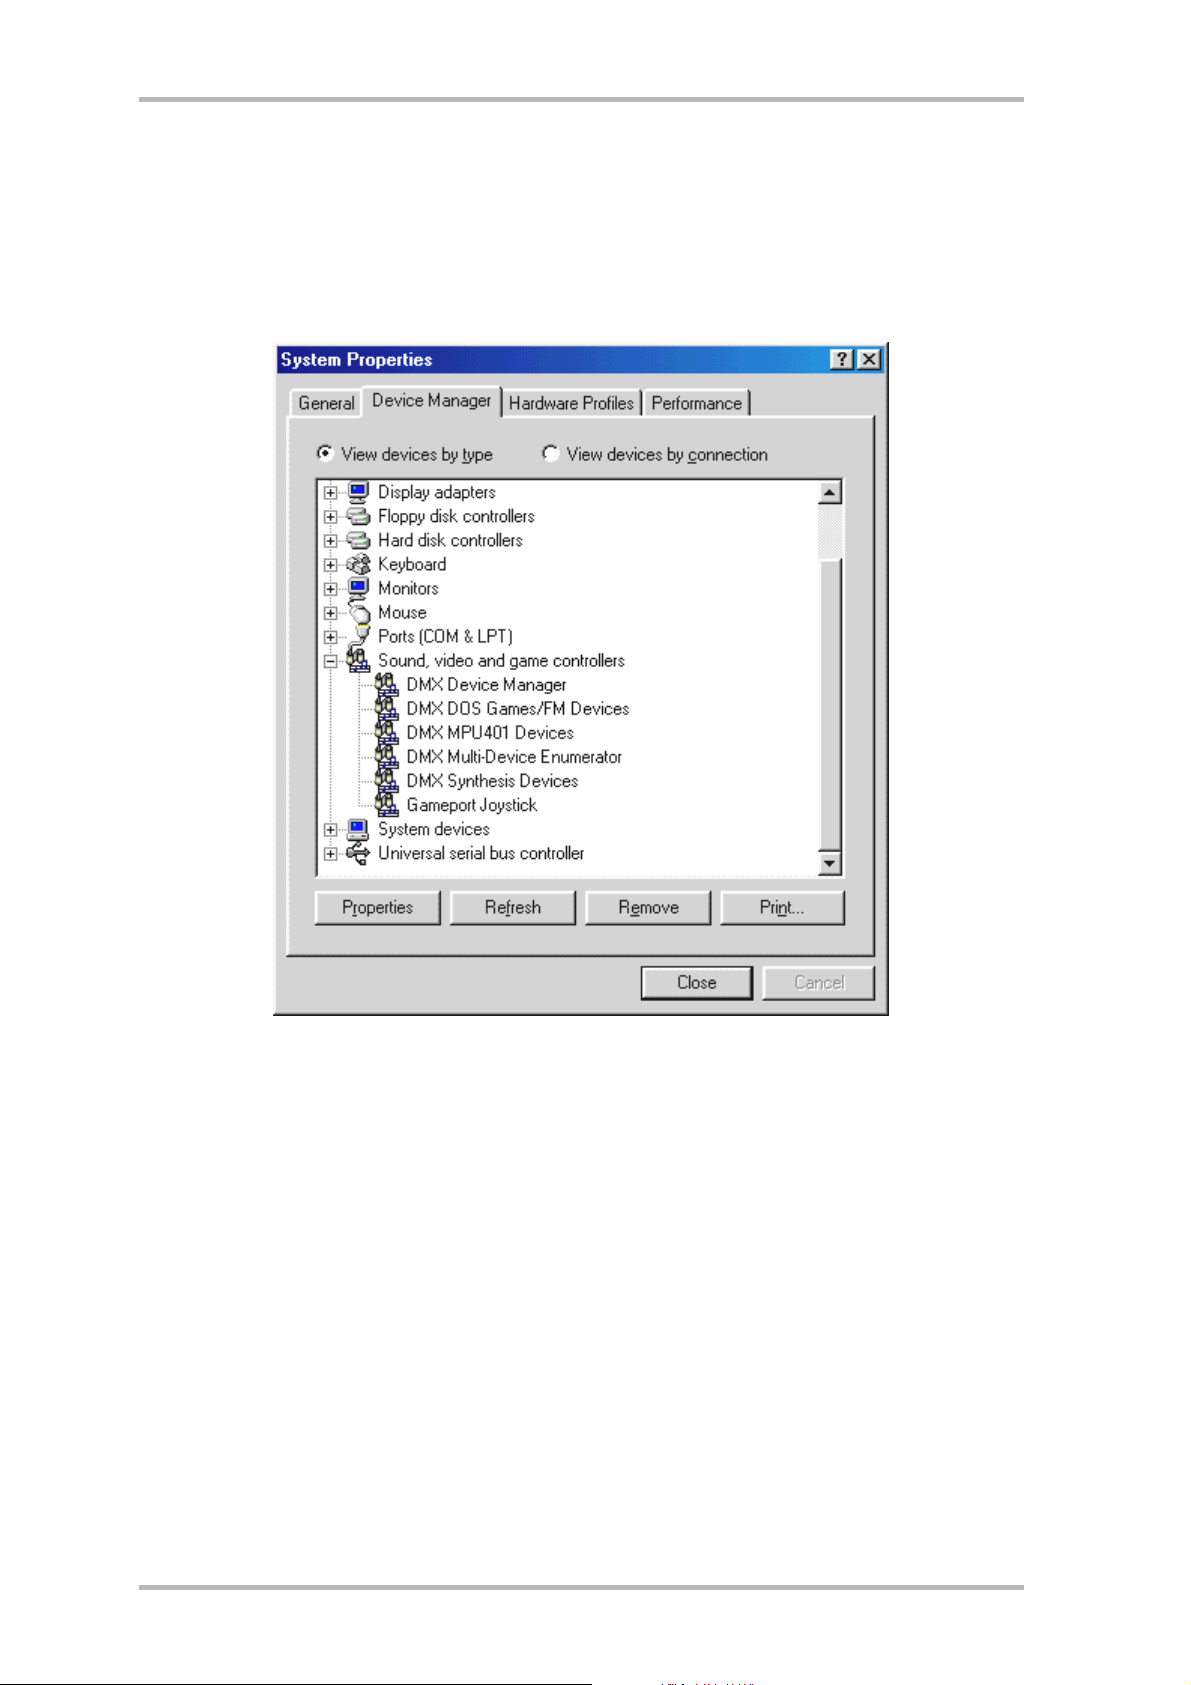
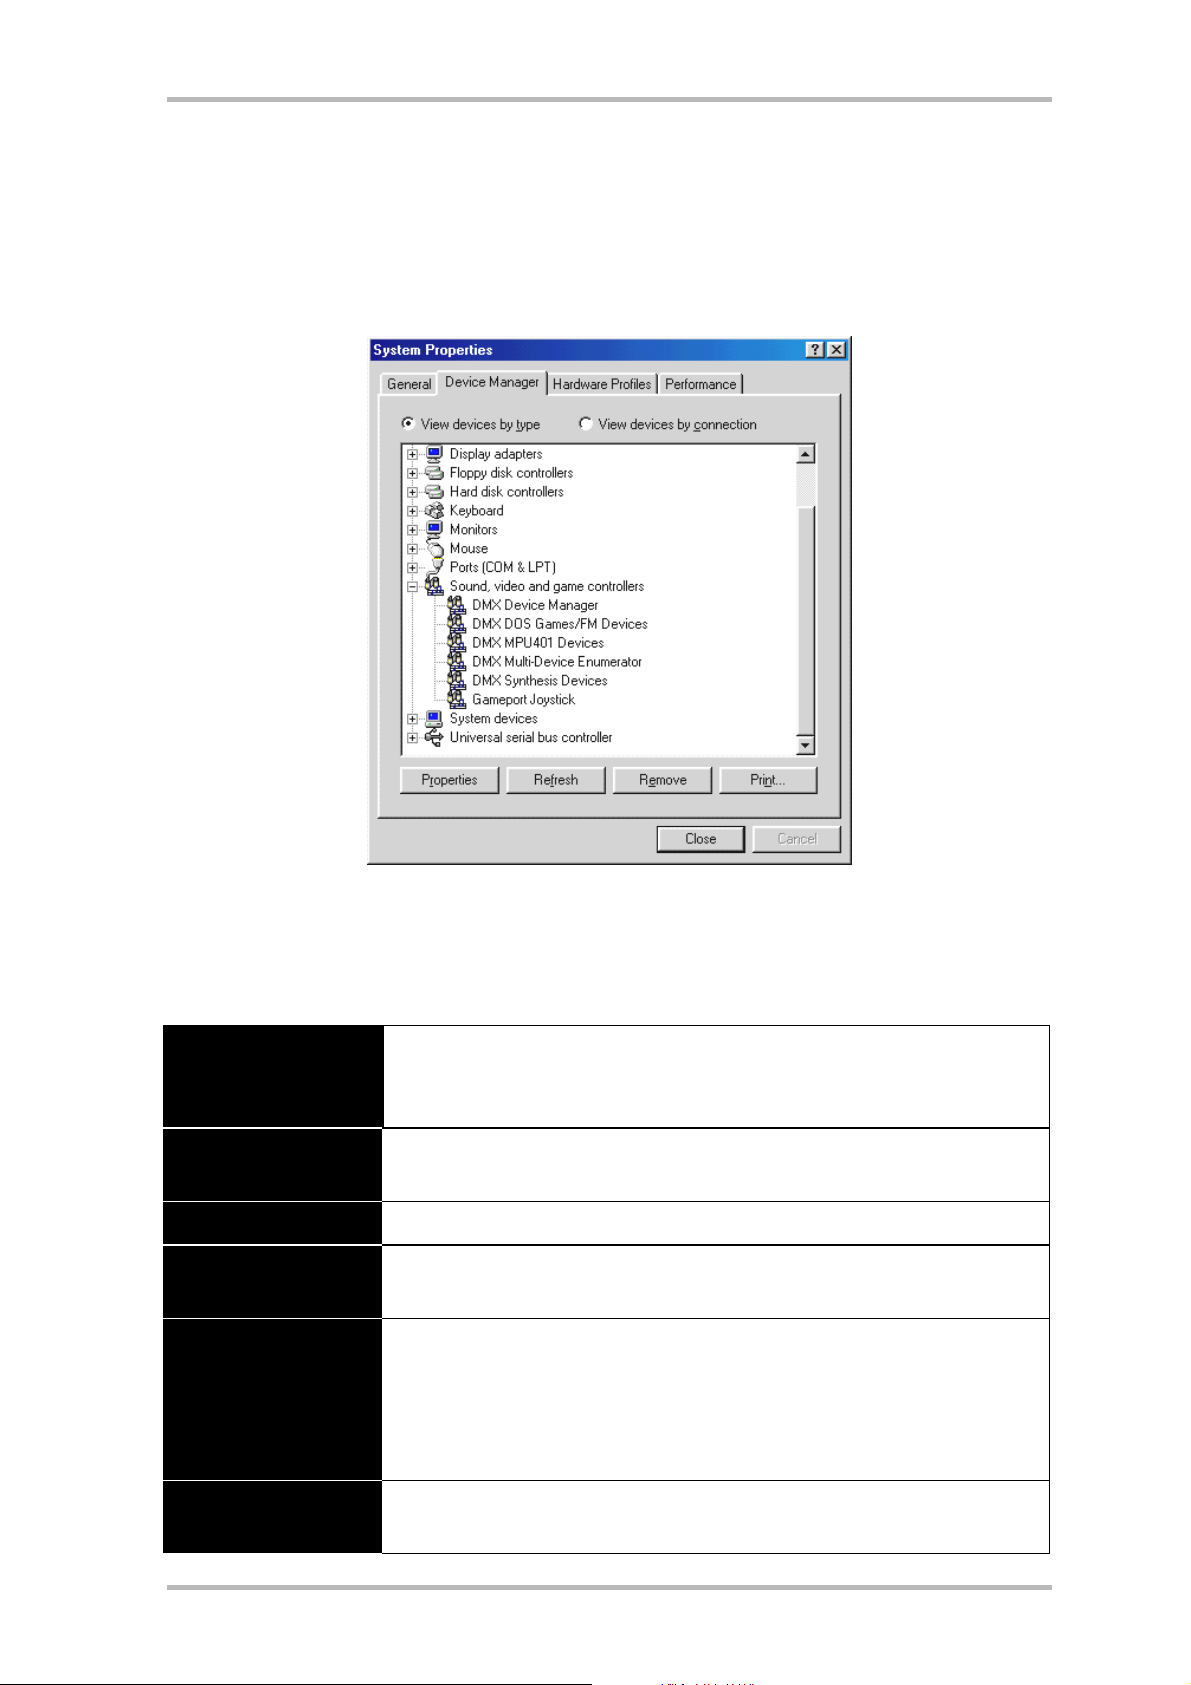
After a successful installation of the driver, you should verify that all systems are go with your
Windows 9x system. In Device Manager you get an overview of the installed and recognized
hardware components on your computer. The Device Manager is found in the Control Panel
under System.
This is how the window should look if everything is properly installed. In the picture the item Sound,
video and game controllers is opened. You can do this by clicking the small "+" symbol on the left hand
side.
In case you are interested: the installed drivers are responsible for the following tasks.
DMX DeviceManager The DeviceManager controls, among other things, the plug&play
configuration of the card and is generally responsible for the smooth
operation of the hardware.
DMX DOS Games/FM
Devices
DMX MPU401 Devices This is where the base address of the MIDI interface is managed.
DMX Multi Device
Enumerator
DMX Synthesis Devices The heart and soul of your DMX. Hidden here is the wavetable synthesizer,
This entry is responsible for compatibility with older standards such as AdLib
or SoundBlaster in DOS.
Sounds cool, huh? This part of your DMX is also responsible for important
system settings and should not be touched.
the WAV playback, the 3D calculation, and DirectSound acceleration ... simply
put, all the sound that comes out of the card. Settings can be changed here,
but do not have to be since everything can be done from the DMX
ControlPanel. Therefore we won't go into detail at this point.
Gameport Joystick This is where the gameports base address is set – from Windows, fully
automatic.
24 SoundSystem DMX
Page 25

Finally, you should double-check the card's MIDI settings. Take a look at
Multimedia Properties (Control Panel > Multimedia) and select MIDI. If it hasn't already
been done so automatically, please set the MIDI output to the driver DMX WaveSynth.
If you have other MIDI devices installed and do not want the standard output to be via the
DMX Wavetable Synthesizer, you can naturally also select an alternative device.
SoundSystem DMX 25
Page 26

The Card Connections and Their Application.
Your SoundSystem DMX has numerous connection options. Nearly everything that can be
used with a PC regarding sound can be connected to the card and used without problem. In
the following we will give a detailed description of the all possibilities as well as the proper
settings for the DMX-ControlPanel. There will also be tips on frequently used applications.
Later on, please take a look at the information regarding the DMX ControlPanel in the chapter
"Software".
26 SoundSystem DMX
Page 27

Line Outs.
1
The line outs operate with a normal "HiFi signal". Use OUT 1 to
connect your amplifier or active speakers. Both OUT connectors can
be preamplified for use with headphones by setting the jumpers.
The Basics.
The most important connection option for a sound card - the experts all agree on this - is the
playback system. The SoundSystem DMX provides you with two such outputs so that you
could, for example, position two stereo speaker pairs around a listener. These outputs take
the form of two mini-jacks (3.5mm stereo jacks). The first should be used to connect either a
HiFi amplifier or active speakers. The jack labeled OUT-1 carries a "normal line signal" (the
exact specification can be found in the appendix).
OUT
For HiFi amplifiers, there are several suitable outputs for connection to the card. So you can,
for example, keep an eye out for a connector labeled AUX, TAPE (Play), CD, or VIDEO.
However, a Phono input cannot be used.
If your amplifier offers connection options for digital devices that follow the S/PDIF standard
(cinch or optical jack with a small cap), then you can also use them. However, this is only the
first stereo output available for DMX digital expansion - hardcore gamers must, therefore,
remain outside. You will find more information on this subject on page 35ff.
SoundSystem DMX 27
Page 28

Headphones.
Instead of using an amplifier system, you can use headphones as an alternative. To be exact
you could even use two sets at a time. But we wouldn't recommend wearing two sets at a time
- as that wouldn't do you much good.
The outputs are equipped with a small (200mWatt at 8 Ohm) headphone amplifier which can
be switched on at its own jumper (JP1 = Out 1, JP2 = Out 2) located on the board. Carefully,
move the small plastic switch from position A to position B.
51
Position A - headphone amplifier turned off ... (line operation)
51
Position B - ... and activated. (headphone operation)
If you switch on the headphone amplifier and then use a HiFi amplifier or active speakers, you
don't need to worry that you will "crash" anything. The only thing that will happen is that the
background noise will be noticeably louder in this situation.
Safety Tip.
Please remember to switch off all (analog) devices before connecting
them. This is to avoid the danger of electrical shock - even a weak one
- it also protects your speaker membranes and your hearing from
sudden signal spikes. For digital devices, the volume of your playback
system should at least be turned to low.
28 SoundSystem DMX
Page 29

4 Speakers
2
To enjoy the pleasure of total sound from 4 speakers positioned around you, connect a second
amplifier or active boxes to the output labeled OUT 2.
OUT
Don't worry if the signal is not quite as loud when you switch to the 4 speaker mode. This is
perfectly normal for this setting.
Tip
For best results, you should give yourself the luxury of having two
identical playback systems since sound differences in speakers can
sometimes be quite extreme. Use two systems both equipped with
sub-woofers. You can also connect both bass speakers to their
respective amplifiers. Low frequencies are hard to locate exactly - but
when doubled in number they can be felt unevenly and more
intensely. You have to have a little fun ...
The Playback Driver.
You can hear your SoundSystem DMX when you select the driver "DMX Playback" for playback
of audio files (e.g., system sounds, WAV files, audio programs).
SoundSystem DMX 29
Page 30

Speaker Position for optimal 3D Sound.
As with the processor-controlled room simulation coming from the speakers, the correct
positioning of the speakers is also important since - as opposed to wearing of headphones the position of the ears is always slightly different.
The following illustration should help you to position your speakers in the optimal way.
Naturally, you don't have to hold your head to the exact degree relative to the system, that
would be too uncomfortable in the long run. This is only a guide so that you can found the
best position suitable for you.
The 3D sound software that comes with the SoundSystem DMX provides you with 3 different
playback modes to choose from. These you should take a look at if possible. The exact
position of basic algorithms differs greatly according to application. Therefore: Operating the
playback via 4 speakers and subsequent use of headphones doesn't do anything.
Internal Output Jack Taps.
Last but not least, we would turn your attention to the internal taps located behind both
output jacks. These can be used to divert the audio signal from the jack and alternatively for
internal connections. There are, for example, front modules with control options on the frontside of the PC which can make use of these connections.
30 SoundSystem DMX
Page 31

Line Input.
The line input operates with normal "HiFi signals" of approx. 1Vrms.
Here you can connect, for example, the TAPE Record output of your
amplifier or the AUX path of your mixing unit.
The Basics.
Analog audio sources such as cassette players, video recorders, or record players can be
recorded via the input labeled IN on your SoundSystem DMX.
!
LINE
The connection is made using a mini-jack bush (3.5mm stereo jack) which you connect to the
TAPE Record output of your amplifier or the AUX SEND path of a mixing unit, for example. The
input sensitivity can be adjustable and is suited for "normal line signals" (the exact
specification is listed in the appendix). Microphones are connect to the input labeled MIC on
the DMX (see below) and digital devices should be connected at the digital input designed for
them located on the SoundSystem.
When recording, select the recording source "Line" in the DMX ControlPanel under "Record".
Safety Tip.
Please remember to switch off all (analog) devices before connecting
them. This is to avoid the danger of electrical shock - even a weak one
- it also protects your speaker membranes and your hearing from
sudden signal spikes. For digital devices, the volume of your playback
system should at least be turned to low.
Connecting and Recording from a Record Player.
At the moment, it is very "hip" to archive and restore vinyl or shellacrecordings. With the
SoundSystem DMX you are well-equipped to make high-quality audio recordings. It also
contains recording and editing software. When connecting record players, there are a few
particulars that you need to know and we will tell you about them in the following.
You cannot directly connect a record player to a sound card such as the DMX because record
players – technically limited by the acceptance system – send out a useful signal that is too
low and extremely unbalanced. Therefore it is necessary to attached an amplifier between the
two devices (HiFi amplifier or a special audio amplifier with an optimized equalizer). If you are
SoundSystem DMX 31
Page 32

using a HiFi amplifier, it usually contains a TAPE Record output which can be used to connect
to the SoundSystem DMX.
Software for digitizing and editing your recordings is included with the sound card. The
program WaveLab (lite) by Steinberg, for example, is great for editing large files and shouldn't
be a problem to use because of its intuitive interface. However, customary audio software is
not completely suitable for tasks related to sound restoration. Along with the normal
functions such as editing, equalizing (working with the equalizer) and volume control, there
are other functions that you need such as a "de-noiser", "de-scratcher", "loudness
maximizer" as well as types of special spreaders and softeners. Last but not least, the ability
to burn CDs would be desirable. All of these functions are contained in specialized software
which you can obtain, for example, from the following leading manufacturers:
Algorithmix
Dartech
Diamond Cut productions
Sonic Foundry
Steinberg
www.algorithmix.com
www.dartech.com
www.diamondcut.com
www.sonicfoundry.com
www.steinberg.net
Internal Input Jack Taps.
Last but not least, we would turn your attention to the internal taps located behind the input
jacks. This can be used to divert the audio signal from the jack and alternatively for internal
connections. There are, for example, front modules with control options on the front-side of
the PC which can make use of these connections.
32 SoundSystem DMX
Page 33

Microphone Input.
The MIC input is only for connecting commercial capacitor
microphones (with or without batteries). The input sensitivity is
approx. 0.1Vrms.
The Basics.
Microphone recordings, e.g., for speech recognition or Internet telephony can be made using
the MIC labeled input on your SoundSystem DMX. User either a commercial capacitor
microphone or headset with a mono-jack bush (3.5mm mini-jack).
!
MIC
The sensitivity can be adjusted using the SoundSystem DMX ControlPanel. There is also a
switch for a built-in booster for the microphone input. It is a button labeled "BOOST" and
increases the sensitivity of the input, and also increases background noise.
Safety Tip.
When using the microphone, unpleasant feedback can occur suddenly
(loud whistling) which can be bad for your speakers as well as your
hearing. Please reduce the volume when first using a microphone and
increase the volume carefully.
Misunderstandings
To avoid misunderstandings: Don't expect wondrous sound to come from a "sound card"
microphone input – not even one from TerraTec ;-) . Please note that the microphone input
does not support a microphone with phantom powering (48V for the power supply). These
devices are used in professional studios and live on-stage and usually have a 6.3mm jack or 3-
SoundSystem DMX 33
Page 34

pin XLR plug –. Save yourself the time and money in making or buying a mini-jack adapter. If
you plan to make professional-quality recordings (e.g., for speech, singing, or instrument
recordings), there is no other choice but to obtain professional peripheral equipment.
Dedicated microphone boosters or mixing units with the corresponding inputs and AUX Send
paths (or subgroups) can be purchased at any music store.
Please also make sure that the microphone input for the SoundSystem DMX is designed for
monophone.
Internal Microphone Input Taps
Last but not least, we would turn your attention to the internal taps located behind the
microphone jack. This can be used to divert the audio signal from the jack and alternatively for
internal connections. There are, for example, front modules with control options on the frontside of the PC which can make use of these connections.
34 SoundSystem DMX
Page 35

The Digital Output.
The digital output delivers a standard S/PDIF signal for consumer
devices. This falls into the category of digital amplifiers, MiniDisks or
DAT recorders, for example.
The Basics.
If you want to digitally transfer music form your computer to other devices, this is done using
the digital module that comes with the card. For playback, you can use either a coaxial (RCA)
or an optical (also often known as a TOS link) output. You can connect two devices without
problem – the signal is played back via both outputs.
!
TOS LINK OUT
On the SoundSystem ControlPanel select the DIG(ital) MODE "Output" in "Settings". This
gives you the option of setting the card's sample rate (sample frequency) for the output. You
can carry out this later under "DIG OUT Frequency".
Tip
Usually consumer devices such as MiniDisks, digital amplifiers or
consumer DATs operate with a sample rate of 44.1kHz. This setting
must be done manually when the affected device is not automatically
synchronized. Synchronization is necessary in order to guarantee
error-free ("drop out"-free) recordings.
For playback purposes, the volume control for the digital signal is labeled MASTER. Make sure
that this controller doesn't just affect the playback volume in what you can hear (monitoring),
but also changes the digital signal. For error-free "transfers" of the audio signal, the
controller should always be set to its base settings. If you are not sure whether everything is
RCA OUT
SoundSystem DMX 35
Page 36

set correctly, load a previous mixer setting for the required settings (Digital OUT
default.TTM).
A digital recording using the SoundSystem DMX is not affected by the above mentioned
settings.
DIG OUT Mode.
The DMX offers two different output modes (DIG OUT Mode) for the different applications of
digital output: OUT1 or WAV/MIDI. The difference between these two settings depends on
which signal can be played back directly via the digital output (i.e., without mixing with other
signal sources). With the setting OUT1 at the digital output, you have the same signal
(including radio, CD audio, etc.) as with the analog output OUT1. Unfortunately, because of
the many signals included you can't prevent a certain amount of background noise. Now we
come to the WAV/MIDI setting: In this mode, only WAV and MIDI files are sent to the digital
output, both are "digitally created" and therefore free of background noise.
Copy Protection.
It is possible to protect your recording from being copied on other devices by adding a copy
protection ID. This makes sense, for example, if you give out a composition as a demo on DAT
or MiniDisk and don't want it to be digitally copied.
Backup.
The digital interface of the SoundSystem as well as the accompanying software cannot be
used for backup on DAT. In principle, this can be done, however cheaper backup options such
as CDs are common today and less time intensive.
More valuable information on the digital interface and the use of digital cables can be found in
the next chapter "The Digital Input".
Therefore, if you please keep reading ... ;-)
36 SoundSystem DMX
Page 37

The Digital Input.
The digital input accepts a standard S/PDIF signal from consumer
devices. This falls into the category of MiniDisks or DAT recorders, for
example. When recording there are few important steps you need to
take into account and they are described in the following.
The Basics
The digital module that comes with this card should be used to connect digital output devices
(S/PDIF standard) to the SoundSystem DMX. For recording, you can use either a coaxial (RCA)
or an optical (also often known as a TOS link) input.
!
RCA IN
Two devices can be connected at the same time, however, only one can be used at a time to
record.
The DMX digital interface operates with all three standard frequencies at 16-bit resolution (32,
44.1, and 48kHz).
On the SoundSystem ControlPanel select the input source (coaxial or optical) under
"Settings". Then select the setting "Input" as DIG(ital) MODE. This tells the SoundSystem to
automatically synchronize itself to an external digital signal. This is necessary in order to
guarantee error-free ("drop out"-free) recordings.
For playback purposes, the volume control for the digital signal is labeled DIG IN. Notice that
this controller only affects the playback volume of the signal connected to the digital input –
the digital recording via the source "DIG" is not affected by it.
For digital recording. You have two options for recording digital input. The first is to record
the DMX's entire signal, i.e., everything that was stored in the Mixer up until the time of
recording - including residual noise e.g., from a CD ROM drive.
TOS LINK IN
The second is to only record the specific digital signal itself – this will probably be the
preferred alternative for most applications. Select the desired recording source on the
ControlPanel on the page "Record" (Mix and DIG).
By the way: Any copy protection that is present (SCMS or CopyProtection bit) will be ignored
and not recorded.
SoundSystem DMX 37
Page 38

Stuff Worth Knowing
A few errors can occur (usually they can't be heard) during the transmission of audio data via
copper (coax) or fiber-optic cable (optical). For this reason, you should use high-quality cable
that is not too long (coaxial, 75 ohm cable up to approx. 5m, fiber-optic cable up to approx.
2m). For optical fiber cables, make sure that there are no kinks in the line.
Audio differences with digital cables seem improbable at first glance, but they can happen
however. This is proved by the fact that error correction algorithms are need sometimes more
frequently than others to correct cables of differing qualities. In any case these audio changes
are usually so minimal that you need to be careful not to mix up the myth or the reality of the
situation. If you are interested: there are a many somewhat entertaining militant newsgroups
dealing with this subject on the Internet ;-) .
Last but not least, some info on the transmission protocol: Only data following the S/PDIF
(Sony/Philips digital interface) standard is transmitted over the optical interface. The use of
ADATs or compatible devices is not supported.
Also devices with AES/EBU interfaces cannot normally be operated - ambitious tinkering with
pure adapters doesn't get you anywhere. Because the AES/EBU protocol is nearly identical to
S/PDIF and the transmission essentially only differs in the signal strength, you can make your
own converter with just a little bit of soldering effort required.
A brief circuit diagram and other information can be found at the following location on the
Internet: http://www.hut.fi/Misc/Electronics/docs/old/spdif.html (see
also the following diagram).
38 SoundSystem DMX
Page 39

AES/EBU to S/PDIF
AES out: 2-------330 ohm------------------- SPDIF in
|
3--- 91 ohm
| |
1---------|-----------------------
ground
S/PDIF to AES/EBU
_
+ 5 volt | \
SPDIF out: | +-| O-+
_ | |_/ |
diode ^ +-4,7k-+ _ | _ |
10 u (+) | | | | \ | | \ | 100 n
O-----+-||-+--------+--+--IC--+--+-| O-+-| O-+-120 r-||-+----+-- 2
| | | | | | |_/ |_/ | |
| +-||-+ 100n _ 2,2k | 1 k |
75r ^ diode | | IC | | AES in
| | --- | --- |
--- --- | _ 220r
| | \ 100 n |
+--+---| O---+--120 r-||-+---+--- 3
Diode = 1N914 or 1N4148 | |_/ | |
| _ | 1 k +--- 1
| | \ | | |
IC = 74HC04 or CMOS 4049 +---| O---+ --- -- |_/
Please note. We do not guarantee in any way the safety or the
functioning of this circuit. We also cannot give any technical support
for its implementation.
SoundSystem DMX 39
!
Page 40

The CD Audio Connections.
The SoundSystem DMX provides two separate connections for the
analog output of your CD drives. On the DMX ControlPanel you can
enter them using the controller labeled "CD".
The Basics.
A very nice feature of the SoundSystem DMX is the ability to simultaneously connect two CD
drives (e.g., your CD-ROM drive and a burner) to the card without signal loss. The inputs CD1
and CD2 are separated electronically from one another and combined in the mixer. The
volume control for both is labeled "CD".
When recording from a CD drive, select the "CD" setting in the ControlPanel under "Record".
The connector jacks are compatible with the widely available MPC3 standard.
The pin configuration of the signal and ground circuit is shown in the following:
!
CN5
Suitable cables usually come with your CD drive or can be purchased at most
computer stores.
If you need independent volume control for both your drives, you can use the DMX AUX input
as an alternative. In any case, the input sensitivity here is pretty much the same: approx.
1.5Vrms for the CD inputs, approx. 1Vrms for the AUX input. For the recording of both sources,
select in this case the "Mix" setting on the DMX ControlPanel under "Record".
CN3
CN4 CD2 CD1
40 SoundSystem DMX
Page 41

The AUX Input.
The SoundSystem DMX comes equipped with an internal audio input
for video cards, for example. You could also connect a CD drive here.
It has a separate volume control on the DMX ControlPanel.
!
The Basics.
The SoundSystem DMX is equipped with an extra input for additional PC peripheral devices.
At the internal AUX input labeled CN4, a video card / grabber card or the analog output of a
DVD card can be connected, for example. You could also connect another CD drive, although,
the input sensitivity at the AUX connection is slightly lower than at the CD inputs (approx.
1Vrms for AUX input, approx. 1.5Vrms for the CD inputs).
The volume control is found on the DMX ControlPanel under the controller labeled "AUX".
When recording select the setting "MIDI2/AUX" under "Record".
Important: What you need to recognize about the combined setting for MIDI and the AUX
connection is that the signal of the daughter board docked to the wavetable connector runs
concurrently with AUX signal. Contrary to both CD inputs, these are not electronically
separated from one another. Therefore, simultaneous operation should be avoided when
possible. If you stick two devices into "one line", you will experience considerable signal loss
of both devices. In addition, we cannot guarantee that this will not have long-term negative
effect on both devices.
The connector jack is compatible with the widely available MPC3 standard.
The pin configuration of the signal and ground circuit is shown in the following:
CN5
A suitable cable usually comes with the product or can be purchased at specialty stores.
CN3
CN4 CD2 CD1
SoundSystem DMX 41
Page 42

The Wavetable Connection and Internal Synthesizer.
The SoundSystem DMX comes equipped with a connection for a
wavetable daughter board. Installation instructions can be found on
page 12 in chapter "Connecting a Wavetable Daughter Board". The
volume control is found on the DMX ControlPanel under the controller
labeled "AUX".
Follow the instructions for installing a wavetable daughter board described on page 12 in
chapter "Connecting a Wavetable Daughter Board". The volume control is found on the DMX
ControlPanel under the controller labeled "AUX". When recording, select the setting
"MIDI2/AUX" in the DMX ControlPanel under "Record".
Important: As was already talked about in the chapter "The AUX Input", the signals of a
daughter board docked to a wavetable connection run concurrently with the AUX signal.
Contrary to both CD inputs, these are not electronically separated from one another.
Therefore, simultaneous operation should be avoided when possible. If you stick two devices
into "one line", you will experience considerable signal loss in both devices. In addition, we
cannot guarantee that this will not have long-term negative effect on both devices.
Information on the integrated wavetable and the future of sound synthesis.
The SoundSystem DMX plays MIDI files over a wavetable synthesizer (hardware with 64
voices) integrated into the chip set. The future of (General MIDI) wavetable technology lies
with host-based software synthesis according to experts. The abandonment by the
entertainment industry of MIDI sounds for games makes it very clear that purely general MIDIbased music won't play a large role any more – the multi-channel playback of complex and
high-quality audio streams in connection with 3D positioning is where it's going and this is the
highest priority for the SoundSystem DMX.
The wavetable synthesizer of the SoundSystem DMX can be made compatible to the Microsoft
DirectMusicstandard and the definition for the DLS2 sound format by updating the software
(WDM driver) after they have been finalized. Currently, several applications are already using
the GS soundset of the much-loved SoundCanvas series which is integrated into new versions
of DirectSound and licensed by Roland. For this reason, we decided not to license a special
SoundSet – with its accompanying additional costs and short-term nonsense – for the
SoundSystem DMX. The sound quality of General MIDI sets delivered by chip set
manufactures are on the same level as other more common sound cards in this price segment.
42 SoundSystem DMX
Page 43

The programming options for this solution have some limitations unfortunately. For example,
SystemExclusiveparameters are not processed.
To remedy this and to bring the high-quality sound to the DMX that TerraTec is known for, the
card provides you with a connection for an additional wavetable daughter board. The
WaveSystem series is available as an option for this purpose. Also modules from other
manufactures – such as Yamaha's DB-50 XG or Roland's SCD-10/15 – can be used along with
the DMX without problem.
The MIDI Driver.
A separate driver is available for the playback of MIDI information via the external Wavetable
module. The driver is labeled in the system as "DMX MPU-401" and can be selected whenever
it is needed. The above-mentioned module output is also available to you for the internal
synthesizer in sequenzer programssuch as Cubase, Logic, Cakewalk, or BUZZ, for example,
along with the driver "DMX WaveSynth". This driver is also used when externally-connected
devices are played from the GAME Port. If MIDI files are to be played via the media playback
from Windows – or you use programs which do not allow additional MIDI settings – you need
to open "Multimedia" from the Control Panel in Windows and set the driver in the MIDI output
(see illustration).
SoundSystem DMX 43
Page 44

The TAD (Telephone Answering Device) Input
The SoundSystem DMX comes equipped with an internal audio input
for modem cards with voice functions. It has a separate volume
control on the ControlPanel.
The Basics.
The SoundSystem DMX is equipped with a special input for an integrated voice modem or
telephone system. The volume control is found on the DMX ControlPanel under the controller
labeled "TAD". When recording, select the "TAD" setting under "Record" – who would have
thought?
The connector jack is compatible with the widely available MPC3 standard.
The pin configuration of the signal and ground circuit is shown in the following:
!
CN5
A suitable cable usually comes with the product or can be purchased at specialty stores.
CN3
CN4 CD2 CD1
44 SoundSystem DMX
Page 45

The Joystick/MIDI Interface.
Analog and digital joysticks can be connected to the SoundSystem
DMX GAME/MIDI port – MIDI devices can also be connected using an
optional adapter. The interface requires a DirectInput-compatible
driver.
The Basics.
The SoundSystem DMX offers a combined connection for old control sticks and modern
InputDevices – in "English": ForceFeedback joysticks, gamepads, flightsticks and other
absolute necessities.
Using optional adapter cables, you can connect several devices to the GAME Port. The support
from the driver-side of things for Microsoft DirectInputspecifications allows games quicker
access to the hardware and to communicate with the devices – very important, for example, for
ForceFeedback joysticks.
!
GAME- / MIDIPORT
MIDI
Even MIDI devices can be connected to the SoundSystem DMX via an adapter cable. This is an
option and can be purchased from your local computer store or directly from TerraTec. Please
visit our Online Shop at http://www.terratec.net/.
Since we are often asked for circuit diagrams of such adapter "cables", we have put together
the necessary information for you in the next section. As you can see, it deals with a GAME
Port / MIDI adapter and not just a simple cable. You will require additional components such
as optocouplers and transistors. For this reason, we suggest that you acquire the parts from
the electronics store – it doesn't cost a lot.
SoundSystem DMX 45
Page 46

The Circuitry of the MIDI Interface
Please note. We do not guarantee in any way the safety or the
functioning of this circuit. We also cannot give any technical support
for its implementation.
46 SoundSystem DMX
!
Page 47

The Radio Connection.
An optional radio module can be connect internally with the
SoundSystem DMX. Installation instructions can be found on in the
chapter "Installation" on page 12.
Recording
You can use the TerraTec radio software or any other wave editor (e.g., WaveLab) to record
radio programs. You just need to set the recording source to "Radio" on the DMX
ControlPanel beforehand. You might also need to set the driver "DMX Record" in the desired
application.
Stuff Worth Knowing
Normally just the information that you find in your radio module is valid. But it is worth
knowing that the volume of the program being run can be controlled in the software itself as
well as on the DMX ControlPanel (in Windows 95/98). If you have both applications opened,
you will see that the slider will move in both of them. Windows is a lot of fun, isn't it? ;-)
!
SoundSystem DMX 47
Page 48

Software Overview.
The TerraTec Team has spared no expense or effort to bring you a software package that really
has something going for it. This gives you a program which allows you to ...
· setup and control the SoundSystem DMX
· listen to all important (and a few unimportant) audio file formats
· discover for yourself a 3D audio world of sound
· edit recorded and imported audio data
· and even create your own pieces of music
You could say a complete package. And the best of all: The program is powerful enough to
give you professional features and options for all your needs. No fooling and (almost ...) no
fluff. Oh, you'll still find that on the SoundSystem DMX CD. In the directory "HOTSTUFF.!!!" –
a TerraTec tradition – you'll find some of the best and most useful (in our humble opinion)
audio shareware and freeware programs. There's enough stuff there to keep you busy with
hours of work and fun.
Now on to it: After installing the software – provided that you selected all components for
installation – you'll find the following programs which we would now like to give you an
overview of. You can find more detailed information in the respective software's help files.
Have fun!
48 SoundSystem DMX
Page 49

The DMX ControlPanel.
The DMX ControlPanel - along with the driver – is the most important software in the package
by far. It is the mover and shaker of your DMX, controlling situations as they come along. It
can start up to five programs, depending on the tasks that you require of the SoundSystem.
To allow quicker access to the ControlPanel and its very important functions, it is available
from the Windows Taskbar as a Taskbar Menu. It is located bottom right as an icon next to the
clock or in its general vicinity. It can be opened by right-clicking it with the mouse.Left-clicking
it will open the ControlPanel to its full glory.
One click with the right mouse button is enough.
Basic Operating Instructions
You can get a brief explanation on every element at the bottom edge of the software window
by simply pointing the mouse overtop the element – in other words, the ControlPanel pretty
much explains itself.
Move the mouse pointer over an element to find out its function.
SoundSystem DMX 49
Page 50

Using the Mouse.
When designing the ControlPanel, we placed a lot of emphasis on high-efficiency for daily use.
Along with its self-explanatory interface using the mouse pointer, you can also use the mouse
to double-click the sliders to call up required control settings. The following functions are
available:
· Left-clicking a slider enables you to move it.
· A simple mouse-click anywhere in the control area, slowly moves the position of the slider
to that area... or in other words: Click – the controller and it follows.
· A double-click on the slider or in the control area resets the slider to its last setting.
· If you right-click an area that doesn't have a control element, a pop-up menu appears to set
the "DMX ControlPanel Always On Top" function". The DMX ControlPanel will then always
appear in front of other programs.
Loading and Saving.
You have the option of saving settings that you want to keep for later on. You could save
special settings for certain games, e.g., settings with 2 or 4 speakers, with or without CD
audio, etc.
The associated functions for this can be found under "Settings". The settings are saved in a
file with the extension .TTM.
Tips for Techo-Freaks. The Mixer can also be started by command
line using parameters ;-) Simply enter the program name followed by
the path and the names of the mixer settings. You can also run the
DMX ControlPanel minimize using the "minimize" parameter (see
example below).
And another wonderful thing: the file *.LNG contains nearly all of the
displayed text in the DMX ControlPanel (StringSet) and it can be freely
edited. So it is possible to used your own labels for recording
sources, for example.
Example
DMXMixer.exe C:\Program\DMX\ControlPanel\indexed Game.TTM /minimize
... starts the panel as a Taskbar Menu using your personal settings.
50 SoundSystem DMX
Page 51

Cool Keys – the hotkeys.
For you specialists, we have assigned nearly all functions a shortcut key (hotkeys) to enable
quicker navigation through the software. It'd be even faster if you used speech recognition
software for this or additional hardware such as PCdash from Saitek (www.saitek.com). The
following gives an overview of the current keyboard configuration.
Volume Control
Ctrl + Spacebar = Master Volume higher
Ctrl + Shift + Spacebar = Master Volume lower
Mute
Ctrl + Alt + Spacebar = Master un/mute
Ctrl + Alt + W = Wave un/mute
Ctrl + Alt + M = MIDI un/mute
Ctrl + Alt + A = AUX un/mute
Ctrl + Alt + L = Line un/mute
Ctrl + Alt + C = CD un/mute
Ctrl + Alt + R = Radio un/mute
Ctrl + Alt + Shift + M = Micro un/mute
Ctrl + Alt + T = TAD un/mute
Ctrl + Alt + D = DigIn un/mute
Ctrl + Alt + G = Mic Boost on/off
Selecting Recording Source
Ctrl + Shift + L = select Line In
Ctrl + Shift + C = select CD In
Ctrl + Shift + A = select AUX
Ctrl + Shift + R = select Radio
Ctrl + Shift + P = select Mic
Ctrl + Shift + D = select Dig In
Ctrl + Shift + T = select TAD In
Ctrl + Shift + X = select Mix
SoundSystem DMX 51
Page 52

Digital Interface Functions
Ctrl + Alt + Shift + C = coaxial input
Ctrl + Alt + Shift + P = optical (TOS link) input
Ctrl + Alt + Shift + I = input mode
Ctrl + Alt + Shift + O = output mode
Ctrl + Alt + Shift + 1 = 32 kHz playback frequency (sample rate)
Ctrl + Alt + Shift + 2 = 44.1 kHz playback frequency (sample rate)
Ctrl + Alt + Shift + 3 = 48 kHz playback frequency (sample rate)
Other Functions
Ctrl + Alt + 2 = 2 speaker mode
Ctrl + Alt + 4 = 4 speaker mode
Ctrl + O = load mixer settings (DMX ControlPanel must be open and active)
Ctrl + S = save mixer settings (DMX ControlPanel must be open and active)
Current hotkeys or any additions to the this list can be found in the file HOTKEYS.TXT in the
DMX ControlPanels program directory.
52 SoundSystem DMX
Page 53

The Playback Window
Here you can set – who would have thought? – the volume of the individual signal sources.
Signs of wear because of frequent use will be the fate of the controller labeled "OUT" – you
can use this to control the entire volume of the system. In addition:
WAV Controls the playback of all audio streams which are played via the DMX
Playback driver.
MIDI 1 Controls the volume of the internal Wavetable synthesizer.
AUX, RADIO
and TAD
Mixes the identified signal paths – detailed information can be found in the
appropriate section of the chapter "Card Connections and their
Applications.".
LINE Controls the playback (not the recording sensitivity) of a line input of a
connected device.
MIC Does the same thing for a connected microphone.
CD Controls the volume of both CD audio inputs.
DIG IN Allows you to decrease the signal strength of digital source and is hidden
when no digital module is connected to the card. This also doesn't control
the recording sensitivity.
All signal sources can be muted by simply pressing the MUTE button. These are still being
recorded when you explicitly select the source - that makes sense, we're in the Playback and
not the Record Window. A muted signal is not recorded when you have selected it as the
recording source "Mix".
The position in the stereo picture is controlled by the higher panoramacontroller.
SoundSystem DMX 53
Page 54

The Record Window.
In the Record Window, you can determine the signal sources from an application that are to be
recorded via the DMX recorddriver. If you want to sample several devices or the DMX output,
select the "Mix" setting.
The middle of the window contains the VU meter, the level control display of the
SoundSystems. The button under the LED chain switches this on and off. This makes sense
because the display requires system resources to show the level. It is digitized in the
background with 16Bit resolution and the dynamic is analyzed. You can optimally adjust the
level to the specifications using the controller for the input sensitivity and the panorama. As
we said before, turn off the VU meter after setting it.
On the right are 5 buttons which run programs that could be needed when recording, for
example. Click one with the right mouse button and a dialog appears giving you the option of
entering the desired software path or changing the buttons name.
Right-click the button with the mouse.
54 SoundSystem DMX
Page 55

The Effects.
The Effects Window is big and fat. Two characteristics that you don't want on your own body,
but for your ears you would like more ... . Nothing particularly amazing here. Just use the
mouse to read the explanations of the individual functions. As stated before the explanations
will appear on the bottom edge of the ControlPanel.
Please note: the effects are only available in 2 speaker mode.
The PreListen Function.
To test your settings, you can sample a WAV or MIDI file by just pressing a button
. Rightclicking the mouse opens a file dialog allowing you to select your own sound or MIDI musical
selection.
The STOP button should be clear. If not, please immediately uninstall the SoundSystem DMX
and stand on your head.
SoundSystem DMX 55
Page 56

Surround.
In the Surround Window, you can determine for yourself where the sound goes around - that is
if you have switched the SoundSystem DMX to 4 speaker operation. You can then position the
signal sources ...
· WAV (everything played back by the DMX Playback driver)
· MIDI (internal Wavetable synthesizer) and
· Analog In (which can be set separately at Analog Input Selection top-right),
· as well as the sum total (MASTER, in other words everything)
... at the 1st or 2nd outputs. The panorama controller determines the position left or right from
you.
Please note that in "4 Speaker" mode the Effects are not available.
56 SoundSystem DMX
Page 57

Settings.
Under "Settings", we have collected several of the important switching functions for the
SoundSystem DMX as well as features that allow you to load and save your own settings. For
a brief explanation of the functions, point your mouse to the individual elements. As stated
before the explanations will appear on the bottom edge of the ControlPanel.
Practice examples for using the digital functions can be found in the chapter "Card
Connections and Their Use" under "The Digital Output" and "The Digital Input" starting on
page 35ff.
SoundSystem DMX 57
Page 58

The Right MediaPlayer.
Your package comes with the full version of the beloved MediaPlayer WinJey - the right player
for the right file at the right time. WinJey plays most all of the audio file formats that exist in
Windows:
· MP3 - MPEG audio layer 3 – (requires only about 16% of system resources on an Intel
Pentium 200MMX)
· MP1 and MP2 - variants of the MPEG format
· WAV and VOC – the most widely used and important format, along with the least widely
used and unimportant as well as oldest file format for DigitalAudio
· MOD, S3M, XM, IT and other tracker formats,
· MID – the standard MIDI file format
· CDA – for playback of music CDs over a CD-ROM drive (analog)
Also the software offers so-calledskin support so that you can customize how the player looks.
Skins can be found on the Internet at www.winjey.com.
58 SoundSystem DMX
Page 59

The 3D Player.
The 3D player lets you position your own sounds around your own head.
For example: Using drag&drop move a WAV file of your own choosing to the 3D player and
press the Play button. Now you can compare the supported 3D capabilities to one another in
the "Listener" menu:
· Headphones: adjusts the 3D positioning of the headphones
· Speakers: adjusts the 3D positioning of the set of 2 or 4 speakers (independent of the
settings of the DMX ControlPanels under "Surround")
· Hardware 3D: 3D functions of the DMX hardware
· Software 3D: 3D functions calculated by the main processor (host)
· Stereo Pan: normal stereo picture
· MacroFX Enable: activates the MakroFX functions (important: set the WAV volume on the
DMX ControlPanel to approx. 70% less to get the full enjoyment of this function)
· EAX Enable: turns on the EnvironmentalAudio functions
· EAX Reverb: (only available when EAX is enabled) turns on the special EAX effects and lets
you select from different effect settings.
SoundSystem DMX 59
Page 60

The path of a sound object in a three-dimensional room can be set through the subpoint path
in the Buffer Menu:
· Horizontal Circle: describes an object's horizontal circular movement relative to the
listener. Recommended for experiencing the "back-front" syndrome.
· Vertical Circle: describes an object's vertical circular movement relative to the listener.
Recommended for experiencing the "up-down" syndrome.
· Flyby: the object flies towards the listener from a distance, passes by the face and
disappears again.
· Manual: this lets you manually select the position of the objects with your mouse.
60 SoundSystem DMX
Page 61

WaveLab Lite – The Audio editor.
Steinberg's well-honored audio editing suite WaveLab, allows you to record and professionally
edit your sounds. Editing, copy functions, volume editing, fades, crossfades, dynamic editing,
loop function, equalization (equalizer), sample rate conversion – it has it all.
More detailed information on using WaveLab Lite can be found in the software's online help.
You can also print out the original Steinburg manual – it can be found as a .PDF for the
AcrobatReader on the DMX CD.
SoundSystem DMX 61
Page 62

"There was a time when music was still made by hand ... :-) "
BuzZ – ThE tRaCker.
BUZZ takes you back to the beginnings of computer-supported popular music – with the most
modern and optimal code for use under Windows. BUZZ is a music program whose design and
use is similar to the"trackers" – used in the mid-80's on the Commodore AMIGA and later on
DOS computers.– In BUZZ music is "programmed" which at first sounds worse than it does at
the end: you select an instrument (here: generator) and program so-called patterns. A pattern
is one or more bars of notes. These patterns are then finally put together into a track list of
complete songs (arranged).
The special features of BUZZ: the patterns do not just contain notes - they also have control
information for the instruments. And these instruments are not just simple "players" of WAV
files, but are, for example, physical modeling models, virtual analog synthesizers, effects
makers and much more. In other words: it's pretty cool. BUZZ continues to exists because of
its open programming code which allows other developers to write their own generators and
62 SoundSystem DMX
Page 63

expansion modules for BUZZ. It's understandable that the Internet represents the number 1
medium for exchanging information (and songs and generators and and ...). If you have a taste
for it, check out the numerous BUZZ sites on the WWW, e.g.,:
English
English
English
German
www.buzz2.com
welcome.to/buzzards/
buzz.lotek.org/
www.terratec.net/panorama
Unfortunately, there currently isn't a manual on this subject. Besides, a techno freak such as
yourself wouldn't want to read one anyway
*
;-) . To help out, the TerraTec team has included
tutorial to get you started. You can open the file TUTORIAL ENGLISH.BMX using BUZZ. In the
program just press F10.
Tip.
BUZZ is a real techno freak tool. It is freeware and continues to exists
through its thousands of fans worldwide. BUZZ is not (and hopefully
never will be) "finished", i.e., the software is in a permanent state of
development. Errors and crashes can occur, and frequencies can be
created that sound terrible and might even hurt a little.The TerraTec
team provides no support and no guarantees for BUZZ – you use the
program at your own risk. This requires you to have a bit of fun
creating new things on your own. Every "BUZZer" has this experience
behind them– because it's well worth it. Make it so. ;-)
*
What are you still doing here...!!!!? ;-)
SoundSystem DMX 63
Page 64

Mixman Studio ES – You become a KeyJayyy!
We also give the Mixman the title "especially freaky". You can use the Mixman to control
virtual records using your keyboard. 16 tracks can be played at once at the press of a key –
and always in the right tempo.
Using the program is so simple and pretty much self-explanatory. If you need a tip or two, just
click the "?" symbol in the program. It gives you all the first aid you need.
64 SoundSystem DMX
Page 65

The 3D Demos.
The SoundSystem DMX software comes with different demos which demonstrate the 3D audio
characteristics of the card:
Athene – development tool for creating your own sound world
(for more info, see the README file for the program).
Donuts – sweet sounds whirl around you in an abstract 3D environment.
SoundSystem DMX 65
Page 66

Playroom – a virtual kid's room in 3D. Can only be run in 2 speaker mode.
DS3D Game – a pretty-ugly recreation of an arcade classic.
You can see and hear all of these programs because of the friendly support from Sensaura Ltd.
(www.sensaura.co.uk ).
66 SoundSystem DMX
Page 67

The HOTSTUFF.!!! Directory.
We have collected a bunch of other programs, tools, and files for you on your SoundSystem
DMX CD-ROM. It's well worth a look.
Many of the programs we present here are shareware. Please support the shareware principle
and reimburse the authors accordingly if you like their programs. Thanks a lot.
SoundSystem DMX 67
Page 68

3D Audio – The Background.
"3D audio" ... That does sound interesting. But it also sounds similar speech synthesis,
motion-tracking, artificial intelligence, bio-scanning, and credit card payment over the Internet.
In other words: wow, cool technology - but it doesn't work the way it's supposed to. Is that
your impression too? Then follow us on a short look into today's possible technological
wonders, the objectives and background of these still young but future-looking technologies.
All good things come in twos.
Most people come with two ears. Both are usually similarly well-linked or very well-linked to
the brain. Hearing – stated simply is the combination of listening and the brain - it offers us
the ability to recognize sounds and even locate them, i.e., the direction they come from, with
some accuracy. Hold one ear closed. Carefully turn around with your eyes closed in a circle
and wait for the phone to ring. ... You'll be able to tell that the phone is ringing, but it is
doubtful that you will be able to determine its position at first. A cool experiment when it
works*.
*and a long wait when no one calls ... ;-)
Industrious developers determined from this experience that you can be trick as to the
position of a sound with speakers and even better with headphones. And rightly so, our
acoustical world picture can actually be perserved and not only that: with the help of highcapacity processors, sounds or music can be partially free and positioned around the listener
in real time.
Let's return once again the beginnings of this development. Perhaps you still remember the
first attempt by developers to stay faithful to the motto "what comes after stereo?". By the
mid-70's there were records and tapes with so-called binauralrecordings. Microphony was
pretty special: two small microphones were placed on the inside of a plastic model skull to
scale and complete with ears and auditory canal. Stereo recordings were made in this way
which when listened to with headphones made possible an astonishing approximation of the
sound environment.
Other attempts were made placing 4 speakers which gave us the so-called quadrophony. Up
until today, many are still upset to have paid a small fortune at that time for such devices ...
All these attempts did was prove that with "Stereo" you can only get a 2-dimensional
playback. An audio signal can only be positioned between both speakers and not before,
behind, or even under them.
68 SoundSystem DMX
Page 69

3D Audio Today
Today, you and developers have available powerful technology which, with the help of clever
algorithms, can make what was recorded with costly microphony hearable and controllable.
The basis for this are: runtime, and phase/frequency shifts in the audio signal. This means
that depending on when and in which acoustical environment a specific frequency reaches our
ear, our hearing interprets a respective position (of the echoing object or our relative position
to it). Reflectors of echo waves as well as their absorption play an important role here, i.e.,
how strongly frequencies change when they "rebound" from other bodies, before they reach
our ears. Meanwhile, even these conditions can be well-simulated.
No to be confused with with "real" 3D audio, there are many other forms of simulated room
sounds such as, for example, (older) versions of Q Sound™, V Space or the surroundswitch on
the TV at home. This deals with the simple widening of the stereo basis (sounds wider – but
also somewhat mushy) – no special experience of aha. However, multi-chanal playback
systems such as Dolby ProLogic™ or Dolby AC3™ are also not the end-all solution because:
using 4 or more speakers with these procedures are positions the audio signal between the
boxes and doesn't simulate the distance for the listener – whether it be flat or vertical (up and
down). A real 3D audio system allows two things: first, the positioning of sounds in a virtual
room and second, the targeted movement (interaction) of an audio object.
Perfect?
As was stated above, hearing is only one way of making "virtual worlds" partially real.Our
eyes also have a part in how we "understand" our environment. And also extremely low
frequencies which we find alarming help us recognize objects, for example, ("Watch out! tank
on the left ...").
For this our brain accesses our vast experiences to evaluate a situation: imagine a door that is
closing and you hear the proper accompanying sound. But if you hear something like a
slamming noise, then you know something is amiss ...
"Perfect" becomes the reflection of our environment through a combination of different
playback systems. And naturally there are still a lot of hurdles to be overcome in the subject
of 3D audio as there are with capable graphics systems. In any case the basics have been
discovered in the meantime, the algorithms found, the standard practice proven – it is now
"only" a question of computer capabilities and optimization. We are at the end of our brief
crash course, remember performance-wise no one will be able to challenge your SoundSystem
DMX for the foreseeable future ... have fun!
SoundSystem DMX 69
Page 70

Appendix
FAQ – Frequently asked questions and their answers.
Do you have to set jumpers and change switch settings before I install the sound card?
All card functions are plug and play and correspond to Intel/Microsoft specification. There
are no jumpers or switches to be set for IRQs, DMA channels and addresses. You can turn
on the booster using the jumper. This allows you to connect headphones to both card
outputs.
I can't change the IRQ of my DMX in the Device Manager.
PCI cards are controlled by the computer's BIOS. Place the card into another PCI slot. It
should now be assigned another IRQ. If there are no other free PCI slots, you could
exchange the card with another one. If this doesn't help, check with the manufacturer of
your mother board.
Help! There is no sound coming from the sound card.
· Check the connections between the soundcard and speakers.
· Are active speakers or Hifi devices switched on?
· Check the control settings on the DMX ControlPanel. Make sure that Mute is not
activated.
· Make sure that the current driver is installed for the operating system being used.
I don't notice the MacroFX effect.
Check the settings in the DMX Mixer. MacroFX operations with a volume increase. If you set
the controller to max., the card cannot increase the volume any further.
70 SoundSystem DMX
Page 71

Every since I connected my sound card to my stereo system you can hear a constant hum.
The hum (50Hz) comes from the 220V power supply. It is caused by a so-called ground
loop. This loop is created when two devices are grounded by a ground wire or other wire
(e.g., antenna cable) together with an audio cable. The hum disappears when you
separate the main connection – either with a sheath current filter connected in the
antenna wire (approx. $ 25 retail), or connect an audio transmitter which has a direct
connection to the audio output (PC) and input (HiFi amplifier) (e.g., from Conrad, Best. No.
31 14 05 or in stereo stores). If you remove the antenna cable from the receiver/tuner and
the hum disappears, then the sheath current filter helped. If the hum is still audible
without the antenna cable, the problem is with the double-grounding and is remedied by
the separate transmitter.
A MIDI keyboard connected to the card doesn't work.
· First, ensure that the driver for communication with the keyboard has been installed.
The driver is called 'DMX MPU-401 Device' and should be found in the Control Panel in
System under Device Manager. If it is not there, reinstall it from the current Windows
95/98 driver.
· If the driver is installed, it must be selected as the MIDI input device in the sequencer
software. Please see your sequencer handbook for details on this. Most sequencer
programs have a menu item labeled "Setup/MIDI Devices", where you can select MIDI
input and MIDI output devices.
· If both these conditions are satisfied and the problem persists, in other words the
software does not react when you hit a key or no sound is audible, the MIDI connecting
cable is almost certainly the cause of the trouble. Experience has shown that there's an
enormous number of different MIDI connector cables which unfortunately are all
identical externally. These cables should contain a so-called optocoupler suitable for
the sound card's levels. As it's not possible to check this from the outside, always use
the sound card manufacturer's MIDI cable. You can obtain this cable either from us
directly or you can visit your local computer store (see also page 45).
SoundSystem DMX 71
Page 72

There is no feedback signal to my ForceFeedback joystick.
For ForceFeedback transmission, MIDI lines are partially used. The DMX should not have
to share the IRQ with other cards. You should also use the current driver software from
Microsoft because older versions can sometimes cause problems.
After installing the ActiveRadiosoftware, I get the message 'Error initializing Hardware'.
This tells you that you have an older version of the ActiveRadio software. Only use the
software that comes with the DMX CD and not the software that comes with the radio
card. Current versions can be obtained online at our Internet site or from our mailbox.
I don't notice the MacroFX effect.
Check the settings in the DMX Mixer. MacroFX operations with a volume increase. If you
set the controller to max., the card cannot increase the volume any further.
72 SoundSystem DMX
Page 73

Measurement Data
THD+N Line in to Line out (1kHz): -93dB(A)
SN/R Line in to Line out (1 kHz): -97 dB(A)
Input and Output Levels
OUT1 / OUT2 Line Out 1Vrms
Amp 200 mW @ 32 Ohm
Line In 1 Vrms
Mic 0.1Vrms
TAD In 1Vrms
TAD Out 1Vrms
CD1/CD2 1,5 Vrms
RADIO 1Vrms
AUX / Wavetable 1Vrms
SoundSystem DMX 73
Page 74

TerraTec service
"Rien ne va plus – Nothing works anymore" is not good, but can happen to the best systems
once in a while. If this happens your TerraTec team is ready, willing, and able to help.
Hotline, Mailbox, Internet
In case of serious problems - which you alone can't handle even with the technical help in the
manual, your neighbor or dealer - then please contact us directly.
The first way to contact us in via the Internet: at http://www.terratec.net/ you will
always find current answers to FAQs as well as the newest driver. This is also available
through our mailbox system. The numbers are: +49 (2157) 8179-24 (analog) and +49
(2157) 8179-42 (ISDN).
If you have no remote data transmission options, send us a self-addressed stamped envelope
to the TerraTec Support Department (product name and registration number, please). Please
do not send us calls for help by snail mail, fax or carrier pigeon. For organizational reasons we
will not be able to respond.
If you are certain that you can't solve your problem without assistance, please call our hotline.
If you live in:
Great Britain or Ireland, please dial (+44) 0 1600-772333 (Monday through Friday, 9:00 am 5:00 pm - local time)
BeNeLux, please dial (+31) 043 3654758 (Monday through Friday, 15:00 - 18:00 local time)
USA, please dial (+1) 949 487-3774 (Monday through Friday, 10:00 am - 5:00 pm - Pacific time)
If you do NOT live in any of these countries, please dial +49 (0) 2157 817914.
Our friendly support team is available from Monday through Friday from 13:00 - 20:00 Central
European Time. Please have the following information handy to ensure that your call is
processed quickly:
· Your registration number
· This documentation
· A printout of your configuration files
· The handbook of your motherboard
· A screenshot of your BIOS configuration.
It also helps our technicians if you are sitting at your computer when call so that you can try
out a few things. When you call make a note of the employee's name who you
talked to. You will need this in case there is a defect and you have to return the card.
74 SoundSystem DMX
Page 75

Broken?!
Before returning your card to us, get in contact with us, note the name of the support
employee who you talk to, and follow the steps:
· Fill out the service form that comes with your card fully and clearly. The more concise and
detailed you explain the problem the quicker we can process your request. Returns without
a problem description cannot be processed and will be sent back at your expense.
· Enclose a copy of the sales slip with your return (not the original). If you do not, we will
assume that the product is no longer under warranty and charge you for the repair.
· Please pack it with care and use plenty of padding. In our experience the original
packaging is the best suited. Please remember that it is a sensitive electronic component
that you are dealing with.
· Please be sure to use the proper postage – we will do the same when we return it.
Everything will be OK. ;-)
SoundSystem DMX 75
Page 76

General Service Conditions
1. General
By buying and retaining the goods, you acknowledge our General Service Conditions.
2. Proof of Warranty
You copy of the sales receipt or delivery notices is necessary for proof of warranty. If you do
not have this proof of warranty, you will be charged for any repairs.
3. Problem Description
Returns received with no or insufficient descriptions of the problem ("defect" or "to be
repaired" is not sufficient), will be returned charging a processing fee since this makes the
repair effort more difficult and is avoidable.
4. Wrongful Complaints
In case of wrongful complaints (no error can be determined, probably user error), we will send
the goods back charging a processing fee
5. Packaging
If possible please return the goods in the original packaging. Inappropriate packaging could
endanger the warranty. Any transport damage cause because of this voids the warranty.
6. Other Products
Devices not manufactured or marketed by TerraTec Electronic GmbH will be returned with a
processing fee.
7. Repairs Liable to Charge
Repairs that do not fall under the warranty will be charged.
8. Transport Costs
The sender is liable for transport and insurance costs when sending goods to TerraTec
Electronic GmbH to be repaired. TerraTec Electronic GmbH will cover the transport costs for
returning the goods if the repair falls under warranty. Packages with postage due will be
declined for organizational reasons.
9. Final Provision
TerraTec Electronic GmbH reserves the right at any time to change or expand these General
Service Conditions.
In any case, these General Terms and Conditions from TerraTec Electronic GmbH are valid as
accepted.
76 SoundSystem DMX
Page 77

Key Word Directory
2
2 Speaker Mode · 55
3
3D Audio – The Background · 68
3D Capabilities · 59
3D Demos, The · 65
3D Player · 59
CD Drive · 40
CD, Setting the Volume · 53
Circuit Diagram, Digital Interfaces · 38
Circuit Diagram, GAME Port/MIDI · 45
Command Line, Controlling the DMX ControlPanels ·
50
Connection Options · 8
Copy Protection · 36, 37
Copy Protection ID · 36
Crossfades, Audio · 61
4
4 Speaker Mode · 56
A
ActiveRadio · 72
Adapter · 34
Adapter Cable, MIDI · 45
ADAT · 38
AES/EBU · 38
Algorithmix · 32
Always On Top Function · 50
Athene · 65
Audio Amplifier · 31
Audio Editor · 61
AUX Input · 41
AUX, Setting the Volume · 53
B
Backup, Via the Digital Interface · 36
bass speakers · 29
Binaural Recordings · 68
BOOST Switch (Microphone) · 33
Boosting the Microphone Input · 33
Buzz · 62
C
Cable, AUX · 41
Cable, CD Audio · 40
Cable, Fiber-optic · 38
Cable, Optical Fiber Cables · 38
Cable, TAD · 44
Capacitor Microphones · 33
Card Connections · 14, 26
Card Diagram · 10
Cassette Players · 31
CD Audio Connections · 14, 40
CD Burner · 40
D
Dartech · 32
DAT · 11, 35
Development Tool · 65
Device Manager · 70
Device Manager after Driver Installation · 24
DeviceManager, what is it · 24
Diamond Cut Productions · 32
DIG IN, Setting the Volume · 53
DIG OUT Frequency · 35
DIG OUT Mode · 36
Digital Amplifiers · 35
Digital Cables · 38
Digital Expansion Module, Connecting · 11
Digital Input · 37
Digital Output · 35
Digitizing, Audio · 32
DirectInput, Microsoft Standard · 45
DirectMusic, Microsoft Standard · 42
DLS2 Sound Format · 42
DMX ControlPanel, The · 49
DMX Playback, what's the purpose of the driver · 29
Dolby AC3 · 69
Dolby ProLogic · 69
Donuts · 65
DOS Games/FM Devices · 24
Driver, DMX MPU-401 · 43
Driver, DMX Record · 47, 54
Driver, DMX WaveSynth · 43
Driver, Installation Basics · 14, 15
Driver, Installation in Windows 95A (OSR1) · 16
Driver, Installation in Windows 95B (OSR2) · 17
Driver, Installation in Windows 98 · 19
Driver, Installing in Windows NT 4.0 · 22
Driver, Uninstalling in Windows 95 and 98 · 21
Driver, WDM · 42
Drop Out, Digital · 35, 37
DS3D Game · 66
Dynamic Editing, Audio · 61
SoundSystem DMX 77
Page 78

E
L
EAX · 59
Editing, Audio · 32, 61
Effects · 55, 56
Entire Volume, Setting the · 53
Equalizer · 61
F
Fades, Audio · 61
Fiber-optic Cable · 38
Flightsticks · 45
Fluff · 48
ForceFeedback · 45, 72
Fun · 29
G
GAME/MIDI Port · 45
Gamepads · 45
Gameport Joystick · 24
GM, General MIDI · 42
GS, Roland · 42
H
Headphone Amplifier · 28
Headphones, Connecting and Using · 28
Headset, Connecting · 33
Hearing · 68
HiFi Amplifier · 27
Hotkeys, Controlling the DMX ControlPanels · 51
HOTSTUFF.!!! Directory, The · 67
I
IN, Input · 31
Input Sensitivity · 31, 33, 54
Installation · 9
Installing the Card · 13
Internal Input Jack Taps · 32
Internal Output Jack Taps · 30
Internet Telephony · 33
IRQ · 9, 70
J
Level Control Display · 54
Line Input · 31
Line Outs · 27
LINE, Setting the Volume · 53
Loading Mixer Settings · 50
Loop Function · 61
M
MacroFX · 59, 70, 72
Media Playback · 43
MediaPlayer · 58
MIC, Input · 33
MIC, Setting the Volume · 53
Microphone Input · 33
MID, File Format · 58
MIDI Devices, Connecting · 45
MIDI Driver · 43
MIDI Settings · 25
MIDI, Setting the Volume · 53
MiniDisk · 11
MiniDisks · 35
Mix, Recording Source · 53, 54
Mixing Unit, Connecting · 31
Mixman Studio · 64
MOD, File Format · 58
MP3, File Extension · 58
MPU401 Devices · 24
Multi Device Enumerator · 24
MUTE Function · 53
N
Noise · 36
Noises · 33, 37
O
On Top, Always · 50
OUT 2 · 29
OUT Controller · 53
OUT-1 · 27
OUT1, Digital-Mode · 36
Output, Digital-Mode · 35
Joystick · 72
Joystick/MIDI Interface · 45
Jumper · 28, 70
K
Keyboard · 71
P
Panorama Controller · 53
Parameters, Controlling the DMX ControlPanels · 50
Path, where is the Windows 95/98 driver? · 16
Path, where is the Windows NT driver? · 23
PCdash · 51
Phantom Powering · 33
78 SoundSystem DMX
Page 79

Playback Driver · 29
Playroom · 66
PreListen Function · 55
Programs, Linking Your Own · 54
Q
Stereo System · 71
Sub-woofers · 29
Surround · 56, 69
Synthesizer · 42
System Resources · 54
SystemExclusive · 43
Q Sound · 69
Quadrophony · 68
R
Radio Connection · 47
Radio Module, Installing · 12
RADIO, Setting the Volume · 53
RCA · 35, 37
Record Player, Connecting and Recording · 31
Record Players · 31
Record Window, The · 54
Recording, Digital · 36
S
S/PDIF, Connection Options · 27
Safety Tip · 28, 31, 33, 63
Sample Frequency · 35
Sample Rat Conversion · 61
Sample Rate · 35
Saving Mixer Settings · 50
Sensaura · 66
Sequenzer Programs · 43
Settings · 57
Shellac · 31
Signal Loss · 12, 41
Signal-to-noise Ratio · 7
Skin Support · 58
Softeners · 32
Software Overview · 48
Sonic Foundry · 32
Speaker Position for optimal 3D Sound · 30
Speech Recognition · 33
Steinberg · 32
Stereo · 68
T
TAD Input · 44
TAD, Setting the Volume · 53
Taskbar Menu, DMX ControlPanel as · 49
TOS Link · 35, 37
Tracker · 62
Transmission Protocol, Digital · 38
TTM, File Extension · 50
U
Uninstalling the (Bundled) Software · 21
Uninstalling the Driver in Windows 95 and 98 · 21
Using the Mouse with the DMX ControlPanels · 50
V
V Space · 69
Video Recorders · 31
Vobis RadioBooster · 12
VOC, File Extension · 58
VU Meter · 54
W
WAV, File Extension · 58
WAV, Setting the Volume · 53
WAV/MIDI, Digital Mode · 36
WaveLab · 32, 61
Wavetable Connection, Using · 42
Wavetable, Connecting a Daughter Board · 12
WDM Driver · 42
X
XLR Plug · 34
SoundSystem DMX 79
 Loading...