

Page 1

Cinergy Digital 2 Software
English manual
Version: 5/23/05
Page 2

Contents
Cinergy Digital 2 software........................................................................................................ 3
Installation. ......................................................................................................................... 3
Launching the software for the first time .............................................................................. 4
Design and controls.............................................................................................................7
On-screen display (OSD) ........................................................................................................15
Main menu. ........................................................................................................................15
EPG—the electronic program guide .....................................................................................16
Info.....................................................................................................................................18
Timeshifting ...........................................................................................................................19
Recording, playing, exporting.................................................................................................21
Recording ...........................................................................................................................21
Immediate recording .......................................................................................................21
Timer-controlled recording—EPG-programmed................................................................ 22
Timer-controlled recording—manually programmed........................................................ 24
Playing, exporting, deleting ............................................................................................... 28
Teletext................................................................................................................................. 29
Configuration ........................................................................................................................ 32
Configuration: Options....................................................................................................... 32
Configuration: Channel scan.............................................................................................. 34
Configuration: TV favorites, radio favorites......................................................................... 34
Configuration: Channel info ............................................................................................... 34
Configuration: About.......................................................................................................... 34
Context menu........................................................................................................................ 35
Setting up the antenna..........................................................................................................36
Keyboard shortcuts ............................................................................................................... 37
2 Cinergy Digital 2 (English)
Page 3

Cinergy Digital 2 software
…is your control center for digital television. The full range of functions and features—channel
selection, timeshifting, recording and teletext—of your new TV hardware are united in the
Cinergy Digital 2 software. It must be installed before you can get started, however.
Installation.
To install the Cinergy Digital 2 software, select the appropriate item on the autostart menu of
the included CD-ROM. If the autostart menu does not open automatically when you insert the
software& installation CD, go to the CD-ROM drive and launch the autorun.exe file.
Note: we are continuously improving the Cinergy Digital 2 software, so please check our
website from time to time for new versions featuring improved or extended functionality.
The current version of the Cinergy Digital 2 software is available at
http://www.terratec.com/. Once you have downloaded the file, double-click it to start
the installation.
The language selected for the installation will also be used in the Cinergy Digital 2 application.
It can be changed at any time, however. The Cinergy Digital 2 icon will be present on your
desktop if you accepted the defaults during the installation.
Cinergy Digital 2 (English) 3
Page 4
Launching the software for the first time
The automatic channel scan will open automatically the first time you start the Cinergy Digital 2 application.
• Channel scan
Click “Start”. The automatic channel scan will enter its results in the “Found channels”
window. Don't worry about the advanced options of the automatic channel scan at this
point.
They will be explained later in the “Configuration: Channel scan
” chapter.
The channel scan.
• Adding the found stations to the Favorites list.
Click the “TV favorites” tab to transfer the found channels to your Favorites list. Use the arrows between the left- and right-hand windows to move individual (>) or all channels (>>) to
the Favorites list in the right-hand window. You will only be able to select and see channels that are in your Favorites list when using the program. Click “Save” to save changes
to your Favorites list. Next, switch to the “Radio favorites” tab and repeat the process.
Note: DVB-T radio programming is not available in all countries.
4 Cinergy Digital 2 (English)
Page 5

• Channel order/program number.
The channels were entered in the Favorites list in the order in which they were found. As
this probably does not correspond to your usual sorting, you can sort your Favorites with
the arrow buttons on the right-hand edge of the list.
• Record folder.
Switch to the “Options” tab and select a folder for storing timeshift and recording files.
Click “OK” to close the configuration menu.
Cinergy Digital 2 (English) 5
Page 6
That completes the basic configuration of the software. The configuration dialog contains a
number of other options that will be covered in the “Configuration” chapter.
6 Cinergy Digital 2 (English)
Page 7
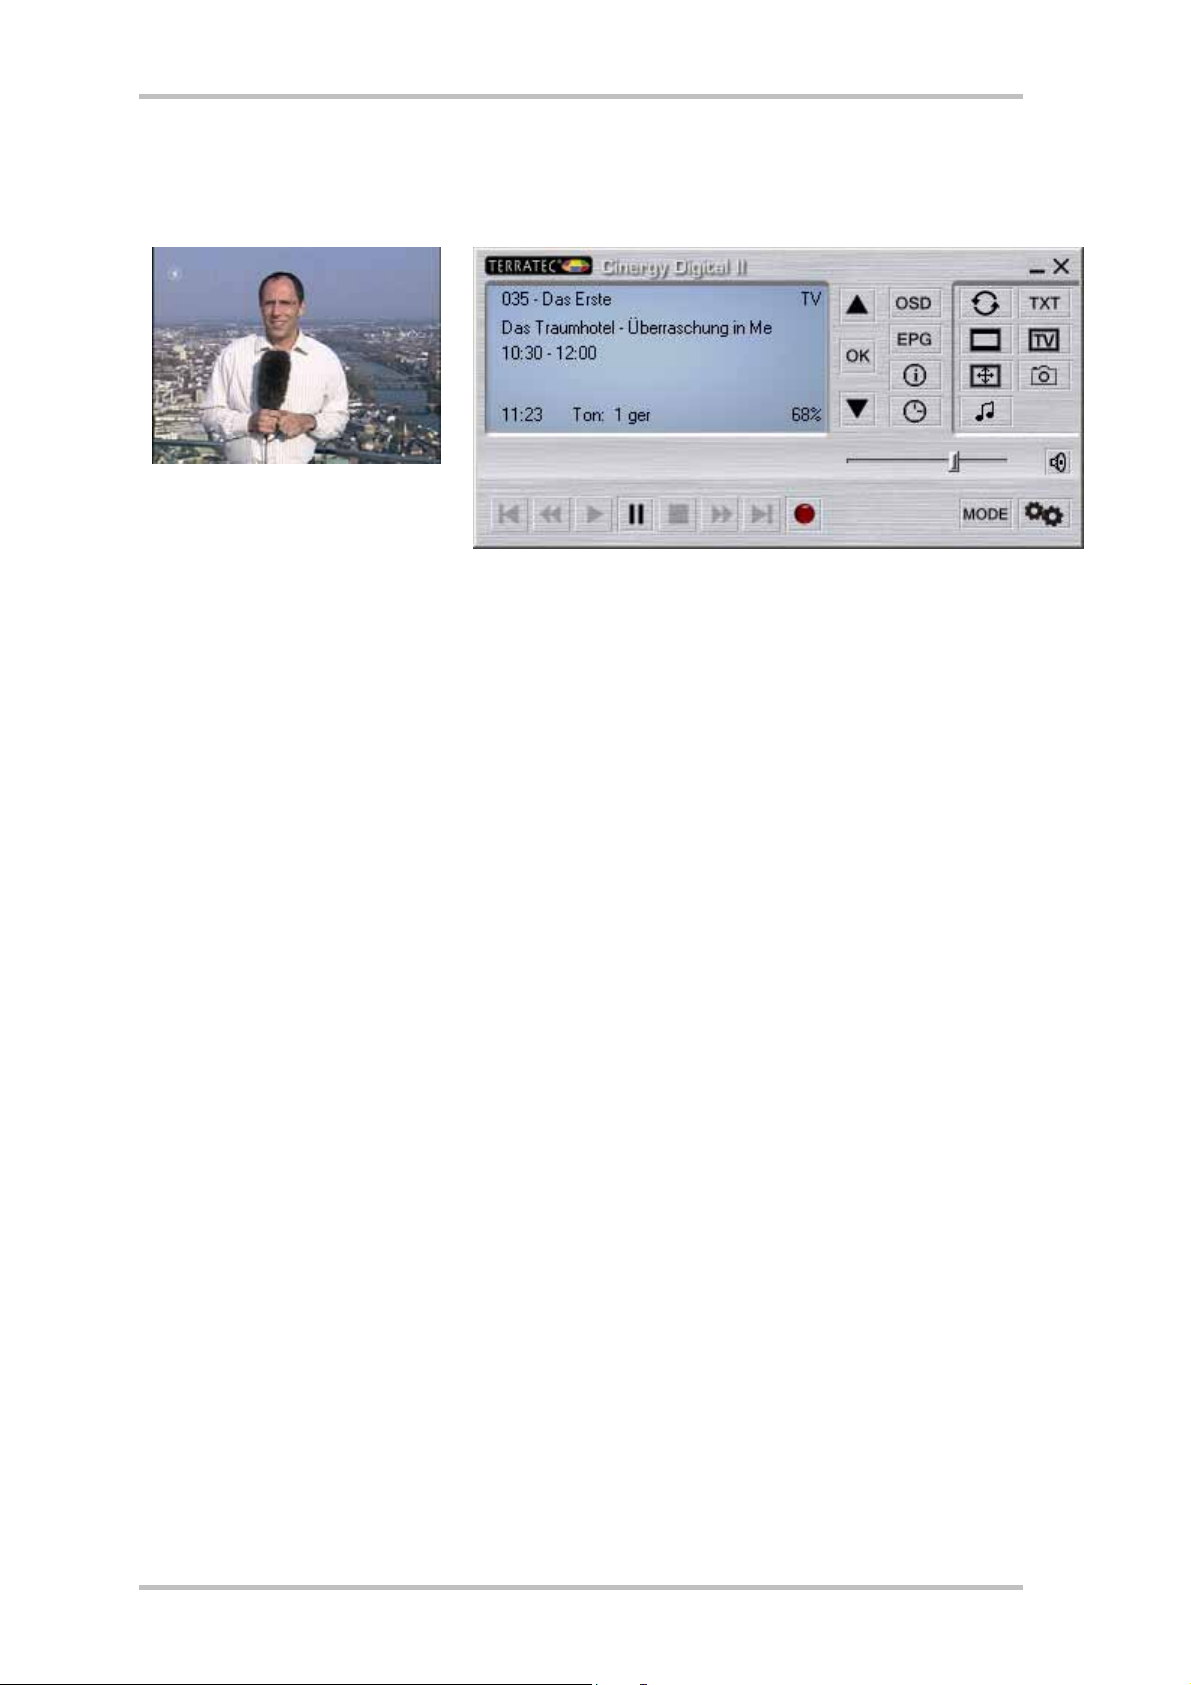
Design and controls
The software essentially consists of the picture window and the user interface.
Display window
User interface
The user interface contains:
• a context-sensitive display for additional information
• the mode button (TV, radio, video)
• navigation buttons (channel selection, menu navigation)
• the teletext button (open/close teletext, transparent teletext)
• display functions (open/close display window, full screen)
• recording navigation functions (playback, record, pause, etc.)
• audio functions (audio channel/format, volume, mute)
• OSD functions (on-screen display, EPG, program information, timer)
• configuration (basic settings and options)
Cinergy Digital 2 software functions can normally be accessed in a number of ways. The following options are always available:
• the buttons of the user interface
• infrared remote control
• on-screen display (OSD)
• context menu—right mouse button on the picture window
• hotkeys or key combinations
Cinergy Digital 2 (English) 7
Page 8
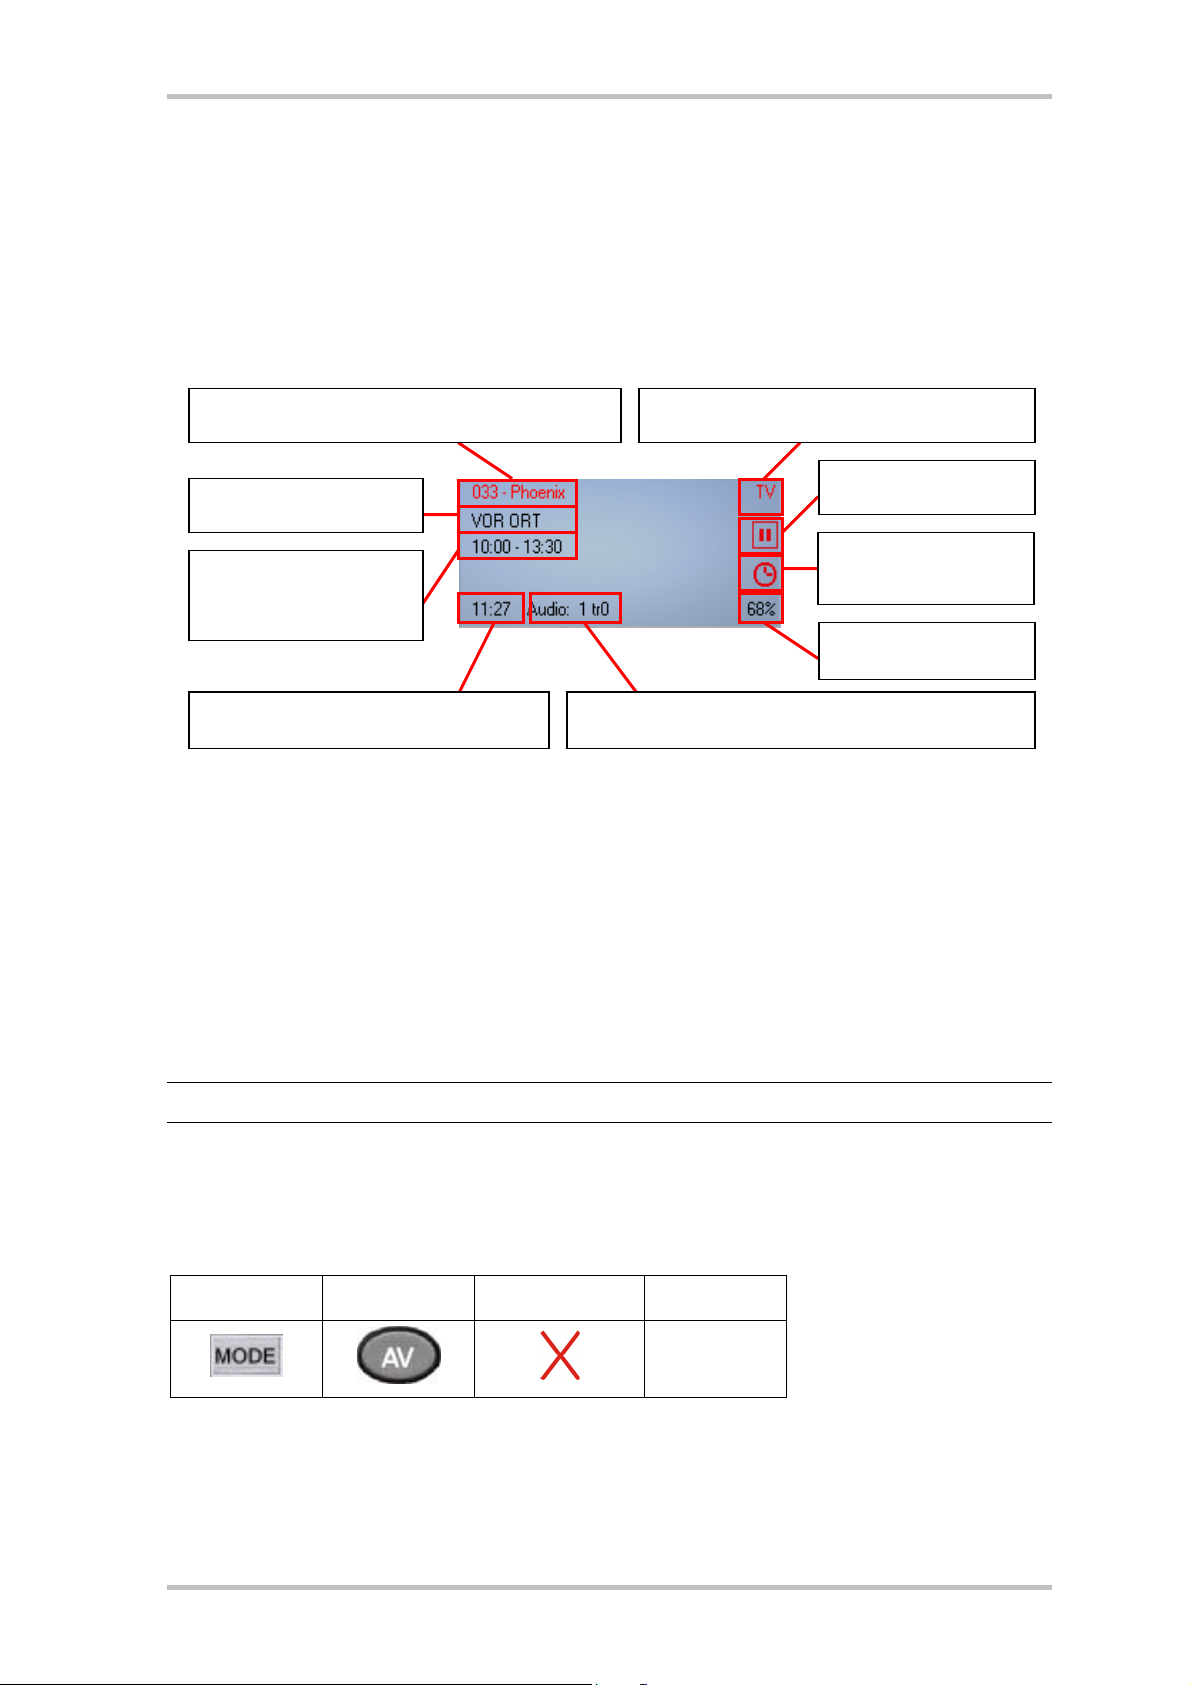
User interface: display
The display of the user interface is context-sensitive and shows e.g.
• general information
• channel and program information
• audio information
Mode Channel number/name
Program name
Timeshift active
Timer
Start of program
programmed
End of program
Volume
Current time
Audio channel/audio format
User interface: mode
The Cinergy Digital 2 software has three different modes.
TV mode. Use TV mode to watch programs and record them. TV mode is only available if you
have at least one TV channel stored in your TV favorites list.
Radio mode. Use Radio mode to listen to programs and record them. Radio mode is only
available if you have at least one radio station stored in your radio favorites list.
Note: DVB-T radio programming is not available in all countries.
Recording mode. Use this mode to play back recordings of TV or radio programs stored in your
Record folder. The display will be empty if there are no recordings in the folder. Please note
that Cinergy Digital 2 software is no substitute for a general-purpose media player. The Cinergy
Digital 2 will only play back recordings made with this application.
Button Remote Context menu Keyboard
TAB
8 Cinergy Digital 2 (English)
Page 9
User interface: navigation functions
Navigation: TV and radio mode. Use the navigation buttons to select your station. Press “OK”
to display a list of TV and radio favorites in the picture window. You can also select stations
directly without navigating through the intermediate stations.
Navigation: OSD. Use the arrow buttons to navigate through the various OSD menus (main
OSD menu, EPG, timer, recording, etc). The menus are shown on the picture window. Press
“OK” to select a menu item.
Button Remote control Context menu Keyboard
Channel +
Channel -
up arrow
down arrow
left arrow
right arrow
RETURN
Z
The mouse scroll wheel can also be used to navigate list fields such as the EPG and EPG
details.
User interface: teletext
Teletext—TV mode only. Press the Teletext button once to display the teletext page of the
current channel in the picture window. Pressing the button again will display the page transparently over the current TV program. Pressing it once more ends the teletext display and
returns you to the normal TV display. For more information, please see “Teletext”
Button Remote control Context menu Keyboard
Teletext
T
Cinergy Digital 2 (English) 9
Page 10
User interface: display functions
TV display—all modes. The TV button closes the picture window. Click the button again to
reopen the picture window.
Note: the digital picture does not need to be decoded if the picture window is closed. This
results in a much lower processor load. Don't worry, however—both manual and programmed
recordings will continue or be started as programmed with the window closed.
Full screen—all modes. Use the Full Screen button to change to full-screen mode and hide the
user interface. Press the button again to restore the window.
Format switching—all modes. Use the format switching button to force video format changes.
Many stations broadcast their programs with black bars above and below the actual picture.
Naturally, these bars are naturally extremely annoying on wide-screen displays, as a large part
of the screen area simply remains black. Some black bars are an integral part of the program.
In other words, the program is broadcast in conventional 4:3 format, while the relevant part of
the picture is in wide-screen format. The Cinergy Digital 2 software automatically recognizes
genuine 16:9 broadcasts and adjusts the picture accordingly. While wide-screen movies in 4:3
broadcasts cannot be identified automatically, it is possible to force the picture to the correct
format.
The following illustrations show how format switching affects a 4:3 broadcast containing widescreen content when viewed on a wide-screen display:
4:3
This is how a 4:3 broadcast with
wide-screen content appears on
a wide-screen display.
Zoom
And this is how it appears when
the Zoom option is selected. The
black bars are cut off and the
program content is displayed
over the entire screen area.
10 Cinergy Digital 2 (English)
Page 11
Wide The Wide option stretches the
picture to the full screen width
without cropping it.
Screenshots—all modes. The Screenshot button captures a still image of the current picture.
The images will be stored in the selected Record folder.
Button Remote control Context menu Keyboard
Open/close TV
window
Full screen
Ctrl + X
F
Format switching
Original/Zoom/Wide
Screenshot
<
P
Cinergy Digital 2 (English) 11
Page 12
User interface: recording navigation functions
All modes. Use the recording navigation buttons to control the timeshifting, recording and
playback functions of the Cinergy Digital 2 Software. Timeshifting, recording and playback are
covered in separate chapters, so this is only an overview of the individual buttons.
Button Remote control Context menu Keyboard
Timeshift
Start recording
L
SHIFT + L
SPACE BAR
PAUSE
X
SHIFT + N
N
R
12 Cinergy Digital 2 (English)
Page 13

User interface: audio functions
All modes. Use the audio functions to select the audio channel and audio format, adjust the
volume or mute the audio output. Some channels broadcast in several languages and/or
audio formats. The selected audio channel will also be used for recording. Advanced recording
functions are available that are covered in detail in the “Configuration: Options” chapter.
Button Remote control Context menu Keyboard
Audio channel
Mute
Volume up
A
M
+
Volume down
-
User interface: OSD functions
All modes. The on-screen menu can be called up in any mode. For more information, please
see the “On-screen display (OSD)” chapter.
Button Remote control Context menu Keyboard
O
E
Signal information
I
S
CTRL + I
Cinergy Digital 2 (English) 13
Page 14

User interface: configuration
Use the context menu to configure the software's general settings, start the channel scan and
manage channels in the Favorites list.
Button Remote control Context menu Keyboard
14 Cinergy Digital 2 (English)
Page 15

On-screen display (OSD)
A number of important Cinergy Digital 2 software functions can be accessed via the conven-
ient on-screen display.
Main menu.
Open main menu.
On-screen display: main menu
TV Shows the TV favorites list, from which you can choose a channel directly.
Radio Shows the radio favorites list, from which you can choose a station directly.
Recordings Displays recordings in the Record folder which you can select and play back.
For more information, see the “Recording, playing, exporting” chapter.
Timer Program recordings here, or check which recordings have already been pro-
grammed. For more information, see the “Recording, playing, exporting”
chapter.
Exit Closes the on-screen display (OSD).
Cinergy Digital 2 (English) 15
Page 16

EPG—the electronic program guide
The EPG displays the programming of the selected channel. The type of information and amount of detail presented in the guide can vary from channel to channel.
Opens the electronic program guide for the current channel.
The EPG in the on-screen display
Details Displays detailed information on the selected program.
Timer Programs a recording of the selected program. For more informa-
Exit Closes the on-screen display (OSD).
16 Cinergy Digital 2 (English)
tion, please see the “Recording, playing, exporting” chapter.
Page 17

Details
Displays detailed EPG information on a program.
Detailed program information
EPG Closes the detailed information and returns to the EPG menu.
Timer Press Timer to program a recording of the selected program. For
more information, please see the “Recording, playing, exporting”
chapter.
Exit Closes the on-screen display (OSD).
Cinergy Digital 2 (English) 17
Page 18

Info
Displays a range of interesting and useful information at the lower edge of the picture window.
Enables the Info bar. The Info bar displays different information than the “Details”
item of the on-screen menu, which provides in-depth information on the current
program from the EPG.
C D E
A
B
A
The current program.
The current time.
Program encrypted
Video format: 4:3
Video format: 16:9
Video format: Zoom
Video format: Wide
The following program.
The progress of the current program.
Audio format: stereo
Audio format: Dolby Digital
Mute
Recording active
Timeshift active
Details Displays detailed EPG information on the current program.
Audio channel
Menu Switches to the main OSD menu.
Exit Closes the on-screen display (OSD).
18 Cinergy Digital 2 (English)
Some channels broadcast in several languages and/or audio formats. Make your selection here.
Page 19

Timeshifting
Timeshifting is a truly excellent feature. The next time you feel the call of nature, there will be
no need to suffer until the commercial break just to make sure that you won't miss a single
second.
Note: the Record button is disabled during timeshift playback.
Interrupting a program—starting timeshift recording
Press the Pause button to pause the current program. The top line of the display
(channel number, station name, mode) will be displayed in red, and the red Pause
icon will be displayed to signal that timeshifting is enabled.
Continuing your viewing—starting timeshift playback
Press the Playback button to continue watching the program from the point at
which you paused it.
Interrupting the program again—pausing timeshift playback
Need to get up again? Simply press the Pause button again during timeshift playback to once again pause the program. To continue, press the Playback button
again, as before. You can repeat this as often as necessary.
Returning to the real-time broadcast (1)—quitting timeshift completely
To quit timeshift playback and recording in order to go back to watching the program in real time, press the Stop button. The top line of the display (channel number, station name, mode) will once again be displayed in black. The red Pause icon
will no longer be displayed, indicating that timeshifting is no longer enabled. If you
have specified in the configuration menu that timeshift recordings should not be
deleted, you will find the complete recording—from the first interruption, to the
time you stopped the timeshift by pressing Stop—in the Record folder.
Cinergy Digital 2 (English) 19
Page 20

Returning to the real-time broadcast (2)
Press the Skip button to continue watching the program in real time without disabling timeshift recording.
Fast-forwarding a program
Use this button to fast-forward through the timeshift buffer. For example, if you
pause a program and then come across a commercial break that was broadcast
while you were away, you can enjoy watching the spots in fast-forward mode. Press
the Play button to return to normal speed. Fast-forwarding will stop automatically
when you reach the end of the timeshift buffer, and thus the current time.
Skip to the beginning of the timeshift
Press this button to skip back to the beginning of the timeshift buffer. This will
return you to the point where you first interrupted the program. Playback will start
automatically.
Rewinding a program
Use this button to rewind through the timeshift buffer. Press the Play button to
return to playback at normal speed at the selected point. The rewind will stop
automatically when you reach the beginning of the timeshift buffer (time of the
first interruption).
20 Cinergy Digital 2 (English)
Page 21

Recording, playing, exporting
Recording
Two options are available for recording a program:
• immediate recording
• timer-controlled recording
o EPG-programmed
o manually programmed
Note—timer-controlled recording. The programmed start and stop time is based on the system time of your computer. You may therefore be in for an unpleasant surprise if your system
time is not reasonably close to the actual time. The “Configuration” chapter contains information on setting pre/post recording times to avoid such problems.
Immediate recording
Starting an instant recording
Press the Record button to begin recording the current program.
Stopping an instant recording
Press the Stop button to stop the recording session.
The recordings will be stored in the selected Record folder. The file will be named according to
the following structure:
Station name_year-month-day_hour_minutes_seconds.<file format>
Example: CNN_2004-09-01_10_15_00.MPG
This file contains programming broadcast by CNN on 1 September 2004 at 10:15:00 in MPG
format.
Cinergy Digital 2 (English) 21
Page 22

Timer-controlled recording—EPG-programmed
Programming your recordings using the EPG is definitely the most convenient option.
Open the electronic program guide for the current channel. Select the program
you would like to record.
Timer Press Timer to program a recording of the selected program. A red icon will
appear next to the selected program. In addition, a red timer icon will
appear in the software's window.
22 Cinergy Digital 2 (English)
Page 23

Use the on-screen timer menu to check the programming of the recording.
Calls up the on-screen Timer menu.
New Manually programs a timer-controlled recording. For more infor-
mation, see the following chapter.
Delete Cancels a programmed recording.
Edit Opens recording settings.
Exit Closes the on-screen display (OSD).
A recording can only be started successfully if the Cinergy Digital 2 software is running at the
time.
Note: the channel cannot be changed during recording. If a different channel is selected when
recording is scheduled to begin, the software will automatically change to the channel to be
recorded.
Cinergy Digital 2 (English) 23
Page 24

The recordings will be stored in the selected Record folder. The file will be named according to
the following structure:
Channel name_day.month.year_program name.<file format>
Example: CNN_01.09.2004_Crossfire.MPG
This file contains the program “Crossfire” broadcast by CNN on 1 September 2004 in MPG
format.
Timer-controlled recording—manually programmed
Calls up the on-screen Timer menu.
New Click “New” to program a new recording manually.
If you make a mistake at any point in the following procedure, click “Back” to go back step by
step to correct it.
24 Cinergy Digital 2 (English)
Page 25

Channel selection.
The channel selection window contains all of the channels in your Favorites list. Select the
channel you would like to record.
Mode selection
Use the mode selection window to choose whether you would like to program a single recording (such as a movie), or a daily or weekly recording (for series or documentary programs).
Cinergy Digital 2 (English) 25
Page 26

Date (for single recordings only)
Set the date of your recording here. Click “OK” or press the Enter key to apply the date.
Start and stop time
Select the start and stop time of the recording here. Click “OK” or press the Enter key to
apply the start time.
26 Cinergy Digital 2 (English)
Page 27

Save Check the recording settings and click “Save” to apply the pro-
gramming and add it to the timer list. If you discover anything that's
incorrect, click “Back”. A red timer icon will appear in the software's
window.
A recording can only be started successfully if the Cinergy Digital 2 software is running at the
time.
Note: the channel cannot be changed during recording. If a different channel is selected when
recording is scheduled to begin, the software will automatically change to the channel to be
recorded.
The recordings will be stored in the selected Record folder. The file will be named according to
the following structure:
Channel name_day.month.year.<file format>
Example: CNN_01.09.2004.MPG
This file contains the programming broadcast by CNN on 1 September 2004 in MPG format.
Cinergy Digital 2 (English) 27
Page 28

Playing, exporting, deleting
Open the main menu and select “Recordings”.
The “Recordings” menu contains all of the files in the selected Record folder.
The following options are available:
Export Exports the selected recording file to MPEG-PS format which can be
Delete Removes a recording file from the Record folder. Caution—the file
Menu Switches to the main OSD menu.
Exit Closes the on-screen display (OSD).
read by the included Cyberlink PowerDVD and Ulead FilmBrennerei
2 TV applications.
will be deleted without further prompting!
28 Cinergy Digital 2 (English)
Page 29

Teletext
Modern media technology like the Internet made a widespread service offered by TV broadcasting establishments somewhat forgotten in recent years: teletext.
Press the Teletext button once to display the teletext page of the current channel
in the picture window. Pressing the button again will display the page transparently over the current TV program. Pressing it once more ends the teletext display
and returns you to the normal TV display.
Normal
The remote control, mouse and keyboard can be used to navigate teletext pages. When using
the numerical keypad, please ensure that the NumLock is active.
Entering the page number directly. To enter a page number directly, use the keypad of the
remote control or keyboard. The page will be opened immediately after the last digit has been
entered.
Home page (page 100).
Remote control Mouse User interface Keyboard
Page forward/page back.
Remote control Mouse User interface Keyboard
Transparent
Pos. 1
Cinergy Digital 2 (English) 29
up arrow
down arrow
Page 30

Page memory and subpage display. In addition to normal teletext navigation, the teletext
function of the Cinergy Digital 2 also indicates whether the memory contains additional pages
with the same page number. The availability of additional pages with the same page number
are indicated by green triangles before or after the selected page number.
No additional pages/subpages have been received or sent.
Additional pages/subpages are available.
Subpage forward/subpage back.
Remote control Mouse User interface Keyboard
right arrow
left arrow
References/color-coded navigation. Teletext itself provides easy navigation options known as
FLOF or TOP teletext. Colored areas or colored text is frequently visible along the bottom of
teletext pages. These markings are comparable to Internet hyperlinks, linking directly to the
referenced pages.
Example 1
Example 2
30 Cinergy Digital 2 (English)
Page 31

Remote control Mouse User interface Keyboard
red button
green button
yellow button
blue button
<mouse click> -
<mouse click> -
<mouse click> -
<mouse click> -
F1
F2
F3
F4
Saving teletext pages. You can also take a screenshot of the current teletext page and store it.
The images will be stored in the selected Record folder.
Remote control Mouse User interface Keyboard
- -
P
The image format for teletext pages (BMP or JPG) and the folder for the files can be specified in
the configuration.
Cinergy Digital 2 (English) 31
Page 32

Configuration
Opening the configuration menu.
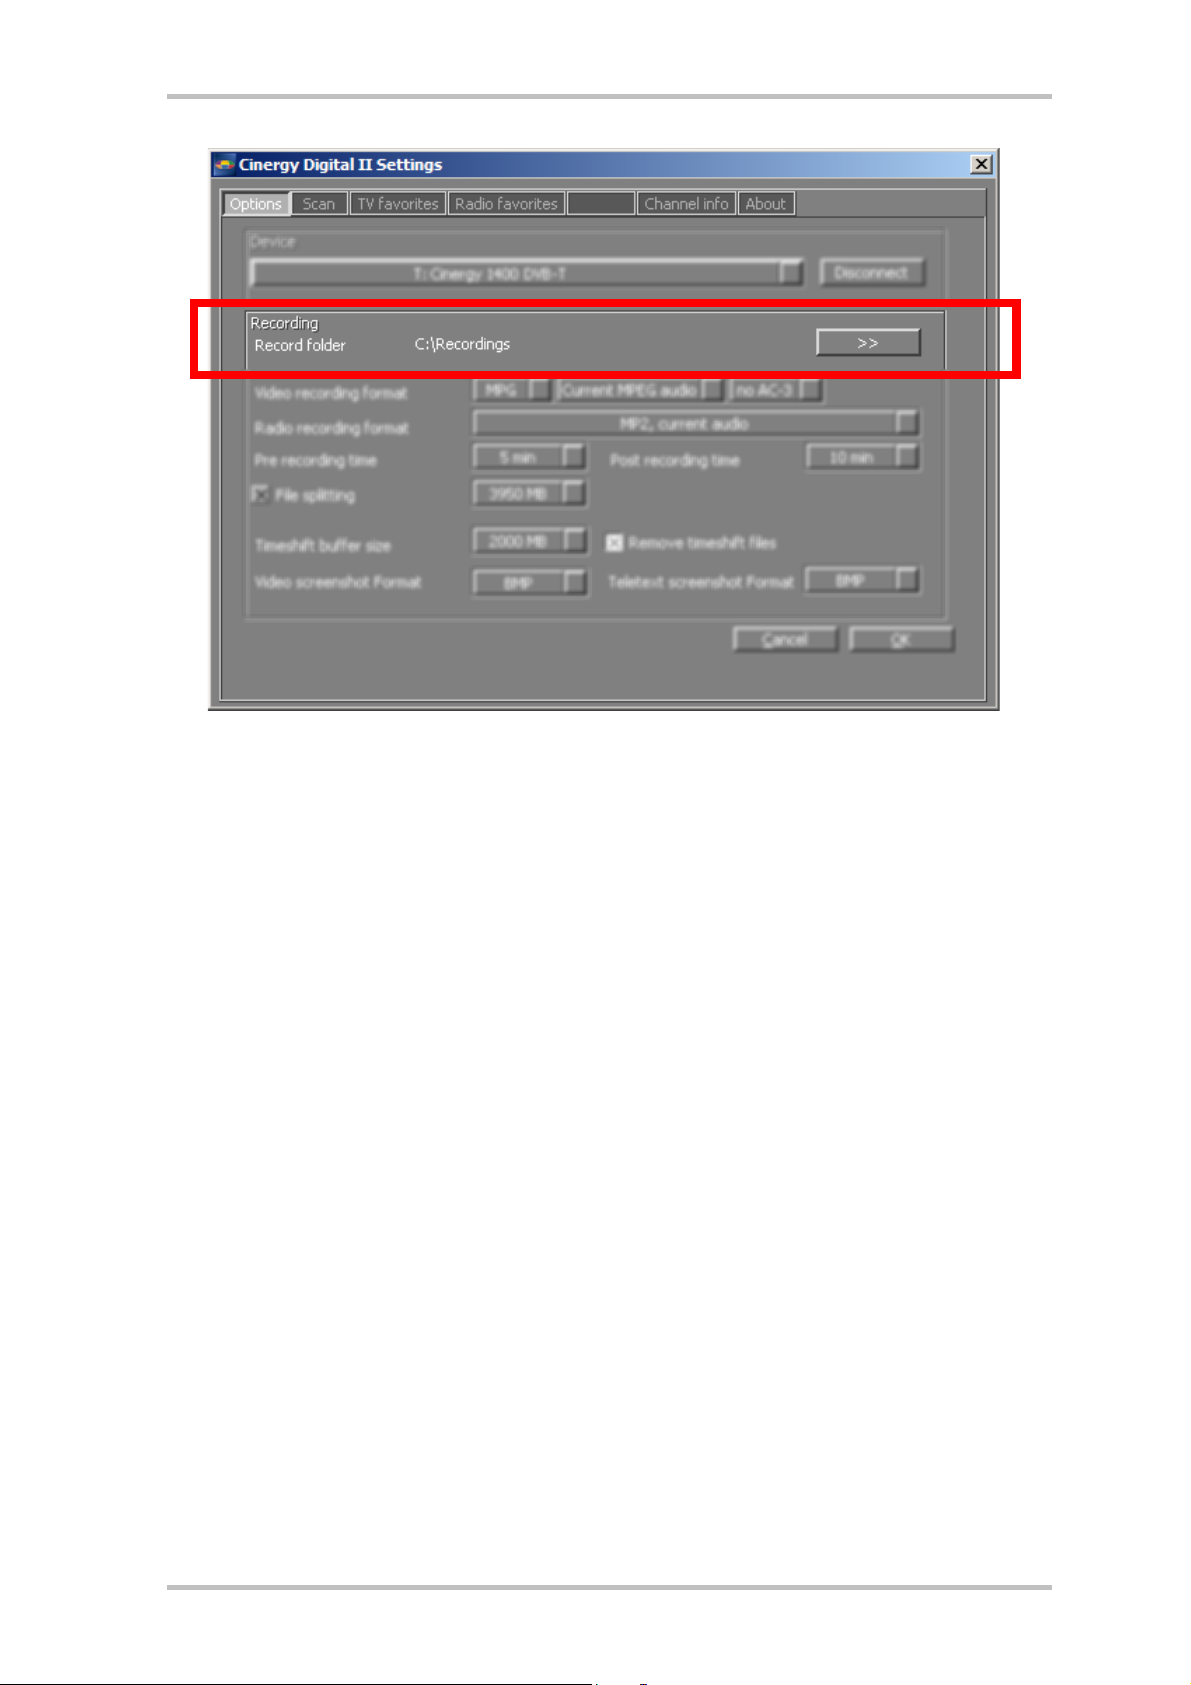
Configuration: Options
Use the “Options” menu to set up the general properties of the Cinergy Digital 2 software.
The options in the configuration menu.
Device. Cinergy Digital 2 software supports a wide range of TerraTec TV products. Select your
device here.
Record folder. The files created by the various recording functions are stored in the Record
folder.
Video recording format. Specifies the type of recording. MPG format, which is supported by
virtually all playback applications, is set as the default. TS (transport stream) format, which
provides enhanced options such as teletext recording, is also supported.
32 Cinergy Digital 2 (English)
Page 33

The following options are available:
MPG o With current MPEG audio
o With all available MPEG audio tracks
o Without MPEG audio
o With AC-3 audio
o Without AC-3 audio
TS o With current MPEG audio
o With all available MPEG audio tracks
o Without MPEG audio
o With AC-3 audio
o Without AC-3 audio
Teletext recording not possible
Teletext recording optional
TS recording with teletext lets you record the subtitles provided for some programs and display them during playback.
Pre and post recording time. Sets the time by which recordings start before and stop after the
programmed times. The programmed times are based on the system time of your computer.
You may therefore be in for an unpleasant surprise if your system time is not reasonably close
to the actual time. This option lets you program additional recording time before and after the
actual times to help avoid this problem.
File splitting. Use this option to specify the size of the files in which the recording should be
split. Your recordings will automatically be stored in multiple files of the predetermined size.
This is especially important if your recording folder is on a hard drive formatted with the FAT
file system. Files in the FAT file system may not be larger than 4GB. We therefore recommend
using the NTFS file system for the drive containing your recording folder. NTFS supports a
maximum file size of 16 terabytes—and that amounts to quite a bit of TV (nearly 555 weeks at
an average bitrate of 4 Mbps).
Timeshift buffer size. The maximum amount of hard drive space that may be used for timeshifting. Please note that timeshift recordings are always made in TS format for technical reasons.
Remove timeshift files. The files created by the timeshift function are normally deleted automatically after use to prevent them from unnecessarily taking up hard drive space. If this
option is disabled, timeshift files are retained and can be processed further or watched again.
Video screenshot/teletext screenshot formats. Specify the format for video and teletext
screenshots here. These files will also be stored in the recording folder.
Note: The settings made here apply globally for the entire Cinergy Digital 2 software and are
not stored individually for each channel.
Cinergy Digital 2 (English) 33
Page 34

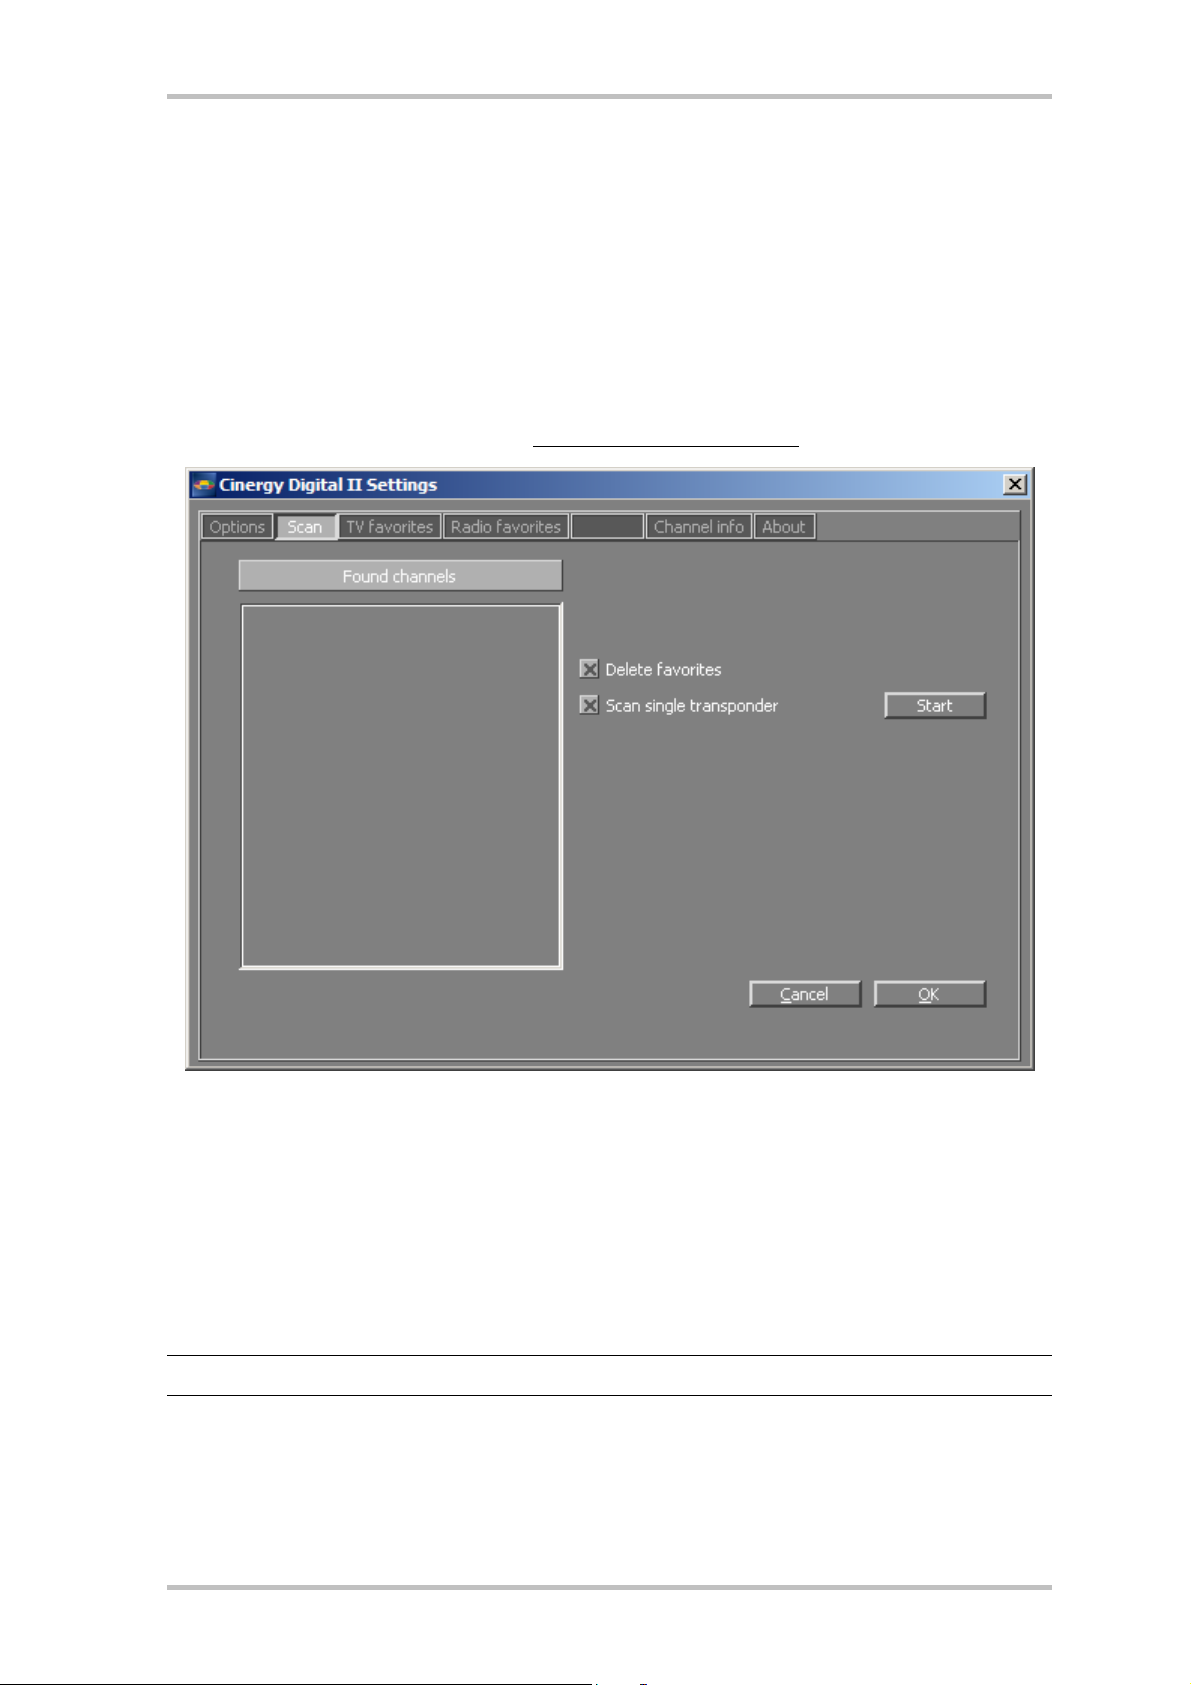
Configuration: Channel scan
A number of options are available in addition to the simple scan described in the “Launching
the software for the first time” chapter.
Delete favorites. This option deletes all of the stations that were on your Favorites list prior to
the scan.
Scan single transponder. Use this option to select specific frequencies to scan for stations.
Select the frequency to be scanned under Frequency and the bandwidth in MHz under Bandwidth. Note: only bandwidths of 7 and 8 MHz are available in Europe.
Configuration: TV favorites, radio favorites
These configuration menus were already covered in the “Launching the software for the first
time” chapter.
Configuration: Channel info
This page contains detailed technical information on the current station. Don't worry, very few
normal mortals can make any sense of this info ☺.
Configuration: About
Here you can find information that can prove useful for your own troubleshooting measures or
for support inquiries.
34 Cinergy Digital 2 (English)
Page 35

Context menu
Most context menu entries were already explained in connection with the user interface. The
items covered here are those that are available solely via the context menu.
Page 100. Opens teletext page 100 of the current channel. Page 100 is generally the home
page of the station's teletext offerings.
Open Record folder. Opens the Record folder in the Windows Explorer.
Always on top. This setting ensures that the TV picture always remains in the foreground and
cannot be partly or completely covered by other windows. (This option is also available for the
user interface.)
Optimize window size. Optimizes the size of the picture window for 1:1 pixel display.
Signal information. Please see the “Setting up the antenna” chapter for information on using
the signal information.
Cinergy Digital 2 (English) 35
Page 36

Setting up the antenna
The Cinergy Digital 2 software is capable of displaying signal information to facilitate setting
up the antenna.
Context menu Keyboard
Signal information
Use the values for signal quality and signal strength to determine the best position for the
antenna. Please note that the signal quality value is decisive, as good quality can be attained
even at a low signal strength.
CTRL + I
36 Cinergy Digital 2 (English)
Page 37

Keyboard shortcuts
The following tables contain all of the keyboard shortcuts of the Cinergy Digital 2 software:
General
Key Function
0-9 Channel selection
M/* (NUM) Mute
+/- Volume up/volume down
CTRL + X Closes the TV window (not the application)
CTRL + I Displays signal information
CTRL + V Opens the recording folder
CTRL + O Force optimal size for TV window
/ Next/previous station
F1 Shows the timer
F2/F Full-screen mode ☺
TV
Key Function
Enter Shows the station list/selects a station
/ Navigation in the station list (see above)
I Shows/hides the station information
< Changes the aspect ratio (4:3/16:9/Zoom)
Z Zaps back and forth between the previously-watched station and the current one.
P Screenshot of TV picture
A Switches audio tracks
Cinergy Digital 2 (English) 37
Page 38

Teletext
Key Function
T Shows/hides teletext
Pos. 1/Home Selects page 100 (contents)
F1 Soft key: red
F2 Soft key: green
F3 Soft key: yellow
F4 Soft key: blue
0-9 Manual page entry
P Screenshot of teletext
Page number + 1
Page number – 1
Next page/subpage in memory
Previous page/subpage in memory
OSD
Key Function
E EPG on/off
I Program information on/off
O Shows/hides the OSD
S Opens/closes the scheduler (timer)
F1 Soft key: red
F2 Soft key: green
F3 Soft key: yellow
F4 Soft key: blue
Page Up Up one page in OSD lists
Page Dn Down one page in OSD lists
/ Navigation in OSD lists
Esc Exits OSD
Backspace Moves the cursor back one space when entering characters
38 Cinergy Digital 2 (English)
Page 39

Transport functions
Key Function
L Skips to the start of playback
To the beginning in case of timeshift
L + Shift Fast rewind
N Skips to the end of playback
In the case of timeshift, as close as possible to real time
N + Shift Fast forward
R Starts recording
R + Shift + Ctrl Starts recording of a complete transponder (cancel by changing channels)
PAUSE Start timeshift
Space bar Start playback/slow motion
X Stop playback/stop recording
Cinergy Digital 2 (English) 39
 Loading...