

Page 1
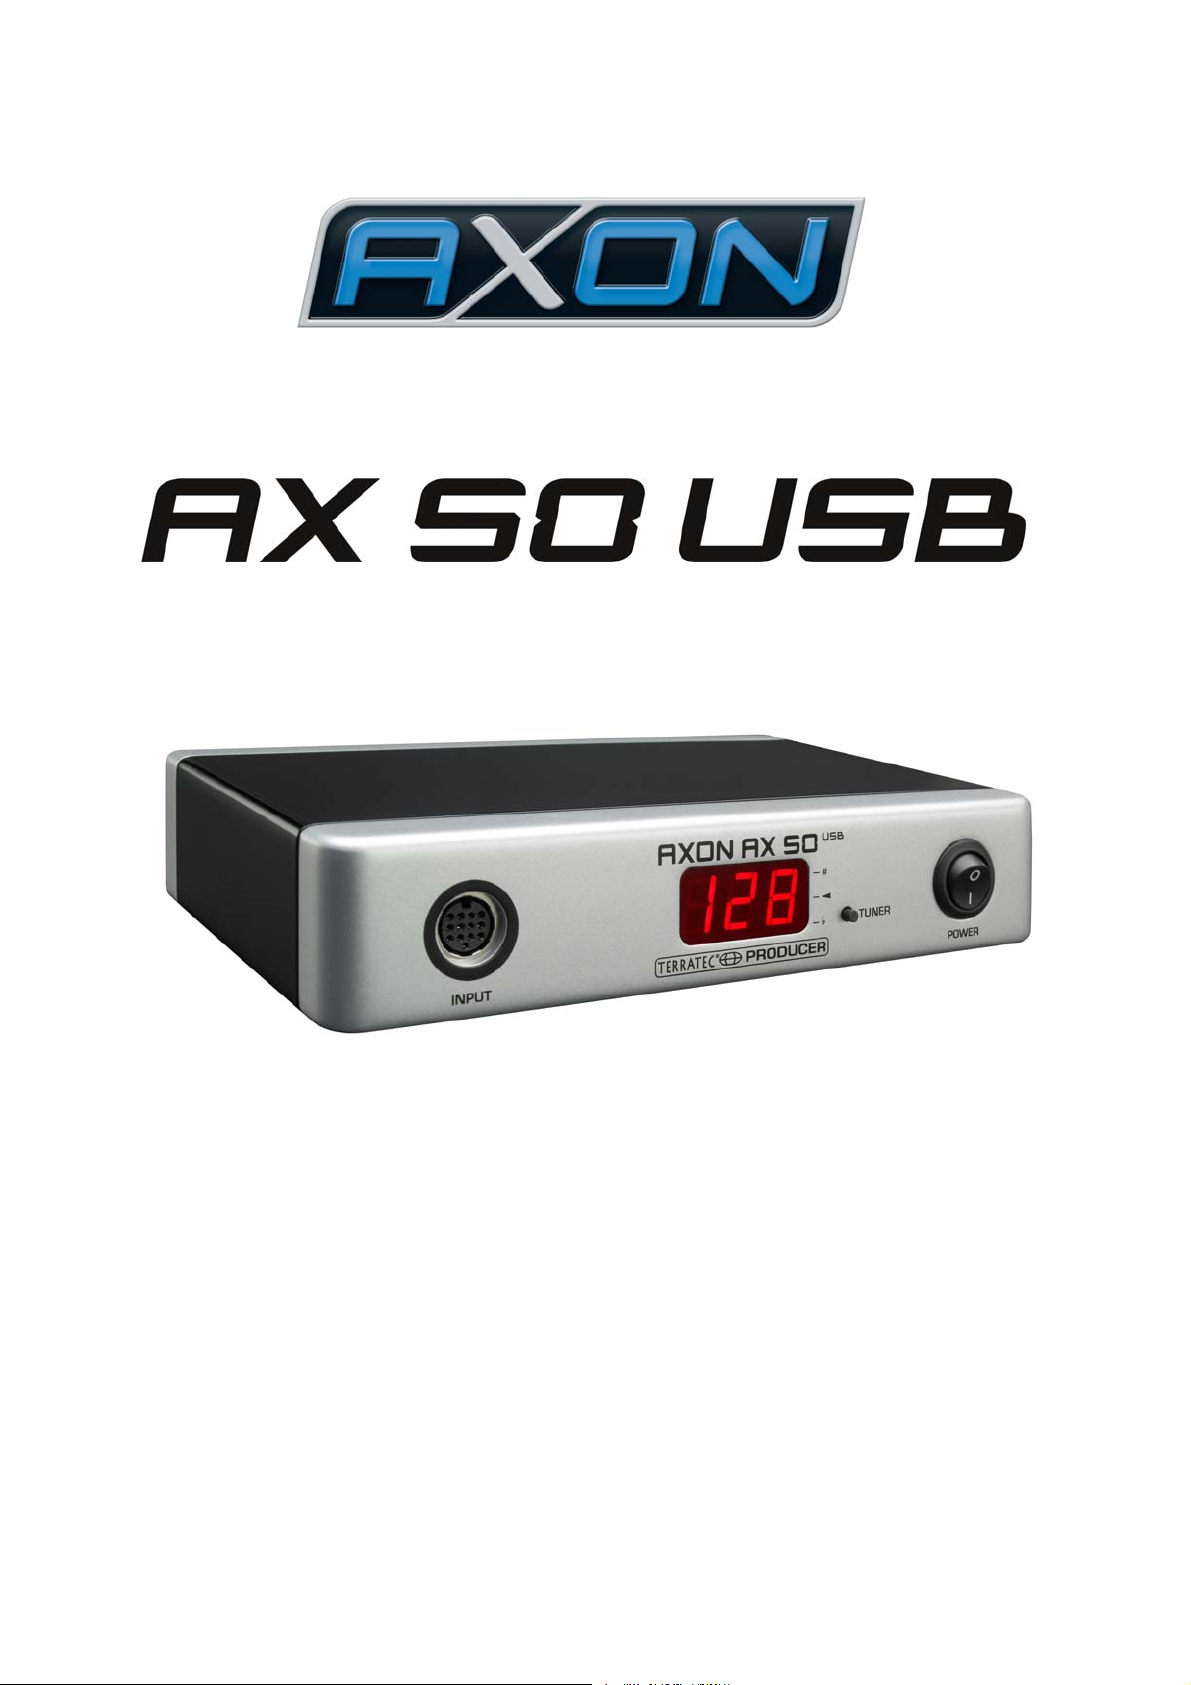
AXON AX 50 USB
English Manual
Version 2.0 | January 2008
Page 2

CE Declaration
We:
TerraTec Electronic GmbH, Herrenpfad 38, D-41334 Nettetal, Germany
hereby declare that the product:
AXON AX 50 USB,
to which this declaration refers is in compliance with the following standards or standardis-
ing documents:
1. EN 55022
2. EN 55024
The following are the stipulated operating and environmental conditions for said compli-
ance:
residential, business and commercial environments and small-company environments.
This declaration is based on:
Test report(s) of the EMC testing laboratory
The information in this document is subject to change without notice and shall not be deemed as a
warranty by the seller. No warranties, express or implied, are made with regard to the quality, suit-
ability or accuracy of this document. The manufacturer reserves the right to change the contents of
this document and/or the associated products at any time without the provision of prior notice to
specific persons or organisations. The manufacturer shall not be held liable for damages of any
kind arising from the use, or the inability to use this product or its documentation, even if the possi-
bility of such damage is known. The information in this document is subject to copyright. All rights
are reserved. No part of this manual may be reproduced or transmitted in any form or for any pur-
pose without the express written permission of the copyright holders. Product and brand names
contained in this document are used for identification purposes only. All registered trademarks,
product designations or brand names used in this document are the registered property of their
respective owners.
©TerraTec Electronic GmbH, 1994 - 2008. All rights reserved (01/01/2008).
2 AXON AX 50 USB v2.0 (English)
Page 3

Contents
Preface ...............................................................................................................................5
Scope of delivery...............................................................................................................5
Optional accessories........................................................................................................ 5
Congratulations…............................................................................................................. 6
QuickStart guide................................................................................................................7
Connectors and controls..................................................................................................8
Front panel....................................................................................................................... 8
Rear panel ....................................................................................................................... 9
Installation in Windows XP.............................................................................................10
Driver installation........................................................................................................ 10
Editor installation........................................................................................................ 10
Installation in MAC OS X ................................................................................................10
Driver installation........................................................................................................ 10
Editor installation........................................................................................................ 11
Launching the software for the first time...................................................................... 11
Tuning............................................................................................................................ 12
The Computer Editor.......................................................................................................13
Global ............................................................................................................................14
Global Parameters ..................................................................................................... 14
Basic Channel (1-16) .................................................................................................14
Pitchbend Range (0-24) ............................................................................................. 15
Tunebase (-99 - +99) ................................................................................................. 15
Guitar Number (1-8) ................................................................................................... 15
Guitar 1-8 ................................................................................................................... 16
Instrument Type (Guitar, Bass, Violin, Cello) ............................................................. 16
Pickup (Magnetic, Piezo) ...........................................................................................16
Note Off Limit (2-30)................................................................................................... 16
Trigger Level (0-9)...................................................................................................... 16
Wheel Controller (On / Off) ........................................................................................ 17
Instrument Tuning ...................................................................................................... 17
Sensitivity (8-64) ........................................................................................................ 17
AXON Connection...................................................................................................... 17
Load all settings / Save all settings............................................................................ 18
Firmware Update........................................................................................................ 18
Presets........................................................................................................................... 19
AXON AX 50 USB v2.0 (English) 3
Page 4

Preset Parameters......................................................................................................19
Preset Management ...................................................................................................19
Guitar No. (Global, 1-8) ..............................................................................................20
String mode (Common, Separate)..............................................................................20
Wheel Controller Pickup.............................................................................................20
NRPN Controller.........................................................................................................20
Finger Pick (On/Off)....................................................................................................21
Splittings (Split 1, Split 2…Split 12)............................................................................22
Layer (Layer 1…Layer 4)............................................................................................24
MIDI Output ................................................................................................................24
Controller....................................................................................................................25
Notes ..........................................................................................................................26
MIDI Tuning................................................................................................................27
CC Defaults....................................................................................................................28
Controller reset values................................................................................................28
MIDI Mapping.................................................................................................................29
Program Change commands......................................................................................29
Practical Examples..........................................................................................................30
Appendix ..........................................................................................................................33
Factory Reset................................................................................................................. 33
Pitches on the Fingerboard............................................................................................33
Pin Assignment of 13-pin Socket ...................................................................................34
MIDI Implementation Chart ............................................................................................35
Troubleshooting .............................................................................................................38
4 AXON AX 50 USB v2.0 (English)
Page 5

Preface
Thank you for choosing a TerraTec AXON Technologies product for your musical en-
deavours. With the AXON AX 50 USB, you've purchased a sophisticated product repre-
senting the state of the art of studio technology – and we're convinced this innovative de-
velopment will prove extremely useful to you in the coming years and, above all, provide
you with a great deal of entertainment.
We hope that this brochure is helpful to you while using the product. It is designed to illus-
trate technical relationships based on practical examples from the studio environment.
This brochure is not only designed to help beginners with this complicated subject - ad-
vanced professionals will also find the occasional bit of useful information.
Sincerely,
Your AXON Technologies Team
Scope of delivery
Start by making sure that the contents of the package are complete.
The AXON AX 50 USB package should contain the following items:
1 AXON AX 50 USB
1 USB cable
1 power adapter 12VAC / 1.5A
1 Quick Start manual
1 AXON AX 50 USB product CD (with detailed manual)
1 WAVE XTABLE VI DVD
1 service request form
1 registration card with the serial number
Please fill out and return the registration card enclosed in the package to us at your earli-
est convenience or register online at
support and hotline services.
www.terratec.net/register.htm. This is important for
Optional accessories
The following products are available separately from TerraTec AXON Technologies:
PU 100 pickup for guitars with steel strings (available from spring 2008)
AIX 103 pickup for 4, 5 and 6-string bass guitars with steel strings
AXK 100 13-pin cable, 5m, to connect the pickup to the AXON AX 50 USB
AXON AX 50 USB v2.0 (English) 5
Page 6
Congratulations…
…on your purchase of an AXON AX 50 USB, the second guitar-to-midi converter by
AXON Technologies. The AX 50 USB is based on the same technology as the AX 100
MKII, the probably most powerful device of this type, but it has additional options, such as
a USB port and four MIDI ports, which makes it ideal for state-of-the-art, computer-based
studios.
Thanks to the neural network used in the development of its algorithms, the AXON AX 50
USB is able to determine the precise pitch of a note the instant it is picked, whereas other
devices require several oscillations of the string for analysis. The early recognition of tran-
sients lets the AXON simultaneously determine pitch, amplitude, and even the location at
which the string was picked – an unparalleled ability to date. This is due to the
AXON’s unusual splitting options. For example, you can use a string split to divide the
strings of your guitar into two zones, each with its own sound properties. Or use a fret split
to divide the fingerboard of your guitar into two separate playing zones. Pick splits let you
divide the picking area of the guitar into up to three independent sound zones that you
can select instantly by changing your picking position. You can achieve impressive effects
with the pick control function, which lets you control modulation effects and others with
your picking position. Splits and effects can be combined, stored in up to 128 complex
presets and recalled as needed. Another unique feature of the AXON AX 50 USB is its
unrestricted support for both acoustic guitars and basses with hex piezo pickups. This
opens the MIDI world to bass players and classical guitarists that are looking for new, con-
temporary forms of expression.
6 AXON AX 50 USB v2.0 (English)
Page 7

Safety information
Please ensure that analog devices are turned off before plugging
them in. This will protect you from any possible – albeit weak –
electrical shocks, as well as protecting your speakers and your
hearing from sudden peaks.
QuickStart guide
for those of you who can't wait:
To configure the many settings of the AXON AX 50 USB, please install the editor soft-
ware on your computer and connect the AXON AX 50 USB to your computer using the
included USB cable. A separate driver installation is not required.
If you would like to use the included WAVE XTABLE VI contact player with its 128
sounds for audio output, please install it from the included DVD.
If you are using an external MIDI instrument for audio output, connect the MIDI OUT of
the AXON to the MIDI IN of the instrument.
Connect your guitar to the AXON AX 50 USB. Your guitar must be equipped with one
of the included hexaphonic pickups such as the AXON PU 100 or 103, or a piezo pickup such as those offered by GraphTech, RMC or other vendors. Please use the 13pin AXK 100 cable. The socket at the left of the front panel labelled "INPUT" is the one
you need. Ensure that the plug clicks into place in the socket for optimal contact.
Finished! The AXON has been preconfigured at the factory to let you get started with a
minimum of hassle.
We nevertheless recommend that you take the time to set up the AXON to suit your
playing style and your instrument. It's essential if you want to fully leverage the
AXON's strengths and experience the best possible tracking.
AXON AX 50 USB v2.0 (English) 7
Page 8
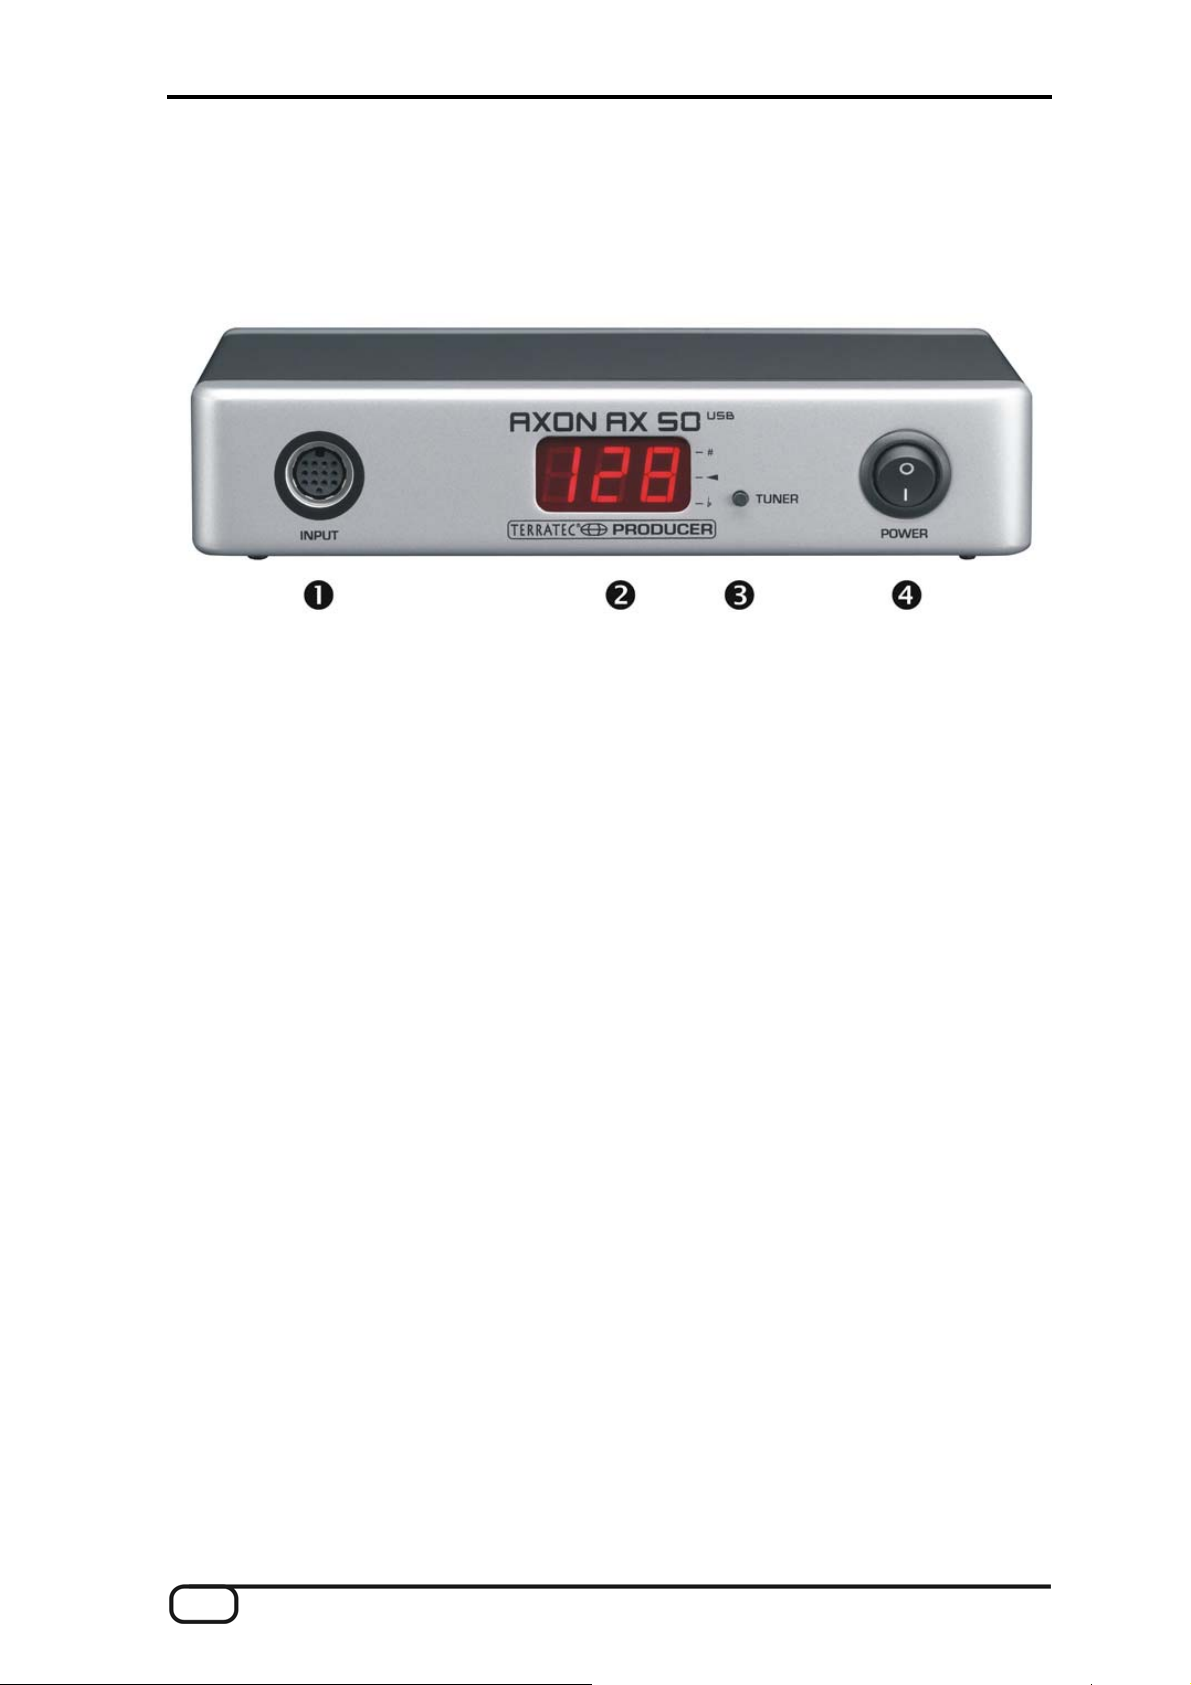
Connectors and controls
Front panel
1. Socket for the special 13-pin AXON AXK 100 cable (not included) to connect gui-
tars/basses with hexaphonic pickup systems (e.g. AXON PU 100 or AXON AIX
101/103).
2. 3-digit 7-segment LED display.
3. TUNER button with multiple functions:
■ TUNE MODE: A minus sign signals that the device is in TUNE mode. Press the
button briefly to activate this mode. Pressing the button again will return it to
preset mode.
■ FIRMWARE UPDATE: Press the Tuner button and hold it for around 3 seconds
while the device is initialising.
■ BRIGHTNESS: Press and hold the button while the device is in operation. The
display will first gradually dim, then gradually brighten again. Release the button at the desired level.
4. POWER ON/OFF switches the AC power of the AXON. The LED display is lit when
the power is turned on.
8 AXON AX 50 USB v2.0 (English)
Page 9
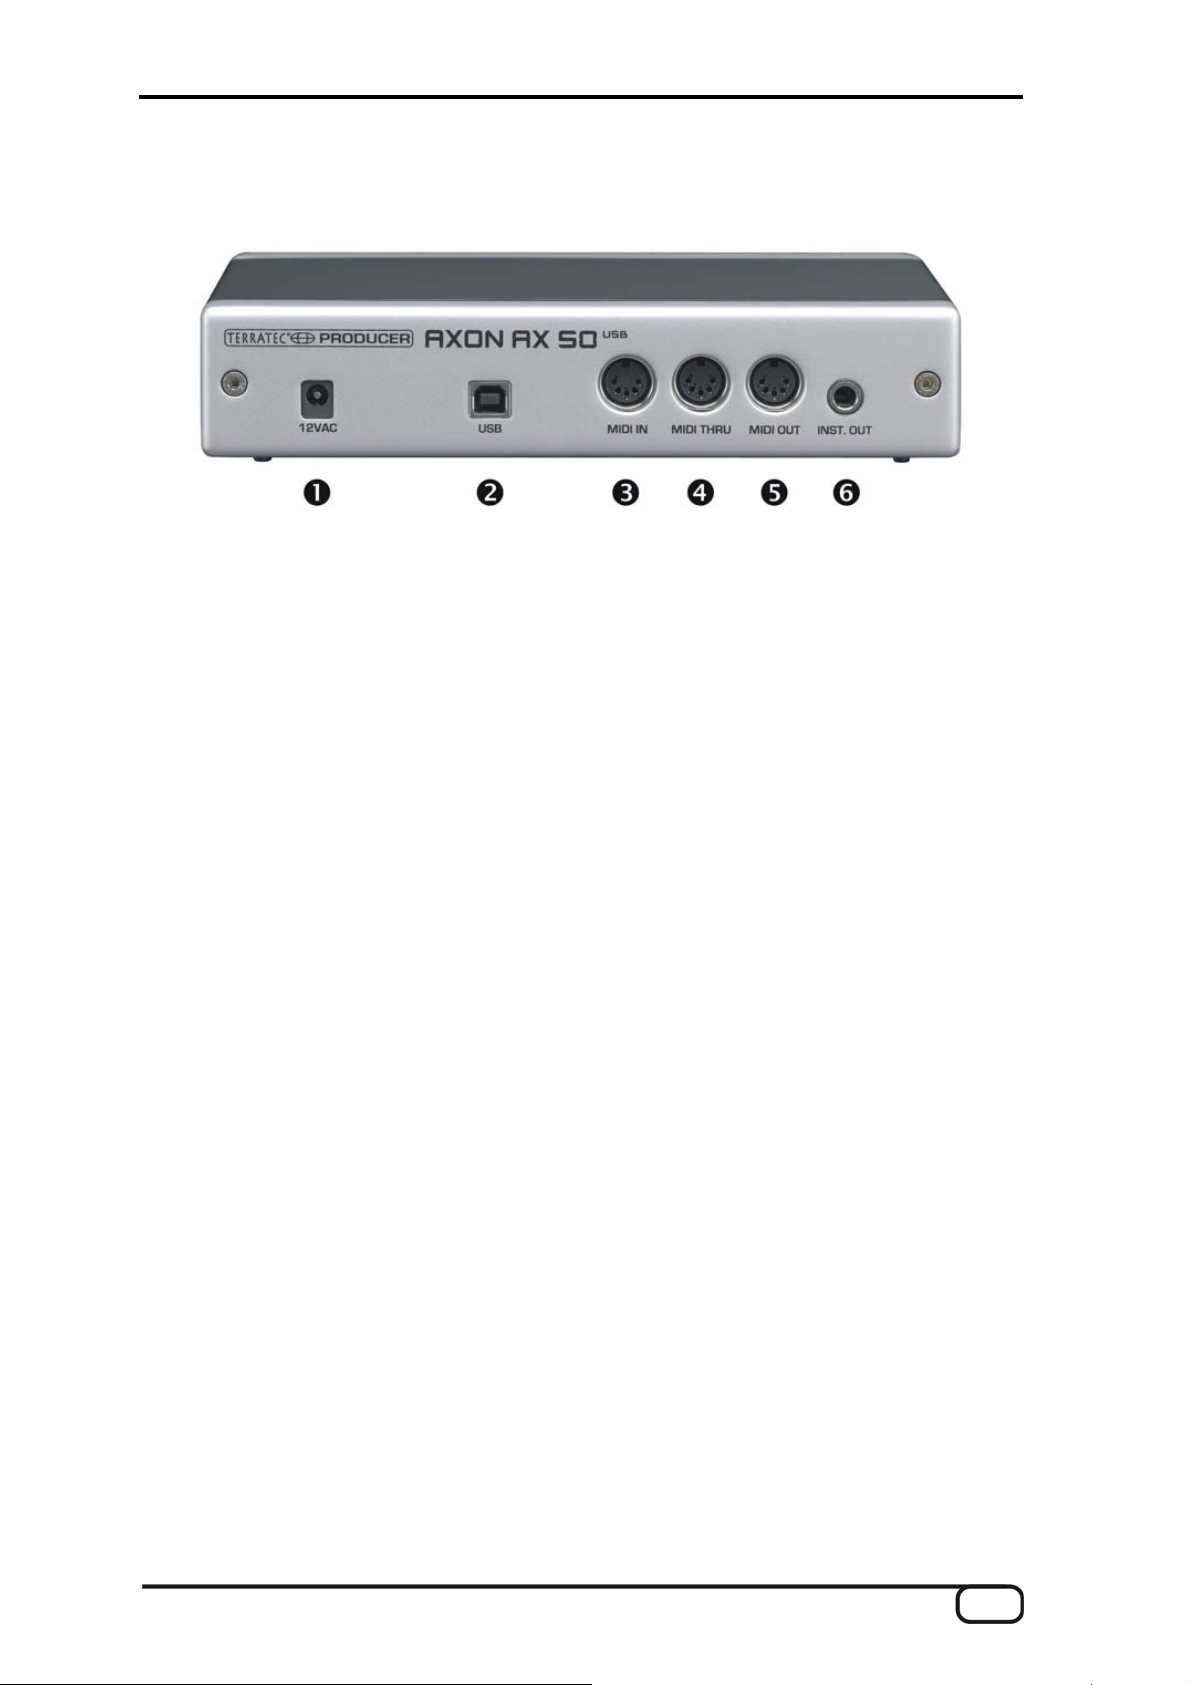
Rear panel
1. 12VAC: Connect the power adapter here (12VAC/1.5A).
2. USB: Socket to connect the device to your computer.
3. MIDI IN: The AXON receives all incoming Program Change commands, as well as
controller data via this input. A MIDI footswitch to change presets can be connected
here.
4. MIDI THRU: All data arriving at MIDI IN is available in unchanged form here.
5. MIDI OUT: All MIDI data generated by your AXON AX 50 USB is available here.
6. INST. OUT: The "normal", unmodified pickup signal of your guitar can be sent through
the 13-pin cable, making it available at this socket. The pickups PU 100 and
AIX101/103 have an input for the pickup signal of your guitar. Use the included cable
to connect the pickup output of your guitar to the minijack socket.
AXON AX 50 USB v2.0 (English) 9
Page 10

Installation in Windows XP
Driver installation
1. Connect the AXON AX 50 USB to a free USB port (1.1 or 2.0) on your computer and
switch the AXON on.
2. A short time later, a pop-up window will appear to indicate that a new device – the AX
50 USB – was found. The Windows installer will complete the installation automati-
cally. The device uses generic drivers already present in your system, making it un-
necessary to enter a path to a custom driver. After a few seconds, another pop-up will
inform you that the new hardware has been installed and is ready to use.
3. There, you're finished already!
Editor installation
1. Insert the included AXON CD in your drive and wait for the autorun application to
launch. If the autorun application on the CD does not launch automatically, start the
application manually by double-clicking "Autorun.exe" in the root folder of the CD.
2. Select your language and "AXON Editor" in the following menu. The setup wizard will
now appear.
3. The wizard will now display its welcome message.
4. In the following menu, select the path and destination folder.
5. Click "Finish" to complete the installation.
6. Launch the application with Start \ Programs \ TerraTec \ AXON AX 50 USB \ AX 50
USB Editor.
Installation in MAC OS X
Driver installation
1. Connect the AXON AX 50 USB to a free USB port (1.1 or 2.0) on your computer and
switch the AXON on.
2. The device uses generic drivers already present in your system, making it unneces-
sary to enter a path to a custom driver.
3. There, you're finished already!
10 AXON AX 50 USB v2.0 (English)
Page 11

Editor installation
1. On the CD, the image files are located at "Editor\MAC":
■ AXON_AX_50_USB_Editor_PPC_Vx.x.x.dmg (G4/G5 OS 10.3)
■ AXON_AX_50_USB_Editor_Universal_Vx.x.x.dmg. (G4/G5/Intel OS 10.4 or hig-
her)
2. Mount the correct image for your system by double-clicking and copy the program
contained there to your programs folder.
3. The Editor can be launched at System\Programs when the installation is complete.
Launching the software for the first time
The AXON AX 50 USB is now set up and ready to use. The device has two different oper-
ating modes:
Connected to a computer via USB: this gives you access to the full range of parame-
ters and lets you configure the AXON via the editor software. You can also transfer
MIDI data to your computer directly via the USB port.
Stand-alone mode: the AXON is not configurable in this mode, but it responds to all
incoming program change commands and controller data from the MIDI IN socket and,
of course, sends all MIDI data generated to the output jack.
When switching on the AXON AX 50 USB, the following will appear on the display:
A dot will appear at the lower right.
Next, the firmware version number is displayed.
Finally, the display will switch to the currently selected preset number.
NOTE: "preset numbers" refer to the memory slots of the AXON AX 50 USB, not the
GM sound or another sound number of your sound generator (as is customary on the
displays of sound machines).
AXON AX 50 USB v2.0 (English) 11
Page 12
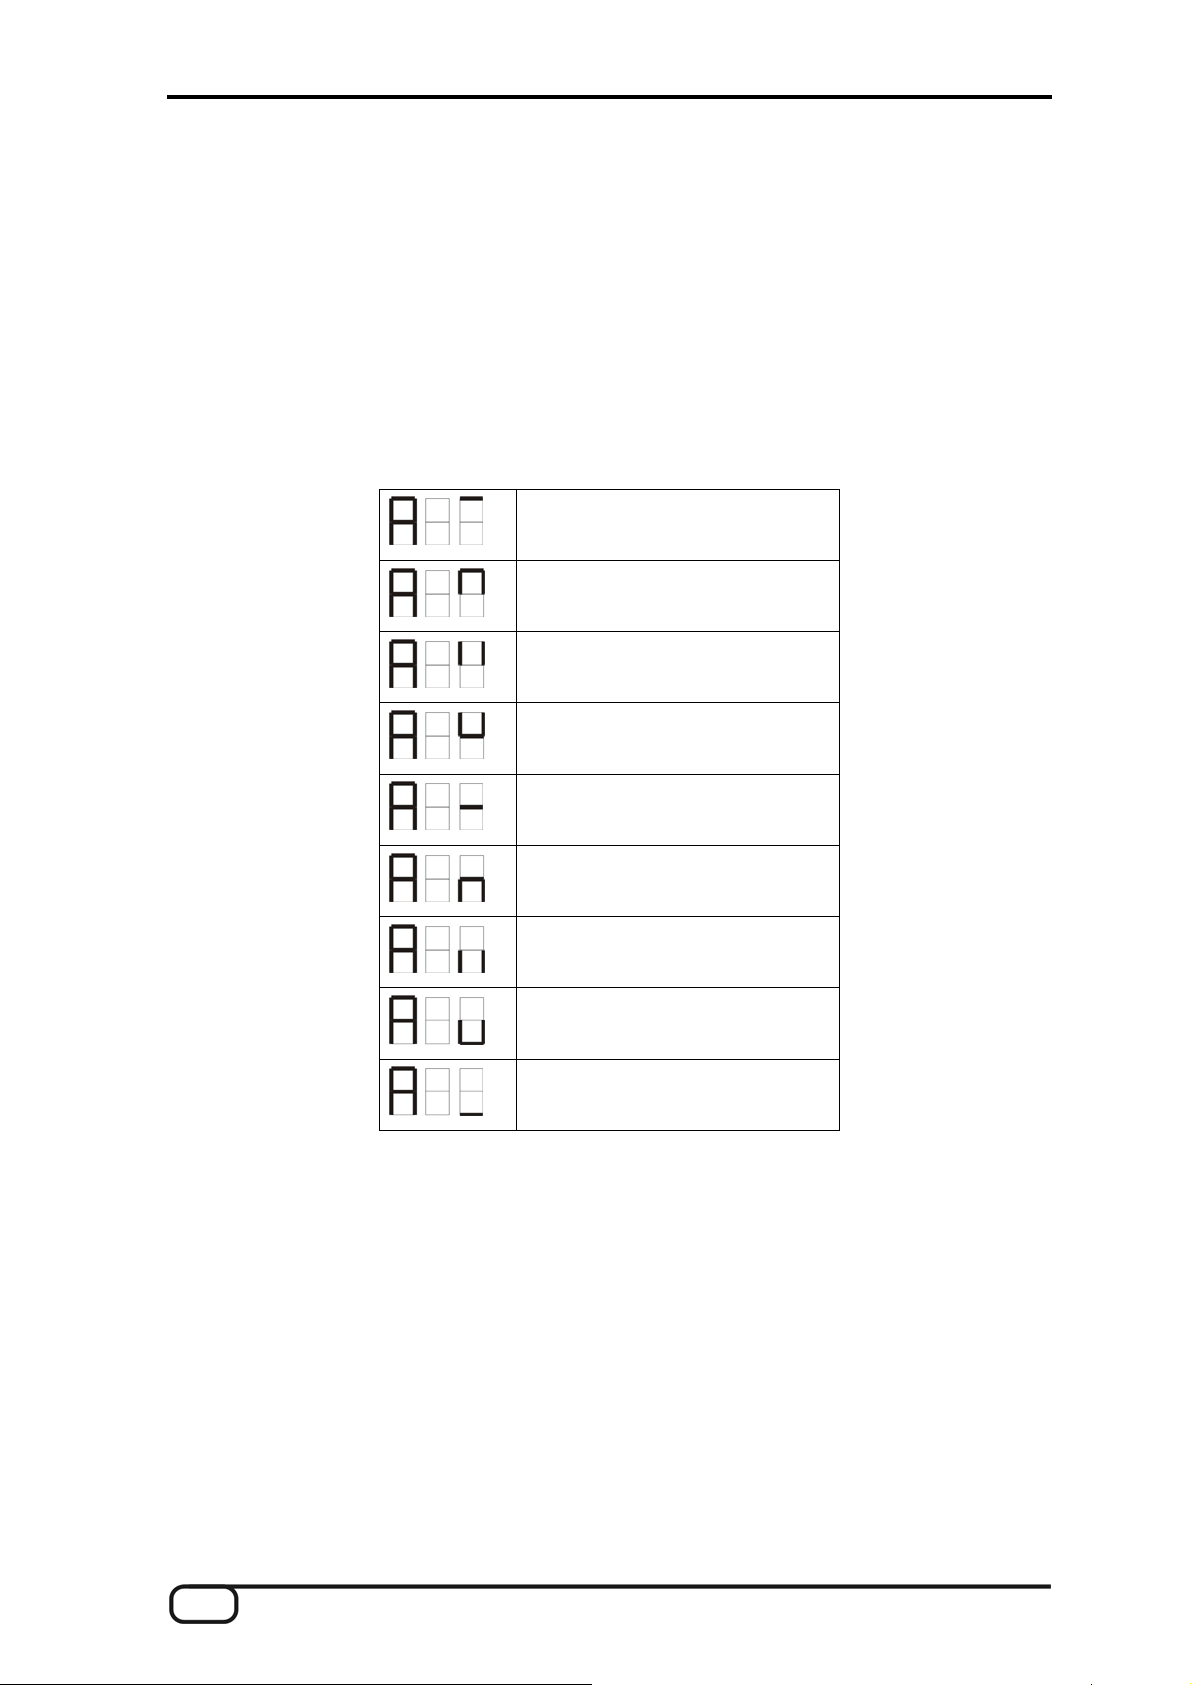
Tuning
A properly tuned instrument is important for smooth, and above all "fast", operation. We
have integrated a tuner in the AXON for that reason. To activate it, press the TUNER but-
ton on the front panel.
The display shows the designation of the current string (at higher semitones such as F# or
G#, an additional bar will be displayed in the middle character, followed by the indication
of whether the string's pitch is too high or low. The information is shown as symbols cov-
ering four pitch ranges (1 cent = 1/100 semitone or 1 semitone = 100 cent):
from +35 to +49 cent
from +23 to +34 cent
from +11 to +22 cent
from +3 to +10 cent
the pitch is correct
from -3 to -10 cent
from -11 to -22 cent
from -23 to -34 cent
from -35 to -50 cent
12 AXON AX 50 USB v2.0 (English)
Page 13

The Computer Editor
To work with the editor, you must connect the AXON AX 50 USB with the computer via the
USB interface. MIDI connections (as with the AXON AX 100) are no longer supported.
Under "AXON Connection" on the Global page, select the AXON AX 50 USB (USB audio
device in Windows) and click "Connect".
Note for Windows users: unfortunately, Windows does not display individual names for
USB MIDI devices, so you will always find the AXON under "USB audio device". As the
device also provides four additional MIDI ports, please choose the first, unnumbered de-
vice when setting up the connection with the editor.
If you have other USB devices connected to your computer, their numbers will be in pa-
rentheses rather than square brackets:
1: USB audio device AXON AX 50 USB virtual MIDI port 1
2: USB audio device [2] AXON AX 50 USB virtual MIDI port 2
3: USB audio device [3] AXON AX 50 USB virtual MIDI port 3
4: USB audio device [4] AXON AX 50 USB virtual MIDI port 4
5: USB audio device [5] AXON AX 50 USB virtual MIDI port 5
6: USB audio device (2) additional USB audio device port 1
7: USB audio device (2) [2] additional USB audio device port 2
The editor is now ready to use, letting you remotely control the AXON AX 50 USB in real
time and monitor the results. Managing, editing and saving becomes child's play with the
editor.
AXON AX 50 USB v2.0 (English) 13
Page 14

Global
Global Parameters
The global parameters contain all higher-level parameters such as information related to
the MIDI channels, the instrument used, the reference tuning and the input sensitivity of
the individual strings. A number of settings can be set individually for each instrument that
you will be using with the AXON. Check and adapt these settings as necessary before
using it for the first time. This is essential to ensure that the AXON will work optimally with
your instrument.
Basic Channel (1-16)
Various options are available for sending the MIDI information generated by the AXON
from the vibrations of your guitar strings to the sound module or MIDI instrument. Ideally,
a MIDI channel is assigned to each string (see STRING MODE SEPARATE) This has the
advantage of evaluating each string separately. For example, bending a string affects only
that string's channel. Otherwise, bending would affect the pitches of the other strings be-
ing played at the same time, an effect that is generally undesirable. Use BASIC
CHANNEL to specify the first of six MIDI channels. All other channels follow automatically
in ascending order. If you select "1", for example, MIDI channels 1 to 6 will be reserved by
your AXON. The value '5' would assign channels 5 to 10, and the value '11' the channels
from 11 to 16. '1' is the default value.
14 AXON AX 50 USB v2.0 (English)
Page 15

Pitchbend Range (0-24)
Bending and sliding are techniques frequently used by guitarists. Your AXON uses the
MIDI pitchbend command for these effects. As with a keyboard pitch wheel, the pitch of
the last note picked is modified without picking a new note. The value ranges must be
adjusted to ensure that the sound module or a connected MIDI instrument reproduces the
pitch changes accurately.
The displayed value indicates the maximum number of semitone steps that can be applied
to a pitchbend. For most instruments, a value of 12 (one octave) is good. We recommend
a setting of 24 for basses. However, please consult your sound generator's manual, as a
setting of 2 is also common.
The value "0" disables pitchbend, triggering chromatic semitones when bending or sliding.
Press "Resend" to ensure that the predefined pitchbend range is resent to the external
sound generator any time you change the preset.
Tunebase (-99 - +99)
Enter the fine tuning for your instrument here in the -99 to +99 cent range, which is rough-
ly one semitone in either direction. (Strictly speaking, 100 cents are a semitone, but let's
not get carried away...) All MIDI notes generated by your AXON are based on the refer-
ence frequency of 440 Hz, plus or minus a deviation determined by this parameter. If you
are playing with musicians using instruments that are difficult to tune, such as a piano, you
can adjust your AXON to the situation. We recommend the following procedure when us-
ing a reference frequency other than 440 Hz: start by carefully tuning the open A-string to
the reference instrument by ear. Next, press the Autotune button.
Autotune: A pop-up window will appear, prompting you to play the open A-string.
This will adjust the internal tuning of the AXON to suit your instrument. The field next to
"Tunebase" will then indicate the value by which the overall tuning of your instrument is
deviating from standard pitch.
Guitar Number (1-8)
You can save settings for up to eight different instruments, but if you have a favourite and
don't want to use a different instrument for each preset, enter the number of your main
instrument here. That is the instrument that will be used by default whenever you have not
selected a different one in the presets.
AXON AX 50 USB v2.0 (English) 15
Page 16

Guitar 1-8
A number of basic settings related to sensitivity and other parameters must be set up to
ensure that your AXON works optimally with your guitar. These settings depend on the
type and setup of your guitar. They can vary widely from one instrument to the next. How-
ever, the AXON stores up to eight sets of basic settings, making it unnecessary to set up
the required parameters individually every time – simply choose a guitar preset number
with the touch of a button. Click the "Guitar 1 – Guitar 8" buttons to activate a setup.
Instrument Type (Guitar, Bass, Violin, Cello)
Specify the type of instrument you are using here (guitar, bass, violin, or cello). This is
especially important for the assignment of the strings to the MIDI channels you specified.
Pickup (Magnetic, Piezo)
Select your pickup system type here. Magnetic is the default mode, for example when
using the optionally available pickup AXON PU 100 or AIX 101/103 with its magnetic pi-
ckup. The Piezo setting supports polyphonic piezo pickups (available separately). Piezo
pickups are designed to reproduce the natural sound of hollow-body instruments as faith-
fully as possible and have been engineered especially for use with acoustic guitars. An
important advantage for guitarists is that piezo pickups, which can be installed invisibly in
the bridge of the instrument, can also be used on instruments with nylon strings such as
classical guitars.
Note Off Limit (2-30)
Unlike a keyboard, which holds its notes until the key is released, a guitar string will sound
until the note dies out naturally or the string is stopped. The duration of the note depends
primarily on the type of guitar, how it is set up, and the type of strings used. Some guitars
therefore sound percussive, while others have more sustain. This can be represented as
an envelope curve in which the volume or amplitude values gradually decline to zero. By
specifying a threshold value on this envelope, it becomes possible to control the duration
of the note. Selecting a higher value will cause the MIDI Note Off command to be sent
sooner, while lower values will result in greater sustain. The AXON can thus be matched
optimally to the characteristics of your guitar.
Trigger Level (0-9)
Use this parameter to specify a threshold at which notes should be triggered on your MIDI
instrument to suit your playing technique. A low value will ensure that even a weak pick
will trigger a "Note On" command. Conversely, a higher value will require a harder pick.
Experiment with the values a bit to find your optimal setting.
16 AXON AX 50 USB v2.0 (English)
Page 17

Wheel Controller (On / Off)
If your pickup does not have a potentiometer (control dial), please specify that here, as the
AXON will not receive the correct values and will function incorrectly otherwise. This will
only be the case with accessory piezo pickups, however, as the AXON PU 100, AIX 101
and the AIX 103 have such a potentiometer.
Instrument Tuning
Set the actual tuning of your instrument here, so that the AXON can use it as the basis for
its further actions. Please do not confuse "Instrument Tuning" with the "MIDI Tuning" on
the Preset page. The latter will only work correctly if you enter the correct values here.
Either enter the correct pitch for each string individually, or select a tuning via the "Preset"
button (which is set to "Normal" the first time you run the Editor). You can also save your
own personal tuning by clicking the "Save" button. It will then be stored in the preset list
and can be selected as described above. To remove tunings, delete the appropriate file
(.axt) in the installation folder (default path: "Program Files\TerraTec\AXON AX 50
USB\Tuning"). For the Mac, this folder is included in the package.
Sensitivity (8-64)
The six sliders in this section control the sensitivity of the inputs at the A/D converter. The
scale ranges from 8 to 64, with 64 being the highest sensitivity. For best results, set this
value to the highest possible value without overdrive or double triggering.
Overdrive is signalled with O 1 for the E string, O 2 for the B string, O 3 for the G string,
etc. Double triggering can be recognised as two tones in short succession after picking
the string once.
With the Link button all six sliders can be linked, allowing them to be moved as a single
slider.
AXON Connection
Select the devices that you want to control with the Editor here. Please select "USB audio
device".
NOTE: unfortunately, Windows does not display individual names for USB MIDI devices,
so you will always find the AXON under "USB audio device". As the device also provides
four additional MIDI ports, please choose the first, unnumbered device when setting up
the connection with the Editor.
Connect: if the AXON AX 50 USB appears in "PC MIDI In Device" and "PC MIDI Out De-
vice" (as USB audio device), please click the "Connect" button. An error message will now
appear if the AXON is not correctly installed or the incorrect devices are listed under MIDI
devices—otherwise, a window with a progress bar will open and the connection between
the computer and the AXON will be established in a few seconds.
AXON AX 50 USB v2.0 (English) 17
Page 18

Load all settings / Save all settings
Using these buttons, you can save all the device's settings to the hard drive as a SysEx
file (Save all settings) and restore them later (Load all settings). This is useful before a
firmware update or can be used for general backup purposes.
Firmware Update
We always strive to ensure our products have the highest possible quality. Nevertheless,
we sometimes need to fix bugs or add new features. We generally offer new firmware for
download on our website for this purpose. Here's how to perform the update:
NOTE: installing a firmware update will overwrite all of your presets. Be sure to save
them in a SysEx file before you start!
Hold the TUNE button while switching on the power of the AXON AX 50 USB. "UPD"
will appear in the display.
The ID of the device changes while in update mode, causing Windows to recognise
new hardware and automatically install the drivers.
Start the software editor now.
On the GLOBAL page, select the desired firmware file (.axu) in "Firmware Update".
The display will now show the progress of the upgrade.
Do not turn the device off at this point!
When the update is complete, RDY. (ready) will appear on the display to indicate that
the upgrade was successful. After restarting, FAC. will be displayed to indicate that
the factory settings have been restored.
Note: if ERR. appears on the display, simply repeat the update process. Don't worry,
it's not possible to break anything, as the bootloader is not overwritten.
18 AXON AX 50 USB v2.0 (English)
Page 19

Presets
Preset Parameters
The Preset parameters contain all of the settings that the AXON needs to manage a pre-
set. A preset is a playing environment that you have defined which contains a wide range
of playing and audio property settings that you can select at any time. You can save up to
128 complex programmable presets. The complexity of your presets is entirely up to you.
For example, you can organise the strings of your guitar as 12 completely different split
areas that can be combined freely. Countless effects and playing parameters can be as-
signed to each of the splits independently.
Preset Management
Get Preset: calls up the individual presets. Use the arrows to the left and right of the but-
ton to navigate the preset memory slots.
Store to: stores the settings to the location shown at the right.
Load from Disk / Save to Disk: loads individual presets from the computer or saves
them there.
Preset Name: be sure to give presets you have created a descriptive name to make them
easier to find. The name may contain up to 12 characters.
AXON AX 50 USB v2.0 (English) 19
Page 20

Guitar No. (Global, 1-8)
You can assign a certain instrument to the preset here. Enter the value "Global" to apply
all changes to the default guitar on the "Global" page. Alternatively, enter the guitar num-
bers 1-8.
String mode (Common, Separate)
String mode determines how the strings of your guitar are assigned to the MIDI basic
channel (see Global Parameters):
Separate Mode: In Separate mode, a separate MIDI channel is reserved for each
string of your guitar (see Global Parameters). This mode provides the greatest possible flexibility. Pitchbend effects such as bending, hammer-on and sliding only affect
the channel of the string being played. These techniques can thus be applied without
restrictions. Virtually all current MIDI instruments support multiple channels, so choose
this mode whenever possible. The currently used channels are shown at the left of the
fingerboard graphic for a better overview.
Common Mode: In Common mode, all of the strings of your guitar are assigned to the
MIDI basic channel. To prevent conflicts with notes still sounding on the same channel, no pitchbend information is sent when more than one note is being played in this
mode. Solo playing is therefore possible with some restrictions. Use this mode if your
MIDI instrument can only receive on one MIDI channel. Also, not all sequencer programs support recording multiple channels at the same time. You should also select
this mode in this case.
Wheel Controller Pickup
Specify the MIDI controller to be controlled by the wheel controller. The default parameter
is "Channel Volume".
NRPN Controller
Many synthesiser manufacturers support the modification of sound properties via so-
called NRPN (non-registered parameter number) and RPN (registered parameter number)
numbers. RPNs are defined in the MIDI specification; NRPNs are manufacturer-specific.
For more information on NRPNs, please refer to the manual of the MIDI output device.
The approach is the same for both types: a system parameter is set with the associated
(N)RPN-LSB and MSB controllers that can be modified subsequently with controller #6
(DATA ENTRY MSB) or controller #38 (DATA ENTRY LSB).
The following is an example of such an application with your AXON: Let's assume you
have read in the manual of your synthesiser that the manufacturer supports filter control
via the NRPNs MSB=01h and LSB=21h. Enter the value 01h in the MSB field, and 21h in
the LSB field. You have now set up the NRPN and specified that controller #6 (or #38) can
be applied to a filter. Pick control and the three possible wheels are now available as
sources for the controller #6/#38. If you specify the wheel of the AIX 101 / 103 interface
20 AXON AX 50 USB v2.0 (English)
Page 21

for the controller #6 (#38), you can now use it to affect the current sound of your synthe-
siser.
Note: We would advise less-experienced users against using the RPN controllers, as this
may affect pitchbend sensitivity and tuning in such a way that your AXON will play incor-
rect notes.
And another note: Normally, the underlying NRPN or RPN controller should be reset to
NULL (7fh) after making changes with the DATA ENTRY controller. The DATA ENTRY
controller will then no longer have an effect. Your AXON does not do this, as it would re-
sult in an enormous increase in MIDI data. These controllers are reset to NULL when
changing presets or changes to the NRPN/RPN itself, however.
Finger Pick (On/Off)
The pitch recognition of the AXON is best suited for use with a pick. You can also get
good results with finger picking, however. If you have problems in normal mode, such as
double triggering, unplayed or incorrect MIDI notes or the like, please switch "Finger Pick"
on. The pick split and pick control functions will no longer be available in this case, as the
transient early detection is deactivated.
AXON AX 50 USB v2.0 (English) 21
Page 22

Splittings (Split 1, Split 2…Split 12)
The playing area (fingerboard and picking position) can be divided in up to 12 different
zones, each with its own sound, volume, panorama, etc.
Use the "+" button in the "Split" line to set a split position.
The following dialog is displayed. Select the desired split type here. Though this can be
one split, you can also combine multiple splittings:
For example, if a simple string split is selected, this is displayed as follows:
The settings now only apply to the three low strings. Switching to Split 2 inverts the dis-
play and the settings then apply to the three high strings.
To delete a split, click the " - " button. This will rejoin the split zone with its neighbour.
If you click the " – " button in an active split (in this case Split 1), you can rejoin the sepa-
rated playing zones back into this split. To do so, simply enable the corresponding tick
box and click "OK".
22 AXON AX 50 USB v2.0 (English)
Page 23

String Split (1-5, fader at guitar head): When configuring a string split, use this parame-
ter to specify the first string of the lower string segment, i.e. the start of the lower playing
zone. The number refers to the string, with the number 1 being the high E string. For ex-
ample, if you se the string split to 4, the two bass strings (5 and 6) will belong to the upper
and the lower four strings (1-4) to the lower split zone.
Fret Split (1-23, fader at guitar neck): If you are using a fret split in your preset, use this
parameter to specify the first fret of the left split segment, i.e. the left playing zone as seen
on the graphic of the AXON. The number refers to the fret numbers, with fret 0 being the
open string. For example, if you set the fret split to 4, the open strings and frets 1 through
3 will be assigned to the right split zone, while frets 4 and up will belong to the left split
zone.
Pick Split 1 and 2 (0-99, faders at the pickups): if you are using pick split options in
your preset, these parameters determine the width of the individual picking zones be-
tween the bridge and neck. The picking area is divided into 100 units: 0 is the bridge, 99
corresponds to the start of the fingerboard. If you have divided this area into two zones,
the parameter in PICK SPLIT 1 will indicate the start of the right picking zone. For exam-
ple, if you enter 50, the picking area will be divided into two equally large zones. To divide
the picking area into 3 zones, specify a value for the start of the third zone in PICK SPLIT
2. For three equally large zones, set the value for PICK SPLIT 1 to 33 and the value for
PICK SPLIT 2 to 66. For the "Pick Controller" function (see page 27), please set PICK
SPLIT 1 to 0 and PICK SPLIT 2 to 99.
AXON AX 50 USB v2.0 (English) 23
Page 24

Layer (Layer 1…Layer 4)
Within a split zone, you can create additional layers. This allows you to play multiple in-
struments at the same time or, in addition to the internal sounds, also activate external
sound generators with various Program Change commands and Controller data. You can
create up to four layers per split zone, but the total number of layers in a preset is limited
to 12. You also have to ensure that the MIDI channels you are using do not overlap. How-
ever, as the MIDI standard only provides for 16 channels, you have to enable the output
ports of the newly created layers manually. If overlaps result, a warning message appears
and you cannot save the preset in that form.
By default, each split has at least one layer that cannot be deleted.
MIDI Output
Channel, (Basic, 1-16): select the MIDI output channel for the layer in your split here.
"Basic Channel" applies the channel allocation of the "Global" page. The selected chan-
nels are displayed immediately to the left of the fingerboard graphic.
Ports (MIDI OUT, USB 2…5): select the destination (virtual) MIDI ports here. These can
be set separately for each layer in the split zone. "MIDI" refers to the physical port on the
rear panel of the device, whereas USB 2…5 are the virtual MIDI ports in the driver. Port
USB 1 is reserved for communication with the Editor and is thus not available.
Example: set the string split (the fader at the head of the guitar graphic, value range 1–5)
to 3 and click the "Split +" button. The lower three strings on the graphic are now marked
with a grey bar. Next, click "USB2", so that only that box is lit red. Everything you play
over the top three strings will now be sent via USB 2.
A further point will now appear above the "Basic Channel" box: "Split 2" will now be visible
next to "Split 1". When this box is selected, the top three strings (i.e. the low ones) will be
marked with a grey bar. Next, select "USB 3" as its output path. You can now select a
different sound for the three low strings than for the three high ones – it's that simple.
24 AXON AX 50 USB v2.0 (English)
Page 25

Controller
Program: if this is enabled, the program change command will be sent by the AXON. If it
is disabled, no program changes will be sent. This is sometimes useful when recording
only the MIDI notes in a sequencer.
Program Number: here (in the small grey box to the right of "Program"), enter the num-
ber of the desired program change command to be sent by the AXON for this layer.
Bank MSB, LSB: sound generators with more than 128 sounds often organise their
sounds in multiple banks that can be selected via the MSB and LSB values. Please see
the sound table of the sound generator for the parameters and their values.
GM Instrument Name: if you are working with a GM sound generator, you can select
sounds by name here.
Volume: (0 to 127): the volume for the individual split. Like the others, this controller can
be disabled when it is not needed. To do this, just disable the button.
Panorama (-15 to +15): This parameter shifts the selected sound of your MIDI instrument
in the stereo image. The values -15... -1 indicate that the current sound will be shifted
more toward the left channel, while the values 1...15 would result in a shift toward the right
channel. The value 0 corresponds to the middle position.
Pan Spread (-15 to +15): Use this parameter to spread the positions of individual sounds
across the panorama to ensure that not all (up to six) tones appear in the stereo position
you selected with the Panorama parameter. Set the PAN POS value to MID (middle posi-
tion), for example. Play your guitar and vary the PAN SPREAD value. Please note that
your MIDI instrument must be able to support panorama information. Please refer to the
manual of your MIDI instrument for more information.
+15: low sounds to the right, high sounds to the left of the panorama
-15: low sounds to the left, high sounds to the right of the panorama
None, None, None: is not a new pop song, but a further convenient configuration option.
In the AX 100, the "Chorus", "Reverb" and "Attack Time" MIDI controllers were fixed; the
AXON AX 50 Editor lets you configure them freely.
Pick Control: This submenu lets you associate your current sound with one of the many
MIDI controllers. This can be used to control effects thanks to the AXON's ability to recog-
nise your picking position. For example, if you set the value to "Modulation Wheel", you
can simulate the effect of a keyboard modulation wheel with your picking position.
Other interesting effects can be achieved with filter control or Panorama, for example. Use
the faders Value 1 and 2 to specify the value range of the parameters, for which the con-
troller is suited. The effective range of the controller is restricted to one pick split zone
(Your AXON supports up to three pick zones, for which you can theoretically use three
different pick controllers). Generally, you will not use additional pick splits for a pick con-
trol effect, otherwise the playing area will become very "narrow". Please ensure that the
Pick Split 1/2 controls are set to "0" and "99" in order to use the entire range. Otherwise,
AXON AX 50 USB v2.0 (English) 25
Page 26

only the range within the pick split will be available, not the entire range from the bridge to
the fingerboard.
(Pick) Value 1 (0-127): Once you have associated the split zone with a MIDI controller via
Pick Controller, use this parameter to set the starting value for the controller. Moving your
picking position from the bridge toward the neck will cause the value sent to the MIDI con-
troller to continuously move toward the value set for Value 2.
(Pick) Value 2 (0-127): Once you have associated the split zone with a MIDI controller
via Pick Controller, use this parameter to set the end value for the controller. Moving your
picking position from the neck toward the bridge will cause the value sent to the MIDI con-
troller to continuously move toward the value set for Value 1.
Notes
Send Notes: If this button is disabled, no more MIDI notes are sent. This can be useful if
using the AXON to control a non-sound generator (e.g. effects unit, mixer etc.) using only
MIDI controllers.
Transpose (-36 to +36): the MIDI notes can be transposed in pitch. Each step equals a
semitone, so +/-12 = +/-1 octave.
Quantize (Auto, Off, On, Trigger): This parameter determines whether pitch changes
within the set pitchbend range will be realised continuously or stepwise (quantised):
Auto: If more than one note is played, pitchbend quantisation is enabled automati-
cally. Chords are thus played precisely (without pitchbend), while pitchbend quantisation is disabled for single-note solos with bending, hammer-on, sliding and similar
techniques.
Off: No quantisation, continuous pitchbend. All pitch changes (bends, hammer-ons
and other techniques) are followed as closely as possible (also see Global: Pitchbend
Range).
On: Quantisation with pitchbend in steps. Increases in pitch are NOT followed with
pitchbend until the next semitone is reached, at which point the new pitch value is used. Continuous bends and other techniques are not reproduced as expected. This
setting is advantageous when playing chords exclusively, as minor changes in pitch
due to varying pressure on the strings no longer have any effect.
Trigger: Quantisation through new Note On command. This value disables pitchbend
completely, triggering chromatic semitones when bending or sliding. It corresponds
exactly to the global setting Pitchbend Range: 0 (see Global Parameters) but only affects the current layer in the split zone. This setting is especially suited to organ or piano sounds, which would otherwise sound extremely unnatural.
26 AXON AX 50 USB v2.0 (English)
Page 27

Velocity Sensitivity (0-127): You can reduce the dynamic range of your MIDI instrument
by reducing the value of this parameter. In an extreme case, a value of 0 will cause all
sounds from the MIDI instrument to be played at the same volume, regardless of the ve-
locity with which they are played. The value 127 will result in the greatest possible dy-
namic range.
Velocity Offset (-64 to +63): If the restricted dynamic range (see Velocity Sensitivity) of
your MIDI instrument has caused it to become too loud or soft, use this parameter to raise
or lower the overall volume.
MIDI Tuning
Unlike the tuning on the GLOBAL page, this has nothing to do with the actual tuning of
your instrument, but with what you want to hear in the end. An example: your guitar is in
standard tuning, and the band is playing in D minor because of your guest artist – a Ti-
betan horn player, whose instrument can only be played in that key. Simply set the tuning
under GLOBAL / INSTRUMENT TUNING to "NORMAL", and on the PRESET page, set
the MIDI TUNING to D-MINOR—your guitar will now be correctly transposed.
You can also experiment at random with different instrument and MIDI tuning values –
you'll be surprised at the odd keys your instrument suddenly can handle.
AXON AX 50 USB v2.0 (English) 27
Page 28

CC Defaults
Controller reset values
Using the various control options of the wheel and pick control functions requires a pre-
cise reset of the MIDI controller to its default values (i.e. after a preset change). This is
generally the value 0, but there are exceptions. A wide range of free controllers are avail-
able that manufacturers can use as they see fit, so your AXON lets you set default values
for all available controllers.
The table is already filled with default values. All controllers reserved according to the
MIDI specification were given default values. Refer to the manual of your MIDI sound ge-
nerator to set the value of the controller used to the value recommended by the manufac-
turer.
28 AXON AX 50 USB v2.0 (English)
Page 29

MIDI Mapping
Program Change commands
Commands received by your AXON on the current basic channel via the MIDI IN socket
can be assigned to any AXON presets using this mapping table. By default, a Program
Change command will select the AXON preset with the same program number. To chan-
ge this setting, select the desired preset from the drop-down menu. Your entries will be
adopted by the AXON immediately and do not need to be saved manually.
AXON AX 50 USB v2.0 (English) 29
Page 30

Practical Examples
1. AXON AX 50 USB plus WAVE XTABLE VI
Do you work with the AXON Guitar-to-MIDI System and your guitar or bass is your favour-
ite instrument for writing tracks? Look forward to the well thought-out combination of
AXON AX 50 USB plus WAVE XTABLE VI.
NOTE: WAVE XTABLE VI is a complex piece of software, and we urgently recommend
reading the included manual, as we can't cover all of its possibilities here.
When WAVE XTABLE VI is launched, a so-called multi-instrument (GM.nkm) is loaded
automatically. The player then responds to all incoming program change commands, let-
ting you select the sounds you need in the AXON Editor. These are then loaded in the
player and are available immediately.
To use other libraries, close GM.nkm in the Load/Save menu, and "feed" the player ma-
nually.
To take full advantage of the AXON's capabilities, open six instruments in WAVE XTABLE
VI and set them to the MIDI channels you have assigned to individual strings in the
AXON.
You can open the same instrument six times or choose six different ones.
30 AXON AX 50 USB v2.0 (English)
Page 31
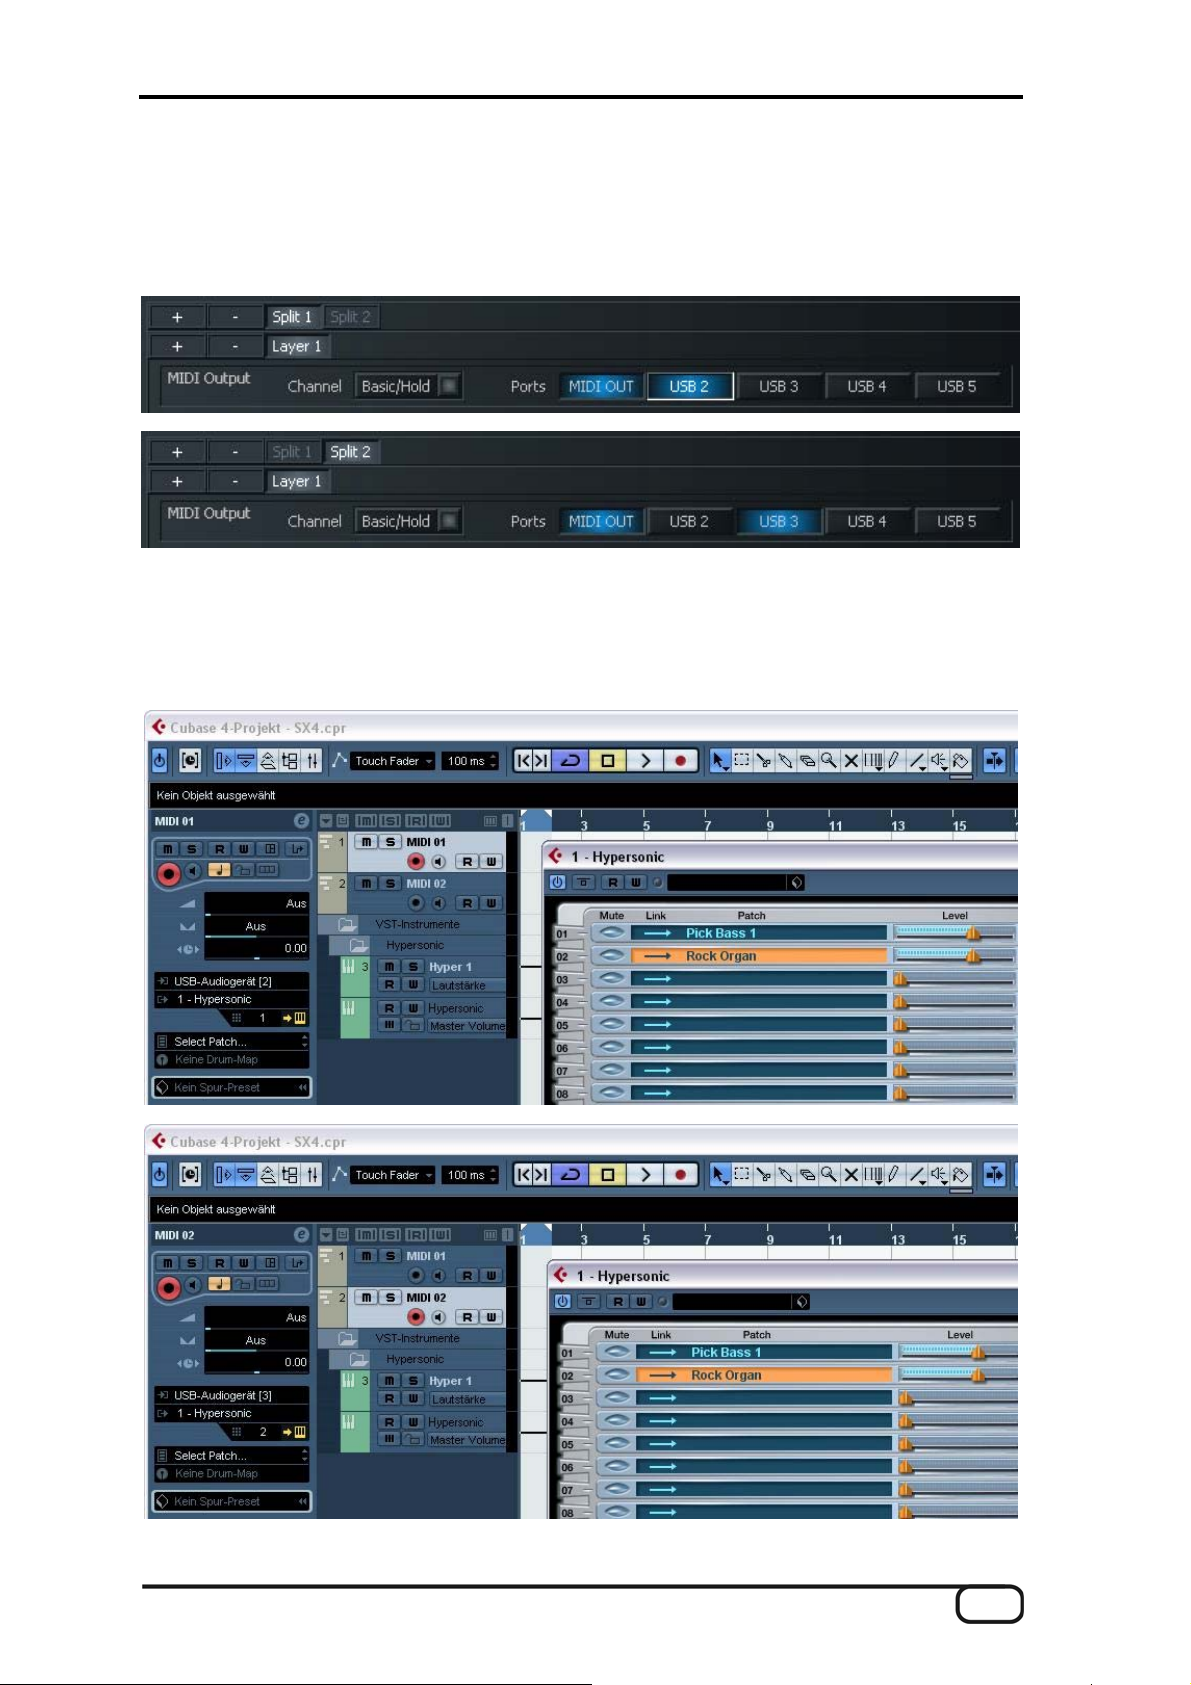
2. AXON in combination with a software sequencer (here: Cubase 4)
In our example, we are using Cubase 4 to describe the use of the virtual MIDI ports and
the possibilities they present. Let's start by dividing the fingerboard into two split zones,
assigning Split 1 to the USB 2 port and Split 2 to USB 3.
In Cubase, select the MIDI input for each track. Assign track MIDI 01 to the input USB
audio device [2], and track MIDI 02 to USB audio device [3]. Now you can change the
assigned sound simply by switching the track, without the need for any changes on the
AXON.
AXON AX 50 USB v2.0 (English) 31
Page 32

3. AXON in combination with notation software (here: Sibelius G7)
Again, in this case it's only necessary to select the input device. Select the "Play/Devices"
menu item to open the dialog box shown below. Select the input devices USB audio de-
vice [2], USB audio device [3], etc.
32 AXON AX 50 USB v2.0 (English)
Page 33

Appendix
Factory Reset
Unlike the AXON 100, the AXON 50 USB will not do a hardware reset. Instead, the Edi-
tor's installation folder (default: "Program Files\TerraTec\AXON AX 50 USB" contains a
SysEx file ("Default.syx") with the basic settings that you can apply via the LOAD button
on the GLOBAL page.
Pitches on the Fingerboard
1 3 5 7 9 12
E F F# G G# A A# B c c# d d# e
A A# B c c# d d# e f f# g g# a
d d# e f f# g g# a a# b c1 c#1 d1
g g# a a# b c1 c#1 d1 d#1 e1 f1 f#1 g1
b c1 c#1 d1 d#1 e1 f1 f#1 g1 g#1 a1 a#1 b1
e1 f1 f#1 g1 g#1 a1 a#1 b1 c2 c#2 d2 d#2 e2
13 15 17 19 21 24
f f# g g# a a# b c1 c#1 d1 d#1 e1
a# b c1 c#1 d1 d#1 e1 f1 f#1 g1 g#1 a1
d#1 e1 f1 f#1 g1 g#1 a1 a#1 b1 c2 c#2 d2
g#1 a1 a#1 b1 c2 c#2 d2 d#2 e2 f2 f#2 g2
c2 c#2 d2 d#2 e2 f2 f#2 g2 g#2 a2 a#2 b2
f2 f#2 g2 g#2 a2 a#2 b2 c3 c#3 d3 d#3 e3
AXON AX 50 USB v2.0 (English) 33
Page 34

Pin Assignment of 13-pin Socket
4. Analog signal e-string (1)
5. Analog signal B-string (2)
6. Analog signal G-string (3)
7. Analog signal D-string (4)
8. Analog signal A-string (5)
9. Analog signal E-string (6)
10. Analog magnetic pickup signal
11. Direct current volume
12. N.C.
13. Down-button
14. Up-button
15. +7V
16. -7V
Shield: Ground
34 AXON AX 50 USB v2.0 (English)
Page 35

MIDI Implementation Chart
Manufacturer: TerraTec Electronic GmbH Model: AXON AX 50 USB Version: 6.00 Date: 18.09.2006
1. Basic Information
MIDI channels 1-6 1 Default Values; All channels 1-16 can be used
Note numbers 0-126 No
Program Change 0-127 0-127 Receive: Mapped to Presets 1-128
Bank Select response? (Yes/No)
If yes, banks utilized
Modes Supported (Yes/No)
Multi (Mode 5)
Poly (Mode 3)
Omni (Mode 1)
Mono (Mode 2)
“Guitar” (Mode 4)
Note On Velocity (Yes/No) Yes No
Note Off Velocity (Yes/No) No No
Channel Aftertouch (Yes/No) No No
Poly (Key) Aftertouch (Yes/No) No No
Pitch Bend (Yes/No) Yes No
Active Sensing (Yes/No) No No
System Reset (Yes/No) No No
Tune Request (Yes/No) No No
System Exclusive messages supported
(Yes/No)
Sample Dump Standard
Device Inquiry (General Information)
File Dump
MIDI Tuning
Master Volume
Master Balance
Notation Information
Turn GM System On
Turn GM System Off
Other (note in Remarks column)
NRPNs (Yes/No) No No
RPN 00 (Pitch Bend Sensitivity) (Yes/No)
RPN 01 (Fine Tuning) (Yes/No)
RPN 02 (Coarse Tuning) (Yes/No)
RPN 03 (Tuning Program Select) (Yes/No)
RPN 04 (Tuning Bank Select) (Yes/No)
2. MIDI Timing and Synchronization
MIDI Clock (Yes/No) No No
Song Position Pointer (Yes/No) No No
Song Select (Yes/No) No No
Start (Yes/No)
Continue (Yes/No)
Stop (Yes/No)
MIDI Time Code (Yes/No) No No
MIDI Machine Control (Yes/No) No No
MIDI Show Control (Yes/No)
If yes, MSC Level supported
3. Extensions Compatibility
General MIDI compatible? (Yes/No)
If yes, is GM default power-up mode?
(Yes/No)
DLS compatible? (Yes/No)
If yes, DLS Level(s) supported
If yes, can DLS files be imported?
(Yes/No)
If yes, can DLS files be exported?
(Yes/No)
Importation of Standard MIDI Files
(Yes/No)
If yes, Types supported
Exportation of Standard MIDI Files
(Yes/No)
If yes, Types supported
NOTES
1)
Any Controller is recognized on Basic channel. It is ignored if it is already assigned internally. It is re-transmitted on the incoming channel
when Stringmode = Common. It is re-transmitted on the incoming channel and the 5 following channels when Stringmode = Separate. In this
table “Recognized” is only marked with “Yes” if the controller has a function additional to these assignments.
2)
Any Controller between 0 and 119 can be transmitted when assigned to the Wheel or used with one of the 3 Zone Controllers or the
Pickcontrol feature. In this table “Transmitted” is only marked with “Yes” if the controller has a function additional to these assignments.
3)
The effective Volume/Pan value depends not only on the incoming controller value, but also on several internal parameters
MIDI Implementation Chart v. 2.0 (Page 1 of 3)
Transmitted Recognized Remarks
No
No
No
No
No
No
No
No
No
No
Yes
Yes
Yes
No
No
No
No
No
No
No
No
No
No
No
No
No
No
No
No
No
No
No
No
No
No
No
No
No
No
No
No
No
No
No
No
No
No
No
No
Described in “MIDI SysEx Implementation”
AXON AX 50 USB v2.0 (English) 35
Page 36

Manufacturer: TerraTec Electronic GmbH Model: AXON AX 50 USB Version: 6.00 Date: 18.09.2006
Control # Function Transmitted (Y/N)
0 Bank Select (MSB) Yes No See Patchlist for banks used
1 Modulation Wheel (MSB) No No
2 Breath Controller (MSB) No No
3 No No
4 Foot Controller (MSB) No No
5 Portamento Time (MSB) No No
6 Data Entry (MSB) No No
7 Channel Volume (MSB) Yes Yes3)
8 Balance (MSB) No No
9 No No
10 Pan (MSB) Yes Yes3)
11 Expression (MSB) No No
12 Effect Control 1 (MSB) No No
13 Effect Control 2 (MSB) No No
14 No No
15 No No
16 General Purpose Controller 1 (MSB) No No
17 General Purpose Controller 2 (MSB) No No
18 General Purpose Controller 3 (MSB) No No
19 General Purpose Controller 4 (MSB) No No
20 No No
21 No No
22 No No
23 No No
24 No No
25 No No
26 No No
27 No No
28 No No
29 No No
30 No No
31 No No
32 Bank Select (LSB) Yes No
33 Modulation W heel (LSB) No No
34 Breath Controller (LSB) No No
35 No No
36 Foot Controller (LSB) No No
37 Portamento Time (LSB) No No
38 Data Entry (LSB) No No
39 Channel Volume (LSB) No No
40 Balance (LSB) No No
41 No No
42 Pan (LSB) No No
43 Expression (LSB) No No
44 Effect Control 1 (LSB) No No
45 Effect Control 2 (LSB) No No
46 No No
47 No No
48 General Purpose Controller 1 (LSB) No No
49 General Purpose Controller 2 (LSB) No No
50 General Purpose Controller 3 (LSB) No No
51 General Purpose Controller 4 (LSB) No No
52
53
54
55
56
57
58
59
60
61
62
63
MIDI Implementation Chart v. 2.0 (Pag e 2 of 3)
2)
Recognized (Y/N)
No No
No No
No No
No No
No No
No No
No No
No No
No No
No No
No No
No No
1)
Remarks
36 AXON AX 50 USB v2.0 (English)
Page 37

Manufacturer: TerraTec Electronic GmbH Model: AXON AX 50 USB Version: 6.00 Date: 18.09.2006
Control # Function Transmitted (Y/N)
64 Sustain Pedal No No
65 Portamento On/Off No No
66 Sostenuto No No
67 Soft Pedal No No
68 Legato Footswitch No No
69 Hold 2 No No
70 Variation No No
71 Timbre / Harmonic Intensity No No
72 Release Time No No
73 Attack Time No No
74 Brightness No No
75 Decay Time No No
76 Vibrato Rate No No
77 Vibrato Depth No No
78 Vibrato Delay No No
79 Sound Controller 10 No No
80 General Purpose Controller 5 No No
81 General Purpose Controller 6 No No
82 General Purpose Controller 7 No No
83 General Purpose Controller 8 No No
84 Portamento Control No No
85 No No
86 No No
87 No No
88 No No
89 No No
90 No No
91 Reverb Send Level No No
92 Effects 2 Depth No No
93 Chorus Send Level No No
94 Effects 4 Depth No No
95 Effects 5 Depth No No
96 Data Increment No No
97 Data Decrement No No
98 Non-Registered Parameter Number Yes No
99 Non-Registered Parameter Number Yes No
100 Registered Parameter Number Yes No
101 Registered Parameter Number Yes No
102 No No
103 No No
104 No No
105 No No
106 No No
107 No No
108 No No
109 No No
110 No No
111 No No
112 No No
113 No No
114 No No
115 No No
116 No No
117 No No
118 No No
119 No No
120 All Sound Off No No
121 Reset All Controllers No No
122 Local Control On/Off No No
123 All Notes Off No No
124 Omni Mode Off No No
125 Omni Mode On No No
126 Poly Mode Off No No
127 Poly Mode On No No
MIDI Implementation Chart v. 2.0 Control Number Information (Page 3 of 3)
2)
Recognized (Y/N) Remarks
AXON AX 50 USB v2.0 (English) 37
Page 38

Troubleshooting
No output to external MIDI sound generator.
When I play my guitar, the AXON responds in Tuning mode on the display, but the MIDI
output device does not play.
Possible fault: Cabling/setup
Solution:
Ensure that the MIDI cables are correctly connected (from the MIDI OUT of your
AXON to the MIDI IN of your synthesiser).
The MIDI channels of both instruments must be set correctly.
When in separate mode, the synthesiser should be in multi-mode (device receiving on
all channels).
MIDI volume must not be set to "0".
If your MIDI pickup does not have a volume control, ensure that "Wheel Controller" is
disabled in the instrument setup on the Global page.
Ensure that the 3-position switch of the pickup is not set to "Guitar", as that would set
the MIDI volume to "0".
Also ensure that the audio cable from your synthesiser to the amplifier is intact and
correctly connected.
Bending doesn’t work properly.
I hear the right note when I pick a string, but hammer-on, pull-off and bending does not
work.
Possible problem: The pitchbend settings of the AXON and the external device may not
match, or "Quantize" is enabled.
Solution:
Check whether the pitchbend range settings of the external MIDI device match those
of the AXON (GLOBAL).
Ensure that the QUANTIZE value in the preset is set to AUTO or OFF.
38 AXON AX 50 USB v2.0 (English)
Page 39

I get partially incorrect notes.
When I play, the notes I hear are either partially or completely wrong.
Possible problem: Tuning discrepancy.
Solution:
Tune your guitar using the AXON tuning aid. If you need to tune the AXON to match
your guitar, use the Autotune function on the GLOBAL page.
Ensure that you have selected the correct instrument tuning (Global), and check the
MIDI tuning (presets).
The transposition function may be accidentally enabled in the preset. Disable transpo-
sition.
Your MIDI output device may also be incorrectly tuned or transposed. Make sure that
all of the values in your sound generator are correct.
Differing string volumes
One or more strings is too loud or soft in relation to the others.
Possible source of problem: the sensitivity of the individual strings is not set correctly, or
the spacing between the pickup and strings is not even.
Solution:
Adjust the sensitivity (Global/Sensitivity) of the affected string(s) in the AXON.
Check the installation of the pickup. Ensure that the spacing between the strings and
magnets is as even as possible. Contact a guitar technician if necessary.
Strong differences in the dynamics of individual notes
What can I do about extremely irritating, strong dynamic differences between individual
notes?
Possible problem: Incorrect velocity parameters.
Solution:
The velocity settings (Velocity) of the AXON must be suitable to the sound of the out-
put device. Try reducing the velocity sensitivity parameter and increasing the velocity
offset parameter.
AXON AX 50 USB v2.0 (English) 39
 Loading...