

Page 1
AXON AX 100 mkII V. 1.0
English Manual
Version 1.0, status: August 05
Page 2

CE Declaration
We:
TerraTec Electronic GmbH, Herrenpfad 38, D-41334 Nettetal, Germany
hereby declare that the product:
AXON AX 100 mkII,
to which this declaration refers is in compliance with the following standards or standardizing documents:
EN 55013, EN 55020
The following are the stipulated operating and environmental conditions for said compliance:
residential, business and commercial environments and small-company environments.
This declaration is based on:
Test report(s) of the EMC testing laboratory
The information in this document is subject to change without notice and shall not be deemed as a
warranty by the seller. No warranties, express or implied, are made with regard to the quality,
suitability or accuracy of this document. The manufacturer reserves the right to change the
contents of this document and/or the associated products at any time without the provision of prior
notice to specific persons or organizations. The manufacturer shall not be held liable for damages
of any kind arising from the use, or the inability to use this product or its documentation, even if the
possibility of such damage is known. The information in this document is subject to copyright. All
rights are reserved. No part of this manual may be reproduced or transmitted in any form or for any
purpose without the express written permission of the copyright holders. Product and brand names
contained in this document are used for identification purposes only. All registered trademarks,
product designations or brand names used in this document are the registered property of their
respective owners.
®
©TerraTec
Electronic GmbH, 1994 - 2005. All rights reserved (8/16/2005).
2 AXON AX 100 mkII V. 1.0 (English)
Page 3

Contents
Welcome!...........................................................................................................................................................7
Congratulations… ............................................................................................................................................7
Scope of delivery..............................................................................................................................................8
Optional accessories .......................................................................................................................................8
QuickStart guide—for those of you can't wait.................................................................................................9
Connectors and controls...............................................................................................................................10
Front panel: ..................................................................................................................................................10
Rear panel....................................................................................................................................................12
Editing preset sounds....................................................................................................................................13
The operating modes of the AXON AX 100 mkII..........................................................................................14
Global Mode ............................................................................................................................................14
Preset Mode ............................................................................................................................................14
Utility Mode ..............................................................................................................................................14
Chain Mode .............................................................................................................................................14
Global Mode....................................................................................................................................................15
Global Parameters .......................................................................................................................................15
Basic Channel ..............................................................................................................................................15
Hold Channel ...............................................................................................................................................15
Sequencer Channel (SEQ CHANNEL).........................................................................................................15
Pitchbend Range (PBEND RANGE) ............................................................................................................16
Send Pitchbend Range (SND PBENDRG)...................................................................................................16
Local Mode...................................................................................................................................................16
Tune Base.................................................................................................................................................... 17
Guitar Preset Number (GUITAR NO) ...........................................................................................................17
Input Type................................................................................................................................................ 17
Input Pickup .............................................................................................................................................18
Wheel Control (WHEELCNTRL) ..............................................................................................................18
Input Trigger Level...................................................................................................................................18
Input Sense..............................................................................................................................................18
Pedal Sens................................................................................................................................................... 19
CC Defaults.................................................................................................................................................. 19
MIDI Mapping...............................................................................................................................................20
Preset Mode....................................................................................................................................................20
Preset Parameters ....................................................................................................................................... 20
Selecting Presets .........................................................................................................................................20
Guitar Tuner .................................................................................................................................................21
Preset Programming ....................................................................................................................................21
String Split ...............................................................................................................................................21
Fret Split ..................................................................................................................................................21
Pick Split..................................................................................................................................................21
Split Combinations...................................................................................................................................22
Selecting the Split Zones..............................................................................................................................22
Changing the Split Parameters ....................................................................................................................22
Select Instrument.....................................................................................................................................23
Volume.....................................................................................................................................................23
Transpose................................................................................................................................................23
Quantize ..................................................................................................................................................24
Panorama Position (PAN POS) ...............................................................................................................24
Panorama Spread (PAN SPREAD) .........................................................................................................24
Reverb .....................................................................................................................................................25
Chorus ..................................................................................................................................................... 25
AXON AX 100 mkII V. 1.0 (English) 3
Page 4

Attack Time ............................................................................................................................................. 25
Velocity Sense (VEL SENSE) ................................................................................................................. 25
Velocity Offset (VEL OFFSET)................................................................................................................ 26
Pick Value 1 (PICK VAL1)....................................................................................................................... 26
Pick Value 2 (PICK VAL2)....................................................................................................................... 27
Changing parameters shared by split zones................................................................................................ 27
Preset Name................................................................................................................................................ 27
String Mode ................................................................................................................................................. 28
Common Mode (COM)............................................................................................................................ 28
Separate Mode (SEP) ............................................................................................................................. 28
Hold Mode (HOLDMD) ................................................................................................................................ 28
Common (COM)...................................................................................................................................... 28
Separate (SEP) ....................................................................................................................................... 28
Layer ....................................................................................................................................................... 30
Arpeggiator (ARPEG).............................................................................................................................. 30
Controller (CNTRL) ................................................................................................................................. 34
Stack ....................................................................................................................................................... 35
Wheel Control (WHEELCNTL) ................................................................................................................ 35
Non Registered Parameter Number / Registered Parameter Number (NRPN/RPN) .............................. 35
Finger Pick .............................................................................................................................................. 36
String Split............................................................................................................................................... 36
Fret Split.................................................................................................................................................. 36
Pick Split 1 and 2 .................................................................................................................................... 37
Chain Mode ................................................................................................................................................. 37
Setting Up Chain Presets ........................................................................................................................ 37
Chain Preset Name................................................................................................................................. 37
Preset...................................................................................................................................................... 38
Step......................................................................................................................................................... 38
Storing Chain Presets ............................................................................................................................. 38
Utility Mode.................................................................................................................................................. 39
Display .................................................................................................................................................... 39
Sound names .......................................................................................................................................... 39
Double-click Response (DCLIC RESPNS).............................................................................................. 40
Transmit SysEx (XMIT SYSEX) .............................................................................................................. 40
Receive SysEx ........................................................................................................................................ 40
Edit Sequence......................................................................................................................................... 41
Tempo..................................................................................................................................................... 41
Volume.................................................................................................................................................... 41
Reverb Send ........................................................................................................................................... 41
Chorus Send ........................................................................................................................................... 42
Mode ....................................................................................................................................................... 42
Pattern .................................................................................................................................................... 42
KIT .......................................................................................................................................................... 42
Steps....................................................................................................................................................... 42
Instruments (1-4)..................................................................................................................................... 43
Track ....................................................................................................................................................... 43
ADC Monitor (ADC MON)............................................................................................................................ 44
The Computer Editor..................................................................................................................................... 45
Installation in Windows ................................................................................................................................ 45
Installation in MAC OS X ............................................................................................................................. 45
Global .......................................................................................................................................................... 46
Presets ........................................................................................................................................................ 47
Arpeggiator / Sequencer.............................................................................................................................. 48
4 AXON AX 100 mkII V. 1.0 (English)
Page 5

Chains..........................................................................................................................................................48
CC Defaults.................................................................................................................................................. 49
MIDI Mapping...............................................................................................................................................49
Appendix.........................................................................................................................................................50
Factory Reset...............................................................................................................................................50
Factory Presets ............................................................................................................................................50
Troubleshooting.............................................................................................................................................50
Preset list .....................................................................................................................................................53
Parameter Overview Presets .......................................................................................................................55
Parameter Overview Global .........................................................................................................................56
Parameter Overview Chain .......................................................................................................................... 56
Parameter Overview Utility...........................................................................................................................56
MIDI Implementation Chart v. 2.0...............................................................................................................57
MIDI Implementation Chart v. 2.0...............................................................................................................58
Table of implemented NRPN controllers 2 ...................................................................................................60
MIDI SysEx Implementation .........................................................................................................................61
Table of AX 100 SysEx dumps.....................................................................................................................61
Format for GS Compatible SysEx commands..............................................................................................62
Table of GS Compatible SysEx commands .................................................................................................62
Patch list.......................................................................................................................................................64
AXON AX 100 mkII V. 1.0 (English) 5
Page 6

6 AXON AX 100 mkII V. 1.0 (English)
Page 7

Important safety information
Safety information.
Please ensure that analog devices are turned off before plugging them in. This
will protect you from any possible—albeit weak—electrical shocks, as well as
protecting your speakers and your hearing from sudden peaks.
Welcome!
We're pleased that you've chosen a TerraTec Producer product for your musical endeavors and would like to
congratulate you on your decision. With the AXON AX 100 mkll, you've purchased a sophisticated product
representing the state of the art of studio technology—and we're convinced this innovative development will
prove extremely useful to you in the coming years and, above all, provide you with a great deal of
entertainment.
We hope that this brochure is helpful to you while using the product. It is designed to illustrate technical
relationships based on practical examples from the studio environment. This brochure is not only designed to
help beginners with this complicated subject—advanced professionals will also find the occasional bit of useful
information.
We hope you find this manual both informative and entertaining to read, and hope you find lots of pleasure in
the AXON AX 100 mkII.
Sincerely,
Your TerraTec Producer Team
Congratulations…
…on your purchase of the AXON AX 100 mkII, the fastest and most powerful guitar to MIDI converter currently
available. The AXON AX 100 mkII is a further development of the NGC 77, which set standards for innovative
technology and was standard equipment for many professional guitarists, including John McLaughlin. Thanks
to its neural network, the AXON AX 100 mkII is able to determine the precise pitch of a note the instant it is
picked, whereas other devices require several oscillations of the string for analysis. The early recognition of
transients lets the AXON simultaneously determine pitch, amplitude, and even the location at which the string
was picked—an unparalleled ability to date. This is due to the AXON's unusual splitting options. For example,
you can use a string split to divide the strings of your guitar into two zones, each with its own sound properties.
Or use a fret split to divide the fingerboard of your guitar into two separate playing zones. Pick splits let you
divide the picking area of the guitar into up to three independent sound zones that you can select instantly by
changing your picking position. You can achieve impressive effects with the pick control function, which lets
you control modulation effects and others with your picking position. Special effects such as COMMON
(bypass), SEPARATE (hold), LAYER (ensemble/doubling) and others can be applied with the multi-
programmable hold switch. The implementation of a full-featured arpeggiator provides users further options to
add expression to their playing with striking variations. Splits and effects can be combined, stored in up to 128
complex presets and recalled as needed. Another unique feature of the AXON AX 100 mkII is its unrestricted
support for both acoustic guitars and basses with hex piezo pickups. This opens the MIDI world to bass
players and classical guitarists that are looking for new, contemporary forms of expression. The internal
soundboard upgrades the AXON AX 100 mkII to a professional guitar synthesizer for live use, supporting
ambitious musicians with over 500 excellent sounds, including 10 drum kits. The system is fully MIDI
compatible, and also features an editable drum sequencer.
AXON AX 100 mkII V. 1.0 (English) 7
Page 8

Scope of delivery
Start by making sure that the contents of the package are complete.
The AXON AX 100 mkII package should contain the following items:
1 AXON AX 100 mkII
1 MIDI cable, 1.5m
1 footswitch for hold and chain function
1 network adapter
CD with Editor software
DVD with AXON workshop, interviews and installation instructions
1 service request form
1 registration card with the serial number
This manual
Please fill out and return the registration card enclosed in the package to us at your earliest convenience or
register online at
www.terratec.net/register.htm. This is important for support and hotline services.
Optional accessories
The following products are available separately:
AIX 101 interface board (pickup) for guitars with steel strings
AIX 103 interface board (pickup) for 4, 5 and 6-string bass guitars with steel strings
AXK 100 13-pin cable, 5m, to connect the pickup to the AX-100 mkII
8 AXON AX 100 mkII V. 1.0 (English)
Page 9
QuickStart guide—for those of you can't wait
Connect your guitar to the AXON AX 100 mkII. If your guitar is equipped with one of the optional
interfaces (AIX 101, 103), please use the 13-pin cable (AXK 100). The socket at the left of the front panel
labeled GUITAR INPUT is the one you need.
If you are using an external MIDI instrument for audio output, connect the MIDI OUT of the AXON to the
MIDI IN of the instrument. You can skip this step if you intend to use the internal soundboard, of course.
Now connect the AXON AX 100 mkII to your mixer or amplifier using the SOUNDBOARD RIGHT / LEFT
ports on the rear panel. If you're using an external sound module, ensure that the optional sound module
is connected to the mixer or amplifier.
Switch the device on now—but first, set the volume of your amplifier to zero to prevent possible peaks
from damaging your speakers and eardrums.
You're almost finished now. You should check a few basic settings before getting started, however. Press
the GLOBAL button. BASIC CHANNEL will now appear on the display. It should have the value 1. If not,
change it using the VALUE + and - buttons.
Press the PARAMETER + button to navigate to the next menu item, the HOLD CHANNEL. It should have
the value 11. (At any rate, the value should not be lower than 7. Please see page XX for more
information.)
Press PARAMETER + again for the SEQ CHANNEL. Ensure that it is set to 10.
At this point, we will skip the next two settings related to pitchbend —for more information on this subject,
please turn to page XX. The next important item is LOCAL MODE, which you can reach by repeatedly
pressing the PARAMETER button. It should be set to ON if you intend to address the internal soundboard
of the AXON AX 100 mkII directly, or if the generated MIDI data should be sent to the MIDI OUT. You can
disable local mode if you would like to control the AXON using a sequencer or MIDI recording software.
The AXON AX 100 mkII then behaves like any other external sound module.
The next item is the TUNE BASE. The AXON AX 100 mkII is preset to a reference pitch of 440 Hz, which
is indicated on the display by a “0”. If you would like to play together with other, hard-to-tune instruments,
you can adjust your tuning to suit them here.
The next item to check is the type of instrument used. Press the PARAMETER button again and GUITAR
NO will appear on the display. Up to four presets for different guitars can be stored here.
AXON AX 100 mkII V. 1.0 (English) 9
Page 10
Press ENTER to open the submenu and select the instrument you will be using from the available
instruments: BASS, GUITAR, VIOLIN and CELLO.
Press PARAMETER + to open the selection menu for the pickup you will be using. MAGNETIC is
selected by default. If you are going to be using an acoustic guitar or a bass with a piezo pickup, please
change this setting to PIEZO.
Finished! We can deal with the other parameters later—the AXON has been preconfigured at the factory
to let you get started with a minimum of hassle.
Connectors and controls
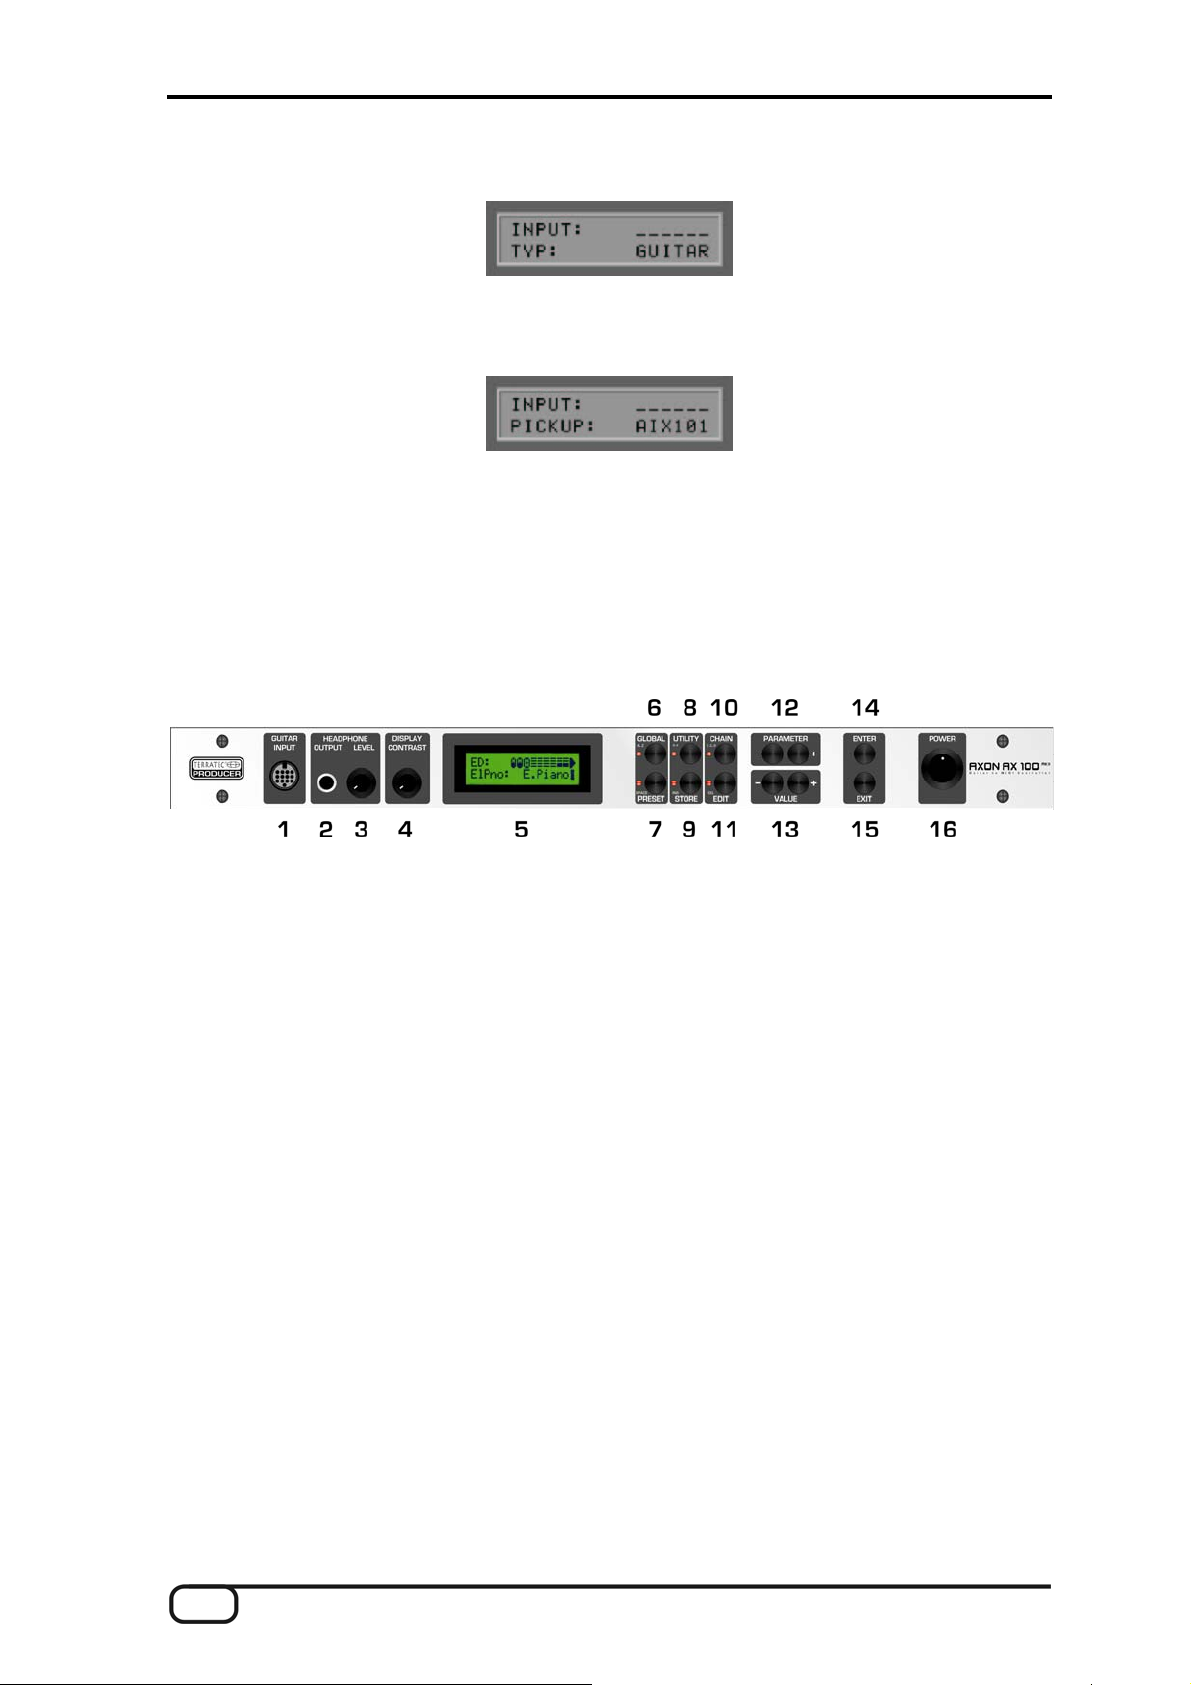
Front panel:
1. Socket for the special 13-pin AXON AXK 100 cable (not included) to connect guitars with hexaphonic
pickup systems (e.g. AXON AIX 101 or AXON AIX 103)
2. HEADPHONE OUTPUT: Stereo output (1/4" jack). Connect stereo headphones here to monitor the
internal soundboard.
3. HEADPHONE LEVEL: Adjust the volume of the headphone output (2) here.
4. Contrast control for the LC display
5. LC display
6. GLOBAL button to open the Global menu. Use the GLOBAL button to access general system settings
such as the MIDI channel, guitar settings, and the default values of all available MIDI controllers.
When entering characters for preset names, use the GLOBAL button (A..Z) to change the current
character to uppercase.
7. PRESET button for direct access to the Preset menu. The selected sound is shown on the display when
in Preset mode. A guitar tuner can also be displayed.
Use this button to insert spaces when entering characters for preset names. An LED next to the button
signals the operating status of the device.
8. UTILITY: A variety of special functions are available while in Utility mode:
■ Sending of MIDI System Exclusive data (SysEx) for sharing presets and archiving.
■ Access to the pattern-oriented drum sequencer
■ When entering characters for preset names, use the UTILITY button (A..Z) to change the current
character to lowercase.
10 AXON AX 100 mkII V. 1.0 (English)
Page 11

9. STORE: Use the STORE button to copy and save preset data, arpeggiator patterns, drum patterns and
chains to memory.
When inserting characters for preset names or arpeggio patterns, all characters to the right of the current
cursor position will be moved to the right by one place.
10. Use the CHAIN button to activate Chain mode and step through a programmed sequence of presets.
When entering characters for preset names, use the CHAIN button (!..0..@) to change the current
character to the first special character: '!'
11. The EDIT button...
■ provides access to the various preset parameters when in Preset mode.
■ adjusts the chain parameters in Chain mode.
■ When entering characters for preset names or arpeggio patterns, the EDIT (Delete) button
deletes the current character and moves all subsequent characters to the left by one place,
inserting a space at the end.
12. The PARAMETER buttons select...
■ the individual submenus in UTILITY and GLOBAL mode.
■ the individual parameters of the instrument in EDIT mode.
■ The PARAMETER buttons have no function in PRESET and CHAIN mode.
13. The VALUE + and – buttons raise or lower the current value in the display.
■ In Preset mode, they step through the presets.
■ In Edit mode, they change the value of the displayed parameter.
■ Alternatively, you can also use the UP / DOWN buttons of the optional guitar interface.
14. The ENTER button confirms store and copy actions and opens submenus. The presence of a submenu is
indicated by the presence of 2-3 dots in the parameter name. Use the EXIT button to close any submenu.
15. The EXIT button closes submenus. Pressing the button repeatedly will always return you to Preset mode.
Also use this button to cancel store or copy actions.
16. POWER ON/OFF switches the AC power of the AXON. The PRESET LED and the LCD are lit when the
power is turned on.
AXON AX 100 mkII V. 1.0 (English) 11
Page 12
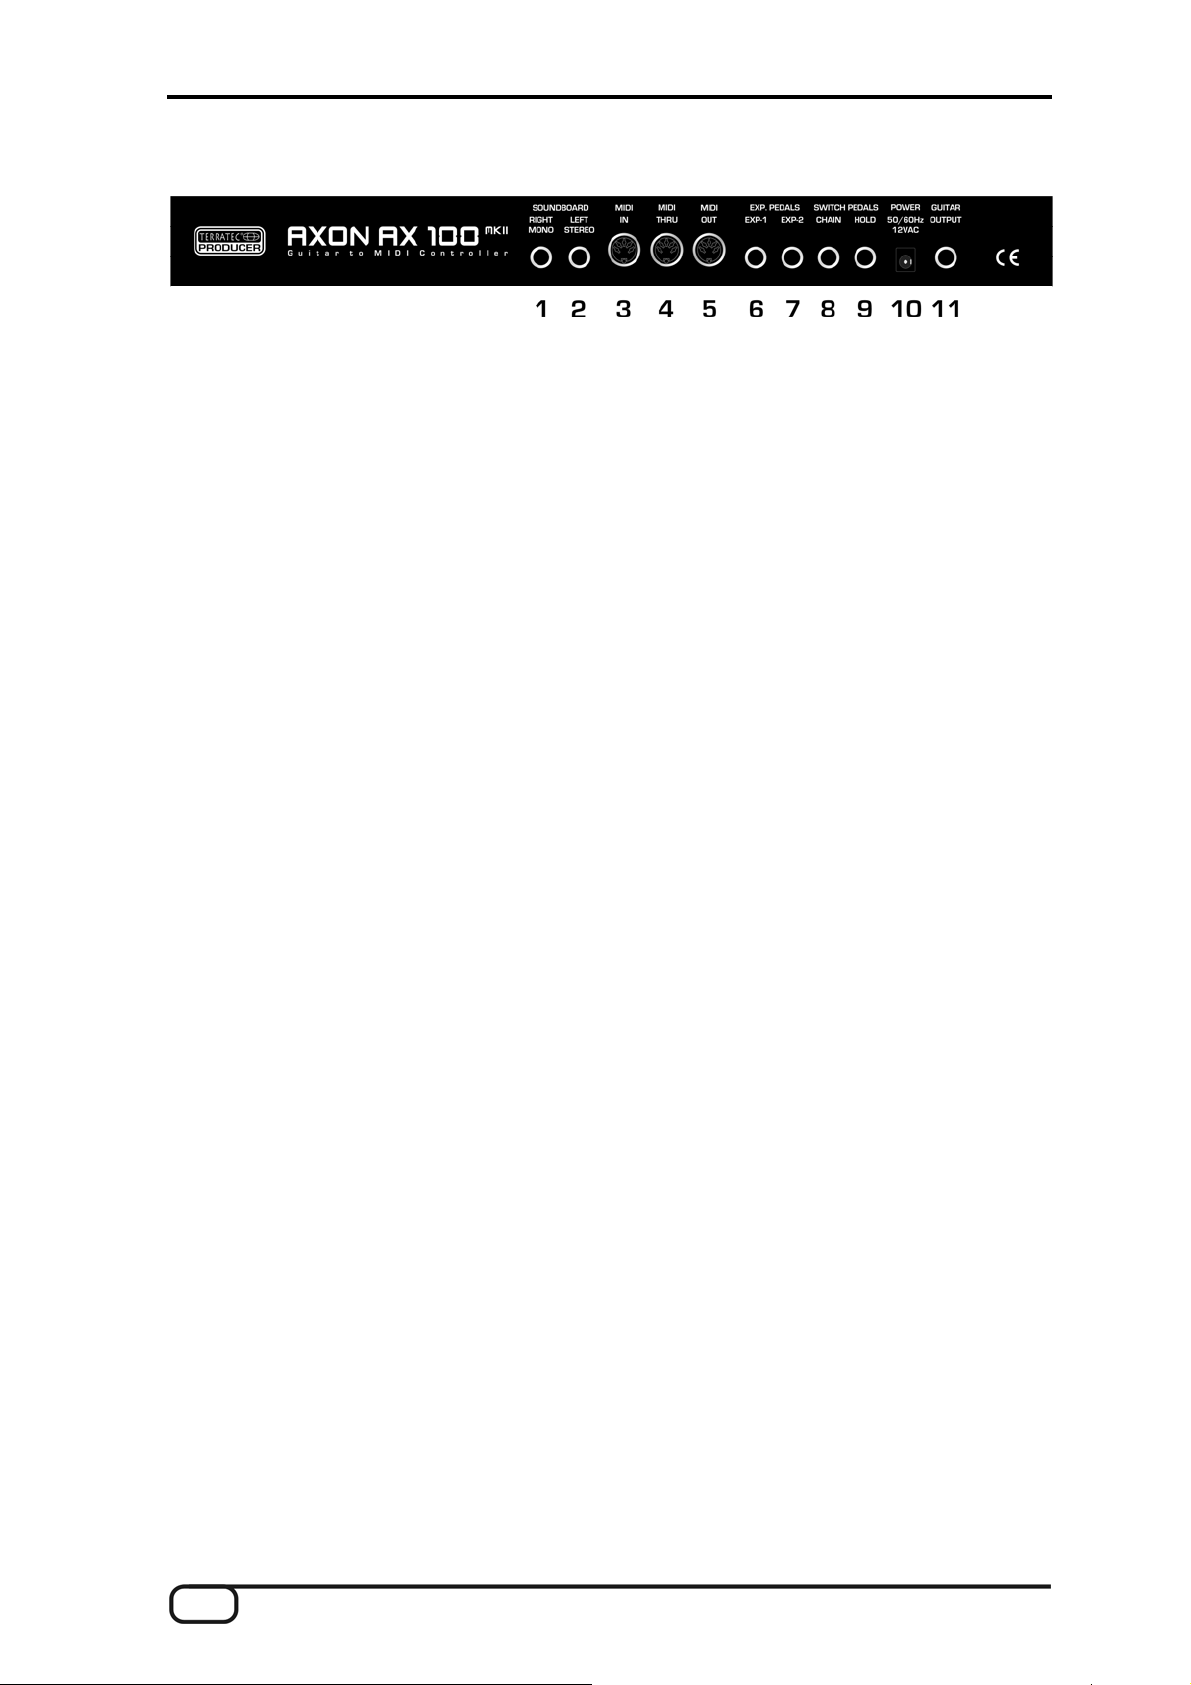
Rear panel
1. SOUNDBOARD RIGHT (MONO): The sound signal is output in mono via this socket. The right stereo
channel will be available from the socket next to it (2) when in use.
2. SOUNDBOARD LEFT (STEREO): The signal is available in stereo from this socket when using a stereo
jack for the output. The left channel of the stereo signal is available here when using a mono jack.
3. MIDI IN: The AXON receives Program Change commands, as well as System Exclusive and controller
data via this input. Alternatively, all incoming MIDI data can be sent directly to the soundboard with the
LOCAL OFF global setting. This is the typical application in conjunction with a sequencer.
4. MIDI THRU: All data arriving at MIDI IN is available in unchanged form here.
5. MIDI OUT: All MIDI data generated by your AXON AX100 mkII is available here.
6. EXP. PEDALS, EXP1: An expression pedal may be connected here and assigned to a MIDI controller in
the PRESET – EDIT- WHEEL CNTL – EXP1 menu. Modulation and filter effects are especially suitable
for use with expression pedals. As your AXON also supports NRPN/RPN (non-registered parameter
number / registered parameter number) controllers, you can assign these pedals to the MIDI controllers
#6 or #38 for an extremely versatile range of applications unparalleled in any other device of this category.
7. EXP. PEDALS, EXP2: Same function as EXP1
8. SWITCH PEDALS, CHAIN: A footswitch connected here lets you step through a preprogrammed set of
presets while in Chain mode.
9. SWITCH PEDALS, HOLD: Connect the included footswitch here to activate one of the programmed hold
modes such as COMMON, SEPARATE, LAYER, ARPEGGIATOR or CONTROL.
10. POWER: Connect the power adapter here.
11. GUITAR OUTPUT: The unmodified pickup signal of your guitar is available at this socket. To prevent hum
when using the synthesizer and original guitar signal at the same time, you should always route the
original guitar signal through the 13-pin cable and pick it up at this socket on the rear panel. The
AX101/102 interface has a minijack input for the pickup signal of your guitar. Use the included cable to
connect the pickup output of your guitar to the minijack socket.
12 AXON AX 100 mkII V. 1.0 (English)
Page 13
Editing preset sounds
Ensure that the AXON is in Preset mode (Preset LED lit on the front panel). This is automatically the case
when you switch the device on and none of the other modes (GLOBAL, UTILITY or CHAIN) are selected. The
top half of the display shows the name of the currently active preset, with the number of the preset to the right.
Use the VALUE +/- buttons or the UP/DOWN buttons of the guitar interface to step through the presets 1-256.
Presets 1-128 are reserved for the user and can be edited. 129-256 are fixed factory presets. By default, these
presets have been copied to the programmable user area (1-128) to ensure that it contains playable
parameter settings, but they can be overwritten as needed, of course.
Once you have familiarized yourself with them, you can try modifying one of the existing presets:
1. Use the VALUE +/- buttons to select preset 2, “PianoMellow” (same as factory preset 130). You can also
use the UP/DOWN buttons of the guitar interface to select the preset. Next, press the EDIT button.
2. Press ENTER to open the AXON's split zone area. Confirm the selected split zone with ENTER.
3. Next, use the VALUE +/- buttons to select an INSTRUMENT.
4. Press the PARAMETER + button. Use the VALUE +/- buttons to set the VOLUME parameter to the
required value.
You may also change the TRANSPOSE setting in the next parameter. This can be useful for a bass, for
example. This parameter results in a semitone shift of the note from its standard tuning. Press the
PARAMETER + button and set the value with the VALUE +/- buttons (+12 or -12 raises or lowers the pitch
one octave).
5. Press the EXIT button twice to access the global preset area. We now want to give our modified preset a
new name by pressing the PARAMETER + and the ENTER button. The cursor is now located on the “P”
of the old preset name, “PianoMellow”.
Use the VALUE +/- buttons to change the letter at the cursor position. Think of a new name for your
preset and set the first letter. Use the PARAMETER +/- buttons to move the cursor one position to the left
or right. Repeat the process for the other letters. If the new name is shorter than the old one, delete the
remaining letters with the EDIT button.
6. Press the EXIT button twice to exit preset editing mode. The top half of the AXON display will now be
flashing. This indicates that you have changed the parameters and that you still need to confirm the
changes to store them permanently. Press the STORE button. You can now select a slot in which to store
the new preset. Either overwrite the preset or store it in any of the slots within the user range (1-128).
AXON AX 100 mkII V. 1.0 (English) 13
Page 14

Select preset 128, for example, (VALUE +/- buttons). Now press the ENTER to copy the preset to the
selected location and store it there.
The operating modes of the AXON AX 100 mkII
The many options of your AXON require a wide range of parameters that you can adjust to suit your
requirements. The following explanation of the user interface will help you find your way around quickly.
For a clear overview, the operating functions of your AXON have been organized in four different modes or
sections that can be selected using the buttons on the front panel. Each of these modes (GLOBAL, PRESET,
UTILITY, CHAIN) contain a number of parameters that can be displayed using the PARAMETER +/- buttons
after pressing the appropriate mode button.
Press the PARAMETER + to switch to the next parameter. PARAMETER - returns you to the previous
parameter. Change the values of the individual parameters using the VALUE +/- buttons, using VALUE + to
raise the value and VALUE - to lower it. The VALUE +/- buttons feature an acceleration function to help ensure
that you don't get a repetitive strain injury. You can accelerate the counting even more by pressing both
buttons (+ and -) at the same time while counting up or down.
A number of parameters contain submenus with additional parameters. Dots at the end of the parameter name
indicate the presence of a submenu. To open a submenu, press the ENTER button. Press the PARAMETER
+/- buttons to access the various parameters within the submenu. The EXIT button will return the AXON to the
original parameter. The EXIT button will also return the AXON to its default Preset mode.
Global Mode
The global parameters contain all higher-level parameters related to the MIDI channels, the instrument used,
the reference tuning and input sensitivity of the individual strings. You should check a number of the global
parameters before using your AXON for the first time to ensure its best possible interaction with your
instrument.
Preset Mode
All of the parameters that your AXON needs for managing individual presets can be found here. Preset mode
is the most extensive mode, with a wide range of split and effect settings. This is the mode that is active by
default whenever you have not selected one of the other modes.
Utility Mode
This mode contains a wide range of settings for drum sequences. It also contains the functions for loading and
storing settings via MIDI (SysEx), letting you manage and save the parameter settings of your AXON on your
computer. It's easier using the included Editor, by the way. ;-)
Chain Mode
The Chain parameters let you define preset chains for easy access to presets sorted by style for live
performances.
14 AXON AX 100 mkII V. 1.0 (English)
Page 15
Global Mode
Global mode can be activated by pressing the GLOBAL button on the front panel of your AXON. The state is
signaled by a red LED next to the GLOBAL button.
Global Parameters
The global parameters contain all higher-level parameters such as information related to the MIDI channels,
the instrument used, the reference tuning and the input sensitivity of the individual strings. A number of
settings can be set individually for each instrument that you will be using with the AXON. Check and adapt
these settings as necessary before using it for the first time. This is essential to ensure that the AXON will
work optimally with your instrument.
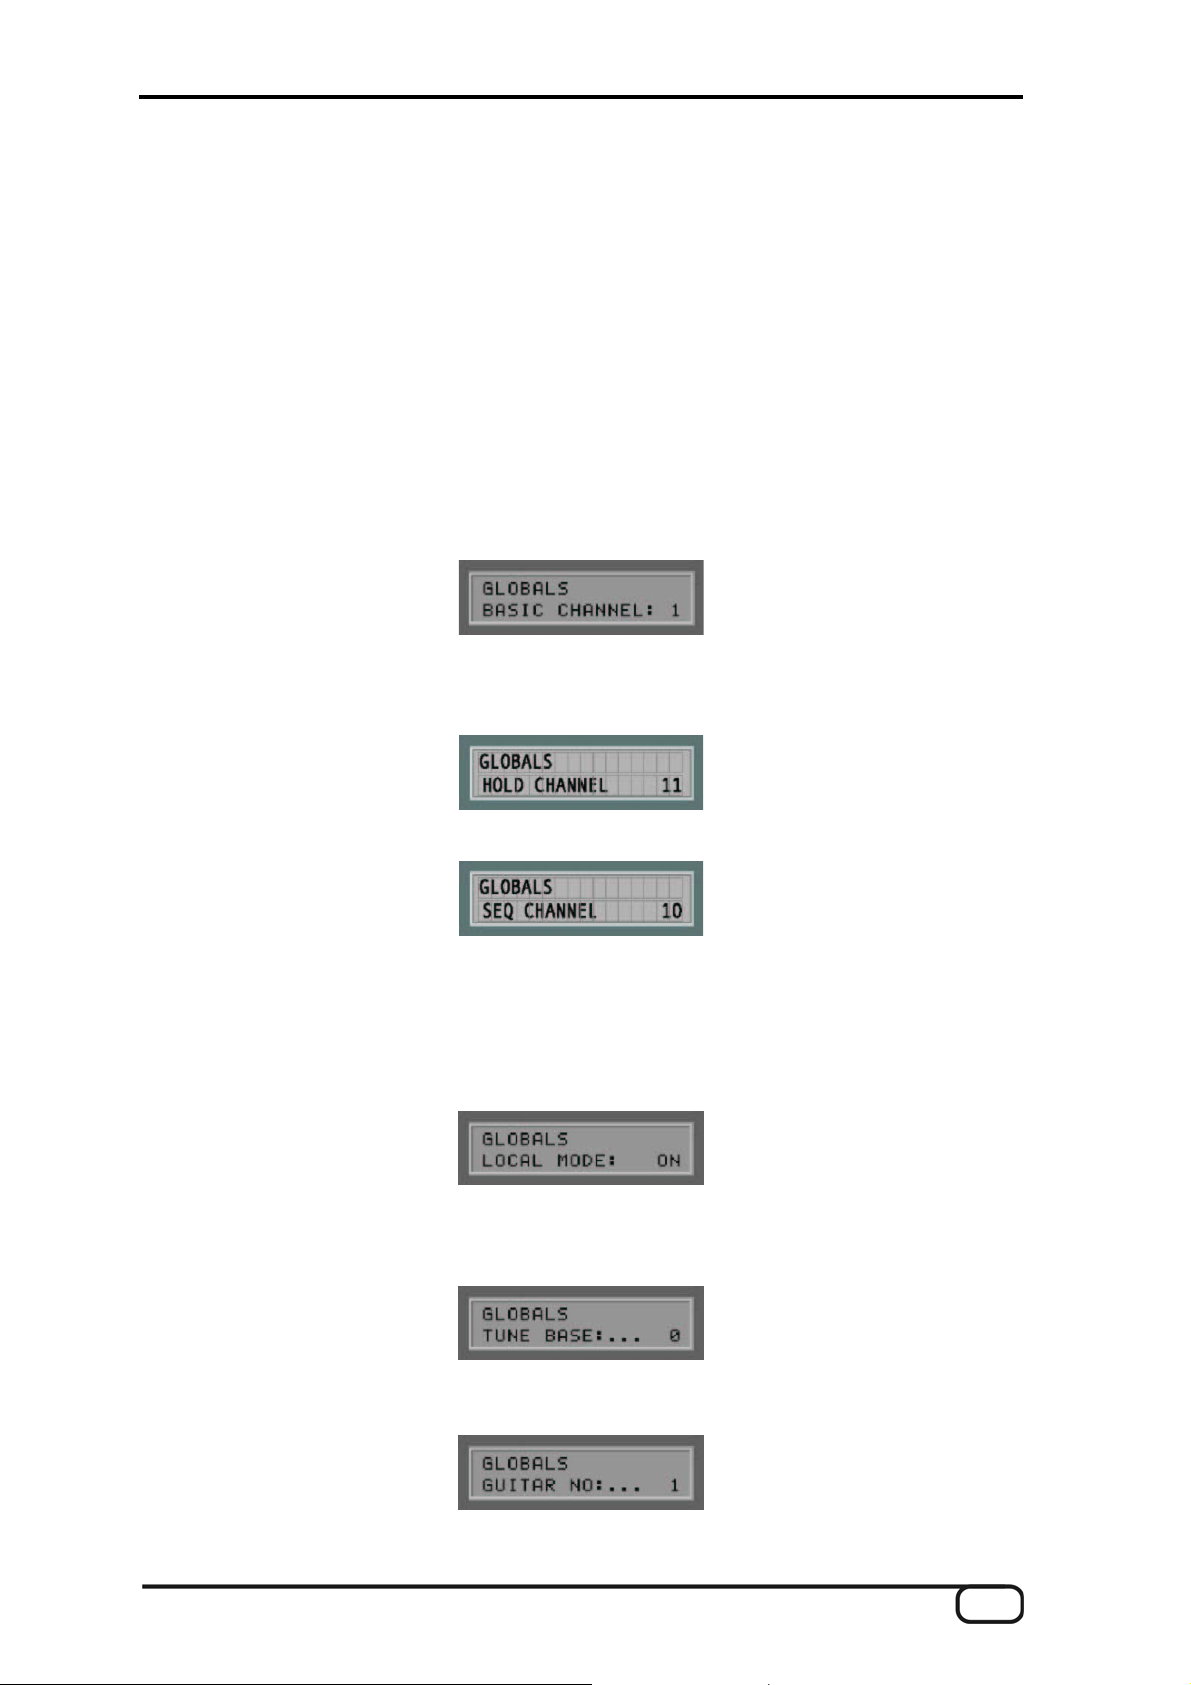
Basic Channel
Basic MIDI channel (1-16)
Various options are available for sending the MIDI information generated by the AXON from the vibrations of
your guitar strings to the sound module or MIDI instrument. Ideally, a MIDI channel is assigned to each string
(see STRING MODE SEPARATE) This has the advantage of evaluating each string separately. For example,
bending a string affects only that string's channel. Otherwise, bending would affect the pitches of the other
strings being played at the same time, an effect that is generally undesirable. Use BASIC CHANNEL to specify
the first of six MIDI channels. All other channels follow automatically in ascending order. If you select “1”, for
example, MIDI channels 1 to 6 will be reserved by your AXON. The value '5' would assign channels 5 to 10,
and the value '11' the channels from 11 to 16. '1' is the default value.
Hold Channel
Hold MIDI channel (1-16)
While BASIC CHANNEL reserves six MIDI channels for normal playing, the HOLD CHANNEL parameter
reserves the first of six additional consecutive MIDI channels for Hold effects such as SEPARATE, LAYER
and ARPEGGIO. It's important to ensure that the Basic and Hold channels do not overlap. Ensure that at least
six MIDI channels are between the Basic and Hold channels. The default value for this parameter is 11, thus
reserving the MIDI channels 11 to 16.
Sequencer Channel (SEQ CHANNEL)
MIDI channel for soundboard drum sequences (1-16)
A separate MIDI channel is used for drum sequences. Use this parameter to select the channel. Please
ensure that the SEQ CHANNEL does not conflict with the BASIC or HOLD channels and that you reserve a
free MIDI channel for the drum sequencer. MIDI channel 10 is the default setting.
AXON AX 100 mkII V. 1.0 (English) 15
Page 16
Pitchbend Range (PBEND RANGE)
Pitchbend value range (OFF, 1-24)
Bending and sliding are techniques frequently used by guitarists. Your AXON uses the MIDI pitchbend
command for these effects. As with a keyboard pitch wheel, the pitch of the last note picked is modified
without picking a new note. The value ranges must be adjusted to ensure that the sound module or a
connected MIDI instrument reproduces the pitch changes accurately.
The displayed value indicates the maximum number of semitone steps that can be applied to a pitchbend. Set
this value to 12 (one octave). For bass, we recommend setting the value to 24.
The value OFF disables pitchbend, triggering chromatic semitones when bending or sliding.
Send Pitchbend Range (SND PBENDRG)
Send pitchbend range (ON/OFF)
If your MIDI instrument supports separate pitchbend settings for each preset, you must set this parameter to
ON. In this case, your AXON will send the required pitchbend settings to the MIDI instrument after every
Program Change command. If your MIDI instrument stores the pitchbend range globally, set this value to OFF
Local Mode
Local mode (ON/OFF)
ON: This is the internal operating mode of your AXON. The integrated sound module is controlled directly.
Program Change commands received via MIDI IN permit programmed AXON presets to be accessed. MIDI
data is sent to MIDI OUT, permitting additional MIDI instruments to be controlled. You should choose this
setting if you are not using a sequencer to control the AXON. That will usually be the case during live
performances.
OFF: You can disable local mode if you would like to control the AXON using a sequencer or MIDI recording
software. The integrated sound module of your AXON will now act as a conventional MIDI expander. However,
it will no longer be possible to select AXON presets via MIDI IN. Naturally, you will still be able to select the
presets of your AXON using the operating buttons. All MIDI data generated by your AXON while playing is
available only via MIDI OUT. Connect the MIDI OUT of the sequencer to the MIDI IN of your AXON and
activate the echo function of the sequencer. The sequencer will loop the incoming MIDI data through to MIDI
OUT and send it to the internal sound module. Local mode is always set to ON when switching the AXON on.
If you set this parameter to OFF, this setting will only be retained until you switch the device off.
16 AXON AX 100 mkII V. 1.0 (English)
Page 17

Tune Base
Tune base (-99 - +99) Unit: cent (1/100th semitone)
All MIDI notes generated by your AXON are based on the reference frequency of 440 Hz, plus or minus a
deviation determined by this parameter. If you are playing with musicians using instruments that are difficult to
tune, such as a piano, you can adjust your AXON to the situation. We recommend the following procedure
when using a reference frequency other than 440 Hz: start by carefully tuning the open A string to the
reference instrument by ear. Next, press the ENTER button. “PICK THE OPEN A STRING” will now appear on
the display.
Pick the open A string. Your AXON will analyze the pitch and automatically set the tune base parameter to the
correct value. If you already know the exact value, you can enter it manually using the VALUE +/- buttons, of
course. Next, tune the remaining strings of your guitar with the integrated tuner of your AXON. If you are
playing alone, set the parameter to 0.
Guitar Preset Number (GUITAR NO)
Global guitar settings (1- 4)
A number of basic settings related to sensitivity and other parameters must be set up to ensure that your
AXON works optimally with your guitar. These settings depend on the type and setup of your guitar. They can
vary widely from one instrument to the next. However, the AXON stores up to four sets of basic settings,
making it unnecessary to set up the required parameters individually every time—simply choose a guitar
preset number with the touch of a button.
Setting up the individual parameters is easy—simply press the ENTER button to step through the parameters
and edit them. Use the PARAMETER +/- buttons to select individual functions. The VALUE +/- buttons adjust
the actual values. Within these basic settings, your AXON provides a VU meter in the first line of the display.
The positions of the bars corresponds to the levels of the individual strings, varying depending on how hard
you pick and the sensitivity settings of the individual strings.
Input Type
Instrument type (GUITAR, BASS, VIOLIN, CELLO)
Specify the type of instrument you are using here. This is especially important for the assignment of the strings
to the MIDI channels you specified.
AXON AX 100 mkII V. 1.0 (English) 17
Page 18
Input Pickup
Pickup system (MAGNETIC, PIEZO)
Select your pickup system type here. MAGNETIC is the default mode, for example when using the AIX 101
guitar interface with its magnetic pickup. The PIEZO setting supports polyphonic piezo pickups (available
separately). Piezo pickups are designed to reproduce the natural sound of hollow-body instruments as
faithfully as possible and have been engineered especially for use with acoustic guitars. An important
advantage for guitarists is that piezo pickups, which can be installed invisibly in the bridge of the instrument,
can also be used on instruments with nylon strings such as classical guitars.
Wheel Control (WHEELCNTRL)
(ON/OFF)
If your pickup does not have a wheel, please specify that here, as the AXON will not receive the correct values
and will function incorrectly otherwise. This will only be the case with accessory piezo pickups, however, as
both the AXON AIX 101 and the 103 have a wheel.
Input Note Off Limit
Note off limit value (2-30)
Unlike a keyboard, which holds its notes until the key is released, a guitar string will sound until the note dies
out naturally or the string is stopped. The duration of the note depends primarily on the type of guitar, how it is
set up, and the type of strings used. Some guitars therefore sound percussive, while others have more
sustain. This can be represented as an envelope curve in which the volume or amplitude values gradually
decline to zero. By specifying a threshold value on this envelope, it becomes possible to control the duration of
the note. Selecting a higher value will cause the MIDI Note Off command to be sent sooner, while lower values
will result in greater sustain. The AXON can thus be matched optimally to the characteristics of your guitar.
Input Trigger Level
Trigger threshold (0-9)
Use this parameter to specify a threshold at which notes should be triggered on your MIDI instrument to suit
your playing technique. A low value will ensure that even a weak pick will trigger a “Note On” command.
Conversely, a higher value will require a harder pick. Experiment with the values a bit to find your optimal
setting.
Input Sense
Input sensitivity for guitar: E6-E1 or bass: B6-C1 (8-64)
18 AXON AX 100 mkII V. 1.0 (English)
Page 19
Here you can select the individual strings of your instrument with the PARAMETER +/- buttons and assign
suitable values for the input sensitivity. A higher value means greater sensitivity. Please note that your AXON
is very sensitive with regard to distortion—as are all electronic devices that process audio signals digitally. On
the other hand, do not set the values of your AXON too low. It will usually be necessary to increase the
sensitivity for the lighter strings to achieve a well-balanced result. When using a bass, the AXON will assume
that you are using a six-string bass for reasons of compatibility. If your bass has fewer strings, which will
usually be the case, simply skip the parameters for the nonexistent strings.
Pedal Sens
The AXON is compatible with virtually any expression pedal on the market. However, pedals do vary, and this
menu item lets you set up the AXON AX 100 mkII to suit your pedal.
First, use the VALUE buttons to select either EXP1 or EXP2. Press ENTER to open the submenu. Move the
pedal to its minimum position and press ENTER. Next, move the pedal to its maximum position and press
ENTER again. The AXON is now configured to your pedal.
CC Defaults
Controller reset values...
Using the various control options of the wheel and pick control functions requires a precise reset of the MIDI
controller to its default values (i.e. after a preset change). This is generally the value 0, but there are
exceptions. The soundboard expects the value 64(40h) as the default value for the controllers 71-74, as these
controllers are used as offset. A wide range of free controllers are available that manufacturers can use as
they see fit, so your AXON lets you set default values for all available controllers.
Press ENTER to open the submenu. The first line displays the controller and its number, the second line
contains the default value in hexadecimal notation. The cursor is initially in the first row while you use the
VALUE +/- buttons to display the desired controller. Use the PARAMETER + button to move the cursor to the
second row and the VALUE +/- buttons to change the default value of the displayed controller. The settings will
be stored in the AXON's memory. The table is already filled with default values. All controllers reserved
according to the MIDI specification were given default values. Refer to the manual of your MIDI sound
generator to set the value of the controller used to the value recommended by the manufacturer.
Use the EXIT button to leave the submenu.
AXON AX 100 mkII V. 1.0 (English) 19
Page 20

MIDI Mapping
Program Change commands
Commands received by your AXON on the current basic channel can be assigned to any AXON presets using
this mapping table. Press the ENTER button—the first line of the display will show the program number that
your AXON is receiving, the second line will show the associated preset. By default, a Program Change
command will select the AXON preset with the same program number. To change this setting, use the
PARAMETER +/- buttons to switch between the lines and the VALUE +/- buttons to change the values. Your
entries will be sent to memory immediately and do not need to be saved manually.
Use the EXIT button to exit this submenu, as always.
Preset Mode
Preset mode is active by default whenever you have not selected one of the other modes. The device
automatically returns to Preset mode when exiting another mode. The status is indicated by a lit LED to the left
of the PRESET button on the front panel.
Preset Parameters
The Preset parameters contain all of the settings that the AXON needs to manage a preset. A preset is a
playing environment that you have defined which contains a wide range of playing and audio property settings
that you can select at any time. You can choose from up to 128 complex programmable presets. The
complexity of your presets is entirely up to you. For example, you can organize the strings of your guitar as 12
completely different split areas that can be combined freely. Countless effects and playing parameters can be
assigned to each of the splits independently.
Selecting Presets
To navigate the presets, use the VALUE +/- buttons. You can also use the UP/DOWN buttons of the guitar
interface.
20 AXON AX 100 mkII V. 1.0 (English)
Page 21
Guitar Tuner
In its default setting (see Utility Mode, Display), the lower half of the display shows a guitar tuner with which
you can monitor the correct tuning of your instrument. It is important for the guitar to be tuned within certain
tolerances for the AXON to identify MIDI note values correctly. Tune each string until the line is located over
the arrow in the middle of the scale. If the Tune Base parameter is set to 0, the middle arrow corresponds to a
tuning calibration of 440 Hz. If you need to tune to a different reference value than 440 Hz—out of
consideration to another musician, for example—you can also tune the AXON to your guitar via Tune Base
(see Global Parameters). The middle position will then correspond to the custom value (assuming you reach
an agreement).
Preset Programming
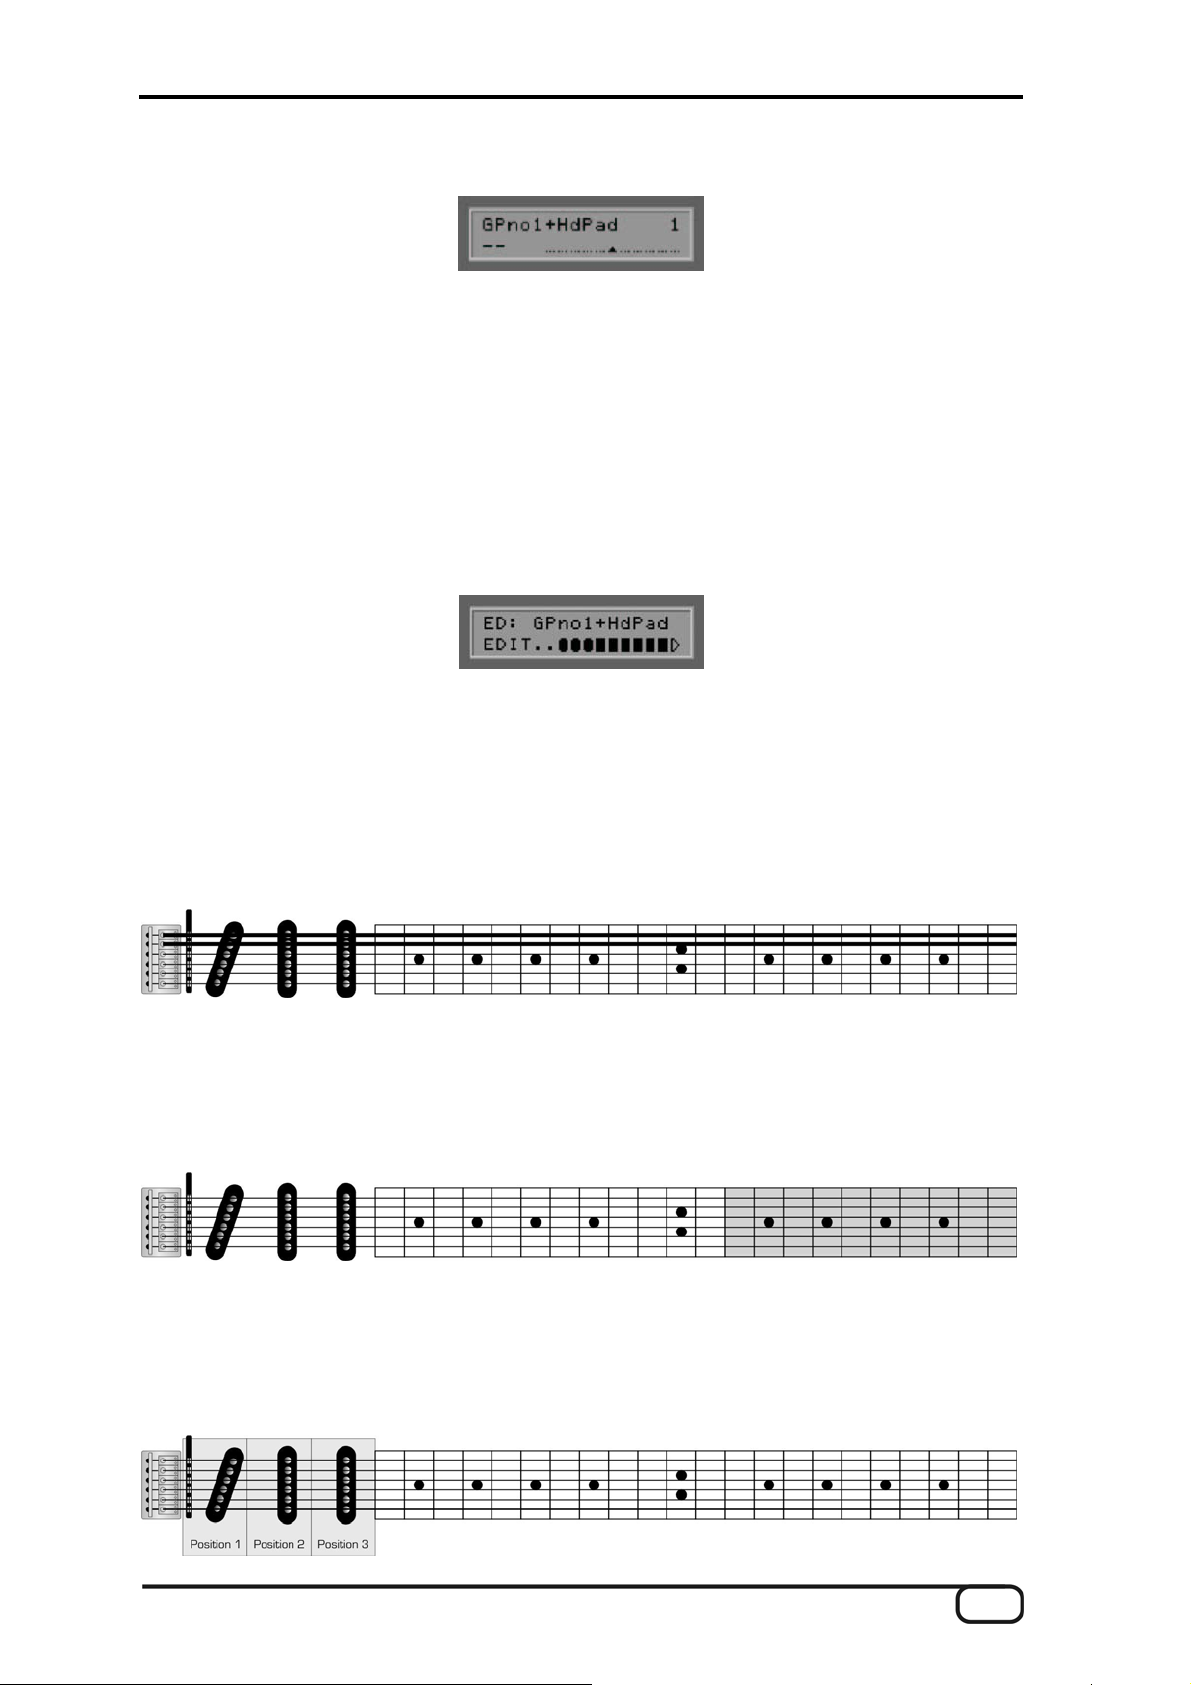
With your AXON in Preset mode, press the EDIT button to program or edit the current preset. The graphic
appearing at the bottom of the display symbolizes the current split zone.
For a more detailed explanation of split zones, we will be taking a closer look at the split options of your AXON
below. 'Splitting' refers to dividing the playing area of your instrument into two or more independent zones.
Your AXON supports the following split types:
String Split
You can divide the six strings of your instrument into two groups, with a different synthesizer sound for each
group. For example, you can assign a bass guitar sound to the low E and A string, while using an e-piano
sound for the remaining strings. It's entirely up to you where you would like to locate the split.
Fret Split
You can also divide the fingerboard of your guitar into two areas with a different synthesizer sound assigned to
each area, regardless of the string you are currently playing. You can freely choose the fret position for the
split.
Pick Split
AXON AX 100 mkII V. 1.0 (English) 21
Page 22

It's also possible to divide the area between the bridge and the highest fret—the area in which you normally
pick—into up to three sections. The width of each section is freely customizable. You can thus use completely
different sounds, depending on whether you are picking near the neck, in the middle, or near the bridge.
Split Combinations
These three different split types can be combined freely, giving you up to 12 different split combination options
(2 string * 2 fret * 3 pick split zones). Being able to choose the split points freely within these combinations
opens a whole range of possibilities.
Selecting the Split Zones
Ensure that the AXON is in Preset mode (Preset LED lit on the front panel) and press the EDIT button on the
front panel. A small graphic will appear on the lower half of the display symbolizing the playing area of your
guitar. The triangle at the right side represents the head of your guitar. The three rounded symbols on the far
left stand for three pick splits; these can be split into six parts for possible string splits. The area between the
pick splits and the head (i.e. the neck) can also be divided horizontally and vertically into four sections
corresponding to possible string splits and fret splits. With this graphic, every possible split zone can be
represented in the form of bars (selected) or inverted display (not selected). The simplest version is when the
preset that you are currently editing does not involve any splits at all. In that case, the bar will cover the entire
playing area. If you are working on a preset with a simple string split, the bar will fill either the upper or lower
half, depending on the currently active split zone. Press the VALUE +/- buttons to step through all split zones.
Depending on the complexity of the preset, you can assign up to 12 different split zones this way. At this point,
try once again to analyze the types of splits combined in your selected preset. While this may seem difficult at
the moment, you will soon get used to the split zone display. Press the EXIT button to return to normal playing
mode.
Changing the Split Parameters
Select a split zone as described in the previous section and press the ENTER button. SLCT will be flashing
next to the graphic described above. Your AXON is now waiting for you to either accept the current split zone
by pressing the ENTER button or define your own splits. Except for the ENTER and EXIT buttons, all of the
buttons are now used to set up split zones. For a start, we will set up a simple string split, resulting in a
continuous bar in the upper part of the playing area (lower strings). Press the following buttons: PRESET,
STORE, EDIT, VALUE – and VALUE +.
22 AXON AX 100 mkII V. 1.0 (English)
Page 23

Each button represents a section that can be enabled by pressing it once. Pressing the button a second time
will disable the section. Enable all of the sections for the upper playing zone and disable them for the lower
zone. Next, press the ENTER button. We can now set a number of sound properties for our split using the
PARAMETER +/- buttons:
Select Instrument
Determine the sounds for the split zone here.
Use the VALUE +/- buttons to make a selection by instrument name. In our case, we have selected
AKOU.BASS.
Note: depending on your Utility/Soundnames setting (GM, NUM or WXT) you may see numbers here instead
of names.
Volume
Volume (0-127)
A separate volume level can be assigned to each split here. Use the VALUE +/- buttons to set the volume of
the bass to the required level.
Transpose
Transposition (-36 - +36)
Use this parameter to transpose the notes played in semitone steps. This lets you play notes on your MIDI
instrument that are outside the normal range of your guitar. For our example, enter a value of -12 (-1 octave)
to put the bass in its characteristic range.
AXON AX 100 mkII V. 1.0 (English) 23
Page 24

Quantize
Pitchbend quantization (AUTO, OFF, ON, TRIGGER)
This parameter determines whether pitch changes within the set pitchbend range will be realized continuously
or stepwise (quantized):
Auto
If more than one note is played, pitchbend quantization is enabled automatically. Chords are thus played
precisely (without pitchbend), while pitchbend quantization is disabled for single-note solos with bending,
hammer-on, sliding and similar techniques.
Off:
No quantization, continuous pitchbend. All pitch changes (bends, hammer-ons and other techniques) are
followed as closely as possible (also see Global Parameters: Pitchbend Range).
On:
Quantization with pitchbend in steps. Increases in pitch are NOT followed with pitchbend until the next
semitone is reached, at which point the new pitch value is used. Continuous bends and other techniques are
not reproduced as expected. This setting is advantageous when playing chords exclusively, as minor changes
in pitch due to varying pressure on the strings no longer have any effect.
Trigger:
Quantization through new Note On command. This value disables pitchbend completely, triggering chromatic
semitones when bending or sliding. It corresponds exactly to the global setting PBEND RANGE: OFF (see
Global Parameters) but only affects the current split zone. This setting is especially suited to organ or piano
sounds, which would otherwise sound extremely unnatural. You can also set the Quantize parameter to AUTO
for our example. It then only applies to the bass split, permitting bending there while the piano only triggers
chromatic halftones.
Panorama Position (PAN POS)
Panorama Position (L15-L1, MID, R1-R15)
This parameter shifts the selected sound of your MIDI instrument in the stereo image. The values L15-L1
indicate that the current sound will be shifted more toward the left channel, while the values R1-R15 would
result in a shift toward the right channel. The value MID corresponds to the middle position.
Panorama Spread (PAN SPREAD)
Panorama width (-15-+15)
Use this parameter to spread the positions of individual sounds across the panorama to ensure that not all (up
to six) sounds appear in the stereo position you selected with the PAN POS parameter. Set the PAN POS
24 AXON AX 100 mkII V. 1.0 (English)
Page 25

value to MID (middle position), for example. Play your guitar and vary the PAN SPREAD value. Please note
that your MIDI instrument must support panorama information. Please refer to the manual of your MIDI
instrument for more information.
+15: low sounds to the right, high sounds to the left of the panorama
-15: low sounds to the left, high sounds to the right of the panorama
Reverb
Degree of reverb (0-127)
Use this parameter to set the degree of reverb for the sound used. Increasing the value increases the amount
of reverb added to the original sound.
Chorus
Degree of chorus (OFF, 0-127)
Use this parameter to control the strength of the effect. Increasing the value will make the effect that your MIDI
instrument adds to the original sound more pronounced.
Attack Time
Reduce/increase attack time (-64 - 63)
Attack time refers to the time from the start of a sound to the point at which it reaches its maximum volume.
The effect of this parameter is strongly dependent on the sound being used. If you have selected a percussive
instrument such as a piano, shortening the attack time will not be possible, as it is already minimal. This
parameter is especially useful for sounds that develop slowly such as so-called pad sounds.
Velocity Sense (VEL SENSE)
Velocity sensitivity (0-127)
You can reduce the dynamic range of your MIDI instrument by reducing the value of this parameter. In an
extreme case, a value of 0 will cause all sounds from the MIDI instrument to be played at the same volume,
regardless of the velocity with which they are played. The value 127 will result in the greatest possible dynamic
range.
AXON AX 100 mkII V. 1.0 (English) 25
Page 26

Velocity Offset (VEL OFFSET)
Velocity offset (-64 - +64)
If the restricted dynamic range (see VEL SENSE) of your MIDI instrument has caused it to become too loud or
soft, use this parameter to raise or lower the overall volume. A section of the Editor is shown below for clarity.
Pick Control
Pick Controller (NO CONTROLLER, CONTRLxxx)
This submenu lets you associate your current sound with one of the many MIDI controllers. This can be used
to control effects thanks to the AXON's ability to recognize your picking position. For example, if you set the
value to Controller 1 (Modulation Wheel), you can simulate the effect of a keyboard modulation wheel with
your picking position.
Other interesting effects can be achieved with CTRL 74 (Filter) or CTRL 10 (Pan), for example. Press the
ENTER button and use the +/- Value buttons to choose a suitable controller. The function of the controller will
be displayed in plain text. A horizontal line will appear for non-specified controllers. Use the following
parameters to specify the value range for which the controller is suited. The effective range of the controller is
restricted to one pick split zone (Your AXON supports up to three pick zones, for which you can theoretically
use three different pick controllers). Generally, you will not use additional pick splits for a pick control effect.
You should therefore set both preset parameters PICKSPLIT1 and PICKSPLIT2 to 0—otherwise the entire
picking area from the bridge to the neck will not be available, but only the section within the pick split zone.
Pick Value 1 (PICK VAL1)
Pick value 1 for pick controller (0-127)
Once you have associated the split zone with a MIDI controller via PICK CONTRL, use this parameter to set
the starting value for the controller. Moving your picking position from the bridge toward the neck will cause the
value sent to the MIDI controller to continuously move toward the value set for PICK VAL2.
26 AXON AX 100 mkII V. 1.0 (English)
Page 27

Pick Value 2 (PICK VAL2)
Pick value 2 for pick controller (0-127)
Once you have associated the split zone with a MIDI controller via PICK CONTRL, use this parameter to set
the end value for the controller. Moving your picking position from the neck toward the bridge will cause the
value sent to the MIDI controller to continuously move toward the value set for PICK VAL1.
Changing parameters shared by split zones
Until now, the preset parameters were specifically to individual split zones. A preset also consists of higher-
level parameters used to manage split zones and describe shared characteristics. The transitions or borders
between the individual split types are also defined here. To access this level, press the EDIT button while in
Preset mode (PRESET LED on). If you are still in the split zone level, simply press the EXIT button twice. Use
the PARAMETER +/- buttons to select the following parameters and modify them with the VALUE +/- buttons:
Preset Name
Be sure to give presets you have created a descriptive name to make them easier to find. The name may
contain up to 12 characters. Press ENTER to start editing a name. The cursor will now move to the first letter,
which you can change using the VALUE +/- buttons. Upper and lower-case letters are supported, as are
special characters. Use the PARAMETER + button to move the cursor to the next letter. The PARAMETER -
button moves the cursor back by one place. A number of buttons on the front panel of the AXON have special
functions during the editing process:
The GLOBAL button switches the current lower-case letter to upper case.
The UTILITY button switches the current upper-case letter to lower case.
The CHAIN button switches the current letter to the first available special character, “!”.
The PRESET button replaces the current letter with a space.
The STORE button has an insert function, moving all characters to the right of the current cursor position
one place to the right. The last character will be removed or overwritten.
The EDIT button has a delete function, removing the character at the cursor position and moving all
following characters one place to the left. A space is inserted as the last character.
Press the EXIT button to exit the Text Editor.
AXON AX 100 mkII V. 1.0 (English) 27
Page 28

String Mode
String mode (COM, SEP)
String mode determines how the strings of your guitar are assigned to the MIDI basic channel (see Global
Parameters):
Common Mode (COM)
In Common mode, all of the strings of your guitar are assigned to the MIDI basic channel. To prevent conflicts
with notes still sounding on the same channel, no pitchbend information is sent when more than one note is
being played in this mode. Solo playing is therefore possible with some restrictions. Use this mode if your MIDI
instrument can only receive on one MIDI channel. Also, not all sequencer programs support recording multiple
channels at the same time. You should also select this mode in this case.
Separate Mode (SEP)
In Separate mode, a separate MIDI channel is reserved for each string of your guitar (see Global Parameters).
This mode provides the greatest possible flexibility. Pitchbend effects such as bending, hammer-on and sliding
only affect the channel of the string being played. These techniques can thus be applied without restrictions.
Virtually all current MIDI instruments support multiple channels, so choose this mode whenever possible.
Hold Mode (HOLDMD)
Hold mode (COMMON, SEP..., LAYER..., ARPEG..., CNTRL..., STACK...)
A variety of effects are available while playing that can be triggered by pressing the hold switch. Your AXON
supports five different Hold modes:
Common (COM)
No further MIDI data is sent while the hold switch is being pressed. A chord played previously will be played by
the MIDI instrument until the hold switch is released. This also realizes a bypass function of sorts—your AXON
will not send any additional MIDI data for as long as the hold switch is being pressed while in this mode.
Separate (SEP)
In Separate mode, the MIDI channels defined in Hold Channel (see Global Parameters) are additionally
available. You can thus add a pad sound to your solos to back yourself. Select a suitable pad preset for the
backing in the submenu (ENTER). Play a chord while pressing the hold switch and release the hold switch.
The chord will now be played continuously and you can continue playing on the normal channels. When you
press the hold switch again, all sounds being played at that moment will be stopped and you can play another
chord. To return to normal mode, press the hold switch briefly and release it.
28 AXON AX 100 mkII V. 1.0 (English)
Page 29

The following parameters can be set in the submenu:
Preset
(1-256)
Choose the preset to be played on the additional channels while the hold switch is pressed with the VALUE +/-
buttons.
Volume
(OFF, 0..127)
You have the option of reducing the volume of the hold preset to ensure a correct balance between the main
and hold preset. This will not change the settings of the hold preset itself.
Sequencer Pattern (SEQ PATTERN)
(OFF, 1-32)
AXON AX 100 mkII users can play a sequencer pattern (drum sequence) parallel to the hold preset (see
UTILITY MODE, EDIT SEQUENCE). The drum sequence will be started on a separate MIDI channel as soon
as your press the hold switch. The pattern will continue to repeat until you press the hold switch briefly twice
(double-click). Enter the pattern number 1-32 of the sequencer pattern to be played when the pedal is pressed,
or set the parameter to OFF.
Sequencer Track (SEQ TRACK)
(OFF, 1-8)
You can also play a complex track sequence (see UTILITY MODE, EDIT SEQUENCE) parallel to the hold
preset instead of a pattern sequence. The track sequence (drum sequence) will be started on a separate MIDI
channel as soon as your press the hold switch. The track sequence can be canceled by pressing the hold
switch briefly twice. Otherwise, it will continue playing until its defined end. Enter the track number 1-8 of the
track sequence to be played when the pedal is pressed, or set the parameter to OFF. Please note that you can
only use one of the sequencer types—in other words, if you intend to use a track sequence, the SEQ
PATTERN parameter must be set to OFF.
Sequencer Tempo (SEQ TEMPO)
(EXT., 41-240)
AXON AX 100 mkII V. 1.0 (English) 29
Page 30

The tempo of the sequence can be synchronized externally using the MIDI Clock (EXT/MIDI IN) or internally
by specifying a BPM (beats per minute) value between 41 (very slow) and 240 (very fast). In case of external
synchronization (by a MIDI keyboard or MIDI drums, for example), output does not start until MIDI Start/Sync
commands have been received.
Layer
This operating mode lets you combine two presets—in other words, you can play two presets at the same
time. This can be useful for realizing especially rich solo or ensemble sounds. Select a suitable preset for the
hold channels in the submenu (ENTER). This preset will be played together with the normal preset whenever
you press the hold switch. After pressing the ENTER button, the submenu will let you set the same parameters
as in Separate mode: PRESET, SEQ PATTERN, SEQ TRACK and SEQ TEMPO.
Arpeggiator (ARPEG)
This operating mode provides a powerful arpeggiator with which you can virtually accompany yourself. Unlike
SEP mode, which only lets you back yourself with held chords, this mode lets you use more complex backing
structures. The notes you play with the hold switch pressed are collected in a loop and the current content of
the loop is played on the hold channels. The arpeggio capture ends when you release the hold switch. When
playing new notes, the captured arpeggio will play endlessly in the background on the hold channels,
otherwise the arpeggio will be stopped. It is thus possible to press the hold switch again and “feed” the current
arpeggio new notes without interruption to realize a change in harmony, for example. To stop an arpeggio,
simply press the hold switch briefly without playing a note. The parameter settings of the arpeggiator
determine how the individual notes will be played back. Not only is it possible to manipulate the sequence of
the notes, they can also cover several octaves, for example. Perhaps the most interesting property of the
arpeggiator is the rhythmic quantization of the playback loop with a freely programmable rhythm pattern.
Press ENTER to open the Arpeggiator submenu.
Preset
(1-256)
Choose the preset with the audio properties to apply to the arpeggio while the hold switch is pressed with the
VALUE +/- buttons.
Tempo
(EXT., 41-240)
The tempo of the arpeggio can be synchronized externally using the MIDI Clock (EXT/MIDI IN socket) or
internally by specifying a BPM (beats per minute) value between 41 (very slow) and 240 (very fast). In case of
30 AXON AX 100 mkII V. 1.0 (English)
Page 31

external synchronization (by a MIDI keyboard or MIDI drums, for example), output does not start until MIDI
Start/Sync commands have been received.
NOTE: The tempo selected here also applies to the sequencer!
Arpeggio Length (ARP. LENGTH)
(1-32)
This parameter specifies the maximum number of notes in the arpeggio. While capturing, the content of the
arpeggio buffer is constantly output in a loop. Every note you play lengthens the loop until you reach the value
set in ARP. LENGTH. If you continue playing, the oldest notes of the loop will be replaced. An arpeggio loop
can contain a maximum of 32 notes.
Scan
(Assign, Reverse, Recycle, Up, Down, Up/Down, Random)
A variety of functions are available for playing arpeggio loops:
In the ASSIGN position, the notes are played in the order in which they were captured.
The REVERSE position acts as a stack and plays the notes back in reverse order.
RECYCLE starts by playing the notes in their original order (like ASSIGN). When the end of the loop has
been reached, the notes are played back in reverse order (like REVERSE). This sequence repeats once it
has reached the beginning.
In UP mode, the captured notes are played sorted according to pitch in ascending order, in DOWN mode
they are played in descending order.
UP/DOWN mode combines these two modes.
Finally, RANDOM plays the captured notes back in random order.
Rhythm (RHTHM)
(1/16thSt - USER#1-16)
Use this parameter to apply rhythmic patterns to the arpeggio loop. The arpeggio will be quantized rhythmically
according to the pattern:
1/16thSt:
Classical arpeggio. Returns the captured notes in a 1/16 staccato.
1/16thLg:
1/16th notes as above, but legato.
1/8thSt:
Arpeggio at a moderate tempo. Returns the captured notes in a 1/8 staccato.
1/8thLg:
1/8th notes as above, but legato.
AXON AX 100 mkII V. 1.0 (English) 31
Page 32

1/4thSt:
Slow arpeggio. Returns the captured notes in a 1/4 staccato.
1/4thLg:
1/4 notes as above, but legato.
1/2th:
Very slow arpeggio with half notes (more precisely: 1/4 note values with 1/4 rests).
1/8Trpl:
Arpeggio at a moderate tempo. Returns the captured notes as 1/8 triplets.
The patterns BLUES 1 to HOUSE contain rhythmic styles and grooves as factory presets for interesting
groove effects:
BLUES 1:
Blues rhythm. Especially suitable for bass backing lines.
BLUES 2:
Variation of BLUES 1 pattern.
BOOGI 1:
Boogie Groove. Especially suitable for bass backing.
BOOGI 2:
Variation of BOOGI 1 pattern.
DISCO 1:
Disco groove. Especially suitable for bass backing.
DISCO 2:
Additional DISCO variation.
ROCK:
Rock groove for bass backing.
HOUSE:
House rhythm. Well-suited for organ riffs.
You can also apply one of 16 user-defined rhythm patterns to arpeggios with USER#1 to USER#16. Select
one of the USER patterns and press the ENTER button. The Pattern Editor will appear on the display which
you can use to enter the time values for the arpeggio notes.
Use the PARAMETER +/- buttons to move the cursor on the pattern buffer grid. Set the time value at the
cursor location with the VALUE +/- buttons. A “<” at this point marks the end of the pattern. The pattern is
continuously repeated between the start and end point and controls the output of the arpeggio note values. A
pattern can use a maximum of eight different note value symbols at the same time (no restriction applies when
using the Computer Editor). The LOOP symbol “<” is not affected by this. A number of buttons on the front
panel of the AXON have special functions during the editing process:
32 AXON AX 100 mkII V. 1.0 (English)
Page 33

The STORE button has an insert function, moving the pattern one place to the right from the current
cursor position. The last symbol at the end of the pattern will be removed or overwritten.
The EDIT button has a delete function, removing the symbol at the cursor position and moving all
following symbols one place to the left. A loop symbol “<” is inserted at the far right.
Press the EXIT button to exit the Pattern Editor.
Display of note values
Sync
(ON, OFF)
If you played fewer notes while ON than specified in LENGTH, the pattern will repeat after the last captured
note and before the start of the next note value.
Octaves
(1-4)
Here you can determine whether the arpeggio should be repeated in the next octave position after the loop
completes. For example, if you enter a “2” here, the arpeggio will be played first in the normal, then in the next
higher octave position. The maximum value is 4 octaves. Value 1 plays the arpeggio only at the pitch at which
it was recorded.
Repeats
(1-32)
Use this value to repeat the individual notes of the arpeggio. If this parameter is set to “1”, each note will be
played once only. Higher values cause the note to be repeated accordingly. Each note can be played up to 32
times.
AXON AX 100 mkII V. 1.0 (English) 33
Page 34

Velocity
(OFF, 0-127)
If this value is set to OFF, the arpeggio will be played back with velocity values as played on the guitar. You
can assign a fixed value for the dynamics of the notes by specifying a value between 0 (soft) and 127 (loud).
Sequencer Pattern (SEQ PATTERN)
(see page
Sequencer Track (SEQ TRACK)
(see page
Editing HOLD Presets
You have the option of branching directly to the parameter settings of the hold presets while editing HOLDMD:
SEP..., HOLDMD: LAYER... and HOLDMD: ARPEG.... Press the EDIT button when the hold preset is
displayed. The first line will display the text 'HD: <Presetname>' and all parameters will be editable as usual.
Press the EXIT button to return to your starting point. The hold preset name will flash whenever a parameter
has been edited but not saved. The edited hold preset can be stored under any preset number using the
STORE button.
Controller (CNTRL)
In this operating mode, you have the option of associating the hold switch with any MIDI controller. When the
hold switch is pressed, the specified controller is output with the maximum value 127 (7Fh). As soon as you
release the hold switch, the controller is reset to 0. Suitable controllers include Sustain (64) and Portamento
(65). Press the ENTER button to open the submenu and set the values for the following parameters.
29)
29)
Hold Controller
(CNTRL0-119)
Select the MIDI controller that is to be set to its maximum value of 127 when the hold switch is pressed. The
function of the controller will be shown in plain text on the display of your AXON.
Sequencer Pattern (SEQ PATTERN)
(see page
Sequencer Track (SEQ TRACK)
(see page
Sequencer Tempo (SEQ TEMPO)
(see page
29)
29)
29)
34 AXON AX 100 mkII V. 1.0 (English)
Page 35

Stack
The effect is the same as in the LAYER hold mode. The only difference is that the hold switch does not have
to be explicitly pressed for this mode. The layer effect is thus continuously available. Otherwise, the same
parameters are available as in LAYER mode. (also see LAYER...)
Wheel Control (WHEELCNTL)
WHEEL CONTROLLER (AIX, EXP1, EXP2)
Your AXON supports up to three different wheel controllers at the same time.
AIX is the wheel on the AIX 101 / 103 interface.
EXP1 and EXP2 are expression pedals that can be connected to the rear panel of the AXON.
Select the wheel that you would like to associate with a MIDI controller with the VALUE +/- buttons and press
ENTER. The first line of the display shows the currently selected wheel, the second indicates the controller to
be associated with the wheel. Use the VALUE +/- buttons to select the correct controller type. The name of the
controller will be displayed in plain text. Controllers that do not comply with the MIDI specification are shown as
“--------”. The “NO CONTROLLER” setting will result in the wheel not being associated with a controller and
thus being without an effect. This setting is useful for controlling a running arpeggio without affecting the main
preset. Set up the preset used by the arpeggio so that the wheel at the AIX 101 / 103 interface affects a filter
controller (#74). For the main preset, select “NO CONTROLLER” instead of “VOLUME 7”. Now you can
control the running arpeggio continuously with the filter effect without affecting the volume of the main preset.
Press the EXIT button to return to the main menu.
Non Registered Parameter Number / Registered Parameter Number (NRPN/RPN)
(NONE, NRPN, RPN)
Many synthesizer manufacturers support the modification of sound properties via so-called NRPN (non-
registered parameter number) and RPN (registered parameter number) numbers. RPNs are defined in the
MIDI specification; NRPNs are manufacturer-specific. For more information on NRPNs, please refer to the
manual of the MIDI output device.
The approach is the same for both types: a system parameter is set with the associated NRPN-LSB and MSB
or RPN-LSB and MSB controllers that can be modified subsequently with controller #6 (DATA ENTRY MSB)
or controller #38 (DATA ENTRY LSB).
The following is an example of such an application with your AXON: Let's assume you have read in the
manual of your synthesizer that the manufacturer supports filter control via the NRPNs MSB=01h and
LSB=21h. Select “NRPN/RPN”, then “NRPN” with the VALUE +/- buttons, then press the ENTER button. The
first line of the display will once again indicate whether your are currently editing NRPNs or RPNs. The second
line shows the MSB and LSB values. The cursor will initially be positioned over the MSB field. Use the VALUE
+/- buttons to enter the value 01h. Use the parameter buttons to switch to the right to the LSB field and enter
the value 21h. You have now set up the NRPN and specified that controller #6 (or #38) can be applied to a
filter. Pick control and the three possible wheels are now available as sources for the controller #6/#38. If you
specify the wheel of the AIX 101 / 103 interface for the controller #6 (#38), you can now use it to affect the
current sound of your synthesizer. Press EXIT to leave the submenu.
Please see page
60 for the NRPN controllers of the internal soundboard.
AXON AX 100 mkII V. 1.0 (English) 35
Page 36

Note: We would advise less-experienced users against using the RPN controllers, as this may affect pitchbend
sensitivity and tuning in such a way that your AXON will play incorrect notes.
And another note for insiders: Normally, the underlying NRPN or RPN controller should be reset to NULL (7fh)
after making changes with the DATA ENTRY controller. The DATA ENTRY controller will then no longer have
an effect. Your AXON does not do this, as it would result in an enormous increase in MIDI data. These
controllers are reset to NULL when changing presets or changes to the NRPN/RPN itself, however.
Finger Pick
(OFF, ON)
The pitch recognition of the AXON is best suited for use with a pick. You can also get good results with finger
picking, however. Simply switch this parameter to “ON”. The pick split and pick control functions will no longer
be available in this case. Ensure that the current preset does not use a pick split, or that the pick controller is
disabled (NO CONTROLLER).
String Split
String split (1-5)
When configuring a string split, use this parameter to specify the first string of the lower string segment, i.e. the
start of the lower playing zone. The number refers to the string, with the number 1 being the high E string. For
example, if you se the string split to 4, the two bass strings (5 and 6) will belong to the upper and the lower four
strings (1-4) to the lower split zone.
Fret Split
Fret split (0-23)
If you are using a fret split in your preset, use this parameter to specify the first fret of the left split segment, i.e.
the left playing zone as seen on the graphic of the AXON. The number refers to the fret numbers, with fret 0
being the open string. For example, if you set the fret split to 4, the open strings and frets 1 through 3 will be
assigned to the right split zone, while frets 4 and up will belong to the left split zone.
36 AXON AX 100 mkII V. 1.0 (English)
Page 37

Pick Split 1 and 2
Pick split 1 and 2 (0-99)
If you are using pick split options in your preset, these parameters determine the width of the individual picking
zones between the bridge and neck. The picking area is divided into 100 units: 0 is the bridge, 99 corresponds
to the start of the fingerboard. If you have divided this area into two zones, the parameter in PICK SPLIT 1 will
indicate the start of the right picking zone. For example, if you enter 50, the picking area will be divided into
two equally large zones. To divide the picking area into 3 zones, specify a value for the start of the third zone
in PICK SPLIT 2. For three equally large zones, set the value for PICK SPLIT 1 to 33 and the value for PICK
SPLIT 2 to 66.
Chain Mode
It is likely that you will want to change your programmed presets frequently when performing live. The Chain
mode of your AXON lets you program chains of presets that you can then call up easily in the required order.
Up to 32 Chain presets are supported, each with up to 32 preset steps. You can then step through the Chain
presets or the individual preset steps with the UP/DOWN buttons of your guitar interface, or use a footswitch to
step through the individual steps of a chain only. Connect the footswitch to the socket marked “Chain” on the
rear panel of the AXON. A single click will move forward one step, while a double-click will go back one step in
the chain. You can thus navigate all Chain presets and steps from your guitar using a combination of
footswitch and UP/DOWN buttons.
Setting Up Chain Presets
Press the CHAIN button on the front panel of your AXON and select Chain preset 1-32 with the VALUE +/-
buttons. Press the EDIT button to start programming the chain. The following parameters can be accessed
using the PARAMETER +/- buttons.
Chain Preset Name
(max. 12 characters)
Give the Chain preset a descriptive name (e.g. the name of a song) here for easy orientation later. Press the
ENTER button and select the individual letters with the VALUE +/- buttons. The PARAMETER +/- buttons will
take you directly to the first and last characters. Press EXIT to exit the naming submenu. As in all text-related
functions, the special buttons (A-Z, a-z, !-9, Space, Insert, Delete) are also available here.
AXON AX 100 mkII V. 1.0 (English) 37
Page 38

Preset
(1-256)
Use the VALUE +/- buttons to assign the number of the preset to be used for the current step. Confirm the
selected preset number with ENTER. This will automatically take you to the next step.
Step
(1-32)
Use the VALUE +/- buttons to select the current step within the chain. The preset assigned to the step is
shown at the left. To insert a preset step into an existing chain, simply press STORE at the insertion point.
This will insert a further step into the chain and move all subsequent steps to the rear by one step. You can
now specify the program or preset number for the step. By default, the inserted step has the same values as
the previous step in this location. You can also delete existing preset steps from the chain. Select the number
of the step you would like to delete and press the EDIT button. The current step will be removed and all
following steps will be moved forward.
Storing Chain Presets
Press the EXIT button to exit Chain mode. Whenever you edit any values, a line of the display will flash to
indicate that the changes have not been saved. Press the STORE button. Choose the location (1-32) at which
you would like to store the changes. Pressing the ENTER button will save the changes to the current, edited
location. You can choose a different location, however. In this way you can copy Chain presets in which you
only intend to make minor changes. To exit without saving your changes, simply press the EXIT button.
38 AXON AX 100 mkII V. 1.0 (English)
Page 39

Utility Mode
Utility mode can be activated by pressing the UTILITY button on the front panel of your AXON. The state is
signaled by a lit LED next to the UTILITY button. A number of settings for the display of your AXON can be
configured using the Utility parameters. It also contains the functions for loading and storing settings via MIDI
(SysEx), letting you manage and save the parameter settings of your AXON on your computer. These
functions are more convenient in the Editor, however. This mode contains a wide range of settings for drum
sequences.
Display
Monitoring instrument for display (TUNING, LEVEL)
Select the monitoring instrument that will be displayed continuously on the lower half of the display here.
Tuning
If you set the display parameter to this value, your AXON will show a guitar tuner on the lower half of the
display that you can use to monitor the correct tuning of your instrument while playing. Tune each string until
the line is located over the arrow in the middle of the scale. If the Tune Base parameter is set to 0, the middle
arrow corresponds to a tuning calibration of 440 Hz.
Level
Selecting this value will replace the tuner with a VU (LEVEL) meter. The positions of the bars correspond to
the levels of the individual strings. These levels let you monitor the dynamics of the played strings.
Sound names
Display mode for sound names (NUM, GM, WXT)
The AXON can display the sound presets or timbres used in a variety of ways.
NUM
All sounds or timbres are managed numerically in the form of a program number and a MIDI bank. A MIDI
bank can contain up to 128 program numbers. By splitting the MIDI bank into an MSB (Most Significant Byte)
and LSB (Least Significant Byte) section, it becomes possible to address up to 128 x 128 MIDI banks. Use this
setting if your sound module does not support the GM (General MIDI) standard.
GM
The sounds or timbres are managed according to the GM (General MIDI) standard. The names of the timbres
are shown in plain text on the display. As the GM standard only features 128 timbres, some manufacturers of
GM-capable sound modules have implemented a number of kits that can be selected via MIDI banks. The
AXON splits the MIDI bank into an MSB (Most Significant Byte) and LSB (Least Significant Byte) section,
making it possible to address up to 128 x 128 GM kits. Use this setting if your sound module supports GM.
WXT
The sounds or timbres are displayed and selected according to the names of the internal WAVE XTABLE
soundboard. This soundboard contains 492 sounds and 12 drumkits. The sounds are sorted into 21 groups for
easier orientation.
In this setting, the MIDI banks are selected automatically. Manual MIDI bank selection therefore is not
necessary.
AXON AX 100 mkII V. 1.0 (English) 39
Page 40

Double-click Response (DCLIC RESPNS)
Double-click speed (1-20)
This parameter sets the interval that will be recognized as a double-click on one of the two footswitches. As
you may recall, double-clicking the chain switch navigates back one step in the chain, while double-clicking the
hold switch can stop the drum sequencer.
Transmit SysEx (XMIT SYSEX)
Send System Exclusive data
Use this submenu to send all important parameter settings of your AXON via MIDI. The data can be received
by a computer running suitable software such as a sequencer program, or another AXON AX 100 mkII. This
function can also be used to send the parameter set to the computer, manage it there in groups and reload it
to the AXON. This can be useful for creating your own preset library. Press the ENTER button and use the
Parameter +/- buttons to select the range you would like to send. Use the Value +/- buttons to select individual
sections.
Press the ENTER button again to start the transfer. The transfer is complete when READY appears on the
display.
TOTAL DUMP
Use this function to send the full parameter set of your AXON as one large dump.
PRESET... (ALL, 1-128)
Here you can choose whether to send all 128 USER presets or selected presets.
CHAIN... (ALL, 1-32)
Sends all chains or selected chains.
ARP-PATTRN... (ALL, 1-16)
Sends all rhythm patterns programmed for the arpeggiator, or only selected individual patterns.
SEQUENC... (ALL, PATTRN, TRACKS)
Sends all programmed drum sequences, or separated according to patterns and tracks.
Receive SysEx
Receive System Exclusive data
ON
The AXON is ready to receive SysEx data at its MIDI IN port. This setting must be selected when using the
Editor.
OFF
All received SysEx data will be ignored.
40 AXON AX 100 mkII V. 1.0 (English)
Page 41

Edit Sequence
Editing drum sequences...
The AXON supports the programming of drum sequences that can be triggered by the hold switch while in
Preset mode. A distinction must be made between a pattern and a track sequence. A pattern consists of a
maximum of 16 individual steps of identical length. You may select up to four drum instruments from any
drumkit and trigger them within the step at three different dynamic levels. Up to 32 patterns can be created in
the Pattern Editor. You may then use the programmed patterns in a track sequence that controls the patterns
according to your specifications. Up to 32 program steps are available in which you can combine patterns in
any order or repeat them as needed.
Press the ENTER button to open the drum sequencer menu.
Tempo
Speed (EXT., 41-240)
The tempo of the drum sequencer can be synchronized externally using the MIDI Clock (EXT/MIDI IN socket)
or internally by specifying a BPM (beats per minute) value between 41 (very slow) and 240 (very fast). In case
of external synchronization (by a MIDI keyboard or MIDI drums, for example), output does not start until MIDI
Start/Sync commands have been received. The tempo set here will be overwritten by the tempo in the preset
and is only intended for editing sequences.
Volume
Volume (0-127)
The drum sequencer features a separate volume control. Views the value of this parameter to adjust the level
of the drum sequencer in relation to the other conditions.
Reverb Send
Degree of reverb (0-127)
The degree of reverb effect for the drum sequencer can be adjusted separately. Use the VALUE +/- buttons to
set the parameters to the required value. Select 0 if you do not need reverb for the drum instruments.
AXON AX 100 mkII V. 1.0 (English) 41
Page 42

Chorus Send
Degree of chorus (0-127)
Determine the degree of chorus effect for the drum instrument output. Select 0 if you do not need chorus effect
for the drum instruments.
Mode
Operating mode (PATTERN, TRACK)
As mentioned previously, your AXON has two different options for playing drum sequences. You can call either
individual patterns or complete tracks containing multiple patterns. Use this parameter to determine the
operating mode for the drum sequences.
Pattern
Pattern Editor (1-32)
Use this submenu to open the Pattern Editor. Up to 32 patterns can be created and either played individually
or assembled to complete track sequences in the Track Editor. Select the desired pattern number with the
VALUE +/- buttons and press ENTER to start programming a pattern.
KIT
Drumkit selection (Jazz Kit, Brush Kit, etc.)
Choose the drumkit to be used for the drum pattern here.
Steps
Steps (1-16)
Here you can specify the number of 1/16 steps within the pattern. Later, you will be able to assign up to four
simultaneous drum instruments in three dynamic levels to each step. A value of 12 corresponds to a three-
quarter beat, for example.
42 AXON AX 100 mkII V. 1.0 (English)
Page 43

Instruments (1-4)
Select an instrument from the list of the selected drumkit and start the editing process (ENTER button). The
lower half of your AXON display will now show a dotted line with a cursor that you can move back and forth
(PARAMETER +/- buttons) according to the individual steps specified in STEPS. Use the VALUE + button to
set an accent at a selected step position. The accent is marked by a small bar at the step position.
Pressing the VALUE + button repeatedly strengthens the accent, which is indicated by a larger bar.
Conversely, the VALUE - button weakens existing accents and removes them from the pattern.
Press the EXIT button when you are finished programming the drum instrument. You can now repeat the
process for up to three additional instruments to be used within the pattern.
Press the EXIT button again to close the Pattern Editor. Changes to a pattern are indicated by a flashing
display. Press the STORE button to save the pattern to memory.
Track
Track Editor (1-8)
Use this submenu to open the Track Editor for drum sequences. Up to 8 tracks can be programmed, which
can then be triggered within a preset using the hold switch. A track sequence consists of up to 32 steps in
which you can combine patterns in any order or repeat them as needed. Select the desired track number with
the VALUE +/- buttons and press ENTER to start programming the track. Press the EXIT button again to close
the Track Editor.
Step (ST)
(0-31)
Enter the step number of the track sequence here. The individual steps will be played in order. A maximum of
32 steps are available.
Count (C)
(0-99)
Use this parameter to set the number of times the pattern should be repeated within the step specified in ST.
The value 1 will play the pattern once. Higher values will repeat the pattern the given number of times. The
value 0 marks the end of a track sequence. The drum sequencer will automatically cancel the track output at
this point.
Pattern (PT)
(1-32)
AXON AX 100 mkII V. 1.0 (English) 43
Page 44

Select the pattern to be played back at the step number specified in ST. Changes to a track are indicated by a
flashing display. Press the STORE button to save the track to memory.
ADC Monitor (ADC MON)
This option will provide you with an insight into the ANALOG/DIGITAL CONVERTER of your AXON. Press the
ENTER button to monitor the digitized hex data generated by the AXON from the analog string signals. This
can be useful for diagnostic purposes, when detecting defects in the cable between the guitar interface and
the AXON, for example.
44 AXON AX 100 mkII V. 1.0 (English)
Page 45

The Computer Editor
As you have surely seen by now, it's not easy to keep a clear overview in the face of so many options. Be
included Editor simplifies this problem immediately, as it offers direct on screen access to all parameters of the
AXON AX 100 mkII. All you need is a computer (PC or Mac) with a MIDI interface (generally an integral
component of the soundcard).
Installation in Windows
1. Insert the included AXON CD in your drive and wait for the autorun application to launch. If the autorun
application on the CD does not launch automatically, start the application manually by double-clicking
“Autorun.exe” in the root folder of the CD.
2. Select your language, and “AXON AX 100 mkII” in the following menu. The setup wizard will now appear.
3. Choose a language for the setup wizard and click “Next” to continue with the installation.
The InstallShield Wizard will now display its welcome message.
4. The default destination for the installation is specified in the following window. If you prefer a different
location, please click “Change”.
5. Click “Finish” to complete the installation.
6. Launch the application with Start \ Programs \ TerraTec \ AXON Editor.
Installation in MAC OS X
1. Look for the file AXON_AX_100_Editor_Vxxx.pkg on the CD in the Editor\MAC folder.
2. Start the installation by double-clicking the file. The setup wizard will now appear.
3. Select the location for the installation.
4. The Editor can be launched at System\Programs when the installation is complete.
Note: We will not describe the individual functions again at this point, as they are identical to those of the
AXON and have been already explained above.
The use of the Editor is self-explanatory once you have read the relevant chapters carefully. We will explain
differences and enhanced functions, of course.
AXON AX 100 mkII V. 1.0 (English) 45
Page 46

Global
To work with the Editor, you must have a bidirectional connection between the AXON AX 100 mkII and a MIDI
interface, i.e.:
MIDI In AXON with MIDI Out of your interface and
MIDI Out AXON with MIDI In of your interface.
Once you have set up the connection, select the MIDI port of your computer in the Editor under Global – MIDI
I/O and click “Connect”. A pop-up will appear and the checkbox under AXON will be marked “Connected”. The
Editor is now ready to use, letting you remotely control the AXON AX 100 mkII in real time and monitor the
results.
Managing, editing and saving the 500 sounds in 128 memory slots becomes child's play with the Editor.
Special features:
Sensitivity – Link button: this button links all six sliders, allowing them to be moved as a single slider.
SysEx File – Load & Save button: use this function to import and export SysEx data. All SysEx formats
from AXON firmware 2.00 upward may be imported.
46 AXON AX 100 mkII V. 1.0 (English)
Page 47

Presets
This page manages all parameters related to the creation of presets such as sound selection, hold functions,
arpeggiator and sequencer settings.
Special features:
A split can be set by clicking the “Split at” button. The Editor illustrates the split like this:
The settings now only apply to the three low strings. Switching to Split 2 inverts the display and the
settings then apply to the three high strings.
To delete a split, click the “Merge with” button. This will rejoin the split zone with its neighbor.
To edit a preset, activate it using the “Get Preset” button in the Editor. After editing, save it to one of the
128 memory slots with “Save to”.
AXON AX 100 mkII V. 1.0 (English) 47
Page 48

Arpeggiator / Sequencer
A broad range of arpeggiator and sequencer settings can be configured here.
Chains
48 AXON AX 100 mkII V. 1.0 (English)
Page 49

CC Defaults
MIDI Mapping
AXON AX 100 mkII V. 1.0 (English) 49
Page 50

Appendix
Factory Reset
Press and hold the PRESET and EXIT buttons while powering the device up. All settings will be returned to
their factory defaults. As this also affects the presets, be sure to back them up beforehand with the Editor (see
SysEx)
Factory Presets
Factory presets were assigned to memory slots 129-256 to give you an overview of the wide range of possible
playing parameters. You can also use the factory presets as a starting point for your own experimentation,
editing them to suit your wishes. Edited factory presets can be stored in any of the slots within the USER range
(1-128).
Troubleshooting
No output to external MIDI output device.
Question: When I play my guitar, the AXON responds by displaying the pitches or the string level on the
display, but the MIDI output device does not play.
Possible fault: Cabling/setup
Solution:
Ensure that the MIDI cables are correctly connected (from the MIDI OUT of your AXON to the MIDI IN of
your synthesizer).
The MIDI channels of both instruments must be set correctly.
The synthesizer should be in multitimbral mode.
Also ensure that the audio cable from your synthesizer to the amplifier is intact and correctly connected.
Bending doesn’t work properly.
Question: I hear the right note when I pick a string, but hammer-on, pull-off and bending does not work.
Possible problem: The pitchbend settings of the AXON and the external device may not match, or quantize is
enabled.
Solution:
Check whether the pitchbend range settings of the external MIDI device match those of the AXON
(GLOBAL MODE).
Ensure that the QUANTIZE value in the preset split (PRESET MODE) is set to AUTO or OFF.
I get partially incorrect notes.
Question: When I play my guitar, the notes I hear are either partially or completely wrong.
Possible problem: Tuning discrepancy.
Solution:
Tune your guitar using the AXON tuning aid. If you need to tune the AXON to match your guitar, use the
Tune Base function in GLOBAL MODE.
The transposition function may be accidentally enabled in the preset split. Disable transposition (PRESET
MODE).
50 AXON AX 100 mkII V. 1.0 (English)
Page 51

Your MIDI output device may also be incorrectly tuned or transposed. Make sure that all of the values are
correct.
Differing string volumes
Question: One or more strings is too loud or soft in relation to the others.
Possible problem: the sensitivity of the individual strings is not set correctly.
Solution:
Adjust the sensitivity of the affected string(s) in the AXON.
(-> GLOBAL/GUITAR)
Strong differences in the dynamics of individual notes
Question: What can I do about extremely irritating, strong dynamic differences between individual notes?
Possible problem: Incorrect velocity parameters.
Solution:
The velocity settings of the AXON must be suitable to the sound of the output device. Try reducing the
velocity sensitivity parameter in the split preset (PRESET MODE) and increasing the velocity offset
parameter.
Incorrect sounds
Question: Sounds shown on the display of the AXON do not match those that I'm hearing from the external
MIDI output device.
Possible problem: The external MIDI output device is not working in General MIDI mode, or does not support
this mode.
Solution:
Set your MIDI output device to GM mode. If your output device does not support this standard, set the
Soundnames parameter to “NUM”. You will then be able to select sound programs numerically via the
MIDI bank and number.
AXON AX 100 mkII V. 1.0 (English) 51
Page 52

52 AXON AX 100 mkII V. 1.0 (English)
Page 53

r
r
f
f
r
r
r
r
r
r
Preset list
-
Attack -7 -
-
-
-
Attack -40 -
Attack -20 -
Attack -20
-
-
1 GrandPiano Control Damper Pedal On/Off - Grand Piano Wide Trigger -
2 PianoMellow Control Damper Pedal On/Off - Grand Piano Mellow Trigger -
3 ElectGrand Control Damper Pedal On/Off - Electric Grand Trigger -
4 Big Stage Control Damper Pedal On/Off - The Big Stage Trigger -
5 PianoString Control Damper Pedal On/Off - Grand Piano & Stereo Strings Trigger -
6 E-Piano1 Control Damper Pedal On/Off - Electric Piano 1 Trigger -
7 EPianoTrem Control Damper Pedal On/Off - Electric Piano 1 Tremolo Trigger -
8 E-Piano2 Control Damper Pedal On/Off - Electric Piano 2 Trigger -
Style Nr. Name Holdmode Control/Preset Split 1 Instrument Transpose Quantize Misc Split 2 Instrument Transpose Quantize Misc
9 E-Piano2 FX Control Damper Pedal On/Off - Electric Piano 2 Chorus Trigger -
10 Clavichord Control Damper Pedal On/Off - Clavichord Trigge
11 Organ 1 Control Modulation Wheel - Drawbar Organ 1 Trigger -
12 Organ 2 Control Modulation Wheel - 70s Organ Trigger -
13 RockOrgan Control Modulation Wheel - Rock Organ Trigger -
PianoOrgansGuitarsBassesBrassReedPipesChrom. PercEthnic
18 A-Guitar 1 Seperate 128: Hold Pad - Nylon Guitar 2 Off -
19 A-Guitar 2 Seperate 128: Hold Pad - Nylon Guitar Wide Off -
20 AGuitar&Pad Control Modulation Wheel - Ocean Memories Off -
21 JazzGuitar Arpeggiator 24: JazzRhythm - Jazz Guitar Amp Off -
14 RockRotary Control Modulation Wheel - Rock Rotary Trigger -
15 ChurchOrgan Control Modulation Wheel - Church Organ Trigger -
16 Hitchcock Control Modulation Wheel - Hitchcock Organ Trigger Attack -6 -
17 Accordion Control Modulation Wheel - Accordion Trigge
22 Nylon&Steel Seperate 128: Hold Pad - Nylon & Steel Of
23 AcouBass Seperate 25: FingerBass - Acoustic Bass -12 Off -
24 JazzRhythm Seperate 128: Hold Pad - Jazz Rhythm -12 Off -
25 FingerBass Seperate 26: PickBass - Finger Bass -12 Off -
26 PickBass Seperate 28: SlapBass - Pick Bass -12 Off -
27 Fretless Seperate 25: FingerBass - Fretless -12 Off -
28 SlapBass Seperate 25: FingerBass - Slap Bass 1 -12 Of
29 Violin Seperate 127: String Pad - Violin +12 Off Attack -20 -
30 Viola Seperate 127: String Pad - Viola Off Attack -20 -
31 Cello Seperate 127: String Pad - Cello -12 Off Attack -20 -
32 Contrabass Seperate 127: String Pad - Contrabass -12 Off Attack -30 -
33 TremStrings Seperate 128: Hold Pad - Tremolo Strings Off Attack -30 -
34 Harp Seperate 127: String Pad - Harp Trigger -
35 Enya's Seperate 128: Hold Pad - Enya's Garden Trigger -
36 Eden's Seperate 128: Hold Pad - Eden's Garden Trigge
37 Strings 1 Seperate 128: Hold Pad - Strings Wide Pan On Attack -20 -
38 Strings 2 Seperate 128: Hold Pad - Slow Strings On Attack -40 -
39 SynthString Seperate 128: Hold Pad - Synth Strings 1 On Attack -20 -
ble
Strings
Ensem
String-
44 SopranSax Seperate 127: String Pad - Soprano Sax Off Attack -64 -
45 AltoSax Seperate 127: String Pad - Alto Sax Off Attack -64 -
46 Oboe Seperate 127: String Pad - Oboe +12 Trigger -
47 EnglishHorn Seperate 127: String Pad - English Horn Trigger Attack -30 -
48 Bassoon Seperate 127: String Pad - Bassoon Trigger Attack -25 -
49 Clarinet Seperate 127: String Pad - Clarinet Trigge
50 Piccolo Seperate 127: String Pad - Piccolo +12 Trigger Attack -20 -
51 Flute Seperate 127: String Pad - Flute Trigger Attack -20 -
52 Pan Flute Seperate 127: String Pad - Pan Flute Trigger Attack -20 -
53 Bottle Seperate 127: String Pad - Bottle Trigge
54 Celesta Seperate 127: String Pad - Celesta Trigger -
55 Vibes Seperate 127: String Pad - Vibes Trigger -
56 Marimba Seperate 127: String Pad - Marimba Trigger -
57 Xylophon Seperate 127: String Pad - Xylophon Trigger -
40 Trumpet Control Modulation Wheel - Trumpet Trigger -
41 Trombone Control Modulation Wheel - Trombone Trigger -
42 Tuba Control Modulation Wheel - Tuba Trigger Attack -30 -
43 French Horn Control Modulation Wheel - French Horn Solo Trigge
58 TubularBell Seperate 127: String Pad - Tubular Bells Trigge
59 Sitar Seperate 128: Hold Pad - Sitar Trigger -
60 Tamboura Seperate 128: Hold Pad - Tamboura Trigger -
61 Koto Seperate 128: Hold Pad - T.Koto Trigger -
62 Kanoon Seperate 128: Hold Pad - Kanoon Trigger -
63 Kalimba Seperate 128: Hold Pad - Kalimba Trigger -
64 Shamisen Seperate 128: Hold Pad - Shamisen Trigge
AXON AX 100 mkII V. 1.0 Tables 53
Page 54

f
f
f
y
r
f
r
r
f
f
r
Attack -20
-
Attack -20 -
Attack -30 -
Attack -40 Fret 9-End Violin Of
PickControl 50 Marimba Wide Trigge
Channel Volume
-
Attack -20 -
Seperate 128: Hold Pad String 1,2 Warm Pad -12 On Attack -7 String 3,4,5,6 Tamboura On
65 Square Lead Seperate 128: Hold Pad - Square Lead 2 Off -
66 MunchSquare Seperate 128: Hold Pad - Munch Square Off -
67 Saw Lead Seperate 128: Hold Pad - Saw Lead Off -
68 SeqAnalog Seperate 128: Hold Pad - Seq Ana Off -
69 Big Lead Seperate 128: Hold Pad - Big Lead Off -
70 Fifth Lead Seperate 128: Hold Pad - Fifth Lead Off -
71 The Source Seperate 128: Hold Pad - The Source Off -
72 Oberheim Seperate 128: Hold Pad - Oberheim Off -
73 Dewire Lead Seperate 128: Hold Pad - Dewire Lead Off -
Style Nr. Name Holdmode Control/Preset Split 1 Instrument Transpose Quantize Misc Split 2 Instrument Transpose Quantize Misc
74 PercSquare Seperate 128: Hold Pad - Percussive Square Of
75 Warm Pad Control Damper Pedal On/Off - Warm Pad Off Attack -20 -
76 Thick Pad Control Damper Pedal On/Off - Thick Pad Off Attack -20 -
77 SuperAnalog Control Modulation Wheel - SuperAnalog Off Attack -20 -
78 Horn Pad Control Modulation Wheel - Horn Pad Off Attack -20 -
79 PolySyntPad Control Damper Pedal On/Off - Poly Synth Pad Off Attack -20 -
80 AnalogPad Layer 127: String Pad - Ana Pad Off Attack -20 -
85 HarmoRain Seperate 127: String Pad - Harmo Rain Off -
86 AfricaWater Seperate 128: Hold Pad - African Waterfalls Off -
87 AnceString Control Modulation Wheel - AnceString Off Attack -20 -
88 Crystal Seperate 128: Hold Pad - Crystal Off -
89 Harp Vox Seperate 127: String Pad - Harp Vox Trigger Attack -20 -
90 Stardust Seperate 128: Hold Pad - Stardust Of
91 Bass&Piano Control Damper Pedal On/Off String 1,2 Acoustic Bass -12 Off String 3,4,5,6 Grand Piano Wide Trigger
92 Jazz Trio Control Damper Pedal On/Off String 1,2 Jazz Rhythm -12 Off String 3,4,5,6 Electric Piano 1 Wide Trigger
93 Bass&Guitar Seperate 128: Hold Pad String 1,2 Fretless -12 Off String 3,4,5,6 Nylon Guitar Off
94 Moog&Lead Seperate 128: Hold Pad String 1,2 Simple Moog -12 Off String 3,4,5,6 Munch Square Off
95 IndishCurr
96 Bass&Flange Seperate 128: Hold Pad Fret 1-11 Finger Bass -12 Off Fret 12-End Flange Bass -12 Off
97 Country Arpeggiator 30: Viola Fret 1-8 Banjo Off Fret 9-End Fiddle +12 Off Attack -62
98 Organs Control Modulation Wheel Fret 1-8 Drawbar Organ 1 Trigger Fret 9-End Percussive Organ Trigger
81 Glass Pad Seperate 128: Hold Pad - Glass Pad Off Attack -20 -
82 Bowed Glass Seperate 128: Hold Pad - Bowed Glass Off Attack -20 -
83 Silona Pad Control Brightness - Silona Pad Off Attack -20 -
84 Cold Space Seperate 128: Hold Pad - Cold Space Of
99 GoEast Seperate 128: Hold Pad Fret 1-8 Sitar Trigger Fret 9-End T.Koto Trigger
100 Classic Seperate 127: String Pad Fret 1-8 Strings Trigge
101 Basses Seperate 128: Hold Pad PickControl 50 Finger Bass -12 Off PickControl 50 Slap Bass 1 -12 Off
102 Pianos Seperate 127: String Pad PickControl 50 Grand Piano Trigger PickControl 50 Grand Piano Mellow Trigger
103 Brass Seperate 127: String Pad PickControl 50 Trumpet Trigger PickControl 50 Brass Section -12 Trigger
106 Organ&Mod Seperate 128: Hold Pad Pick Control Drawbar Organ 1 Trigger Modulation Wheel
107 Guitar&Mod Seperate 128: Hold Pad Pick Control Nylon Guitar Off Chorus Send Level
104 SynthLeads Control Modulation Wheel PickControl 50 Wire Lead Off PickControl 50 Fifth Lead Off
105 Percussion Seperate 128: Hold Pad PickControl 50 Celesta Trigge
108 Bass&Filter Seperate 128: Hold Pad Pick Control Synth Bass 1 Off Brightness
109 Synth&Pan Seperate 128: Hold Pad Pick Control Seq Ana On Panorama
110 Flute&Revrb Seperate 128: Hold Pad Pick Control Flute Trigger Reverb Send Level
111 Harp&Attack Seperate 128: Hold Pad Pick Control Harp Trigger Attack Time
112 SynthMorph1 Stack 113: SynthMorph2 Pick Control Saw Lead Off Channel Volume
113 SynthMorph2 Stack 112: SynthMorph1 Pick Control Fat & Perky Of
114 MS Bass Seperate 128: Hold Pad see Editor for details
115 MS Guitar Seperate 128: Hold Pad see Editor for details
116 MS Organs Control Modulation Wheel see Editor for details
117 MS Piano Control Damper Pedal On/Off see Editor for details
118 MS Synth Arpeggiator 118: MS Synth see Editor for details
119 MS Misc1 Seperate 128: Hold Pad see Editor for details
120 MS Misc2 Seperate 128: Hold Pad see Editor for details
121 Easy Kit - - - Guitar Easy Kit Off -
122 StandardKit - - - Standard Kit -12 Off -
123 Electro Kit - - - Electro Kit -12 Off -
Multisplits Synth LeadSynth PadPickcontrol Picksplit Synth EffectsStringsplitFretsplit
124 TR-909 Kit - - - TR-909 Kit -12 Off -
Drums
125 Jazz Kit - - - Jazz Kit -12 Off -
126 SFX Kit - - - SFX Kit Of
127 String Pad - - - Strings Trigger Attack -20 -
128 Hold Pad - - - Warm Pad Trigge
Hold
54 AXON AX 100 mkII V. 1.0 Tables
Page 55

Parameter Overview Presets
PRESET Splitzone selektieren SOUND auswählen
VOLUME 0 - 127
TRANSPOSE -36 - +36
QUANTIZE AUTO, OFF, ON,
PAN POS L15 - R15
PAN SPREAD -15 - +15
REVERB 0 - 127
CHORUS 0 - 127
VEL SENSE 0 - 127
VEL OFFSET -64 - +63
PICK CONTROL Controller Auswahl 0 - 119
PICK VAL1 0 - 127
PICK VAL2 0 - 127
NAME editieren
STRING MODE SEP, COM
HOLDMD COMMON
SEP Preset Auswahl 1 - 256
VOLUME OFF - 127
SEQ PATTERN OFF - 32
SEQ TRACK OFF - 8
SEQ TEMPO EXT., 41 - 240
LAYER Preset Auswahl 1 - 256
VOLUME OFF - 127
SEQ PATTERN OFF - 32
SEQ TRACK OFF - 8
SEQ TEMPO EXT., 41 - 240
ARPEG Preset Auswahl 1 - 256
TEMPO EXT., 41 - 240
LENGTH 1 - 32
SCAN ASSIGN, REVERS,
RYTHM 1/16, 1/8, 1/4,…
SYNC ON, OFF
OCTAVES 1 - 4
REPEATS 1 - 32
VELOCITY OFF - 127
SEQ PATTERN OFF - 32
SEQ TRACK OFF - 8
CNTRL Controller Auswahl 0 - 119
SEQ PATTERN OFF - 32
SEQ TRACK OFF - 8
SEQ TEMPO EXT., 41 - 240
STACK Preset Auswahl 1 - 256
VOLUME OFF - 127
SEQ PATTERN OFF - 32
SEQ TRACK OFF - 8
SEQ TEMPO EXT., 41 - 240
WHEELCNTL AIX Controller Auswahl 0 - 119
EXP1 Controller Auswahl 0 - 119
EXP2 Controller Auswahl 0 - 119
NRPN/RPN NONE
NRPN Controller Auswahl 0 - 119
RPN Controller Auswahl 0 - 119
FINGER PICK ON, OFF
STRING SPLIT 1 - 5
FRET SPLIT 0 - 23
PICK SPLIT1 0 - 99
PICK SPLIT2 0 - 99
AXON AX 100 mkII V. 1.0 Tables 55
Page 56

Parameter Overview Global
GLOBAL BASIC CHANNEL 1 - 16
HOLD CHANNEL 1 - 16
SEQ CHANNEL 1 - 16
PBEND RANGE OFF - 24
SND PBENDRG ON, OFF
LOCAL MODE ON, OFF
TUNE BASE PICK THE OPEN A
GUITAR NO. INPUT TYP GUITAR, BASS, VIOLIN,
INPUT PICKUP MAGNET IC, PIEZO
WHEELCNTRL ON/OFF
NOTE OFF LIMIT 2 - 30
TRIG. LEVEL 0 - 9
SENSE E6 - E1 8 - 64
CC DEFAULTS BANK SEL MSB
MODULATION
BREATH CONTROL
u.s.w.
MIDI MAPPING Map MIDI X to Preset
Parameter Overview Chain
CHAIN Edit Chain Name
Select Preset
Select Step
Parameter Overview Utility
UTILITY DISPLAY Tuning, Level
SOUNDNAMES NUM, GM, WXT
DCLIC RESPNS 1 - 20
XMIT SYSEX Total Dump
PRESET ALL, 1 - 128
CHAIN ALL, 1 - 32
ARP-PATTERN ALL, 1 - 16
SEQUENC ALL, PATTERN,
RECEIVE SYSEX ON, OFF
EDIT SEQUENCE TEMPO EXT., 41 - 240
VOLUME 0 - 127
REVERB SEND 0 - 127
CHORUS SEND 0 - 127
MODE PATTERN, TRACK
PATTERN KIT Select Drum STEPS 1 - 16
Instrument 1 Edit Sequen Instrument 2 Edit Sequen Instrument 3 Edit Sequen Instrument 4 Edit Sequen TRACK STEP 0 - 31
COUNT 0 - 99
PATTERN 1 - 32
ADC MON
56 AXON AX 100 mkII V. 1.0 Tables
Page 57

Manufacturer: TerraTec Electronic GmbH Model: AXON AX 100 mkII Version: 4.xx Date: 27.04.2005
MIDI Implementation Chart v. 2.0
1. Basic Information
MIDI channels 1-6, 10, 11-16 1, 11 / 1-16 1) Default Values; Channels 1-16 can be used
Note numbers 0-126 0-127 1)
Program Change 0-127 0-127 Mapped to Presets when Local Mode = On
Bank Select response? (Yes/No)
If yes, banks utilized
Modes Supported (Yes/No)
Multi (Mode 5)
Poly (Mode 3)
Omni (Mode 1)
Mono (Mode 2)
“Guitar” (Mode 4)
Note On Velocity (Yes/No) Yes Yes 1)
Note Off Velocity (Yes/No) No No
Channel Aftertouch (Yes/No) No Yes 1)
Poly (Key) Aftertouch (Yes/No) No No
Pitch Bend (Yes/No) Yes Yes 1)
Active Sensing (Yes/No) No No
System Reset (Yes/No) No Yes 1)
Tune Request (Yes/No) No No
System Exclusive messages supported (Yes/No)
Sample Dump Standard
Device Inquiry (General Information)
File Dump
MIDI Tuning
Master Volume
Master Balance
Notation Information
Turn GM System On
Turn GM System Off
Other (note in Remarks column)
NRPNs (Yes/No) No Yes 2) Described in “Table of NRPN Controllers”
RPN 00 (Pitch Bend Sensitivity) (Yes/No)
RPN 01 (Fine Tuning) (Yes/No)
RPN 02 (Coarse Tuning) (Yes/No)
RPN 03 (Tuning Program Select) (Yes/No)
RPN 04 (Tuning Bank Select) (Yes/No)
2. MIDI Timing and Synchronization
MIDI Clock (Yes/No) Yes Yes Used for Arpeggiator and Sequencer
Song Position Pointer (Yes/No) No No
Song Select (Yes/No) No No
Start (Yes/No)
Continue (Yes/No)
Stop (Yes/No)
MIDI Time Code (Yes/No) No No
MIDI Machine Control (Yes/No) No No
MIDI Show Control (Yes/No)
If yes, MSC Level supported
3. Extensions Compatibility
General MIDI compatible? (Yes/No)
If yes, is GM default power-up mode? (Yes/No)
DLS compatible? (Yes/No)
If yes, DLS Level(s) supported
If yes, can DLS files be imported? (Yes/No)
If yes, can DLS files be exported? (Yes/No)
Importation of Standard MIDI Files (Yes/No)
If yes, Types supported
Exportation of Standard MIDI Files (Yes/No)
NOTES
1) Only recognized when Local Mode = Off. 2) Recognized on any channel when Local Mode = Off . Recognized on Basic/Hold channel
only when Local Mode = On. In this case the controller is ignored if it is already assigned internally. It is re-transmitted on the incoming
channel when Stringmode = Common. It is re-transmitted on the incoming channel and the 5 following channels when Stringmode =
Separate 3) Any Controller between 0 and 119 can be transmitted when assigned to a Wheel/Pedal or used with the Pickcontrol feature.
In this table “Transmitted” is only marked with “Yes” if the controller has a function additional to these assignments. 4) The effective
Volume/Pan value depends not only on the incoming controller value, but also on several internal parameters
Transmitted Recognized Remarks
Yes 1)
No
No
No
No
No
No
No
No
No
Yes
Yes
Yes
No
No
No
Yes
No
Yes
No
Yes 1)
No
Yes 1)
Yes 1)
No 1)
No 1)
Yes 1)
No
No
No
No
Yes 1)
No
No
Yes 1)
No
Yes
Yes 1)
Yes 1)
Yes 1)
No
No
Yes
Yes
Yes
No
Yes 1)
No
No
MSB only, see Patchlist
Described in “MIDI SysEx Implementation”
Used for Arpeggiator and Sequencer
Used for Arpeggiator and Sequencer
Used for Arpeggiator and Sequencer
AXON AX 100 mkII V. 1.0 Tables 57
Page 58

MIDI Implementation Chart v. 2.0
Manufacturer: TerraTec Electronic GmbH Model: AXON AX 100 MkII Version: 4.xx Date: 27.04.2005
Control # Function
0 Bank Select (MSB) Yes Yes 2) See Patchlist for banks used
1 Modulation Wheel (MSB) No Yes 2)
2 Breath Controller (MSB) No No
3 No No
4 Foot Controller (MSB) No No
5 Portamento Time (MSB) No Yes 2)
6 Data Entry (MSB) No Yes 2)
7 Channel Volume (MSB) Yes Yes 2) 4)
8 Balance (MSB) No No
9 No No
10 Pan (MSB) Yes Yes 2) 4)
11 Expression (MSB) No Yes 2)
12 Effect Control 1 (MSB) No No
13 Effect Control 2 (MSB) No No
14 No No
15 No No
16 General Purpose Controller 1 (MSB) No No
17 General Purpose Controller 2 (MSB) No No
18 General Purpose Controller 3 (MSB) No No
19 General Purpose Controller 4 (MSB) No No
20 No No
21 No No
22 No No
23 No No
24 No No
25 No No
26 No No
27 No No
28 No No
29 No No
30 No No
31 No No
32 Bank Select (LSB) Yes No
33 Modulation Wheel (LSB) No No
34 Breath Controller (LSB) No No
35 No No
36 Foot Controller (LSB) No No
37 Portamento Time (LSB) No No
38 Data Entry (LSB) No No
39 Channel Volume (LSB) No No
40 Balance (LSB) No No
41 No No
42 Pan (LSB) No No
43 Expression (LSB) No No
44 Effect Control 1 (LSB) No No
45 Effect Control 2 (LSB) No No
46 No No
47 No No
48 General Purpose Controller 1 (LSB) No No
49 General Purpose Controller 2 (LSB) No No
50 General Purpose Controller 3 (LSB) No No
51 General Purpose Controller 4 (LSB) No No
52 No No
53 No No
54 No No
55 No No
56 No No
57 No No
58 No No
59 No No
60 No No
61 No No
62 No No
63 No No
MIDI Implementation Chart v. 2.0
Transmitted
(Y/N)3
Recognized (Y/N) Remarks
58 AXON AX 100 mkII V. 1.0 Tables
Page 59

Manufacturer: TerraTec Electronic GmbH Model: AXON AX 100 MkII Version: 4.xx Date: 27.04.2005
Control # Function Transmitted
64 Sustain Pedal No Yes 2)
65 Portamento On/Off No Yes 2)
66 Sostenuto No Yes 2)
67 Soft Pedal No Yes 2)
68 Legato Footswitch No No
69 Hold 2 No No
70 Variation No No
71 Timbre / Harmonic Intensity No Yes 2)
72 Release Time No Yes 2)
73 Attack Time Yes Yes 2)
74 Brightness No Yes 2)
75 Decay Time No Yes 2)
76 Vibrato Rate No Yes 2)
77 Vibrato Depth No Yes 2)
78 Vibrato Delay No Yes 2)
79 Sound Controller 10 No No
80 General Purpose Controller 5 No No
81 General Purpose Controller 6 No No
82 General Purpose Controller 7 No No
83 General Purpose Controller 8 No No
84 Portamento Control No Yes 2)
85 No No
86 No No
87 No No
88 No No
89 No No
90 No No
91 Reverb Send Level Yes Yes 2)
92 Effects 2 Depth No No
93 Chorus Send Level Yes Yes 2)
94 Effects 4 Depth No No
95 Effects 5 Depth No No
96 Data Increment No No
97 Data Decrement No No
98 Non-Registered Parameter Number (LSB) Yes No
99 Non-Registered Parameter Number (MSB) Yes No
100 Registered Parameter Number (LSB) Yes No
101 Registered Parameter Number (MSB) Yes No
102 No Yes Value>63 = Hold Pedal pressed
103 No Yes Value>63 = Chain Pedal pressed
104 No No
105 No No
106 No No
107 No No
108 No No
109 No No
110 No No
111 No No
112 No No
113 No No
114 No No
115 No No
116 No No
117 No No
118 No No
119 No No
120 All Sound Off No Yes 2)
121 Reset All Controllers No Yes 2)
122 Local Control On/Off No No
123 All Notes Off No Yes 2)
124 Omni Mode Off No No
125 Omni Mode On No No
126 Poly Mode Off No Yes 2)
127 Poly Mode On No Yes 2)
MIDI Implementation Chart v. 2.0 Control Number Information
(Y/N)3
Recognized
(Y/N)
Remarks
AXON AX 100 mkII V. 1.0 Tables 59
Page 60

Table of implemented NRPN controllers 2)
NRPN
MSB
(CC
0x63)
0x01 0x08 0x40 -> no modif.
0x01 0x09 0x40 -> no modif. Vibrate depth modify GS
0x01 0x0A 0x40 -> no modif. Vibrate delay modify GS
0x01 0x20 0x40 -> no modif. TVF cutoff freq modify GS
0x01 0x21 0x40 -> no modif. TVF resonance modify GS
0x01 0x63 0x40 -> no modif. Env. attack time modify GS
0x01 0x64 0x40 -> no modif. Env. decay time modify GS
0x01 0x66 0x40 -> no modif. Env. release time modif GS
0x18 rr 0x40 -> no modif. Pitch coarse of drum instr. note rr in semitones 1) GS
0x1A rr 0x00 – 0x7F
0x1C rr 0x00=left, 0x40=center,
0x1D rr 0x00 – 0x7F Reverb send level of drum instrument note rr 1) GS
0x1E rr 0x00 – 0x7F Chorus send level of drum instrument note rr 1) GS
0x37 0x07 0x00 – 0x7F Master Volume
0x37 0x08 0x00=-12dB, 0x40=0dB,
0x37 0x09 0x00=-12dB, 0x40=0dB,
0x37 0x0A 0x00=-12dB, 0x40=0dB,
0x37 0x0B 0x00=-12dB, 0x40=0dB,
0x37 0x0C 0x00=0Hz to 0x7F=1.25Khz Midi Equalizer Low band freq
0x37 0x0D 0x00=0Hz to 0x7F=1.4Khz Midi Equalizer Med1 band freq
0x37 0x0E 0x00=0Hz to 0x7F=1.4Khz Midi Equalizer Med2 band freq
0x37 0x0F 0x00=0Hz to 0x7F=5.2Khz Midi Equalizer High band freq
0x37 0x10 0x00 – 0x7F Midi Equalizer Med1 band width
0x37 0x11 0x00 – 0x7F Midi Equalizer Med2 band width
0x37 0x18 0x00 – 0x7F Midi Master volume
0x37 0x19 0x00=left, 0x40=center,
0x37 0x1A 0x00=no send,
0x37 0x1B 0x00=no send,
0x37 0x55 bits 7,6: 0
0x37 0x57 0x00 – 0x1F 0x20=all ac-
1) Drumset edit NRPN: 2 different drumset edit tables are implemented :
NRPN
LSB
(CC
0x62)
Data Entry MSB
(CC 0x06)
0x7F=right
0x7F=+12dB
0x7F=+12dB
0x7F=+12dB
0x7F=+12dB
0x7F=right
0x40=default,
0x7F=max
0x40=default,
0x7F=max
bit 5: Reverb on/off
bit 4: Chorus on/off
bit 3,2: 0
bit 1: EQ2
bit 0: EQ1
cepted
1 for channel 10
1 for channels 1-9 or 11-16 : for all these channels, edit table is the same
Description Compatible to
Vibrate rate modify GS
Level of drum instrument note rr 1)
Pan of drum instrument note rr 1) GS
Midi Equalizer Low band gain
Midi Equalizer Med1 band gain
Midi Equalizer Med2 band gain
Midi Equalizer High band gain
Midi Master pan
General Midi reverb send
General Midi chorus send
Effects on/off
EQ2=0, EQ1=0 : equalizer off
EQ2=1, EQ1=0 : 2 band equalizer
EQ2=1, EQ1=1 : 4 band equalizer
System Exclusive Device ID
Standard
GS
60 AXON AX 100 mkII V. 1.0 Tables
Page 61

MIDI SysEx Implementation
Format for AX 100 SysEx dumps (Local Mode = On):
0xF0, SysEx status
0x00, 0x20, 0x36, TerraTec ID
0x20, 0x00, Model ID: AX 100
ah, am, al, Address high, mid, low
ch, cm, cl, Data byte count high 7 bits, mid 7 bits, low 7 bits
dh, dl Data #0 high 7 bits, low 7 bits
... Data ...
dh, dl Data #n high 7 bits, low 7 bits
cc, Checksum
0xF7 End of exclusive
Table of AX 100 SysEx dumps
Local mode = on
Address
ah am al
0x00 0x00 0x00 0x03 0x38 0x5C Dump all data R/T
0x00 0x00 0x01 0x03 0x06 0x00 Dump all presets R/T
0x00 0x00 0x02 0x00 0x16 0x00 Dump all chain presets R/T
0x00 0x00 0x03 0x00 0x04 0x00 Dump all arpeggio pattern R/T
0x00 0x00 0x09 0x00 0x14 0x08 Dump all sequence (tracks/pattern) R/T
0x00 0x00 0x0A 0x00 0x0C 0x00 Dump all sequence pattern R/T
0x00 0x00 0x0B 0x00 0x08 0x00 Dump all sequence tracks R/T
0x00 0x00 0x11 0x00 0x03 0x06 Dump edit preset R/T
0x00 0x00 0x12 0x00 0x00 0x58 Dump edit chain R/T
0x00 0x00 0x13 0x00 0x00 0x20 Dump arpeggio edit pattern R/T
0x00 0x00 0x1A 0x00 0x00 0x30 Dump sequencer edit pattern R/T
0x00 0x00 0x1B 0x00 0x00 0x80 Dump sequencer edit track R/T
0x00 0x00 0x20 0x00 0x00 0x14 Dump global parameter R/T
0x00 0x00 0x21 0x00 0x01 0x70 Dump CC defaults R/T
0x00 0x00 0x22 0x00 0x00 0x50 Dump guitar parameter R/T
0x00 0x00 0x23 0x00 0x02 0x00 Dump MIDI mapping R/T
0x00 0x00 0x24 0x00 0x00 0x06 Dump sequencer globals R/T
0x00 0x00 0x25 0x00 0x00 0x02 Firmware version number T
0x00 0x00 0x26 0x00 0x00 0x06 Sequencer control command (for editor test mode only) R
0x00 0x00 0x27 0x00 0x00 0x00 Lock device (when connected to editor) R
0x00 0x00 0x28 0x00 0x00 0x00 Unlock device (when disconnected from editor) R
0x00 0x01 nn 0x00 0x03 0x06 Dump preset #nn (nn = 0x00..0x7F) R/T
0x00 0x02 nn 0x00 0x00 0x58 Dump chain preset #nn (nn = 0x00..0x1F) R/T
0x00 0x03 nn 0x00 0x00 0x20 Dump arpeggio pattern #nn (nn = 0x00..0x0F) R/T
0x00 0x0A nn 0x00 0x00 0x30 Dump sequence pattern #nn (nn = 0x00..0x1F) R/T
0x00 0x0B nn 0x00 0x00 0x80 Dump sequence track #nn (nn = 0x00..0x07) R/T
0xaa 0x4a 0xaa 0x00 0x00 0x00 Dump Request
Byte Count
ch cm cl
Description Received/
Transmitted
R
Combine bit 6 in “am” with any address to request a dump
of this type
AXON AX 100 mkII V. 1.0 Tables 61
Page 62

Format for GS Compatible SysEx commands
(Local Mode = Off)
0xF0, SysEx status
0x41, id, 0x42, GS Standard address. id=device ID, selected with NRPN 3757
0x12, GS Standard data command
ah, am, al, Address high, mid, low
vv, …, vv, Value databytes
xx, Don´t care
0xF7 End of exclusive
Table of GS Compatible SysEx commands
(Local Mode = Off)
Address
(ah, am, al)
0x40 0x00 0x00 vv vv vv vv Master tune (default vv = 0x00 0x04 0x00 0x00) -100.0 to +100.0 cents.
0x40 0x00 0x04 vv Master volume (default vv = 0x7F)
0x40 0x00 0x05 vv Master key-shift (default vv = 0x40, no transpose)
0x40 0x00 0x06 vv Master pan (default vv = 0x40, center)
0x40 0x00 0x7F 0x00 GS reset
0x00 0x00 0x7F xx GS reset
0x40 0x01 0x10 vv1 … vv16
0x40 0x01 0x30 vv Reverb type (vv=0x00 to 0x07), default = 0x04
0x40 0x01 0x31 vv Reverb character, default vv = 0x04
0x40 0x01 0x32 vv Reverb Pre-LPF, 0 to 7, default vv = 0
0x40 0x01 0x33 vv Reverb master level, default vv = 0x40
0x40 0x01 0x34 vv Reverb time
0x40 0x01 0x35 vv Reverb delay feedback. Only if reverb number=6 or 7 (delays)
0x40 0x01 0x38 vv Chorus type (vv=0 to 7), default = 0x02
0x40 0x01 0x39 vv Chorus Pre-LPF, 0 to 7, default vv = 0
0x40 0x01 0x3A vv Chorus master level, default vv = 0x40
0x40 0x01 0x3B vv Chorus feedback
0x40 0x01 0x3C vv Chorus delay
0x40 0x01 0x3D vv Chorus rate
0x40 0x01 0x3E vv Chorus depth
0x40 0x01 0x3F vv Chorus send level to reverb, default=0
0x40 0x1p 0x02 nn MIDI channel to part assign
Databytes Description
Nibbelized data should be used (always four bytes). For example, to tune
to +100.0 cents, sent data should be 0x00 0x07 0x0E 0x08
Not reset by GS reset.
Voice reserve :
vv1= Part 10 (default vv = 2)
vv2 to vv10 = Part 1 to 9 (default vv = 2)
vv11 to vv16= Part 11 to 16 (default vv = 0)
0x00 : Room1 0x01 : Room2
0x02 : Room3 0x03 : Hall1
0x04 : Hall2 0x05 : Plate
0x06 : Delay 0x07 : Pan delay
0x00 : Chorus1 0x01 : Chorus2
0x02 : Chorus3 0x03 : Chorus4
0x04 : Feedback 0x05 : Flanger
0x06 : Short delay 0x07 : FB delay
p is part (0x0 to 0xF)
nn is MIDI channel (0x00 to 0x0F, 0x10=OFF).
This SYSEX allows to assign several parts to a single MIDI channel or to
mute a part.
Default assignment :
part MIDI channel
0 9 (DRUMS)
1-9 0-8
10-15 10-15
62 AXON AX 100 mkII V. 1.0 Tables
Page 63

Address
(ah, am, al)
0x40 0x1p 0x15 vv Part to rhythm allocation
In the following addresses, n is the MIDI channel (0x0 to 0xF)
0x40 0x1n 0x40 vv1 ... vv12 Scale tuning
0x40 0x1n 0x1A vv Velocity slope from 0x00 to 0x7F (default = 0x40)
0x40 0x1n 0x1B vv Velocity offset from 0x00 to 0x7F (default = 0x40)
0x40 0x1n 0x1F vv CC1 Controller number (0x00-0x5F) (default = 0x10)
0x40 0x1n 0x20 vv CC2 Controller number (0x00-0x5F) (default = 0x11)
0x40 0x2n 0x00 vv Mod pitch control (-24,+24 semitone) (default = 0x40)
0x40 0x2n 0x01 vv Mod tvf cutoff control (default = 0x40)
0x40 0x2n 0x02 vv Mod Amplitude control (-100%-+100%) (default = 0x40)
0x40 0x2n 0x03 vv Mod lfo1 rate control (default = 0x40)
0x40 0x2n 0x04 vv Mod lfo1 pitch depth (0-600 cents) (default = 0x0A)
0x40 0x2n 0x05 vv Mod lfo1 tvf depth (default = 0)
0x40 0x2n 0x06 vv Mod lfo1 tva depth (0-100%) (default = 0)
0x40 0x2n 0x10 vv Bend pitch control (-24,+24 semitone) (default = 0x42)
0x40 0x2n 0x11 vv Bend tvf cutoff control (default = 0x40)
0x40 0x2n 0x12 vv Bend Amplitude control (-100%-+100%) (default = 0x40)
0x40 0x2n 0x14 vv Bend lfo1 pitch depth (0-600 cents) (default = 0)
0x40 0x2n 0x15 vv Bend lfo1 tvf depth (default = 0)
0x40 0x2n 0x16 vv Bend lfo1 tva depth (0-100%) (default = 0)
0x40 0x2n 0x20 vv CAF pitch control (-24,+24 semitone) (default = 0x40)
0x40 0x2n 0x21 vv CAF tvf cutoff control (default = 0x40)
0x40 0x2n 0x22 vv CAF Amplitude control (-100%-+100%) (default=0x40)
0x40 0x2n 0x24 vv CAF lfo1 pitch depth (0-600 cents) (default = 0)
0x40 0x2n 0x25 vv CAF lfo1 tvf depth (default = 0)
0x40 0x2n 0x26 vv CAF lfo1 tva depth (0-100%) (default = 0)
0x40 0x2n 0x40 vv CC1 pitch control (-24,+24 semitone) (default = 0x40)
0x40 0x2n 0x41 vv CC1 tvf cutoff control (default = 0x40)
0x40 0x2n 0x42 vv CC1 Amplitude control (-100%-+100%) (default=0x40)
0x40 0x2n 0x44 vv CC1 lfo1 pitch depth (0-600 cents) (default = 0)
0x40 0x2n 0x45 vv CC1 lfo1 tvf depth (default = 0)
0x40 0x2n 0x46 vv CC1 lfo1 tva depth (0-100%) (default = 0)
0x40 0x2n 0x50 vv CC2 pitch control (-24,+24 semitone) (default = 0x40)
0x40 0x2n 0x51 vv CC2 tvf cutoff control (default = 0x40)
0x40 0x2n 0x52 vv CC2 Amplitude control (-100%-+100%) (default = 0x40)
0x40 0x2n 0x54 vv CC2 lfo1 pitch depth (0-600 cents) (default = 0)
0x40 0x2n 0x55 vv CC2 lfo1 tvf depth (default = 0)
0x40 0x2n 0x56 vv CC2 lfo1 tva depth (0-100%) (default = 0)
Databytes Description
p is part (0x0 to 0xF)
vv is 0x00 (sound part) or 0x01 (rhythm part).
This SYSEX allows a part to play sound or drumset. There is no limitation
of the number of parts playing drumset.
Default assignment : part 0 plays drums (default MIDI channel 9) all other
parts play sound.
vv1 to vv12 are 12 semi-tones tuning values (C, C#, D, ... A#, B)
Range: -64 (0x00) … 0 (0x40) … +63(0x7F) cents.
This SYSEX allows non chromatic tuning of the musical scale on a given
MIDI channel.
Default vv1, ... ,vv12 = 0x40 (chromatic tuning).
Scale tuning has no effect if the part is assigned to a rhythm channel or if
the sound played is not of chromatic type.
n is don’t care. Rate is common on all channels
AXON AX 100 mkII V. 1.0 Tables 63
Page 64

Patch list
PRG BNK
0 0 Grand Piano 1 GM
0 1 Grand Piano Wide 1 XG
0 18 Grand Piano Mellow 1 XG
0 40 Grand Piano & Strings 2 XG
0 41 Dream Piano 3 XG
0 50 Grand Piano & StereoStrings 3 TT
1 0 Bright Piano 1 GM
1 1 Bright Piano Wide 1 XG
1 50 The Grand Opener 5 TT
2 0 Electric Grand 1 GM
2 1 Electric Grand Wide 1 XG
2 32 Electric Grand Detuned 2 XG
2 40 Electric Grand & Piano 2 XG
2 41 The Big Stage 2 XG
3 0 Honky Tonk 2 GM
3 1 Honky Tonk Wide 2 XG
4 0 Electric Piano 1 1 GM
4 1 Electric Piano 1 Wide 1 XG
4 18 Electric Piano Mellow 2 XG
4 32 Electric Piano 1 Chorus 2 XG
4 40 Electric Piano 1 Hard 1 XG
4 45 Electric Piano VX 2 XG
4 50 Electric Piano 1 Tremolo 2 TT
4 51 Electric Piano 1 SlowTremolo 2 TT
4 52 Electric Piano 1 & WarmPad 3 TT
4 64 60's EP 3 TT
5 0 Electric Piano 2 2 GM
5
5 32 Electric Piano 2 Chorus 2 XG
5 33 Electric Piano 2 Hard 2 XG
5 34 Electric Piano 2 Legend 2 XG
5 40 Electric Piano 2 Phase 2 XG
5 41 Electric Piano 2 & WarmPad 4 XG
5 42 Electric Piano 2 & Koto 3 XG
5 45 Electric Piano 2 VX 1 XG
5 50 Foster On Stage 4 TT
6 0 Harpsichord 2 GM
6 1 Harpsichord Wide 2 XG
6 25 Harpsichord 2 3 XG
6 35 Harpsichord 3 Modern 3 XG
7 0 Clavichord 2 GM
7 1 Clavichord Wide 2 XG
7 27 Clavichord Wha 2 XG
7 50 Hammer Clav 2 TT
7 51 DX Clav 2 TT
7 52 Mouth Clav 2 TT
7 64 Synthochord 2 XG
7 65 Clavichord Pierce 2 XG
8 0 Celesta 2 GM
8 50 Celesta UnderWater 2 TT
9 0 Glockenspiel 2 GM
10 0 MusicBox 2 GM
10 64 MusicBox Organ 2 XG
11 0 Vibes 1 GM
11 1 Vibes Wide 2 XG
11 45 Vibes Hard 3 XG
12 0 Marimba 2 GM
12 1 Marimba Wide 2 XG
12 64 Marimba Sine 2 XG
12 97 Balafon 1 XG
12 98 Log Drum 2 XG
13 0 Xylophon 1 GM
14 0 Tubular Bells 1 GM
14 96 Church Bell 2 XG
14 97 Carillon 2 XG
15 0 Dulcimer 2 GM
15 35 Dulcimer 2 2 XG
15 96 Gipsy Pick 3 TT
15 97 Santur 4 XG
16 0 Drawbar Organ 1 2 GM
16 32 Drawbar Organ Detuned 2 XG
16 33 60's Organ 1 2 XG
16 34 60's Organ 2 2 XG
16 35 70's Organ 1 2 XG
16 36 OctaSwell 2 XG
16 37 60's Organ 3 2 XG
16 38 EventBar 2 XG
16 40 Dave's Road 3 TT
16 64 Organ Bass 2 XG
16 65 Wallace Organ 2 TT
16 66 Jahrmarkt 2 TT
16 67 Drawbar Organ 3 2 XG
17 0 Percussive Organ 1 1 GM
17 24 Percussive Organ Rotary 2 TT
17 32 Percussive Organ Detuned 2 XG
17 33 Percussive Organ Lite 1 XG
17 37 Percussive Organ 2 2 XG
1 Electric Piano 2 Wide 2 XG
Name
Voices Typ Notes
64 AXON AX 100 mkII V. 1.0 Tables
Page 65

PRG BNK
17 50 Play House C0 4 TT Split D0 / D#0
17 51 Short Reggae 1 TT
18 0 Rock Organ 2 GM
18 50 Rotary Swell 3 TT
18 64 Rock Rotary 2 XG
18 65 Rock Rotary Slow 3 XG
18 66 Rock Rotary Fast 3 XG
19 0 Church Organ 2 GM
19 32 Church Organ Detuned 2 XG
19 35 Church Organ Octave 2 XG
19 40 Notre Dam 3 XG
19 50 Hitchcock Organ 4 TT
19 64 Organ Flute 3 XG
19 65 Organ Flute Tremolo 3 XG
20 0 Reed Organ 2 GM
20 40 Puff Organ 3 XG
21 0 Accordion 3 GM
21 32 AccordIt 3 XG
22 0 Harmonica 1 GM
22 32 Harmonica 2 2 XG
23 0 Bandoneon 3 GM
23 64 Bandoneon 2 3 XG
24 0 Nylon Guitar 1 GM
24 16 Nylon Guitar 2 2 XG
24 25 Nylon Guitar 3 1 XG
24 43 Nylon Guitar Wide 2 TT
24 50 Nylon Guitar & WarmPad 4 TT
24 51 Ocean Memories 4 TT ab A5 Möwen
24 96 Ukunjo 1 TT
25 0 Steel Guitar 2 GM
25 16 Steel Guitar 2 2 XG
25 35 12-String Guitar 2 XG
25 40 Nylon & Steel 2 XG
25 59 Mono Steel 2 TT
25 96 Mandolin 2 XG
26 0 Jazz Guitar 2 GM
26 18 Mellow Guitar 2 XG
26 32 Jazz Guitar Amp 3 XG
26 50 Jazz Bend 4 TT
26 59 Mono Jazz 1 TT
27 0 Clean Guitar 2 GM
27 32 Clean Guitar Chorus 2 XG
28 0 Mute Guitar 2 GM
28 40 Funk Guitar 1 2 XG
28 41 Mute Steel Guitar 2 XG
28 43 Funk Guitar 2 4 XG
28 45 Velo MuteClean 4 XG
28 50 Muted Wah 2 TT
29 0 Overdrive 2 GM
29 43 Guitar Pinch 3 XG
30 0 Distortion Guitar 1 GM
30 40 Feedback Guitar 1 2 XG
30 41 Feedback Guitar 2 2 XG
31 0 Guitar Harmonics 1 GM
31 65 Guitar Feedback 1 XG
31 66 Feedback World 2 TT
32 0 Acoustic Bass 2 GM
32 40 Jazz Rhythm 3 XG
32 50 The Jazz Trio 5 TT Split F2 / F#2
33 0 Finger Bass 1 GM
33 18 Finger Bass Dark 1 XG
33 27 Flange Bass 1 XG
33 40 Bass & Distortion Guitar 2 XG
33 43 Finger Slap 2 XG
33 45 Finger Bass 2 2 XG
33 50 Finger Combo 3 TT
34 0 Pick Bass 1 GM
34 28 Muted Pick Bass 1 XG
35 0 Fretless 2 GM
35 27 Fretless Reso 2 TT
35 32 Fretless 2 2 XG
35 35 Fretless Octave 2 TT
35 50 Warm Combo 4 TT Split E2 / F2
35 59 Mono Fretless 1 TT
35 96 SynFretless 2 TT
36 0 Slap Bass 1 1 GM
36 27 Slap Bass Reso 1 XG
36 32 Punch Thumb 1 XG
37 0 Slap Bass 2 1 GM
37 43 Slap Bass 2 Velo 1 XG
38 0 Synth Bass 1 1 GM
38 18 Synth Bass 1 Dark 1 XG
38 20 Synth Bass 1 Fast Reso 1 XG
38 24 Acid Bass 1 XG
38 35 Whoop Bass 2 TT
38 40 SID Bass 2 TT
38 64 Distorante B. 2 TT
38 65 Square Bass 1 XG
38 66 Gummy Bass 2 TT
38 96 Hammer Bass 3 TT
39 0 Synth Bass 2 1 GM
Name
Voices Typ Notes
AXON AX 100 mkII V. 1.0 Tables 65
Page 66

PRG BNK
39 6 Synth Bass 2 Mellow 2 XG
39 12 Seq Bass 2 XG
39 18 Smack Bass 1 TT
39 19 Dark Bass 1 TT
39 32 Smooth Flange 2 TT
39 40 Mellow Drone 2 TT
39 41 DX Bass 1 XG
39 64 X-Wire Bass 2 XG
40 0 Violin 1 GM
40 8 Slow Violin 1 XG
41 0 Viola 1 GM
42 0 Cello 1 GM
43 0 Contrabass 1 GM
44 0 Tremolo Strings 2 GM
44 8 Slow Tremolo Strings 2 XG
44 40 Tremolo Concerto 4 TT
45 0 Pizzicato Strings 2 GM
45 50 Pizzicato & Strings 4 TT
46 0 Harp 1 GM
46 40 Yangqin 1 XG
46 50 Enya's Garden 6 TT
46 51 Eden's Garden 5 TT
46 52 Harp Wide & Bright 2 TT
47 0 Timpani 1 GM
47 50 Timpani Wide 1 TT
47 51 Comical Timpani 2 TT
48 0 Strings 2 GM
48 3 Strings Wide Pan 2 XG
48 8 Crescendo Strings 2 XG
48 24 Arco Strings 2 XG
48 35 60'ies Strings Mellotron 2 XG
48 40 Orchstra 3 XG
48 42 Tremolo Orchestra 5 XG
48 45 Velo Strings 4 XG
48 50 Battle For Troy 6 TT
49 0 Slow Strings 2 GM
49 3 Slow Strings Wide Pan 2 XG
49 8 Unreleased Strings 2 TT
49 40 Warm Strings 2 XG
49 50 Century Strings 3 TT
49 64 Seventies Strings 3 XG
49 65 String Ensemble 3 3 XG
50 0 Synth Strings 1 2 GM
50 27 Synth Strings Reso 2 XG
50 50 FiftyFifty Synth Strings 2 TT
50 64 Synth Strings 4 4 XG
50 65 5th Synth Strings 2 TT
51 0 Synth Strings 2 2 GM
52 0 Choir Aah 2 GM
52 3 Choir Aah Wide Pan 2 XG
52 16 Choir Aah 2 Warm 4 TT
52 32 Mellow Choir 2 XG
52 40 Choir Strings 4 XG
52 50 Wuah Choir 2 TT
53 0 Voice Ooh 2 GM
53 50 Voice Dope 2 TT
53 51 Doopimba 4 TT
54 0 SynVox 2 GM
54 40 SynVox 2 3 XG
54 41 Choral 4 XG
54 50 Angels Swirls 3 TT
54 51 Bubble Voice 4 TT
54 64 AnaVoice 1 XG
55 0 Orchestra Hit 1 GM
55 35 Orchestra Hit 2 2 XG
55 64 Impact 5 TT
56 0 Trumpet 1 GM
56 16 Trumpet Duo 2 TT
56 17 Trumpet Combo 4 TT
56 32 Warm Trumpet 1 XG
57 0 Trombone 1 GM
57 18 Trombone 2 1 XG
58 0 Tuba 1 GM
58 16 Tuba Duo 2 TT
59 0 Mute Trumpet 1 GM
59 50 Mute Duo 2 TT
60 0 French Horns 2 GM
60 6 French Horn Solo 1 XG
60 32 French Horns 2 2 XG
60 37 Horn Orchestra 2 XG
61 0 Brass Section 2 GM
61 35 Trumpet & Trombone Section 4 XG
61 40 Brass Section 2 3 XG
61 41 Eurovision 4 TT
61 42 Mellow Brass 4 XG
62 0 Synth Brass 1 2 GM
62 12 Quack Brass 2 XG
62 20 Reso Synth Brass 2 XG
62 24 Poly Brass 2 XG
62 27 Synth Brass 3 3 XG
62 32 Oberheim 4 XG
Name
Voices Typ Notes
66 AXON AX 100 mkII V. 1.0 Tables
Page 67

PRG BNK
62 45 Ana Velo Brass 2 XG
62 64 Ana Brass 1 4 XG
63 0 Synth Brass 2 2 GM
63 18 Soft Brass 3 XG
63 40 Synth Brass 4 4 XG
63 41 Choir Brass 4 XG
63 45 Velo Brass 2 4 XG
63 52 Bad Analog Horn 2 TT
63 64 Ana Brass 2 4 XG
64 0 Soprano Sax 2 GM
65 0 Alto Sax 1 GM
65 40 Sax Section 3 XG
65 43 Hyper Alto 2 XG
66 0 Tenor Sax 1 GM
66 40 Breath Tenor Sax 1 XG
66 41 Soft Tenor 1 XG
66 64 Tenor Section 3 XG
67 0 Bariton Sax 2 GM
68 0 Oboe 1 GM
69 0 English Horn 1 GM
70 0 Bassoon 1 GM
71 0 Clarinet 1 GM
72 0 Piccolo 2 GM
73 0 Flute 2 GM
74 0 Recorder 1 GM
75 0 Pan Flute 1 GM
76 0 Bottle 1 GM
77 0 Shakuhachi 2 GM
78 0 Whistle 2 GM
79 0 Ocarina 1 GM
80 0 Square Lead 2 GM
80 6 Square Lead 2 1 XG
80 8 Lyles Three Voice 3 XG
80 18 Hollows 3 XG
80 19 Munch Square 3 TT
80 50 Square Trip 4 TT
80 51 Future Square 1 TT
80 64 Percussive Square 1 TT
80 65 Solo Sine 1 XG
80 66 Sine Lead 2 XG
81 0 Saw Lead 2 GM
81 6 Saw 2 1 XG
81 8 Comic Saw 2 TT
81 18 Dyna Saw 1 XG
81 19 I Speak FM 2 XG
81 20 Big Lead 4 TT
81 24 Heavy Synth 3 TT
81 25 Simple Moog 1 TT
81 40 Variation Lead 3 TT
81 41 Doctor Lead 2 XG
81 45 Velo Fifth Lead 3 TT
81 50 Unheil 7 TT
81 51 Cinema Scope 9 TT
81 52 Night Lead 4 TT
81 96 Seq Ana 2 TT
82 0 Calliope 2 GM
82 65 Desert Calliope 2 TT
83 0 Chiffer Lead 2 GM
83 64 Rubby 2 XG
84 0 Charang Lead 2 GM
84 50 Dewire Lead 2 TT
84 64 Dist Lead 3 XG
84 65 Wire Lead 4 XG
85 0 Solo Vox 2 GM
85 24 Synth Aah 1 XG
85 64 Vox Lead 3 TT
86 0 Fifth Lead 3 GM
86 35 The Source 2 TT
87 0 Bass & Lead 2 GM
87 16 Big & Low 3 XG
87 64 Fat & Perky 3 XG
87 65 Soft Wurly 3 TT
88 0 Fantasia 1 3 GM
88 64 Fantasia 2 3 XG
89 0 Warm Pad 2 GM
89 16 Thick Pad 3 XG
89 17 Soft Pad 2 XG
89 18 Sine Pad 2 XG
89 50 Super Analogue 4 TT
89 64 Horn Pad 4 XG
89 65 Silona Pad 4 TT
90 0 Poly Synth Pad 2 GM
90 64 Poly Pad 80 2 XG
90 65 Click Pad 3 TT
90 66 Ana Pad 2 XG
90 67 Square Pad 3 XG
91 0 Space Voice 3 GM
91 50 Cold Space 3 TT
91 51 Cool Choir 3 TT
91 64 Heaven 2 3 XG
91 66 Itopia 4 XG
Name
Voices Typ Notes
AXON AX 100 mkII V. 1.0 Tables 67
Page 68

PRG BNK
91 67 CC Pad 3 XG
92 0 Bowed Glass 2 GM
92 50 Alaska Flares 5 TT
92 64 Glacier 2 XG
92 65 Glass Pad 3 XG
93 0 Metallic Pad 3 GM
93 64 Tine Pad 4 XG
93 65 Pan Pad 4 XG
94 0 Halo Pad 3 GM
95 0 Sweep Pad 2 GM
95 20 Shwimmer 2 XG
95 27 Converge 2 XG
95 64 Polar Math. Pad 2 XG
95 66 Celestial 4 XG
96 0 Ice Rain 3 GM
96 45 Clavi Pad 2 XG
96 50 Clavi Pad Mono 1 TT
96 64 Harmo Rain 3 XG
96 65 African Waterfalls 3 TT
96 66 Caribean 3 XG
97 0 Soundtrack 2 GM
97 27 Prologue 2 XG
97 50 Analog Soundtrack 4 TT
97 64 AnceString 2 XG
98 0 Crystal 3 GM
98 12 Synth Drum Cmp 3 XG
98 14 Popcorn 1 XG
98 18 Tiny Bell 2 XG
98 35 Round Clock 2 XG
98 40 Glock China 2 XG
98 41 Clear Bell 2 XG
98 42 Choir Bell 3 XG
98 50 Kuibono 3 TT
98 64 Synth Mallet 1 XG
98 65 Soft Crystal 3 XG
98 66 Loud Glock 2 XG
98 67 Xmas Bell 2 XG
98 68 Vibe Bell 2 XG
98 69 Babybel :0) 3 TT
98 70 Air Bells 3 XG
98 71 Bell Harp 3 XG
98 72 Gamelimba 3 XG
99 0 Atmosphere 3 GM
99 18 Warm Atmos 3 XG
99 19 Hollow Rise 2 XG
99 40 Nylon EP 2 XG
99 50 Plasticman 3 TT
99 64 Nylon Harp 2 XG
99 65 Harp Vox 3 XG
99 66 Atmos Pad 4 XG
99 67 Planet 3 XG
100 0 Brightness 3 GM
100 64 Fanta Bell 3 XG
100 96 Smokey 2 XG
101 0 Goblins 2 GM
101 50 Vectormorph 4 TT
101 64 Goblin Syn 2 XG
101 65 50's SciFi 2 XG
101 66 Ring Pad 3 XG
101 67 Ritual 2 XG
101 68 To Heaven 3 XG
101 70 Night 5 XG
101 71 Glisten 4 XG
101 96 Bell Choir 4 XG
102 0 Echo Drops 2 GM
102 8 Echo Pad Slow 3 TT
102 14 Echo Pan 3 XG
102 64 Echo Bell 2 XG
102 65 Big Pan 2 XG
102 66 Synth Piano 3 XG
102 67 Creation 3 XG
102 68 Stardust 2 XG
102 69 Reso Pan 2 XG
103 0 Star Theme 2 GM
103 64 Starz 3 XG
104 0 Sitar 2 GM
104 32 Detuned Sitar 2 XG
104 35 Sitar 2 3 XG
104 96 Sitar 3 1 XG
104 97 Tamboura 3 XG
105 0 Banjo 1 GM
105 28 Mute Banjo 1 XG
105 50 Gopichant 2 2 TT
105 96 Rabab 2 XG
105 97 Gopichant 2 XG
105 98 Oud 2 XG
106 0 Shamisen 1 GM
106 50 Berim Tao 4 TT
107 0 Koto 2 GM
107 96 T.Koto 3 XG
107 97 Kanoon 3 XG
Name
Voices Typ Notes
68 AXON AX 100 mkII V. 1.0 Tables
Page 69

PRG BNK
108 0 Kalimba 2 GM
109 0 Bagpipe 3 GM
110 0 Fiddle 1 GM
111 0 Shanai 1 GM
111 64 Shanai 2 1 XG
111 96 Pungi 1 XG
111 97 Hichriki 2 XG
112 0 Tinkle Bell 2 GM
112 96 Bonang 2 XG
112 97 Gender 2 XG
112 98 Synth Gamelan 2 TT
112 99 Slow Synth Gamelan 3 TT
112 100 Rama Cymbal 2 XG
112 101 Asian Cymbal 2 XG
113 0 Agogo 2 GM
114 0 Steel Drum 2 GM
114 97 Glass Percussion 3 TT
114 98 Thai Bell 3 XG
115 0 Wood Block 1 GM
115 96 Castanet 1 XG
116 0 Taiko Drum 2 GM
116 96 Grand Cassa 1 XG
117 0 Melodic Tom 1 GM
117 64 Melodic Tom 2 2 XG
117 65 Real Tom 1 XG
117 66 Rock Tom 3 XG
118 0 Synth Drum 2 GM
118 64 Ana Tom 1 XG
118 65 Electronic Percussion 3 XG
119 0 Reverse Cymbal 2 GM
120 0 Fret Noise 1 GM
121 0 Breath Noise 1 GM
122 0 Seashore 2 GM
122 50 Sea Gulls 1 TT
122 51 Space Storm 2 TT
123 0 Birds 2 GM
124 0 Telephone 2 GM
125 0 Helicopter 2 GM
126 0 Applause 2 GM
127 0 Gunshot 2 GM
127 2 Laser Gun 1 GS
127 50 Burr's Easy Kit 1 TT
0 x Standard Kit 1 GS
8 x Room Kit 2 GS
16 x Power Kit 2 GS
24 x Electro Kit 2 GS
25 x Analog Kit 2 GS
28 x TR-808 Kit 2 TT
29 x TR-909 Kit 2 TT
32 x Jazz Kit 1 GS
40 x Brush Kit 1 GS
48 x Orchestra Kit 1 GS
50 x Burr's Easy Kit 1 TT
126 x SFX Kit 2 GS
Name
Voices Typ Notes
AXON AX 100 mkII V. 1.0 Tables 69
 Loading...