

Page 1
TERRATEC PRODUCER/AXON AIX 101/103
English Manual
Version 1.0, status: October 05
Page 2

CE Declaration
We:
TerraTec Electronic GmbH, Herrenpfad 38, D-41334 Nettetal, Germany
hereby declare that the product:
AXON AIX 101 and AXON AIX 103
to which this declaration refers is in compliance with the following standards or standardiz-
ing documents:
EN 55013(2001)+A1(2003), EN 55020(2002).
The following are the stipulated operating and environmental conditions for said compli-
ance:
residential, business and commercial environments and small-company environments.
This declaration is based on:
Test report(s) of the EMC testing laboratory
The information in this document is subject to change without notice and shall not be deemed as a
warranty by the seller. No warranties, express or implied, are made with regard to the quality, suit-
ability or accuracy of this document. The manufacturer reserves the right to change the contents of
this document and/or the associated products at any time without the provision of prior notice to
specific persons or organizations. The manufacturer shall not be held liable for damages of any
kind arising from the use, or the inability to use this product or its documentation, even if the possi-
bility of such damage is known. The information in this document is subject to copyright. All rights
are reserved. No part of this manual may be reproduced or transmitted in any form or for any pur-
pose without the express written permission of the copyright holders. Product and brand names
contained in this document are used for identification purposes only. All registered trademarks,
product designations or brand names used in this document are the registered property of their
respective owners.
®
©TerraTec
Electronic GmbH, 1994 - 2005. All rights reserved (10/28/2005).
2 AXON AIX 101/103 (English)
Page 3

Contents
AXON AIX 101/103 Guitar/Bass Pickup ........................................................................... 4
Safety notes .......................................................................................................................5
Parts list ............................................................................................................................. 6
Connectors and controls.................................................................................................. 8
Installation ......................................................................................................................... 9
Installing the controller................................................................................................... 10
Determining the optimal location................................................................................ 10
Selecting the mounting method.................................................................................. 10
Mounting with screws and/or adhesive strips/pads.................................................... 11
Mounting with Velcro.................................................................................................. 12
Mounting with bracket ................................................................................................ 13
Mounting with suction cups........................................................................................ 14
Installing the pickup ....................................................................................................... 14
Marking the optimal mounting position....................................................................... 15
Selecting the mounting method.................................................................................. 17
Mounting with adhesive strips .................................................................................... 17
Mounting with screws and springs ............................................................................. 20
Installation with mounting plates (AIX 103 only) ........................................................21
Getting ready to play....................................................................................................... 23
Technical data .................................................................................................................25
AXON AIX 101/103 (English) 3
Page 4
AXON AIX 101/103 Guitar/Bass Pickup
The AIX-101/103 is a high-performance guitar synthesizer pickup for use with the Ter-
raTec AXON Guitar-To-MIDI Controller. Correctly installed and set up, it provides full MIDI
capabilities to virtually any electric guitar or bass, or any steel-string acoustic guitar. The
AXON AIX 101 is the pickup for six-string guitars, while AXON AIX 103 designates the
pickup for bass guitars with up to 6 strings. The illustrations in the following instructions all
show the AIX 101. The installation process for the AIX 103 bass pickup is identical, how-
ever. Please read these instructions with care and perform the steps in the order listed
here to ensure trouble-free operation.
4 AXON AIX 101/103 (English)
Page 5

Safety notes
Place of installation
Protect the AIX 101/103 against the following influences to prevent distortion or discolor-
ing of the housing or other serious damage:
direct sunlight (e.g. near windows)
high temperatures (near radiators, in direct sunlight or in closed vehicles during the
daytime
excessive humidity
excessive dust
sharp mechanical shocks.
Connections
Use only the 13-pin AXON AXK 100 cable (available separately) to connect the AIX
101/103 to the AXON.
If you are using an electric guitar or bass, connect its pickups to the AIX 101/103 as
well (see page
nection is important for grounding the instrument to prevent noise and electric shock.
Always grasp the plug, not the cable itself, when unplugging cables.
Remove all cables before moving or transporting the instrument or any connected
equipment.
Handling and transport
Do not use excessive force on the controls or when inserting or removing plugs.
Dropping or bumping the instrument or placing heavy objects on it can result in
scratches or other damage.
Take care not to damage the AIX 101/103 when placing the instrument on a stand.
Cleaning
Use a soft, dry cloth to clean the instrument.
Moisten the cloth slightly to remove stubborn dirt.
Never use cleaning products such as alcohol or thinner.
Customer service, maintenance and modifications
23), even if you do not need the conventional guitar sound. This con-
The AIX-101/103 does not contain any user-serviceable parts. Opening the housing or
other tampering may result in electrical shock or irreparable damage. Please refer all
servicing work to TerraTec technicians.
TerraTec cannot be held liable for damage resulting from installation and operation
errors or improper use.
AXON AIX 101/103 (English) 5
Page 6
Parts list
Please ensure that you have received all of the following parts before installing the pickup:
AIX 101/103 controller with
pickup
guitar cable, 1/4" to 1/8" jack
Mounting hardware for the AIX 101/103 pickup
2 button-head screws
(3x25 mm)
2 springs
spacing gauge
double-sided adhesive strips,
4 ea. (AIX 101),
16 ea. (AIX 103)
1 pickup cushion (AIX 101) spacer A (1 mm)
5 ea. (AIX 101)
10 ea. (AIX 103)
reusable adhesive pads,
2 ea. (AIX 101)
8 ea. (AIX 103)
small screws, 3x6 mm
with washers,
2 ea. (AIX 103)
spacer B (0.3 mm)
10 ea. (AIX 101)
12 ea. (AIX 103)
small screws,
3x6, 3x8 and 3x12 mm,
2 ea. (AIX 103)
6 AXON AIX 101/103 (English)
Page 7
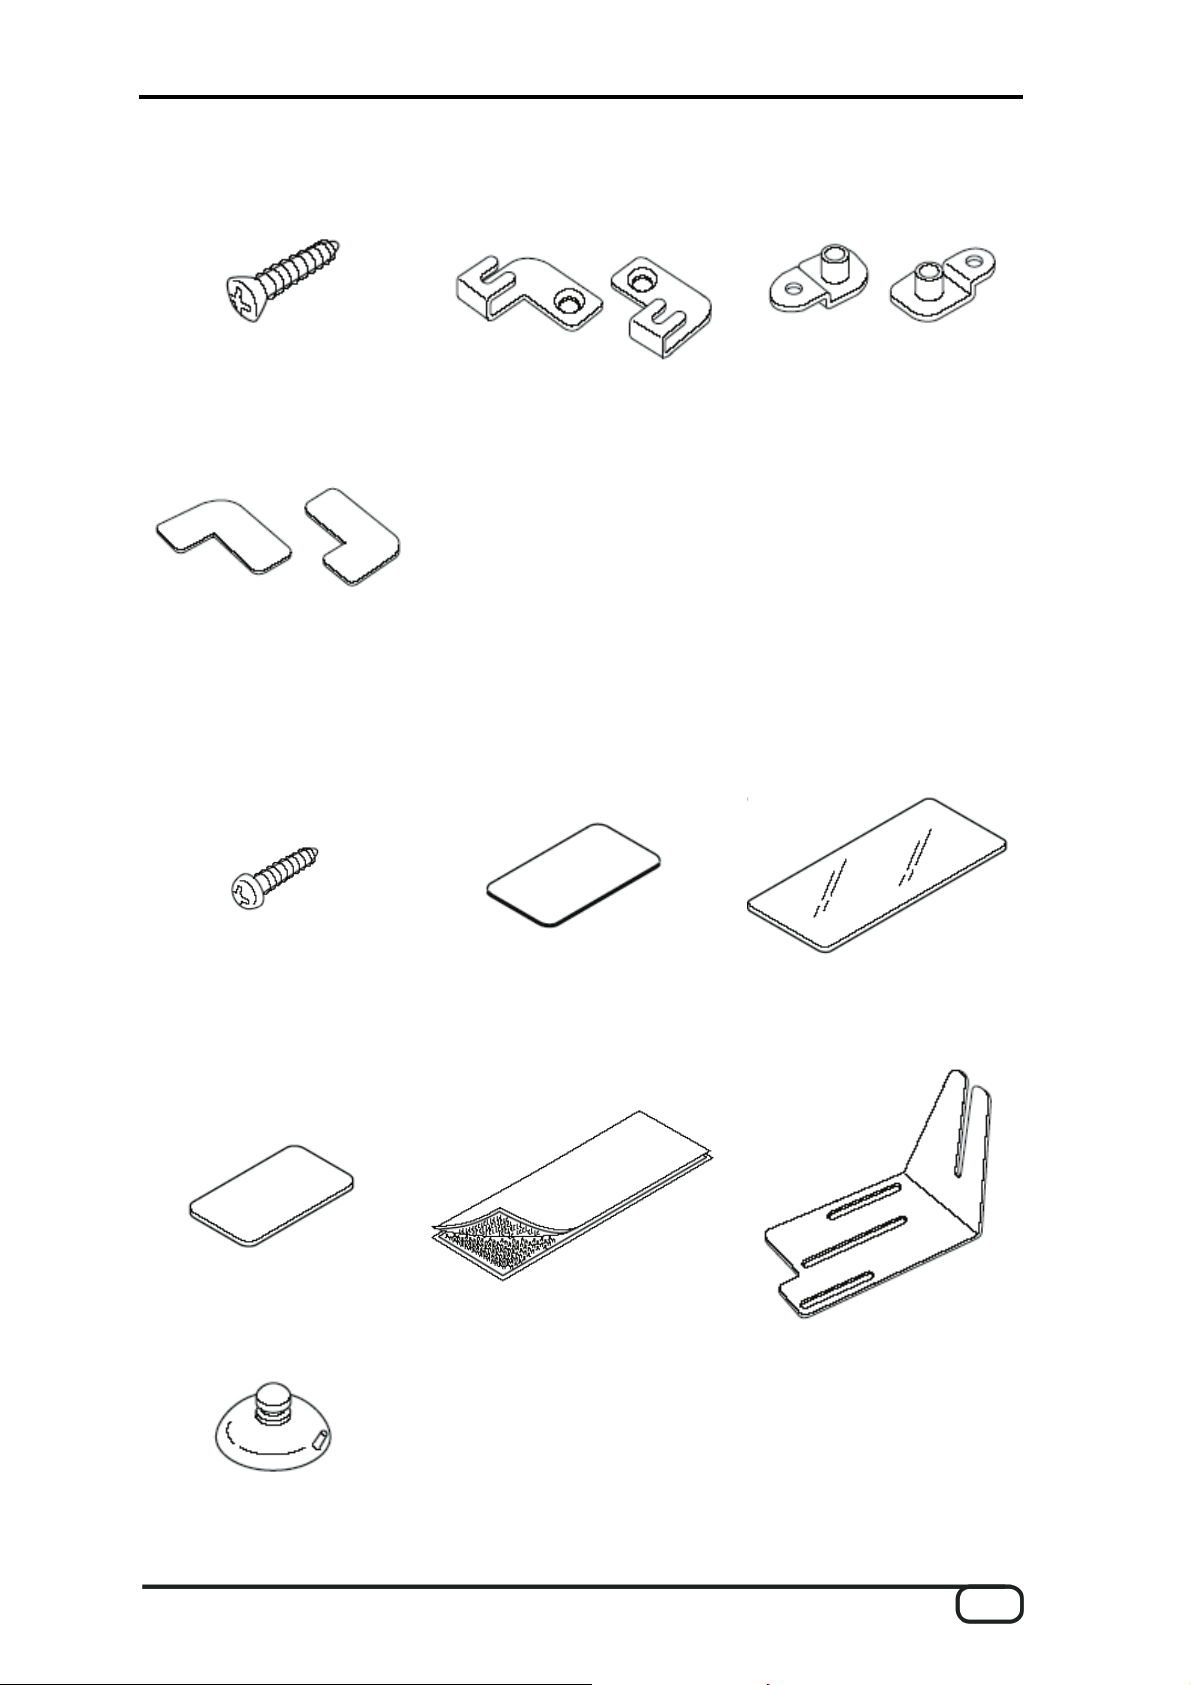
countersunk screws, 3x10 mm,
2 ea. (AIX 103)
mounting plates,
1 set (AIX 103)
8 double-sided adhesive strips
for mounting plates (AIX 103)
Controller mounting hardware
1 button-head screw
(3x16 mm)
3 double-sided adhesive strips
(AIX 101)
pickup holders,
1 set (AIX 103)
reusable adhesive pads
3 ea. (AIX 101)
6 ea. (AIX 103)
6 spacers
(with double-sided adhesive,
AIX 101)
1 Velcro set
3 suction cups
1 bracket
AXON AIX 101/103 (English) 7
Page 8

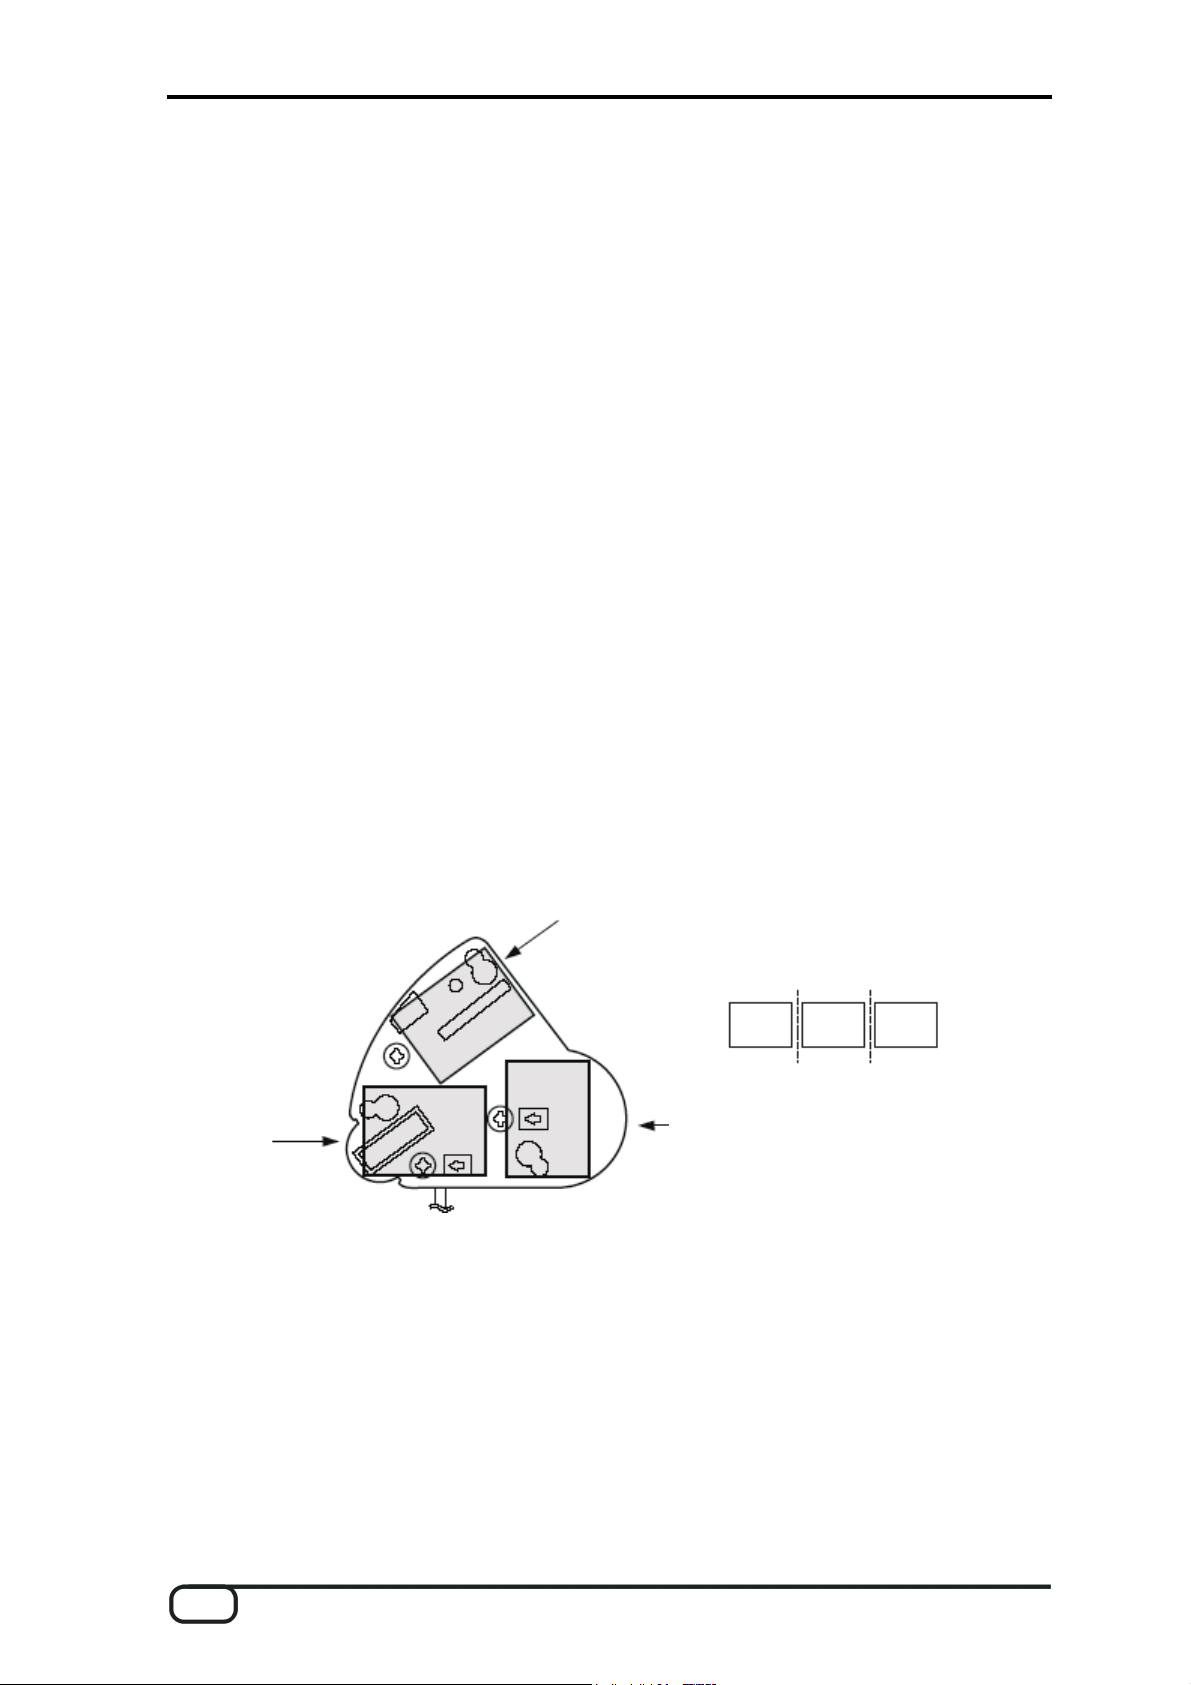
Connectors and controls
1. Pickup: this component converts the vibrations of the strings into an electrical signal
that is processed by the AIX 101/103 and sent to the AXON.
CAUTION: due to its extremely flat design, the pickup is delicate and can easily be
damaged by strong pressure, bending or twisting. Please handle the pickup with great
care.
2. Connector socket for the 13-pin cable (AXON AXK 100): this is the signal output of
the AIX 101/103. Use the 13-pin cable to connect this socket to the INPUT socket on
the AXON. The cable carries the signals of the individual strings from the AIX 101/103
pickup as well as the signal from the conventional instrument output. The cable also
carries power for the AIX 101/103, as well as the control signals generated by the
UP/DOWN buttons and the volume control on the AIX 101/103.
3. Guitar/bass input socket: the AIX101/103 receives the signal from the conventional
pickups of the instrument via this socket. Use the short cable supplied with the AIX
101/103 to connect this socket to the 1/4" output socket of the instrument.
4. Operation LED: this LED indicates that the AIX 101/103 is receiving power from the
AXON via the 13-pin cable.
8 AXON AIX 101/103 (English)
Page 9

5. VOLUME: this knob controls the volume of the sound generators connected to the
AXON (the AXON translates the control position into a master volume value and
sends this value to the connected oscillators). To adjust the volume of the conven-
tional guitar sound, use the controls on the guitar itself.
6. UP (higher) and DOWN (lower) buttons: use these buttons to select different sounds
and other functions while playing. Press the buttons as required to step through the
memory numbers of the AXON (and the corresponding voice numbers of the con-
nected synthesizer). Press and hold the buttons to switch numbers without stopping.
7. GUITAR/MIX/SYNTH selector: this switch determines the signal to be sent to the
AXON:
GUITAR: the output contains only the signal from the conventional pickups (no
MIDI)
MIX: both the direct guitar signal and synthesizer signals (MIDI) are sent.
SYNTH: only the synthesizer signals (MIDI) are sent, not the conventional guitar
signal.
Installation
While mounting the AIX 101/103 on a guitar or bass is not difficult, it does require great
care and a certain degree of manual skill. If you are not sure you have the necessary
skills, we recommend leaving the installation work to someone who has experience in
modifying and repairing guitars.
Note: before installing the AIX 101/103, be sure that the neck and the string
height/intonation (bridge) of the instrument are set correctly.
Suitable guitars/basses
The AIX 101/103 can be used with most electric guitars and basses as well as acoustic
guitars with steel strings, with the following exceptions:
As the AIX 101/103 is equipped with a magnetic pickup, it will not work with nylon or
other nonmetallic strings.
The AIX 101/103 is designed for 6-string guitars or 4/5/6-string basses. The system
cannot work correctly with 12-string guitars or unconventional string configurations.
The AIX 101/103 pickup must be fitted between the bridge and rear pickup of the gui-
tar. Installation is not possible if there is not enough room between the bridge and rear
pickup or the body and the strings.
AXON AIX 101/103 (English) 9
Page 10

Installing the controller
Install the controller (interface) first – please ensure that the pickup is not damaged in the
process.
Determining the optimal location
The controller (interface) should normally be installed behind the bridge. It should be
within convenient reach, yet should not interfere with your playing or the controls of the
instrument. Please observe the following points when determining a suitable mounting
location:
The controller should not be in your way when picking the strings. When installing the
controller, ensure that it does not affect your playing style.
The controller should not block the volume or tone controls of the instrument, or im-
pede access to the bridge, especially the intonation screws that are adjusted from the
back of the bridge.
The mounting location must ensure that the length of the pickup cable and the con-
necting cable to the instrument are sufficient.
Neither the controller nor the plug of the connecting cable should extend beyond the
edge of the guitar body to reduce the risk of damage.
When choosing the mounting location, ensure that the instrument can be placed on a
stand with the controller attached.
Choose the mounting location to ensure that the instrument will not be subjected to
undue pressure while being transported in a bag or case with the AIX 101/103 attached.
Selecting the mounting method
Mounting with screws and/or adhesive strips/pads
Permits the installation of the controller on a curved top in conjunction with adhesive
strips
Permits simple mounting and secure attachment.
Requires a hole to be drilled in the body.
Mounting with Velcro
Permits the controller to be mounted and removed with ease.
Mounting with bracket
Permits the mounting of the controller on a curved top in conjunction with adhesive
strips.
The bracket can also be attached to the strap button of the instrument. This requires a
certain amount of care to prevent damage to the strap button mounting screw, however.
10 AXON AIX 101/103 (English)
Page 11

Mounting with suction cups
Permits easy mounting, removal and transportation of the unit.
This is an elegant alternative for attaching the controller to guitars or basses with flat
tops and a smooth, glossy finish.
Choose the method best suited to your instrument and intended use.
Mounting with screws and/or adhesive strips/pads
Marking and drilling the screw hole for the controller
Hold the controller in the planned position and mark the center of the hole to be drilled (in
front of the socket for the multi-pin cable) in the instrument body with a sharp pencil or
other suitable tool. Set the controller aside and using the greatest care, drill a 2 mm dia.
and 10 mm deep hole at the marked point.
Note:
If your guitar or bass is an acoustic or semiacoustic instrument with a top unsuitable
for drilling, or if you break out in a sweat already at the thought of mistreating your instrument in such a manner, then you can also install the controller with double-sided
adhesive strips or Velcro. Screw mounting is the most secure, however, and we recommend it wherever possible.
Mounting with Velcro is advisable whenever the AIX 101/103 is going to be removed
and replaced frequently. The adhesive strips must NOT be used when mounting the
device with Velcro!
Remove the protective backing from one side of the adhesive strip/pad and apply it to the
underside of the controller as shown (3 strips).
Clean the mounting surface of the guitar thoroughly to ensure that the adhesion is not
affected by dust, dirt or grease. Remove the remaining protective backing from the adhe-
sive strip/pads on the controller and place it on the guitar body in such a way that the
screw hole in the guitar (if drilled) is aligned with the hole in the controller. Press the con-
troller firmly – but carefully – into place to ensure proper adhesion. Finally, insert the self-
tapping button-head screw (3x6 mm) through the hole in the controller and into the hole
AXON AIX 101/103 (English) 11
Page 12
previously drilled in the instrument. Ensure that the screw is only finger-tight. Over tighten-
ing the screw can damage the controller or the instrument.
Note:
The controller can be attached to practically any body type using the adhesive strips
or pads. For more information, please see “Reusable adhesive pads” below.
Adhesives may react chemically with some instrument finishes, resulting in discolora-
tion or other damage. If in doubt, apply a small piece of adhesive strip/pad in an inconspicuous location for several days to determine whether they affect the finish of the
instrument.
If your instrument has a curved top or the installation location is shaped in such a way
that the controller cannot be attached using adhesive strips alone, apply spacers to
compensate for the uneven surface. Like the strips, the spacers also have adhesive
on both sides which is protected by backing paper.
The adhesive pads can be used in the same way as the strips to attach the controller.
The pads can be reused many times, and can be washed carefully with a neutral
cleaning product to remove dust and dirt, restoring their adhesive properties. When
removing the controller, put the original protective backing back on the pads to keep
them in good condition.
Mounting with Velcro
1. Cut the Velcro strips, which are attached to one another, into three sections and apply
them to the underside of the controller.
Cut the Velcro into three
sections
Underside of the controller
2. Remove the protective backing from the other side of the Velcro strips and attach the
controller to the guitar body.
3. The controller can now be gently pulled off and reattached to the body as needed.
Note:
This is not the most secure mounting method and should only be used if no other op-
tion is suitable, or if the pickup will be used often on different instruments.
12 AXON AIX 101/103 (English)
Page 13
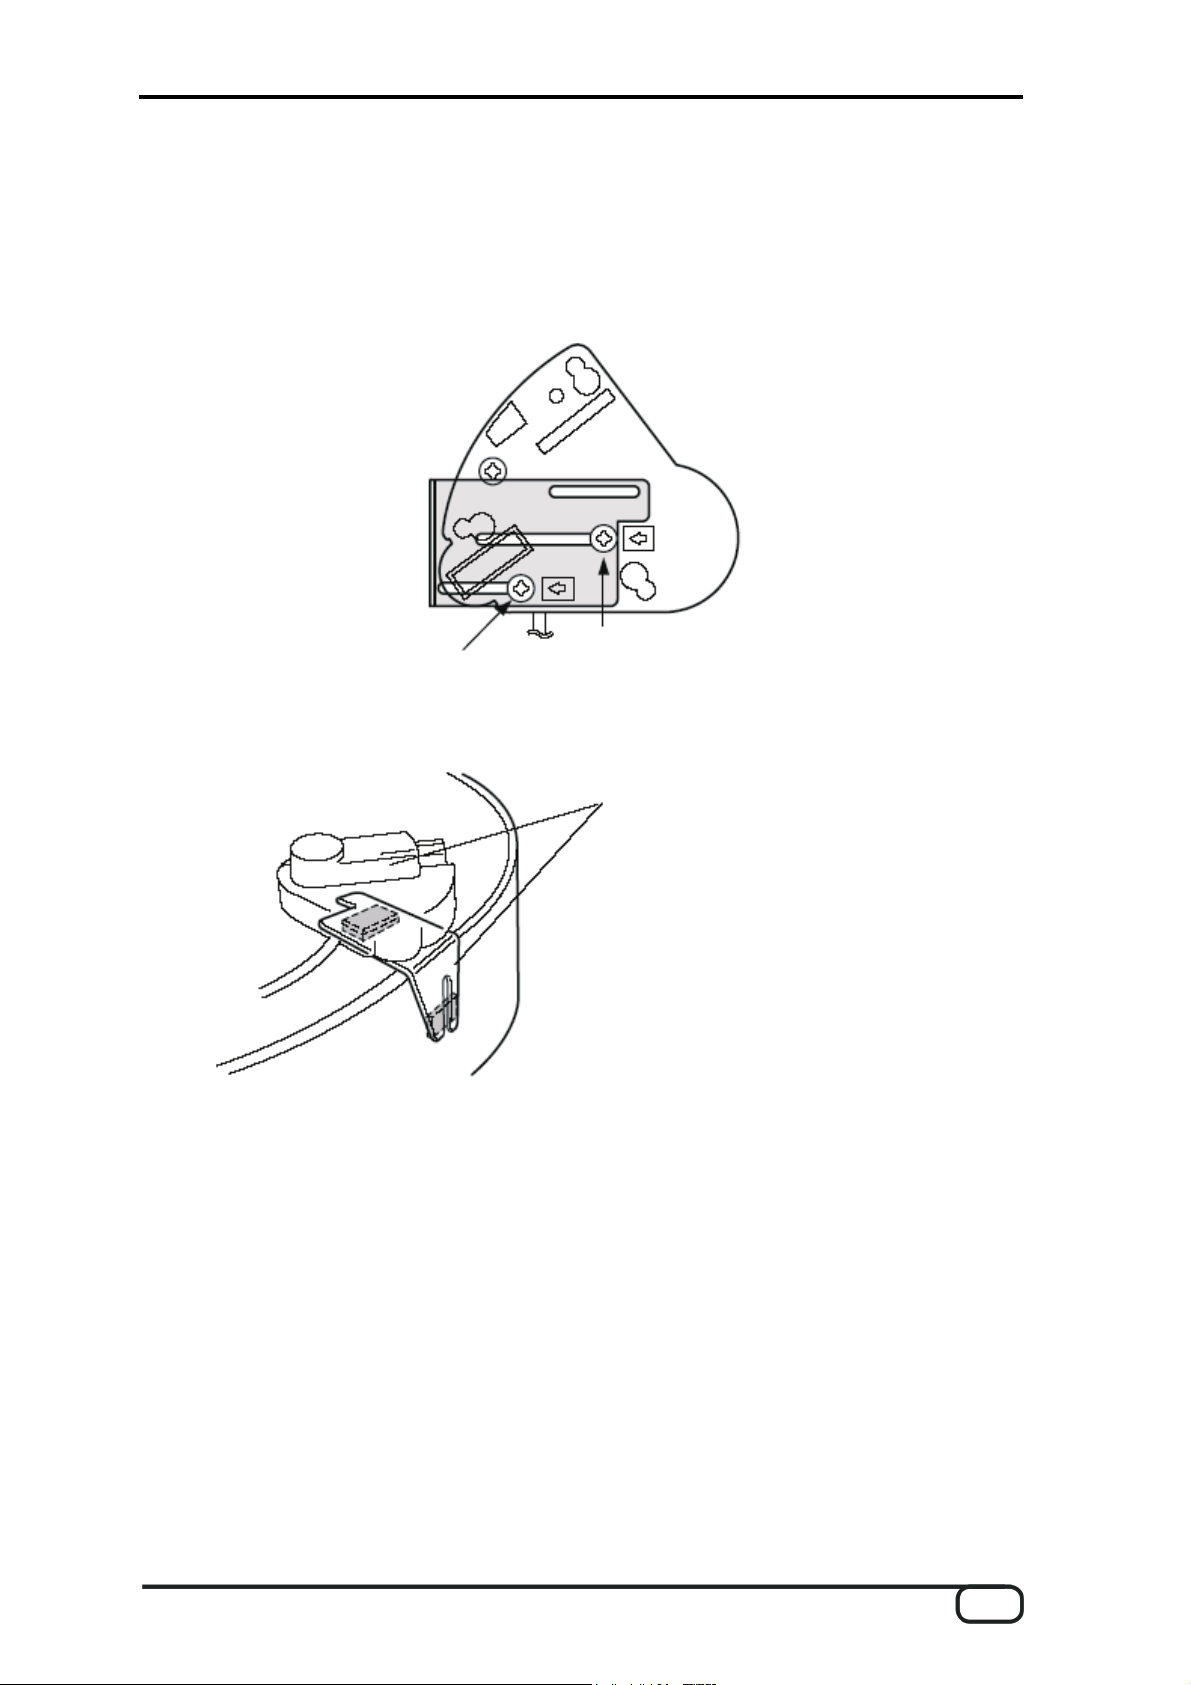
Mounting with bracket
This mounting method has the advantage of not requiring screws to attach the controller
to the instrument body. Before attaching the bracket to the instrument, remove the screws
indicated by arrows on the underside of the controller and use the screws to mount the
bracket to the controller as shown.
Apply two spacers (with double-sided adhesive) to the bracket to prevent scratching the
instrument's finish and attach the controller to the instrument as shown.
spacers
(with double-sided
adhesive)
As an elegant alternative, you can also attach the bracket to the instrument with the strap
button (using spacers if possible to avoid scratches). Loosen the strap button of the in-
strument by unscrewing it a couple of turns and insert the slot of the bracket under the
button. Tighten the screw to secure the bracket to the body.
AXON AIX 101/103 (English) 13
Page 14

CAUTION! The screw of the strap button can loosen due to repeated removal and tighten-
ing or strong pressure on the bracket.
Mounting with suction cups
The included suction cups are an especially convenient mounting method and a com-
pletely adequate alternative for instruments with a glossy finish. Attach the suction cups to
the controller by inserting the noses of the cups into the wider section of the cutouts on
the underside of the controller, then pressing them into the narrow section until they are
firmly seated. Ensure that the mounting surface on the body is free of dust or dirt, and
press the suction cups onto the top of the instrument. To release the suction cups, simply
lift them slightly at the edge.
Installing the pickup
Once you have mounted the controller to your instrument, attach the AIX 101/103 pickup
with double-sided tape, screws or mounting plates (AIX 103 only). Although adhesive tape
is the most convenient method, we recommend screws, as these provide better seating
and permit the height of the pickup to be adjusted. Regardless of the mounting method,
the optimal position of the pickup must be determined first.
14 AXON AIX 101/103 (English)
Page 15
Marking the optimal mounting position
AXON AIX 101
The AIX 101 pickup must be mounted between the rear conventional guitar pickup and
the bridge – ideally at a distance of 20 mm from the bridge. If not enough space is avail-
able to provide a spacing of 20 mm, ensure that the pickup is as far away from the bridge
as possible (not more than 20 mm and no less than 10 mm). The end of the pickup with
the cable must be positioned under the sixth (low E) string. Each of the six magnet pairs
of the pickup must be aligned with one of the strings. The spacing of the strings may vary
slightly from one guitar to the next, but the pickup will work correctly if the strings are
above their respective magnets (it is not necessary to center them precisely). Ensure that
the strings remain over their magnets even when bending them.
guitar pickup
bridge
not more than 20 mm
AIX-101 or AIX-102 pickup
OK OK wrong
string
Note:
Ensure that the pickup does not restrict the action of the tremolo arm, if present.
Once the pickup is correctly aligned, mark the centers of the screw holes with a sharp
pencil or punch on the guitar top. If you do not want traces of the marking to remain on the
top, use small pieces of marking tape instead of a pencil.
AXON AIX 101/103 (English) 15
magnet yokes of the pickup
Page 16
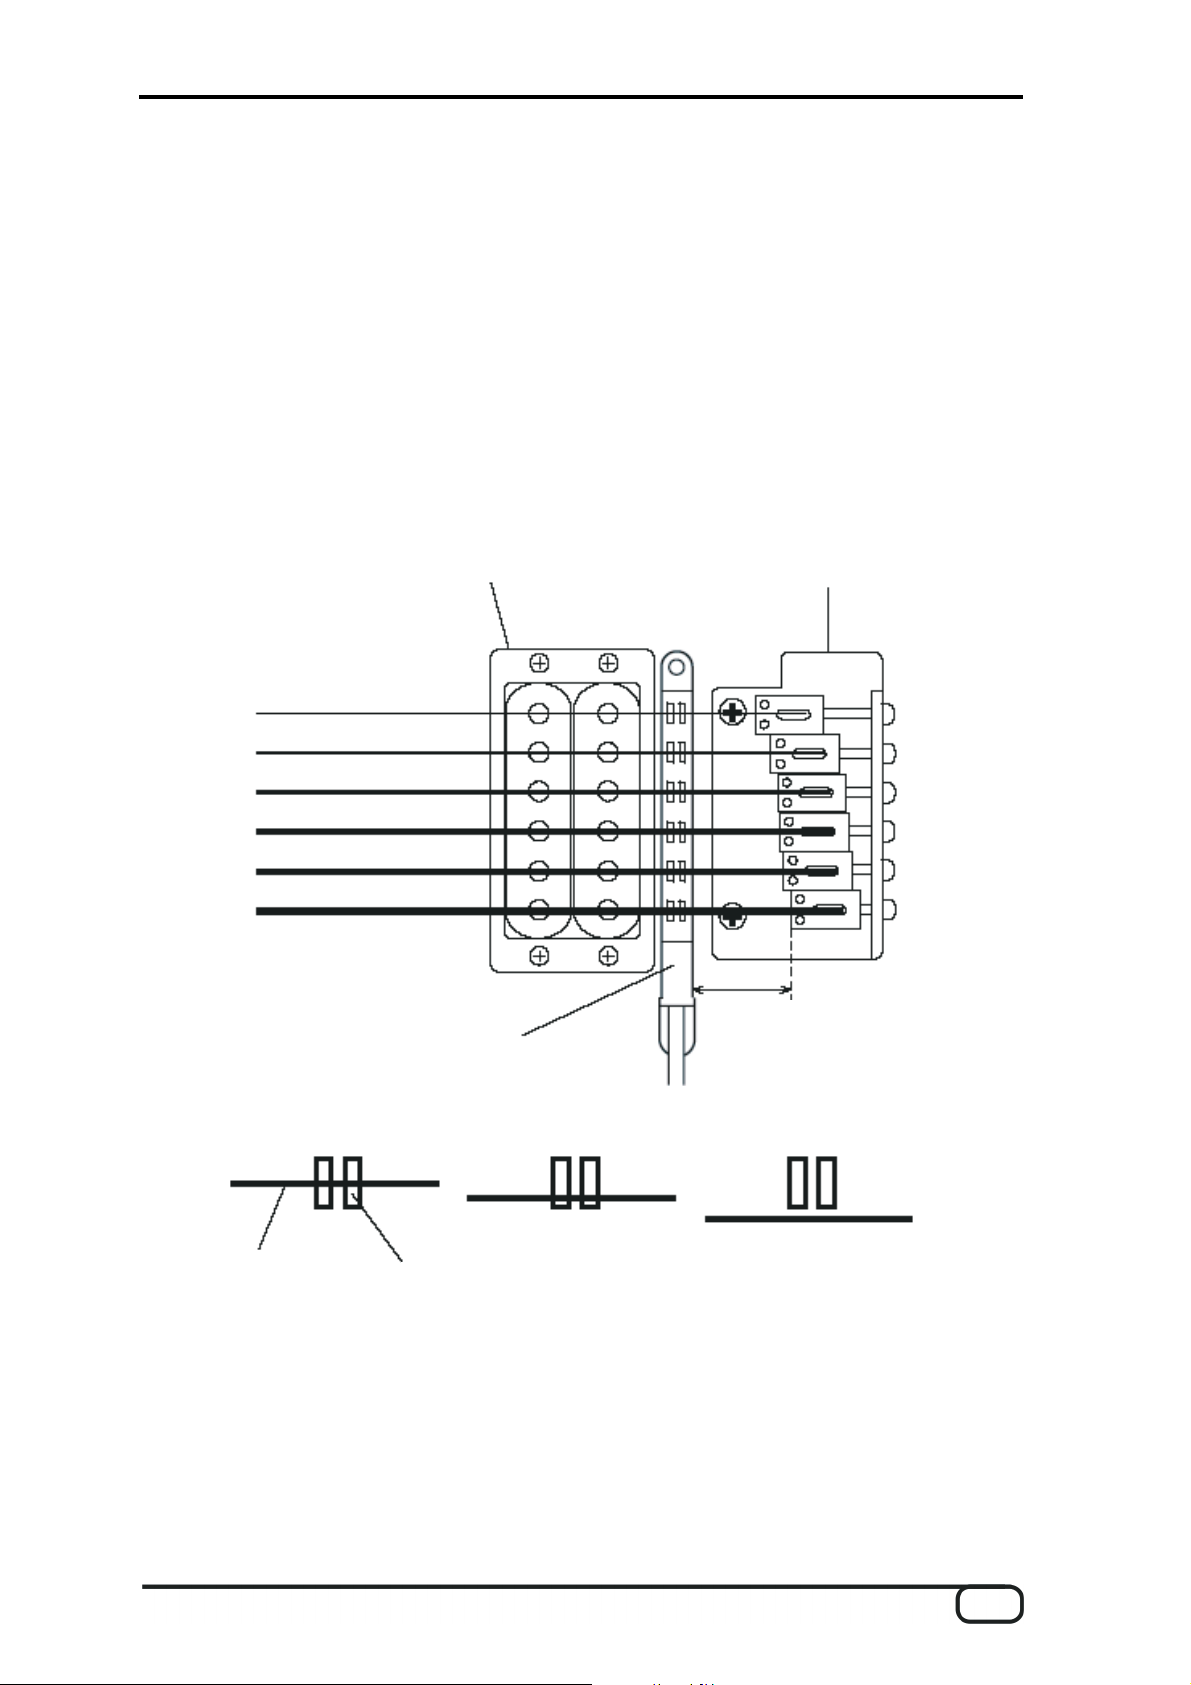
AXON AIX 103
The AIX 103 should be positioned between the rear pickup and the bridge (10 to 20 mm
spacing to the bridge) in such a manner that the cable end is on the side of the lowest
string – the pickup will not work otherwise.
bridge
rear pickup
multichannel pickup
The pickup is suitable for bass guitars with up to six strings (6B, 5E, 4A, 3D, 2G, 1C). In
the case of four-string basses, the four central magnet pairs must be positioned under the
strings, leaving one pair at either end of the pickup unused. The mounting position for five-
string basses depends on the tuning: for [B, E, A, D, G], the magnet pair opposite the ca-
ble end, for [E, A, D, G, C] the magnet pair at the cable end is unused, as shown below.
4 strings 5 strings
16 AXON AIX 101/103 (English)
Page 17
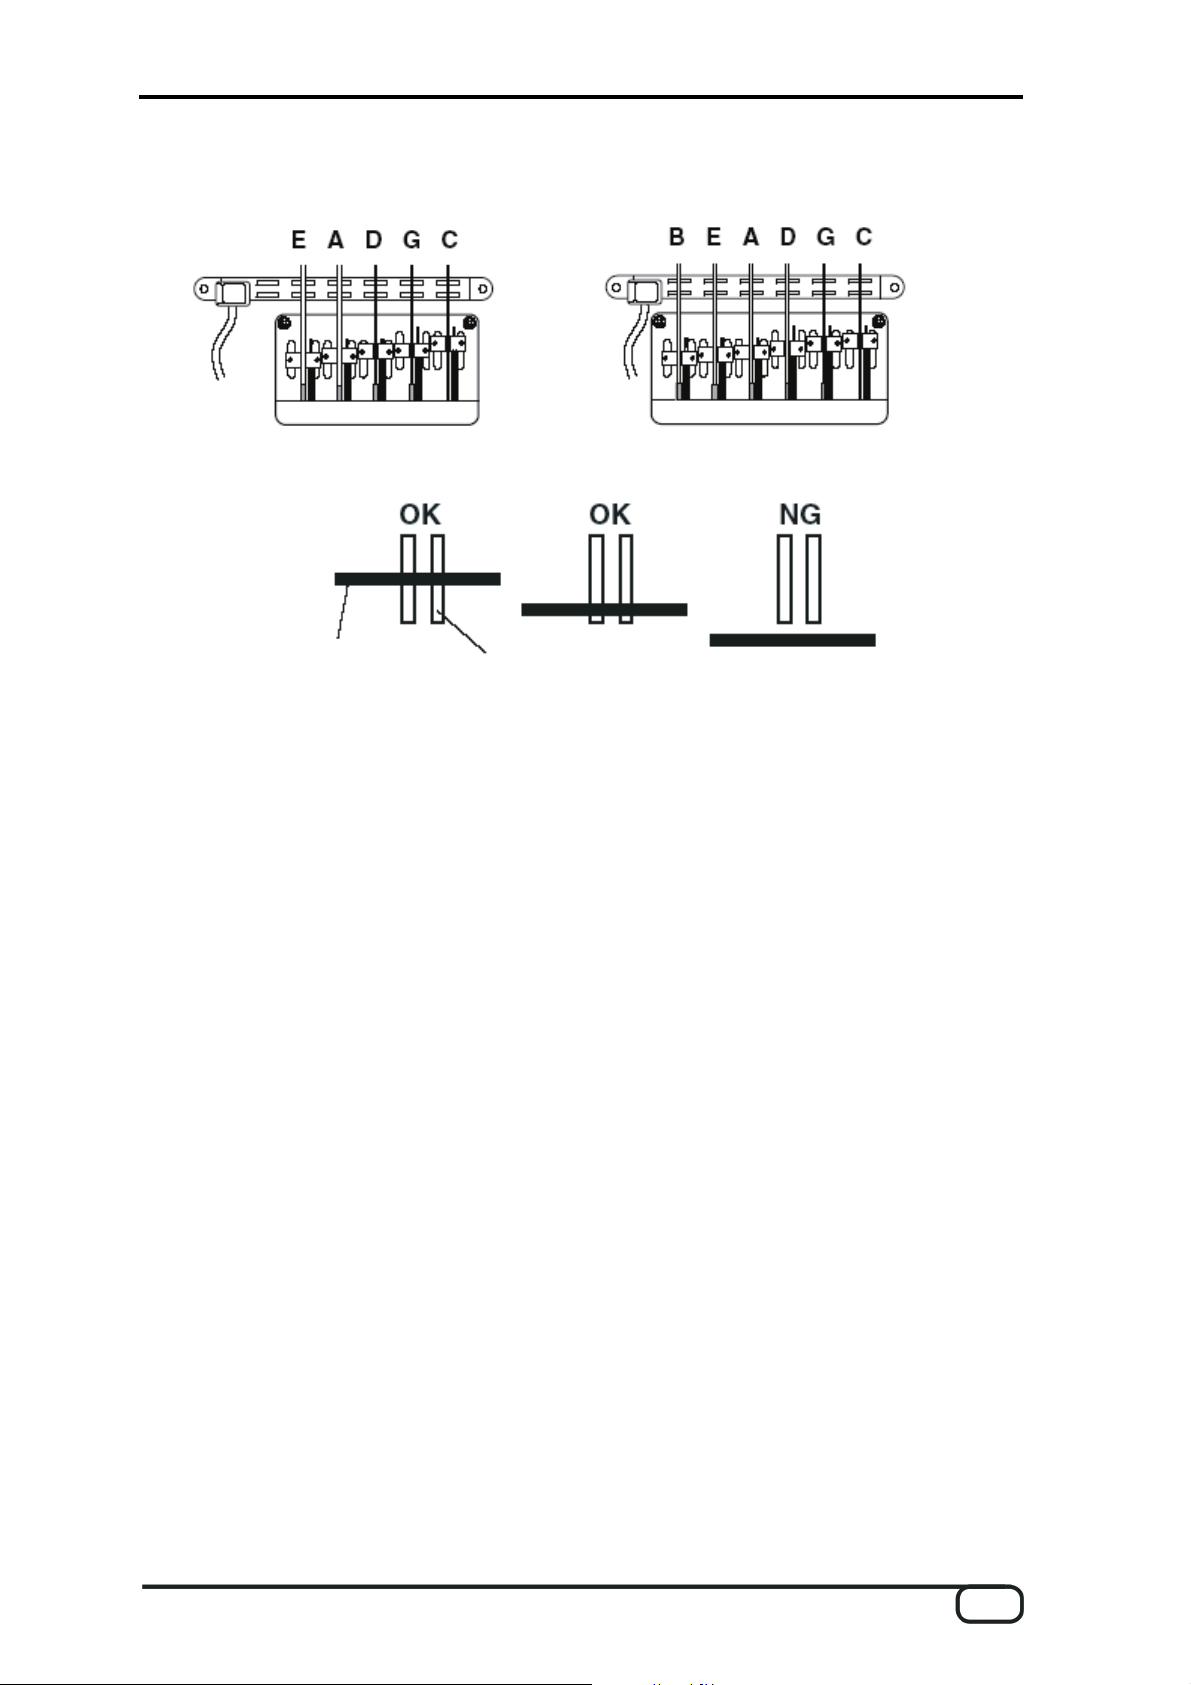
5 strings 6 strings
Each string must be positioned over its magnet pair.
string
Once the pickup is correctly aligned, mark the centers of the screw holes with a sharp
pencil or punch on the bass top. If you do not want traces of the marking to remain on the
top, use small pieces of marking tape instead of a pencil.
Selecting the mounting method
Mounting with adhesive strips
Permits installation without damaging the body
Requires more time and patience when setting the pickup height
magnet yoke pair of the pickup
Mounting with screws and springs
Ensures easy adjustment of the pickup height
Guarantees solid mounting of the pickup
Requires holes to be drilled in the body!
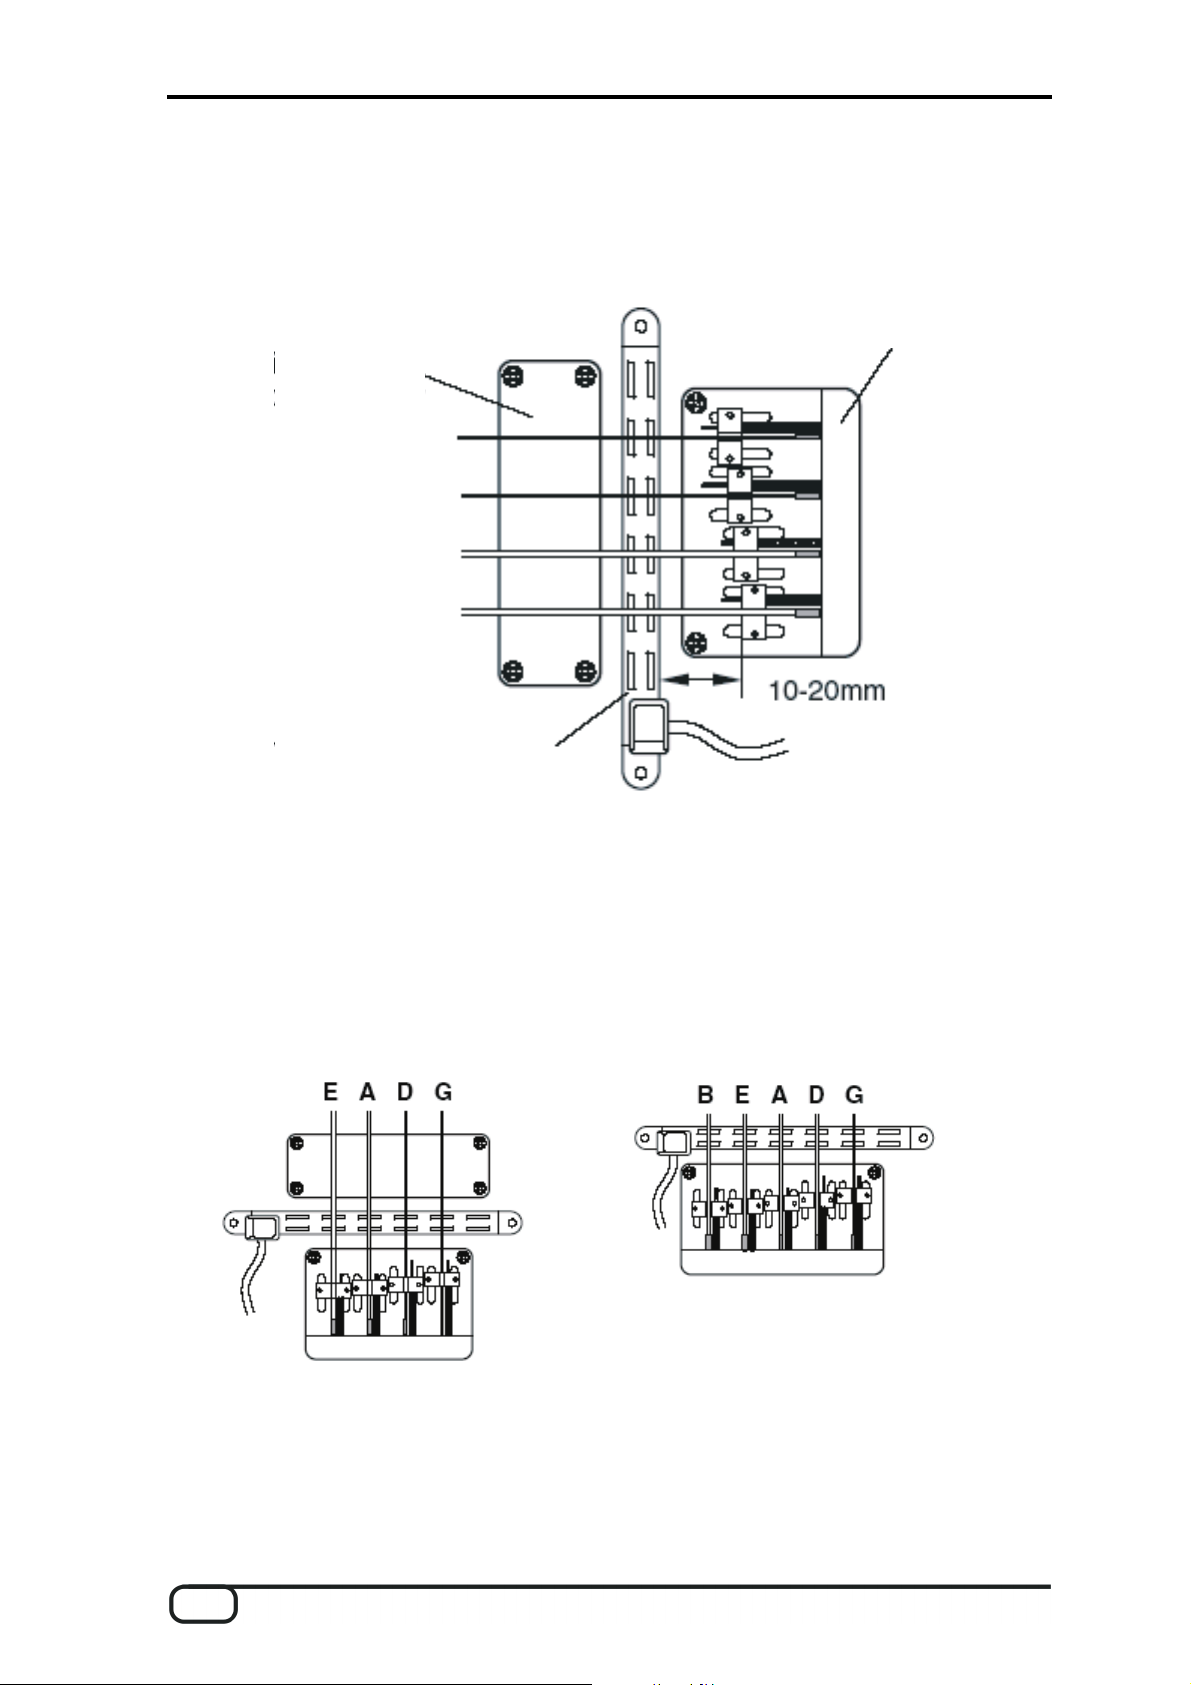
Installation with mounting plates (AIX 103 only)
Ensures easy adjustment of the pickup height.
Permits the pickup to be removed and replaced without having to readjust the pickup
height.
Mounting with adhesive strips
1. Adjusting the pickup height
Once you have determined the optimal mounting position, prepare the installation. How-
ever, please note that the spacing between the strings and the pickup magnets are an
important factor. As the heights of the pickup magnets are not individually adjustable, you
AXON AIX 101/103 (English) 17
Page 18

must find a suitable compromise between the position and overall height of the pickup and
the height of the strings. The distance between the upper edge of the magnets and the
underside of the string should be around 1 to 2 mm when pressing the string to the high-
est fret. The spacing can also be less than 1 mm, as long as the strings do not touch the
pickup when playing.
As the output level for the individual strings varies widely, you must set the input gain for
the signals of the strings individually at the AXON Guitar-to-MIDI Converter after installing
the pickup.
First ensure that the height of the strings (neck and bridge) is correct, then tune the
strings. Increase the height of the pickup with spacers (see notes below) until the spacing
between the top of the pickup and the underside of the strings is around 1 to 2 mm when
pressing the strings to the highest fret. Use the included gauge to check the spacing.
guitar pickup
AIX-101/102
bridge
pickup
guitar body
gauge
Note:
Do not initially remove the protective backing from the adhesive when adjusting the
height of the pickup. The protective backing increases the thickness of the pickup
pads and spacers by 0.1 mm – please take that into consideration when using multiple
spacers.
If the mounting surface is not level – when applying the pickup to a guitar with a
curved top, for example – add pieces of spacer shortened to one quarter or one third
of their original length at either end of the pickup. The spacers can be cut easily with
scissors.
18 AXON AIX 101/103 (English)
Page 19

adhesive strips
spacers
2. Attaching the pickup
Remove the strings from the instrument. Apply one layer of double-sided adhesive (multi-
ple strips) to the underside of the pickup and remove the protective backing. Next, apply
the required spacer(s) by removing their protective backing and applying them to the un-
derside of the pickup. Carefully apply the pickup/spacer assembly to the marked location.
Replace and tune the strings.
AXON AIX 101 AXON AIX 103
pickup
adhesive strips
spacer A, B
adhesive pads
or double-sided
adhesive strips
spacer
A or B
pad
protective backing
Note: the reusable adhesive pads may be used as the bottom (guitar-side) layer. Trim the
pads as required to match the shape of the pickup.
3. Checking the height of the pickup
Measure the height of the pickup again and play across the entire range of the instrument
to ensure that the strings do not touch the pickup at any point. If everything is correctly set
up, the installation is complete and the instrument is ready to play.
4. Changing the pickup height
Should it become necessary to change the height of the pickup, remove the strings and
release the pickup from the instrument by inserting a thin, flat object such as the blade of
a small knife between the pickup and the top spacer. Gently lever the pickup off of the
spacer.
AXON AIX 101/103 (English) 19
Page 20
The double-sided adhesive can be rolled off the underside of the pickup with a fingertip.
Correct the height of the pickup by adding or removing spacers.
When adding spacers to raise the pickup, remove the remaining double-sided adhe-
sive from the existing spacer before removing the protective backing from the new
spacer and applying it to the existing one.
When removing a spacer to lower the pickup, remove the spacer together with its ad-
hesive.
Next, apply a fresh layer of double-sided adhesive to the underside of the pickup and re-
move its protective backing. Carefully apply the pickup to the top spacer. Replace and
tune the strings.
Mounting with screws and springs
Mounting the pickup with screws and springs has a number of advantages over adhesive
mounting. Not only do the screws ensure that the pickup is securely positioned, they also
permit the height of the pickup to be adjusted easily, without adding or removing spacers
and adhesive strips.
Note: mounting with screws is only possible if a minimum space of 13 mm is available
between the instrument top and the strings.
1. Drilling the screw holes
Remove the strings from the instrument and carefully drill two holes with a diameter of
2 mm and a depth of approx. 10 mm at the marked points (see page
15 „Marking the op-
timal mounting position“). If the top is made of extremely hard wood such as maple, cherry
or rosewood, it may be necessary to drill holes of a slightly larger diameter.
2. Mounting the pickup
Insert the self-tapping button-head screws (3x25 mm) through the screw holes in the
pickup and the springs under the pickup. Fasten the pickup by threading the screws into
the holes in the guitar top.
20 AXON AIX 101/103 (English)
Page 21

3. Replacing the strings and adjusting the pickup height
Replace the strings of the instrument and adjust the height of the pickup by turning the
mounting screws. The distance between the upper edge of the pickup and the undersides
of the strings should be around 1 mm when pressing the string to the highest fret. Use the
included gauge to check the spacing.
Installation with mounting plates (AIX 103 only)
Permits the pickup to be removed and replaced without having to readjust the pickup
height.
1. Apply one double-sided adhesive strip each to the undersides of the mounting plates.
(Do not remove the protective backing.)
2. Attach the mounting plates to the pickup with screws and springs. Select the correct
screw length to ensure the proper height of the pickup (6, 8, 10 or 12 mm). You may
initially mount the pickup with 6 mm screws and replace them with screws of the
proper length after installing the mounting plates.
3. Attach the pickup holders to the mounting plates with the 3x6 mm screws and wash-
ers.
4. Align the pickup assembly on the body of the guitar in order to mark the positions of
the mounting plates.
5. Remove the protective backing from the double-sided adhesive strips (left and right)
on the mounting plates.
6. Hold the pickup assembly over the marked mounting location without contacting the
adhesive surfaces, align the mounting plates exactly and attach the assembly.
Press the pickup gently into place at either end so that it adheres properly.
If the mounting plates are also to be fastened with screws, remove the pickup and
its holders from the mounting plates at this point. Drill holes with a diameter of
2 mm vertically into the guitar body at the mounting point. Attach the mounting
plates to the guitar body with one countersunk screw (3x10 mm) each.
AXON AIX 101/103 (English) 21
Page 22

(
)
)
7. Tune the bass and adjust the spacing between the pickup and strings with the small
screws. Measure the spacing between the strings and their respective magnet pairs
when pressing the strings to the highest fret using the included gauge.
8. When the pickup height is correct, set the input gain for each string at the AXON Gui-
tar-to-MIDI Converter (see AXON manual).
multichannel
pickup
mounting plate
(left)
small screw
3x6, with washer
mounting plate (right
small screw
(3x6/8/10/12)
Step 2
spring
pickup holder (left)
Step 1
Step 2
small screw
(3x6, with washer)
Step 3
countersunk
self-tapping screw (3x10)
mounting plate
(right)
double-sided
adhesive strip
for mounting plate
22 AXON AIX 101/103 (English)
Page 23

Getting ready to play
Once the controller and pickup are installed, connect the AIX 101/103 to your AXON Gui-
tar-to-MIDI Converter. The 13-pin AXON AXK 100 cable, which is available separately, is
required for this.
1. Connecting the instrument cable
Insert the 1/4" jack of the instrument cable included with the AIX 101/103 into the output
socket of the guitar or bass and the 1/8" jack into the input socket of the AIX 101/103.
guitar cable
Note: connect the instrument cable even if you will not be using the conventional pickup
sound. This connection is important for grounding the instrument to prevent noise and
electric shock.
AXON AIX 101/103 (English) 23
Page 24

2. Connecting the AIX 101/103 to the AXON
Ensure that the AXON is switched off, then connect one end of the 13-pin AXON AXK 100
cable to the appropriate socket of the AIX 101/103 and the other to the INPUT socket of
the AXON.
multi-pin cable (13-pin cable)
Note:
To prevent the 13-pin cable from coming unplugged or being damaged, we recom-
mend running it between the strap and the body of the instrument.
strap
multi-pin cable
(13-pin)
To unplug the 13-pin cable from the AXON or the AIX 101/103, press the unlock but-
ton on the plug body.
24 AXON AIX 101/103 (English)
Page 25

1. Press unlock button.
2. Remove cable by pulling
the plug body.
3. Switching on the AXON
The LED of the AIX-101/102 will light up when the AXON is switched on. The controller is
now receiving power from the AXON.
4. Playing
The system is ready to play when the AXON, the synthesizer and other devices are prop-
erly connected and set up as described in their respective manuals.
Technical data
Dimensions (WxHxD): 85.1 mm x 75.9 mm x 28.8 mm
Weight: 30g (AIX 101), 78g (AIX 103)
AXON AIX 101/103 (English) 25
 Loading...