

Page 1

D
1
Quick Setup Guide - Mac OS X
Bitte kontrollieren Sie zunächst den Lieferumfang:
4
3
5
6/7
2
1
1. Aureon 7.1 FireWire
2. Schutztasche
3. Netzteil
4. FireWire Kabel
5. FireWire Adapter 6pin auf 4pin
6. 2 x 6,3mm/5.5mm Klinkenadapter
7. RCA Erdungsadapter für Schallplattenspieler
Installations & Software CD-ROM
+ Servicebegleitschein, Registrierungsunterlagen, CD
2
3
1. Bitte legen Sie zunächst die beiliegende CD ein und
öffnen diese über das CD / DVD Symbol auf Ihrem
Desktop.
2. Öffnen Sie den Ordner Control Panel
3. Hier finden Sie die Installationsdatei *.dmg. Mit einem
Doppelklick starten Sie den Installationsvorgang.
4. Nach der Installation finden Sie das Aureon Control
Panel Symbol auf Ihrem Dock.
Hinweis:
Sie benötigen die Firmware Version 1.10, um die Aureon
7.1 FireWire an Ihrem MAC zu benutzen.
5. Jetzt brauchen Sie nur noch die Aureon 7.1 FireWire
anschließen.
4
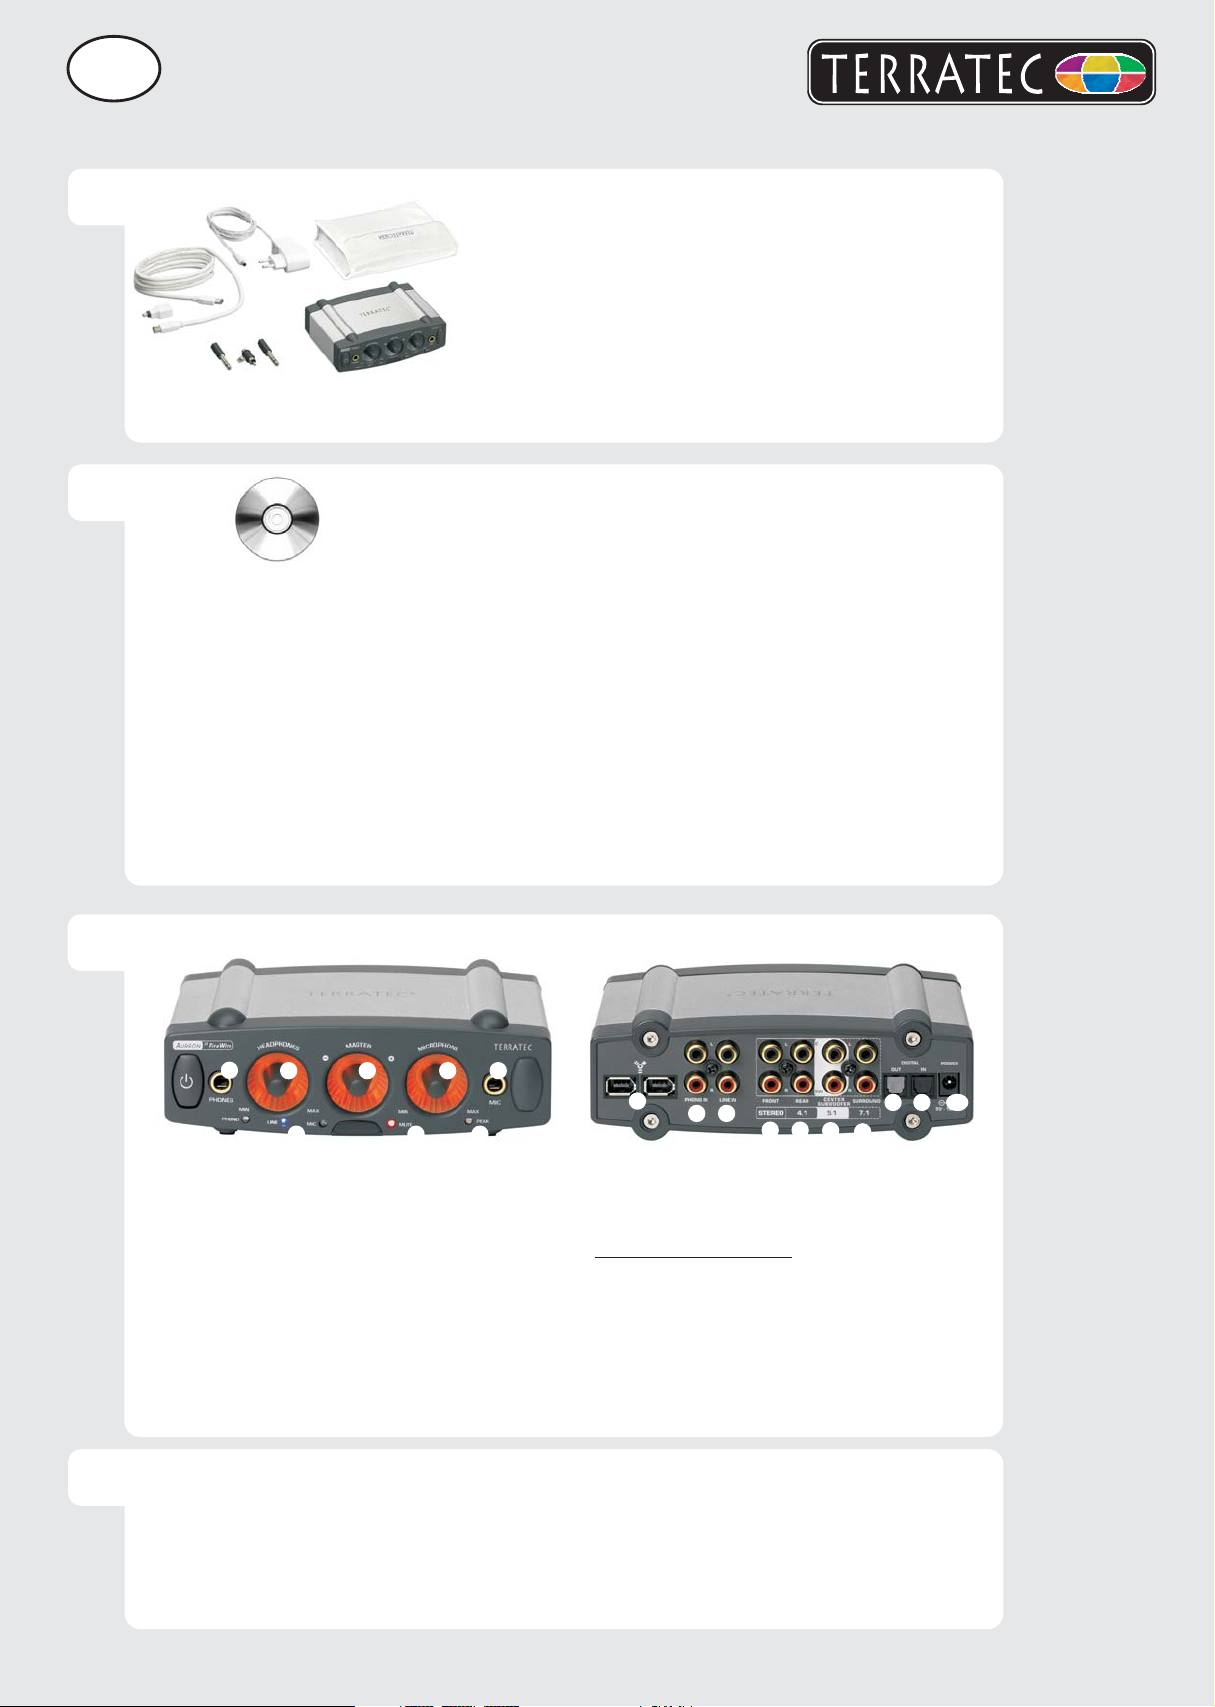
2
1
1: Analoger Kopfhörer Audio-Ausgang
2
: Regler für den Kopfhörerausgang
3: Regler für die Gesamtlautstärke
: Regler für den Mikrofonvorverstärker
4
5: Analoger Mikrofoneingang
6
: Diese LED hilft, den Mikrofoneingang
auszusteuern
7: Diese LED leuchtet, wenn die Ausgabe
stumm geschaltet wurde
8: Diese LED zeigt die externe Quelle an
Kontakt TerraTec Deutschland:
www
.terratec.de
Support Hotline
02157-817914
Montag - Freitag 13:00 - 20:00 Uhr
http://supportde.terratec.net
3 4 5
678
1
2 3
1: FireWire Anschlüsse
2
: Eingang für einen Plattenspieler
3: Eingang für ein Linegerät (z.B.Tapedeck)
Lautsprecheranschlüsse:
4: vorne links und vorne rechts
5: hinten links und hinten rechts
6
: Center und Subwoofer
7: Surround links und Surround rechts
8: Optischer Digital Ausgang (TOS-Link)
9: Optischer Digital Eingang (TOS-Link)
10: Anschluss für das Netzteil
4 5
6
8 9
10
7
quick setup guide
Page 2
EN
1
Quick Setup Guide - Mac OS X
Please verify that you have received these items:
4
3
5
6/7
2
1
1. Aureon 7.1 FireWire
2. Protective bag
3. Power supply unit
4. FireWire cable
5. FireWire adapter 6-pin to 4-pin
6. Two 1/4" jack/5.5mm jack adapters
7. RCA grounding adapter for turntable
Installation and software CD
+ Customer service card, registration documents, CD
2
3
1. Insert the CD provided and open it using the CD /
DVD symbol on your desktop.
2. Open the Control Panel folder.
3. It contains the installation file *.dmg. Double-click this
file to launch the installation process.
4. After the installation, the Aureon Control Panel icon is
located on your Dock.
Note:
You need Firmware Version 1.10 to operate the Aureon
7.1 FireWire on your Mac.
5. Now, simply connect the Aureon 7.1 FireWire, and
you're done.
4
2
1
1: Analog headphone audio output
2: Controller for the headphone output
3: Controller for the master volume
4: Controller for the microphone preamp
5: Analog microphone input
6. This LED helps control the recording level
of the microphone input
7. This LED is illuminated if the output has
been muted
8. This LED indicates the external source
Contact TerraTec International:
www.terratec.com
Contact TerraTec UK:
0208-6027029
Monday-Friday 12am-7pm
http://supporten.terratec.net
3 4 5
678
1
2 3
1: FireWire connections
2: Input for a turntable
3. Line level input (e.g. for a tape deck)
Speaker connections:
4: front left and front right
5: rear left and rear right
6: center and subwoofer
7: left surround and right surround
8: Optical digital output (Toslink)
9: Optical digital input (Toslink)
10: Connection for power adapter
4 5
6
8 9
7
10
quick setup guide
Page 3

F
Quick Setup Guide - Mac OS X
1
2
Pour commencer, vérifiez si le coffret est complet :
4
3
5
6/7
2
1
1. Aureon 7.1 FireWire
2. Sac de protection
3. Bloc d'alimentation
4. Câble FireWire
5. Adaptateur FireWire de 6 broches à 4 broches
6. 2 adaptateurs jack 6,3mm/5,5mm
7. Connecteur de mise à la terre RCA pour tourne-disques
CD d'installation et de logiciel
+ Carte de service, documents d'enregistrement
1. Veuillez commencer par insérer le CD fourni dans le
lecteur de CD-ROM, puis double-cliquez sur le
symbole CD / DVD qui se trouve sur votre bureau.
2. Ouvrez le dossier du panneau de contrôle (Control
Panel).
3. Ici vous trouverez le fichier d'installation *.dmg. Lancez
la procédure d'installation en double-cliquant sur le
fichier.
4. Au terme de l'installation, vous trouverez le symbole
du panneau de contrôle Aureon sur votre Dock.
Remarque :
Vous avez besoin du progiciel version 1.10 pour pouvoir
utiliser le système Aureon 7.1 FireWire sur votre MAC.
5. Il ne vous reste plus qu'à brancher le système Aureon
7.1 FireWire.
3
4
2
1
1: Sortie audio casque analogique
2: Bouton de réglage pour la sortie casque
3: Bouton de réglage pour le volume total
4: Bouton de réglage pour le préamplificateur
du microphone
5: Entrée microphone analogique
6. Cette DEL aide à un réglage optimal de
l'entrée microphone
7. Cette DEL s'allume quand le son a été
coupé
8. Cette DEL indique la source externe
Contact TerraTec International:
www.terratec.com
3 4 5
678
1
2 3
1: Raccords FireWire
2: Entrée pour un tourne-disques
3: Entrée pour un appareil auxiliaire
Raccords de haut-parleurs :
4: avant gauche et avant droit
5: arrière gauche et arrière droit
6: centre et subwoofer
7: ambianceur à gauche et à droite
8: Sortie numérique optique (TOS Link)
9: Entrée numérique optique (TOS Link)
10: Raccord pour le bloc d'alimentation
4 5
6
8 9
7
10
Ligne d'assistance
+49 (0)2157-817914
Lundi - Vendredi 13:00 - 20:00 heures
http://supporten.terratec.net
quick setup guide
Page 4

I
Quick Setup Guide - Mac OS X
1
2
Controllate prima il contenuto della confezione:
4
3
5
6/7
2
1
1. Aureon 7.1 FireWire
2. Custodia protettiva
3. Alimentatore
4. Cavo FireWire
5. Adattatore FireWire da 6pin a 4pin
6. 2 adattatori jack 6,3mm/5,5 mm
7. Spinotto di messa a terra RCA per un giradischi
CD di installazione e software
+ Scheda di servizio, documenti di registrazione
1. Inserire prima il CD accluso ed aprirlo tramite il simbolo
del CD / DVD sul desktop.
2. Aprire la cartella Control Panel.
3. Qui si trova il file di installazione *.dmg. La procedura
d'installazione si avvia con un doppio clic.
4. Al termine dell'installazione, sul Dock si troverà il
simbolo dell'Aureon Control Panel.
Avvertenza:
Per usare l'Aureon 7.1 FireWire con il MAC, si necessita
della versione del firmware 1.10.
3
5. Adesso basterà collegare l'Aureon 7.1 FireWire.
2
1
1: Uscita audio per la cuffia analogica
2: Potenziometri per l'uscita per la cuffia
3: Potenziometri per il volume complessivo
4: Regolatore per il preamplificatore
microfonico
5: Ingresso microfono analogico
6: Questo LED aiuta a modulare l'ingresso
del microfono
7: Questo LED si accende se l'emissione è
muta
8: Questo LED indica la sorgente esterna
3 4 5
678
1
2 3
1. Prese FireWire
2. Ingresso per un giradischi
3. Ingresso per un apparecchio Line
Prese per gli altoparlanti:
4: avanti a sinistra e avanti a destra
5: dietro a sinistra e dietro a destra
6: center e subwoofer
7: surround a sinistra e surround a destra
8. Uscita digitale ottica (TOS Link)
9. Ingresso digitale ottico (TOS Link)
10. Presa per l'alimentatore
4 5
6
8 9
7
10
4
Contatto TerraTec:
www.terratec.it
Hotline di supporto
+49 (0)2157-817914
Lunedì - Venerdì 13:00 - 20:00
http://supporten.terratec.net
quick setup guide
Page 5

E
Quick Setup Guide - Mac OS X
1
2
A continuación, compruebe el volumen de suministro:
4
3
5
6/7
2
1
1. Aureon 7.1 FireWire
2. Bolsa protectora
3. Bloque de alimentación
4. Cable FireWire
5. Adaptador de FireWire de 6 clavijas a 4 clavijas
6. 2 adaptadores de jack 6,3 mm/5,5 mm
7. Conector a tierra RCA para tocadisco
CD de instalación y de software + Documento de
seguimiento postventa, tarjeta de registro
1. Introduzca el CD de instalación suministrado y ábralo
con el símbolo CD / DVD de su escritorio.
2. Abra la carpeta Control Panel.
3. Aquí encontrará el archivo de instalación *.dmg. Haga
doble clic para iniciar el proceso de instalación.
4. Al término de la instalación encontrará el símbolo
Aureon Control Panel en su Dock.
Advertencia:
Necesitará la versión 1.10 de firmware para utilizar el
Aureon 7.1 FireWire en su MAC.
3
5. Ahora tendrá que conectar el Aureon 7.1 FireWire.
2
1
1: Salida de audio analógica para auriculares
2: Regulador para salida de auriculares
3: Regulador para volumen total
4: Regulador para el preamplificador de
micrófono
5: Entrada analógica para micrófono
6: Este diodo luminoso ayuda en la
modulación de la entrada de micrófono
7: Este diodo luminoso se ilumina cuando se
enmudició el sonido
8: Este diodo luminoso muestra la fuente externa
3 4 5
678
1
2 3
1: Conexiones FireWire
2: Entrada para tocadiscos
3: Entrada para aparato en línea (p.ej. platina)
Conexiones de altavoz:
4: delante izquierda y derecha
5: detrás izquierda y derecha
6: centro y altavoz de graves
7: sonido ambiente izquierda y derecha
8: Salida digital óptica (conexión TOS)
9: Entrada digital óptica (conexión TOS)
10: Conexión para el bloque de alimentación
4 5
6
8 9
10
7
4
Contacto TerraTec Alemania:
www.terratec.de
Servicio de Atención al Cliente
+49 (0)2157-817914
Lunes a viernes 13:00 - 20:00 h
http://supporten.terratec.net
quick setup guide
Page 6

NL
Quick Setup Guide - Mac OS X
1
2
Gelieve eerst de leveromvang te controleren:
4
3
5
6/7
2
1
1. Aureon 7.1 FireWire
2. Opbergtas
3. Voeding
4. FireWire-kabel
5. FireWire-adapter van 6pins naar 4pins
6. 2 x 6,3 mm/5,5 mm klinkadapter
7. RCA aardingsadapter voor platenspeler
Installatie en software-cd
+ Servicekaart, registratiekaart
1. Gelieve eerst de bijgeleverde cd te plaatsen en te
openen via het cd/dvd-symbool op uw bureaublad.
2. Open de map Control Panel.
3. Hier vindt u het installatiebestand *.dmg. Met een
dubbelklik start u de installatieprocedure.
4. Na de installatie vindt u het Aureon Control Panel
symbool op uw dock.
Aanwijzing:
u heb de firmwareversie 1.10 nodig om de Aureon 7.1
FireWire aan uw MAC te gebruiken.
3
5. Nu moet u alleen nog de Aureon 7.1 FireWire
aansluiten.
2
1
1. Analoge hoofdtelefoon-audiouitgang
2: Regelaar voor de hoofdtelefoonuitgang
3: Volumeregelaar voor het totale volume
4: Regelaar voor de microfoonvoorversterker
5: Analoge microfooningang
6. Deze LED helpt de microfooningang te
sturen
7. Deze LED brandt als de uitgave op "mute"
geschakeld werd
8. Deze LED geeft de externe bron aan
3 4 5
678
1
2 3
1. FireWire-aansluitingen
2. Ingang voor een platenspeler
3. Ingang voor een linetoestel (b.v. tapedeck)
Luidsprekeraansluitingen:
4: vooraan links en vooraan rechts
5: achteraan links en achteraan rechts
6: center en subwoofer
7: surround links en surround rechts
8. Optische digitale uitgang (TOS-link)
9. Optische digitale ingang (TOS-link)
10. Aansluiting voor de voedingseenheid
4 5
6
8 9
10
7
4
Contact TerraTec Duitsland:
www.terratec.de
Support Hotline
+49 (0)2157-817914
Maandag - vrijdag 13:00 - 20:00 uur
http://supporten.terratec.net
quick setup guide
 Loading...