


MODELS TS-400, TS-500, TS-700B, TS-WSA
For your safety please read all safety precautions in this
manual before operating your Terrasaw.
OPERATOR’S /
OWNER’S MANUAL

Sept 2013
Thank you for purchasing a patented award-winning TerrasawTM, the world’s
most portable power trenching tool.
Your Terrasaw provides you with quick, easy and versatile trenching when
and where you need it! The Terrasaw digs rapidly with minimum ground and
turf disturbance, which enables a very quick site cleanup.
Before putting the Terrasaw to use, please read and follow all safety,
assembly, operating and maintenance instructions.
Terrasaw Industries has a policy of ongoing product innovation and
improvement. We therefore reserve the right to modify specications, design
and conguration without notication. In some instances product may differ
slightly from that illustrated.
© 2013 Terrasaw Industries Ltd.
Contents Page
Important Safety Information 2
Assembly Instructions 3
Before You Start Trenching 7
Using Your Terrasaw
TM
:
Some Useful Tips 8
Special Situations 9
Fuel Information 10
Lubrication 11
Maintenance, Cleaning and Storage 11
Using Your Terrasaw
TM
Wheel Support Accessory 12
Service and Parts 13
Terrasaw
TM
Contact Details 13
Optional Digging Chain Tooth Patterns 14,15
Terrasaw
TM
Warranty 16
To prevent serious injury:
All operators of the Terrasaw must read and fully understand this Terrasaw
instruction manual before operation of the trenching unit.
All operators must use safety approved equipment as outlined by your local or
national safety codes. Safety foot, leg, eye and ear protection should be worn at all
times during operation of the Terrasaw trenching unit. In particular you must wear
sturdy safety boots, preferably steel-capped, and keep feet well clear of the digging
chain at all times.
Before you dig, check the location of all underground services, especially
electric cables. Electric shock can cause severe or fatal injury.
Check that the power head, including handles, chain brake and all safety features
are in good working order.
Ensure that Terrasaw is correctly tted to powerhead, chains are correctly tensioned,
and safety guards are in place. Before starting work, remove scabbard and inspect
the digging chain for any damage.
When starting power head, use the correct safety starting techniques as outlined in
your powerhead operators manual and ensure that the digging chain is clear of
contact with the ground or any other object. For extra safety when starting, apply
chain brake where tted. Be aware that the chain will otherwise be in motion as
soon as engine starts.
Important: Digging chain must be stationary when power head is at idle (refer to
power head operators manual for correct idle adjustment).
Maintain a rm footing and a good grip on the power head handles during digging.
We strongly advise trenching with the digging blade inclined back at a comfortable
angle (25 to 30 degrees from vertical) rather than vertical. This tool is designed
to dig to its designated depth when used at these angles. Digging with the blade
vertical should be avoided as it will bring the moving chain dangerously close to the
operator’s feet/legs and will also increase operator fatigue.
If you are trenching on a sloping surface, always stand on the downhill side of the
digging bar. In slippery ground conditions be particularly careful to maintain a rm
footing and stand so that a sudden slip or loss of balance will not bring you into
contact with the moving digging chain.
Minors should never be allowed to operate the Terrasaw.
Important Safety Information
2
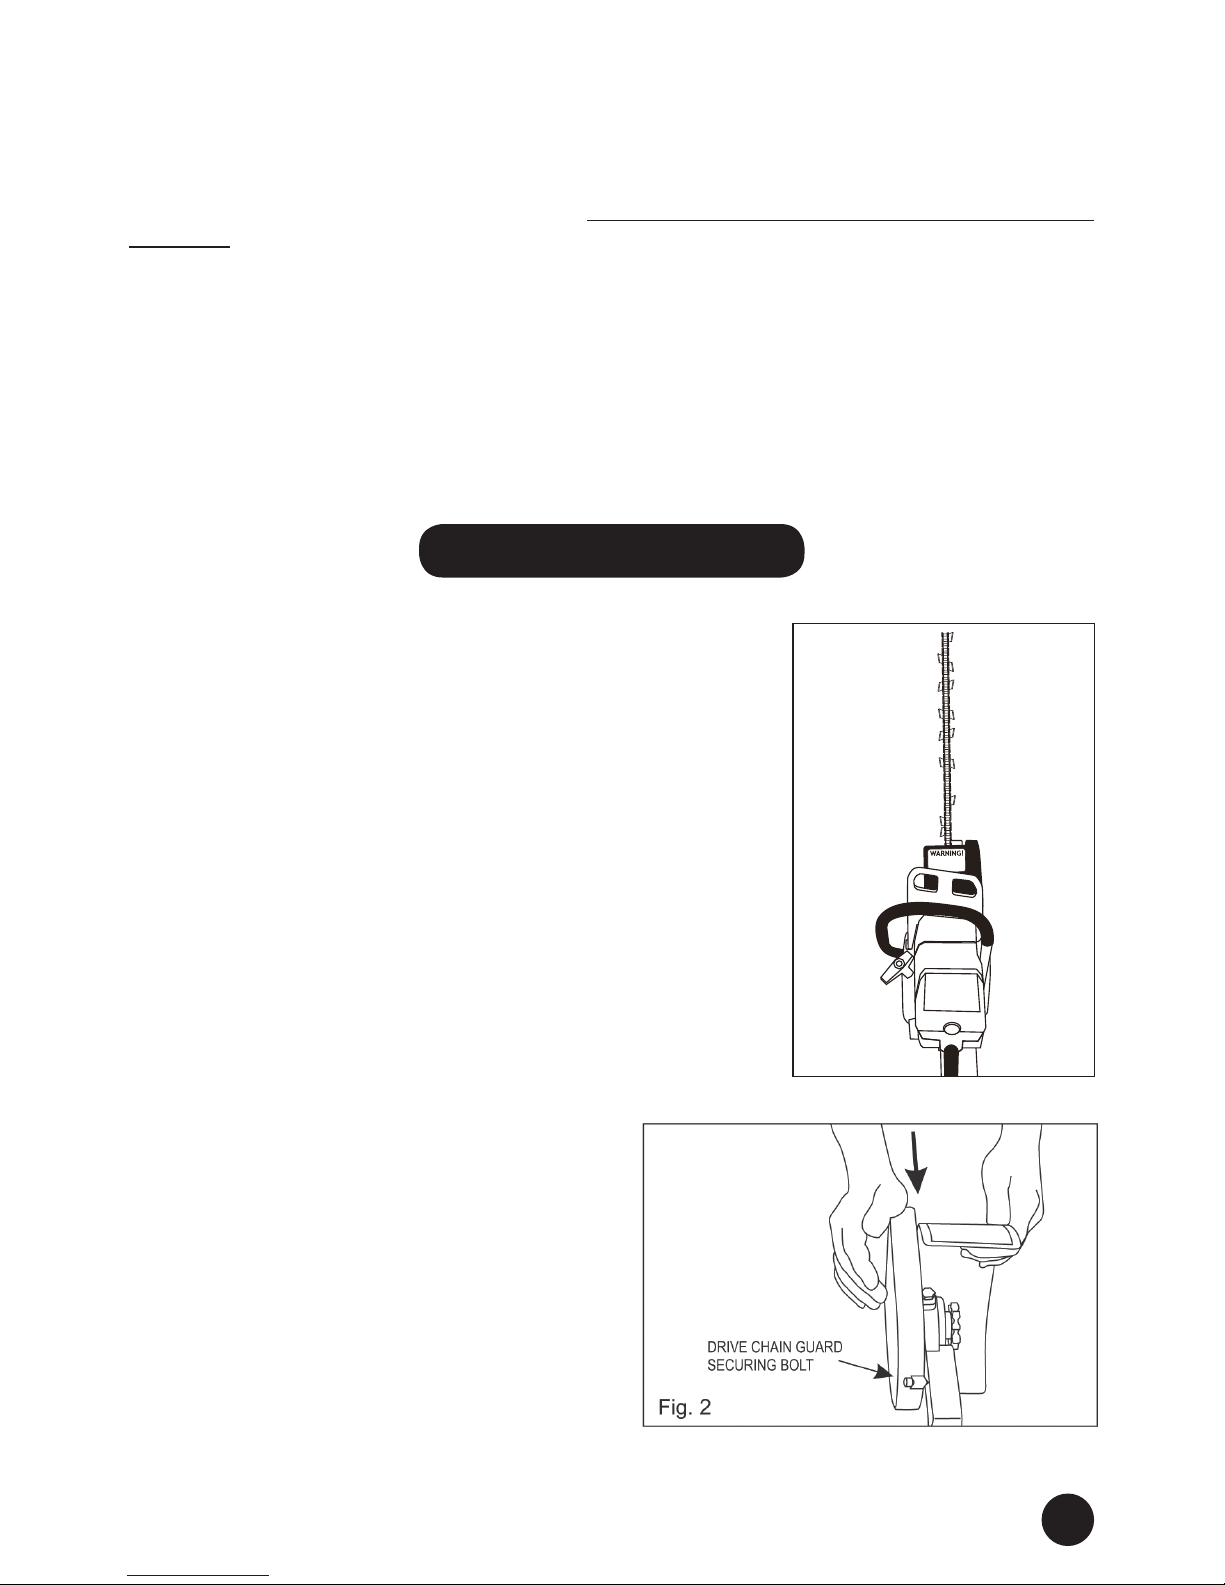
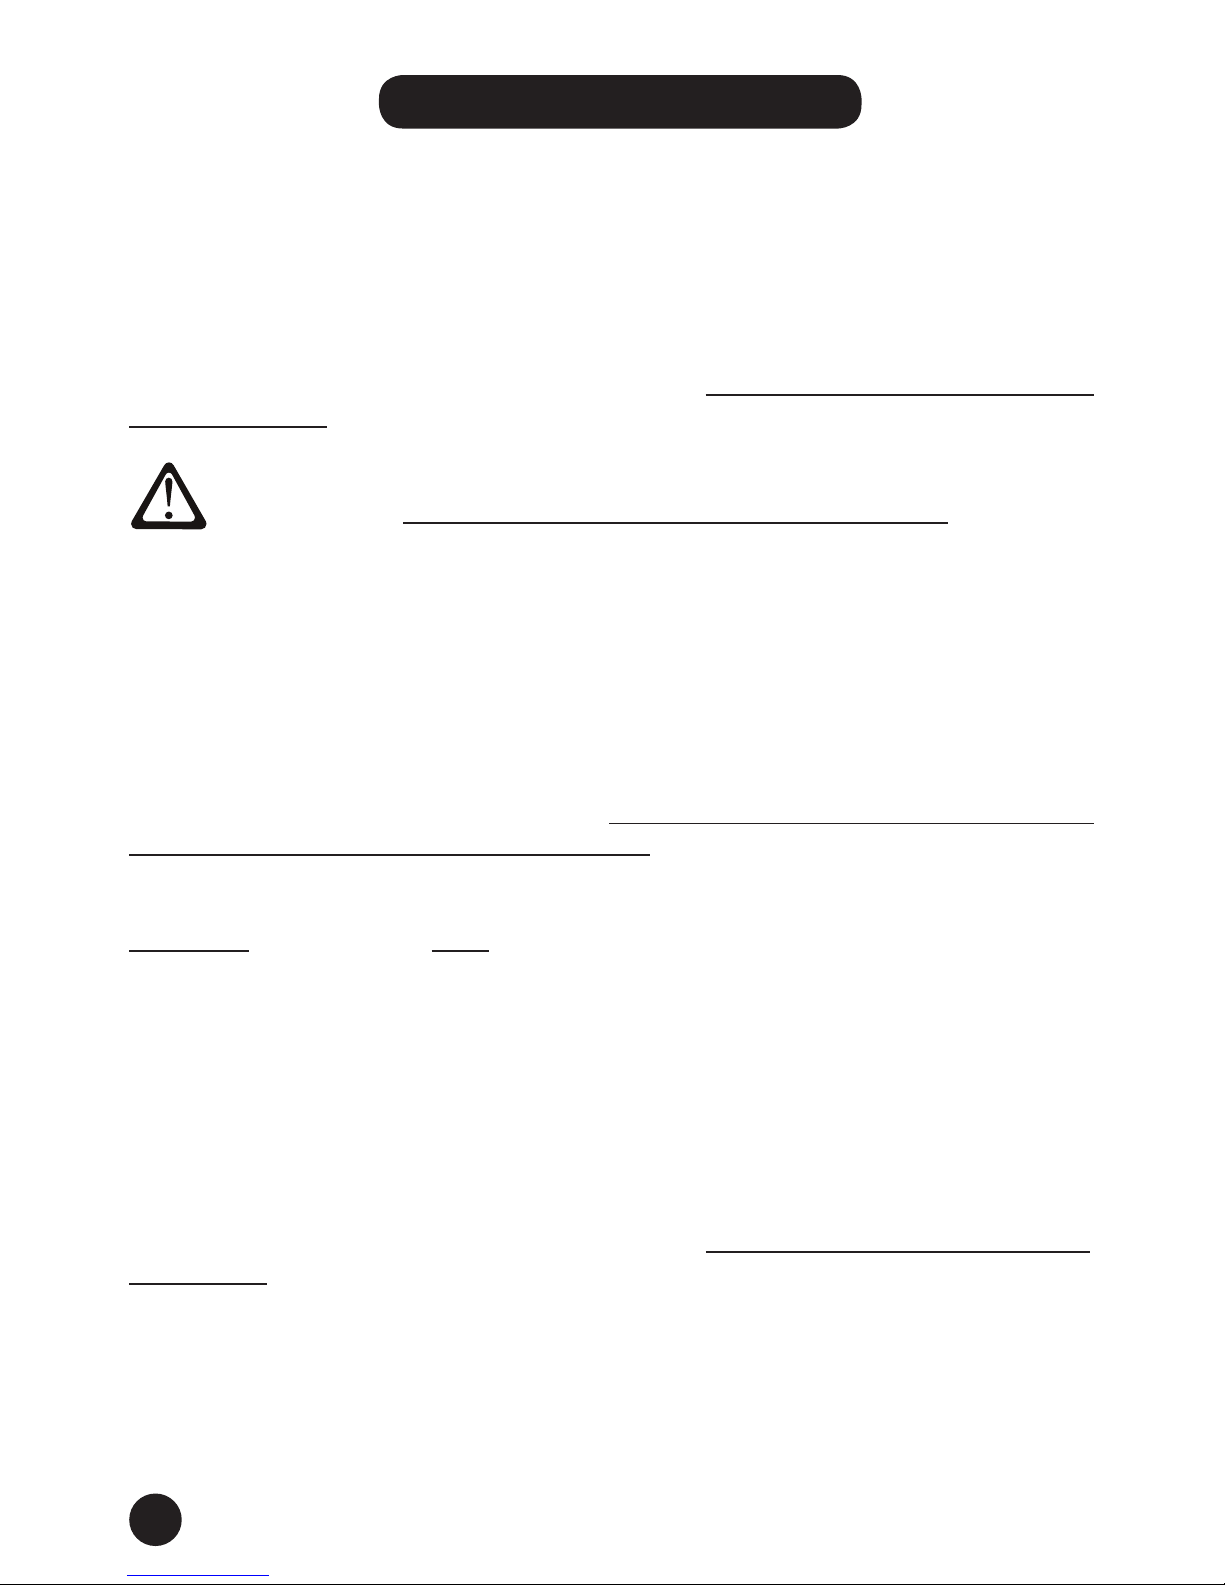
Fig. 1
[Note that when correctly assembled, the digging
bar is centrally located and approximately in line with
rear handle of power head (Fig. 1), giving the best
possible balance and control.
1. Remove the powerhead chain side cover nuts
and remove the side cover.
2. Wind the slack adjuster to give maximum
slack.
3. Unscrew the drive chain guard-securing bolt
(Fig 2). Slide chain guard out of channel on
main block, by pushing rmly with the heel of
your hand.
3
Be aware that the digging blade may kick back if upper quadrant of the digging tip
contacts solid ground or any obstruction, in a similar manner to a chainsaw timber
blade.
When tuning or testing the Terrasaw, be sure to point the blade away in a safe
direction as chain will instantly rotate at high speed and may throw off mud, stones
etc. Always keep bystanders and small animals at a safe distance.
Ensure that you have no loose clothing etc. that may become entangled in the
digging chain. Be aware that guards may become heated by exhaust during use.
When transporting or storing the Terrasaw use the protective chain scabbard
supplied.
Assembly Instructions
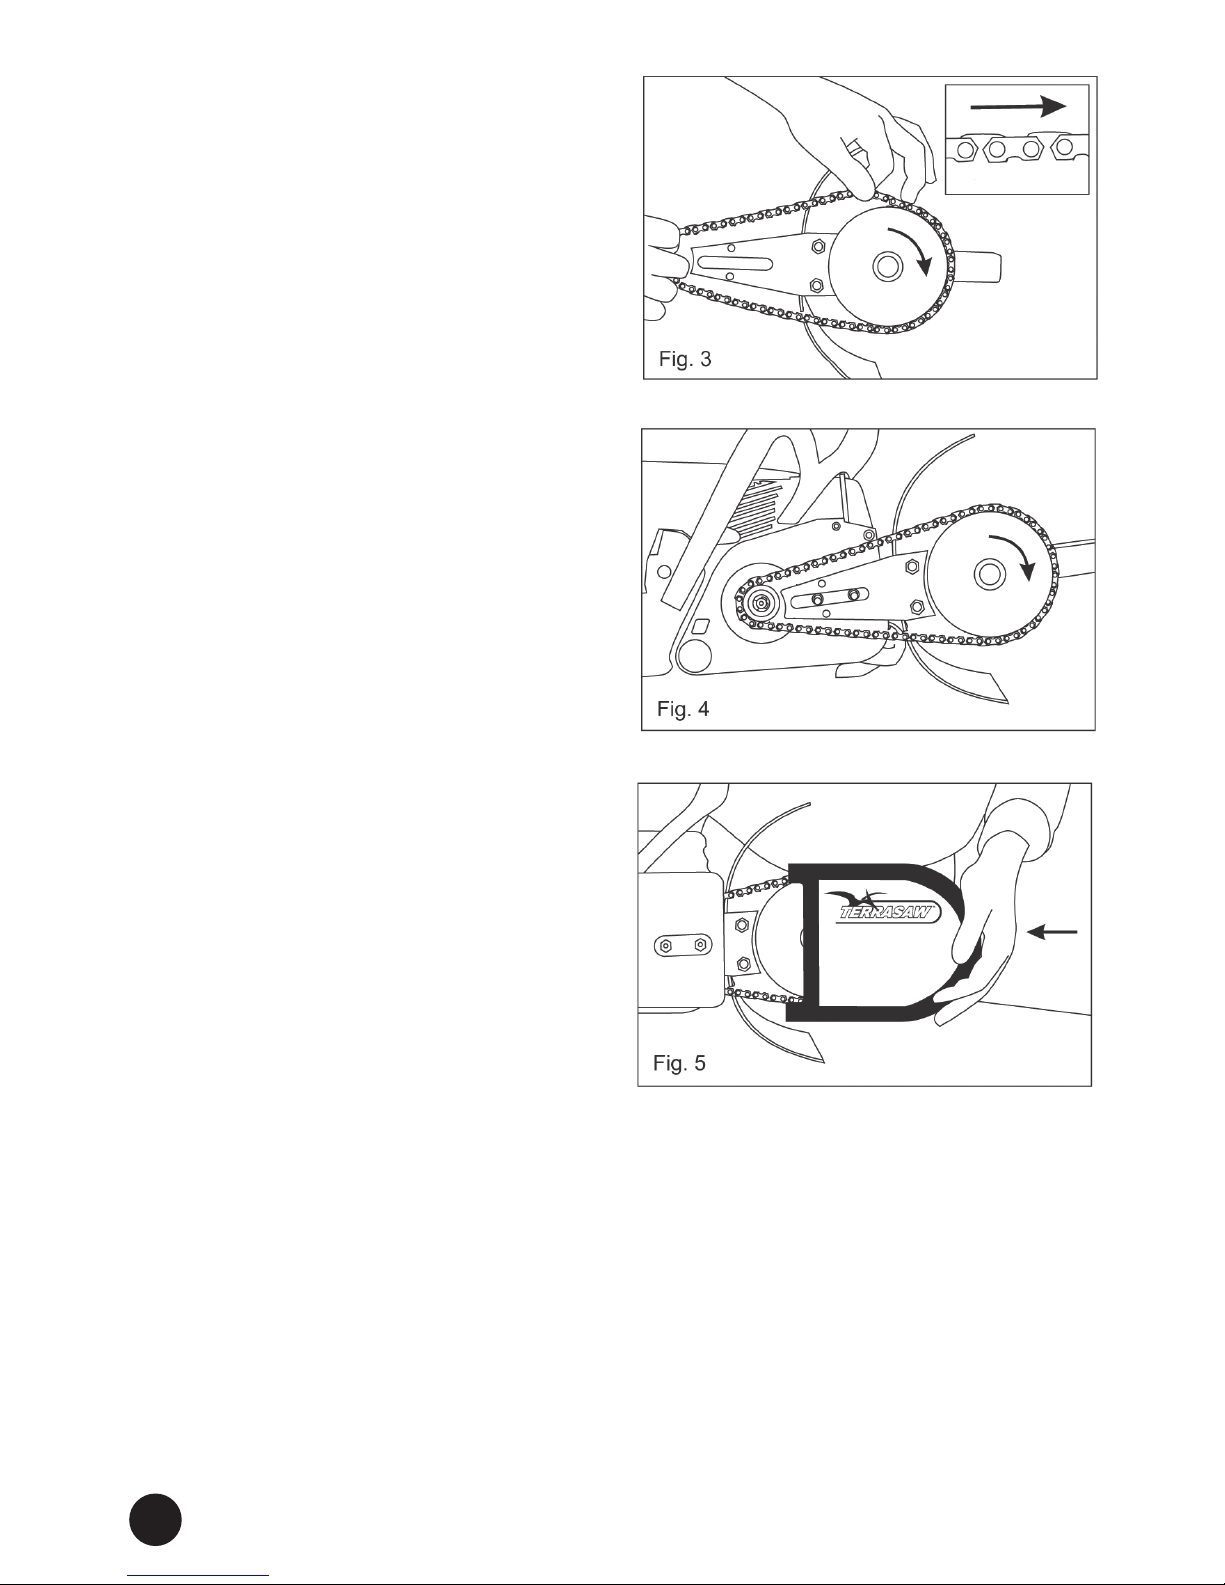
4. Loop the supplied Terrasaw
TM
drive chain over the large sprocket
(Fig. 3).
5. Engage the drive chain with power
head drive sprocket, ensuring the
drive teeth are seated correctly
(Fig. 4).
Warning: Fitting drive chain with
too much tension will result in
the premature wear and possible
failure of the primary transmission
system.
6. Reassemble the power head side
cover to the power head ensuring
that the chain adjuster is engaged
with the Terrasaw bar and lightly
tighten retaining nuts.
7. Using a screwdriver, adjust the
drive chain so that the slack
is taken up and a light nger
pressure on the drive chain at
midpoint yields approximately half
a chain height deection. Once the
correct position is obtained, rmly
tighten side cover retaining nuts.
Re-check tension and repeat Step
7 if required.
Note: A new chain will require tensioning more frequently than one that has been
in use for some time. Check the tension of a new chain after only a few minutes
operation and thereafter at each refuelling or as soon as slack is apparent.
Remember: If adjustment is required ensure that the side cover nuts are retightened.
8. Using the aerosol chain wax provided apply a light spray while rotating the
chain by hand, refer also Lubrication page 11. DO NOT START ENGINE AT
THIS TIME.
4
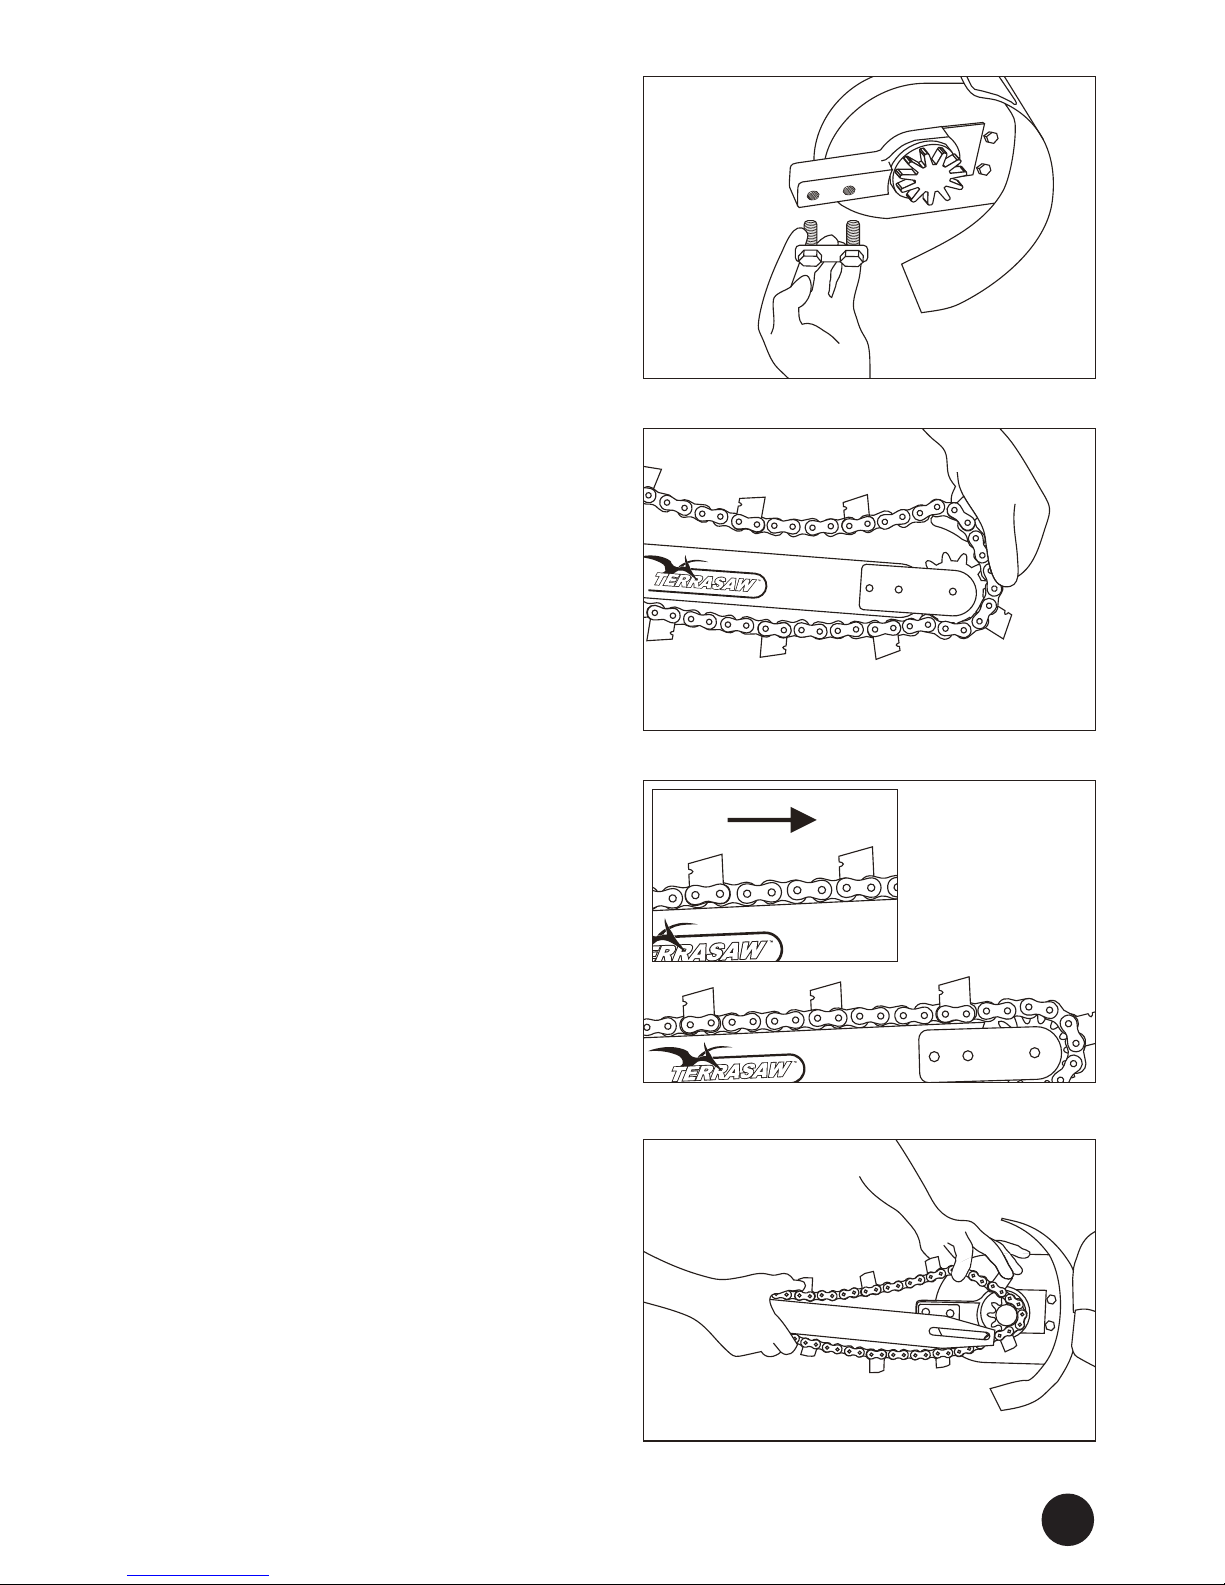
Fig. 7
Fig. 8
Fig. 9
Fig. 6
9. Ret the Terrasaw drive chain
guard. With securing bolt drawn
back slide the chain guard into the
retaining channel on main block
and push rmly home with the heel
of your hand (Fig. 5). Re-tighten
the guard securing bolt.
10. Roll power head onto its right side
(on a surface that will not scratch
chain cover instructions, etc)
so that you have a clear view of
digging bar securing bolts. Using
the spanner provided undo and
set aside the two large securing
bolts and large at washer that
(will) attach the digging bar to the
main block of the Terrasaw (Fig.
6).
11. Hold the digging bar as shown
(Fig. 7), with the bar slot facing
towards the main block body.
Note: Digging bar is reversible,
but the digging chain direction is
critical (Fig. 8).
12. Loop the digging chain around
the nose sprocket of the digging
bar (Fig. 7). Note: The digging
chain must be assembled with
the directional notches on rear/
trailing edge of teeth as the chain
runs along the top of the digging
bar (Fig. 8). Important: Fitting
digging chain in reverse will cause
a dramatic loss of performance.
13. Holding the bar and chain in one
hand, loop the digging chain over
drive sprocket with the other hand.
Engage the slotted section of bar
to the matching raised section of
the main block and slide the bar to
lightly tension the chain (Fig. 9).
5

Fig. 10
Fig. 11
Lubrication
Maintenance, Cleaning and Storage
All bearings on your Terrasaw are of a special sealed type which do not require any
lubrication or maintenance. Only the primary drive chain on your Terrasaw needs
minimal oil lubrication, refer to Assembly section - Step 10.
The digging chain should not normally be lubricated in any way. Due to the harsh
abrasive nature of soil trenching, it is advisable to avoid any oil, grease or other
lubrication on the digging chain during use, as this will attract dirt and increase wear.
Important: We advise frequent cleaning of the power head air filter and where
possible the fitment of fine dust elements. Power head cylinder cooling fins
should also be inspected/blown out with compressed air every 8-10hrs.
Note: In the same way that chainsaw operators need to regularly replace anti-
vibration mounts and other wearable powerhead components, users of the Terrasaw
will need to similarly maintain the power head in good condition.
When finishing work it is advisable to clean the digging chain and spray lightly with
CRC or similar to prevent rust or corrosion while in
storage. For longer-term storage
14. Reinstall the large washer and two
large securing bolts and lightly
tighten.
15. Using a screwdriver, inserted in the
tensioner slot (Fig. 10). Leaver the
digging bar away from the Square
main block. While keeping tension
on the digging bar, securely tighten
the bolts (Fig. 11).
Note: The chain tension should allow
correctly installed chain to sag
approximately half the height of
the chain as measured in the
middle of the bar (Fig. 11).
16. Fit the plastic dirt guard extender
as shown in Fig. 12. Note that this
ts on the outside of the metal dirt
guard.
17. Your Terrasaw is now ready for
operation! Please refer to both
your Terrasaw and Powerhead
user manual for correct and safe
operation.
6
Fig. 12
TERRASAW DIRT GUARD EXTENDER
METAL GUARD
(shown detached)
PLASTIC GUARD
EXTENDER
NYLOC NUTS
(on bolts through
rear of metal guard)
LARGE METAL
WASHER

1. Give the machine a good visual inspection before starting/Re-starting.
2. Carry out all safety instructions as listed on page 2.
3. Check with local authorities for any underground services. Most utility
providers (for example Telecom, local electricity and gas suppliers) provide
a free cable location and advisory service, to prevent accidental disruption
of services. In rural areas, check also with local farmers or landowners who
may have detailed knowledge of utilities. Note: in many locations (e.g. along
roadsides and near subdivisions) excavation may have occurred after utilities
were laid. This can result in cables etc. being encountered unexpectedly at
shallower depths than regulations would suggest.
4. Check along your desired trench route clearing any obstructions, branches,
stones etc. and any other object which may either obstruct the trencher or
cause you to slip/lose your footing. If a long continuous trench is planned,
consider tting the optional Terrasaw wheel support accessory.
5. IMPORTANT: Use of the Terrasaw in Dusty Conditions
In some ne dusty soils there is a risk that harmful dust may be drawn into
and through the powerhead air lter resulting in damage to the engine. If
dusty conditions are encountered special precautions must be taken (eg.
the digging area should be dampened prior to trenching and/or a ne water
spray used during operation, with lters cleaned frequently. Where practical,
work with wind from behind the operator.
See also maintenance, cleaning & storage section on page 11.
Terrasaw Industries Ltd will not be liable for damage to any powerhead
resulting from dust intake - refer warranty section.
Please feel free to contact us at any time if you would like further advice or
guidance on this or any other aspect of using your Terrasaw.
Before You Start Trenching
7

CAUTION: UNDER NO CIRCUMSTANCES allow the digging chain to jam
or bog to a standstill whilst holding throttle on as this will cause severe
clutch damage. Refer also to powerhead manual.
1. Start the powerhead as per the manufacturers instruction manual. With a
rm grip on the powerhead handles and a rm footing, start cutting trench
with the Terrasaw blade at a comfortable angle (25 to 30 degrees from
vertical), and slowly walk backwards along your desired line. In lighter soil
types it may be necessary to do a nal quick pass at the desired depth to
clean out any remaining spoil.
2. Most chainsaw engines are designed to operate best and develop
maximum power at near full throttle. The Terrasaw is designed for this and
also operates well at high throttle settings, recommended when digging in
difcult ground or at full depth. When trenching in conned or difcult areas
however, particularly at shallow depths of 200mm or less, the use of very
low throttle settings will provide extra safety and control.
3. When trenching freehand in particularly difcult soils the following technique
is useful. Place the Terrasaw’s metal guard on the ground and use this as a
‘pivot point’. Using a pushing down motion on the top handle and a pulling
up motion on the rear handle of the power head, allow the Terrasaw to
dig to the depth you require. Lift the Terrasaw up and back and repeat the
above. This method requires a quick nal pass to even the bottom of the
trench!
4. If you strike solid obstacles such as rock, concrete, timber etc. remove
these before continuing. The Terrasaw is designed to dig earth, not large
stones or large tree roots!
5. For wider trenches, simply dig two parallel cuts to the desired width and
remove the remaining centre section by hand. If accurate trench placement
is important, consider marking your desired line with spray paint or similar.
6. Regular checking/adjustment of chains will extend chain life!
7. After digging, brush the loose dirt off of the digging chain, and inspect the
digging teeth for any damage. See Maintenance, Cleaning and Storage
page 11.
8
Using Your TerrasawTM : Some Useful Tips

1. The special Terrasaw digging tooth and tooth pattern is specically designed
to provide maximum digging speed in common soils with minimum friction
and engine loading. However when digging in very compacted ground, hard
clay pans etc. changing to the Terrasaw Alternative Dig Pattern Chain (refer
pages 14 & 15) may be required. This pattern will assist in trench clearing.
To do this simply slacken and remove the digging chain, and swap for the
Alternative Dig Pattern Chain (Supplied with new machines).
2. For digging in light or sandy soils containing ne hard stones, use the
following technique. The Terrasaw digging chain should be at speed before
contacting the ground surface and when the trench is complete, lift the blade
clear before throttling off. This reduces the chance of stones jamming the
nose sprocket. In these conditions it is also an advantage to run the chain
with twice the normal amount of slack.
3. When digging at full depth in difcult wet pliable clays, it is advisable to
take three or four passes to achieve the desired nal depth, as this reduces
operator fatigue and undue strain on the powerhead anti-vibration mounts.
4. When cutting curves or radius cutting (e.g. concrete lawn edgings, footings,
building foundations, etc.) it is advisable to use several shallow cuts rather
than a single cut at full depth.
5. When digging a trench across a farm road or raceway (e.g. for underground
water pipes or electric fence cable), it is advisable to rst loosen the compacted
gravel/stones along the desired line. Use a pick or similar tool and remove
any large rocks before trenching to avoid damaging your Terrasaw digging
teeth.
Special Situations
9

Mixing ratio 40:1 using high quality air cooled two stroke oil.
Use 95 Octane fuel avoiding biofuels or octane boosters.
Use freshly mixed fuel/oil.
At all times keep fuel mix container out of direct sun.
Mix only enough fuel for the job at hand.
Fuel Information
10

Front Oil Tank - Do not ll with oil as powerhead does not dispense oil. See wax
below.
All bearings on your Terrasaw are of a special sealed type which do not require any
lubrication or maintenance. Due to the harsh abrasive nature of soil trenching, it is
advisable to avoid any oil, grease or other lubrication on the digging chain during
use, as this will attract dirt and increase wear.
Only the primary drive chain on your Terrasaw needs minimal lubrication.
PRIMARY DRIVE
Wax – not oil!
The primary drive chain should be given a 2-3 second spray of chain wax at every
fuel stop (in light digging - every second tank) from the chain wax can as provided
with your Terrasaw. (Always keep it with the Terrasaw).
To apply:
1. Loosen the Front screw holding the Terrasaw (Black) Drive cover.
2. Slide the drive cover forward just enough to expose the top of drive chain
3. Start Terrasaw and with a slow/low throttle setting apply a 2-3 second burst
onto the rotating chain from the Chain Wax can nozzle aiming for the centre
of the chain.
4. Turn off the engine and slide home the Terrasaw Drive Chain cover and
reinstall the cover retaining screw.
Important: We advise frequent cleaning of the power head air lter with low
pressure air. Power head cylinder cooling ns should also be inspected/
blown out with low pressure compressed air every 8-10 hrs.
Note: In the same way that chainsaw operators need to regularly replace anti-
vibration mounts and other wearable powerhead components, users of the Terrasaw
will need to similarly maintain the power head in good condition.
When nishing work it is advisable to clean the digging chain and spray lightly with
CRC or similar to prevent rust or corrosion while in storage. For longer-term storage
the digging chain should be removed and soaked in a light oil or diesel. Clean other
surfaces of the Terrasaw unit with a brush or damp cloth. Avoid using petrol, other
cleaning solvents or harsh abrasives on labels. Remove drivechain guard, clean
out any dust and dirt and ret to Terrasaw. Replace the scabbard and store your
Terrasaw in a safe place.
Maintenance, Cleaning and Storage
Lubrication
11

Using the TerrasawTM Wheel Support Accessory (WSA)
Warning: Electric shock can be fatal. Regardless of whether you are using
the Terrasaw freehand or with the WSA system, remember to check the
location of all underground services, especially electric cables, before you
dig (see page 2).
Having assembled your WSA (refer instructions supplied with unit) lay the control
handle on the ground.
Position the tongue (located) under the Terrasaw into the axle mount of WSA. Lock
in place by sliding latching handle across into catch on Terrasaw.
Lift control handle and engage in notched depth adjuster.
Before starting powerhead:
Position throttle control assembly onto throttle handle of powerhead so that WSA
throttle latch engages the power head throttle trigger. Secure in place by wrapping
velcro strap around powerhead handle.
With engine still switched off, check for smooth throttle operation by operating
remote throttle lever and adjust throttle cable slack as required using the in-line
adjuster to ensure engine will safely return to idle once started.
Place towing strap around lower back and adjust length for comfortable operation.
You are now ready for action! (Refer to powerhead operator’s manual along with
page 2 of the Terrasaw Operator’s Manual for correct starting procedure).
Tips for Use
Start digging your trench and select a notch on the depth adjuster which gives
both the desired trench depth and a comfortable operating position for the control
handle. Before changing to a different notch, throttle off and allow your digging
chain to come to rest so that you retain full control of the Terrasaw at all times.
When trenching with this attachment tted, allow the trencher to dig at a rate at
which the soil type/conditions allow. If excessive backwards pressure is used for
the particular soil type/condition, the Terrasaw will try to ‘surface’ and the wheels will
come off the ground. This situation places unnecessary strain on all componentry
including the operator.
Happy Trenching!
12

Your Terrasaw is professionally engineered and designed for easy servicing and
parts replacement. During the warranty period if any non-routine servicing is
required (i.e. other than digging or drive chain replacement) this should be referred
to our service department or authorised service agent in order to maintain the
warranty status. This work will be charged at the normal rates unless found to be a
warranty item. Beyond this period you can order the required parts for convenient
eld or local replacement.
Never attempt to t other than genuine Terrasaw parts, or modify your Terrasaw
in any way. Not only will this invalidate any warranty; it may cause a hazardous
malfunction and result in injury to either the operator or bystanders.
When ordering accessories, parts or service please quote:
• your Terrasaw model number (TS-400, TS-500, TS-700B, other)
• the serial number (stamped on the top of the main block)
Replaceable parts/accessories include:
Part Number Description
22 - DC4 Digging Chain - complete loop, TS-400
22 - DC5 Digging Chain - complete loop, TS-500
22 - DC7 Digging Chain - complete loop, TS-700B
22 - DC4 - A Alternative Digging Chain - complete loop, TS-400
22 - DC5 - A Alternative Digging Chain - complete loop, TS-500
22 - DC7 - A Alternative Digging Chain - complete loop, TS-700B
18 - DCB Drive Chain Loop, suits 400/500/700B
9 - DSB Digging Sprocket and Shaft, suits 400/500/700B
23 - SC4 Scabbard, TS-400
23 - SC5 Scabbard, TS-500
23 - SC7 Scabbard, TS-700B
TSB - WSA WSA Wheel Support Accessory, suits 400/500/700B
Service and Parts
13
Service Department
Terrasaw Industries Ltd
Matakohe West Road, Matakohe 0594,
Northland, New Zealand.
Phone: +64 9 431 6400
Fax: +64 9 431 6420
Email: enquiries@terrasaw.co.nz

Digging Chain Tooth Pattern : TS-500 (14 Teeth)
14
D
C
B
A
Direction
of chain
travel
The following diagram represents the entire length of chain - viewed from above.
ALTERNATIVE PATTERN
(For digging compacted ground - see also page 9)
Note: When ordering
replacement teeth specify
dig tooth type (A,B,C,D).
STANDARD PATTERN

Direction
of chain
travel
D
C
B
A
Digging Chain Tooth Pattern : TS-700B (20 Teeth)
ALTERNATIVE PATTERN
(For digging compacted ground - see also page 9)
15
Note: When ordering
replacement teeth specify
dig tooth type (A,B,C,D).
The following diagram represents the entire length of chain - viewed from above.
STANDARD PATTERN

1. Terrasaw Industries will repair or replace, at its option, any new Terrasaw
product which fails due to a defect in materials or workmanship during
the applicable warranty period specied in section 2 below, subject to the
exclusions as noted in Section 3.
2. The warranty period applicable to new Terrasaw products, depending on the
end use of the product and product type, with coverage commencing from
the date of sale, is 30 Days.
3. This warranty does not in any way cover
• normal wear and tear
• failure arising from improper use of the product
• failure arising from improper assembly, maintenance or storage
• failure arising from the use of parts not manufactured or supplied by
Terrasaw Industries or its authorised agents
• drive chain and ground-engaging items
4. During the warranty period, if any non-routine servicing is required (ie.
other than digging or drive chain replacement) this should be referred to
our service department or authorised service agents in order to maintain the
warranty status.
If this Terrasaw product fails to comply with any guarantee in the Consumer
Guarantees Act 1993, Terrasaw Industries will repair or replace the product,
at its discretion.
The safe and correct use of this product is beyond the control of the
Manufacturer. Terrasaw Industries will not be liable to any purchaser or any
other person for any loss of prots or any consequential, indirect or special
loss, damage or injury of any kind however caused (including negligence)
arising directly or indirectly from or in connection with any Terrasaw product
and/or any failure of or any fault in any Terrasaw product. By way of
explanation, we are not liable if you cause or suffer damage, injury or loss
when using a Terrasaw product.
For handy reference, record your Terrasaw™ details here:
Model No.
Serial No.
Terrasaw Limited Warranty
16

 Loading...