

Page 1

EN ES
Online
User
Manual
Page 2
ENGLISH
2 |
Thank you for choosing the TERRANO-X. We hope you will enjoy using it. — Your Terrano Team
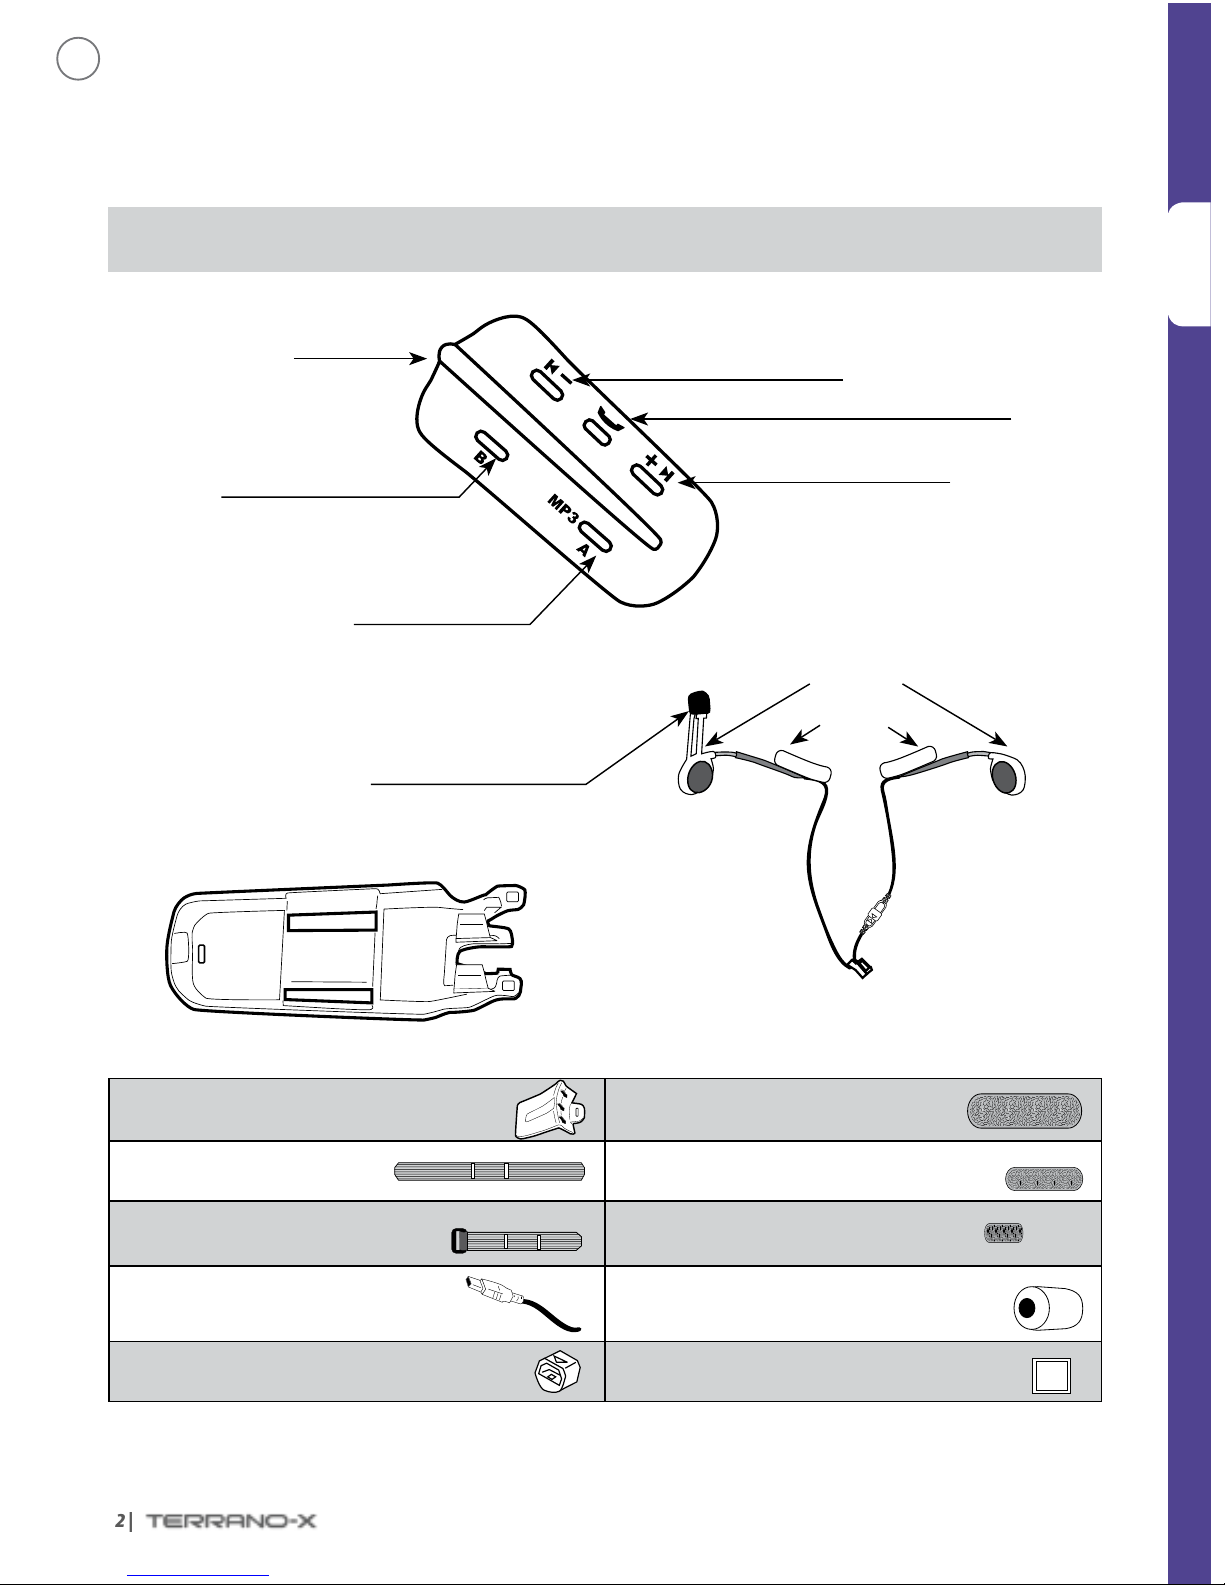
CONTENTS OF BOX
IMPORTANT: If you purchased the double pack, your retail box will include two sets of each component listed except
for the Quick Start Guide.
TERRANO-X
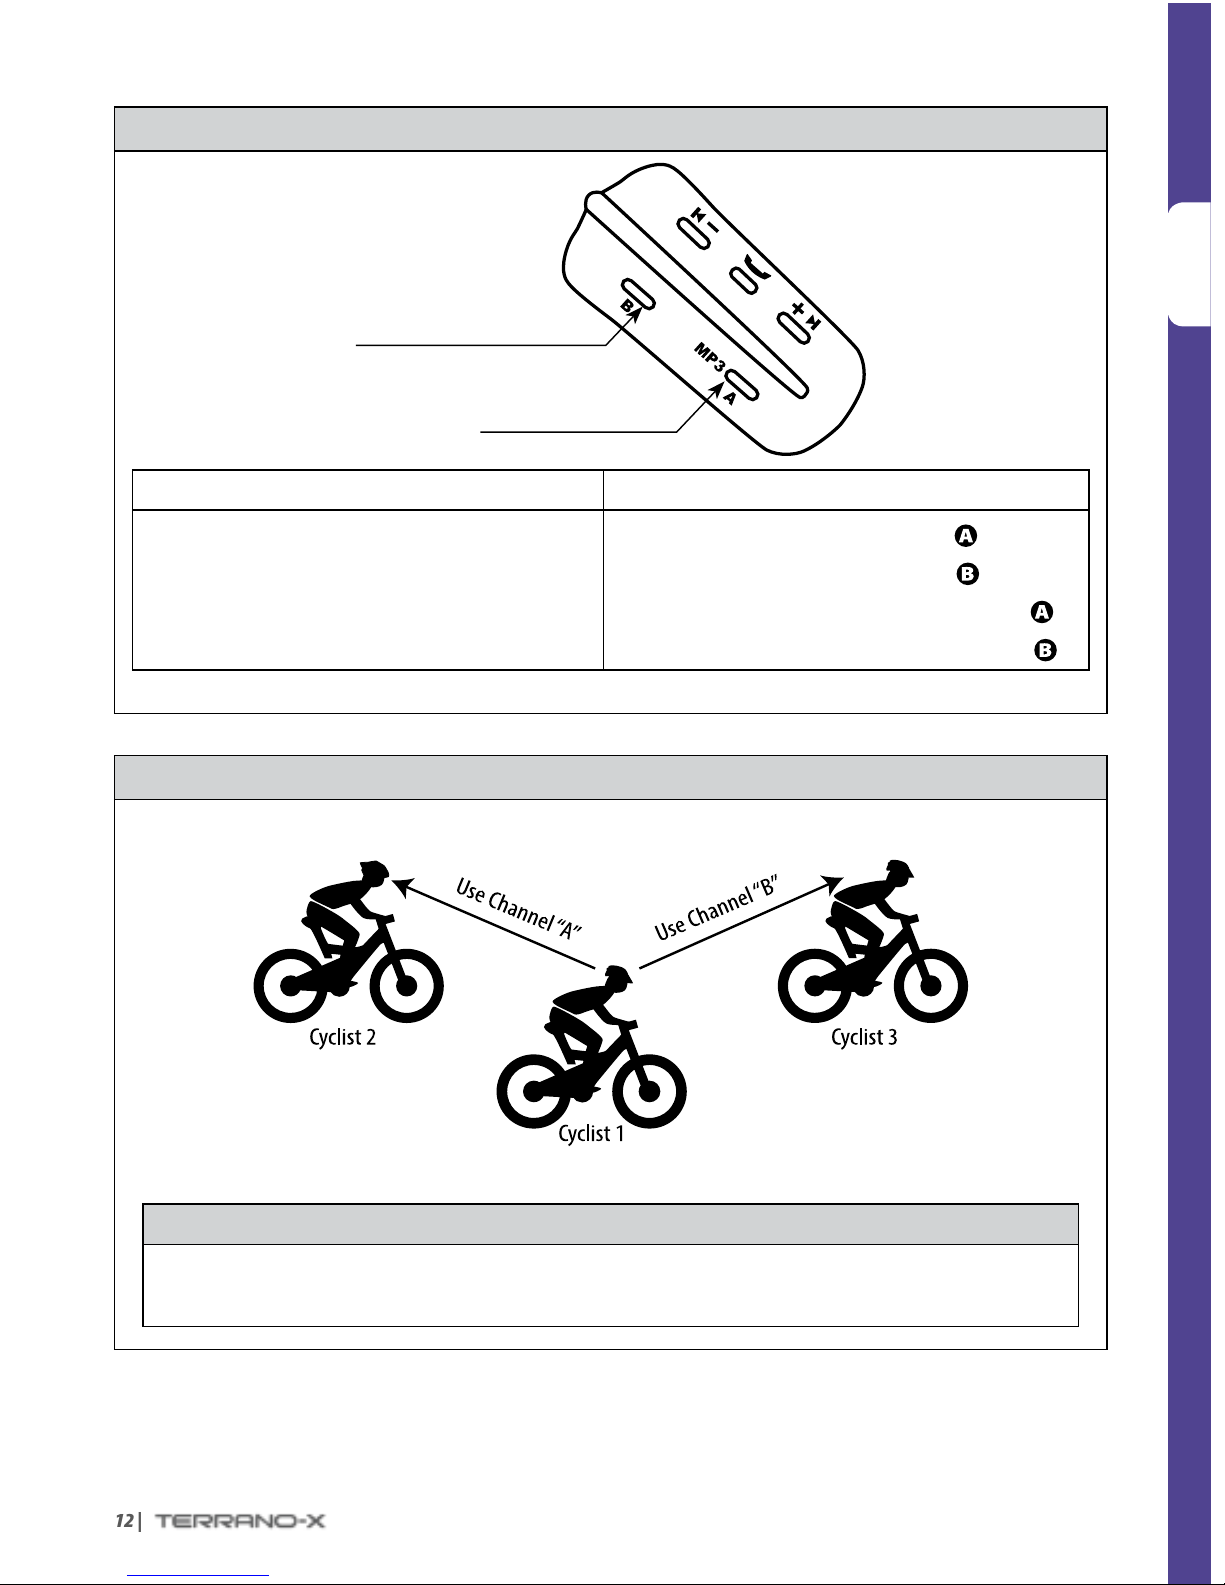
Channel B Button
• Connects to Channel B / D
Volume Down / Rewind Button
USB cable jack
Mobile Phone Button – Receive / Reject / Pairing
Volume Up / Forward Button
Channel A Button
• Connects to Channel A / C
• MP3 Button
Cradle
Audio Kit
Velcro helmet
mount
Audio Kit Connector
Two speakers
Noise canceling microphone
Spoiler 4 Large Velcro pads
Long strap 4 Small Velcro pads
Short buckle strap
4 Adhesive pads (to hold the
speaker wires on the helmet lining)
USB charging cable
Microphone sponge
Silicone Cap
Pre-moistened Alcohol Pad
Alcohol
Pad
EN
Page 3
ENGLISH
| 3
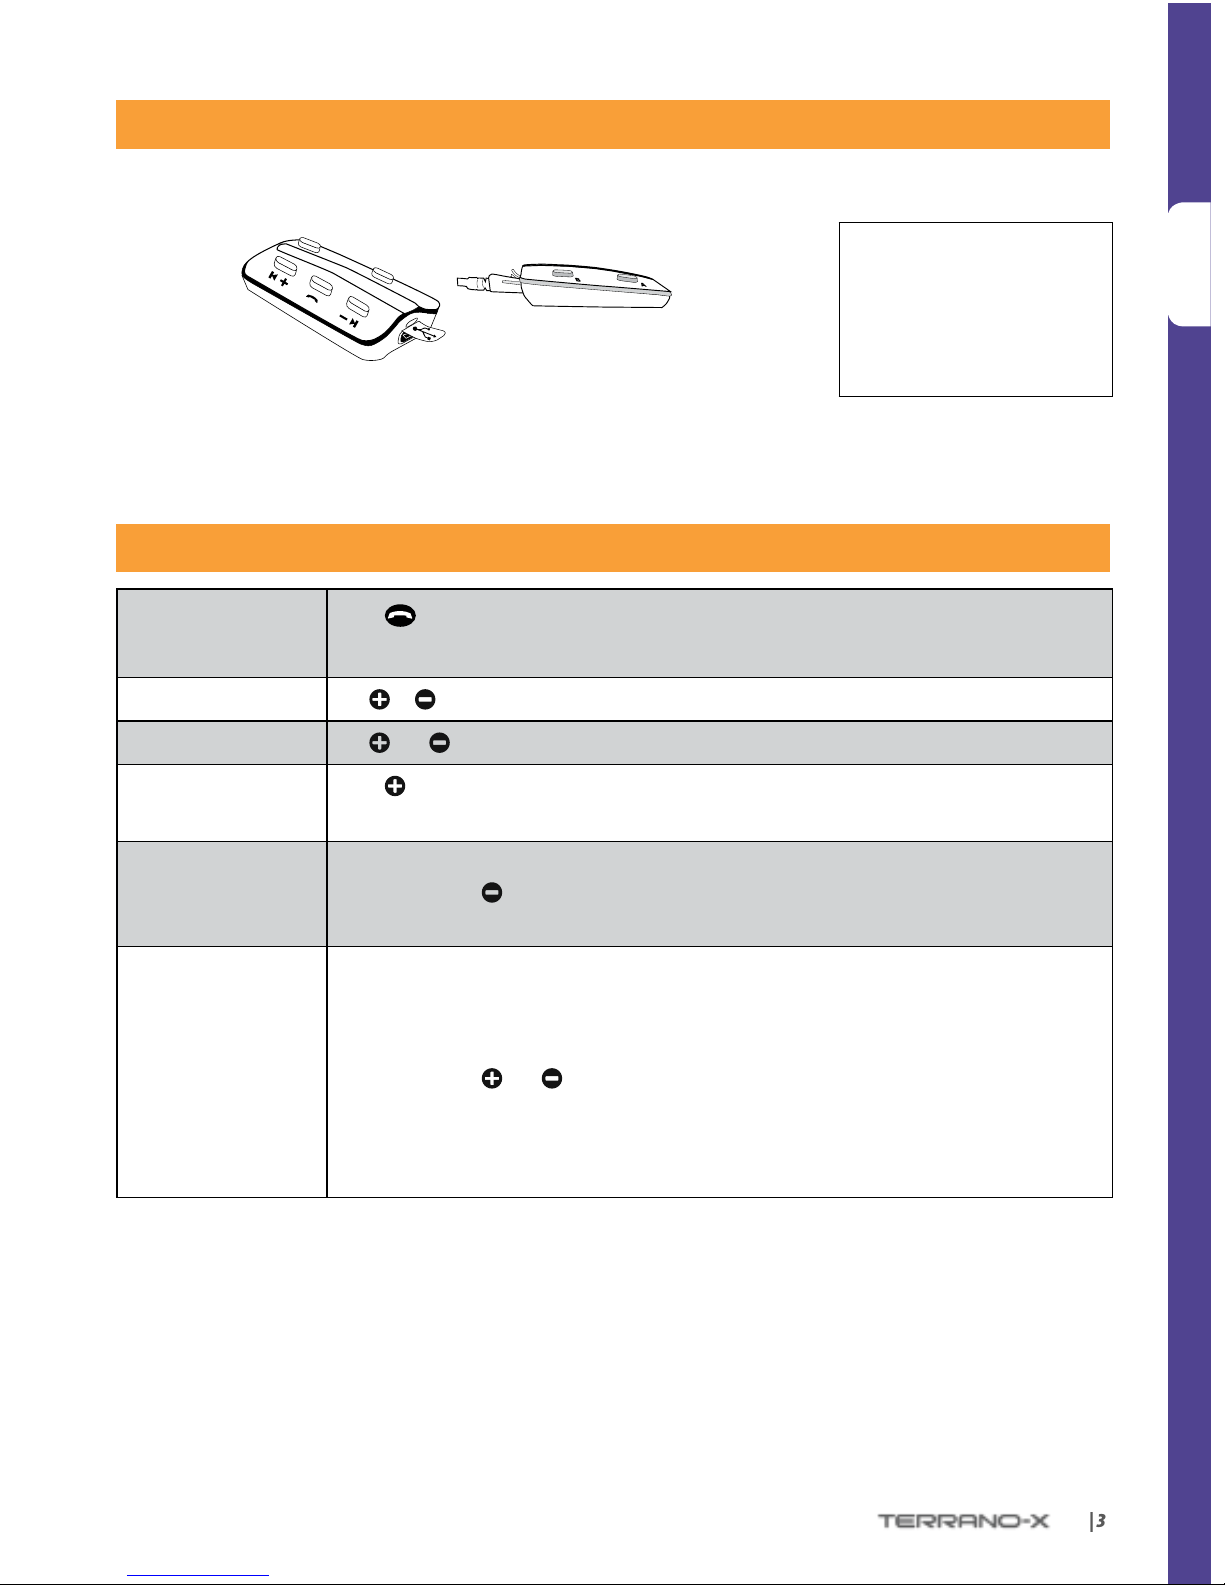
CHARGING THE BATTERY
Use the USB cable to charge the unit for at least 3 hours before initial use.
Channel “B” /
Channel “D”
Channel “A” / Channel “C”
While charging, the RED LED turns on. When charging is complete, the
LED will turn o.
GENERAL FUNCTIONS
Power ON/ OFF
Press
for 2 seconds
• ON: 3 BLUE ashes, Ascending tone • OFF: 3 RED ashes, Descending tone
Volume
Tap
or to adjust and set volume of current audio source
Mute
Tap
and simultaneously
Battery Check
Press
for 2 seconds and check the LED color:
• Blue = Full charge • PURPLE = Half charge • RED = Almost empty
Automatic Volume
Adjustment
(Default: Enabled)
Automatic volume adjustemnt according to ambient noise and riding speed.
In Standby, press
for 5 seconds
• Enabled: BLUE ash for 2 seconds • Disabled: RED ash for 2 seconds
Voice Activation
(Default: Regular)
Voice activation can be customized to make it more or less sensitive. Voice activation for
Intercom calls can also be turned OFF.
You can choose between ‘Regular’ and ‘High’ sensitivity. If you experience diculties starting
a conversation, change the setting to ‘High’:
In Standby, press
and simultaneously for 2 seconds.
• Regular: BLUE ash for 2 seconds
• High: PURPLE ash for 2 seconds
• O: RED ash for 2 seconds
The TERRANO-X is waterproof
and dustproof. However,
when in use, the silicon cover
should be kept tightly closed
to prevent moisture from
entering the unit.
Page 4
ENGLISH
4 |
STATUS LIGHTS
LED Indication Status
None TERRANO-X is OFF
1 BLUE ash every 3 seconds Standby mode No active audio sources
2 BLUE ashes every 3 seconds Active mode–Call in progress / music or other audio source is ON
1 RED ash every 3 seconds
Low-battery Beep every 3 minutes
Standby mode–Battery is low
2 RED ashes every 3 seconds
Low-battery Beep every 3 minutes
Active mode – Battery is low
Solid RED Charging
AUDIO SOURCES AND PRIORITIES
If two connected audio sources try to play audio simultaneously, the TERRANO-X automatically determines
which to play through the speakers based on the priority of the connected devices.
Higher Priority
1. Mobile phone audio or GPS instructions
*
2. Intercom/Click-to-Link (CTL)
3. A2DP (Stereo Bluetooth) audio
4. Multi-Port–(for corded connection i.e. music players)
*GPS instructions from Smartphone GPS Apps are prioritized like A2DP audio
Lower Priority
• Incoming mobile phone calls will interrupt ongoing intercom calls
• Incoming intercom calls will interrupt the A2DP audio source
• Click-to-Link® calls and Intercom calls have the same priority. A Click-to-Link request cannot interrupt
an Intercom call in progress, and vice-versa.
IC (Intercom) Busy Tone: If you are on a mobile call, Click-to-Link call, or receiving GPS instructions and
Cyclist A or Cyclist B try to connect to you for an IC Call, you will both hear a busy tone (double beep).
Page 5
ENGLISH
| 5
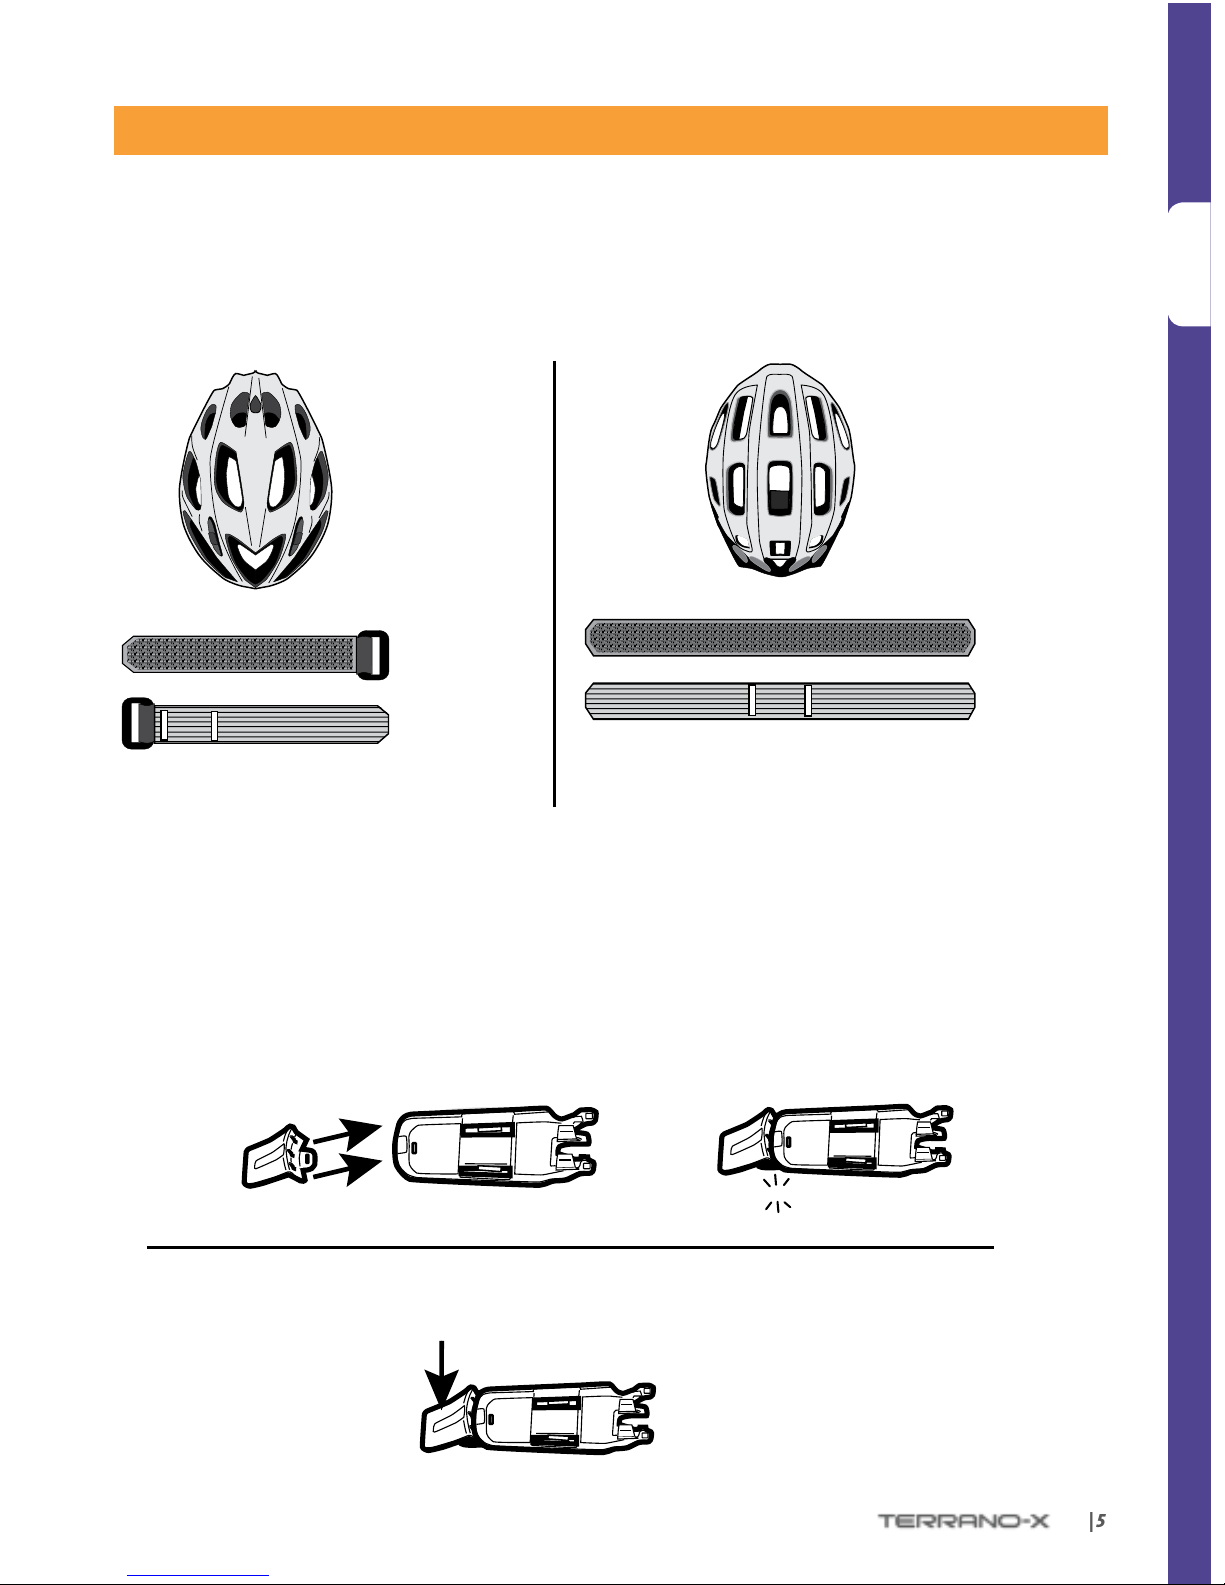
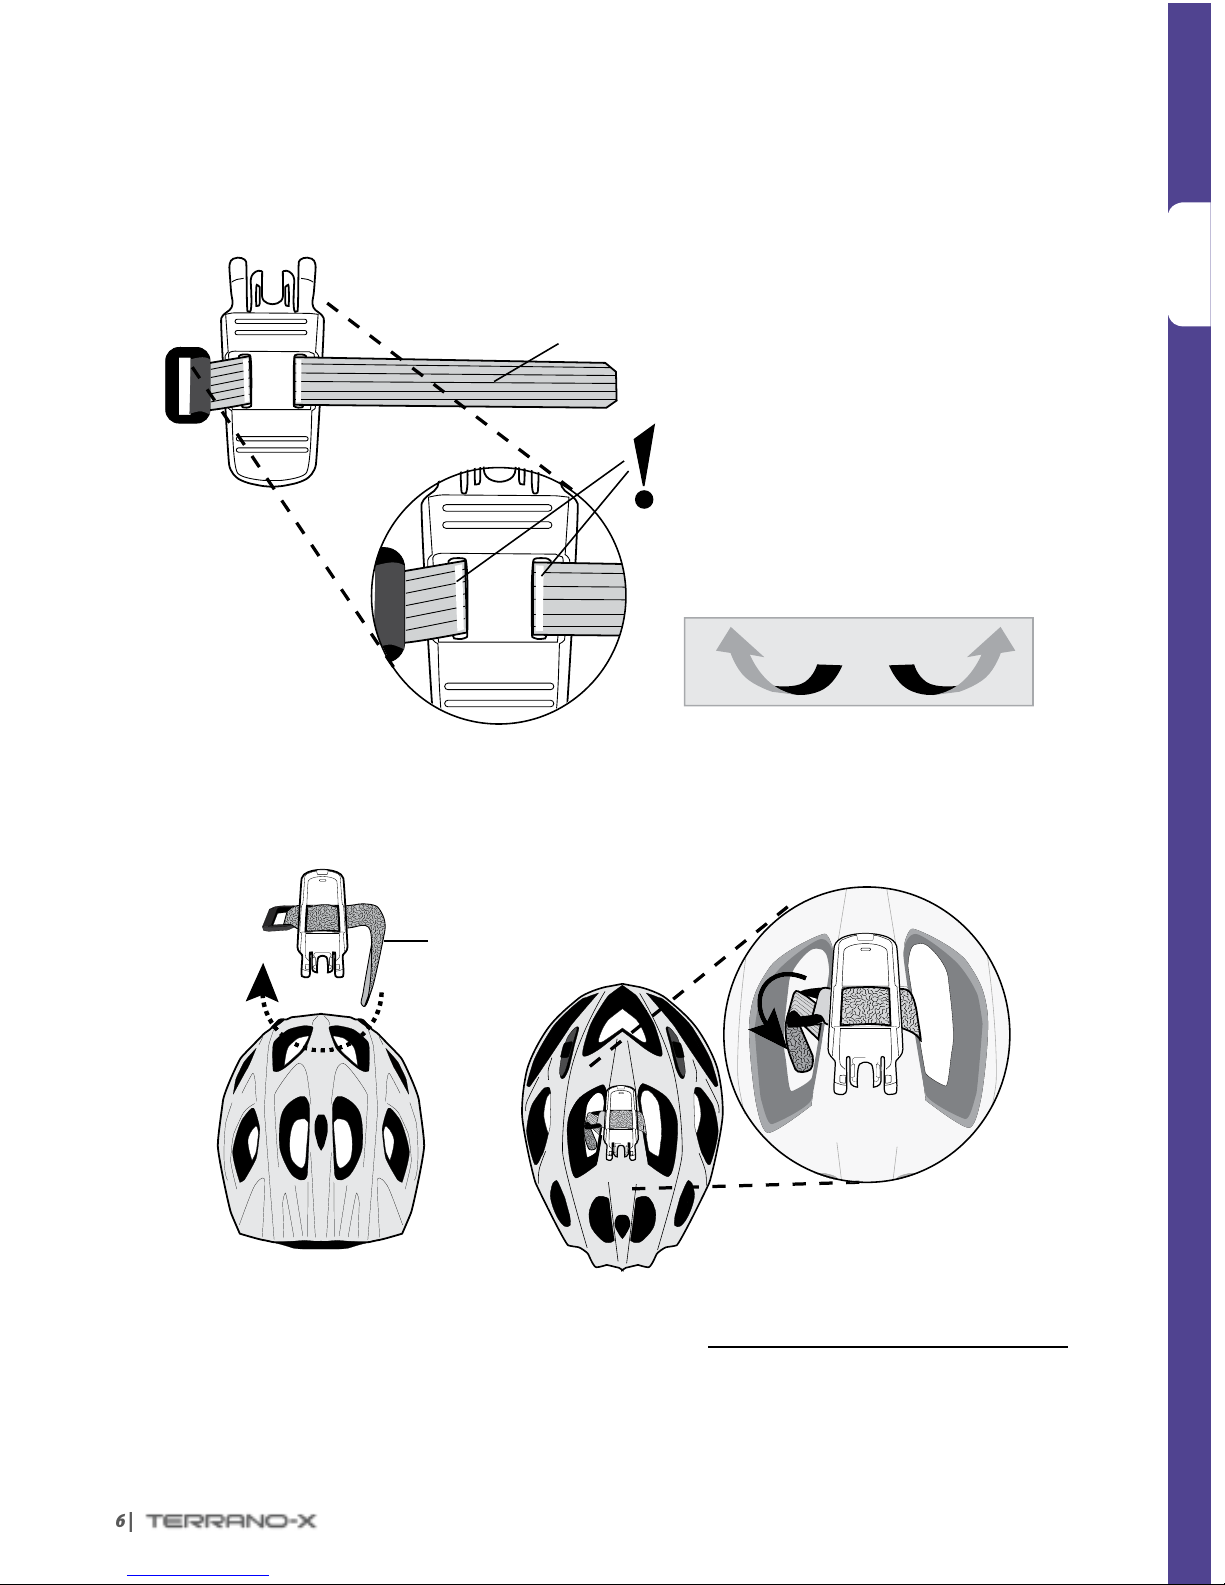
ASSEMBLY ON A HELMET
Helmet Type 1:
O-center vents
Helmet Type 2:
Center vents
(go to page 5) (go to page 6)
Short Buckle Strap
Long Strap
Velcro Side
Smooth Side
Velcro Side
Smooth Side
Front
Front
Back
Back
CradleSpoiler
Optional Spoiler
Deflect branches or other objects
Press here
Connect the Spoiler
Remove the Spoiler
CradleSpoiler
CLICK!
(go to page 6) (go to page 7)
Page 6
ENGLISH
6 |
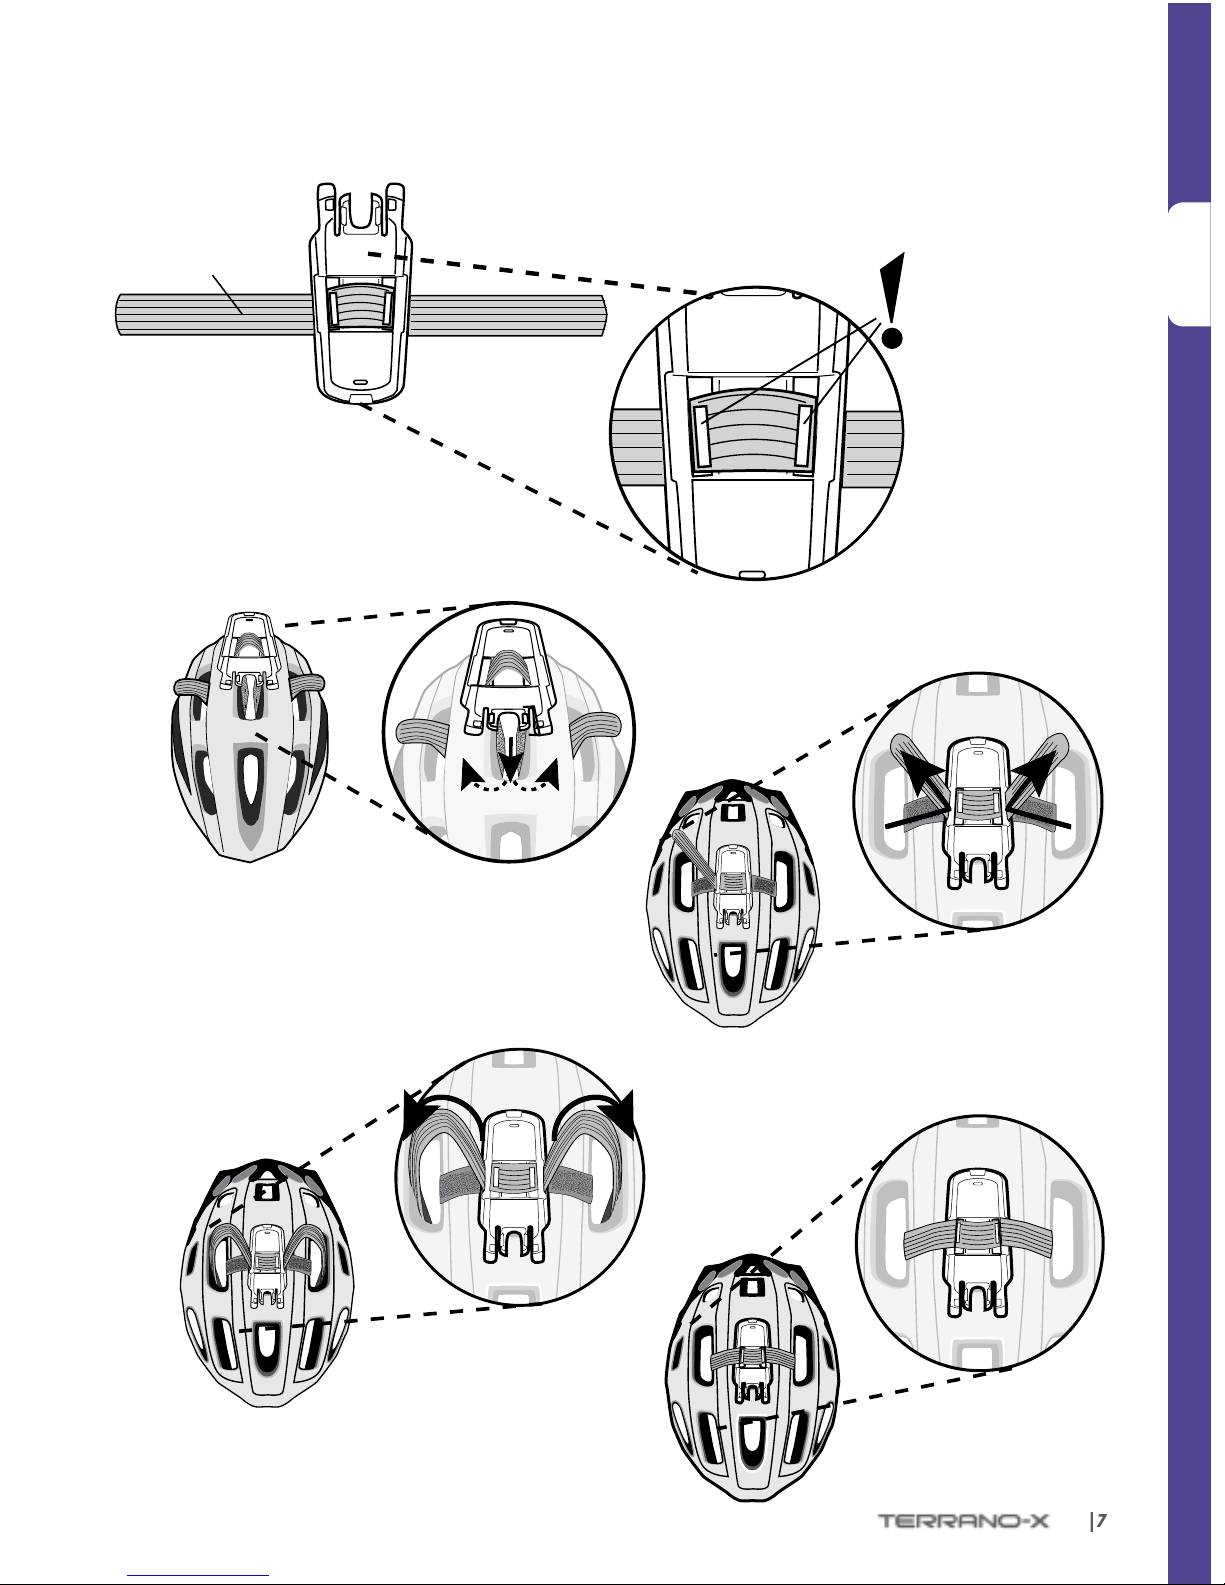
➋
➊
Back
Front
Front
Back
Velcro Side
Cradle (Top)
FLIP THE CRADLE
Helmet Type 1
Cradle
(Bottom)
Short Buckle Strap
Smooth Side
Continue on page 7
Continued on page 8
Page 7
ENGLISH
| 7
➊
➋
➌
➍
Front
Back
Front
Back
Front
Back
Helmet Type 2
Back
Front
Cradle
(Top)
Long Strap
Smooth Side
Page 8
ENGLISH
8 |
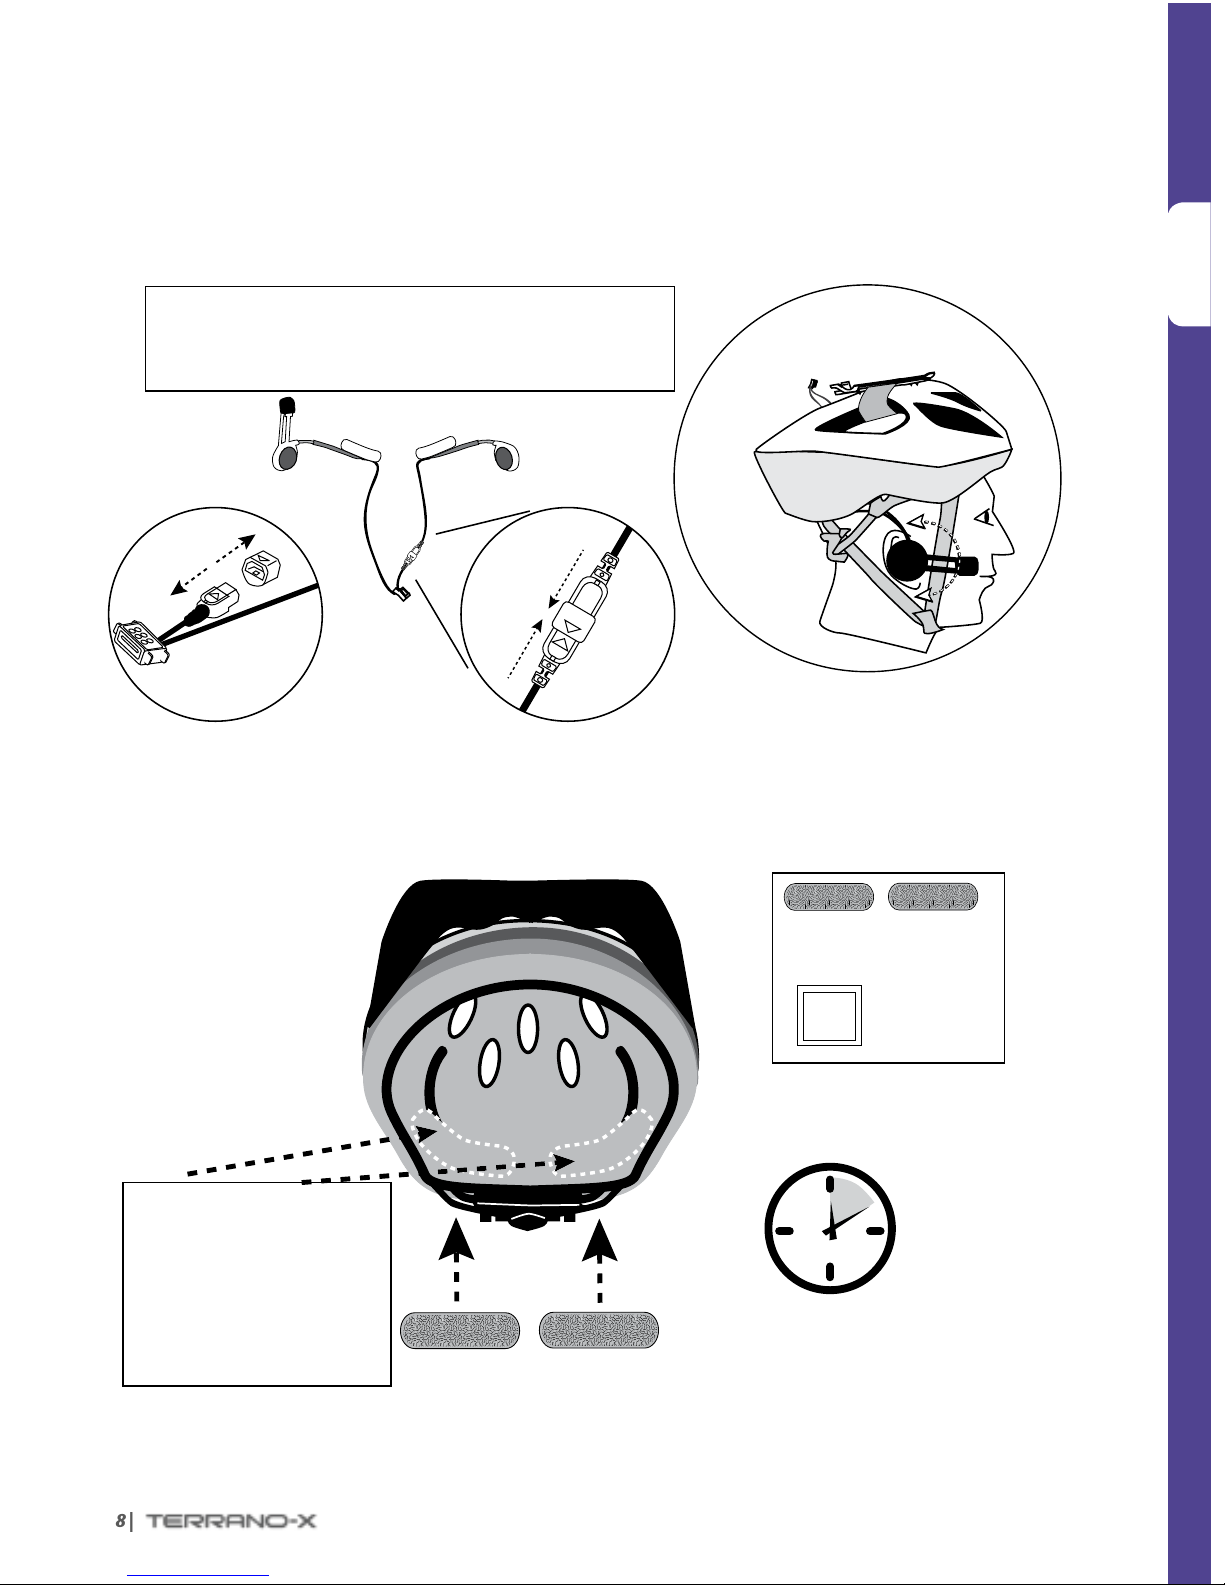
➊
➋➊
Alcohol
Pad
Back
Large Velcro Pads
Wait TEN
minutes
Preview:
Final Audio Kit Position
Attaching the Left Speaker
(Optional)
NOTE: Using two speakers inside the helmet may be prohibited
in certain jurisdictions. If you wish to use two speakers, you
should connect the left speaker to the audio kit as shown below.
Cradle
Audio Kit
Connector
Inner helmet view
Front
Position the Audio Kit
R L
Small Velcro Pads
(optional)
Alcohol Pad
(optional)
R
INSTRUCTIONS:
1. Remove any existing
stickers.
2. Optional: Use the Alcohol
Pad to clean the exact spot
on the helmet.
3. Position and attach the
adhesive Velcro Pads.
Position the Velcro pads
Page 9
ENGLISH
| 9
➋
➌
Spare Velcro Pads
Back
If needed, use the
adhesive pads
to hold the speaker
wires in a
comfortable
location
Inner helmet view
Front
Back
Inner helmet view
Front
Audio Kit
Cradle
Audio Kit
Connector
Audio Kit
R L
R L
R
Page 10
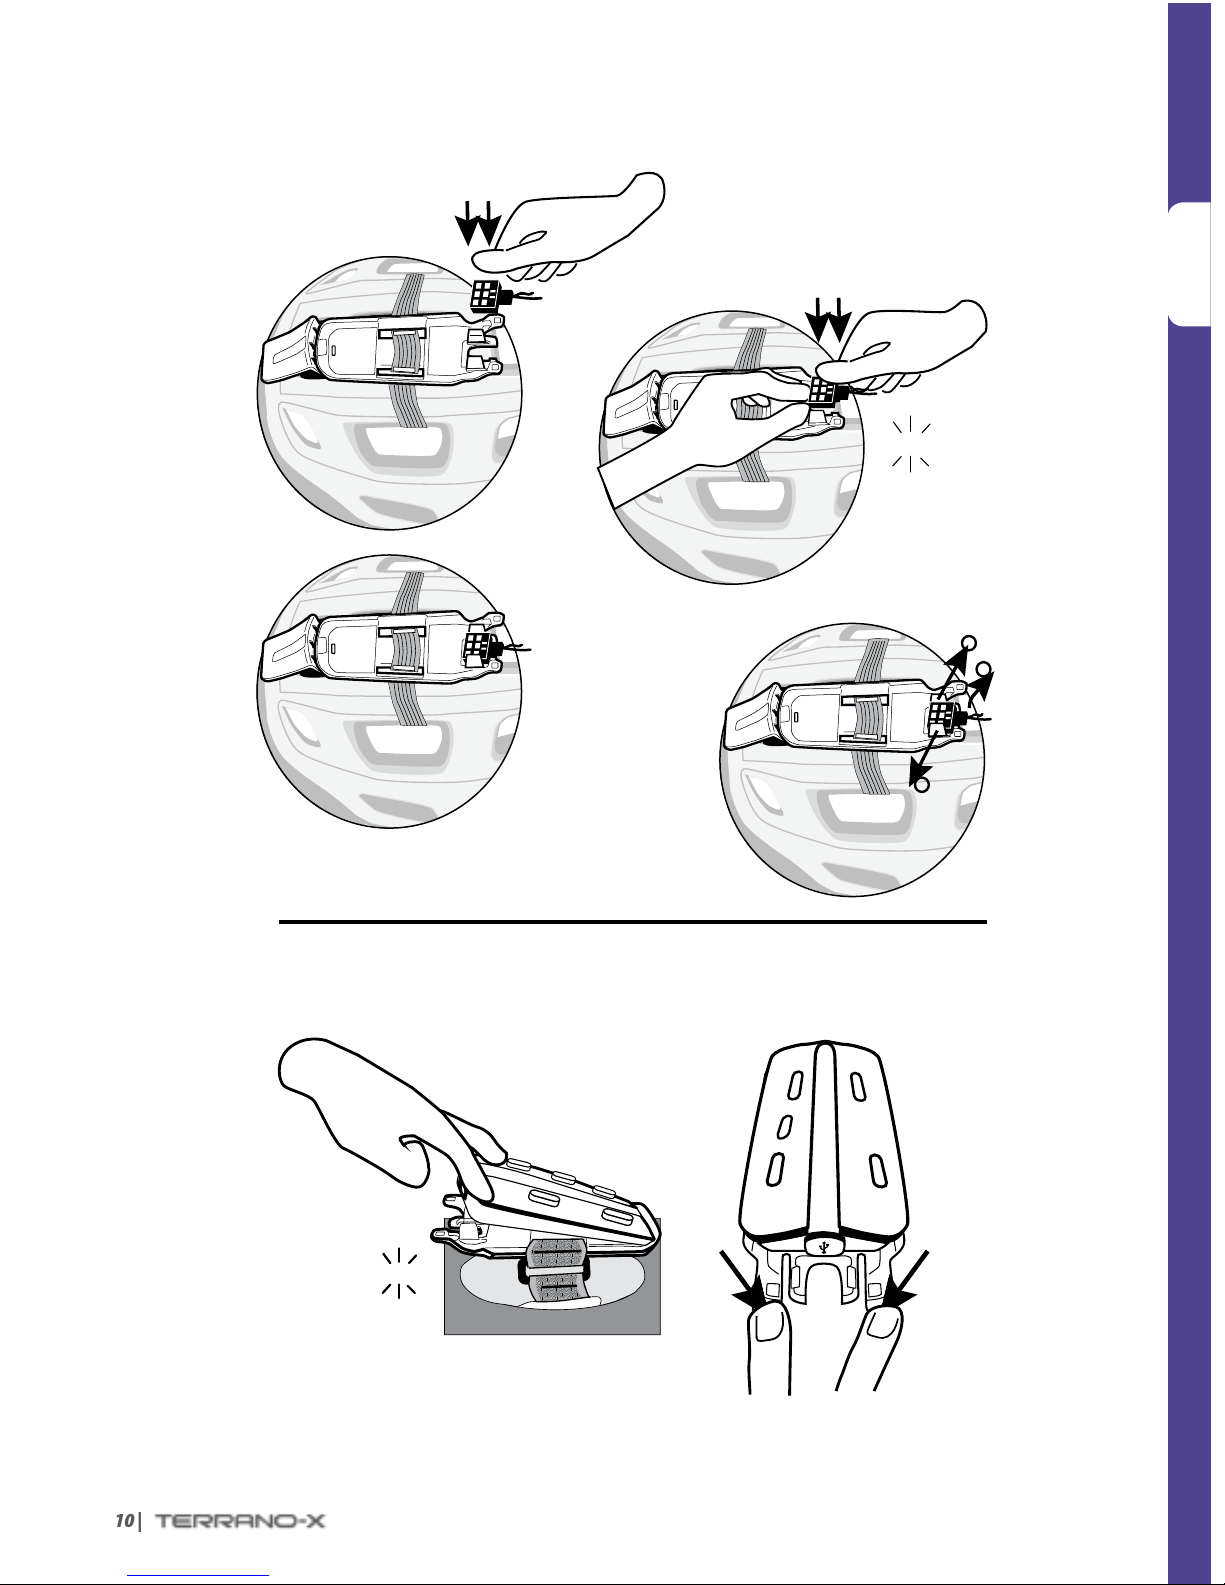
ENGLISH
10 |
➍
➏
➎
1
2
1
Release the
Audio Kit
Connect the Audio Kit
Attach the Headset
Release the
Headset
CLICK!
CLICK!
Page 11
ENGLISH
| 11
INTERCOM
The TERRANO-X gives you smooth and continuous intercom communication with other
riders at a range of up to 1,640 ft. / 500 m (subject to terrain). Intercom communication
(one on one) is possible between up to ve riders, i.e you and four other TERRANO-X users,
through the available channels (“A”, “B”, “C” or “D”).
To chat with another TERRANO-X user via Intercom, rst pair the TERRANO-X devices to each other.
Pairing is a one-time process. Once paired, the TERRANO-X units will automatically recognize each other
whenever they are at close range.
If you have purchased the double pack, both units are factory-paired to communicate via their respective Channel
“A” Buttons. If for any reason you have to pair them again, OR if you purchased a single TERRANO-X and wish to pair
with a second unit to make Intercom calls, see below.
INTERCOM PAIRING
1. Make sure both units are near each other and in Standby or just after power on (BLUE ash every 3 seconds).
2. Choose the Intercom Channel you wish to pair (see table below) and enter Intercom Pairing mode by pressing
the relevant buttons for 5 seconds until the LEDs begin ashing rapidly.
INTERCOM CHANNEL PRESS BUTTON(S) FLASHING LED COLOR
“A”
RED
“B”
BLUE
“C”
and PURPLE
“D”
and PURPLE
3. Enter Intercom Pairing mode on the second unit, and after a few seconds, both units will show a solid
LED for 2 seconds, indicating that they are paired.
4. If Pairing is not completed within 2 minutes, the units will return to Standby and you can try pairing
again.
Page 12
ENGLISH
12 |
USING THE INTERCOM
Channel B Button
• Connects to Channel B / D
Channel A Button
• Connects to Channel A / C
VOICE CONNECT MANUAL CONNECT
Start Conference Call with Channel “A” and “B”
Say any word loudly into the microphone
(Call ends automatically after 30 seconds of silence)
Start / End Call with Channel “A”: Tap
Start / End Call with Channel “B”: Tap
Start / End Call with Channel “C”:
Double-tap
Start / End Call with Channel “D”:
Double-tap
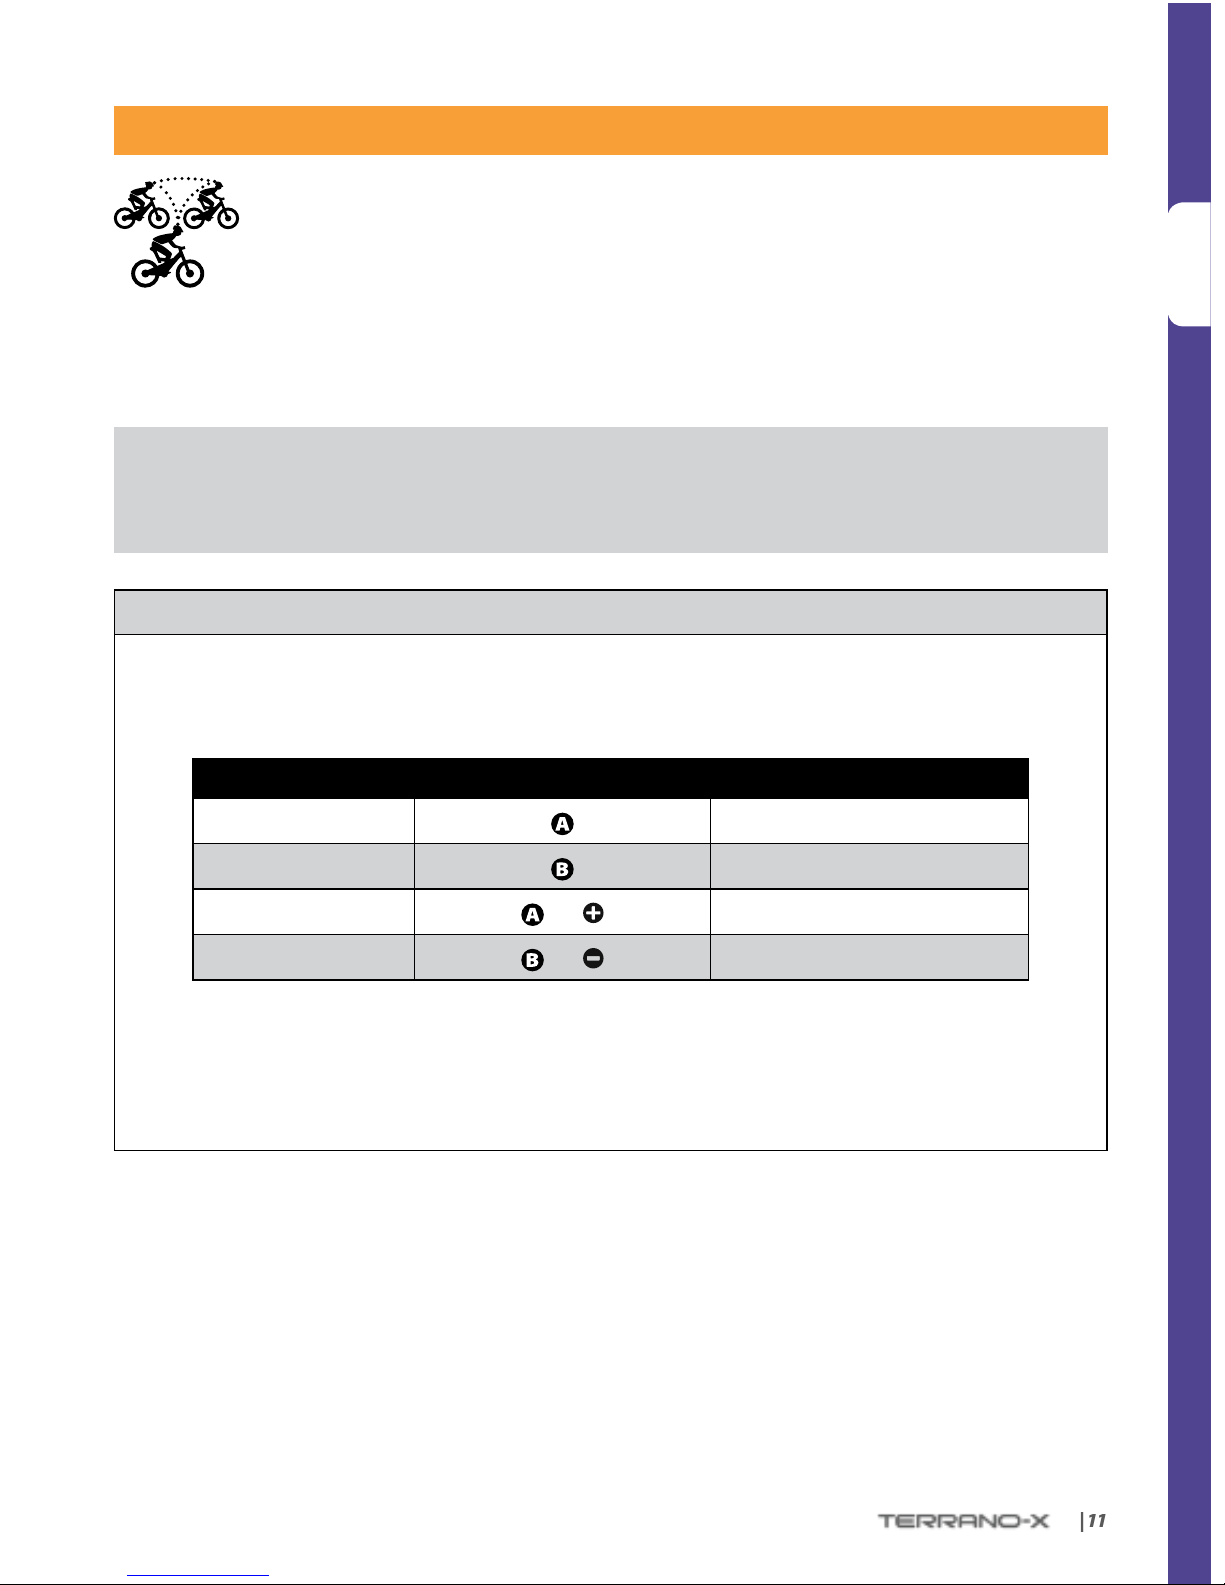
THREE-WAY CONFERENCE INTERCOM
For 3-Way Conference Mode Intercom, use Channels A and B as follows:
Cyclist “1” is paired to Cyclist “2” and Cyclist “3”
IMPORTANT: Three-Way Conference Mode Considerations
When in Intercom Conference mode with 2 other participants, you will not be able to receive mobile phone
calls, GPS navigation instructions or make a toggling call as long as the conference call is in progress.
Page 13

ENGLISH
| 13
CLICKTOLINK®: SPONTANEOUS INTERCOM
Click-to-Link (CTL) is the spontaneous, “social” feature of your TERRANO-X.
Use CTL to instantly initiate 1-on-1 intercom calls with other TERRANO-X users near you, without
already being paired.
Start a CTL call request
(search lasts up to 10 seconds)
Press
for 3 seconds
End a CTL call /
Cancel a CTL call request
Tap
Accept a CTL call
When hearing the
CTL ringtone, tap or speak any word loudly to answer
by VOX
Reject a CTL call
While hearing the
CTL ringt one, r emain silent f or 10 seconds or unt il the
ringtone stops
ENABLE/DISABLE CTL
(Default: DISABLED)
In Standby, press
for 2 seconds
• Enabled: BLUE ash for 2 seconds
• Disabled: RED ash for 2 seconds
At the end of a CTL call, if other TERRANO-X users are nearby, the next CTL call you attempt may
connect randomly with another user.
Page 14
ENGLISH
14 |
BLUETOOTH DEVICES: MOBILE PHONES AND MUSIC PLAYERS
PAIRING A BLUETOOTH ENABLED DEVICE
1. Make sure your phone or music player is ON and its Bluetooth mode is activated.
2. With your Terrano-X in Standby mode, press
for at least 6 seconds. The TERRANO-X will rst
ash RED. Continue to hold the button until the RED and
BLUE lights begin rapidly alternating.
3. Search for Bluetooth devices on your phone or MP3 player. After a few seconds the “TERRANO-X” will
appear as a discovered device. Select it. If prompted for a PIN or Passkey, enter 0000 (four zeros).
4. Your phone or music player will conrm that pairing has succeeded and the LED on the TERRANO-X will
begin ashing slowly in
BLUE.
• If Pairing is not completed within 2 minutes, the TERRANO-X will return to Standby mode.
• Not all Bluetooth mobile phones can broadcast Bluetooth stereo music (A2DP), even if the phone has an MP3 player
function. Consult your mobile phone’s User Manual for more information.
• After pairing, you may need to tap
to connect the TERRANO-X to the phone.
USING YOUR MOBILE PHONE
Answer a call
Tap
or speak a ny word loudly in to the mic rophone
Reject a call
Remain silent for 15 seconds, or press
for 2 seconds
End a call
Tap
Voice Dial*
(if supported by phone)
Tap
and follow the prompt from the Mobile
Redial*
Tap
twice
Reconnect
Tap
INTERCOM CONFERENCE MODE
Add or Remove Rider “A” or “B”
to/from a phone call
Tap
or while on a phone call
*This feature is not available during intercom or mobile calls
LISTENING TO MUSIC
Control available from most smartphones and music players - Bluetooth stereo (A2DP) and remote control
feature (AVRCP)
Play
Press
for 2 seconds
Next track
Press
for 2 seconds
Pause/Stop
Press
for 2 seconds
Previous track*
Press
for 2 seconds
*With some phones you may need to repeat this ac tion
Page 15

ENGLISH
| 15
TROUBLESHOOTING
Reboot
If the unit stops responding, reset it by turning it o and then on again (press
for 2 seconds).
Reset Pairing
(Deletes all paired
devices)
1. In Standby, press for 6 secs until LED ashes RED/BLUE.
2. Press
for 2 seconds until LED ashes 5 times in PURPLE.
SUPPORT
www.terranosystems.com
support@terranosystems.com
NOTICES
Federal Communications Commission (FCC) / Industry Canada (IC) Statement
15.21
You are cautioned that changes or modications not expressly approved by the part responsible for compliance could void the
user’s authority to operate the equipment.
15.105( b)
This equipment has been tested and found to comply with the limits for a Class B digital device, pursuant to part 15 of the FCC
/ IC rules. These limits are designed to provide reasonable protection against harmful interference in a residential installation.
This equipment generates, uses and can radiate radio frequency energy and, if not installed and used in accordance with the
instructions, may cause harmful interference to radio communications. However, there is no guarantee that interference will
not occur in a particular installation. If this equipment does cause harmful interference to radio or television reception, which
can be determined by turning the equipment o and on, the user is encouraged to try to correct the interference by one or more
of the following measures:
• Reorient or relocate the receiving antenna.
• Increase the separation between the equipment and receiver.
• Connect the equipment into an outlet on a circuit dierent from that to which the receiver is connected.
• Consult the dealer or an experienced radio/TV technician for help.
Operation is subject to the following two conditions:
1) this device may not cause interference and
2) this device must accept any interference, including interference that may cause undesired operation of the device.
FCC/IC RF Radiation Exposure Statement:
This equipment complies with FCC/IC radiation exposure limits set forth for an uncontrolled environment. End users must
follow the specic operating instructions for satisfying RF exposure compliance. The antenna used for this transmitter must not
transmit simultaneously with any other antenna or transmitter, except in accordance with FCC / IC multi-transmitter product
procedures.
European CE Notice
Your TERRANO-X (the “Product”) is in conformity with the following essential requirements of Council Directive 1999/5/EC
(referred to as R&TTE Directive): Articles 3.1a, 3.1.b and 3.2. The Product is manufactured in accordance with Annex II of the
above directive.
Page 16

ENGLISH
16 |
Declaration of Conformity (DOC)
The TERR ANO-X is com pliant wit h and adopts t he Bluetooth® Spec ication 2 .1 and has succ essfull y passed al l interoper ability t ests
that are specied in the Bluetooth® specication. However, interoperability between the device and other Bluetooth®-enabled
products is not guaranteed.
IMPORTANT SAFETY INFORMATION – WAIVER AND GENERAL RELEASE
WARNING:
Terrano Systems Inc., (“Terrano” or the “Company”) noties you that your complete and undivided attention is required when
using a communication device (the “Product”) while riding. Failure to avoid potentially hazardous situations could result in
accident resulting in serious injury or death.
Terrano advises you to take all necessary precautions and remain alert to the trac, weather and all road conditions. It is best to
stop away from trac prior to activating or deactivating the Product or initiating or receiving any calls.
Do not perform pairing, linking or similar operations while riding. All publications are intended to address technical capabilities
and should not be construed as encouraging the operation of Terrano’s Products in any manner that is unsafe or prohibited by law.
Exercise all due caution while using this Product and obey all applicable trac laws. Always ride and use the Product in a safe
manner. Do not become distracted by the Product while riding on a vehicle. When riding, always consider road, trac, terrain
and other conditions to maximize safety. Do not operate the Product if it becomes unsafe to do so.
In some regions or states, the use of mobile communications systems is prohibited or restricted. Check all laws and regulations
that apply to your region before using the Product and be mindful that compliance with all laws and regulations is the user’s
responsibility. Use the Product in motion only where and in the manner that such devices are permitted by applicable law. The
Product should not be used in contravention of local, state or federal laws and regulations. Please check federal, state and local
laws and regulations before using your Terrano Product.
No part of the body should come in contact with the antenna during operation of the equipment. Use Product only where safe,
and avoid usage at gas s tations, f uel depots o r around exp losives. Use w ith hearing aids and medi cal devices o nly after co nsulting
a physician or specialist. Make sure to install and mount the Product in a stable manner.
HEALTH WARNINGS:
Hearing Loss
Audio devices can cause hearing loss. Employ care and avoid exposure to excessive volume levels that may damage or impair
hearing or lead to hearing loss. Permanent hearing loss may occur if Products are used at high volume for prolonged periods of
time.
RF Signals
Most electronic equipment is shielded from RF signals. However, certain electronic equipment may not be shielded against the
RF signals emanating from your wireless equipment.
Pacemakers
The Health Industry Manufacturers Association recommends that a minimum separation of about six inches (or 16 cm) to be
maintained between a mobile phone or wireless device and a pacemaker to avoid potential interference with the pacemaker. Be
sure not to interfere with the functionality of personal medical devices.
Hearing Aids
Some devices may interfere with certain hearing aids. In the event of such interference, you should consult your hearing aid
manufacturer to discuss alternatives.
Other Medical Devices
If you use any other personal medical device, consult the manufacturer of your device and/ or your physician to determine if it is
adequately shielded from interference caused by external RF energy. Your physician may be able to assist you in obtaining this
information.
Page 17

ENGLISH
| 17
LIMITED WARRANTY
Subject to the applicable laws and regulations in your jurisdiction, your Product is covered by a Two-Year Limited product
warranty from the date of original purchase. Please retain the retail sales receipt for proof of purchase.
Subject to the aforementioned, Terrano hereby represents that this Product is warranted to be free from defects in materials or
workmanship (proof of purchase and registration required). Within the subject period, Terrano will, at its sole option, repair or
replace any components that fail in normal use. Such repairs or replacements will be made at no charge to the cus tomer for par ts
or labor, provided that the customer shall be responsible for any shipping cost. This warranty does not cover failures due to abuse,
misuse, accident or unauthorized alteration or repairs.
This Product is intended to be used only as a communication and entertainment device and should not be used in any location or
jurisdiction where its use is prohibited.
THE WARRANTIES AND REMEDIES CONTAINED HEREIN ARE EXCLUSIVE AND IN LIEU OF ALL OTHER WARRANTIES EXPRESS, IMPLIED
OR STATUTORY, INCLUDING ANY LIABILITY ARISING UNDER ANY WARRANTY OF MERCHANTIBILITY OR FITNESS FOR A PARTICULAR
PURPOSE, STATUTORY OR OTHERWISE THAT Terrano SPECIFICALLY DISCLAIMS. THIS WARRANT Y GIVES YOU SPECIFIC LEGAL RIGHTS
WHICH MAY VARY FROM STATE TO STATE OR FROM JURISDICTION TO JURISDICTION. Terrano MAKES NO OTHER WARRANTIES
EXPRESS OR IMPLIED BEYOND THOSE STATED SPECIFICALLY HEREIN. THIS WARRANTY IS EXTENDED BY Terrano SOLELY TO THE
ORIGINAL PURCHASER AND IS NOT ASSIGNABLE OR TRANSFERABLE TO OTHERS. Terrano ASSUMES NO OBLIGATION OR LIABILITY
FOR ADDITIONS OR MODIFICATIONS TO THIS WARRANTY UNLESS MADE IN WRITING AND SIGNED BY AN OFFICER OF THE COMPANY.
Batteries are warranted only if the battery capacity falls below 50% of rated capacity or if the battery develops leakage.
IMPORTANT: Do not store your TERRANO-X without charging it from time to time for periods in excess of six months, as this may
cause irreversible damage to the capacity of your battery. Your warranty will not cover such events.
This warranty also becomes void if:
a. any of the seals on the case or battery are broken or Product or battery show signs of tampering,
b. the bat tery is used in equipment other than the equipment for which it was intended.
c. the Product is used in contravention of its intended purpose
d. the Product was purchased from online auctions
Terrano assumes no responsibility resulting from the use of non-Terrano components or products in conjunction with its
Products, and specically the use of third party chargers or Bluetooth® devices. Furthermore, Terrano is not responsible for any
damage to any part of the Product resulting from the use of ancillary equipment not furnished by Terrano which is attached to
or used in connection with the Product.
Not covered by the warranty:
1. Defects or damage resulting from the use of this Product in other than its normal and customary manner.
2. Defects or damage from misuse, accident or neglec t.
3. Defects caused by improper operation, maintenance, installation, adjustment or modication of any kind (incl. long-term
storage without periodic charging of the battery).
4. Products opened, disassembled or repaired by non-authorized parties.
5. Defects or damage due to exposure to excessive temperatures, adverse weather conditions, external impacts or spills of food
or liquid.
6. All plastic surfaces and all other externally exposed parts that are scratched or damaged af ter purchase.
Disclaimer of Warranty
Terrano DISCLAIMS ALL EXPRESS AND IMPLIED WARRANTIES WITH REGARD TO THE ENCLOSED DEVICE, INCLUDING WITHOUT
LIMITATION ANY IMPLIED WARRANTIES OF MERCHANTABILITY, FITNESS FOR A PARTICULAR PURPOSE, AND NON-INFRINGEMENT.
THE DEVICE AND ITS ACCESSORIES ARE PROVIDED “AS IS” AND “AS AVAILABLE” WITHOUT WARRANTY OF ANY KIND BEYOND THOSE
ASSUMED IN THE ENCLOSED MANUAL.
LIMITATION OF LIABILITY
IN NO EVENT SHALL Terrano BE LIABLE FOR ANY INCIDENTAL, SPECIAL, INDIRECT, PUNITIVE, EXEMPLARY OR CONSEQUENTIAL
DAMAGES, WHETHER RESULTING FROM THE USE, MISUSE, OR INABILITY TO USE THIS PRODUCT OR FROM DEFECTS IN THE PRODUCT,
OR FOR ANY DAMAGES WHATSOEVER RESULTING FROM THE USE OF THE PRODUCT, WHETHER BASED ON BREACH OF CONTRACT,
Page 18

ENGLISH
18 |
TORT (INCLUDING NEGLIGENCE), PRODUCT LIABILITY OR OTHERWISE EVEN IF ADVISED OF THE POSSIBILITY OF SUCH DAMAGES.
YOU ACKNOWLEDGE AND AGREE THAT THE LIMITATIONS SET FORTH ABOVE ARE FUNDAMENTAL ELEMENTS OF THIS AGREEMENT TO
WHICH YOU CONSENT AND WITHOUT WHICH THE PRODUCT WOULD NOT BE PROVIDED TO YOU ABSENT SUCH LIMITATIONS. SOME
STATES DO NOT ALLOW CERTAIN EXCLUSIONS OF INCIDENTAL OR CONSEQUENTIAL DAMAGES, SO THE ABOVE LIMITATIONS MAY NOT
APPLY TO YOU.
Terrano retains the exclusive right to repair or replace (with a new or newly-refurbished replacement Product) the device or
software or give a refund of the purchase price at its sole discretion. SUCH REMEDY SHALL BE YOUR SOLE AND EXCLUSIVE REMEDY
FOR ANY BREACH OF WARRANTY.
WAIVER AND GENERAL RELEASE
By using the Produc t, you will waive substantial legal rights including the right to sue. Please read the following carefully before
using the Product.
By using the Product, you are irrevocably releasing, indemnifying from any liability, loss, claim and expense (including attorneys
fees) and holding Terrano harmless for any bodily injuries, harm or death as well as losses or damages in goods, to any vehicles
including your own, or to any property or asset that belong to you or to third parties, any of which may result from using the
Product under any circumstances or conditions and irrespec tive of jurisdiction.
1. You, your heirs, legal representatives, successors or assigns, hereby voluntarily and forever release, discharge, indemnify and
hold harmless Terrano from any and all litigation, claims, debts, demands, actions and liability which may arise, directly or
indirectly, from using the Product for any distress, pain, suering, discomfort, loss, injury, death, damages to or in respect to
any person or property however caused, WHETHER ARISING FROM THE NEGLIGENCE OR OTHERWISE, and which may hereafter
accrue to you on some future date as a result of said use, to the fullest extent permitted by law.
2. You fully understand and assume the risks in using the Pro duct, including risk of negligent acts or omissions by others. All risk s
for operating the Product are assumed solely by the user of the Product.
3. You conrm that you are physically capable to use the Product and that you have no medical conditions or needs that may
infringe upon your abilities to do so in a safe manner. You further conrm that you will not consume any alcohol that may
aect your alertness or any mind-altering substance, and will not carry, use or consume these substances before or during the
use of the Product.
4. You fully acknowledge our warnings and understand that:
(a) risks exist in using the Product while in trac, including but not limited to injury or illness, strains, fractures, partial and/or
total paralysis, death or other ailments that could cause serious disability;
(b) these risks may be caused by the negligence of the manufacturers or its agents or any third party involved in the Product;
(c) these risks and dangers may arise from foreseeable or unforeseeable causes.
You hereby assume all risks and dangers and all responsibility for any losses and/or damages, whether caused in whole or in part
by the negligence or other conduct of others, including Terrano.
5. By using the Product, you conrm that you have read this release of liability and fully understand and accept its terms and
conditions.
www.terranosystems.com
Page 19

ESPAÑOL
|
19
Gracias por elegir el TERRANO-X. Esperamos que disfrute con su uso. — Su equipo Terrano
CONTENIDO DEL ESTUCHE DE VENTA
Si compró el Kit de TERRANO-X , su estuche de venta incluirá dos unidades de cada componente, enumerado a
continuación, a excepción de la Guía Rápida.
TERRANO-X
Botón del CANAL B
• Conecta al Canal B / D
Botón para Bajar Volumen/Retroceder
USB
Botón del Móvil – Contestar llamadas/
Rechazar llamadas/Emparejar
Botón para Subir Volumen/Adelantar
Botón del CANAL A
• Conecta al Canal A / C
• Botón para el MP3
Soporte
Kit de Audio
Base de Velcro para
el Casco
Conector del Kit de Audio
Dos Parlantes
Micrófono de cancelación
de ruido
Alerón 4 Almohadillas Velcro Largas
Correa Larga 4 Almohadillas Velcro Cortas
Correa Corta con Hebilla
4 almohadillas adhesivas (para sostener los cables
de los parlantes en el interior del casco)
Adaptador de Cable USB
Esponja para el Micrófono
Tapón de silicona
Toallita pre-humedecida
Alcohol
Pad
ES
Page 20

ESPAÑOL
20 |
CARGAR EL TERRANO-X
Use el cable USB para cargar la unidad por mínimo 3 horas previo al
uso inicial.
Channel “B” /
Channel “D”
Channel “A” / Channel “C”
Durante la carga, la luz ROJA permanecerá encendida.
Al completarse la carga, la luz ROJA se apagará.
FUNCIONES GENERALES
Encendido / Apagado
Presione
por 2 segundos
• Encendido: 3 destellos AZULES + tono ascendente
• Apagado: 3 destellos ROJOS + tono descendente
Volumen
Pulse
o para ajustar el volumen de la fuente de audio activa
Silenciamiento
Pulse
y simultáneamente
Indicador del
Nivel de la Batería
Presione
por 2 segundos. Luz:
• AZUL = Totalmente cargada
• PÚRPURA = Medio descargada
• ROJA = Casi descargada
Ajuste Automático
del Volumen
(Por defecto: Activado)
Permite el ajuste automático del volumen, de acuerdo al ruido del ambiente y a la
velocidad de conducción.
En Modo de Espera, presione
por 5 segundos.
• Activado: destello AZUL de 2 segundos
• Desactivado: destello ROJO de 2 segundos
Activación por Voz
(Por defecto: Regular)
La activación por voz se puede personalizar, para lograr que sea más o menos sensible.
La activación por voz para las llamadas del intercomunicador, también puede ser
completamente desactivada.
Si tiene dicultades para iniciar una conversación, cambie la conguración a ‘Alta’ de la
siguiente manera:
En Modo de Espera, presione
y simultáneamente por 2 segundos.
• Regular: destello AZUL por 2 segundos
• Alta: destello PÚRPURA por 2 segundos
• Desactivado: destello ROJO por 2 segundos
El TERRANO-X es un
dispositivo a prueba de agua y
polvo. Sin embargo, mientras
está en uso, la cubierta de
silicona debe mantenerse bien
cerrada en todo momento
para impedir la entrada de
humedad a su TERRANO-X.
Page 21

ESPAÑOL
|
21
LUCES Y SONIDOS DE ESTADO
Indicación LED Estado
Ninguna TERRANO-X apagado
1 destello AZUL cada 3 segundos Modo de espera – No hay fuentes de audio activas
2 destellos AZULES cada 3 segundos
Modo activo – Llamada en progreso/música u otra fuente de
audio Encendida
1 destello ROJO cada 3 segundos. Batería
baja emite un pitido cada 3 minutos
Modo de Espera – Batería baja
2 destellos ROJOS cada 3 segundos. Batería
baja emite un pitido cada 3 minutos
Modo activo – Batería baja
Luz ROJA sólida Cargando
FUENTES DE AUDIO Y PRIORIDADES
Si dos fuentes de audio conectadas, intentan reproducir audio al mismo tiempo, el TERRANO-X
determinará automáticamente la fuente de audio a reproducir a través de los parlantes, con base a la
prioridad de los dispositivos conectados.
Alta prioridad
1. Audio del Teléfono móvil o las instrucciones del GPS*
2. Intercomunicador/Click-to-Link (CTL)
3. Fuente de audio A2DP (Estéreo Bluetooth)
4. Puerto Múltiple (por conexión con cable, es decir, Reproductores de Música)
*Las instrucciones del GPS desde un Smartphone con aplicaciones de GPS, son priorizadas como audio A2DP
Menor prioridad
Por ejemplo:
• Las llamadas entrantes de teléfono móvil, interrumpirán las llamadas en progreso del
intercomunicador
• Las llamadas entrantes del intercomunicador, interrumpirán la fuente de audio A2DP
Las llamadas de Click-to-Link® y del Intercomunicador tienen la misma prioridad:
Una solicitud de Click-to-Link, no puede interrumpir una llamada del Intercomunicador en progreso, y
viceversa.
Tono Ocupado del IC (Intercomunicador): Si está en una llamada de teléfono móvil, llamada de
Click-to-Link, o recibiendo instrucciones del GPS, y el Ciclista A o el Ciclista B intentan conectarse con usted,
en una Llamada por el IC, ustedes escucharán un Tono Ocupado (doble pitido).
Page 22

ESPAÑOL
22 |
INSTALACIÓN
Casco Tipo 1:
Rejillas de Ventilación
Fuera de Centro
Correa Corta con Hebilla
Correa Larga
Lado del Velcro
Lado Liso
Lado del Velcro
Lado Liso
Casco Tipo 2:
Rejillas de Ventilación
al Centro
Parte delantera
Parte delantera
Parte trasera
Parte trasera
Soporte
Soporte
Alerón
Alerón
Alerón Opcional
Desvía las ramas u otros objetos
Presione aquí
Desconexión del Alerón
Conectar el Alerón
¡CLIC!
(ir a página 16) (ir a página 17)
(ir a página 23) (ir a página 24)
Page 23
ESPAÑOL
|
23
➋
➊
Casco Tipo 1
Soporte
(Abajo)
Correa Corta con Hebilla
Parte trasera
Parte
delantera
Lado Liso
Parte delantera
Parte trasera
Soporte (Arriba)
Lado del Velcro
Continúe en la página 18
VOLTEAR EL SOPORTE
Continúe en la página 25
Page 24

ESPAÑOL
24 |
➊
➋
➌
➍
Casco Tipo 2
Parte
delantera
Parte trasera
Parte
delantera
Parte trasera
Parte
delantera
Parte trasera
Parte
delantera
Parte trasera
Soporte
(Arriba)
Correa Larga
Lado Liso
Page 25

ESPAÑOL
|
25
➊
➋➊
Alcohol
Pad
Vista Preliminar: Posición Final
del Kit de Audio
Parte trasera
Almohadillas Velcro Largas
Soporte
Conector del
Kit de Audio
Vista del interior del
casco, parte delantera
Der. Izq.
Espere DIEZ
minutos
Instalación del Kit de Audio
Colocación de las Almohadillas Velcro
Almohadillas Velcro Cortas
(opcional)
Toallitas
de Alcohol
(opcional)
De r.
Nota:
1. En primer lugar, retire
cualquier adhesivo existente
2. Opcional: Utilice la Toallita de
Alcohol para limpiar el lugar
exacto en el casco.
2. Coloque y je las Almohadillas
de Velcro adhesivas
Fijando el Parlante Izquierdo
(Opcional)
NOTA: El uso de dos parlantes dentro del casco puede estar
prohibido en ciertas jurisdicciones. Si desea usar dos parlantes,
debe conectar el parlante izquierdo al kit de audio como se
muestra a continuación
Page 26

ESPAÑOL
26 |
➋
➌
Parte trasera
Conector del Kit de Audio
Vista interior del casco
Parte delantera
Parte
trasera
Si es necesario, utilice
las almohadillas
adhesivas para
sostener los cables del
parlante en un lugar
cómodo.
Conector del
Kit de Audio
Almohadillas Velcro de repuesto
Vista interior del casco
Parte delantera
Der. Izq.
Der. Izq.
Der.
Soporte
Conector del
Kit de Audio
Page 27
ESPAÑOL
|
27
➍
➏
➎
1
2
1
Separación
del Kit de
Audio
Fijación de la Unidad de Control
Separación
de la Unidad
de Control
Conexión del Kit de Audio
¡CLIC!
¡CLIC!
Page 28

ESPAÑOL
28 |
INTERCOMUNICADOR
El Intercomunicador del TERRANO-X permite una comunicación de Bicicleta a Bicicleta
en modo full dúplex a una distancia de hasta 500 m (dependiendo del terreno). La
comunicación por intercomunicador (uno a uno) involucra a un máximo de 5 usuarios,
por ejemplo, usted y otros cuatro usuarios del TERRANO-X, a través de los 4 canales
disponibles (“A”, “B”, “C” o “D”).
Para conversar con otro usuario de TERRANO-X por intercomunicador, primero empareje los dispositivos
TERRANO-X entre sí. El emparejamiento es un proceso Irrepetible. Una vez emparejadas, las unidades
TERRANO-X se reconocerán automáticamente siempre que estén dentro de la distancia de alcance.
Si usted compró el paquete doble, ambas unidades vienen emparejadas de fábrica y conguradas para comunicarse
a través de sus respectivos botones de Canal “A”. Si por cualquier razón tiene que emparejarlas nuevamente, O
si adquirió una sola unidad TERRANO-X y desea emparejarla con una segunda unidad para hacer llamadas por
intercomunicador, proceda de la siguiente manera:
EMPAREJAMIENTO DEL INTERCOMUNICADOR
1. Verique de que ambos dispositivos están en modo de espera (un destello AZUL cada 3 segundos).
2. Seleccione el canal de intercomunicación que desea emparejar (ver tabla abajo) y entrar en el modo de
emparejamiento del intercomunicador pulsando los botones correspondientes durante 5 segundos hasta
que los LED comienzan a parpadear rápidamente.
CANAL BOTONES LED
“A”
ROJO
“B”
AZUL
“C”
y PÚRPURA
“D”
y PÚRPURA
3. Entre en el modo de emparejamiento de intercomunicación en la segunda unidad, y después de
unos segundos, ambos dispositivos presentarán una luz sólida por 2 segundos, indicando que están
emparejados.
4. Si el emparejamiento no se completa en 2 minutos, las unidades retornarán al modo de Espera.
Page 29

ESPAÑOL
|
29
USO DEL INTERCOMUNICADOR
MODO DE CONEXIÓN DE VOZ MODO MANUAL
Para iniciar una llamada
por Canal “A” y “B”
Diga en voz alta cualquier
palabra al micrófono
La llamada termina
automáticamente tras
30 segundos de silencio.
Iniciar/Terminar una Llamada por Canal “A”: Pulse
Iniciar/Terminar una Llamada por Canal “B”: Pulse
Iniciar/Terminar una Llamada por Canal “C”: Pulse Doblemente
Iniciar/Terminar una Llamada por Canal “D”: Pulse Doblemente
Una llamada del Intercomunicador termina sólo cuando se cierra
manualmente
CONFIGURACIÓN DEL INTERCOMUNICADOR DE TRES-VÍAS
Para congurar el intercomunicador en modo de conferencia de 3-vías, para llamadas en conferencia con el
Canal “A” y el Canal “B”, sólo proceda de la siguiente manera:
Ciclista 2 Ciclista 3
Ciclista 1
Use el canal “A”
Use el canal “B”
En esta conguración, el Ciclista «1» está apareado con el Ciclista «2» y también con el Ciclista «3».
IMPORTANTE: Consideraciones del Modo de Conferencia de 3-Vías
Cuando el Intercomunicador está en modo de Conferencia con otros 2 participantes, no podrá recibir
llamadas del teléfono móvil, instrucciones de navegación del GPS o realizar llamadas a través de la
característica Toggling, siempre y cuando la llamada en conferencia esté en progreso.
Botón del CANAL B
• Conecta al Canal B / D
Botón del CANAL A
• Conecta al Canal A / C
Page 30
ESPAÑOL
30 |
CLICKTOLINK®: INTERCOMUNICADOR ESPONTÁNEO
Click-to-Link es la naturaleza “social” espontánea de su TERRANO-X.
Utilice el Click-to-Link para iniciar de inmediato llamadas del intercomunicador una a una, con otros
usuarios de TERRANO-X cerca de usted, sin que aquellos usuarios estén ya apareados en su CANAL “A”,
“B”, “C” o “D”.
Comenzar una solicitud de llamada de
Click-to-link
(La búsqueda puede durar hasta 10 segundos)
Presione
durante 3 segundos
Terminar una llamada de Click-to-Link /
Cancelar una solicitud de Click-to-Link
Pulse
Aceptar una llamada de Click-to-Link
Cuando escuche el tono de llamada de Click-to-Link:
Pulse
o diga en voz alta cualquier palabra para responder
por el VOX
Rechazar una llamada de Click-to-Link
Cuando escuche el tono de llamada de Click-to-Link:
manténgase en silencio durante 10 segundos o hasta que
decaiga el tono de llamada
Activar/Desactivar a Click-to-Link
(Por defecto: DESACTIVADA)
En Modo de Espera, presione
durante 2 segundos.
ACTIVADO: Titila en AZUL durante 2 segundos
DESACTIVADO: Titila en
ROJO durante 2 segundos
Al nal de una llamada de Click-to-Link, si otros usuarios de TERRANO-X están cerca, la próxima
llamada de Click-to-Link que usted intente realizar, puede conectarlo con otros usuarios aparte de su
conexión incial.
Page 31

ESPAÑOL
|
31
DISPOSITIVOS BLUETOOTH:
TELÉFONOS MÓVILES Y REPRODUCTORES DE MÚSICA
EMPAREJAMIENTO DE DISPOSITIVOS BLUETOOTH
1. Verique que el aparato esté Encendido y que la función Bluetooth esté activada.
2. En modo de espera, presione
por 6 segundos. El TERRANO-X primero titilará en ROJO. Continúe
sosteniendo el botón, hasta que las Luces ROJA y
AZUL comiencen a alternar rápidamente.
3. Busque los dispositivos Bluetooth en su teléfono móvil o reproductor MP3. Tras unos segundos, el
“TERRANO-X” aparecerá como dispositivo descubierto. Selecciónelo en la lista. Si se le solicita, ingrese
0000 (cuatro ceros) como su clave PIN o contraseña.
4. Su dispositivo conrmará que el emparejamiento tuvo éxito y el TERRANO-X comenzará a titilar
lentamente en
AZUL.
• Si el proceso de apareamiento no se completa en dos minutos, el TERRANO-X retornará al modo de Espera.
• No todos los teléfonos móviles con Bluetooth pueden emitir música estéreo por Bluetooth (A2DP), incluso si el teléfono
dispone de una función de Reproductor MP3. Para mayor información consulte el Manual de Usuario de su teléfono móvil.
• Tras completar el emparejamiento quizá tenga que pulsar
para conectar el TERRANO-X al teléfono.
USO DE SU TELÉFONO MÓVIL
Contestar una llamada
Pulse
o diga en voz alta cualquier palabra para responder a la activación
por voz
Rechazar una llamada
Manténgase en silencio por 15 segundos, o presione
por 2 segundos
Terminar una llamada
Pulse
Discado por Voz* (si es soportado
por el teléfono móvil)
Pulse
y siga los avisos del Móvil
Redial/Rediscado*
Pulse
dos veces
Reconectarse
Pulse
INTERCOMUNICADOR EN MODO DE CONFERENCIA
Agregar/Retirar el Canal «A»
a/ de una llamada telefónica
Pulse
mientras está en una llamada telefónica
Agregar/Retirar el Canal «B»
a/ de una llamada telefónica
Pulse
mientras está en una llamada telefónica
*Esta característica no está disponible durante llamadas por intercomunicador o teléfono móvil.
ESCUCHA DE MÚSICA
(Control disponible sólo desde reproductores de música compatibles con A2DP/AVRCP)
Reproducir
Presione
por 2 segundos
Adelantar
Presione
por 2 segundos
Pausa/Detener
Presione
por 2 segundos
Retroceder*
Presione
por 2 segundos
* En algunos teléfonos quizá tenga que repetir esta acción
Page 32

ESPAÑOL
32 |
SOLUCIONANDO PROBLEMAS DE CONEXIÓN
Reinicio
Si su TERRANO-X deja de responder, apáguelo y luego enciéndalo otra vez
(presione
por 2 segundos.
Reinicio del
Emparejamiento
(Elimina todos los
dispositivos emparejados)
1. En modo de espera, presione por 6 segundos hasta que la luz ROJA/AZUL
comience a titilar.
2. Presione
por 2 segundos hasta que la luz titile 5 veces en PÚRPURA.
SOPORTE
www.terranosystems.com
support@terranosystems.com
AVISOS
Declaración de la Comisión Federal de Comunicaciones (FCC)
15.21
Los cambios o modicaciones a esta unidad que no hayan sido expresamente aprobados por la parte a cargo del cumplimiento podrían
anular la autoridad del usuario para operar al equipo.
15.105( b)
Este e quipo ha sid o evaluado y d emostró c umplir con l os límites p ara un dispo sitivo dig ital Clase B, d e acuerdo co n la Parte 15 de las R eglas
FCC. Estos límites están diseñados para proporcionar protección razonable contra: interferencia dañina en una instalación residencial.
Este equipo genera y puede irradiar energía de radiofrecuencia y si no se lo instala y usa de acuerdo con las instrucciones, puede causar
una interferencia nociva a las comunicaciones de radio. Sin embargo, no hay garantías de que no se produzca una interferencia en una
inst alación en p articu lar. Si este equ ipo causa i nterfer encia dañin a a la recepci ón de radio o te levisión, l o que se deter minará ence ndiendo
o apagando el equipo, se recomienda al usuario que trate de corregir la interferencia haciendo lo siguiente:
• Reoriente o reubique la antena receptora
• Aumente la separación entre equipo y receptor
• Conec te el equipo a una salida en un circuito distinto al que tiene conectado al receptor
• Consulte al distribuidor o a un técnico de radio y TV experimentado para recibir ayuda.
Su operación está sujeta a las dos condiciones siguientes:
1) este dispositivo no causará interferencia y
2) este dispositivo debe aceptar cualquier interferencia, incluida la interferencia que puede causar la operación indeseada del dispositivo.
Declaración de la exposición a radiación RF FCC
Este equipo cumple con los límites de exposición a la radiación FCC establecidos para un ambiente no controlado. Los usuarios nales
deben s eguir las ins trucciones operat ivas espec ícas para c umplir con lo s límites de ex posición RF. Este transmisor no puede ser co locado
ni operar conjuntamente con otra antena o transmisor.
Page 33

ESPAÑOL
|
33
Aviso CE europeo
El TERRANO-X (el “producto”) cumple con los siguientes requisitos esenciales de la Directiva del Consejo 1999/5/EC (referida como la
directiva R&TTE): Artículos 3.1.a, 3.1.b y 3.2. El producto se fabrica de acuerdo con el anexo II de dicha direc tiva.
Declaración de conformidad (DOC)
El TERRANO-X cumple y adopta la especicación 2.1 para Bluetooth® y pasó con éxito todas las pruebas de interoperabilidad que se
detallan en las especicaciones del Bluetooth Sin embargo, no se puede garantizar la interoperabilidad entre el equipo y otros productos
con Bluetooth
Copyright
El contenido de esta Guía del Usuario, incluidos todos los textos, ilustraciones y dibujos, son propiedad intelectual exclusiva de Terrano
Systems, Inc. (la “Compañía”) y están protegidos por los derechos de autor. No son de dominio público. Cualquier reproducción parcial o
total, traducción y/o difusión, sin la previa autorización de la Compañía está estrictamente prohibido. Todos los derechos no concedidos
expresamente aquí son reservados.
IMPORTANTE INFORMACIÓN SOBRE LA SEGURIDAD – RENUNCIA DE RESPONSABILIDAD Y LIBERACIÓN GENERAL ADVERTENCIA
Terrano Systems Inc., (“Terrano”) le notica que el uso de un dispositivo de comunicación mientras se conduce una motocicleta, motoneta,
cicl omotor, ATV, motoci cleta de c uatro rue das, bicic leta o cua lquier otr o vehícul o o equipo (“ve hículo” ), requier e de su atenci ón complet a e
indiv isible. Si no s e evitan las si tuacione s de riesgo p otencial, es tas puede n resultar e n un accidente q ue cause le siones grave s o la muerte.
Terrano le recomienda que tome todas las prec auciones ne cesarias y se mantenga alerta al tr áco, las condiciones del clima y la car retera.
Es mejor detener su vehículo al lado de la carretera, lejos del tráco, antes de activar o desactivar el producto o iniciar o recibir alguna
llamada. No realice apareamientos, conexiones u operaciones similares, mientras se conduce un vehículo. Todas las publicaciones,
anunc ios y materia les similares de ventas, t ienen la inte nción de indi car las capa cidades té cnicas y no de ben interp retarse como el alient o
para operar los productos (“Producto”) de Terrano, de cualquier manera que sea peligrosa o prohibida por la ley.
Ejerza todas las debidas precauciones mientras utiliza este Producto y obedezca a todas las leyes de tránsito aplicables. Siempre opere el
vehículo y el Produ cto de una manera segura. No se distraiga por el P roducto mi entras conduce o maneja un vehículo. Permanezca atento
a todas las condiciones de manejo cuando utiliza el Producto. Siempre asegúrese de que cualquier uso de sus manos en relación con el
Producto sea realizado con facilidad, apropiadamente y de una manera segura. Mantenga sus manos en los manubrios mientras opera
el vehículo. Reduzca el mínimo de tiempo cuando sus manos ejecutan cualquier operación sobre el Producto y deténgase con seguridad,
lejos de cualquier tráco para realizar ajustes.
Cuando maneje, siempre tenga en co nsideraci ón la carret era, el tráco, el terreno y las otras con diciones para maximizar la segu ridad. No
haga funcionar el Producto si llega a ser peligroso hacerlo.
En algunos estados, el uso de los sistemas de comunicación móviles es prohibido o restringido. Consulte todas las leyes y reglamentos
que se aplican a su región antes de utilizar el Producto y tenga en cuenta que el cumplimiento de todas las leyes y reglamentos es
responsabilidad del usuario. Utilice el producto mientras está en movimiento, sólo cuando y en la manera que dichos dispositivos estén
perm itidos po r la ley aplica ble. El Prod ucto no deb e utiliza rse en cont ravención d e las leyes lo cales, fe derales o es tatale s y los reglam entos.
Por favor, verique las leyes locales, federales y estatales y los reglamentos antes de utilizar su Producto de Terrano.
Ninguna parte del cuerpo debe estar en contacto con la antena durante la operación del equipo. Use el Producto sólo donde sea segur o, y
evite u sarlo en las e stacion es de gasoli na, depósit os de combus tible o alre dedor de ex plosivos . El uso con apar atos audit ivos y dispo sitivos
médicos sólo después de consultar a un médico o especialista. Asegúrese de instalar y montar el Producto de una manera estable.
Page 34

ESPAÑOL
34 |
ADVERTENCIAS PARA LA SALUD:
Pérdida de la Audición
Los dispositivo s de audio pueden causar la pérdida de l a audición. Prestar atención y evi tar la expos ición a la sali da de niveles de volumen
que puedan dañar o deteriorar la audición o llevar a la pérdida de la audición. La pérdida permanente de la audición puede ocurrir si los
Productos son utilizados a un volumen alto, durante periodos prologados de tiempo.
Señales de Radiación RF
La mayoría de los equipos electrónicos están protegidos contra las señales de radiación RF. Sin embargo, algunos equipos electrónicos
pueden no estar protegidos contra las señales de radiación RF, procedentes de su equipo inalámbrico.
Marcapasos
La Asociación de Fabricantes de la Industria Médica recomienda que se mantenga una separación mínima de 6 pulgadas (o 16 cm), entre
un teléfono móvil o un dispositivo inalámbrico y un marcapasos, para evitar la potencial interferencia con el marcapasos. Asegúrese de
no interferir con la funcionalidad de los dispositivos médicos personales.
Aparatos Auditivos
deberá consultar al fabricante del aparato auditivo para analizar las alternativas.
Otros Dispositivos Médicos
Si usted utiliza cualquier otro dispositivo personal médico, consulte al fabricante de su dispositivo y/o al médico para determinar si está
adecuadamente protegido contra las interferencias causadas por la energía externa de radiación RF. Su médico puede ayudarle a obtener
esta información.
GARANTÍA LIMITADA
Su Producto está cubierto por una garantía Limitada de producto por Dos Años, desde la fecha original de la compra, sujeto a las leyes y
reglamentos aplicables en su jurisdicción. Por favor, guarde el recibo de venta al por menor y sus datos de registro para la comprobación
de la compra.
Sujeto a lo anteriormente dicho, Terrano por este medio maniesta que este Producto está garantizado de estar libre de defectos en
materiales o por mano de obra (se requiere prueba de la compra y registro). Dentro del periodo sometido, Terrano, a su entera discreción,
reparará o sustituirá cualquier componente que falle durante el uso normal. Tales reparaciones o sustituciones de partes y mano de
obra se realizarán sin costo alguno para el cliente, siempre que el cliente se haga responsable de cualquiera de los gastos de envío. Esta
garantía no cubre las fallas debido al abuso, mal uso, accidente o alteración no autorizada o reparaciones.
Este Producto está destinado a ser utilizado sólo como un dispositivo de comunicación y entretenimiento y no debe utilizarse en ningún
lugar o jurisdicción donde esté prohibido su uso.
Las garantías y recursos contenidos aquí dentro s on exclusivos y sustituyen a todas las otras garantías expresas, implícitas o establecidas
por los estatutos, incluyendo cualquier responsabilidad presentada bajo cualquier garantía de comerciabilidad o adaptación para un
n especíco, legal o de lo contrario que Terrano especícamente desconozca. Esta garantía le otorga derechos legales especícos
que pueden variar de estado a estado o de jurisdicción a jurisdicción. Terrano no otorga otras garantías expresas o implícitas más allá
de aquellas indicadas especícamente aquí dentro. Esta garantía es extendida por Terrano solamente al comprador original y no es
asignable o transferible a otros. Terrano no asume ninguna obligación o responsabilidad por adiciones o modicaciones a esta garantía, a
menos que sean realizadas por escrito y rmadas por un representante de la compañía.
Las baterías están garantizadas únicamente si la capacidad de la batería desciende por debajo del 50% de la capacidad calicada o si la
batería revela pérdidas.
Page 35

ESPAÑOL
|
35
Esta garantía será inválida si:
a. cualquiera de los sellos sobre la caja o la batería están rotos, o el Producto o la batería muestra signos de deterioro,
b. la batería es utilizada en otros equipos, aparte del equipo para lo que fue deseada.
c. el Producto es utilizado en contravención de su objetivo deseado.
d. el producto fue comprado en las subastas en línea
Terrano no asume ninguna responsabilidad por los daños directos y consiguientes, perjuicios, pérdidas o comercialización de cualquier
tipo, incluidos aquellos que resulten de la utilización de componentes que no son de Terrano o productos en relación con sus Productos, y
especícamente el uso de cargadores de terceros o dispositivos Bluetooth®.Por otra parte, Terrano no se hace responsable por cualquier
daño a cu alquier pa rte del Pro ducto, res ultante de l uso de equip os auxilia res no prop orcionado s por Terrano, qu e se jan a o son ut ilizado s
en conexión con el Producto.
Lo que esta garantía no cubre:
1. Los defectos o daños que resulten del uso de este Producto en otra forma distinta de la normal y acostumbrada.
2. Los defectos o daños por uso indebido, accidente o negligencia.
3. Los defectos causados por manejo inadecuado, mantenimiento, instalación, ajuste o modicación de cualquier tipo.
4. Los productos abiertos, desarmados o reparados por partes no autorizadas.
5. Los defectos o daños debidos a la exposición a temperaturas excesivas, las condiciones climáticas adversas, los impactos externos o
derrames de comida o líquidos.
6. Todas las supercies de plástico y las otras partes externas expuestas que estén rayadas o dañadas después de la compra.
Renuncia de Garantía
Terrano renuncia a todas las garantías expresas e implícitas con respecto al equipo, incluidas sin limitaciones, garantías implícitas de
comerciabilidad, adaptación para un n especíco y la no violación de la ley. El equipo y sus accesorios se proporcionan “como está” sin
garantías fueras de las asumidas en el manual adjunto
Limitación de responsabilidad
En ningún caso, Terrano será considerado responsable por daños especiales, indirectos, punitivos, incidentales, ejemplares o
consecuenciales o daños de cualquier tipo que resulten del uso, mal uso, o inhabilidad para usar este producto o por defectos en el
producto, o por cualquier daño que pudiera resultar por el uso del producto, ya sea que se basen en la violación del contrato, agravio
(incluida negligencia), responsabilidad del producto o incluso si se le informó de la posibilidad de tales daños .
Usted reconoce y acepta que las limitaciones establecidas anteriormente, son elementos fundamentales de este acuerdo, en el que usted
da su consentimiento y sin el cual el equipo no le será proporcionado, ausente de tales limitaciones. Algunos estados no permiten ciertas
exclusiones de daños incidentales o consecuentes, así que las anteriores limitaciones pueden no aplicar a su caso.
Terrano se reserva el derecho a reparar o reemplazar (con un nuevo o recién readaptado Producto de reemplazo) el dispositivo o el
sof tware, o concederle una d evolución del precio de la compra a su entera discreción. Dicho recur so será su único y exclusivo recurso para
cualquier incumplimiento de la garantía.
La compra y/o uso de los Productos fabricados o distribuidos por Terrano, comprenden una liberación e indemnización de Terrano, junto
con todos sus aliados y sus funcionarios, directores, propietarios, empleados, distribuidores, junto con la liberación e indemnización de
la responsabilidad para los representantes, agentes, abogados y contratistas de Terrano.
Usted, sus herederos, sus representantes legales, sucesores y asignados, por este medio liberan para siempre, compensan, indemnizan
y consideran a Terrano libre, junto con todos sus aliados y su pasado, presente y futuros funcionarios, directores, propietarios y
empleados de cualquier y todos los litigios, reclamos, demandas, juicios, acciones y responsabilidad, daños y pérdidas que pueden
Page 36

ESPAÑOL
36 |
surgir directamente o indirectamente, por el uso del Producto, incluyendo sin limitación, los reclamos por lesiones, daños, muerte y
daños con respecto a cualquier persona o propiedad sin importar su causa, ya sea ocasionado por negligencia, responsabilidad absoluta,
responsabilidad por productos o de otra manera, y que a partir de ahora puedan ser imputados a usted como resultado del uso del
Producto,en la mayor medida permitida por la ley.
Usted entiende completamente y asume los riesgos del uso del Producto. Todos los riesgos para operar el Producto son asumidos
únicamente por el usuario del Producto.
Disposiciones Generales
Est a garantía se otorga en lug ar de cualqui er otra gara ntía expre sa o implíc ita, incluy endo sin limi tación, las g arantías de c omerciabi lidad
implícitas y conveniencias para un propósito particular.
1. Terr ano no se hace responsable por ningún daño incide ntal o consecuente ori ginado por el u so o mal uso de cualquiera de los Produc tos
de la Compañía.
2. El usuario nunca debe tratar de ejecutar el servicio, ajustes o reparaciones del Producto por si mismo. Si lo hace, anulará todas las
garantías. Durante la vigencia de la garantía, todos los Productos deben ser devueltos al punto de compra o al centro del servicio
autorizado para todos los trabajos necesarios.
3. La Compañía no se hace responsable por cualquier pérdida o daño incurrido durante el envío. Todos los trabajos de reparación del
Producto por partes no autorizadas expresamente por la Compañía, invalidarán cualquier y todas las garantías.
4. La infor mación en e ste Manual es p roporcio nada estr ictamen te para nes i nformati vos y está su jeta a cambi os sin previ o aviso. Terrano
no asume la responsabilidad u obligación por cualquier error o imprecisión que pueda aparecer en el Manual o en la Guía Rápida de
Inicio.
NOTA: Busque muestras apropiadas para vericar que usted está siendo atendido por un Distribuidor Autorizado de Terrano o Centro de
Servicio. Terrano se reser va el derecho de modic ar y cambiar sus Productos, manuales y especicaciones, en cualquier momento
sin previo aviso.
RENUNCIA DE RESPONSABILIDAD Y LIBERACIÓN GENERAL
Al utilizar el Producto, usted renuncia a derechos legales esenciales, incluyendo el derecho a presentar una demanda. Por favor, lea
lo siguiente cuidadosamente antes de utilizar el dispositivo. Al utilizar el Producto, usted acepta cumplir con este acuerdo y pierde el
derecho a presentar una demanda.
Al utilizar el Producto, usted está liberando irrevocablemente, indemnizando de cualquier responsabilidad, pérdidas, reclamos y gastos
(incluidos los honorarios de abogados) y considera a Terrano libre por cualquier lesión corporal, daños o muertes, así como las pérdidas o
daños de bienes, a ningún vehículo, incluido el suyo, o a cualquier propiedad o activos que le pertenezcan a usted o a terceros, cualquiera
de los cuales puedas resultar del uso del Producto bajo cualquier circunstancia o condición e independientemente de la jurisdicción.
1. Usted, sus herederos, representantes legale s, sucesores o asignados, voluntariamente liberan, compensan y consideran a Terrano libre
de cualquier acción legal, reclamo, deuda, demanda, acción y responsabilidad que pueda surgir directa o indirectamente, por el uso del
Produ cto por suf rimiento, d olor,molestias, pérdida, lesión, muerte, daños a una persona o propi edad, SE DEBAN O NO A NEGLIGENCIA, y
que le puedan ser imputados a us ted en el futuro como resultado de dicho uso, en la medida permitida por la ley.
2. Entiende y asume los riesgos del uso del Producto, incluido el riesgo de actos u omisiones negligentes por terceros.
3. Conrma que es físicamente capaz de usar el Producto y que no tiene problemas médicos o necesidades que puedan afectar su
capacidad de hace rlo en forma s egura. Conrma que tiene diecioc ho años por lo menos y que se le informó de los riesgos asociado s con
el uso d el Produc to. También con rma que no con sumirá alco hol que pued a afect ar su estado d e alerta , ni ninguna su stancia qu e pueda
afec tar la mente y que no transportará, usará ni consumirá estas sustancias antes o durante el uso del Producto.
Page 37

ESPAÑOL
|
37
4. Reconoce todas las advertencias y entiende que: (a) hay riesgos relacionados con el uso del Producto en el tránsito, incluyendo sin
limitaciones, lesiones o enfermedad, esguinces, fracturas, parálisis total o parcial, muerte u otras enfermedades que podrían resultar
en discapacidad grave (b) estos riesgos pueden deberse a negligencia de los fabricantes o sus agentes o terceros participantes en el
diseño o fabricación del Producto; (c) estos riesgos pueden deberse a causas inesperadas o impredecibles. Por ende asume todos los
riesgos y responsabilidad por pérdidas y/o daños, causados en todo o en parte por negligencia o la conducta de otros, incluyendo
Ter rano .
5. Al utiliz ar el Produ cto, uste d conrma qu e ha leído est a liberac ión de respo nsabilid ad y compren de plename nte y acepta e stos térmi nos
y condiciones
www.terranosystems.com
Software License Agreement
BY USING THE TERRANO-X, YOU AGREE TO BE BOUND BY THE TERMS AND CONDITIONS OF THE FOLLOWING SOFTWARE LICENSE AGREEMENT.
PLEASE READ THIS AGREEMENT CAREFULLY.
Terrano LLC (“Terrano”) grant you a limited license to use the software embedded in this device ( the “Software”) in binary executable
form in the normal operation of the product. Title, ownership rights, and intellectual property rights in and of the Sof tware remain with
Terrano and/or its third-par ty providers.
You acknowledge that the Software is the property of Terrano and/or its third-party providers and is protected under the United States
of America copyright laws and international copyright treaties. You further acknowledge that the structure, organization, and code of
the Software, for which source code is not provided, are valuable trade secrets of Terrano and/or its third-party providers and also that
the Software in source code form remains a valuable trade secret of Terrano and/or its third-party providers. You agree not to decompile,
disassemble, modify, reverse assemble, reverse engineer, or reduce to human readable form the Software or any part thereof or create
any derivative works based on the Software. You agree not to export or re-export the Software to any country in violation of the export
control laws of the United States of America or the export control laws of any other applicable country.
© Terrano, LLC
The Blu etooth® wor d mark and log os are owned b y the Blueto oth SIG, Inc. a nd any use of suc h marks by Terr ano, LLC is under l icense. Ot her
trademarks and trade names are those of their respective owners.
The contents of this User Manual, including all text, illustrations and drawings are the exclusive intellectual property of Terrano, LLC.
(the “Company”) and are protected by copyright laws. They are not in the public domain. Any partial or total reproduction, translation
and or dissemination, without the prior written authorization by the Company are strictly prohibited. Any rights not expressly granted
herein are reserved.
La palabra, marca y logotipo Bluetooth® son propiedad de Bluetooth SIG, Inc. Cualquier uso de dichas marcas por Terrano, LLC se hace
bajo licencia. Otras marcas y nombres comerciales pertenecen a sus respectivos dueños.
El contenido de este Manual de Usuario, incluyendo todos los textos, ilustraciones, y dibujos son propiedad intelectual exclusiva
de Terrano, LLC (la “Empresa”) y están protegidos por las leyes de propiedad intelectual. No se hallan en el dominio público. Queda
totalmente prohibida cualquier reproducción, traducción y/o difusión parcial o total sin autorización previa por escrito de la Empresa.
Todos los derechos que no se otorgan explícitamente en este documento están reservados.
Page 38

MAN0018 5 TERRANO QSG B OOK 002
 Loading...