

Page 1

OPERATING MANUAL
TM
KIT INCLUDES:
700C Wheel with AIRhub
Viiiiva Dual heart rate monitor
TM
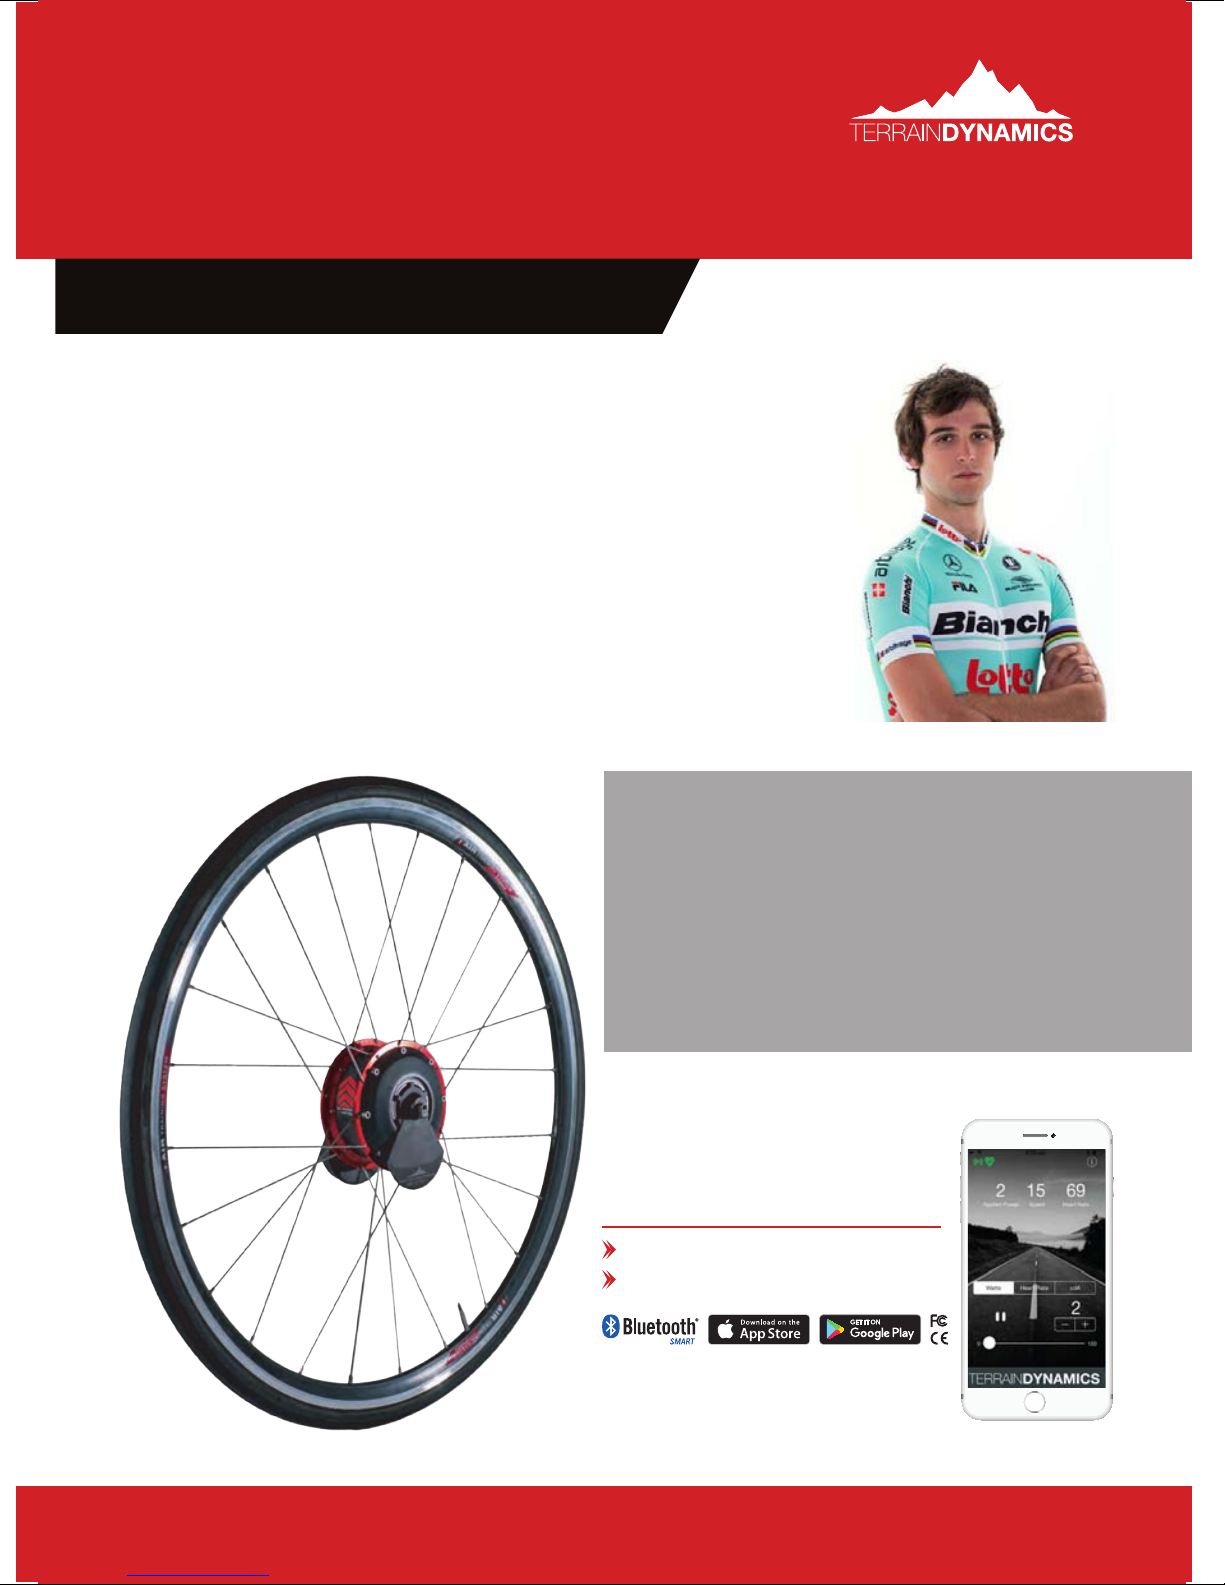
• Replaces your front wheel
• Self powered
- no battery needed
• Bluetooth to your smartphone
www.terraindynamics.com.auinfo@terraindynamics.com.au
Page 2
info@terraindynamics.com.au
TABLE OF CONTENTS
1. Introduction Page 3
2. Warranty Page 4
3. Before using the AIRhub Page 6
4. Using the AIRhub Smartphone Application Page 8
5. Setting up the AIRhub Page 10
6. Setting up Accessories Page 12
7. Using the AIRhub Page 15
8. Thermal Management Page 26
9. Troubleshooting Page 27
10. FAQs Page 28
11. Safe Use Page 31
Page 2
Page 3
www.terraindynamics.com.au
TM
1. INTRODUCTION
Thank you for your purchase of the AIRhub; The World’s rst
and only On-road Resistance Training System.
We created this tool out of a desire to train efciently and
effectively and to leave no room for excuses out on the road.
We hope that the AIRhub will take your performance to all new
heights.
– Michael Freiberg, Inventor
“...I knew that by computer
controlling the loads on an
athlete you could achieve
performances far beyond
anything we see today”
Michael Freiberg, inventor of the AIRhubTM. 2011 World
Omnium Champion, Gold & Silver at Commonwealth
Games Delhi.
KIT INCLUDES:
700C Wheel with AIRhub
Viiiiva Dual heart rate monitor
TM
Page 3
Page 4

info@terraindynamics.com.au
2. WARRANTY
IMPORTANT INFORMATION
WARNING
Always consult your physician before
beginning or modifying any exercise
program. If you have a pacemaker or
other implanted electronic device,
consult your physician before using a
heart rate monitor.
WARRANTY
Terrain Dynamics’ AIRhub™ comes with
guarantees that cannot be excluded
under Australian consumer law. You are
entitled to a replacement or refund for
a major failure and compensation for
any other reasonably foreseeable loss or
damage. You are also entitled to have
the goods repaired or replaced if the
goods fail to be of acceptable quality
and the failure does not amount to a
major failure.
Summary of Australian statutory
consumer guarantees in relation to
goods
• The goods will be of acceptable
qualit y.
• The goods will be t for a particular
purpose.
• The goods will match their
description.
• The goods will match the sample or
demonstration model.
• You have title to the goods.
• You have undisturbed possession of
the goods.
• There are no undisclosed securities
on the goods.
Under Australian consumer law, the
remedy you are entitled to if a product
fails to meet a consumer guarantee
will depend on whether the failure to
comply with the guarantee is major or
minor.
Minor failures to comply with a
consumer guarantee can normally be
xed or resolved in a reasonable amount
of time. In this case, Terrain Dynamics
can choose to offer you a refund,
replacement or repair.
If Terrain Dynamics does not x the
problem or takes too long to do so,
Page 4
Page 5

www.terraindynamics.com.au
TM
you may be able to get it xed by
someone else and recover the costs
from Terrain Dynamics depending on
the circumstances.
Major failures to comply with a consumer
guarantee cannot normally be xed or
resolved easily. In such a case, you can
choose one of the remedies set out
below:
• Return the product and ask for a
refund.
• Return the product and ask for an
identical replacement, or one of
similar value if reasonably available.
sample or demonstration model you
were shown.
• The AIRhub™ is substantially
unt for its normal purpose and
cannot easily be made t within a
reasonable time.
• The AIRhub™ is substantially unt
for a purpose that you told Terrain
Dynamics about, and cannot easily
be made t within a reasonable
time.
• The AIRhub™ is unsafe.
For information on Australian consumer
laws, please visit Australian consumer
• Keep the product and ask for
compensation for the drop in value
caused by the problem.
For goods, there is a major failure to
comply with a consumer guarantee
when:
• You would not have purchased the
AIRhub™ if you had known about
the problem.
• The AIRhub™ is signicantly
different from the description,
law website at
www.consumerlaw.gov.au.
Page 5
Page 6
info@terraindynamics.com.au
3. BEFORE USING THE AIRHUB
Steps prior to taking the AIRhub out on the road.
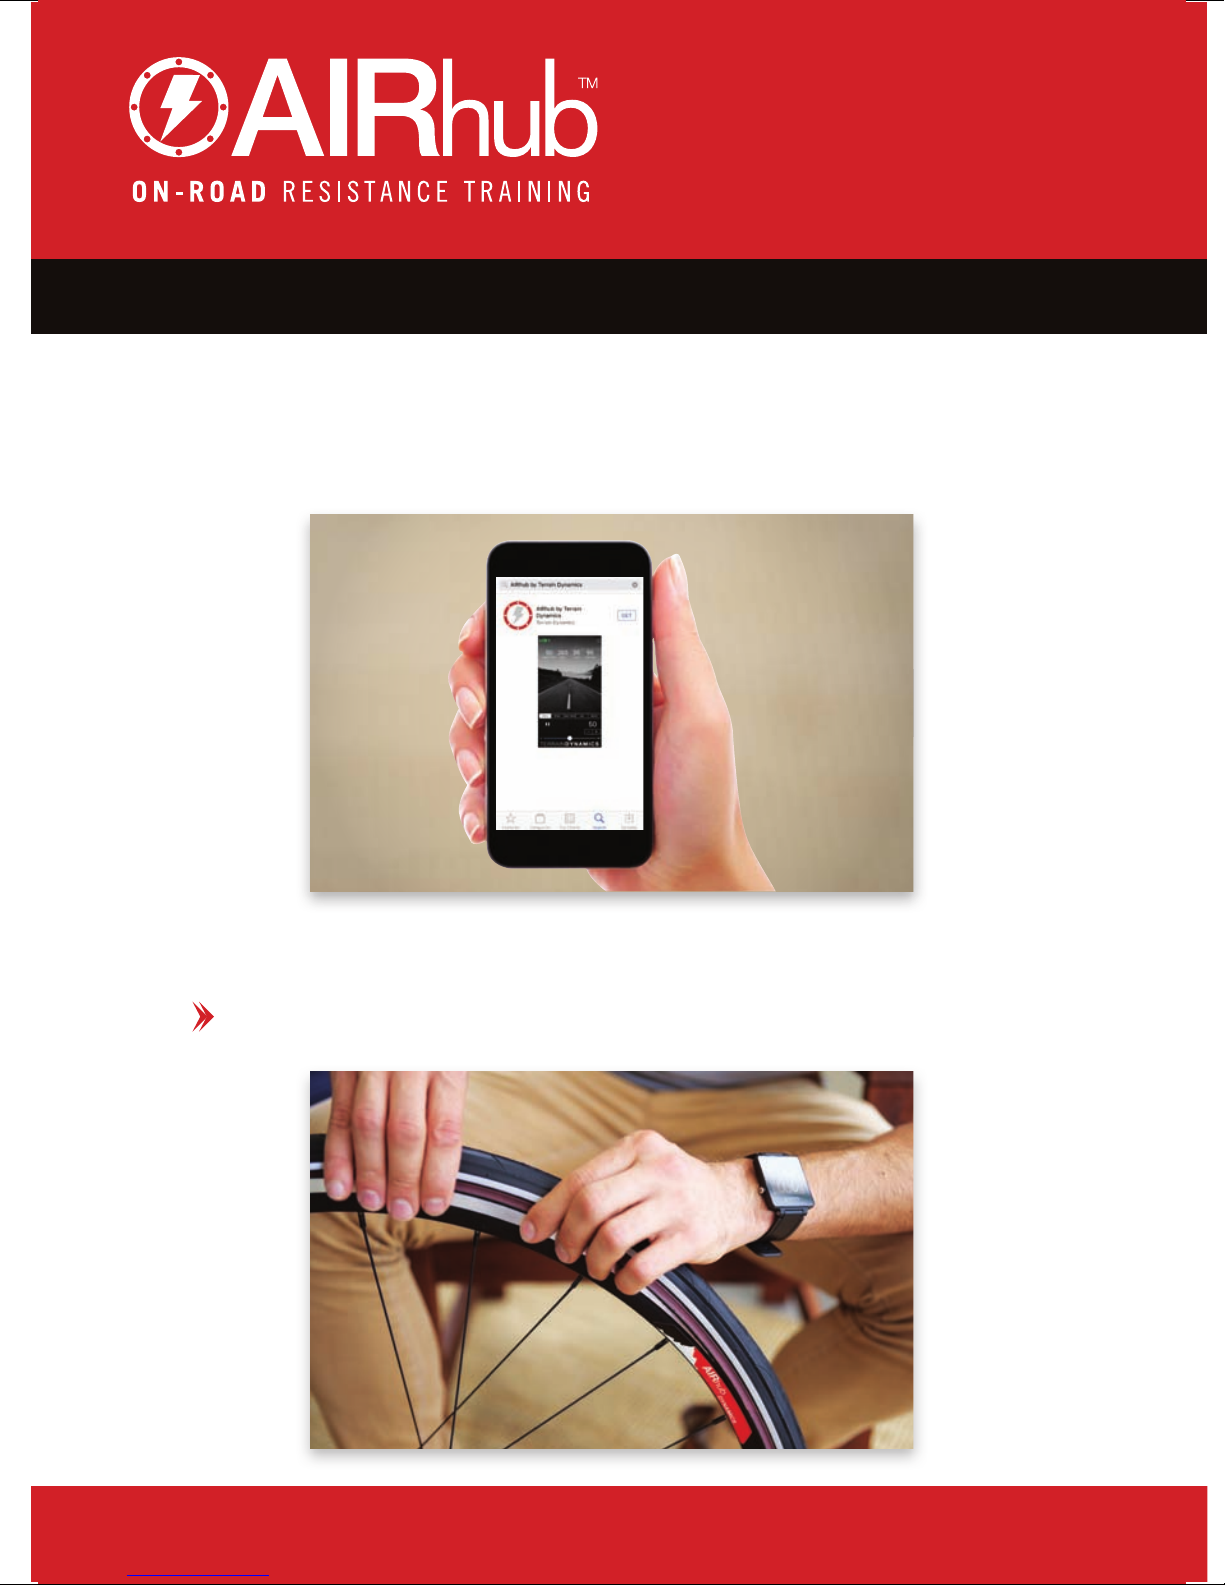
Step 1: Download smartphone Application from Apple App Store or
Google Play Store - AIRhub by Terrain Dynamics
Step 2: Remove AIRhub from box and t with tyre and tube.
To maintain a high quality ride feel, use a good quality tyre and tube.
Page 6
Page 7
www.terraindynamics.com.au
TM
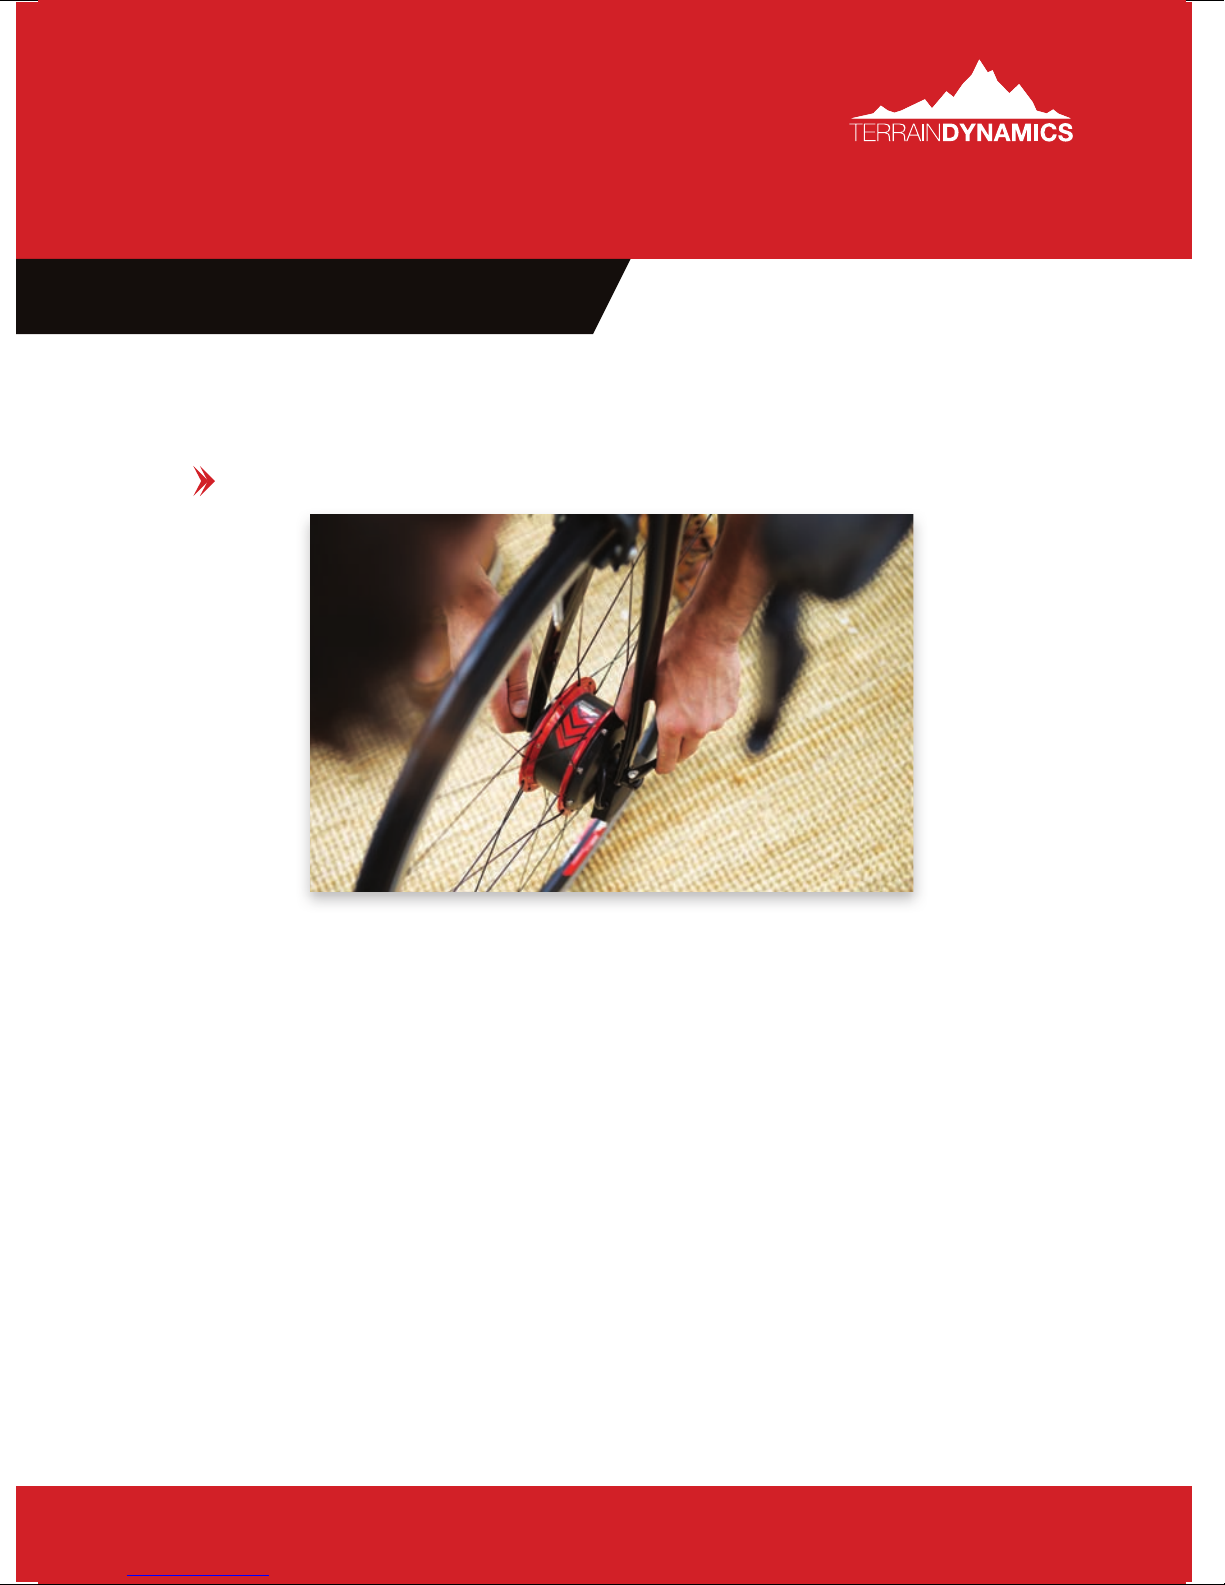
Step 3: Place AIRhub in front forks and tighten skewer.
Ensure red arrows are pointing forward. (See image below)
Page 7
Page 8
info@terraindynamics.com.au
4. USING THE AIRHUB SMARTPHONE APPLICATION
4.1. Training application
Green = Heart Rate Strap Connected
Grey = Searching for Heart Rate Monitor or Poor connection
Red = No Heart Rate Strap Connected
Red = No AIRhub detected or connected
Grey = Signal sent to AIRhub
Green = Signal received from AIRhub. AIRhub connected.
To save power on your smartphone try these ideas: reduce brightness,
activate lock screen while running app in the background and/or use
aeroplane mode with Bluetooth activated.
4.2. Device Compatibility
The AIRhub Smartphone App is currently compatible with Apple iOS and
Android devices.
The Viiiiva Heart Rate Monitor broadcasts both Bluetooth Light protocol
(BLE) and ANT+ signals, allowing heart rate data to be collected
simultaneously by your phone and other recording devices; SRM, Garmin
etc.
The AIRhub uses BLE to transmit data. BLE protocol uses power similar
to that of the super low power wireless protocol ANT+ and will not drain
your battery like other Bluetooth devices.
Page 8
Page 9
www.terraindynamics.com.au
TM
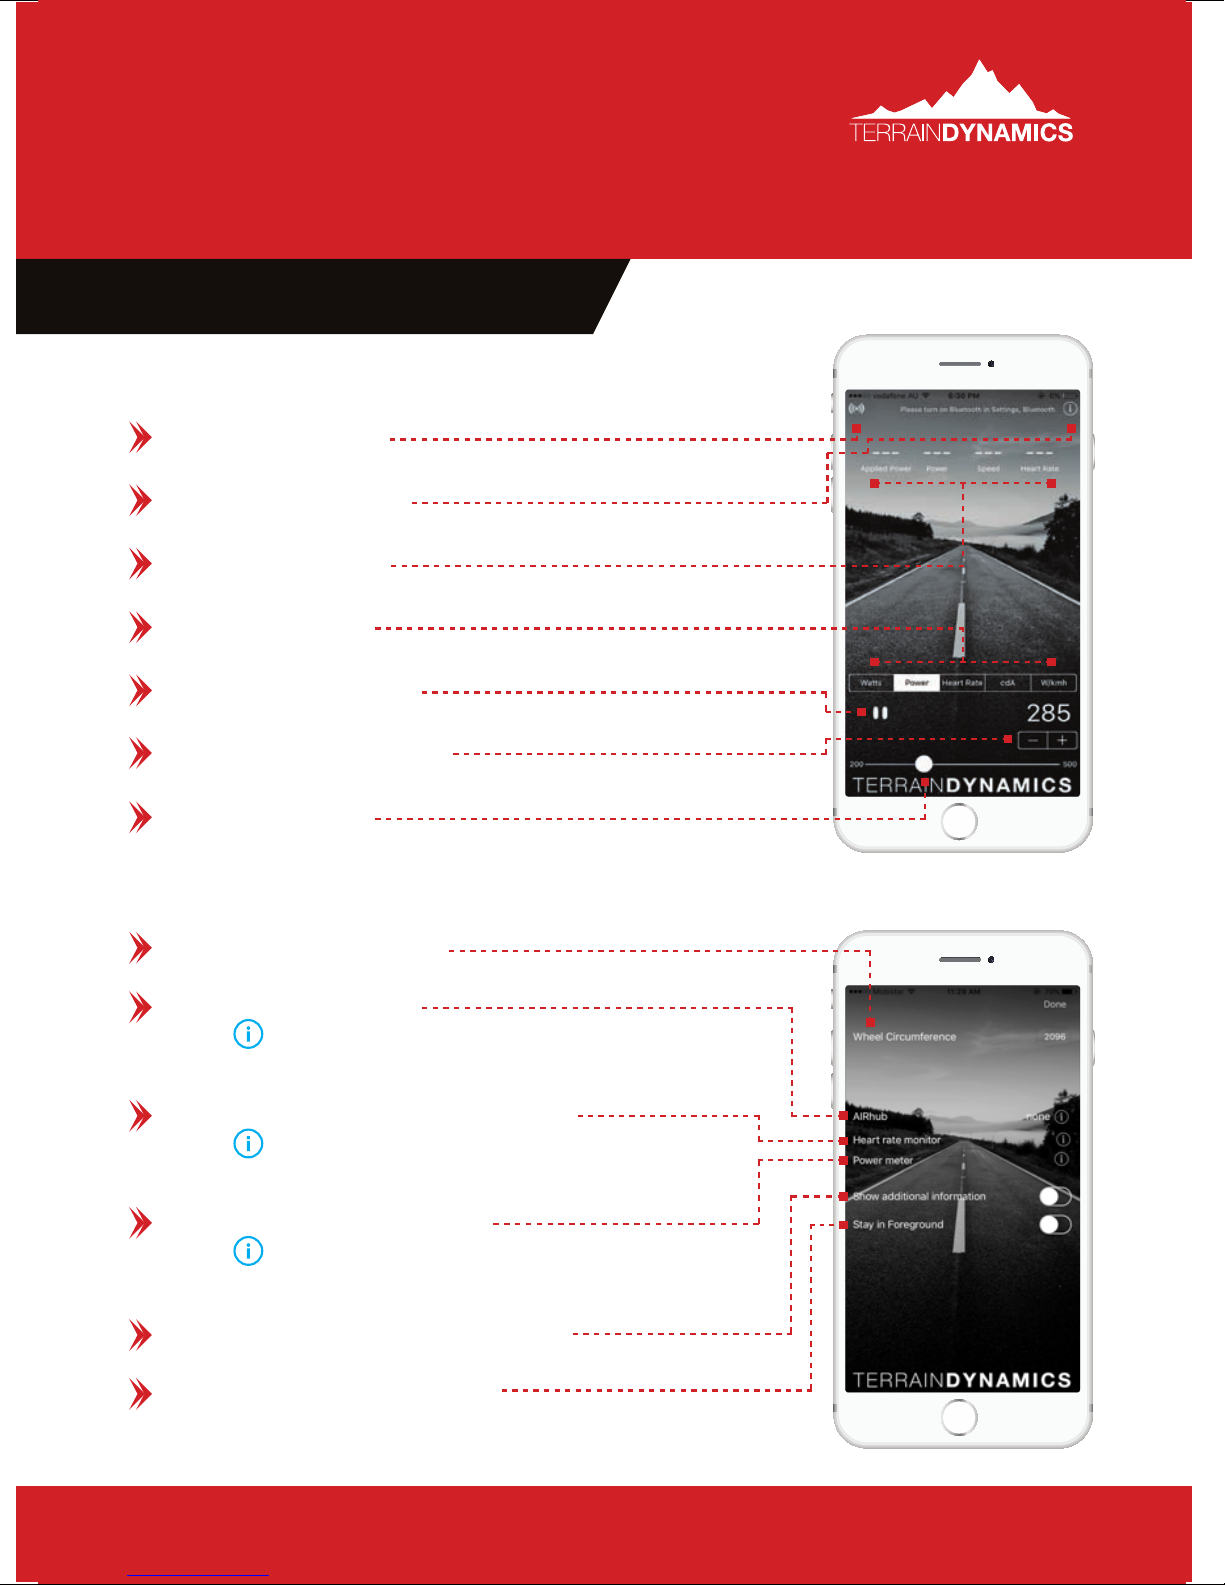
SMARTPHONE APPLICATION DISPLAY:
Status Indicators
Icons show connection status to the AIRhub and heart rate monitor.
Settings Page Icon
Select to go to App Settings page. (see below)
Vital information
Displays current session information.
Mode Selectors
Used to choose training mode.
Start/Pause Button
Button starts and pauses the AIRhub’s resistance.
Fine Selector Buttons
Use to ne turn the training values entered into the application.
Selection Slider
Slider enables quick entry of training values.
SETTINGS PAGE:
Wheel Circumference
Input wheel circumference here (2096mm as standard)
AIRhub Connection
Select to manually search for AIRhub.
(return to App homepage to complete search)
AIRhub serial number displayed when connected.
Heart Rate Monitor Connection
Select to manually search for Heart Rate Monitors.
(return to App homepage to complete search)
Status displayed when connected.
Power Meter Connection
Select to manually search for Bluetooth Power Meters.
(see page 14 for pairing Non-Bluetooth Power Meters)
Power Meter name will be displayed when paired.
Addtional Information Selector
Displays Raw AIRhub Sensor Data. (for developer use)
Foreground App Selector
Select to prevent phone screen lock and keep App open
while riding.
Page 9
Page 10
info@terraindynamics.com.au
5. SETTING UP THE AIRHUB
5.1. Connection and resistance parameters
The AIRhub requires a minimum speed of 15km/h before data is transmitted
to the Smartphone App and pairing can occur.
No resistance is applied below 15km/h.
Maximum speed where resistance can be applied is 50km/h.
When resistance is applied a light tapping is felt. This is normal and indicates
the AIRhub is working.
Once a command is sent, resistance will be continuously applied – even
while the Application is closed/in the background.
To stop resistance a Pause command must be sent by using the “Pause”
button on the home screen.
The device will stay active whilst stationary for up to 2 mins.
Page 10
Page 11

www.terraindynamics.com.au
TM
5.2. Pairing the AIRhub to AIRhub App
NB# For the AIRhub to be recognised
by the application a minimum speed of
15km/h must be met.
We recommend undertaking
the pairing of your device on a
quiet street or bike path.
1
Step 1: Open AIRhub Application.
Step 2: Begin riding and reach a speed
of 15km/h or above. Wait for the
smartphone to recognise the
AIRhub. This will appear as a
4-digit number at the bottom of
the screen (eg. LE 001C).
Step 3: Select recognised AIRhub. The
device will now begin
2
transmitting data.
It may take up to 30 seconds for
data to appear on App after
pairing.
Step 4: Radio symbol in top left
hand corner will turn green when
AIRhub is successfully paired.
If after these steps the AIRhub will not pair or data is
3
not being transmitted, please see troubleshooting
page (Page 25) for further information.
Page 11
Page 12

info@terraindynamics.com.au
6. SETTING UP ACCESSORIES
6.1. Pairing the Viiiiva Heart Rate Monitor to AIRhub app.
NB#: Any BLE heart rate monitor can be used with the AIRhub App. The Viiiiva heart rate monitor was
specially chosen for dual BLE & ANT+ Broadcasts. This will allow data to record to your Garmin or SRM
while simultaneously using the App.
6.1.1. Place supplied Viiiiva Heart
Rate Strap on your chest.
Step 1: Start by wetting electrodes on
the strap and clip in the centre
module.
Step 2: Adjust strap to t snug around
your chest, ensuring it sits
below your breastbone, with
the Viiiiva logo centred on your
sternum.
The monitor will turn on when
worn in this manner and shuts
off 2 minutes after it is removed.
6.1.2 Pairing the Viiiiva Heart Rate
Monitor.
Once Viiiiva Heart Rate Strap is tted to
chest, pair with the AIRhub Smartphone
app.
Step 1: Open AIRhub Application on
smartphone.
Step 2: App will search for Heart Rate
monitors.
Step 3: When recognised by App,
Heart Rate serial number will
appear at the bottom of the
AIRhub application screen.
Step 4: Select recognised Heart Rate
Page 12
monitor to pair.
Once paired, symbol in top
left hand corner of App home
screen will turn green. This
indicates Heart Rate monitor is
successfully connected.
Page 13

www.terraindynamics.com.au
TM
6.2. Pairing your Bluetooth Power Meter to AIRhub app.
NB#: If your power meter is not Bluetooth-enabled, please see instructions for pairing at 6.3.
‘Pairing a Non-Bluetooth-enabled Power Meter’.
Bluetooth-enabled power meters can connect directly to the AIRhub App and begin
transmitting data. Please use the following steps to pair to the AIRhub.
Step 1: Open AIRhub App - ensuring Bluetooth is enabled on your smartphone and
power meter.
Step 2: AIRhub App will automatically search for Bluetooth Power Meters.
If no power meter appears, try waking up your power meter.
If still not found, try manually searching - go to Settings > Tap the next to
‘Power Meters’ and press ‘Yes’ when prompted to search.
Step 3: When power meter appears in App, select it to pair.
Step 4: symbol will appear green when a Bluetooth power meter is connected.
Page 13
Page 14

info@terraindynamics.com.au
6. SETTING UP ACCESSORIES
6.3. Pairing a Non-Bluetooth Power Meter.
In order for the AIRhub App to receive data from your power meter, you must
program the Viiiiva Heart Rate Strap to act as a bridge between the two. Once
programmed, you will no longer need the Viiiiva App open and only use it if you
need to reprogram your HR strap.
6.3.1. Apple iOS Smartphones
Step 1: Download Viiiiva App from
the Apple App Store
(Named: 4iiii Device
Conguation)
Step 2: Open side menu from top left
corner. Select ‘Set Default
Device’.
Step 3: Set default device type.
Select ‘Viiiiva’.
Step 4: Press ‘Scan for Viiiiva’.
Step 5: Select your Viiiiva device.
Step 6: Your Viiiiva Heart Rate strap is
now connected. To begin
pairing your power meter,
select the ‘Viiiiva Cong’ icon
to enter settings mode.
Step 8: Select your power meter from
the device list. If needed, wake
up your power meter by moving
your pedals or wheels.
Step 9: Your Power Meter and the
AIRhub App are now
connected.
Step 10: Close the Viiiiva App.
(You must close the App to
allow data to be picked up by
the AIRhub App).
You are now using your heart
rate strap to transmit power
data to the AIRhub App.
If your power data seems to be
incorrect you will need to
calibrate your power meter. If
you have any problems please
Step 7: Select the ‘Pair ANT+ devices’
icon.
Page 14
email Viiiiva on
support@4iiii.com.
iOS Requirements: Requires iOS 9.3 or later.
Compatible with iPhone, iPad and iPod Touch.
Page 15

www.terraindynamics.com.au
TM
Step 2
Step 5
Step 3
Step 6
Step 4
Step 7
Step 8
Step 9
Page 15
Page 16

info@terraindynamics.com.au
6. SETTING UP ACCESSORIES
6.3. Pairing a Non-Bluetooth Power Meter.
In order for the AIRhub App to receive data from your power meter, you must
program the Viiiiva Heart Rate Strap to act as a bridge between the two. Once
programmed, you will no longer need the Viiiiva App open and only use it if you
need to reprogram your HR strap.
6.3.2. Android Smartphones
Step 1: Download VIIIIVA App from the
Google Play Store.
(Named: 4iiii Device
Conguration)
Step 2: Set default device type.
Select ‘Viiiiva’.
Step 3: In top left corner, open side
menu.
Select ‘Viiiiva Conguration’.
Step 4: Tap the magnifying glass
symbol to search for your heart
rate monitor.
Step 5: Select your Viiiiva device.
Step 6: Your Viiiiva HR Strap is now
connected.
To begin pairing your power
meter, select the ‘ANT+ pairing’
icon along the bottom of the
screen to enter pairing mode.
Step 7: Press ‘Scan for ANT+ sensors’.
Wake up your power meter by
moving the pedals if needed.
Step 8: Select your power meter under
the ‘Bike Power Sensor’ tab
Step 9: Select ‘Save’.
Step 10: Your Power Meter is now
connected.
Close the VIIIIVA App.
(You must close the Viiiiva App
to allow data to be picked up by
the AIRhub App).
You are now using your heart
rate strap to transmit power
data to the AIRhub App.
If your power data seems to be
incorrect you will need to
calibrate your power meter
If you have any problems please
email Viiiiva on
support@4iiii.com.
Requires Android 4.3 or better and Bluetooth
4.0 support on the phone. We have seen better
BLE stability with Android 4.4 and Google Nexus
devices. We have tested with Nexus 5, Samsung
Galaxy S4, Note 3, and Note Pro (tablet). Older
phones have been less stable, especially for
rmware updates.
Page 16
Page 17

www.terraindynamics.com.au
TM
Step 2
Step 5
Step 3
Step 6
Step 4
Step 7
Step 8
Step 9
Step 10
Page 17
Page 18

info@terraindynamics.com.au
7. USING THE AIRHUB
Once your AIRhub and accessories are paired and you are ready to begin your
training session, select an Operating mode to set your resistance.
7.1. Selecting an Operating mode
The AIRhub comes with the choice of
ve modes to add resistance to your
ride in various ways:
Manual Wattage Mode
Apply 0-100 additional watts.
Power Meter Mode
Pair your Power Meter and
choose a power output to work
at.
Target Heart Rate Mode
Choose a Heart Rate to work at.
CdA Mode
Apply resistance to mimic wind
See 7.2 for detailed information on each
operating mode.
To select a particular mode, choose the
specied button on the home screen of
the application.
Use the slider or ne control buttons +/-
to select your desired resistance setting.
drag.
Watts per km/h Mode
Increase resistance by 0 - 2
Watts for every km/h increase in
speed.
Page 18
Page 19

www.terraindynamics.com.au
TM
7.2. Applying resistance using
different Operating modes
Once an Operating mode has been
chosen, and a minimum speed of
20km/h has been met, the AIRhub will
begin to apply resistance.
When resistance is applied a
light tapping is felt. This is
normal and indicates the
AIRhub is working.
NB#: Once a command is set,
resistance will be continuously
applied – even while the
Application is closed/in the
7.2.1. Manual Wattage Mode
Using this mode, you can select
an extra resistance from 0 to 100
additional watts. It allows for the
manual application of large amounts of
resistance from 15km/h to 45km/h.
This mode is usually chosen when
maximum resistance is required, such
as high intensity efforts or strength
endurance efforts, or when the specic
increase in resistance needed is known.
(Session example, see page 24)
background.
To stop resistance a Pause
command must be sent by
using the “Pause” button on the
home screen.
Resistance will turn off when
speed slows below 15km/h. This
will not inhibit riding below
15km/h.
The device will stay active whilst
stationary for up to 2 mins.
Page 19
Page 20

info@terraindynamics.com.au
7. USING THE AIRHUB CONTD.
7.2.2. Power Meter Mode
This mode allows you to receive power
data to your smartphone and use it via
the AIRhub App to hold a power output
that you choose.
In order to use this mode your Power
Meter must connect to your smartphone
via Bluetooth. Power meters with
Bluetooth capability will be able to
connect directly to the AIRhub App.
For instructions on how to
connect your Bluetooth power
meter to the AIRhub App
please see ‘6.2 Pairing your
Bluetooth Power Meter’ on
Please see point 6.3 on pages
14 and 16 for step by step
instructions on how to con gure
the Viiiiva Bluetooth bridge to
your Android or Apple iOS
Smartphone, which will allow
you to pair your power meter.
This mode is best used when a specic
amount of watts want to be held during
a training session. This mode is useful
over consistent terrain where wattage
doesn’t change frequently or during
efforts where a certain power needs to
be sustained.
page 13.
Non-Bluetooth power meters must be
connected to the AIRhub App via a
Bluetooth bridge. The Viiiva Heart Rate
Monitor (included) acts as a Bluetooth
bridge. This must rst be congured via
the Viiiiva App before a Non-Bluetooth
power meter can be paired. You will only
need to congure the Viiiiva HR Strap as
a Bluetooth bridge once.
Page 20
Page 21

www.terraindynamics.com.au
TM
7.2.3. Target Heart Rate Mode
Using both Bluetooth and ANT+ the
Viiiiva Heart Rate Monitor communicates
with the Smartphone App and the
AIRhub to give real time resistance
adjustments. Applied resistance, heart
rate and other data will be shown on the
AIRhub app home screen.
This mode is most useful during
workouts over undulating terrain or
bunch rides where a specic resistance
or consistent Wattage may be hard to
maintain.
This mode also works well when riding
with a training partner of a different
The AIRhub will adjust resistance every
second to give you the most accurate
control of your heart rate.
The further you are from your target
heart rate the faster the resistance will
change to get you back to your set
beats per min.
ability as it can keep you in your desired
training zone while riding at a slower
speed.
(Session example, see page 24)
Page 21
Page 22

info@terraindynamics.com.au
7. USING THE AIRHUB CONTD.
7.2.4. CdA Mode
The resistance in this mode can
be likened to air drag, and applies
resistance proportional to speed. This
mode has settings from 0.00 (“off”) to
0.20 (“very hard”). Out on the road the
faster you go the more resistance is
applied. When you slow down, eg. for a
climb, the resistance will back itself off.
This mode is great for applying
additional resistance without sacricing
ride feel. This mode works well
when riding with a partner and the
performance difference is known. This
will let power requirements update over
undulating terrain (Manual Wattage
Mode will still apply up to 100w even on
7.2.5. Watts per km/h Mode.
Using this mode you’re able to add
0 to 2 watts of resistance (in 0.1 watt
increments) for every km/h of speed.
This mode is best used for general
riding as it simulates a constant, slight
incline on every road you ride on. The
incline steepens the closer you are to 2
watts per km/h.
For example, if you’re riding at 25km/h
and you’ve chosen 2 watts per km/h of
resistance, your total resistance applied
at that speed will be 50 watts. If you only
chose 1 watt per km/h for this speed
the AIRhub would apply 25 watts of
resistance.
steep hills).
(Session example, see page 24)
Page 22
Page 23

www.terraindynamics.com.au
TM
Page 23
Page 24

info@terraindynamics.com.au
7. USING THE AIRHUB CONTD.
TO START MAKING THE MOST OF YOU TRAINING, INCLUDE SOME OF
THESE TEMPO EFFORTS NEXT TIME YOU ARE OUT ON THE BIKE.
SESSION 1
Warm up for 10-15 minutes
3 x 8 minutes Tempo efforts at
75-85rpm
Riding at 75% to 85% of max
heart rate or 76-90% of FTP
4-minute recoveries
Ride at endurance pace for the
remainder of the session.
Cool-down 15min
SESSION 2
SESSION 3
Warm up for 10 - 15 minutes
15 minutes tempo 90 - 95rpm
5 minutes recovery
15 minutes tempo 75 - 85rpm
5 minutes recovery
15 minutes tempo 90 - 95rpm
Riding at 75% - 90% ftp or
75% - 85% Max Hr
Ride at endurance pace for the
remainder of the session.
Cool-down 15min
Warm up for 10 – 15 minutes
35 minutes tempo at 75-85rpm
Riding at 75% to 85% of max
heart rate or 76-90% of FTP
Ride at endurance pace for the
remainder of the session.
Cool-down 15min
Page 24
Include between 2 and 3 sets of
tempo training per week during
tempo block and base build
phases.
Continue with 1x per week
in threshold and peaking
phases to maintain high energy
turnover.
Page 25

www.terraindynamics.com.au
TM
Page 25
Page 26

info@terraindynamics.com.au
8. THERMAL MANAGEMENT
The AIRhub dissipates your energy through heat. The AIRhub has multiple
temperature sensors that monitor the internal conditions and modify the resistance
accordingly.
8.1. The maximum temperature of
the resistance mechanisms is limited
to 110 degrees C. When temperature
approaches this level it will begin to
reduce the applied power to keep
the temperature within operating
requirements.
8.2. During extreme weather the
thermal dissipation of the AIRhub can
be impaired. In temperatures exceeding
40 degrees C and in high humidity,
20 minutes of riding at 100W can be
enough to raise the core temperature
to over 100 degrees C. In this situation
the device will automatically adjust to
8.3. During high heat loads a small
amount of heat may be transferred to
the front forks. Carbon has great heat
dissipating properties and will assist in
cooling.
NB: Never use cheap quality forks. It is
not recommended that the AIRhub be
used with low quality bicycles.
maintain equilibrium.
Page 26
Page 27

www.terraindynamics.com.au
TM
9. TROUBLESHOOTING
Pairing Viiiiva Heart Rate Monitor
Troubleshooting:
If multiple Heart Rate Monitors
are being used in the same
area, ensure the correct Heart
Rate Strap is connected to your
App by cross checking the
Heart Rate serial number in App
Settings. Use the in the top
right hand corner of the App
home screen to access the
settings page.
If the wrong strap is paired, tap
the Heart Rate Monitor serial
number in Settings .
speed to reach 20km/h or
above.
Step 3: Go into App settings and
ensure no previous AIRhub
is paired. If so, select AIRhub
serial number and, when
prompted, choose ‘Forget this
device’. Restart App. Re-Pair
AIRhub as per step 6.2.
Step 4: Restart App.
Step 5: Turn Bluetooth off. Restart
phone and turn Bluetooth on.
If data does not begin
appearing in the app after
longer than one minute:
Select ‘Forget this device’ when
prompted. Pair new device
when it is recognised, ensuring
the serial matches that of your
Heart Rate Monitor.
Pairing the AIRhub Troubleshooting:
If no AIRhub is recognised by
app, try the following steps:
Step 1: Ensure smartphone Bluetooth is
turned on.
Step 2: Ensure you are riding at a speed
of 15km/h or above - Increase
Step 1: Add or subtract resistance
in the app home screen. This
will re-request resistance. The
radio symbol will turn green
indicating data is being
received. If it remains grey or
red try following steps.
Step 2: Ensure the serial of the AIRhub
in your front wheel matches the
serial in the application settings.
Step 3: Restart App.
Page 27
Page 28

info@terraindynamics.com.au
10. FAQS
WHEN TO USE THE AIRHUB?
If you aren’t racing, then it should be
snugly secured in your forks. The AIRhub
is great for a number of situations;
• Tempo sessions
• Hill simulation when you only have
at road.
• Travelling and training on unknown
roads.
• Maintaining watts on a bunch ride.
• Partner speed matching.
• Reducing speeds on bike paths
during high intensity efforts.
intense morning & evening sessions
through the neighbourhood keeps me
t and healthy. Without the AIRhub,
speeds would be unsafe or the intensity
too low.”
IT FEELS WEIRD. WHATS UP WITH
THAT?
A light tapping is felt when resistance is
applied.
I DON’T WANT MY PHONE TO DIE!
The new BLE protocol uses almost no
energy. Remember to activate your
lock screen. The app will still run in
the background, however after a really
• Quality pre race training and
activation session.
• Base load increase during pre season
training.
• Form maintenance through base
loading.
I DON’T RACE WHAT ABOUT ME?
“I nd inner city commuting too short
for training, the AIRhub works me so
I’m sweaty when I get to work. Short,
Page 28
long coffee stop you will have to open
the App again. For worst case, turn on
airplane mode then turn on Bluetooth
and enjoy saving battery on disruption
free ride.
DOES THE RESISTANCE CHANGE
YOUR PEDAL STROKE?
By using electromagnetic braking, the
AIRhub provides uid resistance, which
is very different to riding with your
brakes on. The AIRhub will help improve
Page 29

www.terraindynamics.com.au
TM
your pedal stroke. A slightly higher
resistance makes riding with a lazy pedal
stroke difcult. The AIRhub will naturally
train you to deliver power through the
dead spot at the top and bottom of the
pedal stroke. A smoother more even
pedal stroke is the beginning of a more
efcient ride.
I WANT A BLUE ONE.
Red goes faster.
I KNOW IT WAS BUILT FOR ROAD
RACERS, DOES IT WORK FOR
TRIATHLETES TOO?
The AIRhub will work even better for
Triathletes. More training in less time. It
allows high quality training in the Aero
Smartphone App, automatic Bluetooth
connect, no batteries, complete wireless
connectivity, a super stable connection
and a quick release skewer. All you need
is a tyre and tube and you are ready
to ride 5 minutes after unpacking. Just
remember - press pause on the App
before closing, to turn off the resistance.
See our 10-Step Quick Start Guide for
more information.
DOES IT FIT NORMAL ROAD BIKE
FORKS?
Yep. All 700c forks work. We are yet to
nd a company that has managed to
stump us. We highly recommend quality
forks, as with most bicycle equipment.
position to become safe and easily
achievable. No need to travel for miles
to nd safe roads. Long high intensity
sessions can be done on a bike path, at
lower speeds.
IS IT HARD TO SET UP?
One of our design parameters was to
make your life as easy as possible. As
a standard, each AIRhub includes our
CAN MY COACH PLAN SPECIFIC
SESSIONS USING THE AIRHUB?
The AIRhub is awesome, so any training
that incorporates it will benet. We
recommend using the AIRhub under
the guidance of a coach for MAXIMUM
results. We plan to build stronger coach
centric features in later versions of the
mobile application.
Page 29
Page 30

info@terraindynamics.com.au
10. FAQS CONTD.
IS THE AIRHUB LOCKED TO MY
PHONE?
No. Anyone who can search for a free
AIRhub can make a secure connection to
it. If you go riding with your mum/coach,
you can have her phone connect to your
AIRhub and control it on the ride.
CAN SOMEONE ELSE TAKE
CONTROL OF MY AIRHUB WHILE
I’M USING IT?
No. Unlike ANT+, Bluetooth is a secure
handshake connection. Once an AIRhub
is paired to a phone it will become
invisible and no one can connect to it.
If for some reason someone is able to
you must rst forget the current one in
the settings page. The App will then
search and display all available AIRhubs.
The same goes for Bluetooth heart rate
monitors.
I WANT TO BUILD MY OWN
TRAINING APP AND USE THE
AIRHUB TO DOMINATE THE WORLD.
Sure, we love world domination plans.
Please email us for the SDK.
CAN I BUILD IT INTO MY OWN RIM?
Yes. Most quality wheel builders will be
able to do this for you. Please contact us
for more information.
connect to your AIRhub before you do,
you won’t be able to nd it when you
start the App. If this happens you need
to nd the paired phone and disconnect
it before you will be able to pair.
WILL MY AIRHUB AUTOMATICALLY
CONNECT TO MY PHONE?
The App will remember the last AIRhub
it connected to and always try to nd
it. If you want to nd another AIRhub
Page 30
Page 31

www.terraindynamics.com.au
TM
11. SAFE USE
11.1. The AIRhub has been Road and Rig tested up to speeds of 700RPM (88km/h).
We do not recommend using the wheel in scenarios where this speed can be
exceeded.
REMEMBER: If you have previously paired
with a different AIRhub you must rst ‘Forget’
the old device in the application settings
before attempting to connect a new AIRhub.
Page 31
Page 32

TM
110517
www.terraindynamics.com.auinfo@terraindynamics.com.au
 Loading...