


USER MANUAL E-BIKE (PEDELEC)
Original Instructions
MANUAL DEL USUARIO E-BIKE (PEDELEC)
Traducción de Instrucciones Originales
MANUEL D’UTILISATEUR VAE (PEDELEC)
Traduction des Instructions Orginales
MANUALE D’USO – BICICLETTE A PEDALATA
ASSISTITA (PEDELEC) Traduzione delle Istruzioni Originali
전기 자전거 사용자 설명서 (PAS 시스템)
원문 설명서의 번역
EN
ES
FR
IT
KO
2
3
EN
ES
FR
IT
KO
EN
ES
FR
IT
KO
Contents
Dear Customer,
Thank you for choosing Tern, a leader in urban mobility and transportation!
We design bikes that bring together all the things people need to drive less and ride more.
We are dedicated to the goal of sustainable transportation, and design and manufacture bicycles for urban transport with a focus on
portability and utility. Tern donates at least 1% of net profits every year to social and environmental causes.
General Safety Notes
Turn the page
Your bicycle has specially designed components so please read this manual carefully before riding. Before hitting the road, spend some
time to understand how to operate your new bicycle in a safe environment such as a parking lot.
Respect others on the road
Please obey traffic laws and respect motor vehicles. You and your bike will always lose in a vehicle collision and you can also injure
pedestrians. Stay alert and show consideration to other road users.
Head protection
A good, authorized bike helmet may prevent injury in an accident. Wear one, it’s a no-brainer.
Servicing precautions
Do not proceed with servicing or adjustments without proper knowledge or tools.
Hit the books
This manual is only to be used in conjunction with other manuals included with your pedelec such as motor, control system, component,
and folding manuals.
Where to Go for Additional Help
If you are unsure about anything, please talk to your local Tern dealer. Tern dealers are specialists in Tern products and servicing.
1. Introduction
1. Introduction .................................................3
2. General Information ................................... 4
3. Legal Details ..............................................5
4. Local Regulations ....................................... 5
5. Intended Use ............................................... 7
6. Unfolding and Folding your Tern .............7
7. Before the First Ride .................................. 8
8. Before Every Ride ....................................... 13
9. Safe Riding .................................................. 16
10. Passenger and Cargo Transport .............. 18
11. Transporting your Tern ..............................22
12. ABCs of Pedelec ......................................... 23
13. Tips for Riding a Pedelec ..........................26
14. Service ......................................................... 29
15. Torque Settings ..........................................33
16. Service and Maintenance Schedule ........ 35
17. Warranty ...................................................... 38
18. Declaration of Conformity ........................ 41
4
5
EN
ES
FR
IT
KO
EN
ES
FR
IT
KO
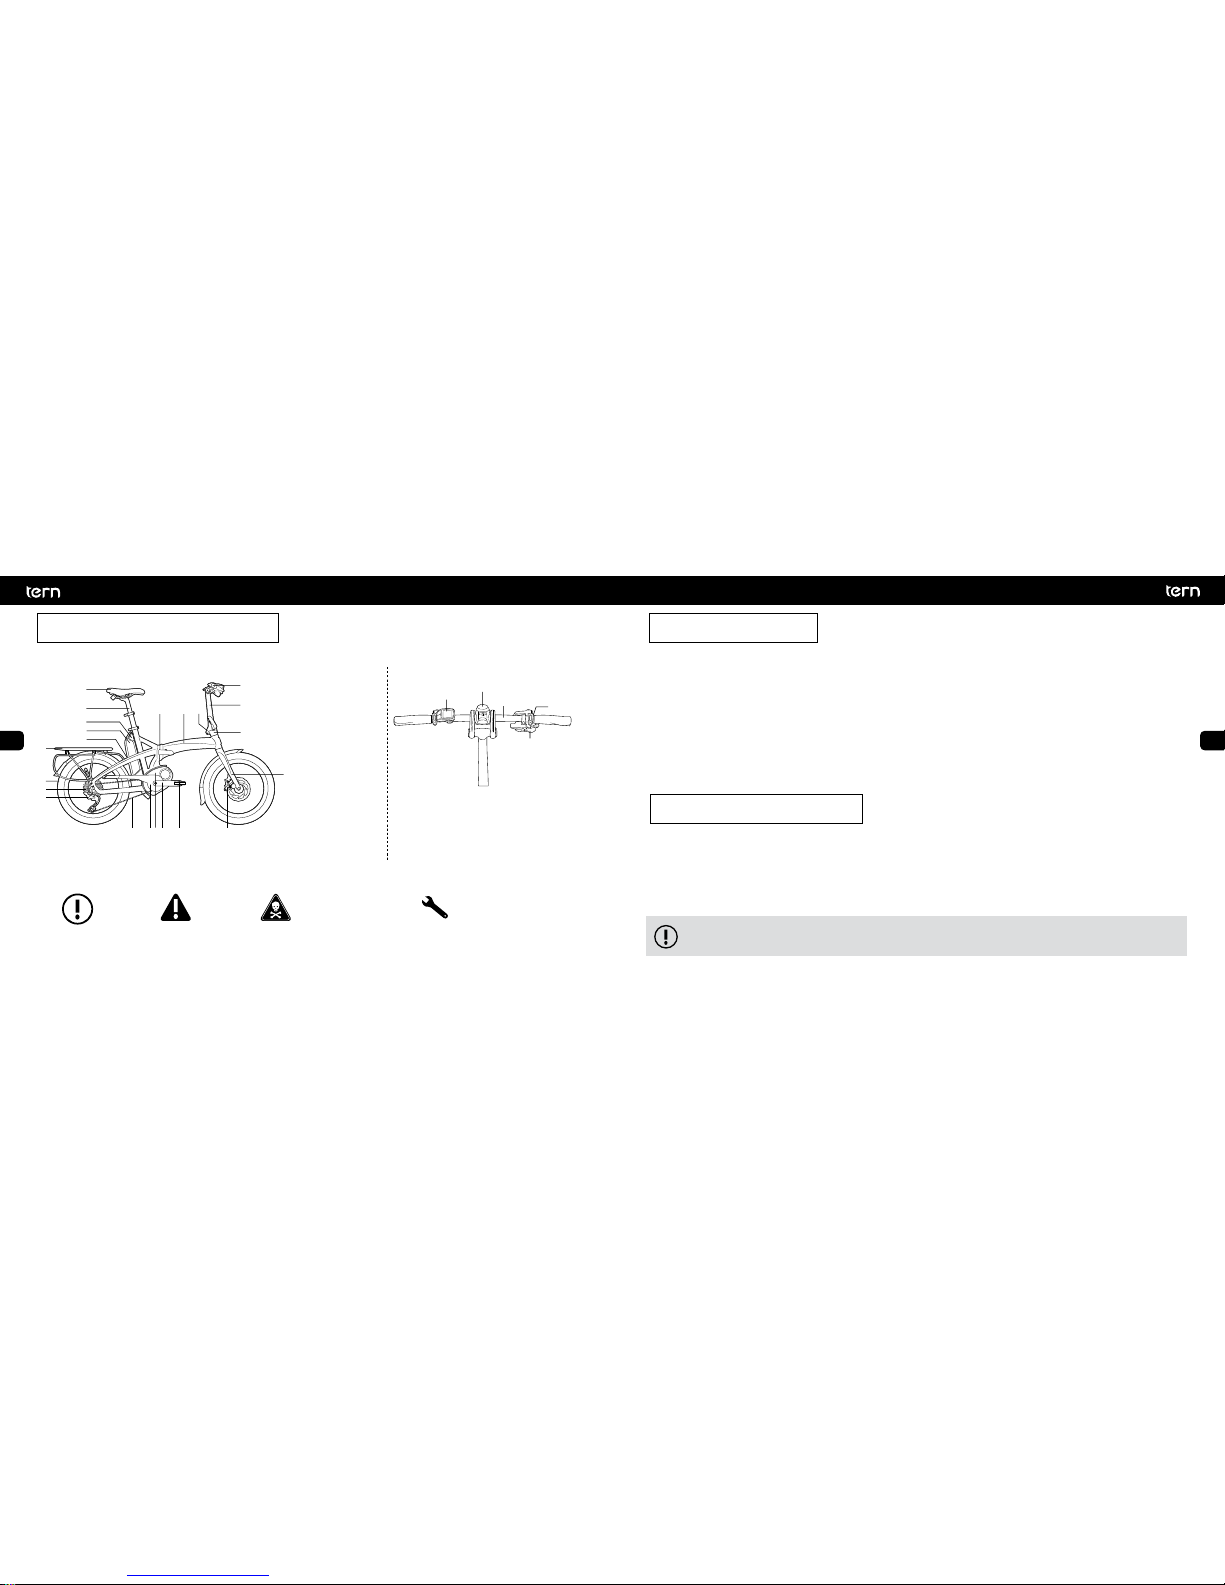
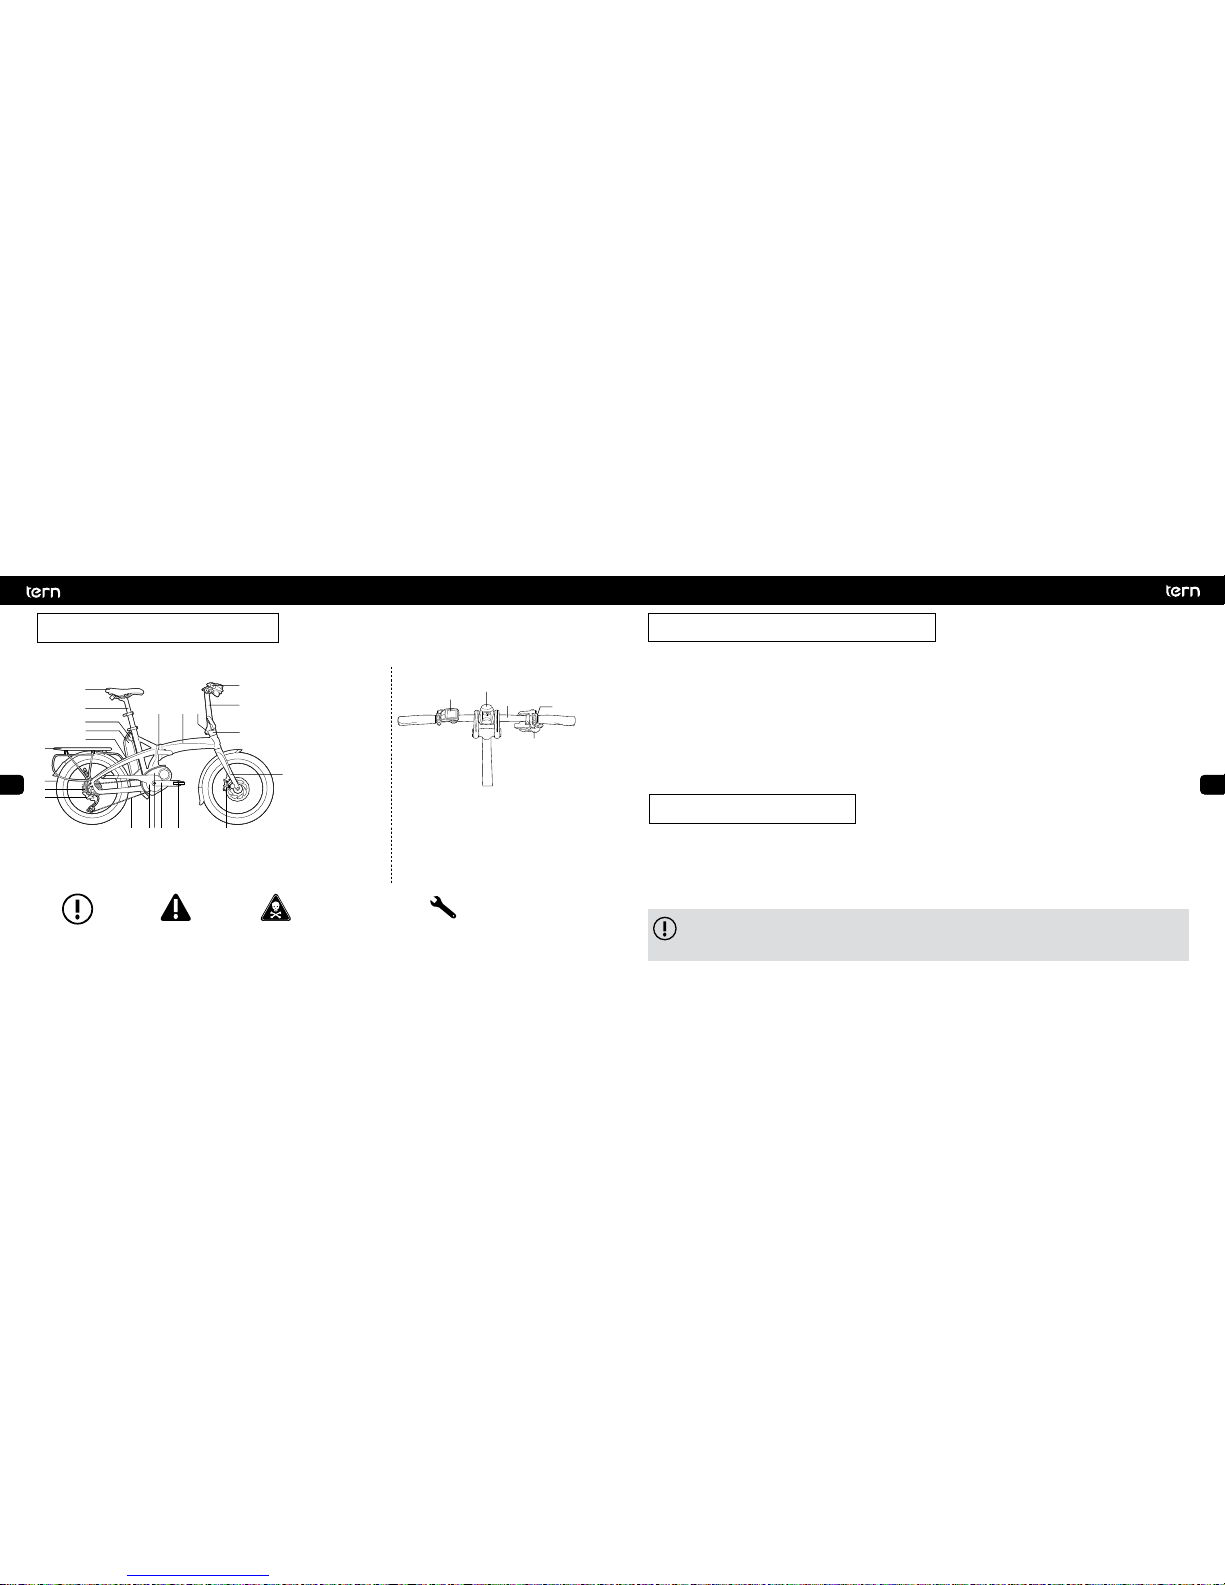
Bike Parts
Meaning of Icons
1. Wheel
2. Cassette
3. Rear Derailleur
4. Chain/Belt
5. Chainring
6. Motor
7. Crankset
8. Pedal
9. Brakes
10. Fork
11. Carrier/Rack
12. CE Frame Sticker
13. Battery
14. Battery Lock
15. Seat Post
16. Saddle
17. Frame Joint
18. Frame
19. Handlepost Joint
20. Handlebar
21. Handlepost
22. Headset
3
1
2
5
4
Handlebar
1. Controller/Display
2. Light
3. Handlebar
4. Brake Lever
5. Shifter
Indicates how to use the
product or items that
require special attention.
Incorrect action could
result in damage to the
equipment.
Life-threatening danger if
instructions are not
followed or preventive
measures are not taken.
You must have the proper tool, such as a torque wrench
for items that require a specific torque. A torque that is too
high or too low can cause parts to fall off or break and can
lead to serious accidents and injuries.
Manufacturer
Mobility Holdings Limited (Hong Kong), Taiwan Branch
8F-8, Lane 609, Chongxin Road, Section 5, Sanchong District, New Taipei City, Taiwan
Contact: service@ternbicycles.com / Website: www.ternbicycles.com
Marking on Bike
If your Tern is a pedelec, it will have a CE frame sticker which confirms that it has passed all tests outlined in EN 15194.
Declaration of Conformity
This user manual complies with the requirements of EN 15194 and Machinery Directive EC/2006/42.
See the separate Declaration of Conformity insert.
Edition 1 Rev 1, October 2017
Pedelec stands for pedal electrical cycles. They are also known as EPACs which stands for Electrically Power Assisted Cycles. Pedelecs are
bicycles with a motor that provides assistance when a rider starts to pedal. When a rider stops pedaling, the assistance stops. Some bikes
will also have a push assistance mode with a max speed of 6 km/hr.
In general, electric bikes are viewed by law as more similar to a conventional bicycle than a motorized scooter or motorcycle. In most
cases, an electric bike can be ridden in bike lanes, on bike paths, and can be locked to bike racks like a regular bicycle. Riders are not
required to have a driver’s license to operate an electric bike and are not required to obtain any special licensing or registration for their
pedelecs.
It’s important to note that the specific laws, rules, and guidelines governing electric bike use may vary from country to country.
If you are not using your bicycle in Germany, it’s important to familiarize yourself with the laws in your specific location before
you begin riding your pedelec. Take time to learn local bike laws before hitting the road.
To use public roads with your pedelec in Germany, your bike must be equipped in accordance with Road Licensing Regulations (StVZO)
and the Road Traffic Act (StVO). Please note there may be different regulations that apply in your country.
2. General Information
3. Legal Details
4. Local Regulations
1
3
4
7
8
15
16
18
17
21
19
20
22
10
13
6
11
5
2
14
9
12
6
7
EN
ES
FR
IT
KO
EN
ES
FR
IT
KO
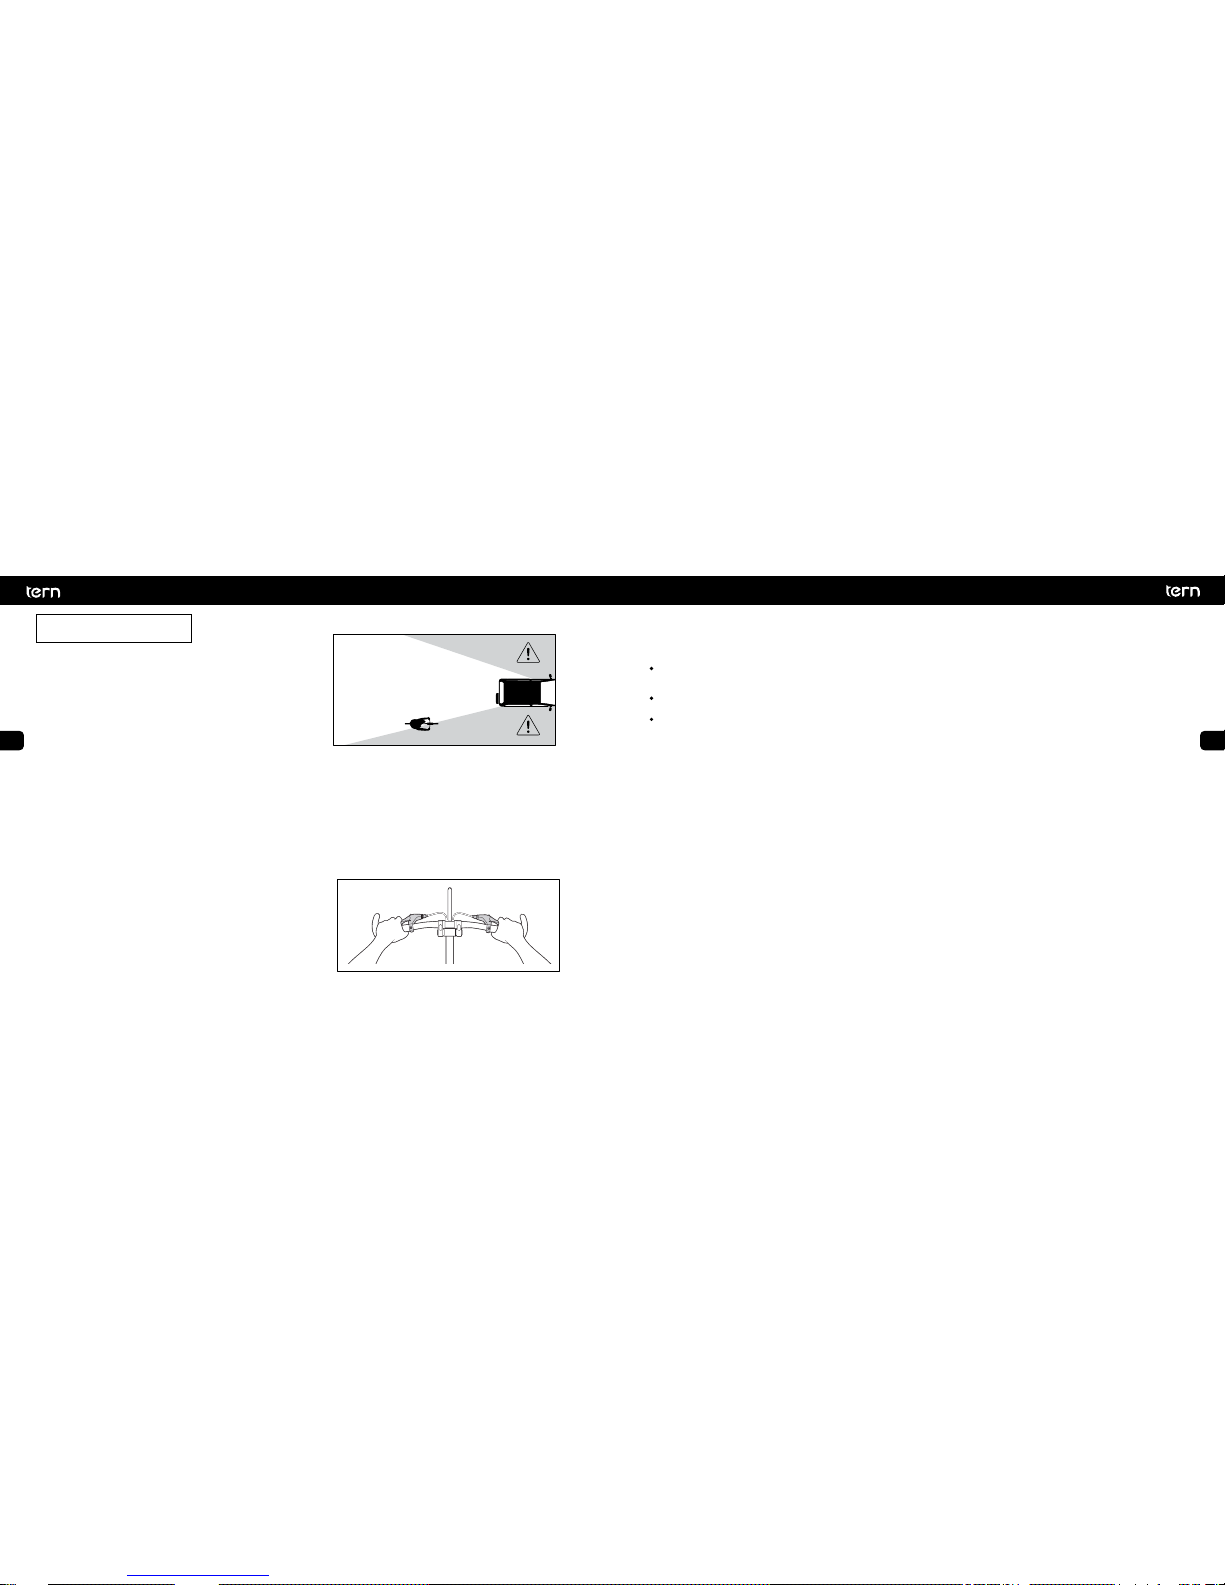
StVZO
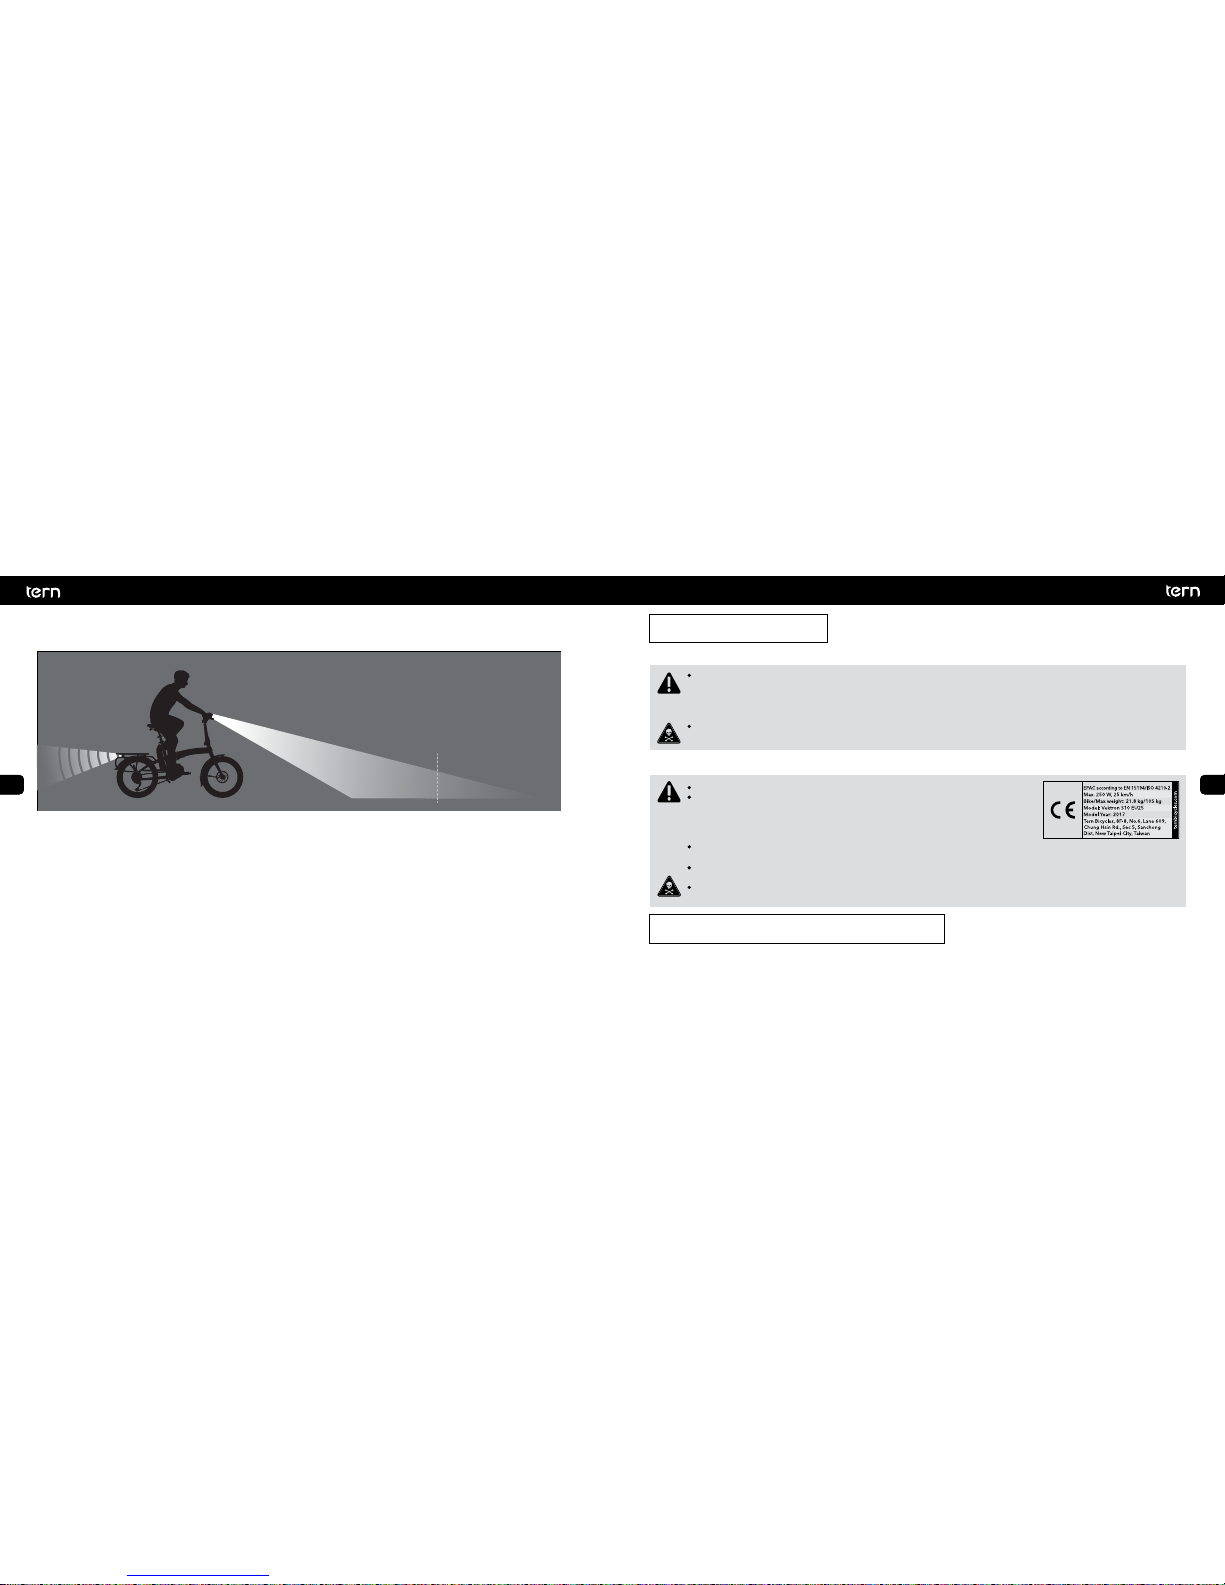
The lighting system needs to have the K-number mark to be legal on public roads. The front and rear lights must be powered by the
same power source.
The front light projection center must be no more than 10 meters from the front of the bike on the road. The rear light must be mounted
at least 25 cm above the road surface.
Reflectors are required, in addition, to lights. In the front, a white reflector is required. In the rear, at least two red reflectors are required.
Two yellow reflectors must be attached to each pedal.
Each wheel must meet at least one of the below requirements:
Two yellow reflectors
White reflective rings on both sidewalls of the tires
The braking system must have independent functioning front and rear brakes.
You must maintain the bike in good condition.
Built for Urban Warriors, not Stuntmen
Watch the Weight
Tern bicycles are only designed for one person riding with both wheels in contact with the ground on paved roads only. They
are not intended for racing, jumps, hops, wheelies or anything of the kind. The manufacturer and dealer are not liable for any
direct or consequential damages. The warranty will be void if your pedelec is not used in accordance with the intended usage.
Using the bike for off-road riding, jumps or stunts may cause damage to the frame and risk injury or death to the rider.
Maximum carrying capacity = Rider weight + Cargo weight
If you have a folding Tern Pedelec, the standard carrying capacity is 105 kg (230 lbs).
If the capacity stated here differs from your pedelec’s CE Frame Sticker’s, follow the
CE Frame Sticker. If you have a non-folding Tern Utility Pedelec, refer to the CE frame
sticker for maximum allowable weight and read the Utility Pedelec Supplemental
Manual for balancing the load.
If carrying cargo or extra weight, make sure the bike is stable and is within the
maximum load capacity.
Practice handling the bike in a safe area before riding on public roads.
If not properly handled, sudden shifts in load while riding can affect your balance and lead to serious injury or death.
Please see the separate enclosed folding instructions.
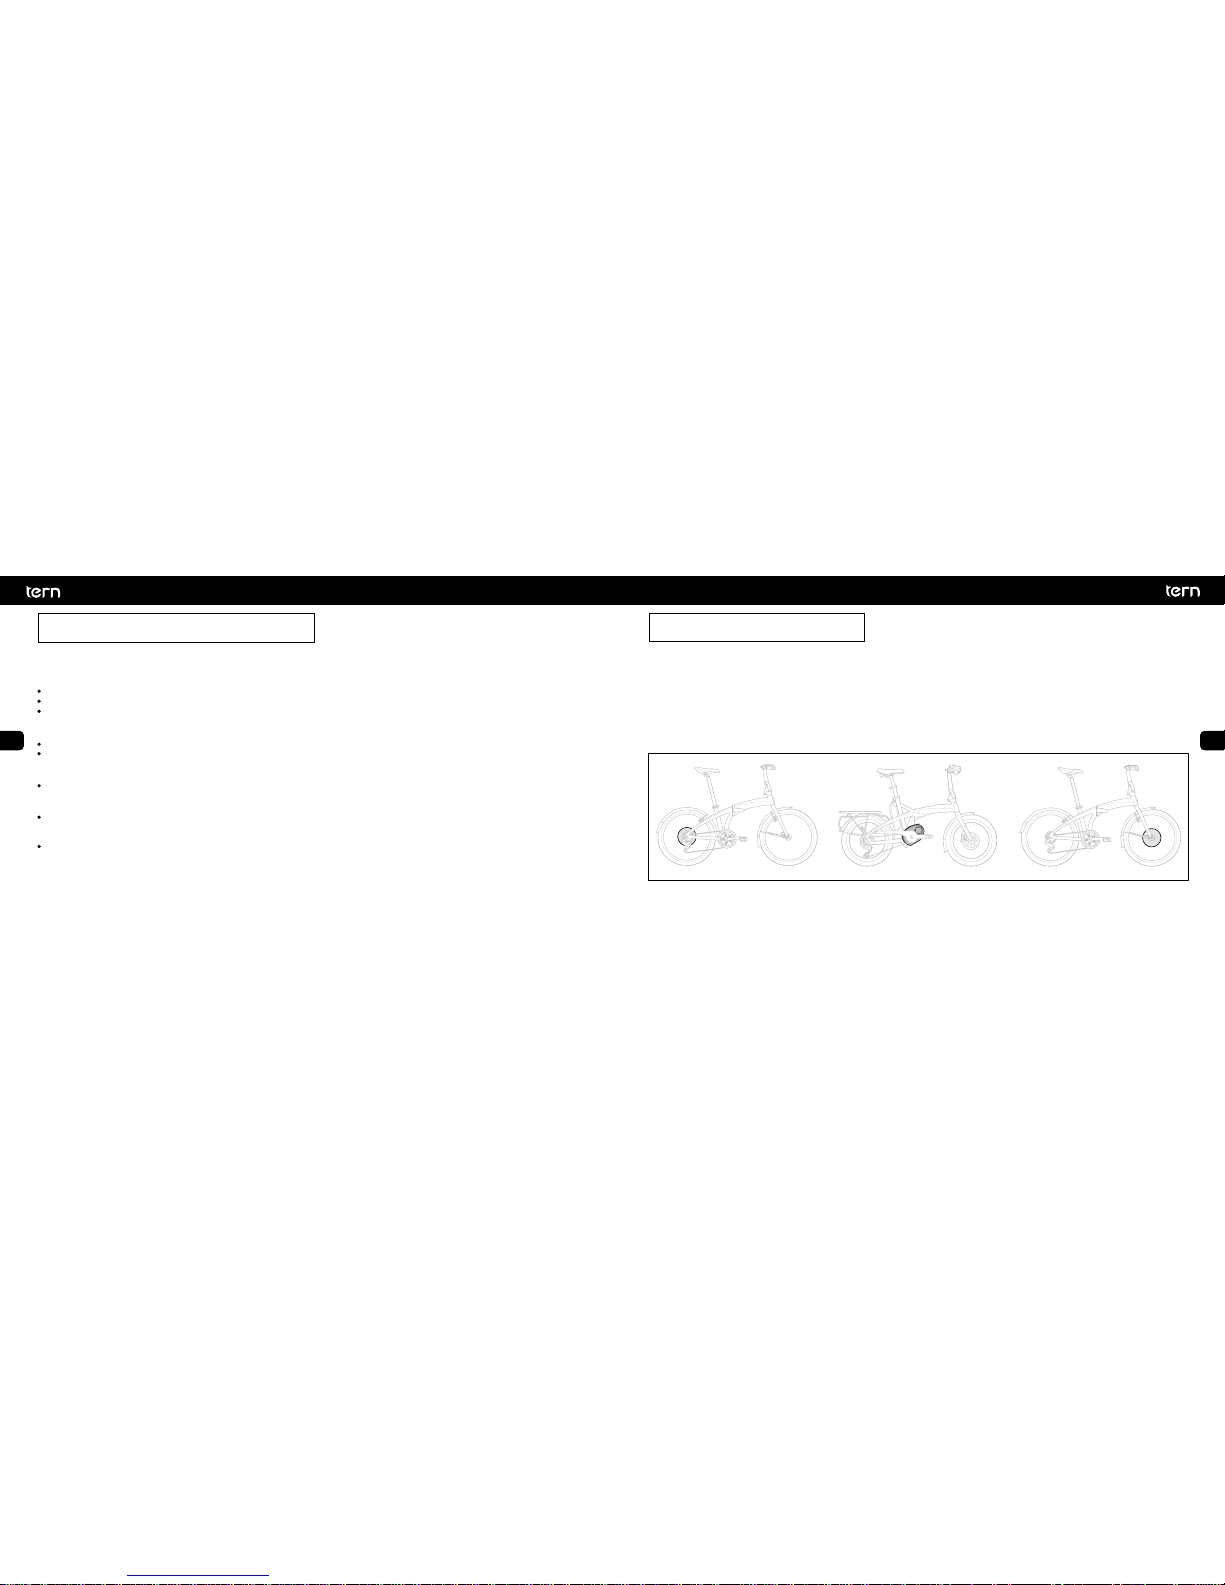
5. Intended Use
6. Unfolding and Folding your Tern
CE Frame Sticker example
10 m
8
9
EN
ES
FR
IT
KO
EN
ES
FR
IT
KO
Hit the Books before You Ride
Spend some time to understand how to operate and use your new bike before hitting the road. Operating manuals for individual
components and folding instructions for your specific bike are supplied together with this manual. Please read all the manuals.
If anything is unclear, ask your dealer.
Please Check
Electrical system
Make sure you are familiar with the function of all the controller buttons and meaning of the displays.
Please consult the information in the relevant section from the manual of the motorized system manufacturer.
Wheels
Check the Tire pressure and make sure it is within the minimum and maximum values indicated on the sidewalls of the Tires.
Spin both Wheels to make sure they rotate smoothly, are true (not wobbling) and do not rub against the Brakes. If the Wheel wobbles
side to side or rubs against the Brake Pads, take the bike to a qualified bike shop to have the Wheel trued or replaced.
Wheels that do not run true may indicate problems with the Spokes or Tires.
Headset
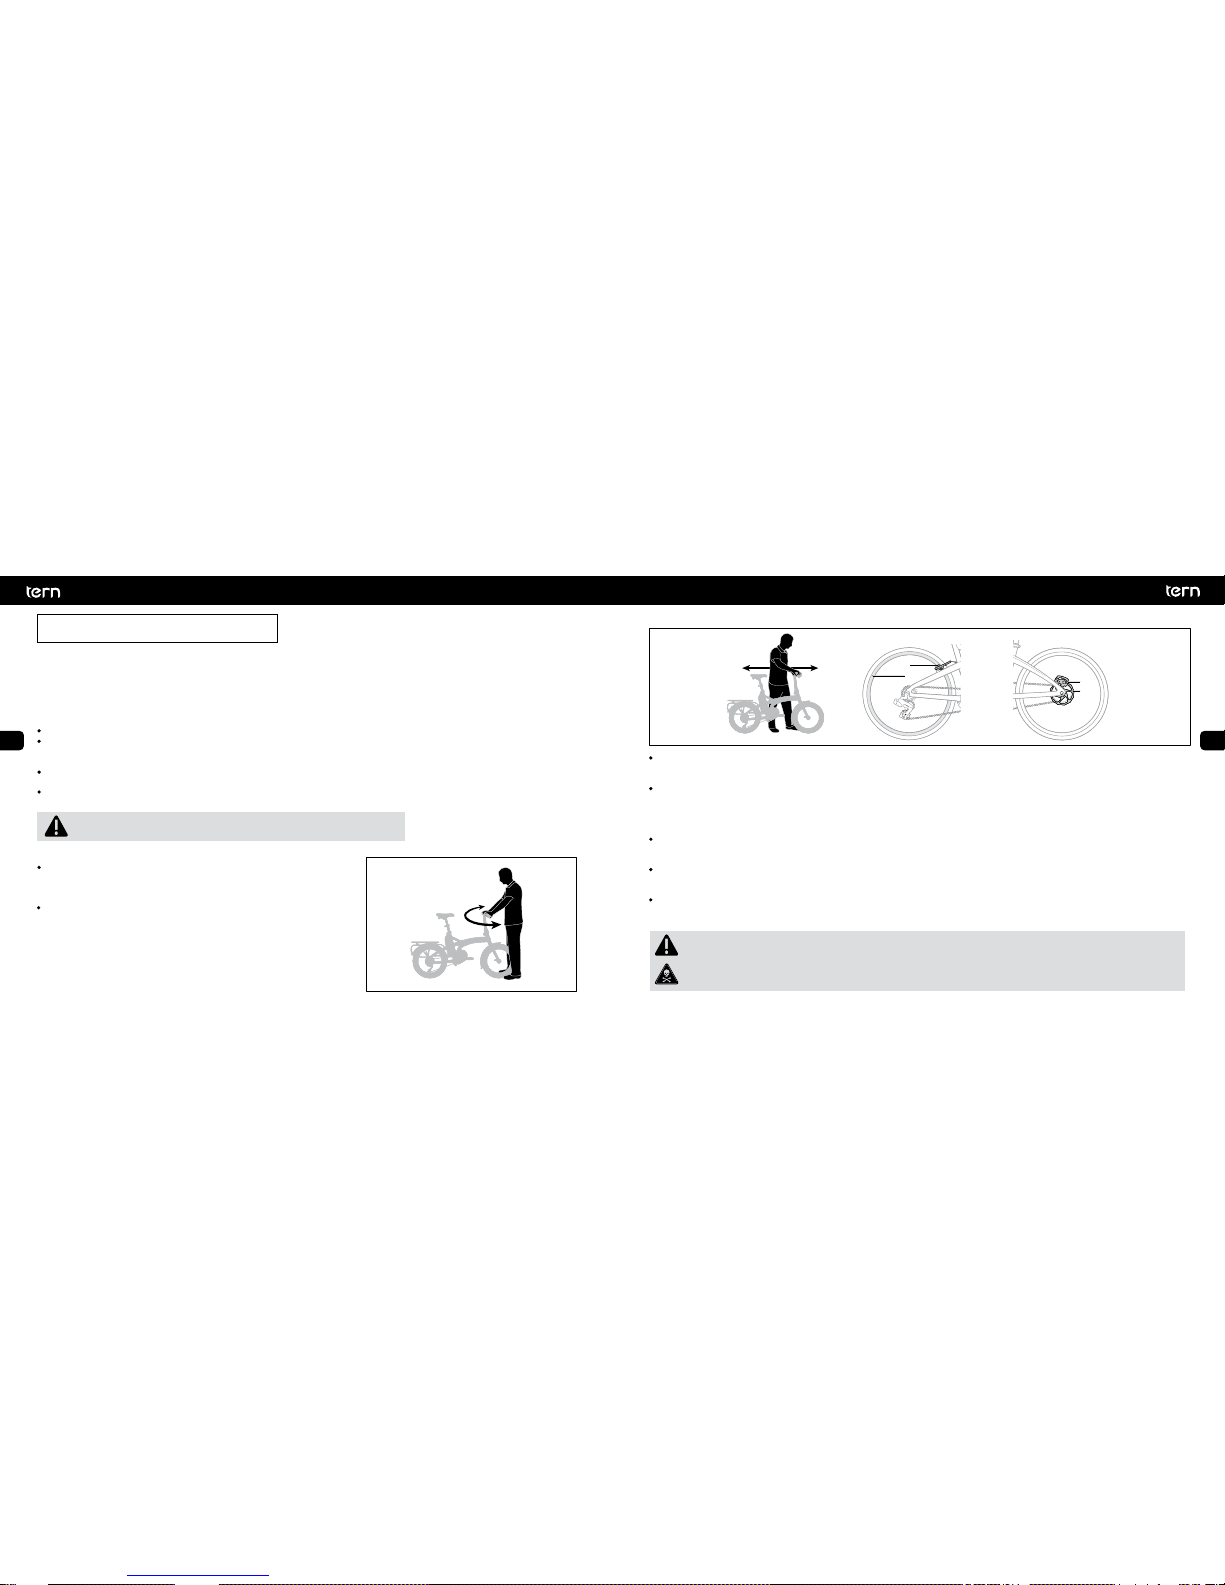
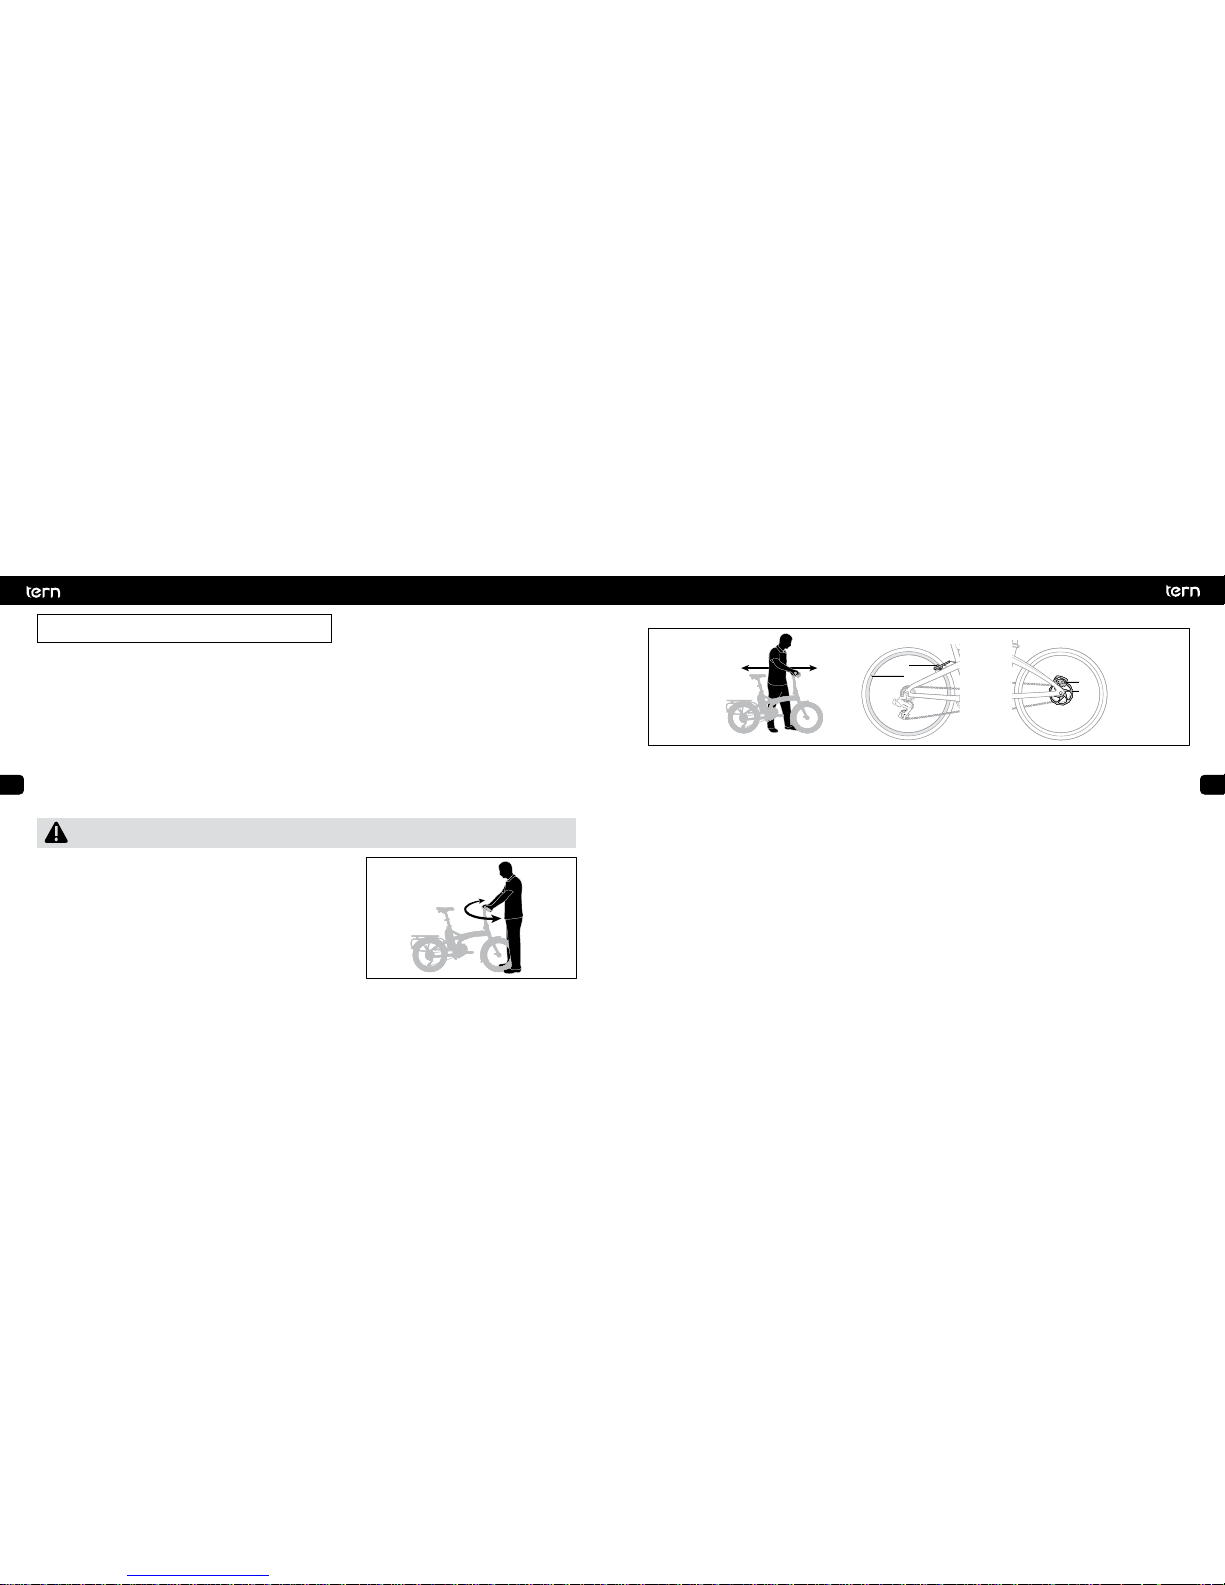
Stand with the Front Wheel pressed firmly between your legs and try to twist
the Handlebar. If movement occurs, realign your Handlebar and tighten the
Headset and handpost base or service it at your dealer.
Lift the Front Wheel off the ground and swing it from side to side. Does it feel
smooth? If you feel any binding or roughness in the steering, you may have an
overly tight Headset. Have your dealer check it.
Brakes
CBA
3
4
2
1
Test your Brakes by standing next to your bike, pull both Brakes, and rock the Bike back and forth. (A) The Bike should not roll and the
Brake Pads should remain firmly in place.
Does your Tern feel solid? If you feel a clunk with each forward or backward movement of the bike, you probably have a loose
Headset. Have your dealer check it. Note that for certain Disc Brakes you may feel a bit of play when attempting to rock the bike back
and forth. These are caused by the built-in clearances between the Brake Pads and the Brake Caliper to allow for thermal expansion and
is considered normal. In these cases, it’s not a loose Headset.
Rim-Actuated Brakes (B) have Brake Pads (1) that align with the Rim (2). The Brake Pads press against the Rim to slow the Wheel so
make sure the Brake Pads align with the Rim. Check Rim and Pads for wear.
Disc Brakes (C) have a Disc Rotor (3) and a Disc Caliper (4). Pads inside the Disc Caliper squeeze the Disc Rotor to slow the Wheel but
can get very hot under use. Do not touch them immediately after riding.
Which Lever operates the Front Brake and which Lever operates the Rear Brake varies depending on the country. For countries such as
United Kingdom and Japan, the left lever operates the rear brake and the right lever operates the front brake. For USA, Germany and
most other countries the right lever operates the rear brake and the left lever operates the front brake.
Be careful not to damage the Disc Rotor or Disc Caliper when changing wheels or by pulling the Brake Levers when the Disc
Rotor is not aligned.
Make sure to test the braking power before heading into traffic. It can be much more powerful than what you are used to.
Squeezing the Lever too fast can lead to unintended sudden stopping and cause you to crash or get rear ended.
7. Before the First Ride
Do the twist

10
11
EN
ES
FR
IT
KO
EN
ES
FR
IT
KO
Gears
Test ride in a safe area away from traffic to familiarize yourself with the function of the Gear Shifters and how to upshift and downshift.
Check that indexing (shifting from gear to gear) is crisp and that you are able to shift into the lowest and highest gears without the
Chain skipping.
If your Tern uses an Internal Gear Hub (IGH), avoid shifting and pedaling hard at the same time. Unlike derailleurs, most conventional
IGH’s are designed in such a way that it shifts optimally when coasting or not pedaling / coasting / stationary. This mean Internal Gear
Hubs can shift when you are stopped, a very nice feature in stop-and-go urban traffic.
Check for tight links in the Chain and that the Chain turns freely through the Gears.
With a pedelec, drive assistance begins immediately when you step on the pedal. Squeeze the brakes before mounting your
bike to avoid any unintentional movement.
For any noise
Lift the bike up about 10 cm and drop it to the ground. If you hear any unusual noise or notice issues with Frame stability (especially Frame
and Handlepost Joints), book it for a service appointment at your dealer.
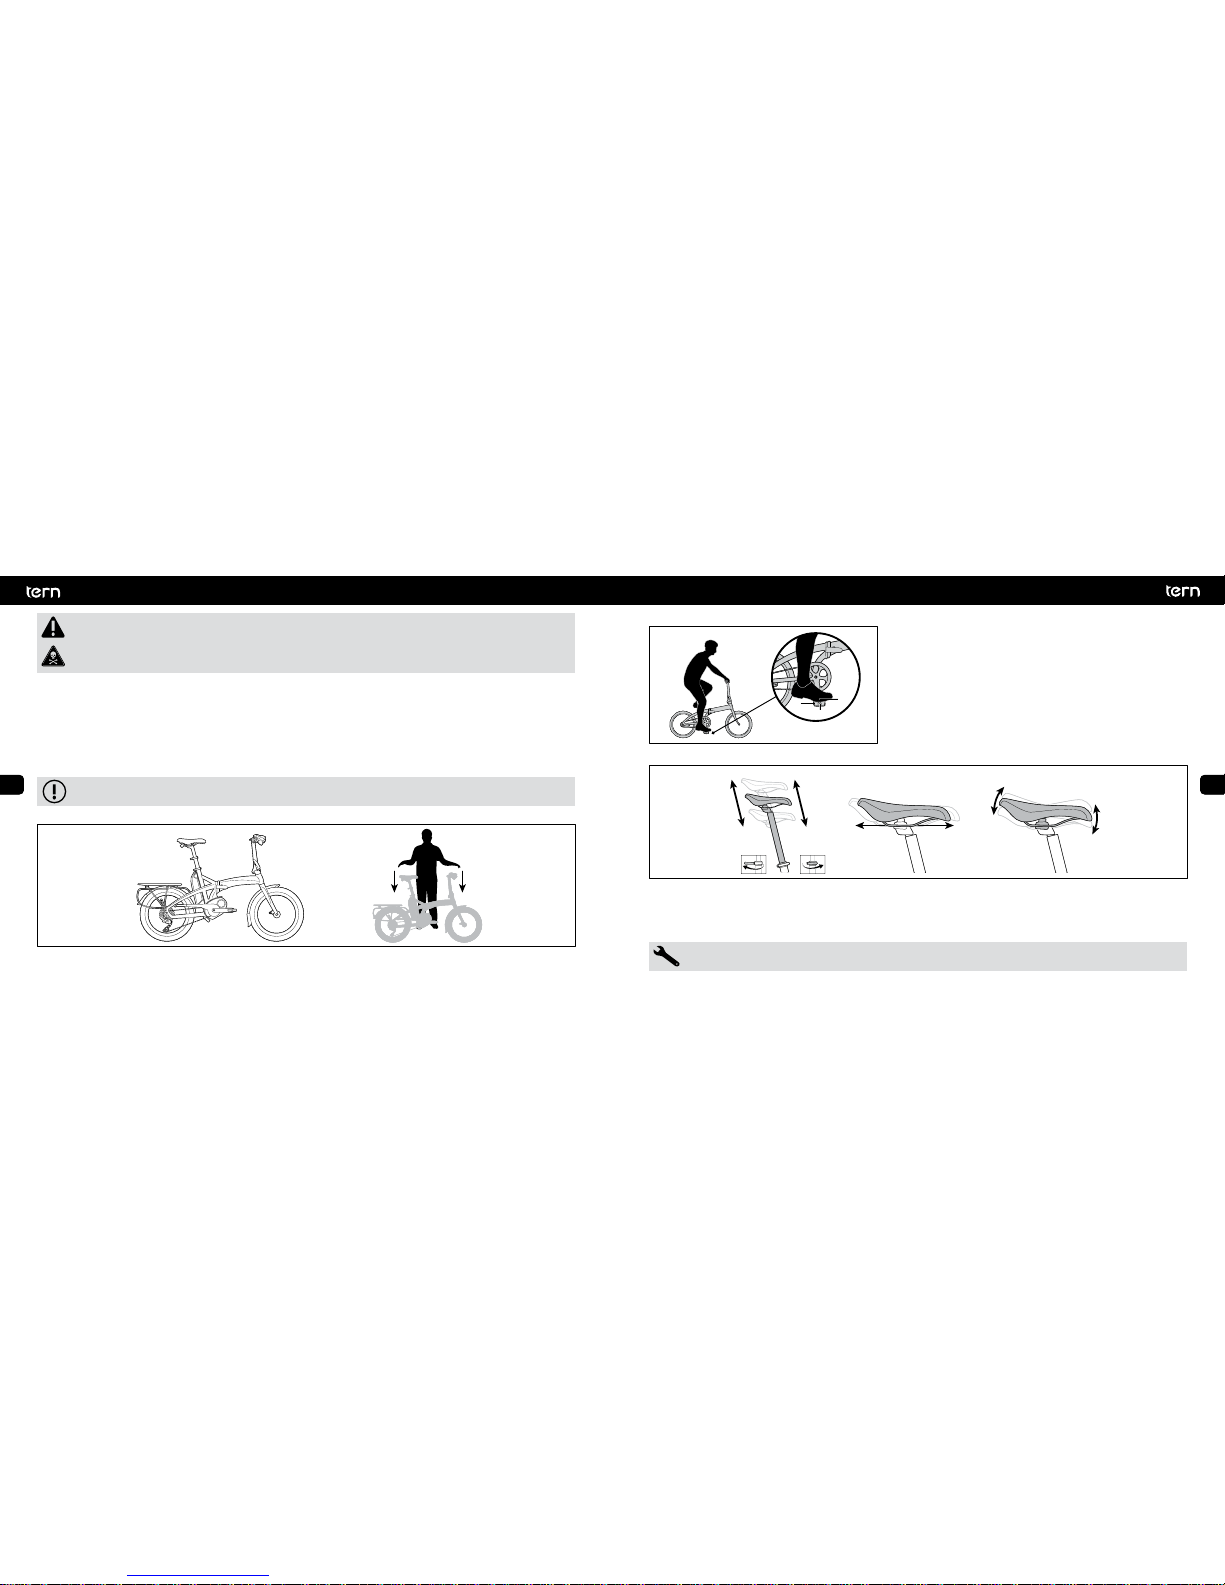
How the bike fits
The best riding position is the one that you are most comfortable in, but a
badly adjusted bicycle may lead to back or joint pain and reduce your
control. Check that your Saddle and Handlebar are at the correct height
and that you can reach Brake and Gear Levers comfortably.
For most people, the ball of the foot (1) should be placed on the Pedal (2)
directly above the Pedal Spindle (3).
Saddle
The saddle height is an important component of the overall riding position. While seated, you should have a slight bend in your knee
when the Pedal is pushed down all the way. The leg should not be fully extended so make sure the Saddle is not too high. If the seat is
too low, repetitive strain on the knee may lead to pain.
The Saddle can be moved up and down, forward and back and angled up and down. Play around with it to get the best fit. A badly
fitted Saddle can injure nerves, joints, and blood vessels.
1
2
3
Refer to section 15 for appropriate saddle rail torque values
12
13
EN
ES
FR
IT
KO
EN
ES
FR
IT
KO
When riding, your hips should remain stationary and your knee should only bend about 20-25° when the pedal is all the way down.
The Saddle should be roughly parallel to the ground, but if it’s not comfortable, tip the Nose down to relieve pressure on the crotch or
up to distribute your weight over a greater area of the Saddle. The seat should be tilted no more than 5° up or down.
Moving the Saddle backward works your glutes harder and forward works your quads harder. Generally, the front of the knee should
not pass the Pedal Spindle. Once comfortable, check your saddle height again and adjust as necessary.
Do not raise the Seatpost above the minimum insertion line etched on the post. Doing so may result in post/frame failure
and serious injury. If proper saddle height cannot be achieved without raising the post above this line, you need a longer
Seatpost. Similarly, do not lower the Seatpost below the maximum insert mark when riding. The lower exposed portion
may hit objects on the pavement and cause a riding hazard.
Stem
Models fitted with Andros Stems are adjustable in angle and height without tools. Please refer to the included manual for information on
how to adjust the Stem positions.
Handlebar orientation
Rotate your Handlebar so that your palms are supported and that your fingers can easily reach the Brake and Gear Levers. For Handlebar
adjustment procedures, refer to the Stem manual included with your Tern.
Be sure to check the following before every ride:
Electrical System
Check that the battery is seated properly in the carrier on the frame and fully plugged in.
Check the controller display for any warnings or error messages. Resolve the error before riding.
Check that the battery is adequately charged for the length of ride you are planning to do.
Make sure the front and rear lights are illuminated when they are actuated and remain on when the bike is at a standstill.
Mechanical
As with all mechanical components, the bicycle is subjected to wear and high stresses. Different materials and components
might react to wear or stress fatigue in different ways. If the design life of a component has been exceeded, it may suddenly
fail, possibly causing injuries to the rider. Any form of crack, scratches, or change of coloring in highly stressed areas indicate
that the life of the component has been reached and it should be replaced.
8. Before Every Ride

14
15
EN
ES
FR
IT
KO
EN
ES
FR
IT
KO
Check the Welds
In addition to this test, please check the weld area around the Frame Joint.
Your Pedelec will experience stress and wear during riding. Check
Frame welds for deformation and changes in color which may indicate
cracking. This is especially important if the bike has fallen over or has
been involved in a crash. Note that aluminum parts, once bent, cannot
be safely bent back into place and will require replacement.
Rim
The Rim should be clean and undamaged. Look out for discolorations, scratches or wear. If you have Rim Brakes, the contact surface should
be checked for pits or grooves. Some Rims have a wear indicator on the brake contact surface; once the Rim wears down to the wear
indicator it should be replaced.
A worn or damaged Rim may fail without warning and cause the rider to crash.
Wheels
Check that the Wheels are fixed inside the Fork by pushing from each side. They shouldn’t slide along the Hub Axle.
Use your hands to squeeze the neighboring pair of Spokes. If Spoke tension difference is pronounced, have your Wheel trued.
Make sure your Wheels are securely seated by lifting each end of the bike and knocking the Wheel toward the opening of the Dropout;
the Hub Axle should stay in position.
Saddle
Try to turn the Saddle by hand to make sure the Seatpost and Saddle are securely clamped; there should be no movement in either the
Seatpost or Saddle.
A
AIR
Check the air pressure on
your Tires. Use your thumb
to press the Tires. They
should feel nice and firm but
avoid over-inflating.
B
BRAKES AND BARS
Check the Brakes by squeezing
the Levers and making sure the
bike stops. Check that the Brake
Cables are undamaged and
untangled.
Check that Bars (Handlebar,
Handlepost, Handlebar
Extensions) are tightly in place
and undamaged by turning the
Handlebar left and right with the
Front Wheel in
between your legs.
C
CHAIN AND CABLES
Check that Chain turns freely
through Gears by rotating the
Crank backwards, and make
sure Cables are undamaged.
QUICK
QUICK RELEASES
Check that Quick Releases
(Wheels, Seat Tube,
Handlepost) and Joints
(Frame, Handlepost) are
closed securely.
DROP
DROP THE BIKE
Lift the bicycle a few
inches and drop it to the
ground. If anything shakes
or rattles, make
adjustments before
riding.
ABC Quick Drop Test
We design our bikes so that they can be everyday companions. For safety, however, we recommend this test before each ride:
16
17
EN
ES
FR
IT
KO
EN
ES
FR
IT
KO
Keep Your Eyes on the Road
Check for potholes and other dangers, like car doors opening and kids
playing. Also, think about your own visibility and avoid entering vehicle
blind spots.
Wake Up!
You need to stay alert when riding. Don’t wear earphones or headphones that affect your hearing or sunglasses if they hinder your vision.
Don’t ride if you have consumed alcohol or are on medication that affects your motor skills.
Stand out from the Crowd
Riding in low light or poor visibility, such as at night, dawn, dusk, in rain or in fog is much more dangerous than in daytime lighting
conditions. Wear bright colors and reflective gear.
Stay Clean – Shine Bright
Reflectors should be clean, unbroken and mounted correctly. Don’t cover reflectors with loose clothing or bags. Also, they only reflect light
in some directions, so you need lights to make sure you are seen with all around visibility. Make sure your lights are working properly.
Using Brakes
Go with the flow
Braking distances increase in wet weather or under heavy load, so brake
more gently and earlier under those circumstances.
Easy tiger
To prevent skidding when slowing or stopping your bike, pull Brakes
gradually. Skidding does not slow you down faster and means you can’t steer
well so it should be avoided.
9. Safe Riding
Lean back
If you slam on your Front Brake, you may fly over the Handlebar or your Rear Wheel may slide out behind you. If the Rear Wheel rises, lean
back and ease off your Front Brake.
Be a Straight Shooter
Ride cautiously and defensively when visibility is reduced. Your movement may be obscured so ride predictably. (Heck, you should
always ride this way regardless of the conditions!)
Use a bell, horn or your voice to indicate your intention to pass and do so in advance so as not to startle the rider you are passing.
Travel in a straight line unless you are avoiding hazards or passing and always indicate your intention to turn or pass.
18
19
EN
ES
FR
IT
KO
EN
ES
FR
IT
KO
10. Passenger and Cargo Transport
Riding with passenger(s), cargo, or both affect the pedelec’s
weight, balance, center of gravity, and handling. For your safety,
please read the below guidelines.
Changes in Handling
A combination of factors – including the structural rigidity of the
frame, individual component strength, steering behavior, and
weight distribution – affect the bike’s handling. When riding with
a heavy load, the pedelec will require more effort to balance and
more time to brake.
There is a strong relationship between the weight of the rider and
the amount of cargo the rider can comfortably balance and ride
with. In practice, cargo weight should be no more than 80% of
the rider’s weight.
Get familiar with riding a loaded pedelec in a safe area before
riding on public roads.
If you have a utility pedelec, refer to the included Utility Pedelec Supplement for specific rider-to-cargo weight and cargo
positioning guidelines.
Do not to exceed the maximum carrying capacity, which includes rider weight, passenger weight, rear rack, child seat(s) and
any other accessories. Check the CE frame sticker on the pedelec frame for the maximum weight limit.
Do not use trailers to transport children.
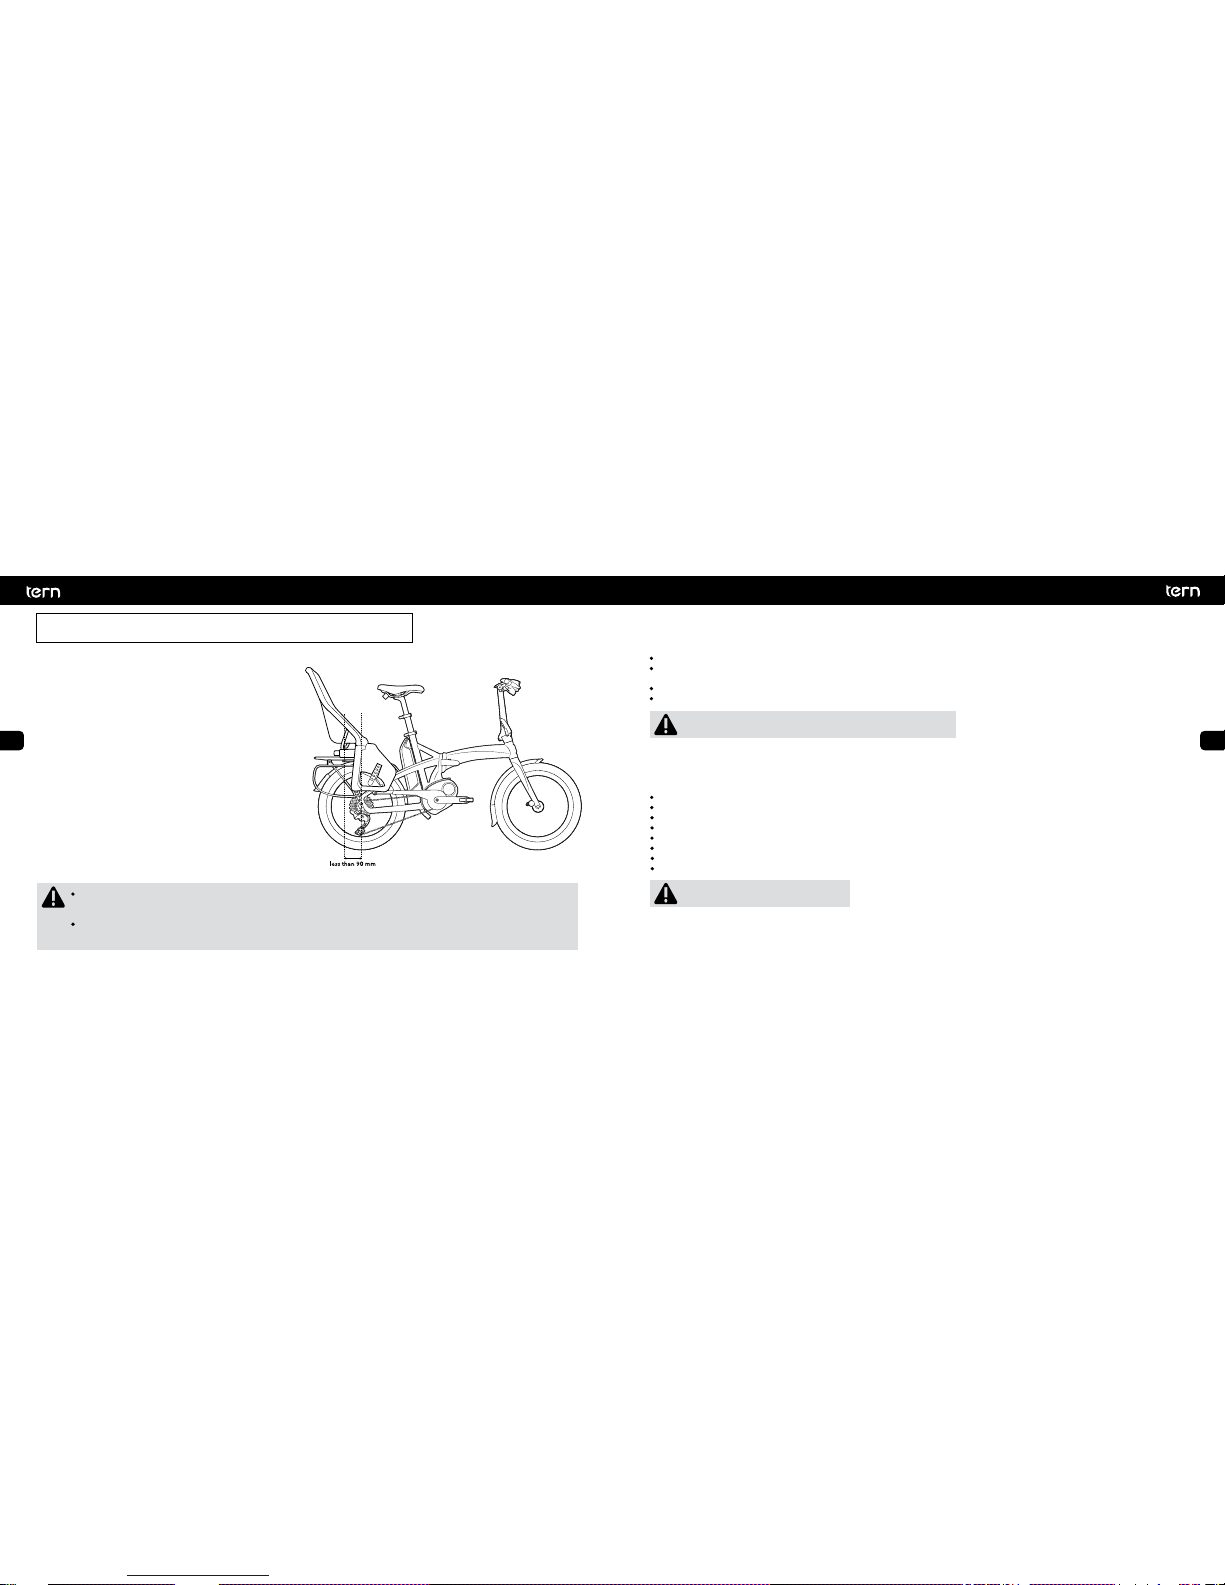
Riding With Children
You may install and use a child seat provided that your seat and setup meet the following requirements (Based on EN 14344, European
Standard for Child’s Seats for Bicycles):
The seat is designed so that any contact between the child’s feet and the wheel is impossible.
The distance from the center of the Wheel and the seat’s center of gravity (as indicated by the center of gravity mark on the child’s seat)
should be no less than 90 mm and no more than 100 mm. This will avoid the bike and Front Wheel from swinging upwards.
The child’s fingers are protected against being caught in any part of the Saddle (such as the springs of suspension saddles).
The carrier (rack) is approved for mounting child seats.
The child seat should NOT be mounted or attached to the seatpost.
Approved Child Seat
The Thule Yepp Maxi Easyfit has been tested to work with Tern pedelecs with built-in racks or Tern Cargo Racks.
Safety and Precautions
Children – regardless of age – should be strong enough to hold up their head and withstand the bouncing that comes with riding.
Check for sufficient heel clearance. Heel clearance varies with the rider’s foot size and the child’s leg length.
Make sure the seat is properly mounted in accordance with the manufacturer’s instructions.
Make sure the maximum gross weight is not exceeded.
Make sure that nothing can get caught in the Wheel Spokes, Saddle Rails, and Springs.
Make sure the child is wearing a helmet and the straps are adjusted for a snug fit.
Always hold onto your pedelec when a child is in the child seat to prevent the pedelec and child from falling over.
Periodically check on your child while riding as they may fall asleep. Don’t let their head strain excessively to one side.
20
21
EN
ES
FR
IT
KO
EN
ES
FR
IT
KO
When loading cargo onto your pedelec with the kickstand down, do not exceed the maximum weight limit of the kickstand.
For a list of kickstand maximum weight capacities, go to: https://www.ternbicycles.com/support/techtips/maximum-weight-capacity
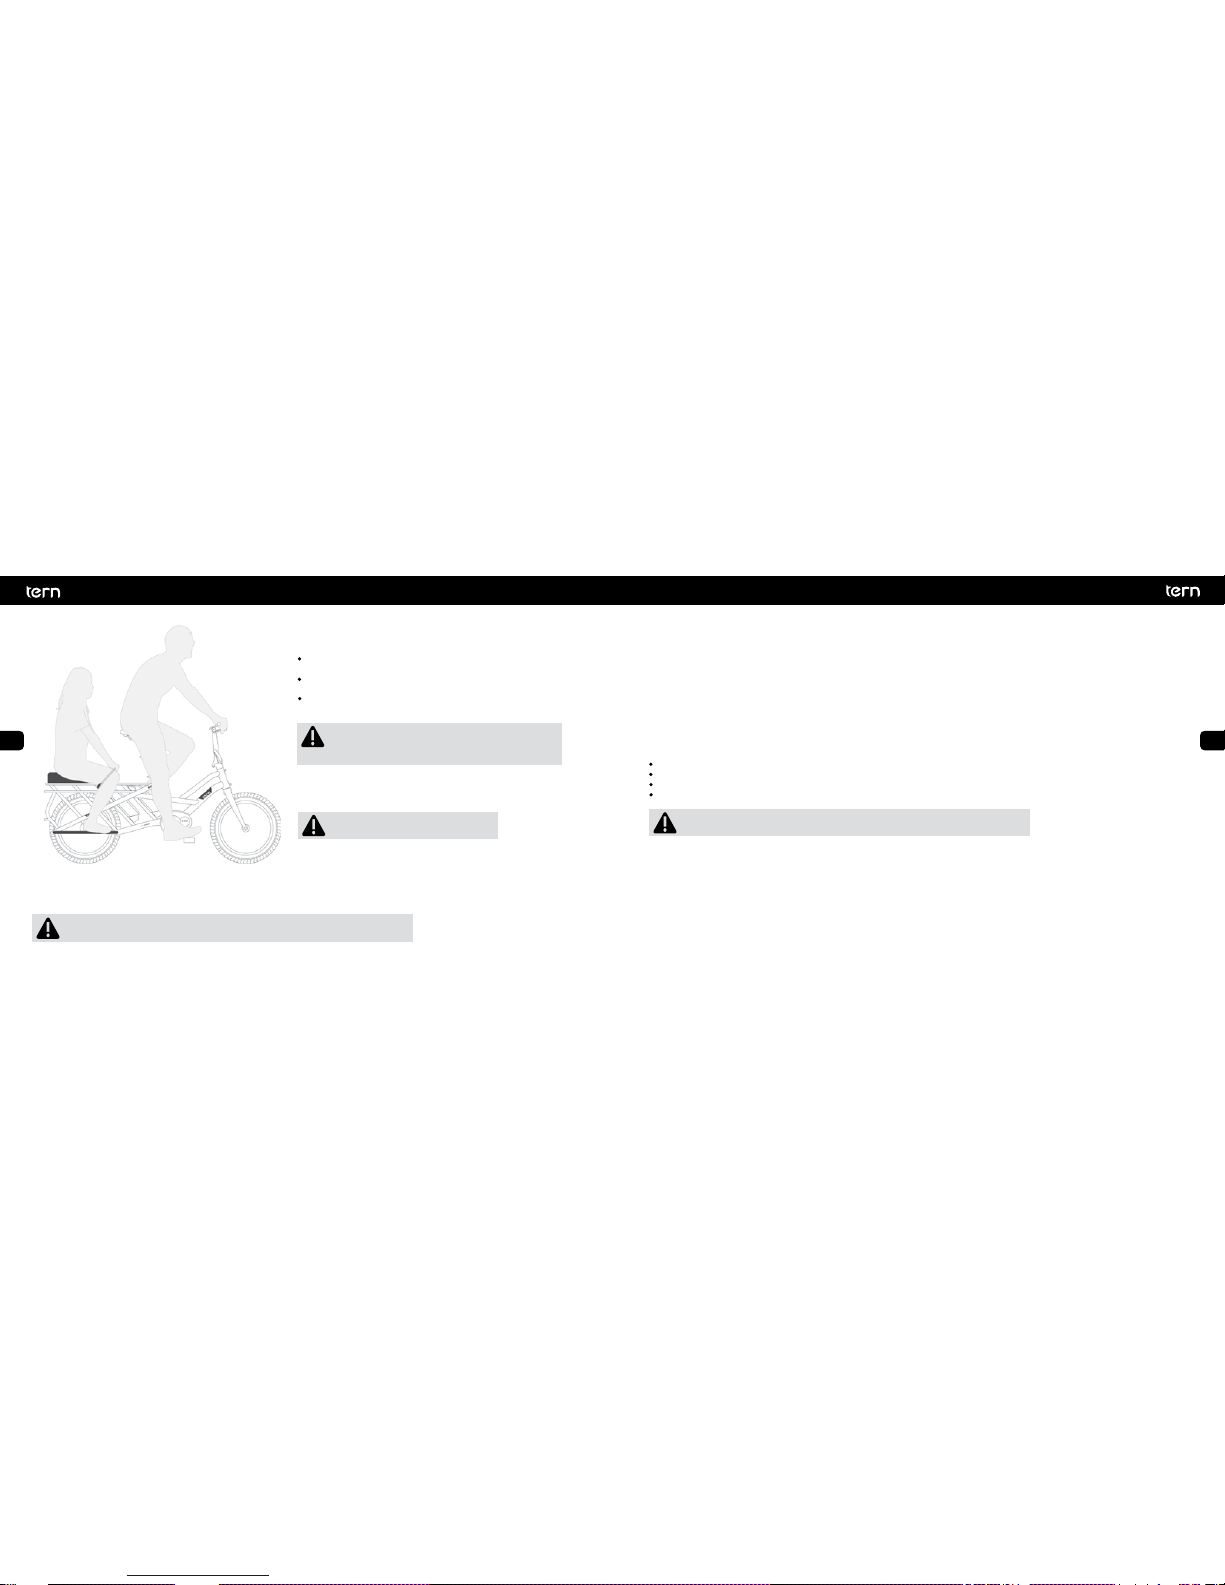
Riding With a Passenger
If you have a Tern utility pedelec, it is designed to carry
an adult passenger if:
The passenger can straddle the pedelec and properly rest his/her feet
on the foot pegs or foot platforms.
It has a seat securely attached to the pedelec frame (the Tern
Sidekick™ Seat Pad fulfills this requirement).
There is a place for the passenger to rest his or her feet (the Tern
Sidekick™ Lower Deck and Sidekick™ Foot Pegs fulfill this requirement).
Footrest
Footrests such as Tern Sidekick™ Lower Deck and Sidekick™ Foot Pegs
are designed for passengers to rest their feet when seated on the rack.
Kickstand and Parked Weight
If your pedelec is equipped with a kickstand, it can make loading and
unloading easier. However, please note the kickstand’s
maximum weight limit.
Do not sit on the pedelec with the kickstand down. This can damage the kickstand and
the kickstand mount on the pedelec frame.
It may be illegal to carry passengers on a pedelec in your
area even if it has been designed or adapted to do so.
Check your local regulations before carrying passengers.
Do not stand on the foot rests.
Riding With Cargo
If the rear of the pedelec is fully loaded, test that the front wheel does not lift off and make the pedelec tip over.
Cargo Positioning
Position cargo so that the center of gravity is as close to the centerline of the pedelec as possible. Secure the cargo as close to the front of
the rack as possible.
Balance the load. For example, when carrying a box, you should try to carry two if possible (one on either side). Lopsided loads can pull the
pedelec to one side.
Securing Cargo
Make sure your cargo is secured by straps rated for the weight of your cargo.
Checking for Interference
Make sure that you have enough space to sit properly, pedal, and steer the bike without any interference.
Cargo should not interfere with normal operations of the brakes and derailleur(s).
Long or large objects should be positioned far enough from the pedals to avoid heel strikes.
Tall or large objects in the front of the bike should not block your vision.
If you cannot position cargo to fulfill ALL of the above requirements, do not attempt to
ride with cargo!
22
23
EN
ES
FR
IT
KO
EN
ES
FR
IT
KO
Public Transportation
Pedelecs can generally be transported on trains and public transportation, like conventional bicycles.
Please check with the rail or public transport operator for specific requirements:
Some operators require you to pre-book a space and buy a separate ticket for the pedelec.
Some allow travel with your pedelec only during off-peak hours.
Some require a cover to be placed on the pedelec.
Airplane
Batteries used on pedelecs are considered potentially hazardous and cannot be transported on airplanes.
Inquire with your local forwarder to see if you can ship the battery separately.
Car
Your Tern can be transported with a standard roof or rear-mounted bicycle carrier provided it is under the maximum load capacity of
the bike carrier. To reduce the weight, remove the battery from your Tern and place it inside the vehicle.
We suggest transporting your Tern inside your vehicle if you drive a hatchback or have sufficient trunk space. Be careful not to damage
the Derailleur.
When entering into a parking structure or garage, be mindful of the pedelec on the roof of the car and make sure it is lower than the
maximum height clearance.
11. Transporting your Tern
Concept
Pedal assist electric bikes or pedelecs are equipped with an electric motor that provides assistance when the bike is being pedaled. The
assist is activated by a pedal action sensor designed to detect when the pedal is being turned. In Europe, pedelecs are limited to 25 km/h (15
mph). In the United States, the limit is 32 km/h (20 mph). Assistance is cut off above those designated speeds.
The controller allows you to select the degree of power assist provided by the motor from economy to sport mode, enabling you to tailor the
performance of the bike to fit your specific style and road topographies.
Your Tern may use a Mid-Drive Motor or Hub Motor. See the diagram below:
Other Pedelec Features
Walk-assist
Selected Tern pedelecs come with a walk-assist function. It allows the rider to push or trolley the bike with less effort. This is beneficial for
certain road conditions, such as going uphill. The assist is limited to walking speed. Please refer to the motor manufacturer’s instruction for
more detail.
Battery lock
Your Tern pedelec may be equipped with a battery lock. Always lock the battery in place before you ride and store the keys in a safe place.
If you lose your keys, contact your local Tern dealer for key recovery service.
12. ABCs of Pedelec
Rear Hub Mid Motor
Front Hub

24
25
EN
ES
FR
IT
KO
EN
ES
FR
IT
KO
Battery
Your Tern pedelec is equipped with a lithium-ion battery. Modern lithium-ion batteries have more than 500 full discharge cycles before
the capacity decreases. The battery does not have a memory effect so you may charge the battery at any time and do not have to wait
until the battery is completely depleted before charging again. If you’re going to stop using the bike for more than a month, charge the
battery to about 80% full before storage. Never fully drain the battery and leave it uncharged for a prolonged period of time as this may
damage the battery permanently.
Only use the original charger from the battery manufacturer. Do not use another charger, even if the plug fits.
When your Tern’s battery has reached the end of its service life, it should be treated as hazardous waste material and should not be
disposed of in normal household trash. Ask your dealer for advice on proper disposal.
Tampering with the motor system
It is forbidden to tamper with the motor system, in any way. Aftermarket devices or software that alters the speed limit and/or
an addition of throttle and/or other devices will void the warranty of your bike. It will potentially create a severe safety hazard
and might be considered unlawful.
Additional Info
Please read the separate enclosed manuals from the drive manufacturer for information on:
• Drive and controller operations
• Proper handling of charger and battery
• Troubleshooting
• Maintenance
• Cleaning
Batteries must not be disposed of in landfills or by incineration
Lighting
Your Tern pedelec comes with front and rear lighting directly powered by the battery onboard. Use the lights according to your
local road regulations.
Charging
Your Tern pedelec comes with battery charger compatible with your
country’s voltage. For more usage and safety information, please refer to
the motor manufacturer’s instruction.
Multi-Battery Configuration
If your pedelec allows use of more than one battery pack, read the
below instructions.
On-Bike Charging
If both batteries are installed, charge using only one charger. The
batteries will charge simultaneously.
Connect the charger to the charging port adjacent to the motor. The rear
port is sealed to prevent using both ports simultaneously.
Off-Bike Charging
Each battery can be charged individually if removed from the pedelec.
Terminal Lid
When riding the bike in single battery configuration, make sure to cover
the exposed terminal with the supplied socket terminal lid to protect the
circuits.
26
27
EN
ES
FR
IT
KO
EN
ES
FR
IT
KO
Riding without Power Assistance
Your Tern is designed to be ridden normally like a conventional bike if the power assist is turned off. If you are going downhill or want to
extend your range you can turn off the assistance but keep the display on to watch your speed. However, if the battery runs empty during
your ride, the lights will not function since they are connected to the motor battery.
If your Tern is fitted with a Valo Direct light, you may purchase a Tern spade to USB cable and connect an USB power bank to turn on the
light so you don’t ride in the dark. The power bank should indicate how much power remains and provide you a visual alarm (such as
blinking) when the power level is low (less than 20%). Verify empirically that there is enough power to last your ride after the low indicator
has turned on.
Range of Battery
Range varies depending on factors such as:
Average riding speed
The faster you go the more energy is required and the quicker the battery will be depleted. However, if you ride faster than the maximum
assist speed, the motor assist will completely shut off and the motor will not drain the battery.
Assistance level used
The best way to conserve battery power is pedaling effort! Using less assistance and exerting more effort into pedaling will decrease
battery power consumption and result in a longer range.
General maintenance
Keep Tire pressure correctly inflated. Maintain and lubricate moving parts.
Stop-and-go traffic
Starting from a standstill will always require more energy. To extend your range, start in Eco mode.
Rider’s weight and cadence
The motor will use up more energy for heavier riders. Keeping a cadence of at least 60 rpm will be more efficient.
Road conditions (road surface, terrain, wind)
Unpaved (dirt, gravel) roads, headwinds, and going uphill will reduce your range.
Starting Off
When the controller is on, the power assist will be applied immediately when you step on the Pedal. It is, therefore, recommended to mount
your Tern with the controller off. After you are seated, make sure no weight is on the pedals to prevent accidental movement, then turn on
the controller. Start off at the lowest level of assistance.
Certain motor systems ask you not to put any weight on the Pedals before powering on so it can reset itself correctly.
Selecting the Correct Level of Assistance
Do not only ride in high gear with power assist. Change gears as you would on a conventional bicycle to maintain an efficient cadence for
your riding style. This will maximize the efficiency of the assistance to your power input.
For example, with a Bosch Mid-Drive Motor system, keeping your cadence constantly at approximately 90 rpm, regardless of speed, will
ensure the motor is assisting you most efficiently.
Riding with Power Assistance
How much you pedal determines how much assistance the motor provides. All pedelecs have an internal control algorithm to stop assisting
as soon as you stop pedaling. This is an inbuilt safety feature conforming to EN 15194 (EPAC – Electrically Power Assisted Cycles).
When cornering on a pedelec, stop pedaling sooner than you are used to, otherwise, you may have too much speed through the turn.
As you are likely to be traveling at an average above speed, look further up the road and be ready to brake whenever a possible situation
appears before you.
Due to the near silent nature of an electric motor, pedestrians and other cyclists may not hear you approaching.
Ride defensively, wear bright clothing, signal your intentions, and use your bell when necessary.
13. Tips for Riding a Pedelec

28
29
EN
ES
FR
IT
KO
EN
ES
FR
IT
KO
Your Tern has many advanced parts and components. Many bicycle service and repair tasks require special knowledge and tools.
Do not begin any adjustments or service on your bicycle unless you are able to properly complete them. Improper adjustment or
service may result in damage to the bicycle or cause serious injury. Consult your dealer if you need any help.
Keeping It Real
When replacing components such as the Frame, Fork, Tires, Rims, Brakes, Front and Rear Lights, Kickstand, Handlebar, Handlepost, Stem,
Drive Unit, Battery, or Control Unit/Display, etc., use the original spare parts or Tern-approved replacements. They are tested to ensure they
work safely with your Tern pedelec. We recommend you visit a Tern dealer for parts and repairs.
Service actions that you can (and should) perform do not require special tools or knowledge beyond what is presented in this
manual. They are listed below:
Stay Slick
Remember to maintain and lubricate your bike using appropriate lubricants. Ask your dealer when and where to lubricate on your bike.
Air
The Wheel consists of a Hub (1), Spokes (2), Rim (3), Tire (4), Valve (5) and
Axle (6).
The Valve may be a Schrader (7) or a Presta (8) type. Presta Valves have a
Valve Cap (9) that must be loosened before inflating.
Check the air pressure is within bounds as indicated on the sidewall of the
Tire.
Check your Tires to see if they have adequate tread depth and no
punctures.
14. Service
Battery capacity
Batteries, measured in watt-hours, have different energy capacities. In general, the more watt-hours,
the longer the range, the more expensive battery, and the heavier your pedelec is.
Ambient temperature can have a significant impact on battery capacity. Battery capacity is tested at a reference temperature of 23°C
(73F). Large deviations from the reference temperature will drain the battery faster due to changes in internal resistance and will shorten
the range.
As the battery ages, the original capacity diminishes. This is true of all batteries but some chemistries last longer than others.
You can always check the amount of charge remaining in the battery from the control display.
30
31
EN
ES
FR
IT
KO
EN
ES
FR
IT
KO
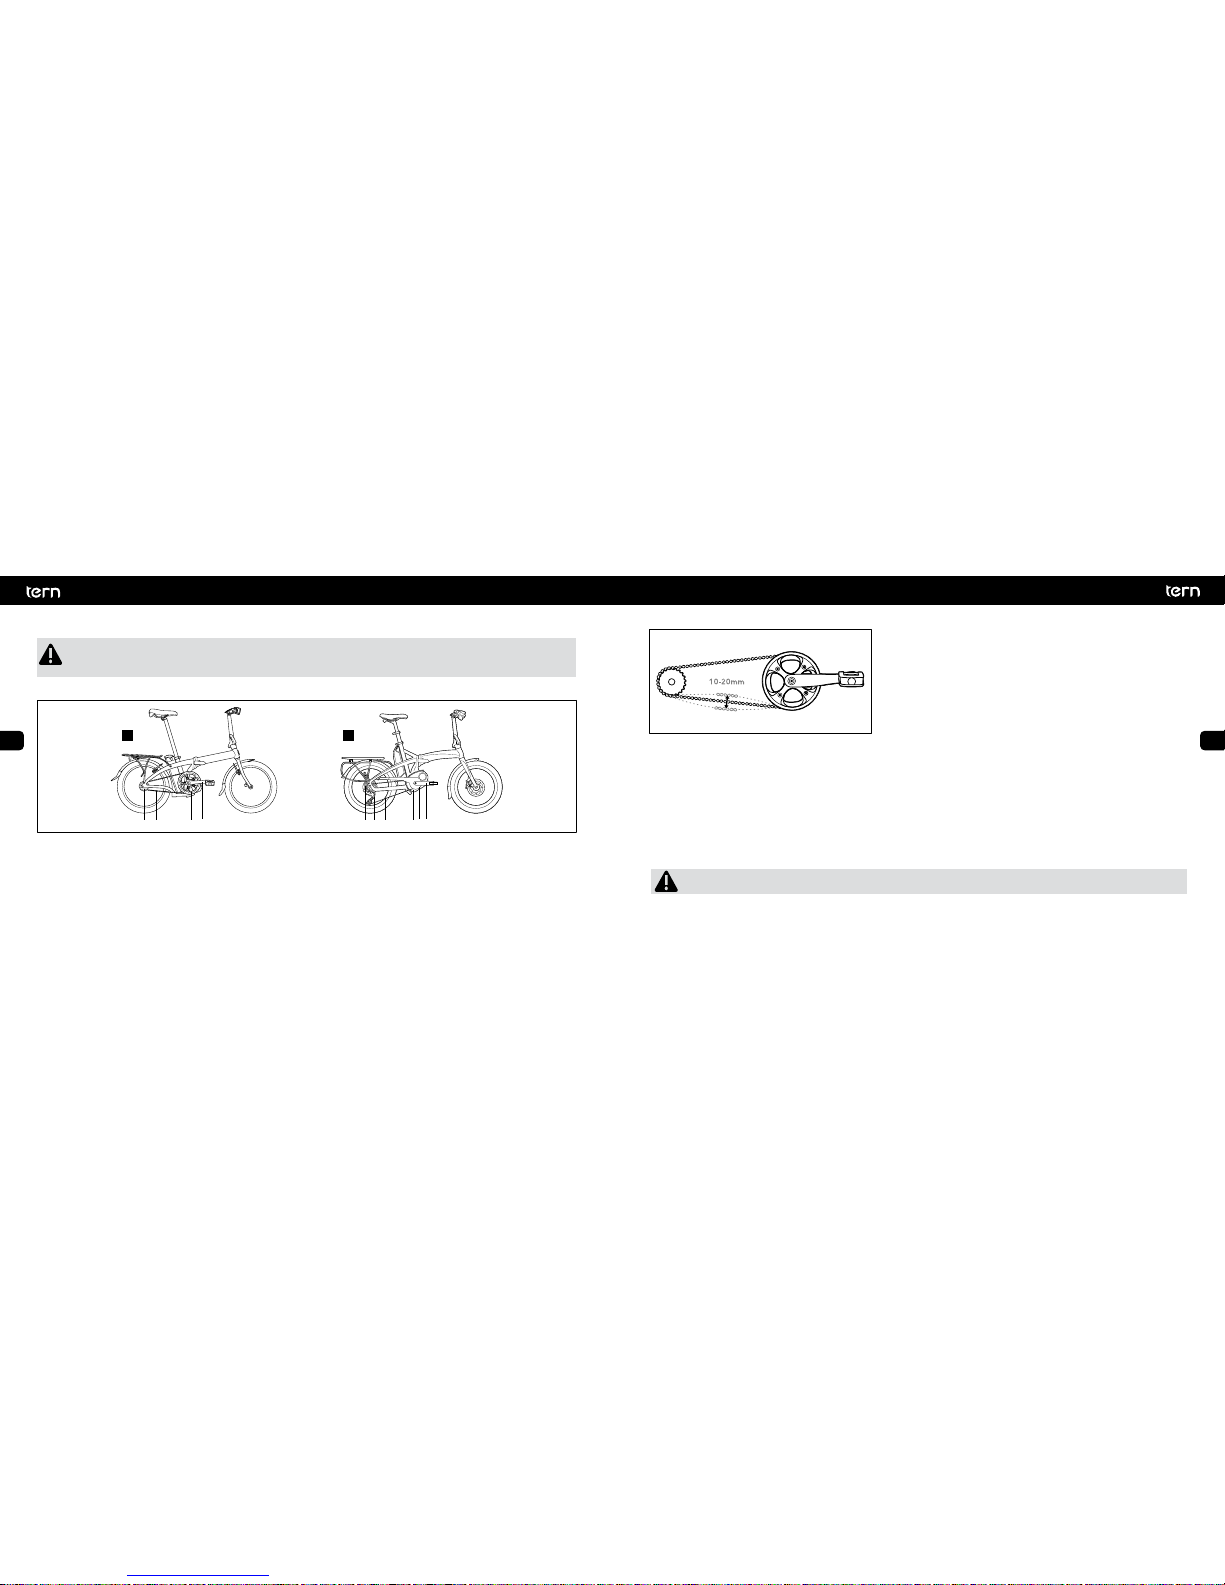
Chain Tension
The chain endures huge tension forces from pedaling. For optimal shifting
and efficiency, the Chain must connect with the teeth properly.
To check for excessive slack, shift to the smallest gear on the Cassette (if
applicable) to create the greatest amount of slack in the Chain. Chain slack
should be within 10-20 mm per span. This amount of slack is equally
applicable to all internal hub gear chain drives.
Note: Belt drive tension is more complicated and should be serviced by
dealers.
Excessive slack can be caused by a Chain that is worn and stretched. A stretched Chain will not sit properly in the teeth. Over time, gaps
between the teeth of the Sprockets becomes greater, mirroring the shape of the Chain. Replacing a Chain when it is worn will help extend
the life of the most expensive Cassette and Chainring.
For internal gear hubs, excessive slack can also be due to misadjustment of the rear wheel position relative to the dropout.
If you are not sure if the chain slack is from chain wear or wheel misadjustment, take your bike to the dealer for servicing.
Cleaning
When your Tern needs cleaning, use a bucket of water and gently sponge off any accumulated dirt and salt from your bike. Dry your Tern
after cleaning to prevent rusting.
Do not clean your Tern using a pressurized spray or steam because water can be forced into sealed areas and damage your bike.
Brakes
Make sure the Brakes are working with proper stopping power. The Levers should stop short of touching the Handlebar.
Riding with improperly adjusted or worn Brakes is dangerous and can result in injury or death. Check the Brake manufacturer’s
instructions for care and operation of your Brakes. Keep Brake surfaces clean and free from oil or lubricants. Replace worn
Brakes with authorized replacements.
Chain, Cranks, and Cables
A bicycle drivetrain has an Internal (A) or External (B) hub. The drivetrain consists of the Cranks (1), Chainring (2), Rear Sprocket (3) or
Cassette (4), Chain (5), Front Derailleur (6) and Rear Derailleur (7). Bicycle gears are numbered from 1 upwards, with 1 being the lowest and
easiest gear.
The lower gears are used for climbing and the higher ones are for descending. We recommend you practice shifting gears in a safe
location.
To check that your Chain is fully connected with the Chainring, rotate the Cranks and ensure no gaps or kinks are visible.
Before riding, shift through all Gears and make sure the Chain and Derailleurs are fully functional. If your Gears are not shifting smoothly, we
recommend consulting your dealer. If the Rear Derailleur is malfunctioning, do not use the highest and lowest gears of the Rear Cassette
since the Chain or Wheel may get jammed which can cause bicycle damage or rider injury.
Check all control Cables and Housings for rust, kinks, and fraying. They should be replaced if damaged.
12
3
5
1
2
4
5 67
A
B
32
33
EN
ES
FR
IT
KO
EN
ES
FR
IT
KO
Quick Release and Fasteners
Check that quick releases and important nuts and bolts that keep your wheels, handlebar and seatpost in place are properly
closed and adequately tightened. Correct tightening force is vital. Too little force and the fastener may not hold securely. Too
much force and the fastener can strip threads, stretch, deform or break. Either way, incorrect tightening can result in
component failure and cause loss of control and accidents. See section 15 for correct torque values. If you’re unsure, visit your
dealer and ask them to show you the proper way.
All other repair or maintenance which is not specifically described in this manual should be performed by your dealer.
It’s all Torque to Me
Torque Values are standard measures of how much you must tighten a bolt and are listed below. When a torque value is given,
a torque wrench should be used to ensure that the correct torque is applied.
Recommended Tightening Values - Torque Values
Frame and Forkand Fork
Component lbf.in Newton Meters (Nm) kgf.cm
Kickstand Mounting Bolt 53-60 6-8 61-69
Water Cage Mounting Bolt 25-35 2.8-4 29-40
Rack Bolts 25-35 2.8-4 29-40
Fender Bolts 50-60 5.6-6.8 58-69
15. Torque Settings
Quick Releases
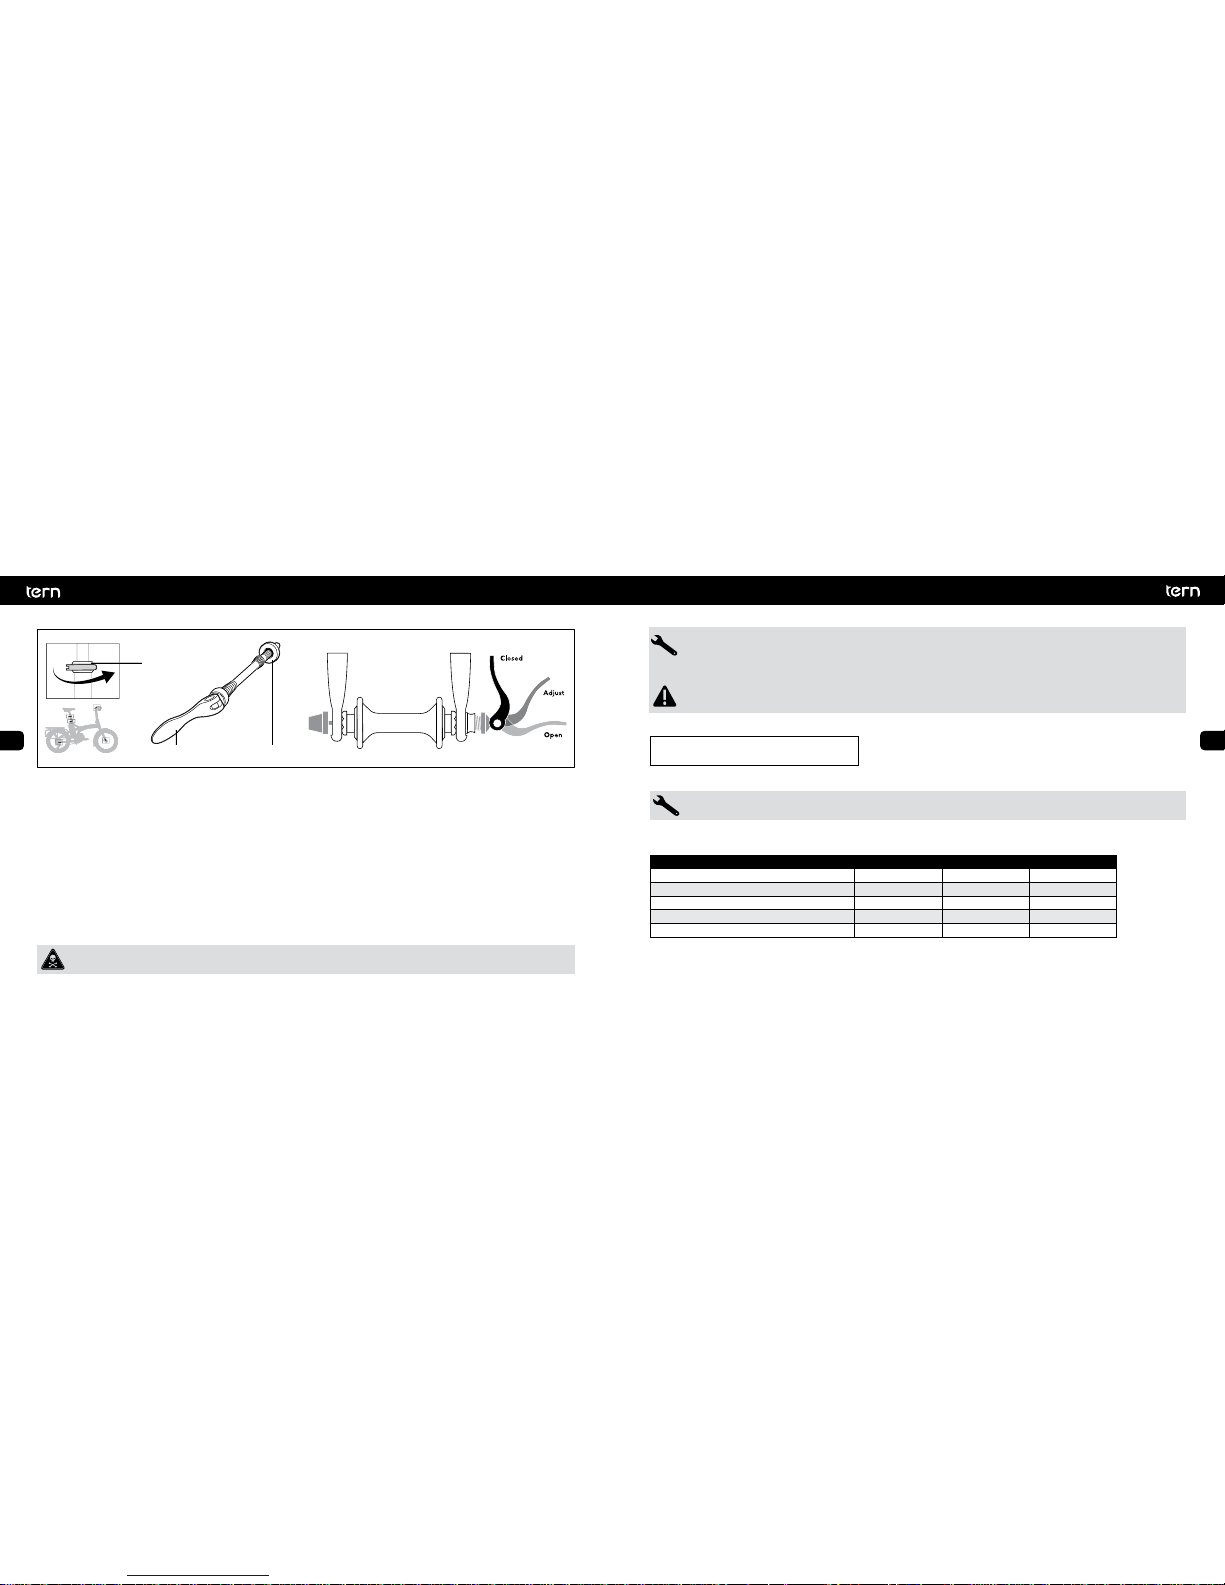
The Quick Release uses over-center cam action to clamp the component in place and allows for easy, tool-less removal.
A Quick Release has a Clamp (1), an Acorn (2) and a Lever (3). The concave side closes inward.
The Acorn allows you to adjust the clamping force. Closing the Lever as it passes the over-center point requires increasing force. This force
should require you to use the palm of your hand.
Quick Releases hold the Wheels, Seatpost, and Handlebar in place.
When tightened on Wheels, the Quick Release should emboss the Fork Dropouts.
When tightened on the Seatpost, the Seatpost should not rotate.
When tightened on the Handlebar, the Handlebar should not rotate.
When the Lever is closed, position it in a way so that it cannot accidentally open through contact during riding.
Quick Releases are very convenient but many accidents occur because of misuse. Improper adjustment may result in damage to
the bicycle or in an accident which can cause serious injury or death.
23
1
34
35
EN
ES
FR
IT
KO
EN
ES
FR
IT
KO
Service Intervals
Break-in
All bikes go through a normal break-in period. Your bike will last longer and work better if you break it in before riding it hard.
We recommend all riders get a quick tune-up one month after purchase so that the dealer can adjust cables and other key parts.
Maintenance schedule
Your bike needs a regular tune-up by an Authorized Tern Dealer. Below is our recommended tune-up frequency based on how often you
ride, and under what conditions.
Types of Riding
HEAVY RIDER
Tune-Up Frequency
Monthly
Rides 25 km (15 mi) or more
daily
Rides in all weather conditions
Rides on roads with bumps
and/or potholes
Carries 105 kg (230 lb) or less
on the bike, including rider’s
weight
FREQUENT RIDER
Tune-Up Frequency
Bi-Monthly
Rides 3 or 4 times a week or
an average of 100 km (62 mi)
per week
Sometimes rides in wet
weather
Rides on roads with bumps
and/or potholes
Carries 105 kg (230 lb) or less
on the bike, including rider’s
weight
RECREATIONAL RIDER
Tune-Up Frequency
Quarterly
Rides once or twice a week
Rides in dry weather or
occasional light rain
Always rides on smooth
bicycle paths or paved roads
Carries 105 kg (230 lb) or less
on the bike, including rider’s
weight
LIGHT RIDER
Tune-Up Frequency
Annually
Rides once or twice a month
Only rides in dry weather
Always rides on smooth
bicycle paths or paved roads
Carries 105 kg (230 lb) or less
on the bike, including rider’s
weight
16. Service and Maintenance Schedule
Brakes and Fork
Component lbf.in Newton Meters (Nm) kgf.cm
Brake Lever (Flat Bar) 53-60 6-6.8 61-69
Brake Lever (Drop Bar) 55-80 6.2-9 63-92
Disc Rotor to Hub (M5 bolts) 18-35 2-4 21-40
Caliper Mount 55-70 6.2-7.9 63-81
Wheels and Fork
Component lbf.in Newton Meters (Nm) kgf.cm
Free Hub Body 305-434 34.5-49 352-499
Cassette Sprocket Lockring 260-434 29.4-49 299-499
Front Axel Nuts 180 20.3 207
Rear Axel Nuts 260-390 29.4-44.1 299-449
Drivetrain and Fork
Component lbf.in Newton Meters (Nm) kgf.cm
Pedal into Crank 307 34.7 353
Crank Bolt (Spline and Square Spindles) 300-395 33.9-44.6 345-454
Bottom Bracket (External Shell) 610-700 40-50 702-805
Bottom Bracket (Cartridge and Cup-and-Cone) 435-610 49.1-68.9 500-702
Others and Fork
Component lbf.in Newton Meters (Nm) kgf.cm
Steerer Clamp Bolt (Stem) 70-89 8-10 80-102
Top Cap Bolt 35-53 4-6 41-62
Handlebar Clamp Bolts (4 Clamp Bolts) 36-53 4-6 41-62
Saddle Rail Clamp 70-89 8-10 80-102
Relationship : 1 Nm = 8.9 lbf.in = 10.2 kgf.cm
36
37
EN
ES
FR
IT
KO
EN
ES
FR
IT
KO
Stamp/Signature of dealer
Inspection 4
Date
Work Done
Replaced or Repaired Parts
Stamp/Signature of dealer
Inspection 5
Date
Work Done
Replaced or Repaired Parts
Stamp/Signature of dealer
Inspection 6
Date
Work Done
Replaced or Repaired Parts
Service Record
Stamp/Signature of dealer
Inspection 1
Date
Work Done
Replaced or Repaired Parts
Stamp/Signature of dealer
Inspection 2
Date
Work Done
Replaced or Repaired Parts
Stamp/Signature of dealer
Inspection 3
Date
Work Done
Replaced or Repaired Parts
Within 1 month of purchase or
200 km
38
39
EN
ES
FR
IT
KO
EN
ES
FR
IT
KO
In addition, the Owner must confirm that they have received the Owner Briefing from their dealer or that they have watched the Owner
Briefing video on ternbicycles.com/support.
Exclusions
This warranty does not cover damage and/or defects that occur under the following conditions:
If a bike has been used, ridden, handled, maintained or overloaded in a manner that does not abide by the product specifications,
intended use or guidelines in the Owner’s Manual. This includes, but is not limited to, off-road riding.
Normal wear and tear. Parts are subject to varying wear depending on use, load, weather, road conditions, etc.
Paint finish is considered consumable and is not part of the warranty.
If a bike or part has been re-assembled, repaired or maintained by personnel not authorized by Tern.
If a bike has been subjected to fire, flood, accidental breakage, improper actions by third parties, and/or any event outside Tern’s control.
Modification of the Frame, Fork, Handlepost, or Components.
Installation of Parts, Accessories, Motor Units or Batteries not originally intended or compatible with the bicycle as sold.
If the frame number and/or service tag on the bike have been defaced, modified, manipulated or is otherwise not clearly identifiable.
Tern Warranty Support
Tern will repair or replace any parts that manifest a defect in materials and/or workmanship during the warranty period. Any part that is
replaced pursuant to this warranty will be replaced by parts of the same or similar design. However, Tern reserves the right to replace
defective parts with other parts of different design or color manufactured by or on behalf of Tern, provided that such replacement will not
reduce the function of the original part.
Due to product evolution and obsolescence, some components may not be available for older models. In these cases, sourcing and
payment for components are the responsibility of the Owner.
Tern may, at its discretion, repair or replace defective parts falling outside the warranty period, but such work shall not be deemed to be any
admission of liability.
Any Frame, Handlepost, or Fork replaced under the warranty terms will be covered for the remaining period of the warranty of the bike.
This is the only warranty made by Tern and no employee, agent, or reseller of Tern is authorized to make any other warranty on behalf of
Tern.
Tern Limited Warranty
Tern bicycles are sold on behalf of our company (“Tern”) by selected Authorized Tern Dealers who understand the assembly and service
needs of our products. Tern provides a warranty against defects in materials and workmanship to the original retail purchaser (“Owner”) of a
Tern bicycle from the date of purchase according to the following terms:
Five Years: Frame, Handlepost, and Fork
One Year: All Tern or BioLogic branded parts and components, except as noted below.
Any other parts or components are covered by the stated warranty of the original manufacturer of that part or component.
Extended 10-Year Warranty
Owners who sign up for Tern Care on ternbicycles.com will be covered by an extended 10-year warranty for the Frame, Handlepost, and
Fork, as long as they sign up within 30 days of purchase and are the original purchasers. In addition, the bike must have been assembled by
an Authorized Tern Dealer at the time of purchase—regardless of whether the bike was purchased from a physical or online store.
The following items are excluded from the extended 10-year warranty:
Frame and Handlepost Latches
Paint finish
Bikes for commercial use
The warranty does not mean that the Frame, Handlepost, and Fork are indestructible. All materials can fail if pushed beyond design and
manufacturing limits. It simply means that these items are covered under the specific terms of this limited warranty.
Owner’s Responsibility
The Owner shall demonstrate reasonable care and use, and follow preventive maintenance, storage, and lubrication schedules as required
by use, climate and other pertinent factors. Should a product defect become known, the Owner should stop riding the bicycle and transport
the bike or part(s) to an Authorized Tern Dealer for warranty repair (within the applicable warranty period). The transport of the bike or any
bike part to and from the dealer shop is the Owner’s responsibility and at the owner’s expense.
All claims to this warranty must be made through a Tern Authorized Dealer or exclusive distributor. Proof of purchase, either digital or
physical copy, must be supplied with any warranty request. All Tern bicycles must be registered via Tern Care before a warranty claim may
be processed.
17. Warranty
40
41
EN
ES
FR
IT
KO
EN
ES
FR
IT
KO
According to EC directive 2006/42/EC on machinery (Annex II A)
This declaration relates exclusively to the machinery in the state in which it was placed on the market and excludes components which
are added and/or operations carried out subsequently by the final user. The declaration is no longer valid if the product is modified.
Herewith, we declare, that your Tern Pedelec complies with all essential requirements of the Machinery Directive 2006/42/EC and
Directive 2004/108/EC relating to electromagnetic compatibility.
The following technical standards were used:
EN ISO 4210:2015 Cycles — Safety requirements for bicycles
EN 15194:2009+A1:2011 Electrically power assisted cycles (EPAC)
Taipei, October 2017
Tern Bicycles
8F-8, No. 6, Lane 609, Chung Hsin Rd, Sec 5,
Sanchong District, New Taipei City, Taiwan
ternbicycles.com
18. Declaration of Conformity (For countries within EU)
This warranty is expressly limited to the repair or replacement, at Tern’s discretion, of a defective part and is the sole remedy of the
warranty. This warranty applies only to the original retail purchaser and is not transferable. This warranty only covers bicycles and bicycle
components purchased through an Authorized Tern Dealer and is only valid within the country in which the bicycle was originally
purchased. As not all models or parts are sold in all countries, service is not guaranteed outside of the original country of purchase. Claims
made outside of the original country of purchase or the Authorized Tern Dealer network may be subject to additional fees and/or delays in
obtaining service parts and information. For internet sales, the original country of purchase is defined as the country in which the seller is
located.
Should there be any modifications done on the bike that is not specified by Tern, the Owner assumes complete responsibility for any risk
or injury that may arise from riding or using a bicycle with any modifications or changes from the standard manufacturer’s offering
excepting manufacturer mandated modification(s) (“Modified Bicycle”). The Owner understands that a Modified Bicycle does not
necessarily conform to relevant safety standards so using and/or riding is inherently dangerous and may cause serious injuries, including
bodily injury and/or damage to personal property.
This limited warranty is in lieu of all other expressed or implied warranties, including any warranty of fitness for a particular purpose or use
otherwise applicable to this product. Tern shall not be liable for any special incidental or consequential damage, including lost profits.
There are no warranties extended other than as provided herein. This limited warranty may be modified only by Tern.
If any part of this warranty does not comply with local law, then it shall be deemed separable from the rest of this warranty, which remains
enforceable and shall be interpreted as the closest meaning of that written above, in English, or the minimum required by such local law.
This warranty does not affect the statutory rights of the consumer.

42
43
EN
ES
FR
IT
KO
EN
ES
FR
IT
KO
1. Introducción ................................................ 43
2. Información General .................................. 44
3. Especificaciones Legales ........................... 45
4. Regulación Local ........................................45
5. Uso o Destino .............................................. 47
6. Despliega y Pliega tú Tern ........................47
7. Antes del Primer Viaje ............................... 48
8. Antes de Cada Viaje ................................... 53
9. Viaja Seguro ................................................ 56
10. Pasajeros y transporte de Carga .............. 58
11. Transportando tu Tern ...............................62
12. ABCs de la Pedelec .................................... 63
13. Tips Para Montar en una Pedelec ............66
14. Servicio ........................................................ 69
15. Ajustes de Torque ......................................73
16. Cronograma de Servicio y
Mantenimiento ........................................... 75
17. Garantía ....................................................... 78
18. Declaración de Conformidad ................... 81
Tabla de Contenido
Querido Usuario,
Gracias por escoger Tern, compañía líder en la movilidad y el transporte urbano!
Diseñamos bicis que reúnen todas las características que la gente necesita para conducir menos y montar más.
Estamos dedicados a nuestra meta de transporte sostenible, diseño y fabricación de bicicletas para el transporte urbano con un enfoque
en la portabilidad y la utilidad. Tern dona al menos el 1% de los beneficios netos cada año a causas sociales y medioambientales.
Notas Generales de Seguridad
Pasa la página
Tu bicicleta tiene componentes diseñados especialmente, así que, por favor lee cuidadosamente este manual antes de salir a andar.
Tómate el tiempo necesario para entender cómo funciona tu nueva bicicleta en un ambiente seguro, como un estacionamiento.
Respeta a otros en el camino
En un accidente automovilístico, tú y tu bicicleta siempre pierden y también pueden lesionar a los peatones. Mantente alerta y muestra
respeto a otros usuarios de la vía.
Protege tu cabeza
Un buen casco con estándares de seguridad puede prevenir lesiones en un accidente. Lleva uno, no lo pienses tanto.
Precauciones de mantenimiento
No realices trabajos de mantenimiento o ajustes sin el conocimiento o las herramientas adecuadas.
A estudiar
Este manual sólo debe utilizarse junto con otros manuales incluidos con su pedelec, como e del motor, el sistema de control, el componente y los manuales de plegado.
Dónde Obtener Ayuda Adicional
Si no estás seguro de algo, habla con el distribuidor local de Tern. Los distribuidores de Tern son especialistas en los productos y servicios
de Tern.
1. Introducción
44
45
EN
ES
FR
IT
KO
EN
ES
FR
IT
KO
Piezas de Bicicletas
Significado de los Símbolos
1. Rueda
2. Piñones
3. Cambio Trasero
4. Cadena/Cinturón
5. Platos
6. Motor
7. Bielas
8. Pedal
9. Frenos
10. Horquilla
11. Porta Equipaje
12. Etiqueta del
Cuadro del CE
13. Batería
14. Bloqueo de Batería
15. Poste del Asiento
16. Sillín o Asiento
17. Articulación
del Cuadro
18. Cuadro
19. Articulación de la
Potencia
20. Manillar
21. Potencia
22. Juego de Dirección
3
1
2
5
4
Manillar
1. Controlador/Pantalla
2. Luz
3. Manillar
4. Maneta de Freno
5. Palanca de Cambio
Indica cómo usar el
producto o los ítems
que requieren atención
especial.
Una acción incorrecta
podría dañar el equipo.
Peligro de muerte si no se
siguen las instrucciones o
si no se toman medidas
preventivas.
Debes tener la herramienta adecuada, tal como una llave de
torque específica. Un torque que es demasiado alto o una her-
ramienta muy baja puede causar que las partes se caigan o se
rompan y pueden conducir a accidentes y lesiones graves.
Fabricante
Mobility Holdings Limited (Hong Kong), Taiwan Branch
8F-8, Lane 609, Chongxin Road, Section 5, Sanchong District, New Taipei City, Taiwan
Contacto: service@ternbicycles.com / Sitio web: www.ternbicycles.com
Marcación en la Bicicleta
Si tu Tern es una pedelec, esta tendrá una etiqueta en el marco CE que confirma que ha superado todas las pruebas descritas en la norma
EN 15194.
Declaración de Conformidad
Este manual del usuario cumple con los requisitos de la norma EN 15194 y de la Directiva de Máquinas EC/2006/42. Ver Declaración de
Conformidad por separado.
Edición 1 Rev 1, Octubre 2017
Pedelec significa ciclos eléctricos de pedales. También se conocen como EPACs que significa ciclos asistidos por energía eléctrica. Son
bicicletas con un motor que proporciona ayuda de pedaleo cuando empiezas a pedalear. Cuando dejas de pedalear, la ayuda se detiene.
Algunas bicis también tendrán un modo de ayuda con una velocidad máxima de 6 km/hr.
En general, las bicicletas eléctricas son vistas por la ley como similares a una bicicleta convencional, más que a una moto o un scooter mo
torizados. En la mayoría de los casos, una bicicleta eléctrica se puede montar en ciclo rutas, y se puede guardar en bicicleteros como una
bicicleta regular. Los ciclistas no están obligados a tener una licencia de conducir para operar una bicicleta eléctrica y no están obligados a
obtener ninguna licencia especial o registro para sus pedelecs.
Es importante tener en cuenta que las leyes, reglas y directrices específicas que rigen el uso de bicicletas eléctricas pueden
variar de un país a otro. Si no estás usando tú bicicleta en Alemania, es importante familiarizarse con las leyes, en la ubicación
específica antes de comenzar a montar tú pedelec. Tómate el tiempo para aprender las leyes locales de bicicletas antes de ir a
la carretera.
Para utilizar las vías públicas con tú pedelec en Alemania, tú bicicleta debe estar equipada de acuerdo con las Normas de Licencias de
Carreteras (StVZO) y la Ley de Tráfico (StVO). Ten en cuenta que puede haber diferentes regulaciones que aplican en tú país.
2. Información General
3. Especificaciones Legales
4. Regulación Local
1
3
4
7
8
15
16
18
17
21
19
20
22
10
13
6
11
5
2
14
9
12
46
47
EN
ES
FR
IT
KO
EN
ES
FR
IT
KO
StVZO
El sistema de iluminación debe tener la marca “K” y el número para ser legal en las vías públicas. Las luces delanteras y traseras deben
estar alimentadas por la misma fuente de alimentación.
El centro de la proyección de luz delantera en la carretera no debe ser a más de 10 metros de la parte frontal de la bicicleta. La luz
trasera debe estar 25 cm por encima de la superficie de la carretera.
Se requieren reflectores además de las luces. En la parte delantera, se requiere un reflector blanco. En la parte trasera, se requieren al
menos dos reflectores rojos.
Se deben colocar dos reflectores amarillos en cada pedal. Cada rueda debe cumplir al menos uno de los requisitos siguientes:
• Portar dos reflectores amarillos
• Portar aros blancos reflectivos en ambas paredes laterales de los neumáticos.
El sistema de frenos debe tener frenos delanteros y traseros funcionando independientemente.
Debes mantener la bicicleta en buenas condiciones.
Construida Para los Guerreros Urbanos, no Para Acróbatas
Acerca del Peso
Las bicis Tern están diseñadas para una persona que monta con ambas ruedas en contacto con el suelo y solamente en
carreteras pavimentadas. No están destinadas a carreras, saltos, saltos en una rueda, maniobras con la rueda delantera
levantada o cualquier otra cosa de este tipo. El fabricante y el distribuidor no son responsables de ningún daño directo o
consecuente. La garantía será anulada si tú pedelec no se utiliza de acuerdo con el uso previsto
El uso inadecuado de la bici fuera de carretera, saltos o trucos puede causar daños en el marco, riesgo de lesiones o la
muerte del ciclista.
Consulta las instrucciones de plegado adjuntas, de forma separada.
5. Uso o Destino
6. Despliega y pliega tú Tern
10 m
Peso total máximo = Peso del ciclista + Peso del equipo
Si tiene una bicicleta plegable Tern Pedelec, la capacidad de carga estándar es de 105
kg (230 lbs). Si la capacidad indicada aquí difiere de la de la etiqueta engomada en el
marco de su pedelec CE, siga la etiqueta engomada en el marco. Si tiene una bicicleta
Tern pedelec no plegable, consulte la etiqueta del marco CE para obtener el peso
máximo permitido y lea el manual suplementario para equilibrar la carga.
Si llevas carga o peso extra, asegúrate que la bicicleta esté estable y esté dentro de
la capacidad de carga máxima.
Practica el manejo de la bicicleta en un área segura antes de manejar en la vía pública.
Si no se controla adecuadamente, los cambios repentinos en la carga durante la
conducción pueden afectar el equilibrio y causar lesiones graves o la muerte.
CE ejemplo de etiqueta del marco
48
49
EN
ES
FR
IT
KO
EN
ES
FR
IT
KO
Lee las Instrucciones antes de Montar la Bici
Invierte un poco de tiempo para entender cómo operar y usar tú nueva bicicleta antes de salir a la carretera. El manual de instrucciones
para componentes individuales y las instrucciones de plegado para tú bicicleta específica, se suministran junto con este manual. Lee todos
los manuales suministrados. Si algo no está claro, pregúntale a tú distribuidor.
Verificar
Sistema Eléctrico
• Asegúrate que estás familiarizado con la función de todos los botones del controlador y el significado de las pantallas.
• Consulta la información en la sección correspondiente del sistema eléctrico en el manual del fabricante
Ruedas
• Comprueba la presión de los neumáticos y asegúrate que esté dentro de los valores mínimos y máximos indicados en las paredes laterales de los neumáticos.
• Gira ambas ruedas para asegurarte que giran suavemente, están alineadas (no se tambalean) y no rozan contra los frenos. Si la rueda se
tambalea de lado a lado o frota contra las pastillas de freno, lleva la bicicleta a una tienda de bicicletas calificada para que la rueda sea
alineada.
Las ruedas que no funcionan correctamente pueden indicar problemas con los radios o neumáticos.
Frenos
CBA
3
4
2
1
• Prueba los frenos, de pie junto a tú bicicleta, aprieta ambos frenos, luego balancea la bicicleta hacia adelante y hacia atrás. La bicicleta no
debe rodar y las pastillas de freno deben permanecer firmemente en su lugar
• ¿Es tú Tern confiable? Si sientes un ruido fuerte o estruendoso con cada movimiento de la bici hacia delante o hacia atrás, es probable que
tenga un rodamiento suelto. Así que llévala al distribuidor para que la revise. Ten en cuenta que para ciertos frenos de disco puede sentirse
un poco de ruido al intentar balancear la bicicleta hacia adelante y hacia atrás. Esto es causado por los espacios entre las pastillas de los
frenos y el cáliper de los frenos para permitir la expansión térmica y es considerado normal. En este caso, el rodamiento no está suelto.
• Frenos accionados por el rin (B) tienen pastillas de freno (1) que se alinean con el rin (2). Las pastillas de freno hacen presión contra el
borde del rin para reducir la velocidad de la rueda así que asegúrate que las pastillas de freno estén alineadas con el rin y chequea regularmente el desgaste del rin y de las pastillas de freno
• Los frenos de disco (C) tienen un rotor de disco (3) y un cáliper de disco (4). Las pastillas dentro del cáliper de disco presionan el rotor del
disco para reducir la velocidad de la rueda, pero pueden calentarse mucho durante el uso, así que no las toques inmediatamente después
de montar.
• La palanca que acciona el freno delantero y la palanca que acciona el freno trasero varía en función del país. Para países como Reino Unido
y Japón, la palanca izquierda activa el freno trasero y la palanca derecha acciona el freno delantero. Para los EEUU, Alemania y la mayoría
de los demás países, la palanca derecha acciona el freno trasero y la palanca izquierda acciona el freno delantero.
7. Antes del Primer Viaje
Haz el hiro
Juego de Dirección
• Párate con la rueda delantera presionada firmemente entre las piernas e intenta
girar el manubrio. Si se produce un movimiento, realinea el manubrio y aprieta el
vástago/stem o llévalo al distribuidor más cercano.
• Levanta la rueda delantera del suelo y gírala de lado a lado. ¿Se siente suave? Si
sientes cualquier atadura o aspereza en la dirección, puedes tener los rodamientos
demasiado apretados. Es mejor que tú distribuidor lo revise.
50
51
EN
ES
FR
IT
KO
EN
ES
FR
IT
KO
Cambios
• Prueba la bici en un área segura lejos del tráfico para familiarizarte con la función del sistema de cambios. Comprueba que la transición
de cambio a cambio sea suave y que puedas pasar de los piñones más bajos a los más altos y viceversa, sin que la cadenilla se salte.
• Si tú Tern utiliza un sistema de cambios interno (IGH) por sus siglas en inglés, evita realizar un cambio y pedalear duro al mismo tiempo.
A diferencia de los descarrilado res, la mayoría de los cambios internos convencionales están diseñados de tal manera que se desplaza
de forma óptima cuando sólo se está rodando o no se está pedaleando.
• Revisa si hay eslabones apretados en la cadenilla y si la cadenilla gira libremente a través de los piñones.
Con una pedelec, la asistencia de conducción comienza inmediatamente pisas el pedal. Aprieta los frenos antes de montar tú
bicicleta para evitar cualquier movimiento involuntario
Por cualquier ruido
Levanta la bicicleta unos 10 cm y déjala caer al suelo. Si oyes ruidos o notas algún problema con la estabilidad del marco (especialmente
en las juntas del marco y juntas del poste del manubrio), agenda una cita de servicio con tú distribuidor.
Ajustando tú bicicleta
La mejor posición de conducción es con la que te sientes más cómodo,
pero una bicicleta mal ajustada puede provocar dolor en la espalda o en
las articulaciones y reducir su control. Comprueba que tú sillín y el manubrio están a la altura correcta y que puedes alcanzar las palancas de freno
y cambios cómodamente.
Para la mayoría de las personas, el metatarso del pie (1) debe colocarse
sobre el pedal (2) directamente sobre el eje del pedal (3).
Sillín
• La altura del sillín es un componente importante de la posición general de conducción. Mientras estés sentado, debe haber una ligera
curva en la rodilla, cuando el pedal es empujado hacia abajo. La pierna no debe estar completamente extendida, así que asegúrate que el
sillín no sea demasiado alto. Si el sillín está demasiado bajo, la tensión repetitiva en la rodilla puede provocar dolor.
• El sillín se puede mover hacia arriba y hacia abajo, hacia adelante y hacia atrás y en ángulo hacia arriba y hacia abajo, así que puedes jugar
con él para obtener el mejor ajuste. Un sillín mal ajustado puede causar lesiones en los nervios, las articulaciones y los vasos sanguíneos.
1
2
3
Consulte la sección 15 para conocer los valores de ajuste del sillín
Ten cuidado de no dañar el Rotor del Disco o el cáliper del Disco al cambiar las ruedas o al presionar las Palancas de Freno
cuando el Rotor del Disco no está alineado
Asegúrate de probar la potencia de frenado antes de entrar en el tráfico, puede ser mucho más potente de lo que estás acostumbrado. Presionar la palanca demasiado rápido puede conducir a una parada súbita no intencionada y causar un accidente.
52
53
EN
ES
FR
IT
KO
EN
ES
FR
IT
KO
• Al montar, las caderas deben permanecer inmóviles y la rodilla se debe doblar alrededor de 20-25° cuando el pedal está hacia abajo.
• El sillín debe estar más o menos paralelo al suelo, pero si no es cómodo, inclina la parte frontal hacia abajo para aliviar la presión en la
entrepierna o para distribuir el peso sobre una mayor área del sillín. El asiento debe inclinarse no más de 5° hacia arriba o hacia abajo.
• Mover el sillín hacia atrás trabaja los glúteos de manera más fuerte y hacia adelante trabaja los cuádriceps. Generalmente, el frente de la
rodilla no debe pasar el Eje del Pedal. Una vez que estés cómodo, comprueba nuevamente la altura del sillín y ajústalo según sea necesario.
No levante el poste del asiento por encima de la línea de inserción mínima grabada en el poste. Si lo hace, puede producirse un
fallo en el poste / marco y una lesión grave. Si la altura adecuada del sillín no se puede lograr sin elevar el poste por encima de
esta línea, se necesita una poste más largo. Del mismo modo, no baje el asiento debajo de la marca de inserción máxima al montar. La parte inferior expuesta puede golpear objetos en el pavimento y causar un riesgo de montar
Tallo
Los modelos equipados con tallos Andros son ajustables en ángulo y altura sin herramientas. Consulte el manual incluido para obtener
información sobre cómo ajustar las posiciones del tallo.
Orientación del manillar
Gire el manillar para que las palmas de sus manos estén apoyadas y que sus dedos puedan llegar fácilmente a las palancas de freno y
engranaje. Para los procedimientos de ajuste del manillar, consulte el manual del tallo incluido con su Tern.
Antes de cada viaje asegúrese de verificar lo siguiente:
Sistema Eléctrico
• Verifiqué que la batería está correctamente asentada en el soporte del bastidor y está completamente enchufada.
• Verifiqué si hay advertencias o mensajes de error en la pantalla del controlador. Resuelva el error antes de conducir.
• Verifiqué que la batería esté debidamente cargada durante la duración del viaje que planea realizar.
• Asegúrese de que las luces delanteras y traseras se iluminan cuando se accionan y permanecen encendidas cuando
la bicicleta está parada
Mecánica
Como con todos los componentes mecánicos, la bicicleta está sometida a desgastes y altas tensiones. Diferentes materiales y
componentes pueden reaccionar al desgaste o a la fatiga por estrés de diferentes maneras. Si la vida de diseño de un componente ha sido excedida, puede fallar repentinamente, posiblemente causando lesiones al ciclista. Cualquier forma de fisuras,
arañazos o cambios de coloración en zonas altamente estresadas indica que se ha alcanzado la vida del componente y que
debe ser reemplazado.
8. Antes de Cada Viaje

54
55
EN
ES
FR
IT
KO
EN
ES
FR
IT
KO
Verifiqué las Soldaduras
Además de esta prueba, compruebe el área de soldadura alrededor de la junta del bastidor.
Su Pedelec experimentará estrés y desgaste durante la conducción.
Revise las soldaduras de la estructura para ver si hay deformaciones y
cambios de color que puedan indicar grietas. Esto es especialmente
importante si la moto ha caído o ha estado involucrado en un accidente. Tenga en cuenta que las piezas de aluminio, una vez dobladas, no
pueden ser dobladas con seguridad de nuevo en su lugar y requerirá
reemplazo
Llanta
La llanta debe estar limpia y sin daños. Tenga cuidado con las decoloraciones, arañazos o desgaste. Si usted tiene Frenos de llanta, la superficie de contacto debe ser revisada para agujeros o ranuras. Algunas llantas tienen un indicador de desgaste en la superficie de contacto
del freno; Una vez que la llanta se desgaste hasta el indicador de desgaste debe ser reemplazado.
Una llanta desgastada o dañada puede fallar sin advertencia y causar que el piloto se estrelle.
Ruedas
• Compruebe que las ruedas estén fijadas dentro de la horquilla empujando desde cada lado. No deben deslizarse a lo largo del eje del
cubo.
• Use las manos para apretar el par de rayos vecinos. Si la diferencia de tensión del rayo se pronuncia, haga que su rueda sea igual.
• Asegúrese de que sus ruedas estén firmemente asentadas levantando cada extremo de la bicicleta y golpeando la rueda hacia la abertura
de la salida; El eje del eje debe permanecer en posición.
Sillín
Trate de girar el asiento a mano para asegurarse de que el sello y el asiento estén bien sujetos; No debe haber ningún movimiento en el
sillín.
A
AIRE
Compruebe la presión de
aire en sus neumáticos. Uti-
lice su pulgar para presionar
los neumáticos. Deben
sentirse agradables y firmes,
pero evitan el sobre-inflado.
B
BARRAS Y FRENOS
Revise los frenos apretando
las palancas y asegurándose
de que la bicicleta se detenga.
Compruebe que los cables de
freno no estén dañados y estén
desenredados.
Compruebe que las barras (ma-
nillar, manillar, extensiones del
manillar ) estén firmemente en su
sitio y no estén dañadas girando
el manillar hacia la izquierda y
hacia la derecha con la rueda
delantera entre las piernas.
C
CADENA Y CABLES
Verifiqué que la cadena gire
libremente a través de los
engranajes girando el manivela
hacia atrás y asegúrese de que
los cables no estén dañados
RÁPIDO
CIERRE RÁPIDO
Compruebe que los cierres
rápidos (ruedas, tubo del
asiento, manillar) y las
articulaciones (marco, ma-
nillar) estén correctamente
cerrados.
CAÍDA
DEJE CAER LA
BICICLETA
Levante la bicicleta unos
centímetros y déjela caer
al suelo. Si algo sacude
o vibra, haga los ajustes
antes de montar.
ABC Prueba Rápida de Caída
Diseñamos nuestras bicicletas para que puedan ser compañeras cotidianas. Sin embargo, recomendamos por seguridad esta prueba
antes de cada viaje:
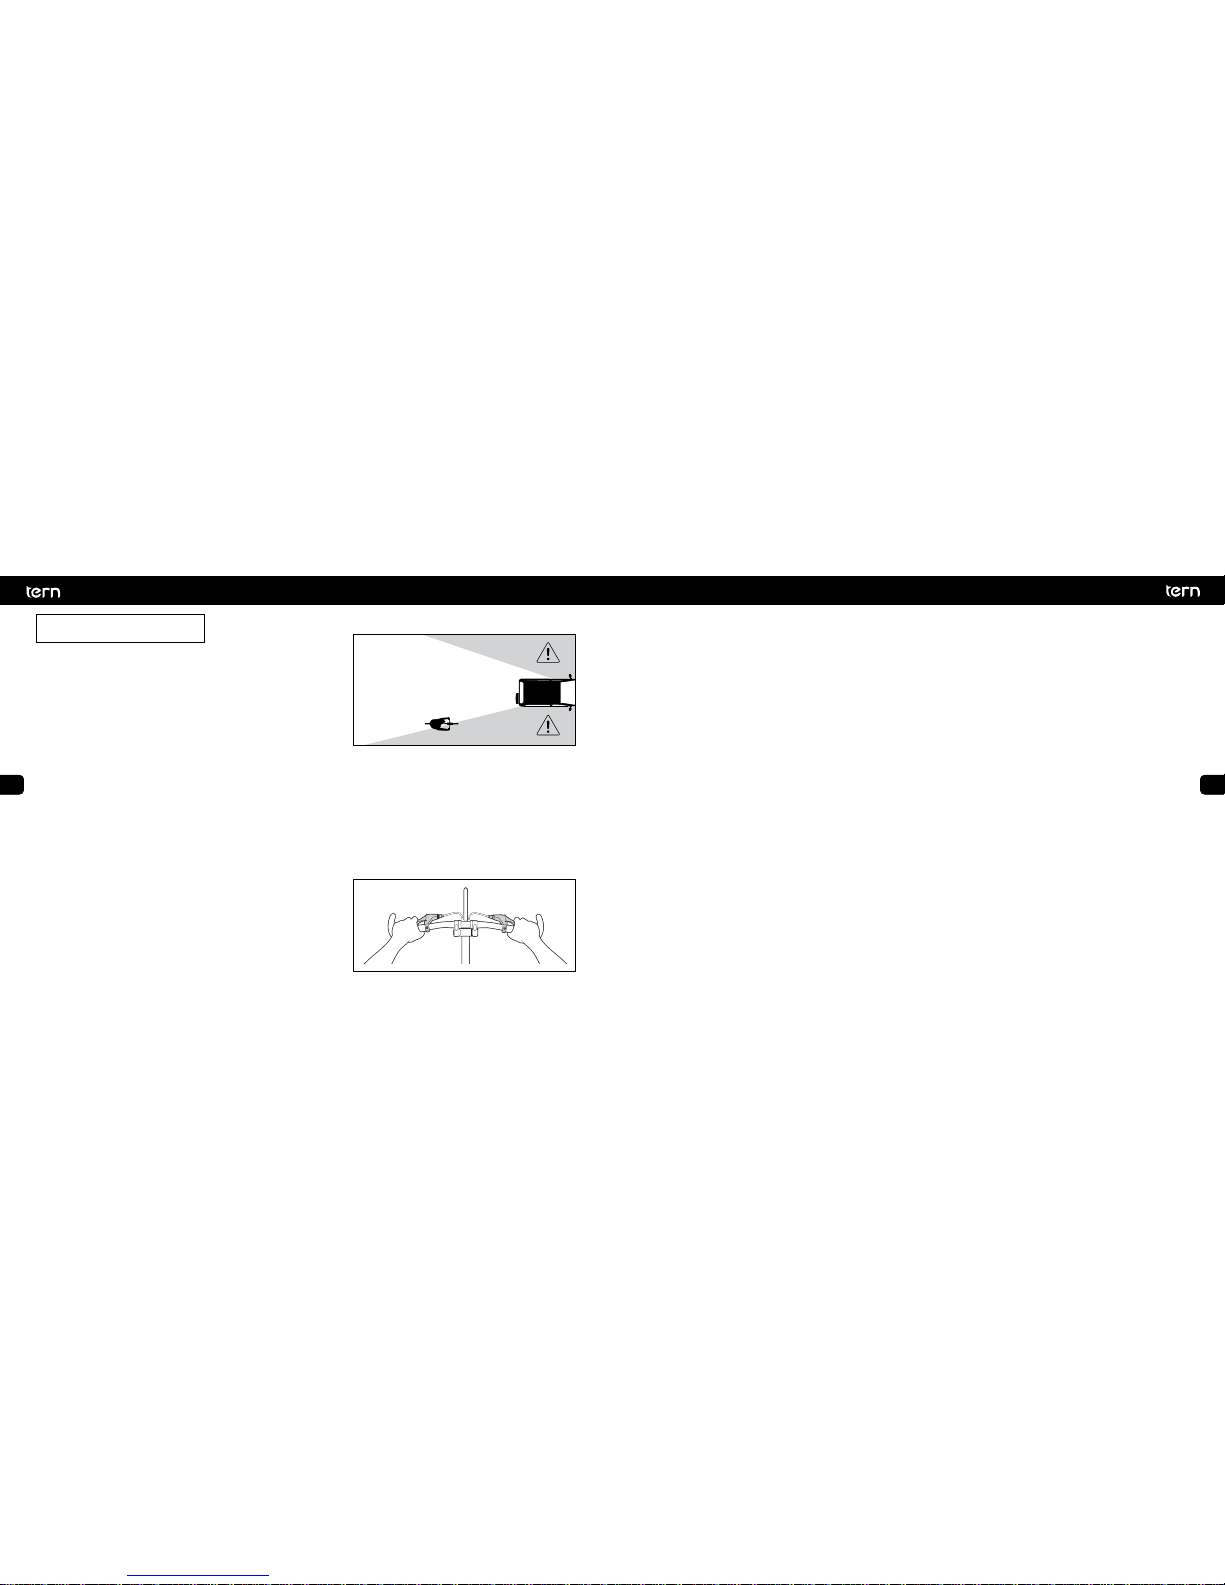
56
57
EN
ES
FR
IT
KO
EN
ES
FR
IT
KO
Mantén Tus Ojos en el Camino
Mantén tus ojos en la carretera Vigila si hay baches y otros peligros,
como puertas de un auto abriéndose, o niños jugando. Además, piensa
en tu propia visibilidad y trata de evitar entrar en los puntos ciegos del
conductor.
9. Viaja Seguro
Inclínate Hacia Atrás
Si frenas de golpe con el freno delantero, puedes volar sobre el manillar o tu rueda trasera pueden girar hacia fuera detrás de ti. Si tu
rueda trasera se levanta, inclínate hacia atrás y suelta el freno delantero ligeramente.
Ve Derecho
• Pasea con precaución y a la defensiva cuando haya visibilidad reducida. Tu movimiento puede dificultar la visibilidad por parte de los
otros conductores, por lo tanto maneja predeciblemente. (¡Oye, deberías manejar siempre de esta manera, independientemente de las
condiciones!)
• Utilice una campana, una bocina o su voz para indicar su intención de pasar y hacerlo con antelación para no asustar a la persona que
está pasando.
• Viaje en línea recta a menos que esté evitando peligros o pasando, y siempre indique su intención de dar la vuelta o pasar.
Despierta!
Necesita permanecer alerta cuando está montaro. No use auriculares que afecten su audición o gafas de sol si obstaculizan su visión. No
monte si ha consumido alcohol o está tomando medicamentos que afectan sus habilidades motoras.
Destácate entre la Multitud
Riding in low light or poor visibility, such as at night, dawn, dusk, in rain or in fog is much more dangerous than in daytime lighting
conditions. Wear bright colors and reflective gear.
Manténgase Limpio – Brilla Brillante
Pasear con poca luz o poca visibilidad, como por la noche, al amanecer, al anochecer, o bajo la lluvia y en medio de la niebla, es mucho más
peligroso que en condiciones normales de iluminación. No deje que sus hijos paseen en condiciones de poca luz. Los adultos que lo hagan
deben estar equipados con luces y reflectores.
Usar los Frenos
Ve con la corriente
La distancia de frenada aumenta con clima húmedo, por lo que debes frenar
más suave y con mas anticipación en la lluvia.
Tranquilo tigre
Para evitar el derrape al frenar o detener su bicicleta, tire de los frenos gradualmente. El derrape no lo retarda más rápido y no podrá dirigir bien, así
que debe ser evitado.
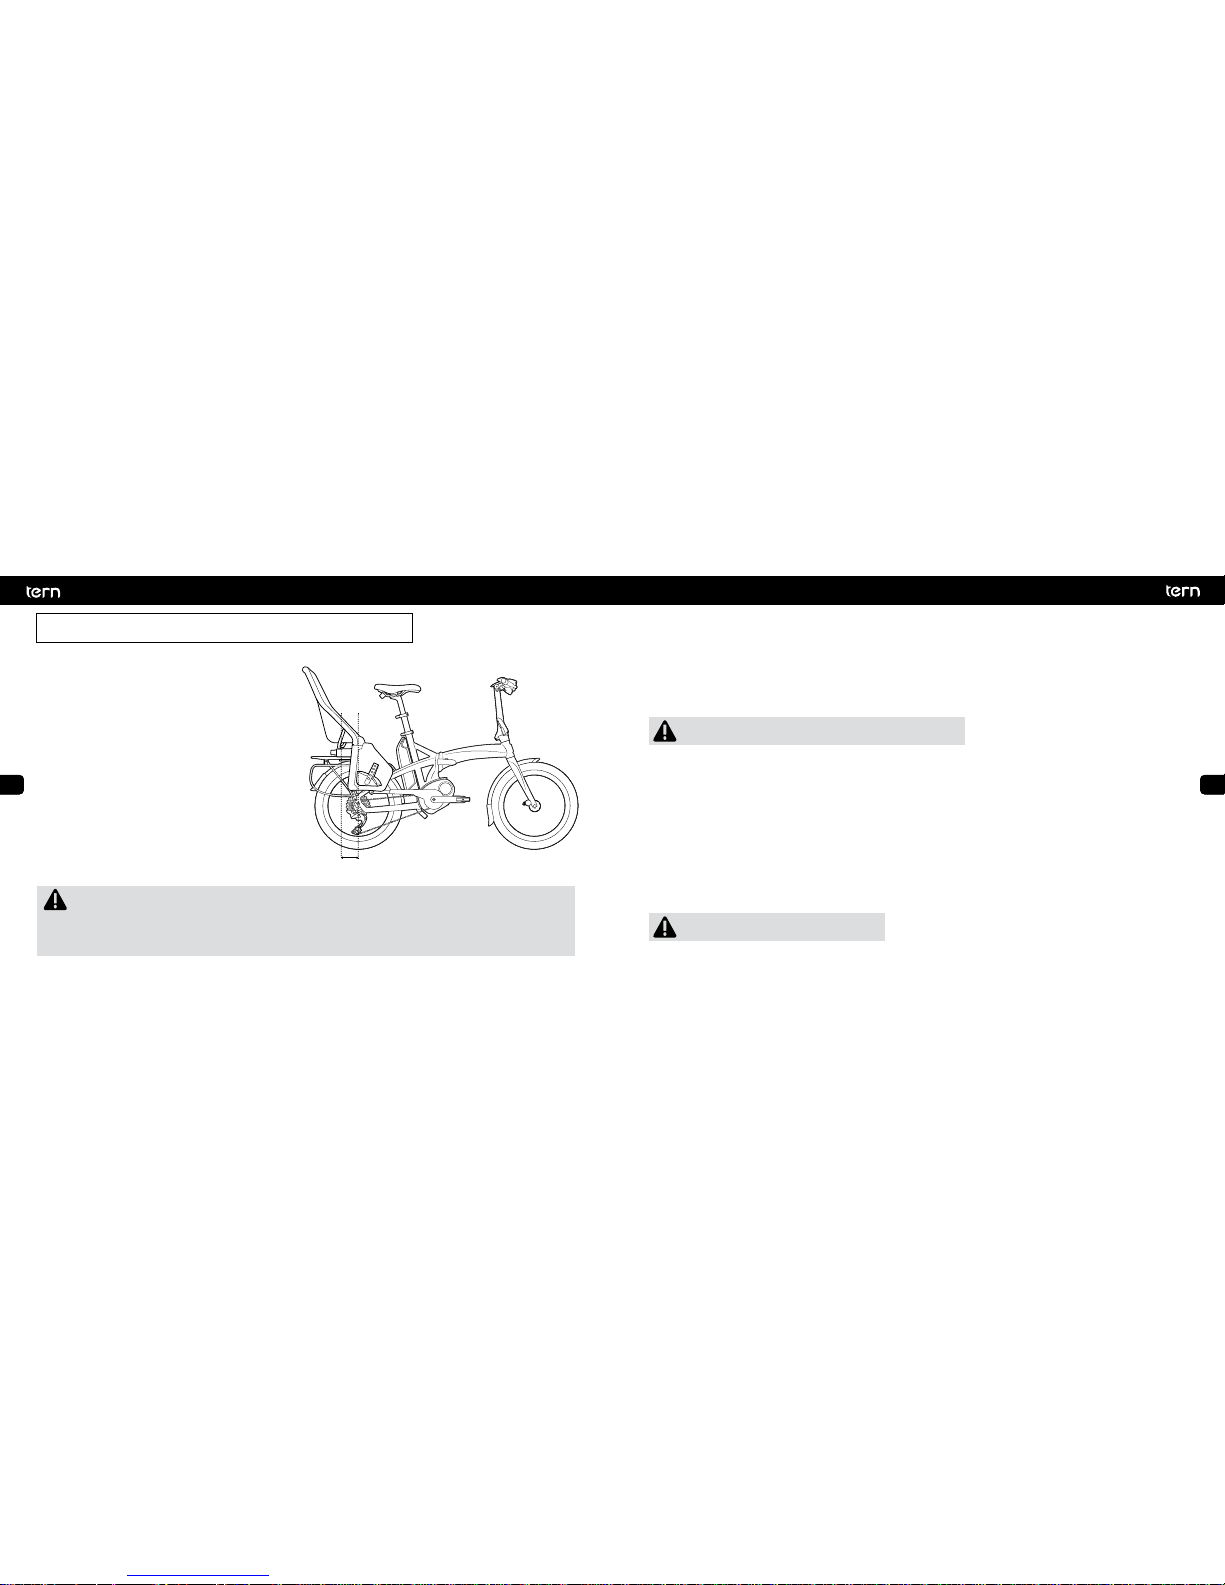
58
59
EN
ES
FR
IT
KO
EN
ES
FR
IT
KO
Montar con pasajeros, carga, o ambas, afecta el peso, equilibrio,
centro de gravedad y el manejo de su pedelec. Para su seguridad, lea las siguientes instrucciones.
Los cambios en el manejo
Una combinación de factores -incluyendo la rigidez estructural
del marco, resistencia de componentes individuales, el comportamiento de la dirección y la distribución del peso- afectan el
manejo de la bici. Cuando se conduce con una carga pesada,
la pedelec requerirá más esfuerzo para equilibrar y más tiempo
para frenar.
Existe una fuerte relación entre el peso del ciclista y la cantidad
de carga que el ciclista puede equilibrar y montar cómodamente. En la práctica, el peso de la carga no debe ser superior al
80% del peso del conductor.
familiarícese con el manejo de una pedelec cargada en un área
segura antes de montar en las vías públicas.
10. Pasajeros y transporte de Carga
• Si tiene una pedelec de utilidad, refiérase al Suplemento incluido en la pedelec de Utilidad para las guías específicas
de posicionamiento de peso y carga del conductor.
• No exceda la capacidad máxima de carga, que incluye el peso del conductor, el peso del pasajero, la rejilla trasera, el
asiento para niños y cualquier otro accesorio. Verifique la etiqueta del marco del CE en el marco del pedelec para el
límite máximo del peso.
Montar con niños
Puede instalar y utilizar un asiento infantil siempre y cuando su asiento y configuración cumplan los siguientes requisitos: (Basado en la
norma europea EN 14344 para asientos de niños de bicicletas):
• El asiento está diseñado para que cualquier contacto entre los pies del niño y la rueda sea imposible.
• La distancia entre el centro de la rueda y el centro de gravedad del asiento (indicado por el centro de gravedad del asiento del niño) no
debe ser inferior a 90 mm, ni superior a 100 mm. Esto evitará que la bicicleta y la rueda delantera se balanceen hacia arriba.
• Los dedos del niño están protegidos contra ser atrapados en cualquier parte de la silla de montar (como los resortes de las sillas de
suspensión).
• El soporte (bastidor) está aprobado para el montaje de asientos para niños.
El asiento para niños NO debe montarse o fijarse al soporte del sillín.
Asiento infantil aprobado
Yepp Maxi Easyfit fue testeado para trabajar con la Tern pedelec con bastidores integrados o bastidores de carga de Tern.
Seguridad y Precaución
Los niños - independientemente de la edad - deben ser lo suficientemente fuertes como para sostener su cabeza y soportar el rebote del
manejo.
Compruebe si hay suficiente espacio entre talón y el asiento para niños, esto varía por el tamaño del pie del ciclista y la longitud de la pierna
del niño.
Asegúrese de que el asiento esté montado correctamente de acuerdo con las instrucciones del fabricante.
Asegúrese de que no se exceda el peso bruto máximo.
Asegúrese de que nada pueda quedar atrapado en los radios de las ruedas, los rieles de la silla de montar y los resortes.
Asegúrese de que el niño está usando un casco y las correas se ajusten.
Siempre sostenga su pedelec cuando un niño está en el asiento infantil para evitar que su pedelec y el niño se caigan.
Revise periódicamente al niño mientras está montado, ya que pueden quedarse dormidos. No deje que su cabeza se extienda
excesivamente hacia un lado.
No utilice remolques para transportar a los niños.
Menos de 90 mm

60
61
EN
ES
FR
IT
KO
EN
ES
FR
IT
KO
Cuando cargue su pedelec con el pata de apoyo hacia abajo, no exceda el límite de peso máximo de la pata de apoyo.
Montar con un pasajero
Si usted tiene un Ter pedelec de utilidad , está diseñado para transportar
un pasajero adulto si:
El pasajero puede montar a horcajadas sobre su pedelec y descansar
adecuadamente sus pies en las clavijas de pie o plataformas de pie.
Tiene un asiento firmemente atado al marco del pedelec (el cojín del
asiento de Tern Sidekick? Satisface este requisito).
Hay un espacio para que el pasajero descanse sus pies (el Tern
Sidekick™ Lower Deck y los Soportes para Pies Sidekick™ se
complementan con esta necesiadad)
Soporte para pies
Los soportes para pies como el Tern Sidekick™ Lower Deck y los Soportes
apra pies SideKick™ estan dieñados para que los pasajeros descansen sus
pies cuando estan sentados en el portapaquetes.
Pie de apoyo y peso estacionado
Si su pedelec está equipado con un caballete, puede facilitar la carga y
descarga. Sin embargo, tenga en cuenta el límite de peso máximo de la
horquilla.
No se siente en el pedelec con la pata de apoyo hacia abajo. Esto puede dañar el
caballete y la montura del caballete en el marco de su pedelec.
Puede llegar a ser ilegal transportar pasajeros en un
pedelec en su área, incluso si ha sido diseñado o adaptado
para hacerlo. Compruebe las regulaciones locales antes de
transportar pasajeros.
No te pares en los soportes para pies
Para obtener una lista de las capacidades de peso máximo con la pata de apoyo, vaya a: https://www.ternbicycles.com/support/techtips/
maximum-weight-capacity
Montar con carga
Si la parte trasera de su pedelec está completamente cargada, pruebe que la rueda delantera no se levante y haga que la punta de si
pedelec se vuelque.
Posicionamiento de Carga
Coloque la carga de modo que el centro de gravedad esté lo más cerca posible de la línea central del pedelec. Asegure la carga lo más
cerca posible de la parte delantera del bastidor.
Equilibre la carga. Por ejemplo, al llevar una caja, usted debe tratar de llevar dos si es posible (uno a cada lado). Las cargas inclinadas
pueden tirar la pedelec hacia un lado.
Asegurar la carga
Asegúrese de que su carga esté asegurada con correas clasificadas para el peso de su carga.
Compruebe la interferencia
Asegúrese de tener suficiente espacio para sentarse correctamente, pedalear y conducir su bicicleta sin interferencias.
La carga no debe interferir con el funcionamiento normal de los frenos y el los desviadores.
Los objetos largos o grandes deben colocarse lo suficientemente lejos de los pedales para evitar golpes en el talón.
Los objetos altos o grandes en la parte delantera de la bicicleta no deben bloquear su visión.
Si no puede colocar la carga para cumplir con todos los requisitos anteriores, no trate
de montar con carga!

62
63
EN
ES
FR
IT
KO
EN
ES
FR
IT
KO
Transporte Público
Las Pedelecs pueden ser transportadas generalmente en trenes y transporte público, como las bicicletas convencionales. Por favor,
consulte con el ferrocarril o el operador de transporte público para los requisitos específicos:
• Algunos operadores requieren pre-reservar un espacio y comprar un boleto separado para tu pedelec.
• Algunos permiten viajar con su pedelec sólo durante las horas no pico.
• Algunos requieren una cubierta para ser colocado en el pedelec.
Avión
• Las baterías usadas en pedelecs se consideran potencialmente peligrosas y no pueden ser transportadas en aviones.
• Pregunte a su promotor local si puede enviar la batería por separado.
Auto
• Su Tern puede ser transportado con un techo estándar o un soporte de bicicleta montado en la parte trasera siempre y cuando se
encuentre bajo la capacidad de carga máxima del portabicicletas. Para reducir el peso, retire la batería de su Tern y colóquela en el
interior del vehículo.
• Sugerimos que transporte su Tern dentro de su vehículo si maneja un hatchback o tiene suficiente espacio en el maletero. Tenga
cuidado de no dañar el Derailleur.
• Al entrar en una estructura de estacionamiento o garaje, tenga en cuenta la pedelec en el techo del automóvil y asegúrese de que es
inferior a la altura de altura máxima.
11. Transportando tu Tern
Concepto
Las bicicletas eléctricas de pedal asistido o pedelecs están equipados con un motor eléctrico que proporciona asistencia cuando se está
pedaleando la bicicleta. La ayuda es activada por un sensor de acción de pedal diseñado para detectar cuando el pedal está siendo girado.
En Europa, los pedelecs están limitados a 25 km / h (15 mph). En los Estados Unidos, el límite es de 32 km / h (20 mph). La asistencia es
cortada por encima de las velocidades designadas.
El controlador permite seleccionar el grado de potencia asistida por el motor desde el modo económico al deportivo, lo que le permite
adaptar el rendimiento de la moto para adaptarse a su estilo específico y topografías de carreteras.
Tu Tern debe usar el motoren el cuerpo del cuadro o en la maza. Vea el siguiente diagrama:
Otras Características de las Pedelec
Ayuda de Paseo
Las pedelecs seleccionadas de Tern vienen con una función de caminata. Permite que el usuario empuje la bicicleta con menos esfuerzo.
Esto es beneficioso para ciertas condiciones de caminos, tales como ir cuesta arriba. La asistencia se limita a la velocidad de marcha. Consulte las instrucciones del fabricante del motor para obtener más detalles
12. ABCs de la Pedelec
Rear Hub Mid Motor
Front Hub
Buje Trasero Motor Central Buje Delantero

64
65
EN
ES
FR
IT
KO
EN
ES
FR
IT
KO
Iluminación
Su Tern pedelec viene con iluminación delantera y trasera accionada directamente por la batería a bordo. Utilice las luces de acuerdo con las
normas locales de la carretera.
Batería
• Su Tern pedelec está equipada con una batería de iones de litio. Las baterías de iones de litio modernas tienen más de 500 ciclos de
descarga completa antes de que disminuyan su capacidad. La batería no tiene un efecto de memoria por lo que puede cargar la batería
en cualquier momento y no tiene que esperar hasta que la batería se agota por completo antes de cargar de nuevo. Si va a dejar de usar
la bicicleta por más de un mes, cargue la batería a un 80% antes de guardarla. Nunca drene completamente la batería y déjela sin carga
durante un período de tiempo prolongado ya que esto podría dañar la batería permanentemente.
• Utilice únicamente el cargador original del fabricante de la batería. No utilice otro cargador, incluso si el enchufe encaja.
• Cuando la batería de su Tern haya llegado al final de su vida útil, debe tratarse como material de desecho peligroso y no debe desecharse
en la basura normal del hogar. Consulte a su distribuidor para obtener consejos sobre la eliminación adecuada.
Manipular el Sistema del motor
Información Adicional
Por favor lea los manuales adjuntos del fabricante de la unidad para obtener información sobre:
• Manejo y operaciones de control.
• Manejo correcto del cargador y la batería.
• Solución de problemas.
• Mantenimiento.
• Limpieza.
Las baterías no deben eliminarse en vertederos o por incineración
Cuando la batería de su Tern haya llegado al final de su vida útil, debe tratarse como material de desecho peligroso y no
debe desecharse en la basura normal del hogar. Consulte a su distribuidor para obtener consejos sobre la eliminación
adecuada.
Bloqueo de la batería
Su Tern pedelec puede estar equipada con un bloqueo de batería. Siempre
bloquee la batería en su lugar antes de montar y guarde las llaves en un
lugar seguro. Si pierde las llaves, póngase en contacto con el distribuidor de
Tern local para obtener el servicio de recuperación de llaves.
Cargando
Su Tern pedelec viene con un cargador de batería compatible con el voltaje
de su país. Para obtener más información sobre el uso y la seguridad, consulte las instrucciones del fabricante del motor.
Configuración de varias baterías
Si su pedelec permite el uso de más de una batería, lea las instrucciones a
continuación.
Carga en bicicleta
Si las dos baterías están instaladas, cargue con un solo cargador. Las baterías
se cargarán simultáneamente.
Conecte el cargador al puerto de carga adyacente al motor. El puerto trasero
está sellado para evitar el uso de ambos puertos simultáneamente.
Carga de bateria off
Cada batería se puede cargar individualmente si se quita de la pedelec.
Tapa del terminal
Al montar la bicicleta en la configuración de una sola batería, asegúrese de
cubrir el terminal expuesto con la tapa del terminal de enchufe suministrado
para proteger los circuitos.

66
67
EN
ES
FR
IT
KO
EN
ES
FR
IT
KO
Conducir sin Asistencia Eléctrica
Su Tern está diseñado para ser montado normalmente como una bicicleta convencional si la asistencia de energía está apagada. Si usted
va cuesta abajo o quiere ampliar su alcance puede apagar la asistencia, pero mantener la pantalla encendida para ver su velocidad. Sin
embargo, si la batería se vacía durante el viaje, las luces no funcionarán ya que están conectadas a la batería del motor.
Si su Tern está equipado con una luz Valo Direct, puede comprar el cable Tern spade USB y conectarlo a un banco de alimentación USB
para encender la luz con el fin de no viajar en la oscuridad. El banco de energía debe indicar cuánto energía permanece y proporcionarle
una alarma visual (como un parpadeo) cuando el nivel de potencia es bajo (menos del 20%). Verifique empíricamente que haya suficiente
energía para la duración de todo su paseo, después de que el indicador bajo se haya encendido.
Rango de Batería
El rango varía dependiendo de factores tales como:
Velocidad promedio de conducción
Cuanto más rápido se vaya, más energía se requiere y más rápido se agotará la batería. Sin embargo, si se conduce más rápido que la
velocidad de asistencia máxima, la asistencia del motor se apagará completamente y el motor no drenará la batería.
Nivel de asistencia utilizado
La mejor manera de conservar la energía de la batería es el esfuerzo de pedaleo! Utilizar menos asistencia y ejercer más esfuerzo en el
pedaleo disminuirá el consumo de energía de la batería y resultará en un rango más largo.
Mantenimiento general
Mantenga la presión de los neumáticos correctamente ajustada. Mantenga y lubrique las partes móviles.
Tráfico Pare y Siga
Iniciando desde parada necesitará siempre más energía. Para ampliar su alcance, inicie en modo Eco.
Peso y cadencia del conductor
El motor consumirá más energía para los conductores más pesados. Mantener una cadencia de al menos 60 rpm será más eficiente.
Condiciones de la carretera (superficie de la carretera, terreno, viento)
Caminos sin pavimentar (suciedad, grava), vientos de frente y subir cuesta arriba reducirán su alcance.
Comenzando
Cuando el controlador está encendido, el asistente de potencia se aplicará inmediatamente cuando pise el Pedal. Por lo tanto, se recomienda montar su Tern con el controlador apagado. Después de que usted está sentado, asegúrese de que no hay peso en los pedales para
evitar el movimiento accidental, a continuación, encienda el controlador. Comience en el nivel más bajo de asistencia.
Algunos sistemas de motores le piden que no ponga peso en los pedales antes de encender para que puedan restablecerse correctamente.
Seleccionando el Nivel Correcto de Asistencia
No conduzca únicamente en alta velocidad con asistencia del motor. Cambie las velocidades como lo haría en una bicicleta convencional
para mantener una cadencia eficiente para su estilo de conducción. Esto maximizará la eficiencia de la asistencia a su entrada de energía.
Por ejemplo, con un sistema de motor Bosch Mid-Drive, mantener su cadencia constantemente a aproximadamente 90 rpm, independientemente de la velocidad, garantizará que el motor le está ayudando de manera más eficiente.
Conducir con Ayuda de Energía del Motor
Cuanto pedalees determina cuanta asistencia proporciona el motor. Todas los pedelecs tienen un algoritmo de control interno para dejar
de asistir tan pronto como dejes de pedalear. Se trata de una característica de seguridad incorporada conforme a EN 15194 (EPAC - Electric
Assisted Cycles).
Al doblar en una esquina, deje de pedalear antes de lo que está acostumbrado, de lo contrario, puede tener demasiada velocidad a través
del giro.
Como es probable que viaje a una velocidad media por encima de la velocidad, mire el hacía arriba el camino y esté listo para frenar cuando haga falta.
Debido a la naturaleza casi silenciosa de un motor eléctrico, los peatones y otros ciclistas pueden no oír cuando usted se acerca.
Conduce con cuidado, usa ropa brillante, señala sus intenciones, y utiliza su campana cuando sea necesario.
13. Tips para Montar en una Pedelec

68
69
EN
ES
FR
IT
KO
EN
ES
FR
IT
KO
Siendo Realistas
Cuando sustituya componentes, tales como la estructura, la horquilla, los neumáticos, los frenos, las luces delanteras y traseras, el pedal, el
manubrio, el manillar, el vástago, la unidad motriz, la batería o la unidad / pantalla de control, etc., utilice las partes originales o los remplazos aprobados por Tern. Se prueban para asegurar que funcionan de manera segura en su Tern pedelec. Le recomendamos que visite un
distribuidor de Tern para reparaciones y piezas.
Mantén Tente Reluciente
Recuerda que debes mantener y lubricar tu bicicleta usando lubricantes apropiados. Pregunta a tu distribuidor por las ubicaciones y periodicidad de la lubricación.
Aire
• La rueda de la bicicleta tiene un buje (1), radios (2), una llanta (3), un
neumático (4), una válvula (5), y eje de buje (6).
• La válvula puede ser tipo Schrader (7) o tipo Presta (8). Las válvulas
Presta también tienen un tapón de la válvula (9) que se debe aflojar
antes de inflar.
• Comprueba que el neumático esté inflado con la presión adecuada.
• Comprueba que el neumático no esté deteriorado.
14. Servicio
Capacidad de la batería
• Las baterías, medidas en vatios-hora, tienen diferentes capacidades de energía. En general, cuanto más vatios-horas, más larga la distancia, más cara es la batería y más pesada es su pedelec.
• La temperatura ambiente puede tener un impacto significativo en la capacidad de la batería. La capacidad de la batería se prueba a
una temperatura de referencia de 23°C (73F). Las grandes desviaciones de la temperatura de referencia drenarán la batería más rápidamente debido a cambios en la resistencia interna y acortarán la gama.
• A medida que la batería envejece, disminuye la capacidad original. Esto es una verdad para todas las baterías, pero algunos químicos
duran más que otros.
Siempre puede compr obar la cantidad de carga que queda en la batería desde la pantalla de control.
Nuestra Tern tiene muchas piezas y componentes avanzados. Muchas tareas de reparación y servicios de bicicletas
requieren conocimientos y herramientas especiales. No comience ningún ajuste o servicio en su bicicleta a menos
que pueda completarlos adecuadamente. Un ajuste o servicio inadecuado puede causar daños a la bicicleta o causar
lesiones graves. Consulte con su distribuidor si necesita ayuda.
Las acciones de servicio que usted puede (y debe) realizar no requieren herramientas o conocimientos especiales más
allá de lo que se presenta en este manual. Se enumeran a continuación:

70
71
EN
ES
FR
IT
KO
EN
ES
FR
IT
KO
Tensión de Cadena
La cadena sufre fuertes fuerzas de tensión al pedalear. Para un cambio óptimo y eficiencia, la Cadena debe conectarse correctamente con los dientes.
Para comprobar la excesiva soltura de la cadena, cambie al engranaje más
pequeño del piñón para crear mayor cantidad de soltura en la cadena. La
tensión de la cadena debe estar entre 10 y 20 mm por lapso. Esta cantidad de tensión es igualmente aplicable a todos los cambios internos de la
cadena.
Nota: La tensión de la transmisión de la correa es más complicada y debe
ser atendida por los concesionarios.
La soltura excesiva puede ser causada por una Cadena que está desgastada y estirada. Una cadena estirada no se fijará correctamente en
los dientes. Con el tiempo, el espacio entre los dientes de los piñones se hace mayor, reflejando la forma de la Cadena. El reemplazo de
una Cadena cuando está desgastado ayudará a extender la vida de los piñones y los platos que son más caros.
Para los cambios internos, la soltura excesiva puede deberse a un desajuste de la posición de la rueda trasera con respecto a la desviación.
Si no está seguro si la soltura de la cadena es debido al desgaste de la cadena o al desajuste de la rueda, lleve su bicicleta al distribuidor
para realizar reparaciones.
Limpieza
Cuando su Tern necesita limpieza, use un balde de agua y suavemente esponja de la suciedad acumulada y la sal de su bicicleta. Secar su
Tern después de la limpieza para evitar la oxidación.
Frenos
Asegúrese de que los frenos estén funcionando con la potencia de parar adecuada. Las palancas deben dejar de tocar el manillar.
Pasear con los frenos mal ajustados o desgastados es peligroso y puede causar lesiones o la muerte. Lee las instrucciones
del fabricante de los frenos para el mantenimiento y la operación de tus frenos, mantén las superficies de freno limpias y
libres de aceite o lubricantes. Reemplaza las zapatas de los frenos desgastados con repuestos homologados.
Cadena, Bielas y Cables
El motor de una bicicleta tiene un eje interno (A) o externo (B). El sistema se compone de las bielas (1), plato (2),Piñón Trasero(3) o piñones
(4), cadena (5), desviador delantero (6) y desviador trasero (7). Los engranajes de la bicicleta se numeran a partir de 1 hacia arriba, siendo 1
el engranaje más bajo y más fácil.
Los engranajes inferiores se utilizan para escalar y los más altos para descender. Le recomendamos practicar el cambio de marchas en un
lugar seguro
Para comprobar que tu cadena engrana completamente con el anillo de la cadena, gira las bielas y asegúrate de que no son visibles interrupciones o torceduras.
Antes de manejar, acciona los cambios a través de todas las marchas y asegúrate de que la cadena y el desviador funcionan perfectamente.
Si tus marchas al cambiar presentan problemas, te recomendamos que consultes con tu distribuidor. Si el desviador trasero está funcionando mal, no uses las coronas mayor ni menor, ya que la cadenilla o la rueda pueden atascarse.
12
3
5
1
2
4
5 67
A
B
No limpie su Tern utilizando un aerosol o vapor a presión porque el agua puede ser forzada a entrar en áreas selladas y
dañar su bicicleta.
Comprueba que todos los cables y cubiertas estén libres de óxido, grietas y roeduras, y que funcionen bien, reemplázalos si están dañados.

72
73
EN
ES
FR
IT
KO
EN
ES
FR
IT
KO
Liberación Rápida y Sujetadores
Compruebe que los cierres rápidos y las tuercas y pernos importantes que mantienen sus ruedas, manillar y sillín en su
lugar estén bien cerrados y apretados correctamente. Una fuerza de apriete correcta es vital. Poca fuerza y el sujetador
pueden no sujetarse firmemente. Demasiada fuerza y el sujetador puede quitar las roscas, estirarse, deformarse o romperse. De cualquier manera, un apriete incorrecto puede resultar en un fallo del componente y causar pérdida de control
y accidentes. Consulte la sección 15 para conocer los valores de par correctos. Si no está seguro, visite a su distribuidor y
pídales que le muestren la manera correcta.
Cualquier otra reparación o mantenimiento que no se describe específicamente en este manual debe ser realizado por
su distribuidor.
Es muy Importante el Esfuerzo de Torsión
Los valores de esfuerzo de torsión son las medidas estándar de cuánto debe apretarse un tornillo y se encuentran al final
de este manual. Cuando se da un valor de esfuerzo de torsión, debes usar una llave medidora de torsión (torque) para
asegurarte de que aplicas el esfuerzo de torsión correcto.
Valores de Esfuerzo de Torsión (Torque)
Cuadro y horquillaand Fork
Componente libras pulgada Newton Metro (Nm) kilográmetros centímetro
Tornillo de montaje del soporte 53-60 6-8 61-69
Tornillo de montaje del portabidón 25-35 2.8-4 29-40
Tornillos del bastidor 25-35 2.8-4 29-40
Tornillos de la defensa 50-60 5.6-6.8 58-69
15. Ajustes de Torque
Cierre Rápido
El cierre rápido utiliza una acción sobre el centro del árbol de levas para sujetar el componente en su lugar y de esta forma permite una
extracción fácil y sin herramientas.
Un cierre rápido tiene una abrazadera (1), una tuerca (2) y una palanca (3). El extremo cóncavo se cierra hacia el interior
La tuerca le permite ajustar la fuerza de sujeción. Cerrando la palanca a medida que pasa el punto central requiere fuerza creciente. Esta
fuerza debe requerir que usted use la palma de su mano.
Los cierres rápidos mantienen las ruedas, el poste del asiento y el manillar en su lugar.
Cuando se ajusten las ruedas, el cierre rápida debe realzar las desviaciones de las horquillas.
Cuando se aprieta el porta asiento, el porta asiento no debe girar.
Cuando se aprieta en el manillar, el manillar no debe girar.
Cuando la palanca esté cerrada, colóquela de manera que no pueda abrirse accidentalmente durante el desplazamiento.
Los cierres rápidos son muy convenientes pero muchos accidentes ocurren debido al mal uso. Un ajuste inadecuado
puede causar daños a la bicicleta o un accidente que puede causar lesiones graves o la muerte.
23
1
Cerrada
Ajustar
Abierta

74
75
EN
ES
FR
IT
KO
EN
ES
FR
IT
KO
Intervalos de Servicio
Irrumpir
Todas las bicicletas pasan por un periodo de adaptación.Su bicicleta durará más tiempo y funcionará mejor si espera antes de montarla de
manera más dura. Recomendamos que todos los conductores obtengan un ajuste rápido un mes después de la compra para que el concesionario pueda ajustar los cables y otras partes clave.
Programa de mantenimiento
Su bicicleta necesita un ajuste regular por un distribuidor de Tern autorizado. A continuación, se muestra nuestra frecuencia de ajuste
recomendada en función de la frecuencia con la que circule y en qué condiciones.
Tipos de Conductores
PESADO
Frecuencia de ajuste
Mensual
Realiza paseos de 25 km (15
millas) o más diarios
Realiza paseos en cualquier
condición climática
Realiza paseos en carreteras
con baches
Carga 105 kg (230 lb) o
menos en la bicicleta, incluyendo el peso del ciclista
FRECUENTE
Frecuencia de ajuste
Bimestral
Realiza paseos 3 o 4 veces
por semana o un promedio
de 100 km (62 millas) por
semana
A veces realiza paseos en
clima húmedo
Realiza paseos en carreteras
con baches
Carga 105 kg (230 lb) o
menos en la bicicleta, incluyendo el peso del ciclista
RECREATIVO
Frecuencia de ajuste
Cuatrimestral
Realiza paseos una o dos
veces por semana
Realiza paseos en climas
seco o lluvias ligeras ocasionalmente
Siempre realiza paseos en
senderos de bicicleta suave
o carreteras pavimentadas
Carga 105 kg (230 lb) o
menos en la bicicleta, incluyendo el peso del ciclista
DÓCIL
Frecuencia de ajuste
Anual
Realiza paseos una o dos
veces por semana
Solo conduce con clima
seco
Siempre realiza paseos en
senderos de bicicleta suave
o carreteras pavimentadas
Carga 105 kg (230 lb) o
menos en la bicicleta, incluyendo el peso del ciclista
16. Cronograma de Servicio y Mantenimiento
Frenos and Fork
Componente libras pulgada Newton Metro (Nm) kilográmetros centímetro
Maneta de freno (barra plana) 53-60 6-6.8 61-69
Maneta de freno (barra caída) 55-80 6.2-9 63-92
Rotor del disco al buje (tornillos M5) 18-35 2-4 21-40
Soporte de la pinza 55-70 6.2-7.9 63-81
Ruedas and Fork
Componente libras pulgada Newton Metro (Nm) kilográmetros centímetro
Buje de rueda libre 305-434 34.5-49 352-499
Virola Sprocket 260-434 29.4-49 299-499
Tuercas eje delantero 180 20.3 207
Tuercas eje trasero 260-390 29.4-44.1 299-449
Transmisión por Cadena and Fork
Componente libras pulgada Newton Metro (Nm) kilográmetros centímetro
Pedal en la biela 307 34.7 353
Tornillo de la biela (incluidos los ejes de estrías y ejes cuadrados) 300-395 33.9-44.6 345-454
Eje del pedalier (revestimiento externo) 610-700 40-50 702-805
Eje del pedalier (cartucho y copa y cono) 435-610 49.1-68.9 500-702
Otros and Fork
Componente libras pulgada Newton Metro (Nm) kilográmetros centímetro
Tornillo de la abrazadera del tubo de dirección (Vástago) 70-89 8-10 80-102
Tornillo tapa superior 35-53 4-6 41-62
Tornillos abrazaderas manillar (4 tornillos abrazaderas) 36-53 4-6 41-62
Abrazadera del riel del sillín 70-89 8-10 80-102
Relación : 1 Newton metro = 8.9 libras pulgadas = 10.2 kilográmetros centímetro

76
77
EN
ES
FR
IT
KO
EN
ES
FR
IT
KO
Sello/Firma del distribuidor
Inspección 4
Fecha
Trabajo Realizado
Piezas Reemplazadas o Reparadas
Sello/Firma del distribuidor
Inspección 5
Fecha
Trabajo Realizado
Piezas Reemplazadas o Reparadas
Sello/Firma del distribuidor
Inspección 6
Fecha
Trabajo Realizado
Piezas Reemplazadas o Reparadas
Service Record
Sello/Firma del distribuidor
Inspección 1
Fecha
Trabajo Realizado
Piezas Reemplazadas o Reparadas
Sello/Firma del distribuidor
Inspección 2
Fecha
Trabajo Realizado
Piezas Reemplazadas o Reparadas
Sello/Firma del distribuidor
Inspección 3
Fecha
Trabajo Realizado
Piezas Reemplazadas o Reparadas
Al mes de haber realizado la
compra o 200 km alcanzados

78
79
EN
ES
FR
IT
KO
EN
ES
FR
IT
KO
digital o física, debe ser proporcionada con cualquier solicitud de garantía. Todas las bicicletas Tern deben estar registradas a través de Tern
Care antes de que pueda ser procesado un reclamo de la garantía.
Además, el Dueño debe confirmar que ha recibido las Instrucciones del Dueño por parte del Dealer o que ha visto el video de Instrucciones
del Dueño en ternbicycles.com/support.
Exclusiones
Esta garantía no cubre daños y/o defectos que se produzcan bajo las siguientes condiciones:
• Si una bici ha sido utilizada, montada, manipulada, mantenida o sobrecargada de una manera que no cumple las especificaciones del
producto, el uso previsto o las recomendaciones en el Manual del Dueño. Esto incluye, pero no esta limitado a, uso off-road.
• Uso y desgaste normales. Las partes están sujetas a un tiempo de vida variable dependiendo del uso, carga, clima, condiciones del terreno, etc.
• Las terminaciones de pintura son consumibles y no son parte de la garantía.
• Si una bici o parte ha sida re ensamblada, reparada o mantenida por personal no autoizado por Tern.
• Si una bici ha sido expuesta al fuego, inundaciones, daños accidentals, acciones inapropiadas por parte de terceros, y/o cualquier evento
fuera del control de Tern.
• Modificación del cuadro, horquilla, manubrio o components.
• Instalación de partes, accesorios, unidades motorizadas o baterías que originalmente no están destinadas o son compatibles con la bicicleta vendida.
• Si el número de cuadro y/o etiqueta de servicio en la bici han sido despegados, modificados o manipulados o no están claramente identificables.
Soporte de Garantía Tern
Tern se compromete a reparar o reemplazar cualquier pieza que manifieste un defecto en materiales o mano de obra durante el período de
garantía. Cualquier pieza que se sustituya de conformidad con esta garantía, será reemplazada por piezas del mismo diseño o similar, sin
embargo, Tern se reserva el derecho a reemplazar las piezas defectuosas con otras piezas de diferente diseño o color, fabricados por o en
nombre de Tern, siempre que dicha sustitución no reduzca la función de la pieza original.
Debido a la evolución de productos y antigüedad, algunas piezas no estarán disponibles para modelos anteriores. En estos casos, los pagos
y responsabilidades por los componentes serán responsabilidad del propietario.
Tern puede, a su discreción, reparar o reemplazar piezas defectuosas fuera del período de garantía, pero tal trabajo no será considerado
una responsabilidad.
Garantía Tern Limitada
Las bicicletas Tern son vendidas bajo el nombre de nuestra compañía (“Tern”) por Dealers Tern Autorizados quienes entienden el ensamblado y servicios requeridos por nuestros productos. Tern provee una garantía contra defectos en materiales y manufactura en favor del
comprador minorista (“Dueño”) de una bicicleta Tern desde el día de compra de acuerdo a los siguientes términos:
Cinco años: Marco, Manubrio y Horquilla.
Un año: Todas las piezas originales bajo las marcas Tern o BioLogic, excepto las que se indican más adelante.
Cualquier otra pieza o componente original cubierto por la garantía del fabricante original para dicha pieza o componente.
Garantía Extendida de 10 Años
Los dueños que se registren en Tern Care en ternbicycles.com estarán cubiertos por una garantía extendida de 10 años en Marco, Manubrio y Horquilla, mientras se registren dentro de los treinta días luego de la compra y sean los compradores originales. Además, la bici
debe estar ensamblada por un Dealer Tern Autorizado al momento de la compra-independientemente del clima, o si fue comprada en una
Tienda física u online.
Los sigueintes items están excluidos de la garantía extendida de 10 años:
• Bisagras de Manubrio y Marco
• Terminaciones de pintura
• Bicis para uso comercial
La garantía no implica que el Marco, el Manubrio y la Horquilla sean indestructibles. Todos los materiales pueden fallar si son exigidos
más allá de los límites de diseño y manufactura. Simplemente significa que estos items están cubiertos bajo los términos específicos de la
garantía limitada.
Responsabilidad del Propietario
El propietario debe demostrar cuidado y uso razonables, y realizar mantenimiento preventivo, almacenamiento, y programas de lubricación
tal y como sea requerido por el uso, el clima y otros factores pertinentes. En caso de que se advierta un defecto del producto, el propietario
debe dejar de montar la bicicleta y transportar la bicicleta o pieza(s) desde y hacia un Dealer Tern Autorizado para su reparación por garantía (en el pedido de garantía). El transporte de la bicicleta o cualquier pieza de la bicicleta es responsabilidad del propietario.
Todos los reclamos a esta garantía deben hacerse a través de un Dealer Autorizado o un exclusivo de Tern. La prueba de compra, ya sea
17. Garantía

80
81
EN
ES
FR
IT
KO
EN
ES
FR
IT
KO
De acuerdo con la Directiva 2006/42 / CE sobre maquinaria (Anexo II A)
Esta declaración se refiere exclusivamente a la maquinaria en el estado en que fue comercializada y excluye los componentes que se
agregan y / o las operaciones realizadas posteriormente por el usuario final. La declaración ya no es válida si se modifica el producto.
Declaramos que su Tern Pedelec cumple todos los requisitos esenciales de la Directiva Maquinaria 2006/42 / CE y la Directiva 2004/108 /
EC relativa a la compatibilidad electromagnética.
Se utilizaron las siguientes normas técnicas:
EN ISO 4210: 2015 Ciclos - Requisitos de seguridad para bicicletas
EN 15194: 2009 + A1: 2011 Ciclos con asistencia eléctrica (EPAC)
Taipei, Octubre 2017
Bicicletas Tern
8F-8, No. 6, Lane 609, Chung Hsin Rd, Sec 5,
Sanchong District, New Taipei City, Taiwan
ternbicycles.com
18. Declaración de Conformidad
(Para los países dentro de la UE)
Cualquier Cuadro, Manubrio u Horquilla reemplazado bajo términos de garantía serán cubiertos por el período remanente de la garantía de
la bicicleta.
Esta es la única garantía hecha por Tern y ningún empleado, agente o distribuidor de Tern está autorizado a dar ninguna otra garantía en
nombre de Tern.
Esta garantía está expresamente limitada la reparación o reemplazo, a discreción de Tern, de una pieza defectuosa y es el único remedio de
la garantía. Esta garantía aplica solo al consumidor final original y no es transferible. Esta garantía solo cubre bicicletas y componentes
adquiridos a través de Dealers Tern Autorizados y es solo válida en el país donde la bici fue adquirida originalmente. Como no todos los
modelos y piezas son comercializados en todos los países, el service no es garantizado fuera del país original de la compra. Aquellos
reclamos hechos fuera del país original de adquisición o de la red de Dealers Tern Autorizados puede estar sujeta a costos adicionales y/o
retrasos a la hora de obtener partes o información. Para ventas a trevés de Internet, el país original de adquisición es el país donde el
vendedor se encuentra establecido.
Sobre aquellas modificaciones realizadas en la bicicleta que no están especificadas por Tern, será completa responsabilidad del propietario
cualquier riesgo o lesión que pueda causar montar o usar una bicicleta con modificaciones o cambios de la manufactura estándar, habiendo
realizado modificaciones exclusivas. (“Bicicletas Modificadas”). El propietario entiende que una Bicicleta Modificada no conforma
necesariamente los estándares de seguridad, por lo que utilizar y/o montar es inherentemente peligroso y puede causar serias lesiones,
incluyendo lesiones corporales y/o daños a propiedad personal.
Esta garantía limitada sustituye a cualquier otra garantía expresa o implícita, incluyendo cualquier garantía de INDONEIDAD PARA UN
PROPOSITO PARTICULAR O USO que por otra parte se aplique a este producto. Tern no será responsable por ningún daño especial,
incidental o consecuencial, incluyendo perdida de ganancias. No hay garantías extendidas que no sean las dispuestas en este documento.
Esta garantía limitada solo puede ser modificada por Tern.
Si alguna parte de esta garantía no cumple con las leyes locales, entonces se considerara separable del resto de la garantía, que seguirá
siendo válida, y dicha parte deberá ser interpretada con significado más cercano de lo escrito más arriba, en inglés, o como el mínimo
requerido por dicha la ley local. Esta garantía no afecta los derechos legales del consumidor.

82
83
EN
ES
FR
IT
KO
EN
ES
FR
IT
KO
1. Introduction ................................................. 83
2. Informations Générales ............................. 84
3. Détails Juridiques ...................................... 85
4. Réglementations Locales ......................... 85
5. Usage Prévu ............................................... 87
6. Déplier et Plier votre Tern ........................87
7. Avant la Première Utilisation .................... 88
8. Avant Chaque Utilisation ..........................93
9. Roulez en Sécurité ..................................... 96
10. Passagers et Transport de Charges ........ 98
11. Transport de votre Tern .............................102
12. Abécédaire du VAE ...................................103
13. Astuces pour Rouler en VAE ....................106
14. Maintenance .............................................. 109
15. Paramètres de Serrage ............................. 113
Table des matières
16. Maintenance et Calendrier d’Entretien .. 115
17. Garantie ....................................................... 118
18. Déclaration de Conformité ....................... 121
Cher/Chère Client(e),
Merci d’avoir choisi Tern, leader de la mobilité urbaine et du transport!
Les vélos Tern combinent un design industriel stylisé avec des composants haut-de-gamme qui, ensemble, font toute la différence et
procurent fiabilité et fonctionnalité aux consommateurs d’aujourd’hui.
Nous concevons des vélos qui combinent tout ce dont les gens ont besoin pour moins utiliser leurs voitures et rouler plus en vélo.
Tern est engagé dans le combat au but de favoriser des solutions durables de transport. Nous concevons et fabriquons nos vélos pour le
transport urbain avec un accent particulier sur la portabilité et l’utilité. Aussi, Tern fait don chaque année d’au moins 1% de ses profits nets à
des causes sociales et environnementales.
Notes Générales de Sécurité
Tournez la page
Votre vélo dispose de composants spécifiques. Merci de lire attentivement ce manuel avant de rouler. Avant de prendre la route, prenez le
temps de comprendre comment utiliser votre vélo dans un environnement sécurisé tel qu’un parking.
Respectez les autres usagers de la route
Lors d’une collision avec un véhicule motorisé, vous et votre vélo serez toujours perdant. Et vous pouvez aussi blesser les piétons. Restez
alerte et respectez les autres usagers de la route.
Protégez votre tête
Un casque homologué de bonne qualité vous protègera en cas d’accident. Portez-en un.
Précautions de maintenance
Ne réparez pas ou n’ajustez pas votre vélo si vous ne disposez pas des bonnes connaissances ou des bons outils.
Ouvrez les manuels
Ce manuel doit uniquement être utilisé en conjonction avec les autres manuels inclus avec votre VAE, tels que ceux pour le moteur, le système de contrôle, les composants et les instructions de pliage.
Ou Vous Rendre Pour Obtenir de L’aide
Si vous n’êtes pas certain des étapes pour réparer ou adjuster votre vélo, nous vous recommandons de contacter votre revendeur Tern le
plus proche.
1. Introduction

84
85
EN
ES
FR
IT
KO
EN
ES
FR
IT
KO
Nomenclature des Composants
Significations des Icônes
1. Roue
2. Cassette
3. Dérailleur arrière
4. Chaine/Courroie
5. Plateau
6. Moteur
7. Pédalier
8. Pédale
9. Freins
10. Fourche
11. Porte-bagage
12. Sticker cadre
norme CE
13. Batterie
14. Verrou de la batterie
15. Tige de selle
16. Selle
17. Charnière de cadre
18. Cadre
19. Charnière de la
colonne de direction
20. Guidon/Cintre
21. Colonne de direction
22. Jeu de direction
3
1
2
5
4
Guidon
1. Contrôleur LCD
2. Eclairage
3. Guidon
4. Levier de frein
5. Manette de vitesses
Indique comment utiliser
le produit ou composant
nécessitant une attention
plus particulière.
Action incorrecte
pouvant endommager
l’équipement.
Danger en cas d’instructions
non respectées ou de
mesures préventives non
prises.
Vous devez utiliser l’outil approprié tel qu’une clé dynamométrique
pour les composants qui nécessitent un couple de serrage spécifique.
Un couple trop élevé ou trop bas peut provoquer la chute ou la rup-
ture du composant et entrainer de graves accidents et blessures.
1
3
4
7
8
15
16
18
17
21
19
20
22
10
13
6
11
5
2
14
9
12
2. Informations Générales
Fabricant
Mobility Holdings Limited (Hong Kong) Taiwan Branch
8F-8, Lane 609, Chongxin Road, Section 5, Sanchong District, New Taipei City, Taiwan
Contact: service@ternbicycles.com / Site internet: www.ternbicycles.com
Marquage du Vélo
Si votre vélo est un Vélo à Assistance Electrique, il dispose d’un sticker sur le cadre informant qu’il a passé tous les tests relatifs à la norme
EN 15194.
Déclaration de Conformité
Ce manuel d’utilisateur est conforme aux exigences de la norme EN 15194 et de la Directive Machines EC/2006/42.
Voir l’insert séparé Déclaration de Conformité.
Edition 1 Rev 1, Octobre 2017
Pedelec signifie “pedal electrical cycles” (cycles à pédalage électrique). Ils sont aussi connus sous le terme de VAE (Vélos à Assistance
Electrique). Il s’agit de vélos disposant d’un moteur qui fournit une assistance au pédalage lorsque vous commencez à pédaler. Lorsque
vous vous arrêtez de pédaler, l’assistance s’arrête également. Certains vélos peuvent disposer d’un mode d’assistance à la poussée avec une
vitesse maximum de 6 km/hr.
En général, les vélos électriques sont considérés par la loi comme étant similaires à des vélos conventionels plutôt qu’un scooter ou une
moto. Dans la plupart des cas, un vélo électrique peut être utilisé sur les pistes cyclables et peut être attaché sur la voie publique comme des
vélos traditionnels. Le permis de conduire n’est pas obligatoire pour utiliser un VAE et il n’est pas non plus nécessaire d’immatriculer le vélo.
Il est important de noter que les lois et réglementations spécifiques liées à l’utilisation d’un vélo électrique peuvent varier d’un
pays à un autre. Si vous utilisez votre vélo en dehors de l’Allemagne, il est important de vous familiariser avec la réglementation
locale avant de commencer à utliser votre VAE. Prenez le temps d’apprendre les lois locales avant de prendre la route.
Pour rouler sur la voie publique avec votre VAE en Allemagne, votre vélo doit etre équipé en concordance avec la réglementation routière
(StVZO et StVO). Veuillez noter que des règles différentes peuvent s’appliquer dans votre pays.
3. Détails Juridiques
4. Réglementations locales

86
87
EN
ES
FR
IT
KO
EN
ES
FR
IT
KO
StVZO
Le système d’éclairage doit disposer du marquage « K-nombre » pour être considéré comme légal sur la voie publique. Les éclairages
avant et arrière doivent être alimentés par la même source d’alimentation.
Le centre du faisceau lumineux de l’éclairage avant sur la route ne doit pas dépasser 10 mètres (distance calculée depuis l’avant du vélo).
L’éclairage arrière doit être installé à au moins 25 cm au dessus du sol.
Les réflecteurs sont obligatoires, en complément de l’éclairage. A l’avant, le réflecteur doit être blanc. A l’arrière, au moins deux
réflecteurs sont nécessaires. Deux réflecteurs jaunes doivent être présents sur chaque pédale.
Chaque roue doit répondre à au moins une des exigences ci-dessous :
Doit avoit avoir deux réflecteurs attachés aux rayons
Doit avoir des bandes réflechissantes sur les flancs des pneus
Le système de freinage doit être équipé de freins avant et arrière indépendants.
Vous vous devez de maintenir le vélo dans de bonnes conditions.
Concu Pour les Guerriers Urbains, non Pour les Cascadeurs
Attention au Poids
Les vélos Tern sont conçus pour etre utilisés par une seule personne, les deux roues en contact avec le sol uniquement. Ils ne
sont pas conçus pour faire la course, faire des acrobaties, des sauts, wheelies ou toute autre chose de la sorte. Ni le fabricant
ni le revendeur ne peuvent être tenus responsables des dommages directs et indirects résultant de ces comportements. La
garantie ne sera pas valide dans le cas où votre VAE n’aurait pas été utilisé conformément à l’usage prévu.
Utiliser le vélo pour faire du tout-terrain, des sauts ou des acrobaties peuvent endommager le cadre et engendrer des risques
de blessures graves voire de décès pour le cycliste.
Poids total maximum = poids du cycliste + poids de l’équipement/des bagages
Si vouz possédez un VAE Tern pliant, la charge utile standard est de 105 kg.
Si la capacité citée ici diffère de celle inscrite sur l’étiquette CE de votre cadre,
veuillez vous référer à la limite indiquée sur cette étiquette CE. Si vous possédez un
VAE Tern non-pliant, veuillez vous référer à l’étiquette CE située sur le cadre pour
connaître la limite maximale de poids et veuillez lire le Manuel Supplémentaire
VAE Utilitaire pour plus de détails concernant l’équilibre de la charge.
Si vous transportez de lourdes charges, assurez-vous que le vélo soit stable et
dans la limite de sa capacité maximale de chargement.
Exercez-vous à manier votre vélo dans un endroit calme et sécurisé avant de
rouler sur la voie publique.
S’il n’est pas correctement manié, des mouvements brusques dus au poids peuvent affecter votre équlibre et engendrer de
sérieuses blessures voire le décès.
Veuillez vous référer aux instructions de pliage jointes séparément.
5. Usage Prévu
6. Déplier et plier votre Tern
Exemple étiquette norme CE
10 m

88
89
EN
ES
FR
IT
KO
EN
ES
FR
IT
KO
Ouvrez le Manuel Avant de Rouler
Passez un peu de temps pour comprendre comment utiliser votre nouveau vélo avant de prendre la route. Les manuels d’instructions pour
les composants ainsi que les instructions de pliage pour votre vélo sont fournis avec ce manuel. Merci de lire tous les manuels
fournis très attentivement. Si certains points nécessitent d’être clarifiés, n’hésitez pas à demander à votre revendeur.
Vérifications
Système électrique
Assurez-vous de vous familiariser avec tous les boutons du contrôleur LCD et son affichage.
Veuillez consulter les informations dans la section correspondante du manuel du fabricant du système motorisé.
Roue
Vérifiez la pression des pneus et assurez-vous que celle-ci soit comprise entre les valeurs maximales et minimales indiquées sur les
flancs des pneus.
Faites tourner les deux roues afin de vous assurez qu’elles tournent de manière fluide, qu’elles ne soient pas voilées et qu’elles ne
frottent pas contre les patins de freins. Si la roue oscille d’un côté à un autre et frotte contre les patins de frein, apportez votre vélo
chez un réparateur cycles qualifié afin de dévoiler la roue.
Des roues voilés peuvent indiquer un problème avec les rayons ou les pneus.
Jeu de direction
• Positionnez la roue avant entre vos jambes et essayez de faire pivoter le guidon. Si
vous constatez un mouvement, reserrez la potence ou contactez votre revendeur.
• Soulevez la roue avant et faites la tourner de gauche à droite. Tout est fluide? Si
vous ressentez le moinde a-coup ou une certaine rugosité dans la direction, il se peut
que votre jeu de direction soit trop serré. Faites-le vérifier par votre revendeur.
7. Avant la première utilisation
Twistez !
Freins
CBA
3
4
2
1
Testez vos freins en vous tenant sur le côté de votre vélo et en appuyant sur les deux freins, puis en poussant votre vélo vers l’avant et
vers l’arrière. (A) Le vélo ne doit pas bouger et les patins de freins doivent rester bien en place.
Votre Tern semble-t-il solide? Si vous ressentez un a-coup à chaque mouvement du vélo vers l’avant et vers l’arrière, votre jeu de
direction est certainement desserré. Faites-le vérifier par votre revendeur. Veuillez noter que, pour certains freins à disques, il se peut
que vous ressentiez un peu de jeu lorsque vous actionnez les freins et bougez votre vélo vers l’avant ou vers l’arrière. Ceci est dû à
l’espace entre les étriers et les plaquettes permettant de favoriser la dilatation thermique et est donc considéré comme normal. Dans ce
cas, il ne s’agit pas d’un problème de jeu de direction.
Les freins s’activant via la jante (B) disposent de patins (1) qui s’alignent avec le flanc de la jante (2). Les patins de freins s’appuient
contre la jante pour ralentir la roue. Assurez-vous donc que les patins de freins soient bien alignés avec la jante et vérifiez
régulièrement l’usure de la jante et des patins.
Les freins à disques (C) sont composés d’un disque ou rotor, (3) et d’étriers (4). Des plaquettes à l’interieur des étriers compressent le
disque pour ralentir la roue mais peuvent être extrêmement chaudes après usage. Il est donc recommandé de ne pas les les toucher
immédiatement après utilisation.
Lequel des leviers de freins actionne le frein arrière ou avant varie en fonction du pays. Par exemple, pour le Royaume-Uni et le Japon,
le levier de gauche actionne le frein arrière tandis que le levier droit actionne le frein avant. Pour les Etats-Unis, l’Allemagne et la
plupart des autres pays, le levier droit actionne le frein arrière et le levier gauche actionne le frein avant.

90
91
EN
ES
FR
IT
KO
EN
ES
FR
IT
KO
Vitesses
Testez votre vélo dans un endroit calme et en dehors du trafic pour vous familiariser avec le passage des vitesses. Vérifiez que le
passage d’une vitesse à une autre se fasse de manière fluide et qu’il soit possible de passer sur la plus petite vitesse et la plus grande
sans que la chaîne ne déraille.
Si votre Tern utilise un moyeu à vitesses internes, évitez de passez les vitesses tout en appuyant fortement sur les pédales en même
temps. Contrairement aux dérailleurs, les moyeux à vitesses internes sont conçus de telle sorte qu’ils passent les vitesses de manière
optimale lorsqu’aucun mouvement de pédale n’est exercé. Cela signifie que vous pouvez même passer les vitesses à l’arrêt. Un atout
non-négligeable dans le trafic urbain.
Vérifiez que les maillons de la chaîne soient bien flexibles et que la chaîne tourne de manière fluide sur chacune des vitesses.
Avec un VAE, l’assistance démarre immédiatement lorsque vous appuyez sur la pédale. Actionnez les freins dès lors que
vous prenez votre vélo afin d’éviter tout mouvement involontaire.
Chute rapide
Faites bien attention à ne pas endommager votre disque ou vos étriers lorsque vous changez la roue ou en actionnant vos
freins lorsque le disque n’est pas parfaitement aligné.
Assurez-vous de tester la puissance de vos freins avant de vous aventurer dans le trafic. Ils peuvent être plus puissants que
ce que vous pouvez imaginer. Actionner le levier trop rapidement peut entrainer un arrêt trop soudain et causer la chute
ou le risque de vous faire emboutir par l’arrière.
Ajustez votre position
La meilleure position de conduite est celle avec laquelle vous vous sentez
le plus confortable, mais un vélo mal ajusté peut conduire à des douleurs
de dos ou de ligaments et réduire votre contrôle. Vérifiez que votre selle
et votre guidon soient à la bonne hauteur et que vous pouvez atteindre
manettes de vitesses et leviers de freins confortablement.
Pour beaucoup de personnes la plante du pied (1) doit se placer sur la
pédale (2) directement au dessus de l’axe de la pédale (3).
Selle
La hauteur de la selle est un point important de la position générale de conduite. Lorsque vous êtes assis, vos genoux doivent être
légèrement pliés lorsque la pédale est au plus bas. La jambe ne doit en aucun cas être tendue. Assurez-vous donc que votre selle ne soit
pas trop haute. Si la selle est trop basse, des pressions répétitives sur le genou peuvent conduire à des douleurs gênantes.
La selle peut être ajustée de haut en bas, d’avant en arrière et inclinée vers le haut ou vers le bas. Jouez avec tous les réglages pour
trouver l’ajustement parfait. Une selle mal ajustée peut avoir un effet néfaste sur les nerfs, les ligaments et les vaisseaux sanguins.
1
2
3
Veuillez vous référer à la section 15 pour les valeurs de serrage adaptés aux rails de votre selle.
Soulevez votre vélo à environ 10 cm du sol et lâchez-le pour
qu’il retombe au sol. Si vous entendez des bruits anormaux
ou si vous remarquez un problème avec la stabilité du cadre
(notamment au niveau des charnières), rendez-vous chez
votre revendeur.

92
93
EN
ES
FR
IT
KO
EN
ES
FR
IT
KO
Lorsque vous roulez, votre bassin ne doit pas bouger et vos genoux doivent se plier à 20-25° environ lorsque les pédales sont au
plus bas.
La selle doit etre parallèle au sol, mais si cela ne vous parait pas confortable, inclinez le nez vers le bas pour relâcher la pression sur
l’entrejambe ou vers le haut pour redistribuer votre poids sur une surface plus large de la selle. La selle ne doit pas être inclinée de
plus de 5° vers le haut ou vers le bas.
Déplacer la selle vers l’arrière permet de faire travailler vos muscles fessiers tandis que la déplacer vers l’avant favorise les
quadriceps. En général, l’avant du genou ne doit pas dépasser le niveau de l’axe de la pédale. Une fois que la selle vous parait
confortable, vérifiez une nouvelle fois la hauteur de selle et ajustez si nécessaire.
Ne pas relever la tige de selle au delà du niveau minimum d’insertion indiqué par une ligne sur la tige de selle. Cela pourrait conduire à une rupture de la tige de selle ou du cadre et engendrer de sérieuses blessures. Si la hauteur de selle ne
peut être ajustée correctement sans dépasser cette limite, vous aurez alors besoin d’une tige de selle plus longue.
Potence
Les modèles disposant de la potence Andros sont ajustables (angle et hauteur) sans outils. Veuillez vous référer au manuel concerné pour
plus d’informations concernant l’ajustement et les positions possible de la potence.
Orientation du guidon
Faites pivoter le guidon de sorte que la paume de vos mains soit correctement reposée sur le guidon et que vos doigts puissent
atteindre facilement les leviers de freins et manettes de vitesses. Pour la procédure d’ajustement du guidon, veuillez vous référer au manuel
d’ajustement de la potence fourni avec votre Tern.
Assurez-vous de vérifier chacun des points suivants avant chaque sortie avec votre vélo.
Electrique
Vérifiez que la batterie soit bien placée sur le cadre ou sur son support porte-bagage et qu’elle soit correctement connectée.
Vérifiez le bon fonctionnement du contrôleur LCD et, en cas de message d’erreur, résolvez le probleme avant de rouler.
Vérifiez que la batterie soit suffisamment chargée pour la durée de votre sortie.
Assurez-vous que les éclairages avant et arrière soient allumés lorsqu’activés et qu’ils ne s’éteignent pas lorsque vous êtes à l’arrêt.
Mécanique
Tel que tous les composants mécaniques, le vélo est sujet à l’usure et à un stress important. Des matériaux et composants
différents peuvent réagir de façon différente à l’usure et à la fatigue. Si la durée de vie du composant prévue à sa conception
a été excédée, il peut faillir et potentiellement causer des blessures au cycliste. Toute forme de fissures, de rayures ou de
changement de couleur dans une zone soumise à un grand stress peut indiquer que la fin de vie du composant est atteinte
et qu’il est nécessaire de le remplacer.
8. Avant chaque utilisation

94
95
EN
ES
FR
IT
KO
EN
ES
FR
IT
KO
Vérifiez les Soudures
En complément de ce test, vérifiez les soudures autour de la charnière de cadre afin de détecter toute fatigue ou anomalie.
Votre VAE sera soumis à beaucoup de stress et d’usure lors de son
utilisation. Vérifiez tous les joints afin de détecter toute déformation ou
changement de couleur qui pourrait indiquer une fissuration. Ceci est
d’autant plus important si le vélo est tombé ou fut impliqué dans une
collision. Veuillez noter que, pour les composants ou parties en
aluminium, une fois déformés, ceux-ci ne peuvent être remis en place en
toute sécurité et nécessiteront un remplacement.
Jante
La jante doit être propre et non-endommagée. Vérifiez qu’il n’y ait pas de décoloration, de rayures ou d’usure. Si vous avez des freins à
patins, vérifiez la surface des jantes et assurez-vous qu’elle n’ait pas de cavités ou d’irrégularités. Certaines jantes ont un indicateur d’usure
sur la paroi (surface de freinage). Une fois que ce niveau maximum d’usure est atteint, il est fortement conseillé de remplacer la jante.
Une jante usée ou emdommagée peut se briser sans prévenir et entrainer la chute du cycliste.
Roues
Vérifiez que la roue soit bien installée en appuyant de chaque côté. La roue ne doit pas glisser le long de l’axe du moyeu.
Utilisez vos mains pour vérifier la tension de vos rayons en pressant deux rayons côte à côte. Si la différence de tension est importante,
veuillez faire dévoiler et re-centrer votre roue par votre vélociste.
Assurez-vous que vos roues soient bien en place et correctement serrées sur les pattes de la fourche ou pattes arrière. Levez la roue et
poussez-la dans le sens de l’ouverture des pattes. L’axe doit rester en position.
Selle
Essayez de faire pivoter la selle à deux mains et assurez-vous que la selle et la tige de selle soient correctement fixées. Il ne doit y avoir
aucun mouvement.
Abécédaire Test de Chute rapide
Nous concevons nos vélos afin qu’ils vous accompagnent tous les jours. Par mesure de sécurité, cependant, nous vous recommandons
de réaliser ce test avant chaque utilisation :
A
AIR
Vérifiez la pression de vos
pneus. Utilisez votre pouce
pour appuyer sur vos pneus.
ils doivent être fermes mais
pas trop. Evitez le
sur-gonflage.
B
FREINS ET GUIDON
Vérifiez les freins en les
actionnant et en vous assurant
que le vélo s’arrête. Vérifiez que
les câbles de freins ne soient pas
endommagés ou emmêlés.
Vérifiez que votre guidon, votre
tube de direction et extension
(potence Andros/VRO) soient
bien en place et non-endom-
magés en faisant pivoter votre
guidon de gauche à droite, la
roue avant bloquée entre vos
jambes.
C
CHAINE ET CABLES
Vérifiez que votre chaîne
tourne de manière fluide en
faisant pivoter le pédalier dans
le sens inverse et vérifiez que
les câbles de vitesse ne soient
pas endommagés.
RAPIDE
ATTACHES-RAPIDE
Vérifiez que toutes vos
attaches-rapides (roues, tube
de selle, tube de direction/
potence) et charnières
(cadre, colonne de direction)
soient solidement fixés.
CHUTE
LAISSEZ TOMBER
LE VELO
Soulevez votre vélo
quelques centimètres au
dessus du sol et laissez-le
retomber sur le sol. Si
quoi que ce soit bouge
ou fait un bruit anormal,
procédez aux ajustements
avant de rouler.

96
97
EN
ES
FR
IT
KO
EN
ES
FR
IT
KO
Gardez Votre Regard sur la Route
Portez une attention toute particulière aux nids-de-poule et autres dangers,
tels que les ouvertures soudaine de portières, des enfants en train de jouer.
Aussi, pensez à votre propre visibilité et évitez au maximum de vous trouvez
dans l’angle mort des automobilistes.
Restez Vigilant!
Vous devez rester vigilant à tout moment lorsque vous roulez. N’utilisez pas d’écouteurs ou de casques audio qui pourraient altérer votre
ouïe ou des lunettes de soleil pouvant gêner votre vision. Ne roulez pas si vous avez consommé de l’alcool ou suivez un traitement qui
pourrait affecter vos capacités motrices.
Faites Vous Voir
Rouler dans des conditions de faible éclairage ou de faible visibilité, tel que de nuit, à l’aube, à la tombée de la nuit, par temps de pluie ou
de brouillard, est bien plus dangereux que de rouler de jour. Portez des vêtements de couleur claire ainsi que des accessoires
réfléchissants.
Restez Propre – Brillez
Les réflecteurs de votre vélo doivent rester propres, en bon état et correctement installés. Ne les recouvrez pas avec des vêtements ou des
sacs. Par ailleurs, ils ne réflechissent la lumière que dans quelques directions uniquement. Vous aurez donc besoin d’un bon éclairage pour
vous assurez d’être bien vu. Asurez-vous que votre éclairage fonctionne correctement.
9. Roulez en Sécurité
Utilisez vos Freins
Analysez la situation
Les distances de freinage augmentent par temps de pluie ou lorsque vous
transportez de lourdes charges. Dans ces conditions, il est donc conseillé de
freiner doucement et plus tôt.
Doucement !
Afin d’éviter le dérapage lorsque vous ralentissez ou stoppez votre vélo,
actionnez vos freins graduellement. Le fait de déraper ne vous aide pas à
ralentir plus vite et rend plus difficile le contrôle de la direction. Cela doit
donc être évité.
Penchez-vous en arrière
Si vous appuyez trop fort sur votre frein avant, vous pouvez passer au-dessus du guidon. Si votre roue avant décolle du sol, ajustez votre
poids vers l’arrière et relâchez le frein avant.
Soyez Futé
Roulez prudemment, surtout lorsque la visibilité est réduite. Faites-en sorte que vos mouvements et changement de direction soient
prévisibles.
Utilisez une sonnette, un klaxon ou utilisez votre voix pour prévenir de votre intention de dépasser. Faites-le suffisamment à l’avance pour
ne pas surprendre.
Roulez aussi droit que possible. Ne zigzaguez pas, sauf pour éviter un danger ou un obstacle. Annoncer à l’avance votre intention de
tourner ou de dépasser.

98
99
EN
ES
FR
IT
KO
EN
ES
FR
IT
KO
moins de 90 mm
10. Passagers et Transport de Charges
Rouler avec un ou plusieurs passagers, une charge lourde, ou
bien les deux, affecte le poids du VAE, son équilibre, son centre
de gravité et sa conduite. Pour votre sécurité, veuillez lire
attentivement les consignes ci-après.
Effets sur la Conduite
Une combinaison de facteurs, incluant la rigidité structurelle du
cadre, la solidité des composants, la manière même de rouler,
et la distribution du poids, peuvent affecter la conduite et le
comportement du vélo. Lorsque vous roulez avec une lourde
charge, le VAE nécessitera un effort supplémentaire pour garder
l’équilibre et un temps de freinage plus long.
Il y a une forte relation entre le poids du cycliste et le niveau de
charge avec lequel celui-ci peut confortablement rouler et garder
son équilibre. En pratique, la charge additionnelle ne devrait pas
dépasser 80% du poids du cycliste.
Familiarisez-vous à la conduite d’un VAE chargé dans un endroit
calme et sûr avant de vous aventurer sur une voie publique.
Si vous avez un VAE utilitaire, veuillez vous référer au Manuel Supplémentaire VAE Utilitaire pour plus de conseils quant à la
répartition poids du cycliste et cargaison mais aussi quant au positionnement de la charge.
Ne dépassez pas la capacité maximum de cargaison de votre vélo qui comprend le poids du cycliste, celui du passager, le
poids du porte-bagage arrière, sièges enfants et tout autre accessoire installé. Veuillez vérifier l’étiquette CE située sur le
cadre de votre VAE pour connaître la limite de poids.
N’utilisez pas de remorques pour transporter des enfants.
Rouler avec des Enfants
Vous avez la possibilité d’installer et d’utiliser un siège enfant dans la mesure où ce siège et son utilisation répondent aux conditions
suivantes (fondées sur la norme EN 14344, Sièges enfants pour bicyclettes):
Le siège est concu de telle sorte qu’aucun contact ne soit possible entre les pieds de l’enfant et la roue du vélo.
La distance entre le centre de la roue et le centre de gravité du siège (indiqué par un marquage sur le siège enfant) doit être comprise
entre 90 mm et 100 mm. Ceci évitera au vélo et à la roue avant de basculer vers l’arrière.
Les doigts de l’enfant sont protégés et ne peuvent en aucun cas se coincer dans quelconque partie de la selle (telle que les ressorts des
selles à suspension).
The carrier (rack) is approved for mounting child seats.
Le siège enfant ne doit pas être monté ou attaché sur la tige de selle.
Siège Enfant Approuvé
Le siège Yepp Maxi Easyfit a été testé pour une utilisation avec les VAE Tern dotés d’un porte-bagage integré ou du porte-bagage Tern
Cargo.
Sécurité et Précautions
Les enfants, quelque soit leur âge, doivent être capable de tenir parfaitement leur tête, avec une tonicité musculaire leur permettant
d’amortir les secousses sur la route.
Vérifiez que le dégagement du talon lors du pédalage soit suffisant. Le dégagement du talon varie en fonction de la taille du pied du
cycliste et de la longueur et position des jambes de l’enfant.
Assurez-vous que le siège soit correctement monté selon les instructions du fabricant.
Assurez-vous que le poid maximum ne soit pas dépassé.
Assurez-vous que rien ne viennent s’accrocher au travers des rayons de la roue, des rails ou des ressorts de la selle.
Assurez-vous que l’enfant porte un casque et que les sangles d’attaches soient bien ajustées.
Ne lâchez pas votre VAE des mains lorsqu’un enfant est sur le siège afin d’éviter toute chute du vélo et de l’enfant.
Jetez un œil de manière périodique sur votre enfant lorsque vous roulez. En cas d’endormissement, ne laissez pas sa tête pencher
excessivement d’un côté.

100
101
EN
ES
FR
IT
KO
EN
ES
FR
IT
KO
Béquille et Poids à l’Arret
Si votre VAE est équipé d’une béquille, cela peut rendre le chargement et déchargement plus aisé. Cependant, veuillez prendre en
considération le poids maximal que peut supporter la béquille.
Lorsque vous chargez votre VAE avec la béquille abaissée, ne dépassez jamais le poids maximum que peut supporter celle-ci.
Pour visualiser une liste des capacités maximales des béquilles, rendez-vous sur le lien suivant: https://www.ternbicycles.com/support/
techtips/maximum-weight-capacity
Rouler avec un Passager
Si vous avez un VAE Tern utilitaire, celui-ci est concu pour transporter un
passager adulte uniquement sous les conditions suivantes:
Le passager peut facilement enjamber le VAE et positionner
correctement ses pieds sur les pegs ou la plateforme concue pour.
Le vélo doit avoir un siège passager attaché en toute sécurité au cadre
du VAE (le siège passager Tern SideKick répond à cette exigence).
Le vélo dispose d’un emplacement permettant au passager de poser
ses pieds (la plateforme Tern SideKick ou les pegs Tern SideKick
répondent à cette exigence).
Repose-Pied
Les repose-pieds tels que la plateforme SideKick et les pegs rétractables
SideKick sont concus pour permettre aux passagers d’y reposer leurs
pieds lorsqu’ils sont assis sur le siège de porte-bagage.
Ne vous asseyez pas sur le VAE lorsque la béquille est abaissée. Ceci pourrait
endommager la béquille et le point de montage de celle-ci sur le cadre.
Rouler avec un Chargeement
Dans le cas ou l’arrière du VAE serait chargé, testez bien que la roue avant ne se soulève pas entrainant un basculement du vélo.
Position du Chargement
Positionnez le chargement de sorte que le centre de gravité soit aussi proche que possible du centre du VAE. Sécurisez le chargement en
le placant le plus à l’avant du porte-bagage arrière.
Equilibrez la cargaison. Par exemple, répartissez votre cargaison de manière la plus égale de chaque coté du vélo si vous transportez celleci dans les paniers. Une charge mal équilibrée entraîne le vélo du côté le plus lourd.
Sécuriser le Chargement
Assurez-vous que votre chargement soit bien attaché par des sangles ou tendeurs capable de résister au poids chargé.
Vérifiez les Interférences
Assurez-vous que vous ayez suffisamment de place pour vous asseoir correctement, pédaler et diriger le vélo sans aucune interférence.
Le chargement ne doit en aucun cas interférer avec le bon fonctionnement des freins et du/des dérailleur(s).
Les objets longs et larges doivent être suffisamment éloignés des pédales afin d’éviter tout contact avec vos talons.
Les objets hauts et larges à l’avant du vélo ne doivent en aucun cas bloquer votre vision.
Il peut être illégal de transporter des passagers sur un VAE
dans votre pays, même si celui-ci a été concu pour en offrir la
possibilité. Renseignez-vous sur les réglementations locales
avant de transporter un passager.
Si vous ne pouvez pas positionner votre chargement de sorte à répondre à TOUTES les exigences
mentionnées ci-dessus, n’essayer en aucun cas de rouler avec votre chargement.
Ne jamais se tenir debout sur les repose-pieds.

102
103
EN
ES
FR
IT
KO
EN
ES
FR
IT
KO
Trains et Transports en Commun
Les VAE peuvent en général être transportés dans les trains et les transports en commun de la même manière que les vélos classiques.
Vérifiez avec la compagnie de train ou de transport en commun pour les exigences particulières:
Certaines sociétés de transport peuvent vous demander de réserver un espace spécifique et d’acheter un billet pour le transport du VAE.
Certaines permettent le transport d’un VAE seulement en dehors des heures de pointe.
Certaines exigent qu’un sac de transport soit utilisé pour couvrir le VAE.
Avion
Les batteries utilisées pour les VAE ont une capacité trop importante et sont donc considérées comme dangereuses et ne peuvent être
transportées dans les avions.
Il vous est possible de demander à votre transporteur afin de voir si la batterie peut être envoyée séparément.
Voiture
Votre vélo Tern peut être transporté avec un porte-vélo standard, sur toît ou sur coffre, dans la limite de poids que peut supporter le
porte-vélo. Afin de réduire le poids du vélo, enlevez la batterie de votre vélo Tern et placez-la dans le véhicule.
Si vous possédez un break ou avez un grand coffre, nous recommandons de placer le VAE plié dans celui-ci. Faites bien attention à ne
pas endommager le dérailleur.
Lorsque vous entrez dans un parking, n’oubliez pas votre vélo sur le toît et assurez-vous qu’il ne dépasse pas la hauteur maximum du
parking.
11. Transport de votre Tern
Concept
Les vélos à assistance électriques ou VAE sont équipés d’un moteur électrique qui fournit une assistance au pédalage. L’assistance est
activée par un capteur de mouvement de pédalage conçu pour détecter le moment où la pedale est actionnée. En Europe, les VAE sont
limités à 25 km/h. Aux Etats-Unis, la limite est de 32 km/h (20 mph). L’assistance est automatiquement désactivée au delà de ces vitesses.
Le contrôleur permet de sélectionner le degré d’assistance fournit par le moteur, d’un mode économie au mode sport, vous permettant ainsi
d’ajuster la performance du vélo selon votre style de conduite ou selon la topographie de la route.
Votre Tern peut utiliser un moteur central ou moyeu. Voir illustration ci-dessous :
Autres Spécificités du VAE
Mode Assistance à la marche (Walk)
Certains VAE Tern disposent d’un mode assistance à la marche ou à la poussée. Celui-ci permet au cycliste de pousser le vélo avec un effort
moindre. Cela peut s’avérer utile dans certaines conditions, telle que lors d’une montée. L’assistance est limitée à une vitesse de marche à
pied. Veuillez consulter le manuel du fabricant du moteur pour plus de détails.
Verrouillage de la batterie
Votre VAE Tern peut être équipé d’un verrou de batterie. Veuillez toujours verrouiller la batterie avant de rouler et conserver la clé dans un
endroit sûr. En cas de perte, contactez votre revendeur Tern pour assistance.
12. Abécédaire du VAE
Moyeu ArrièreMoteur Central/Pédalier
Moyeu Avant

104
105
EN
ES
FR
IT
KO
EN
ES
FR
IT
KO
Chargement
Votre VAE Tern est fournit avec un chargeur compatible au voltage accepté dans votre région. Pour plus d’informations, veuillez consulter
le manuel d’instruction du fabricant du moteur.
Eclairage
Votre VAE Tern dispose d’un éclairage avant et arrière alimenté directement par la batterie. Utilisez l’éclairage conformément à la réglementation routière locale.
Batterie
Votre VAE Tern est équipé d’une batterie lithium-ion. Les batteries lithium-ion modernes possèdent un maximum de cycles de
chargement et de décharge de plus de 500 cycles avant que la capacité de la batterie ne se réduise. La batterie n’a pas d’effet mémoire.
Vous pouvez donc la recharger à tout moment et il est inutile d’attendre que la batterie soit complètement déchargée avant de pouvoir
la recharger. Dans le cas où vous avez prévu de ne pas rouler avec votre vélo pendant plus d’un mois, rechargez la batterie à 80% avant
de l’entreposer. Il est conseillé de ne jamais décharger complètement la batterie et de la laisser déchargée pour une longue periode.
Cela pourrait endommager la batterie de manière permanente.
Utilisez toujours le chargeur original fourni par le fabricant de batterie. N’utilisez jamais un autre chargeur même si celui-ci dispose d’un
connecteur similaire.
Lorsque votre batterie arrive en fin de vie, elle doit être traitée comme un déchet dangereux et ne doit pas être jetée dans une poubelle
classique. Renseignez-vous auprès de votre revendeur pour connaître le meilleur endroit pour recycler votre batterie.
Altération du système moteur
Il est strictement interdit d’altérer le système moteur, et ce, de quelconque manière. L’ajout de tout appareil modifiant la vitesse
maximale du moteur ou permettant l’accéleration (retirant ainsi la nécessité de pédaler) ou encore tout autre appareil ou
modification logicielle entrainera l’annulation de la garantie de votre vélo. Ces modifications peuvent être à la source de dangers
potentiels et peuvent etre considérées comme illégales.
Informations Supplémentaires
Il est recommandé de lire également les manuels supplémentaires fournis par le fabricant du moteur et de la transmission, concernant :
L’utilisation de votre unité de transmission et du contrôleur L’entretien
L’utilisation du chargeur et de la batterie Le nettoyage
Le dépannage
Les batteries ne doivent en aucun cas être jetées dans la nature ou détruites par incinération.
Eclairage
Votre VAE Tern dispose d’un éclairage avant et arrière alimenté directement par la batterie. Utilisez l’éclairage conformément à
la réglementation routière locale.
Chargement
Votre VAE Tern est fournit avec un chargeur compatible au voltage
accepté dans votre région. Pour plus d’informations, veuillez consulter le
manuel d’instruction du fabricant du moteur.
Configuration Multi-Batteries
Si votre VAE permet l’utilisation de plus d’une batterie, lisez attentivement
les consignes ci-après.
Chargement de la Batterie sur le Vélo
Si les deux batteries sont installées sur le vélo, n’utilisez qu’un seul chargeur. Les batteries se chargeront simultanément.
Connectez le chargeur sur le port de charge directement adjacent au
moteur. Le port arrière est obstrué pour éviter le branchement simultané
des deux ports.
Chargement de la Batterie Déconnectée du Vélo
Chaque batterie peut etre chargée séparément lorsqu’elle est retirée de
son support sur le vélo.
Cache de Borne
Lorsque vous roulez avec une seule batterie, assurez vous que le cache de
la borne de branchement soit installé sur l’emplacement libre afin de ne
pas endommager les circuits.

106
107
EN
ES
FR
IT
KO
EN
ES
FR
IT
KO
Rouler sans Assistance Electrique
Votre vélo Tern est conçu pour être utilisé normalement, comme un vélo classique lorsque le moteur est éteint. Si vous êtes dans une
descente ou souhaitez prolonger la durée de votre batterie, vous pouvez désactiver l’assitance mais conserver l’affichage allumé pour
connaître votre vitesse. Cependant, si la batterie se décharge complètement pendant votre trajet, notez que l’éclairage ne fonctionnera
plus puisque celui-ci est connecté sur la même batterie que le moteur.
Si votre Tern est fourni avec une lampe Valo Direct à l’avant, vous pouvez acheter le câble permettant de connecter une batterie externe
(Powerpack) via USB et ainsi faire marcher l’éclairage pour ne pas rouler dans le noir. La batterie externe doit pouvoir indiquer le niveau de
charge restant et vous prévenir lorsque celui-ci est bas (moins de 20%). Vérifiez qu’il vous reste suffisamment de batterie pour finir votre
trajet lorsque l’indicateur de niveau bas est allumé.
Autonomie
L’autonomie dépend de différents facteurs, tels que:
La vitesse moyenne
Plus vous roulez vite, plus vous avez besoin d’énergie et plus la batterie s’épuisera. Cependant, si vous roulez au-delà de la vitesse
maximale d’assistance, l’assistance moteur s’arrête complètement et le moteur n’épuisera donc pas l’énergie de la batterie.
Le niveau d’assistance utilisé
Le meilleur moyen d’économiser de la batterie est de faire des efforts! Utiliser un niveau d’assistance moindre et produire plus d’effort au
pédalage diminuera la consommation en énergie de la batterie et permet donc une plus grande autonomie.
Entretien général
Assurez-vous que vos pneus soient correctement gonflés. Entretenez et lubrifiez les parties en mouvement constant.
Trafic urbain
Un départ arrêté nécessitera toujours plus d’énergie. Pour prolonger l’autonomie, démarrez en mode Eco.
Poids du cycliste et cadence
Le moteur utilisera plus d’énergie avec des cyclistes lourds. Conserver une cadence d’au moins 60 rpm sera plus efficace.
Conditions de la route (surface, terrain et vent)
Des surfaces telles que les chemins de terre ou gravier, le vent de face et les montées réduiront l’autonomie de votre batterie.
Au Démarrage
Lorsque le contrôleur est allumé, l’assistance démarre dès que vous appuyez sur la pédale. Il est donc recommandé d’avoir le contrôleur
éteint lorsque vous montez sur votre vélo. Une fois assis, assurez-vous qu’aucun poids n’est exercé sur la pédale afin de prévenir tout
mouvement accidentel, puis allumer le contrôleur. Démarrez au niveau d’assistance le plus faible.
Certains systèmes nécessitent qu’il n y ait aucune force exercée sur la pédale au moment de l’allumage afin de pouvoir se réinitialiser
correctement.
Sélectionner le Niveau D’assistance Approprié
Ne roulez pas toujours sur la plus grande vitesse avec l’assistance électrique. Changez les vitesses comme vous le feriez avec un vélo
classique afin de maintenir une cadence efficace pour votre style de conduite. Cela maximisera l’efficacité de l’assistance en fonction de
votre puissance de pédalage.
Par exemple, avec un système à moteur central Bosch, le fait de conserver une cadence constante à environ 90 rpm, quelque soit la vitesse,
vous assurera une assistance moteur optimale.
Rouler avec l’Assitance au Pédalage
Votre vitesse de pédalage détermine le niveau d’assistance fournit par le moteur. Tous les VAE disposent d’un algorithme interne qui arrête
l’assistance dès que vous arrêtez de pédaler. Il s’agit d’un dispositif de sécurité intégré, conforme à la norme EN 15194 (Cycles à assistance
électrique – Bicyclettes - EPAC).
Lorsque vous entrez dans un virage avec un VAE, arrêtez de pédaler plus tôt que vous n’en avez l’habitude. Dans le cas contraire, il se peut
que votre vitesse soit trop importante dans le virage.
Dans la mesure où il est probable que votre vitesse moyene soit plus élevée, analysez la situation plus en avance et commencez à freiner dès
qu’un risque se fait sentir.
En raison de la nature silencieuse du moteur électrique, les piétons et autres cyclistes peuvent ne pas vous entendre venir.
Roulez prudemment, portez des vêtements colorés, signalez vos intentions et utilisez votre sonnette si besoin.
13. Astuces pour Rouler en VAE

108
109
EN
ES
FR
IT
KO
EN
ES
FR
IT
KO
Votre Tern a de nombreux composants et de nombreuses pièces de technologie avancée. Beaucoup de réparations et tâches
d’entretien nécessitent des connaissances et des outils spécifiques. Ne commencez pas à ajuster ou réparer quoi que ce soit à
moins d’être capable de terminer correctement la tâche. Des ajustements ou réparations mal effectués peuvent endommager le
vélo ou causer de sérieuses blessures. Prenez conseils chez votre vélociste en cas de besoin.
Evitez les Fantaisies
Lorsque vous remplacez des composants tels que le cadre, la fourche, les pneus, les jantes, les freins, l’éclairage avant et arrière, la béquille,
le guidon, la colonne de direction, la potence, l’unité de transmission, la batterie, l’unité de contrôle/écran LCD, etc., veillez à bien utiliser
des pièces détachées d’origine ou approuvées par Tern. Celles-ci sont testées et assurent la compatibilité et la sécurité de votre VAE Tern.
Pour toute réparation ou achat de pièces détachées, nous vous recommandons de vous rendre chez un revendeur Tern.
Les actions d’entretien que vous pouvez et devez réaliser vous-même ne nécessitent pas d’outils spécifiques ou de connaissances
particulières autres que celles présentées dans ce manuel. Elles sont listées ci-dessous:
Restez Lubrifié
Pensez à entretenir et à lubrifier régulièrement votre vélo avec les lubrifiants appropriés. Contactez votre revendeur pour les produits à
utiliser et les fréquences à respecter.
Air
Une roue est composée d’un moyeu (1), de rayons (2), d’une jante (3), d’un
pneu (4), d’une valve (6) et d’un axe (6).
La valve peut être une valve de type Schräder (7) ou Presta (8). Les valves
Presta ont une petite molette (9) qui doit être dévissée avant de pouvoir
gonfler le pneu.
Vérifiez que la pression des pneus soit dans les limites recommandées,
telles qu’indiquées sur les parois du pneu.
Vérifiez régulièrement l’usure de vos pneus et qu’ils ne soient pas crevés.
14. Maintenance
Capacité de la batterie
Les batteries ont différentes capacités, mesurées en watt/heures, allant du standard au premium. En général plus le nombre de watt/
heures est grand, plus l’autonomie est longue et plus le prix est élevé et votre VAE lourd.
La température ambiante peut avoir un impact significatif sur la capacité de la batterie. La capacité de la batterie est testée à une
température de référence de 23°C. De larges écarts de températures par rapport à celle-ci entrainera un drainage plus rapide de la
batterie en raison des changements de résistance interne et réduira donc l’autonomie.
Plus la batterie est ancienne, plus la capacité initiale diminue. Ceci est vrai pour toutes les batteries mais certains produits chimiques
durent plus longtemps que d’autres.
Vous pouvez toujours contrôler le niveau de charge restant sur l’écran du contrôleur.

110
111
EN
ES
FR
IT
KO
EN
ES
FR
IT
KO
Tension de la chaîne
La tension de la chaîne supporte d’importantes forces lors du pédalage.
Pour un passage des vitesses optimal et une meilleure efficacité, les
maillons de la chaîne doivent s’entre-connecter correctement avec les dents
des pignons ou des plateaux.
Pour vérifier que la chaîne ne soit pas trop détendue, mettez vous sur la plus
petite vitesse de la cassette (en cas d’utilisation d’une cassette) afin que la
chaiîne soit détendue au maximum. Le jeu ou mouvement de la chaîne doit
être compris entre 10 et 20 mm. Cette valeur est également applicable aux
chaines utilisées avec une transmission à moyeu interne.
Note: La tension d’une courroie est plus complexe et doit être ajustée par
un vélociste.
Un jeu excessif peut être causé par une chaîne usée et qui s’est étirée. Une chaîne étirée ne s’enclenchera pas correctement dans les
pignons. Au fil du temps, l’espace entre les dents des plateaux et des pignons se creuse en fonction de la forme de la chaîne. Remplacer une
chaine lorsqu’elle est usée prolongera la vie de votre cassette et de vos plateaux, bien plus chers à remplacer.
Dans le cas d’un moyeu à vitesses internes, un jeu important peut être dû à un mauvais ajustement de la roue arrière dans la base arrière.
Si vous n’êtes pas certain d’où provient le jeu de la chaîne, faites vérifier votre vélo par votre revendeur.
Nettoyage
Lorsque votre vélo Tern nécessite un bon nettoyage, utilisez un sceau avec de l’eau et épongez simplement toutes saletés accumulées sur
votre vélo. Séchez votre vélo après nettoyage afin de prévenir l’apparition de rouille.
N’utilisez pas de nettoyeur haute pression (eau ou vapeur) car l’eau pourrait s’insérer dans les parties jointées et endommager
votre vélo sur le long terme.
Vérifiez tous les câbles et gaines. Il ne doit pas y avoir de rouille, de plis ou d’effilochage et tout doit fonctionnr sans accrocs.
Remplacez-les si endommagés.
Freins
Assurez-vous que les freins fonctionnent et qu’ils freinent suffisamment. Quand actionnés au maximum, les leviers de freins doivent être
proches du guidon, sans le toucher.
Rouler avec des freins usés ou mal ajustés est dangereux et peut conduire à de sérieux accidents pouvant causer le décès.
Consultez les instructions du fabricant pour plus de détails concernant l’utilisation et l’entretien de vos freins. Essayez de garder
les surfaces de freinage (patins, plaquettes, jantes et disques) aussi propres que possible et ne huilez/graissez jamais celles-ci.
Remplacez vos freins usés avec des pièces autorisées.
Chaîne, pédalier et câbles
La transmission d’un vélo est consitué d’un moyeu à vitesses internes (A) ou d’un moyeu classique avec cassette (B). La transmission est
composée d’un pédalier (1), d’un ou plusieurs plateaux (2), d’un(e) simple pignon/roue libre (3) ou d’une cassette (4), d’une chaîne (5), d’un
dérailleur avant (6) et d’un dérailleur arrière (7). Les vitesses du vélo sont numérotées à partir de 1, la première état la plus petite vitesse et la
plus facile.
Les vitesses les plus petites sont utilisées pour les montées et les plus grandes pour les descentes ou pour aller plus vite. Nous vous recom
-
mandons d’essayer de passer les vitesses dans un endroit sécurisé.
Pour vérifier que votre chaîne soit bien installée, faites tourner le pédalier et assurez vous qu’il n’y ait pas d’écart ou d’anomalie.
Avant de rouler, passez et testez toutes les vitesses afin de vous assurer que le passage est fluide et qu’elles fonctionnent. Si le passage des
vitesses n’est pas fluide, nous vous recommandons de les faire vérifier par votre vélociste. Si le dérailleur arrière ne fonctionne pas correctement, n’utilisez pas la plus petite vitesse et la plus grande de la cassette pour éviter que la chaîne ne saute et se coince à la roue, ce qui
pourrait endommager le vélo ou causer un accident.
12
3
5
1
2
4
5 67
A
B

112
113
EN
ES
FR
IT
KO
EN
ES
FR
IT
KO
Attaches-Rapides et Autres Fixations
Vérifiez que les attaches-rapides et autres écrous et boulons importants qui maintiennent vos roues, votre guidon et votre
tige de selle soient correctement placés et serrés. Une force de serrage correcte est vitale. Mal serrée, la fixation peut ne
pas maintenir le composant en place. Trop serrée, la fixation peut endommager le filetage, se déformer ou même casser.
Dans les deux cas, un mauvais serrage peut conduire à la défaillance d’un composant et causer la perte de contrôle voire
des accidents. Reportez-vous à la section 15 pour les correctes valeurs de serrage. Dans l’incertitude, demandez à votre
vélociste.
Toutes les réparations et les entretiens qui ne sont pas spécifiquement traités dans ce manuel doivent être reéalisés par
votre revendeur.
L’importance du couple
Les valeurs de serrage sont des mesures standards de la force de serrage à laquelle vous devez serrez vos boulons et sont
listées à la fin de ce manuel. Lorsqu’une valeur de couple de serrage est donnée, une clé dynamométrique doit être utilisée
afin de vous assurer que la bonne force est appliquée.
Valeurs de serrage (couples) recommandées
Cadre et FourcheFork
Composant lbf.in Newton Mètre (Nm) kgf.cm
Boulon de Serrage de la Béquille 53-60 6-8 61-69
Boulons du Porte-Bidon 25-35 2.8-4 29-40
Boulons du Porte-Bagage 25-35 2.8-4 29-40
Boulons des Gardes-Boue 50-60 5.6-6.8 58-69
15. Paramètres de Serrage
Attaches-Rapides
L’attache-rapide pemet de maintenir en place un composant (tel qu’une roue) et permet un montage-démontage facile, sans outil.
Une attache-rapide est composée d’un collier (1) – dans le cas d’un collier de selle par exemple -, d’un écrou (2) et d’un levier de serrage (3).
L’écrou permet d’ajuster la force de serrage. Fermer le levier au delà du point central nécessite une force plus importante. Il vous faudra alors
utiliser la paume de votre main.
Les attaches-rapides maintiennent en place les roues, la tige de selle et le guidon.
Lorsque serrées sur les roues, les attaches-rapides doivent également serrer les pattes de la fourche ou de la base arrère.
Lorsque serrée sur la tige de selle (et tube de selle), la tige de selle ne doit plus pivoter.
Lorsque serrée sur le guidon, celui-ci ne doit pas pivoter.
Lorsque vous fermez le levier, positionnez-le de sorte à ce qu’il ne puisse pas s’ouvrir de manière accidentelle.
Les attaches-rapides sont très pratiques mais de nombreux accidents sont causés par une mauvaise utilisation de celles-ci.
Un mauvais ajustement pourrait endommager le vélo ou conduire à un accident causant des blessures sérieuses pouvant
aller jusqu’au décès.
23
1
Fermé
Ajustement
Ouvert

114
115
EN
ES
FR
IT
KO
EN
ES
FR
IT
KO
Intervalles d’Entretien
Rodage
Tous les vélos passent par une période de rodage. Votre vélo aura une durée de vie plus longue si vous le roder. Nous recommandons
de faire ajuster une nouvelle fois votre vélo par votre revendeur un mois après sa première utilisation afin d’ajuster les câbles et les
autres composants importants.
Calendrier d’entretien
Votre vélo a besoin d’une révision régulière chez un revendeur Tern. Ci-dessous se trouve la fréquence que nous recommandons en
fonction de votre utilisation et des conditions générales de la route.
Types de Conduite
INTENSE
Fréquence de révision
Mensuelle
Roule 25 km ou plus
quotidiennement
Roule quelles que soient les
conditions météorologiques
Roule sur des routes pavées,
ayant de nombreux
nids-de-poule ou bosses
Transporte plus ou moins
105 kg sur son vélo, poids du
cycliste inclus
FRÉQUENT
Fréquence de révision
Bi-Mensuelle
Roule 3 ou 4 fois par semaine
ou une moyenne de 100 km
par semaine
Roule occasionnellement dans
des conditions pluvieuses
Roule sur des routes pavées,
avec des bosses ou
nids-de-poule
Transporte 105 kg ou moins
sur son vélo, poids du cycliste
inclus
RÉCRÉATIF
Fréquence de révision
Trimestrielle
Roule une ou deux fois par
semaine
Roule par temps sec ou
occasionnellement par temps
de pluie faible
Roule toujours sur une route
ou piste cyclable bitumée
plane
Transporte 105 kg ou moins
sur son vélo, poids du cycliste
inclus
MODÉRÉ
Fréquence de révision
Annuelle
Roule une à deux fois par mois
Roule uniquement par temps
sec
Roule toujours sur une piste
cyclable ou route bitumée
Transporte 105 kg ou moins
sur son vélo, poids du cycliste
inclus
16. Maintenance et Calendrier d’Entretien
Freins and Fork
Composant lbf.in Newton Mètre (Nm) kgf.cm
Levier de Frein (Cintre Droit) 53-60 6-6.8 61-69
Levier de Frein (Cintre Route) 55-80 6.2-9 63-92
Fixation du Disque au Moyeu (Boulons M5) 18-35 2-4 21-40
Inserts Etriers 55-70 6.2-7.9 63-81
Roues and Fork
Composant lbf.in Newton Mètres (Nm) kgf.cm
Corps de Roue Libre 305-434 34.5-49 352-499
Ecrou de Cassette 260-434 29.4-49 299-499
Boulons axe Avant 180 20.3 207
Boulons axe Arrière 260-390 29.4-44.1 299-449
Transmission and Fork
Composant lbf.in Newton Mètres (Nm) kgf.cm
Pédales 307 34.7 353
Boulon D’axe de Pédalier 300-395 33.9-44.6 345-454
Boitier de Pédalier (Roulement Externe) 610-700 40-50 702-805
Boitier de pédalier (Cartouche intégrée/ “jeu de pédalier”) 435-610 49.1-68.9 500-702
Autres and Fork
Composant lbf.in Newton Mètres (Nm) kgf.cm
Vis Pivot de Fourche (Potence) 70-89 8-10 80-102
Bouchon de Potence 35-53 4-6 41-62
Capot de Potence (4 vis) 36-53 4-6 41-62
Vis Chariot de Selle 70-89 8-10 80-102
Correspondances : 1Nm = 8.9 lbf.in = 10.2 kgf.cm

116
117
EN
ES
FR
IT
KO
EN
ES
FR
IT
KO
Tampon/Signature du revendeur
Inspection 4
Date
Travail réalisé
Composants remplacés ou réparés
Tampon/Signature du revendeur
Inspection 5
Date
Travail réalisé
Composants remplacés ou réparés
Tampon/Signature du revendeur
Inspection 6
Date
Travail réalisé
Composants remplacés ou réparés
Carnet d’Entretien
Tampon/Signature du revendeur
Inspection 1
Date
Travail réalisé
Composants remplacés ou réparés
Tampon/Signature du revendeur
Inspection 2
Date
Travail réalisé
Composants remplacés ou réparés
Tampon/Signature du revendeur
Inspection 3
Date
Travail réalisé
Composants remplacés ou réparés
Un mois ou 200 km après
l’achat

118
119
EN
ES
FR
IT
KO
EN
ES
FR
IT
KO
De plus, le Propriétaire doit confirmer avoir reçu le «Brief Propriétaire» de la part du revendeur ou avoir regardé la vidéo respective sur
ternbicycles.com/support.
Exclusions
Cette garantie ne couvre pas les dommages et/ou défauts résultants des conditions suivantes:
Si un vélo a été utilisé, manipulé, entretenu ou surchargé de façon contraire aux spécifications du produit, à l’usage normal ou
instructions se trouvant dans le manuel d’utilisateur. Ceci inclut, mais n’est pas limité à, l’utilisation « tout terrain » du vélo.
Détérioration normale. Les pièces et composants sont sujets à des durées de vie différentes selon l’utilisation, la charge, le temps, les
conditions de la route, etc.
La finition/peinture est considérée comme consommable et n’est pas incluse dans la garantie.
Si un composant du vélo a été réassemblé, réparé ou modifié par du personnel non autorisé par Tern.
Si le vélo a été exposé à un incendie, à une inondation ou à un accident, à une action inappropriée par une partie tierce et/ou en cas
d’événement hors du contrôle de Tern
Suite à la modification du cadre, de la fourche, de la potence et d’autres composants
Suite à l’installation de pièces, d’accessoires, d’un moteur ou de batteries non initialement compatible avec le vélo vendu.
Si la référence du cadre et/ou l’étiquette de service a été décollée, modifiée ou manipulée de manière à la rendre illisible.
Assistance Garantie Tern
Tern s’engage à réparer ou à remplacer les pièces sujettes à un défaut de matériau ou de fabrication pendant toute la durée de la garantie.
Tout élément remplacé dans le cadre de cette garantie sera remplacé par des éléments de même facture ou de facture similaire. Toutefois,
Tern se réserve le droit de remplacer les éléments défectueux par d’autres éléments, de facture différente, au nom de Tern, dans la mesure
où ce remplacement n’affecte pas le fonctionnement de la pièce d’origine.
En raison de l’évolution des produits et de l’obsolescence, certains composants peuvent ne plus être disponibles. Dans ces cas-là, la
recherche et le paiement des composants restent à la charge du propriétaire.
Tern peut, à sa seule discrétion, réparer ou remplacer des pièces défectueuses en dehors de la période de garantie, cependant une telle
action ne peut être considérée comme une reconnaissance de responsabilité.
Tout cadre, fourche et potence remplacé(e) selon les termes de la garantie sont couverts uniquement pendant la période de garantie
initiale restante.
Les garanties susmentionnées sont les seules et uniques garanties offertes par Tern et aucun employé, agent, ou revendeur de Tern n’est
autorisé à proposer d’autres garanties que celles établies par Tern.
Les vélos Tern sont vendus au nom de notre compagnie (“Tern”) par des Revendeurs Tern Agréés sélectionnés qui comprennent
l’assemblage et les besoins en termes d’entretien et de réparation de nos produits. Tern fournit à l’acheteur initial (“propriétaire”) d’un vélo
Tern une garantie contre les défauts matériels et d’assemblage à compter de la date d’achat, selon les termes suivants:
Cinq ans : Cadre, la potence principale et la fourche
Un an : Tous les accessoires et composants Tern ou BioLogic, à l’exception de ceux mentionnés ci-dessous.
Tout autre pièce ou composant d’origine sera couvert par la garantie du fabricant d’origine de ladite pièce ou du composant.
Extension de Garantie - 10 ans.
Les propriétaires qui s’enregistrent au programme Tern Care sur ternbicycles.com seront éligibles à l’extension de garantie de 10 ans sur le
cadre, la potence et la fourche, à condition qu’ils s’enregistrent dans les 30 jours suivant l’achat et qu’ils soient les premiers acquéreurs du
vélo. De plus, il est nécessaire que le vélo ait été assemblé par un Revendeur Tern Agréé au moment de l’achat – que l’achat ait été réalisé
dans un magasin physique ou bien une boutique en ligne.
Sont exclus de l’extension de garantie:
Les leviers du cadre et de la potence
La peinture
Les vélos à usage commercial
L’Extension de Garantie ne signifie en aucun cas que le cadre,la potence et la fourche soient indestructibles. Tout matériau peut faiblir ou
casser en cas d’abus, au delà des limites de conception et de fabrication. Cela signifie simplement que ces pièces sont couvertes par les
termes spécifiques de cette garantie limitée.
Responsabilité du Propriétaire
Le Propriétaire doit utiliser le produit selon les consignes qui lui sont fournies, stocker le produit dans de bonnes conditions, respecter
le programme de lubrification et veiller à ce que le produit soit bien entretenu. En cas de constatation de problème sur le produit, il est
conseillé au Propriétaire d’arrêter immédiatement d’utiliser le vélo et emmener la ou les pièce(s) défectueuses auprès d’un Revendeur Tern
Agréé afin d’activer la garantie (dans le cadre de la période de garantie). Le transport du vélo ou de l’un de ses composants est à la seule
charge du propriétaire.
Toute réclamation concernant cette garantie doit être déposée auprès d’un Revendeur ou d’un distributeur Tern Agréé. Toute réclamation
doit être accompagnée d’une preuve d’achat (copie digitale ou physique). Tous les vélos de la marque Tern doivent être déclarés auprès de
Tern via le programme Tern Care avant de pouvoir lancer une réclamation.
17. Garantie Limitée- Tern

120
121
EN
ES
FR
IT
KO
EN
ES
FR
IT
KO
Conformément à la directive européenne 2006/42/EC sur les machines (Annexe II A)
Cette déclaration s’applique exclusivement à la machine dans l’état dans lequel elle a été mise sur le marché et exclue les composants
ajoutés et/ou les modifications effectuées ultérieurement par l’utilisateur final. La déclaration n’est plus valide dans le cas où le produit
aurait été modifié.
Par la présente, nous déclarons que votre VAE Tern est conforme aux exigences essentielles de la Directive sur les Machines 2006/42/EC
et la Directive 2004/108/EC concernant la compatibilité électromagnétique.
Les normes techniques utlisées sont les suivantes:
EN ISO 4210:2015 Cycles — Exigences de sécurité des bicyclettes
EN 15194:2009+A1:2011 Cycles – Cycles à assistance électrique (EPAC)
Taipei, Octobre 2017
Tern Bicycles
8F-8, No. 6, Lane 609, Chung Hsin Rd, Sec 5,
Sanchong District, New Taipei City, Taiwan
ternbicycles.com
18. Déclaration de Conformité
Cette garantie est exclusivement limitée à la réparation ou au remplacement des pièces défectueuses, à la seule discrétion du fabricant
(Tern). Cette garantie ne s’applique qu’au propriétaire initial et n’est pas transmissible. Cette garantie ne couvre que les vélos et les
composants de vélo achetés auprès d’un Revendeur Tern Agréé et n’est valide que dans le pays dans lequel le vélo ou le composant a été
acheté. Dans la mesure où la totalité des modèles et/ou des composants n’est pas disponible dans tous les pays, le service après-vente n’est
pas garanti en dehors du pays d’achat d’origine. Les réclamations provenant des pays non couverts par la garantie ou en dehors du réseau
couvert par les Revendeur Tern Agréés sont soumis à des frais et/ou à des délais de traitement et de renseignement
supplémentaires. Lors d’achat en ligne, le pays d’origine est le pays où le vendeur est basé.
En cas de modifications survenues sur le vélo qui ne sont pas spécifiées par Tern, le propriétaire assume complètement la responsabilité
pour tout risque et blessure pouvant survenir lors de l’utilisation du vélo qui a subit des modifications non conformes à celles mandatées
par le fournisseur («vélo modifie»). Le propriétaire reconnait que le vélo modifié ne répond pas nécessairement aux normes de sécurité et
que l’utilisation résultante est dangereuse et peut engendrer des blessures sérieuses, incluant des blessures corporelles et destruction de
propriété.
Cette garantie limitée remplace toutes les autres garanties implicites ou explicites, y compris toutes les garanties liées aux UTILISATIONS
SPECIFIQUES de ce produit. Tern ne saurait être tenu responsable de dommage accidentel ou ayant eu lieu suite à un accident, y compris
les éventuelles pertes de bénéfices. Il n’existe aucune autre garantie que celles établies par ce document. Cette garantie limitée ne peut être
modifiée que par Tern.
Si l’un des éléments de cette garantie n’est pas conforme aux réglementations locales, elle devra être envisagée individuellement du reste
de cette garantie, qui reste celle à appliquer et qui prévaut sur la loi locale. Cette garantie n’affecte pas les droits statutaires du
Consommateur.
Cette dernière devrait être interprétée dans le strict sens de ce qui est écrit au-dessus, en anglais.

122
123
EN
ES
FR
IT
KO
EN
ES
FR
IT
KO
1. Introduzione ................................................ 123
2. Informazioni Generali ................................ 124
3. Dettagli Legali ............................................125
4. Regolamentazioni Locali ........................... 125
5. Utilizzo Della Bicicletta .............................. 127
6. Piegare e Aprire La Tua Tern ..................... 127
7. Prima del Primo Utilizzo ............................128
8. Prima di Ogni Utilizzo ................................ 133
9. Guidare in Modo Sicuro ............................ 136
10. Trasporto di passeggeri e di carichi .......138
11. Trasportare la tua Tern ............................... 142
12. L’ABC delle Pedelec ................................... 143
13. Suggerimenti nell’utilizzo
di una Pedelec ............................................ 146
Contenuti
14. Manutenzione ............................................149
15. Coppie di Serraggio .................................. 153
16. Intervalli di Manutenzione ........................ 155
17. Garanzia ...................................................... 158
18. Dichiarazione di Conformità .................... 161
Gentile Cliente,
Grazie per aver scelto Tern, un leader indiscusso nella mobilità e nel trasporto urbano. Progettiamo biciclette pensate con tutte le caratteristiche per far si che le persone riducano l’utilizzo dell’automobile e vadano maggiormente in bicicletta.
Siamo fortemente convinti della necessità di promuovere la mobilità ecosostenibile e progettiamo e produciamo biciclette per il trasporto
urbano con un’attenzione particolare alla portabilità e all’utilità. Tern dona almeno l’1% del prodotti netti ogni anno per sostenere iniziative
legate alla tutela dell’ambiente e al miglioramento delle condizioni sociali.
Alcune Note di Sicurezza Generale
Gira la pagina
Le biciclette pieghevoli hanno componenti appositamente progettati, perciò leggi attentamente questo manuale prima di usare la tua.
Prima di usare la bicicletta assicurati di aver compreso bene le modalità di utilizzo e utilizza la bicicletta in un ambiente sicuro (i.e. un area di
parcheggio libera).
Rispetta gli altri sulla strada
Per cortesia segui le regole del traffico e rispetta gli utenti della strada. Tu e la tua bicicletta risultate sempre perdenti in caso di collisione
con un altro veicolo ma potete sempre ferire un pedone. Fai attenzione e mostra considerazione per tutti gli utenti della strada.
Protezione per la testa
Un casco di buona qualità e omologato può prevenire un ferimento alla testa in caso di incidente. Utilizzane uno, è una scelta che non richie
-
de ripensamenti.
Precauzioni nella messa a punto
Non effettuare manutenzione se non hai gli strumenti e non sai come fare.
Studia i manuali
Questo manuale è da usare in abbinamento ai manuali delle altre parti della bicicletta a pedalata assistita, come per esempio il motore,
l’unità di controllo, componenti e il manuale del sistema di chiusura e apertura.
Dove Andare Per Avere Ulteriore Aiuto
Se non sei sicuro di qualche cosa rivolgiti al rivenditore Tern. I rivenditori Tern sono specialisti relativamente ai prodotti e Tern e alla loro
manutenzione
1. Introduzione

124
125
EN
ES
FR
IT
KO
EN
ES
FR
IT
KO
Parti Della Bicicletta
3
1
2
5
4
Manubrio
1. Controller/Display
2. Luce
3. Manubrio
4. Leve Freno
5. Comando Del
Cambio
Produttore
Mobility Holdings Limited (Hong Kong), Taiwan Branch
8F-8, Lane 609, Chongxin Road, Section 5, Sanchong District, New Taipei City, Taiwan
Contatto: service@ternbicycles.com / Sito web: www.ternbicycles.com
Certificazioni sulla Bicicletta
Se la tua bicicletta Tern è una Pedelec, ha un marchio CE sul telaio che conferma che la bicicletta ha
passato tutti i test previsti dalla norma EN 15194.
Dichiarazione di Conformità
Questo manuale dell’utente è conforme alla norma EN15194 e alla direttiva EC/2006/42
Vedere la dicitura Dichiarazione di conformità separata.
Edizione 1 Rev 1, Ottobre 2017
Pedelec è l’acronimo di bicicletta a pedalata assistita (pedal electrical cycle). Le pedelec possono essere anche denominate EPAC che è
l’acronimo di Electrically Power Assisted Cycles. Le Pedelec sono biciclette dotate di un motore che entra in funzione nel momento in cui il
ciclista inizia a pedalare. Quando il ciclista smette di pedalare il motore si ferma. Alcune biciclette hanno anche la possibilità di spingere la
bicicletta fino ad una velocità massima di 6 km/h.
In generale le biciclette elettriche sono viste dal legislatore più simili ad una bicicletta tradizionale che non ad uno scooter. Nella maggior
parte dei casi le biciclette a pedalata assistita possono essere utilizzate sulla piste ciclabili e possono essere legate alle rastrelliere come
biciclette normali. I ciclisti non devono avere una patente di guida e non devono registrare la bicicletta o dotarla di targa.
E’ importante prendere coscienza delle leggi e delle regole che possono governare l’uso delle biciclette a pedalata
assistita nei diversi paesi. Prima di usare la bicicletta verifica quali leggi ne regolano l’utilizzo.
Per usare la bicicletta Pedelec in Germania occorre che sia dotata di equipaggiamenti conformi al codice della strada (StVZO e StVO).
Presta attenzione alla regolamentazione in vigore nel tuo paese.
2. Informazioni Generali
3. Dettagli Legali
4. Regolamentazioni Locali
Indica come utilizzare un
prodotto o un componente
che richiede particolare
attenzione.
Un’azione non corretta
può provocare una
danneggiamento.
Pericolo di morte se le istruzioni
non vengono seguite in modo
corretto e se non si prendono le
dovute precauzioni.
E’ necessario utilizzare gli strumenti appropriati, per
esempio una chiave dinamometrica. Una coppia di ser-
raggio troppo elevata o troppo bassa può causare un
cedimento e può essere la causa di un grave incidente.
1
3
4
7
8
15
16
18
17
21
19
20
22
10
13
6
11
5
2
14
9
12
1. Ruota
2. Cassetta
3. Deragliatore
Posteriore
4. Catena/Cinghia
5. Corona
6. Motore
7. Guarnitura
8. Pedale
9. Freni
10. Forcella
11. Portapacchi
12. Adesivo Con
Certificazione CE
13. Batteria
14. Serrattura Batteria
15. Reggisella
16. Sella
17. Giunto Telaio
18. Telaio
19. Giunto del Piantone
Manubrio
20. Manubrio
21. Piantone Manubrio
22. Serie Sterzo

126
127
EN
ES
FR
IT
KO
EN
ES
FR
IT
KO
StVZO
Il sistema di illuminazione deve riportare una certificazione con marchio K per essere utilizzato su strada. La luce anteriore e posteriore
devono essere alimentate dalla stessa sorgente di corrente.
Il fuoco della proiezione della luce anteriore sulla strada deve essere a non più di 10 m dalla parte anteriore della bicicletta. La Luce
posteriore deve essere montata ad almeno 25 cm di altezza dal suolo.
E’ richiesta l’installazione dei catarifrangenti in aggiunta alle luci. Nella parte anteriore è richiesto l’uso di un catarifrangente bianco
mentre per la parte posteriore è obbligatorio installare almeno 2 catarifrangenti di colore rosso. Due catarifrangenti gialli devono essere
applicati su ciascun pedale.
Ogni ruota deve aver installato:
• Almeno due riflettori arancioni
• Un anello riflettente su entrambe le spalle del pneumatico
I sistemi di frenata anteriore e posteriore devono avere un funzionamento indipendente.
La bicicletta deve essere in buono stato di manutenzione.
Costruite per Urban Warriors, non per Acrobati
Attento al Peso
• Le biciclette Tern sono progettate per essere usate da una sola persona in sella e con entrambe le ruote in contatto con il terreno su strade pavimentate. Non sono pensate e costruite per gareggiare, saltare o fare ogni sorta di acrobazia. Il produttore
e il rivenditore non sono responsabili per nessun danno che può seguire ad un uso diverso da quello per cui la bici è stata
progettata. La garanzia non sarà valida se la tua pedelec non è utilizzata nel modo previsto dal produttore.
• Usare la bicicletta fuori strada, per saltare o per acrobazie può causare danni al telaio e procurare ferite anche mortali al
ciclista.
Fare riferimento alle istruzione specifiche di come aprire e piegare la bicicletta.
5. Utilizzo Della Bicicletta
6. Piegare e Aprire La Tua Tern
Esempio di adesivo con certificazione CE
10 m
• Il massimo peso ammesso è dato dalla somma del peso del ciclista e del pes
degli oggetti trasportati.
• se possiedi una bicicletta pieghevole TERN a pedalata assistita, la capacità di
carico è pari a 105 kg. Se la capacità di carico dichiarata su questo manuale
differisce da quella riportata sull’adesivo CE riportato sul telaio, fa fede il
valore riportato sull’adesivo CE. Se possiedi una bicicletta non peghevole
TERN a pedalata assistita, fai riferimento all’adesivo CE per il massimo carico e
leggi il manuale aggiuntivo per le biciclette a pedalata assistita Utility per
come bilanciare il carico.
• Se trasporti qualcosa sulla bicicletta, fai attenzione a che la bicicletta sia
stabile e che il peso totale sia inferiore al peso massimo ammesso.
• Verifica la dinamica di guida e la maneggevolezza della bicicletta prima di andare su strada.
• Se non viene assicurato il carico in modo appropriato, uno spostamento repentino dello
stesso può inficiare la stabilità e portare a un grave ferimento o ad un ferimento mortale.

128
129
EN
ES
FR
IT
KO
EN
ES
FR
IT
KO
Leggi i Manuali Prima di Usare La Bicicletta per la Prima Volta
Utilizza un po’ di tempo per capire come funziona la tua nuova bicicletta prima di andare su strada. I manuali di utilizzo per i singoli componenti e le istruzioni su come piegare la bicicletta accompagnano questo manuale di utilizzo. Per cortesia leggi tutti i manuali e se qualcosa
non è chiaro, chiedi al tuo rivenditore.
Controlla
Sistema elettrico
• Assicurati di avere familiarità con le funzioni dell’unità di controllo e con quanto evidenziato sullo schermo dell’unità di controllo.
• Consulta le informazioni nelle sezioni rilevanti del manuale del produttore dell’ unità motore.
Ruote
• Controlla la pressione dei pneumatici e assicurati che sia all’interno dei valori minimo e massimo riportati sul lato dei pneumatici stessi.
• Fai ruotare entrambe le ruote assicurandoti che ruotino liberamente, che siano diritte (nessun movimento laterale o radiale) e che non
tocchino i pattini dei freni. Se la ruota oscilla da un lato all’altro o se il cerchio sfrega contro i pattini dei freni, porta la ruota da un meccanico
qualificato per far riparare la ruota o per farla sostituire.
Serie sterzo
• Stai in piedi con la ruota anteriore ferma tra le gambe e prova a girare il manubrio. Se
il manubrio si muove, riallinea il manubrio e stringi live di regolazione della serie sterzo
e le viti alla base del piantone manubrio oppure recati dal rivenditore per effettuare un
controllo.
• Solleva la ruota anteriore dal terreno e falla girare da un lato all’ altro. E’ libera di ruotare?
se avverti che lo sterzo non gira liberamente, potresti aver la serie sterzo eccessivamente
serrata. Recati dal rivenditore per un controllo.
Freni
CBA
3
4
2
1
• Prova i tuoi freni stando vicino alla bici ed applicando entrambi i freni, quindi spingi la bici avanti ed indietro. La bici non dovrebbe muoversi ed i pattini dei freni dovrebbero restare fermamente al loro posto.
• La tua Tern si comporta in modo solido? Se senti un dondolio ogni volta che spingi avanti o indietro la bici, probabilmente hai la serie
sterzo non ben serrata. Fai in modo che il tuo rivenditore la regoli in modo corretto. Nota che per certi freni a disco potrai sentire un po’ di
gioco quando spingi avanti e indietro la bici. Questo è dovuto alle tolleranze di progetto tra le pastiglie dei freni e la pinza del freno.
• I freni a cerchio (B) hanno dei pattini dei freni (1) allineati con il cerchio (2). I pattini dei freni premono sul cerchio per rallentare la ruota,
perciò assicurati che i pattini dei freni siano allineati con il cerchio e controlla che il cerchio ed i pattini dei freni non siano usurati.
• I freni a disco (C) hanno un rotore a disco (3) ed una pinza per disco (4). Le pastiglie dei freni all’interno della pinza per disco stringono il
rotore a disco per rallentare la ruota, ma possono diventare molto calde, quindi non toccare il disco subito dopo l’uso.
• A seconda del paese in cui viene venduta la bicicletta, la leva destra comanda il freno anteriore o posteriore. Per la maggior parte dei
paesi inclusa l’Italia, la leva destra comanda il freno posteriore e la leva sinistra il freno anteriore.
Fai attenzione a non danneggiare il rotore o la pinza del freno quando cambi la ruota o quando tiri la leva del freno con il
rotore non allineato.
Controlla il funzionamento dei freni prima di andare in strada. I freni a disco possono essere molto più potenti di quanto
sei abituato e un eccessiva pressione sulla leva freno può portare ad un arresto della bicicletta non intenzionale e inaspet
-
tato con conseguente incidente.
7. Prima del Primo Utilizzo
Prova a girare
il manubrio
Ruote che non ruotano diritte possono essere dovute ad problemi con i raggi delle ruote o con il pneumatico

130
131
EN
ES
FR
IT
KO
EN
ES
FR
IT
KO
Cambio
• Prova la bicicletta in un area sicura lontano dal traffico. E’ importante avere familiarità con il funzionamento del cambio. Verifica che il
cambio funzioni bene, che le cambiate siano precise e che tutte le velocità si inseriscano in modo corretto.
• Se la tua Tern usa un cambio interno al mozzo, non cambiare mentre stai pedalando forte. A differenza dei deragliatori, i cambi interni al
mozzo sono progettati per cambiare velocità quando non stai pedalando. Questo significa che puoi cambiare con la bicicletta ferma al
semaforo, una bella possibilità nell’uso quotidiano in città.
• Verifica che non ci siano maglie della catena danneggiate e che la catena non salti da un pignone all’altro.
Nelle biciclette Pedelec l’assistenza inizia subito, non appena spingi sul pedale. Tira i freni prima di salire in bici per
evitare movimenti accidentali della bici.
Per ogni rumore
Solleva la bici per circa 10 cm e lasciala cadere a terra. Se senti rumori strani o se noti problemi di stabilità del telaio (presta attenzione in
particular modo ai giunti del telaio e del piantone manubrio), prenota un intervento di manutenzione presso il tuo rivenditore.
Come mettere a punto la bici
La migliore posizione di guida è quella più comoda per te, mentre una
bicicletta non messa a punto bene può portare a dolori alla schiena e ridurre
la tua capacità di controllo. Verifica che la sella e il manubrio siano alla giusta
altezza e che tu riesca a raggiungere bene le leve dei freni e i comandi del
cambio.
Per la maggior parte delle persone la parte anteriore del piede (1) dovrebbe
essere posta sul pedale (2) proprio sull’asse di quest’ultimo (3).
Sella
• L’altezza della sella è un componente importante della posizione in sella. Mentre sei seduto dovresti avere la gamba leggermente flessa
con il pedale nella posizione più bassa (punto morto inferiore). Se la gamba è completamente tesa la sella è troppo alta. Se la sella è troppo bassa, il ginocchio potrebbe essere sollecitato eccessivamente e portare a dolori.
• La sella può essere posizionata in avanti o indietro e ne può essere regolata l’angolazione. Prova a fare alcuni tentativi per trovare la migliore posizione in sella. Una sella non ben regolata può danneggiare i nervi, i vasi sanguigni e le giunture.
1
2
3
Fai riferimento alla sezione 15 per i corretti valori della copia di serraggio del sistema di fissaggio della sella

132
133
EN
ES
FR
IT
KO
EN
ES
FR
IT
KO
• Quando pedali, i tuoi fianchi dovrebbero rimanere fermi e le tue ginocchia dovrebbero piegarsi di 20°-25° quando il pedale è nel punto
più basso della rotazione.
• La sella dovrebbe essere parallela al terreno, ma se non è una posizione comoda puoi alzare abbassare il naso della sella per trovare la
posizione più comoda. In linea generale l’inclinazione della sella non dovrebbe superare i 5°.
• Posizionare la sella indietro fa si che i tuoi glutei lavorino maggiormente, mentre se sposti la sella in avanti farai lavorare i quadricipiti
maggiormente. In linea generale, il ginocchio non dovrebbe passare l’asse del pedale. Una volta che hai trovato la posizione comoda
regola l’altezza della sella.
Fai attenzione a non sollevare la sella oltre il segno (min insert) posto sul tubo reggisella. Alzare oltre il consentito la
sella può comportare una rottura del telaio con grave rischi per il ciclista. Se non riesci a trovare l’altezza corretta senza
superare il livello definito dalla inserzione minima del reggisella, significa che hai bisogno di un reggisella più lungo.
Allo stesso modo non abbassare la sella oltre il limite di massimo inserimento (max insert). Se troppo basso, il reggisella
può urtare contro il terreno o contro ostacoli sulla strada mettendo in pericolo il ciclista.
Attacco Manubrio
I modelli con l’Andros stem possono regolare l’angolazione dell’attacco manubrio e la sua altezza senza bisogno di usare attrezzi. Fai riferimento al manuale per trovare le informazioni su come regolare le posizioni dell’attacco manubrio.
Orientamento del manubrio
Ruota il manubrio in modo che i palmi delle mani siano ben supportati e che le dita delle mani riescano a raggiungere le leve dei freni e i
comandi del cambio. Per la regolazione del manubrio, per cortesia fai riferimento al manuale dell’attacco manubrio incluso nella confezione della tua Tern.
Verifica i seguenti componenti sempre, prima di ogni utilizzo della bicicletta:
Sistema Elettrico
• Verifica che la batteria sia alloggiata in modo corretto.
• Verifica che lo schermo dell’unità di controllo non dia allarmi o segnali anomalie. Risolvi l’eventuale problema prima di usare la bicicletta.
• Verifica che la batteria sia carica in modo adeguato per la lunghezza del percorso che devi fare.
• Verifica che sia la luce posteriore che quella anteriore funzionino in modo corretto e che rimangano accesse quando la bicicletta è ferma.
Parti Meccaniche
Tutte le parti meccaniche sono soggette a usura e a stress. I materiali differenti possono reagire in modo diverso all’usura,
alla fatica e alle sollecitazioni. Se la vita utile di un componente è stata superata, potrebbe cedere all’improvviso, causando il ferimento del ciclista. Ogni crepa, graffio o cambiamento di colore in una zona di forte sollecitazione, significa che la
vita utile è stata raggiunta e che il componente deve essere sostituito.
8. Prima di Ogni Utilizzo

134
135
EN
ES
FR
IT
KO
EN
ES
FR
IT
KO
Verifica le Saldature
In aggiunta a questo test verifica lo stato delle saldature, specialmente nella zona intorno al giunto.
Verifica che non ci siano deformazioni, o variazioni di colore che portino
a delle crepe. Questa verifica è estremamente importante se la bicicletta
ha subito un incidente o e se è caduta accidentalmente. Le parti in alluminio, una vola piegate non possono essere raddrizzate senza comprometterne la sicurezza.
Cerchi
I cerchi dovrebbero essere puliti e privi di danni. Osserva se ci sono delle variazioni di colore, graffi, scolorimenti, usura. Se hai freni tipo
V-Brake, la superficie di contatto del cerchio non dovrebbe avere scanalature. Alcuni cerchi hanno degli indicatori di usura. Una vola raggiunto il livello di usura massimo consentito dall’indicatore, il cerco va sostituito.
Un cerchio usurato o danneggiato può causare un cedimento senza preavviso e causare un incidente.
Ruote
• Verifica che le ruote siano ben fissate sulla forcella facendo pressione da ciascun lato. Non dovrebbe esserci movimento lungo l’asse
• Verifica la tensione dei raggi, se la tensione dei raggi è diversa tra due raggi vicini, fai verificare la tua ruota al rivenditore.
• Verifica che le ruote siano nella posizione corretta alzando la bicicletta e verificando che l’asse del mozzo sia ben inserito nel forcellino.
Sella
Prova a ruotare la sella e verifica che la sella e il reggisella siano ben serrati. Non dovrebbero esserci movimenti sia per quanto riguarda il
reggisella sia per quanto riguarda la sella.
A
ARIA
Verifica la pressione dei
pneumatici. Usa il police per
sentire se il pneumatico è
gonfio. Dovrebbero essere
ben gonfi ma cerca di evitare
di gonfiare i pneumatici
eccessivamente.
B
FRENI E MANUBRIO
Verifica che i freni funzionino
bene e che la bici si fermi quan-
do vengono azionati. Verifica
che i cavi siano in buone con-
dizioni e liberi da impedimenti.
Verifica che il manubrio, il pi-
antone manubrio e le estensioni
siano ben serrate, verificalo
mantenendo la routa anteriore
tra le gambe.
C
CATENA E CAVI
Verifica che la catena giri bene
su tutte le velocità muovendo i
pedali all’indietro. Verifica che i
cavi sino in buone condizioni.
QUICK
SGANCI RAPIDI
Verifica che gli sganci rapidi
(ruote, sella e manubrio) e
i giunti (telaio e manubrio)
siano chiusi in modo sicuro.
DROP
FAI CADERE LA BICI
Solleva la bici 10 cm e falla
cadere a terra. Se qualcosa
fa rumore mettilo a posto
prima di usare la bici.
ABC Test Veloce di Caduta Controllata
Progettiamo le biciclette in modo che siano compagni di vita quotidiana. Per la tua sicurezza verifica sempre che:

136
137
EN
ES
FR
IT
KO
EN
ES
FR
IT
KO
Tieni Gli Occhi sulla Strada
Stai attento alle buche ed altri pericoli, come gli sportelli delle auto che si
aprono ed i bambini che giocano. Inoltre pensa alla tua visibilità e cerca di
evitare di entrare nell‘angolo morto di un guidatore (come nel diagramma)
Stai sveglio!
Questo è importante. Devi stare all’erta mentre guidi. Non indossare cuffie e/o
occhiali da sole che potrebbero in influenzare la tua visione. Non guidare se
hai assunto delle droghe o hai consumato delle bevande alcoliche.
Stai Lontano Dalla Folla
Guidare con poca luce o cattiva visibilità, come di notte, all’alba od al crepuscolo o nella pioggia e nella nebbia è molto più pericoloso che
in condizioni normali di luce. Non lasciare che i tuoi figli vadano in bici con poca luce. Gli adulti che lo fanno dovrebbero comprare e mantenere funzionanti luci, catarifrangenti ed indumenti riflettenti.
Resta Pulito – Sii Radioso
I catarifrangenti dovrebbero essere puliti, in perfetto stato e montati correttamente. Non coprire i catarifrangenti con borse o con il vestiario.
Inoltre i catarifrangenti riflettono la luce solo in alcune direzioni, quindi ricordati di usare luci che ti rendono visibile in tutte le direzioni.
Verifica che le tue luci funzionino in modo corretto.
Usare i Freni
Segui il flusso
Le distanze di frenata aumentano sul bagnato, perciò frena gradualmente
e in anticipo quando piove
9. Guidare in Modo Sicuro
Sii una tigre paziente
Poiché i freni sono più efficaci proprio al livello di pressione che precede uno slittamento dei pneumatici, premili in modo progressivo e
rilasciali appena iniziano a slittare. Uno slittamento non ti rallenta in modo più veloce e significa che non puoi governare bene la bici. In effetti i freni sono più efficaci proprio prima che inizino a slittare i pneumatici, perciò rilasciali un po’ se inizia uno slittamento.
Piegati all’indietro
Se freni di colpo con i tuoi freni anteriori, potresti volare oltre il manubrio o la tua ruota posteriore potrebbe alzarsi dietro di te. Se la tua
ruota posteriore si alza, piegati all’indietro e rilascia leggermente il tuo freno anteriore.
Segui Le Linee Guida
• Guida la bici in modo cauto e stando attento a tutti i pericoli quando la visibilità è ridotta. Il tuo movimento potrebbe non essere facile da
intuire, pertanto guida in modo che sia facile capire che direzione prenderai (in realtà dovresti sempre guidare in questo modo indipendentemente dalle condizioni).
• Usa il campanello, una tromba o la voce per indicare la tua intenzione di superare e fallo in anticipo per far preparare il ciclista davanti a te.
• Vai diritto a meno che tu non stia evitando un pericolo o sorpassando e indica sempre la tua intenzione di girare o di superare.

138
139
EN
ES
FR
IT
KO
EN
ES
FR
IT
KO
Usare la bicicletta con uno o più passeggeri, un carico o entrambi, influisce sul peso, bilanciamento, baricentro e maneggevolezza della bicicletta stessa. Per la tua sicurezza leggi le
linee guida qui sotto riportate.
Cambiamenti nella maneggevolezza
Una combinazione di fattori, incluso la rigidezza strutturale del
telaio, la rsistenza di componenti singoli, il comportamento
dello sterzo e la distribuzione del peso, influiscono sulla
maneggevolezza della bicicletta. Quando usate la bicicletta con
un carico pesante, la bicicletta richiederà più attenzione per
trovare il giusto bilanciamento e più tempo per frenare.
C’è una forte correlazione tra il peso del ciclista e il peso del
carico che si può trasportare in modo comodo e agevole. In
pratica, il carico non dovrebbe superare l’80% del peso del
ciclista.
Trova familiarità con il compirtamento della bicicletta carica
pedalando in un’area protetta prima di andare per strada.
10. Trasporto di passeggeri e di carichi
• Se hai una bicicletta a pedalata assistita Utility, fai riferimento al supplemento per biciclette a pedalata assistita
Utility per il rapporto tra il peso del ciclista e il carico e per come posizionare il carico sulla bici.
• Non superare il massimo carico consentito che include sempre il peso del ciclista, il peso del passeggero e il peso
del carico, nonchè il peso dell’eventuale seggiolino e di altri accessori. Verifica quanto riportato sull’adesivo CE
riportato sul telaio della bicicletta a pedalata assistita per verificare il massimo carico consentito.
Usare la bicicletta con bambini
Puoi installare un seggiolino per bambini se il seggiolino e l’intallazionerispettano i seguenti criteri (facendo riferimento alle norme europee
per i seggiolini da bambino EN 14344)
• Il seggiolino è realizzato in modo che non è possibile che ci sia contatto tra i piedi del bambino e la ruota della bicicletta.
• La distanza tra il centro della ruota e il baricentro del seggiolino (come indicato dal segno di demarcazione del baricentro sul
seggiolino stesso) è superiore a 90 mm ma inferiore a 100mm. Questo eviterà che la ruota si sollevi inavvertitamente.
• Le dita del bambino sono protette contro lo schiacciamento da qualunque parte della sella (ad esepio dalle molle di sospensione della
sella).
• Il portapacchi su cui viene montato il seggiolino prevede il montaggio del seggiolino
Il seggiolino non deve essere agganciato al tubo reggisella.
Seggiolini approvati
Il seggiolino Yepp Maxi Easyfit è stato verificato per funzionare bene con le biciclette a pedalata assistita TERN con portapacchi integrato o
con i portapacchi TERN Cargo Rack.
Sicurezza e precauzioni
• I bambini, indipendentemente dall’età, dovrebbero essere abbastanza forti per sorreggere la testa e sopportare il movimento intrinseco dell’andare in bicicletta.
• Verifica che ci sia abbastanza spazio perchè i tuoi talloni non urtino contro il seggiolino. Lo spazio necessario varia a seconda con la
dimensione del piede e la lunghezza della gamba del bambino.
• Verifica che il seggiolino sia montato in maniera appropriata in accordo con le istruzioni de produttore.
• Verifica che il peso massimo lordo non venga superato.
• Verifica che nulla vada ad interferire con i raggi della ruota, i supporti e le molle della sella.
• Fai in modo che il bambino indossi un casco e che le cinghe siano ben tese.
• Tieni sempre in equilibrio la bicicletta quando c’è un bambino seduto sul seggiolino al fine di prevenire la caduta della bicicletta e del
bambino.
• Verifica periodicamente lo stato del bambino durante la pedalta dal momento che possono addormentarsi. Fai in modo che la testa
non si pieghi eccessivamente da un lato.
Non usare carrelli per trasportare bambini.
Meno di 90 mm

140
141
EN
ES
FR
IT
KO
EN
ES
FR
IT
KO
Cavalletto centrale e peso parcheggiato
Se la tua bicicletta a pedalta assistita è dotata di un cavalletto centrale, è più facile caricare e scaricare i carichi. Verifica sempre il
massimo peso sopportato dal cavalletto.
Quando carichi la tua bicicletta con il cavalletto giù, non superare mai il carico massimo ammesso del cavalletto.
Usare la bicicletta con un passeggero
Se possiedi una bicicletta a pedalata assistita TERN Utility, è possibile
trasportare un adulto se:
• Il passeggero può accomodarsi sulla bicicletta e appoggiare i piedi
sulle pedane.
• Il passeggero si possa sedere su un sedile agganciato al telaio della
bicicletta ( il cuscino Tern Sidekick Seat pad risponde a questa
esigenza)
• Il passeggero può appoggiare i piedi utilizzando o il Tern Sidekick™
Lower Deck oppure il Sidekick™ Foot Pegs.
Appoggiapiedi
Footrests such as Tern Sidekick™ Lower Deck and Sidekick™ Foot Pegs
are designed for passengers to rest their feet when seated on the rack.
Gli a-poggiapiedi come il Terj sidekick Lower deck e il Foot Pegs sono
progettati per far si che i passeggeri appoggino i piedi quando sono
seduti sul piano posteriore.
Non sederti sulla bicicletta con il cavalletto giù. Questo può danneggiare il cavalletto e
la piastra di supporto del cavalletto sul telaio della bici.
Può essere illegale trasportare un passeggero su una
bicicletta nel tuo paese anche se la bicicletta è stata
progettata per questo. Verifica la legislazione vigente
prima di trasportare un passeggero.
I poggiapiedi non sono fatti per sostenere il peso di una
persona in piedi. Non alzarsi in piedi sugli appoggiapiedi.
Per la lista dei massimi carichi ammessi dal cavalletto, riferisciti a i valori pubblicato sulla pagina: https://www.ternbicycles.com/support/
techtips/maximum-weight-capacity
Utilizzare la bicicletta con un carico
Se il retrotreno della bicicletta a pedalata assistita è carico, verifica che la ruota anteriore non si sollevi facendo cadere la bicicletta.
Posizionamento del carico
Posiziona il carico in modo che il centro di gravità sia il più vicino possibile alla mezzeria della bicicletta. Assicura il carico il più vicicno possibile alla parte anteriore del portapacchi.
Bilancia il carico. Per esempio, quando trasporti una scatola dovresti trasportarne due (una per lato). Carichi unilaterali, possono tirare la
bicicletta da un lato.
Assicurare il carico
Verifica che il carico sia ben saldo sulla bicicletta e che non siano superati i valori di massimo carico ammesso.
Verifica che non ci siano interferenze
Fai in modo che tu abbia abbastanza spazio per sederti in sella pedalare e girare il manubrio della bicicletta senza alcuna interferenza.
Il carico non dovrebbe ineterferire con le normali operazioni di frenata e dell’uso del deragliatore.
Oggetti lunghi o grandi dovrebbero essere posizionati lontano dai pedali in modo da evitare colpi sui talloni.
Oggetti alti o grandi posizionati sulla parte anteriore della bicicletta non dovrebbero ostruire la tua visuale.
Se non puoi posizionare il arico in modo che rispettino tutti i criteri sopra elencati, non
provare a pedalare con il carico.

142
143
EN
ES
FR
IT
KO
EN
ES
FR
IT
KO
Trasporto Pubblico
Le biciclette Pedelec, generalmente, possono essere trasportate su mezzi pubblici e treni. Verifica con la società di trasporto quali siano
le condizioni da rispettare per il trasporto della bicicletta:
• Alcune aziende di trasporto richiedono di prenotare lo spazio di comprare un biglietto per il trasporto della Pedelec.
• Alcune aziende di trasporto permettono di portare con se la pedelec solo al di fuori degli orari di punta.
• Alcune aziende chiedono che la pedelec sia coperta.
Aereo
• Le batterie usate sulle pedelec sono considerate potenzialmente pericolose e non possono essere trasportate sugli aeroplani.
• Verifica con il tuo trasportatore locale se puoi spedire la batteria separatamente.
Auto
• L a tua Tern può essere trasportata con un portabici standard da automobile. Per ridurre il peso della bicicletta, rimuovi la batteria e
posiziona la batteria all’interno del veicolo.
• Ti suggeriamo di trasportare la tua bicicletta all’interno del veicolo solo se hai abbastanza spazio all’interno del veicolo. Assicurati di
non danneggiare il deragliatole posteriore.
• Quando entri in un garage ricordati che la bicicletta sul tetto richiede più luce per il passaggio del veicolo.
11. Trasportare la tua Tern
Concetto
Le biciclette a pedalata assistita sono biciclette equipaggiate con un motore elettrico che entra in funzione quando si azionano i pedali. L’assistenza è attivata da un sensore che percepisce il movimento dei pedali. In Europa l’assistenza si interrompe nel momento in cui la bicicletta
raggiunge i 25 km/h.
L’unità di controllo ti permette di selezionare il livello di assistenza alla pedalata che desideri avere, da economy a sport.
La tua bicicletta Tern può utilizzare un motore nel movimento centrale (mid motor) o nei mozzi delle ruote. Vedi il disegno qui sotto:
Altre Caratteristiche Delle Pedelec
Assistenza nel camminare
Alcune pedelec hanno la possibilità di fare intervenire il motore quando stai camminando a fianco della bicicletta. Questo è un valido aiuto
nel momento in cui vai in salita. Salire la rampa del garage camminando a fianco della bici sarà molto più facile. La velocità massima che
puoi raggiungere è la velocità di una persona che cammina. Per maggiori informazioni fai riferimento al manuale del produttore del sistema
motore.
Lucchetto per la batteria
La tua Tern Pedelec può avere una serratura per far si che la batteria sia in posizione corretta durante l’uso della bicicletta e che non possa
essere rubata quando parcheggi la bicicletta. Assicurati che la serratura si sempre chiusa quando utilizzi la batteria e tieni le chiavi in un pos
-
to sicuro. Se dovessi perdere le chiavi della batteria, contatta il tuo rivenditore locale.
12. L’ABC delle Pedelec
Rear Hub Mid Motor
Front Hub
Mozzo Posteriore Movimento Centrale Mozzo Anteriore

144
145
EN
ES
FR
IT
KO
EN
ES
FR
IT
KO
Batteria
• La tua Tern Pedelec è equipaggiata con una batteria agli ioni di Litio. Le moderne batterie agli ioni di litio possono fare 500 cicli di carica
prima di perdere capacità. La Batteria non ha effetto memoria quindi puoi caricare la batteria in qualsiasi momento senza aspettare che
la batteria sia completamente scarica. Se non userai la batteria per più di un mese carica la batteria ad almeno l’80% prima di mettere
via la bici. Non scaricare mai completamente la batteria senza ricaricarla subito. Una batteria lasciata completamente scarica per tempi
prolungati può danneggiarsi in modo irreparabile.
• Usa solo il carica batteria che viene consegnato insieme alla batteria. Non usare nessun altro carica batteria anche se il connettore può
essere utilizzato con la batteria della tua Tern.
• Quando la batteria della tua Tern ha raggiunto la fine della vita utile dovrà essere smaltita come un rifiuto potenzialmente pericoloso e
smaltita in modo opportuno. Chiedo al tuo rivenditore come smaltire la batteria.
Alterare i parametri di funzionamento del motore
E’ proibito alterare i parametri di funzionamento del motore. Sistemi o software che alterano la velocità massima o
che introducono un acceleratore fanno decadere la copertura di garanzia. Inoltre posso creare condizioni pericolose di
guida ed essere ritenute illegali.
Informazioni Aggiuntive
Assicurati di aver letto i manuali del produttore del sistema di motore relativamente a:
• Unità motore e unità di controllo
• Corretto utilizzo della batteria e del carica batteria
• Risoluzione dei problemi
• Manutenzione
• Pulizia
Le batterie non devono essere buttate in discarica o negli inceneritori
Luci
La tua Tern è equipaggiata con luci anteriori e posteriori alimentate dalla batteria. Utilizza le luci seguendo le disposizioni del
codice della strada.
Caricamento della batteria
La tua bicicletta Tern viene fornita con un caricatore specifico per la tua
batteria. Per maggiori informazioni circa il funzionamento del carica batter
-
ia fai riferimento al manuale del produttore del carica batteria.
Configurazione con multi-batteria
Se la tua bicicletta a pedalata assistita permette l’uso di una o più batterie,
leggi le istruzioni qui sotto riportate.
Caricare le batteria sulla bicicletta
Se entrambe le batterie sono installate sulla bicicletta, caricale usando un
solo carica batteria. Le batterie si caricheranno contemporaneamente.
Collega il carica batteria alla porta adiacente al motore. La porta
posteriore è chiusa per prevenire l’uso di entrmabe le porte
contemporaneamente.
Caricamento delle batteria una volta disinstallate dalla bicicletta
Ciascuna batteria può essere caricata individualmente se rimossa dalla
bicicletta.
Protezione dei contatti
Quando usi una sola batteria, verifica che i conttatti del secondo
alloggiameto siano protetti con la protezione in gomma fornita. Questo
serve a impedire che il circuito elettrico venga danneggiato
inavvertitamenete.

146
147
EN
ES
FR
IT
KO
EN
ES
FR
IT
KO
Pedalare senza Aiuto del Motore
La tua Tern è progettata per essere utilizzata come una normale bicicletta se il motore è disattivato. Se stai andando in discesa o se vuoi
aumentare l’autonomia puoi spegnere il motore ma non l’unità di controllo. In questo modo potrai tenere sott’occhio la velocità, la distanza
percorsa, le luci. Se la batteria si scarica completamente le luci smetteranno di funzionare.
Se la tua Tern è dotata di una luce anteriore Valo Direct puoi acquistare un adattatore USB per collegare la luce ad un accumulatore USB
per alimentare la luce. L’accumulatore USB dovrebbe indicare quanta anergia è immagazzinata e dovrebbe avvisarti (ad esempio con una
spia lampeggiante) quando la riserva di carica è inferiore al 20%. Verifica in modo empirico quanta autonomia ti rimane dopo che la spia
lampeggiante si è accesa.
Autonomia della batteria
L’autonomia della batteria dipende da molteplici fattori come:
Velocità media
Più vai veloce e più energia è richiesta dal motore con conseguente scaricamento della batteria. Tuttavia, se pedali più veloce della velocità
massima di assistenza (25 km/h) il motore si spegnerà e non consumerà nessuna energia.
Livello di assistenza prescelto
Il modo migliore di aumentare l’autonomia della batteria è di pedalare con sforzo. Usare meno assistenza e fare un po’ di fatica in più ridurrà
l’uso della batteria e aumenterà l’autonomia della stessa.
Manutenzione generale
Tieni la pressione delle gomme a livello corretto e lubrifica le parti in movimento.
Traffico stop&go
Le partenze al semaforo richiedono molta energia. Per aumentare l’autonomia parti sempre in modalità eco.
Peso del ciclista e cadenza di pedalata
Il motore richiederà più energia se il ciclista è più pesante. Tenere una cadenza di almeno 60 rpm migliora l’effficienza.
Condizioni della strada (superficie, terreno, vento)
Strade non pavimentate, vento contrario e salite riducono l’autonomia.
Partenza
Quando il controller è acceso, l’assistenza viene erogata non appena fai pressione sui pedali. E’ pertanto importante che tu salga sulla
bicicletta con l’unità di controllo spenta. Dopo esserti seduto in sella assicurati che non ci sia alcun peso sui pedali per prevenire movimenti
accidentali. A questo punto puoi accendere l’unità di controllo. Ti suggeriamo di iniziare dal minimo livello di assistenza.
Alcuni sistemi richiedono di non mettere alcuna pressione sui pedali prima di accendere il sistema in modo che il reset possa essere portato
a termine in modo corretto.
Selezionare il Corretto Livello di Assistenza
Non pedalare solo con le marce lunghe e l’assistenza elettrica. Utilizza una marcia che ti permetta di avere una buona ed efficiente cadenza
di pedalata. Questo massimizzerà l’efficienza e l’intervento del motore.
Per esempio con il sistema Bosch centrale mantenere la cadenza di pedalata a circa 90 rpm, indipendentemente dalla velocità, permette al
motore di aiutarti nel modo più efficiente.
Pedalare con l’assistenza del Motore
Il motore interviene a seconda della tua potenza di pedalata. Tutti i sistemi Pedelec hanno un’unità di controllo che interrompe l’intervento
del motore non appena smetti di pedalare. Questa è una caratteristica di sicurezza prevista dalla norma EN 15194 (EPAC – Electrically Power
Assisted Cycles).
Quando fai una curva con una pedelec, interrompi la pedalata, dal momento che potresti avere una velocità di curva troppo elevata.
Siccome avrai la tendenza a viaggiare ad una velocità più elevata della media presta attenzione ad eventuali ostacoli o situazioni di pericolo.
I pedoni o altri utenti della strada potrebbero non accorgersi del tuo arrivo.
Pedala in modo attento, usa un abbigliamento ad alta visibilità, segnala le tue intenzioni e usa un campanello quando opportuno.
13. Suggerimenti nell’utilizzo di una Pedelec

148
149
EN
ES
FR
IT
KO
EN
ES
FR
IT
KO
La tua Tern ha molti componenti e parti sofisticati. Molte operazioni di manutenzione richiedono strumenti e conoscenze
specifiche. Non iniziare alcun intervento di manutenzione se non sei in grado di eseguirlo. Una regolazione impropria può
comportare in un danno per la bicicletta o causare un ferimento. Chiedi al tuo rivenditore per un aiuto specifico
Mantienila Originale
Quando sostituisci le parti come il telaio, la forcella le gomme, i cerchi, i freni, la luce anteriore o posteriore, il cavalletto, il manubrio, il piantone manubrio e così via, utilizza i componenti originali. Sono stati messi alla prova e verificati per garantire la tua sicurezza. Chiedi al tuo
rivenditore le parti di ricambio originali.
Le operazioni di manutenzione che puoi e dovresti fare e che non richiedono particolari strumenti sono:
Resto Fluido
Ricordati di lubrificare la tua bicicletta utilizzando i prodotti corretti. Chiedi al tuo rivenditore quando e dove lubrificare la bici.
Aria
• La ruota consiste di Mozzo (1) , Raggi (2) , Cerchio (3), Pneumatico (4), Valvola
(5) e Asse (6).
• La valvola può essere del tipo Schrader (7) o Presta (8). Le valvole Presta
hanno una chiusura di sicurezza che deve essere allentata prima di gonfiare
la gomma.
• Controlla la pressione dell’aria e verifica che sia compresa tra i valori riportati
sul lato del pneumatico.
• Verifica i pneumatici per vedere se hanno un battistrada adeguato e nessuna
foratura.
14. Manutenzione
Capacità della batteria
• La capacità delle batterie si misura in Watt per ora (w/h). In linea generale se la capacità in w/h è maggiore, maggiore sarà l’autonomia a
parità di condizioni. La batteria sarà più costosa e la bicicletta più pesante.
• La temperatura ambiente ha influenza sul funzionamento e l’efficienza della batteria. La capacità della batteria è stabilita a 23° C Utilizzare la bicicletta e la batteria a temperature molto diverse dai 23° C di riferimento può comportare una significativa riduzione della
capacità della batteria e dunque dell’autonomia.
• Con l’invecchiamento della batteria, diminuisce la capacità della stessa. Alcune batterie hanno component chimici che decadano in
maggior tempo.
Puoi sempre controllare lo stato di carica della batteria sul display del controller.

150
151
EN
ES
FR
IT
KO
EN
ES
FR
IT
KO
Tensione della Catena
La catena è sottoposta a grande stress quando si pedala. Per ottimizzare il
cambio di velocità la catena deve essere ben connessa ai denti della corona.
Per verificare la tensione, cambia sulla velocità più corta e verifica che la catena oscilli al massimo di 10-20 mm per lato. Questo criterio va bene sia per il
cambio interno che per quello esterno.
Nota: le trasmissioni a cinghia sono più complicate e dovrebbero essere
verificate dal rivenditore.
Una tensione inadeguata causata da una catena troppo usurata causerà un alloggiamento improprio sui denti della corona. Sostituire una
catena quando usurata aiuterà a prolungare la vita utile dei componenti costosi quali la corona e i pignoni della cassetta.
Per i sistemi con cambio interno al mozzo, una tensione errata della catena porterà ad un disallineamento della ruota posteriore rispetto ai
forcellini.
Se noi sei sicuro dello stato di usura della catena recati dal rivenditore più vicino.
Pulizia
Quando la tua Tern richiede di essere pulita, usa un secchio d’acqua e rimuovi lo sporco in eccesso con una spugna. Asciuga la tua Tern
dopo averla pulita per evitare la ruggine.
Non pulire la tua Tern con acqua in pressione o vapore dal momento che potrebbe entrare acqua in zone sigillate e
danneggiare le parti
Freni
Assicurati che i freni funzionino e che abbiano un potere frenante adeguato. Le leve non dovrebbero toccare il manubrio quando azionate.
Pedalare con freni non regolati o usurati può essere pericoloso e causare ferimenti o morte. Segui le indicazioni contenute
nel manuale di uso e manutenzione dei freni. Tieni le superfici frenanti pulite e libere da olio o lubrificanti. Sostituisci le parti
usurate solo con parti autorizzate dal produttore dei freni.
Catena, Guarnitura, e Cavi
Le velocità più corte sono pensate per andare in salita mentre quelle più lunghe sono pensate per sviluppare velocità in piano o in discesa.
Ti suggeriamo di esercitarti a cambiare velocità in un posto sicuro.
Per verificare che la tua catena sia correttamente alloggiata sulla corona anteriore, ruota le pedivelle e verifica che non ci siano salti o incertezze.
Prima di usare la bicicletta cambia tutte le velocità e assicurati che la catena e il deragliatore funzionino bene. Se le velocità non cambiano
bene ti suggeriamo di contattare il tuo rivenditore. Se il deragliatore non funziona bene ti suggeriamo di evitare l’uso della velocità più corta
e di quella più lunga. In questo modo siamo sicuri di evitare che la catena salti o incastri.
Verifica tutti i cavi e le guaine assicurandoti che non ci sia ruggine, crepe o usura. Se fossero danneggiati, occorre sostituirli.
La trasmissione di una bicicletta ha un
cambio integrato nel mozzo (A) o esterno
al mozzo (B). La trasmissione consiste
di pedivelle (1), corona anteriore (2),
pignone posteriore (3) o cassetta (4),
Catena (5), deragliatore anteriore (6) e
deragliatore posteriore (7). Le velocità
delle biciclette sono numerate da 1 in su
con il numero 1 associato alla velocità più
facie e corta.
12
3
5
1
2
4
5 67
A
B
1
2
4
5 67
B

152
153
EN
ES
FR
IT
KO
EN
ES
FR
IT
KO
Sganci Rapidi e Fissaggi
Verifica che gli sganci rapidi, i dadi e i bulloni che tengono insieme le ruote, il manubrio e reggisella sia serrati in modo
adeguato. Un serraggio corretto è di vitale importanza. Se il seraggio è troppo lasco la chiusura può non funzionare
bene e far uscire di sede il componente. Troppa forza di chiusura può causare un danneggiamento e un cedimento del
componente. In entrambi un serraggio errato può portare ad un malfunzionamento con conseguente perdita di controllo
e ferimento del ciclista. Segui le indicazioni contenute nella sezione 15 per applicare la corretta coppia di serraggio. Se
non sei sicuro, rivolgiti al rivenditore più vicino.
Tutte le altre operazioni di manutenzione o di riparazione che non sono descritte in questo manuale dovrebbero essere
eseguite dal tuo rivenditore.
È Solo Coppia di Serraggio per Me
Le coppie di serraggio misurano quanta forza devi applicare per stringere un bullone o un dado. Quando viene definito
un valore di coppia di serraglio dovresti usare una chiave dinamometrica per garantire che quel valore sia rispettato.
Valori di Coppia
Telaio e forcellaand Fork
Componente lbf.in Newton Meters (Nm) kgf.cm
Bullone di montagio del cavalletto 53-60 6-8 61-69
Bullone di montagio portaborraccia 25-35 2.8-4 29-40
Bulloni portapacchi 25-35 2.8-4 29-40
Bulloni parafango 50-60 5.6-6.8 58-69
15. Coppie di Serraggio
Sganci Rapidi
Lo sgancio rapido usa un sistema a camma per serrare un componente in posizione e per rilasciarlo senza l’uso di attrezzi.
Uno sgancio rapido è composto da un morsetto (1), da un dado (2) e da una leva (3). La parte concava si chiude verso l’interno.
Il dado permette di regolare la forza di chiusura del morsetto. Chiudere la leva richiede una forza applicabile con il palmo della tua mano.
Gli sganci rapidi tengono in posizione le ruote, il reggisella e il manubrio.
Quando vengono utilizzate per fissare la ruota, dovrebbero sormontare i forcellini della forcella.
Quando vengono chiusi per mantenere in posizione il reggisella, quest’ultimo non dovrebbe ruotare.
Quando viene serrato il manubrio il manubrio non dovrebbe ruotare.
Quando la leva è chiusa, deve essere posizionata in modo che un urto accidentale non la possa aprire.
23
1
Chiuso
Regolare
Aperto
Gli sganci rapidi sono molto comodi ma molti incidenti capitano perchè vengono usati in modo improprio. Una regolazione
errata può causare un danneggiamento della bicicletta o un incidente con grave pericolo, anche di morte, per il ciclista

154
155
EN
ES
FR
IT
KO
EN
ES
FR
IT
KO
Intervalli di Servizio
Rodaggio
Tutte le biciclette hanno un periodo di rodaggio. La tua bicicletta durerà più a lungo se le farai fare un periodo di rodaggio prima di utilizzarla in modo intensivo. Suggeriamo a tutti di fare un controllo dopo un mese di utilizzo per mettere a punto eventuali regolazioni.
Intervalli di manutenzione
La tua Bicicletta richiede delle verifiche periodiche da parte di un rivenditore autorizzato.Qui sotto riportiamo una tabella con gli intervalli di
manutenzione suggeriti a seconda del tipo di utilizzo.
Tipologia d’uso
UTILIZZATORE
INTENSIVO
Intervallo di manutenzione
Mensile
Percorre più di 25 km al giorno
Usa la bici in ogni condizione
Percorre strade con buche e
imperfezioni
Trasporta 105 kg o meno sulla
bicicletta incluso il peso del
ciclista
UTILIZZATORE
FREQUENTE
Intervallo di manutenzione
Bi-Mensile
Usa la bici tre o 4 volte la setti-
mana per un totale di 100 km
Qualche volta usa la bici sotto
la pioggia
Percorre strade con buche e
imperfezioni
Trasporta 105 kg o meno sulla
bicicletta incluso il peso del
ciclista
UTILIZZATORE NEL
TEMPO LIBERO
Intervallo di manutenzione
Trimestrale
Usa la bici una o due volte la
settimana
Usa la bici con bel tempo
Percorre percorsi ciclabili o
strade ben asfaltate
Trasporta 105 kg o meno sulla
bicicletta incluso il peso del
ciclista
UTILIZZATORE
SALTUARIO
Intervallo di manutenzione
Annuale
Usa la bici una o due volte al
mese
Usa la bici solo con il bel
tempo
Percorre percorsi ciclabili o
strade ben asfaltate
Trasporta 105 kg o meno sulla
bicicletta incluso il peso del
ciclista
16. Intervalli di Manutenzione
Freni and Fork
Componente lbf.in Newton Meters (Nm) kgf.cm
Leva del freno (tipo barra dritta) 53-60 6-6.8 61-69
Leva del freno (tipo barra a corna di bue) 55-80 6.2-9 63-92
Rotore del disco al mozzo (bulloni M 5) 18-35 2-4 21-40
Montaggio delle pinze 55-70 6.2-7.9 63-81
Ruote and Fork
Componente lbf.in Newton Meters (Nm) kgf.cm
Corpo a mozzo libero 305-434 34.5-49 352-499
Anello di fissaggio gruppo pignoni 260-434 29.4-49 299-499
Dadi assale anteriore 180 20.3 207
Dadi assale posteriore 260-390 29.4-44.1 299-449
Catena and Fork
Componente lbf.in Newton Meters (Nm) kgf.cm
Pedale della pedivella 307 34.7 353
Bullone della pedivella (scanalatura ed alberini quadrati) 300-395 33.9-44.6 345-454
Movimento centrale (cassa esterna) 610-700 40-50 702-805
Movimento centrale (cartuccia ed unitá coppa e cono) 435-610 49.1-68.9 500-702
Altri and Fork
Componente lbf.in Newton Meters (Nm) kgf.cm
Bullone del morsetto del manubrio (canotto del manubrio) 70-89 8-10 80-102
Bullone del cappuccio superiore 35-53 4-6 41-62
Bullone del morsetto del manubrio (4 bulloni del morsetto) 36-53 4-6 41-62
Morsetto del binario della sella 70-89 8-10 80-102
Rapporto : 1 Nm = 8.9 lbf.in = 10.2 kgf.cm

156
157
EN
ES
FR
IT
KO
EN
ES
FR
IT
KO
Timbro / Firma del rivenditore
Ispezione 4
Date
Lavoro Fatto
Parti Sostituite o Riparate
Timbro / Firma del rivenditore
Ispezione 5
Date
Lavoro Fatto
Parti Sostituite o Riparate
Timbro / Firma del rivenditore
Ispezione 6
Date
Lavoro Fatto
Parti Sostituite o Riparate
Servizio Record
Timbro / Firma del rivenditore
Ispezione 1
Date
Lavoro Fatto
Parti Sostituite o Riparate
Timbro / Firma del rivenditore
Ispezione 2
Date
Lavoro Fatto
Parti Sostituite o Riparate
Timbro / Firma del rivenditore
Ispezione 3
Date
Lavoro Fatto
Parti Sostituite o Riparate
Entro un mese dall’acquisto o
dopo 200 km

158
159
EN
ES
FR
IT
KO
EN
ES
FR
IT
KO
Tutte le richieste di sostituzione o riparazione di una parte in garanzia devono essere fatti tramite un rivenditore autorizzato Tern o un distributore esclusivo di Tern. La prova d’acquisto deve essere fornita unitamente a qualsiasi richiesta in garanzia in formato elettronico o cartaceo.
Tutte le biciclette Tern devono essere registrate attraverso il programma Tern Care prima che un reclamo in garanzia possa essere esaminato.
In aggiunta, il proprietario deve confermare di aver ricevuto e compreso il briefing del proprietario da parte del rivenditore o di aver visto e
compreso il video del briefing del proprietario sul sito ternbicycles.com/support.
Esclusioni
La garanzia non copre danni e/o difetti evidenziati:
• Se una bicicletta è stata usata, pedalata, utilizzata o sovraccaricata in un modo non consono alle specifiche del prodotto o secondo l’uso o
le linee guida del manuale del proprietario. Questo include ma non è limitato alla guida fuoristrada.
• dall’usura e il normale logorio. Le parti e componenti possono avere una vita utile a seconda dell’uso, del carico, delle condizioni meteorologiche, delle condizioni della strada, ecc…
• La verniciatura è considerata una parte soggetta a logoramento e non è pertanto coperta dalla garanzia.
• Se una bicicletta o un componente è stato riassemblato, riparato o manutenuto da personale non autorizzato da Tern.
• Se la bicicletta è stata danneggiata da fuoco, alluvione, danneggiamento accidentale, azioni improprie da parte di terzi e/o da ogni evento
fuori dal controllo della Tern.
• Se sono state effettuate modificazioni del Telaio, Forcella, Piantone sterzo, o componenti.
• Se sono stati installate parti, accessori, unità motore o batterie non originariamente progettate o compatibili con la bicicletta nella sua
configurazione di vendita.
• Se il numero di telaio e/o la Service tag è stata cancellata, modificata o manipolata o se in qualunque modo non è chiaramente identificabile.
Garanzia Tern d’assistenza
Tern riparerà o sostituirà, durante il periodo di garanzia, qualsiasi parte che evidenzia un difetto di fabbricazione o costruttivo. Qualsiasi parte
che sia sostituita ai sensi di questa garanzia sarà sostituita con parti equivalenti o di simile disegno costruttivo o di altro colore. Tern si riserva
il diritto di sostituire le parti difettose con parti di disegno diverso fabbricate da, o per conto di Tern, a condizione che tale sostituzione non
riduca la funzione della parte originale.
A causa dell’obsolescenza di prodotto alcuni componenti potrebbero non essere disponibili per i modelli più vecchi. In questo caso, trovare
i componenti sostitutivi e il costo associato all’approvvigionamento delle parti sarà responsabilità.
Tern si riserva a suo insindacabile giudizio di riparare o rimpiazzare le parti difettose che non fanno parte del periodo di garanzia ma tale
decisione non potrà essere assunta come una qualunque responsabilità.
Garanzia limitata di Tern
Le biciclette Tern sono vendute per conto della nostra società (“Tern”) da rivenditori autorizzati Tern selezionati che comprendono appieno
lo specifico assemblaggio e le necessita d’assistenza richiesti dai nostri prodotti. Tern garantisce le biciclette Tern al primo proprietario contro i difetti di fabbricazione, di materiale e costruttivi a partire dalla data d’acquisto. La garanzia ha la seguente durata:
Cinque anni: Telaio, Piantone sterzo e Forcella
Un anno: Tutte le altre parti originali, incluse le parti e componenti a marchio Tern o BioLogic, eccetto per quanto evidenziato successiva-
mente in questo documento
Qualsiasi altra parte o componente originale sarà coperto dalla garanzia indicata dal costruttore originale di quella parte o componente.
Estensione di garanzia a 10 anni
I proprietari che si iscrivono entro 30 giorni dalla data di acquisto al programma Tern Care sul sito ternbicycles.com riceveranno gratuitamente un’estensione di garanzia a 10 anni per il Telaio, il Piantone sterzo e la Forcella. In aggiunta, la bicicletta deve essere stata assemblata
da un rivenditore autorizzato Tern al momento dell’acquisto - indipendentemente dal fatto che la bicicletta sia stata acquistata on line o in un
negozio fisico.
I seguenti componenti sono esclusi dall’estensione di garanzia:
• Meccanismo di chiusura del Telaio e del Piantone sterzo
• Verniciatura
• Biciclette ad uso commerciale (ad esempio noleggio, uso promozionale)
Il fatto di essere coperti da garanzia non significa che il Telaio, il Piantone sterzo e la Forcella siano indistruttibili. Tutti i materiali possono
rompersi se sottoposti a sollecitazioni superiori a quelle di progetto. Significa che questi componenti sono coperti da garanzia nei termini e
condizioni di quest’ultima.
Responsabilita del Proprietario
Il Proprietario dovra’ utilizzare e manutenere la bicicletta Tern in modo ragionevole, effettuando la manutenzione in modo preventivo seguendo un piano di manutenzione che sia conforme all’uso, al clima e altri fattori rilevanti. Se si evidenzia un difetto del prodotto il Proprietario
deve smettere di usare la bicicletta e portare la bicicletta e la(le) parte(i) a un rivenditore autorizzato Tern per le riparazioni in garanzia (entro
il periodo di garanzia applicabile). Il trasporto della bici o di qualsiasi parte della bici al rivenditore è responsabilità del Proprietario.
17. Garanzia

160
161
EN
ES
FR
IT
KO
EN
ES
FR
IT
KO
In accordo con la direttiva EC 2006/42/EC sui macchinari (Allegato II A)
Questa dichiarazione si riferisce ed è valida solo per la configurazione del macchinario nello stato in cui si trova al momento della immissione sul mercato ed esclude componenti che possano essere aggiunti successivamente all’acquisto o modifiche che l’utilizzatore finale
possa aver fatto dopo l’acquisto. La dichiarazione non è più valida se il prodotto viene modificato.
Qui di seguito, dichiariamo, che la Tern Pedelec è conforme a tutti i requisiti essenziali richiesti dalla direttiva per i macchinari 1006/42/
EC e dalla direttiva 2004/108/EC nell’ambito della compatibilità elettromagnetica.
Sono stati seguiti i seguenti standard tecnici:
EN ISO 4210:2015 Cycles — Requisiti di sicurezza per tutte le biciclette
EN 15194:2009+A1:2011 Electrically power assisted cycles (EPAC)
Taipei, Ottobre 2017
Tern Bicycles
8F-8, No. 6, Lane 609, Chung Hsin Rd, Sec 5,
Sanchong District, New Taipei City, Taiwan
ternbicycles.com
18. Dichiarazione di Conformità
(Per i paesi all’interno dell’UE)
Qualunque Telaio, Piantone manubrio o Forcella sostituiti in garanzia saranno coperti per il restante periodo di garanzia della bicicletta.
Questa e la sola garanzia data da Tern e nessun impiegato, agente o rivenditore di Tern è autorizzato a dare qualsiasi altra garanzia per
conto di Tern.
La garanzia è espressamente limitata alla riparazione o sostituzione a discrezione del Costruttore di una parte difettosa. La garanzia tutela
solo il primo acquirente della bicicletta da un dealer autorizzato Tern e non è trasferibile. La garanzia copre solo le biciclette e i loro componenti se acquistati tramite un rivenditore Tern autorizzato ed è valida solo all’interno del paese in cui la bicicletta e’ stata originalmente
acquistata. Poiché non tutti i modelli o parti sono venduti in tutti i paesi, l’assistenza non e garantita al di fuori del paese originale d’acquisto.
I reclami fatti al di fuori del paese originale d’acquisto o della rete di rivenditori autorizzati Tern possono essere soggetti a spese aggiuntive
e/o ritardi nell’ottenimento delle parti di ricambio ed informazioni. Per le vendite via internet , il paese di acquisto è definito come il paese in
cui ha sede il venditore.
Il proprietario si assume ogni responsabilità di danneggiamenti, ferimenti provocati con l’uso di una bicicletta Tern modificata rispetto alle
specifiche Tern. Il proprietario comprende che una bicicletta modificata non è conforme necessariamente agli standard di sicurezza e che
l’uso della stessa può provocare seri danni e ferimenti
Questa garanzia sostituisce tutte le altre garanzie espresse o implicite, inclusa qualsiasi garanzia d’IDONEITA PER UNO SCOPO O USO
PARTICOLARE altrimenti applicabili a questo prodotto. Tern non sarà responsabile per qualsiasi danno incidentale o consequenziale, inclusi
i mancati guadagni. Non sono date altre garanzie diverse dalla presente. Questa garanzia può essere modificata solo da Tern.
Se qualsiasi parte di questa garanzia non rispetta le leggi locali, sara ritenuta separabile dal resto della garanzia che rimane applicabile e
sarà interpretata, per quanto possibile, come qui scritta, in lingua italiana, o per la minima parte richiesta da tale legge locale. Questa garanzia non incide sui diritti legali del consumatore.

162
163
EN
ES
FR
IT
KO
EN
ES
FR
IT
KO
1. 도입 .................................................. 163
2. 전반적인 정보 ..................................... 164
3. 법률상의 세부 사항 .............................. 165
4. 현지의 규제 ........................................ 165
5. 사용 의도 ........................................... 167
6. Tern자전거 펴고 접기 ........................... 167
7. 처음 타기 전에 .................................... 168
8. 라이딩을 하기 전에 .............................. 173
9. 안전 라이딩 ........................................ 176
10. 여객 및 화물 운송 .............................. 178
11. Tern 자전거의 운반 ............................ 182
12. 전기자전거 첫걸음 ............................. 183
13. 전기자전거 라이딩 팁 ......................... 186
14. 정비 ................................................ 189
15. 조임 토크 ......................................... 193
16. 점검 및 정비 스케줄 ........................... 195
콘텐츠
17. 보증 ................................................ 198
18. 적합성의 공표 ................................... 201
고객 여러분,
도심에서의 이동과 교통편의 선두주자인 Tern을 선택해주셔서 감사드립니다!
저희는 사람들이 더 적게 운전하고 더 많이 타는데 필요한 모든 것을 모아 놓은 자전거를 디자인합니다.
저희는 지속 가능한 교통편의 목표를 위해 전념하고 있으며, 휴대성과 유용성에 중점을 둔 도심의 교통수단을 위한 자전거를 설계하고 제조합니다. 매년
Tern은 사회 및 환경을 위해 순이익의 1% 이상을 기부하고 있습니다.
일반적인 안전 정보
페이지를 넘기며
당신의 자전거는 특수 설계된 부품이 있으므로 라이딩 전에 이 설명서를 주의 깊게 읽어주십시오. 길을 나서기 전에, 주차장처럼 안전한 환경에서 당신의 새
자전거가 어떻게 작동하는지 이해하기 위해 시간을 할애하여야 합니다.
길에서 타인을 존중하기
교통 법규를 준수하고 자동차를 존중하십시오. 당신과 당신의 자전거는 차량과의 충돌에서 항상 부상을 입게 되고, 보행자를 다치게 할 수 도 있습니다. 방
심하지 말고 도로 위의 다른 사람들도 배려해 주십시오.
머리보호
좋은, 인증 받은 자전거 헬멧은 사고로 인한 부상을 막아줄 수 있습니다. 반드시 착용하십시오.
서비스 시 주의 사항
적절한 지식이나 도구 없이 서비스 또는 정비를 진행하지 마십시오.
열심히 보기
이 설명서는 모터와 같은 PAS 시스템, 컨트롤 시스템, 부품, 그리고 접이식 설명을 포함한 다른 설명서와 함께 사용되어야만 합니다.
추가적으로 도움을 얻을 수 있는 곳
만약 확실하지 않은 어떠한 사항이 있다면, 가까운 Tern 대리점에 문의하십시오. Tern 딜러는 Tern 제품과 서비스 분야의 전문가입니다.
1. 도입

164
165
EN
ES
FR
IT
KO
EN
ES
FR
IT
KO
자전거 부품
아이콘의 의미
1. 바퀴
2. 스프라켓
3. 뒤 변속기
4. 체인/벨트
5. 체인링
6. 모터
7. 크랭크셋
8. 페달
9. 브레이크
10. 포크
11. 캐리어/랙
12. CE 프레임 스티커
13. 배터리
14. 배터리 자물쇠
15. 시트 포스트
16. 안장
17. 프레임 조인트
18. 프레임
19. 핸들포스트 조인트
20. 핸들바
21. 핸들포스트
22. 헤드셋
3
1
2
5
4
핸들바
1. 컨트롤러/디스플레이
2. 전조등
3. 핸들바
4. 브레이크 레버
5. 기어
특별한 주의가 필요한 제
품 및 품목을 사용하는
방법을 나타냅니다.
잘못된 사용으로 장
비가 손상 될 수 있습
니다.
사용 설명서를 따르지 않
거나 예방 조치를 취하지
않으면 생명을 위협하는
위험이 있습니다.
특정 토크를 필요로 하는 품목에 알맞은 토크 렌치 같
은, 적절한 도구를 사용해야 합니다. 토크가 너무 높거
나 낮으면 부품이 떨어져 나가게 하는 원인이 될 수 있
으며 심각한 사고와 부상을 초래할 수 있습니다.
제조사
Mobility Holdings Limited (Hong Kong), Taiwan Branch
8F-8, Lane 609, Chongxin Road, Section 5, Sanchong District, New Taipei City, Taiwan
연락처: service@ternbicycles.com / 웹사이트: www.ternbicycles.com
자전거 검사
당신의 Tern 자전거가 PAS 시스템이라면, EN 15194에 명시된 모든 테스트를 통과하여 인증받은 CE frame sticker를 부착하고 있습니다.
적합성의 공표
이 사용 설명서는 EN 15194 와 Machinery Directive EC/2006/42의 요구 상항을 준수합니다.
별도로 적합성의 공표에 대한 부분을 참조하여 주십시오.
Edition 1 Rev 1, 십월 2017
PAS 시스템은 페달을 통해 전기가 작동하는 것입니다. 이는 EPACs(Electrically Power Assisted Cycles)라고도 합니다. PAS 시스템은 라이더가 페달을 밟
기 시작할 때 모터가 보조해 주는 방식으로 움직입니다. 라이더가 페달 질을 멈추면, 보조 시스템도 같이 멈추게 됩니다. 어떤 자전거들은 최고 속도 6 km/hr
의 워크 모드를 지원을 하기도 합니다.
일반적으로, 전기 자전거는 법에 의해 전동 스쿠터 또는 오토바이보다 자전거와 유사한 것으로 분류됩니다. 대부분의 경우, 전기 자전거는 자전거 도로에서
탈 수 있고 다른 보통의 자전거처럼 자전거 랙을 달 수 도 있습니다. 라이더는 전기 자전거 운전을 위한 면허증을 따로 소지할 필요가 없으며 다른 어떠한 특
별한 인허가나 PAS 시스템 사용을 위한 등록을 할 필요가 없습니다.
전기 자전거 사용에 적용되는 특정 법규, 규범, 지침은 국가마다 다를 수 있습니다. 당신이 독일에서 자전거를 타는 것이 아니라면
PAS 시스템을 사용하여 라이딩을 하기 전에 해당 지역의 법률을 숙지하여 따르는 것이 중요합니다. 길을 떠나기 전에 현지의 자전
거 법규를 배우고 가십시오.
독일에서 PAS 시스템으로 공공 도로를 달리려면, 당신의 자전거는 도로 면허 규정(StVZO)과 도로 교통 법규(StVO)에 따라 장비를 갖추어야 합니다. 당신의
국가에서는 다른 규범이 적용 될 수 있습니다.
2. 전반적인 정보
3. 법률상의 세부 사항
4. 현지의 규제
1
3
4
7
8
15
16
18
17
21
19
20
22
10
13
6
11
5
2
14
9
12

166
167
EN
ES
FR
IT
KO
EN
ES
FR
IT
KO
StVZO
전조등 시스템은 공공 도로에서 합법적인 K번호 표시를 가지고 있어야 합니다.
전조등과 후미등은 같은 전원으로부터 동력이 공급되어야 합니다.
전조등의 투사 중심부는 도로에서 자전거 정면으로부터 10m 이내를 초과하면 안 됩니다. 후미등은 반드시 도로 표면으로부터 최소 25cm의 높이에 설치
되어야 합니다.
반사경이 필요합니다. 앞에는 흰색 반사경이 필요하며, 후면에는 최소한 두 개의 적색 반사경이 필요합니다.
두 개의 노란 반사경이 각각의 페달에 부착되어 있어야 합니다.
각각의 휠은 아래 요구 사항의 하나 이상을 최소한 충족해야 합니다.
• 두 개의 노란 반사경
• 타이어의 양 사이드에 흰색 반사링.
브레이크 시스템은 앞, 뒷 브레이크가 독립적으로 작동해야 합니다.
자전거를 늘 최적의 상태를 유지하도록 해 주십시오.
스턴트맨이 아닌, 도시의 용사들을 위해 만들어졌습니다.
무게
• Tern 자전거는 포장된 도로에서 두 바퀴를 땅에서 굴리는 사람을 위해서 설계된 것입니다. 경주용, 점프용, 도약용, 휠체어 및 기타의 용도로
사용하지 마십시오. 제조사 및 판매사는 이에 따른 직접, 또는 파생적으로 발생하는 손해에 대해 어떠한 책임도 지지 않습니다. 당신이 PAS 시
스템을 원래의 사용 의도에 따라 사용하지 않는다면 그 보증은 무효가 됩니다.
• 자전거를 비포장도로를 달리거나 점프하고, 오프로드 라이딩, 스턴트를 위해 사용하는 것은 프레임을 손상 시킬 수도 있으며 라이더의 상해,
또는 사망 위험 원인이 될 수 있습니다.
• 최대 적재량 = 라이더의 체중 + 물건의 무게
• 여러분이 PAS 방식의 접이식 TERN 자전거를 가지고 있는 경우,
표준 운반 용량은 105kg(230lbs)입니다. 여기에 명시된 용량이 당신의 PAS 방
의 CE프레임 스티커와 다르다면 CE 스티커 내용을 따라주시기 바랍니다.
만약 PAS 방식이지만 비접이식 Tern을 가지고 있다면,
적재 가능한 최대치의 중량을 알기위해 CE프레임 스티커를 참고해 주시고,
하중의 균형을 맞추기 위해 PAS 방식 보조 사용 설명서를 읽어 주십시오.
• 화물이나 초과 무게를 운반하는 경우, 자전거가 안정되어 있고, 최대 적재량 내에
있는지 확인하십시오.
• 공공 도로에서 라이딩 하기 전에 안전한 장소에서 자전거를 충분히 핸들링 할 수
있도록 연습하십시오.
• 자전거 핸들링이 제대로 되지 않는다면, 라이딩 중 급격한 방향 전환 등이 균형에
영향을 주어 심각한 부상이나 사망을 초래할 수도 있습니다.
별도로 첨부된 접이식 자전거 설명서 참조 부탁드립니다.
5. 사용 의도
6. Tern 자전거 펴고 접기
CE 프레임 스티커 예
10 m

168
169
EN
ES
FR
IT
KO
EN
ES
FR
IT
KO
라이딩 전에 열심히 읽어 보세요
도로에서 라이딩을 하기 전에 새 자전거를 어떻게 조작하고 사용하는 지 이해하기 위해 시간을 들여야 합니다. 특정 부품과 당신의 자전거를 위한 접이식 지
시사항에 대한 설명서는 전기 자전거 사용설명서와 함께 공급됩니다. 반드시 모든 사용설명서를 읽어주십시오. 불명확한 부분이 있다면 대리점에 문의 바랍
니다.
반드시 확인해야 될 것
전기 시스템
• 모든 컨트롤러 버튼의 기능과 디스플레이가 의미하는 바에 익숙해야합니다.
• 전동 시스템 제조사의 매뉴얼에서 해당 섹션 정보를 참조하여 주십시오.
바퀴
• Check 타이어 압력을 체크하고, 그것이 타이어 측벽에 표시된 최소 및 최댓값 이내의 범위에 있는 지 확인하십시오.
• 두 바퀴를 돌려보면서 바퀴가 부드럽게 회전하는지, 흔들리지는 않는지 확인하고 브레이크에 닿지 않게 하십시오. 휠이 좌우로 흔들리거나 브레이크 패
드에 닿으면, 자전거 가게에 가서 바퀴를 확인해보거나 교체하십시오.
헤드셋
• 프론트 휠을 다리 사이에 단단히 누르고 핸들바를 돌리며 섭니다. 움직임이 발생하면, 핸들
바를 다시 정렬하고, 헤드셋과 핸들 포스트 베이스를 조이거나 대리점에서 서비스를 받으십
시오
• 앞바퀴를 지면으로부터 들어올려 좌우로 흔들어 봅니다. 부드럽게 느껴지십니까? 조향 장치
가 구부러지거나 뻑뻑하게 느껴질 경우 헤드셋이 지나치게 밀착되어 있을 수 있습니다. 대리
점에 정비를 의뢰하십시오.
7. 처음 타기 전에
비틀어보기
바퀴가 정확히 작동하지 않으면 스포크나 타이어에 문제가 있을 수도 있습니다.
브레이크
CBA
3
4
2
1
• 자전거 옆에 서서, 양 쪽의 브레이크를 당겨 보고, 자전거를 앞뒤로 흔들어 보면서 브레이크를 테스트 해보세요. (A) 자전거가 굴러가서는 안 되며 브레이
크 패드는 제 자리에 단단히 고정되어 있어야 합니다.
• 자전거가 단단한 느낌입니까? 자전거를 앞, 뒤로 움직이기 힘들다고 느꼈다면, 헤드셋이 느슨해져 있을 수도 있습니다. 대리점에서 점검하시기 바랍니다.
특정 디스크 브레이크의 경우는 자전거를 앞뒤로 흔들면 약간 움직이는 것을 느낄 수도 있습니다. 이는 브레이크 패드와 브레이크 캘리퍼 사이에 내장된
간극으로 인한 열팽창이 발생한 것으로 정상적인 것으로 간주됩니다. 헤드셋이 느슨해서가 아닙니다.
• 림 작동식 브레이크는(B) 림과 정렬되는(2) 브레이크 패드가 있습니다(1).브레이크 패드가 휠을 감속시키기 위해 림을 누르고 있으므로 브레이크 패트가
림과 정렬되도록 해주십시오. 림과 패드의 마모 여부도 점검 바랍니다.
• 디스크 브레이크는(C) 디스크 로터와(3) 디스크 캘리퍼가 있습니다(4). 디스크 캘리퍼 내부의 패드는 디스크 로터를 조여 휠을 감속하므로 사용 중에 매우
뜨거워 질 수 있습니다. 라이딩 직후에 만지지 말아 주십시오.
• 어느 레버가 앞 브레이크를 조작하고, 또 어느 레버가 뒷 브레이크를 조작하는 지는 국가마다 다릅니다. 영국이나 일본의 경우 왼쪽 레버는 뒷 브레이크를
작동시키고 오른쪽 레버는 앞 브레이크를 작동시킵니다. 미국, 독일 및 대부분의 국가에서는 오른쪽 레버가 뒷 브레이크를 작동시키고 왼쪽 레버는 앞 브
레이크를 작동시킵니다.
디스크 로터가 정렬되지 않은 상태에서 휠을 바꾸거나 브레이크 레버를 당길 때에는, 디스크 로터 또는 디스크 캘리퍼 파손에 주의
하십시오.
도로에 들어가기 전에는 브레이크 제동력을 먼저 테스트 해 보십시오. 이것은 당신이 익숙하게 알고 있는 것보다 훨씬 강력할 수 있
습니다. 브레이크 레버를 너무 빨리 잡으면 의도하지 않은 급정지로 이어질 수 있고, 충돌이나 뒤틀림을 초래할 수 있습니다.

170
171
EN
ES
FR
IT
KO
EN
ES
FR
IT
KO
기어
• 도로에서 벗어난 안전한 지역에서 시프트 기어의 기능을 익히고 기어를 높이고 낮추는 것이 익숙해지도록 하십시오. 인덱싱을 확인(기어에서 기어로 변
속)하여 체인이 건너뛰지 않고 가장 낮은 기어와 가장 높은 기어로 전환이 가능하도록 해야 합니다.
• 당신의 Tern 자전거가 내장 기어 허브(IGH)를 사용한다면, 변속과 페달링을 동시에 하지 말아 주십시오. 변속기와 달리 대부분의 IGH는 프리 스탠딩,
페달링을 하지 않을 때도 최적으로 변속될 수 있도록 설계되었습니다. 이것은 내부의 기어 허브는 멈추었을 때도 전환이 가능하다는 뜻입니다. 이것은
도심에서 멈추고, 가고를 반복하는 라이더들에게 아주 좋은 특징입니다.
• 체인의 조여져 있는 링크와 체인이 기어를 통해 자유롭게 회전 될 수 있는 지 확인 해 주십시오.
PAS 시스템은 페달을 밟으면서 보조 동력이 즉시 시작됩니다. 의도하지 않은 움직임을 피하기 위하여 자전거를 타기 전에 브레
이크를 잡아주십시오.
소리가 난다면
자전거를 10 cm 들었다가 바닥에 놓아보세요. 만약 이상한 소음이나 프레임의 유격이 느껴지면(특히 조인트 부분)
당신이 자전거를 구매한 딜러에게 서비스를 예약해 주세요.
자전거 피팅
기본적으로 최고의 라이딩 포지션은 당신이 매우 편안한 자세입니다. 하지만 잘못
된 세팅은 관절에 무리를 주거나 자전거의 컨트롤을 어렵게 만들 수 있습니다. 당
신이 브레이크 레버와 쉬프트레버에 편안하게 손이 닿을. 수 있는지 안장과 핸들바
가 올바른 높이를 확인해 주세요.
대부분의 사람들에게 발의 위치는(1) 앞부분이 페달위에 올려야 하며(2) 페달축이
직선이어야 합니다 (3).
안장
• 안장 높이는 라이딩에 매우 중요한 요소입니다. 앉아있는 동안에 페달을 가장 밑으로 굴려보세요. 가장 낮은 위치에서 당신의 무릎은 살짝 구부러져
있어야 합니다. 당신의 다리는 안장 높이가 너무 높게 세팅되어 페달링을 하는 동안에 완전하게 펴지거나, 너무 낮게 세팅되어 너무 구부러지면 안 됩
니다.
• 안장은 위, 아래, 앞, 뒤 혹은 안장의 세팅 각도를 조정할 수 있습니다. 최적의 포지션을 찾기 위해 주변을 몇 바퀴 돌아보세요. 잘못된 안장 세팅은 신
경이나 관절에 무리를 줄 수 있고, 혈액순환에 방해가 될 수 있습니다.
1
2
3
적절한 안장레일 토크 값은 섹션 15를 참고하세요.

172
173
EN
ES
FR
IT
KO
EN
ES
FR
IT
KO
• 라이딩을 하면서 당신의 몸통이 자전거 바깥쪽으로 이탈하지 않도록 유지해야 합니다. 그리고 페달이 가장 밑으로 내려갔을 때 당신의 무릎은 20~25도
만 구부러져야 합니다.
• 안장은 대략적으로 지면과 평행하여야 합니다. 하지만 이것이 불편하다면, 안장코를 아주 조금만 밑으로 향하게 해주세요. 당신의 몸무게로 인해 압박받
는 부위가 안장 위에서 분산될 수 있습니다. 5도 안팎으로만 조절해 주세요.
• 안장을 뒤로 조정하면 당신의 둔근(엉덩이)을 더 많이 사용하게 되고, 안장을 앞으로 조정하면 당신의 대퇴근(허벅지)을 더 많이 사용하게 됩니다. 대체적
으로는 당신의 무릎 앞쪽이 페달 스핀들을 넘어가지 말아야 합니다. 편안함을 느끼면 마지막으로 당신의 안장 높이를 한번 더 체크해주세요.
주의) 당신의 싯포스트를 MINIMUM INSERTION LINE(최소 삽입 라인)을 넘게 길게 뽑지 마세요.
그럴 경우 싯포스트나 프레임에 무리를 주어 심각한 사고를 야기할 수 있습니다. 만약 당신의 키가 너무 커서 싯포스트를 더 뽑아야
한다면, 당신은 더 긴 싯포스트가 필요합니다. 이와 비슷하게 싯포스트를 MAXIMUM INSERTION LINE(최대 삽입 라인)위로 너무
짧게 넣지 마세요. 너무 낮은 싯포스트는 땅의 요철에 부딪힐 수 있습니다.
스템
안드로스 스템이 장착된 모델은 특정한 툴 없이도 각도와 높이를 조절할 수 있습니다. 스템 포지션 조절과 관련해서는 별도의 설명서를 참고하세요.
핸들바
핸들바를 이리저리 돌려보며 당신의 손바닥이 지지를 받는지, 손가락이 브레이크와 기어레버에 쉽게 닿을 수 있는지 체크하세요. 핸들바 조정을 위해서는 당
신의 Tern 자전거와 동봉된 스템 설명서를 참고하세요.
모든 라이딩 전에 아래 사항들을 체크해 주세요.
전기 시스템
• 배터리가 프레임 캐리어에 올바르게 장착 되었는지 확인해 주세요.
• 컨트롤러 디스플레이가 에러나 경고를 표시하고 있는지 확인해 주세요.
• 배터리가 당신이 계획한 라이딩에 적합할 만큼 충전이 되어 있는지 확인해 주세요.
• 앞, 뒤 라이트가 잘 작동하는지 확인해 주세요.
기계적인 사항 주의
모든 기계적인 부품들은 자전거를 사용하면서 피로가 쌓이고 닳게 됩니다. 각기 다른 재질의 부품들은 각각의 피로도와 내구성이
다릅니다. 이런 부품들은 수명이 다하면 기능을 잃게 되어 사고로 이어질 수 있습니다. 피로도 누적에 의한 크랙, 스크래치 혹은 컬
러 변화는 부품의 수명이 다했음을 암시하는 것이고, 이런 부품들은 교체해 주셔야 합니다.
8. 라이딩을 하기 전에

174
175
EN
ES
FR
IT
KO
EN
ES
FR
IT
KO
용접부 체크
이 테스트에 조금 더 보태어 프레임 조인트 부분에 용접부를 확인해 보세요.
당신의 전기 자전거가 라이딩 중에 피로가 쌓일 수 있습니다. 프레임 용접부의 뒤
틀림이나 변형으로 인해 크랙이 생길 수 있습니다. 특히, 자전거를 타다가 넘어지
거나 부딪히게 되었을 때 체크 해보는 것이 중요합니다. 알루미늄 파트는 구부러
진 것을 다시 편다 해도 안전하지 않습니다. 교체 하여 주시는 것이 안전합니다.
림
림은 깨끗해야하며 손상되지 않아야 합니다. 변색, 긁힘, 또는 마모에 주의하여야 합니다. 림 브레이크가 있다면, 접촉 표면에 구멍이나 패인 부분이 있지는
않은지 점검 해 보아야 합니다. 어떠한 림은 브레이크 접촉면에 마모 인디케이터가 있습니다; 림이 한 번이라도 마모 인디케이터에 표시되면 교체해야 합니
다.
마모 되거나 손상 된 림은 경고 없이 작동되지 않을 수 있으며 라이더가 충돌하는 원인이 될 수 도 있습니다.
휠
• 휠양쪽 방향에서 눌러보고 휠이 포크 안쪽에 잘 고정되어 있는지 확인합니다. 허브 엑셀에서 빠져나가서는 안 됩니다.
• 같이 붙어있는 스포크 한 쪽을 가볍게 눌러봅니다. 스포크 장력이 다르다면 조절을 받아야만 합니다.
• 자전거 양쪽 바퀴가 잘 장착 되었는 지 확인하기 위해 휠을 가볍게 지면에 튕기고 허브 엑셀이 제자리에 있는지 확인합니다.
안장
안장을 손으로 돌려보고 시트포스트와 안장이 클램프에 잘 물려있는 지 확인 합니다. 시트포스트나 안장이 움직여서는 안 됩니다.
A
AIR
(공기압)
타이어의 공기압이 적
절한지 체크해 보세
요. 엄지로 타이어를
눌러보세요. 단단한
느낌이 나야 합니다.
그렇다고 타이어에 적
힌 공기압 보다 많이
넣지 마세요.
B
BRAKES AND BARS
(브레이크와 핸들바)
브레이크 레버를 당기면서
브레이크가 잘 들고 있는
지 확인해 보세요. 브레이
크 케이블도 상처가 없는
지 확인해 주세요.
핸들바도 조임부가 확실히
고정 되어있는지 좌우로
흔들며 확인해 보세요. (핸
들바, 핸들포스트, 핸들바
익스텐션).
C
CHAIN AND CABLES
(체인과 케이블)
크랭크를 뒤로 굴려 보면서 체
인이 기어 위에서 제대로 굴러
가는지 확인해 보세요. 그리고
기어 케이블에 상처가 없는지
도 확인해 주세요.
QUICK
QUICK RELEASES
(퀵 릴리즈)
당신의 퀵릴리즈(휠, 싯튜
브, 핸들바)와 조인트가 완
벽하게 닫혀져 있는지 확인
하세요.
DROP
DROP THE BIKE
(자전거를 살짝 떨어뜨려보기)
자전거를 10 cm 정도 수직으로
들었다가 살짝 떨어뜨려보세요.
만약 어떤 것이 흔들리거나 달
그락 거리면 라이딩 하기 전에
조정해 주세요.
ABC 퀵 드랍 테스트
우리는 매일매일 자전거가 당신의 친구가 되어줄 수 있도록 디자인 하였습니다. 하지만 안전을 위해서는 라이딩 전에 아래 사항들을 체크해 보세요. :

176
177
EN
ES
FR
IT
KO
EN
ES
FR
IT
KO
도로를 주시하세요
움푹 파인 곳이나 열려있는 자동차 문짝이나 뛰어다니는 아이들이 없는 지 잘
확인하시기 바랍니다. 자동차 운전자 시야의 사각지대를 피하고 눈에 띄는 옷을
입으시기 바랍니다.
일어나세요!
라이딩 중에는 항상 집중하셔야만 합니다. 이어폰 또는 헤드폰을 착용해서는 안 되며, 시력이 좋지 않아 선글라스 착용이 시야에 방해가 된다면 착용을 피
하셔야만 합니다. 술이나 약을 복용 뒤에는 라이딩을 해서는 안 됩니다.
눈에 띄는 옷을 입으세요
저녁 또는 새벽의 어두운 도로를 달리거나 비나 안개 속에서 라이딩을 하실 때에는 훨씬 위험하기 때문에 밝은 색상의 옷이나 반사 재질의 옷을 착용하시
기 바랍니다.
깨끗하고 반짝이게
반사경이나 안전 반사 띠 등은 항상 깨끗한 상태로 유지시켜주세요. 반사경을 옷이나 가방 등으로 가리지 마시고 전조등이나 후미등이 제대로 작동하는 지
항상 확인하시기 바랍니다.
브레이크 사용하기
흐름을 따라가세요
젖은 노면을 주행하거나 무거운 짐을 실었다면 브레이크로 정지하는데 더 긴 거리가
필요합니다. 이런 환경에서는 평소보다 더 부드럽고 일찍 브레이크를 잡아주세요..
차분하고 침착하게
감속을 하거나 멈출 때에 바퀴가 끌리는 현상 (스키딩) 을 피하기 위해서는 브레이크
를 서서히 잡아주세요. 스키딩은 제동력을 증가시킬 순 없을 뿐더러 핸들링을 제대로
할 수 없게 됩니다.
9. 안전 라이딩
느긋하게
앞 브레이크를 갑자기 잡게 되면 몸의 중심이 핸들바를 넘어 가게 되어 뒷바퀴가 들릴 수 있습니다. 만약 이렇게 된다면 무게 중심을 뒤로하고 앞 브레이크를
놓아 주세요.
고지식한 사람이 되세요
• 시야가 잘 확보되지 않을 때에는 주의를 기울이고 방어적으로 라이딩을 하세요.
• 앞에 있는 라이더를 지나칠 때에는 항상 벨을 울리거나 큰 소리로 지나가려는 의도를 알리세요.
• 위험한 것을 피하는 상황이 아니라면 항상 똑바로 주행하여야 합니다. 추월을 하거나 좌/우 회전을 하게 되면 수신호나 음성으로 꼭 의사를 전달하세요.

178
179
EN
ES
FR
IT
KO
EN
ES
FR
IT
KO
아이들과 라이딩하기
Yepp Maxi Easyt 제품은 Tern 전기자전거에 달린 Tern Cargo Rack 과 함께 사용할 수 있습니다.
• 시트가 어린이의 발이 바퀴 사이에 접촉이 불가능하도록 설계되어 있습니다.시트 제조사의 지침에 따라 시트가 올바르게 고정되어 있는지 확인 하십시오.
• 휠 중심으로부터 시트의 무게 중심의 거리 (유아용 시트의 무게 중심에 표시된 바와 같이)는 90mm 이상 100mm 이하여야 합니다.
이렇게 하면 자전거와 프론트 휠이 위로 올라오지 않습니다.
• 아이들의 손가락이 안장의 어느 부분에도 끼지 않도록 보호됩니다. (서스펜션 안장의 스프링 등)
• 캐리어(랙)는 유아용 시트 장착용으로 승인되었습니다.
유아용 시트는 시트 포스트에 장착되거나 부착되지 않아야 합니다.
승인 된 유아용 시트
Yepp Maxi Easyt은 TERN에 장착되어 있는 기본랙 또는 카고랙을 사용하여 PAS 방식의 TERN 자전거에 사용되도록 테스트 되었습니다.
안전 및 주의 사항
• 아이들 -나이에 상관 없이- 은 자신의 머리를 지탱하고 라이딩 시 발생하는 도약을 견딜만한 힘을 가지고 있어야 합니다.
• 발꿈치와 충분한 간격이 있는지 확인하세요. 발꿈치의 간극은 승차자의 발 크기와 어린이의 다이 길이에 따라 달라집니다.
• 제조 업체의 지침에 따라 시트가 올바르게 장착되었는지 확인하십시오.
• 최대 총 중량이 초과되지 않도록 하십시오.
• 휠 스포크, 안장 레일 및 스프링에 걸릴 수 있는 것이 아무것도 없는지 확인하십시오.
• 어린이가 헬멧을 착용하고 있는지 확인하고 헬멧 끈이 편안하게 맞도록 조정되었는지 확인하십시오.
• 아이가 유아용 시트에서 넘어지지 않도록 PAS 방식의 자전거를 꼭 잡도록 해주세요.
• 정기적으로 주행 중에 아이가 잠이들어 있지는 않은지 확인 해 주십시오. 아이의 고개가 지나치게 한 쪽으로 쏠려서는 안됩니다.
어린이를 태우기 위해 트레일러를 사용하지 마십시오.
다른 사람을 태우거나, 화물 또는 둘 모두를 태우는 것은 승차감, 균형,
무게 중심 및 핸들링에 영향을 미칩니다.
귀하의 안전을 위해 아래의 지침서를 참고 해 주십시오.
취급 시 변경 사항
요소의 조합 - 프레임의 구조적 견고함, 개별 구성 요소 강도, 조타 행동
및 하중 분포 등-이 자전거의 조종에 영향을 미칩니다.
무거운 짐을 싣고 주행할 때 PAS 방식은 제동하는 데 더 많은 노력을 기
울여야 하고 브레이크를 밟는 데 더 많은 시간을 들여야 합니다.
승차자의 체중과 화물의 중량은 편안한 승차감 및 균형감과 강력한 상
관 관계가 있습니다.
실제로, 수하물의 중량은 승차자 체중의 80%이하여야 합니다.
공공 도로를 주행하기 전에 안전한 구역에서 PAS 방식을 먼저 익히십
시오.
10. 여객 및 화물 운송
• PAS 방식이 있는 경우, 무게 대 화물의 위치 및 수하물의 지정된 위치에 관한 지침을 알기 위하여 PAS 방식을 포함한 부록을
참조 해 주십시오
• 승차자 체중, 승객 체중, 후방 랙, 유아용 시트 및 기타 액세서리를 포함하여 최대 운반 용량을 초과하지 마십시오.
90 mm 미만

180
181
EN
ES
FR
IT
KO
EN
ES
FR
IT
KO
킥스탠드를 내려놓고 짐을 적재 할 때, 킥 보드의 최대 중량을 초과하지 않도록 해주십시오.
킥스탠드 최대 중량 목록은 다음을 참조하십시오: https://www.ternbicycles.com/support/techtips/maximum-weight-capacity
승객 태우기
PAS 방식의 TERN 탄다면, 어른 승객을 태울 때 다음과 같이 설계되어 있습
니다.
• 승차자는 다리를 벌리고 앉을 수 있고 발 밭침대에 바르게 발을 올려 고
시킵니다.
• PAS 방식의 프레임에 안전하게 부착 된 시트가 있습니다.
(TERN 사이드킥? 시트 패드가 이 요구 사항을 충족시킵니다.)
• 승차자는 자신의 발을 놓을 수 있는 곳이 있습니다. (Tern Sidekick™
Lower Deck 과 Sidekick™ Foot Pegs 가 그 요구 사항을 충족합니다.)
발판
Tern Sidekick™ Lower Deck 과 Sidekick™ Foot Pegs 같은 발판은 승차자
가 랙에 앉았을 때 발을 위에 편히 둘 수 있도록 설계되었습니다.
킥스탠드와 정차된 중량
만약 여러분의 자전거에 킥스탠드가 장착되어 있다면, 더 쉽게 짐을 싣고 내
릴 수가 있습니다. 그러나 킥 보드의 최대 중량 한도를 유의하여 주십시오.
발판에 서지 말아주십시오.
킥스탠드를 내려놓은 채 앉지 마십시오.
이렇게 하면 킥스탠드와 프레임에 장착 된 킥스탠드 마운트가 손상이 될 수 있습니다.
수하물 싣고 라이딩하기
뒤쪽으로 가득 수하물을 싣은 경우, 앞바퀴가 들어 올려지거나 넘어지지 않는 상태를 유지하는지 시험해 보십시오.
수하물의 위치
수하물의 위치는 가능한 중심부에 가깝게 배치되어야 합니다.
가능한 한 랙의 앞부분에 수하물을 가까이 고정시킵니다.
하중을 조정 바랍니다. 예를 들어, 상자를 나를 때, 가능하면 두 가지를 시도해 보아야 합니다. (어느 쪽이든) 한쪽으로 치우친 짐은 한쪽으로 쏠림을 가할
수가 있습니다.
화물의 보안
바르게 앉을 수 있고, 페달질 및 자전거 조종에 어떠한 방해도 없는 충분한 공간이 확보되었는 지 확인하십시오.
간섭 확인
• 바르게 앉을 수 있고, 페달질 및 자전거 조종에 어떠한 방해도 없는 충분한 공간이 확보되었는 지 확인하십시오.
• 수하물은 브레이크와 드레일러의 정상적인 작동을 방해하지 않아야 합니다.
• 길거나 커다란 물체는 페달로부터 발 뒤꿈치가 닿지 않도록 페달로부터 멀리 떨어져 있어야 합니다.
• 자전거 앞부분에 실린 큰 높거나 큰 물체들은 시야를 가리지 않아야 합니다
여러분의 거주지에서는 승객을 탑승시키도록 PAS 시
스템 자전거가 설계되거나 개조 되어있음에도 불구하
고 뒤에 사람을 태우는 것이 불법일 수도 있습니다.
승객을 태우기 앞서 지역의 규범을 먼저 확인하여 주
시기 바랍니다.
상기의 요건들을 충족하여 수하물을 적재할 수 없는 경우, 수하물을 싣고 라
이딩 하지 마십시오!

182
183
EN
ES
FR
IT
KO
EN
ES
FR
IT
KO
대중교통 이용하기
전기 자전거는 일반적인 자전거와 같이 기차 및 대중 교통수단을 이용할 수 있습니다.
특정 요구사항에 대해서는 철도 또는 대중교통 운영 지침을 따르십시오.
• 일부 이용자는 미리 예약해야 하고, PAS 시스템에 대한 별도의 티켓을 구매해야 합니다.
• 교통 혼잡 시간이 아닐 때만 PAS 시스템이 사용 가능 할 수도 있습니다.
• 경우에 따라 PAS 시스템에 커버를 씌워야 할 수도 있습니다.
비행기 이용하기
• 전기자전거에 사용되는 배터리는 위험물로 간주되어 항공기로 운송할 수 없습니다.
• 지역 화물 운송 업체에 배터리를 별도로 운송할 수 있는지 확인 하십시오.
자동차 이용하기
• Tern 자전거는 일반적인 루프 캐리어나 후방 캐리어에 장착하여 운반할 수 있습니다. 캐리어의 최대 적재 용량을 확인 하십시오. 무게를 줄이려면, 배
터리를 분리하여 차량 내부에 보관 하십시오.
• 트렁크 공간이 충분한 경우 차량 내부에 자전거를 적재 할 것을 권장합니다. 리어 디레일러가 눌리지 않도록 주의 하십시오.
• 주차장 또는 터널에 진입 시 루프 캐리어에 있는 자전거의 높이를 고려하십시오.
11. Tern 자전거의 운반
컨셉
페달 보조 방식 전기 자전거는 자전거의 페달을 밟을 때 도움을 주는 전기 모터가 장착되어 있습니다. 파워 어시스트는 페달을 돌리는 시점을 감지하도록 설
계 되어 있습니다. 유럽 및 대한민국에서는 최고 속도가 25Km/h 로 제한됩니다. 지정된 속도보다 빨라질 경우 어시스트가 끊깁니다.
컨트롤러를 사용하여 라이딩 스타일 및 도로 지형에 알맞도록 Economy 에서 Sport 까지 어시스트 단계를 고를 수 있습니다.
당신의 Tern 자전거는 중앙 모터 또는 허브 모터 방식을 사용합니다. 아래의 그림을 참조하십시오.:
기타 전기자전거 기능
보행 지원
몇몇의 Tern 전기자전거 모델은 보행 지원기능을 탑재하고 있습니다. 이는 라이더가 자전거를 밀거나 끌고 다닐 때 드는 힘을줄여 줍니다. 이 기능은 오르막
길 에서 특히 유용합니다. 모터 어시스트는 걷는 속도로 제한됩니다.자세한 사항은 모터 제조사의 지침을 참조하십시오.
배터리 잠금
일부 Tern 전기자전거에는 배터리 잠금 장치가 장착되어 있습니다. 주행 전에 항상 배터리를 잠그고 열쇠를 안전한 장소에 보관하십시오. 만약 열쇠를 분실
한 경우 Tern 대리점에 문의 하여 키 복구 서비스를 요청 하십시오.
12. 전기자전거 첫걸음
Rear Hub Mid Motor
Front Hub
리어 허브 모터 중앙 모터 앞 허브 모터

184
185
EN
ES
FR
IT
KO
EN
ES
FR
IT
KO
184
배터리
• Tern 전기자전거에는 리튬이온 배터리가 장착되어 있습니다. 최신 리튬이온 배터리는 500회 이상의 충/방전 에 버티도록 설계되어 있습니다. 이 배터리
는 메모리 효과가 없으므로 사용 중 언제든지 충전이 가능하며 충전하기 전에 완전히 방전될 때까지 기다릴 필요가 없습니다. 만약 한달 이상 자전거를 사
용하지 않을 경우 배터리를 80% 까지 충전 후 보관 하십시오. 절대로 완전히 방전된 상태로 오랫동안 보관하지 마십시오. 배터리에 영구적인 손상을 입힐
수 있습니다.
• 반드시 정품 충전기를 사용하십시오. 플러그가 맞더라도 절대로 다른 충전기를 사용하지 마십시오.
• 수명이 다 한 배터리는 위험 물질로 다뤄져야 하며 일반 쓰레기로 분류하면 안 됩니다. 올바른 처리방법은 대리점에 문의하시기 바랍니다.
모터 시스템 개조
임의로 모터 시스템을 개조하지 마십시오. 속도 제한을 풀거나, 추가적인 스로틀 레버를 장착할 경우 워런티 대상에서 제외됩니
다. 또한 심각한 안전상 문제를 야기하며 불법행위로 간주될 수 있습니다.
추가 정보
아래의 항목은 동봉된 사용설명서를 읽어 주시기 바랍니다.
• 구동 및 조절 작동법
• 배터리 충전 및 올바른 취급법
• 문제해결
• 정기점검
• 세차
배터리를 땅에 묻거나 불에 태우면 안 됩니다.
조명
Tern 전기자전거에는 장착된 배터리를 통해 직접 전방 및 후방 조명에 전력이 공급됩니다. 지역 도로교통법에 따라 적절한 조명을 사용 하십시오.
충전하기
Tern전기자전거에는 각 국가별 전압에 맞는 충전기와 배터리가 함께 제공됩니다.
자세한 사용법 및 안전 정보는 모터 제조업체의 지침을 침조 하십시오.
멀티 배터리의 구성
만약 여러분의 PAS 방식 자전거가 한 개 이상의 배터리를 사용한다면, 하기의 지
침을 읽어주십시오.
자전거에 거치된 배터리의 충전
두 개의 배터리가 모두 장착 되어 있는 경우, 한 개의 충전기만 사용하면 됩니다.
배터리 두 개가 동시에 충전 됩니다.
모터에 인접한 충전 포트에 충전기를 연결합니다. 후방 포트는 양쪽 포트가 동시에
사용되지 않도록 봉인됩니다.
자전거에서 분리한 배터리의 충전
PAS 방식의 자전거에서 분리한 각각의 배터리는 개별적으로 충전할 수 있습니다.
마개 덮기
단일 배터리 배열 상태에서 주행할 때, 회로를 보호하기 위하여 제공된 소켓 단자
의 마개를 잘 덮어주십시오.

186
187
EN
ES
FR
IT
KO
EN
ES
FR
IT
KO
파워 어시스턴트를 사용하지 않는 라이딩
Tern은 모터 파워가 꺼졌을 경우에는 일반 자전거와 같은 보통의 방식으로 타도록 설계되어 있습니다. 내리막이나 PAS 시스템의 보조를 받지 않는 이동 범
위를 넓히려고 할 때 모터를 끌 수 있지만, 화면을 통해 당신의 현재 속도를 볼 수 있습니다. 그러나 주행 중에 배터리가 비게 되면, 모터 배터리에 연결 되어
있는 것이기 때문에 표시등이 작동하지 않을 수가 있습니다.
당신이 타고 있는 Tern에 Valo 조명이 장착되어 있다면, Tern spade를 구입하고USB 케이블과 USB 파워 뱅크에 연결하여 라이트를 켜서 어둠 속에 라이딩
을 할 필요가 없습니다. 파워 뱅크는 전력이 얼마나 남아있는지를 표시하며, 전력이 20% 미만일 때 시각적인 경보 (사례로, 깜박임)를 제공합니다.
배터리의 범위
범위는 다음과 같은 요소에 따라 다릅니다:
평균 라이딩 속도
더 빠르게 이동할수록 더 많은 에너지를 필요로 하고, 배터리 소모도 더 빠릅니다. 그러나 당신이 모터 최대 출력 스피드보다 더 빠르게 주행한다면, 모터는
완전히 전원을 끄고, 배터리 소모도 전혀 없게 됩니다.
보조 지원 수준
배터리 파워를 아끼는 가장 좋은 방법은 열심히 페달링을 하는 것입니다! 보조 장치를 덜 사용하고 페달링에 더 많은 노력을 기울이면 배터리 파워 소모가 줄
고 더 긴 거리를 갈 수 있게 됩니다.
일반 유지 보수
타이어의 압력에 알맞게 바람을 넣으십시오. 체인에 윤활유를 바르고 유지해야 합니다.
멈추고 가는 교통
정지 상태에서 시작을 하게 되면 더 많은 에너지를 필요로 하게 됩니다. 더 장거리를 사용할 수 있도록 하기 위해, ECO 모드로 시작해주세요.
라이더스의 체중과 케이던스
더 무거운 라이더는 더 많은 모터의 에너지를 사용하게 됩니다. 최소 60rpm의 케이던스를 유지하는 것이 더 효율적입니다.
도로 상황 (길 표면, 지형, 바람)
비포장 도로 (흙, 자갈), 역풍 및 오르막길은 배터리 사용거리를 단축시킵니다.
출발하기
컨트롤러가 켜지면 페달을 밟는 즉시 파워 어시스트가 지원됩니다. 우선 자전거에 올라타기 전에 컨트롤러의 전원을 끄는 것이 좋습니다. 안장에 앉은 후, 의
도하지 않은 움직임을 방지하기 위해 페달에 발을 얹지 않은 상태에서 컨트롤러의 전원을 켜십시오. 가장 낮은 레벨의 어시스트모드로 출발 하십시오.
해당 모터시스템은 센서 초기화를 위해 전원을 켜기 전에 페달에 발을 얹지 않을 것을 요구합니다.
파워 조절하기
최고 파워 모드로만 주행하지 마십시오. 일반적인 자전거와 같이 기어를 변속하여 효율적인 케이던스를 유지 하십시오. 이것은 당신의 페달링에 따라 최적의
파워 어시스트 효율을 나타낼 것입니다.
예를 들어 Bosch Mid-Drive 모터 시스템의 경우, 케이던스를 꾸준하게 약 90 rpm정도로 유지하면서, 속도와 관계 없이 모터가 가장 효율적인 방식으로 보
조할 것입니다.
파워 어시스턴트를 통한 라이딩
모터가 얼마나 보조를 하는 지는 얼마나 많이 페달링을 하느냐가 결정합니다. 모든 PAS 시스템은 페달링을 멈추자마자 보조를 중지시키는 내부 제어 알고리
즘을 가지고 있습니다. 이것은 EN 15194 (EPAC - 전기 전력 보조 사이클) 에 따른 안전 기능입니다.
PAS시스템에서 코너링을 할 때, 익숙하게 해 왔던 때보다 페달링을 더 일찍 멈추세요. 그렇지 않으면 회전 속도가 너무 빠를 수가 있습니다.
당신이 평균 이상의 속도로 이동할 가능성이 있기 때문에, 기존보다 가능한 도로를 더 멀리까지 바라보고 언제든 브레이크를 밟을 준비를 해 주세요.
전자 모터의 소음이 거의 존재하지 않기 때문에, 보행자와 다른 라이더가 당신이 접근하는 것을 듣지 못할 수도 있습니다.
방어적으로 라이딩을 하고, 밝은 색의 옷을 입고, 당신의 의도를 표현하고, 필요할 때에는 벨을 울리세요.
13. 전기자전거 라이딩 팁

188
189
EN
ES
FR
IT
KO
EN
ES
FR
IT
KO
당신의 Tern자전거는 여러 가지 첨단 부품으로 구성되어 있습니다. 자전거 정비는 특별한 지식과 공구가 필요합니다. 당신이 해당
작업을 제대로 완료할 수 있게 되기 전 까지는 어떠한 조절이나 정비를 하지 마십시오. 잘못된 조절이나 정비는 자전거를 망가뜨리
거나 심각한 부상의 원인이 될 수 있습니다. 도움이 필요한 경우 대리점에 문의하시기 바랍니다.
정품 사용
프레임, 포크, 타이어, 림, 브레이크, 라이트, 킥스탠드, 핸들바, 핸들포스트, 스템, 구동유닛, 배터리 또는 컨트롤 유닛/디스플레이, 기타 등등 의 부품을 교환
할 때에는 정품 스페어 파트 또는 승인된 제품을 사용하십시오. 그것들은 Tern 전기자전거에서 안전하게 작동하는지 확인된 제품입니다. 우리는 Tern 대리점
에 방문하여 부품 교체나 수리를 할 것을 권장합니다.
사용자가 수행 할 수 있거나 해야 하는 정비 작업은 이 설명서에 제시된 것 이외의 특수공구 또는 지식이 필요하지 않습니다. 아래의
목록을 참고하십시오. :
윤활성 유지
적절한 오일을 사용하여 자전거의 윤활성을 유지하십시오. 자전거의 윤활 부위와 정비 시기는 대리점에 문의하시기 바랍니다.
공기압
• 휠은 허브(1), 스포크(2), 림(3), 타이어(4), 밸브(5), 축(6) 으로 구성되어 있습니다.
• 밸브 방식은 슈레더(7) 혹은 프레스타(8)입니다. 프레스타 밸브는 공기를 주입하기 전
에 밸브 캡(9)을 반드시 풀어야 합니다.
• 타이어의 공기압이 측면에 적힌 규정 내에 있는지 확인 하십시오.
• 타이어의 마모 상태와 펑크 여부를 확인 하십시오.
14. 정비
배터리 용량
• 와트-시 로 측정되는 배터리들은 다른 에너지 용량을 가지고 있습니다. 일반적으로 와트시가 클수록 주행거리가 길고 더 비싸며, 더 무겁습니다.
• 주변 온도는 배터리 용량에 큰 영향을 줍니다. 배터리 용량은 섭씨 23도를 기준으로 측정되어 있습니다. 기준 온도에서 크게 벗어날 경우 배터리 용량이
빠르게 줄어들어 주행거리가 짧아지게 됩니다.
• 배터리를 계속 사용할수록 용량은 점점 줄어듭니다. 이러한 현상은 모든 배터리에서 발생하며 특정 화학 물질이 사용된 배터리는 다른 모델보다 수명이
길 수 있습니다.
컨트롤 디스플레이 화면에서 배터리의 남은 충전 용량을 확인할 수 있습니다.

190
191
EN
ES
FR
IT
KO
EN
ES
FR
IT
KO
체인 장력
체인은 페달링에 의한 강력한 장력을 견뎌냅니다. 최적의 변속과 효율을 위해 체인은
기어에 올바르게 물려있어야 합니다.
체인 장력을 확인하려면, 가장 작은 기어로 변속하여 유격을 최대로 만드십시오. 체인
유격은 10~20mm 범위 이내에 있어야 합니다. 이 정도의 유격은 모든 내장기어 허브
에도 동일하게 적용됩니다.
참고: 벨트 드라이브 장력은 좀 더 복잡하며 대리점을 통해 점검 받아야 합니다.
체인 유격은 체인의 마모 또는 늘어남에 따라 발생할 수 있습니다. 늘어난 체인은 기어 이빨에 제대로 물리지 않습니다. 시간이 지남에 따라 스프라켓의 톱니
사이의 간격이 벌어져 마모가 발생합니다. 늘어난 체인을 제 때 교체한다면 비싼 카세트와 체인링의 수명을 연장할 수 있습니다.
내장기어 허브의 경우 뒷바퀴가 제대로 드롭아웃에 정렬되지 않았을 때 체인 유격이 발생할 수 있습니다.
원인이 불확실한 체인 유격의 경우 대리점을 방문해 점검을 받으십시오.
청소
세차를 할 때에는, 물과 스펀지를 사용하여 흙먼지와 염분을 닦아 내십시오. 녹이 스는 것을 방지하기 위해 세차 후 잘 말려 주십시오.
고압의 물이나 스팀으로 세차하지 마십시오. 봉인부위에 물이 들어가 자전거에 손상을 줄 수 있습니다.
브레이크
브레이크가 절절한 제동력을 발휘하는지 반드시 확인하십시오. 레버는 핸들바에 닿기 전에 움직임이 멈춰야 합니다.
부적절하게 조정되거나 브레이크가 마모된 상태로 주행하는 것은 위험하며 부상 또는 사망을 초래할 수 있습니다. 브레이크의 관리
및 작동에 대한 브레이크 제조업체의 지침을 확인하십시오. 브레이크 접촉면을 깨끗하게 유지하십시오. 오일이나 윤활유가 묻어있지
않아야 합니다. 마모 된 브레이크 패드는 공인 된 제품으로 교체하십시오.
체인, 크랭크, 케이블
Tern구동계에는 내장기어(A) 또는 외장기어 (B) 허브가 있습니다. 구동계는 크랭크(1), 체인링(2), 리어 스프라켓(3) 또는 카셋트 스프라켓(4), 체인(5), 앞
디레일러(6), 뒤 디레일러(7) 로 구성됩니다. 자전거 기어는 위쪽의 가장 큰 기어부터 번호가 매겨지며 1단이 가장 낮고 쉬운 기어입니다.
낮은 단수의 기어는 오르막에서 사용되고, 높은 단수의 기어는 내리막에서 사용됩니다. 안전한 장소에서 변속기 사용법을 연습하는 것을 권장합니다.
체인이 체인링과 완전히 연결되어 있는지 확인하기 위해 크랭크를 돌려서 튀는 부분이 없는지 살펴보십시오.
자전거를 타기 전에 모든 기어를 점검하여 체인과 디레일러가 완벽하게 작동하는지 확인 하십시오. 만약 기어변속이 부드럽지 않다면, 대리점에 방문하여 점
검을 받으십시오. 뒷 변속기에 문제가 있는 경우 체인이 이탈하여 스포크나 자전거에 손상을 입힐 수 있으므로 최고단 및 최저단 기어를 사용하지 마십시오.
케이블과 하우징에 녹이나 마모 또는 꼬임이 없는지 점검 하십시오. 문제가 있는 경우 교체해야 합니다.
12
3
5
1
2
4
5 67
A
B

192
193
EN
ES
FR
IT
KO
EN
ES
FR
IT
KO
퀵 릴리즈와 잠금장치
휠과 핸들바, 시트포스트를 고정하는 퀵릴리즈와 중요한 너트, 볼트 들이 제대로 조여져 있는지 확인하십시오. 올바른 조임 토크
가 중요합니다. 너무 강한 조임 토크는 나사산이 파손되거나 변형될 수 있습니다. 어느 쪽이든, 부정확한 조임은 컴포넌트의 파손
과 사고의 원인이 되는 조종 성능의 손실을 일으킬 수 있습니다. 조임 토크 값은 설명서 제 15장을 참조하십시오. 확실하지 않은 경
우 대리점을 방문하여 점검을 받으십시오.
이 설명서에서 특별히 명시되지 않은 모든 수리 또는 점검은 대리점을 통해 수행되어야 합니다.
나에게 토크는 전부
아래의 표에 나온 조임 토크 값을 지켜 주십시오. 토크 값이 주어지면 올바른 토크가 적용되도록 토크 렌치를 사용하여야 합니다.
권장 조임 토크 값
프레임과포크
부품 lbf.in 뉴턴 미터 kgf.cm
킥스탠드 고정 볼트 53-60 6-8 61-69
물통케이지 고정 볼트 25-35 2.8-4 29-40
랙 고정 볼트 25-35 2.8-4 29-40
펜더 고정 볼트 50-60 5.6-6.8 58-69
15. 조임 토크
퀵 릴리즈
퀵릴리즈 레버 사용으로 별도의 공구 없이 쉽게 부품을 탈부착 할 수 있습니다.
QR은 클램프(1), QR너트(2), 레버(3) 로 구성되어 있습니다.
QR너트는 조임 강도를 조절할 수 있게 해 줍니다. 레버가 가운데 지점을 지나면 잠그는 데 힘이 필요합니다.
퀵 릴리즈는 휠, 시트포스트, 핸들바를 고정시켜줍니다.
휠 고정 시 퀵릴리즈가 포크 드롭아웃에 정확히 위치해야 합니다.
시트포스트가 좌우로 회전하지 않아야 합니다.
핸들바 고장 시, 핸들바가 좌우로 회전하지 않아야 합니다.
레버는 주행 중 갑자기 열리지 않도록 자전거의 뒤쪽 방향을 향해 잠가져 있어야 합니다.
퀵 릴리즈는 매우 편리하지만 잘못된 사용으로 많은 사고가 발생합니다. 부적절한 조절로 인해 자전거에 손상을 주거나 심각한 부
상 또는 사망을 유발하는 사고가 발생할 수 있습니다.
23
1
닫은
맞추다
열다

194
195
EN
ES
FR
IT
KO
EN
ES
FR
IT
KO
점검 주기
길들이기
모든 자전거들은 일반적인 길들이기 기간이 필요합니다. 적절한 길들이기는 자전거의 수명을 오래 유지하고 더 잘 작동하도록 해 줍니다. 모든 라이더는 구
입 후 1개월 이내에 간단한 정비를 받을 것을 권장합니다. 대리점 에서는 케이블과 다른 주요 부품을 점검해 줄 것입니다.
정비 스케줄
자전거는 공인된 Tern 대리점에서 정기점검을 받아야 합니다. 아래의 점검주기에 따라 점검을 받으십시오.
주행 유형
매일 라이딩
빈도수
매월
매일 25km 이상 주행
비가오나 눈이오나 주행
도로 상태 불량
라이더의 무게를 포함하여 무게
105kg 이하 적재 가능
자주 라이딩
빈도수
2달에 한번
주당 3~4회 또는 매주 평균
100km 이상 주행
가끔 우중 라이딩
도로 상태 불량
라이더의 무게를 포함하여 무게
105kg 이하 적재 가능
주말 라이딩
빈도수
3달에 한번
주당 1~2회 주행
가끔 우중 라이딩
도로 상태 양호
라이더의 무게를 포함하여 무게
105kg 이하 적재 가능
가끔 라이딩
빈도수
매년
매달 1~2회 주행
건조한 날씨
도로 상태 양호
라이더의 무게를 포함하여 무게
105kg 이하 적재 가능
16. 점검 및 정비 스케줄
브레이크
부품 lbf.in 뉴턴 미터 kgf.cm
브레이크 레버 (플랫바) 53-60 6-6.8 61-69
브레이크 레버 (드롭바) 55-80 6.2-9 63-92
디스크 로터 (M5 볼트) 18-35 2-4 21-40
캘리퍼 마운트 55-70 6.2-7.9 63-81
휠
부품 lbf.in 뉴턴 미터 kgf.cm
프리 허브 바디 305-434 34.5-49 352-499
카세트 스프라켓 락링 260-434 29.4-49 299-499
프론트 액슬 너트 180 20.3 207
리어 액슬 너트 260-390 29.4-44.1 299-449
구동계
부품 lbf.in 뉴턴 미터 kgf.cm
페달 307 34.7 353
크랭크 볼트 300-395 33.9-44.6 345-454
외장형 버텀 브라켓 610-700 40-50 702-805
일반 버텀 브라켓 435-610 49.1-68.9 500-702
기타
부품 lbf.in 뉴턴 미터 kgf.cm
스티어러 클램프 볼트 (스템) 70-89 8-10 80-102
헤드셋 탑 캡 볼트 35-53 4-6 41-62
핸들바 클램프 볼트 36-53 4-6 41-62
안장 레일 클램프 70-89 8-10 80-102
단위 환산 : 1 Nm = 8.9 lbf.in = 10.2 kgf.cm

196
197
EN
ES
FR
IT
KO
EN
ES
FR
IT
KO
대리점 확인
4차 점검
날짜
작업내용
교체 또는 수리 부품
대리점 확인
5 차 점검
날짜
작업내용
교체 또는 수리 부품
대리점 확인
6 차 점검
날짜
작업내용
교체 또는 수리 부품
점검 기록
대리점 확인
1 차 점검
날짜
작업내용
교체 또는 수리 부품
대리점 확인
2 차 점검
날짜
작업내용
교체 또는 수리 부품
대리점 확인
3 차 점검
날짜
작업내용
교체 또는 수리 부품
구입 후 1개월 이내 또는 200km
주행 이내

198
199
EN
ES
FR
IT
KO
EN
ES
FR
IT
KO
추가적으로, 사용자는 구매 시 사용자 브리핑을 대리점으로부터 설명을 듣거나 ternbicycles.com/support 에서 사용자 브리핑 동영상을 시청해야만 합니다.
제외사항
이 품질보증은 아래의 조건 아래 발생한 파손 또는 불량에 대해서는 적용 되지 않습니다:
• 자전거가 오프로드 등의 주행을 포함한 제품 스펙이나 사용자 매뉴얼에 나온 가이드라인의 사용목적에 맞지 않는 용도로 사용되었을 경우
• 일상적인 마모. 파트는 사용주기나 날씨, 도로 조건에 따라 수명이 다를 수 있습니다.
• 페인트 마감은 소모성으로 간주되며 워런티에 포함되지 않습니다.
• 자전거나 파트가 Tern 공식 대리점이 아닌 개인에 의해 수리, 재조립, 정비 등이 된 경우
• 자전거가 화재, 홍수, 사고파손, 3자에 의한 부적절한 행위나 Tern 이 컨트롤 가능한 범위를 넘어선 피해의 의해 파손된 경우
• 프레임, 핸들포스트, 부품 등이 개조된 경우
• 순정이 아닌 파트, 액세서리, 모터 또는 배터리 등이 장착된 경우
• 프레임에 각인된 시리얼번호 또는 서비스태그가 변형되거나 지워져서 식별이 불가능한 경우
Tern 품질보증 지원
Tern은 품질보증 기간에 재료 및 제조과정 상의 불량이 있는 부품을 수리하거나 교체 해줄 것입니다. 이 품질보증에 따라 교체되는 모든 부품은 동일하거나
유사한디자인으로 제작된 부품으로 교체 될 것입니다. 하지만 이러한 교체가 원본 부품의 기능에 영향을 주지 않는 상황하에서,Tern은 불량 부품을 직접 또
는 다른 제조 업체에서Tern을 대신하여 제작한 서로 다른 디자인 (또는 색상) 을 지닌 부품으로 교체할 수 있는 권한을 보유하고 있습니다.
제품의 진화와 구식화에 따라 오래된 모델의 경우 특정 부품을 구할 수 없게 될 수 있습니다. 이러한 경우에는 부품의 구매와 지불의 책임은 사용자 본인에
게 있습니다.
Tern은 품질보증 기간이 만료된 불량 부품을 재량에 따라서 교체하거나 수리해 줄 수 있습니다. 하지만 이런 작업이 책임의 인정으로 여겨지지는 않을 것 입
니다.
품질보증 기간 중 교체된 프레임, 핸들포스트 또는 포크는 자전거의 남은 보증기간 동안 품질보증을 받을 수 있습니다.
이것은 Tern에서 제공하는 유일한 품질보증이며, 직원, 수입처 또는 재판매업자 등 그 어느 누구도 Tern을 대신하여 다른 품질보증을 제공할 수 없습니다.
Tern 한정적 품질보증
Tern 자전거는 당사 (“Tern”) 를 대신하여 제품의 조립과 서비스에 대한 요구사항을 잘 이해하고 있는Tern 공식 대리점들을 통해 판매되고 있습니다. Tern
은 재료와
제조과정 상의 불량에 있어 Tern 자전거의 최초 구매자에 한하여 구매일자로부터 다음과 같은 조항에 따라 품질보증을 제공합니다.
5년 품질보증: 프레임, 핸들포스트, 포크
1년 품질보증: 아래 별도로 명시된 제품을 제외한 모든 Tern, Biologic 파트 및 부속
기타 모든 파트와 부속은 원 제조사의 워런티 조항에 따라 커버 됩니다
10년 연장 워런티
Ternbicycles.com 에서 Tern Care 에 구매일로부터 30일 이내 등록하신 1차 구매 고객은 프레임, 핸들포스트, 포크에 대해 10년 연장 워런티가 적용됩니
다. 추가적으로,
자전거는 온/오프라인 구매와 관계없이 Tern 공식 대리점에서 조립 되어야만 워런티 적용이 가능합니다
아래 사항들은 10년 워런티에서 제외됩니다:
• 프레임, 핸들포스트 라치
• 페인트 마감
• 상업적 용도의 자전거
워런티는 프레임, 핸들포스트, 포크가 부셔지지 않는다는 것을 의미하진 않습니다. 어떤 재료도 설계/제조 한계를 넘어선 힘이 가해진다면 파손될 수 있습니
다. 이것은 단지이런 부품들이 한정적 워런티의 특정 조항에 따라 커버되는 것을 의미합니다.
사용자 (Owner 또는 소유자) 책임
사용자는 반드시 제품을 합리적으로 관리하고 사용하여야 하며 사용습관, 날씨 등의 요인들과 관련하여 필요한 예방차원의 유지 보수, 보관 및 윤활 작업을
일정에 따라서수행해야만 합니다. 만약 제품에 결함이 생긴 것을 발견했다면 사용자는 자전거를 더 이상 주행해서는 안되며, 자전거 또는 부품(들)을 품질보
증 수리를 받기 위해 Tern공식 대리점으로 가져가야만 합니다 (품질보증 적용 가능 기간 내에). 자전거나 자전거 부품을 대리점으로 운반하는 것은 사용자의
책임입니다.
이 품질보증에 대한 모든 청구는 반드시 Tern 공식 대리점이거나 독점 수입처를 거쳐 처리 되어야 합니다. 온라인 발급 영수증 또는 실제 영수증과 같은 실
구매를 증명할 수있는 자료를 품질보증 요청 시 함께 제공 하여야만 합니다. Tern케어의 모든 자전거는 반드시 품질보증 청구가 처리되기 전에 등록 되어 있
어야만 합니다.
17. 보증
 Loading...