


Valo
™
2
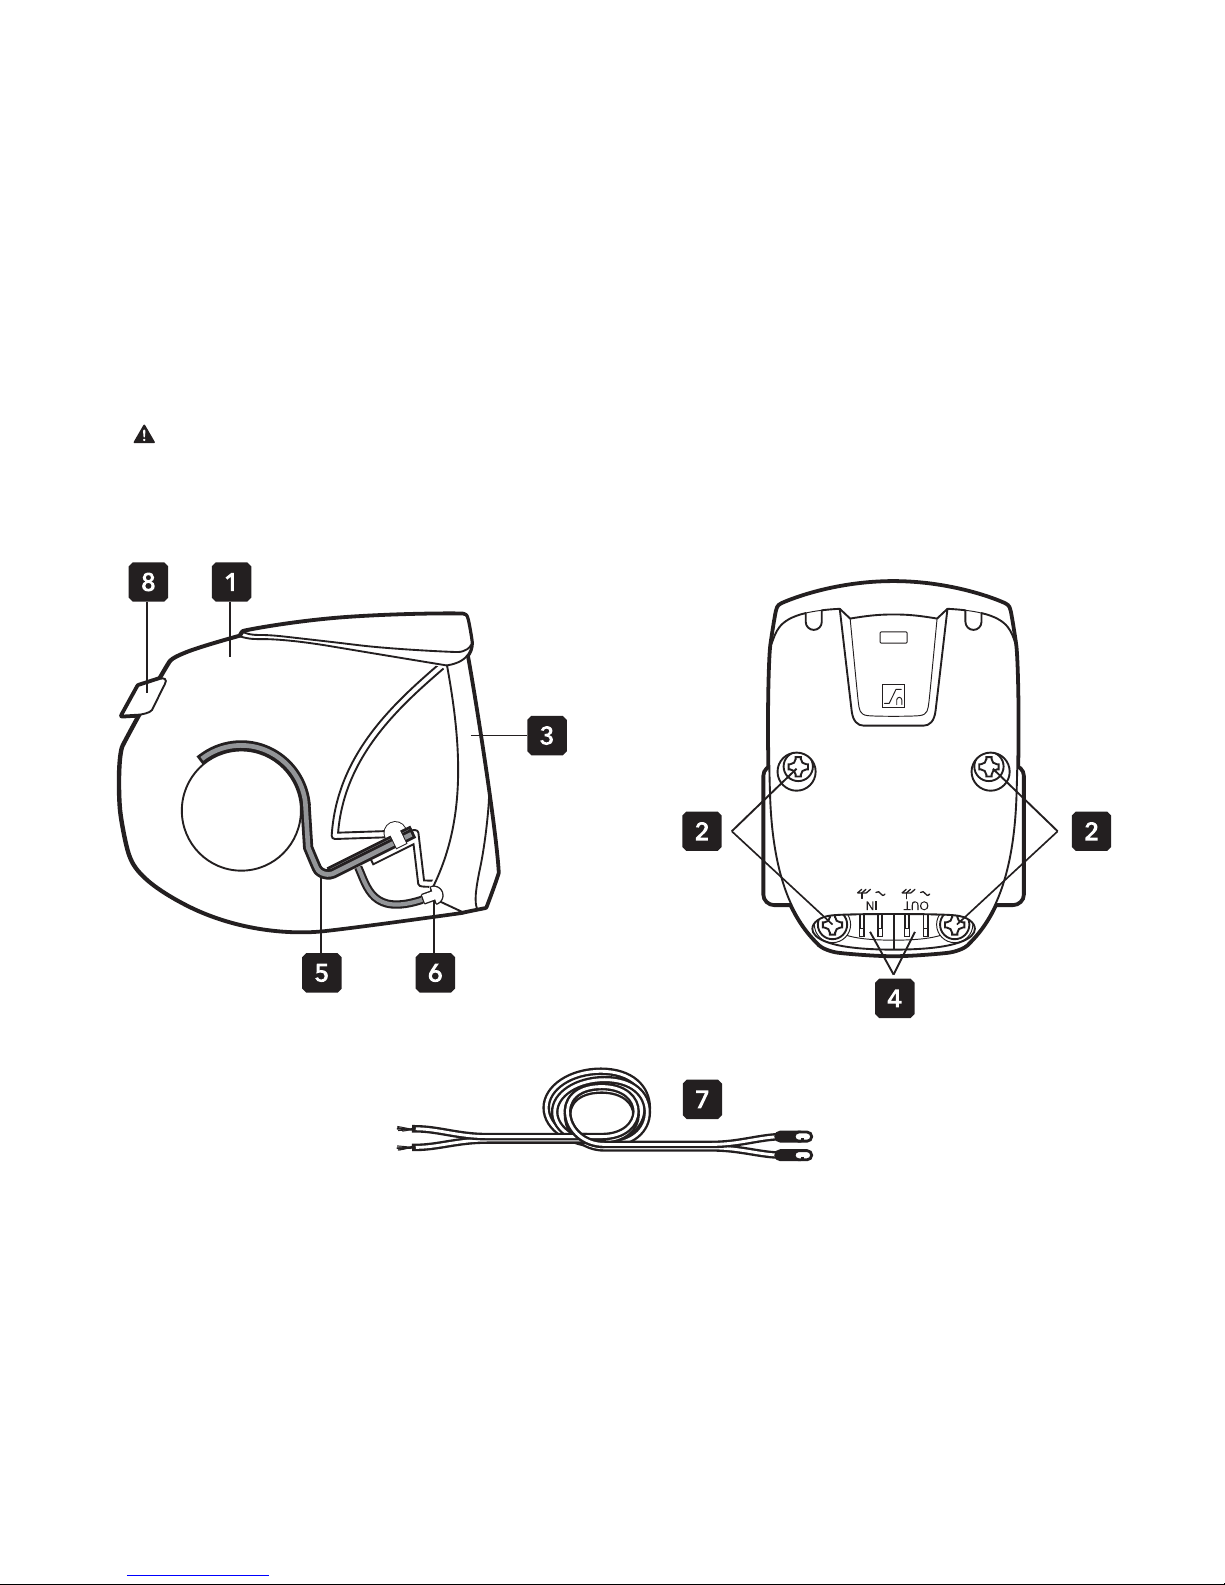
Parts
1. Cover
2. Clamp Bolts
3. Lens with Clarity
™
Optics
4. Connection Terminals
5. CryoCore
™
Connector
6. Standlight LEDs
7. Dynamo Cable
8. On/Off Switch
Hub Dynamo, Dynamo Plug and Rear Light not included

Tools Required (not supplied)
No.2 Crosshead Screwdriver
Usage and Service
The electronics are maintenance-free and lamp parts do not need servicing or
replacing. The electronics are protected against over-voltage from the dynamo,
even when no rear light is connected.
The Valo 2 can only be used with hub dynamos (AC). Do not connect to direct current,
such as batteries and other DC power supplies, including ebikes.
To prevent vision impairment, never look directly at the light.
Before riding, always ensure your light is clean, functioning correctly and that you are
visible to other road users.
To clean, wipe the Lens and Cover with a damp cloth using mild detergent. Do not use
solvents or alcohol.
The Valo 2 has been designed for outdoor usage and can be used in heavy rain and
snow. Do not submerge in water.
The light may flicker at low speeds as the light attempts to use as much energy as
possible.
Compatibility
The Valo 2 fits handlebars that use the Andros™ adjustable stem as well as those
using the Syntace VRO 47.

Installation
1. Remove Grip, Brake Lever, and Gear Shifter from one side of the Handlebar.
2. Loosen the Stem and slide the Handlebar halfway out. Remove Valo if fitted.

3. Position the Valo 2 within the Stem and slide Handlebar through the Clamp Hole.
If the Handlebar doesn’t fit through the Clamp Hole, loosen the four Clamp Bolts
evenly and try again.
4. Tighten the Stem and install the Grip, Brake Lever, and Gear Shifter, tightening all
to manufacturer specifications.

5. Tighten the four Clamp Bolts evenly until the Valo 2 remains in place.
Do not over-tighten the screws, otherwise the plastic casing may break.
6. Connect the Dynamo Cable to the Dynamo Terminals. There is no polarity so the
cables can be installed to either Terminal (+/-).
To prevent rider injury or death, ensure the Dynamo Cable is installed correctly and
does not entangle moving parts.

7. Switch on the Valo 2 and adjust the angle according to the area you want lit up.
We recommend angling the central beam approximately 10 m in front of the bicycle.
If the Valo 2 cannot rotate, evenly loosen the Clamp Bolts a quarter turn.
Ensure the beam does not shine into on-coming traffic.
Standlight
A capacitor is charged when moving so that when you’re stationary, the power is
dissipated through two Standlight LEDs. The capacitor takes about three minutes
to reach full charge (depending on speed, wheel size and dynamo power). The
Standlight LEDs only function when the Valo 2 is switched on.
Rear Light
The Valo 2 is compatible with conventional rear dynamo lights and allows the On/Off
Switch to control both lights. Follow the rear dynamo light manufacturer’s directions
and connect to the Rear Light Terminals.
Never ground to frame. Always connect both cables to both lights.
10m

Technology by Herrmans
™
Specification
Max. Brightness ................................................... 150 lumen, 40 lux at 10 m
Lens Type ............................................................. Clarity
™
Optics
Illuminant ............................................................. Philips Luxeon Rebel (white LED)
Illuminant Lifespan .............................................. 50,000 hours
Standlight ............................................................. Two oval (white LED)
Standlight Runtime ............................................. 4 min (minimum)
Material ................................................................ Cold-resistant ABS
Dimensions .......................................................... 77 x 60 x 63 mm
Weight .................................................................. 74 g | 2.61 oz
Compatible Handlebar Diameter ..................... 25.4 mm (1”)
StVZO Compliant ................................................ Yes, K1022
Temperature Range ............................................ -40°C ~ 50°C (-40°F ~ 122°F)
* Included parts and specification subject to change.
Dynamo Hub
The Valo 2 is optimized for usage with both 2.4 W and 3.0 W Dynamo Hubs, but we
recommend using the BioLogic Joule
™
3 Dynamo Hub.
Legal and Trademarks
* Tern, the Tern Werd (logotype), the Tern Berd (device), SideLight, CryoCore, Clarity,
Joule 3, and BioLogic used alone or in combination are trade names, trade devices
or registered trademarks of Mobility Holdings, Ltd.
* Trademarks are the property of their respective owners.
© 2013, Mobility Holdings, Ltd.
ternbicycles.com
 Loading...