

Termometerfabriken Viking 03601 User Manual
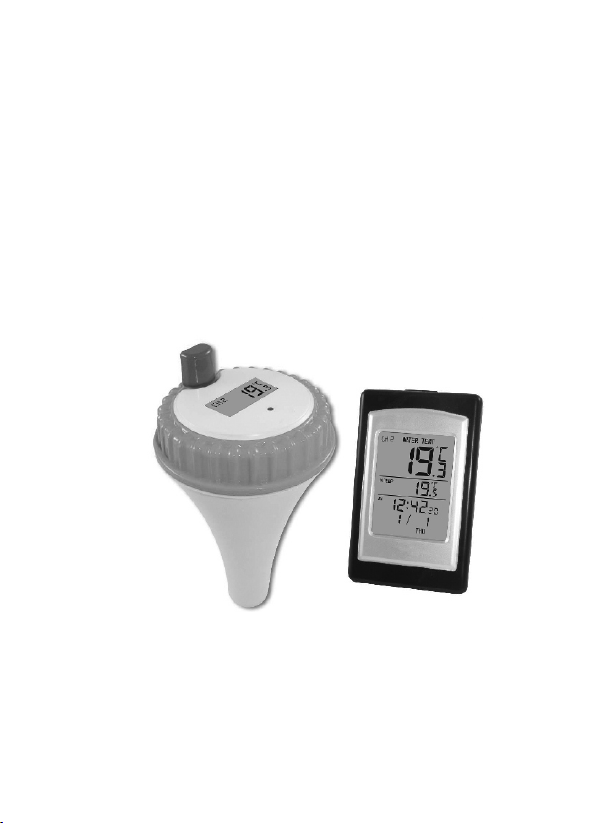
WIRELESS POOL THERMOMETER
Trådlös pooltermometer
ART. 03601
- User’s manual –
Användarmanual
1. INTRODUCTION
Thank you for your purchase of the Wireless Pool Thermometer with time,
date, and indoor temperature. The following user guide provides step by step
instructions for installation, operation and troubleshooting.
IMPORTANT NOTES:
- ONLY INSTALL IN FRESH WATER. DO NOT INSTALL IN SALT WATER.
- DO NOT EXCEED THE OPERATIONAL RANGE (-40 °C TO 35°C )
-NOT FOR USE IN SPA BATHS.
2.GETTING STARTED
The Wireless Poo Thermometer consists of a display station (receiver), and a
wireless thermometer (remote transmitter).
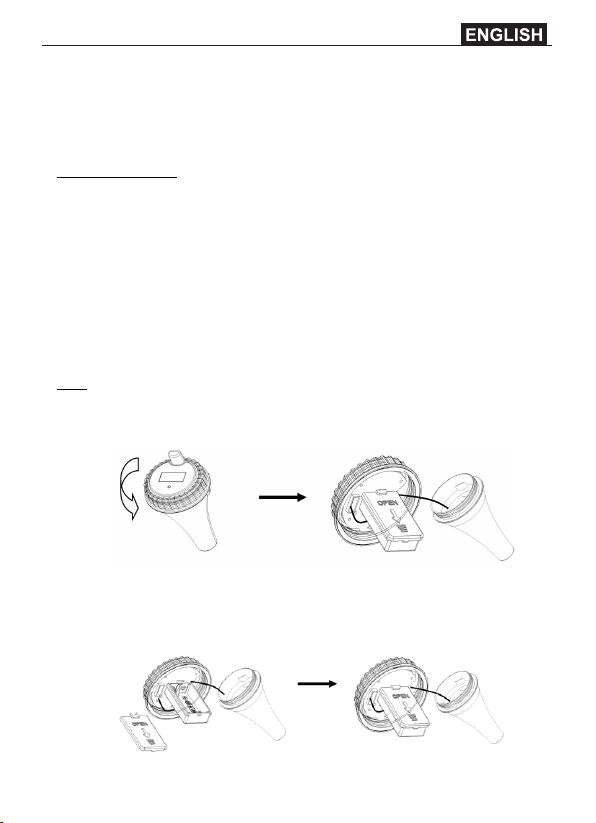
2.1 Remote Pool Thermometer Sensor Set Up
Note: To avoid permanent damage, please take note of the battery polarity
before inserting the batteries.
1. Twist off the transmitter cover (counterclockwise), as shown in
Figure 1. Be careful not to stress the sensor wire.
Figure 1
2. Insert two AA batteries and close the battery door, as shown in
Figure 2.
Figure 2
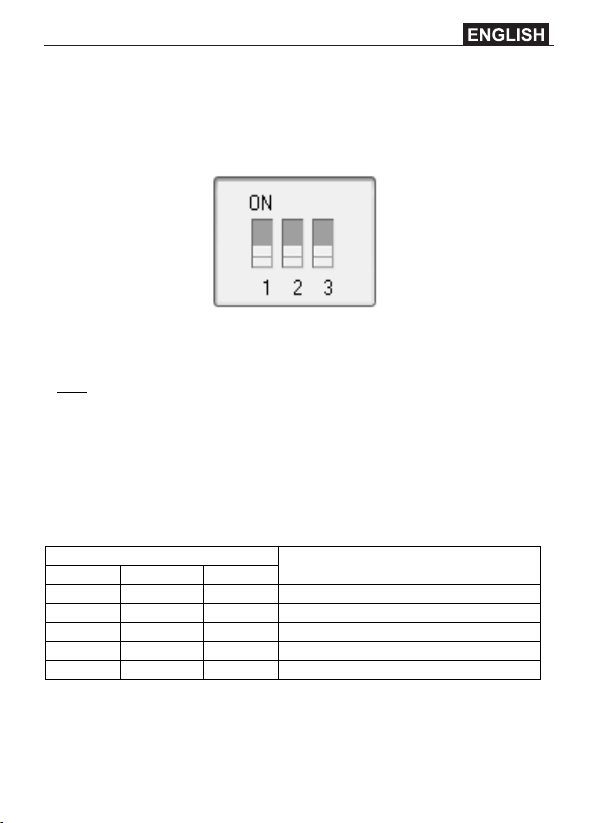
DIP SWITCH
FUNCTION
1 2 3
DOWN
DOWN
---
Channel 1 (factory default setting)
UP
DOWN
---
Channel 2
DOWN
UP
---
Channel 3
---
---
DOWN
°F
---
---
UP
°C (factory default setting)
3. Locate the dip switches on the inside cover of the lid of the
transmitter.
Figure 3 displays all three switches in the OFF position (down).
Note: The default setting is as follow: Dip Switches 1 and 2 are down, this
transmitter is as Channel 1; Dip Switch 3 is up, the temperature unit of this
transmitter is °C .
4. Channel Number: The display console supports up to 3
transmitters. To set each channel number, change Dip Switches 1
and 2, as referenced in Table .
5. Temperature Units of Measure: To choose the transmitter display
units of measure (°F / °C), change Dip Switch 3, as referenced in
Table .
Figure 3
6. Verify the correct channel number (CH) and temperature units of
measure (°F /°C) are other display, as shown in Figure 4 and Figure
Table 1
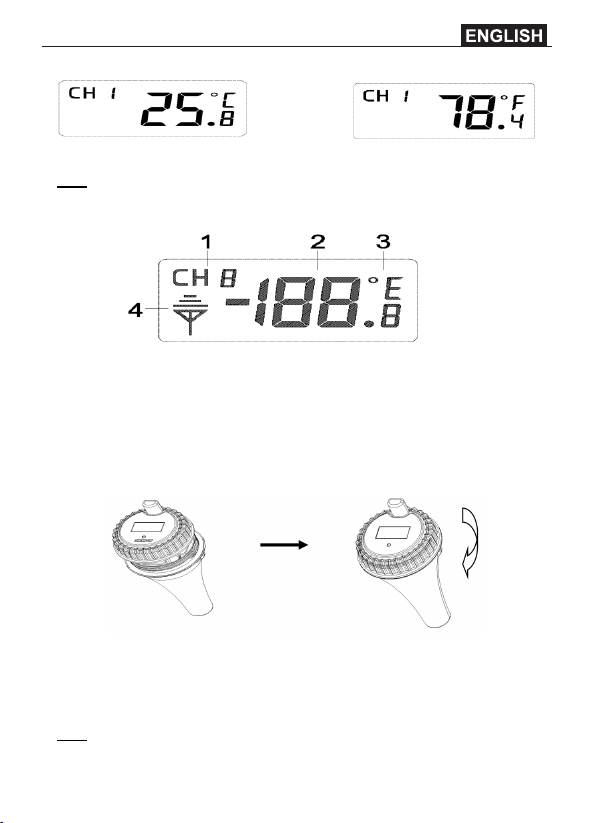
Figure4 Figure 5
Note: The following illustration shows the full segments of the transmitter LCD
for description purposes only and will not appear like this during normal
operation.
Figure 6
1. Transmitter channel number, total 3 channels
2. Water temperature
3. Water temperature units (°F/ °C)
4. Transmitter indication (flashes when sent)
Verify the gasket is properly seated in the guide on transmitter cover. Twist on
the transmitter cover (clockwise), as shown in Figure .
Figure 7
2.2 Display Console Set Up
Note: To avoid permanent damage, please take note of the battery polarity
before inserting the batteries.
Remove the battery door on the back of the display. Insert 2 AAA 1.5V (alkaline
or lithium, avoid rechargeable) batteries in the back of the display console.
All of the LCD segments will light up for a few seconds to verify all segments
are operating properly, and the unit will beep.
Replace the battery door, and fold out the desk stand and place the console in
the upright position.
The console will instantly display indoor temperature, and the default date and
time. The thermometer transmitter will display --, then update remote
temperature on the display within a few minutes. Do not touch any buttons
until the remote sensor reports in, otherwise the remote sensor search mode
will be terminated, and you must power down and power up the console again
by removing batteries.
When the remote sensor data has been received, the console will
automatically switch to the normal mode, and all further settings can be
performed.
If the remote does not update, please reference the troubleshooting guide in
Section 7.
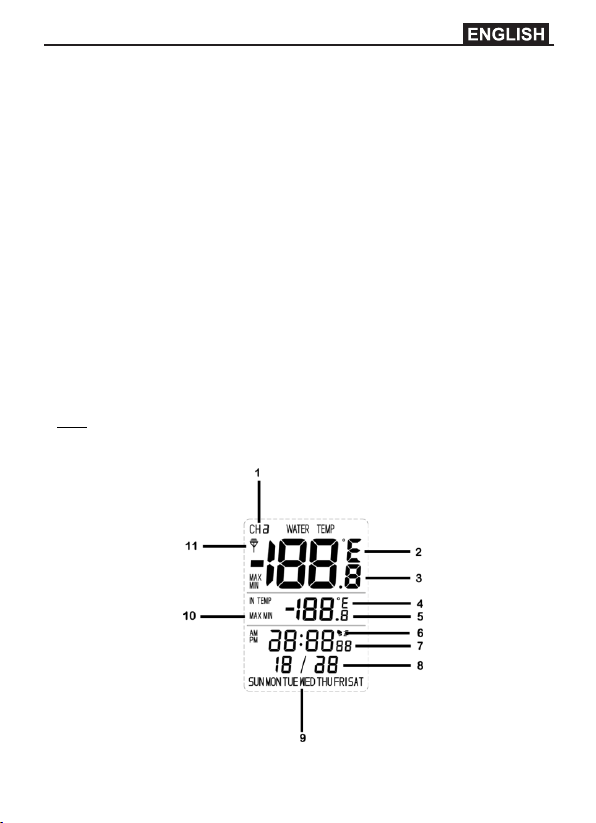
2.3 Display Console Layout
Note: The following illustration shows the full segments of the receiver LCD for
description purposes only and will not appear like this during normal
operation.
Figure8
1. Transmitter channel number
2. Water temperature units (°F/°C)
3. Water temperature
4. Indoor temperature units (°F /°C)
5. Indoor temperature
6. Time and snooze alarm
7. Time of day
8. Date
9. Day of week
10. Min/max icon
11. Transmitter reception (flashes when received)
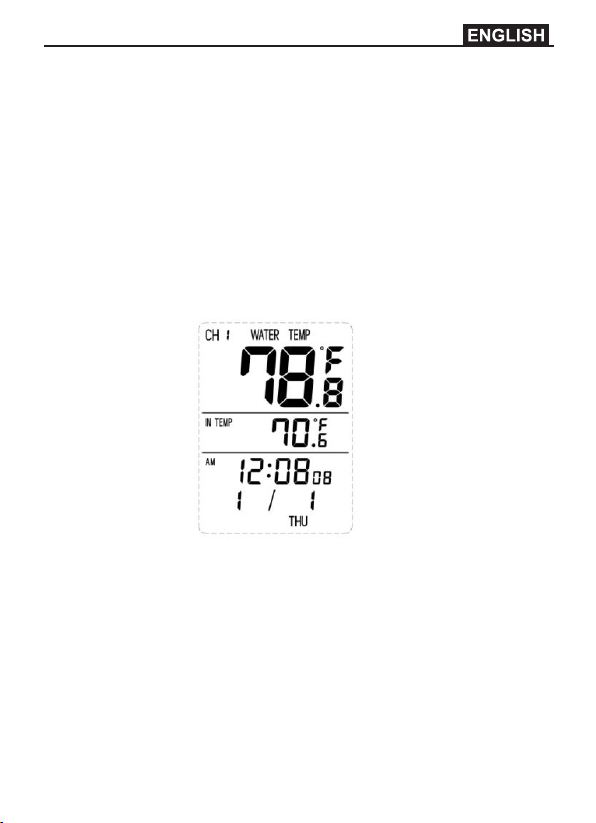
The normal display mode, as shown in Figure 9.
Figure 9
3 REMOTE SENSOR INSTALLATION
Place the remote sensor into the water (pool, spa, etc). The temperature will
take a few hours to stabilize. There is bracket on the thermometer to optionally
tether the float.

CONSOLE OPERATION
4.1 Buttons
The display console includes the following buttons (and location)
1. MODE: on the back of the display
2. C/F: on the back of the display
3. MAX/MIN: on the back of the display
4. SET: on the back of the display
5. CHANNEL: on the top of the display
6. CLEAR: on the top of the display
Set (Program) Mode
Press the MODE button to switch between TIME -> ALARM -> DATE
The following section defines how to set the time, alarm and date.
Notes:
- After 60 seconds of inactivity, the display will automatically revert to the
normal display mode (automatic time out).
- Press and hold the C/F button for two seconds to advance rapidly.
4.2.1 Set Time
1. While in the TIME mode, press the SET button, and the hour will
begin flashing. Press the C/F button to advance the hour. Make
special note of the AM / PM icon.
2. Press the SET button again, and the minute will begin flashing.
Press the C/F button to advance the minute.
3. Press the SET button again, and the second will begin flashing.
Press the C/F button to toggle between 12 hour and 24 hour
display mode.
4. Press the SET button again to return to normal mode.
4.2.2 Set Alarm Time
1. While in the ALARM mode, press the SET button, and the alarm
hour will begin flashing. Press the C/F button to advance the
alarm hour. Make special note of the AM / PM icon.
2. Press the SET button again, and the alarm minute will begin
flashing. Press the C/F button to advance the alarm minute.
3. Press the SET button again to return to normal mode.
4.2.3 Set Date
1. While in the DATE mode, press the SET button, and the year will
begin flashing. Press the C/F button to advance the year.
2. Press the SET button again, and the month will begin flashing. Press
the C/F button to advance the month.
3. Press the SET button again, and the day will begin flashing. Press
the C/F button to advance the day.
4. Press the SET button again to return to normal mode.
4.3 Alarm Mode
4.3.1 Activating / Deactivating the Alarm
1. While in the ALARM mode, press the C/F button to activate the
alarm. The alarm icon will appear .
2. Press the C/F button again to deactivate the alarm. The alarm icon
will disappear.
4.3.2 Cancelling the Alarm
When an alarm has been triggered, the alarm will sound and the alarm icon
will flash for 60 seconds. Press any button on the back of the display to
silence the alarm.
Snooze Alarm
When an alarm has been triggered, the alarm will sound and the alarm icon
will flash for 60 seconds. Press the CHANNEL button on the top of the
display or allow the alarm to time out to enter the snooze mode. The snooze
icon will flash (ZZ). After five minutes, the alarm will sound again. After five
consecutive snooze alarms, the snooze alarm mode will be deactivated.
 Loading...