

Page 1
Installation and Operating Instructions
ELECTRIC HOB
17070
The appliance must be installed only by a qualified electrician and in accordance with the
manufacturer’s instructions.
Please read these instructions carefully before attempting to install or use this product. It is
advisable to keep these instructions in a safe place for future reference.
Page 2
Thank you for choosing this quality hob. It
has been designed to give years of
trouble-free service, provided it is installed
and maintained correctly.
Please read these instructions carefully
before installing or using your hob. It is
advisable to keep your purchase and
installation receipts with these instructions
in a safe place for future reference.
Included is some important safety
information, in addition to guidelines and
recommendations, which will enable you
to take full advantage of all the functions
available.
This quality appliance has been tested
and certified to meet all applicable
electrical and safety standards.
This appliance must only be installed and
repaired by qualified electricians or
authorised service personnel. If it is not
installed and repaired properly you could
be putting yourself and others in danger. It
will also invalidate the guarantee.
Do not use this appliance if it is known to
be faulty.
After unpacking the hob, ensure that there
is no visible damage. If the hob has been
damaged during transit, do not use it.
This appliance is guaranteed
for one year from date of purchase. Keep
your purchase receipt with these
instructions.
To fulfil the conditions of the guarantee,
this appliance must have been correctly
installed and operated in accordance with
these instructions. The appliance is
intended for domestic use only.
If the appliance fails to work properly
during the one year guarantee period,
contact the Faults and Assistance Helpline
shown below.
The appliance will be repaired or replaced
(at the manufacturer’s discretion) at no
cost to you. If the guarantee has lapsed,
you will be given a quotation for any
repairs or parts required.
Page No.
3 Using the hob
Before using your hob for the
first time
The hot plates
4 Choice of utensils
Cleaning the hob
Care of your hot plates
5 Safety tips
6 Installation
Positioning
Fitting your hob
Electrical connections
7 Installation - continued
2
INTRODUCTION GUARANTEE CONTENTS
PLEASE NO
TE:
All packaging materials should be discarded and not left within the reach of
children as they are a potential safety hazard.
Dispose of packing material in accordance with your local authority's relevant
regulations.
CAUTION!
Do not attempt to repair or replace the mains cable yourself.This must be done
by qualified service personnel only.
Page 3
Before using your hob for the first time
you should:
• Read the operating and safety
instructions thoroughly.
• Remove the remnants of any stickers
and glue from the surfaces of the hob
with warm water and washing-up
liquid.
• When using for the first time, turn on
the hot plates, one at a time, and set
the temperature selector knob to
position '6'. Leave them on for about
5 minutes. This will burn off the
protective film covering the plates.
When the plates are cool, wipe them
with a soft dry cloth.
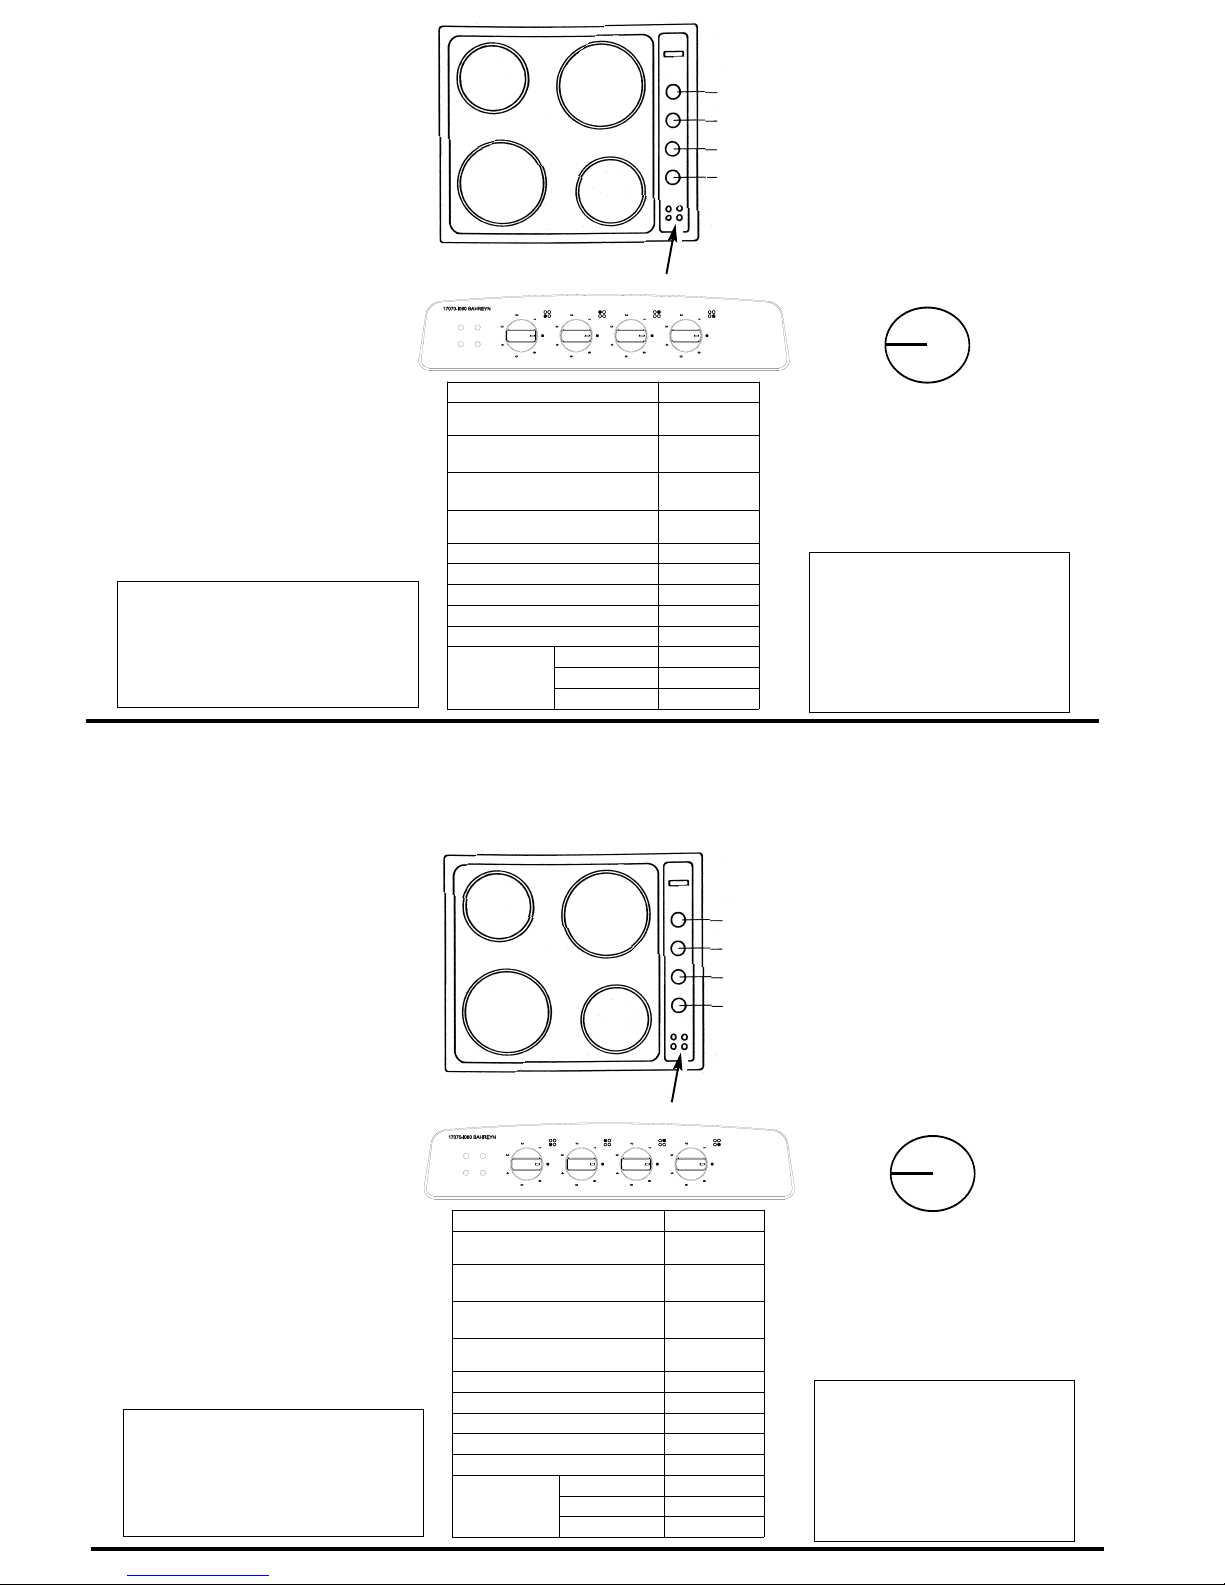
• Before switching on a hot plate, make
sure that the selector knob you are
going to use corresponds to the hot
plate you wish to switch on. The
relationship between knobs and hot
plates is shown in
Figure 1
. The
corresponding indicator LEDs also
illuminate to show which hot plates
are on.
3
USING THE HOB
Figure 1
HOT PLATE INDICATOR LEDs
1
1
2
2
3
3
4
4
The hot plates
• The hot plate power is regulated with
a 7-position temperature selector
knob. The control allows for the
efficient transfer of heat to the
cooking pan.
Warning!
If any of the hot plates become
cracked, disconnect the appliance
from the mains supply and do not use
until repaired by a qualified
electrician.
Important!
1. Never turn the hot plate on before
placing a pan on it, except when
first used.
2. If the hot plate is not to be used for
a long time, apply a little grease to
the painted surface.
3. Mop up spills onto the hot plate
quickly
• The selector knob can be turned in
both directions; anti-clockwise to
increase heat, clockwise to decrease.
There are numbers 0 to 6 marked on
the knobs (Figure. 2). These numbers
correspond to the heat setting of the
hot plate where 6 is the highest
setting and 0 is off.
• We recommend you turn off the hot
plate 5 to 10 minutes before the
cooking is ready. This allows the heat
accumulated in the hot plate to be
used economically.
Figure 2
4
0
1
2
3
5
6
MODEL 17070
HOB TYPE
KNOB POSITION SIDE
HOTPLATE INDICATOR LAMP YES
VOLATAGE- CURRENT 230 V- 25 A
FREQUENCY
WEIGHT
DIMENSIONS
WITDTH ( MM)
585 mm
DEPTH ( MM)
500 mm
HEIGHT ( MM)
85 mm
4 ELECTRIC
HOTPLATE
145 MM NORMAL HOTPLATE
(QUANTITY X WATT )
2x1 Kw
180 MM NORMAL HOTPLATE
(QUANTITY X WATT )
1x1.5 Kw
180 MM RAPID HOTPLATE
(QUANTITY X WATT )
1x2 Kw
50-60 Hz
10 Kg
Before using your hob for the first time
you should:
• Read the operating and safety
instructions thoroughly.
• Remove the remnants of any stickers
and glue from the surfaces of the hob
with warm water and washing-up
liquid.
• When using for the first time, turn on
the hot plates, one at a time, and set
the temperature selector knob to
position '6'. Leave them on for about
5 minutes. This will burn off the
protective film covering the plates.
When the plates are cool, wipe them
with a soft dry cloth.
• Before switching on a hot plate, make
sure that the selector knob you are
going to use corresponds to the hot
plate you wish to switch on. The
relationship between knobs and hot
plates is shown in
Figure 1
. The
corresponding indicator LEDs also
illuminate to show which hot plates
are on.
3
USING THE HOB
Figure 1
HOT PLATE INDICATOR LEDs
1
1
2
2
3
3
4
4
The hot plates
• The hot plate power is regulated with
a 7-position temperature selector
knob. The control allows for the
efficient transfer of heat to the
cooking pan.
Warning!
If any of the hot plates become
cracked, disconnect the appliance
from the mains supply and do not use
until repaired by a qualified
electrician.
Important!
1. Never turn the hot plate on before
placing a pan on it, except when
first used.
2. If the hot plate is not to be used for
a long time, apply a little grease to
the painted surface.
3. Mop up spills onto the hot plate
quickly
• The selector knob can be turned in
both directions; anti-clockwise to
increase heat, clockwise to decrease.
There are numbers 0 to 6 marked on
the knobs (Figure. 2). These numbers
correspond to the heat setting of the
hot plate where 6 is the highest
setting and 0 is off.
• We recommend you turn off the hot
plate 5 to 10 minutes before the
cooking is ready. This allows the heat
accumulated in the hot plate to be
used economically.
Figure 2
4
0
1
2
3
5
6
MODEL 17070
HOB TYPE
KNOB POSITION SIDE
HOTPLATE INDICATOR LAMP YES
VOLATAGE- CURRENT 230 V- 25 A
FREQUENCY
WEIGHT
DIMENSIONS
WITDTH ( MM)
585 mm
DEPTH ( MM)
500 mm
HEIGHT ( MM)
85 mm
4 ELECTRIC
HOTPLATE
145 MM NORMAL HOTPLATE
(QUANTITY X WATT )
2x1 Kw
180 MM NORMAL HOTPLATE
(QUANTITY X WATT )
1x1.5 Kw
180 MM RAPID HOTPLATE
(QUANTITY X WATT )
1x2 Kw
50-60 Hz
10 Kg
Page 4

4
General comments:
• Clean the hob regularly to maintain its
working condition and aesthetic
appearance; clean it when it is cold.
• When cleaning the hob, do not use
harsh abrasives, caustic cleaners or
sharp objects.
• All stainless steel parts should be
cleaned with a non-abrasive cleaning
liquid on a soft cloth.
• Clean the hot plates with a damp
sponge and then dry them by turning
them on for a few seconds. To maintain
their appearance apply a commercially
available grease intended for the
maintenance of hot plates.
• The hot plate trim rings can be cleaned
with agents intended for the
maintenance of stainless steel parts.
The rings may become yellowed as a
result of overheating. This is normal.
• If a hotplate is to be out of use for a long
time, apply the special grease
periodically.
• Immediately after use, soak pans and
other utensils in warm water with
washing up liquid. Thoroughly clean
them with a brush or sponge and dry
them carefully.
Care of your hot plates
• Keep the hot plates clean. A dirty plate
does not transfer heat efficiently.
• Avoid placing wet pans on the hot
plates.
• Never sprinkle cold water on an
overheated plate.
• Turn the hot plate off for a few minutes
before the dish is cooked; the plate
accumulates heat and is still hot for a
while after turning off.
• Never use the hot plates for preparing
foods wrapped in aluminium foil or in
plastic pans. Never place any plastic
trays etc. on the hot plates.
CHOICE OF UTENSILS
• Any cookware should have a thick, flat
and dry base of the same diameter or
slightly bigger than the hot plate. If the
cookware diameter is smaller than the
hot plate heat will be wasted.
• Cookware with uneven bases are very
inefficient, making the cooking time
longer and wasting electricity.
• Cookware made of flameproof glass,
suitable for hot plate cooking, should
match the hot plate size. Pans
projecting beyond the hot plate may be
broken due to temperature stresses.
The heated pan must never be filled up
with cold water or placed on cold metal
or stone surfaces.
• Always use the pan with its lid on. This
prevents the accumulation of odour
and vapour in the kitchen.
Correct
• Low current consumption
• Good heat transfer
even pan base
pan and plate
diameters are equal
pan covered with lid
Pan too small
Uneven pan base
Lid not properly positioned
CLEANING THE HOB
NOTE!
Switch off the hob at the mains
electricity switch before cleaning.
Incorrect
• High electricity consumption
• Poor heat transfer
• Longer cooking time
Page 5

5
SAFETY TIPS
SAFETY ADVICE IN THE CASE OF A
COOKING PAN FIRE
Never fill a deep fat frying pan more
than 1/3 full of oil, or use a lid. DO
NOT LEAVE UNATTENDED WHILE
COOKING!
IN THE EVENT OF A COOKING PAN
FIRE:
1. Turn off the hob at the electricity wall
socket.
2. Cover the pan with a fire blanket or
damp cloth. This will smother the
flames and extinguish the fire.
3. Leave the pan to cool for at least an
hour before attempting to move it.
Injuries are often caused by picking
up a hot pan and rushing outside
with it.
NEVER USE A FIRE EXTINGUISHER
TO PUT OUT A PAN FIRE as the force
of the extinguisher could tip the pan
over.
Never use water to extinguish oil or fat
pan fires.
ALWAYS:
• Always be careful when operating the
hob and take care to avoid touching
the hot plates.
• Always keep children away from the
hob as it will get hot during use.
• Always turn off the hot plates when
not in use.
• Always ensure that the cables of
other household appliances, used
near the hob, are away from the hot
plates.
• Always place pans centrally on the
hot plates and position them so that
the handles cannot accidentally be
caught or become heated by other
hot plates.
• Always keep the hob clean as a build
up of grease or fat from cooking can
cause a fire.
• Always allow the hob to cool before
cleaning.
NEVER:
• Never leave children unsupervised
where the hob is installed as the
appliance will get hot during and after
use.
• Never allow anyone to sit or stand on
the hob.
• Never store items above the hob that
children may attempt to reach.
• Never heat up unopened food
containers as pressure can build up
causing them to burst.
• Never store chemicals, food stuffs or
pressurised containers in cabinets
above or next to the hob.
• Never place flammable or plastic
items on or near the hob.
• Never use the hob as a room heater.
• Never wear garments with long
flowing sleeves whilst cooking.
Page 6

6
INSTALLATION
CAUTION!
The supply cable must be fitted by a
qualified electrician or technician
from an authorised service dealer
and in accordance with the local
authority regulations in force.
The hob must be properly connected
to the mains supply by a qualified
electrician according to current
safety regulations. Do not modify or
change the hob in any way.
Figure 3
Electrical connections
Before the hob is connected to the mains
supply make sure:
• The mains voltage is the same as that
specified on the data plate on the
underside of the hob.
• The mains supply cable is rated for
the maximum power consumed by the
appliance as specified on the data
plate.
• No lead must touch hot surfaces over
75°C.
A mains supply on/off switch should be
provided in case of an emergency, if not
already existing. The working contacts of
the safety switch should be at least 3mm
apart.
Release the cover by removing the cover
screws. Loosen the cable clamp and
connect the mains supply cable to the
terminal block on the hob using the
following colour code (Figure 3):
• The green or yellow/green (earth) wire
should be connected to the
corresponding yellow/green wire on
the terminal block or marked E or E.
• The blue or black (neutral) wire should
be connected to the corresponding
blue wire on the terminal block or
marked N.
• The brown or red (live) wire should be
connected to the corresponding brown
wire on the terminal block or
marked L.
Secure the cable clamp. Check the cable
terminals for tightness and ensure that the
terminal links are in place, then close the
cover over the terminal block.
LIVE
TERMINAL
NEUTRAL
TERMINAL
MAINS
SUPPLY
EARTH
TERMINAL
CABLE
CLAMP
CABLE
CLAMP
SCREWS
COVER
COVER
SCREWS
Page 7

7
The kitchen where the hob is to be
installed should be dry and have an
efficient ventilation system.
There should be an open space above
the appliance to allow kitchen odours to
disperse. A cooker hood may be installed
to either absorb or extract the odours. The
distance between the hob and the hood
must not be less than 650mm.
Do not install the hob on a window-door
axis because of draughts.
Positioning your hob
The hob can be fitted into a work surface
with a cut-out the size shown in Figure 5.
Beneath the cut out surface there must be
a minimum depth of 130mm to any
appliance or built-in unit. It is important to
observe the cut-out dimensions and to
check the cut-out before attempting
installation.
It is advisable to mark and check the hob
position with masking tape before cutting
the work surface.
INSTALLATION – continued
Figure 5
Figure 4
Please note: Your product may differ
from the one illustrated above but the
principle of installation remains the
same.
50mm
480mm
650mm
min
565mm
Leave
adequate
clearance
between
hob and
adjacent
cupboards
Fitting your hob
The fitted hob must have the minimum
space around it as shown in Figure 5.
• Loosen the securing clip screws.
• Apply a bead of sealant around the
edges of your hob.
• Centralise the hob in the cut-out.
• Ensure the clips grip the worktop (as
shown in Figure 4), and then tighten
the screws.
• Make sure the electricity supply cable
is clear of the base of the hob and
any other possible heat source.
• Finish the bead of sealant with a
suitable tool while it is still workable.
Page 8

This appliance/fitting is marked according to the European directive 2002/96/EC on Waste Electrical
and Electronic Equipment (WEEE). By ensuring this product is disposed of correctly, you will help
prevent potential negative consequences for the environment and human health, which could
otherwise be caused by inappropriate waste handling of this product.
The symbol on the product, or on the documents accompanying the product, the Crossed Out Wheelie Bin
symbol, indicates that this appliance/fitting may not be treated as household waste. Instead it shall be
handed over to the applicable collection point for the recycling of electrical and electronic equipment.
Disposal must be carried out in accordance with local environmental regulations for waste disposal. For
more detailed information about treatment, recovery and recycling of this product, please contact your local
authority, your household waste disposal service or the retailer where you purchased the product.
 Loading...