

Page 1
Please read these instructions carefully before attempting to install or use this
product. It is advisable to keep these instructions in a safe place for future reference.
Installation and Operating Instructions
The device is in compliance with the Directives 2009 / 142 / EC 2006 / 95 / EC and 2004 / 108 / EC
USER INSTRUCTIONS
50 cm Double Cavity Dual Fuel Cooker
3 Gas Burners + 1 Electrical Burner with Digital Timer
50 cm Single Cavity Dual Fuel Cooker
3 Gas Burners + 1 Electrical Burner with Digital Timer
50 cm Double Cavity Dual Fuel Cooker
3 Gas Burners + 1 Electrical Burner with Mechanical Timer
50 cm Single Cavity Dual Fuel Cooker
3 Gas Burners + 1 Electrical Burner with Mechaical Timer
14220
14221
14200
14201
14202
ϱ0 cm Single Cavity Dual Fuel Cooker
3 Gas Burners + 1 Electrical Burner
Page 2

Thank you for choosing this quality cooker. It has been designed to give years of troublefree service provided it is installed and maintained correctly.
Please read these instructions carefully before installing or using your cooker. Included is
some important safety information in addition to guidelines and recommendation which
will enable you to take full advantage of all the functions available.
The manufacturer reserves the right to make changes and modifications to this product
without notice.
This appliance must only be installed by a qualified electrician or technician from
an authorised service dealer and in accordance with the local authority regulations
in force.
The manufacturer will not accept responsibility for injury or damage caused by
incorrect installation or improper use of the appliance.
This appliance does not contain any materials that are dangerous to the
environment.
All materials used for packaging can be recycled.
Care must be taken to ensure that this appliance is not a hazard to others,
particularly children, when it is disposed of. Cut through the mains cable and
remove the door. Contact your local authority regarding recycling etc.
CAUTION!
1. This appliance must only be repaired by authorised service personnel. If it is not
repaired properly, you could be putting yourself and others at danger.
Do not use this appliance if it is known to be faulty.
2. Never lift the cooker by the oven door handle.
3. Do not attempt to repair or replace the mains cable yourself. This must be done
by qualified service personnel only.
INTRODUCTION
Page 3

GENERAL INFORMATION . . . . . . . . . . . . . . . . . . . . . . . . . . . . . . . . . . . . . . . . . . . . . . . .1
PURPOSE . . . . . . . . . . . . . . . . . . . . . . . . . . . . . . . . . . . . . . . . . . . . . . . . . . . . . . . . . . . .1
TECHNICAL SPECIFICATION . . . . . . . . . . . . . . . . . . . . . . . . . . . . . . . . . . . . . . . . . . .. .1
PARTS IDENTIFICATION . . . . . . . . . . . . . . . . . . . . . . . . . . . . . . . . . . . . . . . . . . . . . .. . .1
IMPORTANT NOTES . . . . . . . . . . . . . . . . . . . . . . . . . . . . . . . . . . . . . . . . . . . . . . . . . . . .2
INSTALLATION . . . . . . . . . . . . . . . . . . . . . . . . . . . . . . . . . . . . . . . . . . . . . . . . . . . . . . .. .3
POSITIONING . . . . . . . . . . . . . . . . . . . . . . . . . . . . . . . . . . . . . . . . . . . . . . . . . . . . . . . .. .3
ELECTRICAL CONNECTIONS . . . . . . . . . . . . . . . . . . . . . . . . . . . . . . . . . . . . . . . . . . .. .3
CONNECTING THE COOKER TO THE GAS SUPPLY . . . . . . . . . . . . . . . . . . . . . . . . . . .4
USING THE HOB . . . . . . . . . . . . . . . . . . . . . . . . . . . . . . . . . . . . . . . . . . . . . . . . . . . . . .4-5
COOKWARE SELECTION . . . . . . . . . . . . . . . . . . . . . . . . . . . . . . . . . . . . . . . . . . . . . . .5-6
CONTROL PANELS . . . . . . . . . . . . . . . . . . . . . . . . . . . . . . . . . . . . . . . . . . . . . . . . . . .. . .6
SETTING THE DIGITAL AND MECHANICAL CLOCK TIMER . . . . . . . . . . . . . . . . . .7-9
USING THE COOKER – TOP CAVITY GRILLING . . . . . . . . . . . . . . . . . . . . . . . . . . . . .9
USING THE COOKER – BOTTOM CAVITY . . . . . . . . . . . . . . . . . . . . . . . . . . . . . . . . . .9
OVEN FUNCTIONS . . . . . . . . . . . . . . . . . . . . . . . . . . . . . . . . . . . . . . . . . . . . . . . . . . . .10
MAINTENANCE AND CLEANING . . . . . . . . . . . . . . . . . . . . . . . . . . . . . . . . . . . . . . . ..11
GENERAL REMARKS . . . . . . . . . . . . . . . . . . . . . . . . . . . . . . . . . . . . . . . . . . . . . . . . .11
CLEANING THE PAN SUPPORTS . . . . . . . . . . . . . . . . . . . . . . . . . . . . . . . . . . . . . . . .11
CLEANING THE OVEN . . . . . . . . . . . . . . . . . . . . . . . . . . . . . . . . . . . . . . . . . . . . . . . . .11
CLEANING THE BURNERS . . . . . . . . . . . . . . . . . . . . . . . . . . . . . . . . . . . . . . . . . . . . .11
REPLACING THE LAMP . . . . . . . . . . . . . . . . . . . . . . . . . . . . . . . . . . . . . . . . . . . . . . . .12
TROUBLESHOOTING . . . . . . . . . . . . . . . . . . . . . . . . . . . . . . . . . . . . . . . . . . . . . . . . . .12
INDEX
Page 4

- 1 -
GENERAL INFORMATION
PURPOSE
The cooker should be used for preparing household meals only. It must not be used for
any other purpose.
TECHNICAL SPECIFICATION
Supply voltage:
230V 50-60Hz
Gross weight: 52 kg
External dimensions (cm): 50 width; 60 depth; 90 height
Top cavity capacity (litres):
25
Bottom cavity capacity (litres): 55
PARTS IDENTIFICATION
Fig. 1
14220
14221
14200
14201
14202
Page 5

- 2 -
NOTE!
The use of a gas cooker results in the production of heat and moisture in the room in
which it is installed. Always ensure that the kitchen is well ventilated.
POSITION
After unpacking the cooker ensure that there is no visible damage. If the cooker has been
damaged during transit, do not use it. After reading any information stickers, remove them
from oven door, burners or pan supports.
- The appliance is not to be used by persons (including children) with reduced
physical, sensory or mental capabilities, or lack of experience and knowledge,
unless they have been given supervision or instruction.
- Children being supervised not to play with the appliance.
- Children less than 8 years of age shall be kept away unless continuously supervised.
- Cleaning and user maintenance shall not be made by children without supervision.
-During use the appliances becomes hot. Care should be taken to avoid touching
heating elements inside the oven, for cooking ranges and ovens.
- Accessible parts may become hot during use. Young children should be kept away.
-Do not use harsh abrasive cleaners or sharp metal scrapers to clean the oven door
glass since they can scratch the surface, which may result in shattering of the glass.
-Any spillage should be removed from the lid before opening.
- Hob surface should be allowed to cool before closing the lid.
WARNING: Ensure that the appliance is switched off before replacing the lamp to
avoid the possibility of electric shock .
WARNING: Unattended cooking on a hob with fat or oil can be dangerous and may
result in fire.
NEVER try to extinguish a fire with water, but switch off the appliance and then cover
flame e.g. with a lid or a fire blanket.
WARNING: Danger of fire: do not store items on the cooking surfaces.
WARNING: If the surface is cracked, switch off the appliance to avoid the possibility of
electric shock. - The instructions for ovens that have shelves shall include details
indicating the correct installation of the shelves.- The instructions for cooking ranges,
hobs and ovens shall state that a steam cleaner is not to be used. - Appliance is not
intended to be operated by means of an external timer or separate remote-control
system.
IMPORTANT SAFETY NOTICE
Page 6
- 3 -
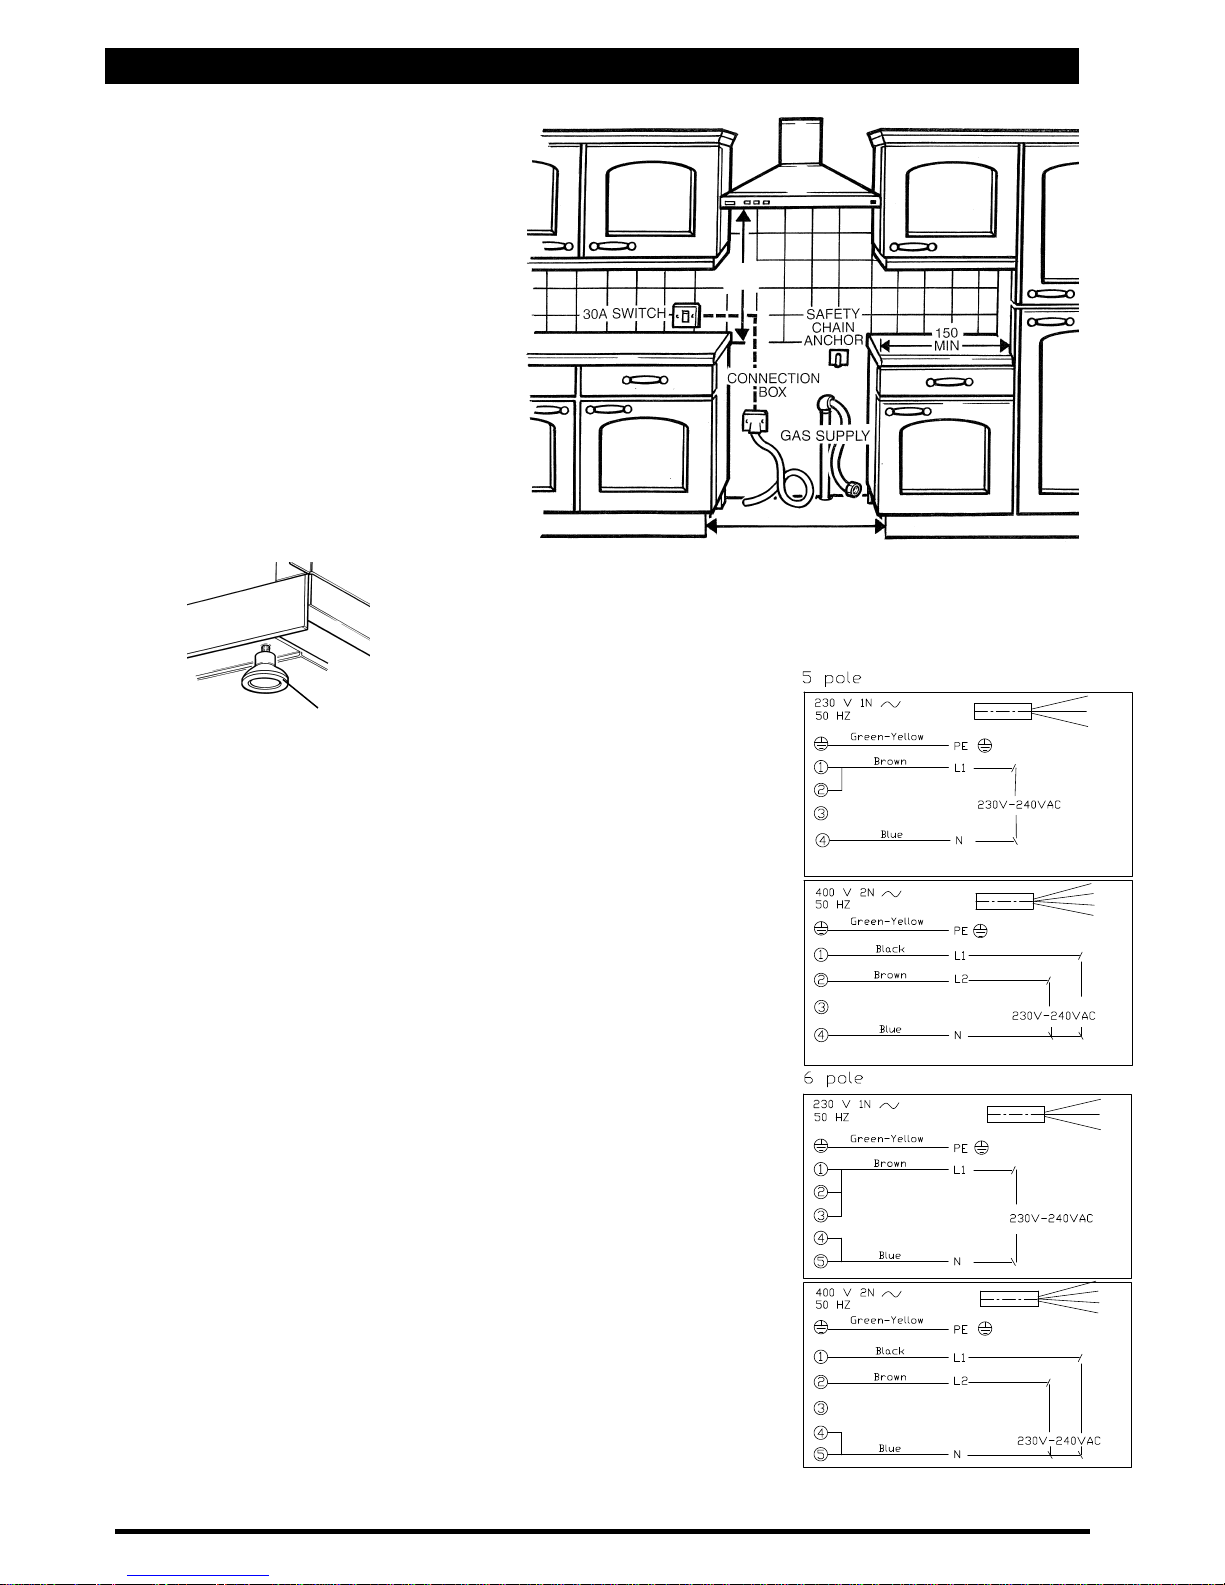
POSITIONING
INSTALLATION
• Remove all packing materials
including the protective film
covering the chrome-plated
and stainless steel parts (if
applicable).
• The kitchen should be dry and
well ventilated. Position the
cooker ensuring free access to
all the controls.
• The distance between the hob
and extractor hood should be
at least 750mm. Level the
cooker before using it. To do
this, use the adjustable feet.
Fig. 2
Fig. 3
ADJUSTABLE
FOOT
Fig. 4
ELECTRICAL CONNECTIONS
The cooker must be properly connected to the mains
supply by a qualified electrician according to current
safety regulations. Do not modify or change thecooker
in any way.
Before the cooker is connected to the mains supply make sure:
The mains voltage is the same as that specified on the data plate
on the cooker.
The mains supply cable is rated for the maximum power
consumed by the appliance as specified on the data plate on the
cooker.
The appliance must be installed using a double pole switch of
30A minimum capacity, with 3mm minimum contact separation
between poles.
Connect the cooker to the mains connection box following the
colour code:
Yellow/green wire should be connected to earth terminal marked
E or E.
Blue wire should be connected to the neutral terminal marked N.
Brown wire should be connected to live terminal marked L.
Ensure that connections are tight and that no loose strands are
left out of the terminals.
No lead must touch hot surfaces over 75°C.
750
MIN
700 MIN
Minimun vertical distance 750 mm above hotplate and the minimum
horizontal distances 55 mm from vertical planes must be left.
Page 7

- 4 -
CONNECTING THE COOKER TO THE GAS SUPPLY
• No LPG burners are supplied with this appliance. Telephone the Helpline (back
page) for advice and availability if LPG burners are required.
• The cooker may be connected to the natural gas supply or to an LPG cylinder. The
appliance is supplied with natural gas burners fitted.
• The cooker may be connected to the natural gas supply with a rigid connection or by
means of a flexible hose manufactured to current safety regulations.
• Use a rubber hose with a safety certificate to connect the appliance to an LPG
cylinder.
• Every time the cooker has been connected to an LPG cylinder, check the cylinder
valve for soundness, the connection of the regulator to the cylinder as well as its
operation.
NOTE!
1. Under no circumstances should the gas soundness be checked by means of a
naked flame (e.g. with a match or candle) as there is a danger of explosion!
2. Regularly check the condition of the hose and soundness of the connection in
accordance with the regulations in force.
Before installing the cooker to the gas supply system, ensure that the appliance is
compatible with the local distribution conditions (nature of the gas and gas
pressure). In the event of incompatibility replace the nozzles and adjust the gas
fittings.
The connection should be made in accordance with the regulations in force and by
a certified installer.
USING THE HOB
Before using the cooker for the first time
you should: • Read the operating and
safety
instructions thoroughly.
• If applicable, remove the remnants of
stickers and glue from the gas hob,
surfaces of hobs, pan supports and
oven door.
• Ensure that all elements of the
burners are positioned correctly.
Press and turn the control knob to the
large flame position. Press and hold the
ignition button downwards until ignition
has started (Fig. 5).
The large flame mark is for maximum
heat output.
For simmering, lower the heat output by
turning the control knob towards the
smaller flame position.
Turn the knob to OFF (G) when cooking
has finished.
Fig. 5
IGNITION AND
LIGHT BUTTON
FRONT
RIGHT
FRONT
LEFT
BACK
LEFT
BACK
RIGHT
OFF POSITION
LARGE
FLAME
SMALL
FLAME
• This appliance shall be installed and only used in well ventilated space.
Page 8

• The flame should not lick around from the bottom of a pan but cover only two-thirds of
its surface. This will reduce the gas consumption and prevent the flame from soiling the
utensils.
• The size of the flame depends on the position of the knob. The full flame should be
used until the dish begins to boil, then it is better to use the simmering flame.
• Burners and ignitor tips should be kept clean, as dirt adversely affects the
performance.
• Before removing an item off a burner, reduce the flame or turn the burner off
completely.
• Before switching on a burner, make sure that the knob you are going to use corresponds to the burner you wish to switch on. The relationship between knobs and
burners is shown in Fig. 5.
Operating burners supplied from an LPG cylinder.
Before lighting the first burner, open the valve on the LPG cylinder. Then light the burner
using one of the methods described above.
When closing the flow of gas before turning off the last burner:
• Close the valve on the LPG cylinder.
• When the flame has gone out, close the tap of that burner. When the cooker is not
used, the valve of the LPG cylinder should be closed.
Use of the Electric Hotplate
Turn the electric hotplate switch clockwise to the desired position.
The electric hotplate is activated when the electric indicator lamp is lit.
When cooking is finished, turn the switch to “0” position.
Prior to initial use of electric hotplate, turn the electric hotplate switch to position “3”
and allow hotplate to get hot for 5 minutes without putting a pan on it. This makes the
upper surface of the electric hotplate, which is heat resistant, harder.
Use pans and dishes on the electric hotplate that have a flat base and permit
good contact. That enables the heat to be applied most effectively.
POSITION
1 2 3 4 5 6
POWER ( WATT )
100 165 250 500 750 1000
• Any cookware should have a thick, flat and dry base of the same diameter or slightly
bigger than the hot plate. If the cookware diameter is smaller than the hot plate, heat
will be wasted.
• Cookware with uneven bases is very inefficient, making the cooking time longer and
wasting electricity.
• Cookware made of flameproof glass, suitable for hot plate cooking, should match the
hot plate size. Pans projecting beyond the hot plate may be broken due to temperature
stresses. The heated pan must never be filled up with cold water or placed on cold
metal or stone surfaces.
• Always use the pan with its lid on. This prevents the accumulation of vapour in the
kitchen.
Correct !
• Low current consumption
• Good heat transfer
- even pans
- pan and plate diameters are equal pan covered with lid
Fig. 6A
COOKWARE SELECTION
- 5 -
Page 9

Wrong !
• High current consumption
• Poor heat transfer
• Longer cooking time
Pan too small !
Uneven pan bottom !
Lid not properly placed !
Fig. 6B
Fig. 6C
Fig. 6D
Important !
1. Never turn the hot plate on before placing a pan on it, except when first used.
2. If the hot plate is not to be used for a long time, apply a little grease to the
painted surface.
3. Do not allow spills to be burnt onto the hot plate since baked stains are very
difficult to remove.
Control Panels
Upper Burner
Control
Buttons
Lower Oven
Heating
Control
Buttons
Hob
Control
Buttons
- 6 -
14220
14200
14221
14201
Thermostat
Oven Heating
Control
Buttons
Hob
Control
Buttons
Upper Burner
Control
Buttons
Lower Oven
Heating
Control
Buttons
Hob
Control
Buttons
M
echanical
Timer
Thermostat
Lower Oven
Heating
Control
Buttons
Hob
Control
Buttons
M
echanical
Timer
D
igital Timer
D
igital Timer
Page 10

Your digital timer is an electronic timing module that makes the
food in the oven ready for servicing when you want. All you need
to do is to program the cooking duration and the time when you
want your food to be ready.
W
hen the timer is first powered up 12.00 appears on the display.
icon flashes. In this case the oven will not work as the contacts
of the clock relay are open.
The electricity current is transmitted to the heating elements
through the alarm clock. Press to manually operate the oven.
Oven clock / timer works the same way as the normal clock. In the
event of power failure the clock is reset. If the electricity current is
less than 50 Hz the clock will be slow. This is not a defect of the
clock. In such cases set the clock again.
Note: You don’t have to set the real time of the day for manual and
semi automatic cooking with your oven. For full automatic
programming you should set the real time of the day.
With the clock of your oven
1. You can set the cooking time from 0 to 10 hours.
2. You can set the alarm time between 00:00 and 23:59 hours.
3. You can set the oven to full automatic, semi-automatic or
manual cooking.
4. You c
an use it for warning purposes
ETTING THE REAL TIME OF THE DAY
ime setting can only be done when there is no active cooking
rogramme. Press the button. Two dots between the hour
d minute start flashing; you can set the clock forward by + and
ackward by -. Longer pressing on these keys will change the
lock faster.
1) Select clock setting
mode
2) Set the time with + or –
keys
3) Display will be fixed
after 5 seconds.
SETTING THE REAL TIME OF THE DAY
Time setting can only be done when there is no active cooking
programme. Press the button. Two dots between the hour
and minute start flashing; you can set the clock forward by + and
backward by -. Longer pressing on these keys will change the
clock faster.
1) Select clock setting
mode
2) Set the time with + or –
keys
3) Display will be fixed
after 5 seconds.
ETTING THE REAL TIME OF THE DAY
ime setting can only be done when there is no active cooking
rogramme. Press the button. Two dots between the hour
d minute start flashing; you can set the clock forward by + and
ackward by -. Longer pressing on these keys will change the
lock faster.
1) Select clock setting
mode
2) Set the time with + or –
keys
3) Display will be fixed
after 5 seconds.
- 7 -
to manually operate the oven.
Oven clock / timer works the same way as the normal clock. In the
event of power failure the clock is reset. If the electricity current is
less than 50 Hz the clock will be slow. This is not a defect of the
clock. In such cases set the clock again.
Note: You don’t have to set the real time of the day for manual and
semi automatic cooking with your oven. For full automatic
programming you should set the real time of the day.
With the clock of your oven
1. You can set the cooking time from 0 to 10 hours.
2. You can set the alarm time between 00:00 and 23:59 hours.
3. You can set the oven to full automatic, semi-automatic or
manual cooking.
4. You c
an use it for warning purposes
ALARM DURATION SETTING
With this function you can get your alarm clock beep after a period
set by you.
1) Select alarm setting 2) Enter time with + or – keys 3) Time will be displayed mode.
(eg:5 minutes) after a few seconds.
When the set period ends the alarm starts beeping. You can stop
the alarm by pushing any button.
ALARM VOLUME SETTING
You can select the 3-level volume of your oven by pressing the
button. Alarm volume is changed with every push on the key.
Note: By factory default, volume is set to the highest. In the event
of power failure, the volume setting will be reset to the factory
default, if changed.
DISPLAY BRIGHTNESS SETTING
You can select the 3-level display brightness setting by pressing
the
button. The display brightness setting will change with
every push on the key.
Note: By factory default, the brightness is set to the highest. In the
event of power failure, the brightness setting will be reset to the
factory default, if changed.
IN THE EVENT OF POW
ER FAILURE
In the event of power failure your oven will be switched off for
safety reasons. This is indicated by the flashing of the hand icon
on the display. All current cooking programmes will be deleted.
Display shows 12:00 and the clock should be set. First switch on
the oven by pressing the
button (see Clock setting).
SETTING THE REAL TIME OF THE DAY
Time setting can only be done when there is no active cooking
programme. Press the
THE FLASHING HAND ICON INDICATES THAT THE OVEN IS SWITCHED OFF
AND THAT YOU NEED TO PRESS THE BUTTON TO SWITCH TO THE
NORMAL POSITION.
3. As an example you can enter the desired period as 2 hours 15
minutes. Cooking starts. After 5 seconds clock setting will appear
COOKING WITHOUT A PROGRAM (MANUAL)
It means that you start and finish
cooking without making any
programming. If there is any
programme in the memory you need
to reset the programme. Press the
button to reset.
1. If there is a programme in the memory, it will be reset when the
button is pressed and manual cooking will be started.
2. After putting in the oven the food that you want to cook set the
oven control button to the concerned position shown in the
cooking table.
3. Your oven works manually. Check your food with certain
intervals and finish cooking by switching the oven control button
to off (zero) position (since there is no programme).
Now you finished cooking. Your food is ready for servicing.
SEMI AUTOMATIC PROGRAMMING
It is the instant start of cooking and stopping after a
predetermined period. In this programme, you need to enter the
cooking time.
1) The time is 18:30 2) Switch to the cooking 3) Enter the time length.
time setting mode by + or - keys.
1. Switch the oven selector switch and thermostat button to the
positions indicated on the cooking table.
2. Enter the cooking time by pressing the (+) button in 5 seconds
after pressing the
button. You can reduce the time by the (-)
button. During setting
icon starts flashing and after 5
seconds the display is fixed showing the time.
3. As an example you can enter the desired period as 2 hours 15
minutes. Cooking starts. After 5 seconds clock setting will appear
on the display. You can view the remaining time by pressing the
button any time during cooking.
ADJUSTMENT OF DIGITAL TIMER
Page 11

TIMER SETTING
Your digital timer is an electronic timing module that makes the
food in the oven ready for servicing when you want. All you need
to do is to program the cooking duration and the time when you
want your food to be ready.
W
hen the timer is first powered up 12.00 appears on the display.
icon flashes. In this case the oven will not work as the contacts
of the clock relay are open.
The electricity current is transmitted to the heating elements
through the alarm clock. Press
button. Two dots between the hour
and minute start flashing; you can set the clock forward by + and
backward by -. Longer pressing on these keys will change the
clock faster.
1) Select clock setting
mode
2) Set the time with + or –
keys
3) Display will be fixed
after 5 seconds.
COOKING WITHOUT A PROGRAM (MANUAL)
It means that you start and finish
cooking without making any
programming. If there is any
programme in the memory you need
to reset the programme. Press the
button to reset.
1. If there is a programme in the memory, it will be reset when the
button is pressed and manual cooking will be started.
2. After putting in the oven the food that you want to cook set the
oven control button to the concerned position shown in the
cooking table.
3. Your oven works manually. Check your food with certain
intervals and finish cooking by switching the oven control button
to off (zero) position (since there is no programme).
Now you finished cooking. Your food is ready for servicing.
SEMI AUTOMATIC PROGRAMMING
It is the instant start of cooking and stopping after a
predetermined period. In this programme, you need to enter the
cooking time.
1) The time is 18:30 2) Switch to the cooking 3) Enter the time length.
time setting mode by + or - keys.
1. Switch the oven selector switch and thermostat button to the
positions indicated on the cooking table.
2. Enter the cooking time by pressing the (+) button in 5 seconds
after pressing the
button. You can reduce the time by the (-)
button. During setting
icon starts flashing and after 5
seconds the display is fixed showing the time.
SETTING THE REAL TIME OF THE DAY
Time setting can only be done when there is no active cooking
programme. Press the button. Two dots between the hour
and minute start flashing; you can set the clock forward by + and
backward by -. Longer pressing on these keys will change the
clock faster.
1) Select clock setting
mode
2) Set the time with + or –
keys
3) Display will be fixed
after 5 seconds.
TIMER SETTING
Your digital timer is an electronic timing module that makes the
food in the oven ready for servicing when you want. All you need
to do is to program the cooking duration and the time when you
want your food to be ready.
W
hen the timer is first powered up 12.00 appears on the display.
icon flashes. In this case the oven will not work as the contacts
of the clock relay are open.
The electricity current is transmitted to the heating elements
through the alarm clock. Press
to manually operate the oven.
Oven clock / timer works the same way as the normal clock. In the
event of power failure the clock is reset. If the electricity current is
less than 50 Hz the clock will be slow. This is not a defect of the
clock. In such cases set the clock again.
Note: You don’t have to set the real time of the day for manual and
semi automatic cooking with your oven. For full automatic
programming you should set the real time of the day.
With the clock of your oven
1. You can set the cooking time from
0 to 10 hours.
2. You can set the alarm time between 00:00 and 23:59 hours.
3. You can set the oven to full automatic, semi-automatic or
manual cooking.
4. You c
an use it for warning purposes
SETTING THE REAL TIME OF THE DAY
Time setting can only be done when there is no active cooking
programme. Press the button. Two dots between the hour
and minute start flashing; you can set the clock forward by + and
backward by -. Longer pressing on these keys will change the
clock faster.
1) Select clock setting
mode
2) Set the time with + or –
keys
3) Display will be fixed
after 5 seconds.
COOKING WITHOUT A PROGRAM (MANUAL)
It means that you start and finish
cooking without making any
programming. If there is any
programme in the memory you need
to reset the programme. Press the
button to reset.
1. If there is a programme in the memory, it will be reset when the
button is pressed and manual cooking will be started.
2. After putting in the oven the food that you want to cook set the
oven control button to the concerned position shown in the
cooking table.
3. Your oven works manually. Check your food with certain
intervals and finish cooking by switching the oven control button
to off (zero) position (since there is no programme).
Now you finished cooking. Your food is ready for servicing.
SEMI AUTOMATIC PROGRAMMING
It is the instant start of cooking and stopping after a
predetermined period. In this programme, you need to enter the
cooking time.
1) The time is 18:30 2) Switch to the cooking 3) Enter the time length.
time setting mode by + or - keys.
icon starts flashing and after 5
seconds the display is fixed showing the time.
3. As an example you can enter the desired period as 2 hours 15
minutes. Cooking starts. After 5 seconds clock setting will appear
SETTING THE REAL TIME OF THE DAY
Time setting can only be done when there is no active cooking
programme. Press the button. Two dots between the hour
and minute start flashing; you can set the clock forward by + and
backward by -. Longer pressing on these keys will change the
clock faster.
1) Select clock setting
mode
2) Set the time with + or –
keys
3) Display will be fixed
after 5 seconds.
4. After entering this value the clock will switch off the power and
the alarm will beep. HAND icon will start flashing. You can silence
the alarm beep by pressing any button. Current time of the day,
sign and a flashing sign will appear on the display.
If you wish to restart the oven press the button and then the
oven will start working manually.
6. Cooking will end by bringing the oven control button to off (0)
position.
The display to be shown when the
cooking starts
The display to be shown when the
cooking finishes
When the cooking programme is completed, audible warning is on and will remain
on for 7 minutes if not switched off before.
You have finished the semi automatic cooking. Your food is ready
for servicing.
AUT
OMATIC PROGRAMMING
With this programme, cooking duration and the time to finish
cooking are programmed beforehand. Current time of the day
must be set before starting programming.
1) The time is 18:30 2) You want the food
to be ready at 20:45.
Yo
u can set the finish
time by pressing the
and buttons.
3) You can set the
cooking time by
pressing the and
buttons. Let’s
enter the cooking time
as 1:0
0 hour.
Your oven is in standby mode and the display shows
as the current time of the day and standby signs. The
oven will not work. It starts working at 19:45 and the
icon is
displayed with the current time. The oven works for 1:00 hour and
stops at 20:45. The
sign appears with the end hour.
1. Prepare the food that you want to cook and put it in the oven.
Bring the oven selector switch and the thermostat button to the
position shown in the cooking table.
2. Press the
button. Enter the end time of cooking by pressing
the button In 5 seconds. Let’s enter the end time as 20:45.
While entering the time, auto
sign and the flashing sign
appear with the time. After 5 seconds
sign and the word
“auto” appear on the display. The oven is in operation.
3. Enter the cooking time by pressing first the button and then
the (-) button. The display is automatically set for 2:15 hours
cooking time. Let’s say that we want to set the cooking time as
1:00 hour. We can change the time as 1:00 instead of 2:15 hours
by pressing the (-) button. In 5 seconds after making the setting,
the current time of the day (18:30), the word “auto” and the
sign appear. The oven will switch to the standby mode and it will
not work.
4. When the oven is in standby mode, you can view the end time
of cooking by pressing the
button and the cooking time by
pressing the button.
5. The oven starts working after 1 hour and 15 minutes, that is at
19:45. While the oven is in operation the 19:45 auto
is
displayed. The oven works for 1 hour as the entered time is 1
hour.
1) The time is 18:30 2) You want the food
to be ready at 20:45.
Yo
u can set the finish
time by pressing the
and buttons.
3) You can set the
cooking time by
pressing the and
buttons. Let’s
enter the cooking time
as 1:0
0 hour.
A
fter 1:00 hour power will be switched off and the oven stops.
Alarm starts beeping.
The display to be shown when the
cooking starts
The display to be shown when the
cooking finishes
When the cooking programme is completed, audible warning is on and will remain
on for 7 minutes if not switched off before.
7. When the 1 hour cooking finishes, alarm starts beeping at the
preset level. Alarm can be stopped by pressing any button.
8.
sign is shown.
9. If you wish to restart the oven press the button. The oven
starts working manually.
NOTE: If your
press the button during semi automatic and full
automatic programming the programmes in the memory will be
cancelled and your oven operates manually.
10. Cooking will end by bringing the oven control button to off (0)
position.
Yo
u have finished the semi automatic cooking. Your food is ready
for servicing.
Your oven is in standby mode and the display shows
is
displayed. The oven works for 1 hour as the entered time is 1
hour.
NOTE: The cooking time entered should be less than the
difference between the current time of the day and the end time
of cooking. Otherwise the oven will not switch to standby mode
and it will work until the end of cooking time.
6. By pressing the
button, the remaining time can be viewed.
After 5 seconds the display switches to the clock mode and the
current time of the day is displayed. The end of cooking time will
appear on the display by pressing the
button.
C
hanging the cooking time after programming.
You can change the cooking time and the end of cooking time
while your oven is in operation.
T
o change the end time of cooking:
The new value is entered by pressing
the
C
hanging the cooking time after programming.
You can change the cooking time and the end of cooking time
while your oven is in operation.
T
o change the end time of cooking:
The new value is entered by pressing
the
button and using the (+) and (-)
keys.
To change cooking time:
The cooking time is displayed while the
button is pressed. Press the “+” or
“-“ keys to set the new cooking time..
1) The time is 18:30 2) You want the food
to be ready at 20:45.
Yo
u can set the finish
time by pressing the
and buttons.
3) You can set the
cooking time by
pressing the and
buttons. Let’s
enter the cooking time
as 1:0
0 hour.
Your oven is in standby mode and the display shows
- 8 -
Page 12

Mechanical Timer can be adjusted by its button on front panel. Timer must
be adjusted to start the oven cooking. Cooking time can be adjusted between 10
to 90 minutes with mechanical timer. You should position the button to ‘ON’
manually if cooking time will exceed 90 minutes.
Adjustment of Mechanical Timer :
- 9 -
USING THE COOKER – TOP CAVITY GRILLING
Fig. 9
GRILL
PA N
Fig. 8
The top cavity control turns the upper cavity heating elements
on and off (Fig. 8). Press in the control knob and turn clockwise
to select the temperature.
When grilling you should close the door.
When the food is cooked turn the top cavity control to off (
�
).
Heating Elements
On Light
USING THE COOKER – BOTTOM CAVITY
End user can choose the desired function on the control panel
related bottom oven cavity. By making this related heating
elements will be on the circuit. Ovens functions table is below.
Fig. 10
Page 13

-10 -
LEVEL
FUNCTION DESCRIPTION
O Close Oven is not working
Oven Lamp
Double Grill
Outer Heating Element and Grill Heating
Element works together.Recommends to use
for big and powerfull grill.
Oven Lamp
Grill Heating Element
Oven Lamp and Grill heater works.
Recommend to use for frying.Thermostat must
be at maximum position.
Oven Lamp
Top&Bottom Heating
Elements
Hot air comes from up and down heats the tray
from both side. Top and bottom sides of meals
cooked equally.
Oven Lamp
Grill Heating Element
Turbo Fan
Oven Lamp, Grill heater and Turbo Fan work
together. Recommend to use for frying.
Thermostat must be at maximum position.
Oven Lamp
Double Grill
Turbo Fan
Oven Lamp, Double Grill and Turbo Fan work
together. Recommend to use for frying.
Thermostat must be at maximum position.
Oven Lamp
Turbo Heating Element
Turbo Fan
Oven Lamp, Turbo Fan and Turbo Heating
Element work.Recommend to use fast cooking.
Oven Lamp
Turbo Heating Element
Turbo Fan, Bottom
Heating Element
Oven Lamp, turbo heating element,
turbo fan and bottom
heating element work together.
Recommed to use for pizza.
Oven Lamp
Turbo Fan
Only Oven Lamp and Turbo Fan work.
Recommend to use for defrosting.
Bottom
Heating Element
Bottom heating element,
Recommed to use cake and bread.
Top
Heating Element
Top Heating Element for keeping cooked food
warm or gently reheating.
Oven Lamp
Top&Bottom Heating
Elements
Turbo Fan
Hot air comes from up and down heats the tray
from both side. Top and bottom sides of meals
cooked equally with Turbo Fan.
OVEN FUNCTIONS
Page 14

MAINTENANCE AND CLEANING
NOTE!
Switch off the cooker at the mains supply before cleaning and wait for it to cool.
GENERAL COMMENTS
• Clean the cooker regularly to maintain its working condition and aesthetic appearance.
• Do not use harsh abrasive cleaners or sharp metal scrapers to clean the oven door
glass since they can scratch the surface, which may result in shattering of the glass.
• Clean the stainless steel elements, knobs and control panel with soft cleaners which
do not contain abrasives.
• Burners and ignitors should always be kept clean and dry to ensure proper
performance.
• Immediately after use, soak used baking trays, tins and other utensils in warm water
with washing-up liquid. Thoroughly clean them with a soft brush or sponge and dry
them carefully.
• Ensure that the oven seal is always clean.
CLEANING THE PAN SUPPORT
Remove the dirty pan support from the hob, put it in warm soapy water for some time,
then wash and dry it.
CLEANING THE BURNERS
• Gas burners should be cleaned regularly and after each spillage to remove cooking
residuals and dirt.
• To clean burners, remove the caps and rings
(Fig. 12), putting them separately in warm
soapy water. After cleaning, check that the
burner ports are clear.
• The body near the nozzle should always be
clean. Dirt accumulating around the nozzle may
clog it, as a result of which the burner will not
light or will light only with a small flame. To
clean the nozzle use a brush soaked in solvent.
• Dry all the elements of the burner carefully
as wet elements may not light properly.Assemble clean and dry burners, carrying out
the disassembly steps in the reverse order.
CLEANING THE OVEN
The oven compartment is coated with vitreous enamel. To clean particularly difficult burnt
spots special oven cleaning agents may be used. However, as these agents are caustic,
be careful when using them and follow the agents’/manufacturers’ guidelines.
To make cleaning easier the oven door may be removed (Fig. 14).
Fig. 12
CAP
RING
NOZZLE
BODY
- 11 -
Page 15

REPLACING THE LAMP
Wait for the oven to cool.
Unscrew and remove the diffuser. Unscrew the lamp from the lampholder. Replace lamp
and diffuser (Fig. 13).
The replacement lamp must be of the same type, voltage and wattage (15W SES 300°C).
Fig. 13
LAMP
LAMPHOLDER
DIFFUSER
TROUBLESHOOTING
• Ignition does not work
If all burners fail to ignite, check that the electric plug is in the mains socket.
If the electricity supply has failed, all burners may be lit with a match.
If one burner fails to ignite, check that the burner and ignitor is clean and dry. Wash
and dry the burner and ignitor, clean the nozzle with a thin copper wire and check if
the burner ports are clear.
• Uneven cooking
Ensure that the dish is positioned centrally.
Removing the door
For easier cleaning, the door can be removed and placed on a canvas.
To remove the door proceed as follows: 1. Open the door completely and lift levers near the two
hinges.
2. Grasp the door on both sides with both hands, lift it forming an angle
of around 30° and remove it.
3. To reassemble the door, put the hinges in the relevant slots in the
oven, making sure that grooved sections are resting completely
in the slots. Lower the door and disengage the lock levers.
- 12 -
Page 16

4. After entering this value the clock will switch off the power and
the alarm will beep. HAND icon will start flashing. You can silence
the alarm beep by pressing any button. Current time of the day,
sign and a flashing sign will appear on the display.
If you wish to restart the oven press the
button and then the
oven will start working manually.
6. Cooking will end by bringing the oven control button to off (0)
position.
The display to be shown when the
cooking starts
The display to be shown when the
cooking finishes
When the cooking programme is completed, audible warning is on and will remain
on for 7 minutes if not switched off before.
You have finished the semi automatic cooking. Your food is ready
for servicing.
AUT
OMATIC PROGRAMMING
With this programme, cooking duration and the time to finish
cooking are programmed beforehand. Current time of the day
must be set before starting programming.
as the current time of the day and standby signs. The
oven will not work. It starts working at 19:45 and the
icon is
displayed with the current time. The oven works for 1:00 hour and
stops at 20:45. The
sign appears with the end hour.
1. Prepare the food that you want to cook and put it in the oven.
Bring the oven selector switch and the thermostat button to the
position shown in the cooking table.
2. Press the
button. Enter the end time of cooking by pressing
the
button In 5 seconds. Let’s enter the end time as 20:45.
While entering the time, auto
sign and the flashing sign
appear with the time. After 5 seconds
sign and the word
“auto” appear on the display. The oven is in operation.
3. Enter the cooking time by pressing first the
button and then
the (-) button. The display is automatically set for 2:15 hours
cooking time. Let’s say that we want to set the cooking time as
1:00 hour. We can change the time as 1:00 instead of 2:15 hours
by pressing the (-) button. In 5 seconds after making the setting,
the current time of the day (18:30), the word “auto”
and the
sign appear. The oven will switch to the standby mode and it will
not work.
4. When the oven is in standby mode, you can view the end time
of cooking by pressing the
button and the cooking time by
pressing the
button.
5. The oven starts working after 1 hour and 15 minutes, that is at
19:45. While the oven is in operation the 19:45 auto
button and using the (+) and (-)
keys.
To change cooking time:
The cooking time is displayed while the
as the current time of the day and standby signs. The
oven will not work. It starts working at 19:45 and the
icon is
displayed with the current time. The oven works for 1:00 hour and
stops at 20:45. The
sign appears with the end hour.
1. Prepare the food that you want to cook and put it in the oven.
Bring the oven selector switch and the thermostat button to the
position shown in the cooking table.
2. Press the
button. Enter the end time of cooking by pressing
the
button In 5 seconds. Let’s enter the end time as 20:45.
While entering the time, auto
sign and the flashing sign
appear with the time. After 5 seconds sign and the word
“auto” appear on the display. The oven is in operation.
3. Enter the cooking time by pressing first the
button and then
the (-) button. The display is automatically set for 2:15 hours
cooking time. Let’s say that we want to set the cooking time as
1:00 hour. We can change the time as 1:00 instead of 2:15 hours
by pressing the (-) button. In 5 seconds after making the setting,
the current time of the day (18:30), the word “auto” and the
sign appear. The oven will switch to the standby mode and it will
not work.
4. When the oven is in standby mode, you can view the end time
of cooking by pressing the
button and the cooking time by
pressing the
button.
5. The oven starts working after 1 hour and 15 minutes, that is at
19:45. While the oven is in operation the 19:45 auto
4. After entering this value the clock will switch off the power and
the alarm will beep. HAND icon will start flashing. You can silence
the alarm beep by pressing any button. Current time of the day,
sign and a flashing sign will appear on the display.
If you wish to restart the oven press the
button and then the
oven will start working manually.
6. Cooking will end by bringing the oven control button to off (0)
position.
The display to be shown when the
cooking starts
The display to be shown when the
cooking finishes
When the cooking programme is completed, audible warning is on and will remain
on for 7 minutes if not switched off before.
You have finished the semi automatic cooking. Your food is ready
for servicing.
AUT
OMATIC PROGRAMMING
With this programme, cooking duration and the time to finish
cooking are programmed beforehand. Current time of the day
must be set before starting programming.
as the current time of the day and standby signs. The
oven will not work. It starts working at 19:45 and the
icon is
displayed with the current time. The oven works for 1:00 hour and
stops at 20:45. The
sign appears with the end hour.
sign and the flashing sign
appear with the time. After 5 seconds sign and the word
“auto” appear on the display. The oven is in operation.
3. Enter the cooking time by pressing first the
button and then
the (-) button. The display is automatically set for 2:15 hours
cooking time. Let’s say that we want to set the cooking time as
1:00 hour. We can change the time as 1:00 instead of 2:15 hours
by pressing the (-) button. In 5 seconds after making the setting,
the current time of the day (18:30), the word “auto”
and the
sign appear. The oven will switch to the standby mode and it will
not work.
4. When the oven is in standby mode, you can view the end time
of cooking by pressing the
button and the cooking time by
pressing the
button.
5. The oven starts working after 1 hour and 15 minutes, that is at
19:45. While the oven is in operation the 19:45 auto
button and using the (+) and (-)
keys.
To change cooking time:
The cooking time is displayed while the
as the current time of the day and standby signs. The
oven will not work. It starts working at 19:45 and the
icon is
displayed with the current time. The oven works for 1:00 hour and
stops at 20:45. The
sign appears with the end hour.
sign and the flashing sign
appear with the time. After 5 seconds sign and the word
“auto” appear on the display. The oven is in operation.
3. Enter the cooking time by pressing first the
button and then
the (-) button. The display is automatically set for 2:15 hours
cooking time. Let’s say that we want to set the cooking time as
1:00 hour. We can change the time as 1:00 instead of 2:15 hours
by pressing the (-) button. In 5 seconds after making the setting,
the current time of the day (18:30), the word “auto” and the
sign appear. The oven will switch to the standby mode and it will
not work.
4. When the oven is in standby mode, you can view the end time
of cooking by pressing the
button and the cooking time by
pressing the
button.
5. The oven starts working after 1 hour and 15 minutes, that is at
19:45. While the oven is in operation the 19:45 auto
Safety chain anchors
This cooker MUST be secured to the wall,
please follow the instructions below.
o Decide on a suitable wall location for
fitting the anchor brackets directly behind
each cooker safety chain.
o Hold the chain anchor up to the wall
where it will be required and mark the
fixing holes.
o Drill the fixing holes and fix the chain anchors
to the wall using the screws provided and
suitable wall plugs for the type of wall being
fixed to.
o Leave the chains unattached until the installation
process has been completed.
Securing the safety chains
o Before securing the safety chains, check that
you have completed the installation process
and that all connections have been
made successfully and that the cooker is in its
final operating position.
o Connect safety chain as per above diagrams.
o In order to eliminate the risk of the
oven falling forward, two chains have
been supplied with the appliance.
Before use, these will need to be fastened
securely to the wall behind the appliance
with the anchor brackets supplied.
IMPORTANT SAFETY NOTICE
- 13 -
Page 17

button and using the (+) and (-)
keys.
To change cooking time:
The cooking time is displayed while the
button is pressed. Press the “+” or
“-“ keys to set the new cooking time..
4. After entering this value the clock will switch off the power and
the alarm will beep. HAND icon will start flashing. You can silence
the alarm beep by pressing any button. Current time of the day,
sign and a flashing sign will appear on the display.
If you wish to restart the oven press the
button and then the
ov l start working manually.
6. Cooking will end by bringing the oven control button
to off (0)
position.
The display to be shown when the
rts
The display to be shown when the
cooking finishes
When the cooking programme is completed, audible warning is on and will remain
on for 7 minutes if not switched off before.
You have finished the semi automatic cooking. Your food is ready
for servicing.
AUT
OMATIC PROGRAMMING
With this programme, cooking
duration and the time
to finish
cooking are programmed beforehand. Current time of the day
must be set before starting programming.
as the current time of the day and standby signs. The
oven will not work. It starts working at 19:45 and the icon
is
displayed with the current time. The oven works for 1:00 hour and
stops at 20:45. The
sign appears with the end hour.
1. repare te food that you want to cook and put it in the oven.
Bring the oven selector switch and
the thermostat button to
the
pn sho wn in the cooking table.
2. Press the
button. Enter the end time of cooking by pressing
the
button In 5 seconds. Let’s enter the end time as 20:45.
While entering the time, auto sign and the flashing
sign
appear with the time. After 5 seconds sign and the word
“auto” appear on the display. The oven is in operation.
3. Enter the cooking time by pressing first the button and then
the (-) button. The display is automatically set for 2:15 hours
cooking time. Let’s say that we want to set the cooking time as
1:00 hour. We can change the time as 1:00 instead of 2:15 hours
by pressing the (-) button. In 5 seconds after making the setting,
the current time of the day (18:30), the word “auto”
and the
sign appear. The oven will switch to the standby mode and it will
not work.
4. When the oven is in standby mode, you can view the end time
of cooking by pressing the button and the cooking time by
pressing the
button.
5. The oven starts working after 1 hour and 15 minutes, that is at
19:45. While the oven is in operation the 19:45 auto
button and using the (+) and (-)
keys.
To change cooking time:
The cooking time is displayed while the
as the current time of the day and standby signs. The
oven will not work. It starts working at 19:45 and the icon is
displayed with the current time. The oven works for 1:00 hour and
stops at 20:45. The
sign appears with the end hour.
1. Prepare the food that you want to cook and put it in the oven.
Bring the oven selector switch and
the thermostat button to the
position shown in the cooking table.
2. Press the
button. Enter the end time of cooking by pressing
the
button In 5 second’s enter the end ti
1:00 hour. We can change the time as 1:00 instead of 2:15 hours
by pressing the (-) button. In 5 seconds after making the setting,
the current time of the day (18:30), the word “auto” and the
sign appear. The oven will switch to the standby mode and it will
not work.
4. When the oven is in standby mode, you can view the end time
of cooking by pressing the button and the cooking time by
pressing the
button.
5. The oven starts working after 1 hour and 15 minutes, that is at
19:45. While the oven is in operation the 19:45 auto
TECNICAL VALUES
GROUPS UPPER CAVITY BOTTOM CAVITY
PRUDUCT HOB
1
4200
YES NO 5 NO SWITCH 1000 WATT 1000 WATT 35 WATT 2000 WATT1500 WATT 3GAS+1 ELECTRIC 3050 WATT 5750 WATT
1
4201
NO YES 5 NO SWITCH 1000 WATT 1000 WATT 35 WATT 2000 WATT1500 WATT 3GAS+1 ELECTRIC 3050 WATT 5750 WATT
14220 YES NO 8 NO SWITCH 9 NO SWITCH 700 WATT 500 WATT 1000 WATT 1000 WATT 35 WATT NO1500 WATT 3GAS+1 ELECTRIC 4250 WATT 5750 WATT
14221 NO YES 8 NO SWITCH 9 NO SWITCH 700 WATT 500 WATT 1000 WATT 1000 WATT 35 WATT NO 1500 WATT 3GAS+1 ELECTRIC 4250 WATT 5750 WATT
DIGITAL
TIMER
MECHANICAL
TIMER
BOTTOM CAVITY
FUNCTION
UPPER CAVITY
FUNCTION
BOTTOM
HEATER
UPPER
HEATER
BOTTOM
HEATER
UPPER
HEATER
TURBO
FAN
TURBO
HEATER
GRILL
HEATER
MAXIMUM ELECT-
RICAL POWER
MAXIMUM
GAS POWER
GAS CATEGORIES AND COUNTRIES
II2 H 3 B/P GAS GROUP II2 H 3+ GAS GROUP
UA
I2 H GAS
GROUP
I 3B/P
GAS
GROUP
G20 , 20
mbar
G30/G31 ,
30 mbar
G20 , 20
mbar
G30/G31 ( 28-
30/37 mbar )
G20 , 13
mbar
G30/G31 ,
50 mbar
14200,
14201
14220,
14221,
14202
TR, BG, HR,
IT, DK, RO,
AT, FI, SE,
CZ, EE, LV,
LT, SK, SI,
CH, NO
TR, BG, HR,
IT, DK, RO,
AT, FI, SE,
CZ, EE, LV,
LT, SK, SI,
CH, NO
IE,GB,GR
,PT
AT,DE,CH,
SK
BIG
BURNER
MEDIUM
BURNER
SMALL
BURNER
TOTAL HOB
GAS POWER
HOTPLATE
POWER
14200,14201,
14220,14221,
14202
1X3000
WATT
1X1750
WATT
1X1000
WATT
1000
WATT
G20 , 20
mbar
G30 , 30
mbar
G31 , 37
mbar
G20 , 13
mbar
G30 , 50
mbar
IE,GB,GR
,PT
BURNER POWER
5750 WATT
/N:ECTOR DIAMETER
BIG BURNER 1,15 0,85 0,85 1,35 0,75
MEDIUM BURNER 0,97 0,65 0,65 1,10 0,58
SMALL BURNER 0,72 0,50 0,50 0,80 0,43
"Appliance is Class 1"
Gas Type
Auxiliary Burner
Normal Burner
Big Burner
LPG Consumption (gr/h)
73
127
218
dŽƚĂůŽŶƐƵŵƉƚŝŽŶ
ϰϭϴŐŚ
G20 , 20
mbar
G20 , 13
mbar
/N:ECTOR DIAMETER
BIG BURNER
1,
30
0,
90
0,8
0
1,35 0,75
MEDIUM BURNER 0,97
0,
65
0,65 1,10 0,58
SMALL BURNER 0,72 0,50 0,50
0,8
5
0,43
G30/G31 ,
29
mbar
G30/G31 ( 28-
30/37 mbar )
G30/G31 ,
50 mbar
142
02
YES
NO 8 NO SWITCH
1000 WATT
NO
1500 WATT
3GAS+1 ELECTRIC 4250 WATT
1000 WATT
5750 WATT
- 14 -
Page 18

This appliance/fitting is marked according to the European directive 2002/96/EC on Waste
Electrical and Electronic Equipment (WEEE). By ensuring this product is disposed of
correctly, you will help prevent potential negative consequences for the environment
and human health, which could otherwise be caused by inappropriate waste handling
of this product.
The symbol on the product, or on the documents accompanying the product, the
Crossed Out Wheelie Bin symbol, indicates that this appliance/fitting may not be
treated as household waste. Instead it shall be handed over to the applicable
collection point for the recycling of electrical and electronic equipment. Disposal must
be carried out in accordance with local environmental regulations for waste disposal. For
more detailed information about treatment, recovery and recycling of this product, please
contact your local authority, your household waste disposal service or the retailer where you
purchased the product.
 Loading...