

Page 1
(Built-in)
OVEN
USER'S MANUAL
13550
13554
Page 2

Dear Customer
Congratulations on purchasing your TERMIKEL Built-In Electric Oven.
This product has been made to the most exacting standards and will
provide you with years of service if used properly. Please read this user
guide carefully, it contains all the information you require to use this product
safely and successfully. Before commissioning you cooker please check for
any damage which may have been caused in transportation. If your cooker
is damaged in any way, please contact your supplier.
TABLE of CONTENTS
SECTION 1
Technical Features & Sectıons of Oven
SECTION 2
Important Safety Notices
SECTION 3
Installation of Built-In Oven
SECTION 4
Introductıon of Control Panel
SECTION 5
Usage of Oven
SECTION 6
Grill Function of Oven
SECTION 7
Adjustment of Timer
SECTION 8
Maintenance & Cleaning
SECTION 9
Information on Transportation
SECTION 10
Troubleshooting
Page 3
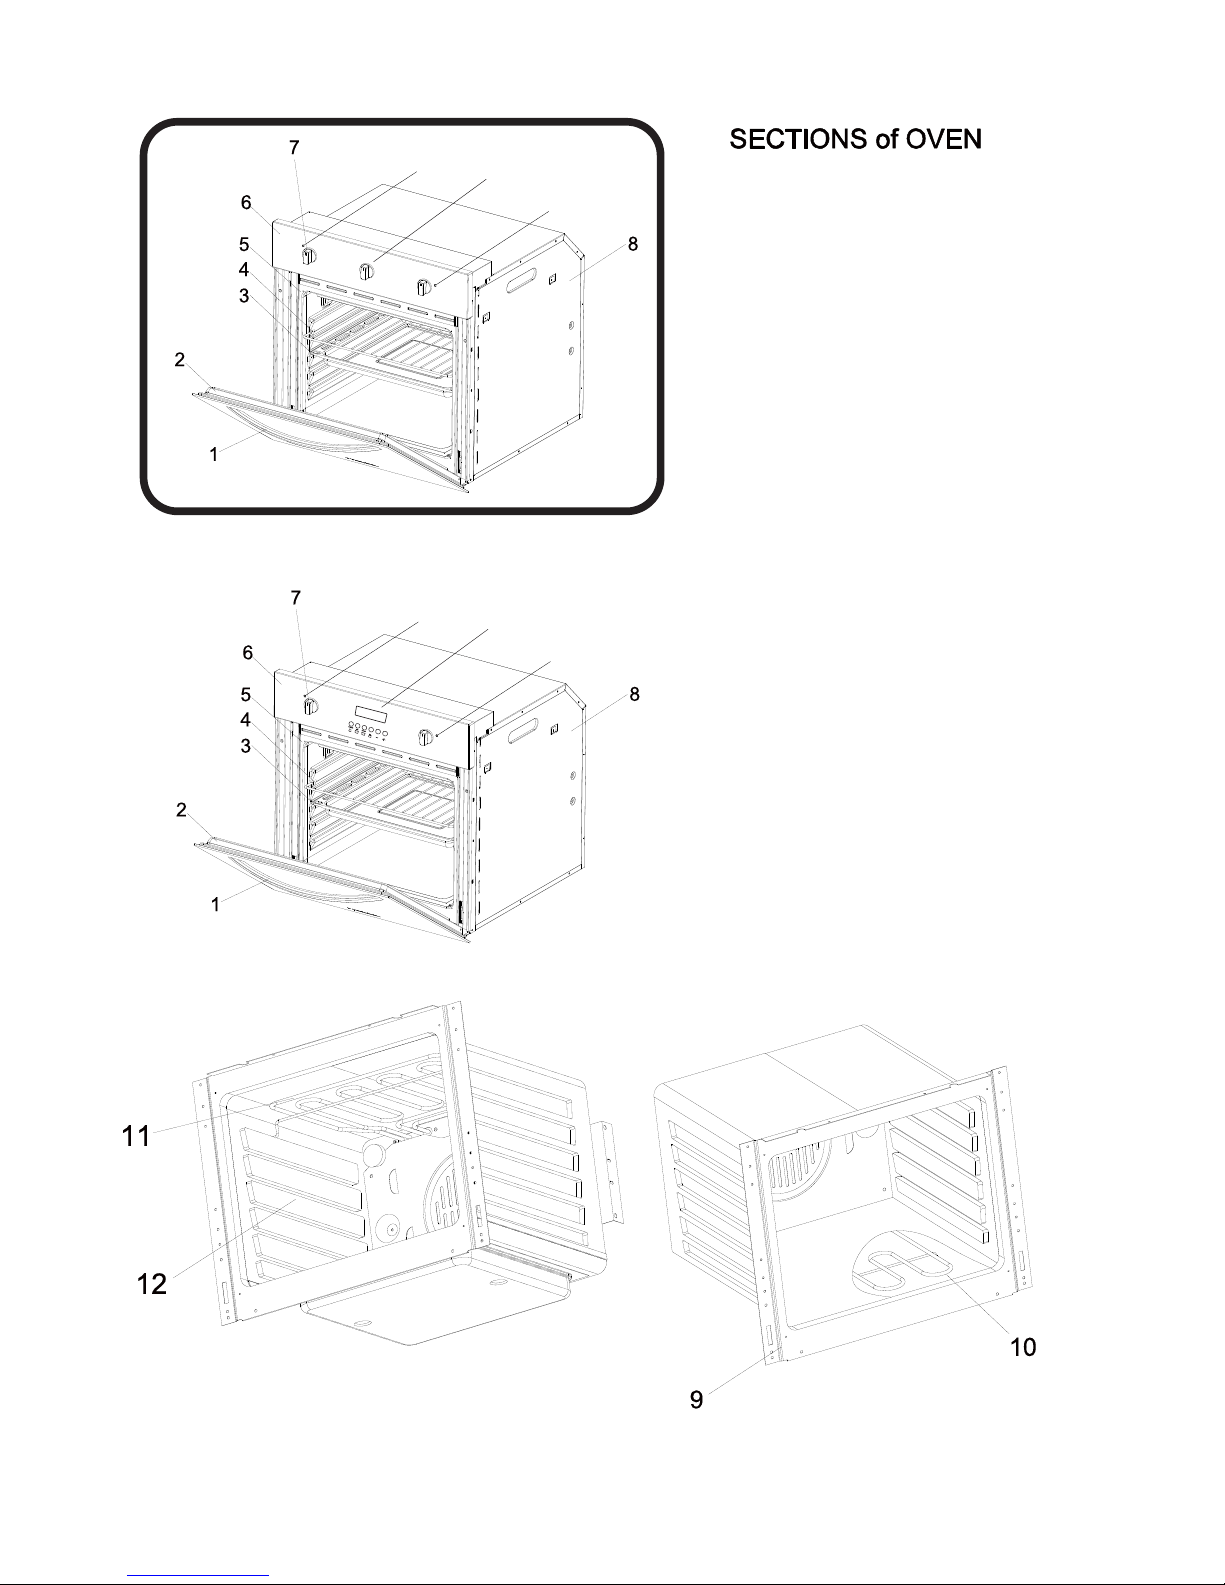
SECTION 1 TECHNICAL FEATURES of OVEN
-2-
14
13
13
14
13
13
1. Oven Handle
2. Oven Glassdoor
3. Tray
4. Grid
5. Oven Gasket
6. Control Panel
7. Control Knob
8. Foreign Body
9. Inner Body
10. Lower Resistance
11. Upper Resistance
12. Indicator Light
13. Signal Lamp
14. Timer
Page 4
-3-
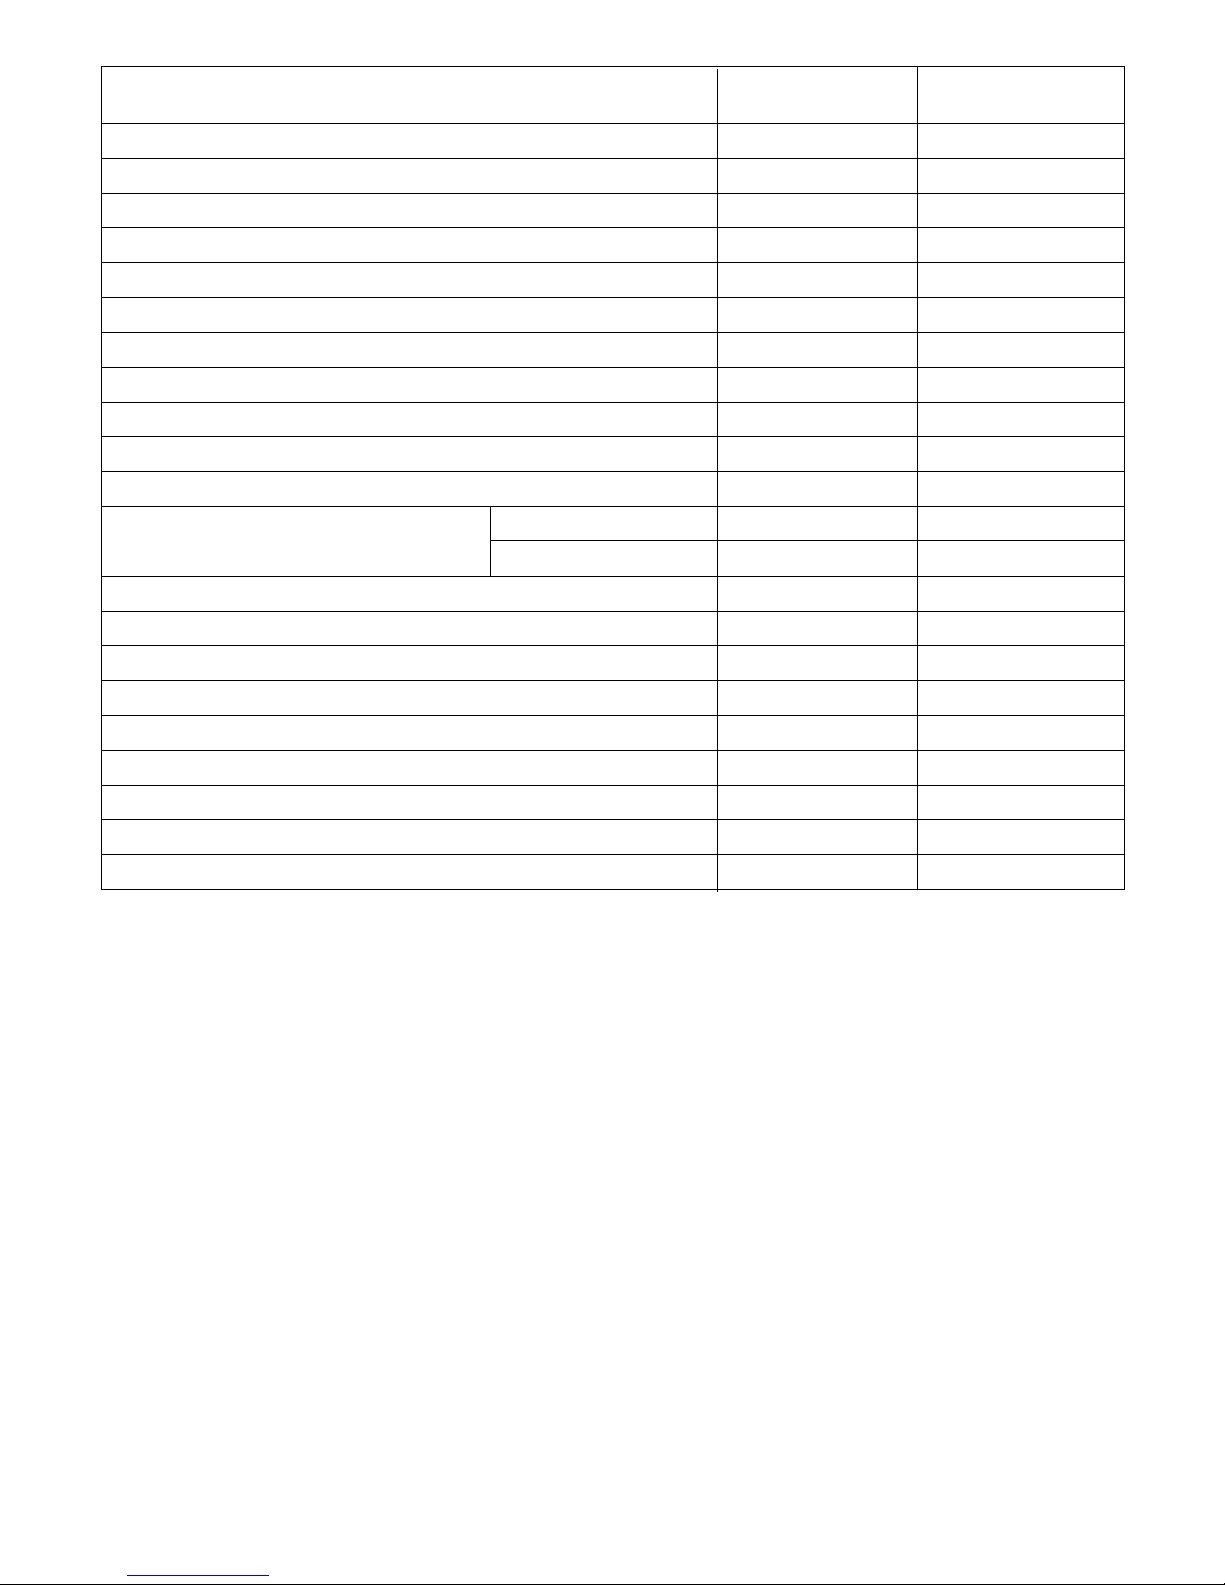
MODEL
COLOUR
BLACK
ENERGY TYPE
ELECTRIC
TIMER MECHANICAL
INNER CAVITY 1
COOKING FUNCTION 6 FUNCTIONS
OVEN VOLUME
58 LITERS
OVEN POWER
2550 WATTS
GRILL POWER 2000 WATTS
TURBO REZISTANCE -
TURBO FAN YES
TOTAL POWER 2550 WATTS
THERMOSTAT
OVEN 0-285 C
SECURITY 160 C
VOLTAGE 230 V
FREQUENCY 50-60 HZ
ENERGY CLASS A
ENERGY CONSUMPTION ( CONVENSIONAL-KWH)
ENERGY CONSUMPTION – FORCED AIR- KWH
PRODUCT DIMENSIONS
OUTER WIDTH ( MM )
594
OUTER DEPTH ( MM ) 560
OUTER HEIGHT ( MM ) 594
0,84 Kwh
0,79 Kwh
BLACK
ELECTRIC
DIGITAL TIMER
1
6 FUNCTIONS
58 LITERS
2550 WATTS
2000 WATTS
-
YES
2550 WATTS
0-285 C
160 C
230 V
50-60 HZ
A
594
560
594
0,84 Kwh
0,79 Kwh
13554 13550
Page 5

SECTION 2 IMPORTANT SAFETY NOTICES
This Built-in electrical oven is manufactured for use in the preparation of
normal home meals. Please do not use for other purposes.
Installation:
- This appliance must be installed by qualified personnel, according to the
manufacturer’s instructions and the relevant Safety Standards.
- This appliance is heavy. Take care when moving it.
- Remove all packaging, protective films and oils from the appliance
before using for the first time.
- Ensure that the electrical supply complies with the type stated on the
rating plate.
- Do not attempt to modify the appliance in any way.
- The voltage of your oven is 230 Volt – 50-60 Hz.
- This appliance has been constructed and distributed in compliance with
the regulations of AS/NZS 3350-1 and AS/NZS 3350-2-6.
- This appliance must be correctly installed by a suitably qualified person in
conjunction with Australian Wiring rules AS3000.
Warning:
This appliance must be earthed.
Do not use a steam cleaning device with this appliance.
WARNING : ensure the appliance is switched off before replacing the lamp
to avoid the possibility of electric shock.
When you have finished cooking check that all controls are in the OFF
position.
- Please check your electrical installation is earthed. This appliance must be
installed by a qualified engineer.
- This appliance must be fitted with a min 16 A Fuse.
- Please ensure that plug of your oven is not accidentally pulled or stretched
beyond the extent of the power cord. If this appliance is installed without
proper earthing the manufacturer dose not accept any reasonability for any
damage caused. Commissioning of this appliance should only be
attempted by an Authorised Service or an expert authorised by customer
relations. Connection of this appliance must be via a cable that is
3 x 2.5 mm
2
- For isolation safety the length of the power cord must not
exceed 2 meters.
- Connection diagram can be found on the rear of the appliance
- Please reset the timer when in the event of a power failure. The oven will
not operate until the timer is properly set.
-4-
Page 6
- The oven door must always close properly. Keep the door seal areas
clean.
- Pressing on open cover of oven with heavy matters can cause damage
on cover hinges. So please do not sit or load heavy matters on open
cover of oven.
- Do not use aluminium foil to cover the grill pan, or put items wrapped in
foil under the grill as this creates a fire hazard. The high reflectivity can
also damage the elements.
- Do not use the oven with the door inner glass panel removed.
- Do not use the drop down door as a step to reach above cabinets
- After using oven please wipe vapour drops with a cloth that can be
formed on oven cover by high temperature.
- Do not block the oven vent in anyway, as this creates a fire hazard.
- When opening the appliance door, take care to avoid skin contact with
any steam that may escape from the oven.
- Perishable food, plastic items and aerosols may be affected by heat and
should not be stored above or around the appliance.
Service:
- Cables routed too near to oven may become damaged and short, if they
come intocontact with hot parts of oven. The cables of other appliances
must be routed a safe distance from oven. If power cord is damaged
then contact your authorised repairer.
- This appliance should only be repaired or serviced by an authorised
Service Engineer and only genuine approved spare parts should be
used.
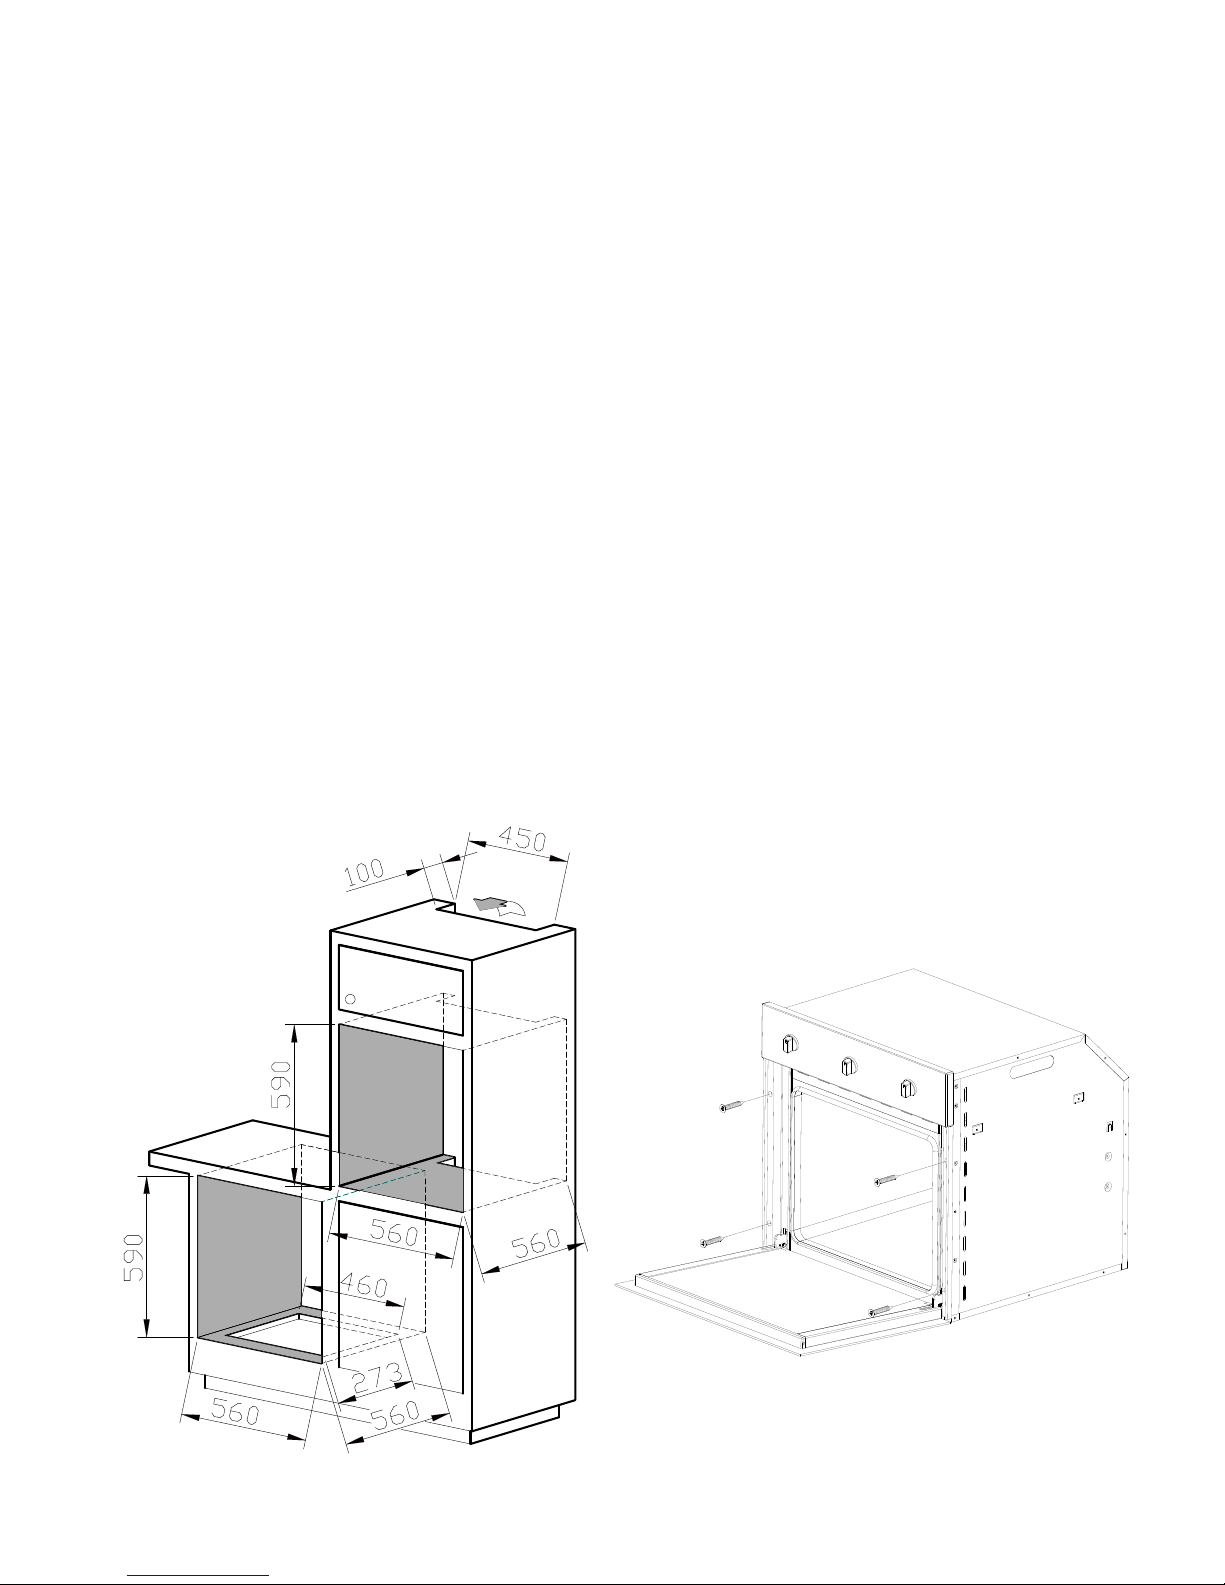
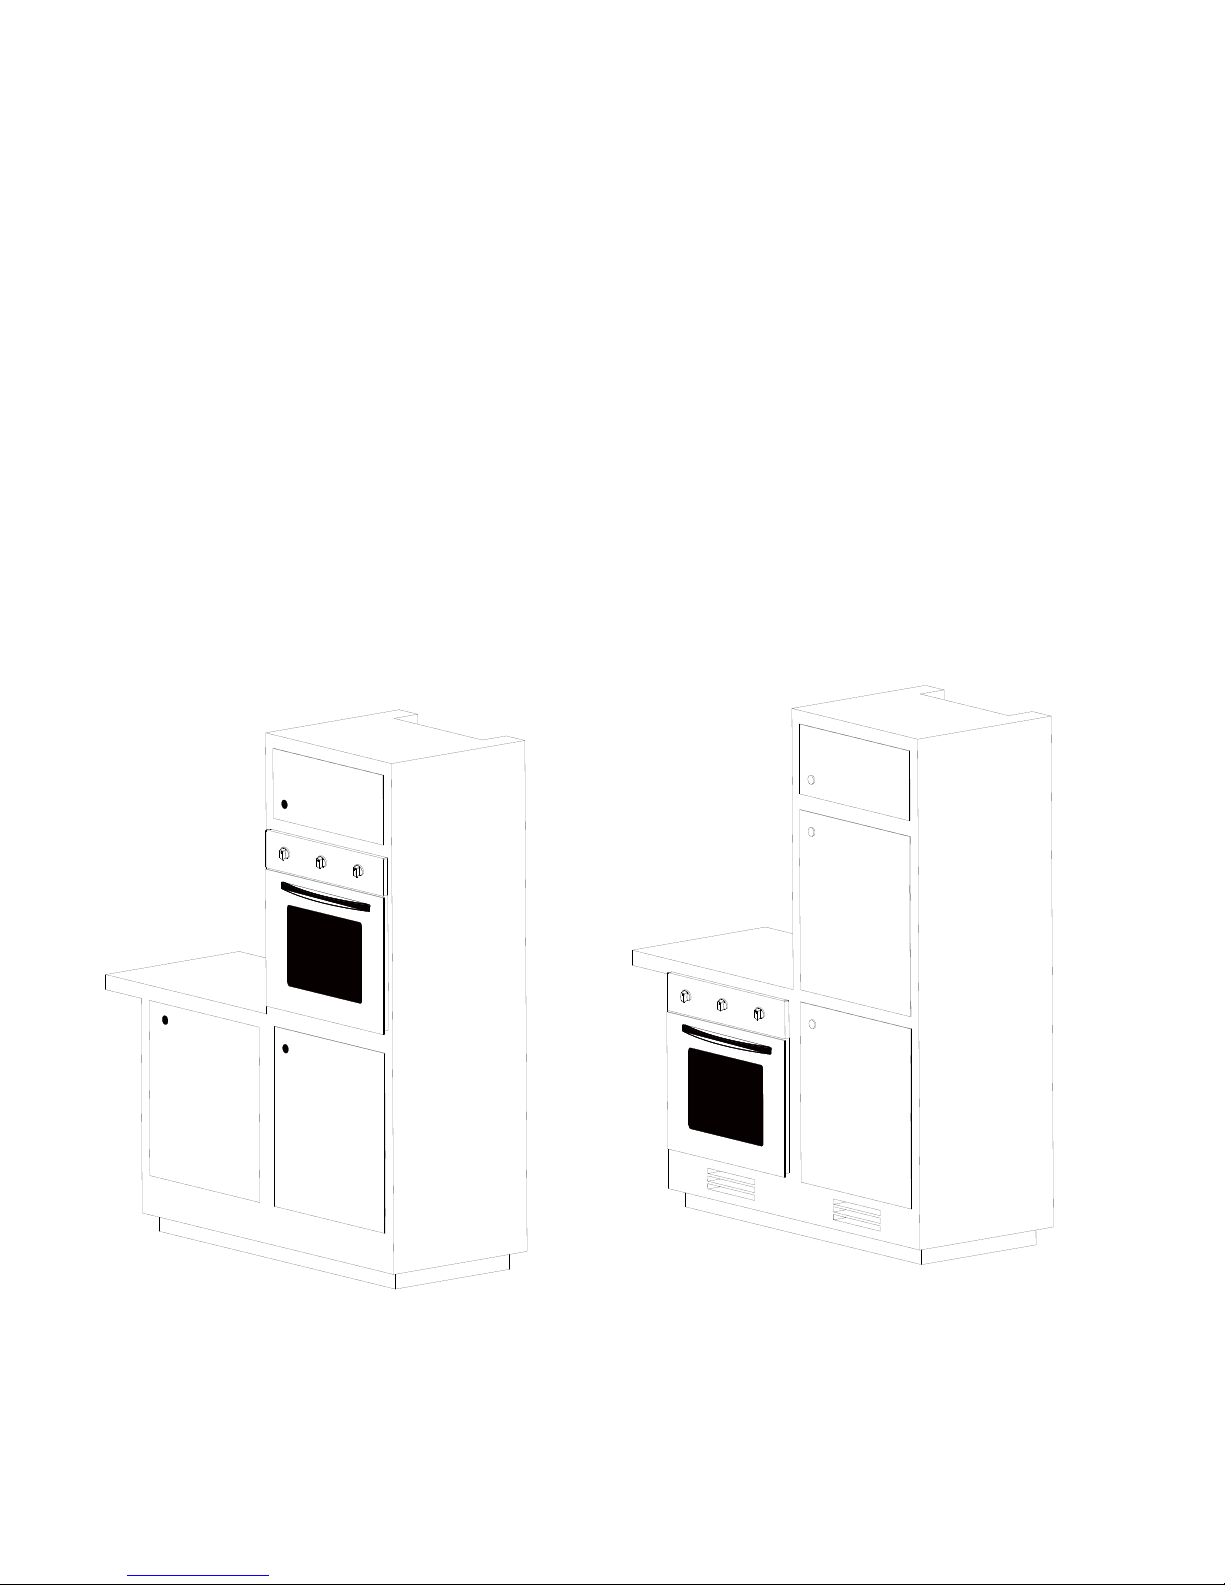
SECTION 3 INSTALLATION of BUILT-IN OVEN
Figure.3 Oven Dimensions
Figure.4 Cabinet Dimensions
-5-
Page 7
-6-
Installation instructions :
Installation must be completed by an authorised technician
- Dimensions and materials of cabinet must be suitable and capabable of
withstanding heat radiation from oven.
- Correct Installation - Cabinet should not come into contact with any of
the ovens electrical parts.
Isolation materials or parts that used for isolation must affix strongly to
prevent taking out by any tool.
- It is not recommend you to install your appliance near refrigator or
freezer.
- If a hob is installed with your oven, all electrical cables of cooker and
oven must be seperat.
- Install your appliance in a position that allows access to power cable.
- Do not place power cable to close or in contact with hot surfaces. Do not
attach the cable to the oven door.
Dimensions of Built-in oven and cabinet are at Figure.3 & 4
Installed Built-in Oven pictures are at Figure.5 & 6
Figure.6
Figure.5
Figure
Figure
Page 8
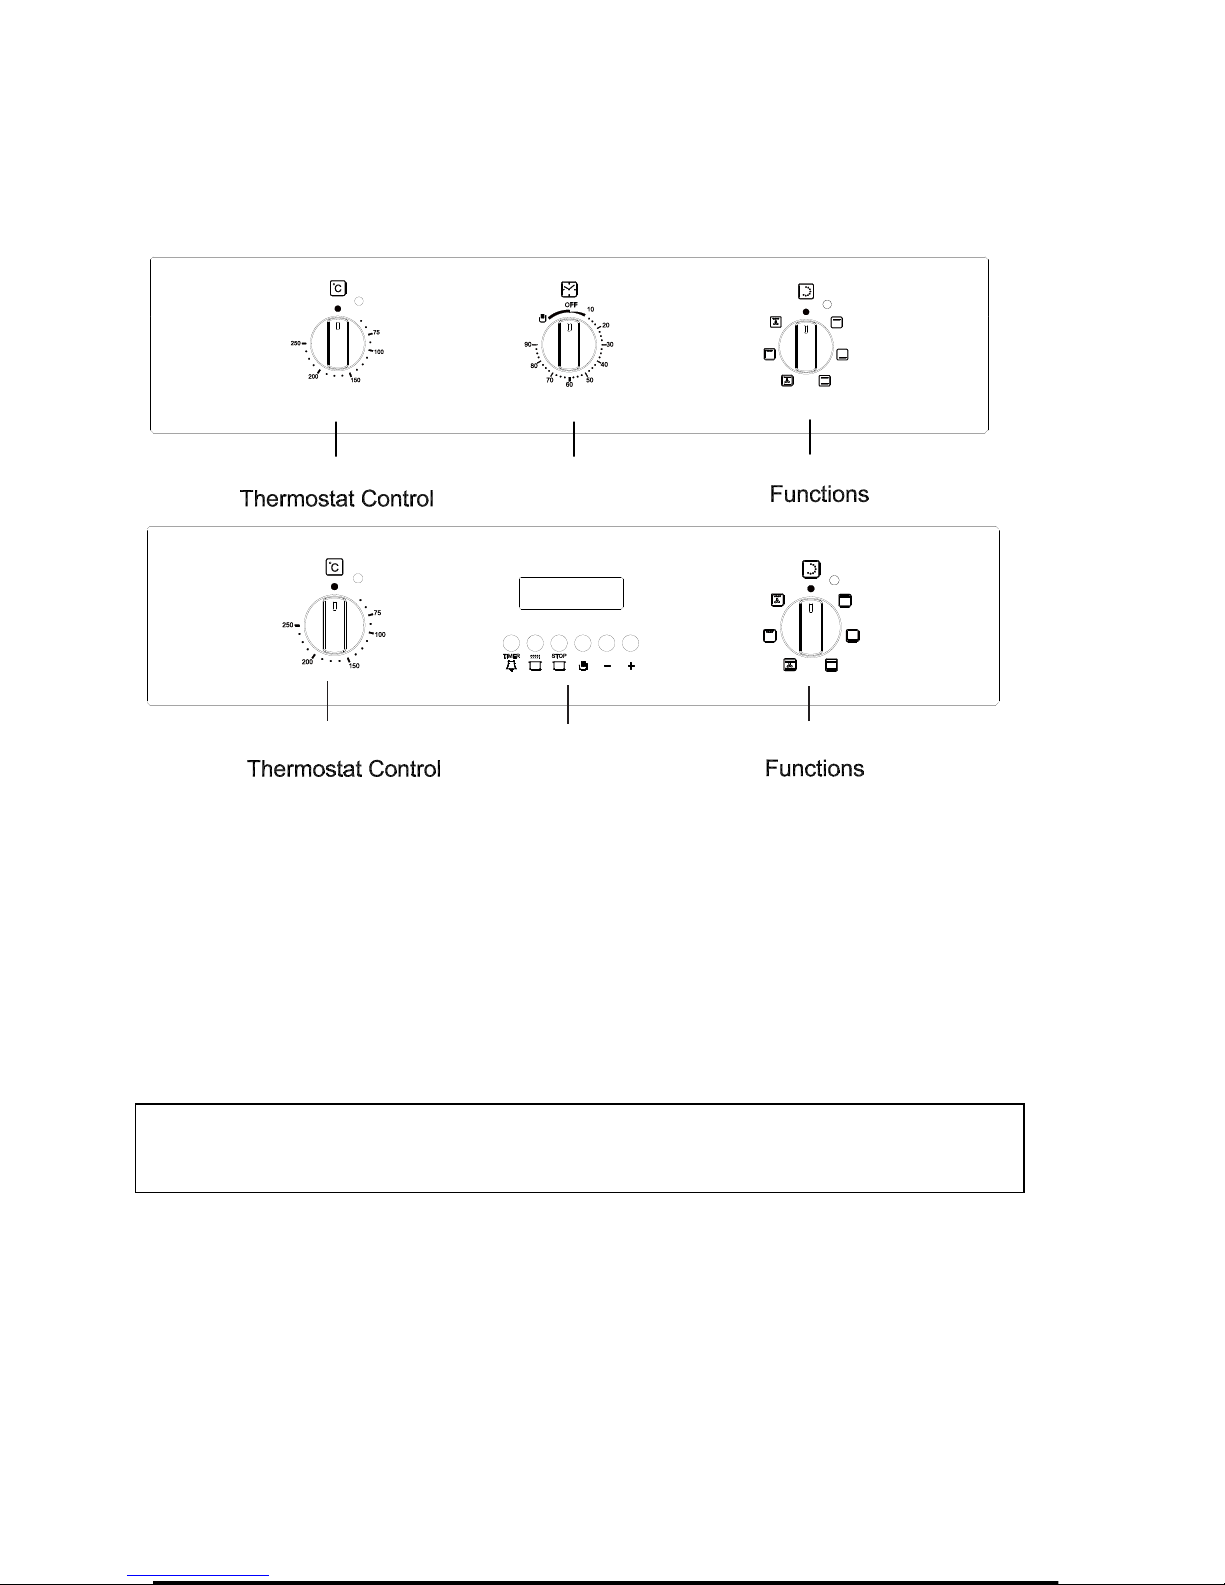
SECTION 4 INTRODUCTION of CONTROL PANEL
Front panels and control knobs for Built-In Oven models are at Figure 7.
The Knobs control power and setting of each heating element. Turn Knobs
clockwise to activate oven and set at required cooking temperature. Turn
Knob anti-clockwise to decrease cooking temperature and to deactivate
oven.
1
2
3
Mechanical Timer
-7-
SECTION 5 USING THE OVEN
Thermostatic Control of Oven
The indicator lamp will switch on together with the thermostat. When the
heat inside the oven reaches the set value, the thermostat cuts the circuit
and the lamp will go off. When the heat falls below set value,the thermostat
will switch on again and indicator lamp will be lit.
Usage of Oven
For initial operation of your oven, a smell arising from insulation materials
and heating elements will be generated. To help avoid it, operate your oven
at 250 C for 45 minutes without putting any trays in oven.
Suggested Settings
1. Meals that may be cooked
2. Oven Control Position
3. Thermostat position
4. Recommended cooking times are given in cooking table.
5. Turn the “oven heating control” switch clockwise to adjust cooking time for
the meal you desire to cook, refer to cooking table.
6. Before cooking, pre-heat the oven for 10 minutes. The door of the oven
should be open. Put the dish in the oven after pre-heating.
Figure. 7
Dijital Timer
1
2
3
Page 9

-8-
OVEN FUNCTIONS :
WARNING
To ensure the oven shelves operate safely, correct
placement of the shelves between the side rails
(figure 1, 2, 3, 4) is imperative.
This will ensure that during careful removal of the
shelf or tray, hot food items should not slide out.
LEVEL FUNCTION DESCRIPTION
O Close Oven is not working
Oven Lamp
Grill Heating Element
Oven Lamp and Grill heater works.
Recommend to use for frying.Thermostat must
be at maximum position.
Oven Lamp
Top&Bottom Heating
Elements
Hot air comes from up and down heats the tray
from both side. Top and bottom sides of meals
cooked equally.
Oven Lamp
Grill Heating Element
Turbo Fan
Oven Lamp, Grill heater and Turbo Fan work
together. Recommend to use for frying.
Thermostat must be at maximum position.
Bottom
Heating Element
Bottom heating element,
Recommed to use cake and bread.
Top
Heating Element
Top Heating Element for keeping cooked food
warm or gently reheating.
Oven Lamp
Top&Bottom Heating
Elements
Turbo Fan
Hot air comes from up and down heats the tray
from both side. Top and bottom sides of meals
cooked equally with Turbo Fan.
Page 10

COOKING TABLE
NOTE: The values given in cooking table are the values obtained in our
laboratories. You can obtain various results to satisfying your tastes
depending on your cooking and use habits. Cooking times depend on
quantity of ingredients. Using cake forms gives better results for making
cakes.
-9-
Page 11

SECTION 6 Grill Function of Oven - Closed Door Grilling
Turn the oven control knob to position
• We advise you to use trivet shelf placed into grill tray when you are
grilling. This will help avoid spills and help keep your oven clean
• If you decide use grill wire on shelf rather than placing in tray, position a
tray below to collect oils. For easy cleaning, put some water in tray.
• Preheat grill with door closed position for 5-10 minutes before use.
• Always pre-heat grill before use and grill with door closed.
ATTENTION:
It is recommended that you always grill with the Panel Protection Sheet in
place. Our company is not responsible for damage made by not using this
sheet.
GRILL
Shelf Time (min.)
Lamb Meat 4-5 15
Lamb Chops 4-5 15
Calf Chops 4-5 15-25
Sheep Chops 4-5 15-25
Figure 8
SECTION 7 ADJUSTMENT of TIMER
A) Adjustment of Mechanical Timer : (13554)
Mechanical Timer can be adjusted by its button on front panel. Timer must
be adjusted to start the oven cooking. Cooking time can be adjusted between 5 to
90 minutes with mechanical timer. You should position the button to ‘ON’ manually
if cooking time will exceed 90 minutes.
-10-
Page 12

B) Dijital Timer ( 13550)
Your digital timer is an electronic timing module that makes the
food in the oven ready for servicing when you want. All you need
to do is to program the cooking duration and the time when you
want your food to be ready.
When the timer is first powered up 12.00 appears on the display.
icon flashes. In this case the oven will not work as the contacts
of the clock relay are open.
The electricity current is transmitted to the heating elements
through the alarm clock. Press
to manually operate the oven.
Oven clock / timer works the same way as the normal clock. In the
event of power failure the clock is reset. If the electricity current is
less than 50 Hz the clock will be slow. This is not a defect of the
clock. In such cases set the clock again.
Note: You don’t have to set the real time of the day for manual and
semi automatic cooking with your oven. For full automatic
programming you should set the real time of the day.
With the clock of your oven
1. You can set the cooking time from 0 to 10 hours.
2. You can set the alarm time between 00:00 and 23:59 hours.
3. You can set the oven to full automatic, semi-automatic or
manual cooking.
4. You can use it for warning purposes
SETTING THE REAL TIME OF THE DAY
Time setting can only be done when there is no active cooking
programme. Press the
and minute start flashing; you can set the clock forward by + and
backward by -. Longer pressing on these keys will change the
clock faster.
button. Two dots between the hour
-1-
Page 13

1) Select clock setting
mode
2) Set the time with + or –
keys
3) Display will be fixed
after 5 seconds.
ALARM DURATION SETTING
With this function you can get your alarm clock beep after a period
set by you.
1) Select alarm setting 2) Enter time with + or – keys 3) Time will be displayed mode.
(eg:5 minutes) after a few seconds.
When the set period ends the alarm starts beeping. You can stop
the alarm by pushing any button.
-1-
Page 14

ALARM VOLUME SETTING
You can select the 3-level volume of your oven by pressing the
button. Alarm volume is changed with every push on the key.
Note: By factory default, volume is set to the highest. In the event
of power failure, the volume setting will be reset to the factory
default, if changed.
DISPLAY BRIGHTNESS SETTING
You can select the 3-level display brightness setting by pressing
the
button. The display brightness setting will change with
every push on the key.
Note: By factory default, the brightness is set to the highest. In the
event of power failure, the brightness setting will be reset to the
factory default, if changed.
IN THE EVENT OF POWER FAILURE
In the event of power failure your oven will be switched off for
safety reasons. This is indicated by the flashing of the hand icon
on the display. All current cooking programmes will be deleted.
Display shows 12:00 and the clock should be set. First switch on
the oven by pressing the
THE FLASHING HAND ICON INDICATES THAT THE OVEN IS SWITCHED OFF
AND THAT YOU NEED TO PRESS THE BUTTON TO SWITCH TO THE
NORMAL POSITION.
button (see Clock setting).
COOKING WITHOUT A PROGRAM (MANUAL)
It means that you start and finish
cooking without making any
programming. If there is any
programme in the memory you need
1. If there is a programme in the memory, it will be reset when the
button is pressed and manual cooking will be started.
2. After putting in the oven the food that you want to cook set the
oven control button to the concerned position shown in the
cooking table.
3. Your oven works manually. Check your food with certain
intervals and finish cooking by switching the oven control button
to off (zero) position (since there is no programme).
Now you finished cooking. Your food is ready for servicing.
to reset the programme. Press the
button to reset.
-1-
Page 15

Your oven is in standby mode and the display shows
as the current time of the day and standby signs. The
oven will not work. It starts working at 19:45 and the icon is
displayed with the current time. The oven works for 1:00 hour and
stops at 20:45. The sign appears with the end hour.
1. Prepare the food that you want to cook and put it in the oven.
Bring the oven selector switch and the thermostat button to the
position shown in the cooking table.
2. Press the button. Enter the end time of cooking by pressing
the button In 5 seconds. Let’s enter the end time as 20:45.
While entering the time, auto sign and the flashing sign
appear with the time. After 5 seconds sign and the word
“auto” appear on the display. The oven is in operation.
3. Enter the cooking time by pressing first the button and then
the (-) button. The display is automatically set for 2:15 hours
cooking time. Let’s say that we want to set the cooking time as
1:00 hour. We can change the time as 1:00 instead of 2:15 hours
by pressing the (-) button. In 5 seconds after making the setting,
the current time of the day (18:30), the word “auto” and the
sign appear. The oven will switch to the standby mode and it w
ill
not work.
4. When the oven is in standby mode, you can view the end time
of cooking by pressing the
button and the cooking time by
pressing the button.
5. The oven starts working after 1 hour and 15 minutes, that is at
19:45. While the oven is in operation the 19:45 auto is
displayed. The oven works for 1 hour as the entered time is 1
hour.
SEMI AUTOMATIC PROGRAMMING
It is the instant start of cooking and stopping after a
predetermined period. In this programme, you need to enter the
cooking time.
1) The time is 18:30 2) Switch to the cooking 3) Enter the time length.
1. Switch the oven selector switch and thermostat button to the
positions indicated on the cooking table.
2. Enter the cooking time by pressing the (+) button in 5 seconds
after pressing the
button. During setting
seconds the display is fixed showing the time.
3. As an example you can enter the desired period as 2 hours 15
minutes. Cooking starts. After 5 seconds clock setting will appear
on the display. You can view the remaining time by pressing the
button any time during cooking.
4. After entering this value the clock will switch off the power and
the alarm will beep. HAND icon will start flashing. You can silence
the alarm beep by pressing any button. Current time of the day,
sign and a flashing sign will appear on the display.
If you wish to restart the oven press the
oven will start working manually.
6. Cooking will end by bringing the oven control button to off (0)
position.
The display to be shown when the
cooking starts
When the cooking programme is completed, audible warning is on and will remain
on for 7 minutes if not switched off before.
You have finished the semi automatic cooking. Your food is ready
for servicing.
time setting mode by + or - keys.
button. You can reduce the time by the (-)
icon starts flashing and after 5
The display to be shown when the
cooking finishes
-1-
button and then the
Page 16

AUTOMATIC PROGRAMMING
With this programme, cooking duration and the time to finish
cooking are programmed beforehand. Current time of the day
must be set before starting programming.
1) The time is 18:30 2) You want the food
to be ready at 20:45.
You can set the finish
time by pressing the
and buttons.
3) You can set the
cooking time by
pressing the and
buttons. Let’s
enter the cooking time
as 1:00 hour.
Your oven is in standby mode and the display shows
as the current time of the day and standby signs. The
oven will not work. It starts working at 19:45 and the
icon is
displayed with the current time. The oven works for 1:00 hour and
stops at 20:45. The
sign appears with the end hour.
1. Prepare the food that you want to cook and put it in the oven.
Bring the oven selector switch and the thermostat button to the
position shown in the cooking table.
2. Press the
button. Enter the end time of cooking by pressing
the
button In 5 seconds. Let’s enter the end time as 20:45.
While entering the time, auto
sign and the flashing sign
appear with the time. After 5 seconds
sign and the word
“auto” appear on the display. The oven is in operation.
3. Enter the cooking time by pressing first the
button and then
the (-) button. The display is automatically set for 2:15 hours
cooking time. Let’s say that we want to set the cooking time as
1:00 hour. We can change the time as 1:00 instead of 2:15 hours
by pressing the (-) button. In 5 seconds after making the setting,
the current time of the day (18:30), the word “auto” and the
sign appear. The oven will switch to the standby mode and it will
not work.
-1-
Page 17

4. When the oven is in standby mode, you can view the end time
of cooking by pressing the
button and the cooking time by
pressing the
button.
5. The oven starts working after 1 hour and 15 minutes, that is at
19:45. While the oven is in operation the 19:45 auto
is
displayed. The oven works for 1 hour as the entered time is 1
hour.
Aft
er 1:00 hour power will be switched off and the oven stops.
Alarm starts beeping.
The display to be shown when the
cooking starts
The display to be shown when the
cooking finishes
When the cooking programme is completed, audible warning is on and will remain
on for 7 minutes if not switched off before.
7. When the 1 hour cooking finishes, alarm starts beeping at the
preset level. Alarm can be stopped by pressing any button.
8.
sign is shown.
9. If you wish to restart the oven press the button. The oven
starts working manually.
NOTE: If your press the
button during semi automatic and full
automatic programming the programmes in the memory will be
cancelled and your oven operates manually.
10. Cooking will end by bringing the oven control button to off (0)
position.
You have finished the semi automatic cooking. Your food is ready
for servicing.
NOTE: The cooking time entered should be less than the
difference between the current time of the day and the end time
of cooking. Otherwise the oven will not switch to standby mode
and it will work until the end of cooking time.
6. By pressing the
button, the remaining time can be viewed.
After 5 seconds the display switches to the clock mode and the
current time of the day is displayed. The end of cooking time will
appear on the display by pressing the
button.
-1-
Page 18

SECTION 7 ADJUSTMENT of TIMER
Adjustment of Mechanical Timer :
Mechanical Timer can be adjusted by its button on front panel. Timer must
be adjusted at begining of cooking in oven. Cooking time can be adjusted between 5
to 90 minutes with mechanical timer. You should position the button to ‘ON’
manually if cooking time will exceed 90 minutes.
SECTION 8 MAINTENANCE & CLEANING
Cleaning your Oven
1. Before you start cleaning, switch off power-supply at the socket. If the
oven is hot, wait it to cool off.
2. Do not use the abrasive cleaning agents on enamel, ceramic or painted
surfaces. Use only creams or liquid cleaning agents that do not contain
abrasive agents.
3. Any liquid spilling on the cooker may cause damage to enamel surfaces
when they burn. Promptly clean spilt liquids.
4. Do not use corrosive cleaning agents when cleaning control panel.
5. Never drip water on and touch the glass when the oven is hot.
6. Remove covers of the oven. Wash and rinse with soapy water.
Cleaning the Interiorof Your Oven
● Switch off power supply before starting to clean oven.
Remove trays and grill. Wipe the interior parts with soap soaked cloth.
Clean it with dampened cloth again and wipe dry.
● Do not use dry or powder cleaning agents. Clean the glass surfaces
with specialised glass cleaning agents.
● Do not use hard brushes, steel wood or sharp instruments such as a
knife when cleaning the interior part of the oven.
MAINTENANCE & CLEANING
To change cooking time:
The cooking time is displayed while the
button is pressed. Press the “+” or
“-“ keys to set the new cooking time..
You can change the cooking time and the end of cooking time
while your oven is in operation.
Changing the cooking time after programming.
To change the end time of cooking:
The new value is entered by pressing
the
button and using the (+) and (-)
keys.
--
Page 19

● Remove the glass front door by unscrewing the fixings using
a screwdriver, remove the inside glass, clean and rinse it.
After drying it place the seal properly and re-install the glass
Inserting the Oven Door
1- Hold the door in an open position and push up the locking part with
screwdriver.
2- Place hinges into the hinge holes.
Removal oven door for easy cleaning
Before cleaning the oven door, we advise you to follow below steps to
seperate oven door from the oven body:
1. Open the door completely. Dismount the locking part on the hinge by
lifting with screwdriver.
2. Push the locking part in the direction of the glass door to the hinge body.
3. Open the glass door to the back slightly and insert the locking part
to it’s place on hinge. Make sure that this is done on both for left and
right hinges.
4. Lift the door slightly and pull the door with your two hands to
seperate from the oven.
Inserting the oven door
After cleaning, for inserting oven door to oven body it is recommended
to apply below steps:
1. Hold the door in open position and insert the hinge to hinge counter part.
2. Open the glass door to the back slightly for getting the locking part
and then push ahead and lock with screwdriver.
3. Open and close the door to make sure that it has been fitted
correctly.
-1-
Page 20

Frn Contas
Contay düzenli aralklarla kontrol ediniz. Eer temizlenmesi
gerekiyorsa andrc temizlik malzemeleri kullanmadan temizliini
yapabilirsiniz.
Eer conta zarar görmüse, en yakn yetkili servisle temasa geçiniz.
Conta kendi yerine oturana kadar frn kullanmaynz.
Frn kapann cam ksmn scak su ve yalnzca yumuak bir bezle
temizleyin.
Frnn
düzgün çalmas, frn içinin kenarlarn çevreleyen bir conta
t
arafndan salanmaktadr.
- Bu contann durumunu düzenli aralklarla kontrol edin. Gerekirse ypratc
temizlik maddelerini kullanmadan temizleyin.
- Contann hasarl olduu görülüyorsa, bulunduunuz yerdeki Yetkili
Servise bavurun. Frn tamir edilene kadar kullanmayn.
Frn Lambasnn Deitirilmesi
1. Akm fiini prizden çekiniz.
2. Frnn
içine konmu olan lamba tespit camn çkarmak için saat dönü
yö
nü tersine çeviriniz.
3. Lambay yerinden çkarmak için saat dönü yönünün tersi istikametinde
çeviriniz.
4. Yetkili servislerden yeni bir lamba alp çkarm olduunuz eski lambann
yerine taknz.
CHANGING OVEN LAMP
Inserting the Oven Door
1- Hold the door in an open position and push up the locking part with
screwdriver.
2- Place hinges into the hinge holes.
3- Support the oven door and push down the locking part with screwdriver.
4- Remove pins from the hinges. Open and Close the door to make sure
that it has been fitted correctly.
Oven Gasket
Please check this gasket at regular periods. If it requires cleaning, clean it
without using abrasive materials.
If gasket is damaged, immediately contact with closest authoris
ed servicel.
Do not use oven till gasket repaired or replaced.
Changing Oven Lamp
1. Pull the plug out of socket.
2. Turn the lamp fixing glass counter-clockwise direction to seperate it.
3. To seperate lamp from body turn it to counter-clockwise direction.
4. Fix new lamp that you gain from authorised service in place of old lamp.
5. Ensure the appliance is switched off before replacing the lamp to avoid the
possibility of electric shock.
-1-
Mounting the wire rackMounting the wire rackMounting the wire rack
Page 21

SECTION 9 INFORMATION ABOUT TRANSPORTATION
In case of transport hold your oven vertically and do not put anything
on it.
Transportation;
Please Keep your ovens original box.
Carry your oven with original box. Obey carrying signs on box.
To keep your oven door from damage that may occur during
transportation by wire grate and trays, stick 1-1,5 cm thin cardboard or
paper on oven front door inner glass with sticky tape at level of trays.
Stick oven door to side walls with sticky tape.
To place packaging materials look at figures below.
If your oven haven’t got an original box ;
Take precautions to avoid possiblity of oven outer walls, glass, painted,
enamelled or stainless steel surfaces.
--
Page 22

SECTION 10 TROUBLESHOOTING
-1-
.
Page 23

This appliance/fitting is marked according to the European directive
2002/96/EC on Waste Electrical and Electronic Equipment (WEEE). By
ensuring this product is disposed of correctly, you will help prevent potential
negative consequences for the environment and human health, which could
otherwise be caused by inappropriate
waste handling of this product.
The symbol on the product, or on the documents accompanying the product,
the Crossed Out Wheelie Bin symbol, indicates that this appliance/fitting may
not be treated as household waste. Instead it shall be handed over to the
applicable collection point for the recycling of electrical and electronic
equipment. Disposal must be
carried out in accordance with local environmental regulations for waste
disposal. For more detailed information about treatment, recovery and
recycling of this product, please contact your local authority, your household
waste disposal service or the retailer where you purchased the product.
Page 24

 Loading...