

Page 1

User’s manual
Wood-burning stove TT40 models
Version 18.11..2009
1
Installation and user’s manual: TT40
(EN 13240/CE marked / Sintef)
Congratulations on your new TermaTech wood-burning stove.
In order to enjoy your new wood-burning stove as much as possible it is important that you read
this user’s manual thoroughly, even if you have previously owned a wood-burning stove.
Before you can really enjoy your wood-burning you have to become familiar with it. Already after
firing the first few times you will begin to be familiar with your new wood-burning stove. In the
following sections we will go through the use.
TermaTech wood-burning stoves are tested and approved according to the EN 13240 (CE) norm
as well as Sintef approval in Norway, i.e. according to some of Europe’s strictest demands for
wood-burning stoves.
Naturally the stoves are also in accordance with the requirements in the Danish ’Order concerning
wood-burning stoves’ which came into effect on 1.6.2008. The approvals give you a guarantee that
your wood-burning stove is approved according to the most important Scandinavian and European
standards which means that the stove complies with a number of requirements for among other
things safety, environment and efficiency which leads to good firing economy.
Page 2
User’s manual
Wood-burning stove TT40 models
Version 18.11..2009
2
1. Before installing the wood-burning stove
When installing your wood-burning stove you must make sure that all local laws, incl. those that
refer to national and European standards, are followed. It is always a good idea to consult your
chimney sweep before installation. It must be emphasised that the chimney sweep always has to
approve the installation, even if a wood-burning stove was installed previously. You also have to
make sure that the placement complies with the current rules in the Building Regulations for small
houses. See the below statement of minimum distances to flammable materials. If the woodburning stove is to be installed near a non-inflammable there are no requirements for minimum
distance, but we recommend 8-10 cm behind the stove for cleaning purposes.
2. Distance to flammable material
All distances have been determined in connection with approval of the wood-burning stove.
100 mm behind the stove to flammable material.
200 mm beside the stove to flammable material.
900 mm in front of the stove to flammable material.
100 mm behind
200 mm to the side
900 mm in front
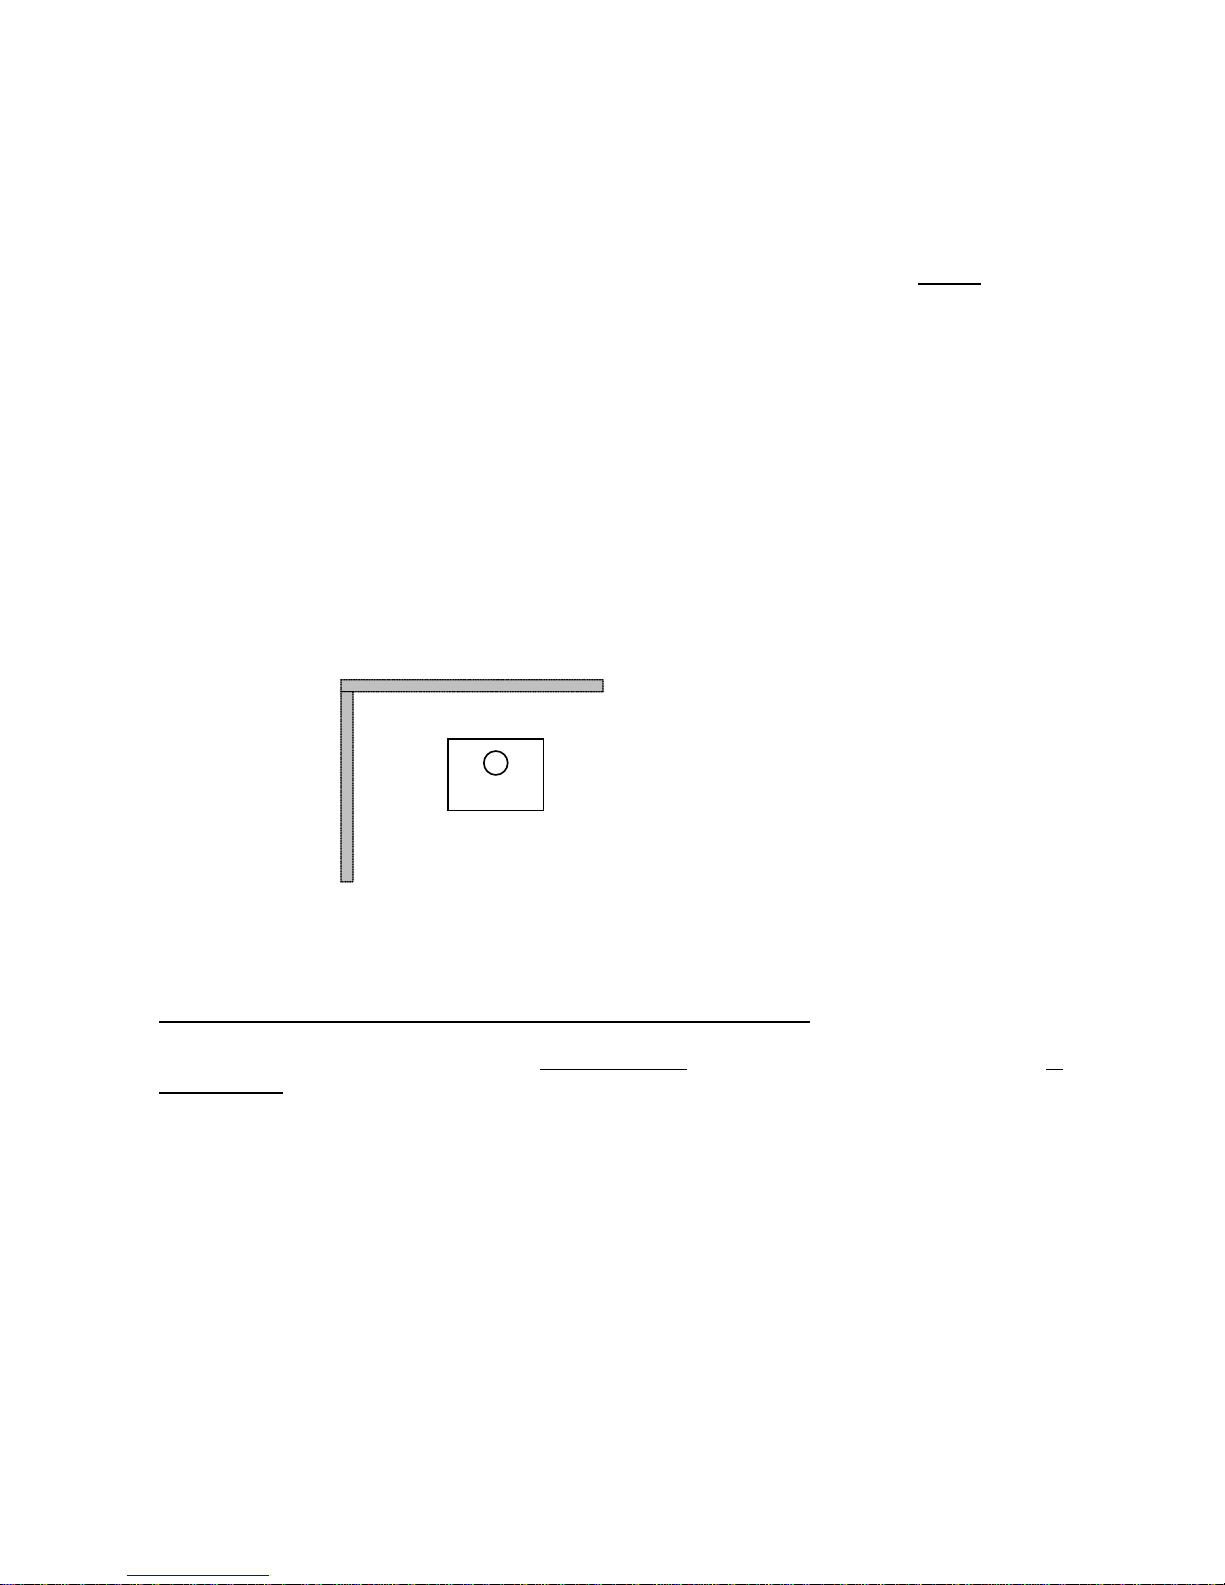
The floor underneath the wood-burning stove must be non-inflammable or coated with a noninflammable material. The non-inflammable material, e.g. a steel plate, glass plate, slate/ imitation
slate or tile, must be placed so it reaches at least 300 mm in front of the wood-burning stove and at
least 150 mm to each side of the opening of the wood-burning stove.
3. The chimney
The chimney is the lung of the wood-burning stove, i.e. a chimney with good draught is a
precondition for good combustion. You must use a chimney with a diameter of at least Ø150 mm
which is the equivalent of an internal diameter of 175 cm² for your TermaTech stove. It is important
to follow the directions in the Building regulations for small houses and to make sure that the
existing or new chimney is high enough to ensure optimum draught in the wood-burning stove. The
chimney must be of sufficient height so the draught conditions are okay and the smoke does not
bother anyone. We recommend 80 cm above the ridge. If the chimney does not have sufficient
draught smoke nuisances and poor combustion can occur. If the chimney draught is not sufficient
an evacuator can be mounted on the chimney. If there is too much draught, a damper can be
mounted on the chimney. Ask your dealer or your local chimney sweep if your have doubts.
100 mm behind
200 mm
side
900 mm
front
Page 3
User’s manual
Wood-burning stove TT40 models
Version 18.11..2009
3
4. Ventilation
Combustion air is a precondition for a good and clean combustion. In most cases there is sufficient
air in the room. However in special cases it may be necessary to provide extra air in the room
where the stove is placed. This can e.g. be done by mounting an air valve in the exterior wall of the
room. Air valves which add necessary combustion air must be kept clean.
5. Before use of the oven
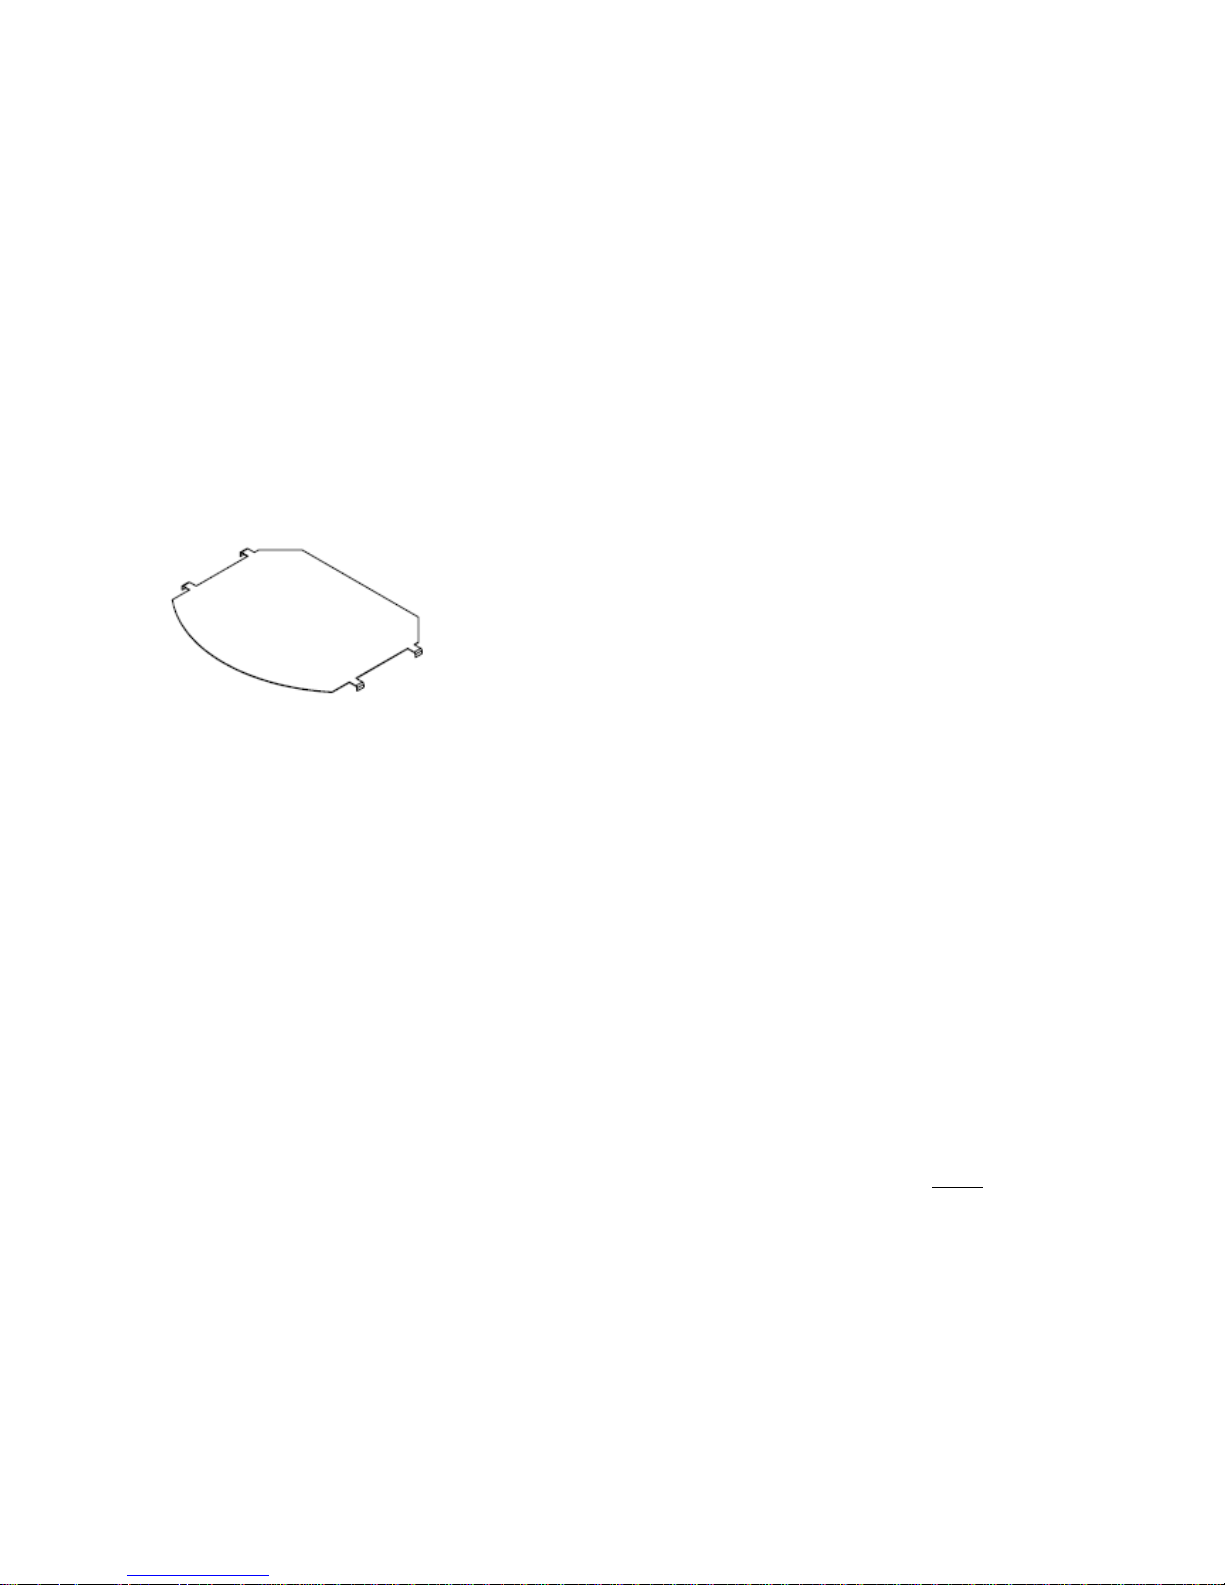
It is very important that you make sure that the heat cover above the firewood compartment is
mounted in the stove; it is loose from the manufacturer and could fall down during transport. Place
the heat cover right below the door/bottom of the combustion chamber so it protects the firewood
compartment against radiant heat. The heat cover is mounted by letting the 4 pegs rest on
convection holes inside the firewood compartment.
6. Before the first lighting
The first time the stove is lit is must be done gently as all the materials need to get use to the heat.
The Senotherm varnish that the stove is painted with will harden the first couple of times the stove
is heated, and it may cause some odour nuisances. So make sure that you have proper ventilation.
7. Lighting and firing in the wood-burning stove
It is very important to heat your wood-burning stove and chimney as fast as possible in order to
create optimum draught in the chimney and achieve the best combustion. A wood-burning stove
made from sheet iron will give during lighting/cooling, this may result in creaks, that is completely
normal for the stove and should not be considered as a complaint.
1. When you light your wood-burning stove we recommend the use of kindling, i.e. thin
wooden sticks (app. 1.2 – 1.5 kg), in the bottom of the stove, laid in a criss-cross
pattern as a log house. Put 2 firelighters in the middle and light them (never use
alcohol, petrol, other flammable liquids or newspapers or magazines for lighting).
2. Open air damper for lighting air (the damper at the bottom of the wood-burning
stove), this is done by pushing the rod under the door all the way to the right.
3. Leave the door ajar so there is an opening of about 2-3 cm. Leave the stove like
that for about 8-10 minutes before you close the door completely.
4. The air damper at the top of the oven, above the door, is opened completely by
pushing it to the right.
5. Let the kindling burn to a solid layer of embers (there are no more flames) before
firewood is put into the wood-burning stove.
Page 4

User’s manual
Wood-burning stove TT40 models
Version 18.11..2009
4
6. Put 2 pieces of firewood in the stove, app. 1.5 – 1.8 kg total. The pieces are both
put at the bottom of the stove and parallel to the front of the stove, with equal
distance to the stove’s sides and with mutual distance of about 1 cm. The front
piece is best lit if it has a split side that is turned to the door and one in the embers.
Close the door completely immediately.
7. When there are good, visible flames in the fire (after about 2-4 minutes) the damper
for lighting air is closed (the damper at the bottom of the wood-burning stove).
8. The air damper at the top of the stove can be regulated down a little bit to 2/3 open,
and after another few minutes it can be closed to 1/ open. How much or how little
the damper should be regulated depends among other things on the chimney
draught and the firewood. The flames must stabilise to a calmly burning fire.
9. When the wood has burned to embers (after about 1 hour) you start again from
point 6.
In order to get the optimum combustion it is important that you only regulate the effect or heat
amount with the firing. Small pieces of firewood give a more powerful combustion than large pieces
of firewood as the surface is bigger and thereby more gas is released. The amount of firewood in
the combustion chamber is also crucial, for normal use you should not put more than 2 logs (max.
2 kg per hour) into the stove and that is how you get the optimum effect.
If you want a higher heat amount you should put logs in the stove with many ’open’ sides, they
burn more powerfully and faster, but also give out larger amounts of heat.
NOTE! Remember that the handles on the wood-burning stove get hot, so use a glove when
you use the stove.
NOTE! Never light with the lighting damper open. (only for start-up)!
8. Firing
Your TermaTech wood-burning stove is made for firing with wood/firewood, we recommend the
use of split hardwood that has been stored for at least one year outdoors under a roof. Preferably
put the firewood on a wooden pallet, bearers or the like so it is off the ground. Remember to bring
in the firewood in good time before use so surface moisture can evaporate.
Kindling is the designation for finely split wood/sticks that are about 20-30 cm long and have a
diameter of 2-3 cm preferably with many open surfaces.
Firewood should have a diameter of 7-9 cm and be no more than about 30 cm long, otherwise it
will get too close to the side of the stove. The most important thing for good combustion is that the
wood is dry (15-18% moisture). If the firewood is too wet it is difficult to get it to burn, the chimney
draught is nonexistent, there is a lot of smoke and the exploitation is lower and it damages the
environment. Furthermore there may be damage to the stove and the chimney in the shape of
shining soot and tarry deposits. If the firewood is too dry it will burn too quickly, and often the
gasses in the wood are released faster than they can burn and some go unburned through the
chimney. This also gives lower exploitation and harms the environment.
Bio-briquettes can be used, but they develop a lot of ash and dust.
Coal & Energy coke must not be used as it contains a lot of sulphur which wears on a stove, the
chimney and the environment. The life of stove and chimney will be significantly reduced by using
this firing type and the right to claim compensation for the product is void.
Page 5

User’s manual
Wood-burning stove TT40 models
Version 18.11..2009
5
9. Maintenance – always use original parts
Maintenance and cleaning of the stove should only be performed when the stove is cold. The daily
maintenance is limited, but once a year the stove should get thorough maintenance. The
combustion chamber should be cleaned for ashes and soot and the door hinges and the closing
mechanism should be lubricated with copper grease and tightened if necessary.
The surface is maintained by brushing it with a soft, long-haired brush or a dust brush. Always
remember: only when the stove is cold.
Jointings can look okay, but they collapse under the heat and thereby lose the ability to keep the
stove sealed. Jointings should be changed as needed as it is important to good combustion and a
clean window that the stove is sealed.
Insulation in the combustion chamber that are broken or worn can easily be changed as they are
loosely fixed. The material used is called Vermiculite and is a porous, but very suitable insulation
material. It has no effect on the stove’s efficiency that the insulation cracks. However, it should be
changed when the wear surpasses half of the original thickness or when corners break off.
Painting the stove with Senotherm-spray can cover spots or small scratches. Larger damages
needs to be ground with fine steel wool, vacuumed and then sprayed. The can has to be shaken
vigorously and then sprayed on at a distance of 15-20 cm (remember to cover glass and handles).
It is very important that the stove is not in use and completely cold before you use the spray due to
the fire hazard. In order to keep the stove’s varnished surfaces looking nice for years to come you
should try to avoid touching the varnished surfaces when the stove is hot.
Glass normally does not need any maintenance apart from cleaning. This is most easily done by
using TermaTech’s glass cleaner.
Original parts which need to be changed due to wear can be found at your dealer. Because of fit
etc. only original parts from termaTech should be used.
Right to claim compensation for defective product is under current law. When stating
deviations the use of the product must be suspended immediately and the dealer must be
contacted. The right to claim compensation implies correct use of the wood-burning stove. Spare
parts and wearing parts like Vermiculite, glass, jointings and handles are not covered by the
guarantee as they are worn with use. These parts can be changed and bought as spare parts from
your dealer.
10. Malfunctions
If problems should occur with the use of the stove the cause can possibly be found below. If not,
then you are always welcome to contact your dealer.
The stove is difficult to control – it burns too fast: If the stove is new, then check that the
directions have been followed. If the stove is more than 1 year old or if it has been used heavily,
then the jointings may need to be changed. If the jointings sit for too long the heat makes them
lose their ability to keep the stove sealed. Check your firewood, if it is too dry it may burn too
fast/powerfully.
Page 6

User’s manual
Wood-burning stove TT40 models
Version 18.11..2009
6
If there is heavy draught in the chimney it may be necessary to fit a damper in it.
The stove has poor draught after installation: Check that the mounting instructions have been
followed. It is especially the conditions surrounding the chimney that may cause problems. Are
diameter and length okay, is it sealed, are smoke pipe and junctions sealed? Is the cleaning hatch
sealed? You may need to contact a chimney sweep to remedy the problem as the chimney may be
blocked.
Smoke and soot smell: This can be caused by down-draught in the chimney and most often
happens in specific wind directions. The chimney may be too short for the ridge or surrounding
trees.
Remember not to open the door while there are flames.
The stove is difficult to light and may die out: There may be a number of causes. The most
typical are that the firewood is too wet, the damper is not sufficiently open, the draught in the
chimney is too small or maybe it is blocked or leaking. The ember layer was too small/incinerated
and did not give enough heat to light the logs (see point 7.5). Possibly give some start-up air to the
fire by opening the damper. Then the damper has to be closed again. Depending on the problem it
may be necessary to contact the dealer or a chimney sweep.
The glass soots up: The wood is too moist, Lack of draught in the chimney or wrong firing.
11. Questions and answers
If you have further questions concerning your TermaTech wood-burning stove – see
www.termatech.com
12. Good advice for the wood-burning stove
If the stove has not been used for a long time the chimney should be checked for
possible blockage before lighting. Furthermore it is a good idea to remove any dust
from the wood-burning stove as it might smell after a long break.
If a regulation or smoke damper has been fixed to the chimney it should not close of more
than 80% of the internal diameter of the chimney.
The ashes can be put in the rubbish bin for garbage collection. The ashes should
always have cooled for 1-2 days before it is put in the rubbish bin, as there might still
be embers that can light garbage or a garbage bag.
The Danish Environmental Protection Agency has made a list of advice to how to fire
correctly in your wood-burning stove:
It is important to fire correctly and with the correct firing in your wood-burning stove. Always
make sure that there is plenty of air and never fire with printed paper, newspapers, plastic,
household waste or wood that may be painted, varnished, glued or impregnated.
Page 7

User’s manual
Wood-burning stove TT40 models
Version 18.11..2009
7
When you are lighting it is important that the fire takes hold and that the temperature rises
quickly. E.g. light with dry brushwood or kindling wood.
Only fire with clean and dry wood in your wood-burning stove.
When you hit two pieces of dry wood against each other it makes a ’crisp’ or ’dry’ sound. It
is a good idea to bring in the firewood in good time so the surface moisture evaporates
before it goes into the wood-burning stove.
Do not put too much firewood into the wood-burning stove at once. With small amounts it is
easier for the fire to take hold and reach a high temperature quickly. Put more firewood into
the wood-burning stove a little at a time and remember to turn up the air each time until
there is a nice fire again.
Air is important to ensure good combustion. As long as there are yellow flames you do not
need to turn up the air supply. A good combustion of the exhaust gasses requires a high
temperature and sufficient air. If you turn it down too quickly the unburned gasses will rise
up through the chimney and leave soot. It is a bad idea to let the wood-burning stove burn
all night with a minimum of air. The chimney may soot up and poor combustion leads to
more unhealthy smoke.
If you are unsure whether your wood-burning stove bothers anyone, then go outside and
see if there is a lot of smoke. If you think it smells badly, then your neighbour probably
thinks so too.
Technical specifications
Height: 950 mm
Width: 458 mm
Depth: 414 mm
Rear exit: 788 mm
Exhaust branch: Ø 150 mm
Weight: 120 kg
Average values for testing
Exhaust gas temperature: 324º C
Exhaust gas mass flow: 4.4 g/s
Effect degree: 79.6%
Nominal effect: 5 kW
Uptake: 0.12 mbar/12 Pa
 Loading...