

Page 1
User and mounting manual
TT20 + TT20Bazic + TT20R +TT20S + TT20RS + TT20SA
Please read also:
SUPPLEMENTARY INSTALLATION INSTRUCTIONS FOR
THE UK MARKET (last 6 pages)
CE approved according to: EN13240
DS (Danish Standard), DIN (Deutsche Industrienorm),
SINTEF (Norwegian Standard) and 15A (Austria)
Page 2

2
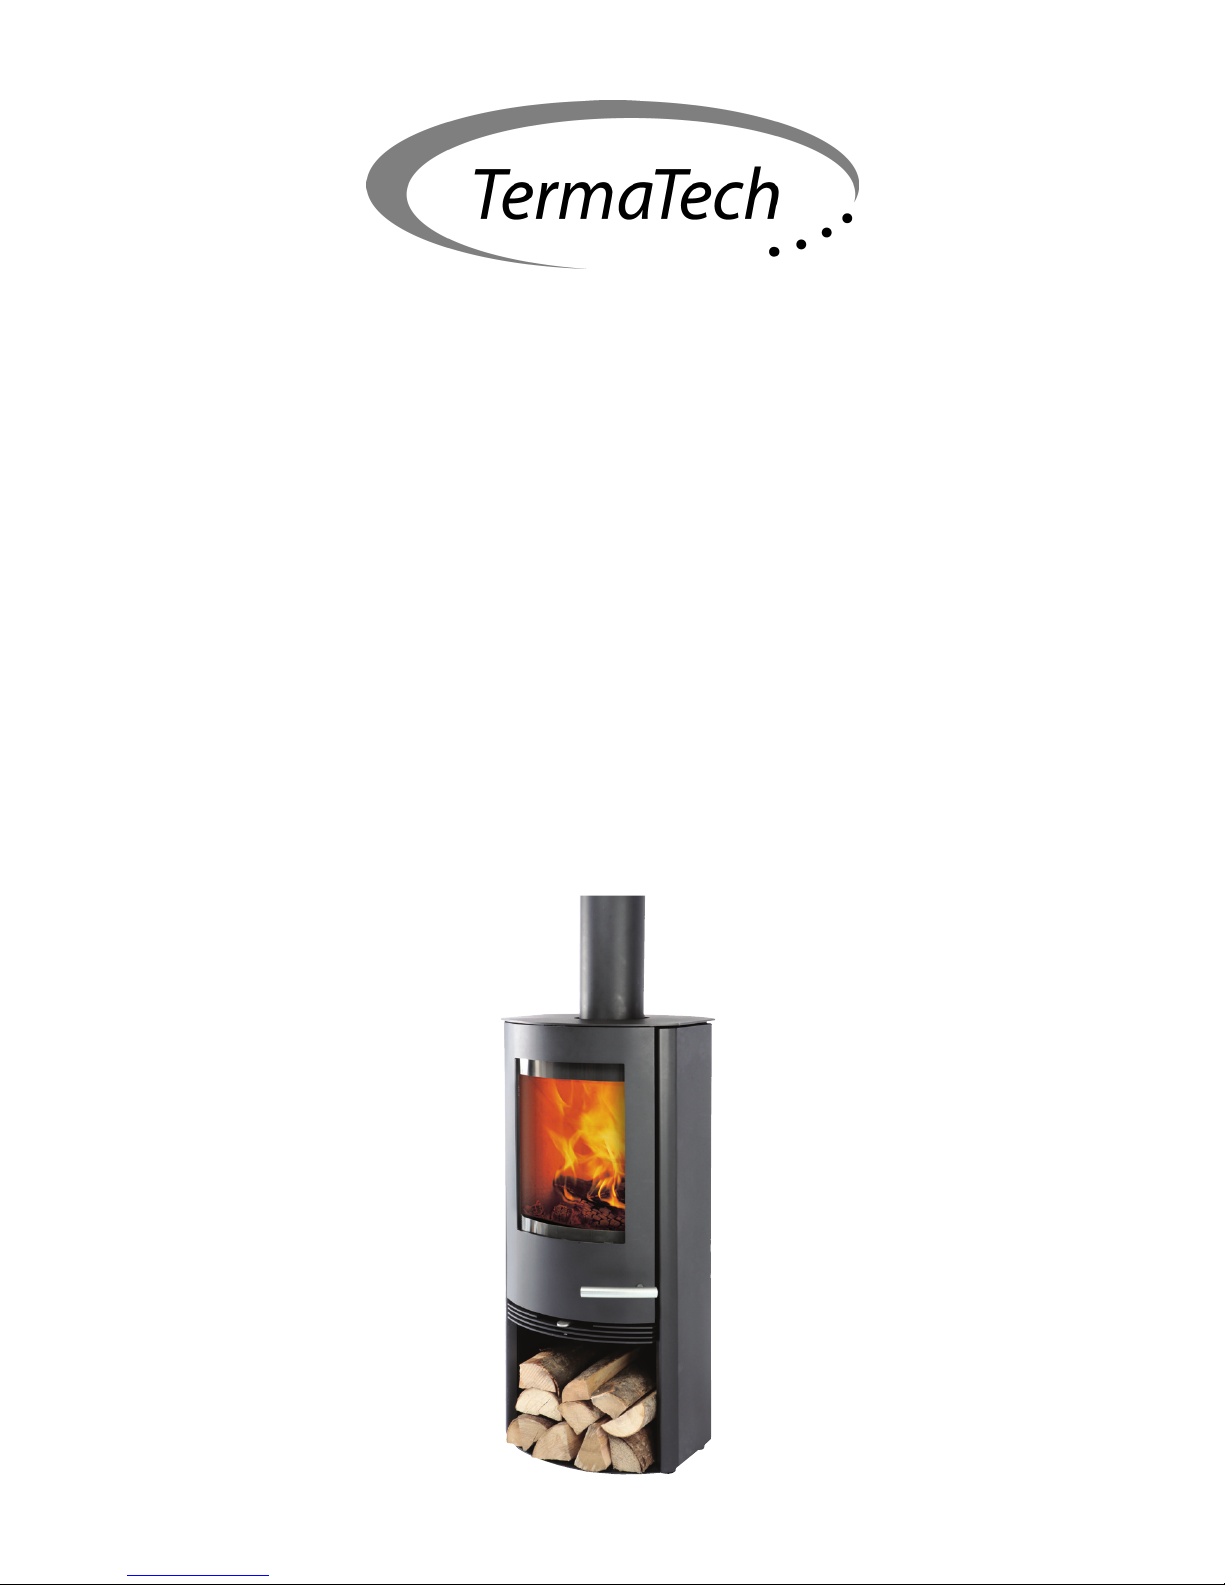
Congratulations on your new wood-burning stove.
We thank you for choosing a TermaTech wood-burning stove and
wish you many cosy and warm moments in the future.
Before using the stove you should read the user and mounting manual and also the SUPPLEMENTARY INSTALLATION INSTRUCTIONS
FOR THE UK MARKET (last 6 pages of this manual) so you are familiar with the legal requirements as well as the instructions regarding maintenance. By this it is ensured that the product works as it
is intended and you get the most out of your investment for many
years to come.
Installation/user instruction.................................. Page 3
Installation instructions in ”smoke control areas”.. Page 6
Lighting instruction................................................ Page 6
Maintenance........................................................... Page 8
Warranty/right to invoke lack of conformity.......... Page 9
Hints...................................................................... Page 10
Remedy of malfunctions / FAQ............................... Page 11
Technical specications.......................................... Page 13
Supplementary Inst. Instructions UK..................... Page 14
Drawing concerning smoke control kit.................... Page 22
Page 3

3
INSTALLATION INSTRUCTION
The stove is intended for ”intermittent combustion”. It is not meant to “heat over” at night. By following the instruction below in
“Lighting instruction” the best and most environmentally friendly
combustion is achieved.
The wood-burning stove is delivered ”ready for mounting” (the
exhaust branch may need to be screwed on) and must be connected
to the chimney with a smoke pipe. The connection between stove
and chimney must, as far as possible, be mounted in one straight
piece (with as few bends as possible) and as minimum horizontally,
but preferably rising from the stove to the chimney. Joints must be
tight. Remember that is has to be possible to clean the pipe (possibly with a cleaning hatch on the pipe).
Any unauthorised changes to the wood-burning stove will be viewed
as a structural change and thereby the warranty will be void and is
also a risk to safety.
In the door on your TT stove there is a spring that makes the door
close by itself when you let go of the handle.
This closing device is not a demand in the UK, Denmark and many
other countries and can therefore be removed. In the bottom hinge
the split with lentil head is removed which removes the tension from
the spring. This is most easily done by using a small screw driver
and side-cutting pliers.
National and European norms
The regulations in force at the time in question, including those
that refer to national and European standards, must be respected
when installing the wood-burning stove. Contact your local dealer
for further advice and guidance in connection with mounting. Notify your Hetas installer before you use your wood-burning stove. It
must be ensured that there is sufcient airow for the combustion
in the stove, so care must be taken concerning closely shut windows
and doors that may hinder the ow of air to the combustion.
Safety references
The surface of the stove as well as knobs, handle, window, smoke
pipe, etc. become very hot when the stove is in use. Touching these
parts without necessary protection (glove or other protective material) can lead to burns.
Remember to make children aware of this danger and make sure to
keep them away from the wood-burning stove when it is in use. For
this purpose TermaTech offers various grates for the protection of
children. (Ask your dealer)
Allowed in the wood-burning stove
Only use dry and clean wood for combustion in the wood-burning
stove. Maximum size of logs used in the stove is up to 30 cm in
length and 10 cm in diameter.
Only use dry wood. The burning of waste, synthetic materials and
Page 4

4
other treated or impregnated materials is not allowed as it is very
hazardous to the environment. Furthermore the stove and the chimney will be damaged by these materials. There is a danger of emission of unhealthy substances which can also lead to complaints from
neighbours.
Dry and clean wood has a maximum of 20% water which is achieved
with outdoor storage for between 1 year (soft wood) and 2 years
(hard wood). The wood must be in contact with air during storage so
the moisture can get out of the wood.
Firewood is not meant to ”burn overnight”. Never close off the air-
ow completely, instead let the re die out and light it again when
you need it.
We warn against closing off the airow completely. The wood-burning stove can only burn sensibly and environmentally friendly if
there is sufcient airow for the combustion.
Cleaning and checks
The wood-burning stove and the smoke pipe should be checked
and cleaned once a year. The chimney must also be cleaned by the
chimney sweep who will set the necessary intervals for cleaning /
sweeping.
The wood-burning stove should be checked by a professional about
once a year.
Ash build up/empty of ashpan
When the stoves have been in use maximum 10 times, it is required to check the ashpan for build up ashes. This is checked by
taking the ashpan out of the ash section, shake the ashpan so an
even layer is obtained. It is recommended that the ash level is not
more than half of the ashpans capacity. If the ash level is more than
half the capacity with an even layer, the ashpan is emptied by taken
the ash pan out of the ash section, place the ashpan lid on top of
the ash pan and empty it. Please be aware of embers in the ashpan,
so the disposal of ashes do not start a re! If the ashpan contains
embers the ash must be cooled of, until no embers is present in the
ashes.
If no checks of the ash build up in the ashpan is carried out, the
grate bars can be damaged and a hazard may occur!
Removal of ashes/charcoal from re-bed
Before light-up the stove, re-bed must be cleaned for ashes and
bricks of charcoal.
To do this, take the squared metal plate placed on the grate bars out
and clean the ashes and charcoals into the ashpan below.
Check for level in ashpan. If ashes is build up – please see item Ash
build up/empty of ashpan.
Combustion air
Combustion air is a precondition for a good and clean combustion.
The air is normally taken from the room where the wood-burning
stove is mounted, however in some circumstances it may be neces-
Page 5
5
sary to provide extra air in the room where the stove is placed. This
can e.g. be done by mounting an air valve in the room’s outer wall.
Air valves that supply necessary combustion air must be kept free
from blockage.
An exhaust fan in the same room or close to the wood-burning stove
can also have a negative effect on the combustion (at worst it can
lead to exhaust gases in the room, even with the stove door closed). Therefore, in the above case, the wood-burning stove and the
exhaust fan must never be in use at the same time.
The TT20 models are available with combustion air branch. Ask your
dealer for further information.
Adjustable feet:
The enclosed adjustable feet are to be used if the oor is uneven
or they can also be used to create the impression that the stove is
“ying” / “oating”
Metal plate on the grate:
Delivered with the stove is a metal plate with 4 holes. This plate is
to be placed on the cast iron grate. The plate secures the cleanest
combustion.
When you clean out ashes remove the plate from the grate and
sweep ashes down into the ashdrawer.
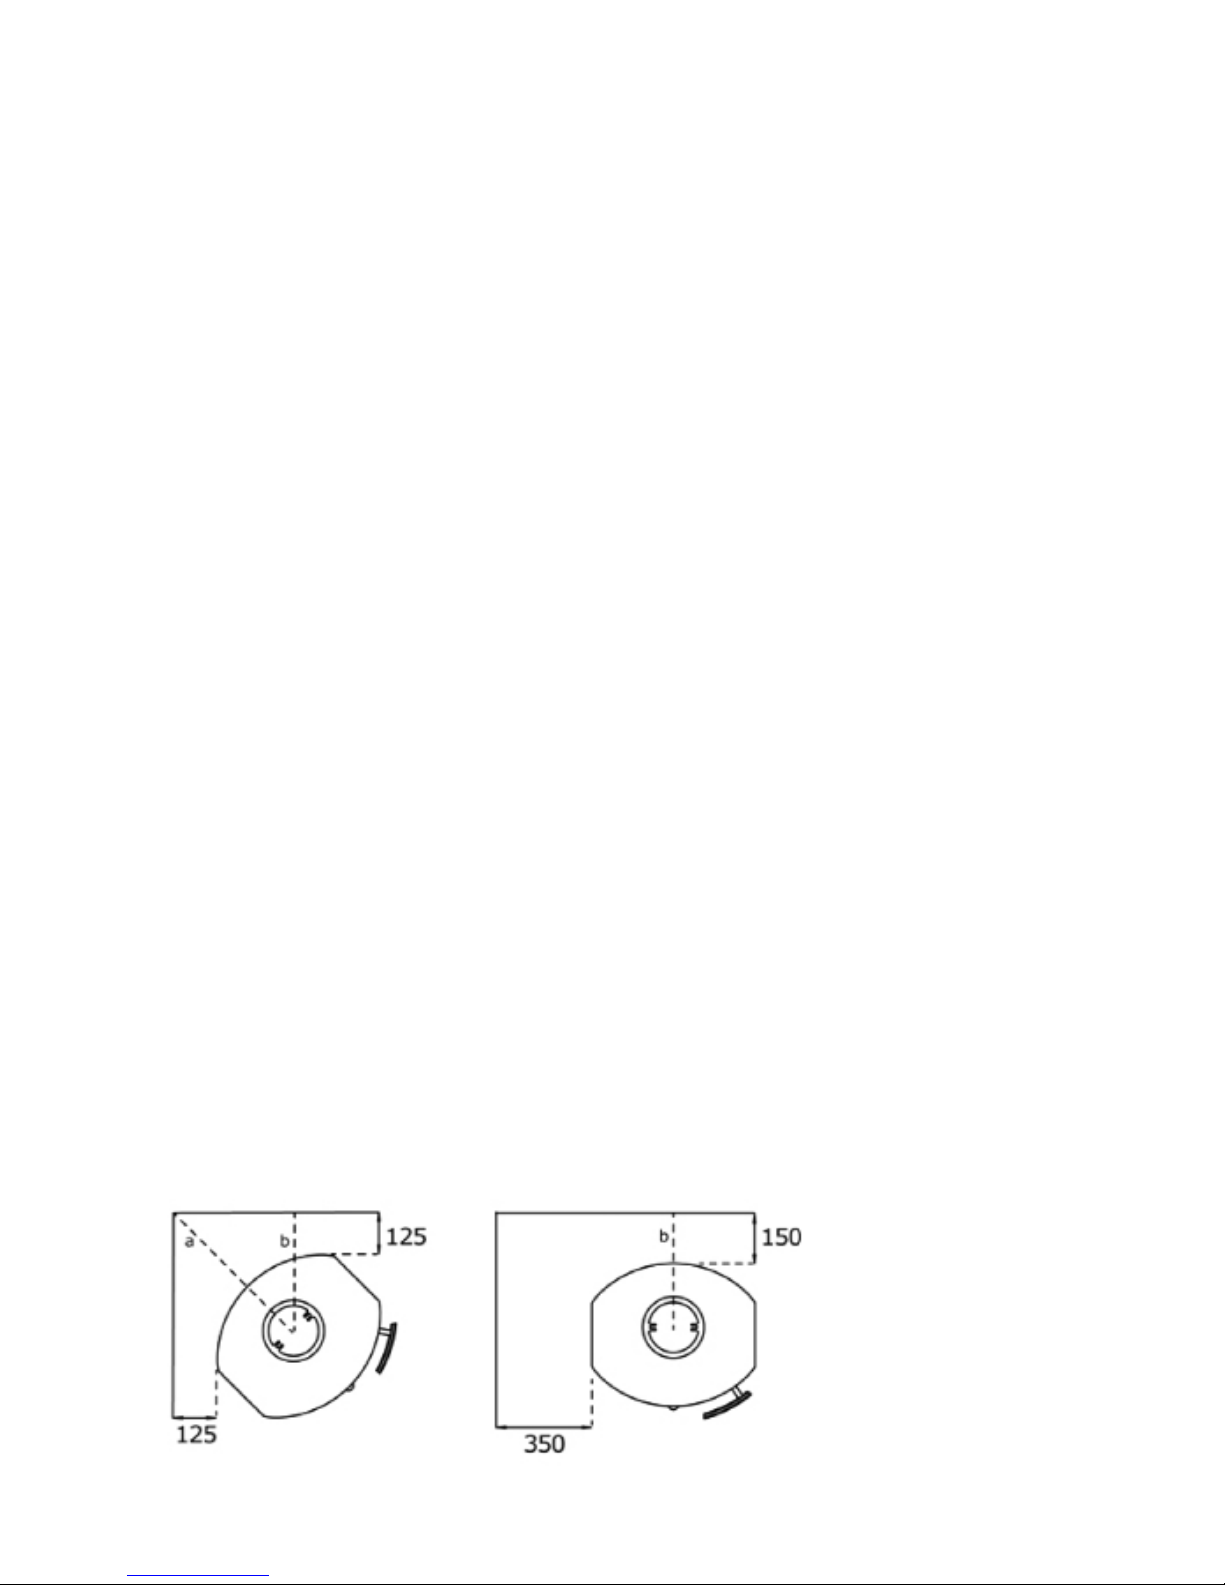
Distance to ammable material:
The stove must be put on a non inammable foundation. This foun-
dation must as a minimum cover 150 mm on each side of the stove
and 300 mm in front of the stove.
For inammable material like inammable walls made of wood, furniture, etc. the following minimum distances apply for safety reasons:
150 mm behind the stove to ammable material. (picture 2)
350 mm beside the stove to ammable material. (picture 2)
125 mm behind/beside if mounted 45° in a corner (picture 1)
1000 mm in front of the stove to ammable material.
Picture 1 Picture 2
Page 6

6
Distance to non-ammable materials:
It is recommended that there is a minimum of 80-100 mm behind
and beside the stove so the stove can dispose of the heat, this distance makes cleaning of and around the stove easier. In addition,
refer to the relevant Building Regulations.
Requirements for the chimney:
The chimney must be of sufcient height so the draught conditions
are okay the smoke does not bother anyone. Good draught in the
chimney is crucial to the stove working as intended and burns as environmentally friendly as possible. The height of the chimney must
typically be a minimum of 3.5 m from the top of the stove to the top
of the chimney.
The chimney must have a minimum internal diameter of Ø150mm.
The chimney must be equipped with an easily accessible cleaning
hatch. All joints and connections must be tight and the chimney
must be able to provide a draught of at least 1.2 mm water gauge
(12Pa).
It is possible to connect the wood-burning stove to chimneys that
are also used for other purposes. However, the concrete conditions
must be assessed by the tter and/or chimney sweep.
If the stove is to be mounted with back exit the following is done:
The round, welded or screwed cover plate at the back of the stove
is removed. Then the cut-out piece on the base-plate is removed
(the thin division plate). Be careful not to drop the piece between
the back plate and the stove! This is best done with a screwdriver /
chisel or pliers.
Finally the screwed smoke cover is removed and then the exhaust
branch can be mounted.
Remember to x the smoke cover at the top of the stove before use.
Demands for the oor:
The foundation must be able to bear the stove and possibly the
chimney’s weight.
INSTALLATION INSTRUCTIONS IN SMOKE CONTROL AREAS
Installation in a smoke control area requires the additional assembling / installation of the ”Damper control unit” which must be
installed by the installer. See drawing and picture on page 19
LIGHTING INSTRUCTION
The rst time:
The rst time the stove is lit is must be done gently as all the materials need to get use to the heat. The Senotherm varnish that the
stove is painted with will harden the rst couple of times the stove is
heated, and it may cause some odour nuisances. So make sure that
you have proper ventilation. Do not touch the painted surface, when
Page 7

7
the stove is hot. The painting has to harden up rst.
Use of the stove:
Below is the procedure used for testing/approval of the stove. It is
this procedure that will lead to the best combustion for the given
chimney. Firewood amount and damper setting can be adjusted
to the individual need for heating and the draught in the concrete
chimney.
On your new TT20 the work with controlling the air input has been
simplied so there is only one knob/damper (below the door).
Between the left position and the middle position you have the normal area where you control the air input.
No air input = left position and
maximum air input = middle position.
As help for lighting the control knob/damper can be pushed down a
little and pushed completely to the right. This start help adds some
air from below and ensures faster lighting. After a few minutes the
control knob/damper is returned to the normal position (between
the left and middle position).
Lighting and continuous ring at EN-testing
1. The ashpan must always be closed completely, also when you
light the re. The damper/start-up device can be opened (the knob
is pushed down and to the right) for a few minutes at lighting. Put
about 10 kindling sticks (dia. 2-3 cm) in the bottom of the stove,
laid in a criss-cross pattern as a log house. Put 2 relighters in the
middle and light them.
2. Leave the door ajar so there is an opening of about 2-3 cm.
Leave the stove like that for about 8-10 minutes before you close
the door completely. Stay by the stove as long as the door is ajar.
3. When the re has burned to embers (there are no more ames)
open the door gently so the ash is not whirled out through the door.
Gently spread out the embers with a poker so they are even.
4. Put 2-3 pieces of rewood in the stove, about 1.7 kg total. The
pieces are put in the bottom of the stove and parallel to the front of
the stove with equal distance to the stove’s sides and with mutual
distance of about 1 cm. The front piece is best lit if it has a split side
that is turned to the door and one in the embers. Close the door
completely immediately.
5. The knob/damper is opened so it is about 2/3 open (between
the left and middle position) and after about 2 minutes the damper
is set to about 1/3 open. How much the damper should be open
depends on the individual chimney’s draught, but the ames should
now stabilise to a calm re.
6. When the wood has burned to embers (after about 1 hour) you
start again from point 3.
Page 8

8
MAINTENANCE – always use original parts
Maintenance and cleaning of the stove should only be performed
when the stove is cold. The daily maintenance is limited, but once
a year the stove should get thorough maintenance. The combustion
chamber should be cleaned for ashes and soot and the door hinges
and the closing mechanism should be lubricated with copper grease.
The surface is maintained by brushing it with a soft, long-haired
brush or by using the vacuum cleaner with a brush.
The stove can also be dusted with a duster. Always remember: only
when the stove is cold.
Jointings can look okay, but they collapse under the heat and
thereby lose the ability to keep the stove sealed. Jointings should
be changed as needed as it is important to good combustion and a
clean window that the stove is sealed.
The insulation plates in the combustion chamber that are broken
or worn can easily be changed as they are loosely xed. The material used is called Vermiculite and is a porous, but very suitable
insulation material. It has no effect on the stove’s efciency that
the insulation cracks. However, it should be changed when the wear
surpasses half of the original thickness.
Painting the stove with Senotherm-spray can cover spots or small
scratches from kettles and such. Larger damages needs to be
ground with ne steel wool, vacuumed and then sprayed. The can
has to be shaken vigorously and then sprayed on at a distance of
15-20 cm. It is very important that the stove is not in use and com-
pletely cold before you use the spray due to the re hazard. In order
to keep the stove’s varnished surfaces looking nice for years to
come you should try to avoid touching the varnished surfaces when
the stove is hot. Make sure to have sufcient ventilation when using
spray paint.
Glass normally does not need any maintenance apart from cleaning. This is most easily done by using TermaTech’s glass cleaner.
Remember only to use glass cleaner when the stove is cold. Glass is
made of ceramic glass, be sure of environmentally disposal.
Original parts which need to be changed due to wear can be found
at your dealer. Because of t etc. only original parts from TermaTech
should be used.
Right to claim compensation for defective product is under
current law.
When stating deviations the use of the product must be suspended
immediately and the dealer must be contacted.
Chimney/Flues must be swept on regular occasions, as per manufacturers recommendations.
Page 9

9
5 YEAR WARRANTY* / RIGHT TO INVOKE LACK OF CONFORMITY
If defects/faults are ascertained, use of the wood burner must be
stopped immediately and the dealer contacted.
*5 Year warranty
Provided that there has been normal operation of the wood burner,
TermaTech offers a 5 year warranty on material and manufacturing
faults on the load-bearing frame, exclusive of the combustion chamber.
Combustion chamber: The following parts are not covered by the
warranty: The combustion chamber, Cast iron parts (bottom, door
and grate), Insulation material (vermiculite plates), Smoke deector
plates, Glass, gaskets as well as the closing mechanism/handle.
Exterior parts: The following parts are not covered by the warranty: Varnished plates/surfaces, stone facings, glazed tiles, concrete
and glass as well as the closing mechanism/ handle
The warranty does not cover faults which are due to:
• the user/mounting guide not being followed
• the mounting being carried out incorrectly
• overheating/deterioration of the materials, caused by the use
of, for example, the incorrect type of fuel, petroleum coke or too
much fuel
• the product has been connected to a chimney with poor drawing
qualities, for example, chimneys that are too short or are leaking
• the product being positioned or has been positioned/kept in unheated or damp surroundings
• the product being in bad repair or not maintained in accordance
with the instructions
• normal wear and tear of wearing parts/expendable items as well
as the varnish
• similar circumstances which are not due to material or manufacturing faults
The lesser defects below, which cannot underlie any claim, can occur
in the product:
• naturally occurring variations in the colour nuances and marbling
on the soapstone, sandstone and other stone cladding.
• sounds which occur during burning are normal, this occurs when
metal expands/retracts.
If a fault occurs during delivery to the customer, or if such a fault
arises during the warranty period which is covered by this warranty,
TermaTech A/S agrees to send a suitable replacement part free of
charge to rectify the fault. Any additional obligation of TermaTech
A/S to remedy the fault, for example, in the form of installation of
the replacement part, does not exist.
In addition the purchaser has, apart from the right to a replacement
part, no right to either direct or indirect damages.
Page 10

10
Repairs of faults or replacement of parts on the product do not
extend the product or replacement part’s warranty period. Neither
does a new warranty period begin for the product or replaced part.
Apart from the above warranty rules, the consumer also has those
rights which are evident from the obligatory consumer legislation
Any fault or defect must be examined by the vendor who has sold
the product. In this case the purchaser must be able to prove that
the product has been purchased via the vendor and when it was
purchased, for example, in the form of an invoice/receipt. The
purchaser must specify the model and production number, which is
stated on the product. If the purchaser wishes to refer to a fault,
the vendor must be informed within a reasonable time, i.e. 14 days
after the defect has been ascertained.
HINTS
Lighting after long break
If the stove has not been used for a long time the chimney should
be checked for possible blockage before lighting. Furthermore it is
a good idea to remove any dust from the wood-burning stove as it
might smell after a long break.
Chimney re
In case of chimney re the doors, drawers and damper of the wood-
burning stove must be closed immediately in order to shut of the
supply of oxygen. The relevant authorities must be notied if necessary. The stove must not be used until the chimney has been inspected.
Kindling is the designation for nely split wood/sticks that are
about 20 cm long and have a diameter of 2-3 cm.
Wood like birch, beech, oak, ash, elm, pine wood and wood from
fruit trees is all suitable for splitting into rewood.
Waste products like pressure-treated wood, chipboard, coloured
brochure or glossy paper must not be used in a wood-burning stove.
They develop hydrochloric acid or heavy metals which cause a lot of
damage to the stove and the environment.
Firewood should have a diameter of 7-9 cm and be no more than
about 30 cm long, otherwise it will get too close to the side of the
stove (at the CE-testing rewood at a length of 28 cm was used).
The most important thing for good combustion is that the wood is
dry (15-20% moisture). If the rewood is too wet it is difcult to get
it to burn, the chimney draught is nonexistent, there is a lot of smo-
ke and the exploitation is lower as the water has to evaporate rst.
Furthermore there may be damage to the stove and the chimney in
the shape of shining soot and tarry deposits. At worst it can cause a
Page 11

11
chimney re. If the rewood is too dry it will burn too quickly. Often
the gasses in the wood are released faster than they can burn and
some go unburned through the chimney. This also gives lower exploitation and harms the environment.
So it is a balance that is quite easy to nd with a little practise. See
also below under Storage.
Bio-briquettes can be used, but they develop a lot of ash and dust.
Put in max. 2 kg per hour.
Energy coke must not be used as it contains a lot of sulphur which
wears on a stove, the chimney and the environment. The life of
stove and chimney will be signicantly reduced by using this ring
type and the right to claim compensation for the product is void.
Storage of the rewood is best under a roof, however with good
ventilation, e.g. in a carport or under a shed roof. Place the wood on
a wooden pallet or the like so it is free from the ground. Fresh wood
that has been sawed and split must be stored for about 1-2 years
this way until the moisture in the wood is down to 15-20%.
The ashes can be put in the rubbish bin for garbage collection. The
ashes should always have cooled for 1-2 days before it is put in the
rubbish bin, as there might still be embers that can light garbage or
a garbage bag.
Regulation and smoke damper:
If one is xed in the chimney it should not close of more than 80%
of the internal diameter of the chimney.
MALFUNCTIONS
If problems should occur with the use of the stove the cause can
possibly be found below. If not, then you are always welcome to
contact your dealer.
The stove is difcult to control – it burns too fast
If the stove is new, then check that the directions have been followed. If the stove is more than 1 year old or if it has been used heavily, then the jointings may need to be changed. If the jointings sit
for too long the heat makes them lose their ability to keep the stove
sealed. Check that the ashpan is closed completely.
If there is heavy draught in the chimney it may be necessary to t a
damper in it.
The stove has poor draught after installation
Check that the mounting instructions have been followed. It is especially the conditions surrounding the chimney that may cause problems. Are diameter and length okay, is it sealed, are smoke pipe
and junctions sealed? Is the cleaning hatch sealed? You may need
to contact a chimney sweep to remedy the problem as the chimney
Page 12

12
may be blocked.
Smoke at soot smell
This can be caused by down-draught in the chimney and most often
happens in specic wind directions. The chimney may be too short
for the ridge or trees may have grown and are creating turbulence.
Remember not to open the door while there are ames.
The stove is difcult to light and may die out
There may be a number of causes. The most typical are:
The damper is not sufciently open.
The rewood is too wet.
The draught in the chimney is too small or maybe it is blocked or
leaking.
The ember layer was too small/incinerated and did not give enough
heat to light the logs. Possibly give some start-up air to the re by
opening the damper (pushed down and to the right) to get the stove
going again. Then the damper has to be closed again (back to position between left and the middle).
Depending on the problem it may be necessary to contact the dealer, installer or a chimney sweep.
The glass soots up
The wood is too moist.
Lack of draught in the chimney.
Check that the damper is not closed.
Door is closed too early at lighting (point 3 section 2).
Page 13

13
TECHNICAL SPECIFICATIONS
TT20 TT20R TT20Bazic
Nominal heat output: 5 kW 5 kW 5 kW
Height: 1053mm 1053mm 958mm
Width: 478mm 531mm 478mm
Depth: 419mm 419mm 419mm
Weight: ca. 118kg ca. 119kg ca. 100kg
TT20S +SA TT20RS
Nominal heat output: 5 kW 5 kW
Height: 1088mm 1088mm
Width: 470mm 531mm
Depth: 419mm 419mm
Weight: ca. 155kg ca. 177kg
Average values for testing of TT20 models:
Exhaust gas temperature 273 °C
Exhaust gas mass ow 4.0 g/s
Efciency 83,4%
Nominal Heat output 5 kW
Flue draught 12 Pa
Page 14

14
SUPPLEMENTARY INSTALLATION INSTRUCTIONS UK
READ THE INSTRUCTION BOOKLET AND THESE SUPPLEMENTARY INSTRUCTIONS CAREFULLY BEFORE INSTALLATION
These instructions together with those in the instruction booklet cover the basic principles to ensure the satisfactory installation of the
stove, although detail may need slight modication to suit particular
local site conditions.
In all cases the installation must comply with current Building Regulations, Local Authority Byelaws and other specications or regulations as they affect the installation of the stove.
It should be noted that the Building Regulations requirements may
be met by adopting the relevant recommendations given in British
Standards BS 8303, BS EN 15287-1:2007 as an alternative means
to achieve an equivalent level of performance to that obtained following the guidance given in Approved Document J.
Please note that it is a legal requirement under England and Wales
Building Regulations that the installation of the stove is either carried out under Local Authority Building Control approval or is installed by a Competent Person registered with a Government approved
Competent Persons Scheme. HETAS Ltd operate such a Scheme
and a listing of their Registered Competent Persons can be found on
their website at www.hetas.co.uk.
CO Alarms:
Building regulations require that when ever a new or replacement
xed solid fuel or wood/biomass appliance is installed in a dwelling a
carbon monoxide alarm must be tted in the same room as the ap-
pliance. Further guidance on the installation of the carbon monoxide
alarm is available in BS EN 50292:2002 and from the alarm manufacturer’s instructions. Provision of an alarm must not be considered
a substitute for either installing the appliance correctly or ensuring
regular servicing and maintenance of the appliance and chimney
system.
The Clean Air Act 1993 and Smoke Control Areas
Under the Clean Air Act local authorities may declare the whole or
part of the district of the authority to be a smoke control area. It
is an offence to emit smoke from a chimney of a building, from a
furnace or from any xed boiler if located in a designated smoke
control area. It is also an offence to acquire an ”unauthorised fuel”
for use within a smoke control area unless it is used in an ”exempt”
appliance (”exempted” from the controls which generally apply in
the smoke control area).
The Secretary of State for Environment, Food and Rural Affairs has
powers under the Act to authorise smokeless fuels or exempt appliances for use in smoke control areas in England. In Scotland and
Page 15

15
Wales this power rests with Ministers in the devolved administrations for those countries. Separate legislation, the Clean Air (Northern
Ireland) Order 1981, applies in Northern Ireland. Therefore it is a
requirement that fuels burnt or obtained for use in smoke control
areas have been ”authorised” in Regulations and that appliances
used to burn solid fuel in those areas (other than ”authorised” fuels)
have been exempted by an Order made and signed by the Secretary
of State or Minister in the devolved administrations.
The TermaTech TT20, TT20Bazic, TT20R, TT20S and TT20RS have
been recommended as suitable for use in smoke control areas when
burning wood logs and when tted with a damper control unit to prevent
closure of the air control lever beyond the 22mm open position.
Further information on the requirements of the Clean Air Act can be
found here: http://smokecontrol.defra.gov.uk/
HEALTH AND SAFETY PRECAUTIONS
Special care must be taken when installing the stove such that the
requirements of the Health and Safety at Work Act are met.
Handling
Adequate facilities must be available for loading, unloading and site
handling.
Fire Cement
Some types of re cement are caustic and should not be allowed to
come into contact with the skin. In case of contact wash immediately with plenty of water.
Asbestos
This stove contains no asbestos. If there is a possibility of disturbing
any asbestos in the course of installation then please seek specialist
guidance and use appropriate protective equipment.
Metal Parts
When installing or servicing this stove care should be taken to avoid
the possibility of personal injury.
STOVE PERFORMANCE
Please refer to the table in the main instruction manual for details of
the stoves’ performances
PREPARATORY WORK AND SAFETY CHECKS
IMPORTANT WARNING
This stove must not be installed into a chimney that serves any
other heating appliance.
There must not be an extractor fan tted in the same room as the
Page 16

16
stove as this can cause the stove to emit fumes into the room.
Chimney
In order for the stove to perform satisfactorily the chimney height
must be sufcient to ensure an adequate draught of approximately
15 Pa so as to clear the products of combustion and prevent smoke
problems into the room.
NOTE: A chimney height of not less than 4.5 metres measured vertically from the outlet of the stove to the top of the chimney should
be satisfactory. Alternatively the calculation procedure given in EN
13384-1 may be used as the basis for deciding whether a particular
chimney design will provide sufcient draught.
The outlet from the chimney should be above the roof of the building in accordance with the provisions of Building Regulations
Approved Document J.
If installation is into an existing chimney then it must be sound and
have no cracks or other faults which might allow fumes into the
house. Older properties, especially, may have chimney faults or the
cross section may be too large i.e. more than 230 mm x 230 mm.
Remedial action should be taken, if required, seeking expert advice,
if necessary. If it is found necessary to line the chimney then a ue
liner suitable for solid fuel must be used in accordance with Building
Regulations Approved Document J.
Any existing chimney must be clear of obstruction and have been swept
clean immediately before installation of the stove. If the stove is tted in
place of an open re then the chimney should be swept one month after
installation to clear any soot falls which may have occurred due to the
difference in combustion between the stove and the open re.
If there is no existing chimney then any new system must be to the
designation described above and in accordance with Building Regulations Approved Document J.
A single wall metal uepipe is suitable for connecting the stove to
the chimney but is not suitable for use as the complete chimney.
The chimney and connecting uepipe must have a minimum diameter
of 150 mm and its dimension should be not less than the size of the
outlet socket of the stove.
Any bend in the chimney or connecting uepipe should not exceed
45°. 90° bends should not be used.
Combustible material should not be located where the heat dissipating
through the walls of replaces or ues could ignite it. Therefore
when installing the stove in the presence of combustible materials
due account must be taken of the guidance on the separation of
combustible material given in Building Regulations Approved
Document J and also in these stove instructions.
Page 17

17
If it is found that there is excessive draught in the chimney then a
draught stabiliser should be tted. Fitting of a draught stabiliser will
affect the requirement for the permanent air supply into the room
in which the stove is tted in accordance with Approved Document J
(see also combustion air supply).
Adequate provision e.g. easily accessible soot door or doors must be
provided for sweeping the chimney and connecting uepipe where it
is not intended for the chimney to be swept through the appliance.
Hearth
The hearth should be able to accommodate the weight of the stove
and its chimney if the chimney is not independently supported. The
weight of the stove is indicated in the brochure.
The stove should preferably be installed on a non-combustible hearth of a size and construction that is in accordance with the provisions of the current Building Regulations Approved Document J.
The clearance distances to combustible material beneath, surrounding or upon the hearth and walls adjacent to the hearth should
comply with the guidance on the separation of combustible material given in Building Regulations Approved Document J and also in
these stove instructions.
If the stove is to be installed on a combustible oor surface, it must
be covered with a non-combustible material at least 12mm thick,
in accordance with Building Regulations Approved Document J, to a
distance of 30 cm in front of the stove and 15 cm to each side measuring from the door of the combustion chamber.
Combustion air supply
In order for the stove to perform efciently and safely there must be
an adequate air supply into the room in which the stove is installed
to provide combustion air. The provision of air supply to the stove
must be in accordance with current Building Regulations Approved
Document J. An opening window is not appropriate for this purpose.
Connection to chimney
Stoves may have a choice of either a rear or top ue gas connector
that allows connection to either a masonry chimney or a prefabricated factory made insulated metal chimney in accordance with their
instructions. In some cases it may be necessary to t an adaptor to
increase the diameter of the ue to the minimum required 150 mm
section of the chimney or liner.
Commissioning and handover
Ensure all parts are tted in accordance with the instructions.
On completion of the installation allow a suitable period of time for
any re cement and mortar to dry out, before lighting the stove.
Once the stove is under re check all seals for soundness and check
Page 18

18
that the ue is functioning correctly and that all products of combustion are vented safely to atmosphere via the chimney terminal.
On completion of the installation and commissioning ensure that the
operating instructions for the stove are left with the customer. Ensure to advise the customer on the correct use of the appliance and
warn them to use only the recommended fuel for the stove.
Advise the user what to do should smoke or fumes be emitted from
the stove. The customer should be warned to use a reguard to BS
8423:2002 (Replaces BS 6539) in the presence of children, aged
and/or inrm persons.
READ THE INSTRUCTION BOOK AND THESE INSTRUCTIONS
CAREFULLY BEFORE USING THE STOVE
WARNING NOTE
Properly installed, operated and maintained this stove will not emit
fumes into the dwelling. Occasional fumes from de ashing and re
fuelling may occur. However, persistent fume emission is potentially
dangerous and must not be tolerated. If fume emission does persist,
then the following immediate action should be taken:
(a) Open doors and windows to ventilate the room and then
leave the premises.
(b) Let the re go out.
(c) Check for ue or chimney blockage and clean if required
(d) Do not attempt to relight the re until the cause of the
fume emission has been identied and corrected. If
necessary seek expert advice.
The most common cause of fume emission is ueway or chimney
blockage. For your own safety these must be kept clean at all times.
Page 19

19
IMPORTANT NOTES
General
Before lighting the stove check with the installer that the installation
work and commissioning checks described above have been carried
out correctly and that the chimney has been swept clean, is sound
and free from any obstructions. As part of the stoves’ commissioning
and handover the installer should have shown you how to operate
the stove correctly.
CO Alarm
Your installer should have tted a CO alarm in the same room as the
appliance. If the alarm sounds unexpectedly, follow the instructions
given under “Warning Note” above.
Use of reguard
When using the stove in situations where children, aged and/or
inrm persons are present a reguard must be used to prevent accidental contact with the stove. The reguard should be manufactu-
red in accordance with BS 8423:2002 (Replaces BS 6539).
Chimney cleaning
The chimney should be swept at least twice a year. It is important
that the ue connection and chimney are swept prior to lighting up
after a prolonged shutdown period.
If the stove is tted in place of an open re then the chimney will
require sweeping after a month of continuous operation. This is a
precaution to ensure that any “softer” deposits left from the open
re usage have not been loosened by the higher ue temperatures
generated by the closed stove.
In situations where it is not possible to sweep through the stove the
installer will have provided alternative means, such as a soot door.
After sweeping the chimney the stove ue outlet and the ue pipe
connecting the stove to the chimney must be cleaned with a ue
brush.
Periods of Prolonged Non-Use
If the stove is to be left unused for a prolonged period of time then
it should be given a thorough clean to remove ash and unburned
fuel residues. To enable a good ow of air through the appliance to
reduce condensation and subsequent damage, leave the air controls
fully open.
Extractor fan
There must not be an extractor fan tted in the same room as the
stove as this can cause the stove to emit smoke and fumes into the
room.
Page 20

20
Aerosol sprays
Do not use an aerosol spray on or near the stove when it is alight.
Use of operating tools
Always use the operating tools provided when handling parts likely
to be hot when the stove is in use.
Refuelling on to a low re bed
If there is insufcient burning material in the rebed to light a new
fuel charge, excessive smoke emission can occur. Refuelling must
be carried out onto a sufcient quantity of glowing embers and ash
that the new fuel charge will ignite. If the re bed is too low or cool,
suitable kindling must be used to re-light res
Fuel overloading
The maximum amount of fuel specied in this manual should not be
exceeded, overloading can cause excess smoke.
Use with door left open
Operation with the door open can cause excess smoke. The appliance must not be operated with the appliance door left open except
as directed in the instructions.
Dampers left open
Operation with the air controls or dampers open can cause excess
smoke. The appliance must not be operated with air controls or
dampers left open except as directed in the instructions.
Chimney Fires
If the chimney is thoroughly and regularly swept, chimney res
should not occur. However, if a chimney re does occur turn off the
stove immediately and isolate the mains electricity supply (if applicable), and tightly close the doors of the stove. This should cause
the chimney re to go out. If the chimney re does not go out when
the above action is taken then the re brigade should be called immediately. Do not relight the stove until the chimney and ueways
have been cleaned and examined by a professional.
Permanent air vent
The stove requires a permanent and adequate air supply in order for
it to operate safely and efciently.
In accordance with current Building Regulations the installer may
have tted a permanent air supply vent into the room in which the
stove is installed to provide combustion air. This air vent should not
under any circumstances be shut off or sealed.
USER OPERATING INSTRUCTIONS
Please read the important notices given above before referring to
the main instruction book for detailed operating instructions.
Recommended fuels
Stoves may be designed to burn dry seasoned wood logs and/or
Page 21

21
solid mineral fuel as indicated in the main stove manuals.
HETAS Ltd Approval
HETAS approval may be limited to specic fuel types as detailed in
the main instruction manuals. Approval does not cover the use of
other fuels either alone or mixed with the recommended fuel, nor
does it cover instructions for the use of other fuels.
Page 22

22
Damper control unit for smoke control areas
Page 23

23
Page 24

24
TermaTech AS • Denmark
www.termatech.com
UK
This installation and user guide with related claim and warranty provisions, concerns TermaTech wood-burning stove:
Model: ___________
Productions/serialnumber:
Purchased on:
99-275 UK version 11/2015
 Loading...