

Page 1
SMART DIGITAL ADAPTER
Installation Guide
XMDPIO110
Smart Digit
al Adapt
er f
or Pioneer Car St
ereos
12 Month Limited Warranty
403P006B
TERK and TERK logo are registered trademarks of AUDIOVOX Corp.
AUDIO
VOX ELECTRONICS CORPORATION (the Company) warrants to the
original retail purchaser of this product that should this productor any part
thereof, under normal use and conditions, be proven defective in material or
w
orkmanship within 12 months from the date of original purchase, such
defect(s) will be repaired or replaced with new or reconditioned product (at the
Company's option) without charge for parts and repair labor. To obtain repair or
r
eplacement within the terms of this Warranty, the product is to be delivered
with pr
oof of warranty coverage (e.g. dated bill of sale), specification of
defect(s), transportation prepaid, to an approved warranty station or the
Company at the address shown below. This Warranty does not extend to the
elimination of e
xternally generated static or noise, to costs incurred for
installation, removal or reinstallation of the product, damage to speakers,
accessories, or vehicle and home electrical systems, malfunction of satellite
transmissions, repeater signal or receiver unit. This Warranty does not apply to
any product or part thereof which, in the opinion of the Company, has suffered
or been damaged through alteration, improper installation, mishandling,
misuse, neglect, accident, or by removal or defacement of the factory serial
number/bar code label(s). THE EXTENT OF THE COMPANY'S LIABILITY UNDER
THIS WARRANTY IS LIMITED TO THE REPAIR OR REPLACEMENT PROVIDED
ABOVE AND, IN NO EVENT, SHALL THE COMPANY'S LIABILITY EXCEED THE
PURCHASE PRICE PAID BY PURCHASER FOR THE PRODUCT. This Warranty is
in lieu of all other express warranties or liabilities. ANY IMPLIED WARRANTIES,
INCLUDING ANY IMPLIED WARRANTY OF MERCHANTABILITY, SHALL BE
LIMITED TO THE DURATION OF THIS WRITTEN WARRANTY. ANY ACTION FOR
BREACH OF ANY WARRANTY HERE UNDER INCLUDING ANY IMPLIED
WARRANTY OF MERCHANTABILITY MUST BE BROUGHT WITHIN A PERIOD OF
48 MONTHS FROM DATE OF ORIGINAL PURCHASE. IN NO CASE SHALL THE
COMPANY BE LIABLE FOR ANY CONSEQUENTIAL OR INCIDENTAL DAMAGES
FOR BREACH OF THIS OR ANY OTHER WARRANTY, EXPRESS OR IMPLIED,
WHATSOEVER. No person or representative is authorized to assume for the
Company any liability other than expressed herein in connection with the sale of
this product. Some states do not allow limitations on how long an implied
warranty lasts or the exclusion or limitation of incidental or consequential
damage so the above limitations or exclusions may not apply to you. This
Warranty gives you specific legal rights and you may also have other rights
which vary from state to state.
U.S.A.: AUDIOVOX ELECTRONICS CORPORATION,
150 MARCUS BLVD., HAUPPAUGE, NEW YORK 11788 1-800-645-4994
CANADA : CALL 1-800-645-4994 FOR LOCATION OF WARRANTY STATION
SERVING YOUR AREA
128-7351
For customer service and
technical information:: 1.800.290.6650
For Customer Service
Visit Our Website At
www.audiovox.com
Product Information, Photos,
FAQ’s, Owner’s Manuals
Page 2
2
Installation Overview
Installation Basics::
When choosing a location to mount the components, care must be
taken not to interfere with any of the vehicles existing systems.
Good installation practices should be observed when mounting
components to avoid any vibration, movement or rattling after
installation. When routing the cables avoid blocked passages and
any obstructions that could kink, crimp, twist, or chafe the cables.
Components should be secured in place with methods such as
Velcro, double stick foam tape, screws and nuts, cable ties etc. All
mounting hardware and methods are at the discretion of the installer.
Cables should also be secured in place to avoid movement. Care
should be taken not to crimp any of the cables when installing them.
And special care should be taken not to route cables on or near sharp
edges that could eventually cut into the jacket of the cable.
Installation Planning::
The XMDPIO110 should be located within 2-3 feet of the XMD1000
due to the cable lengths. The antenna should be located in an area
to insure the cable will reach the tuner location. Check this prior
to installation. The installation guide supplied with your XM
Universal Tuner and bundled antenna has additional information
on antenna location and installation.
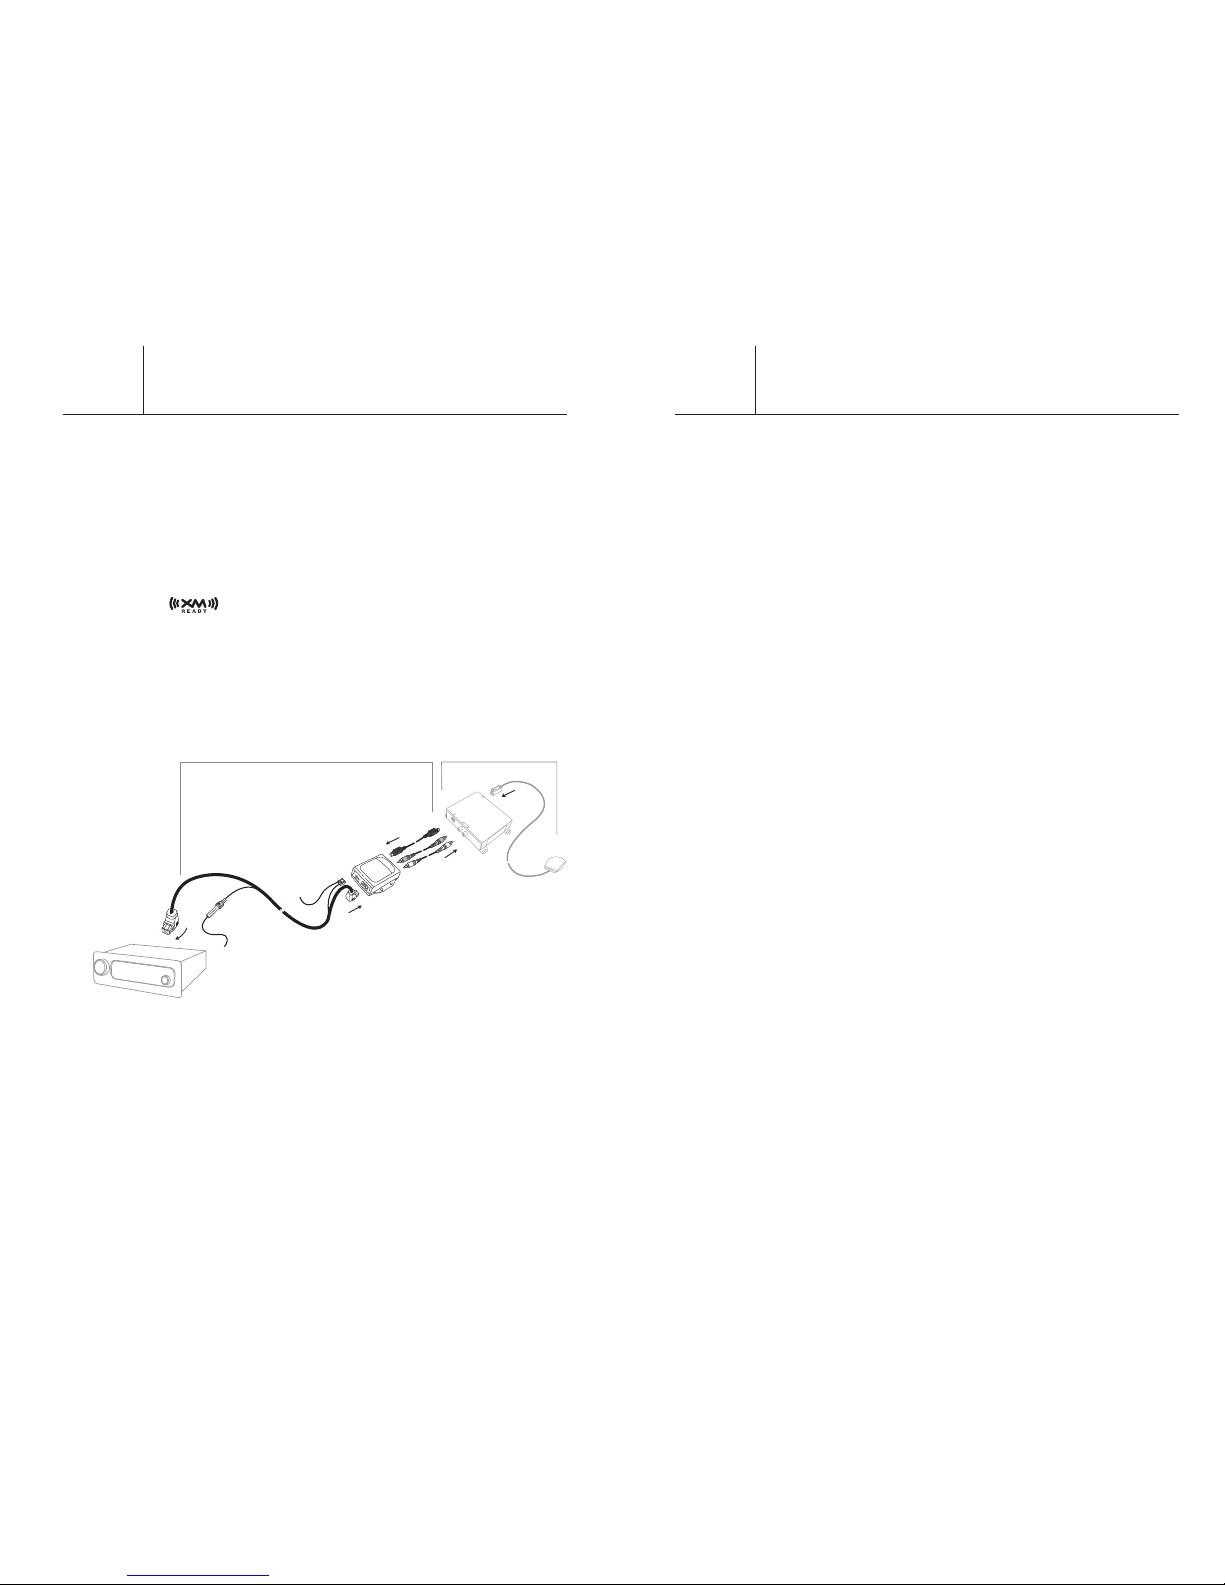
Smart Digital Adapter
1
Smart Digital Adapter
Thank you for purchasing the TERK Smart Digital Adapter for
satellite radio ready Pioneer car stereo head units. This product
must be used in conjunction with the XM Universal Tuner Box
(part # XMD1000) sold seperately. The Smart Digital Adapter for
Pioneer allows you to adapt a satellite radio ready car stereo to
receive XM Satellite Radio service.
Important Note::
The TERK Smart Digital Adapter for Pioneer car stereo head
units is compatible with most Pioneer head units displaying
the logo. For a complete compatibility list go online
to TERK.com/XMDirect
The XMDPIO110 is easy to install plugging directly into the
XMD1000 and the Pioneer car stereo head unit*. The illustration
below shows the complete installation of the XM Direct system,
including the XMDPIO110 and the XMD1000 into your Pioneer car
stereo head unit.
*IT IS RECOMMENDED THAT A PROFESSIONAL INSTALLER
INSTALLS THE XM DIRECT SYSTEM (XMDPIO110 AND XMD1000).
Introduction
Smart Digital Adapter
Universal Tuner
XMDPIO110
XMD1000
Adapter
Tuner
Antenna
Head Unit
to constant
12V source
grounded
Fig. 1
Page 3

4
Step 4
Connect the other end of the thick black cable with the right angle
connector into the corresponding connector on the back of your
Pioneer head unit. Take the thin power cable with the fuse holder
and connect it to a constant 12V power source as shown in Fig 3.
Note: The location of the connectors on the back of the Pioneer
head unit may vary by model.
Step 5
Start your car and turn on your Pioneer head unit to confirm that
the XM Direct system is properly connected. When you tune to
XM channel 01, you should see “XM Preview” on your Pioneer
head unit LCD, and hear that channel through your car speakers.
If not, check to make sure all connections are correct or refer to
the trouble shooting section of this installation guide.
Step 6
Mount and secure the XMDPIO110 in a suitable location that
will not interfere with the radio and will not vibrate or rattle
after installation.
Smart Digital Adapter
3
Installation
Prior to installation, locate the area where the XM Universal Tuner
Box is installed. Make sure you have followed the location
requirements for the XM Universal Tuner prior to installing the
Pioneer Smart Digital Adapter.
Step 1
Remove the Pioneer car stereo head unit from your dash board.
Important: Depending on how your Pioneer head unit was
installed you may have to remove part or all of your dash board to
remove the head unit before the Pioneer head unit can be pulled
out. You may also have to remove screws to complete this step.
Step 2
Connect the red and white audio cables into the red and white
connectors on the XM tuner box (XMD1000) as well as the thinner
black cable with straight connector. Plug the other end of these
three cables into the top of the Pioneer smart digital adapter as
shown in Fig 2.
Step 3
Connect the thick black cable with the right angle connector into
the bottom of the XMDPIO110. Make sure you use the right angle
connector that has the three pin power plug on that end of the
cable. Plug the three pin power plug into the corresponding
connector on the bottom of the XMDPIO110 as shown in Fig 2.
The short thin black cable coming out of the three pin power plug
needs to be grounded. Please secure the end of the cable to a non
moving piece of metal.
Note: Make sure that all of the cables are connected securely.
Smart Digital Adapter
Adapter
Tuner
grounded
Fig 2
Fig 3
Page 4

6
XM Satellite Radio Operation
Please refer to the “XM Operation” section of your Pioneer head unit
operation manual for instructions on your XM satellite radio service.
The information contained in the TERK XMDPIO110 operation
section listed below is provided as a supplement to your Pioneer
manual and is therefore not intended to be a substitution for that
information. If more details are required on a particular function
please refer to your Pioneer head unit operation manual.
Selecting a XM source
1. Press the SOURCE button to select a XM source.
Press the SOURCE button repeatedly to switch between the
following sources: Built-in CD player—Television—Tuner— XM
tuner—Multi-CD player—External unit 1—External unit 2—AUX
2. To turn the unit off press the SOURCE button and hold until the
unit turns off.
Listening to XM
The XM information displayed on the Pioneer head unit as shown
above is:
1. The channel select mode indicator shows what channel select
mode has been selected. CH.No is displayed when CH NUMBER is
selected, and CAT is displayed when CATEGORY is selected.
2. The channel number indicator shows to which channel number
the tuner is tuned.
3. The band indicator shows the band which has been selected.
4. The preset number indicator shows what preset has been selected.
These are the basic steps necessary to operate XM.
• Press SOURCE to select a XM source.
• Press BAND to select a band.
Press BAND until the desired band is displayed, XM1, XM2 or XM3.
• Press or to select a desired channel.
The channel number moves up or down step by step.
Channels that cannot currently be selected are skipped,
and the ne
xt channel is selected.
Smart Digital Adapter
5
Installation (continued)
Step 7
Return the Pioneer car stereo head unit back to its original
location in the dash board, be careful with cables that you just
installed so that they do not unplug or get kinked by the head unit.
Note: If you had removed screws to pull the Pioneer car stereo
head unit out please screw those back in.
Step 8
If you had removed the dash board during installation please
return it back to its original location.
Completing Activation
Now that your XM Direct system has been installed your XM
Universal Tuner will need to be activated. Details on how to
operate your head unit in XM mode are listed on the following
page. Tune your Pioneer car stereo head unit to the XM Preview
Channel, channel 01 and follow instructions for activation. You
can also go on-line at XMradio.com or call the toll free XM
activation number at 1-800-852-9696. Once you have activated
your tuner box make sure the XM antenna on the outside of your
car has an unobstructed view of the sky.
Smart Digital Adapter
XM
CH No
CH
018
XM 1
P1
12 34
Page 5

8
Switching the display
XM channels each have a channel number and channel name. XM
programming also carries song or program title, artist name and
category, when available.
• To change the XM information shown on your display press
DISPLAY repeatedly to switch between the following settings:
Channel name—Artist name/feature—Song/program title—
Channel number—Channel category
Note: When you switch the display, the text is automatically scrolled.
Scrolling the text in the display
You can scroll the text to the left so that the rest of the text can be seen.
• Press DISPLAY and hold until the text begins to scroll to the left.
The rest of the text will appear in the display.
Switching the channel select mode
You can switch from category or channel mode by following the
steps listed below. Initially, channel number select mode is selected.
1 Press FUNCTION to select MODE. Press FUNCTION until MODE
appears in the display.
2 Press or to select the desired channel select mode.
Press or repeatedly to switch between the following
settings:
CH NUMBER (Channel number select mode)—CATEGORY (Channel
category select mode)
Note: Depending on the head unit you are using, it may be possible
to directly switch between the channel select modes using the
allocated button. For details, refer to the head unit’s manual.
Smart Digital Adapter
7
XM Satellite Radio Operation (continued)
Note: If you press and hold or , you can
increase or decrease channel number continuously. You can also
select a channel from a desired channel category. (Refer to
“Switching the channel select mode”, on page 8.)
• Press SOURCE and hold until the unit turns off.
Important: It may take a few seconds before you can hear anything
while this unit acquires and processes the satellite signal when you
turn power on, change the source to XM tuner, or select a channel.
Note: Display changes as follows when you switch channels or
operate in other ways. The text of selected display* is automatically
scrolled. Channel number—Channel name—Selected display *
* For details, refer to “Switching the display” on page 8.
Storing and recalling channels
If you press any of the preset tuning buttons 1–6 you can easily store
up to six channels for later recall with the touch of a button.
• Memory and recall are for broadcasts. If you recall a memorized
broadcast that has been moved to another channel, the channel to
which the broadcast was moved is selected.
When you find a channel that you want to store in memory press a
preset tuning button 1–6 and hold until the preset number stops
flashing.
The number you have pressed will flash in the preset number
indicator and then remain lit. The selected channel has been stored
in memory.
The next time you press the same preset tuning button 1–6 the
channel is recalled from memory.
Notes:
• Up to 18 channels, 6 for each of the three XM bands can be stored
in memory.
• When channel number select mode is selected, you can also use
and to recall channels assigned to preset tuning buttons 1–6.
• If a channel you have recalled cannot be selected, a message is
displayed for 2 seconds and the unit returns to the operating
status before the channel was recalled.
Smart Digital Adapter
Page 6

10
Troubleshooting
When problems occur with your XMDirect system, a message
appears on the display. Refer to the information below to identify
the problem, then take the suggested corrective action.
ANTENNA
The XM antenna is not connected.
• Check whether the XM antenna cable is attached securely.
A short-circuit occurring in the antenna or the surrounding antenna
cable.
• Make sure that there is nothing unusual with the antenna or
antenna cable. Turn the ignition off and then on.
UPDATING
Radio is being updated with latest encryption code.
• Wait until the encryption code updates. Channels 00 and 01
should function normally.
NOSIGNL
XM signal is being blocked from reaching the XM antenna.
• The message should disappear as soon as you move out of an
obstructed area such as an indoor garage. If the problem
persists, make sure your antenna is mounted outside and on
top of the car with a clear view of the sky.
LOADING
Unit is acquiring audio or program information.
• Wait until the unit has received the information.
OFF AIR
The channel currently selected has stopped broadcasting.
• Automatically switches to valid channel. No action needed.
– – – –
There is no artist name/feature, song/program title, or channel
category associated with the channel at that time.
• No action needed.
Other Symptoms
Should any problem persist after you have made the following
checks, call TERK for help at 1-800-942-TERK (8375) on any
business day, between 9 A.M. and 5:30P.M., EST and ask for
Technical Support.
Smart Digital Adapter
9
XM Satellite Radio Operation (continued)
Selecting the channel in the channel category
Channels are organized into various program categories, e.g. Rock,
Classic, Jazz. You can search between different categories, and then
search among channels within each channel category.
1. Select the channel category select mode. (Refer to “Switching the
channel select mode” section on page 8.)
2. Press BAND to return to the XM display.
3. Press or to select the desired channel category.
Once you select a channel category, the unit searches for channels
in that category. During search, the channel category doesn’t
immediately change even if you press the button. To successively
change the channel category, continue pressing the button.
4. Press or to select the desired channel in the selected
channel category.
Note: If you select a channel of another category by channel recall,
etc., during steps 3 and 4, the category selected in step 3 still
remains in memory. If you press or , the channel number
moves up or down in the category selected in step 3 regardless of
the category of the present channel.
Display the ID code (Radio ID)
Each XM tuner is identified with a unique Radio ID. You will need the
Radio ID when activating XM service or when reporting a problem.
• During XM Satellite Radio reception press or to select
the channel number zero (CH 00).
Channel category select mode
RADIO ID is provided as a channel category for displaying the ID code.
• Press or to select the RADIO ID from channel category.
Notes: Display of the ID code repeats displaying RADIO ID and the ID
code one after the other.
Smart Digital Adapter
 Loading...